

Page 1

LOCATION STATUS INFORMATION
INSTALLATION GUIDE
NEC America, Inc.
NDA-30043-002
Revision 2.0
March, 1997
Stock # 241716
Page 2

LIABILITY DISCLAIMER
NEC America reserves the right to change the specifications, functions,
or features in this document at any time without notice. NEC America
has prepared this document for use by its employees and customers. The
information contained herein is the property of NEC America and shall
not be reproduced without prior written approval from NEC America.
Copyright 1996
NEC America, Inc.
Page 3

Location Status Information - Installation Guide CONTENTS
TABLE OF CONTENTS
Page
Chapter 1 - Introduction . . . . . . . . . . . . . . . . . . . . . . . . . . . . . . . . . . . . . . . . . . . . . . . . . . 1
Chapter 2 - Application Configuration. . . . . . . . . . . . . . . . . . . . . . . . . . . . . . . . . . . . . . . 3
Step 1 – Applic ation Charac te ristics . . . . . . . . . . . . . . . . . . . . . . . . . . . . . . . . . . . . . . . . . . . . . . . . 3
Step 2 – Primary Configuration Parameters . . . . . . . . . . . . . . . . . . . . . . . . . . . . . . . . . . . . . . . . . . 4
Step 3 – Facilities . . . . . . . . . . . . . . . . . . . . . . . . . . . . . . . . . . . . . . . . . . . . . . . . . . . . . . . . . . . . . . 4
Step 4 – Secondary OAI Configuration Parameters. . . . . . . . . . . . . . . . . . . . . . . . . . . . . . . . . . . . 5
Step 5 – User-Defined Parameters. . . . . . . . . . . . . . . . . . . . . . . . . . . . . . . . . . . . . . . . . . . . . . . . . 6
Chapter 3 - Database Requirements . . . . . . . . . . . . . . . . . . . . . . . . . . . . . . . . . . . . . . . . 7
Instructions . . . . . . . . . . . . . . . . . . . . . . . . . . . . . . . . . . . . . . . . . . . . . . . . . . . . . . . . . . . . . . . . . . . 7
Extension Database Information. . . . . . . . . . . . . . . . . . . . . . . . . . . . . . . . . . . . . . . . . . . . . . . . . . . 8
Field Definitions . . . . . . . . . . . . . . . . . . . . . . . . . . . . . . . . . . . . . . . . . . . . . . . . . . . . . . . . . . . . . . 8
Employee Identification Database Information . . . . . . . . . . . . . . . . . . . . . . . . . . . . . . . . . . . . . . . . 9
Field Definitions . . . . . . . . . . . . . . . . . . . . . . . . . . . . . . . . . . . . . . . . . . . . . . . . . . . . . . . . . . . . . . 9
Chapter 4 - Control Options . . . . . . . . . . . . . . . . . . . . . . . . . . . . . . . . . . . . . . . . . . . . . . 11
Chapter 5 - NEAX Command Assignments. . . . . . . . . . . . . . . . . . . . . . . . . . . . . . . . . . 13
NEAX2400 Commands. . . . . . . . . . . . . . . . . . . . . . . . . . . . . . . . . . . . . . . . . . . . . . . . . . . . . . . . . 14
AOKC Command: (Assignment of OAI Key Codes) . . . . . . . . . . . . . . . . . . . . . . . . . . . . . . . 14
AKYD Command: (Assignment of Dterm Function Key). . . . . . . . . . . . . . . . . . . . . . . . . . . . . 14
Example. . . . . . . . . . . . . . . . . . . . . . . . . . . . . . . . . . . . . . . . . . . . . . . . . . . . . . . . . . . . . . . . . . . 15
NEAX2000 Commands. . . . . . . . . . . . . . . . . . . . . . . . . . . . . . . . . . . . . . . . . . . . . . . . . . . . . . . . . 16
CMD79: (Assignment of Internet Address) . . . . . . . . . . . . . . . . . . . . . . . . . . . . . . . . . . . . . . . . 16
CMD7: (Assignment of MSF Operation Code) . . . . . . . . . . . . . . . . . . . . . . . . . . . . . . . . . . . . . 16
CM90: (Assignment of the OAI Function Key for MSF) . . . . . . . . . . . . . . . . . . . . . . . . . . . . . . 17
NDA-30043 Revision 2.0 Page i
Page 4

CONTENTS Location Status Information - Installation Guide
This Page Left Blank.
Page ii NDA-30043 Revision 2.0
Page 5

Location Status Information - Installation Guide Introduction
Chapter 1 Introduction
This guide provides specific field entries that need to be made in the process of
installing and conf iguring Location Status Info rmation. In addition to this guide,
use the following manuals for this in stallation:
• Applications Manager ( APM) Installation Manual – Contains step-by-step
instructions for installing the software from the release media.
• Applications Manage r (APM) Operati ons Manual – Explains how applicati ons
like Location Status Information are configured in the APM environment,
using the entries and values provided in this guide.
• NEAX System Manuals - Give very detailed explanations about the
assignments that need to be made with the NEAX2400 Maintenance
Administration Terminal (MAT) commands, the NEAX2000 Customer
Administration Terminal (CAT), or the NEAX2000 Maintenance Operations
Console (MOC).
Briefly, the installation and set up of Location Status Info rmation involves the
following processes:
• Software Installation - Location Status Information software must first be
loaded from the release media. Log in to the APM Platform Management
Menu, select the Installation of Applications/Packages option, and follow the
instructions provided in the APM Installation Manual to complete this part of
the installation.
• Applicatio n Configuration - Location Status Information is internally
supported by the APM and must be configured in the APM environment.
Application Configuration of this guide provides the information that must be
entered into this APM configuration file. Use the instructions provided in the
APM Operations Manual to make the entries provided in this section.
• Database Requirement s - Location Status Informat io n requires two
application databases which are constructed and maintained through the APM
Database Administration option. Database Re qui rements of this guide def ines
the information which must be included in these database files. Use the
instructions provided in the APM Operations Manual to make the entries
contained in this secti on.
• Control Options - If the AMS_to_LSI utility is running with AMS,
AMS_to_LSI must be set up to run nightly.
• NEAX Command Assignments - Before Location Stat us Information will
function, specific data settings must be assigned at the NEAX2400
Maintenance Administration Terminal (MAT), the NEAX2000 Customer
Administration Terminal (CAT), or the NEAX2000 Maintenance Operations
Console (MOC). NEAX Command Assignments specifies the necessary
commands and the values at which they are to be set. Use the instructions
provided in the appropriate NEAX System Manuals to make the entries
contained in this secti on.
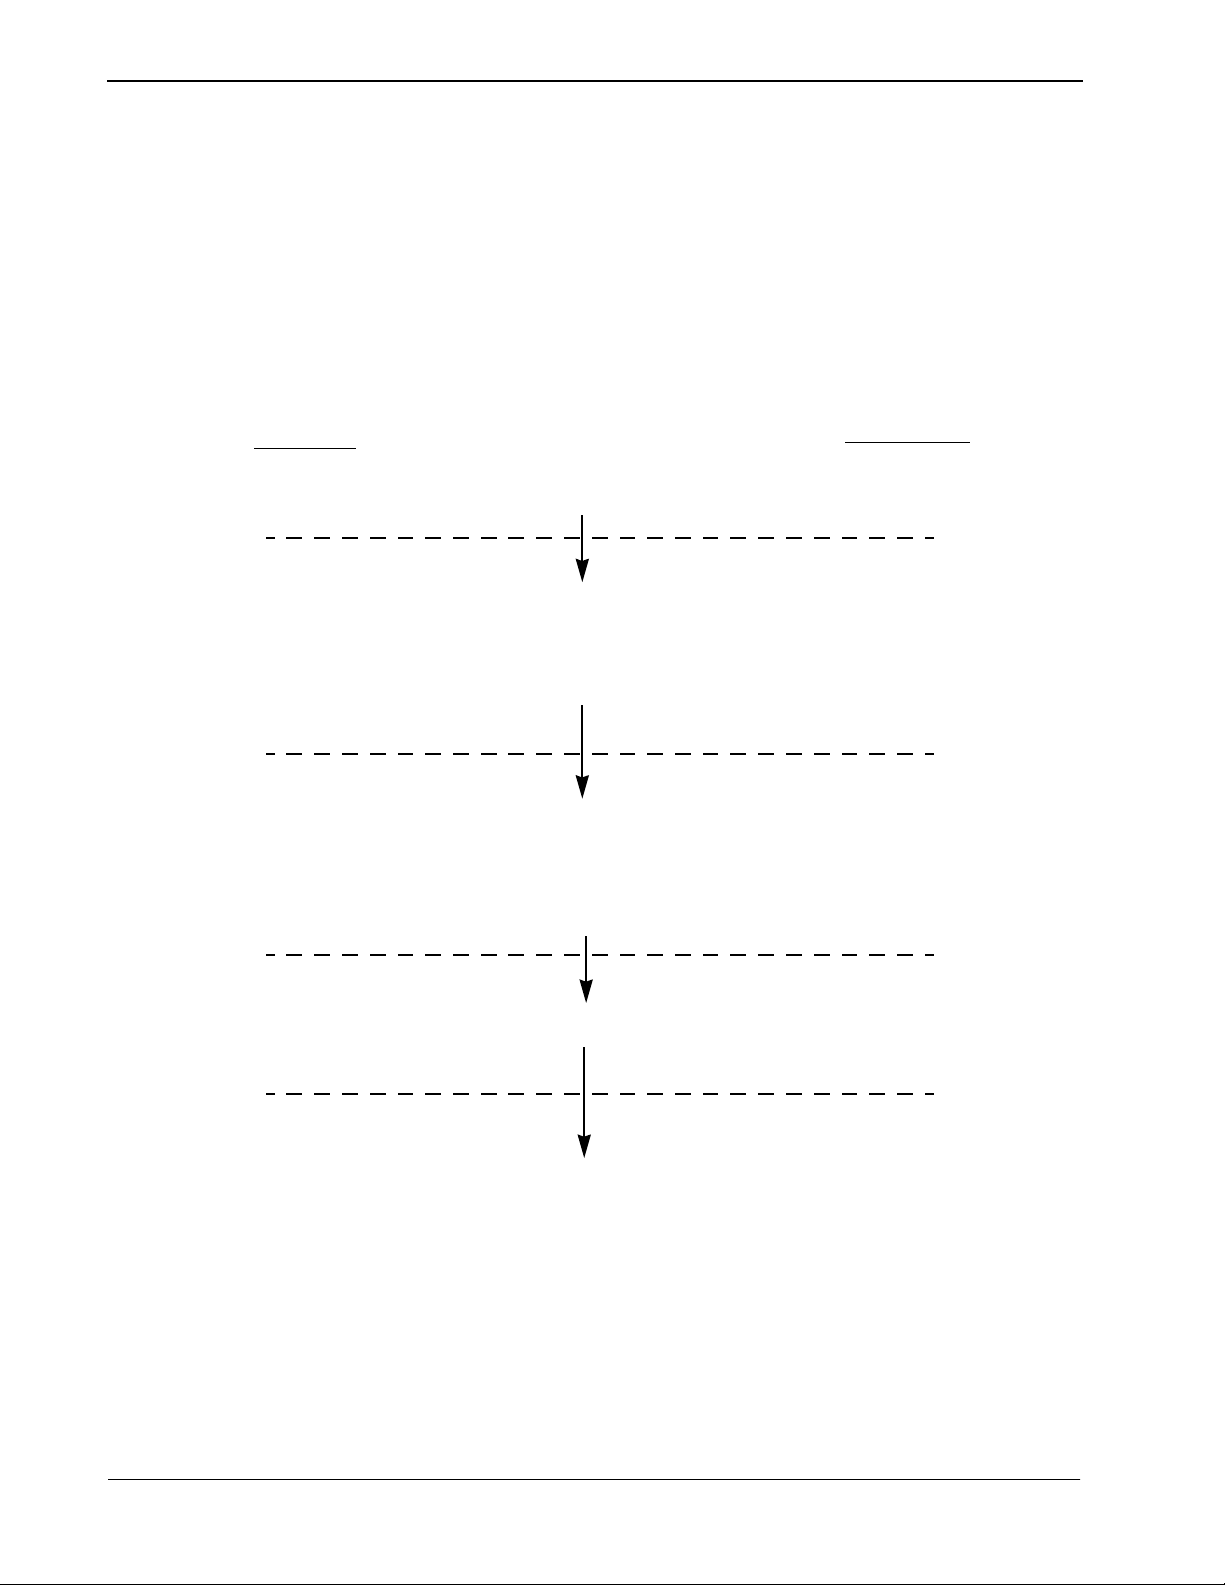
The installation proce ss, incl uding i ts pres entat ion in thi s manual an d refer ence to
other required manuals, is illustrated below:
NDA-30043 Revision 2.0 Page 1
Page 6
Introduction Location Status Information - Installation Guide
LOCATION STATUS INFORMATION
INSTALLATION REQUIREMENTS
Discussed in
Chapter 1
Introduction
Chapter 2
Chapter 3
Chapter 4
Software In stallation
Software Release Media
Application Configuration
Application Characteristics
Primary Parameter Configuration
OAI Facilities (Optional)
OAI Configuration Parameters (Optional)
User-Defined Parameters
Database Requirements
Master File Definitions
Master Database File
Application File Definition
Application Database
Control Options
Instructions in:
APM Installation
Manual
APM Operations
Manual
APM Operations
Manual
APM Operations
Manual
Chapter 5
NEAX2400 MAT Commands
NEAX2400 IMS
System Manuals
NEAX2000 CAT/MOC Commands
NEAX2000 IVS
System Manuals
Page 2 NDA-30043 Revision 2.0
Page 7

Location Status Information - Installation Guide Application Configuration
Chapter 2 Application Configuration
Location Status Information
of the Application Configuration op tion on the APM S ystem Administration menu:
1. Enter the APM option from the APM Platform Management Menu.
2. Enter the System Administrator password at the APM password screen.
3. Enter the Application Configuration option from the System Administration
menu.
This section contains the information that should be entered to the configuration
file for Location Status Information. For specific instructions on what these
parameters mean and how to make these entries, refer to the APM Operations
Manual.
Note:
Configure AMS_to_LSI only if the At t endant Management System ( AMS) is installed on the same U AP as Location St atus Inf ormati on (LSI) and the LSI data base will be generated from the AMS database. This option is only available on
the NEAX2400 System.
Step 1 – Application Characteristics
In the APM Application Conf iguration option, choo se the Add command to display
the Define Application Character istics scree n. Then make the entries exactly as
shown below:
is set up in the APM system using the
Add
function
Parameter LSI Entry
AMS_to_LSI
Entry
OAI Application Y N
CRT Application N N
Communication
Queue
NN
Definition
Whether (Yes or No) the application communicates with the NEAX2400 usi ng O AI processes.
Whether (Yes or No) the application requires a
terminal screen of the same type as t he one used
by the APM.
Whether (Yes or No) the application needs an
IPC queue to communicate with other processes.
NDA-30043 Revision 2.0 Page 3
Page 8

Application Configuration Location Status Information - Installation Guide
Step 2 – Primary Configuration Parameters
On the APM Configuration Entry screen, make the following entries for the
parameters shown below:
Parameter LSI Entry AMS_to_LSI
Entry Definition
The name to be displayed in the
Application
Name
Location_Status AMS_to_LSI
APM menus. This name is
displayed exactly as it is entered
here.
Executable
Filename
/oai/app/lsi /oai/app/bldlsi
Group (no entry) (no entry)
The path name of the executable
file.
The application is not a group
member.
The default val ue, sin ce the
Response Mode I(gnore) I(gnore)
components do not belong to a
group.
Initialization
Batch
Termination
Mode
N(o) N(o)
M(essage) T(erminate)
The application is not to be
initialized a utomatica lly when t he
OAI system is initialized.
How the APM is to not ify the
application to terminate.
Standard Output /oai/log/dbg/lsi.out /oai/log/dbg/bldlsi.out Where output is sent.
The APM is not to restart the
Number of Restarts 0 0
application if it terminates in
error.
Step 3 – Facilities
According to instructions in the APM Operations Manual, designate the followi ng
facilities for Location Status Information using the Facilities command on the
APM Configuration Entry screen:
MRFI Mode Release Facility (I) SCF Switch Control Facility
MRFR Mode Release Facility(R) TCFD Terminal Control Facility (D)
MSF OAI Mode Set Facility TCFI Terminal Control Facility (I)
NTF Number Transfer Facility
Note:
Page 4 NDA-30043 Revision 2.0
The same MSF identification number (i.e., fro m 128 to 192) that is selected in the
APM during Step 3 must be assigned to
propriate NEAX commands. See NEAX Command Assignments for more information.
Location Status Information
with the ap-
Page 9

Location Status Information - Installation Guide Application Configuration
Step 4 – Secondary O AI Configuration Parameters
Note:
Entries for parameters that are marked with an asterisk (*) should be made exactly as shown. All other entries in this section serve as examples only.
Using the OAI-Conf command on the APM Configur ation Entry s creen, make the
entry shown for each of these parameters required by Location Status
Information. Use the instructions provided for this option in the
Manual
Parameter Entry Definition
:
The pathname of the database containing
extension information. The database
Database Na me #1* /oai/db/cur/lsi_extn
filename (i.e., lsi_extn) shown here with its
path should be entered as the name of the
application database as noted in the
“Database Requirements” section.
The pathname of the data base containing the
possible messages. The database filename
Database Name #2* /oai/db/cur/lsi_msg
(i.e., lsi_msg) listed here with its path should
be entered as the name of the application
database as noted in the “Database
Requirements” section.
APM Operations
Time-out Value #1 20
Time-out Value #2 10
The number of seconds LSI waits for user
term
input before it releases the D
.
The number of seconds LSI displays a
term
message on the D
LCD.
Tenant Number (0-64)† 1 The number of the tenant that LSI serves.
The port on the source side of the
Source Link Name OAI1TCP
communication link. This entry should
match a link name in the APM system
configuration file.
The port on the destination side of the
Destination Link Name PBX1TCP
communication link. This entry should
match a link name in the APM system
configuration file.
The number of seconds LSI waits before
Association Recovery 10
trying to re-establish an association with the
NEAX that has been released.
† – The maximum Tenant Number for the NEAX2000 is 64.
NDA-30043 Revision 2.0 Page 5
Page 10

Application Configuration Location Status Information - Installation Guide
Step 5 – User-Defi ned Parameters
Make these parameter entries for LSI installation through the UserDefined
command on the APM Configuration Entry screen:
User-
Defined
LSI Entry Definition
#1 Installa tion-dependent This is the OAI key assigned to LSI.
#2 /oai/db/cur/Lsi_extn The full pathname of the master LSI e xtension database.
#3 Installation-dependent Set to 1 if using in conjunction with AMS.
Set to 2 if using in conjunction with AMS and a space
exists between t he last name and fi rst name in the AMS
database. (i.e., ’last name, first name’)
This completes the configurati on of Location Status Information in the APM.
Refer to Database Requirements for information on how to create its database
support.
Make this parameter entry for AM S_to_LSI installation through the UserDefined
command on the APM Configuration Entry screen:
User-
Defined
#1 /oai/db/cur/Lsi_extn
AMS_to_LSI Entry Definition
This is the name of the m aster extension database for
LSI.
This completes the configurati on of AMS_to_LSI in the APM. Refer to Control
Options to choose its control options.
Page 6 NDA-30043 Revision 2.0
Page 11

Location Status Information - Installation Guide Database Requirements
Step 1 –
Define
Master Database Fields
Step 2 –
Build
Master Database File
Step 3–
Specify
Application Database Fields
Step 4 –
Process
Application Database
Chapter 3 Database Re quirements
Location Status Information requires two databases (i.e., extensions and
messages). These databases are created through the Database Administration
option on the APM System Adminis trat ion Menu. Da tabase creat ion i nvolves the
following four-step process for
1. Define Master Database Fields: This step involves creating the master data-
base fields. Generally one master set of fields serves as parent databases for
several applications. Location Status Inf ormation, ho wev er, requires tw o separate sets of fields, one for the extensions and one for the messages.
2. Build a Master Database File: This step involves entering data (e.g., actual
extension numbers and th e names associated with them) into the master database fields that were just defined in Step 1.
each of the two required databases:
Instructions
3. Specify Location Status I nformation Database Fields: This step defines how
data from the master f ile s is t o be converted to meet the needs of Location Sta-
tus Information. The database names in the application configuration file
lsi_extn
(
and
lsi_msg
) must be entered during this step.
4. Process the Loc ati on S tat us Information Database: In this step, the Master
Database input i s conv erted to data base files according to th e definiti ons created
in Step 3, using the Process and Install Application Database options on the
APM Database Administrati on menu . Act ivate the Process command to dra w
data from the master database and convert it to the formats specified for Loca-
tion Status Information. Then activate the Install command to enable Loca-
tion Status Information to access its database.
The information required in all four steps for each Location Status Information
database is provide d in tabl e form on t he foll owing pag es. Using t his inf ormati on
with the procedural in structions provided in the APM Operations Manual, enter the
Database Administration option on the APM System Administration Menu and
build the Location Status Information databases, one at a time
. Refer to the
Process and Error Messages chapter of the APM Operations Manual for
information about any messages displayed during these steps
Note:
NDA-30043 Revision 2.0 Page 7
Remember to complete STEP 4, Process the Application Database, for each database after entering the information on the following pages in STEPS 1 through
3.
Page 12

Database Requirements Location Status Information - Installation Guide
Extension Database Information
This database contains the extensions that can access Location Status
Information. For each, the name of t he perso n associa ted with it and t he perso n’s
identifying access code is given. Name the master file Lsi_extn and the
application file lsi_extn
.
Field
Description
Master Definition File
Type Size Min.
Value
Max.
Value
Application
Definition
File
Data
Type
Master
Database
Typical
Entry
Extension Key N 6 1 999999 Long Integer 036150
Extension N 5 1 99999 Long Integer 03615
Name A 16 ASCII MILLER,
KAREN
Access Code N 10 0 9999999999 ASCII 805
Message A 16 ASCII
Month N 2 0 99 Integer 99
Day N 2 0 99 Integer 99
Hour N 2 0 99 Integer 99
Minute N 2 0 99 Integer 99
Phone to Call A 22 ASCII
Active Flag N 1 0 1 NBCD 0
Field Definitions
• Extension Key– The extension number followed by 0 for th e fir st employee
assigned to the extension, 1 for the second, etc.
• Extension– An internal telephone number within the range from 1 to
99999.
• Name– The two- to 16-character name of the person assigned to the
extension.
• Access Code– The identification number used to identify th is person.
• Message– This field should be left blank. It will be filled in by the
application unless the user changes status.
• Month– The two-digit number for the month. I nitially, if there is no
message, this is 99.
• Day– The two-digit number for the day. Initially, if there is no
message, this is 99.
• Hour– The two-digit number for the hour. Initially, if there is no
message, this is 99.
Page 8 NDA-30043 Revision 2.0
Page 13

Location Status Information - Installation Guide Database Requirements
Field Definitions
(Cont.)
• Minute– The two-digit number for the minute. Initially, if there is no
message, this is 99.
• Phone to Call– This field should be left blank.
• Active Flag– This should be set to 0.
Employee Identification Database Information
This database contains the messages that can be selected for display on the D
LCD. Name t he master file Lsi_msg and the applic ation file lsi_msg.
Master Definition File
Field
Description
Message
Number
Type Size
N 2 1 14 Short Integer 01
Min.
Value
Max.
Value
Message A 16 ASCII Out to Lunch
Application
Definition File
Data Type
Master
Database
Typical
Entry
term
Field Definitions
• Message Number–The number of the message that follows, from 1 to 14.
• Message– The message itself, up to 16 characters long (e.g., On
Vacation, In a Meeting, In the Field, Out of Office,
etc.).
NDA-30043 Revision 2.0 Page 9
Page 14

Database Requirements Location Status Information - Installation Guide
This Page Left Blank.
Page 10 NDA-30043 Revision 2.0
Page 15

Location Status Information - Installation Guide Control Options
Chapter 4 Control Options
If AMS_to_LSI is running with AMS on a NEAX2400, it should be conf igure d to
run nightly as follows:
1. Choose Control Options from the System Administration menu.
2. Choose Applications from the Control Options menu.
3. Choose AMS_to_LSI from the Application Selection menu.
4. Choose Initialize from the Appl ication Cont rol Options menu.
Application Control Options Screen
Field Name
Minute (0-59): 10
Hour of Day (0-23): 1
Day of Month (1-31): *
Month of Year (1-12): *
Day of Week (0-6): *
This will build a n ew master extension file. To make these changes effective , take
the following steps:
1. Choose Control Options from the System Administration menu.
2. Choose Databases from the Master File Options menu.
3. Choose Lsi_extn from the Database Control Options menu.
4. Choose Process Install from the Database Control Options menu.
Database Control Options Screen
Field Name Entry
Entry
Minute (0-59): 10
Hour of Day (0-23): 2
Day of Month (1-31): *
Month of Year (1-12): *
Day of Week (0-6): *
In this example, Lsi_extn is built every night at 1:10 a.m. and is installed at 2:10
a.m. The one-hour difference permits the database building to end before the
installation begins.
NDA-30043 Revision 2.0 Page 11
Page 16

Control Options Location Status Information - Installation Guide
This Page Left Blank.
Page 12 NDA-30043 Revision 2.0
Page 17

Location Status Information - Installation Guide NEAX Command Assignments
Chapter 5 NEAX Command Assignments
This guide assumes that dat a s et ti ngs t h at af fe ct t he operation of all OAI sof tware
on a system-wide basis have already been assigned on the NEAX2400
Maintenance Administration Terminal (MAT) commands, the NEAX2000
Customer Administration Terminal (CAT), or the NEAX2000 Maintenance
Operations Console (MOC). Such settings include, for instance, system index
values and assignment of Interface I/O Port Data in the Interface Processor (IP).
For more information about the system data settings and about the Code Master
settings discussed in this section, refer to the following technical manuals for the
specific NEAX system in use:
• OAI System Manual.
• Command Manual.
• Job Specification.
• Programming Manual (for RDS, MDS, and HDS systems).
• System Data Design Manual (for ICS systems).
Location Status Information requires assignment of the Mode Set Facility (MSF)
to an OAI-assigned fu nction key on all D
involves assigning the MSF and its Operation Code (Op-Code), configured for
Location Status Information in the APM Application Configuration option, to
one of the 14 OAI Key Codes. (The MSF Op-Codes range from 128 to 191;
available for on screen viewing through the Providers command in the APM
Application Confi guratio n option. ) Each of the OAI Key Cod es co rresponds to an
AKYD Function Key Index (FKI) value which is then assigned to the specific
term
D
function key. This process is illustrated below.
terms
affected by appl ication. This process
APM
Application
Configuration
Designation of
Facility (Type)
and its Op-Code
for Use by
Location Status
Information
MAT
AOKC
Command
Assignment of
an OAI Key Code
(between 1 and 14)
to the Same
Facility Type
and Op-Code
PBX Correspondence of
AOKC
OAI
Key Codes
< . . . . >
1
< . . . . >
2
< . . . . >
3
< . . . . >
4
< . . . . >
5
< . . . . >
6
< . . . . >
7
< . . . . >
8
< . . . . >
9
< . . . . >
10
< . . . . >
11
< . . . . >
12
< . . . . >
13
< . . . . >
14
AKYD
Function
Key Indices
34
35
36
37
38
39
40
41
42
43
44
45
46
47
Figure 5-1 OAI Function Key Assignment
MAT
AKYD
Command
Assignment of
Corresponding
MAT Function
Key Index to a
specific D
Function Key
term
. . . . .
. . . . .
. . .
. . .
NDA-30043 Revision 2.0 Page 13
Page 18

NEAX Command Assignments Location Status Information - Installation Guide
NEAX2400 Commands
Use the NEAX2400 Maintenance Administration Terminal (MAT) to enter these
commands.
term
A knowledge of the D
access to Location Status Information is necessary to using the following
commands:
stations in the NEAX system and whic h ones will have
AOKC Command: (Assignment of OAI Key Codes)
AKYD Command:
(Assignment of
term
D
Function
Key)
This command is used to associate the MSF facility and its Op-Code that w as
configured in the APM for Location Status Information to one of the 14 OAI Key
Codes in the MAT.
(a) Select an unused OAI Key Code, from 1 to 14. To determine what Key
Codes are available for assignment, use the LOKC command to list the
AOKC Key Codes that are already assigned.
(b)Enter MSF as the f acili ty to be assig ned to the sele cted K ey Code, us ing the
values on the screen.
(c) E nter the same Op-Code th at was configured for Location Status
Information in the APM. If necessary, retrieve it using the Providers
command on the APM Configuration Entry screen.
This command is used to assig n key data on the D
terms
that are to be us ed to acc ess
Location Status Information.
MAT Function Key Indexes #34 to #47 have been designated for use in the OAI
system and correspond to the 14 OAI Key Codes as illustrated on the previous
term
page. The AKYD command is used to assign a D
function key to the specific
MAT Function Key Index that , in turn, corresponds to the previously assigned OAI
Key Code. This command must be used to assign the function key on each D
term
that is to be set up with access to Location Status Information.
(a) Enter the same tenant number that is configured for Location Status
Information in the APM Application Configuration option.
term
(b)Enter the station number of the D
on which the function key is being
assigned.
Page 14 NDA-30043 Revision 2.0
Page 19

Location Status Information - Installation Guide NEAX Command Assignments
Example
APM
Application
Configuration
Location Info
configured
for
MSF #129
(c) Enter to the D
term
function key field the MAT Function Key Index that
corresponds to the previously assigned OAI Key Code.
PBX Correspondence of
AOKC
OAI
MAT
AOKC
Command
OAI Key
Code #10 given
MSF facility type
and
Op-Code #129
Key Codes
1
2
3
4
5
6
7
8
9
10
11
12
13
14
< . . . . >
< . . . . >
< . . . . >
< . . . . >
< . . . . >
< . . . . >
< . . . . >
< . . . . >
< . . . . >
< . . . . >
< . . . . >
< . . . . >
< . . . . >
< . . . . >
Figure 5-2 OAI Function Key Assignment Example
AKYD
Function
Key Indices
34
35
36
37
38
39
40
41
42
43
44
45
46
47
MAT
AKYD
Command
Function Key
Index #43
assigned to
term
Function
D
Key #3
Function
Key #3
. . . . .
. . . . .
. . .
. . .
The example above indicates that MSF #129 is configured for Location Statu s
Information and is assigned through the AOKC command to OAI Key Code 10.
OAI Key Code 10 corresponds in th e PBX to MAT Functi on Key Inde x 43. Each
term
D
in the system t hat is to acce ss Location Status Information has function key
3 assigned to MAT Function Key Index 43 via the AKYD command. Now
whenever a phone user presses function key 3 on any assigned D
term
, MSF 129
initiates communication with Location Status Information.
Location Status Information
is now installed and ready to be initialized. Enter
the APM Operations Men u and i nitiali ze
to instructions provided in the
APM Operations Manual
Location Status Informatio n
.
according
NDA-30043 Revision 2.0 Page 15
Page 20

NEAX Command Assignments Location Status Information - Installation Guide
NEAX2000 Commands
Use the NEAX2000 Customer Administration Terminal (CA T), or the NEAX2000
Maintenance Operations Console (MOC) to enter these commands. (Refer to the
NEAX2000 System Manuals for more information.)
A knowledge of the D
access to Location Status Information is necessary to using the following
commands:
term
stations in the NEAX system and whic h ones will have
CMD79: (Assignment of Internet Address)
CMD7: (Assignment of MSF Operation Code)
Assigns the Internet Address of TCP/IP-Ethernet.
1st data 00–03: Division No. of Internet Address
2nd data 0–255: Address Data (1–3 digits)
The Internet Address must be assigned to the 1st data 00–03 as follows:
00
01
1st data (1)
Internet Address: XXX • XXX • XXX
Y=0: When pressing the OAI function key to start up MSF, assign the operation
code to the OAI function key assigned by CM90.
1st data: F1032 Function Key Number 0
02
03
• XXX
[XXX: 2nd data (2)]
–
F1047 OAI Function Key Number 15
2nd data: 128–191 Operation Code for MSF
Y=0: When dialing a digit code (1–3 digits) after pressing OAI function key to
start up MSF, assign the d igit number of digit code , then assi gn the oper ation cod e
to the digit code.
1st data: F1032 Function Key Number 0
–
F1047 OAI Function Key Number 15
2nd data: DCX (X=1–3) Operation Code for MSF
Page 16 NDA-30043 Revision 2.0
Page 21

Location Status Information - Installation Guide NEAX Command Assignments
CM90: (Assignment of the OAI Function Key for MSF )
Assigns the OAI function key for starting up MSF to a D
1st data My line number + , + Key Number
2nd dataF1032 Function Key Number 0
–
F1047 OAI Function Key Number 15
term
.
NDA-30043 Revision 2.0 Page 17
Page 22

NEAX Command Assignments Location Status Information - Installation Guide
This Page Left Blank.
Page 18 NDA-30043 Revision 2.0
 Loading...