

Page 1
USER’S MANUAL
MANUEL D’UTILISATION
MANUAL DEL USUARIO
-$%87
-$%87
IdaZVgcVWdjidi]ZgheZX^Vad[[Zgh!gZ\^hiZgdca^cZVilll#cZXY^heaVn#Xdb#
EdjgZchVkd^geajhadc\hjgYÉVjigZhd[[gZhheX^VaZh!^chXg^kZo"kdjhZca^\cZ|lll#cZXY^heaVn#Xdb#
EVgV^c[dgbVghZhdWgZdigVhd[ZgiVhZheZX^VaZh!gZ\higZhZZcacZVZclll#cZXY^heaVn#Xdb#
Page 2
Index
Warning .................................................................................................................... 1
Contents ...................................................................................................................2
Quick Start ..............................................................................................................3
Controls ....................................................................................................................7
Recommended Use ...............................................................................................10
Specifi cations ........................................................................................................12
Features ................................................................................................................ 14
Troubleshooting ....................................................................................................15
References ............................................................................................................. 16
Limited Warranty ................................................................................................. 17
TCO’03 ..................................................................................................................... 18
Manufacturer’s Recycling and Energy Information .................................... 19
Avertissement ..................................................................................................... 21
Contenu ..................................................................................................................22
Mise en marche rapide ........................................................................................23
Commandes ...........................................................................................................27
Usage recommandé .............................................................................................30
Fiche technique ....................................................................................................32
Fonctions .............................................................................................................. 34
Dépannage .............................................................................................................35
Références .............................................................................................................36
Garantie limitée....................................................................................................37
TCO’03 .....................................................................................................................38
Informations du fabricant relatives au
recylage et aux économies d’ énergie .............................................................39
Advertencia ........................................................................................................ 42
Contenidos .............................................................................................................43
Inicio rápido ......................................................................................................... 44
Controles ............................................................................................................... 48
Uso recomendado .................................................................................................51
Especifi caciones .................................................................................................. 54
Características ................................................................................................... 56
Solución de problemas ........................................................................................57
Referencias ............................................................................................................59
Garantía limitada ................................................................................................ 60
TCO’03 ..................................................................................................................... 61
Información del fabricante sobre reciclado y energía ................................62
Page 3
WARNING
TO PREVENT FIRE OR SHOCK HAZARDS, DO NOT EXPOSE THIS UNIT TO RAIN OR MOISTURE. ALSO, DO NOT USE
THIS UNIT’S POLARIZED PLUG WITH AN EXTENSION CORD RECEPTACLE OR OTHER OUTLETS UNLESS THE PRONGS
CAN BE FULLY INSERTED.
REFRAIN FROM OPENING THE CABINET AS THERE ARE HIGH VOLTAGE COMPONENTS INSIDE. REFER SERVICING
TO QUALIFIED SERVICE PERSONNEL.
CAUTION
CAUTION: TO REDUCE THE RISK OF ELECTRIC SHOCK, MAKE SURE POWER CORD IS UNPLUGGED FROM
WALL SOCKET. TO FULLY DISENGAGE THE POWER TO THE UNIT, PLEASE DISCONNECT THE POWER
CORD FROM THE AC OUTLET. DO NOT REMOVE COVER (OR BACK). NO USER SERVICEABLE PARTS
INSIDE. REFER SERVICING TO QUALIFIED SERVICE PERSONNEL.
This
electric shock. Therefore, it is dangerous to make any kind of contact with any part inside this unit.
This symbol alerts the user that important literature concerning the operation and maintenance of this
unit has been included. Therefore, it should be read carefully in order to avoid any problems.
symbol warns user that uninsulated voltage within the unit may have suffi cient magnitude to cause
Canadian Department of Communications Compliance Statement
DOC: This Class B digital apparatus meets all requirements of the Canadian
Interference-Causing Equipment Regulations.
C-UL: Bears the C-UL Mark and is in compliance with Canadian Safety Regulations
according to
CAN/CSA C22.2 No. 60950-1.
FCC Information
1.
Use the attached specifi ed cables with the
22W90PS) color monitors so as not to interfere with radio and television reception.
(1)
Please use the supplied power cord or equivalent to ensure FCC compliance.
(2) Please use the supplied shielded video signal cable and audio cable.
Use of other cables and adapters may cause interference with radio and television
reception.
2.
This equipment has been tested and found to comply with the limits for a Class B digital
device, pursuant to part 15 of the FCC Rules. These limits are designed to provide reasonable protection against harmful interference in a residential installation. This equipment
generates, uses, and can radiate radio frequency energy, and, if not installed and used in
accordance with the instructions, may cause harmful interference to radio communications.
However, there is no guarantee that interference will not occur in a particular installation.
If this equipment does cause harmful interference to radio or television reception, which
can be determined by turning the equipment off and on, the user is encouraged to try to
correct the interference by one or more of the following measures:
• Reorient or relocate the receiving antenna.
• Increase the separation between the equipment and receiver.
• Connect the equipment into an outlet on a circuit different from that to which the receiver
is connected.
• Consult your dealer or an experienced radio/TV technician for help.
Changes or modifi cations not expressly approved by the party responsible for
compliance could void the user’s authority to operate the equipment.
If necessary, the user should contact the dealer or an experienced radio/television techni-
cian for additional suggestions. The user may fi nd the following booklet, prepared by the
Federal Communications Commission, helpful: ”How to Identify and Resolve Radio-TV
Interference Problems.“ This booklet is available from the U.S. Government Printing Offi ce,
Washington, D.C., 20402, Stock No. 004-000-00345-4.
LCD19WV (TFT19W80PS)
and LCD22WV (TFT-
1
Page 4

Contents
Your new NEC LCD monitor box* should contain the
following:
• LCD monitor
• P o w e r C or d
• User’s Manual
• Video Signal Cable
• Base Stand
• Cable Holder
Power Cord
LCD Monitor
(Stand not connected)
Video Signal Cable
(15-pin mini D-SUB to
15-pin mini D-SUB
male)
USER’S MANUAL
MANUEL D’UTILISATION
MANUAL DEL USUARIO
5.
"DDV4ZOD
-$%87
5.
"DDV4ZOD
-$%87
IdaZVgcVWdjidi]ZgheZX^Vad[[Zgh!gZ\^hiZgdca^cZVilll#cZXY^heaVn#Xdb#
EdjgZchVkd^geajhadc\hjgYÉVjigZhd[[gZhheX^VaZh!^chXg^kZo"kdjhZca^\cZ|lll#cZXY^heaVn#Xdb#
EVgV^c[dgbVghZhdWgZdigVhd[ZgiVhZheZX^VaZh!gZ\higZhZZcacZVZclll#cZXY^heaVn#Xdb#
User’s Manual
Cable Holder
* Remember to save your original box and packing material to transport or ship the monitor.
2
Page 5

Quick Start
To attach the Base to the LCD Stand:
1. Insert the front of the LCD Stand into the holes in the front of the Base (Figure 1).
2. Next, position the locking tabs on the back side of the LCD Stand with the holes on the
Base. Lower the Stand until locking tabs are secure.
Figure 1
Stand
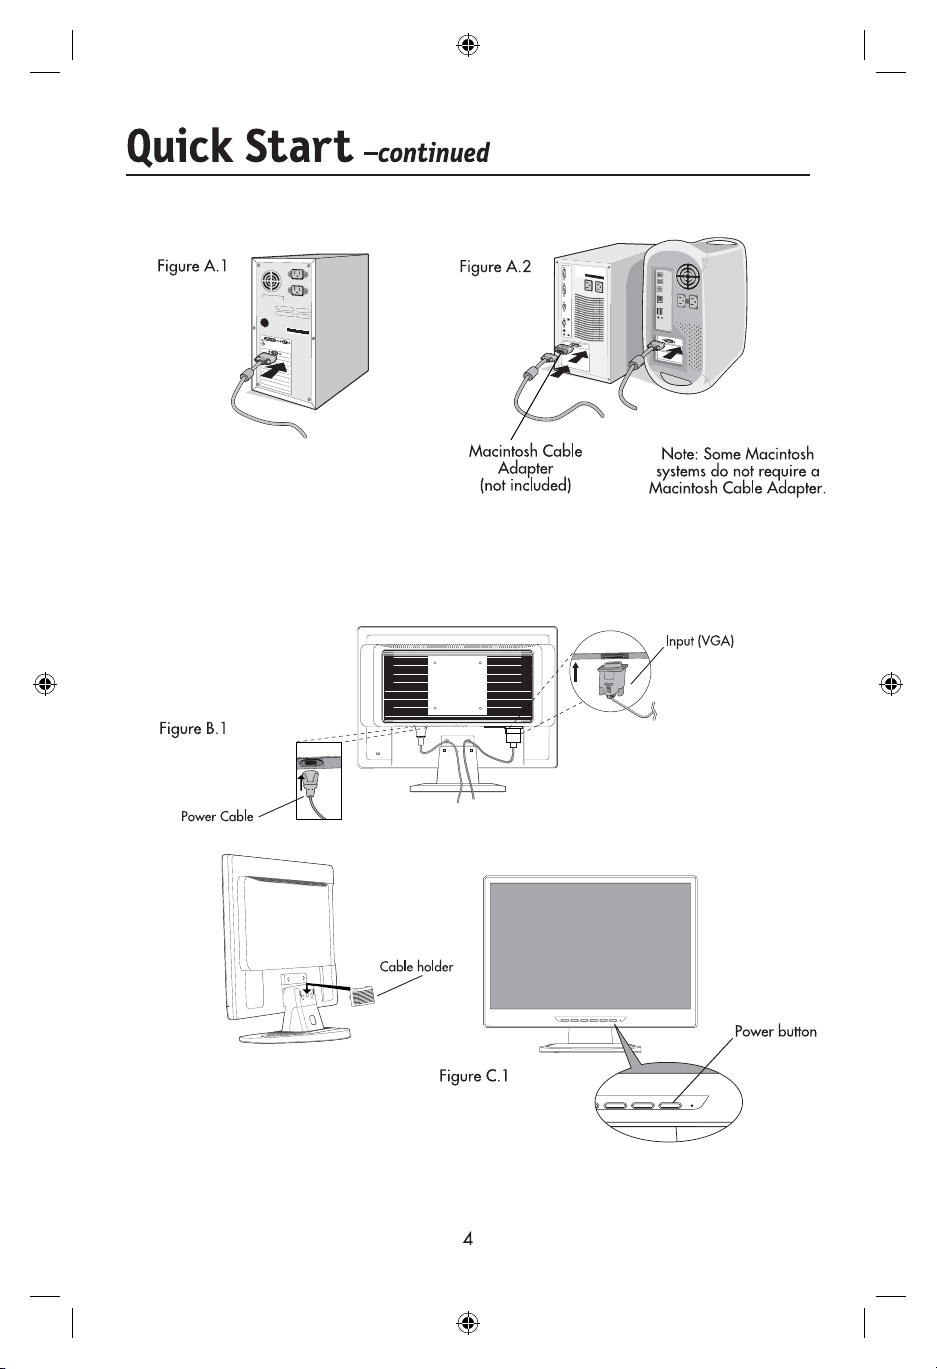
To attach the LCD monitor to your system, follow these instructions:
1. Turn off the power to your computer.
2. For the PC with Analog output: Connect the 15-pin mini D-SUB signal cable to the connector of
For the MAC: Connect the MultiSync Macintosh cable adapter to the computer, then attach the
NOTE: To obtain the MultiSync Macintosh cable adapter, call NEC Display Solutions of America,
3. Connect the15-pin mini D-SUB cable to the appropriate connector on the back of the monitor.
4. Connect one end of the power cord to the LCD and the other end to the power outlet.
NOTE: Adjust the position of cables in the holder to avoid damage.
NOTE: Refer to Recommended Use section of this manual for proper selection of power cord.
5. Turn on the monitor with the front power button and then turn on computer. (Figure C.1)
6. No-touch Auto Adjust automatically adjusts the monitor to optimal settings upon initial setup for
most timings. For further adjustments, use the following OSD
• Image Setup • Image Position
Refer to the Controls section of this User’s Manual for a full description of these OSD controls.
NOTE: For download information on the Windows
NEC monitor, visit www.necdisplay.com.
NOTE: If you have any problems, please refer to the Troubleshooting section of this
NEC User’s Manual.
Locking Tabs
the display card in your system (Figure A.1). Tighten all screws.
15-pin mini D-SUB signal cable to the MultiSync Macintosh cable adapter (Figure A.2). Tighten
all screws.
Inc. at (800) 632-4662.
(Figure B.1)
video signal cable and power cord into the cable holder between each hole of the stand neck.
Insert the tabs of the cable holder until it clicks. (Figure B.1)
Front Base
®
controls:
®
INF fi le for your
Place the
3
Page 6
Page 7
Quick Start –continued
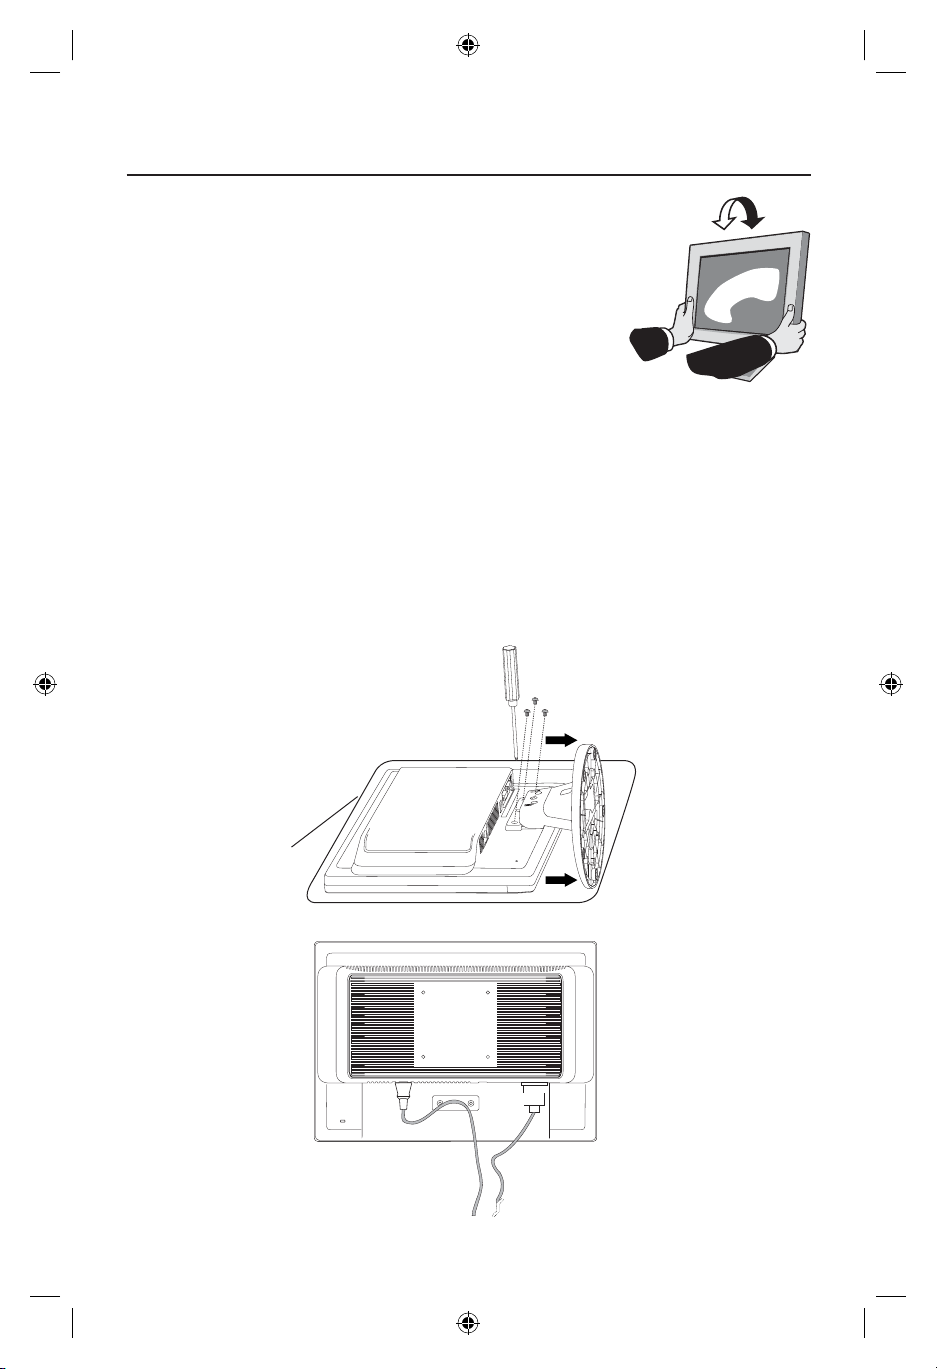
Tilt
Grasp both sides of the monitor screen with your hands
and adjust the tilt as desired (Figure TS.1).
NOTE: Handle with care when tilting the monitor screen.
Remove Monitor Stand for Mounting
To prepare the monitor for alternate mounting purposes:
1. Disconnect all cables.
2. Place monitor face down on a nonabrasive surface (Figure R.1).
3. Remove the 3 screws connecting the monitor to the stand and slide the
stand off from the LCD (Figure R.1).
The monitor is now ready for mounting in an alternate manner.
4.
Connect the AC cord and signal cable to the back of the monitor (Figure R.2).
5. Reverse this process to reattach stand.
NOTE: Use only VESA-compatible alternative mounting method.
NOTE: Handle with care when removing monitor stand.
Figure R.1
Figure TS.1
non-abrasive
surface
Figure R.2
5
Page 8
Quick Start –continued
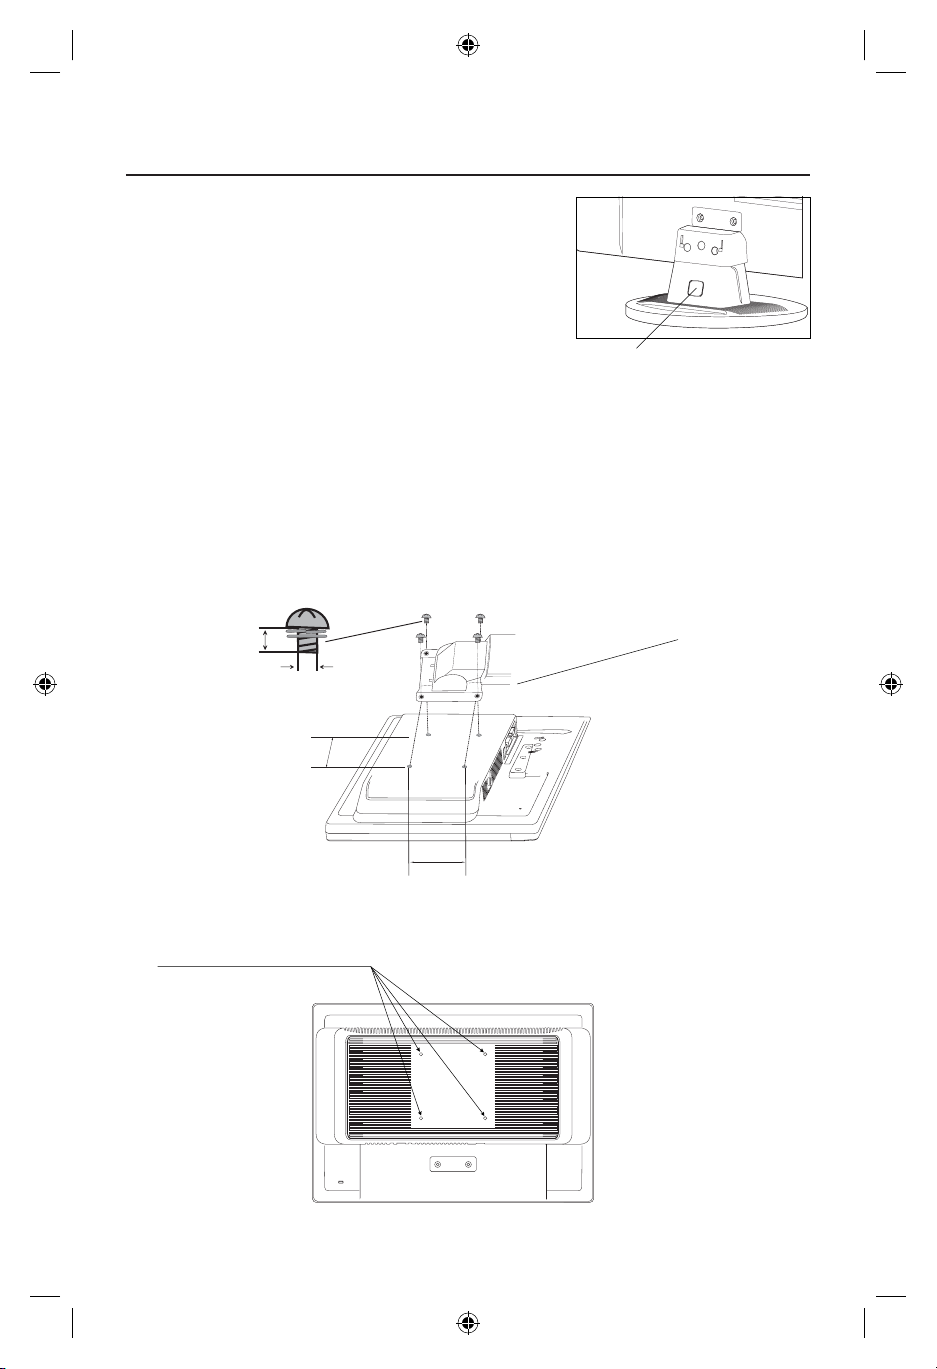
Removing the Base
Note: Always remove the Base when shipping the LCD.
1.
Place monitor face down on a non-abrasive sur
face.
2. Using your thumbs, press the quick release button
to unlock the stand.
3. Pull the unlocked base off the stand.
Connecting a Flexible Arm
This LCD monitor is designed for use with a fl exible arm. Please use the attached
screws (4pcs) as shown in the picture when installing.
To meet the safety requirements, the monitor must be mounted to an arm which
guaranties the necessary stability under consideration of the weight of the monitor.
The LCD monitor should only be used with an approved arm (e.g. GS mark).
Quick release button
12mm
4 x 12mm with lock
washer and flat washer
100 mm
Specifi cations
4-SCREWS (M4)
(MAX depth: 8.5 mm)
If using other screws,
check depth of holes.
M4
100 mm
Thickness of Bracket
(Arm) 2.0~3.2 mm
Tighten all
screws.
Weight of LCD assembly:
LCD19WV - 4.2 kg (MAX)
LCD22WV - 5.0 kg (MAX)
6
Page 9
Page 10
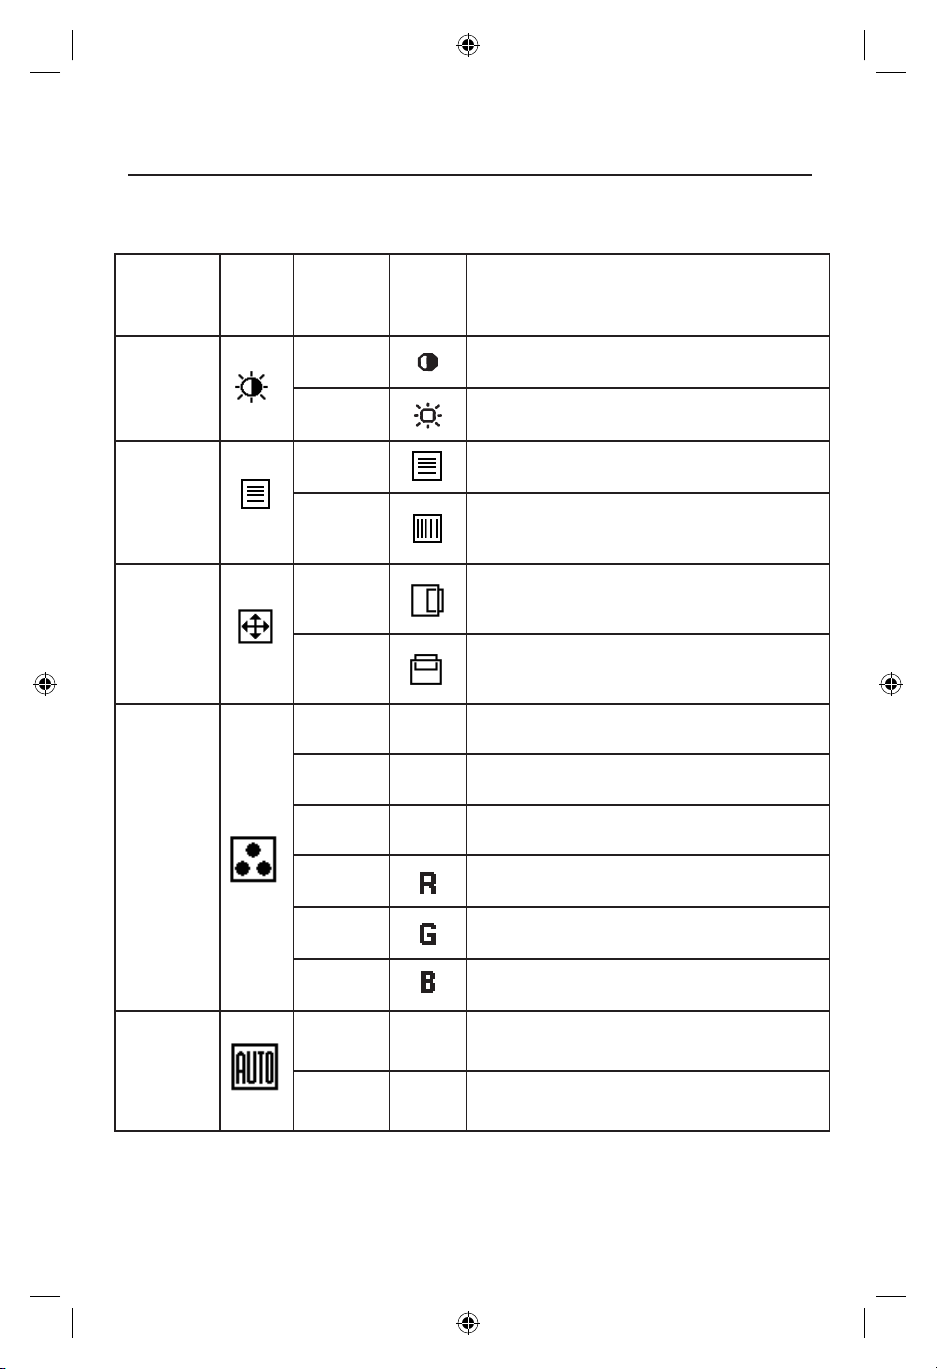
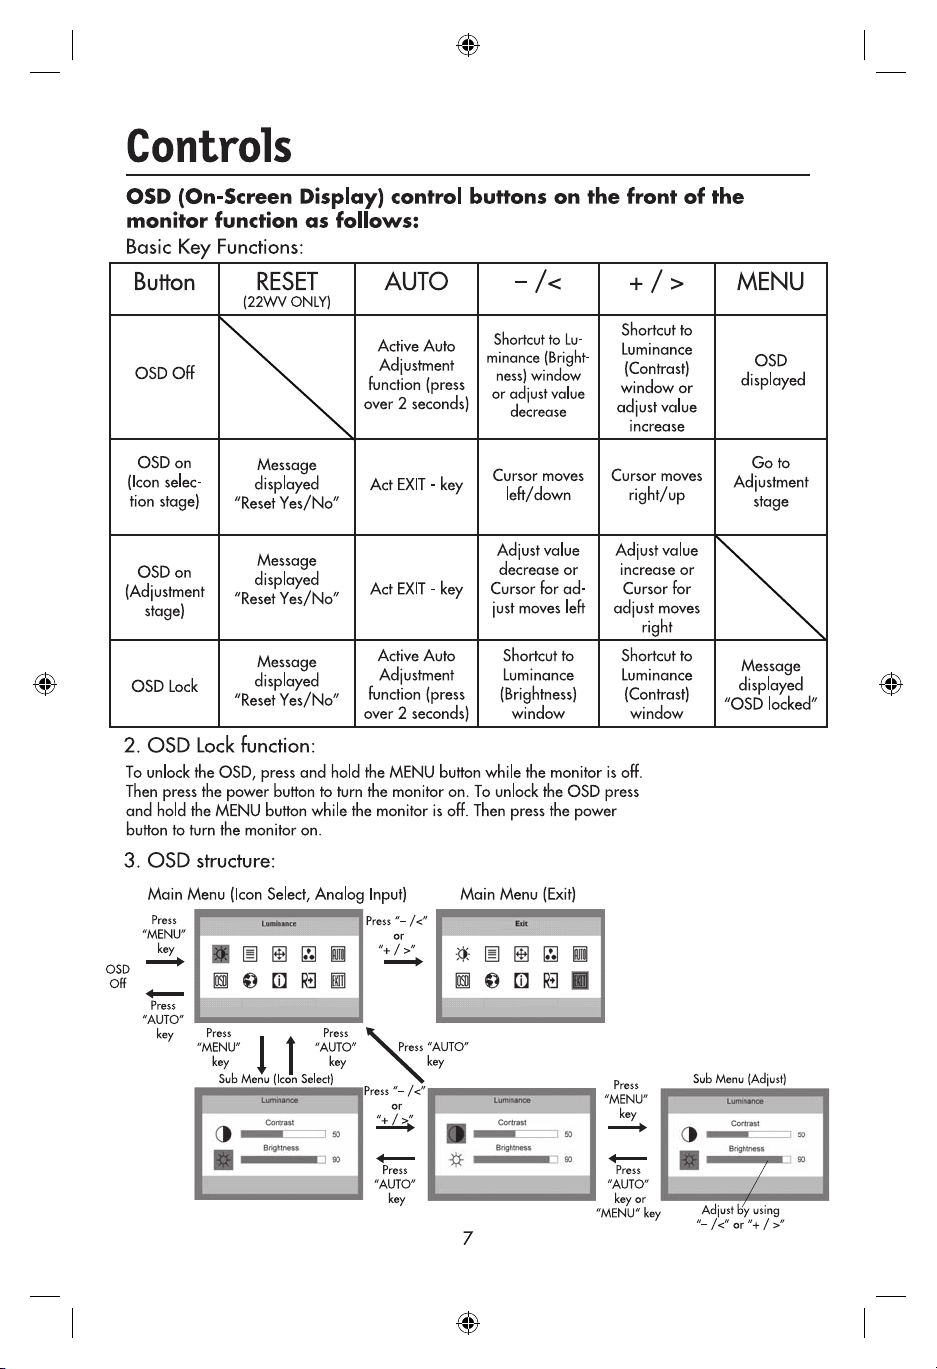
Controls –continued
ADJUSTING THE PICTURE
The description for function-control LEDs
Main
Menu
Item
Luminance
Image
Setup
Image
Position
Color
Temp.
Auto
Confi g.
Main
Menu
Icon
Sub
Menu
Item
Contrast
Brightness
Focus
Clock
H.Position
V. Postion
Warm
Cool
sRGB
User/Red
User/
Green
User/Blue
Yes
No
Sub
Menu
Icon
N/A
N/A
N/A
N/A
N/A
Description
Adjust the image brightness in relation to
the background.
Adjust the overall image and background
screen brightness.
Adjust Picture Phase to reduce HorizontalLine noise.
Adjust the picture Clock to reduce VerticalLine noise.
Adjust the horizontal position of the picture.
Adjust the vertical position of the picture.
Reset Warm color temperature.
Reset Cool color temperature.
Reset sRGB color temperature.
Increase or decrease Red. The change will
appear on screen.
Increase or decrease Green. The change
will appear on screen.
Increase or decrease Blue. The change
will appear on screen.
Auto Adjust the H/V Position, Focus and
Clock of picture.
Do not execute Auto Confi g, return to
main menu.
8
Page 11
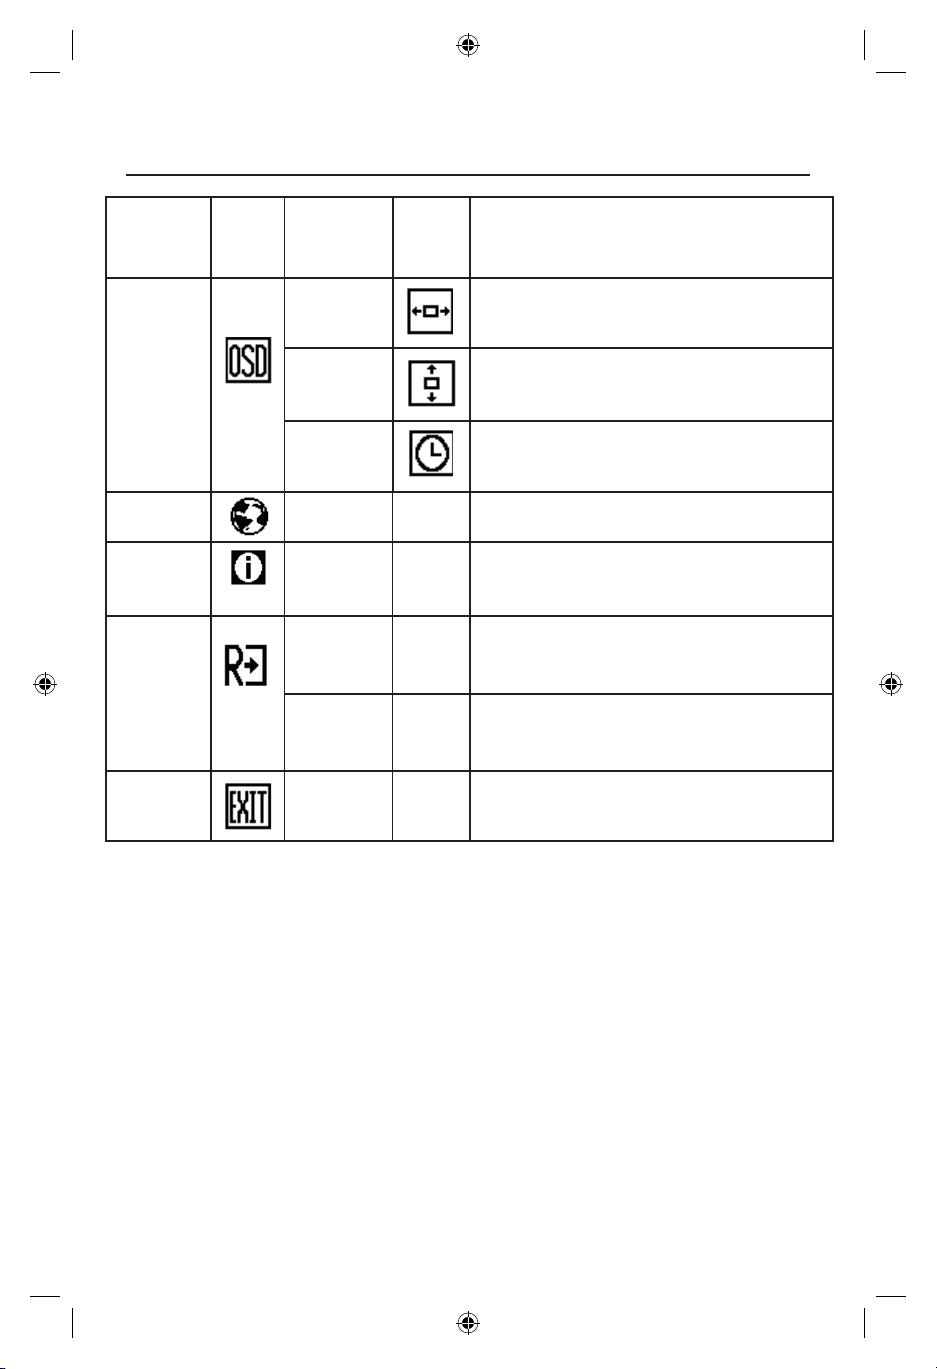
Controls –continued
Main
Menu
Item
OSD
Setup
Language Language
Information Information
Reset
Main
Menu
Icon
Sub
Menu
Item
H.Position
V.Position
OSD
Timeout
Yes
No
Sub
Menu
Icon
N/A
N/A
N/A
N/A
Description
Adjust the Horizontal position of the OSD.
Adjust the Vertical position of the OSD.
Adjust the OSD timeout.
Set OSD language.
Show the resolution, H/V frequency, Serial
No., DDC/CI Enable/Disable and input
port of current input timing.
Clear each old status of Auto-confi guration.
Do not execute reset, return to main menu.
Exit
OSD Message
Auto Confi g Please Wait: If User presses Hot-Key “Auto,” a message will appear, and the monitor
will do the auto confi guration function.
Input Not Supported: this message will appear when the H sync frequency, V sync frequency or
Resolution is out of the monitor’s support range.
Cable Not Connected: this message will appear when the video cable is not connected.
No signal: this message will appear when the video cable is connected but there is no active signal
input. After 5 seconds the monitor will enter Power-Saving mode. This message is located in the position
setting “OSD Setup.”
OSD Locked: When the OSD is locked, hold down the “Menu” key and press the “Power” key once to
turn on the monitor. The OSD will be locked, and this message will appear. When the OSD is locked,
only “Power” key function is still working, and if any other key is pressed this message will remain.
When the OSD is locked, hold down the “Menu” key and press the “Power” key once to turn on the
monitor. The OSD will be unlocked and does not show the message. This message location is in the
position setting “OSD Setup” item.
DDCCI Disable/Enable: When DDCCI enable, press “Auto” key. After 5 seconds the monitor will
show the “DDCCI Disable” message. When DDCCI disable, press “Auto” key. After 5 seconds the
monitor will show the “DDCCI Enable” message. This message is located in the position setting in
“OSD Setup” item.
N/A N/A
Exit OSD
9
Page 12
Recommended Use
Safety Precautions and Maintenance
FOR OPTIMUM PERFORMANCE, PLEASE NOTE THE
FOLLOWING WHEN SETTING UP AND USING
THE LCD COLOR MONITOR:
• DO NOT OPEN THE MONITOR. There are no user serviceable parts inside and opening or
removing covers may expose you to dangerous shock hazards or other risks. Refer all servicing to
qualifi ed service personnel.
• Do not spill any liquids into the cabinet or use your monitor near water.
• Do not insert objects of any kind into the cabinet slots, as they may touch dangerous voltage
points, which can be harmful or fatal or may cause electric shock, fi re or equipment failure.
• Do not place any heavy objects on the power cord. Damage to the cord may cause shock or fi re.
• Do not place this product on a sloping or unstable cart, stand or table, as the monitor may fall,
causing serious damage to the monitor.
• When operating the LCD monitor with its AC 125-240V power supply, use a power supply cord
that matches the power supply voltage of the AC power outlet being used. The power supply cord
you use must have been approved by and comply with the safety standards of your country. (Type
H05VV-F should be used in Europe)
• In UK, use a BS-approved power cord with molded plug having a black (5A) fuse installed for use
with this monitor. If a power cord is not supplied with this monitor, please contact your supplier.
• Do not place any objects onto the monitor and do not use the monitor outdoors.
• The lamps in this product contain mercury. Please dispose according to state, local or federal law.
• Do not bend power cord.
• Do not use monitor in high temperature, humid, dusty, or oily areas.
• If glass is broken, handle with care.
• Do not cover vent on monitor.
Immediately unplug your monitor from the wall outlet and refer servicing to qualifi ed service personnel under the following conditions:
• When the power supply cord or plug is damaged.
• If liquid has been spilled, or objects have fallen into the monitor.
• If the monitor has been exposed to rain or water.
• If the monitor has been dropped or the cabinet damaged.
• If the monitor does not operate normally by following operating instructions.
• If monitor or glass is broken, do not come in contact with the liquid crystal and handle with care.
• Allow adequate ventilation around the monitor so that heat can properly dissipate. Do
not block ventilated openings or place the monitor near a radiator or other heat
sources. Do not put anything on top of monitor.
• The power cable connector is the primary means of detaching the system from the
• Handle with care when transporting. Save packaging for transporting.
CAUTION
Image Persistence
Image persistence is when a residual or “ghost” image of a previous image remains visible on the
screen. Unlike CRT monitors, LCD monitors’ image persistence is not permanent, but constant images
being displayed for a long period of time should be avoided.
To alleviate image persistence, turn off the monitor for as long as the previous image was displayed.
For example, if an image was on the monitor for one hour and a residual image remains, the monitor
should be turned off for one hour to erase the image.
NOTE: As with all personal display devices, NEC Display Solution of America recommends using a
moving screen saver at regular intervals whenever the screen is idle or turning off the monitor when
not in use.
power supply. The monitor should be installed close to a power outlet which is easily accessible.
10
Page 13
Recommended Use –continued
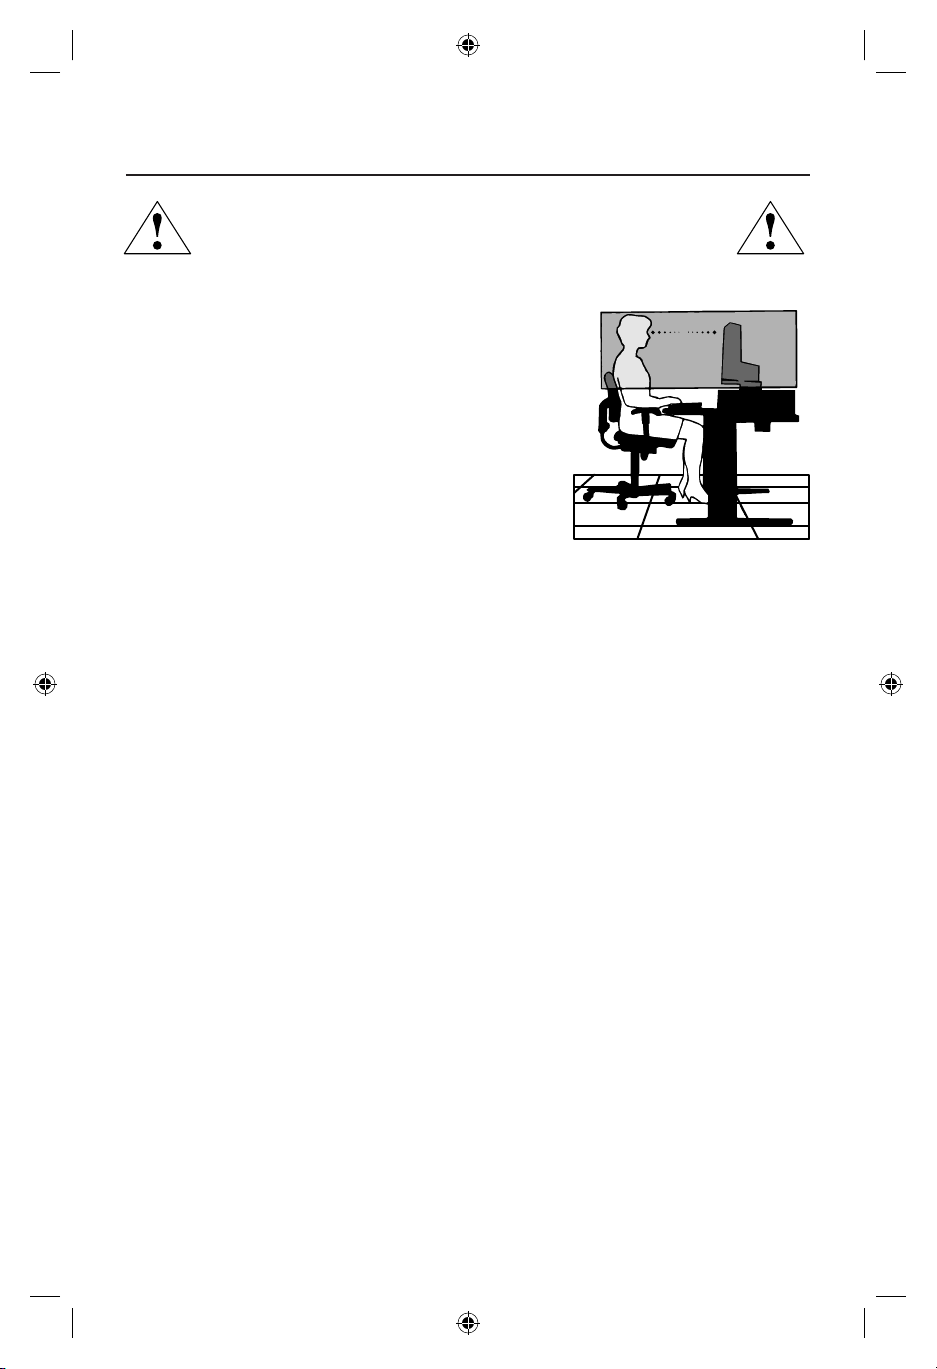
CORRECT PLACEMENT AND ADJUSTMENT OF THE MONITOR
CAN REDUCE EYE, SHOULDER AND NECK FATIGUE. CHECK THE
FOLLOWING WHEN YOU POSITION THE MONITOR:
• For optimum performance, allow 20 minutes for warm-up.
• Adjust the monitor height so that the top of the screen is at
or slightly below eye level. Your eyes should look slightly
downward when viewing the middle of the screen.
• Position your monitor no closer than 16 inches and no
further away than 28 inches from your eyes. The optimal
distance is 20 inches.
• Rest your eyes periodically by focusing on an object at
least 20 feet away. Blink often.
•
Position the monitor at a 90° angle to windows and other
light sources to minimize glare and refl ections. Adjust
the monitor tilt so that ceiling lights do not refl ect on your
screen.
• If refl ected light makes it hard for you to see your screen, use an antiglare fi lter.
• Adjust the monitor’s brightness and contrast controls to enhance readability.
• Use a document holder placed close to the screen.
• Position whatever you are looking at most of the time (the screen or reference material)
directly in front of you to minimize turning your head while you are typing.
• Get regular eye checkups.
Ergonomics
To realize the maximum ergonomics benefi ts, we recommend the following:
•
Use the preset Size and Position controls with standard signals
•
Use the preset Color Setting
•
Use non-interlaced signals with a vertical refresh rate between 60-75Hz
•
Do not use primary color blue on a dark background, as it is diffi cult to see and
may produce eye fatigue to insuffi cient contrast.
Cleaning the LCD Panel
• When the liquid crystal panel becomes dusty or dirty, wipe grntly with a soft cloth.
• Do not rub the LCD panel with coarse or hard material.
• Do not apply pressure to the LCD surface
• Do not use OA cleaner as it will cause deterioration or discoloration to the LCD sur-
face.
Cleaning the Cabinet
• Unplug the power supply.
• Dampen a soft cloth with water and a neutral detergent. Gently wipe the cabinet then
dry gently with a soft cloth.
NOTE: Many plastics are used on the surface of the cabinet. DO NOT clean with benzene,
thinner, alkaline detergent, alcoholic system detergent, glass cleaner, wax,
polish cleaner, soap powder, or insecticide. Do not touch rubber or vinyl to the cabinet
for a long period of time. These type of fl uids and fanrics can cause the paint to deteriorate
crack or peel.
For more detailed information on setting up a healthy work environment, write the American National Standard for
Human Factors Engineering of Visual Display Terminal Workstations – ANSI-HFS Standard No. 100-1988 – The Human
Factors Society, Inc. P.O. Box 1369, Santa Monica, California 90406.
11
Page 14
Specifi cations
Monitor LCD19WV Notes
Specifi cations Monitor
LCD Module Diagonal: 19.0 inch Active matrix; thin fi lm transistor (TFT)
Viewable Image Size: 19.0 inch liquid crystal display (LCD); 0.285 mm dot
Native Resolution (Pixel Count): 1440 x 900 pitch; 300cd/m
1000:1 contrast ratio, typical;
Time
5ms response
Input Signal Video: ANALOG 0.7 Vp-p/75 Ohms
Sync:Separate sync TTL Level (Positive/Negtive)
Display Colors Analog input:
Maximum Left/right: 80°/80° (CR>10)
Viewing Angles Up/Down: 75°/85° (CR>10)
Synchronization Horizontal: 30.0 kHz to 83.0 kHz Automatically
Range Vertical: 55 Hz to 75 Hz Automatically
Resolutions Supported 720 x 400: at 70 Hz
800 x 600: 56 Hz to 75 Hz
832 x 624: at 75 Hz
1024 x 768: 60 Hz to 75 Hz
1152 x 864: at 75Hz
1280 x 768: at 60 Hz
1280 x 960: at 60Hz
1280 x 1024: 60 Hz to 75 Hz
1440 x 900: at 60Hz..................................
recommended resolution at 60 Hz for
Active Display Area Horizontal :
Vertical :
Power Supply
Current Rating 0.75-0.4A/100-240V
Dimensions
17.3 inches (W) x 14.3 inches (H) x 8.3 inches (D)
Weight 4.5 kg
9.9 lbs
Environmental Considerations
Operating Temperature: 5°C to 35°C/41°F to 95°F
Humidity: 30% to 80%
Altitude: 0 to 12,000 Feet
Storage Temperature: -10°C to +60°C/14°F to 140°F
Humidity: 10% to 85%
Altitude: 0 to 40,000 Feet
1
Interpolated Resolutions: When resolutions are shown that are lower than the pixel count of the LCD module, text may appear different. This is
*
normal and necessary for all current fl at panel technologies when displaying non-native resolutions full screen. In fl at panel technologies, each dot on
the screen is actually one pixel, so to expand resolutions to full screen, an interpolation of the resolution must be done.
NOTE: Technical specifi cations are subject to change without notice.
Analog and
Digital Input:
16.7M Depending on display card used.
640 x 480: 60 Hz to 75 Hz
410.4 mm/16.2 inches
256.5 mm/10.1 inches
100-240 V - 50/60 Hz
440.0mm (W) x 363.0mm (H) x 210.0mm (D)
all modes listed.
Some systems may not support
NEC DISPLAY SOLUTIONS cites
optimal display performance
2
white luminence;
12
Page 15
Specifi cations -continued
Monitor LCD22WV Notes
Specifi cations Monitor
LCD Module Diagonal: 21.6 inch Active matrix; thin fi lm transistor (TFT)
Viewable Image Size: 21.6 inch liquid crystal display (LCD); 0.285 mm dot
Native Resolution (Pixel Count): 1440 x 900 pitch; 300cd/m
1000:1 contrast ratio, typical;
Time
5ms response
Input Signal Video: ANALOG 0.7 Vp-p/75 Ohms
Sync:Separate sync TTL Level (Positive/Negtive)
Display Colors Analog input:
Maximum Left/right: 85°/85° (CR>10)
Viewing Angles Up/Down: 80°/80° (CR>10)
Synchronization Horizontal: 30.0 kHz to 83.0 kHz Automatically
Range Vertical: 55 Hz to 75 Hz Automatically
Resolutions Supported 720 x 400: at 70 Hz
800 x 600: 56 Hz to 75 Hz
832 x 624: at 75 Hz
1024 x 768: 60 Hz to 75 Hz
1152 x 864: at 75Hz
1152 x 870: at 75 Hz
1280 x 720: at 60 Hz
1280 x 768: at 60 Hz
1280 x 960: at 60 Hz
1280 x 1024: 60 Hz to 75 Hz
1360 x 768: at 60 Hz
1440 x 900: at 60 Hz
1680 x 1050: at 60 Hz....................................NEC DISPLAY SOLUTIONS cites
recommended resolution at 60 Hz for
Active Display Area Horizontal :
Vertical :
Power Supply
Current Rating 1.2 - 0.5A/100-240V
Dimensions
19.9 inches (W) x 16.0 inches (H) x 8.3 inches (D)
Weight 5.5 kg
12.1 lbs
Environmental Considerations
Operating Temperature: 5°C to 35°C/41°F to 95°F
Humidity: 30% to 80%
Altitude: 0 to 12,000 Feet
Storage Temperature: -10°C to +60°C/14°F to 140°F
Humidity: 10% to 85%
Altitude: 0 to 40,000 Feet
1
Interpolated Resolutions: When resolutions are shown that are lower than the pixel count of the LCD module, text may appear different. This is
*
normal and necessary for all current fl at panel technologies when displaying non-native resolutions full screen. In fl at panel technologies, each dot on
the screen is actually one pixel, so to expand resolutions to full screen, an interpolation of the resolution must be done.
NOTE: Technical specifi cations are subject to change without notice.
Analog and
Digital Input:
16.7M Depending on display card used.
640 x 480: 60 Hz to 75 Hz
464.9 mm/18.3 inches
290.6 mm/29.1 inches
100-240 V - 50/60 Hz
505.8mm (W) x 407.5mm (H) x 210.0mm (D)
all modes listed.
Some systems may not support
optimal display performance
2
white luminence;
13
Page 16

Features
Reduced Footprint: Provides the ideal solution for environments requiring superior image
quality but with size and weight limitations. The monitor’s small footprint and low weight
allow it to be moved or transported easily from one location to another.
No-touch Auto Adjust™: No-touch Auto Adjust automatically adjusts the monitor to optimal settings upon initial setup.
Plug and Play: The Microsoft
setup and installation by allowing
and resolutions supported)
performance.
®
IPM
(Intelligent Power Manager) System: Provides innovative power-saving methods
that allow the monitor to shift to a lower power consumption level when on but not in use,
saving two-thirds of your monitor energy costs, reducing emissions and lowering the air
conditioning costs of the workplace.
Multiple Frequency Technology: Automatically adjusts monitor to the display card’s scanning frequency, thus displaying the resolution required.
FullScan
®
Capability: Allows you to use the entire screen area in most resolutions, signifi -
cantly expanding image size.
®
VESA
Standard Mounting Interface: Allows users to connect their monitor to any VESA
standard third party mounting arm or bracket. Allows for the monitor to be mounted on a
wall or an arm using any third party compliant device.
®
solution with the Windows® operating system facilitates
the monitor to send its capabilities (such as screen size
directly to your computer, automatically optimizing display
14
Page 17

Troubleshooting
No picture
•
The signal cable should be completely connected to the display card/computer.
• The display card should be completely seated in its slot.
• Front Power Switch and computer power switch should be in the ON position.
•
Check to make sure that a supported mode has been selected on the display card or system
being used. (Please consult display card or system manual to change graphics mode.)
• Check the monitor and your display card with respect to compatibility and recommended settings.
• Check the signal input.
Power Button does not respond
• Unplug the power cord of the monitor from the AC outlet to turn off and reset the monitor.
Image Persistence
•
Image persistence is when a residual or “ghost” image of a previous image remains visible
on the screen. Unlike CRT monitors, LCD monitors’ image persistence is not permanent, but
constant images being displayed for a long period of time should be avoided.
To alleviate image persistence, turn off the monitor for as long as the previous image was
displayed. For example, if an image was on the monitor for one hour and a residual image remains, the monitor should be turned off for one hour to erase the image.
NOTE: As with all personal display devices, NEC Display Solutions of America, Inc.
recommends displaying moving images or using a moving screen saver at regular
intervals whenever the screen is idle or turning off the monitor when not in use.
Image is unstable, unfocused or swimming is apparent
• Signal cable should be completely attached to the computer.
• Use the OSD Image Adjust controls to focus and adjust display by increasing or decreasing the FINE control. When the display mode is changed, the OSD Image Adjust
settings may need to be readjusted.
• Check the monitor and your display card with respect to compatibility
and recommended signal timings.
•
If your text is garbled, change the video mode to non-interlace and use 60Hz refresh rate.
LED on monitor is not lit (no blue or amber color can be seen)
• Power Switch should be in the ON position and power cord should be connected.
Display image is not sized properly
• Use the OSD Image Adjust controls to increase or decrease the H.SIZE.
•
Check to make sure that a supported mode has been selected on the display card or system
being used. (Please consult display card or system manual to change graphics mode.)
No Video
• If no video is present on the screen, turn the Power button off and on again.
• Make certain the computer is not in a power-saving mode (touch the keyboard or mouse).
15
Page 18

References
NEC Monitor Customer Service & Support
Customer Service and Technical Support:
Fax: (800) 695-3044
Parts and Accessories/Macintosh
Cable Adapter: (800) 632-4662
Warranty Information: www.necdisplay.com
Online Technical Support www.necdisplay.com
Sales and Product Information
Sales Information Line: (888) 632-6487
Canadian Customers: (866) 771-0266, Ext#: 4037
Government Sales: (800) 284-6320
Government Sales email: gov@necdisplay.com
Electronic Channels
World Wide Web: www.necdisplay.com
Product Registration: www.necdisplay.com
European Operations:
Drivers and Downloads www.necdisplay.com
(800) 632-4662
www.nec-display-solutions.com
16
Page 19

Limited Warranty
NEC Display Solutions of America, Inc. (hereinafter “NEC DISPLAY SOLUTIONS”) warrants this Product to
be free from defects in material and workmanship and, subject to the conditions set forth below, agrees to
repair or replace (at NEC DISPLAY SOLUTIONS’ sole option) any part of the enclosed unit which proves
defective for a period of one (1) year from the date of rst consumer purchase. Spare parts are warranted
for ninety (90) days. Replacement parts or unit may be new or refurbished and will meet speci cations
of the original parts or unit.
This warranty gives you speci c legal rights and you may
state. This warranty is limited to the original purchaser of the Product and is not transferable. This warranty
covers only NEC DISPLAY SOLUTIONS-supplied components. Service required as a result of third party
components is not covered under this warranty. In order to be covered under this warranty, the Product
must have been purchased in the U.S.A. or Canada by the original purchaser. This warranty only covers
Product distribution in the U.S.A. or Canada by NEC DISPLAY SOLUTIONS No warranty service is provided
outside of the U.S.A. or Canada. Proof of Purchase will
substantiate date of purchase. Such proof of purchase must be an original bill of sale or receipt containing
name and address of seller, purchaser, and the serial number of the product.
It shall be your obligation and expense to have the Product shipped, freight prepaid, or delivered to the
authorized reseller from whom it was purchased or other facility authorized by NEC DISPLAY SOLUTIONS
to render the services provided hereunder in either the original package or a similar package aording
an equal degree of protection. All Products returned to NEC DISPLAY SOLUTIONS for service MUST
have prior approval,
been previously altered, repaired, or serviced by anyone other than a service facility authorized by
NEC DISPLAY SOLUTIONS to render such service, the serial number of the product shall not have been
altered or removed. In order to be covered by this warranty the Product shall not have been subjected
to displaying of xed images for long periods of time resulting in image persistence (afterimage eects),
accident, misuse or abuse or operated contrary to the instructions contained in the User’s Manual. Any
such conditions will void this warranty.
NEC DISPLAY SOLUTIONS SHALL NOT BE LIABLE FOR DIRECT,
OR OTHER TYPES OF DAMAGES RESULTING FROM THE USE OF ANY NEC DISPLAY SOLUTIONS
PRODUCT OTHER THAN THE LIABILITY STATED ABOVE. THESE WARRANTIES ARE IN LIEU OF ALL OTHER
WARRANTIES EXPRESS OR IMPLIED, INCLUDING, BUT NOT LIMITED TO, THE IMPLIED WARRANTIES
OF MERCHANTABILITY OR FITNESS FOR A PARTICULAR PURPOSE. SOME STATES DO NOT ALLOW
THE EXCLUSION OF IMPLIED WARRANTIES OR THE LIMITATION OR EXCLUSION OF LIABILITY FOR
INCIDENTAL OR CONSEQUENTIAL DAMAGES SO THE ABOVE EXCLUSIONS OR LIMITATIONS MAY
NOT APPLY TO YOU.
which may be obtained by calling 1-800-632-4662. The Product shall not have
also have other rights, which vary from state to
be required by NEC DISPLAY SOLUTIONS to
INDIRECT, INCIDENTAL, CONSEQUENTIAL,
This Product is warranted in accordance with the terms of this limited warranty. Consumers are cautioned
that Product performance is aected by sy
and operator control of the system, among other factors. While NEC DISPLAY SOLUTIONS Products are
considered to be compatible with many systems, speci c functional implementation by the customers of
the Product may vary. Therefore, suitability of a Product for a speci c purpose or application must be
determined by consumer and is not warranted by NEC DISPLAY SOLUTIONS.
For the name of your nearest authorized NEC Display Solutions of America, Inc. service facility, contact
NEC Display Solutions of America, Inc. at 1-800-632-4662.
stem con guration, software, the application, customer data,
17
Page 20
TCO’03
Congratulations!
The display you have just purchased carries the TCO’03
Displays label. This means that your display is designed,
manufactured and tested according to some of the strictest
quality and environmental requirements in the world. This
makes for a high performance product, designed with the
user in focus that also minimizes the impact on our natural
environment.
Some of the features of the TCO’03 Display requirements:
Ergonomics
• Good visual ergonomics and image quality in order to improve the working
environment for the user and to reduce sight and strain problems. Important
parameters are luminance, contrast, resolution, refl ectance, color rendition and
image stability.
Energy
• Energy-saving mode after a certain time – benefi cial both for the user and the
environment
• Electrical safety
Emissions
• Electromagnetic fi elds
• Noise emissions
Ecology
• The product must be prepared for recycling and the manufacturer must have a
certifi ed environmental management system such as EMAS or ISO 14 001
• Restrictions on
– chlorinated and brominated fl ame retardants and polymers
– heavy metals such as cadmium, mercury and lead.
The requirements included in this label have been developed by TCO Development in cooperation with scientists, experts, users as well as manufacturers all over the world. Since
the end of the 1980s TCO has been involved in infl uencing the development of IT equipment in a more user-friendly direction. Our labelling system started with displays in 1992
and is now requested by users and IT-manufacturers all over the world.
For more information, please visit
www.tcodevelopment.com
18
Page 21

Manufacturer’s Recycling and Energy
Information
NEC DISPLAY SOLUTIONS is strongly committed to environmental protection and sees
recycling as one of the company’s top priorities in trying to minimize the burden placed
on the environment. We are engaged in developing environmentally-friendly products,
and always strive to help defi ne and comply with the latest independent standards from
agencies such as ISO (International Organization for Standardization) and TCO (Swedish
Trades Union).
Disposing of old NEC product
The aim of recycling is to gain environmental benefi ts by means of reusing, upgrading,
reconditioning, or reclaiming old material. Dedicated recycling sites ensure that
environmentally harmful components are properly handled and securely disposed.
To ensure the best recycling of our products, NEC DISPLAY SOLUTIONS offers a
variety of recycling procedures and gives advice on how to handle the product, in an
environmentally sensitive way, once it has reached the end of its life.
All required information concerning the disposal of the product and country-specifi c
information can be found on our following websites:
USA: http://www.necdisplay.com
Europe: http://www.nec-display-solutions.com/greencompany/
Japan: http://www.nec-display.com
Energy saving
This monitor features an advanced energy saving capability. When a VESA Display
Power Management Signaling (DPMS) Standard signal is sent to the monitor, the Energy
Saving mode is activated. The monitor enters a single Energy Saving mode.
Mode Power consumption LED color
LCD19WV
Normal Operation Approx. 34W Green
Energy Saving Mode Less than 2W Amber
Off Mode Less than 1W Unlit
LCD22WV
Normal Operation Approx. 46W Green
Energy Saving Mode Less than 2W Amber
Off Mode Less than 1W Unlit
19
Page 22
Declaration of the Manufacturer
We hereby certify that the color monitors
LCD19WV
(TFT19W80PS) and LCD22WV
(TFT22W90PS)
are
in compliance with
Council Directive 73/23/EEC:
– EN 60950-1
Council Directive 89/336/EEC:
– EN 55022
– EN 61000-3-2
– EN 61000-3-3
– EN 55024
and marked with
NEC Display Solutions, Ltd.
4-13-23, Shibaura,
Minato-Ku
Tokyo 108-0023, Japan
20
Page 23

AVERTISSEMENT
AFIN D’ÉVITER TOUT RISQUE D’INCENDIE OU D’ÉLECTROCUTION, NE PAS EXPOSER CET APPAREIL À LA PLUIE OU À
L’HUMIDITÉ. NE PAS UTILISER LA FICHE D’ALIMENTATION POLARISÉE AVEC UNE PRISE DE CORDON DE RALLONGE
OU AUTRE PRISE SAUF SI LES BROCHES PEUVENT ÊTRE ENTIÈREMENT INTRODUITES.
NE PAS OUVRIR LE BOÎTIER, LEQUEL CONTIENT DES COMPOSANTS À HAUTE TENSION. CONFIER TOUS TRAVAUX
À DU PERSONNEL TECHNIQUE QUALIFIÉ.
ATTENTION
ATTENTION : POUR ÉVITER TOUT RISQUE D’ÉLECTROCUTION, NE PAS OUVRIR LE COUVERCLE (L’ARRIÈRE). À L’INTÉRIEUR, AUCUNE PIÈCE
NE NÉCESSITE L’INTERVENTION DE L’UTILISATEUR. EN CAS DE PROBLÈME, S’ADRESSER À DU PERSONNEL TECHNIQUE QUALIFIÉ.
Ce symbole est une mise en garde contre les risques d’électrocution que présentent certaines parties dépourvues
d’isolation à l’intérieur de l’appareil. Il est donc dangereux d’établir le moindre contact avec ces parties
Ce symbole prévient l’utilisateur que des directives d’utilisation et de maintenance de cet appareil sont fournies avec
ce guide d’utilisateur. Par conséquent, celles-ci doivent être lues attentivement pour éviter tout incident.
.
Déclaration de conformité – Département des Communications du Canada
DOC : Cet appareil numérique de classe B respecte toutes les exigences du Règlement
sur le matériel à l’origine d’interférences du Canada.
C-UL : Ce produit porte la marque «C-UL» et est conforme aux règlements de sécurité
canadiens selon CAN/CSA C22.2 No. 60950-1.
Informations FCC
1. Utiliser les câbles spécifi és fournis avec les moniteur couleur LCD19WV (TFT19W80PS) et LCD22WV
(TFT22W90PS) afi n de ne pas provoquer d’interférences avec la réception radio et télévision.
(1) Prière d’utiliser le câble d’alimentation fourni ou équivalent pour assurer la conformité FCC.
(2) Veuillez employer le câble protégé fourni de signal visuel et le câble audio.
L’utilisation d’autres câbles et adaptateurs peut provoquer des interférences avec la réception
radio et télévision.
2.
Cet appareil a été testé et s’avère conforme avec les spécifi cations d’équipements de Classe B, section
15 de la réglementation FCC. Ces spécifi cations ont été établies pour garantir une protection raisonnable contre les interférences nuisibles dans une installation résidentielle. Cet appareil génère, utilise
et peut émettre des fréquences radio et, s’il n’est pas installé et utilisé selon les directives de ce guide, il
peut perturber les communications radio. Cependant, il n’est pas garanti qu’aucune interférence ne se
produira dans une installation donnée.
Si cet appareil provoque des interférences nuisibles à la réception radio ou télévision, ce que vous pouvez
déterminer en allumant et en éteignant l’appareil, essayez de remédier au problème en prenant une ou
plusieurs des mesures suivantes :
• Réorienter ou repositionner l’antenne de réception.
• Augmenter la distance entre l’appareil et le récepteur.
• Connecter l’appareil à une prise de courant sur un circuit différent de celui sur lequel le récepteur
est connecté.
• Consulter son revendeur ou un technicien radio/TV pour obtenir de l’aide.
Changements ou modifi cations approuva pas explicitement par la réception responsable pour
l’acquiescement pouvions évacuer pour opérer l’équipement l’autorité de l’utilisateur.
Si nécessaire, l’utilisateur doit contacter le revendeur ou un technicien radio/TV afi n d’obtenir des informations supplémentaires. L’utilisateur peut se procurer le livret utile suivant, préparé par la Federal Communications Commission : «How to Identify and Resolve Radio-TV Interference Problems» (Comment cerner
et résoudre les problèmes d’interférences radio/TV). Ce livret est disponible auprès du U.S. Government
Printing Offi ce, Washington, D.C., 20402, Stock No. 004-000-00345-4.
21
Page 24

Contenu
La boîte* de votre nouveau moniteur NEC LCD contient :
• Moniteur LCD
• Cordon d’alimentation
• Manuel de l’utilisateur
• Câble de signal vidéo
• Support de base
• Support de
Cordon d’alimentation
câble
Moniteur LCD
(Socle non connect )
Câble de signal vidéo
(15-pin mini D-SUB 15
au mini D-SUB mâle
de goupille)
USER’S MANUAL
MANUEL D’UTILISATION
MANUAL DEL USUARIO
5.
-$%87
"DDV4ZOD
5.
"DDV4ZOD
-$%87
IdaZVgcVWdjidi]ZgheZX^Vad[[Zgh!gZ\^hiZgdca^cZVilll#cZXY^heaVn#Xdb#
EdjgZchVkd^geajhadc\hjgYÉVjigZhd[[gZhheX^VaZh!^chXg^kZo"kdjhZca^\cZ|lll#cZXY^heaVn#Xdb#
EVgV^c[dgbVghZhdWgZdigVhd[ZgiVhZheZX^VaZh!gZ\higZhZZcacZVZclll#cZXY^heaVn#Xdb#
Manuel de l’utilisateur
Trous à l’avant de la base
* Ne pas oublier de conserver la boîte et le matériel d’emballage d’origine pour transporter ou expédier le moniteur.
22
Page 25

Mise en marche rapide
Pour attacher la base au support LCD :
1. Insérez la partie avant du support LCD dans les trous à l’avant de la base.
2. Ensuite, alignez les languettes de verrouillage à l’arrière du stand LCD avec les trous de la base.
Abaissez le support en place jusqu’à ce que les languettes de verrouillage soient maintenues en place.
Figure 1
Pour raccorder le moniteur LCD au système,suivez les directives ciaprès:
1. Mettez l’ordinateur hors tension.
2. Pour le PC avec sortie analogique: Branchez le mini D-SUB à 15 broches du câble de signal au
connecteur de la carte d’écran de votre système (Figure A.1). Serrez toutes les vis.
Pour une confi guration MAC: Branchez l’adaptateur de câble Macintosh à l’ordinateur, puis fi xez
le mini D-SUB à 15 broches du câble de signal à l’adaptateur de câble Macintosh (Figure A.2).
Serrez toutes les vis.
NOTA : Pour obtenir un adaptateur de câble Macintosh pour le appelez
NEC Display Solutions of America, Inc. au (800) 632-4662.
3. Connecter le mini D-SUB à 15 broches du câble de signal vidéo au connecteur approprié à
l’arrière du moniteur (Figure B.1).
4.
Relier une extrémité du cordon de secteur à l’affi chage à cristaux liquides et l’autre extrémité à la
prise de courant. Placer le câble de signal vidéo et le cordon de secteur dans le support de câble
entre chaque trou du cou de stand. Insérer les étiquettes du support de câble jusqu’à ce qu’il
clique. (fi gure B.1)
NOTA : Régler la position des câbles sous la fi xation pour éviter d’endommager l’appareil.
NOTA : Si vous utilisez ce moniteur à AC125-240V, s’il vous plaît faites référence à section de
l’Usage Recommandée de ce manuel pour sélection adéquate d’AC pouvoir cordon.
5. Allume l’écran de Silhouette de bouton et l’ordinateur (Figure C.1)
6.
Auto aucune de tact ajuste automatiquement ajuste l’écran à réglages optimaux sur setup initial pour
les les plus nombreux minutages. Pour les réajustements plus further, following OSD utilise des réglages:
• Installation d’image • Position d’image
Pour une description complète de ces commandes OSD, consultez la section Commandes de ce manuel.
NOTA : des informations sur le télé chargement du fi chier INF Windows® pour le moniteur NEC,
consultez la www.necdisplay.com.
NOTA : case de probl è me,consultez la section Dépannage de ce manuel NEC.
23
Page 26

Page 27

Mise en marche rapide (suite)
Incliner
Attrapez des deux mains l’écran du moniteur par
les deux côtés et réglez l’inclinaison et l’orientation
selon votre goût.
NOTA: manipulez avec soin en inclinant l’écran de moniteur.
(Figure TS.1)
Figure TS.1
Enlever le support du moniteur pour le montage
Pour préparer le moniteur à différents types de montage :
1. Déconnectez tous les câbles.
2.
Placez le moniteur avec l’écran vers le bas sur une surface non abrasive (Figure R.1).
3. Enlever les 3 vis qui fi xent le moniteur au support et enlever la plaque métallique
(Figure R.1).
Vous pouvëz à présent modifi er le montage du moniteur.
4. Connectez les AC attachent avec une corde et câble du signal au dos du moniteur
(Figure R.2).
5. Inversez la marche à suivre pour réinstaller le support.
NOTA : Utilisez uniquerment une méthode de montage compatible VESA.
NOTA : Prenez des précautions pour ôter le support du moniteur.
Figure R.1
Surface non
abrasive
Figure R.2
25
Page 28

Mise en marche rapide (suite)
Enlever la Base
NOTA : Toujours enlever la base avant d’expédier le LCD.
1.
Placer le moniteur partie avant en contact avec
une surface non abrasive (Figure R.1).
2. En utilisant votre pouce, appuyez sur le bouton
rapide de dégagement pour ouvrir le stand.
3. Appuyer sur les languettes supérieures en les poussant vers le haut pour
déverrouiller et tirer le support.
Connexion d’un bras souple
Ce moniteur LCD a été conçu pour être utilisé avec un bras fl exible. Utiliser les vis
fournies (4pièces) lors de l’installation comme indiqué sur la fi gure.
Le moniteur doit être installé sur un bras garantissant la stabilité nécessaire correspon-
dant au poids du moniteur.
Ce moniteur LCD ne peut être unilisé qu’ avec un bras homoloqué (par ex. marque GS).
12mm
M4
4 x 12mm with lock
4 x 12mm avec la
washer and flat washer
rondelle de
freinage et la rondelle plate
100 mm
Le bouton rapide
de dégagement
L‘épaisseur
de parenthése
(Arme)
2,0~3,2 mm
Fiche Technique
4 vis (M4)
(MAX depth: 8.5 mm)
Si utilisant d‘autres vis,
profondeur de che`que
de trou.
Serrer toutes
les vis.
100 mm
Poids of assemblee:
LCD19WV - 4.2 kg (MAX)
LCD22WV - 5.0 kg (MAX)
26
Page 29

Page 30

Commandes (suite)
AJUSTEMENT DE L‘IMAGE
La description pour la fonction-commande LED
Article
de menu
principal
Luminance
Installation
d’image
Position
d’image
Temp. de
couleur
Confi g.
automatique
Icône
de
menu
princi-
pal
Article
de menu
secon-
daire
Contraste
Éclat
Foyer
Horloge
H.Position
V. Postion Ajuster la position verticale de l’image.
Chaud
Frais
sRGB
Utilisa-
teur/rou-
ge
Utilisa-
teur/vert
Utilisa-
teur/bleu
Oui
Non
Icône
secon-
daire
de
menu
N/A
N/A
N/A
N/A
N/A
Description
Ajuster l’éclat d’image par rapport au
fond.
Ajuster l’image et l’éclat globaux d’écran
de fond.
Ajuster la phase d’image pour réduire la
Horizontal-Ligne bruit.
Ajuster l’horloge d’image pour réduire la
Vertical-Ligne bruit.
Ajuster la position horizontale de l’image.
Remettre à zéro chauffent la température
de couleur.
Remettre à zéro refroidissent la température de couleur
Remettre à zéro la température de couleur
de sRGB.
Augmenter ou diminuer le rouge. Le changement apparaîtra sur l’écran.
Augmenter ou diminuer le vert. Le changement apparaîtra sur l’écran.
Augmenter ou diminuer le bleu. Le changement apparaîtra sur l’écran.
L’auto ajustent la position, le centre et l’horloge
de H/V de l’image.
Ne pas exécuter les confi g automatiques, reviennent au menu principal.
.
28
Page 31

Commandes (suite)
Main
Menu
Item
Main
Menu
Icon
Sub
Menu
Item
H.Position
Installation
d’OSD
V.Position
Temps mort
d’OSD
Langue Langue
L‘Information L‘Information
Oui
Remise
Non
Sub
Menu
Icon
N/A
N/A
N/A
N/A
Description
Ajuster la position horizontale de l’OSD.
Ajuster la position verticale de l’OSD.
Ajuster le temps mort d’OSD.
Placer la langue d’OSD.
Montrer la résolution, la fréquence de
H/V, le numéro périodique, DDC/CI activer/et port d’entrée de la synchronisation
courante d’entrée.
Dégager chaque vieux statut de la confi guration automatique.
Ne pas exécuter la remise, reviennent au
menu principal.
Sortie
N/A N/A
Sortir OSD.
Message d’OSD
Les confi g automatiques attendent svp : Si l’utilisateur presse la touche directe « automobile, » un message apparaîtra, et le moniteur fera la fonction automatique de confi guration.
Entrée non soutenue : ce message apparaîtra quand la fréquence de synchro de H, fréquence de synchro de V
ou résolution est hors de la gamme de soutien du moniteur.
Câble non relié : ce message apparaîtra quand le câble visuel n’est pas relié.
Aucun signal : ce message apparaîtra quand le câble visuel est relié mais il n’y a aucune entrée de signal active.
Après 9 secondes le moniteur entrera le mode de Puissance-Économie. Ce message est situé dans l’arrangement
« installation de position d’OSD. »
OSD a fermé à clef : Quand l’OSD est verrouillé, maintenir la clef de « menu » et appuyer sur la touche de «
puissance » une fois pour allumer le moniteur. L’OSD sera verrouillé, et ce message apparaîtra. Quand l’OSD est
verrouillé, seulement la fonction principale de « puissance » fonctionne, et le cas échéant toute autre clef toujours
est pressé ce message restera. Quand l’OSD est verrouillé, maintenir la clef de « menu » et appuyer sur la touche
de « puissance » une fois pour allumer le moniteur. L’OSD sera ouvert et ne montre pas le message. Cet endroit
de message est dans article installé le « par OSD » d’arrangement de position.
Le débronchement de DDCCI/permettent : Quand DDCCI permettent, appuyer sur la touche « automatique ».
Après 5 secondes le moniteur montrera le message « de débronchement de DDCCI ». Quand le débronchement
de DDCCI, appuient sur la touche « automatique ». Après 5 secondes le moniteur montrera que les « DDCCI
permettent » le message. Ce message est situé dans l’arrangement de position dans l’article installé « par OSD ».
29
Page 32

Usage recommandé
Consignes de sécurité et d’entretien
POUR UN FONCTIONNEMENT OPTIMAL, PRIÈRE DE NOTER CE QUI
SUIT POUR LE RÉGLAGE ET L’UTILISATION DU MONITEUR COULEUR
• NE PAS OUVRIR LE MONITEUR. Aucune pièce intérieure ne nécessite l’intervention de l’utilisateur,
et l’ouverture ou la dépose des couvercles peut entraîner des risques de décharges électriques
dangereuses ou d’autres risques. Confi er tous travaux à du personnel technique qualifi é.
• Ne pas renverser de liquides dans le boîtier, ni utiliser le moniteur près de l’eau.
•
Ne pas introduire d’objets de quelque nature que ce soit dans les fentes du boîtier car ceux-ci pourraient toucher des endroits sous tension dangereuse, ce qui peut provoquer des blessures, voire être
fatal, ou peut occasionner une décharge électrique, un incendie ou une panne de l’appareil.
• Ne pas placer d’objets lourds sur le cordon d’alimentation. Un cordon endommagé peut occasionner une décharge électrique ou un incendie.
• Ne pas placer cet appareil sur un chariot, un support ou une table inclinée ou instable, afi n d’éviter que le moniteur ne tombe, occasionnant de sérieux dommages au moniteur.
• Pour l’utilisation du moniteur LCD avec l’alimentation AC mondiale de
125-240 V, utiliser un cordon d’alimentation qui correspond à la tension de l’alimentation fournie
à la prise de courant AC. Le cordon d’alimentation utilisé doit être agréé et en conformité avec les
normes de sécurité de son pays. (Type H05VV-F à utiliser sauf au Europe.)
• Au R, –U., utilisez avec ce moniteur un cordon d’alimrntation approuvé BS avec fi che moulée
d’un fusible noir (5A). Si un cordon d’alimentation n’a pas été fourni avec ce moniteur, veuillez
contacter votre fournisseur.
• Ne placer aucun objet sur le moniteur et ne pas l’utiliser en extérieur.
• L’intérieur du tube fl uorescent situé dans le moniteur contient du mercure. Pour l’élimination appropriée, observez les règlements en vigueur dans votre région.
• Ne courbe pas le pouvoir du cordon.
• N’utilise pas votre écran dans de hautes températures humides poussiéreuses près d’huile ou.
• Regal toujours glass sur soin.
• Ne couvre pas l’armoire fente ou usage rayonnai mauvaise chaleur.
Débrancher immédiatement le moniteur de la prise murale et confi er la réparation à du personnel technique qualifi é dans les cas suivants :
• Lorsque le cordon d’alimentation ou la fi che est endommagé(e).
• Si du liquide a été renversé ou des objets sont tombés à l’intérieur du moniteur.
• Si le moniteur a été exposé à la pluie ou à de l’eau.
• Si le moniteur est tombé ou le boîtier est endommagé.
• Si le moniteur ne fonctionne pas normalement en suivant les directives d’utilisation.
Si écran ou verre est rodé, ne supporter pas ne venir pas touche le liquide crystal et manche sur soin
•
AVERTISSEMENT
Persistance de l’image
la persistance de l’image se présente lorsqu’une image résiduelle ou “ fantôme ” d’une image précédente reste visible sur l’écran. Contrairement aux moniteurs à tube cathodique, la persistance de le
l’image des moniteurs LCD n’est pas permanente, mais l’affi chage d’images constantes pendant une
longue période de temps doit être évitée. Pour remédier à la persistance de l’image, mettez le moniteur hors tension pendant une durée égale à celle de l’affi chage de l’image précédente. Par exemple,
si une image est restée affi chée sur l’écran pendant une heure et qu’il reste une image résiduelle, le
moniteur doit être mis hors tension pendant une heure pour effacer l’image.
NOTA: Comme pour tous les équipements d’affi chage personnels, NEC Display Solutions of America,
Inc. recommande l’utilisation d’un économiseur d’écran mobile à des intervalles réguliers, à chaque
fois que l’écran est en veille, ou d’éteindre le moniteur lorsqu’il n’est pas utilisé.
•
Prévoir une aération suffi sante autour du moniteur pour que la chaleur puisse se dissiper correctement. Ne pas obstruer les ouvertures de ventilation ni placer le moniteur
près d’un radiateur ou autre source de chaleur. Ne rien poser sur le moniteur.
• La fi che du cordon d’alimentation est le moyen principal de débrancher le système
de l’alimentation. Le moniteur doit être installé à proximité d’une prise de courant
facilement accessible.
•
Manipuler avec soin lors du transport. Conserver l’emballage pour le transport.
LCD
30
:
.
Page 33

Usage recommandé (suite)
LA MODIFICATION DE LA POSITION ET DU RÉGLAGE DU MONITEUR
PEUT RÉDUIRE LA FATIGUE DES YEUX, DES ÉPAULES ET DE LA NUQUE.
OBSERVER LES DIRECTIVES CI-APRÈS LORS DU POSITIONNEMENT
DU MONITEUR :
• Pour une performance optimale, laissez le moniteur se
réchauffer pendant 20 minutes.
• Régler la hauteur du moniteur de sorte que le dessus de
l’écran soit au niveau ou légèrement en-dessous du niveau des
yeux. Les yeux doivent regarder légèrement vers le bas lorsque
l’on regarde le milieu de l’écran.
• Positionner le moniteur à une distance minimale de 40 cm
(16 po) et maximale de 70 cm (28 po) des yeux. La distance
optimale est de 50 cm (20 po).
• Reposer ses yeux régulièrement en regardant vers un objet
situé à au moins 6 m (20 pieds). Cligner régulièrement.
• Positionner le moniteur à un angle de 90° par rapport aux
fenêtres et autres sources de lumière, afi n de réduire au
maximum les refl ets et l’éblouissement. Régler l’inclinaison
du moniteur de sorte que l’éclairage du plafond ne soit pas refl été sur l’écran.
• Si une lumière réfl échie rend la vision de l’écran diffi cile, utiliser un fi ltre anti-refl et.
• Régler les commandes de luminosité et de contraste du moniteur pour améliorer la lisibilité.
• Utiliser un support de document placé près de l’écran.
• Positionner ce que l’on regarde le plus souvent (l’écran ou les documents de référence) directement
devant soi pour réduire au maximum les mouvements de la tête lorsque l’on dactylographie.
• Consulter régulièrement un ophtalmologiste.
Ergonomie
Pour optimiser les avantages ergonomiques, observez les directives suivantes :
• Utiliser les commandes de format et position préprogrammées avec signaux standard .
• Utiliser le réglage couleur et les commandes gauche/droite préprogrammés.
• Utiliser des signaux non entrelacés avec fréquence de rafraîchissement vertical de 60 à 75 Hz.
• Ne pas utiliser la couleur bleu primaire sur fond foncé car cela rend la lecture diffi cile et peut
occasionner de la fatigue oculaire en raison de contraste insuffi sant.
Nettoyage de l’écran ACL
• Lorsque l’écran à cristaux liquides est tâché avec de la poussière ou de la saleté, veuillez essuyer la surface douncement avec un chiffon doux.
• Ne frottez pas l’écran ACL avec un matériel rigide.
• N’exercez pas de pression sur le panneau ACL.
• Veuillez ne pas utiliser du nettoyant OA parce qu’il causera une détérioration ou une décoloration continuez avec un chiffon sec.
Nettoyage du coffret
• Débranchez la source d’alimentation.
• Essuyez délicatement le coffret avec un chiffon doux.
• Pour nettoyer le coffret, humidifi es le chiffon avec un détergent neutre et de l’eau, essuyez-le et
continuez avec un chiffon sec.
REMARQUE : De nombreux plastiques sont utilisés sur la surface du coffret. N’utilisez PAS de
benzéne, de diluant, de détergent alcalin, de détergent de système à base d’alcool, de produit
nettoyant pour vitres, de cire, de nettoyant pour vernis, de poudre de savon ou d’insecticide. Ne
touchez pas le coffret avec du caoutchouc ou du vinyle pendant une longue période. Ces types de
liquides ou de matériaux peuvent détériorer, fi ssurer ou peler la peinture.
Pour des informations plus détaillées sur l’établissement d’un environnement de travail sain, écrire à American National Standard for Human Factors Engineering of Visual Display Terminal Workstations - ANSIHFS Standard No. 100-1988 - The Human Factors Society, Inc. P.O. Box 1369, Santa Monica, California
90406.
31
Page 34

Fiche technique
Caractér. techn. Moniteur Remarques
du moniteur LCD19WV
Module LCD Diagonale : 19,0 po Matrice active; transistor à fi lm fi n (TFT);
Surface utile : 19,0 po affi chage à cristaux liquides (LCD);
Résolution (nombre de pixels) : 1440 x 900 pas 0,285 mm; luminance blanche 300cd/m
Temps contraste caractéristique 1000:1; temps de réponse 5ms
Signal d’entrée Vidéo : ANALOGIQUE 0,7 Vp-p/75 Ohms
Sync : Synchro séparée niveau TTL.
Couleurs d’affi chage Entrée analogique : 16,7 M
Angles de Gauche/droite: 80°/80°
visionnement maximal Haut/bas: 75°/85°
Gamme de Horizontale : 30,0 kHz à 83,0 kHz Automatique
synchronisation Verticale : 55 Hz à 75 Hz Automatique
Résolutions acceptées 720 x 400*1 @ 70 Hz
640 x 480*1 @ 60 Hz à 75 Hz Certains systémes peuvent ne pas prendre
800 x 600*1 @ 56 Hz à 75 Hz en charge tous le modes listés.
832 x 624*1 @ 75 Hz
1024 x 768*1 @ 60 Hz à 75 Hz
1152 x 864*1 @ 75 Hz
1280 x 1024*1 @ 60 Hz à 75 Hz
1440 x 900
recommande une résolution à 60 Hz
performances d’affi chage optimales et couleurs.
Entrée
analogue et
de Digitals:
(CR>10)
(CR>10)
1280 x 768*1 @ 60 Hz
1280 x 960*1 @ 60 Hz à 75 Hz
*1@ 60 Hz..............................
Dépend de la carte vidéo et synchronisation utilisée.
NEC DISPLAY SOLUTIONS
pour
2
; taux de
des
Zone d’affi chage active Horizontale :
Verticale :
Alimentation
Tension d’alimentation 0,75 - 0,4 A/100-240V
Dimensions Paysage :
17,3 pouces (L) x 14,3 pouces (H) x 8,3 pouces (P)
Poids 4,5 kg
9,9 livres
Considérations environnementales
Température de fonctionnement : 5 °C à +35 °C/41 °F à 95 °F
Humidité : 30 % à 80 %
Altitude : 0 à 12,000 pieds
Température de stockage : -10 °C à +60 °C/14 °F à 140 °F
Humidité : 10 % à 85 %
Altitude : 0 à 40,000 pieds
*1 Résolutions interpolées : Quand les résolutions affi chées sont inférieures au nombre de pixels du module LCD, le texte peut apparaître craquelé et les lignes plus
épaisses. Ceci est normal et nécessaire pour toutes les technologies d’affi chage sur panneaux plats pour lesquels chaque point de l’écran occupe réellement un
pixel. Pour agrandir la résolution à celle du plein écran, une interpolation mathématique de celle-ci est nécessaire. Quand cette résolution interpolée ne correspond pas exactement à un multiple entier de la résolution d’origine, la nécessaire interpolation mathématique peut faire que certaines lignes apparaissent plus
épaisses que d’autres.
NOTA : Les spécifi cations techniques sont susceptibles d’être modifi ées sans préavi.
410,4 mm/16,2 pouces
256,5mm/10,1 pouces
100
-240 V
440,0 mm (L) x 363,0 mm (H) x 210,0 mm (P)
~ 50/60 Hz
32
Page 35

Fiche technique (suite)
Caractér. techn. Moniteur Remarques
du moniteur LCD22WV
Module LCD Diagonale : 21,6 po Matrice active; transistor à fi lm fi n (TFT);
Surface utile : 21,6 po affi chage à cristaux liquides (LCD);
Résolution (nombre de pixels) : 1440 x 900 pas 0,285 mm; luminance blanche 300cd/m
Temps contraste caractéristique 1000:1; temps de réponse 5ms
Signal d’entrée Vidéo : ANALOGIQUE 0,7 Vp-p/75 Ohms
Sync : Synchro séparée niveau TTL.
Couleurs d’affi chage Entrée analogique : 16,7 M
Angles de Gauche/droite: 85°/85°
visionnement maximal Haut/bas: 80°/80°
Gamme de Horizontale : 30,0 kHz à 83,0 kHz Automatique
synchronisation Verticale : 55 Hz à 75 Hz Automatique
Résolutions acceptées 720 x 400*1 @ 70 Hz
640 x 480*1 @ 60 Hz à 75 Hz Certains systémes peuvent ne pas prendre
800 x 600*1 @ 56 Hz à 75 Hz en charge tous le modes listés.
832 x 624*1 @ 75 Hz
1024 x 768*1 @ 60 Hz à 75 Hz
1152 x 864*1 @ 75 Hz
1152 x 870*1: @ 75 Hz
1280 x 720*1: @t 60 Hz
1280 x 1024*1 @ 60 Hz à 75 Hz
1360 x 768: @ 60 Hz
1440 x 900
1680 x 1050*1: @ 60 Hz........................
recommande une résolution à 60 Hz
performances d’affi chage optimales et couleurs.
Entrée
analogue et
de Digitals:
(CR>10)
(CR>10)
1280 x 768*1 @ 60 Hz
1280 x 960*1 @ 60 Hz à 75 Hz
*1@ 60 Hz
Dépend de la carte vidéo et synchronisation utilisée.
NEC DISPLAY SOLUTIONS
pour
2
; taux de
des
Zone d’affi chage active Horizontale :
Verticale :
Alimentation
Tension d’alimentation 1,2 - 0,5 A/100-240V
Dimensions Paysage :
19,9 pouces (L) x 16,0 pouces (H) x 8,3 pouces (P)
Poids 5,5 kg
12,1 livres
Considérations environnementales
Température de fonctionnement : 5 °C à +35 °C/41 °F à 95 °F
Humidité : 30 % à 80 %
Altitude : 0 à 12, 000 pieds
Température de stockage : -10 °C à +60 °C/14 °F à 140 °F
Humidité : 10 % à 85 %
Altitude : 0 à 40,000 pieds
*1 Résolutions interpolées : Quand les résolutions affi chées sont inférieures au nombre de pixels du module LCD, le texte peut apparaître craquelé et les lignes plus
épaisses. Ceci est normal et nécessaire pour toutes les technologies d’affi chage sur panneaux plats pour lesquels chaque point de l’écran occupe réellement un
pixel. Pour agrandir la résolution à celle du plein écran, une interpolation mathématique de celle-ci est nécessaire. Quand cette résolution interpolée ne correspond pas exactement à un multiple entier de la résolution d’origine, la nécessaire interpolation mathématique peut faire que certaines lignes apparaissent plus
épaisses que d’autres.
NOTA : Les spécifi cations techniques sont susceptibles d’être modifi ées sans préavi.
464,9 mm/18,9 pouces
290,6mm/29,1 pouces
100
-240 V
505,8 mm (L) x 407,5 mm (H) x 210,0 mm (P)
~ 50/60 Hz
33
Page 36

Fonctions
Encombrement réduit : Constitue la solution idéale pour les environnements qui nécessitent
une image de haute qualité et un encombrement et un poids limités. L’encombrement réduit
et le faible poids du moniteur permettent de le déplacer ou de le transporter rapidement
d’un point à un autre.
Auto aucune de tact n’Ajuste™ : pas qu’auto de tact ajuste automatiquement ajuste l’écran
à réglages oprimaux sur setup initial.
Plug and Play : La solution Microsoft® avec le système d’exploitation Windows® facilite la
confi guration et l’installation en permettant au moniteur d’envoyer ses capacités (telles que
le format et les résolutions d’écran acceptés) directement à l’ordinateur, optimisant ainsi
automatiquement les performances d’affi chage.
Système IPM
des méthodes d’économie d’énergie novatrices qui permettent au moniteur de passer à
un niveau de consommation d’énergie plus faible lorsqu’il est allumé mais non utilisé,
épargnant deux tiers des coûts énergétiques, réduisant les émissions et diminuant les coûts
de conditionnement d’air du lieu de travail.
Technologie à fréquence multiple : Règle automatiquement le moniteur à la fréquence de
la carte vidéo, affi chant ainsi la résolution requise.
Capacité FullScan
dans la plupart des résolutions, augmentant ainsi de façon signifi cative la taille de l’image.
Standard VESA
a n’importe quel autre bras au baie de montage conforme VESA. Permet de monter le
moniteur sur un mur ou un bras à l’aide de n’importe quel autre dispositif compatible.
®
(Intelligent Power Manager/Gestionnaire d’énergie intelligent) : Procure
™
(balayage complet) : Permet d’utiliser la totalité de la surface d’écran
®
de montage d’interface : Permet a l’utilisateur de raccorder son moniteur
34
Page 37

Dépannage
Pas d’image
• Le câble vidéo doit être bien connecté à la carte d’affi chage et à l’ordinateur.
• La carte d’affi chage doit être insérée à fond dans son logement.
• Les interrupteurs d’alimentation du moniteur à l’avantet de l’ordinateur doivent être sur la
position MARCHE.
• Vérifi ez qu’un mode d’affi chage autorisé a été sélectionné pour la carte d’affi chage ou le
système utilisé (veuillez consulter le manuel de votre carte d’affi chage ou de votre système
pour modifi er le mode graphique).
• Vérifi er la compatibilité et les paramètres recommandés de votre moniteur et de votre carte
d’affi chage.
• Vérifi ez que le connecteur du câble vidéo ne comporte aucune broche tordue ou rentrée.
• Contrôlez l’entrée de signal.
L’interrupteur d’alimentation ne fonctionne pas
• Déconnectez le cordon d’alimentation de la prise secteur pour mettre le moniteur sous puis
hors tension.
Persistance de l’image
• La persistance de l’image se produit lorsque «le fantôme» d’une image reste sur l’écran
même après la mise hors tension du moniteur. À la différence de la persistance d’image
sur les moniteurs TRC, celle observée sur les moniteurs LCD n’est pas permanente. Pour
remédier à la persistance de l’image, mettre le moniteur hors tension pendant une durée
égale à celle de l’affi chage de l’image. Si une image est restée affi chée sur l’écran
pendant une heure et qu’il y a «fantôme» de cette image, il faut mettre le moniteur hors
tension pendant une heure pour effacer l’image.
NOTA : Tout comme dans le cas des écrans personnels, NEC Display Solutions of America, Inc. recommande images mobiles d’affi chage l’utilisation
d’un économiseur d’énergie à intervalles réguliers lorsque l’écran n’est pas
utilisé.
L’image défi le ou est instable
• Le câble vidéo doit être bien connecté à la carte d’affi chage et à l’ordinateur.
• Utilisez les boutons de Réglage image OSD pour mettre au point et régler l’affi chage en
augmentant ou en diminuant la valeur Fin. Lorsque l’affi chage est réglé, le Réglage image
OSD peut nécessiter un réajustement.
• Vérifi er la compatibilité et les réglages recommandés de votre moniteur et de votre carte
d’affi chage.
• Si votre texte n’est pas net, con Figurez le mode vidéo en non entrelacé à 60Hz.
La LED sur le moniteur n’est pas allumée (Couleur non verte ou ambrée peut être vue)
• L’interrupteur d’alimentation doit être en position MARCHE et le cordon d’alimentation doit
être connecté.
L’image n’a pas la bonne taille
• Utilisez les boutons de Réglage image OSD pour augmenter ou diminuer le SIMPLE.
• Vérifi ez qu’un mode d’affi chage supporté a été sélectionné pour la carte d’affi chage ou le
système utilisé (veuillez consulter le manuel de votre carte d’affi chage ou de votre système
pour modifi er le mode graphique).
Pas de vidéo
• Si pas be vidéo n’est présent sur l’écran, appuyez le couton d’alimentation marche et
arrêt encore.
• Assurez-vous que l’ordinateur n’est pas réglé dans le mode d’économie d’énergie (touchez
le clavier ou la souris).
35
Page 38

Références
Service à la clientèle et assistance technique du moniteur NEC
Service à la clientèle et assistance technique: (800) 632-4662
Télécopieur: (800) 695-3044
Pièces et accessoires/adaptateur
de câble Macintosh: (800) 632-4662
Information sur la garantie: www.necdisplay.com
Assistance technique en ligne www.necdisplay.com
Ventes et information produit
Ligne d’information sur les ventes: (888) 888-632-6487
Clientèle canadienne: (866) 771-0266, Ext#: 4037
Ventes au gouvernement: (800) 284-6320
Adresse électronique du service
des ventes au gouvernement: gov@necdisplay.com
Courrier électronique
World Wide Web: www.necdisplay.com
Produit enregistré: www.necdisplay.com
Opérations Européennes: www.nec-display-solutions.com
Pilotes et téléchargements www.necdisplay.com
36
Page 39

Garantie limitée
NEC Display Solutions of America, Inc. (ci-après «NEC DISPLAY SOLUTIONS») garantit que ce produit est
exempt de vice de fabrication et de main-d’oeuvre et, selon les conditions énoncées ci-dessous, accepte
de réparer ou remplacer, à sa discrétion, toute pièce de l’appareil concerné qui s’avérerait défectueuse
et ce, pendant une période de trois (3) ans à partir de la date d’achat initial. Les pièces de rechange sont
garanties pendant quatre-vingt dix (90) jours. Les pièces de rechange ou unités peuvent être neuves ou
reconditionnées et seront conformes aux spécifi cations des pièces et des unités d’origine. Cette garantie
vous accorde des droits légaux spécifi ques auxquels peuvent s’ajouter d’autres droits pouvant varier d’une
juridiction à l’autre. Cette garantie est limitée à l’acheteur d’origine du produit et n’est pas transférable.
Cette garantie couvre uniquement les composants fournis par NEC DISPLAY SOLUTIONS. Une réparation
requise à la suite de l’utilisation des pièces provenant d’un tiers n’est pas couverte par cette garantie.
Pour être couvert par cette garantie, le produit doit avoir été acheté aux États-Unis ou au Canada par
l’acheteur d’origine. Cette garantie couvre uniquement la distribution du produit aux États-Unis ou au
Canada par NEC DISPLAY SOLUTIONS. Aucune garantie n’est offerte à l’extérieur des États-Unis et du
Canada. La preuve d’achat sera exigée par NEC DISPLAY SOLUTIONS pour prouver la date d’achat.
Une telle preuve d’achat doit être une facture de vente d’origine ou un reçu reprenant le nom et l’adresse
du vendeur, de l’acheteur et le numéro de série du produit.
Pour obtenir un service au titre de la garantie, vous devez expédier le produit en port prépayé ou le
déposer chez le revendeur agréé qui vous l’a vendu ou dans un autre centre autorisé par
SOLUTIONS
équivalent de protection. Avant de retourner tout produit à
d’abord obtenir une autorisation de retour de marchandise en composant le 1-800-632-4662. Le
produit ne pourra avoir été enlevé ou modifi é, réparé ou entretenu au préalable par personne d’autre
que du personnel technique autorisé par
ne pourra pas avoir été enlevé. Pour être couvert par cette garantie, le produit ne pourra pas avoir été
soumis à l’affi chage d’une image fi xe pendant de longues périodes de temps résultant en une persistance
de l’image, un accident, une utilisation incorrecte ou abusive ou une utilisation contraire aux directives
contenues dans le guide de l’utilisateur. Une seule de ces conditions annulera la garantie.
, soit dans l’emballage d’origine, soit dans un emballage similaire procurant un niveau
NEC DISPLAY SOLUTIONS
NEC DISPLAY SOLUTIONS
, et le numéro de série du produit
NEC DISPLAY
, vous devez
NEC DISPLAY SOLUTIONS
INDIRECTS, ACCIDENTELS, SECONDAIRES OU D’AUTRES TYPES DE DOMMAGES RÉSULTANT DE
L’UTILISATION D’UN PRODUIT QUI N’ENTRENT PAS SOUS LA RESPONSABILITÉ DÉCRITE CI-DESSUS.
CES GARANTIES REMPLACENT TOUTE AUTRE GARANTIE EXPLICITE OU IMPLICITE, Y COMPRIS, MAIS
SANS S’Y LIMITER, TOUTE GARANTIE DE QUALITÉ MARCHANDE OU D’APTITUDE À UNE FIN PARTICULIÈRE. CERTAINES JURIDICTIONS NE PERMETTANT PAS L’EXCLUSION DE GARANTIES IMPLICITES
OU LA LIMITATION OU L’EXCLUSION DE RESPONSABILITÉ POUR DOMMAGES ACCIDENTELS OU
SECONDAIRES, LES EXCLUSIONS OU LIMITATIONS CI-DESSUS POURRAIENT NE PAS S’APPLIQUER
DANS VOTRE CAS.
Ce produit est garanti selon les termes de cette garantie limitée. Les consommateurs doivent savoir que
les performances du produit peuvent varier selon la confi guration du système, le logiciel, l’application,
les données du client et la manière dont le produit est utilisé par l’opérateur, ainsi que d’autres facteurs.
Bien que les produits
systèmes, la mise en oeuvre fonctionnelle du produit peut varier d’un client à l ’autre. Par conséquent,
l’adéquation d’un produit à un besoin ou une application spécifi que doit être déterminée par le consommateur et n’est pas garantie par
Pour connaître le nom du centre de service technique agréé
plus proche, appeler
NE POURRA ÊTRE TENUE RESPONSABLE DE DOMMAGES DIRECTS,
NEC DISPLAY SOLUTIONS
NEC DISPLAY SOLUTIONS
NEC Display Solutions of America, Inc.
soient considérés compatibles avec de nombreux
.
NEC Display Solutions of America, Inc.
au 1-800-632-4662.
le
37
Page 40

TCO’03
Félicitations !
L’écran que vous venez d’acheter porte l’étiquette « Displays
TCO’03 ». Ceci signifie que votre écran a été conçu,
fabriqué, et vérifi é selon certaines des directives relatives à
la qualité et aux exigences environnementales les plus strictes
au monde. Cela permet à un produit de haute performance,
conçu avec l’utilisateur comme priorité, de réduire son impact
sur notre environnement naturel.
Voici certaines caractéristiques de ces directives « TCO’03 Display » :
Ergonomie
• Bonne ergonomie visuelle et qualité de l’image afi n d’améliorer l’environnement de
travail des utilisateurs, et afi n de réduire les problèmes de vue et de tension
nerveuse. Les paramètres importants sont la luminance, le contraste, la résolution,
la rémission, le rendu des couleurs et la stabilité de l’image.
Consommation
• Mode économie d’énergie après un certain temps, un avantage à la fois pour
l’utilisateur et l’environnement
• Sécurité électrique
Émissions
• Champs électromagnétiques
• Émissions de parasites
Écologie
• Le produit doit être conçu afi n d’être recyclable et le fabriquant doit disposer d’une
certifi cation relative à l’environnement telle qu’EMAS ou ISO 14 001
• Restrictions sur l’usage des :
- polymères et retardants au feu chlorés ou bromés
- métaux lourds tels que cadmium, mercure et plomb.
Les directives comprises sous cette étiquette ont été mises au point par « TCO Development
» en coopération avec des scientifi ques, des experts, des utilisateurs, ainsi que des fabricants du monde entier. Depuis la fi n des années 1980, TCO s’est efforcée d’infl uencer le
développement du matériel informatique grâce à une orientation plus conviviale. Notre
système d’étiquetage a débuté avec des écrans en 1992 et se retrouve maintenant demandé par des utilisateurs et des fabricants informatiques du monde entier.
Pour obtenir des renseignements supplémentaires, veuillez visiter
www.tcodevelopment.com
38
Page 41

Informations du fabricant relatives au
recylage et aux économies d’énergie
NEC-DISPLAY SOLUTIONS est extrêmement résolu à protéger l’environnement et
considère le recyclage comme l’une des principales priorités de l’entreprise en essayant
de minimiser les répercussions sur l’environnement. Nous nous engageons à développer
des produits qui n’ont pas d’impact négatif sur l’environnement et nous nous efforçons
toujours de favoriser la défi nition et le respect des normes indépendantes les plus récentes
édictées par les organismes tels lSO (International Organization for Standardization) et
TCO (Swedish Trades Union).
Elimination des produits NEC usagés
Le but du recyclage est d’améliorer l’environnement en réutilisant, mettant à niveau,
reconditionnant ou en récupérant le matériel. Des sites de recyclage spécialisés s’assurent
que les composants nocifs pour l’environnement soient correctement manipulés et éliminés.
Pour garantir le meilleur recyclage possible de nos produits, NEC DISPLAY SOLUTIONS
propose diverses procédures de recyclage et émet des recommandations quant verses à la
manipulation du produit dans le respect de l’environnement lorsqu’il est arrivé en fi n de
vie.
Toutes les informations requises concernant l’élimination du produit ainsi que les
informations spécifi ques à chaque pays concernant les sites de recyclage sont disponibles
sur les sites Web suivants :
Etats-Unis : http://www.necdisplay.com
Europe : http://www.nec-display-solutions.com/greencompany/
Japon : http://www.nec-display.com
Économie d’énergie :
Ce moniteur est équipé d’une capacité d’économie d’énergie avancée. Lorsqu’un signal
standard VESA de signalisation de gestion de la consommation de l’affi chage (DPMS) est
envoyé au moniteur, le mode Économie d’énergie est activé. Le moniteur entre en mode
simple Économie d’énergie.
Mode Consommation d’énergie Couleur DEL
LCD19WV
Fonctionnement normal Approx. 34W Vert
Mode Économie d’énergie Less than 2W Ambre
Mode Arrêt Less than 1W Non allumé
LCD22WV
Fonctionnement normal Approx. 46W Vert
Mode Économie d’énergie Less than 2W Ambre
Mode Arrêt Less than 1W Non allumé
39
Page 42

Déclaration du fabricant
Nous certifi ons par la présente que les
moniteurs
LCD19WV (TFT19W80PS) et LCD22WV
(TFT22W90PS)
sont conformes à
la directive 73/23/EEC du Counseil:
– EN 60950-1
la directive
– EN 55022
– EN 61000-3-2
– EN 61000-3-3
– EN 55024
et porte le sigle
89/336/EEC du Counseil:
NEC Display Solutions, Ltd.
4-13-23, Shibaura,
Minato-Ku
Tokyo 108-0023, Japan
40
Page 43

Série LCD NEC
AVIS DE PROPRIÉTÉ EXCLUSIVE ET DE DÉGAGEMENT DE RESPONSABILITÉ
Les informations contenues dans ce document, y compris tous les designs et matériel s’y rapportant, sont la propriété
de NEC Display Solutions of America, Inc. et/ou ses concédants. NEC Display Solutions of America, Inc. se réserve
les droits de fabrication brevetée, les droits d’auteurs et autres propriétés exclusives à ce document, y compris tous les
droits de design, de fabrication, de reproduction, d’utilisation et de vente y afférent, à condition que ces droits n’ont
pas été directement délivrés à d’autres.
Les produits de NEC Display Solutions of America, Inc. dont il est question dans ce document sont garantis conformément aux termes de la déclaration de garantie limitée accompagnant chaque produit. Cependant, les performances
réelles de chaque produit dépendent de facteurs tels que la confi guration du système, les données du client et la manière
dont le produit est utilisé. Étant donné que la mise en oeuvre fonctionnelle du produit peut varier d’un client à l’autre,
l’adéquation et l’application de confi gurations spécifi ques du produit peuvent être déterminées par le client et ne sont
pas garanties par NEC Display Solutions of America, Inc.
Afi n de permettre l’amélioration du design et des caractéristiques techniques, les informations contenues dans ce
document sont sujettes à modifi cations sans préavis. La reproduction totale ou partielle de ce document sans l’accord
préalable de NEC Display Solutions of America, Inc. est interdite.
DÉCLARATION DE CONFORMITÉ
Cet appareil est conforme à l’article 15 du règlement de la FCC. L’utilisation est soumise à deux conditions. 1) Cet
appareil ne peut pas occasionner d’interférences nuisibles, et 2) cet appareil doit accepter toutes interférences reçues,
y compris les interférences qui peuvent occasionner un mauvais fonctionnement.
Partie responsable américaine : NEC Display Solutions of America, Inc.
Adresse : 500 Park Blvd, Suite 1100
Itasca, Illinois 60143
N
o
tél. : (630) 467-3000
Type de produit : Moniteur d’affi chage
Classifi cation de l’appareil : Périphérique classe B
Modèle :
LCD22WV (TFT22W90PS)
LCD19WV (TFT19W80PS)
Nous déclarons par la présente que les appareils mentionnés ci-dessus sont
conformes aux normes techniques spécifi ées dans le règlement de la FCC.
Windows est une marque déposée de Microsoft Corporation. NEC est une marque déposée de NEC Corporation. ENERGY STAR est une
marque déposée aux États-Unis. Tous les autres noms de marques et de produits sont des marques de commerce ou des marques déposées
de leurs propriétaires respectifs.
En tant que partenaire
matière de rendement énergétique. Le logo
ENERGY S TAR
®
, NEC Display Solutions of America, Inc. a veillé à ce que ce produit respecte les normes ENERGY S TAR en
ENERGY STAR ne représente aucun aval par l’EPA de quelque produit ou service que ce soit.
Page 44

ADVERTENCIA
PARA EVITAR RIESGOS DE INCENDIO O DESCARGA, NO EXPONGA ESTA UNIDAD A LA LLUVIA O HUMEDAD.
TAMPOCO USE EL TOMACORRIENTES POLARIZADO DE ESTA UNIDAD CON EL RECEPTÁCULO DE UN PROLONGADOR U OTRAS SALIDAS A NO SER QUE LAS PUNTAS SE PUEDAN INSERTAR COMPLETAMENTE. ABSTÉNGASE DE
ABRIR EL GABINETE YA QUE HAY COMPONENTES DE ALTO VOLTAJE EN SU INTERIOR. CONSULTE AL PERSONAL
DE MANTENIMIENTO CAPACITADO.
CAUTION
PRECAUCIÓN: ADVERTENCIA: PARA REDUCIR EL RIESGO DE DESCARGA ELÉCTRICA, ASEGÚRESE DE QUE EL CABLE
Declaración de Cumplimiento del Departamento Canadiense de Comunicaciones.
DOC: Este aparato digital Clase B cumple con todos los requisitos del Reglamento de
Equipos Canadienses Causantes de Interferencias.
C-UL: Tiene la Marca C-UL y cumple con el Reglamento de Seguridad Canadiense de
acuerdo con CAN/CSA C22.2 Nº 60950-1.
DE ALIMENTACIÓN ESTÉ DESENCHUFADO DEL TOMACORRIENTES DE LA PARED. PARA DESCONECTAR
COMPLETAMENTE LA CORRIENTE DE LA UNIDAD, DESCONECTE EL CABLE DE ALIMENTACIÓN DEL
TOMACORRIENTES CA. NO QUITE LA TAPA (O PARTE TRASERA). EN EL INTERIOR NO HAY PIEZAS QUE
EL USUARIO PUEDA REPARAR. CONSULTE AL PERSONAL DE MANTENIMIENTO CAPACITADO.
Este símbolo le advierte al usuario que el voltaje no aislado dentro de la unidad puede tener la magnitud
sufi ciente para provocar una descarga eléctrica. Por lo tanto, es peligroso hacer cualquier tipo de contacto
con cualquier parte dentro de esta unidad.
Este símbolo alerta al usuario que se ha incluido información importante concerniente al funcionamiento
y mantenimiento de esta unidad. Por lo tanto, debe leerse cuidadosamente para evitar cualquier
problema.
Información FCC
1.
Use los cables específi cos que se suministran con el monitor a color LCD19WV (TFT19W80PS) y
LCD22WV (TFT22W90PS) para no provocar interferencias en la recepción de radio y televisión.
(1)
Use el cable de alimentación provisto o un equivalente para asegurar el cumplimiento con
FCC.
(2) Use la señal de cable de video revestido provista. El uso de otros cables y adaptadores
puede causar interferencia con la recepción radial y televisiva.
2. Este equipo fue examinado y se concluyó que cumple con los límites para dispositivo digital Clase B,
de acuerdo con la sección 15 del Reglamento FCC. Estos límites brindan protección razonable contra
interferencia perjudicial en una instalación residencial. Este equipo genera, usa y puede irradiar
energía de frecuencia radial, y, si no se instala y usa de acuerdo con las instrucciones, puede causar
interferencia nociva a las comunicaciones radiales. Si embargo, no se garantiza que la interferencia no
ocurrirá en una instalación particular. Si este equipo causa interferencia nociva a la recepción radial
o televisiva, lo cual puede determinarse apagando y prendiendo el equipo, se aconseja al usuario a
que trate de corregir la interferencia a través de una o más de las siguientes medidas:
• Reorientar o trasladar la antena receptora.
• Aumentar el espacio entre el equipo y el receptor.
• Conectar el equipo a un tomacorriente de un cicuito diferente de aquel al que está
conectado el receptor.
• Solicite la asistencia de su vendedor o un técnico especialista en radio/TV.
Los cambios o modifi caciones que no estén expresamente aprobados por la parte responsable de
los cumplimientos podrían anular los derechos del usuario a utilizar este equipo.
De ser necesario, el usuario deberá contactar al vendedor o a un técnico de radio/televisión
capacitado para obtener más sugerencias. Al usuario le puede resultar útil este folleto, preparado
por la Comisión Federal de Comunicaciones. “Cómo identifi car y resolver problemas de interferencias
de radio-televisión”. Este folleto está disponible en la Ofi cina de Prensa de Estados Unidos,
Washington D.C., 20402, Stock Nº 004-000-00345-4.
42
Page 45

Contenidos
La caja del monitor NEC LCD* debe contener lo
siguiente:
• Monitor LCD
• Cable de alimentación
• Manual del usuario
• Cable de señal video
• Soporte de base
• Sujetador de cables
Cable de
alimentación
Monitor LCD (base no
conectada)
Cable de señal video
(15-pin mini D-SUB 15
al mini D-SUB varón
del perno)
USER’S MANUAL
MANUEL D’UTILISATION
MANUAL DEL USUARIO
5.
-$%87
"DDV4ZOD
5.
"DDV4ZOD
-$%87
IdaZVgcVWdjidi]ZgheZX^Vad[[Zgh!gZ\^hiZgdca^cZVilll#cZXY^heaVn#Xdb#
EdjgZchVkd^geajhadc\hjgYÉVjigZhd[[gZhheX^VaZh!^chXg^kZo"kdjhZca^\cZ|lll#cZXY^heaVn#Xdb#
EVgV^c[dgbVghZhdWgZdigVhd[ZgiVhZheZX^VaZh!gZ\higZhZZcacZVZclll#cZXY^heaVn#Xdb#
Manual del usuario
Sujetador de cables
* Recuerde guardar la caja y el material de embalaje original para transportar o enviar el monitor.
43
Page 46

Inicio rápido
Para conectar la base al soporte del LCD:
1. Introduzca la parte frontal del soporte del LCD en los orifi cios del frente de la base (Figura 1)
2. Luego, posicione las palancas de cierre de la parte posterior del soporte del LCD a la altura de
los orifi cios de la base. Baje el soporte hasta que las palancas de cierre estén aseguradas.
3. Coloque el sujetador en la base (fi gura 2).
Figura 1
Para conectar el monitor LCD a su sistema, siga estas instrucciones:
1. Apague su computadora.
2 Para las PC con salida análoga: Conecte el cable de señal de 15 pernos mini D-SUB al conector de la
tarjeta de visualización de su sistema (Figura A.1). Ajuste todos los tornillos.
Para MAC: Conecte el adaptador de cable MultiSync Macintosh a la computadora, luego conecte el
cable de señal de 15 pernos mini D-SUB al adaptador de cable MultiSync Macintosh (Figura A.2).
Ajuste todos los tornillos.
NOTA:Para obtener el adaptador de cable MultiSync Macintosh, comuníquese con NEC Display
Solutions of America, Inc. al (800) 632-4662.
3. Conecte el cable de 15 pernos mini D-SUB al conector correspondiente en la parte posterior del
monitor. (Figura B.1).
4. Conecte un extremo del cable de alimentación al LCD y el otro extremo a un tomacorriente. Coloque de
de señal cable de video y el cable de alimentación en el sujetador de cables (Figura B.1).
NOTA: Ajuste la posición de los cables en el sujetador para evitar que se dañen.
NOTA: Consulte la sección Uso recomendado de este manual para obtener información sobre
la selección apropiada del cable de alimentación.
5. Encienda el monitor con el botón frontal de encendido, luego encienda la computadora (Figura C.1).
6. El ajuste automático sin contacto ajusta automáticamente el monitor en los valores óptimos durante la
confi guración inicial para la mayoría de las temporizaciones. Para realizar más ajustes, use los siguientes
controles OSD:
• Disposición de la imagen • Posición de imagen
Consulte la sección Controles de este manual del usuario para obtener una descripción completa de
estos controles OSD
NOTE: Para obtener información de descarga sobre el archivo de Windows® INF para su monitor
NEC, consulte la www.necdisplay.com.
NOTE: Si tiene problemas, consulte la sección Solución de problemas de este manual del usuario de NEC.
44
Page 47

Page 48

Inicio rápido –continuación
Inclinación
Sujete ambos lados de la pantalla del monitor con las
manos e inclínelo como desee (Figura TS.1).
NOTA: Sea cuidadoso cuando incline la pantalla
del monitor.
Cómo quitar el soporte del monitor
para el montaje
Para preparar el monitor para fi nes de montaje alternativos:
1. Desconecte todos los cables.
2. Coloque el monitor boca abajo sobre una superfi cie no abrasiva
(Figura R.1).
3. Quite los 3 tornillos que conectan el monitor con el soporte y extraiga el
soporte del LCD (Figura R.1).
El monitor está ahora listo para el montaje en una forma alternativa.
4.
Conecte el cable de señal y el cable CA a la parte posterior del monitor
(Figura R.2).
5. Revierta este proceso para volver a colocar la base.
NOTA: Use sólo el método de montaje compatible alternativo VESA.
NOTA: Manipule con cuidado cuando quite el soporte del monitor.
Figura TS.1
Figura R.1
superfi cie no
abrasiva
Figura R.2
46
Page 49

Inicio rápido –continuación
Cómo quitar la base
NOTA: Siempre quite la base cuando envíe el LCD.
1. Coloque el monitor boca abajo sobre una superfi cie
no abrasiva
2. Con sus dedos, presione las lengüetas en la
dirección indicada por las fl echas para
destrabar la base.
3. Quite la base libre del soporte.
Cómo conectar un brazo fl exible
Este monitor LCD está diseñado para utilizarse con un brazo fl exible. Cuando realice la
instalación, use los tornillos provistos (4 piezas) como se muestra en el gráfi co.
Para cumplir con los requisitos de seguridad, el monitor debe montarse en un brazo que
garantice la estabilidad necesaria teniendo en cuenta el peso del monitor. El monitor LCD
sólo se debe utilizar con un brazo aprobado (por ejemplo: Marca GS).
.
Botón de lanzamiento
rápido
12mm
4 x 12mm with lock
4 x 12mm con la
washer and flat washer
arandela de cerradura
y la arandela plana
100 mm
Especifi caciones
4 TORNILLOS (M4)
(Profundidad
MÁXIMA: 8,5 mm)
Si usa otros tornillos,
revise la profundidad de
los orifi cios.
M4
100 mm
Grosor del brazo
2,0 a 3,2 mm
Ajuste todos
los tornillos.
Peso del ensamblaje del LCD:
LCD19WV - 4.2 kg (MAX.)
LCD22WV - 5.0 kg (MAX.)
47
Page 50

Page 51

Controles –continuación
AJUSTE DEL CUADRO
La descripción para el función-control LED
Artículo
de menú
principal
Luminancia
Disposición
de la imagen
Icono
del
menú
princi-
pal
Artículo
de menú
se-
cundario
Contraste
Brillo
Foco
Reloj
Icono
se-
cundar-
io del
menú
Descripción
Ajustar el brillo de imagen en lo referente
al fondo.
Ajustar la imagen y el brillo totales de la
pantalla del fondo.
Ajustar la fase del cuadro para reducir la
Horizontal-Línea ruido.
Ajustar el reloj del cuadro para reducir la
Vertical-Línea ruido.
Posición
de imagen
Temp. del
color
Confi g.
auto
H.Position
V. Postion
Caliente
Fresco
sRGB
Usuario/
rojo
Usuario/
Ver de
Usuario/
Azul
Sí
No
Ajustar el reloj del cuadro para reducir la
Vertical-Línea ruido.
Ajustar la posición vertical del cuadro.
Reajustar calientan temperatura de color.
N/A
Reajustar refrescan temperatura de color.
N/A
Reajustar la temperatura de color del
N/A
sRGB.
Aumentar o disminuir el rojo. El cambio
aparecerá en la pantalla.
Aumentar o disminuir el verde. El cambio
aparecerá en la pantalla.
Aumentar o disminuir el azul. El cambio
aparecerá en la pantalla.
El auto ajusta la posición, el foco y el reloj de
H/V del cuadro.
N/A
No ejecutar los Confi g. autos, vuelven al menú
principal.
N/A
49
Page 52

Controles –continuación
Artículo
de menú
principal
Icono
del
menú
princi-
pal
Artículo
de menú
secundario
H.Position
Disposición
de OSD
V.Position
Descanso
de OSD
Lengua Lengua
Información Información
Sí
Reajuste
No
Icono
se-
cundar-
io del
menú
N/A
N/A
N/A
N/A
Descripción
Ajustar la posición horizontal del OSD.
Ajustar la posición vertical del OSD.
Ajustar el descanso de OSD.
Fijar la lengua de OSD.
Demostrar la resolución, frecuencia de H/
V, No. serial, DDC/CI puerto permiten/de
la neutralización y de entrada de sincronización actual de la entrada.
Despejar cada viejo estado de la autoconfi guración.
No ejecutar el reajuste, vuelven al menú
principal.
Salida
N/A N/A
Salir OSD.
Mensaje de OSD
Los Confi g autos esperan por favor: Si el usuario presiona la tecla de acceso directa “automóvil,” un mensaje
aparecerá, y el monitor hará la función auto de la confi guración.
Entrada no apoyada: este mensaje aparecerá cuando la frecuencia de la sinc. de H, frecuencia de la sinc. de
V o resolución está fuera de la gama de la ayuda del monitor.
Cable no conectado: este mensaje aparecerá cuando el cable video no está conectado.
Ninguna señal: este mensaje aparecerá cuando el cable video está conectado pero no hay entrada de señal
activa. Después de 9 segundos el monitor entrará en modo del Energía-Ahorro. Este mensaje está situado en el
ajuste “disposición de la posición de OSD.”
OSD se trabó: Cuando el OSD es bloqueado, mantener la llave del “menú” y pulsar la tecla de la “energía”
una vez para girar el monitor. El OSD será bloqueado, y este mensaje aparecerá. Cuando el OSD es bloqueado, sólo la función dominante de la “energía” todavía está trabajando, y eventualmente la otra llave se
presiona este mensaje permanecerá. Cuando el OSD es bloqueado, mantener la llave del “menú” y pulsar
la tecla de la “energía” una vez para girar el monitor. El OSD será abierto y no demuestra el mensaje. Esta
localización del mensaje está en el artículo Setup “OSD” del ajuste de la posición.
La neutralización de DDCCI/permite: Cuando DDCCI permiten, pulsar la tecla “auto”. Después de 5 segundos
el monitor demostrará “el mensaje de la neutralización de DDCCI”. Cuando la neutralización de DDCCI, pulsa
tecla “auto”. Después de 9 segundos el monitor demostrará que los “DDCCI permiten” el mensaje. Este mensaje
está situado en el ajuste de la posición en artículo Setup “OSD”
.
50
Page 53

Uso recomendado
Precauciones de seguridad y mantenimiento
PARA UN RENDIMIENTO ÓPTIMO, OBSERVE LO
SIGUIENTE CUANDO INSTALE Y UTILICE EL MONITOR
• NO ABRA EL MONITOR. No hay piezas en el interior que el usuario pueda utilizar y al abrir o sacar
tapas puede exponerse a peligrosas descargas eléctricas u otros riesgos. Consulte a personal de
mantenimiento capacitado.
• No derrame líquidos en el gabinete ni use su monitor cerca del agua.
• No coloque objetos de ningún tipo en las ranuras del gabinete, ya que pueden tocar puntos de voltaje
peligrosos, lo que puede resultar perjudicial o fatal o puede causar descarga eléctrica, incendio o
fallas en el equipo.
• No coloque objetos pesados sobre los cables de alimentación. Los daños al cable de alimentación
pueden causar descargas o incendios.
• No coloque este producto en un carro, estante o mesa inclinado o inestable, ya que el monitor se
puede caer y sufrir un daño importante.
• Cuando el monitor LCD esté funcionando con 125-240V CA, use un cable de alimentación acorde
con el voltaje de suministro de corriente del tomacorriente de CA usado. El cable de alimentación
que use debe estar aprobado y cumplir con las normas de seguridad de su país. (En Europa se debe
usar el Tipo H05VV-F).
• En el Reino Unido, use un cable de alimentación BS aprobado con tomacorrientes moldeado que tenga
un fusible (5A) negro instalado para uso con este monitor. Si no se provee un cable de alimentación
con este monitor, contacte al proveedor.
• No coloque objetos sobre el monitor y no lo use al aire libre.
• El interior del tubo fl uorescente ubicado dentro del monitor LCD contiene mercurio. Siga el reglamento
y las normas municipales para deshacerse del tubo en forma adecuada.
• No doble el cable de alimentación.
• No use el monitor en zonas de altas temperaturas, húmedas, polvorientas o aceitosas.
• Si se ha roto el vidrio, manipúlelo con cuidado.
• No cubra la ventilación del monitor.
Desconecte de inmediato su monitor del tomacorriente de la pared y consulte al personal de
mantenimiento capacitado en los siguientes casos:
• Cuando el cable de alimentación o el tapón estén dañados.
• Si se ha derramado líquido o se han caído objetos dentro el monitor.
• Si se ha expuesto el monitor a la lluvia o al agua.
• Si el monitor se ha caído o se ha dañado el gabinete.
• Si el monitor no funciona normalmente siguiendo las instrucciones de uso.
• Si el monitor o el vidrio está roto, no entre en contacto con el cristal líquido y manipúlelo con
cuidado.
• Permita que haya una ventilación adecuada alrededor del monitor para que el calor
se pueda disipar en forma apropiada. No bloquee aperturas de ventilación ni coloque
el monitor cerca de un radiador u otras fuentes de calor. No coloque nada sobre el
monitor.
Precauciones
Persistencia de la imagen
La persistencia de la imagen se da cuando una imagen residual o “fantasma” de una imagen previa permanece
visible en la pantalla. A diferencia de los monitores CRT, la persistencia de la imagen de los monitores LCD no
es permanente, pero deberían evitarse las imágenes constantes que se muestran por un período prolongado de
tiempo.
Para aliviar la persistencia de la imagen, apague el monitor durante el tiempo equivalente al que se mostró la
imagen previa. Por ejemplo: si una imagen estuvo en el monitor por una hora y se mantiene una imagen residual,
el monitor se debe apagar por una hora para borrar la imagen.
NOTA: Como en todos los dispositivos de visualización personales, NEC Display Solution of America, Inc. recomienda
utilizar protectores de pantalla con movimiento a intervalos regulares siempre que la pantalla esté inactiva, o
apague el monitor si no se va a utilizar.
• El cable de alimentación es el medio principal para desconectar el sistema del suministro de
corriente. El monitor debe instalarse cerca de un tomacorriente que sea de fáci
acceso.
• Manipúlelo con cuidado cuando lo transporte. Guarde el embalaje para transportarlo.
A COLOR LCD:
51
Page 54

Uso recomendado –continuación
LA UBICACIÓN CORRECTA Y EL AJUSTE DEL MONITOR PUEDE REDUCIR
LA FATIGA EN LOS OJOS, HOMBROS Y CUELLO. CUANDO INSTALE
EL MONITOR, VERIFIQUE LO SIGUIENTE:
• Para garantizar el óptimo rendimiento, deje el monitor en marcha durante 20 minutos para que se caliente.
• Regule la altura del monitor de modo que la parte superior
de la pantalla quede apenas por debajo de la altura de la
vista. Sus ojos deben mirar apenas hacia abajo cuando
visualice la mitad de la pantalla.
• Ubique su monitor a no más de 16 pulgadas (40 cm) de
proximidad y no más lejos de las 28 pulgadas (71 cm)
de su vista. La distancia optima es 20 pulgadas (50 cm).
• Descanse la vista periódicamente concentrándose en un
objeto ubicado al menos a 20 pies (6 m). Parpadee con
frecuencia.
• Ubique el monitor en un ángulo de 90° desde las ventanas y otras fuentes de luz para minimizar el resplandor y el refl ejo. Regule la inclinación
del monitor de modo que el techo no se refl eje en su pantalla.
• Si el refl ejo de la luz le difi culta la visión de la pantalla, use un fi ltro antirefl ejos.
• Regule el brillo y los controles de contraste del monitor para mejorar la legibilidad.
• Use un sujetador de documentos cerca de la pantalla.
• Ubique lo que esté mirando la mayor parte del tiempo (la pantalla o material de referencia) directamente al frente para disminuir las veces que gira su cabeza mientras escribe.
• Contrólese la vista regularmente
.
52
Page 55

Uso recomendado –continuación
Ergonomía
Para lograr los máximos benefi cios ergonómicos, le recomendamos lo siguiente:
• Use los controles de tamaño y posición programados con las indicaciones estándar.
• Use la confi guración de color predeterminada.
• Use las señales no entrelazadas con un índice de actualización entre 60-75Hz.
• No use el color primario azul en un fondo oscuro, ya que es difícil de ver y puede
producir cansancio visual debido al contraste insufi ciente.
Limpieza del panel LCD
• Cuando el panel de cristal líquido tenga polvo o se ensucie, limpie con cuidado con un
paño suave.
• No frote el panel LCD con materiales ásperos o rígidos.
• No ejerza presión sobre la superfi cie del LCD.
• No use un limpiador absorbente de olores ya que deteriorará o decolorará la superfi cie
del LCD.
Limpieza del gabinete
• Desconecte el tomacorriente.
• Humedezca un paño suave con agua y un detergente neutro. Limpie con cuidado el
gabinete y luego seque suavemente con un paño suave
NOTA: Se usan muchos plásticos en la superfi cie del gabinete. NO limpie con benceno, tíner,
detergente alcalino, detergente a base de alcohol, limpiador de vidrio, cera, pomada, jabón
en polvo o insecticida. No toque el gabinete con goma o vinilo por un período prolongado
de tiempo. Estos tipos de fl uidos y texturas pueden causar el deterioro, agrietamiento o desprendimiento de la pintura.
Para más información específi ca sobre cómo crear un ambiente de trabajo saludable, escriba a the American National
Standard for Human Factors Engineering of Visual Display Terminal Workstations – ANSI-HFS Standard No. 100-1988
–The Human Factors Society, Inc. P.O. Box 1369, Santa Monica, California 90406..
53
Page 56

Especifi caciones
Especifi caciones Monitor Notas
de Monitor LCD19WV
Módulo LCD Diagonal: 19.0 pulgadas Matriz activa; transistor de película
Tamaño de la imagen visible: 19.0 pulgadas delgada (TFT), pantalla de cristal líquido
Resolución nativa (cuenta de píxeles): 1440 x 900 (LCD); tamaño de puntos de 0,285 mm;
luminiscencia blanca de 300cd/m²;
1000:1 relación de contraste normal;
Tiempo
tiempo de reacción 5ms
Señal de entrada Video: ANALOGA 0.7 Vp-p/75 Ohmios
Sincronización: Sincronización separada, Nivel TTL
(positivo/negativo),
Colores de pantalla Entrada análoga:
utilizada.
Ángulos de Izquierda/derecha: 80°/80° (CR>10)
visualización máximos Arriba/abajo: 75°/85° (CR>10)
Rango de Horizontal: 30.0 kHz to 83.0 kHz Automático
sincronización Vertical: 55 Hz to 75 Hz Automático
Resoluciones compatibles 720 x 400*
800 x 600*1 : @ 56 Hz to 75 Hz enumerados.
832 x 624*
1152 x 864*
1280 x 768*
1280 x 960
1140 x 900: @ 60 Hz..................................
Area activa de la pantalla
Vertical :
Fuente de alimentación
Clasifi cación de corriente 0.75-0.4A/100-240V
Dimensiones
17.3 in (ancho) x 14.3 in (alto) x 8.3 in (grueso)
Peso 4.5 kg
9.9 libras
Consideraciones ambientales
Temperatura de operación: 5°C a 35°C/41°F a 95°F
Humedad: 30% a 80%
Altitud: 0 a 12,000 pies
Temperatura de almacenamiento: -10°C a +60°C/14°F a 140°F
Humedad: 10% a 85%
Altitud: 0 a 40.000 pies
Entrada
análoga y de
Digitaces:
Horizontal : 410.4 mm/16.2 pulgadas
16.7M Dependen de la tarjeta de visualización
1
640 x 480*1 : @ 60 Hz to 75 Hz
1024 x 768*1 : @ 60 Hz to 75 Hz
1280 x 1024 : @ 60 Hz to 75 Hz
256.5 mm/10.1 pulgadas
100
440.0 mm (ancho) x 363.0 mm (alto) x 210.0 mm (grueso)
: @ 70 Hz
1
: @ 75 Hz
1
: @ 75 Hz
1
: @ 60 Hz
*1 : @ 60 Hz to 75 Hz
-240 V
~ 50/60 Hz
Algunos sistemas pueden no ser
compatibles con todos los modos
NEC DISPLAY SOLUTIONS establece la
resolución recomendada a 60 Hz para un
rendimiento óptimo de la pantalla
*1 Resoluciones interpoladas: Cuando se muestran resoluciones inferiores a la cuenta de píxeles del modulo LCD, el texto puede aparecer diferente.
Esto es normal y necesario para todas las tecnologías de paneles planos actuales al visualizar la pantalla completa con resoluciones no nativas. En
tecnologías de panel plano, cada punto en la pantalla es en realidad un píxel, por lo tanto para aumentar la resolución a pantalla completa, se
debe realizar una interpolación de la resolución.
NOTA: Las especifi caciones técnicas están sujetas a cambio sin aviso previo.
54
Page 57

Especifi caciones –continuación
Especifi caciones Monitor Notas
de Monitor LCD22WV
Módulo LCD Diagonal: 21.6 pulgadas Matriz activa; transistor de película
Tamaño de la imagen visible: 21.6 pulgadas delgada (TFT), pantalla de cristal líquido
Resolución nativa (cuenta de píxeles): 1440 x 900 (LCD); tamaño de puntos de 0,285 mm;
luminiscencia blanca de 300cd/m²;
1000:1 relación de contraste normal;
Tiempo
tiempo de reacción 5ms
Señal de entrada Video: ANALOGA 0.7 Vp-p/75 Ohmios
Sincronización: Sincronización separada, Nivel TTL
(positivo/negativo),
Colores de pantalla Entrada análoga:
16.7M Dependen de la tarjeta de visualización
utilizada.
Ángulos de Izquierda/derecha: 75°/85° (CR>10)
visualización máximos Arriba/abajo: 80°/80° (CR>10)
Rango de Horizontal: 30.0 kHz to 83.0 kHz Automático
sincronización Vertical: 55 Hz to 75 Hz Automático
Resoluciones compatibles 720 x 400*
800 x 600*1 : @ 56 Hz to 75 Hz enumerados.
832 x 624*
1152 x 864*
Entrada
análoga y de
Digitaces:
640 x 480*1 : @ 60 Hz to 75 Hz
1152 x 870*
1280 x 720*
1280 x 768*
1280 x 960
1280 x 1024 : @ 60 Hz to 75 Hz
1360 x 768*
1140 x 900: @ 60 Hz
1680 x 1050*1 : @ 60 Hz............................
Area activa de la pantalla
Vertical :
Horizontal : 464.9 mm/18.3 pulgadas
Fuente de alimentación
1
: @ 70 Hz
1
1024 x 768*1 : @ 60 Hz to 75 Hz
: @ 75 Hz
1
: @ 75 Hz
1
: @ 75 Hz
1
: @ 60 Hz
1
: @ 60 Hz
*1 : @ 60 Hz to 75 Hz
1
: @ 60 Hz
290.6mm/29.1 pulgadas
100
-240 V
~ 50/60 Hz
compatibles con todos los modos
Algunos sistemas pueden no ser
NEC DISPLAY SOLUTIONS establece la
resolución recomendada a 60 Hz para un
rendimiento óptimo de la pantalla
Clasifi cación de corriente 1.2 - 0.5A/100-240V
Dimensiones
505.8 mm (ancho) x 407.5 mm (alto) x 210.0 mm (grueso)
19.9 in (ancho) x 16.0 in (alto) x 8.3 in (grueso)
Peso 5.5 kg
12.1 libras
Consideraciones ambientales
Temperatura de operación: 5°C a 35°C/41°F a 95°F
Humedad: 30% a 80%
Altitud: 0 a 12,000 pies
Temperatura de almacenamiento: -10°C a +60°C/14°F a 140°F
Humedad: 10% a 85%
Altitud: 0 a 40.000 pies
*1 Resoluciones interpoladas: Cuando se muestran resoluciones inferiores a la cuenta de píxeles del modulo LCD, el texto puede aparecer diferente. Esto es normal y necesario
para todas las tecnologías de paneles planos actuales al visualizar la pantalla completa con resoluciones no nativas. En tecnologías de panel plano, cada punto en la pantalla es
en realidad un píxel, por lo tanto para aumentar la resolución a pantalla completa, se debe realizar una interpolación de la resolución.
NOTA: Las especifi caciones técnicas están sujetas a cambio sin aviso previo
.
55
Page 58

Características
Tamaño reducido: Brinda la solución ideal para entornos que requieren una calidad de
imagen superior pero con limitaciones de tamaño y peso. El tamaño pequeño y el bajo
peso del monitor permiten trasladarlo o transportarlo fácilmente de un lugar a otro.
El automóvil sin contacto ajusta
sin contacto ajusta automáticamente el monitor en los valores óptimos durante la
confi guración inicial.
Conectar y usar: La solución de Microsoft
facilita la confi guración e instalación al permitir que el monitor envíe directamente a
su computadora sus características (como el tamaño de pantalla y las resoluciones
admitidas), lo cual optimiza automáticamente la calidad de la imagen.
Sistema IPM (Administrador inteligente de energía): Proporciona métodos de ahorro
de energía innovadores que permiten que el monitor consuma menos energía cuando
está encendido pero no se está utilizando, lo que supone un ahorro de dos tercios
de los costos de energía del monitor, y reduce las emisiones y baja los costos de aire
acondicionado del lugar de trabajo.
Tecnología de frecuencia múltiple: Ajusta automáticamente el monitor a la frecuencia de
escaneo de la tarjeta del monitor que de esa manera muestra la resolución requerida.
Capacidad FullScan
las resoluciones, lo cual aumenta de manera signifi cativa el tamaño de la imagen.
Interfaz de montaje estándar VESA: Permite a los usuarios conectar su monitor a
cualquier brazo o soporte de montaje estándar VESA. Permite montar el monitor en una
pared o brazo usando cualquier dispositivo compatible de terceros.
®
: Le permite utilizar el área de la pantalla completa en la mayoría de
™
(Ajuste automático sin contacto): El ajuste automático
®
con los sistemas operativos Windows®
56
Page 59

Solución de problemas
Sin imagen
• El cable de señal debe estar conectado por completo a la tarjeta de visualización/computadora.
• La tarjeta de visualización debe estar colocada por completo en la ranura.
• El botón de encendido frontal y el botón de encendido de la computadora deben estar
en la posición de ENCENDIDO.
• Asegúrese de que se ha elegido un modo compatible con la tarjeta de visualización o
el sistema que se está utilizando. (Consulte el manual de la tarjeta de visualización o
del sistema para cambiar el modo gráfi co).
• Controle el monitor y la tarjeta de visualización en lo que respecta a la compatibilidad
y a las confi guraciones recomendadas.
• Controle la señal de entrada.
El botón de encendido no responde
• Desconecte el cable de alimentación del monitor del tomacorriente CA para apagar y
reiniciar el monitor.
Persistencia de la imagen
• La persistencia de la imagen se da cuando una imagen residual o “fantasma” de una
imagen previa permanece visible en la pantalla. A diferencia de los monitores CRT, la
persistencia de la imagen de los monitores LCD no es permanente, pero deberían evitarse las imágenes constantes que se muestran por un período prolongado de tiempo.
Para aliviar la persistencia de la imagen, apague el monitor durante el tiempo equiva-
lente al que se mostró la imagen previa. Por ejemplo: si una imagen estuvo en el monitor por una hora y se mantiene una imagen residual, el monitor se debe apagar por
una hora para borrar la imagen.
NOTA: Como en todos los dispositivos de visualización personales, NEC Display
La imagen es instable, está fuera de foco o la distorsión es aparente
• El cable de señal debe estar conectado por completo a la computadora.
• Use los controles de ajuste de la imagen OSD para enfocar y ajustar la visualización
• Controle el monitor y la tarjeta de visualización en lo que respecta a la compatibilidad
• Si el texto esta distorsionado, cambie el modo de video a no entrelazado y utilice una
Solutions of America, Inc. recomienda utilizar imágenes o protectores de
pantalla con movimiento a intervalos regulares siempre que la pantalla esté
inactiva, o apague el monitor si no se va a utilizar.
aumentando o reduciendo el control de ESTABILIDAD. Cuando se cambia el modo
de visualización, la confi guración de ajuste de la imagen OSD puede necesitar un
reajuste.
y a las sincronizaciones de señal recomendadas.
velo
cidad de actualización de 60Hz.
57
Page 60

Solución de problemas –continuación
El LED en el monitor no está encendido (no se ve ni un color verde ni ámbar)
• El botón de encendido debe estar en la posición de ENCENDIDO y el cable de alimen-
tación debe estar conectado.
La imagen de la pantalla no posee el tamaño apropiado
• Use los controles de ajuste de la imagen de OSD para aumentar o reducir el
TAMAÑO H.
• Asegúrese de que se ha elegido un modo compatible con la tarjeta de visualización o
el sistema que se está utilizando. (Consulte el manual de la tarjeta de visualización o
del sistema para cambiar el modo gráfi co).
Sin video
• Si no aparece un video en la pantalla, apague y encienda nuevamente con el botón de
encendido.
• Asegúrese de que la computadora no esté en un modo de ahorro de energía (toque el
teclado o el mouse).
58
Page 61

Referencias
Servicio de atención y asistencia al cliente de monitores NEC
Servicio de atención al cliente y soporte técnico:
Fax: (800) 695-3044
Piezas y accesorios/Macintosh
Adaptador de cable: (800) 632-4662
Información sobre la garantía: www.necdisplay.com
Soporte técnico en línea www.necdisplay.com
Información sobre ventas y productos
Línea de información sobre ventas: (888) 632-6487
Clientes canadienses: (866) 771-0266, Ext#: 4037
Ventas gubernamentales: (800) 284-6320
Ventas gubernamentales Correo electrónico: gov@necdisplay.com
Canales electrónicos
Internet: www.necdisplay.com
Registro de productos: www.necdisplay.com
Operaciones europeas:
Controladores y descargas www.necdisplay.com
(800) 632-4662
www.nec-display-solutions.com
59
Page 62

Garantía limitada
NEC Display Solutions of America, Inc. (de aquí en más “NEC DISPLAY SOLUTIONS”) garantiza que este
Producto está libre de defectos de material y fabricación y que está sujeto a las condiciones aquí expuestas,
acepta reparar o reemplazar (a exclusivo criterio de NEC DISPLAY SOLUTIONS) cualquiera de las piezas
de la unidad adjunta que se prueben defectuosas durante un período de tres (3) años a partir de la fecha
de la primera compra del consumidor. Los repuestos tienen una garantía de noventa (90) días. Las piezas
de repuesto o la unidad pueden ser nuevas o reconstruidas y cumplirán con las especifi caciones de la
unidad o de las piezas originales.
Esta garantía le otorga derechos legales específi cos, además de otros derechos que usted puede tener y que
varían de estado a estado. Esta garantía se extiende al comprador original del Producto y no es transferible.
Esta garantía sólo cubre componentes suministrados por NEC DISPLAY SOLUTIONS. El mantenimiento
que se requiera como resultado de componentes de terceros no está cubierto por esta garantía. Para
que esta garantía cubra al Producto, el mismo se debe haber comprado en los EE. UU. o Canadá por el
comprador original. La presente garantía sólo cubre la distribución del Producto en los EE. UU. o Canadá
por parte de NEC DISPLAY SOLUTIONS. No se proporciona servicio de garantía fuera de los EE. UU. o
Canadá. NEC DISPLAY SOLUTIONS requerirá la presentación de la prueba de compra para corroborar
la fecha de la misma. Dicha prueba de compra debe ser una factura o recibo que contenga el nombre y
domicilio del vendedor, del comprador y el número de serie del producto.
Para recibir los servicios aquí mencionados, es su obligación y correrá por su cuenta el envío, el transporte
prepago o la entrega del Producto al revendedor autorizado a quien se compró dicho Producto o a otro
lugar autorizado por NEC DISPLAY SOLUTIONS, ya sea en el embalaje original u otro similar que ofrezca
un grado de protección equivalente. Todos los productos que se devuelvan a NEC DISPLAY SOLUTIONS
para recibir mantenimiento DEBEN tener aprobación previa, la cual puede obtenerse llamando al 1-800632-4662. El Producto no debe haberse sometido a alteraciones, reparaciones ni mantenimiento previos
realizados por parte de personal no autorizado por NEC DISPLAY SOLUTIONS, tampoco se debe haber
alterado ni quitado el número de serie del producto. Para que esta garantía sea válida, el Producto no
se debe haber sometido a visualización de imágenes fi jas durante largos períodos, lo que resulta en
persistencia de la imagen (efectos de imagen superpuesta), ni tampoco a accidentes, uso inapropiado o
abuso o funcionamiento contrario a las instrucciones del Manual de usuario. La presencia de cualquiera
de dichas condiciones anulará esta garantía.
NEC DISPLAY SOLUTIONS NO SE HARÁ RESPONSABLE, SIN PERJUICIO DE LA RESPONSABILIDAD
ANTES DECLARADA, POR OTROS DAÑOS DIRECTOS, INDIRECTOS, INCIDENTALES, DERIVADOS U
OTRO TIPO QUE RESULTEN DEL USO DE CUALQUIER PRODUCTO DE NEC DISPLAY SOLUTIONS. ESTAS
GARANTÍAS REEMPLAZAN CUALQUIER OTRA GARANTÍA, EXPRESA O IMPLÍCITA, INCLUIDAS, EN
FORMA NO TAXATIVA, LAS GARANTÍAS IMPLÍCITAS DE COMERCIALIZACIÓN O ADAPTACIÓN PARA
UN PROPÓSITO EN PARTICULAR. ALGUNOS ESTADOS NO PERMITEN LA EXCLUSIÓN DE GARANTÍAS
IMPLÍCITAS O EL LÍMITE O EXCLUSIÓN DE RESPONSABILIDAD POR DAÑOS INCIDENTALES O DERIVADOS,
POR LO QUE LAS EXCLUSIONES ANTERIORES PUEDEN NO SER APLICABLES A USTED.
Este Producto está garantizado según las condiciones de esta garantía limitada. Se advierte a los consumidores
que el rendimiento del Producto se ve afectado por la confi guración del sistema, el software, la aplicación,
los datos del cliente y el control operativo del sistema, entre otros factores. Mientras que los Productos de
NEC DISPLAY SOLUTIONS se consideran compatibles con muchos sistemas, la implementación funcional
específi ca de los clientes puede variar. Por lo tanto, el consumidor debe determinar la conveniencia de un
Producto para un propósito o aplicación específi cos y la misma no está garantizada por NEC DISPLAY
SOLUTIONS.
Para conocer el servicio de mantenimiento más cercano autorizado por NEC Display Solutions of America,
Inc., contáctese con NEC Display Solutions of America, Inc. llamando al 1-800-632-4662.
60
Page 63

TCO’03
¡Felicitaciones!
El monitor que acaba de adquirir lleva está certifi cado por
TCO’03 Displays. Esta certifi cación indica que su monitor
está diseñado, fabricado y probado de acuerdo con algunos
de los controles de calidad y medioambientales más estrictos
del mundo. Esto contribuye a lograr un producto de alto ren-
dimiento, diseñado para el usuario y que respeta el medio
ambiente.
A continuación se muestran algunas de las características de TCO’03 Display:
Ergonomía
• Buena ergonomía visual y calidad de imagen para mejorar el entorno de
trabajo del usuario y para reducir los problemas de vista y tensión. Los factores
importantes son la luminosidad, el contraste, la resolución, el refl ejo, la
reproducción del color y la estabilidad de la imagen.
Energía
• Modo ahorro de energía luego de transcurrido un tiempo: es benefi cioso tanto
para el usuario como para el medio ambiente
• Seguridad eléctricae
Emisiones
• Campos electromagnéticos
• Emisiones acústicas
Ecología
• El producto debe estar preparado para poderse reciclar y el fabricante debe
disponer de un sistema de gestión medioambiental certifi cado, como EMAS o
ISO 1400
• Restricciones en cuanto a
– polímeros y retardadores de llama bromados y clorados
– metales pesados como cadmio, mercurio y plomo.
Los requisitos incluidos en esta certifi cación han sido desarrollados por TCO Development
conjuntamente con científi cos, expertos, usuarios y fabricantes de todo el mundo. Desde
fi nales de los años 1980, TCO ha fomentado el desarrollo de equipos de TI más fáciles de
utilizar. Nuestro sistema de certifi cación comenzó con los monitores en 1992 y ahora lo
solicitan los usuarios y fabricantes de informática de todo el mundo.
Para obtener más información, visite
www.tcodevelopment.com
61
Page 64

Información del
fabricante sobre reciclado y energía
NEC DISPLAY SOLUTIONS está muy comprometido con la protección del medio ambiente
y considera el reciclaje una de las máximas prioridades de la empresa para reducir los
daños al medio ambiente. Nuestro objetivo es desarrollar productos respetuosos con
el medio ambiente y poner nuestro máximo empeño en ayudar a defi nir y cumplir las
últimas normativas de organismos independientes como ISO (Organización Internacional
de Normalización) y TCO (Confederación Sueca de Trabajadores Profesionales).
Cómo reciclar su producto NEC
El objetivo del reciclado es mejorar el entorno mediante la reutilización, actualización,
reacondicionamiento o recuperación de materiales. Los equipamientos dedicados al
reciclaje garantizan que los componentes dañinos para el medio ambiente se manipulan
y eliminan de la manera adecuada. Para asegurar que sus productos se reciclan de
la forma más conveniente, NEC DISPLAY SOLUTIONS ofrece una amplia variedad de
procedimientos de reciclaje y su consejo sobre la mejor forma de manipular sus productos
para proteger el medio ambiente una vez que llegan al fi nal de su vida útil.
Puede encontrar toda la información necesaria para desechar un producto y la
información específi ca de cada país sobre los equipamientos de reciclaje disponibles en
los siguientes sitios web:
EE.UU.: http://www.necdisplay.com
Europa: http://www.nec-display-solutions.com/greencompany/
Japón: http://www.nec-display.com
Ahorro de energía
Este monitor dispone de una función avanzada de ahorro de energía. Cuando se envía
al monitor una señal del estándar VESA DPMS (señalización para administración de
potencia de pantallas), se activa el modo de ahorro de energía. El monitor sólo dispone
de un modo de ahorro de energía.
Modo Consumo de energía Color del LED
LCD19WV
Operación Normal Aprox. 34W Verde
Modo Del Ahorro De la Moins de 2W Ambarino
Energía
De Modo Menos que than 1W Unlit
LCD22WV
Operación Normal Aprox. 46W Verde
Modo Del Ahorro De la Moins de 2W Ambarino
Energía
De Modo Menos que than 1W Unlit
62
Page 65

Declaración del fabricanter
Por la presente certifi camos que el moni-
tor a color LCD19WV (TFT19W80PS) y
LCD22WV (TFT22W90PS)
cumplen con
Directiva municipal 73/23/EEC:
– EN 60950-1
Council Directive 89/336/EEC:
– EN 55022
– EN 61000-3-2
– EN 61000-3-3
– EN 55024
y presentan la marca
NEC Display Solutions, Ltd.
4-13-23, Shibaura,
Minato-Ku
Tokyo 108-0023, Japan
63
Page 66

64
Page 67

Page 68

Page 69

Page 70

Serie LCD de NEC
DECLARACIÓN DE DERECHOS DE PROPIEDAD
Y DESCARGO DE RESPONSABILIDAD
La información divulgada en este documento, incluidos todos los diseños y materiales relacionados, es propiedad
de valor de NEC Display Solutions of America, Inc. y/o sus licenciatarios, según corresponda, se reservan todos los
derechos de patente, copyright y otros derechos de propiedad de este documento, incluidos todos los derechos de
diseño, fabricación, reproducción, uso y ventas que del mismo se desprendan, excepto en los casos en que dichos
derechos se otorguen expresamente a otros.
Los productos de NEC Display Solutions of America, Inc. mencionados en este documento están garantizados de
acuerdo con las condiciones de la Declaración de Garantía Limitada que acompaña a cada producto. Sin embargo,
el rendimiento real de cada uno de esos productos depende de factores tales como la confi guración del sistema, los
datos del cliente y el control operativo. Dado que la implementación de cada producto puede variar de cliente a cliente,
por el consumidor debe determinar la conveniencia de las confi guraciones y aplicaciones de un producto específi co
y no está garantizada por NEC Display Solutions of America, Inc.
Para permitir mejoras en el diseño y en las especifi caciones, la información de este documento está sujeta a
modifi caciones en cualquier momento sin previo aviso. Se prohíbe la reproducción total o parcial de este documento
sin previa autorización de NEC Display Solutions of America, Inc.
DECLARACIÓN DE CONFORMIDAD
Este dispositivo cumple con las normas de la FCC, Parte 15. Su funcionamiento está sujeto a las siguientes dos condiciones.
(1) Es posible que este dispositivo no cause interferencia dañina, y (2) este dispositivo debe aceptar cualquier interferencia
que reciba, incluida aquella interferencia que pueda provocar un funcionamiento no deseado.
Entidad responsable en los EE.UU: NEC Display Solutions of America, Inc.
Dirección: 500 Park Blvd, Suite 1100
Itasca, Illinois 60143
Nº de tel.: (630) 467-3000
Tipo de producto: Monitor
Clasifi cación del equipo: Dispositivo periférico clase B
Modelos: LCD19WV (TFT19W80PS)
LCD22WV (TFT22W90PS)
Por el presente declaramos que el equipo antes especifi cado
cumple con las normas técnicas especifi cadas por las disposiciones de la FCC.
Windows es una marca registrada de Microsoft Corporation. NEC es una marca registrada de NEC Corporation. Energy Star es una
marca registrada de los EE. UU. Todas los otros nombres de marcas y productos son marcas o marcas registradas de sus respectivos
propietarios.
Como socio de Energy Star®, NEC Display Solutions of America, Inc. ha determinado que este producto cumple con los lineamientos de
EnErgy Star relacionados con el rendimiento energético. El emblema de EnErgy Star no representa el aval de la EPA para ningún producto
o servicio.
Page 71

NEC LCD Series
The information disclosed in this document, including all designs and related materials, is the valuable property of
NEC Display Solutions of America, Inc. and/or its licensors, as appropriate, reserve all patent, copyright and other
proprietary rights to this document, including all design, manufacturing, reproduction, use and sales rights thereto,
except to the extent said rights are expressly granted to others.
The NEC Display Solutions of America, Inc. product(s) discussed in this document are warranted in accordance with
the terms of the Limited Warranty Statement accompanying each product. However, actual performance of each such
product is dependent upon factors such as system confi guration, customer data and operator control. Since implementation by customers of each product may vary, the suitability of specifi c product confi gurations and applications must be
determined by the customer and is not warranted by NEC Display Solutions of America, Inc..
To allow for design and specifi cation improvements, the information in this document is subject to change at any time
without notice. Reproduction of this document or portions thereof without prior approval of NEC Display Solutions of
America, Inc. is prohibited.
DECLARATION OF CONFORMITY
This device complies with Part 15 of FCC Rules. Operation is subject to the following two conditions. (1) This device
may not cause harmful interference, and (2) this device must accept any interference received, including interference
that may cause undesired operation.
U.S. Responsible Party: NEC Display Solutions of America, Inc.
Address: 500 Park Blvd, Suite 1100
Itasca, Illinois 60143
Tel. No.: (630) 467-3000
Type of Product: Display Monitor
Equipment Classifi cation: Class B Peripheral
Model: LCD19WV (TFT19W80PS)
LCD22WV (TFT22W90PS)
PROPRIETARY NOTICE AND LIABILITY DISCLAIMER
We hereby declare that the equipment specifi ed above
conforms to the technical standards as specifi ed in the FCC Rules.
Windows is a registered trademark of Microsoft Corporation. NEC is a registered trademark of NEC Corporation. ENERGY STAR is a
U.S. registered trademark. All other brands and product names are trademarks or registered trademarks of their respective owners.
As an
ENERGY STAR
for energy effi ciency. The
®
Partner, NEC Display Solutions of America, Inc. has determined that this product meets the ENERGY STAR guidelines
ENERGY STAR emblem does not represent EPA endorsement of any product or service.
Part No. 000000000
Printed in China
 Loading...