

Page 1

INASET R2
for the NEAX 2400 IPX
User Guide
NEC America, Inc.
July 2003
NDA-30225, Revision 1
Page 2

Liability Disclaimer
NEC America, Inc. reserves the right to change the specifications,
functions, or features, at any time, without notice.
NEC America, Inc. has prepared this document for the exclusive use of
its employees and customers. The information contained herein is the
property of NEC America, Inc. and shall not be reproduced without
prior written approval from NEC America, Inc.
NEAX and Dterm are registered trademarks of NEC Corporation.
OpenWorX is a registered trademark of NEC America, Inc.
© 2003 NEC America, Inc.
Printed in the USA
MS-DOS, Microsoft, Windows, and Windows NT are registered
trademarks of Microsoft Corporation
All other brand or product names are or may be trademarks or
registered trademarks of, and are used to identify products or services
of, their respective owners.
Page 3

END USER LICENSE AGREEMENT
PLEASE READ CAREFULLY THE FOLLOWING TERMS AND CONDITIONS BEFORE USING THE INASETTM: USING THE
PRODUCT SHALL INDICATE THAT YOUR COMPANY HAS ACCEPTED THE TERMS AND CONDITIONS OF THIS LEGAL
AGREEMENT. AS REFERENCED HEREIN, IF YOU DO NOT AGREE TO THESE TERMS AND CONDITIONS, YOU SHOULD
IMMEDIATELY RETURN THE PRODUCT UNUSED TO THE COMPANY FROM WHICH YOU PURCHASED IT WITHIN A
REASONABLE PERIOD OF TIME (NOT TO EXCEED ONE MONTH) FOR A FULL REFUND OF MONEY PAID FOR THE PRODUCT.
NEC Infrontia Corporation ("NEC-i") and its Licensor NEC
Infrontia, Inc. ("NECII") grants to sublicense to the end-user
("You") the use of the Software preinstalled in the Inaset
acquired ("Product") pursuant to the following terms and
conditions.
1. TERMS
(1) This Agreement is effective upon using the Product and
shall remain in force until terminated.
(2) You may terminate it voluntarily at any time by written
notice as indicated in Section 9.
(3) NECII may terminate this Agreement without notice upon
your failure to abide by this Agreement.
(4) All provisions of this Agreement relating to disclaimers of
warranties, limitation of liability, remedies, or damage, and
NECII or its supplier's proprietary rights shall survive
termination.
2. LICENSE
NECII grants you a nonexclusive and royalty-free license to use
the software solely on the Product which is provided to you as
preinstalled in the Product ("Software").
3.RESTRICTIONS
(1) You may not rent or lease the Software, but you may
transfer the Product, the Software (not a part) and
accompanying documentation on a permanent basis,
provided that you retain no copies of the Software and the
recipient agrees to be bound by all of the terms and
conditions of this Agreement.
(2) You agree not to modify, alter, decompile, disassemble,
reverse engineer or otherwise attempt to derive the Source
Code of the Software.
(3) You may not copy the Software.
(4) You may not use the Software other than in connection
with the Product.
(5) You will not export or re-export the Software without the
appropriate United States or foreign government licenses.
4. TITLE
Title to and ownership of the Software, related documentation
and any reproduction thereof shall remain with NECII, its
affiliates and its suppliers and the trademarks are the property
of such trademark owners. This Agreement does not grant you
any right (whenever by license, ownership or otherwise) in or to
patents, copyrights, trade secrets, trade names, trademarks or
any other intellectual property right with respect to the Software.
5. COPYRIGHT
THE SOFTWARE IS COPYRIGHTED AND, EXCEPT AS
PERMITTED BY THIS AGREEMENT, YOU MAY NOT
DUPLICATE THE SOFTWARE OR DISCLOSE IT TO ANY
OTHER PARTY.
6. LIMITED WARRANTY
YOU AGREE THAT THE SOFTWARE IS PROVIDED AND
LICENSED "AS IS." TO THE MAXIMUM EXTENT PERMITTED
BY APPLICABLE LAW, NECII AND ITS SUPPLIERS
DISCLAIM ALL OTHER WARRANTIES, EITHER EXPRESS
OR IMPLIED, INCLUDING, BUT NOT LIMITED TO, IMPLIED
TM
you
WARRANTIES OF MERCHANTABILITY, FITNESS FOR A
PARTICULAR PURPOSE AND NONINFRINGEMENT, WITH
REGARD TO THE SOFTWARE. YOU BEAR THE ENTIRE
RISK RELATING TO THE QUALITY OF THE SOFTWARE
AND, IF THE SOFTWARE PROVES TO HAVE ANY DEFECTS,
YOU ASSUME THE COST OF ANY NECESSARY SERVICING
OR REPAIRS. SOME STATES DO NOT ALLOW THE
EXCLUSION OF IMPLIED WARRANTIES, SO THAT THE
ABOVE EXTENSION MAY NOT APPLY TO YOU. THIS
WARRANTY GIVES YOU SPECIAL LEGAL RIGHTS AND
YOU MAY ALSO HAVE OTHER RIGHTS WHICH VARY FROM
STATE TO STATE.
7. LIMITATION OF LIABILITY
TO THE MAXIMUM EXTENT PERMITTED BY APPLICABLE
LAW, IN NO EVENT SHALL NECII OR ITS SUPPLIERS BE
LIABLE FOR ANY DAMAGES WHATSOEVER (INCLUDING,
WITHOUT LIMITATION, LOSS OF USE, LOSS OF PROFIT,
INTERRUPTATION OF BUSINESS, OR ANY INDIRECT,
SPECIAL, INCIDENTAL OR CONSEQUENTIAL DAMAGES OF
ANY KIND) REGARDLESS OF THE FORM OF ACTION
WHETHER IN CONTRACT, TORT (INCLUDING
NEGLIGENCE), STRICT PRODUCT LIABILITY OR
OTHERWISE, EVEN IF NECII HAS BEEN ADVISED OF THE
POSSIBILITY OF SUCH DAMAGES. IN NO EVENT SHALL
NECII BE LIABLE FOR ANY AMOUNT IN EXCESS OF THE
AMOUNT YOU ACTUALLY PAID FOR THE SOFTWARE
PORTION OF THE PRODUCT. BECAUSE SOME STATES DO
NOT ALLOW THE EXCLUSION OR LIMITATION OF LIABILITY
FOR INCIDENTAL OR CONSEQUENTIAL DAMAGES, THE
ABOVE LIMITATIONS MAY NOT APPLY TO YOU.
8. OTHERS
(1) This Agreement shall be construed and interpreted
according to the laws of Connecticut.
(2) The Software is a "commercial item" as that term is defined
in 48 C.F.R. 2.101, consisting of "commercial computer
software" and "commercial computer software
documentation" as such terms are used in 48 C.F.R.
12.212. Consistent with 48 C.F.R. 12.212 and 48 C.F.R.
227.7202-1 through 227.7202-4, NECII provides the
Software to U.S. Government End Users only pursuant to
the terms and conditions therein.
(3) You are hereby notified that Wind River K.K. and its
licensors ("Wind River") are a third-party beneficiary to this
Agreement to the extent that this Agreement contains
provisions which relate to your use of the software
provided by Wind River. Such provisions are made
expressly for the benefit of Wind River and are enforceable
by Wind River in addition to NECII.
9. NOTICE
NEC Infrontia, Inc.
6535 N. State Highway 161, Irving, Texas 75039-2402
Attn: CNG Contracts Administration
Main Telephone: 214-262-2000
Page 4

Contents
i
Introduction 1-1
What is INASET R2?. . . . . . . . . . . . . . . . . . . . . . . . . . . . . . . . . . . . . . . . . . . . . 1-1
INASET R2 Overview . . . . . . . . . . . . . . . . . . . . . . . . . . . . . . . . . . . . . . . . . . . . 1-1
How This Guide is Organized. . . . . . . . . . . . . . . . . . . . . . . . . . . . . . . . . . . . . . . 1-2
Using This Guide. . . . . . . . . . . . . . . . . . . . . . . . . . . . . . . . . . . . . . . . . . . . . . . . 1-3
Document Conventions. . . . . . . . . . . . . . . . . . . . . . . . . . . . . . . . . . . . . . . . . . . 1-3
Procedures . . . . . . . . . . . . . . . . . . . . . . . . . . . . . . . . . . . . . . . . . . . . . . . . . . . . 1-3
Keyboard Conventions . . . . . . . . . . . . . . . . . . . . . . . . . . . . . . . . . . . . . . . . . . . 1-4
Features 2-1
Features . . . . . . . . . . . . . . . . . . . . . . . . . . . . . . . . . . . . . . . . . . . . . . . . . . . . . . 2-2
Feature Descriptions. . . . . . . . . . . . . . . . . . . . . . . . . . . . . . . . . . . . . . . . . . . . . 2-3
Phone Login . . . . . . . . . . . . . . . . . . . . . . . . . . . . . . . . . . . . . . . . . . . . . . . . . . . 2-4
Account/Authorization Codes . . . . . . . . . . . . . . . . . . . . . . . . . . . . . . . . . . . . . . 2-5
Account Code . . . . . . . . . . . . . . . . . . . . . . . . . . . . . . . . . . . . . . . . . . . . . . . . . . 2-5
Forced Account Code . . . . . . . . . . . . . . . . . . . . . . . . . . . . . . . . . . . . . . . . . . . . 2-5
Authorization Code . . . . . . . . . . . . . . . . . . . . . . . . . . . . . . . . . . . . . . . . . . . . . . 2-6
Answering a Call . . . . . . . . . . . . . . . . . . . . . . . . . . . . . . . . . . . . . . . . . . . . . . . . 2-6
Making a Call. . . . . . . . . . . . . . . . . . . . . . . . . . . . . . . . . . . . . . . . . . . . . . . . . . . 2-7
Putting a Call on HOLD. . . . . . . . . . . . . . . . . . . . . . . . . . . . . . . . . . . . . . . . . . . 2-7
Last Number Redial. . . . . . . . . . . . . . . . . . . . . . . . . . . . . . . . . . . . . . . . . . . . . . 2-8
Transferring a Call. . . . . . . . . . . . . . . . . . . . . . . . . . . . . . . . . . . . . . . . . . . . . . . 2-8
Callback. . . . . . . . . . . . . . . . . . . . . . . . . . . . . . . . . . . . . . . . . . . . . . . . . . . . . . . 2-8
INASET R2 User Guide - Revision 1
Page 5

ii Contents
Call Waiting . . . . . . . . . . . . . . . . . . . . . . . . . . . . . . . . . . . . . . . . . . . . . . . . . . . . 2-9
Making a Conference Call. . . . . . . . . . . . . . . . . . . . . . . . . . . . . . . . . . . . . . . . . 2-9
Consult Third Party during a Call . . . . . . . . . . . . . . . . . . . . . . . . . . . . . . . . . . 2-10
Call Camp-On . . . . . . . . . . . . . . . . . . . . . . . . . . . . . . . . . . . . . . . . . . . . . . . . . 2-10
Call Park . . . . . . . . . . . . . . . . . . . . . . . . . . . . . . . . . . . . . . . . . . . . . . . . . . . . . 2-11
Call Forwarding . . . . . . . . . . . . . . . . . . . . . . . . . . . . . . . . . . . . . . . . . . . . . . . . 2-11
Save & Redial a Number. . . . . . . . . . . . . . . . . . . . . . . . . . . . . . . . . . . . . . . . . 2-12
Set/Answer a Message . . . . . . . . . . . . . . . . . . . . . . . . . . . . . . . . . . . . . . . . . . 2-13
Set a Message (Calling Station) . . . . . . . . . . . . . . . . . . . . . . . . . . . . . . . . . . . 2-13
Answer a Message (Called Station) . . . . . . . . . . . . . . . . . . . . . . . . . . . . . . . . 2-13
Call Pick-Up. . . . . . . . . . . . . . . . . . . . . . . . . . . . . . . . . . . . . . . . . . . . . . . . . . . 2-14
Outgoing Trunk Queuing . . . . . . . . . . . . . . . . . . . . . . . . . . . . . . . . . . . . . . . . . 2-14
Paging . . . . . . . . . . . . . . . . . . . . . . . . . . . . . . . . . . . . . . . . . . . . . . . . . . . . . . . 2-15
Meet-Me Page . . . . . . . . . . . . . . . . . . . . . . . . . . . . . . . . . . . . . . . . . . . . . . . . 2-15
Paging Transfer . . . . . . . . . . . . . . . . . . . . . . . . . . . . . . . . . . . . . . . . . . . . . . . 2-15
Boss/Secretary Transfer . . . . . . . . . . . . . . . . . . . . . . . . . . . . . . . . . . . . . . . . . 2-16
Boss/Secretary Message Waiting . . . . . . . . . . . . . . . . . . . . . . . . . . . . . . . . . . 2-17
Boss/Secretary Override . . . . . . . . . . . . . . . . . . . . . . . . . . . . . . . . . . . . . . . . . 2-18
Executive Override . . . . . . . . . . . . . . . . . . . . . . . . . . . . . . . . . . . . . . . . . . . . . 2-19
Do Not Disturb/Privacy . . . . . . . . . . . . . . . . . . . . . . . . . . . . . . . . . . . . . . . . . . 2-19
Intercom . . . . . . . . . . . . . . . . . . . . . . . . . . . . . . . . . . . . . . . . . . . . . . . . . . . . . 2-20
Automatic Intercom . . . . . . . . . . . . . . . . . . . . . . . . . . . . . . . . . . . . . . . . . . . . . 2-20
Manual Intercom . . . . . . . . . . . . . . . . . . . . . . . . . . . . . . . . . . . . . . . . . . . . . . . 2-20
Dial Intercom. . . . . . . . . . . . . . . . . . . . . . . . . . . . . . . . . . . . . . . . . . . . . . . . . . 2-21
INASET R2 User Guide - Revision 1
Page 6

Contents iii
INASET R2 Setup 3-1
Setting Your INASET R2 Options . . . . . . . . . . . . . . . . . . . . . . . . . . . . . . . . . . . 3-1
Entering Text Using the Dial Keys . . . . . . . . . . . . . . . . . . . . . . . . . . . . . . . . . . 3-2
Terminal Settings . . . . . . . . . . . . . . . . . . . . . . . . . . . . . . . . . . . . . . . . . . . . . . . 3-3
PBX Settings. . . . . . . . . . . . . . . . . . . . . . . . . . . . . . . . . . . . . . . . . . . . . . . . . . . 3-4
LCD Settings. . . . . . . . . . . . . . . . . . . . . . . . . . . . . . . . . . . . . . . . . . . . . . . . . . . 3-4
User Settings . . . . . . . . . . . . . . . . . . . . . . . . . . . . . . . . . . . . . . . . . . . . . . . . . . 3-8
Network Settings. . . . . . . . . . . . . . . . . . . . . . . . . . . . . . . . . . . . . . . . . . . . . . . . 3-9
Application Settings . . . . . . . . . . . . . . . . . . . . . . . . . . . . . . . . . . . . . . . . . . . . . 3-9
Soft Reset . . . . . . . . . . . . . . . . . . . . . . . . . . . . . . . . . . . . . . . . . . . . . . . . . . . . . 3-9
Feature Options. . . . . . . . . . . . . . . . . . . . . . . . . . . . . . . . . . . . . . . . . . . . . . . . . 3-9
Microphone On / Off . . . . . . . . . . . . . . . . . . . . . . . . . . . . . . . . . . . . . . . . . . . . 3-10
Handset Receiving Volume. . . . . . . . . . . . . . . . . . . . . . . . . . . . . . . . . . . . . . . 3-10
Transmission / Receiving Volume. . . . . . . . . . . . . . . . . . . . . . . . . . . . . . . . . . 3-10
Ringer Tones . . . . . . . . . . . . . . . . . . . . . . . . . . . . . . . . . . . . . . . . . . . . . . . . . 3-10
Hands Free Mode . . . . . . . . . . . . . . . . . . . . . . . . . . . . . . . . . . . . . . . . . . . . . . 3-11
Call Indicator. . . . . . . . . . . . . . . . . . . . . . . . . . . . . . . . . . . . . . . . . . . . . . . . . . 3-11
Home Application Setup 4-1
Home Application Window . . . . . . . . . . . . . . . . . . . . . . . . . . . . . . . . . . . . . . . . 4-1
Function Keys . . . . . . . . . . . . . . . . . . . . . . . . . . . . . . . . . . . . . . . . . . . . . . . . . . 4-2
Configuring Function Keys . . . . . . . . . . . . . . . . . . . . . . . . . . . . . . . . . . . . . . . . 4-3
Local Application Mode 5-1
Using the Local Applications . . . . . . . . . . . . . . . . . . . . . . . . . . . . . . . . . . . . . . . 5-1
Entering Text Using the Dial Keys . . . . . . . . . . . . . . . . . . . . . . . . . . . . . . . . . . 5-2
Directory . . . . . . . . . . . . . . . . . . . . . . . . . . . . . . . . . . . . . . . . . . . . . . . . . . . . . . 5-5
Inbound . . . . . . . . . . . . . . . . . . . . . . . . . . . . . . . . . . . . . . . . . . . . . . . . . . . . . . . 5-7
Browser . . . . . . . . . . . . . . . . . . . . . . . . . . . . . . . . . . . . . . . . . . . . . . . . . . . . . . . 5-9
INASET R2 User Guide - Revision 1
Page 7

iv Contents
INASET Helper . . . . . . . . . . . . . . . . . . . . . . . . . . . . . . . . . . . . . . . . . . . . . . . . 5-10
What is INASET Helper? . . . . . . . . . . . . . . . . . . . . . . . . . . . . . . . . . . . . . . . . 5-10
Installing INASET Helper . . . . . . . . . . . . . . . . . . . . . . . . . . . . . . . . . . . . . . . . 5-10
Using INASET Helper . . . . . . . . . . . . . . . . . . . . . . . . . . . . . . . . . . . . . . . . . . . 5-17
INASET R2 Menu . . . . . . . . . . . . . . . . . . . . . . . . . . . . . . . . . . . . . . . . . . . . . . 5-20
Accessing Local Applications Using the Menu Key . . . . . . . . . . . . . . . . . . . . 5-20
Network Application Mode 6-1
Using the OpenWorX Applications . . . . . . . . . . . . . . . . . . . . . . . . . . . . . . . . . . 6-2
OpenWorX Login . . . . . . . . . . . . . . . . . . . . . . . . . . . . . . . . . . . . . . . . . . . . . . . 6-2
Entering Text Using the Dial Keys . . . . . . . . . . . . . . . . . . . . . . . . . . . . . . . . . . 6-3
Corporate Directory. . . . . . . . . . . . . . . . . . . . . . . . . . . . . . . . . . . . . . . . . . . . . . 6-6
Using Corporate Directory . . . . . . . . . . . . . . . . . . . . . . . . . . . . . . . . . . . . . . . . 6-6
Corporate Directory Window . . . . . . . . . . . . . . . . . . . . . . . . . . . . . . . . . . . . . . . 6-7
Finding a Name and Number . . . . . . . . . . . . . . . . . . . . . . . . . . . . . . . . . . . . . . 6-9
Viewing Entry Details . . . . . . . . . . . . . . . . . . . . . . . . . . . . . . . . . . . . . . . . . . . 6-10
Sending a Message . . . . . . . . . . . . . . . . . . . . . . . . . . . . . . . . . . . . . . . . . . . . 6-11
Dialing a Number . . . . . . . . . . . . . . . . . . . . . . . . . . . . . . . . . . . . . . . . . . . . . . 6-13
Personal Directory. . . . . . . . . . . . . . . . . . . . . . . . . . . . . . . . . . . . . . . . . . . . . . 6-15
Using Personal Directory . . . . . . . . . . . . . . . . . . . . . . . . . . . . . . . . . . . . . . . . 6-15
Personal Directory Window. . . . . . . . . . . . . . . . . . . . . . . . . . . . . . . . . . . . . . . 6-16
Finding an Entry . . . . . . . . . . . . . . . . . . . . . . . . . . . . . . . . . . . . . . . . . . . . . . . 6-17
Adding an Entry . . . . . . . . . . . . . . . . . . . . . . . . . . . . . . . . . . . . . . . . . . . . . . . 6-18
View or Edit an Entry . . . . . . . . . . . . . . . . . . . . . . . . . . . . . . . . . . . . . . . . . . . 6-20
Deleting an Entry . . . . . . . . . . . . . . . . . . . . . . . . . . . . . . . . . . . . . . . . . . . . . . 6-22
Dialing a Number . . . . . . . . . . . . . . . . . . . . . . . . . . . . . . . . . . . . . . . . . . . . . . 6-23
Inbound Calls . . . . . . . . . . . . . . . . . . . . . . . . . . . . . . . . . . . . . . . . . . . . . . . . . 6-24
Using Inbound Calls . . . . . . . . . . . . . . . . . . . . . . . . . . . . . . . . . . . . . . . . . . . . 6-24
Inbound Calls Window . . . . . . . . . . . . . . . . . . . . . . . . . . . . . . . . . . . . . . . . . . 6-25
Returning a Call . . . . . . . . . . . . . . . . . . . . . . . . . . . . . . . . . . . . . . . . . . . . . . . 6-25
Outbound Calls . . . . . . . . . . . . . . . . . . . . . . . . . . . . . . . . . . . . . . . . . . . . . . . . 6-26
Using Outbound Calls . . . . . . . . . . . . . . . . . . . . . . . . . . . . . . . . . . . . . . . . . . . 6-26
Outbound Calls Window . . . . . . . . . . . . . . . . . . . . . . . . . . . . . . . . . . . . . . . . . 6-27
Making a Call . . . . . . . . . . . . . . . . . . . . . . . . . . . . . . . . . . . . . . . . . . . . . . . . . 6-27
Location Status . . . . . . . . . . . . . . . . . . . . . . . . . . . . . . . . . . . . . . . . . . . . . . . . 6-28
Using Status . . . . . . . . . . . . . . . . . . . . . . . . . . . . . . . . . . . . . . . . . . . . . . . . . . 6-28
Location Status Window . . . . . . . . . . . . . . . . . . . . . . . . . . . . . . . . . . . . . . . . . 6-29
Setting Your Location Status . . . . . . . . . . . . . . . . . . . . . . . . . . . . . . . . . . . . . 6-29
Clearing Your Location Status . . . . . . . . . . . . . . . . . . . . . . . . . . . . . . . . . . . . 6-30
Custom Location Status . . . . . . . . . . . . . . . . . . . . . . . . . . . . . . . . . . . . . . . . . 6-31
INASET R2 User Guide - Revision 1
Page 8

Contents v
Message Reader. . . . . . . . . . . . . . . . . . . . . . . . . . . . . . . . . . . . . . . . . . . . . . . 6-32
Using Message Reader . . . . . . . . . . . . . . . . . . . . . . . . . . . . . . . . . . . . . . . . . 6-32
Message Reader Window. . . . . . . . . . . . . . . . . . . . . . . . . . . . . . . . . . . . . . . . 6-33
Viewing a Message. . . . . . . . . . . . . . . . . . . . . . . . . . . . . . . . . . . . . . . . . . . . . 6-34
Returning a Call . . . . . . . . . . . . . . . . . . . . . . . . . . . . . . . . . . . . . . . . . . . . . . . 6-34
Call Information . . . . . . . . . . . . . . . . . . . . . . . . . . . . . . . . . . . . . . . . . . . . . . . . 6-35
INASET R2 Menu . . . . . . . . . . . . . . . . . . . . . . . . . . . . . . . . . . . . . . . . . . . . . . 6-36
Accessing OpenWorX Using the Menu Key . . . . . . . . . . . . . . . . . . . . . . . . . . 6-36
INASET R2 User Guide - Revision 1
Page 9

vi Contents
INASET R2 User Guide - Revision 1
Page 10

Figures
Figure Title Page
vii
2-1 INASET R2 Phone Features and Functions . . . . . . . . . . . . . . . . . . . . . . 2-2
2-2 INASET R2 Login window . . . . . . . . . . . . . . . . . . . . . . . . . . . . . . . . . . . . 2-4
3-1 INASET R2 Main Menu window . . . . . . . . . . . . . . . . . . . . . . . . . . . . . . . 3-2
3-2 Setup Menu window . . . . . . . . . . . . . . . . . . . . . . . . . . . . . . . . . . . . . . . . 3-3
3-3 LCD Setting- Back Light Level window . . . . . . . . . . . . . . . . . . . . . . . . . . 3-4
3-4 LCD Setting- Font Size window . . . . . . . . . . . . . . . . . . . . . . . . . . . . . . . . 3-5
3-5 LCD Setting- Language window . . . . . . . . . . . . . . . . . . . . . . . . . . . . . . . 3-6
3-6 LCD Setting- Screen Saver window . . . . . . . . . . . . . . . . . . . . . . . . . . . . 3-7
3-7 User Setting window . . . . . . . . . . . . . . . . . . . . . . . . . . . . . . . . . . . . . . . . 3-8
4-1 Home Application window . . . . . . . . . . . . . . . . . . . . . . . . . . . . . . . . . . . . 4-1
4-2 Home Application Function Keys. . . . . . . . . . . . . . . . . . . . . . . . . . . . . . . 4-2
4-3 Function Keys Configure dialog box . . . . . . . . . . . . . . . . . . . . . . . . . . . . 4-3
4-4 Adding Programmable Button - Speed Dial dialog box . . . . . . . . . . . . . . 4-4
4-5 Adding Programmable Button - Line Key dialog box . . . . . . . . . . . . . . . . 4-4
4-6 Adding Programmable Button - Function dialog box . . . . . . . . . . . . . . . . 4-5
4-7 Edit Function Button - Speed Dial dialog box . . . . . . . . . . . . . . . . . . . . . 4-5
4-8 Edit Function Button - Line Key dialog box . . . . . . . . . . . . . . . . . . . . . . . 4-6
4-9 Edit Function Button - Function dialog box . . . . . . . . . . . . . . . . . . . . . . . 4-6
5-1 Local Application Mode Main Menu . . . . . . . . . . . . . . . . . . . . . . . . . . . . . 5-1
5-2 Initial Directory dialog box . . . . . . . . . . . . . . . . . . . . . . . . . . . . . . . . . . . . 5-5
5-3 Directory Update dialog box . . . . . . . . . . . . . . . . . . . . . . . . . . . . . . . . . . 5-6
5-4 Add Directory Entry dialog box . . . . . . . . . . . . . . . . . . . . . . . . . . . . . . . . 5-6
5-5 Edit Directory Entry dialog box . . . . . . . . . . . . . . . . . . . . . . . . . . . . . . . . 5-7
5-6 Download Directory dialog box . . . . . . . . . . . . . . . . . . . . . . . . . . . . . . . . 5-7
5-7 Initial Inbound dialog box . . . . . . . . . . . . . . . . . . . . . . . . . . . . . . . . . . . . . 5-8
5-8 Local Application Mode Browser screen . . . . . . . . . . . . . . . . . . . . . . . . . 5-9
5-9 Welcome to the InstallShield Wizard for INASET Helper dialog box . . . 5-11
5-10 InstallShield Wizard License Agreement dialog box . . . . . . . . . . . . . . . 5-12
5-11 InstallShield Wizard Choose Destination Location dialog box . . . . . . . . 5-13
5-12 InstallShield Wizard Select Program Folder dialog box. . . . . . . . . . . . . 5-14
5-13 InstallShield Wizard Start Copying Files dialog box . . . . . . . . . . . . . . . 5-15
5-14 InstallShield Wizard Complete dialog box . . . . . . . . . . . . . . . . . . . . . . . 5-16
5-15 INASET Helper - Select File to Upload dialog box . . . . . . . . . . . . . . . . 5-17
5-16 INASET Helper - Translate Numbers dialog box . . . . . . . . . . . . . . . . . . 5-18
5-17 INASET Helper - Upload Directory dialog box . . . . . . . . . . . . . . . . . . . . 5-19
INASET R2 User Guide - Revision 1
Page 11

viii Figures
5-18 INASET R2 Phone. . . . . . . . . . . . . . . . . . . . . . . . . . . . . . . . . . . . . . . . . 5-20
5-19 INASET R2 Menu - Local Mode window . . . . . . . . . . . . . . . . . . . . . . . . 5-21
6-1 OpenWorX Login window . . . . . . . . . . . . . . . . . . . . . . . . . . . . . . . . . . . . 6-2
6-2 OpenWorX Applications menu window . . . . . . . . . . . . . . . . . . . . . . . . . . 6-6
6-3 Corporate Directory window . . . . . . . . . . . . . . . . . . . . . . . . . . . . . . . . . . 6-7
6-4 Corporate Directory window (Detail) . . . . . . . . . . . . . . . . . . . . . . . . . . . . 6-8
6-5 Corporate Directory - Employee Search window . . . . . . . . . . . . . . . . . . . 6-9
6-6 Corporate Directory - View window . . . . . . . . . . . . . . . . . . . . . . . . . . . . 6-10
6-7 Corporate Directory - Msg window . . . . . . . . . . . . . . . . . . . . . . . . . . . . 6-11
6-8 Corporate DIrectory window . . . . . . . . . . . . . . . . . . . . . . . . . . . . . . . . . 6-13
6-9 Corporate Directory window (Detail) . . . . . . . . . . . . . . . . . . . . . . . . . . . 6-14
6-10 OpenWorX Applications menu window . . . . . . . . . . . . . . . . . . . . . . . . . 6-15
6-11 Personal Directory window . . . . . . . . . . . . . . . . . . . . . . . . . . . . . . . . . . 6-16
6-12 Personal Directory - Personal Directory Search window . . . . . . . . . . . . 6-17
6-13 Personal Directory - Add Personal Directory window . . . . . . . . . . . . . . 6-18
6-14 Personal Directory - View Personal Directory Entry window . . . . . . . . . 6-20
6-15 Personal Directory - Delete Personal Directory Entry window. . . . . . . . 6-22
6-16 Personal DIrectory window . . . . . . . . . . . . . . . . . . . . . . . . . . . . . . . . . . 6-23
6-17 OpenWorX Applications menu window . . . . . . . . . . . . . . . . . . . . . . . . . 6-24
6-18 Inbound Calls window . . . . . . . . . . . . . . . . . . . . . . . . . . . . . . . . . . . . . . 6-25
6-19 OpenWorX Applications menu window . . . . . . . . . . . . . . . . . . . . . . . . . 6-26
6-20 Outbound Calls window . . . . . . . . . . . . . . . . . . . . . . . . . . . . . . . . . . . . . 6-27
6-21 OpenWorX Applications menu window . . . . . . . . . . . . . . . . . . . . . . . . . 6-28
6-22 Location Status window . . . . . . . . . . . . . . . . . . . . . . . . . . . . . . . . . . . . . 6-29
6-23 Location Status - Clearing Your Location window . . . . . . . . . . . . . . . . . 6-30
6-24 Location Status - Custom Status window . . . . . . . . . . . . . . . . . . . . . . . 6-31
6-25 OpenWorX Applications menu window . . . . . . . . . . . . . . . . . . . . . . . . . 6-32
6-26 Message Reader window . . . . . . . . . . . . . . . . . . . . . . . . . . . . . . . . . . . 6-33
6-27 Message Reader - View window . . . . . . . . . . . . . . . . . . . . . . . . . . . . . . 6-34
6-28 Call Information Pop-up screen . . . . . . . . . . . . . . . . . . . . . . . . . . . . . . . 6-35
6-29 INASET R2 Phone. . . . . . . . . . . . . . . . . . . . . . . . . . . . . . . . . . . . . . . . . 6-36
6-30 INASET R2 Menu - Network Mode window . . . . . . . . . . . . . . . . . . . . . . 6-37
INASET R2 User Guide - Revision 1
Page 12

Tables
ix
Table Title Page
1-1 Document Conventions . . . . . . . . . . . . . . . . . . . . . . . . . . . . . . . . . . . . . 1-3
1-2 Keyboard Conventions . . . . . . . . . . . . . . . . . . . . . . . . . . . . . . . . . . . . . . 1-4
2-1 INASET R2 Features and Functions . . . . . . . . . . . . . . . . . . . . . . . . . . . 2-3
4-1 Home Application Window description . . . . . . . . . . . . . . . . . . . . . . . . . . 4-2
5-1 Local Application Mode WIndow description . . . . . . . . . . . . . . . . . . . . . . 5-2
5-2 Text Entry - Uppercase Mode . . . . . . . . . . . . . . . . . . . . . . . . . . . . . . . . . 5-3
5-3 Text Entry - Lowercase Mode . . . . . . . . . . . . . . . . . . . . . . . . . . . . . . . . . 5-3
5-4 Text Entry - Numeric Mode . . . . . . . . . . . . . . . . . . . . . . . . . . . . . . . . . . . 5-4
6-1 Text Entry - Uppercase Mode . . . . . . . . . . . . . . . . . . . . . . . . . . . . . . . . . 6-3
6-2 Text Entry - Lowercase Mode . . . . . . . . . . . . . . . . . . . . . . . . . . . . . . . . . 6-4
6-3 Text Entry - Numeric Mode . . . . . . . . . . . . . . . . . . . . . . . . . . . . . . . . . . . 6-4
6-4 Personal Directory - Add Personal Directory Entry Function Keys . . . . 6-18
6-5 Personal Directory - View Personal Directory Entry Function Keys . . . 6-20
6-6 Call Information Color Definitions . . . . . . . . . . . . . . . . . . . . . . . . . . . . . 6-35
INASET R2 User Guide - Revision 1
Page 13

x Tables
INASET R2 User Guide - Revision 1
Page 14

1
Introduction
This guide provides the information needed to operate the NEC INASET
R2 phone application. The topics in this chapter include:
Chapter Topics • What is INASET R2?
• How this Guide is Organized
• Using This Guide
1-1
What is INASET R2?
NEC INASET R2 desktop terminals deliver traditional business
functionality while providing new value not typically offered by a voice
communication device. The INASET R2 comes embedded with a JAVA
Virtual Machine for running JAVA applications. In addition to basic
telephony features, INASET R2 provides:
• A single IP device for multiple functions such as telephone, Internet,
• Peer-to-peer IP telephony connectivity
• Phone directory for storage of personal and corporate information
• Internet browsing capability
• Display of calling party’s name and number
• Built-in inbound call history
• Ability to customize function and speed dial keys, and more
INASET R2 Overview
INASET R2 provides the ability to run basic applications that are either
embedded in the INASET R2 terminal, or downloaded from the network.
The INASET R2 also includes a web browser with optional Telephony
Transformation Gateway. The two “application mode” capabilities are:
and customized business applications
• Network Application Mode
— Designed to implement multiple network-based applications
INASET R2 User Guide - Revision 1
developed by NEC or other third parties using the INASET R2’s
“application keys”. The NEC INASET Software Developer’s Kit
(SDK) describes how to configure the application keys to load
applications and launch URLs using a simple XML file.
Page 15

1-2 Introduction
— Supports the optional “OpenWorX Applications for INASET”,
providing users with enhanced calling features by using the
network-based OpenWorX shared directory. These applications
include:
• Corporate and Personal directories
• Inbound and Outbound Call Logging with call return
• Location Status
• Text Messaging
• Screen Pop
• Local Application Mode
— The INASET R2 application keys operate in a fixed configuration
using this mode.
— The application keys are used to access the local Personal Directory
and Inbound Call Log applications.
• The Personal Directory includes import capability
• Inbound Call Log provides a Call Return feature
— A Browser button is also provided for network browsing and access
to custom developed applications.
INASET R2 Browser
The INASET R2 integrated browser is designed to support the
implementation of integrated network applications using a wide range of
web-based languages such as: JAVA/JSP, HTML, XML, ASP, CFM, and
PHP.
Telephony Transformation Gateway
The optional Telephony Transformation Gateway (TTG) from Net6
transforms Web pages to fit the specifications of the INASET R2
terminal. The TTG also provides Network-based applications for INASET
R2 users.
How This Guide is Organized
Chapter 1
Introduction
Chapter 2
Features
Chapter 3
INASET R2 Setup
This chapter provides a brief overview of the INASET R2 phone, along
with how this guide is organized.
This chapter describes the INASET R2 phone features and functions.
This chapter explains how to configure the user setup options for the
INASET R2 allowing it to be personalized for your use.
Home Application Setup
Chapter 4
Chapter 5
Local Application Mode
This chapter describes the Home Application function available on the
INASET R2 phone. Enabling you to use many of the functions supported
by a conventional multi-line NEC Dterm telephone.
This chapter describes how the Local Application mode allows the user
to add, edit, download, or delete contacts to the Directory; dial or obtain
details on incoming callers; and access a browser.
INASET R2 User Guide - Revision 1
Page 16

Introduction 1-3
Chapter 6
Network Application Mode
Using This Guide
TIP
Table 1-1 Document Conventions
This chapter explains the OpenWorX applications available on INASET
R2.
This guide is designed to make the NEC INASET R2 phone and
OpenWorX applications easy to understand and simple to use. There are
examples of the screens you will see in the INASET R2, with step-bystep instructions for the procedures you need to perform.
The screens and procedures shown in this guide represent the typical installation of
the INASET R2. Remember that the INASET R2 can be customized for each site, so
the screens shown in this guide may not always reflect what displays on your
network.
Document Conventions
This guide uses the document conventions shown in Ta b l e 1 - 1 .
When you see It means Example
Boldfaced Field names
Button names
Drop-down list names
Commands, keywords, or other
user input
Capitalized Menu names
Window names
Dialog box names
Menu > Submenu
Menu paths Select Edit > Modify.
(boldfaced font)
Enter the ID in the Name field.
Click Save.
Select the names from the
Employees drop-down list.
Enter login admin at the command
prompt.
From the File menu, choose Save.
From the Directory window, select
Edit > Modify.
Click OK to save and close the
Account Properties dialog box.
Procedures
Step-by-step instructions are numbered. Simply follow the numbered
steps to perform the desired procedure.
Sometimes in step-by-step instructions, you will have more than one
option to complete the task. These options are presented as shown in
the following example:
Example:
INASET R2 User Guide - Revision 1
Page 17

1-4 Introduction
Step
Do one of the following to add a new employee to the Employee directory.
—Select the desired employee from the Name field and click Add.
—Double-click the desired employee from the Name field.
—To select all of the available names, click Add all.
Keyboard Conventions
The keys that may be used for some functions are listed in Tab le 1- 2.
Table 1-2 Keyboard Conventions
Key Action
Arrow keys Scrolls among options within a menu or field.
Backspace Erases the character to the left of the cursor.
Enter Accepts a selection or field entry.
ESC
Tab Moves forward through fields and options.
Shift+Tab Moves backward through fields and options.
Exits the current screen or action and moves to the previous screen
or action.
CTRL+Tab Moves forward through tabs.
CTRL+Shift+Tab Moves backward through tabs.
INASET R2 User Guide - Revision 1
Page 18

2
Features
Chapter Topics • Features
2-1
This chapter illustrates the INASET R2 phone and describes its features
and functions.
• Phone Login
• Account/Authorization Codes
• Answering a Call
• Making a Call
• Putting a Call on HOLD
• Last Number Redial
• Transferring a Call
• Callback
• Call Waiting
• Making a Conference Call
• Consult Third Party during a Call
• Call Camp-On
• Call Park
• Call Forwarding
• Save & Redial a Number
• Set/Answer a Message
• Call Pick-Up
• Outgoing Trunk Queuing
• Paging
• Boss/Secretary Transfer
• Boss/Secretary Message Waiting
• Boss/Secretary Override
• Executive Override
• Do Not Disturb/Privacy
• Intercom
INASET R2 User Guide - Revision 1
Page 19
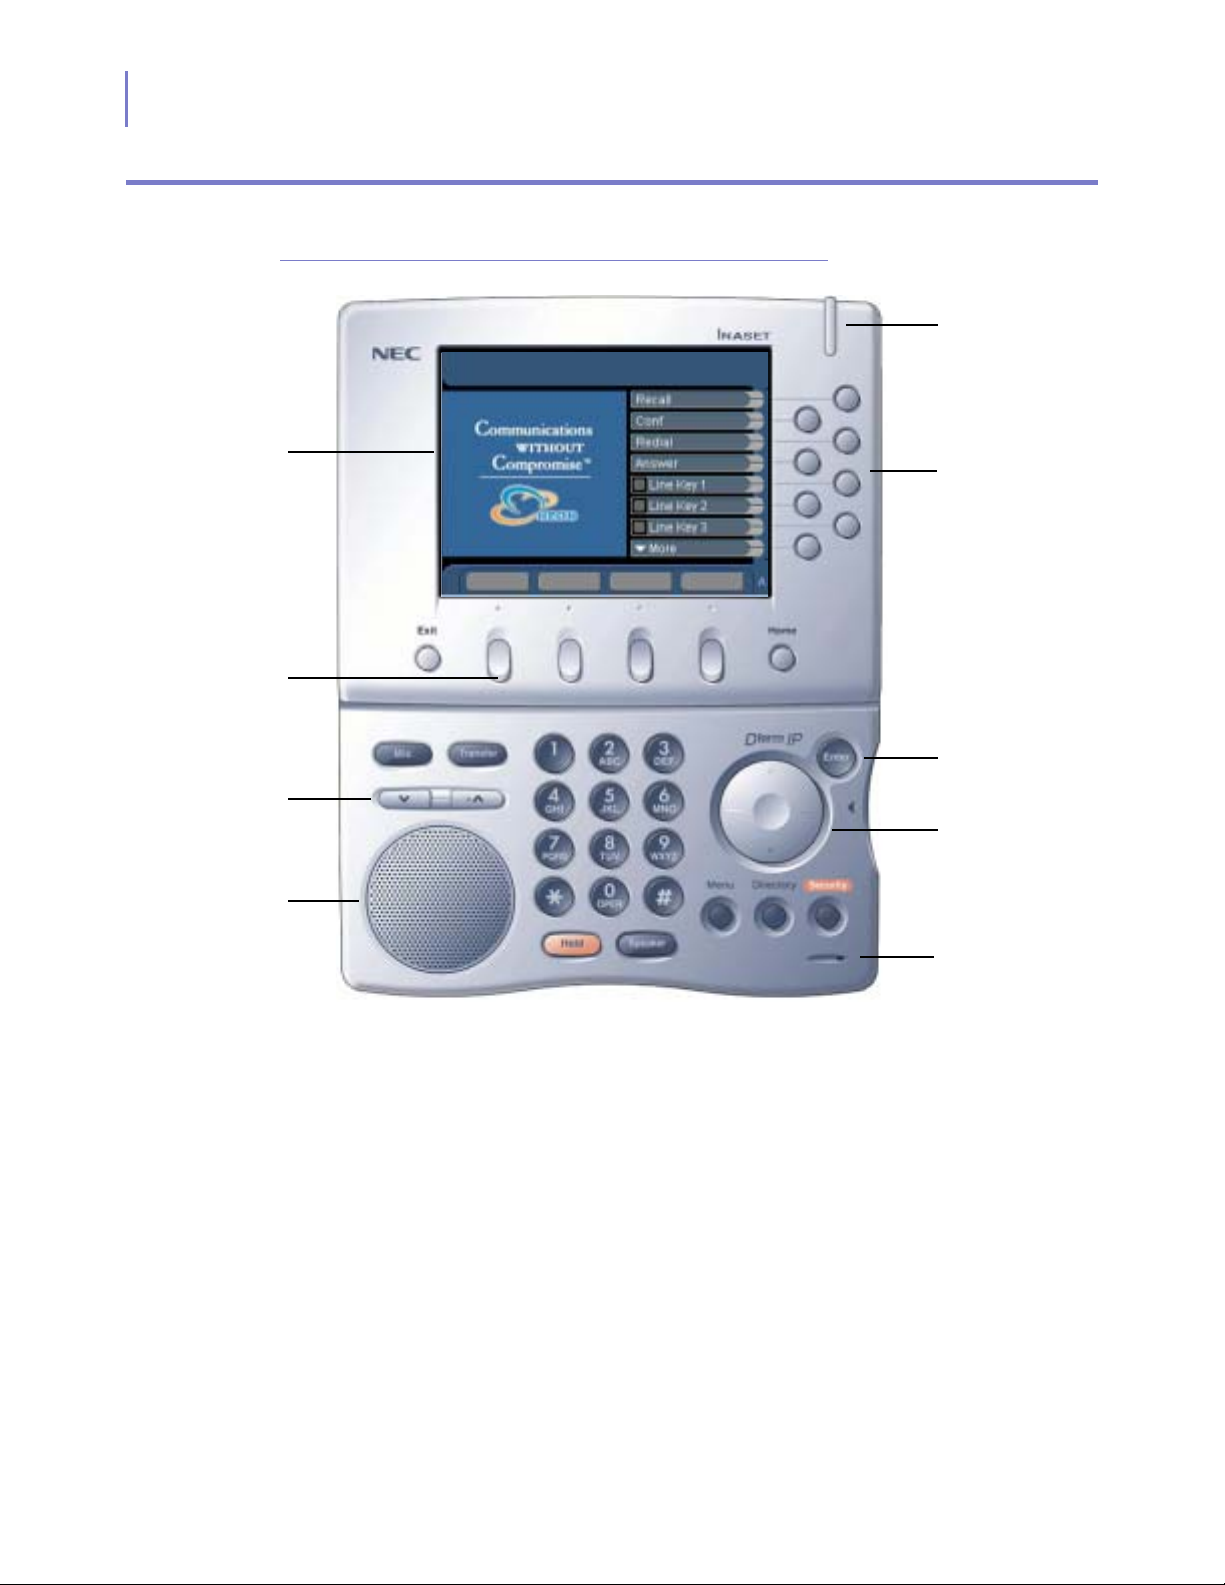
2-2 Features
Features
Display Screen
Function keys
Level function keys
Figure 2-1
INASET R2 Phone Features and Functions
Ring Indicator
Function keys
Corporate Personal Inbound Outbound
Enter key
Cursor key
Speaker
Microphone
INASET R2 User Guide - Revision 1
Page 20

Feature Descriptions
Ta b l e 2 -1 provides a description of all the INASET R2 features and
functions.
Table 2-1 INASET R2 Features and Functions
Feature Description
Use to select the corresponding line, function key, or application
Function keys
Cursor & Enter keys
Directory key Launches the Directory application.
action indicated in the label displayed on the screen next to the
key.
Use the four-way Cursor key to select options on the display
screen and then press the Enter key to complete the selection
action.
Features 2-3
Display Screen
Exit key
Hold key Places the current call on hold.
Home key Displays the Home screen.
Menu key
Mic key
Microphone Use in Hands-free Speakerphone mode.
Function keys
Numeric keypad Used when placing a call or for data input to an application.
Call Indicator
Security key
Speaker Use in Speakerphone mode.
Speaker key Turns the built-in Speaker ON or OFF.
Displays the various INASET R2 call functions and application
screens.
Scrolls the application menu displayed on the function keys to the
right if more than four options are available.
Displays the phone main menu so that the INASET R2 can be
configured via the built-in Set Up utility.
Turns the built-in microphone ON or OFF (used in hands-free
speakerphone mode).
Used to select the associated application function displayed at
the bottom of the window.
Flashes when receiving an incoming call, lights steadily when a
message has been left.
Locks the INASET R2 and displays the INASET R2 screen saver.
(With INASET R2 locked, press this key to display the password
window.)
Transfer key Use to transfer a call.
Level Function keys
INASET R2 User Guide - Revision 1
Use these keys for:
• with phone ringing, increase/decrease ringer volume
• when using handset, increase/decrease handset volume
• during Speakerphone call, increase/decrease speaker volume
• with no call, increase/decrease LCD screen contrast
Page 21
2-4 Features
Phone Login
NOTE
INASET R2 has a login feature that allows the phone to be locked by
login number and password to avoid unauthorized use. This login can be
configured as automatic or manual by your phone system administrator.
If your INASET R2 has been configured for manual login, then you must
manually login before it can be used. (See your phone system
administrator for your login and password numbers.)
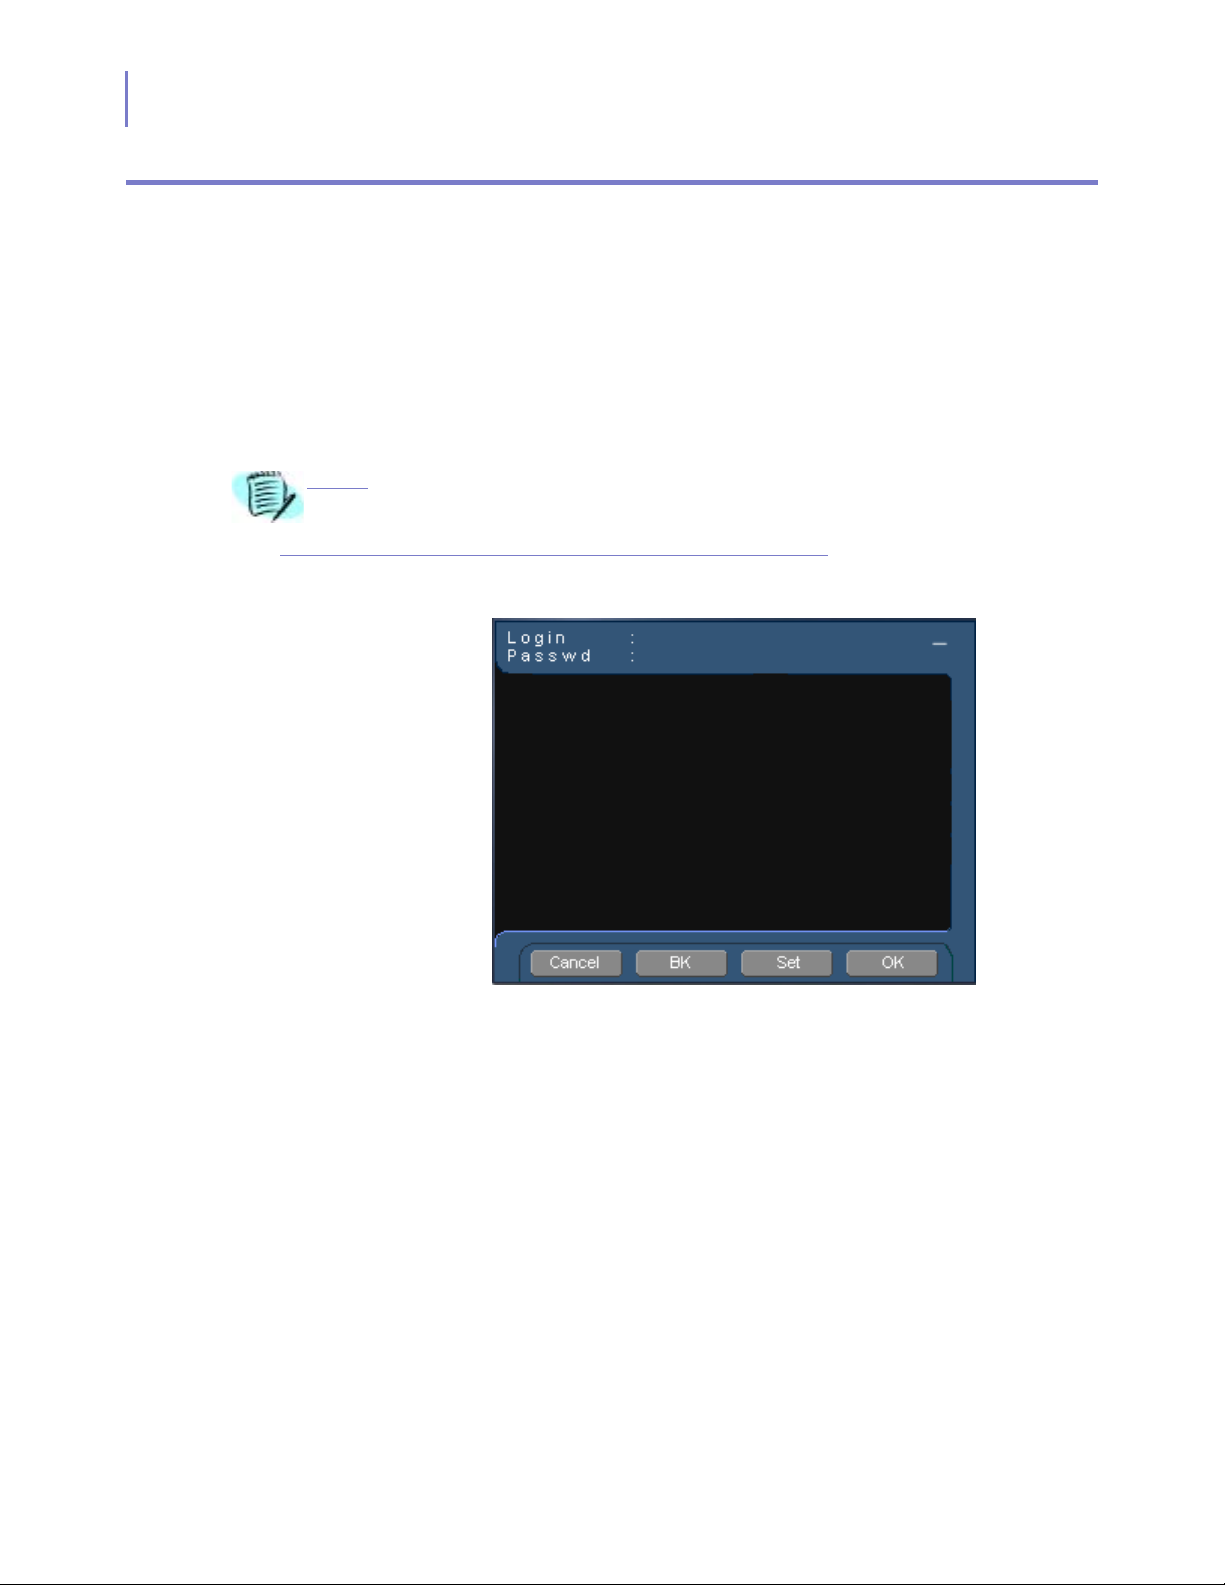
When manual login is required, the INASET R2 Login window displays
when INASET R2 is first started (
In automatic login mode, the INASET R2 Login window will not display. The phone
system will automatically login your INASET R2 phone for you. No additional login is
required by you.
Figure 2-2).
Figure 2-2
INASET R2 Login window
Manual Login Follow these steps to login to your INASET R2 phone:
Step 1
Enter your login number using the Dialing keys (0-9, *, #). When your
number is entered, press the function key for Set on the display. (If you
make an incorrect entry, press the function key for Cancel to clear your
entry and then re-enter your number.)
Step 2
Step 3
Now enter your password number using the Dialing keys (0-9, *, #).
When your number is entered, press the function key for OK on the
display. (If you make an incorrect entry, press the function key for Cancel
to clear your entry and then re-enter your number.)
If login was successful, the time and date will display at the top of the
Home application window. The INASET R2 phone is now ready to use.
INASET R2 User Guide - Revision 1
Page 22

Account/Authorization Codes
Access Code ____________________________
Account Code ____________________________
Access Code ____________________________
Authorization Code____________________________
Account Code ____________________________
Access Code ____________________________
Forced Account Code __________________________
Some PBX systems may require an Account code and/or
Authorization code while using INASET R2. Contact your
phone system administrator for the specific access and
account code numbers needed for your phone. Review the
following sections for entering Account and Authorization
codes.
Account Code
To Enter an Account Code:
Features 2-5
• Lift handset or press the Speaker key, hear dial tone.
• Enter feature access code using the dial keys, hear
service set tone.
• Enter Account Code (up to 10 digits) using the dial
keys.
• Hear dial tone, dial desired number.
To Enter Account Code after an Authorization Code:
• Lift handset or press the Speaker key, hear dial tone.
• Enter feature access code for Authorization Code
using the dial keys, hear service set tone.
• Enter Authorization Code using the dial keys, hear
second service set tone.
• Enter Account Code (up to 10 digits) using the dial
keys.
• Hear dial tone, dial desired number.
Forced Account Code
• Lift handset or press the Speaker key, hear dial tone.
• Enter feature access code using the dial keys, hear
service set tone.
• Enter Forced Account Code (up to 10 digits) using the
dial keys.
• Hear dial tone, dial desired number.
INASET R2 User Guide - Revision 1
Page 23

2-6 Features
Access Code ____________________________
Authorization Code____________________________
Authorization Code____________________________
Internal call
External call
Authorization Code
To Enter an Authorization Code without an Account code
(Procedure 1):
• Lift handset or press the Speaker key, hear dial tone.
• Enter feature access code using the dial keys, hear
service set tone.
• Enter Authorization Code (up to 10 digits) using the
dial keys.
• Hear dial tone, dial desired number.
To Enter an Authorization Code without an Account code
(Procedure 2):
• Lift handset or press the Speaker key, hear dial tone.
• Dial desired number.
• If an Authorization Code is required, hear special dial
tone.
• Enter Authorization Code, or call will be denied.
NOTE
NOTE
Answering a Call
Procedure 2 is available only if your PBX phone system is programmed with Least
Cost Routing.
The top of the INASET R2 Home Application window shows call information as the
call progresses or when a call function is used. An example display of this
information is shown at left (when applicable) for all call functions described in the
following.
Using the Handset
• Phone rings, ring indicator flashes. (Display shows
calling party.)
• Lift handset to answer, and begin conversation.
Hands Free
(Speakerphone mode)
• Phone rings, ring indicator flashes.
•Press the Speaker key to answer, then press the Mic
key (Mic key light ON) and begin conversation.
INASET R2 User Guide - Revision 1
Page 24

Making a Call
Outside Access Code ________________________
l
Features 2-7
Internal Call
• Lift handset, hear dial tone.
• Dial desired extension number. (Display shows dialed
number.)
• Listen for called party to answer and begin
conversation.
External Call
• Lift handset, hear dial tone.
• Dial the outside-line access code, (e.g. 9).
• Dial desired number. (Display shows dialed number.)
• Listen for called party to answer and begin
conversation.
Putting a Call on HOLD
Hands Free
•Press the Speaker key, hear dial tone.
• Dial desired number.
• Listen for called party to answer, press the Mic key
(Mic key light ON) and begin conversation.
Temporarily place the current active call on hold.
• Indicate to the party on the line that you will be
placing them on hold.
•Press the Hold key. (Display shows caller on Hold.)
(Speakerphone mode)
To Retrieve a Call on Hold
• Lift handset or press the Speaker key.
• Press the line key (or press More as needed) for the
line on hold.
If Unanswered
INASET R2 User Guide - Revision 1
After a pre-programmed time with a call on hold,
Automatic Recall is initiated (if enabled). A visual and
audible signal (line key flash and ring burst) is sent to the
station that placed the call on hold.
Page 25

2-8 Features
l
Last Number Redial
Transferring a Call
Redial the last number dialed.
• Press the function key for Redial. (Display shows the
number to redial.)
• Repeat the above step until the desired number is
displayed (for up to 5 previously dialed numbers).
•Press the * key. The number on the display is
automatically dialed.
• After conversing, ask the party to hold.
•Press the Transfer key, hear interrupted dial tone.
• Dial destination station extension, and hang up or wait
for destination to answer.
Callback
Contact your phone system administrator to determine if your INASET R2 has this
function configured and how to specifically access it.
NOTE
Set an automatic Callback when a called station is busy.
• Press the function key for Callback. Hear service set
tone.
• Hang up handset.
• When both parties become idle, your INASET R2 will
ring. When the INASET R2 is answered, the called
station will then ring.
INASET R2 User Guide - Revision 1
Page 26

Call Waiting
NOTE
Features 2-9
Contact your phone system administrator to determine if your INASET R2 has this
function configured.
Activate Call Waiting
• Dial desired station number, hear busy tone.
• Press the function key for Call Waiting. Hear special
ringback tone.
• Call Waiting tone is sent to busy station.
Answer Call Waiting
• Call waiting tone is heard. (Answer icon displays on
the INASET R2 screen.)
• Press the function key for Answer. Waiting call is
automatically connected, original party is placed on
hold.
• Repeat pressing the function key for Answer, to
switch between the original party and the called party.
(Display indicates the connected station or trunk at
any given time.)
Making a Conference Call
Disconnect Call Waiting
• Press the function key for Recall. You are
automatically connected to your original caller and
disconnected from your called party.
Using Programmed Function Key
• With a call in progress, ask party to hold.
•Press the Transfer key, hear interrupted dial tone.
• Dial desired number.
• After the call is answered, press the function key for
Conf. (The Conference icon will display on the INASET
R2 screen.)
• A three-way conference is established, begin
conversation.
INASET R2 User Guide - Revision 1
Page 27

2-10 Features
Using Function Key
• With a call in progress, ask party to hold.
•Press the Transfer key, hear interrupted dial tone.
• Dial desired number.
• After the call is answered, press the function key for
Consult Third Party during a Call
When engaged in a call and you wish to consult a third
party.
•Press the Transfer key. Original caller is
• Dial the desired third party to consult.
•Press the Transfer to return to the original caller.
• Alternately press the Transfer key to switch between
Conference. A three-way conference is established,
begin conversation. (The Conference icon displays on
the INASET R2 screen.)
automatically placed on hold.
Third party is automatically placed on hold.
your original caller and the third party.
Call Camp-On
NOTE
Contact your phone system administrator to determine if your INASET R2 has this
function configured.
Call Camp-On is typically initiated by your phone system
operator/attendant when you receive a new call, and you
are busy with another caller.
Answer a Camped-On Call
• While engaged in a call, receive the camp-on
indication (one short tone burst).
• Press the function key for Answer. The original active
call is placed on hold. Connection to camped-on call is
established. (The Answer icon displays on the INASET
R2 screen.)
•Press the Answer key to return to original call. The
Camped-on call is placed on hold.
INASET R2 User Guide - Revision 1
Page 28

Call Park
Call Park Access Code ________________________
Call Park Local Retrieval Code___________________
Call Park Remote Retrieval Code_________________
l
Features 2-11
• Repeat pressing the function key for Answer, to
alternate between your original caller and the new
call. (Display indicates the connected station or trunk
at any given time.)
Call Park allows you to place a call “on hold” on your phone
and retrieve the call from your phone (local) or another
phone (remote).
Park a Call
• While engaged in a call, press the Transfer key.
• Dial Call Park access code, call is now parked. (Display
shows Call Park Set.)
Call Forwarding
NOTE
Retrieve a Parked Call (Local)
• Dial Call Park Local retrieval code.
• Station is now connected to the parked call.
Retrieve a Parked Call (Remote)
• Dial Call Park Remote retrieval code.
• Dial the station number that parked the call.
• Station is now connected to the parked call.
Contact your phone system administrator to determine if your INASET R2 has this
function configured.
Forward All Calls
All incoming calls to your INASET R2 will be forwarded.
• Lift handset and press the function key for Fwd-All.
• Dial the number that your calls will be forwarded to.
(Display shows call Forward mode is set.)
INASET R2 User Guide - Revision 1
Page 29

2-12 Features
l
Forward - While Busy
Incoming calls to your INASET R2 will be forwarded only
when your line is busy.
• Lift handset and press the function key for Fwd-Busy.
• Dial the number that your calls will be forwarded to.
(Display shows call Forward mode is set.)
Forward - When No Answer
Incoming calls to your INASET R2 will be forwarded only
when there is no answer on your line.
• Lift handset and press the function key for Fwd-
NoAnswer.
• Dial the number that your calls will be forwarded to.
(Display shows call Forward mode is set.)
Cancel Call Forwarding
When the INASET R2 is in Call Forward mode, the FDA
function key displays.
While in Call Forward mode, press the function key for FDA at any time to display
the number the INASET R2 is forwarded to.
TIP
Save & Redial a Number
Contact your phone system administrator to determine if your INASET R2 has this
function configured.
NOTE
• Lift handset and press the function key for FDA.
(Display shows that Call forward is canceled.)
You can save a dialed number for later use. This is helpful
when a recently dialed number must be redialed.
Save a Dialed Number
• Lift handset or press the Speaker key.
• Dial desired number.
• press the function key for S&R. Dialed number is now
stored.
Verify a Saved Number
• With your INASET R2 idle, press the function key for
S&R. (Display shows stored number.)
INASET R2 User Guide - Revision 1
Page 30

If the saved number is busy or did not answer when dialed, press the function key for
Calling Station Display- Message
Called Station Display- Message
S&R to save the number again before hanging up.
NOTE
Set/Answer a Message
Contact your phone system administrator to determine if your INASET R2 has this
function configured.
NOTE
Features 2-13
Redial a Saved Number
• Lift handset or press the Speaker key.
• Press the function key for S&R. Number is dialed
automatically.
This allows you to set a message indicator on a called
party’s INASET R2 when their line was busy or did not
answer. Up to four messages can be stored on the INASET
R2.
Set a Message
• Lift handset or press the Speaker key.
• Dial desired number. Hear busy tone or no answer.
• Press the function key for Msg. (Calling station’s
display shows message set and the called station’s
number.)
Answer a Message
(Calling Station)
(Called Station)
Display all Called Messages:
• Your INASET R2 display shows you received a
message, the calling number and time.
• Press the function key for Msg. (Called station’s
display shows message indicator, the calling station’s
number and time.) Press Msg as needed to display all
stored messages.
Respond to a Message:
• While displaying the desired message (see above), lift
handset. Station that left message is automatically
dialed.
• Message is erased.
INASET R2 User Guide - Revision 1
Page 31

2-14 Features
Queuing Access Code ________________________
Call Pick-Up
NOTE
Erase a Message without Responding:
• Press the function key for Msg (as needed) to display
the specific message to erase.
•Press the # key, message is erased.
Contact your phone system administrator to determine if your INASET R2 has this
function configured.
Call Pick-Up allows you to answer another ringing phone, in
your call pick-up group, from your INASET R2 phone.
• When a phone rings (in your call pick-up group), lift
handset and press the function key for Call Pickup.
Begin Conversation.
Outgoing Trunk Queuing
If Currently on a Call
•Press the Transfer key, then press the function key
for Call Pickup. Your original call is placed on hold,
begin conversation with the call pickup caller.
•Press Transfer again to return to your original caller.
You can queue your outgoing call when all PBX system
trunks are busy.
• Dial an outgoing trunk call and hear a trunks busy
indication, press the function key for Callback.
Replace handset. Your call is placed in queue for next
available trunk.
• When a trunk is available, your INASET R2 will ring.
Lift handset, dial tone is heard or number is
automatically dialed (if NEAX2400 IPX is programmed
for Least Cost Routing).
Off-Hook Trunk Queuing
•Press the Speaker key, hear dial tone.
• Dial Off-hook Queuing access code
• Dial desired number, receive trunk busy indication.
• Hear service set tone, leave speaker set to on. The
desired number is automatically dialed when a trunk
becomes available.
INASET R2 User Guide - Revision 1
Page 32

Paging
Paging Access Code ________________________
Paging Answer Code ________________________
Paging Answer Code ________________________
Features 2-15
Contact your phone system administrator to determine if your INASET R2 has this
function configured.
NOTE
Meet-Me Page
This allows your to receive a page and then connect with a
call using an answer code.
Example:
To Page
• Dial Paging Access code, hear continuous ringback for
• Page Station B.
• Remain off hook or hang up handset.
To Answer
• Dial Paging Answer code, and you are immediately
To Answer
• Dial Paging Answer code, and Station A INASET R2
• Station A lifts handset and you are connected.
Station A can page Station B. When Station B
dials an answer code, they are connected.
(Station A)
one second.
(Station B, if Station A remains off hook)
connected with your call.
(Station B, if Station A has hung up)
rings.
Paging Transfer
Paging Transfer is used when you receive an important call
for another party, however they are not at their desk.
INASET R2 User Guide - Revision 1
Example:
Station A receives a call for Station B who is
away from their desk. Station A pages Station B.
When Station B dials the paging answer code,
Station A can announce the call and transfer it to
Station B (to whatever phone Station B may be
using).
Page 33

2-16 Features
Paging Access Code ________________________
Paging Answer Code ________________________
Paging Answer Code ________________________
Paging
To Answer
To Answer
(Station A)
• Ask calling party to hold, press the Transfer key and
hear interrupted dial tone.
• Dial Paging Access code, hear continuous ringback for
one second.
• Page Station B.
• Remain off-hook or hang up handset.
(Station B, if Station A remains off hook)
• Dial Paging Answer code, and you are connected with
the Station A. Station A announces call.
• Station A hangs up handset, and Station B is
connected with the caller.
(Station B, if Station A has hung up)
• Dial Paging Answer code. Station A INASET R2 rings.
• Station A answers and announces call.
• Station A hangs up handset, and Station B is
connected with the caller.
Boss/Secretary Transfer
A phone line can be assigned to more than one INASET R2,
as may be used in a Boss/Secretary arrangement where
the Secretary answers the Boss’ phone line. (Procedures
shown for Secretary and Boss both with INASET R2
phones.)
Secretary
• Lift handset, press specific line key for the Boss’
ringing line. Ask party to hold.
• Press the function key associated with the line for
Boss. Call is automatically established.
• Announce call to Boss.
Boss Accepts Call
• Secretary hangs up Boss’ line after call is announced.
• Boss lifts handset, presses his flashing Line key and
begins conversation.
Boss Refuses Call
• Secretary presses function key associated with the
Boss’ line again to return to calling party. Announce to
calling party.
INASET R2 User Guide - Revision 1
Page 34

Boss/Secretary Message Waiting
A Secretary can set the Message Waiting indicator lamp on
a Boss’ INASET R2 when a call is received for the boss.
(Procedures shown for Secretary and Boss both with
INASET R2 phones.)
To Set Message Waiting on Boss’ INASET R2
With caller on line:
• Secretary lifts handset or presses Speaker key.
• Press the function key associated with line key for the
• Press the function key associated with line key for
• Boss sees Message Waiting lamp and can call
Without caller on the line:
• Secretary takes message from caller, presses the
• Press the function key for Recall, hear dial tone.
• Press the funtion key for MW-SET. Hear service set
• Message waiting lamp is set on Boss’ INASET R2.
Features 2-17
Boss’ ringing line. Ask calling party to hold.
MW-SET. (No service tone is heard.)
Secretary to receive call.
Home key for Function Keys.
tone.
NOTE
The secretary can hang up after taking a message, and set the message waiting
lamp at anytime by going off hook on the Boss’ line and pressing the function key for
MW-SET.
To Cancel Message Waiting at Boss’ INASET R2
With Caller on the line:
• While engaged in conversation on Boss’ line,
Secretary presses function key for MW-SET. (No
service tone is heard.)
• Message waiting is canceled.
Without caller on the line:
• Secretary lifts handset or presses the Speaker key,
hears dial tone.
• Press the Boss’ line key.
• Press the function key for MW-SET, hear service set
tone. Message waiting is canceled.
INASET R2 User Guide - Revision 1
Page 35

2-18 Features
Override Access Code ________________________
Boss/Secretary Override
Contact your phone system administrator to determine if your INASET R2 has this
function configured and how to specifically access it.
NOTE
The Override function allows a call between two parties to
be interrupted by a third party. This can be the case when a
boss is on their line with a caller, and the secretary receives
another call for the boss of importance to interrupt the
boss.
Setup Override Key
• Secretary presses key for Feature.
• Press the function key for Override.
• Dials the Boss/Secretary Override access code.
•Press the Home key on the INASET R2 panel, then
press the function key for Recall.
• Dials the Boss’ station number, and presses the
function key for Feature.
Secretary
• Receives call for Boss and asks caller to hold.
•Press the Hold key, hear dial tone.
• Press the function key for Boss/Sec Override. Hear
ringback tone.
Boss
(Accepts Interrupt)
• Hear 3 tone bursts, presss the function key Answer
and converses with Secretary. Original call is placed
on hold.
• Secretary hangs up and Boss is connected to new
caller.
• Boss can alternate between this new caller and the
original caller by pressing Answer.
Boss
(Refuses Interrupt)
• If Boss does not respond to tone bursts, Secretary
presses function key for Recall.
• Secretary is reconnected to new caller.
Boss
(Refuses New Call)
• Press the function key for Answer and converses with
Secretary. Original call is placed on hold.
• Boss converses with Secretary and refuses to take
new call.
• Boss presses the Transfer key to return to original
call.
INASET R2 User Guide - Revision 1
Page 36

Executive Override
l
l
Contact your phone system administrator to determine if your INASET R2 has this
function configured.
NOTE
Do Not Disturb/Privacy
Contact your phone system administrator to determine if your INASET R2 has this
function configured.
NOTE
Features 2-19
Override is used to interrupt a called number, when it is
busy.
• Press the function key for Override. The interrupted
parties hear a warning tone to indicate their call is
being interrupted.
• A three-way conference is established.
This function allows you to restrict all incoming calls to your
INASET R2.
Phone Idle
• Press the function key for DND. (Display shows the
DND mode is set.) The DND mode remains set until it
is canceled (see below).
When Engaged in a Call
• Press the function key for DND. (Display shows the
Privacy mode is set.) (This restricts incoming calls
only during this current call.)
Cancel DND Mode
• When in DND mode, press the function key for DND.
(Display shows the DND mode is canceled.)
INASET R2 User Guide - Revision 1
Page 37

2-20 Features
Intercom
Contact your phone system administrator to determine if your INASET R2 has this
function configured.
NOTE
INASET R2 and the PBX system can provide a station to
station intercom function. Three intercom modes are
possible, depending on the phone system configuration.
Automatic Intercom
To initiate an Automatic intercom call:
• Lift handset or press the Speaker key.
• Press the function key for AICM. Hear ringback tone.
To answer an Automatic intercom call:
• Press the function key for AICM.
• Lift handset, start conversation.
Manual Intercom
To initiate a Manual intercom call:
• Press the function key for MICM.
• Lift handset, hear ringback tone.
• Press the function key for SIG (for called station to
receive ringing).
To answer a Manual intercom call:
• Press the function key for MICM.
• Lift handset, start conversation.
INASET R2 User Guide - Revision 1
Page 38

Features 2-21
Dial Intercom
To initiate a Dial intercom call:
• Lift handset or press the Speaker key.
• Press the function key for DICM.
• Dial desired intercom number. Hear ringback tone.
To answer a Dial intercom call:
• Press the function key for DICM.
• Lift handset or press the Speaker key, start
conversation.
INASET R2 User Guide - Revision 1
Page 39

2-22 Features
INASET R2 User Guide - Revision 1
Page 40

3
INASET R2 Setup
This chapter describes how to configure the user setup options for
INASET R2. These options allow INASET R2 to be personalized for your
use. The topics in this chapter include:
Chapter Topics • Setting Your INASET R2 Options
• Feature Options
3-1
Setting Your INASET R2 Options
All User Options for the INASET R2 phone are accessed from the Setup
application. Press the Menu key on the INASET R2 lower panel to
display the main menu window (
key for SETUP to start the Setup application.
Figure 3-1). Then press the function
INASET R2 User Guide - Revision 1
Page 41
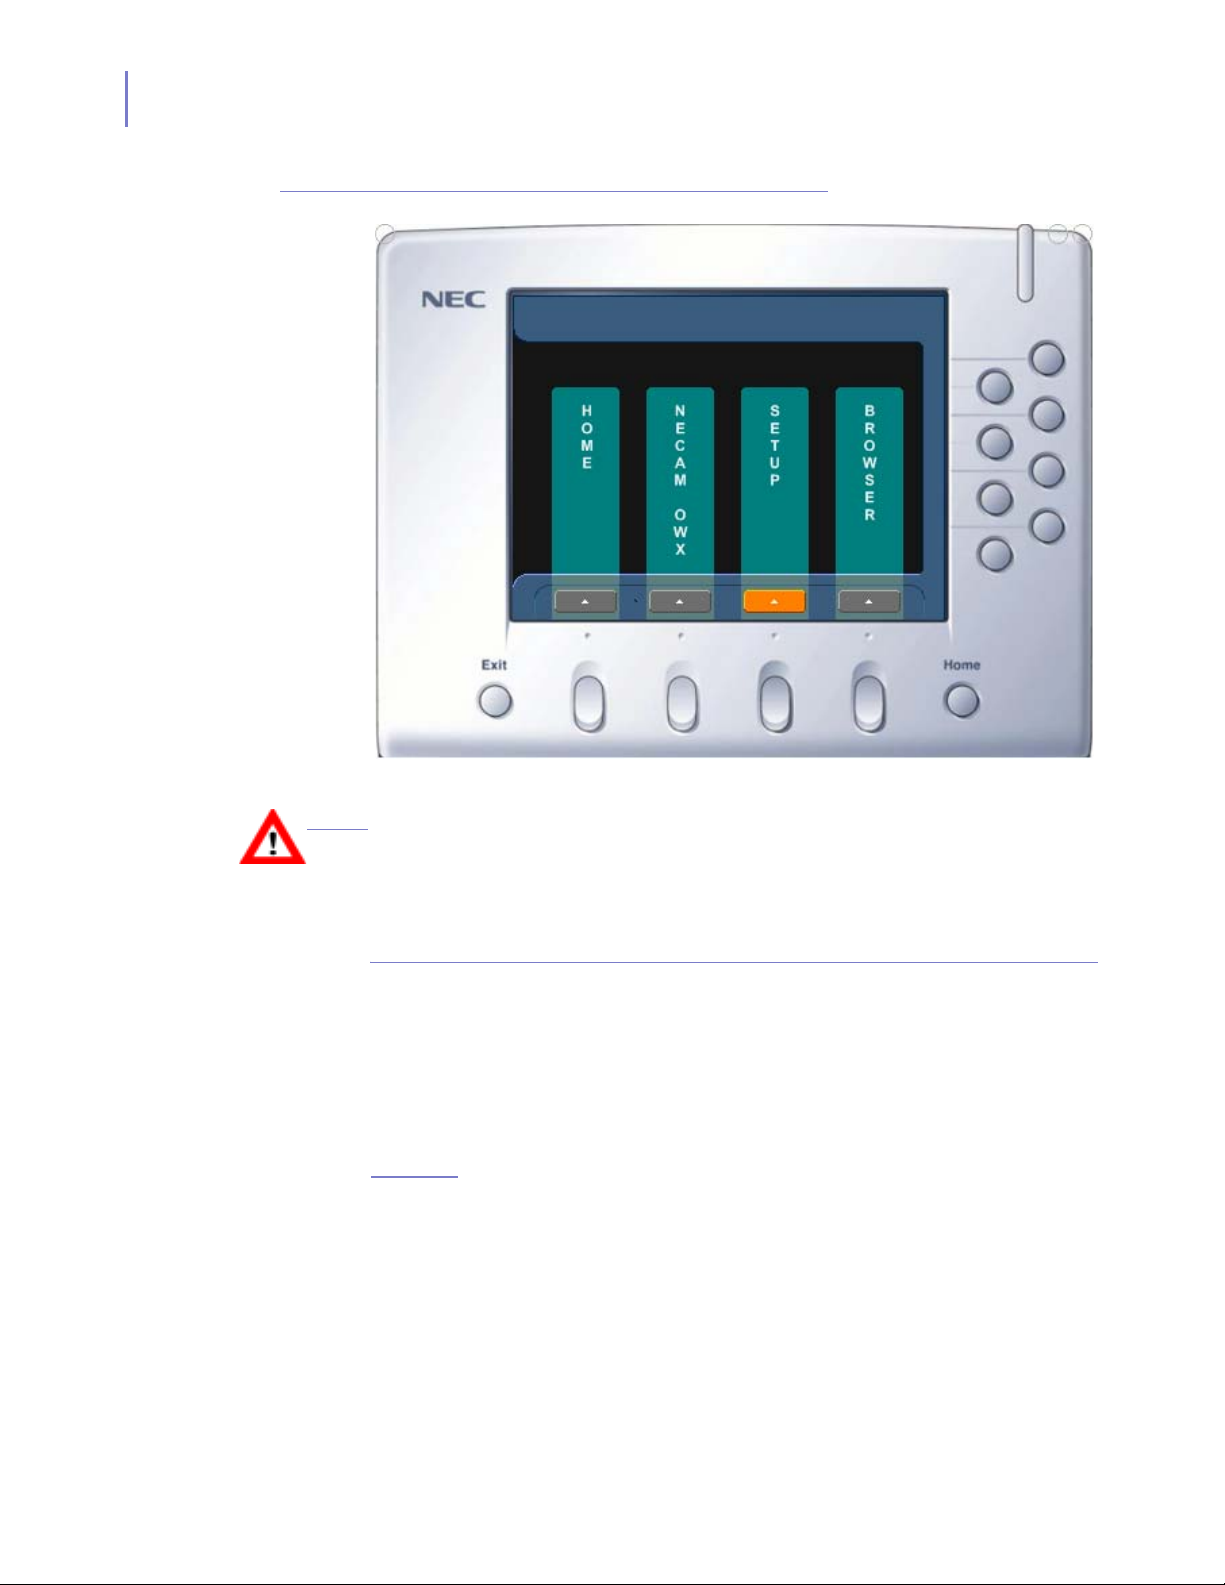
3-2 INASET R2 Setup
Figure 3-1
INASET R2 Main Menu window
2:45 PM THU 28 FEB 2003
CAUTION
Only make changes to the INASET R2 options described in this manual. Changing
other options and settings not described in this manual could cause INASET R2 to
not operate. Should you encounter any problems changing options, contact your
phone system administrator.
Entering Text Using the Dial Keys
The dial keys (0-9, *) are used to enter both text and numbers in the
various INASET R2 display windows. This is required when configuring
the INASET R2 from the Setup menu.
Each dial key can be pressed one or more times to enter the characters
marked on the key. The following example shows the key sequence used
to enter text.
Example:
Step 1
Step 2
Step 3
Step 4
Step 5
To enter the text Smith:
Press 7 four times, then press the cursor right.
Press 6 once, then press cursor right.
Press 4 three times, then press cursor right.
Press 8 once, then press cursor right.
Press 4 two times, then press cursor right.
INASET R2 User Guide - Revision 1
Page 42
INASET R2 Setup 3-3
On a window where text can be entered, a Function Key at the bottom of
the window (Char) can be pressed to alternately set the keys to enter
either numbers of text. The indicator located in the upper right of a
window shows when the entry mode is set to Text (indicator <abc>) or
Number (indicator <123>).
Pressing the * dial key (one or more times as needed) will enter the
characters . @ _ / : ~ (space).
Pressing the 0 dial key (one or more times as needed) will enter the
characters ! ? ‘ - & ( ) “ $ % + , ; <=> [ \ ] ^ ‘ {|} * #.
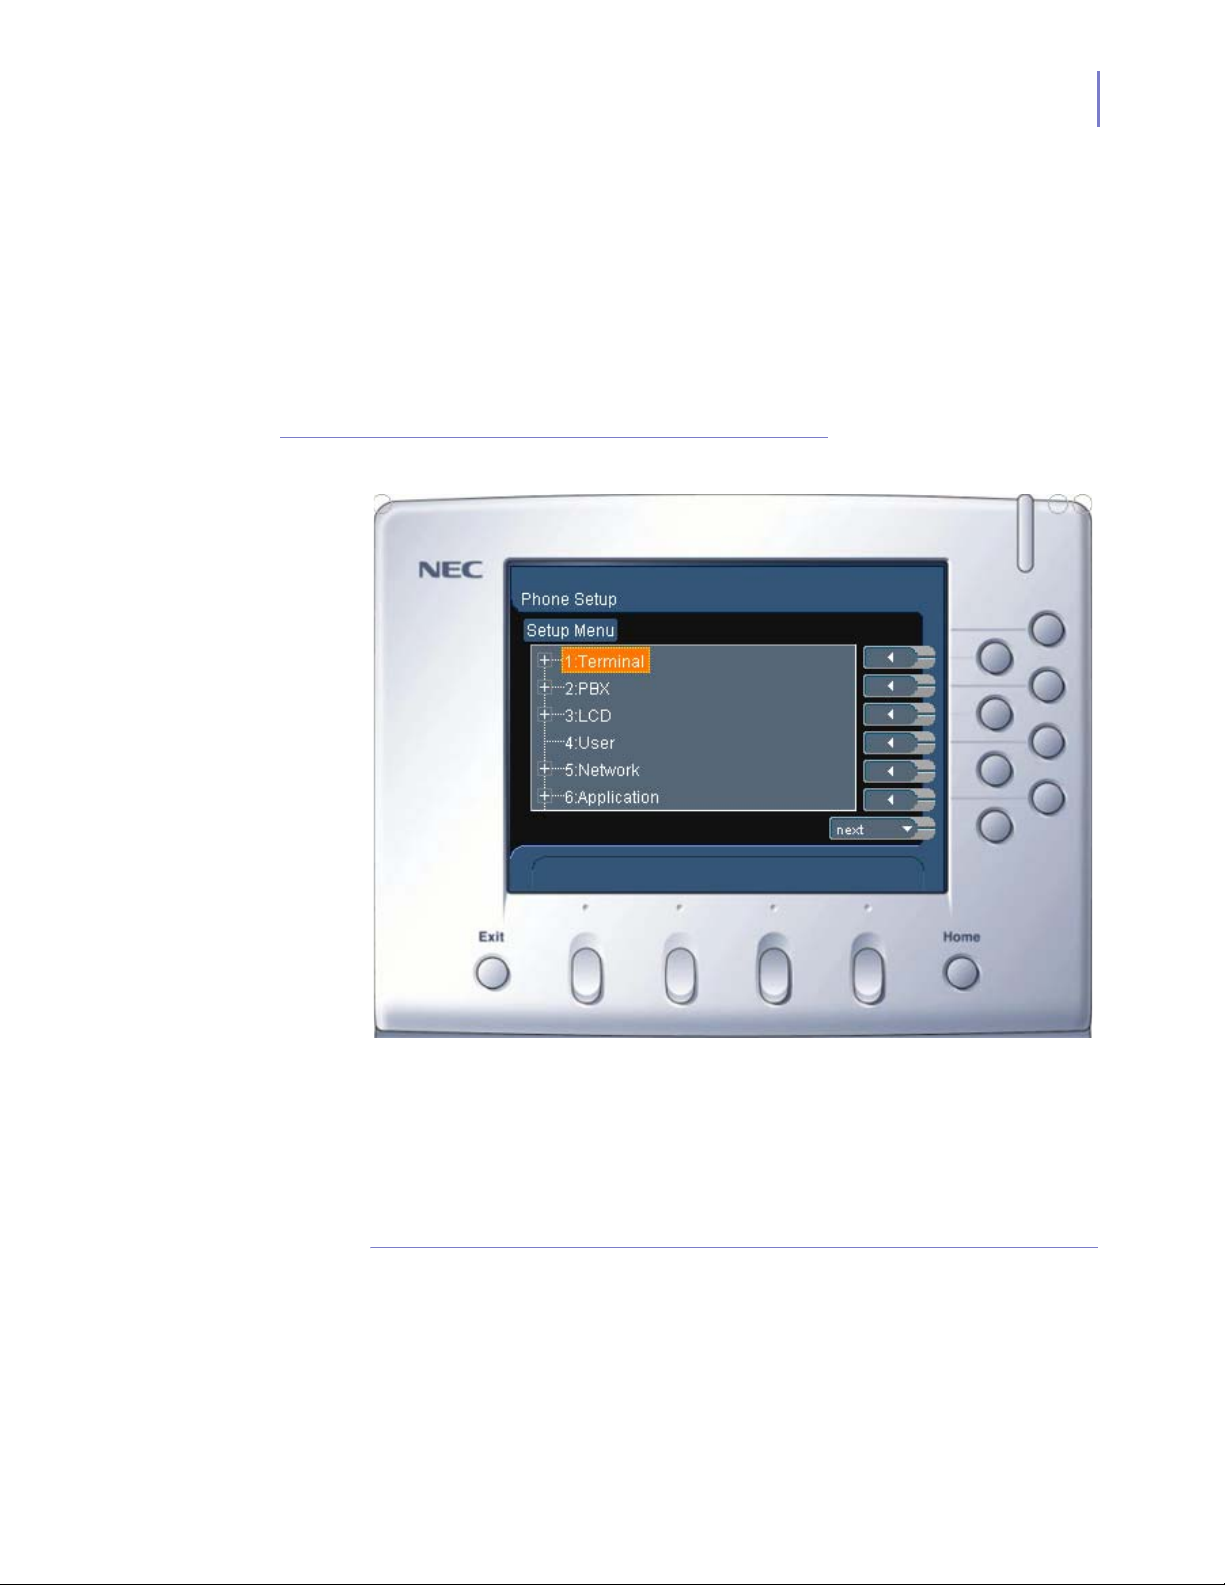
Figure 3-2
Setup Menu window
Various features of the display screen can be changed to make the
display easier to view and use. The back light level and font size can be
adjusted and another language (if available) can be selected. A screen
saver function can also be set for the INASET R2 display.
Terminal Settings
Changes to the Terminal feature should be made by the system
administrator or a qualified NEC technician.
INASET R2 User Guide - Revision 1
Page 43
3-4 INASET R2 Setup
PBX Settings
Changes to the PBX feature should be made by the system
administrator or a qualified NEC technician.
LCD Settings
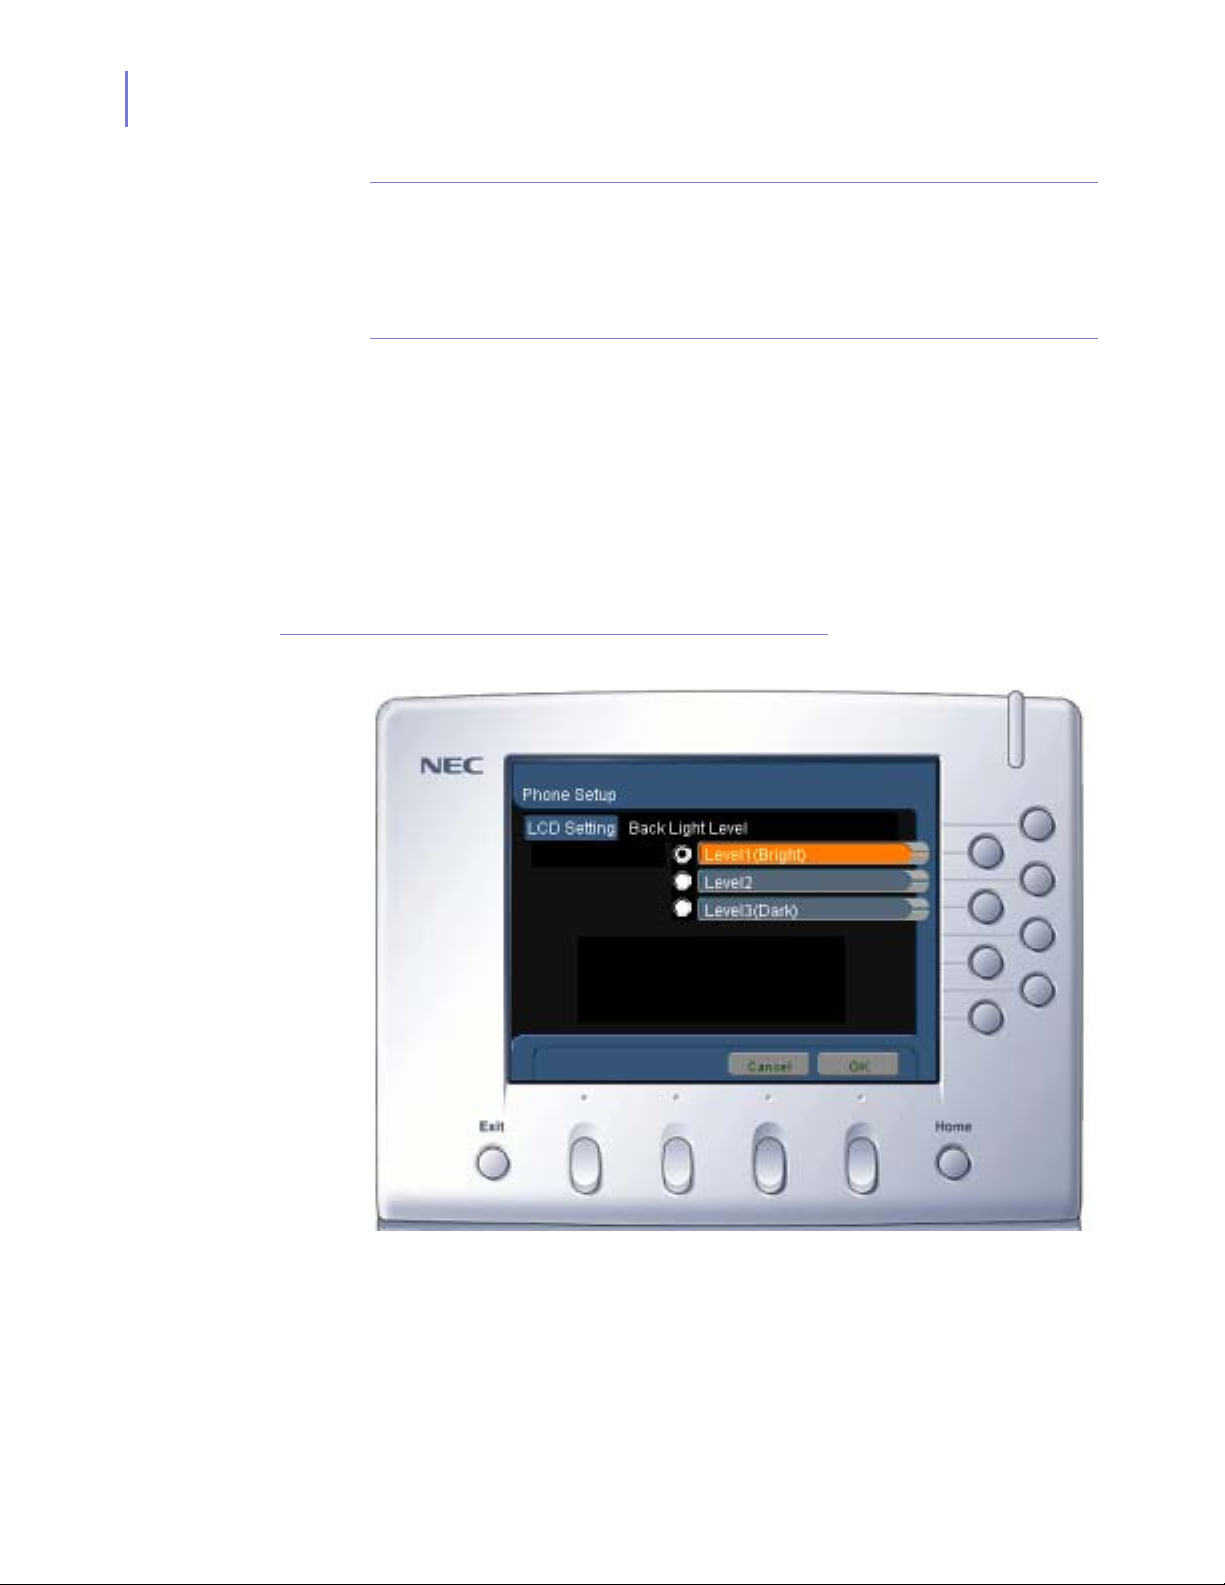
Back Light Level
Follow the steps to adjust the display back light level.
Figure 3-3
Step 1
Start the Setup application as described at the beginning of this chapter.
At the Setup menu, use the cursor key to select
Enter
key.
Step 2
Again use the cursor key to select
key. The LCD Setting Back Light Level window displays (
LCD Setting- Back Light Level window
LCD
Back Light Level
and press the
and press the
Figure 3-3).
Enter
Step 3
Step 4
Step 5
Press the function key for the desired level of display back light. Press
the function key for
When all changes have been made, press the function key for
OK
when complete.
Save
to
save your settings.
Press the function key for
OK
to confirm that you really want to save your
settings. Your display settings have now been changed.
INASET R2 User Guide - Revision 1
Page 44
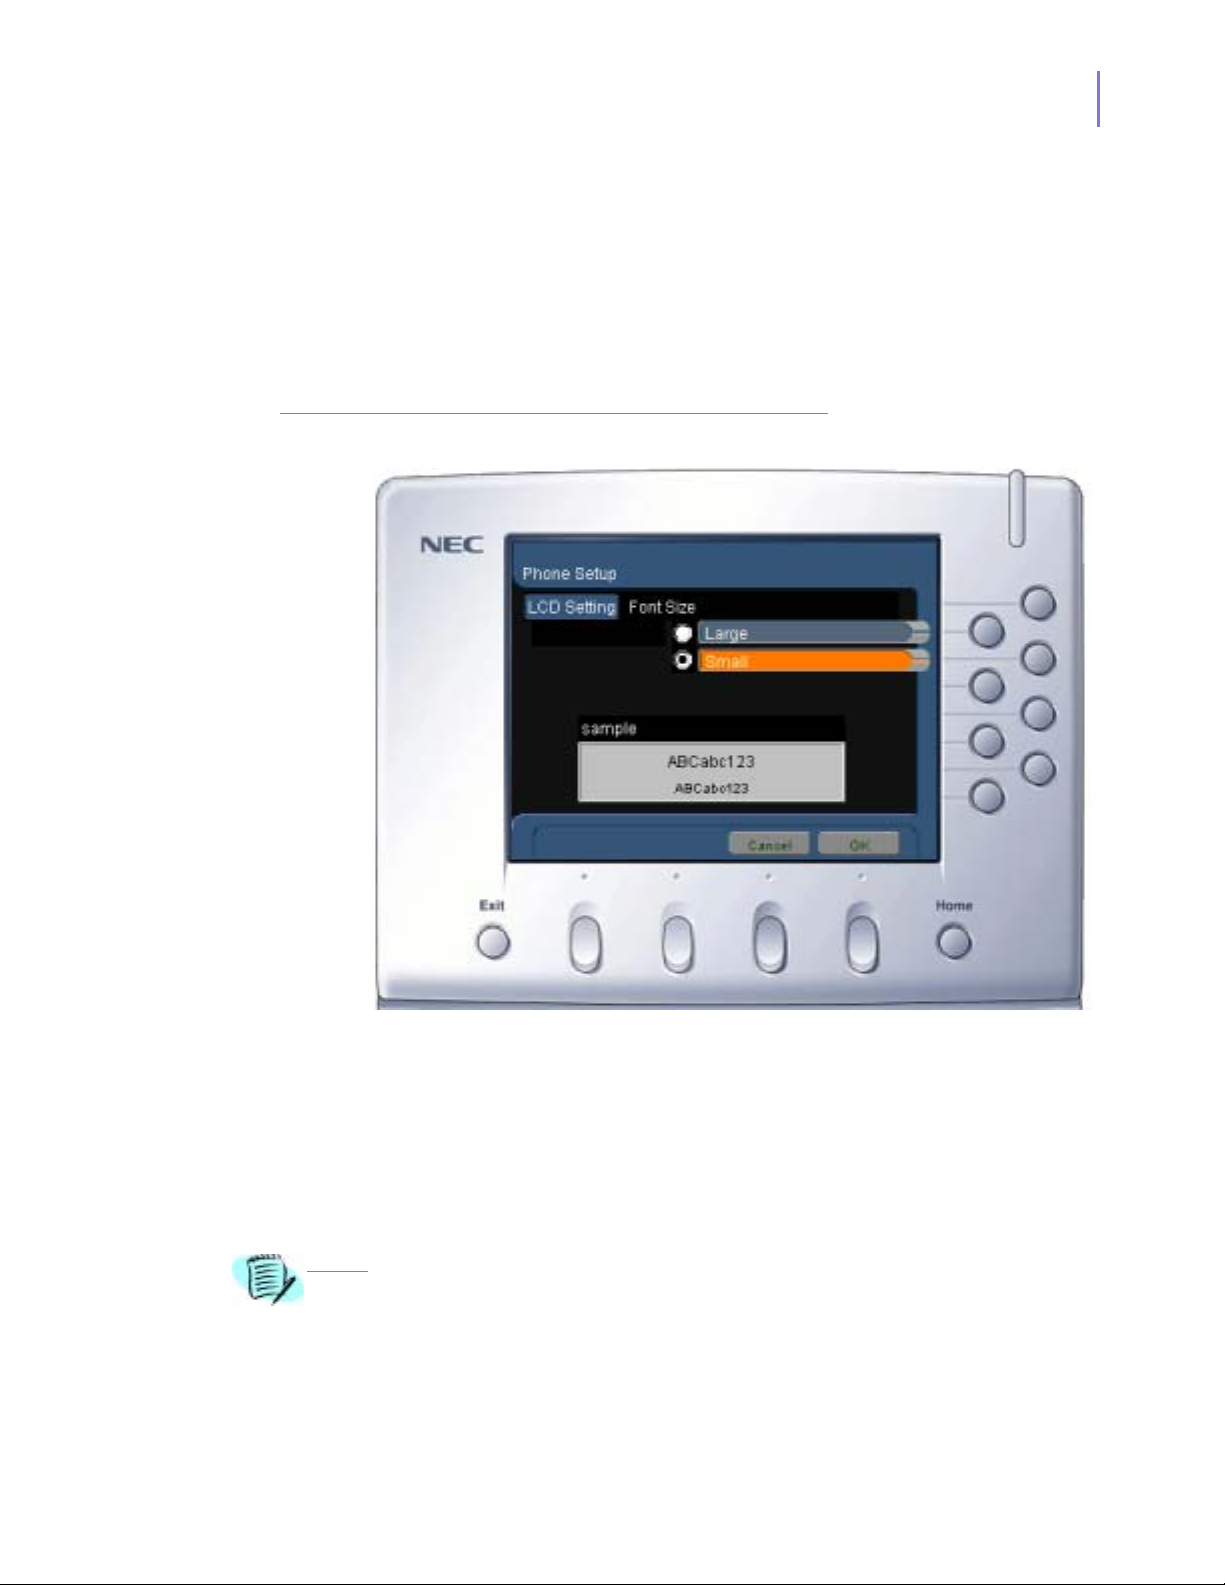
Font Size
Follow the steps to adjust the display font size.
INASET R2 Setup 3-5
Figure 3-4
Step 1
Start the Setup application as described at the beginning of this chapter.
At the Setup menu, use the cursor key to select
Enter
key.
Step 2
Again use the cursor key to select
The LCD Setting Font Size window displays (
LCD Setting- Font Size window
Font Size
LCD
and press the
and press the
Figure 3-4).
Enter
key.
Step 3
Step 4
Step 5
This will cause a reboot of the INASET R2.
NOTE
INASET R2 User Guide - Revision 1
Press the function key for the desired size of the display font. Press the
function key for
When all changes have been made, press the function key for
OK
when complete.
Save
to
save your settings.
Press the function key for
OK
to confirm that you really want to save your
settings. Your display settings have now been changed. (These changes
will not take affect until your INASET R2 phone has been reset.)
Page 45
3-6 INASET R2 Setup
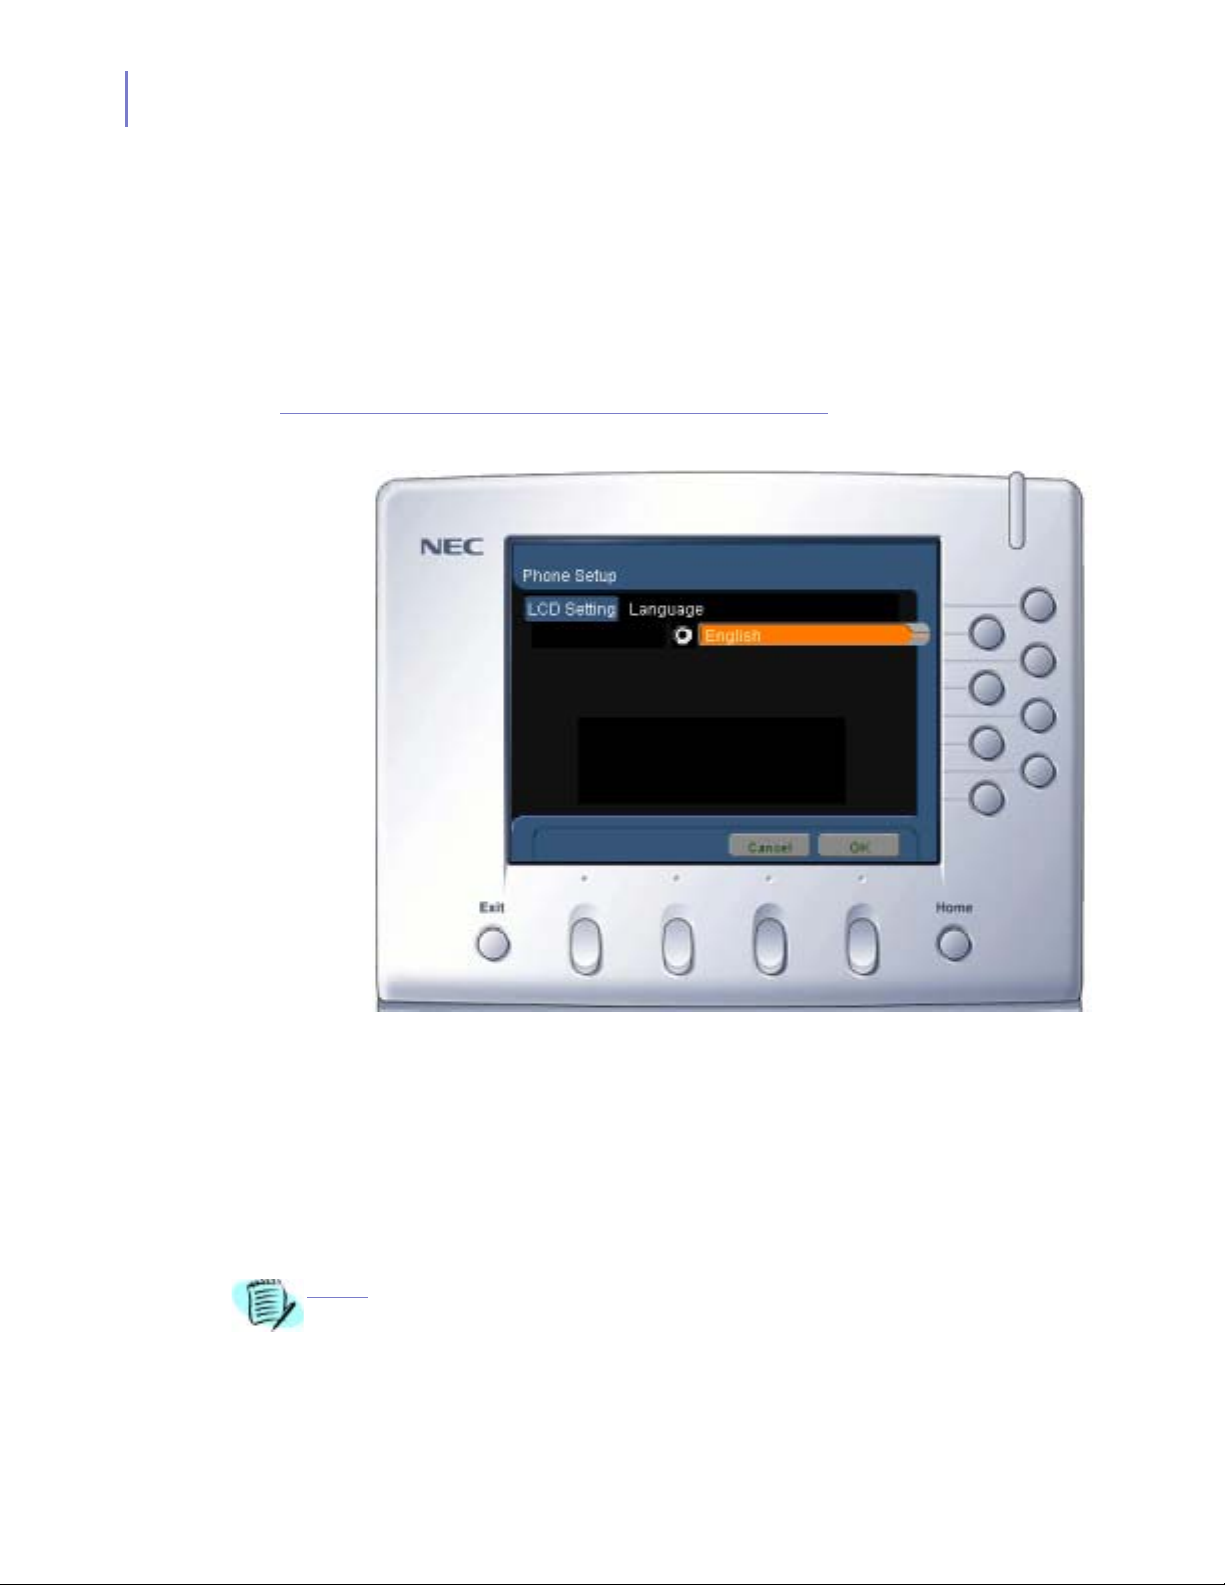
Language
Follow the steps to change the language used on the display.
Figure 3-5
Step 1
Start the Setup application as described at the beginning of this chapter.
At the Setup menu, use the cursor key to select
Enter
key.
Step 2
Again use the cursor key to select
The LCD Setting Language window displays (
LCD Setting- Language window
Language
LCD
and press the
and press the
Figure 3-5).
Enter
key.
NOTE
Step 3
Press the function key for the desired language on the INASET R2
display. (Only the available languages for INASET R2 will be displayed.)
Press the function key for
Step 4
When all changes have been made, press the function key for
save your settings.
Step 5
Press the function key for
settings. Your display settings have now been changed. (These changes
will not take affect until your INASET R2 phone has been reset.)
A soft reboot is required.
OK
when finished.
Save
OK
to confirm that you really want to save your
INASET R2 User Guide - Revision 1
to
Page 46
INASET R2 Setup 3-7
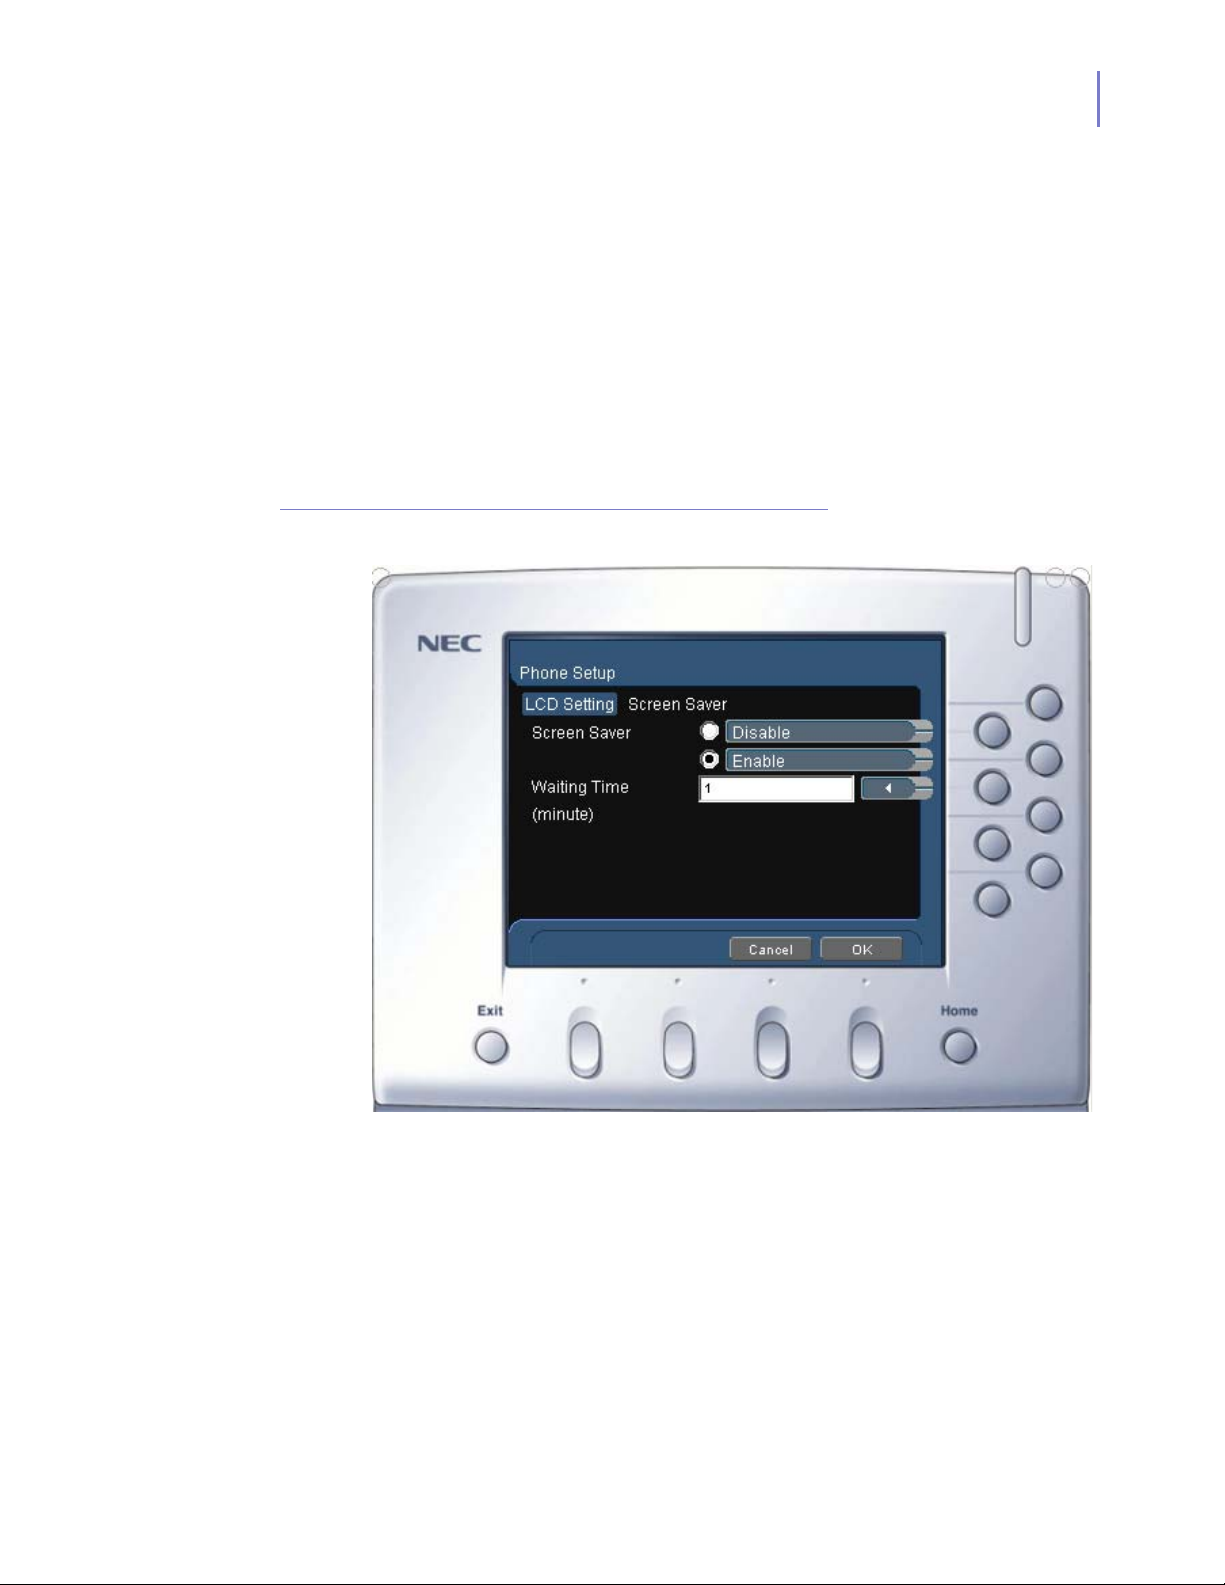
Screen Saver
The Screen Saver function will blank the INASET R2 display after a
preset time period of no activity. When the Screen Saver begins, any
activity on INASET R2 will clear the saver for normal INASET R2
operation. Follow the steps to setup the screen saver function for the
display.
Figure 3-6
Step 1
Start the Setup application as described at the beginning of this chapter.
At the Setup menu, use the cursor key to select
Enter
key.
Step 2
Again use the cursor key to select
key. The LCD Setting Screen Saver window displays (
LCD Setting- Screen Saver window
Screen Saver
LCD
and press the
and press the
Figure 3-6).
Enter
Step 3
Step 4
INASET R2 User Guide - Revision 1
Press the function key for
—If disabling this function, press the function key for
Enable
to enable the Screen Saver function.
Disable
and skip to
Step 5 below.
Press the function key for
Waiting Time
, and enter the time period (in
minutes) before the Screen Saver begins. This would be the period of no
activity on INASET R2 before the Screen Saver would begin.
Page 47
3-8 INASET R2 Setup
NOTE
Step 5
Press the function key for OK, then press the function key for
Save
to
save your settings.
Step 6
Press the function key for
OK
to confirm that you really want to save your
settings. Your display settings have now been changed. (These changes
will not take affect until your INASET R2 phone has been reset.)
A soft reboot is required.
User Settings
Security Password
A security password can be set on your INASET R2 phone to avoid
unauthorized use of your phone. The security password operates with
the Security key on the lower panel of your INASET R2 phone.
Setting (or Changing) Your Password
Follow the steps to set or change your password.
Step 1
Start the Setup application as described at the beginning of this chapter.
At the Setup menu, use the cursor key to select
Enter
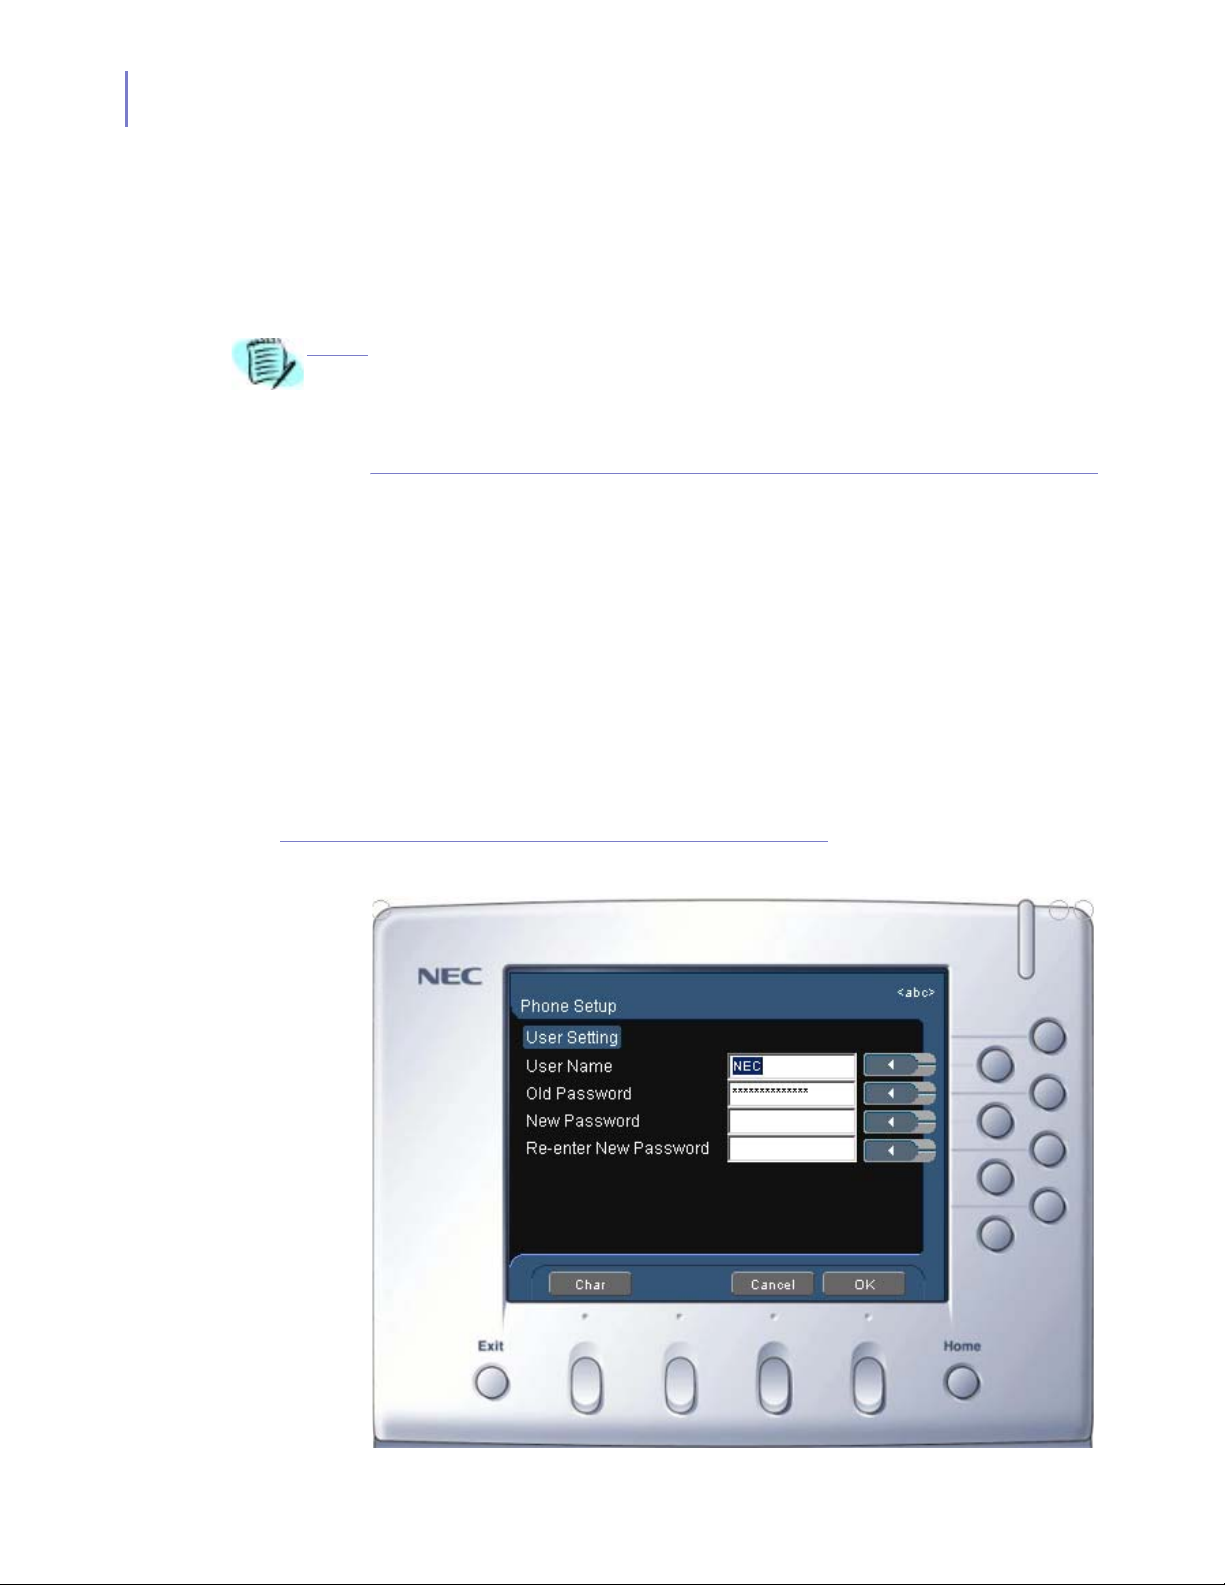
key. The User Setting window displays (Figure 3-7).
User
and press the
Figure 3-7
User Setting window
INASET R2 User Guide - Revision 1
Page 48

INASET R2 Setup 3-9
Step 2
Press the function key for
Old Password
, and enter your current (old)
password you are now using (currently set at
12250424112401200428090111090100).
Step 3
Press the function key for
New Password
, and enter your new
password.
Step 4
Press the
Function
key for
Re-enter New Password
, and enter your
new password again to verify. Press the function key for
OK
when
finished.
Step 5
Press the function key for
settings. Press the
Home
OK
to confirm that you really want to save your
key to return to the Home application.
Network Settings
Changes to the Network feature should be made by the system
administrator or a qualified NEC technician.
Application Settings
Changes to the Application feature should be made by the system
administrator or a qualified NEC technician.
Feature Options
Soft Reset
Causes the INASET R2 to reboot. If not configured to automatically log
in to the network, you will be required to re-enter your login ID and
password for the terminal.
The Feature key provides various options that can be set for your
INASET R2 phone. To program a function key for Feature, refer to
Chapter 4 - Home Application Setup, Configuring Function Keys for
instructions on configuring your function keys displayed in the Home
Application.
INASET R2 User Guide - Revision 1
Page 49

3-10 INASET R2 Setup
Microphone On / Off
To turn the INASET R2 built-in microphone On/Off:
Step 1
On the Home Application window, either press the
Mic
button on the
INASET R2 phone or press the function key for Feature, and press the
dial key. The Mic lamp will illuminate when the Microphone is on.
Step 2
Repeat the previous steps to alternately turn the microphone On/Off as
needed.
Handset Receiving Volume
To adjust the Handset receiving volume:
Step 1
Step 2
On the Home Application window, press the function key for
and press the
Small
).
Repeat the previous steps to alternately select between
Small
Handset receiving volume.
2
dial key. The display shows the current volume (
Large
Feature
Large
and
Transmission / Receiving Volume
To permanently change the Handset Transmission/Receiving volume:
Step 1
On the Home Application window, press the function key for
and press the
Small
).
4
dial key. The display shows the current volume (
Feature
Large
1
,
,
,
,
Step 2
Repeat the previous steps to alternately select between
Small
Handset Transmission/Receiving volume.
Large
and
Ringer Tones
INASET R2 can be set with four different ringer tones. This can provide a
distinctive ring on your INASET R2 phone. Follow the steps to change
your INASET R2 ringer tone.
Step
On the Home Application window, press the function key for
press the
the
3
dial key. A ringer tone will be heard. Each additional press of
3
key will sound a different ringer tone. Stop on the desired ringer tone.
INASET R2 User Guide - Revision 1
Feature
, and
Page 50

INASET R2 Setup 3-11
Hands Free Mode
To set the Hands-Free mode On using the Feature key:
NOTE
Step
On the Home Application window, press the function key for
press the
5
dial key. The display shows Hands Free mode is On.
Feature
To set the Hands-Free mode Off using the Feature key:
Step
On the Home Application window, press the function key for
press the
6
dial key. The display shows Hands Free mode is Off.
Feature
Call Indicator
To set the Call Indicator On/Off during ringing:
Step 1
Step 2
The call indicator will light for a message waiting, even when the indicator is set to off
for incoming call ringing.
On the Home Application window, function key for
the
7
dial key. The display shows the Indicator On.
Feature
, and press
Repeat the previous steps to alternately set the Indicator to On or
needed.
, and
, and
Off
as
INASET R2 User Guide - Revision 1
Page 51

3-12 INASET R2 Setup
INASET R2 User Guide - Revision 1
Page 52
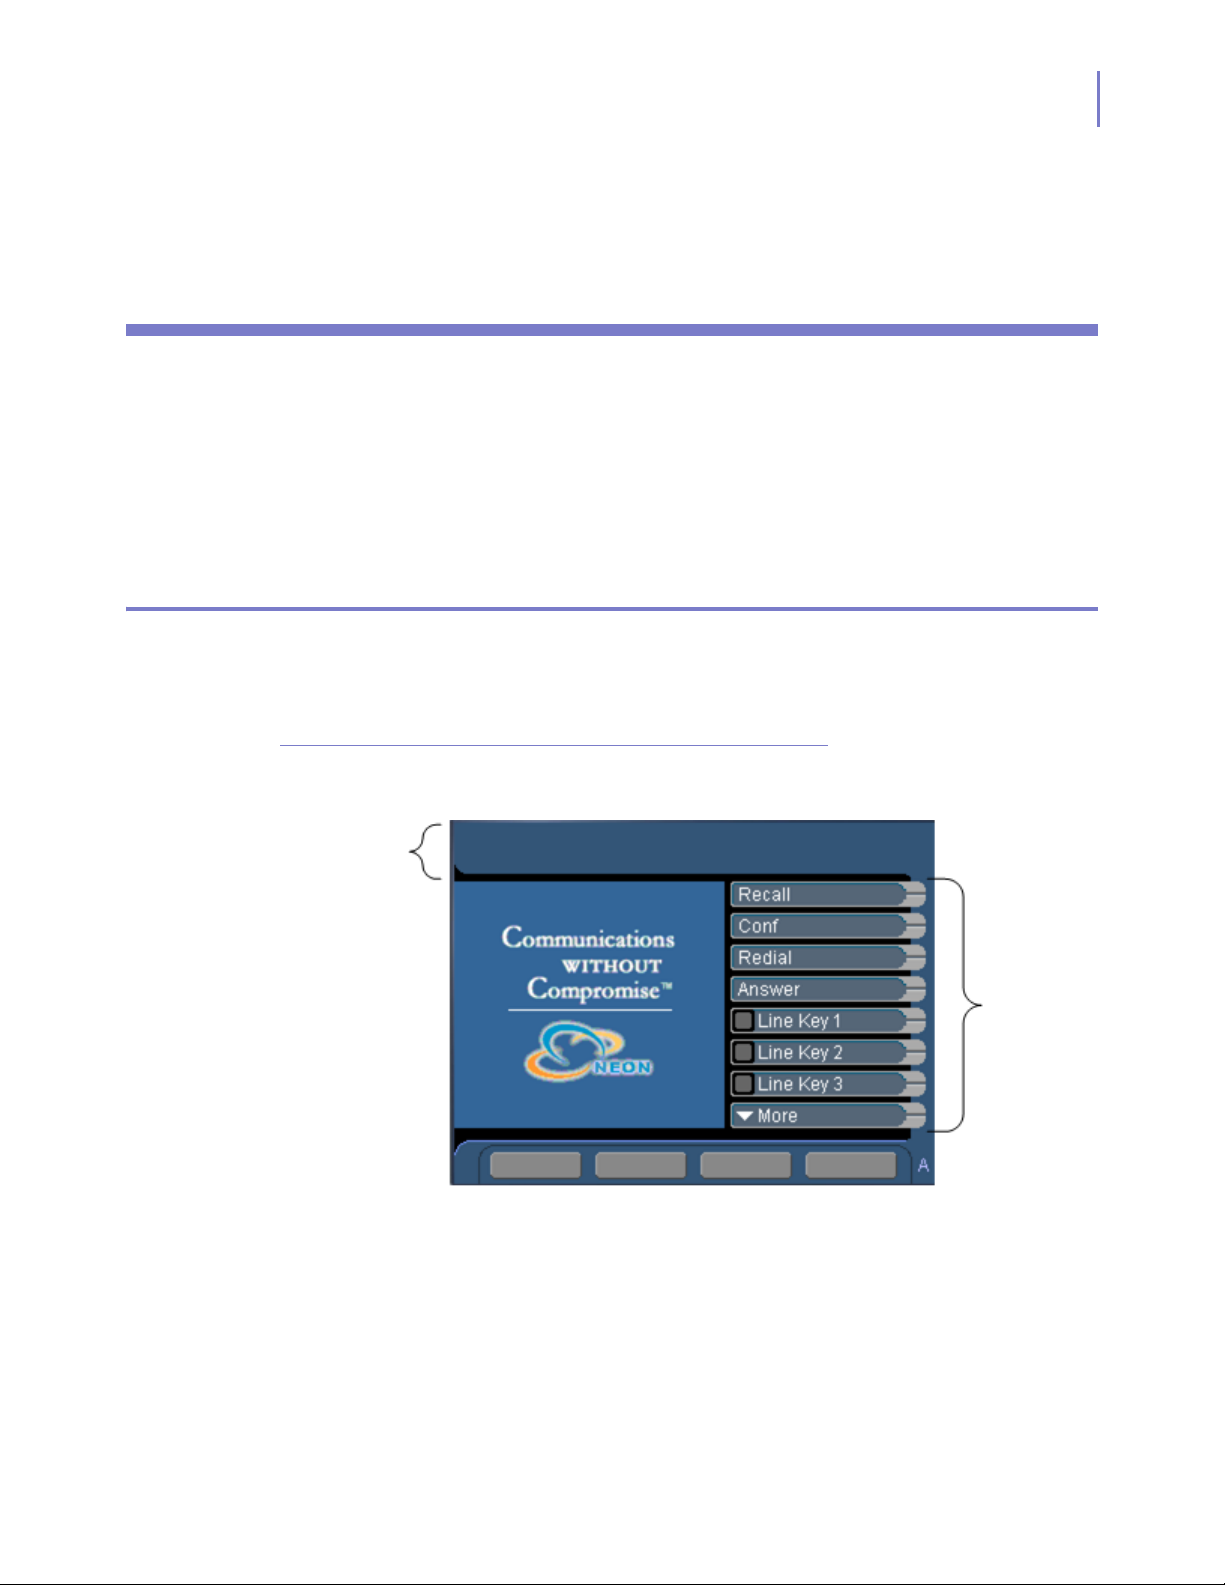
4
Home Application Setup
This chapter describes the Home Application function available on the
INASET R2 phone.
Chapter Topic • Home Application Window
Home Application Window
4-1
Figure 4-1
PBX
Information
Display
The Home Application enables you to use many of the functions
supported by a conventional multi-line NEC Dterm telephone.
Home Application window
2:45 PM THU 28 FEB 2003
Function
Corporate
Personal
Function Keys
Inbound
Outbound
Keys
The Home Application window is used for all call functions and provides
a visual display of the status of the lines assigned to the INASET R2
phone on this window.
INASET R2 User Guide - Revision 1
Page 53
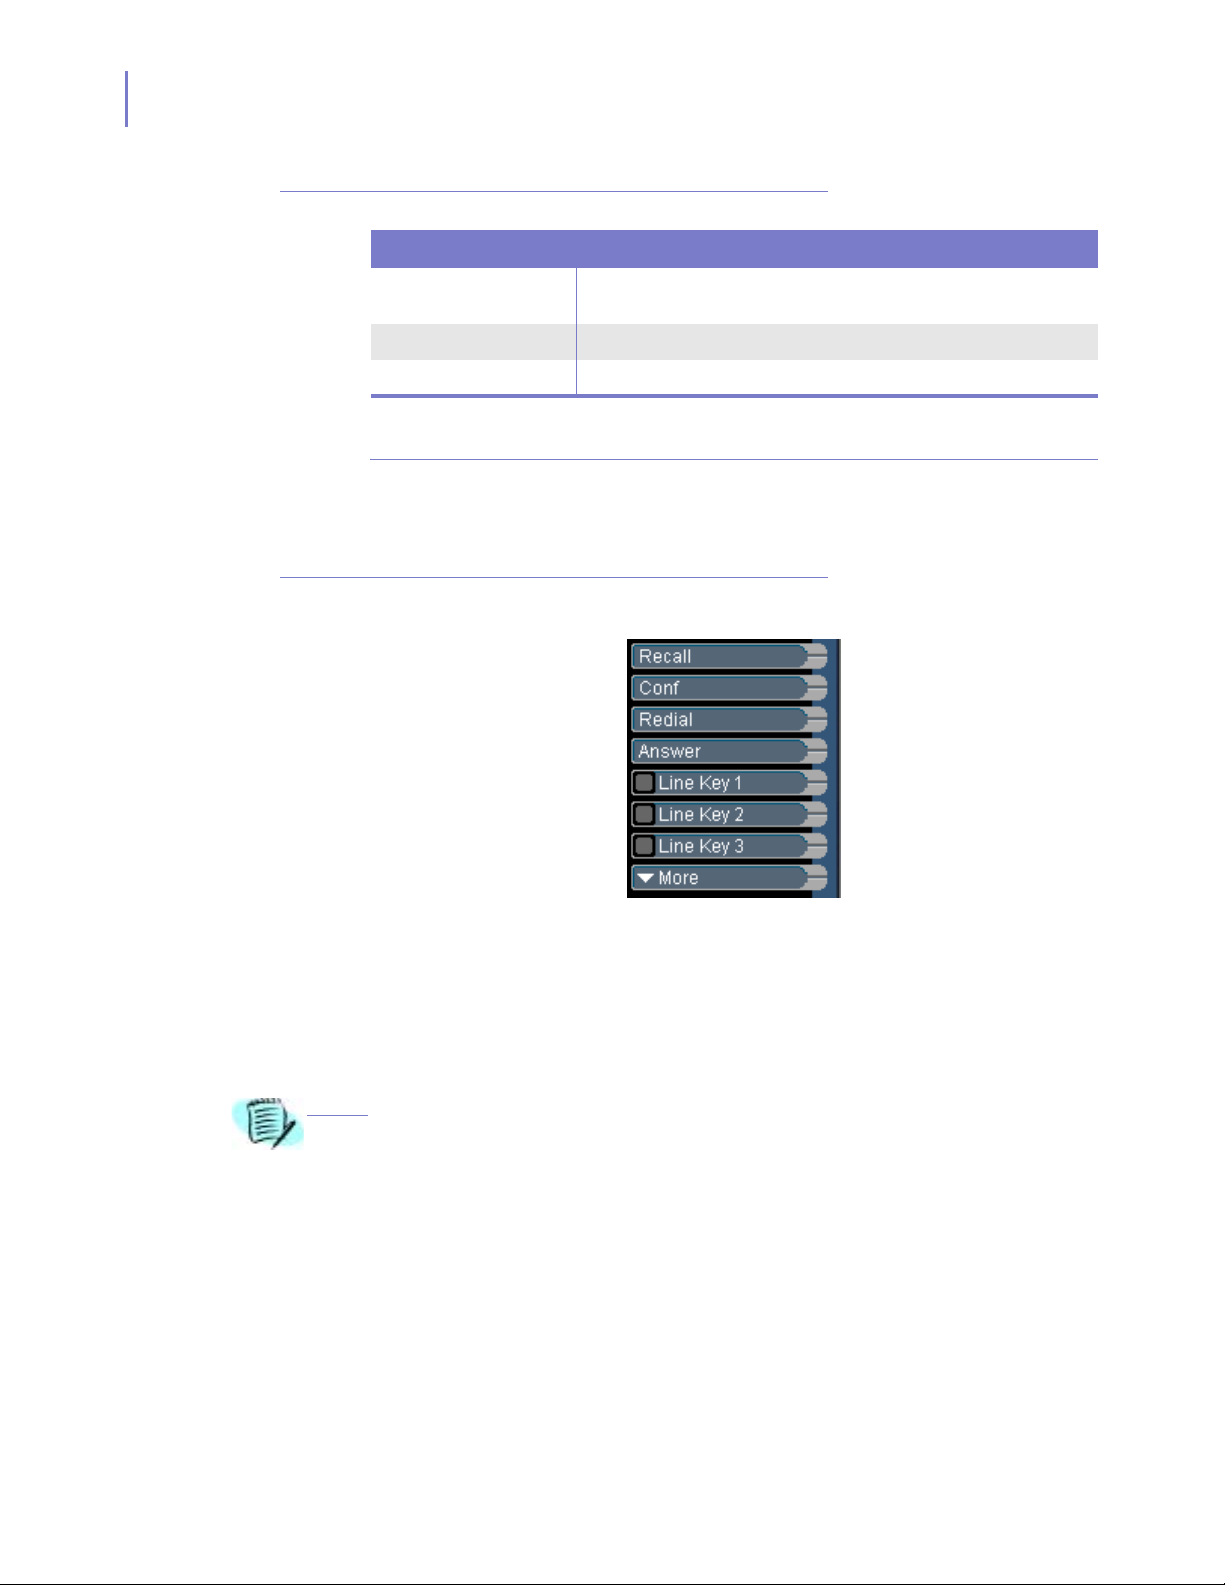
4-2 Home Application Setup
Table 4-1
Figure 4-2
Home Application Window description
Field / Key Description
PBX Information
Display
Function Keys Function keys will appear in various operating modes.
Menu Function Keys Function keys are used to select the various menu functions.
Information from the PBX will display in this area. This would include
PBX time, date, and call status information.
Function Keys
The Home Application Function Keys menu (Figure 4-2) allows you to
select and use additional features on your INASET R2 phone.
Home Application Function Keys
NOTE
The INASET R2 Recall, Conf, Redial, and Answer function keys are
already programmed to perform the function indicated. However, any of
the function keys, including those already programmed, can be
programmed to perform the function you need. Use the Configure
function key to Add, Edit, or Delete a particular function key.
Press
More
to access the
Configure
function key.
INASET R2 User Guide - Revision 1
Page 54
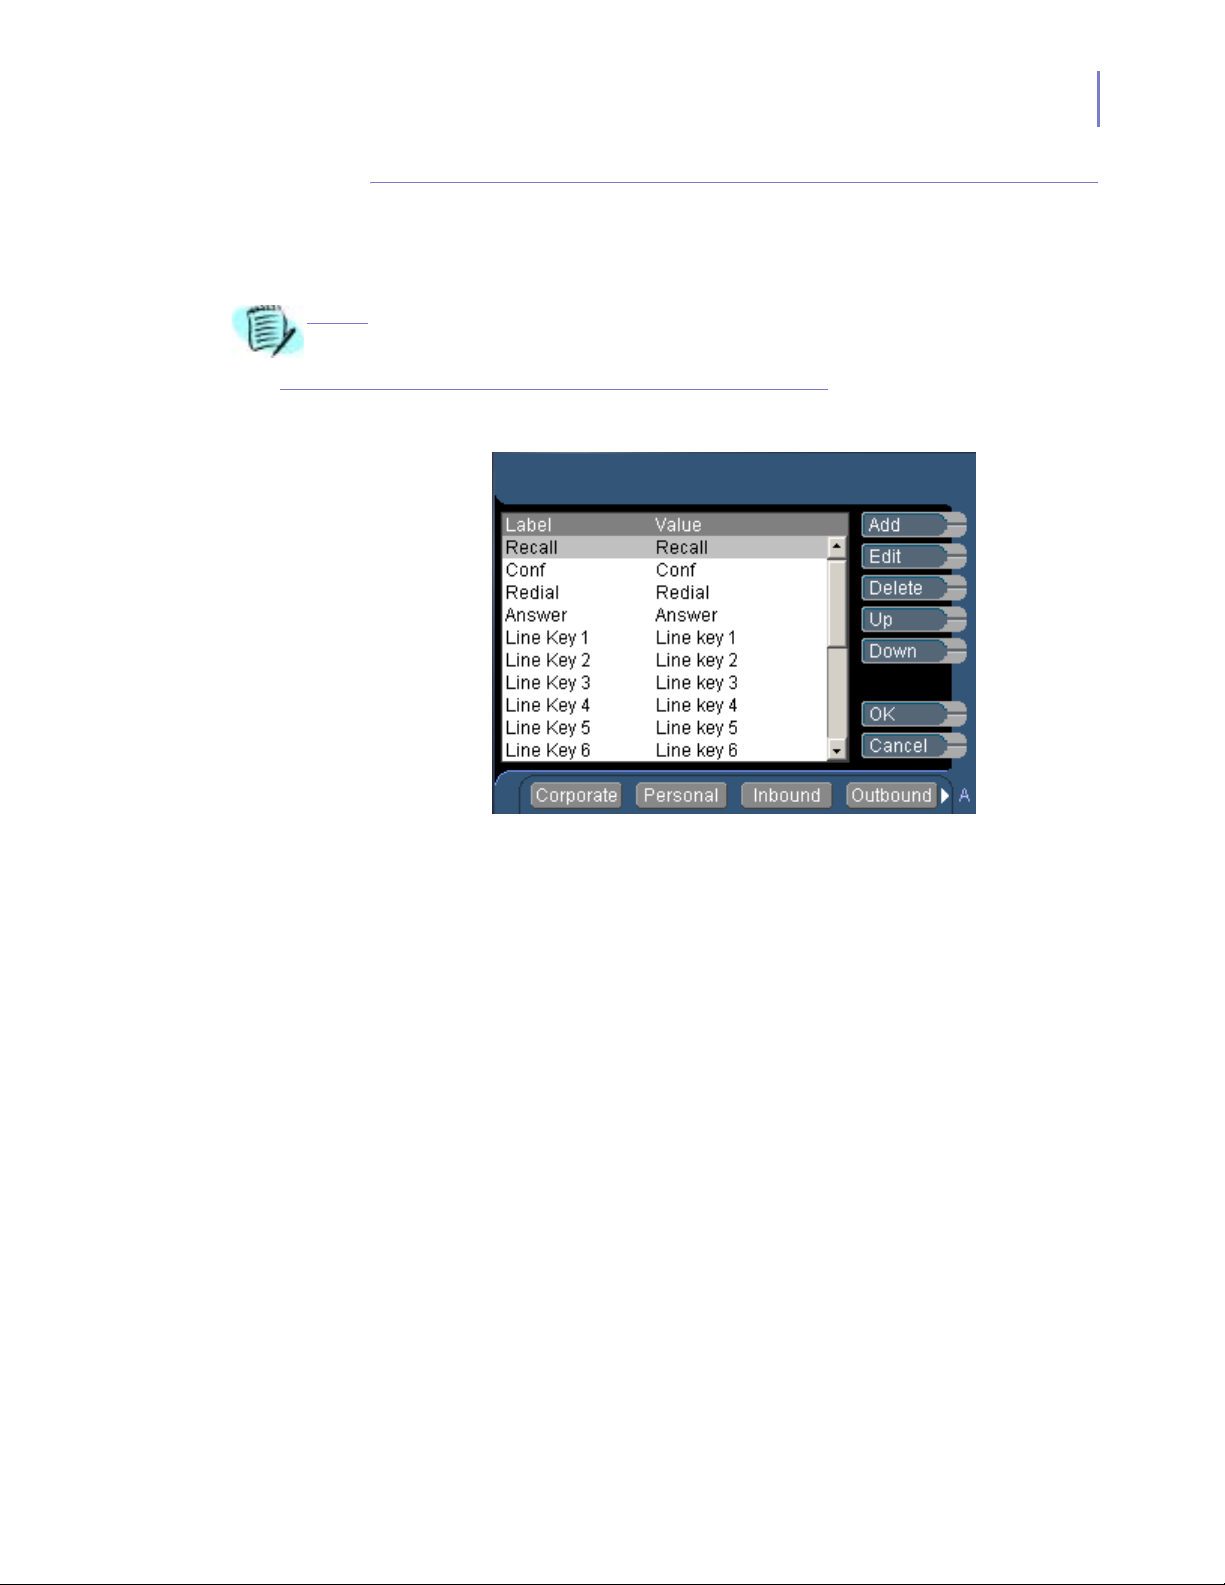
Configuring Function Keys
Home Application Setup 4-3
NOTE
Figure 4-3
Step 1
On the Home Application Function Key menu, press the
function key.
If the
Configure
options until
Function Keys Configure dialog box
function is not listed, use the
Configure
appears. See Figure 4-3.
2:45 PM THU 28 FEB 2003
More
function to scroll through the
Configure
Step 2
—
Add
—
Edit
—
Delete
—
Up
Adds a new function key.
Edits the highlighted function key.
Deletes the function key selected.
Moves a highlighted function key up one space.
This allows you to modify how the order the labels
are viewed.
—
Down
Moves a highlighted function key down one space.
Press the function key to add or edit.
—If adding a new function (Figure 4-4, Figure 4-5, or Figure 4-6 will
appear based on the type of key selected in the radio button)):
INASET R2 User Guide - Revision 1
Page 55
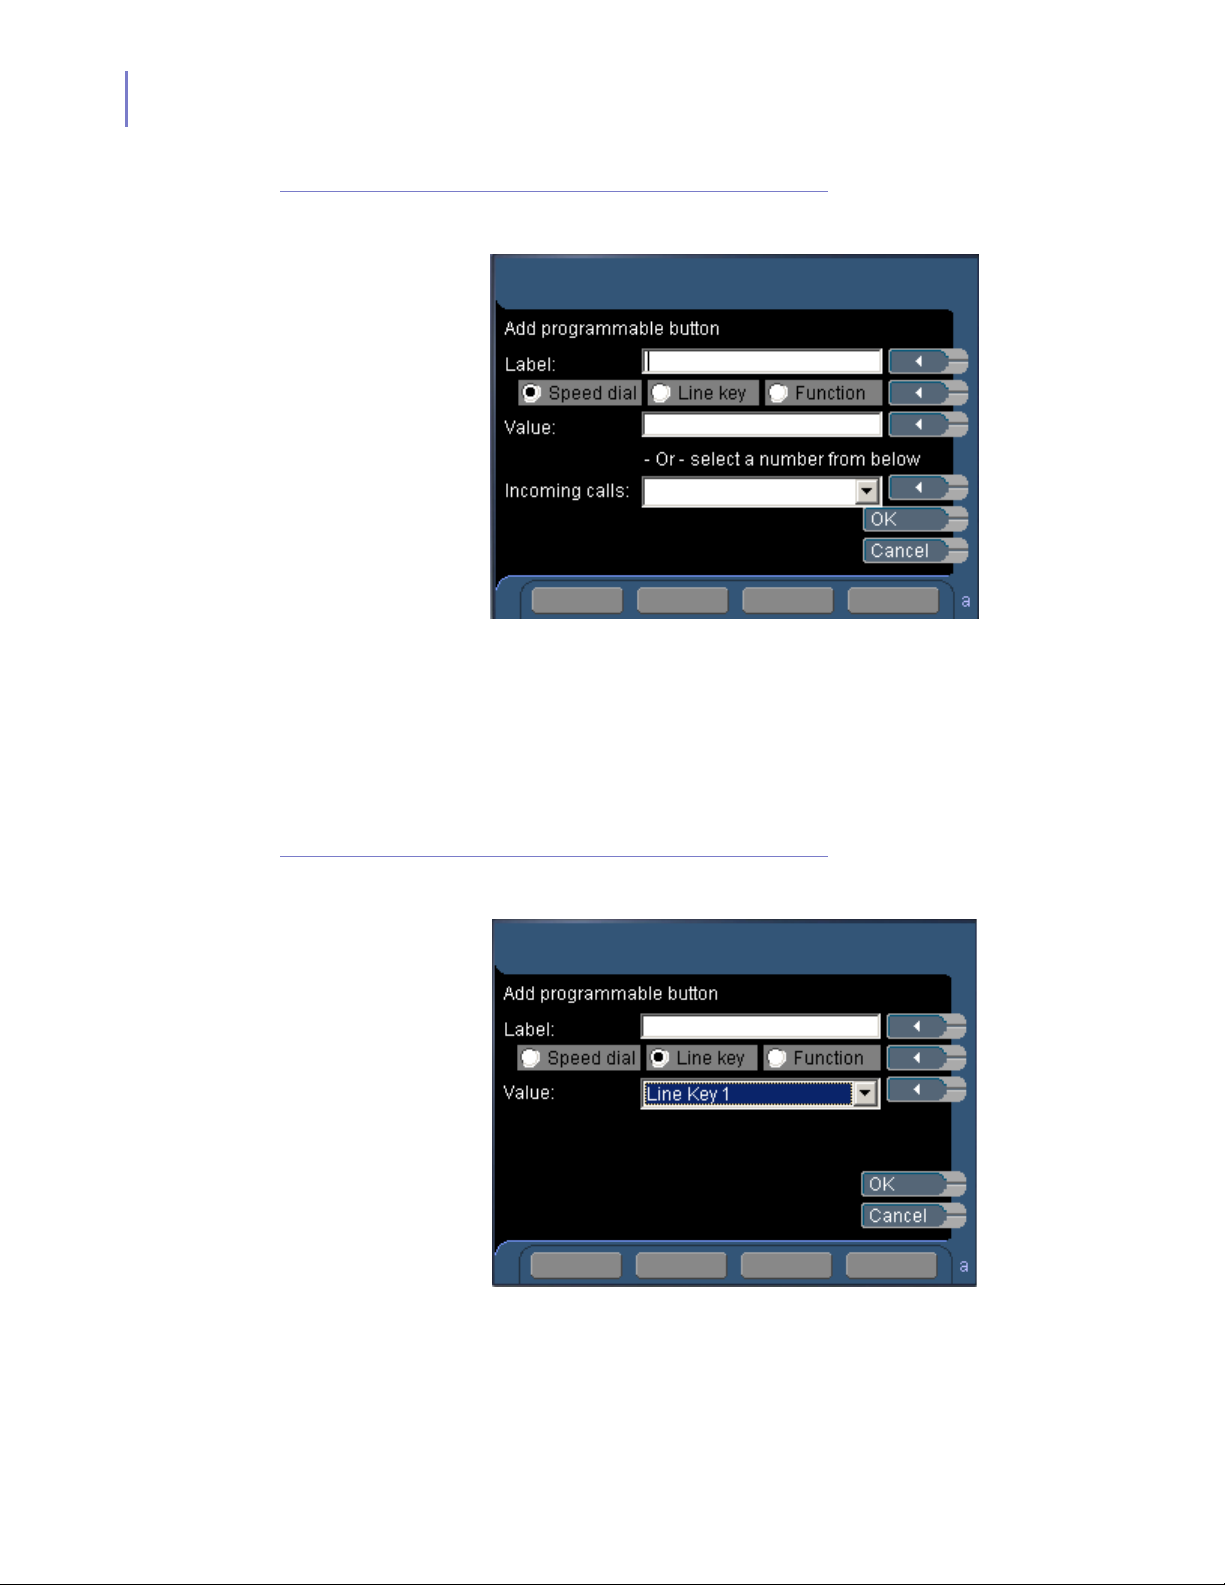
4-4 Home Application Setup
Figure 4-4
Adding Programmable Button - Speed Dial dialog box
2:45 PM THU 28 FEB 2003
PersonalCorporate Inbound Outbound
Label
Value
Enter the name desired in this field, then select the
Speed Dial
option button.
Use this field, or the
a value (for example, a telephone number, or
extension number).
Incoming Calls
This field can be used in lieu of the
using the pull-down menu to select an incoming
call number as the value.
Incoming Calls
field, to enter
Value
field by
Figure 4-5
Adding Programmable Button - Line Key dialog box
2:45 PM THU 28 FEB 2003
PersonalCorporate Inbound Outbound
Label
Value
Enter the name desired in this field, then select the
Line Key
option button.
Indicate which field to apply the Line Key label to
by using the options listed in the pull-down menu.
INASET R2 User Guide - Revision 1
Page 56
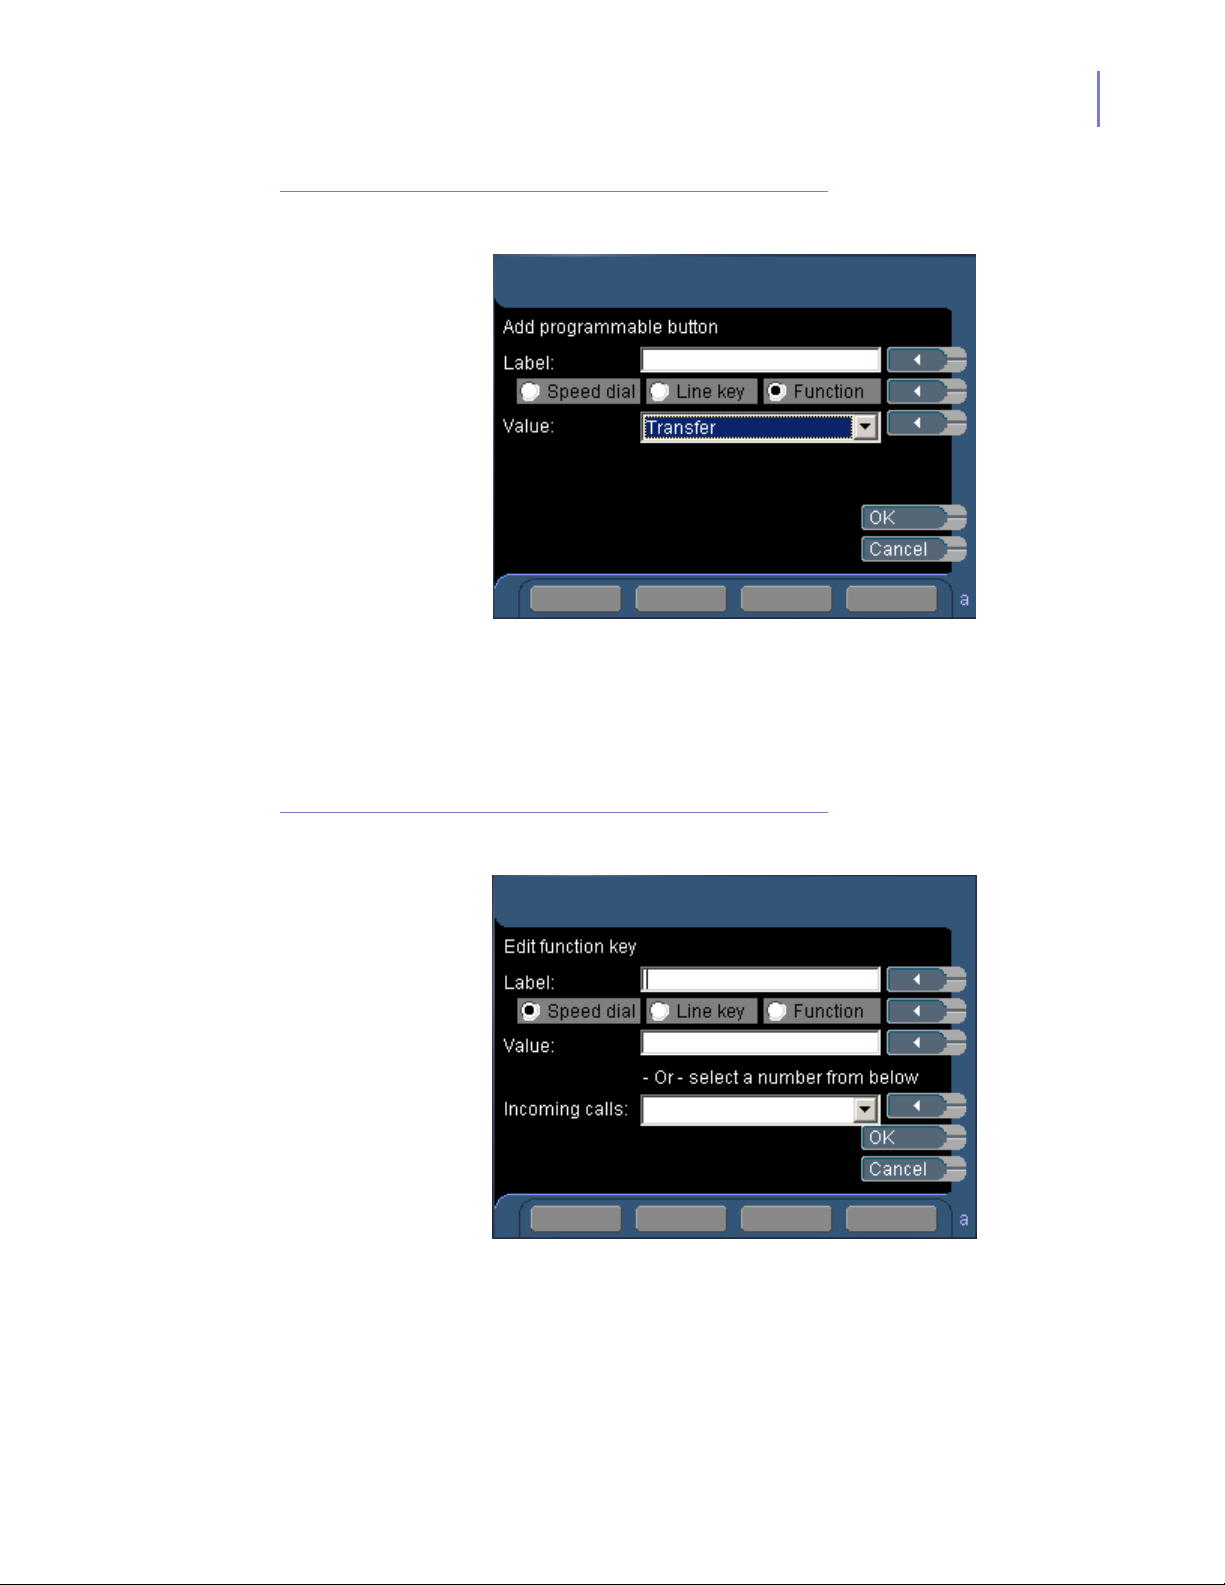
Home Application Setup 4-5
Figure 4-6
Adding Programmable Button - Function dialog box
2:45 PM THU 28 FEB 2003
PersonalCorporate Inbound Outbound
Label
Value
Enter the name desired in this field, then select the
Function
option button.
Indicate which field to apply the Function label to
by using the options listed in the pull-down menu.
—If editing an existing function (Figure 4-7, Figure 4-8, or Figure 4-9 will
appear)
Figure 4-7
Edit Function Button - Speed Dial dialog box
2:45 PM THU 28 FEB 2003
PersonalCorporate Inbound Outbound
Label
Edit or enter the name desired in this field, then
select the
Value
Use this field, or the
entered as dialed with access code, to enter or edit
a value.
Incoming Calls
This field can be used in lieu of the
using the pull-down menu to select an incoming
call number as the value.
Speed Dial
option button.
Incoming Calls
field must be
Value
field by
INASET R2 User Guide - Revision 1
Page 57
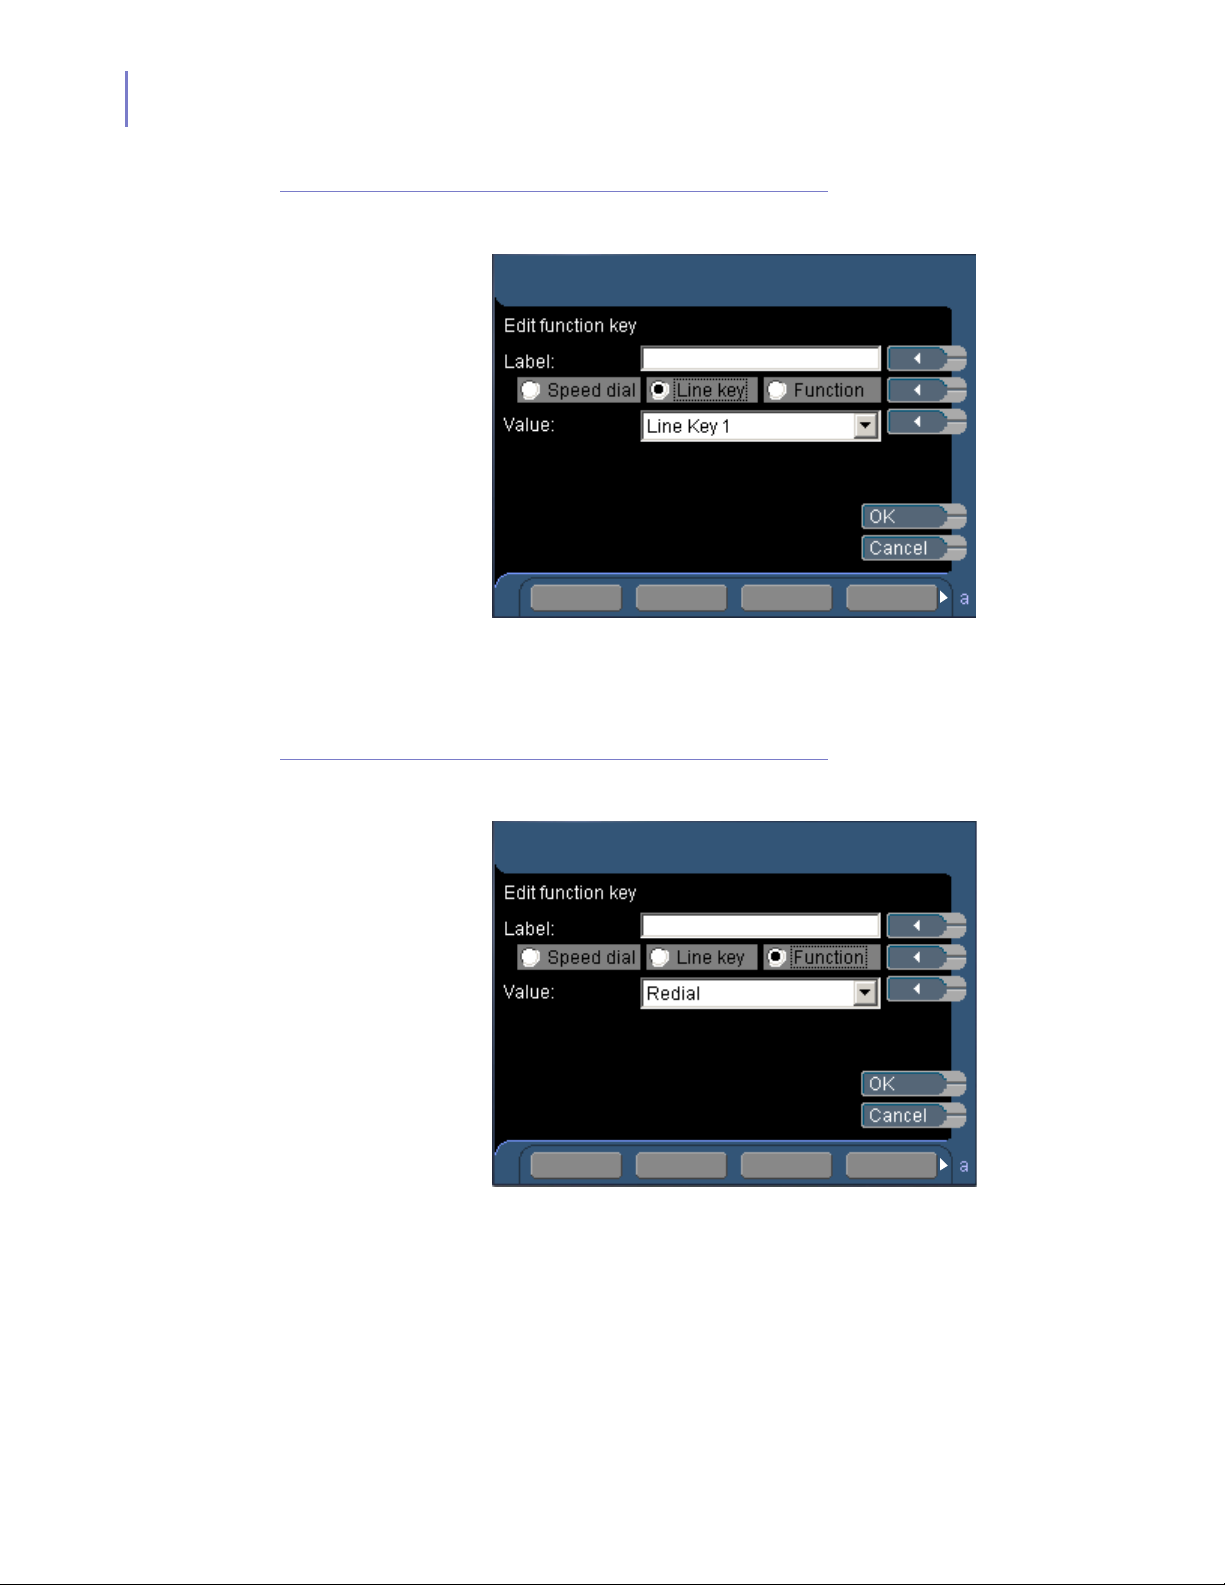
4-6 Home Application Setup
Figure 4-8
Figure 4-9
Edit Function Button - Line Key dialog box
2:45 PM THU 28 FEB 2003
PersonalCorporate Inbound
Label
Edit or enter the name desired in this field, then
select the
Value
Indicate which field to apply the Line Key label to
by using the options listed in the pull-down menu.
Edit Function Button - Function dialog box
Line Key
Outbound
option button.
Step 3
2:45 PM THU 28 FEB 2003
Outbound
option button.
Label
Value
PersonalCorporate Inbound
Enter or edit the name desired in this field, then
select the
Function
Indicate which field to apply the Function label to
by using the options listed in the pull-down menu.
When all changes are complete, select the OK function button.
INASET R2 User Guide - Revision 1
Page 58
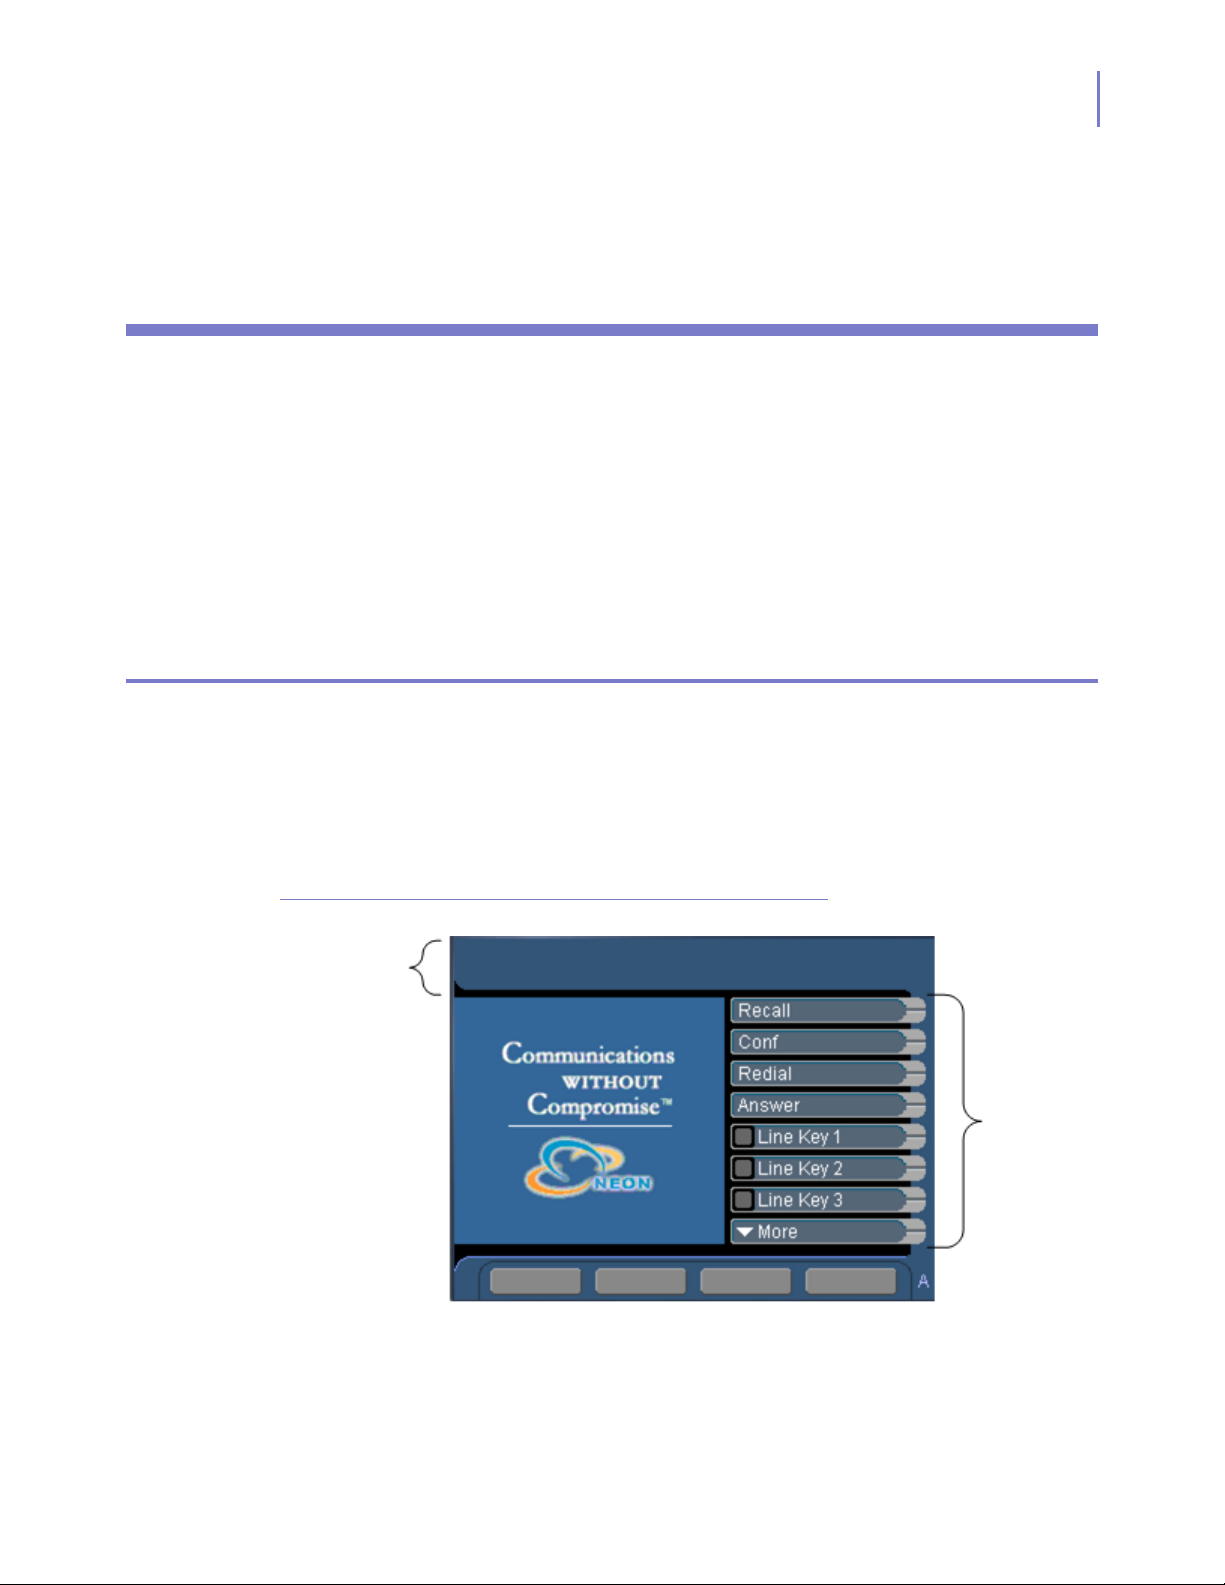
5
Local Application Mode
Chapter Topics • Using the Local Applications
• Directory
• Inbound
• Browser
• INASET Helper
• INASET R2 Menu
5-1
Using the Local Applications
The Local Application mode allows the user to add, edit, download, or
delete contacts to the Directory; dial or obtain details on incoming
callers; and access a browser.
If your phone is configured to run in this mode, you will see Figure 5-1
once logged in to the INASET R2.
Figure 5-1
Information
Local Application Mode Main Menu
PBX
2:45 PM THU 28 FEB 2003
Display
Directory
Inbound
Function
Keys
Browser
Step
INASET R2 UserGuide - Revision 1
Select either the
Function Keys
Directory, Inbound
, or
Browser
function key.
Page 59

5-2 Local Application Mode
Table 5-1
NOTE
Local Application Mode WIndow description
Field / Key Description
PBX Information Display
Function Keys
Function Keys
Refer to Chapter 4 - Home Application Setup, Configuring Function Keys for
information on how to configure your Home Applications function keys.
Information from the PBX will display in this area.
This would include PBX time, date, and call status
information.
Function keys will appear in various operating
modes.
Function keys area used to select the various
menu functions.
Entering Text Using the Dial Keys
Key input into text fields is similar to that of a mobile phone. The
number pad provides both numeric input as well as alpha input. The
INASET SDK handles the functionality automatically for a text field that
has focus.
NOTE
There are three modes of data entry:
•Numeric
• Uppercase
•Lowercase
The user can toggle between uppercase, lower case, and numeric mode
by repeatedly pressing the “#” key. An application can explicitly enable
an input field to the numeric mode via the INASET R2. Depending on the
mode, the user can proceed through the characters by repeatedly
pressing the key. A pause of more than 1.5 seconds between key
presses will cause the cursor to advance to the next input position.
Tab le
5-2 through Tab le 5 -4 provide summaries of the key inputs based on the
input mode.
The * key (asterisk) is used to step through special characters in the following order
for both the uppercase and the lower case mode:
* # . / : ~ ! @ $ % ^ & ( ) ‘ ? “ _ + - = [ ] { } < > , ; \
INASET R2 UserGuide - Revision 1
Page 60

Local Application Mode 5-3
Table 5-2
Table 5-3
Text Entry - Uppercase Mode
Number of Key Presses
1 2 3 4 5 6 7 8 9 10
1 key . , \ 1 ? ! “ @ : ;
2 key A B C 2
3 key D E F 3
4 key G H I 4
5 key J K L 5
6 key M N O 6
7 key P Q R S 7
8 key T U V 8
9 key W X Y Z 9
0 key
# key
Text Entry - Lowercase Mode
space
lowercase numeric uppercase
0
Number of Key Presses
1 2 3 4 5 6 7 8 9 10
1 key . , \ 1 ? ! “ @ : ;
2 key a b c 2
3 key d e f 3
4 key g h i 4
5 key j k l 5
6 key m n o 6
7 key p q r s 7
8 key t u v 8
9 key w x y z 9
0 key
# key
space
numeric uppercase lowercase
0
INASET R2 UserGuide - Revision 1
Page 61

5-4 Local Application Mode
Table 5-4
Text Entry - Numeric Mode
Number of Key Presses
1 2 3
1 key 1
2 key 2
3 key 3
4 key 4
5 key 5
6 key 6
7 key 7
8 key 8
9 key 9
0 key 0
* key * # .
# key
The following example shows the key sequence used to enter text.
uppercase lowercase numeric
Example:
Step 1
Step 2
Step 3
Step 4
Step 5
Step 6
Step 7
To enter the text Smith:
Press # to select upper case text entry (A indicator).
Press 7 four times.
Press # to select lower case text entry (a indicator).
Press 6 once.
Press 4 three times.
Press 8 once.
Press 4 two times.
The following example shows the key sequence to enter a phone
number.
INASET R2 UserGuide - Revision 1
Page 62
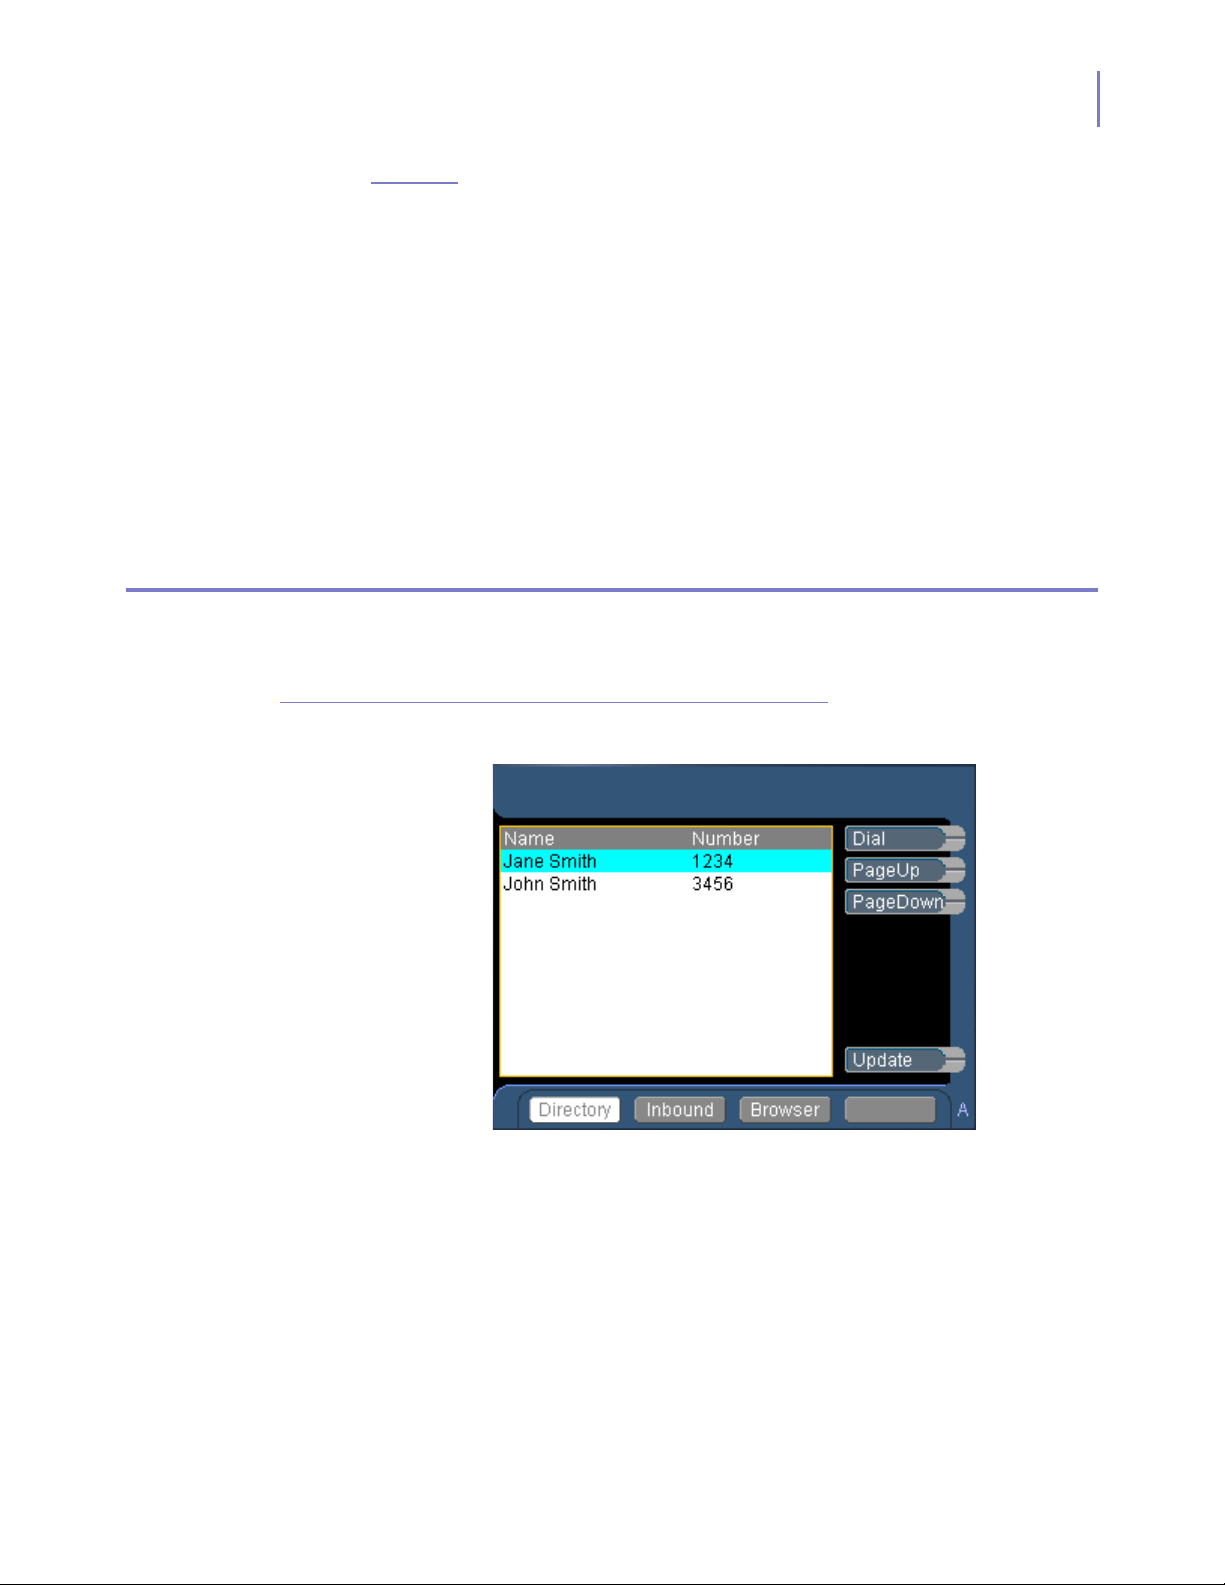
Local Application Mode 5-5
Directory
Figure 5-2
Example:
Step 1
Step 2
Step 3
Step 4
Step 5
Step 6
Step 7
Step 8
To enter the number 272-1290:
Press # to select number entry (1 indicator).
Press 2.
Press 7.
Press 2.
Press 1.
Press 2.
Press 9.
Press 0.
When the Directory function key is selected, Figure 5-2 displays.
Initial Directory dialog box
2:45 PM THU 28 FEB 2003
Function keys:
• Dial Dials the highlighted contact.
• PageUp Scrolls up through the contact list.
• PageDown Scrolls down through the contact list.
• Update Allows the list to be updated after changes have been
made. When this function key is selected,
Figure 5-3
displays.
INASET R2 UserGuide - Revision 1
Page 63
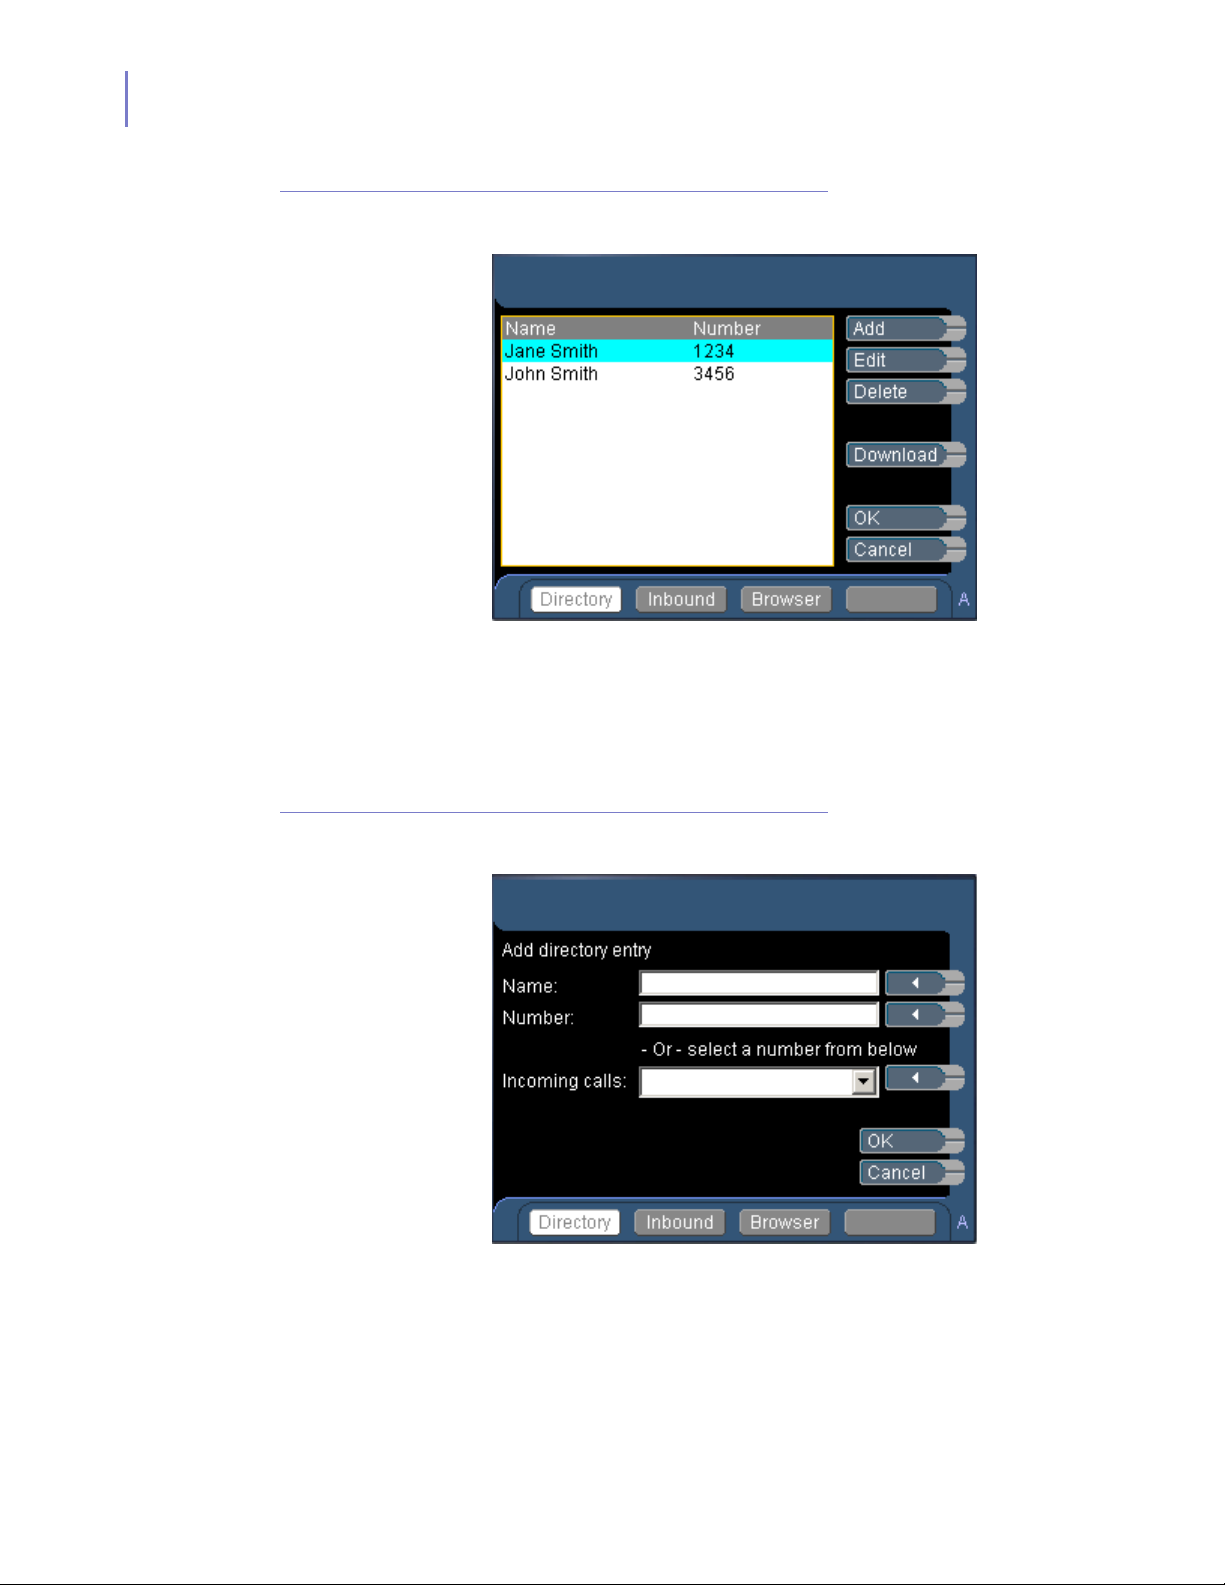
5-6 Local Application Mode
Figure 5-3
Directory Update dialog box
2:45 PM THU 28 FEB 2003
Function keys:
• Add Adds a new entry to the directory (Figure 5-4). Enter
the contact’s name and number, or select a number
from the Incoming Calls drop-down list, then press
the OK function key.
Figure 5-4
Add Directory Entry dialog box
• Edit Edits an existing directory entry (Figure 5-5). Modify
the existing name and contact number then press the
OK function key.
INASET R2 UserGuide - Revision 1
Page 64
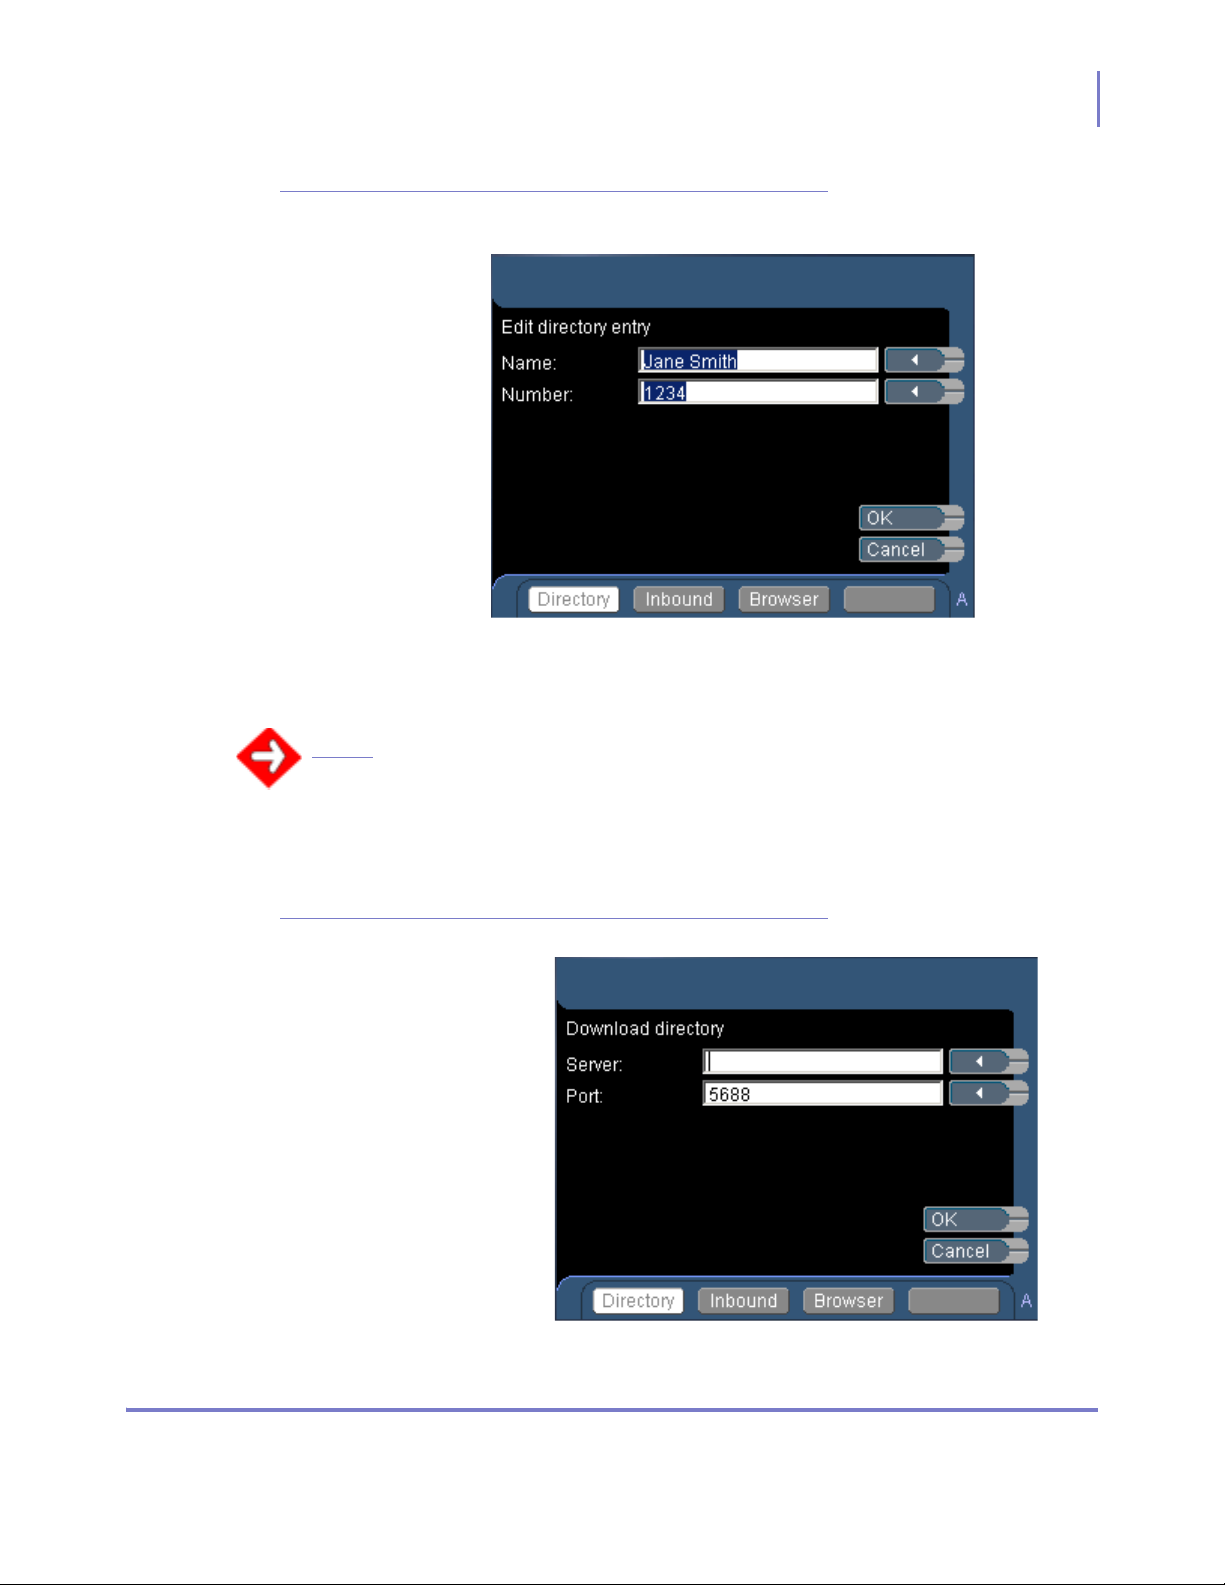
Local Application Mode 5-7
Figure 5-5
Edit Directory Entry dialog box
2:45 PM THU 28 FEB 2003
• Delete Deletes a contact in the directory. Highlight the name,
press the Delete function key, then press the OK
function key.
If you select the
deleting of the highlighted name will be cancelled.
Cancel
function key before selecting the OK function key, the
IMPORTANT
Figure 5-6
• Download Allows the user to download a directory from the
server indicated (
Figure 5-6). Enter the server’s
location and port number to obtain the directory
desired.
Download Directory dialog box
2:45 PM THU 28 FEB 2003
Inbound
INASET R2 UserGuide - Revision 1
Page 65
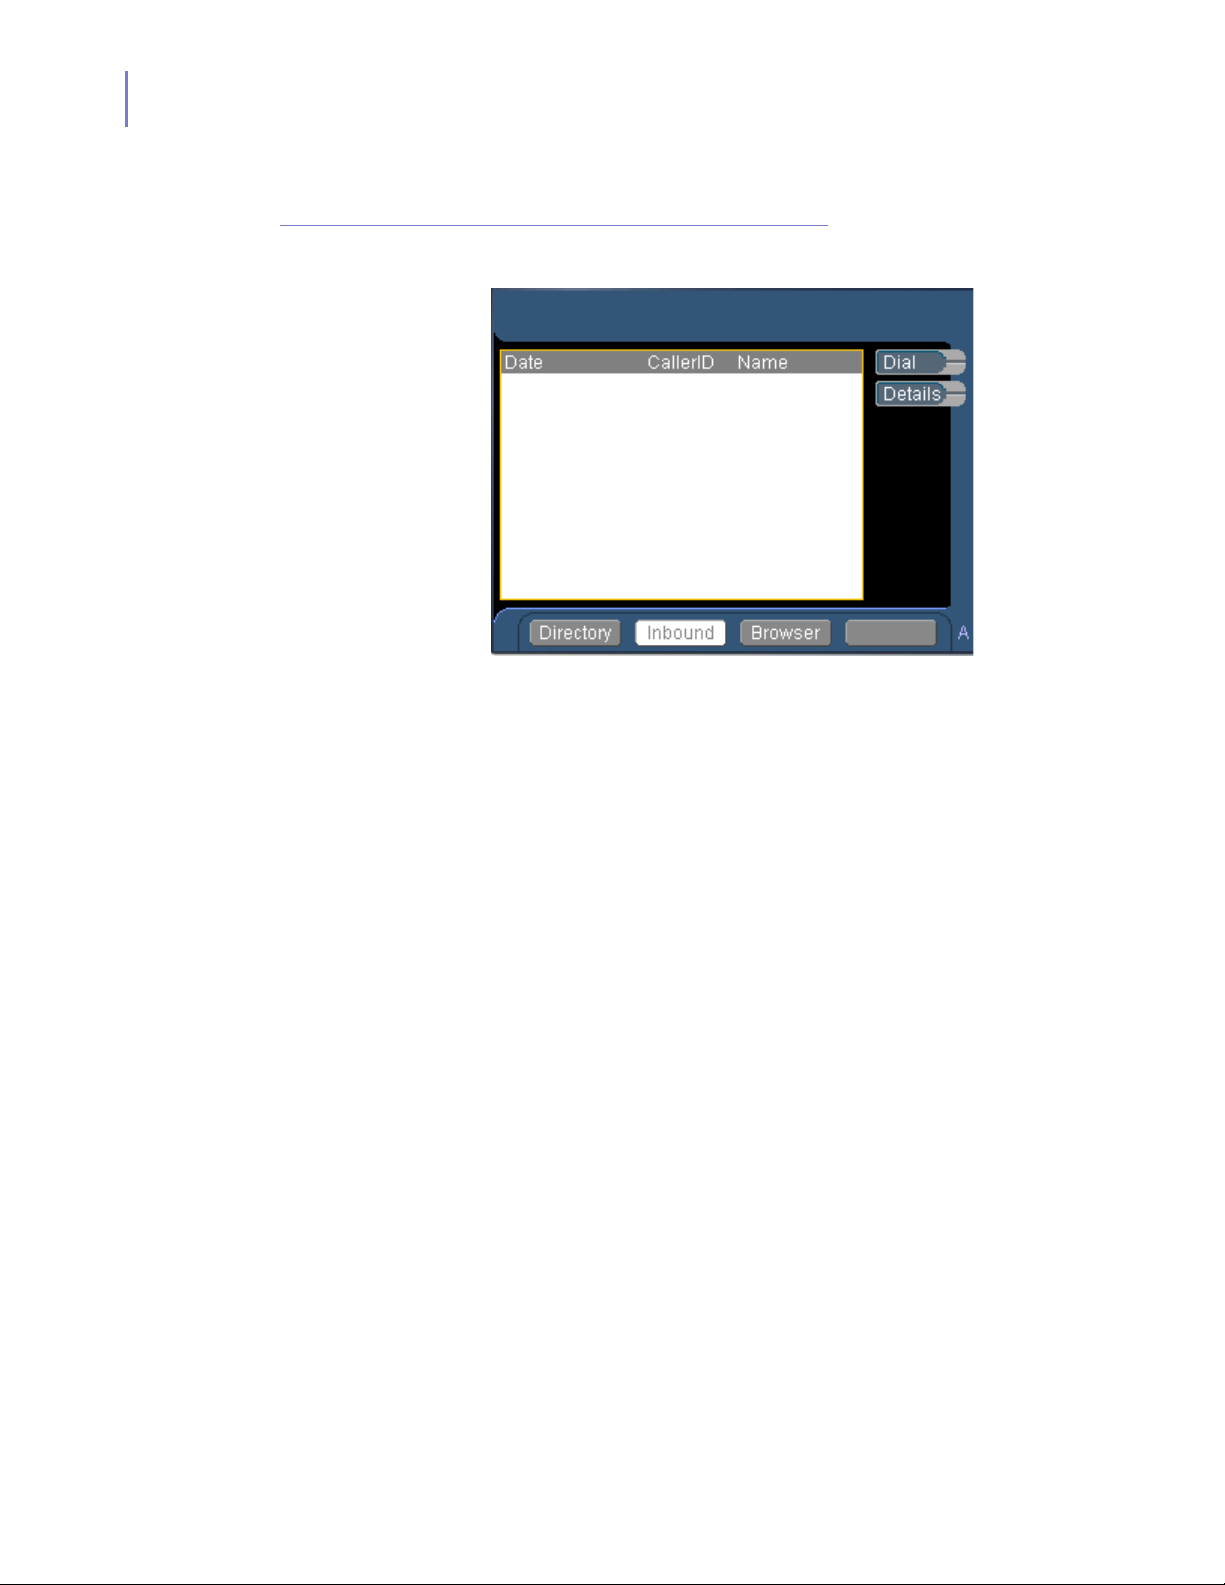
5-8 Local Application Mode
When the Inbound function key is selected, Figure 5-7 displays.
Figure 5-7
Initial Inbound dialog box
2:45 PM THU 28 FEB 2003
Function keys:
• Dial Dials the highlighted contact.
• Details Provides additional details on the incoming caller.
INASET R2 UserGuide - Revision 1
Page 66
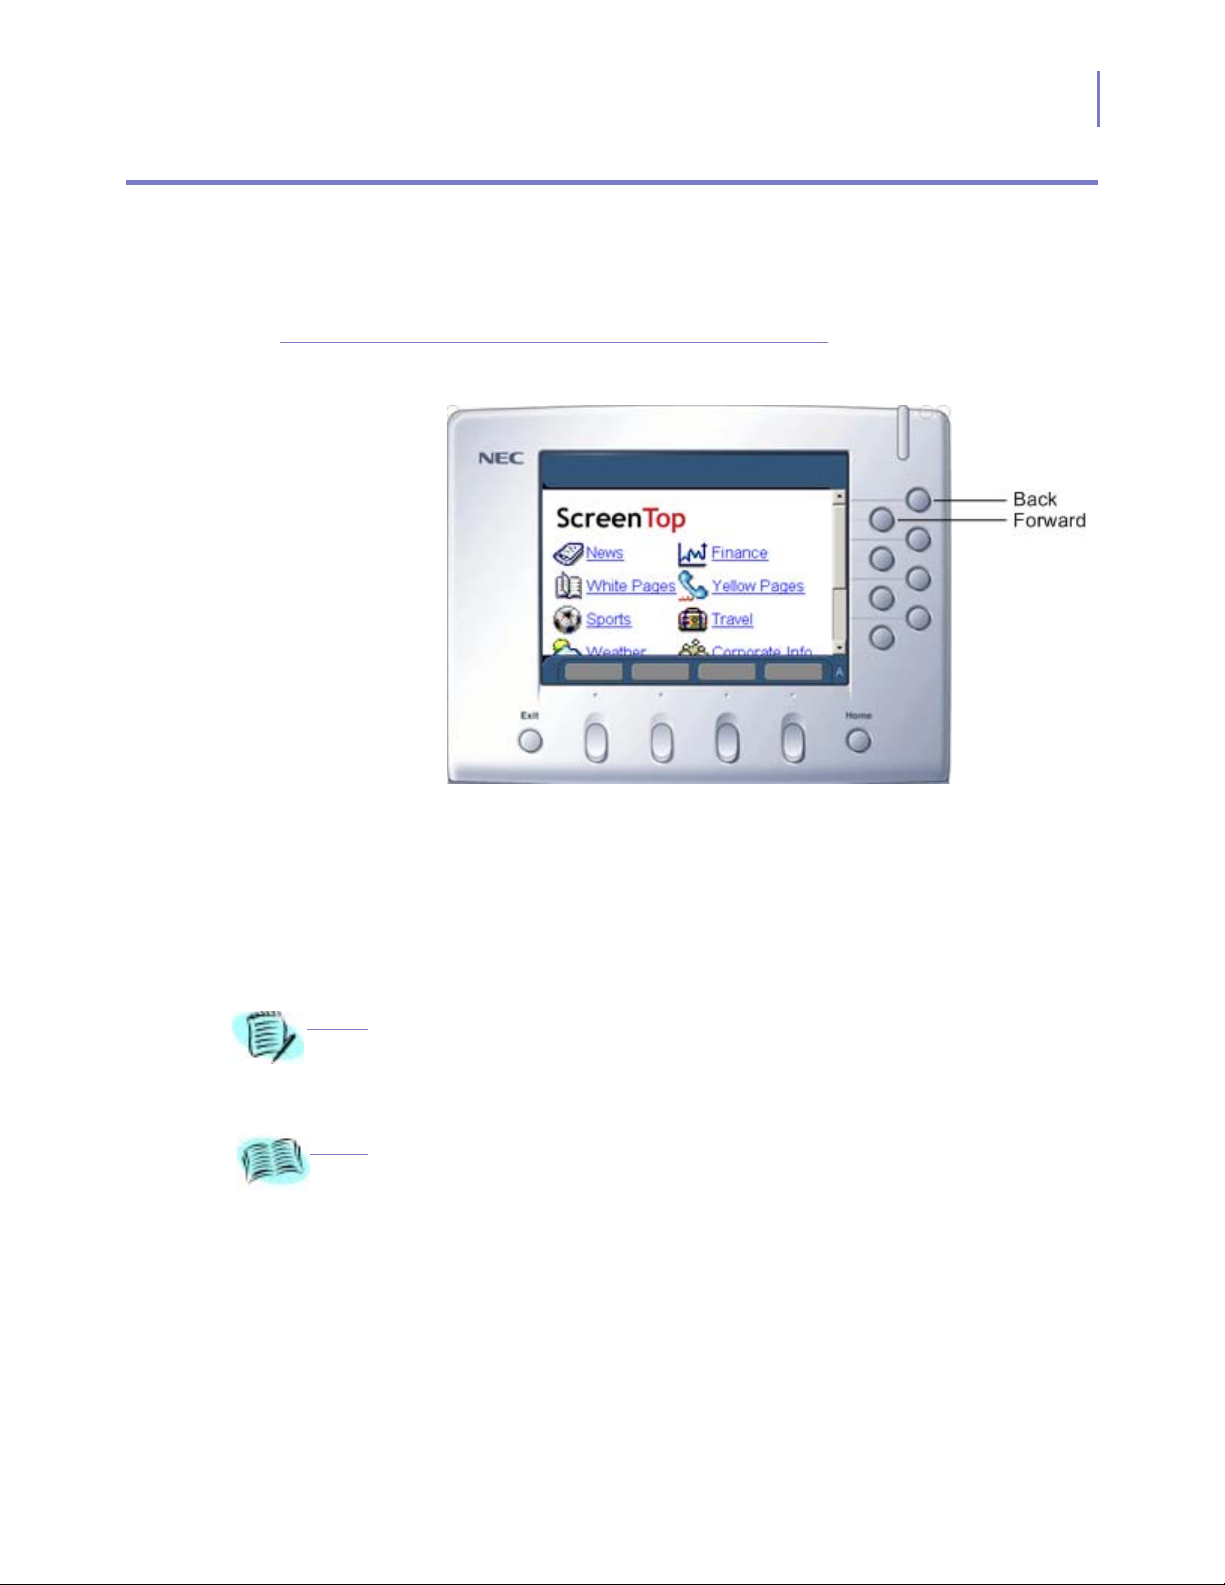
Browser
Local Application Mode 5-9
When the Browser function key is selected, the Browser screen displays
(
Figure 5-8) allowing the user to access the World Wide Web as well as
preconfigured custom web pages.
Figure 5-8
Local Application Mode Browser screen
2:45 PM THU 28 FEB 2002
Directory Inbound
Browser
Function keys:
• Back Scrolls to web sites viewed before the currently view
web page was loaded.
• Forward Scrolls to web site viewed after the currently web
page was loaded.
A mouse device is required to use the Browser function. Use of a keyboard device is
optional.
NOTE
For optimum viewing, use Telephony Transformation Gateway, a network-based
appliance enabling a user to quickly transform existing applications for interaction on
REFERENCE
the screens and speakers of IP telephones.
INASET R2 UserGuide - Revision 1
Page 67

5-10 Local Application Mode
INASET Helper
What is INASET Helper?
INASET Helper is a upload utility allowing you to upload a dialing
directory to your INASET R2. Any file to be uploaded must be a TAB or
comma delimited file with the name in the first column and the number
in the second column.
The dialing directory file can be created using the Microsoft Excel
application, then saved as a comma or tab delimited file. You can also
export a contact list from Outlook by choosing to export the name and
number fields only to a comma or tab delimited text file.
Installing INASET Helper
Follow these procedures to install the INASET Helper application:
Step 1
From the Microsoft Windows Desktop, select
—Choose
Helper.exe
—Enter
Figure 5-9 displays.
Browse
INASET Helper.exe
and locate the directory containing the
file.
directly into the
Start
Open
>
Run
field.
, then either:
INASET
INASET R2 UserGuide - Revision 1
Page 68
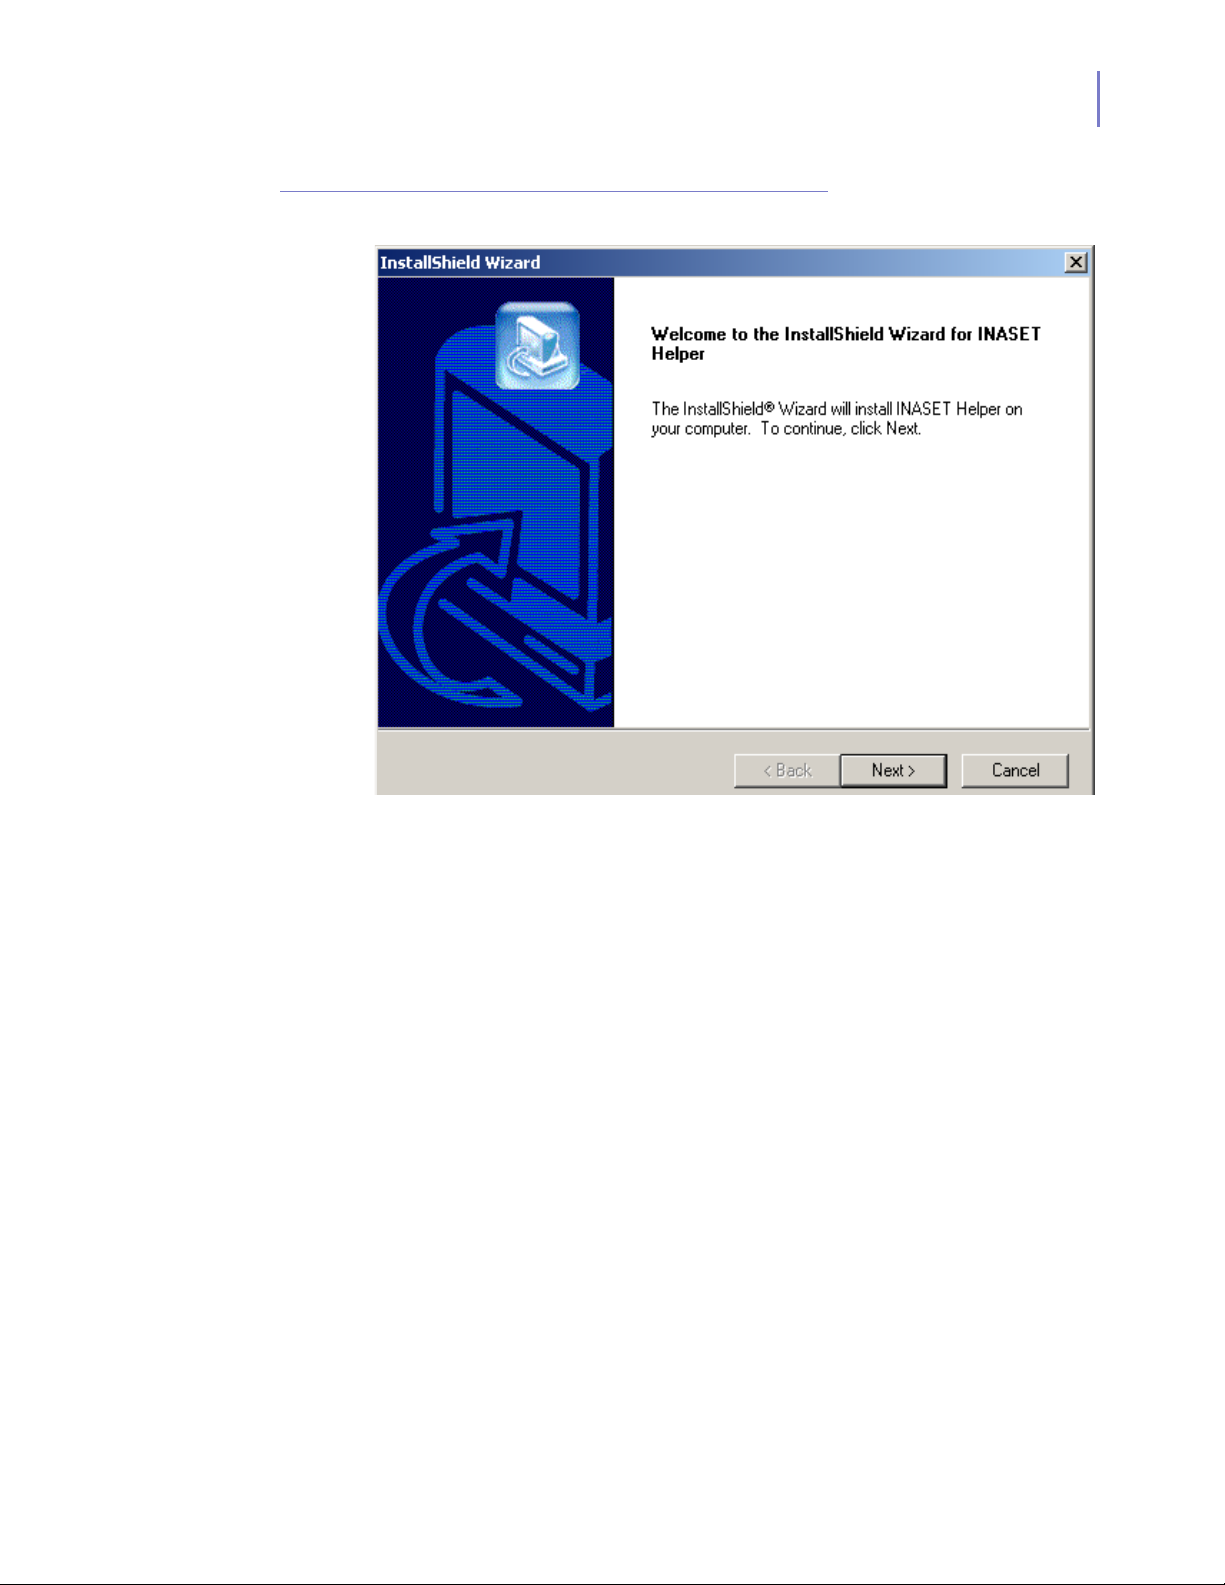
Local Application Mode 5-11
Figure 5-9
Welcome to the InstallShield Wizard for INASET Helper dialog box
Step 2
Select the
10 displays.
Next
button to begin the INASET Helper installation. Figure 5-
INASET R2 UserGuide - Revision 1
Page 69
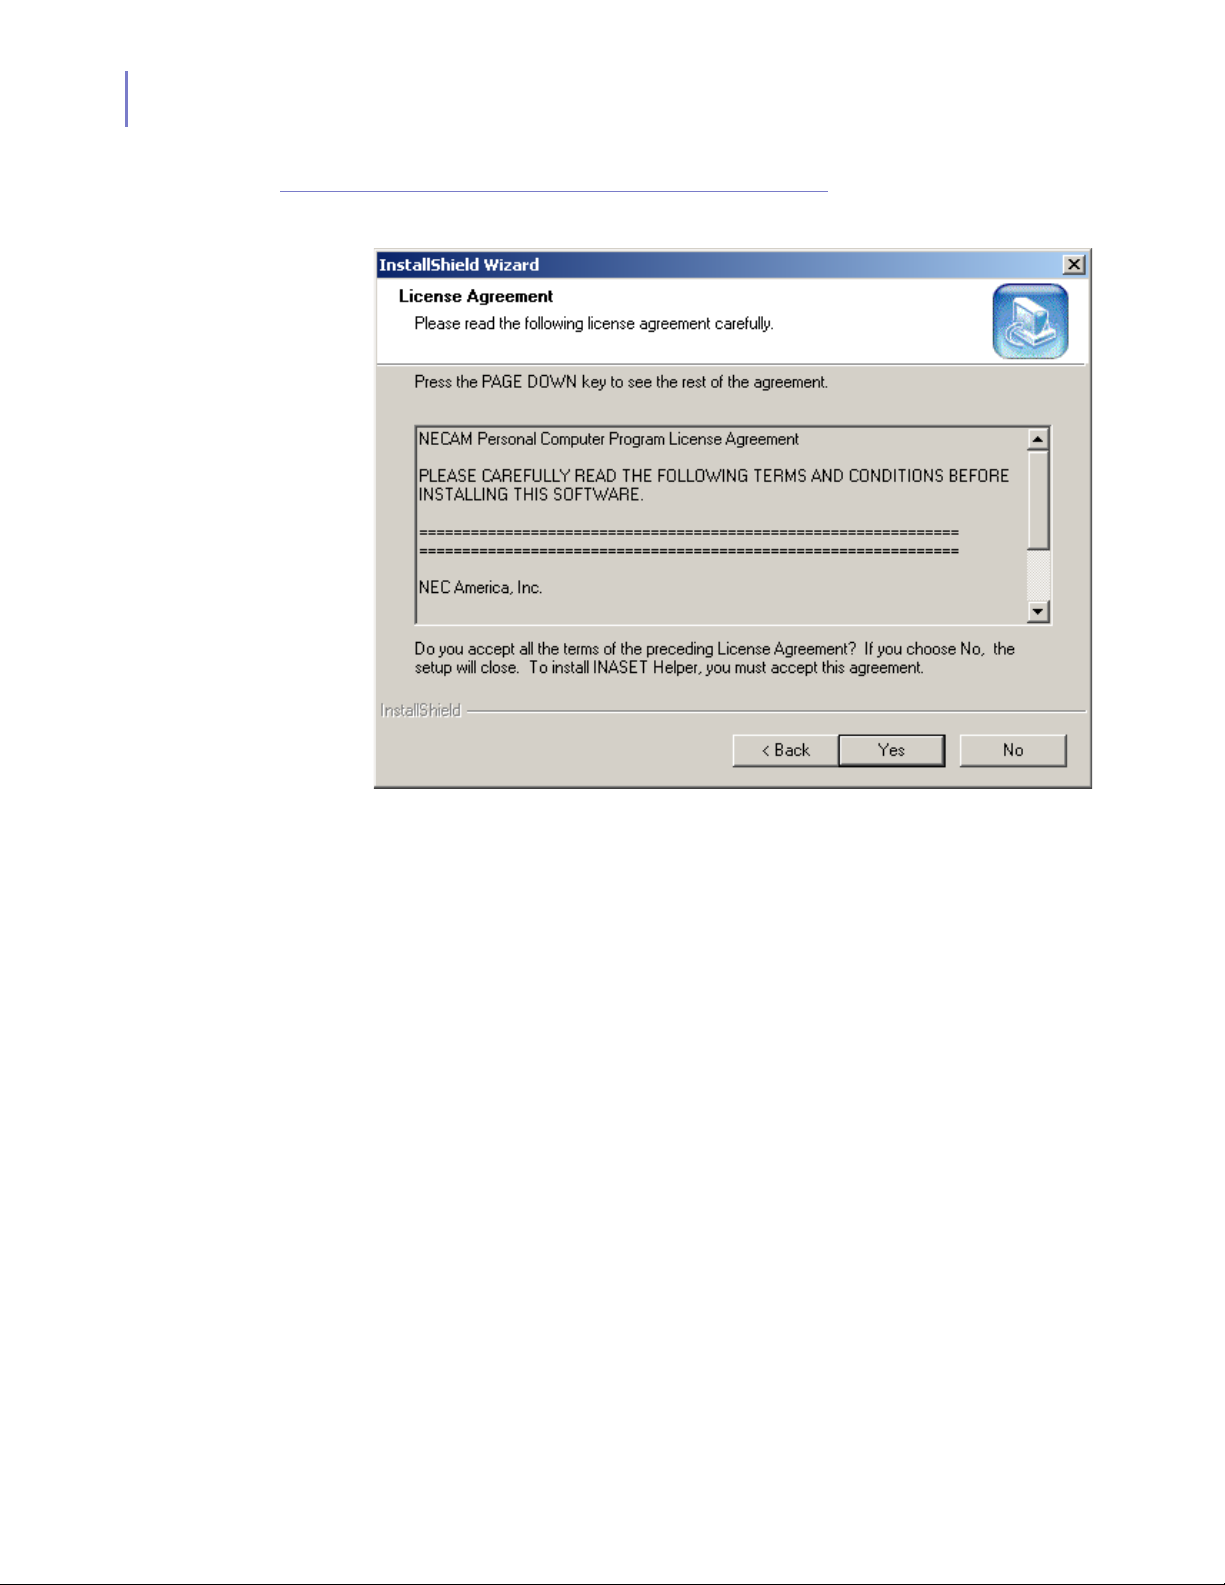
5-12 Local Application Mode
Figure 5-10
InstallShield Wizard License Agreement dialog box
Step 3
Select the
displays.
Yes
button to accept the license agreement. Figure 5-11
INASET R2 UserGuide - Revision 1
Page 70
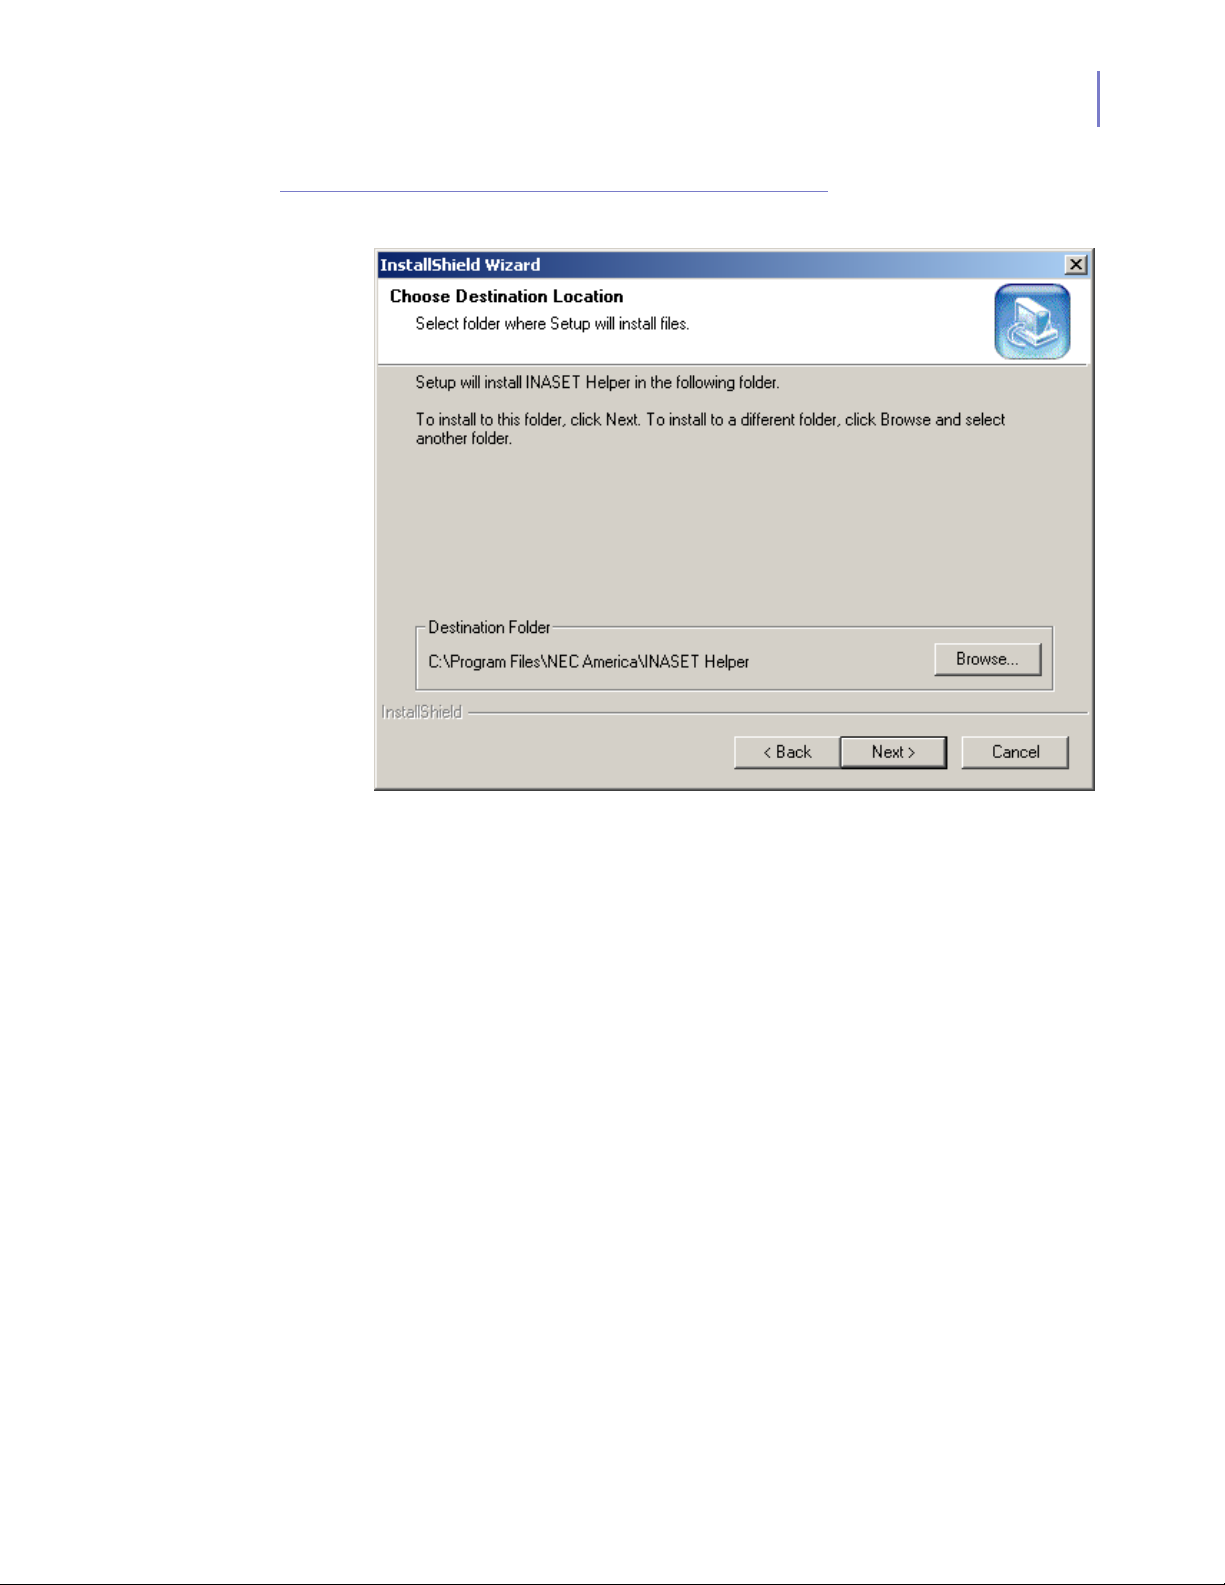
Local Application Mode 5-13
Figure 5-11
InstallShield Wizard Choose Destination Location dialog box
Step 4
Perform one of the following:
—To install to the default folder, click the
—To select a different location, click the
Next
desired location, then click the
button.
Figure 5-15 displays.
Next
button.
Browse
button. Select the
INASET R2 UserGuide - Revision 1
Page 71
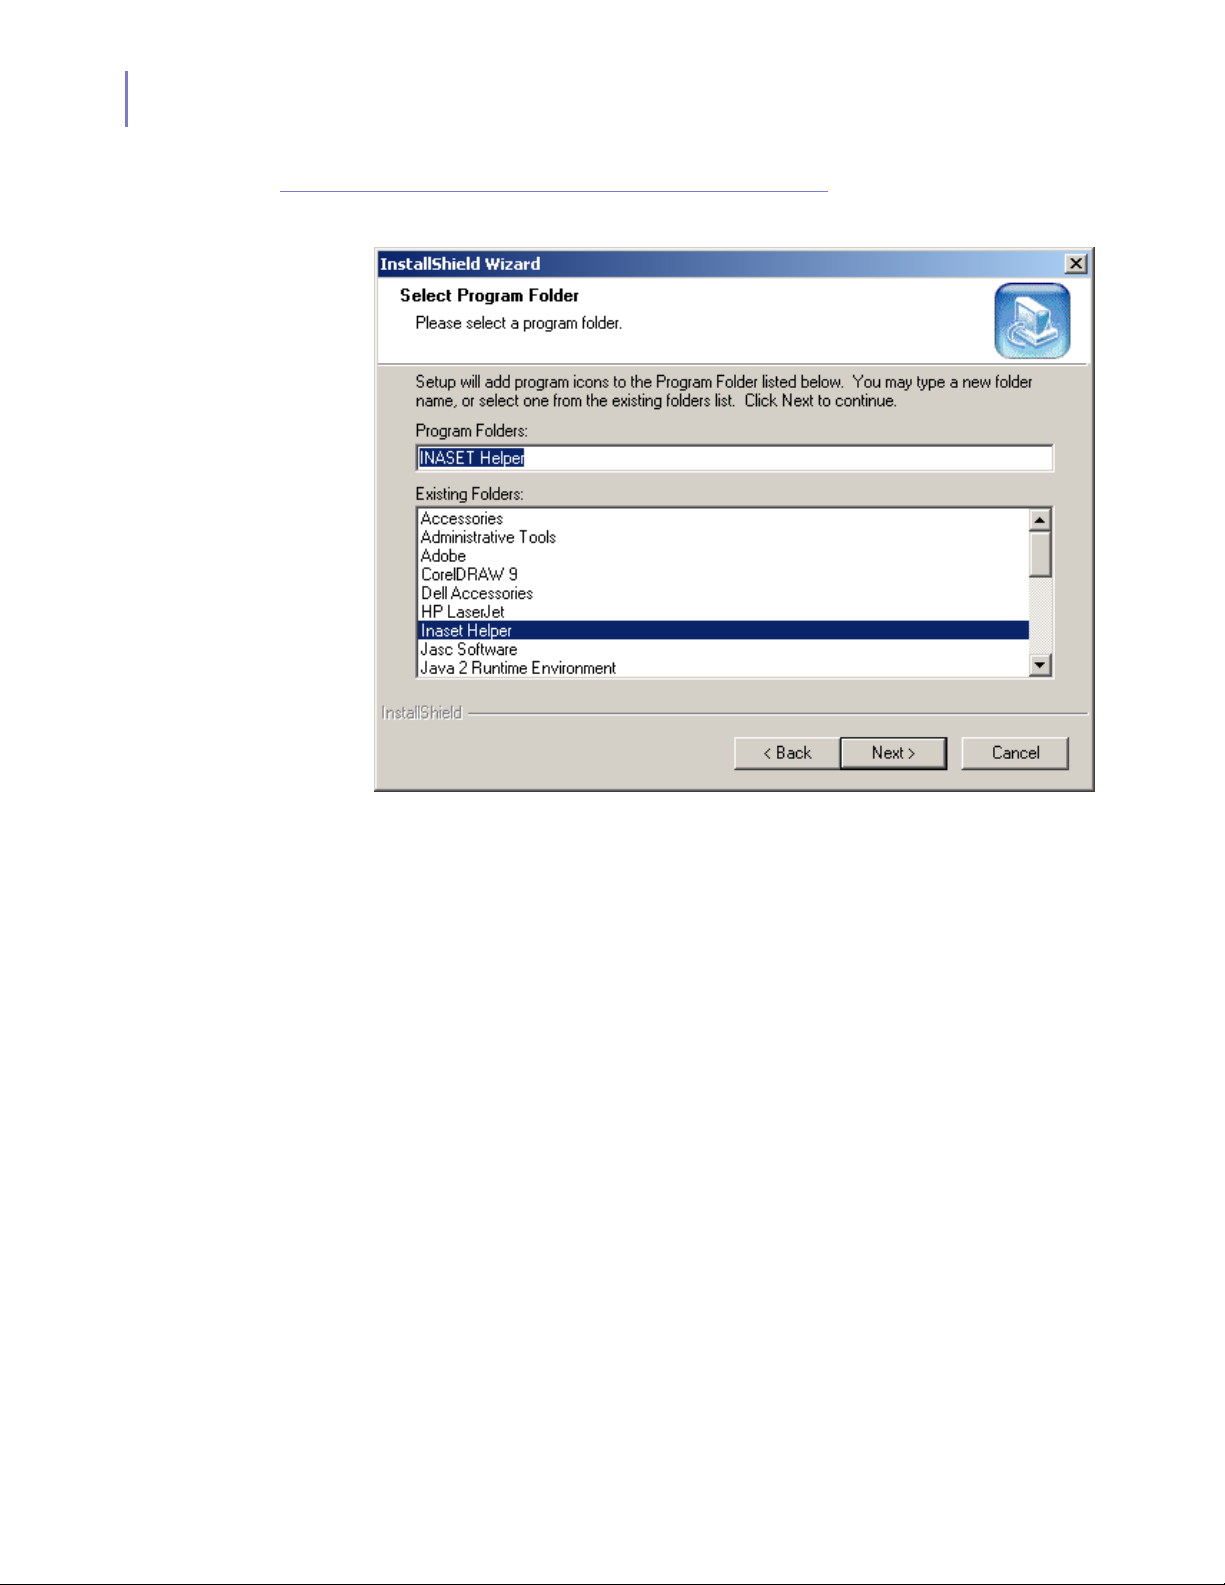
5-14 Local Application Mode
Figure 5-12
InstallShield Wizard Select Program Folder dialog box
Step 5
Select the
Next
button. Figure 5-13 displays.
INASET R2 UserGuide - Revision 1
Page 72
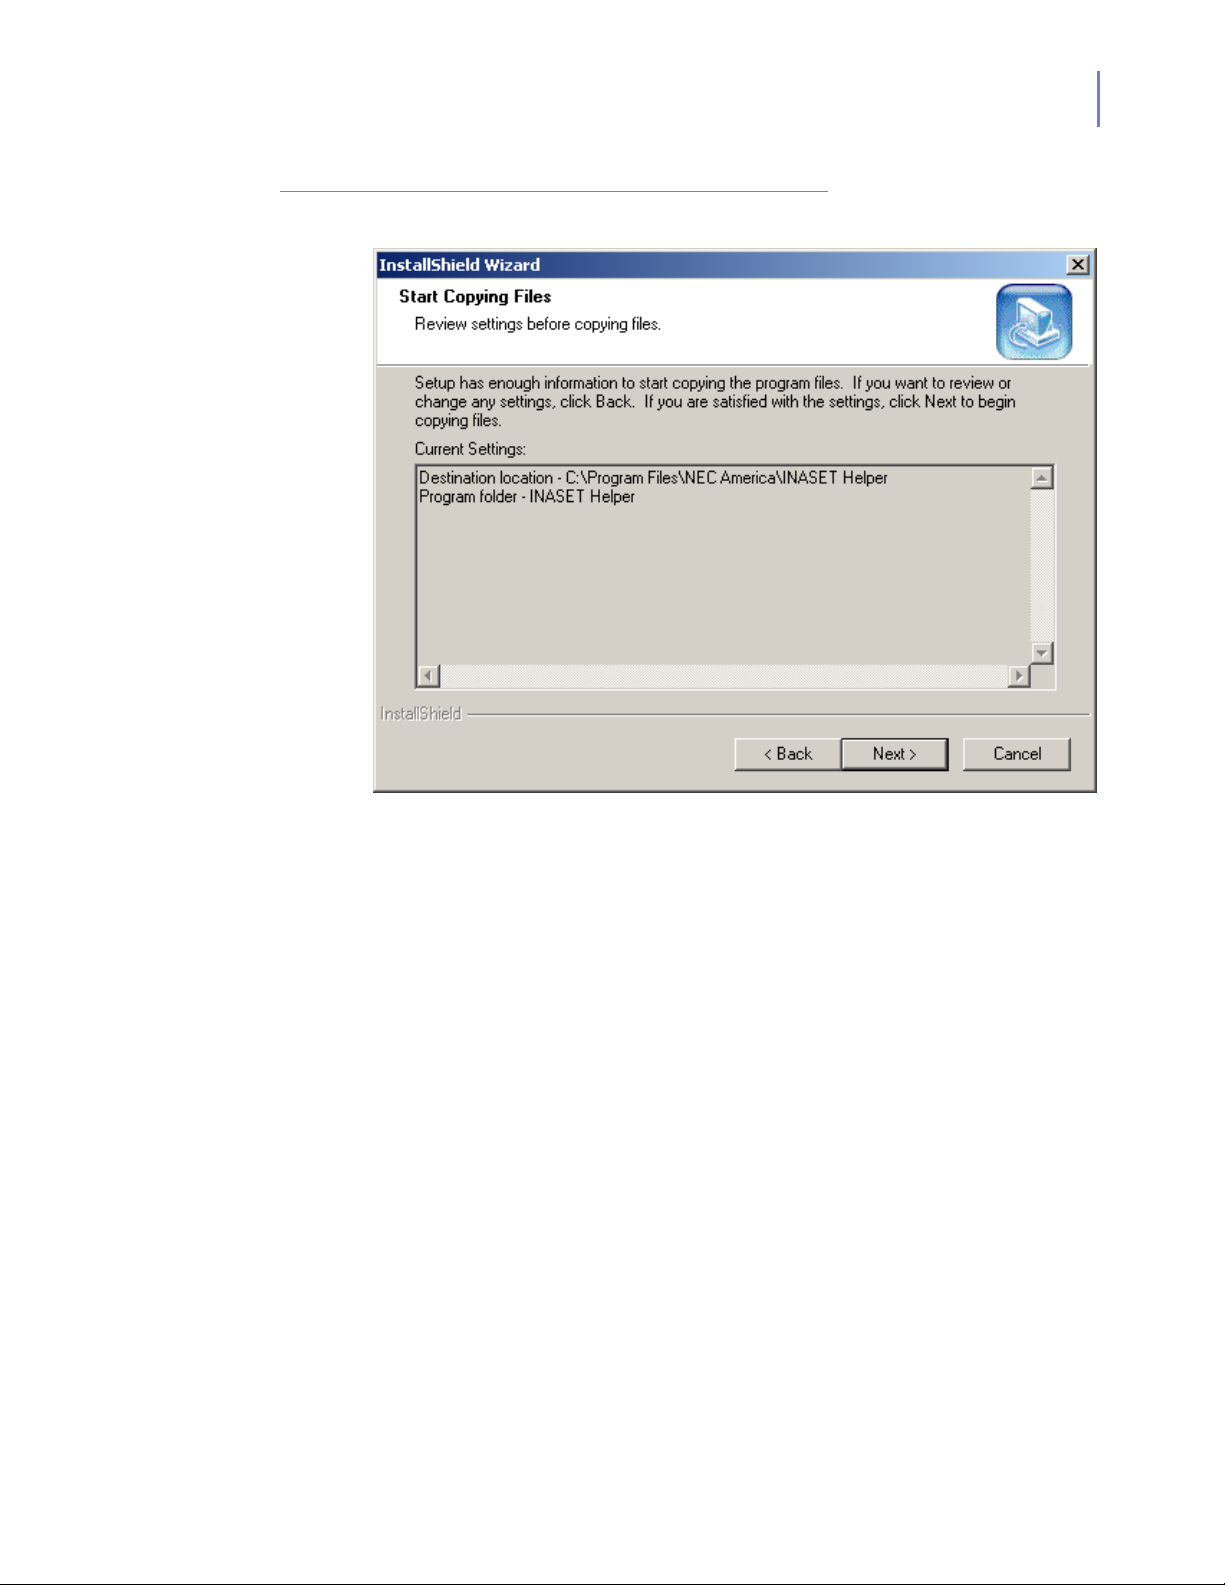
Local Application Mode 5-15
Figure 5-13
InstallShield Wizard Start Copying Files dialog box
Step 6
Step 7
Select the
Next
button to begin copying the program files.
When the installation wizard finishes performing maintenance operations
on INASET Helper,
Figure 5-14 displays.
INASET R2 UserGuide - Revision 1
Page 73
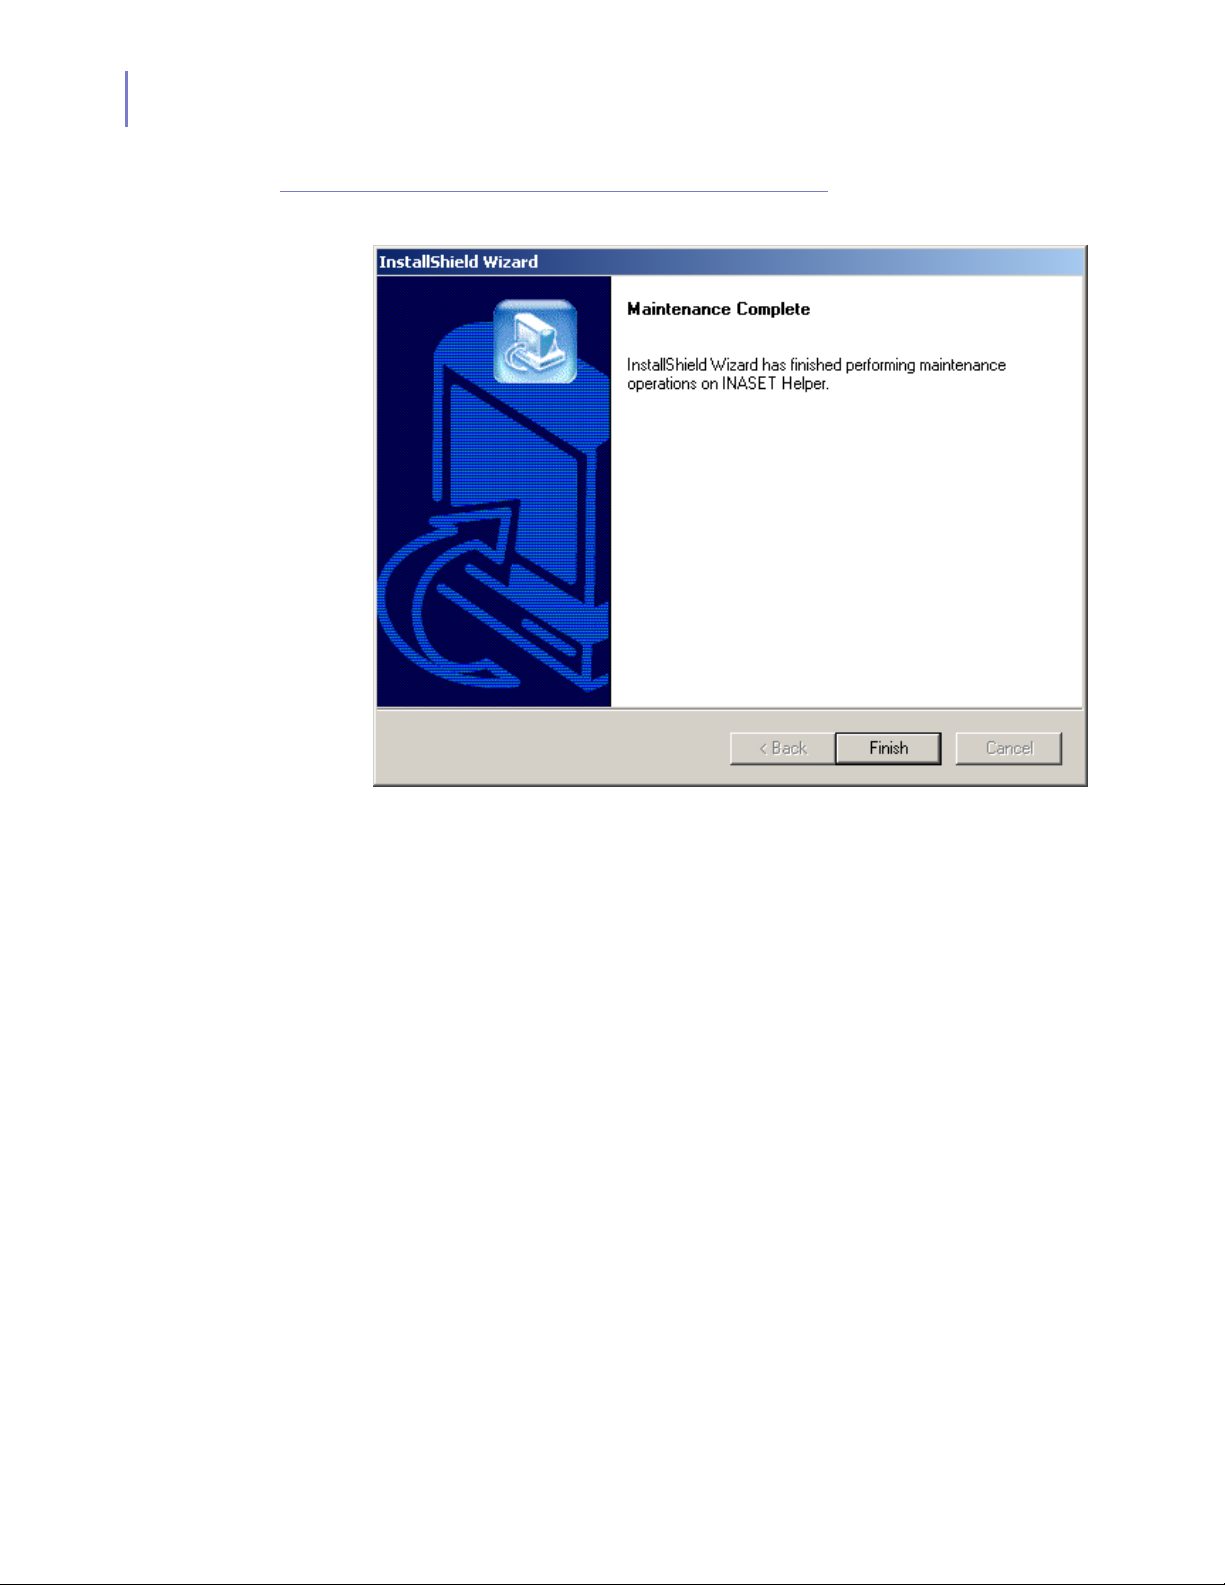
5-16 Local Application Mode
Figure 5-14
InstallShield Wizard Complete dialog box
Step 8
Select the
Finish
button.
Installation of the INASET Helper is complete.
INASET R2 UserGuide - Revision 1
Page 74
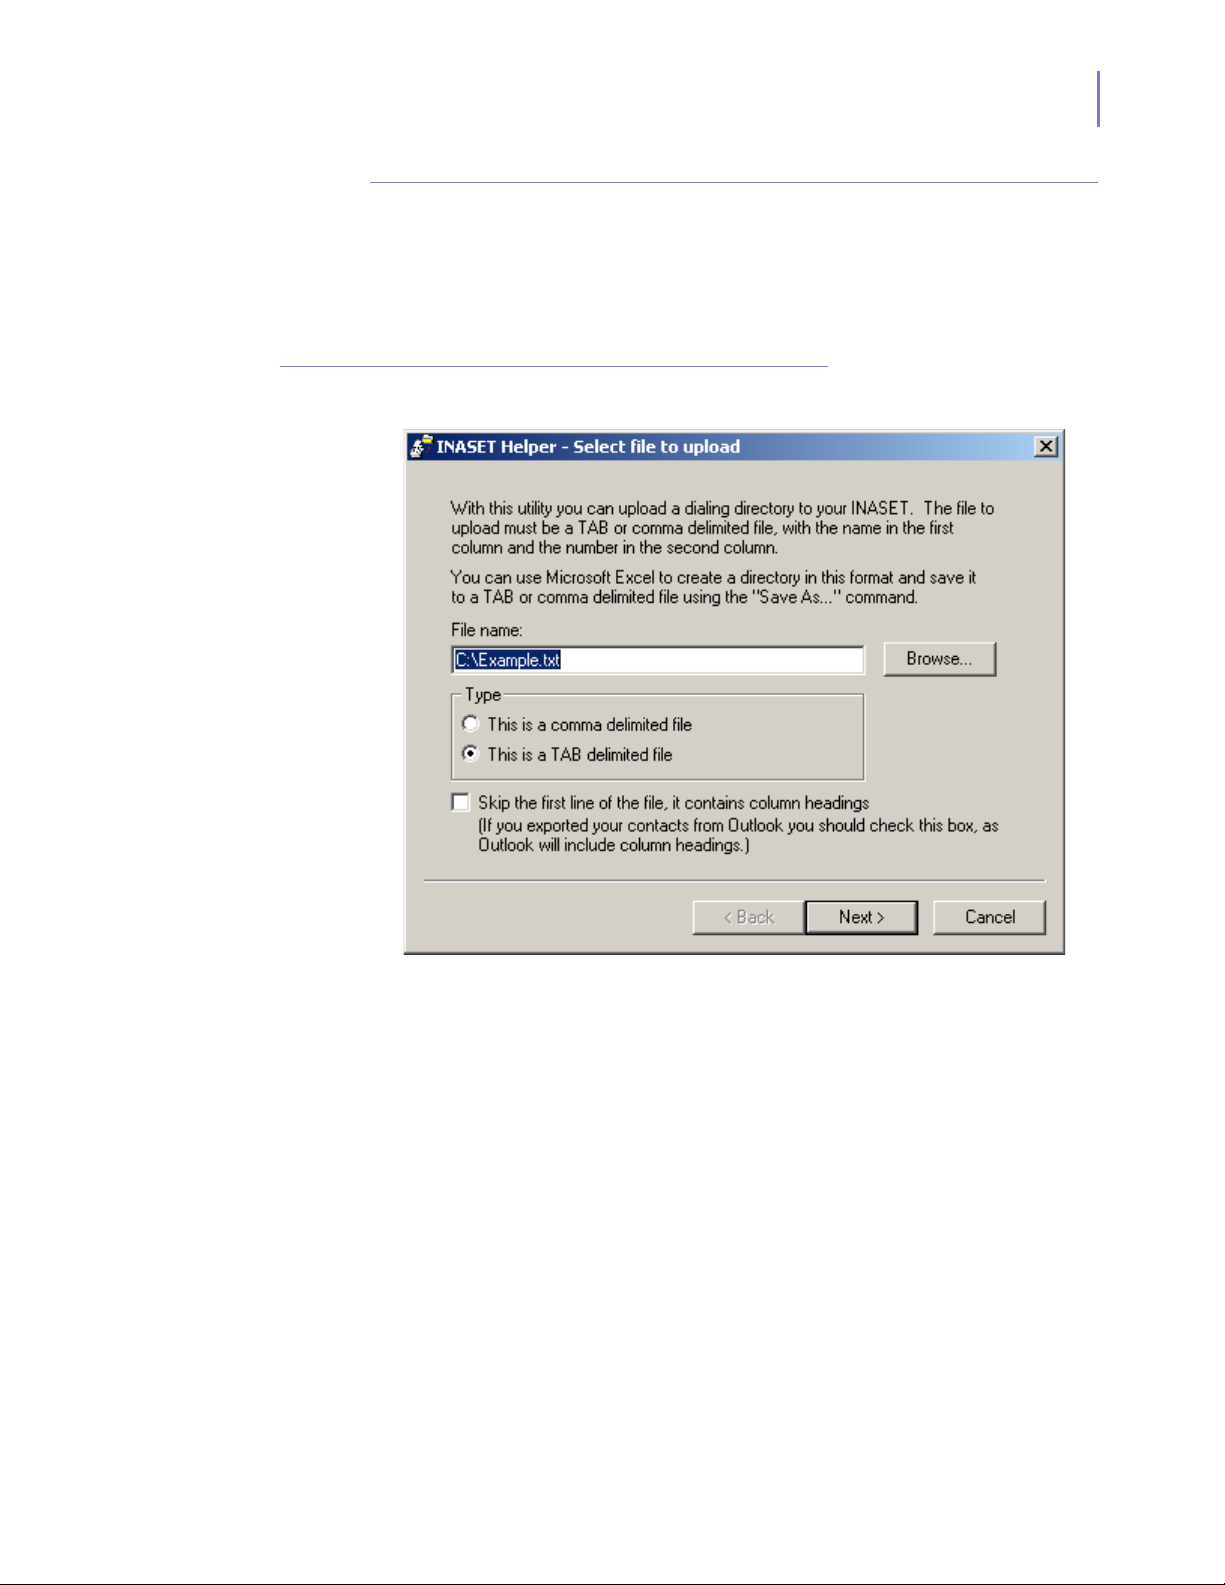
Local Application Mode 5-17
Using INASET Helper
Once the installation process is complete, run the INASET Helper
program using these steps:
Figure 5-15
Step 1
INASET Helper - Select File to Upload dialog box
From the Microsoft Windows Desktop, select
INASET Helper
>
Upload Directory
Start
>
Programs
. Figure 5-15 displays.
>
Step 2
INASET R2 UserGuide - Revision 1
Perform one of the following:
—Enter the file to be uploaded directly in the
the
Next
button.
—To select the file’s location, click the
Next
upload, then click the
button.
Browse
Figure 5-16 displays.
File Name
field then click
button. Select the file to
Page 75
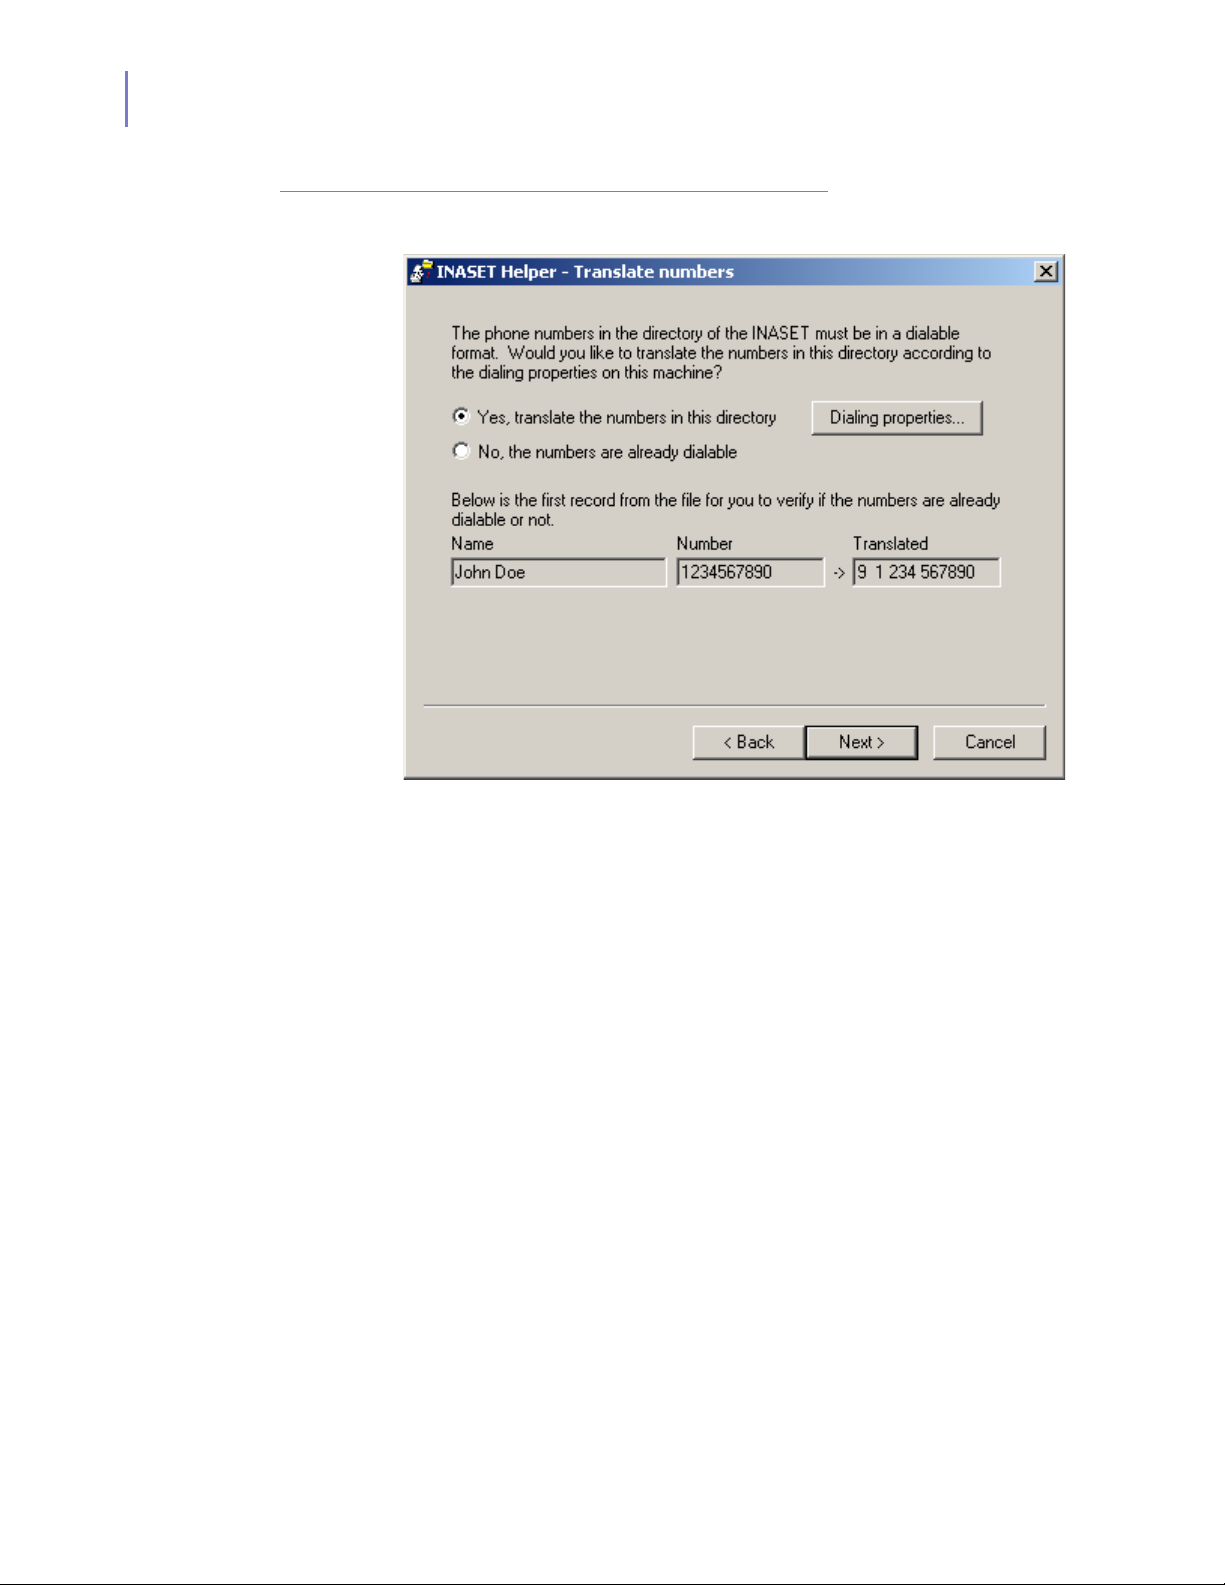
5-18 Local Application Mode
Figure 5-16
INASET Helper - Translate Numbers dialog box
Step 3
The phone numbers in the directory being uploaded will be converted to
a dialable format. Perform one of the following:
—Select the
button, then select the
—Select the
select the
Yes, translated the numbers in this directory
Next
button. Figure 5-17 displays.
No, the numbers are already dialable
Next
button. Figure 5-17 displays.
option button, then
option
—If the dialing properties of the phone numbers must be changed, select
the
Dialing properties
button.
INASET R2 UserGuide - Revision 1
Page 76
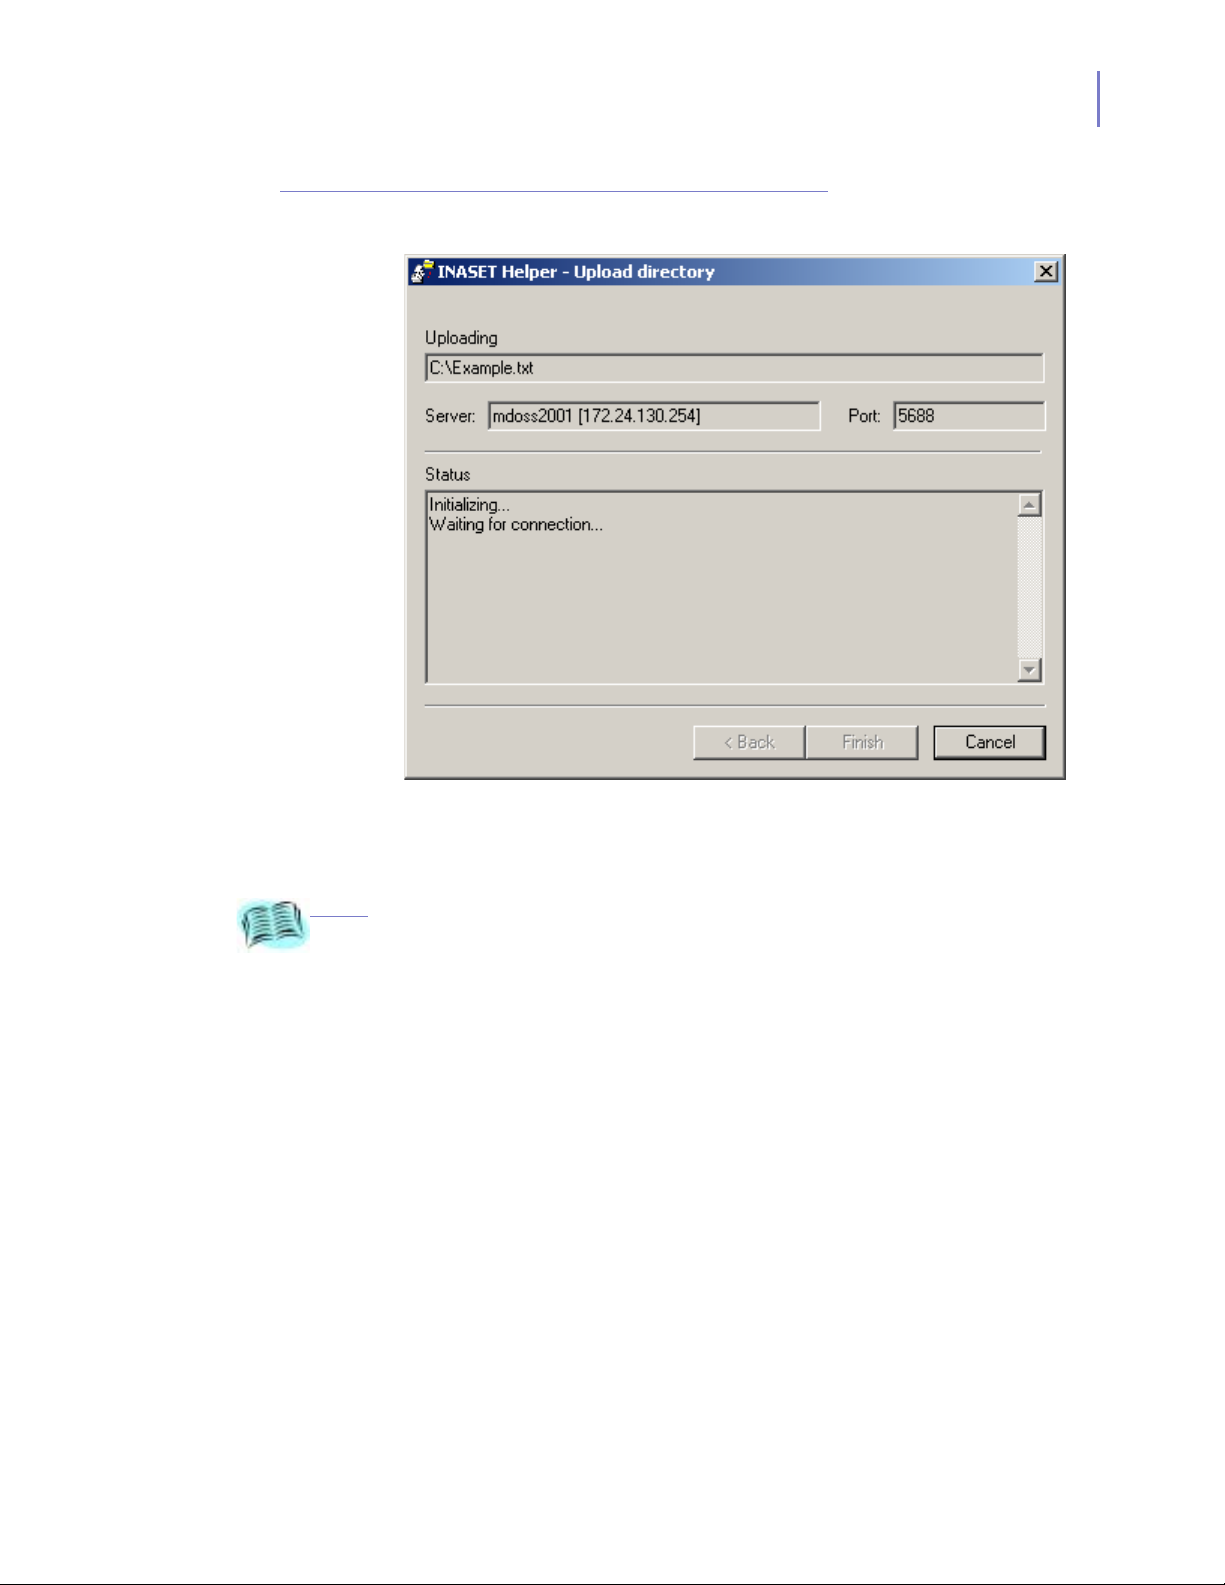
Local Application Mode 5-19
Figure 5-17
INASET Helper - Upload Directory dialog box
REFERENCE
Step 4
Step 5
Refer to Chapter 5 - Local Application Mode, Download on page 5-7 for more
information on how to initiate the download from the INASET R2.
Select the
Finish
button when all uploads are completed.
Now initiate the download process from your INASET R2 phone.
INASET R2 UserGuide - Revision 1
Page 77
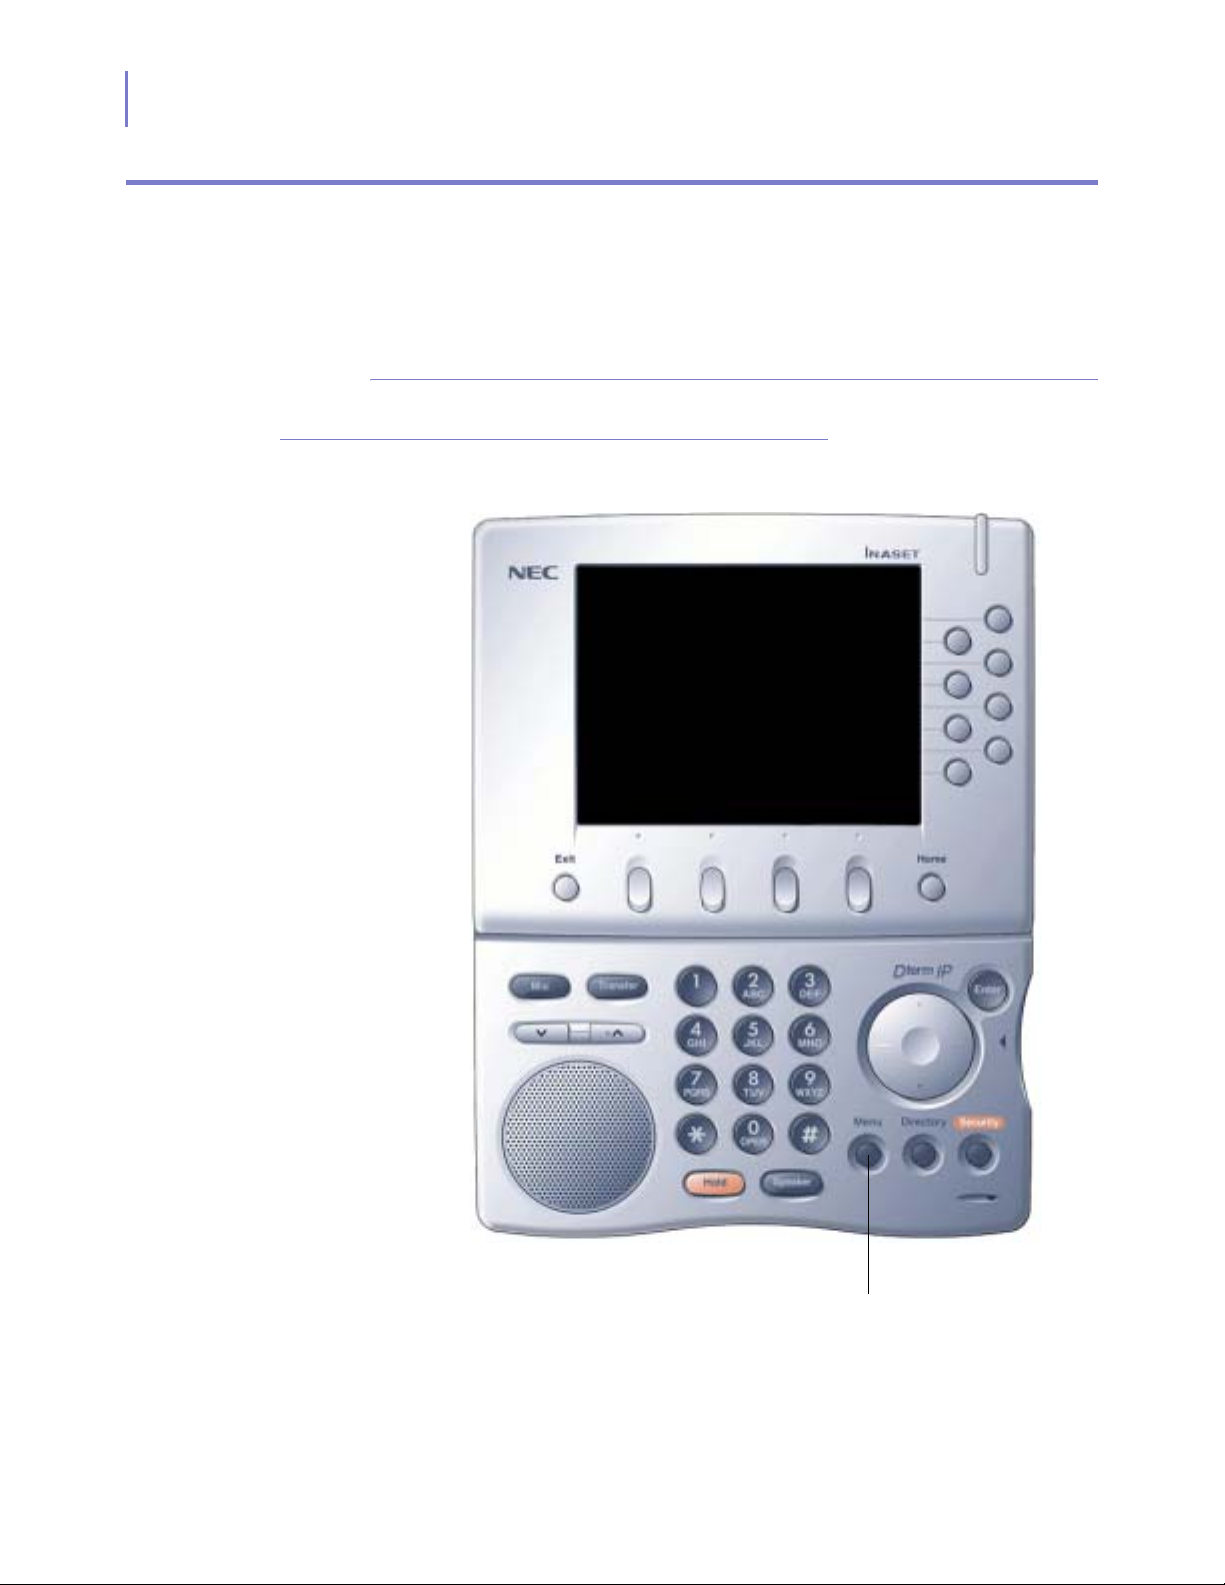
5-20 Local Application Mode
INASET R2 Menu
It is also possible to access the Local Applications menu by pressing the
Menu key on the INASET R2 lower panel (
Home function key as shown in Figure 5-19.
Figure 5-18) followed by the
Accessing Local Applications Using the Menu Key
Figure 5-18
INASET R2 Phone
Menu
INASET R2 UserGuide - Revision 1
Page 78
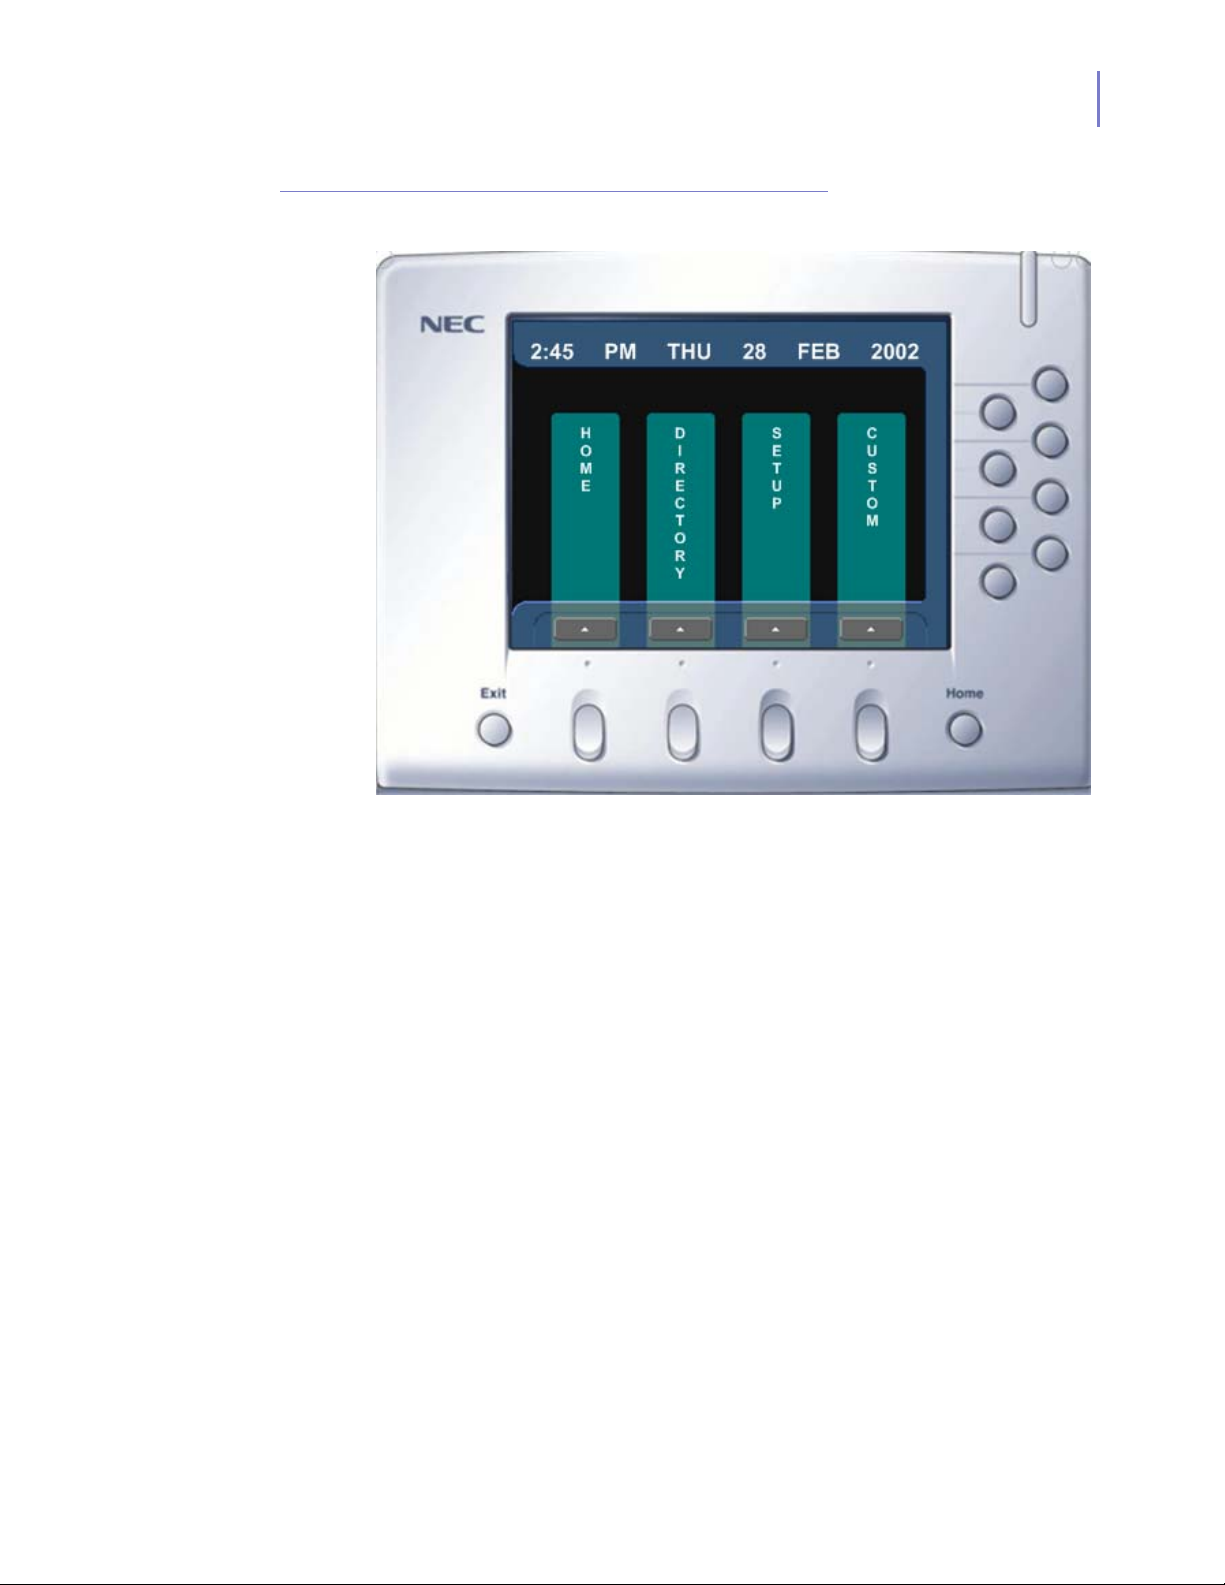
Local Application Mode 5-21
Figure 5-19
INASET R2 Menu - Local Mode window
INASET R2 UserGuide - Revision 1
Page 79

5-22 Local Application Mode
INASET R2 UserGuide - Revision 1
Page 80

6
Network Application Mode
NEC’s Network Application Mode offers OpenWorX applications that are
available in the INASET R2 phone.
The OpenWorx INASET R2 applications add expanded functions to the
INASET R2 phone. This chapter describes these applications and
includes these topics:
Chapter Topics • Using the OpenWorX Applications
• Corporate Directory
• Personal Directory
• Inbound Calls
• Outbound Calls
• Location Status
• Message Reader
• Call Information
• INASET R2 Menu
6-1
REFERENCE
Refer to Chapter 3 - INASET R2 Setup for more information about configuring your
INASET R2 to run OpenWorX applications
INASET R2 User Guide - Revision 1
Page 81
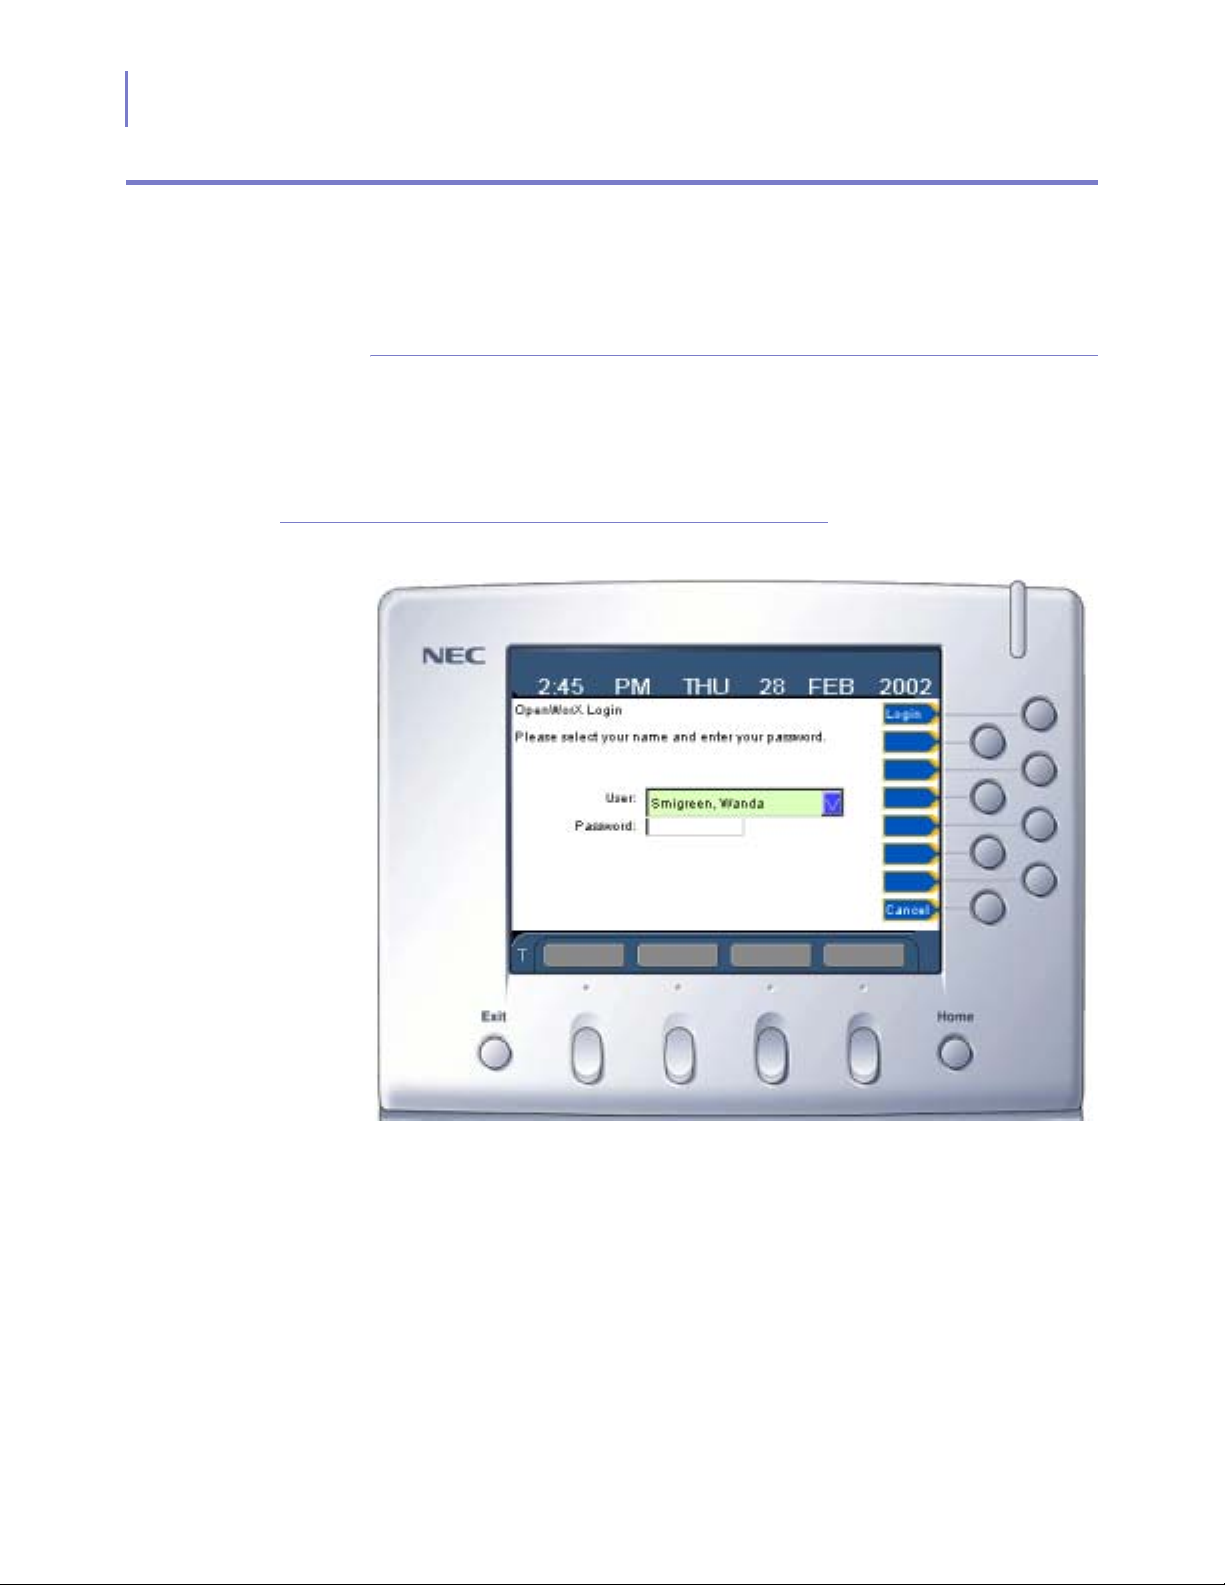
6-2 Network Application Mode
Using the OpenWorX Applications
If your INASET R2 is configured to run OpenWorX applications, you will
either see
OpenWorX Login
If multiple people are sharing the INASET R2 device, a login is
necessary when first starting the OpenWorX applications. After selecting
NECAM OWX from the INASET R2 menu, the OpenWorX Login window
displays (
Figure 6-1 or Figure 6-2 when your phone boots.
Figure 6-1).
Figure 6-1
OpenWorX Login window
PersonalCorporate Inbound Outbound
Step 1
Step 2
Step 3
Press the cursor key left/right to scroll the
User
names to your login
name.
Press the function key to select the password field and enter your login
password using the dial keys. (See
Entering Text Using the Dial Keys
in
this chapter.)
Press the function key for
Login
. The OpenWorX Applications menu
displays.
INASET R2 User Guide - Revision 1
Page 82

Network Application Mode 6-3
Entering Text Using the Dial Keys
Key input into text fields is similar to that of a mobile phone. The
number pad provides both numeric input as well as alpha input. The
INASET SDK handles the functionality automatically for a text field that
has focus.
There are three modes of data entry:
•Numeric
• Uppercase
•Lowercase
The user can toggle between uppercase, lower case, and numeric mode
by repeatedly pressing the “#” key. An application can explicitly enable
an input field to the numeric mode via the INASET R2. Depending on the
mode, the user can proceed through the characters by repeatedly
pressing the key. A pause of more than 1.5 seconds between key
presses will cause the cursor to advance to the next input position.
6-1 through Tab le 6 -3 provide summaries of the key inputs based on the
input mode.
Tab le
NOTE
Table 6-1
The * key (asterisk) is used to step through special characters in the following order
for both the uppercase and the lower case mode:
* # . / : ~ ! @ $ % ^ & ( ) ‘ ? “ _ + - = [ ] { } < > , ; \
Text Entry - Uppercase Mode
Number of Key Presses
1 2 3 4 5 6 7 8 9 10
1 key . , \ 1 ? ! “ @ : ;
2 key A B C 2
3 key D E F 3
4 key G H I 4
5 key J K L 5
6 key M N O 6
7 key P Q R S 7
8 key T U V 8
9 key W X Y Z 9
0 key
space
0
# key
INASET R2 User Guide - Revision 1
lowercase numeric uppercase
Page 83

6-4 Network Application Mode
Table 6-2
Table 6-3
Text Entry - Lowercase Mode
Number of Key Presses
1 2 3 4 5 6 7 8 9 10
1 key . , \ 1 ? ! “ @ : ;
2 key a b c 2
3 key d e f 3
4 key g h i 4
5 key j k l 5
6 key m n o 6
7 key p q r s 7
8 key t u v 8
9 key w x y z 9
0 key
# key
Text Entry - Numeric Mode
space
numeric uppercase lowercase
0
Number of Key Presses
1 2 3
1 key 1
2 key 2
3 key 3
4 key 4
5 key 5
6 key 6
7 key 7
8 key 8
9 key 9
0 key 0
* key * # .
# key
The following example shows the key sequence used to enter text.
Example:
To enter the text Smith:
uppercase lowercase numeric
Step 1
Step 2
Press # to select upper case text entry (A indicator).
Press 7 four times.
INASET R2 User Guide - Revision 1
Page 84

Network Application Mode 6-5
Step 3
Step 4
Step 5
Step 6
Step 7
Press # to select lower case text entry (a indicator).
Press 6 once.
Press 4 three times.
Press 8 once.
Press 4 two times.
The following example shows the key sequence to enter a phone
number.
Example:
Step 1
Step 2
Step 3
Step 4
Step 5
Step 6
Step 7
Step 8
To enter the number 272-1290:
Press # to select number entry (1 indicator).
Press 2.
Press 7.
Press 2.
Press 1.
Press 2.
Press 9.
Press 0.
INASET R2 User Guide - Revision 1
Page 85
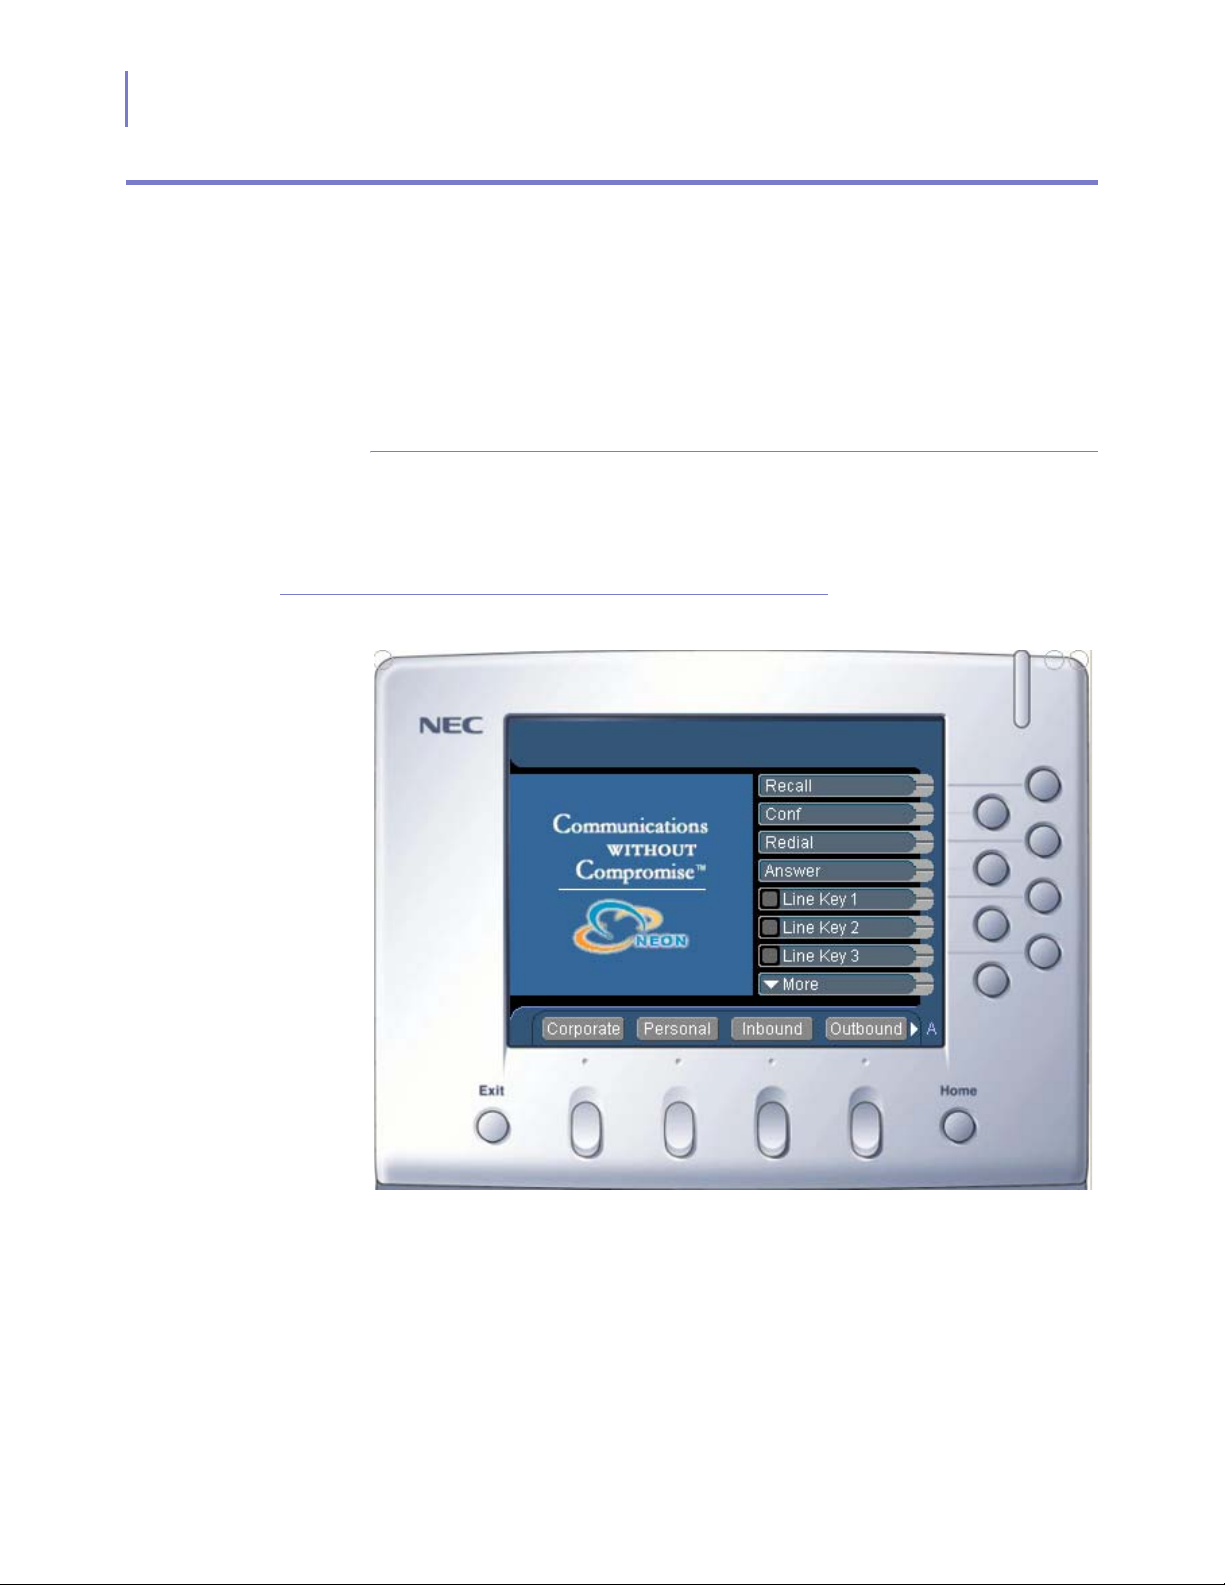
6-6 Network Application Mode
Corporate Directory
The OpenWorX Corporate Directory application lists the names and
phone numbers for a corporate-wide directory. You can search the entire
corporate directory for a an extension or name. Once an entry is
located, detailed information and alternate numbers for the entry can be
viewed. You can then dial the phone number corresponding to that
entry.
Using Corporate Directory
To use the Corporate Directory application, from the OpenWorX
Applications menu window (
the adjacent function key on the INASET R2 panel.
Figure 6-2) select Corporate by pressing
Figure 6-2
OpenWorX Applications menu window
INASET R2 User Guide - Revision 1
Page 86
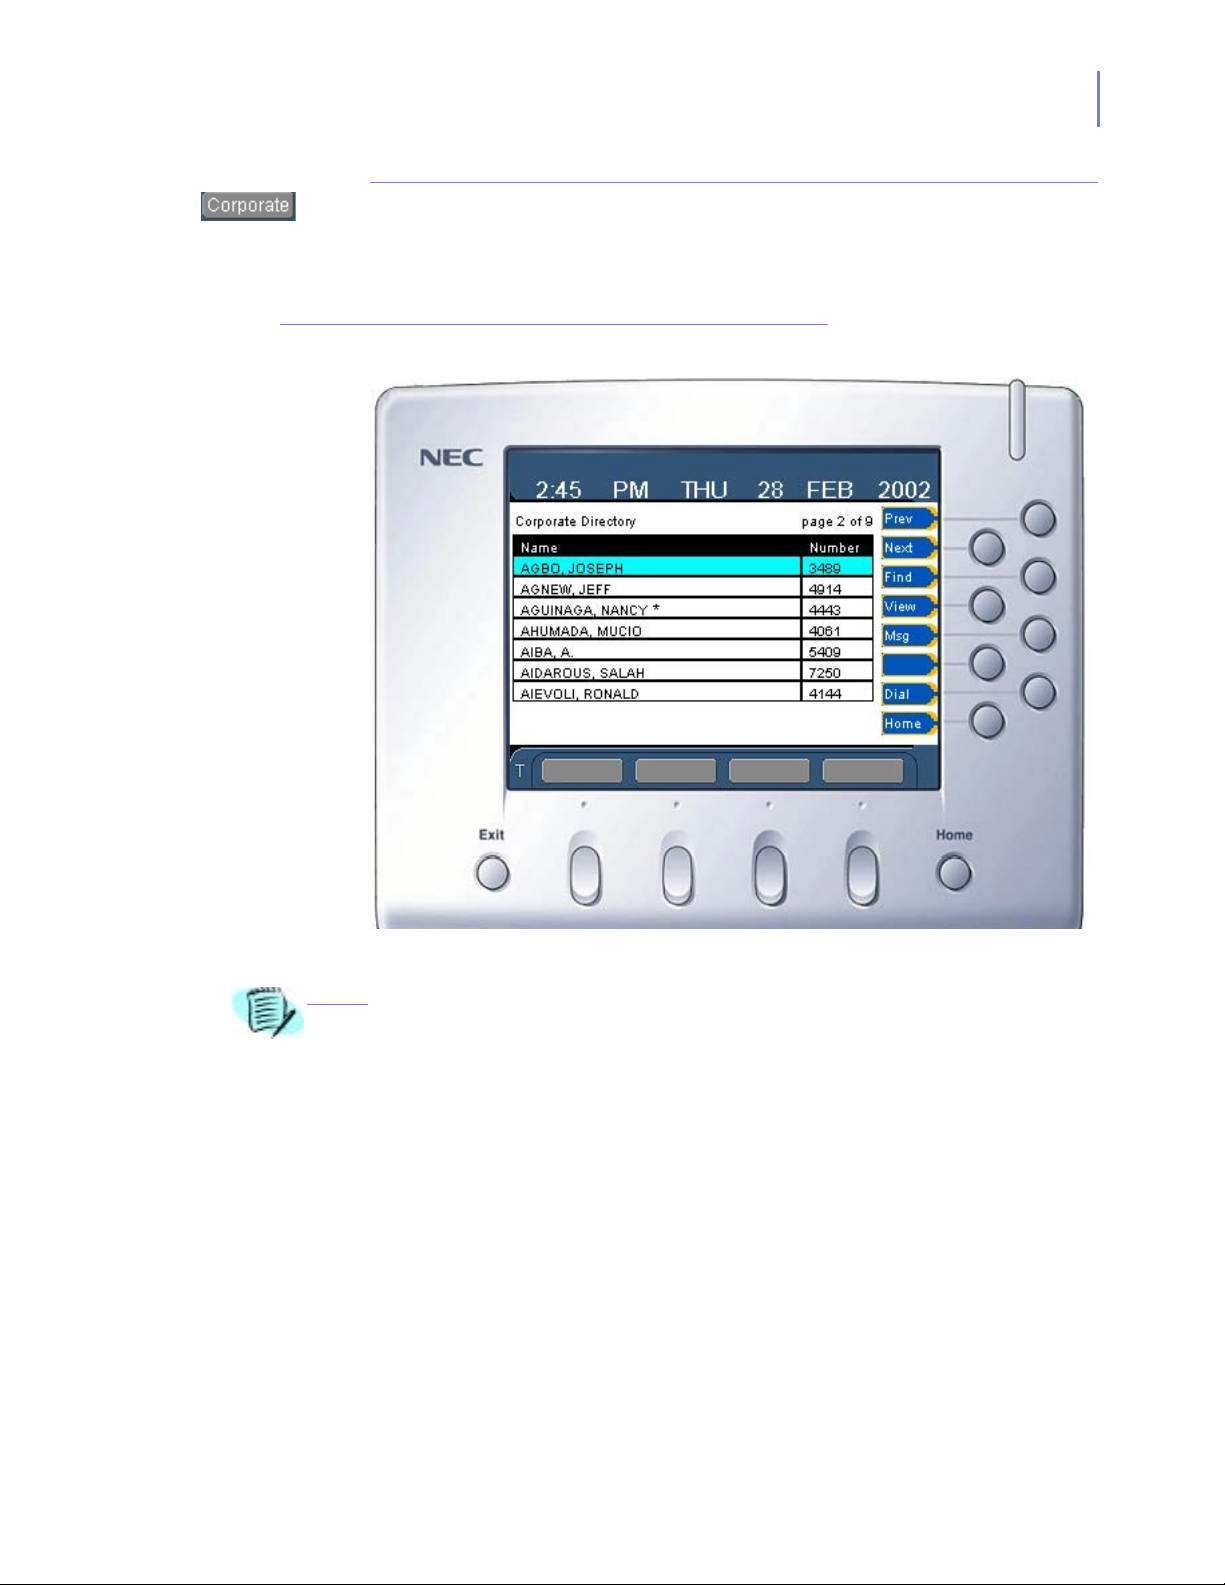
Network Application Mode 6-7
Corporate Directory Window
When Corporate is selected from the OpenWorX Applications menu, the
Corporate Directory window will display on the INASET R2 screen
(
Figure 6-3).
Figure 6-3
Corporate Directory window
PersonalCorporate Inbound Outbound
If you do a search (not a blank search that returns the entire directory) the first few
characters of what was entered in the Search field are displayed at the top of the
NOTE
window in the center in red.
• Press the function keys for Next and Prev to display additional
directory pages.
• Press the function key for Home to return to the INASET R2
OpenWorX main menu window.
INASET R2 User Guide - Revision 1
Page 87
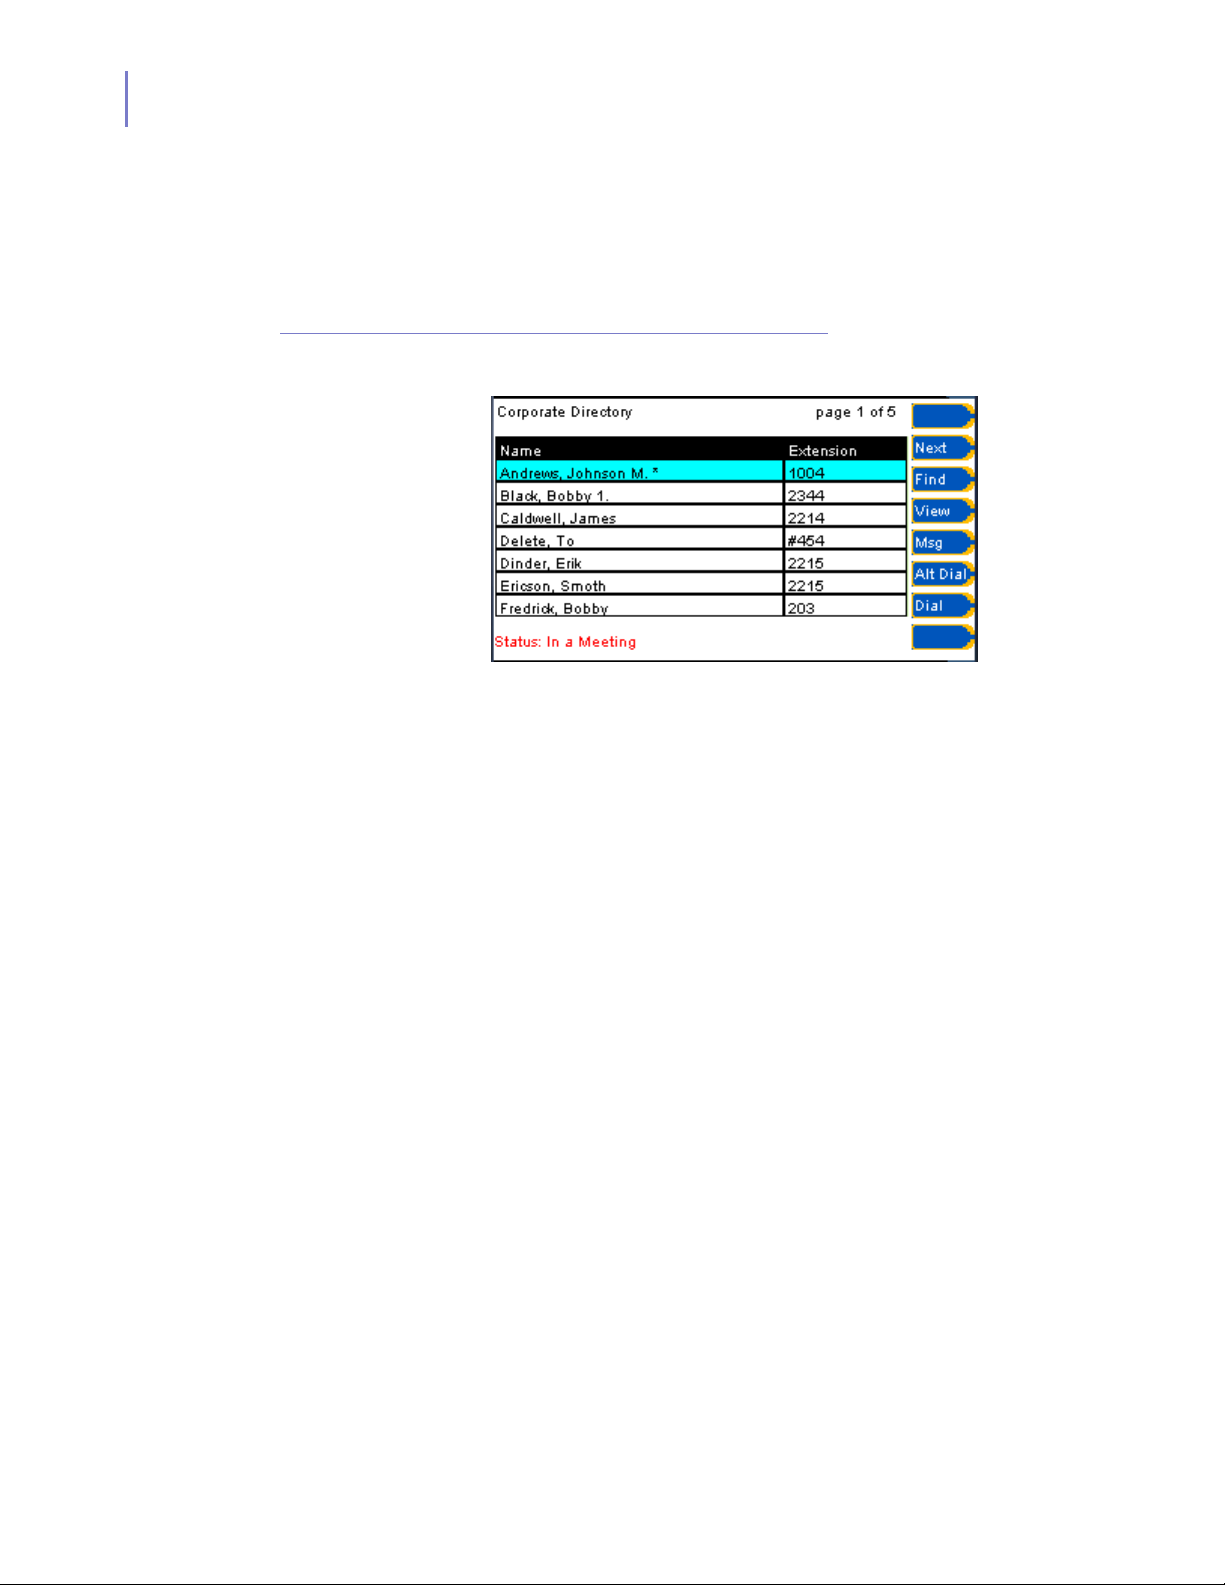
6-8 Network Application Mode
Status Information
A directory entry that displays an asterisk (*) at the end of the name
indicates the person may be currently unavailable. When highlighted,
their location, time of return, and other information will display in red at
the bottom of the directory (see the
Figure 6-4 example).
Figure 6-4
Corporate Directory window (Detail)
INASET R2 User Guide - Revision 1
Page 88
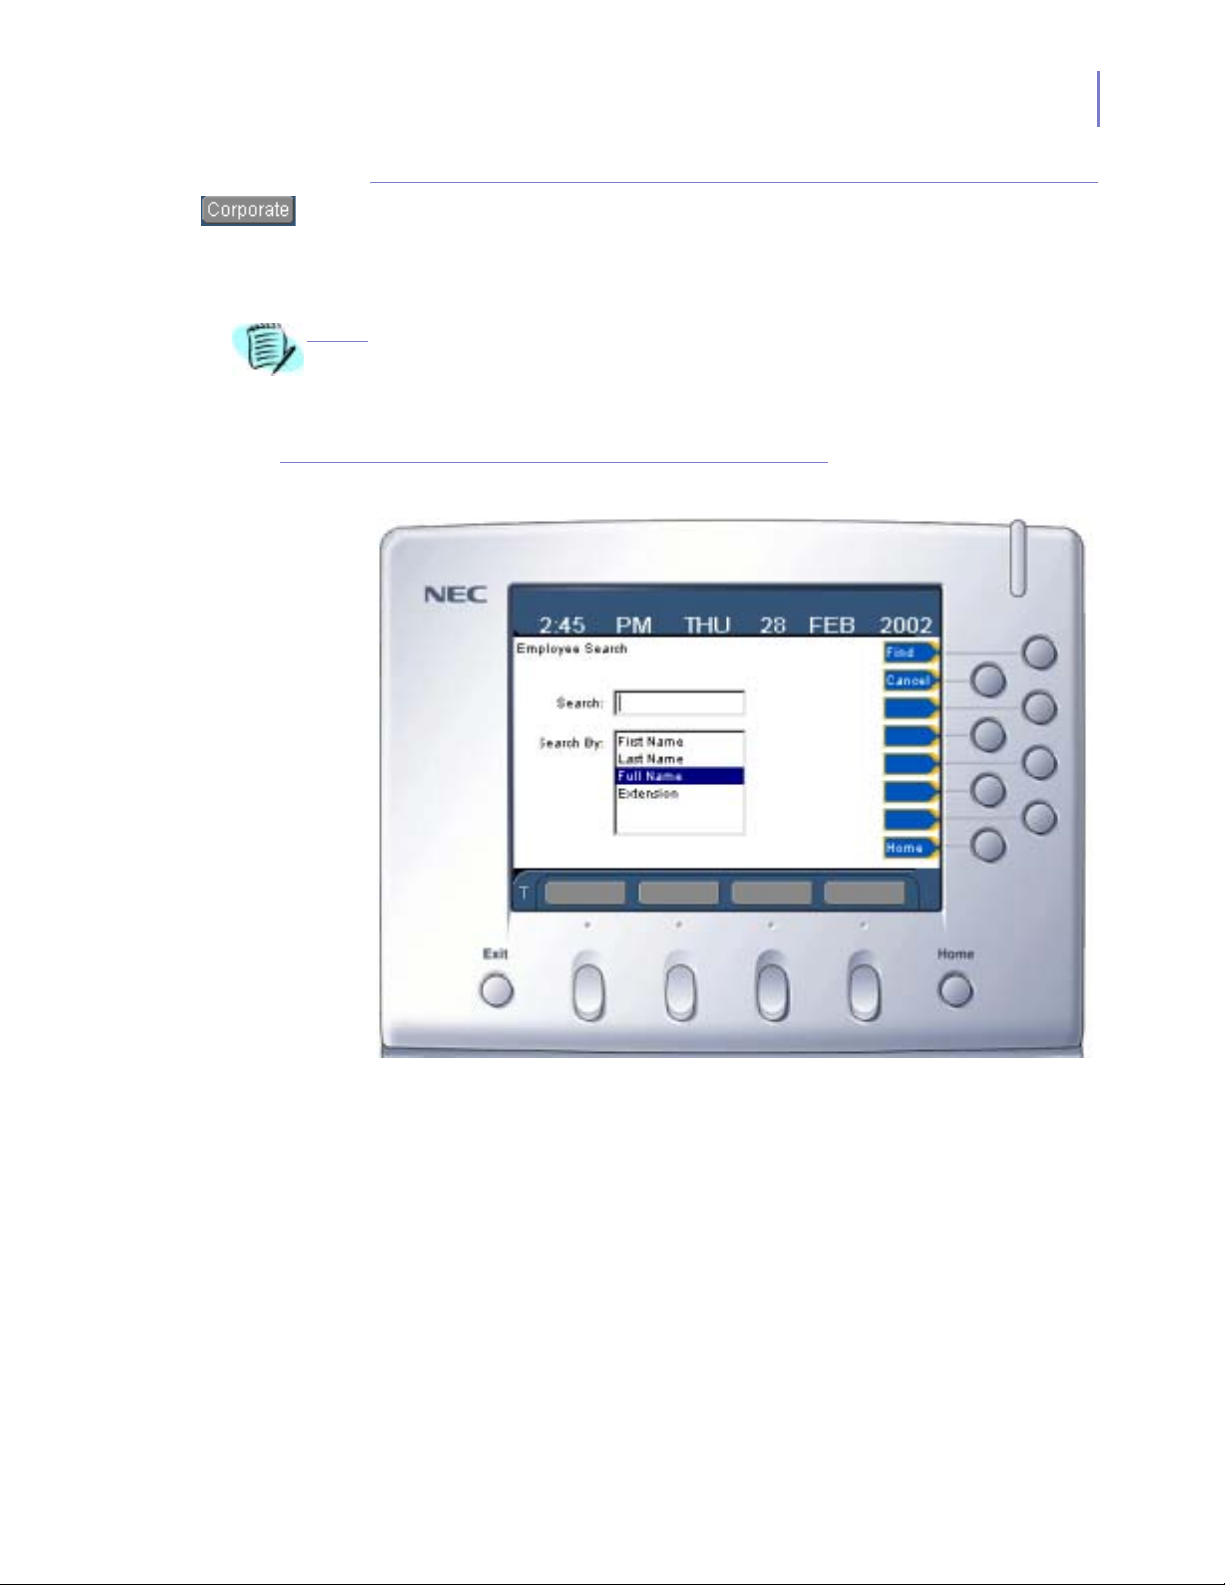
NOTE
Network Application Mode 6-9
Finding a Name and Number
To find a name or extension number in the directory, press the function
key for Find on the Corporate Directory window. The directory
Employee Search window displays (
Your are able to do a quick search in the Corporate Directory window by pressing a
dial key while in a character (lower or upper) entry mode, which will cause the
character you entered to be displayed in red at the top of the window, and then
Enter
pressing the
Search window, entered that one character in the Search field, selected Full Name in
the Search By field, and press
key. This will do a search as if you had gone to the Employee
Find
.
Figure 6-5).
Figure 6-5
Corporate Directory - Employee Search window
PersonalCorporate Inbound Outbound
Step 1
Step 2
Step 3
Step 4
INASET R2 User Guide - Revision 1
Using the dial keys, enter the desired name or extension number value in
the
Search
Press the cursor key down to highlight the
field. (See
Entering Text Using the Dial Keys
Search By
field. Press the
in this chapter.)
cursor key left/right to scroll to a category. (Default category is Full
Name.)
Press the function key for
Find
to search the directory. The Corporate
Directory window will display with all entries meeting the search
parameters.
Press the function key for
Cancel
to return to the main Corporate
Directory window.
Page 89
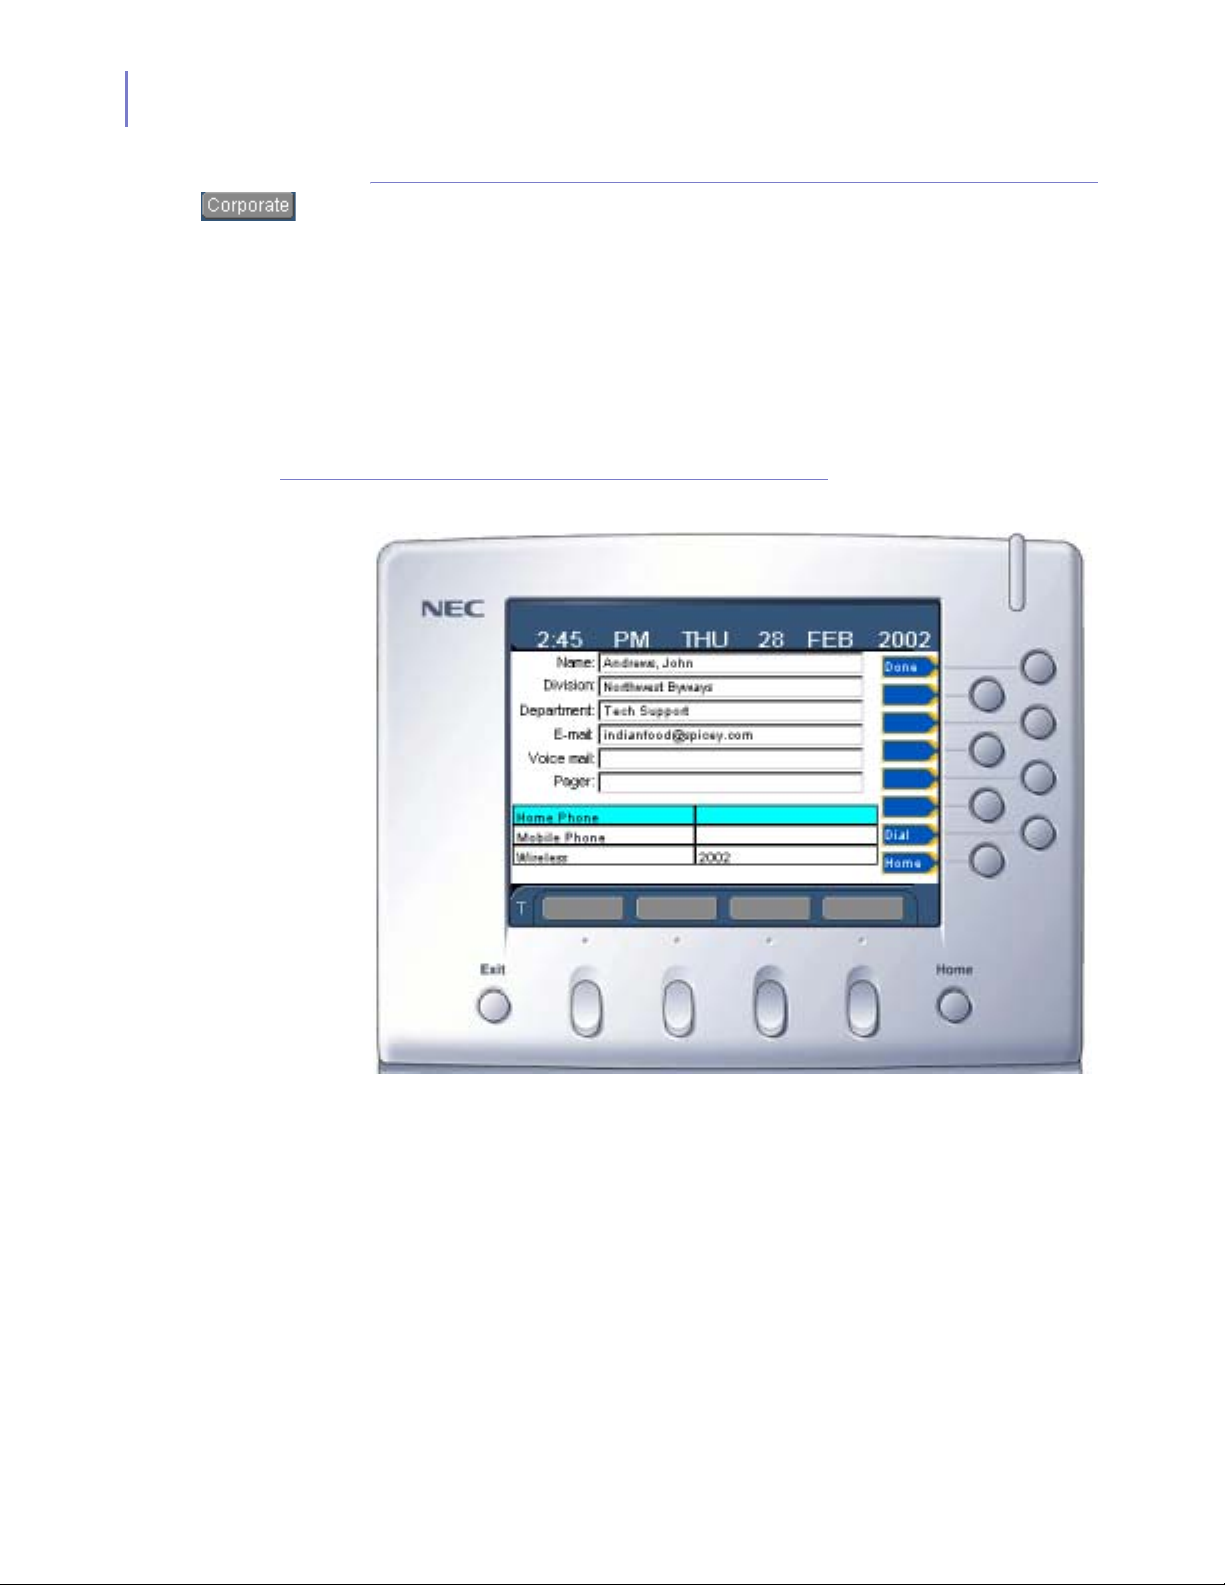
6-10 Network Application Mode
Viewing Entry Details
The Corporate Directory can contain additional information about an
entry including: Division, department, building address, email address,
and alternate numbers where the person this entry corresponds to may
be reached. These alternate numbers can include pager, cell phone,
voice mail, and other location extension numbers.
To view these details for a directory entry, use the cursor key on the
INASET R2 lower panel to highlight a directory entry on the Corporate
Directory window. Press the function key for View on the Corporate
Directory window. The directory View window displays (
Figure 6-6).
Figure 6-6
Corporate Directory - View window
PersonalCorporate Inbound Outbound
• Press the function key for Done to return to the Corporate Directory
window.
Dialing an Alternate Number
The home phone, mobile phone, or wireless number of an entry can be
dialed directly from the View window. Use the cursor key to highlight
the number to dial, and press the function key for Dial. The selected
number will be dialed.
INASET R2 User Guide - Revision 1
Page 90
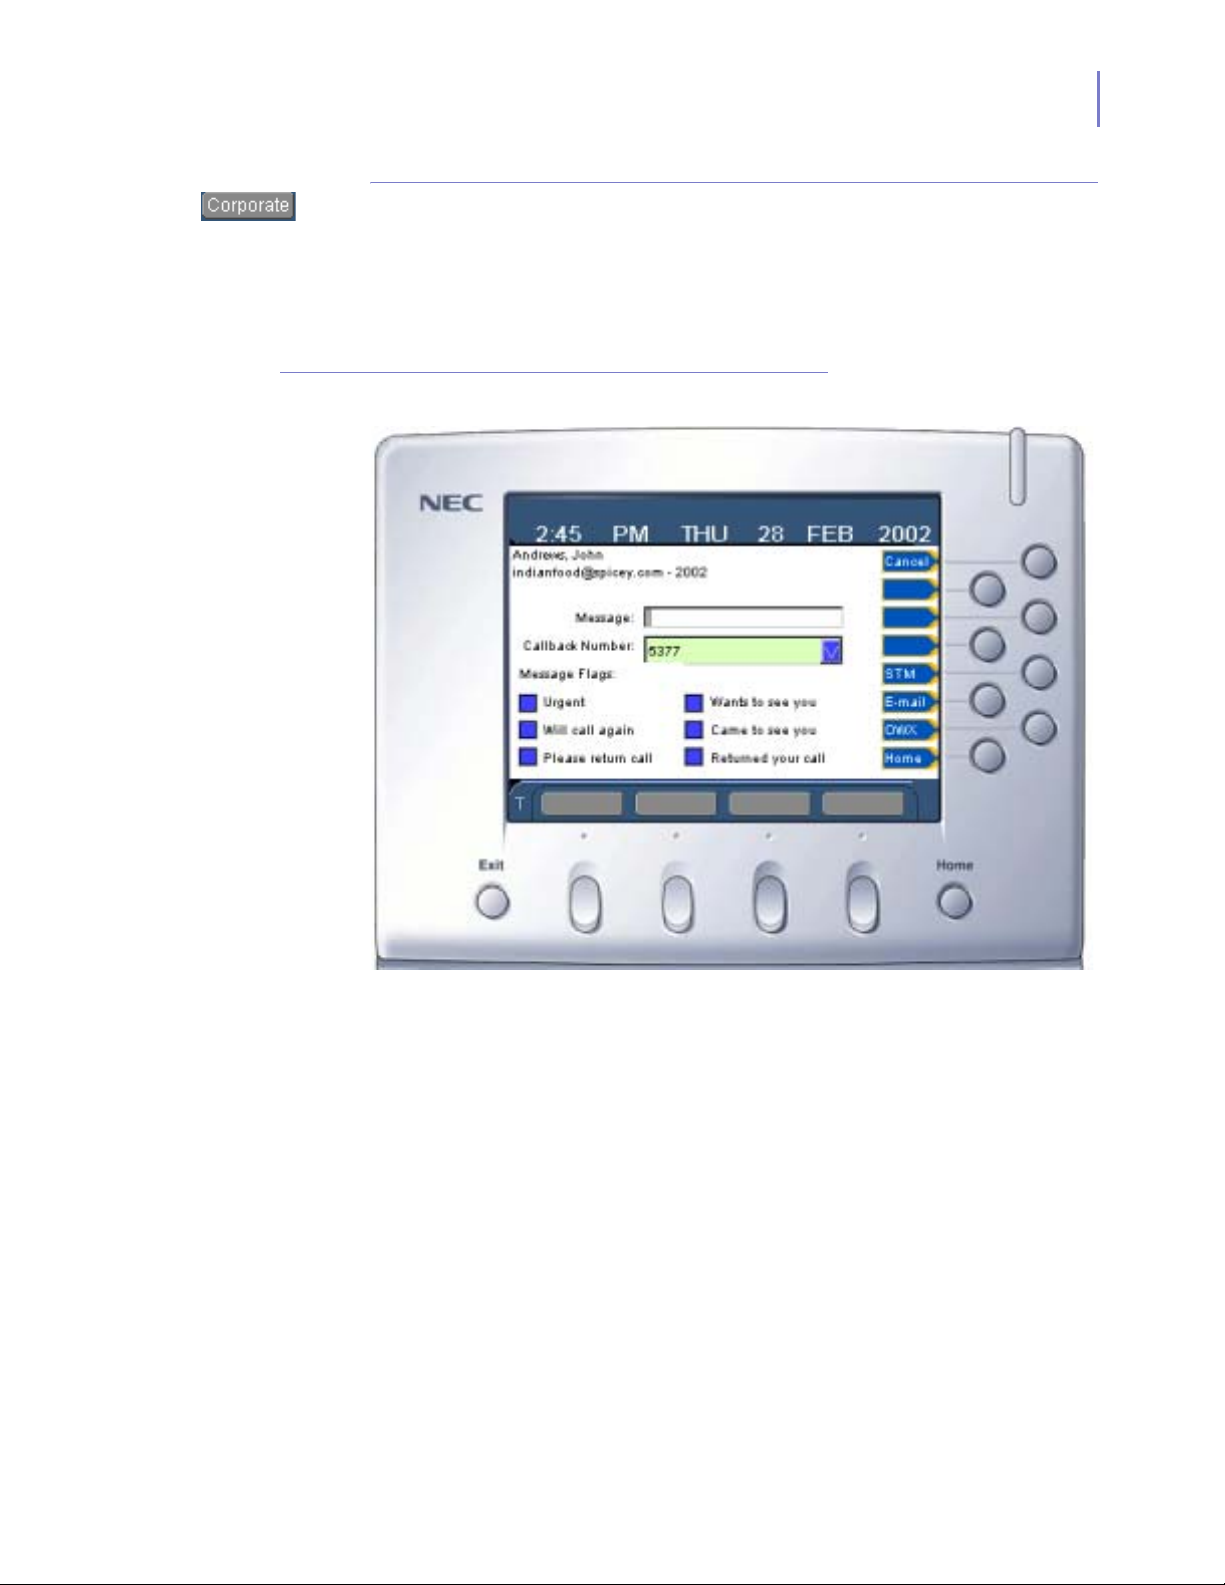
Network Application Mode 6-11
Sending a Message
A text message can be sent to any selected directory entry. To send a
message, use the cursor key on the INASET R2 lower panel to highlight
a directory entry on the Corporate Directory window. Press the function
key for Msg on the Corporate Directory window. The directory Msg
window displays (
Figure 6-7)
Figure 6-7
Corporate Directory - Msg window
PersonalCorporate Inbound Outbound
Step 1
Step 2
Step 3
Step 4
INASET R2 User Guide - Revision 1
Enter the message text in the
Entering Text Using the Dial Keys
Press the cursor key down to select the
Message
field using the dial keys. (See
in this chapter.)
Callback Number
field. Press
the cursor key left/right to select a callback number if you have more than
one listed in the directory.
Press the cursor key down to highlight one of the
message. With the desired flag highlighted, press the
Message Flags
Enter
key to select
for this
that flag. The cursor key actually navigates through the 6 message flags,
any number of which (from all to none) can be selected. They can also
be toggled by pressing enter or the left-right cursor keys.
The available Send options will be shown at right. (Not all options will be
available for each recipient.)
—Press the function key for
STM
to send the message via Short Text
Messaging.
—Press the function key for
E-mail
to send the message via E-mail.
Page 91

6-12 Network Application Mode
NOTE
—Press the function key for
OWX
to send the message via OpenWorX
messaging.
The STM key is available if the entry has an associated wireless number (displayed
at the top if it exists), and if selected, this sends a Short Text Message to that
wireless extension.
The Email key is available if the entry has an e-mail address (also displayed at the
top if it exists), and if selected, an email is sent to that address.
OWX is always available, and if pressed, it sends an OpenWorX message to the
employees extension (these messages are what are viewed in the message reader
screen).
INASET R2 User Guide - Revision 1
Page 92
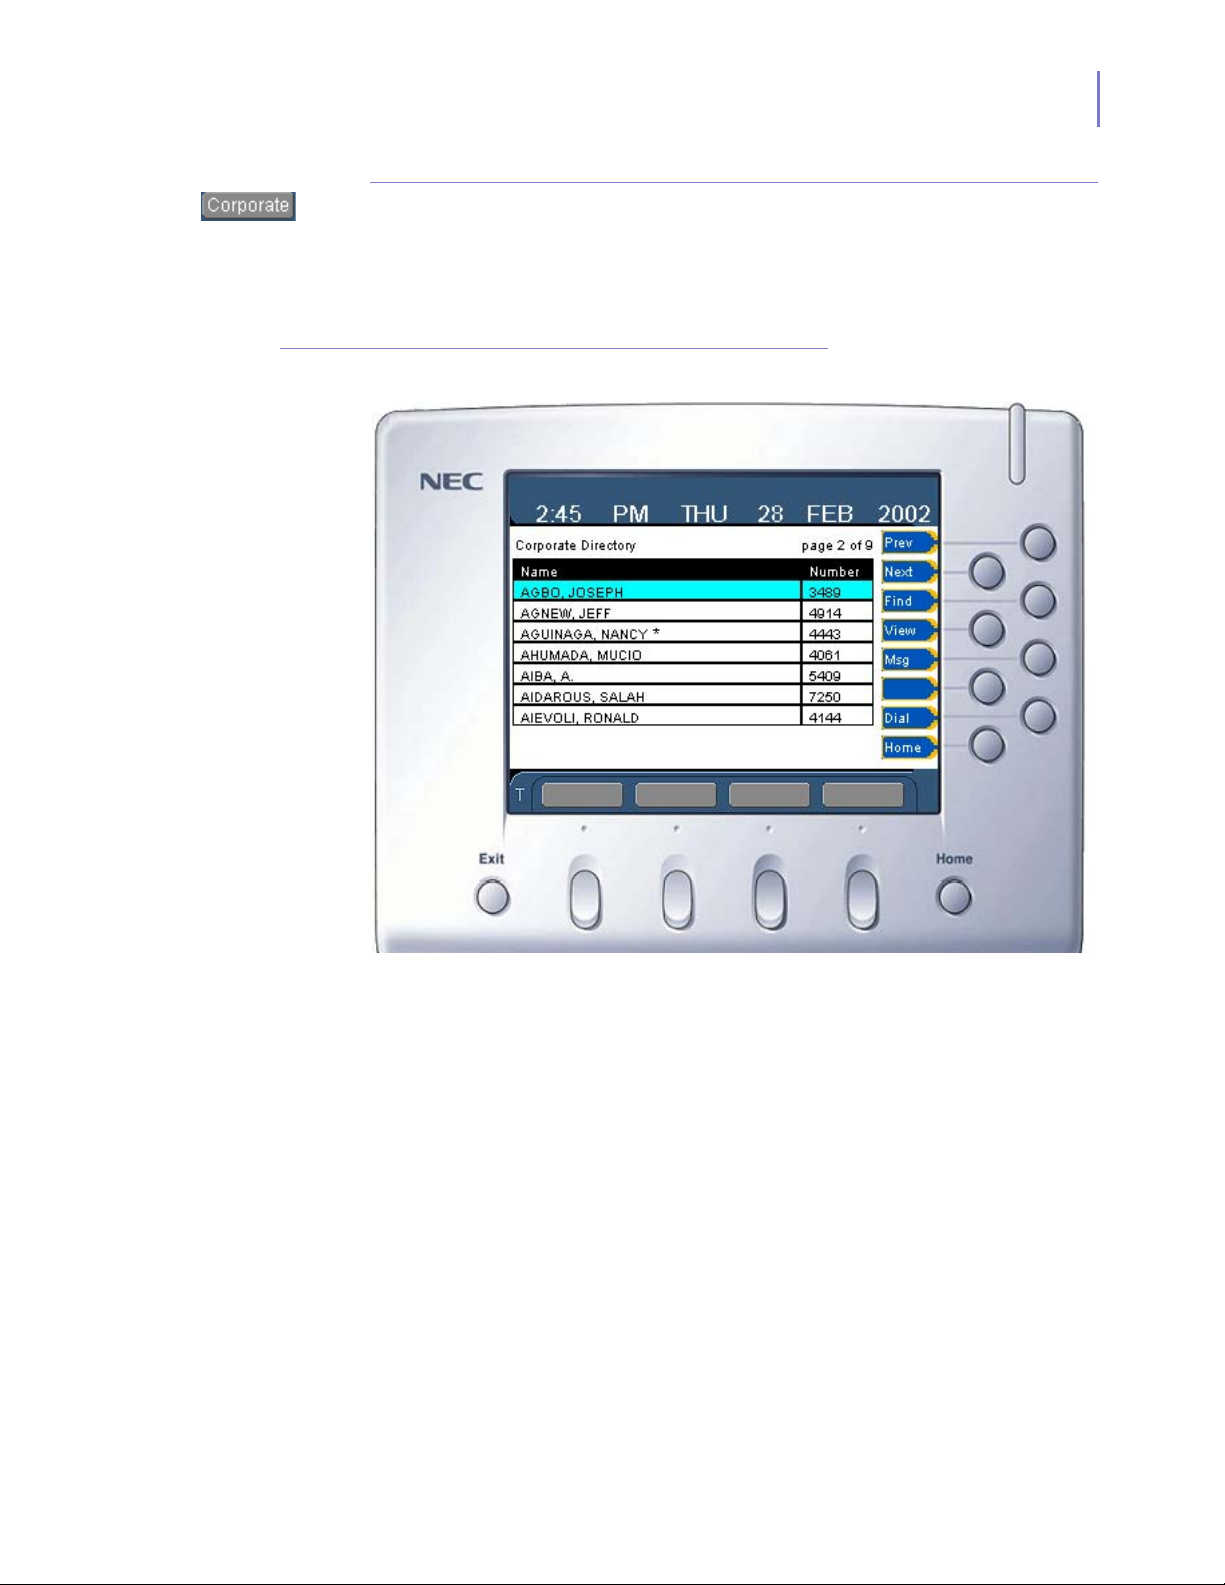
Network Application Mode 6-13
Dialing a Number
To dial an extension number directly from the Corporate Directory, use
the cursor key on the INASET R2 lower panel to highlight a directory
entry (
selected directory entry.
Figure 6-8). Press the function key for Dial to place a call to the
Figure 6-8
Corporate DIrectory window
PersonalCorporate Inbound Outbound
INASET R2 User Guide - Revision 1
Page 93
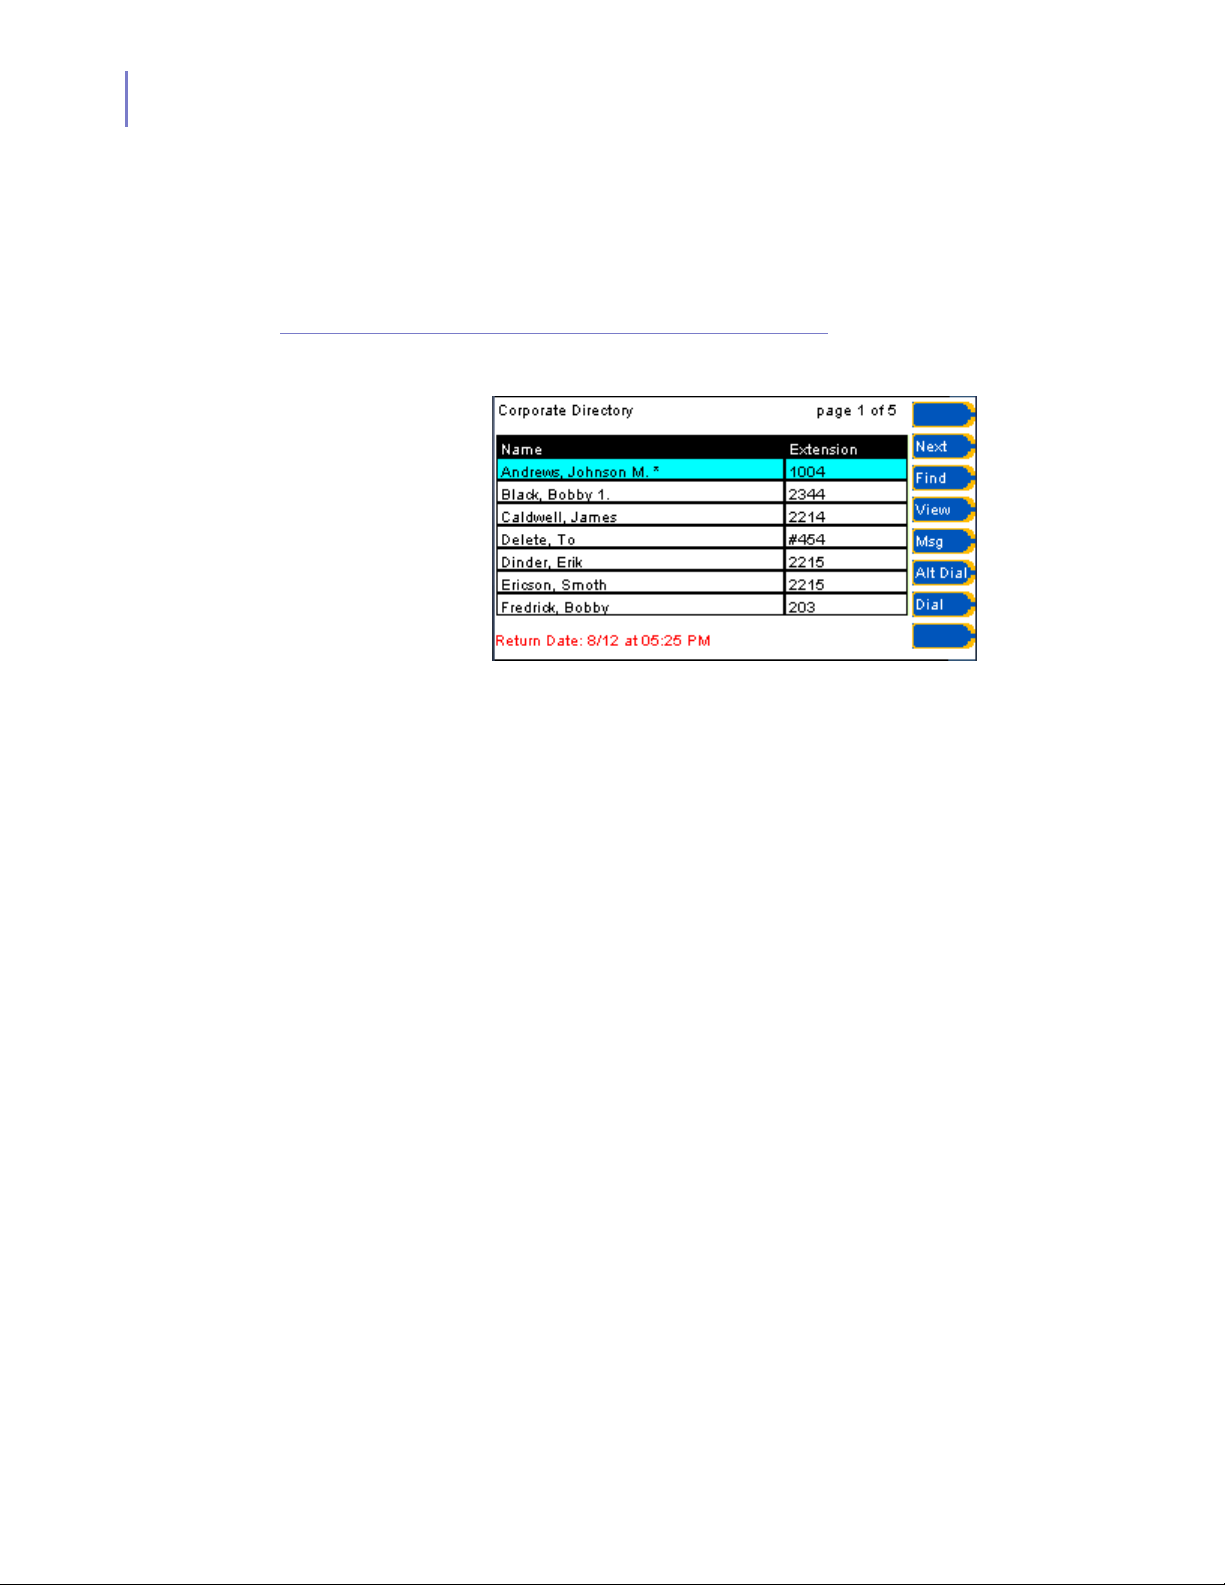
6-14 Network Application Mode
Dialing an Alternate Number
When a directory entry with an asterisk (see Figure 6-9) is highlighted,
the status and any additional information will display. If an Alternate
Number is specified, it can be dialed by pressing the function key for Alt
Dial.
Figure 6-9
Corporate Directory window (Detail)
INASET R2 User Guide - Revision 1
Page 94
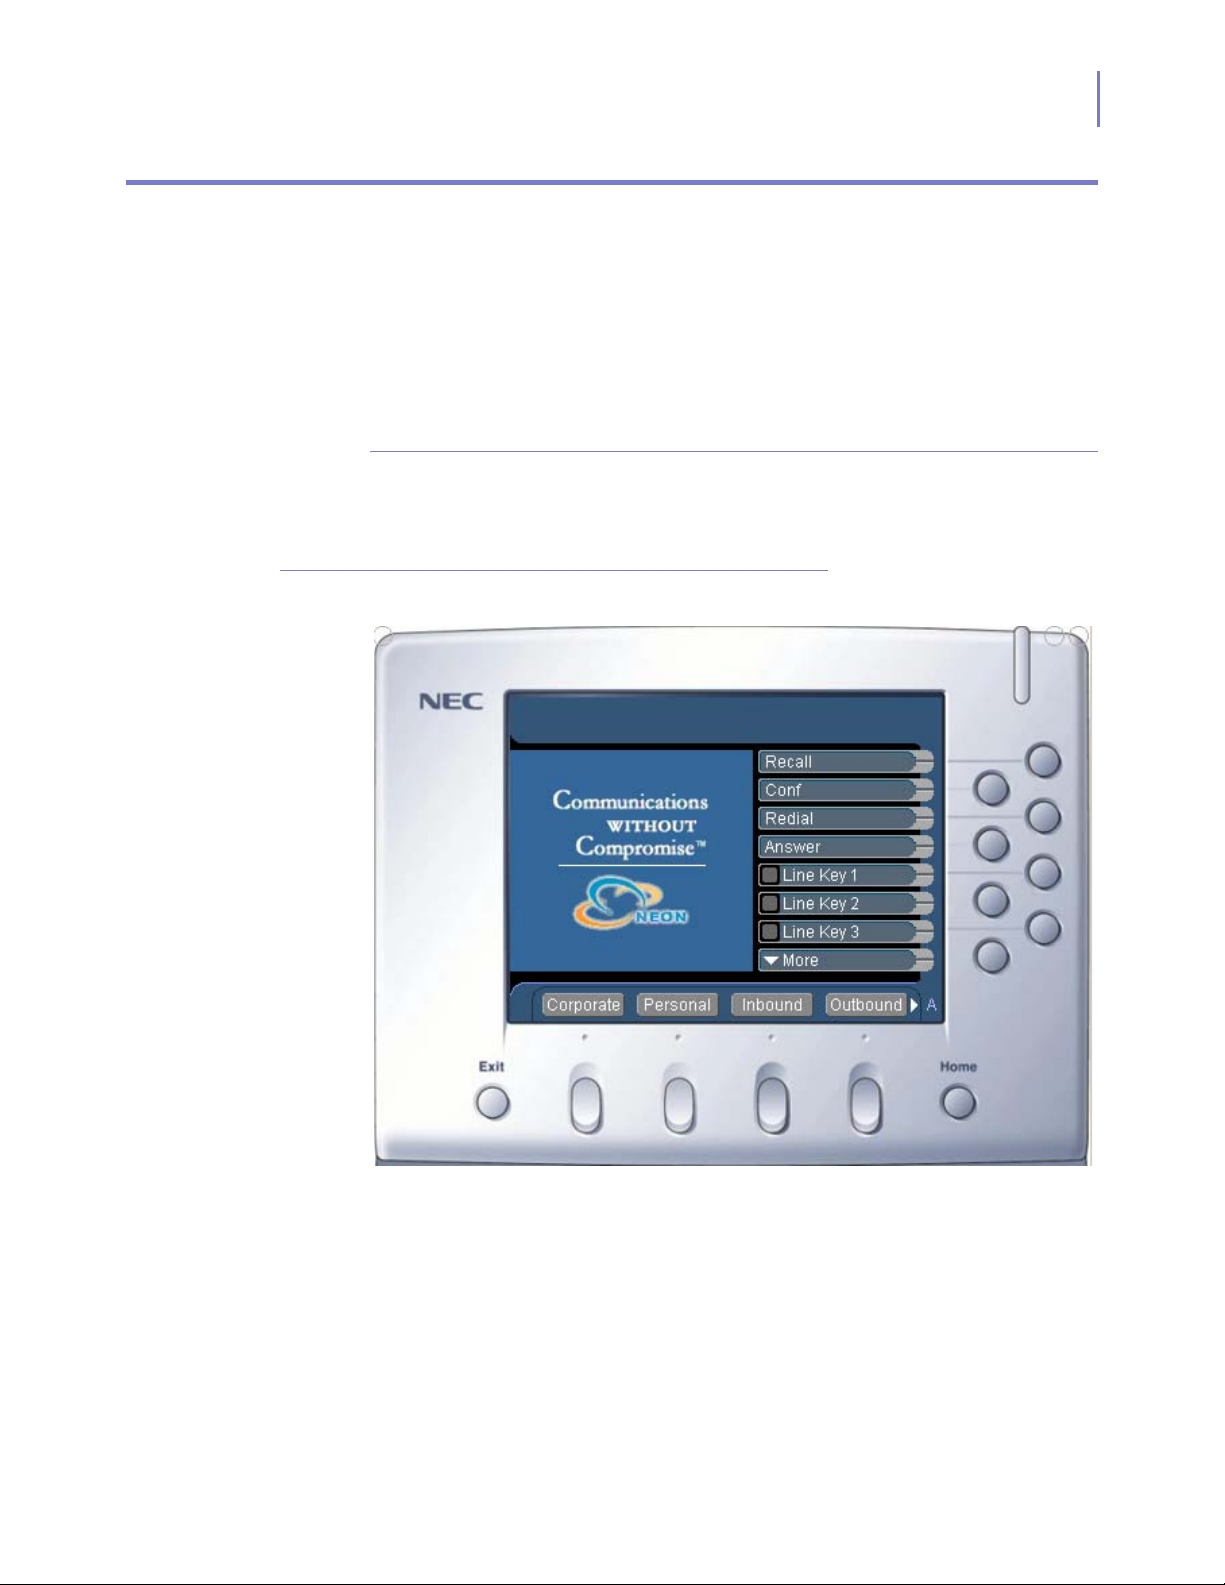
Personal Directory
Network Application Mode 6-15
The OpenWorX Personal Directory application lists the names and
phone numbers of your Personal Directory. You can search the Personal
Directory for a name. Once an entry is located, detailed information and
alternate numbers for the entry can be viewed. You can then dial the
phone number corresponding to that entry. You can add, change, and
delete names and numbers in your personal directory.
Using Personal Directory
To use the Personal Directory application, from the OpenWorX
Applications menu (
Figure 6-10) press the Personal function key.
Figure 6-10
OpenWorX Applications menu window
INASET R2 User Guide - Revision 1
Page 95
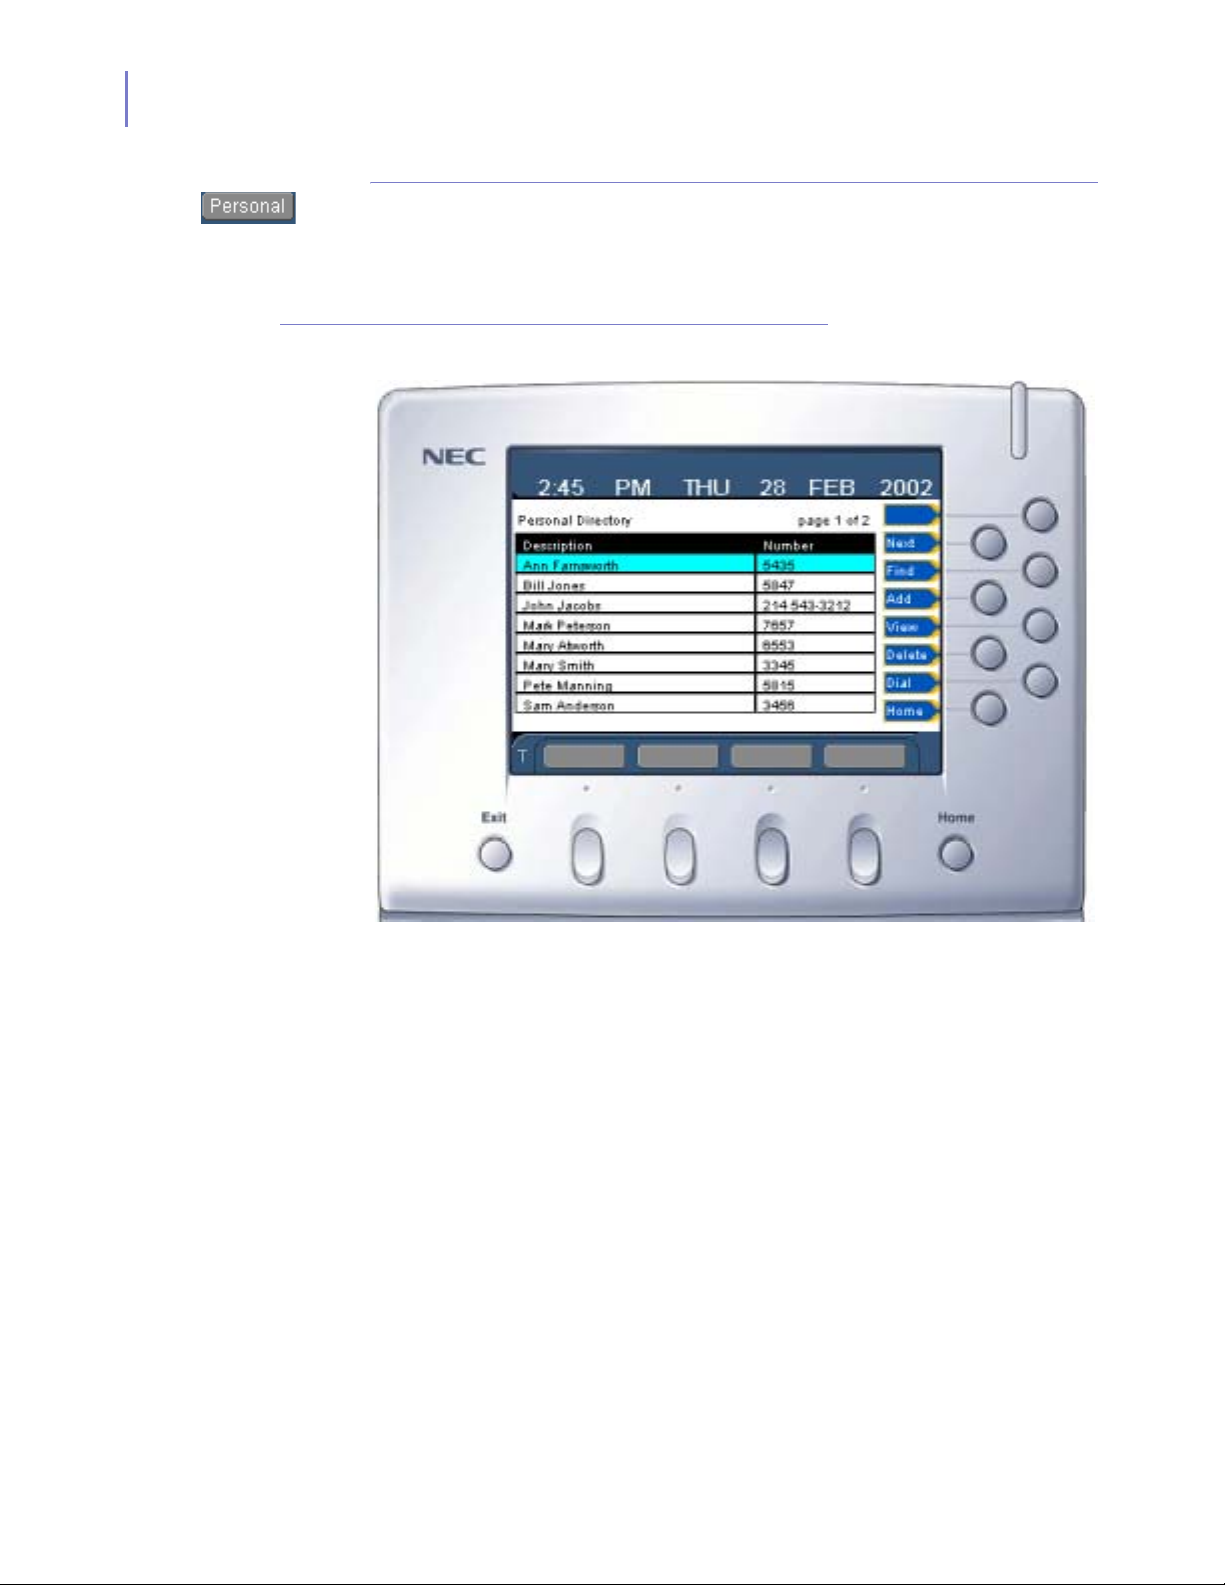
6-16 Network Application Mode
Personal Directory Window
When Personal is selected from the OpenWorX Applications menu, the
Personal Directory window will display on the INASET R2 screen (
6-11).
Figure
Figure 6-11
Personal Directory window
PersonalCorporate Inbound Outbound
•Use the Next and Prev function keys to display additional directory
pages.
•Press the Home key to return to the INASET R2 OpenWorX main
menu window.
The following sections describe the available directory actions.
INASET R2 User Guide - Revision 1
Page 96
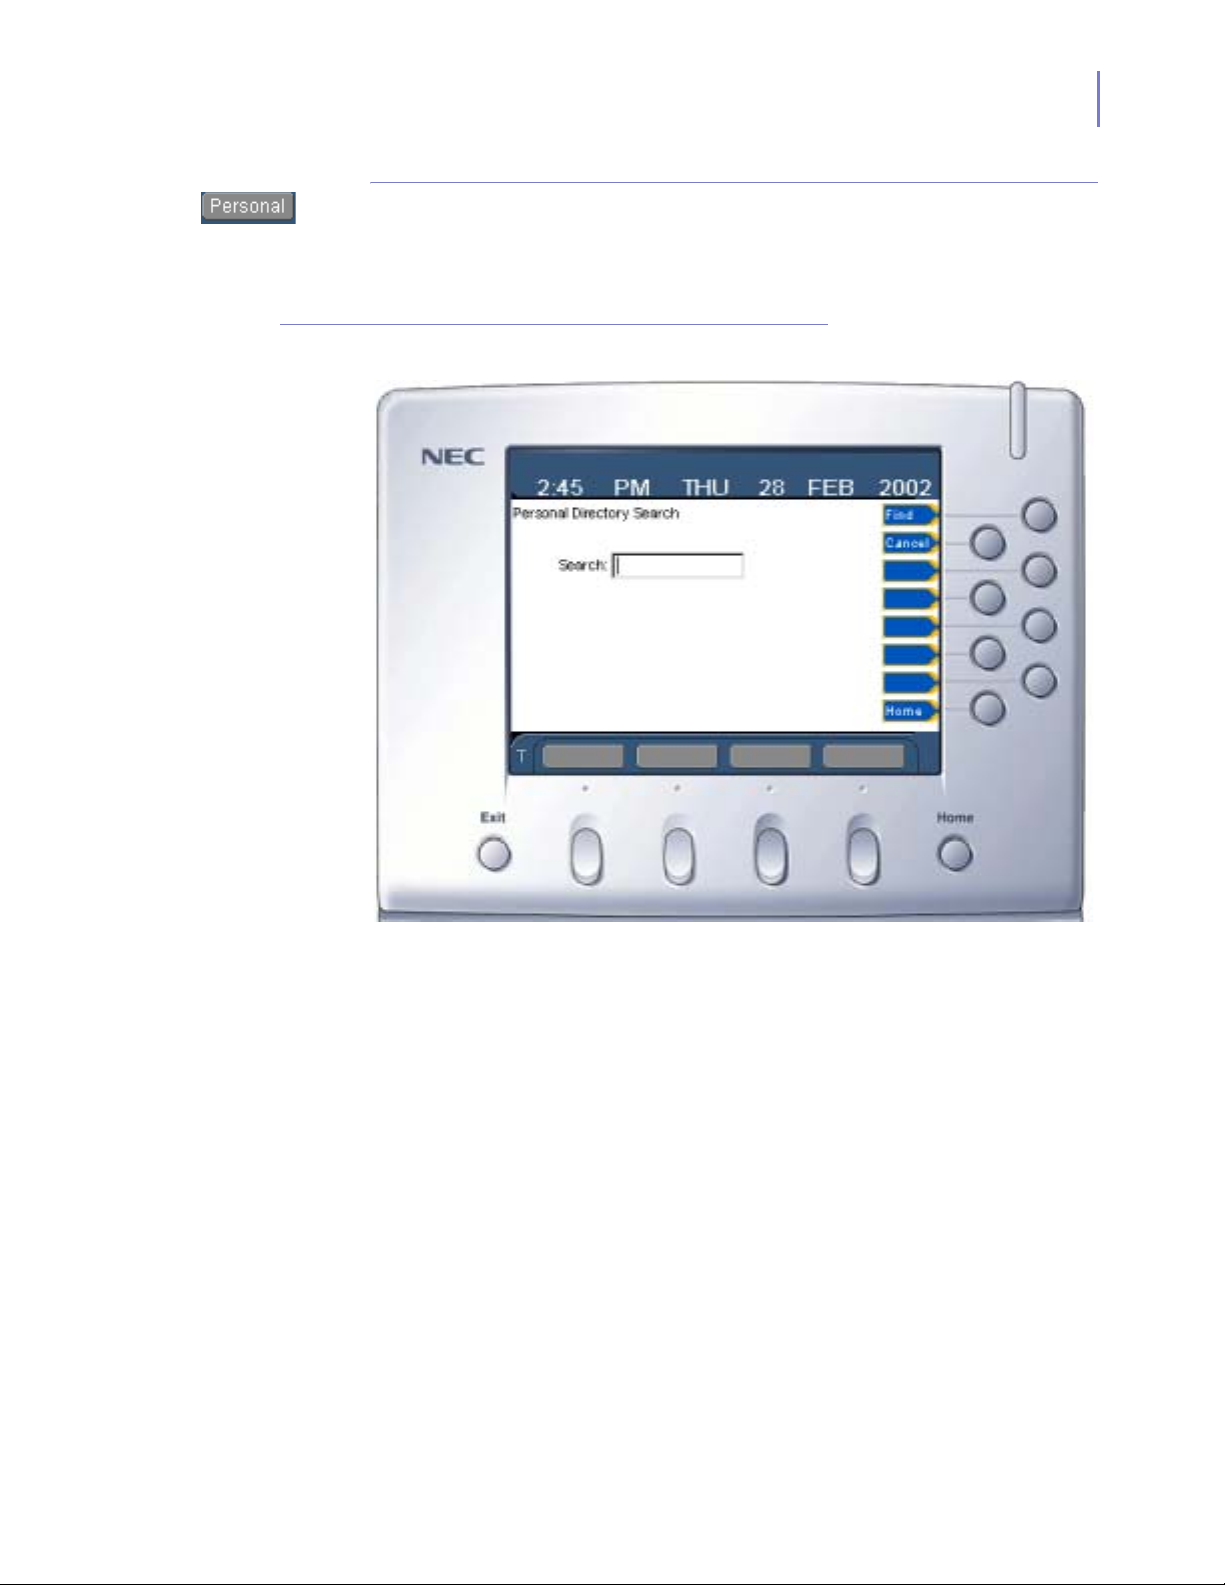
Network Application Mode 6-17
Finding an Entry
To find an entry name in the Personal directory, press the function key
for Find on the Personal Directory window. The Personal Directory
Search window displays (
Figure 6-12).
Figure 6-12
Personal Directory - Personal Directory Search window
PersonalCorporate Inbound Outbound
Step 1
Step 2
Step 3
INASET R2 User Guide - Revision 1
Using the dial keys, enter the desired name value in the
(See
Entering Text Using the Dial Keys
Press the function key for
Find
to search the directory. The Personal
in this chapter.)
Search
field.
Directory window will display with all entries meeting the search criteria.
Press the function key for
Cancel
to return to the main Personal
Directory window.
Page 97
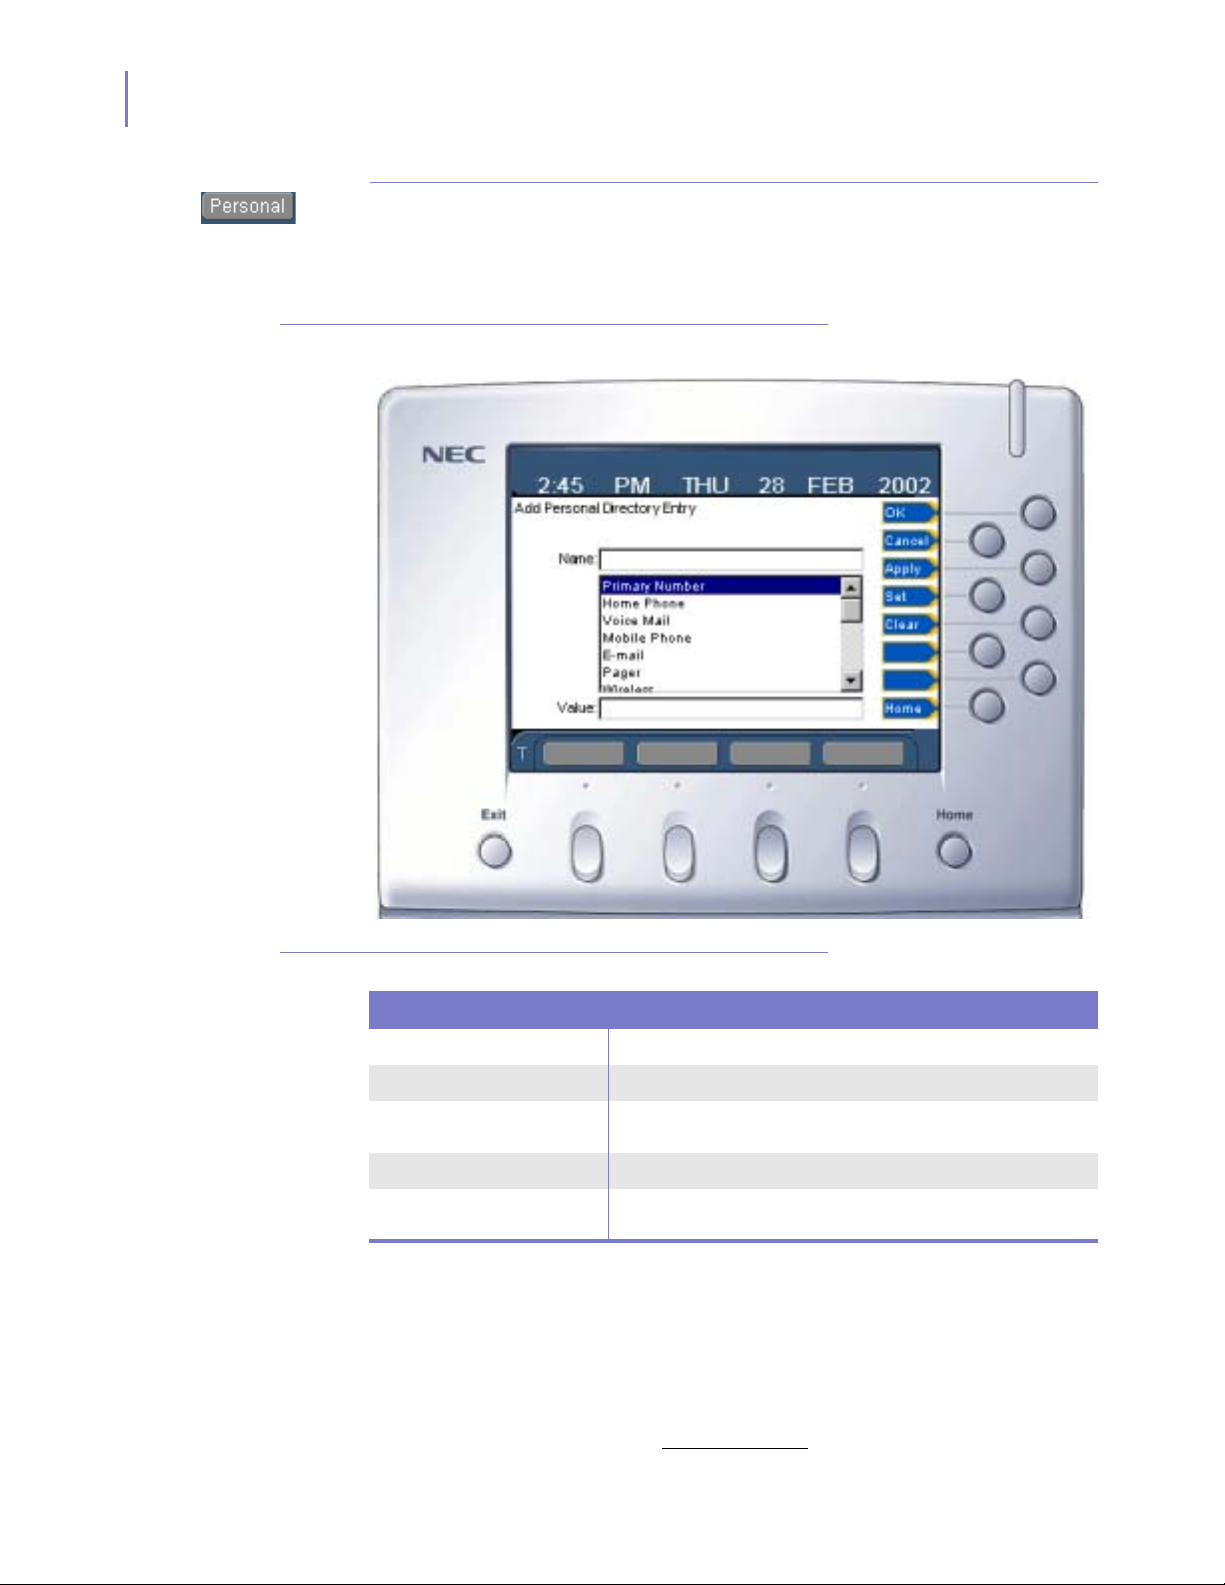
6-18 Network Application Mode
Adding an Entry
To add an entry to the Personal directory, press the function key for Add
on the Personal Directory window. The Add Personal Directory Entry
window displays (
Figure 6-13).
Figure 6-13
Personal Directory - Add Personal Directory window
PersonalCorporate Inbound Outbound
Table 6-4
Personal Directory - Add Personal Directory Entry Function Keys
Function Key Function
OK Saves all values and adds the new entry to your Personal Directory .
Cancel Returns to the Personal Directory window without adding the entry.
Adds an entry with the current information and refreshes the screen
so another entry can be added.
Clear the selected Category value, selects the next in the category
list, and sets focus to the Value field.
in this chapter.) Press the cursor key
field.
INASET R2 User Guide - Revision 1
Step 1
Apply
Set Sets the value.
Clear
Using the dial keys, enter the new entry name in the
Entering Text Using the Dial Keys
down to select the category list. Other optional steps:
—Press the cursor key left/right to scroll through the category list and
select a category. When selected, press the cursor key down to select
the
Value
Example: Select the Primary Number category from the list.
Name
field. (See
Page 98

Network Application Mode 6-19
—Using the dial keys, enter a value for the selected category. Press the
function key for
Set
to set the value, and select the next category in
the category list (and set focus to the Value field if it doesn't already
have it. The value will now display in the category list.
—(Example: This sets the value for the Primary Number.)
NOTE
Step 2
Press the cursor key up and repeat steps 2 and 3 above for all additional
categories you wish to complete for this directory entry.
Step 3
When all category values are set, press the function key for OK to save
all values and add the new entry to your Personal Directory.
You can set as few or as many as you want, but you can add the entry right after you
have filled in the Name field.
INASET R2 User Guide - Revision 1
Page 99
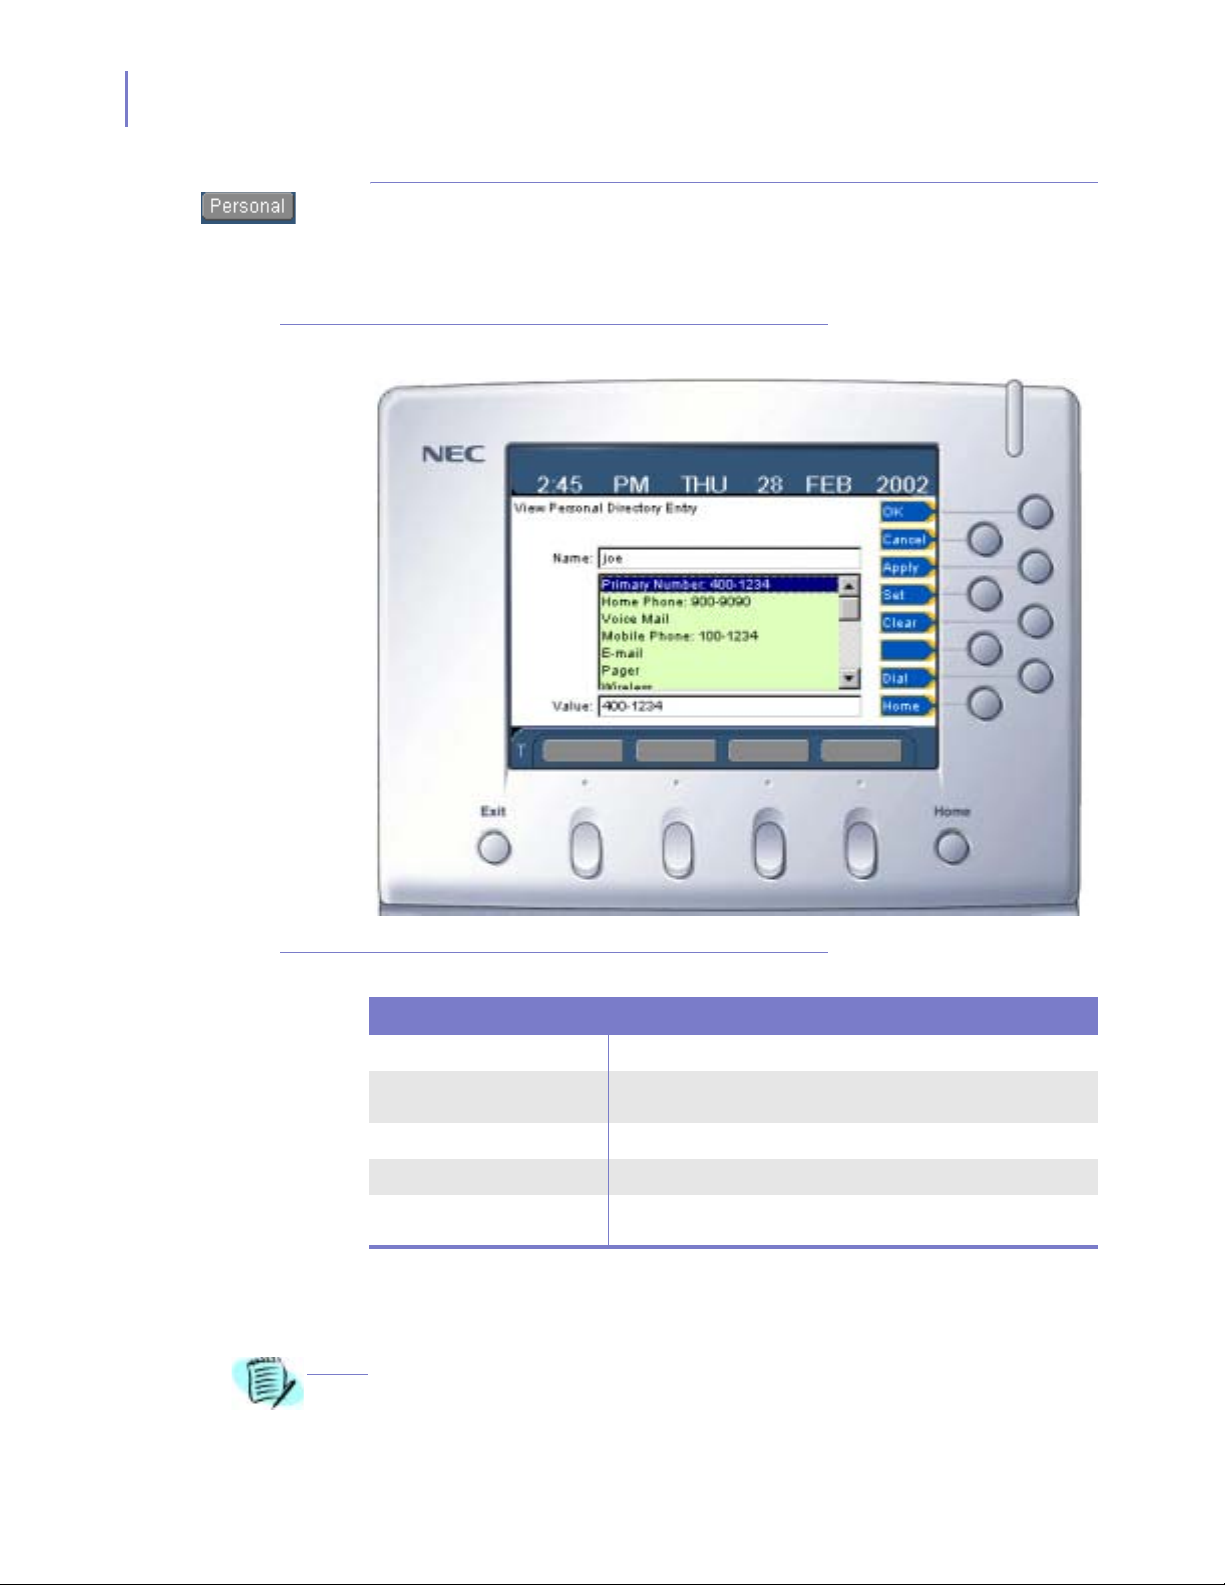
6-20 Network Application Mode
View or Edit an Entry
To view or edit an existing entry in the Personal directory, highlight the
entry on the Personal Directory window then press the function key for
View. The View Personal Directory Entry window displays (
Figure 6-14).
Figure 6-14
Personal Directory - View Personal Directory Entry window
PersonalCorporate Inbound Outbound
Table 6-5
NOTE
Personal Directory - View Personal Directory Entry Function Keys
Function Key Function
OK Sends you back to the Personal Directory window.
Cancel
Apply Saves the changes and leaves you at the current screen.
Set Sets the value.
Clear
Press the cursor key left/right to scroll through the category list and
view the associated values for the entry. You can also dial a value by
highlighting it and then pressing the dial function key.
You can also edit the name of the Personal Directory entry.
Returns you back to the Personal Directory but does not save the
changes.
Clear the selected Category value, selects the next in the category
list, and sets focus to the Value field.
INASET R2 User Guide - Revision 1
Page 100

Network Application Mode 6-21
Edit an Entry Value
While viewing, you can edit an entry to add, change, or delete a value.
• Add a Value
To add a new value, use the cursor key left/right to scroll through the
category list and select a category. Then press cursor key down and
enter the new value in the Value field. Press the function key for Set
to set this value.
• Change a Value
To change a value, use the cursor key left/right to scroll through the
category list and select a category. Press cursor key down, then
cursor key left to erase the value as needed, or right to wrap the
cursor around to the front and then position it. Enter a new value as
needed. Press the function key for Set to set this value.
• Delete a Value
To delete a value, use the cursor key left/right to scroll through the
category list and select a category. Press cursor key down, then press
the function key for Clear to delete the value.
When all category values are set, press the function key for OK to save
all changes for this entry to your Personal Directory.
INASET R2 User Guide - Revision 1
 Loading...