

Page 1

GUARDIAN
AN
OPEN APPLICATION INTERFACE
OPERATIONS MANUAL
NEC America, Inc.
NDA-30008
Revision 2.0
June, 1999
Stock # 184292
Page 2

LIABILITY DISCLAIMER
NEC America reserves the right to change the specifications, functions,
or features in this document at any time without notice. NEC America
has prepared this document for use by its employees and customers. The
information contained herein is the property of NEC America and shall
not be reproduced without prior written approval from NEC America.
Copyright 1999
NEC America, Inc.
Page 3

Guardian Operations Manual CONTENTS
TABLE OF CONTENTS
Page
Chapter 1 - General Information. . . . . . . . . . . . . . . . . . . . . . . . . . . . . . . . . . . . . . . . . . . . 1
System Overview . . . . . . . . . . . . . . . . . . . . . . . . . . . . . . . . . . . . . . . . . . . . . . . . . . . . . . . . . . . . . . 1
Security. . . . . . . . . . . . . . . . . . . . . . . . . . . . . . . . . . . . . . . . . . . . . . . . . . . . . . . . . . . . . . . . . . . . . . 2
User Procedure. . . . . . . . . . . . . . . . . . . . . . . . . . . . . . . . . . . . . . . . . . . . . . . . . . . . . . . . . . . . . . . . 3
Database Organization. . . . . . . . . . . . . . . . . . . . . . . . . . . . . . . . . . . . . . . . . . . . . . . . . . . . . . . . . . 4
Menu Organization . . . . . . . . . . . . . . . . . . . . . . . . . . . . . . . . . . . . . . . . . . . . . . . . . . . . . . . . . . . . . 5
Chapter 2 - Installation Introduction . . . . . . . . . . . . . . . . . . . . . . . . . . . . . . . . . . . . . . . . 7
Software Installation . . . . . . . . . . . . . . . . . . . . . . . . . . . . . . . . . . . . . . . . . . . . . . . . . . . . . . . . . . . . 9
Step 1: Software Installation . . . . . . . . . . . . . . . . . . . . . . . . . . . . . . . . . . . . . . . . . . . . . . . . . . . . 9
Step 2: Login ID. . . . . . . . . . . . . . . . . . . . . . . . . . . . . . . . . . . . . . . . . . . . . . . . . . . . . . . . . . . . . . 9
Step 3: Protected Databases Updated . . . . . . . . . . . . . . . . . . . . . . . . . . . . . . . . . . . . . . . . . . . 10
Application Configuration . . . . . . . . . . . . . . . . . . . . . . . . . . . . . . . . . . . . . . . . . . . . . . . . . . . . . . . 11
Setting up Multiple Tenants . . . . . . . . . . . . . . . . . . . . . . . . . . . . . . . . . . . . . . . . . . . . . . . . . . . . 11
Step 1: Application Characteristics . . . . . . . . . . . . . . . . . . . . . . . . . . . . . . . . . . . . . . . . . . . . . . 12
Step 2: Primary Configuration Parameters . . . . . . . . . . . . . . . . . . . . . . . . . . . . . . . . . . . . . . . . 12
Step 3: OAI Facilities . . . . . . . . . . . . . . . . . . . . . . . . . . . . . . . . . . . . . . . . . . . . . . . . . . . . . . . . . 13
Step 4: Secondary OAI Configuration Parameters . . . . . . . . . . . . . . . . . . . . . . . . . . . . . . . . . . 13
Step 5: User-Defined Parameters . . . . . . . . . . . . . . . . . . . . . . . . . . . . . . . . . . . . . . . . . . . . . . . 14
Database Requirements. . . . . . . . . . . . . . . . . . . . . . . . . . . . . . . . . . . . . . . . . . . . . . . . . . . . . . . . 16
Instructions. . . . . . . . . . . . . . . . . . . . . . . . . . . . . . . . . . . . . . . . . . . . . . . . . . . . . . . . . . . . . . . . . 16
Group Database Information . . . . . . . . . . . . . . . . . . . . . . . . . . . . . . . . . . . . . . . . . . . . . . . . . . . 17
Field Definitions . . . . . . . . . . . . . . . . . . . . . . . . . . . . . . . . . . . . . . . . . . . . . . . . . . . . . . . . . . . 17
Authorization Code and ID Database Information . . . . . . . . . . . . . . . . . . . . . . . . . . . . . . . . . . . 18
Field Definitions . . . . . . . . . . . . . . . . . . . . . . . . . . . . . . . . . . . . . . . . . . . . . . . . . . . . . . . . . . . 19
Extension Database Infor ma tion . . . . . . . . . . . . . . . . . . . . . . . . . . . . . . . . . . . . . . . . . . . . . . . . 20
Field Definitions . . . . . . . . . . . . . . . . . . . . . . . . . . . . . . . . . . . . . . . . . . . . . . . . . . . . . . . . . . . 20
Time Interval Database Information. . . . . . . . . . . . . . . . . . . . . . . . . . . . . . . . . . . . . . . . . . . . . . 20
Field Definitions . . . . . . . . . . . . . . . . . . . . . . . . . . . . . . . . . . . . . . . . . . . . . . . . . . . . . . . . . . . 21
NEAX Command Assignments. . . . . . . . . . . . . . . . . . . . . . . . . . . . . . . . . . . . . . . . . . . . . . . . . . . 22
NEAX2400 Commands . . . . . . . . . . . . . . . . . . . . . . . . . . . . . . . . . . . . . . . . . . . . . . . . . . . . . . . 22
AMND: Assignment of Maximum Necessary Digits . . . . . . . . . . . . . . . . . . . . . . . . . . . . . . . . 22
ARSC Command: Assignment of Route Restriction Class. . . . . . . . . . . . . . . . . . . . . . . . . . . 22
ASDT Command: Assignment of Station Data. . . . . . . . . . . . . . . . . . . . . . . . . . . . . . . . . . . . 23
ASFC Command: Assignment of Service Feature Class . . . . . . . . . . . . . . . . . . . . . . . . . . . . 23
ASPA Command: Assignment of Special Access Code. . . . . . . . . . . . . . . . . . . . . . . . . . . . . 23
ASYD Command: Assignment of System Data . . . . . . . . . . . . . . . . . . . . . . . . . . . . . . . . . . . 24
AATC Command: Assignment of Authorization Code Data . . . . . . . . . . . . . . . . . . . . . . . . . . 24
NEAX2000 Commands . . . . . . . . . . . . . . . . . . . . . . . . . . . . . . . . . . . . . . . . . . . . . . . . . . . . . . . 24
CM20: (Assignment of Access Code). . . . . . . . . . . . . . . . . . . . . . . . . . . . . . . . . . . . . . . . . . . 24
CM42: (Assignment of Maximum Digits for Authorization Code) . . . . . . . . . . . . . . . . . . . . . . 24
CMD79: (Assignment of Internet Address) . . . . . . . . . . . . . . . . . . . . . . . . . . . . . . . . . . . . . . 25
CM08: (Checking ID Codes Using AP01) . . . . . . . . . . . . . . . . . . . . . . . . . . . . . . . . . . . . . . . 25
CMD53: (Handling of ID Codes When the IP is Down) . . . . . . . . . . . . . . . . . . . . . . . . . . . . . 25
CMD7B: (Number of ID Code Digits When IP down). . . . . . . . . . . . . . . . . . . . . . . . . . . . . . . 26
Initialization. . . . . . . . . . . . . . . . . . . . . . . . . . . . . . . . . . . . . . . . . . . . . . . . . . . . . . . . . . . . . . . . . . 26
Step 1: Initialization in APM . . . . . . . . . . . . . . . . . . . . . . . . . . . . . . . . . . . . . . . . . . . . . . . . . . . . 26
Step 2: Login Password. . . . . . . . . . . . . . . . . . . . . . . . . . . . . . . . . . . . . . . . . . . . . . . . . . . . . . . 26
NDA-30008 Revision 2.0 Page i
Page 4

CONTENTS Guardian Operations Manual
Page
Step 3: Regular Entry to Guardian. . . . . . . . . . . . . . . . . . . . . . . . . . . . . . . . . . . . . . . . . . . . . . . 26
Chapter 3 - Administration. . . . . . . . . . . . . . . . . . . . . . . . . . . . . . . . . . . . . . . . . . . . . . . 27
Overview. . . . . . . . . . . . . . . . . . . . . . . . . . . . . . . . . . . . . . . . . . . . . . . . . . . . . . . . . . . . . . . . . . . . 27
Notes . . . . . . . . . . . . . . . . . . . . . . . . . . . . . . . . . . . . . . . . . . . . . . . . . . . . . . . . . . . . . . . . . . . . . 28
Procedure . . . . . . . . . . . . . . . . . . . . . . . . . . . . . . . . . . . . . . . . . . . . . . . . . . . . . . . . . . . . . . . . . 29
Set OAI Application Logical Name . . . . . . . . . . . . . . . . . . . . . . . . . . . . . . . . . . . . . . . . . . . . . . . . 30
Notes . . . . . . . . . . . . . . . . . . . . . . . . . . . . . . . . . . . . . . . . . . . . . . . . . . . . . . . . . . . . . . . . . . . . . 30
Procedure . . . . . . . . . . . . . . . . . . . . . . . . . . . . . . . . . . . . . . . . . . . . . . . . . . . . . . . . . . . . . . . . . 31
Modify Status . . . . . . . . . . . . . . . . . . . . . . . . . . . . . . . . . . . . . . . . . . . . . . . . . . . . . . . . . . . . . . . . 32
Overview . . . . . . . . . . . . . . . . . . . . . . . . . . . . . . . . . . . . . . . . . . . . . . . . . . . . . . . . . . . . . . . . . . 32
Notes. . . . . . . . . . . . . . . . . . . . . . . . . . . . . . . . . . . . . . . . . . . . . . . . . . . . . . . . . . . . . . . . . . . . 32
Procedure . . . . . . . . . . . . . . . . . . . . . . . . . . . . . . . . . . . . . . . . . . . . . . . . . . . . . . . . . . . . . . . . 33
Group. . . . . . . . . . . . . . . . . . . . . . . . . . . . . . . . . . . . . . . . . . . . . . . . . . . . . . . . . . . . . . . . . . . . . 34
Notes. . . . . . . . . . . . . . . . . . . . . . . . . . . . . . . . . . . . . . . . . . . . . . . . . . . . . . . . . . . . . . . . . . . . 34
Procedure . . . . . . . . . . . . . . . . . . . . . . . . . . . . . . . . . . . . . . . . . . . . . . . . . . . . . . . . . . . . . . . . 35
Authorization Code . . . . . . . . . . . . . . . . . . . . . . . . . . . . . . . . . . . . . . . . . . . . . . . . . . . . . . . . . . 36
Notes. . . . . . . . . . . . . . . . . . . . . . . . . . . . . . . . . . . . . . . . . . . . . . . . . . . . . . . . . . . . . . . . . . . . 36
Procedure . . . . . . . . . . . . . . . . . . . . . . . . . . . . . . . . . . . . . . . . . . . . . . . . . . . . . . . . . . . . . . . . 37
Extension . . . . . . . . . . . . . . . . . . . . . . . . . . . . . . . . . . . . . . . . . . . . . . . . . . . . . . . . . . . . . . . . . . 38
Notes. . . . . . . . . . . . . . . . . . . . . . . . . . . . . . . . . . . . . . . . . . . . . . . . . . . . . . . . . . . . . . . . . . . . 38
Procedure . . . . . . . . . . . . . . . . . . . . . . . . . . . . . . . . . . . . . . . . . . . . . . . . . . . . . . . . . . . . . . . . 39
Query Database . . . . . . . . . . . . . . . . . . . . . . . . . . . . . . . . . . . . . . . . . . . . . . . . . . . . . . . . . . . . . . 40
Overview . . . . . . . . . . . . . . . . . . . . . . . . . . . . . . . . . . . . . . . . . . . . . . . . . . . . . . . . . . . . . . . . . . 40
Notes. . . . . . . . . . . . . . . . . . . . . . . . . . . . . . . . . . . . . . . . . . . . . . . . . . . . . . . . . . . . . . . . . . . . 40
Procedure . . . . . . . . . . . . . . . . . . . . . . . . . . . . . . . . . . . . . . . . . . . . . . . . . . . . . . . . . . . . . . . . 41
Group Database. . . . . . . . . . . . . . . . . . . . . . . . . . . . . . . . . . . . . . . . . . . . . . . . . . . . . . . . . . . . . 42
Notes. . . . . . . . . . . . . . . . . . . . . . . . . . . . . . . . . . . . . . . . . . . . . . . . . . . . . . . . . . . . . . . . . . . . 42
Procedure . . . . . . . . . . . . . . . . . . . . . . . . . . . . . . . . . . . . . . . . . . . . . . . . . . . . . . . . . . . . . . . . 43
Authorization Code Database . . . . . . . . . . . . . . . . . . . . . . . . . . . . . . . . . . . . . . . . . . . . . . . . . . 44
Notes. . . . . . . . . . . . . . . . . . . . . . . . . . . . . . . . . . . . . . . . . . . . . . . . . . . . . . . . . . . . . . . . . . . . 44
Procedure . . . . . . . . . . . . . . . . . . . . . . . . . . . . . . . . . . . . . . . . . . . . . . . . . . . . . . . . . . . . . . . . 45
Extension Database. . . . . . . . . . . . . . . . . . . . . . . . . . . . . . . . . . . . . . . . . . . . . . . . . . . . . . . . . . 46
Notes. . . . . . . . . . . . . . . . . . . . . . . . . . . . . . . . . . . . . . . . . . . . . . . . . . . . . . . . . . . . . . . . . . . . 46
Procedure . . . . . . . . . . . . . . . . . . . . . . . . . . . . . . . . . . . . . . . . . . . . . . . . . . . . . . . . . . . . . . . . 47
Time Interval Database . . . . . . . . . . . . . . . . . . . . . . . . . . . . . . . . . . . . . . . . . . . . . . . . . . . . . . . 48
Notes. . . . . . . . . . . . . . . . . . . . . . . . . . . . . . . . . . . . . . . . . . . . . . . . . . . . . . . . . . . . . . . . . . . . 48
Procedure . . . . . . . . . . . . . . . . . . . . . . . . . . . . . . . . . . . . . . . . . . . . . . . . . . . . . . . . . . . . . . . . 49
ID Database. . . . . . . . . . . . . . . . . . . . . . . . . . . . . . . . . . . . . . . . . . . . . . . . . . . . . . . . . . . . . . . . 50
Notes. . . . . . . . . . . . . . . . . . . . . . . . . . . . . . . . . . . . . . . . . . . . . . . . . . . . . . . . . . . . . . . . . . . . 50
Procedure . . . . . . . . . . . . . . . . . . . . . . . . . . . . . . . . . . . . . . . . . . . . . . . . . . . . . . . . . . . . . . . . 50
Initialize Batch Control . . . . . . . . . . . . . . . . . . . . . . . . . . . . . . . . . . . . . . . . . . . . . . . . . . . . . . . . . 51
Notes . . . . . . . . . . . . . . . . . . . . . . . . . . . . . . . . . . . . . . . . . . . . . . . . . . . . . . . . . . . . . . . . . . . . . 52
Procedure . . . . . . . . . . . . . . . . . . . . . . . . . . . . . . . . . . . . . . . . . . . . . . . . . . . . . . . . . . . . . . . . . 53
Initialize Record File . . . . . . . . . . . . . . . . . . . . . . . . . . . . . . . . . . . . . . . . . . . . . . . . . . . . . . . . . . . 54
Notes . . . . . . . . . . . . . . . . . . . . . . . . . . . . . . . . . . . . . . . . . . . . . . . . . . . . . . . . . . . . . . . . . . . . . 54
Procedure . . . . . . . . . . . . . . . . . . . . . . . . . . . . . . . . . . . . . . . . . . . . . . . . . . . . . . . . . . . . . . . . . 54
Generate Reports. . . . . . . . . . . . . . . . . . . . . . . . . . . . . . . . . . . . . . . . . . . . . . . . . . . . . . . . . . . . . 55
Overview . . . . . . . . . . . . . . . . . . . . . . . . . . . . . . . . . . . . . . . . . . . . . . . . . . . . . . . . . . . . . . . . . . 55
Notes. . . . . . . . . . . . . . . . . . . . . . . . . . . . . . . . . . . . . . . . . . . . . . . . . . . . . . . . . . . . . . . . . . . . 55
Page ii NDA-30008 Revision 2.0
Page 5

Guardian Operations Manual CONTENTS
Page
Procedure . . . . . . . . . . . . . . . . . . . . . . . . . . . . . . . . . . . . . . . . . . . . . . . . . . . . . . . . . . . . . . . . 56
Call Attempts . . . . . . . . . . . . . . . . . . . . . . . . . . . . . . . . . . . . . . . . . . . . . . . . . . . . . . . . . . . . . . . 57
Notes. . . . . . . . . . . . . . . . . . . . . . . . . . . . . . . . . . . . . . . . . . . . . . . . . . . . . . . . . . . . . . . . . . . . 57
Procedure . . . . . . . . . . . . . . . . . . . . . . . . . . . . . . . . . . . . . . . . . . . . . . . . . . . . . . . . . . . . . . . . 58
Database Status . . . . . . . . . . . . . . . . . . . . . . . . . . . . . . . . . . . . . . . . . . . . . . . . . . . . . . . . . . . . 59
Notes. . . . . . . . . . . . . . . . . . . . . . . . . . . . . . . . . . . . . . . . . . . . . . . . . . . . . . . . . . . . . . . . . . . . 60
Procedure . . . . . . . . . . . . . . . . . . . . . . . . . . . . . . . . . . . . . . . . . . . . . . . . . . . . . . . . . . . . . . . . 61
Database History . . . . . . . . . . . . . . . . . . . . . . . . . . . . . . . . . . . . . . . . . . . . . . . . . . . . . . . . . . . . 62
Notes. . . . . . . . . . . . . . . . . . . . . . . . . . . . . . . . . . . . . . . . . . . . . . . . . . . . . . . . . . . . . . . . . . . . 62
Procedure . . . . . . . . . . . . . . . . . . . . . . . . . . . . . . . . . . . . . . . . . . . . . . . . . . . . . . . . . . . . . . . . 63
Maintain Password . . . . . . . . . . . . . . . . . . . . . . . . . . . . . . . . . . . . . . . . . . . . . . . . . . . . . . . . . . . . 64
Notes . . . . . . . . . . . . . . . . . . . . . . . . . . . . . . . . . . . . . . . . . . . . . . . . . . . . . . . . . . . . . . . . . . . . . 64
Procedure . . . . . . . . . . . . . . . . . . . . . . . . . . . . . . . . . . . . . . . . . . . . . . . . . . . . . . . . . . . . . . . . . 65
Clear Status Values . . . . . . . . . . . . . . . . . . . . . . . . . . . . . . . . . . . . . . . . . . . . . . . . . . . . . . . . . . . 66
Notes . . . . . . . . . . . . . . . . . . . . . . . . . . . . . . . . . . . . . . . . . . . . . . . . . . . . . . . . . . . . . . . . . . . . . 66
Procedure . . . . . . . . . . . . . . . . . . . . . . . . . . . . . . . . . . . . . . . . . . . . . . . . . . . . . . . . . . . . . . . . . 66
Appendix A - Report Formats. . . . . . . . . . . . . . . . . . . . . . . . . . . . . . . . . . . . . . . . . . . . . 67
Introduction. . . . . . . . . . . . . . . . . . . . . . . . . . . . . . . . . . . . . . . . . . . . . . . . . . . . . . . . . . . . . . . . . . 67
Call Attempt Reports. . . . . . . . . . . . . . . . . . . . . . . . . . . . . . . . . . . . . . . . . . . . . . . . . . . . . . . . . . . 67
Current State Reports. . . . . . . . . . . . . . . . . . . . . . . . . . . . . . . . . . . . . . . . . . . . . . . . . . . . . . . . . . 72
History Reports. . . . . . . . . . . . . . . . . . . . . . . . . . . . . . . . . . . . . . . . . . . . . . . . . . . . . . . . . . . . . . . 80
NDA-30008 Revision 2.0 Page iii
Page 6

CONTENTS Guardian Operations Manual
This Page Left Blank.
Page iv NDA-30008 Revision 2.0
Page 7

Guardian Operations Manual FIGURES
Figure Title Page
1-1 Guardian Du a l S ys t em . . . . . . . . . . . . . . . . . . . . . . . . . . . . . . . . . . . . . . . . . . . . . . . . . 1
1-2 Main Menu Organization. . . . . . . . . . . . . . . . . . . . . . . . . . . . . . . . . . . . . . . . . . . . . . . . 5
3-1 Main Menu. . . . . . . . . . . . . . . . . . . . . . . . . . . . . . . . . . . . . . . . . . . . . . . . . . . . . . . . . . 27
3-2 Set Logical Name . . . . . . . . . . . . . . . . . . . . . . . . . . . . . . . . . . . . . . . . . . . . . . . . . . . . 30
3-3 Modify Status. . . . . . . . . . . . . . . . . . . . . . . . . . . . . . . . . . . . . . . . . . . . . . . . . . . . . . . . 32
3-4 Modify Group. . . . . . . . . . . . . . . . . . . . . . . . . . . . . . . . . . . . . . . . . . . . . . . . . . . . . . . . 34
3-5 Modify Authorization Code . . . . . . . . . . . . . . . . . . . . . . . . . . . . . . . . . . . . . . . . . . . . . 36
3-6 Modify Extension. . . . . . . . . . . . . . . . . . . . . . . . . . . . . . . . . . . . . . . . . . . . . . . . . . . . . 38
3-7 Query Database . . . . . . . . . . . . . . . . . . . . . . . . . . . . . . . . . . . . . . . . . . . . . . . . . . . . . 40
3-8 Query Group Database. . . . . . . . . . . . . . . . . . . . . . . . . . . . . . . . . . . . . . . . . . . . . . . . 42
3-9 Query Authorization Code Database. . . . . . . . . . . . . . . . . . . . . . . . . . . . . . . . . . . . . . 44
3-10 Query Extension Database. . . . . . . . . . . . . . . . . . . . . . . . . . . . . . . . . . . . . . . . . . . . . 46
3-11 Query Time Interval Database . . . . . . . . . . . . . . . . . . . . . . . . . . . . . . . . . . . . . . . . . . 48
3-12 Query ID Database . . . . . . . . . . . . . . . . . . . . . . . . . . . . . . . . . . . . . . . . . . . . . . . . . . . 50
3-13 Initia li z e B a tc h C o nt ro l. . . . . . . . . . . . . . . . . . . . . . . . . . . . . . . . . . . . . . . . . . . . . . . . . 51
3-14 Initialize Record File . . . . . . . . . . . . . . . . . . . . . . . . . . . . . . . . . . . . . . . . . . . . . . . . . . 54
3-15 Reports Menu . . . . . . . . . . . . . . . . . . . . . . . . . . . . . . . . . . . . . . . . . . . . . . . . . . . . . . . 55
3-16 Call Att e m p ts R e p or ts . . . . . . . . . . . . . . . . . . . . . . . . . . . . . . . . . . . . . . . . . . . . . . . . . 57
3-17 Current Database Status Reports. . . . . . . . . . . . . . . . . . . . . . . . . . . . . . . . . . . . . . . . 59
3-18 Database History Reports. . . . . . . . . . . . . . . . . . . . . . . . . . . . . . . . . . . . . . . . . . . . . . 62
3-19 Password Security. . . . . . . . . . . . . . . . . . . . . . . . . . . . . . . . . . . . . . . . . . . . . . . . . . . . 64
3-20 Clear Status Values. . . . . . . . . . . . . . . . . . . . . . . . . . . . . . . . . . . . . . . . . . . . . . . . . . . 66
NDA-30008 Revision 2.0 Page v
Page 8

FIGURES Guardian Operations Manual
This Page Left Blank.
Page vi NDA-30008 Revision 2.0
Page 9

Guardian Operations Manual TABLES
LIST OF TABLES
Table Title Page
2-1 Application Characteristic Entries . . . . . . . . . . . . . . . . . . . . . . . . . . . . . . . . . . . . . . . . 12
2-2 Primary Configuration Parameter Entries . . . . . . . . . . . . . . . . . . . . . . . . . . . . . . . . . . 12
2-3 Secondary Configuration Parameter Entries. . . . . . . . . . . . . . . . . . . . . . . . . . . . . . . . 13
2-4 User-Defined Parameter Entries. . . . . . . . . . . . . . . . . . . . . . . . . . . . . . . . . . . . . . . . . 14
2-5 Group Database Field Entries. . . . . . . . . . . . . . . . . . . . . . . . . . . . . . . . . . . . . . . . . . . 17
2-6 Authorization Code Database Field Entries . . . . . . . . . . . . . . . . . . . . . . . . . . . . . . . . 18
2-7 Extension Dat a b as e F ie l d Ent ries. . . . . . . . . . . . . . . . . . . . . . . . . . . . . . . . . . . . . . . . 20
2-8 Time Interval Database Field Entries . . . . . . . . . . . . . . . . . . . . . . . . . . . . . . . . . . . . . 20
NDA-30008 Revision 2.0 Page vii
Page 10

TABLES Guardian Operations Manual
This Page Left Blank.
Page viii NDA-30008 Revision 2.0
Page 11
Guardian Operations Manual General Information
Chapter 1 General Information
System Overview
Guardian, an Open Application Interface (OAI) application, supports both the
telephone user and those who administer the telephone system within an
organization or institution. As an OAI application, Guardian is supported by the
Applications Manager (APM), particularly in the area of database administration
and application configuration.
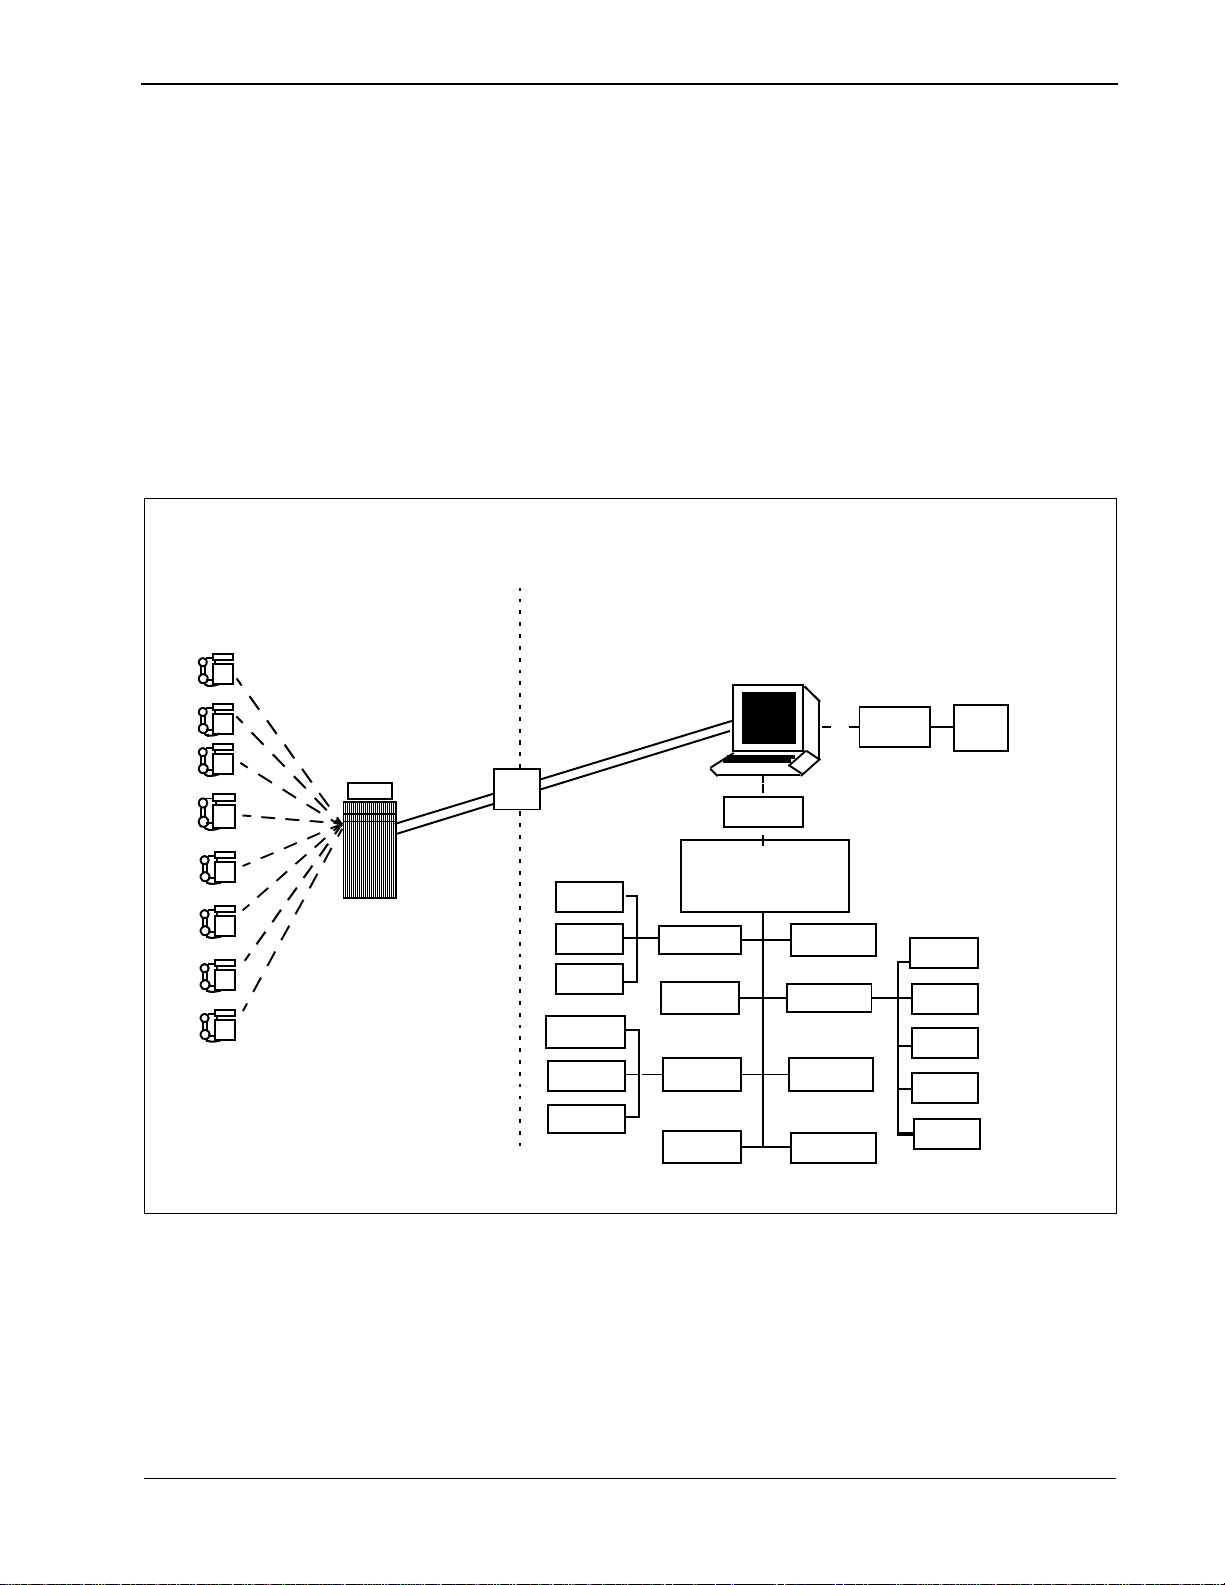
Guardian is a two-pronged system that provides continuous control of real-time
call processing functions as well as a menu-driven terminal interface for system
administration. This dual design is illustrated in Figure 1-1 below.
.
A
Real-Time
Call Authorizing/
Restricting
Processes
NEAX
OAI
Group
Code
Ext.
Calls
Status
History
B
Menu-Driven
Administration Processes
UAP
Console
Password
Guardian Admin
(Operator Access
to * options Operator/Adm
Access to + options)
Modify
Batch
Reports
Clear
+
*+
Log Name
Query
Record
Password
*+
Password
APM
Group
Code
Ext.
Time
Id
Figure 1-1 Guardian Dual System
The system is designed to support the management of multiple tenants (e.g., a
university with four separ ate ca mpuse s or a bu sines s hou sed in s evera l buil dings) .
Each tenant has its own real-ti me call processing, configura tion, and databases, but
all tenants are managed by the centralized System Administrator.
NDA-30008 Revision 2.0 Page 1
Page 12

General Information Guardian Operations Manual
System Overview (Continued)
The Guardian system monitors access to telephone extensions in the system,
detects invalid at tempts to plac e calls, and rest ricts s ervice, whe n neces sary. In the
Guardian system, each telephone user is assigned an authorization code that
corresponds to an individual extension or to a whole group of extensions, as in a
college dormitory or a corporate depa rtment. Authoriza tion codes, ext ensions, and
groups are administratively assigned defined time periods during which access is
prohibited (e.g., weekends or daily after 6:00 p.m.). Any calls attempted during
prohibited periods are considered invalid and are not processed. If an extensio n has
an excessive number of invalid calls, Guard ian restric t s or disables the extension.
Calls that are attempt ed on ext ensio ns or with aut horiz ation codes th at are alrea dy
disabled are also considered invalid.
Guardian uses one of th e foll owing methods to rest rict or d isable tel ephone acce ss:
• System Disable – Guardian monit ors re al-t ime cal l proce ssing f or a fr equenc y
of in va lid call attempts on any e xtensi on that e xce eds the desi gnated maximum
frequency (e.g., 7 invalid call attempts within a 15-minute period). When an
extension exceeds the maximum number of invalid calls, Guardian
automatically dis ables the extensi on temporarily . Both th e maximum frequenc y
and the length of time t hat t he e xte nsi on is tempora rily di sabled are c onf ig ure d
limits specified by extension group. However, the administrator can override a
System Disable at any time.
Security
• Admin Disable – Guardian enabl es the admin istrator to di sable an y ext ension,
authorization code, or group of extensions in one of the following ways:
• Routinely – The disablement of any or all extensions, authorization codes,
or groups of extensions during specified, regularly occurring time periods,
such as weekends or the late night hours
• Unconditionally – The disable ment of an e xt ension , auth oriza tion cod e, or
group at any time, for as long as desired
Guardian logs information about invalid call attempts and modifications to the
status of extensions, authorization codes, and groups. From this log and the
databases, Guardian provides a variety of reports in support of system
management.
Guardian is a password-protected system. You can enter the system with either an
Administrator, an Operator, or the Adm/Operator password. The Administrator
password provides un limited access t o all of the Guard ian administrat ive functions
that appear on the monitor in menu form. The Operator password enables you to
generate reports and to view, but not change, the status of individual extensions,
authorization codes, and groups of extensions. The Adm/Operator password
provides access to all Opera tor functions as well as ac cess to the modify menu. The
Guardian main menu includes a Maintain Password option through which the
Administrator can s pecify or cha nge the Administ rator, Operator o r Adm/Operator
passwords.
Page 2 NDA-30008 Revision 2.0
Page 13

Guardian Operations Manual General Information
User Procedure
You can use one of the following p rocedures to pla ce a call from a n extension using
an authorization code, depending upon the NEAX features that are available and
the data assignments that are configured on the NEAX System. During call
processing, Guardian verifies the disable status of the code and the extension and
either restricts the call or permits it with the routing and service feature privileges
assigned to the code.
Procedure No. 1: (Using a Service Access Code)
Step 1: The caller en ters the service access code to initiate Guardian.
Step 2:At the tone, the caller enters an authorization code.
Step 3:When the dial tone sounds, the caller enters the destination telephone
number.
Step 4: If the author ization code and the e xtension are val id and enabled, the call
is placed, and the caller hears the tele phone ringing at the destinati on. If
the authorization code is disabled or unknown to the system, or if the
extension is disabl ed, the call is not be placed, and the caller hea rs a busy
tone.
Procedure No. 2:
Step 1:The caller enters the destination telephone number.
Step 2:If the special dial tone sounds, the call is restricted and requires an
authorization code.
Step 3:The caller enters the authorization code.
Step 4: If the author ization code and the e xtension are val id and enabled, the call
is placed, and the caller hears the tele phone ringing at the destinati on. If
the authorization code is disabled or unknown to the system, or if the
extension is disabl ed, the call is not be placed, and the caller hea rs a busy
tone.
NDA-30008 Revision 2.0 Page 3
Page 14

General Information Guardian Operations Manual
Database Organization
Guardian requires the five databases described below for each tenant:
• Group – Contains definitions for up to 1,000 groups of extensions such as
corporate departments or student dormitories. Each group is assigned
information that is used to detect and prevent access violation on any of its
extensions b y group members. If all exte nsions in the or ganiz ation are ass igned
to only one group, that group is assigned the default value of zero in the
application conf iguration durin g installation. Ho weve r, if t here is more than one
group, group 0 is defined in the application co nfiguration, and all other gr oup s
are defined in this group dat abase. Groups 1- 9 hav e acces s to all e xtensions a nd
authorization codes. Groups 10-1000 have acces s only to those extensions and
authorization codes assigned to them.
• Extension – Contains e xtension numbers th at are up to fi ve digits i n length with
information relating to their verification. Each extension is mutually crossreferenced with it s group definition. If a n extension used in a cal l at tempt does
not appear in this database, the sys tem assumes that it belongs to the default
group 0, and the extension is marked as unknown for reporting purposes.
• Aut horization Code – Conta ins user -def ined autho rization c odes that a re up to
ten digits in length with information necessary for their verification. Forced
account codes may be substituted for authorization codes. Guardian can work
with either forced accou nt or authori zati on codes b u t not with both at the same
time. Each authorization code is assigned Route Restriction Class (RSC) and
Service Feature Clas s ( SFC) values that indicate levels of privileges granted t o
the code holder.
• Time Interval – Con tains up to 15 prede termined time inter vals us ed to specify
periods during which a uthorization c odes, extens ions, and groups ca n be turned
off by the system administrator. These intervals are user-defined and might
include weekends, holidays, or evenings.
• ID – Contains telephone user identification numbers and the authorization
codes that are assigned to them. The ID numbers may consist of seven to ten
characters. Guardian in it iall y creat es thi s databa se from th e author izat ion code
database. You can access the database by ID number through the Guardian
System Administrator Query Database option and modify it by authorization
code through the APM Database Administration option.
These databases are created and maintained through the Database Administration
option in the Applications Manager (APM). The Guardian system administrator
must have access to the APM at the system administrator security level in order to
create the databas es. The Applications Manager Ope rations Manual provid es stepby-step procedur es for c reating and changi ng the da tabase de finiti ons and r ecords.
Installation Introduction on page 7 of this manual provides information about the
specific fields necessary for each of the databases.
Page 4 NDA-30008 Revision 2.0
Page 15
Guardian Operations Manual General Information
Database Organization (Continued)
Once a database is created or changes are made to it in the APM, it is installed for
active use by Guardian. While this installation is taking place, Guardian briefly
suspends its real-time control and restriction of PBX call processing. During this
period, the PBX reverts to its internal tables that do not reflect the status of
extensions, groups, and authorization codes in the databases. The amount of time
required to load the database(s) is brief eno ugh that it should not s ignificantly affect
the level of control exercised by Guardian.
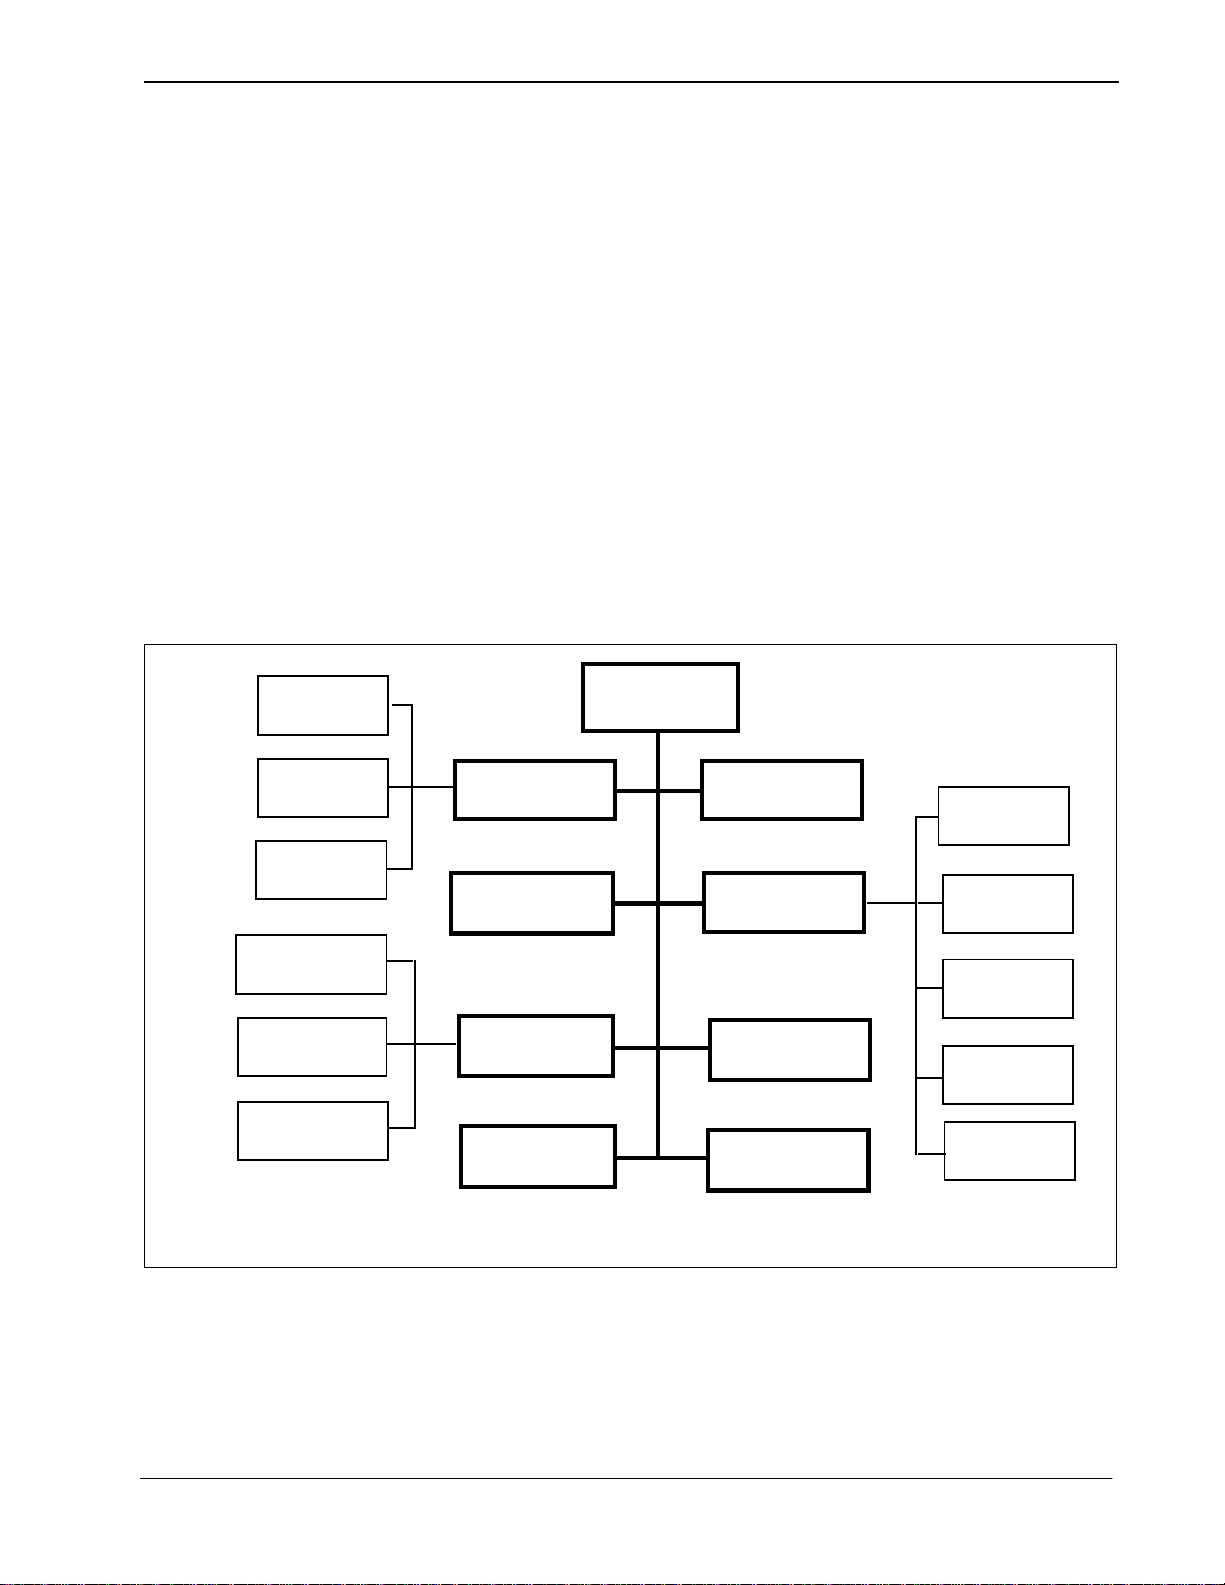
Menu Organization
The system administrator interacts with Guardian through a series of menu-driven
screens. The organization of these screens is illustrated in Figure 1-2. Boldfaced
options appear on the Administration M ain Menu, the asterisk ed options (*) app ear
on the Operator Main Menu and the optio ns indi cated by a ‘+’ appear on the Adm/
Operator Menu. Chapter 3, “Administration” on page 27 of this manual describes
the use of these options and their data entry screens in detail.
Group
Authorization
Code
Extension
Call Attempts
Database Status
Database History
System Administration
Modify Status +
Initialize Batch Control
Generate Reports* +
Clear Status
Values Password
* Accessed through the Operator security level
+ Accessed through the Adm/Operator security level
Set OAI App
Logical Name
Query Database* +
Initialize Record File
Maintain
Group
Authorization
Code
Extension
Time Interval
User ID
Figure 1-2 Main Menu Organization
NDA-30008 Revision 2.0 Page 5
Page 16

General Information Guardian Operations Manual
This Page Left Blank.
Page 6 NDA-30008 Revision 2.0
Page 17

Guardian Operations Manual Installation Introduction
Chapter 2 Installation Introduction
This chapter prov ides you with specific inf ormation and f ield entries that you nee d
to install and configure Guardian. In addition to this chapter, use the following
manuals for installation informat ion:
• Applications Manager (APM) Installation Manual – Contains step-by-step
instructions for installing the software from the release media.
• Applications Manage r (APM) Operati ons Manual – Explains how applications
like Guardian are configured in the APM environment and how Guardian’s
databases are created, using the entries and values provided in this chapter.
• NEAX System Manuals - Give very detailed explanations about the
assignments that need to be made with the NEAX2400 Maintenance
Administration Terminal (MAT) commands, the NEAX2000 Customer
Administration Terminal (CAT), or the NEAX2000 Maintenance Operations
Console (MOC).
The installation a nd set up of Guard ian invol ves the f ollowing steps. Eac h of these
steps is described in more detail within this chap ter:
• Software Installation – Load the Guardian software from the release media
using the instructions provided in the APM Installation Manual. After you
install the software, you must assign the Guardian login name, guardadm so
that users can log in to Guardian from the UNIX prompt. For more information,
refer to this section on page 9.
• Applicati on Configuration – Guardian is internally supported b y the APM and
must be configured in the APM environment. This section that begins on page
11 provides the information that must be entered into this APM con figuration
file. Use the instructions provided in the APM Operations Manual for the
entries contained in this section.
• Database Requirements – Guardian uses fi ve dat abases which are cons tructed
through the APM Database Administration option. To build the databases, the
system creates master definition files and their related master databases. Then,
the system creates the appl ication defin ition files to enable the processing of the
master files int o application databa ses. This section def ines the infor mation that
you must enter to these definition and database files. Use the instructions
provided in the APM Operations Manual for the entries contained in this
section.
• NEAX Command Assignments – Before Guard ian will function, speci fic data
settings must be assigned at the NEAX2400 Maintenance Administration
T erminal (MAT), the NEAX2000 Customer Administrat ion T erminal (CAT), or
the NEAX2000 Maintenance Operations Console (MOC). “NEAX Command
Assignments” on page 22 specifies the necessary commands and the values at
which they are to be set. Use the instructions prov ided in the appropriate NEAX
System Manuals to make the entries contained in this section.
• Initialization – Initialize Guardian from the APM Operations Menu using the
instructions provided in the APM Operations Manual. A password is assigned
to the login ID. This section describes the password assignment process.
NDA-30008 Revision 2.0 Page 7
Page 18

Installation Introduction Guardian Operations Manual
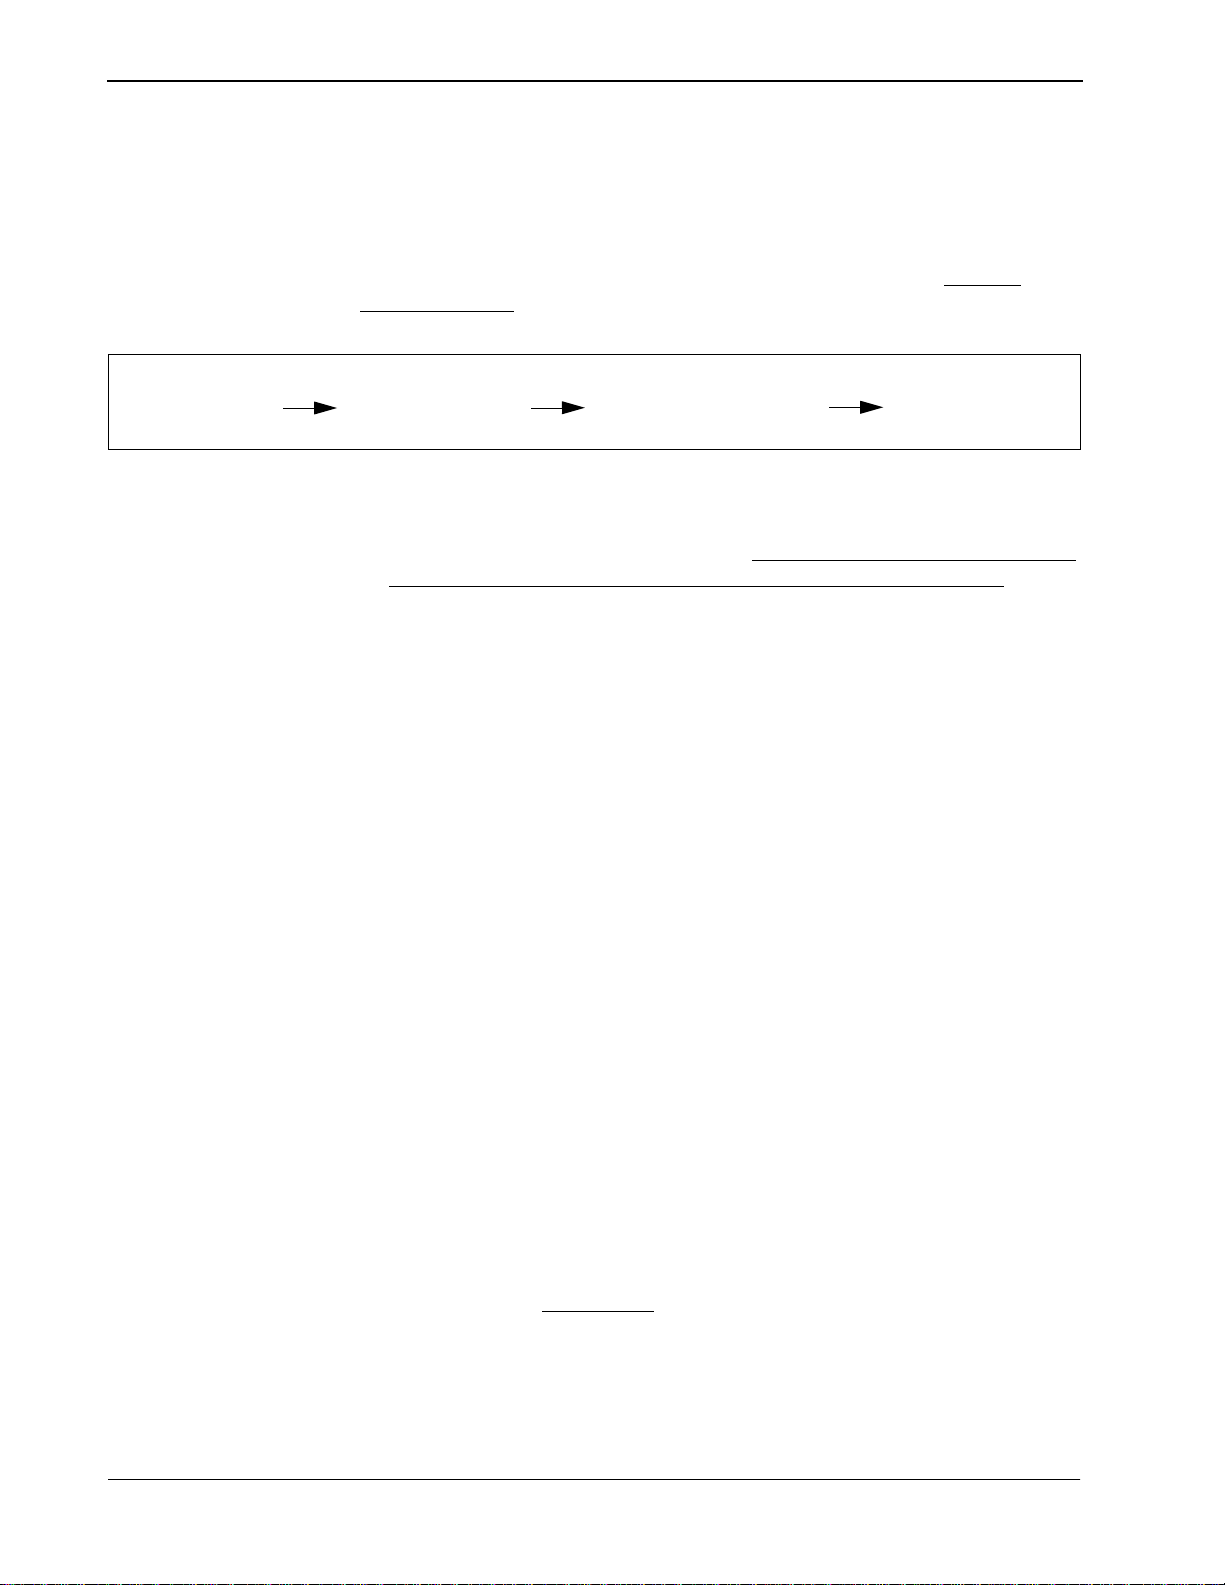
The installation proce ss, incl uding i ts pres entat ion in thi s manual an d refer ence to
other manuals, is illustrated below:
GUARDIAN
INSTALLATION REQUIREMENTS
Discussed in section:
Software Installation
Application Configuration
Database Requirements
Software Installation
Software
Login ID
Protected Databases Update
Application Configuration
Application Characteristics
Primary Parameter Configuration
OAI Facilities (Optional)
OAI Configuration Parameters (Optional)
User-Defined Parameters
Database Requirements
Master Definition File
Master Database File
Application Definition File
Application Database
Instructions in:
APM Installation
Manual
APM Installation
Manual
APM Installation
Manual
NEAX Command
Assignments
Initialization
Page 8 NDA-30008 Revision 2.0
NEAX2400 MAT Commands
NEAX2000 CAT/MOC Commands
Initialization
APM Initialization
Password Assignment
NEAX2400 IMS
System Manuals
NEAX2000 IVS
System Manuals
APM Operations
Manual
Page 19

Guardian Operations Manual Installation Introduction
Software Installation
Use the following steps to complete software installation.
Step 1: Softwar e Installation
Step 2: Login ID
To load the Guardian software from the release media, log on to the APM Platform
Management Menu, select the Installation of Applications/Packages option, and
follow the instructions provided in the APM Installation Manual.
If the Guardian login ID, guardadm, already has a password, this software
installation is considered an upgrade, and the cursor returns to the APM Platform
Management Menu so that you can complete the steps detailed in section
Application Configuration on page 11 through section Initialization on page 26.
If the Guardian login ID, guardadm, does
not already have a password, respond to
the following series of prompts that are displayed on the screen:
Prompt:
To ensure correct in st al lat i on, a ll administrative type files should be
closed – – p lease ensure that all such files are closed at this time .
Response:
Make sure that no one is currently performing administrative
functions in the UNIX root files. Type y to continue the installation.
Prompt:
If you know the root password and wish to continue, enter ‘y’;
otherwise enter ‘n’ to abort the installation.
Response:
To continue, type y and press Enter.
To cancel the installation, type n and press Enter. The installation is
cancelled, and the pr ompt returns to t he APM Platform Management
Menu.
Prompt:
Response:
Please Ent er the su/ro ot Password:
Enter the root password and press En ter.
If you enter the wrong root password, an erro r message displays, and
the installation fails. Press Enter to return to the APM Platform
Management Menu to start again.
NDA-30008 Revision 2.0 Page 9
Page 20

Installation Introduction Guardian Operations Manual
Step 3: Protect ed Databases Updated
Because a new user (i.e., guardadm) has just been installed, you need to execute
two commands from the command li ne under super-user stat us. The first command
(authck) updates the protected database files to incorporate user guardadm, and
the second command (passwd) removes any password that user guardadm may
have inherited during the installation process.
1. From the UNIX login prompt, log on as super user.
2. From the command line, type /tcb/bin/authck -s and press Enter.
The following message appears:
“The following use rs have entries in the def ault user fi le but not in the protected
password database: guardadm
There are discrepancies between the databases.
Fix them? (y/n)”
3. Enter y and press RETURN.
4. Type /bin/passwd -d guardadm at the command line and press Enter.
This completes the nec essary updating of the protec ted databases.
Configuration” on page 11. to configure Guardian in the APM.
See “Application
Page 10 NDA-30008 Revision 2.0
Page 21

Guardian Operations Manual Installation Introduction
Application Configuration
Setting up Multiple Tenants
Guardian is configured into the APM system using the
Application Configuration option on the APM System Administration menu.
1. Enter the APM option from the APM Platform Management Menu.
2. Enter the system adm inistrator password at the APM password screen.
3. Enter the Application Configuration option from the System Administration
menu.
This section contains the information that you should enter into the co nfiguration
file for Guardian. For specific instructions on what these parameters mean and how
to make these entries, use the
A tenant is defined as a group of users that may represent a campus, a corporate
department, or an entire organization. Using Guardian, you can have one or
multiple tenants. For instance, a university may be configured as one tenant, or
each of its campuses or academic departments may be configured as a tenant,
depending upon the needs of the university. Each tenant is associated with an
application name. This name must then be specifie d before any action ca n be taken
through the Administrati on menu. Multiple te nants can be handle d in either of two
ways:
• Each tenant can be configured individually and identified by a unique
application name (e.g., Guardian1 or Guardian2). In configuring each tenant,
only the application name and the tenant number (through OAI-Conf
command) must be changed. Once the tenants are configured, the Guardian
system administrator can specify a specific tenant’s application name so t hat all
actions taken through the menu options affect only the indicated tenant rather
than all of the tenants.
APM Operations Manual
function of the
Add
.
• Guardian can be conf igured once f or tenant No. 0, which means all tenants. Th e
single configured application name is then used to gain access to the
Administration menus, and all actions taken thereafter through those menu
options affect every tenant served by Guardian.
If there is more than one switch in a net work, Guardian will work with all the
PBX’s and maintain its reports and database no differently than a single switch
environment.
There should be a s eparate application configuration in the APM for each Guar dian
switch. All parameters should be identi cal exce pt for th e destina tion lin k, standar d
out file and Guardian ID (UDP #14).
Note:
The following installation is based upon a single tenant (#0). If you need multiple
tenants, complete this configuration for each one.
NDA-30008 Revision 2.0 Page 11
Page 22
Installation Introduction Guardian Operations Manual
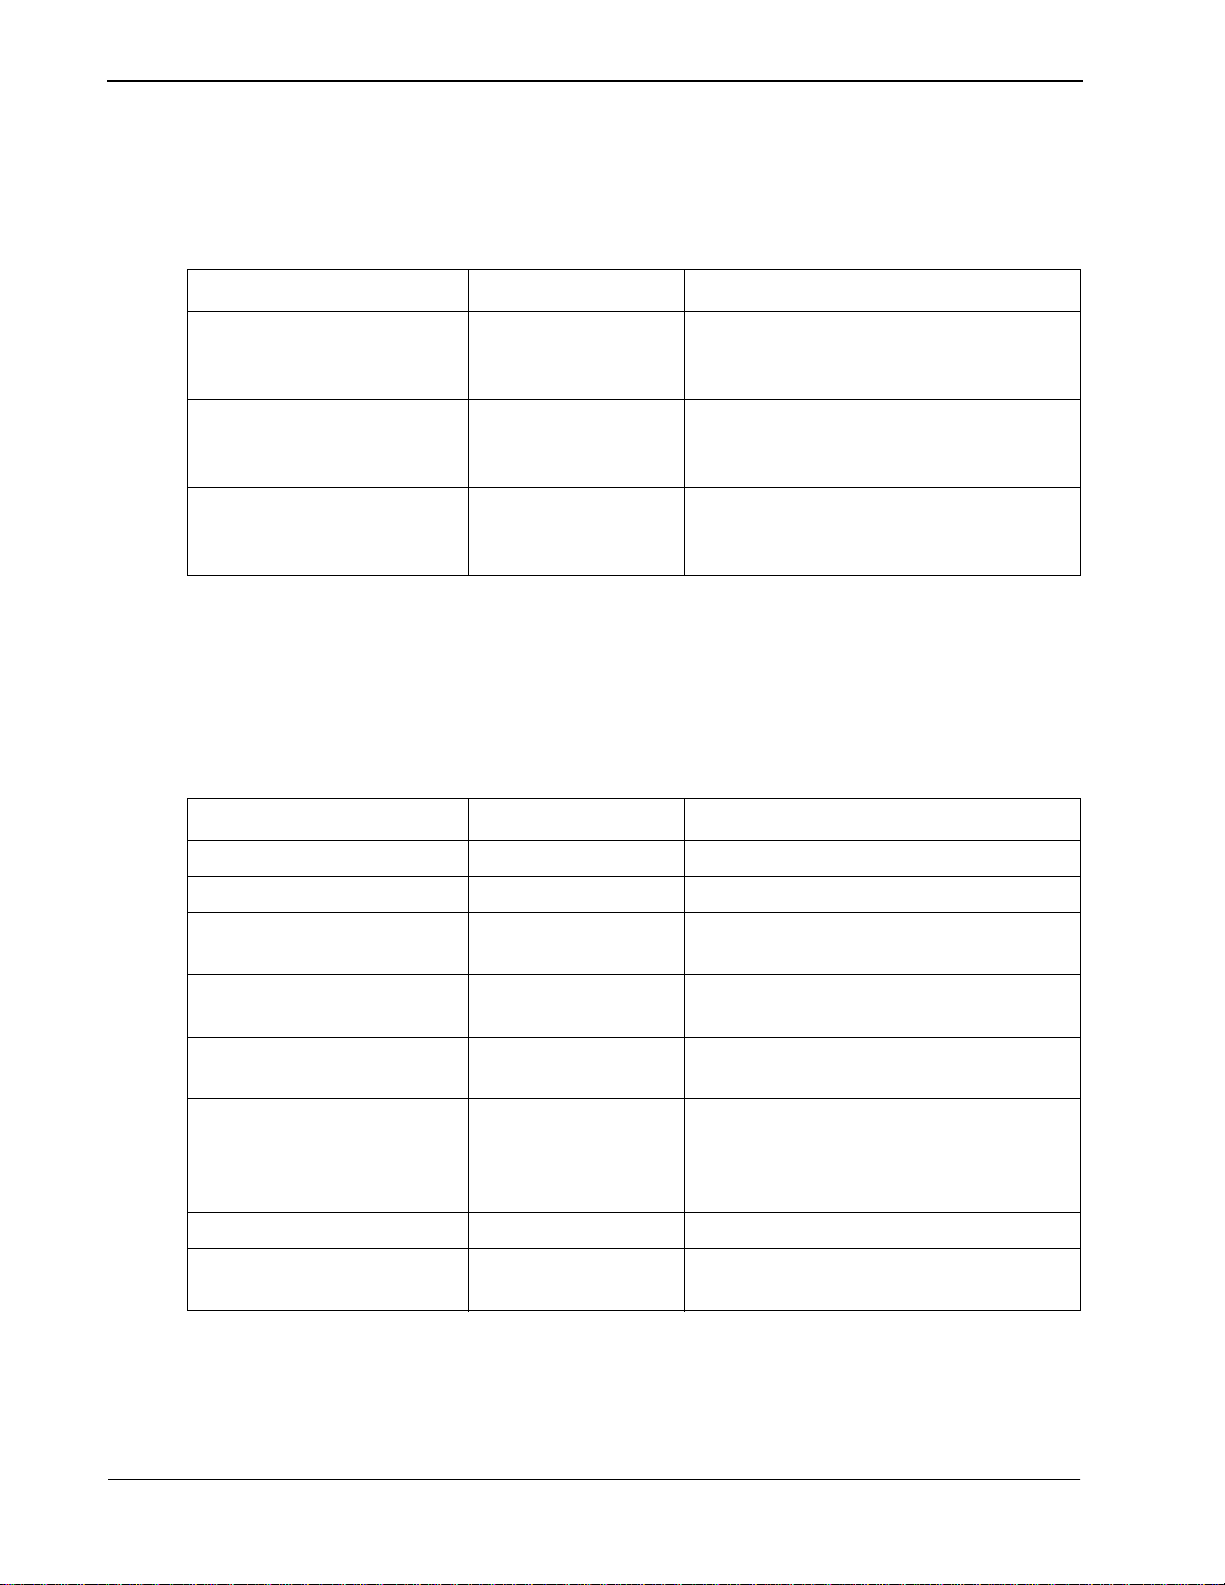
Step 1: Application Characteristics
Parameter Entry Description
OAI Application (Y,N) Y Indicates whether or not (Yes or No) this
CRT Application (Y,N) N Indicates whether or not (Yes or No) this
Communication Queue (Y,N) N Indicates whether or not (Yes or No) this
Step 2: Prim ary Configuration Parameters
In adding Guardian to the APM Applicati on Configuration fil e, define it as an OAI
application that does not need a CRT or a communication queue, as follows:
Table 2-1 Application Characteristic Entries
tenant communicates with the NEAX using
OAI processes.
tenant requires a terminal screen that is of
the same type as the one used by the APM.
non-OAI a pplication ne eds an IPC queue to
communicate with other process.
On the Configuration Entry screen, make the entries shown below to the
parameters indicated:
Table 2-2 Primary Configuration Parameter Entries
Parameter Entry Description
Application Name Guardian The unique logical na me of this appl ication.
Executable Filename /oai/app/guard/grdrt The path name of the executable file.
Group (no entry) (Guardian is not a member of a group of
applications.)
Response Mode I This is a defaul t value since Guardian does
not belong to a group.
Initialization Batch Y Guardian is set to initialize automatically
when the OAI syst em is initialized.
Termination Mode M Guardian is set to receive a termination
message from the APM when it is to
terminate, rather than a kill or termination
signal.
Standard Output /oai/log/dbg/grd.d bg Guardian’s output is sent to this file.
Number of Restarts 5 Guardian may be restarted by the APM up
to 5 times that it terminates erroneously.
Page 12 NDA-30008 Revision 2.0
Page 23

Guardian Operations Manual Installation Introduction
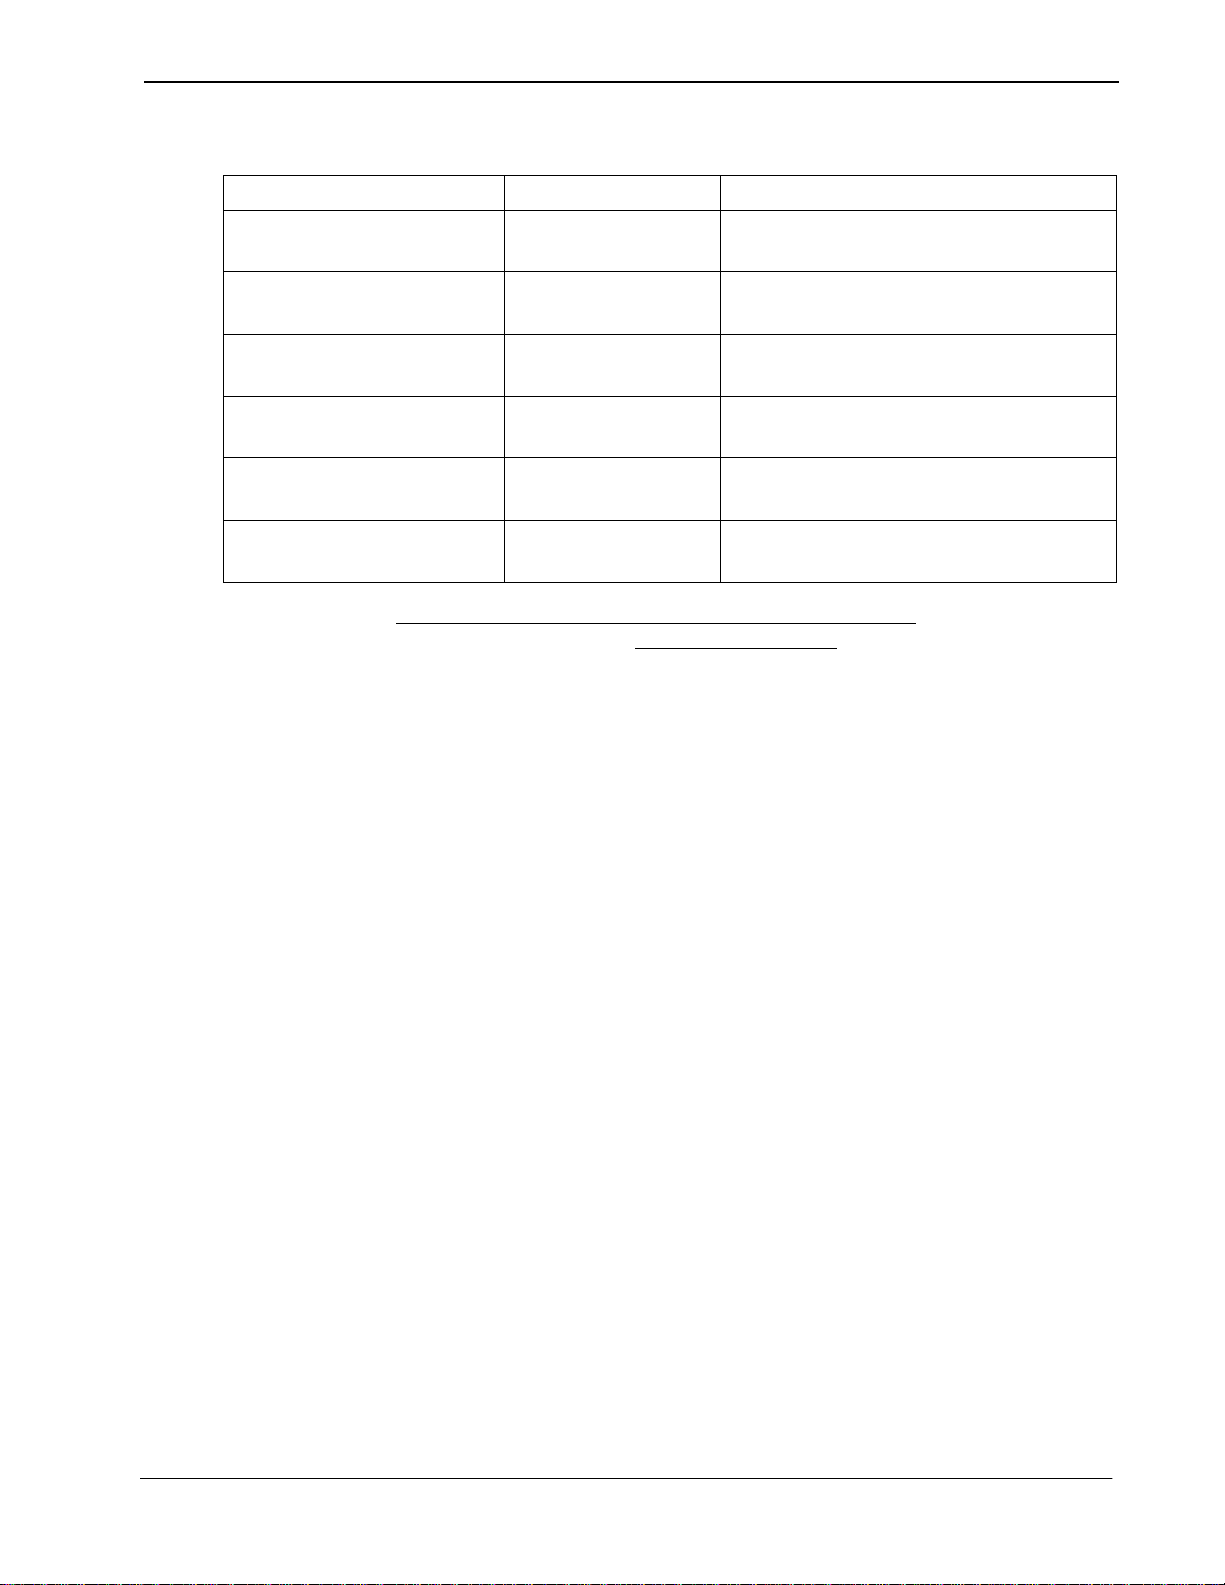
Step 3: OAI Facilities
Step 4: Secondary OAI Configuration Parameters
Parameter Entry Description
Database Name #1 /oai/app/guard/da ta/ The path name of the database that co ntains
Database Name #2 /oai/db/cur/ The path name of the database tha t contains
Timeout Value #1 30 The number of seconds Guardian waits
According to instru ctions in the APM Operations Manua l, designate the f ollowing
PBX facility for Guardi an using the Facilities command on the Configuration
Entry screen:
Authorization Code Facility (ACF)
Using the OAI-Conf command on the Con figuration Entry sc reen, make t he entry
shown for each of the following parameters required by Guardian. Use the
instructions provided for this option in the APM Operations Manual:
Table 2-3 Secondary Configuration Parameter Entries
the back-up files.
the current master databases.
before tryi ng to reopen a PBX facility that
has been closed.
Tenant Number 0 This configuration applies to all tenants.
(See “Setting up Multiple Tenants” on
page 11..)
Source Link Name OAI1TCP The port on the source side of the
communication link. Entry should
correspond to a Link Name in the APM
System Configuration file.
Destination Link Name PBX1TCP The port on the destination side of the
communication link.
Association Recovery 60 The number of seconds Guardian waits
before trying to reestablish an association
with the NEAX that has bee n released.
NDA-30008 Revision 2.0 Page 13
Page 24

Installation Introduction Guardian Operations Manual
Step 5: UserDefined
Parameters
User Defined #1 10 IO Delay Factor – The period of time in
User Defined #2 5 IO Block Factor – The number of hi storical
User Defined #3 4 Default Disable Time – For Group 0
User Defined #4 3 Frequency Period – For Group 0, the time
User Defined #5 3 Frequency Count – For Group 0, the
Make the following additional parameter entries through the UserDefined
command on the APM Configuration Entry screen.
Table 2-4 User-Defined Parameter Entries
Parameter Entry Description
which Guardian collects a block of codes
before recording them.
records accumulated and wri tten as a unit to
the history file.
(default group) , the amount of time that an y
extension in the group is to be system
disabled in response to an excessive
frequency of invalid call attempts.
interval in minutes in which invalid call
attempts are counted to obt ain a fr equency.
number of in v alid att empts that a re counted
before the frequency is considered
excessive and the extension is system
disabled.
User Defined #6 100 Lifetime Invalid Attem pts – For Group 0,
the maximum lifetime number of
accumulated invalid requests that are
allowed before the extension is system
disabled.
User Defined #7 /oai/app/guard/grdrc Record File – The path name of the file in
which processing data is recorded for
reporting purposes.
User Defined #8 vvvvvvviii Authcode Mask – A string of characters
designating which digits of a dialed
authorization code are to be verified, using
the following characters:
Note:
The verifiable digits of the mask must
be consecutive.
I or i: Ignore the digit in this position of
the code.
V or v: Verify the digit i n this posit ion of
the code.
Page 14 NDA-30008 Revision 2.0
Page 25
Guardian Operations Manual Installation Introduction
Table 2-4 User-Defined Parameter Entries
Parameter Entry Description
User Defined #9 /oai/app/guard/ Base Directory – The path name, where
binary files reside.
User Defined #10 /oai/db/cu r/grdacf Authorization Code Database – The path
name of the Authorization Code database.
User Defined #11 /oai/db/cur/grdgrpf Group Database – The path name of the
Group database.
User Defined #12 /oai/db/cur/grdextf Extension Database – The path name of the
Extension database.
User Defined #13 /oai/ db/cur/grdutf Time Interval Database – The path name of
the Time Interval database.
User Defined #14 1 Integer – Guardian ID (1-10); Unique for
each switch in the network.
This completes the configuration of Guardian in the APM. See “Database
Requirements” on page 16. to create its databases.
NDA-30008 Revision 2.0 Page 15
Page 26
Installation Introduction Guardian Operations Manual
Database Requirements
Each configured Guardian tenant requires five working databases (Group,
Authorization Code, Extension, Time Interval, and ID). Each database is created
through the Database Administration option on the APM System Administration
Menu. Database creation involves the following four-step process for each
required database:
Step 1
- Create
Master Definition File
Step 2
- Build
Master Database File
Step 3
- Create
Application Definition File
Step 4
- Process
Application Database
1. Create a Master Definition File: Th is s tep i nvolves c rea ting the mast er de f ini -
tion file t hat defin es the fi elds in the mast er database f ile. F our master def inition
files must be created for Guardian the following databases: Group, Authorization Code, Extension, and Time Interval. The Authorization Code master definition file support s both the Author ization Code and the ID databases. When
more than one tenant has been configured for Guardian, one master definition
file and master data base file can support the database req uir ed for each tenant.
That is, for example, if three tenants have been configured, one Group master
definition file and one Group master database file can support three Group databases, one for each tenant.
2. Build a Master Database Fil e: This step in v olves ente ring tenant-spec ific data
(e.g., extension s, group d efiniti ons, authori zation code s, student IDs, or time in tervals) into the master database fields that were just defined in the four master
definition files in Step 1.
3. Create an Application Definition Fi le: In this step, a definition file is created
for each of the Guardi an databases f or each tenant . This fi le def ines the form ats
by which data fr om the corre sponding mast er f ile is to be converted to meet the
needs of Guardian.
4. Process the Applicatio n Database: In this step, the Proc ess/Install Appl ication
Databases option on the APM Database Administration menu creates the file
that will be used by Guardian. When the Process command is activated, data is
drawn from the master database and converted to the formats specified in the
corresponding applica tion de f init ion f i le. The Install command on the Process/
Install Applicati on Dat abases option is activated to enable the Guardi an te nant
to copy its database into a working file.
Instructions
The information required in all four steps for each Guardian database is provided
in table for m on the follo wing pages. Using this information w ith the procedural
instructions provided in the APM Operations Manual, enter the Database
Administration option on the APM System Administration Menu, and build the
Guardian databases, one at a t ime
. Any messages displayed dur ing these steps are
addressed in the Process and Error Messages chapter of the APM Operations
Manual.
Note:
Page 16 NDA-30008 Revision 2.0
Complete Step 4, Process the Application Database, for each database after entering the information on t he following page s.
Page 27
Guardian Operations Manual Installation Introduction
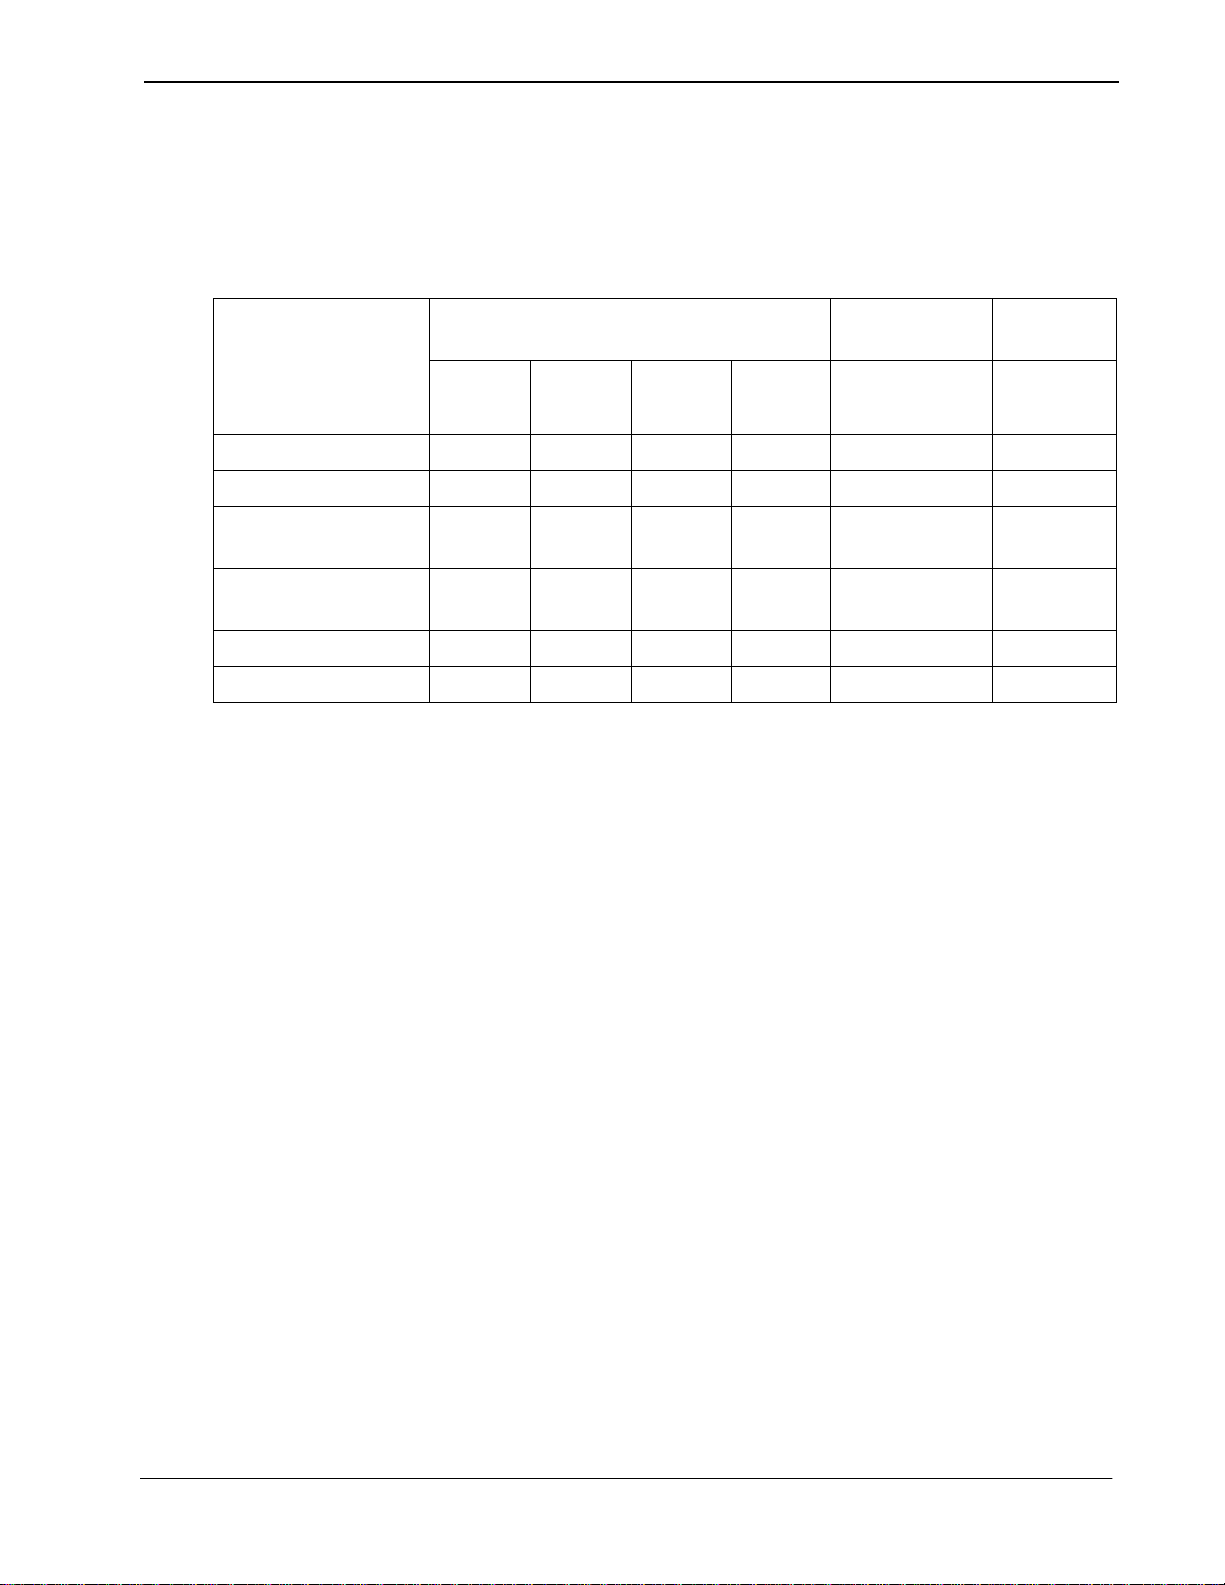
Group Database Information
Field Description
Group ID N 4 1 1000 Short Integer 2
Interval Index N 2 0 15 Short Integer 5
Temp Disable Time
Max
Lifetime Invalid
Attempts
Frequency Period N 2 0 15 Short Integer 10
Frequency Count N 1 0 7 Short Integer 2
The Group database fi eld entries are shown i n the table below and defined in “Field
Definitions” on page 17. Name the master definition file grdgrpf
_
m and the
application definition file grdgrpf.
Table 2-5 Group Database Field Entries
Master Definition File Application
Type Size Min.
Value
Max.
Value
Definition File
Data Type Typical
Master
Database
Entry
N 3 0 255 Short Integer 2
N 3 0 255 Short Integer 255
Field Definitions
• Group ID – A number that identi f ies a gr oup, lying within the range fro m 1 to
1000. This is the key field for database sorting, so entries must be arranged in
ascending order.
Note:
• Interval Index – The index to the specific interval of tim e in t he Time Interva l
• T emp Disabl e Time Max – Number of 15 -minute periods tha t extensions in the
• Lifetime Invalid Attempts – The maximum lifetime number of accumulated
• Frequency P eriod – The time interval in minutes in which invalid call attempts
Groups 1-9 have access to all authorization codes and extensions; groups 101000 have access to only the codes and extensions assigned to them.
Database during which the group extensions are routinely, administratively
turned off. The index uses the following values:
0: Constantly off.
1-15: Inde x that corresp onds to the desired time interva l in the Ti me Interv al
Database.
group will be automaticall y , tempora rily turned of f by the sys tem in response to
an excess frequency of invalid call attempts; maximum 255 periods.
invalid requests that are allowed before the extensions in the group are turned
off by the system; maximum 255 requests.
are counted to obtain a frequency; maximum 15 minutes.
• Frequency Count – The number of invalid call attempts that are counted befo re
the frequency is considered excessive, and the extension is turned off by the
system; maximum of 7 requests.
NDA-30008 Revision 2.0 Page 17
Page 28
Installation Introduction Guardian Operations Manual
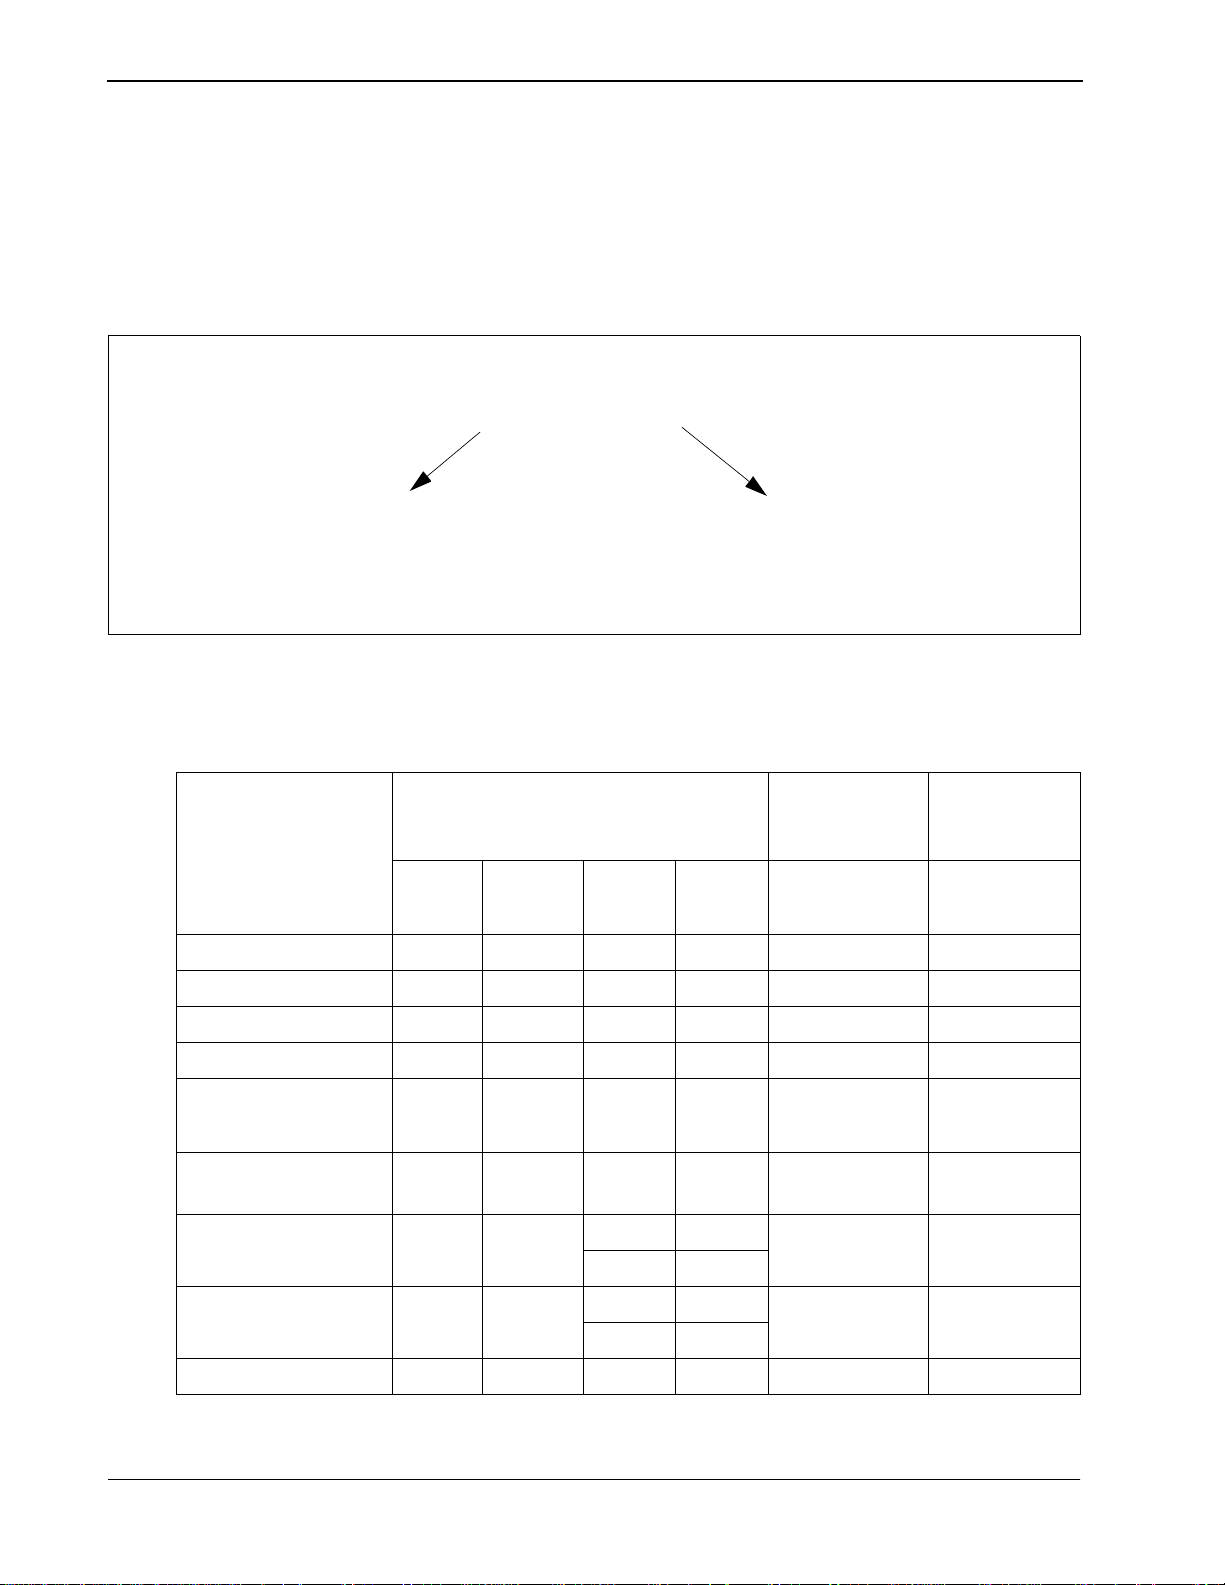
Authorization Code and ID Database Information
Authorization Code
Application Definition File
&Database
grdacf
The Authorization Code master definition file and master database file support
both the Authorization Code database and the ID database. Create separate
Authorization Code and ID application definition files to process the master
database into the two separate databases. Name the master definition file
grdacf
_
m, name the Authorization Code application definition file grdacf, and
name the ID a pplication definition file grdidf, as shown below:
Master Definition File
& Master Database
grdacf_m
ID
Application Definition File
&Database
grdidf
The Authorization Code database field entries are shown in the table below and
defined in Field Definitions on page 19:
Table 2-6 Authorization Code Database Field Entries
Field Description
Master Definition File Application
Type Size Min.
Value
Max.
Value
Definition
File*
Data Type Typical
Master
Database
Entry
Authorization Code* A 10 ASCII 1246247
Assigned A 1 ASCII Y
ID* A 10 ASCII 585241398
Interval In dex N 2 0 15 Short Integer 5
Extension or Group
A 1 ASCII G
Flag
Extension/Group
N 5 0 99999 Long Integer 2
Value
Route Restriction
Class
Service Feature Class N 2 0† 15† Short Integer 1
N20† 15† Short Integer 5
1‡ 8‡
1‡ 8‡
Reserved A 2 ASCII (
No Entry)
†Use these values for the NEAX2400.
Page 18 NDA-30008 Revision 2.0
Page 29

Guardian Operations Manual Installation Introduction
‡Use these values for the NEAX2000.
*The fields of the two a pplication defini tion files (Aut horization Code and I D) that
are derived from the authorization code master database must be entered in the
following sequence:
Order Authcode Definition File ID Definition File
#1 Authorization Code ID
#2 Interval Index Authorization Code
#3 Extension/Group Value
#4 Route Restriction Class
#5 Service Feature Class
#6 Extension or Group Flag
#7 Assigned
#8 Reserved
Field Definitions
• Aut horization Code – Key f ield of the Authori zation Code Database consis ting
of ten digits. Codes must be arranged in ascending order. The authorization
code is also the second field in the ID Database.
• Assigned – Indicates whether or not (Yes or No) this authorization code has
been assigned to a telephone user.
• ID – The telephone user identification number assigned to this authorization
code.
• Interval Index – The index to the specific interval of tim e in t he Time Interva l
Database during which the authori zat ion code is routinely disabled. The index
uses the following values:
0: Constantly off.
1-15: Index to an interval in the Time Interval Database.
• Extension or Group – The assignment of the authorization code to a single
extension or to a group of extensions. Possible field entries are as follows:
Ext: Extens ion
Grp: Group
• Extensio n/Group Value – The actual extension or group to which the
authorization code is assigned, corresponding to the Extension or Group
assignment:
If assignment is Ext: An extension number of up to 5 digits in length.
If assignment is Grp: A group ID ranging from 1 to 1000.
• Route Restriction Class – A value from 0 to 15 on the NEAX2400 or a value
from 1 to 8 on the NEAX 2000 that represents different combinations of
distance and routing privileges available to code holders.
• Service Feature Class – A value from 0 to 15 on the NEAX2400 or a value
from 1 to 8 on the NEAX 2000 that represents different combinations of PBX
call processing features available to code holders.
• Reserved – System-reserved space. This field is not modified by the user.
NDA-30008 Revision 2.0 Page 19
Page 30

Installation Introduction Guardian Operations Manual
Extension Database Information
Field Description
Extension Number N 5 0 99999 Lon g Inte ger 3601
Group ID N 4 0 1000 Short Integer 2
Interval Index N 2 0 15 Short Integer 5
The Extension database field entries are shown in the table below and defined in
“Field Definitions” on page 20. Name the Extension master definition file
grdextf
_
m and the application definition file grdextf.
Table 2-7 Extension Database Field Entries
Master Definition File Application
Definition File
Type Size Min.
Value
Max.
Value
Master
Database
Data Type Typical
Entry
Field Definitions
• Extension No. – The extension number of up to 5-digits in length. This is the
key field of the database, and entries must be arranged in ascending order.
• Group ID – The identification number of the group to which the extension is
assigned. This number must lie within the range from 1 to 1000.
• Interval Index – The index to the specific interval of tim e in t he Time Interva l
database during which the extension is routinely, administratively turned off.
The index uses the following values:
0: Constantly off.
1-15: Inde x of the Time I nt er val database corresponding to the desired time
interval.
Time Interval Database Information
Field Description
Interval Index N 2 0 15 Short Integer 5
Begin Day of Week N 1 0 6 Short Integer 5
Begin Hour N 2 0 23 Short Integer 22
Begin Minute N 2 0 59 Short Integer 0
End Day of Week N 1 0 6 Short Integer 1
End Hour N 2 0 23 Short Integer 5
The Time Interval da ta base f ield entries are s hown in th e tabl e bel ow and d efine d
in Field Definitions on page 21. Name the Time Interval master definition file
_
grdutf
m and the application definition file grdutf.
Table 2-8 Time Interval Database Field Entries
Master Definition File Applicati on
Definitio n File
Type Size Min.
Value
Max.
Value
Data Type Typical
Master
Database
Entry
Page 20 NDA-30008 Revision 2.0
Page 31

Guardian Operations Manual Installation Introduction
Table 2-8 Time Interval Database Field Entries
End Minute N 2 0 59 Short Integer 30
Field Definitions
• Interval Index – The numb er by which the following time interval is indexed
in the database and refer re d to by the group, extension, and author ization code
databases. This number must lie within the range from 1 to 15.
• Begin Day of Week – The day of the week on which the int erv al begi ns and the
group, authorization code, or extension is administratively turned off. The day
of week can be one of the following values:
0: Sunday 4: Thursday
1: Monday 5: Friday
2: Tuesday 6: Saturday
3: Wednesday
• Begin Hour – The hour in which the interval begins and the group,
authorization code, or extension is administratively turned off. The begin hour
is a value between 0 and 23.
• Begin Min. – The minute at which the interval begins and the group,
authorization code, or extension is administratively turned off. The begin
minute is a value between 0 and 59.
• End Day of Week – The day of the week on which the interval ends and the
group, authorization cod e, or ext ension is turne d back on. The day of week can
be one of the following values:
0: Sunday 4: Thursday
1: Monday 5: Friday
2: Tuesday 6: Saturday
3: Wednesday
• End Hour – The hour in which the interval ends and the group, authorization
code, or extension is turned back on. The hour is a value between 0 and 23.
• End Minute – The minute at which the interval ends and the group,
authorization code, or extension is turned back on. The minute is a value
between 0 and 59.
This completes creation of Guardian’s database support.
See “NEAX Command
Assignments” on page 22. to make the necessary command assignments at the
NEAX2400 MAT or NEAX2000 MOC (or CAT).
NDA-30008 Revision 2.0 Page 21
Page 32

Installation Introduction Guardian Operations Manual
NEAX Command Assignments
This guide assumes that data settings that affect the operation of all OAI software
on a system-wide basis have already been assigned on the NEAX2400
Maintenance Administration Terminal (MAT) commands, the NEAX2000
Customer Administration Terminal (CAT), or the NEAX2000 Maintenance
Operations Console (MOC). Such settings include, for instance, system index
values and assignment of Interface I/O Port Data in the Interface Processor (IP).
For more information about the system data settings and about the Guardian
settings discussed in this section, refer to th e OAI System Manual and the
Command Manual for the specific NEAX system in use:
Guardian is only effective if the Authorization Code or Forced Account Code
service feature i s engaged, and the stat ion has been assigned t o use the feature. The
following data assignments set up this configuration on the NEAX MAT.MAT
Assignments.
NEAX2400 Commands
AMND: Assignment of Maximum Necessary Digits
This command assigns the maximum number of digits to be read for the
authorization code and the destination code.
(a) When this command is used for forced account codes or au thorization codes,
the tenant number (TN) must be assigned as 0, regardless of what tenant
number was configured in the application configuration.
(b)Enter other informat ion as reques ted by pr ompts, with the MND a ssigned to
10 digits.
(c) The number of digits in the authorizatio n code or force d accoun t co de must
agree with the number of digits specified in the application configuration
and in the database creation process.
(d)Use the AATC command to provide the PBX with a backup database of au-
thorization codes, in case the OAI application is not operating.
ARSC Command: Assignment of Route Restriction Class
This command assigns and displays route restriction information for a tenant and
route number. This command actually activates the RSC. (Use the ASDT
command to associat e both the t enant and the se rvice feat ure c lass a ssign ed above
to a specific station.)
(a) Use the same tenant number that was conf igured for the application t hrough
the APM.
(b)Enter other necessary inf ormation as requested by prompt s, making sure that
anything entered corresponds to the application configuration.
Page 22 NDA-30008 Revision 2.0
Page 33

Guardian Operations Manual Installation Introduction
ASDT Command: Assignment of Station Data
Use this command to associate both the tenant and the route restriction class
assigned above to a speci fic station and t o specify the telep hone class of the stati on.
(a) Use the same tenant number that was conf igured for the application t hrough
the APM.
(b)Make sure that the station number and route restriction class entered to this
command are the same t hat are ente red to the ARSC command (and/or the
ASFC command).
ASFC Command: Assignment of Service Feature Class
This command assigns the combinations of PBX call processing features to SFC
values from 0 to 15 , by tenant. Use of this command acti vates the speci fied feature .
(Use the ASDT command to a ssociate both the t enant and t he servic e feature cl ass
assigned above to a specific station.)
(a) Use the same tenant number that was configured for Guardian through the
APM, Tenant #0.
(b)Ensure that the SFI for the desired class(es) is enabled.
(c) Enter other necessary information as requested b y prompts, making sure that
the service feature class assignment made through this command corre-
sponds to the SFC as it is configured for the application through the APM.
ASPA Command: Assignment of Special Access Code
This command associates the authorization code to the access code. When the
access code is dialed, it indicates that an authorization code follows and indicates
the number of digits to be read.
(a) Use the same tenant number that was configured for Guardian in its
configuratio n i n t he APM a nd e nte r an access code (ACC) be twee n 1 and 6
digits in length.
(b)Ente r the following data as requested by prompt s:
SRV (Kind of Service) = SSC (Service Code)
CI (Connection Status Index) = N (Normal Service)
SID (Service Feature Inde x) = 42 (Author ization Code and Forc ed Account
Code)
NND (Number of Necessary Digits ) = Number of digits to be rea d, including
the SID.
NDA-30008 Revision 2.0 Page 23
Page 34

Installation Introduction Guardian Operations Manual
ASYD Command: Assignment of System Data
(a) System Data 1:
Index 43, bit 0 -- For remote access to PBX, is authorization code required
after ring back tone (RBT)? 0 = Yes, 1 = No.
Index 43, bit 2 -- Will SST be sent after dialing access code? 0 = No,
1 = Yes
NEAX2000 Commands
(b)System Data 2
Index 3, bit 5 -- 0 = Authorization Code
:
1 = Forced Account Code
AATC Command: Assignment of Authorization Code Data
This command should be used to provide the PBX with a backup database of
authorization codes, in case the OAI application is not operating.
Use the NEAX2000 Customer Administr ation Terminal (CAT), or the NEAX2000
Maintenance Operations Console (MOC) to enter these commands. (Refer to the
NEAX2000 System Manuals for more information.)
CM20: (Assignment of Access Code)
Y=Tenant Group: Access Code for ID code class change.
1st data Access Code (1-3 digits)
2nd data Service Type
:086: Authorization code
Use A57 for the first digit o f the authorization co de
:087: Forced Account code
CM42: (Assignment of Maximum Digits for Authorization Code)
Sets ID code digits.
1st data :11: Authorization code
:12: Forced Account Code
:13: Remote Access to System ID code
2nd data:01–10: Number of digits (The default is 10 digits.)
Page 24 NDA-30008 Revision 2.0
Page 35

Guardian Operations Manual Installation Introduction
1st data (1)
00
01
02
03
Internet Address: XXX • XXX • XXX
[XXX: 2nd data (2)]
• XXX
CMD79: (Assignment of Internet Address)
Assigns the Internet Address of TCP/IP-Ethernet.
1st data 00–03: Division No. of Internet Address
2nd data 0–255: Address Data (1–3 digi ts)
The Internet Address must be assigned to the 1st data 00–03 as follows:
CM08: (Checking ID Codes Using AP01)
Basic Functions
1st data: 217 Check ID code
2nd data::0: Check through MP
:1: Check through AP01 package when using ACF. (Set checking
through AP01 package when using ACF.)
CMD53: (Handling of ID Codes When the IP is Down)
Registers ID codes and temporary class data.
1st data: ID code
2nd data :a b b c c d d e e: Temporary class data
:a: 0–2,9: Temporary class type
:b b: 01–08: Te mp ora ry connection restriction class
:c c: 01–15: Temporary service restriction class – A
:d d: 01–15: Temporary service restriction class – B
:e e: 01–15: Temporary service restriction class – C
:NONE (Initial value )
Note:
This data uses PBX internal class c hang e data when A CF is in opera tion and the
AP is stopped. The number of digits is set through CMD7B
NDA-30008 Revision 2.0 Page 25
Page 36

Installation Introduction Guardian Operations Manual
CMD7B: (Number of ID Code Digits When IP down)
ACF
1st data: 00: Numbe r of I D c ode di gits when AP stops during ACF operation
2nd data :1–3: Number of ID code digits when AP stops
:0 (Initial Value):No ACF operation
Initialization
Follow steps 1-3 below to complete initializati on.
Step 1: Initialization in APM
Step 2: Login Password
Enter the APM Operations Menu and initialize Guardian through the Non-CRT
Application option, according to instructions provided in the APM Operations
Manual.
The first time you initialize Gu ardian and you enter guardadm at the login p rompt,
you must identify the pa ssword that is to be associated with tha t login ID. To assign
a null password, enter the responses indicated for the following prompts:
Prompt:
Response:
Prompt:
Response:
Prompt:
Response:
UNIX login prompt
Enter guardadm and press Enter.
You do not have a password.
1. Select your own password
2. UNIX wi ll select a pa ssword for yo u.
Select option 1 and press Enter.
A prompt asks for the new password, and another prompt requests
verification of the password.
Press Enter at both prompts. This process assigns a null password.
Step 3: Regular Entry to Guardian
Page 26 NDA-30008 Revision 2.0
At the UNIX login prompt, en ter guardadm and press Enter. To exit the password
input field, press Enter a second time. The Guardian password entry screen
displays.
Page 37

Guardian Operations Manual Administration
Chapter 3 Administration
Overview
The Guardian main menu provides too ls which you can use to manage and generate
reports from the record file, assign or alter passwords, and change or view the
status of groups, authorizati on code s, and exte nsi ons.
GUARDIAN
*** NEC PROPRIETARY ***
Enter Password:
GUARDIAN
*** OPERATOR ***
<RET> to accept password, <ESC> to quit
Query Database
Query
Generate Reports
Quit
Arrow keys to move cursor, <RET> to select, <ESC> to quit
(2b)
(1)
GUARDIAN
*** SYSTEM ADMINISTRATION ***
Set OAI Application Logical Name
Modify Status
Query Database
Initialize Batch Control
Initialize Record File
Generate Reports
Maintain Pa ssword
Clear Status Values
Quit
Arrow keys to move cursor, <RET> to select, <ESC> to quit
GUARDIAN
*** ADMN/OPERATOR ***
Modify Status
Query Database
Generate Reports
Quit
(2a)
Arrow keys to move cursor, <RET> to select, <ESC> to quit
(2c)
Figure 3-1 Main Menu
NDA-30008 Revision 2.0 Page 27
Page 38

Administration Guardian Operations Manual
Notes
Guardian menus are password protected. You can enter Guardian at one of the
following levels by entering the appropriate password:
• Administrator level – Provides access to every menu option. The default
password (guardadm) can be changed through the Administrator main menu
• Operator level – Allo ws you to view datab ase information or to gener ate reports.
You must assign this password through the Administrator main menu.
• Admn/Operator level - Provides access to all Operator level menus plus the
modify status menu.
All Guardian menu options are described briefly below. Each option is described
in more detail in the remaining sections of this chapter:
• Set OAI Application Name – Allows you to specify a tenant by logical
application name. The work you perform while working at the Administrator
level applies only to the specified tenant.
• Modify Status – Use this menu option to modify the enable/disable status of a
single
group, authorization code, or extension. The System Administrator can
also use this o ption to o verride t he System Disabl e of an ext ension, if necess ary .
Note:
The ID database can only be modified through the APM Database
Administration menu.
• Query Database – Use this menu opti on t o che ck a working database without
making changes to it. This option enables the System Administrator to review
the disable status of a group, authorization code, ID, or extension and the
parameters by which it is defined in the database.
Note:
This menu option displays after you enter the Operator password.
• Initialize Batch Contr ol – Initiates the Guardian control of batch modifications
to the statu s of a large numb er of
groups, authorization codes, or extensions.
Data entry for this batch control is user-defined and provide d.
• Initiali ze Recor d File – Reinitializes the record file in which data is col lecte d
about invalid call attempts and the ongoing status of groups, authorization
codes, and extensions.
• Generate Reports – Generates v ariou s management and contr ol repo rts abo ut
invalid call attempts; the status of groups, authori zat ion codes, and extensions;
and the history of processing activities logged in the record file.
Note:
This menu option displays after you enter the Operator password.
• Maintain Password – Allows you to change the password required for entry
into the Guardian main menu. Administ rators use thi s option to assig n operator
password(s).
• Clear Status Values – Removes all modifications to the working status of all
groups, extensi ons, and authorizatio n codes and reinstat es the confi gured status
of each.
Page 28 NDA-30008 Revision 2.0
Page 39

Guardian Operations Manual Administration
Notes (Continued)
Procedure
The System Administrator also requires access to the APM Data Entry menu in
order to maintain the Guardian databases.
Note:
Caution:
At the login prompt, enter the
Changes to the databases (i.e., adding, deleting, or modifying records) can only
be made thr ough the APM. The c hanges ar e pr ocesse d into the Guar dian working
databases.
If 80% of disk space has been used on the system, the following message
appears immediately after you logon: “Disk free space warning.” When this
message displays, you must free up disk space before performing other
activities in the system. You can free up disk space by generating reports and
then initializing the record file. If you do not generate the reports before you
reinitialize the file, all of the data logged into the record file is lost when it is
reinitialized. If you do not free u p disk space when you receive this message, you
may run out of disk space completely. When no disk space remains in the
system, you must initialize the record file without generating the reports. The
data logged into the record file is lost.
Action Result
The main menu displays.
Administrator, Operator or Admn/
Operator password and press Enter.
Using the arrow keys to position the
cursor, select the desired menu option
and press E nter.
To exit the main menu, select the Quit
option and press Enter, or press ESC.
The desired option displays.
The password screen reappears.
NDA-30008 Revision 2.0 Page 29
Page 40

Administration Guardian Operations Manual
Set OAI Application Logical Name
Guardian can serve multiple tenants (e.g., different depar tments, different
campuses, etc.). Each tenant is identified by a unique logical name that is
configured in th e APM dur ing i nstallation. When you enter a logical name on this
screen, all functions pe rformed are imp lemente d with the tenant as socia ted to th at
logical name until the logical name is reset.
One tenant could serve more than one switch. Logical names for each switch for
that tenant must be entered. Up to ten logical names are permitted.
Use the Set OAI Application Logi cal Name option on the main menu s et or change
the name of the tenant. This option can be accessed only under the Administrator
password.
GUARDIAN
*** SYSTEM ADMINISTRATION ***
> Set OAI Application Logical Name
Modify Status
Query Database
Initialize Batch Control
Initialize Record File
Generate Reports
Maintain Password
Clear Status Values
Quit
Arrow keys to move cursor, <RET> to select, <ESC> to quit
GUARDIAN
Figure 3-2 Set Logical Name
*** SET LOGICAL NAME ***
Logical Name 1:
Logical Name 2:
.
.
.
Logical Name 10:
<RET> to accept, <ESC> to quit
(1)
(2)
Notes
The first time entering the System Administration menu, access is denied access to
other options un ti l t h e lo gical name is entered. Once thi s a pplication logical name
is set, it remains in effect until changed again through this option, and access to
other menu options is no longer restricted.
If your system accommodates one tenant, you only need to enter the tenant name
once. If your system accommodates more than one tenant, you will need to identify
the tenant each time it changes before you us e any other menu options. When you
enter a new logical name, the system pauses for approximately 3 seconds while
Guardian searches for the corresponding tenant.
Page 30 NDA-30008 Revision 2.0
Page 41

Guardian Operations Manual Administration
Procedure
Action Result
On the main menu, select the Set OAI
Applicatio n Logical Name option a nd
The Logical Name prompt highlights.
(2)
press Enter. (1)
Type the Logical Name of the desired
tenant from the configuration file and
press Enter.
Follo wing a 3-sec ond del ay, the
message Set Logical Name Successful
appears.
Note:
If the name you entered is not in
the configuration data or corresponds to a tenant that is not initialized, the error message
Setting Logical Name
and the field highlights again for
re-entry.
appears,
Press ESC to exit. Control returns to the main menu.
Error
NDA-30008 Revision 2.0 Page 31
Page 42

Administration Guardian Operations Manual
Modify Status
Overview
GUARDIAN
The Modify Status option on the main menu allows Administrators to modify the
disable status of a single group, authorization code, or extension. This option can
only be accessed under the Administrator password.
*** SYSTEM ADMINISTRATION ***
Set OAI Application Logical Name
> Modify Status
Query Database
Initialize Batch Control
Initialize Record File
Generate Reports
Maintain Password
Clear Status Values
Quit
Arrow keys to move cursor, <RET> to select, <ESC> to quit
GUARDIAN
Arrow keys to move cursor, <RET> to select, <ESC> to quit
(1)
(2)
*** MODIFY STATUS ***
Group Authorization
Code Extension
Quit
Figure 3-3 Modify Status
Notes
The Modify Status option allows the Administrator to disable a group of
extensions, an authorization code, or a single extension in the following ways:
• Unconditionally – Disabled constantly and ind ef initely, until enabled again b y
the Administrator.
• Routinely – Disabled durin g the time interval associated with the group,
authorization code, or extension in the database, as illustrated in the following
example:
In the Group database, Group 2 is assigned an Interval Index of 5. In the Time
Interval database, Inter val Inde x 5 is a period that starts Frida y at 10:00 p.m. an d
ends Monday at 5:30 a. m. When the System Administrator uses the Mo dify
Status option to indicat e YES in the Routinely Di sable: f ie ld for Gr oup 2, all of
the extensions in this group are turned off during the Friday to Monday time
period until either this same field is again changed or the Interval Index is
changed.
Page 32 NDA-30008 Revision 2.0
Page 43

Guardian Operations Manual Administration
Notes (Continued)
The System Administrator can also override the System Disable of an extension
using this option. When Guardi an has tempor aril y tur ned of f an exten sion t hat has
been used in an excessive n umber of invalid call attempt s, the administrator can use
this option to turn on the ext ension without alt ering the System Disable pa rameters
in the Extension database. The next time the number of invalid call attempts on that
extension exceeds the tolerated frequency, Guardian disables the extension again.
The ID database can only be modified through th e Database Administr ation option
in the APM. The Guardian Modify Status option cannot access the ID database.
There are two kinds of errors that may occur in the Modify Status option:
• Database Record Not Found: If th e system can not find the record for the
number you enter (group ID, authorization code, or extension number), this
error message appears. Press ESC and re-enter the number. If the error message
appears again, check the record through the APM master database and use the
Process/Install command to reinstate the working database. If the error persists,
call the sys tem distributor.
• Error Processing Modification to Database: If the record has been retrieved
and the status modification has been entered, this message appears. If this
occurs, call the system distributor.
Procedure
Action Result
On the main menu, select the Modify
Status option and press Enter. (1)
Using the arrow keys to move the
cursor, select the desired menu option
and press E nter.
To exit the Modify Status menu, select
the Quit option and press Ent er, or press
ESC.
The Modify Status menu displays. (2)
A selection screen for the option
displays.
The main menu reappears.
NDA-30008 Revision 2.0 Page 33
Page 44

Administration Guardian Operations Manual
Group
The Group option on the Modify Status menu allows Administrators to alter the
disable status of all t he extensio ns in a group simultaneo usly.
Group
GUARDIAN
> Group
Authorization Code
Extension
Quit
Arrow keys to move cursor, <RET> to select, <ESC> to quit
option, the Modify Group screen displays.
*** MODIFY STATUS ***
Figure 3-4 Modify Group
GUARDIAN
(1)
*** MODIFY GROUP ***
Group ID:
Unconditionally Disable:
Routinely Disable:
<RET> to accept, <ESC> to quit
1
Yes
No
When you select the
(2)
Notes
If the group is set to be unconditionally disabled (Yes), all of its extensions are
disabled indefinitely as soon as this procedure is completed. If the group is set to
be routinely disabled (Yes), all of its extensions are regularly disabled during the
time interval that is designat ed by the Inte rval In dex in th e group data base rec ord.
(You can review the database record using the Query Database option on the
System Administration menu or by entering the APM Database Administration
option.)
Page 34 NDA-30008 Revision 2.0
Page 45

Guardian Operations Manual Administration
Procedure
Action Result
On the Modify Status scre en, select the
Group option and press Enter. (1)
Type the ID of the group and press
Enter.
The Group Selection screen displays
with a prompt for the Group ID.
The Modify Group screen displ a ys
showing the curr ent st atus of t he group
in the second field (Yes or No). (2)
Note:
Enter the desired stat us to each field
(Yes or No), pressing Enter after each
Press ESC to exit the screen and
redisplay the Modify Status
menu.
Note:
If the system does not recognize
the Group ID you entered, the
message
Not Found
and try agai n, or exit and quer y
the database.
Error Database Record
appears. Press ESC
The message Modify Group Status
Successful appears.
entry.
Note:
If you enter anything other than
Y es or No in the disable fiel ds, the
message
tus Modification
press ESC to r eturn to the Modify
Status menu or re-enter the correct status and press Enter.
Error Processing Sta-
appears. Either
Press ESC to exit the screen. The Group Selection screen reappears
for entry of another Group ID.
Press ESC again to exit the Selection
screen.
The Modify Status menu reappears.
NDA-30008 Revision 2.0 Page 35
Page 46

Administration Guardian Operations Manual
Authorization Code
GUARDIAN
Arrow keys to move cursor, <RET> to select, <ESC> to quit
Administrators can use the Authorizatio n Code option on the Modify Status menu
to change the disable st atus of the desi gnated au thorizati on code.
When you select
this option, the Modify Authorization Code screen displays.
(1)
*** MODIFY STATUS ***
Group
> Authorization Code
Extension
Quit
Figure 3-5 Modify Authorization Code
GUARDIAN
*** MODIFY AUTHORIZATION CODE ***
Authorization Code:
Unconditionally Disable:
Routinely Disable:
<RET> to accept, <ESC> to quit
(2)
0987654
Yes
No
Notes
If the authorization code is set to be unconditionally disabled (Yes), it is disabled
indefinitely as soon as this pr ocedur e is completed. I f th e authoriz at ion code is set
to be routinely disabled (Yes), the authorization code is regularly disabled during
the time interval that is designated by the Interv al Index in the authorization code
database record. (You can review the database record using the Query Database
option on the System Administration menu or by entering the APM Database
Administration option.)
Page 36 NDA-30008 Revision 2.0
Page 47

Guardian Operations Manual Administration
Procedure
Action Result
On the Modify Status scre en, select the
Authorization Code option and press
Enter. (1)
Enter the authorization code and press
Enter.
Note:
Press ESC to exit the screen and
redisplay the Modify Status
menu.
Enter the desired stat us to each field
(Yes or No), pressing Enter after each
entry.
The Authorization Code Selection
screen displays with a prompt for the
authorization code.
The Modify Authorization Code s creen
displays showing the current status of
the code in the second and third fields
(Yes or No). (2)
Note:
If the system does not recognize
the Authorization Code you entered, the message
base Record Not F ound
Press ESC and try again or exit
and query the database.
Error Data-
appears.
The message Modify AuthCode
Status Successful appears.
Note:
If you enter a value other than
Yes or No in either of th e di s able
fields, the message
cessing Status Modification
pears. Either pr ess ESC to r eturn
to the Modify Status menu or reenter the correct stat us and pr ess
Enter.
Error Pro-
ap-
Press ESC to exit the screen. The Authorization Code Selection
screen reappears for entry of another
authorization code.
Press ESC again to exit the Selection
The Modify Status menu reappears.
screen.
NDA-30008 Revision 2.0 Page 37
Page 48

Administration Guardian Operations Manual
Extension
Administrators can use the Extens ion option on the Modify St atus menu to change
the disable status of an extension.
Extension screen displays.
GUARDIAN
*** MODIFY STATUS ***
Group
Authorization Code
> Extension
Quit
Arrow keys to move cursor, <RET> to select, <ESC> to quit
GUARDIAN
When you select this option, the Modify
(1)
*** MODIFY EXTENSION ***
Unconditionally Disable:
Override System Disable:
Extension No:
Routinely Disable:
<RET> to accept, <ESC> to quit
3201
Yes
No
No
(2)
Figure 3-6 Modify Extension
Notes
If the extension is set to be unconditionally disabled (Yes), it is disabled
indefinitely as soon as this procedure is completed. If the extension is set to be
routinely disabled (Yes), the extension is regularly disabled during the time
interval that is des ignate d by the Inte rval In dex in the author izat ion code dat abase
record. (You can review the database record using the Query Database option on
the System Administration menu or by ent ering the APM Database Administration
option.)
The Administrator can overrid e the system disabl e setting of any extensio n. If the
Administrator needs to turn on an extension after it has been turned off by the
system, the Administ ra tor may set the override field t o Yes. This override affects
only the current syste m disabling of the extens ion; it does not pro tect the extension
from being disabled a fter an other epi sode exces sive invalid call att empts. (‘No’ is
the default setting in this field.)
Page 38 NDA-30008 Revision 2.0
Page 49

Guardian Operations Manual Administration
Procedure
Action Result
On the Modify Status scre en, select the
Extension option and press Enter. (1)
Enter the extension and press Enter.
Note:
Press ESC to exit the screen and
redisplay the Modify Status
menu.
Enter the desired stat us to each field
(Yes or No), pressing Enter after each
entry.
The Extension Selection scree n
displays with a prompt for the
extension.
The Modify Extension screen displays
showing the thre e disable st atuses for
the indicated extension. (2)
Note:
If the system does not recognize
the Extension you entered, the
message
Not Found
and try again or exit and query
the database.
Error Database Record
appears. Press ESC
The message Modify Extension
Status Successful appears.
Note:
If you enter a value other than
Yes or No in any of the disable
fields, the message
cessing Status Modification
pears. Either pr ess ESC to r eturn
to the Modify Status menu or reenter the correct stat us and pr ess
Enter.
Error Pro-
ap-
Press ESC to exit the screen. The Extension Selection screen
reappears for entry of another
extension.
Press ESC again to exit the Selection
The Modify Status menu reappears.
screen.
NDA-30008 Revision 2.0 Page 39
Page 50

Administration Guardian Operations Manual
Query Database
Overview
Use the Query Database o ption on the main menu to view the re cords of a worki ng
database. You can acce ss this optio n with either the Administra tor or the Opera tor
password. When you sel ect this option, t he Query Database Menu displays for one
of the three databases.
GUARDIAN
*** SYSTEM ADMINISTRATION ***
Set OAI Application Logical Name
Modify Status
> Query Database
Initialize Batch Control
Initialize Record File
Generate Reports
Maintain Password
Clear Status Values
Quit
Arrow keys to move cursor, <RET> to select, <ESC> to quit
Figure 3-7 Query Database
(1)
GUARDIAN
*** QUERY DATABASE ***
Group
Authorization Code
Extension
Time Interval
ID
Quit
Arrow keys to move cursor, <RET> to select, <ESC> to quit
(2)
Notes
Using this option, the System Administr ator or Opera tor can review re cords in any
of the five working databases. These databases include the fields maintained
through the APM Database Ad mini st ra tion menu and the current disable stat us o f
each group, authorization code, or extension. The Query option provides a viewonly display of the databases. You cannot make changes through this option.
If the system cannot find the record for the number you entered (group ID,
authorization code, or extension number ), the error message Da tabase Record Not
Found appears. Press ESC and re-enter the number. If the message occurs again,
check the record through the APM master database and use the Process/Install
command to reinstate the working database. If the error persists, call the system
distributor.
Page 40 NDA-30008 Revision 2.0
Page 51

Guardian Operations Manual Administration
Procedure
Action Result
On the main menu, select the Query
Database option and press Enter. (1)
Using the arrow keys to position the
cursor, select the desired menu option
and press E nter.
To exit the Query Database menu,
select the Quit option and press Enter,
or press ESC.
The Query Database menu displays.
(2)
The desired option displays.
The main menu reappears.
NDA-30008 Revision 2.0 Page 41
Page 52

Administration Guardian Operations Manual
Group Database
GUARDIAN
Arrow keys to move cursor, <RET> to select, <ESC> to quit
When you select the Group option on the Query Database menu, the Group
Database screen displays information in the Group database.
(1)
*** QUERY DATABASE ***
> Group
Authorization Code
Extension
Time Interval
ID
Quit
Figure 3-8 Query Group Database
GUARDIAN
*** QUERY GROUP DATABASE ***
Unconditionally Disable:
Group ID:
Routinely Disable:
Interval Index:
Temporary Disable Time:
Lifetime Invalid Attempts:
Frequency Count Max:
Frequency Period:
<ESC> to quit
1
No
Yes
0
1
10
3
2
(2)
Notes
Fields in the working Group database are defined below. Fo r more information
about these fields, refer to Chapter 2, “Installation Introduction” on page 7.
• Group ID – The number that identifies a group.
• Unconditionally Disable – Indicates whether or not the group is disabled
indefinitely by the Administrator.
• Routinely Disable – Indicates whether or not the group is scheduled to be
routinely disabled during a time interval designated by an Interval Index.
• Interval Index – The index to the specific time interval in the Time Interval
Database during which all extensions in a group are routinely disabled, if the
group is scheduled to be disabled.
• Temporary Disable Time – The number of 15-minute intervals that an
extension in the group will remain disabled by the system in response to an
excessive frequency of invalid call attempts.
• Lifetime Invalid Attempts – The maximum lifetime number of accumulated
inv alid at tempts that are allo wed before an e xtension in the group is temporarily
system disabled.
• Frequency Count Max – The maximum number of invalid call attempts that
are counted during the designated period before the frequency is considered
excessive and the extension in the group is system disabled.
• Frequency Period – The period of time in minutes in which invalid call
attempts are counted.
Page 42 NDA-30008 Revision 2.0
Page 53

Guardian Operations Manual Administration
Procedure
Action Result
On the Query Database menu, select
the Group option and press Enter. (1)
Enter the I D of the group to be
reviewed and press Enter.
The Group Database screen displays
with the Group ID prompt.
The remaining fields are completed
with data associated with the identified
group. (2)
Press ESC to exit the display. The Group field is singled out and
highlighted again for entry of another
group ID.
To exit the Query Group Database
The Query Database menu reappears.
screen, press ESC.
NDA-30008 Revision 2.0 Page 43
Page 54

Administration Guardian Operations Manual
Authorization Code Database
GUARDIAN
Arrow keys to move cursor, <RET> to select, <ESC> to quit
Select the Authorization Code op tion on th e Query Datab ase menu to di spla y the
Authorization Code Database screen.
(1)
*** QUERY DATABASE ***
Group
> Authorization Code
Extension
Time Interval
ID
Quit
GUARDIAN
*** QUERY AUTHORIZATION CODE DATABASE ***
Authorization Code:
Unconditionally Disable:
Routinely Disable:
Interval Index:
Extension or Group:
Extension/Group Value:
Route Restriction Class:
Service Feature Class:
<ESC> to quit
0987654
No
Yes
2
Ext
9878
0
0
(2)
Figure 3-9 Query Authorization Code Database
Notes
Fields in the working Authorization Code database are defined below. For more
information about these fields, refer to Chapter 2, “Installation Introduction” on
page 7.
• Authorization Code – The 10-digit authorization code.
• Unconditionally Disable – Indicates whet her or not th e aut hor ization code is
disabled indefinitely by the Administrator.
• Routinely Disable – Indicates whether or not the authorization code is
scheduled to be routinely disabled during a time interval designated by an
Interval Index.
• Interval Index – The index to the specific ti me interval in the Time Interval
Database during which the authorization code is routinely disabled, if the
authorization code is scheduled to be disabled.
• Extension or Group – The assignment of the authorization code, where Ext
indicates that it is ass igned to a n ex tension and Grp indicates that it is assigned
to a group of extensions.
• Extension/Group Value – The actual extension number or group ID to which
the authorization code is assigned, depending upon the Extension or Group
assignment.
• Route Restriction Class – A v alue from 0 to 15 that repre sents the combi nation
of distance (e.g., local, national) and routing service (e.g., MCI, Sprint, AT&T)
privileges assigned to the authorization code.
• Service Feature Class – A value from 0 to 15 t hat re prese nts th e combina tion
of call processing features (e.g., call forwarding, conferencing, call pick-up)
that are assigned to the authorization code.
Page 44 NDA-30008 Revision 2.0
Page 55

Guardian Operations Manual Administration
Procedure
Action Result
On the Query Database menu, select
the Autho rization Code option and
press Enter. (1)
Enter the authorization code to be
reviewed and press Enter.
The Authorization Code Database
screen dis plays with the authorization
code prompt.
The remaining fields are completed
with data associated with the selected
authorization code. (2)
Press ESC to exit the display. The Authorization Code field is singled
out and highlighted again for entry of
another authorization code.
To exit the Query Authorization Code
The Query Database menu reappears.
Database screen, press ESC.
NDA-30008 Revision 2.0 Page 45
Page 56

Administration Guardian Operations Manual
Extension Database
Select the Extension opt ion on the Quer y Databas e menu to displ ay the Ext ension
Database screen. When you enter the desired code, the field values for that
extension display.
GUARDIAN
*** QUERY DATABASE ***
Group
Authorization Code
> Extension
Time Interval
ID
Quit
Arrow keys to move cursor, <RET> to select, <ESC> to quit
Figure 3-10 Query Extension Database
GUARDIAN
*** QUERY EXTENSION DATABASE ***
Extension No:
Unconditionally Disable:
Routinely Disable:
Interval Index:
System Disable:
Enable Time:
Lifetime Invalid Attempts:
Frequency Count:
(1)
Group ID:
<ESC> to quit
(2)
3201
1
No
Yes (Ext)
0
No
N/A
1
1
Notes
Fields in this database are define d below. For more inf ormation about these fi elds,
refer to Chapter 2, “Installation Introduction” on page 7.
• Extension Number – The actual extension number.
• Group ID – The group to which the extension is assigned.
• Unconditionally Disable – Indicates whether or not the extension is disabled
indefinitely by the Administrator.
• Routinely Disable – Indicates whether or not the extension is scheduled to be
routinely disable d during a t ime interv al designa ted by an Interv al Inde x. When
the Routinely Disable status of the extension is YES, a notation to the right
indicates whether the extension is disabled as part of a group (Grp) or
individua lly as a single extension (Ext). The (Ext) notation also displays if both
the extension and its group are disabled.
• Interval Index – The index to the specific time interval in the Time Interval
Database during which the extension is routinely disabled, if the extension is
scheduled to be disabled.
• System Disable – The current system status, indicating whether it is disabled
(YES) or not (NO). Use the Group Database Query to review system disable
limits.
Page 46 NDA-30008 Revision 2.0
Page 57

Guardian Operations Manual Administration
Notes (Continued)
• Enable Time – The time at which the extension is to be enabled, if the exte nsion
is currently disabled. The amount of time before the extension is enabled
depends on the n umber of 15-minute interv als i ndi ca ted in the database for t he
system disable period. If t he extension is not system dis abled, this field dis plays
a N/A (Not Applicable) notation.
• Lifetime Invalid Attempts – The number of invalid attempts currently
accumulated against the number allowed during the lifetime of the extension.
• Frequency Count – The number of inv alid attempt s counted during the current
time period.
Procedure
Action Result
On the Query Database menu, select
the Extension Database option and
The Extension Database screen
displays with the ex tension prompt. (2)
press Enter. (1)
Enter the number of the extension to be
reviewed and press Enter.
The remaining fields are completed
with data associated with the selected
extension.
Press ESC to exit the display. The Extension field is singled out and
highlighted again for entry of another
extension.
To exit the Query Extension Database
The Query Database menu reappears.
screen, press ESC.
NDA-30008 Revision 2.0 Page 47
Page 58

Administration Guardian Operations Manual
Time Interval Database
GUARDIAN
Arrow keys to move cursor, <RET> to select, <ESC> to quit
Select the Time Interval Database option on the Query Database menu to display
the Time Interval Database screen. When you enter an index number, the field
values for that interval display.
(1)
*** QUERY DATABASE ***
Group
Authorization Code
Extension
> Time Interval
ID
Quit
GUARDIAN
*** QUERY TIME INTERVAL DATABASE ***
Interval Index:
Begin Time:
End Time:
1
Sat 13:00
Wed 15:00
<ESC> to quit
(2)
Figure 3-11 Query Time Interval Database
Notes
The time periods specific in this database are those intervals during which
extensions, group s o f ext ens ions, or authorization codes ca n b e r outinely disabled.
Fields in this database are define d below. For more inf ormation about these fi elds,
refer to.
• Interval Index – The number by which the time interval is indexed in the
database and referred to by the group, extension, and authorization code
databases.
• Begin Time – The day of the week, the hour, and the minute at which the
routine disable period begins.
• End Time – Th e day of the week, the hour, and the minute at which the routine
disable period ends.
Page 48 NDA-30008 Revision 2.0
Page 59

Guardian Operations Manual Administration
Procedure
Action Result
On the Query Database menu, select
the Time Interval Database option
and press E nter. (1)
Type the Interval Index to be reviewed
and press E nter.
The Time Interval Database screen
displays with the Interval Index
prompt.
The remaining fields are completed
with the beginni ng and endi ng times o f
the selected Interval Index. (2)
Press ESC to exit the display. The Interval Index field is singled out
and highlighted again for entry of
another extension.
To exit the Query Time Interval
The Query Database menu reappears.
Database screen, press ESC.
NDA-30008 Revision 2.0 Page 49
Page 60

Administration Guardian Operations Manual
ID Database
GUARDIAN
Arrow keys to move cursor, <RET> to select, <ESC> to quit
Select the ID option on the Query Database menu and enter a user identification
number to display the authorization code associated to that identification num ber.
(1)
*** QUERY DATABASE ***
Group
1)
Authorization Code
2)
Extension
3)
Time Interval
4)
ID
5)
Quit
6)
Figure 3-12 Query ID Database
GUARDIAN
*** QUERY ID DATABASE ***
ID:
585241398
Authorization Code:
<ESC> to quit
0987654
(2)
Notes
Fields in the ID database are defined below:
• ID – The telephone us er identifi cation number consis ting of up to 10 charact ers.
• Authorization Code – The authorization code assigned to the telephone user
identification number above.
Procedure
Action Result
On the Query Database menu, select
the ID Database option and press
Enter. (1)
Type the ID to be reviewed and press
Enter.
Press ESC to exit the display. The ID field is singled out and
To exit the Query ID Database screen,
press ESC.
The ID Database screen displays with
the ID prompt.
The authorization code assigned to the
ID you entered displays. (2)
highlighted again for entry of another
ID.
The Query Database menu reappears.
Page 50 NDA-30008 Revision 2.0
Page 61

Guardian Operations Manual Administration
Initialize Batch Control
Use the Initialize Batch Control op tion on the m ain menu to a ctivate a batch
modification to t he disable status o f a large number of groups, auth orization codes,
or extensions. This option provides the internal processing and its control, while
the user prepares the actu al batch file of change s. You can only access this opti on
with the Administrator password.
GUARDIAN
*** SYSTEM ADMINISTRATION ***
Set OAI Application Logical Name
Modify Status
Query Database
> Initialize Batch Control
Initialize Record File
Generate Reports
Maintain Password
Clear Status Values
Quit
Arrow keys to move cursor, <RET> to select, <ESC> to quit
Figure 3-13 Initialize Batch Control
GUARDIAN
Batch Control File Name:
(1)
(2)
*** INITIALIZE BATCH CONTROL ***
<RET> to accept, <ESC> quit
NDA-30008 Revision 2.0 Page 51
Page 62

Administration Guardian Operations Manual
Notes
The following is an example of the Initialize Batch Control function:
If you need to chan ge the dis able sta tus of 100 0 authori zation co des, you ca n enter
the codes into a text file named ‘AC
option, and type AC
_
disable at the prompt, prec eded by the full pat h name. Whe n
disable’. Select the Initialize Batch Control
_
you press Enter, Guardian reads the file and implements each status change.
Each file record must contain the foll owing three fields prepared in ASCII
characters in the format shown below:
Database Record
Type | Database Record Key | Admin Disable Flag<NL>
• Database Record Type – Specifies which database contains the record to be
modified by the batch file record. Valid values are: G (Group),
A (Authorization Code), and E (Extension).
• Database Record Key – Specifies which record in the database is to b e
modified and contains the actual Group ID (1-1000), 10-digit Authorization
Code, or 5-digit Extension Number.
• Disabled – Specif ie s the chang e in stat us to be made to the des ignat ed recor d.
Use one of the follo wing v alues: YES (rout inely disable), UC (unconditionally
disable), or NO (the group, authorization code, or extension is not to be
disabled routinely or
unconditionally).
All three fields must contain an entry. Each field must be separated by the ‘ | ’
character, except the last one of the record. You must conclude the record with
<NL>, the ASCII New Line char acter, which is a Hex (0a) or Decimal (10). Batch
file records are not valid and will not be processed if any of the three fields does
not have an entry or if the record is not concluded by the <NL> character. A few
valid entries are provided below.
G | 1 | YES <NL> – Routinely disable Group No. 1 in the Group database.
A | 1234567000 | NO <NL> – Enable Authorization Code 1234567 in the
Authorization Code database.
E | 4395 | UC <NL> – Unconditionally disable Extension No. 4395 in the
Extension database.
Errors that are encounte red during processing of the batch f ile are logged into a file.
The two types of error s that may occur are as follows:
File Not Found – The named batch file coul d not be found. No processing w as
performed, but the batch file name was logged.
Bad Batch Control File Record – A record contained an error. This record
error was logged in the following format: Record #10, Item #2.
After processing is compl eted, you can use Guard ian options for han dling the error
output, including pri nting, viewi ng, and saving err ors to disk. When you exit fr om
the screen, the error log file is erased. The only way to reproduce it after leaving
the screen is to reprocess the batch file from which it came. Th erefore, we
recommend that you either print or save the error log file on disk if you need to
reference this informat ion later.
Page 52 NDA-30008 Revision 2.0
Page 63

Guardian Operations Manual Administration
Procedure
Action Result
On the main menu, select the Initialize
Batch Control option a nd press Enter .
(1)
Enter the batch control file name and
press Enter.
Note:
Press ESC after a successful
batch process to display the file
name entry field to process another file.
T o examine error items, press Enter and
use the arrow keys to position the
cursor on the desired error output
command (Print File, View File, Save
File) and press Enter.
The batch control file name prompt
appears.
If no errors oc curred during proces sing,
the message Batch Modify Successf ul
appears.
If one or more errors occurred during
processing, the message Error in
Processing – Select Option For
Error Log appears.
PRINT FILE: Error items are printed
and the output commands redisplay.
VIEW FILE: Error items are scrolled
for display on the screen with Top of
File, End of File and More notations
indicating placement. The commands
serve to mo ve the screen do wn the page
(DownPage), up the page (UpPage), to
the beginnin g of the f ile (Top), or to the
end of the file (Bottom). To exit an d
return to the output commands, select
the Quit command and press Enter.
To exit the Initialize Batch Control
option, press ESC.
SAVE FILE: A prompt requesti ng the
name of the file in which the error items
are to be saved appears with a default
file name inserted. Enter the
appropriate f ile name and press Enter.
The error items are stored under the
indicated file name and the output
commands redisplay.
T o exit the output commands, select the
Quit command and press Enter.
The main menu reappears.
NDA-30008 Revision 2.0 Page 53
Page 64

Administration Guardian Operations Manual
Initialize Rec ord File
Use the Initialize Record Files option on the System Administration menu to
reinitialize the record file. This file contains recorded information used by the
system to generate the reports available through the Reports option. This option
can only be accessed with the Administrator password.
GUARDIAN
*** SYSTEM ADMINISTRATION ***
Set OAI Application Logical Name
Modify Status
Query Database
Initialize Batch Control
> Initialize Record File
Generate Reports
Maintain Pa ssword
Clear Status Values
Quit
Arrow keys to move cursor, <RET> to select, <ESC> to quit
Notes
Procedure
Figure 3-14 Initialize Record File
When you reinitialize the record file, the system deletes the previous file material
and starts a new record of information. Reports generated from the record file
reflect the information collected in the file since its most recent reinitialization. For
example, if you want reports to reflect details of system processing on a monthly
basis, you can reini tialize the rec ord file every mont h after you generat e the reports
so that the system can begin collecting data for the next series of monthly reports.
If an error occurs during initialization, retry the process. If the error reoccurs, call
the system distributor.
Action Result
On the main menu, select the
Record File
option and press Enter
twice. (1)
To exit the Initia lize Rec ord F ile, press
ESC.
Initialize
Processing is completed, and the
message
Successful
Initialize Record File
appears.
The cursor returns to the main menu,
and the original command line is
restored.
Page 54 NDA-30008 Revision 2.0
Page 65

Guardian Operations Manual Administration
Generate Reports
Overview
GUARDIAN
Arrow keys to move cursor, <RET> to select, <ESC> to quit
Use the Reports option on the System Administration menu to generate various
management and control re ports from th e record fi le and from four of th e working
databases. The Reports option can be accessed under either the Administrator
password or the Operator password. For more information about how to delete
information from the record file, refer to “Initialize Record File” on page 54.
*** SYSTEM ADMINISTRATION ***
Set OAI Application Logical Name
Modify Status
Query Database
Initialize Batch Control
Initialize Record File
> Generate Reports
Maintain Password
Clear Status Values
Quit
(1)
GUARDIAN
*** REPORTS ***
> Call Attempts
Database Status
Database History
Quit
Arrow keys to move cursor, <RET> to select, <ESC> to quit
(2)
Figure 3-15 Reports Menu
Notes
The system g enerates reports from data collected in the record file. This file
contains in formation logged sinc e the last time it was initialized. For more
information on initializing the record file, refer to “Initialize Record File” on page
54.
• Call Attempts – A menu of reports concerning the recorded invalid call
attempts that involved unknown or disabled groups, authorization codes, or
extensions.
• Database Status – A menu of reports reflecting the status of all groups,
authoriza tion codes, extensions, and time intervals.
• Database History – A menu of reports showing the history of status
modifications to groups, authorization codes, or extensions.
When you select the report you want from these options, you can view the
information on the screen, print a hard copy, or to save it to a disk.
If the computer has less than 20% of disk space available when you select the
Generate Reports option, the following message displays: Not enough free disk
space for report s. If you disregard this message and the system requires more disk
space than is available to process the report, th e following message displays:
Report Not Generated.
NDA-30008 Revision 2.0 Page 55
Page 66

Administration Guardian Operations Manual
Procedure
Action Result
On the main menu, select the Reports
option. (1)
Use the arrow keys to position the
cursor on the type of report desi red and
press Enter.
To exit the Reports menu, select the
Quit option and press Enter, or press
ESC.
The Reports menu displays. (2)
The menu of avai labl e report s displa ys.
The main menu reappears.
Page 56 NDA-30008 Revision 2.0
Page 67

Guardian Operations Manual Administration
Call Attempts
GUARDIAN
Arrow keys to move cursor, <RET> to select, <ESC> to quit
Use the Call Attempts option on t he Reports Menu to gener ate inval id call attempt
reports for calls made from single e xtensions, within groups, and with
authorization co des that are not assigned in the database (unrecog nized) or disabled
by the administrator or the system.
(1)
*** REPORTS ***
Call Attempts
>
Database Status
Database History
Quit
GUARDIAN
*** CALL ATTEMPT REPORTS ***
> Unrecognized Authorization Codes
Unrecognized Extensions
System Disabled Extensions
Routinely Disabled Extensions
Routinely Disabled Authorization Codes
Routinely Disabled Groups
Quit
Arrow keys to move cursor, <RET> to select, <ESC> to quit
(2)
Figure 3-16 Call Attempts Reports
Notes
The following call attempt reports contain date, time, and page number headings.
• Unrecognized A uthor ization Codes – A list of authorizatio n codes that are not
assigned in the database but that hav e be en us ed i n call attempts, including the
time at which the calls were attempted. (Sort ed chronologically by extensi on) .
• Unrecognized Extensions – A list of extensions t hat are not a ssigned in the
database but that have been used in call attempts, including the time at which
the calls were attempted. (Sorted chronologically by extension).
• System Disabled Extensions – A list of extensions on which calls have been
attempted and that are currently disabled by the system, including the time at
which the calls were attempted and the time at which the extension is to be
enabled. (Sorted chronologically by extension).
• Routinely Disabled Extensions – A list of all extensions on which calls have
been attempted during the time interval that the extensions are scheduled to be
disabled, including the times at which the calls were attempted. (Sorted
chronologically b y extension).
NDA-30008 Revision 2.0 Page 57
Page 68

Administration Guardian Operations Manual
Notes (Continued)
• Routinely Disabled Authorization Codes – A list of all authorization codes
with which calls hav e been atte mpted duri ng the time i nterv al that t he codes are
scheduled to be disab led, including the times at which the cal ls were attempted.
(Sorted chronologically by extension).
• Routinely Disabled Groups – A list of groups in which extensions have been
used in call at te mpts during the time interv a ls t hat the groups are scheduled to
be disabled, including the times at which the calls were attempted. (Sorted
chronologically b y extension).
When you select this option and the report you want, the following sequence of
messages displays while the sy ste m prepar es th e repo rt : Sorting..., Processing...,
and Done.
Procedure
Action Result
On the Reports menu, select the Call
Attempts option and press Enter. (1)
Use the arrow ke ys to pos ition the cur sor on
the desired report and press Enter.
Use the arrow ke ys to pos ition the cur sor on
the desired outpu t command and press Enter .
The Call Attempt Reports screen displays.
(2)
A new command line appears containing
output commands (Print File, View File,
Save File).
PRINT FILE: The report prints and the
output commands reappears.
VIEW FILE: Report items are scrolled for
display on the screen with Top of File, End
of File and More notations indicating
placement. The commands serve to move
the screen down the page (DownPage), up
the page (UpPage), to the beginning of the
file (Top), or to the end of the file (Bottom).
To exit and return to the output commands,
select the Quit command and press Enter.
The output commands redisplay.
SAVE FILE: A prompt for the name of the
file in which the report i s to be sa ved appears
with a default file name inserted. Enter the
appropriate file name and press Enter. The
system stores the report under the indicated
file name, and the output commands
redisplay.
To exit the output commands, select the
Quit command and press Enter.
To exit the Call Attempts option , press ESC. The Reports menu reappears.
Page 58 NDA-30008 Revision 2.0
Page 69

Guardian Operations Manual Administration
Database Status
GUARDIAN
Arrow keys to move cursor, <RET> to select, <ESC> to quit
Use the Database St atus option on the Repor ts menu to generate reports concernin g
the current status of all groups, authorization codes, and extensions in the system.
(1)
*** REPORTS ***
Call Attempts
Database Status
>
Database History
Quit
GUARDIAN
*** CURRENT STATUS REPORTS ***
> Time Intervals
All Groups
All Authorization Codes
All Extensions
Routinely Disabled Groups
Routinely Disabled Authorization Codes
Routinely Disabled Extensions
System Disabled Extensions
Extensions by Group
Authorization Codes by Extension
Authorization Codes by Group
Quit
Arrow keys to move cursor, <RET> to select, <ESC> to quit
(2)
Figure 3-17 Current Database Status Reports
NDA-30008 Revision 2.0 Page 59
Page 70

Administration Guardian Operations Manual
Notes
The status reports listed below are available through this option. The reports
notated with (Range Available) can be prepared for a designated portion of the
database as well as for the whol e file. When any one of the se report s is select ed, a
Report Range screen displays where you can enter the first and last items of the
range to be included in a report.
• Time Intervals – A list of the beginning and ending times for each interval
associated with an Interval Index.
• Groups (Range Available) – A printout of the Group database.
• Authorization Codes (Range Available) – A printout of the Authorization
Code database.
• Extensions (Range Available) – A printout of the Extension database.
• Routinely Disabled Groups – A list of all groups that are scheduled to be
routinely disabled, including the time interval of the disablement.
• Routinely Disabled Authorization Codes – A list of all authorization codes
that are scheduled to be routinely disabled, including the time interval of the
disablement.
• Routinely Disabled Ext ensions – A li st of all e xt ensio ns th at are s che duled t o
be routinely disabled, including the time interval of the disablement.
• System Disabled Extensions – A list of all extensions that are currently
disabled by the system
in response to an excessive frequency of invalid call
attempts, in cluding the anticipated enable time.
• Extensions by Group (Range Available) – A list of all groups and the
extensions that are assigned to each.
• Authorization Codes by Extension (Range Available) – A list of
authorization codes that are assigned to single extensions.
• Authorization Codes by Group (Range Available) – A list of the
authorization codes that are assigned to groups.
Page 60 NDA-30008 Revision 2.0
Page 71

Guardian Operations Manual Administration
Procedure
Action Result
On the Reports menu, select the
Database Status option and press
Enter. (1)
Use the arrow keys to position the
cursor on the desired report and press
Enter.
Use the arrow keys to position the
cursor on the desired output command
and press E nter.
Note:
The message,
cates that the report is being prepared, and
is ready.
Processing.
Done
indicates that it
, indi-
The Current State Reports screen
displays. (2)
Range Available Reports: The Report
Range screen displays. Enter the code,
extension, or group with which the
report should begin and the code,
extension, or group with which the
report should end and press Enter.
All Reports: A new command line
containing output commands (Print
File, View File, Save File) appears.
PRINT FILE: The report prints and
the output commands reappears.
VIEW FILE: Report items are
scrolled for display on the screen with
Top of File, End of File and More
notations indicating placement.
The commands serve to move the
screen down the p age (DownPage), up
the page (UpPage) , to the be ginning of
the file (Top), or to the end of the file
(Bottom). To exit and return to the
output commands, select the Quit
command and press Enter. The output
commands are redisplayed.
SAVE FILE: A prompt for the name
of the file in which the report is to be
saved appears with a default file name
inserted. Enter the appropriate file
name and press Ent er. The system
stores the report un der the indicated f ile
name, and the output commands
redisplay.
T o exit the output commands, select the
Quit command and press Enter.
T o exit the Current State Re ports menu,
The Current State Reports menu
displays.
The Reports menu reappears.
press ESC.
NDA-30008 Revision 2.0 Page 61
Page 72

Administration Guardian Operations Manual
Database History
GUARDIAN
Arrow keys to move cursor, <RET> to select, <ESC> to quit
Use the Database History option on the Reports menu to generate reports
concerning the history of routine disable activity of groups, authorization codes,
and extensions, inclu din g sys tem di sabling of extensions in response to exce ssi ve
invalid call attempts.
(1)
*** REPORTS ***
Call Attempts
Database Status
Database History
>
Quit
GUARDIAN
*** HISTORY REPORTS ***
> Admin Disabled Groups
Admin Disabled Authorization Codes
Admin Disabled Extensions
System Disabled Extensions
Quit
Arrow keys to move cursor, <RET> to select, <ESC> to quit
(2)
Figure 3-18 Database History Reports
Notes
The history reports provide information that has been recorded since the last time
the record file was init ialized . The fi elds cont ained in the hi story re ports ar e liste d
below. For more informat ion on initial izing the reco rd file, refer to “Initialize
Record File” on page 54.
• Admin Disabled Groups – A list of all groups that have been unconditional ly
or routinely disabled during the reporting period. (Sorted chronologically by
group).
• Admin Disabled Authorization Codes – A list of all author iza ti on c odes that
have been unconditionally or routinely disabled during the reporting period.
(Sorted chronologically by group).
• Admin Disabled Extensions – A report of all extensions that have been
unconditionally or routinely disabled during the reporting period. (Sorted
chronologically b y group).
• System Disabled Extensions – A report of all extensions that have been
disabled by the system during the reporting period because of an excessive
frequency of invalid call attempts.
Page 62 NDA-30008 Revision 2.0
Page 73

Guardian Operations Manual Administration
Procedure
Action Result
On the Reports menu, select the
Database History option and press
Enter. (1)
Use the arrow keys to position the
cursor on the desired report and press
Enter.
Use the arrow keys to position the
cursor on the desired output command
and press E nter.
Note:
The message,
cates that the report is being prepared, and
is ready.
Processing..
Done
indicates that it
, indi-
The History Reports screen displays.
(2)
A new command line contai ning output
commands (Print File, View File, Save
File) appears.
PRINT FILE: The report prints and
the output commands are redisplayed.
VIEW FILE: Report items are
scrolled for display on the screen with
Top of File, End of File and More
notations indicating placement. The
commands serve to move the screen
down the page (DownPage), up the
page (UpPage), to the be ginning of the
file (Top), or to the end of the file
(Bottom). To exit and return to the
output commands, select the Quit
command and press Enter. The output
commands are redisplayed.
To exit the Database History option,
press ESC.
SAVE FILE: A prompt for the name
of the file in which the report is to be
saved appears with a default file name
inserted. Enter the appropriate file
name and press Ent er. The system
stores the report un der the indicated f ile
name, and the output commands
redisplay.
T o exit the output commands, select the
Quit command and press Enter.
The Reports menu reappears.
NDA-30008 Revision 2.0 Page 63
Page 74

Administration Guardian Operations Manual
Maintain Password
System Administrato rs can use t he Maintain Pa ssword option on the main men u to
change an access level password for the Guardian System Administration menu.
This option can only be accessed with the Administrator password.
GUARDIAN
*** SYSTEM ADMINISTRATION ***
Set OAI Application Logical Name
Modify Status
Query Database
Initialize Batch Control
Initialize Record File
Generate Reports
> Maintain Password
Clear Status Values
Quit
Arrow keys to move cursor, <RET> to select, <ESC> to quit
GUARDIAN
*** NEC PROPRIETARY ***
Enter Password:
Administrator Operator
Figure 3-19 Password Security
GUARDIAN
(1)
(2)
(3)
*** PASSWORD SECURITY ***
New Password:
Verify Password:
<RET> to accept password, <ESC> to quit
Notes
Only the System Administrat or i s aut hor ize d to alter the security passwords. The
Administrator password must be entered before any other password may be
changed. If you enter a password that is not in the file, the Invalid password
message displays. If y ou e nter a pass word that alre ady exi sts in the passwo rd file ,
the system displays a message indicating that the password already exists. Any
new password you ente r into the system becom es effective immediately.
Page 64 NDA-30008 Revision 2.0
Page 75

Guardian Operations Manual Administration
Procedure
Action Result
Select the Maintain Password option
on the main menu (1) to display the
Guardian Password Entry screen. (2)
If the password you enter is valid, a new
command line displays two securi ty
levels (Administrator/Operator). (3)
Enter the correct Guard ian
administrator password.
Select the level of password that you
want to change (Administrator,
The cursor is positioned on the New
Password field for data entry.
Operator, or Admn/Operator) and
press Enter.
Enter the new password. The cursor is immediately positioned
on the Veri fy Password field for data
entry.
Re-enter the ne w password in the Verify
Password field.
If the two en tered passwords match, the
message Modify password successful
appears. Press Enter to display the
main menu.
If the two entered passwords do not
match, the message Passwords do not
match, try again appears, and the
cursor is again positioned on the New
Password field.
To exit the Password Security screen,
select the Quit command and press
Enter.
The main menu displays.
NDA-30008 Revision 2.0 Page 65
Page 76

Administration Guardian Operations Manual
Clear Status Values
Use the Clear Status Values option on the main menu to clear all status
modifications and to re-initialize the group, authorization code, and extension
databases. You can only access this option with the Administrator password.
GUARDIAN
*** SYSTEM ADMINISTRATION ***
Set OAI Application Logical Name
Modify Status
Query Database
Initialize Batch Control
Initialize Record File
Generate Reports
Maintain Password
> Clear Status Values
Quit
Arrow keys to move cursor, <RET> to select, <ESC> to quit
Notes
Procedure
Figure 3-20 Clear Status Values
When you initialize the databases, they are installed to Guardian from the
Applications Manager, where they were originally created. The Guardian
Administrator can make changes as necessary (add, modify, and delete records) to
the databases, but any ch anges made through Guar dian do not change th e database
versions in the Applications Manager. When you use the Clear Status Values
option, the Applicati ons Mana ger ’s versi ons of the da tabase s g roup, au thori zatio n
code, and extension databases are re-installed in Guardian, overriding those
previously in use a nd change d by Guardi an. In e ffect , this reins tall ation e rases all
modifications made to the disable status of all groups, authorization codes, and
extensions, since those changes are made by the System Administrat or dir ect ly to
the Guardian databases, not via the Application Manager.
Action Result
Select the
on the main menu (1) and press Enter
twice.
Clear Status Values
option
When processing is complete the
message
Init System Data Successf ul
appears.
Press ESC. The cursor returns to the main menu.
Page 66 NDA-30008 Revision 2.0
Page 77

Guardian Operations Manual Report Formats
Appendix A Report Formats
Introduction
The following report form ats il lust rate t he co ntent and arra ngeme nt of th e vario us
reports available to the System Administrator. These formats reflect the reports as
they appear in har d c opy for m . When they appear on-screen, the disp la y i ncl udes
Top of File, More, and End of File n otations and a command line that can be u sed
to move to the next page (DownPage) , to the prece ding page (UpPage), to the top
of the file (Top), and to the end of the file (Bottom).
A Disable Time Inter val field appear s in many of the r eports and incl udes the times
at which the group , authorizatio n code, or extension is routinely tur ned off (Beg in)
and turned back on (End). The time interval appears in Day Hou r:Minute forma t.
The times at which the invalid cal l attempts are placed appear in a Month/Day/Year
Hour:Minu t e format.
The Call Attempt Reports and the Database History Reports contain information
that has been collected in the Record File since its last initialization. For instance,
the following samples assume that the Record File was last ini tialized on
November 1, 1990.
Call Attempt Reports
The Call Attempt Reports pr esent list s of call attempt s that are co nsidered inva lid.
A call attempt may be invalid because it is attempted during the time that the
designated group, aut horization code, or ext ension is r outinely di sabled, becau se it
involves a group, authorization code, or extension that the system does not
recognize among it s databas es, or beca use it i s made on an extension that has been
disabled by the system in response to an excessive frequency of invalid call
attempts. The first listed invalid call attempt for each group, authorization code, or
extension is the first one to occur after the group, code, or extension has been
routinely or unconditionally disabled by the administrator or disabled by the
system in response to excessive invalid call attempts.
NDA-30008 Revision 2.0 Page 67
Page 78

Report Formats Guardian Operations Manual
1. Unrecognized Authorization Codes – A list of call attempts made with autho-
rization codes that are not assigned in the database or are not recognized by
Guardian. (Sorted by extension in ascending order.)
Date: 11/1 5/90 Pg1
Tenant: 1
Call Attempt Report
(Unrecognized Authorizat ion Codes)
Auth Time Group
Code
2187500 11/06/90 6:28 1294 2
3897612 11/04/90 10:37 2345 1
5987364 11/04/90 14:10 2345 1
8288348 11/11/90 5:47 2345 2
8352678 11/10/90 17:52 3201 3
8782719 11/15/90 7:23 3201 1
9876543 11/12/90 8:02 9878 1
Call Placed Ext ID
Number of Records: 7
2. Unrecognized Extensi on Number s – A list of calls that have been attempted
Date: 11/15/90 Pg1
Tenant: 1
Ext
2301 11/15/90 14:13 1859427
3979 11/06/90 22:31 2192738
4331 11/10/90 8:02 3492780
5230 11/07/90 12:41 2429379
5575 11/11/90 17:52 9874732
from extensi ons that are n ot assigned in the database or are not recog nized. The
authorization code shown for each extension and used in the call attempt is included in the authorization code database and enabled by the administrator.
(Sorted by extension in ascending order.)
Call Attempt Report
(Unrecognized Extensions)
Time Auth
Call Placed Code
Number of Records: 5
Page 68 NDA-30008 Revision 2.0
Page 79

Guardian Operations Manual Report Formats
3. System Disabled Extensions – A list of calls that have been attem pted from
extensions d uring times that th ose exte nsions were disable d by the s ystem since
the Record File was last initialized. (Sorted by extension in ascending order.)
Date: 11/1 5/90 Pg1
Tenant: 1
Call Attempt Report
(System Disabled Extensions)
System Group Auth Time
Ext
1294 11/06/90 6:15 2 2187500 11/06/90 5:38
2345 11/04/90 13:45 1 3897612 11/04/90 1:11
2345 11/04/90 13:45 1 5987364 11/04/90 3:36
2345 11/11/90 13:45 1 8288348 11/04/90 5:47
3201 11/10/90 19:30 1 8352678 11/10/90 16:52
3201 11/15/90 7:30 1 8782719 11/15/90 6:02
Enable Time ID Code Call Placed
Number of Records: 6
4. Routinely Disabled Extens ions – A li st of call attempts th at were mad e using
authorization codes that were routinely disabled at the time. (Sorted by authorization code in ascending order.)
Date: 11/1 5/90 Pg1
Tenant: 1
Call Attempt Report
(Routinely Disabled Extensio ns)
Routine Disable
Time Interval
Ext
1294 Mon 5:1 Fri 24:0 11/09/90 22:03 2187500 3
2345 Wed 12:0 Thu 8:0 11/07/90 20:47 3897612 1
2345 Wed 12:0 Thu 8:0 11/08/90 7:24 3897612 1
2345 Constant --- 11/08/90 7:21 5987364 1
3201 Constant --- 11/10/90 10:12 5987364 1
3201 Sun 1:1 Sun 24:0 11/11/90 16:31 1827548 2
9878 Wed 12:0 Thu 8:0 11/08/90 7:59 9876543 1
Begin End Call Placed Code ID
Time Auth Group
Number of Records: 7
NDA-30008 Revision 2.0 Page 69
Page 80

Report Formats Guardian Operations Manual
5. Routinely Disabled Authorization Codes – A list of call attempts that were
made using authoriz ation codes that were routi nely disabled at the t ime. (Sorted
by authorization code in ascending order.)
Date: 11/1 5/90 Pg1
Tenant: 1
Call Attempt Report
(Routinely Disabled Authorization Codes)
Routine Di sable
Auth Time Interval
Code
2187500 Sat 1:1 Mon 5:1 11/03/90 5:16 1294
2396857 Sat 1:1 Mon 5:1 11/10/90 10:18 1295
2396857 Sat 1:1 Mon 5:1 11/11/90 21:11 1295
2429879 Constant --- 11/11/90 8:24 5692
3492780 Sun 1:1 Sun 24:0 11/11/90 20:06 4178
6659636 Mon 5:1 Fri 24:0 11/05/90 12:25 3412
9874732 Wed 12:0 Thu 8:0 11/07/90 7:42 9878
Begin End Call Placed Ext
Time
Number of Records: 7
Page 70 NDA-30008 Revision 2.0
Page 81

Guardian Operations Manual Report Formats
6. Routinely Disabled Groups – A list of call attempts that have been made
within the regular time intervals during which group extensions are routinely
disabled. (Sorted by group in ascending order.)
Date: 11/1 5/90 Pg1
Tenant: 1
Call Attempt Report
(Routinely Disabled Groups)
Group Time Interval
ID
0 Sat 1:1 Mon 5:1 11/03/90 5:16 2396857 1295
0 Sat 1:1 Mon 5:1 11/10/90 10:18 2187500 1294
0 Sat 1:1 Mon 5:1 11/11/90 21:11 2396857 1295
1 Wed 12:0 Thu 8:0 11/07/90 7:42 9874732 2847
2 Sun 1:1 Sun 24:0 11/11/90 20:06 3492780 4178
3 Mon 5:1 Fri 24:0 11/05/90 12:25 6659636 3412
3 Mon 5:1 Fri 24:0 11/12/90 12:13 6659636 3412
4 Constant ––– 11/11/90 8:24 2429379 5692
Number of Records: 8
Begin End Call Placed Code Ext
Time Auth
NDA-30008 Revision 2.0 Page 71
Page 82

Report Formats Guardian Operations Manual
Current State Reports
1. Time Interval Database – A list of index es sho wing the be ginning and ending
times for each interval during which groups, authorization codes, and
extensions can be routinely disabled. (Sorted by index in ascending order.)
Date: 11/1 5/90 Pg1
Tenant: 1
Current State Report
(Time Intervals)
Routine Disable
Interval Time Interval
Index Begin End
0 Constant –––
1 Sat 1:00 Mon 5:00
2 Wed 12:00 Thu 8:00
3 Sun 1:00 Sun 24:00
10 Mon 5:00 Fri 24:00
Number of Records: 5
1. Group – A complete print-out of the Group database, sorted in ascending order.
Page 72 NDA-30008 Revision 2.0
Page 83

Guardian Operations Manual Report Formats
Note:
Date: 11/1 5/90 Pg1
Tenant: 1
Admin Routine Disable Temp
Group Disable Time Interval
ID
0NO – – – – – –– – – 60 min 3 1 10
1 YES Wed 12:00 Thu 8:00 60 min 2 3 10
2NO – – – – – – – – 30 min 2 2 100
3 UNCDTL – – – – – – – – 45 min 3 3 150
4 UNCDTL – – – – – – – – 60 min 5 7 100
5 YES Sat 1:00 Mon 5:00 30 min 3 5 75
6NO – – – – – – – – 60 min 5 3 50
Status Begin End Period Cnt Time Count
Number of Records: 7
A group can be both unconditionally and routinely disabled at the same time.
Current State Report
(Groups)
Disable Frequency Lifetime
2. Aut horiz ation Codes – A complete pri nt-out of the Auth orizat ion Code da ta-
base, sorted in ascending order.
NDA-30008 Revision 2.0 Page 73
Page 84

Report Formats Guardian Operations Manual
Note:
Date: 11/1 5/90 Pg1
Tenant: 1
Admin Routine Disable
Auth Disable Time Interval
Code Status Begin End Flag ValueRSC SFC
2187500 NO – – – – – – – – Ext 11111 2 1
2396857 UNCDTL – – – – – – – – Grp 0 10 11
2429379 YES Mon 5:00 Fri 24:00 Grp 3 5 4
3492780 UNCDTL – – – – – – – – Ext 3201 1 1
6659636 YES Mon 5:00 Fri 24:00 Grp 3 2 1
6874392 NO – – – – – – – – Grp 3 10 11
8759210 YES Sat 1:00 Mon 5:00 Grp 0 2 1
9874732 UNCDTL – – – – – – – – Ext 2345 5 4
An authorization code can be both uncond itio nally and routinely disabled at the
same time.
Current State Report
(Authorization Codes)
Ext/Group
Number of Records: 8
Page 74 NDA-30008 Revision 2.0
Page 85

Guardian Operations Manual Report Formats
3. Extensions – A comp lete prin t-out of t he Ext ensio n d atabas e sor ted i n asc end -
ing order.
Note:
Date: 11/1 5/90 Pg1
Tenant: 1
Disable
Ext Status Begin End ID Disabled Enable Time
789 YES Sat 1:00 Mon 5:00 0 NO
1289 YES Sat 1:00 Mon 5:00 0 NO
2345 UNCDTL – – – – – – – – 1NO
3201 NO – – – – – – – – 1 YES 11/15/90 16:45
4556 UNCDTL – – – – – – – – 1NO
5436 YES Sun 1:00 Sun 24:00 2 NO
8976 YES Sun 1:00 Sun 24:00 2 YES 11/15/90 22:30
9878 NO – – – – – – – – 1NO
Number of Records: 8
An extension can be both unconditionally and routinely disabled at the same time.
Current State Report
(Extensions)
Time Interval Group
NDA-30008 Revision 2.0 Page 75
Page 86

Report Formats Guardian Operations Manual
4. Routinely Disabled Gr oups – A li st of all g roups t hat are c urrentl y schedule d
to be routinely disabled dur ing the specif ied time in terv al (Day Hour:Minute) .
(Sorted by group in ascending order.)
Date: 11/1 5/90 Pg1
Tenant: 1
Current State Report
(Routinely Disabled Groups)
Routine Disable
Group Time Interval
ID Begin End
0 Sat 1:00 Mon 5:00
3 Mon 5:00 Fri 24:00
4 Constant –––
6 Sat 1:00 Mon 5:00
Number of Records: 4
5. Routinely Disabled Authorization Codes – A list of all authorization codes
that are currently sche duled to be routinely disabled during a speci fied time interval (Day Hour:Minute). (Sorted by authorization code in ascending order.)
Note:
Includes only authorization codes that are routinely disabled individually. For
those that are disabled by their group, refer to the Routinely Disabled Group report
.
Date: 11/1 5/90 Pg1
Tenant: 1
Current State Report
(Routinely Disabled Authorized Codes)
Routine Disable
Auth Time Interval
Code Begin End
2429379 Mon 5:00 Fri 24:00
6659636 Mon 5:00 Fri 24:00
8759210 Sat 1:00 Mon 5:00
9874732 Sat 1:00 Mon 5:00
Number of Records: 4
Page 76 NDA-30008 Revision 2.0
Page 87

Guardian Operations Manual Report Formats
6. Routinely Disabled Extensions – A list of all extensions that are currently
scheduled to be routinely disabled during a specified time interval (Day
Hour:Minute). (Sorted by extension in ascending order.)
Note:
Date: 11/15/90 Pg1
Tenant: 1
Number of Records: 5
Includes only extensions that are routinely disabled individually; for those that
are disabled by their group, refer to the Routinely Disabled Group report.
Current State Report
(Routinely Disabled Extensions)
Routine Disable
Time Interval
Ext Begin End
789 Sat 1:00 Mon 5:00
1289 Sat 1:00 Mon 5:00
5436 Sun 1:00 Sun 24:00
8976 Sun 1:00 Sun 24:00
10230 Sat 1:00 Mon 5:00
7. System Disabled Extensions – A list of all extensions that are currently dis-
abled by the system in response to an excessive frequency of invalid call attempts, including the ti me at which they will be enabled again (Month/Day/Y ear
Hour:Minute). (Sorted by extension in ascending order.)
Date: 11/1 5/90 Pg1
Tenant: 1
Current State Report
(System Disabled Extensions)
System
Ext Enable Time ID
3201 11/15/90 16:45 1
8976 11/15/90 22:30 2
10230 11/15/90 14:15 0
Number of Records: 3
NDA-30008 Revision 2.0 Page 77
Group
Page 88

Report Formats Guardian Operations Manual
8. Extensions by Group – A report of all extensi ons th at ar e assi gned to groups .
(Sorted by group in ascending order.)
Date: 11/1 5/90 Pg1
Tenant: 1
Current State Report
(Extensions by Group)
ID
1789
2 2345
46 3201
Number of Records: 6
Ext
1289
10230
4556
9. Authorization Codes by Extension – A report of all authorization codes that
are assigned to extensions. (Sorted by extension in ascending order.)
Date: 11/1 5/90 Pg1
Tenant: 1
Current State Report
(Authorization Codes by Extension)
Auth
Ext
1295 2396857
2345 2134475
2847 9874732
3201 3492780
3412 6659636
4556 1294372
5692 8321983
Number of Records: 7
Page 78 NDA-30008 Revision 2.0
Code
Page 89

Guardian Operations Manual Report Formats
10.Authorization Codes by Group – A report of all authorization codes that are
assigned to each group. (Sorted by group in ascending order.)
Date: 11/1 5/90 Pg1
Tenant: 1
Current State Report
(Authorization Codes by Group)
Group Auth
ID
1 5483928
2 9956121
46 2429379
Code
6721936
9174732
9473268
1298432
Number of Records: 7
NDA-30008 Revision 2.0 Page 79
Page 90

Report Formats Guardian Operations Manual
History Reports
1. Admin Disabled Groups – A list of groups whose status has been changed
since the last Record File initial ization, with al l the e xtensi ons in each gro up to
be disabled during the indicated time interval. (Sorted by group in ascending
order.)
Date: 11/1 5/90 Pg1
Tenant: 1
History Report
(Admin Disabled Groups)
Routine Disable Date
Group Time Interval
ID
0 Sat 1:00 Mon 5:00 11/02/90 14:22 UNCDTL
0 Sat 1:00 Mon 5:00 11/12/90 16:14 UNCDTL
1 Wed 12:00 Thu 8:00 11/12/90 15:32 YES
2 Sun 1:00 Sun 24:00 11/09/90 9:57 YES
3 Mon 5:00 Fri 24:00 11/12/90 15:46 NO
4 Constant ––– 11/07/90 10:34 YES
Begin End Modified Status
Group Status Modified
Number of Records: 6
Page 80 NDA-30008 Revision 2.0
Page 91

Guardian Operations Manual Report Formats
1. Admin Disabled A utho rization Codes – A list of authori zation code s whose
status has been changed si nce the last Record File i nitiali zation, ca using the au thorization cod es to be di sable d du ring the i ndicat ed ti me int ervals. (Sorted by
authorization code in ascending order.)
Date: 11/1 5/90 Pg1
Tenant: 1
History Report
(Admin Disabled Authorization Codes)
Auth Time Interval
Code
1298432 Wed 12:0 Thu 8:00 11/5/90 8:52 UNCDTL
2429379 Wed 12:00 Thu 8:00 11/12/90 9:32 YES
5483928 Sat 1:00 Mon 5:00 11/1/90 11:12 NO
6721936 Sat 1:00 Mon 5:00 11/15/90 10:11 UNCDTL
9174732 Mon 5:00 Fri 24:00 11/1/90 11:34 NO
9473268 Sun 1:00 Sun 24:00 11/15/90 10:19 NO
9956121 Wed 12:00 Thu 8:00 11/13/90 15:47 YES
Number of Records: 7
Routine Disable Date
Authcode Status Modif i ed
Begin End Modified Status
NDA-30008 Revision 2.0 Page 81
Page 92

Report Formats Guardian Operations Manual
2. Admin Disabled Extensions – A list of extensions whose status has been
changed since the last Record File i nitializati on, with all extensions on the list
being disabled during the indicated time interval. (Sorted by extension in ascending order.)
Date: 11/1 5/90 Pg1
Tenant: 1
History Report
(Admin Disabled Extensions)
Routine Disable Date
Time Interval
Ext
1289 Sat 1:00 Mon 5:00 11/01/90 9:16 UNCDTL
2345 Wed 12:00 Thu 8:00 11/12/90 8:34 YES
2503 Mon 5:00 Fri 24:00 11/01/90 9:34 YES
4556 Wed 12:00 Thu 8:00 11/09/90 15:23 NO
9878 Wed 12:00 Thu 8:00 11/08/90 9:36 UNCDTL
10230 Sat 1:00 Mon 5:00 11/05/90 12:59 UNCDTL
Begin End Modified Status
Extension Status Modified
Number of Records: 6
Page 82 NDA-30008 Revision 2.0
Page 93

Guardian Operations Manual Report Formats
3. System Disabled Extensi ons – A list of the extens ions that hav e been disabled
by the system since the last Record File initialization, including the time that
each extension was turned back on. If the Administrator overrode the system
disable, the time at which the Administrator enabled the extension is listed.
(Sorted by extension in ascending order.)
Date: 11/1 5/90 Pg1
Tenant: 1
History Report
(System Disabled Extensions)
Time Ext System Group
Ext
1230 11/7/90 10:32 11/8/90 8:15 2
2345 11/2/90 1:02 11/2/90 16:45 1
2345 11/14/90 12:24 11/15/90 9:30 1
3864 11/6/90 11:49 11/7/90 9:30 2
4556 11/11/90 5:03 11/12/90 8:45 46
9878 11/7/90 9:11 11/8/90 12:30 1
Disabled Enable Time ID
Number of Records: 6
NDA-30008 Revision 2.0 Page 83
Page 94

Report Formats Guardian Operations Manual
This Page Left Blank.
Page 84 NDA-30008 Revision 2.0
 Loading...