

NEC Express Server
Express5800 Series
Express5800/T110g-S, R110g-1E, T110g-E
EXP283A/284A/285A/287A/288A
Maintenance Guide
Chapter 1 Maintenance
Chapter 2 Useful Features
Chapter 3 Appendix
10.106.01-104.01
June. 2014 1st Edition
© NEC Corporation 2014

Documents for This Product
Documents for This Product
Documents for this product are provided as booklets ( ) or as electronic manuals ( )
in the EXPRESSBUILDER disc ( ).
Precautions for Use
Getting Started
Describes points of caution to ensure the safe use of this server.
Read these cautions before using this server.
Describes how to use this server, from unpacking to operations.
See this guide at first and confirm an outline of this product.
EXPRESSBUILDER
PDF
User’s Guide
Chapter 1: General Description
Chapter 2: Preparations
Chapter 3: Setup
Chapter 4: Appendix
Overviews, names, and functions of the server’s parts
Installation of additional options, connection of peripheral devices,
and proper location for this server
System BIOS configurations and summary of EXPRESSBUILDER
Specifications and other information
PDF
PDF
Installation Guide (Windows)
PDF
PDF
Chapter 1: Installing Windows
Chapter 2: Installing the Bundled
Maintenance Guide
Chapter 1: Maintenance
Chapter 2: Useful Features
Chapter 3: Appendix
Other documents
Provides the details of NEC ESMPRO, Universal RAID Utility, and the other features.
Software
Installation of Windows and drivers, and important information for
installation
Installation of bundled software, such as NEC ESMPRO and
Universal RAID Utility
Server maintenance and troubleshooting
The details of system BIOS settings, RAID Configuration Utility, and
EXPRESSBUILDER
Error messages and Windows Event Logs
2
Express5800/T110g-S, R110g-1E, T110g-E Maintenance Guide

Contents
Contents
Documents for This Product .................................................................................................................................. 2
Contents ................................................................................................................................................................ 3
Notations Used in This Document ......................................................................................................................... 6
Notations used in the text .............................................................................................................................. 6
Optical disk drive ........................................................................................................................................... 6
Hard disk drive .............................................................................................................................................. 6
Removable media ......................................................................................................................................... 6
Abbreviations of Operating Systems (Windows) ........................................................................................... 7
Trademarks ........................................................................................................................................................... 8
License Notification ............................................................................................................................................... 8
Regulatory Notices ................................................................................................................................................ 9
Warnings and Additions to This Document .......................................................................................................... 12
Latest editions ............................................................................................................................................. 12
Chapter 1 Maintenance .................................................................................................................................... 13
1.
Transfer, Movement, and Disposal .............................................................................................................. 14
1.1
Transfer to a Third Party .................................................................................................................. 14
1.2
Disposal of the Server and Consumables ........................................................................................ 15
1.3
Regarding the Transportation of This Server ................................................................................... 15
1.4
Moving and Storage ......................................................................................................................... 15
2.
Daily Maintenance ....................................................................................................................................... 17
2.1
Checking and Applying Updates ...................................................................................................... 17
2.2
Checking Alerts ................................................................................................................................ 17
2.3
Checking STATUS LED ................................................................................................................... 18
2.4
Backup ............................................................................................................................................. 18
2.5
Cleaning ........................................................................................................................................... 18
2.5.1
2.5.2
2.5.3
3.
User Support ............................................................................................................................................... 20
3.1
Maintenance Services ..................................................................................................................... 20
3.2
Before Asking for Repair .................................................................................................................. 20
4.
Collecting Failure Information ..................................................................................................................... 21
4.1
Collecting Event Logs ...................................................................................................................... 21
4.1.1
4.1.2
4.2
Collecting Configuration Information ................................................................................................ 24
4.2.1
4.2.2
4.3
Collecting User-Mode Process Dump .............................................................................................. 25
4.4
Collecting Memory Dump ................................................................................................................. 25
5.
Troubleshooting .......................................................................................................................................... 26
5.1
Problem of Powering on ................................................................................................................... 26
5.2
Problem of Starting EXPRESSBUILDER ......................................................................................... 28
5.3
Problem of Installing OS .................................................................................................................. 29
5.4
Problem of Starting OS .................................................................................................................... 31
5.5
Problem of Windows STOP Error .................................................................................................... 32
Cleaning the server ............................................................................................................ 19
Cleaning the tape drive ...................................................................................................... 19
Cleaning the keyboard and mouse .................................................................................... 19
Windows Server 2012 R2/Windows Server 2012 .............................................................. 21
Windows Server 2008 R2 / Windows Server 2008 ............................................................ 23
Windows Server 2012 R2/Windows Server 2012 .............................................................. 24
Windows Server 2008 R2/ Windows Server 2008 ............................................................. 24
Express5800/T110g-S, R110g-1E, T110g-E Maintenance Guide
3

5.6
Problem of Operating a RAID System ............................................................................................. 33
5.7
Problem of Using Internal Devices and Other Hardware ................................................................. 35
5.8
Problem of OS ................................................................................................................................. 37
5.9
Problem of Stating EXPRESSBUILDER on Windows ..................................................................... 38
5.10
Problem of Bundled Software .......................................................................................................... 38
5.11
Problem of Optical Disk Drive .......................................................................................................... 39
5.12
Problem of Powering Off .................................................................................................................. 39
6.
Windows System Recovery ........................................................................................................................ 40
6.1
Recovery of Windows Server 2012 R2 and Windows Server 2012 ................................................. 40
6.2
Recovery of Windows Server 2008 R2 and Windows Server 2008 .................................................... 40
7.
Resetting and Clearing the Server .............................................................................................................. 41
7.1
Software Reset ................................................................................................................................ 41
7.2
BMC Reset ...................................................................................................................................... 41
7.3
Forced Shutdown ............................................................................................................................. 43
7.4
Clearing BIOS Settings (CMOS Memory) ........................................................................................ 45
8.
System Diagnostics ..................................................................................................................................... 48
8.1
T ests ......................................................................................................................... ....................... 48
8.2
Usage of System Diagnostics .......................................................................................................... 48
Contents
9.
Offline Tools ................................................................................................................................................ 51
9.1
Starting Offline Tools ........................................................................................................................ 51
9.2
Features of Offline Tools .................................................................................................................. 52
9.3
Console-less Feature ....................................................................................................................... 53
9.3.1
9.3.2
Chapter 2 Useful Features ............................................................................................................................... 54
1.
System BIOS .............................................................................................................................................. 55
1.1
Starting SETUP ............................................................................................................................... 55
1.2
Parameters ...................................................................................................................................... 55
1.2.1
1.2.2
1.2.3
1.2.4
1.2.5
1.2.6
2.
BMC Configuration ...................................................................................................................................... 84
2.1
Starting BMC Configuration ............................................................................................................. 84
2.2
Main menu of BMC Configuration .................................................................................................... 85
2.3
Setting BMC Configuration .............................................................................................................. 86
2.3.1
2.3.2
2.3.3
2.3.4
2.3.5
2.3.6
2.3.7
2.4
Clear BMC Configuration ................................................................................................................. 97
2.5
Resetting BMC ................................................................................................................................. 98
2.6
Initializing BMC ................................................................................................................................ 98
How to remotely control ..................................................................................................... 53
Preparation ........................................................................................................................ 53
Main ................................................................................................................................... 55
Advanced ........................................................................................................................... 57
Security .............................................................................................................................. 72
Server ................................................................................................................................ 76
Boot ................................................................................................................................... 81
Save & Exit ........................................................................................................................ 83
Network ............................................................................................................................. 87
User Management ............................................................................................................. 89
Mail Alert ............................................................................................................................ 91
SNMP Alert ........................................................................................................................ 93
System Operation .............................................................................................................. 94
ECO ................................................................................................................................... 95
Miscellaneous .................................................................................................................... 97
4
3.
Flash FDD ................................................................................................................................................... 99
3.1
Precautions ...................................................................................................................................... 99
3.1.1
3.1.2
3.1.3
4.
Power Control Feature .............................................................................................................................. 100
4.1
Supported OS ................................................................................................................................ 100
Compensation for recorded data ....................................................................................... 99
Handling Flash FDD .......................................................................................................... 99
Precautions when using EXPRESSBUILDER ................................................................... 99
Express5800/T110g-S, R110g-1E, T110g-E Maintenance Guide

4.2
Notes on Using Windows Server 2008 .......................................................................................... 100
5.
RAID System Configuration ...................................................................................................................... 101
5.1
Running the LSI Software RAID Configuration Utility .................................................................... 101
5.1.1
5.2
Menu Tree ...................................................................................................................................... 103
5.3
Using LSI Software RAID Configuration Utility ............................................................................... 105
5.3.1
5.3.2
5.3.3
5.3.4
5.3.5
5.4
LSI Software RAID Configuration Utility and Universal RAID Utility ............................................... 115
5.5
WebBIOS and Universal RAID Utility ............................................................................................. 1 17
6.
Details of EXPRESSBUILDER .................................................................................................................. 119
6.1
Starting EXPRESSBUILDER ......................................................................................................... 1 19
6.2
Menus of EXPRESSBUILDER ....................................................................................................... 120
6.3
Utilities Provided by EXPRESSBUILDER ...................................................................................... 123
7.
EXPRESSSCOPE Engine 3 ..................................................................................................................... 124
Exiting the LSI Software RAID Configuration Utility ......................................................... 102
Creating and adding a configuration ................................................................................ 105
Executing rebuilding manually ......................................................................................... 110
Setting a hot spare ........................................................................................................... 111
Executing the Consistency Check ................................................................................... 113
Other features .................................................................................................................. 1 14
Contents
8.
NEC ESMPRO .......................................................................................................................................... 125
8.1
NEC ESMPRO Agent (for Windows) ............................................................................................. 125
8.2
NEC ESMPRO Manager ................................................................................................................ 126
8.3
NEC ESMPRO Agent Extension .................................................................................................... 127
8.4
BMC Configuration ........................................................................................................................ 127
8.5
NEC ExpressUpdate Agent ............................................................................................................ 127
9.
NEC Product Info Collection Utility ............................................................................................................ 128
9.1
Usage ............................................................................................................................................ 128
10.
Universal RAID Utility ................................................................................................................................ 129
10.1
Easy Configuration Feature ........................................................................................................... 129
10.2
Creating Logical Drive of RAID 6 ................................................................................................... 129
11.
Express Report Service / Express Report Service(HTTPS) ...................................................................... 130
12.
Express Report Service(MG) .................................................................................................................... 131
Chapter 3 Appendix ....................................................................................................................................... 132
1.
POST Error Message ................................................................................................................................ 133
2.
List of Windows Event Logs ...................................................................................................................... 145
3.
Accessing Data for Electric Power, Temperature, and Processor Utilization ............................................. 157
3.1
Windows ........................................................................................................................................ 157
3.1.1
3.1.2
3.1.3
3.2
Linux .............................................................................................................................................. 162
3.2.1
3.2.2
3.2.3
Power consumption ......................................................................................................... 157
Intake air temperature ...................................................................................................... 158
Processor utilization ......................................................................................................... 161
Power consumption ......................................................................................................... 162
Intake air temperature ...................................................................................................... 162
Processor utilization ......................................................................................................... 163
Express5800/T110g-S, R110g-1E, T110g-E Maintenance Guide
5

Notations Used in This Document
Notations used in the text
In addition to safety-related symbols urging caution, three other types of notations are used in this document.
These notations have the following meanings.
Important Indicates critical items that must be followed when handling the hardware or operating
software. If the procedures described are not followed, hardware failure, data loss, and
other serious malfunctions could occur.
Note Indicates items that must be confirmed when handling the hardware or operating software.
Tips Indicates information that is helpful to keep in mind when using this server.
Notations Used in This Document
Optical disk drive
This server is equipped with one of the following drives. These drives are referred to as optical disk dr iv e in this
document.
DVD-ROM drive
DVD Super MULTI drive
Hard disk drive
Unless otherwise stated, hard disk drive described in this document refers to the following.
Hard disk drive (HDD)
Solid state drive (SSD)
Removable media
Unless otherwise stated, removable media described in this document refers to the following.
USB flash drive
Flash FDD
6
Express5800/T110g-S, R110g-1E, T110g-E Maintenance Guide

Abbreviations of Operating Systems (Windows)
Windows Operating Systems are referred to as follows.
See Chapter 1 (1.2 Supported Windows OS) in Installation Guide (Windows) for detailed information.
Notations in this document Official names of Windows
Windows Server 2012 R2 Standard
Notations Used in This Document
Windows Server 2012 R2
Windows Server 2012
Windows Server 2008 R2
Windows Server 2008 *
* Only Windows Server 2008 32-bit Edition
Windows Server 2012 R2 Datacenter
Windows Server 2012 R2 Foundation
Windows Server 2012 Standard
Windows Server 2012 Datacenter
Windows Server 2008 R2 Standard
Windows Server 2008 R2 Enterprise
Windows Server 2008 Standard
Windows Server 2008 Enterprise
Express5800/T110g-S, R110g-1E, T110g-E Maintenance Guide
7

Trademarks
Trademarks
EXPRESSSCOPE is a registered trademark of NEC Corporation.
Microsoft, Windows, Windows Server, Windows Vista, and MS-DOS are registered trademarks or trademarks of Microsoft Corporation
in the United States and other countries. Intel, Pentium, and Xeon are registered trademarks of Intel Corporation of the United States.
AT is a registered trademark of International Business Machines Corporation of the United States and other countries. LSI and the LSI
logo design are trademarks or registered trademarks of LSI Corporation. Adobe, the Adobe logo, and Acrobat are trademarks of
Adobe Systems Incorporated. PCI Express is a trademark of Peripheral Component Interconnect Special Interest Group. Linux is a
trademark or registered trademark of Linus Torvalds in Japan and other countries. Red Hat® and Red Hat Enterprise Linux are
trademarks or registered trademarks of Red Hat, Inc. in the United States and other countries.
All other product, brand, or trade names used in this publication are the trademarks or registered trademarks of their respective
trademark owners.
License Notification
The System BIOS of this product contains open source software for the following license.
EDK FROM TIANOCORE.ORG
BSD License from Intel
Copyright (c) 2004, Intel Corporation
All rights reserved.
Redistribution and use in source and binary forms, with or without modification, are permitted provided that the following conditions
are met:
- Redistributions of source code must retain the above copyright notice, this list of conditions and the following disclaimer.
- Redistributions in binary form must reproduce the above copyright notice, this list of conditions and the following disclaimer in the
documentation and/or other materials provided with the distribution.
- Neither the name of the Intel Corporation nor the names of its contributors may be used to endorse or promote products derived
from this software without specific prior written permission.
THIS SOFTWARE IS PROVIDED BY THE COPYRIGHT HOLDERS AND CONTRIBUTORS "AS IS" AND ANY EXPRESS OR
IMPLIED WARRANTIES, INCLUDING, BUT NOT LIMITED TO, THE IMPLIED WARRANTIES OF MERCHANTABILITY AND
FITNESS FOR A PARTICULAR PURPOSE ARE DISCLAIMED. IN NO EVENT SHALL THE COPYRIGHT OWNER OR
CONTRIBUTORS BE LIABLE FOR ANY DIRECT, INDIRECT, INCIDENTAL, SPECIAL, EXEMPLARY, OR CONSEQUENTIAL
DAMAGES (INCLUDING, BUT NOT LIMITED TO, PROCUREMENT OF SUBSTITUTE GOODS OR SERVICES; LOSS OF USE,
DATA, OR PROFITS; OR BUSINESS INTERRUPTION) HOWEVER CAUSED AND ON ANY THEORY OF LIABILITY, WHETHER IN
CONTRACT, STRICT LIABILITY, OR TORT (INCLUDING NE GLIGENCE OR OTHERWISE) ARISING IN ANY WA Y OUT OF THE
USE OF THIS SOFTWARE, EVEN IF ADVISED OF THE POSSIBILITY OF SUCH DAMAGE.
Copyright (c) 2004 - 2007, Intel Corporation
All rights reserved. This program and the accompanying materials are licensed and made available under the terms and conditions of
the BSD License which accompanies this distribution. The full text of the license may be found at
http://opensource.org/licenses/bsd-license.php
THE PROGRAM IS DISTRIBUTED UNDER THE BSD LICENSE ON AN "AS IS" BASIS, WITHOUT WARRANTIES OR
REPRESENTATIONS OF ANY KIND, EITHER EXPRESS OR IMPLIED.
8
Express5800/T110g-S, R110g-1E, T110g-E Maintenance Guide

Regulatory Notices
FCC Statement
This equipment has been tested and found to comply with the limits for a Class A digital device,
pursuant to Part 15 of the FCC Rules. These limits are designed to provide reasonable protection
against harmful interference when the equipment is operated in a commercial environment. This
equipment generates, uses, and can radiate radio frequency energy and, if not installed and used in
accordance with the instruction manual, may cause harmful interference to radio communications.
Operation of this equipment in a residential area is likely to cause harmful interferenc e in which case
the user will be required to correct the interference at his own expense.
Industry Canada Class A Emission Compliance Statement/
Avis de conformité à la réglementation d'Industrie Canada:
CAN ICES-3(A)/NMB-3(A)
CE / Australia and New Zealand Statement
Regulatory Notices
This is a Class A product. In domestic environment this prod uct ma y cause radi o interference i n which case
the user may be required to take adequate measures (EN55022).
BSMI Statement
Disposing of your used product
In the European Union
EU-wide legislation as implemented in each Member State requires that used electrical
and electronic products carrying the mark (left) must be disposed of separately from
normal household waste. This includes Information and Communication Technology
(ICT) equipment or electrical accessories, such as cables or DVDs.
When disposing of used products, you should comply with applicable legislation or
agreements you may have. The mark on the electrical and electronic products only
applies to the current European Union Member States.
Outside the European Union
If you wish to dispose of used electrical and electronic products outside the European
Union, please contact your local authority and ask for the correct method of disposal.
Express5800/T110g-S, R110g-1E, T110g-E Maintenance Guide
9

Turkish RoHS information relevant for Turkish market
EEE Yönetmeliğine Uygundur
CCC声明
Regulatory Notices
部件名称
印刷线路板 ×○○○○○
HDD、DVD等 ×○○○○○
机箱、支架 ○○○○○○
电源 ×○○○○○
键盘 ×○○○○○
其他(电缆、鼠标
○:表示该有毒有害物质在该部件所有均质材料中的含量均在SJ/T11363-2006标准规定的限量要求以
下。
×:表示该 有 毒有 害 物质至少在 该部 件 的某 一均质材 料中 的 含量 超出SJ /T 11 363 -2 006 标准 规定的限 量要
求。
铅
×○○○○○
汞
有毒有害物质或元素
镉
六价铬
多溴联苯
多溴二苯醚
Vietnam RoHS information relevant for Vietnam market
Complying with "CIRCULAR, No.30/2011/TT-BCT (Hanoi, August 10 2011), Temporary regulations on
content limit for certain hazardous substances in electrical products"
Declaration of Conformity
with the requirements of Technical Regulation on the Restriction Of the use of certain Hazardous
Substances in Electrical and Electronic Equipment
(adopted by Order №1057 of Cabinet of Ministers of Ukraine)
The Product is in conformity with the requirements of Technical Regulation on the Restriction Of the use
of certain Hazardous Substances in electrical and electronic equipment (T R on RoHS).
The content of hazardous substance with the exemption of the applications listed in the Annex №2 of
TR on RoHS:
1. Lead (Pb) – not over 0,1wt % or 1000wt ppm;
2. Cadmium (Cd) – not over 0,01wt % or 100wt ppm;
3. Mercury (Hg) – not over 0,1wt % or 1000wt ppm;
4. Hexavalent chromium (Cr6+) – not over 0,1wt % or 1000wt ppm;
5. Polybrominated biphenyls (PBBs) – not over 0,1wt % or 1000wt ppm;
6. Polybrominated diphenyl ethers (PBDEs) – not over 0,1wt % or 1000wt ppm.
10
Express5800/T110g-S, R110g-1E, T110g-E Maintenance Guide

Regulatory Notices
Декларація про Відповідність
Вимогам Технічного Регламенту Обмеження Використання деяких Небезпечних Речовин в
електричному та електронному обладнанні
(затвердженого Постановою №1057 Кабінету Міністрів України)
Виріб відповідає вимогам Технічного Регламенту Обмеження Використання деяких Небезпечних
Речовин в електричному та електронному обладнанні (ТР ОВНР).
Вміст небезпечних речовин у випадках, не обумовлених в Додатку №2 ТР ОВНР, :
ь(Pb) – не перевищує 0,1 % ваги речовини або в концентрації до 1000 частин на
1. свине
ц
мільйон;
2. кадмій (Cd) – не перевищує 0,01 % ваги речовини або в концентрації до 100 частин на
мільйон;
3. ртуть(Hg) – не перевищує 0,1 % ваги речовини або в концентрації до 1000 частин на
мільйон;
4. шестивалентний хром (Cr6+) – не перевищує 0,1 % ваги речовини або в концентрації до
1000 частин на мільйон;
5. по
лібром
біфеноли (PBB) – не перевищує 0,1% ваги речовини або в концентрації до 1000
частин на мільйон;
6. полібромдефенілові ефіри (PBDE) – не перевищує 0,1 % ваги речовини або в концентрації
до 1000 частин на мільйон.
Декларация о Соответствии
Требованиям Технического Регламента об Ограничении Использования некоторых Вредных
Веществ в электрическом и электронном оборудовании
(утверждённого Постановлением №1057 Кабинета Министров Украины)
Изделие соответствует требованиям Технического Регламента об Ограничении
Использования
некоторых Вредных Веществ в электрическом и электронном оборудовании (ТР ОИВВ).
Содержание вредных веществ в случаях, не предусмотренных Дополнением №2 ТР ОИВВ:
1. свине
ц (Pb)
– не превышает 0,1 % веса вещества или в концентрации до 1000 миллионных
частей;
2. кадмий (Cd) – не превышает 0,01 % веса вещества или в концентрации до 100
миллионных частей;
3. ртуть (Hg) – не превышает 0,1 % веса вещества или в концентрации до 1000 миллионных
частей;
4. шестивалентный хром (Cr6+)– не превышает 0,1 % веса вещества или в концентрации до
1000 миллионных частей;
5. по
либром
бифенолы (PBB) – не превышает 0,1 % веса вещества или в концентрации до
1000 миллионных частей;
6. полибромдифеноловые эфиры (PBDE) – не превышает 0,1 % веса вещества или в
концентрации до 1000 миллионных частей.
Express5800/T110g-S, R110g-1E, T110g-E Maintenance Guide
11

Warnings and Additions to This Document
Warnings and Additions to This Document
Unauthorized reproduction of the contents of this document, in part or in its entirety, is prohibited.
1.
This document is subject to change at any time without notice.
2.
Do not make copies or alter the document content without permission from NEC Corporation.
3.
If you have any concerns, or discover errors or omissions in this document, contact your sales
4.
representative.
Regardless of article 4, NEC Corporation assumes no responsibility for effects resulting from your
5.
operations.
6.
The sample values used in this document are not the actual values.
Keep this document for future reference.
Latest editions
This document was created based on the information available at the time of its creation. The screen i mages,
messages and procedures are subject to change without notice. Substitute as appropria te when content has
been modified.
The most recent version of the guide, as well as other related d ocuments, is also available for download from
the following website.
http://www.nec.com/
12
Express5800/T110g-S, R110g-1E, T110g-E Maintenance Guide

NEC Express5800 Series
Express5800/T110g-S, R110g-1E, T110g-E
Maintenance
This chapter explains the server maintenance, and what actions are to be taken in case of trouble when
operating the server.
1. Transfer, Movement, and Disposal
Describes how to transfer this server to a third party. Also describes how to dispose, move and store the
server.
2. Daily Maintenance
Describes what you must confirm for daily use, how to manage files, and how to clean the server.
3. User Support
Describes various services on this product.
4. Collecting Failure Information
Describes how to collect the failure information. See this section in case of a failure.
5. Troubleshooting
Describes how to troubleshoot the server. See this section if you suspect a failure.
6. Windows System Recovery
Describes Windows recovery setup. See this section if the Windows is corrupt.
7. Resetting and Clearing the Server
Describes how to reset or clear the server. See this section if the server is not working or if you want to
restore the BIOS settings to the factory settings.
8. System Diagnostics
Describes the system diagnostics of the server.
9. Offline Tools
Describes tools for preventive maintenance of the server.
Express5800/T110g-S, R110g-1E, T110g-E Maintenance Guide
13

Chapter 1 Maintenance
1. Transfer, Movement, and Disposal
1.
1.1
Transfer, Movement, and Disposal
Transfer to a Third Party
Note the following precautions if you want to transfer or sell the server to a third party.
Server
Be sure to provide the server's instruction manuals (including electronic data) to the third party.
Data on the hard disk drive
Be sure to erase the data stored in HDD to prevent the leakage of sensitive data, such as customer
information or company management information, to any third parties.
Data seems to be erased when you empty "Recycle Bin" of Windows or run the "format" command of the
operating system. However, the actual data remains on the hard disk dri ve. Data not erased completely
might be restored by special software and used for unexpected purposes.
Important
NEC assumes no liability for data leakage.
Bundled software
Observe the following precautions when transferring the bundled software to a third party.
Transfer them with the server.
All provided discs and documents must be transferred and no backup copies must be retained.
Transfer requirements listed in "Software License Agreement" that comes with software must be
satisfied.
Bundled software on client PC must be uninstalled before transferring.
14
Express5800/T110g-S, R110g-1E, T110g-E Maintenance Guide
Chapter 1 Maintenance
1. Transfer, Movement, and Disposal
1.2
1.3
Disposal of the Server and Consumables
Dispose of the server, hard disk drives, DVD/CD-ROMs, option boards, and batteries according to laws
and regulations of the central and/or local government. Also dispose of the power cord attached to this
product together with the server to prevent diversion to other products.
Note
Some components including fans, built-in batteries, and the optical disk drive work for a limited period of
time and require replacement. For stable operation of the server, NEC recommends you regularly replace
these components. Contact your sales representative for information on replacement or the lifetime of
components.
Regarding the Transportation of This Server
For disposal (or replacement) of the batter y on the mother board of the server,
consult with your sales representative.
It is your responsibility to completely erase all data stored on storage devices
such as hard disk drives, backup data cartridges, or any other media (such as
CD-R/CD-RW) so that the data cannot be restored by a third party.
1.4
This server and/or some of the associated optional devices uses lithium metal batteries or lithium ion batteries.
Regulations for air/ocean transportation apply when transporting lithium batteries. Conform to the
regulations if you want to transport this server or optional devices by air or ship.
Moving and Storage
Follow the steps below when moving or storing this server.
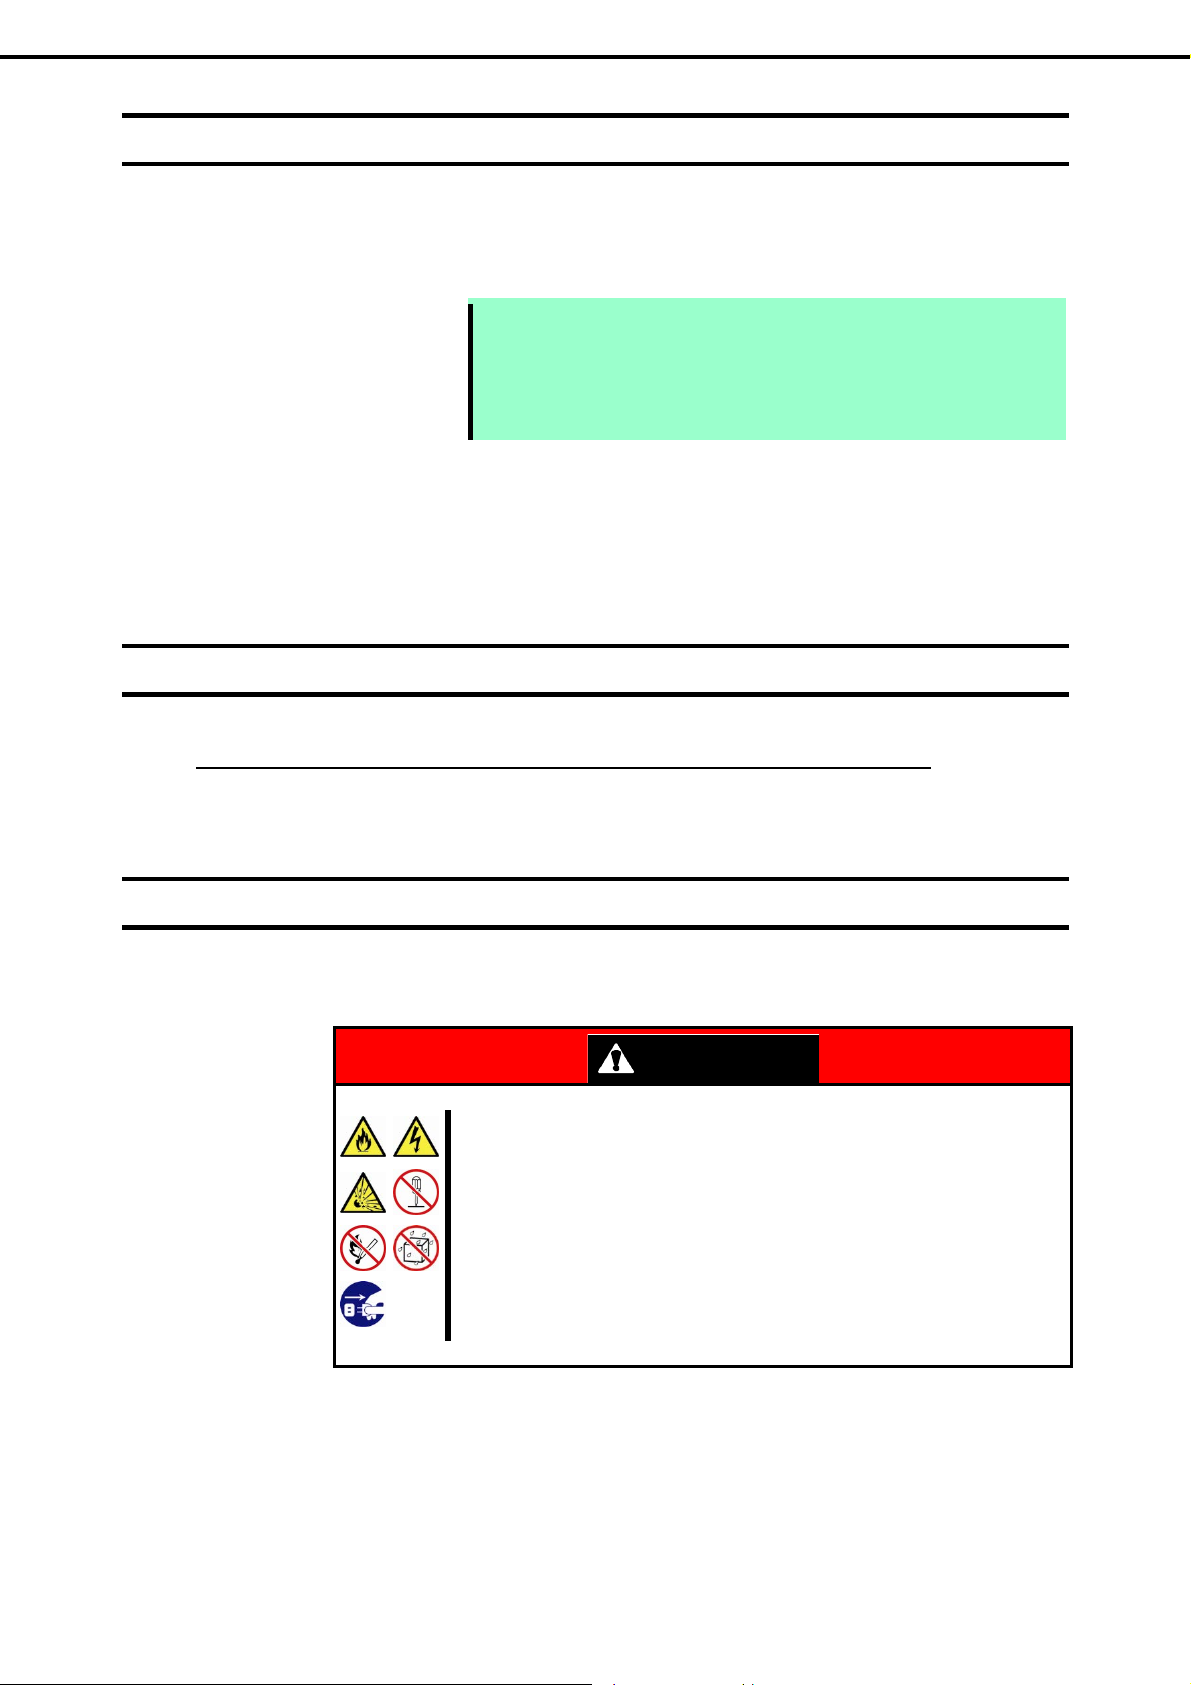
Be sure to observe the following precautions to use the server safety. Failure to
observe the precautions may cause death or s erious injur y. For details, refer to
Safety precautions in Precautions for Use in "User’s Guide".
Do not disassemble, repair, or alter the server.
Do not remove the lithium battery, NiMH, or Li-ion battery.
Disconnect the power plug before installing or removing the server.
WARNING
Express5800/T110g-S, R110g-1E, T110g-E Maintenance Guide
15

Chapter 1 Maintenance
1. Transfer, Movement, and Disposal
Be sure to observe the following precautions to use the server safely. Failure to
observe the precautions may cause burns, injury, and property damage. For
details, refer to Safety precautions in Precautions for Use in "User’s Guide".
Make sure to complete installation.
Do not get your fingers caught.
Be careful of handling internal components that may be at high temperatures.
Note
If the server has hard disk drives, move the server while being careful not to
damage the drive.
When storing the server, monitor the environmental conditions of the storage
area.
Temperature: 10C to 55C, Humidity: 20% to 80%
(No dew condensation is permitted)
Tips
Make backup copies of important data stored in the hard disk drive.
1. Remove the disc from the optical disk drive
CAUTION
2. Power off the server (POWER LED goes off)
3. Unplug the power cord of the server from the power outlet.
4. Disconnect all the cables from the server
5. Pack the server securely to protect from damage, shock, and vibration.
Important
If the server is suddenly moved from a cold place to a warm place,
condensation will occur and cause failures. Wait for a sufficient period of
time before using the server and other components.
Note
Check and adjust the system clock before operating after relocating or
storing the server.
16
Express5800/T110g-S, R110g-1E, T110g-E Maintenance Guide

Chapter 1 Maintenance
r
A
r
2. Daily Maintenance
2.
2.1
Daily Maintenance
To use this server under good conditions at all times, periodically check and maintain as follows. If failures are
found, ask your sales representative, avoiding impossible operation.
Checking and Applying Updates
Express5800 Series posts update information for BIOS, firmware (FW), driver, and others of the server and
peripheral devices on our website. We recommend you to apply the latest update al ways.
NEC corporate site: http://www.nec.com/
[Support & Downloads]
NEC also provides ExpressUpdate that helps you to download and install updates that must be applied to
BIOS and FW of the server.
ExpressUpdate is contained in EXPRESSBUILDER provided with the server.
Tips
2.2
Checking Alerts
Use NEC ESMPRO Manager (for Windows) to constantly verify that no abnormalities are discovered on the
monitored server and that no alerts have been issued.
Example image of NEC ESMPRO Manager
NEC ESMPRO Manage
NEC recommends that you back up data before applying the latest update.
lertViewe
Express5800/T110g-S, R110g-1E, T110g-E Maintenance Guide
17
Chapter 1 Maintenance
2. Daily Maintenance
2.3
2.4
2.5
Checking STATUS LED
After powering on the server or before shutting down the system and powering off the serv er, check ST AT US
LED on the front of the server. For the functions and descriptions of the LED, see Chapter 1 (5. Names and
Functions of Parts) in "User’s Guide". If the indicator shows the server abnormality, contact your salses
representative.
Backup
We recommend that you periodically back up the data on HDD.
If a RAID array has been configured on your system, back up the RAID configuration data. We also
recommend that you back up it after a rebuilt required due to HDD failure. See Chapter 2 (6. Details of
EXPRESSBUILDER) for details.
Cleaning
Regularly clean the server to keep it in good condition.
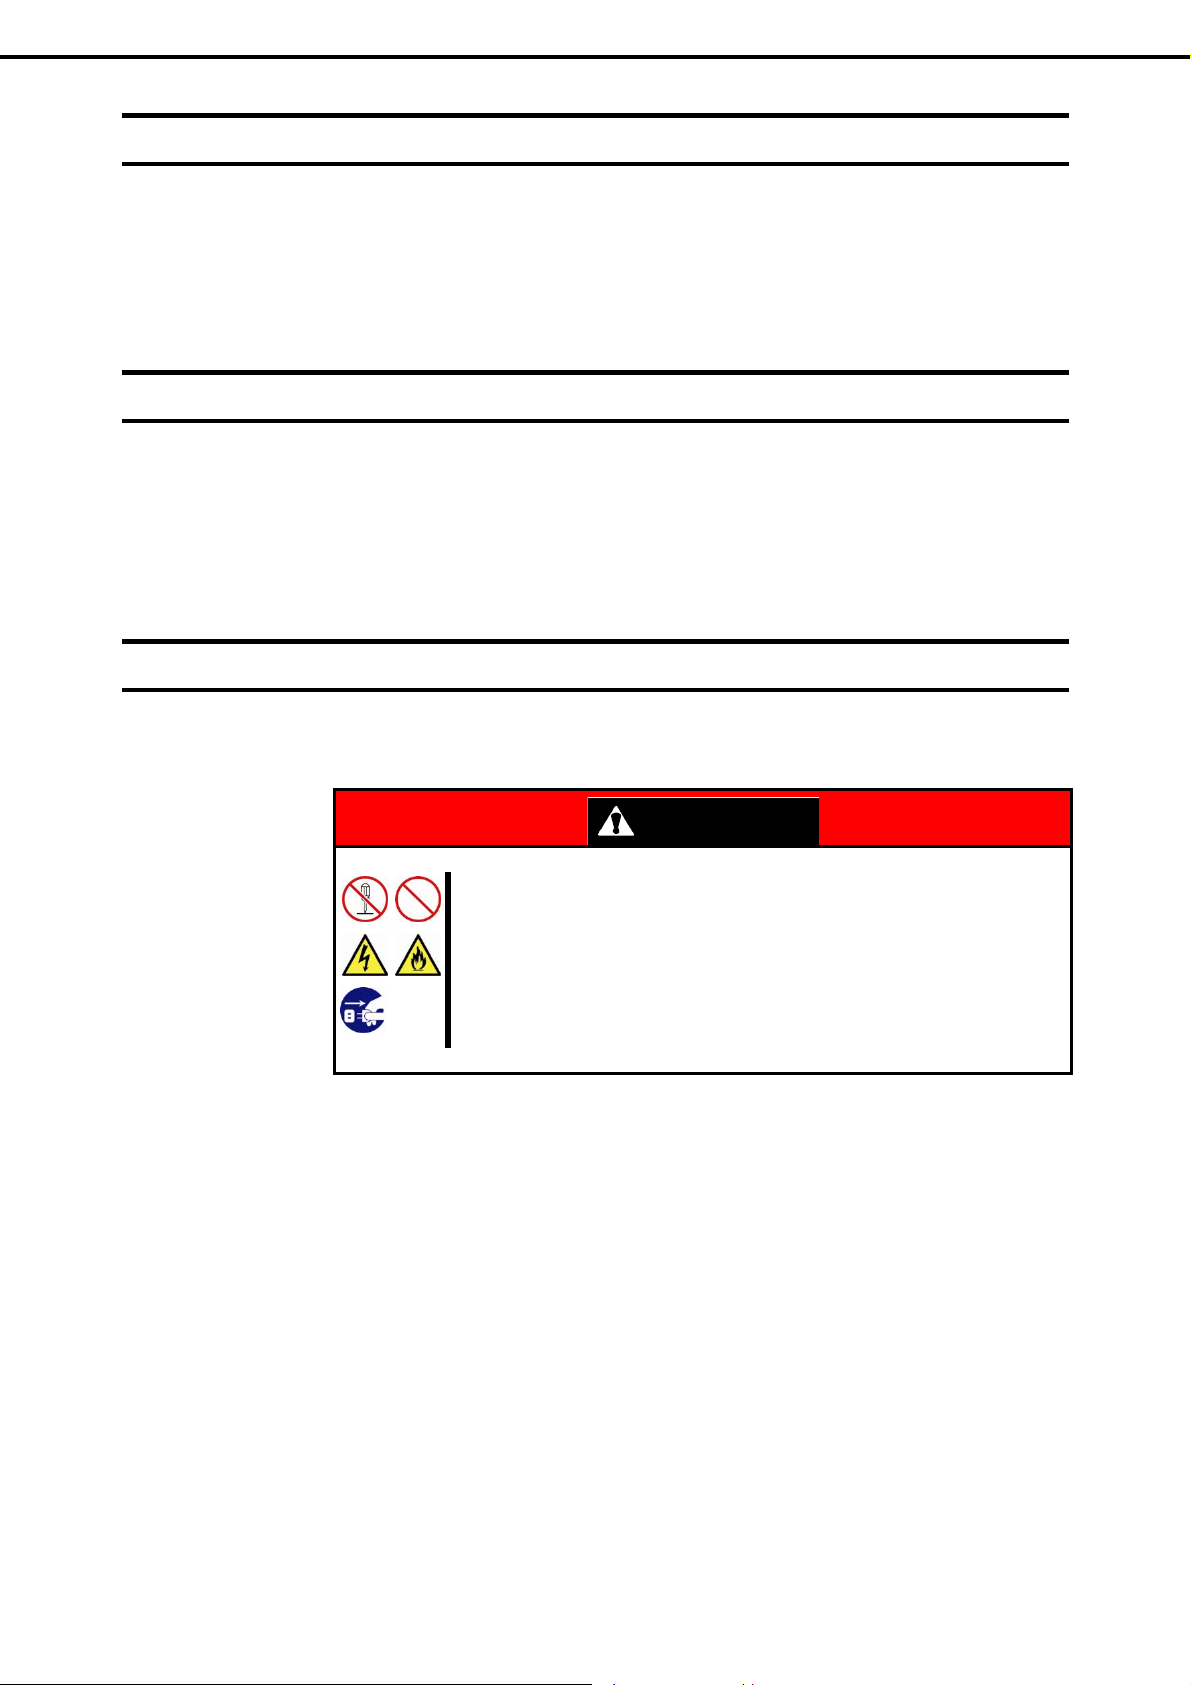
Be sure to observe the following precautions to use the server safety. Failure to
observe the precautions may cause death or s erious injur y. For details, refer to
Safety precautions in Precautions for Use in "User’s Guide".
Do not disassemble, repair, or alter the server.
Disconnect the power plug before cleaning the server.
WARNING
18
Express5800/T110g-S, R110g-1E, T110g-E Maintenance Guide

Chapter 1 Maintenance
2.5.1
Cleaning the server
Wipe the external surfaces of the server with a dry soft cloth. Follow the procedure below if stains remain on
the surfaces.
2. Daily Maintenance
1. Confirm that the power is OFF (POWER LED is OFF)
2. Unplug the power cord of the server from a power outlet.
3. Wipe off dust from the power cord plug with a dry cloth.
4. Soak a soft cloth in neutral detergent that is diluted with cold or lukewarm water, and squeeze it firmly.
5. Rub off stains on the server with the cloth prepared in step 4.
6. Soak a soft cloth in water, squeeze it firmly, and wipe the server with it once again.
7. Wipe the server with a dry cloth.
2.5.2
Cleaning the tape drive
A dirty tape drive head causes unsuccessful file backup and damages the tape cartridge. Periodically cl ean
the tape drive with the designated cleaning tape.
For the cleaning interval and method, the estimated usable period and lifetim e of the tape cartridge, refer to
the manual attached to the tape drive.
Important
Do not use volatile solvents such as thinner and benzene to clean the
server. Those solvents could damage or tarnish the material.
The pow er outlet, cables, connectors on the server, and the inside of the
server must be kept dry.
2.5.3
Cleaning the keyboard and mouse
Wipe the surface of the keyboard with a dry cloth after confirming that the whole system, including the server
and the peripherals, are shut down and the POWER LED is off.
An optical mouse does not work properly if the lens area is not clean. Wipe the sensor with a dry cloth to
remove any dirt or dust.
Express5800/T110g-S, R110g-1E, T110g-E Maintenance Guide
19

Chapter 1 Maintenance
3. User Support
3.
3.1
3.2
User Support
Before getting after-sales service, check the contents of the warranty and service.
Maintenance Services
Service representatives from NEC subsidiary companies or companies authorized by NEC provide
maintenance services. For the services, contact your sales representative.
Before Asking for Repair
If you think that a failure occurred, follow the steps below:
1. Check if the power cord and cables to other products are properly connected.
2. See Chapter 1 (5. Troubleshooting). If you find a symptom similar to your problem, take the action as
instructed.
3. Confirm that the required software has been properly installed.
4. Scan for viruses using a commercial Antivirus Software.
If the problem persists after taking the measures above, contact your sales representative. Take notes on LED
indications and the display on the screen at the failure, which will be useful information for the repair.
For repair within the warranty period, be sure to apply with your warranty.
20
Express5800/T110g-S, R110g-1E, T110g-E Maintenance Guide
Chapter 1 Maintenance
4. Collecting Failure Information
4.
4.1
Collecting Failure Information
If the server does not work correctly, you can collect failure information by using the following way.
The failure information to be described is to be collected only at the request of your sales representative.
Important
Collecting Event Logs
To collect various event logs, follow the steps below.
Tips
When the system restarts after a failure has occurred, a message may appear
indicating virtual memory shortage. Ignore this mes sage and proceed with
starting the system. Restarting the system may result in an inability to
properly dump the data.
If a STOP error, system error, or stall occurs, restart the system and follow th e
steps below.
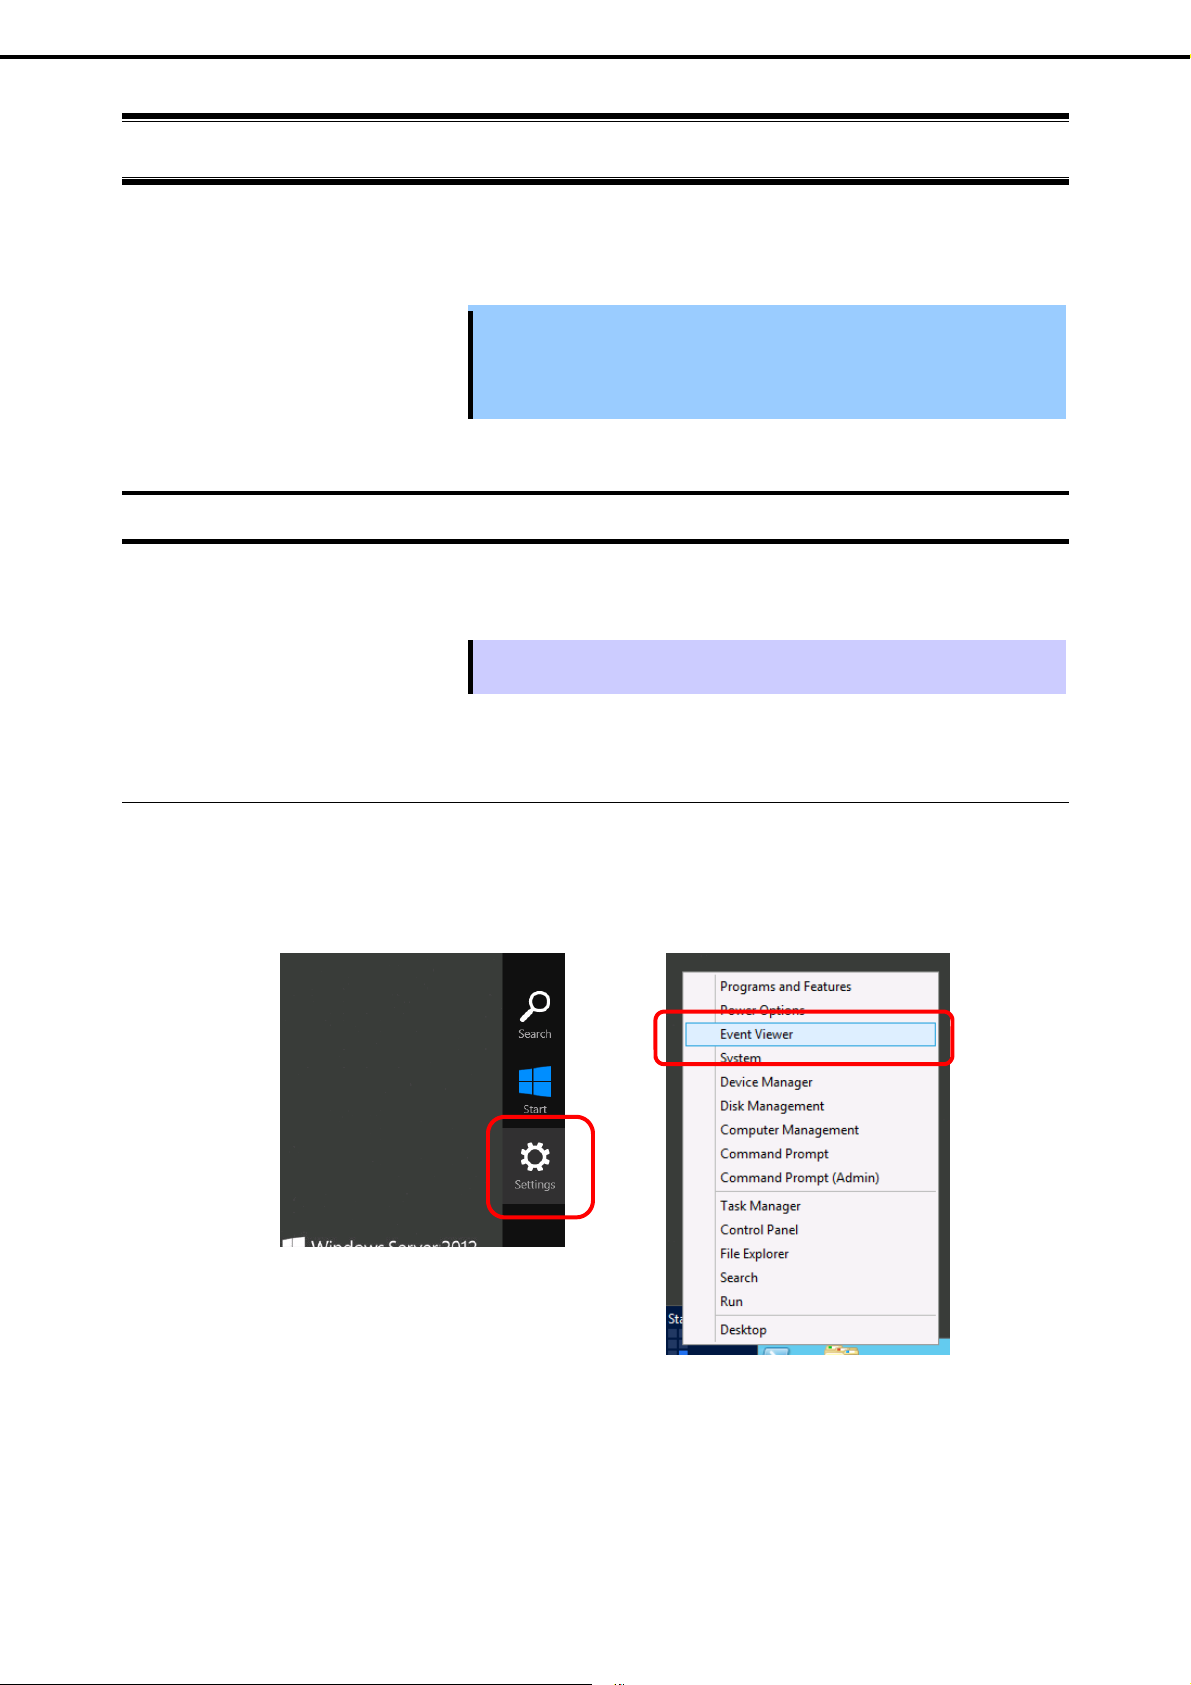
4.1.1
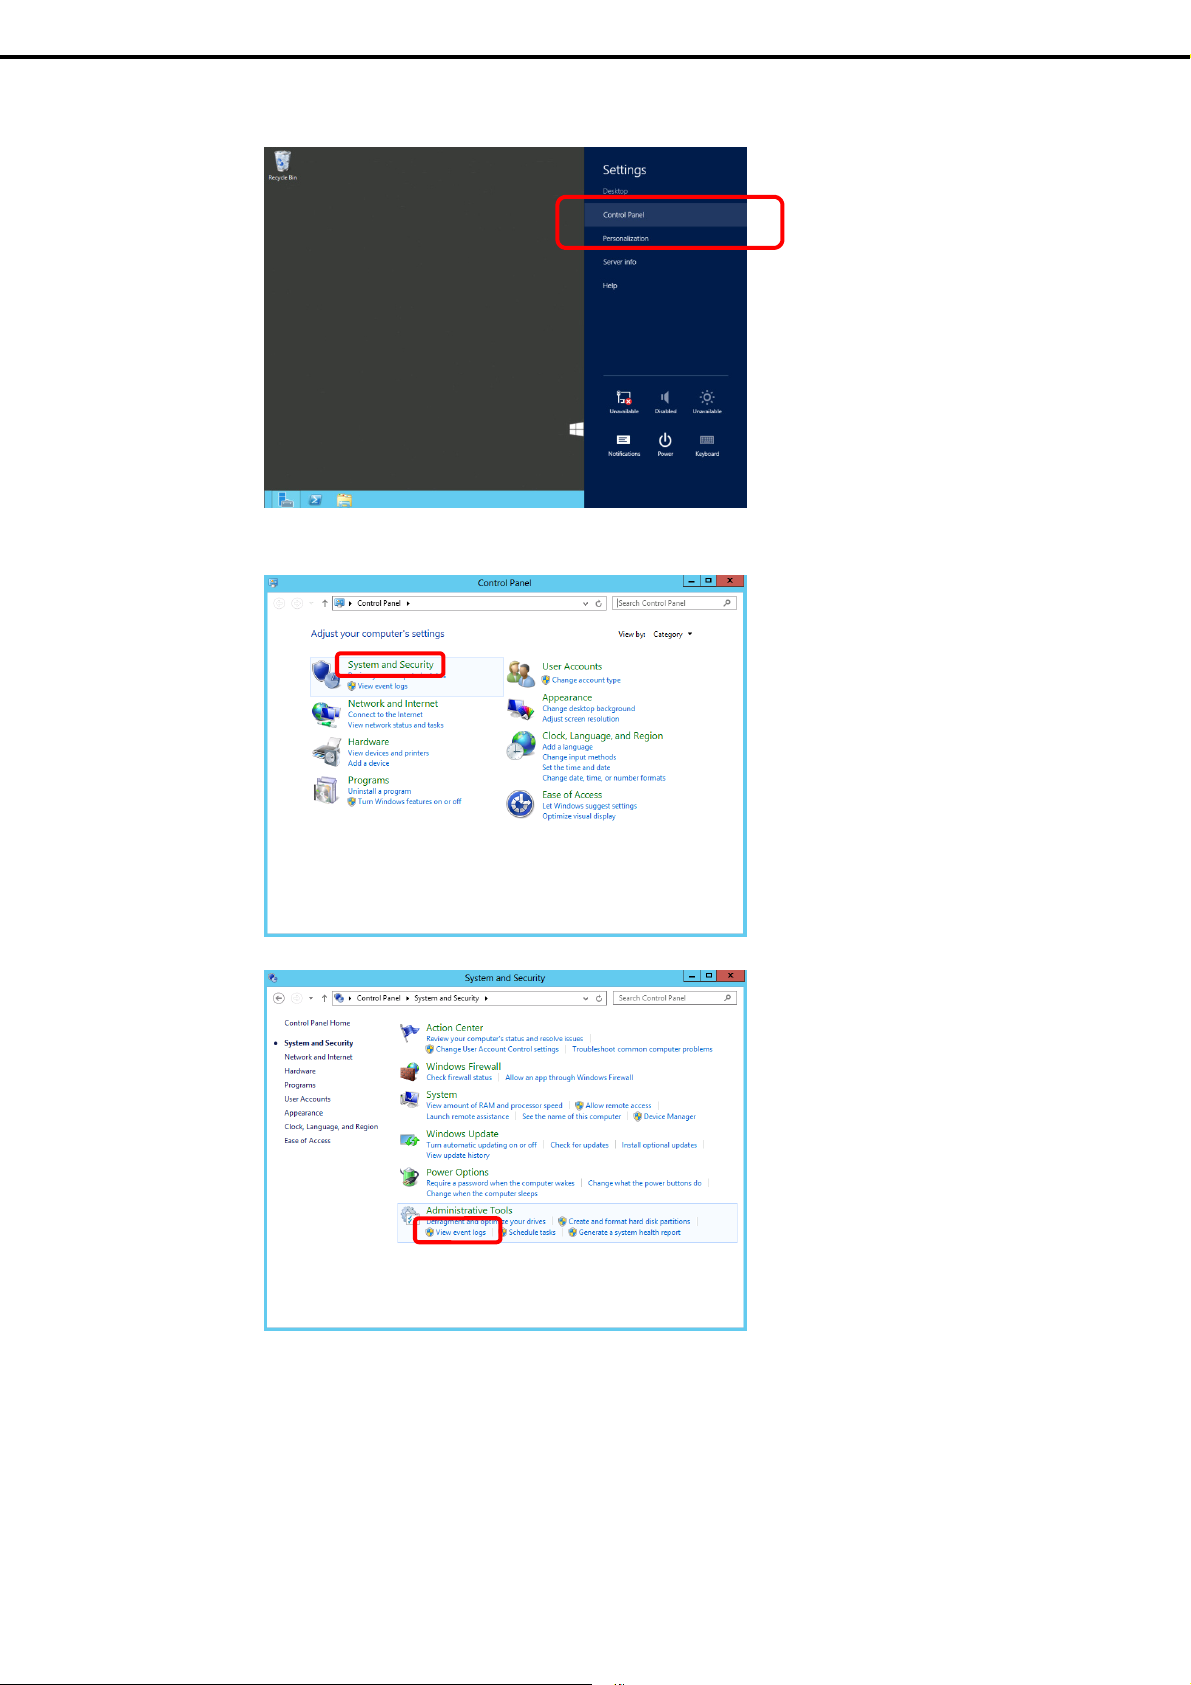
Windows Server 2012 R2/Windows Server 2012
1. Click Settings on the charm bar.
To go to step 5, you can directly choose Event Viewer on the menu that appears when you right click
on the lower left corner of the screen.
[Settings] [Event Viewer]
Express5800/T110g-S, R110g-1E, T110g-E Maintenance Guide
21
Chapter 1 Maintenance
2. Click Control Panel from Settings.
3. Click System and Security of Control Panel.
4. Collecting Failure Information
4. Click Administrative Tools and then click View event logs of System and Security.
22
Express5800/T110g-S, R110g-1E, T110g-E Maintenance Guide

Chapter 1 Maintenance
5. Select the type of log in Windows Logs.
Application records events related to running applications.
Security records events related to security.
System records events that occur in Windows system components.
6. Click Save All Events As... from Action menu.
4. Collecting Failure Information
7. Type the file name of the archived log in File name.
8. Select the type of the log file you want to save in Save as type, and then click Save.
4.1.2
Windows Server 2008 R2 / Windows Server 2008
1. Click Administrative Tool and then click Event Viewer from Control Panel.
2. Select the type of log in Windows Logs.
Application records events related to running applications.
Security records events related to security.
System records events that occur in Windows system components.
3. Click Save All Event As... from Action menu.
4. Type the file name of the archived log in File name.
5. Select the type of the log file you want to save in Save as type, and then click Save.
Express5800/T110g-S, R110g-1E, T110g-E Maintenance Guide
23
Chapter 1 Maintenance
4. Collecting Failure Information
4.2
4.2.1
Collecting Configuration Information
This section describes how to collect hardware information or configuration.
Tips
If a STOP error, system error, or stall occurs, restart the system and then follow the
procedure below.
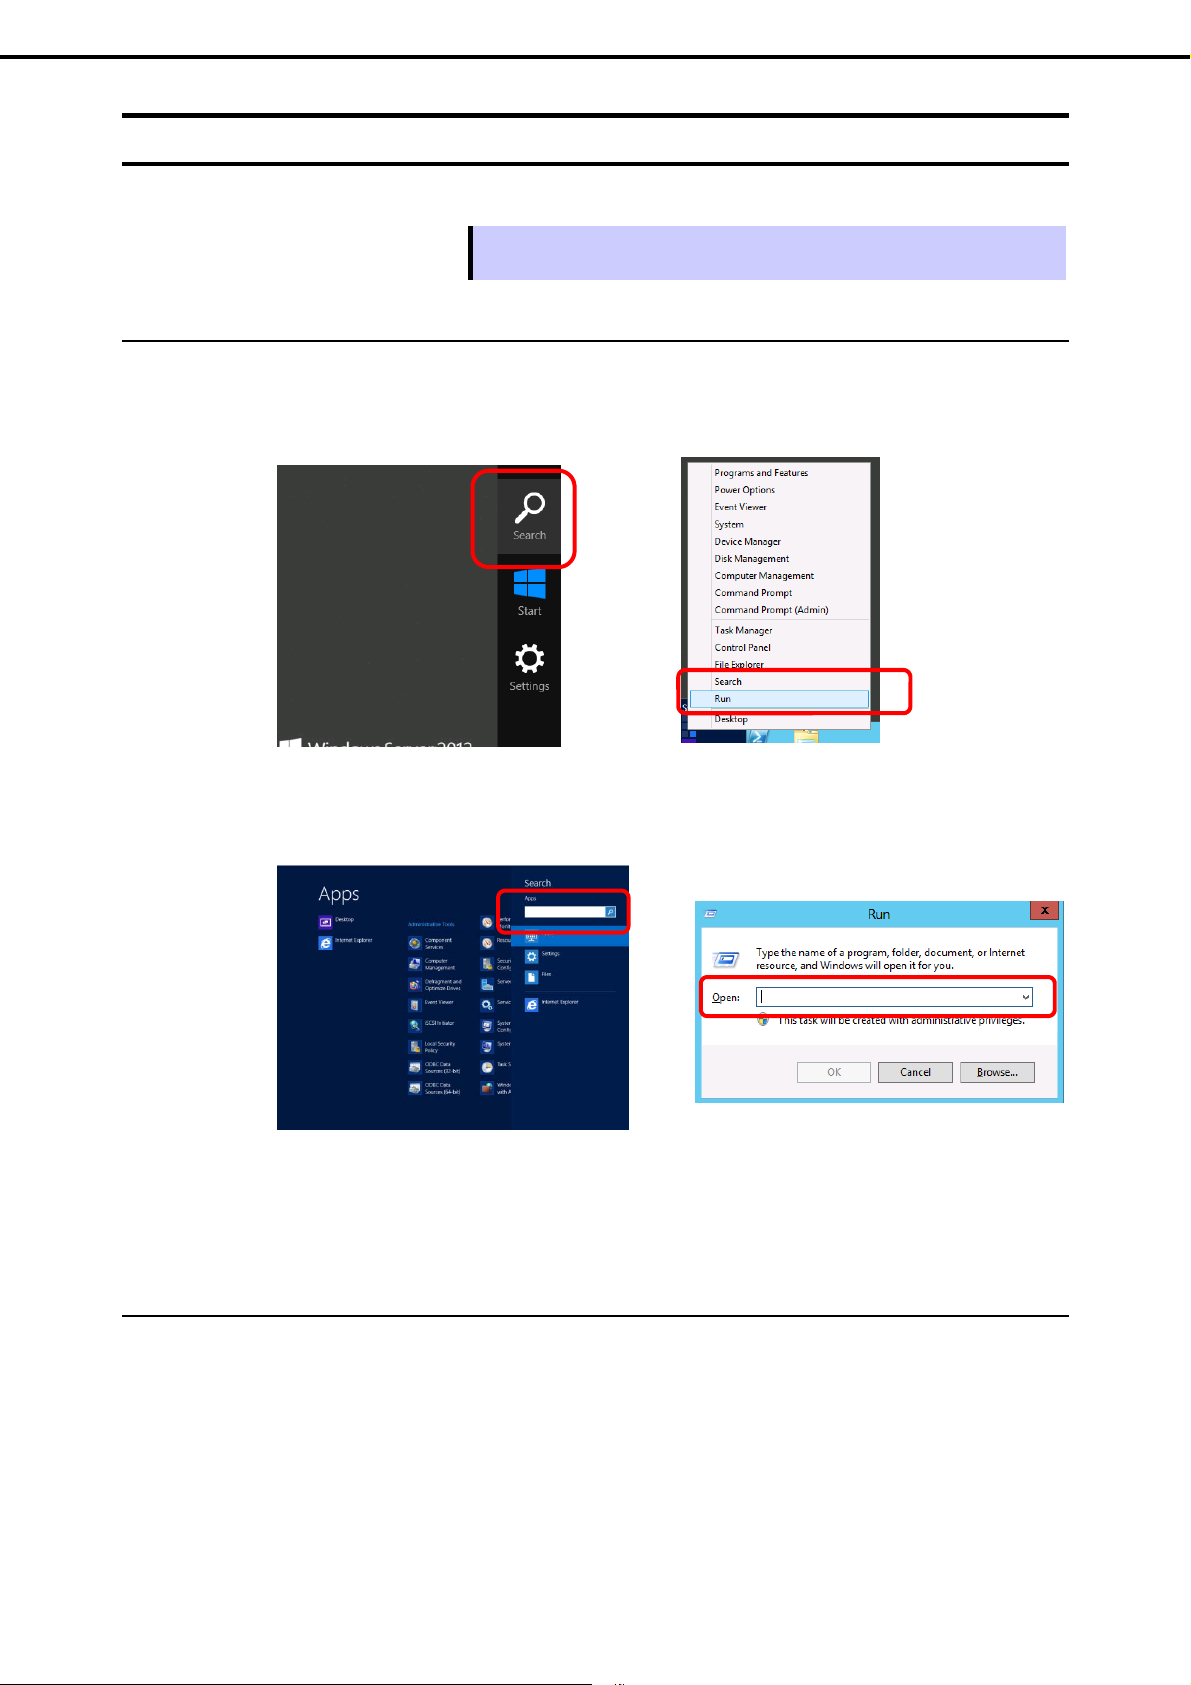
Windows Server 2012 R2/Windows Server 2012
1. Click Search on the charm bar.
You can use Run feature by right-clicking on the lower left corner of the screen.
[Search] [Run]
2. Type msinfo32.exe in the text box, and then press <Enter> key.
[Search] [Run]
3. System Information starts.
4. Click Export from File menu.
5. Type a file name to save in File Name, and then Click Save.
4.2.2
Windows Server 2008 R2/ Windows Server 2008
24
1. Click Run from Start menu.
2. Type msinfo32.exe in Open, and then click OK.
3. System Information starts.
4. Click Export from Files menu.
5. Type a file name to save in File Name, and then Click Save.
Express5800/T110g-S, R110g-1E, T110g-E Maintenance Guide

Chapter 1 Maintenance
4. Collecting Failure Information
4.3
4.4
Collecting User-Mode Process Dump
The user-mode process dump is the failure information related to application errors.
For details, see Chapter 1 (7.2 How to Create a User-Mode Process Dump File) in "Installation Guide
(Windows)".
Collecting Memory Dump
If an error occurs, the dump file is created to acquire necessary information. You can specify any location for
saving it. For details, see Chapter 1 (7.1 Specifying Memory Dump Settings (Debug Information)) in
"Installation Guide (Windows)".
Consult with your sales representative before dumping the memor y. Do not dump the memory while the
server is in normal state.
Important
A message indicating insufficient virtual memory may appear when
restarting the system due to an error. Ignore this message and proceed.
Restarting the system may result in an inability to properly dump the data.
Express5800/T110g-S, R110g-1E, T110g-E Maintenance Guide
25

Chapter 1 Maintenance
5. Troubleshooting
5.
5.1
[?] Wh en the power cable is connected, the POWER LED turns on.
[?] Fail to power on the server
Troubleshooting
If the server does not work correctly, check it according to the contents of the following checklist before sending
it for repair.
If the server still does not work correctly, write down the error messages displayed on the screen and then
contact your sales representative.
Problem of Powering on
POWER LED lights amber during initialization of the server after connecting the power cord.
POWER LED turns off when initialization finishes.
Is the server properly supplied with power?
Check if the power cord connects to the p ower outlet (or UPS) that meets the power specifications for
the server.
Use the po wer cord that comes with the server. Additionally, check the power cord for broken shield or
bent plugs.
Make sure the power breaker for the connected power outlet is on.
If the power cord is plugged to a UPS, make sure the UPS is powered and it outputs power. Refer to the
manual that comes with the UPS for details.
Power supply to the server may be linked with UPS using the BIOS Setup utility.
Did you press POWER Switch?
Wait until POWER LED is unlit if POWER LED lights amber, and then pr ess the switch on the front of
the server to turn on the power.
Is Standby Power Save set to Enabled in the BIOS setup?
When Standby Po wer Save is enabled, remote power on is not allowed, and you can power on the
server only by using POWER Switch on the server. If you change the AC Link setting while Standby
Power Save is enabled, you need to press the switch twice to start up the server.
26
Express5800/T110g-S, R110g-1E, T110g-E Maintenance Guide

Chapter 1 Maintenance
[?] POST do es no t complete
Is memory installed correctly?
Check if memory is installed correctly.
Is the memory size large?
The memory check may take longer than usual if the installed memory size is large. Wait for a while.
Did you perform any keyboard or mouse operation immediately after you started the server?
If you perform any keyboard or mouse operatio n immediately after start-up, POST may accidentally
detect a keyboard controller error and stops processing. In such a case, reboot the server. Do not
perform any keyboard or mouse operation until the BIOS start-up message appears after you reboot the
server.
Are memory and PCI devices supported for use with this server?
Operation of the server with unauthorized devices is not guaranteed.
[?] Th e POST error message “B000: Expansion ROM not initialized” is output when an op t ional card is
installed.
5. Troubleshooting
Check if expanding the option ROM of a device other than the boot device is enabled.
Start the BIOS setup utility and set expansion of the option ROM of a device other than the boot device to
Disabled.
Advanced PCI Configuration PCI Slot n Option ROM Enabled
Advanced PCI Configuration LAN1 Option ROM Scan Disabled
Express5800/T110g-S, R110g-1E, T110g-E Maintenance Guide
27

Chapter 1 Maintenance
t
5. Troubleshooting
5.2
Problem of Starting EXPRESSBUILDER
[?] Unable to start EXPRESSBUILDER
Did you insert EXPRESSBUILDER disc before starting the server?
The server tries to read CD/DVD upon completion of POST. If EXPRESSBUILDER is not inserted at this
timing, an error message may appar or the OS starts up. Restart the server and retry.
Are BIOS settings correct?
BIOS Setup Utility allows you to configure the boot order of the devices. Configure the boot order so that
the optical disk drive will be the first to start up.
(Check menu: Boot)
Is a message such as the following displayed?
Take an appropriate action according to the table below.
Message Solution
EXPRESSBUILDER does not support this computer.
Insert EXPRESSBUILDER disc for the computer and click OK
to restart the computer.
Failed to get the hardware parameters on the motherboard.
Check if EXPRESSBUILDER is for this computer or if
motherboard has failed.
Run the correct version of
EXPRESSBUILDER.
Contact your sales
he
representative.
Failed to find a file.
Failed to open a file.
Failed to get the parameters of a file.
Failed to save a file.
Failed to copy a file.
An undefined error occurred.
EXPRESSBUILDER disc has
stains or cracks or the optical
disk drive is faulty.
Contact your sales
representative.
Contact your sales
representative.
[?] Unable to start EXPRESSBUILDER from Internal Flash Memory
Did you press <F3> key to start EXPRESSBUILDER from Internal Flash Memory during POST?
When the following message appears on screen after starting, press <F3> to start EXPRESSBUILDER
from Internal Flash Memory.
Press <F2> Setup, <F3> Internal Flash Memory, <F4> ROM Utility, <F12> Network
Is there the message, "<F3> Internal Flash Memory", displayed on the POST screen?
If not, make sure that Internal Flash Memory is connected correctly. See Chapter 2 (6. Details of
EXPRESSBUILDER).
Did you purchase Internal Flash Memory as BTO?
If not, copy EXPRESSBUILDER to Internal Flash Memory first. See Chapter 2 (6. Details of
EXPRESSBUILDER).
28
Express5800/T110g-S, R110g-1E, T110g-E Maintenance Guide

Chapter 1 Maintenance
5. Troubleshooting
5.3
[?] Unable to install OS
[?] Unable to install Windows
[?] A product key was not requested
Problem of Installing OS
Is the Hard Disk Drive properly installed?
Make sure that the Hard Disk Drive is installed securely and that cables are properly connected.
Did you configure the RAID Controller?
For the RAID System, use EXPRESSBUILDER or a RAID Configuration Utility (LSI Software RAID
Configuration Utility, WebBIOS) to properly configure the RAID Controller before installing OS.
Did you create a Logical Drive?
For the RAID System, create a Logical Drive using EXPRESSBUILDER, LSI Software RAID
Configuration Utility, WebBIOS to install OS.
Have you checked precautions for installation?
For installing OS, see "Installation Guide (Windows)".
If you install using the backup DVD-ROM, enterin g the product key is not required. If installing using a
DVD-ROM other than the backup DVD-ROM, a screen for entering the product key is displa yed, durin g
OS installation, and, before the MICROSOFT SOFTWARE LICENSE TERMS dialog box, which
displays after OS installation. Follow the on-screen instructions to enter the product key.
[?] The fo llowing devices are indicated as faulty devices in a Windows Server 2012 R2/Windows Server 2012
Server Core installation environment
SM Bus Controller
There is no operational problem.
[?] Unable to access the partition which was previously created after reinstalling while several disks are
connected
For details, refer to the Microsoft website below:
http://support.microsoft.com/kb/2497048/ja (Japanese only)
[?] When Windows Server 2012 R2/Windows Server 2012 is installed while several R2/Windows Server 2012
is installed while several disks are connected, the system partition and the boot partition (350 MB) are
sometimes created in another disk
For details, refer to the Microsoft website below:
http://support.microsoft.com/kb/2530901/ja (Japanese only)
[?] When Window s Server 2008 R2 is installed while several disks are connected, the system partition and
the boot partition (100 MB) are sometimes created in another disk
For details, refer to the Microsoft website below:
http://support.microsoft.com/kb/2530901/ja (Japanese only)
Express5800/T110g-S, R110g-1E, T110g-E Maintenance Guide
29

Chapter 1 Maintenance
5. Troubleshooting
[?] When Starter Pack is executed on Windows Server 2008 R2, the below message is sometimes di sp layed
for a moment upon shutdown
1 program still needs to close:
(Waiting for) Task Host Window
No problems for system operation.
For details, refer to the Microsoft website below:
http://support.microsoft.com/kb/975777/en-us
[?] The system w as installed as Workgroup although it is set to join the domain
Is the LAN cable properly connected?
If the LAN cable is not connected, the system is installed in workgroup setting, not in domain join setting.
After the OS is started, join the domain.
[?] The following features are installed when Windows Server 2008 R2/Windows Server 2008 IIS is installed
using EXPRESSBUILDER
Windows Process Activation Service
Process Model
Configuration APIs
Remote Server Administration Tool
Role Administration Tools
Web Server (IIS) Tools
The features listed above are activated because they are required for the installation of IIS basic
features.
[?] The Telnet Service is not installed
Adjust the computer name to 14 characters or less, and then install the Telnet Service according to th e
following procedure:
How to install the Telnet Service
(1) Click Run on Start menu.
(2) Enter tlntsvr/service in the Open box, and then click OK.
(3) Click Start menu, point to Control Panel, click Administrative Tools, and then click Services to
confirm whether the Telnet Service is registered.
* When the installation of Telnet Service is finished, there is no problem if the computer name is set to 15
characters or more.
[?] Fails to execu te "Create a parameter file for Windows OS"
"Create a parameter file for Windows OS" must be run using Microsoft® HTML Application host. If it
does not start, associate the file type with Microsoft
(1) Select Run in Windows Start menu.
(2) Enter %windir%\system32\mshta.exe/register.
[?] The keyboard or mouse does not work
When the keyboard or mouse is connected to the port that supports USB3.0 this error occurs. It is not a
failure.
Connect them to the USB 2.0 port.
See Chapter 1 (4. Names and Functions of Parts) in User's Guide.
30
Express5800/T110g-S, R110g-1E, T110g-E Maintenance Guide
®
HTML Application host via the following process.

Chapter 1 Maintenance
[?] The following message appears when installing the OS, and you cannot proceed.
The USB optical disk drive in which EXPRESSBUILDER is inserted may be connected to a USB 3.0 port.
Connect the optical disk drive to a USB 2.0 port.
See Chapter 1 (4. Names and Functions of Parts) in User's Guide.
To install the OEM drivers, copy the files of each Windows family to removable media.
[?] An error message is displayed at the system reboot after installing the graphics accelerator driver.
Is your system environment Server Core of Windows Server 2012 R2?
5. Troubleshooting
An application error is registered in the event vie wer, but this does not affect system operation after a
reboot.
5.4
[?] Unable to start OS
Problem of Starting OS
Has the BIOS configuration of the RAID Controller changed?
Set the correct BIOS configuration with a RAID Configuration Utility (LSI Software RAID Configur ation
Utility, WebBIOS).
Is the RAID Controller recognized by POST?
Turn on the power after the RAID Controller is recognized as being connected successfully.
If the RAID Controller is not recognized as being connect ed successfully, the RAID Controller may be
faulty. Contact the maintenance service company with which you signed up or the dealer where you
purchased the product.
Is RAID Controller inserted firmly straight into the PCI slot?
Install the RAID Controller properly.
Is the RAID Controller mounted on the PCI slot for which the mounting is restricted?
Check the mounting restrictions of the server and then mount the RAID Controller on the correct slot.
If the RAID Controller is not recognized as connected although the above action has been taken, the
RAID Controller may be faulty. Contact the maintenance service company with which you signed up or
the dealer where you purchased the product.
Are Hard Disk Drives properly installed?
Install the RAID Controller properly.
Express5800/T110g-S, R110g-1E, T110g-E Maintenance Guide
31

Chapter 1 Maintenance
Is SAS cable connected to Hard Disk Drive correctly?
Connect the SAS cable properly.
If the SAS cable is not recognized as connected although the above action has been taken, the Hard
Disk Drive may be faulty. Contact the maintenance company with which yo u signed up or the dealer
where you purchased the product.
Is the EXPRESSBUILDER DVD inserted?
Eject the EXPRESSBUILDER DVD and reboot.
Is a cartridge inserted into built-in RDX (USB)?
Either remove the cartridge or change the boot order in BIOS Setup.
Is Disk Array unit connected to the PCI card?
Change the boot device configuration from HDD Drive BBS Priorities of the BIOS Setup Boot menu.
[?] Th e fo llowing message appears when logging in the system on Windows Server 2008 R2 or Windows
Server 2008:
5. Troubleshooting
Have you finished license authentication for Windows product?
The above message will appear if you use Windows Serv er 2008 R2 or Windo ws Server 2008 with the
unauthenticated license.
Select [Get Genuine now] and proceed license authentication.
The above message is an example of request for license authentication. The message displayed on
screen may differ from this depending on the license.
5.5
[?] Cannot turn the power OFF at the blue screen (STOP error screen)
Problem of Windows STOP Error
If you want to turn off the power at the blue screen, execute forced shutdown (continue to press the
power switch for 4 seconds). If you press the switch briefly instead of holding it, the server will not power
off.
32
Express5800/T110g-S, R110g-1E, T110g-E Maintenance Guide

Chapter 1 Maintenance
5. Troubleshooting
5.6
[?] Unable to rebuild Hard Disk Drive
[?] Fails to automatically rebuild the Hard Disk Drive
[?] The Hard Disk Drive failed
Problem of Operating a RAID System
Is the capacity of the Hard Disk Drive to be rebuilt enough?
Use a Hard Disk Drive with the same capacity as that of the faulty Hard Disk Drive.
Is the Logical Drive RAID0?
RAID0 cannot be rebuilt because it has no redundancy. Replace the failed Hard Disk Drive, recreate the
configuration information, initialize it, and recover the drive using backup data.
Did you secure sufficient time for replacing the Hard Disk Drive (hot swap)?
T o make auto-rebuild work, secure at least 90 seconds from when a Hard Disk Drive is removed to
when the drive is installed.
Are settings correct?
Use the LSI Software RAID Configuration Utility to check the Auto Rebuild settings.
TOPMENU Objects Adapter Auto Rebuild
* The Auto Rebuild settings are not available in WebBIOS.
Contact the maintenance service company with which you signed up or the dealer where you purchased
the product.
[?] Unable to perform Consistency Check
Is the Logical Drive Critical or Degraded?
Replace the failed Hard Disk Drive with new one, and then perform Rebuild.
Is RAID0 configured for the Logical Drive?
RAID0 has no data redundancy, and therefore, Consistency Check is disabled in the RAID0 configurati on.
[?] A part of Physical Device information of Universal RAID Utility is not be displayed correctly
If LSI Embedded MegaRAID is used, a part of Physical Device information of Universal RAID Utility may
not be displayed correctly.
[?] Cannot set Write-Back for Cache Mode
The current cache of RAID Controller is displayed on Virtual Disks – Properties – Policies – Write. If
an extra battery is faulty, is not connected, or insufficiently charged, the Cache Mod e is changed to
WThru (Write Through) even if you specify WBack (Write Back).
For the description of the Cache Mode, see Chapter 2 (5. RAID System Configuration).
Express5800/T110g-S, R110g-1E, T110g-E Maintenance Guide
33

Chapter 1 Maintenance
[?] Event ID505: If the N8103-154/ 155 extra battery is mounted, the following message may be registered in
the RAID log of Universal RAID Utility and OS logs (Windows event log, Linux syslog)
Event source : raidsrv
Event ID : 505
Type : Warning
Description : <RU0505> [CTRL: Number of RAID Controller] Temperature of battery
is high.
If the above event is registered, check the Cache Mode (current value) of the RAID Controller with Universal
RAID Utility.
If the Cache Mode (current value) is Write Back, use the battery as is because there is no problem.
If the Cache Mode (current value) is Write Through, the battery refresh operation causes the battery
temperature to rise temporarily. This event temporarily stops the refresh operation, so the battery
temperature drops and the refresh operation resumes. However, it may t ake time till the temperature
drops. After the refresh operation is completed, the Cache Mode (current value) changes to Write Back.
If the Cache Mode does not change to Write Back although 24 hours have elapsed, the battery may be
5. Troubleshooting
faulty. Replace the battery.
[?] Event ID508: If the N8103- 154/155 extra battery is mounted, the following message is registered in the
RAID log of Universal RAID Utility and OS logs (Windows event log, Linux syslog)
Event source : raidsrv
Event ID : 508 (800001FC)
Type : Warning
Description : <RU0508> [CTRL: Number of RAID Controller] The battery status is
unstable.
Did the battery become unstable immediately after the extra battery had been mounted?
Immediately after the extra battery is mounted, this event may be registered till the battery refresh
operation is completed.
If this message is registered, wait for about 15 min utes and check the Cache Mode (current value) of the
RAID Controller. If the Cache Mode (current value) is Write Back, use the battery as is becaus e there is no
problem.
If the current cache mode is set to “Write Through”, the battery needs to be refreshed. Contact your
service representative.
If “Write Through” is retained for 9 hours or more after starting refresh operation, the battery may be
faulty. Replace the battery.
[?] Event ID510: The following event is logged in RAID log of Universal RAID Utility and OS log (Windows
event log or Linux syslog) when additionally battery is installed.
Event source : raidsrv
Event ID : 510
Type : Info
Description : <RU0510> [CTRL: Number of RAID Controller]
Battery Refresh required.
Use Universal RAID Utility to perform battery refresh manually. See Universal RAID Utility User's Guide
stored in EXPRESSBUILDER for more information.
34
Express5800/T110g-S, R110g-1E, T110g-E Maintenance Guide

Chapter 1 Maintenance
[?] DISK LED flash es
DISK LED flashes frequently even while the Hard Disk Drive is not accessed.
When Patrol Read is running, the DISK LED flashes even if the Hard Disk Drive is not being accessed. If
SATA Hard Disk Drive is used, the DISK LED may stay on.
[?] Wh en N8190-153/154/157/158 is used, the names of the Fibre Channel contro llers may appear with
different names on Device Manager
When N8190-153/154/157/158 is used in Windows, a different controller name may be displayed per
controller in Device Manager. It is not a problem in operating the system.
To display correct controller name, run the following command stored in the EXPRESSBUILDER DVD and
reboot the system.
Windows Server 2012 R2:
EXPRESSBUILDER DVD:\006\win\winnt\ws2012r2\elxfc\friendlyname.exe
Windows Server 2012:
EXPRESSBUILDER DVD:\006\win\winnt\ws2012\elxfc\friendlyname.exe
Windows Server 2008 R2:
EXPRESSBUILDER DVD:\006\win\winnt\ws2008r2\elxfc\friendlyname.exe
5. Troubleshooting
Windows Server 2008 32-bit Edition:
EXPRESSBUILDER DVD:\006\win\winnt\ws2008\elxstor\friendlyname.exe
[?] Wh en N8103-168 is used, the name of the RAID controller is different between on th e Device Manager of
Windows and on WebBIOS/Universal RAID Utility.
When N8103-168 is used in Windows, the name of the RAID controller is different between on the Device
Manager of Windows and on WebBIOS/Universal RAID Utility. How ever, it is not a problem.
Device Manager
LSI MegaRAID SAS 9265CV-8i
WebBIOS/Universal RAID Utility
LSI MegaRAID SAS 9270CV-8i
5.7
[?] Fail to access the internal or external devices (or such devices fail to operate)
Problem of Using Internal Devices and Other Hardware
Are cables properly connected?
Make sure that the interface cables and power cor d are properly connected. Also make sure that the
cables are connected in the correct order.
Is the power-on order correct?
When the server has any external devices connected, power on the external devices first, then the
server.
Did you install drivers for connected optional devices?
Some optional devices require specific device drivers. Refer to the manual that comes with the device to
install its driver.
Express5800/T110g-S, R110g-1E, T110g-E Maintenance Guide
35

Chapter 1 Maintenance
Is option board setting correct?
Usually, no PCI device settings need to be changed. However, depending on the board to be set,
special setting may be required. Refer to the manual that comes with the board for details to make
correct settings.
Some devices connected to the serial or parallel port, or USB port may require I/O port address or
operation mode settings. Refer to the manual that comes with the device to make correct settings.
[?] The keyboard or mouse does not work
Is the cable properly connected?
Make sure that the cable is connected to the connector on the front or rear of the server.
Is BIOS configuration correct?
You can use th e BIOS setup utility to change the keyboar d feature. Check the BIOS configuration with
this utility.
Are the server drivers installed?
Refer to the manual that comes with your OS to check that the keyboard and mouse drivers are installed.
(These drivers are installed along with the OS.) Some OS’s allow you to change the keyboard and
5. Troubleshooting
mouse settings. Refer to the manual to check that the keyboard and mouse settings are correct.
[?] Unable to access the Hard Disk Drive
Is the Hard Disk Drive supported by the server?
Operation of any device that is not authorized by NEC is not guaranteed.
Is the Hard Disk Drive properly installed?
Check the Hard Disk Drive installation status and the cable connections.
[?] The n umbers assigned to the Hard Disk Drive bays do not match the numbers indicated in the OS.
Is the SATA drive connected in IDE mode?
In SATA IDE mode, the drive bays might be recognized in a different order from the physical connection,
depending on the OS used.
Primary > Secondary
Master > Slave
Port0 : Primary Master
Port1 : Secondary Master
Group1
Group2
Port2 : Primary Slave
Port3 : Secondary Slave
Port4 : Primary Master
Port5 : Secondary Master
36
Express5800/T110g-S, R110g-1E, T110g-E Maintenance Guide

Chapter 1 Maintenance
5. Troubleshooting
5.8
[?] Windows operation is unstable
[?] After the s ystem is restored from the backup tool, Windows is misbehaving
[?] The system time lags
[?] Fails to be recognized on network
Problem of OS
Have you installed the Starter Pack?
If the network driver is installed after OS is installed, Windo ws operation may become unstable. Install
Starter Pack by following "Installation Guide (Windows)".
Apply Starter Pack by using EXPRESSBUILDER (see Chapter 2 Installing the Bundled Software in
"Installation Guide (Windows)".
In Windows Server 2008, if you do not use the server that adjusts time such as NTP (Network Time
Protocol) Server, the system time may differ from actual time.
In this case, use NTP server or disable Windows Time Service.
Is the cable connected properly?
Secu rely c onnect the proper cable to the network port on the rear of the server. Additionally, make sure
that the cable conforms to the network interface standards.
Are BIOS settings correct?
You can disable the int ernal network controller using the BIOS setup utility. Check the settings with
BIOS setup utility.
Have you completed protocol and services settings?
Verity that the network driver for the server network controller has been installed. Also verify that
protocol such as TCP/IP or various services have been properly specified.
Are transfer rate settings correct?
Verify that the transfer rate and duplex mode are the same as those of the connecting hubs.
[?] Communication performance of a network adapter is degraded
NEC recommends that the value of Jumbo Packet be 4,000 bytes or less for N8104-128 if the settings of
Flow Control are specified as anything other than Disabled.
If the value of Jumbo Packet is set larger than the recommended value, communication perform ance
may be degraded.
[?] There are RX dropped packets (ifInDiscards) w hen the system is in operation on Linux and Windows
Althou gh there may be RX dropped packets when the LAN is received multicast frames, there is no
operational problem.
Express5800/T110g-S, R110g-1E, T110g-E Maintenance Guide
37

Chapter 1 Maintenance
5. Troubleshooting
5.9
[?] Cannot read documents
[?] The menu does not appear
[?] The menu items started by Autorun are unavailable
Problem of Stating EXPRESSBUILDER on Windows
Do you have Adobe Reader installed correctly in your system?
Some documents are supplied in PDF format. To read PDF files, Adobe Reader needs to be installed in
your computer.
Is your browser Internet Explorer?
Internet Explor er sometimes displays the Information bar to enforce security. Click the Information bar to
display the documents.
When IE is halted displaying "Connecting...", click "Instruction Manual" on Autorun Menu again.
Is the shift key pressed?
Setting the DVD/CD with the shift key pressed down cancels the Autorun feature.
Is the OS in the proper state?
The menu may not appear depending on the system registry setting or the timing to set the DVD/CD. In
such a case, select My Computer from Explorer and double-click the icon of the set DVD drive.
Is your system environment correct?
Some software requires administrator privilege (built-in administrator) or needs to be o perated on the
server. Run on the appropriate environment.
Confirm the settings of [Regional and Language Options]. Set the language settings of each tab to
English (US).
5.10
[?] The installer was displayed by a wrong language or resulted in an error.
[?] NEC ESMPRO Agent (for Windows)
[?] NEC ESMPRO Manager
Problem of Bundled Software
Is your system environment correct?
Confirm the settings of [Regional and Language Options]. Set the language settings of each tab to
English (US).
For details of NEC ESMPRO Agent (for Windows), see "NEC ESMPRO Agent Installation Guide
(Windows)" in EXPRESSBUILDER or its help.
38
For details of NEC ESMPRO Manager, see "NEC ESMPRO Manager Installation Guide" in
EXPRESSBUILDER or its help.
Express5800/T110g-S, R110g-1E, T110g-E Maintenance Guide

Chapter 1 Maintenance
5. Troubleshooting
5.11
[?] Unable to access or play a disc
[?] Unable to access or play DVD/CD-ROMs
[?] Unable to eject a disc using the eject button
Problem of Optical Disk Drive
Is the disc properly set in the optical disk drive tray?
There is a holder in the tray to secure the disc. Make sure that the disc is securely placed in the holder.
Is the DVD/CD-ROM supported by the server?
For a disc suc h as a CD with copy guard which do es not conform to the CD standard, the playback of
such a disk with the optical disk drive is not supported.
The DVD/CD-ROM for Macintosh is not supported.
Eject the disc in the following procedure.
1. Press POWER Switch to turn off the server (POWER LED is off).
2. Use a 100 mm long metal pin that
is 1.2 mm in diameter (or uncoil a
thick paper clip) and insert it into
the eject hole at the front of the
tray. Keep pressing slowly until the
tray comes out.
Important
3. Pull the tray out with your hands.
4. Remove the disc.
5. Push the tray back.
5.12
[?] The power is not turned off
Problem of Powering Off
Is the suppression feature of the power switch enabled?
Restart the system once and start the BIOS setup utility.
The menu to be confirmed: Server Power Switch Inhibit
Do not use anything that easily breaks such as toothpicks or plastic.
If you still cann ot eject the disk, contact your sales representative.
Eject hole
Express5800/T110g-S, R110g-1E, T110g-E Maintenance Guide
39

Chapter 1 Maintenance
6. Windows System Recovery
6.
6.1
Windows System Recovery
Recover the Windows system by using the following instructions if the system does not work correctly.
Note
Recovery of Windows Server 2012 R2 and Windows Server 2012
If the Windows does not start correctly, you can recover it using the feature of the Windows installation disc.
To run this feature, start the installation disc, and then choose Repair your computer in Windows Setup
wizard.
We recommend that this option is performed by the system administrator.
To install the OEM drivers, copy the files under the following folder in EXPRESSBUILDER to removable
media.
After recovering the system, be sure to install each driver and Starter Pack.
See "Installation Guide (Windows)" to install Starter Pack and device drivers.
If hard disk drives cannot be detected, you cannot recover the Windows system.
Create the OEM drivers to removable media depending on the server
configuration.
6.2
Windows Server 2012: \006\win\winnt\oemfd\ws2012
Recovery of Windows Server 2008 R2 and Windows Server 2008
If the Windows does not start correctly, you can recover it using the system recovery option.
We recommend that this option is performed by the system administrator. For details, refer to Windows Help.
To install the OEM drivers, copy the files under the following folder in EXPRESSBUILDER to removable
media.
Windows Server 2008 R2: \006\win\winnt\oemfd\ws2008r2
Windows Server 2008 32-bit Edition: \006\win\winnt\oemfd\ws2008
40
Express5800/T110g-S, R110g-1E, T110g-E Maintenance Guide

Chapter 1 Maintenance
7. Resetting and Clearing the Server
7.
7.1
Resetting and Clearing the Server
Read this section when the server does not work or when you set BIOS settings back to the factory settings.
Software Reset
If the server halts before starting the OS, press <Ctrl> + <Delete> + <Alt> keys. This clears all the data in
memory, and restarts the server.
7.2
Note
BMC Reset
Press BMC RESET Switch only if a problem occurs in EXPRESSSCOPE Engine 3 (BMC).
Do not press BMC RESET Switch in usual operation.
Make sure that no processing is in progress when you reset the server.
To reset the BMC, press BMC RESET Switch at least five seconds. Remote management feature is disabled
for about 2 minutes after resetting.
<Express5800/T110g-S>
BMC RESET Switch
Note
Tips
Do not shutdown the system, reboot the system, or perform any switch operation
after pressing the BMC Reset switch for approximately 2 minutes.
BMC RESET Switch only resets BMC and that does not restart the server.
Express5800/T110g-S, R110g-1E, T110g-E Maintenance Guide
41

Chapter 1 Maintenance
<Express5800/R110g-1E>
3.5-inch Hard Disk Drive model
2.5-inch Hard Disk Drive model
7. Resetting and Clearing the Server
BMC RESET Switch
BMC RESET Switch
<Express5800/ T110g-E>
BMC RESET Switch
42
Express5800/T110g-S, R110g-1E, T110g-E Maintenance Guide

Chapter 1 Maintenance
(
7. Resetting and Clearing the Server
7.3
Forced Shutdown
Use this feature when an OS command does not shut down the server, POWER Switch does not turn off the
server, or software reset does not work.
Continue to hold POWER Switch of the server for at least four seconds. The power is forcibly turned off. To
turn on the power back again, wait at least 30 seconds after turning off the power.
Note
<Express5800/T110g-S>
If the remote power-on feature is used, cycle the power once to load the OS after
the power has been forcibly turned off, and then turn off the power again by
shutting down the OS.
POWER Switch
Keep pressing for at least fourseconds)
<Express5800/R110g-1E>
3.5-inch Hard Disk Drive model
2.5-inch Hard Disk Drive model
POWER Switch
(Keep pressing for at least four seconds)
POWER Switch
(Keep pressing for at least four seconds)
Express5800/T110g-S, R110g-1E, T110g-E Maintenance Guide
43

Chapter 1 Maintenance
<Express5800/T110g-E>
7. Resetting and Clearing the Server
POWER Switch
(Keep pressing for at least four seconds)
44
Express5800/T110g-S, R110g-1E, T110g-E Maintenance Guide

Chapter 1 Maintenance
7. Resetting and Clearing the Server
7.4
Clearing BIOS Settings (CMOS Memory)
To set the BIOS settings back to the factory settings (clearing CMOS memory), use the internal jumper switch.
You can also clear the password in BIOS Setup Utility (SETUP) by using the same procedure.
Tips
To clear the password or the CMOS memory, use the corresponding jumper switch illustrated in the figure
below.
Important
Use BIOS Setup Utility (SETUP) usually to return the settings to the factory
defaults.
Do not change any other jumper switch settings. Any change ma y cause the
server to fail or malfunction.
Clear CMOS Jumper
(J_CLRCMOS)
3 2 1
Clear
Clear Password Jumper
(J_PASSWORD)
3 2 1
Clear
Keep (factory setting)
Keep (factory setting)
Express5800/T110g-S, R110g-1E, T110g-E Maintenance Guide
45

Chapter 1 Maintenance
The following instructions show how to clear the CMOS memory and the password.
7. Resetting and Clearing the Server
Be sure to observe the following precautions to use the server safety. Failure to
observe the precautions may cause death or s erious injur y. For details, refer to
Safety precautions in Precautions for Use in "User’s Guide".
Do not disassemble, repair, or alter the server.
Do not remove lithium, NiMH, or Li-ion batteries.
Disconnect the power plug before installing or removing the server.
WARNING
Be sure to observe the following precautions to use the server safely. Failure to
observe the precautions may cause burns, injury, and property damage. For
details, refer to Safety precautions in Precautions for Use in "User’s Guide".
Make sure to complete installation.
Do not get your fingers caught.
Avoid installing under extreme temperature conditions.
CAUTION
Important
Take anti-static measures before operating the server. For detailed
information on static electricity, see Chapter 2 (1.2 Anti-static Me asures) in
"User's Guide".
Clearing CMOS memory
1. See "Getting Started" attached to this server or Chapt er 2 (1. Installing Internal Optional Devices) in
"User’s Guide" to remove Top Cover.
2. Confirm the position of Clear CMOS Jumper.
3. Change the jumper from Keep to Clear.
4. Wait at least five seconds and then return the jumper to Keep.
5. Assemble the removed components.
6. Plug in the power cord and turn on the server.
7. POST halts with the following error massage.
ERROR
8006: System configuration data cleared by Jumper.
Press <F1> to resume, <F2> to Setup
8. Press <F2> key to start BIOS Setup Utility, and then run Load Setup Defaults from Save & Exit menu.
The server will restart once before the OS starts.
46
Tips
Express5800/T110g-S, R110g-1E, T110g-E Maintenance Guide
After this operation, system may restart once before the OS is started.

Chapter 1 Maintenance
Clearing a password
1. See "Getting Started" attached to this server or Chapter 2 (1. Installing Internal Optional Devices) in
"User’s Guide" to remove Top Cover.
2. Confirm the position of Clear Password Jumper.
3. Change the jumper from Keep to Clear.
4. Assemble the removed components and turn on the server.
5. POST halts with the following error message
ERROR
8007: SETUP Menu Password cleared by Jumper.
Press <F1> to resume, <F2> to Setup
6. Turn off the power and return the jumper to Keep by following steps 1 and 2.
7. Assemble the server again.
7. Resetting and Clearing the Server
Express5800/T110g-S, R110g-1E, T110g-E Maintenance Guide
47

Chapter 1 Maintenance
8. System Diagnostics
8.
8.1
System Diagnostics
System Diagnostics run several tests on the server.
Tests
The following items are tested in System Diagnostics.
Memory
CPU cache memory
Hard disk drive
Important
Tips
To avoid affecting the network and the s ystem, be sure to disconnect the
LAN cable and the external storage devices, such as Fibre Channel or
iStorage, before executing Systtem Diagnostics.
No data is written on the disk when checking the hard disk drives.
8.2
Usage of System Diagnostics
After turning off the server or restarting the server, run System Diagnostics as follows.
1. Run EXPRESSBUILDER and choose Tool menu from Boot Menu.
For details about EXPRESSBUILDER, see Chapter 2 (6. Details of EXPRESSBUILDER).
Note Choose English if Language selection menu appears.
Press <Y> key If "Hit key to continue. [y|Y]" appears in Redirection mode.
2. Choose Test and diagnostics.
3. Choose End-User Mode (Basic) to run System Diagnostics. This process takes about three minutes.
When the diagnostics is completed, the screen changes as shown below.
See eupro_ug_en.pdf in the ¥isolinux¥diag folder of EXPRESSBUILDER for the End-User Mode
(Professional) feature.
Supervisor-Mode is intended for maintenance personnel.
48
Express5800/T110g-S, R110g-1E, T110g-E Maintenance Guide

Chapter 1 Maintenance
Diagnostics tool title
Guideline
Diagnostics tool title
Shows the name and version of the diagnostic tool.
Test windows title
Shows the progress of the diagnostics. “Test End” is displayed when the diagnostics completes.
Test result
Shows the start, end, and elapsed time and completion status of the diagnostics.
8. System Diagnostics
Test window title
Test results
Test summary window
Guideline
Shows the details of the keys to operate window.
Test summary window
Shows the results of each test. Move the cursor and press <Enter> key on the cursor line to display the
details of the test.
If an error is detected by the System Diagnostics, the relevant test result in the Test summary window is
highlighted in red, and “Abnormal End” appears in the result on the right side.
Move the cursor to the test that detected the error, and press <Enter > key. Take notes about the error
message that has been output to the Detail Information screen and contact your sales representative.
4. Follow the guideline shown at the bottom of the screen, and press <Esc> key.
Enduser Menu below appears.
<Test Result>
Shows the diagnostics completion screen of the above diagnostics.
<Device List>
Shows a list of connected devices.
<Log Info>
Shows the log information of the diagnostics.
To save it, connect FAT formatted removable media, and then choose Save(F).
<Option>
Optional features can be used from this menu.
<Reboot>
Reboots the server.
Express5800/T110g-S, R110g-1E, T110g-E Maintenance Guide
49

Chapter 1 Maintenance
5. Select Reboot in the Enduser Menu.
The server restarts. Remove the EXPRESSBUILDER DVD from the drive.
System Diagnostics is now completed.
8. System Diagnostics
50
Express5800/T110g-S, R110g-1E, T110g-E Maintenance Guide

Chapter 1 Maintenance
9. Offline Tools
9.
9.1
Offline Tools
Offline tools are used for maintenance, failure analysis, and the settings of the server.
Starting Offline Tools
Start up the offline tools in the following steps.
1. Turn on the peripheral devices, such as display unit, and then the server.
2. Press <F4> key while the message below appears.
Press <F2> SETUP, <F3> Internal Flash Memory, <F4> ROM Utility, <F12> Network.
3. Keyboard Selection Menu appears after POST completion.
The following menu appears after choosing a keyboard type.
Off-line TOOL MENU
Maintenance Utility
BMC Configuration
BMC Configuration Initialization
Exit
4. Choose a feature from the menu.
See Chapter 1 (9.2 Features of Offline Tools) for more information.
Express5800/T110g-S, R110g-1E, T110g-E Maintenance Guide
51

Chapter 1 Maintenance
9. Offline Tools
9.2
Features of Offline Tools
The offline tools offer the following features.
Note
Off-line Maintenance Utility
Off-line Maintenance Utility is started when Maintenance Utility is selected. Off-line Maintenance Utility is
used for preventive maintenance and failure analysis for the srver. W hen you are unable to start NEC
ESMPRO due to a failure, Off-line Maintenance Utility can be used to check the cause of the failure.
Note
After starting up Off-line Maintenance Utility, the following features are available to run.
IPMI Information Viewer
Displays System Event Log (SEL), Sensor Data Record (SDR), and Field Replaceable Unit (FRU) in
Intelligent Platform Management Interface (IPMI) and also back up such logs.
Disable RDX by setting RDX to hibernate mode before starting the offline tools.
Off-line Maintenance Utility is intended for mainenance personnel. Consult with
your service representative if a trouble that requires Off-line Maintenance Utility
occurs.
Using this feature, system errors and events can be investigated to locate the parts to be replaced.
You can also clear the SEL area, and specify the operation when the SEL area becomes full.
System Information Viewer
Displays information on processor (CPU), BIOS.
Also output the information to a text file.
System Information Management
Sets the information specific to your server (Product information, Chassis information).
BMC Configuration
This feature is used for setups of alert functions by Baseboard Management Controller (BMC) and rem ote
control functions by "PC for Management".
BMC Configuration Initialization
All of BMC configuration parameters are restored to the default values by using this feature.
52
Express5800/T110g-S, R110g-1E, T110g-E Maintenance Guide

Chapter 1 Maintenance
9. Offline Tools
9.3
9.3.1
9.3.2
Console-less Feature
Off-line tools can be remotely controlled from "PC for Management" without a keyboard or other consoles.
How to remotely control
Operate from a LAN connected "PC for Management" using the remote KVM of EXPRESSSCOPE engine 3.
For details of the remote KVM, see "EXPRESSSCOPE Engine 3 User’s Guide" in EXPRESSBUILDER.
You can also operate Off-line Tools remotely by using BIOS Console Redirection.
Preparation
Set the remote management feature of EXPRESSSCOPE Engine 3 in advance to check hardware error
information during console-less operation.
Note
Connect the LAN cable to the connector on management LAN port.
If Shared BMC LAN feature is used, connect the LAN cable to the corresponding
LAN connector.
For settings information, see "EXPRESSSCOPE Engine 3 User's Guide" or NEC ESMPRO Manager online
help.
Express5800/T110g-S, R110g-1E, T110g-E Maintenance Guide
53

NEC Express5800 Series
Express5800/T110g-S, R110g-1E, T110g-E
Useful Features
This chapter describes useful features for using the server.
1. System BIOS
Describes how to set the BIOS settings.
2. BMC Configuration
The server has the following off-line tools.
3. Flash FDD
Describes the Flash FDD.
4. Power Control Features
Describes the power control feature.
5. RAID System Configuration
Describes the RAID configuration utility installed in the server.
6. Details of EXPRESSBUILDER
Describes the EXPRESSBUILDER attached to the server.
7. EXPRESSSCOPE Engine 3
Describes EXPRESSSCOPE Engine 3.
8. NEC ESMPRO
Describes NEC ESMPRO Agent and NEC ESMPRO Manager, applications to manage and monitor the
server.
9. NEC Product Info Collection Utility
Describes the NEC Product Info Collection Utility.
10. Universal RAID Utility
Describes Universal RAID Utility, an application to manage or monitor the RAID Controllers.
11. Express Report Service / Express Report Service(HTTPS)
Describes about Express Report Service / Express Report Service(HTTPS).
12. Express Report Service(MG)
Describes about Express Report Service(MG).
54
Express5800/T110g-S, R110g-1E, T110g-E Maintenance Guide

Chapter 2 Useful Features
1. System BIOS
1.
1.1
1.2
System BIOS
You can check and change the parameters using the BIOS Setup utility (SETUP).
Starting SETUP
Turn on the server and proceed with POST.
Press <F2> key while the following message is displayed.
Press <F2> SETUP, ...
Parameters
SETUP has the following menus.
Main menu
Advanced menu
Security menu
Server menu
Boot menu
Save & Exit menu
These menus have several submenus for configuring.
1.2.1
Main
When you start SETUP, the Main menu appears first.
The table on the next page shows the items you can configure on the Main menu.
Express5800/T110g-S, R110g-1E, T110g-E Maintenance Guide
55

Chapter 2 Useful Features
BIOS Information
BIOS Version (display only) Displays the BIOS version.
Build Date (display only) Displays the BIOS build date.
1. System BIOS
Option Parameter Description
Access Level (display only)
Memory Information
Total Memory
System Language
System Date WWW MM/DD/YYYY Sets the system date.
System Time HH:MM:SS Sets the system time
[ ]: Factory settings
[English]
Français
Español
Deutsch
Italiano
(display only)
Displays the access level of the login user,
Administrator or User.
If no password is specified, Administrator is
displayed.
Displays the basic memory capacity.
Specifies the display language for the BIOS.
If you run SETUP with BIOS Redirection Port
enabled, English is automatically selected
and you cannot change System Language.
If BIOS Redirection Port is disabled, you can
change System Language.
Tips Make sure that the date and time are correct.
Using a time server (NTP server) is recommended.
56
Express5800/T110g-S, R110g-1E, T110g-E Maintenance Guide

Chapter 2 Useful Features
1.2.2
Advanced
Advanced menu appears when the cursor is moved to Advanced.
For the menus that show a “ ” to their left, press <Enter> key to display its submenu, and then change the
settings.
1. System BIOS
(1) Processor Configuration submenu
On Advanced, choose Processor Configuration and then press <Enter> key to display the menu screen
shown below. For the menu that has on the left, move the cursor to it and then press <Enter> key to show its
submenus.
For details about the options, see the table on the next page.
Express5800/T110g-S, R110g-1E, T110g-E Maintenance Guide
57

Chapter 2 Useful Features
Option Parameter Description
Processor Information
Processor Power Management
DCU IP Prefetcher
DCU Streamer Prefetcher
Hardware Prefetcher
Adjacent Cache Line Prefetch
Execute Disable Bit
VT-x
Active Processor Cores
Hyper-Threading
[ ]: Factory settings
(a) Processor Information submenu
Disabled
[Enabled]
Disabled
[Enabled]
Disabled
[Enabled]
Disabled
[Enabled]
Disabled
[Enabled]
Disabled
[Enabled]
[All]
1
2
3
Disabled
[Enabled]
1. System BIOS
Enables or disables the prefetcher of L1
cache.
Enables or disables the prefetcher of L1 data
cache.
Enables or disables Hardware Prefetcher.
Enables or disables the optimal access from
memory to cache.
Enables or disables Execute Disable Bit
feature. This option is displayed only when the
installed processor supports this featue.
Enables or disables Intel Virtualization
Technology feature.
Specifies the number of active cores in
processor.
The selectable number of cores depends on
processor installed.
Enables or disables the feature to
simultaneously execute two threads in a single
core.
This option is displayed only when the
installed processor supports this featue.
For details about the options, see the table on the next page.
58
Express5800/T110g-S, R110g-1E, T110g-E Maintenance Guide
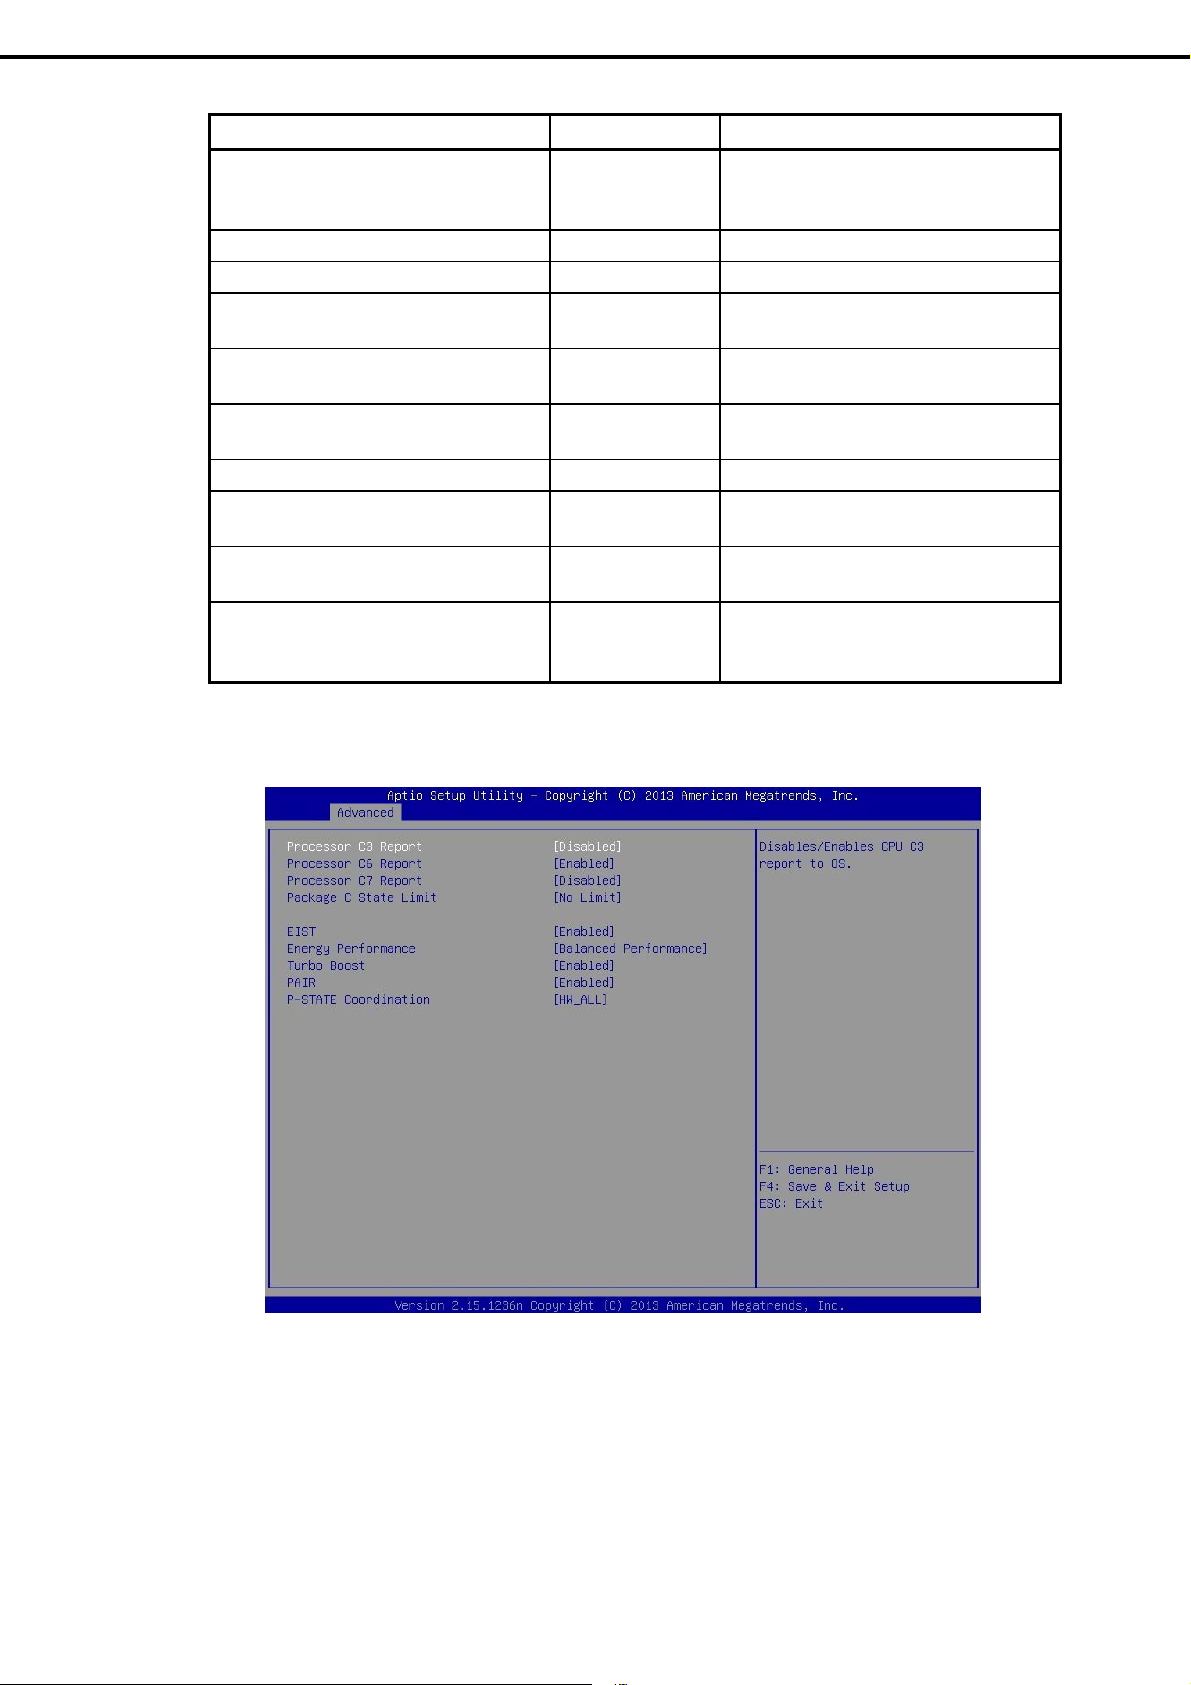
Chapter 2 Useful Features
1. System BIOS
Option Parameter Description
Processor 1 CPUID (display only)
Processor Type
Processor Speed
Active Cores
Max Cores
L2 Cache RAM
L3 Cache RAM
Microcode Revision
EMT64 (display only)
Hyper-Threading (display only)
[ ]: Factory setting
(display only)
(display only)
(display only)
(display only)
(display only)
(display only)
(display only)
Displays the ID of Processor 1.
Error indicates an error was detected during
POST.
Displays the type of Processor 1.
Displays the clock speed of Processor 1.
Displays the number of active cores in
Processor 1.
Displays the maximum number of cores in
Processor 1.
Displays the secondary cache size of
processor 1.
Displays the tertiary cache size of processor 1.
Displays the revision of the microcode applied
to processor 1.
Displays Supported when processor 1
supports Intel 64 architecture.
Displays Supported when processor 1
supports Hyper-Threading Technology
feature.
(b) Processor Power Management submenu
For details about the options, see the table on the next page.
Express5800/T110g-S, R110g-1E, T110g-E Maintenance Guide
59

Chapter 2 Useful Features
Processor C3 Report
Processor C6 Report
Processor C7 Report
Package C state Limit
EIST
Energy Performance
Turbo Boost
PAIR
P-STATE Coordination
[ ]: Factory settings
1. System BIOS
Option Parameter Description
[Disabled]
Enabled
Disabled
[Enabled]
[Disabled]
Enabled
C0
C2
C6
[No Limit]
Disabled
[Enabled]
Performance
[Balanced
Performance]
Balanced Energy
Energy Efficient
Disabled
[Enabled]
Disabled
[Enabled]
[HW_ALL]
SW_ALL
SW_ANY
Enables or disables the feature to report C3
state of processor to OS.
Enables or disables the feature to report C6
state of processor to OS.
Enablesor disables the feature to report C7
state of processor to OS.
Specifies the upper limit for Package C State
of processor.
Enables or disables Enhanced Intel
SpeedStep(R) Technology feature.
This option is displayed only when the
installed processor supports this featue.
Specifies whether the performance is
preferred or energy-saving is preferred while
processor is running.
Enables or disables Intel Turbo Boost
Technology.
This option is displayed only when the
installed processor supports this feature.
Enables or disables the Power Aware Interrupt
Routing feature.
Specifies the type of P-STATE Coordination.
60
Express5800/T110g-S, R110g-1E, T110g-E Maintenance Guide

Chapter 2 Useful Features
(2) Memory Configuration submenu
On Advanced, choose Memory Configuration and then press <Enter> key to display the menu screen shown
below. For the menu that has on the left, move the cursor to it and then press <Enter> key to show its
submenus.
1. System BIOS
Option Parameter Description
Memory Information
Hardware Memory Test
Memory Retest
Memory Frequency Limit
Memory Voltage
[ ]: Factory setting
[Disabled]
Enabled
[No]
Yes
[Auto]
1066 MHz
1333 MHz
1600 MHz
1.5 V
[1.35 V]
Specifies whether to perform a memory test.
Enabled : if an error is detected during the
test, the applicable memory resource will be
disabled.
Yes : the memory error is cleared and all
DIMMs are tested on the next POST process.
This option is automatically changed to No
after starting the server.
Specifies the upper limit of the memory
frequency. The frequency may be lower than
the specified value depending on the memory
configuration.
Specifies the memory voltage.
This option is changed automatically for safe
operation, if necessary.
Express5800/T110g-S, R110g-1E, T110g-E Maintenance Guide
61

Chapter 2 Useful Features
(a) Memory Information submenu
1. System BIOS
Option Parameter Description
Total Memory (display only) Displays the basic memory capacity.
Available under 4 GB (display only)
Current Memory Speed (display only)
DIMM1 Status
DIMM2 Status
DIMM3 Status
DIMM4 Status
[ ]: Factory setting
(display only)
Displays the amount of available memory in
an area at 4 GB or less.
Displays the current memory operating
frequency.
Displays the current memory status.
The number displayed here corresponds to a
DIMM slot number. The number indicates the
amount of memory as well as means that
memory is normal. The list below shows the
meanings of the other states.
Disabled: The memory has failed
Not Present: No memory is installed
Error: Forced memory startup
62
Express5800/T110g-S, R110g-1E, T110g-E Maintenance Guide
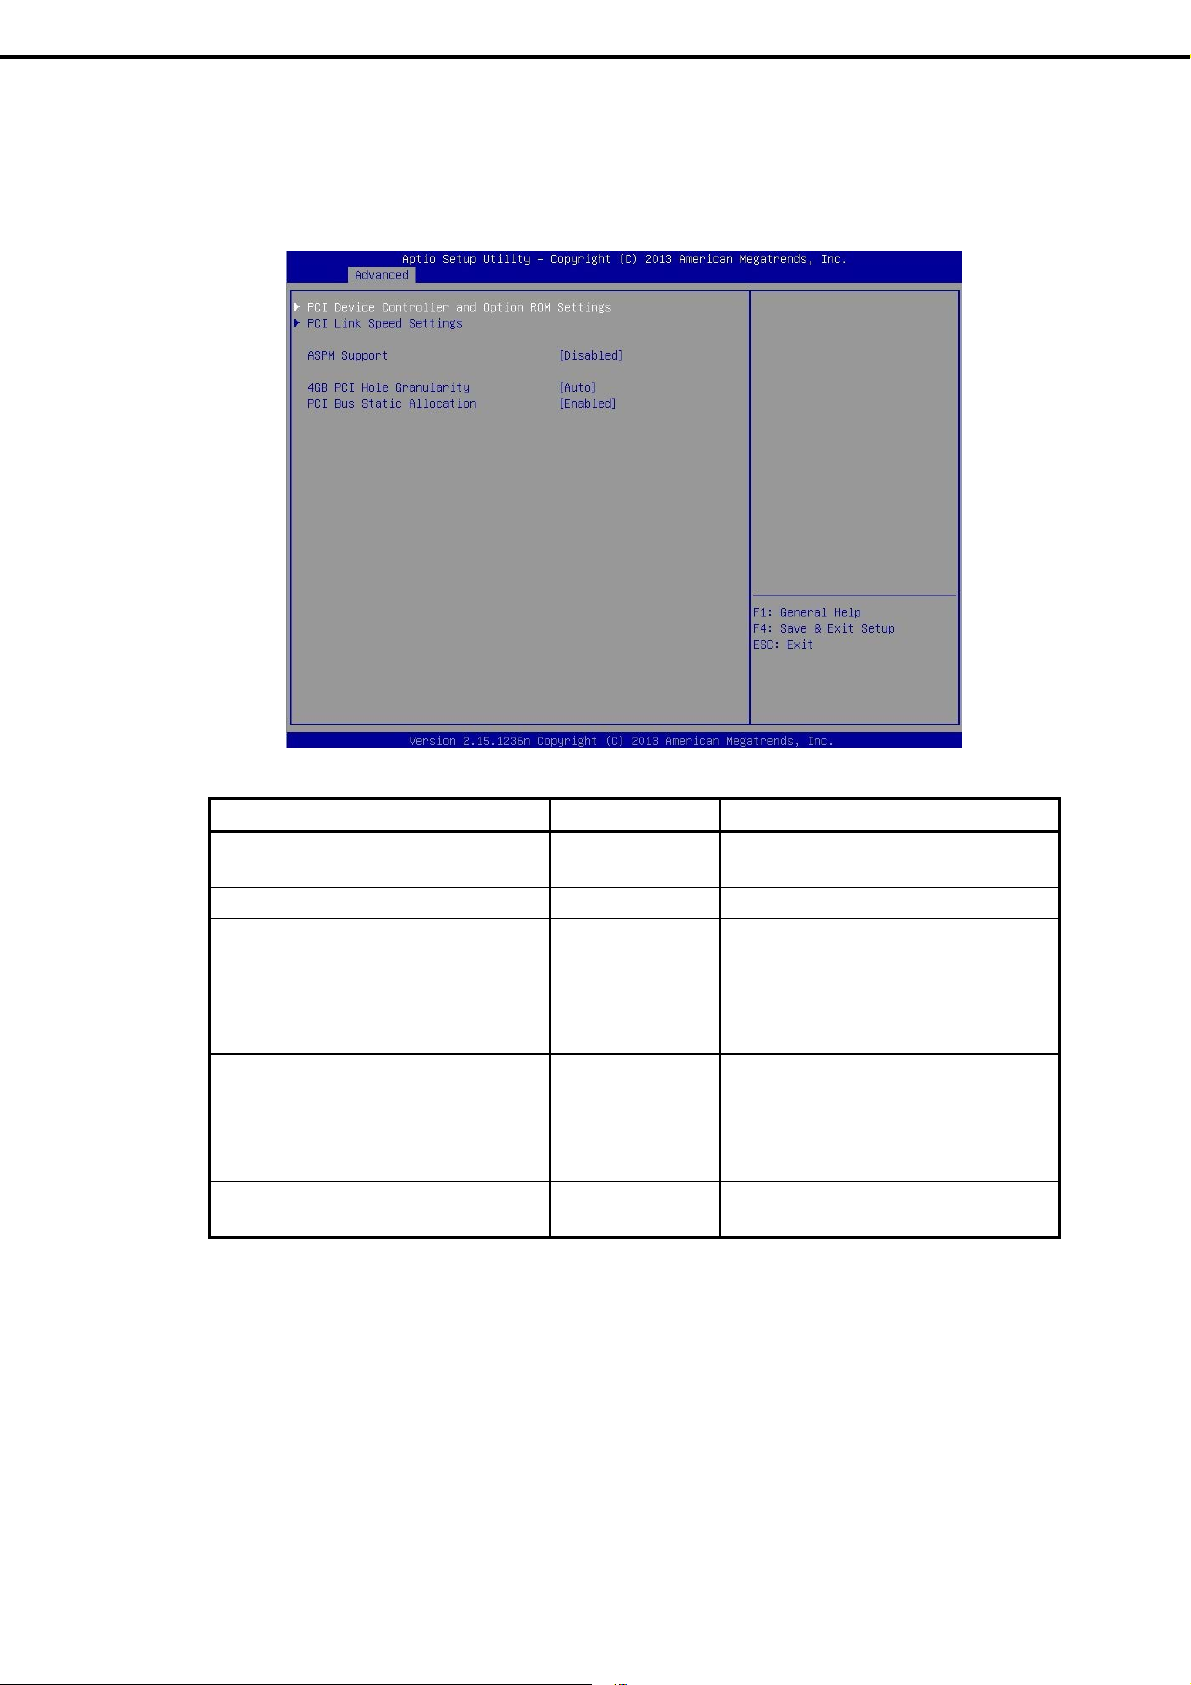
Chapter 2 Useful Features
(3) PCI Configuration submenu
On Advanced, choose PCI Configuration and then press <Enter> key to display the menu scr een as shown
below.
1. System BIOS
Option Parameter Description
PCI Device Controller and Option ROM
Settings
PCI Link Speed Settings
ASPM Support
4GB PCI Hole Granularity
PCI Bus Static Allocation
[ ]: Factory setting
[Disabled]
Auto
Force L0s
[Auto]
3 GB
2 GB
1.5 GB
1 GB
Disabled
[Enabled]
Specifies the level of Active State Power
Management.
Auto : the level supported by the system is
automatically set.
Force L0s : all links are forcibly set to L0s.
Specifies the size of the address space for the
PCI device.
Auto : an appropriate size is automatically
specified.
Enables or disables static allocation of PCI
bus numbers.
Express5800/T110g-S, R110g-1E, T110g-E Maintenance Guide
63

Chapter 2 Useful Features
(a) PCI Device Controller and Option ROM Settings
1. System BIOS
Option Parameter Description
VGA Controller
VGA Priority
LAN Controller
LAN1 Option ROM Scan
LAN2 Option ROM Scan
PCI1 Slot Option ROM
PCI2 Slot Option ROM
PCI3 Slot Option ROM
PCI4 Slot Option ROM
(Express5800/T110g-S, T110g-E)
PCI1A Slot Option ROM
PCI1B Slot Option ROM
(Express5800/R110g-1E)
[ ]: Factory setting
Disabled
[Enabled]
[Offboard]
Onboard
Disabled
[Enabled]
Disabled
[Enabled]
[Disabled]
Enabled
Disabled
[Enabled]
Disabled
[Enabled]
Enables or disables the onboard VGA
controller.
Specifies the priority to expand ROM of the
VGA controller.
Enables or disables the on-board LAN
controller.
Enables or disables the option ROM SCAN for
on-board LAN 1.
Enables or disables the option ROM SCAN for
on-board LAN 2.
Enables or disables the option ROM on each
PCI board.
Enables or disables the option ROM on each
PCI board.
64
Note
For a RAID controller, LAN adapter (network boot), or Fibre Chan nel controller, if
no hard disk drive on which an OS is installed is connected, set the option ROM for
that slot to Disabled.
Express5800/T110g-S, R110g-1E, T110g-E Maintenance Guide

Chapter 2 Useful Features
(b) PCI Link Speed Settings submenu
1. System BIOS
Option Parameter Description
Target Link Speed Limit [Auto]
2.5 GT/s
5.0 GT/s
PCI1 Slot Link Speed Limit
(Express5800/T110g-S,
T110g-E)
PCI2 Slot Link Speed Limit
(Express5800/T110g-S,
T110g-E)
PCI3 Slot Link Speed Limit
(Express5800/T110g-S,
T110g-E)
PCI4 Slot Link Speed Limit
(Express5800/T110g-S,
T110g-E)
PCI1A Slot Link Speed Limit
(Express5800/R110g-1E)
PCI1B Slot Link Speed Limit
(Express5800/R110g-1E)
2.5 GT/s
[5.0 GT/s]
2.5 GT/s
[5.0 GT/s]
2.5 GT/s
5.0 GT/s
[8.0 GT/s]
2.5 GT/s
[5.0 GT/s]
2.5 GT/s
5.0 GT/s
[8.0 GT/s]
2.5 GT/s
[5.0 GT/s]
Specifies the upper limit of the link speed for the onboard
PCI devices and PCI devices connected to the PCI slots
Specifies the upper limit of the link speed for the PCI
slots in the range specified in Target Link Speed Limit
Specifies the upper limit of the link speed for the PCI
slots in the range specified in Target Link Speed Limit
Specifies the upper limit of the link speed for the PCI
slots in the range specified in Target Link Speed Limit
Specifies the upper limit of the link speed for the PCI
slots in the range specified in Target Link Speed Limit
Specifies the upper limit of the link speed for the PCI
slots in the range specified in Target Link Speed Limit
Specifies the upper limit of the link speed for the PCI
slots in the range specified in Target Link Speed Limit
[ ]: Factory settings
Express5800/T110g-S, R110g-1E, T110g-E Maintenance Guide
65

Chapter 2 Useful Features
(4) Advanced Chipset Configuration submenu
On Advanced, choos e Advanced Chipset Configuration and then press <Enter> key to display the menu
screen as shown below.
1. System BIOS
Option Parameter Description
HPET
VT-d
Wake On LAN/PME
Wake On Ring
Wake On RTC Alarm
[ ]: Factory setting
Disabled
[Enabled]
Disabled
[Enabled]
Disabled
[Enabled]
[Disabled]
Enabled
[Disabled]
Enabled
Enables or disables the High-Precision Event
Timer.
This feature may not be supported depending
on OS.
Enables or disables Intel Virtualization
Technology for Directed I/O, which is provided
by the Intel chipset.
This option is displayed only when the
installed processor supports this feature.
Enables or disables the feature that remotely
powers on through a network.
Enables or disables the feature that remotely
powers on using serial ports (modems).
Enables or disables the feature that remotely
powers on using the real time clock.
66
Note
Express5800/T110g-S, R110g-1E, T110g-E Maintenance Guide
If the AC power is turned off, the Wake on Ring feature is not available on the next
booting after AC power-on. Press POWER Switch to start the system.

Chapter 2 Useful Features
(5) Storage Configuration submenu
On Advanced, choose Storage Configuration and then press <Enter> key to display the menu screen shown
below. For the menu that has on the left, move the cursor to it and then press <Enter> key to show its
submenus.
1. System BIOS
Option Parameter Description
SATA Information
SATA Mode
Hard Disk Drive Pre-Delay
[ ]: Factory setting
Disabled
[IDE Mode]
AHCI Mode
RAID Mode
[Disable]
3 Seconds
6 Seconds
9 Seconds
12 Seconds
15 Seconds
21 Seconds
30 Seconds
This option is not displayed when SATA Mode
is RAID Mode.
Specifies SATA Mode.
For the models that show RAID Mode, this
option is only for display.
Specifies delay time before HDD is accessed
during POST.
Note
NEC has not verified AHCI driver support.
Express5800/T110g-S, R110g-1E, T110g-E Maintenance Guide
67

Chapter 2 Useful Features
(a) SATA Information submenu
1. System BIOS
Option Parameter Description
SATA Port0 (display only) Displays the devices connected to each port.
SATA Port1
SATA Port2
SATA Port3
SATA Port4
SATA Port5
[ ]: Factory setting
Not Present means that no device is
connected to the port.
68
Express5800/T110g-S, R110g-1E, T110g-E Maintenance Guide

Chapter 2 Useful Features
(6) USB Configuration subm enu
On Advanced, choose USB Configuration and then pres s <Enter> key to display the menu screen shown
below.
1. System BIOS
Option Parameter Description
Device Reset Timeout
Controller Timeout
XHCI Mode
XHCI Hand-off
[ ]: Factory setting
10 sec
[20 sec]
30 sec
40 sec
1 sec
5 sec
10 sec
[20 sec]
Smart Auto
[Auto]
Enabled
Disabled
Disabled
[Enabled]
Specifies the time to wait when Start Unit
Command is issued to a USB mass storage
device.
Specifies the time to wait when Control, Bulk,
or Interrupt Transfer Command is issued to a
USB controller.
Specifies the operation mode of the USB 3.0
controller.
Smart Auto: Takes over the settings of USB
3.0 according to OS support at execution of
POST.
Auto: Enables USB 3.0 after the OS that
supports USB 3.0 is started.
Enabled: Enables USB 3.0.
Disabled: Disables USB 3.0.
Enables or disables the XHCI Hand-off
feature.
Express5800/T110g-S, R110g-1E, T110g-E Maintenance Guide
69

Chapter 2 Useful Features
(7) Serial Port Configuration submenu
On Advanced, choose Serial Port Configuration and then press <Enter> key to displa y the menu screen
shown below.
1. System BIOS
On BIOS Redirection Port, choose Serial Port A or Serial Port B and then press <Enter> key to displ ay
the menu screen shown below.
For details about the options, see the table on the next page.
70
Express5800/T110g-S, R110g-1E, T110g-E Maintenance Guide

Chapter 2 Useful Features
Serial Port A Settings
Serial Port A
Serial A Base I/O
Serial A Interrupt
Serial Port B Settings
Serial Port B
Serial B Base I/O
Serial B Interrupt
Console Redirection Settings
BIOS Redirection Port
Terminal Type
Baud Rate
Data Bits
Parity
Stop Bits
Flow Control
Continue C.R. after POST
[ ]: Factory setting
1. System BIOS
Option Parameter Description
Disabled
[Enabled]
[3F8h]
2F8h
3E8h
2E8h
[IRQ 4]
IRQ 3
Disabled
[Enabled]
3F8h
[2F8h]
3E8h
2E8h
IRQ 4
[IRQ 3]
[Disabled]
Serial Port A
Serial Port B
[VT100+]
VT-UTF8
ANSI
9600
19200
57600
[115200]
7
[8]
[None]
Even
Odd
[1]
2
None
[Hardware RTS/CTS]
Disabled
[Enabled]
Enables or disables serial Port A
Specifies the base I/O address for serial port
A.
Specifies the interrupt for serial port A
Enables or disables serial Port B
Specifies the base I/O address for serial port B
Specifies the interrupt for serial port B
Enables or disables the console redirection
feature for the specified serial port.
Specifying Serial Port A or Serial Port B
enables direct connection through terminal
unit, and options for connection shown below
are displayed.
Specifies the terminal type.
Specifies the baud rate.
Specifies the data bit width.
Specifies the parity type.
Specifies stop bits.
Specifies the flow control method.
Enables or disables the feature to continue
console redirection after completion of POST.
Express5800/T110g-S, R110g-1E, T110g-E Maintenance Guide
71

Chapter 2 Useful Features
1.2.3
Security
Security menu appears when the cursor is moved to Security. For the menu that has on the left, move
the cursor to it and then press <Enter> key to show its submenus.
1. System BIOS
Choose either Administrator Password or User Password , and then press <Enter> key to display the
screen where you can register/change the password.
Tips Set Administrator Password before setting User Password.
Do not set any password before installing the OS.
If you have forgotten the password, see Chapter 1 (7. Resetting and Clearing the
Server) to clear password.
For details about the options, see the table on the next page.
72
Express5800/T110g-S, R110g-1E, T110g-E Maintenance Guide

Chapter 2 Useful Features
Password Configuration
Administrator Password
User Password
Security Configuration
Password On Boot
Disable USB Ports
Remote Keyboard and Mouse
Trusted Computing
[ ]: Factory setting
1. System BIOS
Option Parameter Description
Up to 20
alphanumeric
characters
Up to 20
alphanumeric
characters
[Disabled]
Enabled
[Disabled]
Front
Rear
Internal
Front + Rear
Front + Internal
Rear + Internal
Front + Rear +
Internal
Disabled
[Enabled]
Specifies the administrator password.
This password can be used to access all
SETUP menus. This option can only be
specified by logging in with an administrator
privilege.
Specifies the user password.
This password can be used to access the
limited SETUP menus. This option can only be
specified by logging in with an administrator
privilege.
Enables or disables the feature that requires a
password entry on boot. This option can be
selected when Administrator Password is
set.
Selects the ports to be disabled.
Note that the USB keyboard can be used while
POST is running.
If the internal USB ports are disabled, Internal
Flash Memoy cannot be used.
Enables or disables the remote keyboard and
mouse supported by BMC.
This option is displayed only when the optional
TPM kit is installed. This option becomes
available after Administrator Password is set
Express5800/T110g-S, R110g-1E, T110g-E Maintenance Guide
73

Chapter 2 Useful Features
(1) Trusted Computing submenu
On Security, choose Trusted Computing and then press <Enter> key to display the menu screen shown
below.
1. System BIOS
If you enable TPM Support, enable TPM State, the following menu screen appears.
74
Express5800/T110g-S, R110g-1E, T110g-E Maintenance Guide

Chapter 2 Useful Features
If TXT Support is enabled, the following screen is displayed.
1. System BIOS
(1/2)
Option Parameter Description
TPM Configuration
TPM Support
TPM State
Pending TPM operation
Current TPM Status Information
TPM Enabled Status (display only) Displays TPM Support Status
TPM Active Status (display only)
TPM Owner Status (display only)
Intel(R) TXT Configuration
[Disabled]
Enabled
[Disabled]
Enabled
[None]
Enable Take
Ownership
Disable Take
Ownership
TPM Clear
Enables or disables Trusted Platform Module
feature.
When set to Enabled, Current TPM Status
Information is displayed.
Enables or disables TPM features.
This option can be changed when TPM
Support is enabled.
Specifies TPM operation.
This option can be selected when TPM State
is set to Enabled.
Express5800/T110g-S, R110g-1E, T110g-E Maintenance Guide
75

Chapter 2 Useful Features
TXT Support
VT-x
VT-d
[ ]: Factory setting
1.2.4
Server
1. System BIOS
(2/2)
Option Parameter Description
[Disabled]
Enabled
Disabled
[Enabled]
Disabled
[Enabled]
Enables or disables the Intel Trusted
Execution Technology feature. This option can
be selected when VT-x, VT-d, and TPM State
are set to Enabled.
Enables or disables Intel Virtualization
Technology for Directed processor feature.
Enables or disables Intel Virtualization
Technology for Directed I/O feature.
This option is displayed only when the
installed processor supports this feature.
Server menu appears when the cursor is moved to Server. For the menu that has on the left, move the
cursor to it and then press <Enter> key to show its submenus.
76
On System Management, press <Enter> key to show its submenus.
Option Parameter Description
System Management
Power Control Configuraiton
Assert NMI on PERR
Express5800/T110g-S, R110g-1E, T110g-E Maintenance Guide
Disabled
[Enabled]
Enables or disables the feature to detect PCI
PERR.
(1/2)

Chapter 2 Useful Features
Assert NMI on SERR
FRB-2 Policy
Boot Monitoring
Boot Monitoring Policy
Thermal Sensor
Check previous System Config
BMC IRQ
(Express5800/T110g-E)
Post Error Pause
Memory Error
Power Switch Inhibit
CLI SETUP
1. System BIOS
(2/2)
Option Parameter Description
Disabled
[Enabled]
[Retry 3 Times]
Disable FRB2 Timer
Always Reset
[Disabled]
5-60 minutes
[Retry 3 times]
Always Reset
Disabled
[Enabled]
[Disabled]
Enabled
[Disabled]
IRQ 11
Disabled
[Enabled]
Halt
[Boot]
[Disabled]
Enabled
[Disabled]
Enabled
Enables or disables the feature to detect PCI
SERR.
Specifies how to operate when FRB level 2
errors occur.
Enables or disables the boot monitoring
feature and specifies the timeout setting.
To use this feature, install NEC ESMPRO
Agent on Windows. If starting up an OS on
which it is not installed, disable this feature.
Specifies the processing to be done when
time-out was enforced during boot
monitoring. This is configurable only if Boot
Monitoring has been enabled.
Retry 3 times resets the server upon the
timeout and attempts to boot OS up to three
times.
Always Reset retries booting the OS
repeatedly.
Enables or disables the thermal sensor
monitoring. If this option is set to Enabled
and when abnormal temperature is detected,
the system stops at the end of POST.
If this option is set to Enabled and the
system configuration differs from the
previous boot, the system waits for user’s
intervention before booting.
Specifies whether to assign an interrupt line
to the BMC.
Specifies whether to stop the POST once at
the end of POST if an error occurs during the
POST.
Specifies whether to stop operation at the
end of POST processing if a memory
resource error occurred while executing
POST.
This option is enabled if POST Error Pause
in the Server menu is enabled.
Even if this option is set to Boot, operation
stops at the end of POST if errors occurred
for all resources.
Enables or disables the power switch inhibit
feature.
Specifies whether to use Command Line
Interface (CLI).
Enabled : SETUP is run by CLI instead of
the menu operation. To switch back to the
meu operation, set this option to Disabled on
CLI.
Express5800/T110g-S, R110g-1E, T110g-E Maintenance Guide
77

Chapter 2 Useful Features
(1) System Management su bmenu
On Server, choose System Management and then press <Enter> key to show its submenus.
1. System BIOS
Option Parameter Description
BIOS Version (display only) Displays the current BIOS version.
Board Part Number (display only) Displays the part number of the motherboard.
Board Serial Number (display only) Displays the serial number of the motherboard.
System Part Number (display only) Displays the part number of the system.
System Serial Number (display only) Displays the serial number of the system.
Chassis Part Number (display only) Displays the part number of the chassis.
Chassis Serial Number (display only) Displays the serial number of the chassis.
Onboard LAN1 MAC (display only) Displays the MAC address of the onboard LAN port 1.
Onboard LAN2 MAC (display only) Displays the MAC address of the onboard LAN port 2.
Management LAN MAC (display only)
BMC Device ID (display only) Displays the BMC device ID.
BMC Device Revision (display only) Displays the BMC device revision.
BMC Firmware Revision (display only) Displays the BMC firmware revision.
SDR Revision (display only) Displays the revision of the sensor data record.
NM Firmware Version (display only) Displays the firmware version of Intel Node Manager
Descriptor Revision (display only) Displays the Descriptor revision.
Chipset Revision (display only) Displays the chipset revision.
Displays the MAC address of the management LAN
port.
78
Express5800/T110g-S, R110g-1E, T110g-E Maintenance Guide

Chapter 2 Useful Features
(2) Power Control Configura tion submen u
On Server, choose Power Control Configuration and then press <Enter> key to show its submenus.
1. System BIOS
Option Parameter Description
AC-LINK
Power On Delay Time Mode
Delay Time [xx]-600
Standby Power Save
Cold Redundant Mode
(Express5800/T110g-E)
Stay Off
[Last State]
Power On
[Manually Setting]
Random
[Disabled]
Enabled
[Disabled]
Enabled
Specifies how the power state should be when the AC
power is supplied again after the power is lost.See the
table below.
Selects a method to specify the delay time before
powering on DC power.
This option is selectable when Power On or Last
State is specified in AC-LINK.
Specifies the waiting time before powering on DC
within the range between “xx” and 600 seconds.
This feature is enabled when Power On or Last State
is specified in the AC LINK setting.
“xx” indicates the minimum configurable time and is
displayed when executing Load Setup Defaults. If
Save Changes and Exit is selected with a value
smaller than the minimum value specified, the
minimum configurable time is automatically applied.
Enables or disables the feature that saves the standby
power on standby.
If this option is enabled, the AC-LINK setting is fixed to
Power On and cannot be changed.
Enables or disables cold redundancy.
This option is displayed only when using redundant
power supply.
Express5800/T110g-S, R110g-1E, T110g-E Maintenance Guide
79

Chapter 2 Useful Features
The table below shows the operation when the AC power is turned off once and then back on, in accordance
with the AC LINK setting.
System status before AC power was turned off AC LINK setting
Operating Off On On
Abort (DC power is also Off) Off Off On
Forced shutdown* Off On On
* Continue pressing the POWER switch for at least 4 seconds to forcibly turn off the power.
1. System BIOS
Stay Off Last State Power On
Tips
If an uninterruptible power supply (UPS) is used for automatic operation, set the
AC-LINK to Power On.
80
Express5800/T110g-S, R110g-1E, T110g-E Maintenance Guide

Chapter 2 Useful Features
1.2.5
Boot
Boot menu appears when the cursor is moved to Boot.
1. System BIOS
Option Parameter Description
Boot Configuration
Quiet Boot
Bootup Numlock State
Setup Prompt Timeout [0] - 65535
Boot Option Priorities
Boot Option #1
Boot Option #2
Boot Option #3
Boot Option #4
CD/DVD ROM Drive BBS Priorities
Floppy Drive BBS Priorities
Hard Drive BBS Priorities
Network Drive BBS Priorities
[ ]: Factory setting
Disabled
[Enabled]
On
[Off]
Specifies whether to display the logo during POST.
Disabled : the results of POST execution are
displayed instead of the NEC logo after the power is
turned on.
If BIOS Redirection Port is enabled, this option is
always disabled.
Enables or disables Numlock.
Specifies the time (in seconds) until <F2> is pressed to
launch SETUP.
The specified value is reflected to waiting time
immediately before completion of POST.
These items display the priority of boot devices.
If all of the Boot Options are set to Disabled, the
SETUP starts running upon completion of POST.
Specifies the boot priority for each BIOS Boot
Specification (BBS).
Express5800/T110g-S, R110g-1E, T110g-E Maintenance Guide
81

Chapter 2 Useful Features
About boot order
(1) If a new bootable device is connected, the device is assigned into each BBS Priorities as the lowest priority
device.
(2) If a bootable device is disconnected from the server, the relevant device is removed from BBS Priorities.
(3) When Load Setup Defaults is executed on Save & Exit menu, the Boot Option and BBS Priorities are
changed as follows.
a) Boot Option Priorities
1. Boot Option #1: CD/DVD ROM Drive
2. Boot Option #2: Floppy Drive
3. Boot Option #3: Hard Drive
4. Boot Option #4: Network Device
b) BBS Priorites
-- Devices other than USB device : High
-- USB device : Next to non-USB devices
c) Bootable devices
If a bootable device has been set to Disabled, the Disabled status is canceled and it is
registered into BBS Priorities.
(4) If Remote Management Extended License (*) is registered, the remote media is added to bootable devices.
The remote media is assigned as follows:
-- The highest priority within "CD/DVD ROM Drive BBS Priorities" is assigned to AMI Remote CD/DVD
device.
-- When executing Load Setup Defaults in Save & Exit menu, the highest priority within "CD/DVD
ROM Drive BBS Priorities" is assigned to AMI Remote CD/DVD device.
1. System BIOS
(*) See EXPRESSSCOPE Engine 3 User's Guide for details of Remote Management Extended License.
82
Express5800/T110g-S, R110g-1E, T110g-E Maintenance Guide

Chapter 2 Useful Features
1.2.6
Save & Exit
Save & Exit menu appears when the cursor is moved to Save & Exit.
1. System BIOS
The options of this menu are described below.
(a) Save Changes and Exit
SETUP closes with all the changes saved in Non-volatile RAM (NVRAM). After the SETUP utility closes, the
system automatically restarts.
(b) Discard Changes and Exit
SETUP closes without saving the changes and returns to the previous BIOS settings.
After the SETUP utility closes, the system automatically restarts.
(c) Save Changes
Changes are saved in NVRAM.
(d) Discard Changes
Changes are discarded and the parameters are reset to the previous settings.
(e) Load Setup Defaults
This option resets all parameters in SETUP to the default settings.
Note
The factory settings and default settings may differ depending on the model. The
settings must be corrected according to your system by referring to the list of
settings in this section.
Express5800/T110g-S, R110g-1E, T110g-E Maintenance Guide
83

Chapter 2 Useful Features
2. BMC Configuration
2.
2.1
BMC Configuration
Starting BMC Configuration
1. "Keyboard type selection" appears after pressing <F4> key at POST.
Keboard type selection menu
2. "Off-line TOOL MENU" appears after choosing the keyboard type.
84
Off-line TOOL menu
3. In Off-line TOOL MENU, select BMC Configuration to launch the BMC configuration main menu.
Express5800/T110g-S, R110g-1E, T110g-E Maintenance Guide

Chapter 2 Useful Features
2. BMC Configuration
2.2
Main menu of BMC Configuration
The BMC Configuration menu appears when you select BMC Configuration on Off-line TOOL MENU.
Main menu
(1) BMC Configuration
Select this item to set configuration information to BMC.
If you select OK after you change the values, the set values are applied to BMC.
See Chapter 2 (2.3 Setting BMC Configuration) for details.
(2) Clear BMC SEL
Select this item to clear BMC SEL (System Event Log).
See Chapter 2 (2.4 Clear BMC Configuration) for details.
(3) BMC Reset
Select this item to reset BMC without changing any settings.
See Chapter 2 (2.5 Resetting BMC) for details.
(4) Help
Select this item to open BMC Configuration help.
(5) Return to the previous menu
Select this item to exit BMC Configuration and return to Off-line Tool menu.
Express5800/T110g-S, R110g-1E, T110g-E Maintenance Guide
85
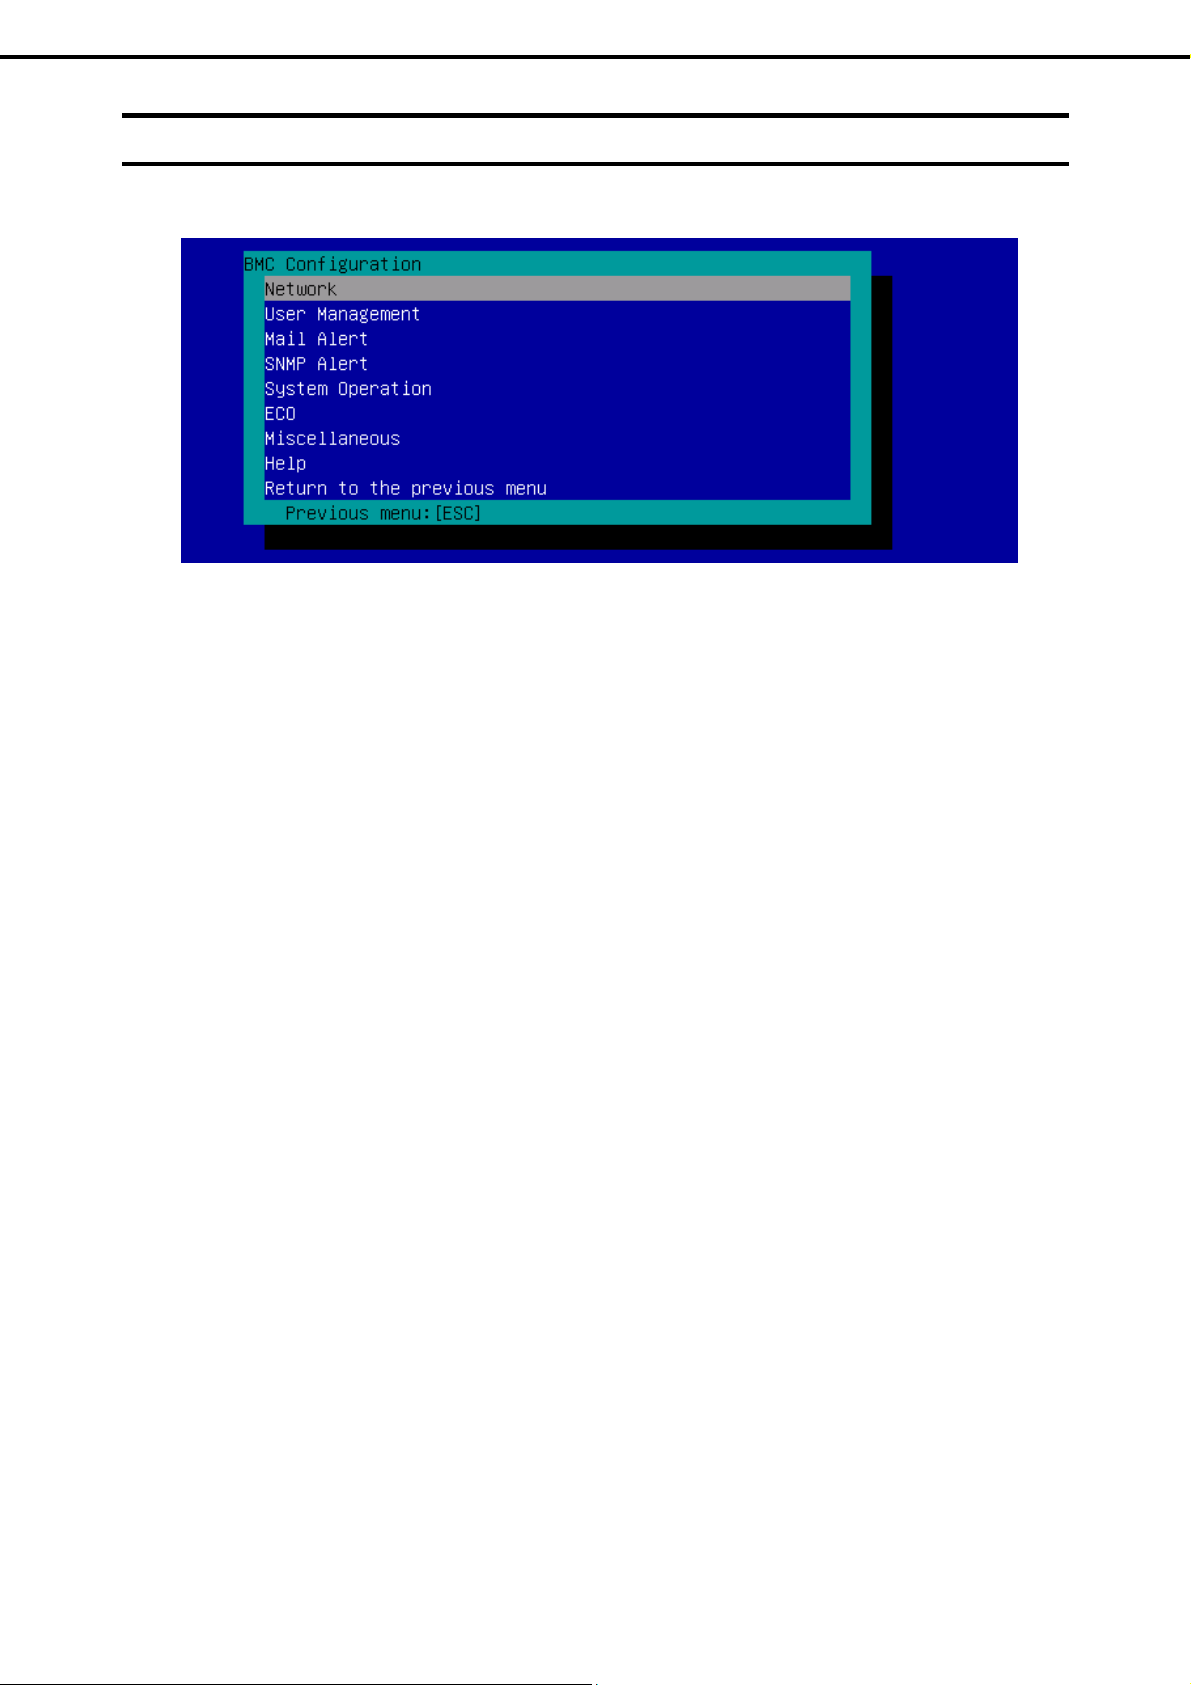
Chapter 2 Useful Features
2. BMC Configuration
2.3
Setting BMC Configuration
The BMC Configuration menu appears when you select BMC Configuration on Off-line TOOL MENU.
BMC Configuration menu
(1) Network
Select this item to view the network environment and services of BMC LAN and change parameter
setting.
See Chapter 2 (2.3.1 Network) for details.
(2) User Management
Select this item to manage BMC users.
See Chapter 2 (2.3.2 User Management) for details.
(3) Mail Alert
Select this item to view E-mail alerts issued from BMC and change parameter setting.
See Chapter 2 (2.3.3 Mail Alert) for details.
(4) SNMP Alert
Select this item to view SNMP alerts issued from BMC and change parameter setting.
See Chapter 2 (2.3.4 SNMP Alert) for details.
(5) System Operation
Select this item to set parameters for remote KVM console and remote media.
See Chapter 2 (2.3.5 System Operation) for details.
(6) ECO
Select this item to view power consumption and system load and change parameter setting.
See Chapter 2 (2.3.6 ECO) for details.
(7) Miscellaneous
Select this item to configure various BMC features.
86
See Chapter 2 (2.3.7 Miscellaneous) for details.
Express5800/T110g-S, R110g-1E, T110g-E Maintenance Guide

Chapter 2 Useful Features
2.3.1
Network
The Network menu appears when you select Network on the BMC Configuration menu.
Network menu
The table below shows details of parameters and their default value.
Item Description Default Value
Property
Management LAN Specify and display LAN port to communicate with BMC. *1 *2
Management LAN
: LAN port for BMC exclusive use.
Shared BMC LAN
: LAN port of System (OS) is shared and used.
Connection Type Specify and display the connection type of BMC LAN.*1
Auto Negotiation
: Connecting by suitable setting.
100Mbps Full
: Connecting by Full Duplex at speed of 100 Mbps.
100Mbps Half
: Connecting by Half Duplex at speed of 100 Mbps.
10Mbps Full
: Connecting by Full Duplex at speed of 10 Mbps.
10Mbps Half
: Connecting by Half Duplex at speed of 10 Mbps.
BMC MAC Address MAC Address of BMC is displayed.
DHCP Determine whether to dynamically obtain an IP address from a DHCP server. If
the item is set to Enable and applied, BMC set the value obtained from DHCP
server on "IP Address", "Subnet Mask" and "Default Gateway".
IP Address Specify the BMC LAN IP address. *4 192.168.1.1
Subnet Mask Specify the Subnet Mask of BMC LAN. *3 *4 255.255.255.0
Default Gateway Specify the Default Gateway IP address of the BMC LAN. *4
If you set this item, it is necessary for applying configuration information that
the gateway is connected on network.
Dynamic DNS Determine whether to enable/disable of Dynamic DNS. *5 Disable
DNS Server Specify the DNS Server. 0.0.0.0
Host Name Specify the Host Name. *6 Blank
Domain Name Specify the Domain Name. *7 Blank
2. BMC Configuration
(1/2)
Management LAN
Auto Negotiation
Disable
0.0.0.0
Express5800/T110g-S, R110g-1E, T110g-E Maintenance Guide
87

Chapter 2 Useful Features
2. BMC Configuration
Item Description Default Value
Access Limitation
Limitation Type Select the Access Limitation Type.
Allow All
: Access to BMC is not limited.
Allow Address
: Specify the IP Address that is allowed to access BMC.
Deny Address
: Specify the IP Address that denied to access BMC.
IP Address Specify the IP Address to allow or deny to access with BMC. *8 *9 Blank
Service
HTTP Enable or disable HTTP service. *10 Enable
HTTP Port Number Specify the HTTP port number. *11 80
HTTPS Enable or disable HTTPS service. *10 Enable
HTTPS Port Number Specify the HTTPS port number. *11 443
SSH Enable or disable SSH service. Enable
SSH Port Number Specify the SSH port number. *11 22
Allow All
*1: You can change this parameter only if you allow it.
*2: After you change parameter value, resetting of BMC may be required depending on the server. When set to "Shared BMC
LAN", the management LAN port is disabled. When set to "Shared BMC LAN", the system (OS) LAN port also transmits or
receives data. Thus, the network performance may be reduced due to load of system LAN (or BMC LAN).
*3: If an illegal value is specified for subnet mask, an error message is displayed and setting is disabled.
*4: Can be changed only when DHCP is set to "Disable".
*5: Can be changed only when DHCP is set to "Enable".
*6: Host Name should be within 63 characters.
Acceptable characters are: alphanumeric, hyphen (-), underscore (_), and period (.).
*7: Host Name and Domain Name should be within total of 255 characters.
Acceptable characters are: alphanumeric, hyphen (-), underscore (_), and period (.).
*8: The range of IP address to "Allow" or "Deny" access is delimited by ",(Comma)". With regard to the setting of “Deny” access,
"*(Asterisk)" can be described as a wild-card. (ex: 192.168.1.*,192.168.2.1,192.168.2.254)
*9: Can be specified when Access Limitation Type is "Allowed Address" or "Deny Address".
The length must not exceed 255 characters.
*10: If HTTP is set to "Enable", HTTPS is changed to "Enable" automatically. You are not allowed to set "Enable" to HTTP only.
*11: Port number can be specified only when the relevant port is set to "Enable". The port number must be unique.
(2/2)
88
Express5800/T110g-S, R110g-1E, T110g-E Maintenance Guide

Chapter 2 Useful Features
2.3.2
User Management
The User Management menu appears when you select User Management on the BMC Configuration menu.
User Management menu
The table below shows details of parameters and their default value on the User Management menu items.
Item Description Default Value
User Account
User Enable or disable the user. *1 Enable
User Name Specify user name. *2 Blank
Password Specify password. *3 Blank
Confirm Password Specify the same character string used for "Password". *3 Blank
Privilege Specify the privilege of the user. *4
Administrator
Operator
User
Active Directory (Property)
Active Directory
Authentication
User Domain Name Specify the user domain name. *5 *6 Blank
Timeout Specify timeout period for connection with Domain Controller. *5 120
Domain Controller
Server1
Server Address1 Specify IP address of Domain Controller 1. *5 *8 Blank
Domain Controller
Server2
Server Address2 Specify IP address of Domain Controller 2. *5 *8 Blank
Domain Controller
Server3
Server Address3 Specify IP address of Domain Controller 3. *5 *8 Blank
Active Directory (Group)
Group Name Specify group name. *8 Blank
Group Domain Specify group domain. *6 Blank
Privilege Specify privilege of group. *4
Enable or disable Active Directory authentication. Disable
Enable or disable Domain Controller 1. *5 *7 Enable
Enable or disable Domain Controller 2. *5 *7 Disable
Enable or disable Domain Controller 3. *5 *7 Disable
Administrator
Operator
User
2. BMC Configuration
(1/2)
Administrator
Administrator
Express5800/T110g-S, R110g-1E, T110g-E Maintenance Guide
89

Chapter 2 Useful Features
2. BMC Configuration
Item Description Default Value
LDAP
LDAP Authentication Enable or disable LDAP authentication. Disable
IP Address Specify the IP address. *9 0.0.0.0
Port Number Specify the LDAP port number. *9 636
Search Base Specify the search base used in LDAP authentication. *9 *10 Blank
Bind Domain Name Specify the bind domain used in LDAP authentication. *9 *10 Blank
Bind Password Specify the bind password used in LDAP authentication. *9 *11 Blank
*1: Can be specified if a user exists.
*2: Up to 15 characters including alphanumeric, hyphen (-), and underscore (_) can be used. Note, however, User Name must
start start with hyphen (-). In addition, "root", "null", "MWA", "AccessByEM-Poem", and names which are already assigned for
other number are not allowed.
*3: Up to 19 ASCII characters excluding " " (blank), " (quotation), & (ampersand), ? (question mark), = (equal sign), #, and ¥, can
be used.
*4: Privileges are defined as follows:
Administrator
: User who has administrator right. All operations are allowed.
Operator
: User who can operate the machine. Session management, license registration, remote KVM/media, configuration, and
update are not allowed.
User
: General user. Viewing IPMI information only is allowed.
*5: Can be specified only when Active Directory authentication is set to "Enable".
*6: Up to 255 characters including alphanumeric, hyphen, underscore, and period can be used.
*7: If Active Directory authentication is set to "Enable", at least one domain controller server must be enabled.
*8: Can be specified only when domain controller server is set to "Enable".
*9: Can be specified only when LDAP authentication is set to "Enable".
*10: Characters in the range between 4 and 62 including alphanumeric, hyphen, underscore, period, comma, and equal sign can be
used.
*11: Alphanumeric characters in the range between 4 a nd 31 excluding ", #, and ¥ can be used.
(2/2)
90
Express5800/T110g-S, R110g-1E, T110g-E Maintenance Guide
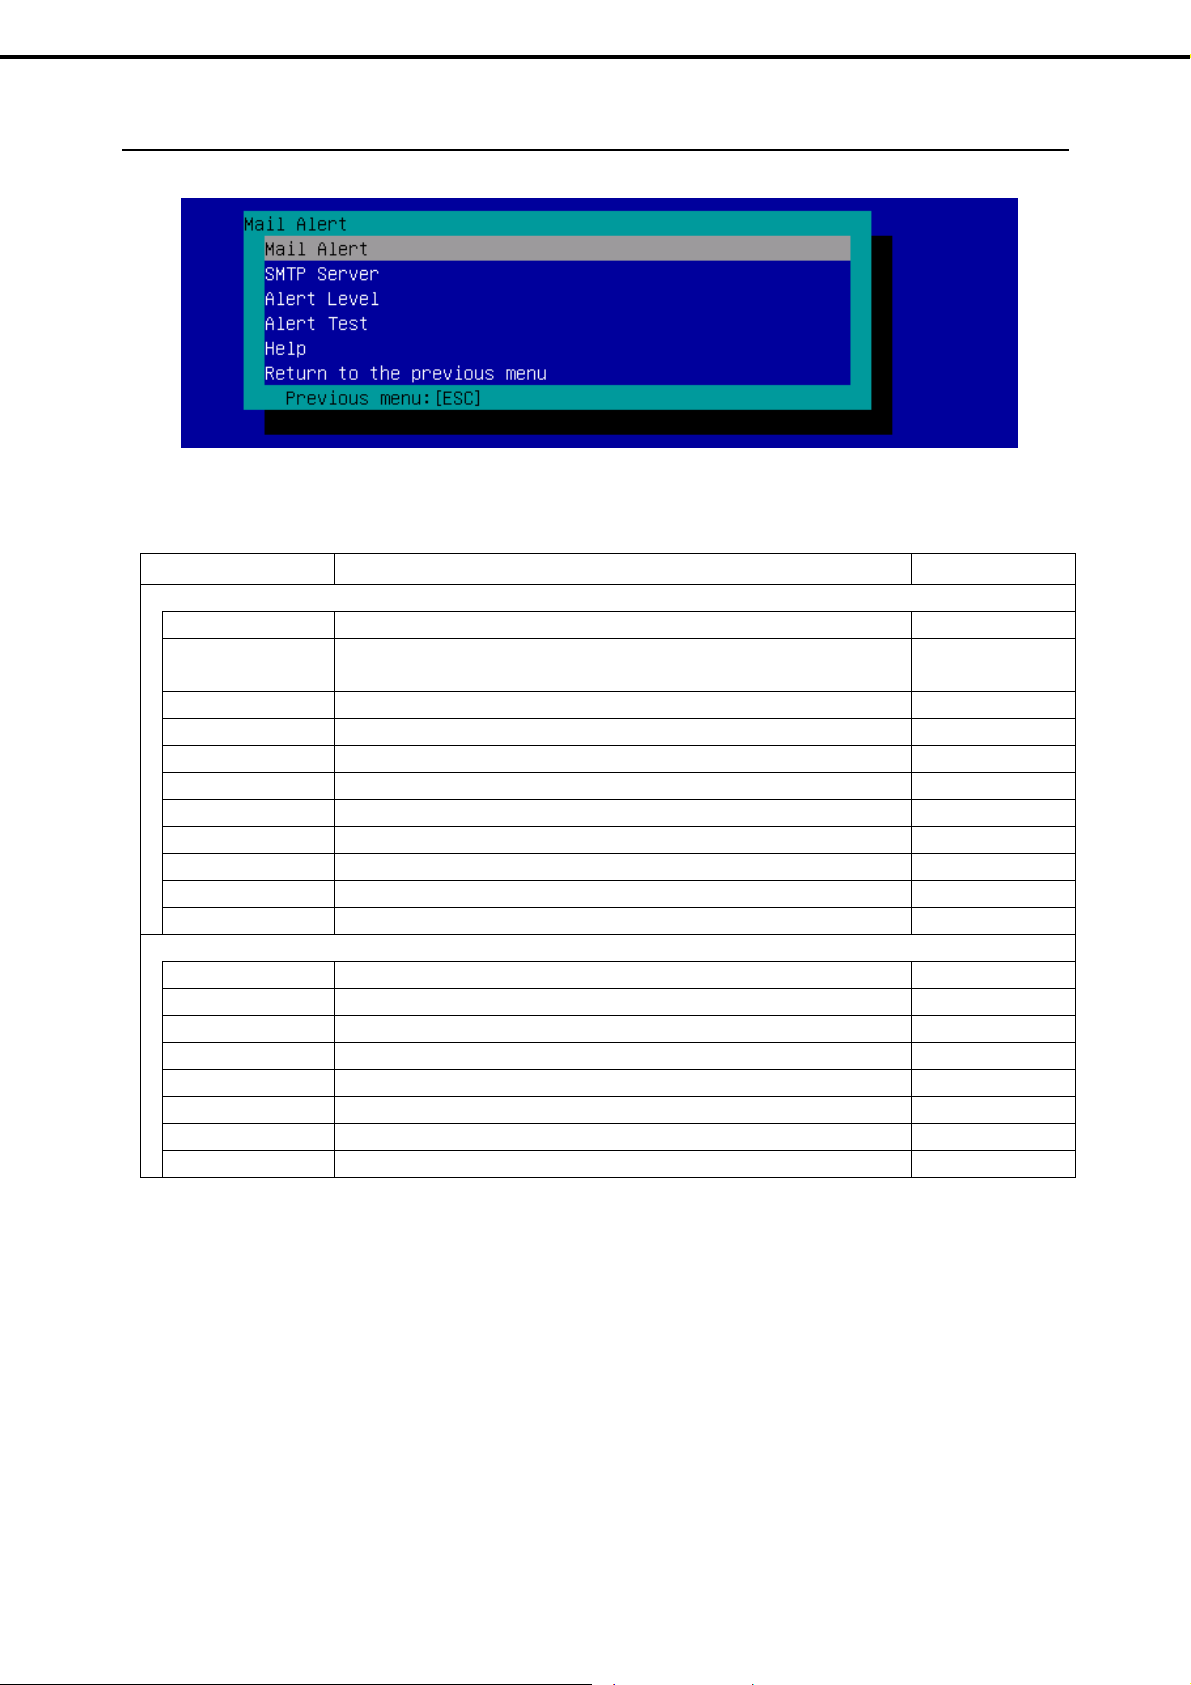
Chapter 2 Useful Features
2. BMC Configuration
2.3.3
Mail Alert
The Mail Alert menu appears when you select Mail Alert on the BMC Configuration menu.
Mail Alert menu
The table below shows details of parameters and their default values.
(1/2)
Item Description Default Value
Mail Alert
SMTP Alert Enable or disable Mail Alert. Disable
Response of SMTP
Server
To:1 Select Enable/Disable of To:1. *1 Enable
To:1 E-Mail Address Specify the mail address of To:1. *2 *3 Blank
To:2 Select Enable/Disable of To:2. *1 Disable
To:2 E-Mail Address Specify the mail address of To:2. *2 *3 Blank
To:3 Select Enable/Disable of To:3. *1 Disable
To:3 E-Mail Address Specify the mail address of To:3. *2 *3 Blank
From: Specify the mail address of From. *3 Blank
Reply-To: Specify the mail address of Reply-To. *3 Blank
Subject: Specify the Subject. *4 Blank
SMTP Server
SMTP Server Specify the SMTP Server. *5 0.0.0.0
SMTP Port Number Specify the SMTP port number. 25
SMTP Authentication Select Enable/Disable of SMTP Authentication. Disable
CRAM-MD5 Select Enable/Disable of CRAM-MD5. *6 *7 Enable
LOGIN Select Enable/Disable of LOGIN authentication. *6 *7 Enable
PLAIN Select Enable/Disable of PLAIN authentication. *6 *7 Enable
User Name Specify the SMTP User Name. *6 *8 Blank
Password Specify the SMTP User Password. *6 *9 Blank
Specify the timeout period until when the connection to SMTP server succeed
by E-mail transmission.
30
Express5800/T110g-S, R110g-1E, T110g-E Maintenance Guide
91

Chapter 2 Useful Features
Item Description Default Value
Alert Level
Alert Level Specify the kind of event to alert. Error, Warning
Error
: When "Error" is detected in each sensor type, the alert is sent to the checked
address.
Error, Warning
: When "Error" or "Warning" is detected in each sensor type, the alert is sent to
the checked address.
Error, Warning, Information
: When "Error", "Warning" or "Information" is detected in each sensor type, the
alert is sent to the checked address.
Separate Setting
: You can arbitrarily select the event and the address (To:X) to alert in each
sensor type.
Alert Test Execute test by sending an alert by mail. *10
*1: When Mail Alert is enabled, at least one address should be enabled.
*2: Can be specified only when To:X is set to "Enable".
*3: Up to 255 characters including alphanumeric, hyphen, underscore, period, and @ (at mark) can be used.
*4: Up to 63 alphanumeric characters excluding +, ", ?, =, <, >, #, and ¥ can be used.
*5: Up to 255 alphanumeric characters, hyphen, and period can be used for full domain name or IP address.
*6: Can be specified only when SMTP Authentication is set to "Enable".
*7: When SMTP Authentication is set to "Enable", at least one of the authentic method should be enabled.
*8: Up to 64 alphanumeric characters excluding " " blank, ",?, =, <, >, #, and ¥, can be used.
*9: Up to 19 alphanumeric characters excluding " " blank, ",?, =, <, >, #, and ¥, can be used.
*10: Be sure to perform Alert Test after all the parameters are configured appropriately.
Alert feature may fail depending on configuration made for network or alert receiver.
2. BMC Configuration
(2/2)
92
Express5800/T110g-S, R110g-1E, T110g-E Maintenance Guide

Chapter 2 Useful Features
2.3.4
SNMP Alert
The SNMP Alert menu appears when you select SNMP Alert on the BMC Configuration menu.
SNMP Alert menu
The table below shows details of parameters and their default values.
Item Description Default Value
SNMP Alert
SNMP Alert Enable or disable SNMP Alert. *1 Disable
Computer Name Specify the Computer Name. *2 Blank
Community Name Specify the Community Name. *2 Public
Alert Process Select One Alert Receiver or All Alert Receiver for Alert Process. One Alert
Receiver
Alert Acknowledge Enable or disable Alert Acknowledge. Enable
Alert Retry Count Specify the count of Alert retry. *3 3
Alert Timeout Specify the timeout period (in seconds) for alert. *3 6
Alert Reciever1 Enable or disable primary receiver. *4 Enable
IP Address1 Specify the IP Address of primary receiver. *5 0.0.0.0
Alert Reciever2 Enable or disable secondary receiver. *4 Disable
IP Address2 Specify the IP Address of secondary receiver. *5 0.0.0.0
Alert Reciever3 Enable or disable tertiary receiver. *4 Disable
IP Address3 Specify the IP Address of tertiary receiver. *5 0.0.0.0
Alert Level
Alert Level Specify the kind of event to alert. Error, Warning
Error
: When "Error" is detected in each sensor type, the alert is sent to the checked
address.
Error, Warning
: When "Error" or "Warning" is detected in each sensor type, the alert is sent to
the checked address.
Error, Warning, Information
: When "Error", "Warning" or "Information" is detected in each sensor type, the
alert is sent to the checked address.
Separate Setting
: You can arbitrarily select the event to alert in each sensor type.
Alert Test Execute a test by SNMP alert. *6
*1: When PEF (Platform Event Filter) is set to "Disable" in Miscellaneous menu, SNMP alert is disabled.
*2: Up to 16 alphanumeric characters are accepted.
*3: Can be specified only when Alert Acknowledge is set to "Enable".
*4: When SNMP Alert is enabled, at least one alert receiver should be enabled.
*5: Can be specified only when each Alert Receiver is set to "Enable".
*6: Be sure to perform Alert Test after all the parameters are configured appropriately.
Alert feature may fail depending on configuration made for network or alert receiver.
2. BMC Configuration
Express5800/T110g-S, R110g-1E, T110g-E Maintenance Guide
93

Chapter 2 Useful Features
2.3.5
System Operation
The System Operation menu appears when you select System Operation on the BMC Configuration menu.
System Operation menu
The table below shows details of parameters and their default values.
Item Description Default Value
Remote KVM Console
Encryption Enable or disable encryption. Enable
Port Number
(No Encryption)
Port Number
(Encryption)
Mouse Cursor Mode Specify display mode of mouse cursor.
Mouse Coordinate
Mode
Keyboard Language Select a keyboard language.
Remote Media
Encryption Enable or disable encryption. Enable
Remote CD/DVD
(No Encryption)
Remote USB
Memory
(No Encryption)
Remote FD (No
Encryption)
Remote CD/DVD
(Encryption)
Remote USB
Memory
(Encryption)
Remote FD
(Encryption)
*1: Port numbers must be the unique one.
Specify the port number when encryption is disabled. *1 7578
Specify the port number when encryption is enabled. *1 7582
Single
Dual
Select a mode to indicate coordinate when moving mouse cursor.
Relative
Absoluite
Japanese (JP)
English (US)
French (FR)
German (DE)
Specify the port number of remote CD/DVD port when encryption is disabled. *1 5120
Display the port number of remote USB memory when encryption is disabled.
(Remote CD/DVD port number + 2)
Display the port number of remote FD when encryption is disabled. (Remote
CD/DVD port number + 3)
Specify the port number of remote CD/DVD port when encryption is enabled. *1 5124
Display the port number of remote USB memory when encryption is enabled.
(Remote CD/DVD port number + 2)
Display the port number of remote FD when encryption is enabled. (Remote
CD/DVD port number + 3)
2. BMC Configuration
Dual
Relative
English (US)
94
Express5800/T110g-S, R110g-1E, T110g-E Maintenance Guide

Chapter 2 Useful Features
2.3.6
ECO
The ECO menu appears when you select ECO on the BMC Configuration menu.
ECO menu
The table below shows details of parameters and their default values.
Item Description Default Value
Reference Values Displays reference values of power consumption.
Maximum Power
Consumption
Minimum Power
Consumption
Statistics Values Shows statistic value for each item.
Power Supply Shows Current / Maximum / Minimum / Average power consumption (Watt).
CPU Throttling Shows Current / Maximum / Minimum / Average CPU throttling rate. *2
Memory Throttling Shows Current / Maximum / Minimum / Average memory throttling rate. *2 *3
Configuration
Aggressive Mode Enable or disable Aggressive Mode. Disable
Power Threshold(Pa) Specify power threshold in Aggressive Mode.
Correction time limit When power consumption exceeds the power threshold for Aggressive Mode
Shutdown System Enable or disable the feature to shutdown the system when power consumption
Non- Aggressive
Mode
Shows the minimum power consumption. *1
Shows the minimum power consumption. *1
Statistic values for all items can be obtained by selecting "<Reload>".
Statistic value of each item can be cleared by selecting "<Reset xxxxx
statistics>".
Allowable range is between AAA and Operating power at maximum
configuration (Watt). *4 *5
and unable to recover within the time period specified in this parameter, collects
event log, sends an alert, and shuts down the system.
Allowable value (in seconds) depends on system. *4
exceeds the time specified in Correction time limit. *4
Enable or disable Non-Aggressive Mode. Disable
2. BMC Configuration
(1/2)
Operating power at
maximum
configuration
The larger value
comparing with 2
and Minimum
system value
Disable
Express5800/T110g-S, R110g-1E, T110g-E Maintenance Guide
95

Chapter 2 Useful Features
2. BMC Configuration
Item Description Default Value
Configuration
Power Threshold(Pn) Specify power threshold in Non-Aggressive Mode.
Allowable range is between BBB and Standby power at minimum configuration
(Watt). *6 *7
Correction time limit When power consumption exceeds the power threshold for Non-Aggressive
Mode and unable to recover within the time period specified in this parameter,
collects event log and sends an alert.
Allowable value (in seconds) depends on system. *6
Safe Power
Capping *3
Boot Time
Configuration *3
Performance Mode Select a performance at system boot-up. *8
Disable CPU Cores Specify the number of cores to be disabled. Allowable values are between 0
*1: These values are reference purpose only. Each value might be different from the actual value which depends on your precise
server configuration.
*2: Technology that decreases frequency or duty cycle of clock, and suppresses power consumption.
*3: This item is not displayed when the system does not support this function.
*4: Can be specified only when Aggressive Mode is set to "Enable".
*5: AAA denotes "Standby power at minimum configuration" or "Power Threshold(Pn)".
*6: Can be specified only when Non-Aggressive Mode is set to "Enable".
*7: BBB denotes "Operating power at maximum configuration" or "Power Threshold(Pa)".
*8: Can be specified only when Boot Time Configuration is set to "Enable".
Enable or disable Safe Power Capping (Monitoring at unreadable power
consumption).
Enable or disable Boot Time Configuration. Disable
Performance Optimized
: Prefer performance and operation.
Power Optimized
: Optimize power consumption.
and (Number of maximum cores –1). *8
The larger value
comparing with
Power
Threshold(Pa) –10
and Standby Power
at Minimum
Configuration +10
The larger value
comparing with 10
and Minimum
system value
Disable
Performance
Optimized
0
(2/2)
Notes
The power value may not reach the threshold value. The power control feature
saves power consumption by lowering the clock speed of CPU/memory. If the
throttling value of CPU/memory reaches 100%, the power value can no longer be
reduced.
If the value specified for Power Threshold(Pa) for Aggressive Mode is lower than
the power required for system startup and the parameter "Shutdown System" is
enabled, the server might not start normally after shutdown.
When validating this setup, it is recommended to fully consider the value of
"Power Threshold (Pa)" to be specified.
96
Express5800/T110g-S, R110g-1E, T110g-E Maintenance Guide

Chapter 2 Useful Features
2. BMC Configuration
2.3.7
Miscellaneous
The Miscellaneous menu appears when you select Miscellaneous on the BMC Configuration menu.
Item Description Default Value
Miscellaneous
Behavior when SEL
repository is Full
Platform Event Filter Enable or disable Platform Event Filter. *2 Enable
Management
Software
ESMPRO
Management
Authentication Key Specify the Authentication Key. *4 *5 guest
Redirection Enable or disable Redirection feature. *4 *6 Enable
*1: When this item is changed to/from "Overwrite oldest SEL", all log records in the SEL Repository are cleared.
*2: Disabling Platform Event Filter also disables SNMP alert.
*3: When BMC can be managed directly from NEC ESMPRO Manager (Ver.5.4 or later), this item must be set to "Enable". If it is
set to "Enable", Authentication Key is required.
*4: Can be specified only when ESMPRO Management is set to "Enable".
*5: This Authentication key is used when NEC ESMPRO Manager (Ver.5.4 or later) manages the target server. Up to 16
alphanumeric characters are accepted.
*6: If Redirection is set to "Enable", Console Redirection Configuration port in BIOS is set to "Serial Port B" at next boot.
Specify the behavior when SEL repository is full. *1
Stop logging SEL
: SEL is not recorded any more.
Clear all SEL
: Delete all SEL and record SEL newly.
Overwrite oldest SEL
: Old SEL is overwritten with new SEL.
Setting for remote management.
Enable or disable NEC ESMPRO Management. *3 Enable
Stop logging SEL
Note
If you do not use remote management feature by ESMPRO, set to "Disable" for
ESMPRO Management in Management Software. In this case, settings for relevant
items are hidden and unnecessary.
2.4
Clear BMC Configuration
When you select Clear BMC SEL on the main menu, the confirmation message below appears.
Confirmation message (Clear BMC SEL)
<ESC> key
: Cancels the clearing configurations and returns to the main menu.
<Enter> key
: Clears SEL of BMC.
Express5800/T110g-S, R110g-1E, T110g-E Maintenance Guide
97

Chapter 2 Useful Features
2. BMC Configuration
2.5
Resetting BMC
When you select BMC Reset on the main menu, the confirmation message below appears.
Confirmation message (BMC Reset)
<ESC> key
: Cancels the resetting BMC and returns to the main menu.
<Enter> key
: Resets BMC. The process of BMC resetting takes for two minutes.
Note
When you select BMC Reset on the main menu, wait for at least two minutes
before shutting down the system, rebooting the system, or performing any switch
operation.
2.6
Initializing BMC
When you select BMC Initialization on the main menu, the confirmation message below appears.
Confirmation message (Initialization)
<ESC> key
: Cancels the initialization and returns to the main menu.
<Enter> key
: Initializes BMC configuration settings and restores the default value except.
After initialization, it takes about two minutes to restart BMC.
98
Note
Express5800/T110g-S, R110g-1E, T110g-E Maintenance Guide
Do not shut down the system, reboot the system, or perform any switch operation
while BMC is being reset (for approximately two minutes).

Chapter 2 Useful Features
3. Flash FDD
3.
3.1
Flash FDD
Flash FDD is a device that is compatible with a floppy disk drive.
One Flash FDD can be connected to a USB connector of this server. If another USB or floppy disk drive is
connected to the server, remove it before using Flash FDD.
CAUTION
Be extremely careful not to lose the Flash FDD or have it stolen.
If the Flash FDD is lost, stolen, misappropriated, or fraudulently obtained, there is a risk
of leaking confidential information to a third party. NEC assumes no responsibility for
damages caused by leaking confidential information in this way.
If you want to change the write protection, remove Flash FDD from the server and change the write protection
switch, and then connect it again.
Precautions
Do not use Flash FDD to back up data. Flash FDD can be used to save temporary data.
3.1.1
Compensation for recorded data
NEC does not pay compensation for data recorded on Flash FDD even if the data is lost.
3.1.2
Handling Flash FDD
Flash FDDs are consumables. If Flash FDD causes an error, exchang e to a new Flash FDD.
Do not turn off the server while the access LED of Flash FDD is blinking.
Flash FDD cannot be connected to a USB hub. Directly connect Flash FDD to the server.
Before touching Flash FDD, discharge static electricity from your body by touching a nearby metal object
such as a doorknob or aluminum frame.
Do not disassemble Flash FDD.
Do not place Flash FDD in an area directly exposed to sunlight or near a heater.
Do not handle Flash FDD while eating, drinking, or smoking. Also, avoid contact with thinner, alcohol, or
other corrosive substances.
3.1.3
Precautions when using EXPRESSBUILDER
Connect Flash FDD after Home Menu is displayed.
When you close EXPRESSBUILDER, remove Flash FDD from the server.
Express5800/T110g-S, R110g-1E, T110g-E Maintenance Guide
99

Chapter 2 Useful Features
4. Power Control Feature
4.
4.1
Power Control Feature
Power consumption of the server can be controlled through the comman d line interface of EXPRESSSCOPE
Engine 3 (BMC) or by using NEC ESMPRO Manager. This feature curves the upper limit of the power
consumption, which allows more servers to be installed in the enviro nment where the power consumption is
limited.
For settings information, see "EXPRESSSCOPE Engine3 User’s Guide" or NEC ESMPRO Manager online
help.
Supported OS
The power control feature is available for the following OSs.
OSs that support the power control feature
Windows Server 2008 Standard (RTM, SP2 or later)
Windows Server 2008 Enterprise (RTM, SP2 or later)
Windows Server 2008 R2 Standard
Windows Server 2008 R2 Enterprise
Windows Server 2012 Standard
Windows Server 2012 Datacenter
Red Hat Enterprise Linux 5.10 or later (x86)
Red Hat Enterprise Linux 5.10 or later (EM64T)
Red Hat Enterprise Linux 6.5 or later (x86)
Red Hat Enterprise Linux 6.5 or later (x86_64)
4.2
Notes on Using Windows Server 2008
Ignore the following event when running Windows Server 2008. This event is logged at the normal oper ation
of controlling the server power.
Source: Kernel-Processor-Power
Event ID: 7
Level: Warning
User: SYSTEM
Source: Kernel-Processor-Power
Event ID: 7 or 37
100
Express5800/T110g-S, R110g-1E, T110g-E Maintenance Guide
 Loading...