

Page 1

Express5800/320Lb Software Notes
Windows® 2000
Advanced Server Setup and
Configuration Procedures
Page 2

Proprietary Notice and Liability Disclaimer
The information disclosed in this document, including all designs and related materials, is
the valuable property of NEC Solutions (America), Inc. and/or its licensors. NEC Solutions
(America), Inc. and/or its licensors, as appropriate, reserve all patent, copyright and other
proprietary rights to this document, including all design, manufacturing, reproduction, use,
and sales rights thereto, except to the extent said rights are expressly granted to others.
The NEC Solutions (America), Inc. product(s) discussed in this document are warranted in
accordance with the terms of the Warranty Statement accompanying each product.
However, actual performance of each product is dependent upon factors such as system
configuration, customer data, and operator control. Since implementation by customers of
each product may vary, the suitability of specific product configurations and applications
must be determined by the customer and is not warranted by NEC Solutions (America), Inc.
To allow for design and specification improvements, the information in this document is
subject to change at any time, without notice. Reproduction of this document or portions
thereof without prior written approval of NEC Solutions (America), Inc. is prohibited.
Trademarks
Microsoft, Windows, and Windows 2000 are registered trademarks of Microsoft
Corporation.
VERITAS Volume Manager is a trademark of VERITAS Software Corporation.
All other trademarks and registered trademarks are the property of their respective
trademark owners.
PN: 455-01686-000 March 2003
Copyright 2003
NEC Solutions (America), Inc
10850 Gold Center Drive, Suite 200,
Rancho Cordova, CA 95670
All Rights Reserved
Page 3

Contents
Proprietary Notice
Introduction..................................................................................................................1
Setup Procedure ........................................................................................................... 2
Configuring for Dual LAN ..........................................................................................7
Configuring for Dual Disk...........................................................................................9
Entering your VERITAS Volume Manager License.................................................11
Setting-up Your Monitoring Facility.........................................................................11
Installing ESMPRO Manager.................................................................................11
Changing the TCP/IP Timeout Value .................................................................... 12
Selecting Your Reporting Message........................................................................12
Configuring your SNMP Trap Destination and Community Rights...................... 12
Windows 2000 Advanced Server Setup Software Notes iii
Page 4

Page 5

Introduction
Your system is preloaded with Windows 2000 Advanced Server Operating
System (OS) and is ready for setup on your system. Windows 2000 Advanced
Server includes the drivers to support devices in your system, the TCP/IP
network protocol, and Internet Explorer. VERITAS Volume Manager™ is
installed on your system during the setup of Windows 2000 Advanced Server
Operating System. After completing the Windows 2000 Advanced Server setup,
use these software notes to configure your ft server for a dual LAN
configuration and to register your VERITAS Volume Manager software.
Before starting the setup procedure, you need to obtain certain information for
use during setup. The information you need in advance is shown in the
following table. NECC recommends that you obtain the information from your
server administrator and record it in the table before starting.
After completing setup, you might want to use the Windows 2000 Control Panel
to configure additional devices or Windows 2000 services and facilities.
Item Information Required Enter Your Information Here
1 Name of the Windows 2000 user.
2 Name of the licensed
organization.
3 OEM License Key number for
MS 2000 Server Software. This
number is on the Certificate of
Authenticity in the documentation
pack included with your server.
4 Name that you assign to the
server.
5 Obtain your network
configuration information. For
example: TCP/IP Configuration
values such as IP address
values, DNS and WINS address
resolution facilities, DHCP Relay
and Routing configuration
values.
6
OEM license key serial number
for VERITAS Volume Manager.
This number is included with the
VERITAS Volume Manager CD
and documentation. Note that the
OEM license key serial number
is located on the back of the CD
case.
Windows 2000 Advanced Server Setup Software Notes 1
Page 6
Setup Procedure
Use the following procedure to set up Windows 2000 on your server.
1. Power up your server (for power up procedures, see the “Getting Started”
sheet that came with your server).
2. The server goes through its Power-On-Self-Test (POST). POST displays a
series of screens that do not require user intervention.
3. At completion of POST, a series of “Windows 2000 Setup: setup is
initializing” screens and progress bars display. Again, user intervention is
not required.
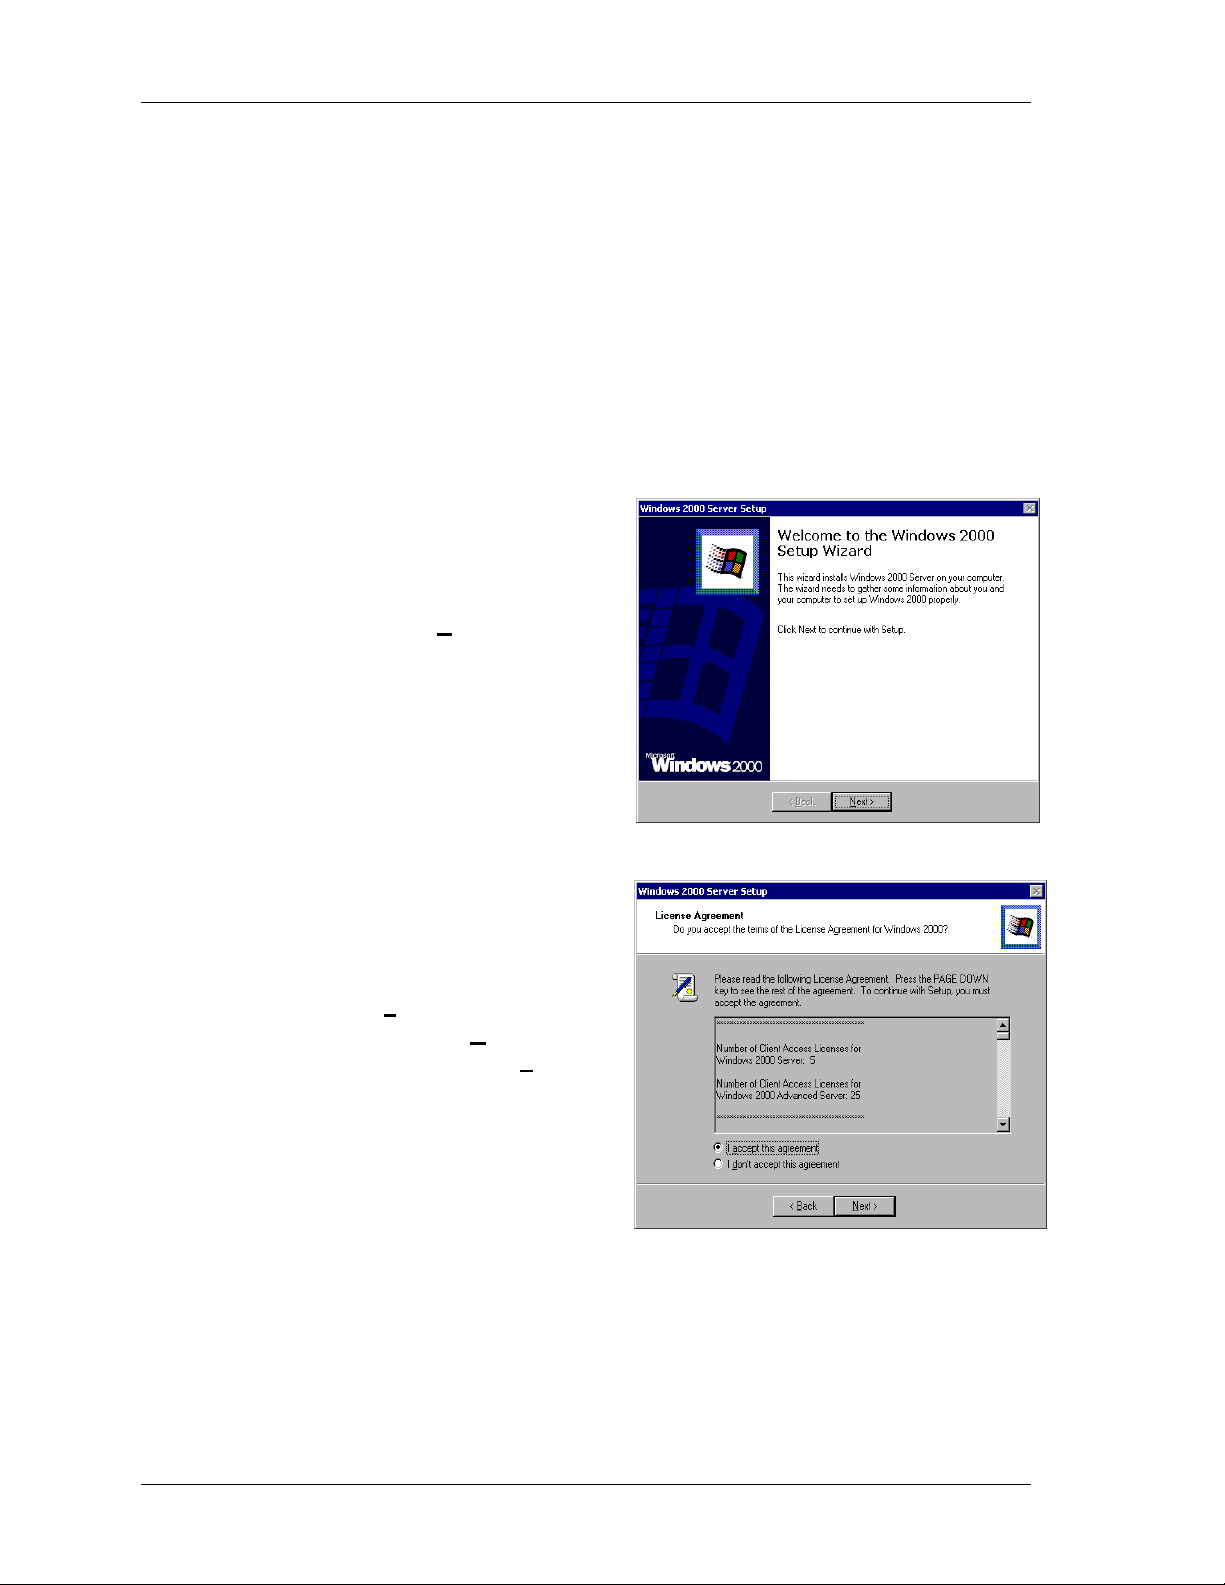
4. At completion of the Windows
2000 Server Setup initialization,
the “Welcome to Windows 2000
Setup Wizard” dialog screen
displays. Click Next > to
continue.
5. At the Microsoft “Software
License Agreement” dialog
screen, read and accept the
Microsoft license agreement by
clicking
agreement. Click Next > to
continue. (If you click I don’t
accept this agreement,
Windows 2000 setup terminates
and does not install.)
I accept this
2 Windows 2000 Advanced Server Setup Software Notes
Page 7

6. At the “Regional Setting” dialog
screen, check that the system
locale, user locale, and keyboard
are correct for your application.
! If the locales and keyboard
display is correct, click Next
> and go to step 9.
! If the system and user locales
require customization, go to
step 7.
! If the keyboard layout
requires customization, go to
step 8.
7. If you need to customize the
system or user locales, click
Customize… at the “Regional
Settings” screen to open the
“Regional Options” dialog
screen. Click a tab and enter your
choices. Click OK when done and
automatically return to the
“Regional Settings” dialog
screen. Click Next > and go to
step 9.
Windows 2000 Advanced Server Setup Software Notes 3
Page 8

8. If you need to customize
keyboard layout settings, click
Customize… at the “Regional
Settings” screen to open the
“Input Locales” dialog screen.
Make your changes and then
OK when done. You are
click
automatically returned to the
“Regional Settings” dialog
screen. Click
Next > and go to
step 9.
9. At the “Personalize Your
Software” dialog screen, enter
your name and organization.
Click Next > when done.
10. At the “Your Product Key”
dialog screen, enter your
software product key number.
The key number is on the
Certificate of Authenticity that
shipped with your system. Be
sure not to lose the product
key number. Store the
certificate in a secure place.
Next > when done.
Click
4 Windows 2000 Advanced Server Setup Software Notes
Page 9

11. At the “Computer Name and
Administrative Password”
dialog screen, enter a
computer name and an
administrative password in
the appropriate dialog box.
Retype the password in the
“Confirm password” dialog
box exactly the same as you
typed in the “Administrative
password” dialog box. Be
sure to save and store your
password in a secure place.
Click Next > when done.
12. At the “Date and Time
Settings” dialog screen, select
your time zone and confirm or
correct the date and time.
Click Next > when done.
13. At the “Networking Settings”
dialog screen, select Typical
settings and click Next.
! Note: This is necessary as
your network will be fully
configured once you set
up your fault-tolerant
LAN connections.
Windows 2000 Advanced Server Setup Software Notes 5
Page 10

14. At the “Workgroup or
Computer Domain” dialog
screen,
! Select “No, this
computer is not on a
network…”
! Leave the default name
“WORKGROUP” in the
“Workgroup or computer
domain:” box.
! Click Next.
15. At the “Completing the Windows 2000 Setup Wizard” screen:
! A “Windows 2000 has been successfully installed” progress bar
displays. This is a countdown to reboot. You can also click Restart.
! Click Finish when the tasks are completed.
16. The system reboots, performs its POST tests, and starts Windows.
17. At the “Starting Windows 2000 Server Family” screen, press Ctrl+Alt+Del
to open the Windows 2000 login screen.
Note: Your fault-tolerant system has been preloaded at
the factory with only one PCI module installed, as this is the
proper way to set up your system. When logging onto the
system for the first time, the Windows 2000 “New Hardware
Wizard” will display for the newly installed SCSI controller
and SCSI disks of the PCI module #2. Click on Finish and
decline to reboot the system at this time. You will reboot the
system later when configuring the mirrored disks.
18. At the “Windows 2000 Login” dialog screen, the user name is automatically
entered for you. Enter the password you set in step 11 of this procedure.
Click
OK to continue.
6 Windows 2000 Advanced Server Setup Software Notes
Page 11

19. The Windows 2000 desktop
opens and the “Windows 2000
Configure Your Server” dialog
screen displays. Follow the
prompts to configure your
server. Then, configure your
server for a dual LAN
configuration and a dual disk
configuration (see the
following sections).
The setup of your system is almost complete. The following five procedures
must be performed to complete the installation of your system:
! Configure for Dual LAN (Network Adapter Teaming).
! Configure for Dual Disk (Mirror System Disk).
! Enter your VERITAS Volume Manager license.
! Set-up your monitoring facility to be properly alerted if a module fails
and needs to be replaced.
Configuring for Dual LAN
The server builds two dual LAN configurations using the "Stratus emp-82559
10/100 Enet Adapter" and the "Stratus emb-82544GC Copper Gigabit Adapter"
installed in the PCI modules. If you have installed additional adapters, you will
also need to team them also.
Build the dual LAN configuration as follows.
1. At the Windows 2000 desktop, click Start, point to Settings, and click
Control Panel. The Control Panel screen displays.
2. Double click the Intel(r) PROSet II icon. The Intel PRO Set II screen
displays.
3. Right click Network Components at the Network Component Tree. At the
popup menu, select Create Team and Fault Tolerance. "Team #1:
Adaptive Fault Tolerance Mode" is added to the NetWork Tree.
4. Right click Stratus emb- 82559 10/100 Enet Adapter at the Network
Component Tree. At the popup menu, select Add to Team and Team #1: to
add the adapter. A Warning screen displays. Click OK.
Windows 2000 Advanced Server Setup Software Notes 7
Page 12

5. Right click Stratus emb- 82559 10/100 Enet Adapter #2: at the Network
Component Tree. At the popup menu, select Add to Team and Team #1: to
add the adapter. Note that "Preferred Primary" or "Preferred Secondary"
should not be set for either adapter.
6. Right click Network Components at the Network Component Tree. At the
popup menu, select Create Team and either Fault Tolerance or Load
Balancing. "Team #2: Adaptive Fault Tolerance Mode" or "Team #2:
Adaptive Load Balancing Mode" is added to the NetWork Tree.
7. Right click Stratus emb- 82544GC Copper Gigabit Adapter at the
Network Component Tree. At the popup menu, select Add to Team and
Team #2: to add the adapter. A Warning screen displays. Click OK.
8. Right click Stratus emb- 82544GC Copper Gigabit Adapter #2 at the
Network Component Tree. At the popup menu, select Add to Team and
Team #2: to add the adapter.
9. Click OK. The Intel PRO Set II screen closes after some period of time.
The Dual LAN settings are now in effect.
8 Windows 2000 Advanced Server Setup Software Notes
Page 13

Configuring for Dual Disk
To achieve fault tolerance, the system disk and up to two additional disks must
be mirrored in specific mirror pairs. The hard disk drive storage bays can house
up to six hard disk drives, which when mirrored, results in three logical drives
(see "Storage Bays" in Chapter 1 of the Express5800/320Lb/320Lb-RUser's
Guide). The physical disk drive slots are numbered 1 to 3 (bottom to top) on
each PCI module. Each hard disk on PCI module #1 is mirrored with the hard
disk in the same slot on PCI module #2.
Perform the following procedure to configure your server for mirrored disk:
1. At the Windows 2000 desktop, click
Start/Programs/VERITAS/VERITAS Enterprise Administrator. On the
tree window (left side panel) under local host (or the server's name) expand
Disk Groups and select Basic Group. The disks are shown on the right
panel of the VERITAS Enterprise Administrator screen.
2. Right click the system disk and select New Dynamic Disk Group. When
the initial screen of the "Dynamic Disk Group Wizard" appears, click Next
to continue. Enter DynamicGroup in the Group Name box and check the
Create Windows 2000 Disk Management compatible group check box.
Confirm that the system disk is selected as a member of the dynamic group
and click Next. A message box is displayed stating that upgrading these
disks may force a reboot - click Yes to continue.
A confirmation window is displayed detailing the contents of the disks to be
upgraded - click Next to continue. A message box is displayed that any file
systems on the disks to be upgraded will be dismounted, and that once
upgraded, prior versions of Windows can not be booted - click Yes to
continue. A final confirmation window will appear. Confirm that the
specification of the disk group is correct and click Finish. You are warned
that a system reboot is required to complete the upgrade - click OK to reboot
the system.
3. After the reboot, press Ctrl-Alt-Del to logon and enter the Administrator
password. When the "System Settings Changed" message box is displayed,
click Yes to restart the computer again.
4. After the reboot, press Ctrl-Alt-Del to logon and enter the Administrator
password. Press OK to continue. The system returns to the Windows
desktop.
5. At the Windows 2000 desktop, click
Start/Programs/VERITAS/VERITAS Enterprise Administrator. Select
the Disk View tab on the right side of the VERITAS Enterprise
Administrator screen.
Windows 2000 Advanced Server Setup Software Notes 9
Page 14

6. Any other disk other than the system disk of PCI module #1 does not have a
signature. Right click on each disk and select “Write Signature”. Click Yes
when asked to confirm that you wish to write a signature for that disk.
7. Select the Basic Group and the PCI module #2 slot 1 disk will be displayed
in the "Disk View" panel. To identify the disk, look at the properties of each
disk on the screen (use the horizontal scroll bar at the bottom of the window
pane). Disk slots 1, 2 and 3 correspond to SCSI target ID 0, 1, and 2
respectively and PCI modules correspond to different SCSI port numbers.
Currently, only the disk in slot 1 of PCI module #1 has space usage, so by
elimination the other disk with a SCSI target ID of 0, is the disk in slot 1 of
PCI Module #2. (Refer to Chapter 1 of the Express5800/320Lb/320Lb-R
User's Guide to identify which SCSI port number corresponds to which PCI
Module.)
8. Right click the disk and select Add Disk to Dynamic Disk Group. The
"Add Disk to Disk Group Wizard" will start. Confirm that the disk is
selected as a member of the dynamic disk group created in step 2 above and
click Next to continue. A confirmation screen is displayed, click Finish to
complete adding the disk.
9. From the VERITAS Enterprise administrator tree window, select the system
volume (C:) from the Volumes tree. Right click on the C: volume and
select “Mirror/Add.”
10. When the “Add Mirror" screen displays, click the Manually Select Disk
radio button, select the new disk and click the Add button. A Volume
Manager warning screen displays. Click OK. It is not necessary to modify
the "boot.ini" file in order to boot from the mirror of the system disk in the
fault-tolerant environment.
11. The "VERITAS Enterprise Administrator" screen will indicate if disk
mirroring is still in progress. The progress of the mirror synchronization can
be monitored by clicking the Task tag at the bottom of the VERITAS
Enterprise Administrator screen. The mirroring will continue even if this
screen is closed. However, the system should not be rebooted until mirroring
has been completed.
12. For each additional disk pair in your system, add the disks to a dynamic
group, create one or more volumes, and mirror the volumes.
The dual disk configuration is effective when mirroring has completed.
10 Windows 2000 Advanced Server Setup Software Notes
Page 15

Entering your VERITAS Volume Manager License
Your system has been configured with a temporary license for VERITAS
Volume Manager. You’ll need to enter your permanent license.
1. Launch the Volume Manager by clicking on Start/ Programs/VERITAS/
VERITAS Enterprise Administrator.
2. Select the menu Tools / System License in “VERITAS Enterprise
Administrator.” The license screen displays.
Note: Your license key certificate is located in the accessory box
shipped with your Fault-Tolerant system.
3. Enter your license number and click the Replace button.
4. Click OK. You license is entered.
5. Close “VERITAS Enterprise Administrator.”
Your permanent license is now in effect.
Setting-up Your Monitoring Facility
Your system includes the ESMPRO Agent installed at the factory. You’ll need
to setup a monitoring station to receive alerts reported by the ESMPRO Agent.
Refer to the ESMPRO User’s Guide located on your EXPRESSBUILDER CD
for detailed information.
Perform the following procedures to install and configure ESMPRO Manager on
your monitoring station.
Installing ESMPRO Manager
Note: You need a system running Windows to install ESMPRO
Manager. It must be a system separate from the Fault-Tolerant system.
1. Insert the EXPRESSBUILDER CD into your monitoring station. The
“Master Control” application screen displays.
2. Click Setup, then click ESMPRO. The ESMPRO Setup screen displays.
3. Click Manager. The setup of ESMPRO Manager displays.
4. Follow instructions on the screen to finish the ESMPRO Manager
installation.
Windows 2000 Advanced Server Setup Software Notes 11
Page 16

Changing the TCP/IP Timeout Value
Change your TCP/IP timeout value to adapt to your fault-tolerant server
characteristics. This is necessary to ensure that the management system is
properly communicating with the fault-tolerant system and not timing out when
a CPU module is brought online on your system.
1. Launch Windows Explorer.
2. Explore the CD folder. Go to WINNT\W2K.
3. Double click FTREG.EXE. A message box displays.
4. Click OK. Another message box displays.
5. Click OK. Your TCP/IP settings have been changed.
Selecting Your Reporting Message
Select your reporting method for the ESMPRO Agent installed on your faulttolerant server. At a minimum you should use the SNMP method of reporting.
(See below for SNMP configuration information.)
To configure additional reporting methods:
1. At the Windows 2000 desktop, click Start, point to Settings, and click
Control Panel. The Control Panel screen displays.
2. Double click the ESMPRO Agent icon. The ESMPRO agent screen
displays.
3. Click Report Setting. The Alert Manager screen displays.
Note: By using the Menus Setting/Base Setting. and
Settings/Destination Settings. you can configure additional services to
report alerts via email, pagers, scripts, etc. Refer to the ESMPRO User’s
Guide on your EXPRESSBUILDER CD for more information.
Configuring your SNMP Trap Destination and Communi ty Rights
The SNMP Service has been installed on your system. You need to set the trap
destination to your monitoring station(s).
1. At the Windows 2000 desktop, click Start, point to Programs,
Administrative Tools, and click Services. The Services Management
Console screen displays.
2. Right click SNMP Service. Click Properties. The Properties panel displays.
3. Click the Agent tab. Setup your contact and location.
4. Click the Trap Tab. Enter Trap Destinations associated with the public
community.
5. Click the Security Tab. Add a “READ WRITE community right” by
clicking on the Add button.
12 Windows 2000 Advanced Server Setup Software Notes
Page 17

Note: The ESMPRO Manager will be able to monitor your system,
but will not be able to change thresholds if you do not set a community
name with the READ WRITE right. Also, it is possible, but not
recommended, to change the rights of the public community to add the
READ WRITE right, as it represents a security hole.
Your Fault-Tolerant system is now monitored and ready to report events.
Windows 2000 Advanced Server Setup Software Notes 13
Page 18

 Loading...