

Page 1

NEC Infrontia Confidential
MH240 Wireless IP Telephone
USER’S GUIDE
Please often read this manual, and handle it correctly
ahead of the use.
Moreover, please keep it importantly so that it is
shown at once when it is necessary after you read.
A50-012054-001
Preliminary Issue, January 2008
Page 2

NEC Infrontia Confidential
Page 3

NEC Infrontia Confidential
LIABILITY DISCLAIMER
NEC Infrontia Corporation reserves the right to change the specifications,
functions, or features, at any time, without notice.
NEC Infrontia Corporation has prepared this document for use by its
employees and customers. The information contained herein is the property
of NEC Infrontia Corporation and shall not be reproduced without prior
written approval from NEC Infrontia Corporation. All brand names and
product names on this document are trademarks or registered trademarks of
their respective companies.
Copyright 2008
NEC Infrontia Corporation
Page 4

NEC Infrontia Confidential
Page 5

User Safety Protocol
NEC Infrontia Confidential
---------------------------------------------------------------------------
Important: Read this information before using your MH240 Phone.
Observe the following instructions to use this product safely, prevent you and other people from
possible injury, and protect properties. Improper handling may cause heat, explosion, and fire.
Danger
Recharge the battery with the matching battery charger (see battery label description).
Use the battery only for this MH240 phone system. Do not use it with other electrical devices.
Keep the following warnings to prevent the battery pack from heating, explosion, and fire.
Do not throw the battery pack into fire.
Do not solder the battery pack directly.
Do not short the positive (+) and negative (-) terminal of the battery pack with metal.
Do not poke the battery nor smash it with hammer.
Do not disassemble nor modify the battery pack. It has a safety circuit and a damaged circuit may
cause heat, explosion, and fire.
The internal liquid of the battery pack has strong acid. If the battery liquid gets into your eye,
rinse your eye well with water and consult with a doctor.
Do not use, leave, nor recharge the battery pack near fire or under the direct sunlight. High
temperature may damage the internal safety circuit and may cause malfunction of the recharge,
heat, explosion, or fire.
Page 6

Warning
NEC Infrontia Confidential
Do not use the unit when you notice smoke, strange smell or other unusual happenings. It may
cause fire if you continuously use them. Turn off the power switch of the phone system
immediately. For the recharger, disconnect the power plug immediately. Confirm that smoke is
ceased, and then contact the nearest NEC service office. Never attempt to repair those units by
yourself.
If you had an accident such as dropping the phone and broke the unit, turn off the power of the
phone system immediately. For the recharger, disconnect the power plug immediately. Contact
the nearest NEC service office. If you keep using those units, they may cause fire or electrical
shock.
If water smeared into the unit, turn off the power of the phone system immediately. For the
recharger, disconnect the power plug immediately. Contact with the nearest NEC service office.
If you keep using those units, they may cause fire or electrical shock.
Do not insert flammable or metal objects into the units. If a foreign object were accidentally
placed into the units, turn off the power of the phone system and plug out the power adapter.
Contact the nearest NEC service office. If you keep using those units, they may cause fire or
electrical shock. Pay special attention to children to prevent from similar accidents.
Do not attempt to disassemble nor modify the units. It may cause fire, electrical shock, or system
malfunction. Modification by a user is prohibited by law.
Do not open the units intentionally. It may cause electrical shock or system malfunction. Ask test
adjustment, and repair of the units for the nearest NEC service office.
Do not twist, put a heavy object, and push the phone system. Such actions may cause damage, fire,
or injuries.
Do not place a container with water such as a vase, a plant pot, a cup, cosmetics, chemicals, nor a
small metal object. Splashing water over the units and foreign metal object inserted into the units
may cause fire or electrical shock.
Do not use the unit in a high humid area such as a bathroom or near a humidifier. They may cause
fire, electrical shock, or system malfunction.
Use the specified power adapter, which is attached to the unit. Other adapters may cause fire or
system malfunction.
Do not damage, or modify the power adapter cord. Do not kink, pull, twist, or bundle it. Do not
put a heavy objector heat it. They may cause fire, electrical shock, or system malfunction. Contact
the nearest NEC service office for a damaged adapter cord.
Do not touch the power plug with a wet hand. It may cause electrical shock or system
malfunction.
Do not touch the units or replace a battery with a wet hand. It may cause electrical shock or
system malfunction.
When you hear thunder during using the phone system outside, immediately stop using it and
move to a safe place.
Do not use multiple plugs to a single outlet. It may cause fire or electrical shock.
Page 7

Follow the instruction below when you use a battery pack. They may cause heating, explosion,
NEC Infrontia Confidential
and fire;
Do not put the battery pack into a microwave oven or a pressure chamber.
Do not use other batteries with this battery pack.
If the internal battery liquid clung to your skin or clothes, immediately rinse it with clean water to
prevent chemical damage to your skin and clothes.
Do not use the phone or recharge the battery in a place where fire or explosion may occur.
This phone system does not have explosion protection. Do not use it where a flammable gas
such as propane and gasoline are stored. Turn off the power of the phone immediately. Do
not recharge the battery in such a place.
Do not use near microwave ovens, medical equipment and industrial equipment.
Page 8

This page is for your notes.
NEC Infrontia Confidential
Page 9

FCC portion
NEC Infrontia Confidential
---------------------------------------------------------------------------
This equipment has been tested and found to comply with the limits for a Class B digital device,
pursuant to Part 15 of the FCC rules. These limits are designed to provide reasonable protection
against harmful interference in a residential installation. This equipment generates, uses, and can
radiate radio frequency energy and, if not installed and used in accordance with the instructions, may
cause harmful interference to radio communications. However, there is no guarantee that interference
will not occur in a particular installation. If this equipment does cause harmful interference to radio or
television reception, which can be determined by turning the equipment off and on, the user is
encouraged to try to correct the interference by one or more of the following measures:
Reorient or relocate the receiving antenna.
Increase the separation between the equipment and receiver.
Connect the equipment into an outlet on a circuit different from that to which the receiver is
connected.
Consult the dealer or an experienced radio/TV technician for help.
This device complies with Part 15 of the FCC Rules. Operation is subject to the following two
conditions: (1) This device may not cause harmful interference, and (2) This device must accept any
interference received, including interference that may cause undesired operation.
Caution:
Any changes or modifications not expressly approved by the party responsible for product compliance
could void the user's authority to operate the equipment.
To comply with FCC RF exposure compliance requirements, this device must not be co-located or
operating in conjunction with any other antenna or transmitter.
Page 10

Industry Canada Portion
NEC Infrontia Confidential
---------------------------------------------------------------------------
Canada Regulatory Compliance Statement
This Class B digital apparatus complies with Canadian ICES-003.
Cet appareil numériqué de la classe B est conformé à la norme NMB-003 du Canada.
For Customers in Canada
This device complies with RSS 210 of Industry Canada (IC).
Operation is subject to the following two conditions:
this device may not cause interference, and
this device must accept any interference, including interference that may cause undesired
operation of this device.
L’utilisation de ce dispositif est autorisée seulement aux conditions suivantes:
il ne doit pas produire de brouillage et
l’ utilisateur du dispositif doit étre prêt a accepter tout brouillage radioélectrique reçu, même
si ce brouillage est susceptible de compromettre le fonctionnement du dispositif.
Exposure to radio frequency radiation
The installer of this radio equipment must ensure that the antenna is located or pointed such that it
does not emit RF field in excess of Health Canada limits for the general population; consult Safety
Code 6, obtainable from Health Canada’s website at www.hc-sc.gc.ca/rpb.
Page 11

TABLE OF CONTENTS
NEC Infrontia Confidential
1.INTRODUCTION
• WAT IS MH240?........................................................................................ 1
• KEYS AND PARTS ...................................................................................2
• ICONS.........................................................................................................3
• STANDBY MODE...................................................................................... 4
• MAIN MENU............................................................................................... 4
2.GETTING SRTARTED
• HOW TO INSERT THE BATTERY.......................................................... 5
• HOW TO REPLACE THE BATTERY ..................................................... 5
• HOW TO CHARGE THE BATTERY ....................................................... 6
3.BASIC OPARATION
• TO POWER ON THE PHONE (STANDBY MODE) ..............................9
• TO POWER OFF THE PHONE................................................................ 9
• TO ANSWER A CALL ............................................................................ 10
• TO MAKE A CALL.................................................................................. 10
• TO PLACE A CALL ON HOLD .............................................................10
• TO TRANSFER A CALL ........................................................................ 10
• TO REDIAL (LAST NUMBER REDIAL)............................................... 11
• TO USE MUTE MODE ............................................................................ 11
• TO USE HEADSET................................................................................. 12
• TO USE SOFT KEYS.............................................................................. 12
4.FEATURES
• TO USE CONFERENCE (3-WAY CALL).............................................13
• TO USE SPEAKER MONITOR.............................................................. 13
• TO ADJUST CALL VOLUME ................................................................ 13
• TO USE COURTESY MODE ................................................................. 14
• TO USE HANDY KEYLOCK.................................................................. 14
• TO USE SHORTCUT ICON ................................................................... 14
• TO RECONNECT TO NETWORK......................................................... 14
5.CALL HISTORY
• TO VIEW CALL HISTORY.....................................................................15
• TO MAKE A CALL FROM CALL HISTORY........................................ 16
• TO ADD PHONE NUMBER TO DIRECTORY.....................................16
• TO DELETE A CALL HISTORY............................................................ 19
i
Page 12

TABLE OF CONTENTS
NEC Infrontia Confidential
• TO DELETE ALL CALL HISTORIES ................................................... 19
6.DIRECTRY
• TO VIEW DIRECTORY........................................................................... 21
• TO SEARCH DIRECTORY .................................................................... 21
• TO SETUP GROUP.................................................................................24
• TO ADD A NEW ENTRY........................................................................ 25
• TO DELETE A RECORD........................................................................ 27
• TO DELETE ALL RECORDS ................................................................ 27
• TO MAKE A CALL FROM DIRECTORY.............................................. 27
• TO EDIT AN ENTRY............................................................................... 28
• TO CONFIRM YOUR PHONE NUMBER ............................................. 28
7.SPEED DIAL/PRESET DIAL
• TO USE SPEED DIAL ............................................................................ 29
• TO ENABLE SPEED DIAL .................................................................... 29
• TO USE PRESET DIAL.......................................................................... 30
• TO ENABLE PRESET DIAL.................................................................. 30
• TO ADD NEW ENTRY/EDIT.................................................................. 30
8.SETTING
• RING VOLUME........................................................................................ 31
• RING TONE.............................................................................................. 31
• INCOMING POPUP................................................................................. 32
• ILLUMINATION .......................................................................................32
• PRIVATE CALL ....................................................................................... 33
• VIBRATOR............................................................................................... 33
• INCOMING MODE................................................................................... 34
• HEADSET................................................................................................. 34
• OFFHOKK RING ..................................................................................... 35
• RTP ALARM ............................................................................................ 36
• HOLD MUSIC........................................................................................... 36
• CALL VOLUME ....................................................................................... 37
• HANDOVER TONE ................................................................................. 37
• TALK START VIBRATOR...................................................................... 38
• LCD CONTRAST..................................................................................... 38
• BACK LIGHT ........................................................................................... 39
• FONT SIZE ............................................................................................... 39
• LANGUAGE ............................................................................................. 40
• MY NAME................................................................................................. 40
ii
Page 13

TABLE OF CONTENTS
NEC Infrontia Confidential
• DISPLAY PATTERN............................................................................... 41
• CHANGE PASSWORD........................................................................... 41
• KEY TOUCH TONE.................................................................................42
• SPEAKER MONITOR............................................................................. 42
• DATE.........................................................................................................43
• TIME.......................................................................................................... 43
• TIME FORMAT ........................................................................................ 44
• DATLIGHT SAVING................................................................................ 44
• NTP SETTING.......................................................................................... 45
• NTP SERVER........................................................................................... 45
• TIME ZONE .............................................................................................. 46
9.INFORMATION
• TO DISPLAY STATUS ........................................................................... 47
• TO DISPLAY WIRELESS STATUS...................................................... 47
• TO DISPLAY SIP STATUS.................................................................... 48
10.PASSWORD LOCK
• TO USE MANUAL LOCK.......................................................................49
• TO UNLOCK YOUR PHONE................................................................. 49
• TO ENBLE MANUAL LOCK.................................................................. 49
• TO USE OUTSIDE LOCK ...................................................................... 50
• TO USE POWEROFF LOCK ................................................................. 50
11.PREFIX DIAL
• TO USE PREFIX DIAL............................................................................ 51
• TO REGISTER PREFIX NO................................................................... 52
12.FAVORITES
• TO USE FAVORITES.............................................................................. 53
• TO ENTRY A MENU TO FAVORITES ................................................. 53
• TO DELETE A MENU FROM FAVORITES ......................................... 53
13.MENU LIST
• MENU LIST .............................................................................................. 55
• CHARACTER CODE LIST.....................................................................62
14.TROUBLE SHOOTING
• MESSAGE MEANINGS AND SUGGESTIONS................................... 63
iii
Page 14

TABLE OF CONTENTS
NEC Infrontia Confidential
• TROUBLES AND SUGGESTIONS....................................................... 64
15.SPECIFICATIONS
• TECHNICAL SPECIFICATIONS ........................................................... 65
16.LICENCE
iv
Page 15
1.INTRODUCTION
NEC Infrontia Confidential
• WAT IS MH240?
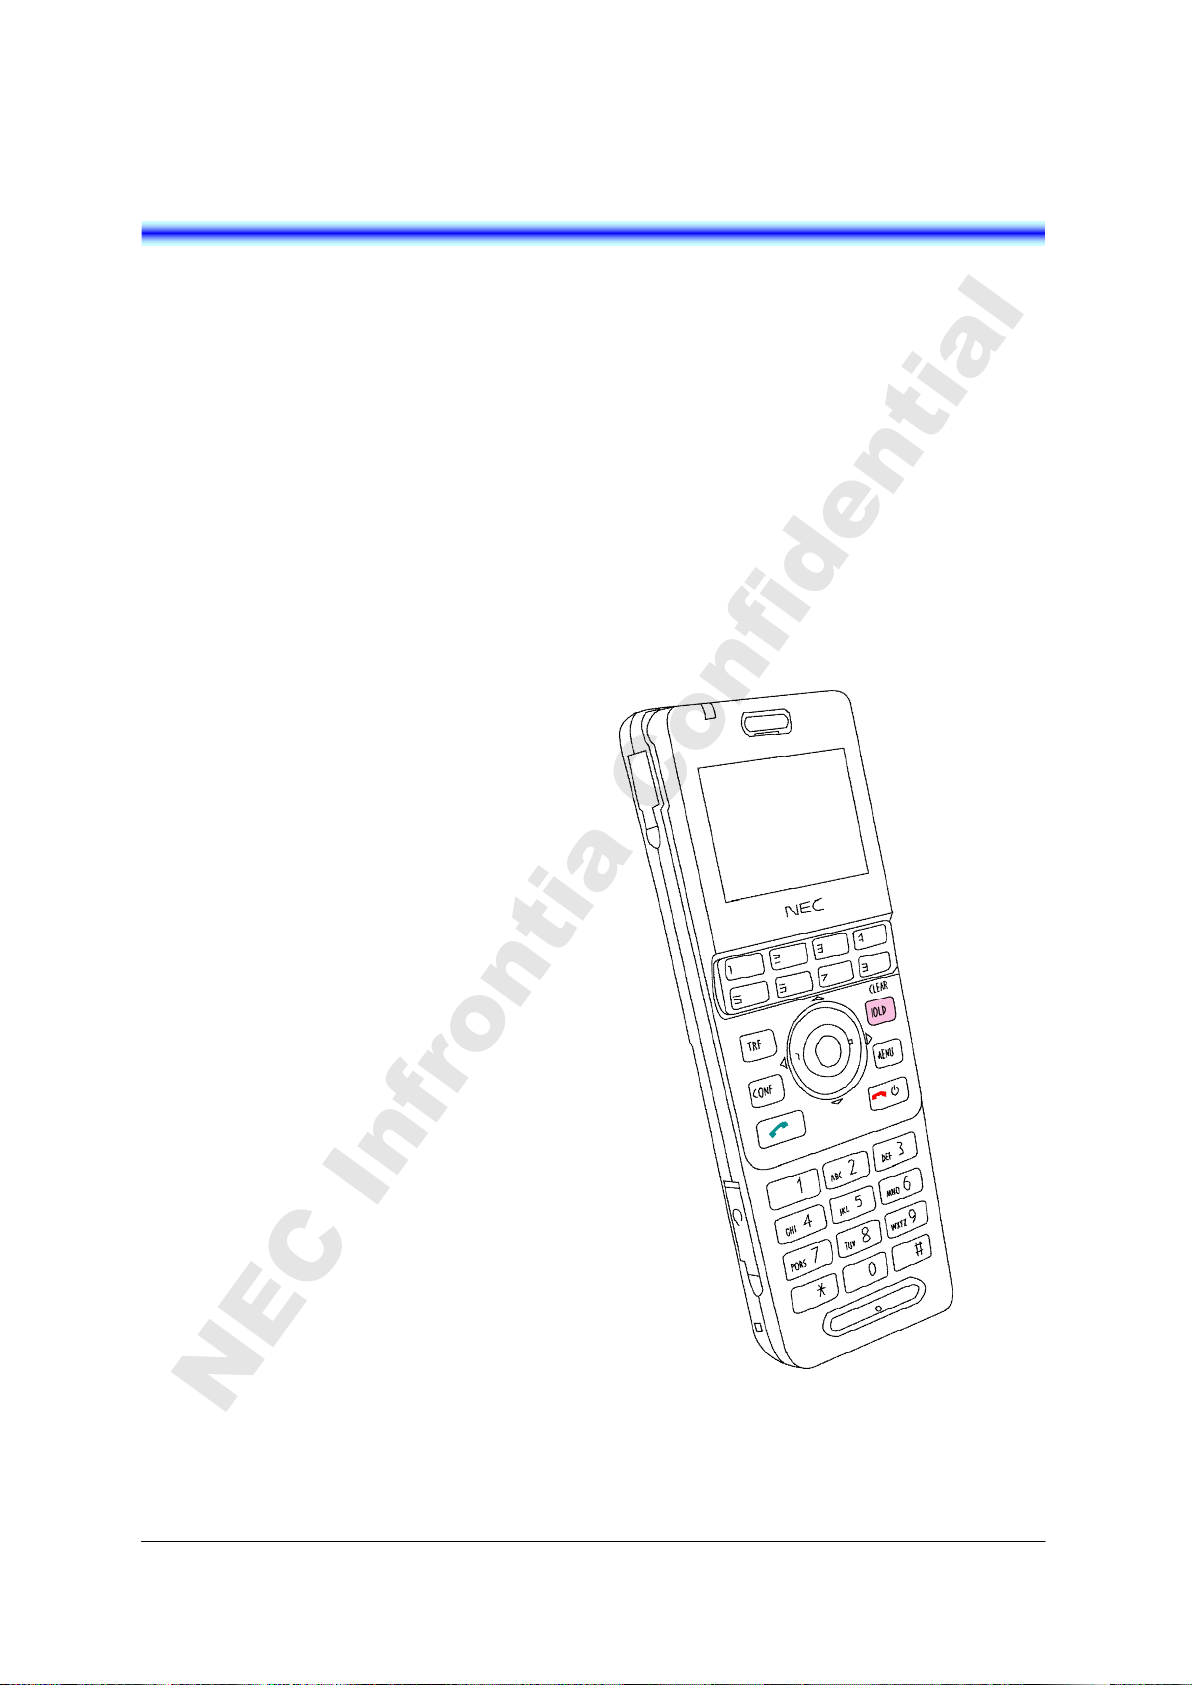
MH240 is a wireless VoIP phone that complies
with IEEE 802.11b/g specifications. MH240 has
the following features:
- PCS/PHS equivalent features are available
by connecting with NEC PABX such as
SV8100, SV8300 or UX5000, and WLAN
system.
- MH240 dedicated features are also
available such as Call History, Directory,
Password Lock, Favorites, Speed Dial,
Speaker monitor and Courtesy Mode.
1
MH240
Page 16
• KEYS AND PARTS
CLEAR Key
(19)Dial Pad
(18)Headset Connector
(20)Microphone
(21)Strap Hole
(22)Speaker
(2
3)Battery Cover
NEC Infrontia Confidential
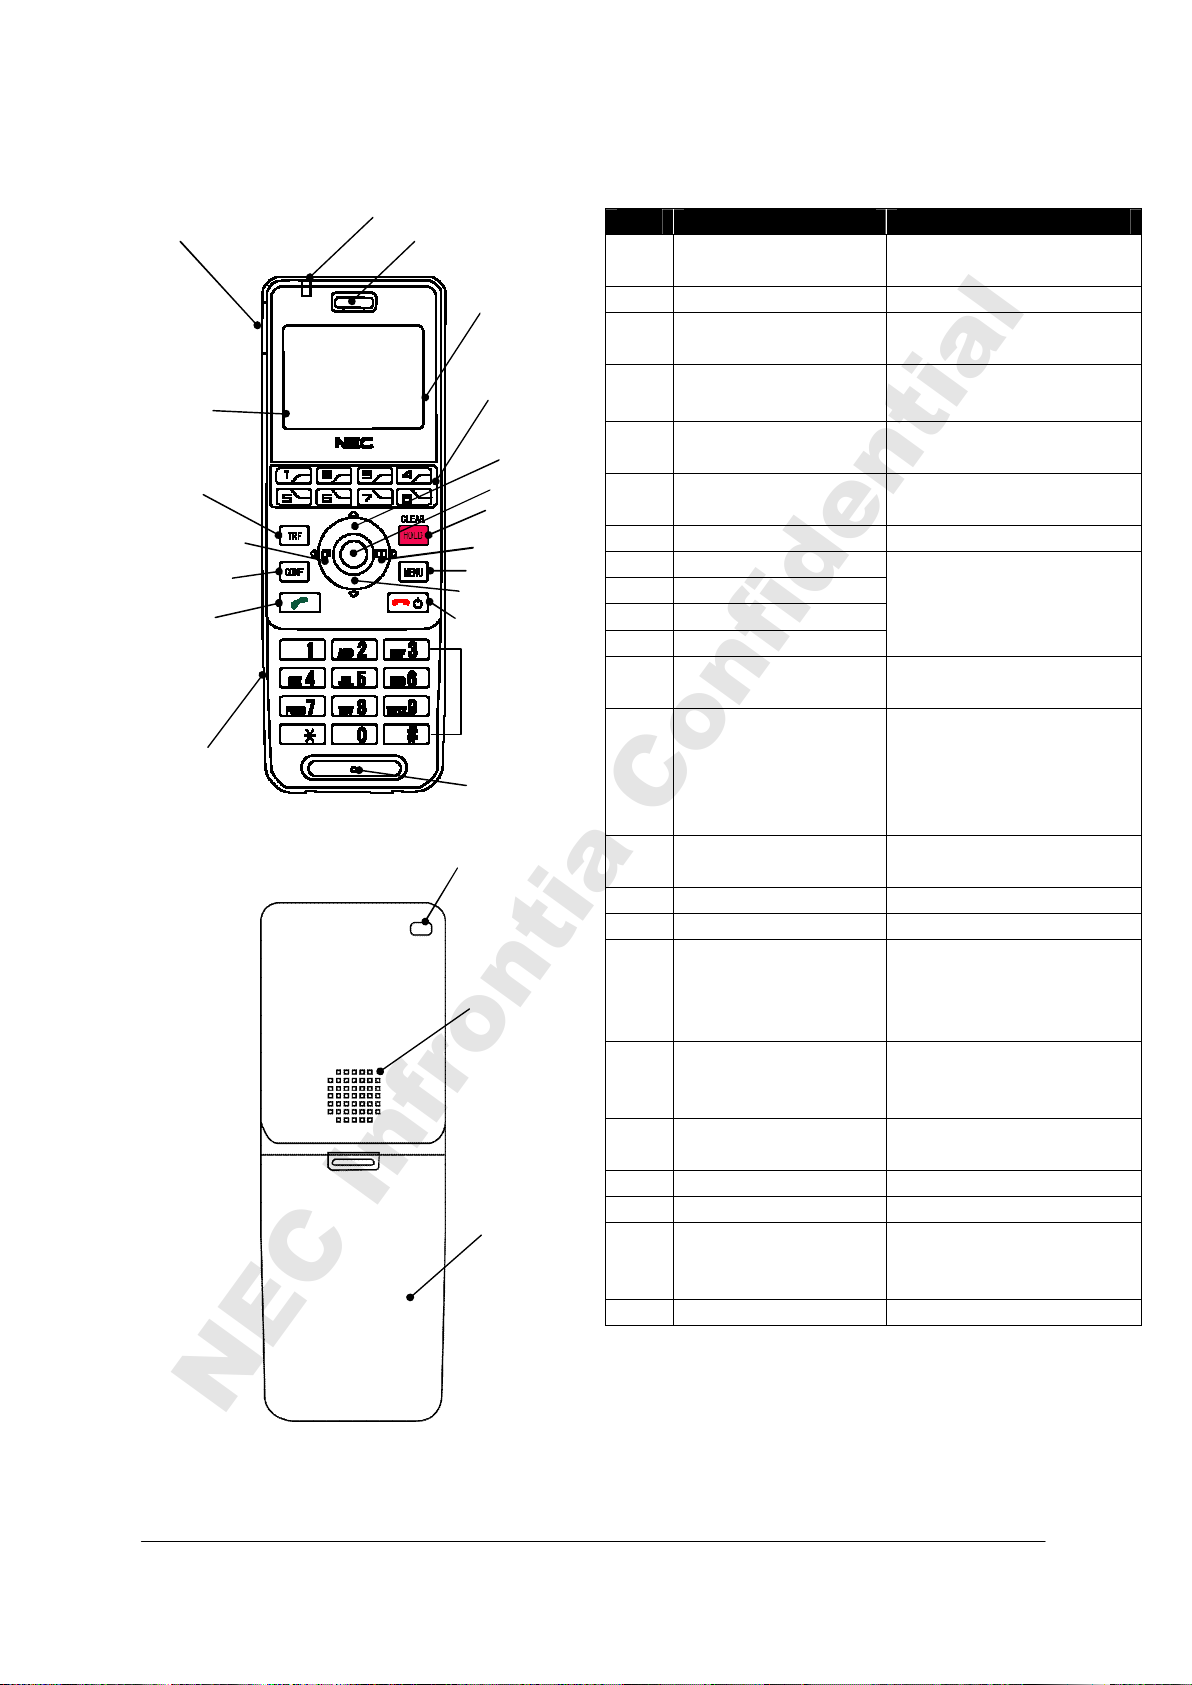
The phone has the following keys and parts.
(3)USB Connector
(5)Soft Keys
(12)TRANSFER Key
(10)LEFT Key
(14)CONFERENCE Key
(16)OFF HOOK Key
Delete Save Back
(1)Info LED
(2)Ear Speaker
(4)Display
(6)Multi Function Keys
(8)UP Key
(7)OK Key
(13)HOLD/
(11)RIGHT Key
(15)MENU Key
(9)DOWN Key
(17)POWER/
ON HOOK Key
No.
PARTS REMARK
(1) Info LED Display charging status
and receiving a call
(2) Ear Speaker (3) USB Connector Charge the power via AC
adapter
(4) Display
Monochrome LCD, 120×
90 pixels
(5) Soft Keys Display soft keys depend
on the phone status
(6) Multi Function Keys Assign various function
by System
(7) OK Key Select Middle soft key
(8) UP Key
(9) DOWN Key
(10) LEFT Key
Select a value from the
list and move the cursor
in edit mode
(11) RIGHT Key
(12) TRANSFER Key Transfer the ongoing call
or select Left soft key
(13) HOLD/CLEAR Key Place the ongoing call in
hold, return to the
previous screen, delete
input character/digit or
select Right soft key
(14) CONFERENCE Key Enter the conference
mode (3-way call)
(15) MENU Key Display Menu screen
(16) OFF HOOK Key Terminate an active call,
(17) POWER/ON HOOK
Key
Terminate an active call,
power on/off the phone or
exit a menu without
making changes
(18) Headset Connector Connect headset had
JEITA RC-5240 plug or
conversion cable
(19) Dial Pad Input dial number or
characters
(20) Microphone (21) Strap Hole Attach hand strap
(22) Speaker Ring when receiving a
call or listen to voice
when speaker monitor
(23) Battery Cover -
2
Page 17
• ICONS
NEC Infrontia Confidential
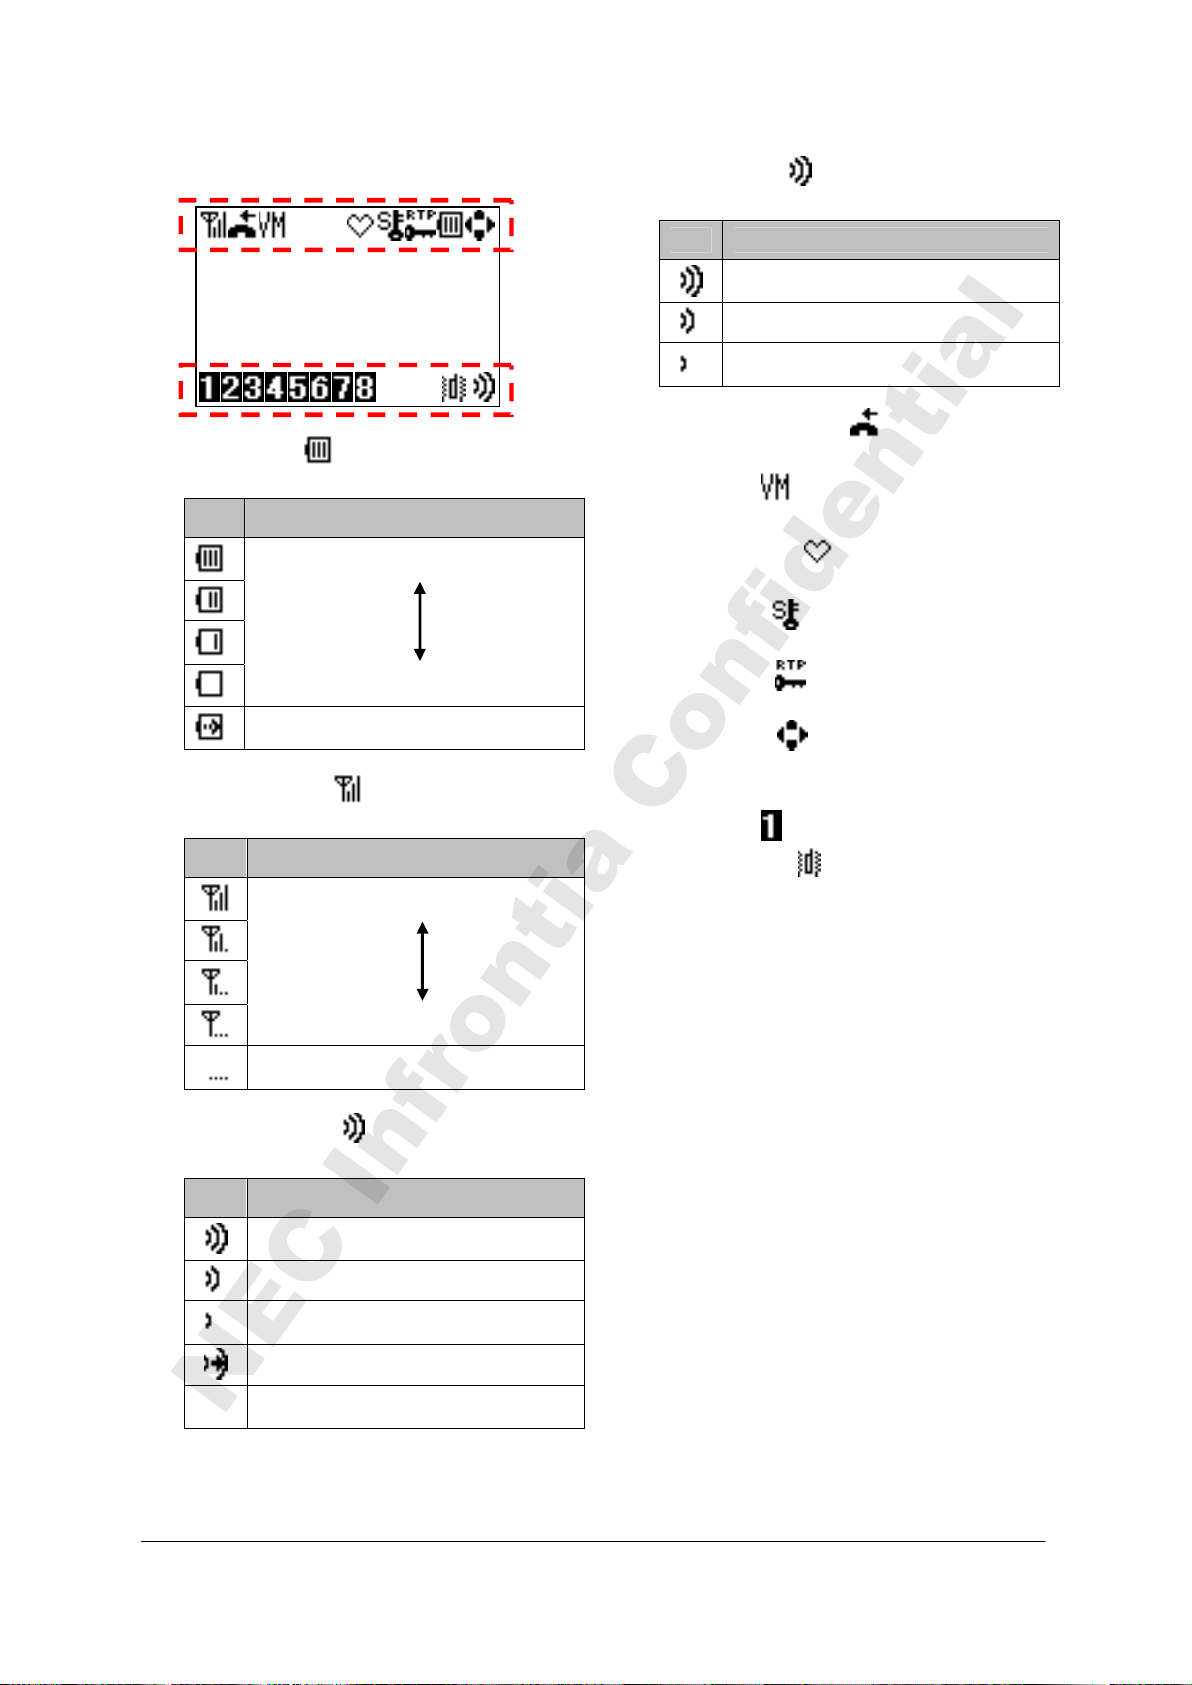
The phone has the following icons.
- Power icon ( ): indicates battery charge
- Antenna icon ( ): indicates the radio
- Volume icon ( ): indicates the ring
1/ 1 Tue 0:00AM
240
level.
Icon
signal strength by your phone.
Icon
volume when Standby mode.
Icon
Off
Battery Charge Level
Full
Empty
Under charge
Radio Signal Strength
Strong
Weak
Out of service area
Ring Volume
Large
Middle
Small
Graduate
- Volume icon ( ): indicates call volume in
taking.
Icon
- Missed call icon ( ): indicates your
missed call(s).
- VM icon ( ): indicates you have voice
mail(s).
- Courtesy icon ( ): indicates your phone
is to courtesy mode
- Lock icon ( ): indicates your phone is
locked.
- RTP icon ( ): indicates your call is
encrypted.
- Cursor icon ( ): indicates active direction
keys (UP, DOWN, LEFT or RIGHT)
depend on the phone status.
- Line icon ( ): indicates line key status.
- Vibrator icon ( ): indicates your phone is
vibrator mode.
Call Volume
Large
Middle
Small
3
Page 18
• STANDBY MODE
TIP
NEC Infrontia Confidential
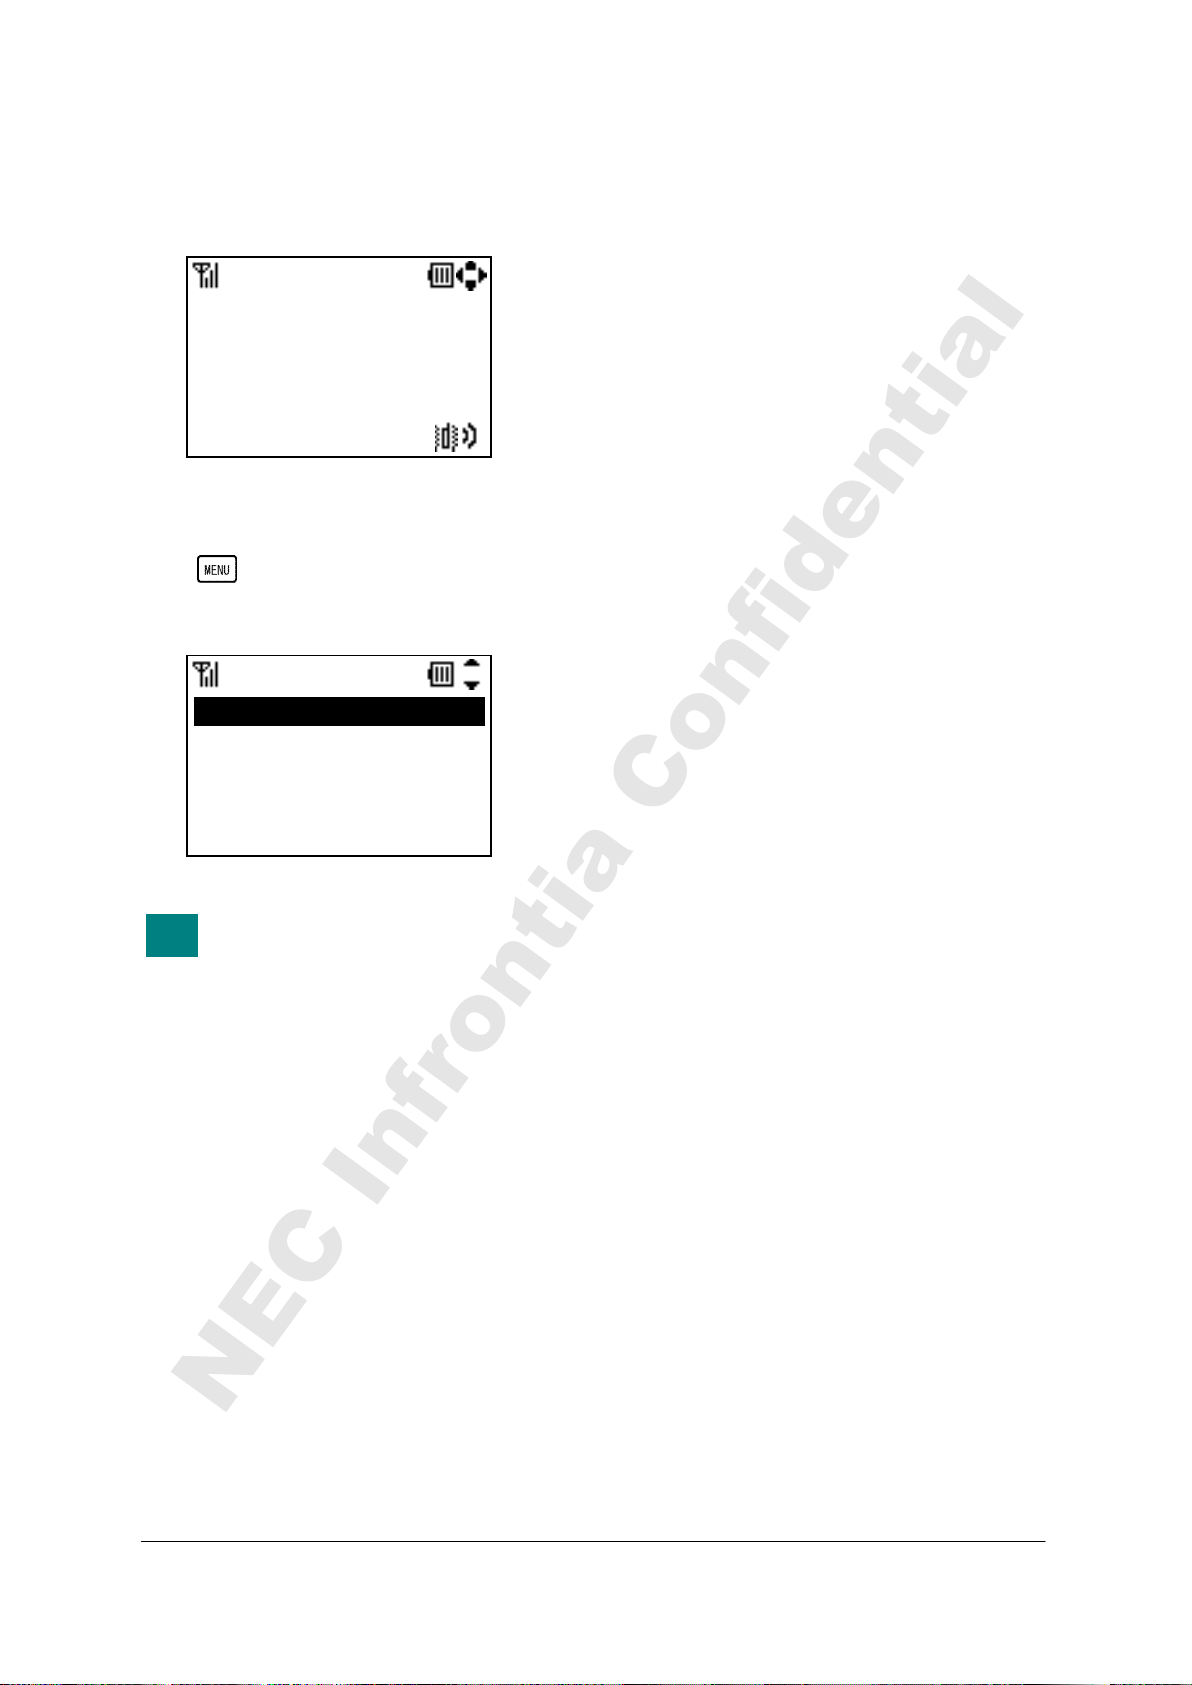
Your phone starts up in this mode after being
powered on. Your phone displays the first screen
similar to the following.
1/ 1 Tue 12:00AM
240
• MAIN MENU
Press key when the pone is in Standby
mode. The following main menu will be
displayed.
0.infomation
1.Call History
2.Directory
3.Tool
4.Voice Mail
The menu list attached in the end
of this guide shows all available
items with the default value.
See “13.MENU LIST” for more
information.
Menu
4
Page 19
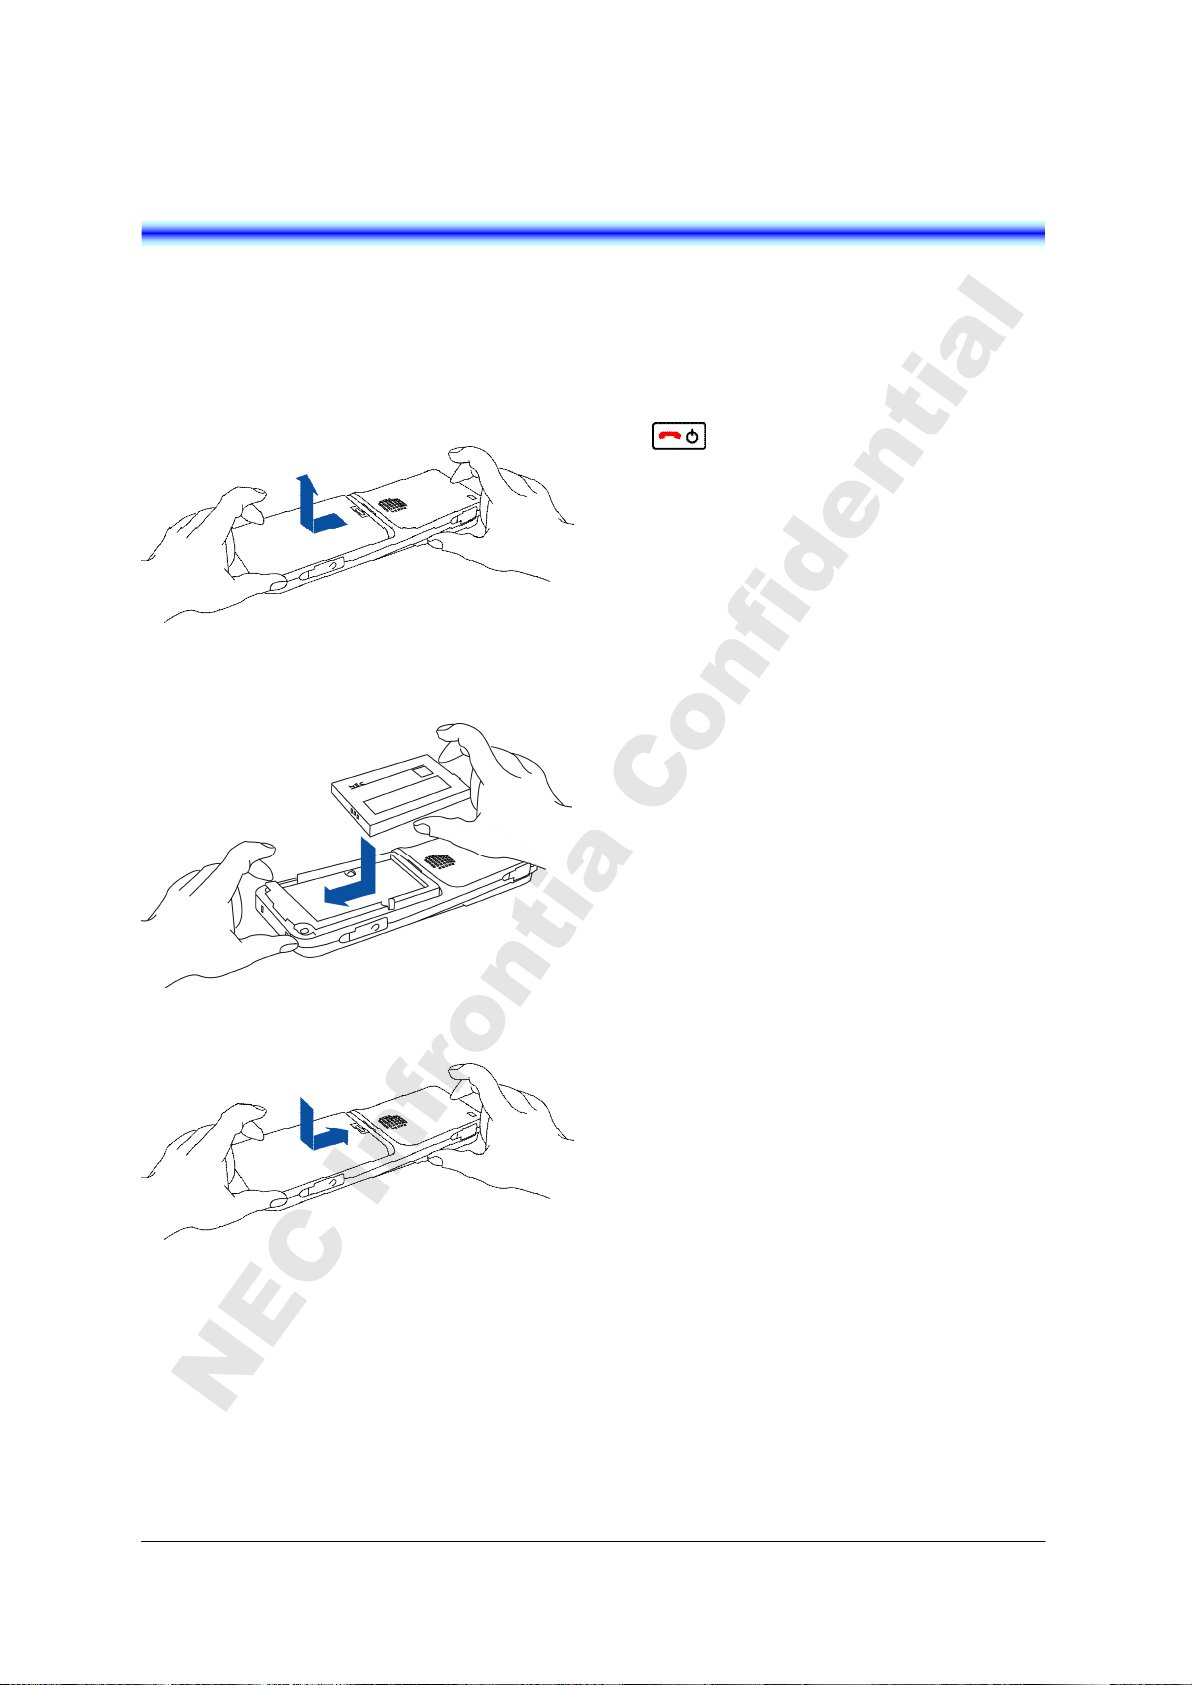
2.GETTING SRTARTED
NEC Infrontia Confidential
• HOW TO INSERT THE
BATTERY
• HOW TO REPLACE THE
BATTERY
Insert the battery into the unit as follows.
(1) Remove the battery cover from the phone.
(2) Place the battery into the unit so that the
label may face toward you.
(3) Attach the battery cover again.
Replace the battery of the phone as follows.
(1) Power off the phone by pressing and holding
key for 2 seconds or more.
(2) Remove the battery cover from the phone.
(3) Remove the Battery.
(4) Insert the new battery into the unit so that the
label may face toward you.
(5) Attach the battery cover again.
5
Page 20
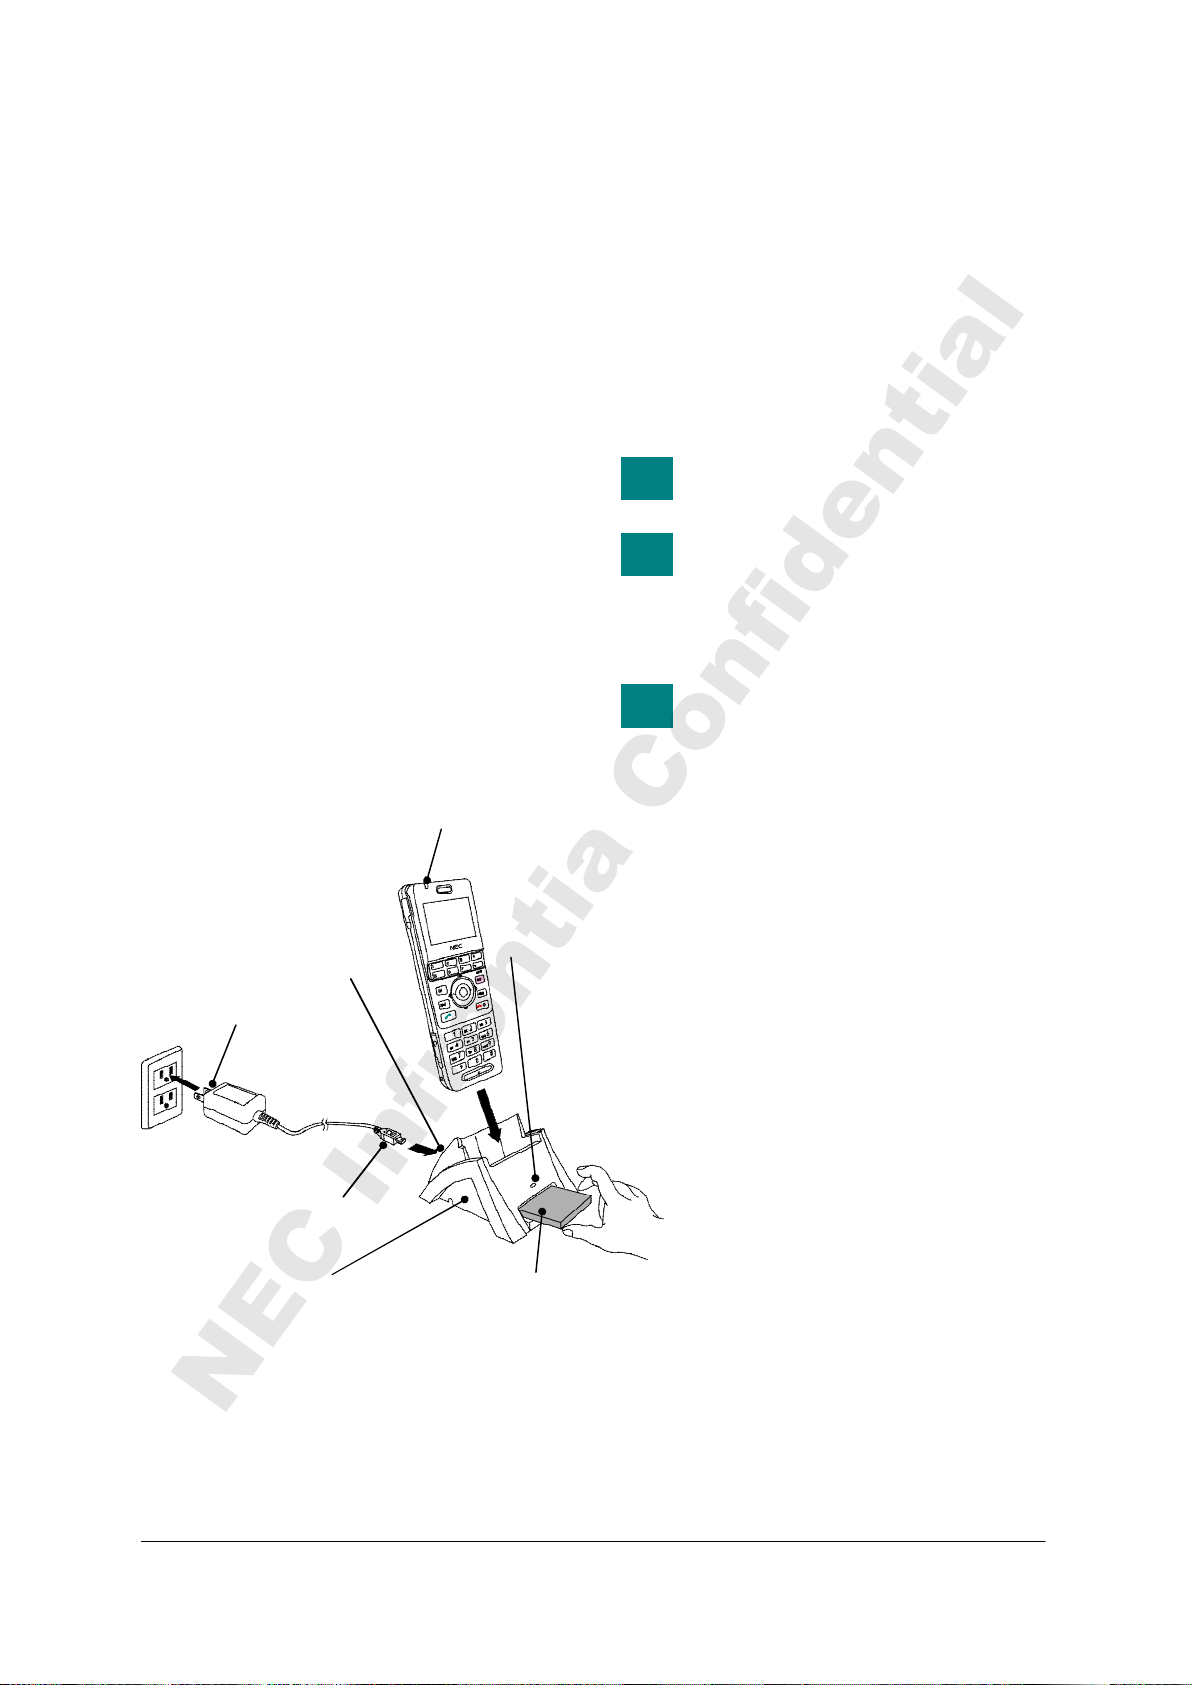
• HOW TO CHARGE THE
TIP
TIP
TIP
NEC Infrontia Confidential
BATTERY
Be sure to charge the battery when using the
phone for the first time. Use one of the
following:
Cradle
AC Adapter (direct connection)
By using the Cradle:
The phone can be charged by using the cradle.
You can also charge the battery by inserting the
battery pack alone to the slot on the cradle. This
is useful when you have a spare battery.
(1) Insert the AC adapter plug (miniUSB) into
the USB connector in the back of the cradle.
(2) Plug in the AC adapter to an appropriate AC
outlet.
(3) Place the phone and/or the spare battery
pack as shown below. When placing a
battery pack into the slot, insert it so that the
label may face downward.
USB connector
AC Adapter
AC outlet
AC adapter plug
Cradle (Battery Charger)
Note: Face the label of the battery pack
downward when inserting the battery
pack.
Info LED
Indicate charge status
LED
Indicate charge status
Spare Battery (option)
(4) The LED on the cradle lights red, indicating
the battery is being charged. In this case, the
phone battery is not being charged and Info
LED turns off.
(5) The LED on the cradle lights green when the
spare battery is fully charged. After this,
charging to the phone battery will start and
Info LED lights red.
(6) Info LED lights green when the phone
battery is fully charged.
An empty battery pack can be fully
charged in about 4 hours.
If any abnormality is found to the
battery, the LED on the cradle
starts flashing. In this case, please
contact your network
administrator.
In case that you place the phone
on the cradle and insert the spare
battery into the slot at the same
time, the spare battery will be
charged first.
6
Page 21
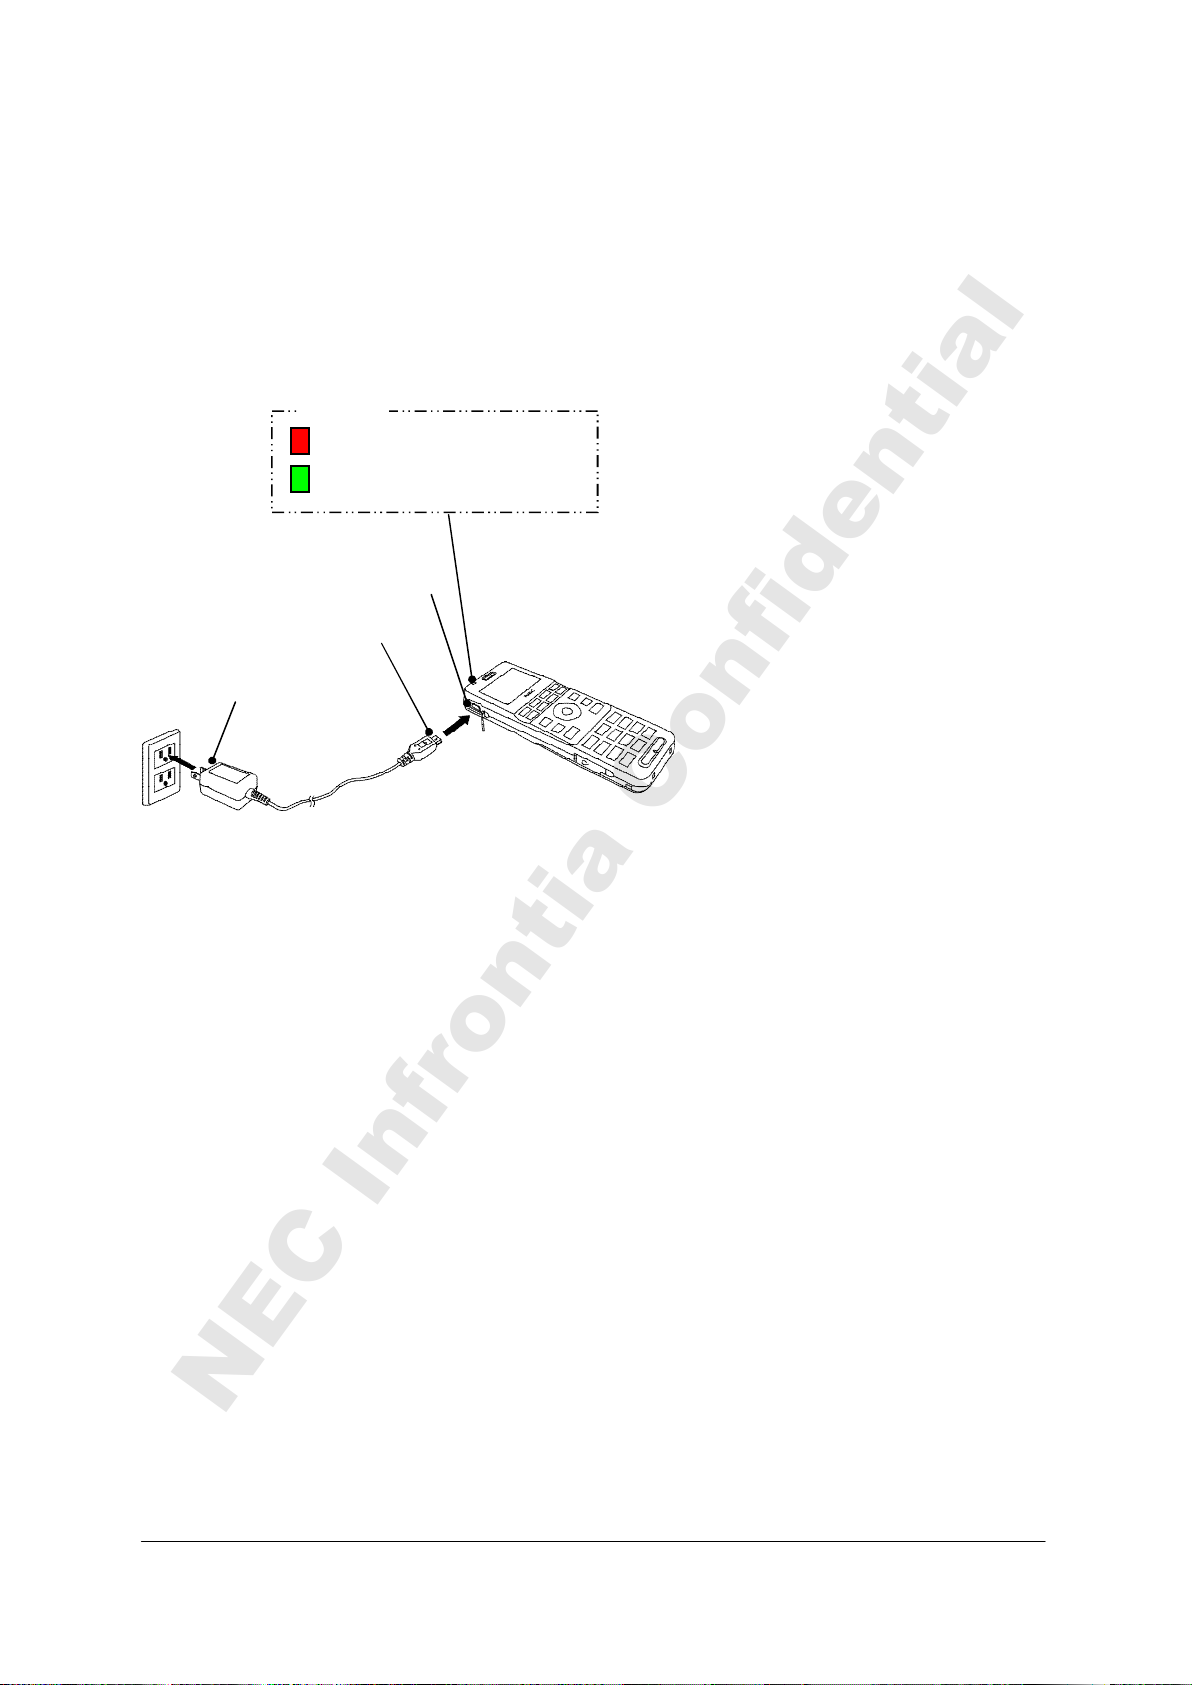
By using the AC Adapter:
NEC Infrontia Confidential
To charge the phone using the AC adapter do as
follows.
(1) Insert the AC adapter to an appropriate AC
outlet.
(2) Insert the AC adapter plug (miniUSB) to
USB connector of the phone.
Info LED
: Light red (Charging)
: Light green (Charging is completed)
USB connector
AC adapter plug
AC Adapter
AC outlet
7
Page 22

This page is for your notes.
NEC Infrontia Confidential
8
Page 23
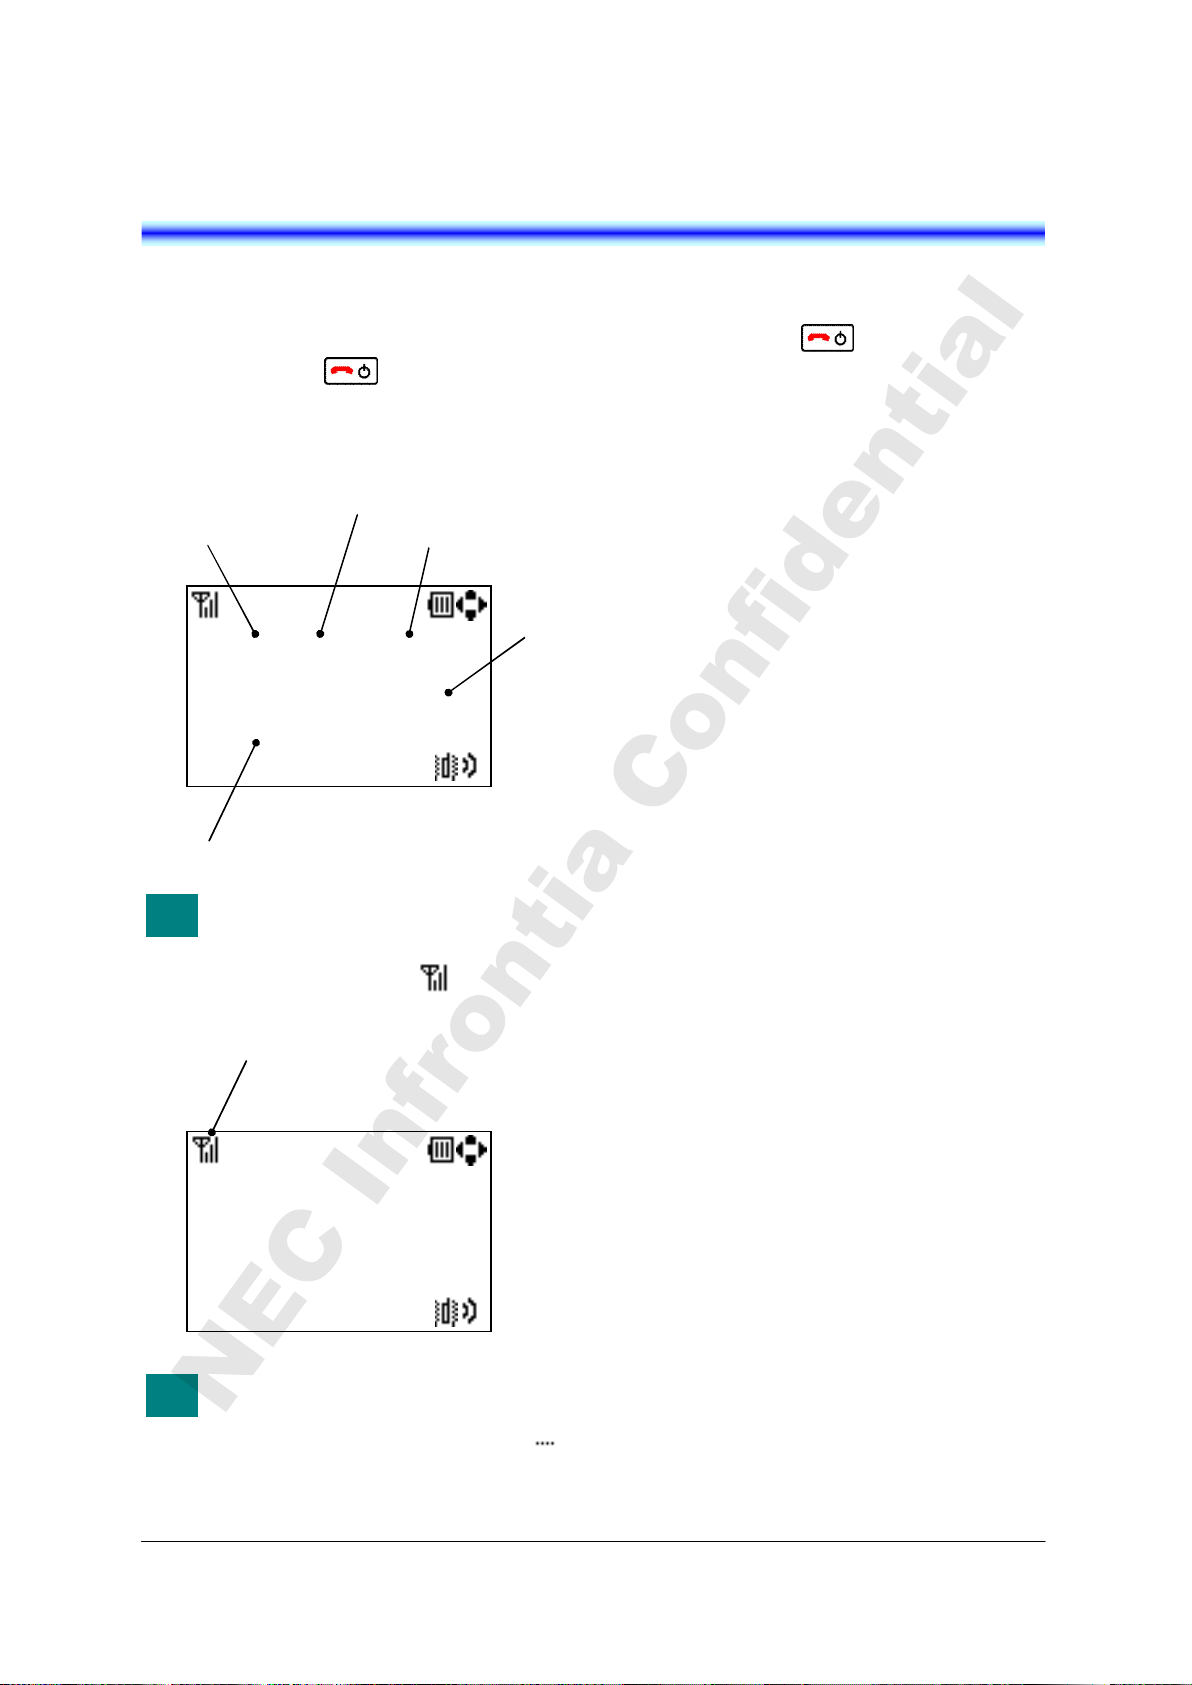
3.BASIC OPARATION
Current Date
A day of the week
Current
Time
My name
Phone Number
TIP
Antenna icon
TIP
NEC Infrontia Confidential
• TO POWER ON THE PHONE
(STANDBY MODE)
- Press and hold key for 2 seconds or
more. The start screen appears and Info
LED flashes orange. After that your phone
displays the following initial screen.
- Make sure Antenna icon ( ) is displayed
9/ 2 Tue 08:27AM
223 Mike
Standby mode
This initial screen is called
Standby mode in this manual.
on your phone as follow.
9/ 2 Tue 08:27AM
223 Mike
Antenna icon indicates you can
use the phone. If Antenna icon
indicates out of service area ( ),
please contact your network
administrator.
• TO POWER OFF THE PHONE
- Press and hold key for 2 seconds or
more. “Power Off” is displayed and Info
LED flashes orange.
9
Page 24
• TO ANSWER A CALL
TIP
TIP
TIP
NEC Infrontia Confidential
• TO PLACE A CALL ON HOLD
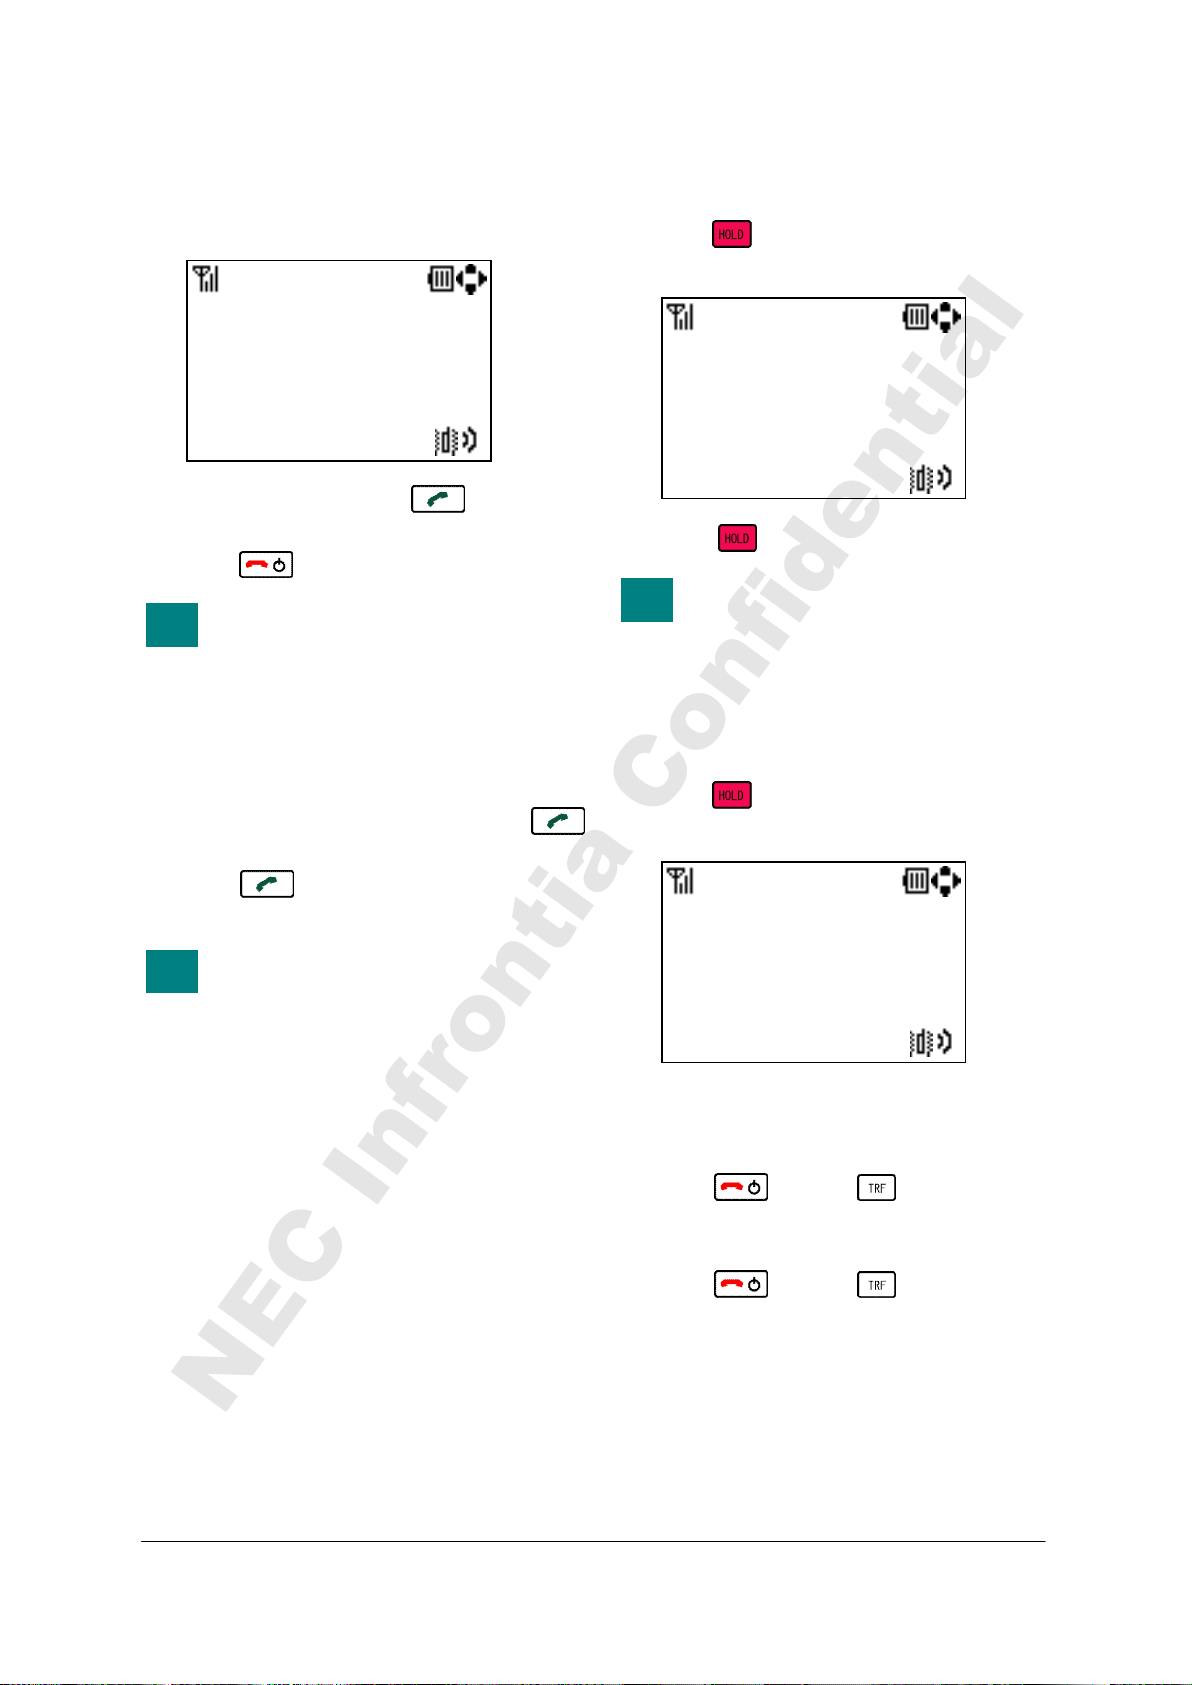
When receiving an incoming call, the display
automatically changes to Incoming Call screen.
- To answer the call, press key
- To stop the ring without answering the call,
9/ 2 Tue 08:30AM
R I N G 240
press key
When the calling party has been
already registered in the Directory,
the registered Name is displayed.
• TO MAKE A CALL
To make a phone call, do either of the following;
- Enter the phone number and then press
key. (Preset Dialing)
- Press key and then enter the phone
number. (Overlap Dialing)
By pressing CLEAR key, you can
delete the last digit of the dialed
number that is currently displayed
on the phone when Preset Dialing
is used.
During an active call, you can hold the call.
- Press key to hold the line. Your phone
displays.
- Press key again to retrieve the line.
00:00:29
H O L D 240
During hold, Info LED blinks
orange.
• TO TRANSFER A CALL
During an active call, you can transfer the call to
other phone.
- Press key during the call. Your phone
displays.
- After hearing Special Dial Tone, enter the
- The called party answers the call, and then
- Press key or key before the
00:00:29
H O L D 240
phone number to transfer the call.
press key or key. (Attended
Transfer)
or
called party answers. (Unattended Transfer)
10
Page 25
• TO REDIAL (LAST NUMBER
NEC Infrontia Confidential
REDIAL)
You can make a call from the Call History of
Outgoing calls. A maximum of the 50 calls can
be automatically recorded.
- Press key in Standby mode. The
headset displays Call History of Outgoing
calls similar to the following.
9/ 2 8:30 240
9/ 1 22:11 Eric
9/ 1 14:56 John
8/31 9:42 Pat
Delete Save Back
- Press key to select a desired party you
want to redial.
9/ 2 8:30 240
9/ 1 22:11 Eric
9/ 1 14:56 John
8/31 9:42 Pat
Delete Save Back
- Press key. your phone displays the
phone number list as follow if the selected
party has been already registered in the
Directory.
1.14581234567
2.12621234567
3.200
Prefix Call Back
- Press key or “Call” soft key to redial
the party after you select a phone number
by pressing key.
Outgoing
Outgoing
Number
• TO USE MUTE MODE
During an active call, you can use Mute mode.
When enter Mute mode, your voice do not reach
to a called party.
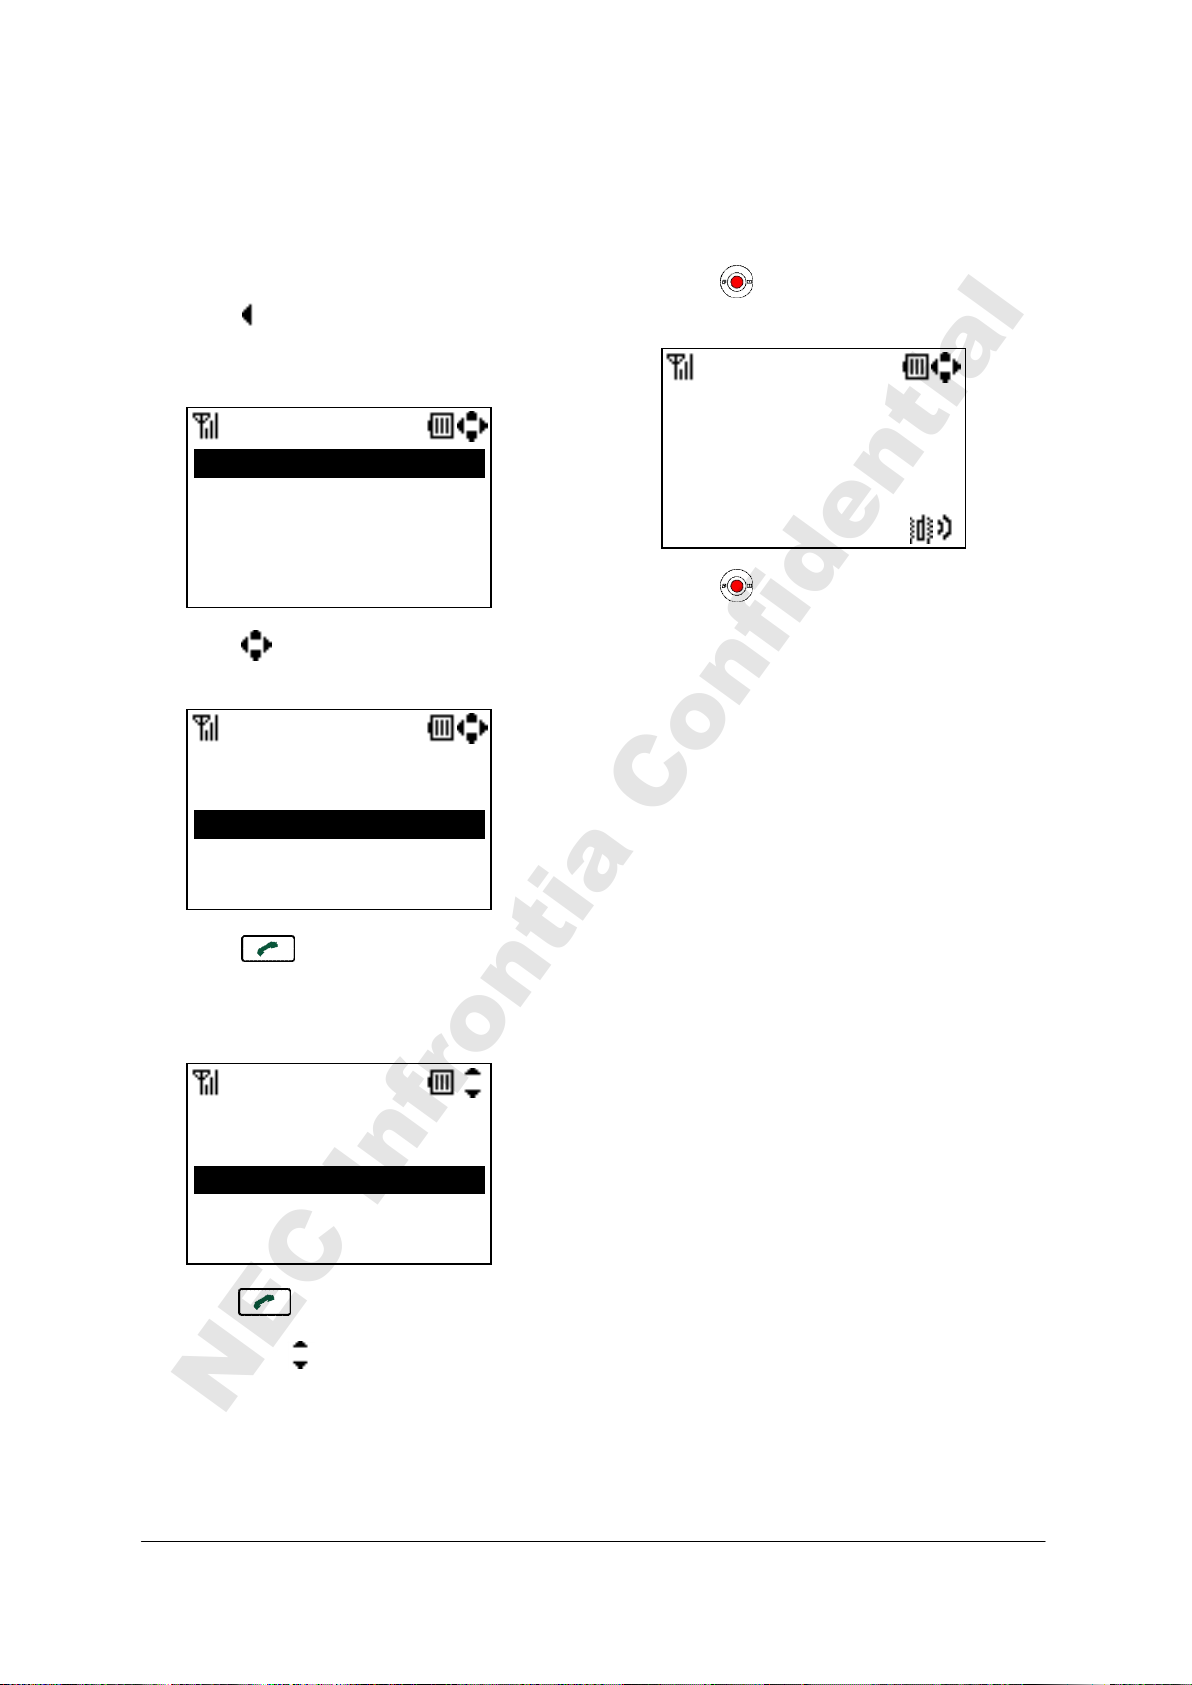
- Press key to enter Mute mode. Your
phone displays.
- Press key again to exit Mute mode.
[M U T E]
00:00:50
TALKING 240
11
Page 26
• TO USE HEADSET
TIP
NEC Infrontia Confidential
When a headset is inserted to the Headset
connector, the phone is in headset call mode.
- Connect a headset to the phone.
- When the phone receives a call, you can
hear ringing from the headset or speaker
(configurable). If a vibrator is set to enable,
it is also available.
- Press key to answer the call.
- You can talk using the microphone and ear
phone of the headset.
- Press key to end the call.
This phone has a JEAITA RC-5240
jack as a headset connector. If
your headset has ∅2.5 plug, you
can connect the headset to the
phone by using a conversion
cable.
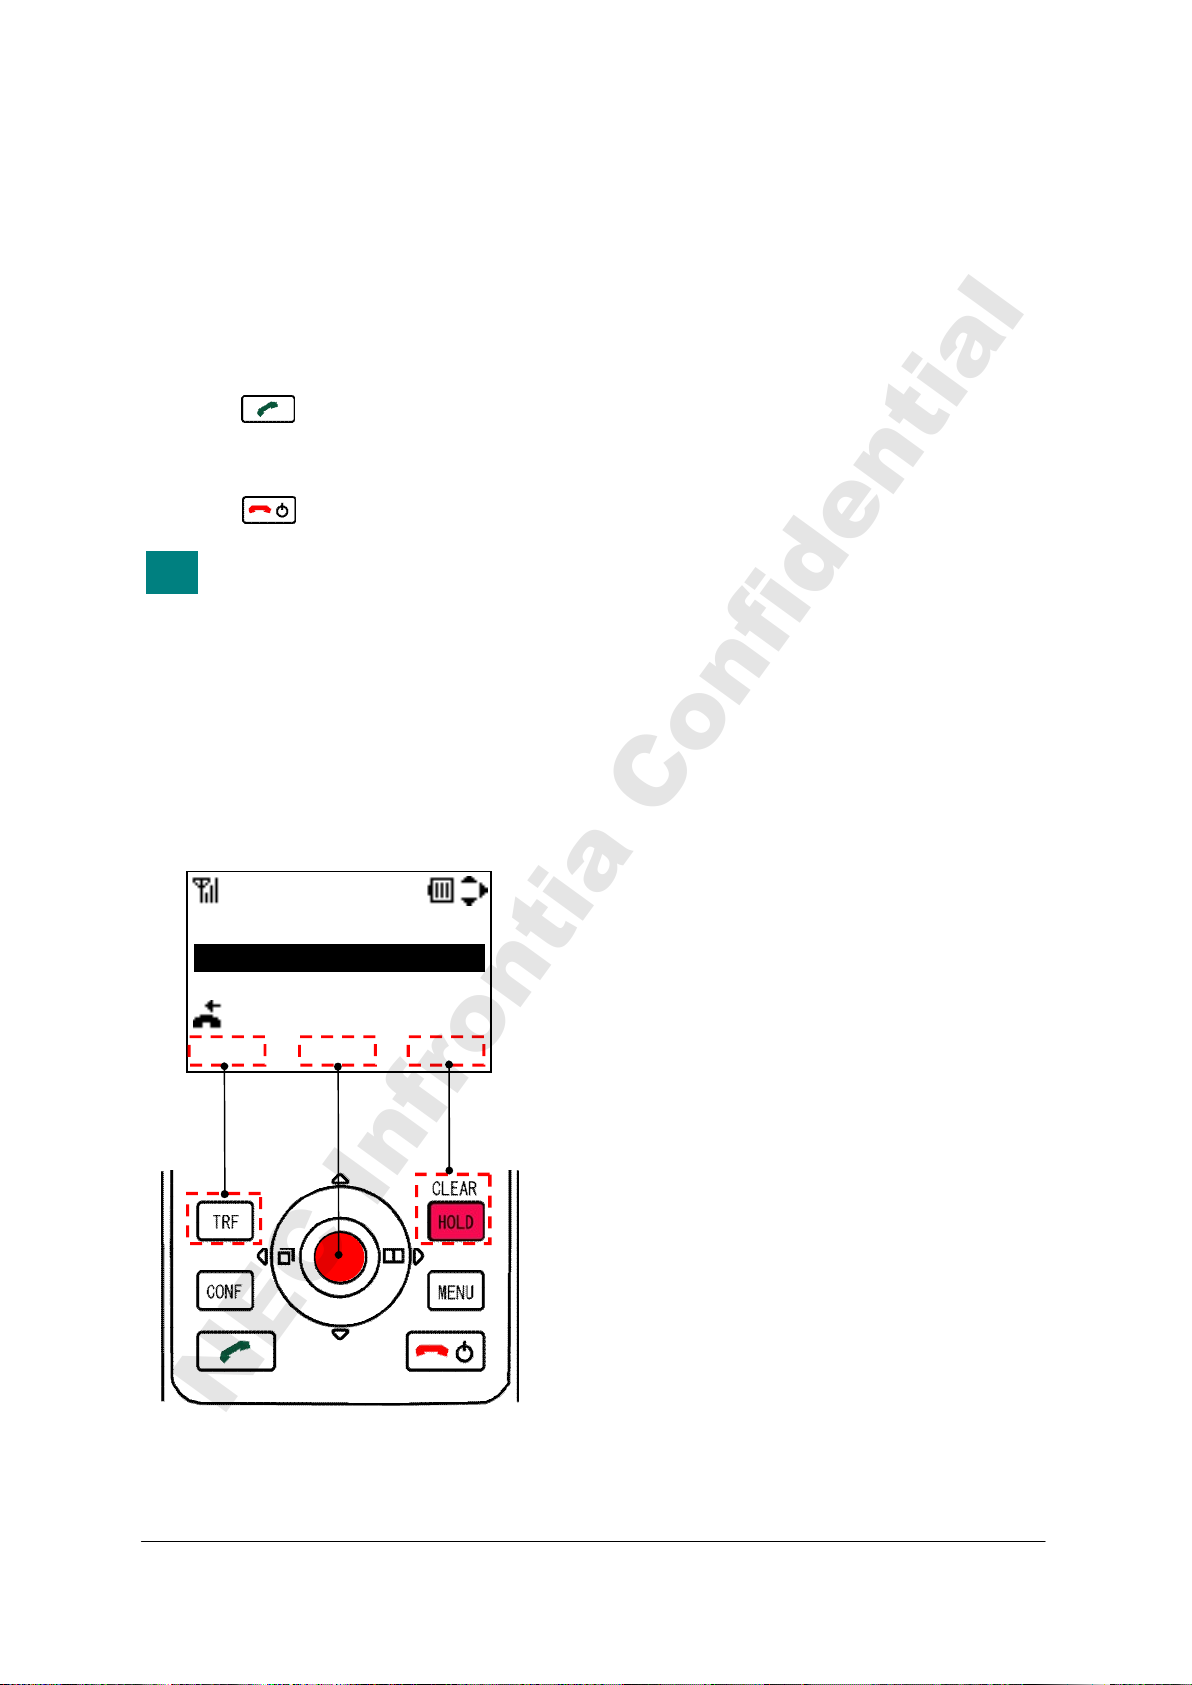
• TO USE SOFT KEYS
You will often use soft keys when you operate
this phone. You can use soft keys as follow.
9/ 1 22:00 Eric
9/ 1 9:25 222
8/31 10:12 Tom
8/31 10:03 Tom
Delete Save Back
Incoming
12
Page 27
4.FEATURES
TIP
NEC Infrontia Confidential
This section explains how to use features on
your phone.
• TO USE CONFERENCE
(3-WAY CALL)
You can establish a Conference call (3-way call).
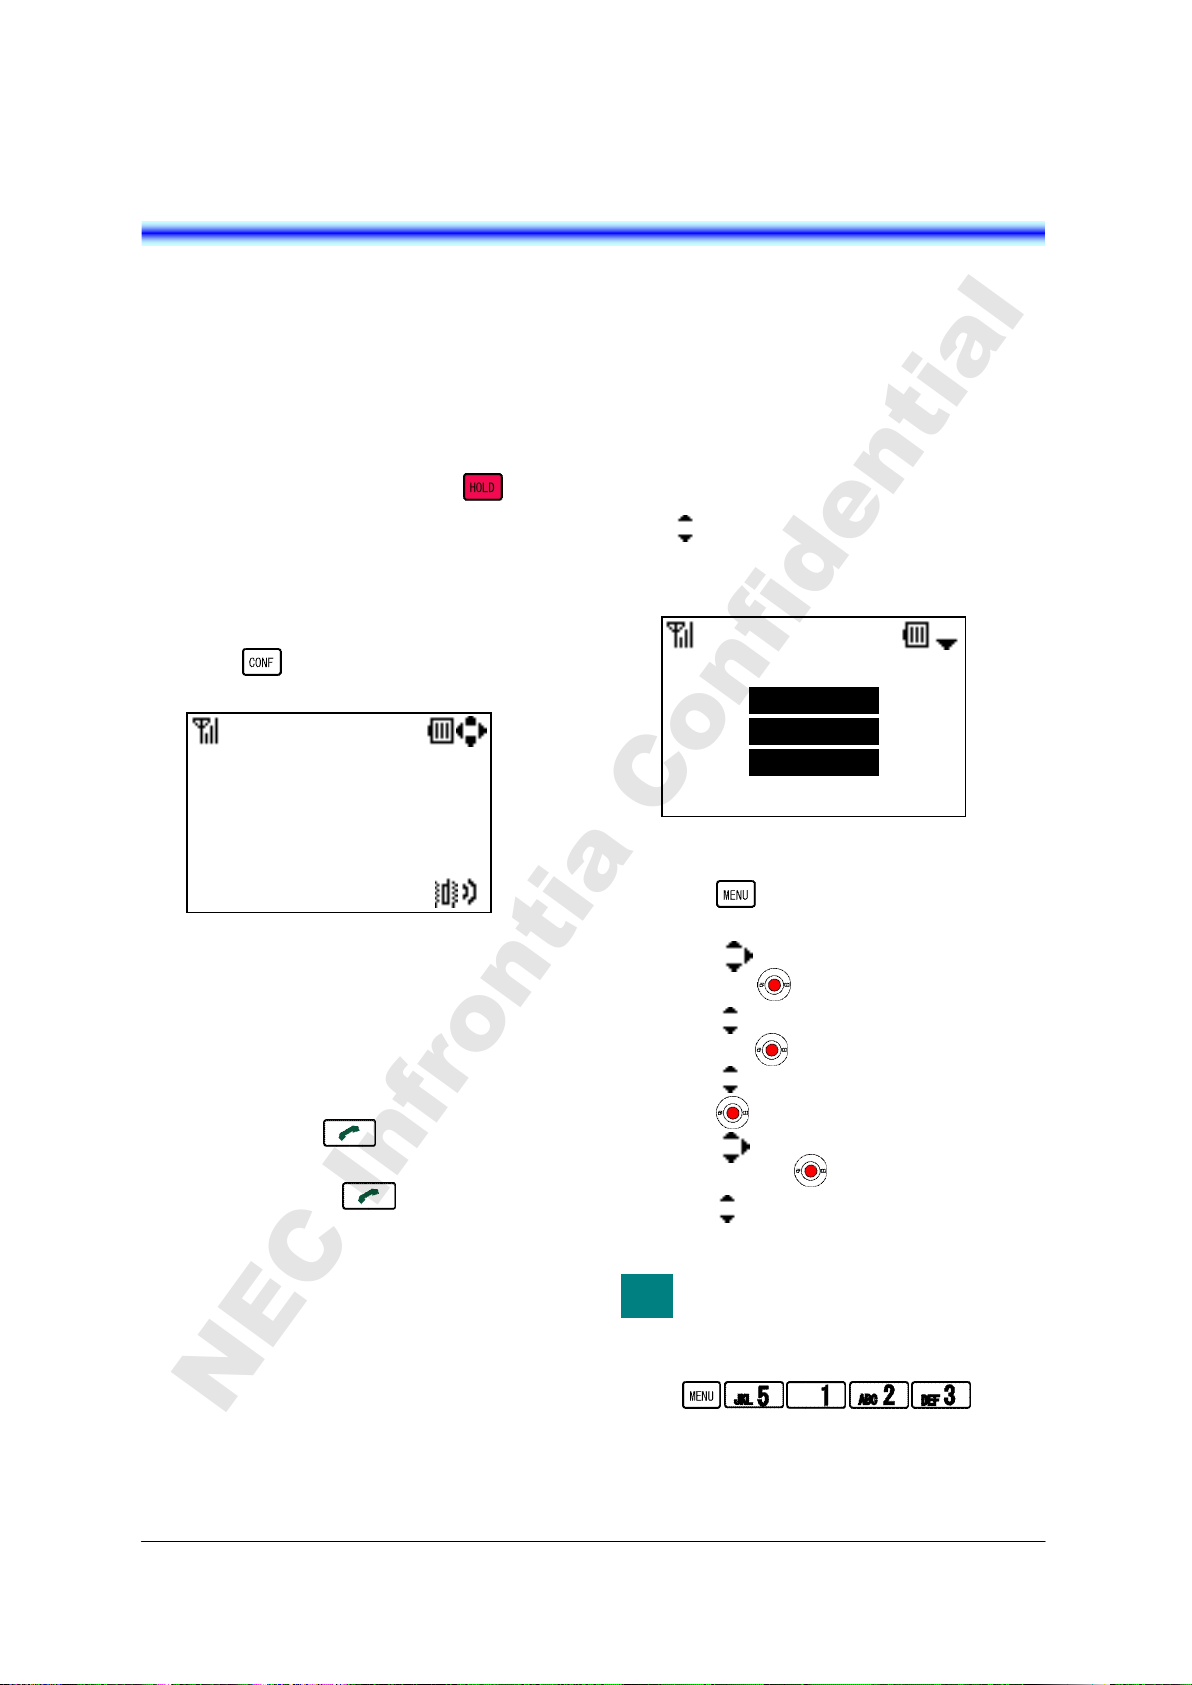
- During an active call, press key to
hold the line.
- After hearing Special Dial Tone, enter the
phone number that you want to have a party
join the call.
- The called party answers the call, and then
press key. Your phone displays.
• TO USE SPEAKER MONITOR
00:00:35
C O N F 240
• TO ADJUST CALL VOLUME
You can increase or decrease the receiver
volume in Standby mode or during a call. The
volume can be set in 3 steps (From Level 1
[Small] to Level 3 [Large]).The factory default
value is Level 2 [Middle].
During a call:
Press key to select an appropriate volume
and then press “OK” soft key or wait timeout
while talking with your phone.
Large
OK Back
In Standby mode:
- Press key in Standby mode. Your
phone displays the main menu.
- Press key to select “5.Setting” and
then press key.
Call Volume
During an active call, you can use Speaker
monitor. When enter Speaker monitor mode, you
can hear called party’s voice from a Speaker of
your phone.
- Press and hold key for 2 seconds or
more to enter Speaker monitor mode.
- Press and hold key again for 2
seconds or more to exit Speaker monitor
mode.
Note: To use Speaker monitor, you need to
enable this feature. See “8.SETTINGS”
for more information.
- Press key to select “1.Usersetting” and
then press key.
- Press key to select “2.Talk” and then
press key.
- Press key to select “3.Call Volume”
and then press key.
- Press key to select an appropriate
volume and then press “OK” soft key.
You can reach Call Volume menu
by pressing following keys.
Go to Call Volume menu:
13
Page 28
• TO USE COURTESY MODE
TIP
TIP
NEC Infrontia Confidential
You can set your phone in Courtesy Mode.
When your phone is placed in this mode, your
phone displays Courtesy icon ( ).
- Press and hold key for 1 second or
more to enter Courtesy Mode.
- Press and hold key again for 1
second or more to exit Courtesy Mode.
When your phone enters Courtesy
Mode, a vibrator works instead of
speaker ringing.
• TO USE HANDY KEYLOCK
You can set your phone in Handy KeyLock
Mode. When your phone is placed in this mode,
you can not operate any key and your phone
displays “Handy KeyLock”.
- Press and hold key for 2 seconds or
more to enter Handy KeyLock Mode.
- Press and hold key again for 2
seconds or more to exit Handy KeyLock
Mode.
Even if your phone enters Handy
KeyLock Mode, you can answer an
incoming call.
• TO USE SHORTCUT ICON
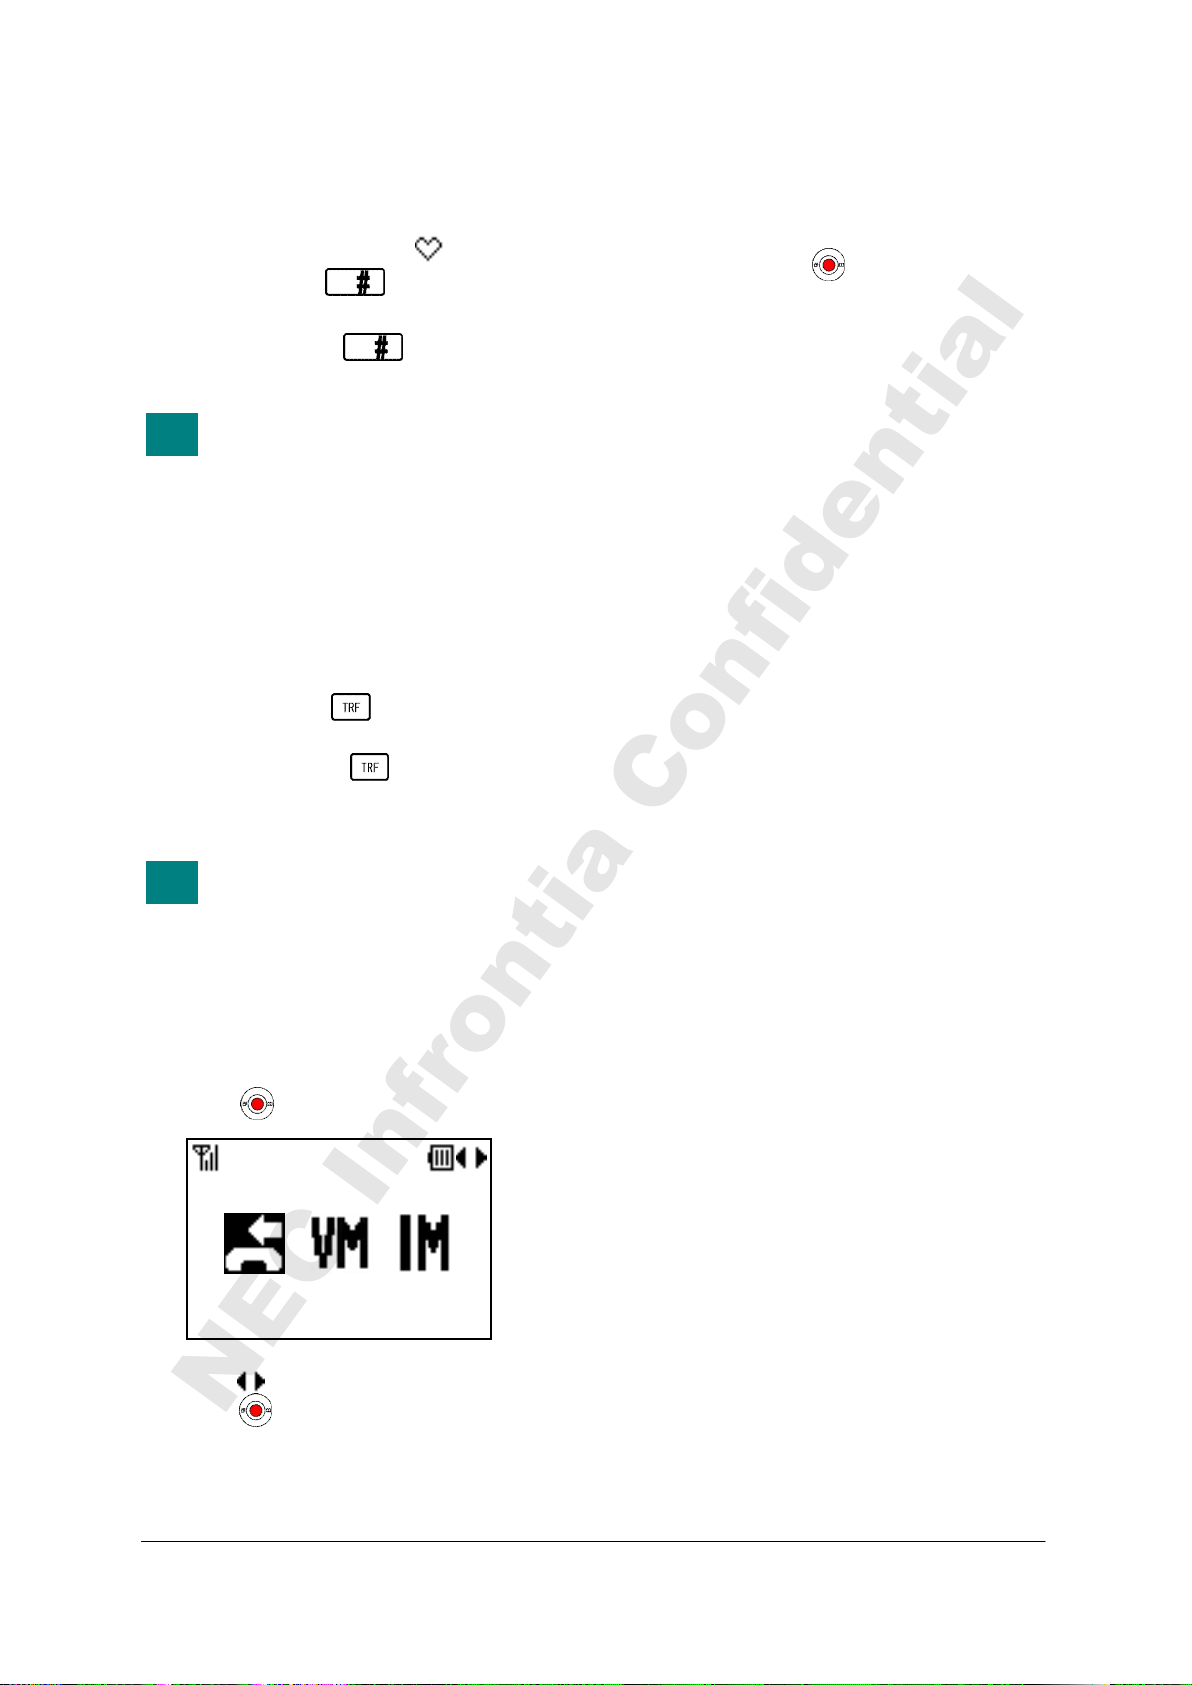
You can use shortcut icon when you have missed
calls and voice mails.
- Press key to display shortcut icon.
( 5) ( 2) ( 0)
- Press key to select an icon and then
press key.
• TO RECONNECT TO
NETWORK
You can reconnect to your network.
- Press and hold key for 3 second or
more to reconnect.
14
Page 29
5.CALL HISTORY
TIP
TIP
TIP
NEC Infrontia Confidential
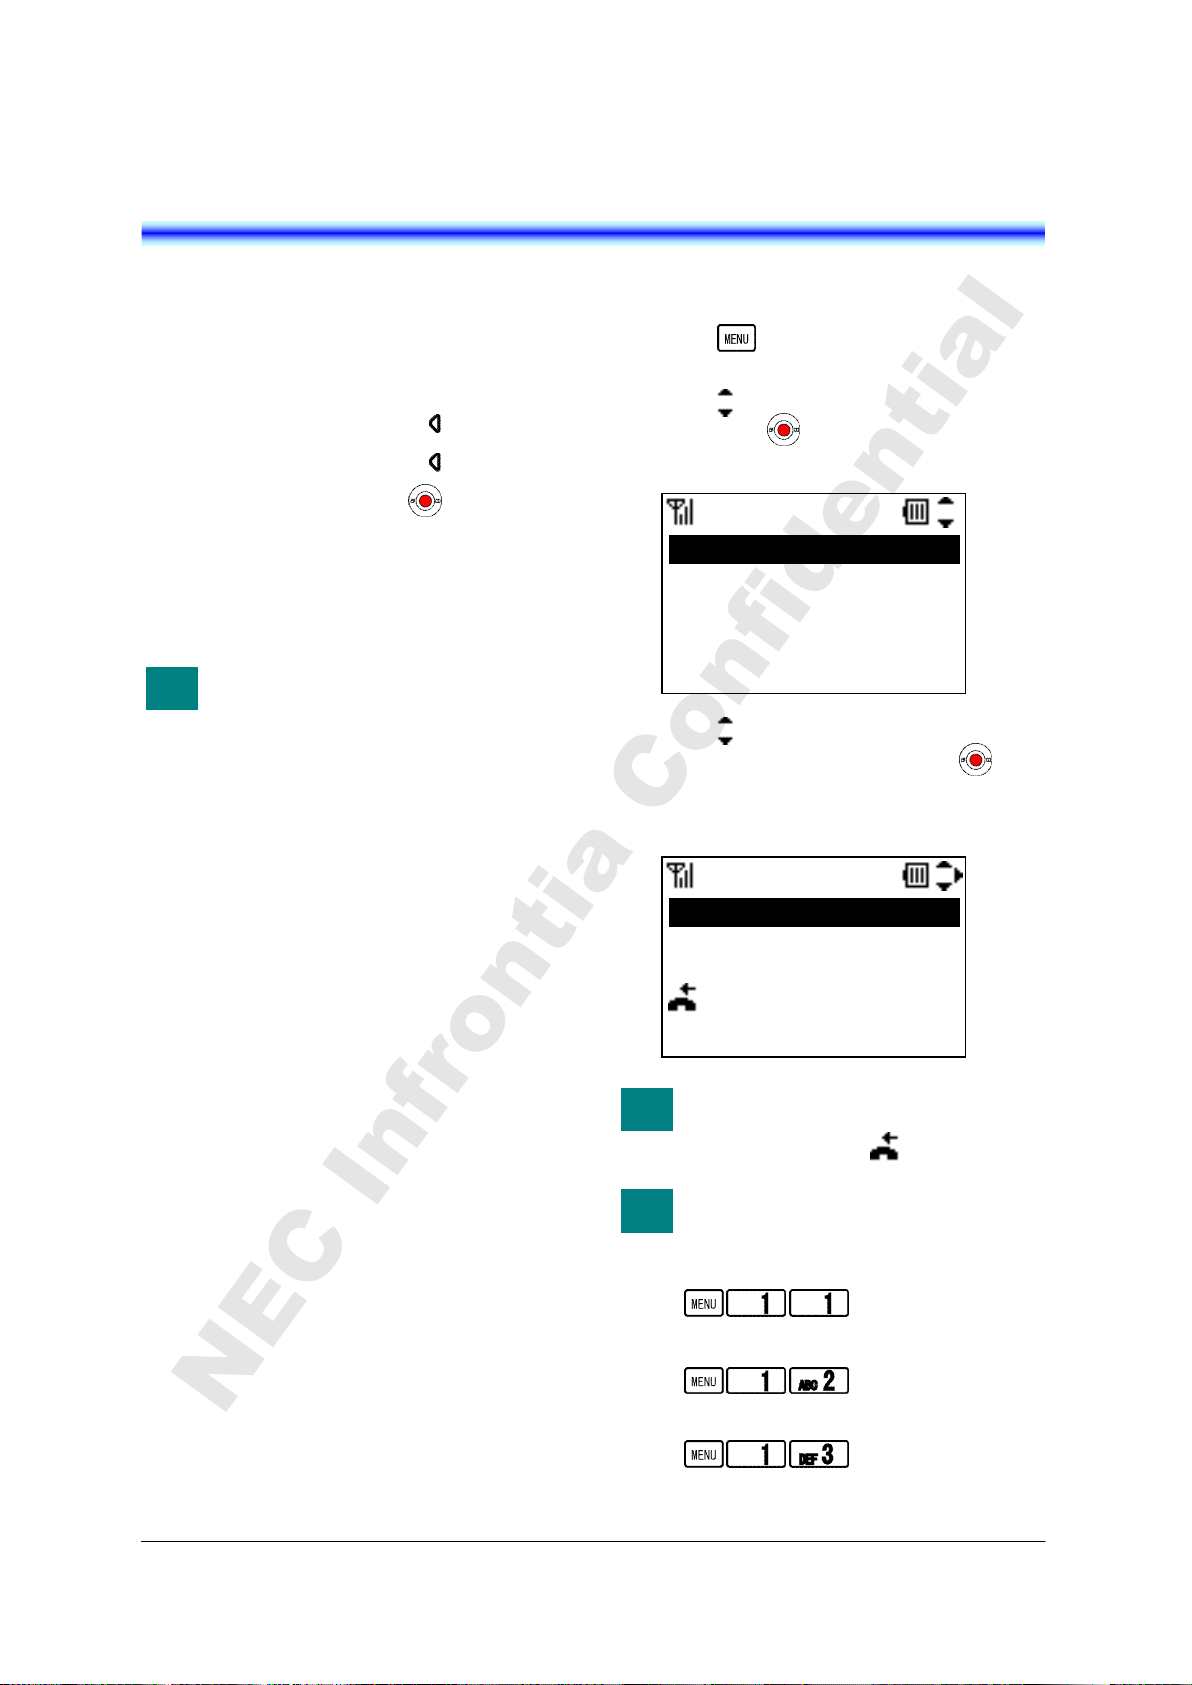
Your phone can record recent Call History in the
following 3 lists up to 50 records for each list.
You can open each list from the main menu or
by pressing the associated key in Standby mode.
Outgoing Calls (Press key)
Incoming Calls (Press key twice)
Missed Calls (Press key twice)
Outgoing Calls show a list of Dialed Numbers
and Incoming Calls show that of Received Calls.
You can make a call from the list and also add a
Call History to Directory as required.
Once you see a list of Missed Calls
and close the screen, the records
are cleared automatically. You can
find those records from the list of
Incoming Calls.
• TO VIEW CALL HISTORY
- Press key in Standby mode. Your
- Press key to select “1.Call History” and
- Press key to select a history you want
- Your phone displays as follow when you
phone displays the main menu.
then press key. Your phone displays as
follow.
Call History
1.Missed
2.Outgoing
3.Incoming
4.All Delete
to view on the list and then press key.
select “3.Incoming”.
Incoming
9/ 1 22:00 Eric
9/ 1 9:25 222
8/31 10:12 Tom
8/31 10:03 Tom
Delete Save Back
You can find missed call easily
from the list of Incoming Calls by
missed call icon ( ).
You can reach each Call History by
pressing following keys.
View Missed Calls:
View Outgoing Calls:
View Incoming Calls:
15
Page 30
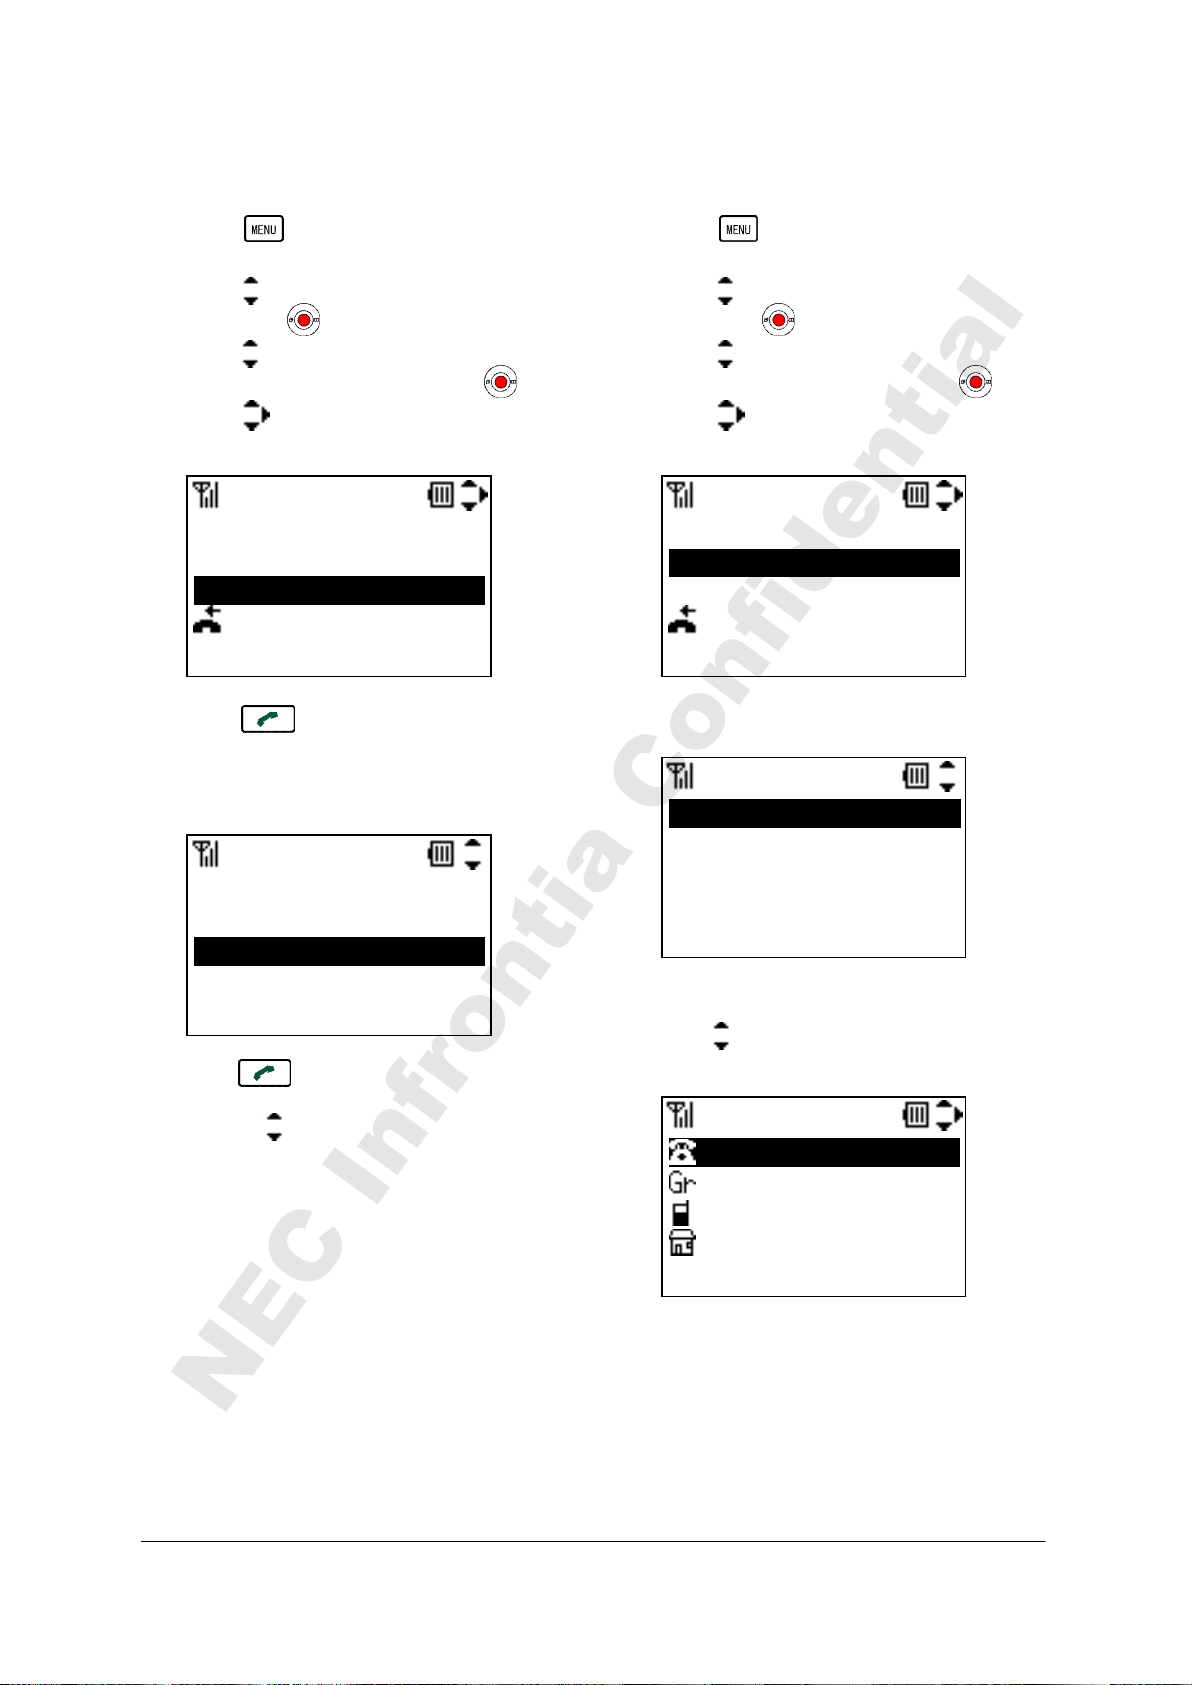
• TO MAKE A CALL FROM CALL
NEC Infrontia Confidential
HISTORY
• TO ADD PHONE NUMBER TO
DIRECTORY
- Press key in Standby mode. Your
phone displays the main menu.
- Press key to select “1.Call History” and
then press key.
- Press key to select a history you want
to view on the list and then press key.
- Press key to select a desired party you
want to make a call.
9/ 1 22:00 Eric
9/ 1 9:25 222
8/31 10:12 Tom
8/31 10:03 Tom
Delete Save Back
- Press key. Your phone displays the
phone number list as follow if the selected
party has been already registered in the
Directory.
1.14581238901
2.12621238901
3.250
Prefix Call Back
- Press key or “Call” soft key to make
the call after you select a phone number by
pressing key.
Incoming
Number
- Press key in Standby mode. Your
phone displays the main menu.
- Press key to select “1.Call History” and
then press key.
- Press key to select a history you want
to view on the list and then press key.
- Press key to select a phone number
you want to add to Directory.
9/ 1 22:00 Eric
9/ 1 9:25 222
8/31 10:12 Tom
8/31 10:03 Tom
Delete Save Back
- Press “Save” soft key.
1.New
2.Add
OK Back
In case of New:
- Press key to select “1.New” and then
press “OK” soft key.
Name
Group
222
Tel #2
Save Edit Back
Incoming
Edit
16
Page 31
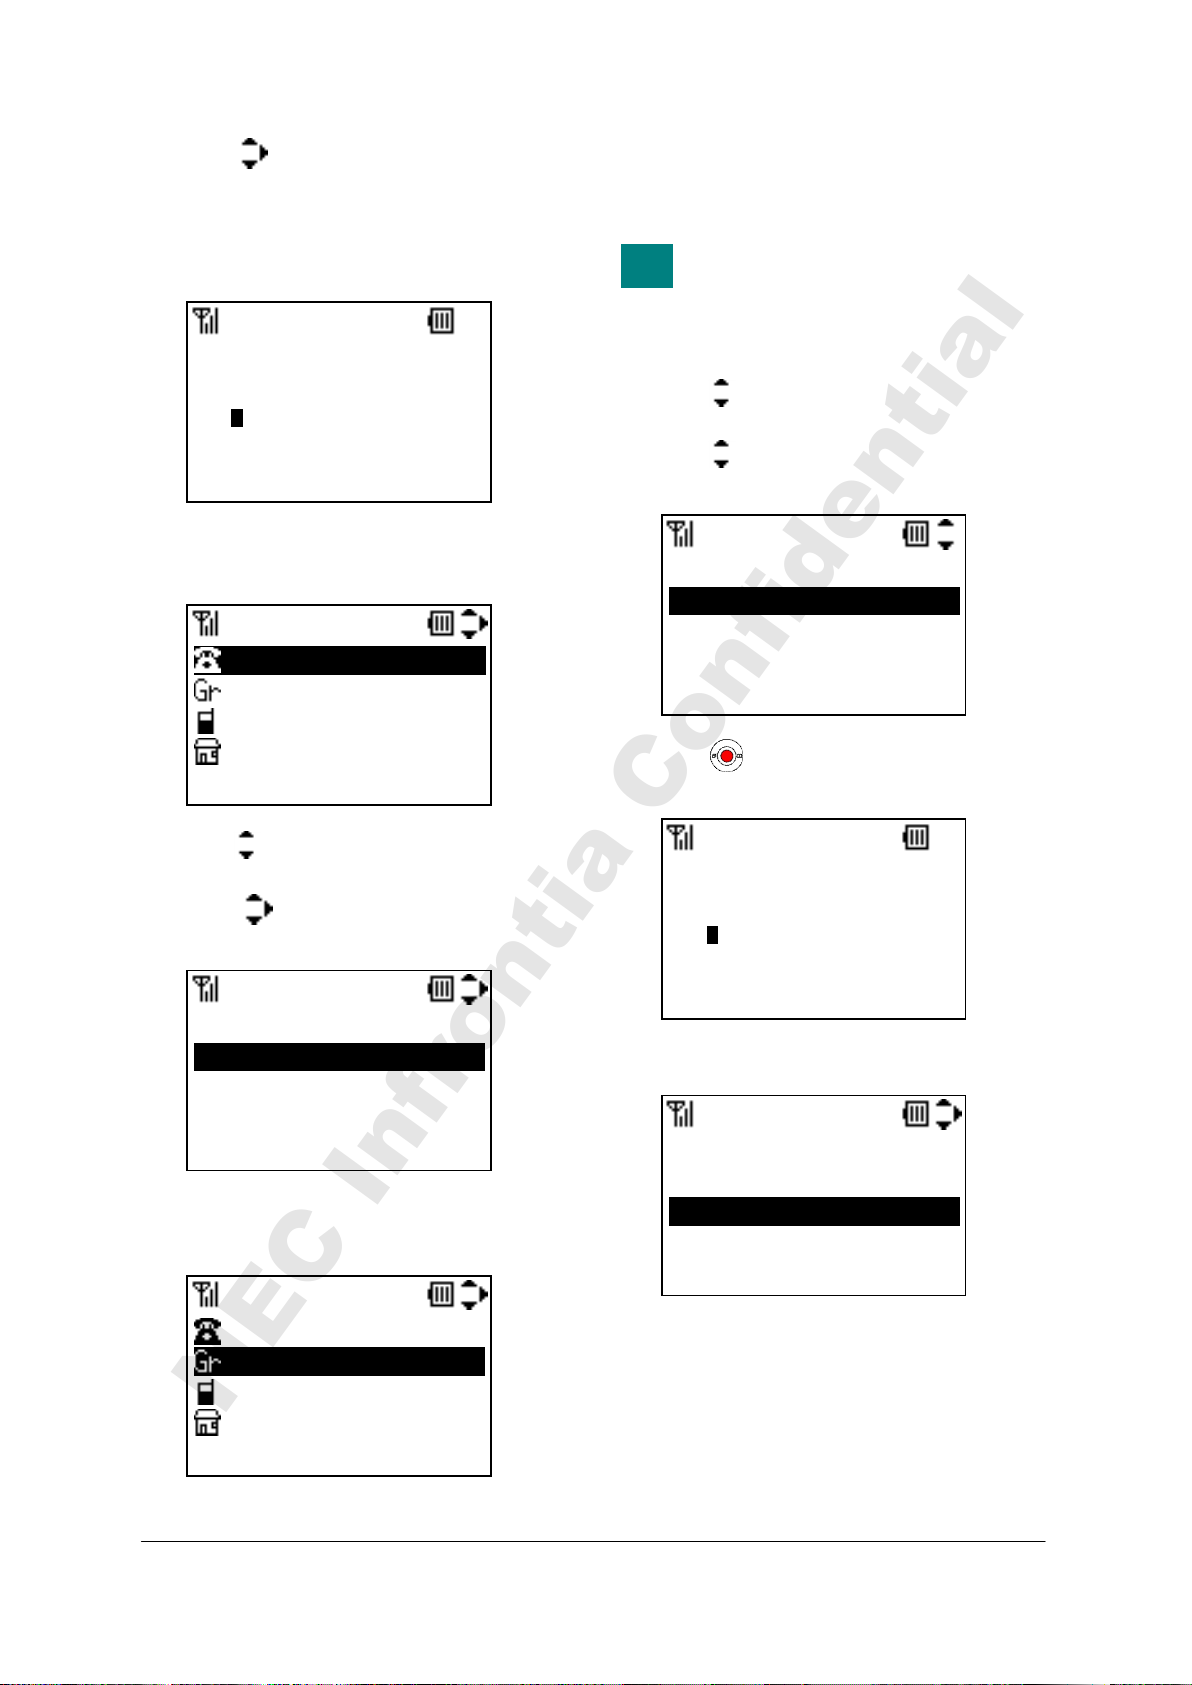
- Press key to select an item you want to
TIP
NEC Infrontia Confidential
edit and then press “Edit” soft key as
required. In this example, Name and Group
will be edited.
- Edit the data in edit display.
Ken
ab OK Clear
- Press “OK” soft key and then the display
returns to the previous one.
Ken
Group
222
Tel #2
Save Edit Back
- Press key to select “Group” and then
press “Edit” soft key.
- Press key to select an appropriate
group.
01.Default
02.Colleagues
03.VIPs
04.Family
OK Back
- Press “OK” soft key and then the display
returns to the previous one.
Ken
Colleagues
222
Tel #2
Save Edit Back
Name
Edit
Group
Edit
- Press “Save” soft key to save the data to
Directory. The display returns to the
previous one.
Name information is minimum
requirement to save the data.
In case of Add:
- Press key to select “2.Add” and then
press “OK” soft key.
- Press key to select a search way you
want. (In this case, to search by Name.)
1.Group
2.Name
3.Tel Number
4.Others
- Press key and then input name you
want to search.
Ken
ab OK Clear
- Press “OK” soft key to search.
005.Eric
001.John
010.Ken
003.Kenny
Detail Back
Search
Name
Name
17
Page 32
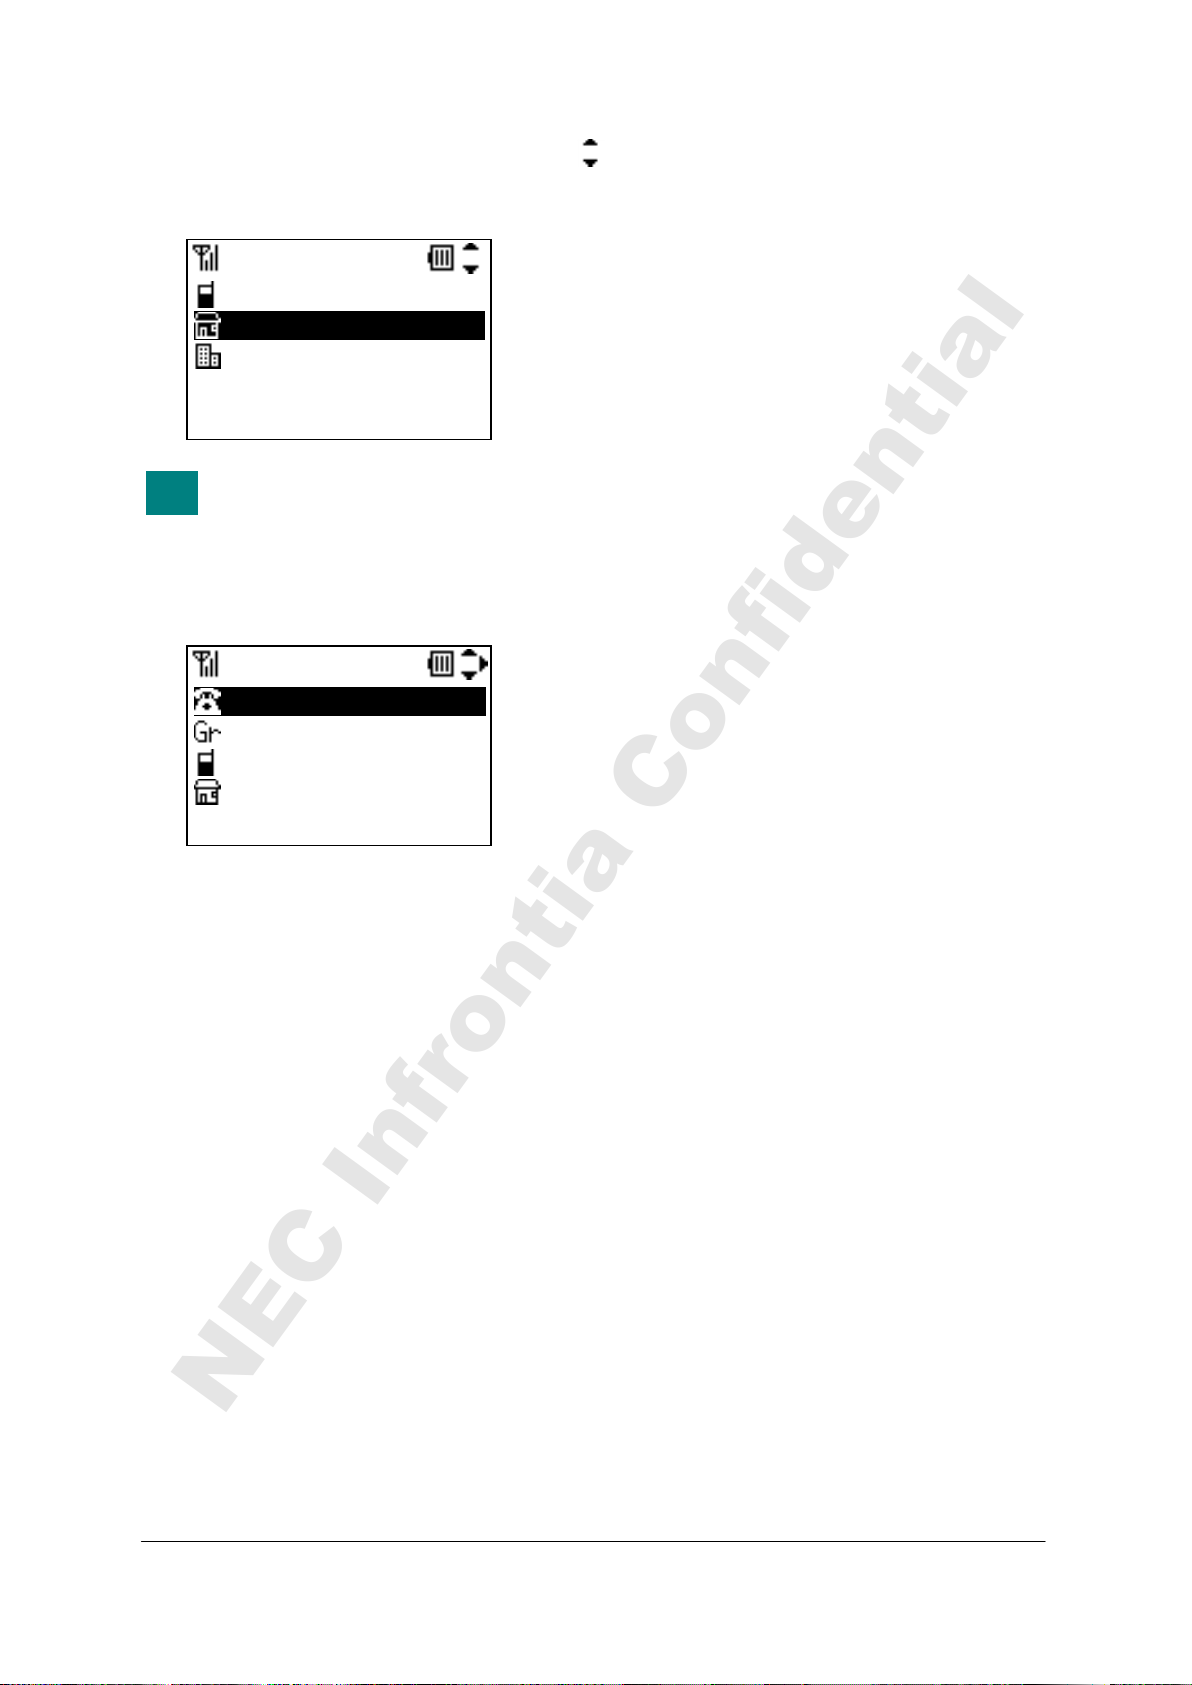
- Press “Detail” soft key and then press
TIP
NEC Infrontia Confidential
key to select a phone number input area you
want to add.
14581237654
OK Back
If you select a phone number area
registered a phone number already,
the area is overwritten by new
phone number.
- Press “OK” soft key. Your phone displays.
Ken
Colleagues
14581237654
222
Save Edit Back
- Press “Save” soft key to save the added data
to Directory. The display returns to the
previous one.
Name
Directory 010
18
Page 33
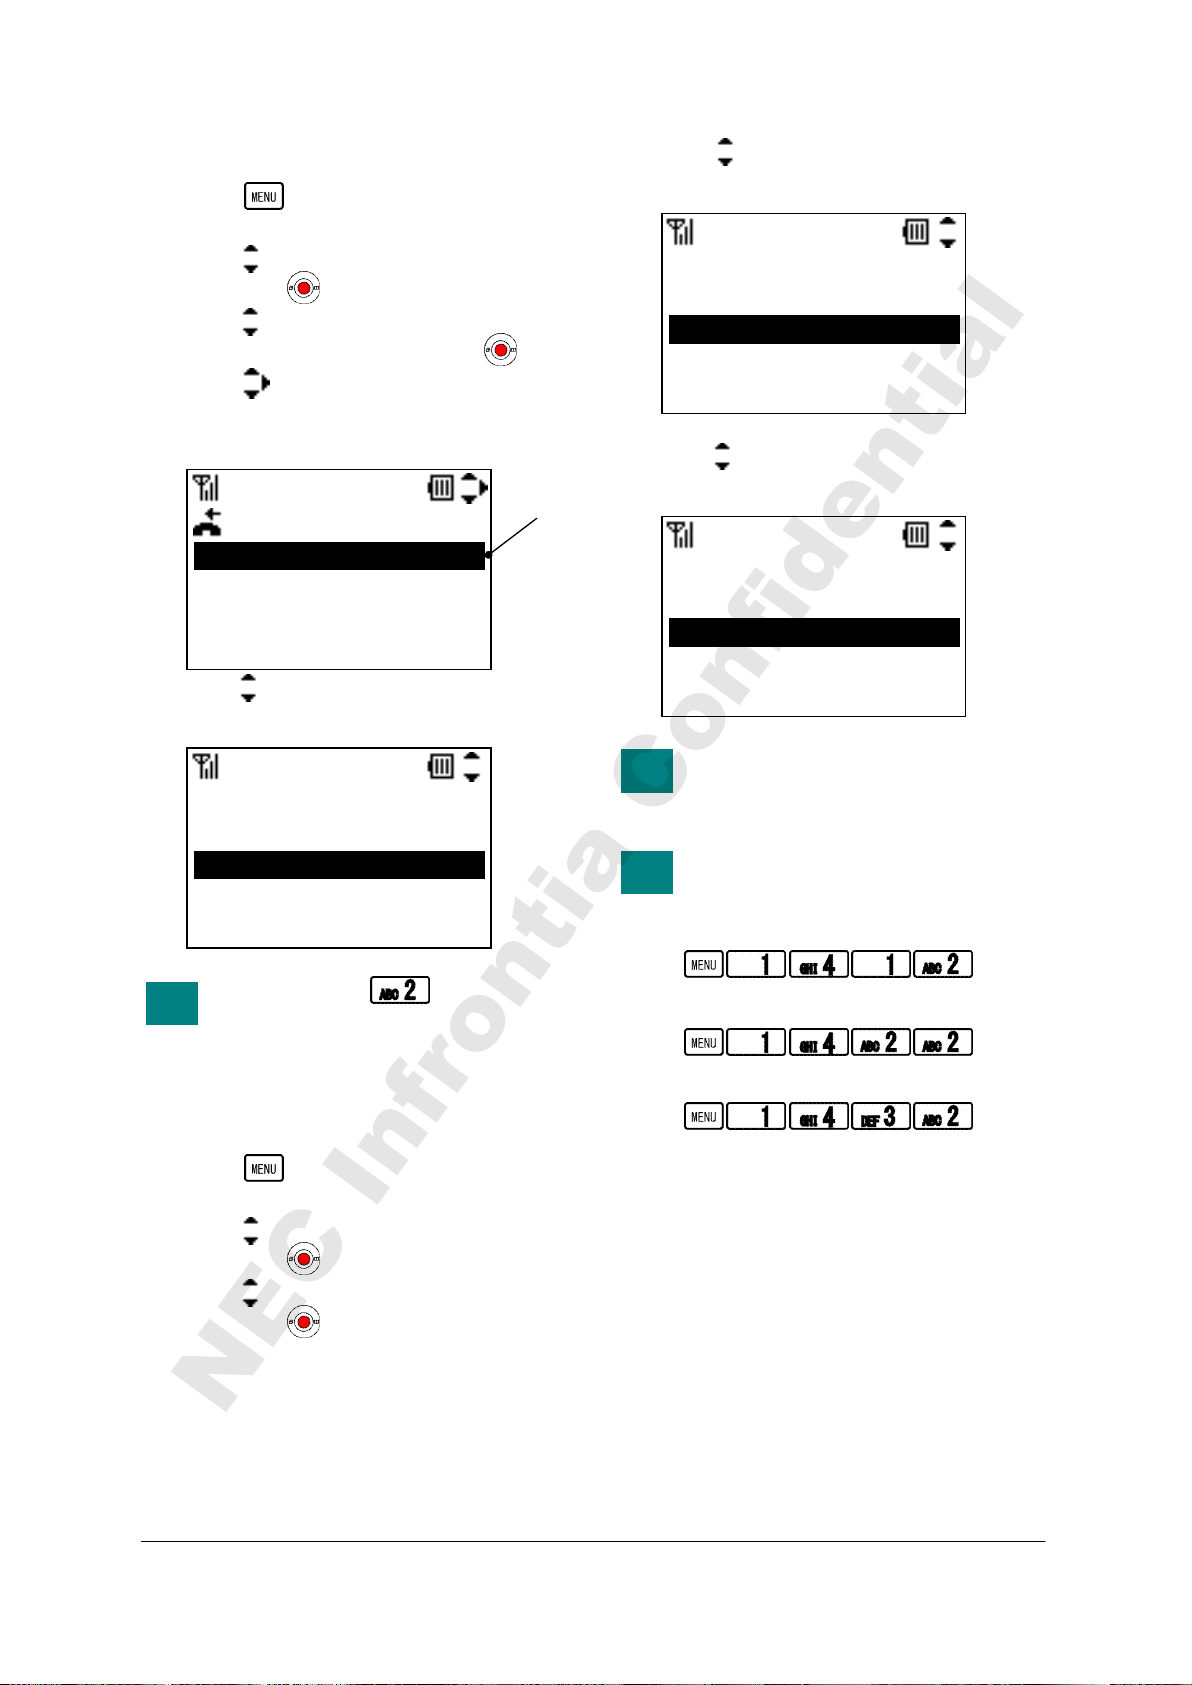
• TO DELETE A CALL HISTORY
Delete
TIP
TIP
TIP
NEC Infrontia Confidential
- Press key in Standby mode. Your
phone displays the main menu.
- Press key to select “1.Call History” and
then press key.
- Press key to select a history you want
to view on the list and then press key.
- Press key to select a phone number
you want to delete and then press “Delete”
soft key.
8/31 10:03 Tom
8/31 9:25 Privat
8/30 19:53 Kenny
8/30 15:44 Eric
Delete Save Back
- Press key to select “2.OK” and then
press “OK” soft key.
Delete this entry?
1.Cancel
2.OK
OK Back
You can press key to delete
instead of above operation.
Incoming
Incoming
• TO DELETE ALL CALL
HISTORIES
- Press key in Standby mode. Your
phone displays the main menu.
- Press key to select “1.Call History” and
then press key.
- Press key to select “4.All Delete” and
then press key.
- Press key to select a history you want
to delete and then press “OK” soft key.
1.Outgoing
2.Incoming
3.All
OK Back
- Press key to select “2.OK” and then
press “OK” soft key.
Del. all histories?
1.Cancel
2.OK
OK Back
If you delete all Incoming Call
histories, Missed Call histories
also are deleted.
You can delete all call histories by
pressing following keys.
Delete Outgoing Call Histories:
Delete Incoming Call Histories:
Delete All Call Histories:
All Delete
All Delete
19
Page 34

This page is for your notes.
NEC Infrontia Confidential
20
Page 35
6.DIRECTRY
TIP
TIP
NEC Infrontia Confidential
Directory can register up to 500 records. You
can view, edit or delete the 500 entries.
• TO VIEW DIRECTORY
- Press key in Standby mode.
- Your phone displays as follow.
007.Aaron
005.Eric
001.John
010.Ken
Delete Detail Back
By pressing or key while
displaying Directory, you can
scroll a list as follow.
All <> ABC <> DEF <> GHI<> JKL
<> MNO <> PQRS <> TUV <>
WXYZ <> Other <>
By pressing to key and
holding for about 1 second in
Standby mode, you can use
Alphabet Search.
• TO SEARCH DIRECTORY
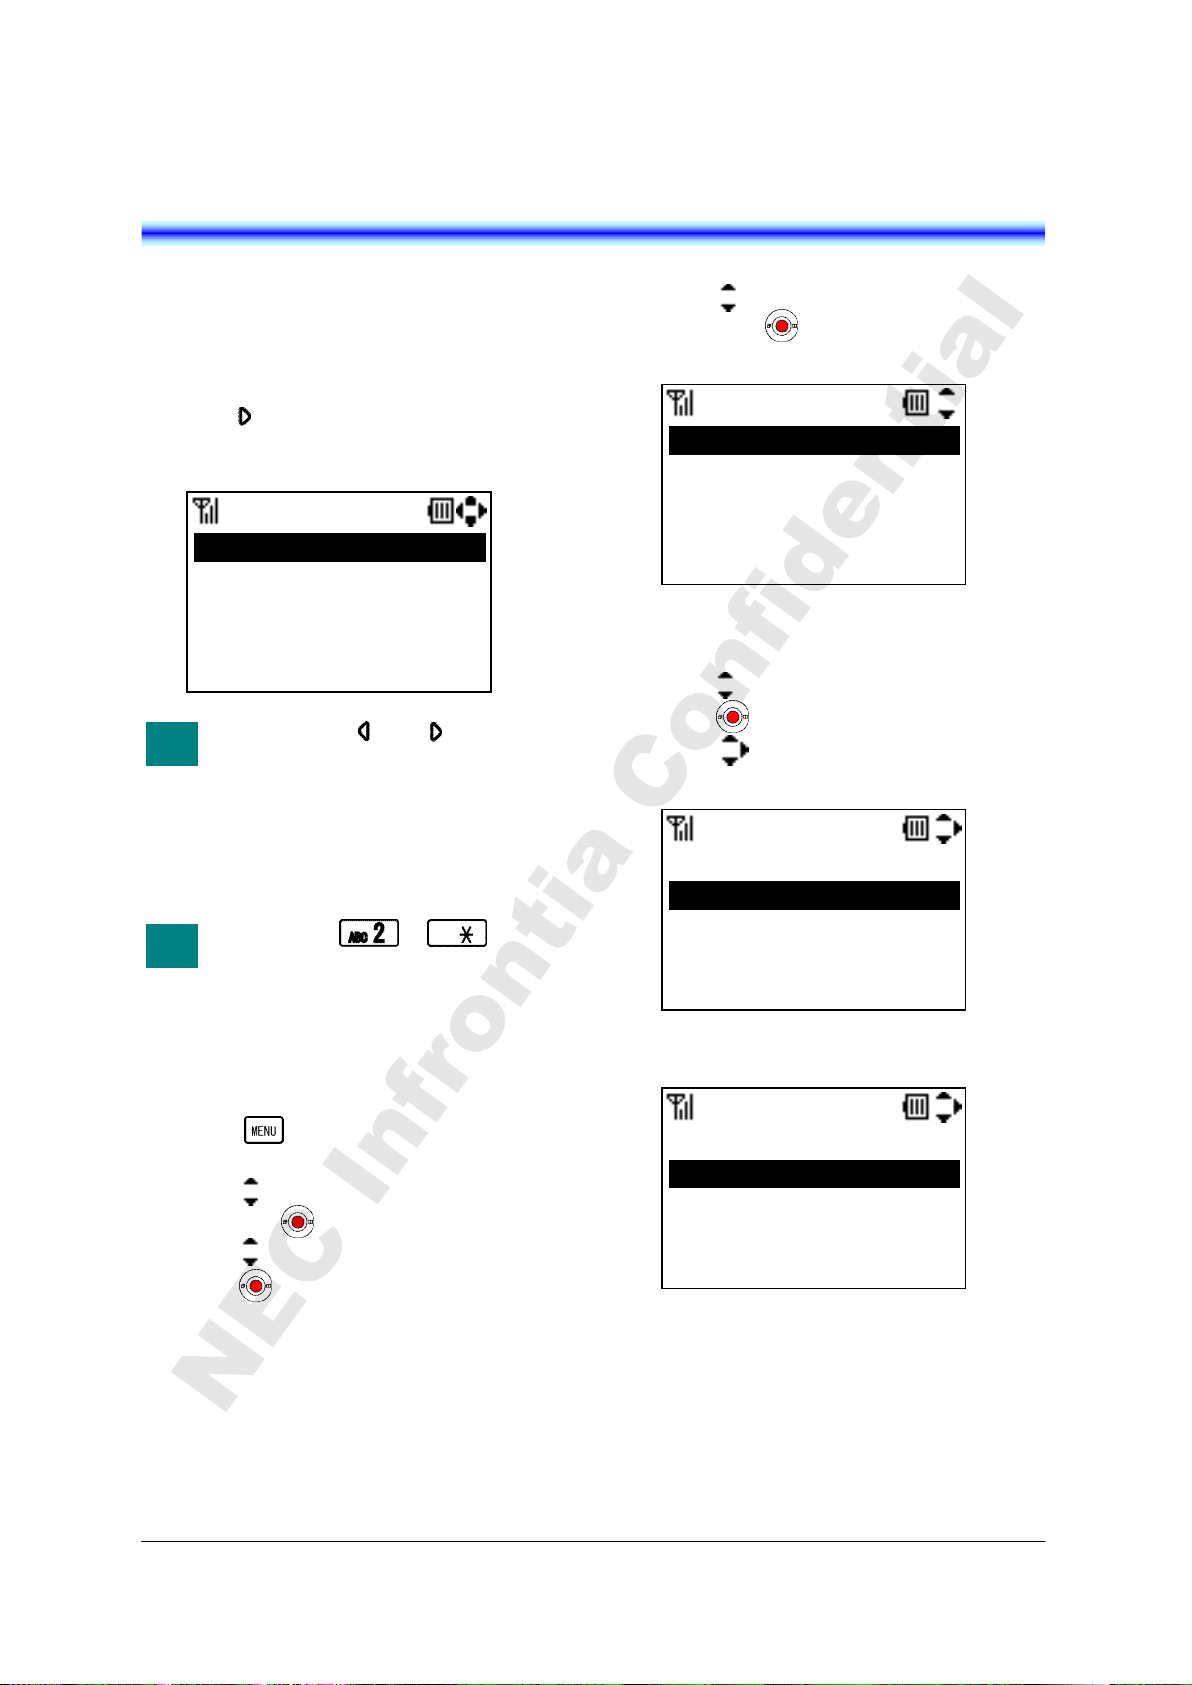
- Press key in Standby mode. Your
phone displays the main menu.
- Press key to select “2.Directory” and
then press key.
- Press key to select “1.Search” and then
press key.
All
- Press key to select “1.Personal” and
then press key. Your phone displays
Search menu.
1.Group
2.Name
3.Tel number
4.Others
To Search by Group:
- Press key to select “1.Group” and then
press key.
- Press key to select a Group you want
to search and then press “OK” soft key.
01.Default
02.Colleagues
03.VIPs
004.Family
OK Back
- Your phone displays searched records.
005.Eric
001.John
010.Ken
003.Kenny
Delete Detail Back
Search
Group
Group
21
Page 36
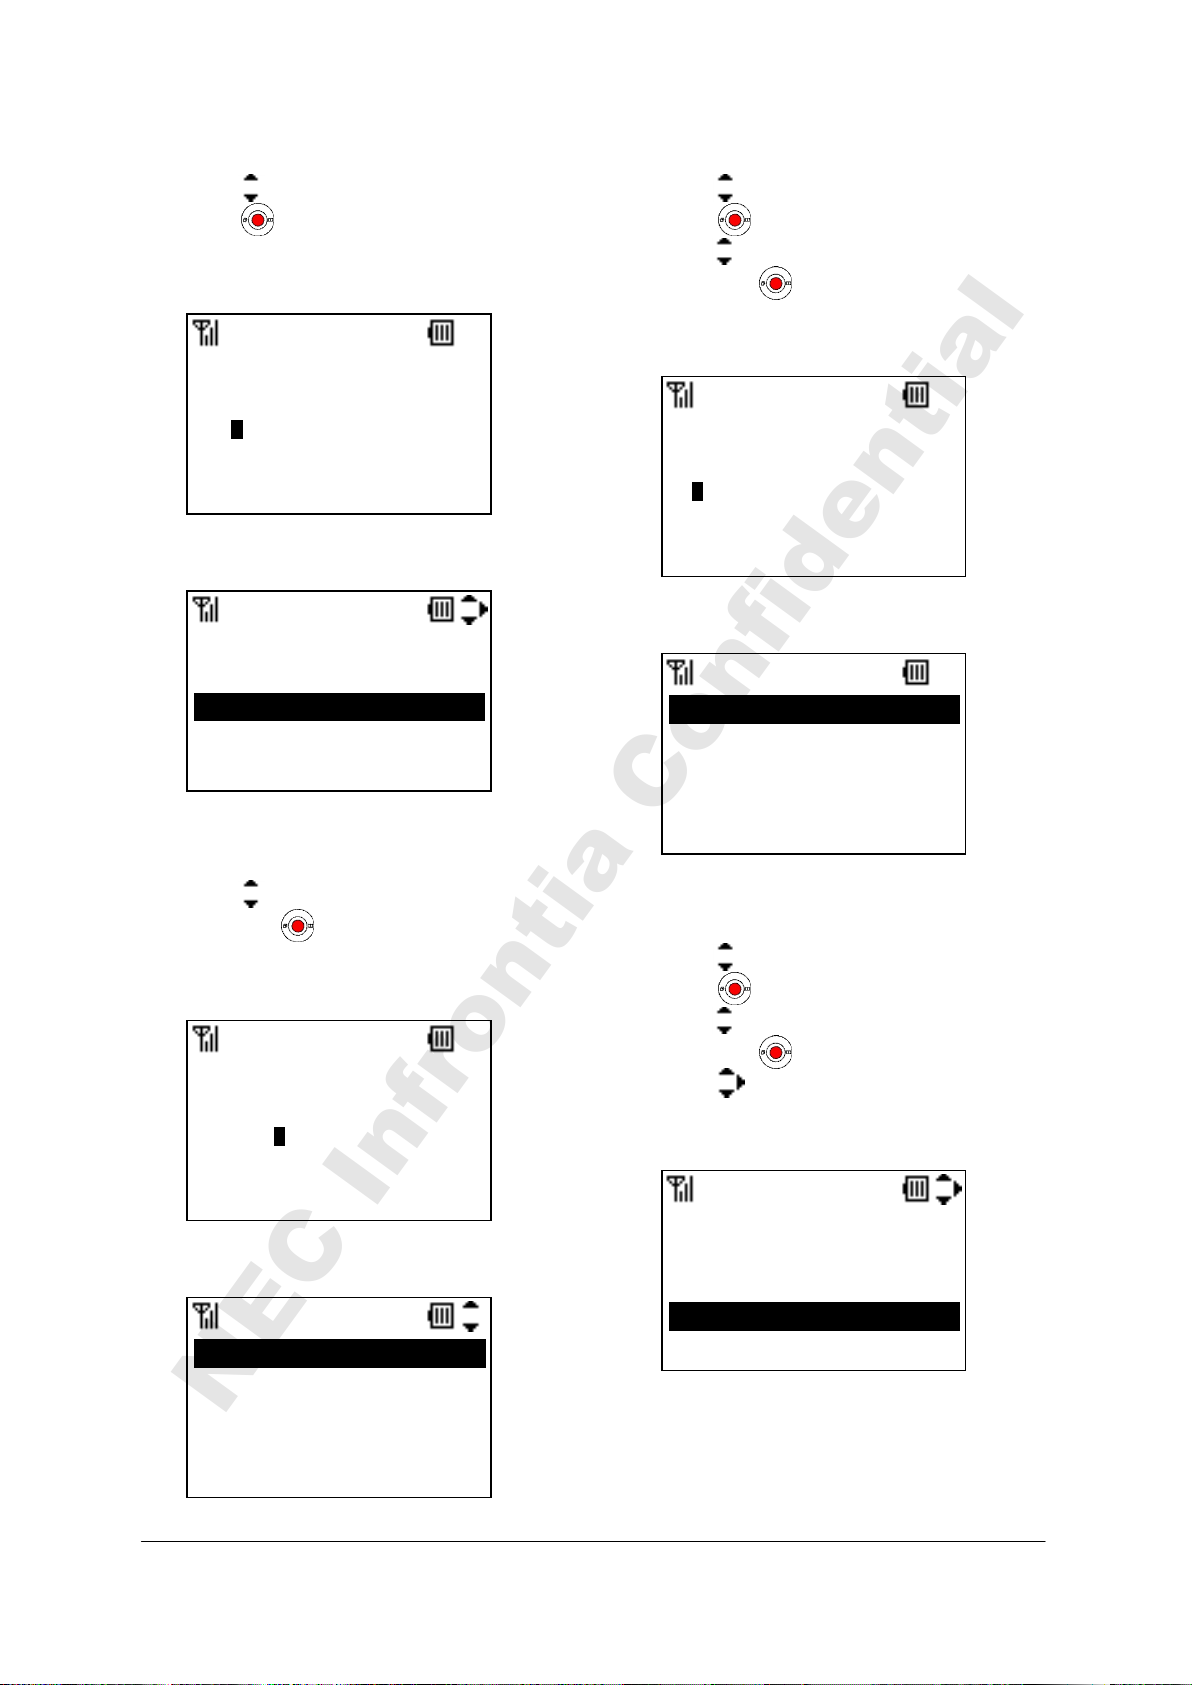
To Search by Name:
NEC Infrontia Confidential
To Search by Memory ID:
- Press key to select “2.Name” and then
press key.
- Enter a name or letter you want to search
and then press “OK” soft key.
Ken
ab OK Clear
- Your phone displays searched records.
005.Eric
001.John
010.Ken
003.Kenny
Delete Detail Back
To Search by Tel number:
- Press key to select “3.Tel number” and
then press key.
Name
Name
- Press key to select “4.Others” and then
press key.
- Press key to select “1.Memory ID” and
then press key.
- Enter a Memory ID (3 digits) you want to
search and then press “OK” soft key.
003
12 OK Clear
- Your phone displays searched records.
003.Kenny
Delete Detail Back
To Search by Alphabet:
Memory ID
Memory ID
- Enter a phone number you want to search
and then press “OK” soft key.
1262123
12 OK Clear
- Your phone displays searched records.
001.John
004.Tom
Delete Detail Back
Name
Tel Number
- Press key to select “4.Others” and then
press key.
- Press key to select “2.Alphabet” and
then press key.
- Press key to select an Alphabet you
want to search and then press “OK” soft
key.
2.ABC
3.DEF
4.GHI
5.JKL
OK Back
Alphabet
22
Page 37
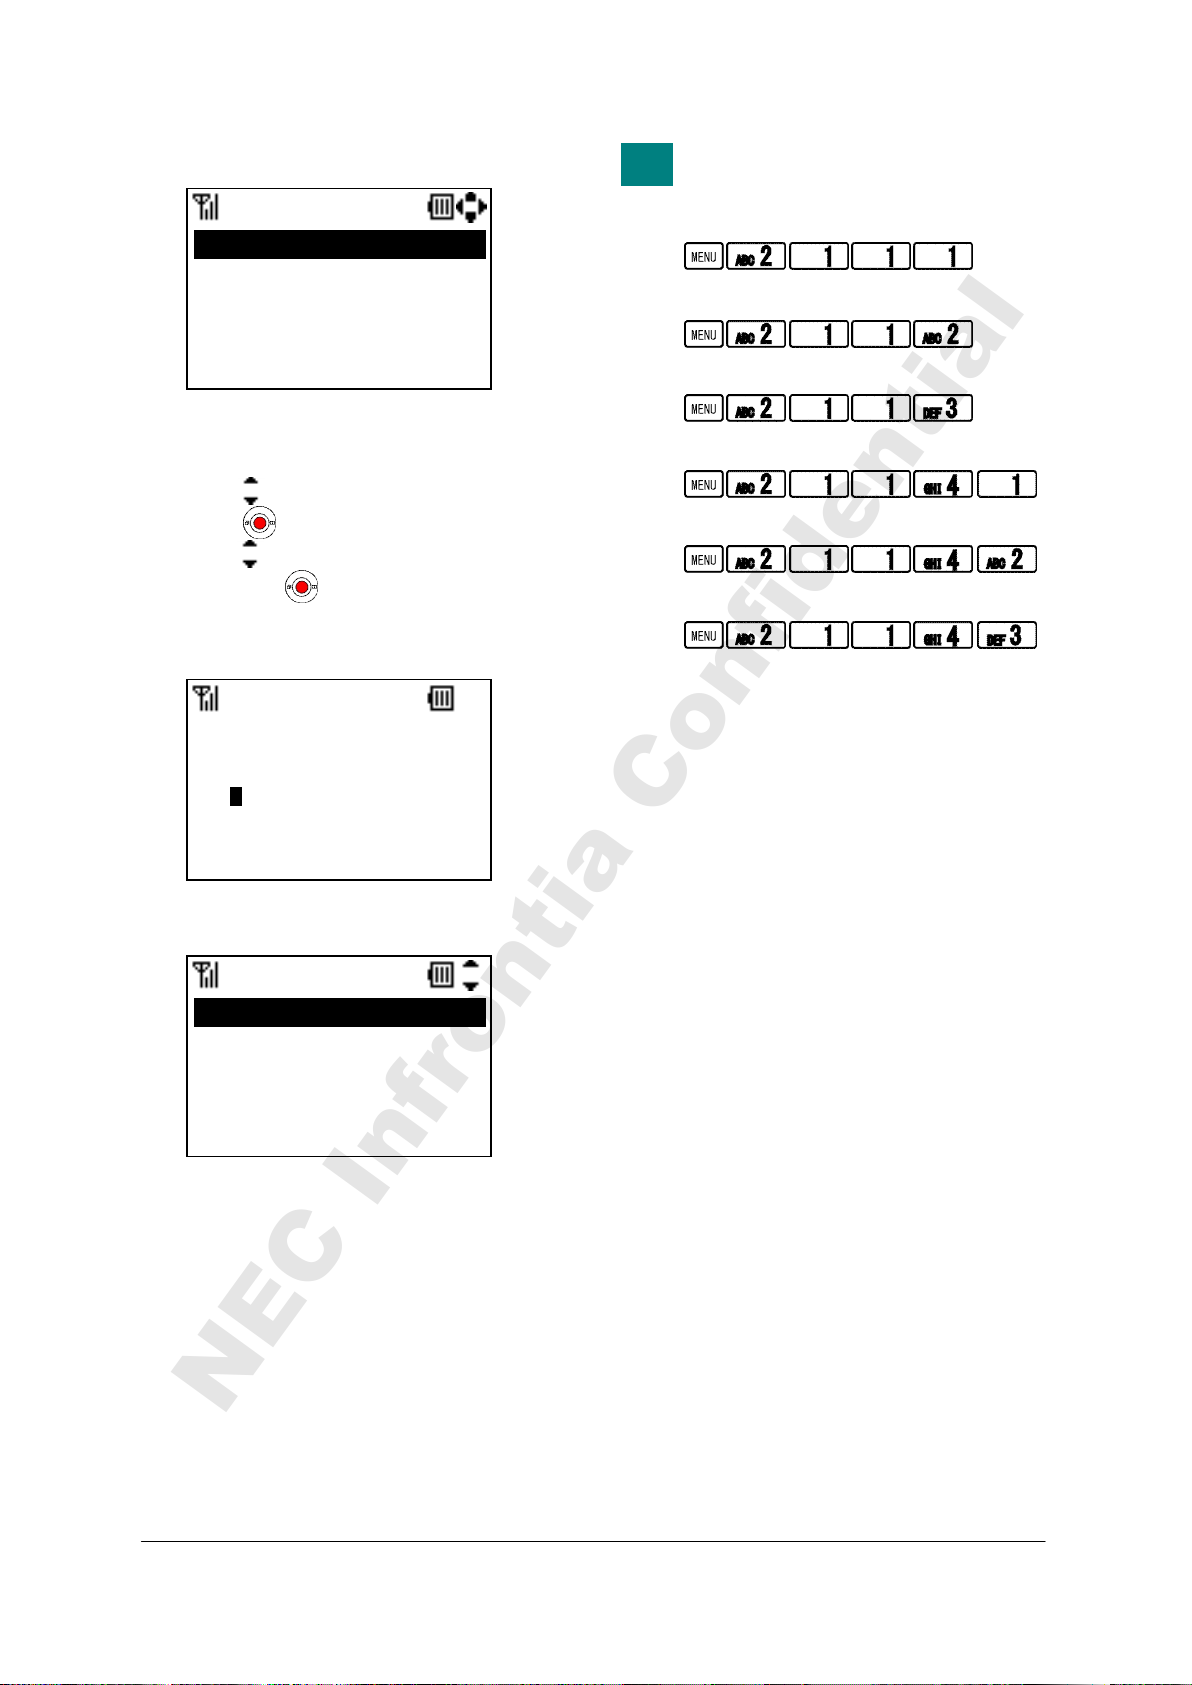
- Your phone displays searched records.
TIP
NEC Infrontia Confidential
001.John
010.Ken
003.Kenny
Delete Detail Back
To Search by Company:
- Press key to select “4.Others” and then
press key.
- Press key to select “3.Company” and
then press key.
- Enter a Company name you want to search
and then press “OK” soft key.
NEC
ab OK Clear
- Your phone displays searched records.
007.Aaron
001.John
010.Ken
004.Tom
Delete Detail Back
JKL
Company
Company
You can reach each Search menu
by pressing following keys.
Go to Group Search menu:
Go to Name Search menu:
Go to Tel Number Search menu:
Go to Memory ID Search menu:
Go to Alphabet Search menu:
Go to Company Search menu:
23
Page 38
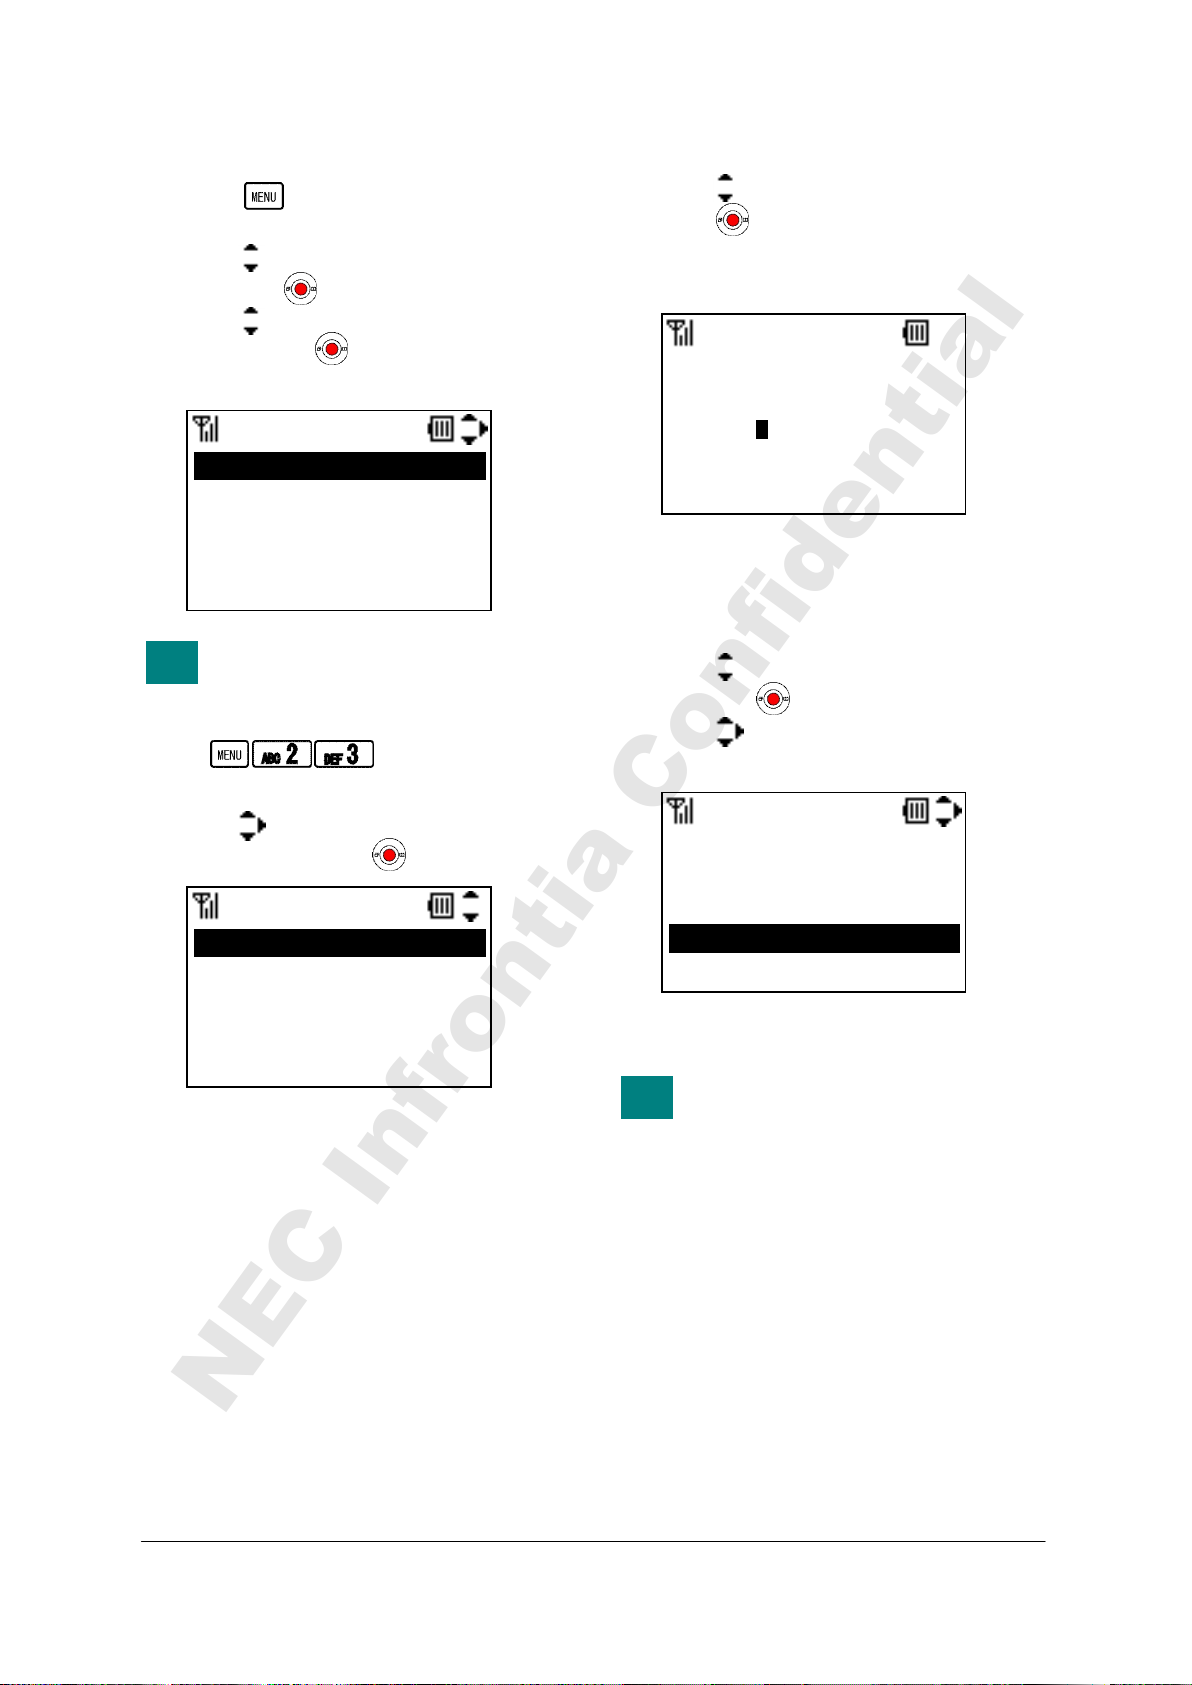
• TO SETUP GROUP
TIP
TIP
NEC Infrontia Confidential
- Press key in Standby mode. Your
phone displays the main menu.
- Press key to select “2.Directory” and
then press key.
- Press key to select “3.Group Setting”
and then press key. Your phone displays
Group Setting menu.
01.Default
02.Colleagues
03.VIPs
004.Family
005.Friends
You can reach Group Setting
menu by pressing following keys.
Go to Group Setting menu:
- Press key to select a Group you want to
setup and then press key.
1.Name
2.Ring Tone
3.Illumination
4.Vibrator
GroupSetting
GroupSetting
To Edit Group Name:
- Press key to select “1.Name” and then
press key.
- Enter a Group Name you want and then
press “OK” soft key.
Customer
ab OK Clear
- The display returns to the previous one.
To Setup Group Ring Tone:
- Press key to select “2.Ring Tone” and
then press key.
- Press key to select a Group Ring Tone
you want and then press “OK” soft key.
01.Disable
02.Default
03.Tone Type1
04.Tone Type2
Play OK Back
- The display returns to the previous one.
By pressing “Play” and “Stop”
soft key, you can hear the Ring
Tone while you select a Group
Ring Tone.
Name
Ring Tone
24
Page 39
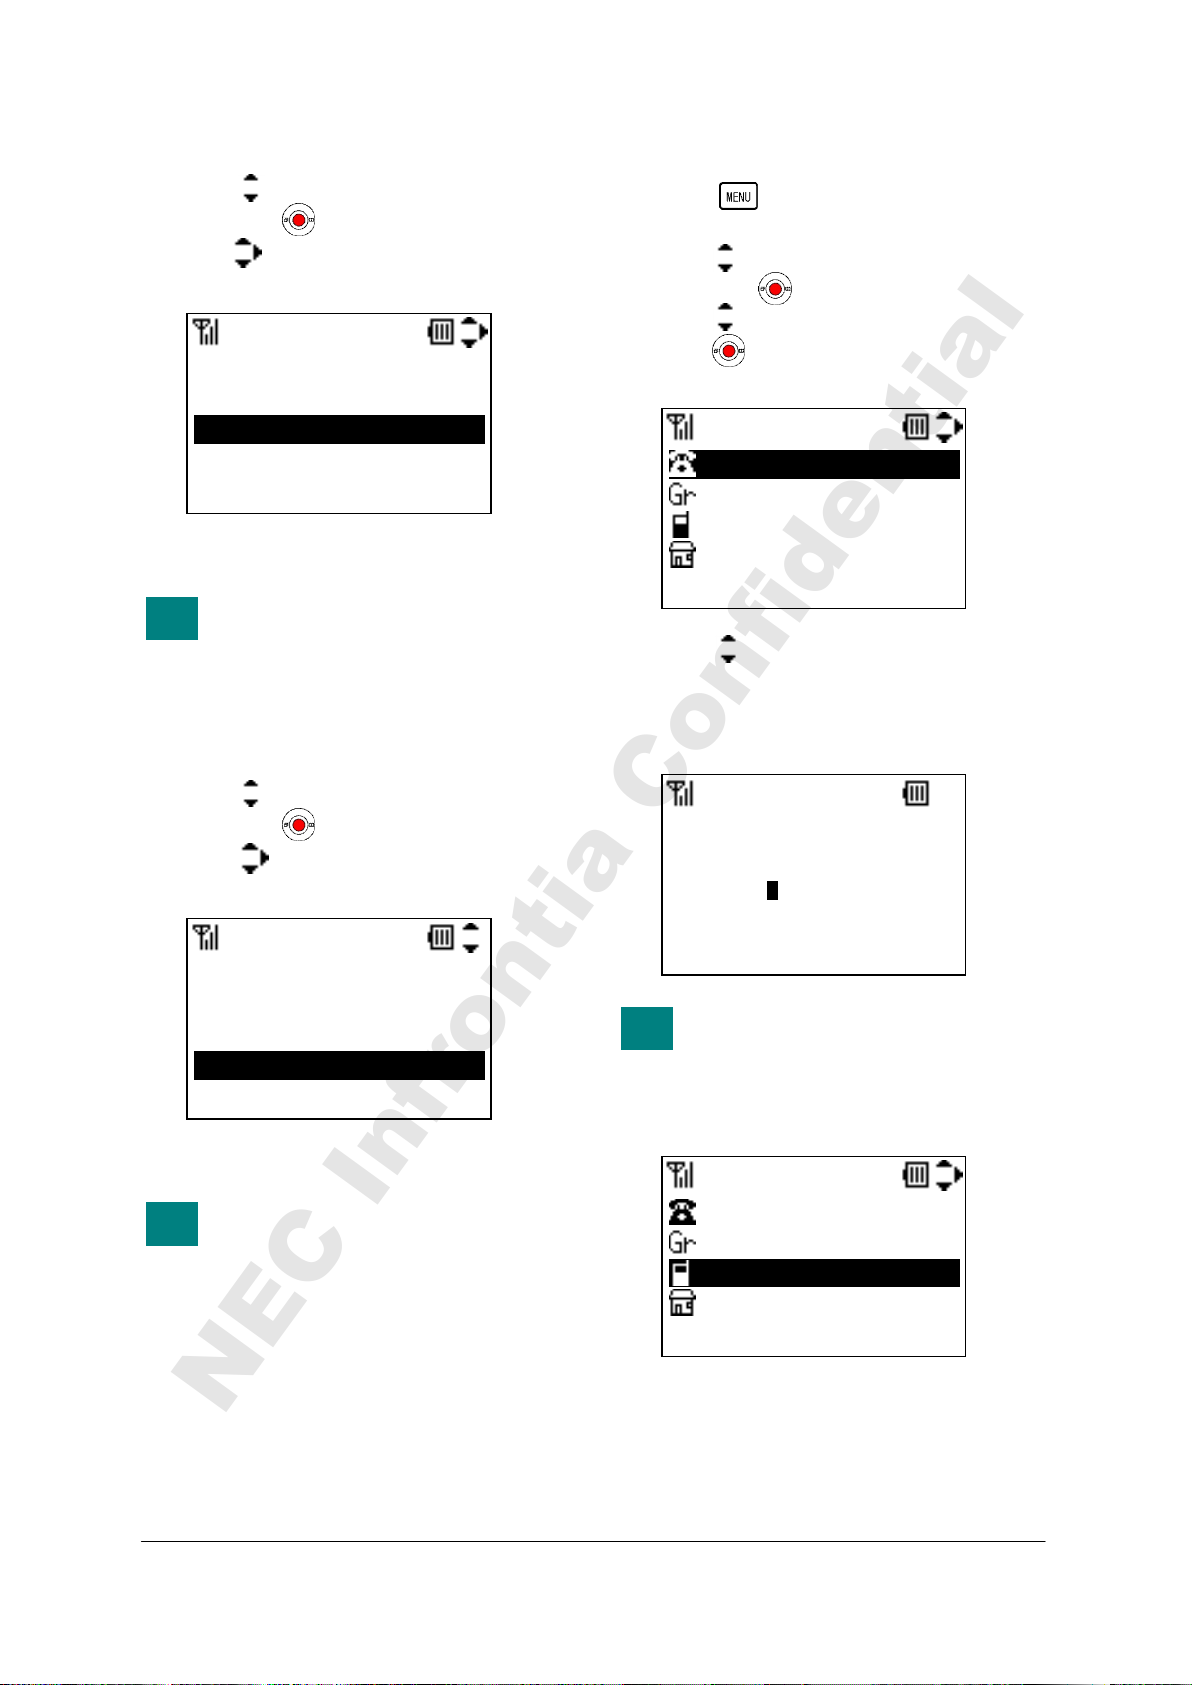
To Setup Group Illumination:
TIP
TIP
TIP
NEC Infrontia Confidential
- Press key to select “2.Ring Tone” and
then press key.
- Press key to select a Group Illumination
you want and then press “OK” soft key.
1.Disable
2.Default
3.Red
4.Green
On OK Back
- The display returns to the previous one.
By pressing “On” and “Stop” soft
key, you can view the Illumination
while you select a Group
Illumination.
To Setup Group Vibrator:
- Press key to select “4.Vibrator” and
then press key.
- Press key to select a Group Vibrator
you want and then press “OK” soft key.
1.Disable
2.Default
3.Pattern1
4.Pattern2
Conf OK Back
- The display returns to the previous one.
By pressing “Conf” and “Stop”
soft key, you can confirm the
Vibrator pattern while you select a
Group Vibrator.
Illumination
Vibrator
• TO ADD A NEW ENTRY
- Press key in Standby mode. Your
phone displays the main menu.
- Press key to select “2.Directory” and
then press key.
- Press key to select “2.Edit” and then
press key. Your phone displays Edit
menu.
Name
Group
Tel #1
Tel #2
Edit Back
- Press key to select an Item you want to
edit and then press “Edit” soft key.
- Edit the selected item. In the following
example, Name data is edited.
Donald E.
ab OK Clear
Name information is minimum
requirement to save the data.
- Press “OK” soft key to write the data. The
display returns to the previous screen.
Donald E.
Group
Tel #1
Tel #2
Save Edit Back
Edit
Name
Edit
25
Page 40
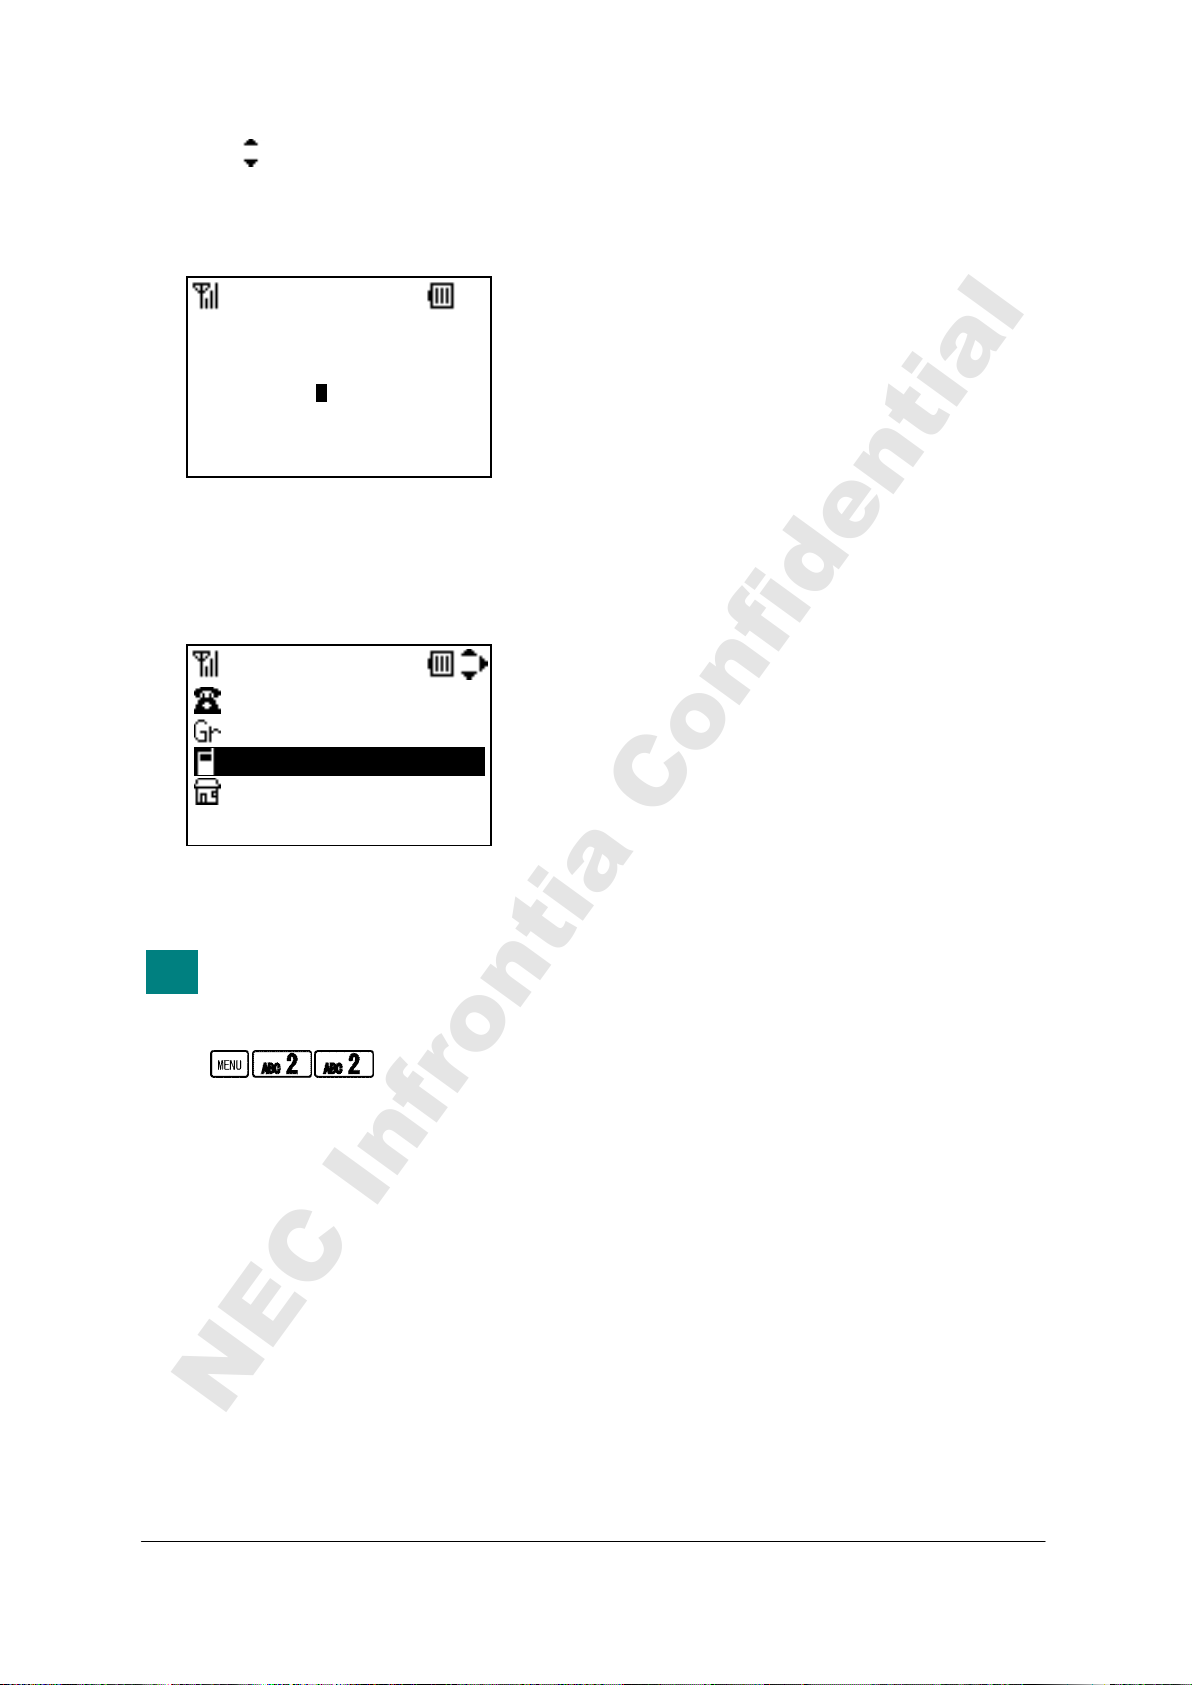
- Press key to select an Item you want to
TIP
NEC Infrontia Confidential
edit and then press “Edit” soft key.
- Edit the selected item. In the following
example, Tel #1 data is edited.
14581233333
12 OK Clear
- Press “OK” soft key to write the data. The
display returns to the previous screen.
- Repeat these steps as required for the new
entry.
Donald E.
Group
14581233333
Tel #2
Save Edit Back
- When edit is completed, press “Save” soft
key.
You can reach Directory Edit menu
by pressing following keys.
Go to Directory Edit menu:
Tel #1
Edit
26
Page 41
• TO DELETE A RECORD
TIP
TIP
NEC Infrontia Confidential
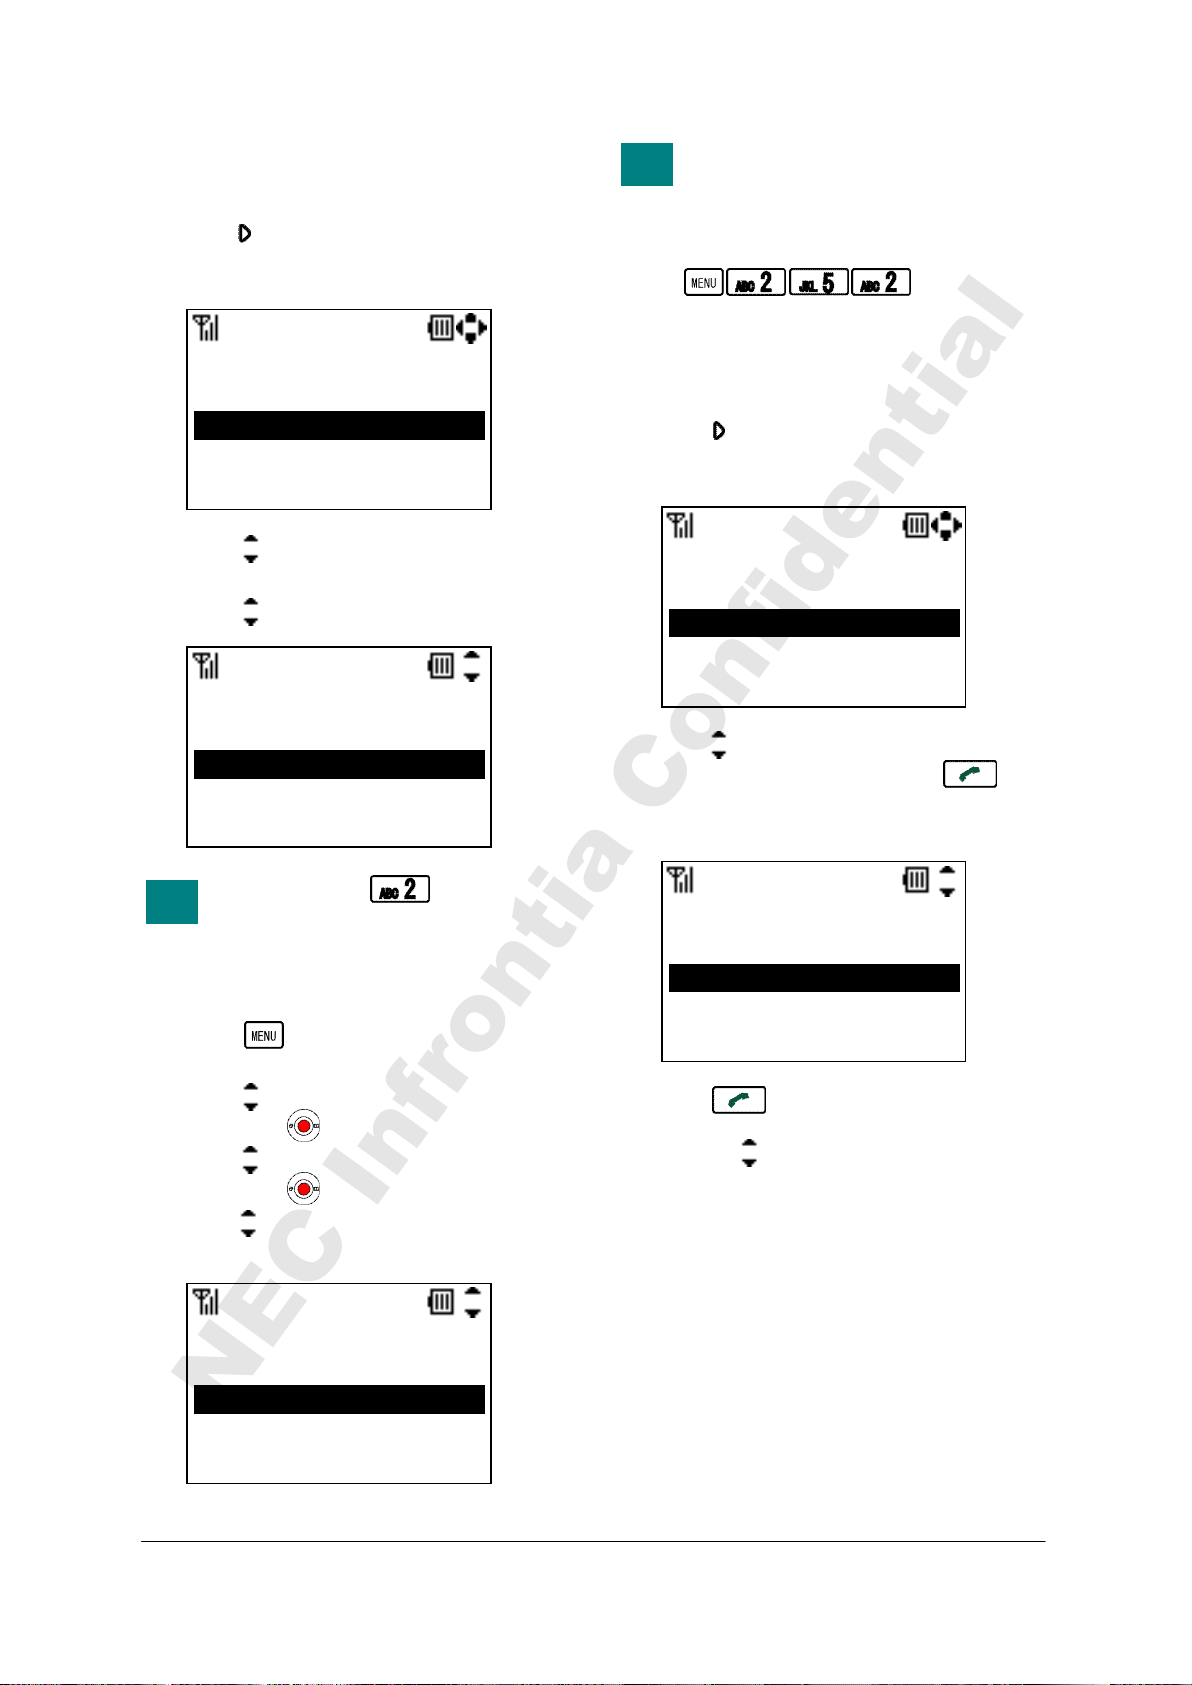
You can delete a record from the Directory.
- Press key in Standby mode.
- Your phone displays as follow.
007.Aaron
005.Eric
001.John
010.Ken
Delete Detail Back
- Press key to select a record you want to
delete and then press “Delete” soft key.
- Press key to select “OK” soft key.
Delete this entry?
1.Cancel
2.OK
OK Back
You can press key to delete
instead of above operation.
All
Directory
• TO DELETE ALL RECORDS
- Press key in Standby mode. Your
phone displays the main menu.
- Press key to select “2.Direcory” and
then press key.
- Press key to select “5.All Delete” and
then press key.
- Press key to select “2.OK” and then
press “OK” soft key.
Del. all Directory?
1.Cancel
2.OK
OK Back
All Delete
You can delete all records in the
Directory by pressing following
keys.
Delete All Directory:
• TO MAKE A CALL FROM
DIRECTORY
- Press key in Standby mode.
- Your phone displays as follow.
007.Aaron
005.Eric
001.John
010.Ken
Delete Detail Back
- Press key to select a party you want to
make a call and then press key.
Your phone displays the phone number list
as follow.
1.14581234567
2.12621234567
3.200
Prefix Call Back
- Press key or “Call” soft key to make
the call after you select a phone number by
pressing key.
27
All
Number
Page 42
• TO EDIT AN ENTRY
TIP
NEC Infrontia Confidential
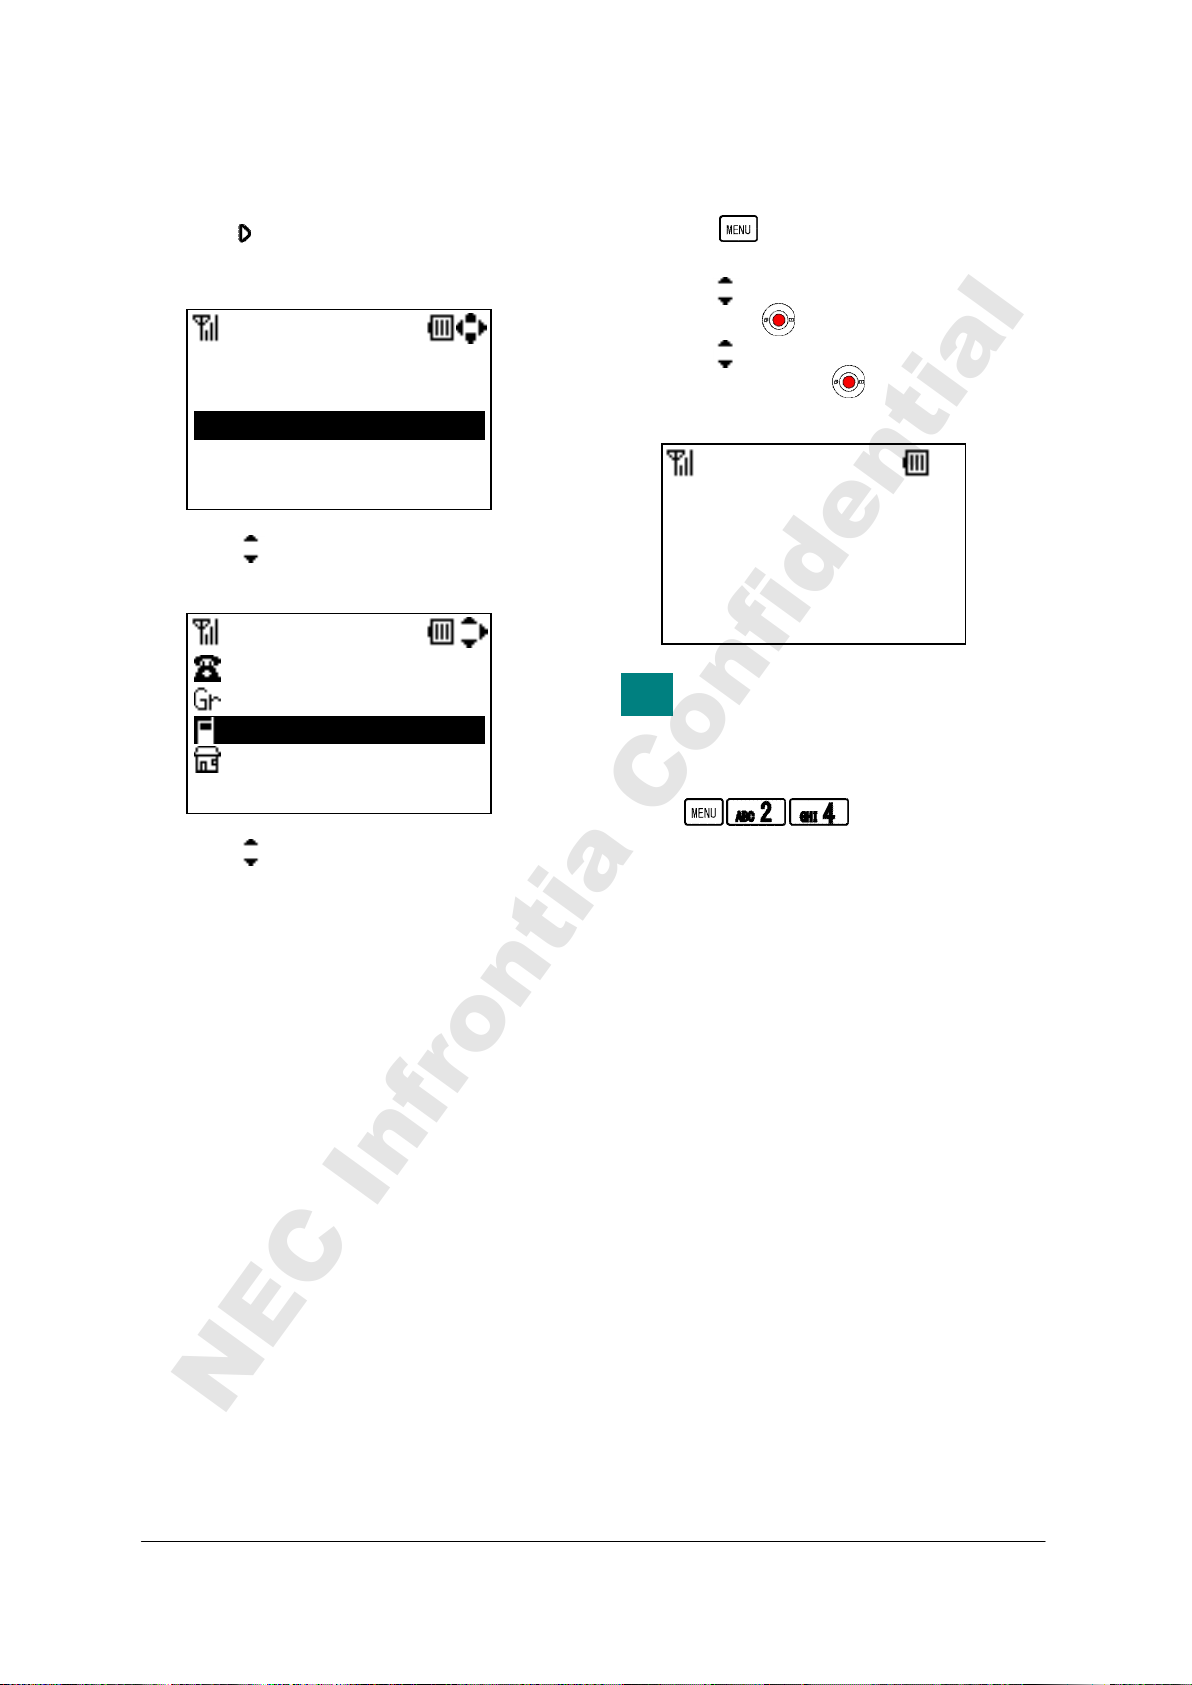
You can edit a registered Directory.
- Press key in Standby mode.
- Your phone displays as follow.
007.Aaron
005.Eric
001.John
010.Ken
Delete Detail Back
- Press key to select a record you want to
edit and then press “Detail” soft key.
John
Colleagues
14581234567
12621234567
Edit Back
- Press key to select an item you want to
edit and then press “Edit” soft key.
- When all edit is completed, press “Save”
soft key.
All
Directory 001
• TO CONFIRM YOUR PHONE
NUMBER
- Press key in Standby mode. Your
phone displays the main menu.
- Press key to select “2.Direcory” and
then press key.
- Press key to select “4.Own Number”
and then press key. Your phone
displays.
Back
You can confirm your phone
number by pressing following
keys.
Confirm Your Phone Number:
Own Number
223
28
Page 43
7.SPEED DIAL/PRESET DIAL
TIP
TIP
NEC Infrontia Confidential
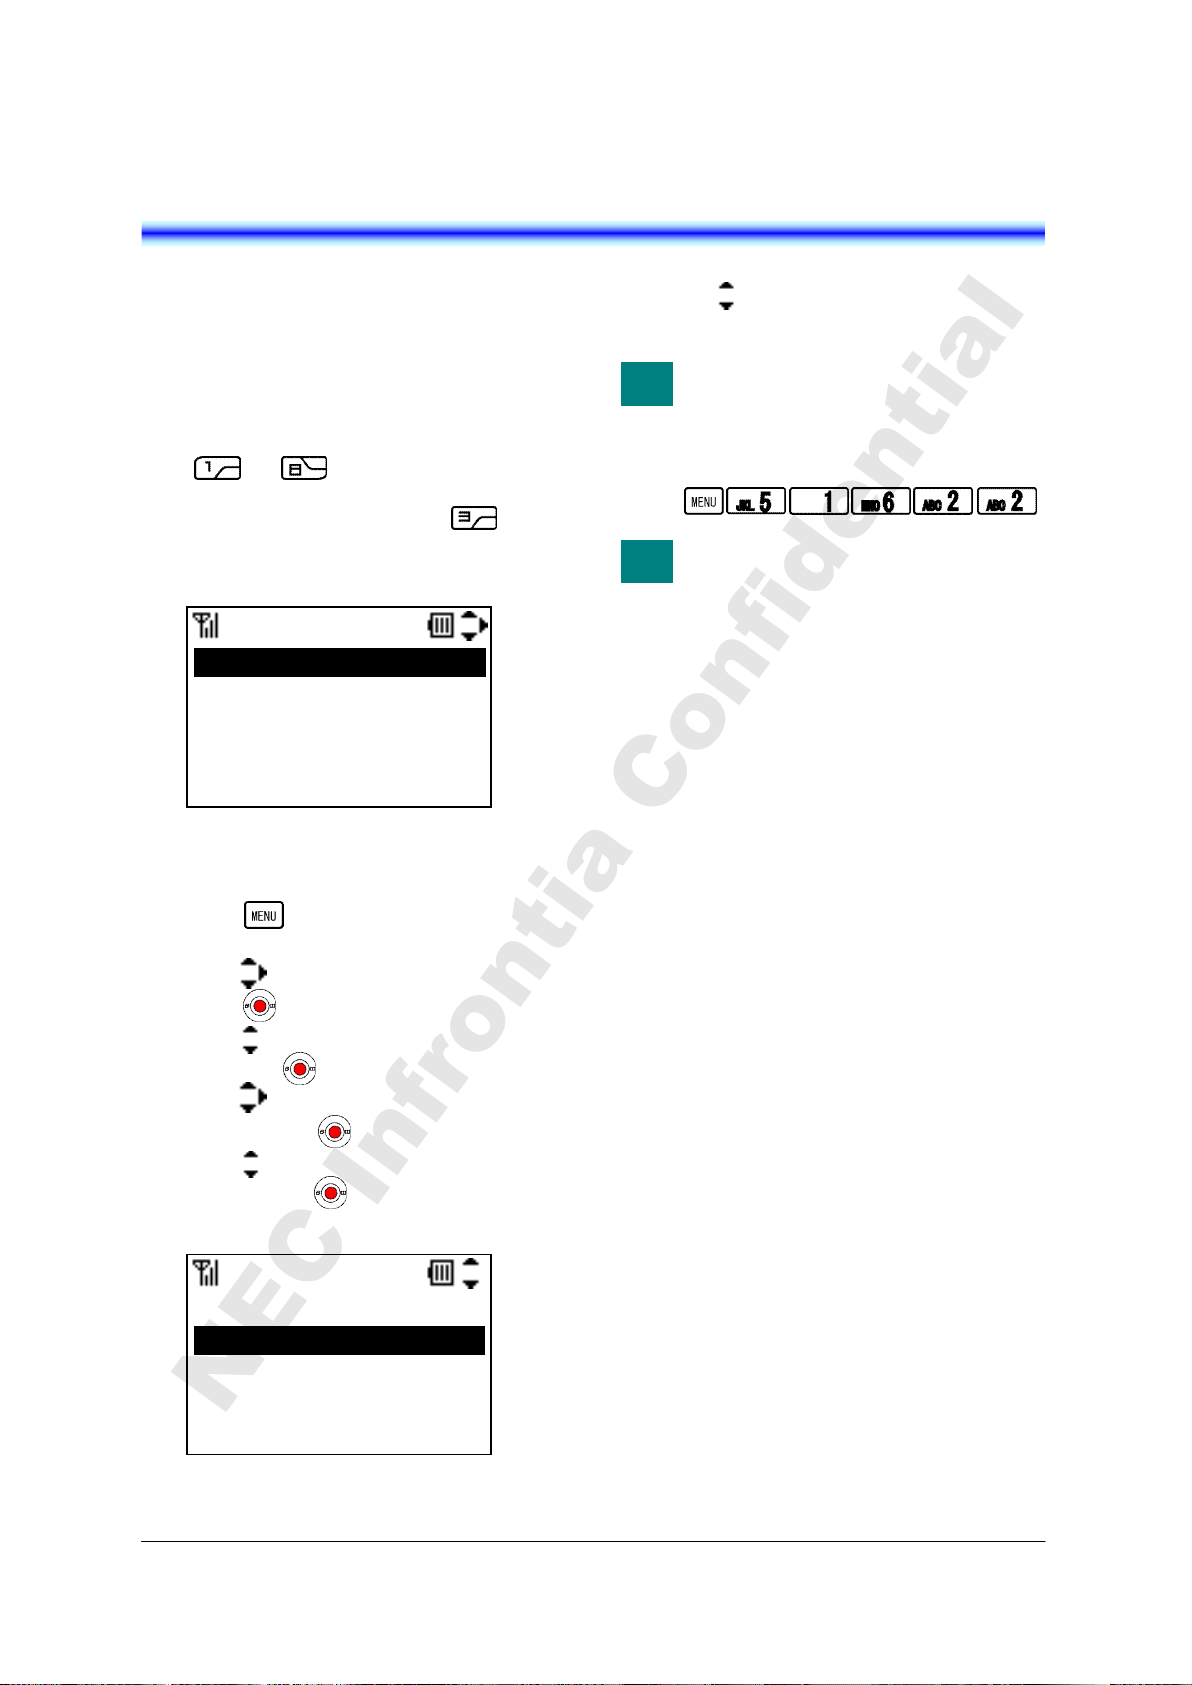
You can use Speed Dial assigned multi function
keys (up to 8 entries) and Preset Dial assigned
dial keys (up to 10 entries).
• TO USE SPEED DIAL
- In Standby mode, press a function key
( to ) to select one Speed Dial
entry that has already registered in your
phone. For example, press key to
make a call to “F3.Ken” that is listed as F3
entry.
F1.John
F2.Eric
F3.Ken
F4.Kenny
OK Back
Assign Dial
• TO ENABLE SPEED DIAL
- Press key in Standby mode. Your
phone displays the main menu.
- Press key to select “5.Setting” and then
press key.
- Press key to select “1.User Setting” and
then press key.
- Press key to select “6.Keypad Mode”
and then press key.
- Press key to select “2.Finction Key”
and then press key. Your phone displays
Function Key menu.
1.Default
2.Speed Dial
OK Back
Function Key
- Press key to select “2.Speed Dial” and
then press “OK” soft key.
You can enable Function Key as
Speed Dial by pressing following
keys.
Enable Speed Dial:
When you enable Function Key as
Speed Dial, Function Keys do not
work as system function key.
29
Page 44
• TO USE PRESET DIAL
TIP
TIP
NEC Infrontia Confidential
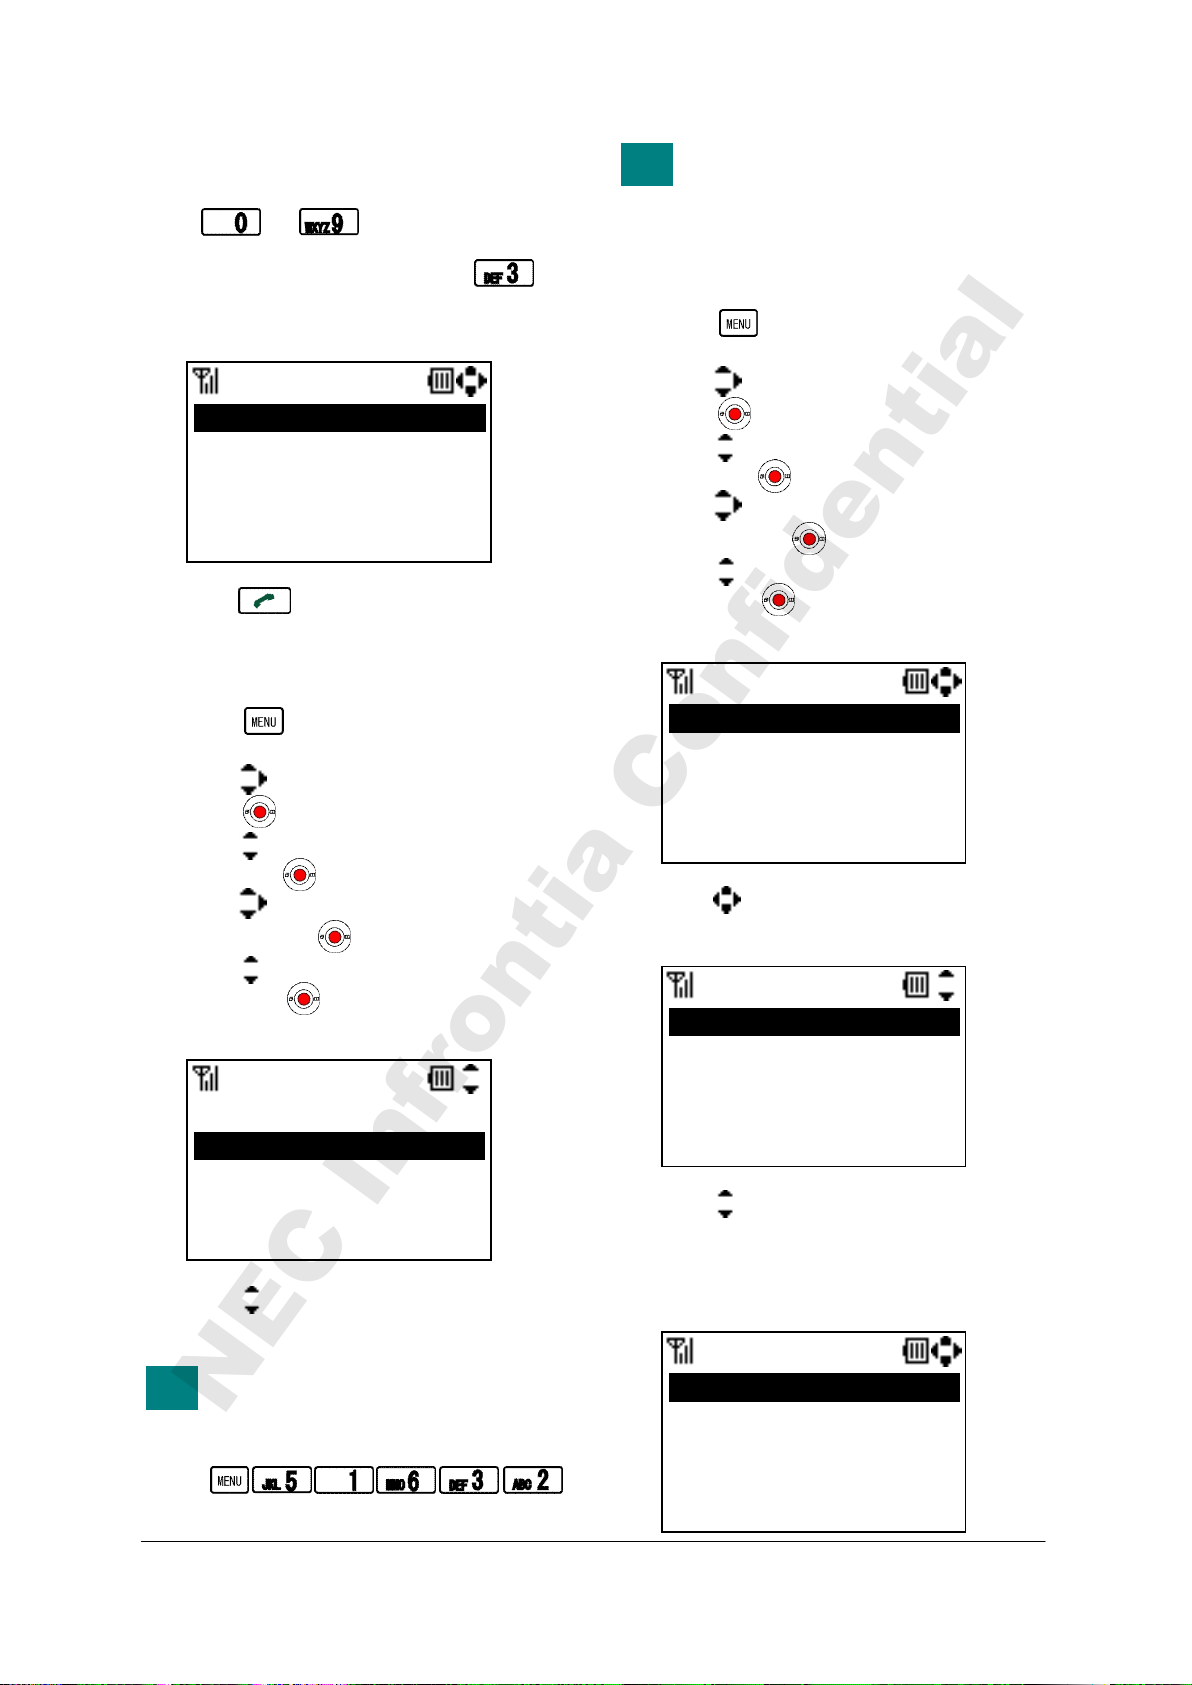
- In Standby mode, press a dial pad
( to ) to select one Preset
Dial entry that has already registered in
your phone. For example, press key
and hold for about 1 second to make a call
to “D3.Tom” that is listed as D3 entry.
D1.Aaron
D2.Donald E.
D3.Tom
D4.Jim
OK Back
- Press key to make the call.
Assign Dial
• TO ENABLE PRESET DIAL
- Press key in Standby mode. Your
phone displays the main menu.
- Press key to select “5.Setting” and then
press key.
- Press key to select “1.User Setting” and
then press key.
- Press key to select “6.Keypad Mode”
and then press key.
- Press key to select “3.Dial Key” and
then press key. Your phone displays
Dial Key menu.
1.Alphabet Search
2.Preset Dial
OK Back
- Press key to select “2.Preset Dial” and
then press “OK” soft key.
You can enable Dial Key as Preset
Dial by pressing following keys.
Enable Preset Dial:
Dial Key
When you enable Dial Key as
Preset Dial, Dial Keys do not work
as Alphabet Search function key.
• TO ADD NEW ENTRY/EDIT
- Press key in Standby mode. Your
phone displays the main menu.
- Press key to select “5.Setting” and then
press key.
- Press key to select “1.User Setting” and
then press key.
- Press key to select “6.Keypad Mode”
and then press key.
- Press key to select “4.Assign Dial” and
then press key. Your phone displays
Assign Dial menu.
F7.
F8.
D1.Aaron
D2.Donald E.
OK Back
- Press key to select a key you want to
add/edit and then “OK” soft key.
1.Name
2.TEL
OK Back
- Press key to select an item you want to
edit and then press “OK” soft key.
- When all edit is completed, press “Back”
soft key.
F7.Bill
F8.
D1.Aaron
D2.Donald E.
OK Back
30
Assign Dial
Assign Dial
Assign Dial
Page 45
8.SETTING
TIP
TIP
NEC Infrontia Confidential
Various settings such as Incoming Call, Talk,
Display, Password, Password Lock, Keypad
Mode and Date & Time can be modified as
required on your phone.
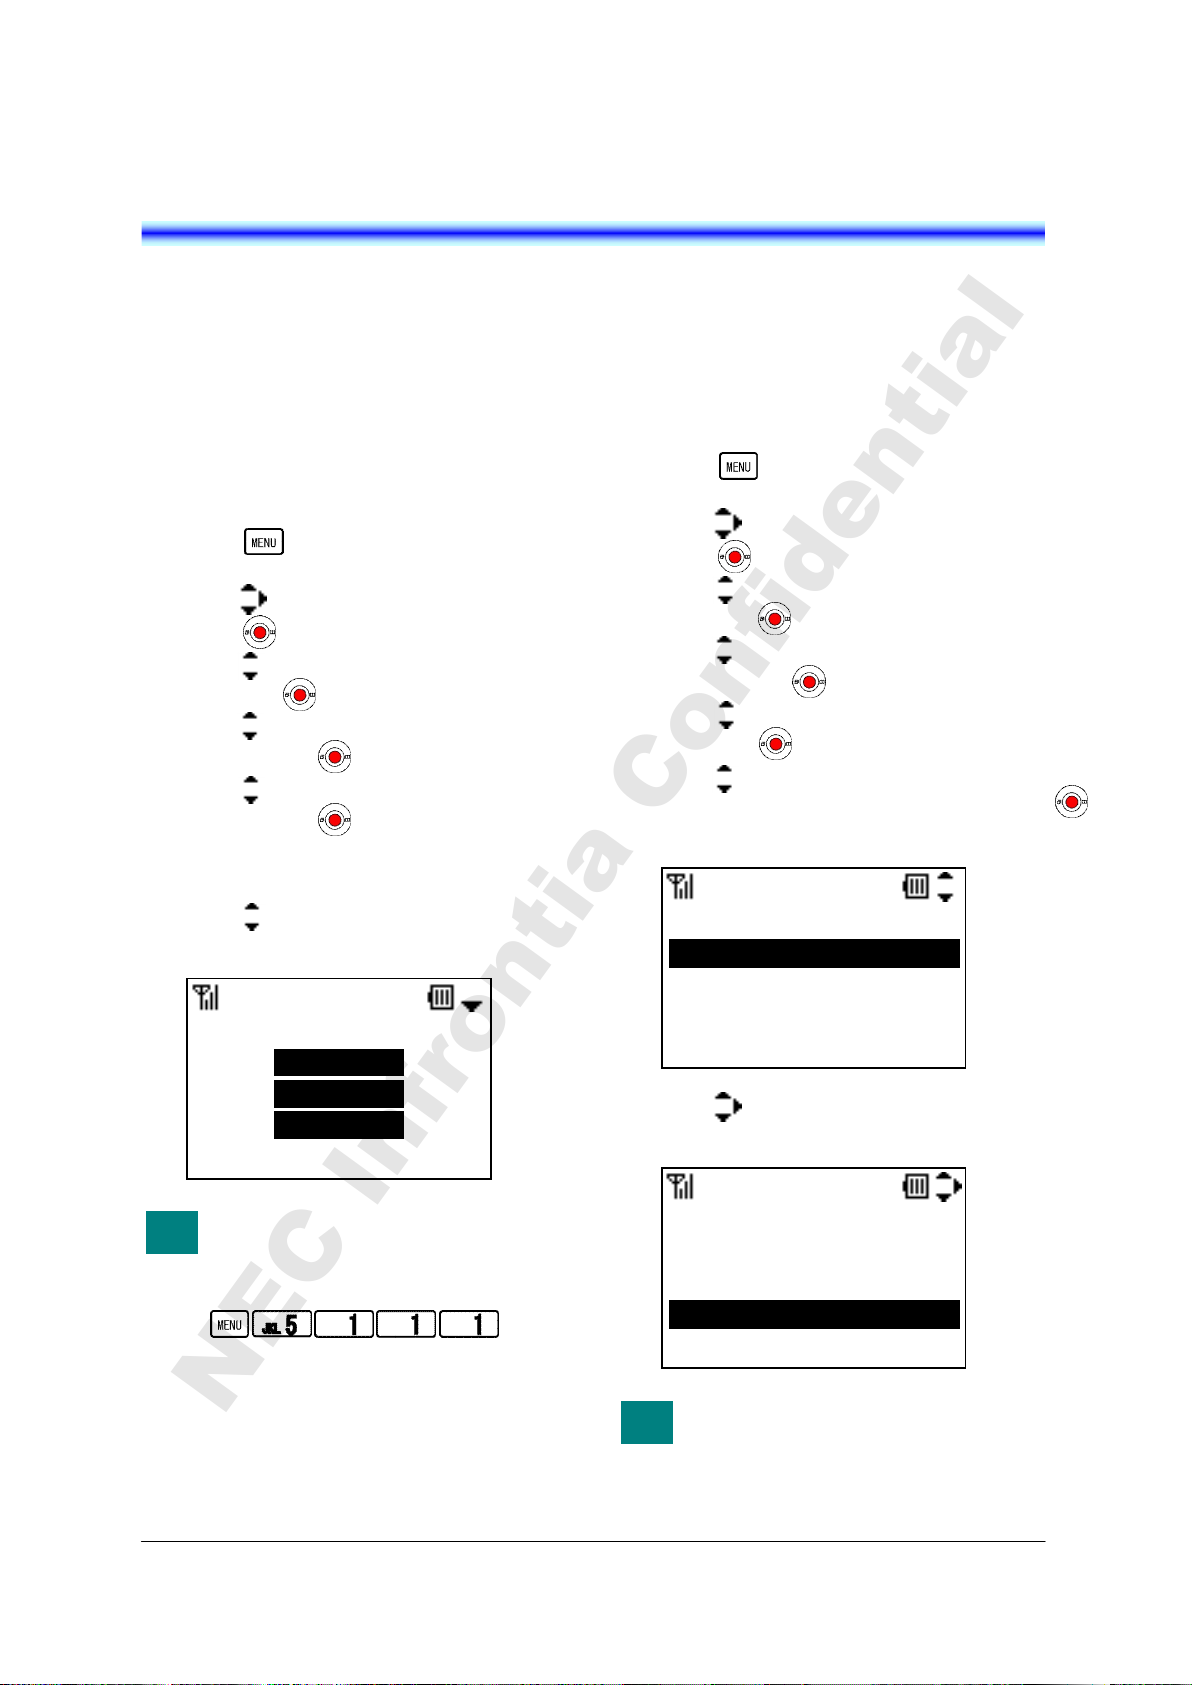
• RING VOLUME
• RING TONE
Factory Default: Tone Type1 (All kind)
You can select ring tone on a call kind basis
(External Ring, Internal Ring, IM and
Non-notification).
Factory Default: Middle
You can adjust ring tone volume.
- Press key in Standby mode. Your
phone displays the main menu.
- Press key to select “5.Setting” and then
press key.
- Press key to select “1.User Setting” and
then press key.
- Press key to select “1.Incoming Call”
and then press key.
- Press key to select “1.Ring Volume”
and then press key.
- Ring Volume can be set in 5 levels (Off,
Graduate, Small, Middle and Large).
- Press key to select an appropriate
volume and then press “OK” soft key.
Large
OK Back
You can reach Ring Volume menu
by pressing following keys.
Go to Ring Volume menu:
Ring Volume
- Press key in Standby mode. Your
phone displays the main menu.
- Press key to select “5.Setting” and then
press key.
- Press key to select “1.User Setting” and
then press key.
- Press key to select “1.Incoming Call”
and then press key.
- Press key to select “2.Ring Tone” and
then press key.
- Press key to select a call kind you want
to change a ring tone and then press
key.
1.External Ring
2.Internal Ring
3.IM
4.Non-notification
- Press key to select a ring tone you want
and then press “OK” key.
01.Tone Type1
02.Tone Type2
03.Tone Type3
04.Tone Type4
Play OK Back
By pressing “Play” and “Stop”
soft key, you can hear the Ring
Tone while you select a Ring Tone.
Ring Tone
Ring Tone
31
Page 46
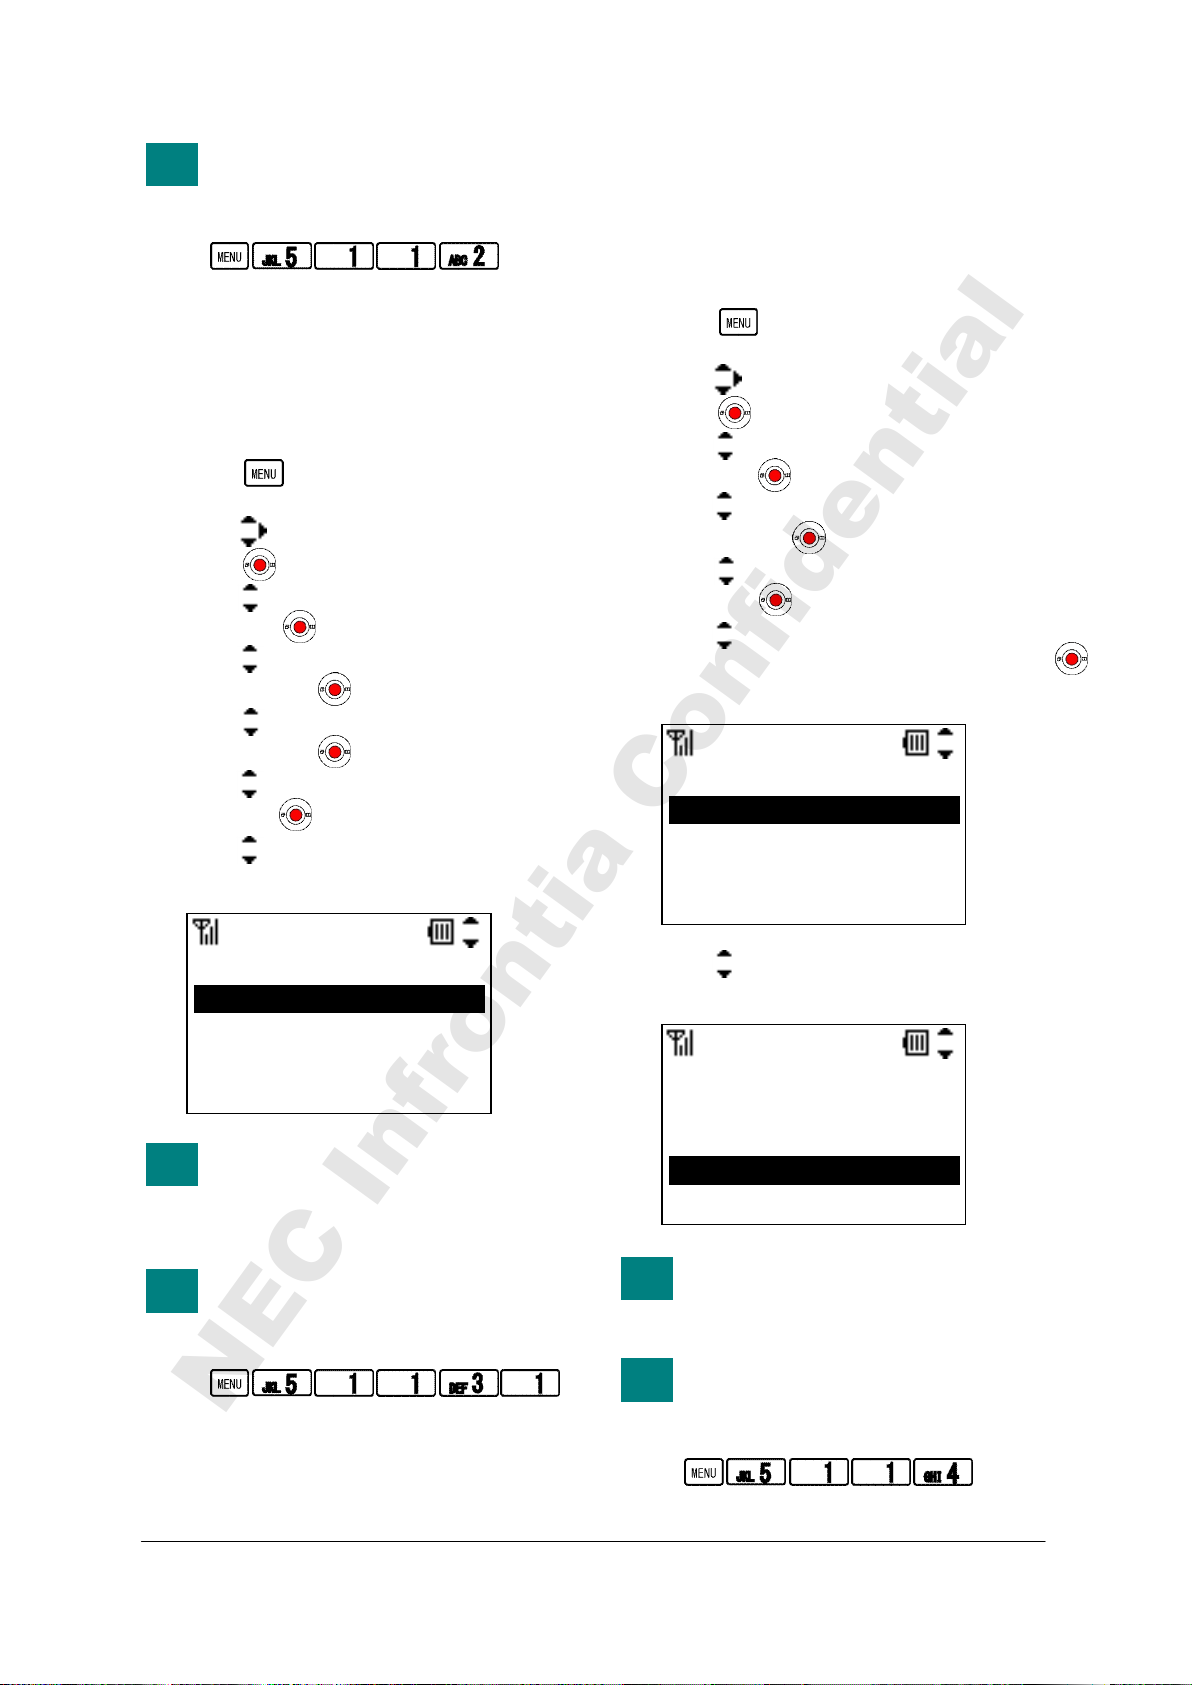
You can reach Ring Tone menu by
TIP
TIP
TIP
TIP
TIP
NEC Infrontia Confidential
pressing following keys.
Go to Ring Tone menu:
• INCOMING POPUP
Factory Default: Disable
Your phone can display a popup window while
ringing.
- Press key in Standby mode. Your
phone displays the main menu.
- Press key to select “5.Setting” and then
press key.
- Press key to select “1.User Setting” and
then press key.
- Press key to select “1.Incoming Call”
and then press key.
- Press key to select “3.Incoming Popup”
and then press key.
- Press key to select “1.Popup mode” and
then press key.
- Press key to select “1.Disable” or
“2.Enable” and then press “OK” soft key.
1.Disable
2.Enable
OK Back
When a caller is not registered in
your Directory, your phone does
not display a popup window even
if this feature is enabled.
You can reach Incoming Popup
menu by pressing following keys.
Go to Incoming Popup menu:
Popup
• ILLUMINATION
Factory Default: Green (All kind)
You can select an illumination color of Info LED
on a call kind basis (External Ring, Internal Ring,
IM and Non-notification).
- Press key in Standby mode. Your
phone displays the main menu.
- Press key to select “5.Setting” and then
press key.
- Press key to select “1.User Setting” and
then press key.
- Press key to select “1.Incoming Call”
and then press key.
- Press key to select “4.Illumination” and
then press key.
- Press key to select a call kind you want
to change an illumination and then press
key.
1.External Ring
2.Internal Ring
3.IM
4.Non-notification
- Press key to select an illumination you
want and then press “OK” key.
1.Disable
2.Red
3.Green
4.Orange
On OK Back
By pressing “On” and “Stop” soft
key, you can view the Illumination
while you select an Illumination.
You can reach Illumination menu
by pressing following keys.
Go to Illumination menu:
Illumination
Ring Tone
32
Page 47
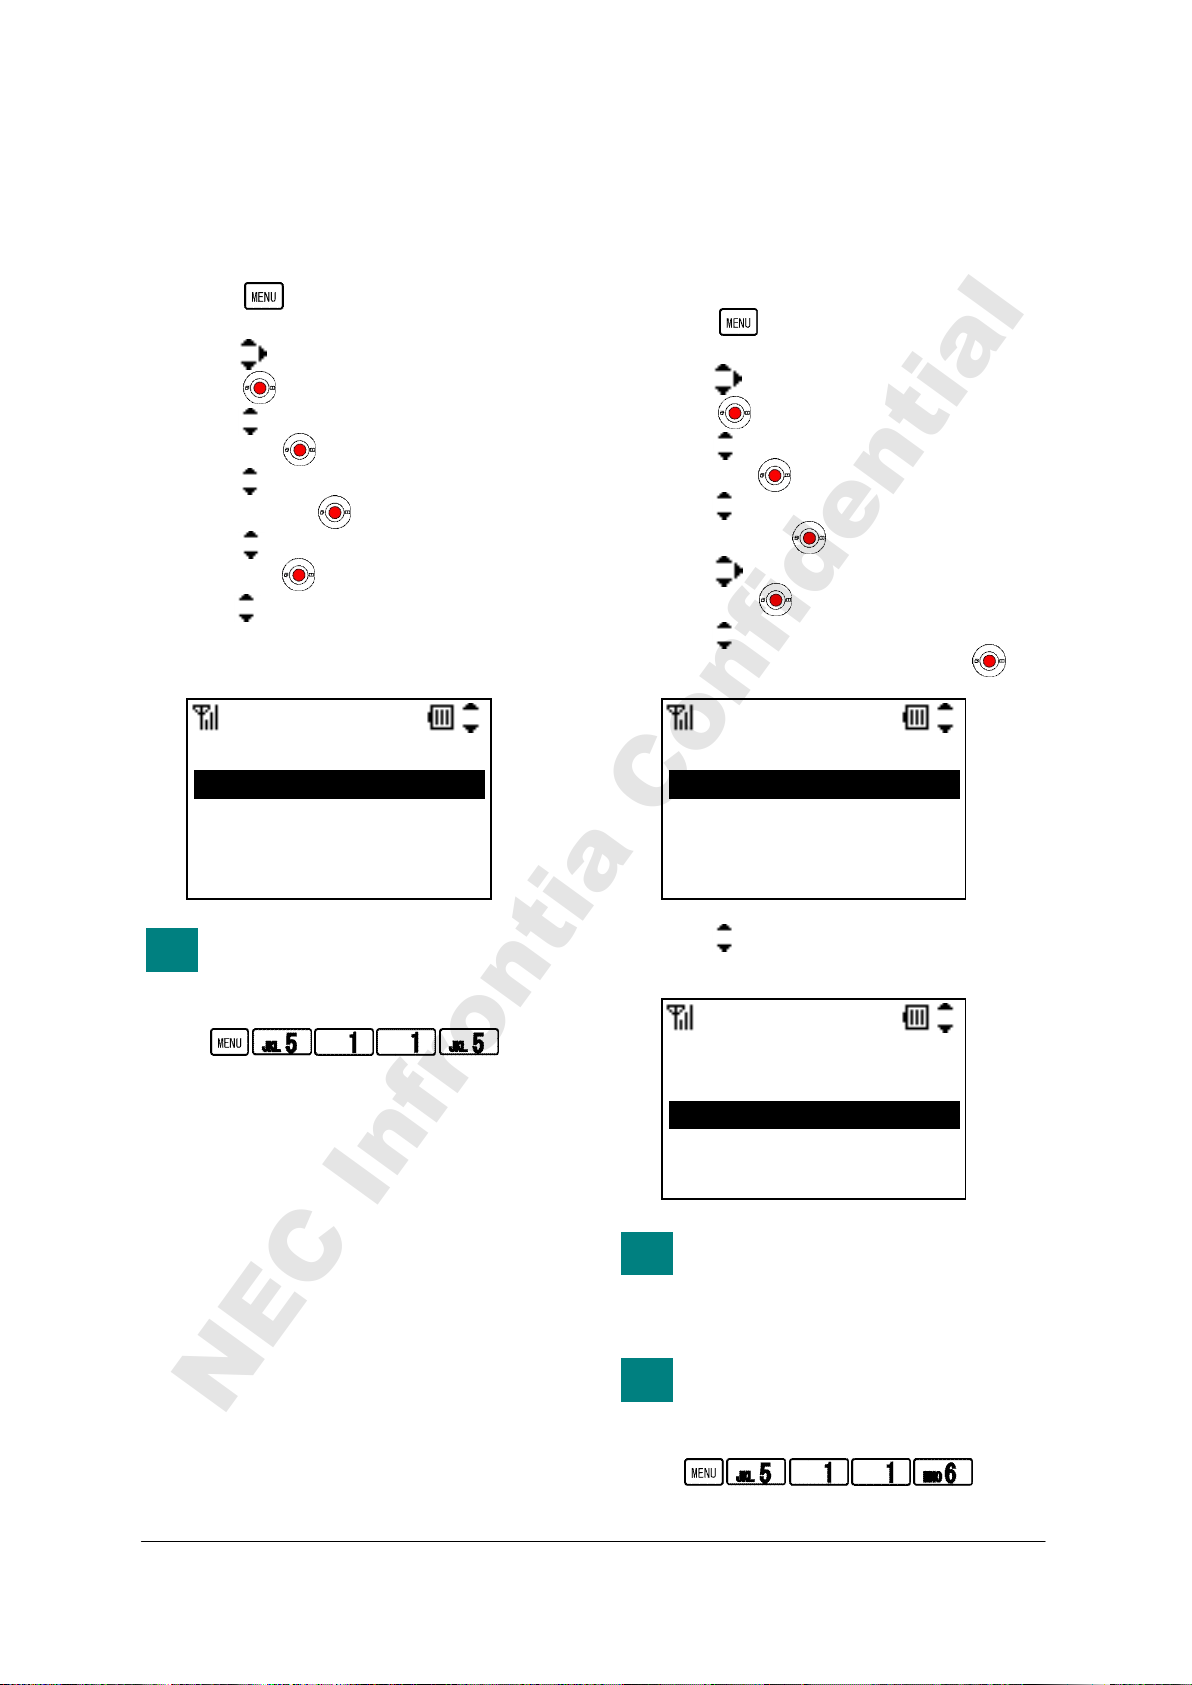
• PRIVATE CALL
TIP
TIP
TIP
NEC Infrontia Confidential
• VIBRATOR
Factory Default: Allow Incoming
Your can block incoming calls without Caller
ID.
- Press key in Standby mode. Your
phone displays the main menu.
- Press key to select “5.Setting” and then
press key.
- Press key to select “1.User Setting” and
then press key.
- Press key to select “1.Incoming Call”
and then press key.
- Press key to select “5.Private Call” and
then press key.
- Press key to select “1.Allow Incoming”
or “2.Block Incoming” and then press
“OK” soft key.
1.Allow Incoming
2.Block Incoming
OK Back
You can reach Private Call menu
by pressing following keys.
Go to Private Call menu:
Private Call
Factory Default: Pattern1 (All kind)
You can select a vibrator pattern on a call kind
basis (External Ring, Internal Ring, IM and
Non-notification).
- Press key in Standby mode. Your
phone displays the main menu.
- Press key to select “5.Setting” and then
press key.
- Press key to select “1.User Setting” and
then press key.
- Press key to select “1.Incoming Call”
and then press key.
- Press key to select “6.Vibrator” and
then press key.
- Press key to select a call kind you want
to change a vibrator and then press key.
1.External Ring
2.Internal Ring
3.IM
4.Non-notification
- Press key to select a vibrator you want
and then press “OK” key.
1.Disable
2.Pattern1
3.Pattern2
Conf OK Back
By pressing “Conf” and “Stop”
soft key, you can confirm the
Vibrator while you select a
Vibrator.
You can reach Vibrator menu by
pressing following keys.
Go to Vibrator menu:
Vibrator
Vibrator
33
Page 48
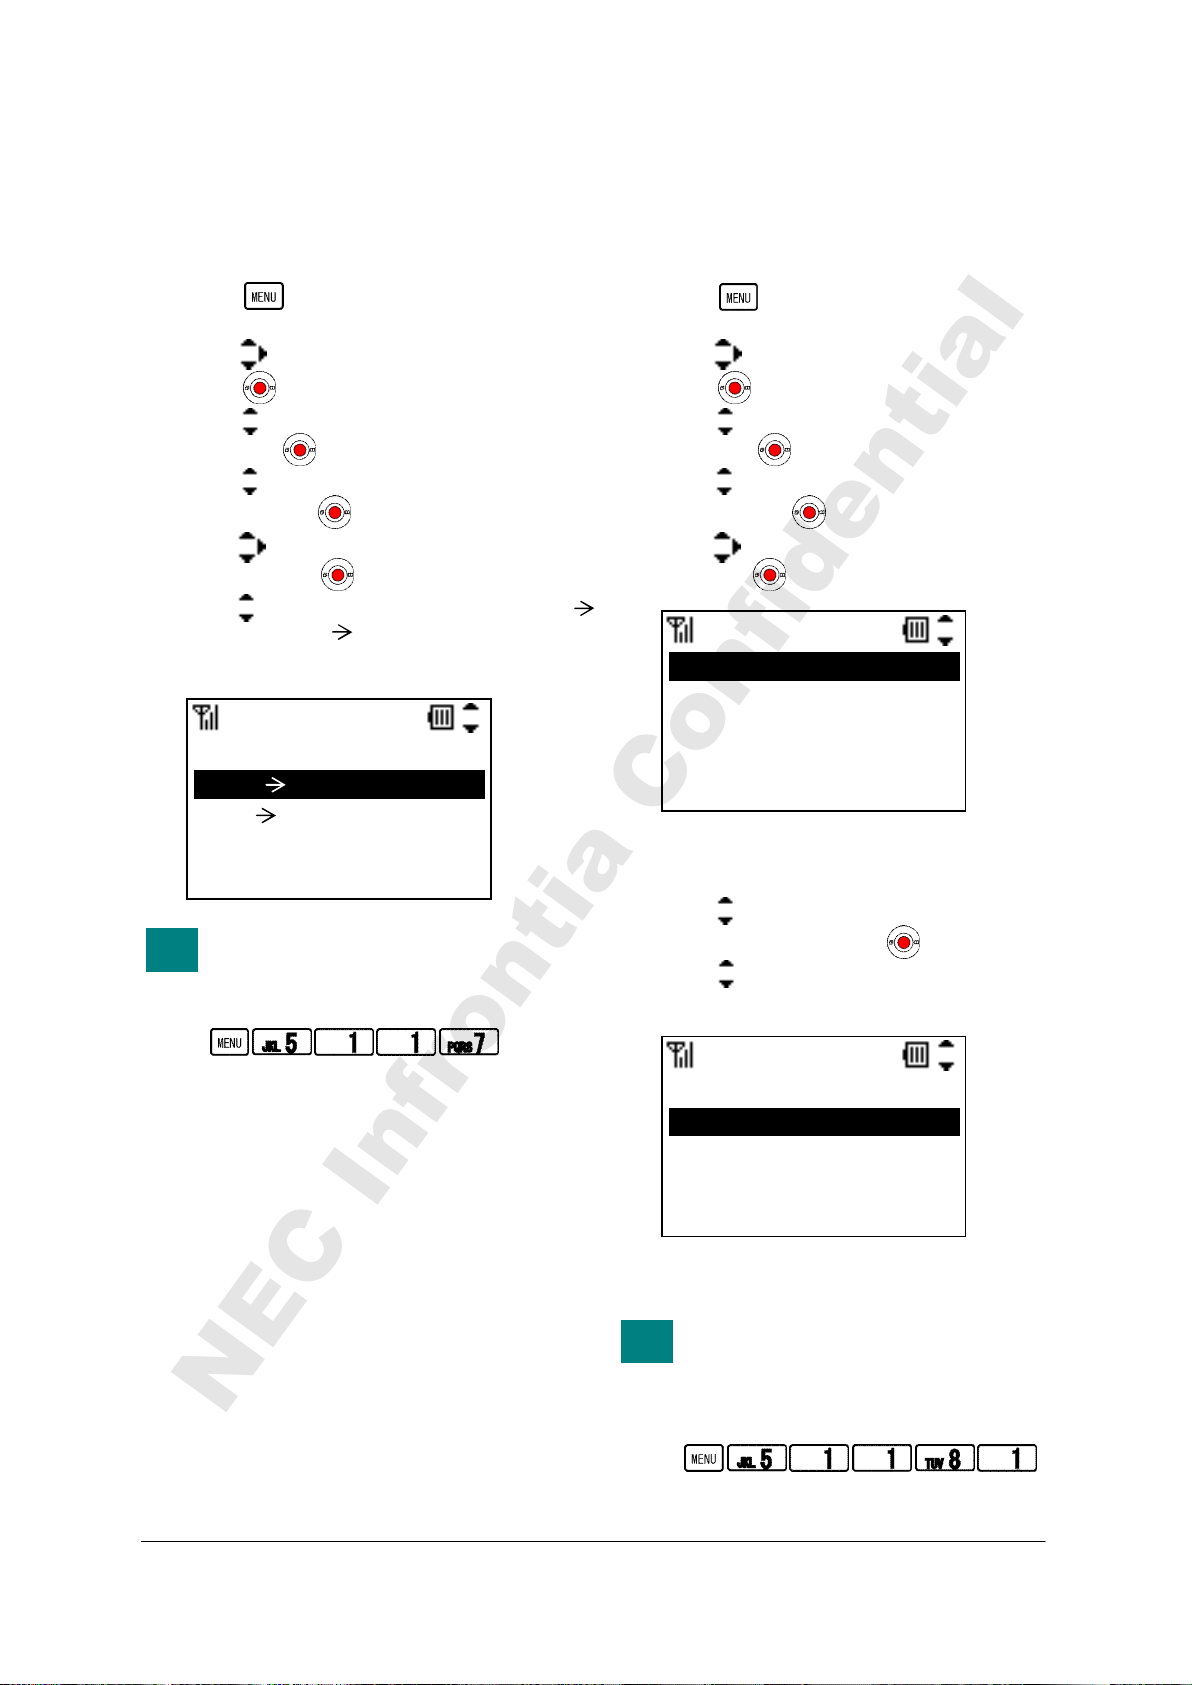
• INCOMING MODE
TIP
TIP
NEC Infrontia Confidential
• HEADSET
Factory Default: Both
Your can select an incoming mode of Ring and
Vibrator.
- Press key in Standby mode. Your
phone displays the main menu.
- Press key to select “5.Setting” and then
press key.
- Press key to select “1.User Setting” and
then press key.
- Press key to select “1.Incoming Call”
and then press key.
- Press key to select “7.Incoming Mode”
and then press key.
- Press key to select “1.Both”, “2.Ring
Vib” or “3.Vib Ring” and then press
“OK” soft key.
1.Both
2.Ring Vib
3.Vib Ring
OK Back
You can reach Incoming Mode
menu by pressing following keys.
Go to Incoming Mode menu:
IncomingMode
Factory Default: Headset (Ring Tone
Sending), None (Auto response)
Your can modify a headset mode.
- Press key in Standby mode. Your
phone displays the main menu.
- Press key to select “5.Setting” and then
press key.
- Press key to select “1.User Setting” and
then press key.
- Press key to select “1.Incoming Call”
and then press key.
- Press key to select “8.Headset” and
then press key. Your phone displays.
1.Ring Tone Sending
2.Auto Response
Ring Tone Sending:
- Press key to select “1.Ring Tone
Sending” and then press key.
- Press key to select “1.Headset”or
“2.Speaker” and then press “OK” soft key.
1.Headset
2.Speaker
OK Back
- The display returns to the previous one.
You can reach Ring Tone Sending
of Headset menu by pressing
following keys.
Go to Ring Tone Sending menu:
Headset
Ring Sending
34
Page 49
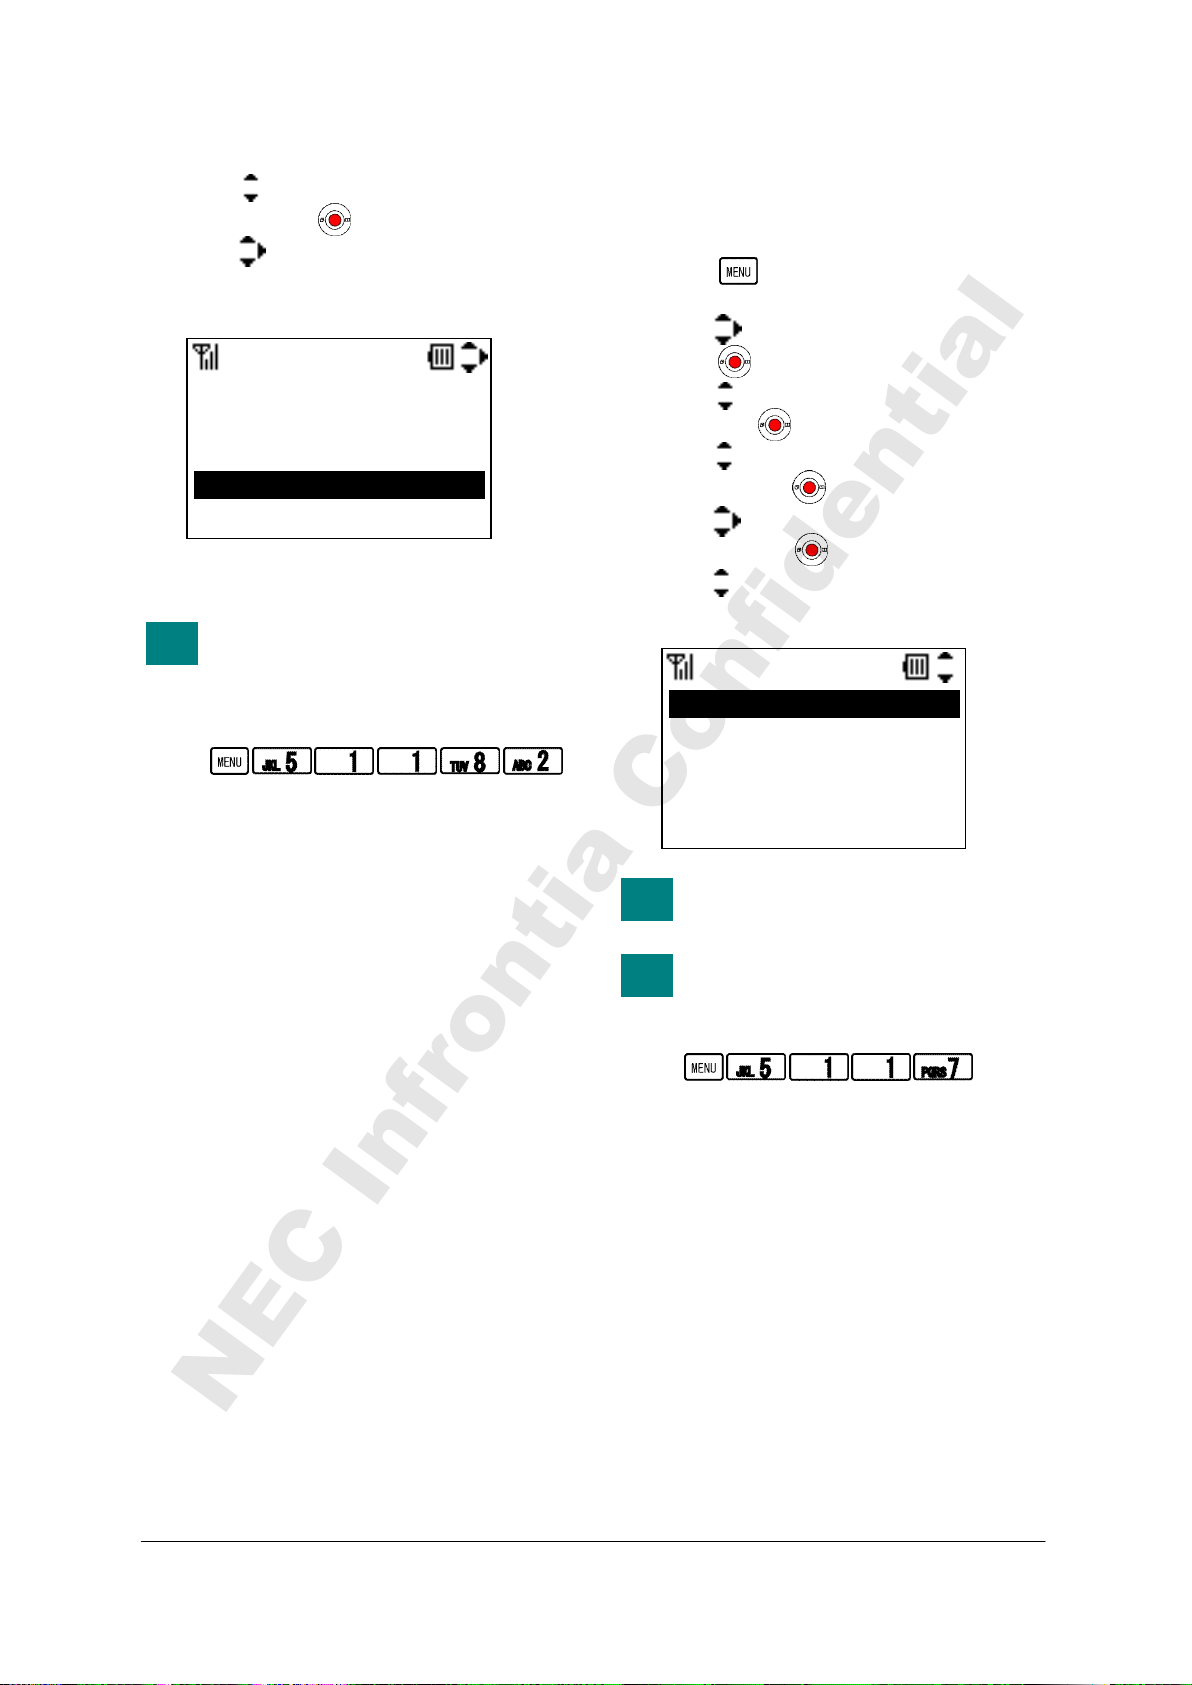
Auto Response:
TIP
TIP
TIP
NEC Infrontia Confidential
- Press key to select “2.Auto Response”
and then press key.
- Press key to select an auto response
times you want and then press “OK” soft
key.
0.None
1.1 time
2.2 times
3.3 times
OK Back
- The display returns to the previous one.
You can reach Auto Response of
Headset menu by pressing
following keys.
Go to Auto Response menu:
AutoResponse
• OFFHOKK RING
Factory Default: Enable
Your can accept second incoming call.
- Press key in Standby mode. Your
phone displays the main menu.
- Press key to select “5.Setting” and then
press key.
- Press key to select “1.User Setting” and
then press key.
- Press key to select “1.Incoming Call”
and then press key.
- Press key to select “9.Offhook Ring”
and then press key.
- Press key to select “1.Disable” or
“2.Enable” and then press “OK” soft key.
1.Disable
2.Enable
OK Back
This feature does not work
depending on your system.
You can reach Offhook Ring menu
by pressing following keys.
Go to Offhook RIng menu:
Offhook Ring
35
Page 50
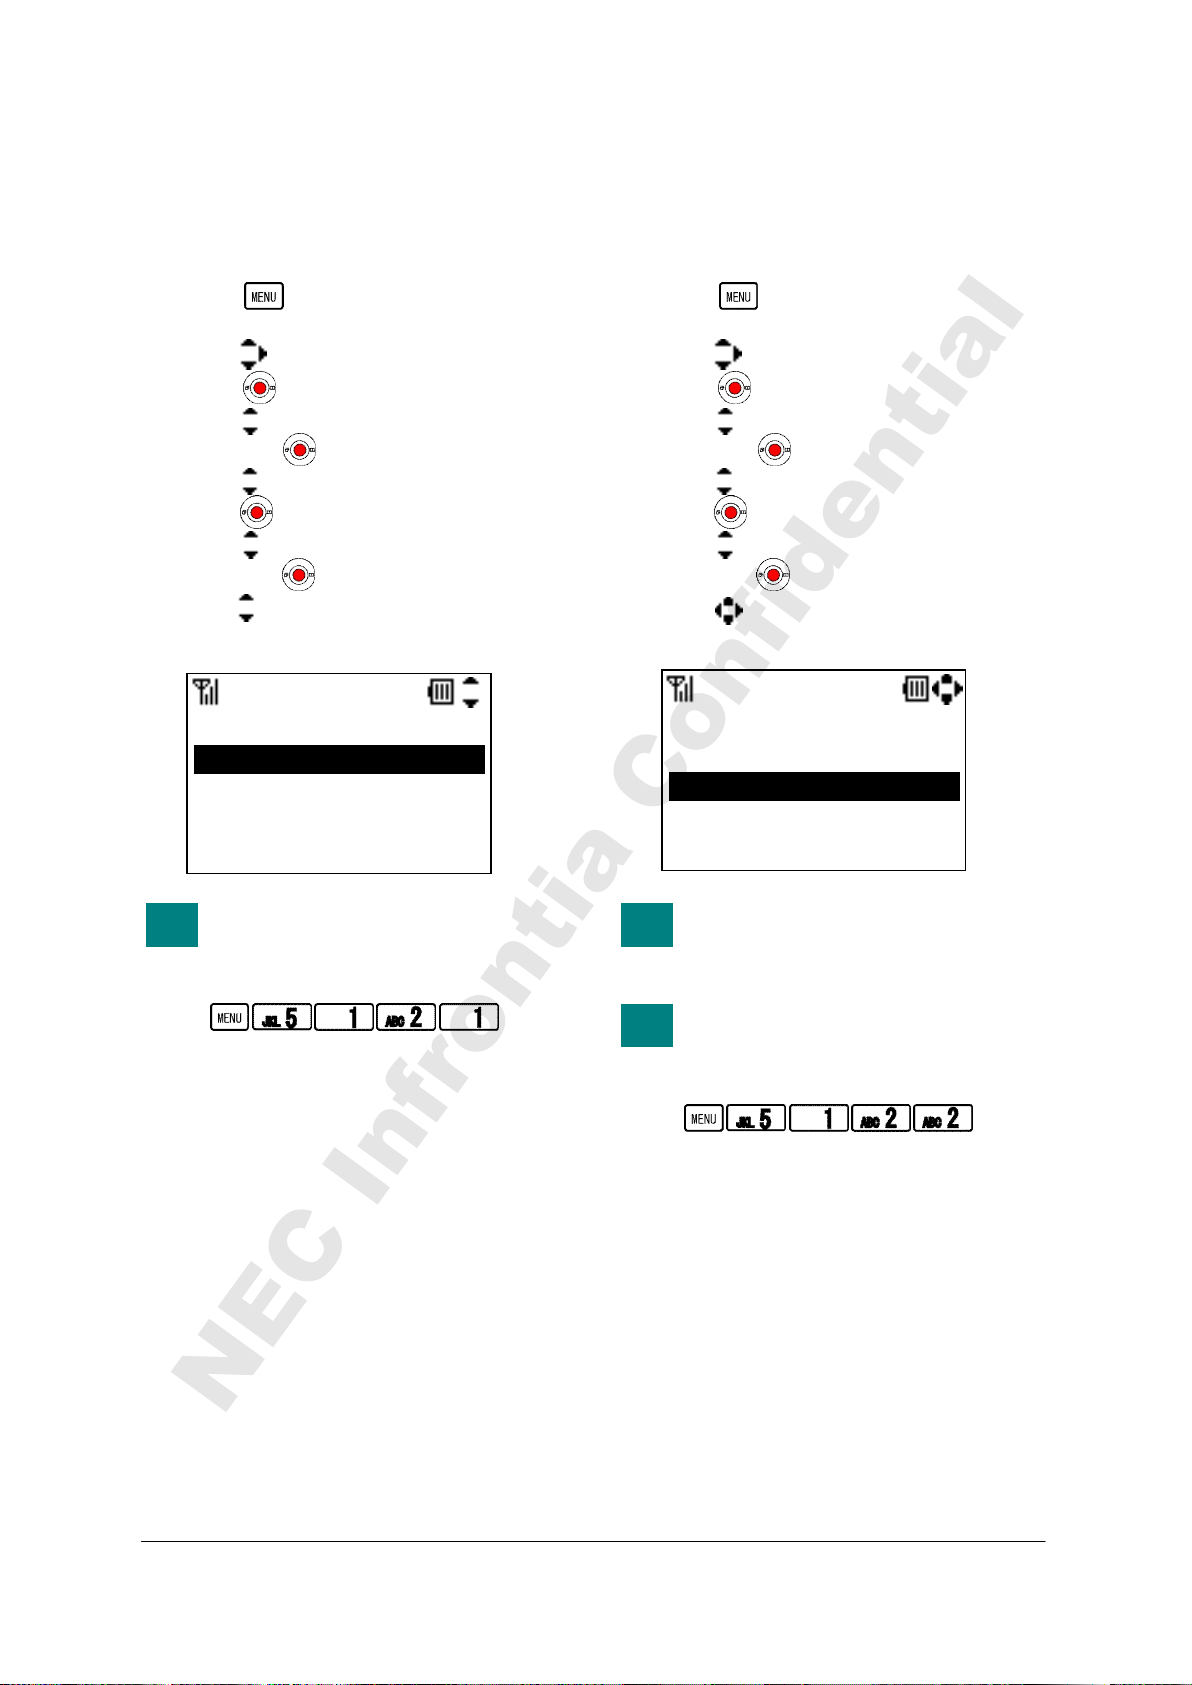
• RTP ALARM
TIP
TIP
TIP
NEC Infrontia Confidential
• HOLD MUSIC
Factory Default: Disable
Your phone can provide an alarm if RTP packet
loss is suspected.
- Press key in Standby mode. Your
phone displays the main menu.
- Press key to select “5.Setting” and then
press key.
- Press key to select “1.User Setting” and
then press key.
- Press key to select “2.Talk” and then
press key.
- Press key to select “1.RTP Alarm” and
then press key.
- Press key to select “1.Disable” or
“2.Enable” and then press “OK” soft key.
1.Disable
2.Enable
OK Back
You can reach RTP Alarm menu by
pressing following keys.
Go to RTP Alarm menu:
RTP Alarm
Factory Default: Tone Type12
You can select a music that is provided while
your phone is in hold status.
- Press key in Standby mode. Your
phone displays the main menu.
- Press key to select “5.Setting” and then
press key.
- Press key to select “1.User Setting” and
then press key.
- Press key to select “2.Talk” and then
press key.
- Press key to select “2.Hold Music” and
then press key.
- Press key to select a music you want
and then press “OK” soft key.
09.Tone Type9
10.Tone Type10
11.Tone Type11
12.Tone Type12
Play OK Back
By pressing “Play” and “Stop”
soft key, you can hear the Music
while you select Music.
You can reach Hold Music menu
by pressing following keys.
Go to Hold Music menu:
Hold Music
36
Page 51
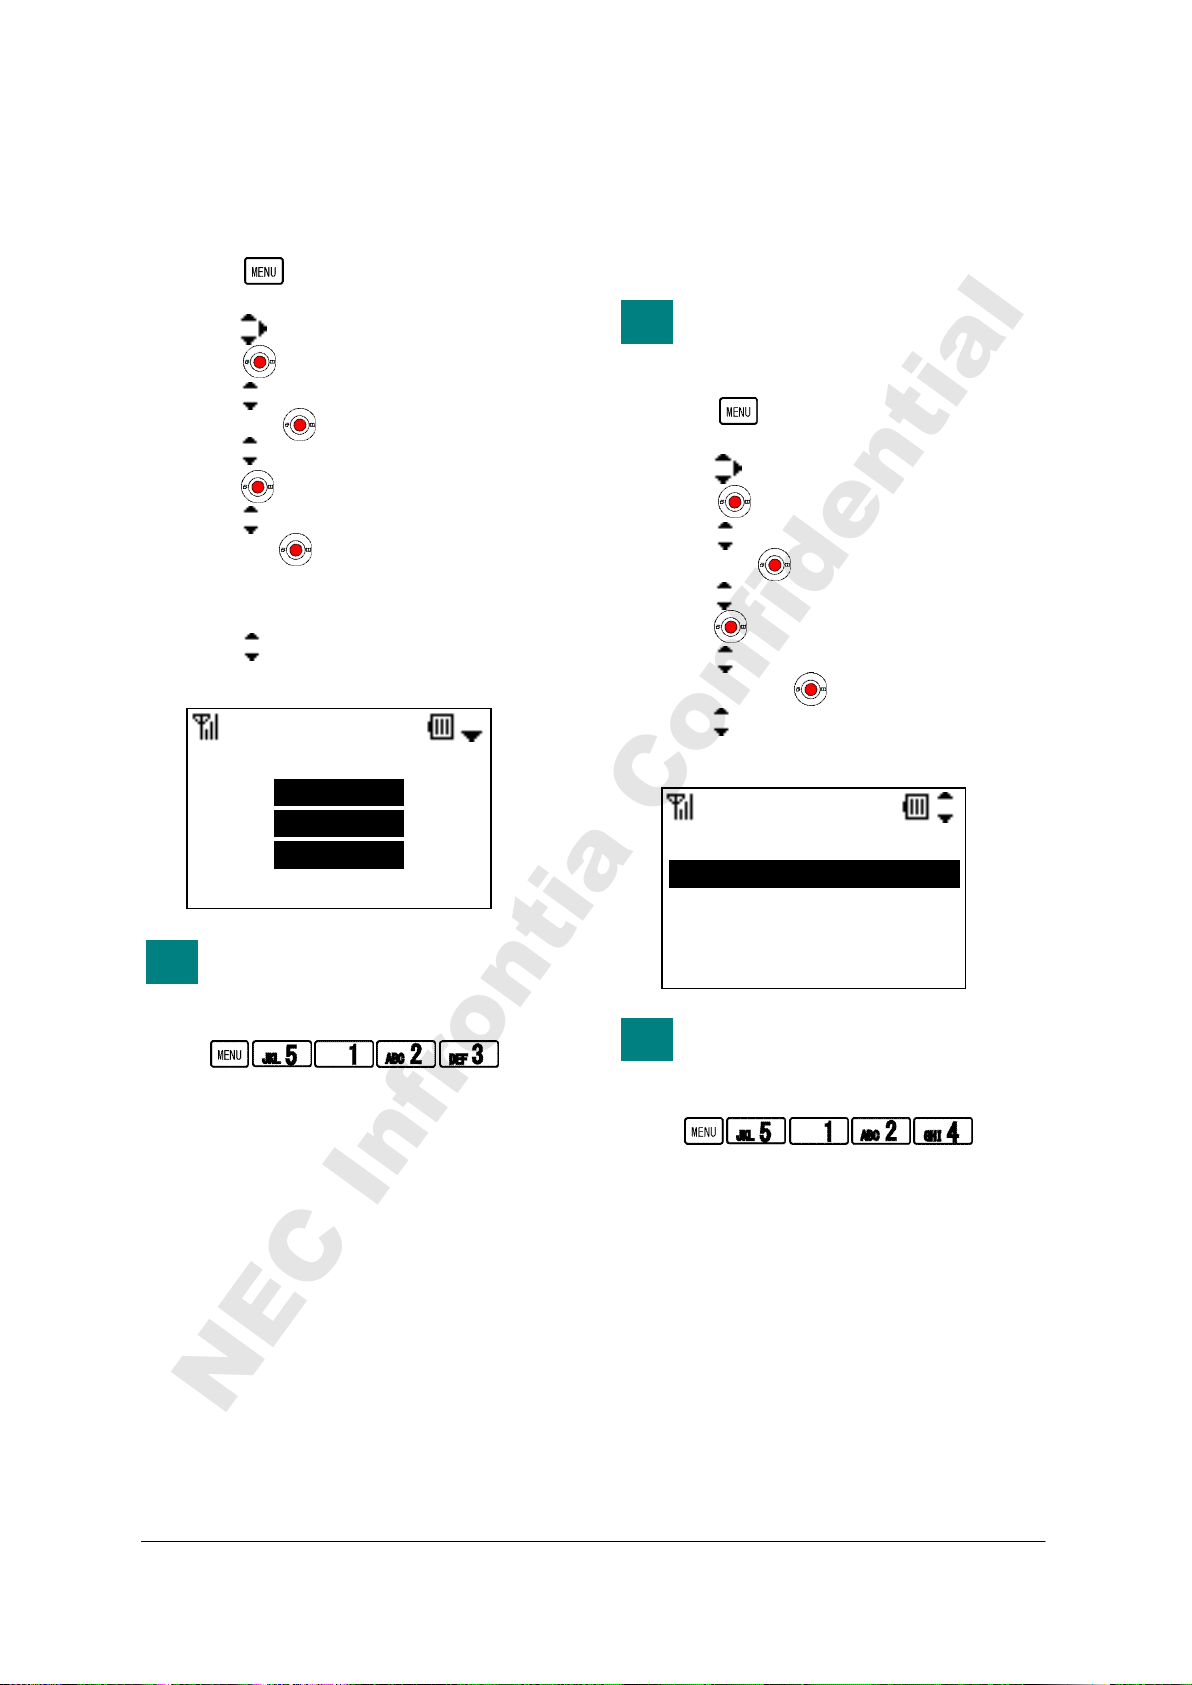
• CALL VOLUME
TIP
TIP
TIP
NEC Infrontia Confidential
• HANDOVER TONE
Factory Default: Middle
You can adjust receiver volume.
- Press key in Standby mode. Your
phone displays the main menu.
- Press key to select “5.Setting” and then
press key.
- Press key to select “1.User Setting” and
then press key.
- Press key to select “2.Talk” and then
press key.
- Press key to select “3.Call Volume” and
then press key.
- Call Volume can be set in 3 levels (Small,
Middle and Large).
- Press key to select an appropriate
volume and then press “OK” soft key.
Large
OK Back
You can reach Call Volume menu
by pressing following keys.
Go to Call Volume menu:
Call Volume
Factory Default: Disable
Your phone can provide a warning tone when
handover takes place.
Handover is the process of
transferring a wireless phone user
from one Access Point to another.
- Press key in Standby mode. Your
phone displays the main menu.
- Press key to select “5.Setting” and then
press key.
- Press key to select “1.User Setting” and
then press key.
- Press key to select “2.Talk” and then
press key.
- Press key to select “4.Handover Tone”
and then press key.
- Press key to select “1.Disable” or
“2.Enable” and then press “OK” soft key.
1.Disable
2.Enable
OK Back
You can reach Handover Tone
menu by pressing following keys.
Go to Handover Tone menu:
HandoverTone
37
Page 52
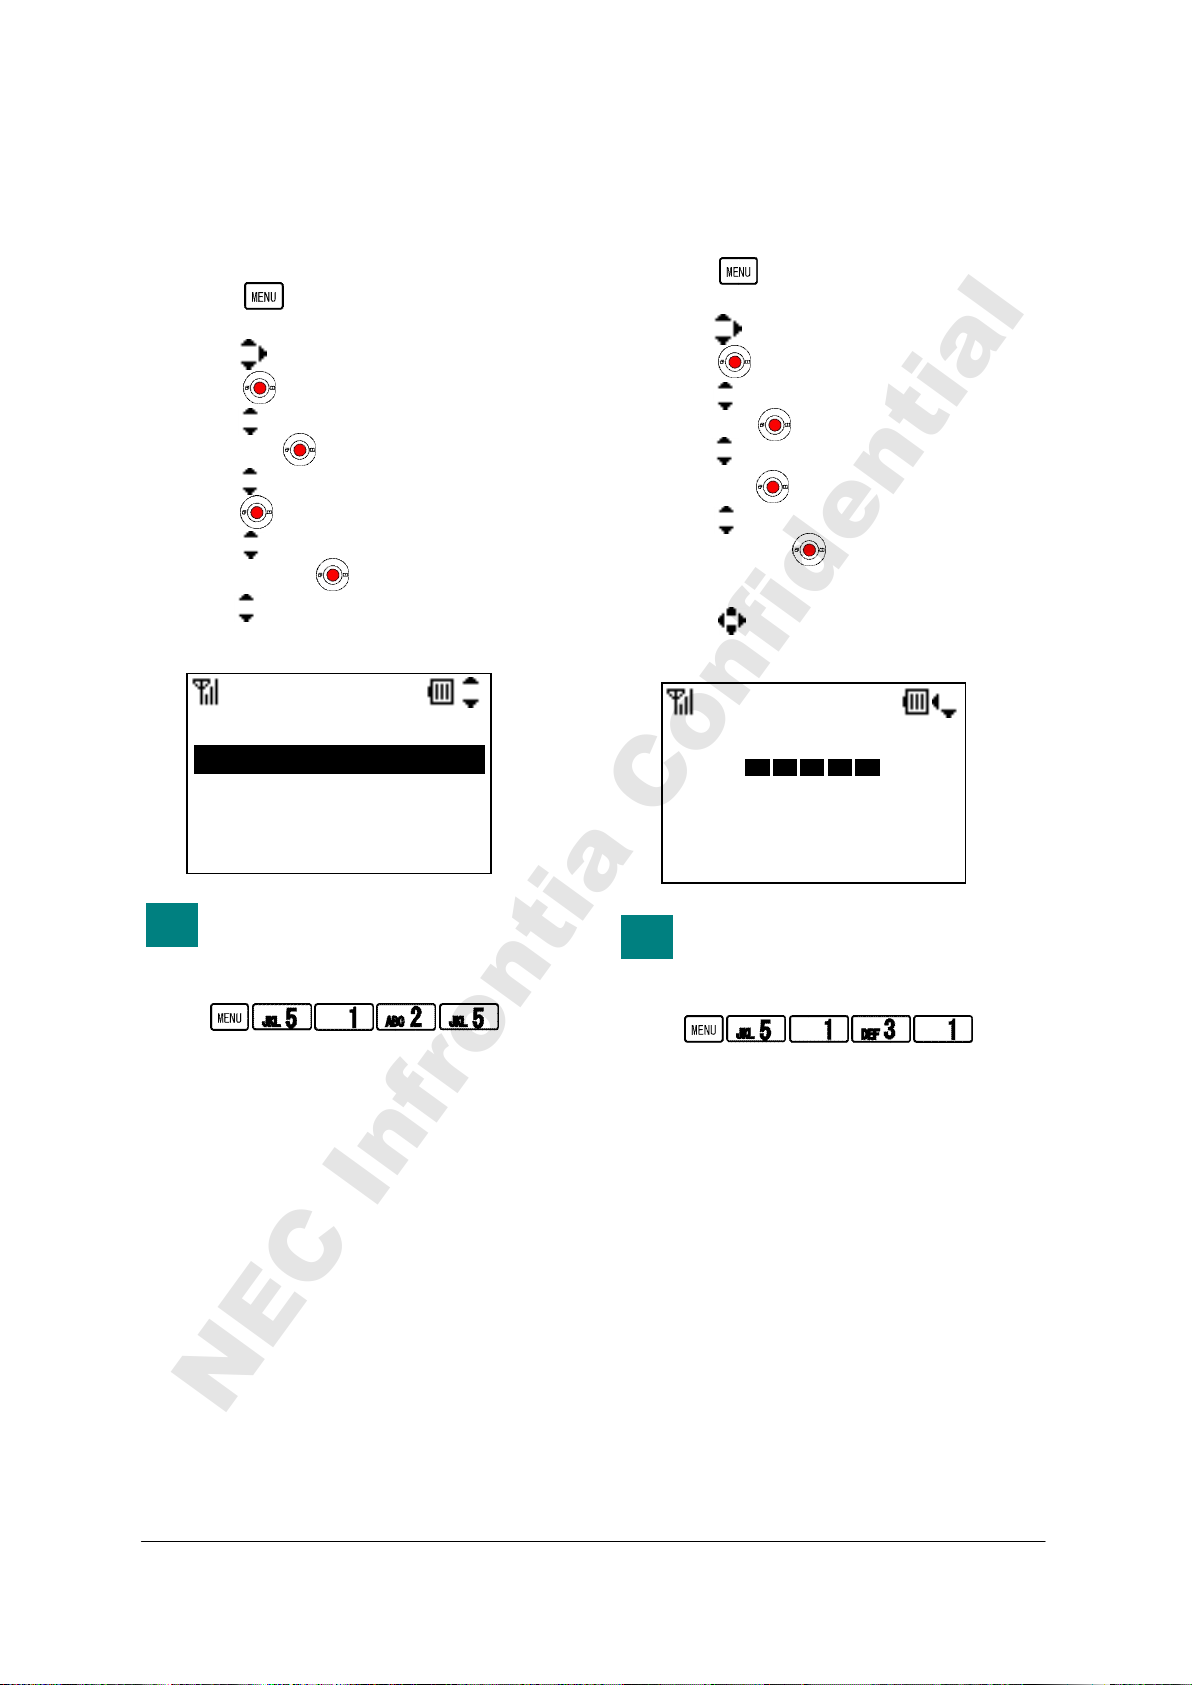
• TALK START VIBRATOR
TIP
TIP
NEC Infrontia Confidential
• LCD CONTRAST
Factory Default: Disable
Vibrator can work as talk start notification when
a called party answers your call.
- Press key in Standby mode. Your
phone displays the main menu.
- Press key to select “5.Setting” and then
press key.
- Press key to select “1.User Setting” and
then press key.
- Press key to select “2.Talk” and then
press key.
- Press key to select “5.Talk Start Vib”
and then press key.
- Press key to select “1.Disable” or
“2.Enable” and then press “OK” soft key.
1.Disable
2.Enable
OK Back
You can reach Talk Start Vib menu
by pressing following keys.
Go to Talk Start Vib menu:
TalkStartVib
Factory Default: 3
You can adjust LCD contrast.
- Press key in Standby mode. Your
phone displays the main menu.
- Press key to select “5.Setting” and then
press key.
- Press key to select “1.User Setting” and
then press key.
- Press key to select “3.Display” and
then press key.
- Press key to select “1.LCD Contrast”
and then press key.
- LCD Contrast can be set in 5 levels (1 to 5).
- Press key to select an appropriate
contrast and then press “OK” soft key.
L H
OK Back
You can reach LCD Contrast menu
by pressing following keys.
Go to LCD Contrast menu:
LCD Contrast
38
Page 53
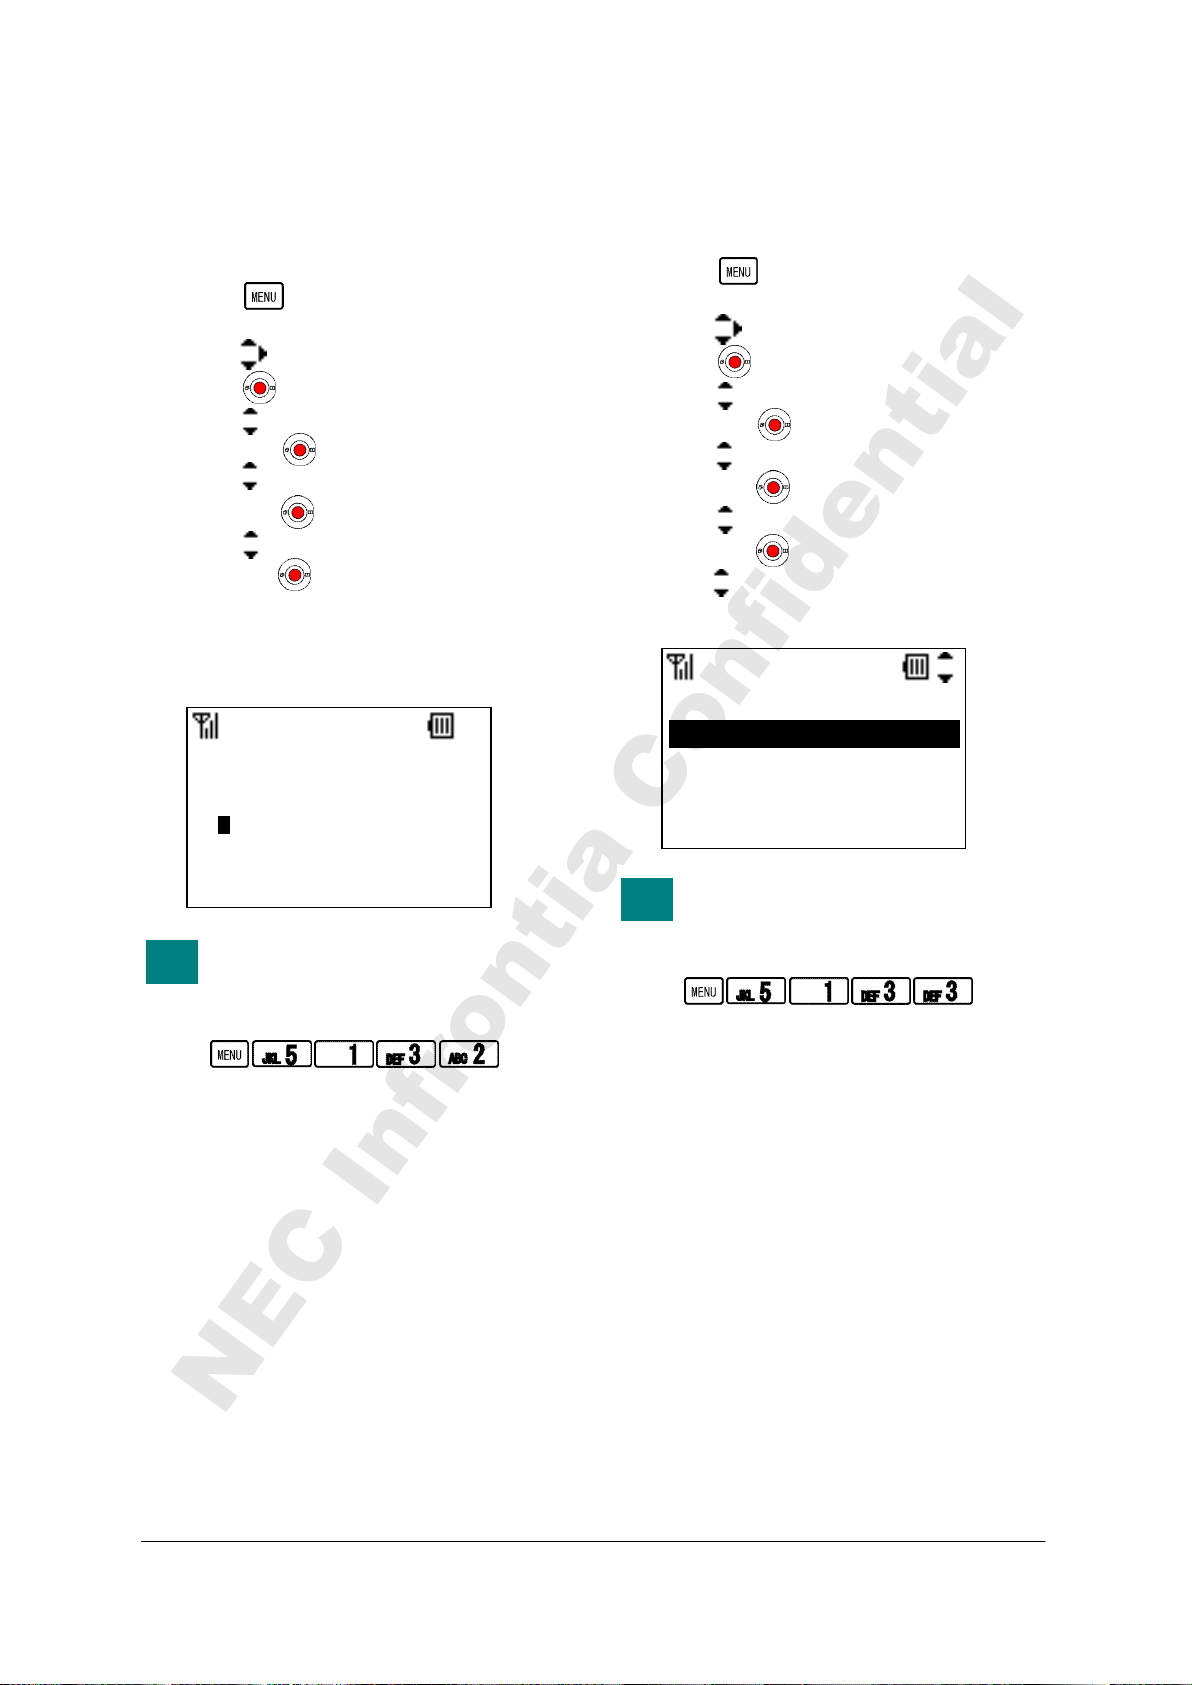
• BACK LIGHT
TIP
TIP
NEC Infrontia Confidential
• FONT SIZE
Factory Default: 5sec
You can adjust a timer until LCD back light is
off.
- Press key in Standby mode. Your
phone displays the main menu.
- Press key to select “5.Setting” and then
press key.
- Press key to select “1.User Setting” and
then press key.
- Press key to select “3.Display” and
then press key.
- Press key to select “2.Back Light” and
then press key.
- Back Light can be set 5 to 30 seconds.
- Edit an appropriate timer value and then
press “OK” soft key.
10
S
12 OK Clear
You can reach Back Light menu by
pressing following keys.
Go to Back Light menu:
Back Light
Factory Default: Standard
You can select a font size.
- Press key in Standby mode. Your
phone displays the main menu.
- Press key to select “5.Setting” and then
press key.
- Press key to select “1.User Setting” and
then press key.
- Press key to select “3.Display” and
then press key.
- Press key to select “3.Font Size” and
then press key.
- Press key to select “1.Standard” or
“2.Large” and then press “OK” soft key.
1.Standard
2.Large
OK Back
You can reach Font Size menu by
pressing following keys.
Go to Font Size menu:
Font Size
39
Page 54
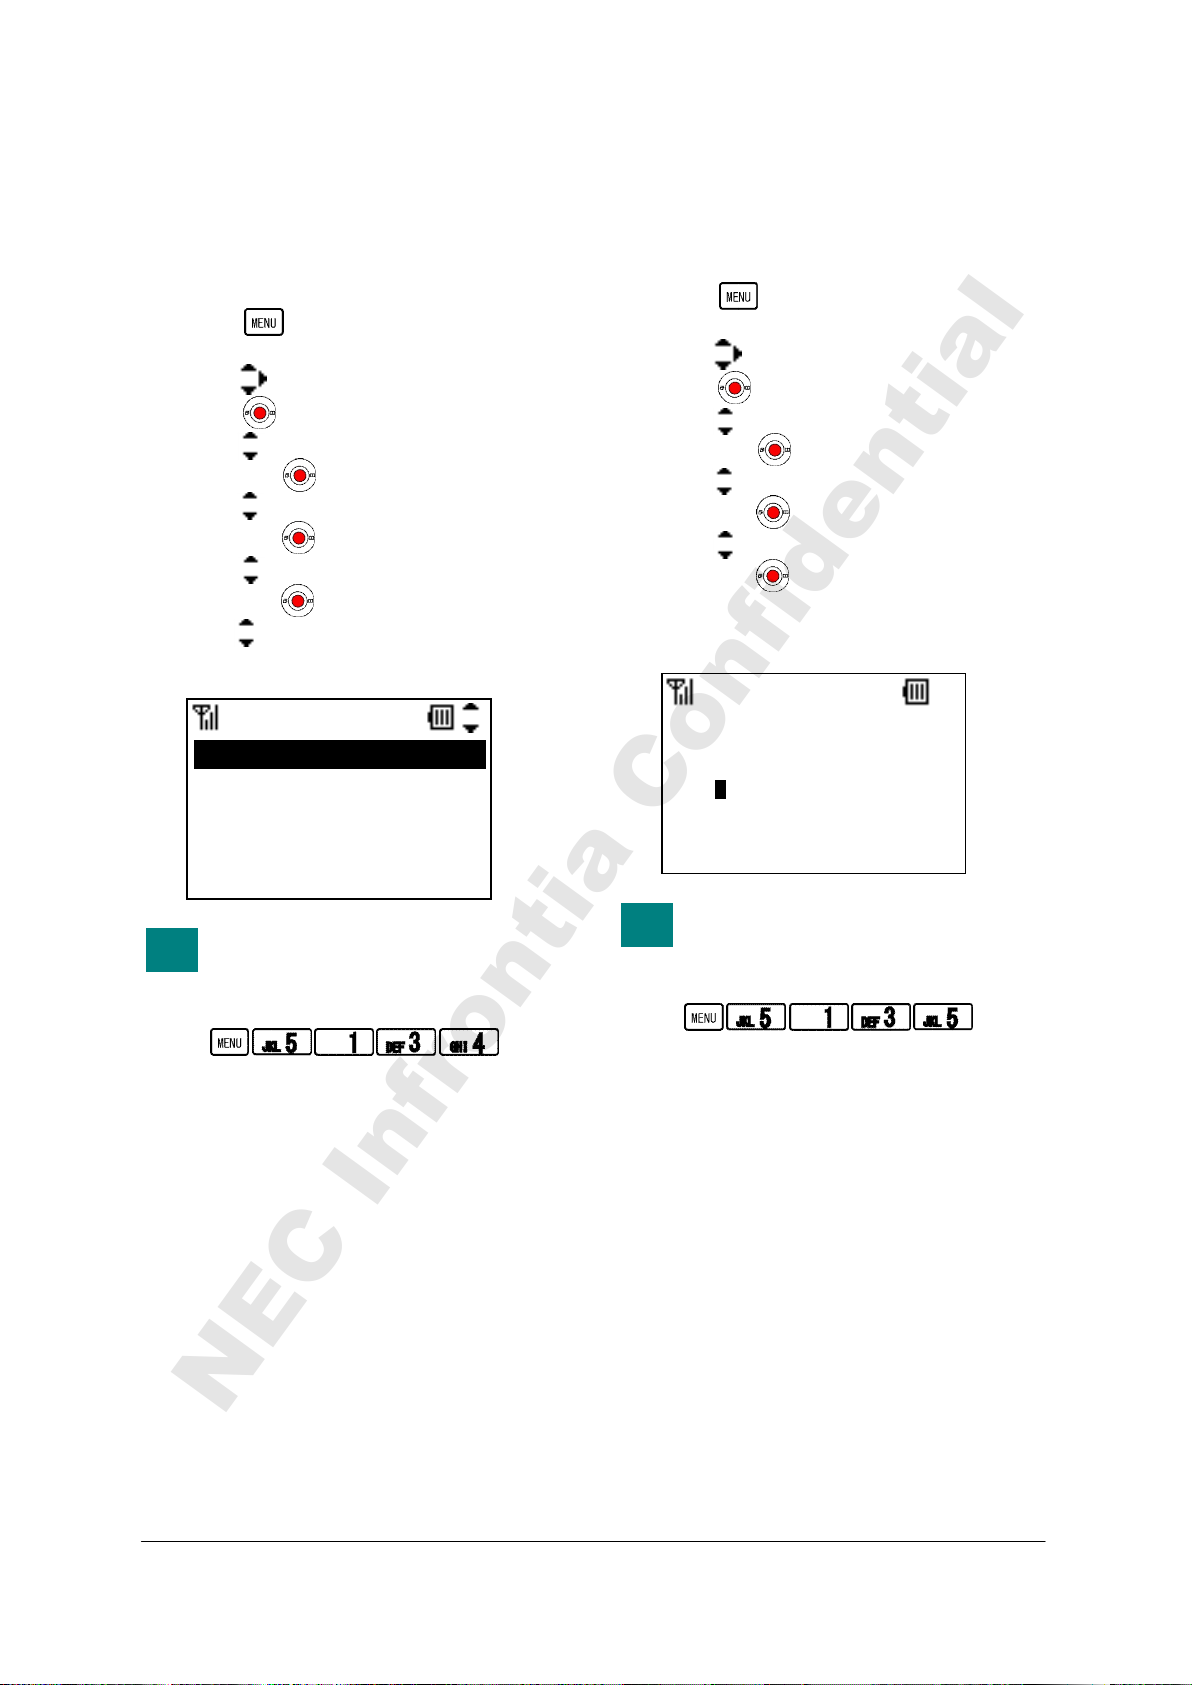
• LANGUAGE
TIP
TIP
NEC Infrontia Confidential
• MY NAME
Factory Default: English
The information on the LCD can be displayed in
English or Japanese. You can switch between 2
languages as follow.
- Press key in Standby mode. Your
phone displays the main menu.
- Press key to select “5.Setting” and then
press key.
- Press key to select “1.User Setting” and
then press key.
- Press key to select “3.Display” and
then press key.
- Press key to select “4.Language” and
then press key.
- Press key to select “1.Japanese” or
“2.English” and then press “OK” soft key.
1.Japanese
2.English
OK Back
You can reach Language menu by
pressing following keys.
Go to Language menu:
Language
Factory Default: -
Your phone can display specific strings (up to 10
characters) such as your name in Standby mode.
- Press key in Standby mode. Your
phone displays the main menu.
- Press key to select “5.Setting” and then
press key.
- Press key to select “1.User Setting” and
then press key.
- Press key to select “3.Display” and
then press key.
- Press key to select “5.Language” and
then press key.
- Edit strings you want to display in Standby
mode. and then press “OK” soft key.
Mike
ab OK Clear
You can reach My Name menu by
pressing following keys.
Go to My Name menu:
My Name
40
Page 55
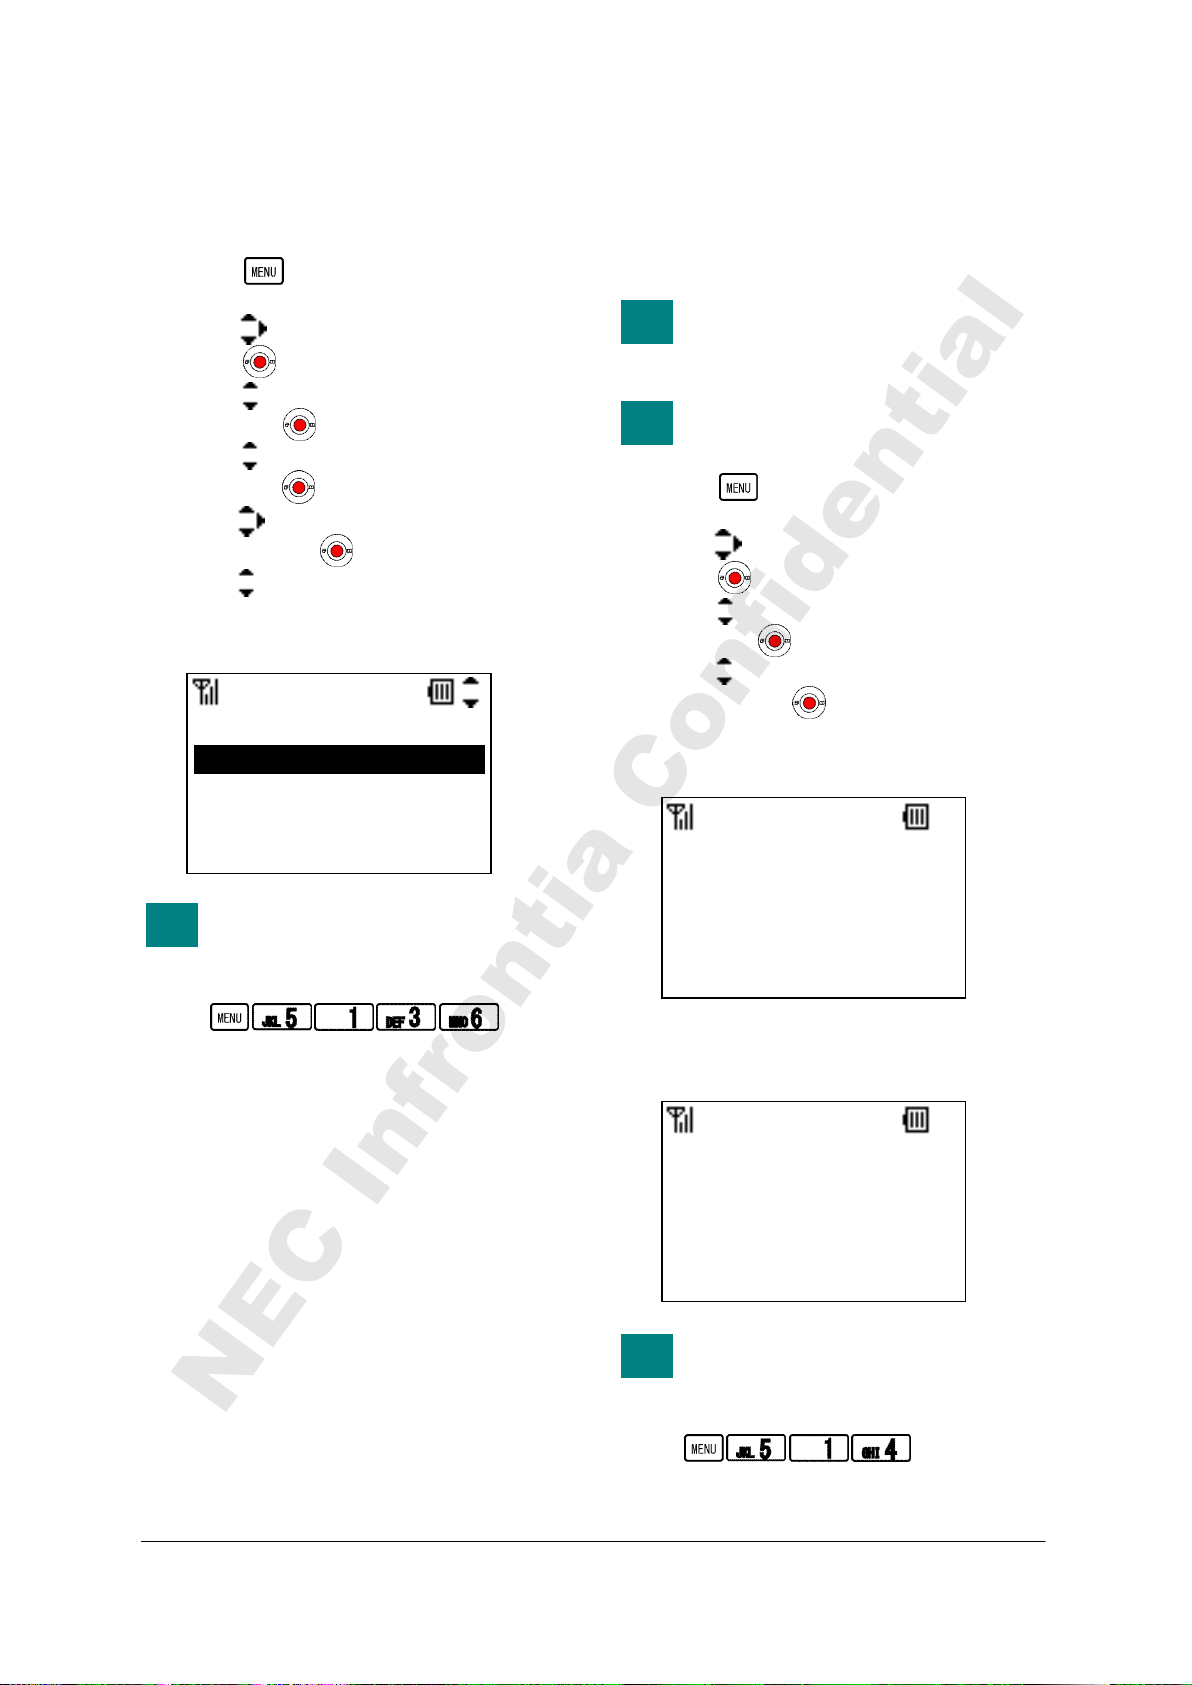
• DISPLAY PATTERN
TIP
TIP
TIP
TIP
NEC Infrontia Confidential
• CHANGE PASSWORD
Factory Default: Normal
Your phone can display reversed LCD pattern.
- Press key in Standby mode. Your
phone displays the main menu.
- Press key to select “5.Setting” and then
press key.
- Press key to select “1.User Setting” and
then press key.
- Press key to select “3.Display” and
then press key.
- Press key to select “6.Display Pattern”
and then press key.
- Press key to select “1.Normal” or
“2.Reversiong” and then press “OK” soft
key.
1.Normal
2.Reversing
OK Back
You can reach Display Pattern
menu by pressing following keys.
Go to Display Pattern menu:
Disp Pattern
Factory Default: -
You can change a password that is used for
Password Lock or Configuration.
Please contact your network
administrator to know your
password.
Use 4 numeric characters for a
password.
- Press key in Standby mode. Your
phone displays the main menu.
- Press key to select “5.Setting” and then
press key.
- Press key to select “1.User Setting” and
then press key.
- Press key to select “4.Change Password”
and then press key.
- Enter your current password and then press
“OK” soft key.
Old Password:
****
12 OK Clear
- Enter new password you want and then
press “OK” soft key.
New Password:
1234
12 OK Clear
You can reach Change Password
menu by pressing following keys.
Go to Change Password menu:
Change Pass.
Change Pass.
41
Page 56
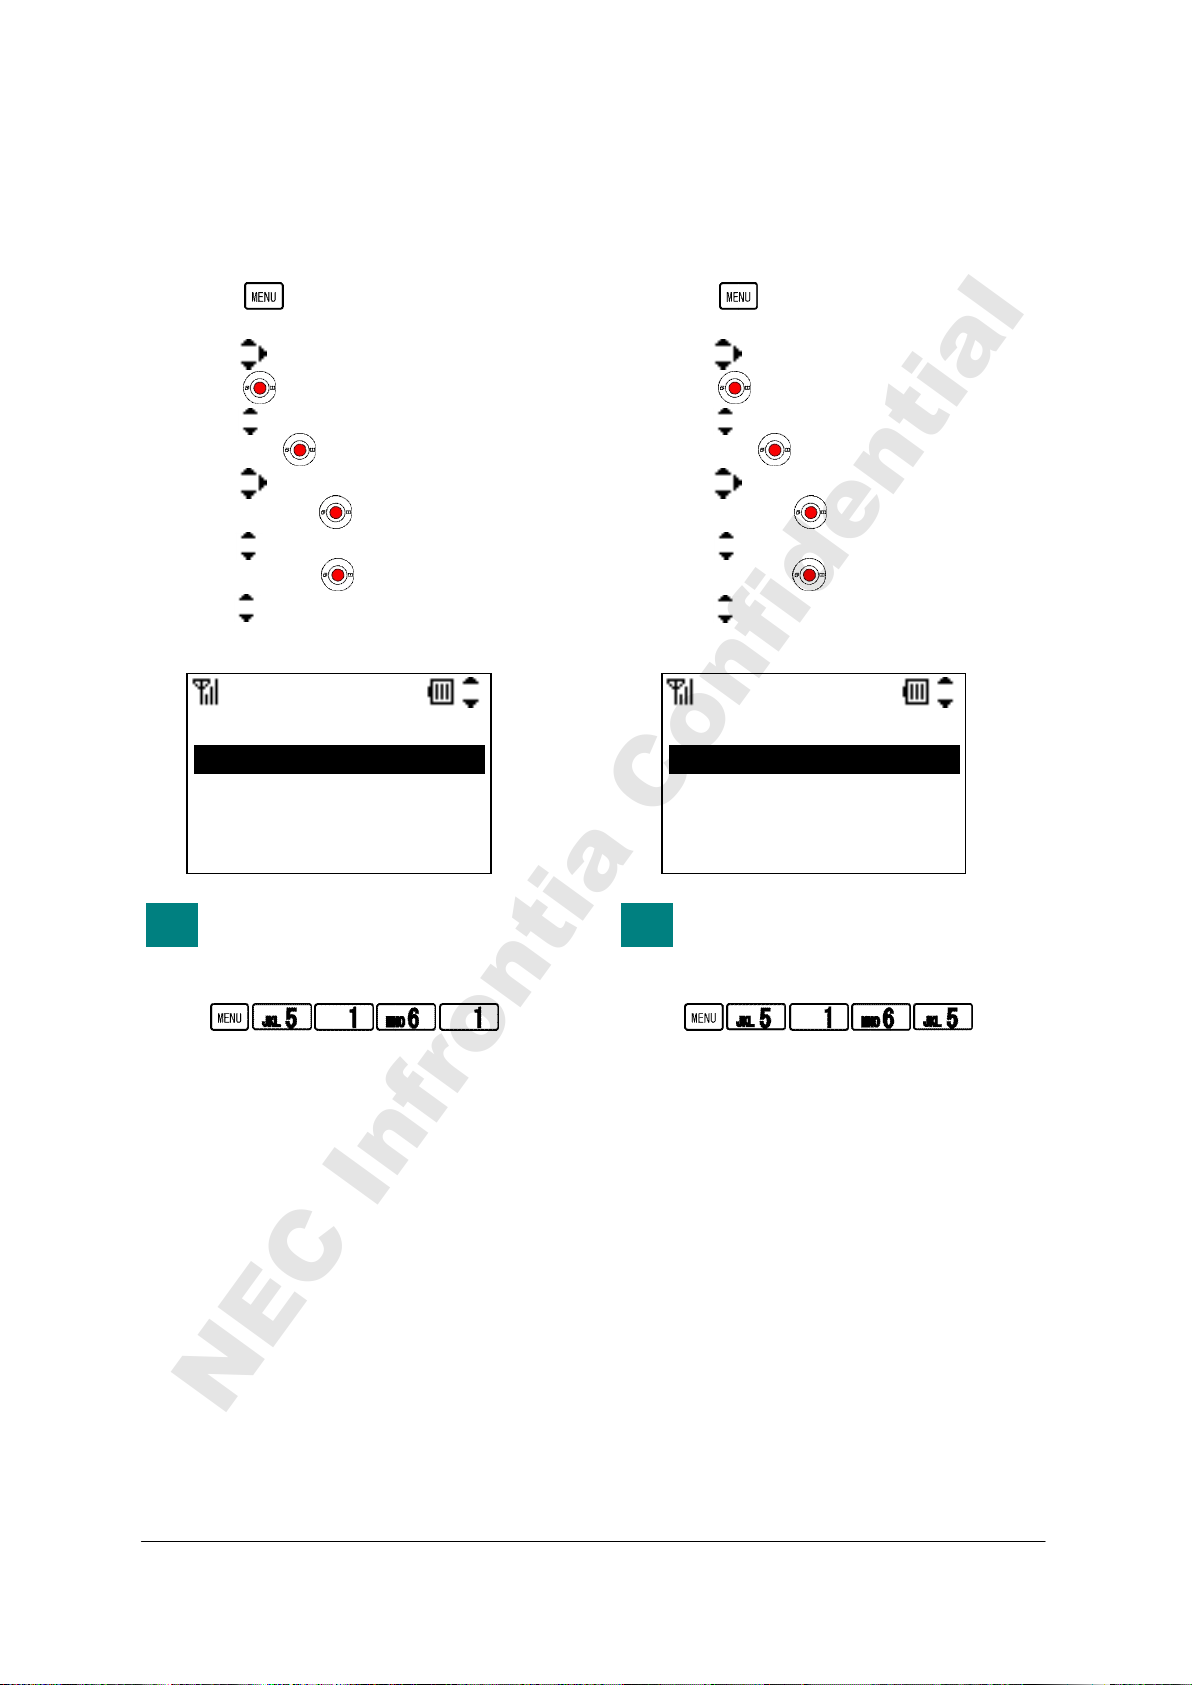
• KEY TOUCH TONE
TIP
TIP
NEC Infrontia Confidential
• SPEAKER MONITOR
Factory Default: Disable
You can sound or mute a tone that is provided
when you press any key on your phone.
- Press key in Standby mode. Your
phone displays the main menu.
- Press key to select “5.Setting” and then
press key.
- Press key to select “1.User Setting” and
then press key.
- Press key to select “6.Keypad Mode”
and then press key.
- Press key to select “1.Key Touch Tone”
and then press key.
- Press key to select “1.Disable” or
“2.Enable” and then press “OK” soft key.
1.Disable
2.Enable
OK Back
You can reach Key Touch Tone
menu by pressing following keys.
Go to Key Touch Tone menu:
KeyTouchTone
Factory Default: Disable
You can use Speaker monitor while talking as
required.
- Press key in Standby mode. Your
phone displays the main menu.
- Press key to select “5.Setting” and then
press key.
- Press key to select “1.User Setting” and
then press key.
- Press key to select “6.Keypad Mode”
and then press key.
- Press key to select “5.Speaker monitor”
and then press key.
- Press key to select “1.Disable” or
“2.Enable” and then press “OK” soft key.
1.Disable
2.Enable
OK Back
You can Speaker monitor menu by
pressing following keys.
Go to Speaker monitor menu:
Spk monitor
42
Page 57
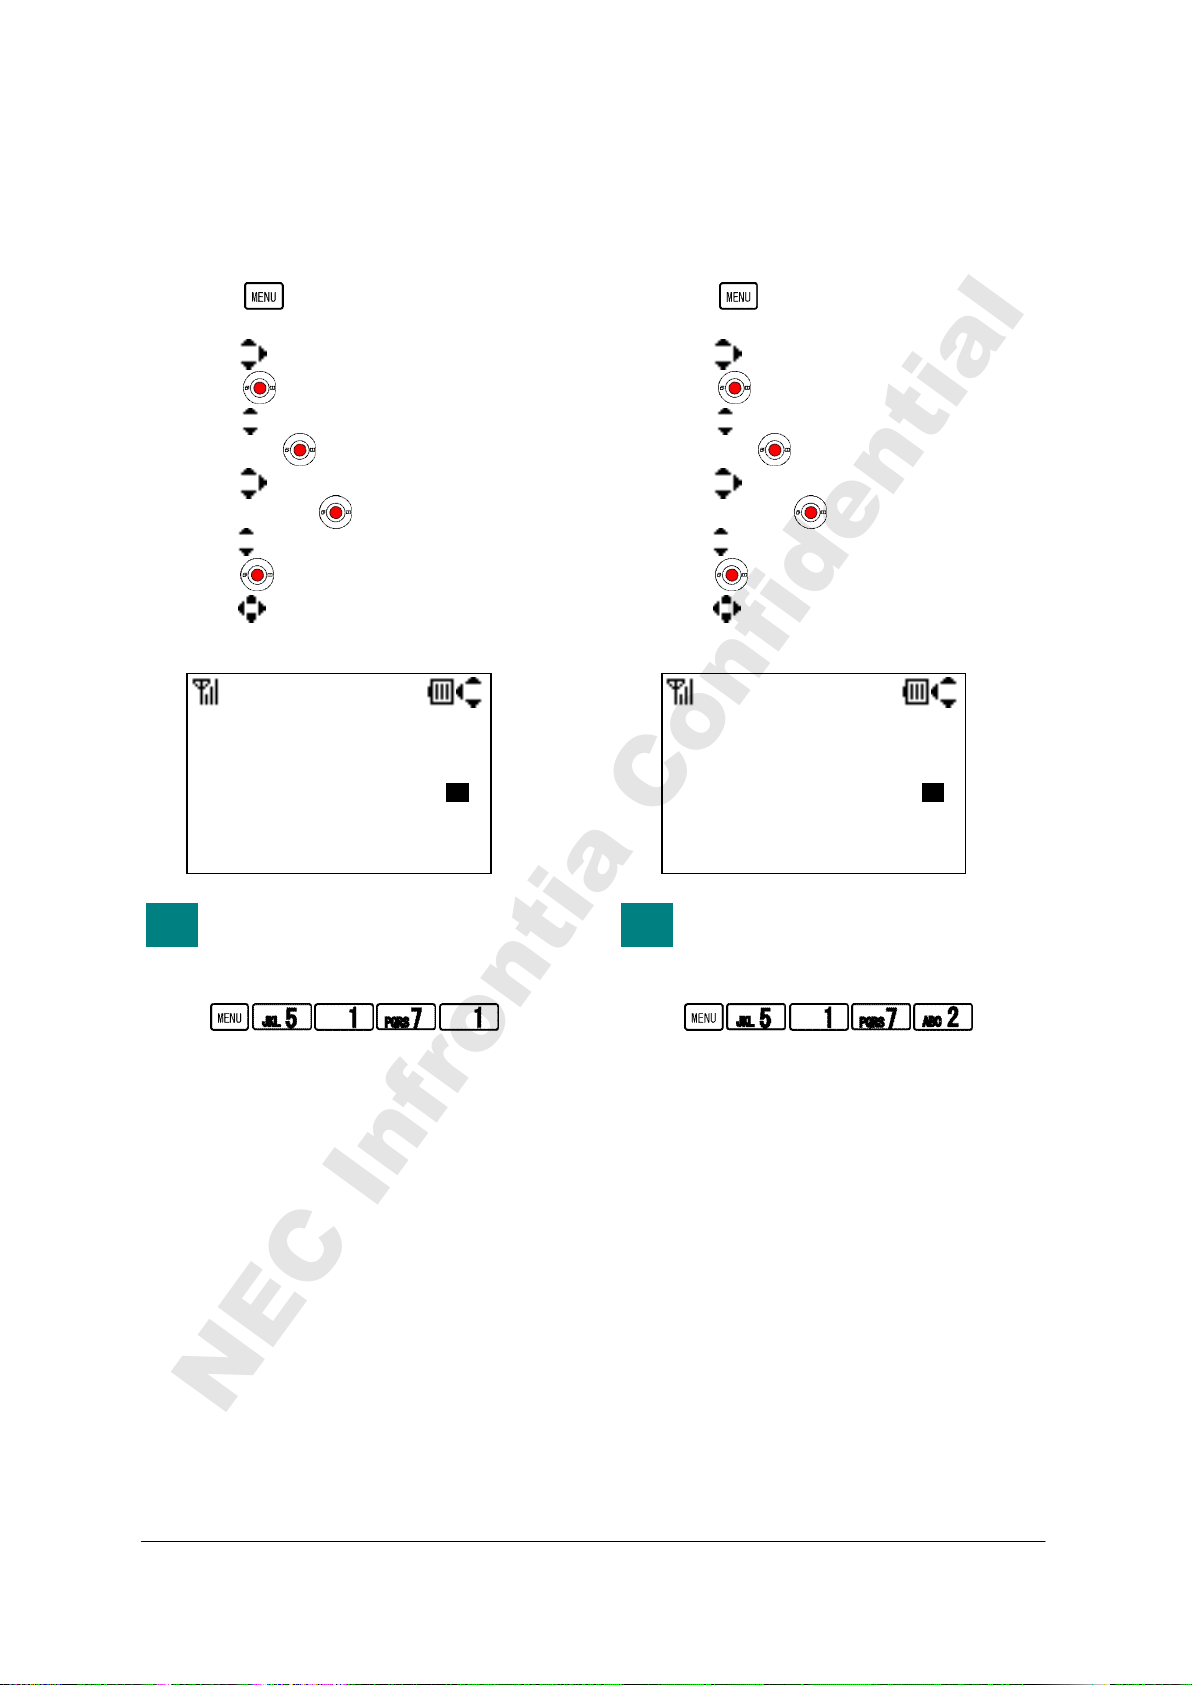
• DATE
TIP
TIP
NEC Infrontia Confidential
• TIME
Factory Default: 2008/ 1/ 1 (YYYY/MM/DD)
You can adjust date information of your phone
as required.
- Press key in Standby mode. Your
phone displays the main menu.
- Press key to select “5.Setting” and then
press key.
- Press key to select “1.User Setting” and
then press key.
- Press key to select “7.Date & Time”
and then press key.
- Press key to select “1.Date” and then
press key.
- Press key to adjust Year, Month and
Day and then press “OK” soft key.
2008/ 9/ 2
OK Back
You can Date menu by pressing
following keys.
Go to Date menu:
Date
Factory Default: 0: 0 (HH:MM)
You can adjust time information of your phone
as required.
- Press key in Standby mode. Your
phone displays the main menu.
- Press key to select “5.Setting” and then
press key.
- Press key to select “1.User Setting” and
then press key.
- Press key to select “7.Date & Time”
and then press key.
- Press key to select “2.Time” and then
press key.
- Press key to adjust Year, Month and
Day and then press “OK” soft key.
16: 0
OK Back
You can Time menu by pressing
following keys.
Go to Time menu:
Time
43
Page 58
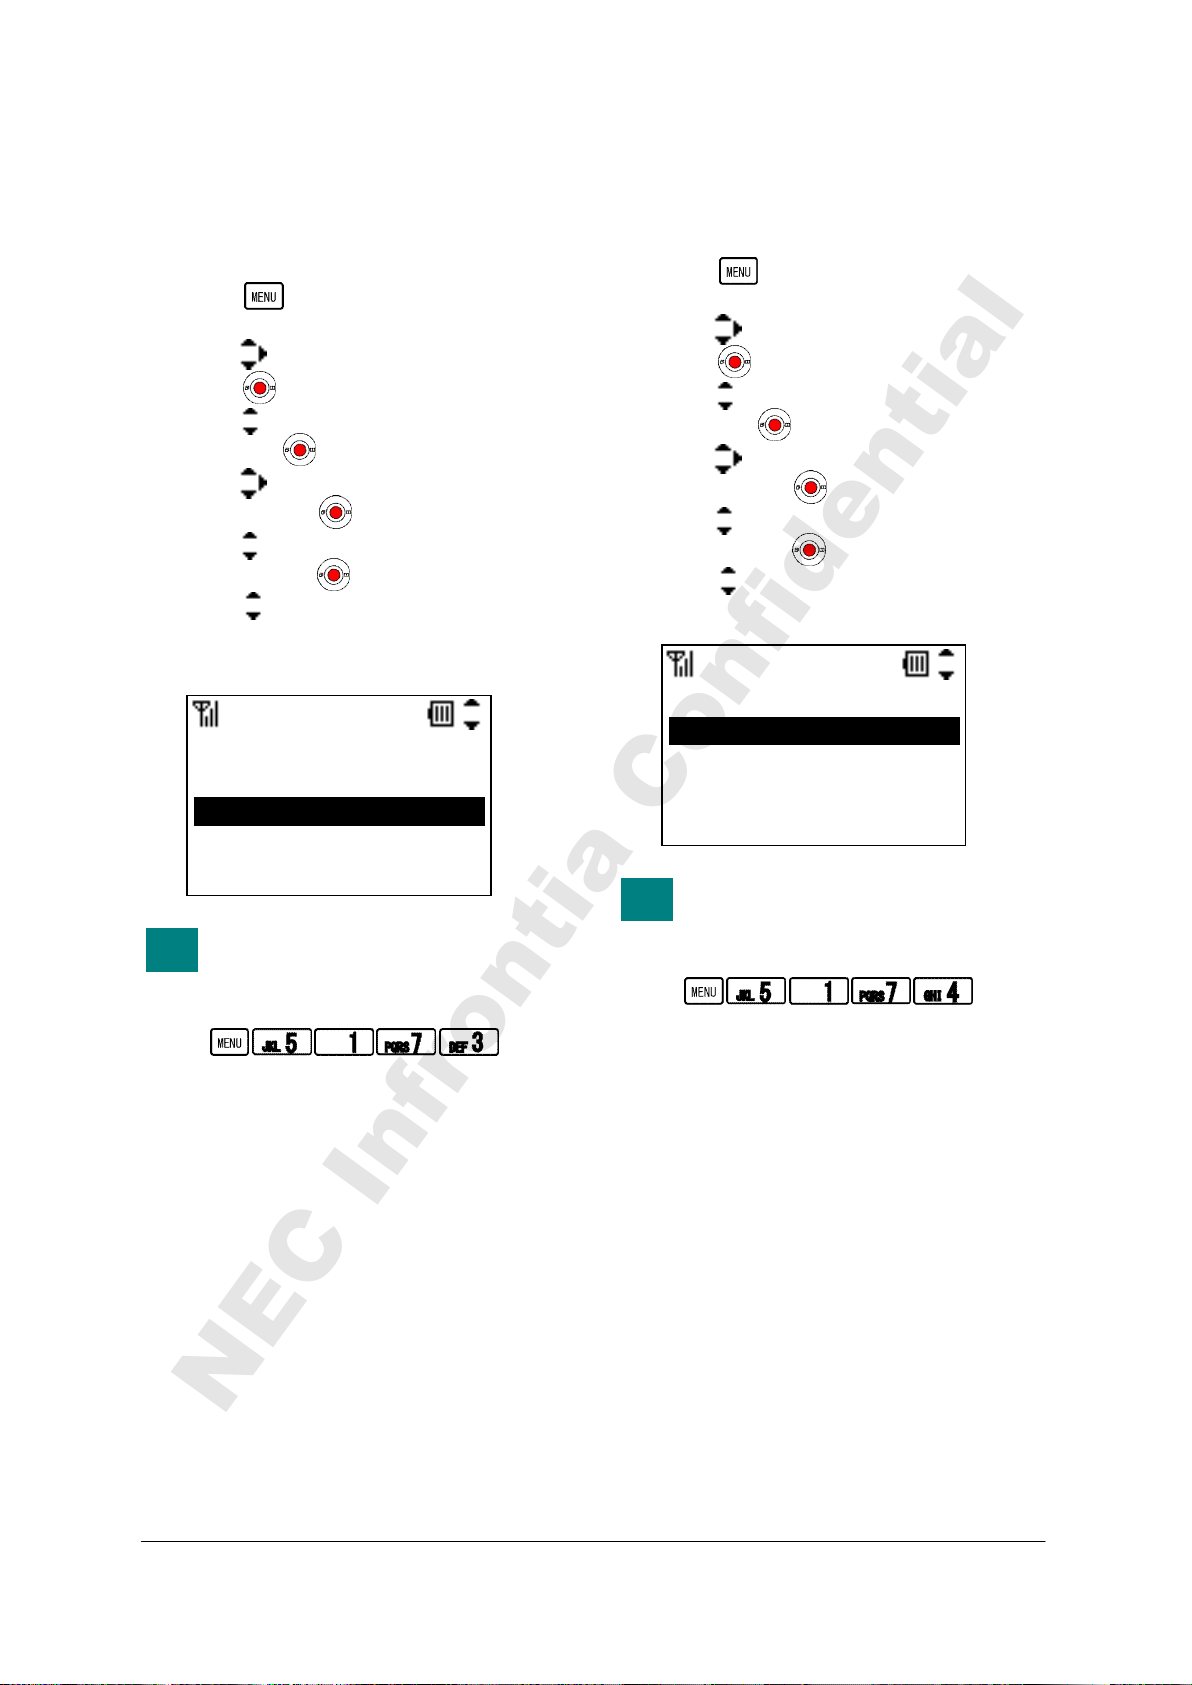
• TIME FORMAT
TIP
TIP
NEC Infrontia Confidential
• DATLIGHT SAVING
Factory Default: 12hours
You can select a time format (12hours, 12hours
(AM0:00) and 24hours) as required.
- Press key in Standby mode. Your
phone displays the main menu.
- Press key to select “5.Setting” and then
press key.
- Press key to select “1.User Setting” and
then press key.
- Press key to select “7.Date & Time”
and then press key.
- Press key to select “3.Time Format”
and then press key.
- Press key to select “1.12hours”,
“2.12hours(AM0:00)” or “3.24hours” and
then press “OK” soft key.
1.12hours
2.12hours(AM0:00)
3.24hours
OK Back
You can Time Format menu by
pressing following keys.
Go to Time Format menu:
Time Format
Factory Default: Disable
You can use daylight saving as required.
- Press key in Standby mode. Your
phone displays the main menu.
- Press key to select “5.Setting” and then
press key.
- Press key to select “1.User Setting” and
then press key.
- Press key to select “7.Date & Time”
and then press key.
- Press key to select “4.Daylight Saving”
and then press key.
- Press key to select “1.Disable” or
“2.Enable” and then press “OK” soft key.
1.Disable
2.Enable
OK Back
You can Daylight Saving menu by
pressing following keys.
Go to Daylight Saving menu:
Daylight Sav
44
Page 59
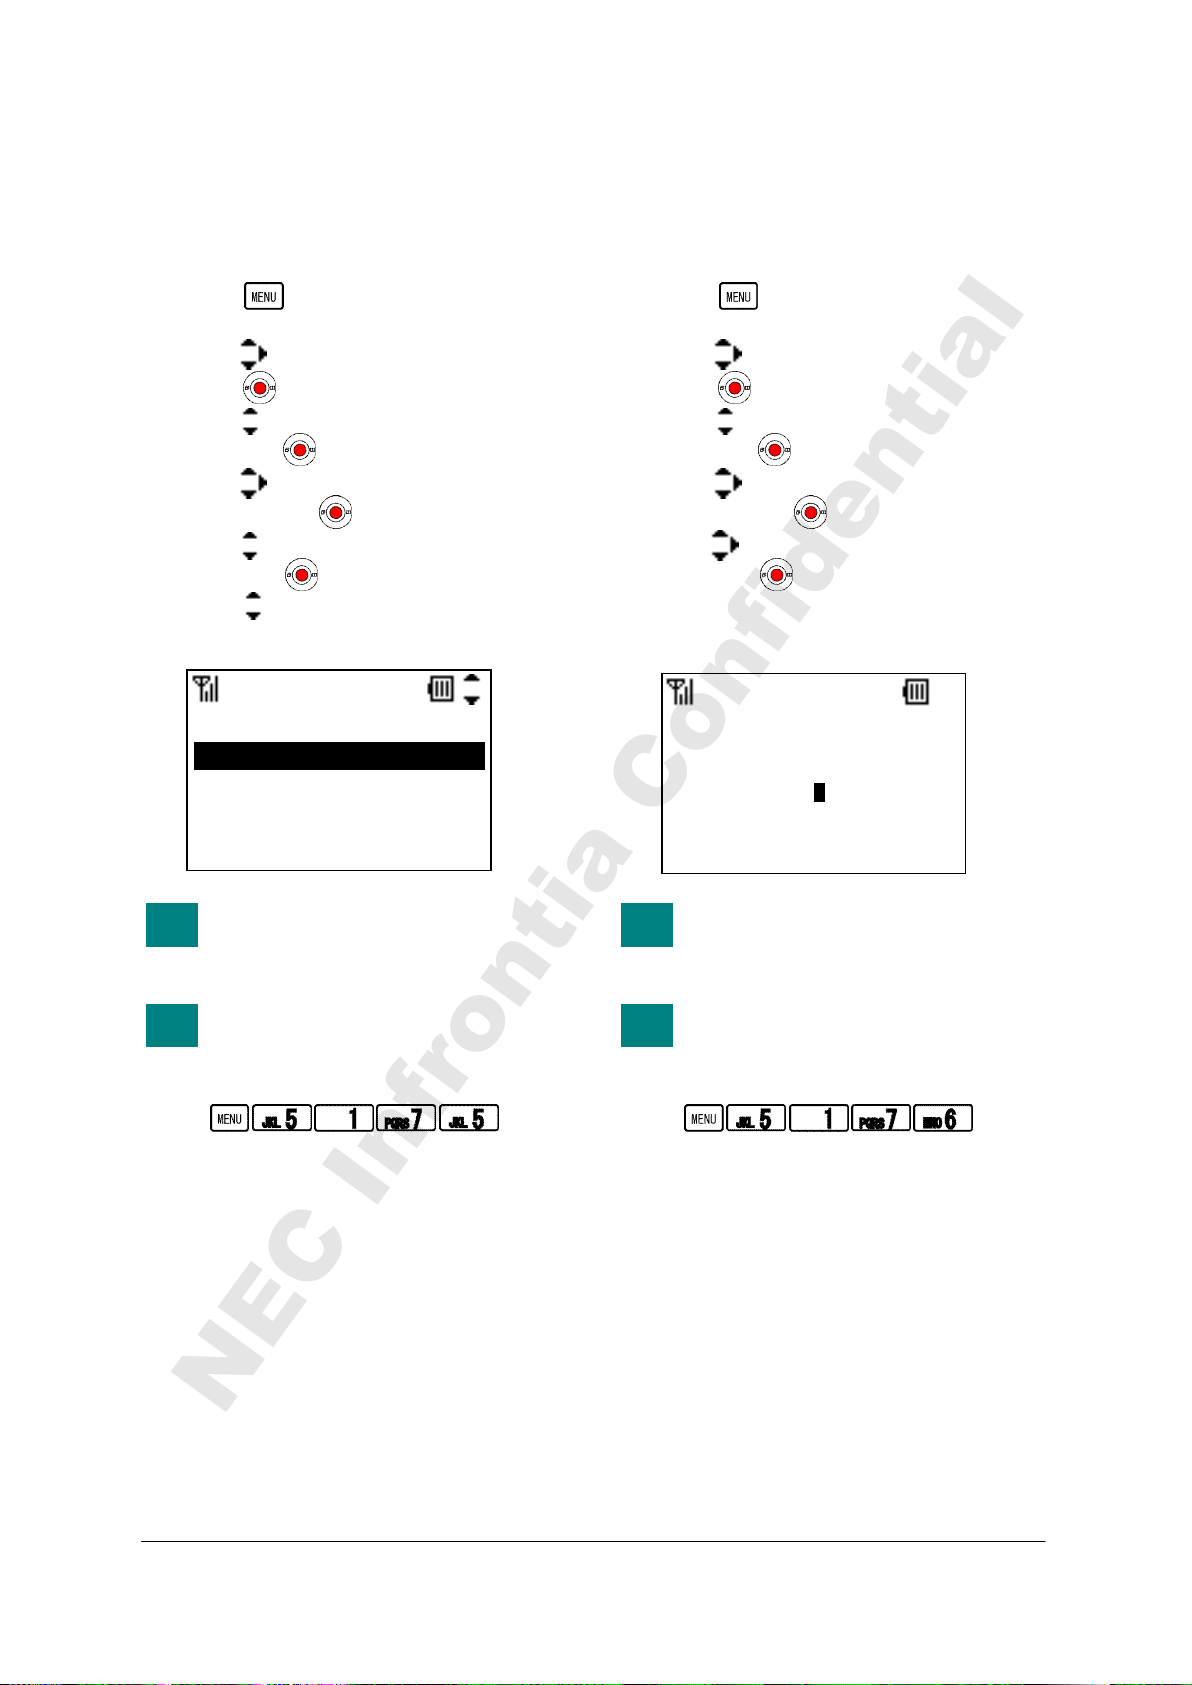
• NTP SETTING
TIP
TIP
TIP
TIP
NEC Infrontia Confidential
• NTP SERVER
Factory Default: Disable
You can use NTP server in your network as
required.
- Press key in Standby mode. Your
phone displays the main menu.
- Press key to select “5.Setting” and then
press key.
- Press key to select “1.User Setting” and
then press key.
- Press key to select “7.Date & Time”
and then press key.
- Press key to select “5.NTP Setting” and
then press key.
- Press key to select “1.Disable” or
“2.Enable” and then press “OK” soft key.
1.Disable
2.Enable
OK Back
Please confirm your network
administrator whether you can use
NTP Server.
You can NTP Setting menu by
pressing following keys.
Go to NTP Setting menu:
NTP Setting
Factory Default: -
You can set NTP server in your network as
required.
- Press key in Standby mode. Your
phone displays the main menu.
- Press key to select “5.Setting” and then
press key.
- Press key to select “1.User Setting” and
then press key.
- Press key to select “7.Date & Time”
and then press key.
- Press key to select “6.NTP Server” and
then press key.
- Edit an appropriate NTP Server Address (IP
or FQDN) and then press “OK” soft key.
time.xxxx.com
ab OK Clear
Please contact your network
administrator to know NTP Server
Address.
You can NTP Server menu by
pressing following keys.
Go to NTP Server menu:
NTP Server
45
Page 60
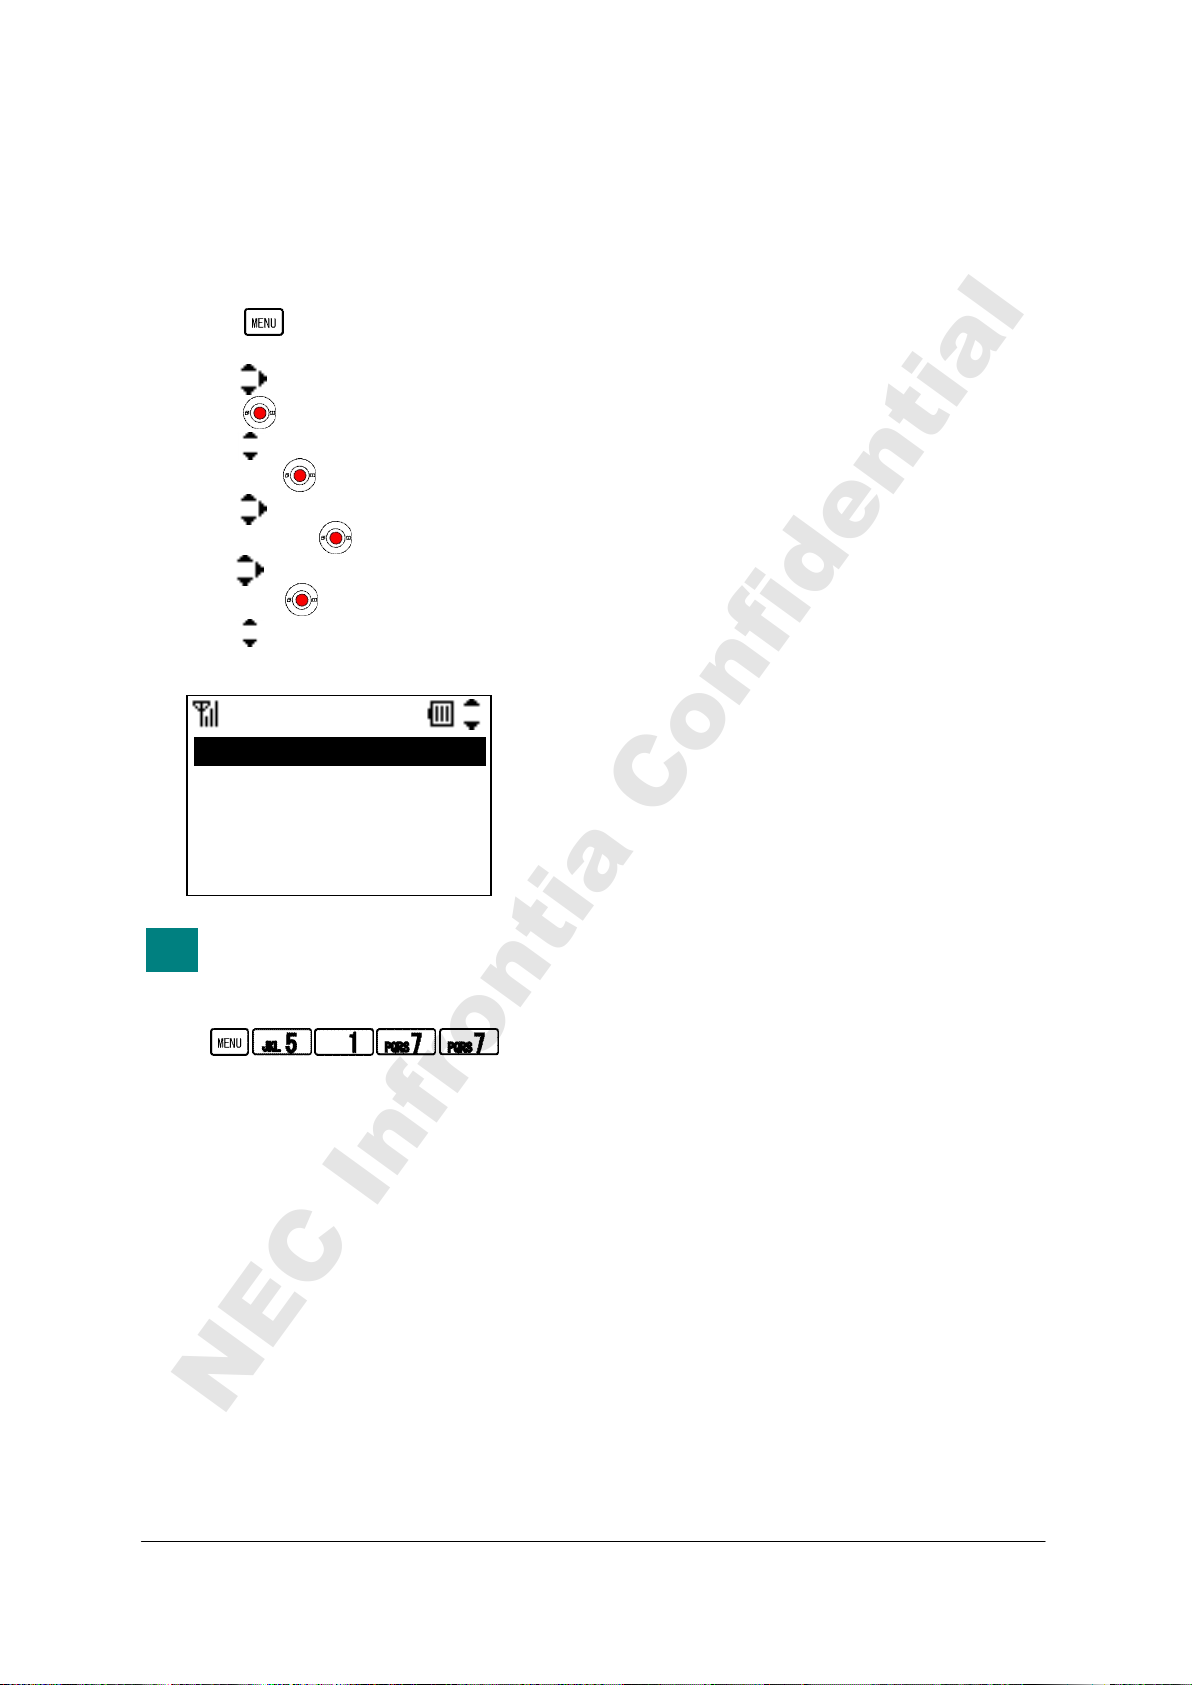
• TIME ZONE
TIP
NEC Infrontia Confidential
Factory Default: GMT+00:00
You can set time offset in the range -12:00 to
+14:00, which specifies time offset between
GMT and your area.
- Press key in Standby mode. Your
phone displays the main menu.
- Press key to select “5.Setting” and then
press key.
- Press key to select “1.User Setting” and
then press key.
- Press key to select “7.Date & Time”
and then press key.
- Press key to select “7.Time Zone” and
then press key.
- Press key to adjust an appropriate time
offset and then press “OK” soft key.
GMT-08:00
OK Back
You can Time Zone menu by
pressing following keys.
Go to Time Zone menu:
Time Zone
46
Page 61
9.INFORMATION
TIP
TIP
NEC Infrontia Confidential
You can confirm the information of your phone
such as Phone No., IP address and MAC
address.
• TO DISPLAY STATUS
You can confirm the Status of your phone as
follow.
SIP Status
Wireless Status
- Press key in Standby mode. Your
phone displays the main menu.
- Press key to select “0.Information” and
then press key.
• TO DISPLAY WIRELESS
STATUS
You can confirm the Wireless Status of your
phone as follow.
BSSID
ESSID
Channel
MAC address
Security
Rate
IP address
- Press key to select “1.Status” and then
press key.
SIP Status
Wireless Status
Connected
Back
You can view Status by pressing
following keys.
View Status:
Status
Registered
Netmask
Gateway
DNS Primary
DNS Secondary
- Press key in Standby mode. Your
phone displays the main menu.
- Press key to select “0.Information” and
then press key.
- Press key to select “2.Wireless” and
then press key.
<Wireless>
1.BSSID
00:0D:02:11:22:33
2.ESSID
Back
You can view Wireless Status by
pressing following keys.
View Wireless Status:
Wireless
47
Page 62
• TO DISPLAY SIP STATUS
TIP
NEC Infrontia Confidential
You can confirm the SIP Status of your phone as
follow.
SIP Status
Phone No.
SIP Proxy
SIP Port
REGISTER
- Press key in Standby mode. Your
phone displays the main menu.
- Press key to select “0.Information” and
then press key.
- Press key to select “3.SIP” and then
press key.
1.SIP Status
Registered
2.Phone No.
223
Back
You can view SIP Status by
pressing following keys.
View SIP Status:
SIP
48
Page 63
10.PASSWORD LOCK
TIP
TIP
TIP
NEC Infrontia Confidential
You can lock your phone against unauthorized
usage. This is also useful for guarding your
phone against inadvertent button presses.
• TO USE MANUAL LOCK
• TO ENBLE MANUAL LOCK
Factory Default: Disable
- Press key in Standby mode. Your
phone displays the main menu.
- Press and hold key for 2 seconds or
more to lock your phone in Standby mode.
- Your phone is locked and displays a lock
icon ( ).
You can make an Emergency Call
even if your phone is locked.
• TO UNLOCK YOUR PHONE
- Press any key except key and then
input your password (4 digits).
****
12 OK Clear
- Your phone is unlocked and a lock icon
( ) disappears.
Please contact your network
administrator to know your
password.
Input Passwd
- Press key to select “5.Setting” and then
press key.
- Press key to select “1.User Setting” and
then press key.
- Press key to select “5.Password Lock”
and then press key.
- Press key to select “1.Manual lock” and
then press key.
- Press key to select “2.Enable” and then
press “OK” soft key.
1.Disable
2.Enable
OK Back
You can reach Manual lock menu
by pressing following keys.
Go to Manual lock menu:
Manual
49
Page 64
• TO USE OUTSIDE LOCK
TIP
TIP
NEC Infrontia Confidential
• TO USE POWEROFF LOCK
Factory Default: 0sec (Disable)
When your phone is in out of service area, your
phone is locked automatically expire timer you
set.
- Press key in Standby mode. Your
phone displays the main menu.
- Press key to select “5.Setting” and then
press key.
- Press key to select “1.User Setting” and
then press key.
- Press key to select “5.Password Lock”
and then press key.
- Press key to select “2.Auto lock” and
then press key.
- Press key to select “1.Outside Lock”
and then press key.
- Edit an appropriate timer value (0:disable to
3600sec) and then press “OK” soft key.
10
S
12 OK Clear
You can reach Outside Lock menu
by pressing following keys.
Go to Outside Lock menu:
Outside Lock
Factory Default: Disable
When your phone is turned on after power off,
your phone is locked automatically.
- Press key in Standby mode. Your
phone displays the main menu.
- Press key to select “5.Setting” and then
press key.
- Press key to select “1.User Setting” and
then press key.
- Press key to select “5.Password Lock”
and then press key.
- Press key to select “2.Auto lock” and
then press key.
- Press key to select “2.PowerOff Lock”
and then press key.
- Press key to select “2.Enable” and then
press “OK” soft key.
1.Disable
2.Enable
OK Back
You can reach PowerOff Lock
menu by pressing following keys.
Go to PowerOff Lock menu:
PowerOffLock
50
Page 65
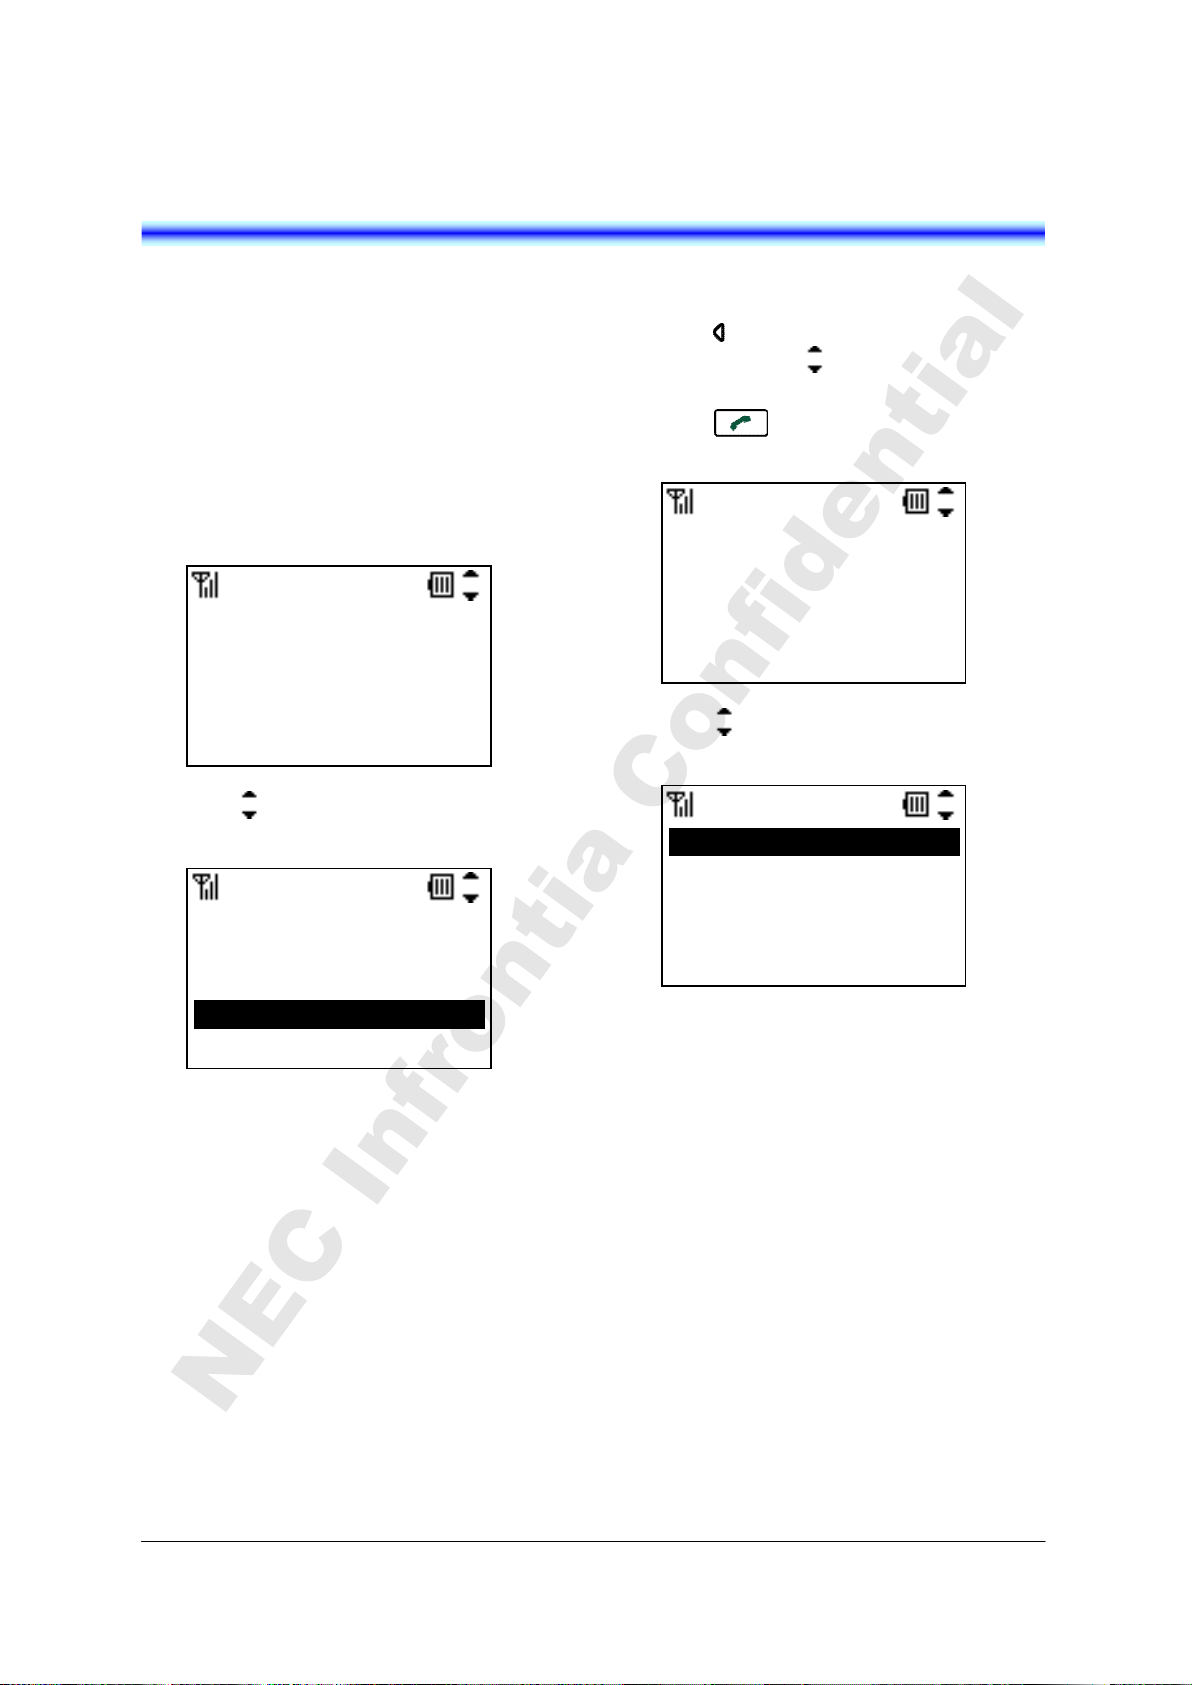
11.PREFIX DIAL
NEC Infrontia Confidential
You can add Prefix Dial to phone number when
you make a call.
• TO USE PREFIX DIAL
You can use Prefix Dial as follow.
To Make a Call by preset dialing:
- Enter the phone number and then press
“Prefix” soft key.
- Press key to select Prefix and then
9/ 2 Tue 09:42AM
356551234
Prefix Add Clear
“Call” soft key.
Prefix
1
8
9
01181
Call Back
To Make a Call from Call History:
- Press key to view a call history you want
- Press key and then press “Prefix”
- Press key to select Prefix and then
and then press key to select a phone
number you want.
soft key.
9/ 2 Tue 09:44AM
4581212
Prefix Add Clear
“Call” soft key.
Prefix
1
8
9
01181
Call Back
51
Page 66
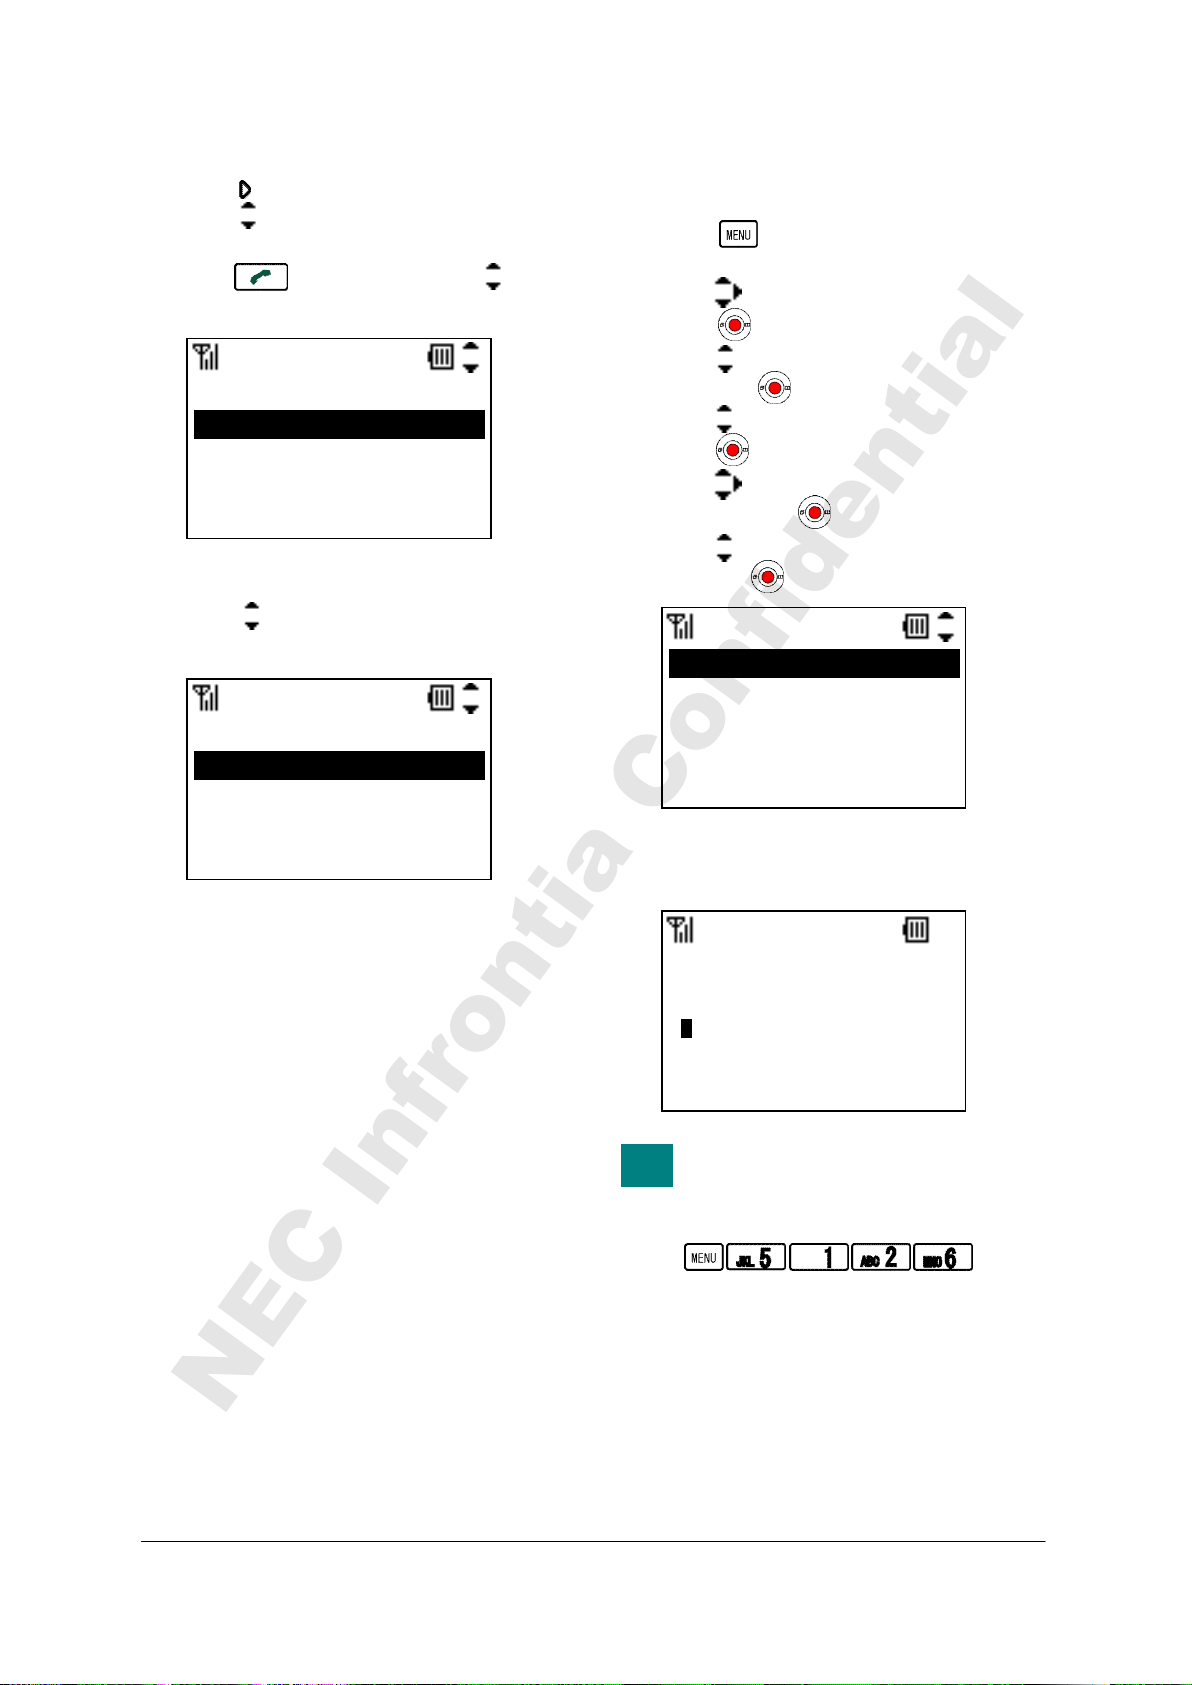
To Make a Call from Directory:
TIP
NEC Infrontia Confidential
- Press key to view Directory and then
press key to select a called party you
want.
- Press key and then press key to
select a phone number you want.
1.4581234444
2.1234555
Prefix Call Back
- Press “Prefix” soft key.
- Press key to select Prefix and then
“Call” soft key.
1
8
9
01181
Call Back
Number
Prefix
• TO REGISTER PREFIX NO.
Factory Default: -
- Press key in Standby mode. Your
phone displays the main menu.
- Press key to select “5.Setting” and then
press key.
- Press key to select “1.User Setting” and
then press key.
- Press key to select “2.Talk” and then
press key.
- Press key to select “6.Reg. Prefix No.”
and then press key.
- Press key to select a registered area and
then press key.
1.<Prefix1>
2.<Prefix2>
3.<Prefix3>
4.<Prefix4>
- Edit prefix number you want and then press
“OK” soft key.
1
12 OK Clear
You can reach Register Prefix No.
menu by pressing following keys.
Go to Register Prefix No. menu:
52
Prefix
Prefix
Page 67
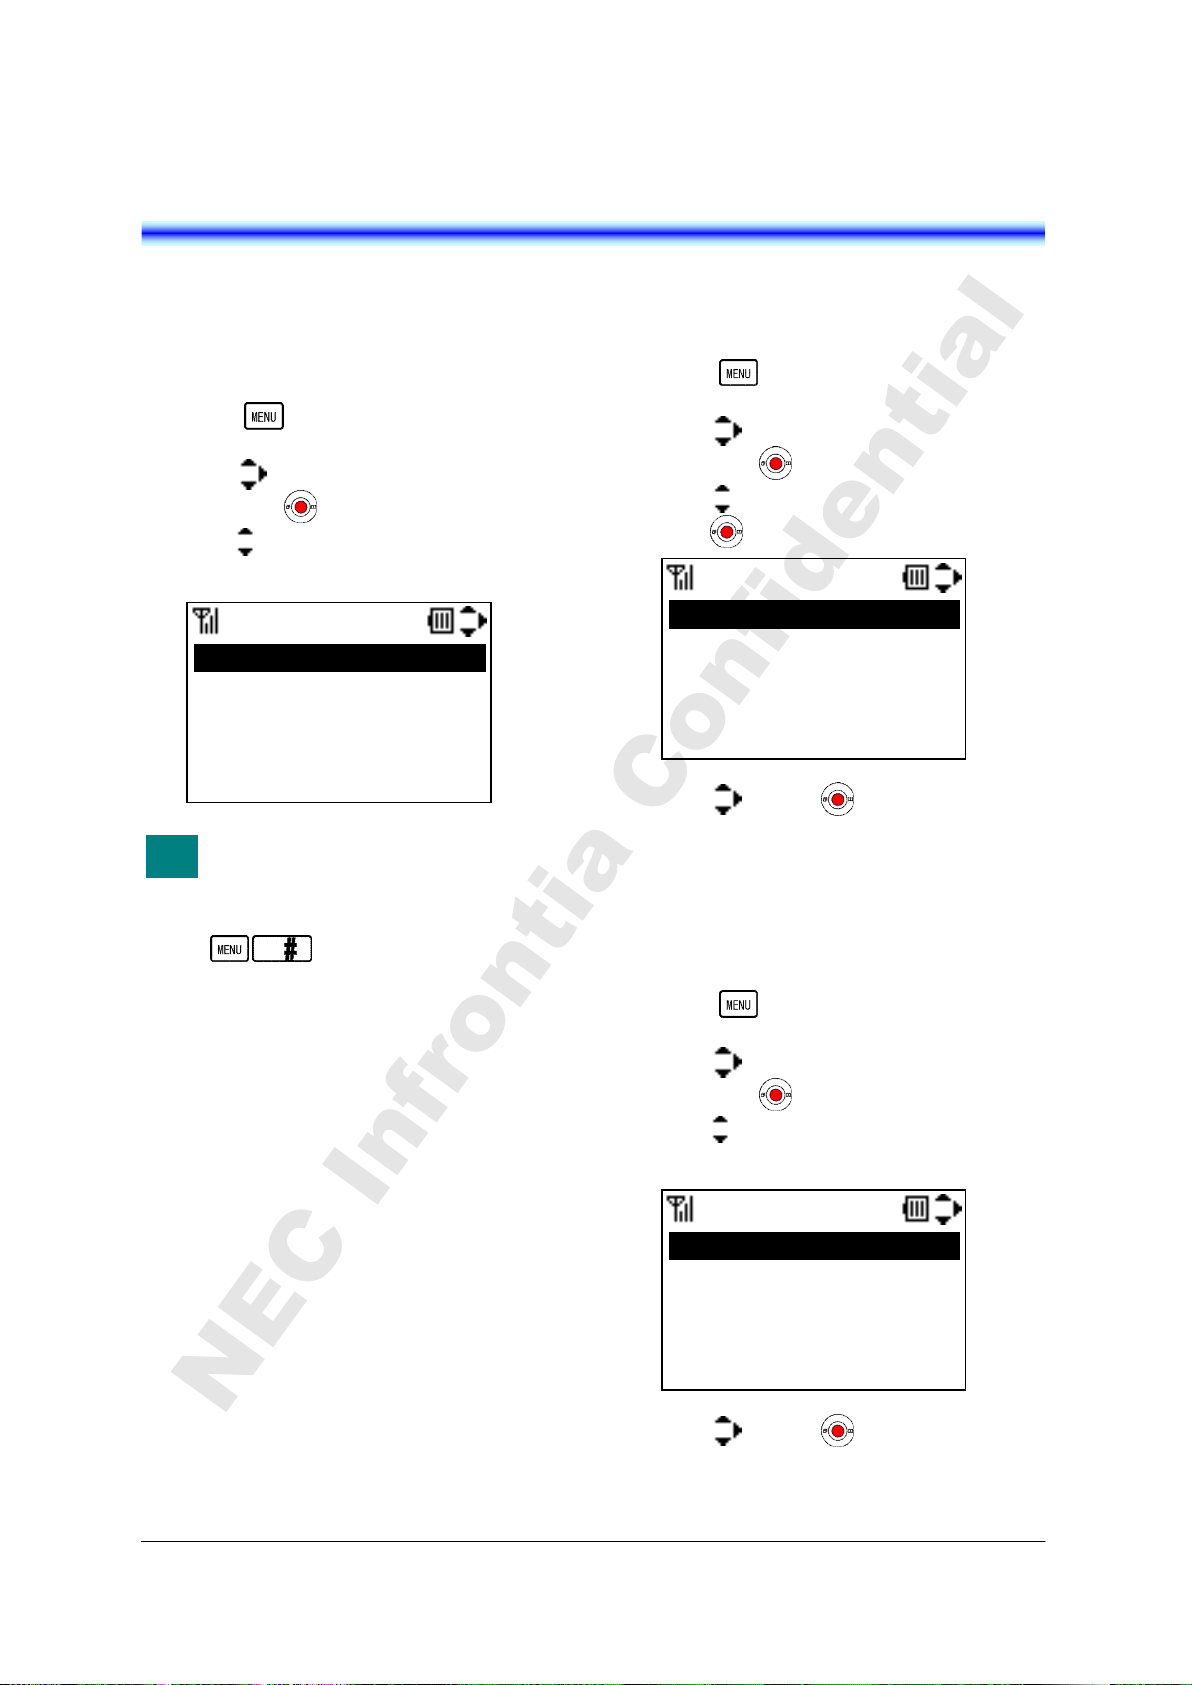
12.FAVORITES
TIP
NEC Infrontia Confidential
You can use favorites menu that you can
customize.
• TO USE FAVORITES
- Press key in Standby mode. Your
phone displays the main menu.
- Press key to select “#.Favorites” and
then press key.
- Press key to select a menu you want to
use and then press “OK” soft key.
1.Information
2.Group Setting
3.Own Number
4.RTP Alarm
Delete OK Back
You can reach Favorites menu by
pressing following keys.
Go to Favorites menu:
Favorites
• TO ENTRY A MENU TO
FAVORITES
- Press key in Standby mode. Your
phone displays the main menu.
- Press key to select “#.Favorites” and
then press key.
- Press key to select an entry area and then
press key.
1.No Entry
2.No Entry
3.No Entry
4.No Entry
Save Back
- Press key and key to select a menu
you want to entry and then press “Save”
soft key.
Favorites
• TO DELETE A MENU FROM
FAVORITES
- Press key in Standby mode. Your
phone displays the main menu.
- Press key to select “#.Favorites” and
then press key.
- Press key to select an entry area and then
press “Delete” soft key.
1.Information
2.Group Setting
3.Own Number
4.RTP Alarm
Delete OK Back
- Press key and key to select a menu
you want to entry and then press “Save”
soft key.
Favorites
53
Page 68

This page is for your notes.
NEC Infrontia Confidential
54
Page 69
13.MENU LIST
NEC Infrontia Confidential
• MENU LIST
The following shows the menu list of MH240 with the default values and remarks as required.
Category Menu Default Remarks
MENU
0.Information
1.Call History
2.Directory
3.Tool
4.Voice Mail
5.Setting
#.Favorites
This is main menu of the phone.
55
Page 70
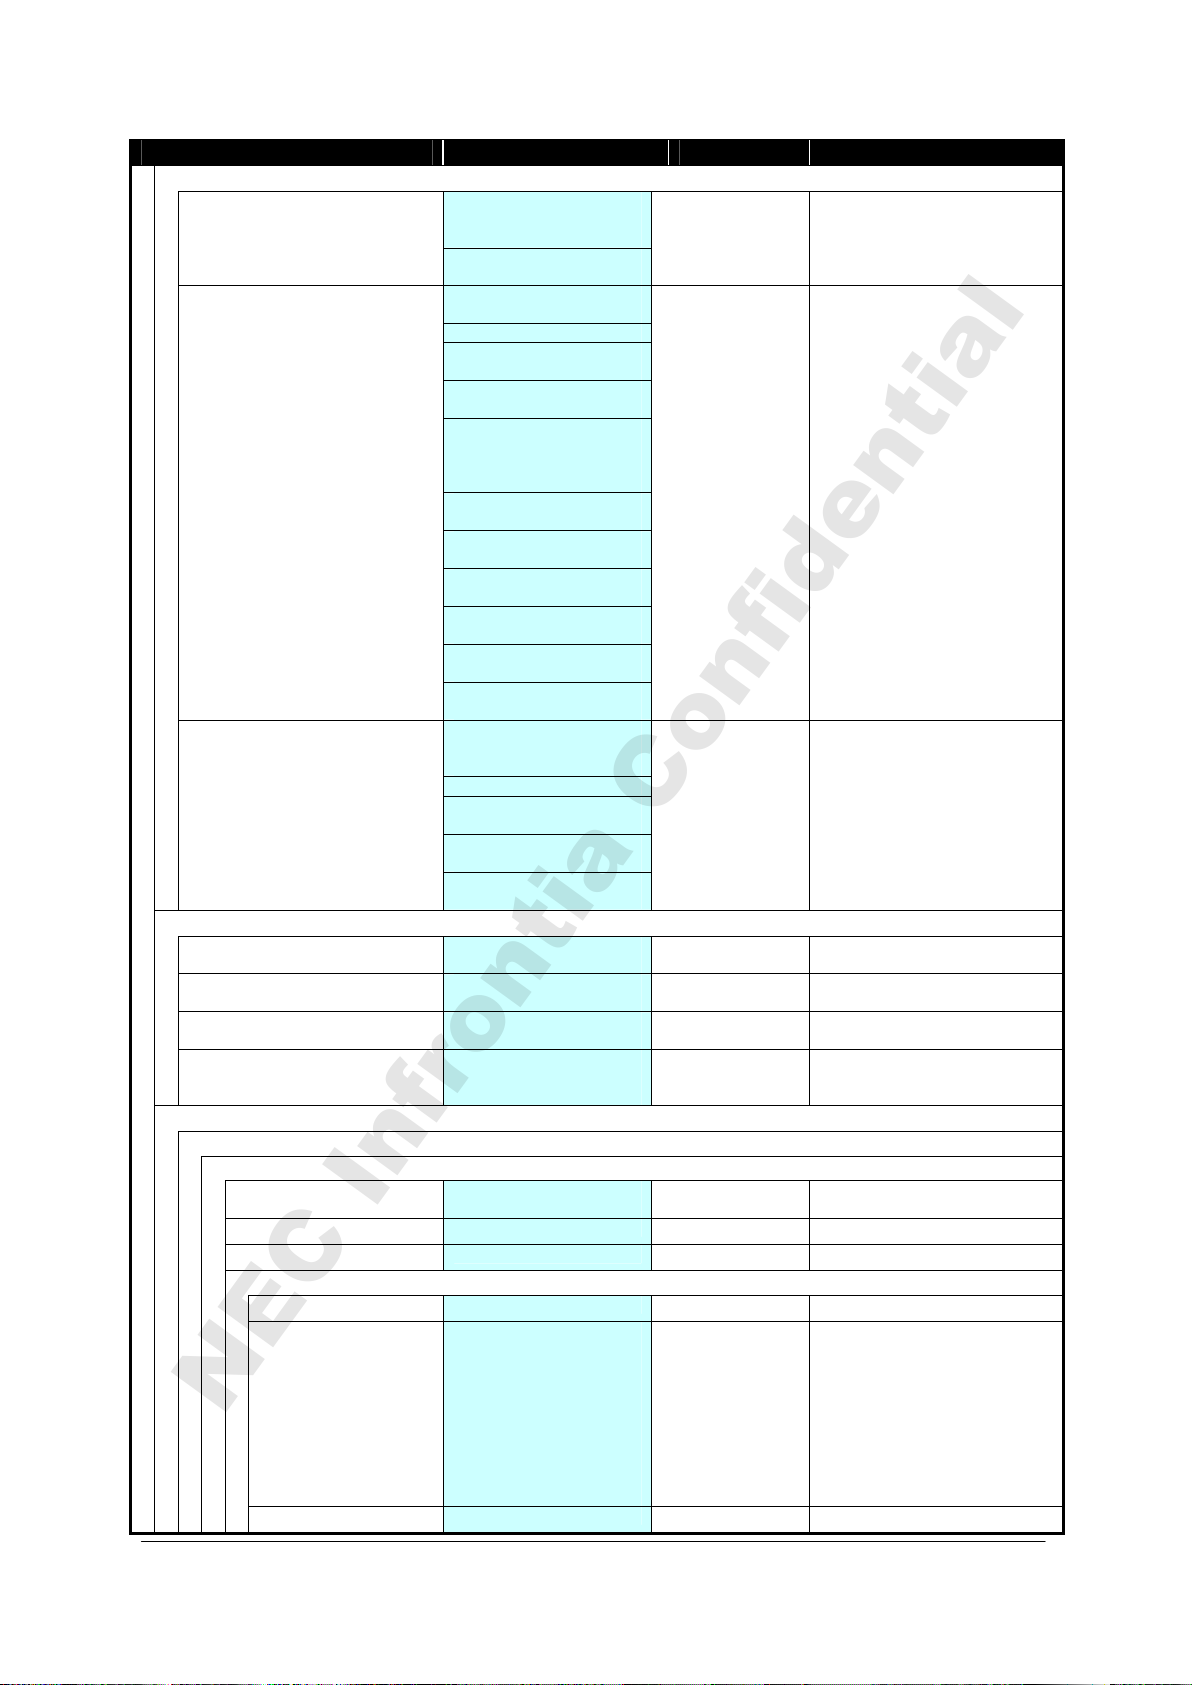
NEC Infrontia Confidential
Category Menu Default Remarks
0.Information
1.Status
2.Wireless
3.SIP
1.Call History
1.Missed No Data
2.Outgoing No Data
3.Incoming No Data
4.All Delete 1.Outgoing
2.Directory
1.Search
1.Personal
1.Group 01.Default to
2.Name (alphanumeric characters)
3.Tel Number (32 digits)
4.Others
1.Memory ID 001 to 500
2.Alphabet 2.ABC
3.Company (alphanumeric characters)
SIP Status
Not Register / Registering
/ Registered
Wireless Status
Not Connect / Connected
BSSID
xx:xx:xx:xx:xx:xx
ESSID
Channel
1 to 11
MAC address
xx:xx:xx:xx:xx:xx
Security
OPEN / WEP / WPA-PSK
/ WPA2-PSK / WPA
/WPA2
Rate
1 to 54 Mbps
IP address
xxx.xxx.xxx.xxx
Netmask
xxx.xxx.xxx.xxx
Gateway
xxx.xxx.xxx.xxx
DNS Primary
xxx.xxx.xxx.xxx
DNS Secondary
xxx.xxx.xxx.xxx
SIP Status
Not Register /
Registering/ Registered
Phone No.
SIP Proxy
xxx.xxx.xxx.xxx
SIP Port
xxxxx
REGISTER
xxx.xxx.xxx.xxx
(when no record)
(when no record)
(when no record)
2.Incoming
3.All
20.Group20
3.DEF
4.GHI
5.JKL
6.MNO
7.PQRS
8.TUV
9.WXYZ
*.Other
#.All
Up to 50 entries
Up to 50 entries
Up to 50 entries
16bytes
32bytes
16bytes
56
Page 71

NEC Infrontia Confidential
Category Menu Default Remarks
2.Edit
Name (alphanumeric characters) blank 16bytes
Group 01.Default to
Tel #1 (32 digits) blank 32bytes
Tel #2 (32 digits) blank 32bytes
Tel #3 (32 digits) blank 32bytes
Company Name (alphanumeric characters) blank 16bytes
Ring Tone 01.Disable
Illumination 1.Disable
Vibrator 1.Disable
3.Group Setting
01.Default
02.Colleagues
03.VIPs
04.Family
05.Friends
06.Group6
07.Group7
08.Group8
09.Group9
10.Group10
11.Group11
12.Group12
13.Group13
14.Group14
15.Group15
16.Group16
17.Group17
18.Group18
19.Group19
20.Group20
4.Own Number Own Number 240
5.All Delete (Delete all Directory)
Name (alphanumeric characters) blank 16bytes
Ring Tone 01.Disable
Illumination 1.Disable
Vibrator 1.Disable
20.Group20
02.Default
03.Tone Type1
04.Tone Type2
05.Tone Type3
06.Tone Type4
07.Tone Type5
08.Tone Type6
09.Tone Type7
10.Tone Type8
11.Tone Type9
12.Tone Type10
13.Tone Type11
14.Tone Type12
15.Tone Type13
16.Download1
17.Download2
18.Download3
2.Default
3.Red
4.Green
5.Orange
2.Default
3.Pattern1
4.Pattern2
02.Default
03.Tone Type1
04.Tone Type2
05.Tone Type3
06.Tone Type4
07.Tone Type5
08.Tone Type6
09.Tone Type7
10.Tone Type8
11.Tone Type9
12.Tone Type10
13.Tone Type11
14.Tone Type12
15.Tone Type13
16.Download1
17.Download2
18.Download3
2.Default
3.Red
4.Green
5.Orange
2.Default
3.Pattern1
4.Pattern2
01.Default
02.Default
2.Default
2.Default
02.Default
2.Default 16bytes
2.Default
57
Page 72

NEC Infrontia Confidential
3.Tool
4.Voice Mail
5.Setting
1.User Setting
1.Incoming Call
Category Menu Default Remarks
No Tool
No Data
(when no record)
1.Ring Volume Large
2.Ring Tone
1.External Ring
2.Internal Ring
3.IM
4.Non-notification
3.Incoming Popup
1.Popup Mode 1.Disable
2.Back Light 1.Disable
4.Illumination
1.External Ring
2.Internal Ring
3.IM
4.Non-notification
5.Private Call 1.Allow Incoming
6.Vibrator
1.External Ring
2.Internal Ring
3.IM
4.Non-notification
7.Incoming Mode 1.Both
8.Headset
1.Ring Tone Sending 1.Headset
2.Auto Response 0.None
9.Offhook Ring 1.Disable
Middle
Small
Graduate
Off
01.Tone Type1
02.Tone Type2
03.Tone Type3
04.Tone Type4
05.Tone Type5
06.Tone Type6
07.Tone Type7
08.Tone Type8
09.Tone Type9
10.Tone Type10
11.Tone Type11
12.Tone Type12
13.Tone Type13
14.Download1
15.Download2
16.Download3
2.Enable
2.Enable
1.Disable
2.Red
3.Green
4.Orange
2.Block Incoming
1.Disable
2.Pattern1
3.Pattern2
2.Ring-->Vib
3.Vib-->Ring
2.Speaker
1.1 time
2.2 times
3.3 times
4.4 times
5.5 times
2.Enable
Middle
01.Tone Type1
1.Disable
1.Disable
3.Green
1.Allow Incoming
2.Pattern1
1.Both
1.Headset
0.None
2.Enable
58
Page 73

NEC Infrontia Confidential
Category Menu Default Remarks
2.Talk
1.RTP Alarm 1.Disable
2.Ring Tone 01.Tone Type1
3.Call Volume Large
4.Handover Tone 1.Disable
5.Talk Start Vib 1.Disable
6.Reg. Prefix No. 1.<Prefix1>
3.Display
1.LCD Contrast (Level 1 to 5) 3
2.Enable
02.Tone Type2
03.Tone Type3
04.Tone Type4
05.Tone Type5
06.Tone Type6
07.Tone Type7
08.Tone Type8
09.Tone Type9
10.Tone Type10
11.Tone Type11
12.Tone Type12
13.Tone Type13
14.Download1
15.Download2
16.Download3
Middle
Small
2.Enable
2.Enable
2.<Prefix2>
3.<Prefix3>
4.<Prefix4>
1.Disable
12.Tone Type12
Middle
1.Disable
1.Disable
blank 32bytes
2.Back Light (5 to 30 sec) 5 sec
3.Font Size 1.Standard
4.Language 1.Japanese
5.My Name (alphanumeric characters) blank 10bytes
6.Display Pattern 1.Normal
4.Change Password
Old Password (4 digits) blank 4bytes
New Password (4 digits) blank 4bytes
5.Password Lock
1.Manual Lock 1.Disable
2.Auto Lock
1.Outside Lock (0 to 3600 sec) 0 (Disable)
2.PowerOff Lock 1.Disable
2.Large
2.English
2.Reversing
2.Enable
2.Enable
1.Standard
2.English
1.Normal
1.Disable
1.Disable
59
Page 74
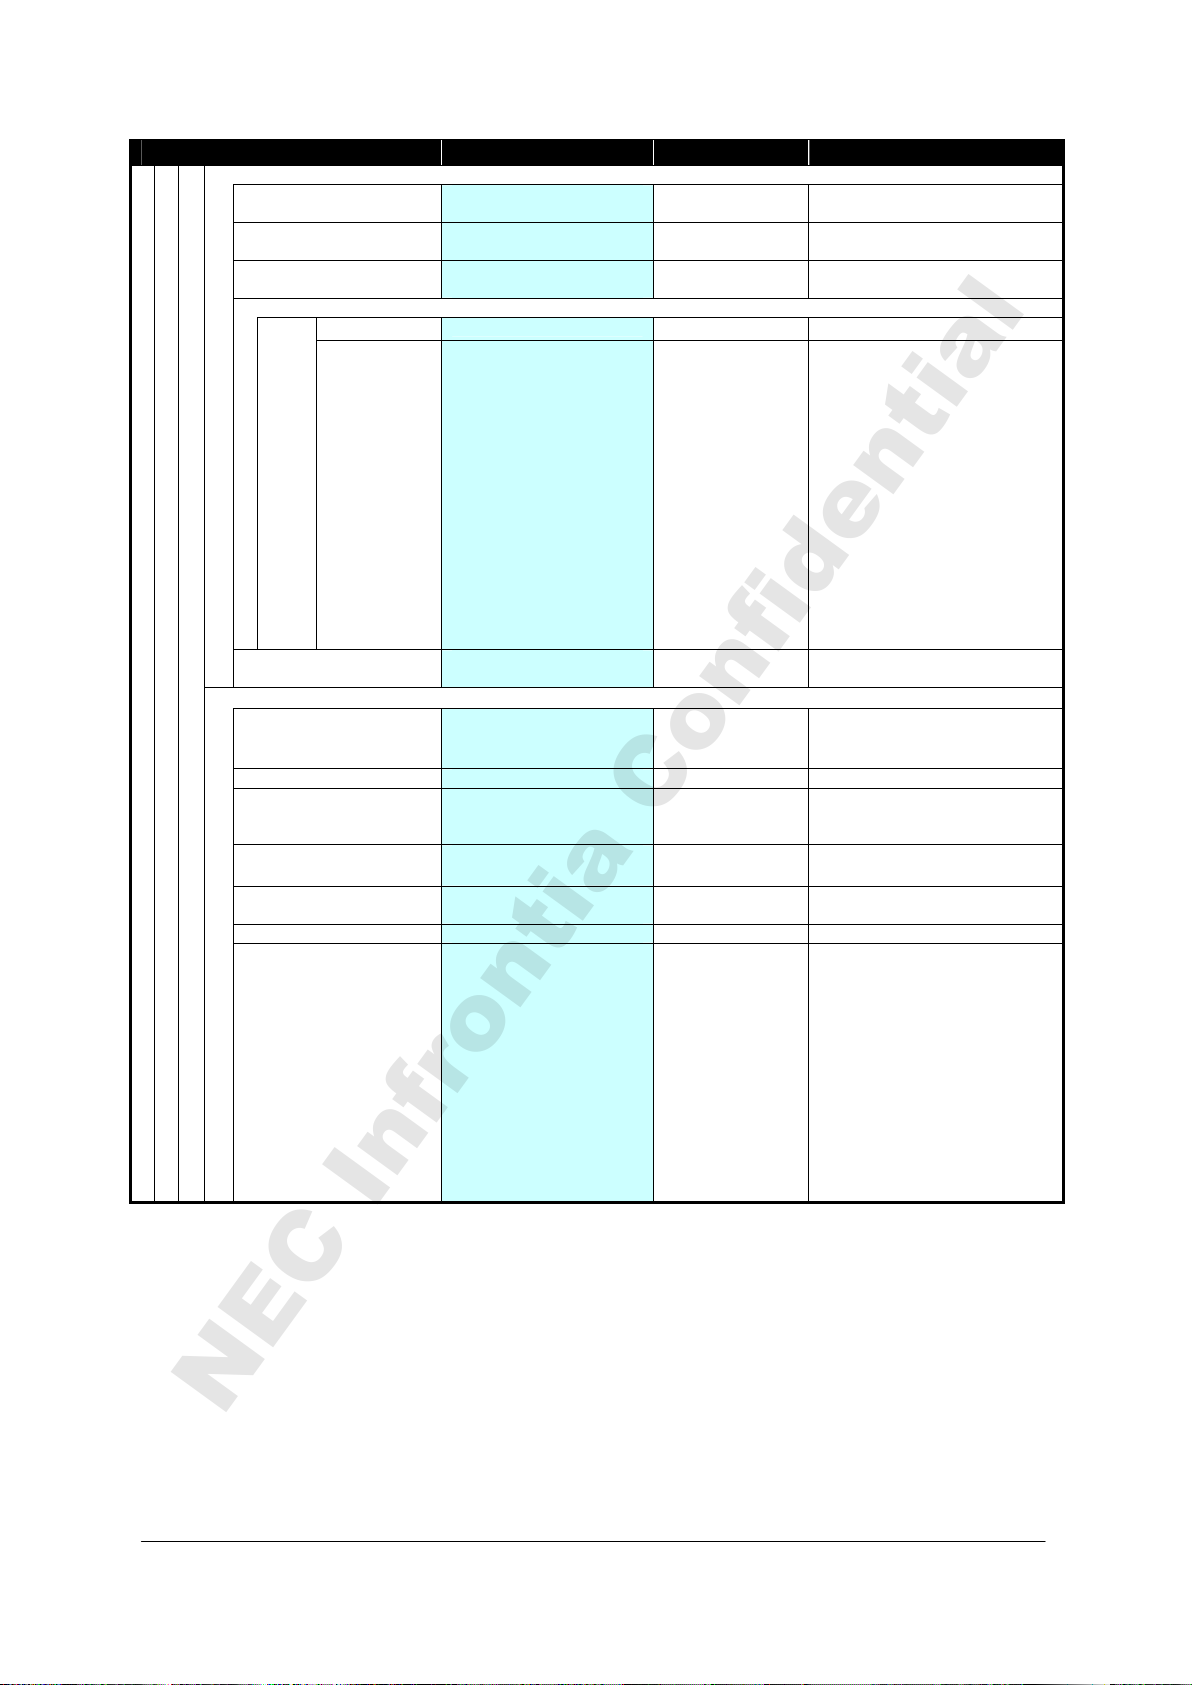
NEC Infrontia Confidential
Category Menu Default Remarks
6.Keypad Mode
1.Key Touch Tone 1.Disable
2.Function Key 1.System
3.Dial Key 1.Alphabet Search
4.Assign Dial
5.Speaker Monitor 1.Disable
7.Date & Time
1.Date (YYYY/MM/DD) 2008/ 1/ 1
1.Name (alphanumeric characters) blank 16bytes
F1.
F2.
2.TEL (32 digits) blank 32bytes
F3.
F4.
F5.
F6.
F7.
F8.
D1.
D2.
D3.
D4.
D5.
D6.
D7.
D8.
D9.
D0.
2.Enable
2.Speed Dial
2.Preset Dial
2.Enable
1.Disable
1.System
1.Alphabet Search
1.Disable
2.Time (HH:MM) 0: 0
3.Time Format 1.12hours
2.12hours(AM0:00)
3.24hours
4.Daylight Saving 1.Disable
2.Enable
5.NTP Setting 1.Disable
2.Enable
6.NTP Server (xxx.xxx.xxx.xxx or FQDN) blank
7.Time Zone GMT-12:00 / -11:00 /
-10:00 / -09:30 / -09:00 /
-08:00 / -07:00 / -06:00 /
-05:00 / -04:00 / -03:30 /
-03:00 / -02:00 / -01:00 /
+00:00 / +01:00 / +02:00 /
+03:00 / +03:30 / +04:00 /
+04:30 / +05:00 / +05:30 /
+05:45 / +06:00 / +06:30 /
+07:00 / +08:00 / +08:45 /
+09:00 / +09:30 / +10:00 /
+10:30 / +11:00 / +11:30 /
+12:00 / +12:45 / +13:00 /
+14:00
1.12hours
1.Disable
1.Disable
GMT+00:00
60
Page 75

NEC Infrontia Confidential
2.Download
1.Download Files 1.Directory
2.Download Address (xxx.xxx.xxx.xxx or FQDN) blank
3.FTP Settings
3.Maintenance
1.Config (Need Manager Password)
2.Check
3.PC Port 1.Close
4.USB Connect
#.Favorites
Category Menu Default Remarks
2.Call History
3.User Setting
4.Config
5.Certificate
6.Ring Tone1
7.Ring Tone2
8.Ring Tone3
1.User ID (alphanumeric characters) blank 32bytes
2.Password (alphanumeric characters) blank 40bytes
3.Folder (alphanumeric characters) blank 40bytes
5.Speaker Monitor 1.Disable
Password (4 digits) blank 4bytes
1.Wireless 1.Profile
2.SIP Settings 1.SIP Proxy
3.Manager Password
Old Password (4 digits) blank 4bytes
New Password (4 digits) blank 4bytes
1.Monitoring
1.QoS
1.QoS Monitor LostPacket:
2.Refresh Timer (0 to 30 sec) 5 sec
2.Ping (xxx.xxx.xxx.xxx) blank
2.Setting List
1.Status
2.Wireless
3.SIP
2.Enable
2.Handover List
2.Register
3.RegisterPort
4.User ID
5.User Password
6.Phone No.
7.Advanced
Codec:
Payload:
Same as “0.Information”
2.Open
1.No Entry
2.No Entry
3.No Entry
4.No Entry
5.No Entry
6.No Entry
7.No Entry
8.No Entry
9.No Entry
0.No Entry
1.Disable
1.Disable
1.Close
61
Page 76
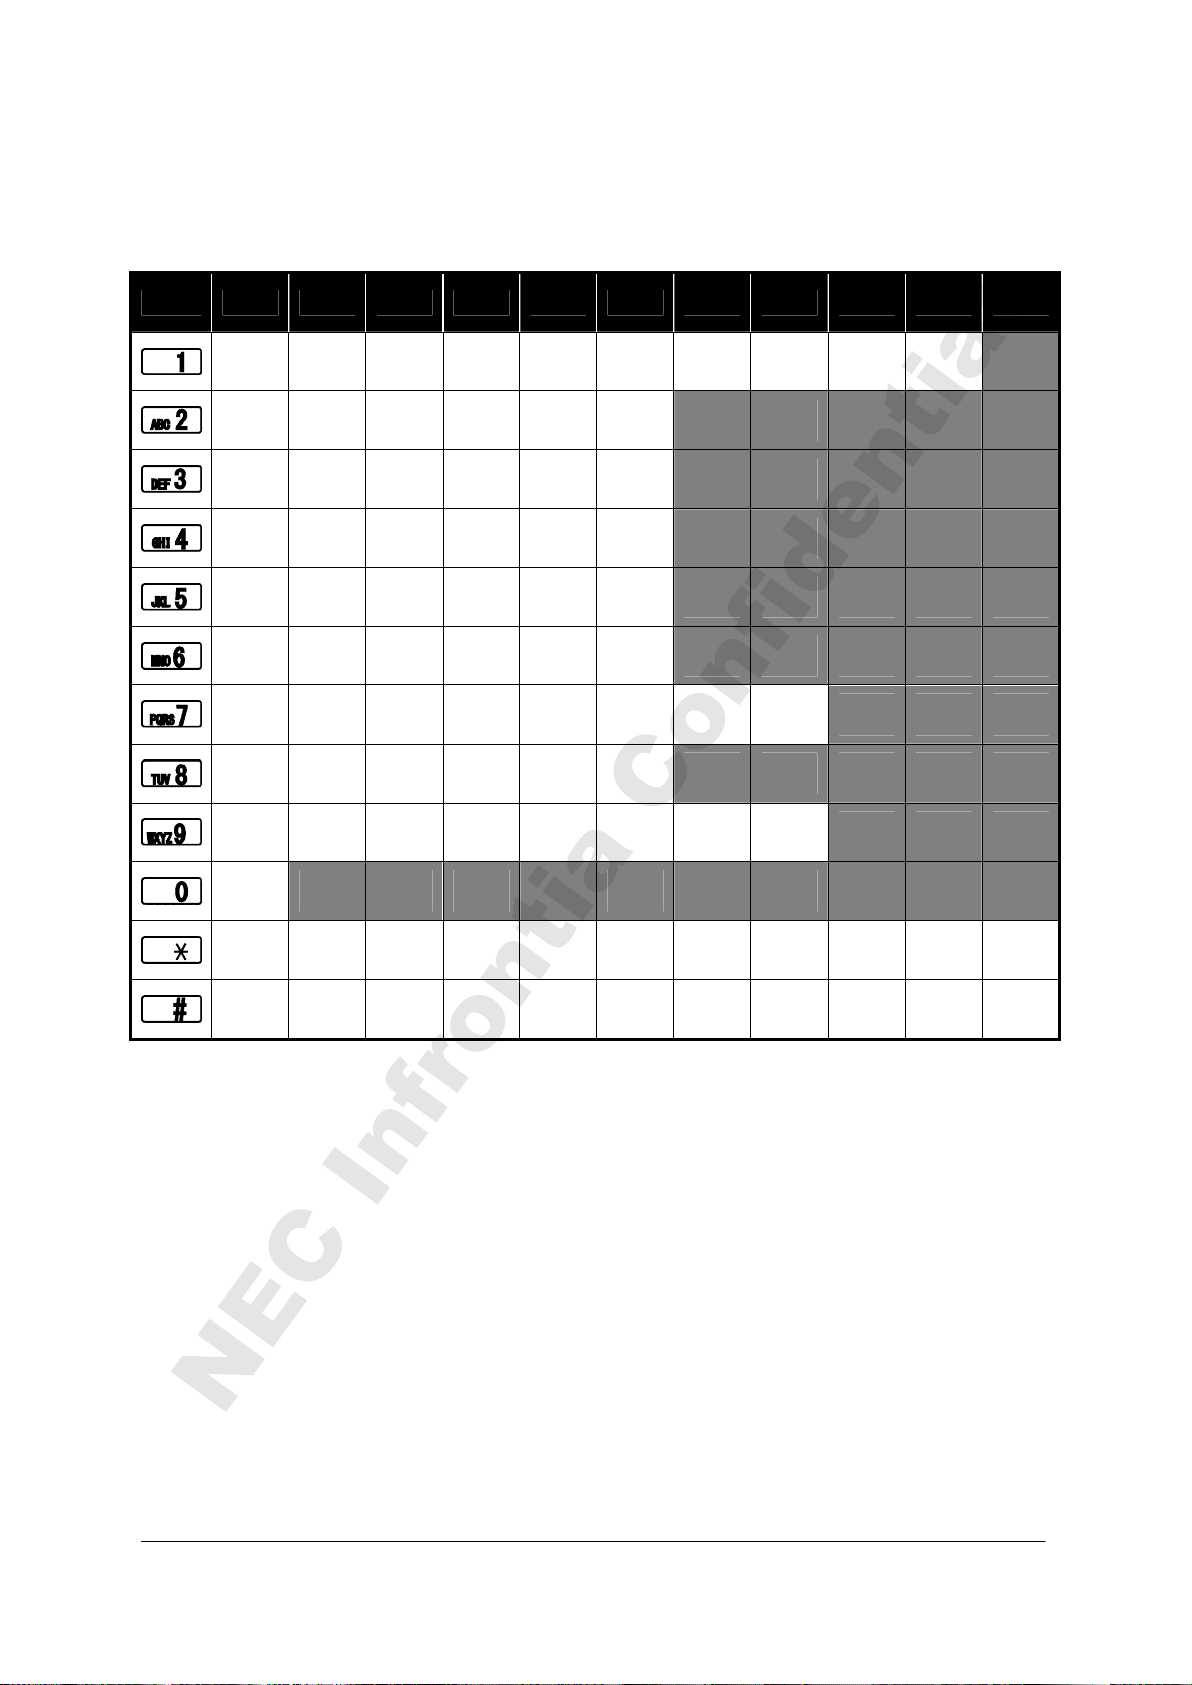
NEC Infrontia Confidential
• CHARACTER CODE LIST
The following shows character code list when your phone is in edit mode.
Character Code List
1st 2nd 3rd 4th 5th 6th 7th 8th 9th 10th 11th
” ’ [ ] < > ( ) { }
A B C a b c
D E F d e f
G H I g h i
J K L j k l
M N O m n o
P Q R S p q r s
T U V t u v
W X Y Z w x y z
[space]
* . + - / , : ; = ? !
# @ $ % & ¥ ^ _ ` | ~
62
Page 77

14.TROUBLE SHOOTING
NEC Infrontia Confidential
• MESSAGE MEANINGS AND SUGGESTIONS
The following shows the meanings and suggestions of messages that may be displayed on your phone.
Message Meaning & Suggestion
[Password]
UnAuthorized!
[Low Battery]
Please charge it
[Directory]
No Input Name
[Directory]
Directory is Full
[Handy KeyLock]
Handy KeyLock Enabled
[Handy KeyLock]
Handy KeyLock Disabled
[Password Lock]
PASSWORD Lock Enabled
[Setting]
X to Y is input
The entered password is not correct. Enter the correct
password.
Battery charge level is low. Charge the battery.
You do not edit Name of Directory. Edit Name.
The number of entries reaches the maximum. To add new
entry, delete some entries in advance.
Displayed when your phone is locked.
Displayed when your phone is unlocked.
Displayed when your phone is locked with password.
Entered value is out of range. Enter the value of X to Y.
63
Page 78

NEC Infrontia Confidential
• TROUBLES AND SUGGESTIONS
The following shows suggestions on how to resolve MH240 operation problems. Confirm the
following before making a call:
Is power ON?
Is battery charged?
Is Antenna icon ( ) displayed?
Symptom Suggestion
- Press key and hold more than 2 seconds.
Can not power on the phone…
Can not operate keys on the
phone…
Communication is lost, audio
break-up occurs…
Can not see Antenna Icon ( )…
Can not sustain battery power…
- Insert the battery to your phone properly.
- Charge the battery.
- Unlock your phone if lock icon ( ) is displayed.
- Unlock your phone if “Handy KeyLock” is displayed.
- Check the receiving signal strength.
- Check the battery when is indicated.
- Apart your phone more than 50cm from Access
Point.
- When you are in area where sufficient signal can not
be obtain, move to other area.
- SIP server registration is uncompleted. If this
occurs, please contact your network administrator.
- Insert the battery to your phone properly.
- Place the battery on the proper position of your
cradle.
- Replace the battery.
- Make sure that phone number of your phone. To
Can not make or receive a call…
The phone does not ring…
change the phone number, please contact your
network administrator.
- When your phone is placed in courtesy mode,
cancel it. Courtesy icon ( ) appears when your
phone is in this mode.
- Check ring volume and adjust except “Off”.
64
Page 79

15.SPECIFICATIONS
NEC Infrontia Confidential
• TECHNICAL SPECIFICATIONS
The following shows the technical specifications of MH240.
Item Specifications
Wireless Interface IEEE802.11b/g
Codec G.711, G.729a, Payload Size: 20 to 80 ms
Control Protocol SIP (RFC3261), NEC Enhanced SIP
Authentication IEEE802.1x (EAP-TLS, PEAP)
Encryption WEP (64 bit / 128 bit), TKIP, AES
LCD Monochrome LCD, 120 × 90 pixels
Main Feature Call History, Directory, Speed Dial, Courtesy Mode
Ringer Ring Tone : selectable from 16 kinds
Ring Volume : selectable from 5 levels
Battery Lithium Ion Battery, 3.7 V - 850 mAh
Battery Life Talk Time : up to 3 hours
Standby Time : up to 90 hours
AC Adapter INPUT : AC 100 V to 120 V, 50/60 Hz, 0.3 A
OUTPUT : DC 5 V, 1 A
DC Plug : miniUSB (typeB) plug
Operation Temperature
Operating Humidity 10 to 90 %
Dimension 135.0 × 48.0 × 17.6 mm
Weight 94.36 g
Certification and
Compliance
0 to 35 °C
CSA60950-1
FCC Part 15 Class B
RSS-210
HAC
65
Page 80

This page is for your notes.
NEC Infrontia Confidential
66
Page 81

16.LICENCE
NEC Infrontia Confidential
This product uses the software of GPL/LGPL, and we will inform that the customer has the right of
obtaining the source code of that software, the modification, and the re-distribution.
Please contact the nearest NEC service office about the method of obtaining the source code.
67
Page 82

This page is for your notes.
NEC Infrontia Confidential
68
Page 83

NEC Infrontia Confidential
Page 84

NEC Infrontia Confidential
Manufacture:
2-3, Kandatsukasa-cho, Chiyoda-ku, Tokyo 101-8532, Japan
 Loading...