

Page 1

384i PC Program
User Guide
Part No. 92600PCP04
Issue 1-0, April 2001
Printed in U.S.A.
Page 2

This manual has been developed by NEC America. It is intended for the use of
its customers and service personnel, and should be read in its entirety before
attempting to install or program the system. Any comments or suggestions for
improving this manual would be appreciated. Forward your remarks to:
NEC America, Inc., Corporate Networks Group
4 Forest Parkway
Shelton, CT 06484
cng.nec.com
Nothing contained in this manual shall be deemed to be, and this manual does
not constitute a warranty of, or representation with respect to, any of the equipment covered. This manual is subject to change without notice and NEC
America has no obligation to provide any updates or corrections to this manual.
Further, NEC America also reserves the right, without prior notice, to make
changes in equipment design or components as it deems appropriate. No representation is made that this manual is complete or accurate in all respects and
NEC America shall not be liable for any errors or omissions. In no event shall
NEC America be liable for any incidental or consequential damages in connection with the use of this manual. This document contains proprietary information that is protected by copyright. All rights are reserved. No part of this document may be photocopied or reproduced without prior written consent of NEC
America.
© 2001 by NEC America, Inc. All Rights Reserved
Printed in U.S.A.
The 384i and its associated PC programming are unaffected by the date change
to year 2000. The system processes the Leap Year correctly and does not require
any additional upgrades or reprogramming. With software 3.07.24, the 384i uses
a four-digit date code entry (e.g., 2000). Previous versions use a two-digit date
code entry (e.g., 00=2000).
Page 3

PC Program
User Guide
Table of Contents
Installation . . . . . . . . . . . . . . . . . . . . . . . . . . . . . . . . . . . . . . .1
If You’re Using System Software 6.00.01 or Higher . . . .1
Introduction . . . . . . . . . . . . . . . . . . . . . . . . . . . . . . . . . . .5
Installing the PC Program . . . . . . . . . . . . . . . . . . . . . . . .6
Starting the PC Program . . . . . . . . . . . . . . . . . . . . . . . . . .7
Main Menu . . . . . . . . . . . . . . . . . . . . . . . . . . . . . . . . . . . . . . .9
Understanding the Main Menu . . . . . . . . . . . . . . . . . . . . .9
Moving Around in the Menus . . . . . . . . . . . . . . . . . . . .11
Main Menu Help . . . . . . . . . . . . . . . . . . . . . . . . . . . . . . .12
File Menu . . . . . . . . . . . . . . . . . . . . . . . . . . . . . . . . . . . . . . .13
Understanding the File Menu . . . . . . . . . . . . . . . . . . . . .13
The File Menu Options . . . . . . . . . . . . . . . . . . . . . . . . . .14
File Menu Help . . . . . . . . . . . . . . . . . . . . . . . . . . . . . . . .20
Edit Menu . . . . . . . . . . . . . . . . . . . . . . . . . . . . . . . . . . . . . . .23
Understanding the Edit Menu . . . . . . . . . . . . . . . . . . . . .23
The Edit Menu Options . . . . . . . . . . . . . . . . . . . . . . . . .24
Edit Menu Help . . . . . . . . . . . . . . . . . . . . . . . . . . . . . . .27
Communication Menu . . . . . . . . . . . . . . . . . . . . . . . . . . . . .31
Understanding the Communication Menu . . . . . . . . . . .31
The Communication Menu Options . . . . . . . . . . . . . . . .31
Communication Menu Help . . . . . . . . . . . . . . . . . . . . . .39
i
Page 4

Print Menu . . . . . . . . . . . . . . . . . . . . . . . . . . . . . . . . . . . . . .43
Understanding the Print Menu . . . . . . . . . . . . . . . . . . . .43
The Print Menu Options . . . . . . . . . . . . . . . . . . . . . . . . .43
Print Menu Help . . . . . . . . . . . . . . . . . . . . . . . . . . . . . . .47
Option Menu . . . . . . . . . . . . . . . . . . . . . . . . . . . . . . . . . . . .49
Understanding the Option Menu . . . . . . . . . . . . . . . . . .49
The Option Menu Options . . . . . . . . . . . . . . . . . . . . . . .49
Option Menu Help . . . . . . . . . . . . . . . . . . . . . . . . . . . . .56
ii
Page 5

1
1
Install the PC Program
Go to Installation on page 1.
2
2
3
3
4
4
Set Up Your Modem
Go to RS-232C Mode on page 51.
Edit the Options
Go to Edit Menu on page 24.
Send the Data
Go to Communication Menu on page 31.
Page 6

Page 7

INSTALLATION
!! IMPORTANT !!
If you’re system software is currently 6.00.01 or higher, you
must use PC Program version 5.00 or higher (see below).
OR
If you’re upgrading from software 5.XX or below to 6.xx, make
sure you follow the instructions below!!
When using system software 6.00.01 or higher on the 384i system, the PC
Program version must be 5.00 or higher. Due to data differences between the
versions of software, the commonized software (6.xx.xx) cannot be used with
previous versions of the PC Programs. These new programs store the database
information under new files names to help ensure that you do not use the previous system files. The 384i PC Program previously used ’xxxxx.nad’ - the
new program uses ’xxxxx.nae’.
The following steps must be used when converting your system software and
PC Program to the new commonized versions.
Upload/Download Instructions:
1. Using the current version of the PC Program and system software, use
the ME-PC command to upload the customer database and then save the
file.
This is a precautionary step, just in case you need to revert to
the previous software.
Issue 1-0 Installation 1
Page 8

INSTALLATION
2. Record the entries that are programmed in Program 1001 - Basic
Extension Port Setup (Part A) and Program 1810 - DID Intercept
Options.
This information will not be transferred to the new program
and must be reentered later in the installation process.
3. From the PC Program, use Program 0091 and the port numbers displayed there to determine what order the PCB's were installed into your
system. Write this information down as it will be required later in the
installation process.
4. Install the new PC Program into your computer.
5. Prior to installing the 6.xx.xx system software, upload the customer
database to the new PC Program and save the file.
During the upload process, you will receive warning messages advising you of conflicts. These messages are caused by
program and database differences. Simply click ‘I’ to ignore
the messages and let the upload process proceed.
6. Once the upload process is complete, save the file within the PC
Program.
7. Terminate the connection between the PC Program and the telephone
system.
8. Unplug all the PCB’s from the system cabinets except the CPRU and
the DSTU located in slot 1 of the first cabinet.
Remember that if you have a Message Waiting Power Supply
PCB, you must turn off the power before removing the PCB.
2 Installation 92600PCP04
Page 9

INSTALLATION
9. Update the telephone’s system software with version 6.00.01 or higher.
Installing the new system software will initialize your telephone system.
10. Plug the PCB’s back into the system cabinet(s) using the order the PCB’s
were originally installed into the system (this is the information from
Program 0091 you obtained in Step 3).
In order to maintain the proper port and extension number
assignments, it’s important that you reinstall the PCB’s in the
order in which they were originally installed into the system.
11. Using a telephone to enter system programming, use Program 0004 to
update all the circuit types within the system.
When uploading data from the 384i system in Step 5, the port
and PCB slot information from Program 0091 will not load so
the system must reidentify the circuits.
12. Enter Program 1001. Using the entries recorded in Step 2, reprogram all
items as required.
13. Save your changes and exit system programming.
14. Re-establish communications between the system and the PC Program.
15. Open the customer’s saved database file in the PC Program.
16. Under the Communication’s ME -> PC option, use the Selected
Programs option to choose Program 0005 - Extension Circuit Type.
Upload this program to the PC Program.
The system will automatically upload Program 1001 as well.
17. Once the upload is complete, save the customer’s database file once again.
Once the system software and PC Programs have been
upgraded and your customer information has been converted, you can upload or download the programming using the
normal process.
Issue 1-0 Installation 3
Page 10

INSTALLATION
18. Download the PC Program file to the system in order to reprogram
the system with the customer’s information.
Note: If you’re using voice mail, depending on your system, you may need to
reprogram. The 384i system using software prior to 3.08.01 used Program
1017 - Voice Mail Port Assignment. With this new system software,
Program 1003 - Extension (Department) Group and Program 0410 Extension (Department) Group Options, Item 3: Voice Mail Group
are used instead allowing for up to 48 voice mail ports. Refer to the Voice
Mail feature in the i-Series Software Manual, P/N 92600SWGxx, for further information.
With the new 6.xx.xx software, DID Intercept is handled differently and
must be reprogrammed in (Program 1810 - DID Intercept Options).
Refer to the 28i/124i/384i Release Notes, P/N 92600RNT01, for further
information.
4 Installation 92600PCP04
Page 11

Introduction
The PC Program is a PC-based off-line application that allows you to:
●
Edit the telephone system programming options.
●
Save your programming to your PC’s hard disk — then upload it via
modem or direct connection to the telephone system.
●
Download the existing programming in the telephone system via
modem or direct connection — and save it to your PC’s hard disk.
●
Set up a default database with the settings you use most often.
●
Access system maintenance functions like reports and tests.
You can also use the PC Program to create a unique database for each
phone system you have installed. Since you save the site-specific data
to your PC’s hard disk, you can easily retrieve a customer’s programming if something goes wrong.
●
386 or higher IBM PC compatible
●
EGA or better monitor
●
DOS 3.1 or higher operating system
●
3 Mbyte of free disk space on the target disk drive for program
and temporary files
●
At least 540K of free low DOS memory
●
Run directly from DOS, with no other programs running in the
background.
●
Modem Kit (P/N 92366) for each remote telephone system.
●
DCI-A (P/N 92266B) or 3DCI-A (P/N 92258) for each remote
telephone system.
●
Industry standard modem for your own PC.
INSTALLATION
System Requirements
Remote Communications Requirements
1
1
Complete installation instructions are provided with each modem kit.
Issue 1-0 Installation 5
Page 12
INSTALLATION
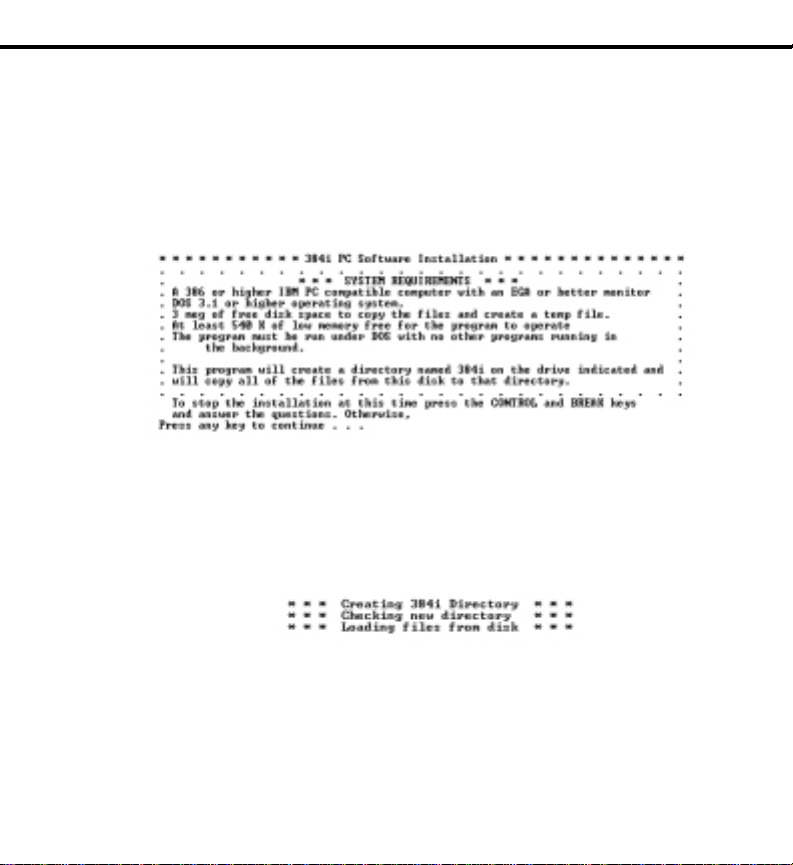
Installing the PC Program
To install the PC Program on your hard disk:
1. Insert the PC Program installation disk into your 3 1/2” floppy drive.
2. Type A: and press Enter.
If your 3 1/2” floppy drive uses another drive letter (such as
B), type B: instead.
3. Type INSTALL [destination] and press Enter. You see:
The [destination] is the target directory on your PC’s hard
drive. The installation program will create a 384i directory for
the PC Program files beneath the destination you enter.
For example, if you type INSTALL C:, your PC Program will
automatically install in C:\384i.
4. While the installation is in progress, you see:
The install program automatically creates the directories you
need. If the destination directory already exists, you see:
“Directory already exists”. The installation program proceeds anyway.
6 Installing the PC Program 92600PCP03
Page 13
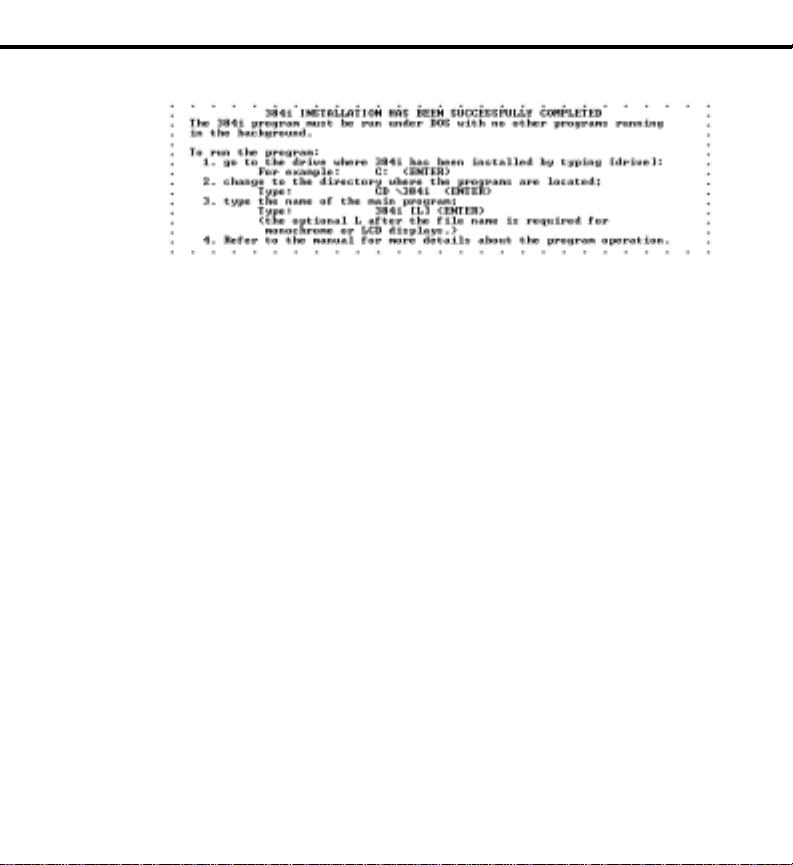
5. When the installation program successfully completes, you see:
Starting the PC Program
You must always start the PC program from the DOS prompt, with no
other programs or applications running in the background. You should
not run Windows, shell back to DOS and start the PC Program.
Note: When you see an instruction like Print ➩ Select items, it
means select Print from the Main Menu and then choose Select
items. You’ll see this convention often in this guide.
To start up the PC Program:
1. Log on to the drive on which the PC Program is installed.
In most installations, for example, you would type C: and
press the Enter key.
2. Change to the directory in which the PC Program is installed.
If you typed INSTALL C: to install, in this step you would
type CD\384I and press the Enter key.
3. If you have a monochrome monitor:
●
Type 384I L and press the Enter key.
If you have a color monitor:
●
Type 384I and press the Enter key.
INSTALLATION
Issue 1-0 Starting the PC Program 7
Page 14

INSTALLATION
4. After a few seconds, you see the following screen requesting your
password:
To quit the PC Program without entering your password, press Esc.
5. Type in your password and press the Enter key.
6. The PC Program opening screen appears. Go to The Main Menu on
the following page.
If you see the error message . . .
Your program is installed in a directory other than C:\384I and it cannot find its required files. To tell the PC Program where to look for it s
required files, turn to Option ➩ File Path on page 49.
The default passwords are:
12345678 for Level 2 (IN—all Tenant Groups)
0000 for Level 3 (SA—Tenant Group 1 only)
9999 for Level 4 (SB—Tenant Group 2 only)
8 Installation 92600PCP04
Page 15
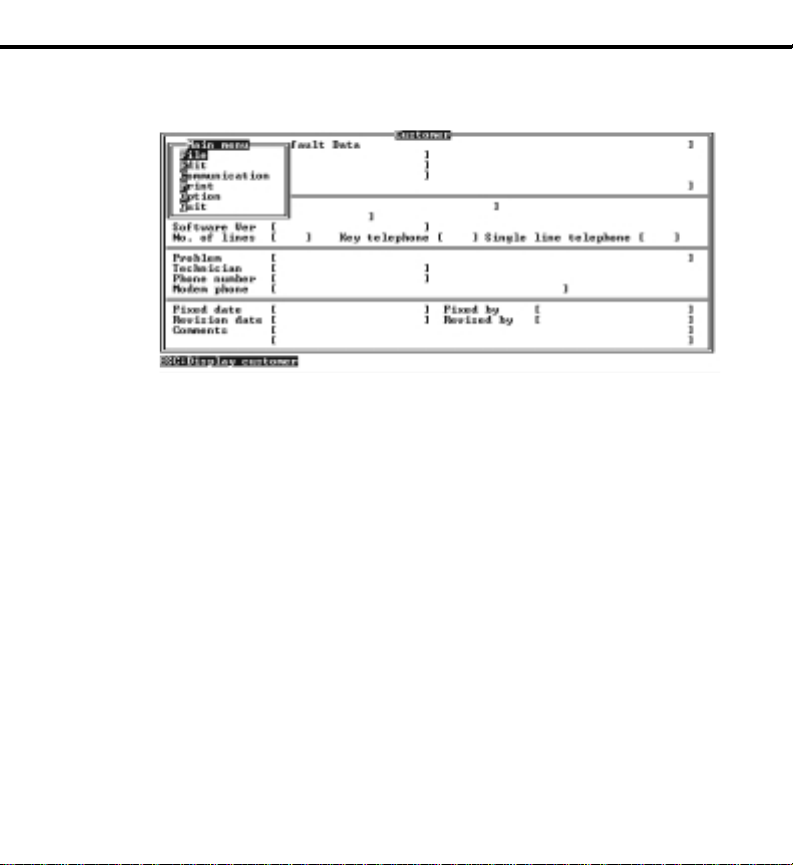
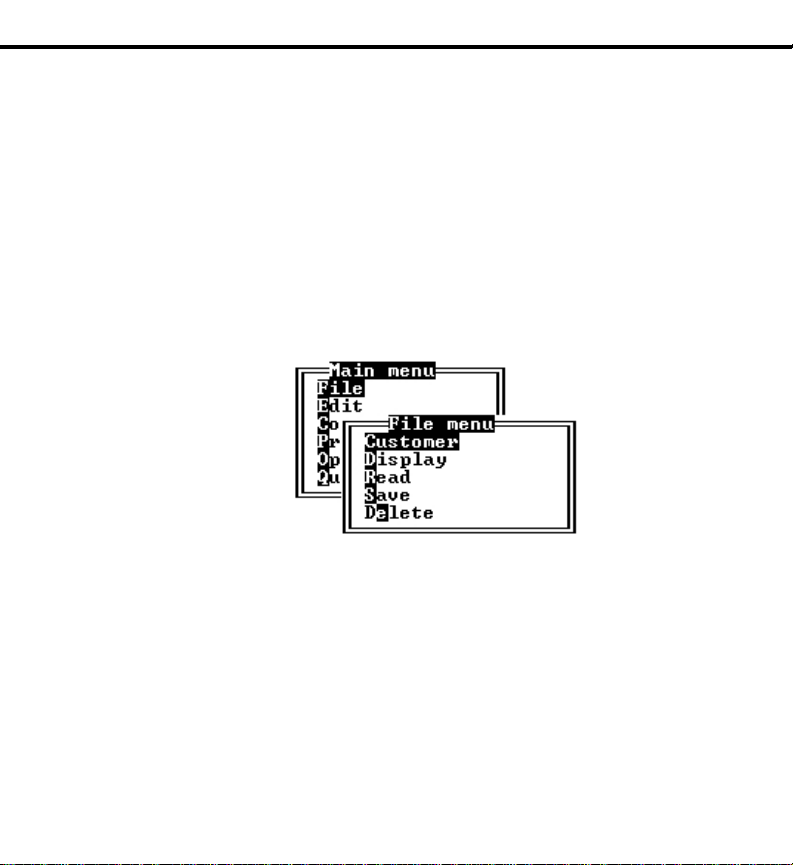
Understanding the Main Menu
After the PC Program loads up, you see the Main Menu:
The Main Menu is the top level menu that lets you choose options
from the five sub-menus (shown below). To find out more on each
sub-menu, turn to the section with the same name.
File Menu
The File Menu lets you display, load, save and delete customer data files.
When you first start the PC Program, the default customer data file displays behind the Main Menu. Turn to the File Menu section for more.
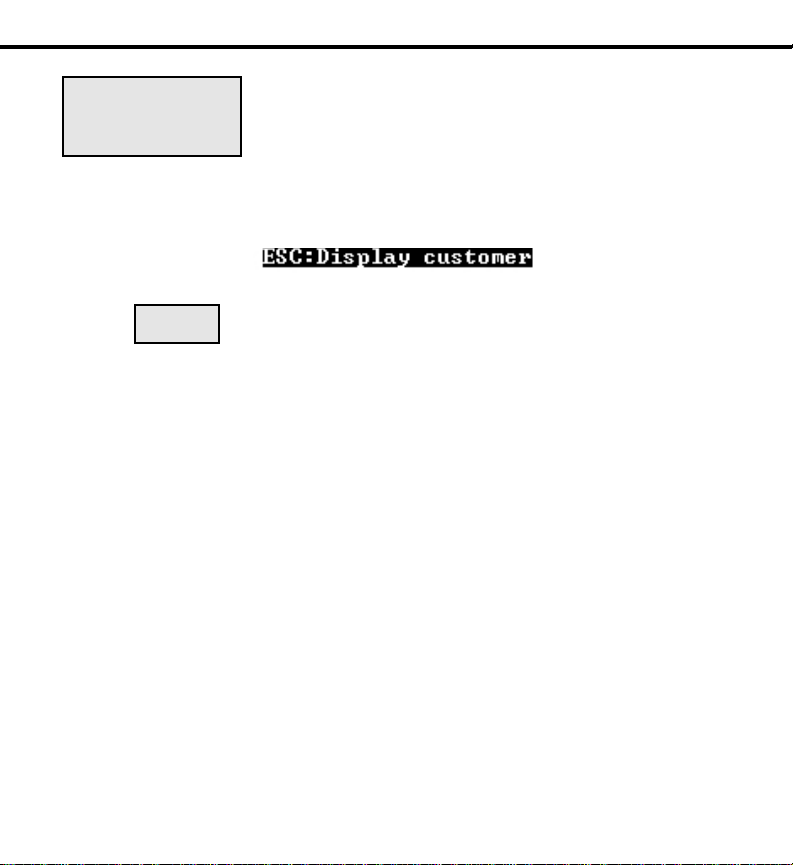
☞ From the Main Menu, you can press Esc any time to toggle
between the Main Menu and the currently active Customer
Information Screen. This mode is for viewing only. To edit the
screen, turn to File ➩ Customer on page 14.
INSTALLATION
Edit Menu
Use the Edit Menu when you want to change the telephone system programming options. These are the same options as those available
Issue 1-0 Understanding the Main Menu 9
Page 16

MAIN MENU
through the system telephone programming. Go to the Edit Menu section for more details on this sub-menu.
Communication Menu
The Communication Menu allows you to:
●
●
●
●
To learn more about the PC Program’s remote communication capability, turn to the Communication Menu section.
Print Menu
When you need to print a database, go the the Print Menu. You can
print an entire database or just selected items. Turn to the Print Menu
section for more information on database printing.
Option Menu
The Option Menu lets you set general parameters for the PC Program.
These parameters include:
●
●
●
●
Set up your modem
Upload a database from a remote phone system
Download a database to a remote phone system
Quickly access select phone system commands
The location of the PC Program’s files
Your PC’s RS-232C port and modem settings
Important printer settings
Other miscellaneous options
Quit
Select Quit when you want to exit the PC Program.
10 Using Merge 92600PCP04
Page 17
Moving Around in the Menus
MAIN MENU
To select an item
from a menu:
To back up to the
previous menu:
To choose an
item from a table
of selections:
To display the
help pop-up
screen:
1. For the option you want, type the numbers or let-
ters that are in bold type. For example, type E to
select Edit from the Main Menu. In certain
menus, you can type a number to select an option
rather than a name.
OR
1. Use the cursor keys to highlight the item you
want and press Enter.
1. Press Esc.
1. Use the Up Arrow and Down Arrow keys to
highlight the item you want to change.
2. Use the Left Arrow and Right Arrow keys to
highlight the selection you want.
1. Press F1. If help is available, you’ll see a pop-up
help screen (similar to the one below) describing
additional options.
For more on the help screens, refer to the sections
that follow.
Issue 1-0 Moving Around in the Menus 11
Page 18
MAIN MENU
To quit the PC
Program:
Main Menu Help
At the bottom of the Main Menu screen, you see:
Esc
1. While the Main Menu displays, type Q.
OR
1. While the Main Menu displays, highlight Quit
and press Enter.
Press Esc anytime while the Main Menu displays to
go to the Customer Information Screen display.
12 Using Merge 92600PCP04
Page 19
Understanding the File Menu
Use the File Menu when you want to display, load, save or delete customer data files. If you have a database of many sites, use the File
Menu to manage your data. Store your customer’s data in unique files,
update the data to keep it current and delete customer data files you no
longer need.
To access the File Menu:
1. From the Main Menu, type F.
OR
1. From the Main Menu, highlight File and press Enter. In either
case, the File Menu Displays.
The File Menu displays on top of the currently loaded Customer
Information screen. This screen shows important site and contact information about the currently loaded database file. To load a new database file (which will show a new Customer Information screen), refer
to the Read option below.
FILE MENU
Issue 1-0 Understanding the File Menu 13
Page 20
FILE MENU
The File Menu Options
The File Menu provides the following options:
●
Customer
●
Display
●
Read
●
Save
●
Delete
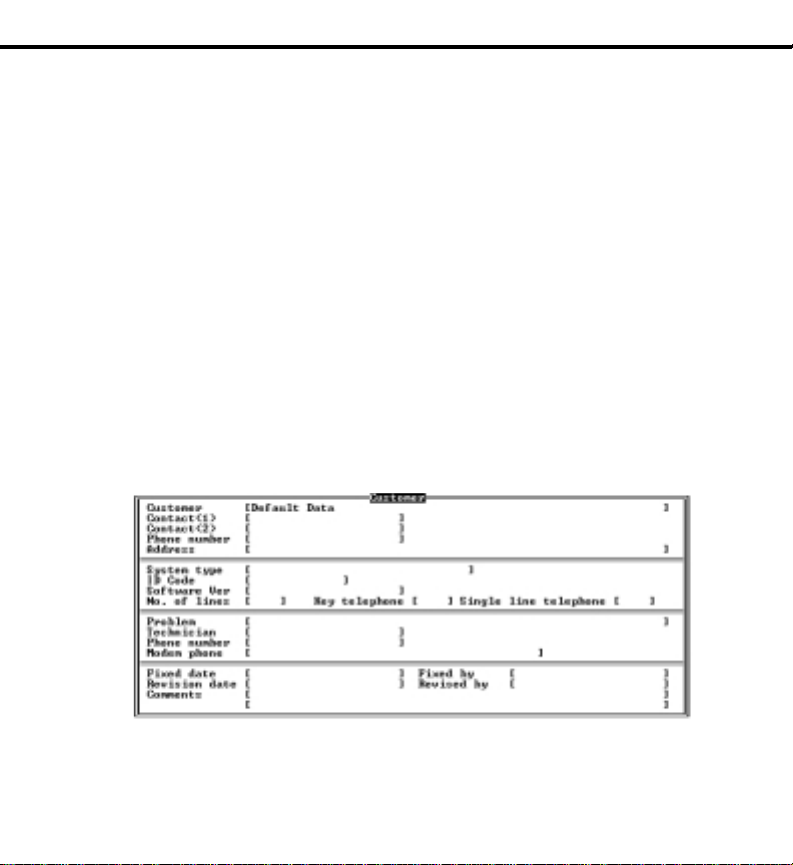
Customer
The Customer option lets you edit the currently displayed Customer
Information Screen. (Remember, this is the screen displayed underneath the File Menu pop-up.)
To select the Customer option:
1. From the File Menu, type C.
OR
1. From the File Menu, highlight Customer and press Enter. In
either case, you see the full Customer Information Screen.
14 Using Merge 92600PCP04
Page 21

FILE MENU
To enter data in the Customer Information Screen:
1. Use the Arrow keys to select the field you want to edit.
When you enter a customer’s name in the Customer field, it
always appears in the upper left corner of the PC Program
screen.
2. Type in the data.
3. Press the Arrow keys to advance to the next field you want to edit.
OR
3. Press Enter to advance to the next consecutive field.
To return to the File Menu after editing the Customer Information
screen:
1. Press Esc.
Display
When you want to view the list of your stored customer database files,
use Display. Display can search any disks and directories on your system, not just the default PC Program directory.
The PC Program automatically assigns the extension NAD or
NAE to the customer database files, depending on the version
of your PC Program.
To display the list of customer database files:
1. From the File Menu, type D.
OR
1. From the File Menu, highlight Display and press Enter. In either
case, you see the Directory Screen:
Issue 1-0 The File Menu Options: Display 15
Page 22

FILE MENU
To select the directory you want to display:
1. Type in the full DOS path for the directory that contains your cus-
2. Press Enter.
tomer database files.
Use the Left Arrow, Right Arrow and Delete keys to edit your
entry.
The database files for the directory you select display.
To return to the opening Display Screen and re-enter another
directory, press F2.
To return to the Display Menu:
1. Press Esc.
16 Using Merge 92600PCP04
Page 23

FILE MENU
Read
The Read option lets you load another database file, making it the current file and placing it in the Customer Information Screen. You can
read a database file from any location on your PC’s hard disk.
To read (load) another database file:
The file you load will become the current (active) database.
1. From the File Menu, type R.
OR
1. From the File Menu, highlight Read and press Enter. In either
case, you see:
2. Type in the path for the customer database you want and press Enter.
For example, type C:\384i if your customer database files are
on your C: drive in the 384i directory.
3. From the list of database files displayed, use the Up and Down
Arrow keys to select the file you want.
4. Press Enter.
The Customer Information Screen for the database you select
displays behind the File Menu.
Issue 1-0 The File Menu Options: Read 17
Page 24

FILE MENU
Save
The Save option lets you save the active customer database file to disk.
This includes the Customer Information Screen as well as all the other
programmable options.
To save the current (active) database file:
1. From the File Menu, type S.
1. From the File Menu, highlight Save and press Enter. In either
2. Using the Up and Down Arrow keys, go to the Directory line.
3. Type in the directory where you want to store the customer’s
4. Using the Up and Down Arrow keys, go to the File name line.
5. Type in the name of the customer’s database file and press Enter.
To edit the displayed Customer Information Screen, go to the
File ➩ Customer option.
OR
case, you see a screen similar to:
database.
Use the Backspace and Delete keys to edit the existing entry.
The file name can be up to eight letters long, using the standard DOS conventions. Do not enter an extension.
If you enter a database file name that already exists, you see:
Press Y to overwrite the exiting file, or N to cancel the save and
return to step 2.
6. You return to the File menu.
18 Using Merge 92600PCP04
Page 25

FILE MENU
Delete
Use Delete when you want to remove database files from your PC’s
hard disk.
To delete a database file:
1. From the File Menu, type E.
OR
1. From the File Menu, highlight Delete and press Enter. In either
case, you see:
2. Type the directory in which the database file you want to delete
resides and press Enter.
Use the Backspace and Delete keys to edit the existing entry.
3. Using the Up and Down Arrow keys, highlight the database file
you want to delete and press Enter.
You can also press F2 to return to step 1.
Issue 1-0 The File Menu Options: Delete 19
Page 26

FILE MENU
You see:
4. Type Y to delete the selected file.
OR
4. Type N to return to step 3 without deleting the file.
5. Press F2 to return to step 1
OR
5. Press Esc to return to the File Menu.
File Menu Help
From the File Menu . . .
At the bottom of the screen, you see:
Esc
From the Customer Menu . . .
At the bottom of the Customer Menu, you see:
Esc
Press Esc anytime to return to the Main Menu.
Press Esc anytime to return to the File Menu.
20 Using Merge 92600PCP04
Page 27

From the Display Menu . . .
At the bottom of the screen, you see:
FILE MENU
Esc
F2
From the Read Menu . . .
At the bottom of the screen, you see:
Esc
Enter
F2
From the Save Menu . . .
At the bottom of the screen, you see:
Press Esc anytime to back up to the File Menu.
While the list of customer database files is displayed,
press F2 to go back to the Directory Screen.
Press Esc anytime to back up to the File Menu.
Press Enter to display the list of customer database
files. While the list of customer database files is displayed, press Enter to load (read) the highlighted file.
While list of customer database files is displayed,
press F2 to go back to the Directory Screen.
Issue 1-0 File Menu Help 21
Page 28

FILE MENU
Esc
Enter
From the Delete Menu . . .
At the bottom of the screen, you see:
Esc
Enter
F2
Press Esc anytime to back up to the File Menu.
Press Enter to save the selected file.
Press Esc anytime to back up to the File Menu.
Press Enter to display the list of customer database
files. While the list of database files is displayed,
press Enter to delete the highlighted file.
While the list of customer database files is displayed,
press F2 to go back to the Directory Screen
22 Using Merge 92600PCP04
Page 29

Understanding the Edit Menu
The Edit Menu gives you full access to the telephone system programming. This gives you several important options when configuring a
system. You can:
Set up a remote system’s programming in your office, and then
●
download it locally or over a modem. This saves you valuable onsite programming time.
Upload a remote system’s programming, modify it in your office,
●
and send the new configuration locally or via modem. This minimizes the disruption to the site, in addition to giving you a complete
database of the site programming.
Periodically upload a remote system’s programming and keep it in
●
your office as a backup.
To access the Edit Menu:
1. From the Main Menu, type E.
OR
1. From the Main Menu, highlight Edit and press Enter. In either
case, you see:
EDIT MENU
Issue 1-0 Understanding the Edit Menu 23
Page 30

EDIT MENU
The Edit Menu Options
The Edit menu uses a three-tiered sub-menu format:
Class Menu
➩
➩
Class Menu
The Class menu allows you to select the programming series you want to
customize. For example, to select the 0500 - System Numbering series:
1. In the Class Menu, select 05 System Numbering.
To select System Numbering, type 05, or highlight 05 System
Numbering and press Enter.
Program Menu
Edit Screen
➩
2. Go to the Program Menu on the next page.
Refer to the Software Manual for more information on each
programming series.
24 Using Merge 92600PCP04
Page 31

EDIT MENU
Program Menu
A subset of the Class Menu, the Program Menu lets you select the
program you want to customize. To select Program 0502 - Extension
Numbers and Names, for example:
1. In the Program Menu, select 0502 - Extension Numbers and
Names.
To select 0502, type 02, or highlight 0502 - Extension
Numbers and Names and press Enter.
2. Go to the Edit Menu on the next page.
Note: The letters to the left of the Program Menu option indicate the pass-
word access level.
Issue 1-0 The Edit Menu Options: Program Menu 25
Page 32

EDIT MENU
Edit Screen
Use the Edit Screen to enter data for the program you select in the
Class Menu. To edit Program 0502 - Extension Numbers and Name,
for example:
1. With 0502 - Extension Numbers and Names highlighted in the Item
2. Change the data as required.
Menu, press Enter. You see:
The window below the Edit Screen gives you additional information about the option you are programming. If you need
more help, refer to the Software Manual.
26 Using Merge 92600PCP04
Page 33

Edit Menu Help
From the Class Menu . . .
At the bottom of the screen, you see:
EDIT MENU
Esc
Enter
From the Program Menu . . .
At the bottom of the Program Menu, you see:
Esc
Enter
F1
Press Esc anytime to return to the Main Menu.
Press Enter to select a program series and go to its
Item Menu.
Press Esc anytime to return to the Class Menu.
Press Enter to select an item and go to its Edit
Screen.
Press F1 anytime to display the Item Menu help
screen:
Issue 1-0 Edit Menu Help 27
Page 34

EDIT MENU
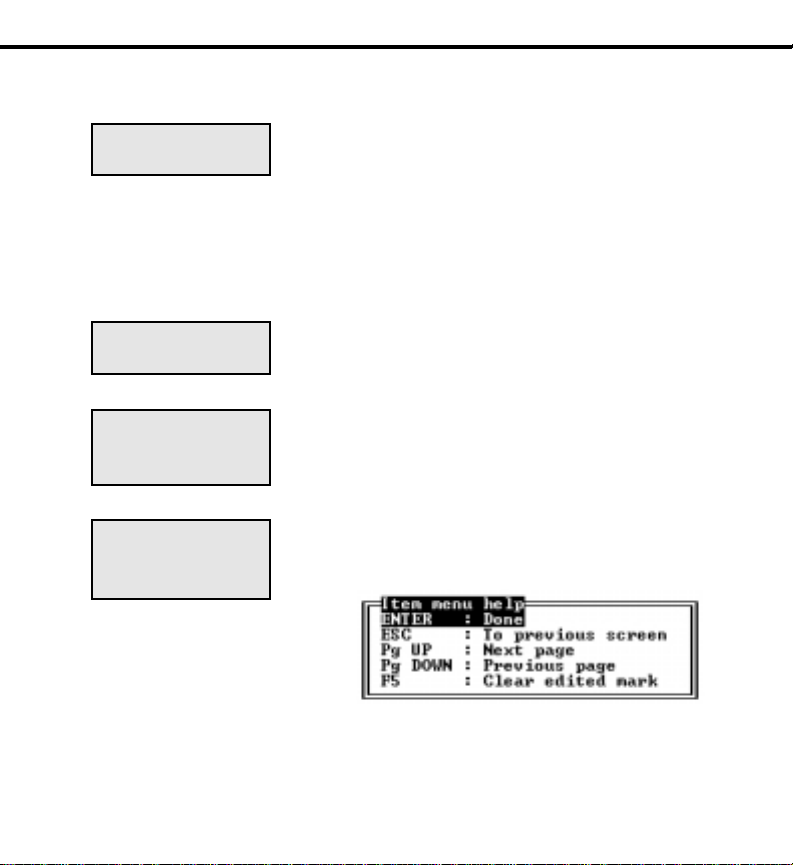
From the Edit Screen . . .
At the bottom of the Edit Screen, you see:
Enter Advances to the Edit Menu.
Esc Backs up to the Class Menu.
Pg UP Jumps to the next page in the Program
Menu (if available).
Pg DOWN Jumps to the the previous page in the
Program Menu (if available).
F5 Clears the edit mark (#) to the left of
the selected program. This prevents the
PC Program from downloading the program change when you do a PC->ME
➩ All Edited Items from the
Communication Menu.
Esc
Enter
28 Using Merge 92600PCP04
Press Esc anytime to return to the Program Menu.
Press F1 to display the Edit Screen help:
Page 35

EDIT MENU
Esc Back Up
Stores your changes in the database file
and backs up to the Program Menu. If
the PC Program detects an entry error,
it will beep and highlight the error.
Correct the entry and press Esc again.
Shift F1 Backs up to the Program Menu without
saving any changes or checking for
errors. This is a useful tool if you suspect that the database is corrupt.
Pg UP Next Page
Jumps to the next page in the option (if
available).
Pg DOWN Previous Page
Jumps to the previous page in the
option (if available).
TAB Next Column
Moves the cursor right to the next column in the Edit Screen
Issue 1-0 Edit Menu Help 29
Page 36

EDIT MENU
HOME Top of Page
Returns cursor to the first data entry field.
F3 Extension/Port Checker
Quickly correlate extension number
to extension port. For example, press
F3, enter 350 and the screen will
show port 50.
F4 Copy
Copy the current selection to a range of
extension or trunk ports.
F6 Goto
Jumps to the first field so you can
jump (e.g., go to another port) without
repeatedly pressing Pg Up or Pg Dn.
F7 Reference
Pops up a Class Menu that you can use
for reference. You can view (without
editing) any Program or Edit Menu and
then just press Esc to jump back to
where you started.
F8 Entry Data
Displays additional data entry information about the active field.
F9 Undo
Restores the original entry for the
active Edit Screen.
F10 Appendix
Takes you to the Appendix data. The
Appendix provides additional technical
data for certain options.
30 Using Merge 92600PCP04
Page 37

COMMUNICATION MENU
Understanding the Communication Menu
Use the Communication Menu to set up communication with the telephone system and then upload or download the customer’s database.
The communication can be via modem or direct connection to a DCI
or 3-DCI port. The Communication Menu also allows you to perform
certain phone system maintenance functions.
To access the Communication Menu:
1. From the Main Menu, type C.
OR
1. From the Main Menu, highlight Communication and press
Enter. In either case, you see the Com Menu:
The Communication Menu Options
The Communication Menu provides the following options:
●
Modem Control
●
Download to Phone System (PC ➩ ME)
●
Upload from Phone System (ME ➩ PC)
●
Maintenance Commands (O/M Command)
Modem Control
Modem Control allows the PC Program to emulate a “dumb” terminal
for direct modem control. For example, you can
1. Connect your modem to your PC.
Optionally, you can connect your PC’s serial port directly to a
Issue 1-0 The Communication Menu Options: Modem Control 31
Page 38

COMMUNICATION MENU
DCI or 3DCI port.
Refer to the instructions that came with your Modem Kit (P/N
92366).
2. Set the PC Program communications parameters in the Option
Menu for compatibility with the connected modem.
3. Use standard AT Command Set modem commands to control the
modem and place calls.
To activate Modem Control:
1. From the Communication Menu, type M.
OR
1. From the Communication Menu, highlight Modem Control and
press Enter. In either case, you see the Modem Control Screen:
The bottom of the screen shows the available shortcut keys.
Turn to Communication Menu Help for more.
2. Enter the AT command string. For example:
●
Type AT + Enter to see OK
●
When connected locally to a DCI, type ATDT #*#* + Enter to
enter the programming mode.
●
To call a remote system, type ATDT + The remote system’s
modem telephone number + Enter
32 Using Merge 92600PCP04
Page 39

COMMUNICATION MENU
PC ➩ ME
The PC ➩ ME Menu lets you download data from a customer database
on your PC to a telephone system. You can download the entire database or just selected options.
To access the PC ➩ ME Menu:
1. From the Communication Menu, type P.
OR
1. From the Communication Menu, highlight PC ➩ ME and press
Enter. In either case, you see the Transfer Mode Menu:
To download just select database items:
1. From the Transfer Mode Menu, Type S.
OR
1. From the Transfer Mode Menu, highlight Select Programs and
press Enter. In either case, you see the Class Menu.
The help at the bottom of the screen explains the shortcut
keys.
2. In the displayed Class Menu, select the program series you want to
download.
Refer to the Edit Menu section for help on selecting Class and
Program Menu options.
3. In the displayed Program Menu, press Enter to mark each program
you want to download.
An asterisk (*) displays to the left of each program series you
select. To save time (particularly if downloading via modem),
Issue 1-0 The Communication Menu Options: PC ➩ ME 33
Page 40

COMMUNICATION MENU
mark all your entries before going to the next step.
4. Press F10 to download the data to the phone system.
If you see “The line was not connected”, return to Modem
Control on page 31 and set up communications with the
phone system.
To download all system data:
All data does not include the Special Items below.
1. From the Transfer Mode Menu, Type A.
OR
1. From the Transfer Mode Menu, highlight All System Data and
press Enter. In either case, you see:
2. Type Y to send the active customer database to the remote system.
OR
2. Type N to return to step 1.
If you see “The line was not connected”, return to Modem
Control on page 31 and set up communications with the
phone system.
To download one of the Special Programs:
Since these are user-programmable items, take care before
downloading them. You may inadvertently overwrite options
that users have entered themselves.
1. From the Transfer Mode Menu, Type P.
OR
1. From the Transfer Mode Menu, highlight Special Program and
press Enter. In either case, you see:
34 Using Merge 92600PCP04
Page 41

COMMUNICATION MENU
2. In the displayed Program Menu, select the program series you want
to download.
The help at the bottom of the screen explains the shortcut
keys. Refer to the Edit Menu section for help on selecting
Program Menu options.
3. In the displayed Program Menu, press Enter to mark each item you
want to download.
4. Press F10 to download the data to the phone system.
If you see “The line was not connected”, return to Modem
Control on page 31 and set up communications with the
phone system.
To download just the edited (changed) items:
When in the Edit Menu, a pound (#) displays to the left of each
program series you have edited.
1. From the Transfer Mode Menu, Type L.
OR
1. From the Transfer Mode Menu, highlight All Edited Programs
and press Enter. In either case, you see:
Issue 1-0 The Communication Menu Options: PC ➩ ME 35
Page 42

COMMUNICATION MENU
2. Type Y to send the edited items to the remote system.
OR
2. Type N to return to step 1.
If you see “The line was not connected”, return to Modem
Control on page 31 and set up communications with the
phone system.
ME ➩ PC
The ME ➩ PC Menu lets you upload data from a telephone system to a
customer database in your PC. You can upload the entire database or
just selected options.
To access the ME ➩ PC Menu:
1. From the Communication Menu, type E.
OR
1. From the Communication Menu, highlight ME ➩ PC and press
Enter. In either case, you see the ME ➩ PC Transfer Mode Menu:
To upload just select database items:
1. From the Transfer Mode Menu, Type S.
OR
1. From the Transfer Mode Menu, highlight Select Programs and
press Enter. In either case, you see the Class Menu.
Refer to the Edit Menu section for help on selecting Class and
Program Menu options.
2. In the displayed Class Menu, select the program series you want to
upload.
36 Using Merge 92600PCP04
Page 43

COMMUNICATION MENU
The help at the bottom of the screen explains the shortcut
keys.
3. In the displayed Program Menu, press Enter to mark each program
you want to upload.
An asterisk (*) displays to the left of each program series you
select. To save time (particularly if uploading via modem),
mark all your entries before going to the next step.
4. Press F10 to upload the data to the phone system.
If you see “The line was not connected”, return to Modem
Control on page 31 and set up communications with the
phone system.
To upload all system data:
All data does not include the Special Items below.
1. From the Transfer Mode Menu, Type A.
OR
1. From the Transfer Mode Menu, highlight All System Data and
press Enter. In either case, you see:
2. Type Y to upload the active customer database from the remote system.
OR
2. Type N to return to step 1.
If you see “The line was not connected”, return to Modem
Control on page 31 and set up communications with the
phone system.
To upload one of the Special Programs:
Since these are user-programmable items, take care before
uploading them. You may inadvertently overwrite options that
users have entered themselves.
Issue 1-0 The Communication Menu Options: ME ➩ PC 37
Page 44

COMMUNICATION MENU
1. From the Transfer Mode Menu, Type P.
OR
1. From the Transfer Mode Menu, highlight Special Item and press
Enter. In either case, you see:
2. In the displayed Program Menu, select the program series you
want to upload.
The help at the bottom of the screen explains the shortcut
keys. Refer to the Edit Menu section for help on selecting
Program Menu options.
3. In the displayed Program Menu, press Enter to mark each program
you want to upload.
4. Press F10 to upload the data to the phone system.
If you see “The line was not connected”, return to Modem
Control on page 31 and set up communications with the
phone system.
O/M Command
The O/M Command provides you with quick access to selected maintenance functions. With O/M, you can read system and alarm reports,
remove or install PCBs, test circuits and save or load customer data.
38 Using Merge 92600PCP04
Page 45

COMMUNICATION MENU
To use the O/M Command option:
1. From the Communication Menu, type O.
OR
1. From the Communication Menu, highlight O/M Command and
press Enter. In either case, you see the O/M Command Menu:
2. In the displayed O/M Menu, select the program you want.
Do not use System Restart, Read Custom Data and Write
Custom Data. They are for factory use only.
The help at the bottom of the screen explains the shortcut
keys. Refer to Communication Menu Help for more.
3. Press Enter to execute (run) your selection.
If you see “The line was not connected”, return to Modem
Control on page 31 and set up communications with the
phone system.
Communication Menu Help
From the Communication Menu . . .
At the bottom of the screen, you see:
Issue 1-0 Communication Menu Help 39
Page 46

COMMUNICATION MENU
Esc
F8
From the Modem Screen . . .
At the bottom of the Modem Screen, you see:
F2
F3
F4
F7
Press Esc anytime to return to the Main Menu.
Press F8 to jump to the Modem Screen.
Auto Dial
Press F2 to automatically dial the number stored in
the Customer Information Screen.
Password
Press F3 to reenter the password while still connection to the remote system. This saves you from
breaking the connection and dialing again.
Break
Press F4 to break (tear down) the modem connection.
Modem Setup
Press F7 to jump to the Option ➩ RS232C Mode
screen. This lets you change the data format for the
modem connection. The change you make is for the
current session only. It is not permanent.
40 Using Merge 92600PCP04
Page 47

COMMUNICATION MENU
F9
F10
From the PC ➩ ME Transfer Mode, ME ➩ PC Transfer Mode and
O/M Command Menus . . .
At the bottom of the screen, you see:
Esc
Enter
F8
From the Class and Program Menus . . .
At the bottom of the screen, you see:
Modem Status
Press F9 to check the status of the RS-232C control
leads. These are the settings stored in Program 1201,
Register Type 1, S-Register 66.
Initializes Modem
Press F10 to send initialization string to modem.
Press Esc to return to the Communications Menu.
In a Transfer Mode Menu, press Enter to select the
highlighted item. In the O/M Command Menu, press
Enter to select (mark) an item.
Press F8 to jump to the Modem Screen.
Esc
Issue 1-0 Communication Menu Help 41
Press Esc to return to the Transfer Mode Menu.
Page 48

COMMUNICATION MENU
Enter
F1
In a Class Menu, press Enter to step down to the
Program Menu. In a Program Menu, press Enter to
mark an entry.
Press F1 to display the following Help pop-up screen:
F2 Selects (marks) all programs for the selected
class.
F3 Selects (marks) all programs for all classes.
F4 Deselects (unmarks) all programs for the selected
class.
F5 Deselects (unmarks) all programs for all classes.
F6 Clears the edit mark (#) to the left of the selected
program. This prevents downloading the program change when you do PC ➩ ME ➩ All
Edited Items.
F8 Jumps to the Modem Screen.
F10 Starts the download to the phone system (if
already connected).
F8
F10
42 Using Merge 92600PCP04
Press F8 to jump to the Modem Screen.
Press F10 to start the download to the phone system
(if connected).
Page 49

Understanding the Print Menu
Use the Print Menu to print the active customer database to the parallel
printer attached to your PC. You can print the entire database, only
selected programs or just the Customer Information Screen. The printer
you use should be Epson FX compatible.
To access the Print Menu:
1. From the Main Menu, type P.
OR
1. From the Main Menu, highlight Print and press Enter. In either
case, the Print Menu displays:
The Print Menu Options
The Print Menu provides the options listed below. Before printing,
make sure your print range is set in Print Range Setup on page 46. This
will help you avoid unnecessary or incomplete printouts.
PRINT MENU
Select Programs
Use Select Programs to choose specific programs for printing. Select
Programs lets you print out just the programs you have changed —
instead of the entire database.
To select programs for printing:
1. From the Print Menu, type S.
OR
Issue 1-0 The Print Menu Options: Select Programs 43
Page 50

PRINT MENU
1. From the Print Menu, highlight Select Programs and press
Enter. In either case, the Class Menu appears:
2. From the Class Menu, select the program series you want. You see
the Program Menu for the selected Class:
The following screen shows System Numbering highlighted.
For more on the Class and Program Menus, refer to the Edit
Menu section.
The following screen shows the Program Menu of program
series 0500 - System Numbering,
3. Press Enter (or type the Program number) to select the programs
you want to print.
An ampersand (&) displays to the left of each program series
44 Using Merge 92600PCP04
Page 51

PRINT MENU
you select.
4. Press Esc to back up to the Class Menu to select additional programs.
OR
4. Press F10 to print the currently selected programs.
To stop the printing, press Esc.
The PC Program will alert you if your printer is not connect-
ed or functioning properly.
All System Data
The All System Data option allows you to print all data in a customer
database.
To print all the system data:
1. From the Print Menu, press A.
OR
1. From the Print Menu, highlight All System Data and press Enter.
In either case, the system database prints. To stop the printing, press Esc.
The PC Program will alert you if your printer is not connected or functioning properly.
Customer Data
To print the Customer Information Screen:
1. From the Print Menu, press C.
OR
1. From the Print Menu, highlight Customer Data and press Enter.
In either case, the Customer Information Screen data prints. To
stop the printing, press Esc.
The PC Program will alert you if your printer is not connected or functioning properly.
Issue 1-0 The Print Menu Options: Customer Data 45
Page 52

PRINT MENU
Print Range Setup
With Print Range Setup, you can print customer database information
for a specified range, rather than all extensions. For example, you can
print only certain Tenant Groups, extension ports or Extension
(Department) Groups. This saves printing time by allowing you to
more narrowly define the items you want to print. The Print Range
Setup option works in addition to whatever other print options you
have enabled. The ranges you select are saved along with the other
data in the customer database.
To set a print range:
1. From the Print Menu, type P.
1. From the Print Menu, highlight Print Range Setup and press
Enter. In either case, you see:
2. Using the Up and Down Arrow keys, select the print range you
want to change.
3. Edit the selected print range:
●
●
●
●
4. Press Esc to return to the Print Menu.
OR
Left and Right Arrow keys highlight the existing entries.
Type in the new range.
Use Backspace and Delete to edit your entries.
Press F2 to reset the print ranges to their default values.
46 Using Merge 92600PCP04
Page 53

Print Menu Help
From the Print Menu . . .
At the bottom of the screen, you see:
PRINT MENU
Esc
F7
From the Select Programs Screen . . .
At the bottom of the Select Programs Screen, you see:
Esc
Enter
F1
Press Esc anytime to return to the Main Menu.
Press F7 to send a form feed to the printer. This
advances the printer to the top of the next page
Press Esc to return to the Print Menu.
While in the Class Menu, press Enter to go to the
selected program series Program Menu.
Press F1 to display the following Help pop-up
screen:
Issue 1-0 Print Menu Help 47
Page 54

PRINT MENU
F2 Selects (marks) all programs for the selected
class.
F3 Selects (marks) all programs for all classes.
F4 Deselects (unmarks) all programs for the select-
ed class.
F5 Deselects (unmarks) all programs for all classes.
F6 Deselects (unmarks) an edited class.
F7 Sends a form feed to the printer.
F10 Starts the printing for the selected programs.
F7
F10
From the Print Range Setup Screen
At the bottom of the Print Range Setup Screen, you see:
F2
48 Using Merge 92600PCP04
Press F7 to send a form feed to the printer.
Press F10 to start the printing for the selected programs.
Press F2 to reset all the Print Range fields to their
default settings.
Page 55

Understanding the Option Menu
Use the Option Menu to:
●
Assign the path (location) of the PC Program’s data and temporary
working files.
●
Determine the permanent RS-232C parameters for the PC’s
modem port.
●
Set the page width and length options for the printer connected to
the PC.
●
Assign the format of the dates displayed in the PC Program and printout.
●
Enable or disable the Invalid Access Level error message.
To access the Option Menu:
1. From the Main Menu, type O.
OR
1. From the Main Menu, highlight Option and press Enter. In either
case, you see the Option (Parameter Setting) Menu:
OPTION MENU
The Option Menu Options
The Option Menu provides the following options:
File Path
Use the File Path option to tell the PC Program where to find its program and temporary working files. Carefully setting this option is
important if you have many customer databases in different directories
on the PC’s hard disk.
Issue 1-0 The Option Menu Options: File Path 49
Page 56

OPTION MENU
To access the File Path option:
1. From the Option (Parameter Setting) Menu, type F.
1. From the Option (Parameter Setting) Menu, highlight File and
press Enter. In either case, you see the File Screen:
Custom File Directory
Use Custom File Directory to indicate which directory the PC Program
looks into for its database files. For example, when you do a File ➩
Read command from the Main Menu, the PC program shows you the
list of database files stored in the Custom File Directory.
Temporary File Directory
The Temporary File Directory option lets you specify where you want
the PC Program to create its temporary working files. You can choose
any directory on any of your hard drives as long as it has about 2
Mbyte of free space. When you exit the PC Program, it automatically
removes the temporary files. You’ll have to exit and restart the PC
Program to have your entry take effect. If your PC has expanded or
extended memory, you can speed up the PC Program by creating a virtual drive (“RAMDisk”) for the temporary files.
OR
Initial File Directory
The Initial File Directory entry tells the PC Program where to look for
the database file it loads on initial startup. Your entry should be the
directory for the file listed in the Initial File Name option. When you
first start the PC Program, it tries to load the file C:\384I\DX2NA.NAD
50 Using Merge 92600PCP04
Page 57

OPTION MENU
or C:\384I\DX2NA.NAE, depending on your PC Program software version. Use the Initial File Directory option if your program is installed in
a different directory, or if you want to use a different initial file.
Initial File Name
When you start the PC Program, it automatically loads the customer
database file entered in the Initial File Name option. You might find it
helpful to create a standard customer database and automatically load it
each time through this option. You could then use the standard file as a
baseline for your new installations.
To edit an entry in the File Screen:
1. In the File Screen, use the Up and Down Arrows to highlight the
option you want to change.
2. Type in the entry you want.
Use the Left and Right Arrows, the Delete and Backspace
keys to edit your entry.
3. Press Enter to go back to the Option (Parameter Setting Menu) and
go to step 4.
OR
3. Use the Up and Down Arrows to highlight another File Screen
option and go back to step 2.
4. Press F2 to save your entries.
OR
4. Press Esc to go back to the Main Menu without saving.
RS-232C Mode
The RS-232C Mode option lets you change the following parameters
for the serial port used by the PC Program.
Issue 1-0 The Option Menu Options: RS-232C Mode 51
Page 58

OPTION MENU
Speed
This option sets the speed of the serial port the PC Program uses for
communicating with the phone system. The speed of the serial port can
be 300, 1200, 2400, 4800 or 9600 baud. Most modems can automatically detect the speed you select. If you have problems uploading and
downloading files, consider lowering the port speed.
Length
Use this option to set the length of each data byte. Currently, the length
option is fixed at 8.
Parity
The Parity option determines the type of parity checking used for each
data byte during the serial communications. You should set this option
at None.
Stop
Use the Stop option to set the number of stop bits used for each data
byte during serial communications. You should set this option at 1.
Echo
The Echo option sets the status of the local echo on your PC. Normally,
you should set this option to Off. However, if you need to do a lot of
manual communication from the Modem Screen, you may want to temporarily change this option to On. This will ensure that the characters
you type will display on your screen. (If you see double characters
while typing in the Modem Screen, return this option to Off.)
COM Port
The COM Port option allows you to choose the COM port to which
your modem is connected (COM 1 or COM 2). If you are working on a
52 Using Merge 92600PCP04
Page 59

OPTION MENU
laptop with an integral pointer (like a track ball), this setting will normally be 1. If you are working on a desktop PC with a serial mouse,
this setting will normally be 2. Check the manuals that came with your
computer to be sure which setting you need.
To access the RS-232C Mode option:
1. From the Option (Parameter Setting) Menu, type R.
OR
1. From the Option (Parameter Setting) Menu, highlight RS232C Mode
and press Enter. In either case, you see RS-232C Mode Screen:
To edit an entry in the RS-232C Mode Screen:
1. In the File Screen, use the Up and Down Arrows to highlight the
option you want to change.
2. Use the Left and Right Arrows to make your selection.
3. Press Enter. You see the Modem Initialization String screen:
4. Press Enter again. You return to the Option (Parameter Setting)
Menu.
5. Press F2 to save your entries.
OR
5. Press Esc to go back to the Main Menu without saving.
Issue 1-0 The Option Menu Options: RS-232C Mode 53
Page 60

OPTION MENU
Printer Options
Use the Printer Options to set the length and width of the paper you are
using for your printouts.
To access the Printer Options:
1. From the Option (Parameter Setting) Menu, type P.
1. From the Option (Parameter Setting) Menu, highlight Printer and
press Enter. In either case, you see Printer Options Screen:
To edit an entry in the Printer Options Screen:
1. In the Printer Options Screen, use the Up and Down Arrows to
highlight the option you want to change.
2. Type in the new entry.
3. Press Enter. You return to the Option (Parameter Setting) Menu.
4. Press F2 to save your entries.
4. Press Esc to go back to the Main Menu without saving.
OR
For printing on an 8 1/2” x 11” sheet, set the print width to
80 and the page length to 60.
Use the Left and Right Arrow, Backspace and Delete keys to
edit your entry.
OR
54 Using Merge 92600PCP04
Page 61

OPTION MENU
Other Options
With the Other Options Menu, you can select the:
●
Date Display Format
●
Access Level Error Indication
Date Display Format
You can select the format the PC Program uses to display the date on
printouts. There are two formats available: yy-mm-dd (e.g., 00-04-01
for April 1, 2000) and mm-dd-yy (e.g., 04-01-00 for April 1, 2000).
Access Level Error Indication
Use the Access Level Error Indication to remind you when you try and
change an option your access level prevents. You can either disable
(Non-Indicate) or enable (Indicate) this option.
To access the Other Options:
1. From the Option (Parameter Setting) Menu, type O.
OR
1. From the Option (Parameter Setting) Menu, highlight Other and press
Enter. In either case, you see Other Options Screen:
To edit an entry in the Other Options Screen:
1. In the Other Options Screen, use the Up and Down Arrows to
highlight the option you want to change.
2. Use the Left and Right Arrows to change the entry.
3. Press Enter. You return to the Option (Parameter Setting) Menu.
4. Press F2 to save your entries.
OR
4. Press Esc to go back to the Main Menu without saving.
Issue 1-0 The Option Menu Options: Other Options 55
Page 62

OPTION MENU
Option Menu Help
From the Option Menu . . .
At the bottom of the screen, you see:
Esc
F2
From any of the Option Menu options . . .
At the bottom of any of the option screens, you see:
Esc
Enter
Press Esc anytime to return to the Main Menu.
Press F2 to save your Option Menu entries. After
pressing F2, you see:
1. Press Y to save you entries.
OR
1. Press N to return to the Option Menu without
saving.
Press Esc to exit the option (without changing) and
return to the Option (Parameter Setting) Menu.
Mark your change and return to the Option
(Parameter Setting) Menu.
You must still press F2 from the Option Menu to save
your change.
56 Using Merge 92600PCP04
Page 63

NEC America, Inc., Corporate Networks Group
4 Forest Parkway, Shelton, CT06484
T el: 800-365-1928 Fax: 203-926-5458
cng.nec.com
Other Important Telephone Numbers
Sales: . . . . . . . . . . . . . . . . . . . . . . . . . . . . . . . . . . . .203-926-5450
Customer Service: . . . . . . . . . . . . . . . . . . . . . . . . . . .203-926-5444
Customer Service FAX: . . . . . . . . . . . . . . . . . . . . . . .203-926-5454
Technical Service: . . . . . . . . . . . . . . . . . . . . . . . . . . .203-925-8801
Discontinued Product Service: . . . . . . . . . . . . . . . . . .900-990-2541
Technical Training: . . . . . . . . . . . . . . . . . . . . . . . . . . .203-926-5430
Emergency Technical Service (After Hours) . . . . . . . .203-929-7920
(Excludes discontinued products)
Page 64

NEC America, Inc., Corporate Networks Group
4 Forest Parkway, Shelton, CT 06484
TEL: 203-926-5400 FAX: 203-929-0535
cng.nec.com
 Loading...