

Page 1
HYBRID TELEPHONE SYSTEM
GROUPHONE
Issue-1
December, 1998
INSTRUCTION
AND
INSTALLATION MANUAL
Model 308/824/1232/2464
Page 2

RECORD OF REVISION
Issue No. Date
1 December, 1998 1st release for following ROM version:
TX-Z 308: 3.0
TX-Z 824: 5.0
TX-Z 1232/2464: 3.0 (CPU-B1)
Remarks
Page 3

Nothing contained in this manual shall be deemed to be, and this manual does not constitute,
a warranty of, or representation with respect to, any of the equipment covered. This manual is
subject to change without notice and Nitsuko has no obligation to provide any updates or
corrections to this manual. Further, Nitsuko also reserves the right, without prior notice, to
make changes in equipment design or components as it deems appropriate. No
representation is made that this manual is complete or accurate in all respects and Nitsuko
shall not be liable for any errors or omissions. In no event shall Nitsuko be liable for any
incidental or consequential damages in connection with the use of this manual. No part of this
document may be photocopied or reproduced without prior written consent of Nitsuko.
(C) 1998 by Nitsuko Corporation. All Rights Reserved.
Printed in Japan
Page 4

This manual consists of eight parts:
PART 1: INTRODUCTION
PART 2: SPECIFICATIONS
PART 3: SYSTEM INSTALLATION
PART 4: FEATURE DESCRIPTION AND OPERATION
PART 5: SYSTEM PROGRAMMING
PART 6: PROGRAM RECORD FORM
PART 7: OPTIONAL ITEMS (Caller-ID, FAXU, VAU)
PART 8: HOW TO USE FOR SINGLE LINE TELEPHONE
Page 5

PART 1
INTRODUCTION
The TX-Z 308/824/1232/2464 system is a microprocessor-based, state-of-the-art communications
system which offers you superb service, and the flexibility and featur es which are usually only found
on larger, more expensive systems.
The TX-Z 308/824/1232/2464 system is designed to give you the best custom-designed services
available, making it as easy to use as it is to install. The system can operate by itself or behind a
Private Branch Exchange (PBX). The TX-Z 308 system is ideal choice for small or home office. It
starts with three lines and eight extensions. TX-Z 824 system can grow in size from the basic four
outside lines and eight extensions to eight outside lines and twenty-four extensions. Main
Equipment for TX-Z 1232/2464 system is slot type expansion cabinet and expandable using one
cabinet. This system can grow in size from twelve outside lines and thirty-tw o extensions to tw entyfour outside lines and sixty-four extensions only adding expansion mother board and power supply
unit.
With the touch of a few keys, you will have such sophisticated features as Abbreviated Dialing,
Repeat Dialing, Conference Call, and Paging etc. at your fingertips. You can also have text
message with display phone!
The possibilities are almost limitless. The system offers you t he flexible assignment of outside lines,
and a toll restriction package that can be tailored to suit your needs. Optional equipments
(Doorphone, BGM/External MOH input, External Paging output, SMDR I/F, Fax Machine, Voice
Mail) can be installed if you desire. Such options are guaranteed to expand and enrich the already
wide horizons of your system.
One of the excellent points about TX-Z 308/824/1232/2464 system are powerful features provided
for single line telephone. Most of features provided for key telephone can be used on single line
telephone. Also, you do not need exclusive interface unit to connect single line telephones to TX-Z
308/824/1232/2464 system. It means that y ou can use t he same interface unit as key t elephone.
This manual will provide you with step-by-step instructions for the installation of the basic
equipment, the procedure for customizing your system so that it serves your office or company's
particular needs, and the easy, almost effortless instructions for using your t elephones.
NOTE:
equipment or attempting any installation.
Please read through this entire manual at least once before ordering any additional
Page 6

PART 2
SPECIFICATIONS
General Description
System Configuration
Visual Indication
Audible Indication
Page 7
General Description
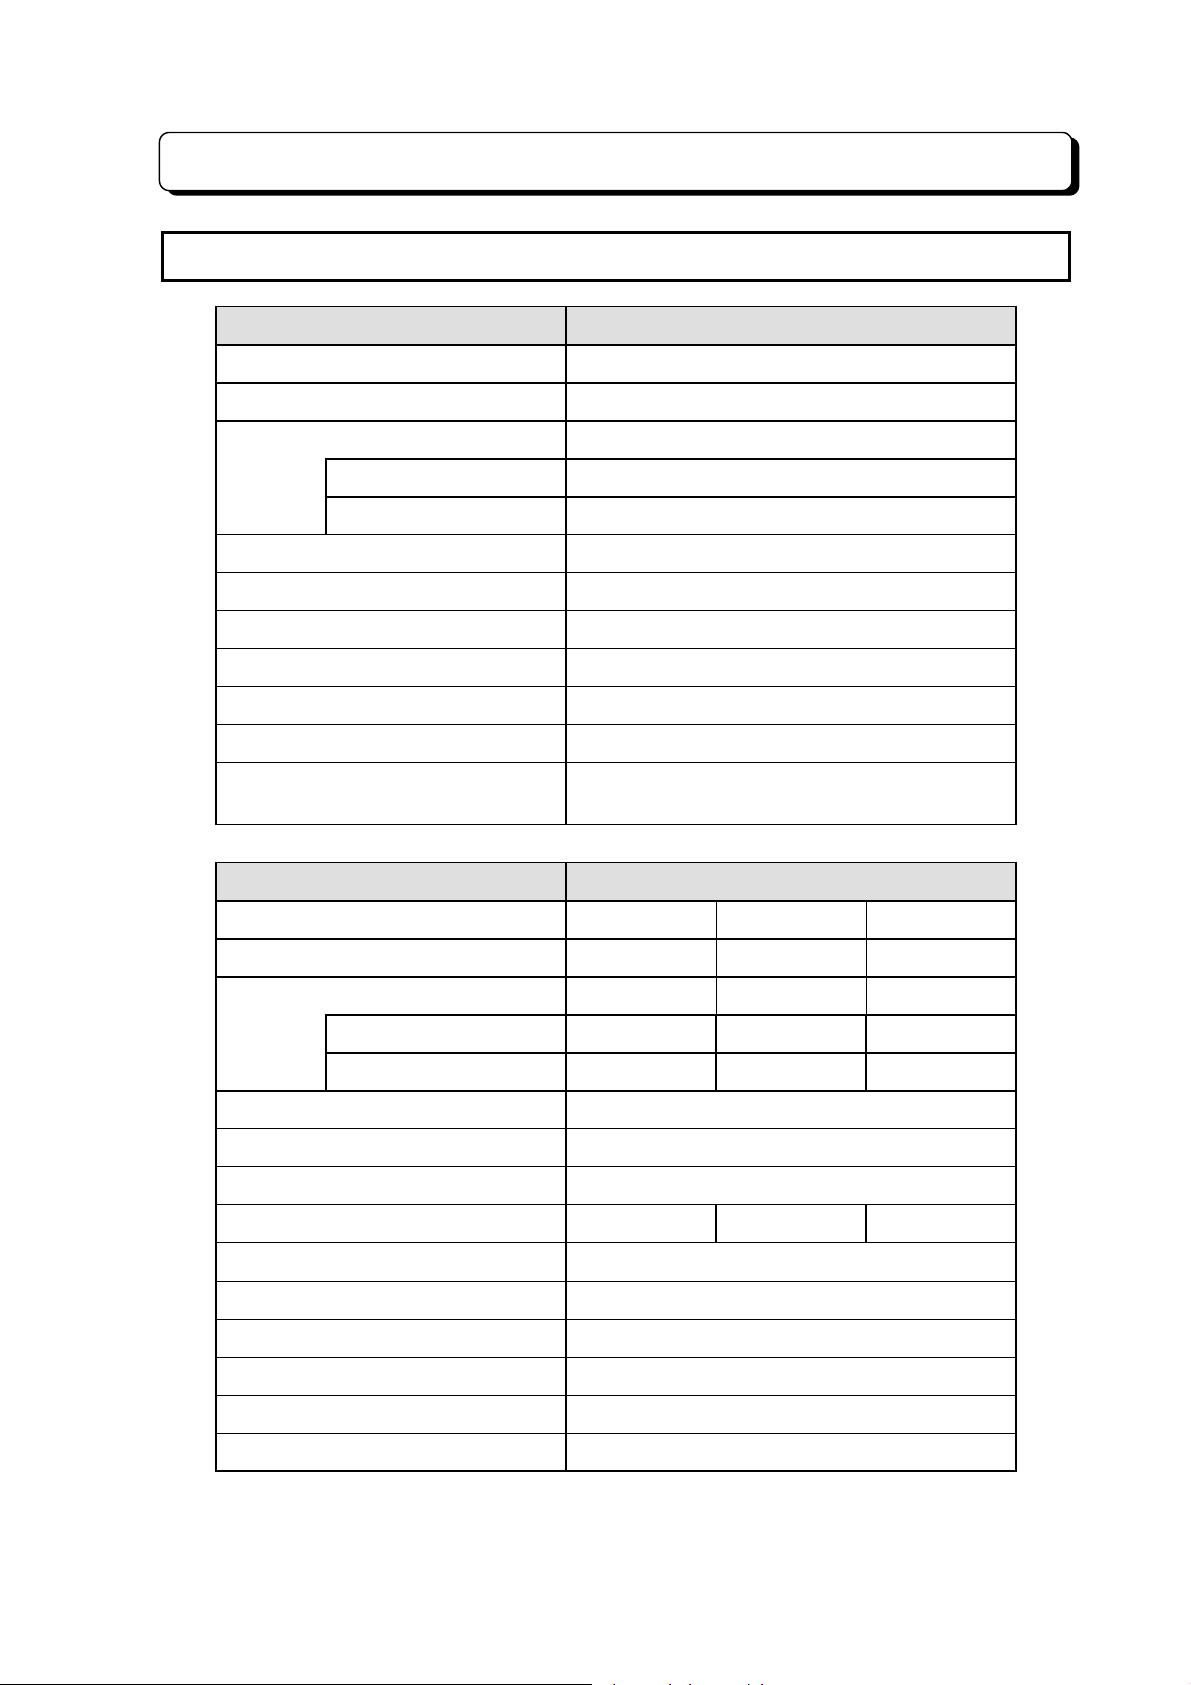
System Capacity
Items TX-Z 308 System
System Size 308
Trunk Line 3
Extension 8
Key Telephone Max. 7 (No. 10 to No. 16)
Single Line Telephone Max. 6 (No. 12 to No. 17)
Intercom Talk Path 2
Paging Path 1
DTMF Receiver 2
Doorphone Interface 2
External Speaker Output 1
External MOH Input 1
PF Transfer Line 1
(Fixed to CO No. 1 to Ext. No. 17)
Items TX-Z 824 System
System Size 408 616 824
Trunk Line 4 6 8
Extension 8 16 24
Key Telephone 8 16 24
Single Line Telephone 8 16 24
DLS Console Max. 3 (Use DLS console as DSS console.)
Intercom Talk Path 6
Paging Path 2
DTMF Receiver 2 4 6
Doorphone Interface 2
BGM Input 1
External Speaker Output 2
External MOH Input 1
Ringer Unit 1
PF Transfer Line 4
¾ 2-1 ¾
Page 8
General Description
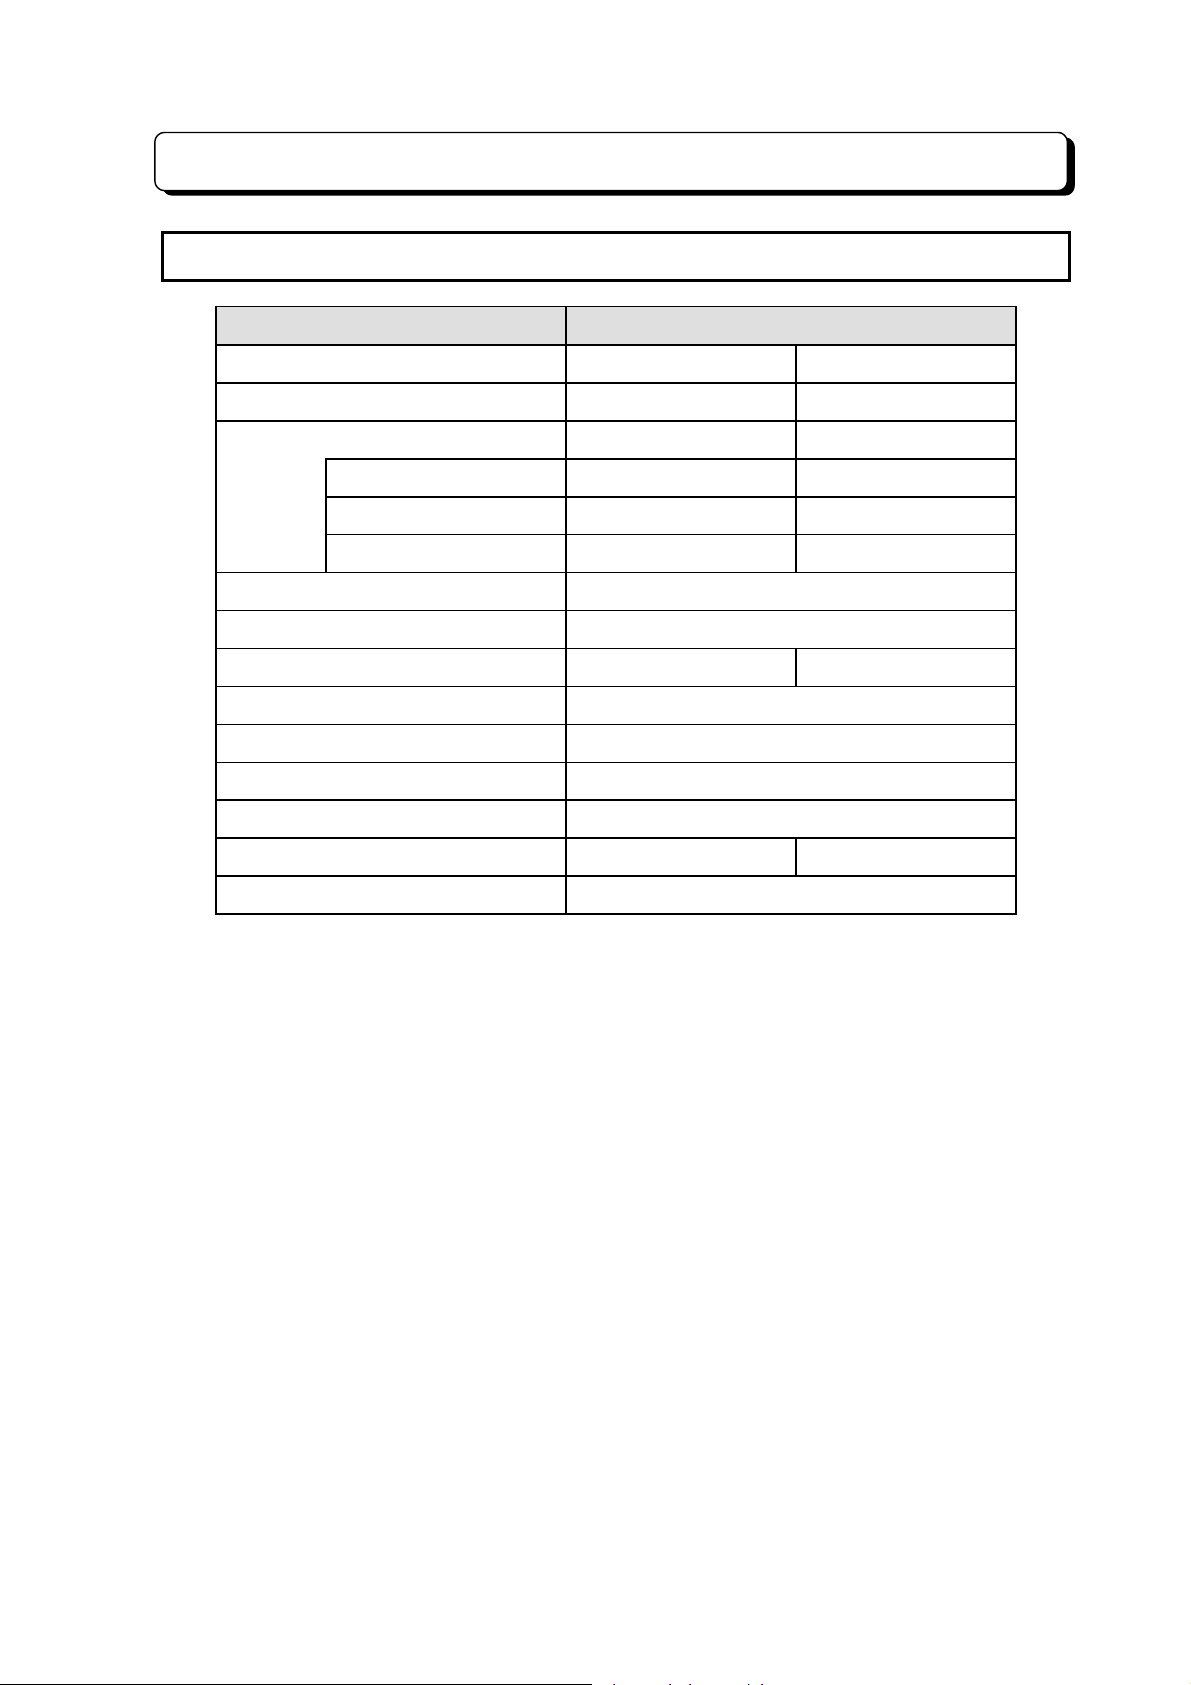
System Capacity
Items TX-Z 1232/2464 System
System Size 1232 2464
Trunk Line 12 24
Extension 32 64
Key Telephone 32 64
Single Line Telephone 32 64
DSS Console 1 2
Intercom Talk Path 10
Paging Path 2
DTMF Receiver 8 16
Doorphone Interface 2
BGM Input 1
External Speaker Output 2
External MOH Input 1
Ringer Unit 1 2
PF Transfer Line 12
Note:
When one DSS Console is connected, one intercom talk path is occupied.
When DSS Console, Paging Path or BGM Input is used, intercom talk path(s)
will be used.
¾ 2-2 ¾
Page 9
General Description
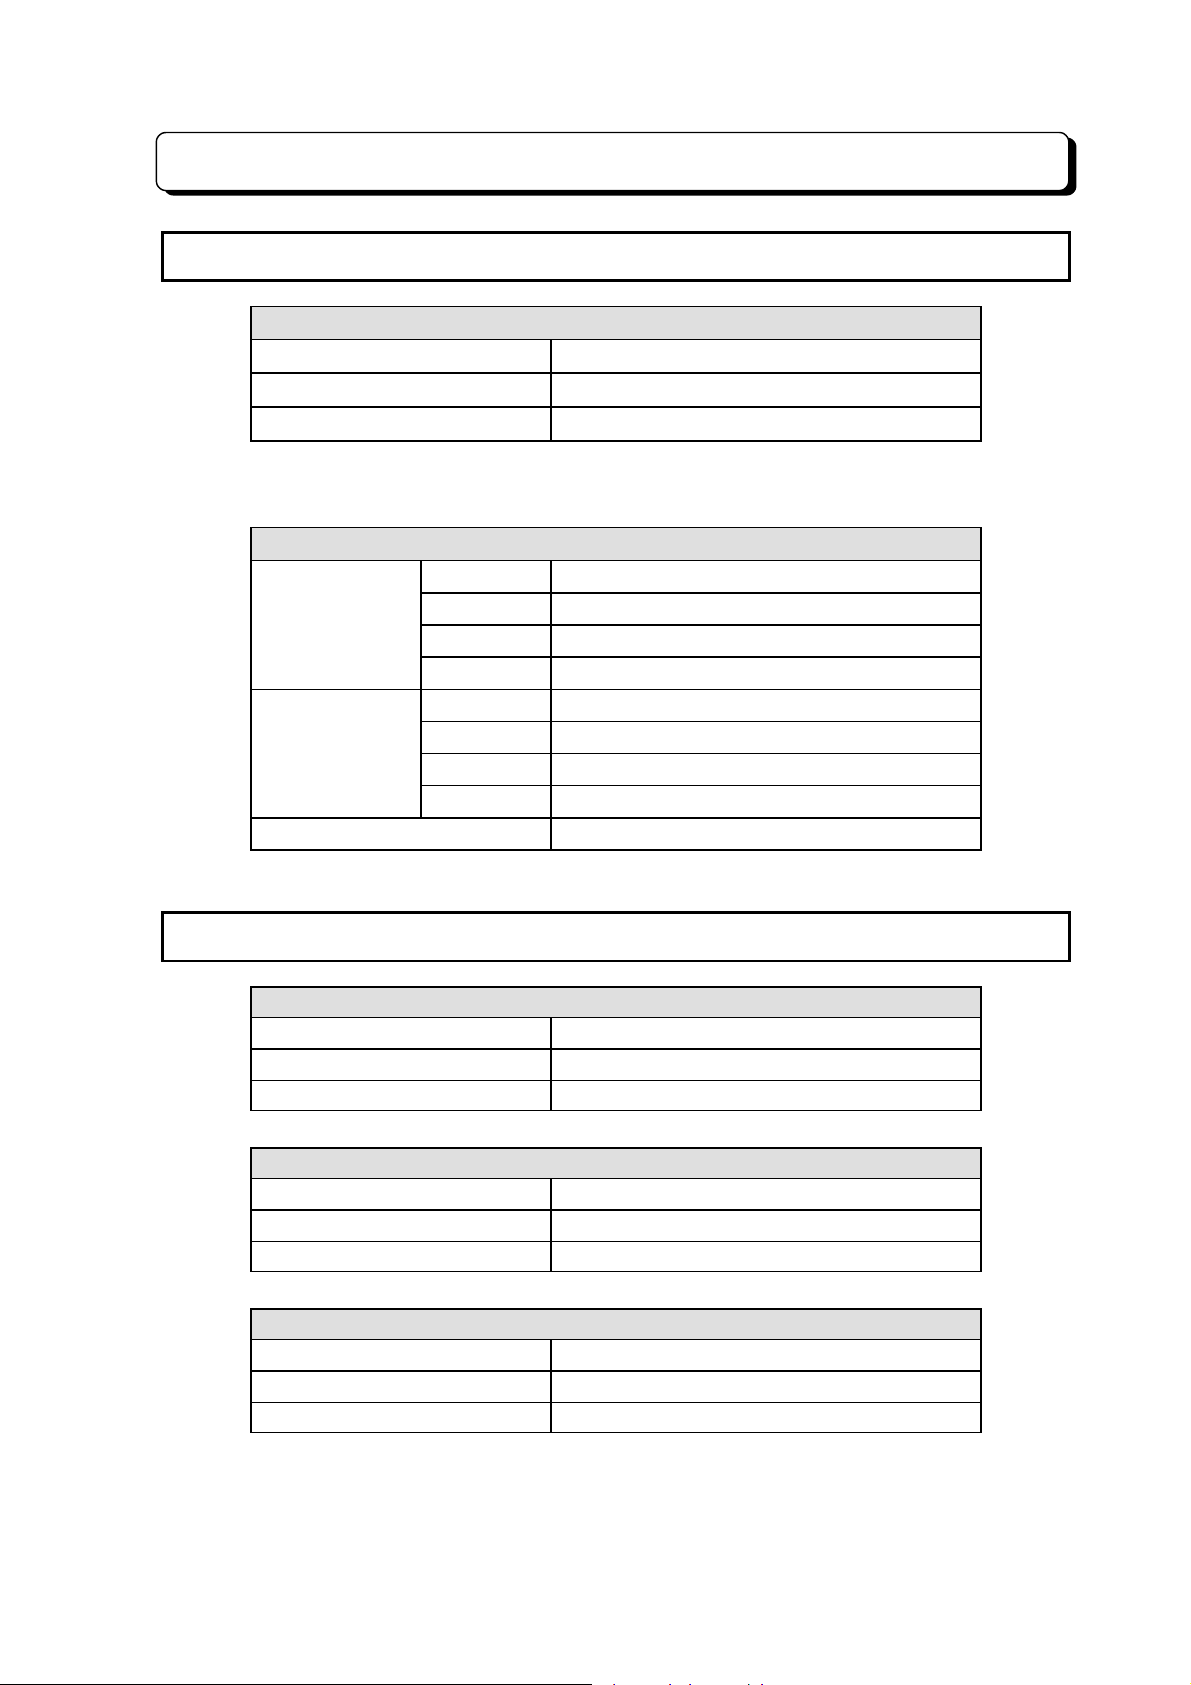
Electrical Specifications
Station Cable Length Limit
Key Telephone
Single Line Telephone
Doorphone Box
* Off-premises extension is not allowed. In other words, do not run the wire
in outdoor.
308M 90 V AC to 264 V AC, 50/60 Hz.
Primary Power
Power
Consumption
Secondary Power +5 V DC, +6 V DC, +12 V DC, +28 V DC.
824M-100 90 V AC to 134 V AC, 50/60 Hz.
824M-200 180 V AC to 264 V AC, 50/60 Hz.
2464M 90 V AC to 264 V AC, 50/60 Hz.
308 40 VA maximum.
824 85 VA maximum.
1232 195 VA maximum.
2464 390 VA maximum.
300 m (0.5 f two-pair twisted cable).
1,125 m (0.5 f one-pair twisted cable).
150 m (0.5 f one-pair twisted cable).
Power Supplies
External Equipment Specifications
Background Music (BGM) /Specifications
Input Impedance
Input Level
Maximum Input 1 Vrms
External Music On Hole (MOH) Specifications
Input Impedance
Input Level
Maximum Input 1 Vrms
External Paging Speaker Specifications
Output Impedance
Output Level
Maximum Output 400 mV rms
600 W
Nominal 250 mV (-10 dBm).
600 W
Nominal 250 mV (-10 dBm).
600 W
Nominal 250 mV (-10 dBm).
¾ 2-3 ¾
Page 10
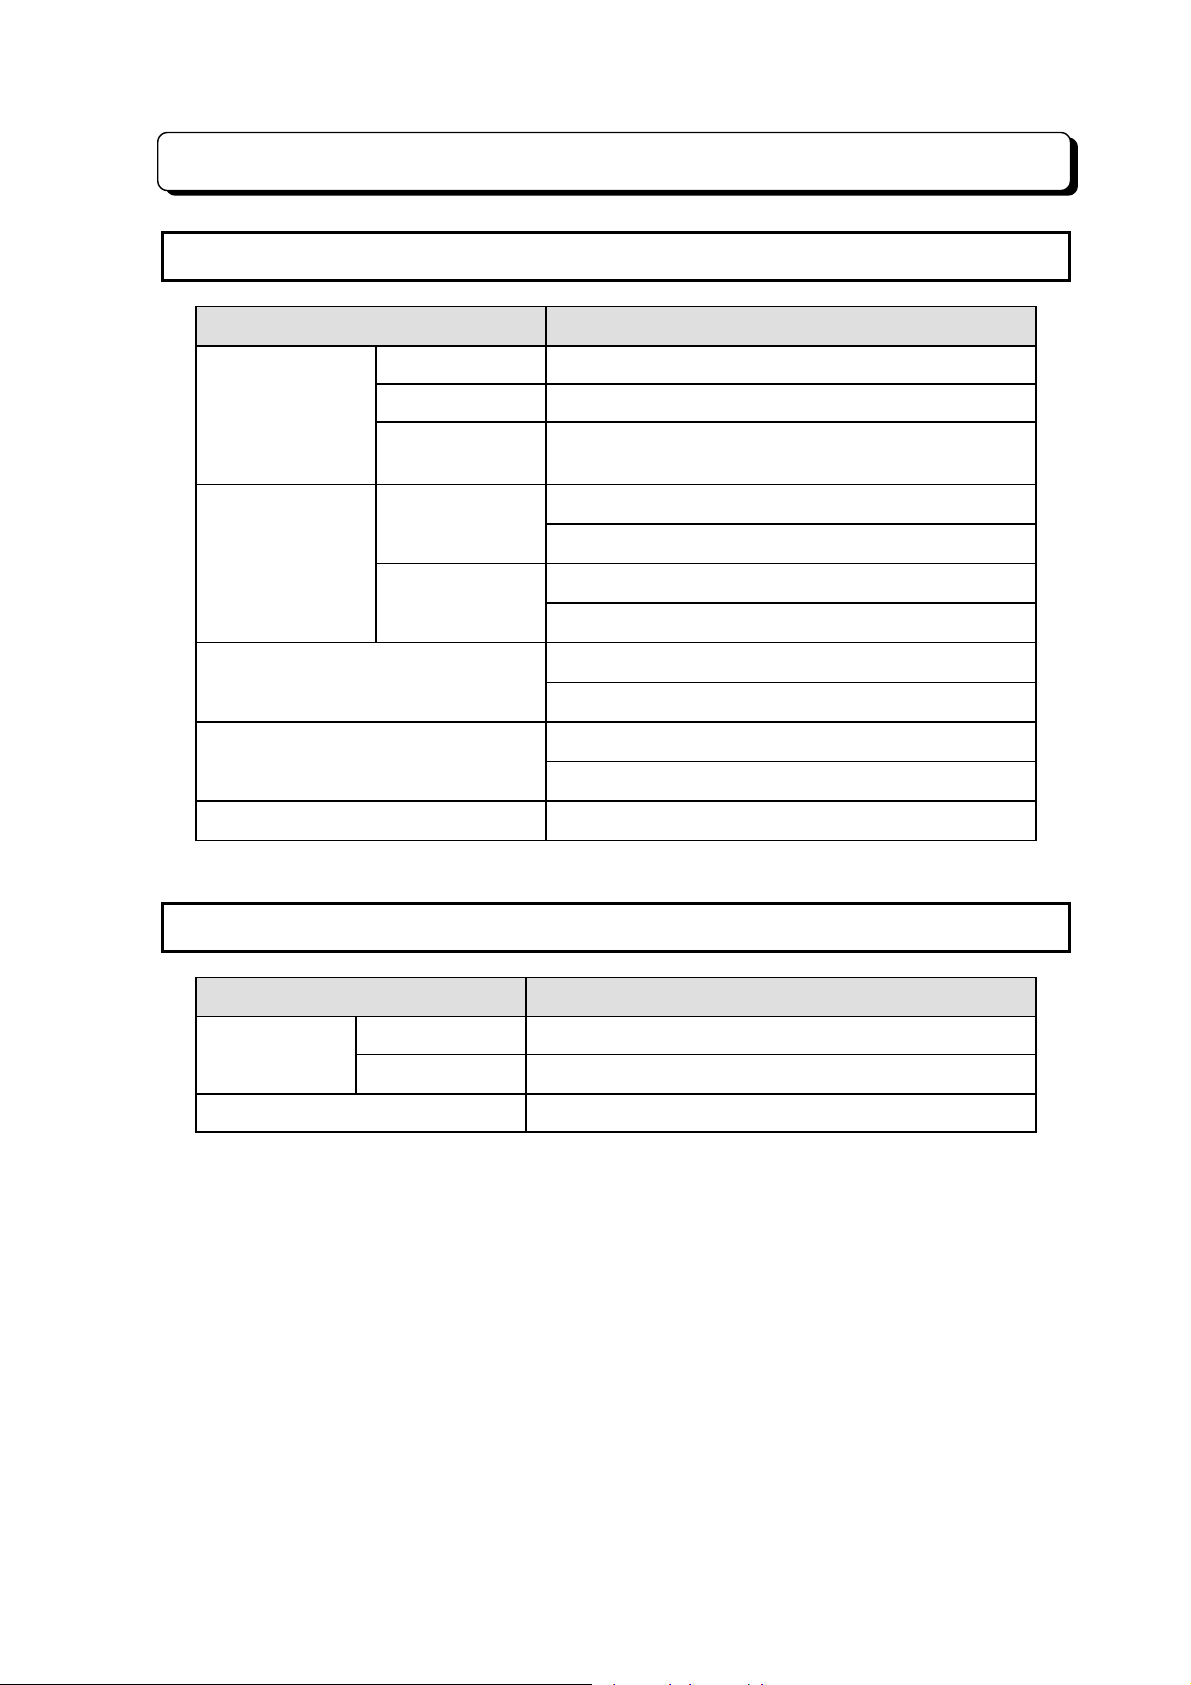
General Description
Mechanical specifications
Main
Equipment
Key Telephone
DSS Console
DLS Console
Doorphone Box
Items
TX-Z 308
TX-Z 824
TX-Z
1232/2464
Display Type
Standard Type
Dimensions (W
335 ´ 265 ´ 90/1.9
475 ´ 325 ´ 104/5.00
494.6 ´ 362 ´ 230/6.70
221 ´ 170 ´ 88/0.80 (TXD)
216 ´ 177 ´ 81/0.75 (BTXD)
221 ´ 170 ´ 88/0.75 (TD)
216 ´ 177 ´ 81/0.70 (BTD)
221 ´ 170 ´ 63/0.50 (64 D DSS)
216 ´ 177 ´ 59/0.50 (64 BD DSS)
221 ´ 62.5 ´ 63/0.20 (24 DL DLS)
212 ´ 60 ´ 59/0.20 (24 BDL DLS)
132 ´ 100 ´ 35/0.20
D
H mm)/Weights (Kg)
´´´´
´´´´
Environmental Specifications
Items Environmental Requir em e nt s
Temperature
Humidity 10% to 95% noncondensing.
System 0 to 45 degree C (32 to 113 degree F).
Doorphone
-20 to 60 degree C (-4 to 140 degree F).
¾ 2-4 ¾
Page 11
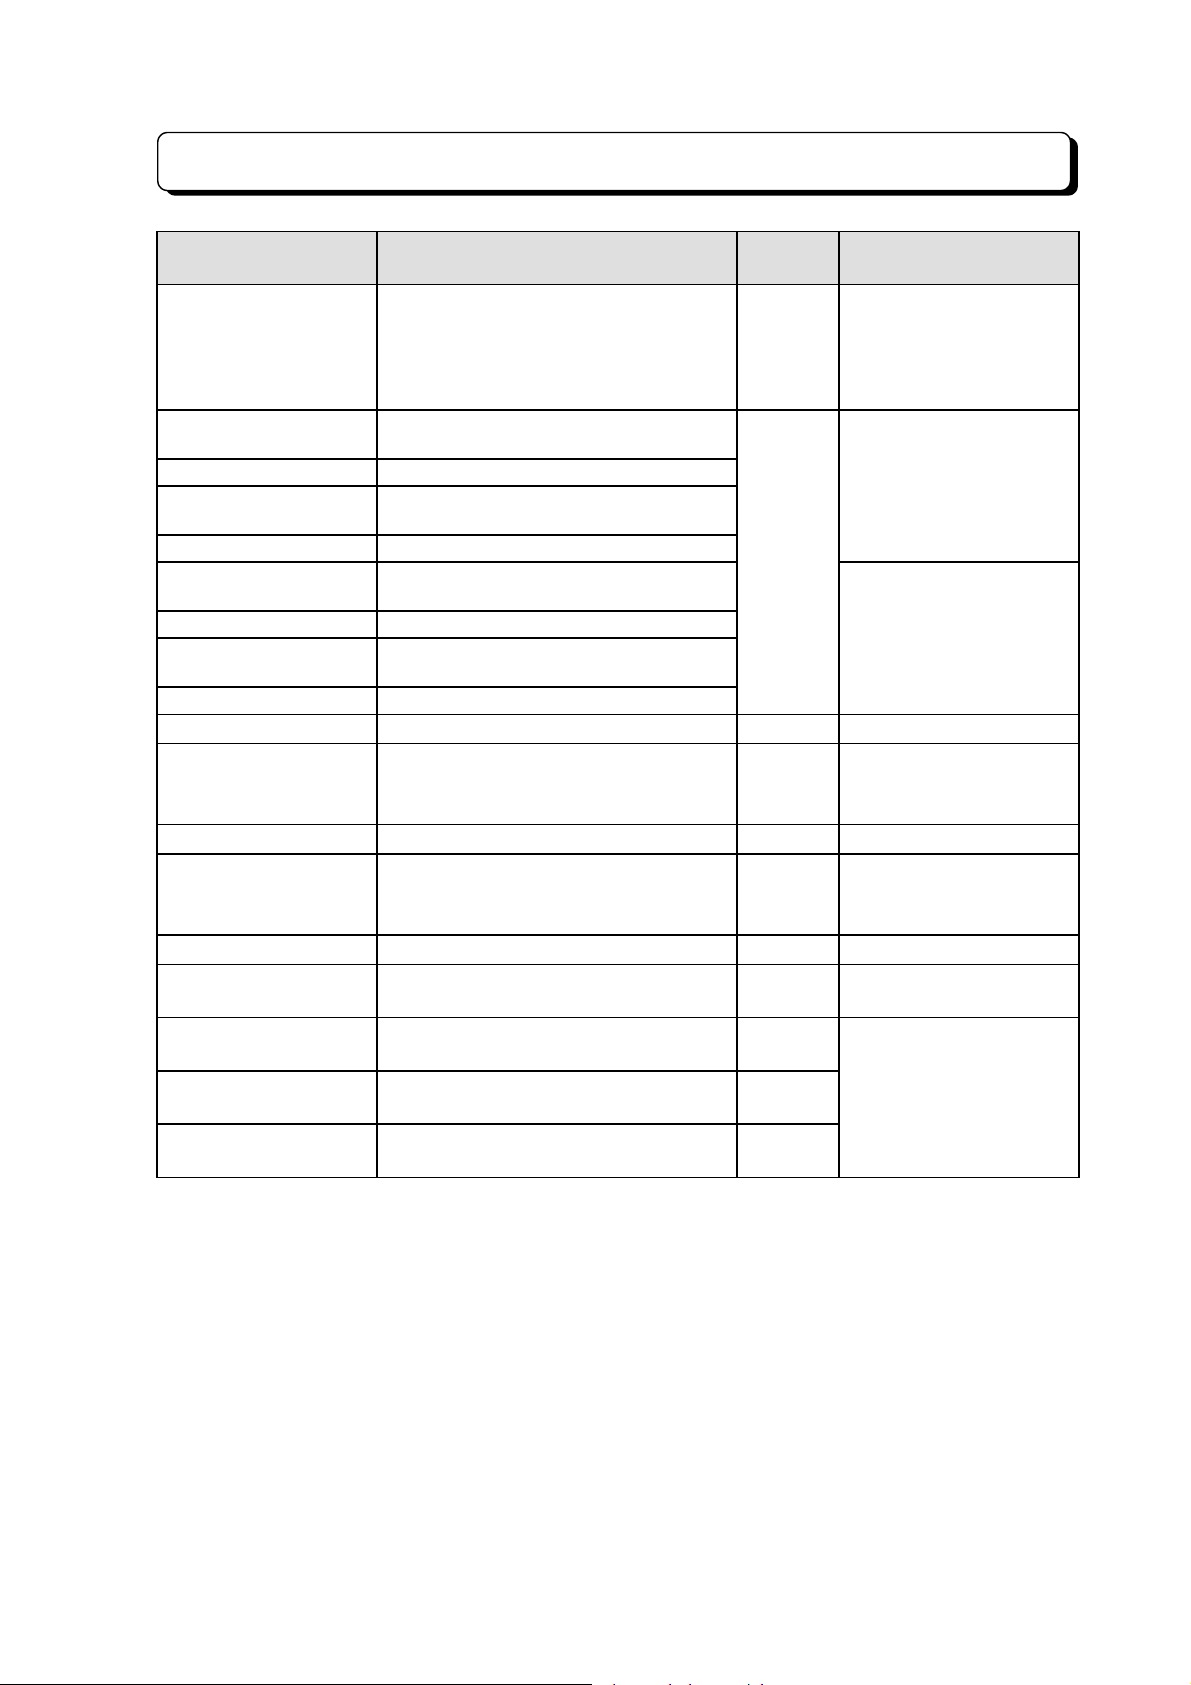
System Configuration (TX-Z 308)
Name Description
NX.E-308M TXZ ME TX-Z 308 Main Equipment 1
NX.E-6TD TXZ KTS 6 Line keys, standard type Key
Telephone
NX.E-6TXD TXZ KTS 6 Line keys, display type Key Telephone
NX.E-12TD TXZ KTS 12 Line keys, standard type Key
Telephone
NX.E-12TXD TXZ KTS 12 Line keys, display type Key Telephone
NX.E-6BTD TXZ KTS 6 Line keys, standard type Key
Telephone
NX.E-6BTXD TXZ KTS 6 Line keys, display type Key Telephone
NX.E-12BTD TXZ KTS 12 Line keys, standard type Key
Telephone
NX.E-12BTXD TXZ KTS 12 Line keys, display type Key Telephone
NX7E-3SMDR-A1 SMDR interface card 1
Doorphone I/F, relay contacts, EXMOH
NX7E-3DHEXU-A1
NX7E-3FAXU-A1 FAX Transfer /DUD Interface Card 1
NX7E-3CIDU-A1 Caller-ID Interface Card 1
NT-S-D6 2-wire doorphone box 2
DX2E-32i/NX7E
BATTERY BOX
NX.E TXZ W.M.K Wall-mount bracket As
NX.E TXZ
ABB.CARD SET
DX.E
ABB.CARD SET
input, EXP output
External backup battery box 1
Pull-out type abbreviated dial number
card (20 pcs)
Stand type abbreviated dial number card
(20 pcs)
Quantity
/System
1 to 7
1
needed
As
needed
As
needed
Remarks
CPU, Power Supply,
battery charger, 3-Trunk/8extension interface, ringer,
1 PF transfer circuit
included.
1st Model.
Modular station cable
included.
2nd Model.
Modular station cable
included.
Note 2
Note 2
Music source is required
for EXMOH.
Note 2
Note 2
Complied with Bellcore
Spec.
NP2.6 or equivalent
batteries are required.
1 pce. per key telephone.
Note 1:
Note 2:
The above list shows composition of a system with full capacity.
A maximum of 2 out of these 4 optional cards can be installed in TX-Z 308 Main
Equipment.
<Abbreviat ions used>
EXMOH: External Music On Hold
EXP: External Paging
KTS: Key Telephone Set
ME: Main Equipment
SMDR: Station Message Detail Recording
SLT: Single Line Telephone
DUD: Direct Universal Dialing
¾ 2-5 ¾
Page 12
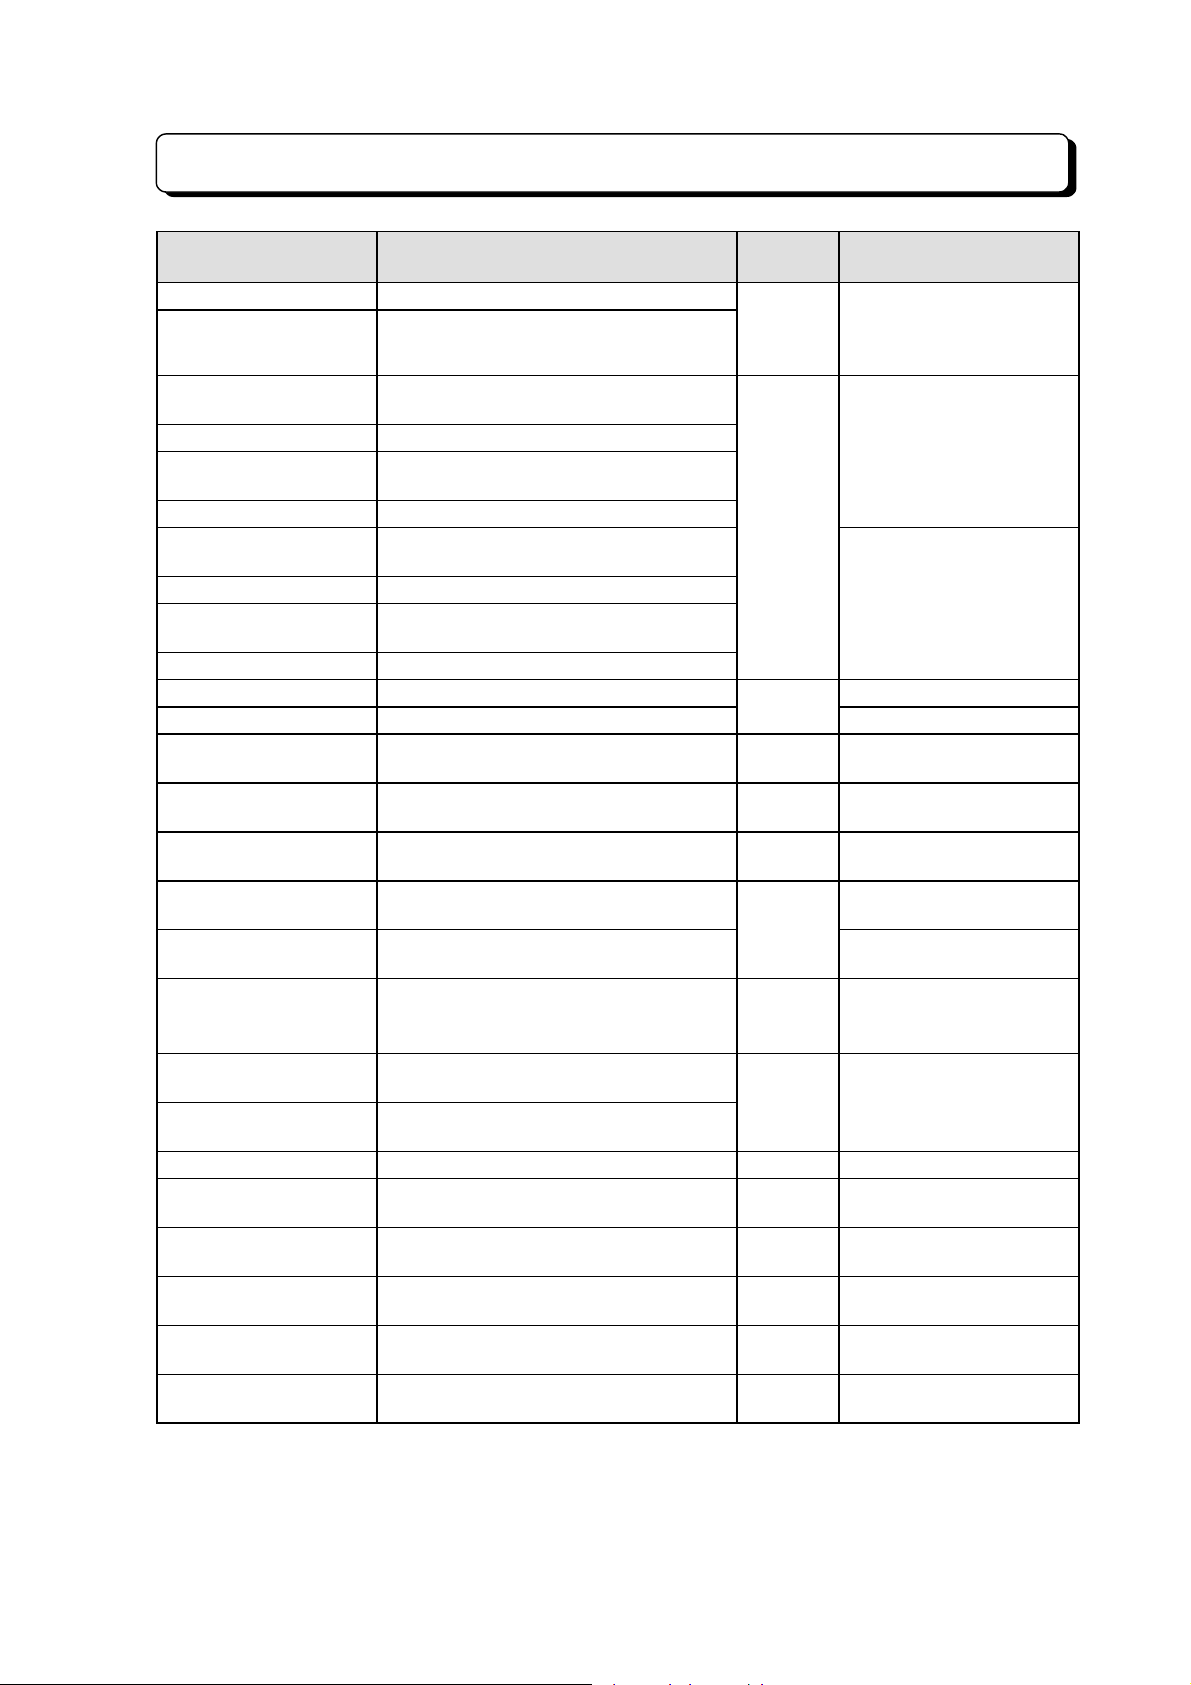
System Configuration (TX-Z 824)
Name Description
NX.E-824M TXZ ME(1) TX-Z 824 Main Equipment for 100V
NX.E-824M TXZ ME(2) TX-Z 824 Main Equipment for 200V
NX.E-6TD TXZ KTS
NX.E-6TXD TXZ KTS 6 Line keys, display type Key Telephone
NX.E-12TD TXZ KTS
NX.E-12TXD TXZ KTS 12 Line keys, display type Key Telephone
NX.E-6BTD TXZ KTS
NX.E-6BTXD TXZ KTS 6 Line keys, display type Key Telephone
NX.E-12BTD TXZ KTS
NX.E-12BTXD TXZ KTS 12 Line keys, display type Key Telephone
NX7E-208E-A1 2-Trunk/8-extension card
NX7E-008E-A1 8-extension card
NX7E-4PFU-A1 4 PF transfer card 1
NX7E-8DHEXU-A1
NX7E-8RGU-A1 Ringer unit for Single Line Telephone 1
NX7E-8SMDR-A1 SMDR interface card
NX7E-8SMCID-A1 Caller-ID/SMDR interface card
NX7E-8CID ADAPTOR Caller-ID adapter 1
NX.E-24DL TXZ DLS
NX.E-24BDL TXZ DLS
NT-S-D6 2-wire doorphone box 2 8DHEXU is required.
NVM-2 Model 1
NVM-2 Model 2
NVM-22
Voice Mail I/F Voice Mail Interface Unit
DX2E-32i/NX7E
BATTERY BOX
6 Line keys, standard type Key
Telephone
12 Line keys, standard type Key
Telephone
6 Line keys, standard type Key
Telephone
12 Line keys, standard type Key
Telephone
Doorphone I/F, relay contacts
EXMOH/BGM input, EXP output
24 key DLS Console for 1st Model Key
Telephone (used as DSS Console)
24 key DLS Console for 2nd Model Key
Telephone (used as DSS Console)
Voice Mail with 2 ports, 2 hour voice
storage, 50 mailboxes.
Voice Mail with 4 ports, 4 hour voice
storage, 50 mailboxes.
Voice Mail with 2-4 ports, 25 hour voice
storage, 50-100 mailboxes.
External backup battery box 1
Quantity
/System
1
24
2
1
1
3
As
needed
As
needed
As
needed
As
needed
Remarks
CPU, Power Supply,
battery charger, and 4Trunk/8-extension
interface included.
1st Model.
Modular station cable
included.
2nd Model.
Modular station cable
included.
4 power failure transfer
circuits for SLT.
Music sources are required
for EXMOH, BGM.
1 pce. for a system when
SLT is connected.
Needed to use SMDR
printer.
Needed to use CallerID/SMDR
1 set for 8 Trunk lines
Complied with Bellcore
Spec.
Connected to display type
key telephone.
1 Voice Mail I/F is required
for 2 ports.
1 Voice Mail I/F is required
for 2 ports.
1 Voice Mail I/F is required
per port.
Required for VM
connection
NP2.6 or equivalent
batteries are required.
¾ 2-6 ¾
Page 13

System Configuration (TX-Z 824)
Name Description
NX.E TXZ W.M.K Wall-mount bracket
NX.E TXZ
ABB. CARD SET
DX.E
ABB. CARD SET
NOTE:
The above list shows composition of a system with full capacity.
Pull-out type abbreviated dial number
card (20 pcs)
Stand type abbreviated dial number card
(20 pcs)
Quantity
/System
As
needed
As
needed
As
needed
Remarks
1 pce. per key telephone.
¾ 2-7 ¾
Page 14
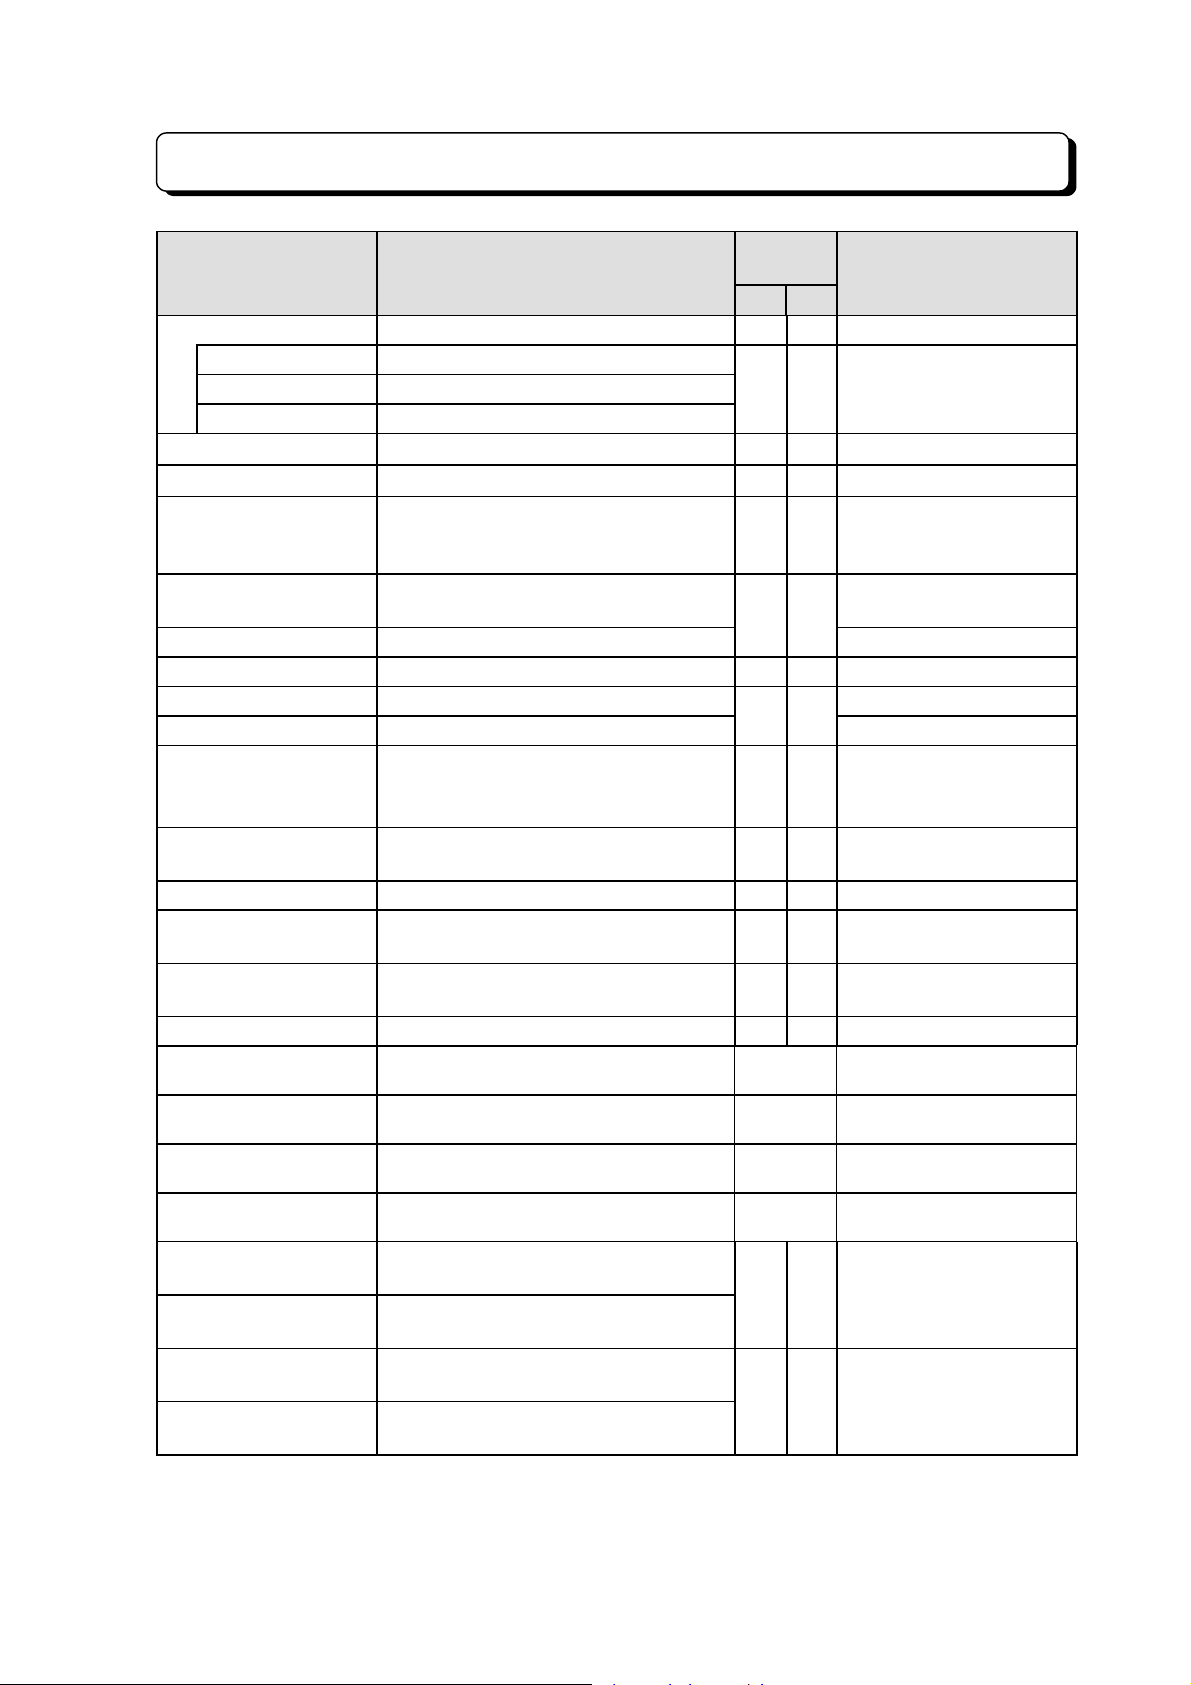
System Configuration (TX-Z 1232/2464)
Name Description
NX.E-2464M TXZ ME TX-Z 1232/2464 Main Equipment 1 1
NX7E-12MB Basic mother board
NX7E-12PS Power supply unit
NX7E-24POWU DC/DC power supply, battery charger
NX7E-24EPMB-A1 Expansion mother board for 2464
NX7E-12PS Expansion power supply unit for 2464
NX7E-24CPU-B1 System main processing unit 1 1
NX7E-408U-A1 4-Trunk/8-extension card
NX7E-008U-A1 8-extension card
NX7E-24DHU-A1 2-doorphone I/F card 1 1 Daughter board for 24CPU
NX7E-24SMDR-A1 SMDR interface card
NX7E-24SMCID-A1 Caller-ID/SMDR interface card
NX7E-8CID Adapter Caller-ID adapter 2 3
NX7E-12PFU-A1 12-Trunk line PF transfer card 1 1
NX7E-24VAU-A1 Voice announce unit 1 1
NX7E-8RGU-A1 Ringer unit for Single Line Telephone 1 2
DX2E-32i/NX7E
BATTERY BOX
NT-S-D6 2-wire doorphone box 2 2 24DHU is required.
NVM-2 Model 1
NVM-2 Model 2
NVM-22
Voice Mail I/F Voice Mail Interface Unit
NX.E-24DL TXZ DLS
NX.E-24BDL TXZ DLS
NX.E-64D TXZ DSS
NX.E-64BD TXZ DSS
External backup battery box 1 1
Voice Mail with 2 ports, 2 hour voice
storage, 50 mailboxes.
Voice Mail with 4 ports, 4 hour voice
storage, 50 mailboxes.
Voice Mail with 2-4 ports, 25 hour voice
storage, 50-100 mailboxes.
24 key DLS console for 1st Model Key
Telephone
24 key DLS console for 2nd Model Key
Telephone
64 key DSS console for 1st Model Key
Telephone
64 key DSS console for 2nd Model Key
Telephone
Quantity
/System
1232 2464
1
-
1
-
48
11
As
needed
As
needed
As
needed
As
needed
816
12
Remarks
Factory equipped units
BGM and EXMOH input, 2
relay contacts, and CallerID software included.
Can not be installed to Slot
No.4 and No.8.
Needed to use Caller-ID
1 set for 8 Trunk lines
Complied with Bellcore
Spec.
12 power failure transfer
circuits for SLT.
Common unit with TX-Z
824
NP2.6 or equivalent
batteries are required.
1 Voice Mail I/F is required
for 2 ports.
1 Voice Mail I/F is required
for 2 ports.
1 Voice Mail I/F is required
per port.
Required for VM
connection
Connected to display type
Key Telephone
Included in the extension
quantity
¾ 2-8 ¾
Page 15
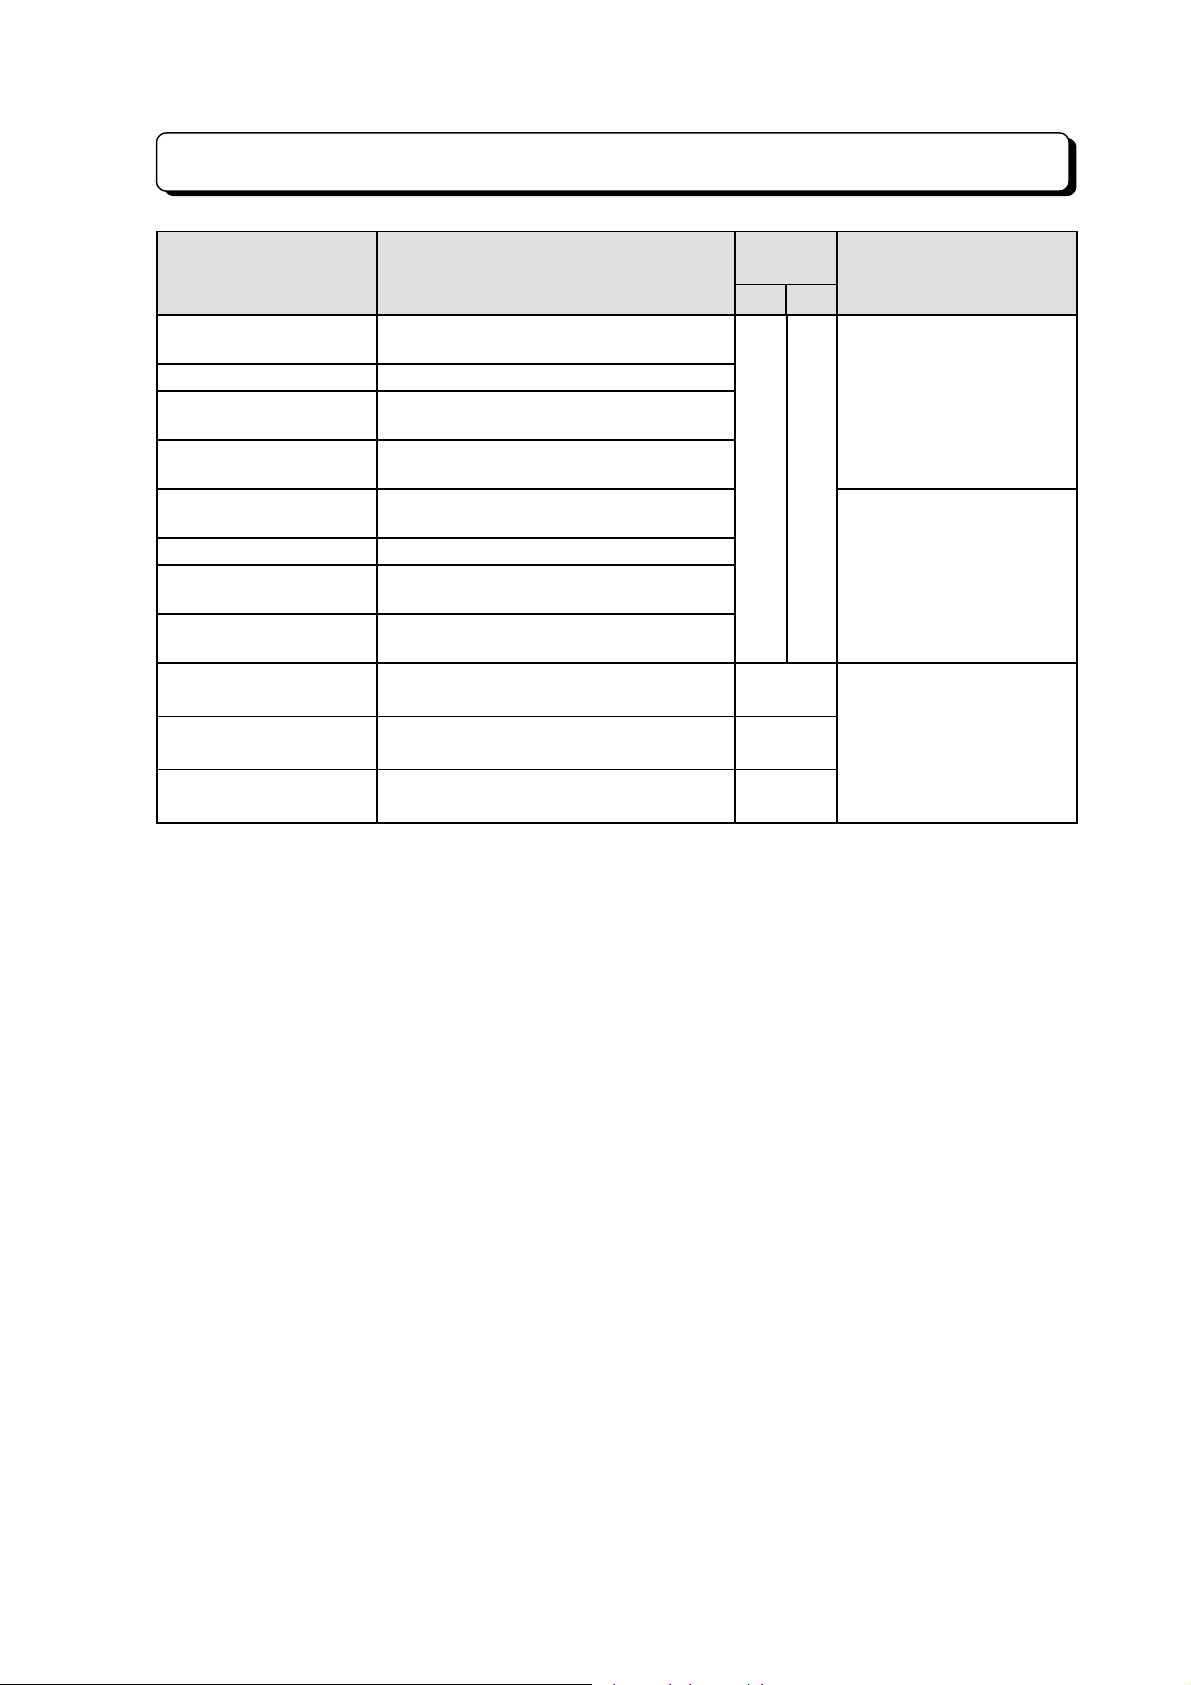
System Configuration (TX-Z 1232/2464)
Name Description
NX.E-6TD TXZ KTS
NX.E-6TXD TXZ KTS 6 Line keys, display type Key Telephone
NX.E-12TD TXZ KTS
NX.E-12TXD TXZ KTS
NX.E-6BTD TXZ KTS
NX.E-6BTXD TXZ KTS 6 Line keys, display type Key Telephone
NX.E-12BTD TXZ KTS
NX.E-12BTXD TXZ KTS
NX.E TXZ W.M.K Wall-mount bracket
NX.E TXZ
ABB. CARD SET
DX.E
ABB. CARD SET
6 Line keys, standard type Key
Telephone
12 Line keys, standard type Key
Telephone
12 Line keys, display type Key
Telephone
6 Line keys, standard type Key
Telephone
12 Line keys, standard type Key
Telephone
12 Line keys, display type Key
Telephone
Pull-out type abbreviated dial number
card (20 pcs)
Stand type abbreviated dial number card
(20 pcs)
Quantity
/System
1232 2464
32 64
As
needed
As
needed
As
needed
Remarks
1st Model.
Modular station cable
included.
2nd Model.
Modular station cable
included.
1 pce. per key telephone.
¾ 2-9 ¾
Page 16
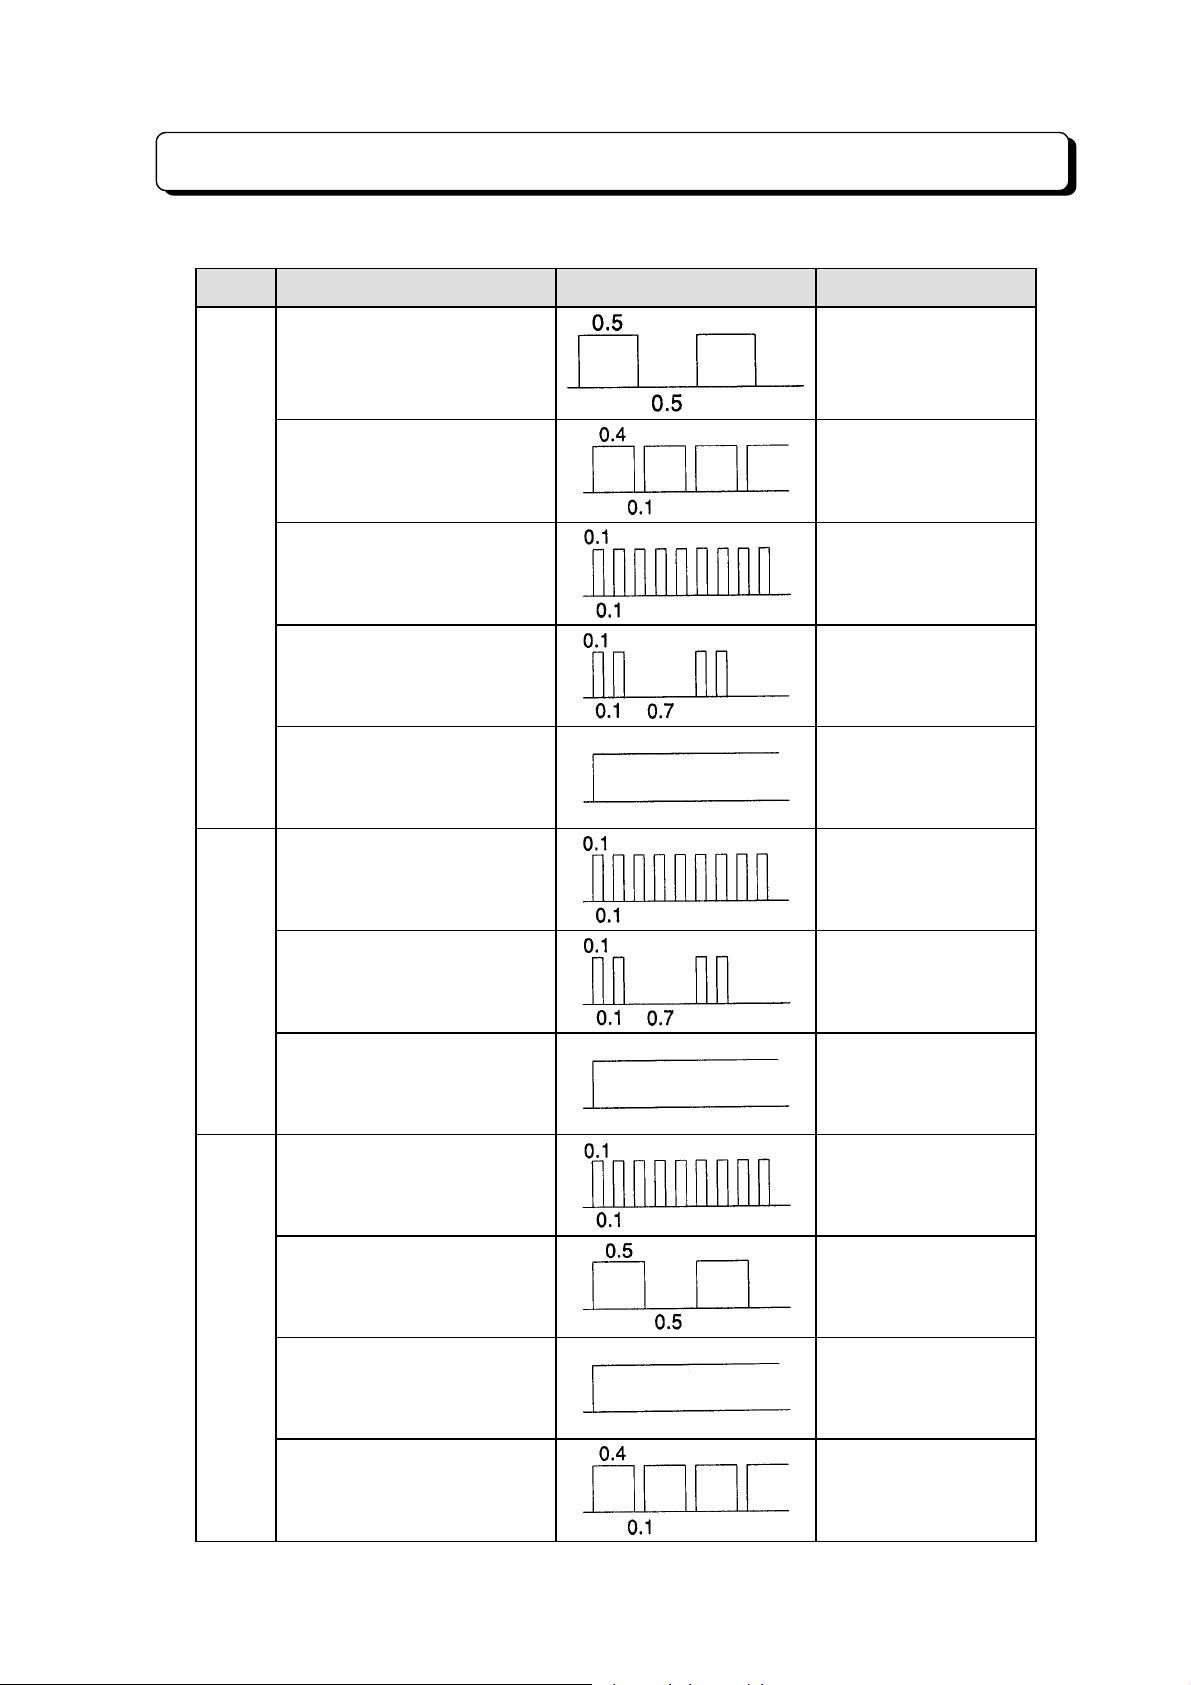
1. LED Indication (KTS)
LED Category Interval (sec) Location
Trunk Line Incoming Call 60 IPM Flash
Trunk Line Hold 120 IPM Flash
Visual Indication
Line
ICM
Trunk Line I-Hold 300 IPM Flutter
Trunk Exclusive Hold 120 IPM Flicker
Trunk Line Busy
Intercom Incoming Call 300 IPM Flutter
Intercom Hold 120 IPM Flicker
Intercom Busy
Steady
Steady
TRFR
Call Forward Transferred
Extension/Follow-Me
Transferred Extension
Call Forward Originating
Extension/Follow-Me
Originating Extension
Night Service
(Manual)
Night Service
(Automatic)
300 IPM Flutter
60 IPM Flash
Steady
120 IPM Flash
¾ 2-10 ¾
Page 17
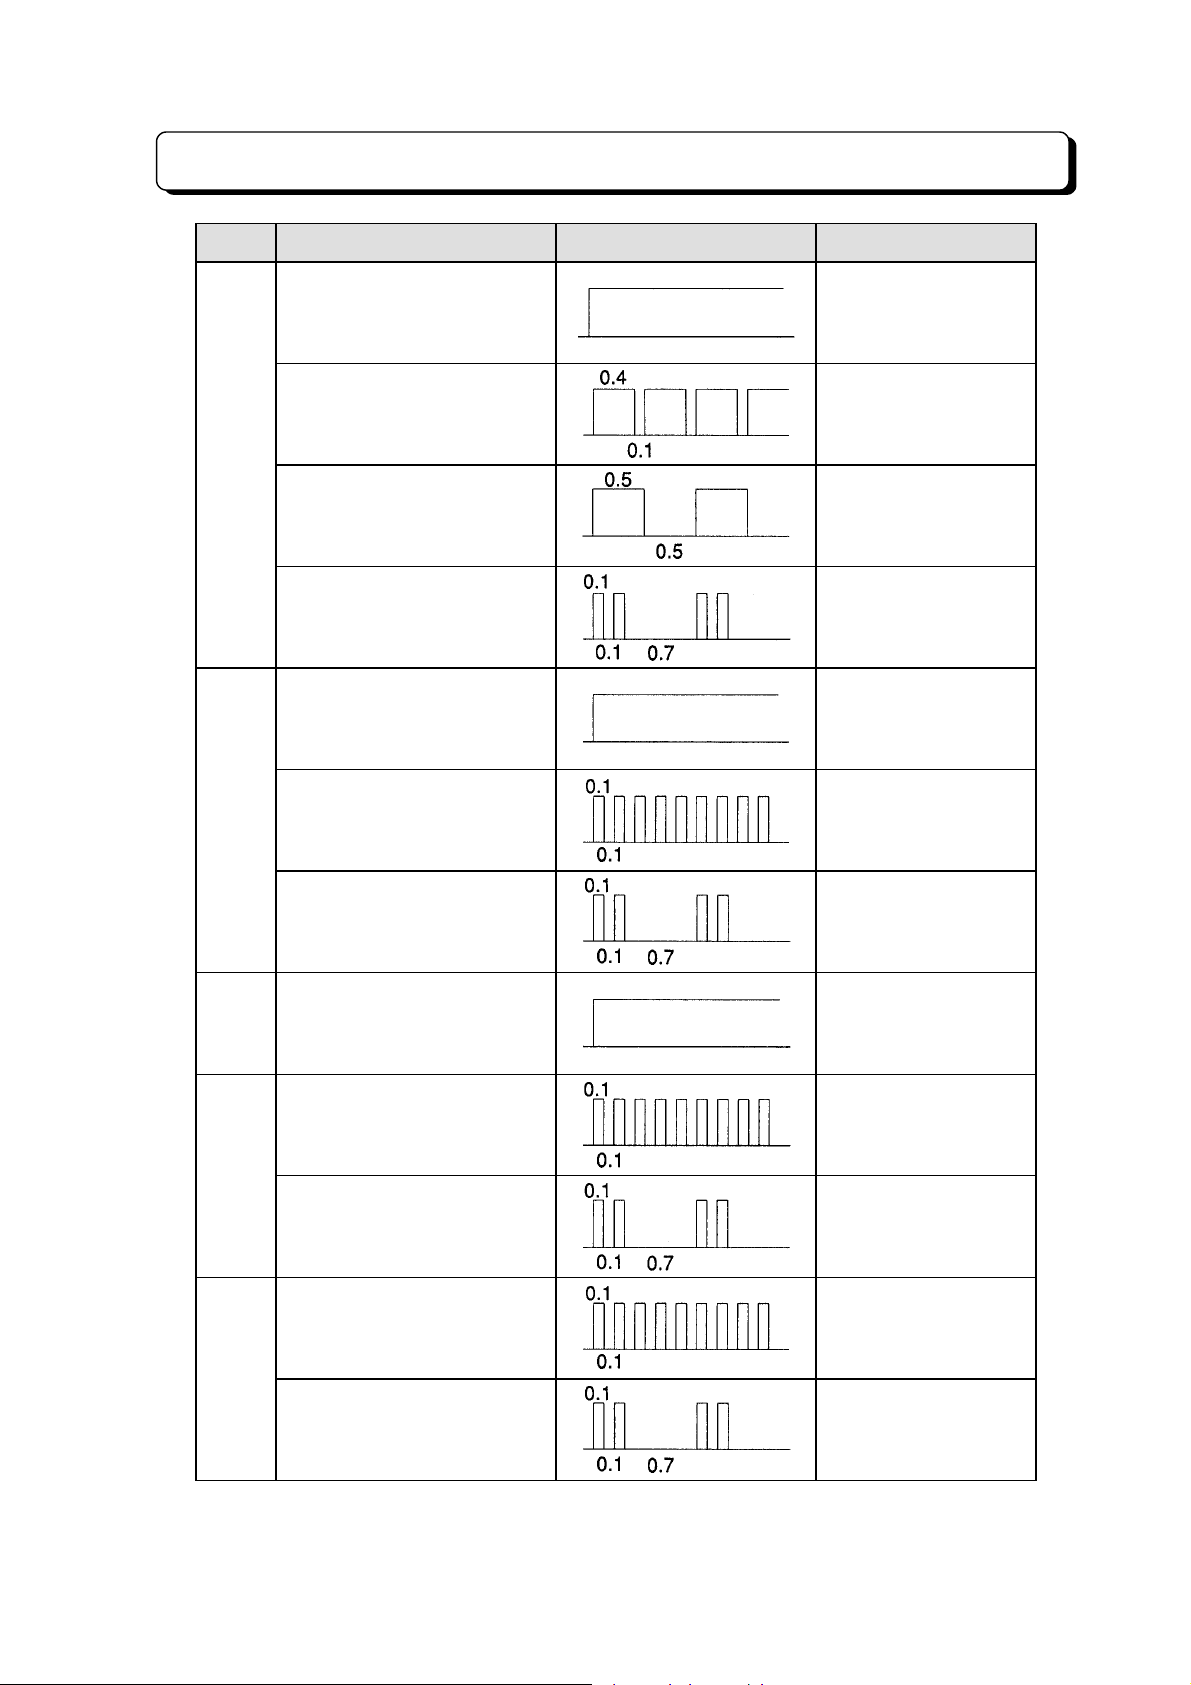
Visual Indication
LED Category Interval (sec) Location
Do Not Disturb Steady
Trunk Line DND 120 IPM Flash
DND
Executive Call Forward
Transferred Extension
DND Message in Active
Microphone Off Steady
Monitored Extension
(BTD, BTXD TEL)
Monitoring Extension
(BTD, BTXD TEL)
SPK Speaker On Steady
60 IPM Flash
120 IPM Flicker
300 IPM FlutterMIC
120 IPM Flicker
MW
MON
Message Waiting Received
(TD, TXD TEL)
Message Waiting
Originated
(TD, TXD TEL)
Monitored Extension
(TD, TXD TEL)
Monitoring Extension
(TD, TXD TEL)
120 IPM Flicker
120 IPM Flicker
300 IPM Flutter
120 IPM Flicker
¾ 2-11 ¾
Page 18
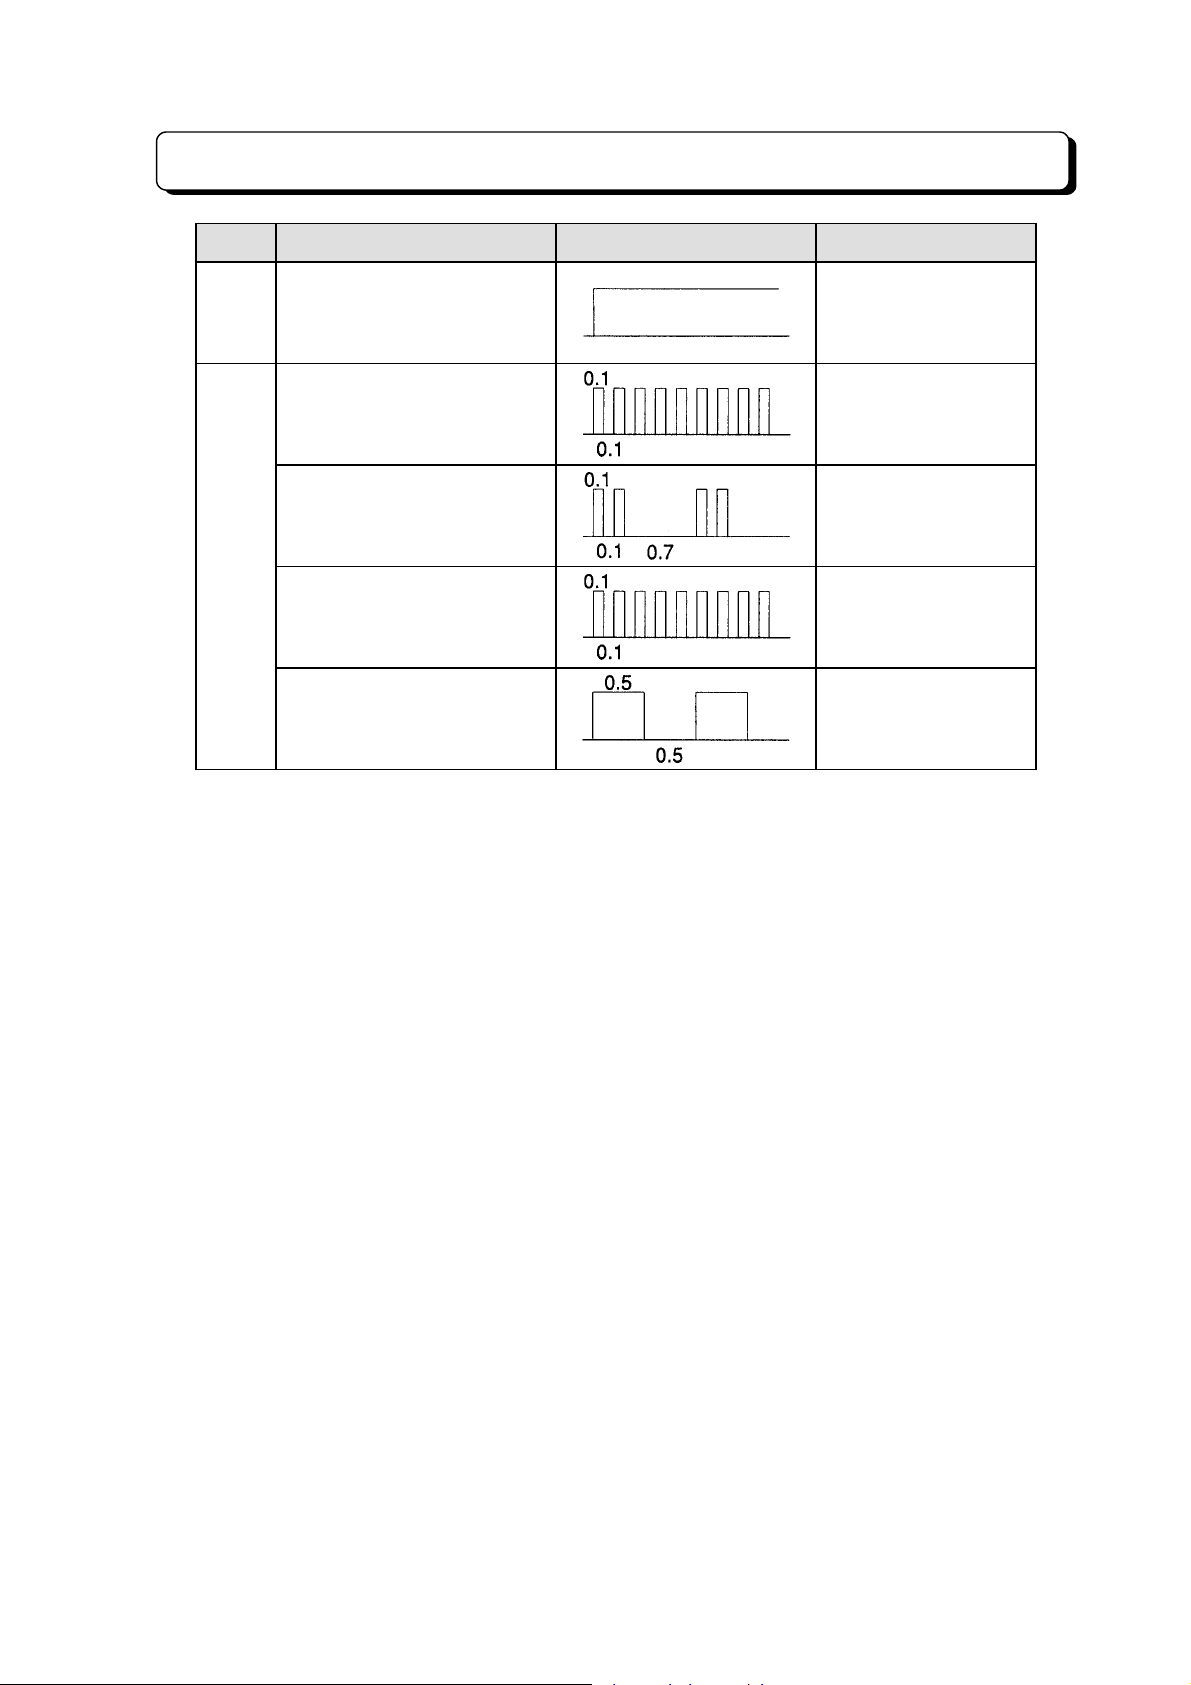
Visual Indication
LED Category Interval (sec) Location
DSS
(BLF)
Indica
-tor
Extension Busy/Intercom
Incoming/DND Extension
Message Waiting Received
(BTD, BTXD TEL)
Message Waiting
Originated
(BTD, BTXD TEL)
Intercom Line Incoming
Call
(BTD, BTXD TEL)
Trunk Line Incoming Call
(BTD, BTXD TEL)
Steady
120 IPM Flicker
120 IPM Flicker
300 IPM Flutter
60 IPM Flash
¾ 2-12 ¾
Page 19
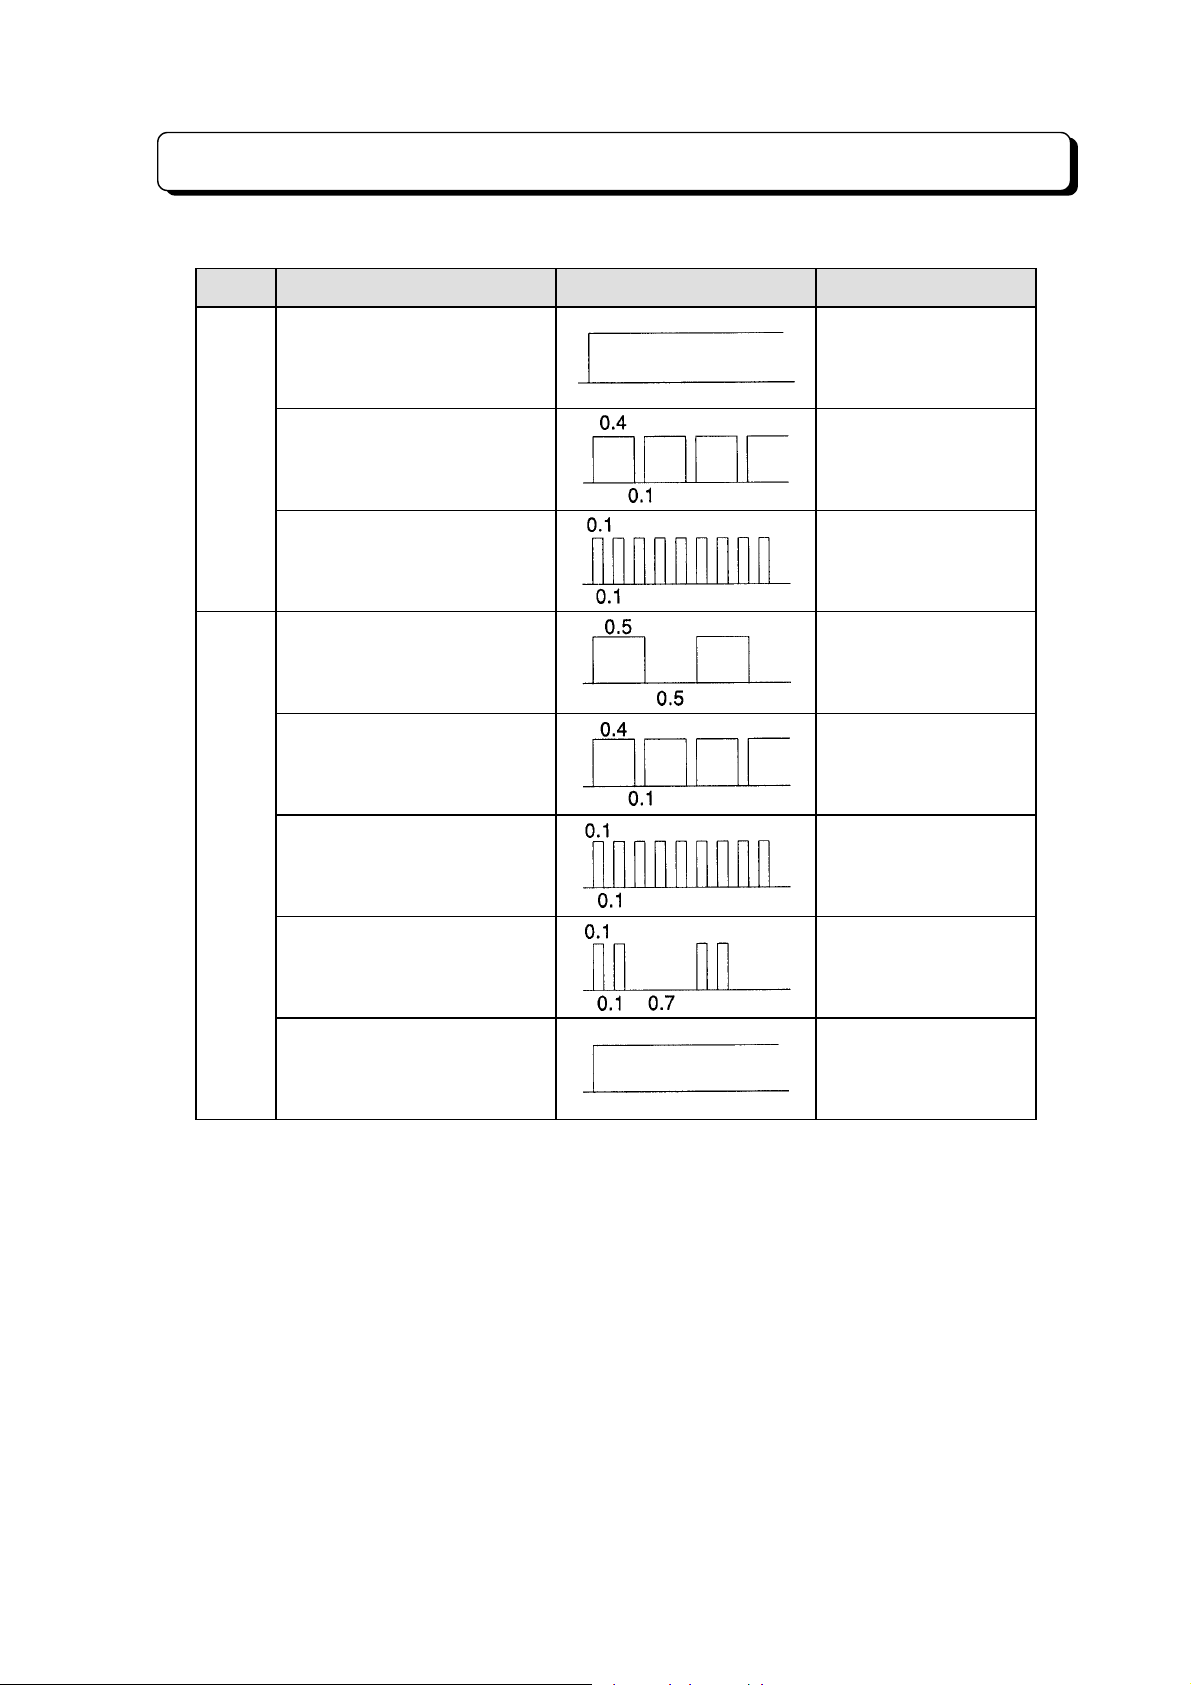
2. LED Indication (DLS)
LED Category Interval (sec) Location
Extension Busy St eady
Visual Indication
DLS
(824)
DLS
(1232)
(2464)
Intercom Incoming Called
Extension
DND Extension
Trunk Line Incoming Call 60 IPM Flash
Trunk Line Hold 120 IPM Flash
Trunk Line I-Hold 300 IPM Flutter
Trunk Line Exclusive Hold 120 IPM Flicker
120 IPM Flash
300 IPM Flutter
Trunk Line Busy
Steady
¾ 2-13 ¾
Page 20
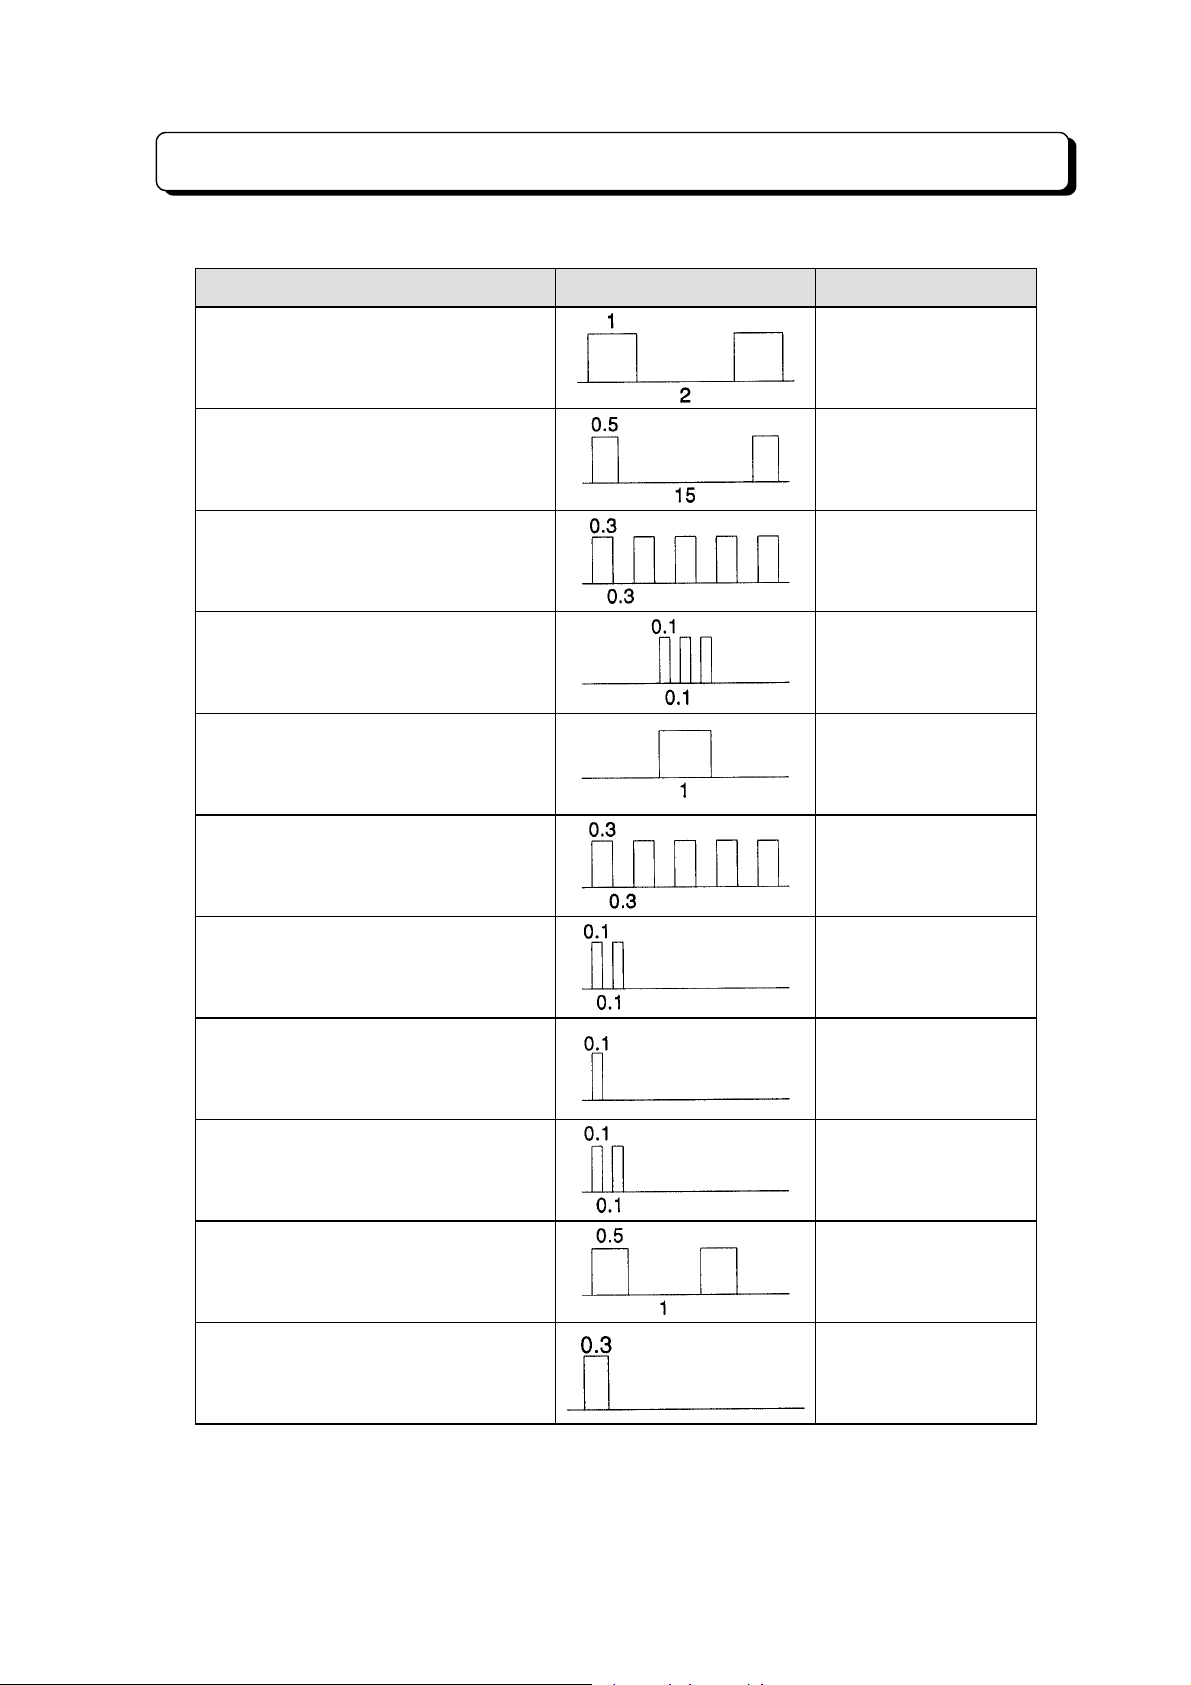
Audible Indication
1. Tone Interval Indication ( KTS)
Category Interval (sec) Location
Trunk Line Incoming Call 600/450/16 Hz FM
Trunk Line Off-Hook Signal Tone
(Speaker Busy)
Trunk Line Automatic Recall 600/450/16 Hz FM
Three-Minute Tone 600 Hz 3 Splash
Toll Restriction and Each Password
Entry Failed
Line Available in Trunk Queuing 600/450/16 Hz FM
Paging/Doorphone Splash Tone 800 Hz 2 Splash
600/450/16 Hz FM
600 Hz 1 Splash
Intercom Call (Voice) Splash Tone
(MIC ON)
Intercom Call (Voice) Splash Tone
(MIC OFF)
Intercom Signal Call 450/16 Hz AM
Intercom Off-Hook Signaling Tone 450/16 Hz AM
¾ 2-14 ¾
800 Hz 1 Splash
800 Hz 2 Splash
Page 21
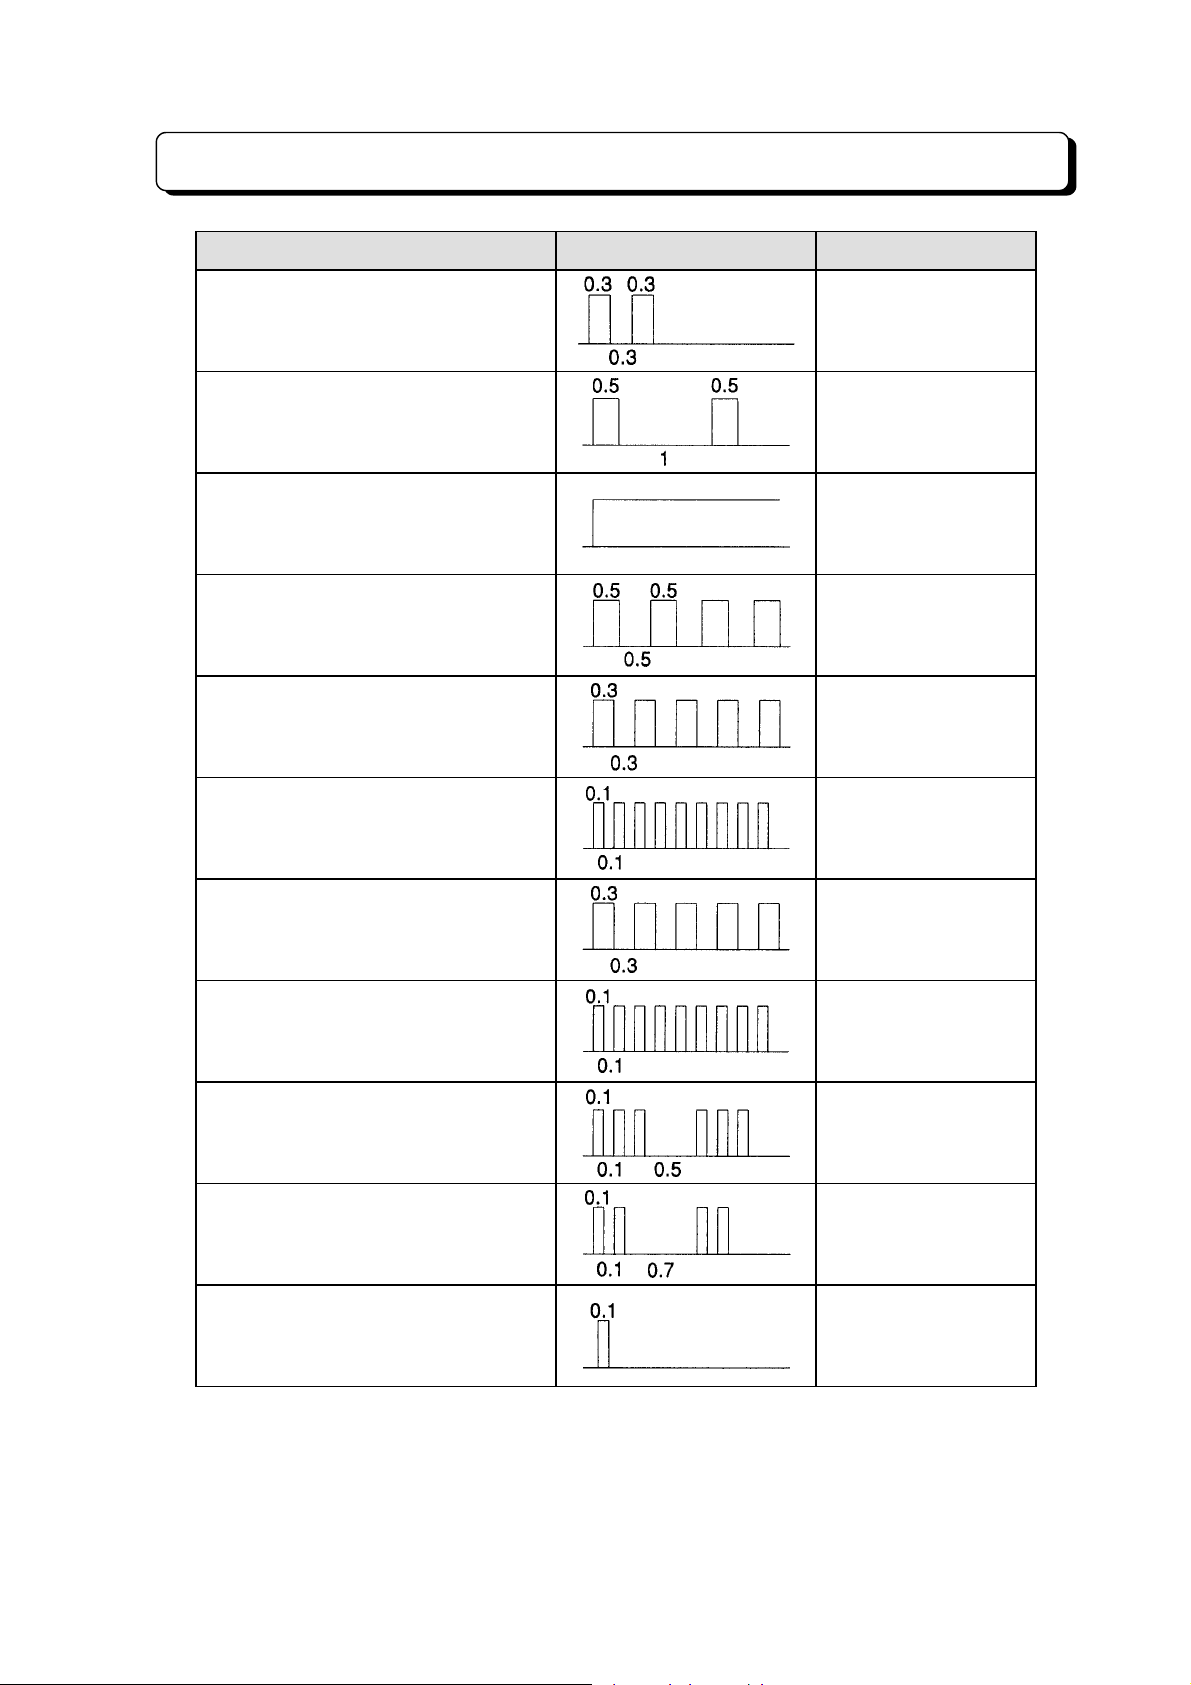
Audible Indication
Category Interval (sec) Location
Intercom Off-Hook Signaling Tone
(DSS Console)
Intercom Ring-Back Tone 450/16 Hz AM
Intercom Dial Tone 400 Hz
Intercom Busy Tone 400 Hz
Intercom DND Tone 400 Hz
Intercom Unobtainable Tone 400 Hz
450/16 Hz AM
Intercom Callback Recall 600/450/16 Hz FM
Emergency Alarm 1
Emergency Alarm 2
Alarm Clock 600 Hz
Call Forward/Follow-Me Accepted 600 Hz 1 Splash
600 Hz (TEL)
800 Hz (EX-SPK)
600 Hz (TEL)
800 Hz (EX-SPK)
¾ 2-15 ¾
Page 22
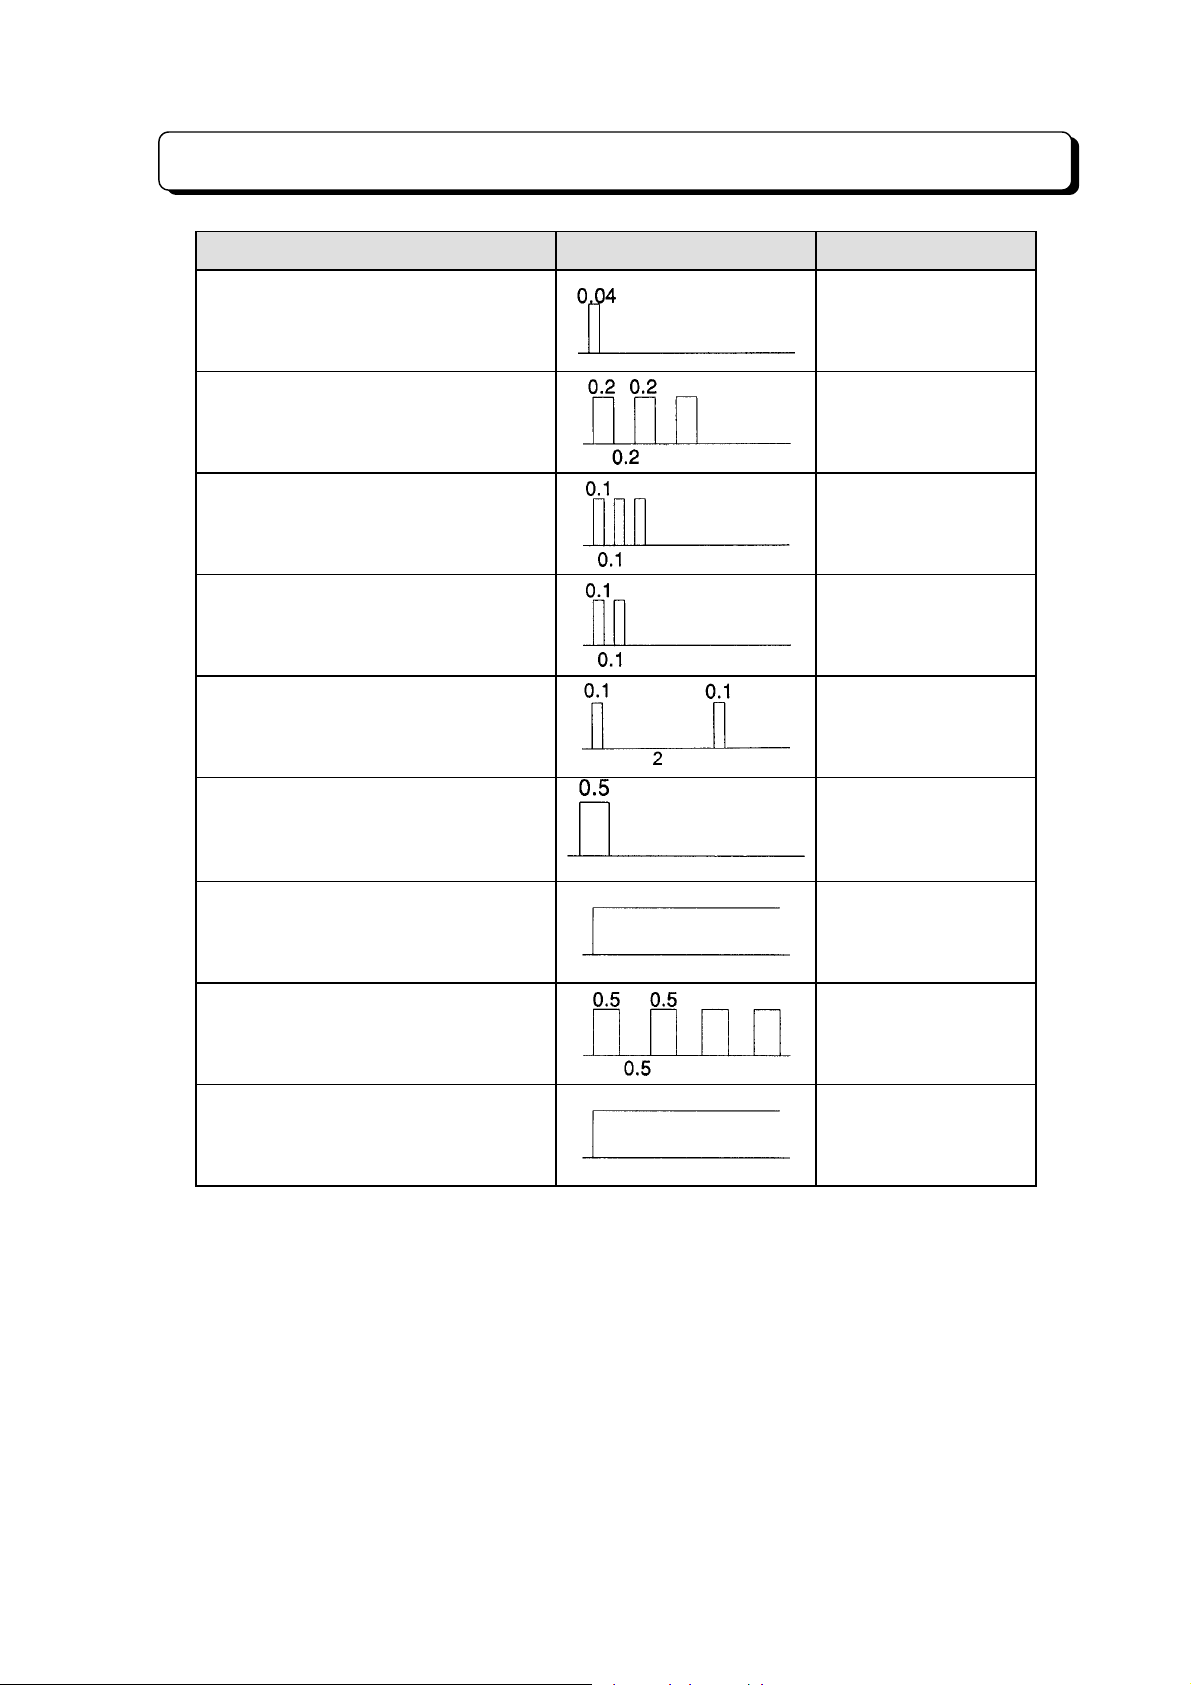
Audible Indication
Category Interval (sec) Location
Key Touch Tone 600 Hz 1 Splash
Call Forward/Follow-Me Denied
(Toll Restriction/Each Error Tone)
Warning Tone when Dial Block is
Set (No-LCD(TD, BTD) TEL)
Automatic Repeat Dial Waiting Tone 600 Hz 2 Splash
Break-In Notification Tone 400 Hz
Message Playback Confirmation
Tone (TX-Z 1232/2464)
KTS Local Dial Tone 400 Hz
600 Hz 3 Splash
600 Hz 3 Splash
400 Hz
KTS Local Busy Tone 400 Hz
Long Conversation Cutoff Warning
Tone
¾ 2-16 ¾
400 Hz
Page 23
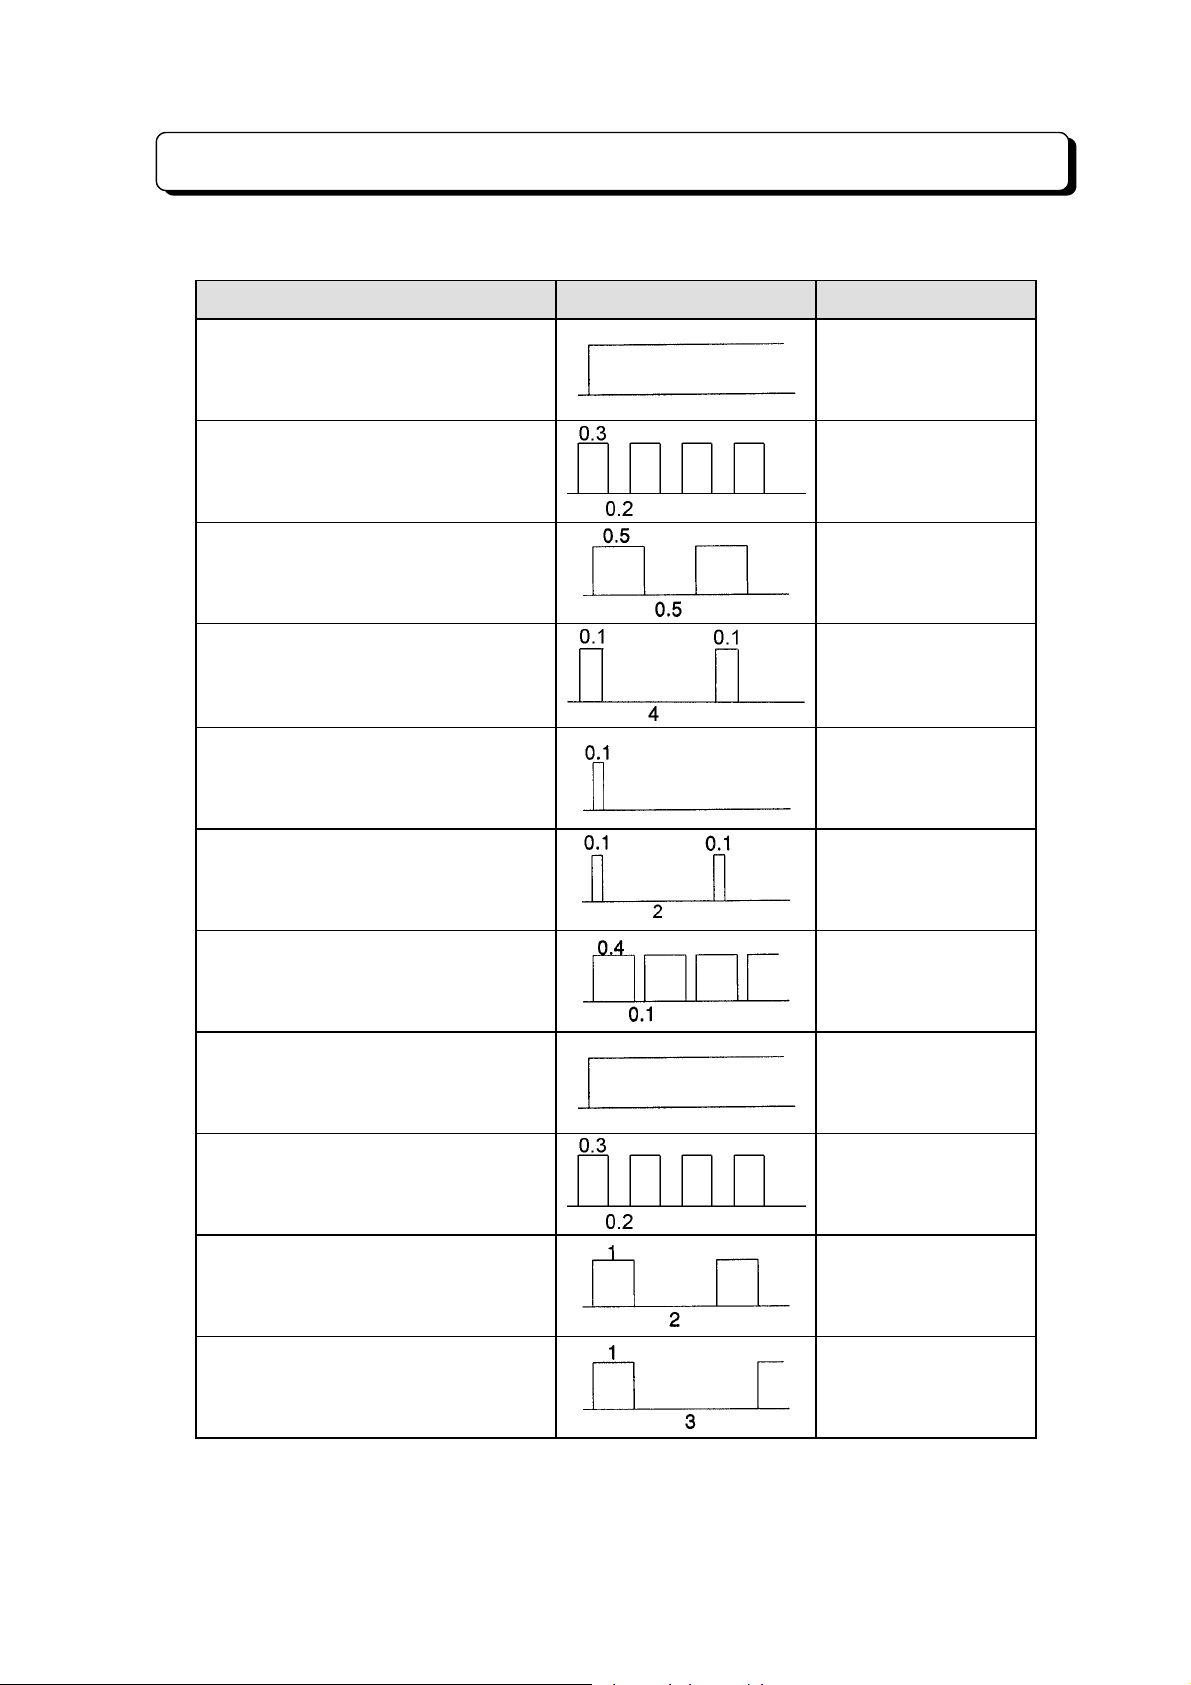
Audible Indication
2. Tone Interval Indication ( SLT)
Category Interval (sec) Location
SLT Local Dial Tone 1
SLT Local Dial Tone 2
SLT Local Busy tone 400 Hz
Hold Transfer to Busy SLT 400 Hz
Break-In Start Tone 400 Hz
Break-In Notification Tone 400 Hz
400 Hz
(#78-B=0)
400 Hz
(#78-B=1)
MW SLT Dial Tone
(When SLT is Set MW)
DISA SLT Dial Tone 1
DISA SLT Dial Tone 2
SLT Ringer 1
(Trunk Calls/Doorphone Calls)
(TX-Z 308/824)
SLT Ringer 1
Trunk Calls/Doorphone Calls)
(TX-Z 1232/2464)
400 Hz
400 Hz
(#78-B=0)
400 Hz
(#78-B=1)
16 Hz
16 Hz
¾ 2-17 ¾
Page 24
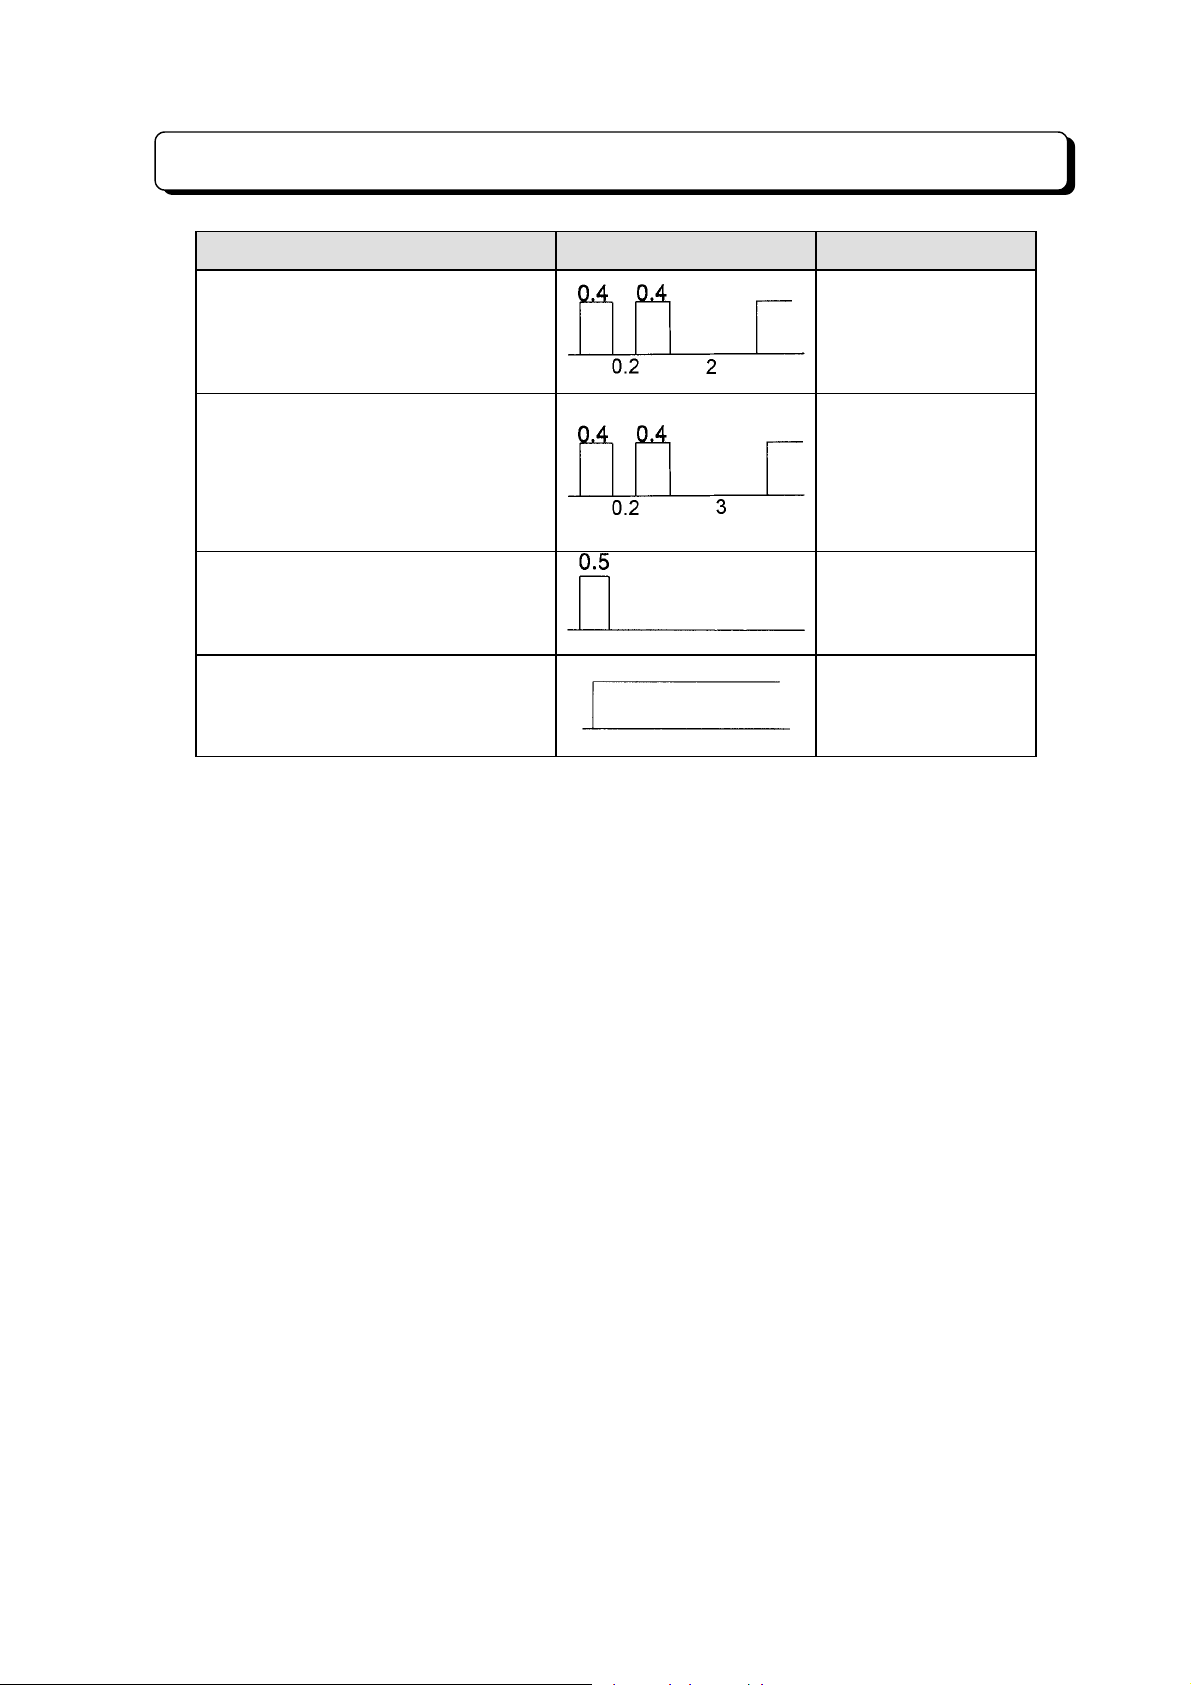
SLT Ringer 2
Audible Indication
Category Interval (sec) Location
(Intercom Calls/ Hold Transfer/
Recall)
(TX-Z 308/824)
SLT Ringer 2
(Intercom Calls/Hold Transfer/
Recall)
(TX-Z 1232/2464)
Message Playback Confirmation
Tone (TX-Z 1232/2464)
Long Conversation Cutoff Warning
Tone
16 Hz
16 Hz
400 Hz
400 Hz
¾ 2-18 ¾
Page 25

PART 3
SYSTEM INSTALLATION
Precaution
3-1 Installation of TX-Z 308 System
3-2 Installation of TX-Z 824 System
3-3 Installation of TX-Z 1232/2464 System
Page 26

Precaution
Please read the following notes concerning installation and connection before installing the system.
Ÿ Never attempt to insert wires, pins, etc. into the vents or other holes of this unit.
Ÿ If there is any trouble, discon nect the unit from the tel ephone line. Plug the telep hone direct ly to the
telephone line. If the telephone operates properly, do not reconnect the unit to the line until the trouble
has been repaired. If the telephone does not operate pr operly, the chanc es are that the tr ouble is in
the telephone system, and not in the unit.
Ÿ Do not use benzine, thinner, or the l ike, or any abrasive p owder to clean the cabinet. W ipe it with a
soft cloth.
WARNING
WHEN A FAILURE OCCURS WHICH RESULTS IN THE INTERNAL PARTS BECOMING
ACCESSIBLE, DISCONNECT THE POWER SUPPLY CORD IMMEDIATELY AND RETURN
THIS UNIT TO YOUR DEALER.
DISCONNECT THE TELECOM CONNECTION BEFORE DISCONNECTING THE POWER
CONNECTION PRIOR TO RELOCATING THE EQUIPMENT, AND RECONNECT THE
POWER FIRST.
THIS UNIT IS EQUIPPED W ITH AN EARTHING CONTACT PLUG FOR SAF ETY REASONS
THIS PLUG MUST ONLY BE CONNECTED TO AN EARNING CONTACT SOCKET WHICH
HAS BEEN INSTALLED ACCORDING TO REGULATIONS.
THE POWER SOCKET WALL OUTLET SHOULD BE LOCATED NEAR THIS EQUIPMENT
AND BE EASILY ACCESSIBL E.
TO PREVENT FIRE OR SHOCK HAZ ARD, DO NOT EX POSE THIS PROD UCT T O RAIN OR
ANY TYPE OF MOISTURE.
Page 27

Precaution
Safety Installation Instructions
When installing teleph one wiring, bas ic safety prec autions sh ould always be f ollowed to re duce the risk
of fire, electric shock and injury to persons, including the following:
1. Never install telephone wiring during a lightning storm.
2. Never install telephone jacks in wet locations unless the jack is specifically designed for wet
locations.
3. Never touch non-insulated telephone wires or terminals unless the telephone line has been
disconnected at the network interface.
4. Use caution when installing or modifying telephone lines.
Installation Precautions
This set is exclusively made for wall mounting only. Avoid installing in the following places.
(Doing so may result malfunction, noise or discoloration.)
1. In direct sunlight and hot, cold, or humid places. (Temperature range: 0°C-45°C/32°F- 113°F)
2. Sulfuric gases produced in areas where there are thermal springs, etc., may damage the
equipment or contacts.
3. Places in which shocks or vibrations are frequent or strong.
4. Dusty places, or places where water or oil may come into contact with the unit.
5. Near high-frequency generating devices such as sewing machines or electric welders.
6. On or near computers telexes, or other office equipment, as well as microwave ovens or air
conditioners, (It is preferable not to install in the same room with the above equipment.)
7. Install at least 1.8 m (6 feet) from radios and televisions. (both the main unit and a key telephone)
8. Do not obstruct area around the main unit (for reasons of maintenance and inspection - be
especially careful to allow space for cooling above and at the sides of the main unit).
Wiring Precautions
Make sure to keep the following instructions when wiring.
1. Do no t wire the telephon e cable in p arallel with an AC power source, computer, telex, etc. If the
cables are run near those wires, shi eld the cables with metal tubing or use shielded ca bles and
ground the shields.
2. If cables are run on the floor, use protectors or the like to protect the wires where the y may be
stepped on. Avoid wiring under carpets.
3. Avoid using the same power supply outlet for computers, telexes, and other office equipment.
Otherwise, the TX-Z 308's system operation m ay be interrupt ed by the inducti on noise from suc h
equipment.
4. Ple ase use one pair telephon e wire for extension con nection of (telephone) eq uipment such as
standard telephones, answering machines, etc., except key telephones.
5. T he AC cord must be plugged off during wiring. After all the wiring are completed, plug t he AC
cord into an AC outlet.
6. Mis-wiring may cause the system to operate improperly.
7. If an extension does not operat e properly, disconn ect the telephone f rom the extension line and
then connect again, or plug off the AC cord of the system and then on again.
8. The TX-Z 308 is equipped with a 3-wire grounding type plug. This is for safety. If you are unable to
insert the plug into the outlet, contact your electrician to replace your obsolete outlet.
9. Use twisted pair cable for Trunk line connection.
10.Tr unk Lines should be ins tal le d with lighting protectors. (Ask your dealer)
11.The aerial distribution wiring is not allowed.
Page 28

PART3-1
INSTALLATION OF
TX-Z 308 SYSTEM
Page 29

Table of Contents
Name and Location....................................................................................... 3-1-1
Wall Mounting ............................................................................................... 3-1-1
Opening Front Cover..................................................................................... 3-1-2
Frame Ground Connection ...........................................................................3-1-2
Extension Connection ................................................................................... 3-1-2
Trunk Line Connection..................................................................................3-1-4
Installation of 3SMDR and Printer/PC .......................................................... 3-1-5
Installation of 3DHEXU ................................................................................. 3-1-8
After Wiring.................................................................................................. 3-1-10
24 V DC Battery Supply.............................................................................. 3-1-11
Note: Refer to PART 7 for installation of 3CIDU-A1 and 3FAXU-A1.
Page 30
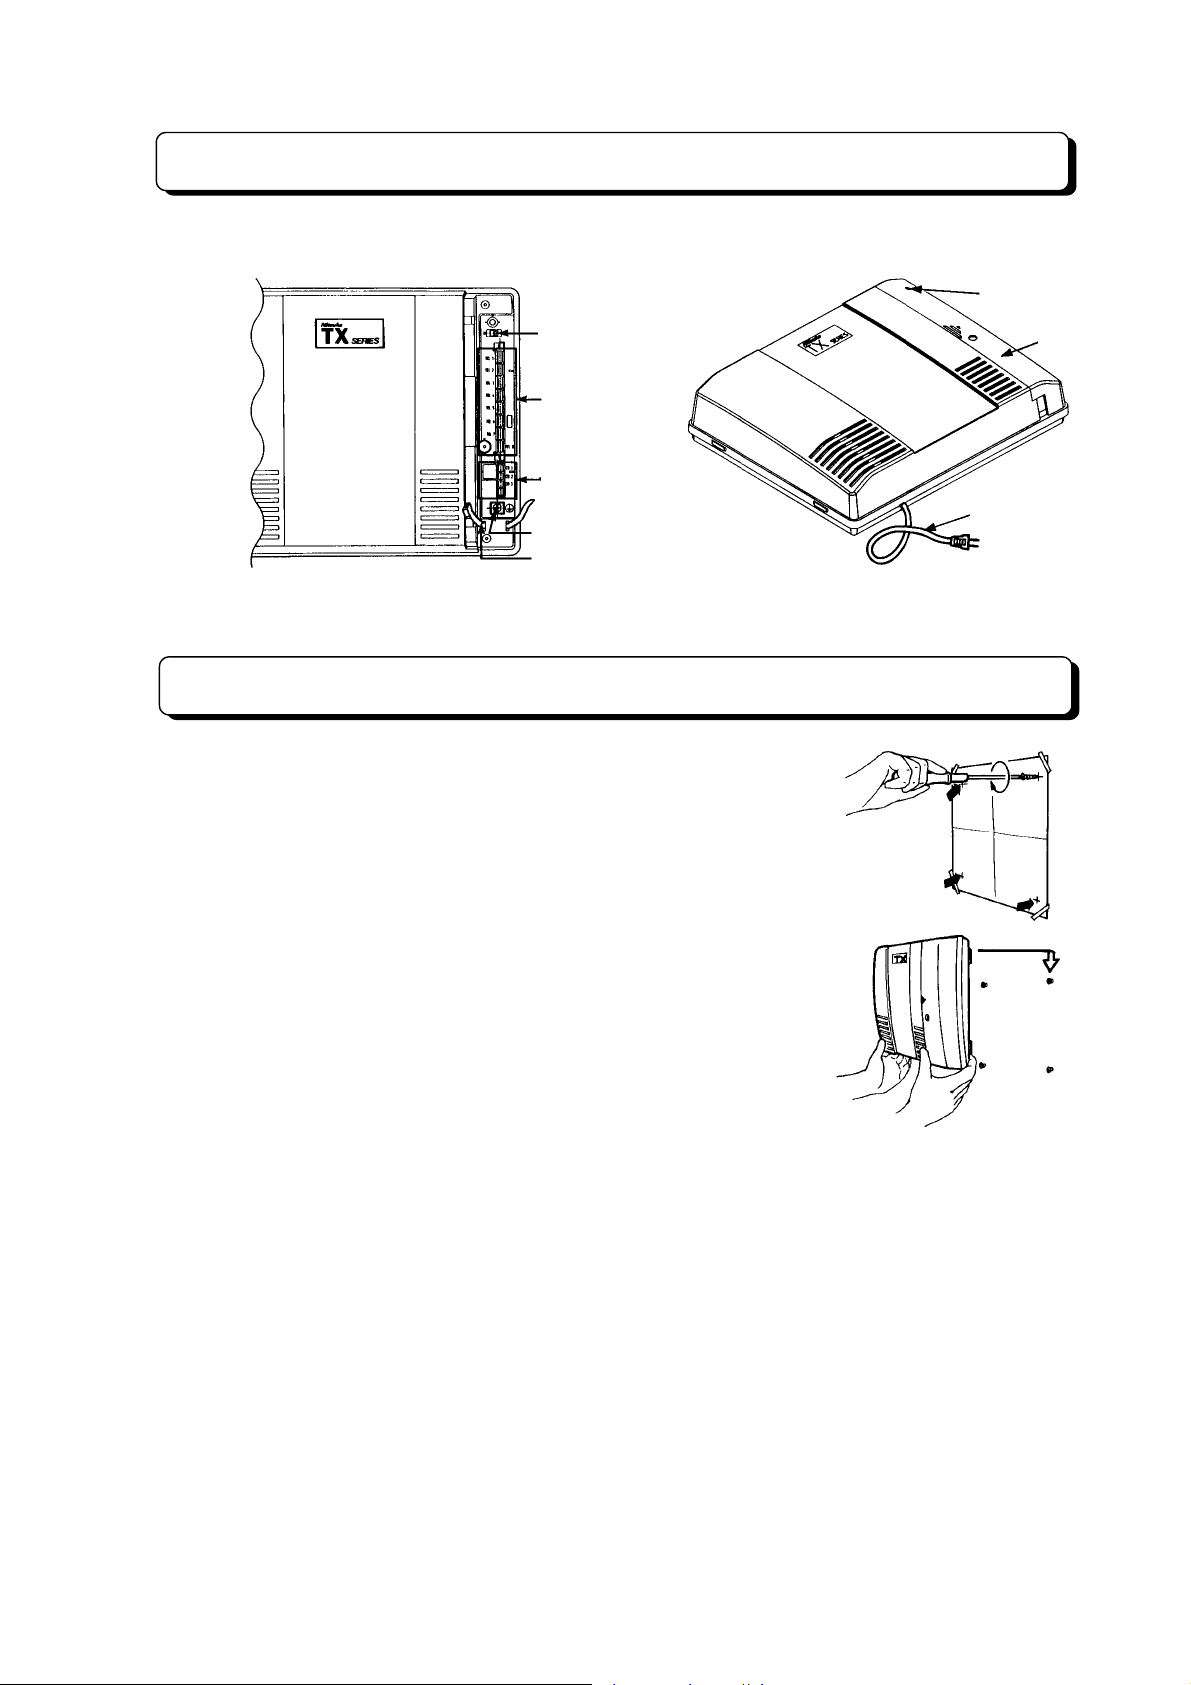
Name and Location
Overview of the Main Unit Inside View of the Main Unit
Power Indicator
Initialization
Switch
Extension 4-pin
Jacks
Trunk 2-pin Jack
AC cord
Ground Terminal
Cable Holders
Wall Mounting
Front Cover
1. Place the template (included) on the wal l to mark the four
screw positions.
2. Install the four screws (included) into the wall.
3. Hook the main unit on the screw heads.
¾
3-1-1
¾
Page 31
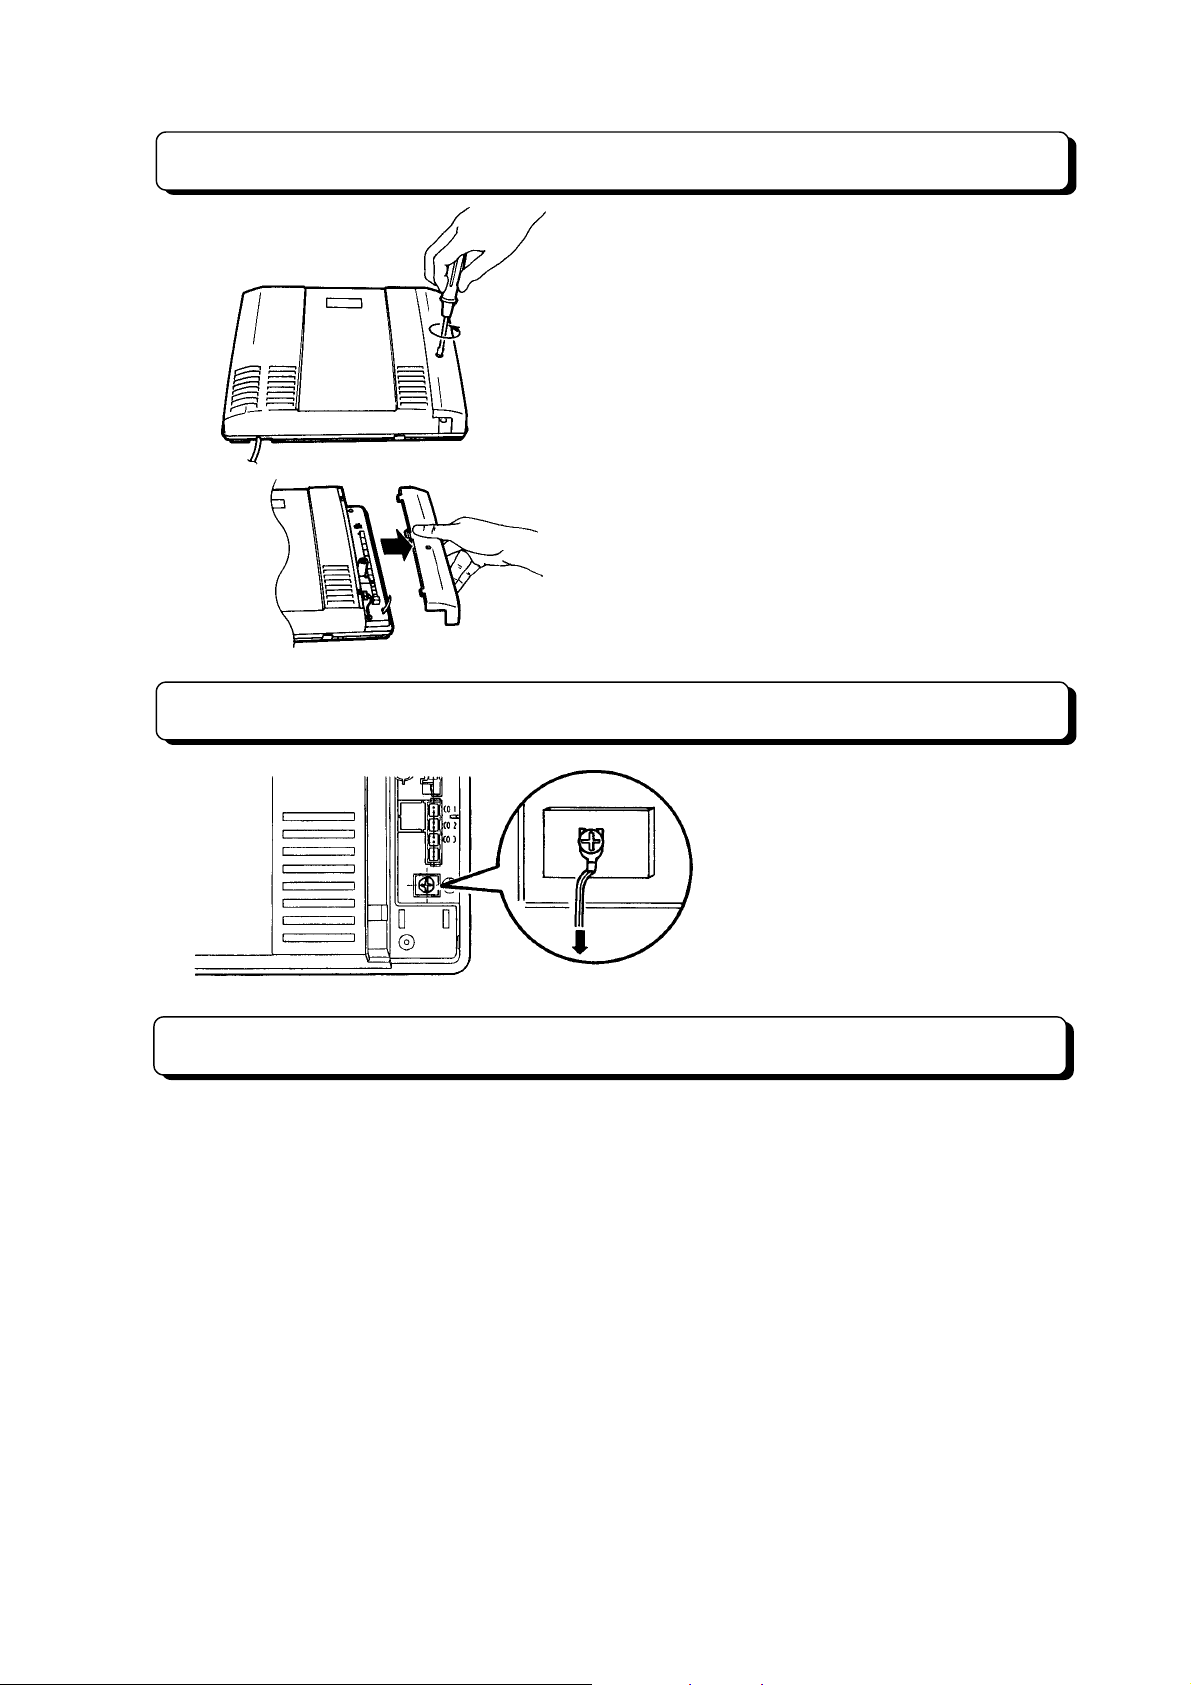
Opening Front Cover
1. Loosen the screw.
2. Slide the cover to the direction of an arrow while
pressing the marked position.
Frame Ground Connection
Wire Specification
Connection
IMPORTANT!!!
Connect the frame of the main unit to
ground.
To ground
Extension Connection
The wire specification are as follows:
Wire Solid wire
Diameter of conductor
Cable Two-pair twisted or quad cable
Cable Length between ME and Extension
For key telephone: Not exceeding 300 m (985 ft)
For single line telephone: Not exceeding 1125 m (3750 ft)
Use a 4-pin plug (included) to connect extension lines.
There are 8 plugs to connect extensions to TEL 1 through TEL 8 jacks.
1. Lift the transparent part.
2. Insert required telephone wires into the holes in a plug.
Then press the transparent part into the black part.
Note:
Do not strip the wires.
Insert the wires all the way into the plug.
f
0.5 mm or 24AWG
¾
3-1-2
¾
Page 32
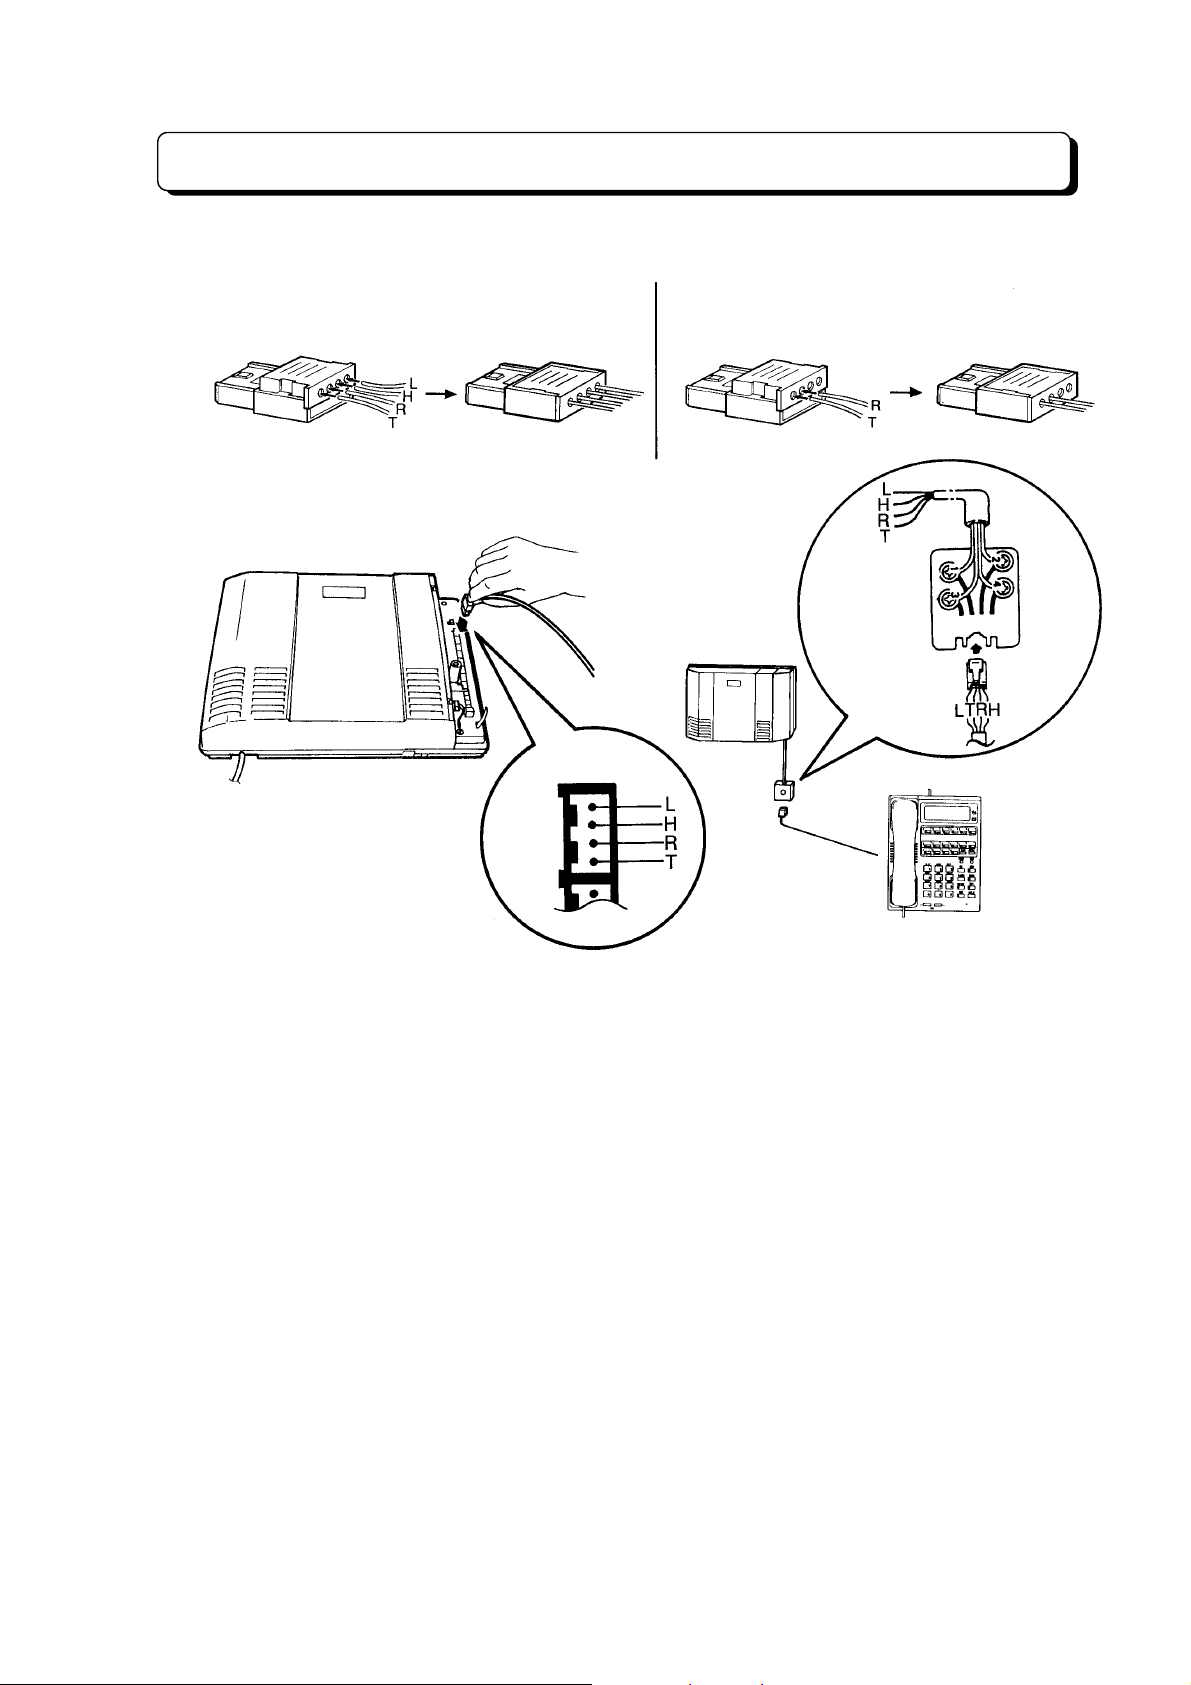
Extension Connection
For key telephone For single line telephone
Modular
Adapter
TEL 1
Key Telephone
Notes:
Ÿ The key telephones can only be connected to the TEL 1 through TEL 7 jacks.
Ÿ The single line telephones can only be connected to the TEL 3 through TEL 8 jacks.
Ÿ A power failure transfer telephon e (sing le line t eleph one) m us t be connec ted to t he T EL 8 jac k if you
want a PF transfer extension.
Ÿ Do not connect key telephone in parallel with a single line telephone.
Ÿ You can use the cable holders to fix the wires. (See illustration on page 3-1-10)
Ÿ Bridge taps are not allowed.
¾
3-1-3
¾
Page 33
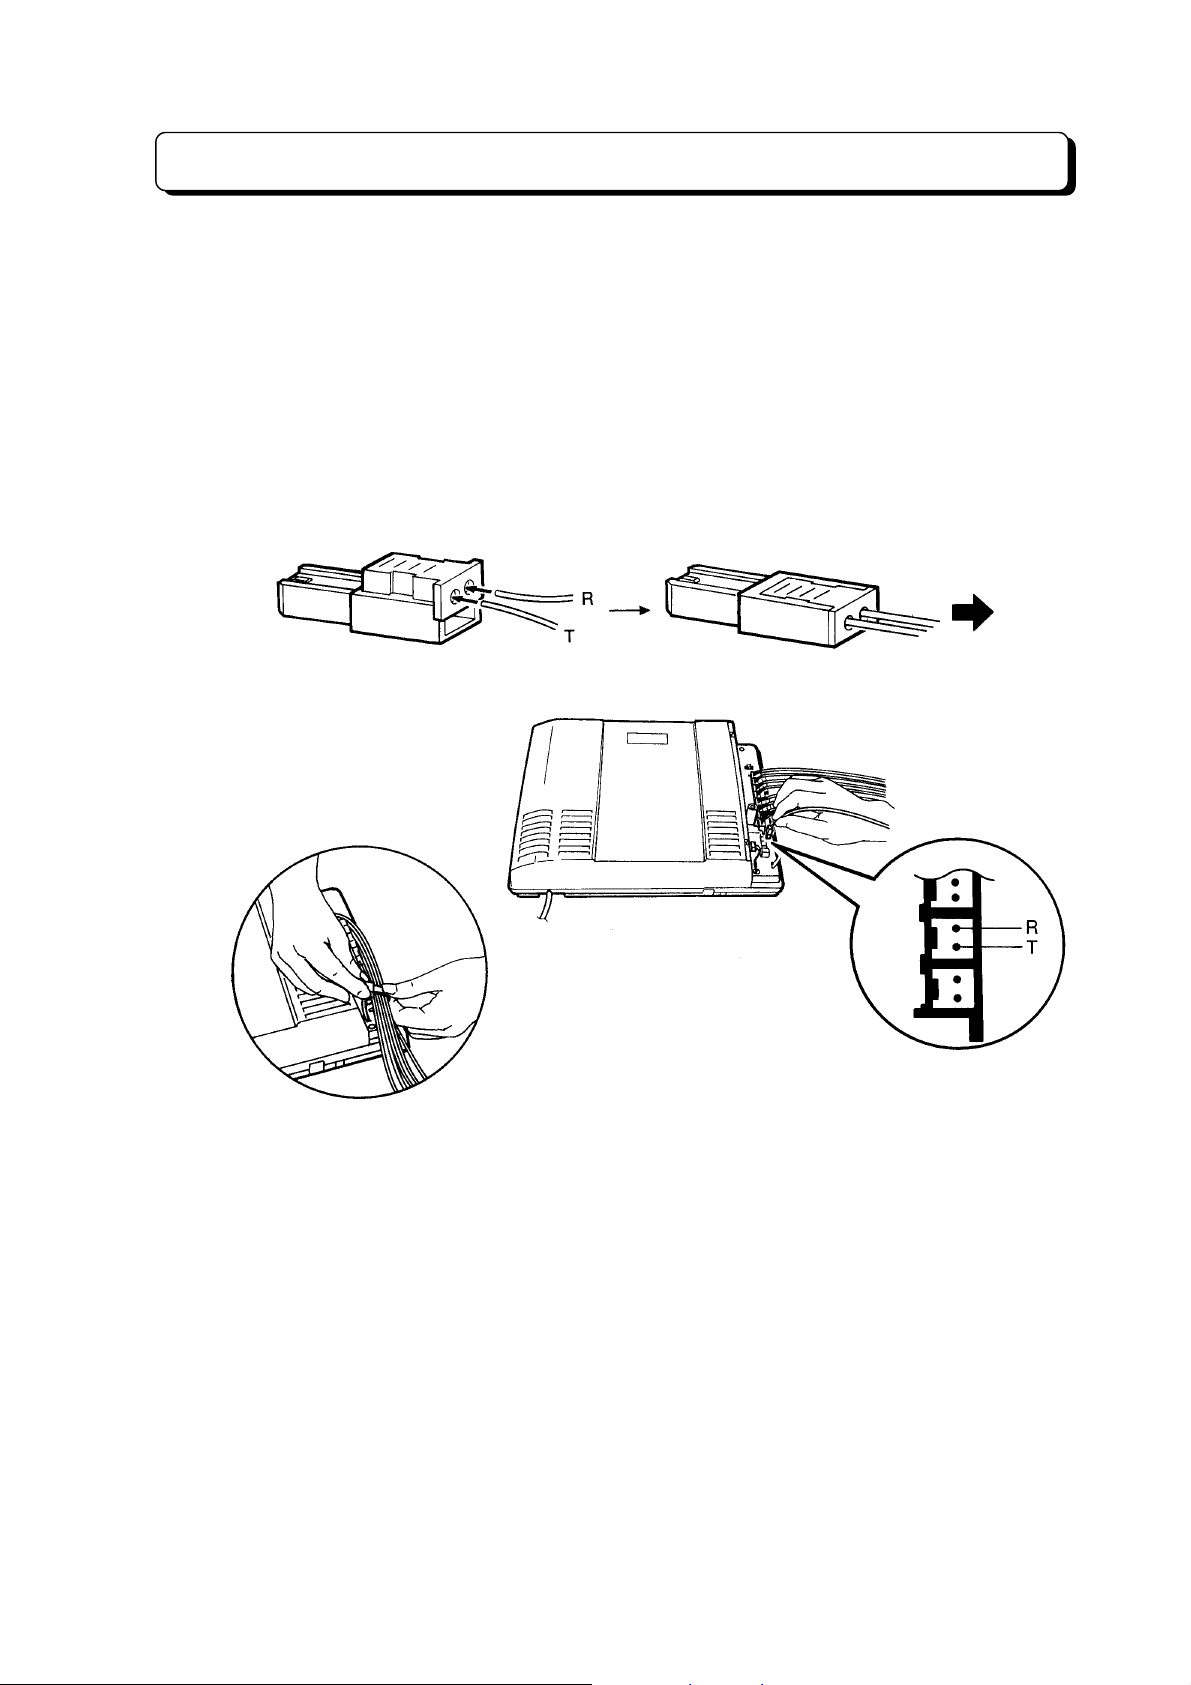
Trunk Line Connection
Wire Specification
Connection
The wire specifications are as follows:
Wire
Diameter of conductor
Use a 2-pin plug (included) to connect Trunk (CO/PBX) lines.
There are 3 plugs to connect Trunk lines to CO1 through CO3 Jacks.
1. Lift the transparent part.
2. Insert required telephone wires into the holes in a plug.
Then press the transparent part into the blue part.
Note:
Do not strip the wires.
Insert the wires all the way into the plug.
Solid wire
f 0.5 mm or 24AWG
To CO/PBX Line
Power Failure
Note:
When the AC power fails, CO1 directly switches to the Single Line
Telephone connected to TEL8 jack.
You can use the cable holders to fix the wires.
¾
3-1-4
¾
Page 34
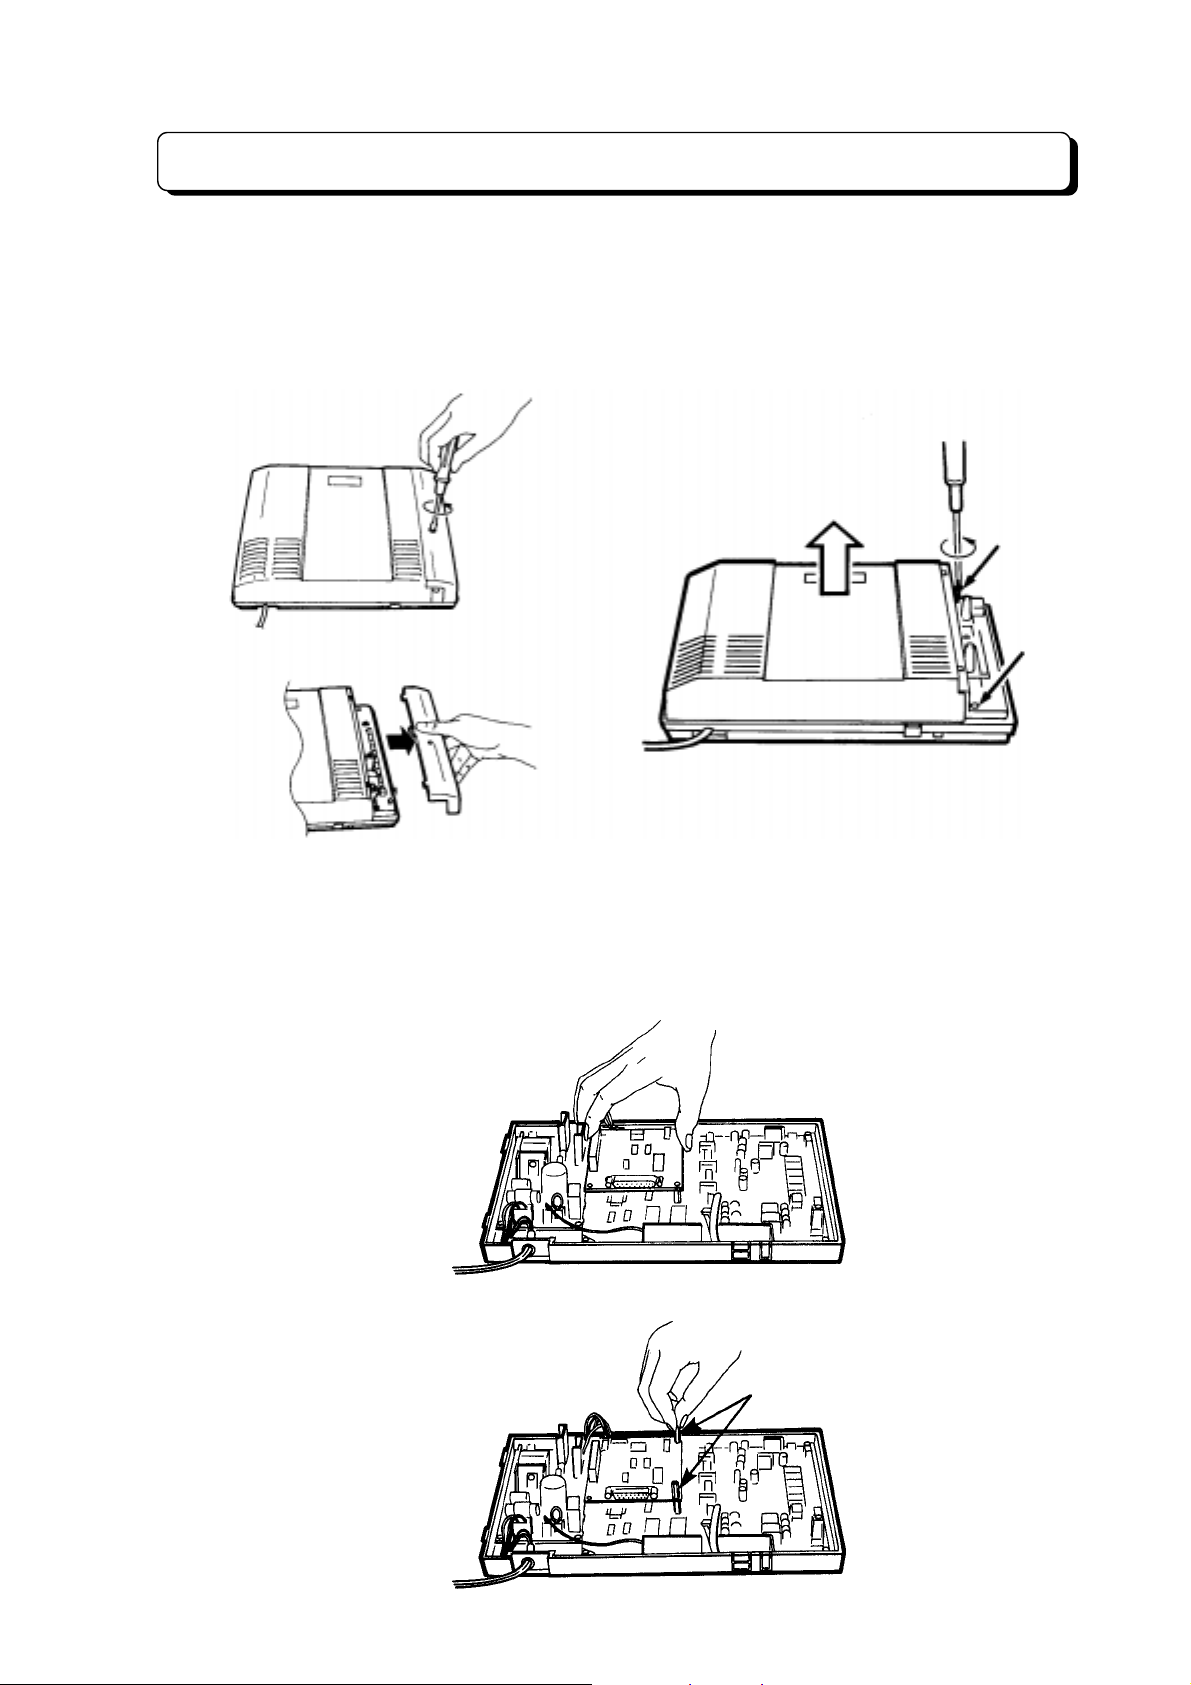
Installation of 3SMDR and Printer/PC
IMPORTANT NOTICE
1. Disconnect the AC cord from an AC outlet.
2. Loosen the screw and remove the front cover.
3. Loosen the two screws and remove the upper housing.
: The TX-Z 308 Main E quipment c an accomm odate only
due to the height.
up to 2 optional cards
Installation of 3SMDR Unit
For use of the Station Message Detail Recording (SMDR) feature, NX7E-3SMDR-A1 unit must be
installed in the main equipment.
To install this unit in the main equipment:
1. Attach the 3SMDR unit to the connector labeled EXPCN on the main unit.
2. Secure the 3SMDR unit with metal spacer (included).
Metal spacer
¾
3-1-5
¾
Page 35
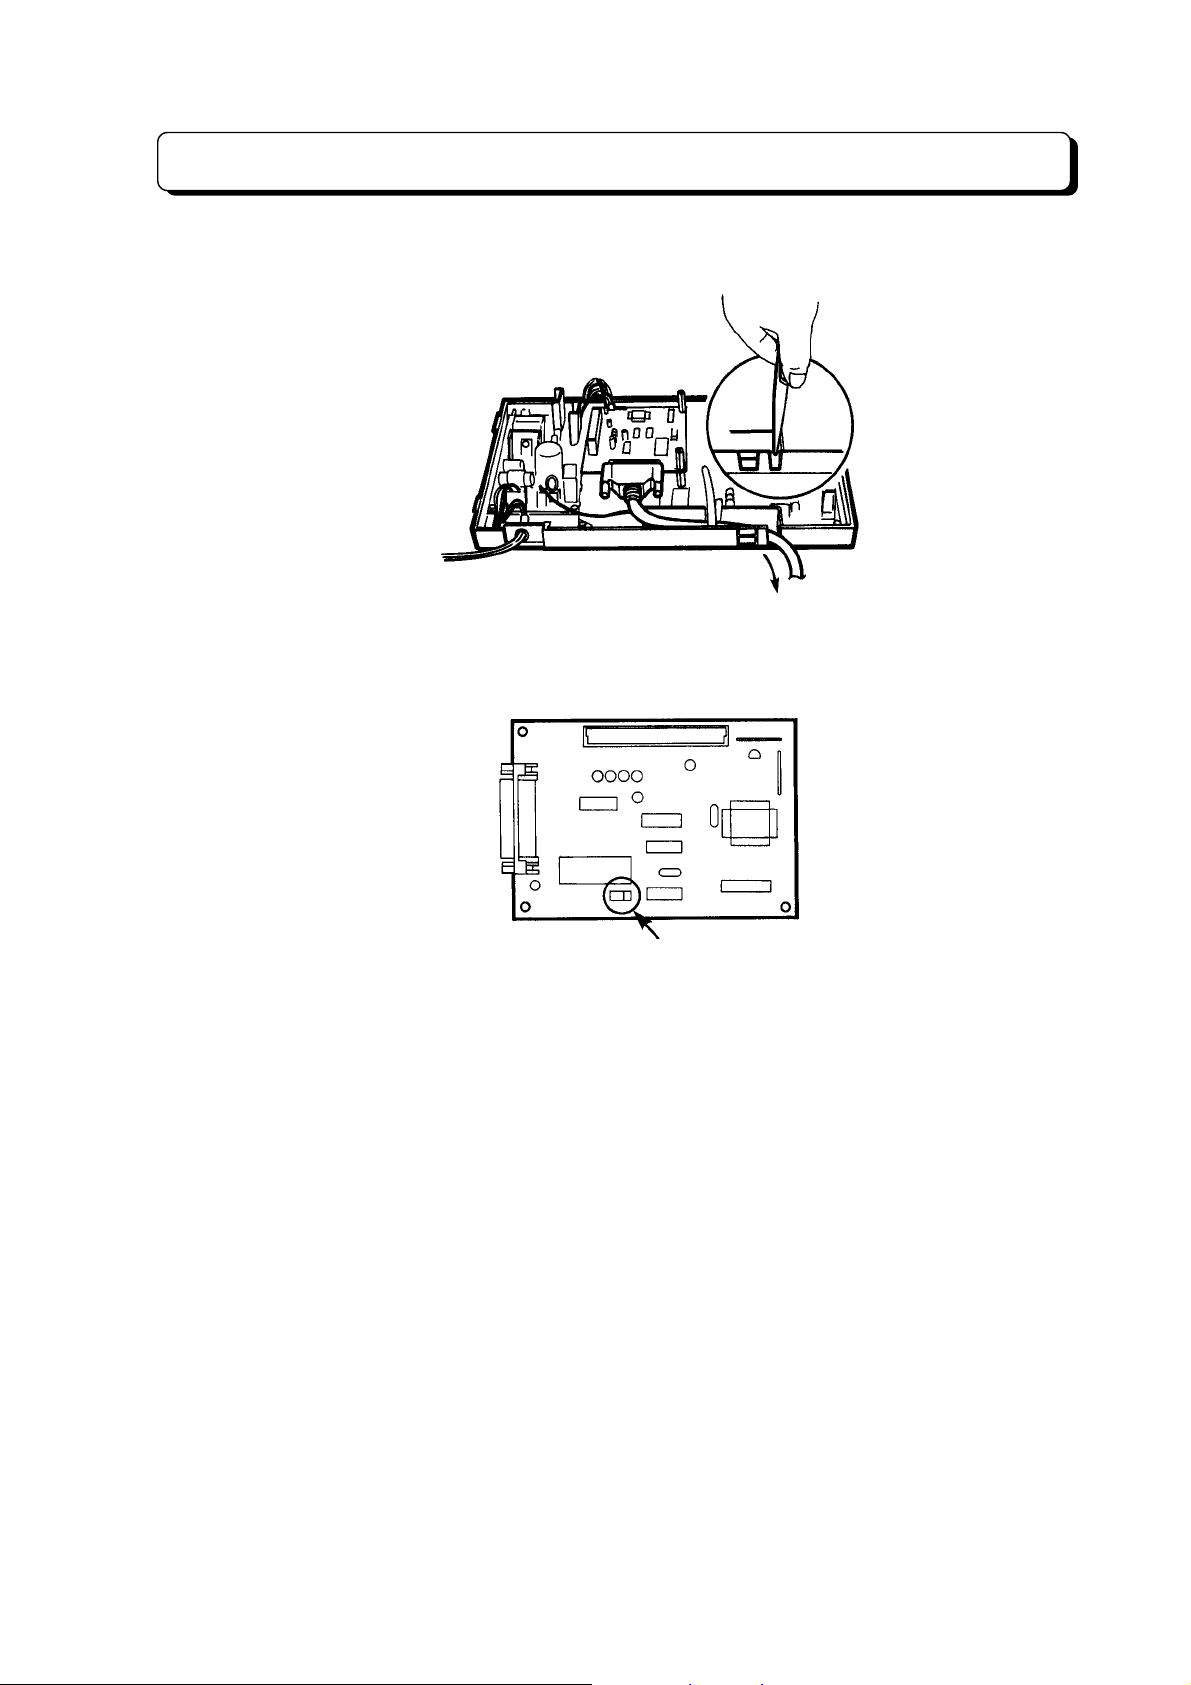
Installation of 3SMDR and Printer/PC
3. Af ter installing the 3SMDR u nit, connect t he printer/PC and the main equipm ent using a RS232C
cable.
Removing the knock-out
panel.
To printer
4. Set the SW1 on the 3SMDR unit to the proper bit rate position.
NX7E-3SMDR-A1 unit
SW1
5. Set the interface conditions of the printer/PC as follows:
Ÿ Word length: 7 bit
Ÿ Parity bit: Even parity
Ÿ Start bit: 1 bit
Ÿ Stop bit length: 2 bit
6. Put the housing and cover back and secure the screws.
7. Plug the AC cord into an AC outlet,
Note:
If the 3DHEXU unit has been ins talled in the m ain equipm ent, rem ove the 3DHEX U unit from
the main unit and install the 3SMDR unit first. T hen mount the r emoved 3DHEXU unit on the
SMDR unit.
¾
3-1-6
¾
Page 36
Installation of 3SMDR and Printer/PC
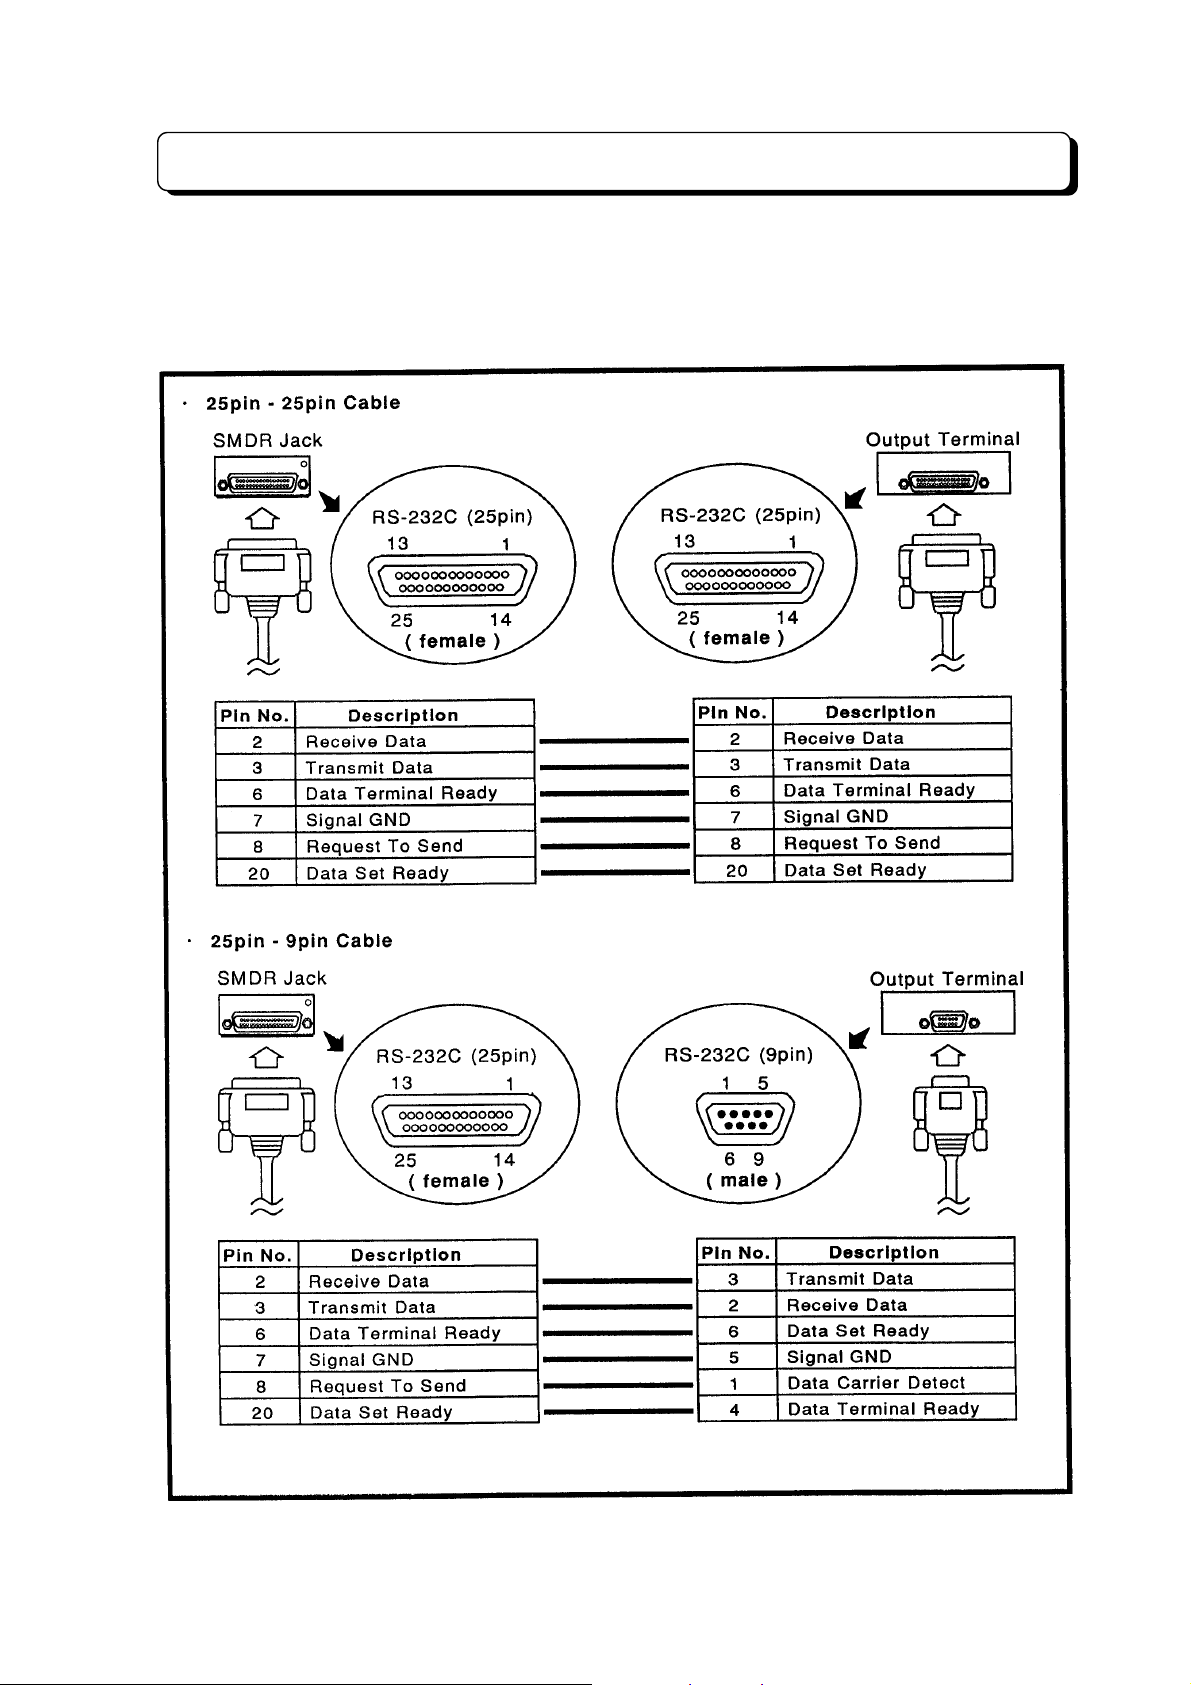
RS-232C Cable Assembly
To connect SMDR and Print er/PC, R S-232C c able is nee ded. How to m ak e cable, refer to the foll owing
illustration.
Cable Length: Below the 15 m
¾
3-1-7
¾
Page 37
Installation of 3DHEXU
IMPORTANT NOTICE
The NX7E-3DHEXU-A1 unit provides:
Ÿ Two doorphone interface
Ÿ One external speaker interface
Ÿ One external MOH input
Ÿ One alarm input
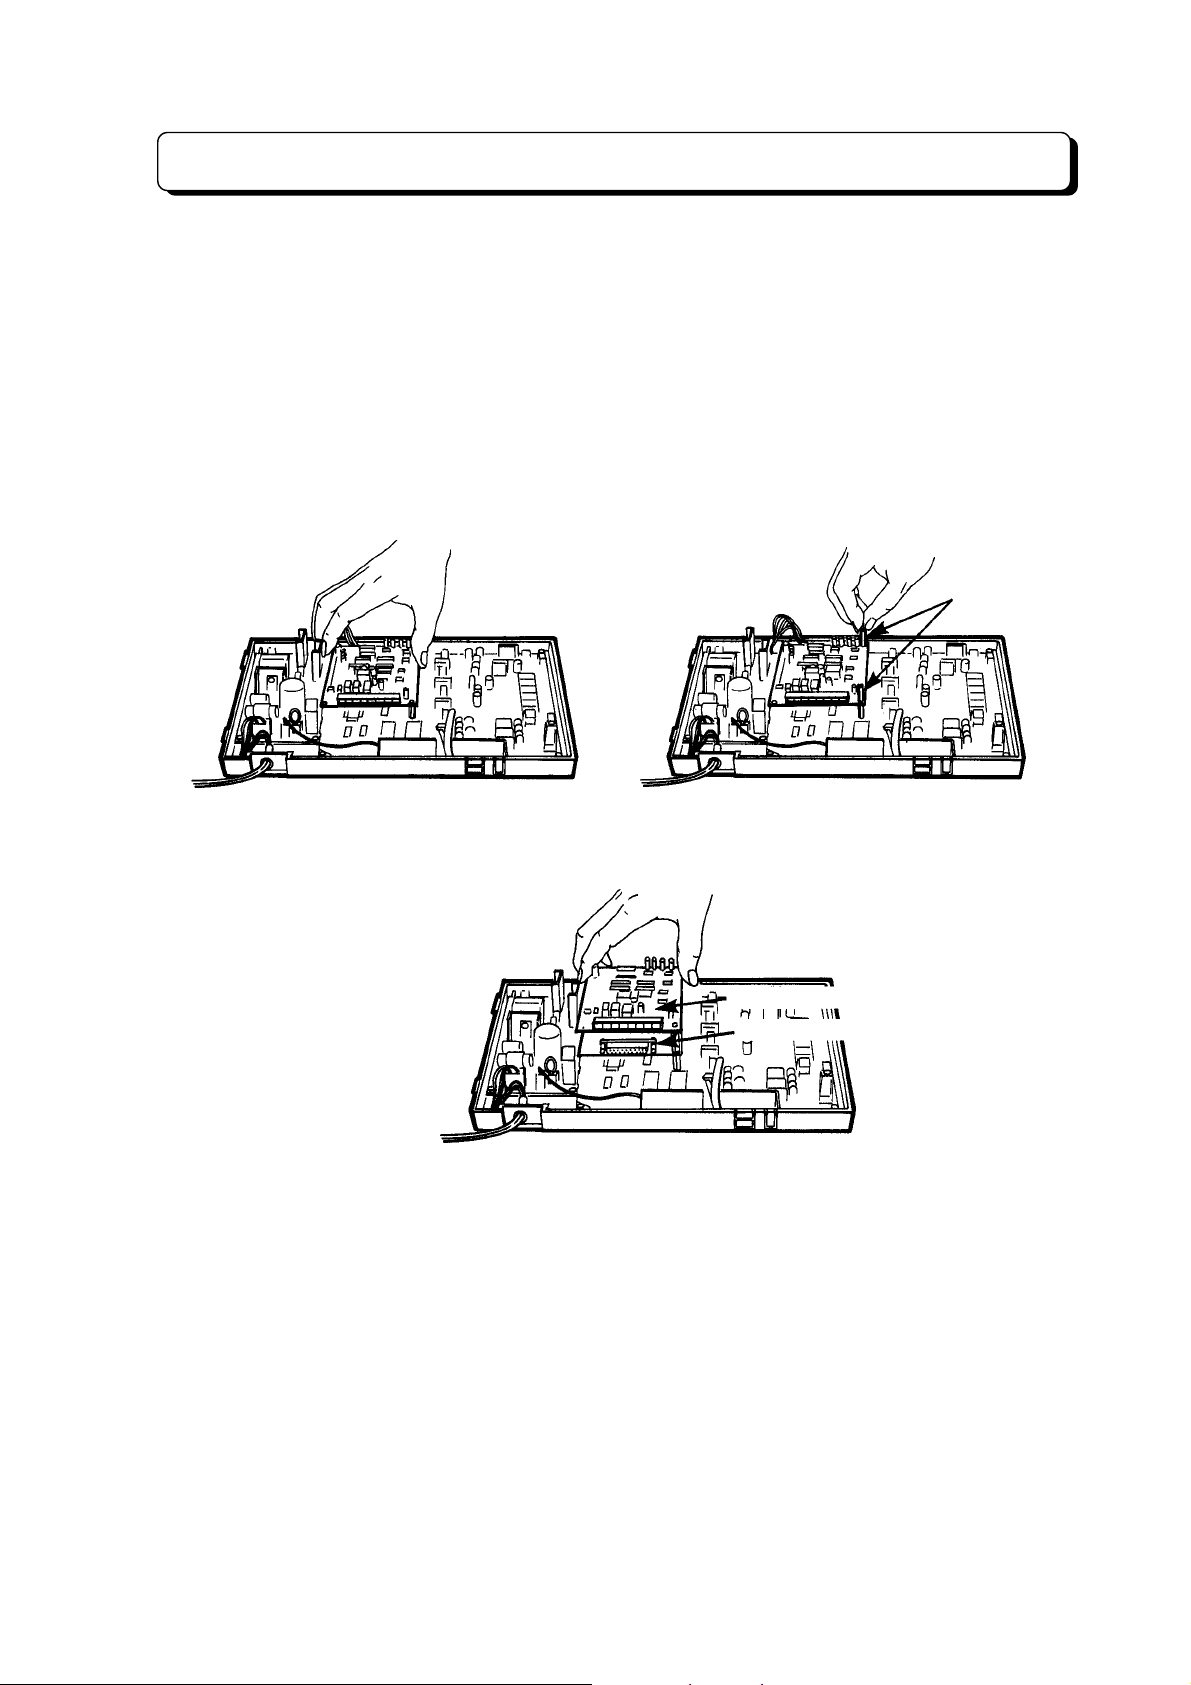
To install this unit in the main equipment:
1. Attach the 3DHEXU unit to the connector labeled EXPCN on the main unit.
2. Secure the 3DHEXU unit with metal spacer (included).
: The TX-Z 308 Main E quipment c an accomm odate only
due to the height.
up to 2 optional cards
Metal spacer
Note:
This section provides information on installing the Doorphone Boxes in TX-Z 308 system.
Specifications:
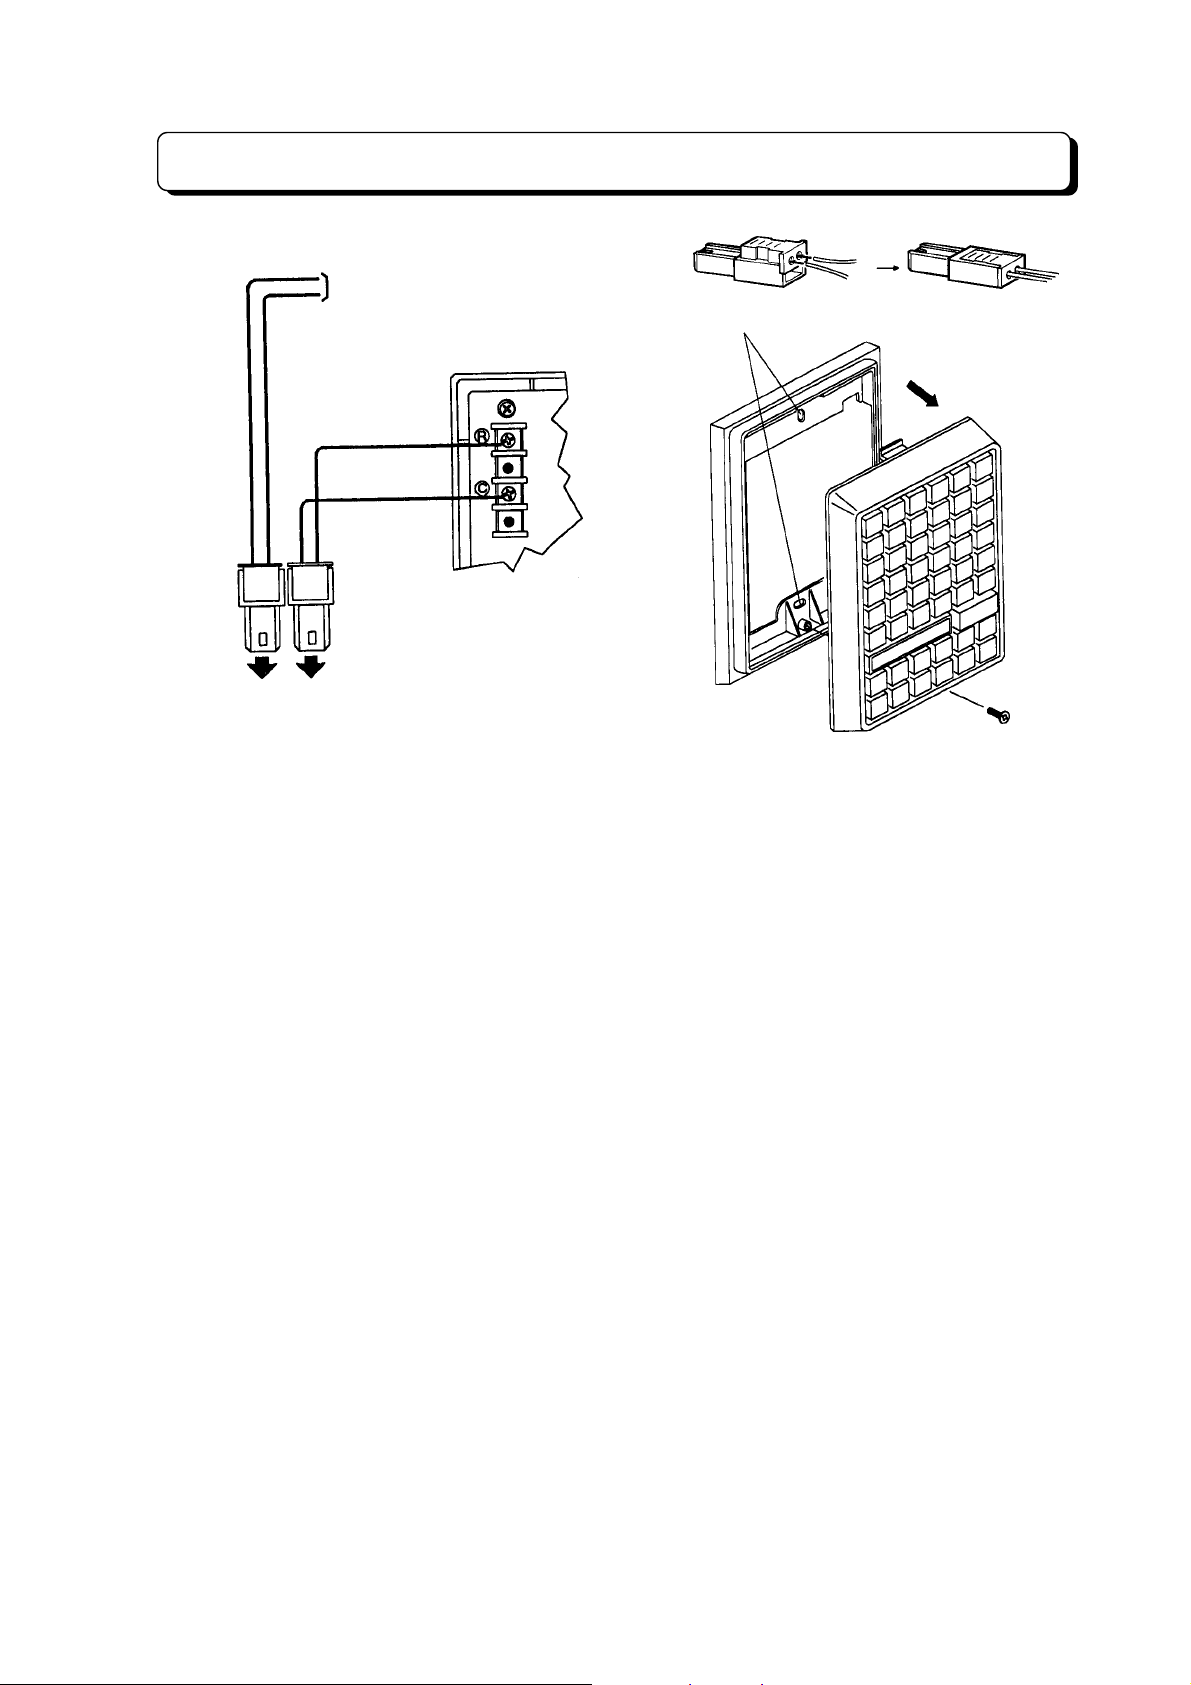
1. Conn ect wires to the terminal m arked R and C on the back of the Doorphone Box, and c onnect
If the 3SMDR unit h as bee n ins talled in the main equ ipment, mount the 3DH EX U un it on the
3SMDR unit as illustrated below.
3DHEXU unit
3SMDR unit
150 m wire maximum of 0.5 f twisted telephone cable.
the other end to DH1 on the 3DHEXU un it for Doorphone Box 1 or DH2 for Doorphone Box 2 .
(See illustration belo w)
¾
3-1-8
¾
Page 38
DH1 DH2
Installation of 3DHEXU
To doorphone box 1
Holes for screws
Rear view left side
2. Adjus t the audio level with VR3 on th e 3DHEXU unit for Doorphone Box 1 or VR4 for Door phone
Box 2.
Note:
This section provides information on the installation of external devices to the external zone.
A zone can receive Trunk Audible and Paging. Speaker can be used to broadcast these signals a t the
zone. External page zone ca n be used to provide Meet-Me Paging. External zone has norm ally open
contact. A relay for zone is energized when Paging amplifier is in use, including Trunk audible.
Specifications:
1. Conn ect wires from the connector on the 3DHEX U unit labeled SPK to an am plifier for External
2. Conn ect wires from the connector on the 3DHEXU unit la beled CTR to the device for External
3. Adjust the volume level of External Zone with VR1 on the 3DHEXU unit.
The relay contacts R L1 and RL2 can be used as Door Unloc k device control. The devic e
must be connected to these contacts. (See Program No.56)
Ÿ Output Impedance: 600 ohms
Ÿ Output Level: Nominal 250 mV (-10 dBm)
Ÿ Maximum Output: 400 mV RMS
Ÿ Relay Contact: 1.25 amps for 24 V DC resistive loads
zone. The amplifier input must match the specifications above. Attach the speaker to your
amplifier.
Zone.
¾
3-1-9
¾
Page 39
Installation of 3DHEXU
This section provides information on installing External Music On Hold in the TX-Z 308 system.
Specifications:
Ÿ
Input Impedance: 600 ohms
Ÿ
Input Level: Nominal 250 mV (-10 dBm)
Ÿ
Maximum Input: 1 Vrms
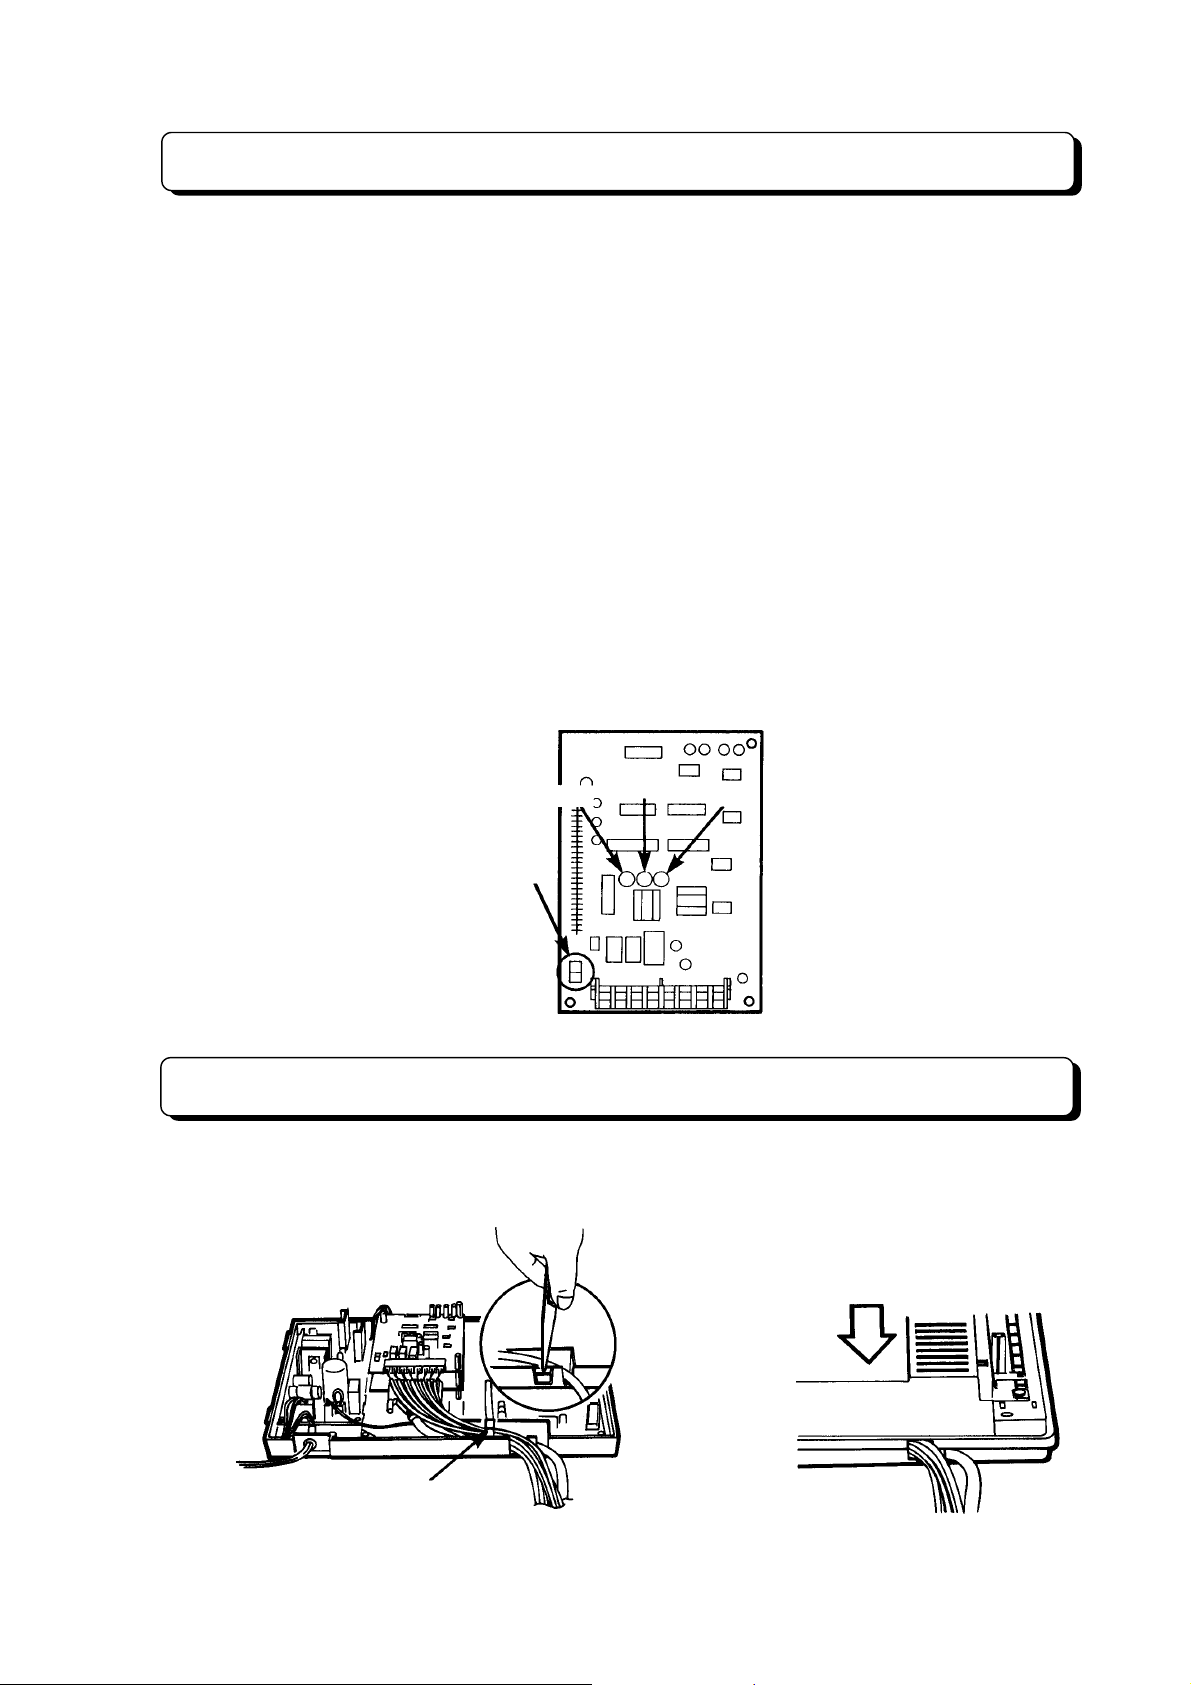
1. Connect input from external MOH source to the connector on the 3DHEXU unit labeled EXMOH.
2. Set SW1 strap to the EXT position. (If the External MOH is not required, set to the INT position.)
3. Adjust the output level of External MOH Source.
Note:
This section provides information on the installation of an external alarm.
An alarm can be connected to the s ystem . Program ming determ ines if the alarm inputs require an ope n
or a closed circuit.
Specifications:
The relay contacts RL1 and R L2 can be used as MOH device control. The rem ote control
terminal on the device must be connected to these contacts. (See Program No. 56)
Ÿ
Loop Resistance: Less than 100 ohms. (Do not supply external power.)
Ÿ
Open Resistance: More than 5 kohms. (Do not supply external power.)
NX7E-3DHEXU-A1 unit
SW1
VR4
VR3
VR1
After Wiring
1. Put the housing and cover back and secure the screws.
2. Plug the AC cord into an AC outlet.
Removing the knock-out
panel.
The cable holder
to fix the wires.
¾
3-1-10
¾
Page 40
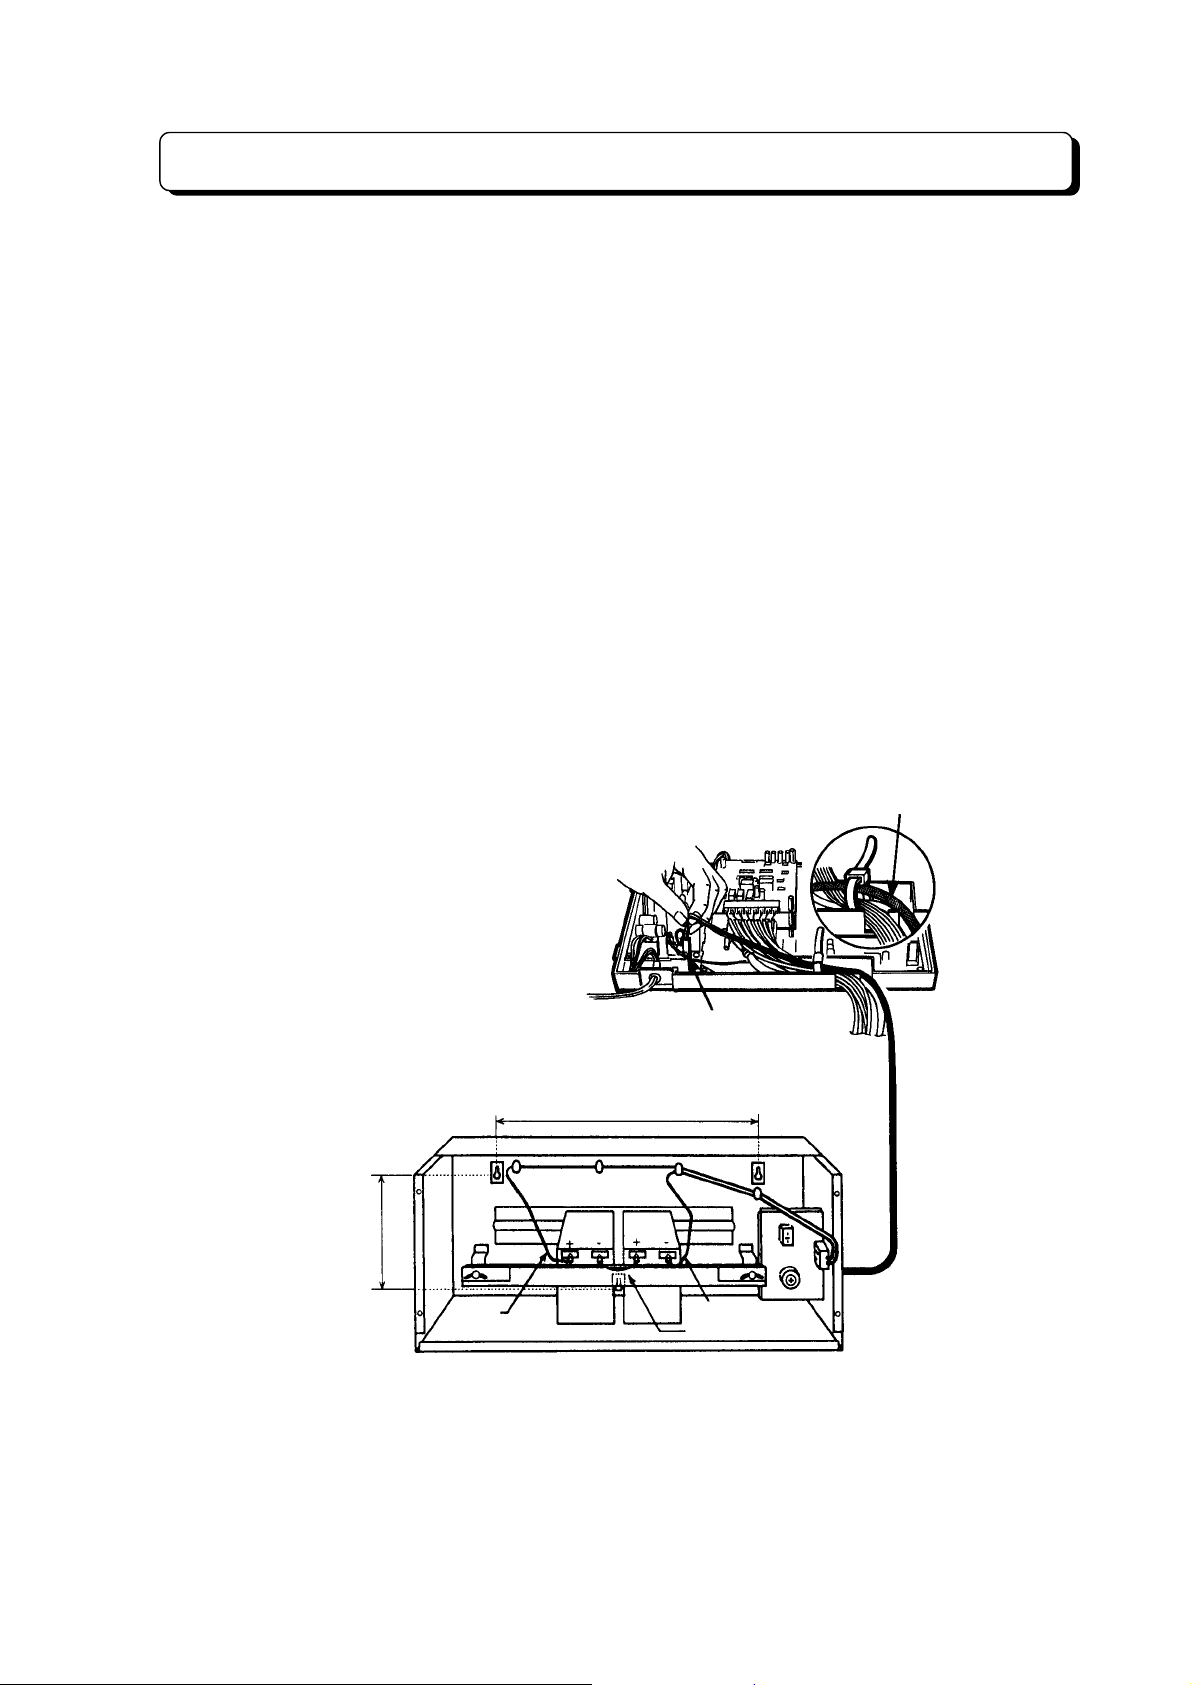
24 V DC Battery Supply
Connecting external batt ery with main equ ipment, the T X-Z 308 system can start eve n in the case of a
power supply failure. If the external battery has been connected in advance, the main equipment
automatically switches to battery power when a power failure occurs.
Required Battery: Yuasa NP2.6-12 (rated at 12 volts, 2.6 amp-hours) ´ 2 piece
Note:
To install batteries in the battery box:
To connect the battery box with main equipment:
A battery storage box (DX 2E-32i/NX7E Battery Box) must be required to accomm odate above
batteries.
1. Loosen the screw and remove the front cover of battery box.
2. Insert one pair of batteries.
3. Secur e batt er ies with tie-wraps attached.
4. Connect attached wires to the battery terminals correctly. (See the following illustration)
5. Put the cover back and secure the screws.
1. Disconnect the AC cord of main equipment from an AC outlet.
2. Loosen the screw and remove the front cover of main equipment.
3. Loosen the screw and remove the upper housing of main equipment.
4. Connect the battery box and the main equipment (insert plug into connector made CN201) using a
cable attached with battery box.
Battery cable
155 mm
Red
CN201
280 mm
Blue
Orange
Battery Box
¾
3-1-11
¾
Page 41

PART3-2
INSTALLATION OF
TX-Z 824 SYSTEM
Page 42

Table of Contents
Installing the Main Equipment.......................................................................3-2-1
The Card Locations.......................................................................................3-2-2
Grounding Requirements.............................................................................. 3-2-2
Connector Assembly..................................................................................... 3-2-3
Trunk Line Connection..................................................................................3-2-3
Extension Connection ................................................................................... 3-2-4
Cable Routing and Cramping........................................................................ 3-2-5
Installing Expansion PCBs............................................................................3-2-5
Installing DLS Console.................................................................................. 3-2-5
Installing the Ringer Unit............................................................................... 3-2-6
Installing the SMDR and Printer/PC ............................................................. 3-2-6
Installing 4PFU-A1 PCB................................................................................ 3-2-7
Installing 8DHEXU-A1 PCB..........................................................................3-2-7
Installing the Doorphone Box........................................................................3-2-8
Installing External Paging Output ................................................................. 3-2-9
Installing External MOH and BGM..............................................................3-2-10
Installing External Alarm Sensor................................................................. 3-2-11
Lithium Battery Installation..........................................................................3-2-11
Backup Battery Connection ........................................................................3-2-12
Note: Refer to PART 7-1 for installation of 8SMCID-A1
Page 43
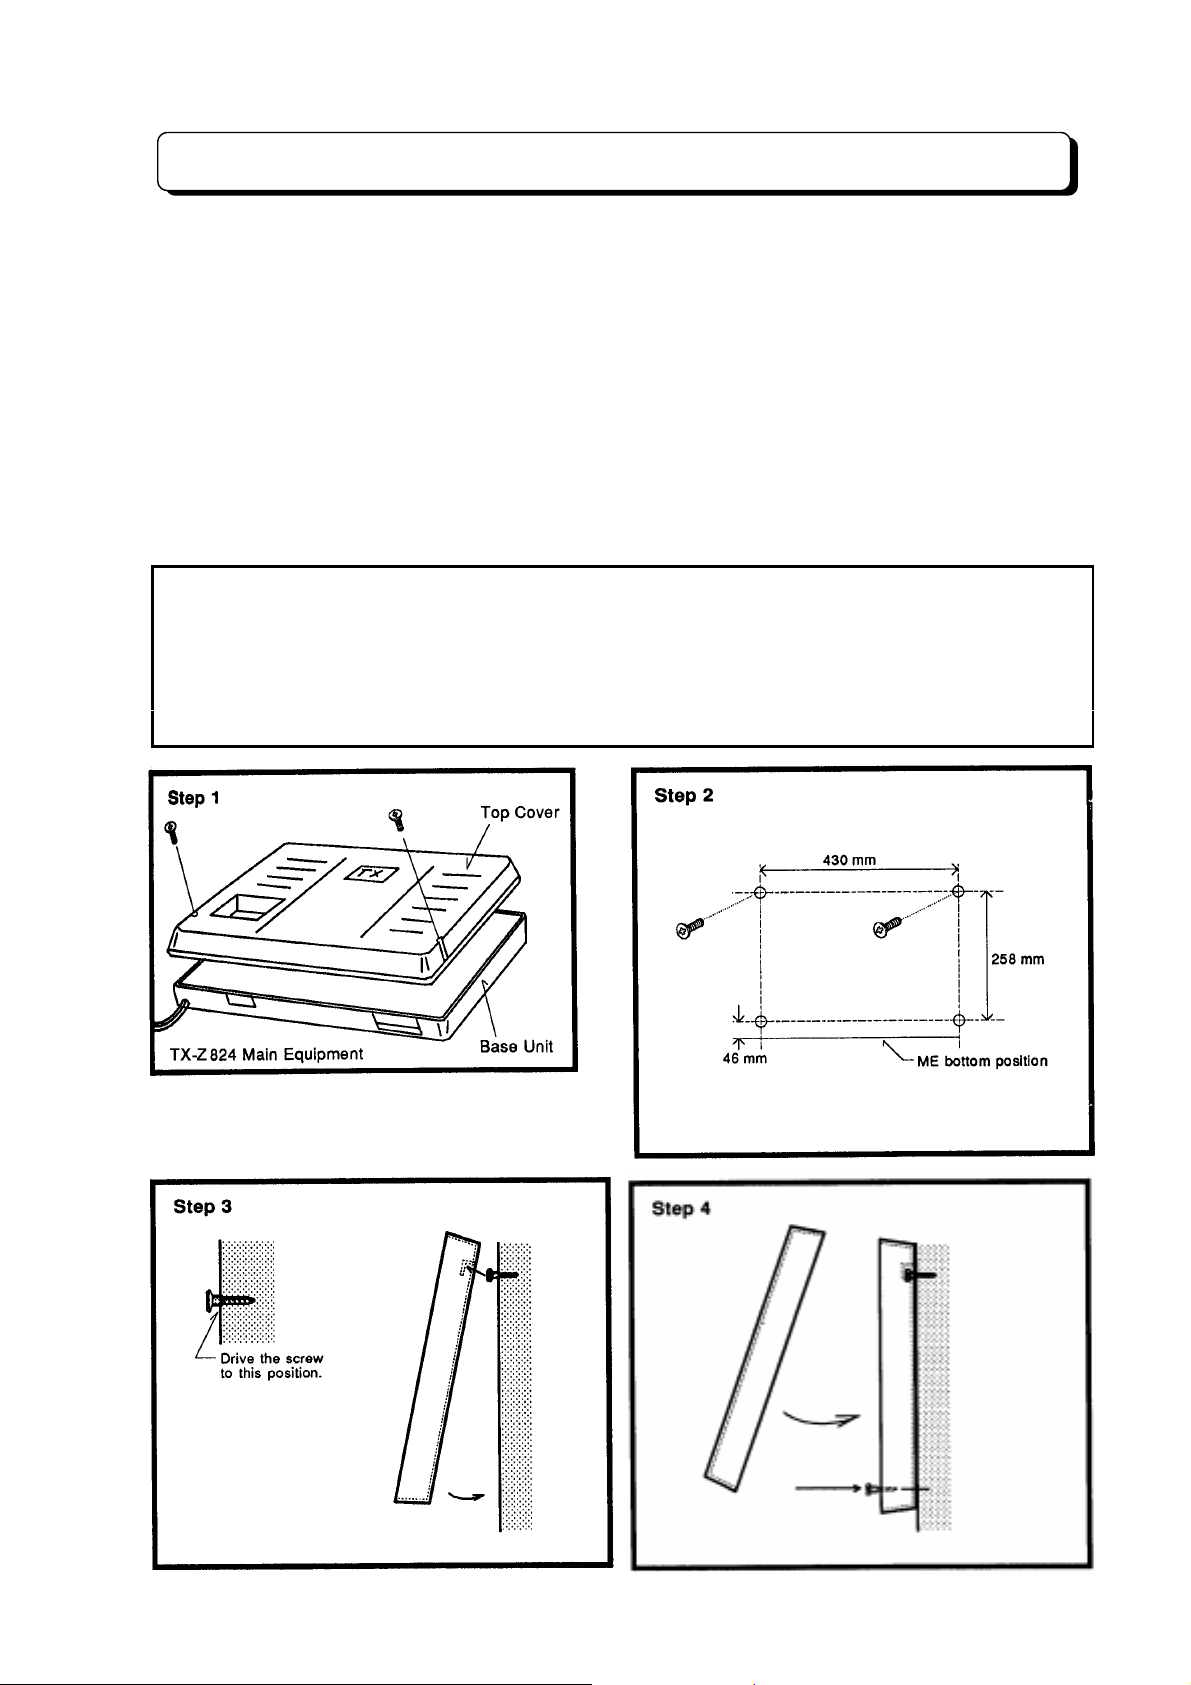
Installing the Main Equipment
The Main Equipment should be installed in a clean, dry, centrally-located spot (such as a closet), where it
is out of direct sunlight. T he area s ho ul d be f ree of moisture (water, dampness , etc .) , an d awa y from any
equipment which might vibrate. You should choose a location that is well-ventilated, where the
temperature does not exceed that of a normal room.
Step 1:
removed. Loosen the two screws and remove the top cover as illustration.
Step 2:
430 mm apart.
Step 3:
the wall and then fully tighten the wood screws.
Step 4:
Before wall m ountin g the TX-Z
Tack-fasten two of the four wood screws ( provided with Main Equ ipment) on the wall at ab out
Place the two holes of the main unit over the tacked wood screws to hang the Main Equipment on
Fasten another two screws on the wall through the two bottom holes of the Main Equipment.
1. Never install the Main Equipment where it may be exposed to water (near a bathtub, pool, sink, etc.).
2. Never mount the Main Equipment on an unstable surface, where it might fall.
3. Never block the vents on the Main Equipment. These vents prevent the unit from overheating.
Proper ventilation must be supplied for the unit.
4. Never place any objects inside the vents of the Main Equipment.
824 Main Equipment, the to p co ver of Ma in Eq uipm ent m ust be
PRE CAUTIO NARY SAF EGUARD S
¾
3-2-1
¾
Page 44
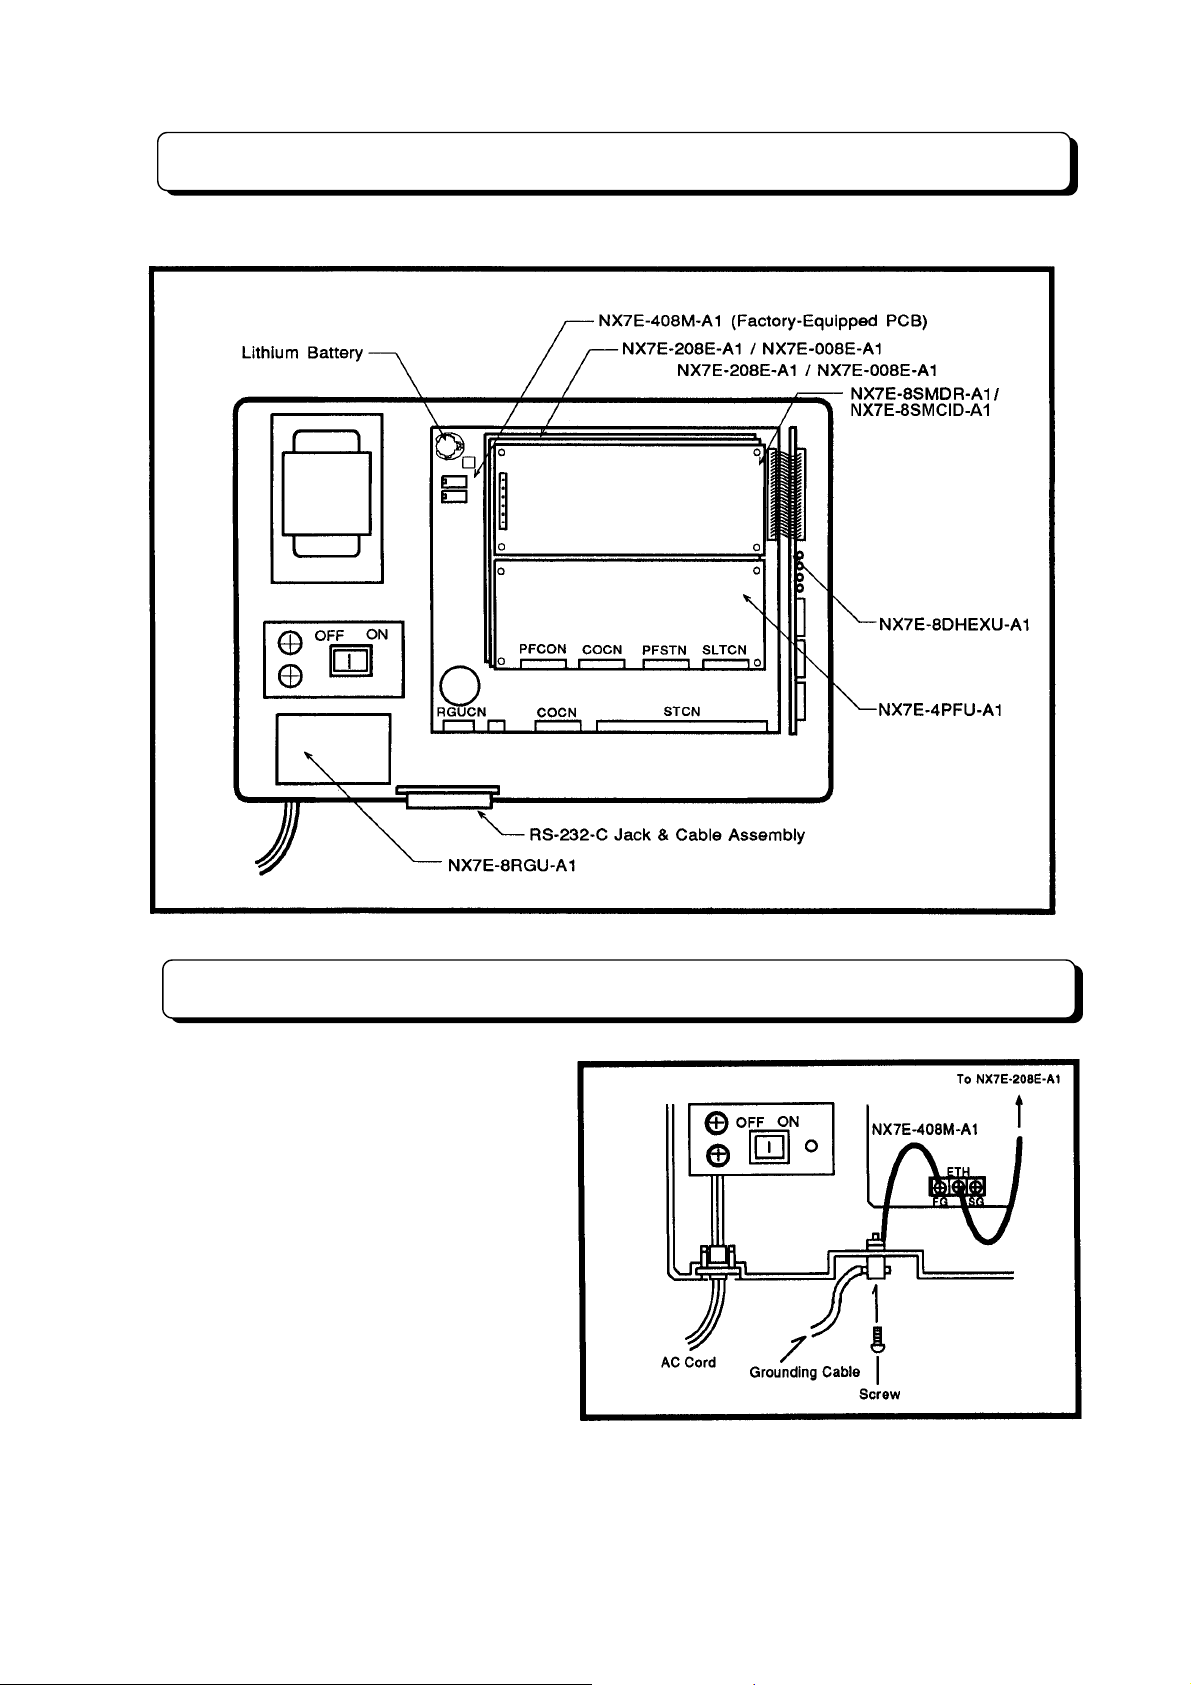
The Card Locations
The card locations for the Main Equipment are shown in the following illustration.
Grounding Requirements
The Main Equipment must be properly
grounded. If circuit ground is not available at
the dedicated AC outlet, the following steps
should be taken:
Step 1:
ground in accordance with the local
operating telephone company procedures.
Step 2:
a ground rod should be installed in
accordance with the local operating
telephone company procedures.
Step 3:
grounding terminal is pr ovided on the Main
Equipment.
Provide a suitable metal pipe
If no metal pipe ground is a vail able,
Where a ground is used, a
¾
3-2-2
¾
Page 45
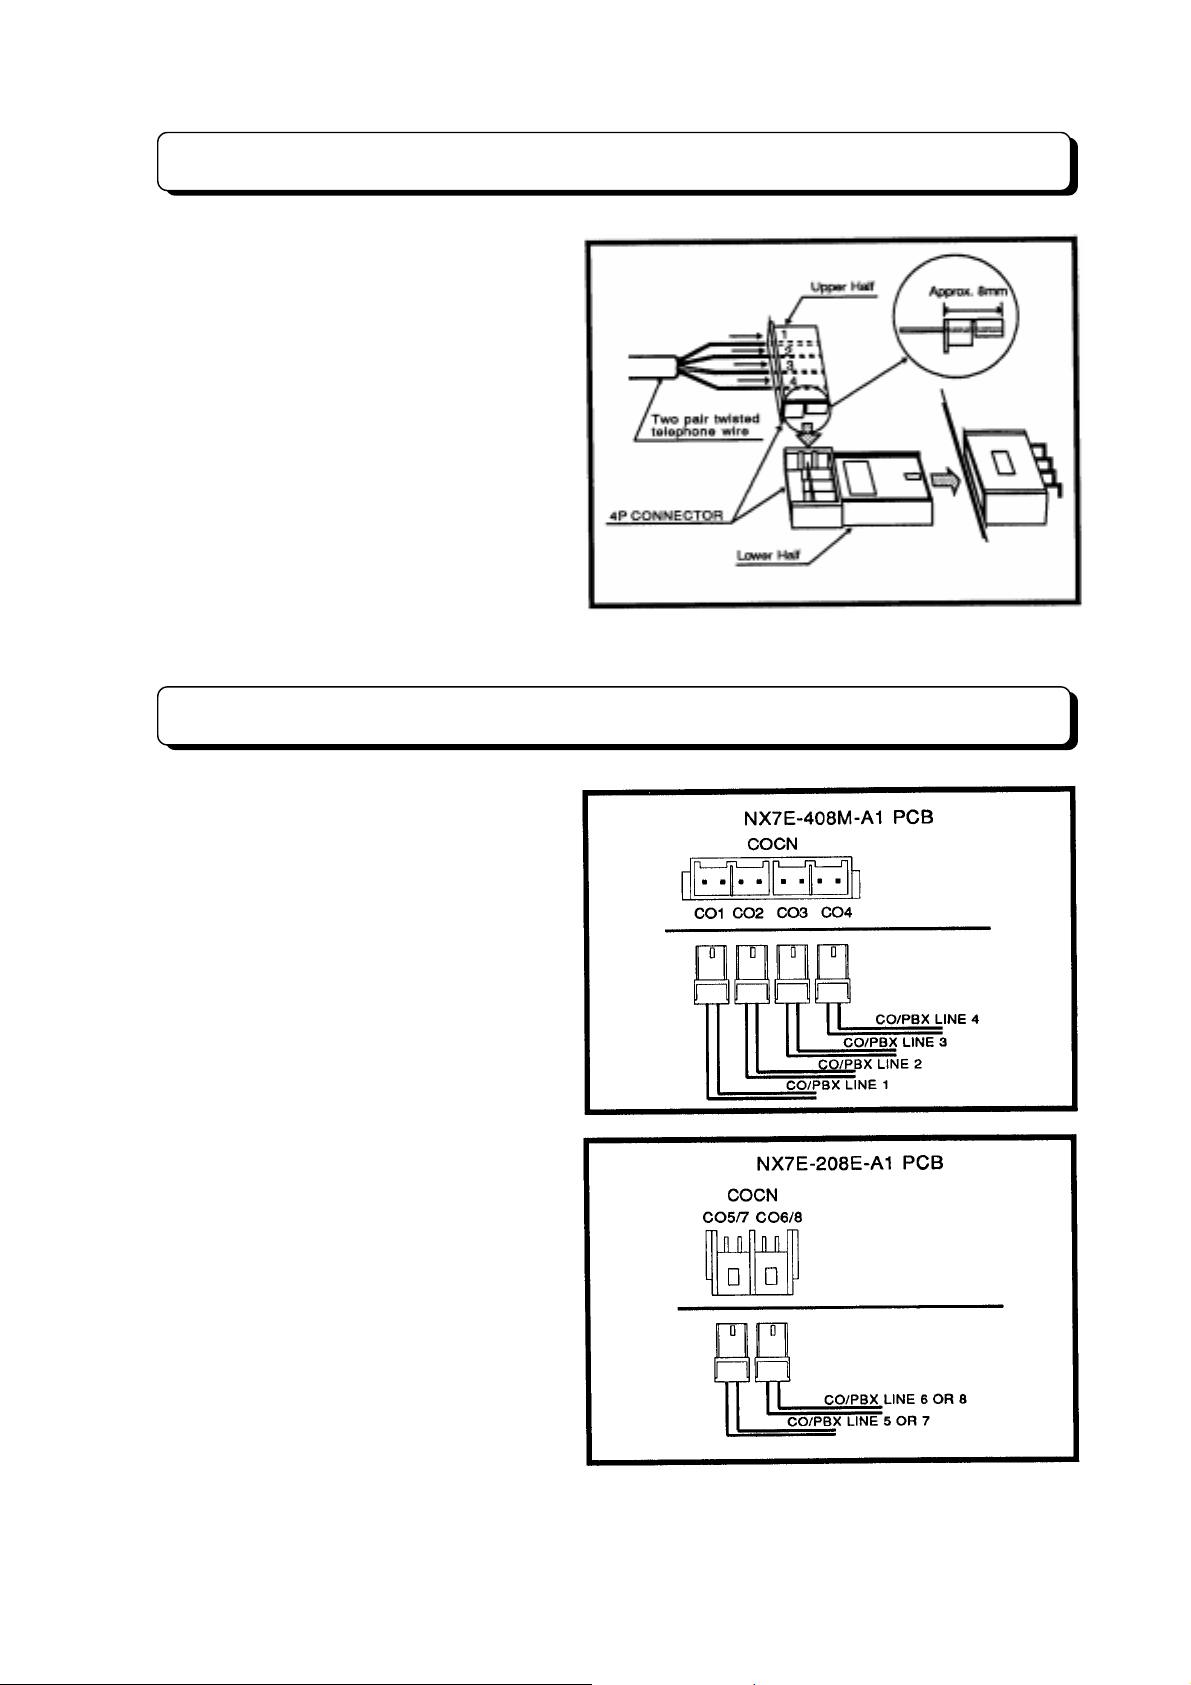
Connector Assembly
When connecting the wiring cables to the
connectors mounted on the units. Insert th e
wires of each cable into the connector and
insert this connector to female connector on
the unit (see illustration).
Step 1:
twisted or quad telephone wire (0.5 to
0.67 mm f) into the upper section of the
connector. Ensure that the lead wire ends d o
not protrude beyond the rear surface of the
connector.
Step 2:
over the lower, and then compress the
assembled connector with pliers or the like.
Verify that the upper section of connect or wi ll
not come off the lower section.
As indicated in the illus tration, insert
Install the upper section of c onnec tor
Trunk Line Connection
The Trunk (CO/PBX) lines shall be
connected as illustration. Make connection
from Telecom provided connector to one of
the connector on the 408M-A1 or 208E-A1
units labeled COCN.
The TX-Z
Trunk lines maximum. The basic system is
equipped to accept four Trunk lines. If two
expansion units (NX7E-208E-A1 PCB) are
installed, four more Trunk lines may be
installed (see System Configuration Table).
824 system can be installed ei ght
¾
3-2-3
¾
Page 46
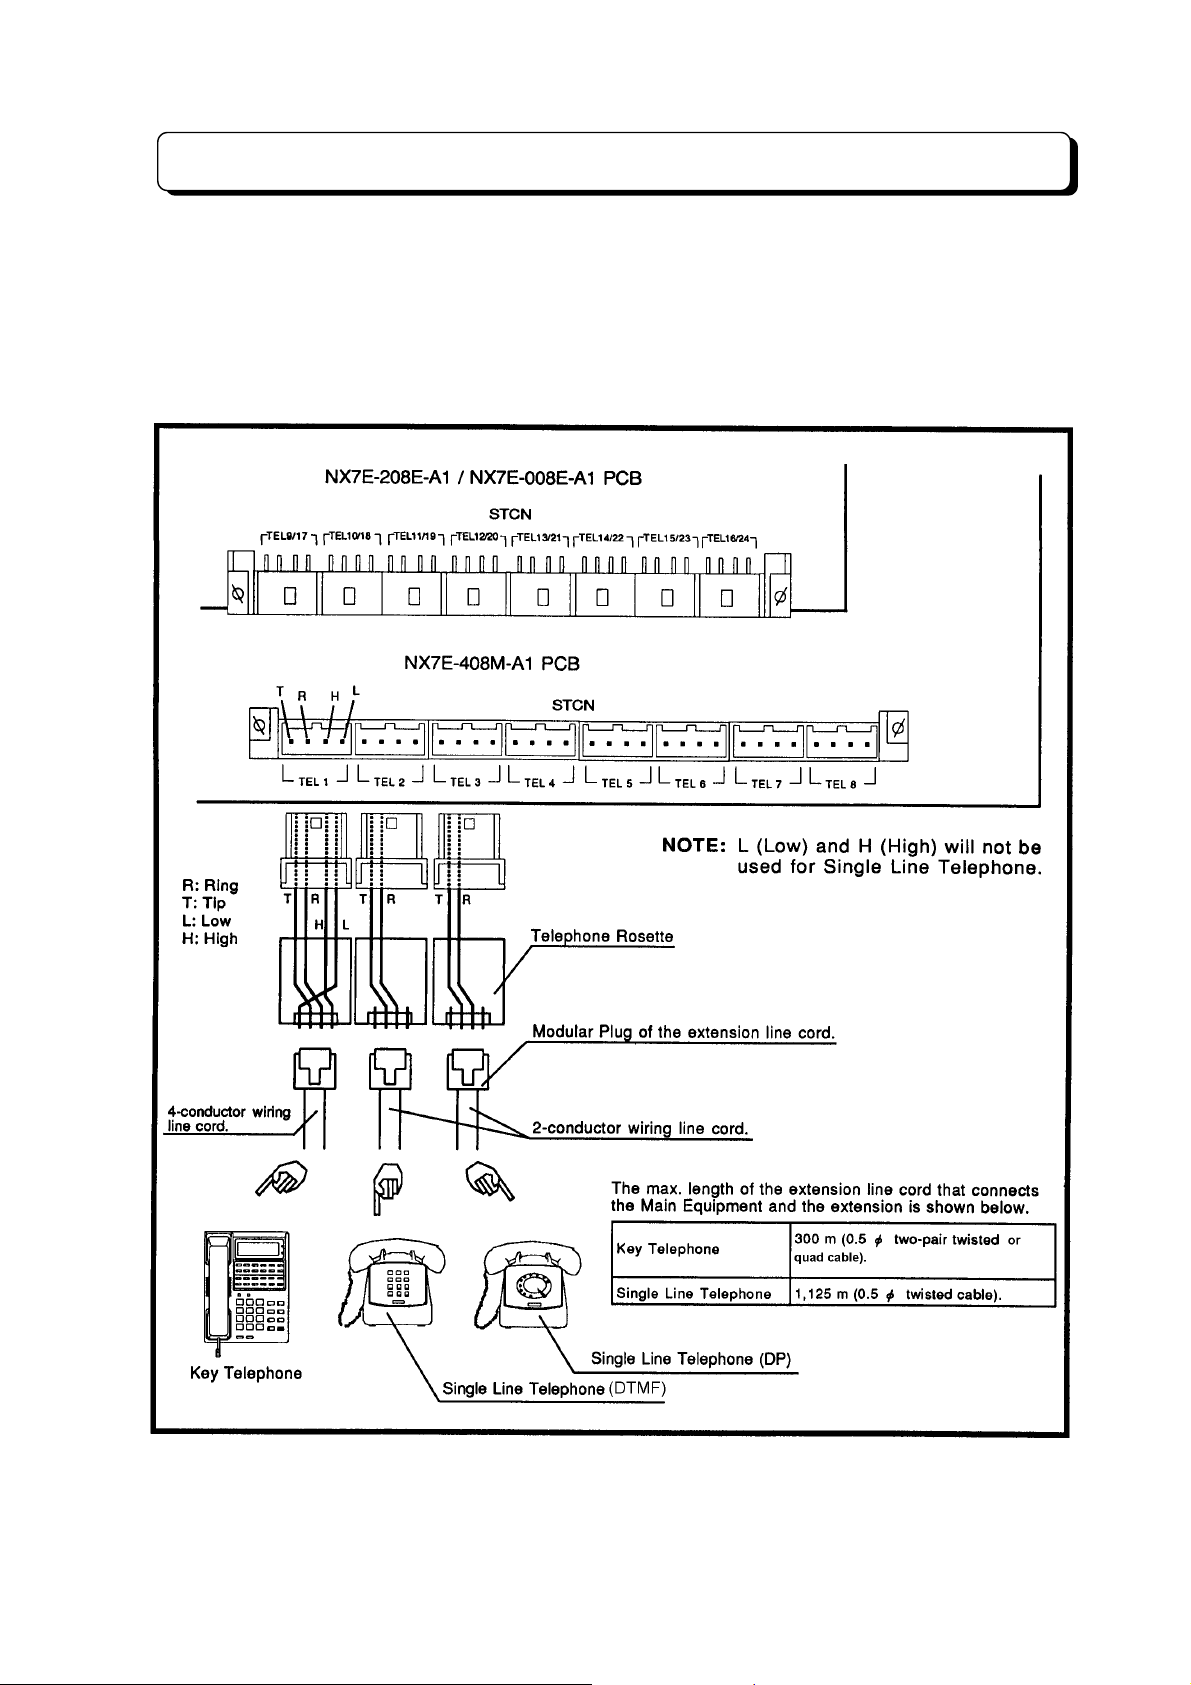
Extension Connection
The extension (Ke y Telephone and Si ngle Line Telepho ne) shal l be conn ected as illustrat ion. Insert the
connector from the ex tension into the fem ale connector on the units ( NX7E-408M-A1, NX7E-208 E-A1,
NX7E-008E-A1) labe led STCN. The basic system is equipped eight extensi on ports. If two expansi on
units (NX7E-208E-A1 and/or NX7E-008E-A1) are installed, Up to twenty-four extensions can be
connected to the system. 4-conductor wiring is required for each extension when connecting Key
Telephone Set to the s ystem. Use 2-conductor wiring for each extension when connecting Singl e Line
Telephone to the system. In other words, L (Low) and H (High) will not be used for Single Line
Telephone.
¾
3-2-4
¾
Page 47
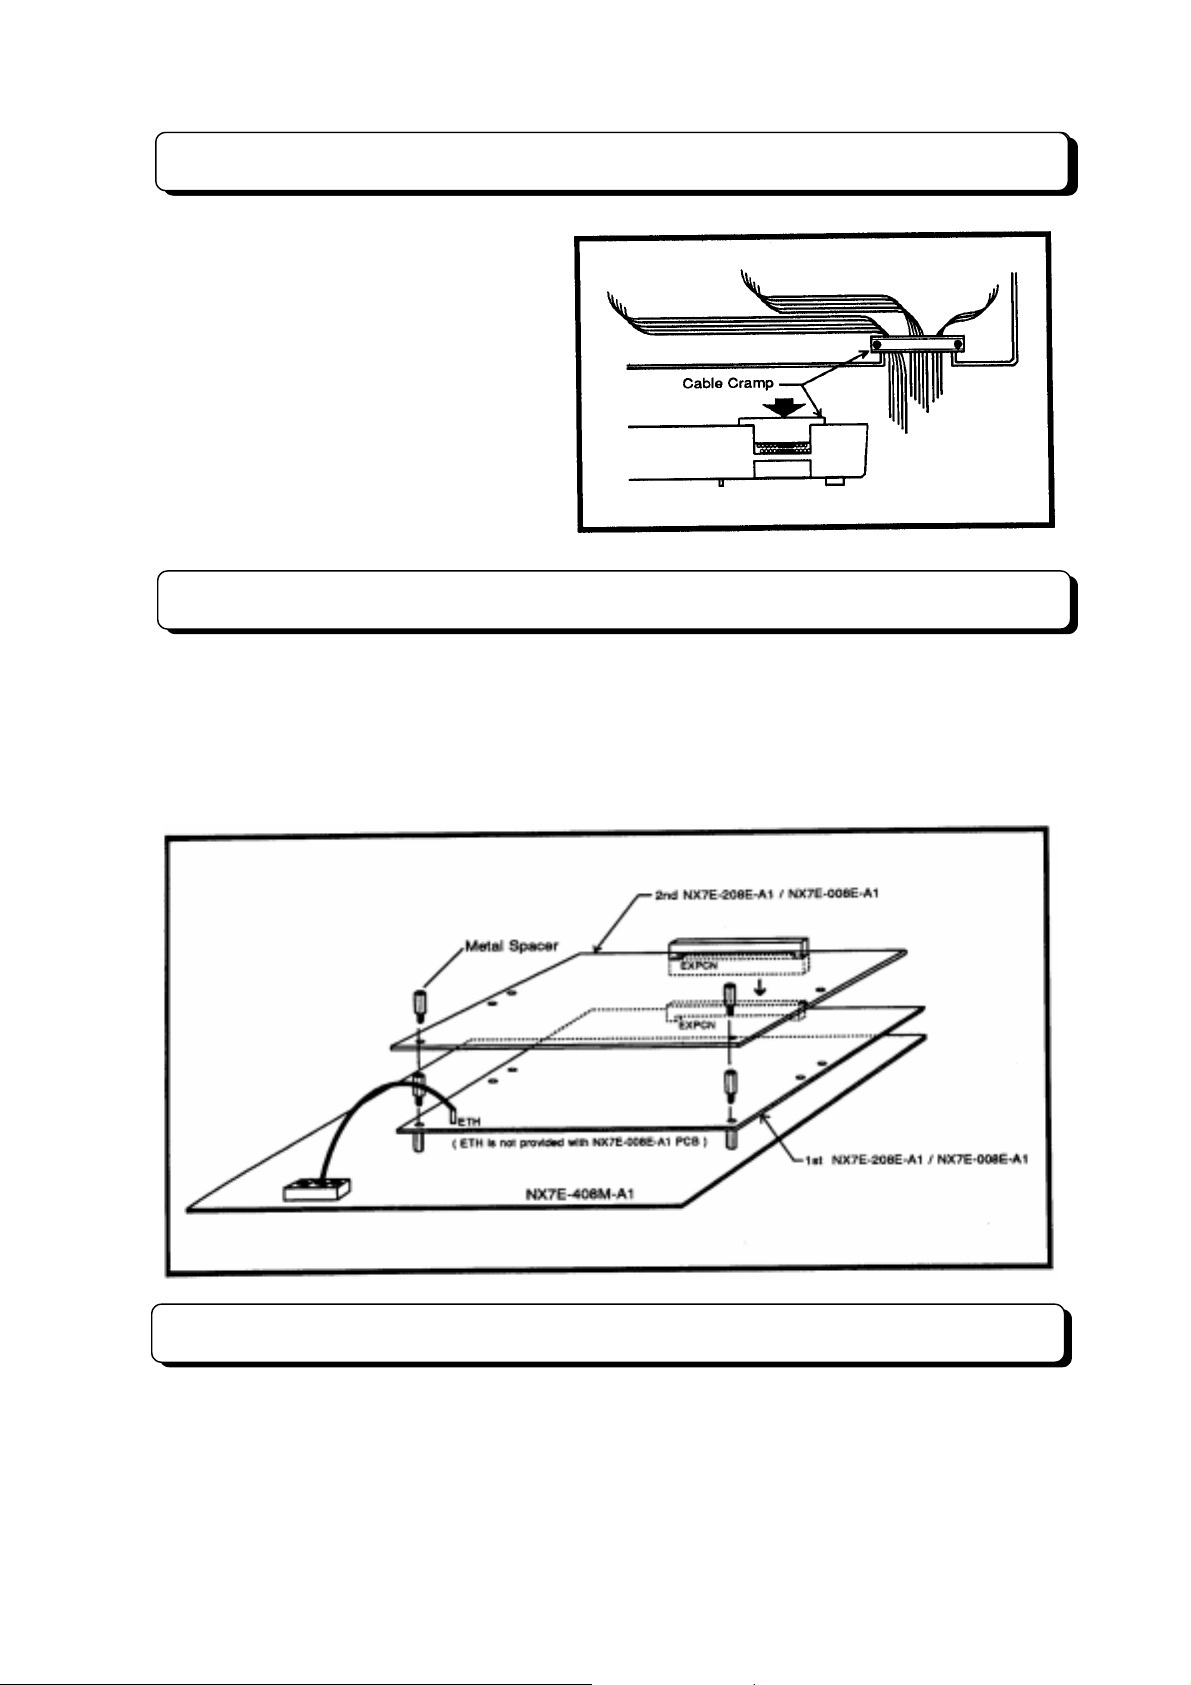
Cable Routing and Cramping
All cabling should exit from the right side of
the Main Equipment. Route and cramp the
cable for the Main Equipment as illustrated
on the right side.
Installing Expansion PCBs
The NX7E-208E-A1 PCB is CO/PBX and station inter face card which provides two CO/PBX interface,
eight station interface. T he NX7E-008E-A1 PCB is station interface card which provides eight station
interface. This two cards are required when expanding the your system.
Install NX7E-208E-A1 and/or NX7E-008E-A1 PCB into the Main Equipment as illustrated below. An earth
ground (ETH) connection is required whenever the NX7E-208E-A1 PCB is installed in the system.
Installing DLS Console
The TX-Z 824 system can accomm odate up t o 3 DL S Consoles used as DSS (D irect Stat ion S election)
console. Refer to “Installing DLS Console” in page 3-3-10.
¾
3-2-5
¾
Page 48
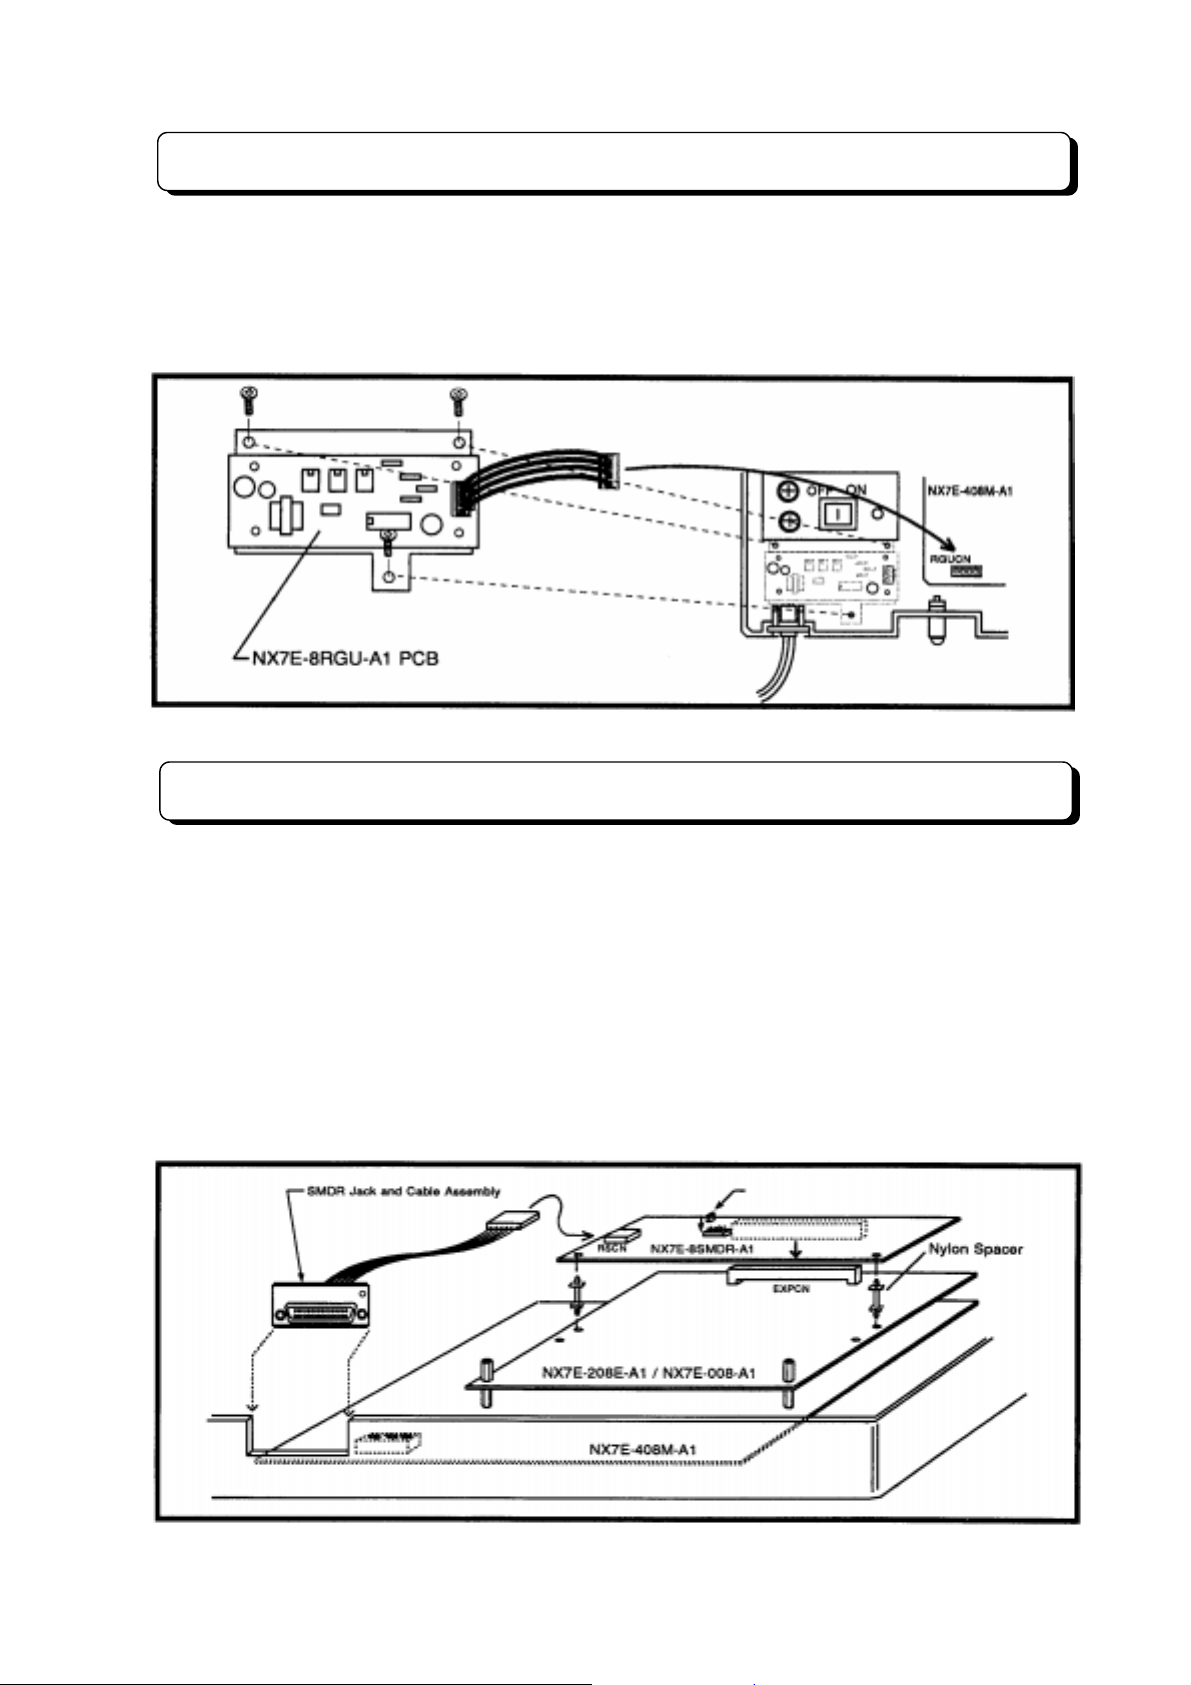
Installing the Ringer Unit
The ring generator sour ce unit (NX7 E-8RGU-A1 PCB) must be i nstalled in th e system when connected
the Single Line Telephone as system extension.
To install NX7E-8RGU-A1 PCB, mount the PCB on the right position of the Main Equipment, and connect
an attached cable to the connector mounted on the NX7E-408M-A1 PCB labeled RGUCN. (See the
following illustrat ion .)
Installing the SMDR and Printer/PC
For use of the Station Message Detail Recording feature, NX7E-8SMDR-A1 PCB must be installed in the
system. To install the NX7E-8SMDR-A1 in the Main Equipment:
Step 1:
A1, NX7E-208E-A1 or NX7E-008E-A1).
Step 2:
insert the cable attached with RS232C Jack into the RSCN connector on the NX7E-8SMDR-A1 PCB.
Refer to RS-232C Cable Assembly in Installation of TX-Z
Step 3:
SMDR Jack Assembly. Set the interface conditions of the printer as follows:
Word length: 7 bit, Parity bit: Even parity, Start bit: 1 bit, Stop bit length: 2 bit.
Insert the NX7E-8SM DR-A1 PCB into the connec tor labeled EXPCN on the units ( NX7E-408M-
Mount the SMDR Jack and Cable Assembly on the bottom side of the Main Equipment, and then
308 System (P 3-1-7).
After installing the NX7E-8SMDR-A1 PCB, using a RS232C cable, plug the printer/ PC to the
Set SW1 to the proper Bit Rate position.
¾
3-2-6
¾
Page 49
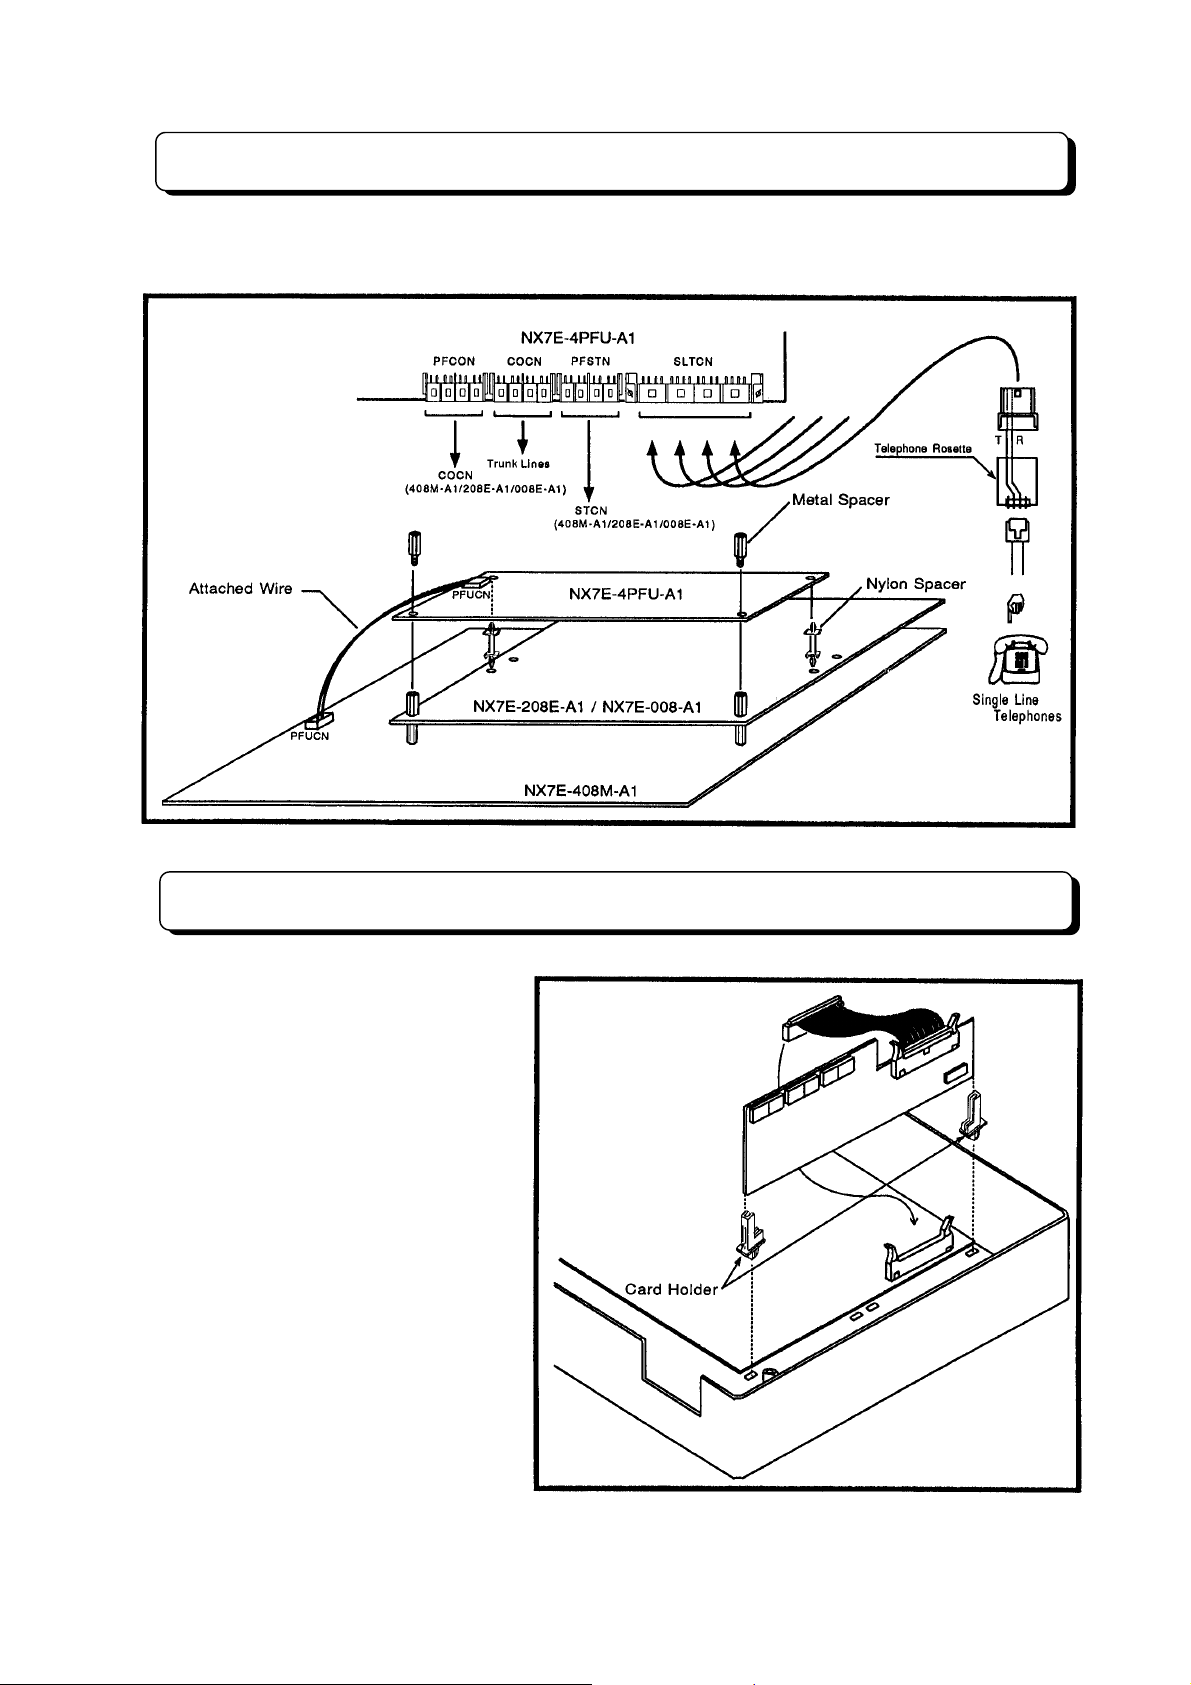
Installing 4PFU-A1 PCB
The NX7E-4PFU-A1 PCB pr o vides 4 po wer f ai lure cu t through circuits to single li ne tel eph one. T o ins ta ll
PCB and connect the wires, refer to following a illustration.
Installing 8DHEXU-A1 PCB
The NX7E-8DHEXU-A1 PCB provides:
- Connections for two alarm sensors
- Connections for customer supplied
MOH and BGM
- Two Doorphone Box interfaces
- Two external paging outputs
- Two common-use relay contact
Step 1:
attached with the PCB into the
specified holes of the Main Equipment.
Step 2:
along the card holders.
Step 3:
attached with the PCB to the DHUCN
connector on the NX7E-408M-A1 PCB.
Insert the card holders
Insert a 8DHEXU-A1 PCB
Connect the ribbon cable
¾
3-2-7
¾
Page 50
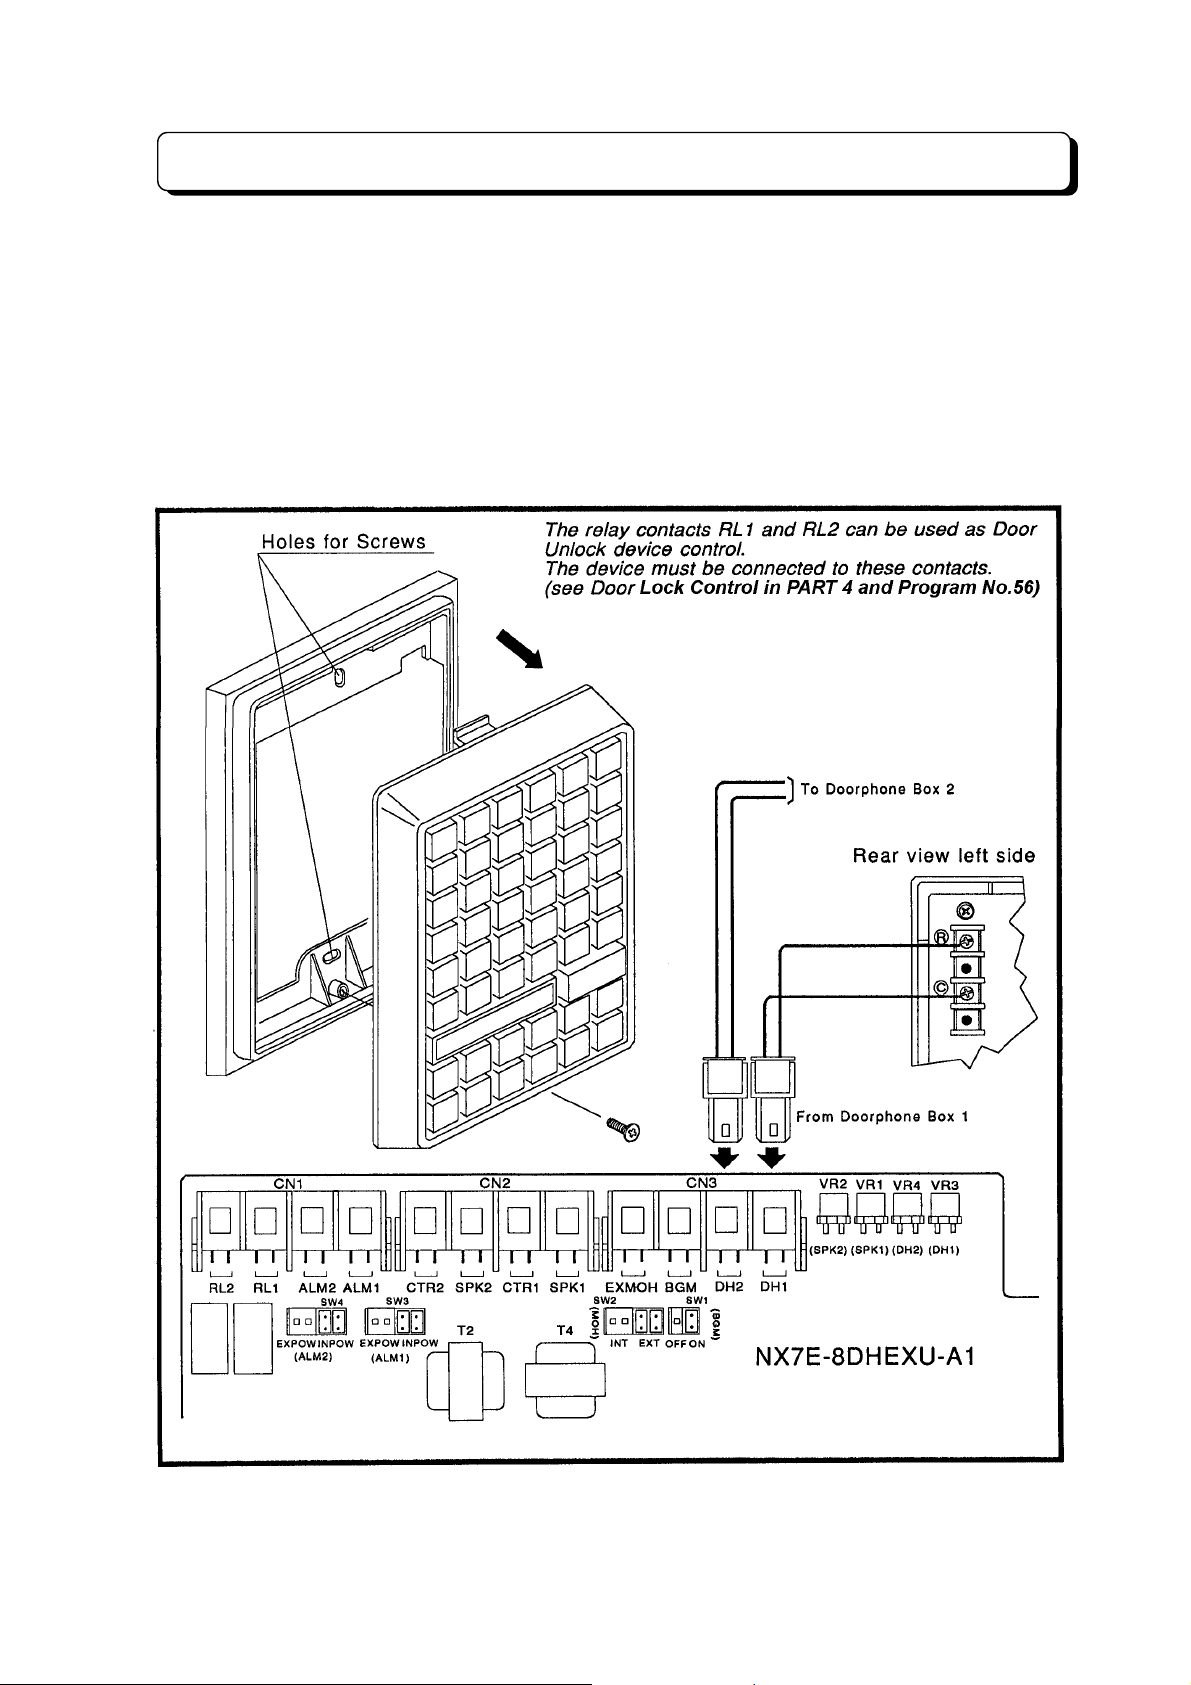
Installing the Doorphone Box
This section provides information on installing the Doorphone Boxes in a TX-Z 824 system.
Specifications:
Step 1:
A1 PCB" on page 3-2-7).
Step 2:
the other end to DH1 on the 8DHEX U-A1 PCB f or Doorp hone B ox 1 or DH2 for Doorpho ne Box 2. ( See
illustration below)
Step 3:
Box 1 or VR4 for Doorphone Box 2.
Mount the 8DHEXU-A1 PC B on the base unit of the Main Equ ipment (see "Ins talling 8DHEXU-
Connect wires t o the term inal m arked R and C on t he back of the Door phone Box , and connec t
Adjust the audio lev el with VR 3 on the 8DHEX U-A1 PC B in the Mai n Equipm ent for Door phone
150 m wire maximum of 0.5 f twisted telephone cable.
¾
3-2-8
¾
Page 51
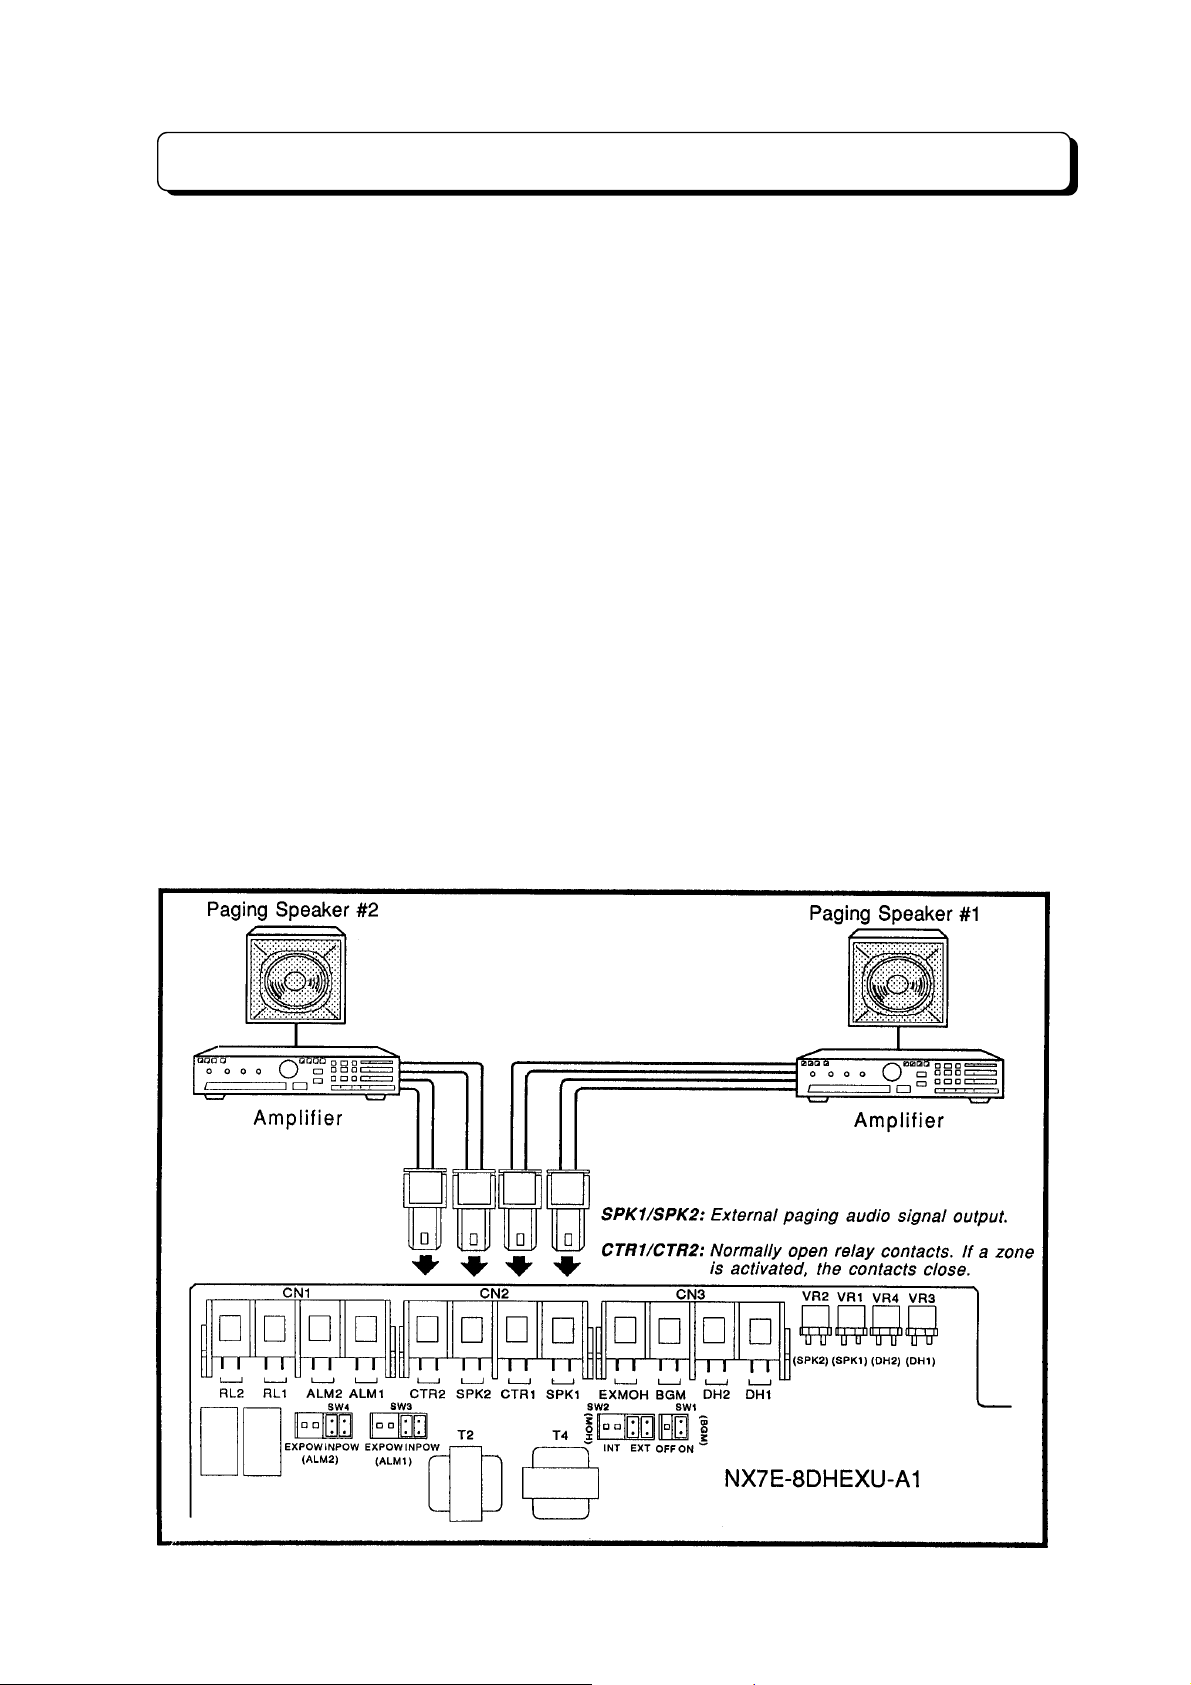
Installing External Paging Output
This section provides information on t he installation of external devices to the external zone(s). Each
zone can receive T runk Audib le, BG M an d P aging. Speak ers can be use d to broa dcast thes e s ignals at
the zone. External page zones can be used to provide Meet-Me Paging. Ex ternal zones have norm ally
open contacts. The relays for each zone are energized when Paging amplifiers are in use, including
Trunk audible and BGM (if programmed).
Specifications:
Step 1:
A1 PCB" on page 3-2-7).
Step 2:
External Zone 1. The amplif ier inputs must match the specif ications above. Attach the spe aker to your
amplifier.
Step 3:
External Zone 1.
Step 4:
External Zone 2. The amplif ier inputs must match the specif ications above. Attach the spe aker to your
amplifier.
Step 5:
External Zone 2.
Step 6:
Step 7:
Mount the 8DHEXU-A1 PC B on the base unit of the Main Equ ipment (see "Ins talling 8DHEXU-
Connect wires fr om the connector on the 8DHEXU-A1 PCB labeled SPK1 to an am plifier for
Connect wires from the connector on the 8DHEXU-A1 PCB labeled CTR1 to the device for
Connect wires fr om the connector on the 8DHEXU-A1 PCB labeled SPK2 to an am plifier for
Connect wires from the connector on the 8DHEXU-A1 PCB labeled CTR2 to the device for
Adjust the volume level of External Zone 1 with VR1 on the 8DHEXU-A1 PCB.
Adjust the volume level of External Zone 2 with VR2 on the 8DHEXU-A1 PCB.
Output Impedance: 600 ohms
Output Level: Nominal 250 mV (-10 dBm)
Maximum Output: 400 mV RMS
Relay Contact: 1.25 amps for 24 V DC resistive loads
¾
3-2-9
¾
Page 52
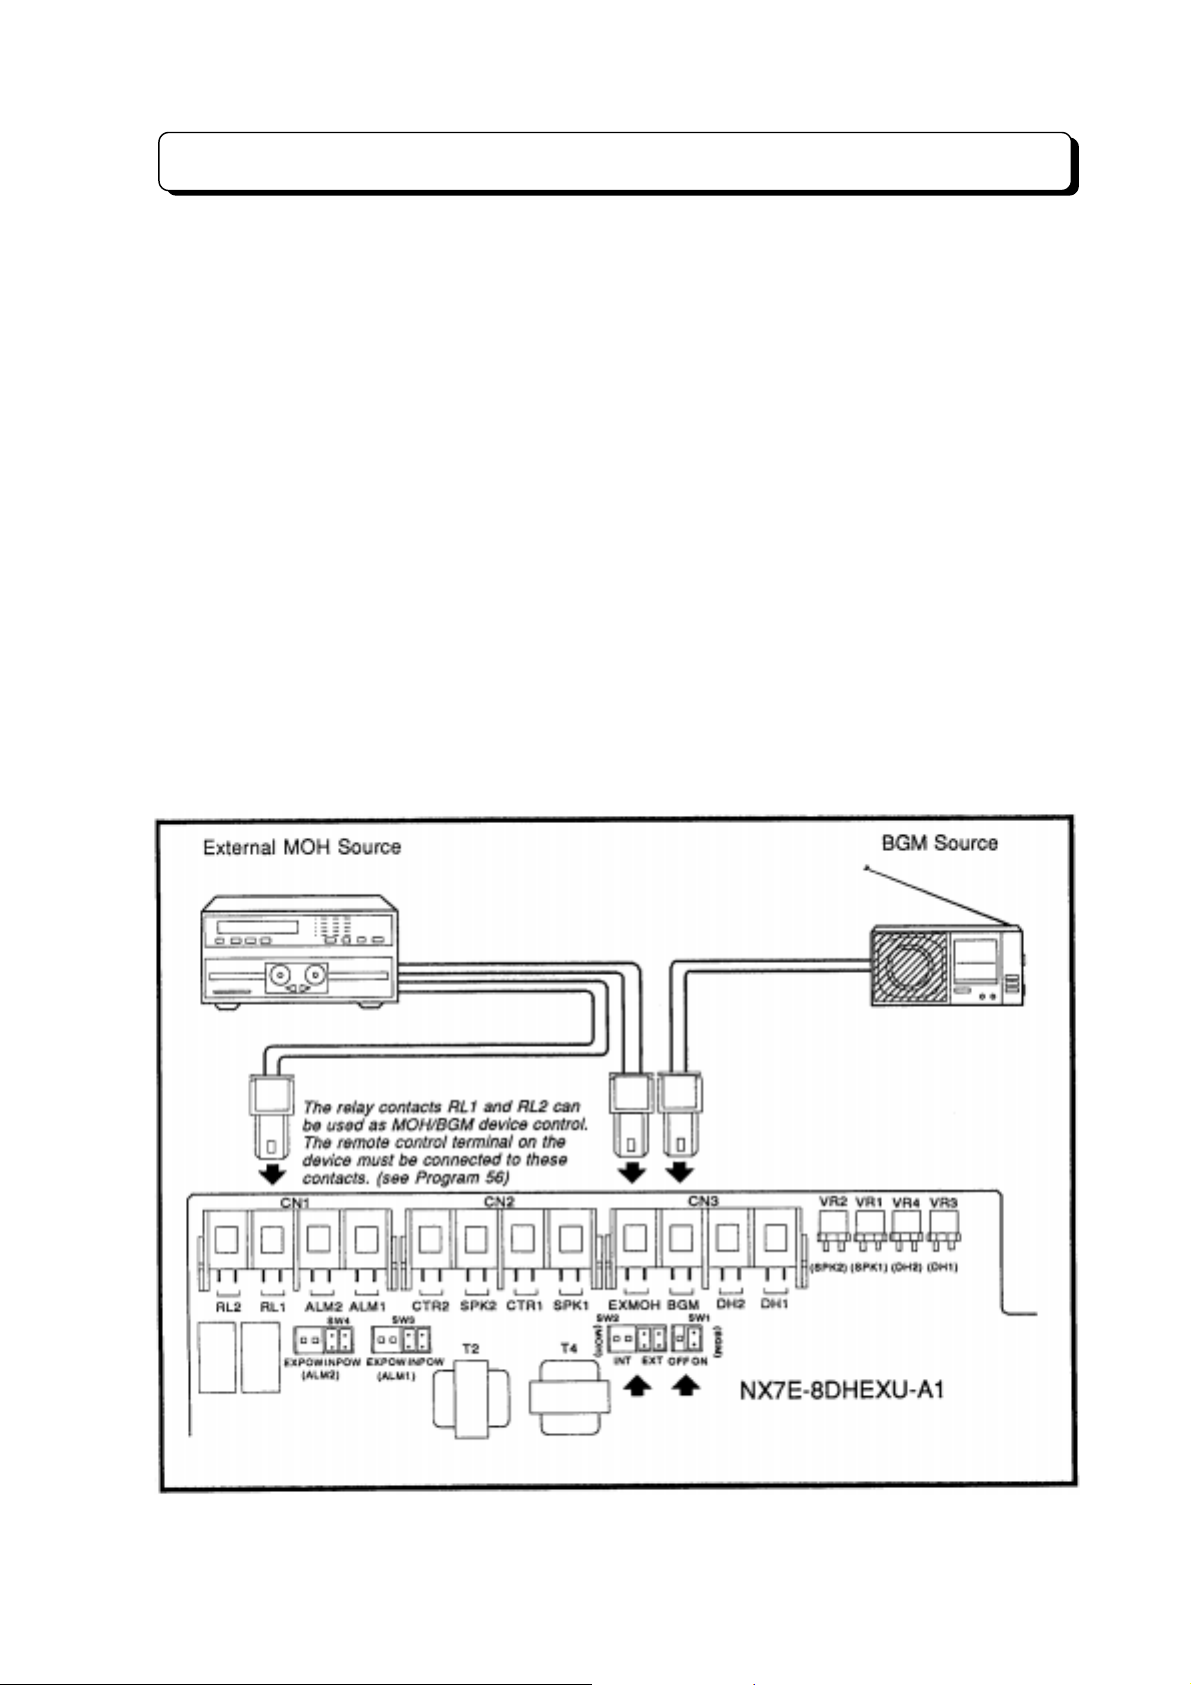
Installing External MOH and BGM
This section provides infor mation on ins talling Backgr ound Music (BG M) and Ex ternal Music On Ho ld in
the TX-Z
824 system.
Specifications:
Mount the 8DHEXU-A1 PCB o n the b ase un it of the M ain E quipm ent (see "I nstal ling 8DHEX U-A1 P CB"
on page 3-2-7).
Installation of External Source of MOH (Music On Hold):
Step 1:
EXMOH.
Step 2:
position.)
Step 3:
Installation of BGM (Background Music) Source:
Step 1:
BGM.
Step 2:
Step 3:
Connect inputs f rom external MOH source to the con nector on the 8DHEXU-A1 PCB labeled
Set SW2 strap to the EXT position. (If the External MOH is not requir ed, set SW2 to the INT
Adjust the output level of External MOH Source.
Connect inputs from external BGM source to the connector on the 8DH EXU-A1 PCB labeled
Set SW1 strap to the ON position. (If the BGM is not required, set SW2 to the OFF position.)
Adjust the output level of External BGM Source.
Input Impedance: 600 ohms
Input Level: Nominal 250 mV (-10 dBm)
Maximum Input: 1 Vrms
¾
3-2-10
¾
Page 53
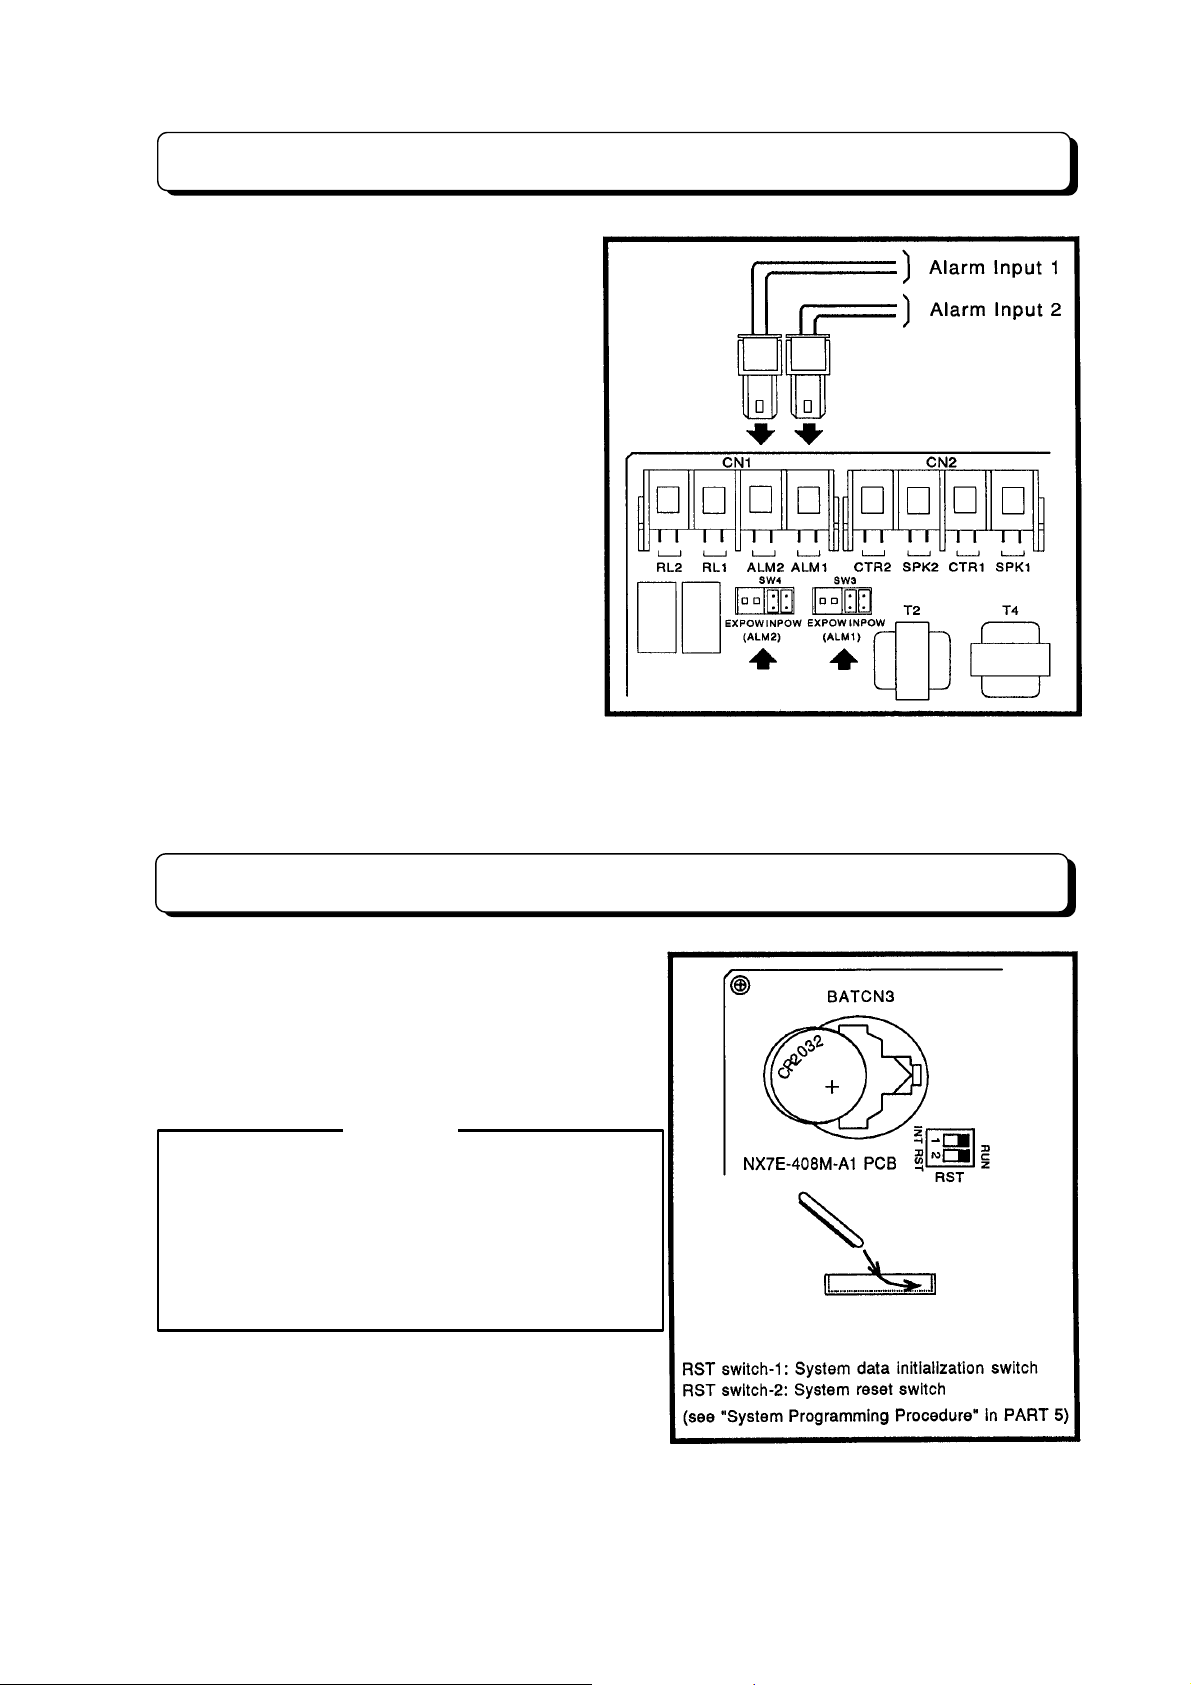
Installing External Alarm Sensor
This section provides information on the
installation of an external alarm. Two alarms
can be connected t o the system . Program ming
determines if the alarm inputs require an open
or a closed circuit.
Specifications:
When using internal power.
Loop Resistance: Less then 100 ohms.
When using external DC power.
Supplied DC power to system:
5 to 24 V DC with 0.65 mA to 4.5 mA.
Step 1:
the connector on the 8D HEXU- A1 PC B label ed
ALM1.
Step 2:
the connector on the 8D HEXU- A1 PC B label ed
ALM2.
NOTE:
Connect wires form External Alarm 1 to
Connect wires form External Alarm 2 to
When using internal power to connect the dry contact of alarm-detecting device to the system, set
SW3 for Alarm 1 or SW4 for Alarm 2 to the INPOW position.
Lithium Battery Installation
Locate and remove the lith ium battery in the upper lefthand corner of NX 7E-408M-A1 PCB. Remove the old
battery and replace it with the new battery as
illustration. The batter y, when fully charged, will retain
memory contents for approximately 24 months.
Battery Type:
SONY CR2032 Lithium Battery
CAUTION
- T he battery may explode if they are not replaced
properly.
- Never replace with battery other than the ones
specified by the manufacturer (battery of the same
type or the equivalent).
- Dispose of spent batteries as instructed by the
manufacturer of the battery.
* "B" flashes on the display of the Key Telephone
when system batter y is l o w. R eplac e i t with t he new
battery. (If battery is not installed in the system , "B"
is not indicated on the display.)
¾
3-2-11
¾
Page 54
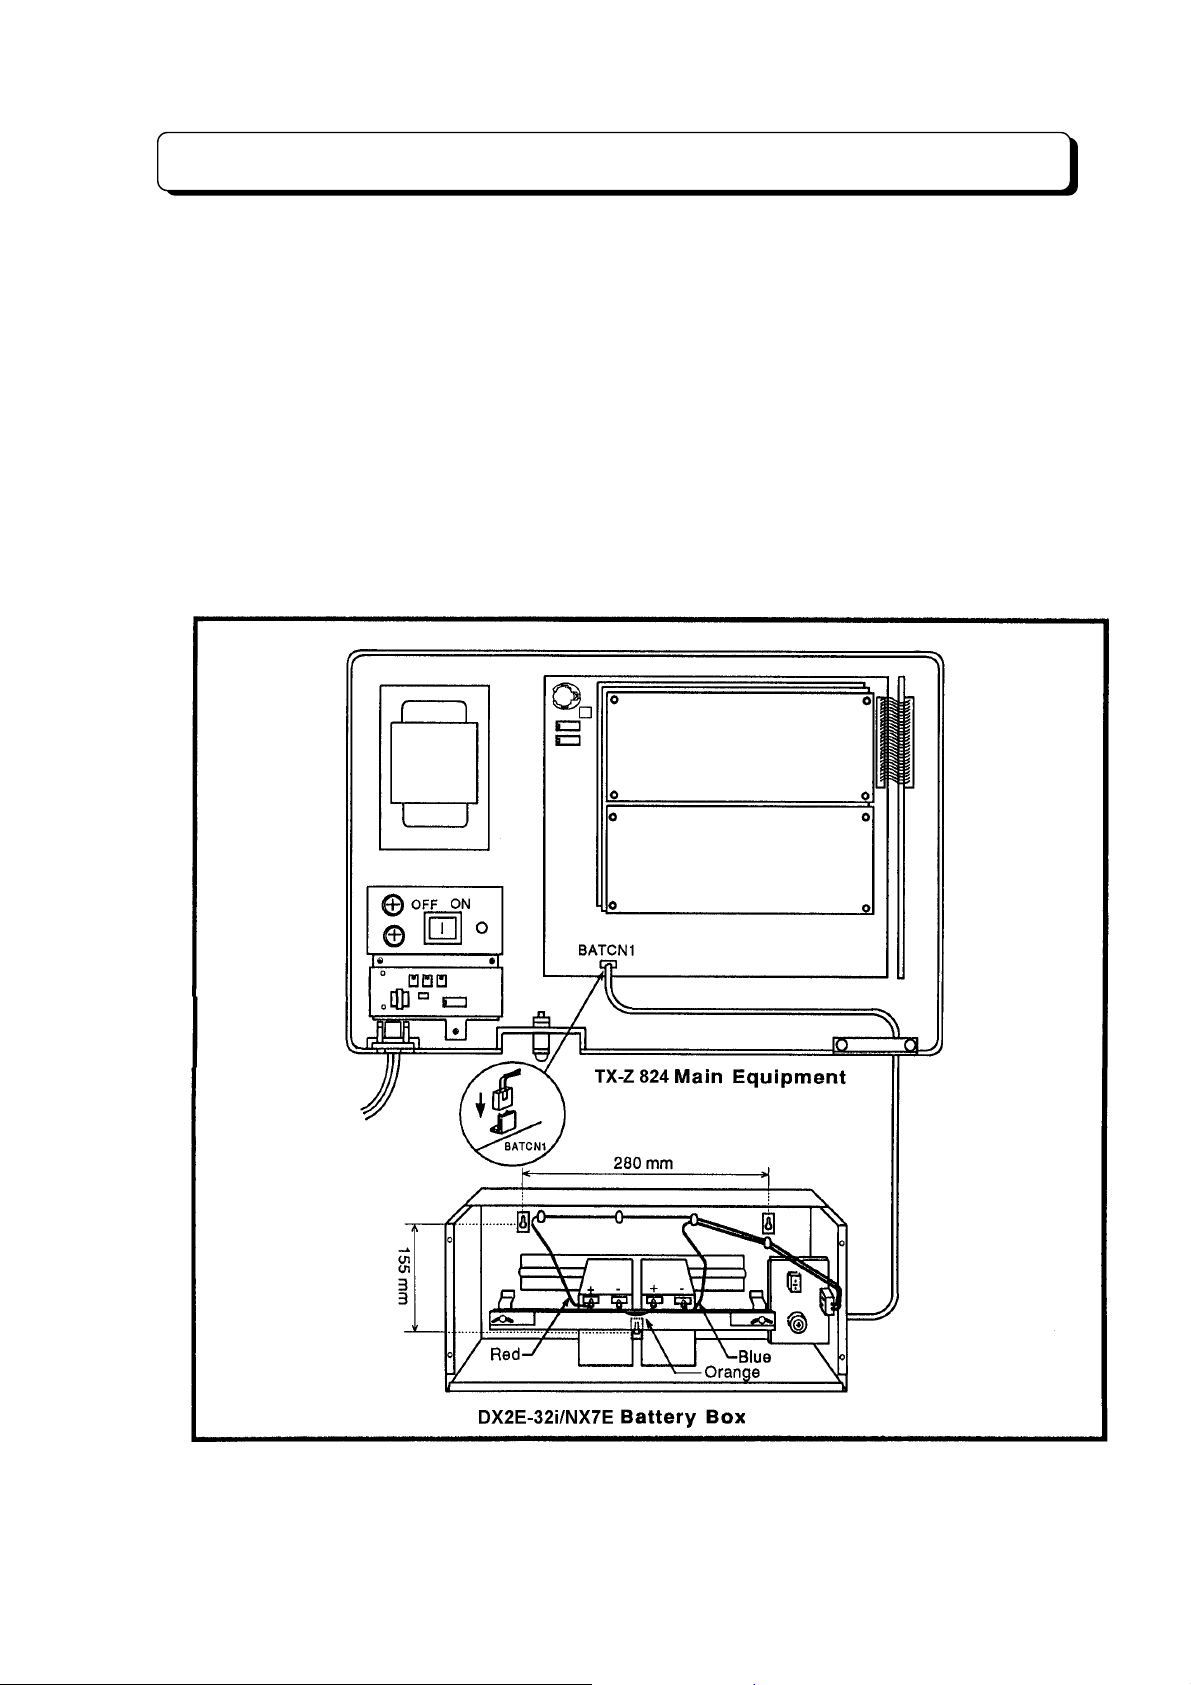
Backup Battery Connection
The Battery Backup Box provides power during a power failure.
Backup Duration:
Battery:
The Battery Backup Box may be wall- or floor-mounted. After mounting Battery Backup Box, follow these
steps to install batteries and connect the cable:
Step 1:
Step 2:
Step 3:
connect the positive term inal of one battery to the negative terminal of the other b attery. ( See illus trat ion
below)
Step 4:
on the NX7E-408M-A1 PCB installed in the Main Equipment.
Yuasa NP2.6-12 (rated at 12 volts, 2.6 am p-hour s)
Insert one pair of batteries. (Batteries should always be installed and replaced in pairs).
Secure batteries with tie-wraps supplie d.
Using battery term inal screws, connect t he wiring to the battery term inals. Use the red wire to
With 2-wire connecti ng cable, conn ect Batter y Backup Box to the connec tor mark ed "BATCN1"
Approximately 1 hr. (depending on traffic)
¾
3-2-12
¾
Page 55

PART3-3
INSTALLATION OF
TX-Z 1232/2464 SYSTEM
Page 56

Table of Contents
Installing the TX-Z 2464 Main Equipment.....................................................3-3-1
The Card Locations of TX-Z 2464 ME..........................................................3-3-2
TX-Z 2464 ME Grounding Requirements .....................................................3-3-3
Trunk Line Connection ..................................................................................3-3-3
Extension Connection ...................................................................................3-3-4
Cable Routing and Cramping........................................................................3-3-6
Installing the Expansion Mother Board .........................................................3-3-6
Installing the Expansion Power Supply Unit .................................................3-3-7
Installing the Ringer Unit...............................................................................3-3-7
Installing 24DHU-A1 PCB .............................................................................3-3-8
Installing NX7E-12PFU-A1 PCB ...................................................................3-3-9
Installing NX7E-24SMDR-A1 PCB and Printer/PC.......................................3-3-9
Installing DLS Console................................................................................3-3-10
Installing Optional Equipment .....................................................................3-3-12
TX-Z 1232/2464 Backup Battery Connection .............................................3-3-16
Note: Refer to PART 7 for installation of 24SMCID-A1, 8CI D Adaptor, and 24VAU-A1.
Page 57
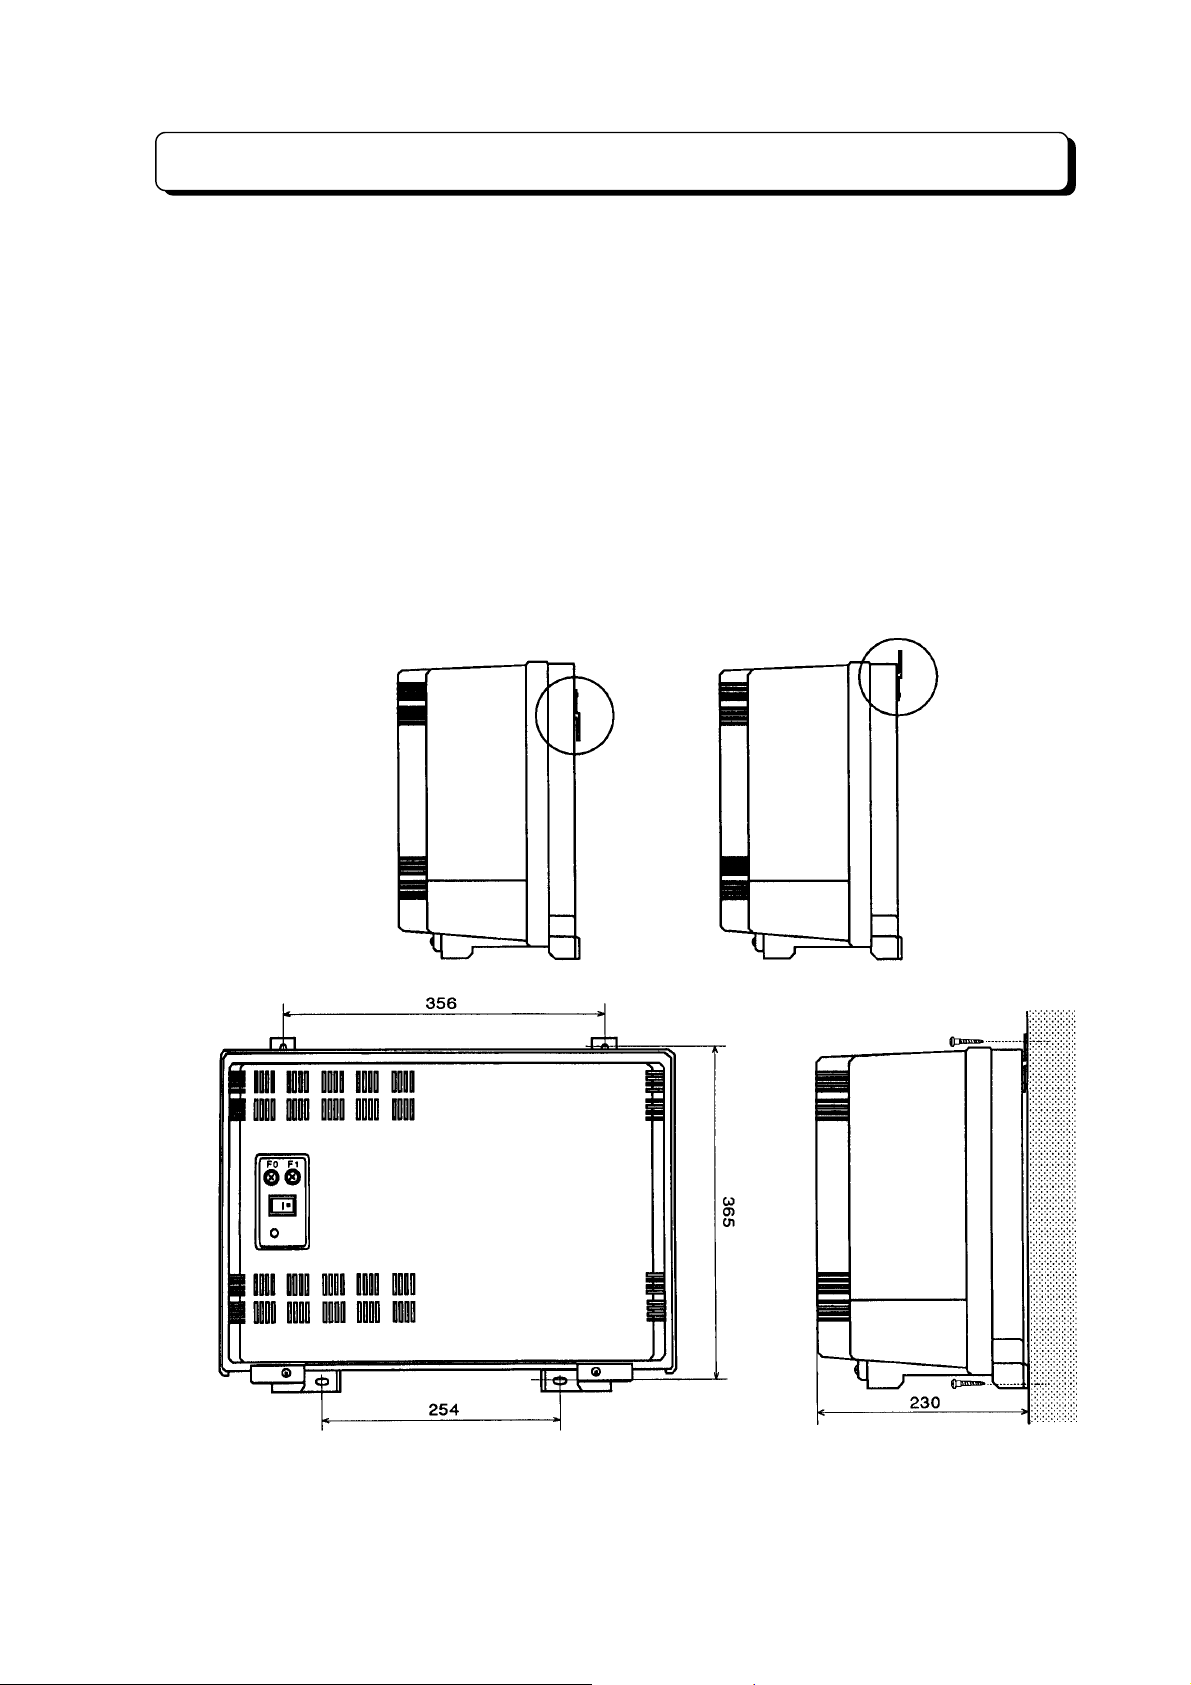
Installing the TX-Z 2464 Main Equipment
The Main Equipment should be installed in a clean, dry, centrally located spot (such as a closet), where it
is out of direct sunlight. The area should be free of moisture (water, dampness, etc.), and away from any
equipment which might vibrate. You should choose a location that is well ventilated, where the
temperature does not exceed that of a normal room.
Step 1:
Step 2:
Step 3:
356 mm apart.
Step 4:
on the wall and then fully tighten the wood screws.
Step 5:
Note:
Remove the wall mounting brackets after loosening their two retaining screws.
Reinstall the mounting brackets, upside down, and screw them.
Tack-fasten two of the four wood screws (provided with Ma in Equipment) on the wall at ab out
Place the two holes of the m ain unit over the tack ed wood screws to hang the Main Equipm ent
Fasten another two screws on the wall through the two bottom holes of the Main Equipment.
The wall where the TX-Z 2464 Main Equipment is to be mounted must be able to support a
weight of TX-Z 2464 Main Equipment.
¾
3-3-1
¾
Page 58
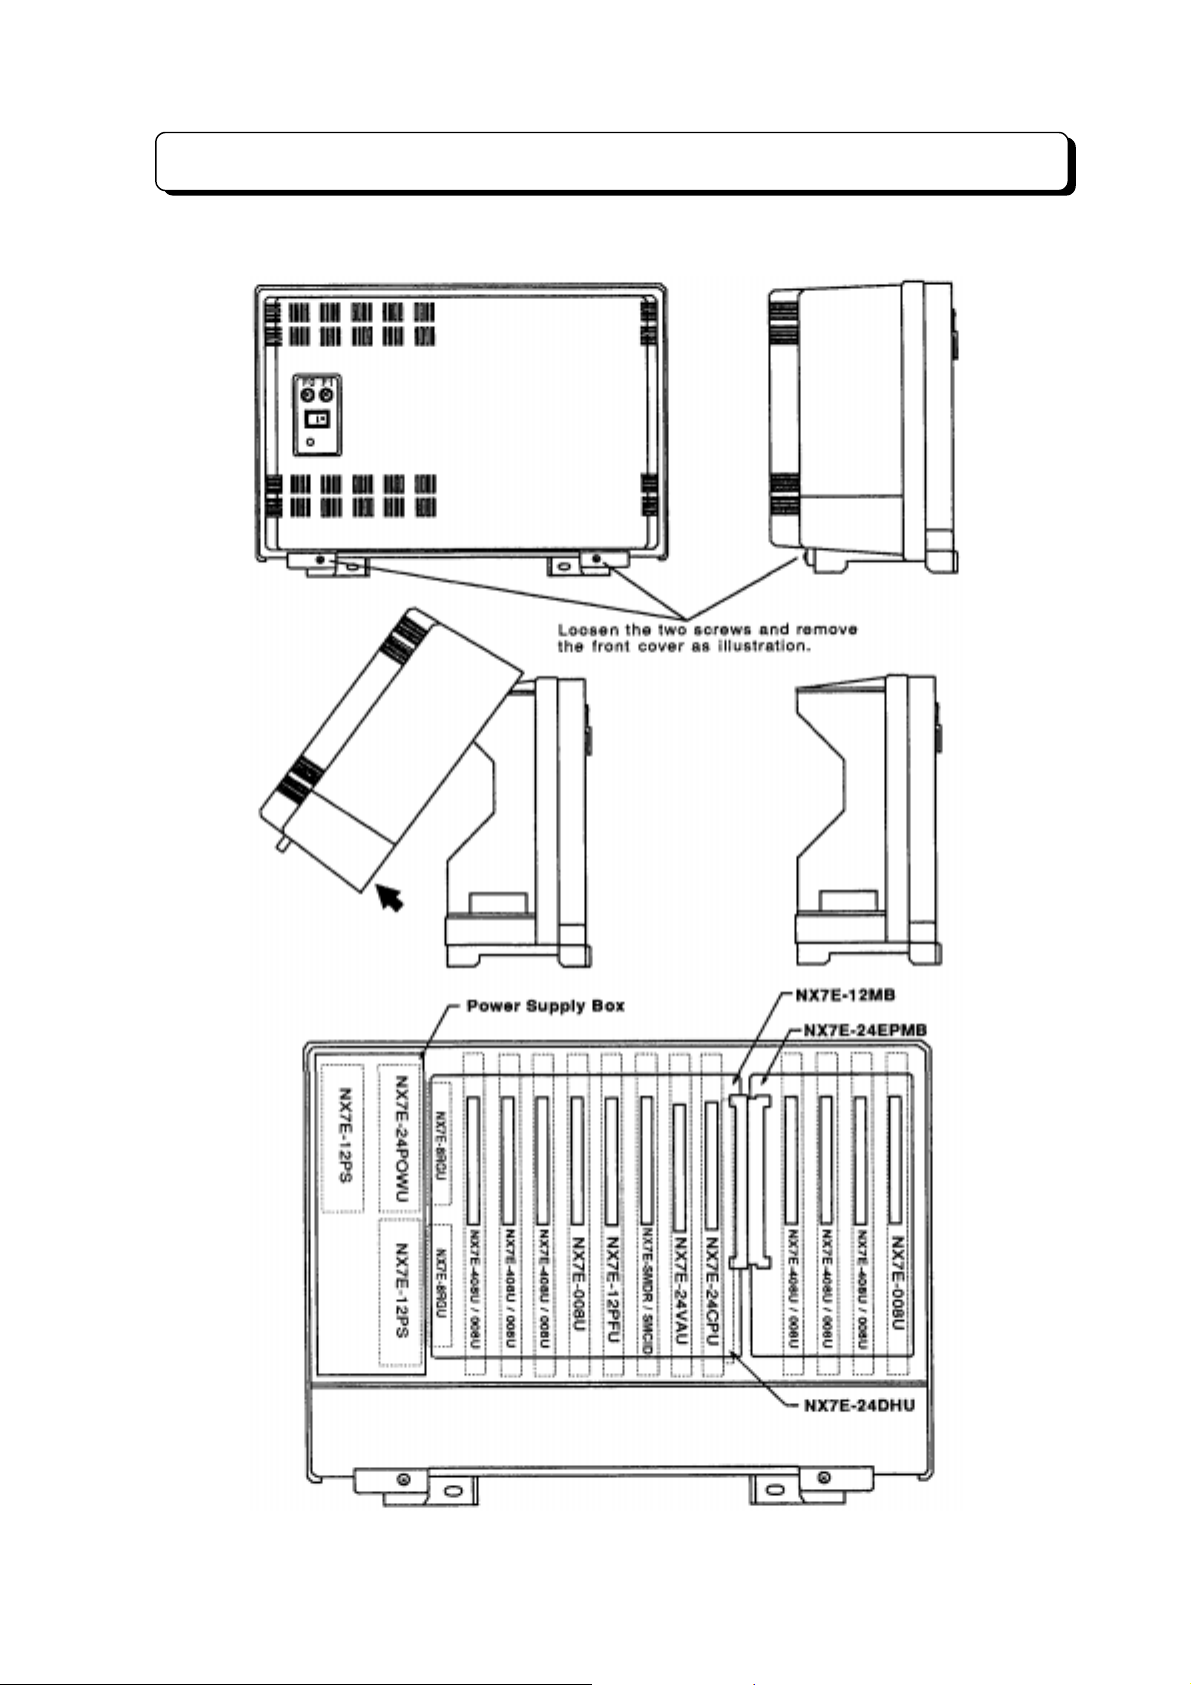
The Card Locations of TX-Z 2464 ME
The card locations for the TX-Z 2464 Main Equipment are shown in the following illustration.
¾
3-3-2
¾
Page 59
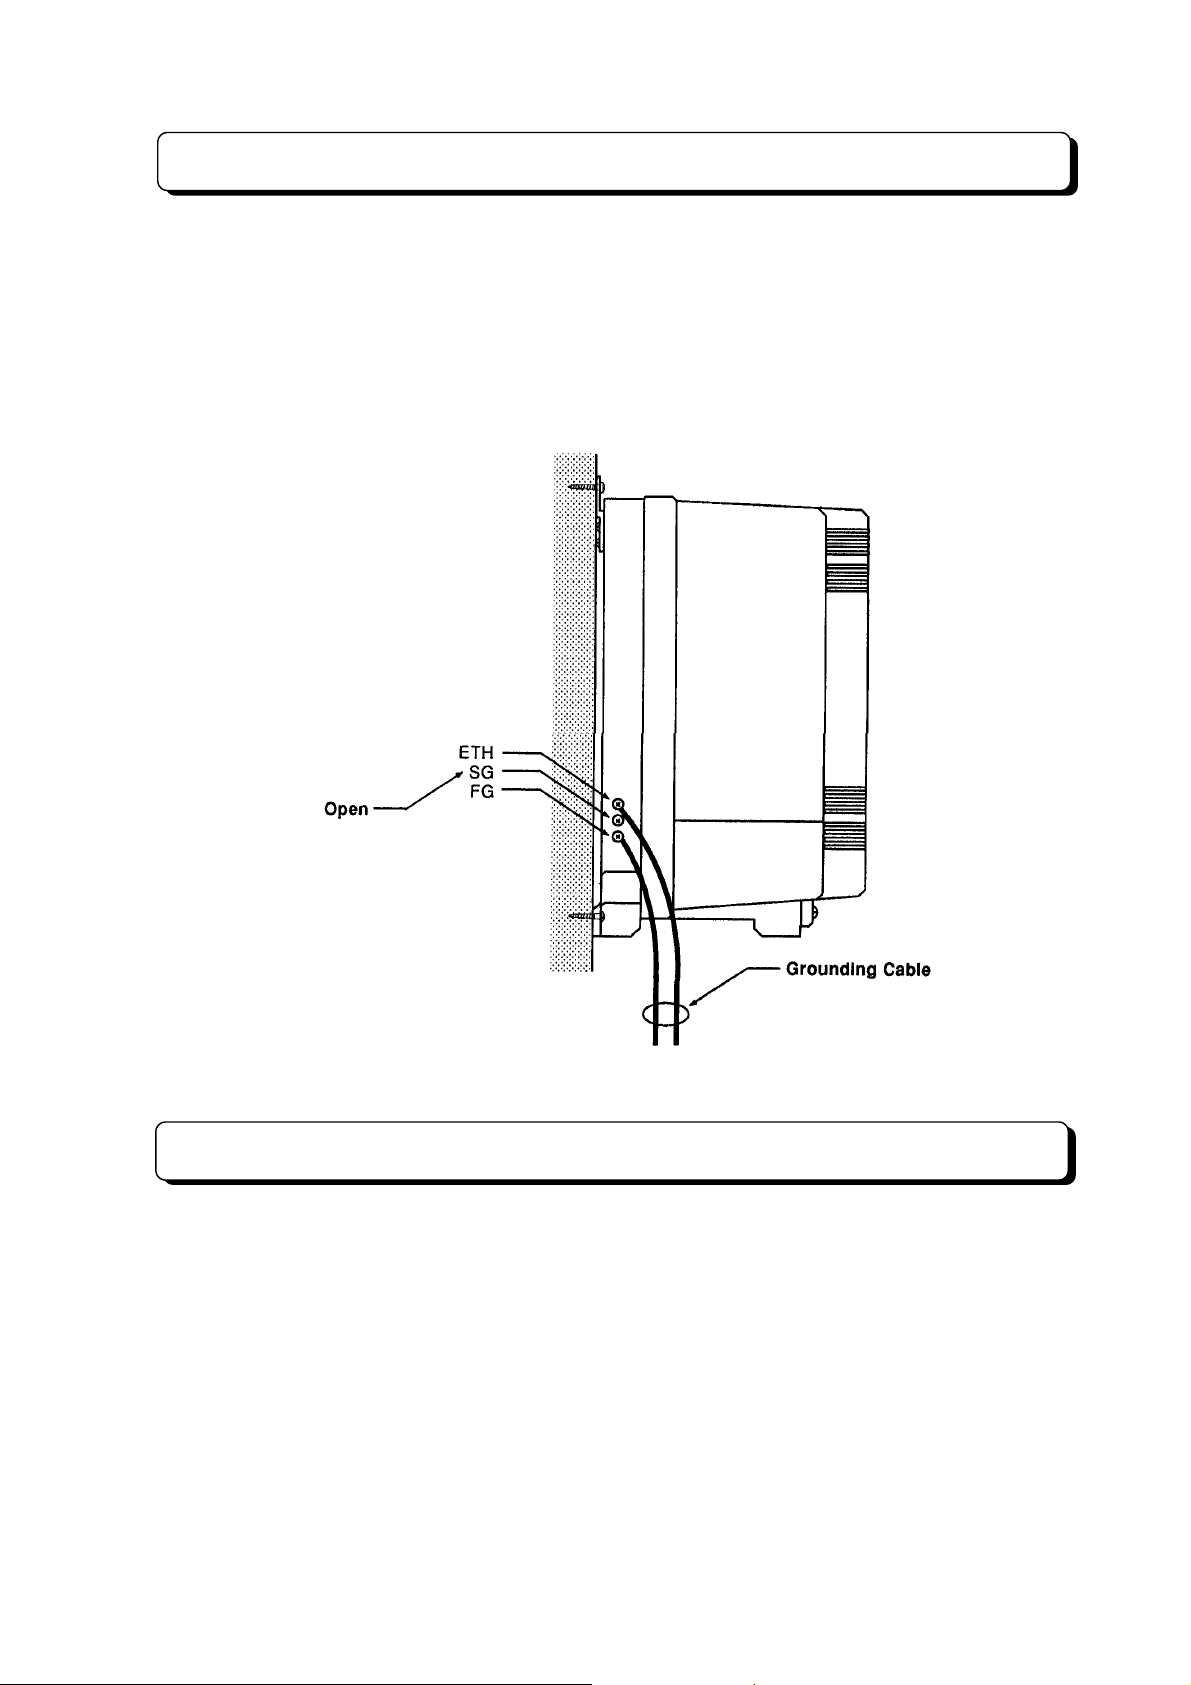
TX-Z 2464 ME Grounding Requirements
The Main Equipment m ust be properly grounded. If circuit ground is not available at the dedic ated AC
outlet, the following steps should be taken:
Step 1:
procedures.
Step 2:
operating telephone company procedures.
Step 3:
Provide a s u ita ble metal pipe ground i n ac c orda nc e with the local op er ati ng t eleph o ne c ompany
If no metal pipe ground is available, a ground rod should be installed in accordance with the local
Where a ground is used, a grounding terminal is provided on the Main Equipment.
Trunk Line Connection
The Trunk (CO/PBX) lines s hall be connected as illustrat ion. Make connection from Telec om provided
connector to one of the connector on the NX7E-408U-A1 units labeled COCN.
The TX-Z 2464 Main Equipment can be installed twenty-four Trunk lines maximum. One NX7E-408U-A1
unit provides four int erface circuits for Trunk lines. The max imum number of NX7E-408U-A1 units that
can be installed in a system is as follows:
Basic System (TX-Z 1232): 3 units maximum
Expanded System (TX-Z 2464): 6 units maximum (NX7E-24EPMB is required)
¾
3-3-3
¾
Page 60
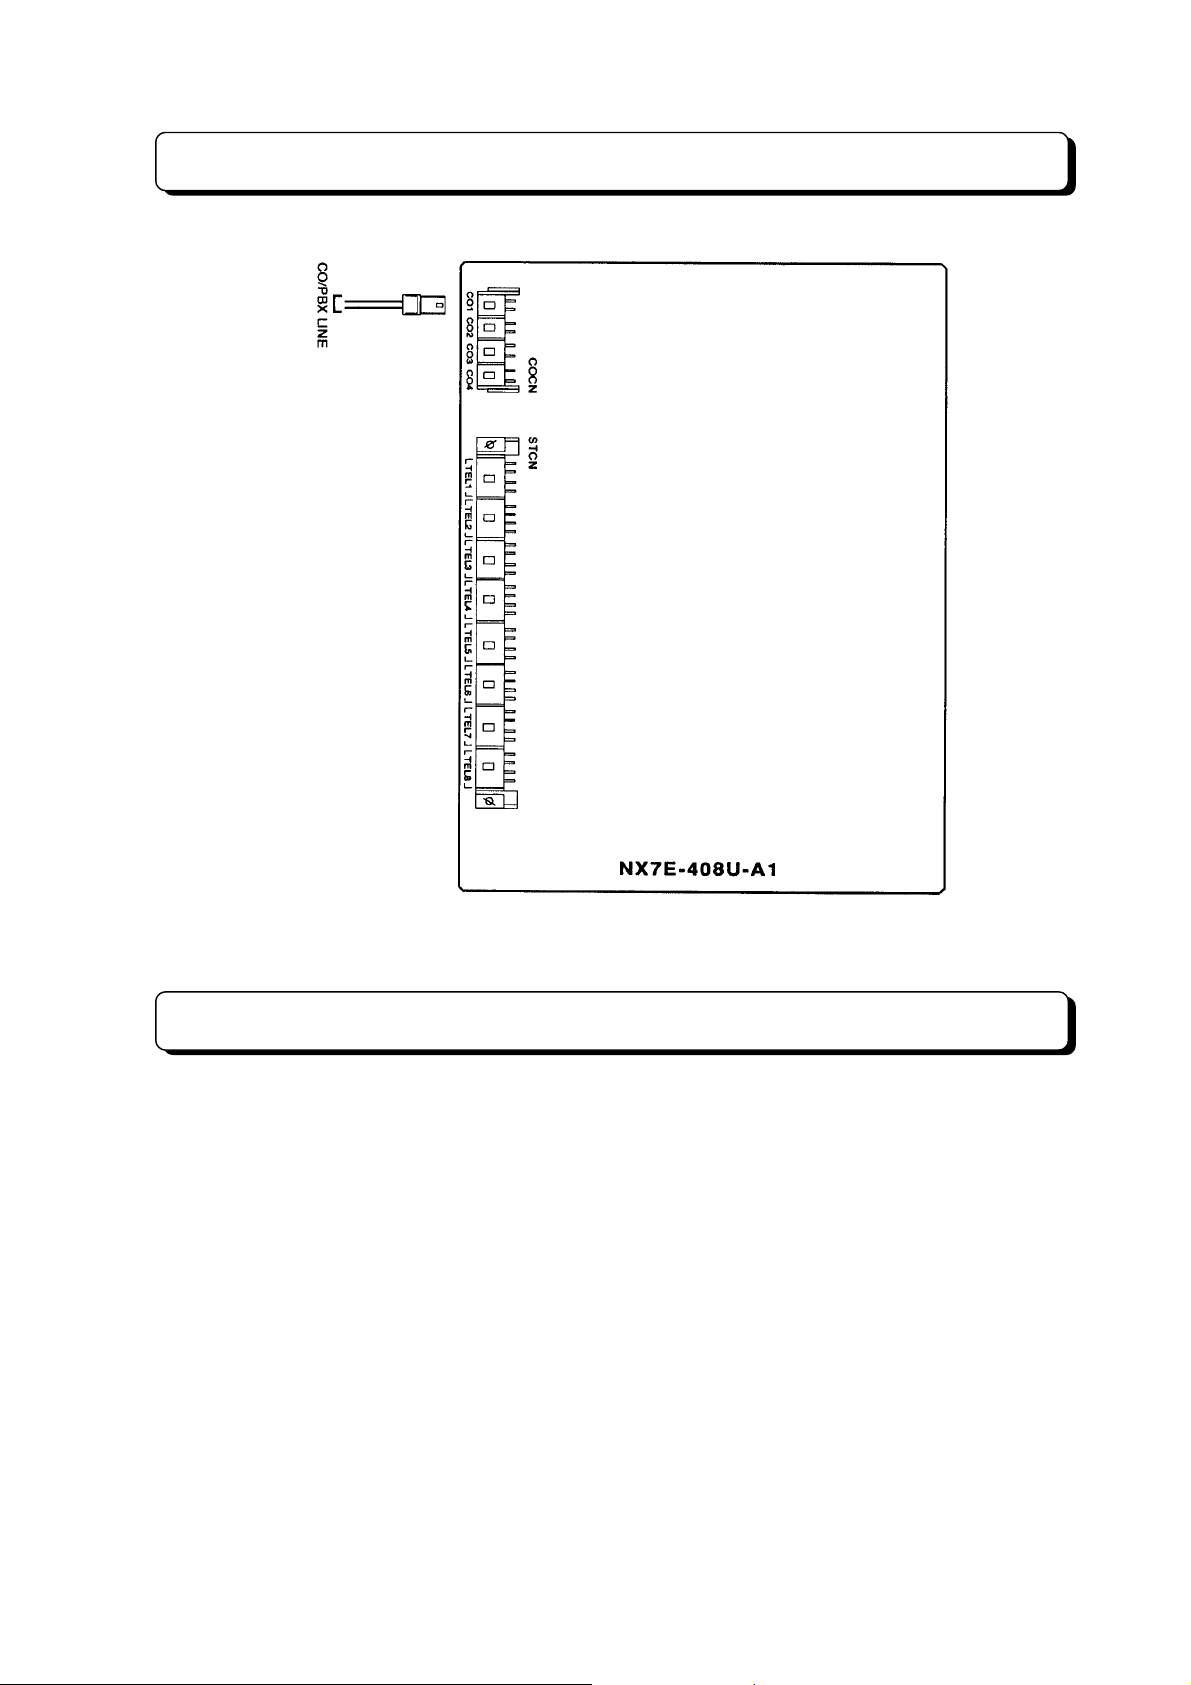
Trunk Line Connection
Extension Connection
The extension (Key Tele phone or Single Line T elephone) shall be connected as illustration. Insert the
connector from the ex tension into the fem ale connector on the units ( NX7E-408U-A1, NX7E-008 U-A1)
labeled STCN.
The TX-Z 2464 Main Equipm ent can be installed sixty-four extension ports maximum . A unit (NX7E408U-A1 or NX7E-008U-A1) provides eight interface circuits for extension. The maximum number of
NX7E-408U-A1 and NX7E-008U-A1 units that can be installed in a system is as follows:
Basic System (TX-Z 1232): 3 units of 408U-A1 (or 008U-A1) and 1 unit of 008U-A1.
Expanded System (TX-Z 2464): 6 units of 408U-A1 (or 008U-A1) and 2 units of 008U-A1.
(NX7E-24EPMB is required)
4-conductor wiring is re quired for each extension when connecting Key Telephone Set to the s ystem.
Use 2-conductor wiring for each extension when connecting Sin gle Line Telephone to the system. In
other words, L (Low) and H (High) will not be used for Single Line Telephone.
¾
3-3-4
¾
Page 61
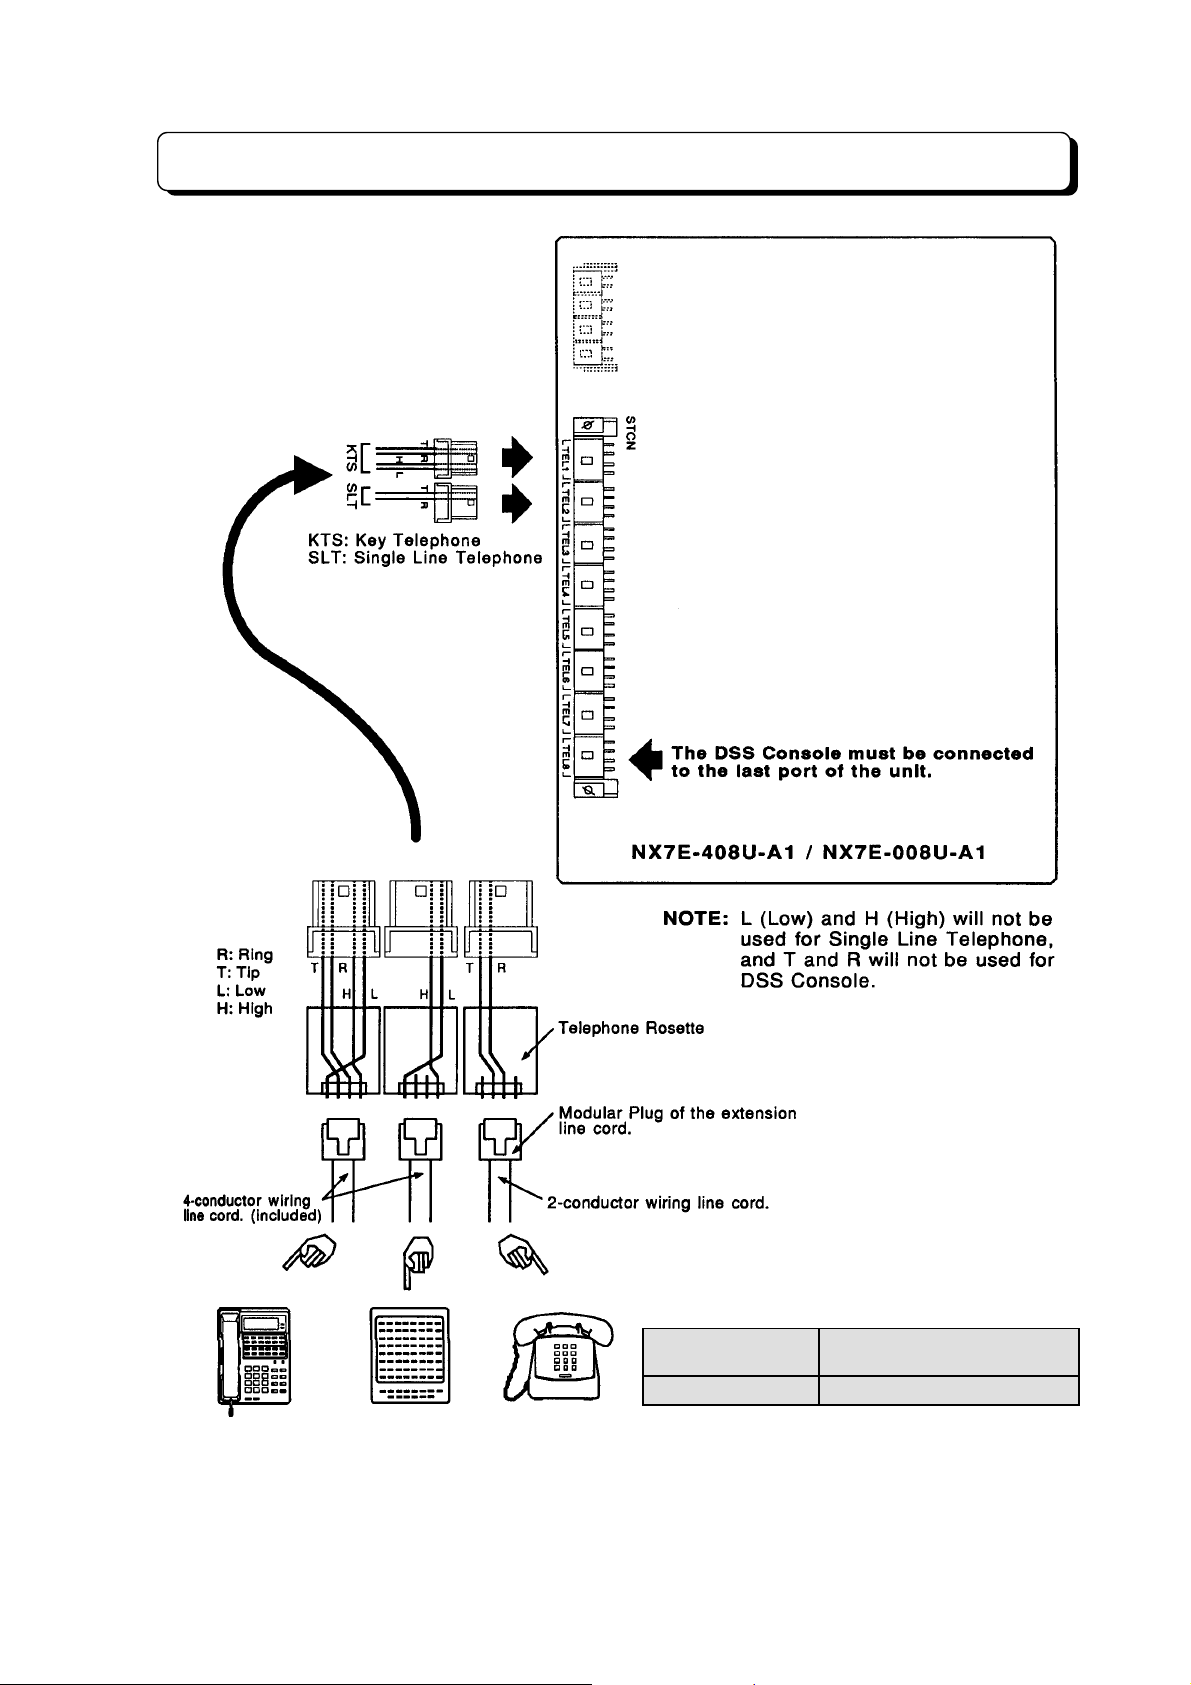
Extension Connection
Key Telephone DS S Co ns ole Single Line Teleph o ne
(DTMF/DP)
¾
3-3-5
The max. length of the extension line cord that connects the
Main Equipment and the extension is shown below.
Key Telephone
DSS Console
Single Line Telephone
300 m (0.5 f two-pair twisted or
quad cable).
1,125 m (0.5 f twisted cable).
¾
Page 62
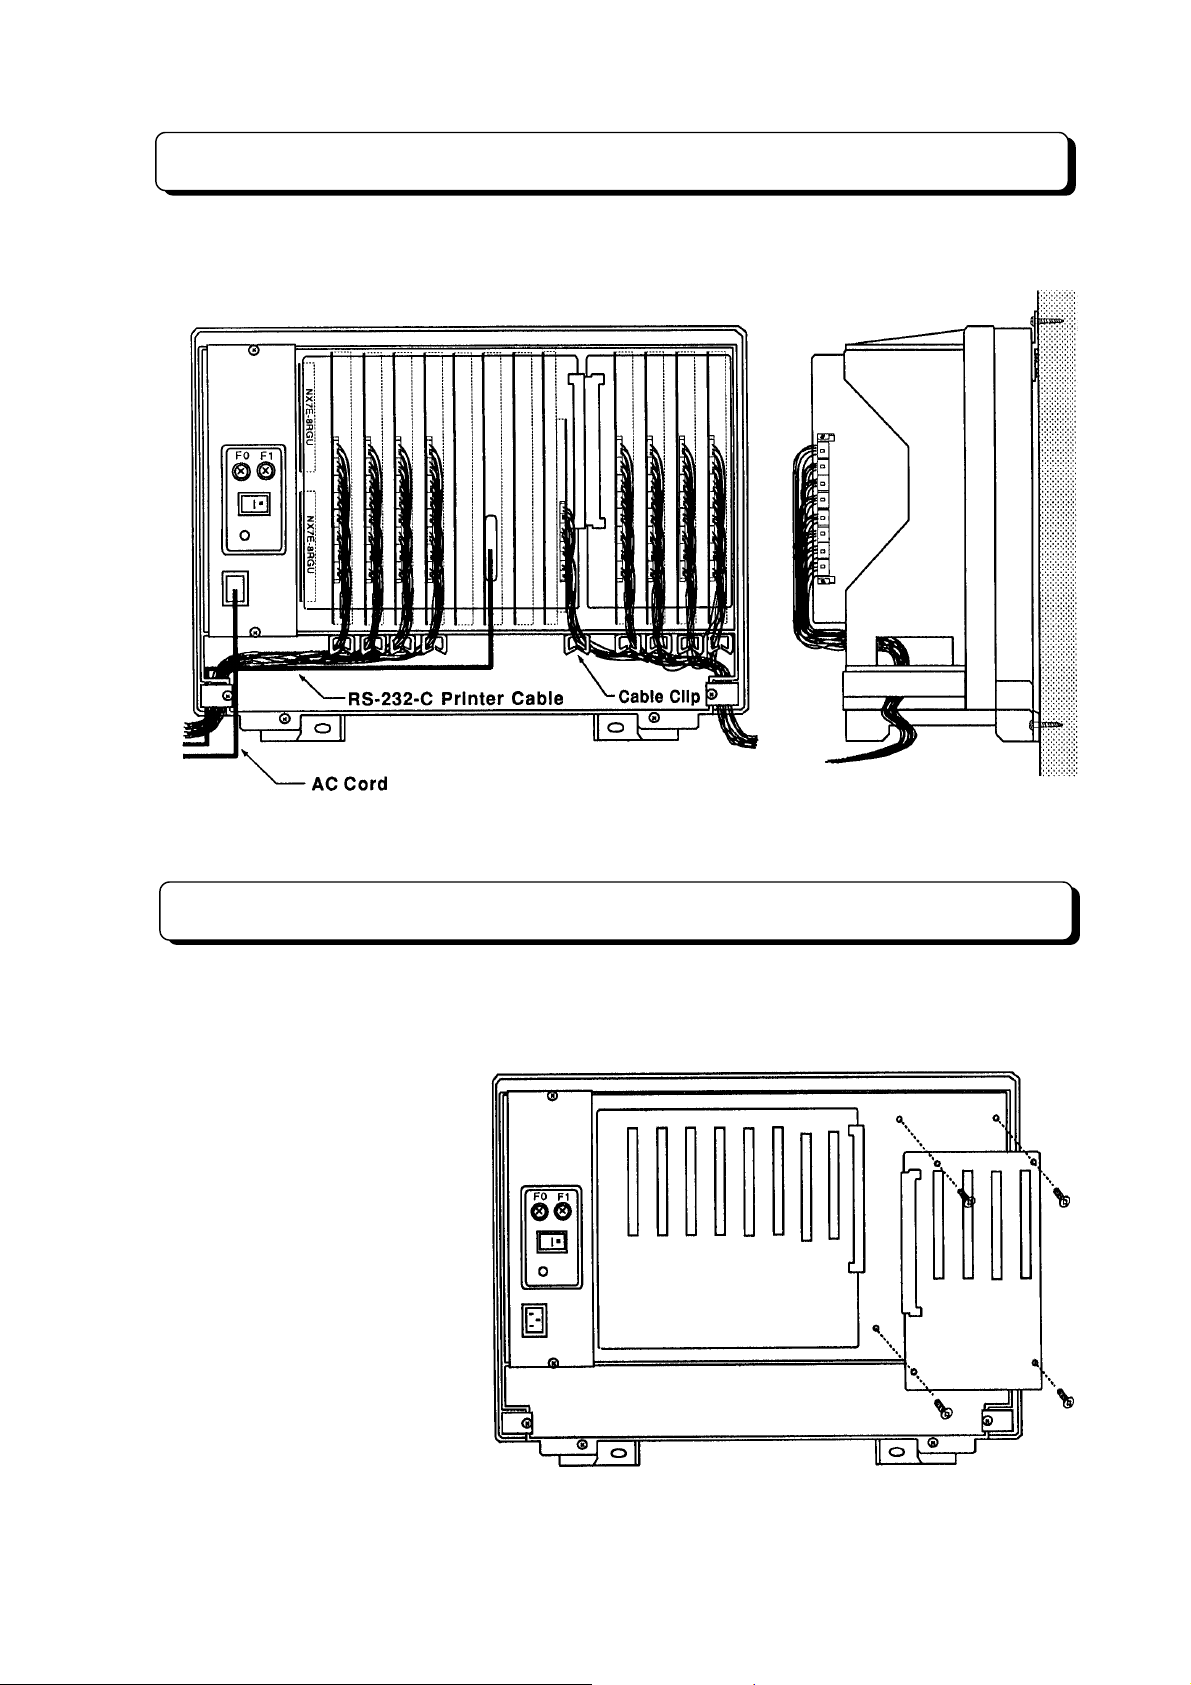
Cable Routing and Cramping
All cabling should ex it from the right and lef t side of M ain Equi pm ent. Route an d cr am p the cable for the
Main Equipment as illustrated below.
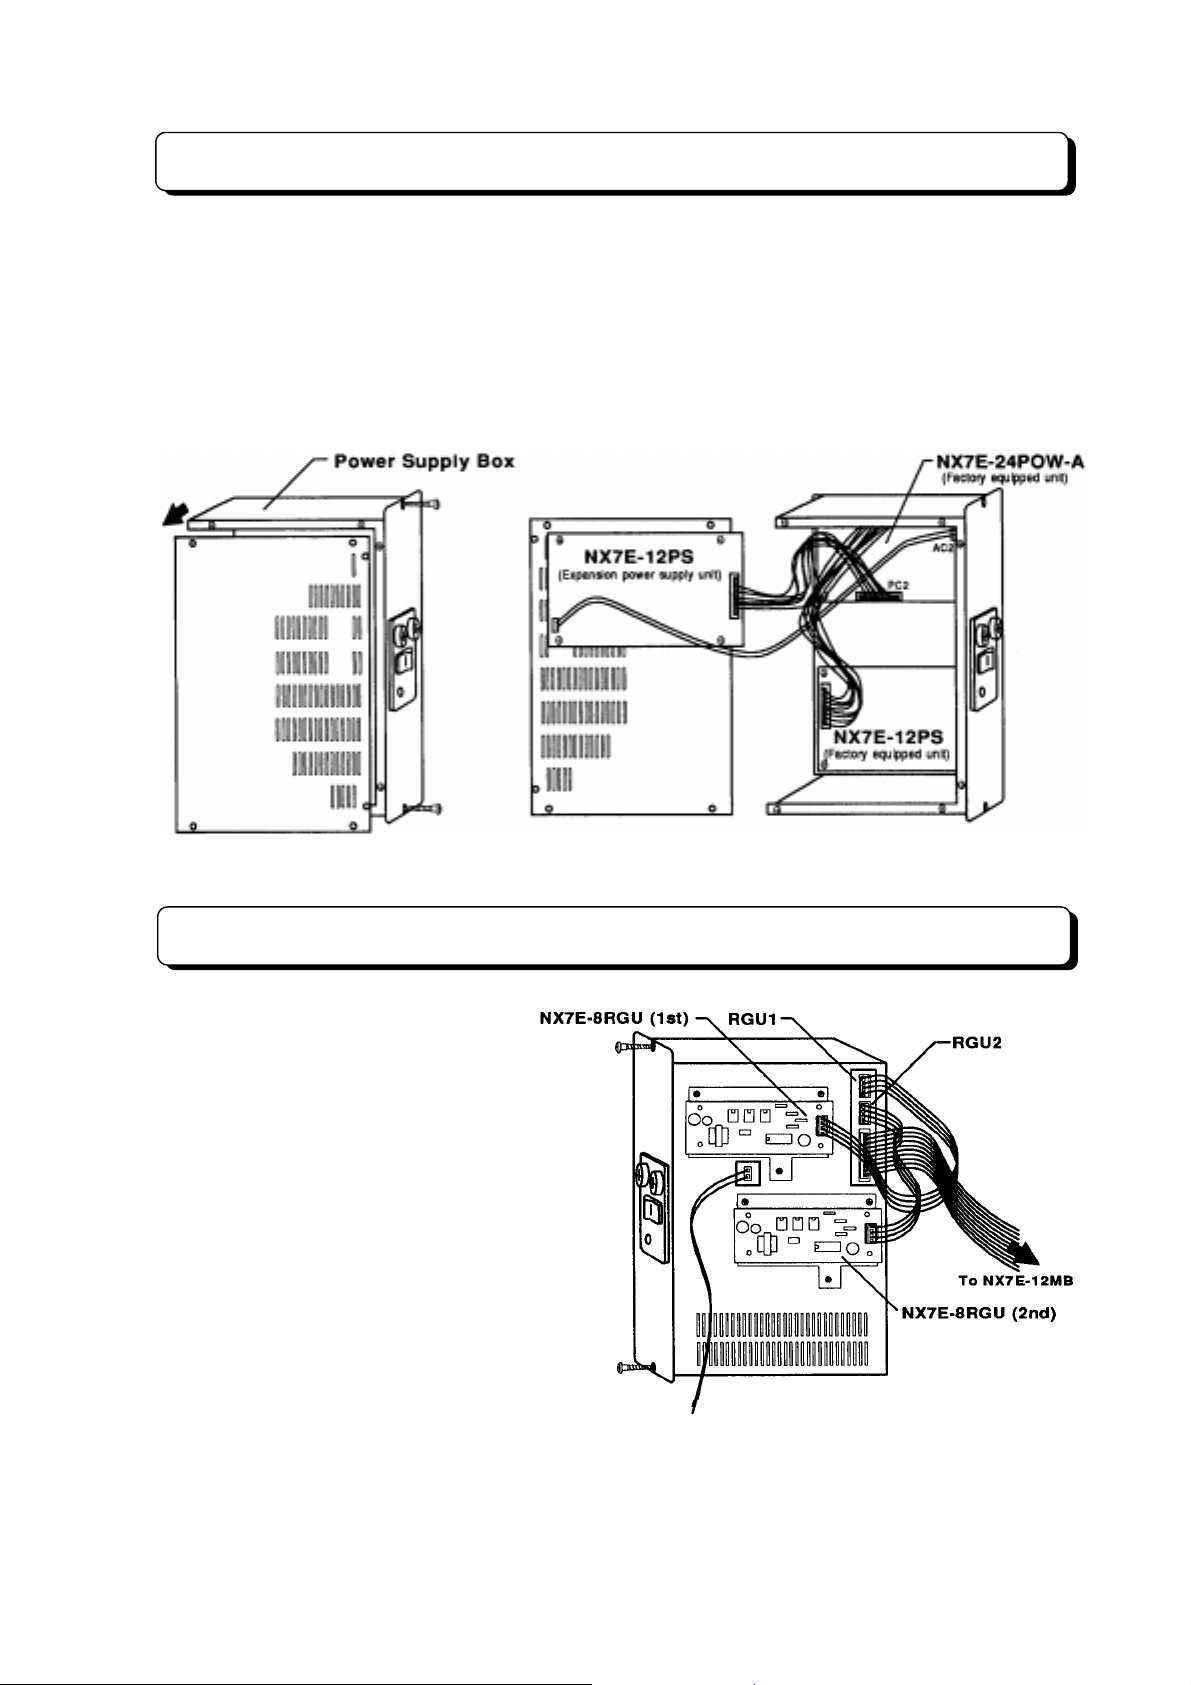
Installing the Expansion Mother Board
The NX7E-24EPMB is the expansion mother board which increases the capacity of the system from
1232 (12 lines and 32 stations) to 246 4 (24 lines and 64 stations) . When you expand the system , note
that the expansion power supply (NX7E-12PS) is also required.
The NX7E-24EPMB can
accommodate three NX7E408U-A1 units and one NX7E008U-A1 unit.
Step 1:
24EPMB board in the Main
Equipment and joint the EXP
connector to another EXP
connector on the main mother
board (NX7E-12MB).
Step 2:
and screw the board to Main
Equipment.
Mount the NX7E-
Insert the four screws,
¾
3-3-6
¾
Page 63
Installing the Expansion Power Supply Unit
The NX7E-12PS (Ex pansion power suppl y unit) is require d when the expansi on mother board (N X7E24EPMB) is installed in the system.
Step 1:
Step 2:
Step 3:
Step 4:
Loosen the two screws and pull the Power Supply Box out of the Main Equipment.
Loosen the six screws and remove the left side panel.
Mount the NX7E-24PS unit on the removed panel, and screw the unit as illustrated below.
Connect the cables as illustrated below.
Back side view
Installing the Ringer Unit
The ring generator source unit (NX7E8RGU-A1 PCB) mu st be installed in the
system when connect ed the Single Line
Telephone as system extension.
The unit connected with RGU1
connector is needed for Basic System.
When expansion mother board is
installed, 2nd unit connec ted wit h RGU2
is required for single line telephone.
To install NX7E-8RGU-A1 PCB, loosen
the two screws and pull the Power
Supply Box out of the Ma in Equipment,
then mount the PCB on the Power
Supply Box, and connect an attached
cable to the connector mounted on the
NX7E-24POWU PCB labeled RGU1 or
RGU2. (See the following illustration.)
To Backup Battery Box
¾
3-3-7
¾
Page 64
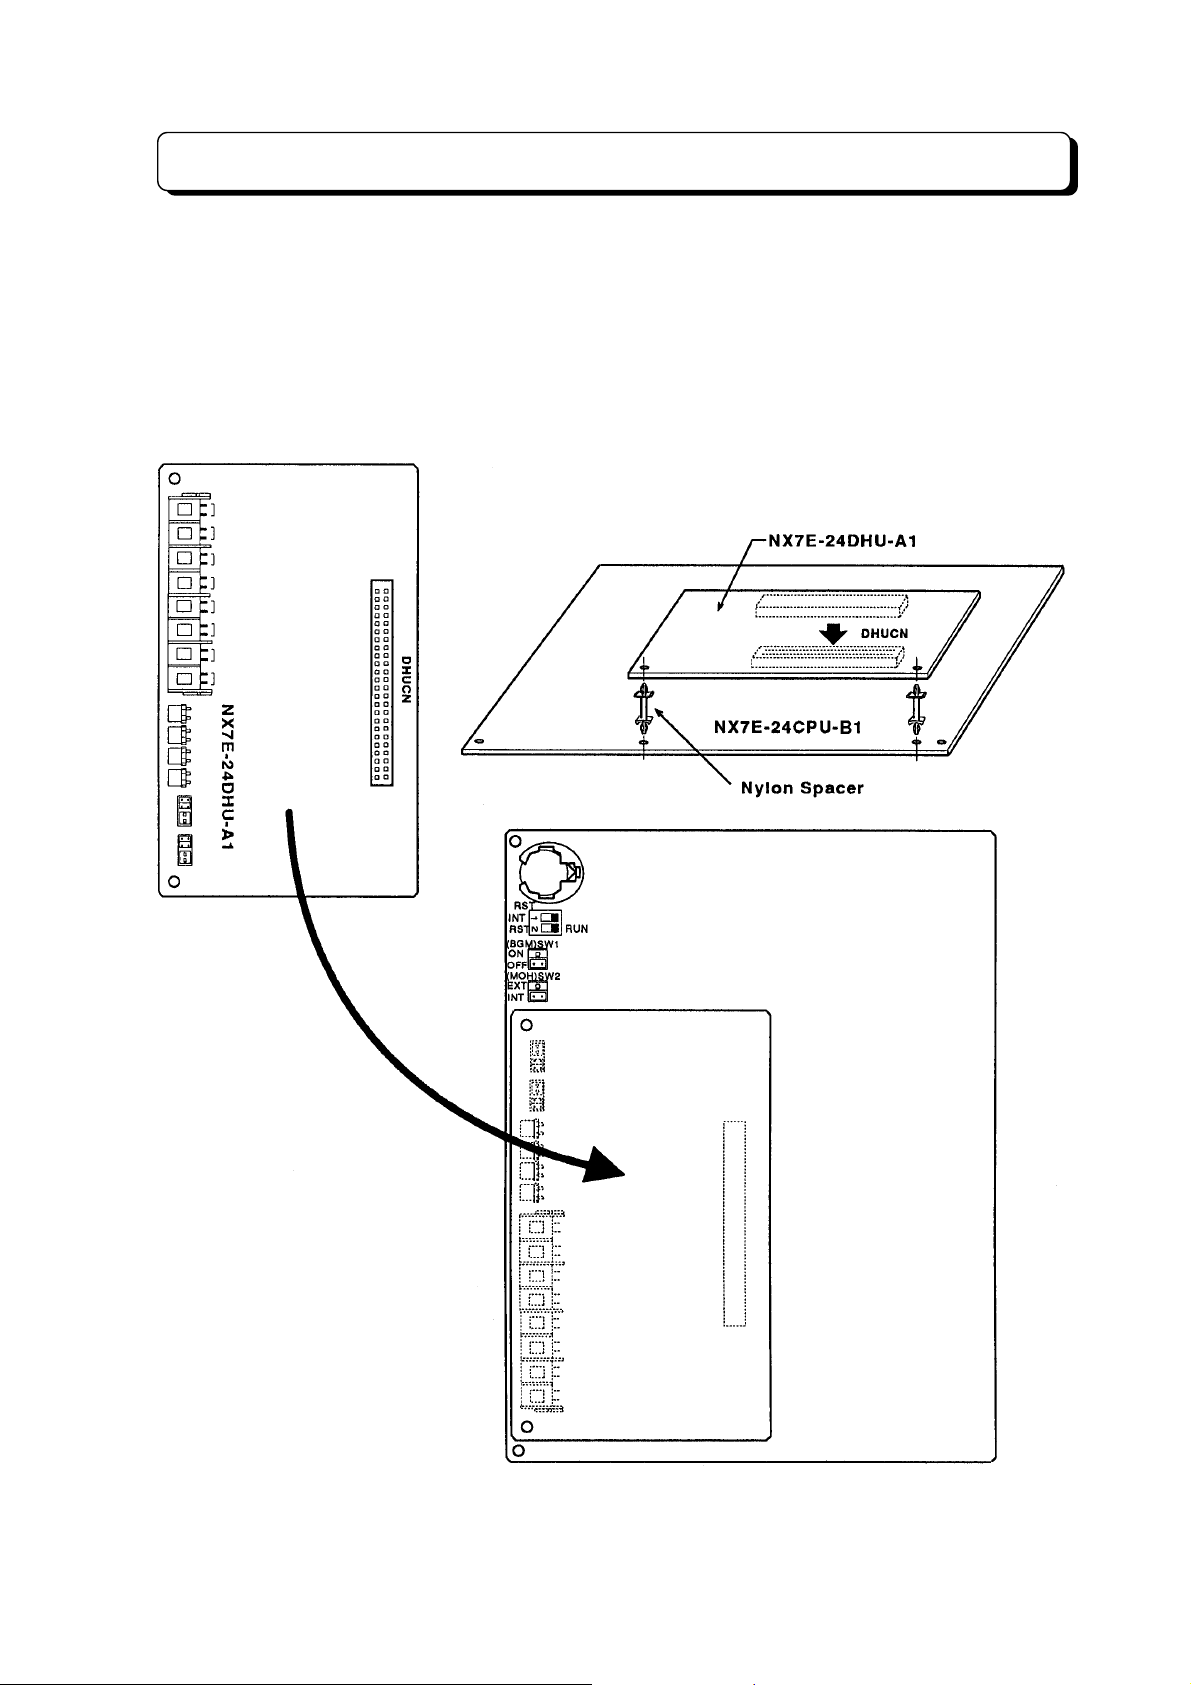
Installing 24DHU-A1 PCB
The NX7E-24DHU-A1 PC B is a daughter board for the NX 7E-24CPU-B1. The NX7E-24DHU-A1 PCB
provides:
- Connections for two alarm sensors
- Two Doorphone Box interfaces
- Two external paging outputs
Mount the NX7E-24DHU-A1 PCB on the 24C PU-B 1 a nd j o int t he D HUCN c o nnec tor t o a noth er DHUC N
on the NX7E-24CPU-B1 unit.
¾
3-3-8
¾
Page 65
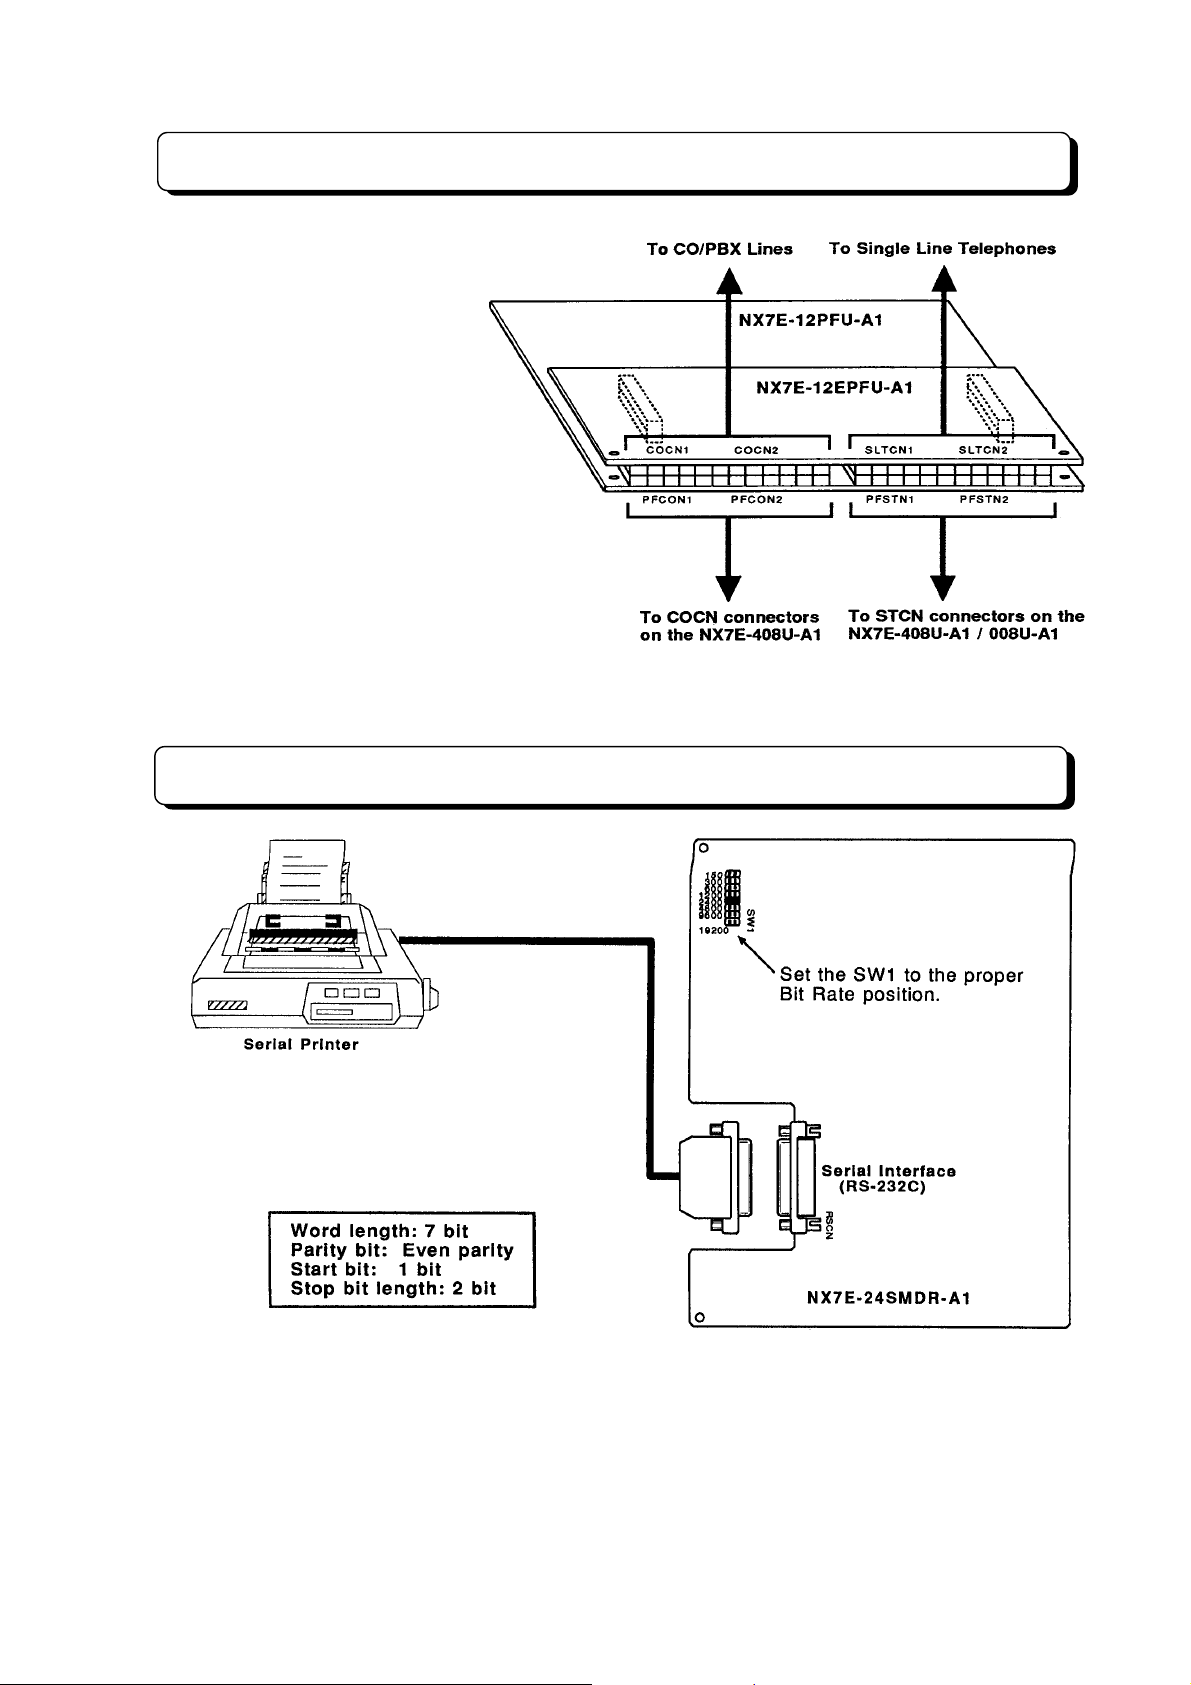
Installing NX7E-12PFU-A1 PCB
The NX7E-12PFU-A1 and
NX7E-12EPFU-A1 PC Bs provide
12 power failure cut through
circuits for Single Line
Telephones. To insta ll PCBs an d
connect the wires, refer to the
illustration.
Installing NX7E-24SMDR-A1 PCB and Printer/PC
Make cables so that the printer /PC will be connected
to the NX7E-24SMDR-A1 as shown in the illustration.
Refer to RS-232C Cable Assembly in Installation of
TX-Z 308 System (P 3-1-7).
¾
3-3-9
¾
Page 66
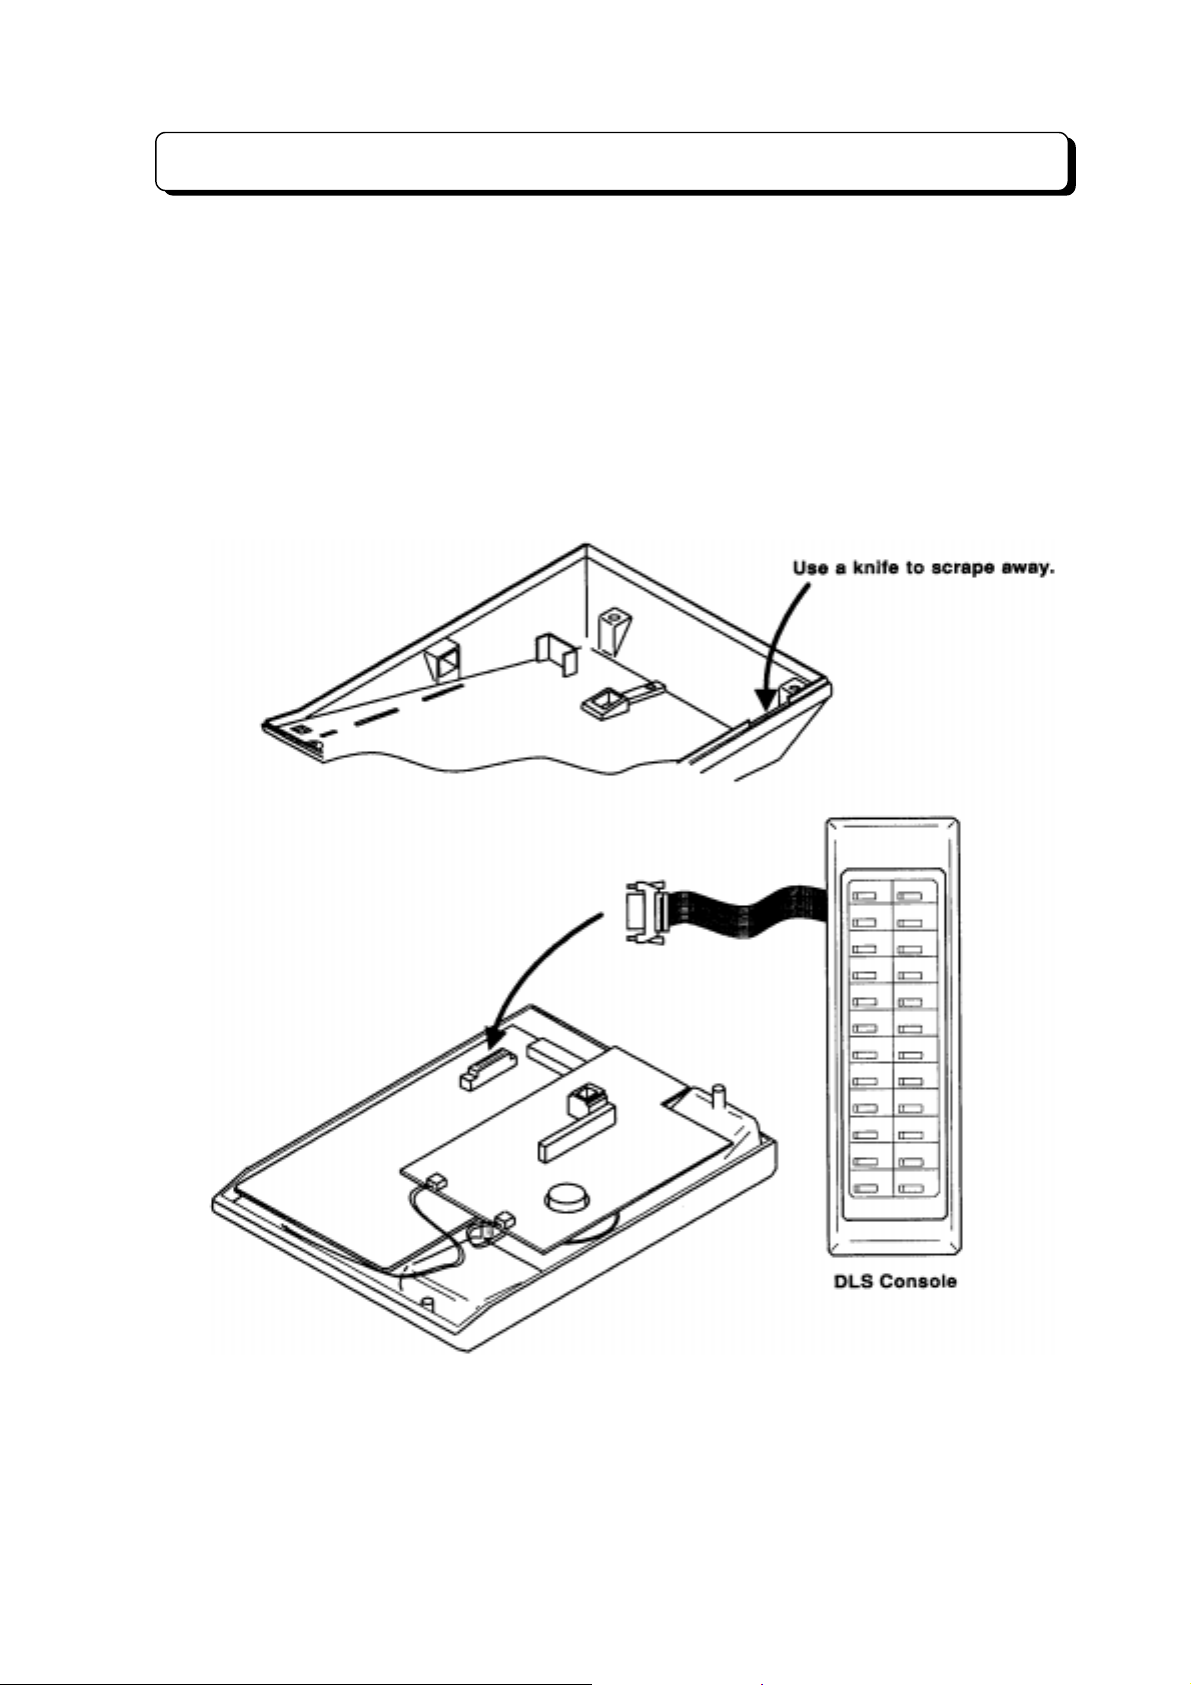
Installing DLS Console
The TX-Z 1232/2464 system can accommodate DLS Console for operator use. The maximum number of
DLS Consoles that can be installed in a system is as follows:
Basic System (TX-Z 1232): 8 set maximum
Expanded System (TX-Z 2464): 16 set maximum
To install the DLS Consoles (DL DLS for 1st Model TEL):
Step 1:
Step 2:
Step 3:
Remove the four screws on the bottom of the telephone.
Insert ribbon cable into connector CN3 on NX7E-KYU PCB.
Replace base plate of telephone and screws on bottom.
¾ 3-3-10 ¾
Page 67
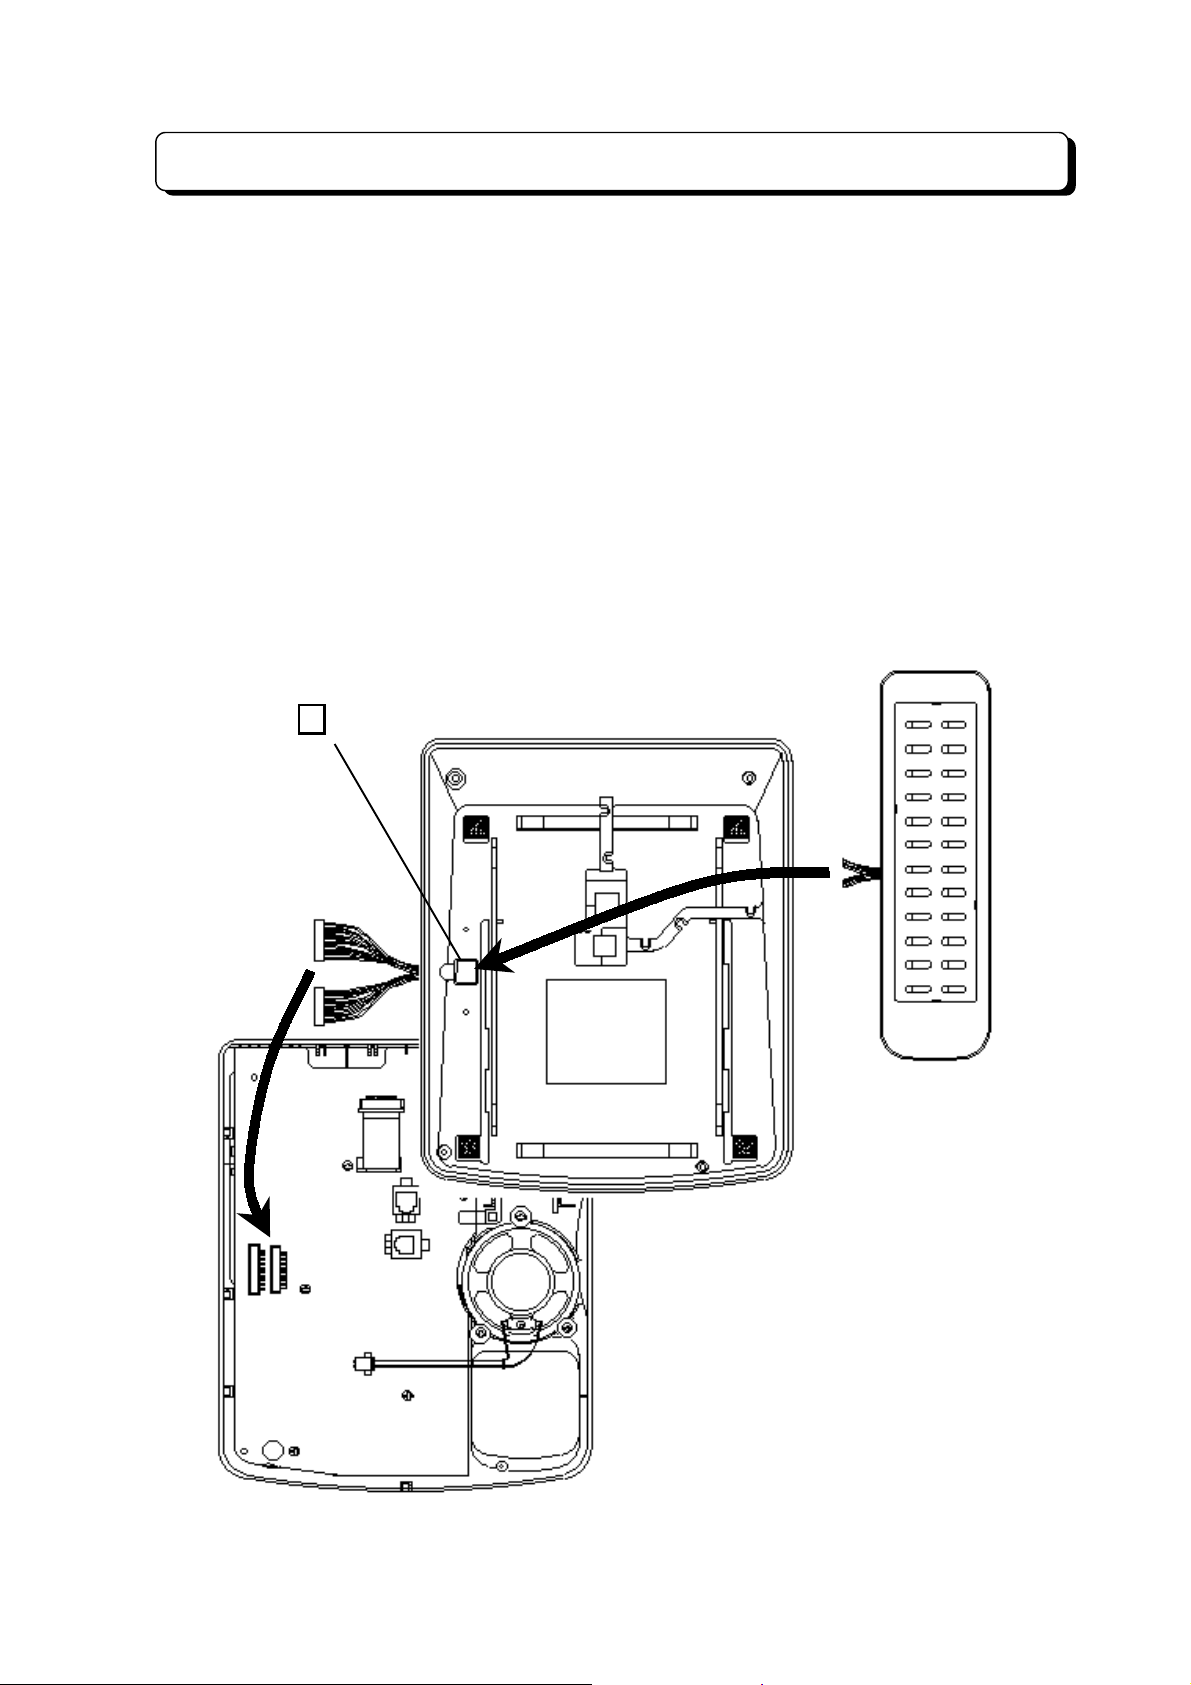
Installing DLS Console
To install the DLS Consoles (BDL DLS for 2nd Model TEL):
Step 1:
Step 2:
Step 3:
Step 4:
Step 5:
Step 6:
Step 7:
Turn the telephone upside down and remove the four screws from each corner.
Lift the upper housing off the telephone base.
On the lower housing, use a blunt object to remove the plastic filter piece that covers the hole for
DLS connector.
Install the DLS connector cable from the back of lower housing.
Insert the connectors on the DLS cable into the co nnectors DLCN1 and DLCN2 o n the NX7E-
ANU-B PCB in the upper housing.
Reassemble the telephone and reinsert the four screws removed in step 1.
Mount the metal bracket between the telephone and DLS console and secure it with four screws
provided.
Remove the plastic filt er
DLCN2
DLCN1
DLS Console
¾ 3-3-11 ¾
Page 68

Installing Optional Equipment
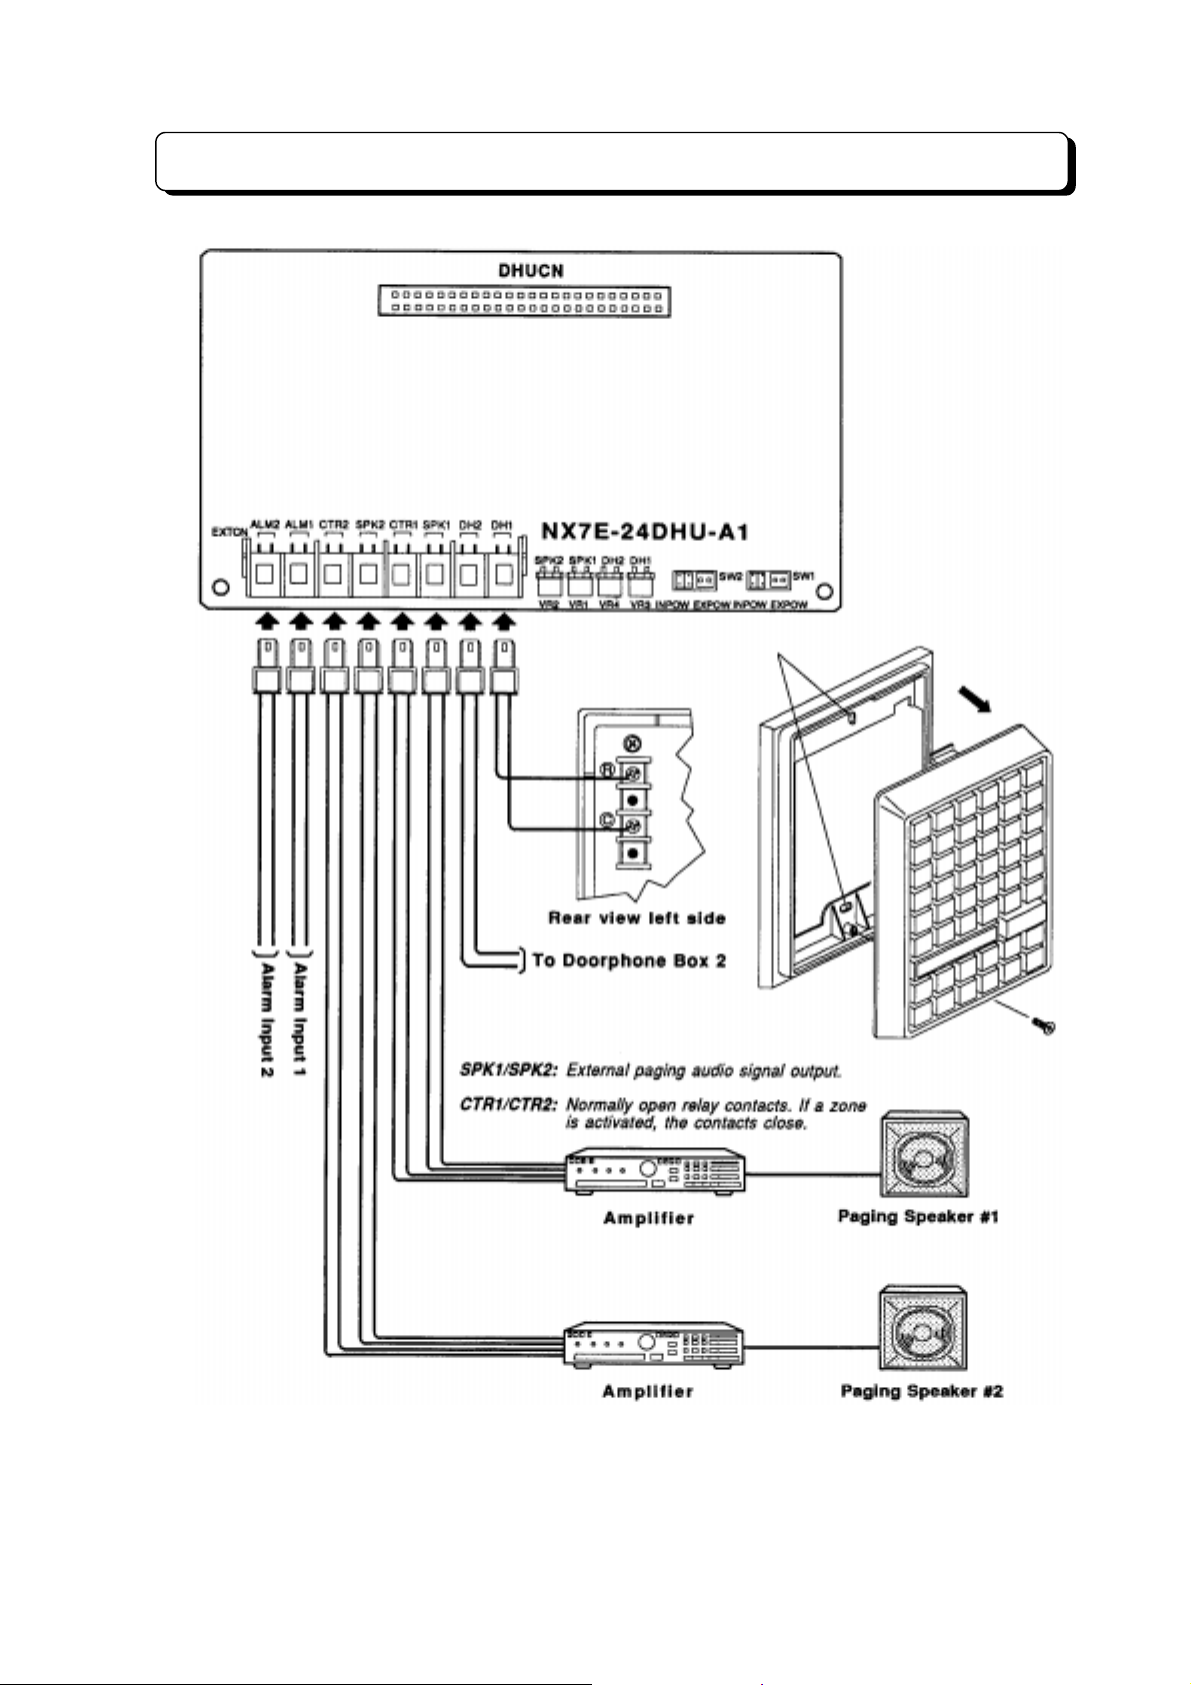
Installing the Doorphone Box:
This section provides information on installing the Doorphone Boxes in TX-Z 1232/2464 system.
Specifications:
Step 1:
the other end to DH1 on the 24DHU-A1 PCB for Doorphone Box 1 or DH2 for Doorphone Box 2.
Step 2:
Doorphone Box 2.
Connect wires t o the term inal m arked R and C on t he back of the Door phone Box , and connec t
Adjust the audio level with VR3 on the 24DHU-A1 PCB for Doorphone Box 1 or VR4 for
150 m wire maximum of 0.5 f twisted telephone cable.
Installing External Paging Output:
This section provides information for the instal lation of external devices to t he external zone(s). Each
zone can receive T runk Audib le, BGM an d Pag ing. Sp eak ers c an be us ed to broa dcas t these signals at
the zone. External page zones can be used to provide Meet-Me Paging. Ex ternal zones have norm ally
open contacts. The relays for each zone are energized when Paging amplifiers are in use, including
Trunk audible and BGM (if programmed).
Specifications:
Step 1:
External Zone 1, or connector labeled SPK2 to an amplifier for External Zone 2. The amplifier inputs must
match the specifications above. Attach the speaker to your amplifier.
Step 2:
External Zone 1, or connector labeled CTR2 to the device for External Zone 2.
Connect wires from the connector on the 24DHU-A1 PCB labeled SPK1 to an amplifier for
Connect wires from the connector an the 24DHU-AI PCB labeled CTR 1 to the device for
Output impedance: 600 ohms
Output Level: Nominal 250 mV (-10 dBm)
Maximum Output: 400 mV RMS
Relay Contact: 1.25 amps for 24 V DC resistive loads
Step 3:
2 with VR2 on the 24DHU-AI PCB.
Adjust the volume level of External Zone 1 with VR1, or adjust the volume level of External Zone
Installing External Alarm Sensor:
This section provides inf ormation on t he installatio n of an exter nal alarm . Two alarms can be connected
to the system. Programming determines if the alarm inputs require an open or a closed circuit.
Specifications:
When using internal power.
Loop Resistance: Less then 100 ohms.
When using external DC power.
Supplied DC power to system:
5 to 24 V DC with 0.65 mA to 4.5 mA.
Step 1:
Step 2:
NOTE:
Connect wires form External Alarm 1 to the connector on the 24DHU-A1 PCB labeled ALM1.
Connect wires form External Alarm 2 to the connector on the 24DHU-AI PCB labeled ALM2.
When using internal power to c onnect the dry contact of alar m-detecting device to the s ystem,
set SW1 for Alarm 1 or SW2 for Alarm 2 to the INPOW position.
¾ 3-3-12 ¾
Page 69
Installing Optional Equipment
Holes for Screws
¾ 3-3-13 ¾
Page 70

Installing Optional Equipment
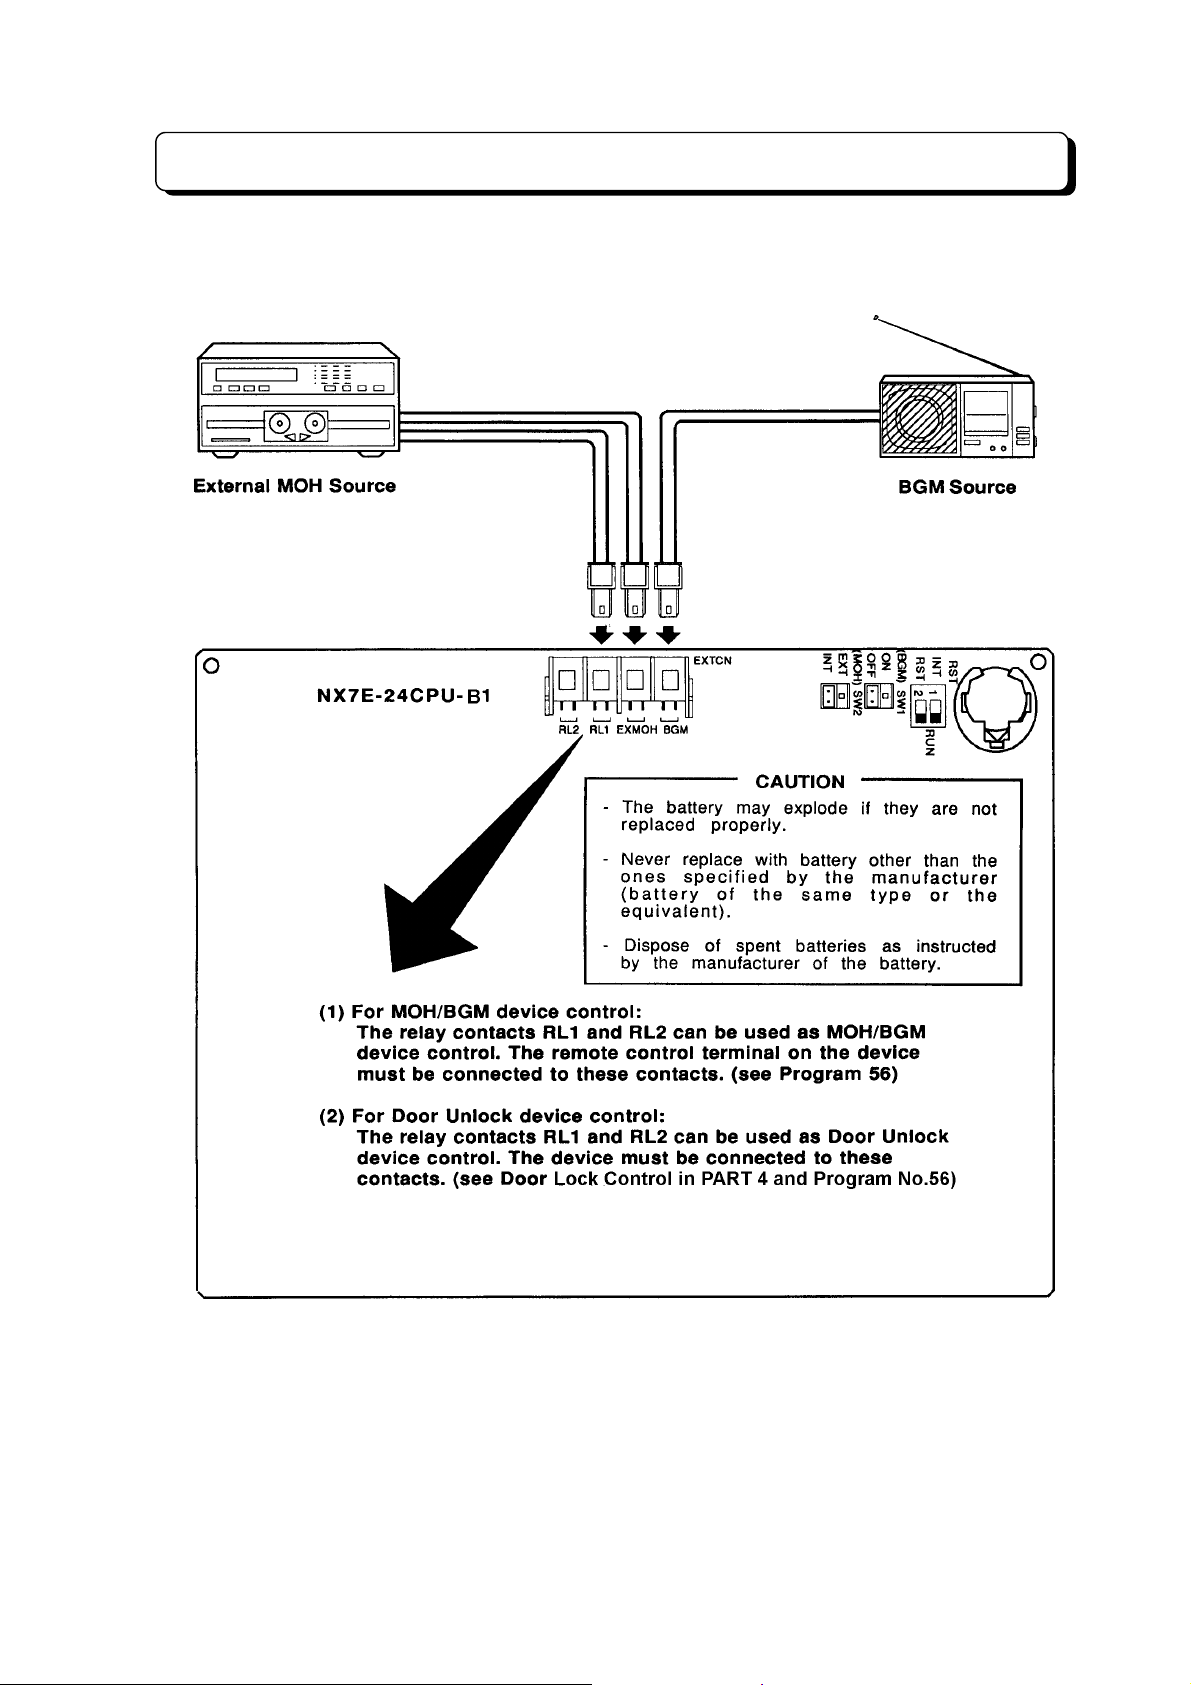
Installing External MOH and BGM:
This section provides infor mation on ins talling Backgr ound Music (BG M) and Ex ternal Music On Ho ld in
the TX-Z 1232/2464 system.
Specifications:
Installation of External Source of MOH (Music On Hold):
Step 1:
EXMOH.
Step 2:
position.)
Step 3:
Installation of BGM (Background Music) Source:
Step 1:
Step 2:
Step 3:
Connect inputs from external MOH source to the connector on the 24CPU-B1 PCB labeled
Set SW2 str ap to the EXT position. (if the External MO H is not required, set SW2 to the INT
Adjust the output level of External MOH Source.
Connect inputs from external BGM source to the connector on the 24CPU-B1 PCB labeled BGM.
Set SW1 strap to the ON position. (If the BGM is not required, set SW2 to the OFF position.)
Adjust the output level of External BGM Source.
Input Impedance: 600 ohms
Input Level: Nominal 250 mV (-10 dBm)
Maximum Input: 1 Vrms
¾
3-3-14
¾
Page 71
Installing Optional Equipment
¾ 3-3-15 ¾
Page 72
TX-Z 1232/2464 Backup Battery Connection
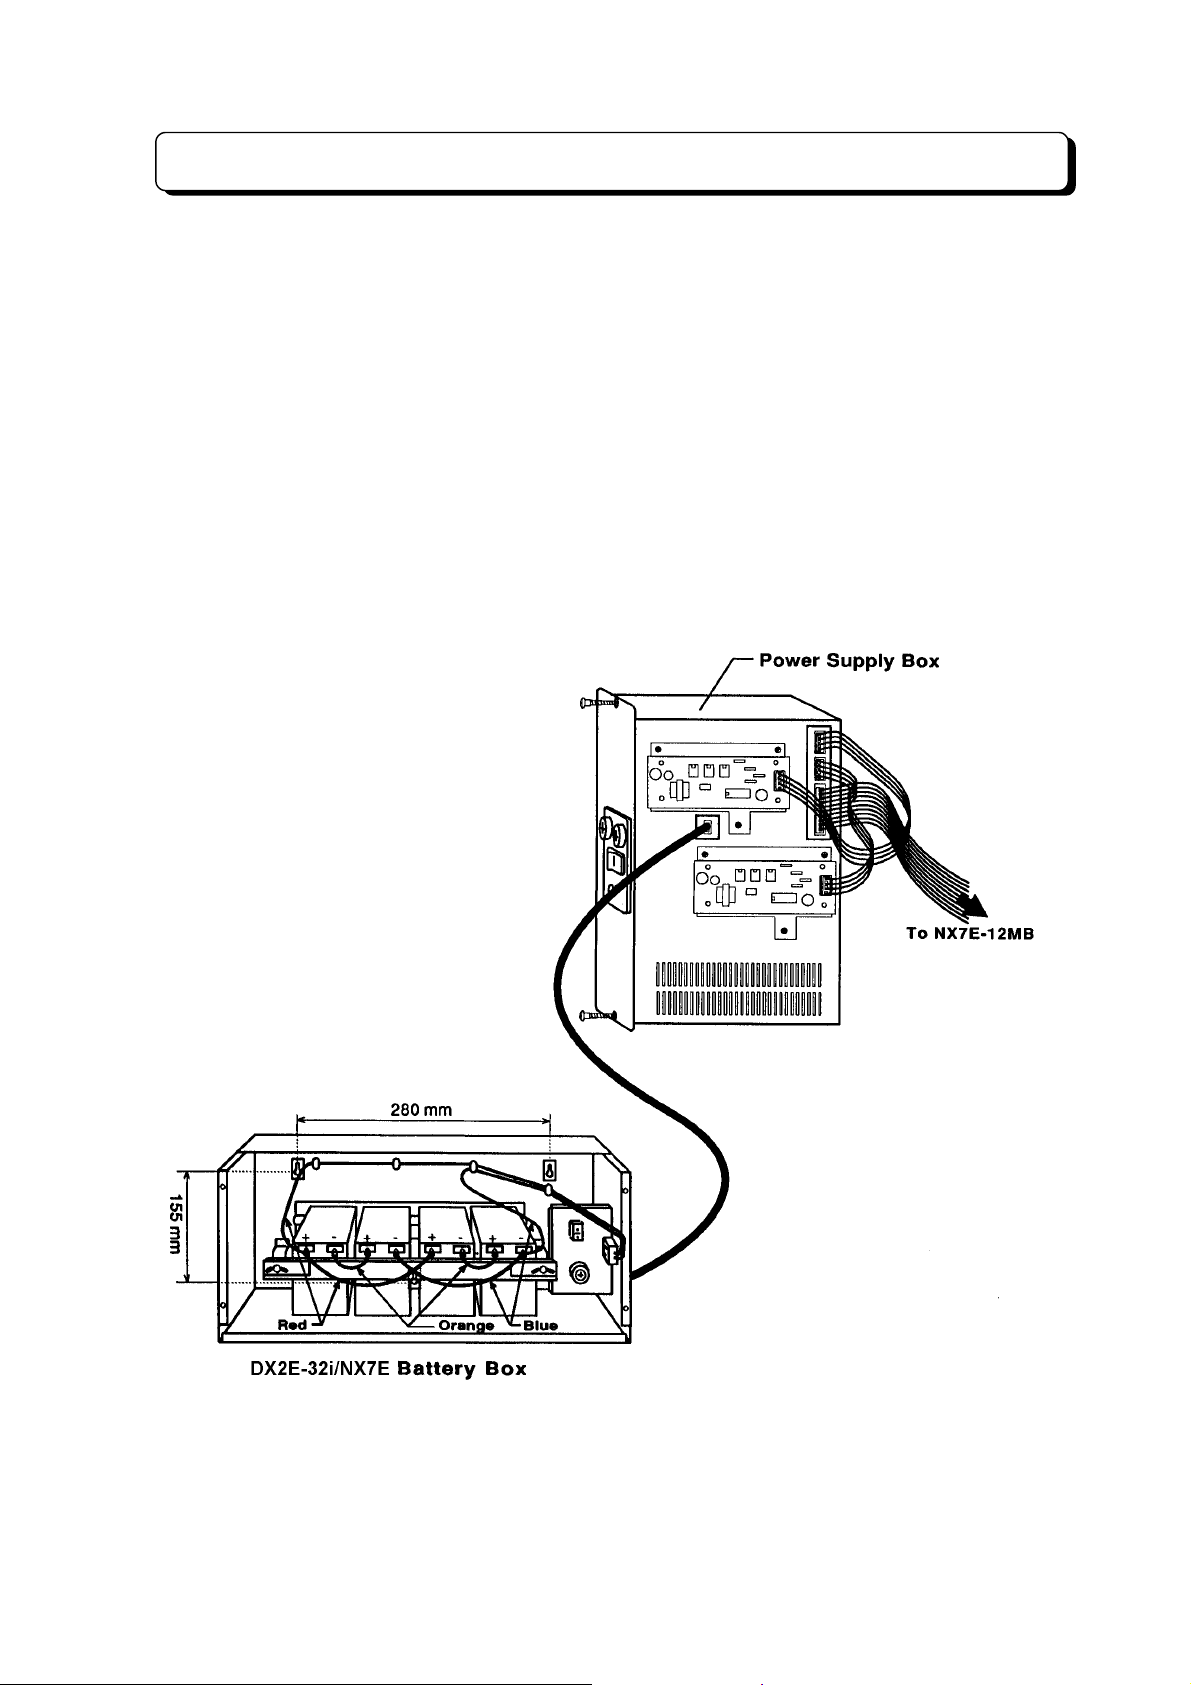
The Battery Backup Box provides power during a power failure.
Backup Duration:
Battery:
The Battery Backup Box may be wall- or floor-mounted. After mounting Battery Backup Box, follow these
steps to install batteries and connect the cable:
Step 1:
Step 2:
Step 3:
connect the positive ter m inal of one b atter y to the ne gative term inal of the other battery. (see illustrat ion
below)
Step 4:
the NX7E-24POWU-A PCB installed in the Power Supply Box.
Yuasa NP2.6-12 (rated at 12 volts, 2.6 amp-hours)
Insert four batteries. (Batteries should always be installed and replaced in fours).
Secure batteries with tie-wraps supplie d.
Using battery term inal screws, connect t he wiring to the battery term inals. Use the red wire to
With 2-wire connec ting cable, conn ect Batter y Backup Box to the co nnector m arked "BAT1" on
1232......Approximately 1 hr. (depending on traffic)
2464......Approximately 0.5 hr. (depending on traffic)
¾ 3-3-16 ¾
Page 73

PART 4
FEATURE DESCRIPTION
AND OPERATION
Page 74

Table of Contents
Trunk Outgoing Call ...........................................................................................4-1
Specified Trunk Access ....................................................................................4-1
Last Number Dialing (LND)...............................................................................4-2
Saved Last Number Dialing (SLND).................................................................4-3
Abbreviated Dialing...........................................................................................4-3
One-Touch Dialing ............................................................................................4-4
Toll Restriction ..................................................................................................4-5
Walking Toll Restriction ....................................................................................4-6
Dial Block ..........................................................................................................4-7
Flash..................................................................................................................4-8
Pulse to Tone Conversion.................................................................................4-8
Camp-On (Trunk Queuing) ...............................................................................4-9
Key Touch Tone................................................................................................4-9
Easy Trunk Access .........................................................................................4-10
Queuing Group Access...................................................................................4-10
Automatic Repeat Dialing ...............................................................................4-11
Loop Key Trunk Access..................................................................................4-12
Automatic Off-Hook Trunk Access..................................................................4-12
Account Code..................................................................................................4-13
Trunk Incoming Call .........................................................................................4-14
Incoming Trunk Access...................................................................................4-14
Trunk Off-Hook Signaling................................................................................4-14
Ringing/Recall Trunk Off-Hook Access ..........................................................4-15
Night Service (Manual/Auto)...........................................................................4-15
Call Forward....................................................................................................4-16
Follow Me........................................................................................................4-18
Call Pickup ......................................................................................................4-19
Do Not Disturb (DND) .....................................................................................4-19
Executive DND................................................................................................4-19
DISA (Extension Access)................................................................................4-20
Hold/Transfer/During Conversation .............................................................4-21
Hold.................................................................................................................4-21
Music On Hold.................................................................................................4-22
External Music On Hold ..................................................................................4-23
Transfer...........................................................................................................4-23
Park Hold (TX-Z 824/1232/2464)....................................................................4-26
Conference......................................................................................................4-26
Long Conversation Warning (Three Minutes).................................................4-29
Long Conversation Cut-Off .............................................................................4-29
Break-In...........................................................................................................4-29
Page 75

Other Trunk Features .......................................................................................4-31
PBX Compatibility ...........................................................................................4-31
Dial Mode (Tone/Pulse) Selection..................................................................4-31
Private Line .....................................................................................................4-32
Tenant Service................................................................................................4-32
Unsupervised Conference ..............................................................................4-33
Call Timer........................................................................................................4-33
DISA (Trunk-to-Trunk).....................................................................................4-34
Intercom Outgoing Call ...................................................................................4-35
Intercom Link Increase....................................................................................4-35
Intercom Call...................................................................................................4-35
Direct Station Selection...................................................................................4-36
Intercom Off-Hook Signaling...........................................................................4-37
Group Hunt......................................................................................................4-37
Step Calling.....................................................................................................4-38
Camp-On (Callback) .......................................................................................4-39
Message Waiting.............................................................................................4-39
Paging.............................................................................................................4-41
Flexible Station Numbering.............................................................................4-43
Dual Handsfree Hotline...................................................................................4-44
Intercom Incoming Call ...................................................................................4-45
Intercom Answer .............................................................................................4-45
Call Pickup ......................................................................................................4-45
Meet-Me Answer Paging.................................................................................4-46
Meet-Me Conference Paging..........................................................................4-46
Do Not Disturb (DND) .....................................................................................4-46
Intercom Hold..................................................................................................4-47
Intercom Call Transfer.....................................................................................4-48
Call Forward....................................................................................................4-48
Follow Me........................................................................................................4-48
Executive DND................................................................................................4-49
Other Intercom Features .................................................................................4-50
BGM (TX-Z 824/1232/2464) ...........................................................................4-50
External Paging...............................................................................................4-50
Doorphone.......................................................................................................4-50
Door Lock Control ...........................................................................................4-51
Room Monitor..................................................................................................4-52
DSS Console (TX-Z 1232/2464).....................................................................4-53
Page 76

Alphanumeric Display TEL Features ...........................................................4-57
Text Message..................................................................................................4-57
Time and Date.................................................................................................4-62
Name Storing (Trunk & Station)......................................................................4-63
Directory Dialing..............................................................................................4-64
Alarm Clock.....................................................................................................4-65
Stopwatch........................................................................................................4-66
Busy Lamp Field .............................................................................................4-66
Other Features ...................................................................................................4-67
Handsfree (Speaker & Microphone)...............................................................4-67
Lamp Shift Mode (TX-Z 824/1232/2464)........................................................4-68
Remind Call on SLT........................................................................................4-69
Station Message Detail Recording (SMDR) ...................................................4-69
Polarity Reverse Detection (TX-Z 1232/2464)................................................4-70
DISA with Audio Guidance..............................................................................4-71
External Call Forward on DISA.......................................................................4-71
One-Touch Feature Access............................................................................4-72
Volume Control ...............................................................................................4-73
DLS Console (TX-Z 824/1232/2464)..............................................................4-74
Headset Operation..........................................................................................4-75
Hotel/Motel Features(TX-Z 1232/2464)..........................................................4-76
Single Line Extension Dial Tone.....................................................................4-85
Special User Password...................................................................................4-85
Voice Mail Connection (TX-Z 824/1232/2464)...............................................4-86
Caller-ID..........................................................................................................4-86
VAU (TX-Z 1232/2464)...................................................................................4-86
DUD (TX-Z 308)..............................................................................................4-86
FAX Transfer (TX-Z 308) ................................................................................4-86
List of Information Display .............................................................................4-87
List of Dial Number Plan ...............................................................................4-102
List of SMDR Printout Data...........................................................................4-111
DISA Operation Flowchart ............................................................................4-113
Page 77
Trunk Outgoing Call
nnnn Specified Trunk Access
DESCRIPTION:
Trunk (CO/PBX) lines can be grou ped into a m aximum of 30 groups. T he line groups assigned to each
extension can be used for outgoing calls. Up to two outgoing line groups can be assigned to an
extension. An extension user can place outside calls on a particular line group b y pressing Line key or
dialing line number .
STATION APPLICATION:
KTS, SLT
OPERATION:
To make an outside call on a particular line:
<KTS>
When the trunk line appears under a Line key:
1. Lift handset or press SPK key.
2. Press a Line key. Hear dial tone.
3. Dial telephone number.
When the trunk line does not appear under a Line key:
1. Lift handset or press SPK key. (See Note 1)
2. Dial 9 (TX-Z 824/1232/2464).
Dial 90 (TX-Z 308).
3. Dial two-digit line number. Hear dial tone.
4. Dial telephone number.
<SLT>
1. Lift handset. Listen for dial tone.
2. Dial 0 or 9. (See Note 2)
3. Dial two-digit line number. Hear dial tone.
4. Dial telephone number.
Note 1: If Program #75-D is 0 (No tone), press ICM key after Step 1 to seize Intercom. (TX-Z 824/1232/2464)
Note 2:
Program #20-D Data Automatic Trunk Access Code for SLT Dial at Step 2
009
190
Note 3: Easy Trunk Access, Queuing Group Access, Loop Key Trunk Access, Automatic Off-Hook Trunk Access
features provide other ways to access a Trunk Line.
RELATED SYSTEM DATA:
#02: Line Group Assignment
#03-C: Common Use Line Assignment
#06: Outgoing Line Access
#75-D: KTS Off-Hook Mode Selection
Single Step Access
u
DESCRIPTION:
Single Step Access all ows a key telepho ne user to obtain outside or inter com dial tone f or an outgoing
call in a single step, without lifting the handset or pressing the SPK key.
STATION APPLICATION:
KTS
¾ 4-1 ¾
Page 78
Trunk Outgoing Call
OPERATION:
To obtain outside dial tone using Single Step Access:
- Do not lift handset.
1. Press a Line key. The Line key and SPK key light.
- Dial tone comes over the speaker.
To obtain intercom dial tone using Single Step Access:
- Do not lift handset.
1. Press ICM key. ICM and SPK key light.
- Dial tone comes over the speaker.
RELATED SYSTEM DATA:
#15-E: Single Step Access
Preselection
u
DESCRIPTION:
This feature perm its acc es s to an T r unk or ICM c all by lifting the handset or pres s ing the SPK key within
three seconds of pressing a Line or ICM key.
STATION APPLICATION:
KTS
OPERATION:
1. Press a Line or ICM key.
2. Lift handset or press SPK key within 3 sec.
- Trunk Line or Intercom is seized.
RELATED SYSTEM DATA:
#15-E: Single step access
nnnn Last Number Dialing (LND)
DESCRIPTION:
The last telephone number dialed on an outgoing call (trunk line) can be redialed. A maximum of 18 digits
are stored.
STATION APPLICATION:
KTS, SLT
OPERATION:
<KTS>
1. Lift handset or press SPK key.
2. Press a Line key.
3. Press LND key.
<SLT>
1. Lift handset.
2. Dial function code. (See Note 1)
3. Dial queuing group number. (See Note 2)
Note 1:
Program #20-D Data Automatic Trunk Access Code for SLT Dial at Step 2
Dial Plan 1 - - 60
Dial Plan 2
Note 2: Queuing group numbers are 0 to 6 (0: Any line, 1-6: Queuing group No).
0094
1904
¾ 4-2 ¾
Page 79

Trunk Outgoing Call
RELATED SYSTEM DATA:
#08-B: SLT Dial Plan Set
#33: LND/Repeat Dial Hooking Time
#64-C: Trunk Line Seizing Order Selection
nnnn Saved Last Number Dialing (SLND)
DESCRIPTION:
This feature permits saving the last number dialed for redialing at a later time. The saved telephone
number remains in memor y until another is stor ed in it's plac e.
STATION APPLICATION:
KTS
OPERATION:
To place an outside call using saved last number:
1. Lift handset or press SPK key.
2. Press a Line key.
3. Press DC key and #.
or
Press One Touch key.
To store dialed number as saved last number:
1. While talking on trunk line.
2. Press DC key twice before terminating a call.
or
Press One Touch key before terminating a call.
To set One-Touch key as SLND key:
1. Press SPK key.
2. Press ICM key. (TX-Z 824/1232/2464 Only) (See Note 1)
3. Press DC key and *.
4. Press One Touch key.
5. Press OPAC key and #.
6. Press SPK key.
Note 1: If Program #75-D is 0 (No tone), skip Step 2. (TX-Z 824/1232/2464)
Note 2: One Touch key #10 is set as SLND key initially.
RELATED SYSTEM DATA:
Not applicable.
nnnn Abbreviated Dialing
DESCRIPTION:
The system provides com mon-use abbreviat ed dialing. Abbr eviated Dialing al lows storage of up to 100
or 200 locations 18 digit telephone number under 2 or 3 digit codes (00 to 99 or 000 to 199).
The user can select the storage quantity of Abbreviated Dial in Program #17-D.
STATION APPLICATION:
KTS, SLT
¾ 4-3 ¾
Page 80
Trunk Outgoing Call
OPERATION:
To place an outside call:
<KTS>
1. Lift handset or press SPK key.
2. Press an idle Line key.
3. Press DC key.
4. Dial abbreviated number. (00 to 99) or (000 to 199)
<SLT>
1. Lift handset.
2. Dial function code. (See Note 1)
3. Dial queuing group number (0 to 6). (See Note 2)
4. Dial abbreviated number. (00 to 99) or (000 to 199)
Note 1:
Program #20-D Data Automatic Trunk Access Code for SLT Dial at Step 2
Dial Plan 1 - - 5
Dial Plan 2
Note 2: Queuing group numbers are 0 - 6 (0: Any line, 1-6: Queuing group No).
To store abbreviated number
(Extension #10 only):
1. Press SPK key.
2. Press ICM key. (TX-Z 824/1232/2464 only) (See Note 1)
3. Press DC key and *.
4. Dial abbreviated number. (00 to 99) or (000 to 199)
5. Dial phone number to be stored. (see Note 2)
6. Repeat steps 3 to 5.
7. Press SPK key to exit from Abbreviated Dialing entry.
Note 1: If Program #75-D is 0 (No tone), skip Step 2. (TX-Z 824/1232/2464)
Note 2: You can enter pauses (TRFR key), flashes (FLASH key) and stops (CONF key) when storing a Abbreviated
Dial number. Each pause, stop or flash counts as a digit when totaling the number of digits in a Abbreviated
Dial number. When stop is inserted, dialing will be stopped this position and can be continued by dialing.
0093
1903
RELATED SYSTEM DATA:
#08-B: SLT Dial Plan Set
#17-D: Storage Quantity of Abbreviated Dial
#18-C: Abbreviated Dialing Restriction
nnnn One-Touch Dialing
DESCRIPTION:
One-Touch Dialing a llows you to stor e ten of your mos t frequently called ou tside numbers as personal
abbreviated dial numbers at your extension so you can call them with just a single to uch. Dial number to
be stored is up to 18 digits inclu ding pauses ( TRFR key), flashes ( FLASH ke y) and stops (CONF key).
The One Touch Dial numbers are stored under the ten One -Touch keys (No.1 to No.10) as F01 to F10.
When the number of common Abbreviated Di aling is set to 100 in Program #17-D, th e memory for the
remaining 100 numbers can be used for per s ona l a bbre vi ated di al numbers at 10 Key tele pho nes. The
assigned Key Teleph one user can stor e up to 1 0 m ore dia l num bers under ten O ne- Touc h Ke ys as F1 1
to F20. When dialing, the user must press OPAC key before pressing an One-Touch Key.
STATION APPLICATION:
KTS
¾ 4-4 ¾
Page 81

Trunk Outgoing Call
OPERATION:
<All KTS>
To place an outside call:
1. Seize a Trunk line.
2. Press One Touch key which stores desired phone number.
To store a One Touch Dial number:
1. Press SPK key.
2. Press ICM key. (TX-Z 824/1232/2464 only) (See Note 1)
3. Press DC key and *.
4. Press a One -Touch key to store a phone number.
5. Dial phone number to be stored. (One-Touch Key No.1 to No.10 store numbers in F01-F10.)
6. Repeat steps 3 to 5.
7. Press SPK key to exit from One-Touch Dialing entry.
<Only assigned KTS>
To place an outside call:
1. Seize a Trunk line.
2. Press
3. Press One-Touch key which stores the desired phone number.
To store a One-Touch Dial number:
1. Press SPK key.
2. Press ICM key. (TX-Z 824/1232/2464 only) (See Note 1)
3. Press
4. Press DC key and *.
5. Press a One-T ouch key to store a phone n umber. (One-Touch Ke y No. 1 to No.1 0 s tor e numbers in
6. Dial phone number to be stored.
7. Go to Step 3 to enter another number
OPAC
key.
OPAC
key.
F11-F20.)
or
Hang up or press SPK to finish.
To check stored One-Touch Dial number:
(On-hook condition)
1. Press CHECK key.
2. Press SPK key.
3. Press DC key and
4. Press a One-Touch key which stores the phone number.
5. Press CLEAR key to finish.
Note 1: If Program #75-D is 0 (No tone), skip Step 2. (TX-Z 824/1232/2464)
Note2: If the above operat ions ar e tak en w ithout press ing OP AC k ey, th e numb ers stores in F1- F10 ar e
called.
RELATED SYSTEM DATA:
#17-D: Storage Quantity of Abbreviated Dialing
#75-B: Personal Abbreviated D ial
OPAC
key.
nnnn Toll Restriction
DESCRIPTION:
Toll Restriction determ ines extens ion’s abil it y to m ak e calls. Eac h extens ion ca n be ass igned one of the
following six class es per mode (Day/Night). Toll Restriction Class A is the highes t an d the Class F is the
lowest.
¾ 4-5 ¾
Page 82

Trunk Outgoing Call
Class-A: No dialing restrictions.
Class-B: Dials are restricted by DATA-B except dials matching PBX extension call or DATA-F.
Class-C:Dials are restricte d by DATA- D2 except dials matching PBX extensio n call, DATA- C, or DAT A-
F.
Class-D: Dials are restricted by DATA-D2 or DATA-D1 except dials matching PBX extension call or
DATA-F.
Class-E: Dials are restricte d a ll outgo ing T runk c alls exc ept dia ls m atc hing PBX extens ion ca ll or DAT A-
F.
Class-F: Intercom calls only.
The DATA (restricted/perm itted codes and number length lim it) within the Classes must be entered in
programming.
If there are PBX lines, PBX access code must be assigned in programming in order for Toll Restriction to
be properly applied.
Toll restrictions are not applied to lines programmed as Unrestricted Lines.
When the system is place d i n n igh t mode by Night Service feat ur e, t he Toll Restriction clas s ass ignment
for night mode is activated.
STATION APPLICATION:
KTS, SLT
OPERATION:
When an extension user d ials a call th at is not al lowed b y the assigned C lass, the s ystem automaticall y
disconnects the line.
RELATED SYSTEM DATA:
#03-D: Unrestricted Lines
#18-C: Abbreviated Dialing Restriction
#35-A: Toll Restriction Class (Day)
#35-B: Toll Restriction Class (Night)
#36: Permitted Codes (DATA-C)
#37: Number Length Limit (DATA-D1)
#38: PBX CO Access Codes (DATA-E)
#39: Common Unrestricted Codes (DATA-F)
#40: Class-B Restricted Codes (DATA-B)
#41: Class-C/D Restricted Codes (DATA-D2)
nnnn Walking Toll Restriction
DESCRIPTION:
Walking Toll Restriction lets you temporarily override an extension's dialing restrictions by dialing
programmed secur ity code at that extension. Dialing the code overrides the restrict ions set up in Toll
Restriction.
STATION APPLICATION:
KTS, SLT
OPERATION:
<KTS>
1. Lift handset.
2. Press an idle Line key.
3. Press OPAC key.
4. Press DC key.
5. Dial security code.
6. Dial phone number.
¾ 4-6 ¾
Page 83
Trunk Outgoing Call
<SLT>
1. Lift handset.
2. Dial 07 (or 97). => (See Note)
3. Dial security code.
4. Dial 9 (or 0). => (See Note)
5. Dial phone number.
Note:
Program #20-D Data Automatic Trunk Access Code for SLT Dial at Step 2 Dial at Step 4
00970
19079
RELATED SYSTEM DATA:
#42: Walking Toll Restriction Security Code
#43: Toll Restriction Class Assignment on Security Code
nnnn Dial Block
DESCRIPTION:
Dial Block allows you to tem porally lock your extension b y entering 4 digit personal c ode so that other
users can not make outside calls f rom your extension. To have this facility each extension ha s to be
assigned by system programming.
At No Display Key Telephones, 3-Splas h tone is emitted from built-in s pe aker if somebod y tri es to make
an outside call while Dial Block is set.
STATION APPLICATION:
KTS, SLT
OPERATION:
To set Dial Block:
<KTS>
1. Press SPK key.
2. Press ICM key. (TX-Z 824/1232/2464 only) (See Note 1)
3. Dial *, # (TX-Z 824/1232/2464)
Dial 95 (TX-Z 308)
4. Dial 4-digit personal code. (See Note 3)
5. Dial *.
- Conf irmation tone when effective.
- Error tone when not effecti ve.
6. Press SPK key.
<SLT>
1. Lift handset.
2. Dial function code. (See Note 2)
3. Dial 4-digit personal code. (See Note 3)
4. Replace handset.
Note 1: If Program #75-D is 0 (No tone), skip Step 2. (TX-Z 824/1232/2464)
Note 2:
Program #20-D Data Automatic Trunk Access Code for SLT Dial at Step 2
Dial Plan 1 - - 65
Dial Plan 2
Note 3: You can dial any number as a personal code.
0 0 955
1 9 055
¾ 4-7 ¾
Page 84
Trunk Outgoing Call
To cancel Dial Block:
<KTS>
1. Press SPK key.
2. Press ICM key. (TX-Z 824/1232/2464 only) (See Note 1)
3. Dial *, # (TX-Z 824/1232/2464).
Dial 95 (TX-Z 308).
4. Dial 4-digit code which is entered when setting Dial Block.
5. Dial #.
- Conf irmation tone when effective.
- Error tone when not effecti ve.
<SLT>
1. Lift handset.
2. Dial function code. (See Note 2)
3. Dial 4-digit personal code which is entered when setting Dial Block.
4. Replace handset.
Note 1: If Program #75-D is 0 (No tone), skip Step 2. (TX-Z 824/1232/2464)
Note 2:
Program #20-D Data Automatic Trunk Access Code for SLT Dial at Step 2
Dial Plan 1 - - 66
Dial Plan 2
0 0 956
1 9 056
RELATED SYSTEM DATA:
35-C: Toll Restriction Class (Dial Block)
nnnn Flash
DESCRIPTION:
The flashing time can be set by system program (#26) to two different timings for CO lines and PBX lines.
To send a flashing signal, just depress the FLASH key after seizing a CO/PBX line.
STATION APPLICATION:
KTS, SLT
OPERATION:
<KTS>
1. On the CO/PBX line
2. Press FLASH key.
<SLT>
(On the CO/PBX line)
1. Flash Hookswitch.
2. Dial 90.
RELATED SYSTEM DATA:
#26: Flash Timer
nnnn Pulse to Tone Conversion
DESCRIPTION:
Pulse to Tone Conversio n allows you to change from Pulse to T one dialing mode to access servic es
such as computer-accessed long distance service.
STATION APPLICATION:
KTS
¾ 4-8 ¾
Page 85

Trunk Outgoing Call
OPERATION:
1. Dial phone number. (Pulse mode).
2. Dial #.
3. Dial phone number. (Tone mode).
RELATED SYSTEM DATA:
#01-B: Dial Mode
nnnn Camp-On (Trunk Queuing)
DESCRIPTION:
When all trunk lines in a particular Queue Group are busy, Camp-On puts an extension user on a
"waiting list" for an available line in the group. As soon as a line becomes free, the user's phone rings and
a Line key flashes. Up t o eight extension us er s c an ac t ivate Camp-On in the same Queue Group. When
signaled, the user must answer within 20 s ec , o th erwise the line ri ngs th e next extension on the "waiting
list".
STATION APPLICATION:
KTS, SLT
OPERATION:
To use Camp-On:
<KTS>
1. Lift handset.
2. Press ICM key. (TX-Z 824/1232/2464 only) (See Note)
3. Press HOLD key.
4. Dial Queuing Group number (0-6) (0: Same group, 1- 6: Group No.).
- If you hear busy tone, the extension can not use Camp-On for that group.
5. Replace handset.
<SLT>
1. Place an outside call. Hear busy tone.
2. Dial Queuing Group number (0-6) (0: Same group, 1- 6: Group No.).
3. Replace handset.
Note : If Program #75-D is 0 (No tone), skip Step 2. (TX-Z 824/1232/2464)
When Camp-On rings an extension:
<KTS>
1. Lift handset.
2. Press flashing Line key.
<SLT>
1. Lift handset.
RELATED SYSTEM DATA:
#01-C: Queuing Group - Line Assignment
#16-B: Recall Trunk Off-Hook Access
nnnn Key Touch Tone
DESCRIPTION:
The Key Touch Tone feat ure allows a tone to be emitted from the built- in speaker each time a Line,
One-Touch or dial pad key is pressed. The tone confirms the key was fully pressed.
STATION APPLICATION:
KTS
¾ 4-9 ¾
Page 86

Trunk Outgoing Call
OPERATION:
To activate Key Touch Tone:
- Do not lift handset.
1. Dial *.
To cancel Key Touch Tone:
- Do not lift handset.
1. Dial *. Final Key Touch Tone is heard.
RELATED SYSTEM DATA:
#13-A: Key Touch Tone
nnnn Easy Trunk Access
DESCRIPTION:
Easy Trunk Access lets an ex t ens io n user ac c ess an out go ing line without pressing a Lin e key or dialing
a two-digit line number. A single-digi t c ode aut omatically access es an out goi ng ou ts i de lin e f r om smaller
number, large number, or rotated number.
STATION APPLICATION:
KTS, SLT
OPERATION:
To access the first available outgoing line:
<KTS>
1. (On-Hook and Speaker off condition)
2. Dial 0. A line is seized and dial tone comes over the speaker.
<SLT>
1. Lift handset.
2. Dial 9 or 0. (refer to Program #20-D)
RELATED SYSTEM DATA:
#15-C: Automatic Trunk Access
#20-D: Automatic Trunk Access Code for SLT
#64-C: Trunk Line Seizing Order Selection
n
n Queuing Group Access
nn
DESCRIPTION:
Queuing Group Access lets an extension user access the first available outgoing line in a Queuing Group
without pressing a Line key or dialing a two-digit line number. A single-digit code automatically accesses
an outgoing outside line from small number, large number, or rotated number.
STATION APPLICATION:
KTS, SLT
OPERATION:
To access the first available line in a Queuing Group:
<KTS>
1. Press SPK key.
2. Press ICM key. (TX-Z 824/1232/2464) (See Note)
Dial 91. (TX-Z 308)
3. Dial Queuing Group number (1-6). A line is seized and dial tone comes over the speaker.
¾ 4-10 ¾
Page 87

Trunk Outgoing Call
<SLT on Dial Plan 1>
1. Lift handset.
2. Dial Queuing Group number (1-4).
<SLT on Dial Plan 2>
1. Lift handset.
2. Dial 06 or 96 (refer to #20-D)
3. Dial Queuing Group number (1-6)
Note 1: If Program #75-D is 0 (No tone), skip Step 2. (TX-Z 824/1232/2464)
RELATED SYSTEM DATA:
#01-C: Queuing Group - Line Assignment
#15-C: Automatic Trunk Access
#20-D: Automatic Trunk Access Code for SLT
#64-C: Trunk Line Seizing Order Selection
nnnn Automatic Repeat Dialing
DESCRIPTION:
If an extension user places a trunk call that is busy or unanswered, the y can have Automatic Rep eat
Dialing try it again lat er on . The us er doesn't c ontin uall y have to tr y the n um ber again -- hop ing it will go
through. Automatic Rep eat Dialing automatically retries it unt il t he c a ll ed p arty answers. Moreover, whi l e
Automatic Repeat Dial ing is s et (waiting, busy or n o-answer), Hurry-Up operat io n c an be taken place for
immediate redial.
While Automatic Repeat Dialing is set (waiting condition), 2-Splash tone (Mute-tone) is emitted from
built-in speaker in 5 sec cycle.
STATION APPLICATION:
KTS
OPERATION:
To use Automatic Repeat Dialing:
1. Place outside call.
- Listen for busy tone or ring-no-answer.
2. Press OPAC key.
3. Dial 1.
4. Replace handset or press SPK key.
- The system periodically redials the call.
To cancel Automatic Repeat Dialing:
1. Lifting the handset cancels Automatic Repeat Dialing.
To use Hurry-Up operation
1. Press OPAC key.
2. Dial 2.
Repeat Dialing and Hurry-Up Operation can be stored under One-touch key.
On TX-Z 308 system, One-Touch Key No.09 is initially set as Automatic Repeat Dial key.
RELATED SYSTEM DATA:
#01-C: Queuing Group - Line Assignment
#33: LND/Repeat Dial Hooking Time
#34: Repeat Dial Timers
¾ 4-11 ¾
Page 88

Trunk Outgoing Call
nnnn Loop Key Trunk Access
DESCRIPTION:
User can assign
an unused Line key in advance by using "One-Touch Feature Access". This feature permits access to an
outgoing line by pressing a Loop Key. The trunk line is seized from small num ber, large number, or
rotated number. This key provides user advantage as follows;
- W hen the number of Trunk lines connected to the system is larger than t he number of Line keys at
user's KTS, user can seize all the Trunk line by pressing the Loop key.
- User can use the Park Hold effectively.
There are 6 types of LED indication.
- System Hold: 0.1 sec ON / 0.1 sec OFF (BLF: Green)
- Exclusive Hold: 0.1 sec ON / 0.1 sec OFF / 0.1 sec ON / 0.7 sec OFF (BLF: Green)
- I-Use: Light (BLF: Green)
- Conference standby: 0.1 sec ON / 0.1 sec OFF / 0.1 sec ON / 0.7 sec OFF (BLF: Green)
- Idle: Extinguish
- All lines are Busy: Light (BLF: Red)
STATION APPLICATION:
KTS
only one
Loop Key to one of undefined Line keys. The Loop Key should be assigned on
OPERATION:
To seize a Trunk line:
1. Press Loop Key. (Dial Tone is heard.)
* Refer to One-Touch Feature Access for how to assign Loop Key.
To answer the incoming call:
(This feature is available for KTS which is allowed Ringing Trunk Off-hook Access feature.)
1. Incoming call to a Trunk line. (Ringing)
(Loop key is still extinguished.)
2. Lift handset. (Loop key lights Green.)
RELATED SYSTEM DATA:
#64-C: Trunk Line Seizing Order Selection
nnnn Automatic Off-Hook Trunk Access
DESCRIPTION:
The assigned extensi on users c an seize an idle T runk Line by o nly liftin g handset. The opera tions such
as pressing Line key or dialing Trunk Access Code become unnecessary. This feature is useful for Key
Telephone users who mainly makes outside calls or to connect Fax Machines (Modems) instead of
Single Line Telephones.
STATION APPLICATION:
KTS, SLT
OPERATION:
<KTS>
1. Lift handset or press SPK key. (An idle Trunk Line will automatically be seized.)
Note 1: If all Trunk Lines are busy, no tone will be heard.
Note 2: This disables the u ser to se ize Intercom after lifting hand set. Press ICM key before lifting h andset to s eize
Intercom.
Note 3: Lifting handset when the extension is ringing answers Trunk Line or Intercom call.
<SLT>
1. Lift handset. (An idle Trunk Line will automatically be seized.)
Note : If all Trunk Lines are busy, Busy Tone will be heard.
¾ 4-12 ¾
Page 89

Trunk Outgoing Call
Note 2: Assigned SLT user can not place Intercom Calls. However, they can r eceiv e inco ming I nterc om Ca ll an d
transferred Trunk Line Call. Transferring Trunk Line calls to another extension is possible.
RELATED SYSTEM DATA:
#64-C: Trunk Line Seizing Order Selection
#75-C: SLT Automatic Trunk Access
#’75-D: KTS Off-Hook Mode Selection
nnnn Account Code
DESCRIPTION:
Account Code is useful to keep track of expenditures. Ex t ens io n us er dia ls Ac cou nt Code before making
outside call. This code is shown on the SMDR print out.
STATION APPLICATION:
KTS, SLT
OPERATION:
To enter the Account Code:
<KTS>
1. Seize an idle Trunk Line. (Hear Dial Tone.)
2. Dial *.
3. Dial Account Code. (Max. 8 digits)
4. Dial *.
5. Dial Telephone Number.
<SLT>
1. Seize an idle Trunk Line. (Hear Dial Tone.)
2. Flash Hookswitch.
3. Dial 99.
4. Dial Account Code. (Max. 8 digits)
5. Flash Hookswitch.
6. Dial Telephone Number.
RELATED SYSTEM DATA:
#57-D: KTS Account Code
#58-B: SLT Account Code
¾ 4-13 ¾
Page 90

Trunk Incoming Call
nnnn Incoming Trunk Access
DESCRIPTION:
Trunk lines can be groupe d into a max imum of 30 groups. T he line groups as signed to each ex tension
can access for incoming calls and the audible assignments (day and/or night mode ringing) for the
extensions. Up to two incom ing line groups can be assigned to an extens ion. An extension user can
answer an incoming call on a particular line group only if the extension has Incom ing Trunk Access to
that group. When an extension is assigned incoming access to a line group, the lines in the group appear
under the Line keys (KTS).
STATION APPLICATION:
KTS, SLT
OPERATION:
<KTS>
To answer an outside call by Direct Pickup:
1. Lift handset or press SPK key.
2. Press flashing Line key.
To answer an outside call by Dial Pickup:
1. Lift handset or press SPK key. (See Note)
2. Dial 96 (TX-Z 824/1232/2464).
Dial 92 (TX-Z 308)
Note: If Program #75-D is 0 (No tone), press ICM key after Step 1 to seize Intercom. (TX-Z 824/1232/2464)
<SLT>
1. Lift handset.
2. Dial 06 (or 96). => Check your dial plan.
RELATED SYSTEM DATA:
#02: Line Group Assignment
#03-C: Common Use Line Assignment
#07: Incoming Trunk Access/Audible
#16-A: Ringing Trunk Off-Hook Access
nnnn Trunk Off-Hook Signaling
DESCRIPTION:
Trunk Off-Hook Signaling provides an extension user with an audible indication of an incoming Trunk call
while already on a cal l: the busy extension user hears muted ringing if on a handset call or one shor t
burst tones (0.5s ON/15s OFF) if on a Handsfree call.
STATION APPLICATION:
KTS
OPERATION:
To answer a Trunk Off-Hook signal:
1. Pres s HOLD to put an outside call in progress on ho ld or hang up the cal l in pro gr es s. Intercom calls
must be hung up since they cannot be put on hold.
2. Press the flashing Line key.
RELATED SYSTEM DATA:
#04-B: Trunk Off-Hook Signaling
¾ 4-14 ¾
Page 91

Trunk Incoming Call
nnnn Ringing/Recall Trunk Off-Hook Access
DESCRIPTION:
Ringing Trunk Off -Hook Ac ces s allo ws a ring in g ou ts ide c al l to be ans wered b y just lif ting the handset; a
Line key does not have to be pr essed. Recal l Trunk Off-Hook Access lets a recalling (re -ringi ng) line be
answered by just lifting the handset.
STATION APPLICATION:
KTS, SLT
OPERATION:
1. Lift handset.
RELATED SYSTEM DATA:
#16-A: Ringing Trunk Off-Hook Access
#16-B: Recall Trunk Off-Hook Access
nnnn Night Service (Manual/Auto)
DESCRIPTION:
Night Service puts the night audible (ringing) assignment (Program #7) into effect manually or
automatically. Incoming calls on a specific line group will ring at extensions that are assigned night
audible for that line group. Night Service remains set even if the system power is turned off.
Night Service is available on a system basis or incoming line group basis according to Program #15-B.
1. Night audible assignments go into effect at all extensions in the system. Day audible assignments are
ignored. The extension #10 can activate this Night Service (NT) mode unless DSS Console is
connected.
On the TX-Z 1232/2464 S ystem, Night Ser vice assignment c an be activated b y the DSS Conso le. If
DSS Console is not connected, the extension #10 can activate this mode assignment.
2. Nigh t au di ble ass ignments go into ef f ec t f or the extens io ns th at h av e th e s ame primary incoming line
group as the extension that ac ti vat es this NT mode. Extensions with a d if f er ent primary incoming line
group receive ringing according to their day aud ible assignments. Any extension can activate this
mode.
This NT mode can be activated by any extension in each same primary incoming line group.
Automatic Mode Switching
Automatic Mode Switching (Program #79) allows to switch Day/Night mode according to preprogrammed
time routine f or the system. W hen Automatic Mode Switching places the system in Night Mode, T RFR
blinks red at all key telephones. If the system mode is switched manually at No.10 telephone or DSS, it
overrides Automatic Mode Switching assignment.
STATION APPLICATION:
KTS, SLT, External speaker, Doorphone
OPERATION:
To activate Night Service:
<KTS>
1. Press SPK key.
2. Press ICM key. (TX-Z 824/1232/2464 only) (See Note)
3. Press TRFR key.
4. Dial #. TRFR lights red.
5. Hang up.
¾ 4-15 ¾
Page 92

Trunk Incoming Call
To activate Night Service:
<DSS>
1. Press NT key. (LED lights red)
To cancel Night Service:
<KTS>
1. Press SPK key.
2. Press ICM key. (TX-Z 824/1232/2464 only) (See Note)
3 Press TRFR key.
4. Dial #. TRFR extinguishes.
5. Hang up.
To cancel Night Service:
<KTS>
1. Press NT key. (LED extinguishes)
This feature can be stored under the One-touch key.
When NT mode 1 is enabled, the TRFR key lights steadily at all KTSs. When NT mode 2 is enabled, the TRFR key
lights steadily at the activating extension and at all other KTSs with the same primary incoming line group.
Note: If Program #75-D is 0 (No tone), skip Step 2. (TX-Z 824/1232/2464)
RELATED SYSTEM DATA:
#07: Incoming Trunk Access/Audible
#15-B: Night Service
#79: Automatic Mode Switching Time
nnnn Call Forward
DESCRIPTION:
Call Forward reroutes an extension user's incoming outside calls so they ring at a different extension. An
extension user who activ ates Call Forward does not lose access to incom ing calls. Incom ing access is
shared with the rece iving (destinat ion) extension, but only the destination ex tension rin gs. Calls can not
be rerouted to an extension in Do Not Disturb. There are four types of Call Forward:
- Call Forward Immediate
All calls transferred immediately to the destination.
- Call Forward when Busy
Calls are transferred only when the extension is busy.
- Call Forward when Unanswered
Calls are transferred only if they are unanswered, and both the destination and the transferring
extension ring.
- Call Forward when Busy/Unanswered
Calls are transferred only when the extension is busy or unanswered, and both the destination and the
transferring extension ring.
STATION APPLICATION:
KTS, SLT
¾ 4-16 ¾
Page 93
Trunk Incoming Call
OPERATION:
To activate Call Forward:
<KTS>
1. Press SPK key.
2. Press ICM key. (TX-Z 824/1232/2464 only) (See Note 1)
3. Press TRFR key.
4. Dial destination extension number.
5. Dial option code (0-3). (see Note 3)
- One short beep sounds as confirmation.
- One long beep means calls cannot be rerouted to that extension. (TX-Z 824)
- 3 splash tone means calls cannot be rerouted to that extension. (TX-Z 1232/2464)
6. Press SPK key.
<SLT>
1. Lift handset.
2. Dial function code. (see Note 2)
3. Dial destination extension number.
4. Dial option code (0-3). (see Note 3)
5. Hang up.
Note 1: If Program #75-D is 0 (No tone), skip Step 2. (TX-Z 824/1232/2464)
Note 2:
Program #20-D Data Automatic Trunk Access Code for SLT Dial at Step 2
Dial Plan 1 - - 63
Dial Plan 2
Note 3: Option codes are as follows:
0 =>
Call Forward
1 =>
Call Forward
2 =>
Call Forward
3 =>
Call Forward
0 0 953
1 9 053
Immediate
when Busy
when Unanswered
when Busy/Unanswered
To cancel Call Forward (at originating and destination extension):
<KTS>
1. Press SPK key.
2. Press ICM key. (TX-Z 824/1232/2464 only) (See Note 1)
3. Press TRFR ke y twice.
4. Press SPK key.
<SLT>
1. Lift handset.
2. Dial function code. (see Note 2)
3. Hang up.
Note 1: If Program #75-D is 0 (No tone), skip Step 2. (TX-Z 824/1232/2464)
Note 2:
Program #20-D Data Automatic Trunk Access Code for SLT Dial at Step 2
Dial Plan 1 - - 69
Dial Plan 2
0 0 959
1 9 059
RELATED SYSTEM DATA:
#28: Unanswered Time
¾ 4-17 ¾
Page 94

Trunk Incoming Call
nnnn Follow Me
DESCRIPTION:
When an extension user is awa y from his/her extension and has to use another extension, Follow Me
reroutes the extension user's incoming outside calls to that extension. There are four types of Follow Me
same as Call Forward.
- Follow Me Immediate
All calls transferred immediately to the destination.
- Follow Me when Busy
Calls are transferred only when the extension is busy.
- Follow Me when Unanswered
Calls are transferred only if they are unanswered, and both the destination and the transferring
extension ring.
- Follow Me when Busy/Unanswered
Calls are transferred only when the extension is busy or unanswered, and both the destination and the
transferring extension ring.
STATION APPLICATION:
KTS, SLT
OPERATION:
To activate Follow Me (at another extension) :
<KTS>
1. Press SPK key.
2. Press ICM key. (TX-Z 824/1232/2464 only) ( See Note 1)
3. Press TRFR key and dial 0.
4. Dial originating extension number (your extension No.).
5. Dial option code (0-3). (see Note 3)
- One short beep sounds as confirmation.
- One long beep means calls cannot be rerouted to that extension. (TX-Z 824)
- 3 splash tone means calls cannot be rerouted to that extension.(TX-Z 1232/2464)
6. Press SPK key.
<SLT>
1. Lift handset.
2. Dial function code. (see Note 2)
3. Dial originating extension number (your extension No.).
4. Dial option code (0-3). (see Note 3)
5. Hang up.
Note 1: If Program #75-D is 0 (No tone), skip Step 2. (TX-Z 824/1232/2464)
Note 2:
Program #20-D Data Automatic Trunk Access Code for SLT Dial at Step 2
Dial Plan 1 - - 630
Dial Plan 2
Note 3: Option codes are as follows:
0 =>
Follow Me
Immediate
0 0 9530
1 9 0530
1 =>Follow Me when Busy
2 =>
3 =>
Follow Me
Follow Me
when Unanswered
when Busy/Unanswered
¾ 4-18 ¾
Page 95
Trunk Incoming Call
To cancel Follow Me (at originating and destination extension):
<KTS>
1. Press SPK key.
2. Press ICM key. (TX-Z 824/1232/2464 only) (See Note1)
3. Press TRFR ke y twice.
4. Press SPK key.
<SLT>
1. Lift handset.
2. Dial function code. (see Note 2)
3. Hang up.
Note 1: If Program #75-D is 0 (No tone), skip Step 2. (TX-Z 824/1232/2464)
Note 2:
Program #20-D Data Automatic Trunk Access Code for SLT Dial at Step 2
Dial Plan 1 - - 69
Dial Plan 2
RELATED SYSTEM DATA:
#28: Unanswered Time
nnnn Call Pickup
0 0 959
1 9 059
DESCRIPTION:
(See "Call Pickup" on page 4-45)
nnnn Do Not Disturb (DND)
DESCRIPTION:
(See "Do Not Disturb" on page 4-46)
nnnn Executive DND
DESCRIPTION:
Executive DND allows two extensions to be specially paired for the purpose of forwarding calls. The
extension designated as the "executive" can forward its incoming calls to the extension designated as the
"secretary". Up to eight such pairs can be formed. Up to all eight executive extensions can be paired with
the same secretary extension, if desired. The executive extension must be programmed for a level of Do
Not Disturb (DND). If, for example, DND level 1 is selected, the executive extension can forward its Trunk
calls - access and audible - to th e s ecr etary extension. T he s ecr etar y ex tens ion c an r eac h t he executive
extension even while Executive DND is activated.
STATION APPLICATION:
KTS
OPERATION:
To activate Executive DND:
1. Activate DND on the executive extension. (see "Do Not Disturb" page 4-46)
To cancel Executive Call Forward:
1. Cancel DND on the executive extension. (see "Do Not Disturb" page 4-46)
RELATED SYSTEM DATA:
#09: Forwarding Pairs Assignment
#13-B: Do Not Disturb
¾ 4-19 ¾
Page 96

Trunk Incoming Call
nnnn DISA (Extension Access)
DESCRIPTION:
Direct Inward System Access (DISA) lets someone outside the system call in on a DISA Line and directly
access an extension or access the Group Hunt feature - in each case, bypassing the system operator. In
case outside caller does not dial extension number within the time which is set in Program #66-2 or called
extension is busy, or called extension does not answer within the time which is set in Program #66-3, this
call will be transferred to operator telephone (pre-assigned extension in Program #51). Attendant
extension can be as signed for Day mode and Nig ht mode res pectivel y. The DISA line ar e autom aticall y
terminated within the time which is set in Program #66-3 when calls are unauthorized, or calls transferred
to operator are unanswered. The DISA caller must use a DTMF telephone.
When Trunk line is as signed as DI SA L ine in Pr ogr am 03-A,
DISA line which must be programmed in Program #08-A with data 1"
During Automatic Answer T ime (Program #66-1), the system indicates LED either bus y (Not to answer)
or Normal Ring (OK to answer) on DISA incom ing call at #64-D. W hen data 1 is set, “ Delayed DISA
Answer function can be realized.
Voice Announce/Record Unit (VAU) (Optional Item) can be used to the TX-Z 1232/2464 system as voice
announce device for DISA Line. VAU unit provides guidance m essages b y user-recorded voice on DI S A
feature (for outside party) and also for extensions.
STATION APPLICATION:
System
OPERATION:
To use DISA to call an extension or access Group Hunt:
1. Call the DISA line. The system answers with dial tone or voice recorded message.
2. Dia l desired extens ion num ber or dial 8, the n the Hunting G roup num ber (0-4). Music on Hold p lays
until the user answers.
To reuse the DISA line when called extension is busy:
1. Dial # and *. Hear dial tone.
2. Dia l desired extens ion num ber or dial 8, the n the Hunting G roup num ber (0-4). Music on Hold p lays
until the user answers.
To answer a call on a DISA Line:
1. Lift handset.
2. Press flashing Line key.
DISA port can be allocated to any one of
.
Refer to the "DISA Operation Flowchart" in this Manual (Page 4-113)
Note: In case Night Mode is set and VAU unit is installed in TXZ 1232/2464 system, Night Announcement function
has the priority. If no dialing is made by t he outs ide ca ller during prepro grammed pe riod afte r sendi ng Night
Message, the incomi ng call sha ll be t erminat ed a utomati cally. If the caller dials an extension num ber dur ing
preprogrammed period after Night Message, the system operates as normal DISA.
RELATED SYSTEM DATA:
#03-A: DISA Line
#03-B: DISA Line Access
#08-A: Instrument Type
#30: Voice Recorded Message Time
#51: Attendant Station for DISA
#64-D: LED Indication for DISA Incoming Call
#66: DISA Timers
¾ 4-20 ¾
Page 97
Hold/Transfer/During Conversation
nnnn Hold
System Hold
u
DESCRIPTION:
System Hold puts an outside call on Hold so that it can be picked up from any extension in the system. If
the System Hold Recall program is enabled, a call left on System Hold longer than a programmed period
of time re-rings the extension that placed it on Hold.
STATION APPLICATION:
KTS, SLT
OPERATION:
To put a call on System Hold:
<KTS>
1. Press HOLD key.
2. Hang up. Line key flashes fast at this KTS and slowly at the other KTS in the system.
<SLT>
1. Flash Hookswitch.
2. Dial 91.
3. Hang up.
To retrieve a call on System Hold:
<KTS>
1. Lift handset.
2. Press flashing Line key.
<SLT>
1. Lift handset.
2. Dial function code. (see Note)
Note:
Program #20-D Data Automatic Trunk Access Code for SLT Dial at Step 2
Dial Plan 1 - - 61
Dial Plan 2
RELATED SYSTEM DATA:
#16-B: Recall Trunk Off-Hook Access
#22: System Hold Recall
Automatic Hold
u
DESRIPTION:
Automatic Hold lets the KTS put an outside call on System Hold quickly without pressing the HOLD key in
order to place an internal call. If necessary, holding operation can be ignored within the assigned timer by
programming after placing an outside call. In that case, assigned extension(s) can still hold calls in spite
of the setting in #87.
0 0 951
1 9 051
STATION APPLICATION:
KTS
¾ 4-21 ¾
Page 98
Hold/Transfer/During Conversation
OPERATION:
To put an outside call on System Hold using Automatic Hold:
1. Press the ICM key to place an extension call. The call in progress is automatically put on Hold.
RELATED SYSTEM DATA:
#77: Extension Assignment 6
#87: Hold Disable Timer
Exclusive Hold
u
DESCRIPTION:
Exclusive Hold puts an outside call on Ho ld at an extension so that it can only be picked up from that
extension. If not picked up within a programmed interval of time, a call on Exclusive Hold recall (re-rings)
the extension that placed it on Hold. On KTS, if the recall is not answered, the call reverts to System Hold
and can be picked up from any extension. On SLT, if the recall is not answered, the call reverts to
extension No.10 (or attendant extension of each tenant), or cut-off.
STATION APPLICATION:
KTS, SLT
OPERATION:
To put an outside call on Exclusive Hold:
<KTS>
1. Press HOLD key twice.
2. Hang up. Line key flashes fast. At all other KTS, the Line key is steadily lit (busy).
<SLT>
1. Flash Hookswitch.
2. Dial 92.
3. Hang up.
To retrieve a call on Exclusive Hold:
<KTS>
1. Lift handset.
2. Press flashing Line key.
<SLT>
1. Lift handset.
2. Dial function code. (see Note)
Note:
Program #20-D Data Automatic Trunk Access Code for SLT Dial at Step 2
Dial Plan 1 - - 61
Dial Plan 2
RELATED SYSTEM DATA:
#15-D: Exclusive Hold
#19-E: SLT Hold Transferring
#21: Exclusive Hold Recall
0 0 951
1 9 051
nnnn Music On Hold
DESCRIPTION:
Music On Hold sends s ynthesized mus ic to an outside part y on System or Exc lusive Hold. T he system
provides a synthesized melody “Home sweet home”.
STATION APPLICATION:
KTS, SLT
¾ 4-22 ¾
Page 99

Hold/Transfer/During Conversation
OPERATION:
Not applicable.
RELATED SYSTEM DATA:
Not applicable.
nnnn External Music On Hold
DESCRIPTION:
An external MOH music source (e.g., radio, tape player) can be used for MOH instead of internal
synthesized melody.
An optional unit for External Music On Hold is required for TX-Z 308/824 system.
STATION APPLICATION:
KTS, SLT
OPERATION:
Not applicable.
RELATED SYSTEM DATA:
#56: Relay Contact Assignment
nnnn Transfer
Unannounced Transfer
u
DESCRIPTION:
Unannounced Transfer lets an extension user transfer (send) a call directly to another extension - that is,
without first notif ying the receiving extension of the call. An Unannounce d Transfer rings the receiv ing
extension. If the rec eiving extension d oes not answer within the Unannounc ed Transfer Recall interval,
the call recalls (re-rings) the transferring extension.
STATION APPLICATION:
KTS, SLT
OPERATION:
To make an Unannounced Transfer:
<KTS>
1. Press ICM key, then dial extension number.
2. Press TRFR key or hang up. (according to #80-01-E)
<SLT>
1. Flash Hookswitch.
2. Dial extension number.
3. Hang up.
To receive an Unannounced Transfer:
<KTS>
1. Lift handset. If Recall Trunk Off-Hook Access is programmed, this single step answers the call.
2. Press flashing Line key (key flashes green).
<SLT>
1. Lift handset.
¾ 4-23 ¾
Page 100

Hold/Transfer/During Conversation
RELATED SYSTEM DATA:
#16-B: Recall Trunk Off-Hook Access
#23: Unannounced Transfer Recall
#80-01-E: On-Hook Transfer
Announced Transfer
u
DESCRIPTION:
Announced Transfer automatically puts the call on S ystem Hold so that the transferring exte nsion can
notify the receiving extension before actually sending the call. To receive an Announced Transfer,
receiving extension just wait on the line to be autom aticall y connected to the tr ansferr ed caller. Both the
transferring and receiving extensions receive a "fast flash" Hold indication, making the call easy to
identify, while al l other KTSs see a "slow f lash." If the call is not se nt within the Announced Transfer
Recall interval, the call then shows a "slow flash" at the receiving extension, and re-rings the transferring
extension.
STATION APPLICATION:
KTS, SLT
OPERATION:
To make an Announced Transfer:
<KTS>
1. Press ICM key, then dial extension number.
2. Ann ounce the ca ll .
3. Press TRFR key or hang up. (according to #80-01-E)
<SLT>
1. Flash Hookswitch.
2. Dial extension number.
3. Ann ounce the ca ll .
4. Hang up.
To receive an Announced Trans f er :
<KTS>
1. Lif t hands et when not if ied of the call.
2. Just wait on the line to be automatically connected to the transferred caller.
<SLT>
1. Lift handset to answer a call.
2. Just wait on the line to be automatically connected to the transferred caller.
RELATED SYSTEM DATA:
#24: Announced Transfer Recall
#80-01-E: On-Hook Transfer
¾ 4-24 ¾
 Loading...