

Nec 232 Owner’s Manual

Copyright Ó 2005 by NEC America, Inc. All rights reserved.
NEC is a registered trademark of NEC Corporation.
All other company or product names are the trademarks of their respective owners.
Manual Part Number: 621-0356
Version 2**
**This may include features not available in all NEC 232 phones, or may not include features available in updated or later version NEC 232 phones. Contact NEC Service Support with any questions.
NEC America, Inc. (”NEC”) reserves the right to make changes or improvements to any of the products described in this guide without prior notice.
All features, specifications, conditions, and actual colors are subject to change without notice.
1, 2, 3, 4
Printed in U.S.A.
THE CONTENTS OF THIS GUIDE ARE PROVIDED ON AN “AS IS” BASIS. EXCEPT AS REQUIRED BY APPLICABLE LAW, NO WARRANTIES OF ANY KIND, EITHER EXPRESS OR IMPLIED, INCLUDING, BUT NOT LIMITED TO THE IMPLIED
WARRANTY OF MERCHANTABILITY OR FITNESS FOR A PARTICULAR PURPOSE, ARE MADE REGARDING THE ACCURACY, COMPLETENESS, OR CONTENTS OF THIS GUIDE. NEC RESERVES THE RIGHT TO REVISE OR RESCIND THIS GUIDE AT
ANY TIME WITHOUT PRIOR NOTICE.
NEC IS NOT RESPONSIBLE FOR ANY LOSS OR CORRUPTION OF DATA, LOSS OF INCOME OR BUSINESS, OR ANY CONSEQUENTIAL, INCIDENTAL, OR SPECIAL DAMAGE, HOWEVER CAUSED.
WARNING! The power cords of this product contain lead, a chemical known to the State of California to cause birth defects or other reproductive harm. Wash hands a fter handling.
_________________
1 Some operations and features are network and subscription dependent and are not available in all areas. Check with your wireless service provider for availability, description, and cost of features.
2 Some of the mobile Internet services have been pre-configured by the service provider.
3 The availability of particular products and language may vary by region.
4 XCPC (synchronization software) capability requires purchase of an additional NEC Authorized Accessory USB cable.
i

NEC 232 2
SAFETY AND PERFORMANCE 10
GETTING STARTED 17
BASIC CALLS AND PHONE USE 22
PERSONALIZING SETTINGS 32
TEXT ENTRY 73
MESSAGING AND VOICE MAIL 76
GAMES AND APPS 85
WEB BROWSER 90
PHONEBOOK 99
AUDIO AND VISUAL 122
CAMERA FUNCTIONS 129
CALL RECORDS 134
TOOLS 138
ACCESSORIES 162
FDA INFORMATION 165
WARRANTY 169
ii

Contents
NEC 232 1
Wireless System Structure .........................1
User Guide Conventions...........................1
Phone Controls ...............................2
Display Information .............................3
Main LCD Display Area..........................3
Second LCD Display Area ........................3
Status Bar Icons .............................3
Softkey Area ...............................3
Main Menu ..................................4
Sub-Menus, Check Boxes/Radio Buttons, and Options Menu ......5
Menu Shortcut Selection .........................5
Keypad Shortcuts ..............................5
Main Phone Features ............................6
Idle Mode Display of Main LCD .......................7
Main LCD Screen Icons ...........................8
Dial Screen Icons .............................8
Pop-up Screen Icons ...........................8
Alert Pop up Icons ............................8
Idle Mode Display of Second LCD .....................9
Other Second LCD Notifications .......................9
Safety and Performance 10
User Caution ................................10
Emergency Services ............................10
General Care ................................10
General Care ..............................10
Safety....................................11
General Safety .............................11
Road Safety ...............................11
Aircraft Safety ................................11
Radio Frequency (RF) Signals .....................12
Electromagnetic Interference ......................13
Blasting Areas and Explosive Atmospheres...............14
Vehicles Equipped with an Air Bag ...................14
Battery Care and Disposal .........................14
Performance ................................15
Third Party Equipment .........................15
Service .................................15
Efficient Use ...............................15
Battery..................................15
Antenna .................................15
Licenses .................................16
Getting Started 17
Service Activation .............................17
Voice Mail and Messaging .........................17
PIN and Security Codes ..........................17
SIM Card ..................................18
Inserting a SIM Card ..........................18
Removing a SIM Card..........................19
Preparing the Battery ............................19
Charging the Battery ..........................19
Checking the Battery ..........................19
.....................................19
Low Battery Indication..........................20
Changing the Battery ..........................20
Powering-On the Phone ..........................21
Turning the Phone On..........................21
Turning the Phone Off..........................21
Language Display .............................21
Frequency Bands..............................21
Basic Calls and Phone Use 22
Dialing Calls ................................22
Using Voice Dialing ...........................22
Using Digit Dialing ...........................22
Correcting Mistakes ...........................23
Ending Calls ................................23
Receiving Calls ...............................23
Accepting a Call .............................24
Rejecting a Call .............................24
Receiving a Call While in an Application ..................24
iii

Using Features/Application During a Call .................24
Unsuccessful Calls/Auto Redial ......................24
Call Features ................................25
Caller ID .................................25
Sending Your Own Number .......................25
Returning an Unanswered Phone Call .................25
Last Number Redial ...........................25
Plus (+) Dialing .............................25
.....................................26
Emergency Calls ............................26
Entering a Pause (for DTMF Dialing) ..................26
Speed Dialing ..............................26
Dialing a Number in Message Text ...................28
Volume Controls.............................28
Voice Mail ................................28
Forwarding Calls ..............................28
Call Timer..................................29
Using Call Features During a Call .....................29
Placing a Call On Hold .........................29
Call Waiting ...............................29
Mute A Call ...............................29
DTMF Tones ..............................30
New Call.................................30
Conference Calls ............................30
Private Conversation ..........................31
Disconnecting a Party ..........................31
Personalizing Settings 32
Phone Settings ...............................32
Voice Volume................................32
Phone Modes................................33
Mode Selection .............................33
Default Mode Settings..........................33
Default Mode Settings Table ......................34
Changing Mode Settings ........................34
Ring Tune ................................35
Ring Tune Volume ...........................35
Message Tune .............................35
Message Tune Volume .........................36
Key Tone ................................36
Service Tone ..............................36
Vibrate..................................36
iv
Backlight.................................36
Auto Answer...............................37
Answer Options...............................37
Activate Open Fold Answer Option ...................37
Activate Any Key Answer Option ....................37
Activate Send Key Answer Option ...................37
Ring Silencer ................................37
Activate Ring Silencer Option ......................37
Deactivate Ring Silencer Option ....................38
Volume Key.................................38
ALS .....................................38
Own Number ................................38
Language ..................................38
Voice Dialing ................................39
Voice Settings ..............................39
Voice Tag List ..............................40
Memory Status .............................40
Delete All Tags .............................40
Personalization .............................40
Screen Settings...............................41
Main LCD ..................................41
Wallpaper ................................41
Color Theme ..............................41
Display Call Timer ............................42
Auto-hyphenation ............................42
Second LCD ................................42
Display .................................42
Contrast .................................42
Backlight.................................43
Number Display .............................43
Event Display ..............................43
Backlight Color .............................43
Call Settings ................................44
Call Forwarding...............................44
Adding and Editing Profiles .......................44
Deleting a Profile ............................45
Setting Call Forwarding On .......................46
Setting Call Forwarding Off .......................46
Manual Call Forwarding .........................46
Check Call Forwarding Status......................47

Call Waiting ................................47
Setting Call Waiting On/Off .......................47
Checking Status of Call Waiting.....................47
Send Own Number .............................47
Auto Redial .................................47
Security Settings ..............................48
Changing PINS ...............................48
Changing PIN Code ...........................48
Changing PIN 2 Code ..........................48
Changing Security Code ........................48
Forgot Your Security Code .......................48
Locks ....................................49
Phone Lock ON .............................49
Phone Lock OFF ............................49
Fixed Dialing ................................50
Network Settings ..............................50
Network Search Type ...........................50
New Network Search ............................50
SIM List ...................................51
Adding Network to Empty SIM List ...................51
Editing the SIM List ...........................51
Moving a Network ............................51
Adding a Network ............................52
Removing a Network ..........................52
Band Priority ................................52
Clock Settings ...............................53
Show Clock .................................53
Setting Time ................................53
Setting the Time .............................53
Network Time ..............................53
Local Time................................53
Remote Time ..............................55
Setting the Date ..............................55
Setting the Alarm ..............................55
Setting the Alarm Off ..........................56
Formatting the Date and Time .......................56
Setting Time Zone .............................56
Other Settings ...............................56
Synchronization Settings ..........................57
Remote Server .............................57
Local Server ...............................58
TTY Settings ................................58
Internet Settings ..............................58
Factory Settings Connection ......................58
Time Out ................................58
Internet Certificates ...........................59
Message Settings .............................60
Sending a Message ...........................60
Receiving a Message ..........................60
Applying Message Look & Feel .....................61
Personalization ..............................61
Sounds .................................62
Emoticons ................................62
Font Size .................................62
Slide Duration ..............................62
Advanced Message Settings ........................63
SMS Settings ..............................63
MMS Settings ..............................63
Email Settings ..............................64
Account .................................64
Polling Interval..............................65
Download Count.............................65
Maximum Message Size ........................65
Delete Preference ............................66
Default Message Type .........................66
Web browser Settings ...........................67
Link Referral...............................67
Cookies .................................67
Downloads ...............................67
Security .................................67
Advanced Web Browser Settings ....................68
Scroll Step................................68
Font Size ................................68
Text Wrap ................................68
Voice Mail Number Setting .........................69
Show Versions ...............................69
Reset Settings ...............................70
Reset Factory Settings .........................70
v

Erase Data ...............................70
Text Entry 73
Normal Text (ABC) .............................73
Numbers ..................................73
Word Mode .................................74
Symbol Mode ................................74
Emoticons .................................74
Pictographs .................................74
New Message Options Menu........................75
Messaging 76
Accessing Messages ............................76
Message Center Overview .........................76
Message Folders ..............................77
Checking Email Messages .........................78
Receiving and Reading Messages .....................78
Phone Number, Email, or URL in Message Text ..............79
Making a Call to a Phone Number ...................79
Creating a Message ...........................79
Access URL in Message Text ......................79
Message Options Menu ..........................80
Message View Options Menu .......................81
Creating and Sending Messages......................81
SMS ...................................81
MMS ...................................81
Email ..................................82
Attachments ................................83
Adding an Attachment..........................83
Deleting Attachments ..........................83
Saving Attachments ...........................83
Editing Messages..............................84
Message Memory Maintenance ......................84
Save Message as Draft...........................84
Games and Apps 85
Software List ................................85
Auto Start ................................85
Ending a Game/Application .......................86
Software List Options Menu .......................86
Get Applications ..............................87
Settings ...................................87
Memory ...................................88
About ....................................88
Web Browser 90
Accessing the Internet ...........................90
Connect to Bookmark ..........................90
Connect to Specific URL ........................90
Connect to History URL .........................91
Connect to URL in a Message .....................91
Web Browser Options Menu ........................91
What Can I Download? ...........................92
Downloading Apps and Games .....................92
Downloading Sounds ..........................92
Downloading Pictures ..........................93
NEC Site ..................................94
Bookmarks .................................94
Adding a Bookmark ...........................94
Go to Bookmark .............................94
Bookmark List Options Menu ......................95
Adding Bookmarks ...........................95
Deleting Bookmarks ...........................95
Advanced Options .............................96
Phonebook 99
Phonebook Types .............................99
Number Entry Screens ..........................100
Blank Entry Screen ..........................100
Number Pre-loaded Entry Screen ...................100
Storing Numbers and Names in Phonebook ...............101
Adding a New Name/Number .....................101
Choose Location ............................102
Location Number in Use ........................102
Full Phonebook ............................102
vi

Phone Number Type ...........................103
Editing or Personalizing Numbers.....................103
Phonebook Entry Edit .........................103
Phonebook Field Icons.........................103
Adding/Editing Information .......................104
Allocate a Voice Tag ..........................105
Allocate Backlight Color ........................106
Allocate a Phonebook Picture .....................106
Allocate a Ring Tune..........................107
Saving the Changes ..........................107
SIM Edit ..................................107
Accessing the Edit Function........................108
From Phonebook Options Menu ....................108
From Entry Detail Screen .......................108
From Entry Detail Options Menu....................108
Phonebook Options Menu ........................109
Entry Details Option Menu ........................109
Copying Entries Between Phonebooks ..................110
Memory Availability ..........................111
Copying/Moving a Phonebook Entry ...................111
Within Same Phonebook........................112
To Another Phonebook ........................112
Overwrite Location ...........................112
Delete a Single Entry ...........................113
From Phonebook............................113
From Entry Details ...........................113
From Group Entries List ........................113
Delete All Phone Entries .........................114
Groups ..................................114
Displaying All Groups and Group Entries ...............114
Naming a Group ............................114
Adding/Moving to a Group .......................115
Remove Entry from Group .......................116
Sorting and Recall Stored Numbers ...................117
Alphanumeric .............................117
Location ................................117
Go To Location.............................118
Voice Tag ...............................118
Calling Stored Numbers ........................118
Sending Email from Phone List ....................119
Calling Number from Entry Details...................119
Sending Email or MMS from Entry Details...............119
Sending Message from Entry Details .................119
Phonebook Availability Summary .....................120
Voice Tags ................................120
Displaying Voice Tag List .......................120
Playing a Voice Tag ..........................120
Deleting Voice Tags ..........................121
Keypad Shortcut to Voice Tag .....................121
Audio and Visual 122
Pictures ..................................122
Selecting and Displaying an Image ..................122
Renaming an Image ..........................123
Pictures Options Menu ..........................123
Web Browser Downloads .........................124
Music ...................................124
Display the Music List Screen .....................124
Selecting and Playing Music ......................124
Renaming a Music Tune ........................125
Using Music Options Menu ........................125
Delete Current .............................125
Delete All................................125
Details .................................125
Set as Ring Tune ...........................126
Set as Message Tune .........................126
Other ...................................126
Voice Memo ................................127
Accessing Voice Memo ........................127
Adding a Memo ............................127
Playing Memos.............................128
Labeling a Memo............................128
Deleting Memos ............................128
Camera Function 129
Camera View Finder Screen .......................129
Activating and Terminating .......................129
Activating Camera from Idle Screen ..................129
Taking a Picture ............................130
Saving a Picture ............................130
Sending a Picture ...........................130
vii

Retake .................................130
Zoom ..................................130
Controlling Brightness .........................131
Discarding Pictures ..........................131
Terminating Camera Function .....................131
Camera Options Menu ..........................131
Image Quality .............................131
Photo Effect ..............................132
Self Timer ...............................132
Zoom Setting..............................132
Brightness Setting ...........................132
Pictures ................................132
Mobile Light ..............................133
Pictures ..................................133
Pictures Option Menu .........................133
Call Records 134
Last Call ..................................134
Call Logs .................................134
Calling from a Call Record .......................135
Calling From Call Record Details ...................135
Adding Call Record to Phonebook ...................135
Deleting Call Records .........................136
Viewing Call Record Details ......................136
Total Calls .................................137
Tools 138
Calculator .................................139
Scheduler .................................140
Viewing Calendars and Daily Events .................140
Accessing Add New and Edit Screens.................141
Adding/Editing an Event ........................142
Copying an Event ...........................143
Deleting Events ............................144
Go To Date...............................145
Go To URL ...............................145
Viewing Events.............................145
Viewing Summary ...........................146
Scheduler Alert.............................146
ToDo List .................................147
Viewing ToDo Tasks and Task Details ................147
Accessing ToDo Add New and Edit Screens .............148
Adding/Editing a Task .........................149
Deleting Tasks ............................150
viii
Filtering ................................151
Sorting .................................152
Viewing ToDo Summary ........................152
Changing Task Detail Status......................152
Notepad ..................................153
Viewing Notes .............................153
Adding and Editing Notes .......................153
Deleting Notes .............................154
Sending as Email ...........................155
Sending as SMS ............................155
Currency Converter ............................156
Setting the Currency Converter Fields .................156
Resetting Currency Converter Fields .................156
Synchronization ..............................157
Setup for Synchronization .......................157
Synchronizing .............................157
Synchronization Process........................158
Full Synchronization ..........................158
Conflicts from Last Synchronization ..................158
Synchronization Errors.........................158
232 Accessories 162
Authorized Accessories ..........................162
Battery .................................163
AC Adapter and Charger Unit .....................163
Hands-free Headset ..........................163
Vehicle Power Adapter.........................164
USB Connector Cable .........................164
U.S. FDA’s Consumer Update 165
Warranty and Service 169
NEC 232 Wireless Phone .........................169
Limited Warranty ............................169
NEC Authorized Accessories .......................171
Limited Warranty ............................171
NEC Customer Service Support .....................172
Index 173
CTIA 175
Cellular Telecommunications and Internet Association Driver Safety Tips 175
NEC 232
Welcome to the NEC 232 wireless phone.
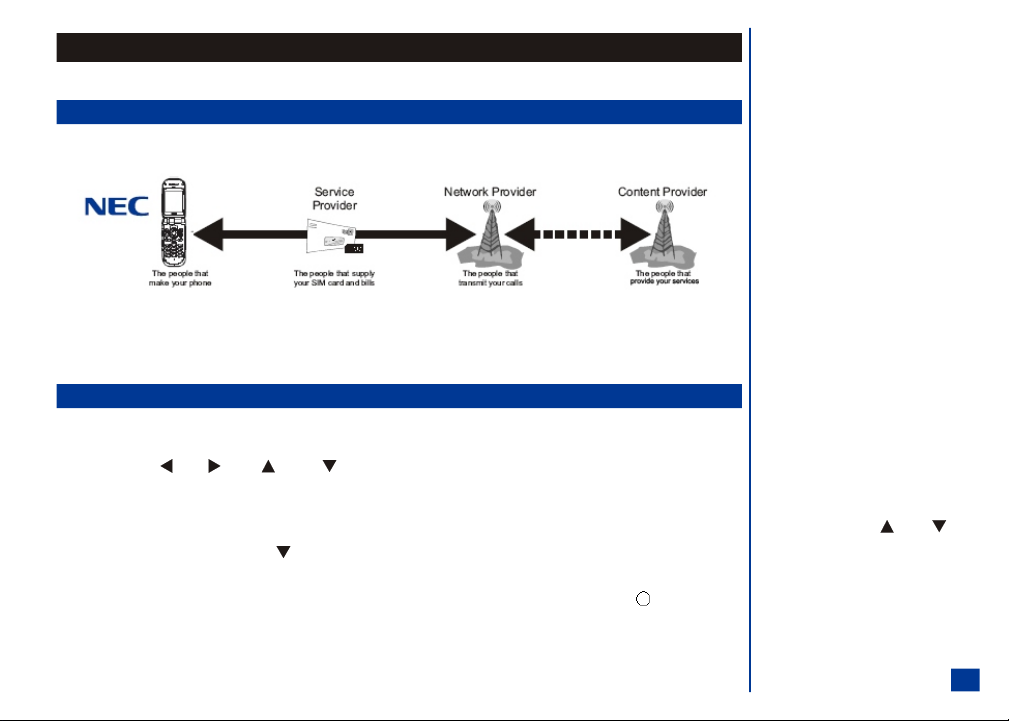
Wireless System Structure
Every time you use your wireless phone, different organizations are involved:
O The service provider may charge additional
fees for some services such as call forwarding,
messages, and Internet service.
User Guide Legends:
* This is a set of paragraphs containing
instructions. Follow the direct ions in the
sequential order provided in the user guide.
All 232 features described in this user guide are supported by your phone. However, for all these fe atures to work, you must have a SIM card (computer chip required for
your phone to operate; included in the box supplied by your Service Provider) that also supports these features. Even if y ou have a fully featured SIM card, any feature will
not work if it is not supported by the Network transmitting your call. This l ast point is especially important when you are roaming among networks. (See Flag.)
User Guide Conventions
The user guide legends direct y our attention to specific information. These are identified i n the right column.
The instructions for all tasks and phone functions start at the Idle screen unless instructed otherwise.
When one or more of the (Left), (Right), (Up), and (Down) symbols are shown in the user guide, press the corresponding part of the 4 way navigation
key to move the cursor, scroll, cycle, or highlight.
The instruction “press” is pressing a key or button for one second or less.
The instruction “press and HOLD” is pressing and holding a key for two to three seconds.
The instruction “scroll” and “scroll to” is pressing the (Down) navigation key to show more selec tions one at a time on a menu or screen. (See Flag.)
The instruction “highlight” is pressing the appropriate navigation keys to move the highlight bar over a desired option or item.
The instruction “highlight and select” is pressing the appropriate navigation keys to move the highlight bar over a desired item and pressing the (Select) button to
confirm your choice and advance t o the next screen of the selected item.
This type of paragraph contains details of
L
where to find related information t o the topic
being explained.
O This type of paragraph contains information
worth noting and is provided in the right
column.
I This type of paragraph contains important
information.
O Press and HOLD the (Up) or
(Down) navigation key to scroll a page at a
time, instead of one item at a time.
1
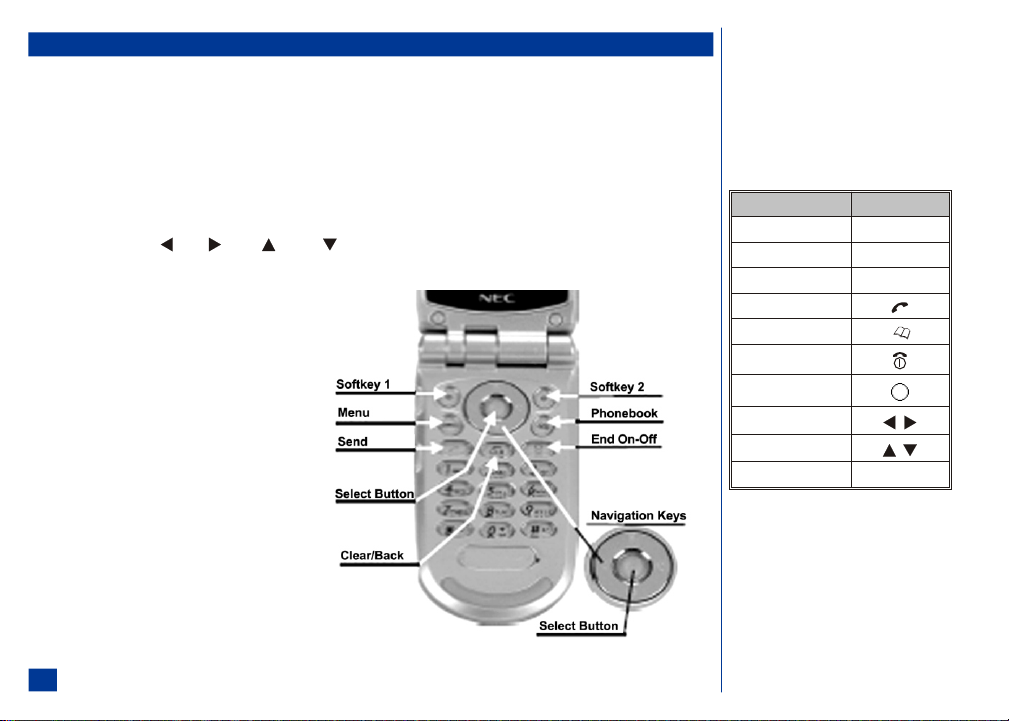
Phone Controls
At the Idle screen, press Softkey 1 to access Messages; press Softkey 2 to access the Internet browsing capability.
Softkey 1 and Softkey 2 functions change according to the phone’s current use. Softkey 1 function displays on the bottom, left corner of t he graphic display screen. Softkey 2
function displays on the bottom, right c orner of the graphic display screen. Softkey 1 is located on t he upper left of the round shape with the navigation keys on the keypad.
Softkey 2 is located on the upper right of the round shape with the navigation keys on the keypad.
When an Options menu is available for the displayed screen, the Options Menu icon (an “M”) displays between the two softkey buttons on the bottom of the graphic display
screen. The Options menu key (sam e as the Menu key) is located on the bottom left of the round shap e with the navigation keys.
The Phonebook key is located on the bot tom right of the round shape with the navigation keys and is used to display a phonebook.
The Select key is located in the center of the round shape with the navigation keys. The Select key is used to select highlighted it ems, select tools, save selections, and save
changes.
The navigation key symbols are: (Left), (Right), (Up), and (Down). The navigation keys are located on the outer edge of the round shape. P ress the
corresponding part of the 4 way navigation key to move the cursor, scroll, cycle, or highlight. Navigation keys are also used as keypad shortcuts to access a specific menu
or list. Refer to page 5 for more keypad shortcuts information.
The Send key is used to dial and send calls. The Send key is
located above the digit 1 key.
The Clear key is used to remove a character or letter in the text
entry screen and clear the present screen to return (go back)
to the previous screen. The Clear key is located above the digit
2 ABC key.
The End/On-Off key is used to turn t he wireless phone On, turn
it Off, terminate a phone call, and end current screen activity
or application to return to the Idle s creen. End/On-Off key is
located on the right side of the keypad, above the digit 3 DEF
key.
The user guide icons for specific keys and actions are identified
in the table in the right column.
Keypad Icons
Key Name Icon
Softkey 1
Softkey 2
Menu
Send
Phonebook
End/On-Off
Select/Save
Left, Right
Up, Down
Clear/Back
Softkey 1
Softkey 2
MENU
CLR
2
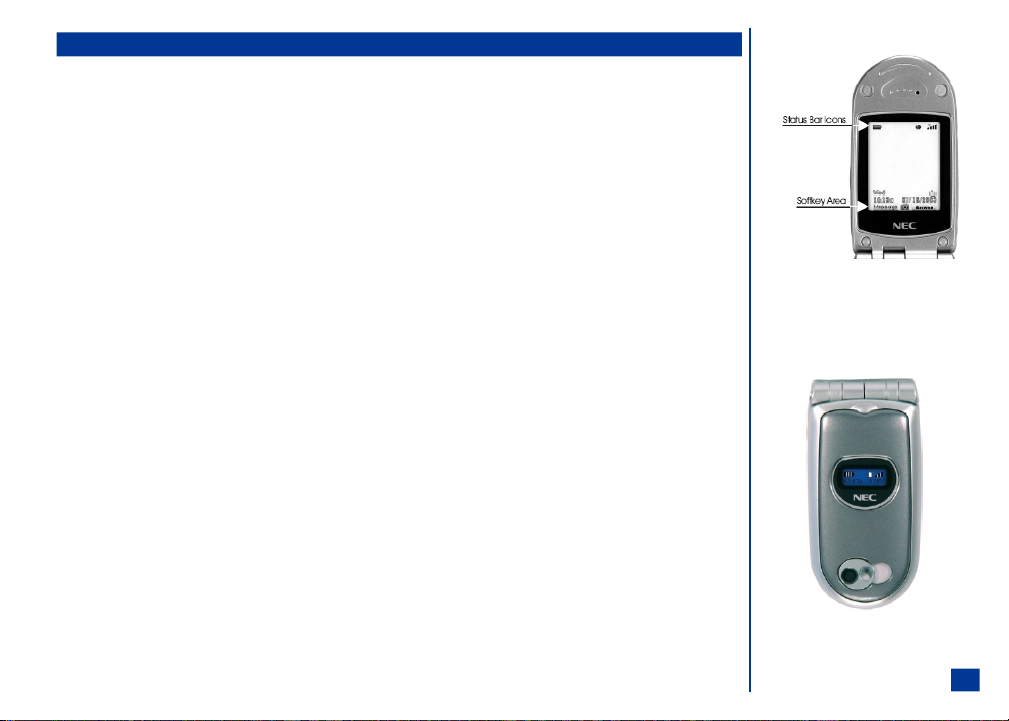
Display Information
Main LCD Display Area
The Main LCD is a 1.8 inch screen in 65,536 colors located on the phone’s inside flip cover. The area contains the greeting graphic upon power-up, status icon graphics, and
information when searching for netw orks and making calls.
The Idle screen shows the current network, vibrate status, mode status, cur rent time and date, battery charge status, signal strength, and what you have keyed in on the
phone’s key pad. See the Main LCD display in the right column. (See Flag.)
Press MENU (Main) to display the phone’s Main Menu with animated icons and text in the display area.
Second LCD Display Area
The Second LCD is a ¾ inch x ¼ inch di splay area in monochrome with a backlight located on the back of the phone’s flip cover. The Second LCD display gives you
information even if the phone is fol ded and closed. The following describes the functions a nd information provided by the Second LCD (See Flag.):
l
Idle screen: Displays the status bar icons, time, and date.
l
Call information: Indicates missed calls and an incoming call.
l
Event indications: Indicates events occurrence such as “active,” “on hold,” “incoming call,” “incoming message,”
l
Battery information: Displays the battery level and charging icons. Indicates the low battery alert and charger connected.
l
Alarms: Displays the schedule event text and alarm when the alarm is activated.
A backlight selection of 12 diff erent colors is part of the Second LCD display. The backlight g lows a continuous red when the phone is being charged; a continuous red for 3
seconds for low battery alert, a continuous orange for 10 seconds when receiving a voice mail, and a continuous green for the scheduler alarm until the end of the alarm.
The backlight colors (midnight, skyblue, cyan, turquoise, green, light green, yellow, orange, red, purple, mage nta, and pearl) may also be utilized as color identification to
assign colors to different calle rs (refer to Phone Book contents on page 99).
A color may be assigned to functions: the standard backlight, incoming call, incoming message, and while talking.
Status Bar Icons
The status bar is located at the top of the Main LCD display. This area contains status icons that indicate the battery strength, messages, call forwarding, voice mail,
Internet connection status, and net work signal strength.
Softkey Area
The softkey area is located at the bottom of the Main LCD display. Depending upon the current screen, the area displays applicable text information (e.g., letters available
for a key press during text entry) or context sensitive descriptions of the softkey indicator functions. Sof tkey 1 and Softkey 2 functions change according to the phone’s
current use.
and “ring color.”
O The Idle screen automatically appears after the
phone is powered On, but not in use.
3

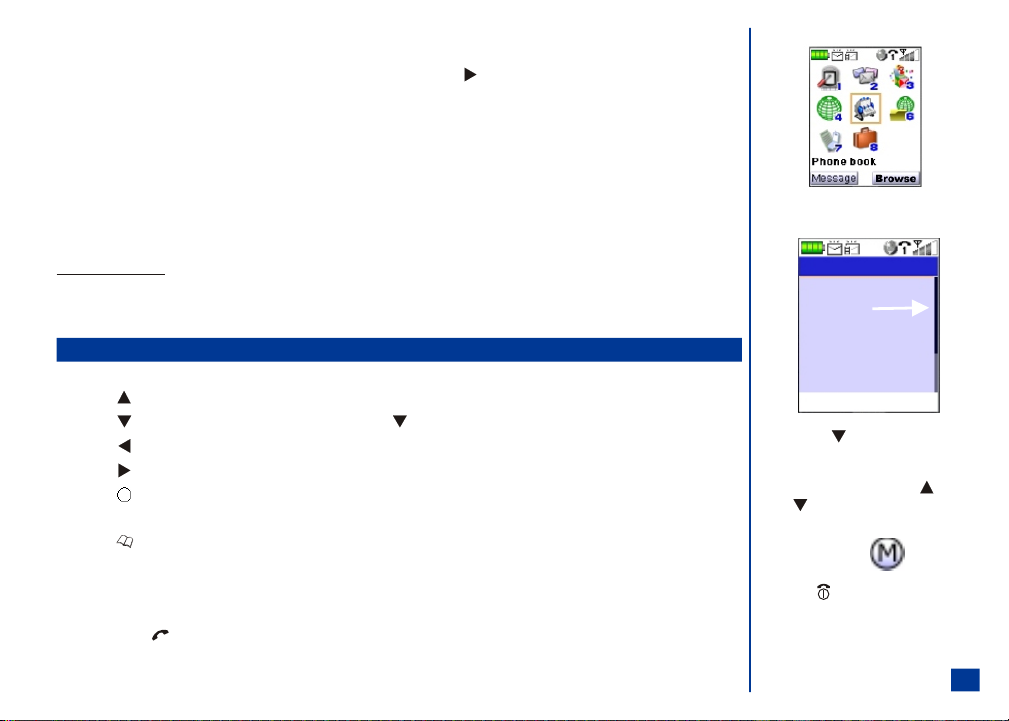
Main Menu
The menu structure begins with t he Main Menu icons for top level options. To access a menu option:
* Press MENU to access the Main Menu. Press the option number 1 through 8 to select the desired menu op tion or
highlight and select the desired menu option. (See Flags for more information.)
O A Main Menu Icon becomes animated when it is
highlighted with a box frame.
1. Settings
4. Web Browser
7. Call records
4
(Sub-menus)
1. Phone
2. Screen
3. Calls
4. Security
5. Network
6. Clock
7. Other
8. Reset
(Sub-menus)
1. Home
2. Bookmarks
3. Mark page
4. Open page
5. History
6. Details
7. Browser data
8. Advanced
9. Exit
(Sub-menus)
1. Last call
2. Missed calls
3. Received calls
4. Dialed calls
5. Total calls
2. Message center
(Sub-menus)
1. New Message
2. Inbox
3. Drafts
4. Outbox
5. Sent
6. Alerts
7. Saved
8. Templates
5. Phone book (See Flag.)
Phone list
8. Tools
(Sub-menus)
1. Calculator
2. Scheduler
3. ToDo list
4. Notepad
5. Currency converter
6. Synchronization
3. Games and Apps
(Sub-menus)
1. Software list
2. Get applications
3. Settings
4. Memory
5. About
6. Audio and Visual
(Sub-menus)
1. Pictures
2. Music
3. Other
4. Voice memo
5. Camera
O The default highlighted selection f or the Main
Menu is Phone book.
O When an option list or sub-menu is displayed,
press (Up) or (Down) navigation key
to move the highlight box over the desir ed
option, and press (Select) to select the
option.
O The currently selected option sett ing on a
sub-menu is marked by a checkmark if the
options are not numbered. The selected option
setting number is green if the options are
numbered.
O Press CLR (Clear/Back) to return to the
previous screen.
O Press (End/On-Off) to return to the Idle
screen.
Sub-Menus, Check Boxes/Radio Buttons, and Options Menu
Scroll Bar
(More selections
listed below)
A sub-menu list displays for the s elected Main Menu option. The sub-menu options are shown in the table on the previous page. Press the sub-menu option number or
highlight and select the desire d sub-menu option. You may also highlight the desired option and pre ss (Right) navigation key t o advance to the next sub-menu. A scroll
bar displays on the side of the display screen when more selections are below the ones shown on the display screen. (See Flag.)
A check box enables/disables an option within a set of options. Multiple check boxes can be selected at the same time. Selecting a radio button option automatic ally cancels
the previous selection, so only one ra dio button can be selected at one time. To select or cancel a c heck box or radio button, highlight and select the option.
An options menu provides additional opt ions for an application function. The Options Menu icon displays bet ween the two softkey indicators on the bottom of the Main LCD.
Within an application, press MENU to display the available options menu. (See Flag.)
Menu Shortcut Selection
An alternative ‘shortcut’ method of selection a llows you to jump straight to a menu or function without highlight ing an icon and scrolling through the sub-menu options.
The selections are made by pressing numbers on the keypad that relate to the displayed menu options.
Shortcut Selection Example
Use the shortcut selection method to se t Any Answer Key feature On as follows:
* Press MENU (Main), 1, 1, 3, and 2. The any key answer option is set and return to the previous menu.
Keypad Shortcuts
The following single button shortcuts are available from the Idle screen (the screen that automatically appears when the phone is powered On but not in use). (See Flag.)
Press (Up) navigatio n key to display the Phone modes menu.
Press (Down) navigation key t o access Voice memo; press and HOLD (Down) navigation key to access Voice Dialing.
Press (Left) navigation key to display the Received call log.
Press (Right) navigation key to display the Missed call log.
Press (Select) to access the camera function and display the camera view finder screen on Main LCD.
Press MENU at Idle screen to display the Main Menu or display the Options Menu for the current screen.
Press (Phonebook) key to display a phone book list .
Press Softkey 1 to display the Message center.
Press Softkey 2 to display the Web browser.
Press and HOLD Softkey 2 to display the Applications list of Games and Apps.
Press off-hook (Send) key once to display the Dialed call Log; press twice to dial last number called.
O Press the (Down) navi gation key to scroll
and show more selections on the display.
Press and press and HOLD the (Up) or
(Down) navigation keys to scroll l ine by
line.
O Option Menu icon:
O Press (End/On-Of f) to end current screen
activity or application and return to the Idle
screen.
5

Main Phone Features
The GSM EGPRS phone can be used almost anywhere in the world with tri-band operation (GSM 850/1800/1900 bands). Your phone has the following features:
l
Games
l
2 Softkeys
l
12-Color Backlight
l
20 Voice memos (20 second recording time per memo)
l
10 Voice dial
l
700 mAh Lithium-ion Battery
l
Alternate Line Service (ALS) compatibility*
l
Calculator
l
Camera
l
Color ID alert and vibrate mode
l
Currency converter
l
Date, Time & Alarm
l
Download graphics, phonebook, pic tures, and ring tunes
l
Email
l
Internet Enabled
l
Main LCD screen, 1.8 inch, 160 (height) by 128 (width) pixels with 65,536
color display
l
Messaging (MMS/SMS) (See Flag.)
l
Multi-media Messaging Service (MMS)
l
Short Messaging Service (SMS)
* Alternate Line Service (ALS) is having 2 phone numbers. The digit 1 displays with ic ons that represent ALS 1. The digit 2 displays with icons that represent ALS 2. ALS
feature is available if provided by your network service provider.
l
Multi-party call capability (conference calling)
l
One-button Internet access (Web browser)
l
Organize your life with NEC Sync hronization software (synchronizes Phone
book, ToDo’s, and Scheduler/Calendar)
l
Contacts
l
Scheduler/Calendar events
l
ToDo tasks
l
Personalize your phone with down-loadable c ontent
l
40-layer polyphonic ring tunes
l
Wallpapers
l
Picture caller-id
l
Phone mode settings (Normal, Meeting, Pocket, and Car)
l
Phone book (can store up to 500 records)
l
SIM memory phonebook (store up to 250 records, depending on SIM
capacity)
l
Second LCD screen, 30 (height) by 90 (width) pixels with monochrome
display.
l
T9™ Text Input
l
USB interface
l
Voice mail
l
Voice digit recognition
O GSM: Global System for Mobile communications.
O EGPRS: Enhanced General Packet Radio Service.
6
O Messaging features also include text
formatting, text size, text alignment, simple
sounds, and simple animations.
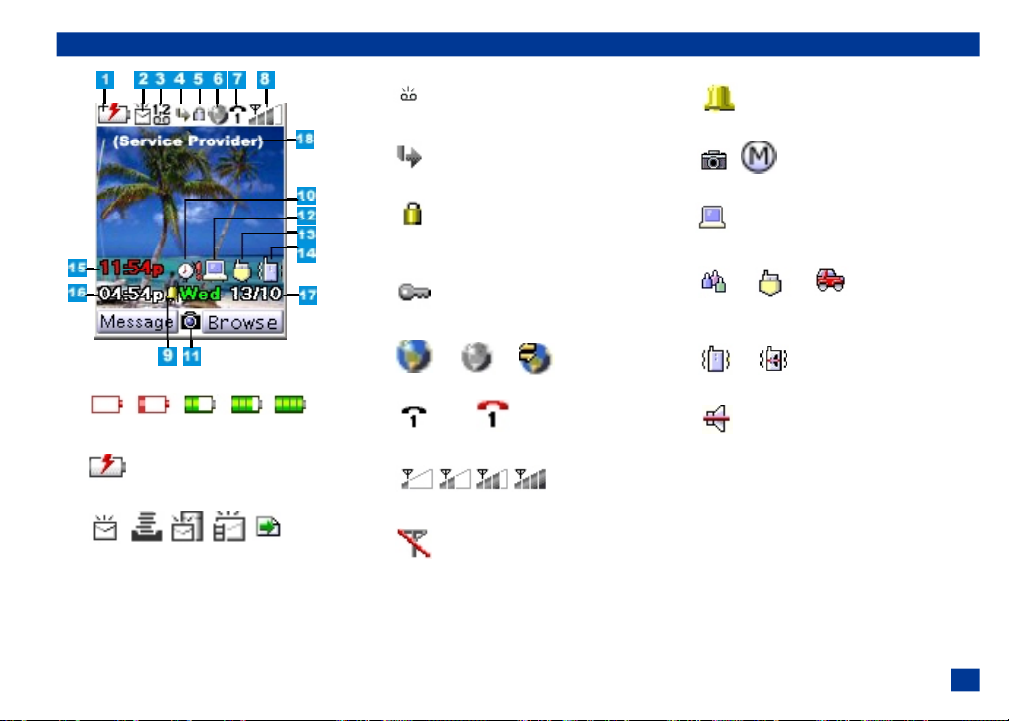
Idle Mode Display of Main LCD
1
Battery power level
Battery is charging
2
New SMS message(s) received /
Message Inbox is almost full /
New message on server because Inbox is full
New MMS message received
WAP Push message received
3
New voice mail messages
4
Call forwarding set On
5
Locked application or device (such as PIM lock,
phone lock, etc.)
Web browser security
6
Web browser (Active, Inactive, and data transfer)
7 (black) (red
Line status (encrypted–black / unencrypted–red)
8
Signal strength level
No network connected (out of the serv ice area)
9
Alarm set On
10
Camera / Options Menu
11
TTY set On
12
Phone mode set On (Meeting mode, Poc ket mode, or Car mode). No
icon shows when Normal mode is set On
13
Vibrate mode set On / Vibrate mode and silent set On
Silent set On
14 Remote time as set for 12 or 24 hour format
(Day if remote time is not selected)
15 Local time as set for 12 or 24 hour format
16 Day and date (MM/DD)
(Date as MM/DD/YYYY if remote time is not selected)
17 Network name
7
Main LCD Screen Icons
Dial Screen Icons
Dialed Call Dialing Dialed Call Connected Received Call Sending Message Checking Server
Pop-up Screen Icons
Busy/Please Wait Decision Symbol Activity Successful Activity Failed
Alert Pop up Icons
Reminder of Scheduled Event Low Battery Alert Something Needs Attention
8
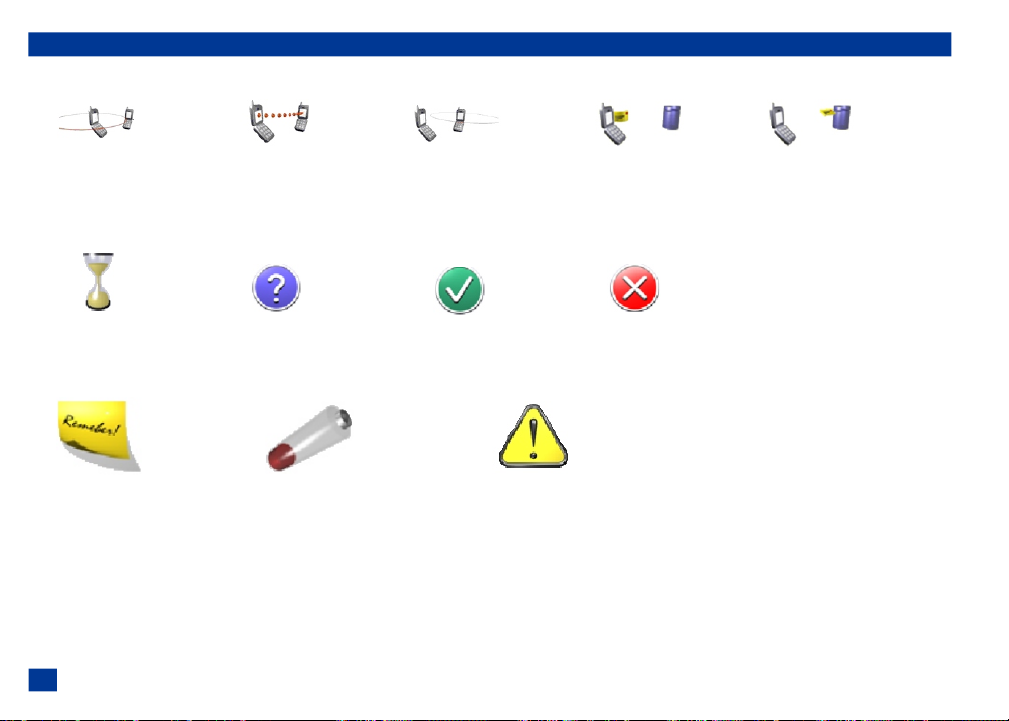
Idle Mode Display of Second LCD
1
2
3
464
5
7
Other Second LCD Notifications
Number of missed calls Incoming Call when During a call while talking Incoming Message
When less than 10 missed calls; Number display is not set On With selected backlight color With selected backlight color
“Missed calls” only with over 10 missed calls With selected backlight color
Scheduled Alarm Text Incoming Call when Low Battery Alert Charger is connected
And Alarm Icon; Number display is set On With red backlight for 3 seconds With red backlight for 3 seconds
With green backlight With backlight color assigned in Phonebook Then backlight turns off Then backlight turns off
Incoming Call when Incoming Call when
Name of Caller is Unknown Name and Number of Caller is Unknown
1
Battery power level / Battery is charging
2
New message(s) received
3
New voice mail messages
4
Silent set On / Vibrate mode and silent set On
5
Signal strength level / No networ k connected (out of the service area)
6 Time
7 Date
9

Safety and Performance
Fully charge the phone’s battery before you use your new wireless phone (see page 19 for the first time charging instructions).
User Caution
Phone settings should be adjusted to suit the likes and preferences of the individual user. Users sensit ive to loud noises or sudden alarms should take care not to use or set
the phone in any manner that may result i n the user being unduly alarmed.
For example, users with heighte ned sensitivity to noise should adjust the wireless phone to a volume set ting that is within his or her range of comfort. If you belie ve the
wireless phone causes you any adverse r eaction, you should discontinue using the phone immediately.
Emergency Services
Ensure your wireless phone is turned On, the battery is properly charged, and the network c onnection signal strength level is adequate in order to attempt an emergency
call. If your battery is empty (see page 19), you can not make or receive any calls, including emergency calls.
To make an emergency call in the United States,
* Input the emergency number for your pres ent location (i.e., 911 or other designated emergency num ber).
Press (Send).
Ask the operator for the service you require: Police, Ambulance, Fire, Coastguard or Mountain Rescue Services. Give accurate and necessary information. If possible, remain stationary to
maintain phone contact. Do not terminat e the call until given permission to do so.
(See Flags for more emergency information.)
General Care
Prior to operating your wireless phone, please read this manual thoroughly, including the care and safety information. Observe the following guidelines:
General Care
A wireless phone contains delicate electronic circuitry, magnets, and battery systems. You should treat it with care and give parti cular attention to the following points.
l
Do not allow the phone or its accessori es to come into contact with liquid or moisture at any time.
l
Do not place anything in the folded phone.
l
Do not expose your phone to extreme high or l ow temperatures.
l
Do not expose your phone to direct flame, cigars or cigarettes.
l
Do not paint your phone.
l
Do not drop or subject your phone to abusive t reatment.
O In the United States of America, the emergency
number is 911.
O Emergency calls (911) are possible without
service activation or SIM card. Your location is
delivered to the emergency operator along
with your caller ID as required by FCC
guidelines.
O Due to the nature of the wireless system, the
success of emergency calls cannot be
guaranteed. Never rely solely on a wireless
phone for essential communications such as
medical emergencies.
10

l
Do not place the phone near or against computer diskettes, credit cards, travel cards and other magnetic media. The information contained on disks or cards may be
affected by the phone.
l
Do not remove the phone’s battery while t he phone is turned On.
l
Do not allow metal objects, such as coins or key rings, to contact or short-circuit the batte ry terminals.
l
Do not attempt to disassemble the phone or any of its accessories. For repair, contact an NEC qualified repair center.
l
Use only an anti-static cloth to cle an the phone. Do NOT use a dry cloth, a saturated wet-cloth, or electrostatically charged cloth. Do not use chemical or abrasive
cleaners as these may damage the case.
l
Remember to recycle: the cardboard packaging supplied with this phone is ideal for recycling.
Safety
General Safety
l
The earpiece and phone may become warm during normal use. The unit itself may become warm during charging and use.
l
Observe ‘Turn off 2-way radio’ or 'wireless devices' signs, such as those near gas stations, chemicals or explosives. (See Flag.)
l
Small rubber plugs (for hands free socket protection) are attached to the phone. Keep these out of reach of small children for whom they could be a choking hazard.
l
Do not allow children to play with t he phone, battery charger, batteries or SIM card.
l
The operation of some medical electronic devices (such as hearing aids, cardiac pacemakers, and other implanted equipment) may be affect ed if a wireless phone is
used next or near to them. Observe any warning signs and manufacturer’s recommendations. (See Flag.)
l
Do not place the wireless phone on or near high heat items (e.g., candles, appliances that generate heat, etc.) or high heat areas (e.g., fireplac e, stoves, etc.) when
the wireless phone is in vibrate mode. The vibration could cause the phone to move into the high heat and cause a hazard.
l
Do not sit or place heavy objects on top of the phone at any time to prevent damage to the LCD and camera lens.
l
The wireless phone contains metal, which may cause a rash, itching, eczema, inflammation, or other skin conditions to appear if the person has metal allergies.
l
Turn Off your phone in any facility whe re posted notices require you to do so.
Road Safety
Check the laws and regulations concerning the use of wireless telephones and their accessories in the areas where you drive and always obey them. If you find it necessary
to use your cellular telephone behind the w heel of a car, please:
l
Give full attention to driving and exercise proper control of your vehicle at all times. (See Flag.)
l
Pull off the road and park before making or answering a call, if driving conditions so require.
l
Turn Off your wireless phone at a re fueling point, such as a gas station, even if you are not refueling your own car.
l
Do not store or carry flammable or explosive materials in the same compartment as a wireless phone.
Aircraft Safety
The use of wireless phones in aircraft may interfere with the operation of the aircraft and may be illegal or dangerous. Any use of a wireless phone on board an aircraft
must be in accordance with applicable regulations. Follow all flight crew instructions. When instructed to turn Off your wireless telephone, do so.
O Turn Off the phone and remove the battery
before you enter a hazardous area. The
wireless phone can be a hazard in these areas
even when set in vibrate mode, and the
scheduler or alarm can cause the phone to
power On.
O Use hands-free operation, if available.
11

Radio Frequency (RF) Signals
THIS MODEL PHONE MEETS THE GOVERNMENT’S REQUIREMENTS FOR EXPOSURE TO RADIO WAVES.
Your wireless phone contains a radio transmitter and receiver. Your NEC phone is designed and manufactured not to exceed the emission limits for exposure to radio
frequency (RF) energy set by the Federal Communications Commission of the U.S. Government. These limits are part of comprehensive guidelines and establish permitted
levels of RF energy for the general population. The guidelines are based on standards that were developed by independent scientific organizations through periodic and
thorough evaluation of scientific st udies.
The exposure standard for wireless mobile phones employs a unit of measurement known as the Specific Absorption Rate (SAR). The SAR limit set by the FCC is 1.6 W/kg.*
Tests for SAR are conducted using standard operating positions accepted by the FCC with the phone transmitting at its highest certified power level in all tested frequency
bands. Although the SAR is determined at the highest certified power level, the actual SAR level of the phone while operating can be well below the maximum value. This is
because the phone is designed to operate at multiple power levels so as to use only the power required to reach the network. In general, the closer you are to a wireless base
station antenna, the lower the output .
Before a phone model is available for sale to the public, it must be tested and certified to the FCC that it does not exceed the limit established by the government-adopted
requirement for safe exposure. The tests are performed on position and locations (for example, at the ear and worn on the body) as required by FCC for each model. The
highest SAR value for this model phone as reported to the FCC when tested for use at the ear is 0.33W/kg in PCS and 0.23W/kg in GSM850 band, and when worn on the
body, is 0.22W/kg in PCS and 0.28W/kg in GSM850 band. (Body-worn measurements differ among phone models, depending upon available accessories and FCC
requirements). While there may be differences between the SAR levels of various phones and at various positions, they all meet the government requirement.
The FCC has granted an Equipment Authorization for this model phone with all reported SAR levels evaluated as in compliance with the FCC RF exposure guidelines. SAR
information on this model phone is on fil e with the FCC and can be found under the Display Grant section at http://ww w.fcc.gov/oet/fccid after search on FCC ID
A98-KMP6J1N1.
For body worn operation, this phone has been tested and meets the FCC RF exposure guidelines when used with a NEC accessory designated for this product or when used
with an accessory that contains no meta l and that positions the handset a minimum of 1.5 cm from the body.
* In the United States, the SAR limit for wireless mobile phones used by the public is 1.6 watts/kg (W/kg) averaged over one gram of tissue. SAR values may vary depending
upon national reporting requirements and the network band.
*In the United States, the SAR limit for wireless mobile
phones used by the public is 1.6 watts/kg (W/kg)
averaged over one gram of tissue. SAR values may vary
depending upon national reporting requirements and
the network band.
12

Electromagnetic Interference
Most modern electronic equipment is shielded from radio frequency (RF) signals; however, certain electronic equipment may not be shielded against the RF signals from
your wireless phone.
Pacemakers
The Health Industry Manufacturers Association recommends a minimum separation of six inches (or 15 cm) be maintained between a handheld wireless phone and a
pacemaker. These recommendations are consistent with the independent research and recommendations by Wireless Technology Research. Persons with cardiac
pacemakers:
l
Should ALWAYS keep the phone more than s ix inches from their pacemaker when the phone is turned On.
l
Should not carry the phone in a breast pocket.
l
Should place the phone to the ear opposit e the pacemaker to minimize the potential for interferenc e.
l
If you have any reason to suspect RF interference, turn Off your phone immediately and remove the battery.
Whether the phone vibrates, plays a ring tune, or the volume buttons increase/decrease the ring sound, a received call to a wireless phone may interfere with a cardiac
pacemaker.
Hearing Aids
Digital wireless phones may interfere with some hearing aids. In the event of such interference, consult your wireless service provider.
Other Medical Devices and Medical Facilities
Operation of wireless phones could interfere with medical devices or implanted equipment which are inadequately shielded from external RF energy. Consult a physician or
the manufacturer of the medical device to determine if such devices are adequately shielded.
Turn Off your phone in health care facilities, if regulations posted in these areas instruct you to do so. Hospitals or health care facilities may be using equipment that could
be sensitive to external RF energy.
Vehicles
Electronic vehicle systems, such as anti-lock brakes, speed control and fuel injection systems are not normally affec ted by radio transmissions. RF signals may affect
improperly installed or inadequately shielded electronic systems in motor vehicles. The manufacturer of such equipment can advise if it is adequatel y shielded from radio
transmissions. If you suspect vehicle problems caused by radio transmissions, consult vehicle manufacturer or its representative regarding your vehicle and do not turn On
your phone until it has been checked by qualified approved installers. You should consult the manufact urer of any equipment that has been added to your vehicle.
13

Blasting Areas and Explosive Atmospheres
Turn Off your phone when in a blasting area or areas posted: “Turn Off Two-Way Radio or Wireless Devices.” Obey all signs and instructions. (See Flag.)
Turn Off your phone prior to entering any area with a potentially explosive atmosphere, and obey all signs and instructions. Do not remove, install, or change batteries in
such areas. Sparks in such areas could cause an explosion or fire resulting in bodily injury or even death. (See Flag.)
Areas with a potentially explosive atmosphere are often, but not always, clearly marked. These include fuelling areas such as gasoline stations; below deck on boats; fuel or
chemical transfer or storage facilities; vehicles using liquefied petroleum gas (such a propane or butane); areas where oxygen is used; areas where the air contains
chemicals or particles such as grain, dust, or metal powders; and any other area where you would normally be advised to turned Off your vehicle engine.
Vehicles Equipped with an Air Bag
An air bag inflates with great force. Do not place objects, including either installed or portable wireless equipment, in the area over the air bag or in the air bag deployment
area. If wireless equipment is improperly installed in the vehicle and the air bag inflates, serious injury could result.
Battery Care and Disposal
Do not leave the phone or the battery in places where the temperature could exceed 140 °F, i.e., on a car dashboard, on a window sill, in direct sunlight, etc.
Do not allow metal objects, such as coins or key rings, to contact or short-circuit the batte ry terminals.
Do not put your phone’s battery in your mouth as battery electrolytes may be toxic, if swallowed.
Do not leave the battery pack empty or disconnected for a long period of time.
Do not dispose of battery packs in a fire.
Keep the battery away from children. It is not a toy and it could be a choking hazard.
Your phone battery is a sealed unit with no serviceable parts inside; do not attempt to open the battery covering.
Use only a battery approved by NEC for the NEC 232 wireless phone.
Using any battery pack or AC adapter not specified by NEC for use with the NEC 232 may be dangerous and may invalidate any warranty and approval given to the wireless
phone. Do not connect more than one charge r at any time.
To ensure the maximum life from your battery, allow the battery to fully discharge at least once a week. To fully disc harge the battery, leave the phone turned on until the
message “RECHARGE BATTERY” is displayed and the phone shuts itself Off. If left unused, a fully charged battery discharges in approximately one month. Store batteries
uncharged in a cool, dark, and dry place.
Batteries must be recycled or disposed of properly. Contact your cellular carrier or check local laws and regulations.
WARNING: Do not swallow the battery. If you do accidentally swallow the battery, call 911 immediately.
O Turn Off the phone and remove the battery
before you enter a hazardous area. The
wireless phone can be a hazard in these areas
even when set in vibrate mode, and the
scheduler or alarm can cause the phone to
power On.
14
Performance
Third Party Equipment
Use only batteries, chargers, and authentic accessories approved by NEC. Modifications, the use of third party equipment, cables, or accessories that are not made or
AUTHORIZED by NEC may invalidate any approval or warranty of your phone, may adversely affect the phone’s operation, and may be dangerous. For availability of
approved accessories, check with your wireless phone dealer.
Service
The wireless phone, batteries and charger do not contain user-serviceable parts. We recommend that your NEC wireless phone be serviced or repaired by an NEC
AUTHORIZED service center. Please contact your Service Provider or NEC at 1-800-637-5917 if you believe that you require service. Any unauthorized service may invalidate
the warranty of your wireless phone.
Efficient Use
For optimum performance with mi nimum power consumption, hold your NEC 232 wireless phone (wit h the flip open) as you would any other phone and speak directly into
the mouthpiece.
Battery
The NEC 232 phone contains an 700 mAh, standard Lithium-ion battery. Battery performance depend s upon signal strength, network configuration, phone features
selected, battery age and condition, battery charging habits, temperatures to which battery is exposed, and many sim ilar factors. (See flag.)
Antenna
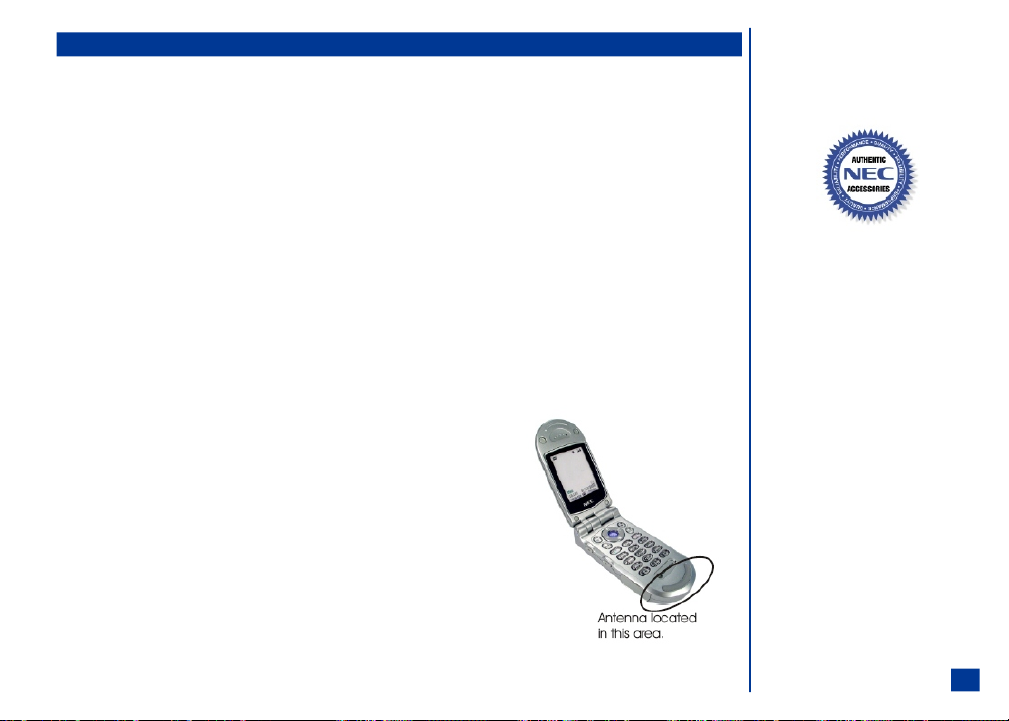
Your phone has an internal antenna located a t the base of the phone below the keypad. As with any other
radio transmitting device, avoi d touching the antenna area when the phone is turned On to optimize the
antenna performance and talk time of the phone. Contact with the antenna area may affect call quality and
may cause the phone to operate at a higher power level than otherwise needed.
O Look for the NEC Authentic Accessories
to know if the item has been approved by NEC
for use with the NEC 232.
I Not using NEC Authentic Accessories
using NEC approved accessories may void your
phone’s warranty.
TM
logo
TM
or not
O Your 232 battery maintains an
“over-discharge protection” that turns the
battery off when the voltage falls below 2.4V.
If this voltage drop occurs, the battery will
require a longer charge period (the duration
depends upon the extent of “over-discharge”,
though typically 5 to 15 minutes longer than
the standard charge time). During this
particular charge period, the Charging LED
will not illuminate.
O The mouthpiece is licated in the same area as
the antenna.
15

Licenses
T9TM Text Input and the T9 logo are registe red trademarks of Tegic Communication. T9 Text Input is lic ensed under one or more of the following: U.S. Pat. Nos. 5,818,437,
5,953,541, 5,187,480, 5,945,928, 6,011,554; and 6,307,548; Australia Pat number 727539; Canadian Pat. Number 1,331,057; United Kingdom Pat. Number 2238414B;
Hong Kong Standard Pat. Number HK0940329; Republic of Singapore Pat.No. 51383; Euro Pat. Number 0 842 463 (96927260.8) DE/DK, FI, FR, IT, NL, PT, ES, SE, GB;
Republic of Korea Pat Nos. KR201211B1 and KR226206B1; and additional patents are pending worldwide.
This phone contains the "Albany" font, a registered trademark of Monotype Imaging, Inc.
Copyright © ART, http://www.artcomp.com.
Copyright ã Yamaha Corporation, http://www.yamaha.com.
Copyright ã of Extended Systems, XCPC software, http://www.extendedsystems.com.
Copyright ã Broadcom, http://www.broadcom.com.
Copyright © Openwave Systems Inc., http://www.openwave.com.
Copyright © Esmertec AG, http://www.esmertec.com.
Copyright © Monotype Imaging, http://ww w.agfamonotype.com.
16

Getting Started
Your NEC 232 wireless phone is equipped with a battery, SIM card, hands-free headset, and a charger. Other accessory options can customize your phone for greater
performance and mobility.
For all the features to work, you must have a SIM card that supports these features. (See Flag.) Even if you have a fully featured SIM card, any f eature not supported by the
Network transmitting your call, will not work. This last point is especially important when you are roaming among networks.
Before you try to use your phone, chec k that you have:
l
NEC Authentic AccessoriesTM (see page 162)
l
A valid SIM card inserted in the phone (see page 18)
l
A battery fully charged (see page 19)
Service Activation
Before you can use your new NEC wireless phone, the service must be activated by a w ireless service provider. Please contact your local wireless service provider for any
questions regarding phone activation.
Voice Mail and Messaging
Voice mail and messaging services, when available, are provided by your wirel ess service provider. Before you can receive either voice or text messages with your wireless
phone, you must subscribe to these wireless service provider options. Contact your wireless service provide r for information on availability and setup of these services.
PIN and Security Codes
When your service is activated, a PIN and PIN2 (Personal Identificati on Number) are provided by the wireless phone retailer and programmed into the SIM card. Check
with your wireless service provider for additional information regarding your security codes and p asswords.
Use the PIN to lock and unlock the SIM c ard to help prevent unauthorized use of the SIM card. Use the PIN2 to access the FDN phonebook.
You may want to set up your own security cod e. Use the security code to lock and unlock the phone, lock acc ess to the Internet, and restrict access to the PIM (Personal
Information Manager) application data. The default security code is ‘0000’ until you change it to a personal security code. After changing the security code to a personal
security code, the default security code is no longer valid.
A Security Code screen displays and requires entry of your PIN when the SIM PIN setting is locked and the phone is powered-on.
A Security Code screen displays and req uires entry of your PIN2 when adding, editing, deleting, copying any phone entries in or to the FDN phonebook. (See Flag.)
A Security Code screen displays and requires entry of your security code when you attempt to access features or functions that you have locked.
O The SIM card is included in the phone box,
supplied by the service provider. The SIM card
is required for your phone to function
properly.
O FDN is a network service provider dependent
feature.
17
SIM Card
Before using your wireless phone you must register with a wireless network service provider to receive a SIM (Subscriber Identity Module). (See fl ag). The SIM card contains
a computer chip that stores and tracks your phone number, the services included in your subscription, and your SIM phonebook information. It is stored in a recess in the
battery compartment.
The phone cannot be used (except for emergency calls) until a valid SIM is inserted. (See Flag.) It is possible to transfer your SIM to another compatible phone and access
your network services. The screen on your phone displays a message if the SIM card is not inserted properly, if any locks have been set, or the wrong SIM has been inserted.
Please follow the instructions given, e.g., “Return to Service Center.” (See Flag and Warnings.)
If the SIM is already inserted, see Powering On the Phone, page 21.
Inserting a SIM Card
* Make sure that the power is Off.
Gently push the indented circle ( as shown on item 1 in the right column) only 1/8 inch towards the hinge end of the wireless phone.
Lift the back cover plate straight up from the wireless phone to reveal the battery location.
At the hinge end of the phone, use the tip of your finger or fingernail to lift the battery up and remove f rom the battery location.
Align the SIM card in the SIM card holder with the notched edge towards the center of the wireless phone.
Gently push the SIM card into place in the card holder.
Place the battery terminal end into the battery holder towards the top (away from the hinged end) of the phone. Lower the battery toward the phone.
Lower the back cover plate on the phone (as shown on item 2 in the right column). At the hinge end, gently push the b ack cover plate into place.
I Do not place the back cover plate on the phone excep t as shown in item 2 in the right column. If you attempt to place the back cover plate on the phone by any
other position, you may damage the back cover.
O Your SIM card is included within the wireless
phone box if you registered with a service
provider at the time of purchase. If you did not
register with a service provider prior to
receiving this phone, you must set up an
account with one in order to receive a S IM
card.
O Ensure your wireless phone is turned On, the
battery is properly charged, and the network
connection signal strength level is adequate
before attempting an emergency call. If your
battery is empty (see page 19), you can not
make or receive any calls, including emergency
calls.
I If the phone, or the SIM, is lost or stolen, you
should contact your Service Provider
immediately in order to prevent unauthorized
use.
18
I Do not bend or scratch your SIM card.
I If the SIM card is not fully inserted when the
battery is replaced, damage to the SIM card
can occur.
Removing a SIM Card
* Remove the back cover.
Remove the battery.
Gently press and push the SIM card towards the hinge end of the phone.
Preparing the Battery
Charging the Battery
Your phone is powered by a rechargeable battery. A new phone battery must be fully charged before using your wireless phone the first time. (See Warning.)
Before charging the battery for the first time,
* Ensure the SIM card is inserted and the battery is in place on the phone. Place the battery terminal end into the battery holder towards the top (away from the
hinged end) of the phone. Lower the b attery toward the phone.
Put the back cover plate on the phone. Follow the back cover plate instructions on page 18.
To charge the battery,
* Connect the NEC battery charger supplied with your phone to a compatible power outlet.
Connect the charger plug into the conne ctor on the base side of the phone. (See picture in right column.)
Check that the recharge battery icon is displayed in the status bar of the main display and the second display backlight glows red (located on the back of the flip).
When charging is complete, the battery icon displays as full and the second display backlight turns off. The battery icon displays on the main LCD display even
when the phone is turned Off during cha rging.
If you need to receive calls, the wireless phone can be turned On and left in Idle while it is chargi ng, although the total time takes longer to charge.
The wireless phone is designed to be charged with the NEC equipment listed in the specifications of your phone as shown on page 162.
Checking the Battery
The battery charge indicator shows the approximate charge level of the battery while the phone is in use and not being charged. The blocks on the power level icon show the
charge of your battery. The empty battery icon displays when the battery is nearly empty with approximately one minute of talk time remaining. Check the icon at the top,
left corner of the screen (the status bar, see page 7).
Full battery power Low battery power Battery empty (red)
I DO NOT connect a charger or any other externa l DC source if the phone's battery is not inserted. If this happens, t he phone may not function properly.
I Do not try to charge the battery if the
temperature is below 5 °C (41 °F) or above 35
°C (95 °F).
I Using any battery pack or AC adapter not specified by NEC for use with this phone creates a potential safety hazard that may be dangerous and may void any
warranty and approval given to the wireless phone.
Do not connect more than one charger at a ny time.
Do not leave the charger connected t o the power supply when it is not in use.
19
Low Battery Indication
If battery is completely discharged or brand new, there could be a few minutes delay before the charging indicator illuminates. This is not an abnormal occurrence.
When the battery voltage falls below the working level, RECHARGE BATTERY appears on the graphics display area and an empty battery icon displays in the status bar.
With the recharge notificatio n, the phone also sounds a short tone at ten-second intervals. Once the rec harge message displays and the short tone sounds, the phone
battery has approximately one minute of use remaining. The phone automatically powers Off.
The battery charge continues to drop after the “RECHARGE BATTERY” warning displays. In extreme cases where the battery is left uncharged for some considerable time
after the warning is displayed, a trickle charge is used to slowly charge the battery back up to a safe level at which fast charging can begin. During this time, the battery
icon will show charging but you are not able to make or receive a call, or fully power On the phone. Normal wireless phone operation resumes once fast charging begins.
The phone can be in trickle charge for a few hours before fast charging starts if the battery is left uncharged for some days after the recharge warning.
Changing the Battery
Make sure the phone is turned Off. Some settings, stored numbers, and messages may be lost if the battery is removed while the power is On.
* Gently push the indented circle only 1/8 inch towards the hinge end of the wireless phone. (See Picture 1.)
Lift the back cover plate straight up from the wireless phone to reveal the battery location. (See Picture 2.)
At the hinge end of the phone, use the tip of your finger or fingernail to lift the battery up and remove f rom the battery location. (See Picture 3.)
Place the new battery with the battery terminal end into the battery holder towards the top (away from the hinged end) of the phone. Lower the battery toward
the phone. (Picture 4.)
Lower the back cover plate on the phone . At the hinge end, gently push the back cover plate into pl ace. (Picture 5.)
I Do not place the back cover plate on the phone
except as shown in item 2 in the ri ght column.
If you attempt to place the back cover plate on
the phone by any other position, you may
damage the back cover.
20
Powering-On the Phone
Turning the Phone On
* Press and HOLD (On-Off) to turn On the phone.
After the powering On process, the phone displays the Idle screen.
You may need to input your PIN code or phone secur ity code (refer to page 17).
Turning the Phone Off
* Press and HOLD (On-Off) until it powers down. The power down screen displays the power-down graphic and the phone powers Off.
After powering Off or turning the wireless phone Off, you must wait three seconds before powe ring On.
Language Display
If the display is showing any language ot her than your own, proceed as follows:
* Press MENU (Main) to display the Main Menu. Press 1, 1, and 8 to display the Language screen. (See Flag.)
Press the appropriate key to select the required language and return to the Phone menu.
Press (End) to return to the Idle screen.
Frequency Bands
The type of frequency band that y ou use depends upon your location. (See Flag.)
* Press MENU (Main), 1, 5, and 4 to display Band Priority screen.
Press 1 to select the 850/1900 frequency band if you are located in the United States or press 2 to select the 1800 frequency band if you are located in Europe and
other locations. The selected setting is saved and the display returns to the Network menu.
O Do not remove the battery to turn your phone
Off as this may cause loss of stored
information.
O The phone supports the above languages and
the keyboard symbols have been chosen for
world-wide operation.
O Frequency bands need to be changed for the
wireless phone to work properly when
travelling outside the United States.
21

Basic Calls and Phone Use
Make a call the same way as you would with a normal push-button phone, except you must press (Send) after entering the area code and phone number to ensure the
call is sent.
Dialing Calls
* Key in the phone number. Check the number on the display.
Press (Send) to connect the call. (See Flag.)
While making the call, the screen displays the phone number dialed with a name (if a name has been stored in a phonebook along with the number--see page 101) and a
connection graphic or a phonebook pictur e if one has been allocated to the number called (see page 106).
The number dialed and information related to the number dialed is stored in the dialed calls list. The last 20 calls made are stored. Each time you make a call after the
dialed call list is full, the oldest call drops off the list and the newest call is placed at the top of the list.
* Press (Send) to access the dialed call list from the Idle screen.
Using Voice Dialing
* Press and hold the (Down) navigation key. You are prompted with, "Please say a command."
To call a contact from the phone book for which you previously recorded a voice tag (refer to page 39) say “Call”. If the command is recognized, the phone will
respond with, “Please say a name.” If the command is not recognized, you will be prompted with “Command not recognized. Try again.”
Speak the name of the call reci pient into the phone. If the phone does not recognize the voice tag, you a re prompted with, “Name not recognized. Try again”. In
this case, you may re-speak the call recipient’s name up to 3 times before the voice tag function ends. Press Softkey1 (OK) to ret urn to the Main LCD.
If you have set “Tone” for the Audio prompts setting, then the phone will not “speak” to you, but only emit a tone for e ach prompt.
Using Digit Dialing
* Press and hold the (Down) navigation key. You are prompted with, “Please say a command.”
To dial a random phone number, say “Dial”. If the command is recognized, the phone will respond with “Please say a phone number.” If the command is not
recognized, you will be prompted with “Command not recognized. Try again.”
Speak the phone number you wish to dial. If t he phone recognizes the correct number of digits (refer to page 39), t he phone will repeat the phone number to dial.
Based on the settings “Ask before dial” and “Results display”, the phone may immediately dial the number after repeating the digits. If “Ask before dial” is set to
“Ask” then the phone will respond to your voi ce digit input with the question “Dial <phone number digits>?” You must respond w ith “Yes”, “No”, or
Softkey1 (Yes), or Softkey2 (No). If you select Yes, then the phone w ill respond with “Calling <phone number digits>”. If you select No, then the phone
will return to the idle screen.
O If you find that the phone has trouble
recognizing your speech, try to perform Voice
Dialing Personalization, refer to page 105.
22
 Loading...