

Page 1
Page 2

Welcome
This Printer Driver User’s Manual describes how to install and use
the Minolta PageWorks 20 Printer Utility. Before reading this
Printer Driver User’s Manual, we recommend that you read the
User’s Manual. It explains how to set up and operate the printer.
No part of this document may be reproduced, transmitted, transcribed, stored in a retrieval system, or translated into other languages without the express written prior consent from Minolta Co.,
Ltd.
The contents of this manual are subject to change without notice.
Trademark Acknowledgments
TrueType is a registered trademark of Apple Computer, Inc.
Microsoft Wind ows 3.1 and 95 are registered trademarks of
Microsoft Corporation.
IBM is a registered trademark of International Business Machines
Corporation.
PageWorksTM is a trademark of Minolta in the U.S. and Canada.
All other products or name brands are trademarks or registered
trademarks of their respective holders.
This printer includes the software developed by T okyo Denshi Sekei
K.K.
U.S.A. Technical Support
If you continue to experience technical difficulty with the operation
of your printer product, please contact your support representative:
Toll free at 1-800-459-3250
or via our website at http://www.minoltappd.com.
Hours of operation and toll free nature of our support program is
subject to change without prior notice.
i
Page 3

Contents
Chapter 1 Printer Driver for Windows 95
Introduction...........................................................1-1
System Requirements .......................................... 1-1
Installing the Printer Driver..................................1-2
Plug and Play ....................................................1-2
Manual Installation.............................................1-5
Setting the Printing Options .................................1-11
General Button Operations...................................1-11
Printer Properties Window ...................................1-11
General..............................................................1-12
Details................................................................1-13
Setup.................................................................1-15
Paper.................................................................1-25
Graphics............................................................1-30
Fonts..................................................................1-32
Device Option....................................................1-33
Printing Documents..............................................1-35
Installing the Minolta Font Manager.................... 1-36
ii
Page 4

Contents
Chapter 2 Minolta Status Monitor 20
Introduction...........................................................2-1
System Requirements .......................................... 2-2
Installing the Minolta Status Monitor.................. 2-3
Understanding the Status Monitor........................ 2-4
Status Icon ...........................................................2-8
Status Monitor Menus..........................................2-9
Settings..............................................................2-9
Choose Printer............................................ 2-9
Alert ............................................................2-10
Monitoring Interval ......................................2-11
View...................................................................2-11
Toolbar........................................................2-11
Recommended Action.................................2-11
Refresh .......................................................2-11
Help...................................................................2-12
Help Topics .................................................2-12
About Minolta Status Monitor......................2-12
User Setting Items..............................................2-13
iii
Page 5

Contents
Chapter 3 Printer Driver for Windows 3.1
Introduction...........................................................3-1
System Requirements .......................................... 3-1
Installing the Printer Driver..................................3-2
Selecting the Printer Port.....................................3-5
Selecting Timeout Options...................................3-6
Choosing the Default Printer................................3-7
Setting the Printing Options .................................3-8
General Button Operations...................................3-8
Printer Setup Window...........................................3-8
Setup.................................................................3-9
Paper.................................................................3-19
Graphics............................................................3-24
Fonts..................................................................3-25
Device Options..................................................3-26
Printing Documents..............................................3-28
Installing the Minolta Font Manager.................... 3-29
iv
Page 6

Chapter 1
Chapter 1
Printer Driver for Windows 95
Printer Driver for Windows 95
1--1
Page 7

Chapter 1
Printer Driver for Windows 95
1-0
Page 8

Introduction
The Minolta PageWorks 20 printer utility was developed especially
to provide true Windows based printing for users of the Minolta
PageWorks 20 printer.
System Requirements
The following describes the minimum system requirements that are
necessary to correctly run the Minolta PageWorks 20 printer utility.
Operating System:
Microsoft Windows 95 (English)
Personal Computer:
IBM PC or compatible with a 486SX 33MHz CPU, or faster CPU
(Pentium processor recommended)
I/O Interface:
Standard PC parallel printer port and cable
Memory:
At least 12MB PC RAM (16MB recommended)
Chapter 1
Printer Driver for Windows 95
Free Disk Space:
Approximately 1MB for files
NOTE
Use of a poor quality parallel cable may adversely affect input.
1-1
Page 9
Chapter 1
Printer Driver for Windows 95
Installing the Printer Driver
Plug and Play
1. Connect the printer to the computer using the parallel interface
cable.
2. Turn on your printer.
3. Turn on your computer and start up Windows 95.
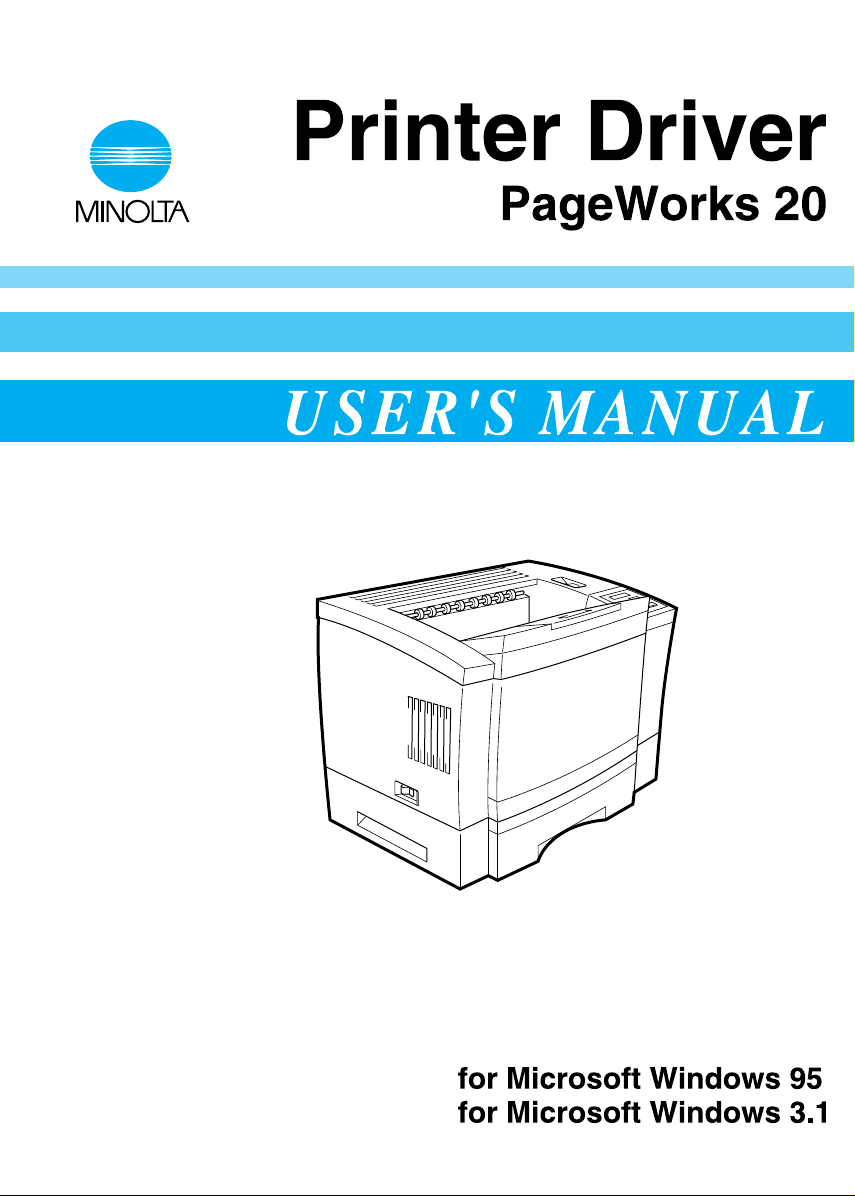
If the New Hardware Found screen appears, go to step 4.
If not, go to “Manual Installation” step 2 on page 1-5.
4. Click “Driver from disk provided by hardware manufacture” and
then click the OK button.
1-2
Page 10

5. Insert the Windows 95 Printer Driver diskette into your computer’s disk drive. After making sure the displayed drive letter is
your computer’s disk drive, click the OK button.
6. Click the OK button.
Chapter 1
Printer Driver for Windows 95
1-3
Page 11
Chapter 1
Printer Driver for Windows 95
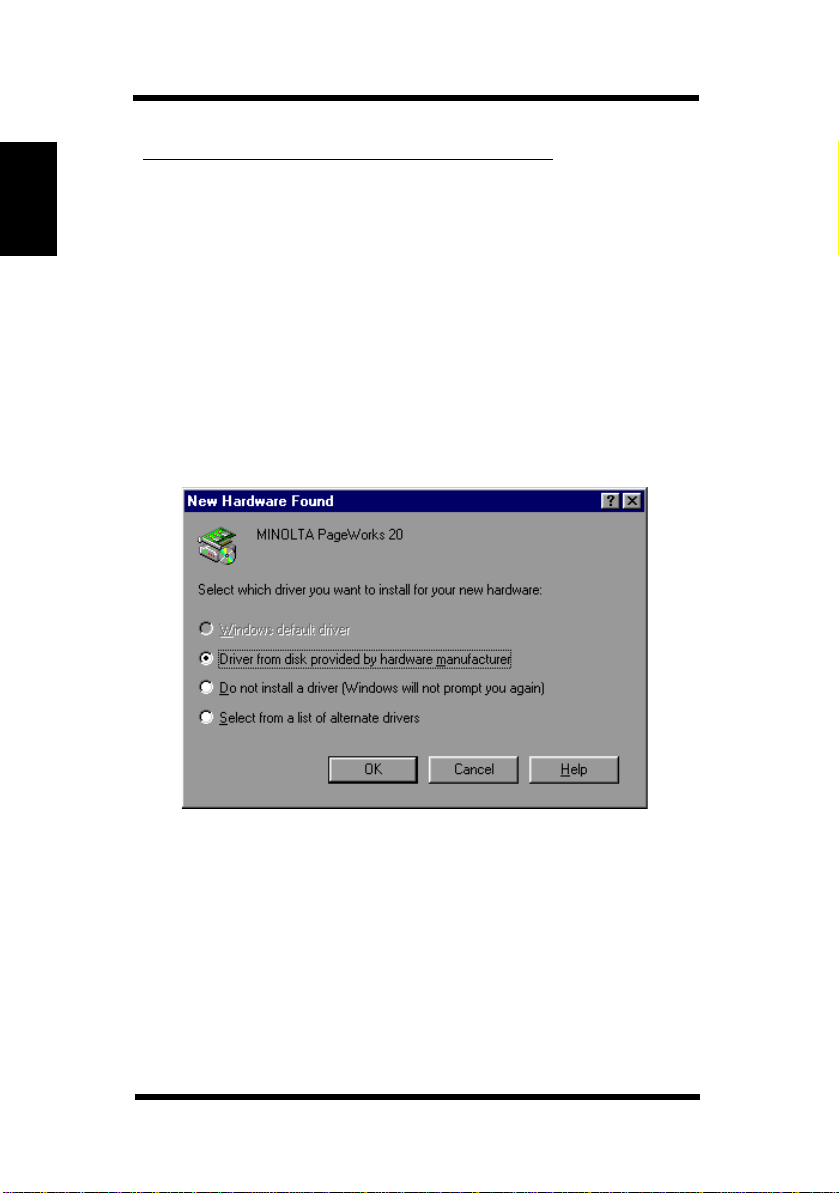
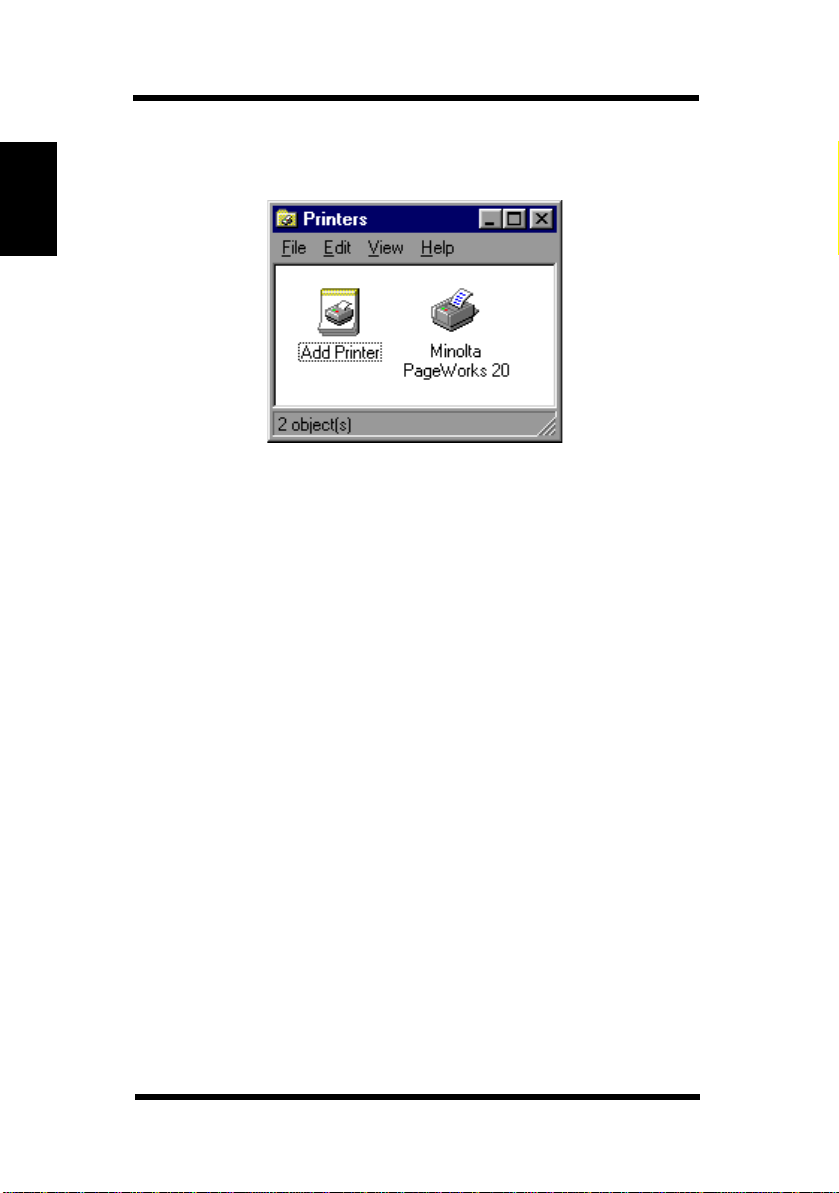
7. Click the Finish button.
8. Installing the Printer Driver is completed. Your new printer icon
appears in the Printers folder.
1-4
Page 12
Manual Installation
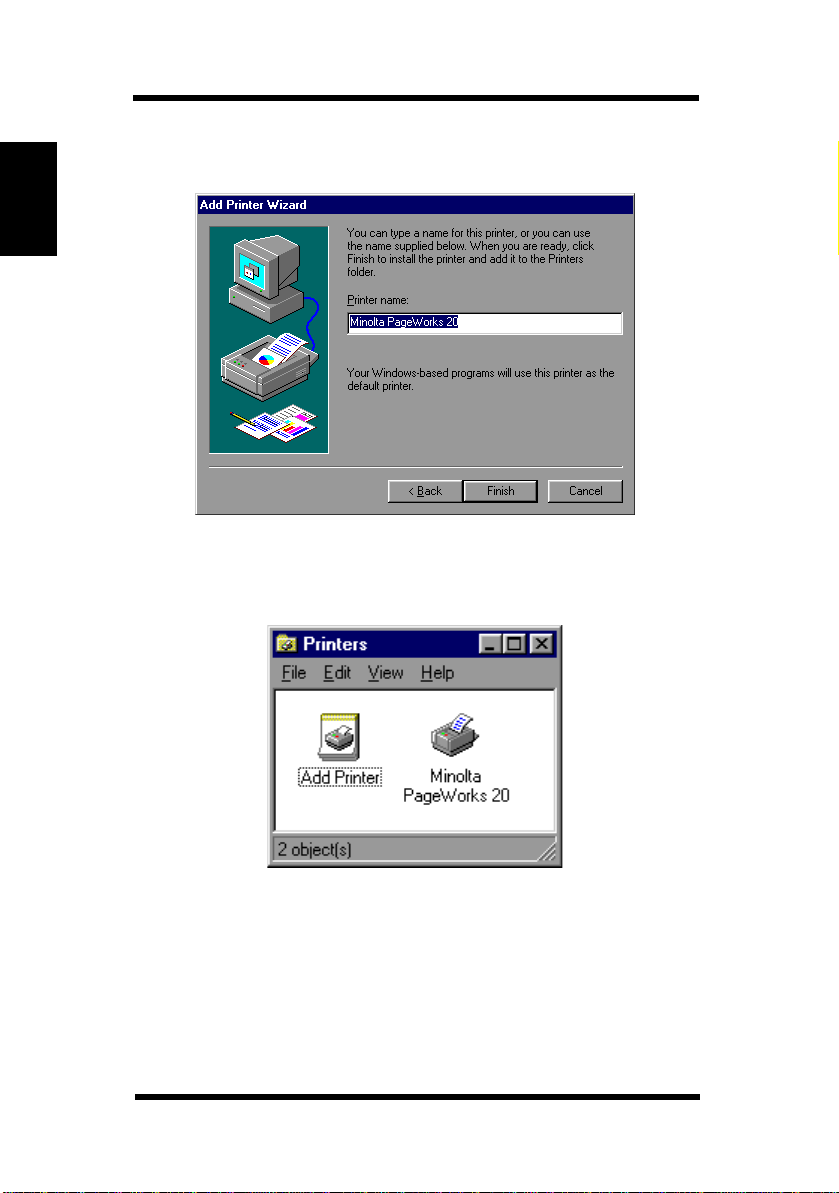
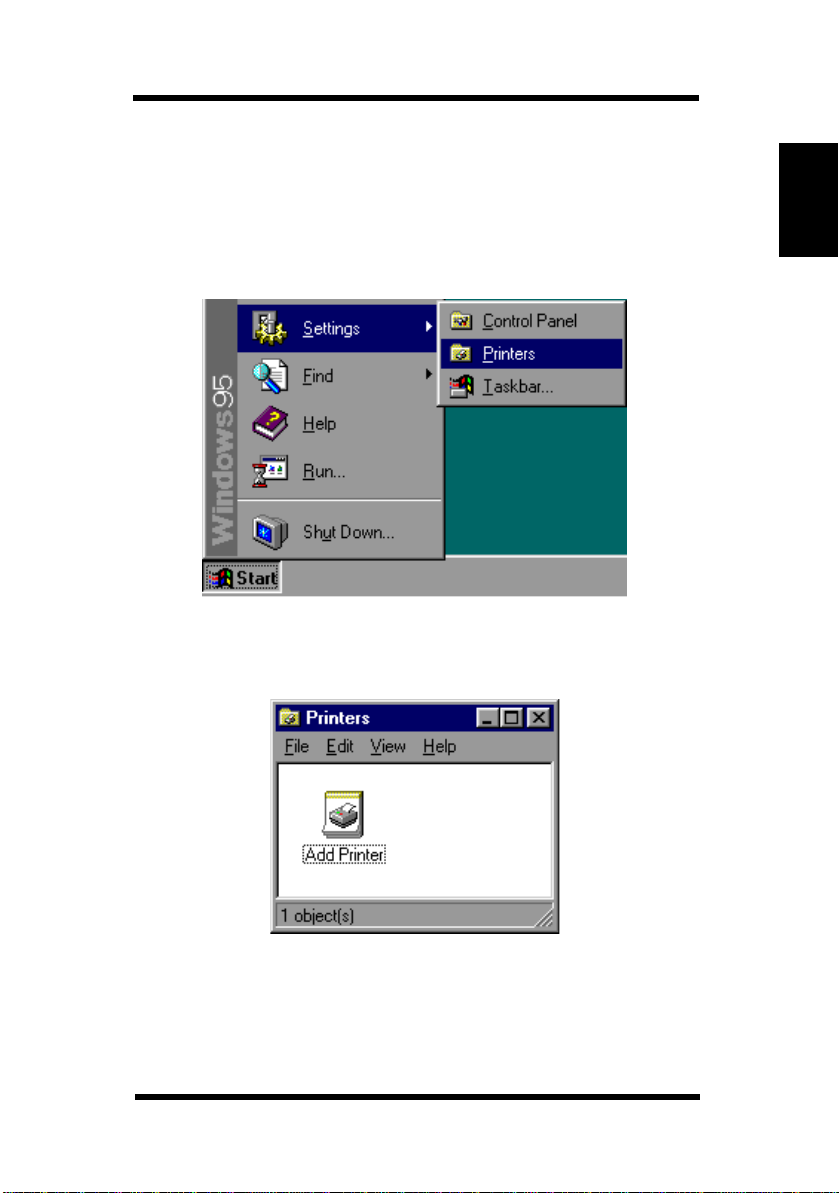
1. Turn on your computer and start up Windows 95.
2. Click the Start Button, point to Settings, and then click Print-
ers.
3. In the Printers folder, double-click the Add Printer icon.
Chapter 1
Printer Driver for Windows 95
1-5
Page 13
Chapter 1
Printer Driver for Windows 95
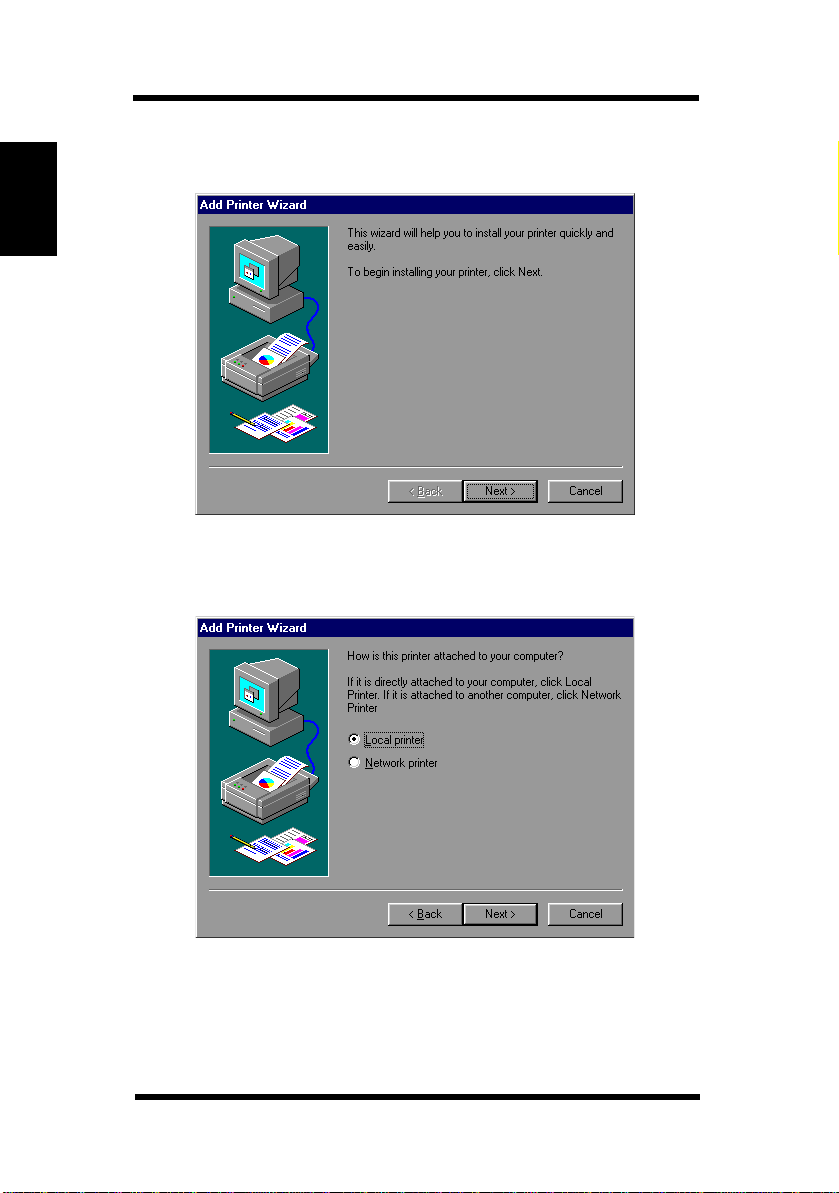
4. Click the Next button.
5. Select “Local printer”, then click the Next button.
1-6
Page 14
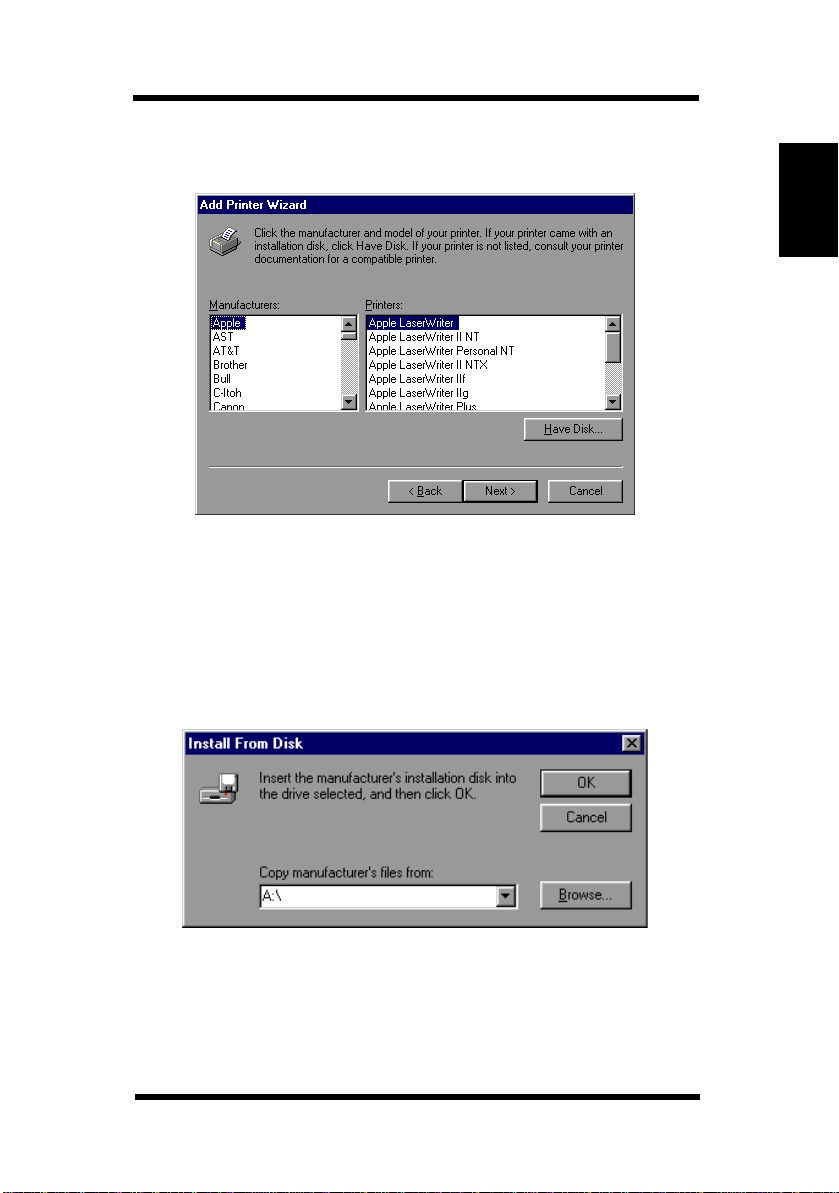
6. Click the Have Disk... button.
7. Insert the Windows 95 Printer Driver diskette into your computer’s disk drive. At the command prompt, type the drive letter
followed by a colon (:) and a back slash (\). For example:
A:\
Click the OK button.
Chapter 1
Printer Driver for Windows 95
1-7
Page 15
Chapter 1
Printer Driver for Windows 95
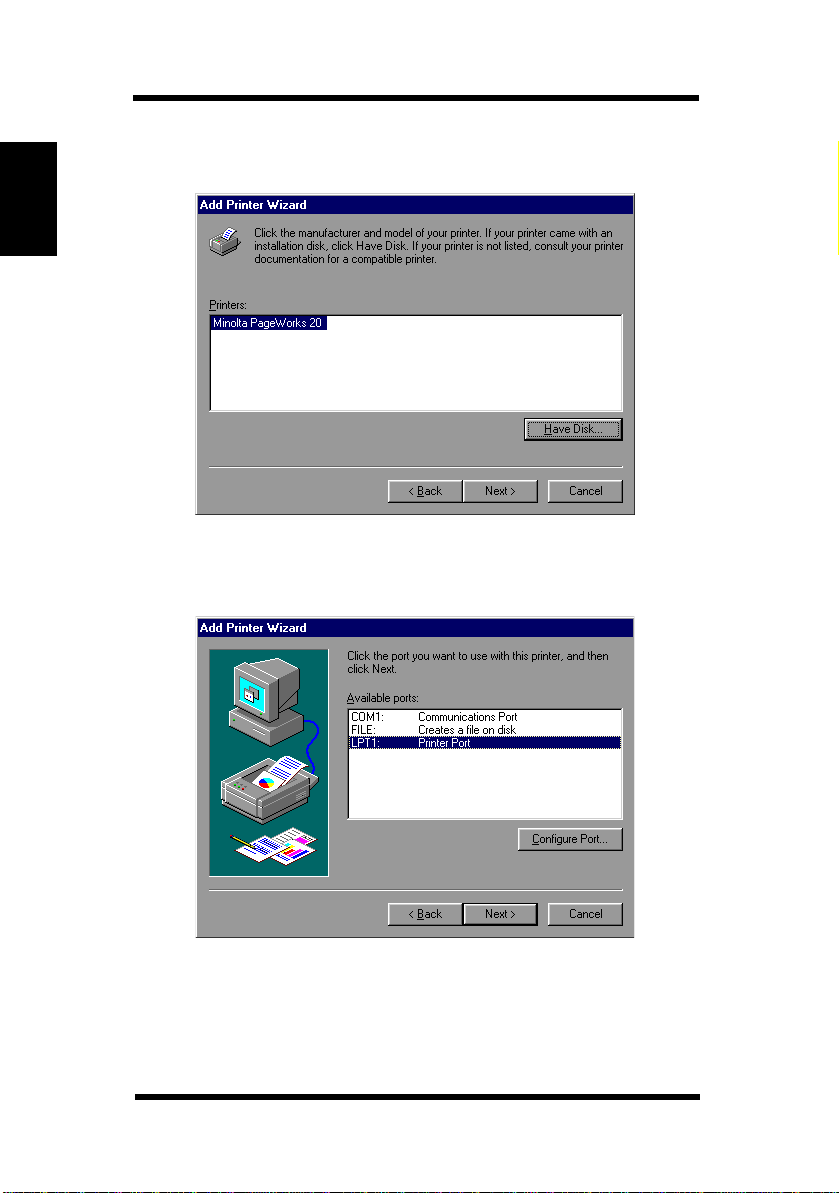
8. Click the Next button.
9. Make sure LPT1 is selected, then click the Next button.
1-8
Page 16
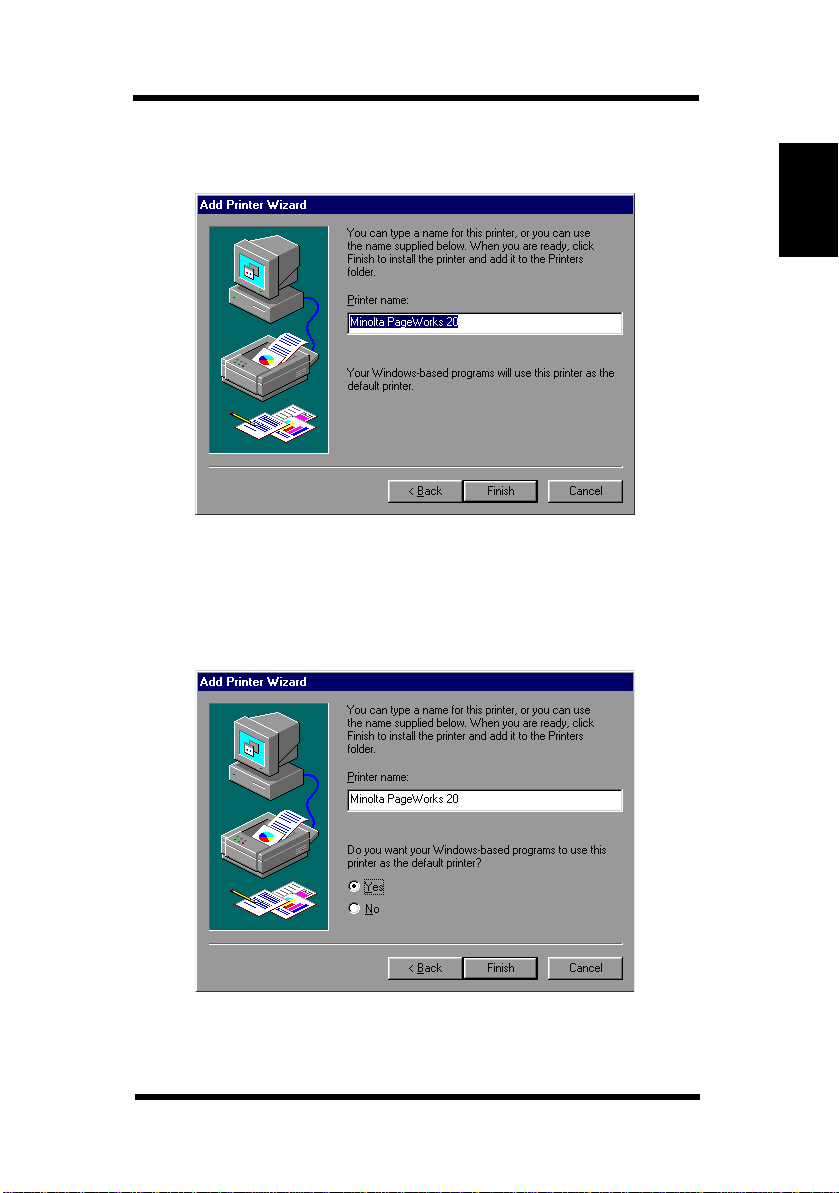
10. Click the Finish button.
11. If you have already installed the printer driver, the following
screen appears.
Check Yes, then click the Finish button.
Chapter 1
Printer Driver for Windows 95
1-9
Page 17
Chapter 1
Printer Driver for Windows 95
12. Installing the Printer Driver is completed. Your new printer icon
appears in the Printers folder.
1-10
Page 18

Setting the Printing Options
Printing options are your printer-specific settings, such as resolution, print quality and installed options.
To change printer settings
1. Click the Start Button, point to Settings, and then click Printers. The Printers folder appears.
2. Click your printer icon, click File, and then click Properties. The
printer properties window appears.
3. Make any necessary changes, then click the OK button.
General Button Operations
The following describes the operation of the three buttons that
appear at the bottom of all setup dialog boxes.
Restore Default
Click this button to restore all settings in the displayed dialog box to
their initial defaults.
OK
Click this button to close the printer properties window and save all
the setting changes you made.
Cancel
Click this button to close the printer properties window without saving any of the changes you have made.
Chapter 1
Printer Driver for Windows 95
Apply
Click this button to send all the setting changes you made to the
printer without closing the printer properties window.
Printer Properties Window
The following describes how to make settings using the dialog
boxes that are available in this window.
1-11
Page 19
Chapter 1
Printer Driver for Windows 95
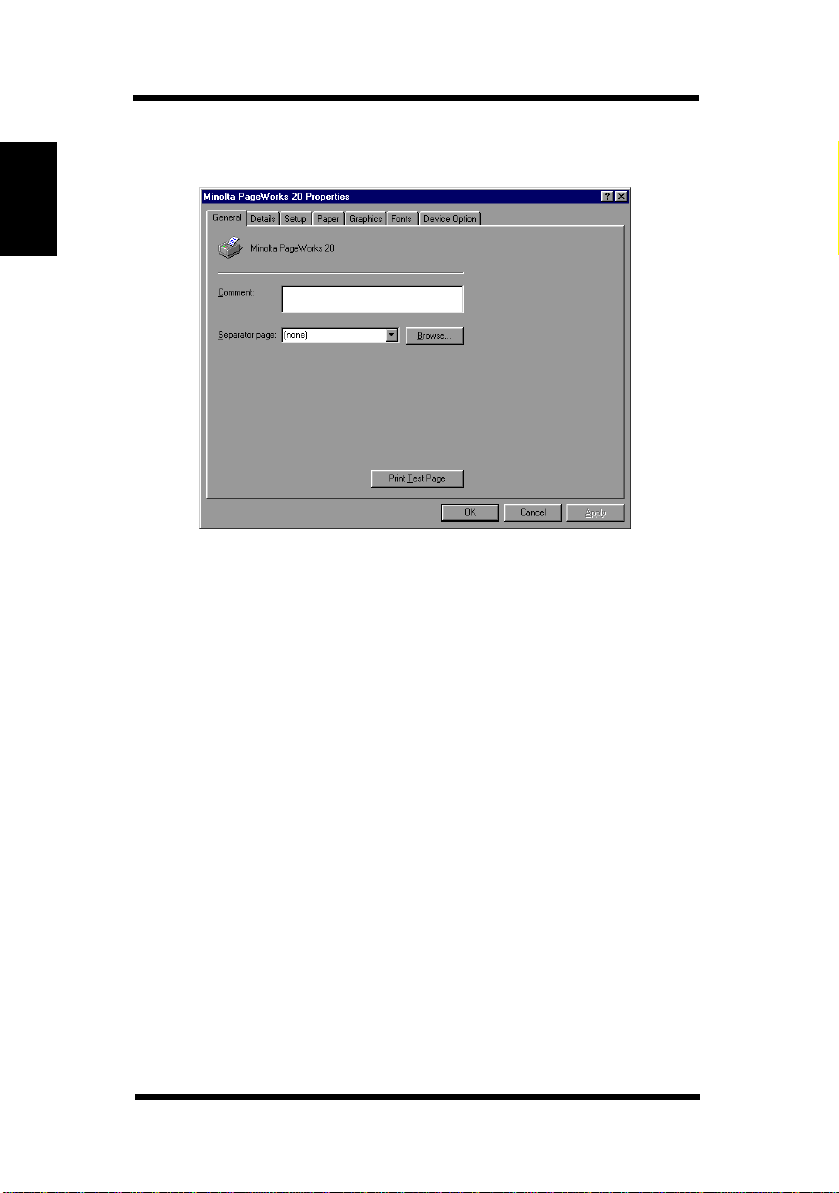
General
Comment
Provides a place for you to add a comment about the printer,
for example, when it is available or what it is used for.
If you share this printer, the comment is transferred when someone
sets up your printer on their computer. However, if you change the
comment, other people will not see the updated version.
Separator page
Inserts a page between each document printed. This is useful if
many people are using your printer or if you are printing multiple
documents at once. You can choose between a full page that
includes graphics or a simple page with text only.
If you want to use a custom separator page, click Browse to locate
and specify which separator file you want to print between docu
ments. You can use any Windows metafile (.wmf) for a separator
page.
You can set up separator pages only if the printer is attached directly
to your computer.
Print Test Page
Click this button to send a test page to your printer. You might want
to do this to make sure your printer is set up correctly.
1-12
-
Page 20
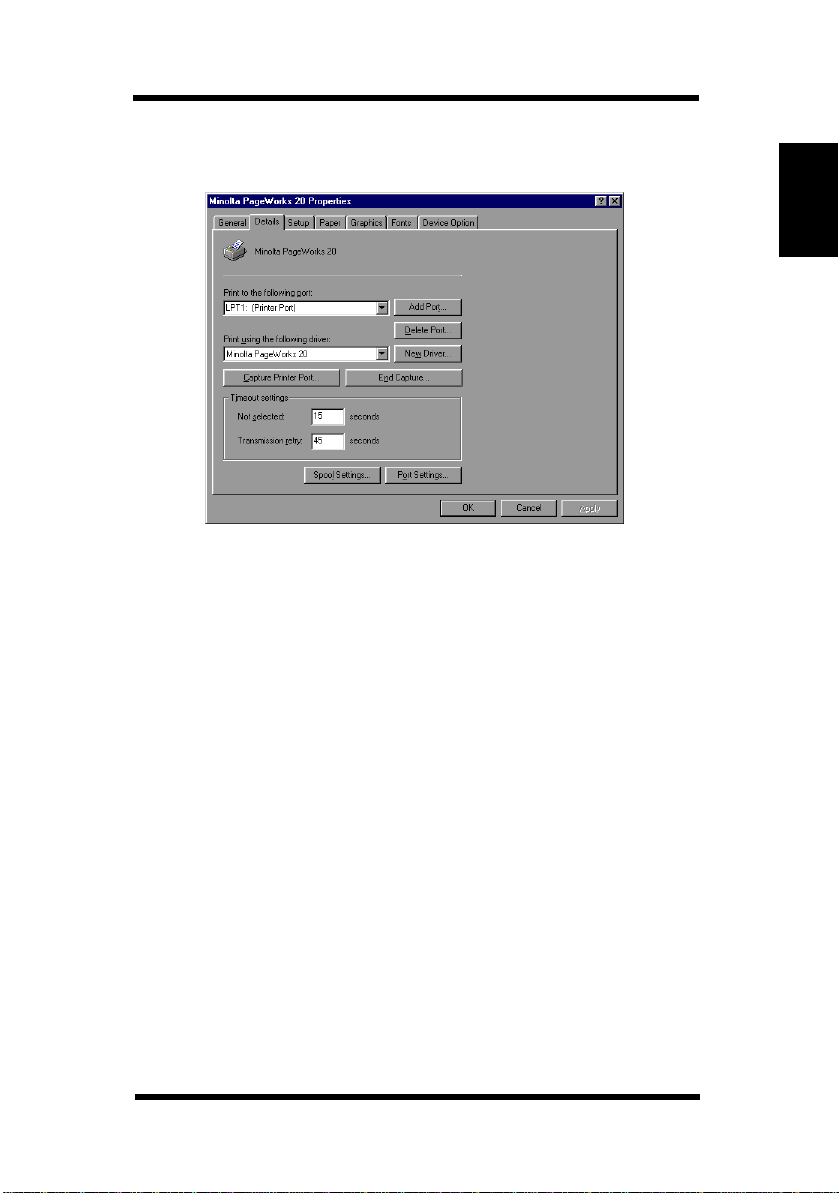
Details
Port
Displays the port your printer is connected to or the path to the network printer you are using.
You can change where you print to by typing the network path here,
by opening the list and clicking a port, or by clicking Add Port.
LPT A parallel port.
COM A serial port.
FILE Prints to a file instead of a printer. If the application you
are working with supports this feature, you can print to a
file even if you don’t select this option.
Chapter 1
Printer Driver for Windows 95
Add Port
Click this button to add a new port or specify a new network path.
Delete Port
Click this button to delete a port from the list of available ports.
Driver
Displays the type of printer you are using. This type must match your
printer or be one that your printer can emulate.
1-13
Page 21

Chapter 1
Printer Driver for Windows 95
New Driver
Click this button to update or change your printer driver.
Capture Printer Port
Click this button to capture a port (map it to a network drive).
End Capture
Click this button to remove the mapping of a port from a network
drive (end the capture).
Timeout
Timeout options control the amount of time that elapses before a
message appears to notify you of printer problems.
Not Selected Specifies how much time (in seconds)
Windows will wait for the printer to
come on-line before reporting an error.
Transmission Retry Specifies how much time (in seconds)
Windows will wait for the printer to be
ready to print before reporting an error. If
you have problems printing large docu
ments, you may want to increase the
value of this setting.
Spool Settings
Click this button to specify how your document is sent from your
program to the printer.
-
Port Settings
Click this button to change settings for the printer port.
1-14
Page 22

Setup
Copies
Specifies the number of copies you want to print. You can specify
any value from 1 to 999.
Collate
Collate Off: When Collate is off, the printer prints each page of
a job the number of times selected in the Copies item. For exam
ple, if you send a three-page job to print and set Copies to 2, the
printer prints page 1, page 1, page 2, page 2, page 3, page 3.
Collate On: When Collate is on, the printer prints each print job
the number of times selected in the Copies item. For example, if
you send a three-page job to print and set Copies to 2, the printer
prints page 1, page 2, page 3, page 1, page 2, page 3.
Separation: Allows you to insert a blank page between print
jobs.
Chapter 1
Printer Driver for Windows 95
-
NOTE
If you specify Separation, you must also specify JOB SEP ARA-
TION in the tray1 paper size setting mode at the control panel.
1-15
Page 23

Chapter 1
Printer Driver for Windows 95
NOTE
If you specify Collate On or Separation through the printer driver,
be sure to set the collate setting of the application software to
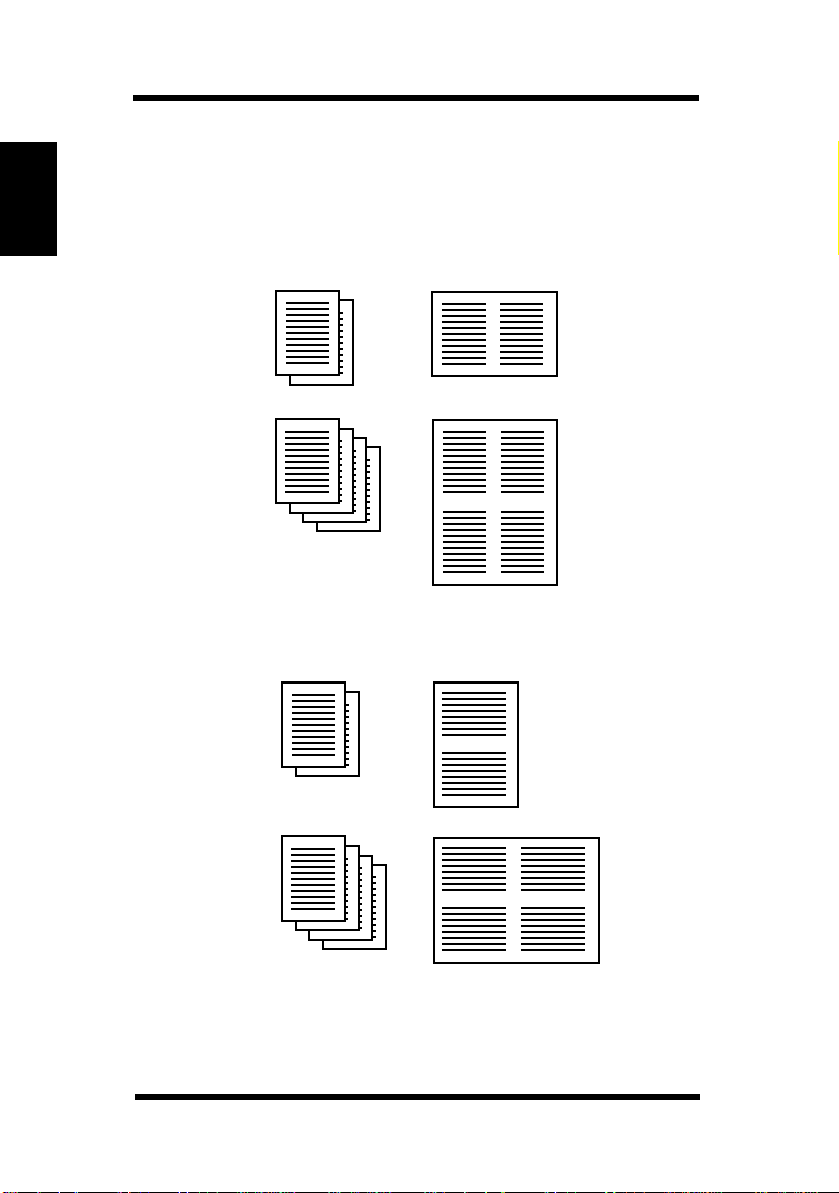
Duplex Print
Specifies whether to print on both sides of the paper. If you attempt
duplex printing, you can choose either Bind Long Edge or Bind
Short Edge.
NOTES
- To activate this setting, you must change the setting for Duplex
Unit in the Device Option dialog box from “Not Installed” to
“Installed”.
- Do not use special paper (transparencies, labels, envelopes,
letterhead and thick paper) for duplex printing.
- You cannot print on a custom size smaller than A5 size for
duplex printing.
By creating a combination of Bind Long Edge, Bind Short Edge,
Portrait, Landscape and N-Up, the printer prints upside down for
odd-numbered pages and even numbered pages, or in the same
direction for all pages.
off.
Portrait
Landscape
1-16
None or 4Up
Long Edge
❍
●
: same direction
❍
Short Edge
●
❍
2Up
Long Edge
Short Edge
●
❍
●: upside down
❍
●
Page 24
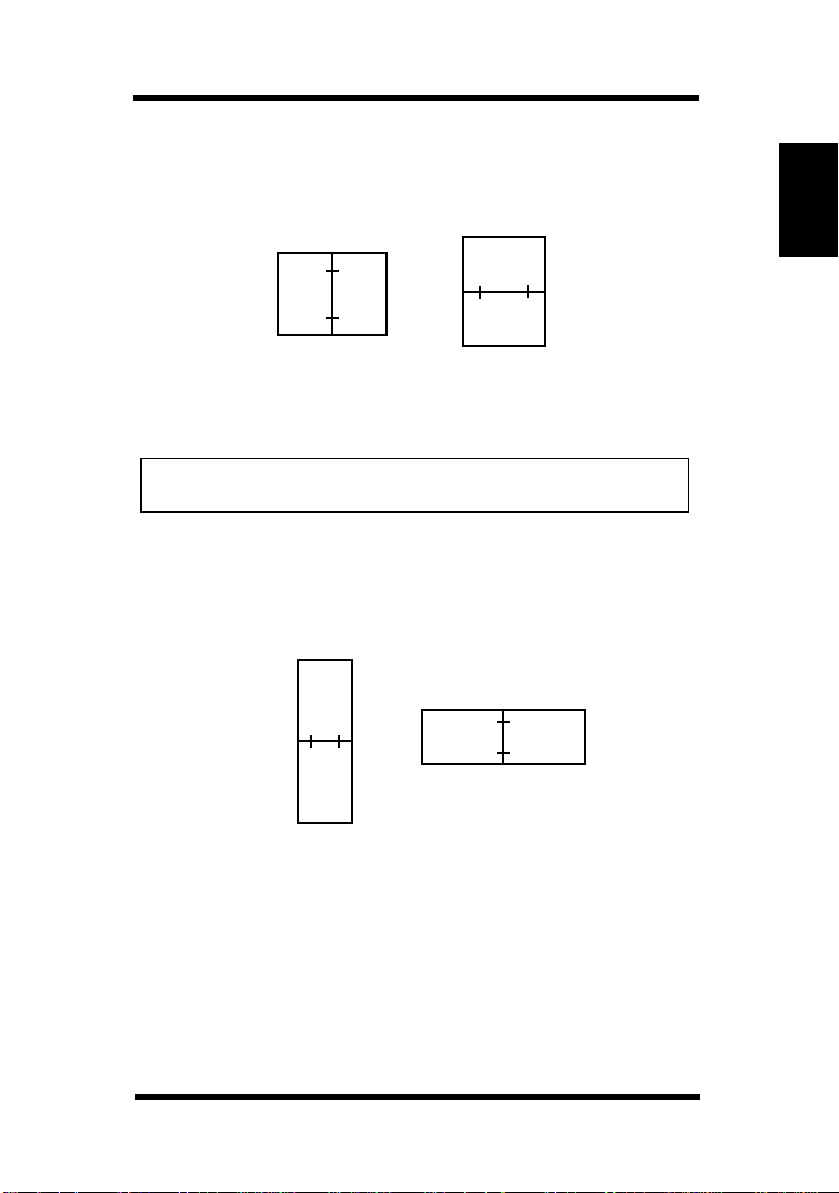
None: Performs one sided printing.
Bind Long Edge: Performs duplex printing for binding along
the long edge.
A
A
A
A
Chapter 1
Portrait
NOTE
When you print on a custom size with Bind Long Edge, the Layout function cannot be used.
Bind Short Edge: Performs duplex printing for binding along
the short edge.
Landscape
A
A A
A
Portrait
Landscape
Printer Driver for Windows 95
1-17
Page 25
Chapter 1
Layout
None: No layout specified.
N-Up: Prints either two or four pages on a single sheet of paper.
Example: Portrait orientation.
2-Up
Printer Driver for Windows 95
1
2
4-Up
1
2
3
4
Example: Landscape orientation.
2-Up
1
2
4-Up
1
2
3
4
1 2
1 2
3 4
1
2
1
3
2
4
1-18
Page 26
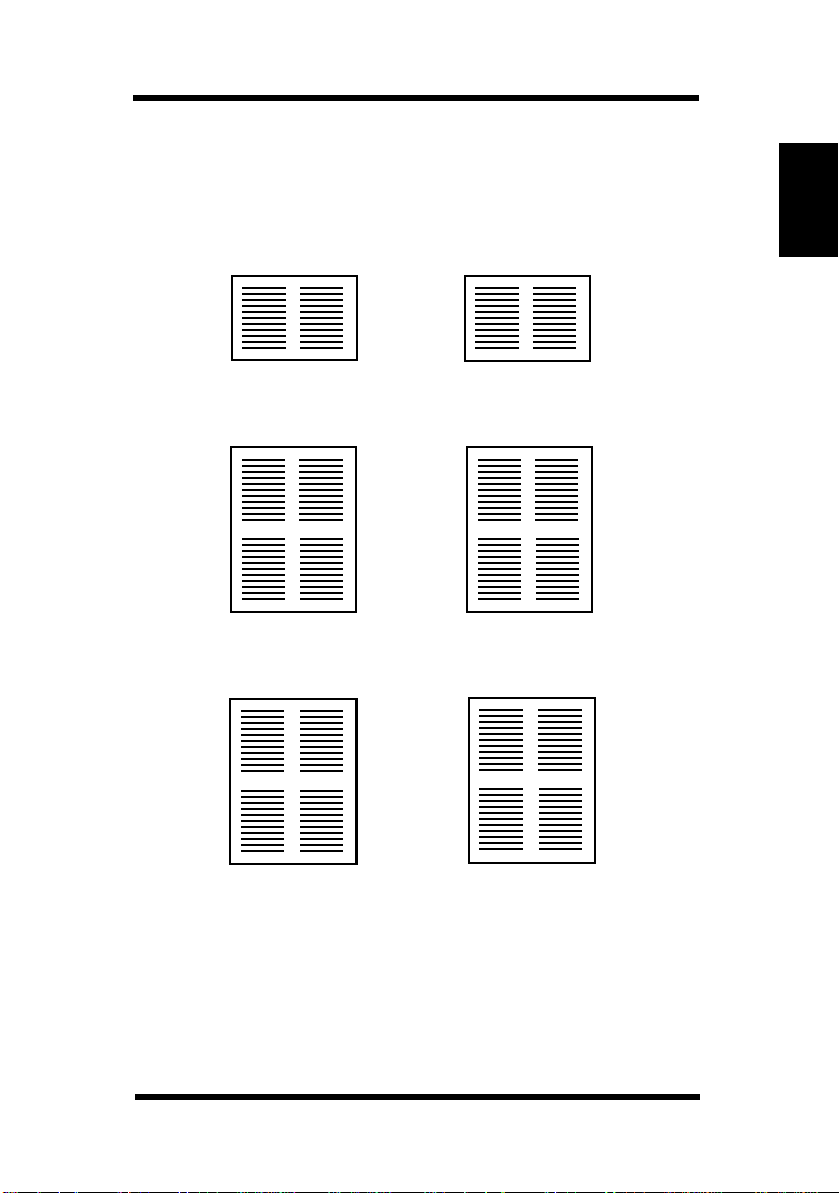
If you select N-Up, the following settings activate.
N-Up Choice: You can select twelve kinds of layouts.
Example: Portrait orientation.
1 2
2-Up Ascending
1 2
3 4
4-Up Hoz. Ascending
2 1
12
2-Up Descending
1
3
4
2
4-Up Ver. Ascending
3
1
Chapter 1
Printer Driver for Windows 95
4 3
4-Up Hoz. Descending
2
4
4-Up Ver. Descending
1-19
Page 27
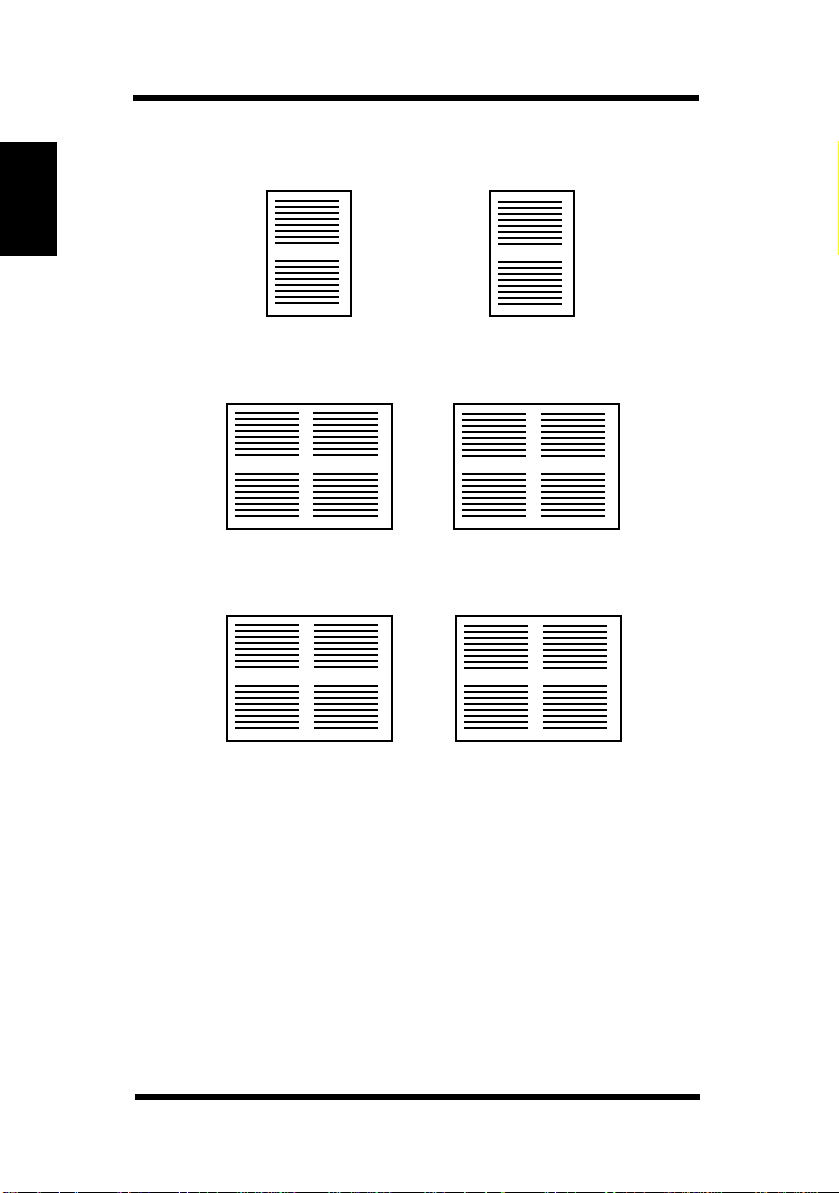
Example: Landscape orientation.
Chapter 1
Printer Driver for Windows 95
1
2
2-Up Ascending
1
3
2
4
4-Up Hoz. Ascending
2
4
1
3
4-Up Hoz. Descending
2
1
2-Up Descending
1
2
3
4
4-Up Ver. Ascending
3
4
4-Up Ver. Descending
1
2
N-Up Paper: p x n -> paper size.
p: the paper size of the document.
n: N-Up
paper size: see “Paper Size” page 1-25.
Border Line: Specifies whether to print a border line.
1-20
Page 28
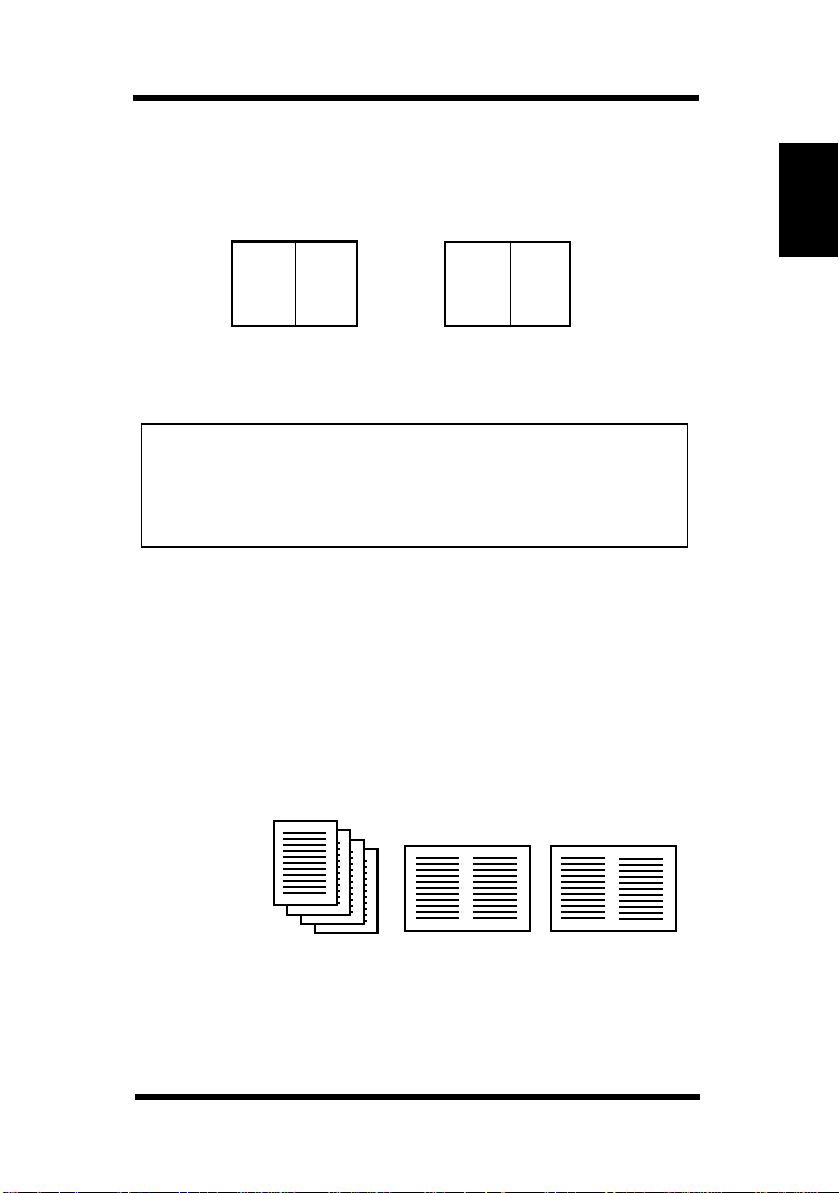
Booklet: Tells the printer that the printed pages will be bound in
the center. Enables booklet printing both for portrait and land
-
scape orientation
Chapter 1
Portrait
A
A
Landscape
A
A
NOTES
- To activate this setting, you must change the setting for Duplex
Unit in the Device Option dialog box from “Not Installed” to
“Installed”.
- When you perform booklet printing, set the Duplex Print setting
in the Setup dialog box to “None”.
If you select Booklet, the following settings activate.
Booklet Choice: You can select either “Left Open” or “Right
Open”.
Booklet Paper: p x 2 -> paper size.
p: the paper size of the document.
paper size: see “Paper Size” page 1-25.
Example: Portrait orientation.
4 pages
front
back
Printer Driver for Windows 95
1
2
3
4
4 1
2
3
1-21
Page 29

Chapter 1
Printer Driver for Windows 95
Enlarge/Reduce: Performs enlargement or reduction printing
according to the paper size you specify.
If you select Enlarge/Reduce, the following settings activate.
Enlarge/Reduce: p -> paper size.
p: the paper size of the document.
paper size: see “Paper Size” page 1-25.
1-22
Page 30

Watermark
Specifies which watermark to use. You will be able to add others,
edit or delete the defined watermark.
Text: Lists the available watermarks from which you can select,
edit or delete.
First Page Only: Prints the watermark on the first page only.
Click the Add or Edit button to display the watermark dialog box.
The following settings are available in the watermark dialog box.
Text: Displays the text of the selected watermark for editing or
type in a watermark (up to 64 characters) you want to print.
Fonts: Specifies a font for the watermark you want to print on
the page.
Style: Specifies a font style in the box. The font style varies with
each font.
Chapter 1
Printer Driver for Windows 95
Size: Specifies a font size. You can set the font size between 4 to
127 points. If there is no point size in the box, you input the point
size directly from the key pad.
Darkness: Specifies the darkness value of the watermark.
Angle: Specifies the angle at which the watermark will be dis-
played on the page.
1-23
Page 31

Chapter 1
Printer Driver for Windows 95
Position: Tells the driver how to position the watermark. Automatically Center Watermark centers the watermark on the page.
Position Relative to Center lets you specify x and y coordinates
for the watermark relative to the center.
1-24
Page 32

Paper
Paper Size
Specifies the paper size of document data. The following is a list of
available paper sizes.
Chapter 1
Printer Driver for Windows 95
Paper
Letter
Ledger
Legal
Executive
A4
A3
B4
JIS B5
COM-10 (envelope)
DL (envelope)
C5 (envelope)
Monarch (envelope)
ISO B5 (envelope)
Custom
Size
8.5 x 11 inch
11 x 17 inch
8.5 x 14 inch
7.25 x 10.5 inch
210 x 297 mm
297 x 420 mm
257 x 364 mm
182 x 257 mm
4.125 x 9.5 inch
110 x 220 mm
162 x 229 mm
3.875 x 7.5 inch
176 x 250 mm
1-25
Page 33

Selecting Custom opens a dialog box that can be used to specify a
paper size within the following ranges:
Chapter 1
Printer Driver for Windows 95
Unit
Inch
Metric
Width
3.63 to 13.00”
92.1 to 330.2mm
Length
5.50 to 19.02”
139.7 to 483.0mm
For example: specify A5 size (148 mm x 210 mm).
1. Open the Custom Paper dialog box.
2. Click “0.1 millimeters” in the Units box.
3. Type in “1480” in the Wi dth box.
4. Type in “2100” in the Length box.
5. Click the OK button.
NOTES
- Do not specify an envelope size (COM-10, DL, C5, Monarch
and ISO B5) and a
printing
.
custom size smaller than A5 size for duplex
- When you print on a custom size with the Bind Long Edge, the
Layout function cannot be used.
1-26
Page 34

Orientation
Selects the direction of the print on the page. You can select either
Portrait or Landscape.
Portrait: Means the page is taller than it is wide when you view
the printed text upright.
Landscape: Means the page is wider than it is tall when you
view the printed text upright.
A
Portrait
When you print with 2-Up or 4-Up, the direction of the print is
determined by the orientation setting for the first page for each
printed sheet of paper.
For example: Print out 4 pages with 2-Up.
P
P
12
A
Landscape
L
3
P
4
Chapter 1
Printer Driver for Windows 95
L
L
1
2
P
3
L
4
1-27
Page 35

For example: Print out 8 pages with 4-Up.
Chapter 1
Printer Driver for Windows 95
P
1 2
P
L
P
P
L
L
When you perform booklet printing, the direction of the print is
determined by the orientation setting for the first page.
P
34
L
1
2
L
3
4
7
P
5
6
P
8
P
L
L
6
5
L
7
8
Example:
1-28
P
Portrait only.
P
Mixing Portrait and Landscape
(the first page is Portrait).
P
L
Page 36

L
L
L
Landscape only.
Paper Source
Specifies the paper source. If Auto is selected, the printer will automatically search all paper trays for the required paper size. At this
time, the paper source is selected in the priority order of tray 2, tray
3 and tray 1.
Auto
Manual Feed
Manual Feed (Transparency)
Manual Feed (Thin Paper)
Manual Feed (Envelope)
Tray1 (Multipurpose)
Tray2 (Upper)
Tray3 (Lower)
Different Paper for 1st Page: Allows you to feed paper from
another tray only for the first page.
Mixing Portrait and Landscape
(the first page is Landscape).
Paper Souce
P
Chapter 1
Printer Driver for Windows 95
1-29
Page 37

Chapter 1
NOTES
- If you set the Installable Options setting for tray 3 in the Device
Option dialog box to “Installed” in spite of tray 3 not being
installed, the prohibition mark for tray 3 will disappear. If you try
to print the data with
tray 3, the printer feeds paper from the tray
that you specify as the paper source at the control panel.
- If you try to print the data with tray 1 or Manual Feed in spite of
tray 1 being set to
JOB SEPARATION in the tray 1 paper size set-
ting mode, the printer feeds paper from the tray that you specified
as the paper source at the control panel.
About
Click this button to display version and copyright information.
Printer Driver for Windows 95
NOTE
The settings you make here may be overridden by the settings you
make with your software application.
1-30
Page 38

Graphics
Dithering
Specifies the type of dithering used in printing. Dithering produces
gray shading in graphics
None: Click this button if you don’t need any halftoning.
Fine: Click this button for printed images that you want to have a
smooth, realistic and photographic appearance. The photographic
images setting provides soft contrasts between various shades of
gray. This setting also works well for images originally designed
with color.
Line Art: Click this button for graphic images with intricate lines
and fine detail, like clip art graphics. The Line Art images setting
provides solid lines and sharp contrasts between shaded areas.
Chapter 1
Printer Driver for Windows 95
Intensity
Move this slider left or right to adjust the darkness of the graphic
image.
Graphics Mode
With Use Vector Graphics in the Graphics Mode, you may be
able to shorten the printing time of a document containing some
graphics. However, if the printed result is different from what you
see on the screen or the printing time is too long, select Use Raster
Graphics instead.
1-31
Page 39

Chapter 1
Printer Driver for Windows 95
Fonts
TrueType Fonts
Controls how TrueType fonts are printed.
Generally, downloading TrueType as Bitmaps speeds up printing.
However, if your document contains graphics and you are not
repeating the same text frequently on a page, use the Print TrueType
As Graphics option. This option is also useful if you want to print
graphics over text so that only the exposed part of a character is
printed, or if you want characters clipped in cases where they are not
visible on the screen.
TrueType Fonts as Bitmap: Prints TrueType fonts as bitmap.
TrueType Fonts as Graphics: Prints TrueType fonts as
graphics.
NOTE
To activate this setting, you must also specify Use Raster Graph-
ics for the Graphics Mode in the Graphics dialog box.
1-32
Page 40

Device Option
Installable Options
Lists the options that are available to you.
Change Setting for
Enables or disables the options available to you.
User Name
Type the user name of the print job up to 8 characters. This is sent
with a print job to the printer and displayed in a status message or
operator call message.
Chapter 1
Printer Driver for Windows 95
Page Protection
Page Protection allows you to make sure the entire page is processed
before it is printed. If Page Protection is set to ON, printing speed
may be slowed. If this option is unavailable, it means that your
printer does not have enough memory to use page protection.
Resolution
Select 300 or 600 dpi (dots per inch) as the print resolution. Higher
resolution prints more slowly but produces higher-quality graphics,
whereas lower resolution prints faster but produces lower-quality
graphics.
1-33
Page 41

Chapter 1
Printer Driver for Windows 95
Print Quality
Specifies the text quality you want to use for your printed document.
Standard: Normal quality printing.
Fine-ART: Smooths the jagged edges of the printed image. More
effective when printing at 600 dpi.
Toner Save: Toner save allows you to use less toner when print-
ing.
Toner Density
Selects the density of the toner applied to the page. This setting can
be fine-adjusted in 7 different steps.
1-34
Page 42

Printing Documents
The way you print documents depends on the application you are
using. Most Windows applications include a print command on the
File menu that you can use to print the current document. When you
print from a Windows application, the application uses the printer
driver for your printer.
1. To print a document from a Windows application, open the application and the selected document.
2. Click Print from the File menu.
3. After verifying the contents of the printing settings, click the OK
button. Printing starts.
Chapter 1
Printer Driver for Windows 95
1-35
Page 43

Chapter 1
Printer Driver for Windows 95
Installing the Minolta Font Manager
1. Turn on your computer and start up Windows 95.
2. Click the Start button, then click Run....
3. Insert the Minolta Font Manager diskette into your computer’s
disk drive. At the command prompt, type the drive letter followed
by a colon (:), a backslash (\) and the phrase “install”. For exam
ple:
A:\install
Click the OK button.
5. Follow the instructions on the screen.
6. The Minolta Font Manager Installation window appears. After
verifying any changes you want in the set up, click the Continue
button.
-
1-36
Page 44

7. The Select Fonts window appears. Select the fonts you want to
install, then click the Install button to start installation.
Chapter 1
8. Click the OK button.
Printer Driver for Windows 95
1-37
Page 45

Chapter 1
Printer Driver for Windows 95
9. Installing the Minolta Font Manager is completed. The following
folder appears.
1-38
Page 46

Chapter 2
Minolta Status Monitor 20
Chapter 2
Minolta Status Monitor 20
2--1
Page 47

Chapter 2
Minolta Status Monitor 20
2-0
Page 48

Introduction
The Minolta Status Monitor provides you with instant information
on the overall status of your printer. It also alerts you in case there is
a problem with your printer.
• Printer status is visually displayed.
• Error and warning messages pop up automatically from the status
icon when a problem occurs.
• An alarm is sounded when an error or warning occurs.
• A recommended course of action appears on the display when an
error or warning occurs.
• The communication time out for networking can be specified.
• The monitoring interval can be specified.
Chapter 2
Minolta Status Monitor 20
2-1
Page 49

Chapter 2
System Requirements
The following describes the minimum system requirements that are
necessary to correctly run the Minolta Status Monitor 20 utility .
Operating System:
Microsoft Windows 95 (English)
Personal Computer:
IBM PC or compatible with a 486DX2 33MHz CPU, or faster CPU
(Pentium processor recommended)
Memory:
At least 12MB PC RAM
Free Disk Space:
Approximately 5MB for files
Printer:
Minolta PageWorks 20 printer
Minolta Status Monitor 20
I/O Interface:
A Local (bi-directional parallel) connection except ECP mode*, or
Network connection
*Obtaining the print status from the printer is restricted by Operat-
ing System.
2-2
Page 50

Installing the Minolta Status Monitor
1. Turn on your computer and start up Windows 95.
2. Click the Start button, then click Run....
3. Insert the Minolta Status Monitor diskette into your computer’s
disk drive. At the command prompt, type the drive letter followed
by a colon (:), a backslash (\) and the phrase “Setup”. For exam
ple:
A:\Setup
Click the OK button.
6. Follow the instructions on your screen.
7. The following folder appears.
-
Chapter 2
Minolta Status Monitor 20
8. To open the Minolta Status Monitor 20, click the Start button,
point to Programs, point to Minolta Status Monitor 20, click
Minolta Status Monitor 20.
2-3
Page 51

Chapter 2
Minolta Status Monitor 20
Understanding the Status Monitor
The following explains each part of the status monitor in detail.
Toolbar
Buttons
Indicator
Status
Recommended Action
Message
Status Image
Toolbar Buttons: Click these buttons to open the Choose Printer ,
Alert or Monitoring Interval dialog box.
Indicator Status: Classifies the printer status into four categories.
Message: Displays the current printer status.
Status Image: Displays the current status image.
Recommended Action: Lets you know what to do.
NOTE
If you have already opened the status monitor window, you cannot
open another status monitor window.
2-4
Page 52

The following is a complete list of all messages that appear in the
status monitor window through the Local or Network.
IMPORTANT
T o use the status monitor through the Local, you must set the PC to
the nibble mode. For more information, see your PC User’s Man
ual.
-
Message & Meaning
No Print Jobs
The PC is not sending a
print job to the printer.
Printing
The PC is sending a print
job to the printer.
Offline
The printer is off-line.
Warming Up
The printer is warming up.
Status Image &
Classification
Normal
Printing
Error
Local
❍
❍
❍
Network
❍
❍
❍
Chapter 2
Minolta Status Monitor 20
Warning
❍
❍
2-5
Page 53

Message & Meaning
Paused Printing
The PC suspended sending a print job.
Status Image &
Status Image &
Classification
Classification
Local
❍
Network
✕
Chapter 2
Minolta Status Monitor 20
Toner Low
The imaging cartridge is
low on toner.
Toner Empty
The imaging cartridge is
out of toner.
Cover Open
The upper or duplex cover
is open.
Paper Out
There is no specified
paper in the tray or no tray
in the printer.
Error
Warning
Error
Error
❍
✕
❍
❍
❍
❍
❍
❍
2-6
Warning
Page 54

Message & Meaning
Paper Jam
The printer detected a
paper misfeed inside the
printer or paper size error .
Status Image &
Status Image &
Classification
Classification
Local
❍
Network
❍
Error
Memory Overflow
The printer received more
data from the computer
than it can fit into its internal memory .
Error
The printer is off or detected an error condition
(ROM, RAM, HDD, Network card, Fuser, Laser
diode or Motor error, etc.).
Memory Overflow: Warning
Error: Error
❍
❍
NOTES
- When the printer is off, depending on the PC you are using, the
other message may be displayed.
- If displaying the Offline message when the printer is off, it is
classfied as a “Warning”.
Chapter 2
✕
❍
Minolta Status Monitor 20
2-7
Page 55

Indicator Status and Status Icon
The indicator statuses and status icons are as follows.
Chapter 2
Minolta Status Monitor 20
Indicator Status
The status monitor window can be minimized by clicking the minimize button on the titlebar . When minimizing the status monitor
window, the status icon is posted at the right end of the taskbar.
Even if the window i s minimized, you can f ind the printer status that
is classified into four categories. Double-clicking the icon can return
the icon to the window.
Status Icon
2-8
Page 56

Status Monitor Menus
Settings
Choose Printer
Local Connection: Select Local Printer if the printer is connected
directly to your computer.
Network Connection: Select either TCP/IP or IPX/SPX if the
printer is connected through the network.
Local Printer
Select the printer you want to monitor from a list.
TCP/IP
Type the community name, IP address and network path. (Usually , type in “public” as the community name.)
Chapter 2
Minolta Status Monitor 20
2-9
Page 57

Chapter 2
Minolta Status Monitor 20
IPX/SPX
Type the community name. (Usually, type in “public” as the community name.)
Alert
Specify how to let you know when a “Warning” or “Error” occurs.
Window Pop Up
Specify whether the status monitor window automatically pops up
when the detected printer status is classified as a “Warning” or
“Error”. The status monitor window will display at the front of the
screen if it is hidden behind another window. The status monitor
will return to the window and display at the front of the screen if it
has been minimized.
Display Recommended Action
Specify whether to display the recommended action.
Use Sound
Specify whether to alert with sound when detecting a “Warning”
or “Error”.
2-10
Page 58

Monitoring Interval
Specify the time interval to renew the printer status.
Time out for Networking
Determines the time to display “Error” when there is no response
from the Network.
Monitoring Interval
Determines the communication interval for checking the printer’s
status.
NOTES
- With a Local connection, the status monitor obtains the print
status after printing starts.
- With a Network connection, it may take more than the specified
time to obtain the print status.
Chapter 2
Minolta Status Monitor 20
View
Toolbar
Specify whether to display the toolbar in the window.
Recommended Action
Specify whether to display the recommended action in the window.
Refresh
Renews the status display.
2-11
Page 59

Chapter 2
Minolta Status Monitor 20
Help
Help Topics
Gives you information about what you see on your screen.
About Minolta Status Monitor
Displays version and copyright information.
2-12
Page 60

User Setting Items
The following table lists the user setting items.
Item
Communication interface
1
Communication protocol
Printer (Local)
2
Printer address setting
3
(TCP/IP)
Printer address setting
4
(IPX/SPX)
Warning
5
(Window Popup)
Warning
6
(Display Recommended
Action)
Warning
7
(Use Sound)
8
Warning
(Alert Sound)
Error
9
(Window Popup)
Error
10
(Display Recommended
Action)
11
Error
(Use Sound)
12
Error
(Alert Sound)
13
Timeout for Networking
14
Monitoring Interval
Description
Local (Parallel), TCP/IP or
IPX/SPX
Select from the Choose Printer
box.
Type the community name,
IP address and network path.
Type the community name or
select from the Printer List.
Click the option button.
Click the option button.
Click the option button.
Specify the file name
Click the option button.
Click the option button.
Click the option button.
Specify the file name.
Specify the length of time.
Specify the length of time.
Chapter 2
Minolta Status Monitor 20
2-13
Page 61

Chapter 2
Minolta Status Monitor 20
MEMO
2-14
Page 62

Chapter 3
Printer Driver for Windows 3.1
Chapter 3
Printer Driver for Windows 3.1
3--1
Page 63

Chapter 3
Printer Driver for Windows 3.1
3-0
Page 64

Introduction
The Minolta PageWorks 20 printer utility was developed especially
to provide true Windows based printing for users of the Minolta
PageWorks 20 printer.
System Requirements
The following describes the minimum system requirements that are
necessary to correctly run the Minolta PageWorks 20 printer utility.
Operating System:
Microsoft Windows 3.1 (English) or later
Personal Computer:
IBM PC or compatible with a 386DX 16MHz CPU, or faster CPU
(Pentium processor recommended)
I/O Interface:
Standard PC parallel printer port and cable
Memory:
At least 4MB PC RAM (8MB recommended)
Chapter 3
Free Disk Space:
Approximately 1MB for files.
NOTE
Use of a poor quality parallel cable may adversely affect input.
Printer Driver for Windows 3.1
3-1
Page 65

Chapter 3
Installing the Printer Driver
1. Turn on your computer and start up Windows 3.1.
2. In the Main group, double-click Control Panel. The Control
Panel window appears.
3. In the Control Panel window , double-click Printers. The Printers
dialog box appears. Click the Add>> button.
Printer Driver for Windows 3.1
3-2
Page 66

4. Select Install Unlisted or Updated Printer from the List of
Printers, then click the Install... button.
5. Insert the Windows 3.1 Printer Driver diskette into your computer’s disk drive. At the command prompt, type the drive letter
followed by a colon (:) and a backslash (\). For example:
A:\
Click the OK button.
Chapter 3
3-3
Printer Driver for Windows 3.1
Page 67

Chapter 3
6. Click the OK button.
7. Installing the printer driver is completed. Your printer appears in
the Installed Printers box.
Printer Driver for Windows 3.1
8. Click the Close button.
3-4
Page 68

Selecting the Printer Port
Change the printer port according to your needs.
1. If you are not already using the Printers dialog box, click Printer
Setup from the Options menu. The Printers dialog box appears.
2. In the Installed Printers box, select the printer whose port assignment you want to change.
3. Click the Connect... button. The Connect dialog box appears.
4. Select the port you want to assign the printer to.
LPT A parallel port.
COM A serial port.
EPT Used for the IBM Personal Pageprinter.
FILE Allows you to save print data to a file instead of printing
directly to the printer.
5. Click the OK button. The Printers dialog box appears.
6. Click the Close button.
Chapter 3
Printer Driver for Windows 3.1
3-5
Page 69

Chapter 3
Printer Driver for Windows 3.1
Selecting Timeout Options
Timeout options control the amount of time that elapses before a
message appears to notify you of printer problems.
1. If you are not already using the Printers dialog box, click Printer
Setup from the Options menu. The Printers dialog box appears.
2. Click the Connect... button. The Connect dialog box appears.
3. Change Timeout options as needed.
Device Not Selected Controls the amount of time that Print
Manager continues to check the printer to
determine whether it is on-line and ready
to print. If the printer is not ready to print
after the specified amount of time has
elapsed, a message appears, notifying
you that the printer is off-line.
Transmission Retry Controls the amount of time that elapses
before a message appears to notify you
that your printer cannot accept any more
information. After the printer finishes
processing the information it currently
has, it clears its memory and is ready to
accept more information.
4. Click the OK button. The Printers dialog box appears.
5. Click the Close button.
3-6
Page 70

Choosing a Default Printer
Many Windows applications use the default printer when you
choose the Print command. Only one default printer can be selected
at a time. If you have several printers installed, you can use th e
Printer Setup command whenever you want to change the default
printer.
To select a default printer
1. If you are not already using the Printers dialog box, click Printer
Setup from the Options menu. The Printers dialog box appears.
2. In the Installed Printers box, select the printer you want to use as
the default printer.
3. Click the Set As Default Printer button. The printer name
appears in the Default Printer area of the Printers dialog box.
Chapter 3
4. Click the Close button.
Printer Driver for Windows 3.1
3-7
Page 71

Chapter 3
Setting the Printing Options
Printing options are your printer-specific settings, such as resolution, print quality and installed options.
To change printer settings
1. In the Main group, double-click Control Panel. The Control
Panel window appears.
2. In the Control Panel window , double-click Printers. The Printers
dialog box appears.
3. Select your printer from the List of Installed Printers.
4. Click the Setup... button. The printer setup dialog box appears.
5. Make any necessary changes and then click the OK button. The
Printers dialog box reappears.
6. Click the Close button.
General Button Operations
The following describes the operation of the three buttons that
appear at the right side of all setup dialog boxes.
OK
Click this button to make your changes take effect and return to the
previous screen.
Printer Driver for Windows 3.1
Cancel
Click this button to ignore any changes you have made and return to
the previous screen.
Help
Click this button to display on-line help about the displayed dialog.
Printer Setup Window
The following describes how to make settings using the dialogs that
are available in this window.
3-8
Page 72

Setup
Copies
Specifies the number of copies you want to print. You can specify
any value from 1 to 999.
Collate
Collate Off: When Collate is off, the printer prints each page of
a job the number of times selected in the Copies item. For exam
ple, if you send a three-page job to print and set Copies to 2, the
printer prints page 1, page 1, page 2, page 2, page 3, page 3.
Collate On: When Collate is on, the printer prints each print job
the number of times selected in the Copies item. For example, if
you send a three-page job to print and set Copies to 2, the printer
prints page 1, page 2, page 3, page 1, page 2, page 3.
Separation: Allows you to insert a blank page between print
jobs.
Chapter 3
-
Printer Driver for Windows 3.1
NOTE
If you specify separation, you must also specify JOB SEPARA-
TION in the tray 1 paper size setting mode at the control panel.
3-9
Page 73

Chapter 3
NOTE
If you specify Collate On or Separation through the printer driver,
be sure to set the collate setting of the application software to
Duplex Print
Specifies whether to print on both sides of the paper. If you attempt
duplex printing, you can choose either Bind Long Edge or Bind
Short Edge.
NOTES
- To activate this setting, you must change the setting for Duplex
Unit in the Device Option dialog box from “Not Installed” to
“Installed”.
- Do not use special paper (transparencies, labels, envelopes,
letterhead and thick paper) for duplex printing.
- You cannot print on a custom size smaller than A5 size for
duplex printing.
By creating a combination of Bind Long Edge, Bind Short Edge,
Portrait, Landscape and N-Up, the printer prints upside down for
odd-numbered pages and even numbered pages, or in the same
direction for all pages.
off.
Printer Driver for Windows 3.1
Portrait
Landscape
3-10
None or 4Up
Long Edge
❍
●
: same direction
❍
Short Edge
●
❍
2Up
Long Edge
Short Edge
●
❍
●: upside down
❍
●
Page 74

None: Performs one sided printing.
Bind Long Edge: Performs duplex printing for binding along
the long edge.
A
A
A
A
Portrait
NOTE
When you print on a custom size with Bind Long Edge, the Layout function cannot be used.
Bind Short Edge: Performs duplex printing for binding along
the short edge.
Landscape
A
A A
A
Portrait
Landscape
Chapter 3
Printer Driver for Windows 3.1
3-11
Page 75

Layout
None: No layout specified.
N-Up: Prints either two or four pages on a single sheet of paper.
Example: Portrait orientation.
2-Up
Chapter 3
Printer Driver for Windows 3.1
1
2
4-Up
1
2
3
4
Example: Landscape orientation.
2-Up
1
2
4-Up
1
2
3
4
1 2
1 2
3 4
1
2
1
3
2
4
3-12
Page 76

If you select N-Up, the following settings activate.
N-Up Choice: You can select twelve kinds of layouts.
Example: Portrait orientation.
1 2
2-Up Ascending
1 2
3 4
4-Up Hoz. Ascending
2 1
4 3
4-Up Hoz. Descending
12
2-Up Descending
1
3
4
2
4-Up Ver. Ascending
3
1
2
4
4-Up Ver. Descending
Chapter 3
Printer Driver for Windows 3.1
3-13
Page 77

Example: Landscape orientation.
Chapter 3
Printer Driver for Windows 3.1
1
2
2-Up Ascending
1
3
2
4
4-Up Hoz. Ascending
2
4
1
3
4-Up Hoz. Descending
2
1
2-Up Descending
1
2
3
4
4-Up Ver. Ascending
3
4
4-Up Ver. Descending
1
2
N-Up Paper: p x n -> paper size.
p: the paper size of the document.
n: N-Up
paper size: see “Paper Size” page 3-18.
Border Line: Specifies whether to print a border line.
3-14
Page 78

Booklet: Tells the printer that the printed pages will be bound in
the center. Enables booklet printing both for portrait and land
-
scape orientation
Portrait
A
A
Landscape
A
A
NOTES
- To activate this setting, you must change the setting for Duplex
Unit in the Device Option dialog box from “Not Installed” to
“Installed”.
- When you perform booklet printing, set the Duplex Print setting
in the Setup dialog box to “None”.
If you select Booklet, the following settings activate.
Booklet Choice: You can select either “Left Open” or “Right
Open”.
Booklet Paper: p x 2 -> paper size.
p: the paper size of the document.
paper size: see “Paper Size” page 3-18.
Example: Portrait orientation.
4 pages
front
back
Chapter 3
Printer Driver for Windows 3.1
1
2
3
4
4 1
2
3
3-15
Page 79

Chapter 3
Enlarge/Reduce: Performs enlargement or reduction printing
according to the paper size you specify.
If you select Enlarge/Reduce, the following settings activate.
Enlarge/Reduce: p -> paper size.
p: the paper size of the document.
paper size: see “Paper Size” page 3-18.
Watermark
Specifies which watermark to use. You will be able to add others,
edit or delete the defined watermark.
Text: Lists the available watermarks from which you can select,
edit or delete.
First Page Only: Prints the watermark on the first page only.
Click the Add or Edit button to display the Watermark dialog box.
Printer Driver for Windows 3.1
3-16
Page 80

The following settings are available in the Watermark dialog box.
Text: Displays the text of the selected watermark for editing or
type in a watermark (up to 64 characters) you want to print.
Fonts: Specifies a font for the watermark you want to print on
the page.
Style: Specifies a font style in the box. The font style varies with
each font.
Size: Specifies a font size. You can set the font size between 4 to
127 points. If there is no point size in the box, you input the point
size directly from the key pad.
Darkness: Specifies the darkness value of the watermark.
Angle: Specifies the angle at which the watermark will be dis-
played on the page.
Position: Tells the driver how to position the watermark. Auto-
matically Center Watermark centers the watermark on the page.
Position Relative to Center lets you specify x and y coordinates
for the watermark relative to the center.
Chapter 3
3-17
Printer Driver for Windows 3.1
Page 81

Chapter 3
Paper
Paper Size
Specifies the paper size of document data. The following is a list of
available paper sizes.
Printer Driver for Windows 3.1
Letter
Ledger
Legal
Executive
A4
A3
B4
JIS B5
COM-10 (envelope)
DL (envelope)
C5 (envelope)
Monarch (envelope)
ISO B5 (envelop e)
Custom
3-18
Paper
Size
8.5 x 11 inch
11 x 17 inch
8.5 x 14 inch
7.25 x 10.5 inch
210 x 297 mm
297 x 420 mm
257 x 364 mm
182 x 257 mm
4.125 x 9.5 inch
110 x 220 mm
162 x 229 mm
3.875 x 7.5 inch
176 x 250 mm
Page 82

Selecting Custom opens a dialog box that can be used to specify a
paper size within the following ranges:
Unit
Inch
Metric
Width
3.63 to 13.00”
92.1 to 330.2mm
Length
5.50 to 19.02”
139.7 to 483.0mm
For example: specify A5 size (148 mm x 210 mm).
1. Open the Custom Paper dialog box.
2. Click “0.1 mm” in the Units box.
3. Type in “1480” in the Wi dth box.
4. Type in “2100” in the Length box.
5. Click the OK button.
NOTES
- Do not specify an envelope size (COM-10, DL, C5, Monarch
and ISO B5) and a custom size smaller than A5 size for duplex
printing.
- When you print on a custom size with the Bind Long Edge, the
Layout function cannot be used.
Chapter 3
Printer Driver for Windows 3.1
3-19
Page 83

Orientation
Selects the direction of the print on the page. You can select either
Portrait or Landscape.
Portrait: Means the page is taller than it is wide when you view
the printed text upright.
Landscape: Means the page is wider than it is tall when you
view the printed text upright.
Chapter 3
Printer Driver for Windows 3.1
A
Portrait
When you print with 2-Up or 4-Up, the direction of the print is
determined by the orientation setting for the first page for each
printed sheet of paper.
For example: Print out 4 pages with 2-Up.
P
P
12
A
Landscape
L
3
P
4
L
1
P
3
L
4
3-20
L
2
Page 84

For example: Print out 8 pages with 4-Up.
P
1 2
P
L
P
PP
34
L
1
L
3
When you perform booklet printing, the direction of the print is
determined by the orientation setting for the first page.
L
2
L
4
78
P
5
6
P
P
L
L
6
5
L
7
8
Chapter 3
Printer Driver for Windows 3.1
Example:
P
Portrait only.
P
Mixing Portrait and Landscape
(the first page is Portrait).
P
L
3-21
Page 85

L
L
Chapter 3
Printer Driver for Windows 3.1
L
Landscape only.
Paper Source
Specifies the paper source. If Auto is selected, the printer will automatically search all paper trays for the required paper size. At this
time, the paper source is selected in the priority order of tray 2, tray
3 and tray 1.
Auto
Manual Feed
Manual Feed (Transparency)
Manual Feed (Thin Paper)
Manual Feed (Envelope)
Tray1 (Multipurpose)
Tray2 (Upper)
Tray3 (Lower)
Different Paper for 1st Page: Allows you to feed paper from
another tray only for the first page.
Mixing Portrait and Landscape
(the first page is Landscape).
Paper source
P
3-22
Page 86

NOTES
- If you set the Installable Options setting for tray 3 in the Device
Option dialog box to “Installed” in spite of tray 3 not being
installed, the prohibition mark for tray 3 will disappear. If you try
to print the data with
tray 3, the printer feeds paper from the tray
that you specify as the paper source at the control panel.
- If you try to print the data with tray 1 or Manual Feed in spite of
tray 1 being set to
JOB SEPARATION in the tray 1 paper size set-
ting mode, the printer feeds paper from the tray that you specified
as the paper source at the control panel.
About
Click this button to display version and copyright information.
NOTE
The settings you make here may be overridden by the settings you
make with your software application.
Chapter 3
3-23
Printer Driver for Windows 3.1
Page 87

Chapter 3
Printer Driver for Windows 3.1
Graphics
Dithering
Specifies the type of dithering used in printing. Dithering produces
gray shading in graphics
None: Click this button if you don’t need any halftoning.
Fine: Click this button for printed images that you want to have a
smooth, realistic and photographic appearance. The photographic
images setting provides soft contrasts between various shades of
gray. This setting also works well for images originally designed
with color.
Line Art: Click this button for graphic images with intricate lines
and fine detail, like clip art graphics. The Line Art images setting
provides solid lines and sharp contrasts between shaded areas.
Intensity
Moves this slider left or right to adjust the darkness of the graphic
image.
Graphics Mode
With Use Vector Graphics in the Graphics Mode, you may be
able to shorten the printing time of a document containing some
graphics. However, if the printed result is different from what you
see on the screen or the printing time is too long, select Use Raster
Graphics instead.
3-24
Page 88

Fonts
TrueType Fonts
Controls how TrueType fonts are printed.
Generally, downloading TrueType as Bitmaps speeds up printing.
However, if your document contains graphics and you are not
repeating the same text frequently on a page, use the Print TrueType
As Graphics option. This option is also useful if you want to print
graphics over text so that only the exposed part of a character is
printed, or if you want characters clipped in cases where they are not
visible on the screen.
TrueType Fonts as Bitmap: Prints TrueType fonts as bitmap.
TrueType Fonts as Graphics: Prints TrueType fonts as
graphics.
Chapter 3
NOTE
To activate this setting, you must also specify Use Raster Graph-
ics for the Graphics Mode in the Graphics dialog box.
3-25
Printer Driver for Windows 3.1
Page 89

Device Options
Installable Options
Lists the options that are available to you.
Chapter 3
Printer Driver for Windows 3.1
Change Setting for
Enables or disables the options available to you.
User Name
Type the user name of the print job up to 8 characters. This is sent
with a print job to the printer and displayed in a status message or
operator call message.
Page Protection
Page Protection allows you to make sure the entire page is processed
before it is printed. If Page Protection is set to ON, printing speed
may be slowed. If this option is unavailable, it means that your
printer does not have enough memory to use page protection.
Resolution
Select 300 or 600 dpi (dots per inch) as the print resolution. Higher
resolution prints more slowly but produces higher-quality graphics,
whereas lower resolution prints faster but produces lower-quality
graphics.
Print Quality
Specifies the text quality you want to use for your printed document.
3-26
Page 90

Standard: Normal quality printing.
Fine Art: Smooths the jagged edges of the printed image. More
effective when printing at 600 dpi.
Toner Save: Toner save allows you to use less toner when print-
ing.
Toner Density
Selects the density of the toner applied to the page. This setting can
be fine-adjusted in 7 different steps.
Chapter 3
3-27
Printer Driver for Windows 3.1
Page 91

Chapter 3
Printing Documents
The way you print documents depends on the application you are
using. Most Windows applications include a print command on the
File menu that you can use to print the current document. When you
print from a Windows application, the application uses the printer
driver for your printer.
1. To print a document from a Windows application, open the application and the selected document.
2. Click Print from the File menu.
3. After verifying the contents of the printing settings, click the OK
button. Printing starts.
Printer Driver for Windows 3.1
3-28
Page 92

Installing the Minolta Font Manager
1. Turn on your computer and start up Windows 3.1.
2. Click the File menu, then click Run.
3. Insert the Minolta Font Manager diskette into your computer’s
disk drive. At the command prompt, type the drive letter followed
by a colon (:), a backslash (\) and the phrase “install”. For exam
ple:
A:\install
Click the OK button.
4. Follow the instructions on the screen.
5. The Minolta Font Manager Installation window appears. After
verifying any changes you want in the set up, click the Continue
button.
-
Chapter 3
3-29
Printer Driver for Windows 3.1
Page 93

Chapter 3
6. The Select Fonts window appears. Select the fonts you want to
install, then click the Install button to start installation.
7. Click the OK button.
Printer Driver for Windows 3.1
8. The following window appears. Installing the Minolta Font Manager is completed.
3-30
Page 94

 Loading...