

Page 1

NEC
S
ILENTWRIT
1700
series
1765 Network Printer
Configuration Guide
September 1996
808-875036-001A
Page 2

PROPRIETARY NOTICE AND
LIABILITY DISCLAIMER
The information disclosed in this document, including
all designs and related materials, is the valuable
property of NEC Corporation (NEC) and/or its
licensors. NEC and/or its licensors, as appropriate,
reserve all patent, copyright and other proprietary,
rights to this document, including all design,
manufacturing, reproduction, use, and sales rights
thereto, except to the extent said rights are expressly
granted to others.
The NEC product(s) discussed in this document are
warranted in accordance with the terms of the Warranty
Statement accompanying each product. However , actual
performance of each such product is dependent upon
factors such as system configuration, customer data,
and operator control. Since implementation by
customers of each product may vary, the suitability of
specific product configurations and applications must
be determined by the customer and is not warranted by
NEC.
To allow for design and specification improvements, the
information in this document is subject to change at any
time, without notice. Reproduction of this document or
portions thereof without prior written approval of NEC
is prohibited.
Silentwriter and Print Navigator are registered
trademarks of NEC Corporation. Windows and
Windows 95 are trademarks of Microsoft Corporation.
All other product, service, brand, or trade names used
in this publication are the trademarks or registered
trademarks of their respective companies or
organizations. NEC disclaims any responsibility for
specifying which marks are owned by which companies
or organiza t i on s.
First Printing—September 1996
Document Number: 808-875036-001A
Copyright 1996
NEC Technologies, Inc.
1414 Massachusetts Avenue
Boxborough, MA 01719
All Rights Reserved.
Copyright 1996
NEC Corporation
7-1 Shiba 5-Chome, Minato- Ku
ii 1765 Network Printer Configuratio n Guide
Tokyo 108-01, Japan
All Rights Reserved.
Page 3

ABLE OF
T
ONTENTS
C
U
SING THIS GUIDE
C
HAPTER
Overview 1-1
Features 1-1
Compatibility 1-3
Qualifications an d Assumptions 1-6
Where to Go Next 1-6
C
HAPTER
Overview 2-1
Upgrading from the 1760 2-2
Connecting and Verifying the Silentwriter 1765 2-8
1I
NTRODUCTION
Hardware Requirements 1-3
Software Requirements 1-4
2 1765 SET U
Unpack the 1760 Upgrade Kit 2-2
Install RAM 2-4
Install the LAN Card 2-6
Identify the LAN Card Panel 2-8
Printing a Configuration Page 2-8
Restoring Factory LAN Card Settings 2- 8
Connect the Network Cable 2-9
Connecting Thin Coaxial Cable 2-9
Connecting Twisted Pair Cable 2-10
Connecting LocalTalk cable 2-10
iii
P
Turn On the Printer 2-12
Print a Configuration Page 2-13
C
HAPTER
Overview 3-1
Using Silentwriter Software with the
Silentwriter 1765 3-1
NEC 1765 Software 3-2
Installing NEC 1765 Software for NetWare 3-4
Installing NEC 1765 Software for TCP/IP 3-10
3I
NSTALLING
The Windows PCL 5e Driver 3-1
The Windows PostScript Driver 3-1
Precautions 3-4
Preparing to Install 3-5
Verifying IPX/SPX Protocol in
Windows 3.1x 3-5
Verifying IPX/SPX Protocol in
Windows 95 3-5
Installing NEC 1765 Administration Software
for NetWare in Windows 3.1x 3-6
Installing NEC 1765 Administration Software
for NetWare in Windows 95 3-6
Installing NEC 1765 Client Software for NetWare in
Windows 3.1x 3-8
Installing NEC 1765 Client Software for NetWare in
Windows 95 3-8
Precautions 3-10
NEC 1765 S
OFTWARE
v
Page 4

Preparing to Install 3-11
Verifying TCP/IP Protocol in
Windows 3.1x 3-11
Verifying TCP/IP Protocol in
Windows for Workgroups 3-11
Verifying TCP/IP Protocol in
Windows 95 3-11
Installing NEC 1765 Administration Software for
TCP/IP in Windows 3.1x 3-12
Installing NEC 1765 Administration Software for
TCP/IP in Windows 95 3-12
Installing NEC 1765 Client Software for TCP/IP in
Windows 3.1x 3-14
Installing NEC 1765 Client Software for TCP/IP in
Windows 95 3-14
Installing NEC 1765 Software for AppleTalk
Systems 3-16
Preparing to Install 3-16
Installing NEC 1765 Software for AppleTalk 3-16
C
HAPTER
P
RINTER
Overview 4-1
Description of Configuration Process 4-2
NetWare with PCONSOLE 4-3
4C
ONFIGURING YOUR NETWORK
Select the Operating Mode 4-3
Local Printers 4-3
Network Printers 4-3
Remote Printers 4-4
Install NetWare Client Software at
the Workstation 4-6
Identify the Printer 4-6
Set the Printer Name 4-6
Set the Printer Operating Mode 4-6
Establish the Printer on the NetWare Network
4-8
Define the Print Queue 4-8
Define the Print Server 4-8
Define the Password 4-8
Configure the Print Server 4-9
Configure the Print Queue 4-9
Set the LAN Card Password 4-10
Enable the Remote Printer 4-11
Enable the Remote Printer if the Print Server
Resides on a File Server (NLM Print
Server) 4-11
Enable the Remote Printer if the Print Server
Resides on a Workstation (Dedicated DOS
Print Server) 4-11
Enable the Remote Printer if it is Connected to
a Workstation With a Parallel Cab le 4-11
NetWare with NetWare Administrator 4-13
Select the Operating Mode 4-13
Local Printers 4-13
Network Printers 4-13
Remote Printers 4-14
Install NetWare Client Software at
the Workstation 4-16
Identify the Printer 4-16
Set the Printer Name 4-16
Set the Printer Operating Mode 4-16
Establish the Printer on the NetWare Network
4-18
Create a Print Queue Object 4-18
vi 1765 Network Printer Configuration Guide
Page 5

Create a Printer Object 4-18
Create a Print Server Object 4-18
Assign the Print Queue Object to the
Printer Object 4-18
Assign the Printer Object to the Print
Server Object 4-19
Exit NetWare Administrator 4-19
Enable the Remote Printer 4-19
Enable the Remote Printer if the Print Server
Resides on a File Server (NLM Print
Server) 4-19
Enable the Remote Printer if the Print Server
Resides on a Workstation (Dedicated DOS
Print Server) 4-19
Enable the Remote Printer if it is Connected to
a Workstation With a Parallel C able 4-19
Windows 95 Using TCP/IP Protocol 4-20
Install Software 4-20
Install the Windows 95 Printing System
Utility 4-20
Install TCP/IP Protocol on Win dows 95 4-22
Verify Printer Driver Installation 4-22
Establish the Printer on the Network 4-23
Define New Printer Ports 4-24
Windows NT Using TCP/IP Protocol 4-25
Install the Software 4-25
Identify the Printer 4-26
UNIX Using TCP/IP Protocol 4-27
Identify the Printer 4-27
Establish the Printer on the Host Computer 4-28
Add the Silentwriter to the /etc/
printcap File 4-28
Set Up Remote Printing 4-28
Send Documents to the Printer 4-29
Printing With the lpr Command 4-29
Printing With the ftp Command 4-29
Windows NT Using DLC Protocol 4-30
Install the Software 4-30
Identifying the Printer 4-31
AppleTalk 4-32
Select the Network 4-32
Select the Printer 4-33
LAN Manager v2.2 4-34
Install Software 4-34
Identify the Printer 4-35
Print a Document 4-35
OS/2 Warp Server or LAN Server v4.0 4-36
Install Software 4-36
Identify the Printer 4-37
Print a Document 4-38
SNMP 4-39
C
HAPTER
WARE
Overview 5-1
NEC 1765 Software 5-1
NEC 1765 Administration Software for NetWare 5-3
5 NEC 1765 A
Using NEC 1765 Administration Software for
NetWare 5-3
Displaying Available Printers 5-3
Displaying LAN Card Parameters 5-4
Changing the Printer Name 5-4
Changing the Printer Polling Rate 5-4
DMINISTRATION SOFT
-
vii
Page 6

Changing the Busy Timeout Time 5-5
Displaying NetWare Network Number and
MAC Address 5-5
Changing NetWare Print Server Name 5-5
Changing the Printer Operating Mode
for NetWare 5-6
Changing NetWare Remote Printer Name
and Number 5-6
Limiting the Silentwriter to a Single File
Server 5-7
Changing NetWare File Server Scanning 5-7
Changing NetWare File Server
Scan Interval 5-7
Changing NetWare File Server Queue Polling
Rate 5-8
Changing NetWare Password 5-8
Changing TCP/IP IP Address 5-9
Changing the TCP/IP Subnet Mask 5-9
Setting the TCP/IP Auto IP Address 5-10
Displaying Silentwriter
Printer Configuration 5-11
Displaying Silentwriter Printer Options 5-12
Changing the Status Polling R ate 5-12
Changing the Response Timeout 5-13
Using Online Help 5-13
NEC 1765 Printer Administration Window 5-14
Printer Administration Menu Bar 5-15
Printer Administration Buttons 5-16
LAN Card Parameters Dialog Box 5-17
NetWare Configuration Dialog Box 5-18
File Server Connection 5-18
Operating Mode 5-19
Remote Printer Information 5-19
Change Password Dialog Box 5-19
NetWare Queue Configuration Dialog Box 5-20
Adding a Queue Assignment 5-20
Removing a Queue Assignment 5-20
Login Dialog Box 5-21
TCP/IP Parameters Dialog Box 5-22
Network Printer Configuration Dialog Box 5-23
Printer Options Dialog Box 5-24
Network Number Dialog Box 5-24
Option Dialog Box 5-25
About NEC Printer Administration Dialog Box
5-26
NEC 1 765 Admin istration Software for TCP/IP 5-27
Using NEC 1765 Administration Software for
TCP/IP 5-27
Displaying Available Printers 5-27
Displaying LAN Card Parameters 5-28
Changing the Printer Name 5-28
Changing the Printer Polling Rate 5-29
Changing the Printer Busy
Timeout Time 5-29
Displaying NetWare MAC Address 5-30
Changing NetWare Print Server Name 5-30
Changing NetWare Operating Mode 5-30
Changing NetWare Remote Printer Name and
Number 5-31
Limiting the Silentwriter to a Single File
Server 5-31
Changing NetWare File Server Scanning 5-32
Changing NetWare File Server
Scan Interval 5-32
viii 1765 Network Printer Configuration Guide
Page 7

Changing NetWare File Server Queue Polling
Rate 5-33
Changing TCP/IP IP Address 5-33
Changing TCP/IP Subnet Mask 5-33
Setting TCP/IP Auto IP Address 5-34
Displaying Silentwriter Printer
Configuration 5-35
Displaying Silentwriter Printer Options 5-35
Changing the Status Polling R ate 5-36
Changing the Response Timeout 5-36
Using Online Help 5-37
Printer Administration Window 5 -38
Printer Administration Menu Bar 5-39
Printer Administration Buttons 5-40
LAN Card Parameters Dialog Box 5-41
NetWare Configuration Dialog Box 5-42
File Server Connection 5-42
Operating Mode 5-43
Remote Printer Information 5-43
TCP/IP Parameters Dialog Box 5-44
Network Printer Configuration Dialog Box 5-45
Printer Options Dialog Box 5-46
IP Address Filter Dialog Box 5-46
Time Definition Dialog Box 5-47
Preference Dialog Box 5-48
About NEC 1765 Administration Dial og Box 5-49
NEC 1765 Software for AppleTalk 5-51
Using NEC 1765 Software for AppleTalk 5-51
Displaying Available Printers 5-51
Displaying LAN Card Configuration 5-52
Changing the Printer Polling Rate 5-52
Changing the Busy Timeout Time 5-52
Changing AppleTalk Entities 5-53
Displaying Silentwriter Printer
Information 5-53
Displaying Silentwriter Printer Options 5-54
Changing the Printer Name 5-54
Changing the Printer’s AppleTalk Zone 5-54
Changing the LAN Card Polling Rate 5-55
Changing the LAN Card Response
Timeout 5-55
Using Online Help 5-5 5
Printer Administration Window 5-56
Printer Administration Menu Opt i ons 5-57
Printer Administration Buttons 5-57
LAN Card Configuration Window 5-58
AppleTalk Entity Window 5-59
Network Printer Configuration Window 5-60
Printer Options Window 5-61
Printer Name Window 5-61
Changing the Printer Name 5-61
AppleTalk Zoner Window 5-62
Time Definition Window 5-63
About Window 5-63
C
HAPTER
Overview 6-1
NEC 1765 Client Software 6-1
NEC 1765 Client Software for NetWare 6-2
6 NEC 1765 C
Using NEC 1765 Client Softwar e for NetWare 6 -3
Displaying Printer Status 6-3
Displaying Current Print Jobs 6-3
LIENT SOFTWARE
ix
Page 8

Deleting Your Current Print Jobs 6-3
Attaching File Servers 6-4
Detaching File Servers 6-4
Displaying Silentwriter
Printer Information 6-4
Displaying Silentwriter Printer Options 6-4
Changing the Status Polling R ate 6-5
Changing the Response Timeout 6-5
Using Online Help 6-5
NEC 1765 Network Printer Client
Access Window 6-6
Network Printer Client Access Menu Bar 6-7
Network Printer Client Access Buttons 6-7
Time Definition Dialog Box 6-8
File Servers Dialog Box 6-9
Login Dialog Box 6-9
Printer Configuration Dial og Box 6-10
Printer Options Dialog Box 6-11
About NEC 1765 Client Software Dialog Box 6-11
Minimized Icon Display 6-11
NEC 1765 Client Software for TCP/IP 6-12
Using NEC 1765 Client Software for TCP/IP 6-12
Displaying Printer Status 6-12
Changing the LAN Card Status
Polling Rate 6-12
Changing the LAN Card Response Timeout
Time 6-12
Displaying Error Messages 6-13
Displaying Silentwriter
Printer Information 6-13
Displaying Silentwriter Printer Options 6-13
Using Online Help 6-13
Client Access Window 6-14
Client Access Menu Bar 6-15
Client Access Buttons 6-15
Option Dialog Box 6-16
Printer Configuration Dialog Box 6-17
Options Dialog Box 6-18
About NEC 1765 Client Dialog Box 6-18
Minimized Icon Display 6-19
Error Dialog Box 6-19
C
HAPTER
Overview 7-1
NEC Technical Support 7-2
7IF YOU N
Assistance Nearby 7-1
Help From Within Your Company 7-1
Help From Your Dealer 7-1
How to Contact NEC 7-2
Contacting NEC Technical Support by
Telephone 7-2
Contacting NEC Customer Service by
Telephone 7-2
Sending Internet Electronic Mail 7-2
Sending a Fax 7-2
Using FastFacts—NEC’s
Information Retrieval System 7-2
Reaching the NEC Bulletin Board System 7-2
Reaching NEC on Compuserve 7-2
Reaching NEC on America Online 7-3
Reaching NEC on the World Wide Web 7-3
Writing NEC 7-3
EED HELP
x 1765 Network Printer Configuration Guide
Page 9

NEC Warranty and Service 7-3
NEC Service Contracts 7-3
A
PPENDIX
Printer Messages A-1
A
PPENDIX
Overview B-1
Installing a Flash-ROM Upgrade With NetWare B-2
Installing a Flash-ROM Upgrade With ftp B-3
Installing a Flash-ROM Upgrade With FWTOOL B-5
Installing a Flash-ROM Upgrade with AppleTalk B-8
AP
BF
Preparing to Install B-2
Installing the Upgrade in NetWare B-2
Preparing to Install B-3
Installing the Upgrade in Windows 95 B-3
Installing the Upgrade in Windows for
Workgroups B-4
Preparing to Install B-5
Unloading the Software B-5
Installing the Upgrade B-6
Preparing to Install B-8
Installing the Upgrade across AppleTalk B-8
RINTER MESSAGES
-ROM U
LASH
PGRADE
G
LOSSARY
I
NDEX
xi
Page 10

xii 1765 Network Printer Configuration Guide
Page 11

SING
U
T
HIS
G
UIDE
This guide includes the information you need to
prepare and operate your NEC® Silentwriter® 1765 for
network printing. This guide contains informa tion
about network utilities and configurations only. Please
refer to the User’s Guide for general operating
information. The seven chapters of this guide are
described below.
Chapter 1, “Introduction”
• Provides an overview of the Silentwriter 1765
networking capabilities and features.
• Includes system and software requirements for
network printing with the Silentwriter 1765.
Chapter 2, “1765 Set Up”
• Shows how to upgrade your 1760 to a 1765 by
installing your new LAN (Local A rea Network)
Card and extra RAM.
• Tells how to prepare your printer for network
installation.
Chapter 3, “Installing NEC 1765 Software”
• Provides instructions for installing the NEC 1765
software you’ll use to operate your printer on the
network.
Chapter 4, “Configuring Your Network Printer”
• Provides information about adding the Silentwriter
1765 to your network.
• Tells how to configure both network and printer to
work together.
Chapter 5, “NEC 1765 Administration Software”
Shows how system administrators can use NEC 1765
Administration software to
• Configure the network
• Set printer parameters
• Supervise the network
Chapter 6, “NEC 1765 Client Software”
Shows how 1765 users can use NEC 1765 Client
software to
• Set printer parameters
• Monitor user print requests
Chapter 7, “If You Need Help”
• Contains sources of technical support. For general
problem solving see Chapter 8, “Troubleshooting,”
in the User’s Guide.
If you have not yet set up your printer, begin
with the
Easy Printer Setup Guide
. It covers
assembly, installing printer options, and
installing printer driver software.
See the
User’s Guide
for information about
operating and maintaining your printer, and
using printer driver software.
iii
Page 12

iv 1765 Network Printer Configuration Guide
Page 13

NTRODUCTION
I
1
Overview
This chapter provides the following information about
the Silentwriter 1765.
Features: Lists the features of the Silentwriter 1765
(or an upgraded Silentwriter 1760)
Compatibility: The Silentwriter 1765 can work with
several different operating systems and network
operating systems. This section describes the
system requirements for using the 1765 with each
platform.
Qualifications and Assumptions: The instructions
provided in this guide assume that you have basic
working knowledge about your computer
networks. This section further describes these
assumptions.
Where to Go Next: Lists the steps you’ll need to
complete to set up and operate the Silentwriter 1765
and where to find the information you need.
Features
You may already be familiar with the benefits of the
Silentwriter 1760—its speed, ease of use, and high
quality output. The networking capabilities of the
Silentwriter 1765 enhance this usefulness. The 1765
network printer has the following features in addition
to the standard features of the 1760.
• Runs with several operating systems and network
operating systems including NetWare®, Micr osoft®
Windows® 3.1x, Microsoft Windows for
Wo rkgroups® (WFW), Microsoft Windows NT®,
Microsoft Windows® 95, UNIX®, Mac™ OS 7.1 or
greater, and IBM® OS/2® with Microsoft LAN
Manager®, IBM WARP Server®, or IBM LAN
Server®.
• Provides three network ports in addition to the
Silentwriter’s bidirectional parallel port
- Thin wire coaxial Ethernet® (10Base2)
- Unshielded twisted pair Ethernet (10BaseT)
-LocalTalk®
• Network printing does not increase the
Silentwriter’s size because the LAN card is installed
inside the 1765.
• Uses flash-ROM, a rewritable memory that allows
users to upgrade LAN card firmware.
• Supports several frame types, including IEEE 802.2,
IEEE 802.3, Ethernet_II, and Ethernet_SNAP.
1–1
Page 14

System administrators and network clients can use
NEC 1765 softwar e to si m plif y se tt in g up and o per ati ng
the Silentwriter 1765. The NEC 1765 Administration
software allows network administrators to define the
network and manage the printer. Administrators can
• Display a list of printers on the network
• Change printer names
• Monitor printer status
• Check printer configuration
• Toggle operation between network and remote
printer modes (NetWare only)
NEC 1765 Client software allows users to
• Confirm or delete their own print jobs
• Monitor printer status
• Check printer configuration
1–2 1765 Network Printer Configuration Guide
Page 15
Compatibility
The Silentwriter 176 5 can be used on several different
platforms and operating systems. This section describes
the system requirements to run the Silentwriter 1765 in
different hardware and software environments.
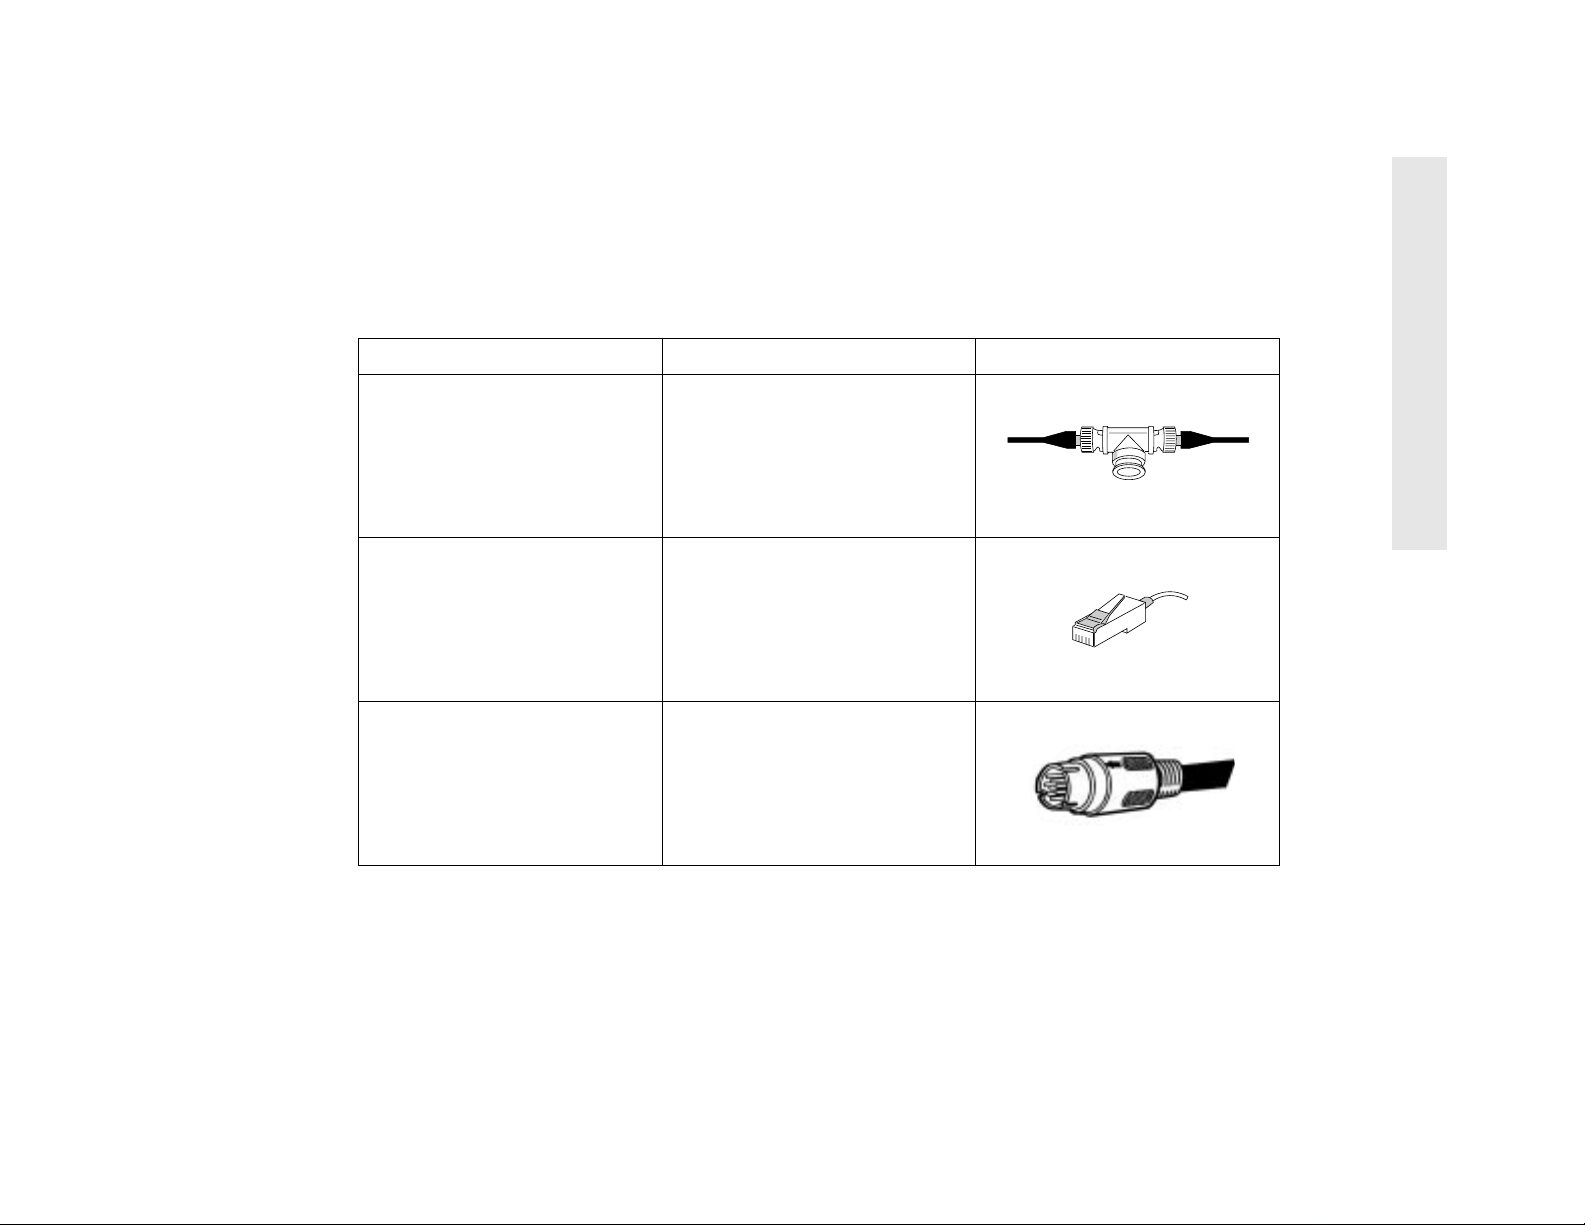
Tab le 1-1: Cables and Connectors
Network Type Cable Type Connector Form
Thin Ethernet Thin Ethernet coaxial cable
(10Base2)
UTP Ethernet Twisted pair cable
(10BaseT)
Apple® LocalTalk Mini-DIN 8
(LocalTalk shielded cable)
Hardware Requirements
Table 1-1 describes the cables and connectors you need
to connect to different networks.
1Introduction
Compatibility 1–3
Page 16

Software Requirements
Table 1-2 shows the operating systems and network
software you will need to configure the
Silentwriter 1765.
Table 1-2: Software Requirements
In addition to your network software, the Silentwriter
1765 comes with software to help administer your
Silentwriter across the network. Table 1-2 sh ows which
configurations are supported by NEC 1765 software.
To use th is
network
with this operating system you will need this network software
protocol
IPX/SPX MS-DOS® Client software for NetWare version 3.11,
3.12, or 4.1
MS-DOS and Windows 3.1x Client software for NetWare version 3.12 or
4.1
MS-DOS and
Windows for Workgroups 3.11
Windows 95 network software included with Windows 95
TCP/IP MS-DOS and Windows 3.1x a third party TCP/IP stack, for example,
MS-DOS and
Windows for Workgroups version 3.11
Windows 95 network software included with Windows 95
Windows NT version 3.1 or 3.5x
(server or workstations)
UNIX any System V or
DLC Windows NT Windows NT Advanced Server 3.1
Client software for NetWare version 3.12 or
4.1
system software
Chameleon by NetManage, Inc. (for
Windows 3.1x) or LAN Workplace by
Novell®
network software included with Windows for
Workgroups system software
system software
network software included with Windows NT
system software
BSD compatible system
or
Windows NT Server 3.5x
Windows NT Workstation 3.5x
or
This NEC 1765 software is
available
NEC 1765 Adm inistration and
NEC 1765 Client for NetWare
NEC 1765 Adm inistration and
NEC 1765 Client for NetWare
NEC 1765 Adm inistration and
NEC 1765 Client for NetWare
NEC 1765 Adm inistration and
NEC 1765 Client for TCP/IP
NEC 1765 Adm inistration and
NEC 1765 Client for TCP/IP
NEC 1765 Adm inistration and
NEC 1765 Client for TCP/IP
Windows 95 Printing System
NEC 1765 Adm inistration and
NEC 1765 Client for TCP/IP
1–4 1765 Network Printer Configuration Guide
Page 17

Table 1-2: Software Requirements (Continued)
1Introduction
To use th is
network
with this operating system you will need this network software
protocol
EtherTalk® Mac OS version 7.1 or greater network software included with Mac OS
system software
LocalTalk® Mac OS version 7.1 or great er network software included with Mac OS
system software
NetBEUI MS-DOS and Windo ws Microsoft LAN Manager version 2.1 or 2.2
OS/2 Warp version 3.0 IBM LAN Server version 3.0 or 4.0
or
IBM Warp Server version 4
This NEC 1765 software is
available
NEC 1765 software for
AppleTalk®
NEC 1765 software for
AppleTalk
Compatibility 1–5
Page 18

Qualifications and Assumptions
This guide assumes that you are familiar with your
system and network layout. Installing the LAN card
and adding the Silentwriter 1765 to your network will
be easier if you
• have used your network operating system
• have the proper network software
• have a fully operational system
In addition, to complete installation and configuration
on the network you must have access to the supervisor
account, or have access to an account that has
supervisor and print server operator privileges.
Where to Go Next
The rest of this document describes the tasks necessary
to complete network installation of the Silentwriter
1765. You will need to complete the following steps:
1. S et up the Silentwriter 1765 or upgrade the
Silentwriter 1760. See Chapter 2, “1765 Set Up.”
2. Install the NEC 1765 Administration software and
NEC 1765 Client software. See Chapter 3,
“Installing NEC 1765 Software.”
3. Connect the Silentwriter to your Network. See
Chapter 4, “Configuring Your Network Printer.”
4. Use NEC 1765 Administration softwar e to configur e
the network and printer. See Chapter 5, “NEC 1765
Administration Software.”
Once the Silentwriter has been connected to the network
and configured properly, users can use NEC 1765 Client
software to manage individual printing jobs. See
Chapter 6, “NEC 1765 Client Software.”
1–6 1765 Network Printer Configuration Guide
Page 19

1765 S
ET
U
P
2
Overview
This chapter describes how to prepare your new
Silentwriter for network printing. It contains the
following information.
• Upgrading from the 1760
• Connecting and verifying the Silentwriter 1765
We assume that you have completed the steps described
in the Easy Printer Setup Guide.
If you are upgrading your 1760, begin with the
next section.
If you are ready to connect your Silentwriter
1765, proceed to page 2-8.
2–1
Page 20

Upgrading from the 1760
Upgrading a 1760 printer to a 1765 network printer
requires the following steps.
1. Unpack the upg rade kit and verify its contents.
2. Install extra RAM (not included).
3. Install the LAN card.
Unpack the 1760 Upgrade Kit
Your upg rade kit should include the following
components
• LAN card (part 805-874292-003A)
• 1765 Network Printer Configuration Guide
(part 808-875036-001A)
• Four NEC 1765 software diskettes
(part 819-058006-000)
- Windows® 95 Printing System and OS/2®
Support Software (part 819-055006-000)
- Network Utilities: NetWare® for Windows®
(part 819-055006-001)
- Network Utilities: TCP/IP for Windows®
(part 819-055006-002)
- Network Utilities: AppleTalk® for Mac™ OS
(part 819-055006-003)
• T-shaped BNC connector (for 10 Base2 network
connections)
• Warranty card (part 819-300017-000)
2–2 1765 Network Printer Configuration Guide
Page 21

Silentwriter 1760 Upgrade Kit Contents
Warranty
LAN Card
NEC 1765 software
2 1765 Set Up
T-shaped BNC
Connector
1765 Network Printer
Configuration Guide
Upgrading from the 1760 2–3
Page 22

Install RAM
The Silentwriter 1765 has two Singl e In line Memory
Module (SIMM) slots that support 72-pin with parity
(36 bits) industry stan dar d RAM SIMM s, availa ble fr o m
many third party vendors. NEC recommends RAM
speeds of 70 nanoseconds or faster. 1, 2, 4, 8, 16 and 32
MB SIMMs are available, and you can add up to 48
additional MB of RAM. The 1760 comes with 4 MB as
standard equipment. The Silentwriter 1765 requires a
minimum of 6 MB for network printing. To upgrade a
1760 to a 1765 you need to pur ch ase and install at least 2
additional MB for a minimum of 6 MB.
To see how much memory is already installed, print a
test page.
1. On the operator panel, press the Online button to
turn the indicator light off and take the printer
offline. The display changes from
.
READ Y
2. Press Menu.
display.
3. Press Next five time s until
the display.
4. Press Select.
display.
5. Press Select to print the test page.
6. Press Online to put the printer back online.
PAPER HANDLING appears on the
TEST PRINT appears on
TEST PRINT TEST PAGE appears on the
READY to NOT
Follow these steps to install a SIMM , as illustrated on
the next page.
Caution!
main controller board while installing RAM.
• Hold the board by its edges to avoid touching the
connectors or components.
• Do not use magnetic tools when handling the board.
• Wear charge-dissipative straps and work on antistatic
surfaces while handling the main controller board.
• Avoid carpets in coo l, dry areas where static may build
up.
1. Turn off the printer power and unplug the power
cord.
2. Detach the power cord from the printer (A).
WARNING!
printer when the power is on. Always turn off the printer
power and unplug the power cord before accessing the
main board.
3. Loosen, but do not remove, the two finger tight
screws fastening the main controller board to the
printer. Using the loosened screws as handles,
gently slide the main controller board out of the
printer (B).
4. Hold the module so that the notch is on the left side
and the metal edge faces toward the m emory socket
(C).
5. Hold the module at a 30 degree angle and firmly
push it into the socket. Push the module into the
back of the socket to fully seat it. Then, rotate the
module up. You will feel and hear a “click” when
the module snaps into place (D).
Take the following steps to protect the
Hazardous voltages are present in the
2–4 1765 Network Printer Configuration Guide
Page 23
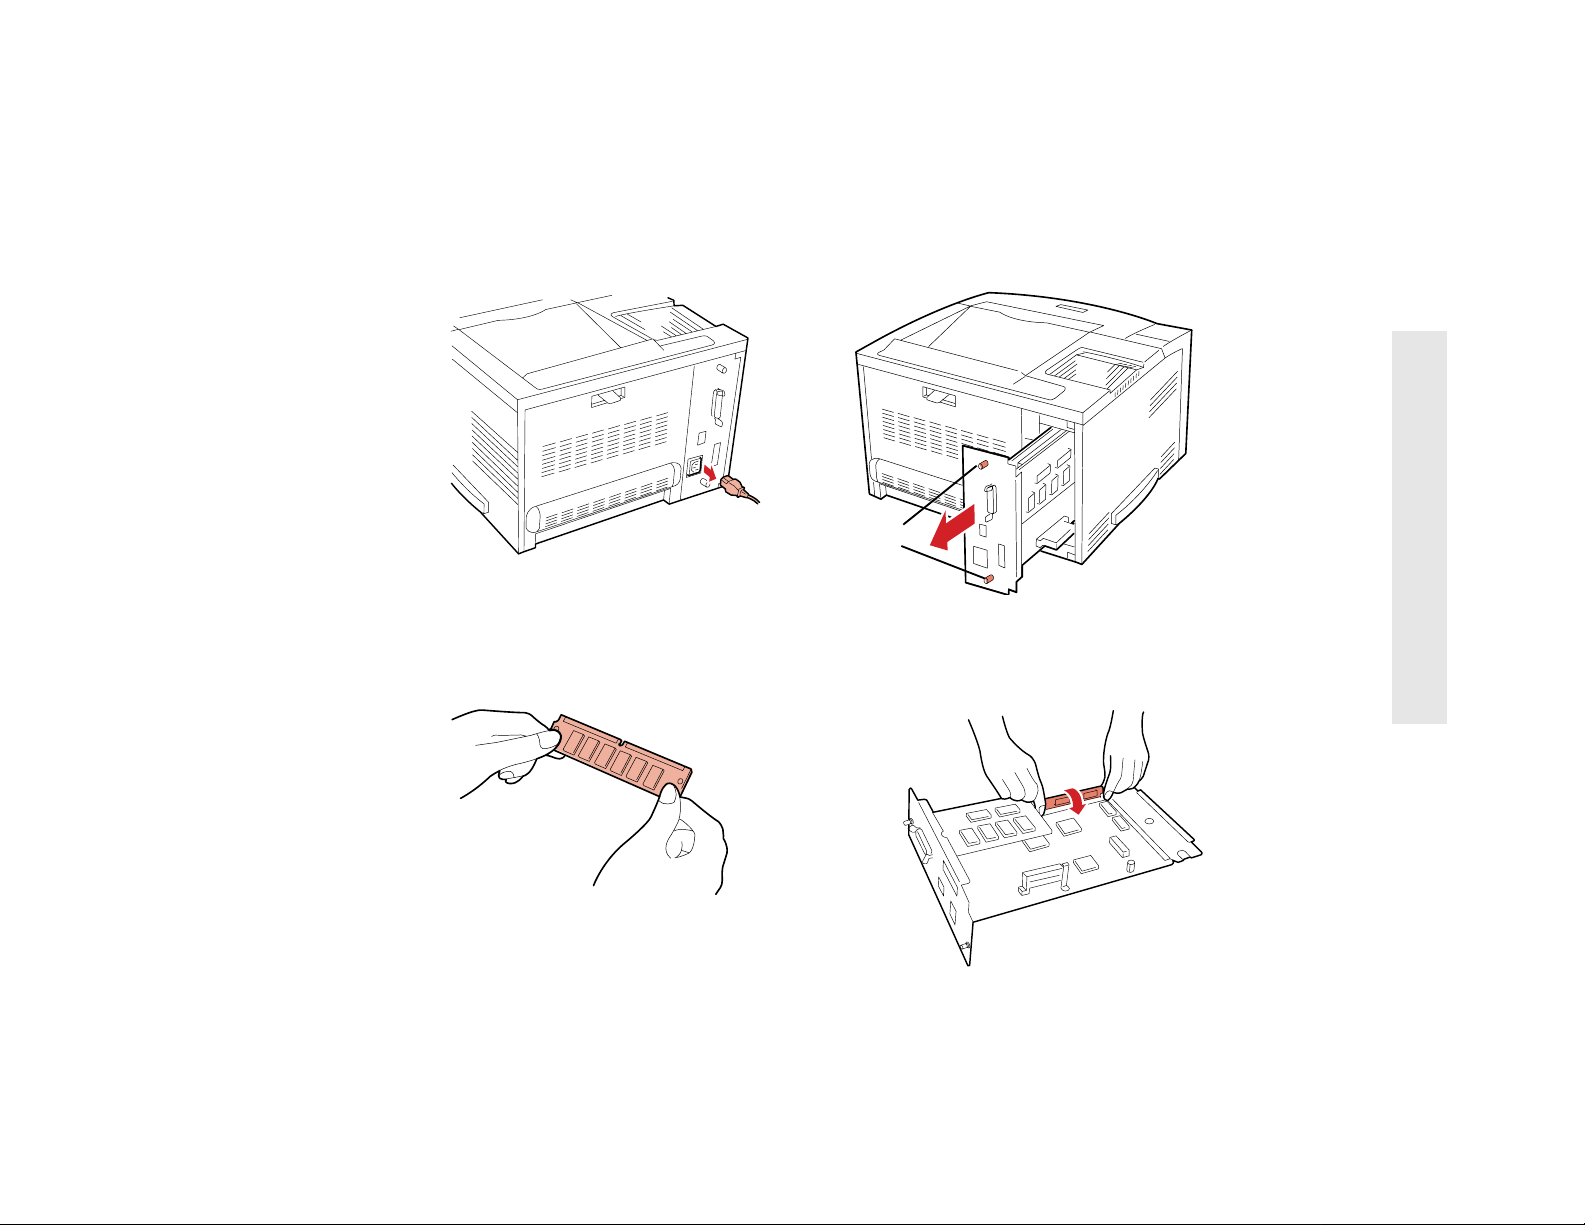
Install a RAM Memory Expansion Module
AB
2 1765 Set Up
Loosen
screws
and pull
to slide out
C
D
Upgrading from the 1760 2–5
Page 24

Install the LAN Card
Follow these steps to install the LAN card, as shown on
the facing page.
Caution!
main controller board while installing the LAN card.
• Hold the board by its edges to avoid touching the
connectors or components.
• Do not use magnetic tools when handling the board.
• Wear charge-dissipative straps and work on antistatic
surfaces while handling the main controller board.
• Avoid carpets in cool, d ry ar eas where static may build
up.
Take the following steps to protect the
1. Place the main controller board flat on a table so
that the LAN card socket and brack et ar e on top (A).
2. Rotate the LAN card bracket 90 degrees (B).
3. Slide the LAN card onto the main controller board,
so that the LAN card plugs into the main controller
board and the LAN card panel fits through the main
controller board (C).
4. Insert the LAN card screws into the main controller
board panel above and below the LAN card panel.
Tighten the screws finger-tight. Rotate the LAN card
bracket 90 degrees so that it supports the LAN card
(D).
5. Slide the main controller boar d back into the printer.
Make sure the board is positioned between the rails
inside the printer (E).
6. Tighten the two screws finger-tight to fasten the
main controller board to the rear of the printer (F).
2–6 1765 Network Printer Configuration Guide
Page 25
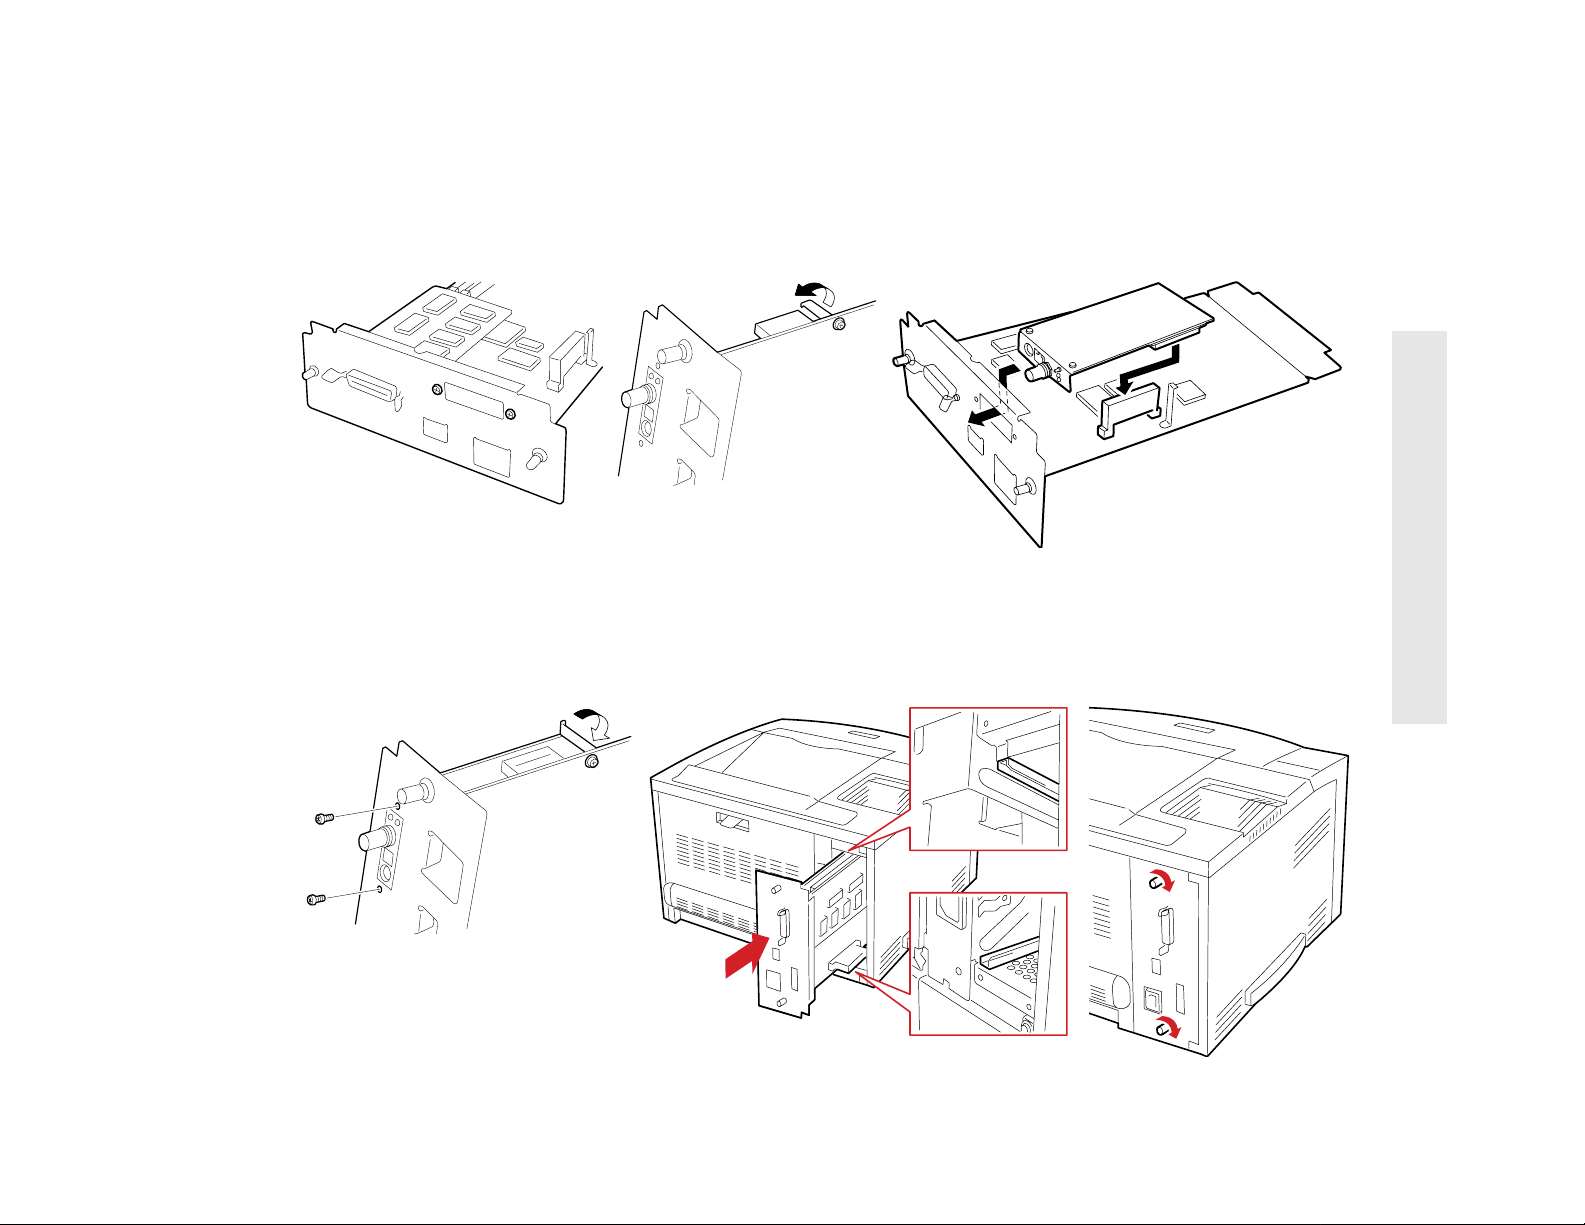
Install the LAN Card
A
D
BC
E
F
2 1765 Set Up
Upgrading from the 1760 2–7
Page 26

Connecting and Verifying the
Silentwriter 1765
This section describes the steps to connect the network
cable to your 1765 and verify its operation. The steps are
1. Identify the LAN card panel.
2. Connect the network cable.
3. Turn on the printer.
4. Print a configuration page.
After completing the tasks in this section you will be
ready to install NEC 1765 software and connect the
Silentwriter to your network.
Identify the LAN Card Panel
The diagram shows the LAN card panel and its
components
Configuration Button: Use this button to print a
configuration page or restore the LAN card to its
factory default settings.
Green LED: Lights up when the Silentwriter is
receiving a packet or downloading flash-RO M
information
Red LED: Lights up when transmitting a packet
Caution!
you restore factory default settings. Before restoring,
print a configuration page so you have a record of
custom settings.
To use this button as a reset button
1. Turn the power off.
2. Press and hold the button.
3. Turn the printer power on.
4. Continue to press the button for at least 15 seconds.
5. Release the button.
LAN Card Panel
Twisted Pair
Ethernet
Connector
Thin Coaxial
Ethernet
Connector
Any custom settings will be lost when
LocalTalk (AppleTalk) connector
Printing a Configuration Page
To print a configuration page, turn on the printer and
press the configuration button. For more information
about the configuration page, see “Print a Configuration
Page” on page 2-13.
Restoring Factory LAN Card Settings
You can use the configuration button to restore the LAN
card to factory default settings.
2–8 1765 Network Printer Configuration Guide
Green LED
Red LED
Configuration
Button
Page 27

Connect the Network Cable
Before connecting any cables make sure your printer is
turned off. The LAN card has three cable ports, two for
Ethernet networks and one for LocalTalk networks. If
you have an Ethernet network, you may use either thin
coaxial cable or twisted pair cable to connect the 1 765 to
your network. Your Silentwriter uses Automatic
Interface Monitoring (AIM) to determine which
interfaces are connected. For more information about
AIM, see the User’s Guide.
WARNING!
any network cable.
WARNING!
simultaneously could result in errors w hile transmitting
and printing data. Connect only one Ethernet cable type
at a time. You may connect one Ethernet connection and
LocalTalk at the same time.
note:
network, the connection must be made quickly to
minimize interruptions to the network.
If you are connecting to an active Ethernet
Turn the printer off before connecting
Using both Ethernet connectors
Connecting Thin Coaxial Cable
Use the BNC T-adaptor to connect the Silentwriter to a
network with thin coaxial Ethernet cable. Follow these
steps.
1. If you are connecting the Silentwriter into the
middle of the network, connect Ethernet cable to
both cable connectors of the BNC T-adaptor.
2. If you are connecting to the end of a cable segment,
connect Ethernet cable to one cable connector and
connect a 50 phm Ethernet terminator to the other
side.
3. Attach the BNC T-adaptor to the bottom connector
on the LAN card panel (A).
4. Rotate the BNC T-adaptor clockwise to make sure
the connector is firmly attached (B).
Connecting Thin Coaxial Cable
2 1765 Set Up
B
A
Connecting and Verifying the Silentwriter 1765 2–9
Page 28
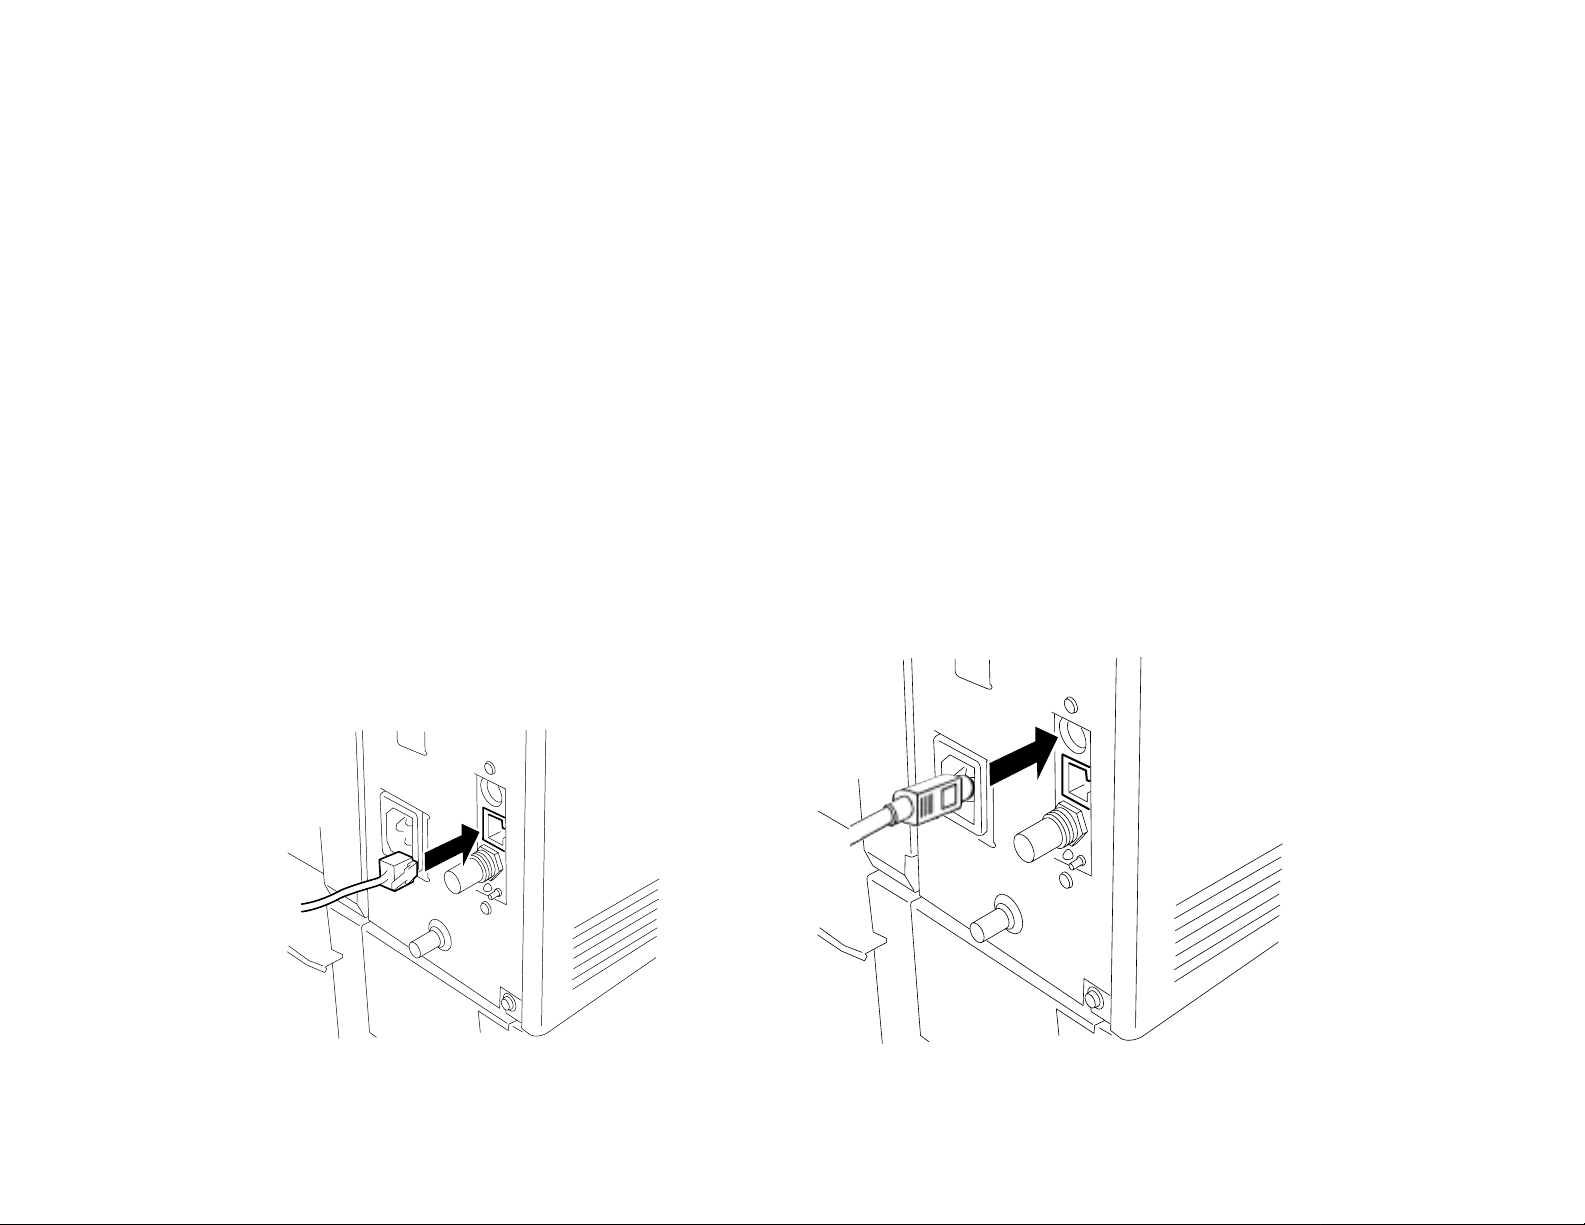
Connecting Twisted Pair Cable
Unshielded twisted pair (UTP) cable connects to the
middle connector of the LAN card panel.
1. Connect one end of the twisted pair cable to the
middle connector on the LAN card panel.
2. Connect the other end of the twisted pair cable to a
UTP wall outlet or other Ethernet source.
Connecting Twisted Pair Cable Connecting LocalTalk Cable
Connecting LocalTalk cable
LocalTalk cable connects to the top connector of the
LAN card panel. You can connect LocalTalk cable
directly to your Macintosh or to a LocalTalk network.
Follow these steps to connect your Silentwriter to a
LocalTalk network using RJ-11 cable.
1. Connect LocalTalk cable and converter box to the
top connector of the LAN card panel.
2. If the Silentwriter is at the end of a LocalTalk
network, connect RJ-11 cable to one RJ-11
connection in the converter box. If necessary,
connect a 120-ohm terminator in the other RJ-11
connection in the converter box (A).
3. If the Silentwriter is in the middle of a LocalTalk
network, move one cable from a workstation to one
RJ-11 connection in the converter box. Connect a
new RJ-11 cable from the Silentwriter to the
workstation (B).
2–10 1765 Network Printer Configuration Guide
Page 29
Connecting the Silentwriter to a LocalTalk Network
A
B
2 1765 Set Up
terminator
add this cable
move this cable
Connecting and Verifying the Silentwriter 1765 2–11
Page 30
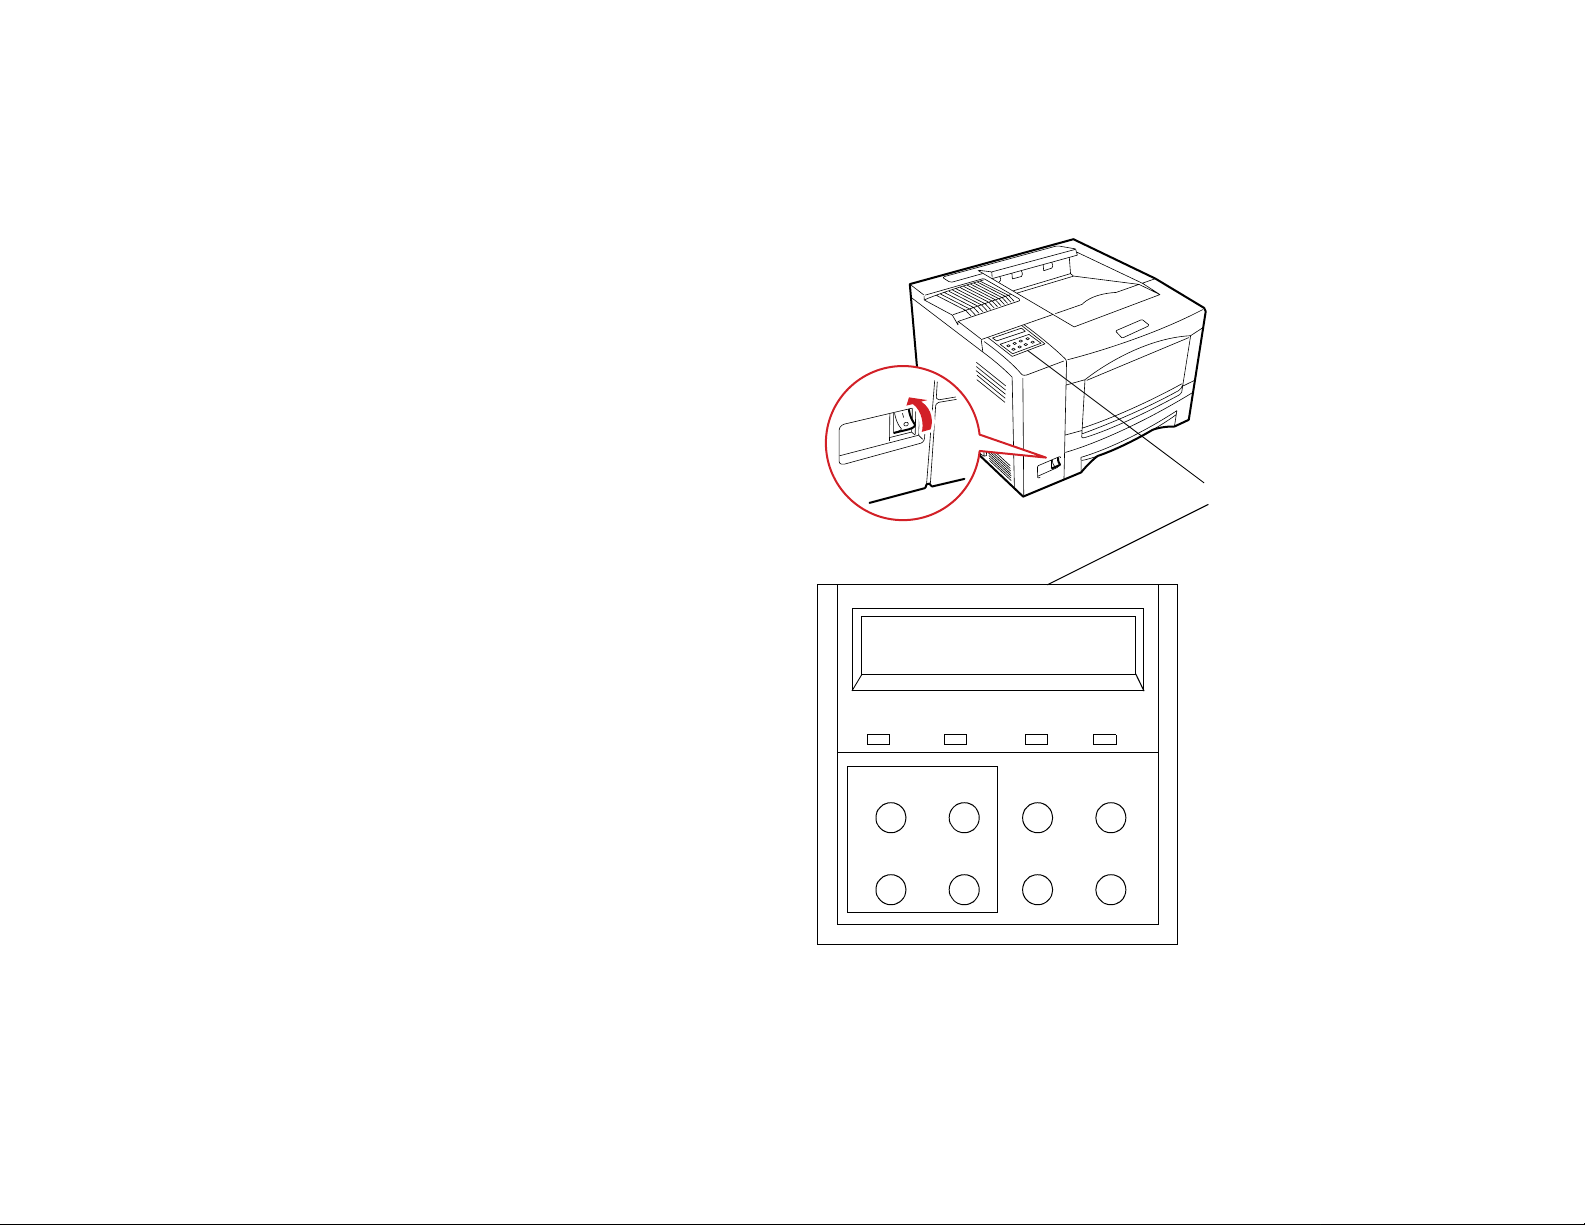
Turn On the Printer
Turn on your printer and wait until it displays the
READY message.
The printer automatically prints a demo page when you
turn it on. You use the demo page to verify that the
printer is ready to provide quality output. Follow these
steps.
1. Turn on the printer power (A).
2. The following messages appear on the operator
panel display (B) in sequence.
RESETTING
WARMING UP
PROCESSING DEMO
PRINTING DEMO
3. The printer issues the demo page and the following
message appears on the operator panel display.
READY
A
Operator
Panel
B
note:
display, see the User’s Guide.
2–12 1765 Network Printer Configuration Guide
For more infor mation about the operator panel
Power
Menu
Next
READY
Warning
Select
Prev
Data
Feed
Test
Online
Online
Reset
Page 31

L
Configu ration Page
Firmware version
MAC Address
IP Address and
Subnet Mask
AppleTalk
Name and
NetWare
Print Server
Name
Zone
NetBEUI
and TCP/IP
Printer Name
Print a Configuration Page
Press the configuration button to print a configuratio n
page for the LAN card. The configuration page displays
information about the printer’s parameter settings and
any installed boards.
2 1765 Set Up
AN Card Panel
Configuration
Button
Connecting and Verifying the Silentwriter 1765 2–13
Page 32

2–14 1765 Network Printer Configuration Guide
Page 33

NSTALLING
I
NEC 1765 S
OFTWARE
3
Overview
This chapter describes how to install NEC 1765
Administration and Client software. It contains the
following sections.
• Using Silentwriter Software with the
Silentwriter 1765
• NEC 1765 Software
• Installing NEC 1765 Software for NetWare
• Installing NEC 1765 Software for TCP/IP
• Installing NEC 1765 Software for AppleTalk
Using Silentwriter Software with the
Silentwriter 1765
This chapter assumes you have already installed the
Silentwriter Printing System and drivers as described in
Chapter 2, “Using Silentwriter Software,” of the User’s
Guide.
The Printer Setup software, which allows you to specify
which printer options have been installed,
communicates with the Silentwriter through the parallel
cable. If you connect your Silentwriter to the network
using Ethernet cable please make note of the following.
The Windows PCL 5e Driver
This printer driver cannot sense installed options across
the Ethernet. All printer options will be enabled
whether they are actually installed or not. To avoid
unexpected output, make sure you choose output
options that are actually installed.
The Windows PostScript Driver
The PostScript driver assumes that all options have
been installed. In order to direct output to specified
printer options you must configure the PostScript driver
manually using the PostScript printer driver as
described in Chapter 2 of the User’s Guide. Be sure to
deselect any option that is not installed.
3–1
Page 34

NEC 1765 Software
NEC 1765 software allows you to configure and
administer the Silentwriter 1765 from your workstation
or networked computer. There are five versions of the
software, described below and summarized in Table 3-1.
• NEC 1765 Administration software for NetWare
networks on Windows systems
• NEC 1765 Client softwa re for NetWare networks on
Windows systems
• NEC 1765 Administration software for TCP/IP
networks on Windows systems
• NEC 1765 Client software for TCP/IP networks on
Windows systems
• NEC 1765 software for AppleTalk networks on
Mac OS systems
Table 3-1: NEC 1765 Software
Mac OS NetWare TCP/IP
Administration
Client
■■■
Windows
■■
3–2 1765 Network Printer Configuration Guide
Page 35

For Windows systems, install NEC 1765 Administration
software on the machine which you use to administer
the network. Install NEC 1765 Client on any computer
in the network which will be used to send documents to
the Silentwriter.
If you have a NetWare network and use
Windows software, turn to the next section to
install NEC 1765 Administration software and
NEC 1765 Client software for NetWare systems.
For Mac OS systems, install NEC 1765 software on any
computer in the network which will be used to send
documents to the Silentwriter.
note:
are able to change printer names and AppleTalk Zones.
Ask the system administrator before changing this
information to prevent system conflicts.
All users of NEC 1765 software on AppleTalk
If you have a TCP/IP network and use Windows
software, proceed to page 3-10 to install
NEC 1765 Administration software and
NEC 1765 Client software for TCP/IP networks.
If you use Mac OS software, proceed to
page 3-16 for information on installing
NEC 1765 software for AppleTalk.
3 Installing NEC 1765 Software
NEC 1765 Software 3–3
Page 36

Installing NEC 1765 Software
for NetWare
Precautions
• Do not run NEC 1765 Administration software and
NEC 1765 Client software simultaneously on the
same computer.
• If the NEC 1765 software requires additional
memory to run, try closing unused software
applications to free more memory.
• Only the system administrator should install and
use NEC 1765 Administration software. Network
users can use NEC 1765 Client software to manage
print jobs across the network.
• Install NEC 1765 Client software on each client
computer . See “Installing NEC 1765 Client Software
for NetWare in Windows 3.1x” and “Installing
NEC 1765 Client Software for NetWare in Windows
95” on page 3-8.
To install NEC 1765 software on Windows systems you
need
• a computer with an 80386 SX pr o cesso r operat ing at
16 mhz or above
• for Windows 3.1x, at l ea st 8megabytes of RAM an d
preferably more
• for Windows 95, at least 8 megabytes of RAM and
preferably more
• a hard disk with at least 2 mega b ytes available
note:
NEC 1765 Client software are easier to use with a
mouse. NEC 1765 software also supports hot key
combinations. Underlined letters indicate a hot key.
Press
combination. Press
Press the Up and
Both NEC 1765 Administration software and
Alt
and the underlined letter to use a hot key
Tab
to move from field to field.
Down
arrows to scroll.
3–4 1765 Network Printer Configuration Guide
Page 37

Preparing to Install
This program operates with W i ndows operating system
software. If the operating system has not been installed,
follow the instructions in your operating system
documentation to install the operating system software
on your computer.
NEC 1765 software for NetW are r equir es the presence of
a driver that supports the IPX/SPX network
communications protocol. One example is the ODI
driver supplied by Novell.
Verifying IPX/SPX Protocol in Windows 3.1x
Follow these steps to verify that the ODI driver has been
installed.
1. From Windows, open the MS-DOS icon to move to
the command prompt.
2. At the com mand prompt type
mem /c
A list of system software modules will appear on
the screen. If the list scrolls by too quickly, type
mem /c /p
to see the list one screen at a time. If it is installed,
the ODI driver appears in the first set of modules in
memory. Look for the IPXODI module.
3. At the com mand prompt type
exit
to return to Windows.
Verifying IPX/SPX Protocol in Windows 95
Follow these steps to verify that the ODI driver has been
installed.
1. From Windows 95, open the control panels. (Select
the Start menu, then the Setting submenu, then the
Control Panel menu option.)
2. Open the Network control panel.
3. Select the Configuration tab in the Network control
panel.
4. See if IPX/SPX Compatible Protocol is listed as one
of the installed network components. If IPX/SPX
has already been installed proceed to step 8.
5. In the Configuration panel click the Add button.
6. In the Select Network Component Type dialog box
select Protocol and click the Add button.
7. In the Select Network Protocol dialog box select
Microsoft from the Manufacturers list, then select
IPX/SPX compatible Protocol from the Network
Protocol list. Click the OK button.
8. Click OK to leave the Network Configuration
panel.
3 Installing NEC 1765 Software
If the ODI driver, or another IPX/SPX-compatible
driver, has not been installed, refer to the NetWare
manuals for details on settin g up NetWare.
Installing NEC 1765 Software for NetWare 3–5
Page 38

Installing NEC 1765 Administration Software
for NetWare in Windows 3.1x
Follow these steps to install NEC 1765 Adm inistration
software for NetWare using the installer program
provided on the NEC 1765 software for NetWare
diskette.
1. Boot your system and start Windows.
2. Insert the NEC 1765 software for NetWare diskette
into the floppy drive (this example uses drive a:).
3. In the Windows Program Manager, select Run from
the File menu. Windows displays the Run dialog
box.
4. Type
a:\setup.exe
in the Command Line field.
5. Click the OK button. This launches the installer
program. The installer starts up, and the Welcome
screen opens. Click the Setup button (A).
6. In the Select Utilities screen, select NEC Printer
Administration. Make sure the checkbox in front of
NEC Printer Client Access is blank. Click the
Continue button (B).
7. The Select Destination Path screen defines the
directory for the new software. Click Continue (C).
8. The Installer begins copying the files (D). The
software will be copied into a directory named
c:\NEC1765\NETWARE.
9. When the installation is complete, click the OK
button in the Exit Setup window to close the
installer (E).
10. Restart Windows to complete the software
installation.
11. Run NEC 1765 Administration software for
NetWare by opening the Program Manager. The
NEC 1765 Administration software icon is located
in the NEC Printer Utility - NetWare program
group (F).
Installing NEC 1765 Administration Software
for NetWare in Windows 95
Follow these steps to install NEC 1765 Administration
software for NetWare using the install er program
provided on the NEC 1765 software for NetWare
diskette.
1. Boot your system and start Windows.
2. Insert the NEC 1765 software for NetWare diskette
into the floppy drive (this example uses drive a:).
3. In Windows, select Run from the Start menu.
Windows displays the Run dialog box.
4. Make sure
a:\setup.exe
appears in the Command Line field.
5. Click the OK button. This launches the installer
program. The installer starts up, and the Welcome
screen opens. Click the Setup button (A).
6. In the Select Utilities screen, select NEC Printer
Administration. Make sure the checkbox in front of
NEC Printer Client Access is blank. Click the
Continue button (B).
7. The Select Destination Path screen defines the
directory for the new software. Click the Continue
button (C).
8. The Installer begins copying the file s (D). The
software will be copied into a directory named
c:\NEC1765\NETWARE.
9. When the installation is complete, click the OK
button in the Exit Setup window to close the
installer (E).
10. R e start Windows to complete the software
installation.
11. Run NEC 1765 Administration software for
NetWare by selecting the Programs submenu from
the Start menu. NEC 1765 Administration software
is located in the NEC Printer Utility - NetWare
program group (F).
3–6 1765 Network Printer Configuration Guide
Page 39

A
D
B
C
E
F
3 Installing NEC 1765 Software
Installing NEC 1765 Software for NetWare 3–7
Page 40

Installing NEC 1765 Client Software for
NetWare in Windows 3.1x
Follow these steps to install NEC 1765 Clien t software
for NetWare using the installer program provided on
the NEC 176 5 softw are for NetWare diskette.
1. Boot your system and start Windows.
2. Insert the NEC 1765 software for NetWare diskette
into the appropriate drive (this example uses drive
a:).
3. In the Windows Program Manager, select Run from
the File menu. Windows displays the Run dialog
box.
4. Type
a:\setup.exe
in the Command Line field.
5. Click the OK button. This launches the installer
program. The installer starts up, and the Welcome
screen opens. Click the Setup button (A).
6. In the Select Utilities screen, select NEC Printer
Client Access. Make sure the checkbox in front of
NEC Printer Administration is blank. Click the
Continue button (B).
7. The Select Destination Path screen defines the
directory for the new software. Click the Continue
button (C).
8. The Installer begins copying the files (D). The
software will be copied into a directory named
c:\NEC1765\NETWARE.
9. When the installation is complete, click the OK
button in the Exit Setup window to close the
installer (E).
10. Restart Windows to complete the software
installation.
11. Run NEC 1765 Client software for NetWare by
opening the Program Manager. The NEC 1765
Client software icon is located in the NEC Printer
Utility - NetWare program group (F).
Installing NEC 1765 Client Software for
NetWare in Windows 95
Follow these steps to install NEC 1765 Client software
for NetWare using the installer program provided on
the NEC 1765 software for NetWare diskette.
1. Boot your system and start Windows.
2. Insert the NEC 1765 software for NetWare diskette
into the appropriate drive (this example uses drive
a:).
3. In Windows, select Run from the Start menu.
Windows displays the Run dialog box.
4. Make sure
a:\setup.exe
appears in the Command Line field.
5. Click the OK button. This launches the installer
program. The installer starts up, and the Welcome
screen opens. Click the Setup button (A).
6. In the Select Utilities screen, select NEC Printer
Client Access. Make sure the checkbox in front of
NEC Printer Administration is blank. Click the
Continue button (B).
7. The Select Destination Path screen defines the
directory for the new software. Click the Continue
button (C).
8. The Installer begins copying the file s (D). The
software will be copied into a directory named
c:\NEC1765\NETWARE.
9. When the installation is complete, click the OK
button in the Exit Setup window to close the
installer (E).
10. R e start Windows to complete the software
installation.
11. Run NEC 1765 Client software for NetWare by
selecting the Programs submenu from the Start
menu. The NEC 1765 C lie nt sof tw ar e icon is loc ated
in the NEC Printer Utility - NetWare program
group (F).
3–8 1765 Network Printer Configuration Guide
Page 41

A
D
B
C
E
F
3 Installing NEC 1765 Software
Installing NEC 1765 Software for NetWare 3–9
Page 42

Installing NEC 1765 Software
for TCP/IP
Precautions
• Sometimes NEC 1765 software requires additional
memory to run. You can free more memory by
closing unused software applications.
• Only the system administrator should install and
use NEC 1765 Administration software. Network
users can use NEC 1765 Client software to manage
print jobs across the network.
• Install NEC 1765 Client software on each client
computer.
To install NEC 1765 software on Windows systems you
need
• a computer with an 80386 SX pr o cesso r operat ing at
16 mhz or above
• for Windows 3.1x, at l ea st 8megabytes of RAM an d
preferably more
• for Windows 95, at least 8 megabytes of RAM and
preferably more
• a hard disk with at least 2 mega b ytes available
note:
NEC 1765 Client software are easier to use with a
mouse. NEC 1765 software also supports hot key
combinations. Underlined letters indicate a hot key.
Press
combination. Press
Press the Up and
Both NEC 1765 Administration software and
Alt
and the underlined letter to use a hot key
Tab
to move from field to field.
Down
arrows to scroll.
3–10 1765 Network Printer Configuration Guide
Page 43

Preparing to Install
This program depends on Windows operating system
software. If that operating system has not been installed,
follow the instructions in your operating system
documentation to install the operating system software
on your computer.
Veri fying TCP/IP Protocol in Windows 3.1x
If you are using Windows 3.1x, you will need to install a
TCP/IP stack and Windows sockets. This software is
available from several third party vendors. Check with
your system administrator for more details.
Veri fying TCP/IP Protocol in Windows for Workgroups
If you use Windows for Workgroups, follow these steps
to confirm that a TCP/IP driver has been installed.
1. From Windows open the Network Setup icon.
2. Look for the TCP/IP driver in the list of Network
Drivers.
Verifying TCP/IP Protocol in Windows 95
Follow these steps to verify that the TCP/IP protocol
has been installed on your Windows 95 system.
1. From Windows 95 open the control panels. ( Select
the Start menu, then the Settings submenu, then the
Control Panel menu option.)
2. Open the Network control panel.
3. Select the Configuration tab in the Network control
panel.
4. See if TCP/IP is listed as one of the installed
network components. If TCP/IP has already been
installed proceed to step 8.
5. In the Configuration panel click the Add button.
6. In the Select Network Component Type dialog box
select Protocol and click the Add button.
7. In the Select Network Protocol dialog box select
Microsoft from the Manufacturers list, then select
TCP/IP from the Network Protocols list. Click the
OK button.
8. In the Configuration panel of the Network control
panel, select TCP/IP from the Network Components
list. Click the Properties button.
9. If your network supports ARP, click Obtain an IP
address automatically in the TCP/IP Properties
dialog box. If your network does not support ARP
click Specify an IP address and enter the IP a ddress
and subnet mask.
10. Click the OK button to close the TCP/IP Properties
dialog box.
11. The System Settings Change dialog box asks if you
want to restart your computer. You must restart for
the changes to take effect. Click the Yes button to
restart.
3 Installing NEC 1765 Software
Installing NEC 1765 Software for TCP/IP 3–11
Page 44

Installing NEC 1765 Administration Software
for TCP/IP in Windows 3.1x
Follow these steps to install NEC 1765 Adm inistration
software for TCP/IP using the installer program
provided on the NEC 1765 software for NetWare
diskette.
1. Boot your system and start Windows.
2. Insert the NEC 1765 software for TCP/IP diskette
into the floppy drive (this example uses drive a:).
3. In the Windows Program Manager, select Run from
the File menu. Windows displays the Run dialog
box.
4. Type
a:\setup.exe
in the Command Line field.
5. Click the OK button. This launches the installer
program. The installer starts up, and the Welcome
screen opens. Click the Setup button (A).
6. In the Select Utilities screen, select NEC Printer
Administration. Make sure the checkbox in front of
NEC Printer Client Access is blank. Click the
Continue button (B).
7. The Select Destination Path screen defines the
directory for the new software. Click Continue (C).
8. The Installer begins copying the files (D). The
software will be copied into a directory named
c:\NEC1765\TCPIP.
9. When the installation is complete, click the OK
button in the Exit Setup window to close the
installer (E).
10. Restart Windows to complete the software
installation.
11 . Run NEC 1765 Administration software for TCP/IP
by opening the Program Manager. The NEC 1765
Administration software icon is located in the NEC
Printer Utility - TCP/IP program group (F).
Installing NEC 1765 Administration Software
for TCP/IP in Windows 95
Follow these steps to install NEC 1765 Administration
software for TCP/IP using the installer program
provided on the NEC 1765 software for NetWare
diskette.
1. Boot your system and start Windows.
2. Insert the NEC 1765 software for TCP/IP diskette
into the floppy drive (this example uses drive a:).
3. In Windows, select Run from the Start menu.
Windows displays the Run dialog box.
4. Make sure
a:\setup.exe
appears in the Command Line field.
5. Click the OK button. This launches the installer
program. The installer starts up, and the Welcome
screen opens. Click the Setup button (A).
6. In the Select Utilities screen, select NEC Printer
Administration. Make sure the checkbox in front of
NEC Printer Client Access is blank. Click the
Continue button (B).
7. The Select Destination Path screen defines the
directory for the new software. Click the Continue
button (C).
8. The Installer begins copying the file s (D). The
software will be copied into a directory named
c:\NEC1765\TCPIP.
9. When the installation is complete, click the OK
button in the Exit Setup window to close the
installer (E).
10. R e start Windows to complete the software
installation.
11. Run NEC 1765 Administration software for TCP/IP
by opening the Programs submenu from the Start
menu. NEC 1765 Administration software is located
in the NEC Printer Utility - TCP/IP program
group (F).
3–12 1765 Network Printer Configuration Guide
Page 45

A
D
B
C
E
3 Installing NEC 1765 Software
F
Installing NEC 1765 Software for TCP/IP 3–13
Page 46

Installing NEC 1765 Client Software for TCP/IP
in Windows 3.1x
Follow these steps to install NEC 1765 Clien t software
for TCP/IP using the installer program provided on the
NEC 1765 software for NetWare diskette.
1. Boot your system and start Windows.
2. Insert the NEC 1765 software for TCP/IP diskette
into the floppy drive (this example uses drive a:).
3. In the Windows Program Manager, select Run from
the File menu. Windows displays the Run dialog
box.
4. Type
a:\setup.exe
in the Command Line field.
5. Click the OK button. This launches the installer
program. The installer starts up, and the Welcome
screen opens. Click the Setup button (A).
6. In the Select Utilities screen, select NEC Printer
Client Access. Make sure the checkbox in front of
NEC Printer Administration is blank. Click the
Continue button (B).
7. The Select Destination Path screen defines the
directory for the new software. Click Continue (C).
8. The Installer begins copying the files (D). The
software will be copied into a directory named
c:\NEC1765\TCPIP.
9. When the installation is complete, click the OK
button in the Exit Setup window to close the
installer (E).
10. Restart Windows to complete the software
installation.
11. Run NEC 1765 Client software for TCP/IP by
opening the Program Manager. The NEC 1765
Client software icon is located in the NEC Printer
Utility - TCP/IP program group (F).
Installing NEC 1765 Client Software for TCP/IP
in Windows 95
Follow these steps to install NEC 1765 Client software
for TCP/IP using the installer program provided on the
NEC 1765 software for NetWare diskette.
1. Boot your system and start Windows.
2. Insert the NEC 1765 software for TCP/IP diskette
into the floppy drive (this example uses drive a:).
3. In Windows, select Run from the Start menu.
Windows displays the Run dialog box.
4. Make sure
a:\setup.exe
appears in the Command Line field.
5. Click the OK button. This launches the installer
program. The installer starts up, and the Welcome
screen opens. Click the Setup button (A).
6. In the Select Utilities screen, select NEC Printer
Client Access. Make sure the checkbox in front of
NEC Printer Administration is blank. Click the
Continue button (B).
7. The Select Destination Path screen defines the
directory for the new software. Click the Continue
button (C).
8. The Installer begins copying the file s (D). The
software will be copied into a directory named
c:\NEC1765\TCPIP.
9. When the installation is complete, click the OK
button in the Exit Setup window to close the
installer (E).
10. R e start Windows to complete the software
installation.
11. Run NEC 1765 Client software for TCP/IP by
opening the Programs submenu from the Start
menu. NEC 1765 Client software is located in the
NEC Printer Utility - TCP/IP program group (F).
3–14 1765 Network Printer Configuration Guide
Page 47

A
D
B
C
E
3 Installing NEC 1765 Software
F
Installing NEC 1765 Software for TCP/IP 3–15
Page 48

Installing NEC 1765 Software for
AppleTalk Systems
Preparing to Install
Before installing the software, make sure that the printer
and the computer have been connected to the EtherTalk
or LocalTalk network correctly.
Follow these steps to confirm that the Macintosh has
been correctly connected to the EtherTalk or LocalTalk
network.
1. Select the Control Panel menu option from the
Apple menu, then open the Network control panel.
2. If you are using EtherTalk, make sure the EtherTalk
icon is selected. If you are using LocalTalk, make
sure the LocalTalk icon is available and select it.
3. Click in the box in the upper left corner of the
window to close the Network control panel.
Then, follow these steps to confirm that the Silentwriter
has been correctly connected to the EtherTalk or
LocalTalk network.
1. Select the Chooser menu option from the Apple
menu.
2. If your network has multiple zones, select the
appropriate zone from the list of zones in the lower
left part of the window. The factory default zone
is “*”.
3. Select the LaserWriter 8 icon in the upper left corner.
4. The Silentwriter should appear in the list of printers
in the upper right corner. The factory default name
is “NP_” followed by 6 digits.
5. Click in the box in the upper left corner of the
window to close the Chooser.
Installing NEC 1765 Software for AppleTalk
Follow these steps to install NEC 1765 for AppleTalk
software.
1. Insert the NEC 1765 software for AppleT alk diskette
into the floppy disk drive.
2. Double click on the Installer to open it.
3. The Installer installs the following software
- NEC 1700 Silentwriter PostScript Printer
Description (PPD) file in the Printer
Descriptions folder in the Extensions folder in
the System folder
- NEC 1765 software for AppleTalk in the NEC
1700 Utilities folder
- Apple Printer Utility in the NEC 1700 Utilities
folder
Proceed to “AppleTalk” on page 4-32 for
information on configuring your Silentwriter
and Mac OS for printing.
3–16 1765 Network Printer Configuration Guide
Page 49

ONFIGURING
C
Y
OUR
ETWORK
N
Overview
This chapter provides information about adding the
Silentwriter to your network and configuring your
network and Silentwriter to work together . Each section
in this chapter corresponds to a particular type of
network and operating system. Following is a list of the
sections in this chapter.
• Description of Configuration Process
• NetWare with PCONSOLE
• NetWare with NetWare Administrator
• Windows 95 Using TCP/IP Protocol
• Windows NT Using TCP/IP Protocol
• UNIX Using TCP/IP Protocol
• Windows NT Using DLC Protocol
• AppleTalk
• LAN Manager v2.2
• OS/2 Warp Server or LAN Server v4.0
The final section briefly describes using SNMP to view
information about the Silentwriter across a network.
RINTER
P
4
4–1
Page 50

Description of Configuration Process
Although the protocols and requirements of each
network and operating system differ, generally each
section tells you how to
Verify installation of prin ter and NEC 1765 software:
Each network uses a different combination of
printer and NEC 1765 software. Before configuring
your Silentwriter, make sure you’ve installed all
necessary software.
Create a unique name or address for the printer: Each
printer on the network must have a uniq ue
identifier or name. NetWare and AppleTalk
networks use a printer name. TCP/IP networks rely
on an IP address for unique identification. DLC
networks use the MAC address. The configuration
page includes this information. An example
configuration page is shown on page 2 -13.
Establish the printer on the network and define a print
queue: The queue manages documents arriving
from different sources to ensure that documents
from all users are printed efficiently.
To configure y ou r Silentwriter and netw ork with
NetWare network operating system (NOS) and
PCONSOLE, turn to the next section.
To configure y ou r Silentwrit er and netw ork with
NetWare NOS and NetWare Administrator
(NetWare 4.1 only), turn to page 4-13.
To configure your Silentwriter and network
using the TCP/IP networking capabilities of
Windows 95 turn to page 4-20.
To configure your Silentwriter and network
using the TCP/IP networking capabilities of
Windows NT turn to page 4-25.
To configure your Silentwriter and network
using the TCP/IP networking capabilities of
UNIX turn to page 4-27.
To configure y ou r Silentwrit er and netw ork with
Windows NT using DLC, turn to page 4-30.
4–2 1765 Network Printer Configuration Guide
To configure y ou r Silentwrit er and netw ork with
AppleTalk, turn to page 4-32.
To configure y ou r Silentwrit er and netw ork with
LAN Manager, turn to page 4-34.
To configure y ou r Silentwrit er and netw ork with
LAN Server, turn to page 4-36.
Page 51

NetWare with PCONSOLE
This section describes how to add your Silentwriter to
the network using NetWare NOS and PCONSOLE. You
may choose either Network Printer or Remote Printer
mode.
The following steps summarize ho w to connect your
Silentwriter in either Network Printer or Remote Printer
mode.
1. Select the operating mode (Network or Remote).
2. Install NetWare Client software on the workstation.
3. Identify the printer.
4. Establish the printer on the network.
5. Enable the print server (for Remote Printer mode
only).
These steps are described in detail below.
Select the Operating Mode
Before you add the Silentwriter to your network, you
must choose a network operating mode for your
Silentwriter. The Silentwriter can be used in three
different modes—local, network, and remote. The 1765
Administration software for NetWare allows you to
choose between Network Printer or Remote Printer
network modes. Remote printers can be connected with
ethernet cables or via the parallel port. Each mode is
described in more detail in this section.
Local Printers
Local printers connect directly to a single computer
workstation with a bidirectional parallel cable. Local
printers can be shared on peer-to-peer networks but are
not part of the NetWare client/server network. For more
information on using your Silentwriter as a Local
Printer see the User’s Guide.
Network Printers
Network printers connect directly to a network. The
network printer’s LAN card acts as a print server for the
printer. Users can monitor their output with NEC 1765
software and take advantage of high-speed Ethernet
connections.
4 Configuring Your Network Printer
NetWare with PCONSOLE 4–3
Page 52

Remote Printers
Remote printers connect to a file server or single
workstation. Documents travel over the network to a
file server and then to a print server which sends the file
to the Silentwriter 1765 for printing.
In Remote Printer Mode the Silentwriter often uses a
parallel cable to connect to the file server or
workstation. Other remote printer configurations use
Ethernet connections but the print server for the printer
resides on a workstation or a file server.
Remote Printers Connected by Ethernet: In remote
printer mode the print server resides on a
workstation or a file server.
If the print server resides on a workstation, the
workstation handles the entire printing process,
reducing the workload on the file server.
If the print server resides on a file server, the print
server is not considered an additional NetWare
connection. This is important for networks which
are close to their user license limits.
Remote Printers Connected by Parallel Cable: If you
use a parallel cable to connect your Silentwriter in
Remote Printer mode, you will not be able to use the
NEC 1765 software to monitor the printer or the
progress of your print jobs except on the
workstation connected directly to your printer. In
addition, parallel cable connections are much
slower than Ethernet connections. For these reasons,
you will most likely want to use Eth e rnet
connections. However , if you use NetWare NOS and
use the Silentwriter to replace a printer that is
currently connected to a remote file server or single
workstation, you can avoid reconfiguring your
network by connecting the Silentwriter in Remote
Printer mode. In addition, connecting your
Silentwriter to a workstation w ith a parallel cable
does not use a network connection, leaving more
network connections available for workstations or
servers.
If you choose Remote Printer mode, consider the
following.
• In Remote Printer mode, NetWare software moves
files from the file server to its print server and from
there to the remote printer.
• The remote print server can be either a NetWare
Loadable Module (NLM) print server or a dedicated
DOS print server.
- An NLM print server resides on a remote file
server , uses PSERVER.NLM, and is used in both
NetWare 3.1x and 4.1.
- A dedicated DOS print server resides on a
single workstation, uses PSERVER.EXE, and is
used in NetWare 3.1x only.
- Dedicated print servers have significantly better
performance.
• Using your Silentwriter as an NLM print server
might result in much slower printing speed.
• If you are using your Silentwriter as a dedicated
DOS print server with a parallel cable connection,
you will be able to monitor the printer with
NEC 1 765 software only from the workstation that
is locally connected to the printer.
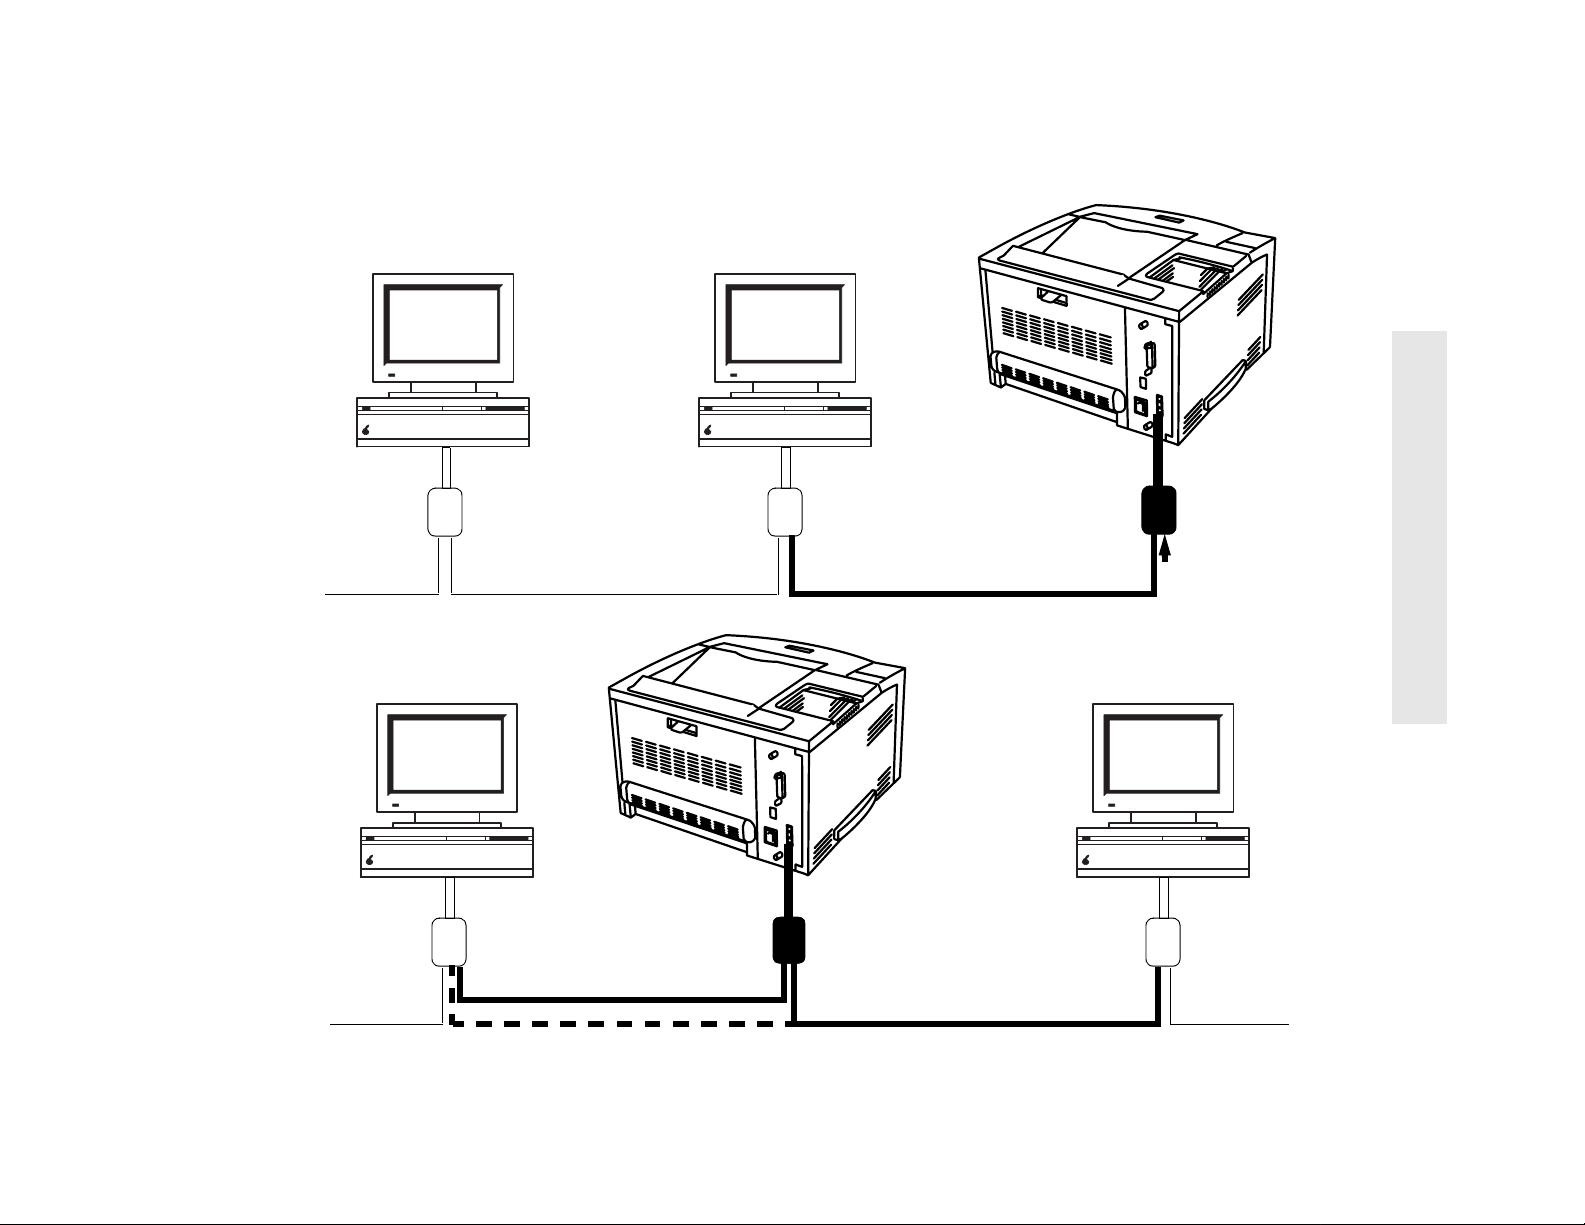
The figure on the next page shows a Silentwriter in
Remote Printer Mode connected to a network with a
dedicated DOS print server. The figure shows the
Silentwriter connected to the Ethernet. To use a parallel
cable connection, connect the Silentwriter dir ectly to the
print server.
4–4 1765 Network Printer Configuration Guide
Page 53

Silentwriter in Remote Printer Mode
Client sends print
data to queue in the
file server
NetWare Client
Workstation
NetWare File Server
File server sends print
job to print server.
NetWare Client
Ethernet Network
Workstation
PC Workstation
Dedicated DOS Print Server
Print server
sends job to
printer.
NEC 1765
Remote Prin t e r
4 Configuring Your Network Printer
NetWare with PCONSOLE 4–5
Page 54

Install NetWare Client Software at
the Workstation
From the workstation, load the version of NetWare
Client software appropriate for your NOS (version 3.11,
3.12 or 4.1). You will also need to load the following four
drivers, provided by NetWare.
• LSL.COM
• NE2000.COM or the appropriate network card
driver
• IPXODI.COM (IPX.COM for older NetWare
versions)
• VLM.EXE (NETX.COM for older NetWare versions)
These drivers usually load automatically; make sure
that they are included in or called from your
AUTOEXEC.BAT file. Follow these steps to check your
AUTOEXEC.BAT file.
1. At the MS-DOS prompt type
edit c:\autoexec.bat
2. Look for the lines
LSL.COM
NE2000.COM
IPXODI.COM
VLM.EXE
Or
call c:\nwclient\startnet.bat
3. Quit edit.
Identify the Printer
Use the NEC 1765 Administration software for NetWare
to set the printer name and define the operating mode.
1. From Windows, run NEC 1765 Administration
software for NetWare.
2. Select the printer you want to change from the list of
printers in the Printer Administration window (A).
Set the Printer Name
3. From the Printer Administration window click the
LAN Card button or select the LAN Card menu
option from the Configure menu (B).
4. The LAN card Parameters dialog box displays the
default and current printer names.
5. Type the new name in the Printer Name text box
(C).
6. Select the Save button to save the new nam e and
leave the LAN card Parameters dialog box (D).
Set the Printer Operating Mode
7. From the Printer Administration window click the
NetWare button or select the NetW are menu op t i on
from the Configure menu (E).
8. The NetWare Configuration dialog box displays the
current operating mode.
9. Select the button of the mode you are planning to
use (F).
10. Make sure the print server name matches the name
you defined in Step 5 (G).
11. Select the Save button to save the new operating
mode and leave the NetWare Configuration dialog
box (H).
12. Select the Exit button from the Printer
Administration window to close NEC 1765
Administration software for NetWare (I).
4–6 1765 Network Printer Configuration Guide
Page 55

Printer Administration Window
A
Set the Printer Operating Mode
G
F
I
B
E
Set the Printer Name
D
C
4 Configuring Your Network Printer
H
NetWare with PCONSOLE 4–7
Page 56

Establish the Printer on the NetWare Network
This section describes how to define a print queue,
define a print server, configure the print server, and
configure the print queue.
Define the Print Queue
1. From the workstation, login to the NetWare File
Server as a supervisor.
2. Run PCONSOLE at the DOS prompt.
3. If you are using NetWare 4.1, press F4 to switch to
Bindery Context Mode before crea ting a print queue
or server.
4. Select Print Queue Information from the Available
Options menu.
5. Use the arrow keys to select a print queue or press
the Insert key and type a print queue name in the
New Print Queue Name text box. Press Enter.
Managing your network will be easier if you select a
queue name that is related to the printer name. For
example, if the printer name is NP_015446, you
could enter NP_015446_Q for the queue name.
6. Press the Esc ke y to return to th e Available Options
menu.
Define the Print Server
7. Select Print Server Information from the Available
Options menu to move to the Print Servers menu.
8. Press the Insert key and enter the new print server
name in the New Print Server Name text box. You
should use the printer name you defined earlier. For
this example, the print server name is NP_015446.
Press Enter.
9. From the Print Servers list, select the new print
server and press Enter to move to the Print Server
Information menu.
10. You may enter a description of the new printer by
selecting Full Name from the Print Server
Information menu and entering a text description.
Define the Password
note:
optional. If you define a password for the LAN card,
make sure the password for the LAN card matches the
password defined in PCONSOLE before printing to the
Silentwriter. See “Set the LAN Card Password” on
page 4-10.
Defining a passwo rd, described in step 11, is
If you do not wish to define a password, skip
to“Configure the Print Server” on page 4-9.
11. Select Change Password from the Print Server
Information menu and enter the new password for
the printer.
4–8 1765 Network Printer Configuration Guide
Page 57

Configure the Print Server
12. In the Print Server Information menu select Print
Server Configuration to move to the Print Servers
Configuration menu.
13. In the Print Servers Configuration menu select
Printer Configuration to move to the Configured
Printers menu.
14. Select the first available Not Installed Printer and
press Enter to move to the specific Printer
Configuration menu. The Printer Configuration
menu name will depend on the number of the Not
Installed Printer you selected. For example, if the
first available Not Installed Printer was Printer 0,
you will move to Printer 0 Configuration menu.
15. Backspace over the old name and enter a printer
name in the Printer Name text box. Users will see
this name on their list of available printers. The
name may be the same as the print server name
defined above, or it may be a name that users will
recognize more easily, for example, NEC Printer 0.
16. Move to Type and press Enter.
17. The printer type depends on the operating mode
you have chosen.
For Ethernet connections
- If you selected Network Printer mode, select
Defined Elsewhere from the Printer Types
menu and press Enter.
- If you selected Remote Printer mode, select
Remote Other/Unknown from the Printer
Types menu and press Enter.
- Select Remote Parallel, LPT<port> if your
printer is connected to a DOS worksta tion
different from the one that is running
PSERVER.EXE. In this case, the connected DOS
workstation runs RPRINTER.EXE for
NetWare 3.1x, or NPRINTER.EXE for
NetWare 4.1.
See your NetWare manual for more information
about parallel printer connections.
18. Press Esc twice to return to the Print Server
Configuration menu. Be sure to select Yes wh en
PCONSOLE asks you to save changes.
Configure the Print Queue
19. Select Queues Serviced by Printer from the Print
Server Configuration menu to move to the Defined
Printers menu.
20. Select the newly defined printer (NP_015446 in this
example) and press Insert to move to the File Server
Queue menu.
21. Press Insert to move to the Available Queues menu.
22. Select the queue you have just created (e.g.,
NP_015446_Q), press Enter, and set the priority.
Lower priority numbers have higher printing
priority. Usually you will set the priority to 1.
23. Use the Esc key several times to leave the
PCONSOLE utility.
4 Configuring Your Network Printer
For parallel printer connections, you may only
select remote printer mode.
- Select Parallel, LPT<port> if your printer is
connected to a server running PSERVER.NLM.
- Select Remote Parallel, LPT<port> if your
printer is connected to a DOS workstation
running PSERVER.EXE.
NetWare with PCONSOLE 4–9
Page 58

Set the LAN Card Password
note:
11 on page 4-8 you need to follow steps 24 to 32 below
to define a password for the LAN card. Otherwise, turn
to “Enable the Remote Printer” on page 4-11. If you
define a password for the LAN card, make sure
the password for the LAN card matches the password
defined in PCONSOLE before printing to the
Silentwriter.
24. Open the NEC 1765 Administration software for
NetWare.
25. Sel ect the printer from the printer list in the Printer
Administration window.
Set the LAN Card Password
If you defined a passw or d as des cri bed in step
26. Click the NetWare button in the Printer
Administration window.
27. Click the Change Password button in the NetWare
Configuration dialog box (A).
28. Type the new password in the New Password text
box in the Change Password dialog box.
29. Retype the new password in the Confirm Password
text box in the Change Password dialog box.
30. Click the Save button from the Change Password
window to close the dialog box (B).
31. Click the Save button from the NetWare
Configuration window to close the dialog box (C).
32. Click the Exit button from the Printer
Administration window.
4–10 1765 Network Printer Configuration Guide
C
A
B
Page 59

Enable the Remote Printer
If you selected Remote Printer mode, you must also
enable the Remote Printer server in order to print
documents. The steps to enable the Remote Printer
server depend on where the print server resides. For
printers connected in Network Printer mode, the LAN
card is the print server.
Enable the Remote Printer if the Print Server Resides on a
File Server (NLM Print Server)
At the NetWare File Server Console, type the command
load PSERVER <print server>
where <print server> is the print server you defined in
step 8 on page 4-8. In this example, the defined print
server is NP_015446 and the command is
load PSERVER NP_015446
Enable the Remote Printer if the Print Server Resides on a
Workstation (Dedicated DOS Print Server)
1. At the workstation login to the file server as a
supervisor.
2. Type the following commands.
cd f:\public
f:\public\pserver.exe <print server>
where <print server> is the print server you defined
in step 8 on page 4-8. In this example, the defined
print server is NP_015446 and the commands are
cd f:\public
f:\public\pserver.exe NP_015446
4 Configuring Your Network Printer
Enable the Remote Printer if it is Connected to a
Workstation With a Parallel Cable
1. From the print server workstation, switch to
MS-DOS and run RPRINTER for NetWare 3.1x or
NPRINTER for NetWare 4.1.
2. Select the name of the print server you defined in
step 8 on page 4-8. In this example, the defined print
server is NP_015446.
NetWare with PCONSOLE 4–11
Page 60

4–12 1765 Network Printer Configuration Guide
Page 61

NetWare with NetWare Administrator
This section describes how to add your Silentwriter to
the network using NetWare NOS version 4.1 and
NetWare Administrator. You may choose either
Network Printer or Remote Printer mode.
The following steps summarize ho w to connect your
Silentwriter in either Network Printer or Remote Printer
mode.
1. Select the operating mode (Network or Remote).
2. Install NetWare Client software on the workstation.
3. Identify the printer.
4. Establish the printer on the network.
5. Enable the print server (for Remote Printer mode
only).
These steps are described in detail below.
Select the Operating Mode
Before you add the Silentwriter to your network, you
must choose a network operating mode for your
Silentwriter. The Silentwriter can be used in three
different modes—local, network, and remote. The 1765
Administration software for NetWare allows you to
choose between Network Printer or Remote Printer
network modes. Remote printers can be connected with
ethernet cables or via the parallel port. Each mode is
described in more detail in this section.
Local Printers
Local printers connect directly to a single computer
workstation with a bidirectional parallel cable. Local
printers can be shared on peer-to-peer networks but are
not part of the NetWare client/server network. For more
information on using your Silentwriter as a Local
Printer see the User’s Guide.
Network Printers
Network printers connect directly to a network. The
network printer’s LAN card acts as a print server for the
printer. Users can monitor their output with NEC 1765
software and take advantage of high-speed Ethernet
connections.
4 Configuring Your Network Printer
NetWare with NetWare Administrator 4–13
Page 62

Remote Printers
Remote printers connect to a file server or single
workstation. Documents travel over the network to a
file server and then to a print server which sends the file
to the Silentwriter 1765 for printing.
In Remote Printer Mode the Silentwriter often uses a
parallel cable to connect to the file server or
workstation. Other remote printer configurations use
Ethernet connections but the print server for the printer
resides on a workstation or a file server.
Remote Printers Connected by Ethernet: In remote
printer mode the print server resides on a
workstation or a file server.
If the print server resides on a workstation, the
workstation handles the entire printing process,
reducing the workload on the file server.
If the print server resides on a file server, the print
server is not considered an additional NetWare
connection. This is important for networks which
are close to their user license limits.
Remote Printers Connected by Parallel Cable: If you
use a parallel cable to connect your Silentwriter in
Remote Printer mode, you will not be able to use the
NEC 1765 software to monitor the printer or the
progress of your print jobs except on the
workstation connected directly to your printer. In
addition, parallel cable connections are much
slower than Ethernet connections. For these reasons,
you will most likely want to use Eth e rnet
connections. However , if you use NetWare NOS and
use the Silentwriter to replace a printer that is
currently connected to a remote file server or single
workstation, you can avoid reconfiguring your
network by connecting the Silentwriter in Remote
Printer mode. In addition, connecting your
Silentwriter to a workstation w ith a parallel cable
does not use a network connection, leaving more
network connections available for workstations or
servers.
If you choose Remote Printer mode, consider the
following.
• In Remote Printer mode, NetWare software moves
files from the file server to its print server and from
there to the remote printer.
• The remote print server can be either a NetWare
Loadable Module (NLM) print server or a dedicated
DOS print server.
- An NLM print server resides on a remote file
server , uses PSERVER.NLM, and is used in both
NetWare 3.1x and 4.1.
- A dedicated DOS print server resides on a
single workstation, uses PSERVER.EXE, and is
used in NetWare 3.1x only.
- Dedicated print servers have significantly better
performance.
• Using your Silentwriter as an NLM print server
might result in much slower printing speed.
• If you are using your Silentwriter as a dedicated
DOS print server with a parallel cable connection,
you will be able to monitor the printer with
NEC 1 765 software only from the workstation that
is locally connected to the printer.
The figure on the next page shows a Silentwriter in
Remote Printer Mode connected to a network with a
dedicated DOS print server. The figure shows the
Silentwriter connected to the Ethernet. To use a parallel
cable connection, connect the Silentwriter dir ectly to the
print server.
4–14 1765 Network Printer Configuration Guide
Page 63

Silentwriter in Remote Printer Mode
Client sends print
data to queue in the
file server
NetWare Client
Workstation
NetWare File Server
NetWare Client
File server sends print
job to print server.
Ethernet Network
Workstation
PC Workstation
Dedicated DOS Print Server
Print server
sends job to
printer.
NEC 1765
Remote Printer
4 Configuring Your Network Printer
NetWare with NetWare Administrator 4–15
Page 64

Install NetWare Client Software at
the Workstation
From the workstation, load the version of NetWare
Client software appropriate for your NOS (version 3.11,
3.12 or 4.1). You will also need to load the following four
drivers, provided by NetWare.
• LSL.COM
• NE2000.COM or the appropriate network card
driver
• IPXODI.COM (IPX.COM for older NetWare
versions)
• VLM.EXE (NETX.COM for older NetWare versions)
These drivers usually load automatically; make sure
that they are included in or called from your
AUTOEXEC.BAT file. Follow these steps to check your
AUTOEXEC.BAT file.
1. At the MS-DOS prompt type
edit c:\autoexec.bat
2. Look for the lines
LSL.COM
NE2000.COM
IPXODI.COM
VLM.EXE
Or
call c:\nwclient\startnet.bat
3. Quit edit.
Identify the Printer
Use the NEC 1765 Administration software for NetWare
to set the printer name and define the operating mode.
1. From Windows, run NEC 1765 Administration
software for NetWare.
2. Select the printer you want to change from the list of
printers in the Printer Administration window (A).
Set the Printer Name
3. From the Printer Administration window click the
LAN Card button or select the LAN Card menu
option from the Configure menu (B).
4. The LAN card Parameters dialog box displays the
default and current printer names.
5. Type the new name in the Printer Name text box
(C).
6. Select the Save button to save the new nam e and
leave the LAN card Parameters dialog box (D).
Set the Printer Operating Mode
7. From the Printer Administration window click the
NetWare button or select the NetW are menu op t i on
from the Configure menu (E).
8. The NetWare Configuration dialog box displays the
current operating mode.
9. Select the button of the mode you are planning to
use (F).
10. Make sure the print server name matches the name
you defined in Step 5 (G).
11. Select the Save button to save the new operating
mode and leave the NetWare Configuration dialog
box (H).
12. Select the Exit button from the Printer
Administration window to close NEC 1765
Administration software for NetWare (I).
4–16 1765 Network Printer Configuration Guide
Page 65

Printer Administration Window
A
Set the Printer Operating Mode
G
F
I
B
E
Set the Printer Name
D
C
4 Configuring Your Network Printer
H
NetWare with NetWare Administrator 4–17
Page 66

Establish the Printer on the NetWare Network
This section describes how to define and configure a
print queue object, printer object, and print server obje ct
using NetWare Administrator for Windows.
note:
object, and print server object make sure th at the correct
bindery context is set for the pri nting object s’ container.
This must be done at the file server. An example
command to set the bindery context is
Set Bindery Context = O=<container>
where <container> is the container for the printing
objects. Include the bindery context command in the
AUTOEXEC.NCF file to set the bindery context
automatically each time the server boots.
1. From the workstation, login to the NetWare file
server. Make sure you have create privileges.
2. Open NetWare Administrator.
3. In the NetWare Administrator window select the
container object in which the printing objects will be
created.
Create a Print Queue Object
4. Select the Create option from the Objects menu.
5. Select the Print Queue object from the Class of New
Object list in the New Object dialog box. Click OK.
6. In the Create Print Queue dialog box type a name
for the print queue in the Print Queue Name text
box.
7. Click the Browse button to the right of the Print
Queue Volume text box.
8. In the Select Object dialog box select the volume
from the Objects: list. Click OK.
9. Click the Create button in the Create Print Queue
dialog box to return to the NetWare Administrator
window.
Before creating the print queue object, printer
Create a Printer Object
10. In the NetWare Administrator window select the
container object, then select the Create option from
the Objects menu.
11. Select the Printer object from the Class of New
Object list in the New Object dialog box. Click OK.
12. In the Create Printer dialog box type the printer
name in the Printer Name text box. Click Create.
Create a Print Server Object
13. In the NetWare Administration window select the
container object, then select the Create option from
the Objects menu.
14. Select the Print Server object from the Class of New
Object list in the New Object dialog box. Click OK.
15. In the Create Print Server dialog box type the name
of the print server in the Print Server Name text box.
The print server name must match the name you
defined in “Set the Printer Name” on page 4-16. To
verify the print server name print a configuration
page as described in “Print a Configuration Page”
on page 2-13.
16. Click the Create button to close the Create Print
Server dialog box.
Assign the Print Queue Object to the Printer Object
17. In the NetWare Administration window open the
printer object you defined in step 12.
18. In the Printer : <name> dialog box click the
Assignments button.
19. In the Assignments dialog box click the Add button.
20. In the Select Object dialog box select the print queue
object you defined in step 6. Click OK.
21. Click OK to close the Printer: <name> dialog box.
4–18 1765 Network Printer Configuration Guide
Page 67

Assign the Printer Object to the Print Server Object
22. In the NetWare Administration window open the
print server object you defined in step 15.
23. In the Print Server : <name> dialog box click the
Assignments button.
24. In the Assignments dialog box click the Add button.
25. In the Select Object dialog box select the printer
object you defined in step 12. Click OK.
26. Click OK to close the Print Server : <name> dialog
box.
Exit NetWare Administrator
27. In the NetWare Administration window select the
Exit option from the Object menu.
Enable the Remote Printer
If you selected Remote Printer mode, you must also
enable the Remote Printer server in order to print
documents. The steps to enable the Remote Printer
server depend on where the print server resides. (For
printers connected in Network Printer mode, the LAN
card is the print server.)
Enable the Remote Printer if the Print Server
Resides on a File Server (NLM Print Server)
At the NetWare File Server Console, type the command
load PSERVER <print server>
where <print serv er > is the print server you defined in
step 8 on page 4-8. In this example, the defined print
server is NP_015446 and the command is
load PSERVER NP_015446
Enable the Remote Printer if the Print Server
Resides on a Workstation (Dedicated DOS Print Server)
1. At the workstation login to the file server as a
supervisor.
2. Type the following commands.
cd f:\public
f:\public\pserver.exe <print server>
where <print serv er > is the print server you defined
in step 8 on page 4-8. In this example, the defined
print server is NP_015446 and the commands are
cd f:\public
f:\public\pserver.exe NP_015446
4 Configuring Your Network Printer
Enable the Remote Printer if it is Connected to a
Workstation With a Parallel Cable
1. From the print server workstation, switch to
MS-DOS and run RPRINTER for NetWare 3.1x or
NPRINTER for NetWare 4.1.
2. Select the name of the print server you defined in
step 8 on page 4-8. In this example, the defined print
server is NP_015446.
NetWare with NetWare Administrator 4–19
Page 68

Windows 95 Using TCP/IP Protocol
This section describes how to add your Silentwriter to
the network using Windows 95 operating system
software and the TCP/IP network protocol.
Before you begin, make sure that your Windows 95
system is configured for TCP/IP networking. If not ,
check with your system administrator.
The following steps summarize ho w to configure your
network.
1. Install the software. This includes installing
Windows 95 Printing System from NEC, the
TCP/IP network protocol, and the Silentwriter
printer drivers.
2. Establish the printer on the network.
You can define multiple printers as part of the software
installation. If you want to define more printers after
you have installed the software follow the steps under
“Define New Printer Ports” on page 4-24.
Install Software
Before you begin you need to know the IP address,
subnet mask, and default gateway for the Silentwriter
and for your workstation. You also need to know if your
network supports Add ress Re solution Protocol (ARP).
The IP address and subnet mask for the Silentwriter can
be found on the configuration page. See “Print a
Configuration Page” on page 2-13. Your system
administrator will know the defaul t gateway, ARP
capabilities for your network, and your workstation’s
IP address and subnet mask.
The first time you set up the Silentwriter the IP address
and subnet mask will have factory default values of
11.22.33.44 and 255.0.0.0 respectively. To change those
values see “Changing TCP/IP IP Address” and
“Changing TCP/IP Subnet Mask” on page 5-33.
Install the Windows 95 Printing System Utility
These steps describe how to install the Windows 95
Printing System utility that came with your
Silentwriter 1765. The dialog boxes are shown on the
next page.
1. Boot your system and start Windows.
2. Insert the Windows driver diskette into the
appropriate drive (in this example we use drive A:).
3. Select Run from the Start menu. Windows displays
the Run dialog box.
4. Make sure
a:\win95\setup.exe
appears in the Open field. Click the OK button.
5. The Windows 95 Printing System Installation dialog
box opens. Click the Next button to begin setup (A).
6. The IP Address Registration dialog box opens (B).
Enter the IP address for the Silentwriter in the Enter
IP address: text box. Click the Add button to
register the IP address as a printer port. Click the
Next button to move to the next screen.
7. Click Finish to complete setup (C).
8. Once setup is complete, click Restart Windows
now?. Then click the Finish button (D).
9. Click OK to complete installation and restart
Windows (E).
4–20 1765 Network Printer Configuration Guide
Page 69

AB
C
E
D
4 Configuring Your Network Printer
Windows 95 Using TCP/IP Protocol 4–21
Page 70

Install TCP/IP Protocol on Windows 95
The W indows 95 network conf iguration depends on the
TCP/IP network software, which is included with
Windows 95. Before you begin you need to know the IP
address for your workstation. You also need the subnet
mask. Check with your system administrator fo r this
information. Follow these steps to install TCP/IP.
1. From Windows 95 open the control panels. (Select
the Start menu, then the Settings submenu, then the
Control Panel menu option.)
2. Open the Network control panel.
3. Select the Configuration tab in the Network control
panel.
4. See if TCP/IP is listed as one of the installed
network components. If TCP/IP has already been
installed proceed to step 8.
5. In the Configuration panel click th e Add button.
6. In the Select Network Component Type dialog box
select Protocol and click the Add button.
7. In the Select Network Protocol dialog box select
Microsoft from the Manufacturers list, then select
TCP/IP from the Network Protocols list. Click the
OK button.
8. In the Configuration panel of the Network control
panel, select TCP/IP from the Network Components
list. Click the Properties button.
9. If your network supports ARP, click Obtain an IP
address automatically in the TCP/IP Properties
dialog box. If your network does not support ARP
click Specify an IP address and enter the IP address
and subnet mask.
10. Click the OK button to close the TCP/IP Properties
dialog box.
11. The System Settings Change dialog box asks if you
want to restart your computer. You must restart for
the changes to take effect. Click the Yes button to
restart.
Verify Printer Driver Installation
You should have installed the printer drivers as you
completed the steps described in the Easy Printer Setup
Guide. Follow these steps to verify that the printer
drivers have been installed correctly.
1. From Windows 95 open the control panels. (Select
the Start m enu, then the Setting s submenu, then the
Control Panel menu option.)
2. Open the Printers control panel.
3. The printer drivers are represented by two icons
labeled “NEC Silentwriter 1700 Series” and “NEC
1700 Series PostScript L2.” If these icons are not
visible see Chapter 3 in the Easy Printer Setup Guide.
4–22 1765 Network Printer Configuration Guide
Page 71

Establish the Printer on the Network
To establish the printer on the network, follow these
steps, as illustrated below.
1. From Windows 95 open the control panels. (Select
the Start me nu, then the Setting s submenu, then the
Control Panel menu option.)
2. Open the Printers control panel.
3. Open the icon representing the driver you wish to
use. If you want to use the PCL 5e driver open the
NEC Silentwriter 1700 Series icon. If you want to
use the PostScript driver open the NEC 1700 Series
PostScript L2 icon (A).
4. In the driver window select the Properties menu
option from the Printer menu.
5. Click on the Details tab in the Properties
window (B).
AB
6. Open the pull-down menu under Print to the
following port. Select the TCP/IP port you defined
in step 6 on page 4-20.
7. Click the Capture Printer Port button in the driver
window.
8. In the Capture Printer Port dialog box open the
pull-down menu next to Device. Select a printer
port and click the Reconnect at logon checkbox to
turn it on. The port will be between LPT1 and LPT9.
9. Click the OK button to close the Capture Printer
Port dialog box and return to the Details tab of the
Propert ies window.
10. Click the Apply button in the Details tab of the
Properties window to save the changes.
11. Click the OK button to close the Properties window.
12. To close the driver window, select the Close option
from the Printer menu.
4 Configuring Your Network Printer
Windows 95 Using TCP/IP Protocol 4–23
Page 72

Define New Printer Ports
If you want to define new printer ports after you have
installed the Windows 95 Printing System Utility , follow
these steps.
1. From Windows 95 open the control panels. (Select
the Start menu, then the Settings submenu, then the
Control Panel menu option.)
2. Open the Printers control panel.
3. If you want to use the PCL 5e driver open the NEC
Silentwriter 1700 Se ries icon. If you want to use the
PostScript driver open the NEC 1700 Series
PostScript L2 icon.
4. In the driver window select the Properties menu
option from the Printer menu.
5. Click on the Details tab of the Properties window,
6. In the Details tab of the Properties window, select
the Add Port option to open the Add Port dialog
box.
7. In the Add Port dialog box click the Other radio
button. Select TCP/IP Printing System under Other.
8. Click the OK button in the Add Port dialog box to
open the TCP/IP Printing System dialog box.
9. Enter the Silentwriter’s IP address in the TCP/IP
Printing System dialog box. Click the OK button to
close the TCP/IP Printing System dialog box.
10. Click the Capture Printer Port button.
11. In the Capture Printer Port dialog box open the
pull-down menu next to Device. Select a printer
port and click the Reconnect at logon checkbox to
turn it on.
12. Click the OK button to close the Capture Printer
Port dialog box and return to the Details tab of the
Properties window.
13. Click the Apply button.
14. Click OK to leave the Properties option.
15. To close the driver window, select the Close option
from the Printer menu.
4–24 1765 Network Printer Configuration Guide
Page 73

Windows NT Using TCP/IP Protocol
If you will operate your Silentwriter with a
Windows NT server/workstation, you may use either
TCP/IP or DLC network protocols. Follow these st eps
to connect your Silentwriter to a network using TCP/IP
network protocol. To connect yo ur S ilentwriter to a
network using DLC protocol, see page 4-30.
The following steps summarize ho w to connect your
Silentwriter.
1. Install the sof t ware.
2. Identify the printer.
These are described in detail below.
Install the Software
Before you begin you will need to know the IP address,
subnet mask, printer name, and default gateway for
your workstation. Your system administrator will know
this information.
The first time you set up the Silentwriter the IP address
and subnet mask will have factory default values of
11.22.33.44 and 255.0.0.0 respectively. To change those
values see “Changing TCP/IP IP Address” and
“Changing TCP/IP Subnet Mask” on page 5-33.
1. From Windows NT open the Main icon.
2. Open the Control Panel icon, then select the
Network control panel.
3. Select Add Software from the Network Settings
window.
4. Select TCP/IP Protocol and Related Components
from the Add Software dialog box. Select Continue.
5. Select TCP/IP Network Printing Support from the
Windows NT TCP/IP Installation Options dialog
box. Click Continue to add the TCP/IP printing
protocol.
6. From the Network Set tings di alog box sele ct TCP/IP
Protocol. Then click the Configure button to move
to the TCP/IP Configuration dialog box.
7. In the TCP/IP Configuration dialog box type the IP
address, subnet mask, and default gateway for the
workstation in the text boxes. Click OK to leave the
TCP/IP Configuration dialog box.
8. Click OK to leave the Network Settings men u and
reboot Windows NT.
4 Configuring Your Network Printer
Windows NT Using TCP/IP Protocol 4–25
Page 74

Identify the Printer
Before you begin you will need to know the IP address
and printer name for your Silentwriter . Th is information
can be found on the configuration page. See “Print a
Configuration Page” on page 2-13.
1. From Windows NT open the Main icon.
2. Open the Control Panel icon, then open the Printers
contro l p a nel.
3. From the Print Manager Control Panel select the
Create Printer option from the Printer menu.
4. Type the printer name from the configuration page
in the Printer Name text box. The name can be up to
32 characters long.
5. Select a printer driver from the pulldown list next to
Driver in the Create Printer dialog box. For
PostScript printing select HP Laserjet 4/4M Plus
PS600. For PCL printing select HP Laserjet 4M
Plus.
6. In the Print To... box, scroll down to Other... and
select it.
7. In the Print Destinations dialog box select LPR Port
from the Available Print Monito r l ist. Then click
OK.
8. From the Add LPR Compatible Printer dialog box,
type the IP address in the Address of Host
Providing lpd text box. T ype the printer name in the
Name of Printer on that Machine text box.
9. Click OK to leave the Add LPR Compatible Printer
dialog box.
10. If you want to share the printer on the network,
select Share this Printer on Network in the Create
Printer window. Type the printer name in the Share
Name text box. Type the location in the Location
text box. Click OK.
11. Under Default select the newly defined printer.
12. A window will appear with the printer name as the
title. Close this window to see a Silentwriter icon in
the Print Manager.
13. Close the Print Manager.
4–26 1765 Network Printer Configuration Guide
Page 75

UNIX Using TCP/IP Protocol
This section describes how to add your Silentwriter to a
network using BSD UNIX and the TCP/IP network
protocol.
The following steps summarize how to configure the
Silentwriter and your netwo rk.
1. Identify the printer.
2. Establish the printer on the host computer.
3. Send documents to the printer.
Identify the Printer
Before you begin you will need to know the IP address
and node address for the Silentwriter. This information
is included on the configuration page. See “Print a
Configuration Page” on page 2-13.
In UNIX networks, each component of the network has
a unique IP address. If you need to check the IP addr ess
for the Silentwriter, use the ping command as shown in
step 3.
Follow these steps to identify the printer on the
network.
1. Use a text editor to add the Silentwriter IP address
and name to the /etc/hosts file on the host
computer. The entry in th e /etc/hosts file has the
following format
<xxx.xxx.xxx.xxx><host name>
where <xxx.xxx.xxx.xxx> is the IP address and
<host name> is the printer name you want to use. If
you want to use a new IP address, enter the new
address in the host table. An example entry is
11.22.33.26 NP015626
2. Add the LAN board entry to the host computer’s
address conversion table with the arp command as
shown below
arp -s <host name> <node address>
Where <host name> is the Silentwriter’s name and
the <node address> is the Silentwriter’s MAC
address. For example,
arp -s NP015626 00:A0:92:01:56:26
3. If you want to check the IP address, use the ping
command with the Silentwriter name.
ping NP015626
Print out a configuration page to confirm the new IP
address. See “Print a Configuration Page” on
page 2-13.
4 Configuring Your Network Printer
UNIX Using TCP/IP Protocol 4–27
Page 76

Establish the Printer on the Host Computer
You can print documents to the Silentwriter with either
the lpr or ftp command. Once the /etc/hosts file
contains the IP address and name of your Silentwriter,
you may use ftp to print documents. If you wish to use
the lpr command you must
1. Add the Silentwriter to the /etc/printcap files
2. Set up remote printing
Set Up Remote Printing
Execute the following commands to make a directory
for the spooler and enable remote printing.
mkdir /usr/spool/lpd/<printer>
lpsystem -t bsd <host name>
lpadmin -p <printer> -s <host name>
accept <printer>
enable <printer>
Add the Silentwriter to the /etc/printcap File
The printcap file entry has the following form
<host name>:\
:lp=:rm=<host name>:rp=<filter>:
sd=<spool dir>:
<host name> is the name defined in the /etc/hosts
file.
<filter> is one of the following filters:
lpb: No filtering. Use for binary files.
lpa: Change LF to CR+LF. Converts the LF line-feed
code (0A) to CR+LF (0D0A).
lpbf: lpb+FF. Adds the FF code (0C) to the end of
the file.
lpaf: lpa+FF. Converts the LF into CR+LF and adds
the FF code (0C) to the end of the file.
The default filter is lpb but for most print requests you
should use lpa or lpaf to ensure correct formatting for
the output.
An example printcap file entry is show n b e lo w.
NP015626:\
:lp=:rm=11.22.33.26:rp=lpaf:sd=/usr/
spool/lpd/NP015626:
The host name can be the same as the printer name.
For example,
mkdir /usr/spool/lpd/NP015626
lpsystem -t bsd NP015626
lpadmin -p NP015626 -s NP015626
accept NP015626
enable NP015626
Everything after the “\” appears on the same line with
no spaces.
4–28 1765 Network Printer Configuration Guide
Page 77

Send Documents to the Printer
You may use the lp, lpr, or ftp command to send
print jobs to your Silentwriter.
Printing With the lpr Command
To use the lpr command, enter the following
lpr -d<printer name> <file name>
where <printer name> is the host name.
An example is
lpr -dNP015626 test.dat
Printing With the ftp Command
The ftp command is usually used for transferring data
between computers on the UNIX platform. The
Silentwriter’s LAN card supports ftp and can receive
files from a client. Follow these steps to print using ftp.
1. Run ftp.
2. At the ftp prompt type
open <IP address>
where <IP address> is the IP address from the
Silentwriter’s configura tion page.
You ca n also type
open <host name>
where <host name> is defined with the lpsystem
command.
3. Ftp will prompt you for a user login. Press enter to
accept the default value (none).
4. At the ftp prompt type
ascii
to set the data transmission mode to as cii.
5. At the ftp prompt type
put <filename>
where <filename> is the name of the data file.
6. When the transfer is complete type
quit
to leave ftp.
4 Configuring Your Network Printer
UNIX Using TCP/IP Protocol 4–29
Page 78

Windows NT Using DLC Protocol
Before you begin you will need to know the LAN card
name and MAC Address. This information is included
on the configuration page. See “Print a Configuration
Page” on page 2-13.
The following steps summarize ho w to connect your
Silentwriter.
1. Install software.
2. Identify the printer.
3. Establish the printer on the network.
These are described in detail below.
Install the Software
1. From Windows NT open the Main icon.
2. Open the Control Panel icon, then select the
Network control panel.
3. If DLC Protocol is not listed under Installed
Network Softw a re, select Add Software from the
Network Settings dialog box. Otherwise , skip to
step 6.
4. Select DLC Protocol from the Add Software dialog
box. Click Continue.
5. You will need your Windows NT system diskettes
or CD-ROM. In the Windows NT Setup dialog box
enter the directory for the Windows NT disk. Click
Continue.
6. Select OK to leave the Network Settings dialog box.
7. If you have just in s talled DLC Protoco l, resta r t y ou r
computer .
4–30 1765 Network Printer Configuration Guide
Page 79

Identifying the Printer
1. From Windows NT open the Main icon.
2. Open the Control Panel icon. Open the Print
Manager control panel.
3. Select Create Printer from the Printer menu in the
Print Manager window. Enter the printer name
from the configuration sheet in the Printer Name
text box.
4. Select the HP Laserjet 4/4M Plus PS600 driver from
the pulldown menu next to Driver in the Create
Printer dialog box.
5. In the Create Printer dialog box, type a description
of the printer in the Printer Description text box.
6. In the Create Printer dialog box click Print To.
7. In the Print To box, select the pulldown menu and
scroll down to Other... Select it to move to the Print
Destinations dialog box.
8. From the Available Print Monitor list select
Hewlett-Packard Network Port. Click OK to open
the Add Hewlett-Packard Peripheral Port dialog
box.
9. Type the LAN card name in the Name text box.
10. Select the Silentwriter’s LAN card MAC address
from the Card Address list in the Add HewlettPackard Peripheral Port dialog box.
11. Click OK to leave the Add Hewlett-Packard
Peripheral Port dialog box and return to the Create
Printer dialog box.
12. If you want to share the Silentwriter click Share this
Printer on the Network in the Create Printer dialog
box. Enter the Share Name and Location.
13. Click OK to close the Create Printer dialog box.
14. The Printer Setup dialog box will open. Click OK to
close the Printer Setup dialog box.
4 Configuring Your Network Printer
If you want the Silentwriter to be the default printer,
select it from the pulldown menu next to Default in the
Print Manager window.
Windows NT Using DLC Protocol 4–31
Page 80

AppleTalk
The following steps summarize ho w to connect your
Silentwriter to an AppleTalk network.
1. Select the network.
2. Select the printer.
These are described in detail below.
Select the Network
You may use the Silentwriter printer with either
EtherTalk or LocalTalk networks. Your Macintosh is
already configured to connect to LocalTalk networks.
While EtherTalk can run up to eight times faster than
LocalTalk, you must install an EtherTalk-compatible
network card in your computer to connect to EtherTalk
networks.
Before you begin you will need to know the printer’s
name. If you are using EtherT alk, you will need to know
the printer’s EtherTalk zone. This information is
included on the configuration page. See “Print a
Configuration Page” on page 2-13.
WARNING!
names and AppleTalk zones to prevent conflicts in the
network. Check with the system administrator before
making any changes in the printer name or AppleTalk
zone.
AppleTalk depends on unique printe r
4–32 1765 Network Printer Configuration Guide
Page 81

Follow these steps to select the network.
1. Select the Control Panels option from the Apple
menu.
2. Open the Network control panel.
3. In the AppleTalk Connection window, select the
icon that represents the network type you want to
use, either LocalTalk or EtherTalk.
4. If you are using an EtherTalk network that has been
divided into zones, select the appropriate zone.
5. Close the Network control panel.
6. Run the NEC 1765 software for Macintosh.
7. Select the pull-down menu under AppleTalk Zone
and choose the printer’s AppleTalk zone. The
factory default zone is “*”. For more information see
“Changing the Printer’s AppleTalk Zone” on
page 5-54.
8. The default name of the printer is “NP_” followed
by six digits. If you wish, you may change the
printer name. Select the current printer name in the
scrolling list at the center of the Printer
Administration window. Select the Change Printer
Name button from the Printer Administration
window. Enter the new name and select OK. For
more information see “Changing the Printer Name”
on page 5-54.
9. Close the NEC 1765 software.
Select the Printer
Before printing documents, select the Silentwriter using
the Chooser. Follow these steps.
1. Select Chooser from the Apple menu. The Chooser
window appears.
2. At the bottom right side of the Chooser window,
make sure that AppleTa lk is Active.
3. Select the AppleTalk Zone from the scrolling list in
the bottom left side of the Chooser window.
4. Select the LaserWriter driver icon.
5. Select the name of the Silentwriter you want to use
from the scrolling list on the right.
6. Select the Setup button at the bottom right of the
Chooser window to specify a PPD file.
7. Click the Auto Setup button. Make sure that the
NEC Silentwriter 1700 PPD file is selected. If not,
select it from the scrolling list of printer drivers.
Click the Select button to leave the Select PPD
dialog box and move to the Configure dialog box.
8. Check the list of hardware features to make sure it
reflects the features currently installed on your
Silentwriter. Hardware features include optional
cassettes, duplex and offset trays, and envelope
feeders.
9. When satisfied with your selections, select the OK
button to leave the Configure dialog box.
10. Select the OK button to leave the Setup dialog box.
11. Close the Chooser window.
4 Configuring Your Network Printer
note:
your Silentwriter, use the Configure dialog box to
update the printer setup.
If you install additional hardware features in
AppleTalk 4–33
Page 82

LAN Manager v2.2
This section describes how to add your Silentwriter to a
network using OS/2 and LAN Manager version 2.2. You
need to complete the following steps.
1. Install software. NEC provides software to simplify
the configuration process.
2. Identify the printer. Create files to define and
activate the printer.
3. Print documents.
Before you begin you will need to know the last ten
digits of the MAC address for the printer. This
information is included on the configuration page. See
“Print a Configuration Page” on page 2-13.
Install Software
Follow these steps to install the NEC printing uti lities
for OS/2.
1. Insert the NEC diskette containing the OS/2
printing utilities in the appropriate drive. This
example uses drive a: and assumes that the hard
drive is drive c:.
2. Create a directory on the hard drive called NECPR
and copy the NEC LAN Manager utility to that
directory.
copy a:\OS2\*.* c:\NECPR
The following files will be copied to the NECPR
directory
ADDPORT.CMD
DELPORT.CMD
PORTCHG.EXE
REMBEU.EXE
REMPRT3.EXE
REMSTAT3.EXE
LANMAN3.TXT
LMSETUP.TXT
3. Move to the NECPR directory.
cd c:\NECPR
4–34 1765 Network Printer Configuration Guide
Page 83

Identify the Printer
This section describes an example of setting the printer
for a network which uses LAN Manager. For more
information see the on-line help manual that came with
your LAN Manager system. The directions in this
section assume that you are in the NECPR directory that
you created in the previous section.
1. Use the ADDPORT command to create a printer port
for each Silentwriter.
ADDPORT <port name>
For example,
ADDPORT LMPORT05
If the command executes successfully, you will see
this message.
Data successfully added
Application : PM_SPOLLER_PORT
Key : \PIPE\<port name>
Date : ;
2. Create a text file named NECPR.INI in the
c:\NECPR directory. Each line in the text file has the
format
NECPR<MAC address> <port name>
For example,
NECPRA092901705 LMPORT05
3. Use the REMPRT3 command to start remote print
service.
REMPRT3 @NECPR.INI
If the command executes successfully, you will see
this message.
ITC REMOTE PRINT service starting
(C) Copyright ITC H. Bollman
Manufacturers 1993. Ver 3.9
ITC REMOTE PRINT service for
<port name> started successfully.
4. If you want to share the Silentwriter across the
network, use the NET SHARE command. After you
enter the NET SHARE command, a prompt appears
to ask if you want to create a queue. Type “y” at the
prompt to confirm that you want to create a queue.
NET SHARE
<share name>=\PIPE\<port name> /PRINT
For example,
NET SHARE LMPRNT05=\PIPE\LMPORT05
/PRINT
5. To use the network printer, enter the NET USE
command.
NET USE <device>
\\<server name>\<share name>
For example,
NET USE LPT1 \\LMSERVER\LMPRNT05
You ca n also use the NET USE command without any
parameters to display network resources. For example,
NET USE
Print a Document
To print a document use the PRINT command.
PRINT /D:<device> <filename>
For example,
PRINT /D:LPT1 CONFIG.SYS
or
PRINT CONFIG.SYS
The default device is LPT1.
4 Configuring Your Network Printer
LAN Manager v2.2 4–35
Page 84

OS/2 Warp Server or
LAN Server v4.0
This section describes how to add your Silentwriter to a
network using OS/2 and Warp Server or LAN Server
version 4.0. You need to complete the following steps.
1. Install software. NEC provides software to simplify
the configuration process.
2. Identify the printer. Create files to define and
activate the printer.
3. Print documents.
Before you begin you will need to know the last ten
digits of the MAC address for the printer. This
information is included on the configuration page. See
“Print a Configuration Page” on page 2-13.
Install Software
Follow these steps to install the NEC printing uti lities
for OS/2. These directions assume you are at the OS/2
window prompt.
1. Insert the NEC diskette containing the OS/2
printing utilities in the appropriate drive. This
example uses drive a: and assumes that the hard
drive is drive c:.
2. Create a directory on the hard drive called NECPR
and copy the NEC LAN Manager utility to that
directory.
copy a:\OS2\*.* c:\NECPR
The following files will be copied to the NECPR
directory
ADDPORT.CMD
DELPORT.CMD
PORTCHG.EXE
REMBEU.EXE
REMPRT3.EXE
REMSTAT3.EXE
LANMAN3.TXT
LMSETUP.TXT
3. Move to the NECPR directory.
cd c:\NECPR
4–36 1765 Network Printer Configuration Guide
Page 85

Identify the Printer
This section describes an example of setting the printer
for a network which uses Warp Server or LAN Server.
The directions in this section assume that you are at the
OS/2 prompt and in the NECPR directory that you
created in the previous section.
1. Use the ADDPORT command to create a printer port
for each Silentwriter.
ADDPORT <port name>
For example,
ADDPORT LSPORT05
If the command executes successfully, you will see
this message.
Data successfully added
Application : PM_SPOLLER_PORT
Key : \PIPE\<port name>
Date : ;
2. Create a text file named NECPR.INI in the
c:\NECPR directory. Each line in the text file has the
format
NECPR<MAC address> <port name>
For example,
NECPRA092901705 LSPORT05
3. Use the REMPRT3 command to start remote print
service.
REMPRT3 @NECPR.INI
If the command executes successfully, you will see
this message.
ITC REMOTE PRINT service starting
(C) Copyright ITC H. Bollman
Manufacturers 1993. Ver 3.9
ITC REMOTE PRINT service for
<port name> started successfully.
4. Move to the OS/2 Desktop to create a new printer.
Open the OS/2 System folder. Then open the
Tem plat e s folder. Drag the Printer template to open
space on the OS/2 Desktop to create a new printer.
The Create a Printer dialog box will open
automatically.
5. In the Create a Printer dialog box enter the printer
name in the Name text box. This example uses
LSPRNT05. Select the Laserjet 4M Plus printer
driver from the Printer Driver list. In the Output
Port text box type
\PIPE\<port name>
where <port name> is the port defined in step 1. This
example uses
\PIPE\LSPORT05
Click the Create button to leave the Create a Printer
dialog box and create the new printer.
6. Click the new printer icon with the right mouse
button to see the Setting menu for the printer. In
this example, the printer icon will be named
LSPRNT05.
7. Select the Start Sharing option from the Setting
menu. The Shared Resource Definition dialog box
will open.
8. In the Shared Resource Definition dialog box enter
the shared printer name in the Resource text box.
This example uses LSPRNT05. You may enter a
description in the Description text box, for
example, Silentwriter 1765. Click the OK button to
save changes and close the Shared Resource
Definition di alog box.
9. To use the network printer, enter the NET USE
command at the OS/2 prompt.
NET USE <device>
\\<server name>\<share name>
For example,
NET USE LPT1 \\LSSERVER\LSPRNT05
4 Configuring Your Network Printer
OS/2 Warp Server or LAN Server v4.0 4–37
Page 86

Print a Document
To print a document use the PRINT command at the
OS/2 prompt.
PRINT /D:<device> <filename>
For example,
PRINT /D:LPT1 CONFIG.SYS
or
PRINT CONFIG.SYS
The default device is LPT1.
4–38 1765 Network Printer Configuration Guide
Page 87

SNMP
The Silentwriter has limited SNMP capabilities. SNMP
recognizes the Silentwriter and displays the information
shown below.
Use any SNMP manager to view the following
information.
4 Configuring Your Network Printer
SNMP 4–39
Page 88

4–40 1765 Network Printer Configuration Guide
Page 89

NEC 1765 A
DMINISTRATION
OFTWARE
S
5
Overview
This chapter describes the NEC 1765 Administration
software. It contains the following sections.
• NEC 1765 Software
• NEC 1765 Administration Software for NetWare
• NEC 1765 Administration Software for TCP/IP
• NEC 1765 Software for AppleTalk
NEC 1765 Software
NEC 1765 software allows you to configure and
administer the Silentwriter 1765 from your workstation
or networked computer. There are three versions of the
Administration software.
• NEC 1765 Administration software for NetWare
networks on Windows systems
• NEC 1765 Administration software for TCP/IP
networks on Windows systems
• NEC 1765 software for AppleTalk networks on
Mac OS systems
You may have already installed the NEC 1765 software.
If you have not installed your Silentwriter network
administration software yet, see Chapter 3, “Ins talling
NEC 1765 Software.”
This chapter describes the software that you installed. If
you have a NetWare or TCP/IP network, your software
is divided into two applications, NEC 1765
Administration software and NEC 1765 Client software.
If you are using Mac OS, you have only one NEC 1765
software application.
5–1
Page 90

The NEC 1765 Administration software allows you to
• Display all printers on the network
• Modify the printer name
• Monitor the printer status
• Check the printer configuration and installed
options
• Change the IP address and subnet mask (NetWare
and TCP/IP versions only)
• Change the printer operation mode from network
printer mode to remote printer mode and back
(NetWare version only)
• Change AppleTalk Zones (AppleTalk version only)
For information on using NEC 1765
Administration software with NetWare
networks on Windows systems, turn to
“NEC 1765 Administration Software for
NetWare” on page 5-3.
For information on using NEC 1765
Administration software with TCP/IP networks
on Windows systems, turn to “NEC 1765
Administration Software for TCP/IP” on
page 5-27.
note:
are able to change printer names and AppleTalk Zones.
Ask the system administrator before changing this
information to prevent system conflicts.
There are two versions of Client software.
• NEC 1765 Client softwa re for NetWare networks on
Windows systems
• NEC 1765 Client software for TCP/IP networks on
Windows systems
The NEC 1 765 Client software allows you to
• Monitor the printer status
• Check the printer configuration and installed
options
• Monitor the current pri nt jobs
• Monitor the print queue
• Delete your own print jobs
All users of NEC 1765 software on Mac OS
For information on using NEC 1765 with
Mac OS systems, turn to “NEC 1765 Software
for AppleTalk” on page 5-51.
For information on using NEC 1765 Client
software with NetWare or TCP/IP networks on
Windows systems, see Chapter 6.
5–2 1765 Network Printer Configuration Guide
Page 91

NEC 1765 Administration Software
for NetWare
The NEC 1765 Administration software for NetWare
allows you to display and modify configuration
information for the NEC Silentwriter 1765. The next
section describes specific tasks and the steps to
complete them. For information about specific
windows, dialog boxes, and menu options see
page 5-14.
note:
difficulties with Windows resources while using NEC
1765 Administration software for NetWare. If your
Windows 3.1x system crashes frequently, try editing
your WIN.INI file. To verify that the problem is caused
by Windows reso urces , m odify t he W IN.INI file so that
both load and run commands are empty as shown
below. Comment out the original load and run
commands by typing a “;” in front of them.
load=
;load=nwpopup.exe stbvisn.exe
run=
;run=c:\SWRITER\wspd.exe
Then restart Windows. If that helps, experiment with
adding one load or run command at a time. You must
restart Windo ws each time the WIN.INI file is edited fo r
changes to take effect. If the problem persists, consider
upgrading to Windows 95.
Windows 3.1x users may encounter
Using NEC 1765 Administration Software
for NetWare
This section describes the steps to perform specific
network and printer configuration tasks with NEC 1765
Administration software for NetWare. Detailed
information about NEC 1765 Administration software
windows, dialog boxes, and menus begins on “NEC
1765 Printer Administration Window” on page 5-14.
Displaying Available Printers
You can display a list of available prin ters on the
network and sort and filter the list.
1. Open the NEC 1765 Administration software.
2. The NEC 1765 Printer Administration window
displays a list of all printers on the network that are
configured to work with NEC 1765 software.
You can sort the list by printer name, MAC address, or
network number.
1. Select the Sort menu from the Printer
Administrat i on window menu bar.
2. Select the sort key from the menu.
You can also filter the list by network number.
1. Select the Filter menu from the Printer
Administrat i on window menu bar.
2. In the Network Number dialog box select the
network number of the printers you wish to display .
3. Click the OK button.
5 NEC 1765 Administration Software
NEC 1765 Administration Software for NetWare 5–3
Page 92

Displaying LAN Card Parameters
You can display the LAN card type, firmware version,
serial number, and MAC address.
1. Select the printer you want to know about from the
list of printers in the Printer Administration
window.
2. From the Printer Administration window cli c k the
LAN Card button or select the LAN Card menu
option from the Configure menu.
3. The LAN Card Parameters dialog box displays the
LAN card information.
4. To leave the LAN Card Parameters dialog box,
select the Save or Cancel button.
Changing the Printer Name
Your LAN card arrives with a factory default name. The
factory default name starts with “NP_” follo wed by six
digits. Y ou can use the LAN Card Parameters dialog box
to change the printer name.
1. Select the printer you want to change from the list of
printers in the Printer Administration window.
2. From the Printer Administration window cli c k the
LAN Card button or select the LAN Card menu
option from the Configure menu.
3. The LAN Card Parameters dialog box displays the
default and current printer names.
4. Type the new name in the Printer Name text box.
5. Select the Save button to save the new name and
leave the LAN Card Parameters dialog box
Or
Select the Cancel button to keep the old name and
leave the LAN Card Parameters dialog box.
Changing the Printer Polling Rate
The printer polling rate determines how often the LAN
card obtains status and configuration information from
the printer. It is defined in tenths of a second. The
default is 50 ten t hs of a second and th e rate can be se t t o
0 or to any number in the range of 20 to 255 tenths of a
second. If the rate is set to 0, the status information will
not be updated.
1. Select the printer you want to change from the list of
printers in the Printer Administration window.
2. From the Printer Administration window click the
LAN Card button or select the LAN Card menu
option from the Configure menu.
3. The LAN Card Parameters dialog box displays the
current polling rate.
4. Type the new polling rate in the Printer Polling
Rate text box.
5. Select the Save button to save the new information
and leave the LAN Card Parameters dialog box
Or
Select the Cancel button to keep the old information
and leave the LAN Card Parameters dialog box.
note:
configuration information is updated in the NEC 1765
software displays. The printer polling rate and busy
timeout time describe interactions between the LAN
card and the Silentwriter. The status polling rate and
response timeout describe interactions betw een the
NEC 1765 software and the LAN card.
Four values define how often status and
note:
other default settings by resetting the LAN card. See
“Restoring Factory LAN Card Settings” on page 2-8.
5–4 1765 Network Printer Configuration Guide
You can restore the factory default name and
Page 93

Changing the Busy Timeout Time
The busy timeout time determines how long the LAN
card waits for information from the printer before
setting the printer status to Busy. The timeout time is
defined in seconds. The default is 15 seconds and the
range is 15 to 255 seconds.
Follow these steps to change the printer response
timeout.
1. Select the printer you want to change from the list of
printers in the Printer Administration window.
2. From the Printer Administration window cli c k the
LAN Card button or select the LAN Card menu
option from the Configure menu.
3. The LAN Card Parameters dialog box displays the
current busy timeout time.
4. Type the n ew busy timeout time in the Busy
Timeout text box.
5. Select the Save button to save the new info rm ation
and leave the LAN Card Parameters dialog box
Or
Select the Cancel button to keep the old information
and leave the LAN Card Parameters dialog box.
Displaying NetWare Network Number and MAC Address
You can display the network number and MAC addr ess
for printers on NetWare networks.
1. Select the printer you want information about from
the list of printers in the Printer Administration
window.
2. From the Printer Administration window cli c k the
NetWare button or select the NetWare menu option
from the Configure menu.
3. The NetWare Configuration dialog box displays the
network number and MAC Address.
4. To leave the NetWare Configuration dialog box,
select the Save or Cancel button.
Changing NetWare Print Server Name
You can display and change the print server name. In
most cases you should use the same name for the print
server and the printer. Use a different name if the print
server resides on a separate computer, for example, if
the Silentwriter is operating in Remote Printer mode.
1. Select the printer you want to change from the list of
printers in the Printer Administration window.
2. From the Printer Administration window click the
NetWare button or select the NetW are menu op t i on
from the Configure menu.
3. The NetWare Configuration dialog box displays the
current print server name.
4. Type the new name in the Print Server Name text
box.
5. Select the Save button to save the new name and
leave the NetWare Configuration dialog box
Or
Select the Cancel button to keep the old name and
leave the NetWare Configuration dialog box.
note:
Printer Administration wi ndow and on t he configurat ion
page, but will not be reflected in PCONSOLE.
The new print server name will appear in the
5 NEC 1765 Administration Software
NEC 1765 Administration Software for NetWare 5–5
Page 94

Changing the Printer Operating Mode for NetWare
You can set the operating mode to Network Printer or
Remote Printer mode. For a description of operating
modes, see “Select the Operating Mode” on page 4-3.
1. Select the printer you want to change from the list of
printers in the Printer Administration window.
2. From the Printer Administration window cli c k the
NetWare button or select the NetWare menu option
from the Configure menu.
3. The NetWare Configuration dialog box displays the
current operating mode.
4. Select the button of the new mode.
5. Select the Save button to save the new operating
mode and leave the NetWare Configuration dialog
box
Or
Select the Cancel button to keep the old operating
mode and leave the NetWare Configuration dialog
box.
Changing NetWare Remote Printer Name and Number
If you are using your Silentwriter in Remote Printer
mode, you can display and change the remote printer
name and number.
1. Select the printer you want to change from the list of
printers in the Printer Administration window.
2. From the Printer Administration window click the
NetWare button or select the NetW are menu op t i on
from the Configure menu.
3. The NetWare Configuration dialog box displays the
current print server name.
4. Type the new name in the Printer Name text box.
5. Type the new number in the Printer Number text
box.
6. Select the Save button to save the new nam e and
leave the NetWare Configuration dialog box
Or
Select the Cancel button to keep the old name and
leave the NetWare Configuration dialog box.
5–6 1765 Network Printer Configuration Guide
Page 95

Limiting the Silentwriter to a Single File Server
NetWare network operating system software allows a
single printer to connect to multiple file servers. Y ou can
connect your Silentwriter to up to 8 file servers. On
multiple file server networks, the Silentwriter searches
for and contacts any file servers reachable through the
router. If your NetWare network uses an analog or
digital telephone network, for example via an ISDN
router, scanning for file servers can result in poor
system performance as well as high network costs. To
prevent scanning for file servers and limit the printer to
only one file server, follow the steps below.
1. Select the printer you want to change from the list of
printers in the Printer Administration window.
2. From the Printer Administration window cli c k the
NetWare button or select the NetWare menu option
from the Configure menu.
3. In the NetWare Configuration dialog box specify a
single file server in the Limited File Server text box.
4. Select the Save button to save the limited file server
and leave the NetWare Configuration dialog box
Or
Select the Cancel button to keep the previous
configuration and leave the NetWare Configuration
dialog box.
Once you have specified a single file server, the
NEC 1765 software will no longer scan for file servers
and the scan interval will change to 0.
Changing NetWare File Server Scanning
You may choose whether or not NEC 1765 software will
scan for file se rvers.
1. Select the printer you want to change from the list of
printers in the Printer Administration window.
2. From the Printer Administration window click the
NetWare button or select the NetW are menu op t i on
from the Configure menu.
3. Click the Scan for File Servers check box.
4. Select the Save button to save the new name and
leave the NetWare Configuration dialog box
Or
Select the Cancel button to keep the old name and
leave the NetWare Configuration dialog box.
Changing NetWare File Server Scan Interval
If NEC 1765 Administration software is scanning for file
servers, you can change the scan interval. The scan
interval is measured in minutes and you can choose an
interval between 1 and 255 minutes. The default is 5
minutes. If you have specified a limited file server or
turned Scan for File Servers off, the scan interval will be
set to 0.
1. Select the printer you want to change from the list of
printers in the Printer Administration window.
2. From the Printer Administration window click the
NetWare button or select the NetW are menu op t i on
from the Configure menu.
3. Type the new scan interval in the Scan Interval text
box.
4. Select the Save button to save the new scan interval
and leave the NetWare Configuration dialog box
Or
Select the Cancel button to keep the old scan
interval and leave the NetWare Configuration
dialog box.
5 NEC 1765 Administration Software
NEC 1765 Administration Software for NetWare 5–7
Page 96

Changing NetWare File Server Queue Polling Rate
You can change the queue polling rate. The queue
polling rate is measured in seconds and can be between
1 and 255 seconds. The queue polling rate is a measure
of the frequency with which the LAN card checks for
jobs in the print queue. If the polling rate is set to 5, the
LAN card checks the print queue every 5 seconds.
1. Select the printer you want to change from the list of
printers in the Printer Administration window.
2. From the Printer Administration window cli c k the
NetWare button or select the NetWare menu option
from the Configure menu.
3. Type the new queue polling rate in the Queue
Polling Rate text box.
4. Select the Save button to save the new queue
polling rate and leave the NetWare Configuration
dialog box
Or
Select the Cancel button to keep the old queue
polling rate and leave the NetWare Configuration
dialog box.
Changing N etWare Password
You ca n change the password for the printer.
note:
password defined in PCONSOLE in order to print
documents on the Silentwriter 1765. For more
information on setting the password in PCONSOLE,
see “Define the Password” on page 4-8.
1. Select the printer you want to change from the list of
printers in the Printer Administration window.
2. From the Printer Administration window click the
NetWare button or select the NetW are menu op t i on
from the Configure menu.
3. Select the Change Password butt on from the
NetWare Configuration dialog box to open the
Password dialog box.
4. Type the current password in the Current Password
text box. If no password has been defined, as with
new printers, leave Current Password blank.
5. Type the new password in the New Password text
box.
6. Verify the new password by retyping it in the
Confirm Password text box.
7. Select the Save button to save the new pa ssword
and leave the Password dialog box
Or
Select the Cancel button to keep the old password
and leave the Password dialog box.
8. To leave the NetWare Configuration dialog box,
select the Save or Cancel button.
The printer password must match the
5–8 1765 Network Printer Configuration Guide
Page 97

Changing TCP/IP IP Address
Follow these steps to change the TCP/IP IP address.
1. Select the printer you want to change from the list of
printers in the Printer Administration window.
2. From the Printer Administration window cli c k the
TCP/IP button or select the TCP/IP menu option
from the Configure menu.
3. Type the new IP address in the IP Address text box.
4. Select the Save button to save the new IP address
and leave the TCP/IP Parameters dialog box
Or
Select the Cancel button to keep the old IP address
and leave the TCP/IP Parameters dialog box.
Changing the TCP/IP Subnet Mask
Follow these steps to change the TCP/IP subnet mask.
1. Select the printer you want to change from the list of
printers in the Printer Administration window.
2. From the Printer Administration window click the
TCP/IP button or select the TCP/IP menu option
from the Configure menu.
3. Type the new subnet mask in the Subnet Mask text
box.
4. Select the Save button to save the new subnet mask
and leave the TCP/IP Parameters dialog box
Or
Select the Cancel button to keep the old subnet
mask and leave the TCP/IP Parameters dialog box.
5 NEC 1765 Administration Software
NEC 1765 Administration Software for NetWare 5–9
Page 98

Setting the TCP/IP Auto IP Address
If Auto IP is on, you can use the UNIX commands arp
and ping to change the LAN card's IP addr ess. Arp is a
host command which displays or mo difies the host's
ARP entry table to assign a MAC address to a known IP
address. Follow these steps to set Auto IP to On.
1. Select the printer you want to change from the list of
printers in the Printer Administration window.
2. From the Printer Administration window cli c k the
TCP/IP button or select the TCP/IP menu option
from the Configure menu.
3. Set the Auto IP Address radio button to On.
4. Select the Save button to save the new auto IP
address selection method and leave the TCP/IP
Parameters dialog box
Or
Select the Cancel button to keep the old auto IP
address selection method and leave the TCP/IP
Parameters dialog box.
note:
changing the Auto IP Address setting has no effect.
If your network does not support arp,
Follow these steps to change the LAN card's IP address
using Auto IP. You wi ll need to know the host's IP
address, the LAN card's old IP address, and the new IP
address for the LAN card. Your system administrator
will know the old IP address. Print a configuration page
to see the LAN card’s IP address. See “Print a
Configuration Page” on page 2-13.
note:
IP address before following these steps.
1. Open the command prompt window.
2. Use the route command to add the LAN card's IP
address to the ARP table.
route add <LAN card old IP> <host IP>
For example,
route add 11.22.33.44 11.22.33.51
Some operating systems require a 0 at the end of the
route add command. Check with your system
administrator.
3. Use the ping command to get the target LAN card
information. Be sure to turn off any other
Silentwriters with the same IP address first.
ping <LAN card old IP>
For example,
ping 11.22.33.44
4. Use the arp command to get the LAN card's MAC
address.
arp -a
The LAN card's MAC address will be displayed.
Interface: <host IP>
Internet Address Physical Address Type
<LAN card old IP><LAN card MAC>dynamic
For example,
Interface: 11.22.33.51
Internet Physical Address Type
11.22.33.44 00-a0-92-01-56-26 dynamic
Turn off any other Silentwriters with the same
5–10 1765 Network Printer Configuration Guide
Page 99

5. Make a new ARP entry for the LAN card with its
new IP address.
arp -s <LAN card new IP> <LAN card MAC>
For example,
arp -s 11.22.33.26 00-a0-92-01-56-26
6. Enter ping with the new address.
ping <LAN card new IP>
For example,
ping 11.22.33.26
7. Print a configuration page to confirm the new IP
address. See “Print a Configuration Page” on
page 2-13. Auto IP will be turned off automatically.
8. Delete the old LAN card IP address from the ARP
table with the route command.
route delete <LAN card old IP>
<host IP>
For example,
route delete 11.22.33.44 11.22.33.51
Some operating systems require a 0 at the end of the
route delete command. Check with your system
administrator.
Displaying Silentwriter Printer Configuration
Silentwriter printer information includes the model
name, current memory size, current printer emulation,
available printer languages, current paper source, and
available paper sources.
To see this informatio n
1. Select the printer you want information about from
the list of printers in the Printer Administration
window.
2. From the Printer Administration window click the
Printer button or select the Printer menu option
from the Configure menu.
3. The Printer Configuration dialog box displays the
information.
4. Select the OK button to leave the Printer
Configuration dialog box.
5 NEC 1765 Administration Software
NEC 1765 Administration Software for NetWare 5–11
Page 100

Displaying Silentwriter Printer Options
To display w hich options have been installed in your
Silentwriter, open the Printer Options dialog box.
1. Select the printer you want information about from
the list of printers in the Printer Administration
window.
2. From the Printer Administration window cli c k the
Printer button or select the Printer menu option
from the Configure menu.
3. Select the Options button from the Printer
Configuration dialog box.
4. Select the OK button to leave the Printer Options
dialog box.
5. Select the OK button to leave the Printer
Configuration dialog box.
Changing the Status Polling Rate
The status polling rate determines how often the
NEC 1765 Administration software requests updates
from the LAN card. The rate is defined in seconds with
a default value of 30 seconds and a range of 5 to 255
seconds.
note:
decrease your computer’s response time. In most
situations, the default value of polling every 30 seconds
provides a good balance between polling frequency and
system performance.
1. From the Printer Administration window select the
Option menu.
2. The Time Definition dialog box displays the current
polling rate.
3. Type the new polling rate in the Status Polling Rate
text box.
4. Select the OK button to save the new info rmation
and leave the Time Definition dialog box
Or
Select the Cancel button to keep the old information
and leave the Time Definition dialog box.
Setting the polling frequency to 5 seconds can
5–12 1765 Network Printer Configuration Guide
 Loading...