

Page 1
Page 2
Table of Contents
Welcome . . . . . . . . . . . . . . . . . . . . . . . . . . . . . . . . . . . . . . . . 2
Hardware System Requirements . . . . . . . . . . . . . . . . . . . . . . 3
Drive Installation . . . . . . . . . . . . . . . . . . . . . . . . . . . . . . . . . . 4
Using Your Drive. . . . . . . . . . . . . . . . . . . . . . . . . . . . . . . . . . 6
About DVD Media Types . . . . . . . . . . . . . . . . . . . . . . . . . . . . 7
Product Specifications . . . . . . . . . . . . . . . . . . . . . . . . . . . . . 8
Disc Care . . . . . . . . . . . . . . . . . . . . . . . . . . . . . . . . . . . . . . . 9
Troubleshooting & Technical Support . . . . . . . . . . . . . . . . . 10
Warranty Information. . . . . . . . . . . . . . . . . . . . . . . . . . . . . . 11
1
Page 3
Welcome
Thank you for purchasing the NEC 16x DVD±R/RW DL
drive. Please remove your service tag sticker found on the
outer carton’s label. This label contains your drive’s service
tag number and model number and can be placed in the
space below or can be affixed to the outer cover of your PC.
You will need this information for product registration and to
obtain technical support service. To register this product
online, please visit http://www.necsam.com/registration/.
Save the box that your drive was shipped in, as NEC can not
be held accountable for damages caused by shipping in the
case of a returned product.
Service Tag Number: _______________________
Purchase Date: ____________________________
FCC NOTICE
This equipment has been tested and found to comply with the limits for a
Class B digital device, pursuant to Part 15 of the FCC Rules. These limits are
designed to provide reasonable protection against harmful interference in a
residential installation. This equipment generates, uses, and can radiate
radio frequency energy, and, if not installed and used in accordance with the
instructions, may cause harmful interference to radio communications.
However, there is no guarantee interference will not occur in a particular
installation. If this equipment causes harmful interference to radio or
television reception, which can be determined by turning the equipment off
and on, the user is encouraged to try to correct the interference by one or
more of the following measures:
■
Reorient or relocate the receiving antenna.
■
Increase the separation between the equipment and receiver.
■
Connect the equipment into an outlet on a circuit different from that to
which the receiver is connected.
■
Consult the dealer or an experienced radio/TV technician for help.
Changes or modifications of this device must be approved by the party
responsible for FCC compliance, or the user loses authority to operate
this product.
LASER WARNING
Visible and invisible laser radiation. Do not open optical housing. Avoid
direct exposure to the beam.
2
Page 4
Hardware System
Requirements
Minimum
■
Intel®Pentium®III 800 MHz.
■
256 MB memory.
■
Used for such things as data backup.
Recommended
■
Intel Pentium 4 1.0 GHz.
■
512 MB memory.
■
Highly recommended for all DVD recording.
3
Page 5
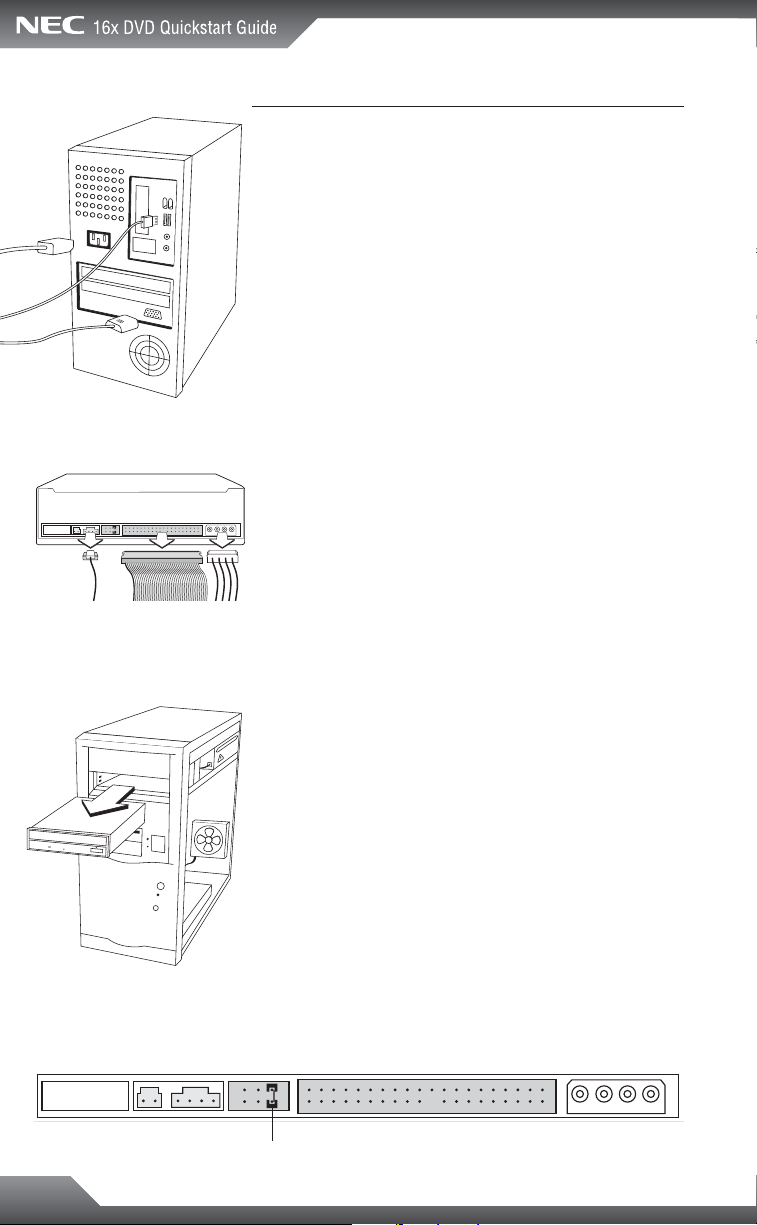
Drive Installation
! Shut down your computer and disconnect all cables
plugged into the computer. [Fig. 1]
@ Remove the computer’s case (refer to your computer’s
documentation).
# Once the cover is removed, touch a non-painted metal
surface (i.e. the power supply) to ground yourself. This is
an important step! You can damage the components
inside the computer if you do not ground yourself.
Fig. 1
Fig. 2
Fig. 3
$ If you are replacing an existing drive:
Unplug the cables from the rear of the drive. [Fig. 2]
Remove the mounting hardware holding the drive in place
(refer to your computer’s documentation).
Slide the drive out through the front of the computer. [Fig. 3]
% If you are NOT replacing an existing drive (i.e. adding an
additional drive):
Remove the front cover plate from the empty drive bay
where you are installing the drive (refer to your computer’s
documentation).
^ Check the jumper settings on the NEC DVD drive:
If you are replacing an existing drive, set the jumper to the
same setting as the drive you are replacing. The jumper is
the black plastic piece on the back of your drive bridging
two of the six pins as seen below [Fig 4]. You may need
small needle nose pliers to gently slide the jumper off.
If you are installing the DVD drive as an additional drive,
you will need to set the jumper settings according to your
system requirements (see next page).
Fig. 4
jumper
4
Page 6

Jumper Setting Tutorial:
There are three possible jumper settings: MASTER, SLAVE,
and CABLE SELECT (CSEL). When two drives are connected
to the same interface cable, one must be set to MASTER, and
one set to SLAVE. Alternatively, both drives may be set to
CABLE SELECT, in which case the system defines which
drive is MASTER and which drive is SLAVE. If only one drive
is present, set the jumper to MASTER. The NEC drive ships
with a default setting of MASTER.
If you are installing the DVD drive as a second drive, look at
the jumper settings on the second drive (already in your
system). If the settings on that drive are set to MASTER or
SLAVE, set the jumper to the opposite setting. If the existing
drive is set to CABLE SELECT (CSEL), set the jumper on the
NEC DVD drive to CSEL also.
& Slide the NEC DVD drive into the empty drive bay, from
the front of the computer. [Fig 5]
* Mount the drive to your computer’s chassis using the
existing mounting hardware, or the provided screws (refer
to your computer’s documentation).
( Connect the interface cable, making sure the red stripe
matches Pin 1 on the drive. If your drive is set to
MASTER, connect it to the endmost connector on the
cable. [Fig. 6]
) Connect your computer’s analog audio cable from the
drive’s audio connector to your sound card (not applicable
for Windows XP users or those using digital audio
playback). [Fig. 7]
1 Connect the power cable. [Fig. 7]
2 Replace the computer’s cover and re-connect all cables
that were previously unplugged.
3 Power-up the computer.
Fig. 5
Fig. 6
Fig. 7
5
Page 7

Using Your Drive
Busy
Indicator LED
Forced Eject
Hole
Busy Indicator LED: Lights up when reading or writing data.
Eject Button: Press to load or unload a disc.
Disc Tray: Open or close by pressing the eject button. Load
discs into the tray with the label side facing up.
Forced Eject Hole: If the eject button will not open the tray,
insert a stiff rod such as a large paper clip into the hole
and push in to eject the tray after the drive has been turned
off and the disc has stopped spinning.
Eject ButtonDisc Tray
6
Page 8

About DVD Media Types
Media compatibility
Disc Types NEC Supports
DVD-ROM . . . . . . . . . . . . . . . . . . . . . . . . . . . . . . . . . . . .Read
DVD-Video . . . . . . . . . . . . . . . . . . . . . . . . . . . . . . . . . . .Read
DVD+R (SL, DL) . . . . . . . . . . . . . . . . . . . . . . . . . . .Read/Write
DVD+RW . . . . . . . . . . . . . . . . . . . . . . . . . . . . . . . .Read/Write
DVD-R . . . . . . . . . . . . . . . . . . . . . . . . . . . . . . . . . .Read/Write
DVD-RW . . . . . . . . . . . . . . . . . . . . . . . . . . . . . . . .Read/Write
DVD-RAM . . . . . . . . . . . . . . . . . . . . . . . . . . . .Not Supported
SL- Single Layer
DL- Double Layer
7
Page 9

Product Specifications
Read Speed: 16x max. DVD-ROM and 48x max. CD-ROM
Write Speed: DVD+R: 16x max., DVD+RW: 8x max.,
DVD+R DL: 4x max., DVD-R: 16x max., DVD-RW: 6x max.,
CD-R: 48x max., CD-RW: 24x max.
Access Time: 120 ms (CD), 140 ms (DVD)
Mechanism: Motorized tray load mechanism for horizontal
and vertical use
Audio: Digital-out and line-out at the back (MPC compatible)
Interface: IDE/ATAPI
Burst Transfer Rate: PIO mode 4/Ultra DMA 33
Cache: 2 MB
Compatibility: MPC level 3, Multi Read, PC2001
Media/Modes Supported: DVD-ROM, DVD-R, DVD-RW,
DVD+R, DVD+R DL, DVD+RW, DVD-Video, CD-ROM,
CD-ROM XA, CD-Audio, CD Extra, CD Text, CD-I Ready,
CD-Bridge, Photo-CD, VideoCD, Hybrid CD
Writing Methods: DAO (disc at once), SAO (session at
once), TAO (track at once) with zero gap, variable or fixed
packet, multisession
Dust Protected Enclosure
Forced Eject Hole
8
Page 10

Disc Care
■
To clean the disc, use a soft cloth and wipe from the
inside to the outside edge rather than in a circular motion.
■
Do not use record-cleaning or anti-static agents as the
solutions may damage a disc.
■
Always store discs in proper storage cases when not in use.
■
Check for dirt, dust, or fingerprints on a disc’s recording
side before inserting into the unit.
■
Avoid touching or scratching the recording side of the disc.
■
Hold the disc only by the edges or by the center hole and
one edge.
■
Do not affix stickers, labels, or tape to the disc.
■
Discard warped or cracked discs as they may cause
damage to the drive.
■
Avoid unusually shaped discs such as “business card” CDs.
9
Page 11

Troubleshooting &
Technical Support
Nothing happens when eject button is pressed:
■
Make sure the power cable is securely connected to the drive.
■
Verify the computer is powered-up and running.
Drive has power (responds to eject button), but is
not recognized by computer:
■
Verify the interface cable is attached correctly.
■
Verify the drive’s jumper settings. If your system uses
CABLE SELECT, verify the jumper settings are set to
CSEL. If your system is MASTER/SLAVE, verify that there
is no other device connected to the same cable using the
same setting.
Computer shuts down immediately after power-up
when drive is installed:
■
Verify the drive’s jumper settings.
■
If drive is the only device connected to the interface cable,
connect it to the alternate interface cable connector.
Drive is very loud when reading/writing:
■
Make sure the drive is securely mounted to the computer’s
chassis. Excessive vibration can be caused by loose or
uneven mounting.
10
Still having problems?
■
Visit NEC customer support at http://support.necsam.com
or call (801) 401-1466 for assistance Monday-Friday,
5:00 a.m. – 5:00 p.m. Pacific Time.
Page 12

Warranty Information
ONE (1) YEAR LIMITED WARRANTY
NEC Solutions (America), Inc. (“NECSAM”) warrants this hardware product (“Product”) against defects in material and
workmanship for a period of one year from the date of original purchase (as established by the date of purchase on
your sales receipt) from an authorized NECSAM dealer, retailer or distributor.
This warranty only covers the hardware packaged with this Product. This warranty does not cover any software
contained in or included with the Product. Any such software is provided “AS IS.” For your rights with respect to
software please refer to any software documentation included.
This limited warranty is valid only for Product purchased within the United States of America. This warranty applies
only to the original purchaser of the Product and is non-transferable.
This limited warranty excludes service due to (1) any external cause, including, acts of God, theft, fire, power failures,
and other electrical and/or environmental problems; (2) accident, misuse, abuse, neglect, unauthorized modifications,
improper installation or service not authorized by NECSAM; (3) cosmetic damages; (4) usage not in accordance with
Product documentation and instructions; or (5) problems caused by use of software, parts and components not
supplied by NECSAM. This warranty does not cover damage or loss to any software programs, data or removable
discs. This warranty is invalid if the serial number has been defaced, modified or removed.
If a defect arises and a valid claim is received by NECSAM during the limited warranty period, at its option, NECSAM
will repair the Product using new or refurbished parts or replace the Product with a new or refurbished Product.
Repair or replacement is your sole and exclusive remedy. All parts or Products exchanged under this warranty become
the property of NECSAM. The replacement part or Product is warranted for the remainder of the original limited
warranty period or thirty (30) days from shipment, whichever is longer.
NECSAM MAKES NO OTHER EXPRESS WARRANTY WITH RESPECT TO THIS PRODUCT. ANY IMPLIED
WARRANTIES, INCLUDING BUT NOT LIMITED TO ANY IMPLIED WARRANTIES OF MERCHANTABILITY OR FITNESS
FOR A PARTICULAR PURPOSE, ARE LIMITED IN DURATION TO THE PERIOD OF THE EXPRESS WARRANTY SET
FORTH ABOVE, AND NO WARRANTIES, WHETHER EXPRESS OR IMPLIED WILL APPLY AFTER SUCH PERIOD.
NECSAM IS NOT RESPONSIBLE FOR ANY INCIDENTAL, INDIRECT, SPECIAL OR CONSEQUENTIAL DAMAGES
RESULTING FROM ANY BREACH OF ANY EXPRESS OR IMPLIED WARRANTY, BREACH OF CONTRACT, NEGLIGENCE,
STRICT LIABILITY OR ANY OTHER LEGAL THEORY RELATED TO THIS PRODUCT. SUCH DAMAGES INCLUDE, BUT
ARE NOT LIMITED TO, LOSS OF DATA, LOSS OF BUSINESS, LOSS OF PROFITS, LOSS OF USE OF THE PRODUCT OR
ANY ASSOCIATED PERIPHERALS, COST OF REPLACEMENT PRODUCT, DOWN-TIME, OR CHARGES FOR
PURCHASER’S TIME AND EFFORT.
Some states do not allow the exclusion or limitation of incidental or consequential damages, or allow limitations on
how long an implied warranty lasts, so the above limitations or exclusions may not apply to you. This limited warranty
gives you specific legal rights and you may also have other rights that may vary from state to state.
Obtaining Warranty Service
■
Please call the NEC telephone technical support line listed below.
■
Original purchase receipt must be retained and presented to obtain warranty service.
■
Request a RMA number and write the RMA number on the outside of the package in a prominent location.
■
Return the Product freight prepaid in its original packaging or in other comparable packaging to avoid
shipping damage.
■
Be sure to remove all parts or options not under warranty or any discs prior to returning the Product.
NECSAM is not responsible for any damage or loss to these items.
NEC Technical Support
For telephone technical support please call (801) 401-1466. Telephone technical support hours are Monday–Friday,
5:00 a.m. – 5:00 p.m. Pacific Time.
Warranty Registration
Register your Product online today to help ensure seamless warranty coverage for your new equipment. Failure to
complete registration does not diminish your limited warranty rights.
http://www.necsam.com/registration/
©2005 NEC Solutions (America), Inc. All rights reserved.
11
Page 13

12
NEC Solutions (America), Inc.
Solutions Platform Group
2890 Scott Boulevard
Santa Clara, CA 95050
Information in this publication is subject to change without notice. NEC is a
registered trademark of NEC Corporation and/or one or more of its
subsidiaries. All are used under license. All other trademarks and registered
trademarks are the property of their respective owners. © 2005 NEC
Solutions (America), Inc. All rights reserved.
Page 14

 Loading...