

Page 1

Empowered by Innovation
Introduction
Features
IntraMail
IntraMail Feature
Handbook
P/N 1093098
Rev 2, June 2006
Printed in U.S.A
01.00.00
.
Page 2

This manual has been developed by NEC Unified Solutions, Inc. It is intended for the use of its customers and service
personnel, and should be read in its entirety before attempting to install or program the system. Any comments or suggestions
for improving this manual would be appreciated. Forward your remarks to:
NEC Unified Solutions, Inc.
4 Forest Parkway
Shelton, CT 06484
www.necunifiedsolutions.com
Nothing contained in this manual shall be deemed to be, and this manual does not constitute, a warranty of, or representation
with respect to, any of the equipment covered. This manual is subject to change without notice and NEC Unified Solutions,
Inc. has no obligation to provide any updates or corrections to this manual. Further, NEC Unified Solutions, Inc. also reserves
the right, without prior notice, to make changes in equipment design or components as it deems appropriate. No
representation is made that this manual is complete or accurate in all respects and NEC Unified Solutions, Inc. shall not be
liable for any errors or omissions. In no event shall NEC Unified Solutions, Inc. be liable for any incidental or consequential
damages in connection with the use of this manual. This document contains proprietary information that is protected by
copyright. All rights are reserved. No part of this document may be photocopied or reproduced without prior written consent
of NEC Unified Solutions, Inc.
©2006 by NEC Unified Solutions, Inc. All Rights Reserved.
Printed in U.S.A.
Page 3

Table of Contents
Table of Contents
Introduction . . . . . . . . . . . . . . . . . . . . . . . . . . . . . . . . . . . . . . . . . . . . . . . . . . . . . . . . . . 1
Using the DSX Feature Handbook . . . . . . . . . . . . . . . . . . . . . . . . . . . . . . . . . . . . . . . . . . 1
Charts . . . . . . . . . . . . . . . . . . . . . . . . . . . . . . . . . . . . . . . . . . . . . . . . . . . . . . . . . . . . . . . . . 2
Telephone Illustrations. . . . . . . . . . . . . . . . . . . . . . . . . . . . . . . . . . . . . . . . . . . . . . . . . . . . 4
IntraMail Features . . . . . . . . . . . . . . . . . . . . . . . . . . . . . . . . . . . . . . . . . . . . . . . . . . . . . 9
Introduction . . . . . . . . . . . . . . . . . . . . . . . . . . . . . . . . . . . . . . . . . . . . . . . . . . . . . . . . . . . . 9
IntraMail Feature Glossary . . . . . . . . . . . . . . . . . . . . . . . . . . . . . . . . . . . . . . . . . . . . . . . 10
Announcement Mailbox. . . . . . . . . . . . . . . . . . . . . . . . . . . . . . . . . . . . . . . . . . . . . . . . . . 15
Announcement Message . . . . . . . . . . . . . . . . . . . . . . . . . . . . . . . . . . . . . . . . . . . . . . . . . 16
Answer Schedule Override . . . . . . . . . . . . . . . . . . . . . . . . . . . . . . . . . . . . . . . . . . . . . . . 17
Answer Tables . . . . . . . . . . . . . . . . . . . . . . . . . . . . . . . . . . . . . . . . . . . . . . . . . . . . . . . . . 18
Answering Machine Emulation . . . . . . . . . . . . . . . . . . . . . . . . . . . . . . . . . . . . . . . . . . . . 19
Auto Attendant Do Not Disturb. . . . . . . . . . . . . . . . . . . . . . . . . . . . . . . . . . . . . . . . . . . . 20
Auto Erase or Save. . . . . . . . . . . . . . . . . . . . . . . . . . . . . . . . . . . . . . . . . . . . . . . . . . . . . . 22
Handling Partially Reviewed Messages . . . . . . . . . . . . . . . . . . . . . . . . . . . . . . . . . . . . 22
Auto Time Stamp. . . . . . . . . . . . . . . . . . . . . . . . . . . . . . . . . . . . . . . . . . . . . . . . . . . . . . . 23
Automated Attendant . . . . . . . . . . . . . . . . . . . . . . . . . . . . . . . . . . . . . . . . . . . . . . . . . . . . 24
Automated Attendant, Built-In . . . . . . . . . . . . . . . . . . . . . . . . . . . . . . . . . . . . . . . . . . . . 25
Automated Attendant Transfer . . . . . . . . . . . . . . . . . . . . . . . . . . . . . . . . . . . . . . . . . . . . 27
Automatic Routing for Rotary Dial Callers . . . . . . . . . . . . . . . . . . . . . . . . . . . . . . . . . . . 28
Bilingual Voice Prompts . . . . . . . . . . . . . . . . . . . . . . . . . . . . . . . . . . . . . . . . . . . . . . . . . 29
Call Forward to a Mailbox. . . . . . . . . . . . . . . . . . . . . . . . . . . . . . . . . . . . . . . . . . . . . . . . 30
Call Forwarding a Subscriber’s Direct Inward Line to their Mailbox . . . . . . . . . . . . . 30
Call Routing Mailbox . . . . . . . . . . . . . . . . . . . . . . . . . . . . . . . . . . . . . . . . . . . . . . . . . . . 32
Call Screening . . . . . . . . . . . . . . . . . . . . . . . . . . . . . . . . . . . . . . . . . . . . . . . . . . . . . . . . . 33
Call Screening and Group Mailboxes. . . . . . . . . . . . . . . . . . . . . . . . . . . . . . . . . . . . . . 33
Automatic Call Screening. . . . . . . . . . . . . . . . . . . . . . . . . . . . . . . . . . . . . . . . . . . . . . . 33
Caller ID and Voice Mail. . . . . . . . . . . . . . . . . . . . . . . . . . . . . . . . . . . . . . . . . . . . . . . . . 36
Calling the Automated Attendant . . . . . . . . . . . . . . . . . . . . . . . . . . . . . . . . . . . . . . . . . . 37
Centrex Transfer . . . . . . . . . . . . . . . . . . . . . . . . . . . . . . . . . . . . . . . . . . . . . . . . . . . . . . . 38
Conversation Record . . . . . . . . . . . . . . . . . . . . . . . . . . . . . . . . . . . . . . . . . . . . . . . . . . . . 39
Conversation Record Key for a Co-worker’s Mailbox. . . . . . . . . . . . . . . . . . . . . . . . . 39
User Programmable Feature . . . . . . . . . . . . . . . . . . . . . . . . . . . . . . . . . . . . . . . . . . . . . 40
Dial Action Table. . . . . . . . . . . . . . . . . . . . . . . . . . . . . . . . . . . . . . . . . . . . . . . . . . . . . . . 41
Directory Dialing . . . . . . . . . . . . . . . . . . . . . . . . . . . . . . . . . . . . . . . . . . . . . . . . . . . . . . . 42
Dialing Options Available while Entering a Name . . . . . . . . . . . . . . . . . . . . . . . . . . . 44
Dialing Options Available when more than one Employee has the Entered Name . . . 45
Erasing All Messages. . . . . . . . . . . . . . . . . . . . . . . . . . . . . . . . . . . . . . . . . . . . . . . . . . . . 46
Exiting a Mailbox . . . . . . . . . . . . . . . . . . . . . . . . . . . . . . . . . . . . . . . . . . . . . . . . . . . . . . 47
External Transfer . . . . . . . . . . . . . . . . . . . . . . . . . . . . . . . . . . . . . . . . . . . . . . . . . . . . . . . 48
Getting Recorded Help . . . . . . . . . . . . . . . . . . . . . . . . . . . . . . . . . . . . . . . . . . . . . . . . . . 49
Greeting . . . . . . . . . . . . . . . . . . . . . . . . . . . . . . . . . . . . . . . . . . . . . . . . . . . . . . . . . . . . . . 50
Multiple Greetings . . . . . . . . . . . . . . . . . . . . . . . . . . . . . . . . . . . . . . . . . . . . . . . . . . . . 50
Remote Greetings . . . . . . . . . . . . . . . . . . . . . . . . . . . . . . . . . . . . . . . . . . . . . . . . . . . . . 50
Guest Mailbox . . . . . . . . . . . . . . . . . . . . . . . . . . . . . . . . . . . . . . . . . . . . . . . . . . . . . . . . . 52
DSX IntraMail Feature Handbook
Table of Contents ◆ i
Page 4

ii ◆
Table of Contents
Instruction Menu . . . . . . . . . . . . . . . . . . . . . . . . . . . . . . . . . . . . . . . . . . . . . . . . . . . . . . . 53
Leaving a Message. . . . . . . . . . . . . . . . . . . . . . . . . . . . . . . . . . . . . . . . . . . . . . . . . . . . . . 54
Listening to Messages . . . . . . . . . . . . . . . . . . . . . . . . . . . . . . . . . . . . . . . . . . . . . . . . . . . 56
Log Onto Voice Mail . . . . . . . . . . . . . . . . . . . . . . . . . . . . . . . . . . . . . . . . . . . . . . . . . . . . 59
Mailbox Name . . . . . . . . . . . . . . . . . . . . . . . . . . . . . . . . . . . . . . . . . . . . . . . . . . . . . . . . . 61
Mailbox Options Menu . . . . . . . . . . . . . . . . . . . . . . . . . . . . . . . . . . . . . . . . . . . . . . . . . . 63
Mailbox Security Code Delete. . . . . . . . . . . . . . . . . . . . . . . . . . . . . . . . . . . . . . . . . . . . . 64
Main Menu. . . . . . . . . . . . . . . . . . . . . . . . . . . . . . . . . . . . . . . . . . . . . . . . . . . . . . . . . . . . 65
Make Call. . . . . . . . . . . . . . . . . . . . . . . . . . . . . . . . . . . . . . . . . . . . . . . . . . . . . . . . . . . . . 67
Message Count Display . . . . . . . . . . . . . . . . . . . . . . . . . . . . . . . . . . . . . . . . . . . . . . . . . . 68
Message Delete . . . . . . . . . . . . . . . . . . . . . . . . . . . . . . . . . . . . . . . . . . . . . . . . . . . . . . . . 70
Message Forward . . . . . . . . . . . . . . . . . . . . . . . . . . . . . . . . . . . . . . . . . . . . . . . . . . . . . . . 71
Message Listen Mode . . . . . . . . . . . . . . . . . . . . . . . . . . . . . . . . . . . . . . . . . . . . . . . . . . . 72
Message Notification . . . . . . . . . . . . . . . . . . . . . . . . . . . . . . . . . . . . . . . . . . . . . . . . . . . . 73
Message On Hold. . . . . . . . . . . . . . . . . . . . . . . . . . . . . . . . . . . . . . . . . . . . . . . . . . . . . . . 76
Message Playback Direction . . . . . . . . . . . . . . . . . . . . . . . . . . . . . . . . . . . . . . . . . . . . . . 77
Message Reply . . . . . . . . . . . . . . . . . . . . . . . . . . . . . . . . . . . . . . . . . . . . . . . . . . . . . . . . . 78
Next Call Routing Mailbox . . . . . . . . . . . . . . . . . . . . . . . . . . . . . . . . . . . . . . . . . . . . . . . 79
Record and Send a Message . . . . . . . . . . . . . . . . . . . . . . . . . . . . . . . . . . . . . . . . . . . . . . 80
Security Code. . . . . . . . . . . . . . . . . . . . . . . . . . . . . . . . . . . . . . . . . . . . . . . . . . . . . . . . . . 81
System Administrator . . . . . . . . . . . . . . . . . . . . . . . . . . . . . . . . . . . . . . . . . . . . . . . . . . . 82
Time and Date with Voice Mail. . . . . . . . . . . . . . . . . . . . . . . . . . . . . . . . . . . . . . . . . . . . 84
Time and Date Stamp. . . . . . . . . . . . . . . . . . . . . . . . . . . . . . . . . . . . . . . . . . . . . . . . . . . . 85
Transfer to a Mailbox. . . . . . . . . . . . . . . . . . . . . . . . . . . . . . . . . . . . . . . . . . . . . . . . . . . . 86
Volume Control with Voice Mail . . . . . . . . . . . . . . . . . . . . . . . . . . . . . . . . . . . . . . . . . . 88
Additional Options While Leaving a Message . . . . . . . . . . . . . . . . . . . . . . . . . . . . . . . 54
Handling Partially Reviewed Messages . . . . . . . . . . . . . . . . . . . . . . . . . . . . . . . . . . . . 57
Telephone Display while Listening to a Message . . . . . . . . . . . . . . . . . . . . . . . . . . . . 57
Local (On-site) Logon . . . . . . . . . . . . . . . . . . . . . . . . . . . . . . . . . . . . . . . . . . . . . . . . . 59
Remote Log On. . . . . . . . . . . . . . . . . . . . . . . . . . . . . . . . . . . . . . . . . . . . . . . . . . . . . . . 59
How Message Notification Works to Normal Telephone Numbers. . . . . . . . . . . . . . . 73
How Message Notification Works to Digital Pager Numbers . . . . . . . . . . . . . . . . . . . 73
Recording Options . . . . . . . . . . . . . . . . . . . . . . . . . . . . . . . . . . . . . . . . . . . . . . . . . . . . 80
Time and Date Stamp with Caller ID . . . . . . . . . . . . . . . . . . . . . . . . . . . . . . . . . . . . . . 85
Transfer Message Handling . . . . . . . . . . . . . . . . . . . . . . . . . . . . . . . . . . . . . . . . . . . . . 86
Table of Contents
DSX IntraMail Feature Handbook
Page 5
Using the DSX Feature Handbook
Using the DSX Feature Handbook
Introduction
Introduction
How the Feature Handbook is Organized
This feature handbook describes the features and operation of the DSX Multibutton Telephone. It is divided
into two chapters, as follows:
❥
Introduction
This is the chapter you are reading now. It provides a handy quick reference chart for the system feature
codes, as well as key layout illustrations for each telephone.
Features
❥
The Features chapter contains the description and operation for each DSX telephone system feature. For
feature operation, use the convenient operation charts at the end of each feature.
Additionally, at the end of this manual are the DSX Program List (page 929) and Index (page 947).
The System Document CD
The System Document CD provided with your system contains documentation, software, and other DSX
resources. Insert this CD into your PC and browse through its contents.
Checking your System’s Software Level
How to Check your System’s Software Level
To check your system’s software level:
1.
Press
INTERCOM
Dial
#*#*
2.
3.
Press
DSX Feature Handbook
.
• The system software level shows on the first line of your display.
• You see:
SPEAKER
DSX-nn vxx.xx.xx
to exit.
.
Introduction ◆ 1
Page 6
Charts
Charts
2 ◆
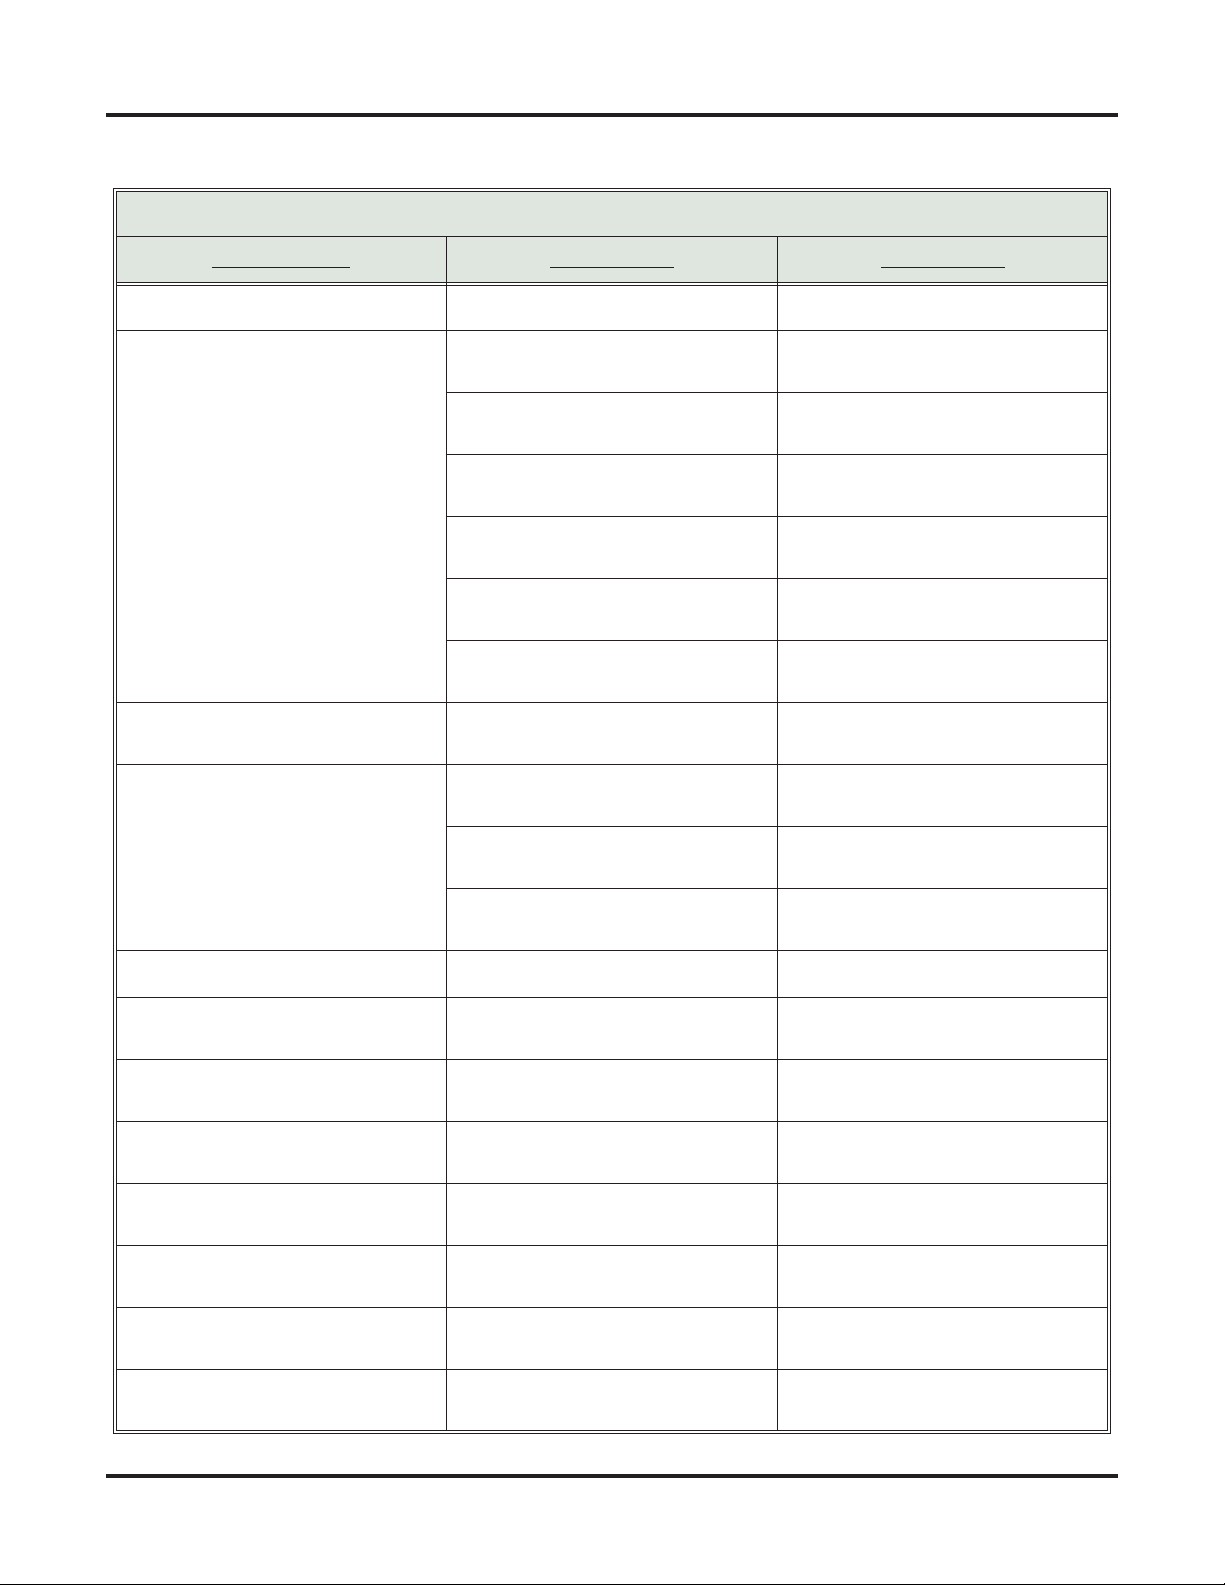
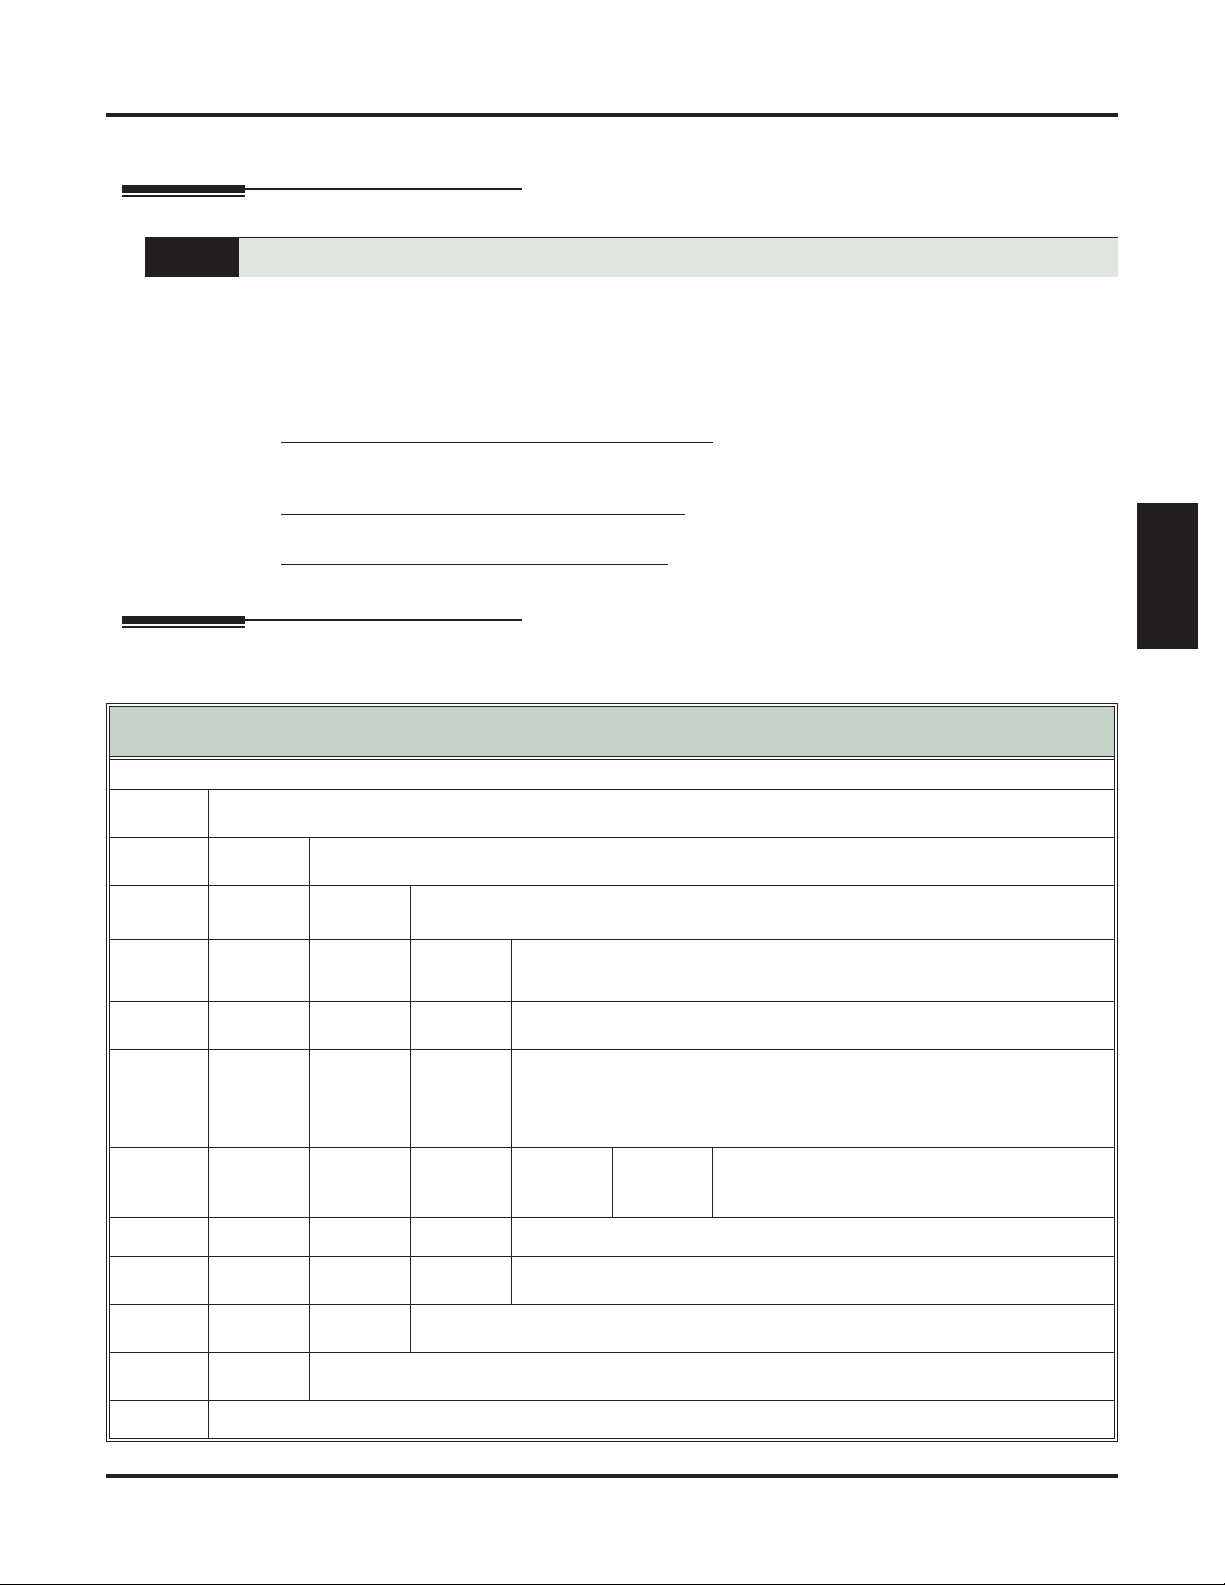
DSX Dial Codes by Feature
For this feature Dial this code When you are
Barge In (Intrusion)
Call Forwarding
INTERCOM
4
(Page 1 of 2)
+
*30
Barging-In on a co-worker’s call
Canceling Call Forwarding at an
extension
INTERCOM
+
*32
+ Extension or 0
(for the operator)
INTERCOM
+
*33
Enabling Call Forwarding Busy/No
Answer
Setting up Call Forwarding Off
Premise
INTERCOM
+
*34
+ Extension or 0
Enabling Call Forwarding All Calls
(for the operator)
INTERCOM
+
*36
+ Extension or 0
Enabling Call Forwarding No Answer
(for the operator)
Call Waiting / Camp-On
Central Office Calls, Placing
INTERCOM
INTERCOM
+
*37
+ 2 (all calls) or 8
(outside calls)
+ Do not hang up
2
2
+ Hang up
+
#9
+ Line number
(e.g., 01)
Setting up Personal Answering
Machine Emulation
Camping-On to a co-worker
Leaving a Callback for a co-worker
Using Line Dial-Up to place an outside call
Dial Number Preview
Directed Call Pickup
Flash
Forced Line Disconnect
Group Call Pickup
Hold
Intercom
Meet-Me Conference
INTERCOM
INTERCOM
INTERCOM
INTERCOM
INTERCOM
INTERCOM
INTERCOM
+ Line extension number
(e.g., 101)
+
9
or
90-98
Using Direct Line Access to place an
outside call
Accessing a Line Group to place an
outside call
*
+
**
+ Extension Intercepting a call ringing a
Previewing a number before dialing
co-worker’s extension
#3
Flashing a line at a single line
extension
#
Using Forced Line Disconnect to disconnect a busy outside line
+
*#
Answering a call ringing a phone in
your Pickup Group
+
*4
+ Line number (e.g.,
01)
Picking up an outside call on System
Hold at a co-worker’s extension
+ Extension (e.g., 301) Placing an Intercom call to a co-
worker
+
#11
or
# 12
Setting up or joining a Meet-Me Conference
Introduction
DSX Feature Handbook
Page 7
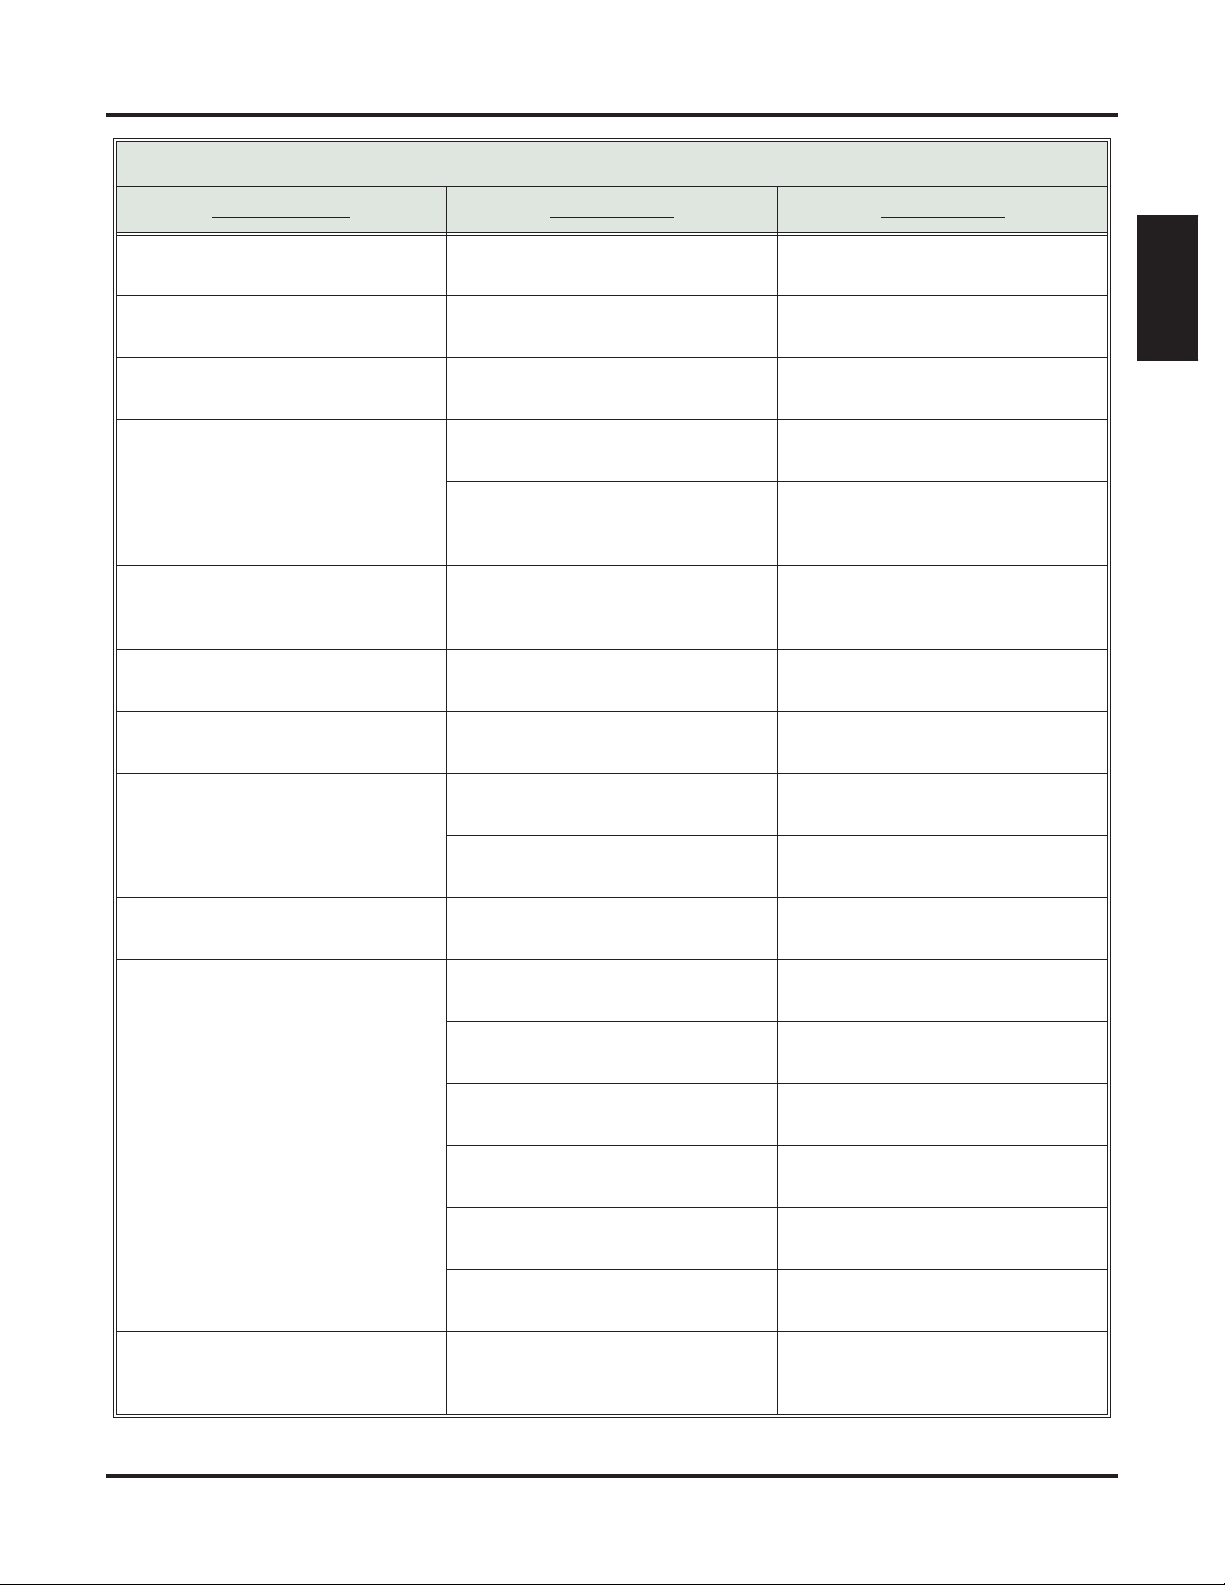
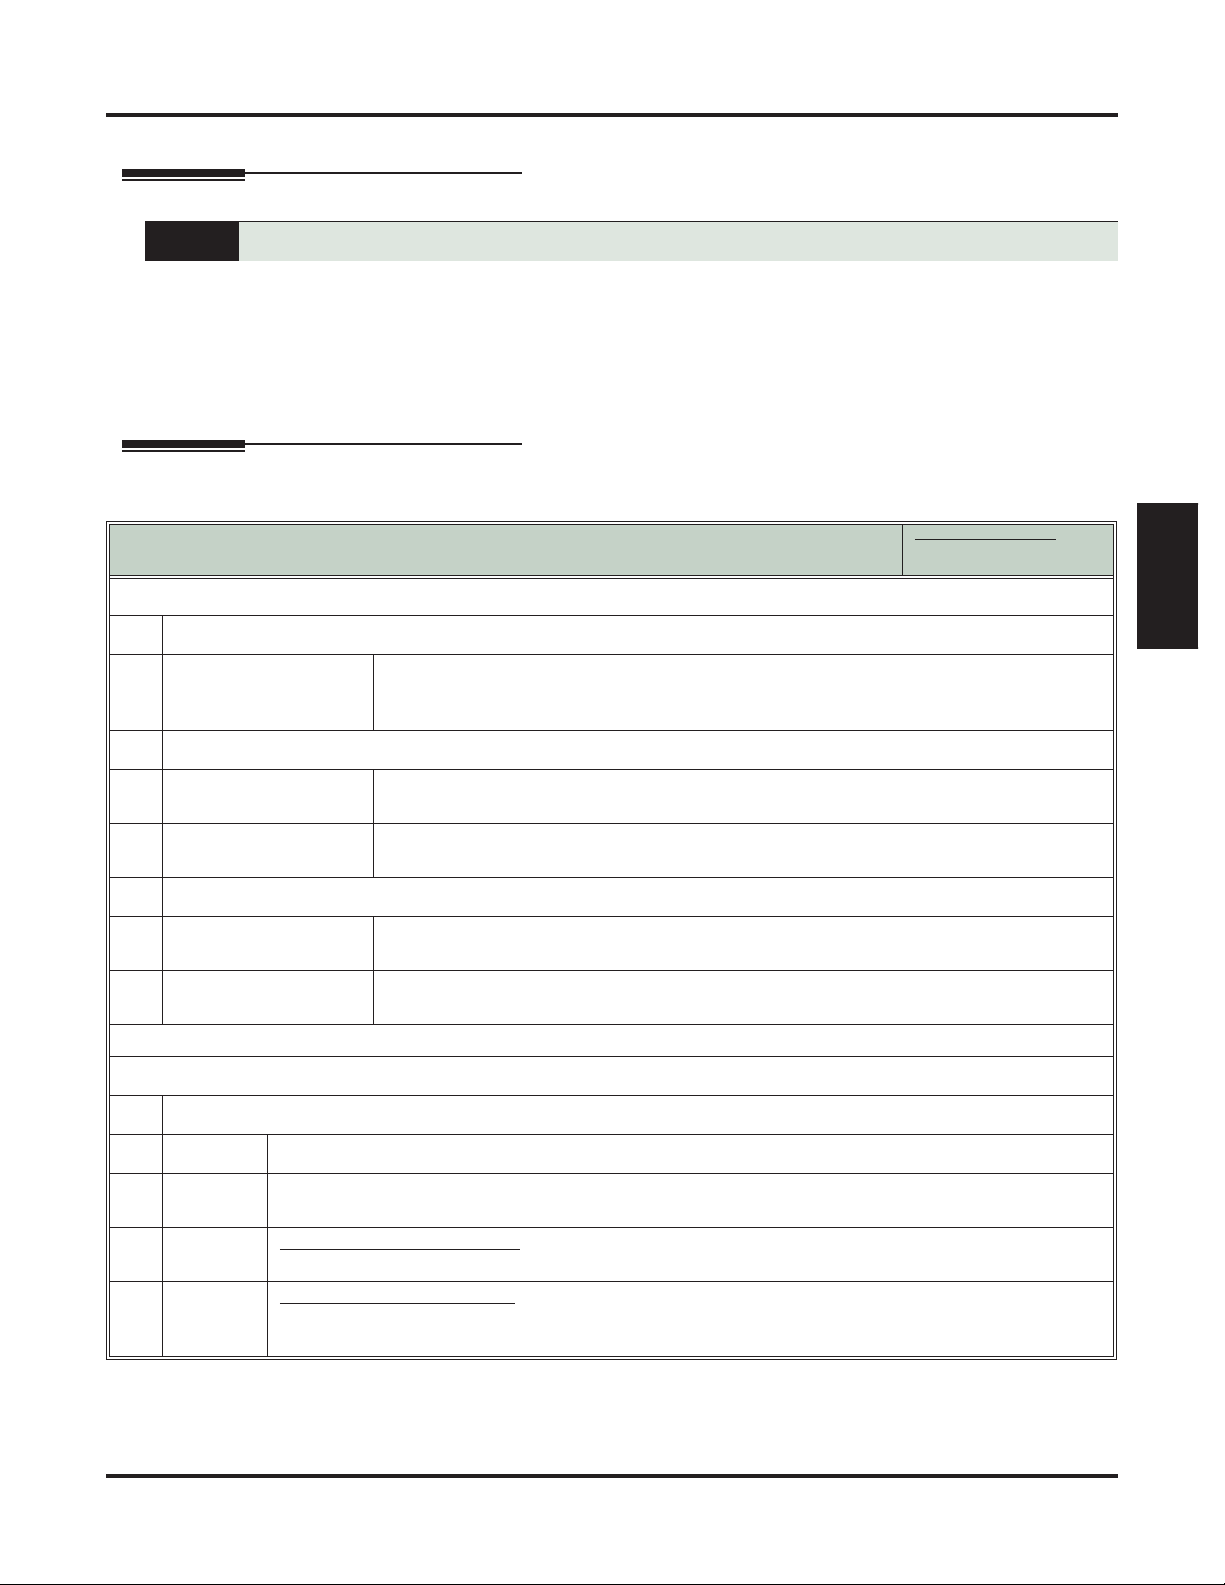
DSX Dial Codes by Feature (Page 2 of 2)
Charts
For this feature Dial this code When you are
Monitor / Silent Monitor
Night Service / Night Ring
Paging
Park
Removing Lines and Extensions
From Service
Selectable Display Messaging
Speed Dial
6
+ UNA code (01-04) Answering a call ringing UNA at
**
+
*1
INTERCOM
+ Page zone (1-7 or
0 for All Call)
INTERCOM
+
*
+ System Park Orbit
(60-69)
INTERCOM
+
**
+ Extension (e.g.,
301)
INTERCOM
301) or line (e.g., 101) +
INTERCOM
+
#40
or
6
(to remove)
+
*38
+ Extension (e.g.,
4
(to return)
+ Message (00-16)
+ Hold + Add additional digits + Hold
+
#
INTERCOM
+ System bin (201-
299) or Personal bin (701-720)
Introduction
Setting up Monitor after calling a busy
co-worker
night
Making an internal Paging announcement
Parking or retrieving a call from System Park Orbit
Using Personal Park to Park or
retrieve a call at a co-workers extension
Removing or returning an extension
or line to service
Enabling a Selectable Display Message
Dialing a System or Personal Speed
Dial number
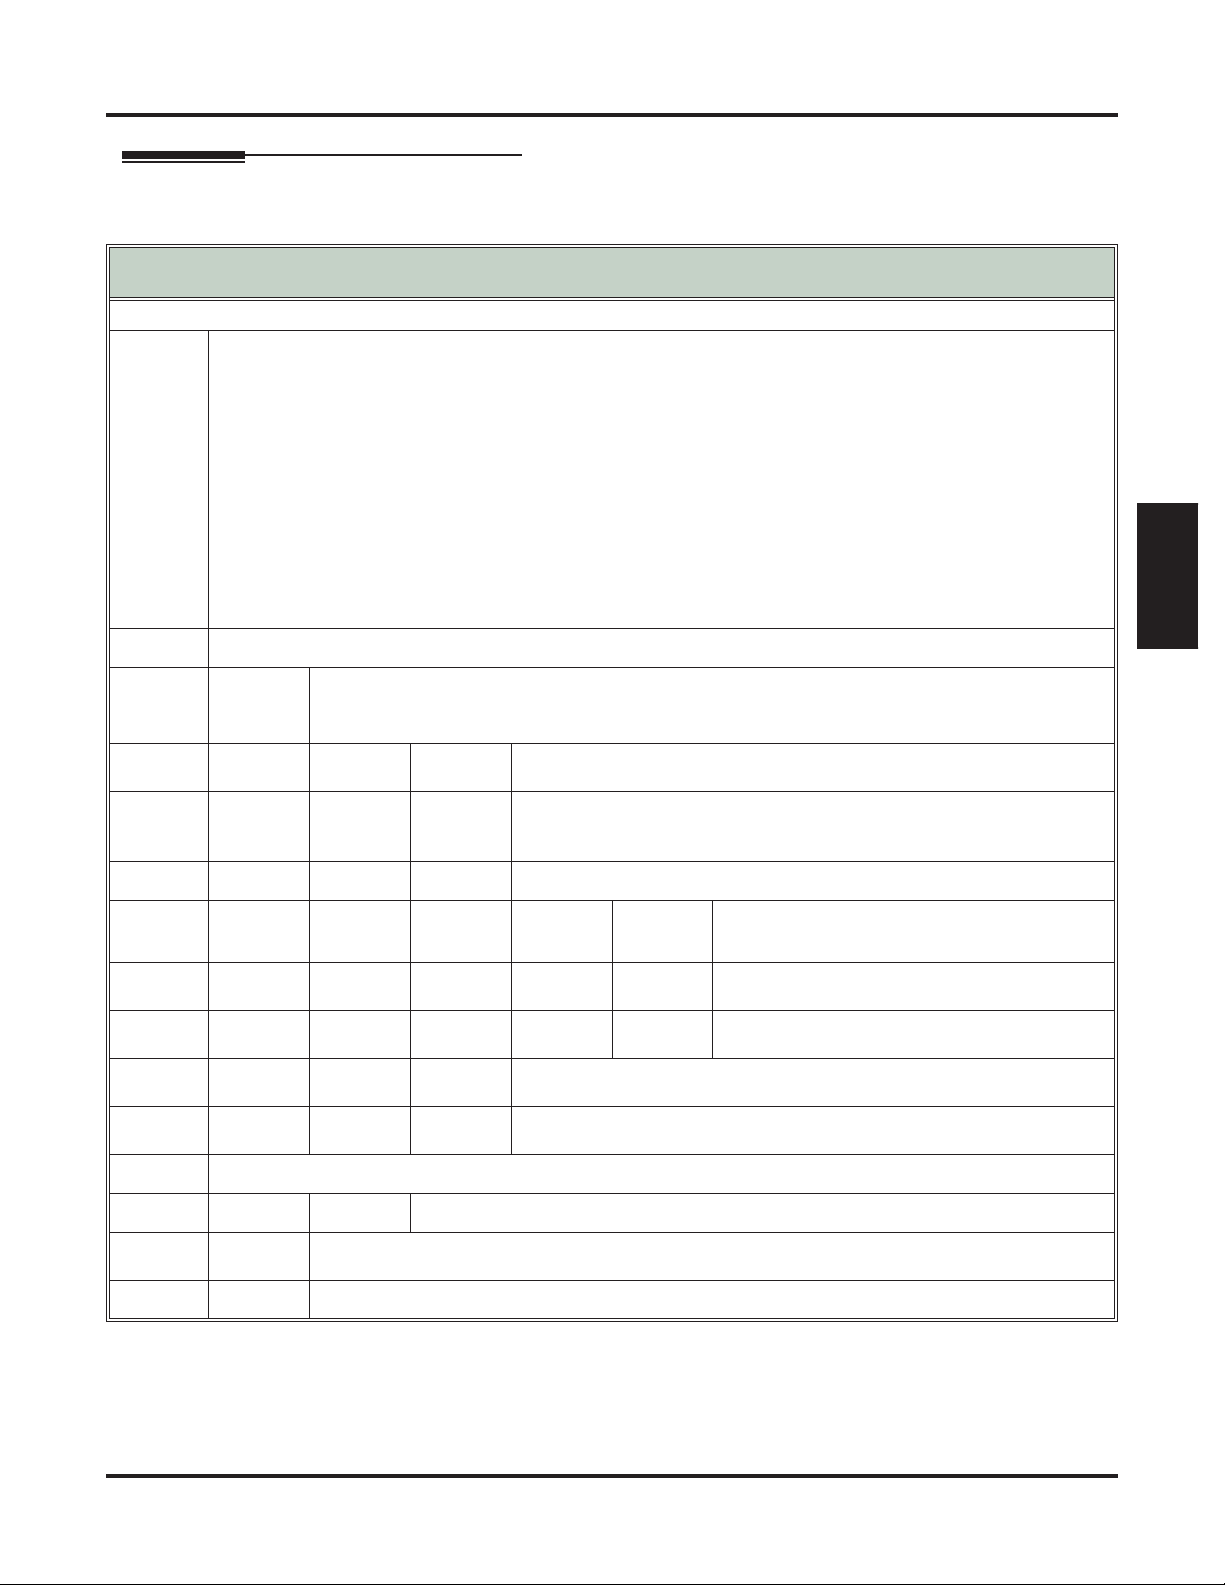
Transfer
Line Queuing / Line Callback
Voice Mail
Voice Over
INTERCOM
INTERCOM
+ Extension (e.g., 301) Transferring a call to a co-worker’s
+ Extension (e.g., 301) +
V-MAIL
2
INTERCOM
+ V-MAIL Calling your mailbox from your key-
Lift handset + *8 Calling your mailbox from your single
INTERCOM + Extension (e.g., 301) +
V-MAIL
Hookflash + Extension (e.g., 301) +
INTERCOM + *37 + 2 (all calls) or 8
(outside calls)
INTERCOM + *30 Canceling Personal Answering
9
extension
Transferring a call to a co-worker’s
mailbox
Queuing or leaving a Callback for a
busy line
set
line telephone
Transferring a call to a co-worker’s
mailbox from your keyset
8
Transferring a call to a co-worker’s
mailbox from your single line telephone
Setting up Personal Answering
Machine Emulation
Machine Emulation
Initiating a Voice Over to a busy
extension (after hearing busy/ring
tone)
DSX Feature Handbook
Introduction ◆ 3
Page 8
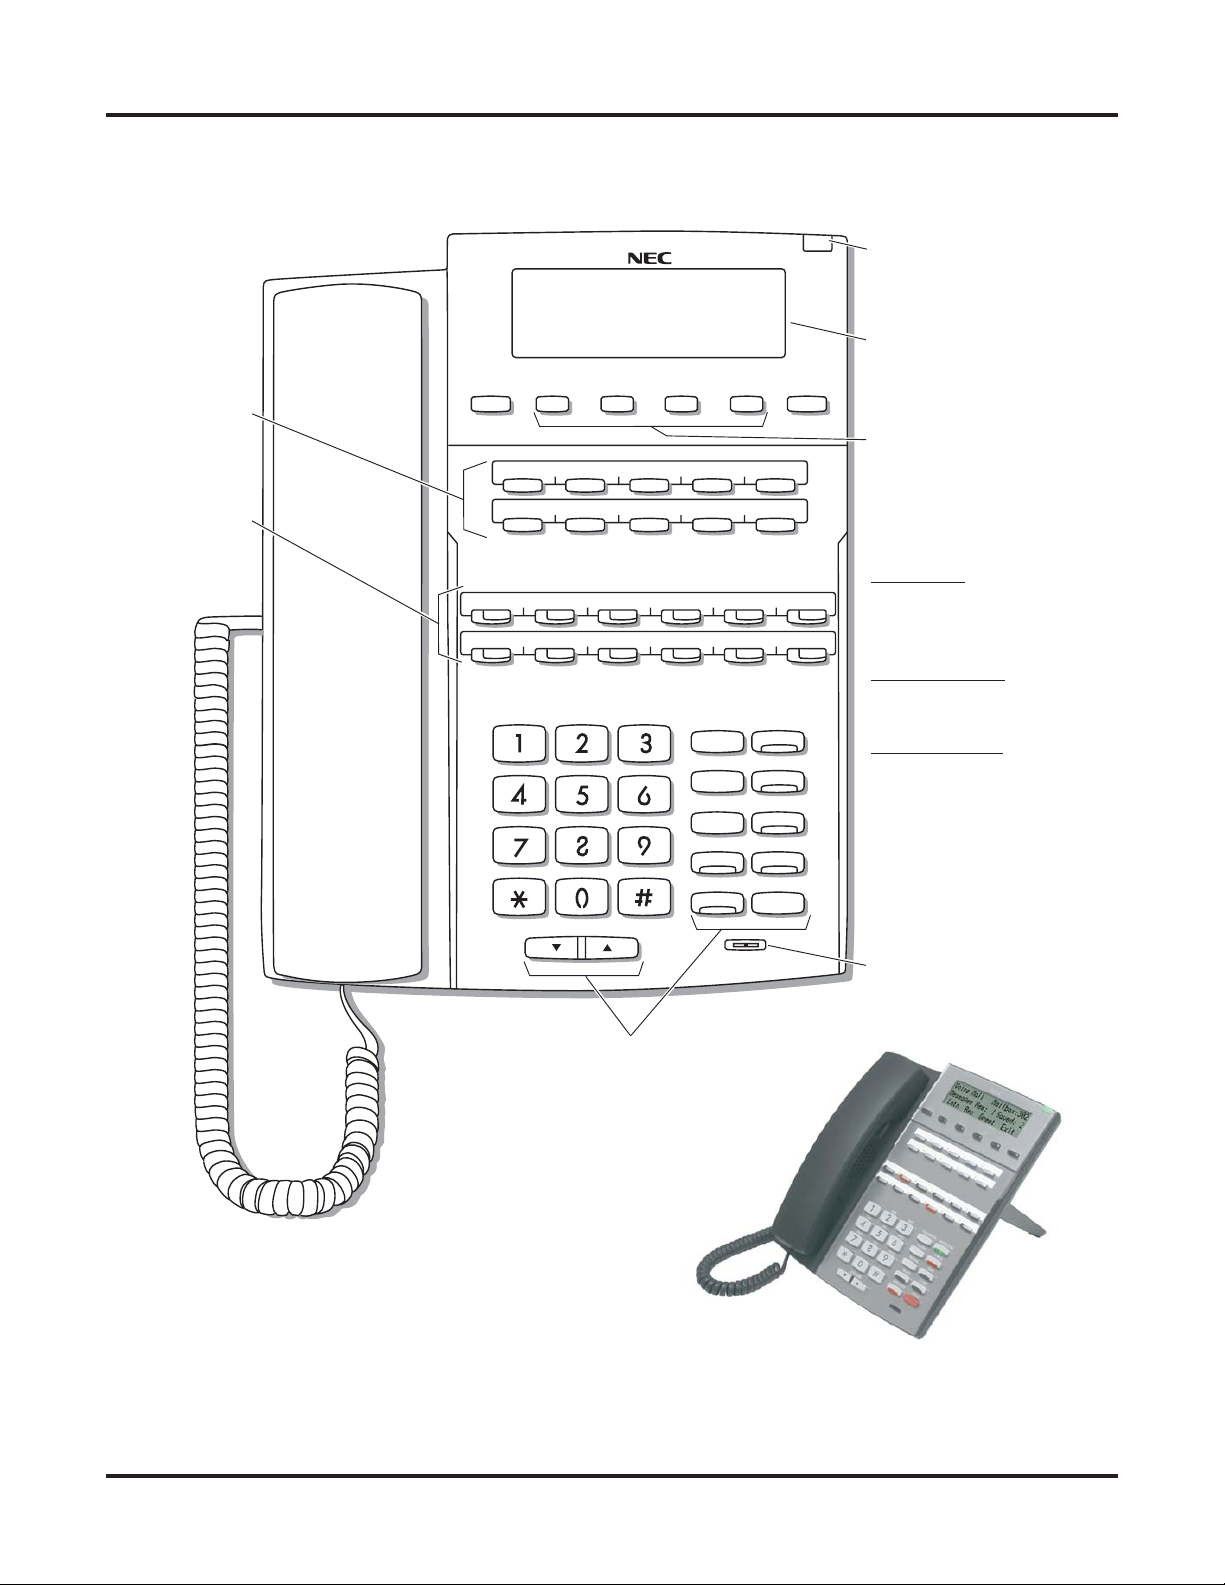
Telephone Illustrations
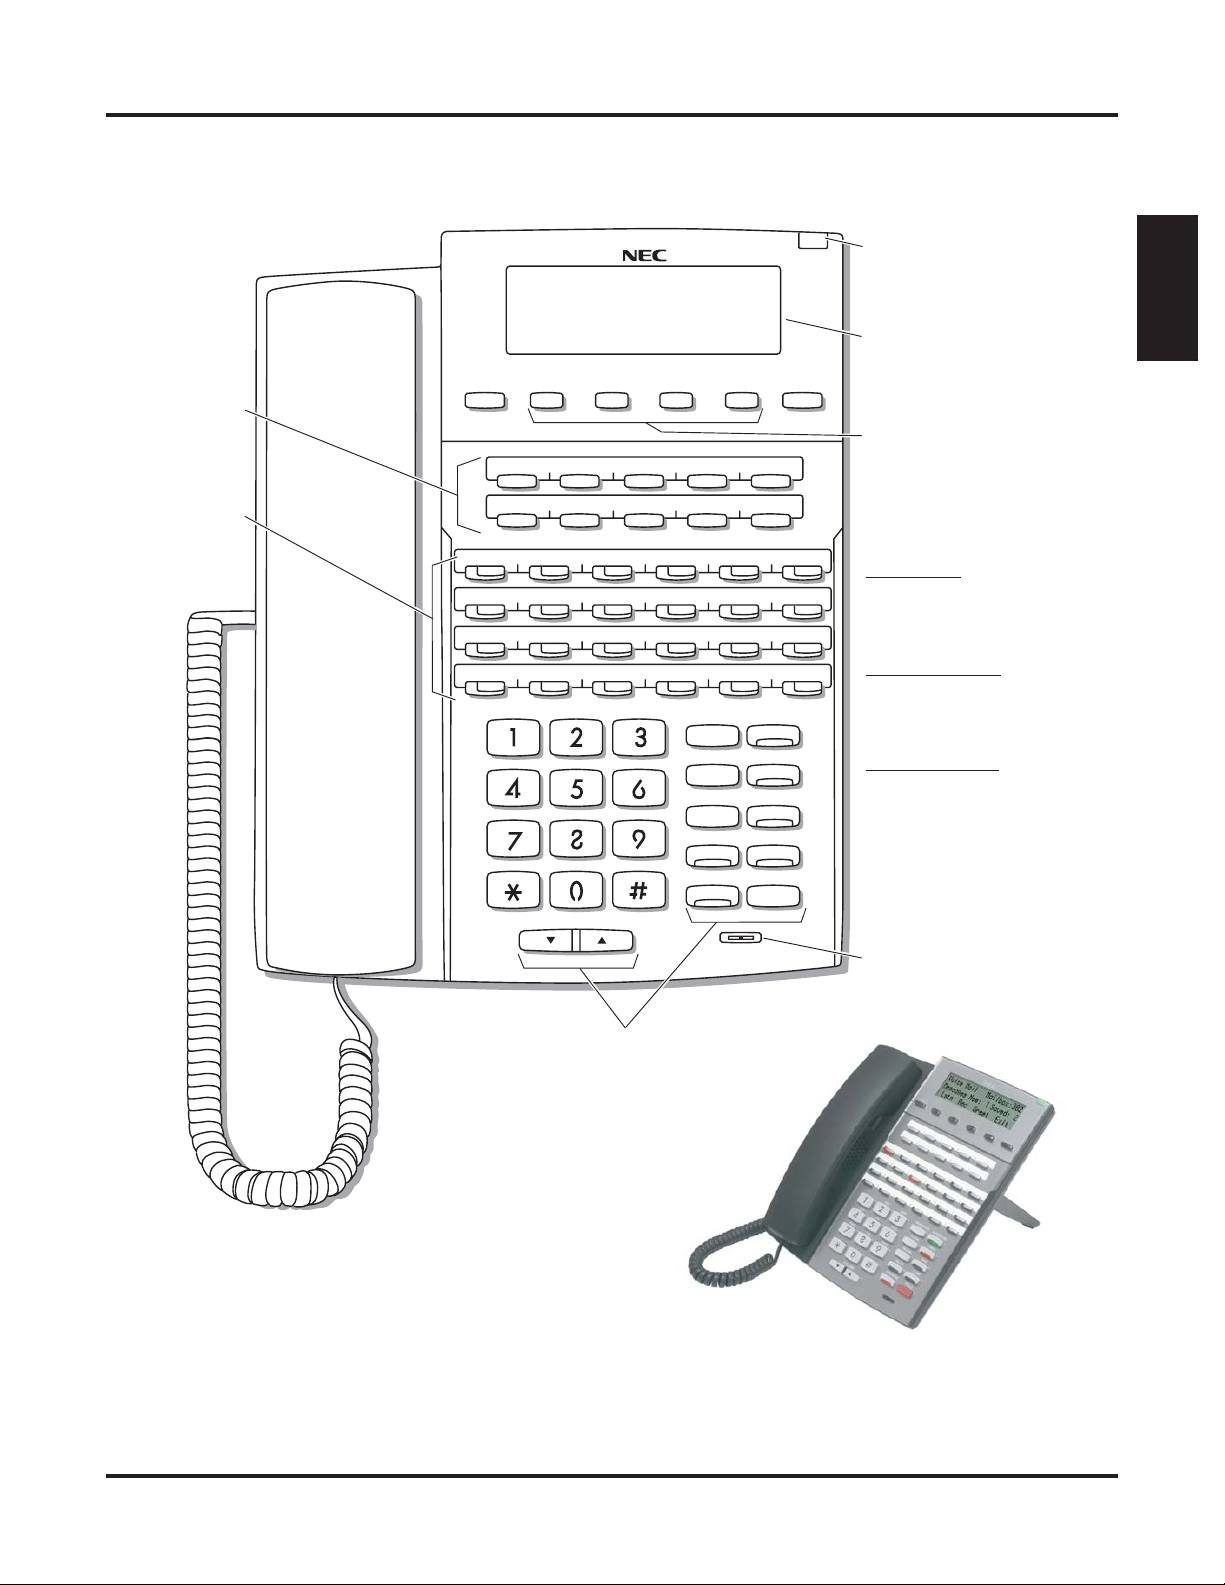
Telephone Illustrations
Ring/Message Lamp
Speed Dial
Bin keys
Feature keys
1093100 - 2
Thu June 8 11:52 AM
Pat Smith x301
Menu Dir VM:00 CL:00
CLEARCHECK
Line 1 Line 2 Line 3 Line 4 Line 5 Line 6
Line 7 Line 8 Line 9 Line 10 Line 11 Line 12
GHI
PQRS
ABC
JKL
TUV
DEF
MNO
WXYZ
TRANSFER
FLASH
REDIAL
MUTE
INTERCOM
V-MAIL
DND
CONF
Alpanumeric Display
Soft keys
In DSX-40:
Keys 1-8 are line keys.
Keys 9-12 are undefined.
In DSX-80/160:
Keys 1-12 are line keys.
For Attendants:
Key 12 is the
Operator Call key.
SPEAKER
VOLUME
Fixed Function keys
22-Button Display Telephone
HOLD
Microphone
4 ◆ Introduction DSX Feature Handbook
Page 9
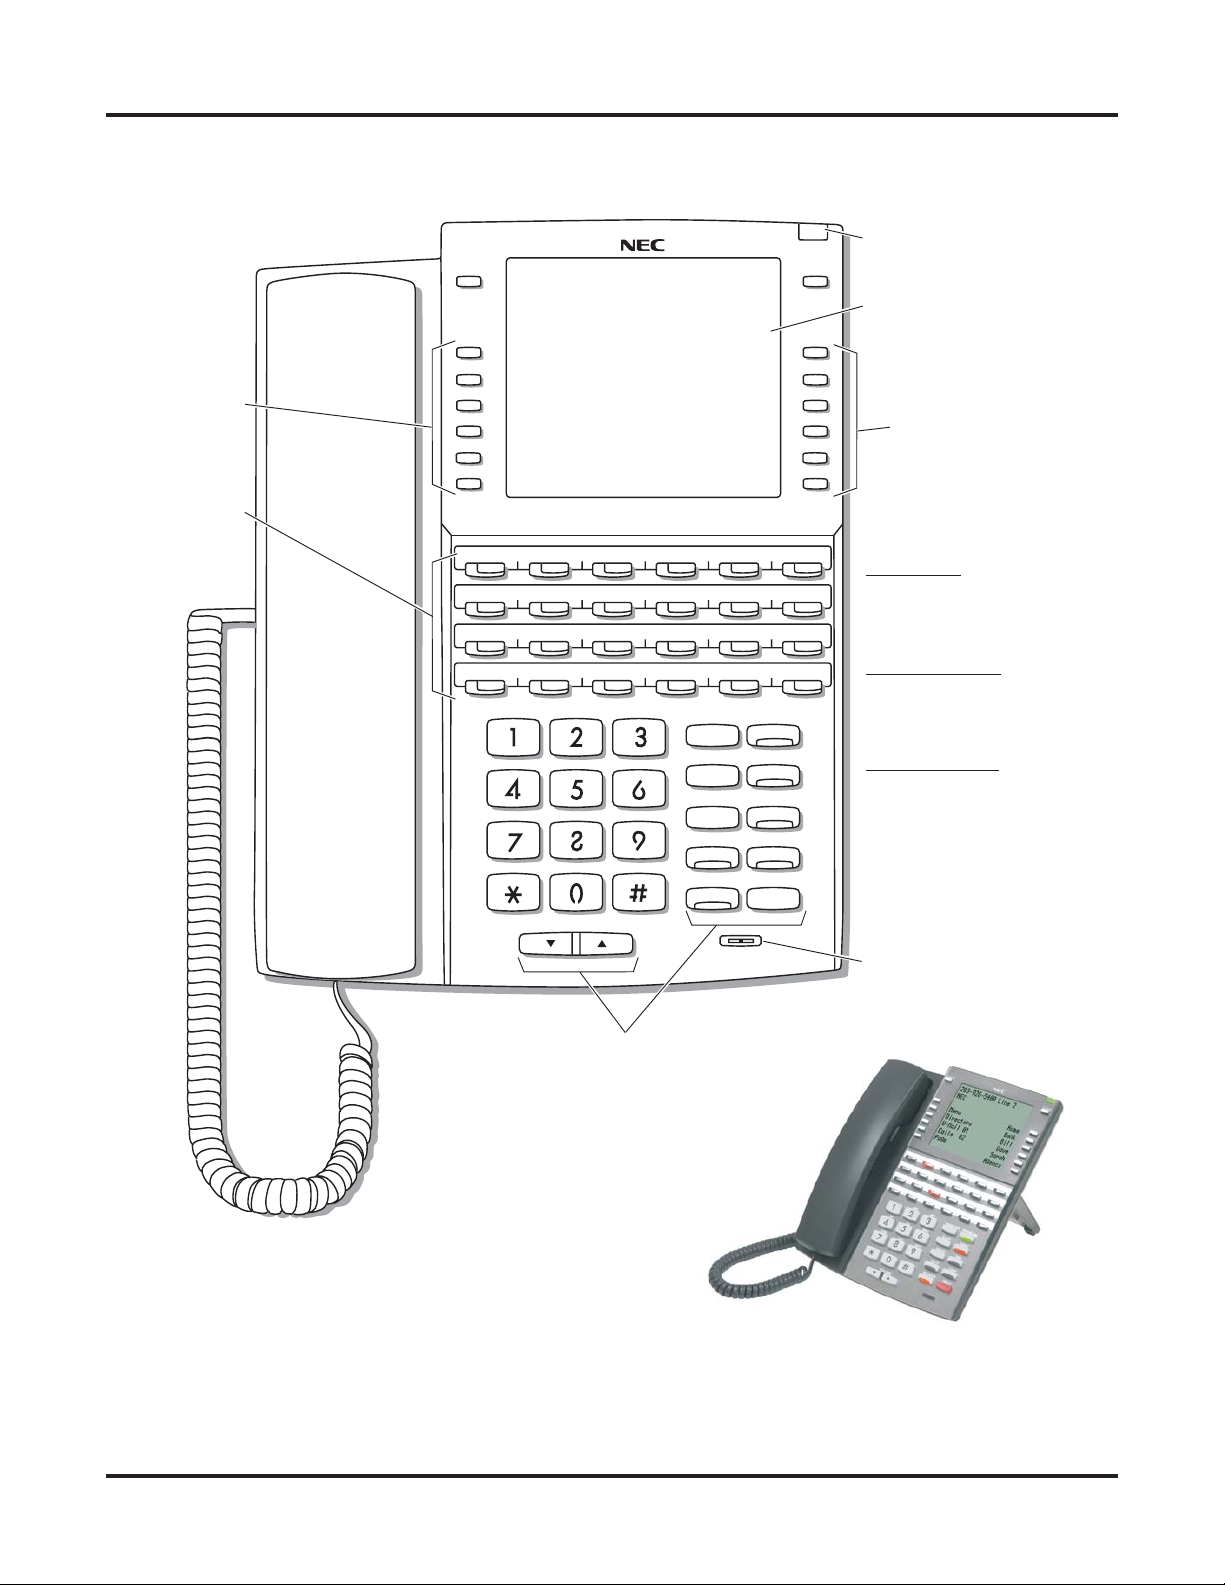
Telephone Illustrations
Ring/Message Lamp
Introduction
Speed Dial
Bin keys
Feature keys
1093100 - 1
Thu June 8 11:52 AM
Pat Smith x301
Menu Dir VM:00 CL:00
CLEARCHECK
Line 1 Line 2 Line 3 Line 4 Line 5 Line 6
Line 7 Line 8 Line 9 Line 10 Line 11 Line 12
GHI
PQRS
ABC
JKL
TUV
DEF
MNO
WXYZ
TRANSFER
FLASH
REDIAL
MUTE
INTERCOM
V-MAIL
DND
CONF
Alpanumeric Display
Soft keys
In DSX-40:
Keys 1-8 are line keys.
Keys 9-24 are undefined.
In DSX-80/160:
Keys 1-12 are line keys.
Keys 13-24 are undefined.
For Attendants:
Key 24 is the
Operator Call key.
SPEAKER
VOLUME
Fixed Function keys
34-Button Display Telephone
HOLD
Microphone
DSX Feature Handbook Introduction ◆ 5
Page 10
Telephone Illustrations
1093100 - 4
Soft keys
Feature keys
Thu June 8 11:52 AM
Pat Smith x301
Menu
Director
y
V-Mail 00
Calls 00
g
Pa e SP Dial 2
SP Dial 1
Ring/Message Lamp
CLEARCHECK
Alpanumeric Display
Soft keys
Line 1 Line 2 Line 3 Line 4 Line 5 Line 6
Line 7 Line 8 Line 9 Line 10 Line 11 Line 12
GHI
PQRS
ABC
JKL
TUV
VOLUME
DEF
MNO
WXYZ
TRANSFER
FLASH
REDIAL
MUTE
SPEAKER
INTERCOM
V-MAIL
DND
CONF
HOLD
Fixed Function keys
In DSX-40:
Keys 1-8 are line keys.
Keys 9-24 are undefined.
In DSX-80/160:
Keys 1-12 are line keys.
Keys 13-24 are undefined.
For Attendants:
Key 24 is the
Operator Call key.
Microphone
34-Button Super Display Telephone
6 ◆ Introduction DSX Feature Handbook
Page 11
1093100 -3
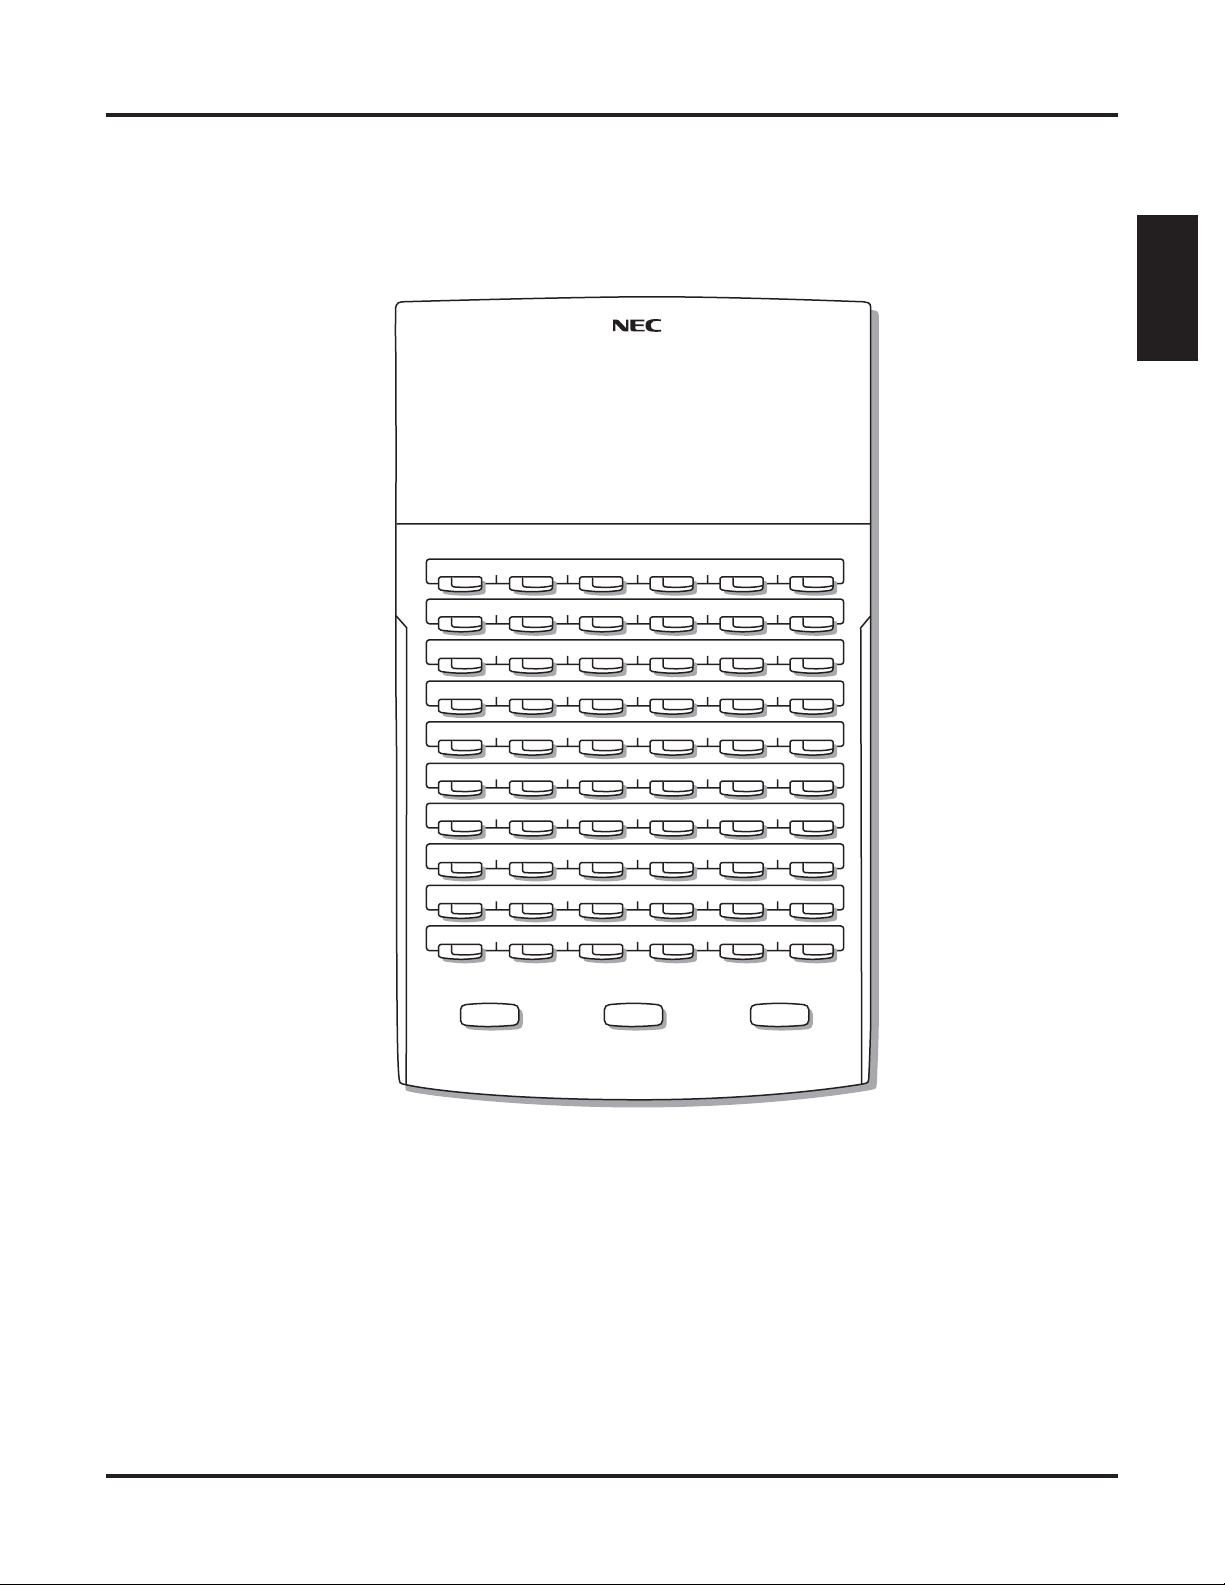
Telephone Illustrations
Introduction
300 301 302 303 304 305
306 307 308 309 310 311
312 313 314 315 316 317
318 319 320 321 322 323
324 325 326 327 328 329
330 331 332 333 334 335
336 337 338 339 340 341
342 343 344 345 346 347
RELEASE
ALL
CALL
Park 60 Park 61
TRANSFERANSWER
Page 1 Page 2 Page 3
NightPark 62 Park 63 Park 64 Park 65 Park 66
60-Button DSS Console
DSX Feature Handbook Introduction ◆ 7
Page 12

Telephone Illustrations
8 ◆ Introduction DSX Feature Handbook
Page 13

Introduction
How To Use This Chapter
This chapter provides detailed information on the IntraMail features. The IntraMail features in this chapter
are in alphabetical order, like a dictionary. This chapter subdivides each feature definition into headings as
follows:
❥ Description
Read Description to get an overview of the feature.
❥ Operation
Operation provides convenient operation charts for each IntraMail feature.
IntraMail
Features
If you are not familiar with the IntraMail features, review
the IntraMail Feature Glossary on page 10.
Introduction
Features
IntraMail
Start-Up (Default) Configuration
Without IntraMail Installed
The Built-In Automated Attendant is enabled. See page 25 for more.
With IntraMail Installed
IntraMail automatically assigns a mailbox to each extension in the number plan.
❥ By default in DSX-40, only the first 8 (300-307) Subscriber Mailboxes are active/enabled.
❥ By default in DSX-80/160, only the first 16 (300-315) subscriber mailboxes are active/enabled.
❥ The IntraMail Automated Attendant does not answer outside calls.
DSX Feature Handbook IntraMail Features ◆ 9
Page 14

IntraMail Feature Glossary
IntraMail Feature Glossary
Name Description Usage
Announcement Mailbox
Announcement Message
Answer Schedule Override
Answer Table
Answering Machine Emulation
Auto Attendant Do Not Disturb
Auto Erase or Save
Mailbox that allows a prerecorded greeting to play to callers.
• See Announcement Mailbox (page 15) for more.
The message that the System Administrator records for a
specific Announcement Mailbox.
• See Announcement Message (page 16) for more.
Enables an alternate greeting and alternate dialing options
for callers.
• See Answer Schedule Override (page 17) for more.
Determines how the Automated Attendant answers outside
calls on each line, according to the time of the day and day
of the week that the call is ringing.
• See Answer Tables (page 18) for more.
A keyset on the connected telephone system can work like
a home answering machine.
• See Answering Machine Emulation (page 19) for
more.
Auto Attendant Do Not Disturb sends Automated Attendant
calls directly to an extension user’s mailbox. Their phone
will not ring for calls from the Automated Attendant.
• See Auto Attendant Do Not Disturb (page 20) for
more. Also see Greeting
in this glossary
.
When a mailbox user completely listens to a new message
and then exits their mailbox, IntraMail will either automatically save or erase the message.
• See Auto Erase or Save (page 22) for more.
Automated Attendant
Automated Attendant
Automated Attendant
Automated Attendant
Voice Mail
Automated Attendant
Voice Mail
Auto Time Stamp
After a user listens to a message, IntraMail can optionally
Voice Mail
announce the time and date the message was left.
• See Auto Time Stamp (page 23) for more.
Automated Attendant
The Automated Attendant can automatically answer the
Automated Attendant
telephone system’s incoming calls, play an Instruction
Menu message, and provide dialing options to callers.
• See Automated Attendant (page 24) for more.
Automated Attendant, Basic
Provides built-in call answering capability when IntraMail
Automated Attendant
is not installed.
• See Automated Attendant, Built-In (page 25) for more.
Automated Attendant Transfer
While on an outside call, an extension user can transfer
Voice Mail
their call to the Automated Attendant so the caller can use
the Automated Attendant dialing options.
• See Automated Attendant Transfer (page 27) for more.
Bilingual Voice Prompts
Call Forward to a Mailbox
• See Bilingual Voice Prompts (page 29) for more. Voice Mail
An extension user can forward their calls to their mailbox.
Voice Mail
• See Call Forward to a Mailbox (page 30) for more.
10 ◆ IntraMail Features DSX Feature Handbook
Page 15

IntraMail Feature Glossary
Name Description Usage
Call Routing Mailbox
Call Screening
Caller ID and Voice Mail
Calling the Automated Attendant
Centrex Transfer
The mailbox associated with an Answer Table that specifies
which dialing options (Dial Action Table) and announcements are available to Automated Attendant callers.
• See Call Routing Mailbox (page 32) for more.
Call Screening allows a display keyset extension user to
listen to (screen) a voice mail message as it is being left in
their mailbox. Unlike Personal Answering Machine emulation, Call Screening does not require the extension user
to forward their calls immediately to voice mail.
• See Call Screening (page 33) for more.
A telephone company service that provides a caller’s number
and optional name. The telephone system can pass this information to IntraMail to enable
• See Caller ID and Voice Mail (page 36) for more.
Automated Attendant callers can use various IntraMail
features and then return to the Automated Attendant for
additional dialing options.
• See Calling the Automated Attendant (page 37) for
more.
The Automated Attendant to transfer a caller from a Centrex line to an outside number using the features of that
Centrex line.
• See Centrex Transfer (page 38) for more.
Caller ID with Return Call
.
Automated Attendant
Voice Mail
System
Automated Attendant
Automated Attendant
Features
IntraMail
Conversation Record
Dial Action Table
Directory Dialing
Erasing All Messages
Exiting a Mailbox
External Transfer
Allows an extension user to record their active call as a message in their mailbox. IntraMail will broadcast a beep and a
voice prompt to the callers as Conversation Record begins.
• See Conversation Record (page 39) for more.
Defines the dialing options for a Call Routing Mailbox
chosen by the active Answer Table, which in turn provides
those dialing options to Automated Attendant callers.
• See Dial Action Table (page 41) for more.
Directory Dialing allows an Automated Attendant caller to
reach an extension by dialing the first few letters in the
extension user’s name.
• See Directory Dialing (page 42) for more.
Lets the System Administrator delete mailbox messages
system-wide.
• See Erasing All Messages (page 46) for more.
An extension user can exit their mailbox by dialing a code
or by hanging up.
• See Exiting a Mailbox (page 47) for more.
An Automated Attendant caller can automatically route to
an outside telephone number.
• See External Transfer (page 48) for more.
Voice Mail
Automated Attendant
Automated Attendant
Maintenance
Voice Mail
Automated Attendant
DSX Feature Handbook IntraMail Features ◆ 11
Page 16

IntraMail Feature Glossary
Name Description Usage
Getting Recorded Help
Greeting
Guest Mailbox
Instruction Menu
Leaving a Message
If an extension user dials an incorrect code or forgets what
to dial while in their mailbox, they can request help from
the IntraMail voice prompts.
• See Getting Recorded Help (page 49) for more.
A Subscriber Mailbox user can record up to three separate
greetings and make any one of the three active. Caller’s to
the user’s mailbox hear the active greeting.
With Remote Greeting, an extension user can call into the
Automated Attendant, access their mailbox, and remotely
record their mailbox greeting.
• See Greeting (page 50) for more.
• Also see Auto Attendant Do Not Disturb in this glos-
sary.
An outside party can have their own mailbox for receiving
and sending messages.
• See Guest Mailbox (page 52) for more.
The Instruction Menu is the announcement that plays to
Automated Attendant callers. Normally, the Instruction
Menu provides callers with the Automated Attendant dialing options.
• See Instruction Menu (page 53).
Leave a voice mail message in a co-worker’s mailbox.
• See Leaving a Message (page 54).
Voice Mail
Voice Mail
Voice Mail
Automated Attendant
Voice Mail
Listening to Messages
Log Onto Voice Mail
Mailbox Name
Mailbox Options Menu
Mailbox Security Code Delete
Main Menu
While or after listening to a message, an extension user has
many message handling options from which to choose.
• See Listening to Messages (page 56) for more.
An extension user can press a key to log onto (access)
their IntraMail mailbox.
With Remote Logon, an employee calling through the Automated Attendant can dial a single digit followed by their own
mailbox number to remotely log onto their mailbox.
• See Log Onto Voice Mail (page 59) for more.
A mailbox caller can hear the extension user’s prerecorded
name instead of their mailbox number.
• See Mailbox Name (page 61) for more.
Sub-menu of a subscriber’s Main Menu that provides
access to the Auto Time Stamp, Mailbox Security Code
Delete, and Message Notification features.
• See Mailbox Options Menu (page 63) for more.
The System Administrator can delete the security code for
any mailbox, effectively unlocking it.
• See Mailbox Security Code Delete (page 64) for more.
• Also see Security Code in this glossary.
The IntraMail options available to an extension user when
they log onto their mailbox.
• See Main Menu (page 65) for more.
Voice Mail
Voice Mail
Voice Mail
Voice Mail
Maintenance
Voice Mail
12 ◆ IntraMail Features DSX Feature Handbook
Page 17

IntraMail Feature Glossary
Name Description Usage
Make Call
Message Count Display
Message Delete
Message Forward
Message Listen Mode
Message Notification
A Subscriber Mailbox user can listen to a voice message
and dial MC to return the call without knowing their
caller’s phone number.
• See Make Call (page 67)
The telephone display can show the number of new messages waiting in a user’s mailbox.
• See Message Count Display (page 68) for more.
An extension user can delete any messages left in their
mailbox.
• See Message Delete (page 70) for more.
A subscriber can forward a message in their mailbox to a
co-worker. They can optionally record a comment before
the forwarded message.
• See Message Forward (page 71) for more.
When a user calls their mailbox, they can dial a code to
listen to all their messages, their new messages, or their
saved messages.
• See Message Listen Mode (page 72) for more.
Once activated by the mailbox user, dials a telephone
number to let the recipient know there are new messages
in the mailbox. Notification can call extensions, local
numbers, long distance numbers and pagers.
• See Message Notification (page 73) for more.
for more
.
Voice Mail
Voice Mail
Voice Mail
Voice Mail
Voice Mail
Voice Mail
Features
IntraMail
Message On Hold
Message Playback Direction
Message Record
Message Reply
Next Call Routing Mailbox
Record and Send a Message
Security Code
The System Administrator can record a message that will
play to callers while they wait on Hold.
• See Message On Hold (page 76) for more.
An extension user can listen to their messages in either
LIFO (last-in-first-out) or FIFO (first-in-first-out) order.
• See Message Playback Direction (page 77) for more.
• See Record and Send a Message in this glossary. Voice Mail
An extension user can reply to a message in their mailbox
by dialing a simple code, without knowing the caller’s
extension number.
• See Message Reply (page 78) for more.
Provides callers with additional dialing options after they
leave a message in an extension’s mailbox (depending on
the setting of the Next Call Routing Mailbox Dial Mode).
• See Next Call Routing Mailbox (page 79) for more.
A Subscriber Mailbox user can record and send a message
to any other Subscriber Mailbox.
• See Record and Send a Message (page 80) for more.
An extension user’s mailbox can have a security code to
protect the mailbox from unauthorized access.
• See Security Code (page 81) for more.
• Also see Mailbox Security Code Delete in this
glossary.
Voice Mail
Voice Mail
Voice Mail
Voice Mail
Voice Mail
Voice Mail
DSX Feature Handbook IntraMail Features ◆ 13
Page 18

IntraMail Feature Glossary
Name Description Usage
System Administrator
Time and Date with Voice Mail
Time and Date Stamp
Transfer to a Mailbox
Volume Control with Voice Mail
The extension user that has IntraMail system administration capabilities.
• See System Administrator (page 82) for more.
Set the system Time and Date.
• See Time and Date with Voice Mail (page 84) for
more.
• Also see Auto Time Stamp in this glossary.
With caller ID enabled, an extension can listen to a message and dial a code to hear the time the message was sent,
as well as the caller’s number.
• See Time and Date Stamp (page 85) for more.
• Also see Caller ID with Return Call and Time and
Date with Voice Mail in this glossary.
An extension user can transfer their active call to a coworker’s mailbox.
• See Transfer to a Mailbox (page 86) for more.
A mailbox user can turn the volume up or down while listening to their messages.
• See Volume Control with Voice Mail (page 88) for
more.
Maintenance
Voice Mail
Voice Mail
Voice Mail
Voice Mail
14 ◆ IntraMail Features DSX Feature Handbook
Page 19
Announcement Mailbox
Description
Operation
Announcement Mailbox
Play a pre-recorded announcement to callers.
An Announcement Mailbox plays a pre-recorded announcement to Automated Attendant callers without
providing dialing options. The Announcement Mailbox is typically set up to provide information to callers
(such as company directions) and then route back to the Automated Attendant. For example:
❥ The Automated Attendant instructs the caller to dial a digit (e.g., 1) for company directions.
- Record this in the Instruction Menu message for the active Call Routing Mailbox. See Instruction
Menu (page 53) for more.
- Set the dialing options in the Dial Action Table associated with the active Call Routing Mailbox.
See Dial Action Table (page 41) for more.
❥ The caller dials the digit and listens to the prerecorded Announcement Mailbox message for directions.
❥
After playing the directions, the caller routes back to the Automated Attendant for additional dialing options.
Features
IntraMail
Recording an Announcement Mailbox Message
Log onto System Administrator’s mailbox.
SA (72)
Access System Administrator options.
[System Admin] - [N/A]
A (2)
Select Announcement Mailbox message.
[Announcement] - [Annc]
Enter the Announcement Mailbox number.
L (5)
R (7)
E (3)
#
0
Plays Help message.
Go back to the System Administrator options.
[Exit] - [Exit]
[Super Display Soft Key] - [Keyset Soft Key]
Listen to current Announcement Mailbox message.
[Listen] - [Lstn]
#
Exit listen mode.
Record a new Announcement Mailbox message.
[Record] - [Rec]
Record message.
*
E (3)
#
Pause or restart recording.
[Resume] - [Resume]
[Pause] - [Pause]
Erase recording.
[Cancel] - [Cancel]
Exit recording mode.
[Done] - [Done]
Erase the Announcement Mailbox message.
[Erase] - [Erase]
#
Go back to the System Administrator options.
[Exit] - [Exit]
DSX Feature Handbook IntraMail Features ◆ 15
Page 20

Announcement Message
Announcement Message
Description
This is the message that the System Administrator records for an Announcement Mailbox.
The Announcement Message is the voice message that the System Administrator records for a specific
Announcement Mailbox. See Announcement Mailbox (page 15) for more.
Operation
See Announcement Mailbox (page 15).
16 ◆ IntraMail Features DSX Feature Handbook
Page 21
Answer Schedule Override
Description
Operation
Answer Schedule Override
Enables an alternate greeting and alternate dialing options for callers.
Answer Schedule Override provides alternate answering for Automated Attendant calls. When enabled,
Answer Schedule Override sends calls to the specified Override Mailbox. The Override Mailbox can be an
Announcement, Call Routing, or Subscriber mailbox. You can use Answer Schedule Override to provide
holiday and bad weather closing announcements, for example. Enable override when you want callers to
hear the special announcements; disable override to have the Automated Attendant answer normally. You can
enable Answer Schedule Override from system programming or from the System Administrator Mailbox.
❥ If the Override Mailbox is an Announcement Mailbox, the outside caller will hear the recorded
announcement. Depending on how the Announcement Mailbox is programmed, IntraMail will then hang
up, reroute the call, or provide additional dialing options.
❥ If the Override Mailbox is a Call Routing Mailbox, the outside caller will hear the instruction menu and
can dial any options allowed by the associated Dial Action Table.
❥ If the Override Mailbox is a Subscriber Mailbox, the outside caller hears the mailbox greeting (if
recorded) and can leave a message.
Features
IntraMail
Log onto System Administrator’s Mailbox.
SA (72)
Access System Administrator options.
[System Admin] - [N/A]
O (6)
Access Answer Schedule Override.
[Answer Schedule] - [N/A]
1-8
Enter the number of the Answer Table you want to override.
O (6)
C (2)
#
#
0
Plays Help message.
Go back to the Main Menu.
[Exit] - [Exit]
Go back to the System Administrator Menu.
[Exit] - [Exit]
Enabling Answer Schedule Override
[Super Display Soft Key] - [Keyset Soft Key]
• You go to the Answer Schedule Override Menu.
Turn Answer Schedule Override on or off.
[On] - [On]
[Off] - [Off]
Select the Override Mailbox.
[Mailbox] - [MBOX]
Enter the Override Mailbox number.
• The Override Mailbox can be an Announcement, Call Routing, or
Subscriber Mailbox.
• If you make an incorrect entry, you back up to the previous step.
#
Go back to the Answer Schedule Override
Menu without entering an Override Mailbox.
[Exit] - [Exit]
0
#
Plays Answer Schedule Override Menu Help message.
Go back to the System Administrator Menu.
[Exit] - [Exit]
DSX Feature Handbook IntraMail Features ◆ 17
Page 22

Answer Tables
Answer Tables
Description
Determines how the Automated Attendant answers outside calls on each line, according to the
time of the day and day of the week that the call is ringing.
The Answer Table determines how the Automated Attendant answers outside calls on each line, according to
the time of the day and day of the week that the call is ringing. The Automated Attendant can automatically
answer the telephone system’s incoming calls, play an Instruction Menu message, and provide dialing
options to callers.
Operation
N/A
18 ◆ IntraMail Features DSX Feature Handbook
Page 23
Answering Machine Emulation
Description
A keyset on the connected telephone system can work like a home answering machine.
A user’s keyset can work like a home answering machine. This lets IntraMail screen their calls, just like their
answering machine at home. If activated, the extension’s incoming calls route to the user’s Subscriber Mailbox. Once the mailbox answers, the user hears two alert tones followed by the caller’s incoming message.
The keyset user can then:
❥ Let the call go through to their mailbox, or
❥ Intercept the call.
Operation
Using Personal Answering Machine Emulation
To activate or cancel Personal Answering Machine Emulation:
1.
Select the Call Forwarding options.
[Menu + Call Forward]
[Menu + Cfwd]
Alternately do one of the following:
• Press INTERCOM and dial *3.
• Press your Call Forwarding Feature Key.
Answering Machine Emulation
In these instructions:
[Super Display Soft Key]
[Keyset Soft Key]
Features
IntraMail
2.
Select or cancel a Personal Answering Machine Emulation.
[Ans Machine]
[More + AME]
[None]
[More + More + None]
3.
Select the Call Forwarding mode.
[All]
[All]
[Line Only]
[Line]
Select Personal Answering Machine Emulation.
• Alternately dial 7.
Select to cancel Call Forwarding.
• Alternately dial 0.
Select forwarding all calls.
Alternately dial 2.
Select forwarding outside calls only.
Alternately dial 8.
When Personal Answering Machine Emulation broadcasts your caller’s voice:
1.
Do one of the following.
a.
b.
c.
d.
Do nothing to have the caller’s message automatically recorded in your mailbox.
Press SPEAKER or lift the handset to intercept the call.
• If your extension is in the headset mode, you can only press SPEAKER.
With Call Screening disabled:
Press V-MAIL to stop the broadcast and send the call directly to your mailbox.
With Call Screening enabled:
Press V-MAIL to switch to the Call Screening mode.
• See Call Screening (page 33) for more.
DSX Feature Handbook IntraMail Features ◆ 19
Page 24

Auto Attendant Do Not Disturb
Auto Attendant Do Not Disturb
Description
Auto Attendant Do Not Disturb sends Automated Attendant calls directly to an extension user’s
mailbox. Their phone will not ring for calls from the Automated Attendant.
When a subscriber enables Auto Attendant Do Not Disturb, Automated Attendant calls to their extension go
directly to their mailbox. Their phone will not ring for calls from the Automated Attendant. You can optionally enable Auto Attendant Do Not Disturb from system programming. A subscriber typically turns on Auto
Attendant Do Not Disturb when they need to work at their desk undisturbed by outside calls from the Automated Attendant.
Keep in mind that Auto Attendant Do Not Disturb will not block Intercom calls from co-workers or any other
type of outside call not routed through the Automated Attendant. For example, with Automated Attendant Do
Not Disturb enabled, Direct Inwards Lines and transferred outside calls to an extension work normally.
20 ◆ IntraMail Features DSX Feature Handbook
Page 25
Operation
Auto Attendant Do Not Disturb
Recording a Multiple Greeting and Setting Up Auto Attendant Do Not Disturb
Log onto Subscriber Mailbox.
G (4)
Access the Mailbox Greeting options.
[Greeting] - [Greet]
IntraMail does the following:
• Plays a summary of your current settings.
• Displays the status of your active Greeting (1-3).
[GREETING n: RECORDED] - [GREETING n: RECORDED], or
[GREETING n: NOT REC] - [GREETING n: NOT REC]
• Shows the Auto Attendant Do Not Disturb status.
[Auto-Attendant DND:OFF] - [Auto-Attendant DND:OFF], or
[Auto-Attendant DND:ON] - [Auto-Attendant DND:ON]
• Provides soft keys for each of the 3 greetings.
[Greeting 1] - [Gr1]
[Greeting 2] - [Gr2]
[Greeting 3] - [Gr3]
Select a Greeting (which also makes it active).
(1) [Greeting 1] - [Gr1]
(2) [Greeting 2] - [Gr2]
(3) [Greeting 3] - [Gr3]
[Super Display Soft Key] - [Keyset Soft Key]
L (5)
Listen to the active greeting (if recorded).
[Listen] - [Lstn]
Record a new greeting (if not recorded), or rerecord the
R (7)
current greeting.
[Record] - [Rec]
Record at the tone, then press # when done.
Features
IntraMail
Erase the currently recorded greeting (if any).
[Erase] - [Erase]
#
Go back to the Mailbox Greeting options.
[Exit] - [Exit]
Change Auto Attendant Do Not Disturb.
O (6)
#
0
Go back to mailbox Main Menu.
[Exit] - [Exit]
Plays Help message.
Turn Auto Attendant Do Not Disturb off or on.
*
E (3)
#
Pause or restart recording.
[Resume] - [Resume]
[Pause] - [Pause]
Erase the greeting.
[Cancel] - [Cancel]
End the recording.
[Done] - [Done]
DSX Feature Handbook IntraMail Features ◆ 21
Page 26

Auto Erase or Save
Auto Erase or Save
Description
When a mailbox user completely listens to a new message and then exits their mailbox,
IntraMail will either save or erase the message.
When a mailbox user completely listens to a new message and then exits their mailbox, IntraMail will either
automatically save or erase the message. The setting of this option depends on how the subscriber would prefer their mailbox to operate. When set to erase, the subscriber can review their messages and retain only those
they specifically save using the SA option. This is a good choice for a subscriber that receives frequent unessential messages. When set to save, the subscriber has the assurance of knowing that every message they listened to was saved in their mailbox. This is a good choice for those that must carefully review and consider
each new message.
Handling Partially Reviewed Messages
When listening to multiple new messages when Auto Erase or Save is set to Save:
❥ Any message to which you partially listen is automatically saved.
❥ Any message to which you hang up during or do not listen is retained as a new message.
For example, if you have three new messages, listen to part of message 1, dial L to hear part of message 2
and then hang up, IntraMail automatically:
❥ Saves message 1.
❥ Retains messages 2 and 3 as new messages.
❥ Restarts the flashing ring/message lamp.
❥ Resets the telephone display to V-MAIL 02 (VM02).
When listening to multiple new messages when Auto Erase or Save is set to Erase:
❥ Any message to which you partially listen is automatically erased.
❥ Any message to which you hang up during or do not listen is retained as a new message.
For example, if you have three new messages, listen to part of message 1, dial L to hear part of message 2
and then hang up, IntraMail automatically:
❥ Erases message 1.
❥ Retains messages 2 and 3 as new messages.
❥ Restarts the flashing ring/message lamp.
❥ Resets the telephone display to V-MAIL 02 (VM02).
Operation
N/A
22 ◆ IntraMail Features DSX Feature Handbook
Page 27
Auto Time Stamp
Description
Automatically hear the time and date a message was left.
After a Subscriber Mailbox user listens to a message, IntraMail can optionally announce the time and date
the message was left. The Subscriber can enable Auto Time Stamp from their mailbox, or you can optionally
enable it from system programming. Auto Time Stamp helps if the subscriber needs to know the time and
date of each message they receive without taking any extra steps. With Auto Time Stamp turned on, IntraMail automatically announces the date, time, and (optionally) the caller’s number at the end of each message. With Auto Time Stamp turned off, the subscriber must dial TI while listening to a message to get the
same information.
Operation
Log onto Subscriber Mailbox.
OP (67)
Access the Mailbox Options Menu.
[MBOX Options] - [N/A]
AT (28)
Turning Auto Time Stamp On or Off
[Super Display Soft Key] - [Keyset Soft Key]
Access Auto Time Stamp.
[Time Stamp] - [Time]
IntraMail plays a summary of your Auto Time Stamp setting.
• By default, Auto Time Stamp is turned off.
O (6)
Turn Auto Time Stamp on or off.
Auto Time Stamp
Features
IntraMail
#
0
Go back to the Mailbox Options Menu.
[Exit] - [Exit]
Plays Help message.
DSX Feature Handbook IntraMail Features ◆ 23
Page 28
Automated Attendant
Automated Attendant
Description
Automatically answers the telephone system’s incoming calls, plays an Instruction Menu
message, and provides dialing options to callers.
For a built-in call answering capability when IntraMail is not installed, see Automated
Attendant, Built-In
The Automated Attendant answers outside calls on each line, according to the time of the day and day of the
week that the call is ringing. The Automated Attendant can automatically answer the telephone system’s incoming calls, play an Instruction Menu message, and provide dialing options to callers.
Operation
For the outside caller:
1.
After Automated Attendant answers, the voice prompts will instruct you on which digits to dial.
(page 24).
Using the Automated Attendant
24 ◆ IntraMail Features DSX Feature Handbook
Page 29

Automated Attendant, Built-In
Description
Automated Attendant, Built-In
Provides built-in call answering capability when IntraMail is not installed.
For the full-featured IntraMail Automated Attendant that automatically answers incoming calls,
plays an Instruction Menu message, and provides dialing options to callers, see Automated
Attendant
The Built-In Automated Attendant gives the system call answering and routing capabilities when IntraMail
is not installed. The Built-In Automated Attendant can use any of the first eight Call Routing Mailboxes
(001-008) for call handling, and each of these eight Routing Mailboxes can have a 30 second Instruction
Menu message (Attendant Greeting). The Routing Mailboxes must be Call Routing Mailboxes, and all other
Routing Mailbox types are ignored. Additionally, the Built-In Automated Attendant provides two voice mail
ports, allowing it to process two calls simultaneously.
(page 24).
The Built-In Automated Attendant does not provide voice mail.
Just like the full featured IntraMail Automated Attendant, the Built-In Automated Attendant can answer outside calls on each line according to the time of the day and day of the week that the call is ringing. After
answering, the Built-In Automated Attendant plays an Instruction Menu message (greeting) to the caller and
provides them with dialing options.
Operation
Using the Built-In Automated Attendant
For the outside caller:
1.
After Automated Attendant answers, the voice prompts will instruct you on which digits to dial.
Features
IntraMail
DSX Feature Handbook IntraMail Features ◆ 25
Page 30

Automated Attendant, Built-In
#AG
(#24)
Recording an Automated Attendant Instruction Menu (Attendant Greeting) Message
[Super Display Soft Key] - [Keyset Soft Key]
Access the Attendant Greeting options.
• Your extension must have access level 5.
Enter the Call Routing Mailbox number (001-008).
L (5)
R (7)
Listen to the current Instruction Menu (if any).
[Listen] - [Lstn]
#
X (9)
Exit.
Record a new Instruction Menu.
[Record] - [Rec]
Record message.
Pause or restart recording.
[Resume] - [Resume]
[Pause] - [Pause]
Erase recording.
[Cancel] - [Cancel]
Exit recording mode.
[Done] - [Done]
E (3)
#
X (9)
*
E (3)
#
Erase the Instruction Menu.
[Erase] - [Erase]
Exit.
[Exit] - [Exit]
0
Plays Help message.
26 ◆ IntraMail Features DSX Feature Handbook
Page 31

Automated Attendant Transfer
Description
Operation
Automated Attendant Transfer
While on an outside call, an extension user can transfer their call to the Automated Attendant
for additional dialing options.
An extension user can transfer their outside call to the Automated Attendant so the outside caller can use the
Automated Attendant dialing options. This helps an outside caller, for example, that wants to return to the
Automated Attendant so they can dial another co-worker or use a different Automated Attendant option.
Automated Attendant Transfer
To transfer an outside call to the Automated Attendant:
1.
While on an outside call, press V-MAIL.
Features
IntraMail
DSX Feature Handbook IntraMail Features ◆ 27
Page 32

Automatic Routing for Rotary Dial Callers
Automatic Routing for Rotary Dial Callers
Description
Automatically route Automated Attendant callers that don’t dial any digits to a specified option.
If an Automated Attendant caller doesn’t dial any digits, IntraMail will automatically route them to a specified option (such as the operator or a mailbox). This lets rotary telephone users stay on the line to leave a
message or have their call processed. Without Automatic Routing for Rotary Dial Callers, rotary callers
would not be able to use the Automated Attendant.
Operation
None
28 ◆ IntraMail Features DSX Feature Handbook
Page 33

Bilingual Voice Prompts
Description
Bilingual Voice Prompts
Provides IntraMail voice prompts in one of two active languages.
Bilingual Voice Prompts provides IntraMail voice prompts in one of two active languages (primary and secondary). These language choices are available to Routing Mailboxes, outside lines, Station Mailboxes, and
Group Mailboxes as follows:
❥ Routing Mailbox
The language an Automated Attendant caller hears is set by the answering Routing Mailbox.
❥ Outside Line
For outside lines not answered by the Automated Attendant, the language the caller hears if routed to
voice mail is set by the line. An outgoing outside call also hears the line’s language setting if it is then
transferred to a co-worker’s mailbox.
❥ Station Mailbox
When you log onto your own mailbox and use its features, you always hear your mailbox language. If
you call a co-worker and leave a message, you will hear the system’s Primary Language.
❥ Group Mailbox and UCD Group Mailbox
Similar to a Station Mailbox, when you log into a Group or UCD Group Mailbox and use its features,
you always hear the language programmed for that mailbox. If a co-worker leaves a message in the
Group Mailbox, they hear the system’s Primary Language.
Features
IntraMail
There are up to six languages stored in the IntraMail CompactFlash card. By default, English mnemonic and
English numeric are active and the other four languages (if any) are inactive. You activate an inactive language through system programming.
Automated Attendant callers can optionally dial a digit to select the language of their choice.
Operation
None
DSX Feature Handbook IntraMail Features ◆ 29
Page 34

Call Forward to a Mailbox
Call Forward to a Mailbox
Description
An extension user can forward their calls to their mailbox.
A subscriber can easily forward calls to their Subscriber Mailbox. Instead of dialing an extension as the forwarding destination, the user just presses their V-MAIL key instead. With Call Forward to a Mailbox, the sub-
scriber is assured that their calls don’t get forgotten when they are busy or unavailable. Unlike with
Extension Hunting to Voice Mail, forwarding lets the subscriber choose when and how they want their unanswered calls to go to voice mail (rather than have the telephone system reroute their calls automatically).
Call Forwarding a Subscriber’s Direct Inward Line to their Mailbox
The following table describes how IntraMail handles a subscriber’s Direct Inward Line when it is Call Forwarded to their mailbox. The routing occurs when the caller dials a digit while listening to the recorded or
default mailbox greeting.
Dialing Options while Listening to a Subscriber Mailbox Greeting
Next Call
Routing Mailbox
Undefined No 0 Caller hears, “That is an invalid entry,” and
1-16 (valid Call
Routing Mailbox)
1-16 (valid Call
Routing Mailbox)
Dialing Option Digit
Dialed
1-9
the greeting repeats, and the caller is
prompted to leave a message.
Action
# IntraMail hangs up.
* Caller skips greeting and can immediately
start recording.
No 0 Caller follows 0 action in Next Call Routing
Mailbox.
1-9 Caller hears, “That is an invalid entry,” the
greeting repeats, and the caller is prompted to
leave a message.
# Caller routes to the Next Call Routing Mail-
box and hears its Instruction Menu.
* Caller skips greeting and can immediately
start recording.
Yes 0 Caller follows key’s action in Next Call Rout-
1-9
ing Mailbox.
# Caller routes to the Next Call Routing Mail-
box and hears its Instruction Menu.
* Caller skips greeting and can immediately
start recording.
30 ◆ IntraMail Features DSX Feature Handbook
Page 35

Operation
Activating or Canceling Call Forward to your Mailbox
To activate Call Forwarding:
1.
Select the Call Forwarding options.
[Menu + Call Forward]
[Menu + Cfwd]
2.
Select or cancel a Call Forwarding type.
[Immediate]
[Immed]
[Ring/No Ans]
[RNA]
[Busy/No Ans]
[BNA]
[None]
[More + More + None]
Select the Call Forwarding destination:
3.
• An extension number.
• 0 for the operator.
• A UCD Group master number.
• V-MAIL for voice mail.
Call Forward to a Mailbox
Alternately do one of the following:
• Press INTERCOM and dial *3.
• Press your Call Forwarding Feature Key.
Select Call Forwarding Immediate.
• Alternately dial 4.
Select Call Forwarding when Not Answered.
• Alternately dial 6.
Select Call Forwarding when Busy or Not Answered.
• Alternately dial 2.
Select to cancel Call Forwarding.
• Alternately dial 0.
1
In these instructions:
[Super Display Soft Key]
[Keyset Soft Key]
Features
IntraMail
1
4.
Select the Call Forwarding mode.
[All]
[All]
[Line Only]
[Line]
1
Option will not forward voice-announced Intercom calls.
Select forwarding all calls.
Alternately dial 2.
Select forwarding outside calls only.
Alternately dial 8.
DSX Feature Handbook IntraMail Features ◆ 31
Page 36

Call Routing Mailbox
Call Routing Mailbox
Description
The mailbox associated with an Answer Table that specifies the dialing options and
announcements for Automated Attendant callers.
The Call Routing Mailbox, associated with an Answer Table, specifies which dialing options (Dial Action
Table) and announcements are available to Automated Attendant callers. The Automated Attendant can automatically answer the telephone system’s incoming calls, play an Instruction Menu message, and provide
dialing options to callers.
Operation
Recording an Instruction Menu for a Call Routing Mailbox
Log onto System Administrator’s mailbox.
SA (72)
Access System Administrator options.
[System Admin] - [N/A]
I (4)
Select Instruction Menus.
[Instruction] - [Instr]
Enter the Call Routing Mailbox number (001-016).
L (5)
R (7)
E (3)
#
0
Plays Help message.
Go back to the System Administrator options.
[Exit] - [Exit]
[Super Display Soft Key] - [Keyset Soft Key]
Listen to the current Instruction Menu (if any).
[Listen] - [Lstn]
#
Exit listen mode.
Record a new Instruction Menu.
[Record] - [Rec]
Record message.
*
E (3)
#
Pause or restart recording.
[Resume] - [Resume]
[Pause] - [Pause]
Erase recording.
[Cancel] - [Cancel]
Exit recording mode.
[Done] - [Done]
Erase the Instruction Menu.
[Erase] - [Erase]
#
Go back to the System Administrator options.
[Exit] - [Exit]
32 ◆ IntraMail Features DSX Feature Handbook
Page 37

Call Screening
Description
Call Screening and Group Mailboxes
Call Screening
Users can screen (listen to) voice mail messages as they are being left in their mailbox.
Call Screening allows a display keyset extension user to listen to (screen) a voice mail message as it is being
left in their mailbox. Call Screening emulates a standard home answering machine — in addition to providing more control when handling incoming messages. Similar to Personal Answering Machine Emulation, the
extension user can listen as the message is being left, intercept the call, or end the screen and have the message recorded privately. Unlike Personal Answering Machine emulation, Call Screening does not require the
extension user to forward their calls immediately to voice mail. The telephone display automatically shows
the Call Screening soft key options as soon as the recording begins.
When enabled, Call Screening will broadcast the caller’s message as soon as the mailbox Greeting completes. Additionally, if the extension user intercepts (answers) the screened call, the first portion of the message is automatically erased from the extension’s mailbox.
Any caller that can leave a message can have their call screened by the extension user.
If extensions share a Group Mailbox, any number of extensions in the group can screen an incoming message.
The group extensions can monitor the incoming message simultaneously. If any group member answers the
call (i.e., intercepts the incoming message), the remaining group members are immediately disconnected.
Features
IntraMail
Automatic Call Screening
With Automatic Call Screening enabled, an extension will immediately screen (broadcast) an incoming message as soon as the caller starts to leave it in the extension’s mailbox. The extension user hears two beeps followed by the caller’s voice.
DSX Feature Handbook IntraMail Features ◆ 33
Page 38

Call Screening
Operation
In these instructions:
Manual Call Screening Operation
• When Automatic Call Screening is off, you hear a single beep and V-MAIL flashes fast while IntraMail records your
caller’s message. Your display automatically changes to show the Call Screening soft key options.
• Call Screening is only available while your telephone is idle.
To intercept the call (and stop recording the message):
1.
To hear your caller’s message as it is recorded in your mailbox (i.e., activate the Call Screening mode):
1.
[Answer]
[Answ]
[Screen] - [Scrn]
This intercepts the call.
• Alternately press the flashing V-MAIL key.
To intercept the call (and stop recording the message):
1.
[Answer]
[Answ]
This intercepts the call.
• Alternately press SPEAKER, lift the handset, or press V-MAIL.
[Super Display Soft Key]
[Keyset Soft Key]
To continue listening to your caller’s message as it is being recorded:
1.
Do nothing.
To exit Call Screening and allow the message to continue recording in private:
1.
[Exit]
[Exit]
The message continues to record privately.
To use another feature or process another call:
1.
[Exit]
[Exit]
To use another feature, lift the handset or press any other feature key.
To exit Call Screening and allow the message to continue being recorded in private:
1.
[Exit]
[Exit]
The message continues to record privately.
To use another feature or process another call:
1.
Lift the handset, press SPEAKER, or press any other feature key.
34 ◆ IntraMail Features DSX Feature Handbook
Page 39

Call Screening
In these instructions:
Automatic Call Screening Operation
• When Automatic Call Screening is on, your idle telephone automatically goes into the screen mode while your
caller leaves a message.
• Call Screening is only available while your telephone is idle.
To turn Automatic Call Screening on or off:
1.
[Menu + Screen]
[Menu + More + More + Scrn]
[On]
[On]
[Off]
[Off]
[Exit]
[Exit]
Turn Automatic Call Screening on.
• The top line of the display shows the Automatic Call Screening status.
Turn Automatic Call Screening off.
• The top line of the display shows the Automatic Call Screening status.
Exit.
Enable or disable Automatic Call Screening.
To intercept the call (and stop recording the message):
[Answer]
1.
[Answ]
This intercepts the call.
• Alternately press SPK, V-MAIL, or lift the handset.
[Super Display Soft Key]
[Keyset Soft Key]
Features
IntraMail
To continue listening to your caller’s message as it is being recorded:
1.
Do nothing.
To exit Call Screening and allow the message to continue recording in private:
1.
[Exit]
[Exit]
The message continues to record privately.
To use another feature or process another call:
[Exit]
1.
[Exit]
To use another feature, lift the handset or press any other feature key.
DSX Feature Handbook IntraMail Features ◆ 35
Page 40

Caller ID and Voice Mail
Caller ID and Voice Mail
Description
A telephone company service that provides a caller’s number and optional name.
Caller ID is a telephone company service that provides an extension with a caller’s number and optional
name. With Caller ID, the keyset user knows who’s calling before they pick up the call. Caller ID Logging
stores a record of the call on the user’s telephone which they can review and use to easily return the call.
When used with IntraMail, Caller ID enables the Make Call feature for outside calls. After listening to a
voice message, the subscriber can dial MC to return the call without knowing the callers phone number.
Operation
N/A
36 ◆ IntraMail Features DSX Feature Handbook
Page 41

Calling the Automated Attendant
Description
Operation
Calling the Automated Attendant
Outside callers can return to the Automated Attendant for additional dialing options.
Automated Attendant callers can use various IntraMail features and then return to the Automated Attendant
for additional dialing options. This lets the caller dial other extensions, leave messages for co-workers, or
use other Automated Attendant features. The features below describe several ways to return to the Automated Attendant.
❥ Automated Attendant Transfer (page 27)
An extension user can transfer their outside call to the Automated Attendant so the outside caller can use
the Automated Attendant dialing options.
❥ Next Call Routing Mailbox (page 79)
The Next Call Routing Mailbox provides callers with additional dialing options after they leave a message in a mailbox (depending on the setting of the Dialing Option).
Turn to Automated Attendant Transfer (page 27) and Next Call Routing Mailbox (page 79).
Features
IntraMail
DSX Feature Handbook IntraMail Features ◆ 37
Page 42

Centrex Transfer
Centrex Transfer
Description
The Automated Attendant can transfer a caller from a Centrex line to an outside number using
the features of that Centrex line.
Centrex Transfer is a Dial Action Table option that can transfer an Automated Attendant call from a Centrex
line to an outside number using the features of that Centrex line. With Centrex Transfer, the Automated
Attendant answers an outside call and then transfers the caller back to the telco using the same line on which
the call initially rang. To set this up, assign a Dial Action Table action as a UTRF to a System Speed Dial bin
(e.g., #201P). The bin should contain the complete dial string (preceded by a Flash command) required to
initiate the Centrex Transfer. When the Automated Attendant answers, the caller dials the digit and IntraMail
automatically routes them to the outside number.
Centrex Transfer is only available if the telephone system connects to Centrex lines that provide the features
required to complete the transfer. Similar to External Transfer, Centrex Transfer allows your callers to easily
reach branch offices and important off-site associates. Unlike External Transfer, Centrex Transfer requires
unique telco features.
-
Operation
Operation is automatic once set up in programming.
38 ◆ IntraMail Features DSX Feature Handbook
Page 43

Conversation Record
Description
Conversation Record
Allows an extension user to record their active call as a message in their mailbox.
Conversation Record allows a subscriber to record their active call as a new message in their mailbox, which
they can review later on. Conversation Record can be helpful when an extension user is on a call that
involves a lot of detail (such as a technical discussion or extensive directions). Rather than taking notes as
the call progresses, the user can record the conversation and carefully review it later on. IntraMail broadcasts
a beep and a voice prompt to the callers as Conversation Record begins. After calling their mailbox, the subscriber can save, edit, or delete the recorded conversation.
The use of monitoring, recording, or listening devices to eavesdrop, monitor, retrieve, or record telephone
Caution
conversations or other sound activities, whether or not contemporaneous with transmission, may be illegal in certain circumstances under federal or state laws. Legal advice should be sought prior to implementing any practice that monitors or records any telephone conversation. Some federal and state laws
require some form of notification to all parties to a telephone conversation, such as using a beep tone or
other notification methods or requiring the consent of all parties to the telephone conversation, prior to
monitoring or recording the telephone conversation. Some of these laws incorporate strict penalties.
Conversation Record Key for a Co-worker’s Mailbox
Your extension or DSS Console can have Conversation Record keys for co-worker’s mailboxes. While on a
call, you can press the key to record your conversation directly into a co-worker’s mailbox. You can set up
the key to record into any valid Subscriber Mailbox (including Group Mailboxes programmed as Subscriber
Mailboxes). This could help a dispatcher, for example, that wants to record a conversation with a client right
into the responsible technician’s mailbox.
Your extension can have multiple Conversation Record keys, each associated with a different mailbox.
Features
IntraMail
DSX Feature Handbook IntraMail Features ◆ 39
Page 44

Conversation Record
Operation
Conversation Record
[Super Display Soft Key] - [Keyset Soft Key]
To record your active call in your mailbox:
• Only one party on a call can use Conversation Record at any one time. This includes Intercom calls and Conference calls.
1.
Do one of the following.
a.
b.
[Record] [More + Rec]
Press your Conversation Record Feature Key.
• The record key can be assigned to yours or a co-worker’s mailbox.
• The key will flash fast (green) on your keyset; flash fast (red) on your DSS Console.
2.
Once recording begins:
• You and your caller hear the voice prompt “Recording.”
• You see: RECORD MAILBOX XXX
(where XXX is the number of the mailbox into which the conversation is recording).
To turn Conversation Record off:
1.
Do one of the following.
• The portion of the call already recorded is sent to your mailbox as a new message.
a.
b.
Press V-MAIL.
Press a Record Feature Key on your extension or DSS Console.
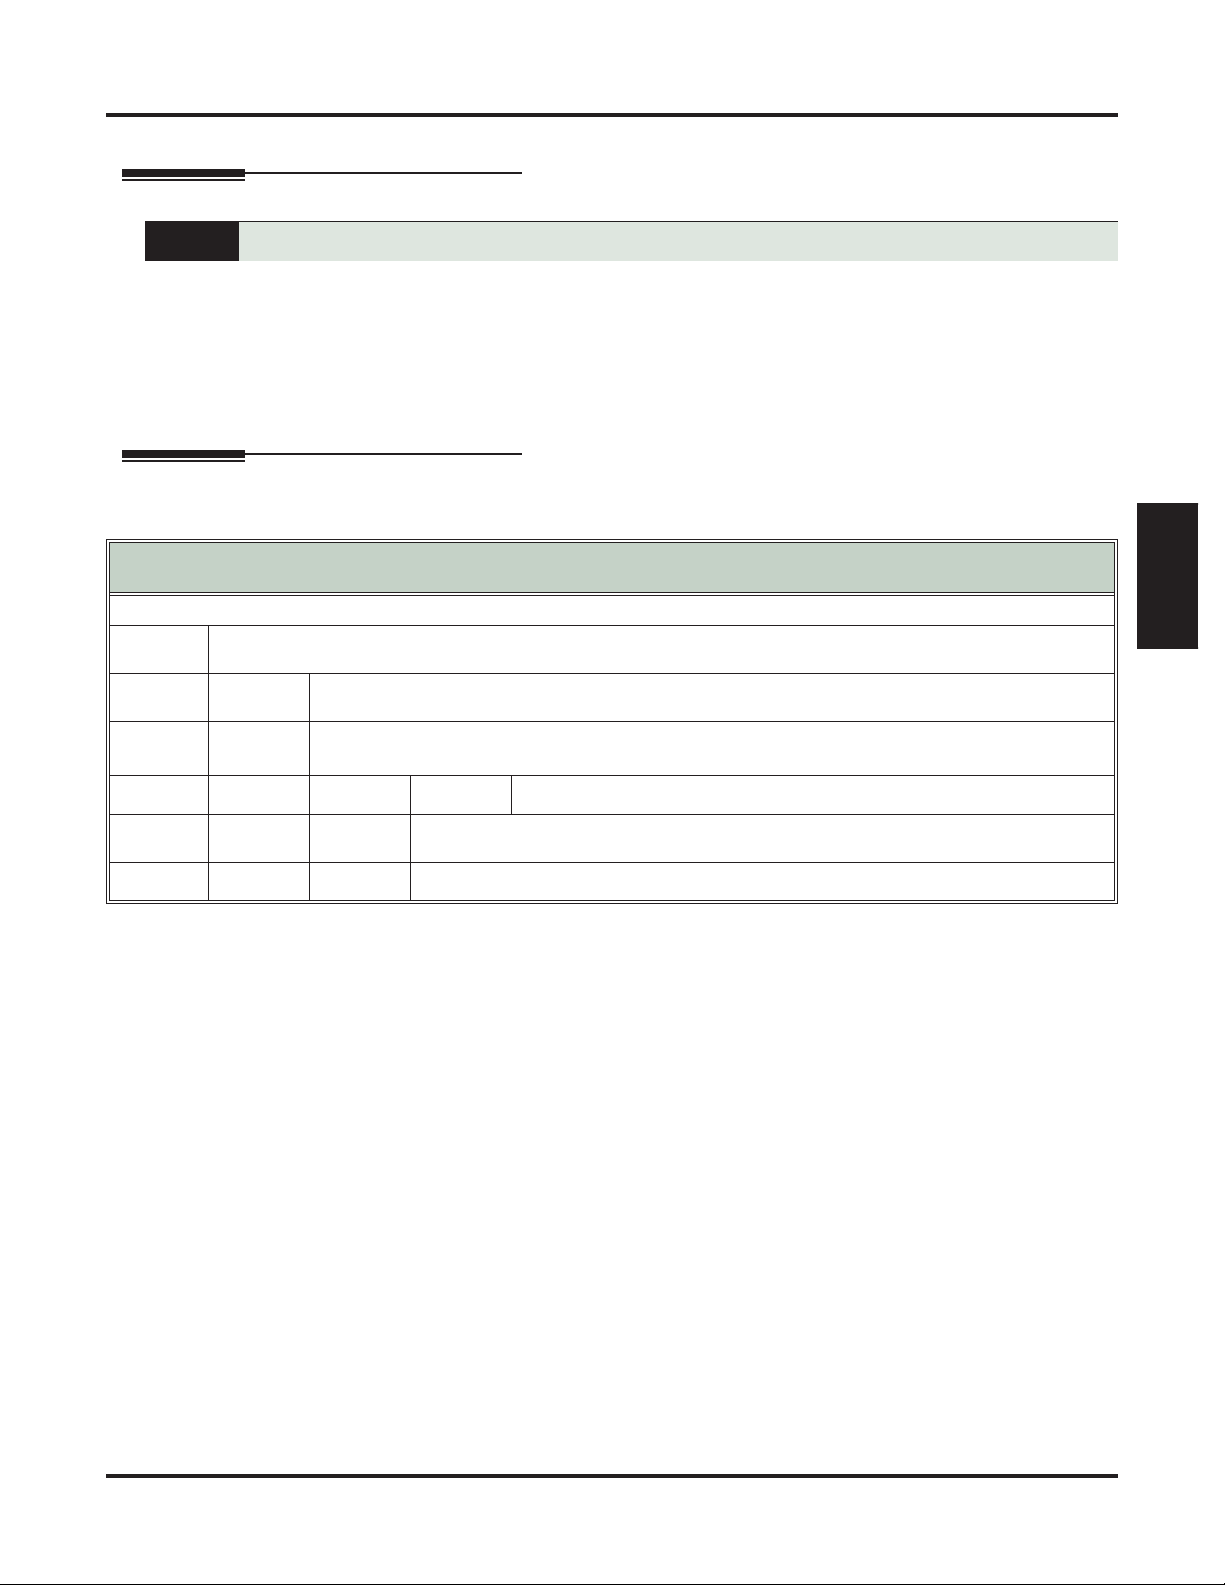
User Programmable Feature
Select to enable Conversation Record.
• The Conversation Record soft key is only available for outside calls.
Setting up a Conversation Record Key
Feature Mnemonic Operation Access Level
Voice Mail
#KP (#57)
+ Press key you want to program + HOLD + Dial 17
#KP
3-5
+ Enter mailbox number or 0 for your own mailbox +
HOLD + SPEAKER twice to exit.
40 ◆ IntraMail Features DSX Feature Handbook
Page 45

Dial Action Table
Description
Operation
Dial Action Table
Defines the dialing options for Automated Attendant callers.
The Dial Action Table defines the dialing options for the Call Routing Mailbox chosen by the active Answer
Table, which in turn provides those dialing options to Automated Attendant callers. The Dial Action Table is
an integral part of the Automated Attendant. The Automated Attendant can automatically answer the telephone system’s incoming calls, play an Instruction Menu message, and provide dialing options to callers.
N/A
Features
IntraMail
DSX Feature Handbook IntraMail Features ◆ 41
Page 46

Directory Dialing
Directory Dialing
Description
An Automated Attendant caller to reach an extension by dialing the first few letters in the
extension user’s name.
Directory Dialing allows an Automated Attendant caller to reach an extension by dialing the first few letters
in the extension user’s name. With Directory Dialing, the caller does not have to remember the extension
number of the person they wish to reach — just their name. Here’s how Directory Dialing works:
1. When the Automated Attendant answers, it sends the call to a Directory Dialing Mailbox. (Optionally,
the caller may be asked to dial a digit to access Directory Dialing.)
2. The Directory Dialing Mailbox plays the Directory Dialing Message (recorded by the System Adminis-
trator) which asks the caller to dial letters for the name of the person they wish to reach.
3. The caller dials the letters for the person’s name plus #. They can dial by first name or last name, depend-
ing on how the Directory Dialing Message was recorded and the Directory Dialing Mailbox was set up.
4. IntraMail searches the list of programmed extension names for a match of the caller-entered letters.
5. Voice prompts announce the first three matches, and allow the caller to dial a digit (1-3) to reach one of
the announced matches. Additionally, the caller can dial 4 to hear additional matches (if any).
6. The caller dials the digit for the extension they wish to reach, and IntraMail sends the call to that exten-
sion. The call is sent as a Screened or Unscreened transfer, depending on programming.
For callers to use Directory Dialing, the system must have a name programmed for each extension (up to 18
characters, A-Z, using upper and lower case letters). Each extension should also have a name recorded in
their Subscriber Mailbox. In addition, each extension used by Directory Dialing must be installed and must
have their Subscriber Mailbox active (Personal or Group).
42 ◆ IntraMail Features DSX Feature Handbook
Page 47

Operation
Recording a Directory Dialing Message
Log onto System Administrator’s mailbox.
SA (72)
Access System Administrator options.
[System Admin] - [N/A]
I (4)
Select Instruction Menus.
[Instruction] - [Instr]
Enter the Directory Dialing Mailbox number.
Directory Dialing
[Super Display Soft Key] - [Keyset Soft Key]
L (5)
R (7)
Listen to the current Directory Dialing Message (if any).
[Listen] - [Lstn]
#
Exit listen mode.
Record a new Directory Dialing Message.
[Record] - [Rec]
Features
IntraMail
Record message.
*
E (3)
#
E (3)
#
#
0
Plays Help message.
Go back to the System Administrator options.
[Exit] - [Exit]
Erase the Directory Dialing Message.
[Erase] - [Erase]
Go back to the System Administrator options.
[Exit] - [Exit]
Pause or restart recording.
[Resume] - [Resume]
[Pause] - [Pause]
Erase recording.
[Cancel] - [Cancel]
Exit recording mode.
[Done] - [Done]
Using Directory Dialing
To use Directory Dialing:
1.
After the Automated Attendant answers, wait for the Directory Dialing Message.
• The Automated Attendant may ask you to dial a digit for Directory Dialing.
2.
Dial the letters that correspond to the name of the person you wish to reach + #.
• The Directory Dialing Message will tell you how many letters you need to dial, and whether you should
enter the person’s first name or last name.
• To exit Directory Dialing without selecting a name, just dial #.
3.
The Automated Attendant will announce the name matches, and tell you which digit to dial (1-3) to reach each
of the announced names.
• To hear additional name matches (if any), dial 4 instead.
4.
Once you make your selection, the Automated Attendant will route your call to the name you select.
DSX Feature Handbook IntraMail Features ◆ 43
Page 48

Directory Dialing
Dialing Options Available while Entering a Name
The following table shows the dialing options available to the caller while they are entering a name into a
Directory Dialing Mailbox.
❥
By default, the caller can dial the digs 2-9 to enter the name or dial # to return to the Automated Attendant.
❥
If a Next Call Routing Mailbox is specified, the caller can dial the digits 2-9 to enter a name, dial 0 to follow
the 0 action of the Next Call Routing Mailbox, or dial # to route directly to the Next Call Routing Mailbox.
Directory Dialing Mailbox Name Entry Options
(Options available while entering a name)
Dialed Digit Next Call Routing Mailbox Setting Action
1
2-9
0
*
#
Timeout
UND (Not assigned) Repeats the Directory Dialing Message (to make a new name entry)
1-16 (valid Call Routing Mail-
UND (Not assigned) Routes to the Automated Attendant (i.e., back to the Call Routing
1-16 (valid Call Routing Mail-
N/A Entry is ignored.If no additional digits are dialed, repeats the Direc-
tory Dialing Message (to make a new name entry) up to twice and
then hangs up.
N/A Interprets the digit as a letter and waits 6 seconds for additional input
(i.e., more letters or a # to conclude name entry). If no additional digits are dialed, repeats the Directory Dialing Message (to make a new
name entry) up to twice and then hangs up.
each time the caller dials the digit.
Caller routes according to the 0 action of the Next Call Routing Mail-
box)
box’s Dial Action Table.
N/A Repeats the Directory Dialing Message (to make a new name entry)
each time the caller dials the digit.
Mailbox that initially answered the call).
Routes to the Next Call Routing Mailbox and plays that mailbox’s
box)
Instruction Menu.
N/A Repeats the Directory Dialing Message (to make a new name entry)
up to two times and then hangs up.
44 ◆ IntraMail Features DSX Feature Handbook
Page 49

Directory Dialing
Dialing Options Available when more than one Employee has the Entered Name
If the name the caller enters is used by more than one employee, IntraMail lets the caller select the employee
to which they want to talk. The caller can dial 1, 2 or 3 to select the employee from the first three name
matches, or dial 4 to hear additional name matches.
❥ By default, the caller can also dial * to make a new entry or dial # to return to the Automated Attendant.
❥
If a Next Call Routing Mailbox is specified, the caller can also dial * to make a new entry, dial 0 to follow the
0 action of the Next Call Routing Mailbox, or dial # to route directly to the Next Call Routing Mailbox
Directory Dialing Mailbox Routing Options
(Options available after a name is entered)
Dialed Digit Next Call Routing Mailbox Setting Action
1-3
4
5-9
0
*
#
Timeout
UND (Not assigned) Plays “That is an invalid entry” and repeats the list of announced
1-16 (valid Call Routing Mail-
UND (Not assigned) Routes to the Automated Attendant (i.e., back to the Call Routing
1-16 (valid Call Routing Mail-
UND (Not assigned)
N/A Route to the respective extension from the list of up to three
announced matches.
N/A If more than three matches for the entered name are found, provides
access to the next set of three matches.
N/A Plays “That is an invalid entry” and repeats the list of announced
matches each time the caller dials the digit.
matches each time the caller dials the digit.
Caller routes according to the 0 action of the Next Call Routing Mail-
box)
box’s Dial Action Table.
N/A Repeats the Directory Dialing Message (to make a new name entry)
each time the caller dials the digit.
Mailbox that initially answered the call).
Routes to the Next Call Routing Mailbox and plays that mailbox’s
box)
Instruction Menu.
Repeats the list of announced matches (up to two times). If no
response, r
epeats the Directory Dialing Message (to make a new
name entry) up to three times and then hangs up.
.
Features
IntraMail
DSX Feature Handbook IntraMail Features ◆ 45
Page 50

Erasing All Messages
Erasing All Messages
Description
Lets the System Administrator delete mailbox messages system-wide.
The System Administrator can delete all messages in a Subscriber Mailbox. Erasing All Messages is an
administrator’s maintenance tool. The administrator may need to use this tool if an employee has left the
company or has an excessive number of messages stored in their mailbox. By deleting the unwanted messages, the administrator can prevent the IntraMail recording capacity from being reached (which would disable many of the IntraMail messaging features).
Operation
Erasing All Messages in a Subscriber Mailbox
Log onto System Administrator’s mailbox.
SA (72)
Access System Administrator options.
[System Admin] - [N/A]
S (7)
Select Subscriber Mailbox Maintenance options.
[Subscriber] - [Subs]
Enter the number of the Subscriber Mailbox you want to maintain.
EA (32)
0
Plays Help message.
[Super Display Soft Key] - [Keyset Soft Key]
Erase all Subscriber Mailbox messages.
[Erase All Messages] - [Msgs]
#
Go back to System Administrator options.
[Exit] - [Exit]
46 ◆ IntraMail Features DSX Feature Handbook
Page 51

Exiting a Mailbox
Description
Operation
Exiting a Mailbox
Exit your mailbox by dialing a code or by hanging up.
A Subscriber Mailbox user can exit their mailbox by dialing a code or by hanging up. After exiting, the subscriber can use their extension for normal call processing.
[Super Display Soft Key] - [Keyset Soft Key]
To exit your mailbox:
Exiting a Mailbox
Log onto Subscriber Mailbox.
XX (99)
To exit and immediately return to your mailbox:
Exit your mailbox.
[Exit + Exit] - [Exit + Exit]
Log onto Subscriber Mailbox.
X# (9#)
0
Exit and return to your mailbox.
[Exit + RETURN] - [Exit + Return]
Plays Help message.
Features
IntraMail
DSX Feature Handbook IntraMail Features ◆ 47
Page 52

External Transfer
External Transfer
Description
An Automated Attendant caller can automatically route to an outside telephone number.
External Transfer allows an Automated Attendant caller to automatically route to an outside telephone number. This requires a Dial Action Table actionassigned as a UTRF to a System Speed Dial bin (e.g., #201 +
Pause for system bin 201). When the Automated Attendant answers, the caller dials the digit and IntraMail
automatically routes them to the outside number contained in the bin. Similar to Centrex Transfer, External
Transfer allows your callers to easily reach branch offices and important off-site associates. Unlike Centrex
Transfer, External Transfer does not require unique telco features.
Operation
Operation is automatic once set up in programming.
48 ◆ IntraMail Features DSX Feature Handbook
Page 53

Getting Recorded Help
Description
Operation
Getting Recorded Help
Request help from the IntraMail voice prompts.
If a Subscriber Mailbox user dials an incorrect code or forgets what to dial while in their mailbox, they can
request help from the IntraMail voice prompts. Recorded Help provides the user with a built-in, interactive
user’s guide. To get recorded help, the user dials 0.
Getting Recorded Help
Log onto your mailbox
Get recorded help.
0
• Recorded help is always available from the Main Menu.
• Recorded help may not be available at all levels.
Features
IntraMail
DSX Feature Handbook IntraMail Features ◆ 49
Page 54

Greeting
Greeting
Description
Multiple Greetings
A user can record a Greeting for their mailbox callers to hear.
A Subscriber Mailbox user can record a personalized greeting for their mailbox. Caller’s to the user’s mailbox hear the prerecorded personalized greeting rather than a default message. The greeting can announce the
subscriber’s name, provide a personal message (such as “Hello - I am on vacation this week”), or instruct the
caller how to leave a message or use other mailbox options. A greeting that provides mailbox instructions is
very helpful if the mailbox has a Next Call Routing Mailbox set up that provides additional dialing options.
Without the greeting, the caller would not know which digits to dial.
If a greeting has not been recorded, a caller leaving a message in the subscriber mailbox will hear, “At the
tone, you can leave your message for (extension number or name).”
While listening to a mailbox greeting, a caller can dial * to immediately leave a message.
A subscriber can record up to three personalized greetings for their mailbox and make any one of the three
active. Callers to the user’s mailbox hear the active greeting rather than a default message. When a caller
leaves a message in the subscriber’s mailbox, they hear the active greeting. This allows the subscriber, for
example, to record separate greetings for work hours, after work, and during vacation. Instead of rerecording
their greeting when they leave the office, they can just activate the “after work” greeting instead.
Remote Greetings
A Subscriber Mailbox user can call into the Automated Attendant, access their mailbox, and remotely record
their mailbox greeting. Following are two of the ways a user can do this:
❥ After the Automated Attendant answers, dial a digit (typically #) followed by their mailbox number. This
method allows outside callers to log into their Subscriber Mailboxes from outside the company. Once
they log into their mailbox, the user can dial G to record a greeting.
❥ If an extension has a Direct Inward Line that is forwarded to voice mail, the caller can dial # and log into
their mailbox (instead of leaving a message). Once they log into their mailbox, the user can dial G to
record a greeting. This option must be set up in the Next Call Routing Mailbox.
50 ◆ IntraMail Features DSX Feature Handbook
Page 55

Operation
Greeting
Recording a Multiple Greeting and Setting Up Auto Attendant Do Not Disturb
Log onto Subscriber Mailbox.
G (4)
Access the Mailbox Greeting options.
[Greeting] - [Greet]
IntraMail does the following:
• Plays a summary of your current settings.
• Displays the status of your active Greeting (1-3).
[GREETING n: RECORDED] - [GREETING n: RECORDED], or
[GREETING n: NOT REC] - [GREETING n: NOT REC]
• Shows the Auto Attendant Do Not Disturb status.
[Auto-Attendant DND:OFF] - [Auto-Attendant DND:OFF], or
[Auto-Attendant DND:ON] - [Auto-Attendant DND:ON]
• Provides soft keys for each of the 3 greetings.
[Greeting 1] - [Gr1]
[Greeting 2] - [Gr2]
[Greeting 3] - [Gr3]
Select a Greeting (which also makes it active).
(1) [Greeting 1] - [Gr1]
(2) [Greeting 2] - [Gr2]
(3) [Greeting 3] - [Gr3]
[Super Display Soft Key] - [Keyset Soft Key]
L (5)
Listen to the active greeting (if recorded).
[Listen] - [Lstn]
Record a new greeting (if not recorded), or rerecord the
R (7)
current greeting.
[Record] - [Rec]
Record at the tone, then press # when done.
Features
IntraMail
Erase the currently recorded greeting (if any).
[Erase] - [Erase]
#
Go back to the Mailbox Greeting options.
[Exit] - [Exit]
Change Auto Attendant Do Not Disturb.
O (6)
#
0
Go back to mailbox Main Menu.
[Exit] - [Exit]
Plays Help message.
Turn Auto Attendant Do Not Disturb off or on.
[Auto-Attendant DND ON] - [Auto-Attendant DND ON]
[Auto-Attendant DND OFF] - [Auto-Attendant DND OFF]
- Skip this step for a “stand-alone” Ring Group.
*
E (3)
#
Pause or restart recording.
[Resume] - [Resume]
[Pause] - [Pause]
Erase the greeting.
[Cancel] - [Cncl]
End the recording.
[Done] - [Done]
DSX Feature Handbook IntraMail Features ◆ 51
Page 56

Guest Mailbox
Guest Mailbox
Description
An outside party can have their own mailbox for receiving and sending messages.
An outside party can have their own Guest Mailbox mailbox for receiving and sending messages. A Guest Mailbox is a Subscriber Mailbox that does not have an extension associated with it. A Guest Mailbox has many of
the IntraMail features of a Subscriber Mailbox. A company visitor with a Guest Mailbox could, for example:
❥ Go to any extension, press INTERCOM + 700, then dial their mailbox number.
❥ Review their messages, leave messages for associates, or record a new greeting for their mailbox.
❥ Use many other features available to a Subscriber Mailbox.
Voice mail routes calls to the Guest Mailbox in the following three ways:
❥ A Screened Transfer (STRF) or Unscreened Transfer (UTRF) from the Automated Attendant goes
directly to the Guest Mailbox, even though there is no extension installed.
❥ An Intercom call to the uninstalled extension goes directly to the Guest Mailbox.
❥ A transferred call to the uninstalled extension also goes directly to the Guest Mailbox.
Operation
Accessing a Guest Mailbox
To log onto a Guest Mailbox:
1.
Do one of the following.
a.
Press INTERCOM + Dial the IntraMail master number (e.g., 700) + Dial your mailbox number.
• You can optionally press a Call Coverage key assigned to the IntraMail master number.
b.
2.
Logging Onto a Guest Mailbox from the Automated Attendant:
1.
When IntraMail answers, dial the Guest Mailbox number.
After the Automated Attendant answers, dial # + Dial the Guest Mailbox number.
Press the Message Center key for the Guest Mailbox.
• This capability may be disabled in the Automated Attendant.
• Your automated attendant may have a LOGON action assigned to the Guest Mailbox. Check with your
Communications Manager.
Transferring your call to a Guest Mailbox:
1.
2.
3.
Press INTERCOM.
Press V-MAIL.
Dial the Guest Mailbox number.
Press SPEAKER to hang up.
4.
• To transfer a call to a co-worker’s mailbox from a single line telephone, use the following procedure:
Hookflash + Dial *8 + Dial the co-worker’s mailbox + Hang up.
52 ◆ IntraMail Features DSX Feature Handbook
Page 57

Instruction Menu
Description
Instruction Menu
Play an announcement to outside callers announcing the Automated Attendant dialing options.
The Instruction Menu is the announcement that plays to Automated Attendant callers. Normally, the Instruction Menu greets callers and provides them with the Automated Attendant dialing options. The Instruction
Menu is associated with the active Call Routing Mailbox. Normally, you should have the System Administrator customize (rerecord) the Instruction Menu to match the dialing options enabled in the site’s Dial
Action Table. If a custom Instruction Menu is not recorded, the Automated Attendant callers hear:
“Thank you for calling. If you are calling from a touch tone phone, please dial the extension number you
wish to reach, or dial 0 for assistance. If you are calling from a rotary dial phone, please stay on the line
for assistance.”
Operation
Recording an Instruction Menu for a Call Routing Mailbox
Log onto System Administrator’s mailbox.
SA (72)
0
Access System Administrator options.
[System Admin] - [N/A]
I (4)
Select Instruction Menus.
[Instruction] - [Instr]
Enter the Call Routing Mailbox number.
L (5)
R (7)
E (3)
#
Go back to the System Administrator options.
[Exit] - [Exit]
Plays Help message.
[Super Display Soft Key] - [Keyset Soft Key]
Listen to the current Instruction Menu (if any).
[Listen] - [Lstn]
#
Exit listen mode.
Record a new Instruction Menu.
[Record] - [Rec]
Record message.
*
E (3)
#
Pause or restart recording
[Resume] - [Resume]
[Pause] - [Pause]
Erase recording.
[Cancel] - [Cancel]
Exit recording mode.
[Done] - [Done]
Erase the Instruction Menu.
[Erase] - [Erase]
#
Go back to the System Administrator options.
[Exit] - [Exit]
Features
IntraMail
DSX Feature Handbook IntraMail Features ◆ 53
Page 58

Leaving a Message
Leaving a Message
Description
Leave a voice message in a mailbox from inside or outside the company.
An extension user or outside caller can leave a voice message in a co-worker’s mailbox if that extension is
busy, unanswered, or in Do Not Disturb. Leaving a voice message is a handy and efficient way to communi-
cate with co-workers that avoids post-it notes, message pads, and unnecessary email.
Additional Options While Leaving a Message
The following chart shows the additional dialing options a caller may have while listening to the mailbox
greeting prior to leaving a message. What happens depends on the setting of the Next Call Routing and Dial-
ing Option options.
Next Call
Routing Mailbox
Undefined No 0 Caller hears, “That is an invalid entry,” and the
1-16 (valid Call
Routing Mailbox)
1-16 (valid Call
Routing Mailbox)
Dialing Options While Leaving a Message
Dialing Option
Digit
Dialed
1-9
Outside Call Intercom Call
greeting repeats.
# IntraMail hangs up.
* Caller skips greeting and can immediately start
recording.
No 0 Caller follows 0 action
in Next Call Routing
Mailbox.
1-9 Caller hears, “That is an invalid entry,” and the
greeting repeats.
# Caller routes to the
Next Call Routing
Mailbox and hears its
Instruction Menu.
* Caller skips greeting and can immediately start
recording.
Yes 0 Caller follows key’s
1-9
action in Next Call
Routing Mailbox.
# Caller routes to the
Next Call Routing
Mailbox and hears its
Instruction Menu.
* Caller skips greeting and can immediately start
recording.
Action
Caller hears, “That is
an invalid entry,” and
the greeting repeats.
IntraMail hangs up.
Caller hears, “That is
an invalid entry,” and
the greeting repeats.
IntraMail hangs up.
54 ◆ IntraMail Features DSX Feature Handbook
Page 59

Operation
Leaving a Message for a Co-worker
To leave a message in the mailbox of an unanswered extension:
Leaving a Message
1.
2.
To leave a message in a mailbox from outside the company:
1.
To leave a message in an extension’s mailbox, you can be:
• Transferred to an extension’s mailbox by another user.
• Automatically routed to a mailbox when the called party doesn’t answer or is unavailable.
• Sent to the mailbox from the Automated Attendant after dialing * plus the called party’s mailbox number.
• Routed from the Automated Attendant after dialing a uniquely programmed digit set up to send you to an extension’s
mailbox.
Press V-MAIL.
Do one of the following.
a.
b.
Do one of the following.
a.
b.
Leave message and hang up.
Leave message and dial #.
• Dialing # sends the message and hangs up.
Leave message and hang up.
Leave message and dial #.
• Dialing # may provide you with additional dialing options. This depends on how the called
mailbox’s Next Call Routing Mailbox is set up.
Features
IntraMail
DSX Feature Handbook IntraMail Features ◆ 55
Page 60

Listening to Messages
Listening to Messages
Description
While or after listening to a message, an extension user has many message handling options
from which to choose.
While or after listening to a message, a Subscriber Mailbox user has many message handling options from
which to choose. The listening options let you quickly and efficiently manage your voice mail messages,
respond to the message sender, or forward the message to a co-worker for additional handling. The following
table shows these options.
Option Description
Message Listen Options
[Super Display Soft Key] - [Keyset Soft Key]
(73)
RE
[Reply] - [N/A]
MF (63)
[Forward] - [N/A]
MC (62)
[Callback] - [N/A]
Record a reply.
• See Message Reply (page 78).
Forward the message to another mailbox.
• See Message Forward (page 71).
Make a call to the message sender.
• See Make Call (page 67).
TI (84) Hear the time and date the message was sent.
• See Time and Date with Voice Mail (page 84).
SA (72) Save the message in your mailbox.
E (3)
[Erase] - [Erase]
L (5)
[Next Message] - [Next]
Erase the message.
• See Message Delete (page 70).
Listen to the next message.
B (2) Back up a few seconds.
BB (22)
[Repeat] - [Rpt]
Back up to the beginning of the message.
G (4) Go ahead a few seconds.
* Pause/resume listening.
[Message List + New Messages] - [N/A]
1S (17)
1N (16)
[Message List + Saved Messages] - [N/
A]
1A (12)
[Message List + All Messages] - [N/A]
#
[Exit] - [Exit]
Select New Message List
• See Message Listen Mode (page 72).
• Select Saved Message List
Select All Message List
• See Message Listen Mode (page 72).
Exit the listen mode.
X (9) Exit your mailbox.
Dial 0 while listening to hear the list of options.
56 ◆ IntraMail Features DSX Feature Handbook
Page 61

Listening to Messages
Handling Partially Reviewed Messages
When listening to multiple new messages when Auto Erase or Save is set to Save:
❥ Any message to which you partially listen is automatically saved.
❥ Any message to which you hang up during or do not listen is retained as a new message.
For example, if you have three new messages, listen to part of message 1, dial L to hear part of message 2
and then hang up, IntraMail automatically:
❥ Saves message 1.
❥ Retains messages 2 and 3 as new messages.
❥ Restarts the flashing ring/message lamp.
❥ Resets the telephone display to V-MAIL 02 (VM02).
When listening to multiple new messages when Auto Erase or Save is set to Erase:
❥ Any message to which you partially listen is automatically erased.
❥ Any message to which you hang up during or do not listen is retained as a new message.
For example, if you have three new messages, listen to part of message 1, dial L to hear part of message 2
and then hang up, IntraMail automatically:
❥ Erases message 1.
❥ Retains messages 2 and 3 as new messages.
❥ Restarts the flashing ring/message lamp.
❥ Resets the telephone display to V-MAIL 02 (VM02).
Telephone Display while Listening to a Message
While listening to a message, your telephone display shows you important information about the message.
This includes:
■ The caller’s telephone number (if available).
■ The selected Message List.
■ The message number in the selected list.
■ The date and time the message was left.
Caller’s phone number
(requires Caller ID)
Date message was left
Super Display
Currently selected
Message List
Message number (in
selected Message List)
Time message was left
Features
IntraMail
DSX Feature Handbook IntraMail Features ◆ 57
Page 62

Listening to Messages
22-Button and 34-Button Display
Currently selected
Message List
Caller’s phone number
(requires Caller ID)
Date message was left
Operation
Listening to Messages
[Super Display Soft Key] - [Keyset Soft Key]
Log onto Subscriber Mailbox
• Your Ring/Message Lamp flashes fast (red) when you have new messages.
L (5)
0
Access the Message Listen mode
[Listen] - [Lstn]
Plays Help message
Message number (in
selected Message List)
Time message was left
58 ◆ IntraMail Features DSX Feature Handbook
Page 63

Log Onto Voice Mail
Description
Local (On-site) Logon
Remote Log On
Log Onto Voice Mail
An extension user can press a key to log onto (access) their IntraMail mailbox.
A subscriber can log onto their mailbox using a method that best suits their needs and location. While at
their own phone, the subscriber just presses a single key to log onto their mailbox. To use their mailbox
while at a co-worker’s phone, the subscriber dials the IntraMail master number, followed by their mailbox
number (which is normally the same as their extension number). If they are away from the office, the sub-
scriber can still use their mailbox by calling in through the Automated Attendant.
An extension user can log onto their mailbox in the following ways:
❥ Press their V-MAIL key to log onto their Subscriber Mailbox.
❥ Dial the IntraMail master number (e.g., 700), followed by their mailbox number. This method is typically
used by Guest Mailbox users, as well as subscribers attempting to log into their Subscriber Mailbox from
a co-worker’s phone.
A Subscriber Mailbox user can call into the Automated Attendant and log onto their mailbox. Following are
two of the ways a user can do this:
❥ After the Automated Attendant answers, dial a digit (typically #) followed by their mailbox number. This
method allows outside callers to log into their mailboxes from outside the company. Once they log into
their mailbox, they can use the allowed features in the mailbox main menu. To avoid unauthorized
access to their mailbox, the user should enable their own unique Security Code.
❥ If an extension has a Direct Inward Line that voice mail picks up, the caller can dial # during their greet-
ing to log into their mailbox (instead of leaving a message). This method allows subscribers to dial their
own number and then use the features of their mailbox. This capability must be set up in the user’s Next
Call Routing Mailbox.
Features
IntraMail
DSX Feature Handbook IntraMail Features ◆ 59
Page 64

Log Onto Voice Mail
Operation
To log onto your Subscriber Mailbox:
Logging Onto Your Mailbox
[Super Display Soft Key] - [Keyset Soft Key]
1.
To log onto your Guest Mailbox or your Subscriber Mailbox from a co-worker’s extension:
1.
To log onto your Subscriber Mailbox from the Automated Attendant:
1.
2.
Press V-MAIL.
• From a single line telephone, lift handset and dial *8.
Do one of the following.
a.
b.
Wait for the Automated Attendant to answer.
Dial # and your mailbox number.
• This option may be different in your system. Check with your Communications Manager.
• After you remotely log onto your mailbox, you can optionally dial 9 then * to return to the Automated
Press INTERCOM + Dial the IntraMail master number (e.g., 700) + Dial your mailbox number.
• You can optionally press a Call Coverage key assigned to the IntraMail master number.
Press the Message Center key for your mailbox.
Attendant.
60 ◆ IntraMail Features DSX Feature Handbook
Page 65

Mailbox Name
Description
A mailbox caller can hear the extension user’s prerecorded name instead of their mailbox number.
A caller leaving a message in a Subscriber Mailbox can hear the mailbox’s prerecorded name instead of the
mailbox number. The prerecorded Mailbox Name gives the subscriber’s mailbox that personal touch. Prior
to leaving a message, caller’s will hear the name instead of the default “extension xxx” prompt. The recorded
name can be up to 10 seconds long.
Operation
Log onto Subscriber Mailbox.
RN (76)
Access the Mailbox Name Menu.
[Name] - [N/A]
L (5)
Recording Your Mailbox Name
[Super Display Soft Key] - [Keyset Soft Key]
Listen to the currently recorded name (if any).
[Listen] - [Lstn]
#
Exit listen mode.
Mailbox Name
Features
IntraMail
R (7)
E (3)
#
0
Record a new name.
[Record] - [Rec]
Record message.
*
E (3)
#
Pause or restart recording.
[Resume] - [Resume]
[Pause] - [Pause]
Erase recording.
[Cancel] - [Cancel]
Exit recording mode.
[Done] - [Done]
Erase the currently recorded name.
[Erase] - [Erase]
Go back to the Mailbox Main Menu.
[Exit] - [Exit]
Plays Help message.
DSX Feature Handbook IntraMail Features ◆ 61
Page 66

Mailbox Name
Recording or Erasing Co-worker’s Names from a System Administrator’s Mailbox
Log onto System Administrator’s Mailbox.
SA (72)
Access System Administrator options.
[System Admin] - [N/A]
S (7)
Select Subscriber Mailbox Maintenance options.
[Subscriber] - [Subs]
Enter the number of the Subscriber Mailbox you want to maintain.
EN (36)
N (6)
0
Plays Help message.
[Super Display Soft Key] - [Keyset Soft Key]
Erase the mailbox name.
[Erase Name] - [Name]
Record a new mailbox name.
[Record MBOX Name] - [N/A]
L (5)
Listen to the currently recorded name (if any).
[Listen] - [Lstn][
#
R (7)
Record a new name.
[Record] - [Rec]
Record message.
*
E (3)
#
E (3)
#
#
Go back to System Administrator options.
[Exit] - [Exit]
Erase the currently recorded name.
[Erase] - [Erase]
Go back to the Subscriber Maintenance Menu.
[Exit] - [Exit]
Exit listen mode.
Pause or restart recording.
[Resume] - [Resume]
[Pause] - [Pause]
Erase recording.
[Cancel] - [Cancel]
Exit recording mode.
[Done] - [Done]
62 ◆ IntraMail Features DSX Feature Handbook
Page 67

Mailbox Options Menu
Description
Mailbox Options Menu
A Subscriber Mailbox sub-menu that provides access to the Auto Time Stamp, Mailbox Security
Code Delete, and Message Notification features.
The Mailbox Options Menu is a sub-menu of a subscriber’s Main Menu that provides access to the Auto
Time Stamp, Mailbox Security Code Delete, and Message Notification features. The chart below summarizes these options. Auto Time Stamp helps if the subscriber needs to know the time and date of each message they receive without taking any extra steps. If mailbox security is not an issue, the subscriber can delete
their security code to simplify logging onto their mailbox.
Mailbox Options Menu
[Super Display Soft Key] - [Keyset Soft Key]
Option Description
[Security Code] - [Sec]
[Notification] - [Notif]
[Time Stamp] - [Time]
Operation
Log onto Subscriber Mailbox.
OP (67)
Access the Mailbox Options Menu.
[MBOX Options] - [N/A]
0
Plays Help message.
(7)
S
N (6)
AT (28)
Erase the mailbox’s Security Code.
• See Mailbox Security Code Delete (page 64).
• Set up Message Notification.
Enable or disable Auto Time Stamp.
• See Auto Time Stamp (page 23).
To hear the list of Mailbox Options, dial 0.
Accessing the Mailbox Options Menu
[Super Display Soft Key] - [Keyset Soft Key]
Features
IntraMail
DSX Feature Handbook IntraMail Features ◆ 63
Page 68

Mailbox Security Code Delete
Mailbox Security Code Delete
Description
Allows the System Administrator to delete the security code for any mailbox.
The System Administrator can delete the security code for any Subscriber Mailbox. This effectively unlocks
the mailbox. If mailbox security is not necessary, deleting a mailbox’s security code speeds up mailbox logon.
Without a security code, the subscriber just presses their
Operation
Deleting a Mailbox Security Code
[Super Display Soft Key] - [Keyset Soft Key]
Log onto System Administrator’s Mailbox.
SA (72)
Access System Administrator options.
[System Admin] - [N/A]
S (7)
Select Subscriber Mailbox Maintenance options.
[Subscriber] - [Subs]
Enter the number of the Subscriber Mailbox you want to maintain.
V-MAIL
key to immediately log onto their mailbox.
S (7)
#
0
Plays Help message.
Erase the mailbox Security Code.
[Erase Security Code] - [N/A]
Go to the System Administrator Menu.
[Exit] - [Exit]
64 ◆ IntraMail Features DSX Feature Handbook
Page 69

Main Menu
Description
Main Menu
Provides options to an extension user when they log onto their mailbox.
After a Subscriber Mailbox user logs into their mailbox, IntraMail provides them with the Main Menu of
options. The Main Menu provides quick access to the most commonly used mailbox features in a central
location. It includes listening and recording options, as well as additional selections for recording mailbox
names and greetings. The chart below summarizes these options.
Mailbox Main Menu
[Super Display Soft Key] - [Keyset Soft Key]
Option Description
(5)
L
[Listen] - [Lstn]
RS (77)
[Record] - [Rec]
G (4)
[Greeting] - [Greet]
RN (76)
[Name] - [N/A]
[Message List] - [N/A]
1N (16)
[Message List + New Messages] - [N/A]
1S (17)
Message List + Saved Messages] - [N/A]
1A (12)
[Message List + All Messages] - [N/A]
OP (67)
[MBOX Options] - [N/A]
SA (72)
[System Admin] - [N/A]
TI (84) Check the current time and date.
X (9)
[Exit] - [Exit]
To hear the complete Main Menu of options, dial 0 while in the Main Menu.
Listen to messages.
• See Listening to Messages (page 56).
Record and send a message.
• See Message Reply (page 78).
Record a mailbox greeting.
• See Greeting (page 50).
Record a mailbox name.
• See Mailbox Name (page 61).
Select the active Message List.
• See Message Listen Mode (page 72).
Select the New Message List.
• See Message Listen Mode (page 72).
Select the Saved Message List.
• See Message Listen Mode (page 72).
Select the All Message List.
• See Message Listen Mode (page 72).
Use the Mailbox Options. See the following:
• See Security Code (page 81).
• Message Notification (page 73).
• Auto Time Stamp (page 23).
Access the System Administrator options.
• See System Administrator (page 82).
• See Time and Date with Voice Mail (page 84).
Exit your mailbox.
• See Exiting a Mailbox (page 47).
Features
IntraMail
DSX Feature Handbook IntraMail Features ◆ 65
Page 70

Main Menu
Operation
Accessing the Mailbox Main Menu
[Super Display Soft Key] - [Keyset Soft Key]
Log onto Subscriber Mailbox.
• You automatically go to the mailbox Main Menu.
0
Plays Help message which summarizes the Main Menu options.
• See the Mailbox Main Menu (page 65) chart for the Main Menu options.
66 ◆ IntraMail Features DSX Feature Handbook
Page 71

Make Call
Description
A Subscriber Mailbox user can dial MC to return a call without knowing their caller’s number.
Make Call lets a Subscriber Mailbox user listen to a voice message and dial MC to return the call without
knowing their caller’s phone number. Make Call automates returning messages since you don’t have to dial
the message sender’s telephone number. Make Call is always available for messages received from co-workers. Make call is available for messages received from outside callers if the system has Caller ID enabled
(and provided by the connected telco).
While listening to a message at a Super Display Telephone, first 2 lines of the display show the callers number (or extension) in addition to the date and time the message was left. At a 22-Button or 34-Button Telephone, the first line of the display shows the date and time the message was left.
Operation
Log onto Subscriber Mailbox.
L (5)
Listen to the message for which you want to make a return call.
[Listen] - [Lstn]
MC (62)
Make Call
Using Make Call from your Mailbox
[Super Display Soft Key] - [Keyset Soft Key]
Dial this code while listening to the message you want to return.
[Callback] - [N/A]
• Make Call automatically places a return call to the co-worker that left you the message.
• If your system has Caller ID, Make Call can automatically place a return call to your outside caller.
• If you hear “Your call cannot go through,” your system’s Caller ID is not properly set up.
You go right back to the listen mode for the message you were listening to when you tried
the Make Call.
Features
IntraMail
DSX Feature Handbook IntraMail Features ◆ 67
Page 72

Message Count Display
Message Count Display
Description
The telephone display can show the number of new messages waiting in a user’s mailbox.
The telephone display provides interactive status updates for the subscriber’s mailbox. The subscriber
doesn’t have to call their mailbox and wait for the voice prompts to find out the number of new and saved
messages in their mailbox. Then can just look at the display instead. While idle, the telephone display shows
the number of new messages waiting in a subscriber’s mailbox. The message count automatically updates as
the subscriber receives new messages and processes older messages. While logged into the mailbox, the tele-
phone display shows the number of both new and saved messages.
While Idle
22-Button and 34-Button Display
One new message waiting
in the Subscriber Mailbox
While Logged-in
One new message waiting
in the Subscriber Mailbox
One saved message waiting
in the Subscriber Mailbox
Super Display
While Idle
One new message waiting
in the Subscriber Mailbox
68 ◆ IntraMail Features DSX Feature Handbook
Page 73

While Logged-in
Message Count Display
One new message waiting
in the Subscriber Mailbox
Operation
Operation is automatic.
One saved message waiting
in the Subscriber Mailbox
Features
IntraMail
DSX Feature Handbook IntraMail Features ◆ 69
Page 74

Message Delete
Message Delete
Description
An extension user can delete any messages left in their mailbox.
A Subscriber Mailbox user can delete any messages left in their mailbox. Message Delete lets the subscriber
do their own mailbox maintenance. They can delete messages they no longer need and save messages that
contain essential information. With Message Delete, the subscriber doesn’t have to rely on the System
Administrator to perform these routine mailbox maintenance functions.
Operation
Log onto Subscriber Mailbox.
L (5)
Access the Message Listen mode (to listen to the message that you want to delete).
[Listen] - [Lstn]
E (3)
Deleting a Message
[Super Display Soft Key] - [Keyset Soft Key]
Erase the message.
[Erase] - [Erase]
• You automatically return to the Message Listen mode.
70 ◆ IntraMail Features DSX Feature Handbook
Page 75

Message Forward
Description
Message Forward
A subscriber can forward a message in their mailbox to a co-worker.
A Subscriber Mailbox user can forward a message in their mailbox to a co-worker. Forwarding is helpful
when a subscriber receives a message with which a co-worker can assist them. Rather than sending a new
message, the subscriber can just forward the message with which they need help. They can also optionally
record a comment before the forwarded message. Typically, the comment would describe the reason for the
message forwarding.
IntraMail saves the message in the subscriber’s mailbox after they forward it. The Message Forward destination receives the forwarded message as a new message.
Operation
Log onto Subscriber Mailbox.
L (5)
0
Access the Message Listen mode and listen to the message that you want to forward.
[Listen] - [Lstn]
MF (63)
Access the Message Forward Menu.
[Forward] - [N/A]
Enter the number of the mailbox to which you want to forward the message.
#
Exit the Message Listen mode and go to the Mailbox Main Menu.
[Exit] - [Exit]
Plays Help message.
Features
IntraMail
Forwarding a Message
[Super Display Soft Key] - [Keyset Soft Key]
#
Continue.
[Continue] - [Cont]
Do one of the following.
a.
b.
Record a comment that will precede the forwarded message
+ Dial #.
Dial # to forward without a comment.
While recording a comment for your forwarded message.
*
E (3)
#
*
#
Go back to the Message Listen mode.
[Exit] - [Exit]
Back up and re-enter the mailbox number.
[Mailbox] - [Mbox]
Pause or restart recording.
[Resume] - [Resume]
[Pause] - [Pause]
Cancel the forwarding and exit your mailbox.
[Cancel] - [Cancel]
End the recording.
[Done] - [Done]
DSX Feature Handbook IntraMail Features ◆ 71
Page 76

Message Listen Mode
Message Listen Mode
Description
When a user calls their mailbox, they can dial a code to listen to all their messages, their new
messages, or their saved messages.
After logging onto their mailbox, the subscriber can select the category of messages to which they want to
listen. Then can listen to just new messages, just saved messages, or all messages. Message Listen Mode lets
the subscriber customize their mailbox to initially play just the list of messages to which they want to listen.
For example, if a subscriber has many saved messages and just a few new messages, then can log onto their
mailbox and dial 1N to select the new message list. When they press L, they will then cycle through just their
new message.
Initially, a Subscriber Mailbox uses the All Message List. If they select a different message list, IntraMail
reinstates the all Message List the next time they log onto their mailbox.
Operation
Log onto Subscriber Mailbox.
Message Listen Mode
[Super Display Soft Key] - [Keyset Soft Key]
[Message List] - [N/A]
1N (16) Listen to new messages.
1S (17) Listen to saved messages.
1A (12) Listen to all messages.
0
Plays Help message.
[Message List + New Messages] - [N/A]
[Message List + Saved Messages] - [N/A]
[Message List + All Messages] - [N/A]
72 ◆ IntraMail Features DSX Feature Handbook
Page 77

Message Notification
Description
Message Notification
Dials a telephone number to let the recipient know there are new messages in their mailbox.
Once activated by the Subscriber Mailbox user, Message Notification dials a telephone number to let the
user know when there are new messages in their mailbox. When Message Notification is on, a subscriber
who is out of the office does not have keep calling their mailbox remotely to find out if they have new messages. IntraMail will let them know automatically. Notification can call extensions, local numbers, long distance numbers and digital pagers. When a Subscriber Mailbox user sets up Message Notification, they
choose from the following options:
❥ If Message Notification is enabled or disabled.
(Message Notification can only occur if it is enabled.)
❥ The time of day Message Notification should begin and end.
(Callouts will only occur between the begin and end times.)
❥ The type of device to which Message Notification will be calling.
(Message Notification can call a normal telephone number or a digital pager.)
❥ The telephone or pager service phone number.
To protect your mailbox from unauthorized access, be sure to record a security code for your mailbox before
enabling Message Notification.
Features
IntraMail
How Message Notification Works to Normal Telephone Numbers
1. The subscriber activates Message Notification for their mailbox (see Operation below).
2. When the subscriber receives a new message, IntraMail dials the destination that should receive the Mes-
sage Notification.
- IntraMail waits up to 30 seconds for ringback, reorder, busy or voice activity from the called number. If nothing is detected, the callout is considered unanswered.
3. If the recipient answers, IntraMail plays the notification message (“Hello, I have a message for”) and
asks the recipient to dial 1 to log onto their mailbox. The recipient hears the notification message if:
- They say “Hello” after answering the callout, or
- The system receives answer supervision from the telco after the recipient answers the call.
(Note that the recipient can skip the announcement by dialing 1 to log onto their mailbox after
answering the callout – without saying “Hello”.), or
- The notification is to a system extension.
4. Once the recipient logs onto the mailbox, the notification is considered acknowledged and will not reoc-
cur until the subscriber receives new messages.
5. If the recipient doesn’t answer, the system will retry the callout number. After completing the pro-
grammed number of callout attempts, Message Notification will stop.
6. Once the notification process begins, a new message does not restart the process if it is already in
progress. Once the process ends (e.g., if the message is acknowledged or the maximum number of callout attempts is reached), the next new message will restart the process.
How Message Notification Works to Digital Pager Numbers
1. The subscriber activates Message Notification for their mailbox (see Operation below).
2. When the subscriber receives a new message, IntraMail immediately dials the pager service.
- IntraMail waits up to 30 seconds for ringback, reorder, busy or voice activity from the called number. If nothing is detected, the callout is considered unanswered.
3. After the pager service answers, IntraMail sends a dial string which causes the pager display to show the
subscriber’s mailbox number as well as the number of new messages in the mailbox.
- The notification is considered acknowledged if the recipient logs onto the mailbox. Notification
will not reoccur until the subscriber receives new messages.
DSX Feature Handbook IntraMail Features ◆ 73
Page 78

Message Notification
- If the pager service doesn’t answer, IntraMail will retry the callout number. Message Notification
may eventually cancel if the callout remains unacknowledged.
Operation
Log onto Subscriber Mailbox.
OP (67)
Access the Mailbox Options menu.
[Mbox Options] - [N/A]
N (6)
Access the Message Notification Options Menu.
[Notification] - [Notif]
IntraMail plays a summary of your Message Notification settings.
For telephone numbers
Notify ON 8AM- 5PM
NUMBER: 12039265400
OR
For pager numbers
Notify ON 8AM- 5PM
PAGER: 12039265400
O (6)
C (2)
Setting Up Message Notification (Page 1 of 2)
[Super Display Soft Key] - [Keyset Soft Key]
• The your telephone display shows your current notification settings (see sample below).
Turn Message Notification on or off.
[On] - [On]
[Off] - [Off]
Change your Message Notification setup.
[Change] - [Chnge]
When you see: Notification Begin:
Enter the hour you want Message Notification to begin.
• Enter 2 digits for the hour
A (2)
P (7)
*
#
Skip this option without changing your entry.
[Next] - [Next]
Back up to the previous level without changing your entry.
[Exit] - [Exit]
Select AM
[AM] - [AM]
Select PM
[PM] - [PM]
When you see: Notification End:
Enter the hour you want Message Notification to end.
• Enter 2 digits for the hour.
• For 24-hour notification, make the End Time the same as the Start
Time.
A (2)
P (7)
*
#
Skip this option without changing your entry.
[Next] - [Next]
Back up to the previous level without changing your entry.
[Exit] - [Exit]
Select AM
[AM] - [AM]
Select PM
[PM] - [PM]
When you see: Notify Via:
74 ◆ IntraMail Features DSX Feature Handbook
Page 79

Message Notification
Setting Up Message Notification (Page 2 of 2)
[Super Display Soft Key] - [Keyset Soft Key]
N (6)
D (3)
*
#
The notification destination is a telephone number.
[Number] - [Num]
The notification destination is a digital pager.
[Pager] - [Pager]
Skip this option without changing your entry.
[Next] - [Next]
Back up to the previous level without changing your entry.
[Exit] - [Exit]
When you see: Number
Enter the Message Notification callout number (16 digits max).
• Enter the number exactly as you want the system to dial it (including a leading 1 for toll calls, if required).
• If the number you enter is 3 digits or less, it will be an Intercom
Features
call. If it is more than 3 digits, it will be an outside call.
IntraMail
Accept the number entered and back up to the
#
[Clear]
*
#
#
#
0
Plays Help message.
Go back to the Main Menu.
[Exit] - [Exit]
Go back to the Mailbox Options menu.
[Exit] - [Exit]
Skip this option without changing your entry.
[Next] - [Next]
Back up to the previous level without changing your entry.
[Exit] - [Exit]
previous level.
[OK] - [OK]
Erase the number you just entered.
Answering a Message Notification Callout to a Telephone
To answer a Message Notification to a telephone:
1.
Answer the callout at the programmed destination.
• If IntraMail doesn’t hear your voice (or you don’t speak), just go to the next step and dial 1 to proceed.
2.
3.
Do one of the following.
a.
b.
Dial 1 to accept the Message Notification.
Hang up to have the Message Notification call back later.
When you dial 1, you automatically log onto the subscriber mailbox that left you the Message Notification.
• If you don’t log onto your mailbox, IntraMail will re-send your notification.
Answering a Digital Pager Message Notification Callout
To answer a Digital Pager notification:
1.
Operation is automatic.
• If you don’t call and log onto your mailbox, IntraMail will re-send your pager notification.
DSX Feature Handbook IntraMail Features ◆ 75
Page 80

Message On Hold
Message On Hold
Description
A prerecorded message can play to callers while they wait on Hold
Message On Hold allows the System Administrator to record a message that will play to callers while they
wait on Hold. For example, you can record a message summarizing available services or hours of operation.
This message will play to callers as soon as you put them on Hold, and continually repeat as long as they
remain on Hold. Message On Hold recording is only available from the System Administrator’s Mailbox. IntraMail provides a single Message On Hold. Any number of callers can simultaneously listen to the Message
On Hold recording.
Operation
Log onto System Administrator’s mailbox.
SA (72)
Access System Administrator options.
[System Admin] - [N/A]
1
Select Message On Hold.
[Message On Hold] - [N/A]
L (5)
Recording the Message On Hold
[Super Display Soft Key] - [Keyset Soft Key]
Listen to the current Message On Hold (if any).
[Listen] - [Lstn]
#
Exit listen mode.
R (7)
Record a new Message On Hold.
[Record] - [Rec]
Record message.
*
E (3)
#
E (3)
#
0
#
0
Plays Help message.
Go back to the Main Menu options.
[Exit] - [Exit]
Erase the Message On Hold.
[Erase] - [Erase]
Go back to the System Administrator options.
[Exit] - [Exit]
Plays Help message.
Pause or restart recording.
[Resume] - [Resume]
[Pause] - [Pause]
Erase recording.
[Cancel] - [Cncl]
Exit recording mode.
[Done] - [Done]
76 ◆ IntraMail Features DSX Feature Handbook
Page 81

Message Playback Direction
Description
Operation
Message Playback Direction
An extension user can listen to their messages in either LIFO (last-in-first-out) or FIFO (first-in-
first-out) order.
When you dial L (5) after logging into your mailbox, IntraMail will play messages in either LIFO (last-infirst-out) or FIFO (first-in-first-out) order. If you prefer to hear new messages first, enable LIFO (last-in-first-
out) listening order. The newest (last-in) messages are at the top of the message list and the oldest messages
are at the bottom of the list. If you wants to be reminded of oldest messages first, enable FIFO (first-in-firstout) listening order. The oldest (first-in) messages are at the top of the message list and the newest messages
are at the bottom. Check with your system administrator to have this set up.
N/A
Features
IntraMail
DSX Feature Handbook IntraMail Features ◆ 77
Page 82

Message Reply
Message Reply
Description
An extension user can reply to a message in their mailbox by dialing a simple code, without
knowing the caller’s extension number.
A Subscriber Mailbox user can reply to a message from a co-worker by dialing RE, without knowing the
caller’s extension or mailbox number. Message Reply saves the subscriber valuable time since they don’t
need to know the sender’s extension number or send a separate message to respond. The subscriber can just
listen to the co-worker’s message, dial a code, and record their answer. The message sender receives the
reply as a new message.
Operation
Log onto Subscriber Mailbox.
L (5)
Listen to your messages.
[Listen] - [Lstn]
While listening to a message.
RE (73)
[Super Display Soft Key] - [Keyset Soft Key]
Message Reply
Reply to the message.
[Reply] - [N/A]
• If the mailbox does not exist, you will be prompted to enter the mailbox number to
receive the reply. This can occur if you dial RE while listening to a message from an
outside caller.
#
Start recording.
[Continue] - [Cont]
Options available while recording.
Pause or restart recording.
[Resume] - [Resume]
[Pause] - [Pause]
Erase recording.
[Cancel] - [Cncl]
End the recording.
[Done] - [Done]
Exit without recording and go back to the Message Listen menu.
*
[Exit] - [Exit]
*
E (3)
#
Back up and re-enter the mailbox number.
[Mailbox] - [Mbox]
#
0
Plays Help message
Exit and go back to the mailbox Main Menu.
[Exit] - [Exit]
78 ◆ IntraMail Features DSX Feature Handbook
Page 83

Next Call Routing Mailbox
Description
Operation
Next Call Routing Mailbox
Provides callers with additional dialing options after they leave a message in an extension’s
mailbox (depending on the setting of the Next Call Routing Mailbox Dial Mode).
The Next Call Routing Mailbox provides callers with additional dialing options while listening to a Subscriber Mailbox recorded or default greeting. It also provides additional dialing options to callers routed to
an Announcement Mailbox. Next Call Routing Mailbox lets the caller choose how IntraMail should handle
their call. For example, if an Automated Attendant caller dials a subscriber’s extension and hears the greeting, Next Call Routing Mailbox (if programmed) allows them to dial other options instead of hanging up.
Ask your System Administrator if your extension has a Next Call Routing Mailbox.
N/A
Features
IntraMail
DSX Feature Handbook IntraMail Features ◆ 79
Page 84

Record and Send a Message
Record and Send a Message
Description
A Subscriber Mailbox user can record and send a message to any other Subscriber Mailbox.
A Subscriber Mailbox user can record and send a message to any other Subscriber Mailbox. Record and
Send a Message is the heart of IntraMail’s voice messaging system. It allows co-workers to efficiently stay in
touch and exchange essential information without relying on message slips, memos, or email.
Recording Options
While recording a message, a Subscriber Mailbox user has several recording options from which to choose.
The following table shows these options.
Option Description
Options available while recording:
* Pause/resume recording.
E (3) Erase the recording.
# End recording.
Dial 0 while recording to hear the list of options.
Message Recording Options
Operation
Log onto Subscriber Mailbox.
RS (77)
Record and send a message.
[Record] - [Rec]
Enter the number of the mailbox to receive the message.
#
*
[Exit]
#
Exit without recording and go back to the mailbox Main Menu.
[Exit] - [Exit]
Record and Send a Message
[Super Display Soft Key] - [Keyset Soft Key]
Continue.
[Continue] - [Cont]
Options available while recording.
*
E (3)
#
Pause or restart recording.
[Resume] - [Resume]
[Pause] - [Pause]
Erase recording.
[Cancel] - [Cancel]
End the recording.
[Done] - [Done]
Back up and re-enter the mailbox number.
[Mailbox] - [Mbox]
Exit without recording and go back to the mailbox Main Menu.
80 ◆ IntraMail Features DSX Feature Handbook
Page 85

Security Code
Description
Operation
Security Code
A mailbox can have a security code to guard against unauthorized access.
A mailbox can have a security code to protect it from unauthorized access. A Security Code must be 4 digits
long, using 0-9. If a subscriber wants to keep their mailbox private, they can enter a Security Code. No one
else can use the subscriber’s mailbox unless they know the code.
Changing or Deleting a Security Code (From your Subscriber Mailbox)
Log onto Subscriber Mailbox.
OP (67)
Access the Mailbox Options Menu.
[MBOX Options] - [N/A]
S (7)
Access the Security Code options.
[Security Code] - [Sec]
Enter new Security Code (4 digits, using 0-9).
C (2)
I (4)
*
Optionally erase your Security Code and go back to the Mailbox Options Menu.
[Erase] - [Erase]
Exit to the Mailbox Options Menu without making any changes to your Security
#
0
Plays Help message.
Code.
[Exit] - [Exit]
Deleting a Security Code (From your System Administrator’s Mailbox)
Log onto System Administrator’s mailbox.
SA (72)
Access System Administrator options.
[System Admin] - [N/A]
S (7)
Select Subscriber Mailbox Maintenance options.
[Subscriber] - [Subs]
Enter the number of the Subscriber Mailbox you want to maintain.
[Super Display Soft Key] - [Keyset Soft Key]
Accept Security Code entry and go back to the Mailbox Options Menu.
[OK] - [OK]
Do not accept Security Code entry and go back to the Security Code
options Menu.
[Clear] - [Clear]
[Super Display Soft Key] - [Keyset Soft Key]
Features
IntraMail
S (7)
#
0
Plays Help message.
Erase mailbox’s Security Code.
[Erase Security Code] - [N/A]
Go back to System Administrator options.
[Exit] - [Exit]
DSX Feature Handbook IntraMail Features ◆ 81
Page 86

System Administrator
System Administrator
Description
The extension user that has IntraMail system administration capabilities.
The System Administrator is a Subscriber Mailbox that has unique system administration features such as
recording Instruction Menus and deleting messages in a co-worker’s mailbox. The System Administrator
features are an essential part of IntraMail setup since they allow the recording of the system-wide messages
and provide Subscriber Mailbox maintenance. After logging onto their Subscriber Mailbox, the System
Administrator can use all of the features in the SA menu. The System Administrator Options table below
shows these options.
Option Description For more, see:
(72)
SA
[System Admin] - [N/A]
I (4)
[Instruction] - [Instr]
[Announcement] - [Annc]
[Erase All Messages] - [Msgs]
[Erase Greeting] - [Greet]
[Erase Security Code] - [N/A]
[Record Mailbox Name] - [N/A]
[Answer Schedule] - [N/A]
A (2)
S (7)
[Subscriber] - [Subs]
EA (32)
EG (34)
EN (36)
[Erase Name] - [Name]
S (7)
N (6)
O (6)
1
[N/A] - [N/A]
V (8)
[N/A] - [N/A]
System Administrator Options
[Super Display Soft Key] - [Keyset Soft Key]
Access the System Administrator options.
Record an Instruction Menu. .Instruction Menu (page 53)
Record an Announcement Message. Announcement Message (page 16)
Access the Subscriber Maintenance options (see the following features).
Erase all messages in a mailbox. .Erasing All Messages (page 46)
Erase a mailbox greeting.
.Greeting (page 50)
• With Multiple Greetings, this option
simultaneously erases all recorded
greetings in a Subscriber Mailbox.
Additionally, the active greeting is
reset to 1.
Erase a mailbox name. .Mailbox Name (page 61)
Delete a mailbox Security Code. .Mailbox Security Code Delete (page 64)
Record Mailbox Name. Mailbox Name (page 61).
Override the active Answer Schedule. Answer Schedule Override (page 17)
Message on Hold Message On Hold (page 76)
Hear the version number of the IntraMail stored voice prompts.
82 ◆ IntraMail Features DSX Feature Handbook
Page 87

Operation
Refer to the individual features referenced in the System Administrator Options (page 82).
Accessing the System Administrator Options
Log onto System Administrator’s Mailbox.
SA (72)
Access the System Administrator Menu.
[System Admin] - [N/A]
• Turn to System Administrator Options (page 82) for more.
System Administrator
[Super Display Soft Key] - [Keyset Soft Key]
0
Plays Help message.
Features
IntraMail
DSX Feature Handbook IntraMail Features ◆ 83
Page 88

Time and Date with Voice Mail
Time and Date with Voice Mail
Description
Set the system time and date.
Since IntraMail is completely integrated with the telephone system software, the IntraMail time and date is
the same as the phone system time and date. Since time and date is used on telephone displays and with the
Auto Time Stamp and Time and Date Stamp features, be sure to set it accurately. To change the time and date,
use either the system programmable options or the User Programmable features. See Programming below.
The Time and Date is retained if the telephone system power should fail or the system resets.
In addition, a Subscriber Mailbox user can hear the time and date when they call their mailbox.
Operation
Hearing the Current Time and Date
[Super Display Soft Key] - [Keyset Soft Key]
Log onto Subscriber Mailbox.
TI (84)
0
Access the Time and Date option.
• IntraMail plays the time and date, and then returns you to the mailbox Main Menu.
Plays Help message.
84 ◆ IntraMail Features DSX Feature Handbook
Page 89

Time and Date Stamp
Description
Time and Date Stamp with Caller ID
Operation
Time and Date Stamp
A mailbox user can listen to a message and dial a code to hear the time the message was sent,
as well as the caller’s number.
While listening to a message, a Subscriber Mailbox user can dial TI to hear the Time and Date the message
was left. This is a handy option while reviewing messages. The subscriber can just dial a code to find out
when the message arrived.
With caller ID installed, a mailbox user can dial TI while listening to a message from an outside caller to hear
the time the message was sent, as well as the caller’s number. This capability is always available for messages left by an Intercom caller.
Features
IntraMail
Log onto Subscriber Mailbox.
L (5)
0
Access the Message Listen mode.
[Listen] - [Lstn]
TI (84)
Plays Help message
Hear the time and date the message was sent.
Hearing the Time and Date a Message was Left
• Turn to Listening to Messages (page 56) for more on your listening options.
[Super Display Soft Key] - [Keyset Soft Key]
DSX Feature Handbook IntraMail Features ◆ 85
Page 90

Transfer to a Mailbox
Transfer to a Mailbox
Description
An extension user can transfer their active call to a co-worker’s mailbox.
An extension user can transfer their active call to a co-worker’s mailbox. This lets the caller leave a personal
message for the co-worker. Transfer to a Mailbox is one of the big conveniences of IntraMail since the caller
can state their business and not have to call back later. It saves the caller time and cuts down on unnecessary
telephone system call processing. Transfer to a Mailbox is frequently used by attendants and receptionists as
well as other co-workers.
Transfer Message Handling
When the transferring extension leaves a message before hanging up (which could occur if the destination’s
calls are forwarded to voice mail), the system will record two separate messages. One message will be from the
transferring extension; the other from the transferred caller. Each message has the correct Caller ID assigned.
Additionally, if a caller is transferred to an extension and Voice Mail picks up, the caller will hear the entire
greeting for the called extension’s mailbox. The greeting will restart as soon as the system connects the
caller to the Transfer destination’s mailbox.
Operation
Transferring Calls to a Mailbox
To Transfer your active call to a mailbox:
Method A
1.
2.
(Ring first, then Transfer)
Press TRANSFER.
Dial the number of the mailbox to receive the Transfer.
• You can optionally press the DSS key for your co-worker.
• To transfer the call to your own mailbox, dial your extension number.
Press V-MAIL and hang up.
3.
• Voice mail will prompt your caller to leave a message.
• The caller will hear the entire mailbox greeting after the Transfer goes through.
Press SPEAKER to hang up.
4.
• To transfer a call to a co-worker’s mailbox from a single line telephone, use the following procedure:
Hookflash + Dial *8 + Dial the co-worker’s mailbox + Hang up.
Method B (Transfer without first ringing)
1.
Press TRANSFER.
2.
Press V-MAIL.
Dial the number of the mailbox to receive the Transfer.
3.
• You can optionally press the DSS key for your co-worker.
• Voice mail will prompt your caller to leave a message.
• The caller will hear the entire mailbox greeting after the Transfer goes through.
In these instructions:
[Super Display Soft Key]
[Keyset Soft Key]
4.
Press SPEAKER to hang up.
86 ◆ IntraMail Features DSX Feature Handbook
Page 91

Transferring Calls to a Mailbox
Method C (Using a Call Coverage key)
Press TRANSFER.
1.
• If your extension has Hotline Automatic Transfer, skip this step.
2.
Press the Call Coverage key.
Press V-MAIL.
3.
• Voice mail will prompt your caller to leave a message.
• The caller will hear the entire mailbox greeting after the Transfer goes through.
4.
Press SPEAKER to hang up.
Method D (Using a Hotline key)
1.
Press the Hotline key.
Press V-MAIL.
2.
• Voice mail will prompt your caller to leave a message.
• The caller will hear the entire mailbox greeting after the Transfer goes through.
4.
Press SPEAKER to hang up.
Transfer to a Mailbox
In these instructions:
[Super Display Soft Key]
[Keyset Soft Key]
Features
IntraMail
DSX Feature Handbook IntraMail Features ◆ 87
Page 92

Volume Control with Voice Mail
Volume Control with Voice Mail
Description
A mailbox user can turn the volume up or down while listening to their messages.
Since IntraMail is completely integrated with the telephone system software, Volume Control is available at a
subscriber’s keyset any time while listening to a message, greeting, or prerecorded voice prompt. Volume Controls let the user interactively adjust the loudness of the IntraMail messages and prompts to a comfortable level.
Operation
[Super Display Soft Key] - [Keyset Soft Key]
To adjust the volume while using any mailbox feature:
1.
Press Volume Up or Volume Down.
Volume Control
88 ◆ IntraMail Features DSX Feature Handbook
Page 93

Page 94

(1093098)
June 9, 2006, Rev 2
NEC Unified Solutions, Inc.
4 Forest Parkway, Shelton, CT 06484
TEL: 203-926-5400 FAX: 203-929-0535
www.necunifiedsolutions.com
Printed in U.S.A.
 Loading...