

Page 1
497-0478005 Rev A
P1535/P1235 Quick Reference
Guide
Graphical Overview
Accessories Included
Power Connection
10ft (3m) Network Cable
6ft (2m) Power Cable 90°
The P1535/P1235 has an integrated 19 V, 90 W power supply rated
for 110 V and 240 V (auto-sensing), 50 Hz or 60 Hz located in the
base.
If the power supply is not installed in the base of the P1535/P1235:
a) remove upper stand cover b) loosen thumbscrew that secures the
base cover c) route AC power cord thru base d) install power brick in
base e) secure cables behind CableLock Cover and close all.
a) b)
c) d)
e)
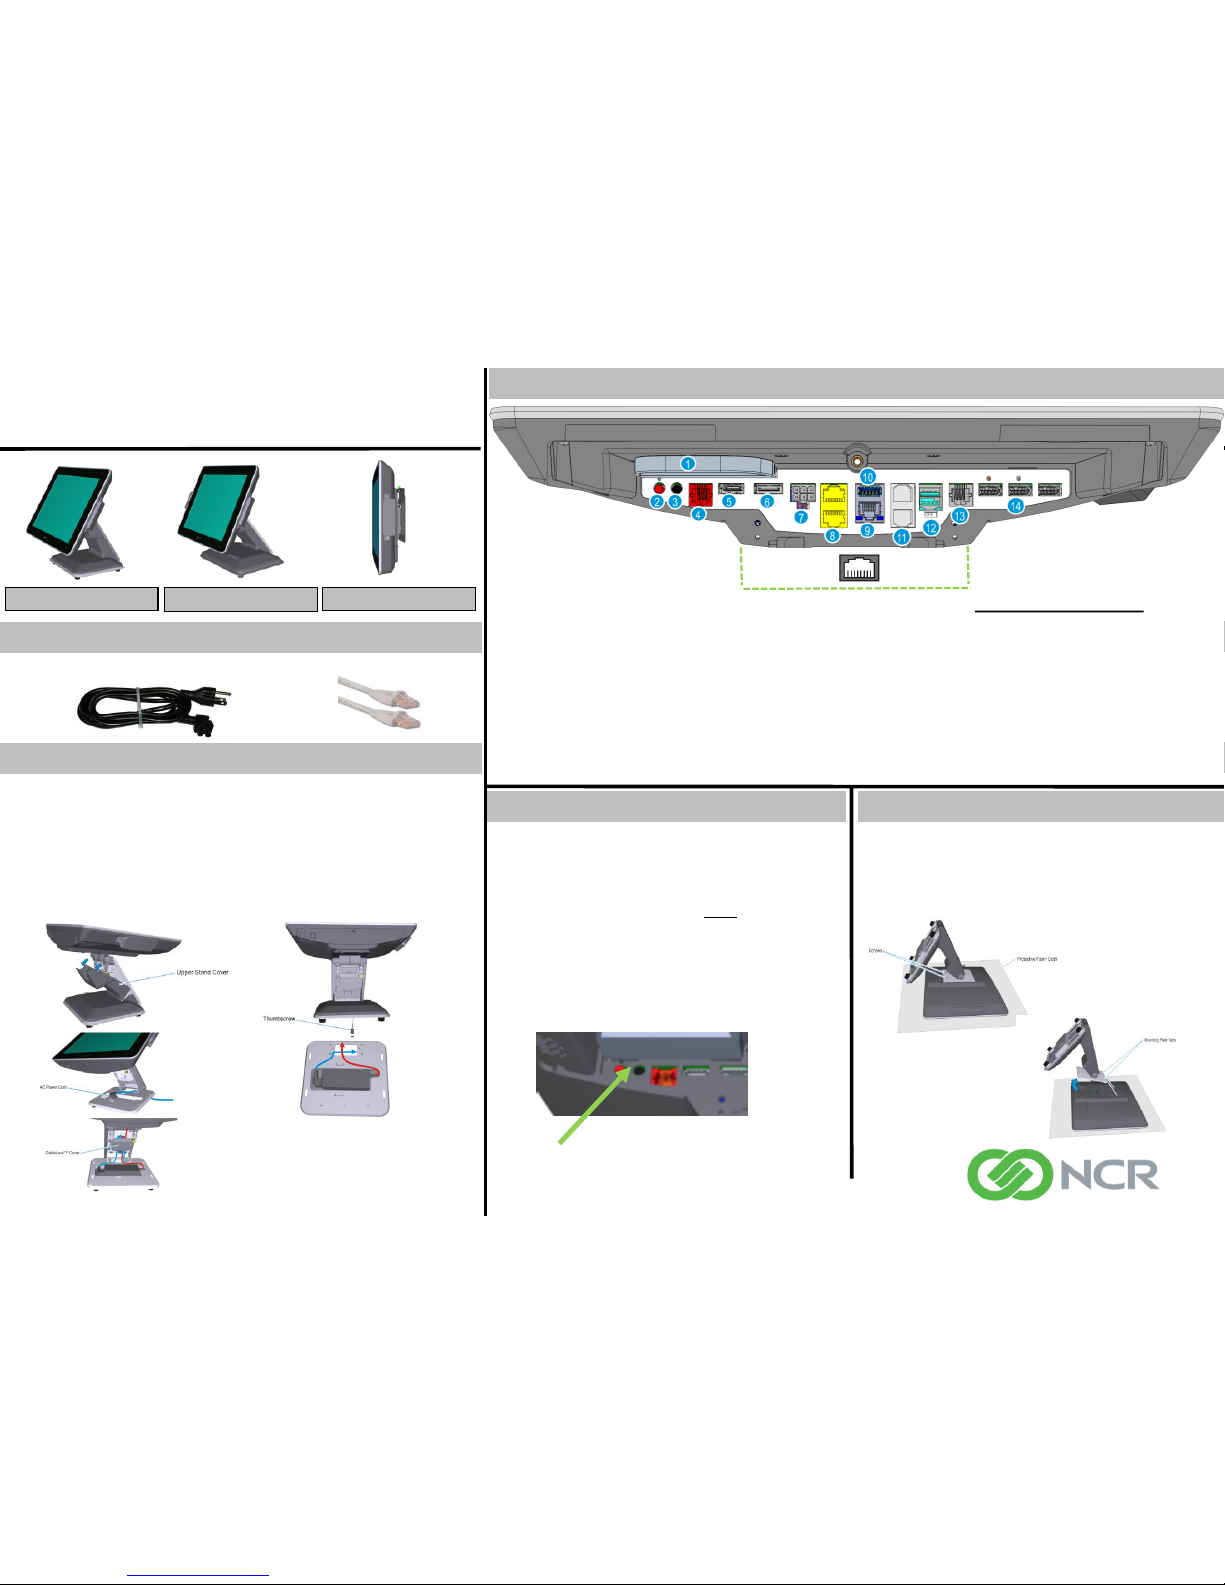
Power Button and I/O Panel Access
1 – Removable SSD
2 – Power Button
3 – Recovery Button
4 – RJ12 Cash Drawer
5 – HDMI
6 – Display Port
7 – Power In
8 – RJ45 Serial Ports (2)
9 – Ethernet Port
10 – USB 3.0
11 – RJ12 Serial Ports (2)
12 – 12V Powered USB
13– RJ12 Serial Port
14 – USB 3.0 (3)
Expansion Options:
A– 24V Powered USB +
RJ12 Serial Ports (2)
B – 5V USB + RJ12 Serial
Ports (2)
C – RJ45 Serial Port + SIM
+ POE
NCR Recovery Utility
P-Series stand removal
The NCR Recovery utility can be used to restore
the factory provided image, or make backups. The
default password is “Recovery1234”.
To start the recovery process, tilt head back to
expose the I/O panel. The unit must be powered
off before beginning the process.
Press and hold the recovery button. While
holding the recovery button, press the power
buttom to power on the unit. Wait 5 seconds,
and release both buttons.
Recovery Button
*Press once and release
Lay terminal face down on a flat surface.
Remove the screws (2) that secure the Base Stand to
the display.
Rotate the P-Series Stand and remove the Mounting
Plate Tabs (2) from the openings in the Rear Cover.
Note: 24V Power Supply is external to base
X-Series Stand
Wall Mount P-Series Stand
Page 2

497-0478005 Rev A
P1535/P1235 Quick Reference Guide
Technical Overview
P1535/P1235 Product Highlights
Thank you for purchasing the 15" P1535 or 12” P1235 POS!
The NCR 15” P1535 and 12” P1235 Point-of-Sale is the newest member
in the NCR Corporation family of open platforms. The terminal utilizes a
next generation Intel® Celeron™ Processor N3160 (Quad core, 2.24
GHz). The highly efficient processor offers great performance, but with
lower power consumption for a more reliable design. The POS terminal
comes in a 15-inch or 12-inch display with a projected capacitive touch
screen.
Essential Safety Precautions
Be sure to follow the instructions given below to ensure the safe use of NCR
P1535/P1235 Point-of-Sale.
• To avoid a possibility of electrical shock, be sure to connect the power cord
to the P1535/P1235 before connecting it to the main power supply.
• A fire or electrical shock may result if the voltages used with the
P1535/P1235 goes beyond the specified range. Be sure to only use the
specified voltage.
• To avoid fires or electrical hazards, do not modify the product in any way.
• Before either plugging in or unplugging a board or interface connector, be
sure to turn the P1535/P1235 power OFF and remove the power cord.
For more information see the P1535/P1235 User Guide.
Support Information
Visit NCR on the World Wide Web Full P1535 user guide :
• http://www.ncr.com
P1535/P1235 Driver Downloads
• http://www.ncr.com
Please see the Support Section
Accessories
•Wall Mount an d Power Supply Mount
•Cash drawer cable kits (24 V and 12 V)
•RJ12 to DB9M adapter kits
•RJ45 to DB9 or DB25 adapter kits
For ordering, please contact NCR directly
Basic Troubleshooting
Problem Suggestions
The unit will not power
on
•Check to make sure the power cord is firmly plugged into both the
terminal and power outlet.
•Press the power button to turn the terminal on. The power button is
located on the left side of the I/O Panel (See the Graphical Overview-
Power Button & I/O Panel Access)
No display on screen
•Check to see if the terminal is in screen saver mode.
•If the screen saver turned off the backlight, touch the screen and wake it up.
•If the NCR terminal is not illuminated on the front bezel (Blue or Yellow), the
terminal is turned off or not receiving power. See “The unit will not power up”
troubleshooting Section.
•Check the LED lights on the I/O Panel (Stat, HD, Pwr, Bezel)
•Below are the LED states when the P1535/P1235 is operating normally:
Touch screen is not
calibrated correctly or
does not work
The PCAP touch controller does not require calibration. If you are
having touch related issues:
- Power down the Point of Sale Terminal
- Power up the Point of Sale Terminal
- This may resolve touch issues, if not contact NCR
Network Connectivity
•Check to see if the network cable is firmly plugged in to both of the
terminal and network outlet.
•Check for network link on the network port.
•LED status:
Network Connector LEDs:
1. 1000Mb/s – LED is Yellow
2. 10/100Mb/s - LED is Green
3. Blinking LED– Data transmission active
•Check the network settings to make sure they are configured
correctly. Configure the TCP/IP settings for static or dynamic IP.
Test peripherals:
Cash Drawer, Line Display
Test, Magnetic Stripe
Reader (MSR)
Go to Start → Control Panel →Hardware Settings → OPOS
From the OPOS tab, select the desisred, peripheral from the drop downs:
Cash Drawer – Select RSDirect.CD1 or RSDirect.CD2.
Line Display Test– Select RSLD.INTEGRATED (display head) or RSLD.COM(n)
(external)
MSR – Select RSMsr (primary) or RSMsr.External. (secondary)
 Loading...