

Page 1

Person as M Series
5887 Operator Manual
B006-6359-C000
1204
Page 2

The product described in this book is a licensed product of NCR Corporation.
™
APTRA
Cencon System 20 00
and Personas™ are trademarks of NCR Corporation.
™
is a registered trademark of the Kaba Mas Corporation in the United States and / or other countries .
It is the policy of NCR Corporation (NCR) to improve products as new technology, components, software, and firmware
become available. NCR, therefore, reserves the right to change specifications without prior notice.
All features, functions, and operations described her ein may not be marketed b y NCR in all part s of the world. In some
instances, photographs are of equipment prototypes. Therefore, before using this document, consult with your NCR
representative or NCR office for information that is applicable and current .
To maintain the quality of our publications, we need your comments on the accuracy, clarity, organization, and value
of this book.
Address correspondence to:
NCR Financial Solutions Group Ltd
Information Solutions
Discovery Centre
3 Fulton Road
Dundee, Scotland
DD2 4SW
© 2003, 2004
By NCR Corporation
Dayton, Ohio U.S.A.
All Rights Reserved
Page 3

Canadia n Cl a s s A De vi c e Declaration
Federal Communications Commission (FCC) Radio Frequency Interference Statement
Note: This equipment has been tested and found to comply with
the limits for a Class A digital device, pursuant to Part 15 of the
FCC Rules. These limits are designed to provide reasonable
protection against harmful inte rference when the equipment is
operated in a commercial environment. This equipment
generates, uses, and can radi ate radio frequency energy and, if not
installed and used in accordance with the instruction manual,
may cause harmful interference to radio communications.
Operation of this equipment in a residential area is likely to cause
harmful interference in which case the user will be required to
correct the interferenc e at his own expense.
This digital apparatus does not exceed t he Class A limits for radio
noise emissions from digital apparatus set out in the Radio
Interference Regulations of the Canadian Department of
Communications.
Information to User
Le présent appareil numérique n’émet pas de bruits
radioélectriques dépas sant les limites applicables aux appareils
numériques de la classe A prescrites dans le Réglement sur le
brouillage radioélectrique édicté par le ministère des
Communications du Canada.
This equipment must be installed and used in strict accordance with
the manufacturer’s instructions. However, there is no guarantee
that interference to radio communications will not occur in a
particular commercial installation. If this equipment does cause
interference, which can be determined by turning the equipment off
and on, the user is encouraged to consult an NCR service
representative immediately.
Caution NCR Corporation is not responsible for any radio or television
interference caused by unauthorised modifications of this
equipment or the substitution or attachment of connecting cables
and equipment other than those specified by NCR. Such
unauthorized modifications, substitutions, or attac hments may void
the user’s authority to operate the equipment. The correction of
interference caused by such unauthorized modifications,
substitutions, or attachments will be the responsibility of the user.
NCR Personas M Series 5887 Operator Manual
iii
Page 4

iv NCR Personas M Series 5887 Operator Manual
Page 5

Revision Record
Date Change to: Description of Change
May 03 All Revision A: New public ation
Revision Record
May 04
Chapter 1
Chapter 11, 12, 13
Dec 04 Chapters 1 and 2 Revision C: Incorporate n ew PC Core.
Revision B:
Instructions for accessing new modules.
New ch apt e rs for Ca s h Acceptor ,
Cheque Acceptor and Coin Dispenser.
NCR Personas M Series 5887 Operator Manual
v
Page 6

vi NCR Personas M Series 5887 Operator Manual
Page 7

Table of Contents
Contents
Preface
Purpose and Audience .........................................................................xiii
Suppo r t In f o rmatio n...... ... .. ................ ...................... ......................xiii
What This Manual Contains ................................................................xiv
Guide to Illustrations Used in This Manual ......................................xvi
Chapter 1
Getting Started
Introduction to the 5887................................... ................................ .. ...1-1
5887 Mo d ule Loc a ti o n. ................ .................................... ......................1-3
How to O p en and Cl ose the Ext e r i o r of Yo u r AT M... .. ......... ...........1 - 4
How to O pe n the AT M To p-box .. .. ......... ....................... ............... 1 -4
How to Open the Coin Dispenser Door ......................................1-4
How to Open the Cheque Acceptor Side-box.............................1-5
How to Switch Your ATM Power On and Off ..................................1-6
How to E nt e r S uperv is o r Mod e ........... ....................... ........................1-7
Auto-Supervisor..............................................................................1-7
Supervisor Mode.............................................................................1-7
In-service Replenishment.....................................................................1-9
How to Use the Enhanced Operator Panel......................................1-10
How to Un lo ck and L o ck a S t a n d ard Secu rit y Enclosure .............1-1 2
Keylocks .........................................................................................1-13
Combination Locks.......................................................................1-13
Combination Lock and Separate Keylock .................................1-15
How to Unlock a nd L o c k a n E le ct r o n ic Lock..... .. ......... ................ ..1-1 8
Unlocking.......................................................................................1-18
Locking...........................................................................................1-19
Emergency Opening Procedure..................................................1-20
How to Unlock and Lock a Controlled Access Electronic Lock...1-21
Unlocking the Master Lock .........................................................1-21
Locking the Master Lock..............................................................1-23
Unlocking the Sub-Lock............................................................... 1-24
NCR Personas M Series 5887 Operator Manual
vii
Page 8

Table of Contents
Locking the Sub-Lock ...................................................................1-25
How to Access the Modules...............................................................1-27
Curre n c y D i spe n se r ....... ......... ...................... ....................... .........1-2 7
Receipt Pr i nt e r a nd J o u r na l Pr in t e r . ......... ......... ................ .........1-28
Statement Pr inter and Passb o o k Pr in t e r....... ......... ............... .....1 -2 9
Motorised Card Reader................................................................1-30
Coin Di s pe nser .... .. .. ............................. ....................... ..................1-3 1
Cash Acceptor (UD-686) ..............................................................1-31
Cheque Acceptor (Type 3) ...........................................................1-32
How to D o a Ha r d w a re Re set of Yo u r AT M ...... .. ................ ...........1-3 3
How to In se r t a nd Re move Di sk s ................. ................ ............... .....1-3 4
Flex Disk in a Type 1 C or e... .. .. ......... ................ ................ ...........1 -3 4
CD-ROM in a Type 1 Core...........................................................1-36
Flex Disk in a Type 2 C or e... .. .. ......... ................ ...................... .....1 - 38
CD or DV D-ROM in a T ype 2 Core... ... .. ................ ............... .....1-4 1
Digita l Audio..... ......... ...................... ............................. .......................1-4 4
Chapter 2
Error Reporting
How Er r o r s Ar e Re p o r te d ................... ............................. ....................2 -1
System Application.........................................................................2-1
State o f H e a l th .. ... .. ............................. ............................. ................2-2
How Errors in the PC Module Are Reported....................................2-3
How to Re a d t he Remote St a t us Ind i c a t o r.......... ............... ................2-4
Chapter 3
Currency Dispenser
How to Re plenish Curr ency Cass e t t es ......... ................ ............... .......3-1
How to E m pty the C u r r e nc y Pu r ge B in ....... .. .. ... ............................. ..3-3
Standa r d C u r re ncy Purg e B i n ... ....................... ...................... .......3 - 3
Latch Fast Currency Purge Bin .....................................................3-4
How to Clear Currency Dispenser Jams ............................................3-7
Chapter 4
Receipt Pr inte r
Overview ................................................................................................4-1
How to Replenish Your Receipt Printer Paper..................................4-2
How to Clear Receipt Printer Jams .....................................................4-6
viii NCR Personas M Series 5887 Operator Manual
Page 9

Table of Contents
Chapter 5
Journal Printer
How to Replenish the Graphics Journal Printer Paper....................5-1
How to Clear Gr a ph i c s J o urnal Pri nt er Ja m s ..... .. ... .. ................ ........5-8
How to Re p le nish the Do t -M a tr ix Jour nal Printer ... .. .. ......... .........5-1 1
How to Re p la c e t he D ot -Matr ix Jo u r na l Pr in t e r R ibbon ......... ......5-18
How to Replace the Dot-Matrix Journal Printer Print Head.........5-21
How to Clear Dot-Matrix Journal Printer Paper Jams ...................5-25
How to Cl e ar a Paper Ja m When the Pa pe r H as T o r n ...... .. ....5 -2 5
How to Clear a Paper Jam When the Paper Has Not Torn..... 5-29
Chapter 6
Letter Quality Document Statement Printer
Important Information for the User....................................................6-1
Overview ................................................................................................6-2
How to Re p l enish the S tat e ment Pri nt e r Pa p e r ... ... ......... ............... ..6-3
Type 1 ...............................................................................................6-3
Type 2 ...............................................................................................6-7
Clearing Printer Jams.......................................................................... 6-11
Type 1 .............................................................................................6-11
Type 2 .............................................................................................6-16
Removing Captured Media ...............................................................6-19
Adju sting The Con t r a st ... .. ......... ................ ...................... ................ ..6-2 1
Chapter 7
Statement/Passbook Printer
How to Re place t he Pa p e r........................ ............... ....................... ......7-1
How to Re place t he Ri b bo n ... .. .. ......... ....................... ............... ...........7-5
How to Re place t he Print He a d..................... ................ ......................7-8
How to Clear Paper and Passbook Jams..........................................7-13
How to Remove Captured Statements and Passbooks..................7-18
Chapter 8
Page Turn Passbook Printer
How to Re place t he Ri b bo n ... .. .. ......... ....................... ............... ...........8-1
How to Clear Jams.................................................................................8-5
NCR Personas M Series 5887 Operator Manual ix
Page 10

Table of Contents
How to Remove Captured Passbooks ................................................8-8
Chapter 9
Enhanced Page Turn Passbook Printer
Overview ................................................................................................9-1
How to Re place t he Ri b bo n... ................ ...................... ................ .........9-2
How to Clear Jams.................................................................................9-5
How to Clear a Jam in the Printer Transport..............................9-6
How to Clear a Jam in the Page Turning Unit............................9-7
How to Remove Captured Passbooks ................................................9-9
Cleaning ................................................................................................9-10
Chapter 10
Motorised Card Reader
How to Clear Motorised Card Reader Jams....................................10-1
How to Remove Captured Cards from a Motorised
Card Reader.......................................................................................10-5
Standard Card Capture Container .............................................10-5
Latch Fast Card Capture ..............................................................10-6
Cleaning ................................................................................................10-8
For ATMs w ith APTR A Self-Service Support system
software .......................................................................................10-8
For ATMs with S4 I sy st e m so f tware .... .. .. .. ................ ................10-8
Chapter 11
Cash Acceptor
Cash Accepto r ..... .. .. ....................... ...................... ....................... .........11 -1
Removing Cash from the Cassette(s) and Capture Bin..................11-2
Clearing Jams in the Cash Acceptor .................................................11-8
Infeed Transport (Long or Mid)................................................11-10
Infeed Transport (Short).............................................................11-10
Reject Un it .............. ................ ...................... ....................... .........11 -1 1
Between the Reject Unit and the Feed Unit or Main Transport
Unit.............................................................................................11-11
Feed Unit.. ... .. ................ ............................. ...................... ............1 1 - 1 2
Vertical Feed Transport..............................................................11-12
Recognition Unit .........................................................................11-13
Escrow Unit..................................................................................11-14
Between Escrow Unit and Main Transport Unit....................11-14
x NCR Personas M Series 5887 Operator Manual
Page 11

Table of Contents
Main Transport Unit...................................................................11-14
Between the Main Transport and the Garage Unit or Cash
Cassettes ....................................................................................11-16
Completing the Jam Clearance Procedures ............................11-20
Clean in g S e ns o r s .................. .................................... .........................11-21
Clean in g M a te r ia ls................................ ............................. ......... 1 1 -2 1
Ident ifying the S en sors .. ... ............... ....................... ....................11- 2 1
Locat in g t he Se nsors.. .. .. ......... .................................... ................11 -2 2
Main Transport Unit (Area One) ..............................................11-23
Main Transport Unit (Area Two) .............................................11-24
Recognition Unit (Area Three)..................................................11-25
Recognition Unit (Area Four)....................................................11-26
Reject Un it - C le a n i ng Le v e r.............. ............... ................ ......... 1 1 -2 7
Completing the Sensor Cleaning Procedures .........................11-27
Chapter 12
Cheque Acceptor
Intro duc tion .. .... ..... .... .. ..... .... ..... .. ..... .... ..... .. .... ..... .... ... .... ..... .... .. ..... ....12- 1
Empt ying the Cheque Bi ns ...... .. .. ....................... ............................. ..12 -2
Open Bin.........................................................................................12-2
Power Pockets ...............................................................................12-4
Clearing Jams in the Cheque Acceptor ............................................12-7
Infeed Transport (long or mid) ...................................................12-8
Infeed Transport (short)...............................................................12-9
Main Transport..............................................................................12-9
Corner Belt Assembly.................................................................12-10
Endorser Track Guide ................................................................12-10
Capture Bin Track Guide...........................................................12-11
Cheque Bins.................................................................................12-12
Trans po r t Ja m a t Outfee d .. .. ......... ............................. ................12 -1 4
Completing Jam Clearance Procedures...................................12-15
Removing and Replacing the Ribbon Cassette .............................12-16
Singl e L in e En d o r se r . ......... ............................. ...........................12-16
Multiple Line Endorser..............................................................12-18
Clean in g a nd M a in t e na n ce ........................ ...................... ................12- 2 0
Chapter 13
Coin Dispense r
Rep le n ishing Co in Cas se tt e s........ .............................. ...................... ..13 -1
Clearing Jams .......................................................................................13-3
NCR Personas M Series 5887 Operator Manual xi
Page 12

Table of Contents
Chapter 14
Cleaning and Maintenance
What is Required to Ma intain a n ATM? ...... .. ................ ..................14 -1
Replenishment .....................................................................................14-2
Modu le s a n d Co n s u m a bles ......................................... ................14-2
Printer M e d ia S t o ra ge.. ......... ............................. ...................... .....14 -4
Cleaning ................................................................................................14-5
Clean in g M a te r ia ls...................... .............................. ....................14-5
Facia and Exterior Panels.............................................................14-5
Dip Card Reader ...........................................................................14-6
Motorised Card Reader................................................................14-6
Enhanced Page Turn Passbook Printer......................................14-6
Cash Accepto r................. ...................... ....................... ..................14 -6
Index
User Feedback Form
xii NCR Personas M Series 5887 Operator Manual
Page 13

Support Information
Preface
Purpose and Audience
Purpose and Audience
This publication is intended for NCR customer personnel who are
responsible for the day-to-day operation and maintenance of
Personas M Series 5887 Automated Teller Machines (ATMs).
The function of this manual is to allow them to maintain an ATM in
an operational state by showing them how to replenish the devices
which make up the ATM.
If you have a problem using the ATM, contact your local Helpdesk
or Customer Engineer. For any other information, contact your local
Account T ea m.
NCR Personas M Series 5887 Operator Manual
xiii
Page 14

Preface
What This Manual Contains
What This Manual Contains
This manual is divided into chapters as follows:
● Chapter 1 - “Getting Started” - Introduces the 5887, shows the
locations of modules, and describes the basic procedures
required to access and start using the ATM and its component
modules. This includes a description of ‘racking’ the modules in
and out of the AT M, wh ich is not described in det ail in the
relevant mo d u le se ctio n .
● Chapter 2- ”Error Reporting” - Describes how to read the ATM’s
error reporting systems.
The following chapters describe how to carry out the various
replenishment and jam clearance operations, and how to remove
any media which have been captured by each module. Details of
how to access the modules are covered in Chapter 1 “Getting
Started”.
● Chapter 3 - “Currency Dispenser”
● Chapter 4 - “Receipt Printer”
● Chapter 5 - “Journal Printer”
● Chapter 6 - “Letter Quality Document Statement Printer”
● Chapter 7 - “Statement/Passbook Printer”
● Chapter 8 - “Page Turn Passbook Printer”
● Chapter 9 - “Enhanced Page Turn Passbook Printer”
● Chapter 10 - “Motorised Card Reader”
● Chapter 11 - “Cash Acceptor”
● Chapter 12 - “Cheque Acceptor”
● Chapter 13 - “Coin Dispenser”
● Chapter 14 - “Cleaning and Maintenance” - Describes the
preventive maintenance procedures for 5887 ATMs.
Note: This manual has been written for use with ATMs which run
either S4I or APTRA™ Self-Service Su pport sy ste m softwar e .
If your ATM uses S4I, it will use State Of Health (SOH) and the
supervisor interface described in the “Supervisor Functions”
manual, (B006-4718).
If your ATM uses APTRA Self -Service Support, it will use the error
reporting system and supervisor interface programs described in
the “APTRA Self-Service Support System Application User Guide”
(B006-6167).
xiv NCR Personas M Series 5887 Operator Manual
Page 15

Preface
What This Manual Contains
Note: To make the most efficient use of this manual, each copy can
be customised to the configuration of the ATM for which it is to be
used. If you decide to remove a chapter, do not destroy it as your
ATM may be upgraded later.
NCR Personas M Series 5887 Operator Manual xv
Page 16
Preface
Guide to Illustrations Used in This Manual
Guide to Illustrations Used in This
Manual
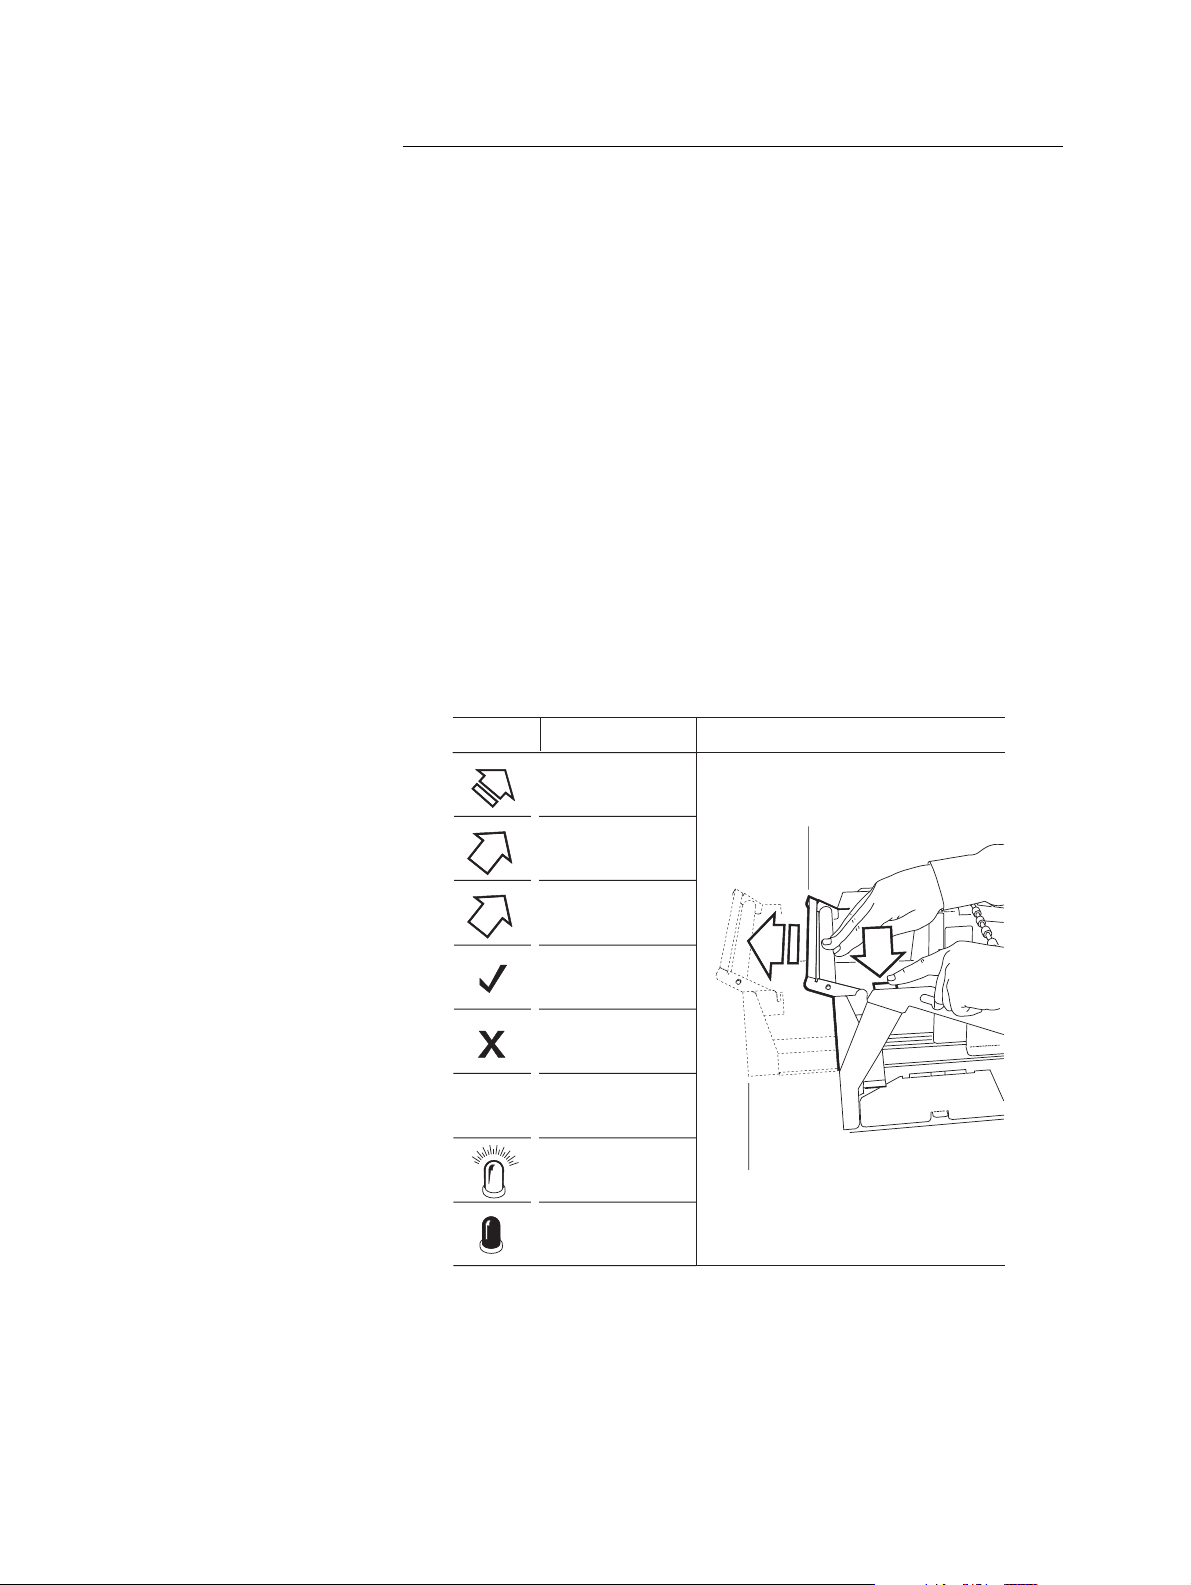
The illustrations are used as follows:
● Solid or black outlined objects (highlighted) are the objects on
which an action is to be performed
● Outlined arrows indicate the direction of movement for the
closest highlighted object. Numbered arrows indicate the
sequence of actions to be taken
● Inserts, or zoom boxes, show detail of a specific action or area of
interest
● Dotted lines indicate the final position of a highlighted object
after the operator has completed the required action.
The follo w in g ill us t ra t ion provide s an exa mple of the illustratio n s
as explained.
Symbol
x
Definition
Movement direction
Start & End
Movement direction
1
Movement direction
Order of sequence
Correct
Incorrect
Not required
Light
Dark
Example
Black outline indicates
object on which action
is to be performed.
2
Dotted lines indicate final
position of outlined object
1
xvi NCR Personas M Series 5887 Operator Manual
Page 17

Table of Contents
Getting Started
Chapter 1
Getting Started
Introduction to the 5887 1-1
5887 Module Location 1-3
How to Open and Close the Exterior of Your ATM 1-4
How to Open the ATM Top-box 1-4
How to Open the Coin Dispenser Door 1-4
How to Open the Cheque Acceptor Side-box 1-5
How to Switch Your ATM Power On and Off 1-6
How to Enter Supervisor Mode 1-7
Auto-Supervisor 1-7
Supervisor Mode 1-7
In-service Replenishment 1-9
How to Use the Enhanced Operator Panel 1-10
How to Unlock and Lock a Standard Security Enclosure 1-12
Keylocks 1-13
Combination Locks 1-13
Combination Lock and Separate Keylock 1-15
How to Unlock and Lock an Electronic Lock 1-18
Unlocking 1-18
Locking 1-19
Emergency Opening Procedure 1-20
NCR Personas M Series 5887 Operator Manual
Page 18

Table of Contents
Getting Started
How to Unlock and Lock a Controlled Access Electronic Lock 1-21
Unlockin g the Master L ock 1-21
Locking the Master Lock 1-23
Unlocking the Sub-Lock 1-24
Locking the Sub-Lock 1-25
How to Access the Modules 1-27
Currency D i spen se r 1-27
Receipt Printer and Journal Printer 1-28
Statement Printer and Passbook Printer 1-29
Motorised Card Reader 1-30
Coin Dispen se r 1-31
Cash Acceptor (UD-686) 1-31
Cheque Acceptor (Type 3) 1-32
How to Do a Hardware Reset of Your ATM 1-33
How to Inse rt and Re m o ve D i sks 1-34
Flex Disk in a Type 1 Core 1-34
CD-ROM in a Type 1 Core 1-36
Flex Disk in a Type 2 Core 1-38
CD or DVD-ROM in a Type 2 Core 1-41
Digital Audio 1-44
NCR Personas M Series 5887 Operator Manual
Page 19
Getting Started
Introduction to the 5887
1
Introduction to the 5887
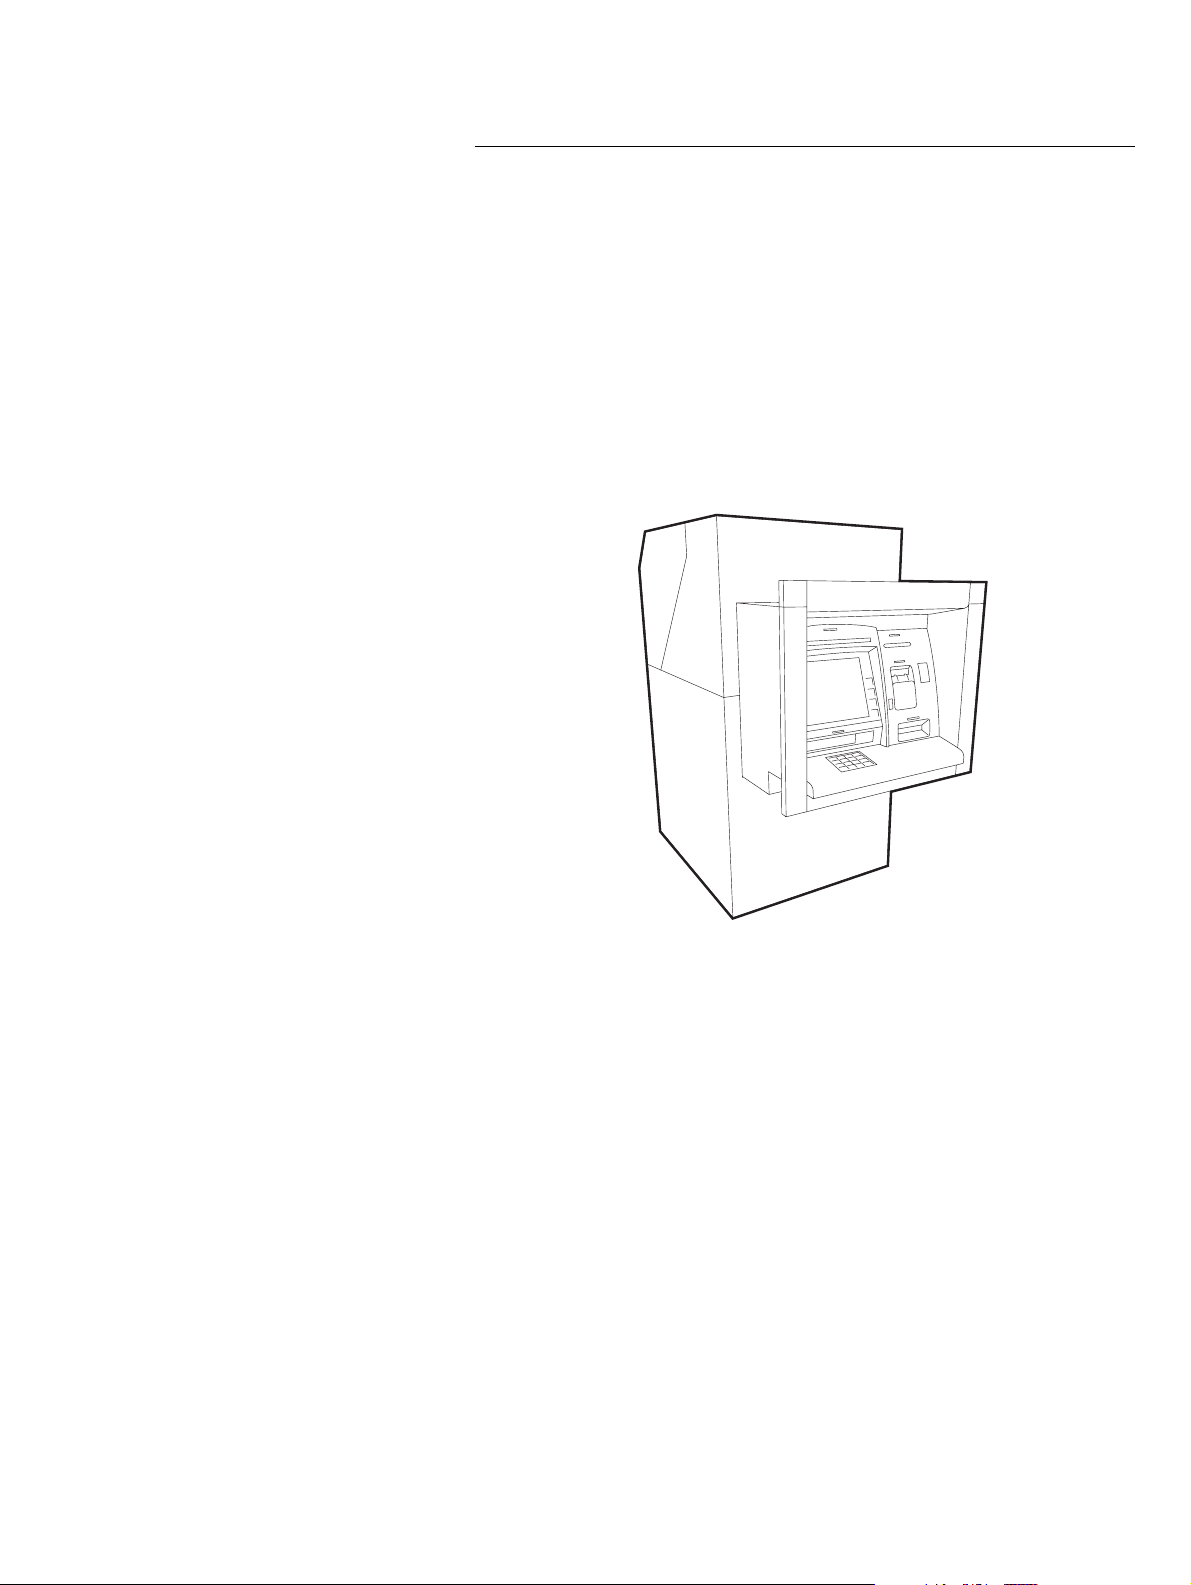
The Personas M Series 5887 is a PC-based multi-function
Automated Teller Machine (ATM). It is installed through-the-wall
and is serviced and replenished from the rear. There are two types
of 5887: the 5887 Walk-Up and the 5887 Drive-Up. The procedures
contained in this manual are identical for both types.
A PC, runn ing self-ser v ic e ap pli ca t io n so ftw a re , is th e hea rt of the
ATM. This self-service software manages transactions and controls
the vario us dev ices, such as prin t e rs, ca rd r ea d er s, m o n ito r scr e ens
and keyboards.
1
The main functions of the 5887 are listed below.
● Dispensing:
● Notes
● Coins (5887 Walk-Up only)
● Cash Securit y
● Depositing:
● Notes
● Cheques
● Receipt printing
● Journal printing
● Statement printing
● Mini-statement printing
● Passbook updating (5887 Walk-Up only)
● Coupon printing
NCR Personas M Series 5887 Operator Manual
-1
1
Page 20

Getting Started
Introduction to the 5887
● Account transactions:
● Transfers
● Order cheque book
● Account e nq ui rie s :
● Account ba lan ce
● Next loan payment
● Credit card lim it
● Interest rates
● Screen advertising and marketing.
Your ATM may not have all the functions in the list, as some are
provided by optional features and some are dependent on the
application that the ATM runs.
1-2 NCR Personas M Series 5887 Operator Manual
Page 21

Getting Started
5887 Module Location
5887 Module Location
The following illustration shows the locations of the various
modules which comprise a 5887 ATM.
Supervisor/
Operator Panel
PC Core
Coin Dispenser
Receipt / Journal Printer
and Card Reader
Card Capture Bin
Standard Side-Box
or
Cheque Acceptor
Side-Box
Top-Box
Digital Audio
Volume Control
Statement Printer
Power On/Off
Switch
1
Security Enclosure
Door
Power Supply
Currency Dispenser
or
Cash Acceptor
NCR Personas M Series 5887 Operator Manual 1-3
Page 22
Getting Started
How to Open and Close the Exterior of Your ATM
How to Open and Close the Exterior
How to Open the ATM Top-box
of Your AT M
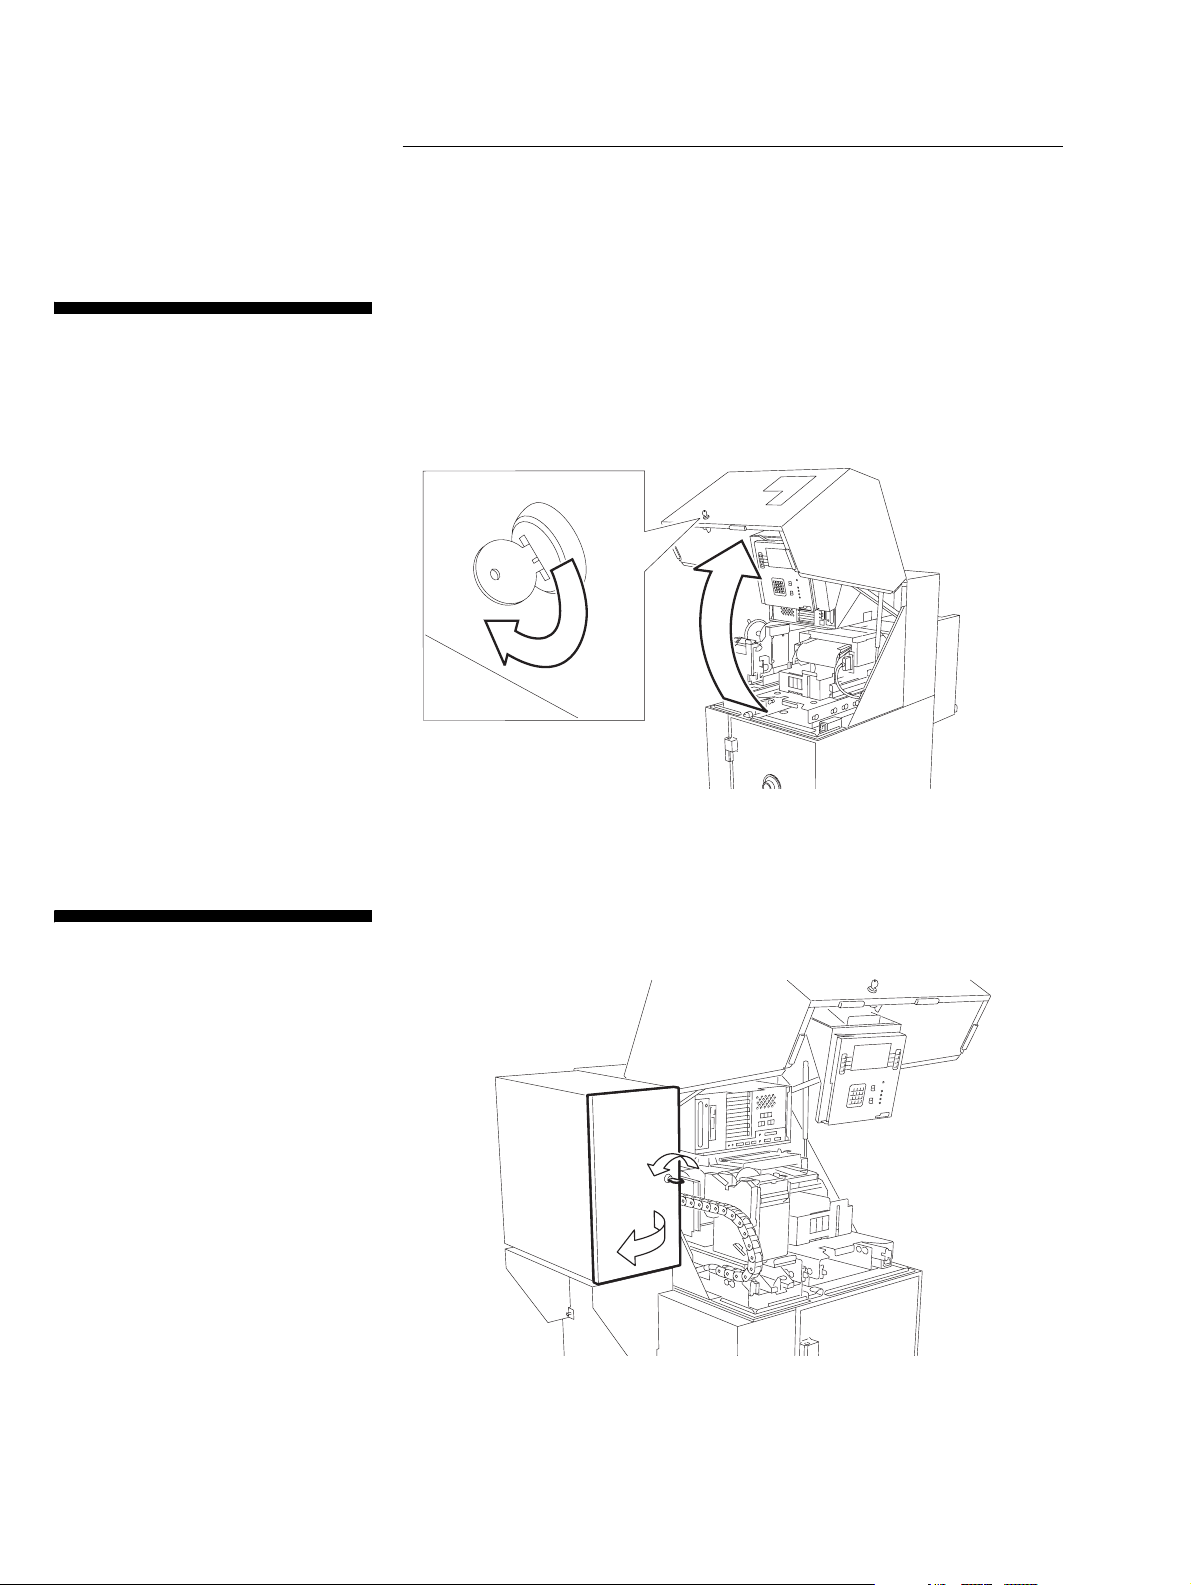
To open the top-box proceed as follows:
1 T ur n t he top -box key clo ckw i se .
1
2 Open the top-box door upwards, until the gas struts are fully
extended.
1
How to Open the Coin Dispenser Door
3 To close your ATM, follow the procedure above in reverse,
pushing the top-box shut to lock it.
To open the coin dispenser door, insert the key and turn it counterclockwise, then open the door.
1
1-4 NCR Personas M Series 5887 Operator Manual
Page 23
How to Open the Cheque Accep tor Sid e - box
Getting Started
How to Open and Close the Exterior of Your ATM
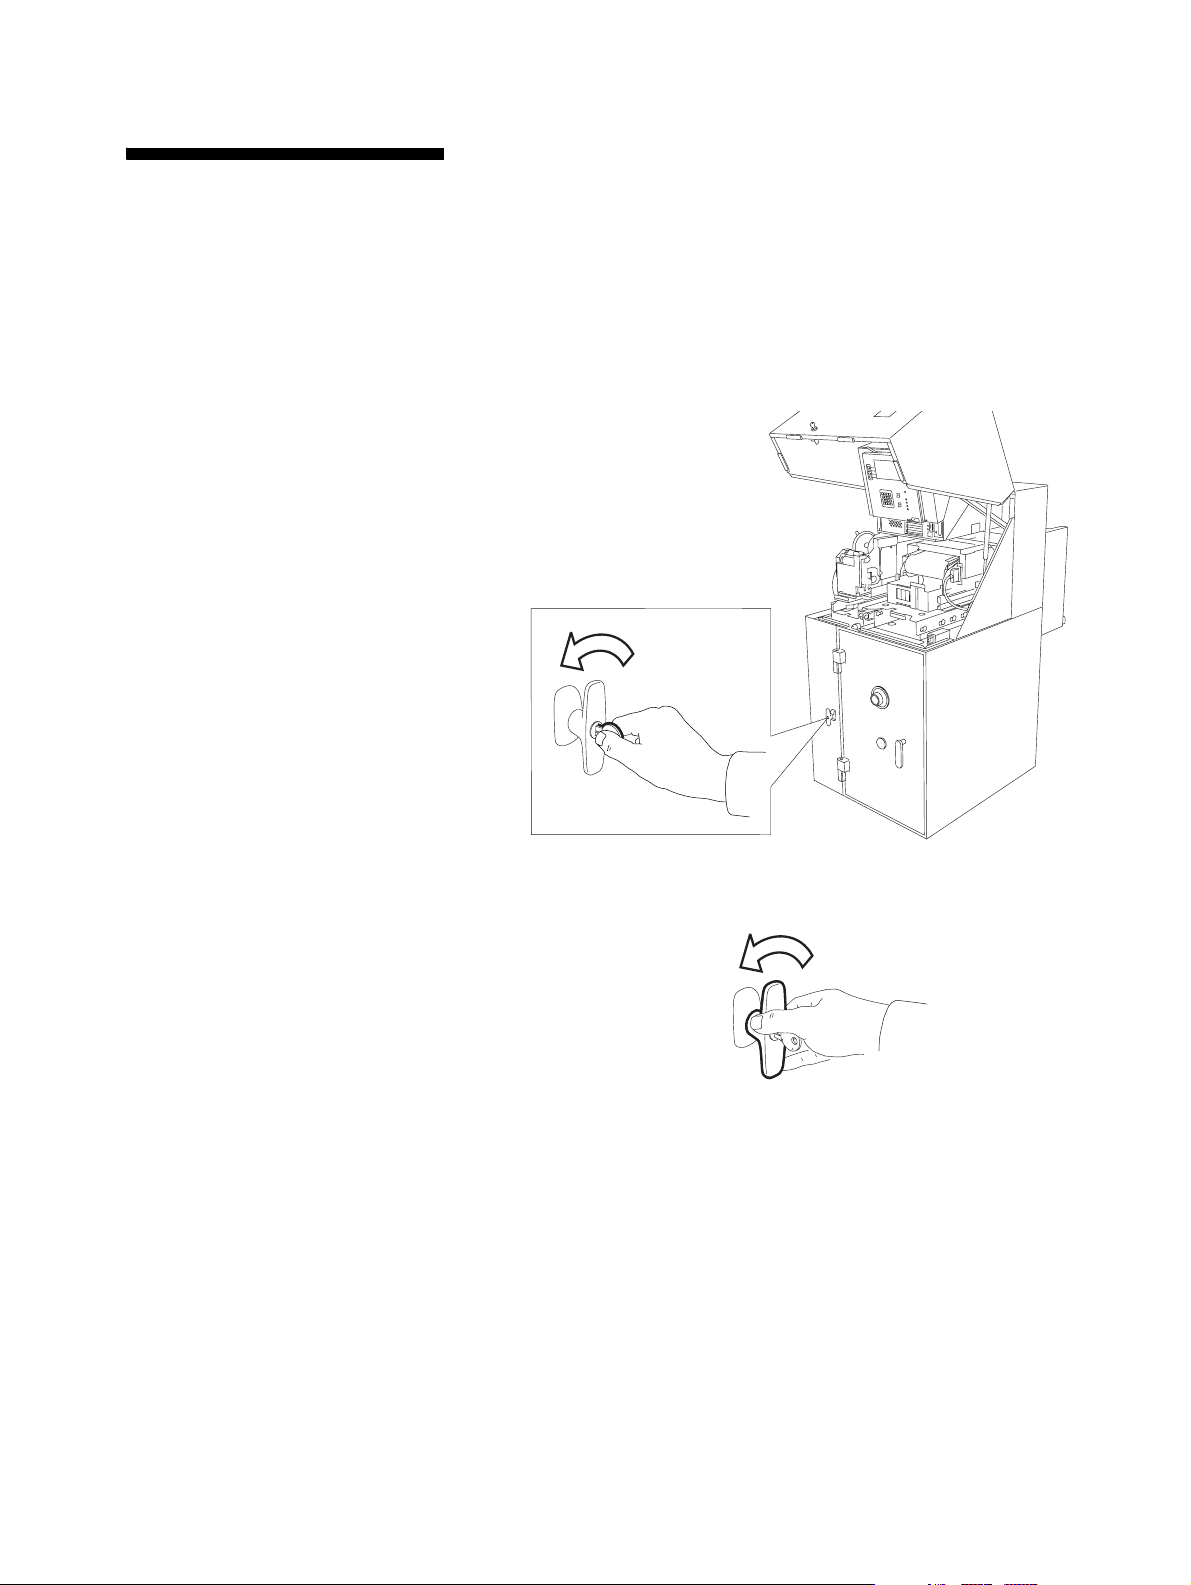
The chequ e ac ce pto r si d e-b ox ha s a lock in g ha n d le and m ay a lso
have a cont ro ll ed a cce s s e lect ro n ic lo ck . Fo r in st ru ct io n s on h o w to
1
open the controlled access electronic lock, refer to the section “How
to Unlock and Lock a Controlled Access Electronic Lock”.
To open the cash acceptor side-box with locking handle only,
proceed as follows:
1 In se rt the key into the keylo ck on the lock in g ha n d le an d tur n it
counterclockwise.
2 T ur n t he lo cking han dle co un t e rcl o ckw i se an d o pe n th e doo r .
NCR Personas M Series 5887 Operator Manual 1-5
Page 24
Getting Started
How to Sw itch Your AT M Po wer On and Of f
How to Switch Your ATM Power On
and Off
To switch the mains power to your ATM on or off, proceed as
follows:
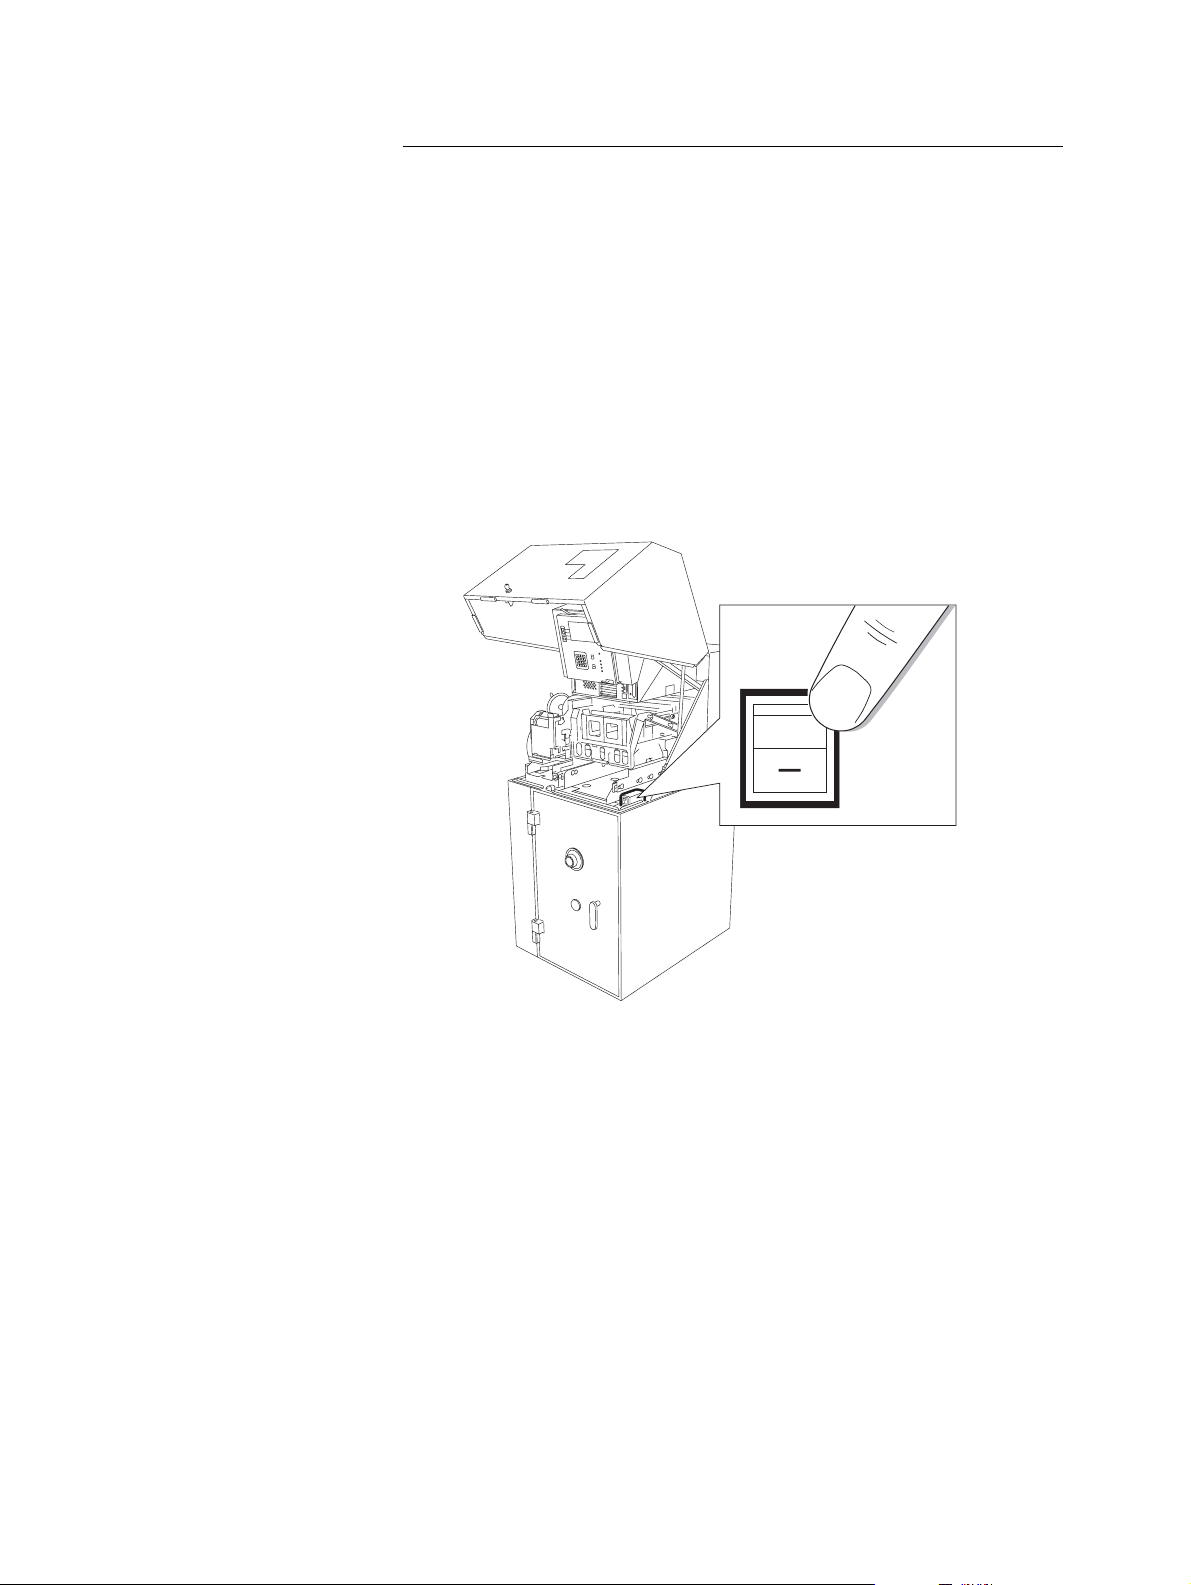
1 Open the top-box of your ATM.
2 Shut down the ATM as described in your in-house procedures.
3 Press the switch to the required ON (pressed in at the"1" side) or
OFF (pressed in at the "0" side) position.
0
1
Note: Afte r you have swit ch e d you r AT M power on, it will
take several minutes for the ATM to load all its software and
start displaying your application.
Do not attempt to load paper into the printers until the ATM has
completed its power up procedures and started displaying
either your application or the supervisor menu.
4 Close your ATM.
1-6 NCR Personas M Series 5887 Operator Manual
Page 25
Getting Started
How to Enter Supervisor Mode
Auto-Supervisor
How to Enter Supervisor Mode
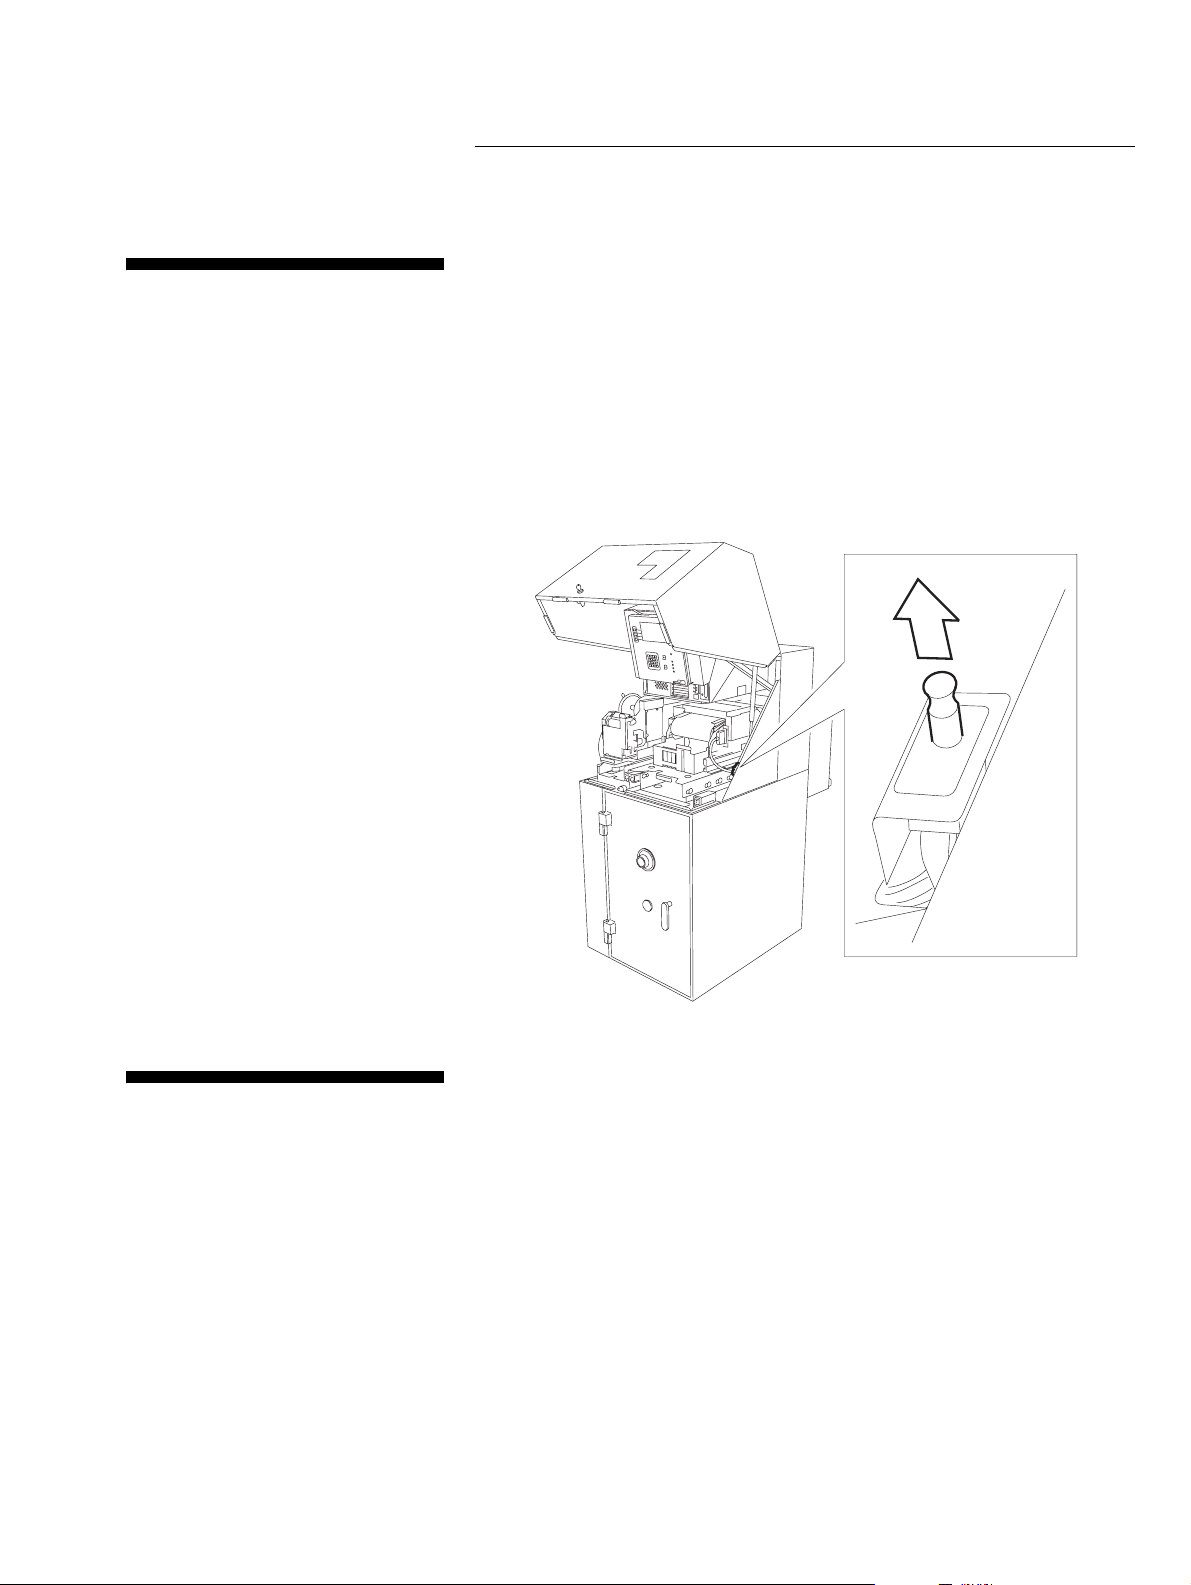
If your ATM is fitted with the auto-supervisor facility, opening the
1
top-box or the security enclosure of your ATM will automatically
enter the ATM into Supervisor Mode. From Supervisor Mode,
follow your in-house procedures for device status information (see
Chapter 3, "Error Reporting"). When you close your ATM it will
automatically return to the Normal Mode.
If you want to return the ATM to Normal Mode whilst keeping the
exterior of the ATM open, pull out the button shown in the
followin g illustra tio n.
1
Supervisor Mode
If your ATM is not fitted with the auto-supervisor facility, your
1
ATM will continue to run your application when the exterior of the
ATM is open. In this case you must use the switch on the operator
panel to ma n ua l ly e nte r yo u r AT M into Superv isor Mod e .
If you do not have the auto-supervisor option, then you will have to
enter the Supervisor Mode manually.
1 Open the top-box of your ATM.
NCR Personas M Series 5887 Operator Manual 1-7
Page 26

Getting Started
How to Enter Supervisor Mode
2 Press the switch on the operator panel to the supervisor
position.
Normal
Supervisor
3 After you have completed the task, press the switch on the
operator panel to the normal positio n.
4 Close and lock the top-box of your ATM.
1-8 NCR Personas M Series 5887 Operator Manual
Page 27

Getting Started
In-service Replenishment
In-service Replenishment
If your application supports In-service Replenishment you will be
able to replenish most of the terminal’s modules while the ATM
remains in service. These modules include the:
● Magnetic Card reader/Writer
● Currency D i spenser
● Receipt printer
● Journal Printer
● Document, Statement and Passbook Printers.
Individual transactions or components of transactions will be deconfigured while the device they rely on is being replenished. For
example, no receipt will be available while the receipt printer is
being reple nish e d .
Depending on your application, when you attempt to enter the
Supervisor Mode you will be prompted through the Operator Panel
to select either the Supervisor Mode (taking the ATM out of service)
or to enter the In-service Replenishment Mode.
1
When in the In-service Replenishment Mode, depending on your
application, the menu will:
● Prompt you to select the device, or part of device, to be serviced
● Tell you when the device is available for In-service
Replenishment
● Tell you when the device replenishment is complete.
The remainder of this manual is written for terminals which do not
have In-service Replenishment. However, other than the entering of
the In-service Repl enishment Mode, th e procedures for replenishing
of all devices is exactly the same whether the ATM supports Inservice Replenishment or not.
NCR Personas M Series 5887 Operator Manual 1-9
Page 28
Getting Started
How to Use the Enhanced Operator Panel
How to Use the Enhanced Operato r
Panel
The Enhanced Operator Panel (EOP) is located on the rear of the
ATM and can be viewed through the clear panel on the top-box
door. The operator panel is used to display any error messages and
to access the various System Application or State of Health (SOH)
options.
System A p pli ca t ion op t ions are descr ibe d in the NC R publicatio n
‘APTRA™ Self-Service Support System Application User Guide’, (B006-
6167).
State of Health options are described in the NCR publication
‘Supervisor Functions’ manual, (B006-4718).
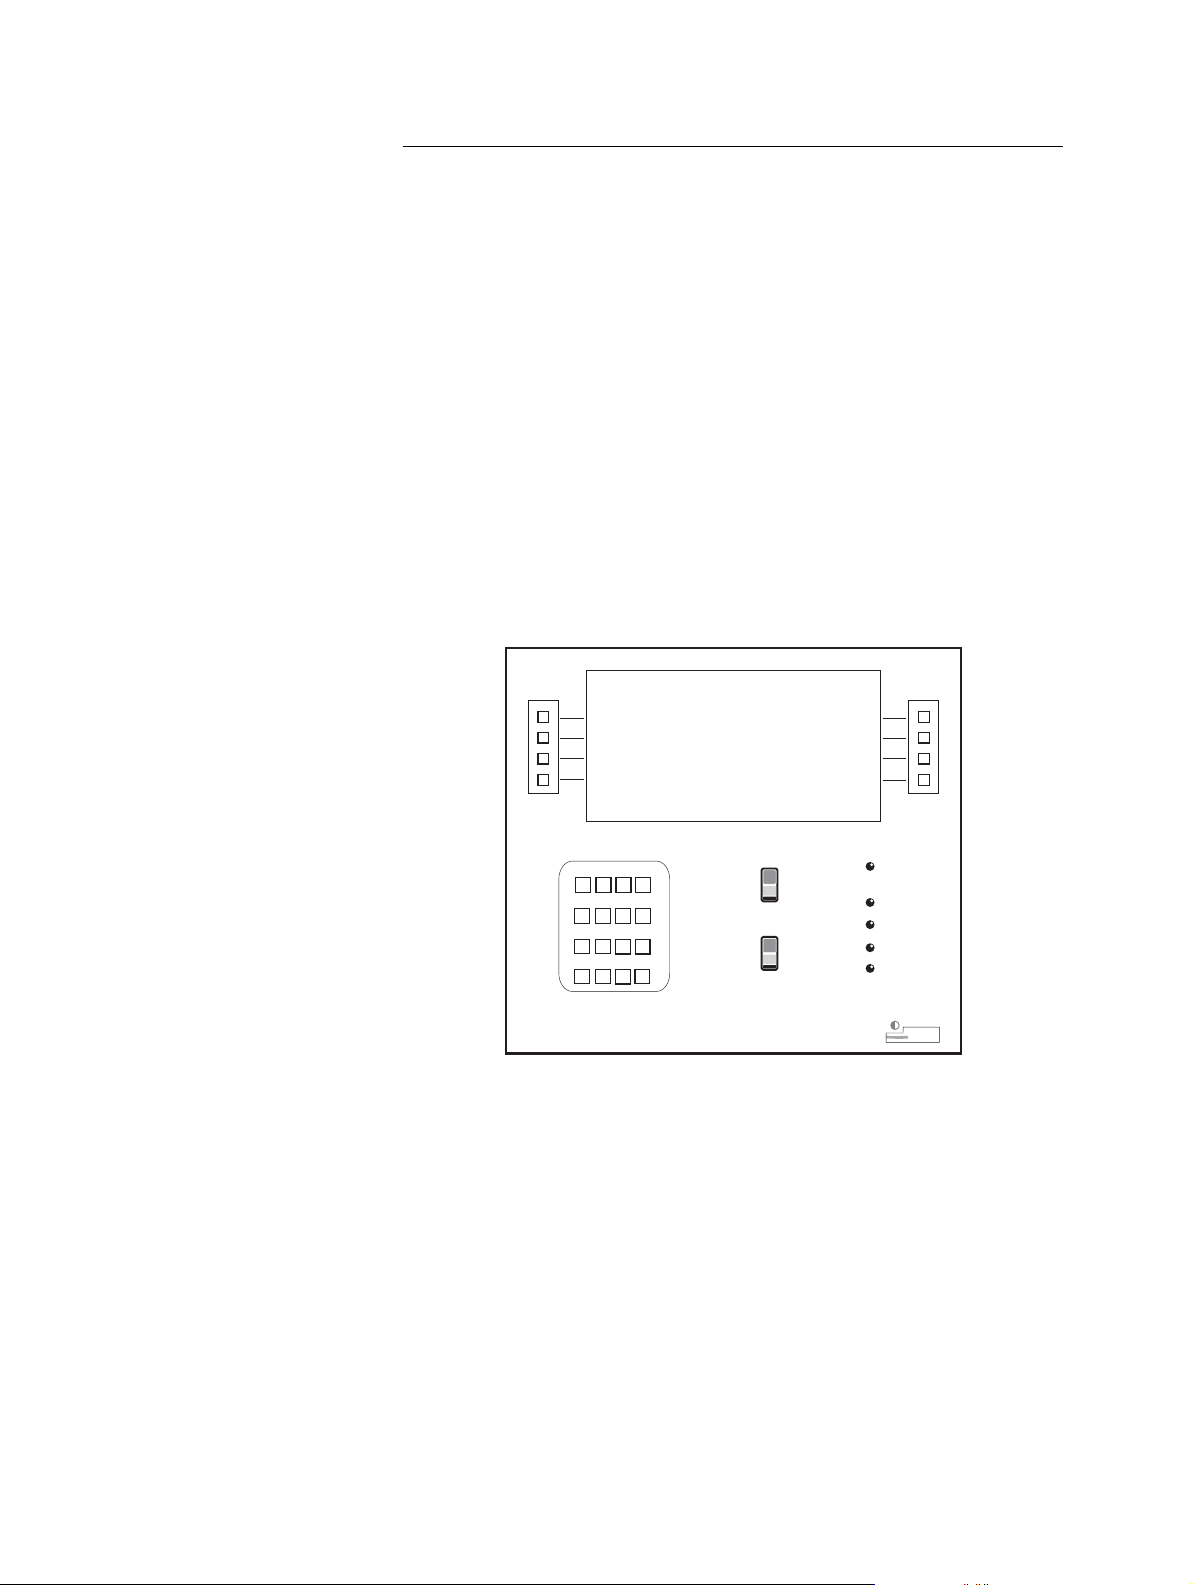
The following illustration shows the layout of the EOP.
1
1
2
4
5
78
0
ENT
3
6
CLR
9
CNL
Normal
Supervisor
Reset
In Service
Supervisor
Power
Error
Comm
The five in dica t or s on the EOP ha ve t he fo ll o wing mean in gs:
● IN-SERVICE - this is illuminated to show that the ATM is
available for transactions
● SUPER V ISO R - this is illum inated to show tha t the AT M is in
the Supervisor Mode and not available for transactions
● ERROR - this is illum inat e d t o indicate a fatal so ftware erro r
● POWER - thi s is ill uminat ed to sho w that the EO P is r e ceiving
power from the ATM
● COMM - this flashes to indicate that the ATM is communicating
with a host system.
1-10 NCR Personas M Series 5887 Operator Manual
Page 29

Getting Started
How to Use the Enhanced Operator Panel
When the door is closed, and the ATM is in normal mode the EOP
will be blank.
The Supervisor switch is used to enter the System Application or
State of He alt h, fro m w her e er ro r me ssa g e s ca n be ac ce ss e d.
The reset switch will cause a reset of the whole ATM.
The contrast control is used to adjust the brightness of the display
panel.
Note: To run a program, or a program from any of the subsequent
menus which will be displayed, press the number key or the
Function Display Key (FDK) on the EOP which corresponds to the
option you wish to select.
It is possib le to t ra ns fe r the op erator functions from the operator
panel to the front of the ATM using the
TRANSFER INTERFACE
option. This procedure is described in either the NCR publication,
‘APTRA Self-Service Support System Application User Guide’, (B006-
6167) or ‘Supervisor Functions’, (B006-4718) depending on which
softwar e sy st em yo u r AT M is running.
NCR Personas M Series 5887 Operator Manual 1-11
Page 30
Getting Started
How to Unlock and Lock a Standard Security Enclosure
How to Unlock and Lock a Standard
Security Enclosure
The standard security enclosure of your ATM will have a locking
handle plus one lock (a primary lock), or two locks (a primary and a
secondary lock). The possible lock types for primary and secondary
locks are as follows:
● Primary lock types:
● Keylock
● Combination lock
● Combination lock with silent alarm
● Combination lock with integral keylock
● Seconda ry lo ck typ e s:
● Keylock
● Combination lock
● Combination lock with silent alarm
● Combination lock with electronic override.
Note: The make of lock fitted (Standard or Sargent and Greenleaf)
depends on the configuration of the ATM. The procedures for
opening and closing the locks are the same for both makes.
1
The follo wing illust ra tio n sho w s the rela tiv e positions o f primary
and secondary locks.
Primary Lock
0
10
90
80
70
Secondary Lock
80
70
20
30
40
60
50
Locking Handle
0
10
90
20
30
40
60
50
1-12 NCR Personas M Series 5887 Operator Manual
Page 31

Keylocks
Getting Started
How to Unlock and Lock a Standard Security Enclosure
If you have both primary and secondary locks fitted to your s ecurity
enclosure, they must be unlocked in the fol lowing order: unlock the
secondary lock, followed by the primary lock and then use the
handle to retract the bolt and open the door. To lock the security
enclosure: close the door and us e the handle to op erate the bolt, then
lock the primary lock, followed by the secondary lock.
The pair of keylock keys supplied with your ATM have been pre-cut
1
to a random factory-set combination. If one key should get lost, then
you should get a new pair of keys and then change the keylock
setting.
Combination Locks
How To Unlock A Keylock
To unlock a keylock, insert the key into the lock and turn it
clockwise as far as it will turn.
How To Lock A Keylock
To lock a keylock, turn the key counterclockwise as far as it will turn
and then remove the key.
Three variants of combination lock may be fitted to your ATM:
1
● Basi c combination lock
● Combination lock with integral keylock
● Combin a tio n loc k w ith a sil e nt al a rm o ptio n .
All the variants of the combination lock are three-number
combination locks.
The locks are precision locks, therefore extreme care must be taken
to align combina tion numbers with the index.
Turn the dial slowly and steadily. If, after turning the dial the
correct number of revolutions, any number is turned beyond the
index, the entire series of combination numbers must be re-dialled.
1
1
Do not turn the dial back to regain a proper alignment of the
number and index, because each time a selected number is aligned
with the index, a revolution is counted.
NCR Personas M Series 5887 Operator Manual 1-13
Page 32

Getting Started
How to Unlock and Lock a Standard Security Enclosure
The procedures for unlocking and changing the combination on a
combin at io n loc k ar e the sa me regardl e ss o f w het h er the lo ck is a
primary or secondary lock.
Changing Index
90
0
Opening Index
10
40
20
30
Dial
80
70
60
50
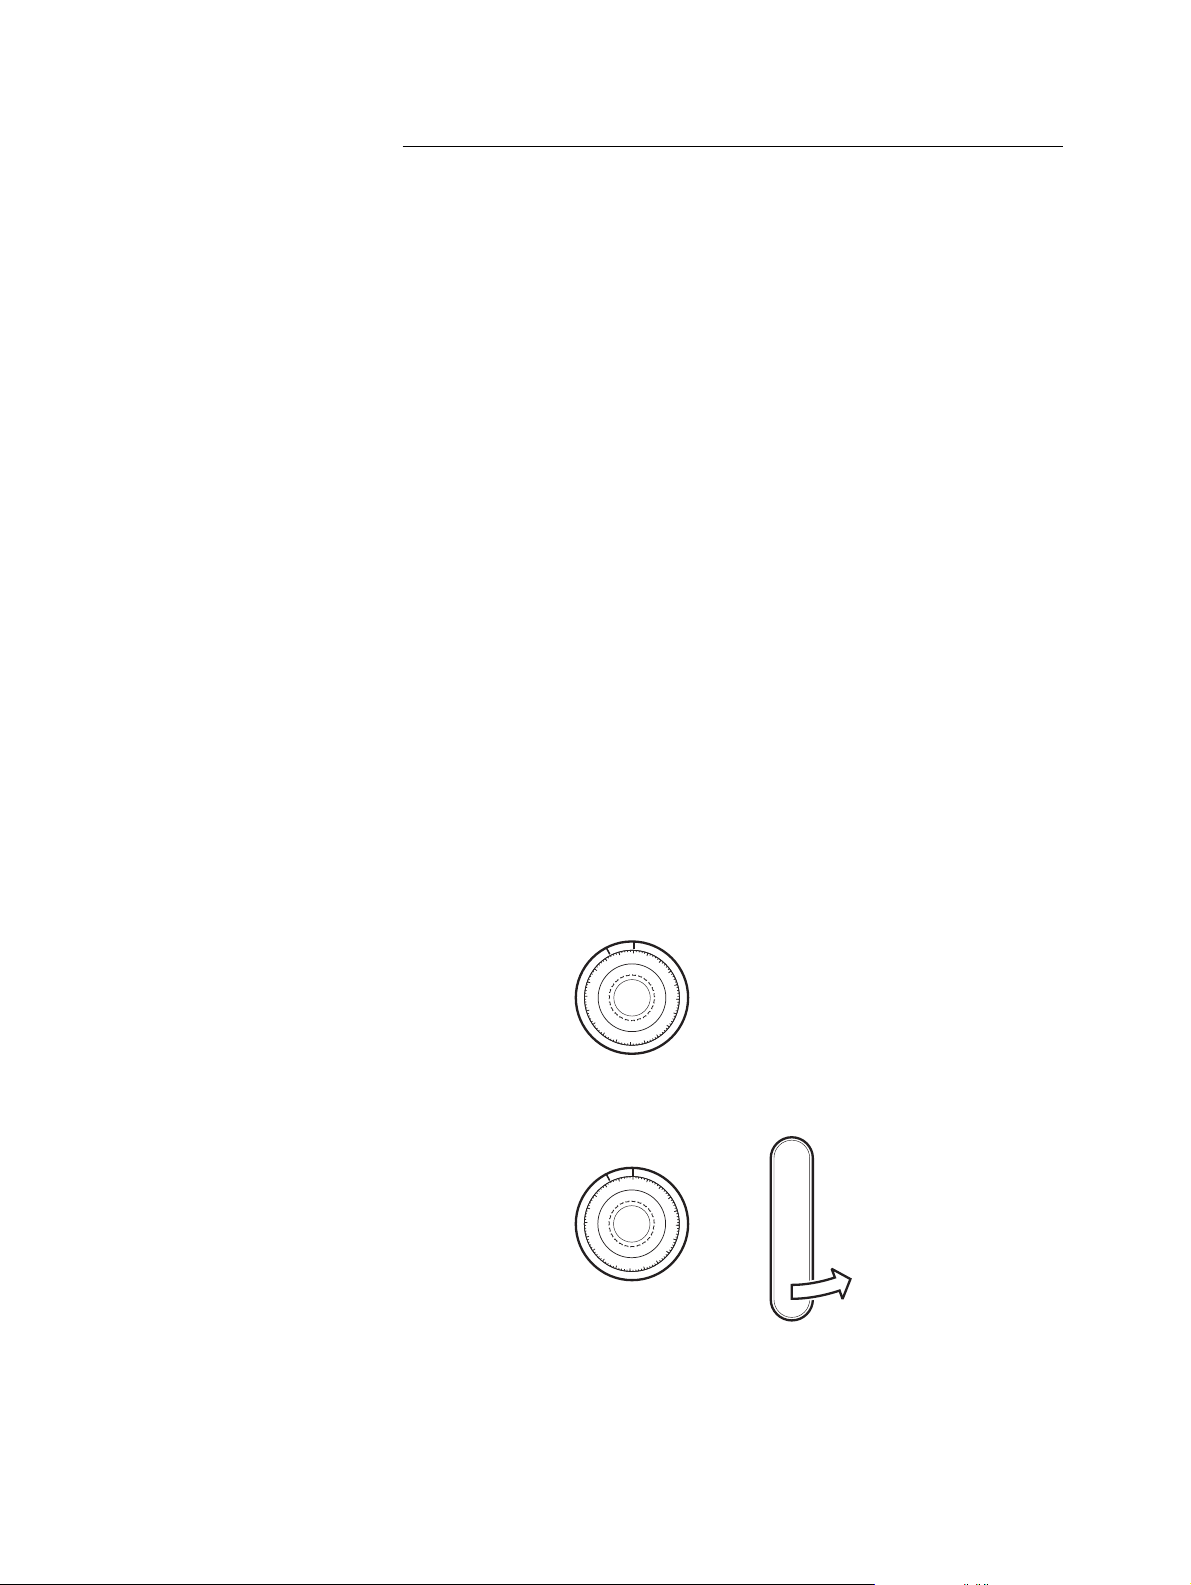
Factory Setting
If the combination lock is set at the original factory setting of 50, you
unlock it as follows, dialling on the opening index:
1 If a ke ylock is fitted to the co m b in at io n loc k, inser t t he ke y int o
the lock and turn it clockwise.
2 Tur n the dial a minimum of four turns counterclockwise and
stop on 50.
3 Turn the dial slowly clockwise until the bolt retracts. The lock is
now open. Use the handle on the door to retract the door bolt
and open the door.
1
Custome r Setting Combination
If the combination has been set at a three-number combination, for
example 36-82-44, unlock it as follows:
1 If a ke ylock is fitted to the co m b in at io n loc k, inser t t he ke y int o
the lock and turn it clockwise.
2 Turn the dial counterclockwise, passing the first number (36)
three times, stop on the first number (36) the FOURTH time.
3 Turn the dial clockwise, passing the second number (82) twice,
and stop on the second number (82) the THIRD time.
4 Turn the dial counterclockwise, passing the third number (44)
once, and stop on the third number (44) the SECOND time.
1-14 NCR Personas M Series 5887 Operator Manual
1
Page 33

Getting Started
How to Unlock and Lock a Standard Security Enclosure
5 Turn the dial clockwise until the bolt retracts. The lock is now
open. Use the handle on the door to retract the door bolt and
open the door.
Combination Lock and Separate Keylock
How To Operate The Silent Alarm
The silent alarm is triggered, if fitted, by adding 10 to the first
number of the combination. For example if the first number was 34,
dial 44 to trigger the silent alarm. Dial the next two numbers of the
combination as normal, the combination lock will open as normal
but the alarm will have been triggered.
How To Lock The Combinati on Lock
To lock the combination lock, turn the dial at least four complete
turns counterclockwise. If a keylock is fitted to the combination
lock, turn th e di a l un t il 0 is in lin e wit h the o pe n in g in d ex and th e n
turn the key counterclockwise and remove it from the lock.
How To Change The Combination
Detailed instructions on how to change the combination of a lock
are inside the security enclosure.
Unlocking
1
On arrival at the site, the combination lock is set at the original
factory setting of 50. To unlock the security enclosure, proceed as
follows:
1
1
1
1
1 Turn the dial of the combination lock until 0 is under the index
mark.
2 Turn the dial of the combination lock counterclockwise until 50
is under the index mark for the FOURTH time.
Index Mark
Note: Combination locks are precision locks, therefore, extreme
care must be taken to align combination numbers with the index.
Turn the dial slowly and steadily. If any of the numbers in the
combination is turned beyond the index, the entire series of
numbers must be re-dialled.
NCR Personas M Series 5887 Operator Manual 1-15
Page 34

Getting Started
How to Unlock and Lock a Standard Security Enclosure
3 Turn the dial clockwise until 0 is under the index mark or until it
stops. The combination lock is now open.
4 In se rt the key into the keylo ck and turn it cloc kw i se to u nlock
the keylock.
5 Turn the locking handle clockwise through approximately 45o to
retract the door bolt. The door is now unlocked.
Locking
To close and lock the security enclosure proceed as follows:
1 Close the door.
2 T ur n t he lo ck ing handle co un t er cl o ckw i se thro u gh
approximately 45
bolt.
1-16 NCR Personas M Series 5887 Operator Manual
o
to the vertical position to engage the door
1
Page 35

Getting Started
How to Unlock and Lock a Standard Security Enclosure
3 T ur n t he ke y in the keylo c k co un t er cl o ckwise and then remove
the key.
4 Lock the combination lock by turning the dial at least four
complete turns counterclockwise.
Custome r Setting Combinat ion
If the combination has been set at a three-number combination, for
example 36-82-44, unlock it as follows:
1 If a ke ylock is fitted to the co m b in at io n loc k, inser t t he ke y int o
the lock and turn it clockwise.
2 Turn the dial counterclockwise, passing the first number (36)
three times, stop on the first number (36) the FOURTH time.
3 Turn the dial clockwise, passing the second number (82) twice,
and stop on the second number (82) the THIRD time.
4 Turn the dial counterclockwise, passing the third number (44)
once, and stop on the third number (44) the SECOND time.
5 Turn the dial clockwise until it stops. The lock is now open. Use
the handle on the door to retract the door bolt and open the
door.
How To Lock The Combinati on Lock
To lock the combination lock, turn the dial at least four complete
turns counterclockwise. Turn the dial until 0 is in line with the
opening index and then turn the key counterclockwise and remove
it from the lock.
1
1
How To Change The Combination
Detailed instructions on how to change the combination of a lock
are inside the security enclosure.
NCR Personas M Series 5887 Operator Manual 1-17
1
Page 36

Getting Started
How to Unlock and Lock an Electronic Lock
How to Unlock an d Lock an
Unlocking
Electronic Lock
To unlock the security enclosure proceed as follows:
1
1 With the keypad in its vertical position, enter the first six digits
of the combination (set to 123456 when shipped from factory). If
the sequence is entered correctly, the lock will beep and the led
flash. If the l ock has been set to operate on a single combination,
proceed to step 3.
1
2 If the lock is set to operate on a dual combination, enter the
second six digits of the combination (set to 456789 when shipped
from factory). If the sequence is entered correctly, the lock will
beep and the led flash.
3 Turn the keypad clockwise to unlock the lock.
1-18 NCR Personas M Series 5887 Operator Manual
Page 37

Getting Started
How to Unlock and Lock an Electronic Lock
4 T ur n the keylock clockwise to unl ock t he lo ck .
5 Turn the safe handle counterclockwise to open the door.
Locking
Note: If when entering a combination you enter the wrong
combination 4 times, a 5 minute time delay period is activated.
During this time the led on the lock will flash red at 10 second
intervals. You must wait until the end of the 5 minute period before
attempting to enter the correct combination.
Note: If fitted, the silent alarm may be activated by entering one
number higher or lo wer for the last digit of a combination. For
example, if the combination was 1-2-3-4-5-6, entering 1-2- 3-4-5- 5 or
1-2-3-4-5-7 would activate the silent alarm.
Note: Repeated beeping of the lock during an opening sequence
indicates that the lock battery requires replacing. If the lock keypad
is completely “dead”, tha t is, it makes no sound or flashes, follow
the emergency opening procedure to open the lock prior to having
the battery replaced.
To lock the security enclosure proceed as follows:
1
1 Close the security enclosure door and turn the handle clockwise.
2 T ur n the keylock coun terc lo ck w is e
3 T ur n t he ke yp a d countercloc kw i se un t il the keypad is verti c al.
The door should now be locked.
NCR Personas M Series 5887 Operator Manual 1-19
Page 38

Getting Started
How to Unlock and Lock an Electronic Lock
Emergency Opening Procedure
1
If the keypad is completely “dead”, that is it does not flash or beep,
it is an indication that the lock battery requires replacing. To open
the lock when it is in this condition you must hold a new 9 volt
alkaline battery against the terminals of the lock. The larger battery
terminal must be against the larger of the l ock terminals. The battery
must be held in place while carrying out the normal procedures for
opening the lock.
1-20 NCR Personas M Series 5887 Operator Manual
Page 39

How to Unlock and Lock a Controlled Access Electronic Lock
How to Unlock an d Lock a
Getting Started
Controlled Access Electronic Lock
Note: For ATMs with security enclosures fitted with a Kaba Mas
(Mas-Hamilton) controlled access electronic lock, refer to the
followin g K aba M as Co rporation publicatio n s for d etai ls o f ho w t o
set up and manage the operations of the lock:
● CENCON System 2000 Access Control System
● Getting Started Guide
● Supervisor Guide
● Special S up e r viso r G ui d e
● FLM Dispatcher Guide
● Route Dispatcher Guide
● CENCON 2000 System Guide.
These publications can be purchased from the following order
point:
Kaba Mas Corporation
749, W.Short Street
LEXINGTON, Kentucky
40508
Tel: (1) 859 253 4744
Toll Free: (1) 888 959 4715
Fax: (1) 859 225 2655
1
Unlocking the Master Lock
Note: For the attention of Customer Service Manager.
The contr olle d a ccess electronic lock , ca ll e d th e master lock, can be
fitted with or without a sub-lock on the Cheque Acceptor door. To
unlock a security enclosure with a master lock and one sub-lock,
you will require the foll o w in g:
● Perso n al Identifier key (PI key)
● 6-digit access code - obtai ned fr om the Key Management Centre
(KMC).
To open the master lock, proceed as follows:
1
1 Contact the KMC.
2 Give requested details to verify your identity to the KMC.
3 Specify which areas on the ATM you want to access.
NCR Personas M Series 5887 Operator Manual 1-21
Page 40

Getting Started
How to Unlock and Lock a Controlled Access Electronic Lock
4 Take note of the 6-digit access code (three pairs of two),
allocated by the KMC.
5 Unlock and open the exterior of the ATM.
6 Spin the lock dial counterclockwise to charge the lock, until EC
is displayed on the LCD.
Note: If DL (Dial Left) is d isplayed , yo u must only turn the dia l
to the left (counterclockwise).
LCD
2
1
6
*
#
Key Reader
7 T ur n the dial to the home position.
8 Enter the 6-digit access code provided by the KMC on the
keypad.
5
4
3
7
0
9
8
Keypad
Home Position
Dial
(Opening/Closing)
9 IPI should be displayed on the LCD.
1-22 NCR Personas M Series 5887 Operator Manual
Page 41

Getting Started
How to Unlock and Lock a Controlled Access Electronic Lock
10 Hold the PI key against the key reader to verify a valid user
identity. If sub-lock access is required, the appropriate authority
is passed to the PI key at this stage.
Keypad
LCD
2
1
6
*
Key Reader
PI Key
11 If the correct 6-digit code has been entered and a valid PI key
has been pressed against the key reader, OPr will be displayed
on the LCD.
#
5
4
3
7
(Opening/Closing)
0
9
8
Dial
Locking the Master Lock
Note: If an incorrect code or PI key is used or there is a bad PI
key contact, a lightning bolt symbol will be displayed on the
LCD, indicating an error condition.
If the error condition was caused by a bad PI key contact, YOU
HAVE ONE MORE ATTEMPT AT OPENING THE LOCK. I f th e
error condition occurs after the 2nd attempt, contact the KMC
immediately.
12 Turn the lock dial a quarter turn (90o) clockwise to release the
bolt.
13 Open the security enclosure.
To lock the master lock, proceed as follows:
1
1 Close the security enclosure.
NCR Personas M Series 5887 Operator Manual 1-23
Page 42

Getting Started
How to Unlock and Lock a Controlled Access Electronic Lock
2 Turn the lock dial counterclockwise to activate the bolt and
charge the lock until IPI is displayed on the LCD.
3 Hold the PI key against the key reader.
4 Take a note of the unique 4-digit close code that is displayed, as
it will be required by the KMC.
5 Close the exterior of the ATM.
6 Contact the KMC.
Note: Ensure that all the locks and doors on t he AT M are closed
and locked before contacting the KMC.
7 Verify identification.
8 Provide the 4-digit close code to the KMC.
Unlocking the Sub-Lock
9 The KMC will inform you that either the code is correct or give
you the correct procedure to follow if the close code is wrong.
If a sub-lock is configured on your Cheque Acceptor door, proceed
1
as follow s:
1 Carry out Steps 1 to 10 of “Unlocking the Master Lock”.
Note: The code displayed on the LCD will depend on which area of
the ATM you requested access to.
2 In se rt the key into the keylo ck on the lock in g ha n d le an d tur n it
counterclockwise.
1-24 NCR Personas M Series 5887 Operator Manual
Page 43

Getting Started
How to Unlock and Lock a Controlled Access Electronic Lock
3 Hold the PI key against the key reader of the sub-lock.
4 T he L ED flas he s th ree (3) t imes. You have eight (8 ) se con d s t o
unlock t he su b-lo ck by turnin g th e loc kin g ha n d le
counterclockwise to release the catch. If the locking handle
cannot be moved, contact the KMC for another access code.
Note: The locki ng handle cannot be turn e d before the L E D
flashes. After turning, the catch remains in position until the
lock is closed.
Locking the Sub-Lock
5 Open the cheque acceptor side-box door.
To lock the sub-lock, if configured, proceed as follows:
1
1 Close the cheque acceptor side-box door and turn the locking
handle clockwise to hold the catch.
2 T ur n the ke y in the keylo c k clo c kw is e an d remove the key .
3 Hold the PI key against the key reader of the sub-lock until the
LED flashes four (4) times. This indicates the lock is closed.
4 On the master lock, turn the lock dial counterclockwise and
charge the lock until IPI is displayed on the LCD.
5 Hold the PI key against the key reader of the master lock.
6 Take a note of the unique 4-digit close code that is displayed, as
it will be required by the KMC.
7 Close the exterior of the ATM.
Note: Ensure that all the doors and locks on the ATM are closed
and locked before contacting the KMC.
8 Contact the KMC.
NCR Personas M Series 5887 Operator Manual 1-25
Page 44

Getting Started
How to Unlock and Lock a Controlled Access Electronic Lock
9 Verify your identification.
10 Provide the 4-digit close code to the KMC.
11 The KMC will inform you that either the code is correct or give
you the correct procedure to follow if the close code is wrong.
1-26 NCR Personas M Series 5887 Operator Manual
Page 45

Getting Started
How to Access the Modules
Currency Dispenser
How to Access the Modules
The following sections describe in detail how to gain access to each
of the modules within the 5887, once the exterior of the ATM is
open. You should ensure that you are familiar with the access
procedure for a module before you carry out the procedures
described in its operator guide.
To gain access to the currency dispenser, release the green latch and
1
pull the dis pe n se r o ut of th e ATM un t il its slides are full y ex te n d ed.
You do not need to pull the dispenser out of the ATM to replenish
cassettes or empty the purge bin, but will need to do so to clear
jams.
1
1
2
Note: The position and appearance of the latch handle may differ
from that shown.
To return the dispenser, simply push it back into the ATM until it
clicks into place.
NCR Personas M Series 5887 Operator Manual 1-27
Page 46

Getting Started
How to Access the Modules
Receipt Printer and Journal Printer
To gain access to the receipt printer or the journal printer, press the
green latch and use the green handle to pull the module tray out of
1
the ATM until its slides are fully extended.
The journal printer is the printer nearest to you, and the receipt
printer is the furthest away.
2
1
To return the printers, simply push the module tray back into the
ATM until it clicks into place.
1-28 NCR Personas M Series 5887 Operator Manual
Page 47

Statement Printer and Passbook Printer
Getting Started
How to Access the Modules
Your ATM may be configured with either the Letter Quality
Document Statement printer, the Statement/Passbook printer, the
1
Page Tu rn Passbo o k Pr i nt e r o r th e En ha n ce d Pa g e T u r n Passbook
printer. To gain access to the statement or passbook printer press
the green latch and using the green handle, pull the printer out of
the ATM until its slides are fully extended.
2
1
Note: The Letter Quality Document Statement printer is shown
here.
To return the printer, simply push it back into the ATM until it
clicks into place.
NCR Personas M Series 5887 Operator Manual 1-29
Page 48

Getting Started
How to Access the Modules
Motorised Card Reader
To gain access to the card reader, press the green latch and use the
1
green handle to pull the module tray out of the ATM until its slides
are fully ext e n d ed. Th e rec e ipt a nd j o urn a l printers wil l al so sli d e
out.
2
1
The card reader is located underneath the receipt printer, at the back
of the module tray. Pull out the receipt printer transport locking
plunger, as shown below, and then raise the receipt printer
transport.
2
1
To return the card reader, pull out the receipt printer transport
locking plunger and then lower the printer transport to its normal
operating position, then push the module tray back into the ATM
until it click s into place.
1-30 NCR Personas M Series 5887 Operator Manual
Page 49

Coin Dispenser
Getting Started
How to Access the Modules
To gain access to the coin dispenser, use the green handle to pull the
1
dispen se r ou t un t il it s sli d es are fully ext end e d .
Cash Acceptor (UD-686)
To return the coin di spenser, simply pus h it back in, t hen close and
lock the door.
To gain access to the cash acceptor, release the green latch, and use
1
it to pull the cash acceptor out of the ATM until its slides are fully
extended.
1
2
To return the cash acceptor, simply push it back into the ATM until
it clicks into place.
NCR Personas M Series 5887 Operator Manual 1-31
Page 50

Getting Started
How to Access the Modules
Cheque Acceptor (Type 3)
To gain access to the cheque acceptor, release the green latch and
1
using the green handle, pull the cheque acceptor out of the ATM
until its slides are fully extended.
1
2
To return the cheque acceptor, simply push it back into the ATM
until it clicks into place.
1-32 NCR Personas M Series 5887 Operator Manual
Page 51

Getting Started
How to Do a Hardware Reset of Your ATM
How to Do a Hardware Reset of Your
ATM
A reset switch is provided on the operator panel. When the reset
switch is pressed the ATM executes its diagnostic procedures,
reloads t he system soft ware and in itia l ise s th e use r ap plication
program.
To reset the ATM, proceed as follows:
1 Open the top-box of your ATM.
2 Press the reset switch on the operator panel.
1
Reset
3 Close and lock the ATM.
Note: After you reset your ATM it will take several minutes for the
ATM to load all its software and to start displaying your
application.
NCR Personas M Series 5887 Operator Manual 1-33
Page 52

Getting Started
How to Insert and Remove Disks
How to Insert and Remove Disks
The procedure for inserting and removing disks depends on the
type of PC core in the ATM. There are two types of PC core. The
difference between them is shown below:
Type 1 Core
The following procedures are detailed below:
● Inserting and removing a flex disk in a Type 1 core
● Inserting and removing a CD-ROM in a Type 1 core
● Inserting and removing a flex disk in a Type 2 core
● Inserting and removing a CD or DVD-ROM in a Type 2 core.
Type 2 Core
1
Flex Disk in a Type 1 Core
To insert and remove a flex disk from the drive in a Type 1 core
1
proceed as follows:
1 Open the top-box of your ATM.
2 If a disk drive security cover is fitted, unlock or remove the lock
or seal supplied by your organization, then pull out the popper
and pull ou t the cov e r as far a s it w ill go .
Note: If your ATM has an enhanced alarm system fi tted, the
disk drive security cover may be alarmed. If this is the case, you
1-34 NCR Personas M Series 5887 Operator Manual
Page 53

Getting Started
How to Insert and Remove Disks
should follow your organization’s procedures for accessing an
alarmed area.
3 To insert a disk, firmly push the disk into the disk drive as
shown below until the small button ejects slightly.
NCR Personas M Series 5887 Operator Manual 1-35
Page 54

Getting Started
How to Insert and Remove Disks
CD-ROM in a Type 1 Core
4 To remove a flex disk from the disk drive, f ully press in the eject
button on the drive. This will eject the disk allowing you to
remove it.
5 If fitted, close the disk drive security cover then lock or seal it as
required by you r o rga n iz at ion.
6 Close and lock the ATM.
To insert and remove a CD-ROM from the drive in a Type 1 core
1
proceed as follows:
1 Open the top-box of your ATM.
2 If a disk drive security cover is fitted, unlock or remove the lock
or seal supplied by your organization, then pull out the popper
and pull ou t the cov e r as far a s it w ill go .
Note: If your ATM has an enhanced alarm system fi tted, the
disk drive security cover may be alarmed. If this is the case, you
1-36 NCR Personas M Series 5887 Operator Manual
Page 55

Getting Started
How to Insert and Remove Disks
should follow your organization’s procedures for accessing an
alarmed area.
3 To insert a CD-ROM, press the eject button to bring out the
motorized tray.
NCR Personas M Series 5887 Operator Manual 1-37
Page 56

Getting Started
How to Insert and Remove Disks
4 Place the CD-ROM in the tray with the printed label visible and
the machine readable surface next to the tray. Press the eject
button to retract the tray into the drive.
5 To remove a CD-ROM from the drive, press the eject button on
the drive to bring out the motorized tray. Remove the CD-ROM
from the tray and press the eject button to retract the tray into
the drive.
6 If fitted, close the disk drive security cover then lock or seal it as
required by you r o rga n iz at ion.
Flex Disk in a Type 2 Core
7 Close and lock the ATM.
To insert and remove a flex disk from the drive in a Type 2 core
1
proceed as follows:
1 Open the top-box of the ATM.
2 If a disk drive security latch is fitted, unlock or remove the lock
or seal supplied by your organization, then pull out the popper
and pull ou t the la tch as far a s it wi ll go .
Note: If your ATM has an enhanced alarm system fi tted, the
disk drive security latch may be alarmed. If this is the case, you
1-38 NCR Personas M Series 5887 Operator Manual
Page 57

Getting Started
How to Insert and Remove Disks
should follow your organization’s procedures for accessing an
alarmed area.
3 Pull the two spring loaded pins out of their latches and pull
open the drive bay cover.
NCR Personas M Series 5887 Operator Manual 1-39
Page 58

Getting Started
How to Insert and Remove Disks
4 To insert a disk, firmly push the disk into the disk drive as
shown below until the small button ejects slightly.
5 To remove a disk from the disk drive, fully press in the eject
button on the drive. This will eject the disk allowing you to
remove it.
6 Close the drive bay cover by pushing it firmly so that the spring
loaded pins fully locate in their latches as shown below.
Caution This is an ES D (e le ctr ostatic discharge ) se ns it iv e d evice, there f o re ,
after any maintenance or service actions the drive bay cover must be
closed and fully latched home.
7 If fitted, close the disk security latch then lock or seal it as
required by you r o rga n iz at ion.
8 Close and lock the ATM.
1-40 NCR Personas M Series 5887 Operator Manual
Page 59

CD or DVD-ROM in a Type 2 Core
Getting Started
How to Insert and Remove Disks
To insert and remove a CD or DVD-ROM from the drive in a Type 2
core proceed as follows:
1
1 Open the top-box of the ATM.
2 If a disk drive security latch is fitted, unlock or remove the lock
or seal supplied by your organization, then pull out the popper
and pull ou t the la tch as far as it will go .
Note: If your ATM has an enhanced alar m system fitted, the
disk drive security latch may be alarmed. If this is the case, you
should follow your organization’s procedures for accessing an
alarmed area.
NCR Personas M Series 5887 Operator Manual 1-41
Page 60

Getting Started
How to Insert and Remove Disks
3 Pull the two spring loaded pins out of their latches and pull
open the drive bay cover.
4 To insert a CD or DVD-ROM, press the eject button to bring out
the motorized tray.
1-42 NCR Personas M Series 5887 Operator Manual
Page 61

Getting Started
SOFTWARE
How to Insert and Remove Disks
5 Place the CD or DVD-ROM in the tray with the printed label
visible and the machine readable surface next to the tray. Press
the eject button to retract the tray into the drive.
SOFTWARE
6 To remove the CD or DVD-ROM from the drive, press the eject
button on the drive to bring out the motorized tray. Remove the
CD or DVD-ROM from the tray and press the eject button to
retract the tray into the drive.
7 Close the drive bay cover by pushing it firmly so that the spring
loaded pins fully locate in their latches as shown below.
Caution This is an ES D (e le ctr ostatic discharge ) se ns it iv e d evice, there f o re ,
after any maintenance or service actions the drive bay cover must be
closed and fully latched home.
8 If fitted, close the disk security latch then lock or seal it as
required by you r o rga n iz at ion.
9 Close and lock the ATM.
NCR Personas M Series 5887 Operator Manual 1-43
Page 62

Getting Started
Digital Audio
Digital Audio
To change the digital audio volume, use the volume control dial, as
shown in the ‘Module Location’ section.
1
1-44 NCR Personas M Series 5887 Operator Manual
Page 63

Table of Contents
Error Reporting
Chapter 2
Error Reporting
How Errors Are Reported 2-1
System Application 2-1
Clearing a Device State 2-1
State of Health 2-2
How Errors in the PC Module Are Reported 2-3
How to Read the Remote Status Indicator 2-4
NCR Personas M Series 5887 Operator Manual
Page 64

Table of Contents
Error Repo rt in g
NCR Personas M Series 5887 Operator Manual
Page 65

Error Reporting
How Errors Are R epo r te d
2
System Application
How Errors Are Reported
The 5887 uses error reporting systems, which are designed to tell
you how "healthy" your ATM is. The systems not only report error
conditions, but also report when a module, for example the card
reader or printer module, requires to be replenished or replaced.
The error reporting system you have will depend on the System
Software running on your ATM. Your ATM will run either System
Application or State Of Health (SOH).
To check if all the modules in your ATM are healthy, you must
2
follow your in-house procedures to run the System Application.
From the Sy ste m Applicatio n M a in Men u, select the De v ic e Stat us
List func t ion. A list of all t he m od ules which require att e n tio n is
displayed.
The follo wing informa tion is provided for ea ch mod u le or dev ic e
requiring attention:
● Device name - This is the name of the module or device that
requires attention.
● Descrip t ion - This is a short d e scri pt i o n o f the st ate.
● Attention - This shows whether the state requires attention
‘now’ or will require attention ‘soon’.
● User category - This specifies what type of user is able to deal
with the state - Operator or Customer Engineer (CE). A user
category of ‘CE may be required’ indicates that an operator can
attempt to deal with the state, but if the operator fails to clear it,
a CE should be called.
● Self-clea ring - This sh ow s w het h e r the sta te is sel f-c le a rin g o r
not.
● Status ID - This is a unique number which identifies the state.
You can use the Status ID, together with the product class
number, to give to a help desk when reporting faults.
2
For more information refer to NCR publication, ‘APTRA™ Self
Service Support, System Application User Guide’ (B006-6167).
Clearing a Device State
To clear a device state, follow your in-house procedures.
NCR Personas M Series 5887 Operator Manual
2
-1
2
Page 66

Error Reporting
How Errors Are Reported
State of Health
To check if all the modules in your ATM are healthy, you must
2
follow your in -house pro ced u re s to run State O f Health (SOH).
From the Enhanced Operator Panel, the ATM will display SOH
messages consta ntly.
If all the mod u le s in yo ur ATM are he al th y, a T ERMINA L
HEALTHY message will be displayed. If there is a module that
requires attention, a message stating the module name and a
description of the problem is displayed. If th ere is more than one
message to be displayed, each me ssage will be displayed in turn for
a few seconds.
The 4-digit number which appears alongside the SOH message is a
message identification number. If you have to call a customer
engineer at any time, quote the SOH message identification number
as well as the message text.
The asterisks (*) indica t e t he ski ll le ve l r equired to fix wha te v e r
problem is gen er a tin g t he cu rr ent S OH m e ssage, and al so in di ca t e
which VERIFY SOH option should be selected to clear the SOH
message. For more information refer to NCR publication,
‘Supervisor Functions’ (B006-4718).
Some SOH messages require that you act upon them immediately,
while ot her s ind ic a te tha t you should be pre pa re d to car ry out a
replenishment/replacement procedure in the near future. If
required, use the relevant VERIFY SOH option as described in the
‘Supervisor Functions’ manual to clear the SOH message.
Note: If a SOH message is displayed which in dicates that a module
needs to be replaced, contact your local service centre.
2-2 NCR Personas M Series 5887 Operator Manual
Page 67

Error Reporting
How Errors in the PC Module Are Reported
How Errors in the PC Module Are
Reported
The reporting system does not report on the operator panel if a fault
has occurred on one of the boards in the PC module.
The boards in the PC module are tested during power-up and at
reset. If a fault is detected on one of the components of the PC
module , the L ig ht Em itt in g Diode (LED) will be ill uminated r ed .
The following table gives a summary of the LED colour code.
LED Colour Result Of Test
AMBER TEST STIL L EXECUTING
RED TEST FAILED
GREEN TEST PASSED
UNLIT NO POWER TO MODULE
The location of the LED i s different in th e two types o f PC module as
shown in the following illustration:
Note: In some designs of ATM the PC module is fitted in a
horizo nt a l position.
2
If the LED is unlit or illuminated red after power-up or system reset,
call your customer engineer.
NCR Personas M Series 5887 Operator Manual 2-3
Page 68

Error Reporting
How to Read the Remote Status Indicator
How to Read the Remote S tat us
Indicator
The meaning of each Light Emitting Diode (LED), when
illuminated, is marked clearly on the remote status indicator.
2
2-4 NCR Personas M Series 5887 Operator Manual
Page 69

Table of Contents
Currency Dispenser
Chapter 3
Currency Dispenser
How to Replenish Currency Cassettes 3-1
How to Empty the Currency Purge Bin 3-3
Standard Currency Purge Bin 3-3
Latch Fast Currency Purge Bin 3-4
How to Clear Currency Dispenser Jams 3-7
NCR Personas M Series 5887 Operator Manual
Page 70

Table of Contents
Currency Dispenser
NCR Personas M Series 5887 Operator Manual
Page 71

How to Replenish Currency Cassettes
How to Replenish Currency
Currency Dispenser
3
Cassettes
To replenish the currency cassettes in y our A TM proceed as follows:
1 Open the exterior of the ATM.
2 If your ATM does not have the auto-supervisor function, press
the switch on the operator panel to the supervisor position.
3 Open the security enclosure.
4 Lift the catch on the right-hand side of the currency cassette you
wish to replenish and pull the cassette out of the ATM.
3
1
2
5 If the cassette is to be sent to a secure area for refilling, do so in
accordan ce w ith yo ur in stit u t e's rule s. Re fe r to the N CR
publication “H-8015-STD1-01/02-08 Currency Cassette Owner's
Manual”, B00 6-1297, fo r detail s of how to open and replenish the
currency cassette.
6 Push the full cassette firmly into the ATM until the cassette latch
clicks into place.
7 Repeat Steps 3, 4 and 5 for all cassettes which require to be
replenished.
NCR Personas M Series 5887 Operator Manual
-1
3
Page 72

Currency Dispenser
How to Replenish Currency Cassettes
8 Close and lock the security enclosure.
9 Follow your in-house procedures for indicating that the
currency cassettes have been replenished.
10 If your ATM does not have the auto-supervisor option, press the
switch on the operator panel to the normal position.
11 Close and lock the exterior of the ATM.
3-2 NCR Personas M Series 5887 Operator Manual
Page 73

Currency Dispenser
How to Empty the Currency Purge Bin
How to Empty the Currency Purge
Stan dard Curr ency Purge Bin
Bin
The procedure for removing purged currency depends on whether
the purge bin is Latch Fast or Standard.
To empty the standard currency purge bin in your ATM proceed as
follows:
3
1 Open the exterior of the ATM.
2 If your ATM does not have the auto-supervisor function, press
the switch on the operator panel to the supervisor position.
3 Open the security enclosure.
4 Lift the catch on the left-hand side of the currency purge bin and
pull the bin out of the ATM.
3
1
2
5 R e mov e the pu r ged curre ncy fr o m the b in.
6 Slide the empty purge bin into the ATM until it clicks into place.
7 Close and lock the security enclosure.
NCR Personas M Series 5887 Operator Manual 3-3
Page 74

Currency Dispenser
How to Empty the Currency Purge Bin
Latch Fast Currency Purge Bin
8 Follow your in-house procedures for indicating that you have
emptied the currency purge bin.
9 If your ATM does not have the auto-supervisor option, press the
switch on the operator panel to the normal position.
10 Close and lock the exterior of the ATM.
To empty the latch fast currency purge bin in your ATM proceed as
follows:
3
1 Open the exterior of the ATM.
2 If your ATM does not have the auto-supervisor function, press
the switch on the operator panel to the supervisor position .
3 Open the security enclosure.
4 If the purge bin is to be removed from the ATM, lift t he catch (to
the left of the currency purge bin) and pull the bin out of the
ATM.
1
5 To empty the purge bin either in or out of the ATM, remove the
lock/sea l fro m t he bin .
3-4 NCR Personas M Series 5887 Operator Manual
2
Page 75

Currency Dispenser
How to Empty the Currency Purge Bin
6 Press the latch hasp down and pull the bottom of the latch
towards you.
7 Lift the latch up to free it from the top block. Pull the top of the
latch towards you and hinge it down.
NCR Personas M Series 5887 Operator Manual 3-5
Page 76

Currency Dispenser
How to Empty the Currency Purge Bin
8 Using the handle, pull the door towards you and up to remove it
from the bin.
9 R e mov e the pu r ged curre ncy fr o m the b in.
10 Locate the door between the sides of the bin and slide the door
down.
11 Close the door and lift the latch up and forwards to hook it on to
the top block.
12 Press the la t ch dow n un t il the la tch hasp click s a nd locks the
latch.
13 Secure the bin with a lock/seal.
14 If the bin was removed from the ATM, slide the empty purge
bin into the ATM until it clicks into place.
15 Close and lock the security enclosure.
16 Follow your in-house procedures for indicating that you have
emptied the currency purge bin.
17 If your ATM does not have the auto-supervisor option, press the
switch on the operator panel the normal position .
18 Close and lock the exterior of the ATM.
3-6 NCR Personas M Series 5887 Operator Manual
Page 77

Currency Dispenser
How to Clear Currency Dispenser Jams
How to Clear Currency Dispenser
Jams
The indication of a currency dispenser jam will be an error message.
To clear a currency jam proceed as follows:
1 Open the exterior of the ATM.
2 If your ATM does not have the auto-supervisor function, press
the switch on the operator panel to the supervisor position.
3 Open the security enclosure.
4 Access the currency dispenser, as described in Chapter 1,
‘Getting Started’.
5 T he procedures for clearing a jam depend on where the jam is
within the dispenser. An error description will indicate where
the jam is. The following tab le describes the procedure to follow
for each error message.
3
Error Description Go To
Bill jam at the pick sensor/module or a gulp feed failure Step 6
Bill jam in the main transport Step 9
Bill jam at sensor 2 Step 12
Bill jam at sensor 1 or a purge bin overfill Step 12
Bill jam at sensor 3, 4, or 5 Step 15
NCR Personas M Series 5887 Operator Manual 3-7
Page 78

Currency Dispenser
How to Clear Currency Dispenser Jams
6 Lift the green catch on the right-hand side of the currency
cassette indicated by the error description (cassette position 1 is
the top cassette), and pull the cassette out of the ATM.
1
2
7 Reach inside the hole vacated by the cassette and remove any
jammed bills.
8 Push the cassette back into the ATM until the cassette latch
clicks into place. Proceed to Step 16.
3-8 NCR Personas M Series 5887 Operator Manual
Page 79

Currency Dispenser
How to Clear Currency Dispenser Jams
9 Turn the green handle on the side of the dispenser
counterclockwise until the bills enter the stacking area on the
top of the main transport.
10 If your disp e ns e r ha s a b il l al ignment m e ch anism as sho wn,
move it backwards until it stops.
11 Insert your hand through the hole in the side or the top of the
dispenser, and remove any jammed bills. Proceed to Step 18.
NCR Personas M Series 5887 Operator Manual 3-9
Page 80

Currency Dispenser
How to Clear Currency Dispenser Jams
12 Lift the latch on the left-hand side of the purge bin and pull the
purge bin out of the dispenser.
1
2
Note: If the purge bin is a latch fast bin, and the jam is caused by an
overfill, it may be impossible to remove the bin from the ATM. In
this case yo u can em pt y th e pur g e bin whilst it is in posit i o n.
Remove the door (see latch fast replenishment section) and then
remove the jammed cash. Replace the door and go to Step 16.
3-10 NCR Personas M Series 5887 Operator Manual
Page 81

Currency Dispenser
How to Clear Currency Dispenser Jams
13 Reach inside the hole vacated by the purge bin and remove any
jammed bills. If you cannot reach the bills, turn either of the
shaft wheels as indicated below, until the bills are in an
accessible position. Remove the jammed bills.
14 Push the purge bin back into the ATM until it locks in place.
Proceed to Step 16.
NCR Personas M Series 5887 Operator Manual 3-11
Page 82

Currency Dispenser
How to Clear Currency Dispenser Jams
15 Turn the drums on the top of the transport until the bills are in
an accessible position. If your dispenser does not have drums on
the top, pull the timing belts on the right hand side of the
transport. Reach into the transport and remove the bills.
16 Push the dispenser back into the ATM.
17 Close and lock the security enclosure.
18 Follow your in-house procedures for indicating that you have
fixed, without replacing, the faulty module in the currency
dispenser.
19 If your ATM does not have the auto-supervisor option, press the
switch on the operator panel to the normal position.
20 Close and lock the exterior of the ATM.
3-12 NCR Personas M Series 5887 Operator Manual
Page 83

Table of Contents
Receipt Printer
Chapter 4
Receipt Printer
Overview 4-1
How to Replenish Your Receipt Printer Paper 4-2
How to Clear Receipt Printer Jams 4-6
NCR Personas M Series 5887 Operator Manual
Page 84

Table of Contents
Receipt Printer
NCR Personas M Series 5887 Operator Manual
Page 85

Receipt Printer
Overview
4
Overview
There are two types of receipt printer possible in your ATM. The
main difference between them is material: the first type is made
with yellow coloured metal, the second type is grey. There are also
small differences in operation between the two types of printer.
Where differences occur, the illustrations in the following sections
show both printers, with the yellow coloured printer at the top and
the grey coloured printer at the bottom of each illustration.
Note: The angle of the receipt transport on your printer may differ
from those in the illustrations. This does not affect the instructions
that follow.
The pape r use d in you r pr in te r m u st co nf o rm to the sp e cification
given in NCR publication B006-4992, Consumable Items for Self-
Service . The manual also provides details of the ATM consumables
which can be ordered from NCR Systemedia.
4
NCR Personas M Series 5887 Operator Manual
-1
4
Page 86

Receipt Pr inter
How to Replenish Your Receipt Printer Paper
How to Replenish Your Receipt
Printer Paper
To replace the printer paper proceed as follows:
1 Open the exterior of the ATM.
2 If your ATM does not have the auto-supervisor function, press
the switch on the operator panel to the supervisor position .
3 Access the receipt printer as described in Chapter 1, ‘Getting
Started’.
4 Open the print mechanism cover either by pulling out one of the
green locking levers, or by pressing on the lock shaft, depending
the type of receipt printer you have. The cover will spring open.
2
1
4
1
2
1
4-2 NCR Personas M Series 5887 Operator Manual
Page 87

Receipt Printer
How to Replenish Your Receipt Printer Paper
5 Lift out the paper roll core, spindle and any remaining paper.
Pull out any paper from the paper entry slot (you may have to
partially close the print mechanism to see this). Discard the
paper and paper roll core but retain the spindle.
6 Close the print mechanism cover by pushing it down until it
clicks shut.
NCR Personas M Series 5887 Operator Manual 4-3
Page 88

Receipt Pr inter
How to Replenish Your Receipt Printer Paper
7 Remove sufficient paper from the new supply roll so that no
traces of glue or tape remain on the roll. Fold and tear off the
end of the paper to leave a clean, straight edge.
8 Insert the spindle into the core of the new paper roll. Lower the
paper roll into the printer so that the spindle drops i nto the sl ots.
The paper should feed from the top of the roll.
9 Guide the paper into the paper entry slot. Manually feed in
about
75 mm (3 in.) o f pa pe r un t il it st o ps .
4-4 NCR Personas M Series 5887 Operator Manual
Page 89

Receipt Printer
How to Replenish Your Receipt Printer Paper
10 Press the paper feed button and continue to feed in the paper by
hand u n t il it is gr ip pe d by the print me ch a n ism. The paper will
start to feed automatically, and the printer will produce a
sample receipt, printed with a test graphic. This confirms that
the printer is operating correctly.
11 If nothing happens when the feed button is pressed, the paper
may not have been loaded correctly. Check the paper is feeding
from the top of the roll. Open the print mechanism, rotate the
paper roll backwards to pull the paper clear and try loading the
paper again starting at Step 9.
12 Make sure that you remove the sample receipt and any other
paper from the exit slot or receipt transport.
13 Push the printer back into the ATM until it clicks into place.
14 Follow your in-house procedures for indicating that the paper
has been replaced in the receipt printer.
15 If your ATM does not have the auto-supervisor option, press the
switch on the operator panel to the normal position.
16 Close and lock the exterior of the ATM.
NCR Personas M Series 5887 Operator Manual 4-5
Page 90

Receipt Pr inter
How to Clear Receipt Printer Jams
How to Clear Receipt Printer Jams
A receipt printer jam will be indicated by an error message.
To clear a jam within the receipt printer, proceed as follows:
1 Open the exterior of the ATM.
2 If your ATM does not have the auto-supervisor function, press
the switch on the operator panel to the supervisor position .
3 Access the receipt printer as described in Chapter 1, ‘Getting
Started’.
4 Inspect the printer to see if you can identify the cause of the
paper jam.
5 If necessary, tear the paper to separate the roll from the paper
entering the print mechanism.
6 Open the print mechanism cover either by pulling out one of the
green locking levers, or by pressing on the lock shaft, depending
the type of receipt printer you have. The cover will spring open.
4
1
2
1
2
1
4-6 NCR Personas M Series 5887 Operator Manual
Page 91

Receipt Printer
How to Clear Receipt Printer Jams
7 Carefully remove any torn or crumpled paper from the print
mechanism. Check under the cover and at the paper entry slot.
You may have to partially close the print mechanism to do this.
8 If there is any paper jammed in the receipt transport, remove it
carefully.
Caution: Do not pull on transport belts to remove paper.
9 Make sure the paper roll can turn freely by rotating it backwards
(away from the print mechanism). If the rol l does not turn freel y,
remove it from the printer and check that there is nothing
jamming the paper roll or spindle.
10 Before reloading the paper, fold and tear off the end of t he paper
to leave a cl ean, straight edge.
NCR Personas M Series 5887 Operator Manual 4-7
Page 92

Receipt Pr inter
How to Clear Receipt Printer Jams
11 Close the print mechanism cover by pushing it down until it
clicks shut.
12 Lower the paper roll into the printer so that the spindle drops
into the slots. The paper should feed from the top of the roll.
4-8 NCR Personas M Series 5887 Operator Manual
Page 93

Receipt Printer
How to Clear Receipt Printer Jams
13 Guide the paper into the paper entry slot. Manually feed in
about
75 mm (3 in.) o f pa pe r un t il it st o ps .
14 Press the paper feed button and continue to feed in the paper by
hand u n t il it is gr ip pe d by the print me ch a n ism. The paper will
start to feed automatically, and the printer will produce a
sample receipt, printed with a test graphic. This confirms that
the printer is operating correctly.
NCR Personas M Series 5887 Operator Manual 4-9
Page 94

Receipt Pr inter
How to Clear Receipt Printer Jams
15 If nothing happens when the feed button is pressed, the paper
may not have been loaded correctly. Check the paper is feeding
from the top of the roll. Open the print mechanism, rotate the
paper roll backwards to pull the paper clear and try loading the
paper again starting at Step 13.
16 Make sure that you remove the sample receipt and any other
paper from the exit slot or receipt transport.
17 Push the printer back into the ATM until it clicks into place.
18 Follow your in-house procedures for indicating that you have
fixed, without replacing, the receipt printer mechanism.
19 If your ATM does not have the auto-supervisor option, press the
switch on the operator panel to the normal position.
20 Close and lock the exterior of the ATM.
4-10 NCR Personas M Series 5887 Operator Manual
Page 95

Table of Contents
Journal Printer
Chapter 5
Journal Printer
How to Replenish the Graphics Journal Printer Paper 5-1
How to Clear Graphics Journal Printer Jams 5-8
How to Replenish the Dot-Matrix Journal Printer 5-11
How to Replace the Dot-Matrix Journal Printer Ribbon 5-18
How to Replace the Dot-Matrix Journal Printer Print Head 5-21
How to Clear Dot-Matrix Journal Printer Paper Jams 5-25
How to Clear a Paper Jam When the Paper Has Torn 5-25
How to Clear a Paper Jam When the Paper Has Not Torn 5-29
NCR Personas M Series 5887 Operator Manual
Page 96

Table of Contents
Jour n a l Printer
NCR Personas M Series 5887 Operator Manual
Page 97

How to Replenish the Graphics Journal Printer Paper
How to Replenish the Graphics
Journal Printer
5
Journal Printer Paper
ATM consumables can be ordered from the NCR Systemedia ATM
Consuma ble s Gr oup . P lea se co nta ct y our NC R ac co unt Man ager fo r
more information.
To replace the journal paper roll proceed as follows:
1 Open the exterior of the ATM.
2 If your ATM does not have the auto-supervisor function, press
the switch on the operator panel to the supervisor position.
3 Access the journal printer as described in Chapter 1, ‘Getting
Started’.
4 If there is any paper left on the supply roll, press the paper feed
button to wind on a few turns of blank paper to protect the
printed journal roll.
5
NCR Personas M Series 5887 Operator Manual
-1
5
Page 98

Journal Printer
How to Replenish the Graphics Journal Printer Paper
5 Pull the printed journal roll out of the printer. The spindle is
spring lo a d ed , so yo u wil l ne e d to tilt the r oll a s yo u p ul l it out .
If necessary, tear off the paper against the serrated cutter.
6 Rem ove the take-up spindle from the paper roll
.
5-2 NCR Personas M Series 5887 Operator Manual
Page 99

Journal Printer
How to Replenish the Graphics Journal Printer Paper
7 Lift one of the green locking levers to open the print mechanism.
8 Remove the paper roll core and any remaining paper from the
printer.
NCR Personas M Series 5887 Operator Manual 5-3
Page 100

Journal Printer
How to Replenish the Graphics Journal Printer Paper
9 Rem ove sufficient paper from the new journal roll so that there
are no traces of glue or tape. Place the new roll in the journal
printer as s h o wn.
10 Tear the end of the paper to leave a clean straight edge.
11 Lifting the paper entry cover with one hand, feed the paper
through until the end is visible. Release the paper entry cover.
2
1
5-4 NCR Personas M Series 5887 Operator Manual
 Loading...