

Page 1

User Manual
MobileNavigator 6
August 2006
Page 2

Impressum
1NAVIGON AG
Berliner Platz 11
D-97080 Würzburg
The information contained herein may be changed at any time witho ut prior notification. This manual nor any
parts thereof may not be reproduced for any purpose whatsoever without the express written consent of
NAVIGON AG, nor transmitted in any form either electronically or mechanically, including photocopying and
recording. All technical information, illustrations etc. are subject to copyright law.
© Copyright 2006,
1NAVIGON AG
All rights reserved.
Page 3

Table of Contents
1 Introduction................................................................5
1.1 About this manual............................................................ 6
1.1.1 Arrangement........................................................ 6
1.1.2 Conventions.........................................................6
1.1.3 Symbols .............................................................. 6
1.2 Legal notice .................................................................... 7
1.2.1 Warranty .............................................................7
1.2.2 Trademarks..........................................................7
1.3 Support.......................................................................... 7
1.4 Terminology .................................................................. 10
2 Before You Start........................................................11
2.1 How your navigation system works................................... 12
2.2 Important safety information........................................... 13
2.2.1 Navigation safety information ............................... 13
2.2.2 Safety information for a switch-on in the vehicle ..... 13
User Manual MobileNavigator 6
3 Operating the Navigation Software...........................15
3.1 Navigation device keys................................................... 16
3.2 Volume ........................................................................ 16
3.3 Information................................................................... 17
3.3.1 GPS .................................................................. 17
3.3.2 Energy .............................................................. 17
3.3.3 TMC (Traffic information) ..................................... 18
3.3.4 Direction............................................................ 18
3.4 Software keyboard......................................................... 18
3.5 Lists............................................................................. 19
3.6 Options ........................................................................ 20
3.7 Menus.......................................................................... 20
4 Navigation ................................................................21
4.1 General information on navigation.................................... 22
4.1.1 Safety and other information................................ 22
4.2 Starting MobileNavigator 6.............................................. 23
4.2.1 Initialising the GPS receiver.................................. 23
4.2.2 Main window ...................................................... 24
4.3 Entering a new destination.............................................. 25
4.3.1 Destination address............................................. 25
4.3.2 Points of interest................................................. 27
4.3.3 Quick link points of interest.................................. 31
4.3.4 Specifying destination country .............................. 32
4.4 Selecting a saved destination .......................................... 32
4.4.1 Last destinations................................................. 33
4.4.2 Favourites.......................................................... 34
4.5 Navigation "upon command" ........................................... 35
User Manual Table of Contents i
Page 4

User Manual MobileNavigator 6
4.6 Navigating home ........................................................... 35
4.7 Defining destinations on the map..................................... 36
4.8 Starting navigation ........................................................ 37
5 Managing Destinations..............................................39
5.1 Favourites .................................................................... 40
5.2 Last destinations............................................................ 43
5.1.1 Saving destinations............................................. 40
5.1.2 Setting up a speech command.............................. 41
5.1.3 Changing the name of the destination.................... 41
5.1.4 Deleting a destination from the Favourites list......... 42
5.1.5 Defining a destination as your home address .......... 42
5.1.6 How to start planning a route ............................... 43
5.2.1 Saving destinations as favourites .......................... 43
5.2.2 Deleting a destination from the Last destinations
list....................................................................
5.2.3 Deleting all destinations from the Last
destinations list ..................................................
5.2.4 How to start planning a route ............................... 44
44
44
6 Routes with stages....................................................45
6.1 Route planning.............................................................. 46
6.1.1 Specifying the starting point................................. 47
6.1.2 Specifying route points ........................................ 48
6.1.3 Editing route points............................................. 49
6.2 Managing routes............................................................ 50
6.2.1 Saving routes..................................................... 50
6.2.2 Loading routes.................................................... 50
6.2.3 Renaming routes................................................. 51
6.2.4 Deleting routes................................................... 51
6.3 Navigation.................................................................... 52
6.3.1 Calculating and showing routes............................. 52
6.3.2 Simulating routes................................................ 52
6.3.3 Starting navigation.............................................. 53
7 Working with the Map...............................................55
7.1 Map material................................................................. 56
7.1.1 Copying a navigation map to the memory card........ 56
7.2 Map in the Preview mode................................................ 57
7.3 Maps in the Navigation mode........................................... 59
7.4 Map in the Destination search mode ................................. 63
8 Useful Functions .......................................................67
8.1 Information about the destination .................................... 68
8.2 GPS status.................................................................... 68
8.3 Inserting an interim destination ....................................... 70
8.4 Skipping a stage............................................................ 71
8.5 Blocking a route section.................................................. 71
8.6 POI on your route.......................................................... 72
8.7 TMC (Traffic information)................................................ 72
ii Table of Contents User Manual
Page 5

User Manual MobileNavigator 6
8.7.1 Configuring the message display........................... 74
8.7.2 TMC Settings...................................................... 74
8.7.3 Managing TMC information................................... 76
8.7.4 Tuning............................................................... 76
9 Configuring MobileNavigator 6..................................79
9.1 Opening the Settings window .......................................... 80
9.2 Current map ................................................................. 81
9.3 POI.............................................................................. 82
9.3.1 Categories for quick link and for POI on your
route.................................................................
9.3.2 Indications on the map ........................................ 82
9.4 Basic settings................................................................ 83
9.5 Route profile ................................................................. 87
82
10 Index ........................................................................89
User Manual Table of Contents iii
Page 6

Page 7

User Manual MobileNavigator 6
1 Introduction
Topics covered in this chapter:
21.1 2About this manual page 26
2Arrangement
2Conventions
2Symbols
21.2 2Legal notice page 27
2Warranty
2Trademarks
21.3 2Support page 27
21.4 2Terminology page 210
Introduction - 5 -
Page 8

User Manual MobileNavigator 6
1.1 About this manual
1.1.1 Arrangement
If you are looking for specific information or the explanation of a
specific term, you can refer to the following sections in the
manual:
Ù As of page
explanation of terms used in this manual.
Ù As of page
10 in the list "Terminology" you'll find an
89 in the Index you´ll find page references.
1.1.2 Conventions
For better legibility and clarification, the following styles are used
in this manual:
Style Use
Bold
Bold italic
MALL CAPITALS
S
Uderlined
Highlighting important parts in the text.
Registered names, company and product
descriptions.
Window and dialogue box titles.
Descriptions of buttons, input fields and other
elements in the user interface.
1.1.3 Symbols
The following symbols refer to specific passages of text:
- 6 - About this manual
Symbol Use
Information and tips that facilitate working
with
More detailed information and explanations.
Warning information.
MobileNavigator 6.
Page 9

User Manual MobileNavigator 6
1.2 Legal notice
1.2.1 Warranty
The software and documentation are subject to change without
notice.
information contained in this manual or for damages resulting
from the use of this manual.
To improve the quality of our products and services we
appreciate all suggestions for improvement and notification of
error.
1.2.2 Trademarks
All brands and trademarks mentioned in this document are
possibly registered by third parties and are subject to the current
legislation and to the rights of their respective owners without
reservation. All mentioned names of products, societies, or
brands may be registered trademarks of their respective owners.
Every right that is not explicitly accorded is reserved.
NAVIGON AG is not liable for the correctness of the
The absence of an explicit labelling of registered trademarks does
not suggest that this brand is not subject to third party rights.
Ù Windows and ActiveSync are registered trademarks of the
Microsoft Corporation.
Ù Navigon is a registered trademark of
NAVIGON AG.
1.3 Support
1.3.1 Telephone Support
Germany
Our service team can be reached in many countries by telephone
or by email.
For more information go to
the "Service & Support" area.
Note: All charges quoted are based on landline calls from within
the respective country.
NAVIGON AG (www.navigon.com) in
Telephone: 01805-6284466
Service times: Monday to Saturday from 08.00 to 20.00 CET
Costs: 0.12 €/min.
Introduction - 7 -
Page 10

User Manual MobileNavigator 6
Belgium
Telephone: 0900-70016
Service times: Monday to Friday from 08.00 to 20.00 CET
Costs: 0.45 €/min. + 0.05 €/call
Denmark
Telephone: 901-31033
Service times: Monday to Friday from 08.00 to 20.00 CET
Costs: 3.00 DKK/min.
Finland
Telephone: 0600-413414
Service times: Monday to Friday from 08.00 to 21.00 CET
Costs: 0.50 €/min.
France
Telephone: 0891-650065
Service times: Monday to Saturday from 08.00 to 20.00 CET
Costs: 0.22 €/min.
Great Britain
Telephone: 0905-8480701
Service times: Monday to Friday from 08.00 to 20.00 CET
Costs: 0.25 GBP/min.
Italy
Telephone: 166-205301
Service times: Monday to Friday from 08.00 to 20.00 CET
Costs: 0.40 €/min. + 0.09 €/call
The Netherlands
Telephone: 0900-0400468
Service times: Monday to Friday from 08.00 to 20.00 CET
Costs: 0.30 €/min. + 0.045 €/call
Norway
Telephone: 820-33050
Service times: Monday to Friday from 08.00 to 20.00 CET
Costs: 3.26 NOK/min.
- 8 - Support
Page 11

Austria
Telephone: 0820-240437
Service times: Monday to Friday from 08.00 to 20.00 CET
Costs: 0.145 €/min.
Sweden
Telephone: 0900-1001110
Service times: Monday to Friday from 08.00 to 20.00 CET
Costs: 4.00 SEK/min.
Switzerland
Telephone: 0848-662544
Service times: Monday to Friday from 08.00 to 20.00 CET
Costs: 08.00 - 17.00: 0.11 CHF/min.
17.00 - 22.00: 0.09 CHF/min.
22.00 - 08.00: 0.06 CHF/min.
Spain
User Manual MobileNavigator 6
Telephone: 807-001205
Service times: Monday to Friday from 08.00 to 20.00 CET
Costs: 08.00 – 20.00: 0.356 €/min. + 0.104 €/call
20.00 – 08.00: 0.288 €/min. + 0.104 €/call
USA
Telephone: +1-888-8480701
Service times: Monday to Friday from 08.00 to 20.00 CET
Costs: free of charge
Email:
support.us@navigon.com
Other states
Telephone: +43-820-8888-10
Service times: Monday to Friday from 08.00 to 20.00 CET
Costs: Dependent on telephone provider
Introduction - 9 -
Page 12

User Manual MobileNavigator 6
1.3.2 Support via E-Mail
Danish: support.dk@navigon.com
German:
English:
Finnish:
French:
Italian:
The Netherlands:
Norway:
Sweden:
Spanish:
support.de@navigon.com
support.uk@navigon.com
support.fin@navigon.com
support.fr@navigon.com
support.it@navigon.com
support.nl@navigon.com
support.no@navigon.com
support.se@navigon.com
support.es@navigon.com
1.4 Terminology
A specific terminology is used in this manual to designate
elements of the product, operating elements of the mobile phone
and user actions.
Display The physical display unit of the mobile.
Term Use
Screen A functional software operating unit that
occupies the entire display.
Dialog window Includes warnings, error messages or
information. Queries whether a specific action
should really be executed.
Button Element of the user interface that can have
the focus and which when tapped triggers a
software action. Buttons can be labeled and /
or provided with a graphic.
Icon Small graphics on the user interface. These
represent information. An example of this is
the symbol for GPS reception.
Icons cannot be operated.
Entry field A field in which data can or must be input.
Input fields are generally labeled either above
or in front of the field.
- 10 - Terminology
Page 13

User Manual MobileNavigator 6
2 Before You Start
Topics covered in this chapter:
22.1 2How your navigation system works page 212
22.2 2Important safety information page 213
2Navigation safety information
2Safety information for a switch-on in the vehicle
Before You Start - 11 -
Page 14

User Manual MobileNavigator 6
2.1 How your navigation system works
The days of searching for the correct route through thick folding
maps are over. Now your navigation software
MobileNavigator 6 can guide you to your destination quickly
and reliably – without leafing through maps.
The American military developed the Global Positioning System
(GPS) in the 70s to be used as a guided weapons system.
GPS is based on a total of 24 satellites that circle the earth and,
in doing so, are constantly transmitting their position and their
time. The GPS receiver receives this data and calculates its own
geographical position from the various position and time
information broadcast by the different satellites.
For a sufficient, precise positioning it is necessary to obtain the
data from at least three satellites. If you have the data from 4 or
more satellites the altitude above sea level can also be
ascertained. The positioning is precise up to 3 metres.
If
can be used as a starting point for a route calculation.
The map material of your navigation device includes the
geographical coordinates of all the digitally recorded points of
interest, streets and locations. The navigation device can
therefore calculate a path from a starting point to a destination.
The calculation of the current position and its representation on
the map takes place once every second. So you can see where
you are on the map.
MobileNavigator 6 has determined you rposition, this position
- 12 - How your navigation system works
Page 15

User Manual MobileNavigator 6
2.2 Important safety information
It is in your own interest to read the following safety information
and warnings carefully before you start up your navigation
system.
2.2.1 Navigation safety information
Use the navigation system at your own risk.
Attention: Do not operate the navigation system whilst you are
driving – this could cause an accident!
Attention: Do not look at the display unless it is absolutely safe
to do so!
Attention: The rules of the road and traffic signs must be
obeyed prior to following the instructions of the navigat ion
system.
Attention: Do not follow the instructions of the navigation
system unless the circumstances and the street traffic regulations
allow you to do so! The navigation system will guide you to your
destination even if you have to go off course from your calculated
route.
Note: If you have not understood the speech instructions or are
unsure what you should do at the next crossroads, you can use
the map or arrow view to orientate quickly.
2.2.2 Safety information for a switch-on in the vehicle
Attention: Do not fix the support for the navigation device
within the functioning area of the airbag.
Attention: When installing the cradle, ensure that it does not
represent a risk in the event of an accident.
Before You Start - 13 -
Page 16

Page 17

User Manual MobileNavigator 6
3 Operating the Navigation
Software
Topics covered in this chapter:
23.1 2Navigation device keys page 216
23.2 2Volume page 216
33.3 3Information page 317
3GPS
3Energy
TMC (Traffic information)
3Direction
33.4 3Software keyboard page 318
33.5 3Lists page 319
33.6 3Options page 320
33.7 3Menus page 320
Operating the Navigation Software - 15 -
Page 18

User Manual MobileNavigator 6
3.1 Navigation device keys
Two keys are located on the right side of your navigation device.
(On/Off)
You switch the device on and off with the top key.
(HOLD)
Use the bottom key to switch the touch sensitivity of the
touchscreen on and off. If the touchscreen is switched to
no longer reacts to touch.
HOLD it
3.2 Volume
Refer to your navigation device user manual to find out how to
adjust the volume.
The volume of the spoken driving instructions from t he
MobileNavigator 6 can also be set by means of the software.
You have started navigating. The map opens in
mode or in
1. Tap on the
The volume bar opens.
Ù Use the
the volume accordingly.
Ù Use the
driving instructions on and off.
2. Tap again on the
The volume bar closes.
Destination search mode.
(Volume) button.
(Louder) and (Quieter) buttons to adjust
(Sound on/off) button to switch the spoken
(Volume) button.
Navigation
- 16 - Navigation device keys
Page 19
User Manual MobileNavigator 6
3.3 Information
Various icons are located along the top margin of the screen.
These show information.
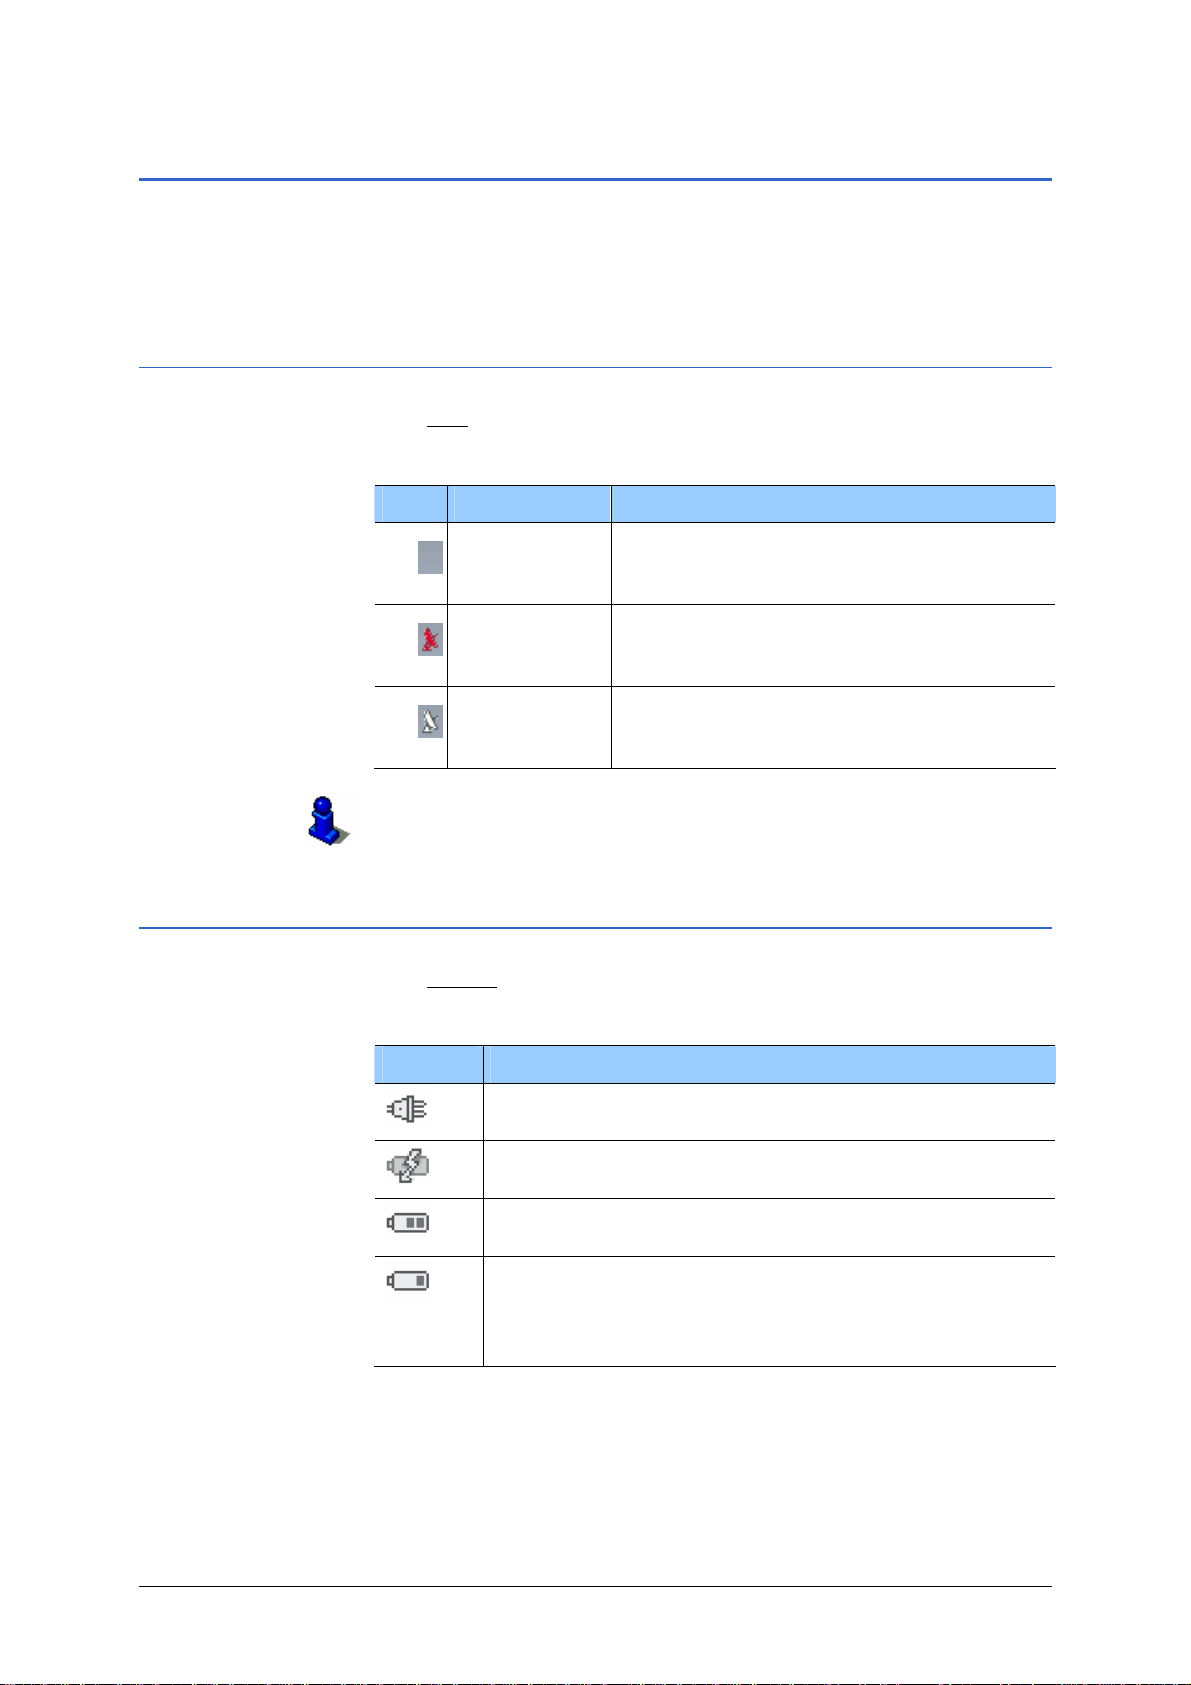
3.3.1 GPS
The GPS icon can display the following states of the GPS
reception:
Icon Meaning Explanation
The built-in GPS receiver is not ready.
No GPS
No Signal
GPS ready
Refer to chapter "
regarding the GPS status.
Contact your customer services
department if this problem continues.
The data is being received from less than
three satellites. The position cannot be
calculated.
The data is being received from at least
three satellites. The position can be
calculated.
GPS status" on page 68 for detailed information
3.3.2 Energy
The Energy icon can display the following states of the built—in
battery:
Icon Meaning
The device is being supplied by an external power
source. The battery is completely recharged.
The device is being supplied by an external power
source. The battery is being charged.
The device is being supplied by its internal battery.
The battery is insufficiently charged.
The device is being supplied by its internal battery.
The battery charge is too weak.
A warning will notify you if the charge of the battery is
weak.
Operating the Navigation Software - 17 -
Page 20

User Manual MobileNavigator 6
3.3.3 TMC (Traffic information)
If your device has an integrated TMC-receiver, or if you have
connected an external TMC receiver, the navigation system will
have the latest traffic information available. If required, it can
dynamically change your route, e.g. avoid a traffic jam.
The symbol TMC
screen. The various symbols have the following meaning:
Symbol Explanation of symbols
can be found in the centre of the top bar on the
No Symbol
Tuning
TMC on Standby
For details of the TMC-functions please refer to chapter "
(Traffic information)" on page
There is no TMC receiver connected,
or the connected or installed TMC
receiver is not working.
The TMC-receiver is ready but cannot
receive TMC signals. This is the case,
for example, when you are in an area
where TMC is not available.
Traffic messages can be received.
3.3.4 Direction
The
N, NE, E, SE, S, SW, W, NW
Direction icon in the top, right corner of the screen indicates
in which direction you are currently moving. One of the following
compass points can be displayed:
TMC
72.
3.4 Software keyboard
If text entries are required a software keyboard appears on the
screen.
You can use your finger to make all the entries on the software
keyboard. You can enter only uppercase letters.
When entering place or street names you do not have to enter
any special characters or umlauts.
these characters automatically. If, for example, you are
searching for “Würzburg”, then simply type in “WURZBURG”.
- 18 - Software keyboard
MobileNavigator 6 will add
Page 21

User Manual MobileNavigator 6
Inserting spaces
To enter a space tap on the key
.
Deleting individual characters
To delete the character directly in front of the cursor, tap on the
key
.
Entering numbers
To enter numbers, e.g. a postcode, tap on the key
.
To return to characters, tap on the key
.
Special characters
To enter a special character, tap on the key
.
The special character keyboard appears.
As soon as you have entered a special character the character
keyboard appears again automatically.
You do not have to use special characters when entering address
data, but it can be useful to do so when naming destinations or
routes that are to be saved.
3.5 Lists
Often lists appear from which you can select an entry.
This is the case, for example, when you enter a place.
As soon as you have entered the first letters, the largest location
(of the specified country) that starts with the entered letters
appears.
As soon as you enter the second letter, a list appears including all
the locations that include start with the entered letters.
As you enter other characters, the list changes respectively. You
obtain in each case only those entries that start with or include
the text you have entered. The more characters you enter, the
shorter the list becomes.
Then accept an entry from the list. Therefore you cannot enter a
place that is not listed in the map you are currently using.
Operating the Navigation Software - 19 -
Page 22

User Manual MobileNavigator 6
Such lists include 3 buttons:
To scroll up or down the list by several elements at a time, tap
As soon as you have accepted an entry, close the list.
(Up): Tap on this button to scroll up the list by one element.
(Down): Tap on this button to scroll down the list by one
element.
the button the appropriate number of times.
(OK): Tap on this button in order to accept the entry that
appears right at the top of the list.
To accept a different entry in the list, simply tap on this entry.
3.6 Options
Some windows offer options that include further functions.
1. Tap on the
2. Tap on the option that you wish to perform.
If you wish to close the list of options without executing an
option, then tap on the
Options button in order to open the list of options.
Options button.
3.7 Menus
Some buttons include a menu that opens when you activate it.
Tap on a menu item in order to execute its function.
If you wish to close the menu without executing any of its
functions, then tap on the button that you used to open the
menu in the first place.
- 20 - 342HOptions
Page 23

User Manual MobileNavigator 6
4 Navigation
Topics covered in this chapter:
34.1 3General information on navigation page 322
3Safety and other information
34.2 3Starting MobileNavigator 6 page 323
3Initialising the GPS receiver
3Main window
34.3 3Entering a new destination page 325
3Destination address
3Points of interest
3Quick link points of interest
3Specifying destination country
4.4 3Selecting a saved destination page 332
Last destinations
3Favourites
34.5 Navigation "upon command" page 35
4.6 3Navigating home page 335
34.7 3Defining destinations on the map page 336
34.8 3Starting navigation page 337
Navigation - 21 -
Page 24

User Manual MobileNavigator 6
4.1 General information on navigation
4.1.1 Safety and other information
Use the navigation system at your own risk.
Attention: Do not operate the navigation system whilst you are
driving – this could cause an accident!
Attention: Do not look at the display unless it is absolutely safe
to do so!
Attention: The rules of the road and traffic signs must be
obeyed prior to following the instructions of the navigat ion
system.
Attention: Do not follow the instructions of the navigation
system unless the circumstances and the street traffic regulations
allow you to do so! The navigation system will guide you to your
destination even if you have to go off course from your calculated
route.
When the GPS reception is obstructed, the navigation is
interrupted. The navigation sofware remains open.
As soon as the GPS signals are being received again, the
navigation system notices if your position has since changed. You
can simply continue navigation.
If you end the navigation prior to reaching your destination, the
MAIN WINDOW opens. You can then enter a different destination.
You can also resume navigation to the original destination by
choosing
Wenn Sie das angegebene Ziel erreicht haben, wird eine
entsprechende Meldung ausgegeben.
Auf der Karte wird dann nur noch Ihr aktueller Standort (triangle
in orange) angezeigt.
Tap on the
WINDOW
If you would like to end the navigation, then in the
LAST DESTINATIONS from the list.
(Back) button. This takes you to MAIN
.
MAIN WINDOW
tap on the
- 22 - General information on navigation
(Quit) button.
Page 25

User Manual MobileNavigator 6
4.2 Starting MobileNavigator 6
1. Switch on your navigation device.
2. Tap on the navigation software icon.
Each time you start the navigation software, the following
window appears:
"
Please note that the road traffic regulations are prior to the
instructions of the navigation system. Please do not operate
the device while driving."
3. When you have read the text completely, press the
button.
If you do not wish to accept this information , then tap on the
Cancel button in order to end the navigation software.
The M
AIN WINDOW opens.
OK
4.2.1 Initialising the GPS receiver
Note: It can take up to 20 minutes to initialise the GPS receiver
for the first time.
Each time you switch on the receiver after this, the GPS reception
will start within one minute..
If the navigation device has been switched off for over a week,
the next installation can take up to 10 minutes.
The GPS receiver starts initialisation as soon as the navigation
device is switched on.
In the top right corner of the display you will see the
can show three different states:
Icon Meaning Explanation
GPS icon. It
Navigation - 23 -
No GPS
No Signal
GPS ready
The GPS receiver is switched off.
- OR –
an external GPS receiver has not been
connected properly.
The data is being received from less than
three satellites. The position cannot be
calculated.
The data is being received from at least
three satellites. The position can be
calculated.
Page 26

User Manual MobileNavigator 6
As soon as the data is being received from at least 3 satellites,
GPS icon changes to GPS ready.
the
Note: If the
GPS icon displays GPS ready after considerably less
than 20 minutes, then it is best to switch off the receiver for at
least 15 minutes so as to guarantee a reliable operation of the
receiver.
Attention: If you have connected the navigation device to the
power supply via a cigarette lighter, then remove the connector
before you leave the vehicle standing for a long period of time.
The GPS receiver needs constant power, so it could run down the
vehicle´s battery.
4.2.2 Main window
You can access all the functions of the navigation software from
AIN WINDOW.
the M
Options of the main window
While the MAIN WINDOW is visible, tap on the Options button, in
order to open a list with the following options:
Option Description
Opens the
ROUTE PLANNING window. Here
you can plan routes, administer planned
Route planning
routes and start navigating to a planned
route.
Refer to chapter "
45 for more information.
page
Opens the
SETTINGS window. Here you can
Routes with stages" on
configure the navigation system.
Settings
Refer to chapter "
1290HMobileNavigator 6" on page
Configuring
79 for
more information.
Open the map in Destination search
mode. Here you can specify a navigation
Show Map
destination directly on the map.
Refer to chapter "
the map" on page
Opens the
GPS STATUS window. Here you
Defining destinations on
36 for more information.
can see details regarding the GPS reception.
GPS status
You can also save data regarding the current
location.
Refer to chapter "
GPS status" on page 68 for
more information.
Launches the integrated MP3 player of your
navigation device. If you close the MP3
MP3 player
player, MobileNavigator 6 appears again.
The MP3 player remains on during a
navigation instruction.
- 24 - Starting MobileNavigator 6
Page 27

User Manual MobileNavigator 6
Tap on an option in order to execute its function.
Tap on the
Options button in order to open the list of options.
Opening the main window
The main window opens when the navigation software STARTS UP.
If a different software window is open, tap on the (Back)
button. You then reach the window that was previously open.
Tap on the
(Back) button until the MAIN WINDOW opens.
4.3 Entering a new destination
For MobileNavigator 6, new destinations are all the
destinations to which you have not yet navigated, or you have
not yet saved.
Here you can enter an address, select a point of interest or select
a destination from the quick link.
If you specify a destination for the first time, the
COUNTRIES
country" on page
list opens (refer to chapter "Specifying destination
32).
COVERED
1. Tap on the country in which your destination is located.
4.3.1 Destination address
If you enter address data, this will be continuously compared
with the address databases of the navigation system. Under your
entry you will always find a list with places (e.g. streets, house
numbers, intersecting streets) that suit the data you have
entered and are listed in the map that is currently loaded.
This list is updated after each character is entered.
Note: You don't have to enter all the address data.
If you just enter the city, the navigation device will calcul ate a
route to the city centre. If you just enter a city and street, but no
house number or intersecting road, then the navigation device
will calculate a route to the centre of the specified city.
1. In the M
The
2. Tap on the
AIN WINDOW tap on the New destination button.
NEW DESTINATION menu opens.
Enter an address menu item.
The
Navigation - 25 -
ADDRESS window opens.
The
City or postal code entry field is selected, and the cursor
can be seen inside it.
Page 28

User Manual MobileNavigator 6
Note: Ensure that the country in which your destination is
located is specified on the Country icon (above the right
margin of the input field
Refer to chapter "
Specifying destination country" on page 32
City or postal code).
for information on specifying a different destinat ion country.
3. Enter the name or the post code of the destination.
4. Enter the name of the destination street. You can also enter
the name of a known place e.g. “Olympia Stadium” or “Eiffel
Tower”.
5. Enter a house number. If you don´t know the house number
or if you have entered a place in the previous step, then leave
this field empty.
6. If you don´t know the house number, but you do know the
name of an intersecting road in its vicinity, enter this name in
Intersection field. The navigation server then calculates a
the
route to the intersection of both specified roads.
Note: More detailed information on a large number of
locations is stored in the navigation system´s database. Tap
on the
This function is described in detail in chapter "
about the destination" on page
(Destination info) button.
Information
68.
7. Tap on the
Start navigation button.
Refer to chapter "
information on how to start navigating. Please read on there.
Starting navigation" on page 37 for
Options of the Address window
The options of the ADDRESS window offer the following functions:
Option Description
FAVOURITES
Save
destination
Save the specified address in the
list.
Refer to chapter "
Saving destinations" on page
40 for more information.
Show on map Shows the specified address on the map.
Opens the route planning. The specified
address is inserted as the first route point of a
Add to route
new route.
Refer to chapter "
route" on page
43 for more information.
How to start planning a
- 26 - Entering a new destination
Page 29

User Manual MobileNavigator 6
4.3.2 Points of interest
Points of interest, also known as POI, are included in the
navigation system´s database. It concerns addresses or points
on the map that are categorized according to specific criteria.
Included as points of interest are airports and harbours,
restaurants, hotels, petrol stations, public facilities, doctors,
hospitals, shopping centres and others.
Points of interest can be displayed using a symbol on the map.
Refer to chapter "
information.
Points of interest can also be specified as navigation destinations
Point of interest nearby
Points of interest nearby are points of interest that are located
within a specific radius of your current location. This way you
can, for example, always find the next petrol station with ease,
irrespective of your location.
Note: The GPS reception must be sufficient for positioning.
Without knowledge of the current location, the navigation system
cannot list any points of interest from the current area.
Indications on the map" on page 82 for more
You can see if there´s sufficient GPS reception from the
) symbol.
ready
Refer to chapter "
GPS status" on page 68.
Note: The
three categories of points of interest in the local
vicinity are available in the quick link. You can use these to
search without enterting anything else.. Refer to chapter "
link points of interest" on page
31 for more information.
1. In the M
The
2. Tap on the
3. Tap on the
The
The
AIN WINDOW tap on the New destination button.
NEW DESTINATION menu opens.
Search for POI menu item. The POI menu opens.
nearby menu item.
POI NEARBY window opens.
Category list opens.
4. Specify from which category you wish to find a point of
interest.
If the chosen category has sub categories, the
Sub category
list opens.
(GPS
Quick
5. Specify from which sub category you wish to find a point of
interest.
Navigation - 27 -
Page 30

User Manual MobileNavigator 6
The Name of the destination list opens. It includes the nearest
points of interest (sorted according to distance) in the
specified category.
If the list is long, you can move within it using the
and
(Down) buttons.
6. Tap on the name of the destination.
Note: More detailed information on a large number of
locations is stored in the navigation system´s database. Tap
on the
Diese Funktion ist im Kapitel "
destination" on page
(Destination info) button.
Information about the
68 detailliert beschrieben.
7. Tippen Sie auf die Schaltfläche Start navigation
This function is described in detail in chapter "
navigation" on page
37. Please read on there.
Options of the
The options of the
POI nearby window
POI NEARBY window offer the following
functions:
Option Description
(Up)
.
Starting
Save
destination
Saves the specified destination in the list
FAVOURITES.
Refer to chapter "
Saving destinations" on page
40 for more information.
Show on map Shows the specified destination on the map.
Opens the route planning. The specified
address is inserted as the first route point of a
Add to route
new route.
Refer to chapter "
route" on page
43 for more information.
How to start planning a
Point of interest of nationwide significance
Points of interest of nationwide significance are airports,
attractions and monuments of national significance, large
harbours and the like. This way you can find e.g. well- known
attractions if you know in which city they are located.
1. In the M
The
2. Tap on the
AIN WINDOW tap on the New destination button.
NEW DESTINATION menu opens.
Search for POI menu item.The POI menu opens.
3. Tap on the
The
POI OF NATIONAL SIGNIFICANCE window opens.
The
Category list opens.
nationwide menu item.
- 28 - Entering a new destination
Page 31

User Manual MobileNavigator 6
Note: Ensure the country in which your destination is located
is specified on the Country icon (above the right margin of
Country the input field).
Refer to chapter "
Specifying destination country" on page 32
for information on specifying a different destinat ion country.
4. Specify from which category you wish to find a point of
interest.
The
Name of the destination list opens. It includes the nearest
points of interest (sorted according to distance) in the
specified category.
If the list is long, you can move within it using the
and
(Up) buttons.
5. Tap on the name of the destination.
Note: More detailed information on a large number of
locations is stored in the navigation system's database. Tap
on the
This function is described in detail in chapter "
about the destination" on page
(Destination info) button.
68.
6. Tap on the
Start navigation button.
Refer to chapter "
navigating. Please read on there.
" on page 37 for information on how to start
Options of the
The options of the
POI of national significance window
POI OF NATIONAL SIGNIFICANCE window offer
the following functions:
Option Description
(Up)
Information
Save
destination
Saves the specified destination in the list
FAVOURITES.
Refer to chapter "
Saving destinations" on page
40 for more information.
Show on map Shows the specified destination on the map.
Opens the route planning. The specified
address is inserted as the first route point of a
Add to route
new route.
Refer to chapter "
route" on page
43 for more information.
How to start planning a
Navigation - 29 -
Page 32

User Manual MobileNavigator 6
Point of interest in a specific city
Points of interest in a specific city can be useful when navigating
in an unknown city.
1. In the M
AIN WINDOW tap on the New destination button.
The
2. Tap on the
3. Tap on the
The
NEW DESTINATION menu opens.
Search for POI menu item. The POI menu opens.
in a city menu item.
POI IN A CITY window opens.
The
City or postal code entry field is selected, and the cursor
can be seen inside it.
Note: Ensure that the country in which your destination is
located is specified on the Country icon (above the right margin
of the input field
Refer to chapter "Specifying destination country" on page 32
Country).
for information on specifying a different destinat ion country.
4. Enter the name or the post code of the destination.
The
Category list opens.
5. Specify from which category you wish to find a point of
interest.
If the chosen category has sub categories, the
Sub category
list opens.
6. Specify from which sub category you wish to find a point of
interest.
The
Name of the destination list opens. It includes the points
of interest (sorted alphabetically) in the specified category.
If the list is long, you can move within it using the
and
(Up) buttons.
7. Tap on the name of the destination.
Note: More detailed information on a large number of
locations is stored in the navigation system's database. Tap
on the
This function is described in detail in chapter "
about the destination" on page
(Destination info) button.
68.
8. Tap on the
Start navigation button.
Refer to chapter "
information on how to start navigating. Please read on there.
Starting navigation" on page 37 for
(Up)
Information
- 30 - Entering a new destination
Page 33

Options of the POI in a city window
The options of the
functions:
Option Description
User Manual MobileNavigator 6
POI IN A CITY window offer the following
Save
destination
Saves the specified destination in the list
FAVOURITES.
Refer to chapter "
Saving destinations" on page
40 for more information.
Show on map Shows the specified destination on the map.
Opens the route planning. The specified
address is inserted as the first route point of a
Add to route
new route.
Refer to chapter "
route" on page
43 for more information.
How to start planning a
4.3.3 Quick link points of interest
three categories of points of interest are available in the quick
link. You can quickly search for destinations in you r area that
correspond with these categories without entering anything else.
You can configure which categories of points of interest are
available in the quick link. Refer to chapter "
link and for POI on your route" on page
Note: The GPS reception must be sufficient for positioning.
Without knowledge of the current location, the navigation system
cannot list any points of interest from the current area.
Categories for quick
82 for more information.
You can see if there's sufficient GPS reception from the
) symbol.
ready
Refer to chapter "
GPS status" on page 68 for more information
(GPS
on the GPS status.
1. In the M
The
AIN WINDOW tap on the New destination button.
NEW DESTINATION menu opens.
Icons of the categories are shown at the bottom of the menu.
Their points of interest are available in the quick link.
2. Tap on the category in which you'd like to search for a point
of interest.
The
Name of the destination list opens. It includes the nearest
points of interest (sorted according to distance) in the
specified category.
If the list is long, you can move within it using the
and
(Up) buttons.
(Up)
Navigation - 31 -
Page 34

User Manual MobileNavigator 6
3. Tap on the name of the destination. The map opens in
Preview mode. You can start navigating here.
4.3.4 Specifying destination country
If you look in the upper right corner of the entry field of the
ADDRESS, POI IN A CITY and POI OF NATIONAL SIGNIFICANCE
windows you will see the
the country for which navigation destinations can be specified at
the moment.
If your destination is located in a different country, proceed as
follows:
Country button. It shows the code for
1. Tap on the
The
2. Tap on the country in which your destination is located.
The
Covered countries list opens.
You can move within the list using the buttons
(Down).
Covered countries list closes again.
The code for the country is displayed on the icon.
Note: You can choose only countries for which at least a part
of the data is covered by the map which is currently loaded.
Country button.
(Up) and
4.4 Selecting a saved destination
Under My destinations in MobileNavigator 6 the following list
of destinations / addresses are available for selection:
AST DESTINATIONS: Destinations to which you have already
Ù L
navigated once before,
AVOURITES: all destinations that you have saved in th e
Ù F
MobileNavigator 6.
- 32 - Selecting a saved destination
Page 35

User Manual MobileNavigator 6
4.4.1 Last destinations
MobileNavigator 6 saves the last 100 destinations to which you
have started navigation in the
select these destinations quickly as navigation destinations and
without repeating the already entered data.
1. In the M
AIN WINDOW tap on the My destinations button.
LAST DESTINATIONS list. You can
The
2. Tap on the
The
MY DESTINATIONS menu opens.
Last destinations menu item.
LAST DESTINATIONS list opens.
If the list is long, you can move within it using the
and
(Up) buttons.
(Up)
3. Tap on the destination to which you wish to navigate.
4. Tap on the
Start navigation button.
Refer to chapter "
information on how to start navigating. Please read on there.
Starting navigation" on page 37 for
Options of the Last destinations window
The options of the LAST DESTINATIONS window offer the following
functions:
Option Description
Saves the specified destination in the list
Save as
favourite
FAVOURITES.
Refer to chapter "
40 for more information.
Delete
destination
Deletes the specified destination in the list
LAST DESTINATIONS. A dialogue asks you to
confirm the deletion.
Deletes all the destinations in the list
Delete all
DESTINATIONS
dialogue asks you to confirm the deletion.
Opens the route planning. The specified
address is inserted as the first route point of a
Add to route
new route.
Refer to chapter "
route" on page
Saving destinations" on page
LAST
. The list is then empty. A
How to start planning a
44 for more information.
Navigation - 33 -
Page 36

User Manual MobileNavigator 6
4.4.2 Favourites
Destinations to which you want to drive time and again can be
saved in the
quickly as navigation destinations and without repeating the
already entered data.
FAVOURITES list. You can select these destinations
You can save up to 300 destinations in the F
AVOURITES list.
Refer to chapter "
information on saving a destination
Saving destinations" on page 40 for
1. In the M
The
2. Tap on the
The
AIN WINDOW tap on the My destinations button.
MY DESTINATIONS menu opens.
Favourites menu item.
FAVOURITES list opens.
If the list is long, you can move within it using the
and
(Up) buttons.
3. Tap on the destination to which you wish to navigate.
4. Tap on the
Start navigation button.
Refer to chapter "
information on how to start navigating. Please read on there.
Starting navigation" on page 37 for
Options of the Favourites window
(Up)
The options of the FAVOURITES window offer the following
functions:
Option Description
Rename
Opens a window in which you can rename the
selected destination.
Opens a window in which you are asked to enter
Store a
voice
command
a speech command in the navigation device for
the selected destination. You can then always
start navigation to this destination “upon
command”, by tapping on the Voice command
button in the M
Saves the selected address as your home
Home
address
address. You can always start navigating to this
destination quickly by tapping on the
button in the MAIN WINDOW.
home
Deletes the specified destination in the list
Delete
FAVOURITES. A dialogue asks you to confirm the
AIN WINDOW.
Take me
deletion.
Add to route
Opens the route planning. The specified address
is inserted as the first route point of a new route.
Refer to chapter "
on page
43 for more information.
How to start planning a route"
- 34 - Selecting a saved destination
Page 37

User Manual MobileNavigator 6
4.5 Navigation "upon command"
A speech recording can be set up for destinations from the
AVOURITES list; using this you can navigate to destinations
F
“upon command”. You can set up this speech command when
you save the destination, but also at any other point.
Refer to chapter "
Setting up a speech command" on page 41 for
how to set up a speech command.
1. In the M
AIN WINDOW tap on the Voice command button.
2. Upon request, speak the speech command that you have
saved for the desired destination into the navigation device.
A dialogue indicates the name of the destination.
3. Tap on the Start navigation
button.
Refer to chapter "
information on how to start navigation.
Starting navigation" on page 37 for
4.6 Navigating home
In MobileNavigator 6 you can save one address as a home
address. The navigation to this address can take place at any
time by pressing just one button.
When you press on the
you will be asked to enter your address.
Take me home button for the first time
Refer to chapter "
on page
42 for more information about entering your home
address.
1. In the M
If you haven't yet specified your address, you will be asked to
do so in a dialogue.
Refer to chapter "
information on how to start navigating. Please read on there.
Defining a destination as your home address"
AIN WINDOW tap on the Take me home button.
Starting navigation" on page 37 for
Navigation - 35 -
Page 38

User Manual MobileNavigator 6
4.7 Defining destinations on the map
You can define a destination for navigation directly on the map.
Alongside towns and streets you can also quickly select points of
interest.
1. In the M
The options list opens.
AIN WINDOW tap on the Options button.
2. Tap on the
The map opens in
Show Map button.
Destination search mode.
3. Tap on the point to which you wish to navigate.
Note: Refer to chapter "
Map in the Destination search
mode" on page 63 for information on changing the map
section so that you can easily see your destination.
The destination on which you have tapped appears under the
crosshair.
In the
Selected destination field in the lower third of the
screen you are shown geographical coordinates of the
destination and the respective address.
4. Tap on the
The
DESTINATION ON MAP window opens. In the top left corner
(OK) button.
you can see the detailed address data of the chosen
destination.
5. Tap on the
Take me there button.
Refer to chapter "
information on how to start navigating. Please read on there.
Starting navigation" on page 37 for
- 36 - Defining destinations on the map
Page 39

User Manual MobileNavigator 6
4.8 Starting navigation
You have specified a new destination (refer to chapter "Entering a
new destination" on page
button,
- OR –
25) and tapped on the Start navigation
You have specified a destination (refer to chapter "
saved destination" on page
navigation
- OR –
In the M
button (refer to chapter "
- OR –
You have defined a destination on the map (refer to chapter
"
Defining destinations on the map" on page 36) and tapped on
Take me there button.
the
The map opens in
The navigation destination is shown by a small flag. The route
and the probable duration of journey are displayed.
The calculation of the route takes so-called route options as a
basis.
1. If you now wish to view or change these route options, tap on
the
Note: If you change the route options, these changes remain
valid for the following navigations.
button,
AIN WINDOW you have tapped on the Take me home
Preview mode.
Route profile button.
32) and tapped on the Start
Navigating home", page 35),
Selecting a
2. Tap on the Start navigation button or simply get going.
Refer to chapter "
changing the route profile.
Route profile" on page 87 for information on
No GPS reception
If an insufficient GPS signal is being received, the following
message appears:
No GPS signal available at present. Would you like to use the
"
last known position?"
You have the following options:
Ù Tap on the
last known position as a starting point. As soon as the GPS
reception is sufficient for positioning, the route will be
recalculated and you can commence navigation.
Ù Tap on the
destination is saved in the
OK button. The route will be calculated using the
Cancel button. The MAIN WINDOW opens. Your
LAST DESTINATIONS list.
Navigation - 37 -
Page 40

Page 41

User Manual MobileNavigator 6
5 Managing Destinations
Topics covered in this chapter:
75.1 7Favourites page 740
7Saving destinations
Setting up a speech command
7Changing the name of the destination
7Deleting a destination from the 766HFavourites list
7Defining a destination as your home address
7How to start planning a route
75.2 7Last destinations page 743
7Saving destinations as favourites
7Deleting a destination from the 819HLast destinations list
7Deleting all destinations from the 830HLast destinations list
7How to start planning a route
Managing Destinations - 39 -
Page 42

User Manual MobileNavigator 6
There are two lists of destinations in which the individual
destinations are saved:
Ù In the
Ù In the
Each destination that you specify, and the destinations from the
LAST DESTINATIONS list can be saved in the FAVOURITES list. This
is then particularly practical if you need to drive to this
destination quite often.
You can rename destinations from the
You can also delete individual destinations from both lists.
FAVOURITES list
LAST DESTINATIONS list
FAVOURITES list.
5.1 Favourites
In the FAVOURITES list you will find all the destinations th at you
have saved with
As to how to select a destination for navigation from the
FAVOURITES list, refer to chapter "Favourites" on page 34.
5.1.1 Saving destinations
MobileNavigator 6.
1. Specify a destination as described in chapter "Entering a new
destination" on page
button!
2. Tap on the
The options list opens.
3. Tap on the
- OR -
1. Select a destination from the
described in chapter "
tap on the
2. Tap on the
The options list opens.
3. Tap on the
The
4. Enter a name for the destination.
5. If you would like to set up a speech command for the
SAVE DESTINATION AS… dialogue window opens. The
cursor flashes in the
Options button.
Save destination.
Start navigation button!
Options button.
Save as favourite option.
25. Do not tap on the Start navigation
LAST DESTINATIONS list, as
Last destinations" on page 33. Do not
Name field.
destination, then tap on the
- 40 - Favourites
(Voice command) button.
Page 43

User Manual MobileNavigator 6
A dialogue asks you to speak the speech command for the
chosen destination into the navigation device.
5a Speak the command for the chosen destination int o the
navigation device.
The dialogue closes again.
6. If you would like to define the destination as a home address,
then tap on the
(Toggle) button, so the Yes value is
highlighted in black.
7. Tippen Sie auf die Schaltfläche Save
Das Ziel ist jetzt in der Liste F
AVOURITES gespeichert. Das
.
Dialogfenster schließt sich.
Sie gelangen zu dem Fenster zurück, das vor dem Öffnen des
Dialogfensters S
AVE DESTINATION AS… geöffnet war.
5.1.2 Setting up a speech command
1. In the FAVOURITES list, select the destination for which you
would like to set up a speech command. (Refer to chapter
Favourites", page 34)
"
2. Tap on the Options
The list opens.
3. Tap on the Store a voice command
A dialogue asks you to speak the speech command for the
chosen destination into the navigation device.
button.
option.
4. Speak the command for the chosen destination into the
navigation device.
The dialogue closes again. This destination is now marked
with a symbol in the F
AVOURITES list.
5.1.3 Changing the name of the destination
1. In the FAVOURITES list, select the destination the name of
which you wish to change. (refer to chapter "
34)
page
2. Tap on the
The options list opens.
3. Tap on the
The
SAVE DESTINATION AS… dialogue window opens. The
cursor flashes in the
4. Enter a new name for the destination.
5. Tap on the
The destination appears in the list
name.
Options button.
Rename option.
Name field.
Save button.
FAVOURITES under its new
Favourites",
Managing Destinations - 41 -
Page 44

User Manual MobileNavigator 6
5.1.4 Deleting a destination from the Favourites list
1. In the FAVOURITES list, select the destination the name of
which you wish to change. (refer to chapter "
34)
page
Favourites",
2. Tap on the
The options list opens.
3. Tap on the
The following message appears in a dialogue window.
"
Do you really want to delete this destination?"
4. Tap on the
The destination no longer appears in the
Options button.
Delete option.
Yes button.
FAVOURITES list.
5.1.5 Defining a destination as your home address
You can set exactly one destination from the FAVOURITES list as
your home address.
You can always start navigating to this destination quickly by
tapping on the
1. In the
which you wish to change. (refer to chapter "
page
34)
Take me home button in the MAIN WINDOW.
FAVOURITES list, select the destination the name of
Favourites",
2. Tap on the
The options list opens.
3. Tap on the
The selected destinat ion is now saved as your home address.
Your home address is marked with a little icon in the
FAVOURITES list.
Note: The home address is marked with a picture of a little
house in the FAVOURITES list. If you delete this destination from
FAVOURITES list, the home address is also deleted.
the
Options button.
Home address option.
- 42 - Favourites
Page 45

5.1.6 How to start planning a route
User Manual MobileNavigator 6
1. In the
2. Tap on the
The
If you have chosen a destination from the
you can start planning a route with this. The chosen destination
is inserted as the first route point of a new route.
FAVOURITES list, select the destination the name of
which you wish to change. (refer to chapter "
34)
page
The options list opens.
3. Tap on the
ROUTE PLANNING window opens. The specified destination
is inserted as the first route point of a new route.
Refer to chapter "
about planning a route.
Options button.
Route planning option.
Routes with stages" on page 45 for information
FAVOURITES list, then
Favourites",
5.2 Last destinations
In the LAST DESTINATIONS list you will find the last 100
destinations saved that you saved with
MobileNavigator 6.
As to how to select a destination for navigation from the
DESTINATIONS
33.
list, refer to chapter "Last destinations" on page
LAST
5.2.1 Saving destinations as favourites
1. Select the destination (that you wish to save under favourites)
from the
destinations" on page
Do not tap on the
2. Tap on the
The options list opens.
3. Tap on the
The
cursor flashes in the
4. Enter a name for the destination.
5. Tap on the
LAST DESTINATIONSlist. (refer to chapter "Last
33)
Start navigation button!
Options button.
Save as favourite option.
SAVE DESTINATION AS… dialogue window opens. The
Name field.
Save button.
The destination is now saved in the
dialogue window closes.
Managing Destinations - 43 -
FAVOURITES list. The
Page 46

User Manual MobileNavigator 6
5.2.2 Deleting a destination from the Last destinations list
1. Select the destination (that you wish to save under favourites)
from the
on page
LAST DESTINATIONSlist. (chapter "Last destinations"
33)
2. Tap on the
The options list opens.
3. Tap on the
The following message appears in a dialogue window.
"
Do you really want to delete this destination?"
4. Tap on the
The destination no longer appears in the
list.
Options button.
Delete destination option.
Yes button.
LAST DESTINATIONS
5.2.3 Deleting all destinations from the Last destinations
list
1. Select the destination (that you wish to save under favourites)
from the
on page
2. Tap on the
The options list opens.
3. Tap on the
LAST DESTINATIONSlist. (chapter "Last destinations"
33)
Options button.
Delete all option.
The following message appears in a dialogue window:
"Do you really want to delete all destinations?"
4. Tap on the
The
LAST DESTINATIONS list is now empty.
Yes button.
5.2.4 How to start planning a route
1. Select the destination (that you wish to save under favourites)
2. Tap on the
The
If you have chosen a destination from the
list, then you can start planning a route with this. The chosen
destination is inserted as the first route point of a new route.
from the
on page
The options list opens.
3. Tap on the
is inserted as the first route point of a new route.
Refer to chapter "
information about planning a route.
LAST DESTINATIONSlist. (chapter "Last destinations"
33)
Options button.
Route planning option.
ROUTE PLANNING window opens. The specified destination
Routes with stages" on page 45 for
LAST DESTINATIONS
- 44 - Last destinations
Page 47

User Manual MobileNavigator 6
6 Routes with stages
Topics covered in this chapter:
86.1 8Route planning page 846
8Specifying the starting point
8Specifying route points
8Editing route points
86.2 8Managing routes page 850
8Saving routes
8Loading routes
8Renaming routes
8Deleting routes
86.3 8Navigation page 852
8Calculating and showing routes
8Simulating routes
8Starting navigation
Routes with stages - 45 -
Page 48

User Manual MobileNavigator 6
You can also plan a route if you have no GPS reception, e.g. in
the comfort of your own home. You can save routes already set
up so that you can use them again, and therefore plan as many
routes as you like – perhaps for your holiday.
6.1 Route planning
1. In the MAIN WINDOW tap on the Options button.
The options list opens.
2. Tap on the
The
ROUTE PLANNING window opens.
Route planning option.
Options of the Route planning window
The options of the ROUTE PLANNING window offer the following
functions:
Option Description
Opens a window in which you can save
Save route
Saved routes
New route
Show Map
GPS status
the planned route under a specified
name.
Saves the selected address as your home
address. You can always start navigating
to this destination quickly by tapping on
Take me home button in the MAIN
the
WINDOW.
Deletes the specified destination in the
list
FAVOURITES. A dialogue asks you to
confirm the deletion.
Opens the map that is currently being
used in
you can specify a destination directly on
the map.
Refer to chapter "
the map" on page
information.
Opens the
can see details regarding the GPS
reception.
Refer to chapter "
for more information.
Destination search mode. Here
GPS STATUS window. Here you
Defining destinations on
36 for more
GPS status" on page 68
- 46 - Route planning
Page 49

User Manual MobileNavigator 6
6.1.1 Specifying the starting point
The starting point of a route is the point at which you wish to
start off the journey. This doesn't always have to be the current
location. If you are planning a route for an excursion on your
holiday whilst you are at home, you can, for example, use your
hotel as the starting point.
The starting point is only important if you wish to see a planned
route on the map, but at the moment have no GPS reception or
you are not located at the planned starting point. The starting
point that you specify therefore has the consecutive number “0”.
As soon as you start navigating, your current location will be
used for the route calculation.
The first stage is therefore the journey to the route point with the
consecutive number “1”.
1. Tap on the
0 button or on the Specify starting point field.
The
If you wish to specify a specific address as a starting point:
2. Tap on the
3. Enter the address of the starting point. (refer to chapter
4. Tap on the
If you wish to specify a point of interest as a starting point:
If you wish to specify a save destination as a starting point:
If you wish to specify your home address as a starting point:
2. Tap on the Search for POI menu item.
3. Enter the address of the starting point. (Refer to chapter
4. Tap on the Set starting point button.
2. Tap on the My destinations menu item.
3. Select a destination. (refer to chapter "Selecting a saved
4. Tap on the Set starting point button.
POINT OF DEPARTURE menu opens.
Enter an address menu item.
Destination address", page 25)
"
Set starting point button.
Points of interest", page 27)
"
destination", page
32)
Routes with stages - 47 -
2. Tap on the My Address menu item.
Refer to chapter "
address" on page
address.
Defining a destination as your home
42 for information on saving your home
Page 50

User Manual MobileNavigator 6
If you wish to specify your current location as a starting point:
2. Tap on the Current position menu item.
The chosen starting point is now shown alongside the 0
DEPARTURE
) button.
(Point OF
Editing the starting point
1. Tap on the 0 button or on the Specify starting point field.
The
POINT OF DEPARTURE menu opens. You can now specify a
different starting point. Proceed as described above.
6.1.2 Specifying route points
The route points of a route are the destinations to which you
would like to navigate.
In front of each route point you can see its consecutive number
on a button.
1. Tap on the
+ button or on the Specify route point field.
The
ROUTE POINT menu opens.
If you wish to specify a specific address as a route point:
2. Tap on the
Enter an address menu item.
3. Enter the address of the route point. (refer to chapter
Destination address", page 25)
"
4. Tap on the
Add button.
If you wish to specify a point of interest as a route point:
2. Tap on the Search for POI menu item.
3. Enter the address of the starting point. (Refer to chapter
Points of interest", page 27)
"
4. Tap on the Add button.
If you wish to specify a save destination as a route point:
2. Tap on the My destinations menu item.
3. Select a destination. (refer to chapter "Selecting a saved
destination", page
32)
4. Tap on the Add button.
- 48 - Route planning
Page 51

User Manual MobileNavigator 6
If you wish to specify your home address as a route point:
The specified route point is now shown as the last route point .
Repeat these steps for each additional destination that you wish
2. Tap on the My Address menu item.
Refer to chapter "
address" on page
address.
On the button before it you can see its consecutive number.
to add to the route.
Defining a destination as your home
42 for information on saving your home
6.1.3 Editing route points
Route points can be deleted from a route. You can change the
sequence of the route points too.
The
1. Tap on the route point you wish to edit.
ROUTE PLANNING is open. At least one route point has already
been specified. (refer to chapter "
Note: You can neither move nor delete the starting point
(consecutive number “0”).
Route planning", page 46)
If the list of route points is long, you can move within it using
the
The route point pop-up menu opens. To the left of this you
can see the consecutive number of the chosen route point.
The pop-up menu includes the following buttons:
Ù
further forwards. (Example: Route point 2 becomes route
point 1)
Ù
point further backwards. (Example: Route point 2 becomes
route point 3)
Ù
dialogue asks you to confirm the deletion.
2. Tap on one of the buttons in order to execute the respective
function.
(Up) and (Up) buttons.
Route point up: moves the selected route point
Route point down: moves the selected route
Delete: Deletes the selected route point. A
- OR –
Tap on the consecutive number alongside the buttons. The
pop-up menu then closes without performing a function.
Routes with stages - 49 -
Page 52

User Manual MobileNavigator 6
6.2 Managing routes
You can save each planned route under a specific name.
Note: Only the starting point and the route points are saved, but
not the calculated route. If you load a saved route, you must
recalculate prior to navigating.
You can load, rename or delete saved routes.
6.2.1 Saving routes
The ROUTE PLANNING is open. You have specified the starting
point and at least one route point. (refer to chapter "
planning", page
1. Tap on the
46)
Options button.
Route
The options list opens.
2. Tap on the
The
3. Enter a name for the destination.
4. Tap on the
SAVE ROUTE AS… dialogue window opens. The cursor
flashes in the
The destination is now recorded in the
dialogue window closes.
Save route option.
Name field.
Save button.
SAVED ROUTES list. The
6.2.2 Loading routes
The ROUTE PLANNING is open. (refer to chapter "Route planning",
46)
page
1. Tap on the
The options list opens.
2. Tap on the
The
SAVED ROUTES list opens.
Options button.
Saved routes option.
If the list is long, you can move within it using the
and
3. Tap on the route that you wish to load.
4. Tap on the
The
the route points of the loaded route are entered.
- 50 - Managing routes
(Up) buttons.
Load route button.
ROUTE PLANNING window opens. The starting point and
(Up)
Page 53

User Manual MobileNavigator 6
6.2.3 Renaming routes
The ROUTE PLANNING is open. (refer to chapter "Route planning",
46)
page
1. Tap on the
The options list opens.
Options button.
2. Tap on the
The
3. Tap on the route that you wish to rename.
4. Tap on the
The
5. Enter the new name for the route.
6. Tap on the
SAVED ROUTES list opens.
If the list is long, you can move within it using the
and
SAVE ROUTE AS… dialogue window opens. The cursor
flashes in the
The dialogue window closes. The route appears under a new
name in the
Saved routes option.
(Up)
(Up) buttons.
Rename option.
Name field.
Save button.
SAVED ROUTES list.
6.2.4 Deleting routes
The ROUTE PLANNING is open. (refer to chapter "Route planning",
46)
page
1. Tap on the
Options button.
The options list opens.
2. Tap on the
The
3. Tap on the route that you wish to delete.
4. Tap on the
The following message appears in a dialogue window:
5. Tap on the
Routes with stages - 51 -
SAVED ROUTES list opens.
If the list is long, you can move within it using the
and
"Would you really like to delete the entire route?"
The route no longer appears in the
Saved routes option.
(Up)
(Up) buttons.
Delete option.
Yes button.
SAVED ROUTES list.
Page 54

User Manual MobileNavigator 6
6.3 Navigation
The route must first be calculated. Then you can start or simulate
a navigation.
6.3.1 Calculating and showing routes
A planned route can also be calculated and shown on the map
without GPS reception – this way you can get an overview of the
route.
The
1. Tap on the
ROUTE PLANNING is open. You have specified the starting
point and at least one route point (refer to chapter "
planning", page
routes", page
The map opens in
The starting point and the route points are marked by little
flags. The distance and probable duration of journey are
specified for each stage. This data is also specified for the
entire route.
46) or load a route (refer to chapter "Loading
50).
Show route button.
Preview mode.
Route
6.3.2 Simulating routes
You can also just simulate a navigation.
Note: You don't have to have GPS reception for a simulation.
Only routes of maximum 100 km in length can be simulated.
You have calculated and viewed a route. (refer to chapter
Calculating and showing routes", page 52)
"
1. Tap on the
The options list opens.
2. Tap on the
The route is recalculated for the simulation. After the
calculation the simulation is launched.
Options button.
Simulation option.
- 52 - Navigation
Page 55

Ending simulation
The simulation can be ended at any time.
User Manual MobileNavigator 6
1. Tap on the
A dialogue asks you to confirm the end of the navigation.
The M
AIN WINDOW then opens.
(Back) button.
6.3.3 Starting navigation
You have calculated and viewed a route. (refer to chapter
Calculating and showing routes", page 52)
"
The calculation of the route takes so-called route options as a
basis.
1. If you now wish to view or change these route options, tap on
Route profile button.
the
Note: If you change the route options, these changes remain
valid for the following navigations.
Refer to chapter "
changing the route profile.
Route profile" on page 87 for information on
2. Tap on the Start navigation button or simply get going.
No GPS reception
If you are receiving an insufficient GPS signal, the follow ing
message appears:
No GPS signal available at present. Would you like to use the
"
last known position?"
You have the following options:
Ù Tap on the
last known position as a starting point. As soon as the GPS
reception is sufficient for positioning, the route will be
recalculated and you can commence navigation.
Ù Tap on the
destination is saved in the
OK button. The route will be calculated using the
Cancel button. The MAIN WINDOW opens. Your
LAST DESTINATIONS list.
Routes with stages - 53 -
Page 56

Page 57

User Manual MobileNavigator 6
7 Working with the Map
Topics covered in this chapter:
17.1 1Map material page 156
1Copying a navigation map to the memory card
17.2 1Map in the Preview mode page 157
17.3 1Maps in the 1089HNavigation mode page 159
17.4 1Map in the 1133HDestination search mode page 163
Working with the Map - 55 -
Page 58

User Manual MobileNavigator 6
7.1 Map material
Even if you've saved several navigation maps on the memory
card of your navigation device, you can only work with
MobileNavigator 6 one map at a time.
You can see which map you are currently using from the
settings window. From here you can also select a different
MAP
map.
Refer to chapter "
Current map" on page 81 for more information.
CURRENT
7.1.1 Copying a navigation map to the memory card
You will find more navigation maps on the product DVD of
MobileNavigator 6. If you would like to copy one of these maps
to the memory card, then proceed as follows:
Insert the product DVD into the DVD drive of your computer.
The Installer Tool opens. Follow the program´s instructions.
Note: If the Installer Tool doesn´t start, open Windows
Explorer. Select the DVD drive directory and double click on the
"Start.exe" file.
- 56 - Map material
Page 59

User Manual MobileNavigator 6
7.2 Map in the Preview mode
You have specified a destination and tapped on the Start
navigation
- OR –
button.
You have planned or loaded a route and tapped on the
button.
route
The map opens in
Tap on the
Description
1
2
3
4
Note: You can configure the content of the information box.
Refer to chapter "Configuring MobileNavigator 6" on page 79.
the settings that form the basis of the route calculation.
The destination is marked by a small flag.
If you view a planned or loaded route, the starting
point and each route point are marked with a little
flag.
The route is orange highlighted.
A triangle in orange shows the current position.
If you view a planned or loaded route and the
specified starting point is not your current position,
then the current position may not be shown on the
preview.
You can see the entire route in a small inf o rmation
box. This also includes the probable duration of
journey and probable arrival time.
If you are viewing a route with several stages, you
can also see this information for each stage.
Route profile button in order to view and possibly load
Show
Preview mode. You see the entire route.
Working with the Map - 57 -
Page 60

User Manual MobileNavigator 6
Tap on the Start navigation button in order to start the journey.
If you are viewing a planned or loaded route, the route may be
recalculated. Now your current position will be included as a
starting point in the calculation. The navigation initially leads to
the first specified route point.
Tap on the
of the navigation instructions. (refer to chapter "
16)
page
(Volume) button in order to control the volume
Volume",
Tap on the
the map in
Destination search mode.
(Destination search) button in order to view
Refer to chapter "
63 for more information.
page
Map in the Destination search mode" on
Tap on the
(Back) button in order to return to the window
that was previously open.
Options of the map in the Preview mode
The options of the map in the Preview mode offer the following
functions:
Option Description
Simulates a navigation on the displayed
route. This simulation can also be carried
Simulation
out without GPS reception. However, only
routes up to a length of maximum
can be simulated.
Opens the
SAVE DESTINATION AS…
window. You can enter a name under
which the destination is to be saved in
FAVOURITES list.
the
Save destination
Refer to chapter "
40 for more information.
page
This option is only available if you have
started navigating to a specified
destination.
Opens the S
can enter a name under which the route
should be saved in the S
Save route
Refer to chapter "
50 for more information.
This option is then only available if a
planned route is shown on the map.
Opens the
SETTINGS window. Here you
can configure the navigation system.
Settings
Refer to chapter "
1290HMobileNavigator 6" on page
more information.
60 mi
Saving destinations" on
AVE ROUTE AS… window. You
AVED ROUTES list.
Saving routes" on page
Configuring
79 for
- 58 - Map in the 1053HPreview mode
Page 61

User Manual MobileNavigator 6
GPS status
Opens the
can see details regarding the GPS
reception. You can also save data
regarding the current location.
Refer to chapter "
for more information.
GPS STATUS window. Here you
GPS status" on page 68
7.3 Maps in the Navigation mode
After the route has been displayed in the Preview mode, the
navigation is started.
The map opens in
The size of the map section you are viewing depends on the
settings and on your speed. Refer to chapter "
MobileNavigator 6", page 79)
The map changes continuously. Your position can always be seen
at the same place on the screen. Your direction of driving is
always upwards (north).
Navigation mode.
Configuring
Working with the Map - 59 -
Description
1
2
3
This shows which signposts you should follow.
This is where any speed limits are shown.
The small arrow field shows you the next but one
action when there are actions that need to be carried
out quickly in succession.
Page 62

User Manual MobileNavigator 6
4
5
6
7
8
The large arrow field shows a schematic view of the
next crossroads at which you should turn. Underneath
this is the distance until you reach this crossroad.
As you approach the crossroad, the distance
information changes to a point display.
The fewer yellow points showing, the closer you are to
the crossroads.
If you don't have to turn yet, only one arrow points
upwards stating a distance beneath it showing how far
you must follow the street.
The route is shown in orange.
A triangle in orange shows your current position on
the map. In doing so, a continuously changing map
section ensures that the current position is always
shown as centred as possible on the map.
This is where the altitude above mean sea level and
the current speed is displayed.
If you are navigating a route with several stages, the
following information is shown in the Next field:
Ù Probable arrival time at the next route point
Ù Remaining distance from the next route point
Ù Probable remaining driving time until the next
route point.
9
10
11
12
Note: You can configure the display of many of the areas
mentioned above. Some displays also only work if the respective
information is available in the map material. Refer to chapter
Configuring 1290HMobileNavigator 6" on page 79 for more
"
information.
The following information is shown in the Total field:
Ù Probable arrival time at the destination
Ù Remaining distance until the destination
Ù Probable remaining driving time until the
destination.
If the current section that is being driven has several
lanes, these will be shown here. The lanes that lead to
your destination are shown in
these lanes.
In the top street field you can see the name of the
route section you must drive next.
In the bottom street field you can see the name of the
route section you are currently driving.
orange. Get into one of
Note: If you tap on the large arrow field, the current valid driving
instruction is repeated.
- 60 - Maps in the 1089HNavigation mode
Page 63

User Manual MobileNavigator 6
Tap on the
of the navigation instructions. (refer to chapter "
16)
page
(Volume) button in order to control the volume
Volume",
Tap on the
the map in
Refer to chapter "
63 for more information.
page
Destination search mode.
(Destination search) button in order to view
Map in the 1133HDestination search mode" on
Ending navigation
Tap on the
(Back) button in order to end navigation. A
dialogue asks you to confirm.
Functions of the map in the Navigation mode
Tap on any point in the map in Navigation mode.
Buttons with various functions are shown.
Funktion Description
Tap on this button to toggle between 2D
2D/3D
and 3D mode. The icon of the current set
mode is shown in orange.
Tap on this button to toggle between the
modes “day” and “night” (refer also to
Day/Night
chapter "
Basic settings", page 83). The
icon of the current set mode is shown in
orange.
Opens a menu to input an interim
destination. You can close this menu
without entering a destination – just click
on the icon to the left of it.
The navigation then first leads to this
Interim destination
interim destination. Then you can
continue your navigation to your original
destination.
Refer to chapter "
destination" on page
information.
Tap on this button in order to omit the
next route point. The button becomes
Skip route point
inactive if less than 2 route points
remain.
Refer to chapter "
71 for more information.
page
Inserting an interim
70 for more
Skipping a stage" on
Working with the Map - 61 -
Page 64

User Manual MobileNavigator 6
Tap on this button in order to block a
route section before you, i.e. recalculate
so you can avoid this section because,
Block
perhaps, you have heard of a traffic jam
on this section.
Refer to chapter "
section" on page
Tap on this button in order to show points
Blocking a route
71 for more information.
of interest on your route. This way you
can find out quickly, e.g. where the next
POI on your route
la—by is. A destination shown here can
also be inserted as an interim destination.
Refer to chapter "
72 for more information.
page
POI on your route" on
Options of the map in the Navigation mode
The options of the map in Navigation mode offer the following
functions:
Option Description
Opens the
SETTINGS window. Here you
can configure the navigation system.
Settings
Refer to chapter "
1290HMobileNavigator 6" on page
more information.
Opens the
ROUTE PROFILE window. Here
you can view and, if necessary, change
Route profile
the options for the route calculation.
Refer to chapter "
87 for more information.
page
Opens the
GPS STATUS window. Here you
can see details regarding the GPS
GPS status
reception. You can also save data
regarding the current location.
Refer to chapter "
for more information.
Launches the integrated MP3 player of
your navigation device. If you then close
MP3 player
the MP3 player, MobileNavigator 6
appears again.
The MP3 player remains on during the
navigation instruction.
Configuring
79 for
Route profile" on
GPS status" on page 68
- 62 - Maps in the 1089HNavigation mode
Page 65

User Manual MobileNavigator 6
7.4 Map in the Destination search mode
The map is then always in Destination search mode if you can
see a crosshair on it.
If you are currently en route, the map doesn't change. It is
always aligned so that north is at the top.
Description
Zoom out
but you have less detail.
Zoom in
but you have more detail.
Zoom mode
pen or your finger to mark a section of map.
Mark the map section from the top left to the bottom
right, it then zooms on the screen.
Mark the map section from the bottom right to the top
left, it then zooms out on the screen.
Pan mode
pen or your finger to change a section of map. Simply
move the map in the desired direction.
Entire route
entire route is visible.
Current position
way that the current location is centred.
: The map section shown becomes larger,
: The map section shown becomes smaller,
: If this button is active, you can use your
: The map then zooms in so that the
: If this button is active, you can use your
: Selects the map section in such a
Working with the Map - 63 -
Page 66

User Manual MobileNavigator 6
1. Tap on the point to which you wish to navigate.
The destination on which you have tapped appears under the
crosshair.
In the
Selected destination field in the lower third of the
screen you are shown geographical coordinates of the
destination and the respective address.
2. Tap on the
The
DESTINATION ON MAP window opens. In the top left corner
(OK) button.
you can see the detailed address data of the chosen
destination.
Buttons with various functions are shown.
Funktion Description
Tap on this button to start navigating to
the selected point. If you are currently
Take me there
navigating, this will be interrupted. You
can start navigating to your original
destination however via the
DESTINATIONS
This function is only available if you are
list.
currently navigating.
Tap on this button in order to set the
chosen point as an interim destination.
The navigation then first leads to this
Interim destination
interim destination. Then you can
continue your navigation to your original
destination.
Refer to chapter "
destination" on page
Inserting an interim
70 for more
information.
Tap on this button in order to add the
chosen point as the last point in the route
planning. If no route planning has been
Add to route
opened, then the chosen point will be the
first point in a new route planning. (refer
also to chapter "
46)
page
Opens the
Route planning",
SAVE DESTINATION AS…
window. You can enter a name under
Save
Neighbourhood
search
which the specified point is saved in the
FAVOURITES list.
Refer to chapter "
40 for more information.
page
Opens the
POI NEARBY window. Here you
Saving destinations" on
can search for destinations close to the
specified point.
Refer to chapter "
nearby" on page
Point of interest
27 for more information.
LAST
- 64 - Map in the 1133HDestination search mode
Page 67

User Manual MobileNavigator 6
Tap on the
(Volume) button in order to control the v olume
of the navigation instructions. (refer to chapter "Volume",
16)
page
Tap on the
(Destination search) button in order to end the
Destination search mode. You return to the window from which
you started this mode.
Tap on the
(Back) button in order to return to the MAIN
WINDOW. If you are currently navigating, you will be asked to
confirm interrupting this navigation.
Options of the map in the Destination search mode
The options of the map in the Destination search mode offer
the following functions:
Option Description
Opens the
SETTINGS window. Here you
can configure the navigation system.
Settings
Refer to chapter "
1290HMobileNavigator 6" on page
more information.
Opens the
ROUTE PROFILE window. Here
you can view and, if necessary, change
Route profile
the options for the route calculation.
Refer to chapter "
87 for more information.
page
Opens the
GPS STATUS window. Here you
can see details regarding the GPS
GPS status
reception. You can also save data
regarding the current location.
Refer to chapter "
for more information.
Launches the integrated MP3 player of
your navigation device. If you then close
MP3 player
the MP3 player, MobileNavigator 6
appears again.
The MP3 player remains on during the
navigation instruction.
Configuring
79 for
Route profile" on
GPS status" on page 68
Working with the Map - 65 -
Page 68

Page 69

User Manual MobileNavigator 6
8 Useful Functions
Topics covered in this chapter:
18.1 1Information about the destination page 168
18.2 1GPS status page 168
18.3 1Inserting an interim destination page 170
18.4 1Skipping a stage page 171
18.5 1Blocking a route section page 171
18.6 1POI on your route page 172
8.7 TMC (Traffic information) page 72
Useful Functions - 67 -
Page 70

User Manual MobileNavigator 6
The majority of the functions described here can only be used
practically if there is sufficient GPS reception in order to establish
the current location. You can see if there's sufficient GPS
reception from the
(GPS ready) symbol.
8.1 Information about the destination
The navigation system's database has additional information
about many of the destinations you specify.
For example, many restaurants also have a telephone number
saved. You can then call them instantly e.g. to reserve a table.
1. Specify a destination as described in chapter "
destination" on page
- OR -
Specify a destination as described in chapter "
saved destination" on page
Do not tap on the
The
2. Tap on the
DESTINATION INFO window opens. It includes all the
information (on the specified destination) that is available in
the navigation system's database.
Tap on the
destination on the map.
(Show on map) button in order to view the
25.
32.
Start navigation button!
(Destination info) button.
Entering a new
Selecting a
Tap on the
window again.
Cancel button in order to close the DESTINATION INFO
8.2 GPS status
On the
that the navigation system has extracted or calculated from the
received GPS signal.
The M
- OR –
The map is opened.
3. Tap on the
The options list opens.
GPS STATUS window you will find an overview of the data
AIN WINDOW is opened.
Options button.
- 68 - Information about the destination
Page 71

4. Tap on the GPS status option,
User Manual MobileNavigator 6
The
GPS STATUS window opens.
Auf dem Fenster
Feld Meaning
GMT:
Longitude:
Latitude:
Altitude:
Satellites:
HDOP:
Direction:
Speed: Shows your current speed.
Current position
Saving the current location
GPS STATUS finden Sie folgende Informationen:
Greenwich Mean Time: The time in London.
If you are in a different time zone, then this
time does not correspond to your location.
The coordinates of the current location. The
letters mean the following:
W: Western longitude
E: Eastern longitude
N: Northern latitude
S: Southern latitude
Height above sea level. To calculate the
altitude you must be receiving signals from
at least 4 GPS satellites.
The number of GPS satellites that are
receiving at present. To establish the
current location you must be receiving
signals from at least 3 satellites.
A measure for the quality of the location
detection. The smaller the value, the more
precise the location detection. Values up to
8 are acceptable for navigation.
Indicates in which direction you are
currently travelling .
Shows your current location. If no address
can be detected, then the geographical
coordinates will be shown.
The current location can be saved in the FAVOURITES list.
1. Tap on the
The
SAVE DESTINATION AS… dialogue window opens. The
cursor flashes in the
Save position button.
Name field.
2. Enter a name for the destination.
3. Indicate whether you wish you to use the current position as
a home address.
4. Tap on the
The destination is now saved in the
Save button.
FAVOURITES list. The
dialogue window closes.
Useful Functions - 69 -
Page 72

User Manual MobileNavigator 6
8.3 Inserting an interim destination
During navigation you can insert a new interim destination at any
time. The route is then recalculated so that this interim
destination can be approached as the next destination. After
reaching the interim destination you can continue navigating to
the original destination.
If the map is opened in
follows:
1. Tap briefly on any point on the map.
Navigation mode, then proceed as
2. Tap on the
The
3. Specify a destination as described in chapter "
4. Tap on the
The route is recalculated. The specified interim destination is
If you are navigating and the map is opened in
search mode, then proceed as follows:
1. Tap on the point on the map that you wish to specify as an
The destination on which you have tapped appears under the
INTERIM DESTINATION menu opens.
destination" on page
taken as the next route point.
interim destination.
Note: Refer to chapter "
mode" on page 63 for information on changing the map
section so that you can easily see your destination.
crosshair.
In the
screen you are shown geographical coordinates of the
destination and the respective address.
Interim destination button.
Entering a new
25.
Add button.
Destination
Map in the Destination search
Selected destination field in the lower third of the
2. Tap on the
The
3. Tap on the
The route is recalculated. The specified interim destination is
- 70 - Inserting an interim destination
DESTINATION ON MAP window opens. In the top left corner
you can see the detailed address data of the chosen
destination.
taken as the next route point.
(OK) button.
Interim destination button.
Page 73

User Manual MobileNavigator 6
8.4 Skipping a stage
This function is only available if you are navigating and have at
least 2 route points ahead of you.
The map is opened in
Use this function is you wish to leave out the next route point.
Example: You have planned and already started a route from
your office via “company a” to “company b”. Before you reach
company A you are told that you do not need to visit company A.
Tap on the
but one route point (in this example: “company B”).
The route is then recalculated so that the next but one route
point is approached as the next destination.
Skip route point button in order to approach the next
Navigation mode.
8.5 Blocking a route section
Whilst navigating you can block one of your route sections at any
time, i.e. recalculate the route to avoid this section, perhaps
because you've heard there is a jam on this section.
Note: The block is valid for the current navigation and will no
longer be taken into consideration for a new navigation.
The map is opened in
Navigation mode.
1. Tap on any point on the map.
2. Tap on the
The
3. Enter how many kilometres you wish to block – starting from
The route is recalculated. The blocked section of route will be
BLOCK menu opens.
your current location.
detoured. It is marked on the map in
Block button.
red.
Cancelling the block
1. Tap on any point on the map.
2. Tap on the
The block is cancelled. The route is recalculated. The section of
route the block for which has been cancelled can then be included
in the calculation again.
Unblock button.
Useful Functions - 71 -
Page 74

User Manual MobileNavigator 6
8.6 POI on your route
Whilst navigating you can view points of interest (that are located
on your route) from three specific categories at any time. This
way you can find out quickly, e.g. where the next la—by is. You
can then, for example, insert this lay-by as an interim destination
in your route.
Note: Points of interest from the same categories that are also
available in the Direct Access will be shown. You can configure
these categories.
Refer to chapter "
route" on page
The map is opened in
1. Tap on any point on the map.
Categories for quick link and for POI on your
82 for more information.
Navigation mode.
2. Tap on the
The
POI ON YOUR ROUTE window opens. It shows from each of
the three categories the two next points of interest that are
located on or in the vicinity of your route.
The points of interest are arranged according to distance.
POI on your route button.
Specifying one of the points of interest as an interim destination
If you wish to drive to one of the displayed points of interest,
then tap on the
alongside its entry in the list.
The route is recalculated. The specified point of interest is taken
as the next route point.
(Interim destination) button to the right
8.7 TMC (Traffic information)
If your device has an integrated TMC-receiver, or if you have
connected an external TMC receiver, the navigation system will
have the latest traffic information available, an d can, where
necessary, dynamically change your route in order to avoid a
traffic jam, for example. The current valid traffic reports can be
displayed.
1. Tap the Options
button in the Main window.
The options list opens.
2. Tap the Traffic
- 72 - POI on your route
button.
Page 75

User Manual MobileNavigator 6
The TRAFFIC INFORMATION window opens.
Explanation of symbols
c
d
The Traffic information button shows what kinds of traffic
messages are listed and the number of messages
received.
Tap the button to select which traffic messages should be
displayed.
For detailed information, please refer to chapter
Configuring the message display", page 74.
"
The following information is displayed for each traffic
message on the list.
Ù On Route
: message number.
: distance from current location. Not on Route
Ù Country (in North America; state or province) in which
the reported traffic hindrance occurs.
Ù Street in which the hindrance occurs.
Ù At least one traffic symbol which depicts the type of
traffic hindrance.
Tap a message to display detailed information.
e
If the list is long, you can toggle using the
(Down
Tap the
window.
The Avoid / Ignore button next to each message shows
whether or not an alternative route is being calculated
which will avoid the relevant traffic obstruction.
(activated:Avoid) An alternative route avoiding the
traffic obstruction is being calculated.
(deactivated:Ignore ): The traffic obstruction will be
ignored by the navigation system when calculating the
route.
(Up) and
) buttons.
(Back) button to close the TRAFFIC INFORMATION
Useful Functions - 73 -
Page 76

User Manual MobileNavigator 6
Options of the Traffic information window
The options of the TRAFFIC INFORMATION screen offer the
following functions:
Option Description
Opens the TMC
which you can configure the reception of
TMC Settings
messages and their influence on the route
calculation.
For detailed information, please refer to
chapter "
Opens the
TMC Settings", page 74.
GPS STATUS window. Here you
can see details regarding GPS reception.
GPS status
You can also save data regarding your
current location.
For detailed information, please refer to
chapter "
GPS status" on page 68.
SETTINGS window in
8.7.1 Configuring the message display
1. Tap the TRAFFIC INFORMATION button in the Traffic
information window.
A list with various options opens.
The following options are available:
Ù On Route
navigation is not in operation, no message will be shown.
Ù Not on Route
concern the calculated route.
Ù Not on Route
traffic obstructions which are not on the calculated route.
Ù Not on Route
jams which are not on the calculated route.
Ù Not on Route
about storms which are not on the calculated route.
2. Tap your desired option.
3. Tap the OK
: shows all messages concerning your route. If
- All: shows all the messages that do not
- Obstructions : shows messages about
- Traffic Jams: shows messages about traffic
- Weather Warnings: - : shows messages
button.
8.7.2 TMC Settings
1. Tap the T
The options list opens.
2. Tap the TMC Settings
The TMC
- 74 - TMC (Traffic information)
RAFFIC INFORMATION button in the Options window.
button.
SETTINGS window opens.
Page 77

In the TMC
TMC-sender, this will determine the effect that the reception
of a message concerning your route will have on its
calculation.
Setting Descri ption and possible settings
User Manual MobileNavigator 6
SETTINGS window you can set and configure the
Determine the settings of the station
chosen to receive traffic messaging.
Automatic
Tuning
Hold Station
Hold Frequency
For detailed information, please refer to
chapter "
Tuning", page 76.
Factory-setting is Automatic
Determine how new messages concerning
your route should be managed.
Automatically
the traffic obstruction will be calculated.
On request
this window you can determine whether
Recalculate Route
or not an alternative route should be
calculated. For detailed information,
please refer to chapter "
information", page
This setting only takes effect if the route
profile has been set to consider traffic
jams. See "
Factory-setting is Automatically
3. Select your desired settings.
.
: An alternative route avoiding
: The message is displayed. In
Managing TMC
76.
Route profile", on page 87).
.
4. Tap the Done
button to close the TMC SETTINGS window.
Useful Functions - 75 -
Page 78

User Manual MobileNavigator 6
8.7.3 Managing TMC information
You can configure the TMC settings to determine how TMC
information concerning your route should be managed.
For information on how to determine the settings, please refer to
TMC Settings", page 74.
"
Note: This setting only takes effect if the rout e profile has been
set to consider traffic jams. For detailed information, please refer
to chapter "
Recalculate Route: Automatically
If a reported obstruction concerns your route, the system will
calculate an alternative route automatically. The following
message appears while the system is calculating the deviation.
"The route is being recalculated due to traffic information
update."
Route profile", page 87.
You can reset the alternative to the original route at any time. To
do this, open the T
(Ignore
) symbol next to the relevant message.
RAFFIC INFORMATION window and tap the
Recalculate Route: On request
If a reported obstruction concerns your route, the MESSAGE
window opens. It displays the full message.
Ù Tap the Avoid / Ignore
button in order to to take traffic
obstructions on your route into consideration.
The navigation system calculates an alternative route in order
to avoid the obstruction.
Ù Tap the same button again to ignore the obstruction reported
on your route.
8.7.4 Tuning
1. Tap the T
RAFFIC INFORMATION button in the Options window.
The options list opens.
2. Tap the TMC Settings
The TMC
SETTINGS window opens. The name, frequency, and
button.
the reception quality of the current station are displayed at
the top of the screen.
3. In the Tuning field, select one of the following settings
Automatic
, Hold Station or Hold Frequency.
- 76 - TMC (Traffic information)
Page 79

User Manual MobileNavigator 6
In Automatic mode, the system searches for a station with
good reception.
4. Tap the arrows in the Station field if you want to receive an
alternative station.
As soon as an alternative station has been found, its name
and frequency will be displayed.
In Hold Station
mode, the TMC-receiver will try to find better
reception of the station on another frequency.
4. Tap the arrows next to the Station field if you want to
receive an alternative station.
As soon as an alternative station has been found, its name
and frequency will be displayed. The station will now be held.
In Hold Frequency
mode, the TMC-receiver will not try to find
another station or another frequency.
4. Tap the arrows next to the Station field in order to alter the
frequency in steps of 0.1 MHz.
If a station can be received on the frequency currently tunedin, its name will be displayed.
5. Tap the OK
button to close the TMC SETTINGS window.
Useful Functions - 77 -
Page 80

Page 81

User Manual MobileNavigator 6
9 Configuring
MobileNavigator 6
Topics covered in this chapter:
19.1 1Opening the 1308HSettings window page 180
19.2 1Current map page 181
19.3 1POI page 182
1Categories for quick link and for POI on your route
1Indications on the map
19.4 1Basic settings page 183
19.5 1Route profile page 187
Configuring 1290HMobileNavigator 6 - 79 -
Page 82

User Manual MobileNavigator 6
9.1 Opening the Settings window
The SETTINGS window is the starting point for all adaptations that
you can use to set up
your personal requirements.
The
MAIN WINDOW is open (refer to chapter "Opening the main
window", page
25).
MobileNavigator 6 in accordance with
1. Tap on the
Options button.
The options list opens.
2. Tap on the
The
SETTINGS window opens.
Settings option.
The
SETTINGS window has several buttons. Tap on a button in
order to open the respective settings window.
There are four settings windows:
SETTINGS
And ROUTE PROFILE.
CURRENT MAP, POI, BASIC
The settings of the individual windows are distributed over
several screens. You can leaf through them by using the
the left
) and (To the right) buttons.
(To
Some settings can only accept two or three different values. You
can see which settings these are from the
(Toggle) button.
All possible values are visible. The currently v a lid value is
highlighted in black.
1. Tap on the
(Toggle) button in order to toggle between
the possible values.
Some settings can accept lots of different values. You can see
which settings these are from the
(List) button. The
currently valid value is visible.
1. Tap on the
(List) button.
A list of possible values opens. The currently valid value is
selected.
If the list is long, you can move within it using the
and
(Up) buttons.
(Up)
2. Tap on the desired value. It is now selected.
3. Tap on the
OK button.
The list closes. The new value is displayed.
- 80 - Opening the 1308HSettings window
Page 83

User Manual MobileNavigator 6
You can close settings windows in two ways:
Ù Tap on the
accepted.
Ù Tap on the
not be accepted.
SETTINGS window opens again.
The
Done button. Any changes you have made will be
Cancel button. Any changes you have made will
Options of the Settings window
The options of the SETTINGS window offer the following functions:
Option Description
Opens a window in which you can
Calibration
Product info
Factory settings
Note: The following explanations refer to factory settings.
recalibrate the touchscreen (align it) if it
is reacting imprecisely to contact.
Opens a window in which you obtain
information about the installed software
version. You can also see the navigation
system's time here.
Opens a window in which you can reset
all the settings back to the factory
settings.
9.2 Current map
The CURRENT MAP window shows which map the navigation
system is currently using.
If several navigation maps are available on the currently inserted
memory card, then you can select a different map.
1. Tap on the map's name.
A list of all the available maps opens. If the list is long, you
can move within it using the
2. Tap on the map you wish to use.
3. Tap on the
The
CURRENT MAP window opens again. The new map is
entered.
Ù Tap on the
accepted.
Ù Tap on the
not be accepted.
OK button.
Done button. Any changes you have made will be
Cancel button. Any changes you have made will
(Up) and (Up) buttons.
Configuring 1290HMobileNavigator 6 - 81 -
Page 84

User Manual MobileNavigator 6
9.3 POI
The POI window shows which categories are available on the
three buttons of the quick link in menu
categories are also shown if you execute the
function during navigation.
Also, you can set which categories of points of interest are to be
displayed on the map
9.3.1 Categories for quick link and for POI on your route
1. Tap on the category you wish to change. (Direct Access 1,
Direct Access 2, Direct Access 3)
The list of categories opens. You can move through them by
NEW DESTINATION. These
POI on your route
using the
2. Ta p on the category that should be available in the quick link
and for the
3. Tap on the
The
POI window opens again. The new category is entered in
the respective field.
Note: The following categories are already set as factory
defaults: Parking, Petrol station, Hotel or Motel.
(Up) and (Up) buttons.
POI on your route function.
OK button.
9.3.2 Indications on the map
1. Tap on the Show POIs button.
The list of categories opens. You can move through them by
using the
2. Points of interest from the selected categories will be shown
on the map.
Ù Tap on a selected category in order to cancel your
selection.
(Up) and (Down) buttons.
Ù Tap on a category that has not been selected in order to
select it.
3. Tap on the
The
POI window opens again.
- 82 - POI
OK button.
Page 85

User Manual MobileNavigator 6
9.4 Basic settings
In the BASIC SETTINGS window, settings are carried out that
influence the appearance and the functionality of the map and
the navigation software.
You can carry out the following settings on the
window:
Einstellung Meaning und mögliche Werte
Establish in which view the map should
open as default for the navigation.
2D
Navigation view
: is similar to the look of a normal map.
3D
: is similar to the driver's perspective.
BASIC SETTINGS
The factory default is 3D
3D auto zoom
2D auto zoom
2D map: show
street names
Establish if autozoom should (Yes
shouldn't (No
3D view.
With autozoom the zoom depth changes in
dependence of your speed: If you drive
slowly, the scale reduces. If you drive
faster, the scale enlarges.
The factory default is Yes
Establish if autozoom should be activated
as standard for the map in 2D view.
No automatic zoom
Smaller map section
Standard
Larger map section
With autozoom the zoom depth changes in
dependence of your speed: If you drive
slowly, the scale reduces. If you drive
faster, the scale enlarges.
The more intense the autozoom, the
smaller the scale of the map.
The factory default is Standard
Establish if the street names should (Yes
or shouldn't (No
is in 2D view.
The factory default is Yes
) be activated for the map in
) be shown when the map
.
) or
.
.
)
.
Configuring 1290HMobileNavigator 6 - 83 -
Page 86

User Manual MobileNavigator 6
Establish how the map should be aligned as
standard when navigating in 2D view.
in direction of travel
: The direction in which
you are driving is above. This view is
Map 2D:
Orientation
very suitable for navigation.
set to north
: North is up. This alignment
corresponds to a printed map. It is
suitable in order to get an overview of a
specific area.
The factory default is in direction of travel
Show altitude and
speed
Establish if the current altitude above sea
level and the current speed should (Yes
shouldn't (No
The factory default is No
) be shown on the map.
.
Establish whether the remaining distance to
.
) or
the destination, and, if stages are planned
Show remaining
distance
in, also the remaining distance to the next
route point should (Yes
) or shouldn't (No)
be shown on the map.
The factory default is Yes
Establish whether the remaining duration of
.
drive to the next destination, and, if stages
Show duration of
journey
are planned in, also the remaining duration
until the next route point, should (Yes
shouldn't (No
The factory default is No
) be shown on the map.
.
) or
Establish whether the probable arrival time
to the next destination, and, if stages are
Show time of
arrival
Info when crossing
borders
Show signposts
planned in, also the probable arrival time
until the next route point, should (Yes
shouldn't (No
The factory default is Yes
) be shown on the map.
.
) or
Establish if, when crossing a border,
information should (Show
) be shown regarding the now valid
(Hide
) or shouldn't
speed restrictions.
The factory default is Show
.
Establish, whether during a navigation the
signposts that you must follow should (Yes
or shouldn't (No
The factory default is Yes
) be shown.
.
Note: This display depends on the
)
information being available in the map
material that is currently being used. This is
not always the case on all streets.
- 84 - Basic settings
Page 87

User Manual MobileNavigator 6
Show lane info
Establish whether during a navigation, the
lane on which you must drive, should (Yes
or shouldn't (No
The factory default is Yes
) be shown.
.
Note: This display depends on the
)
information being available in the map
material that is currently being used. This is
not always the case on all streets.
Establish whether during a navigation
references should be shown regarding the
valid speed restrictions.
: Speed limits will be shown.
Yes
Only if exceeding
: Speed limits will only be
shown if they are exceeded.
: Speed limits will not be shown.
No
Show speed limits
The factory default is Yes
Note: This display depends on the
.
information being available in the map
material that is currently being used. This is
not always the case on all streets.
Attention! The information in the map
material could be incorrect on account of
sudden changes (construction sites etc.)!
The traffic situation and the signposts on
site have priority over the information given
by the navigation system.
Warnings within
built-up areas
Warnings outside
built-up areas
Show conditional
speed limits
Establish to which degree you wish to be
warned of exceeding a speed limit within
built—up areas.
The factory default is 6 mph too fast
.
Establish to which degree you wish to be
warned of exceeding a speed limit outside
of built—up areas.
The factory default is 9 mph too fast
Establish whether you should (Yes
shouldn't (No
)be warned of speed
.
) or
restrictions that only apply in the case of
rain, snow or at certain times of the day.
The factory default is Yes
Establish whether you should (Warn
shouldn't (Do not warn
.
) or
) be warned of
speed traps.
.
Speed monitoring
The factory default is Do not warn
Attention! The activation of this product
feature can be subject to legal restrictions
in some countries. Note that in some cases
it may be necessary to have additional data
in order to use this feature. Refer to
www.navigon.com.
Configuring 1290HMobileNavigator 6 - 85 -
Page 88

User Manual MobileNavigator 6
Distance format
Establish whether distances should be
shown in Kilometres
or in Miles.
The factory defaults depend on the
language in which you are operating the
software.
Time format
Establish whether times should be shown in
12h (am/pm)
or im 24h format.
The factory defaults depend on the
language in which you are operating the
software.
Brightness day
Brightness night
Select a degree of brightness (1
the display in "day" mode.
The factory default is 8
.
Select a degree of brightness (1
the display in"night" mode.
The factory default is 1
.
Establish whether the volume of the driving
to 8) for
to 8) for
directions should be increased when you
drive faster.
: The volume is not controlled in
No
dependence on the speed.
Speed-dependent
volume
Low amplification
slightly in accordance with an increase in
: The volume increases
speed.
High amplification
: The volume increases
considerably in accordance with an
increase in speed.
The factory default is No
.
- 86 - Basic settings
Page 89

User Manual MobileNavigator 6
9.5 Route profile
In the ROUTE PROFILE window, settings are carried out that
influence the appearance and the functionality of the map and
the navigation software.
You can carry out the following settings on the
window:
Einstellung Meaning and possible values
Specify how to continue. This setting is
important for calculating the route and the
arrival times.
Fast car
ROUTE PROFILE
Standard car
Slow car
Speed profile
Type of route
Motorbike
Lorry
: Avoid through streets as much as
possible.
Bicycle
inapplicable to cyclists.
Pedestrian
only to vehicles are not taken into
consideration.
Establish which sort of route should be
calculated.
Nice route
nice to drive.
Fast route
the set speed profile.
Short route
Optimum route
route if the detour to be driven is
sensible in terms of the time saved.
: Bendy routes are preferred.
: One-way streets are often
: Traffic regulations that apply
: prefers winding streets that are
: calculates the quickest route for
: calculates the shortest route.
: Calculates the quickest
Consider traffic
information
Configuring 1290HMobileNavigator 6 - 87 -
Determine if the traffic messages are to be
considered in the route calculation (Yes
).
(No
If necsessary, you can determine how
traffic messages are to be considered
seperately. For detailed instructions, please
refer to chapter "
information", page
Factory-setting is Yes
Managing TMC
76.
.
) or
Page 90

User Manual MobileNavigator 6
Specify whether you wish to use these
types of roads.
Motorways
Ferries
Toll roads
: Can be used.
Allow
Avoid
: Only use if there’s no other option
(e.g. driving to islands).
Forbid
: Cannot be used.
This setting is only effective if you are
navigating a route with several stages.
Calculation of the
next stage
Specify whether, after reaching a route
point, the next stage should be calculated
automatically (Automatically
request (On request
).
) or only upon
- 88 - Route profile
Page 91

10 Index
2
2D auto zoom................................. 85
2D map
show street names ....................... 85
3
3D auto zoom................................. 85
A
Avoid Traffic Jam .......................75, 77
User Manual MobileNavigator 6
Destination info............................... 70
Destinations
Delete....................................46, 48
Destination info............................ 70
Home address.............................. 46
Manage..................................44, 47
Rename ...................................... 45
Route planning........................47, 48
Save......................................44, 47
Voice command............................ 45
Dialog window ................................ 11
Direct Access.................................. 84
Display .......................................... 11
Distance format .............................. 88
E
B
Basic settings ................................. 85
Block............................................. 73
Brightness day................................ 88
Brightness night.............................. 88
Button........................................... 11
C
Calculation of the next stage............. 90
Calibration ..................................... 83
Consider traffic information .............. 89
Conventions followed in this manual .... 6
Current map................................... 83
Current position
Save........................................... 71
Current position.............................. 71
D
Data entry ..................................... 22
Destination
Direct Access ............................... 35
Enter an address.......................... 29
Favourites ................................... 38
From map ................................... 40
Last destinations .......................... 37
My destinations............................ 36
New destination ........................... 29
Search for POI ............................. 31
in a city.................................... 34
nationwide................................ 32
nearby ..................................... 31
Voice command............................ 39
Entering data.................................. 22
Entry field ...................................... 11
F
Factory settings .............................. 83
Ferries........................................... 90
G
GPS
Faulty reception............................ 26
Initialise...................................... 27
Signals........................................ 14
GPS............................................... 14
GPS status
Current position............................ 71
GPS status ..................................... 70
H
Home address................................. 39
Hotline.............................................7
I
Icon .............................................. 11
Info when crossing borders............... 86
Interim destination.......................... 72
Index - 89 -
Page 92

User Manual MobileNavigator 6
K
Keyboard ....................................... 20
M
Main window .................................. 27
Manual
Conventions...................................6
Structure....................................... 6
Symbols........................................ 6
Map
Destination search........................ 66
Navigation................................... 62
Preview....................................... 60
Map 2D
Orientation.................................. 86
Menu............................................. 23
MobileNavigator 6 ...................... 26, 27
Motorways ..................................... 90
My destinations............................... 36
N
R
Recalculate Route............................ 77
Route planning................................ 50
Route points
Delete......................................... 53
Indicate....................................... 52
Order.......................................... 53
Order.......................................... 53
Route profile................................... 89
Routes
Calculate..................................... 56
Delete......................................... 55
Load ........................................... 54
Manage....................................... 54
Planning...................................... 50
Point of departure......................... 51
Rename ...................................... 55
Route points ................................ 52
Save........................................... 54
Simulation................................... 56
Starting navigation ....................... 57
S
Navigation
Block .......................................... 73
Interim destination ....................... 72
No GPS reception ....................41, 57
POI on your route......................... 74
Skip route point ........................... 73
Skip stage................................... 73
Start........................................... 57
Starting navigation ....................... 41
Unblock....................................... 73
Navigation view .............................. 85
New destination.............................. 29
O
Options.......................................... 23
P
POI
Direct Access ............................... 35
in a city....................................... 34
nationwide................................... 32
nearby........................................ 31
Show.......................................... 84
POI ............................................... 31
POI on your route ........................... 74
Product info.................................... 83
Safety information........................... 15
Screen........................................... 11
Search for POI
Direct Access ............................... 35
in a city ....................................... 34
nationwide................................... 32
nearby ........................................ 31
Search for POI ................................ 31
Service ............................................7
Settings
2D auto zoom .............................. 85
2D map: show street names
3D auto zoom .............................. 85
Basic settings............................... 85
Brightness day ............................. 88
Brightness night ........................... 88
Calculation of the next stage.......... 90
Calibration................................... 83
Consider traffic information............ 89
Current map ................................ 83
Direct Access ............................... 84
Distance format............................ 88
Factory settings............................ 83
Ferries ........................................ 90
Info when crossing borders ............ 86
Interim destination ....................... 85
Map 2D: Orientation
Motorways................................... 90
POI............................................. 84
Product info ................................. 83
Recalculate Route......................... 77
Route profile................................ 89
- 90 - Index
Page 93

User Manual MobileNavigator 6
Show altitude and speed................ 86
Show conditional speed limits......... 87
Show duration of journey............... 86
Show lane info ............................. 87
Show remaining distance............... 86
Show signposts............................ 86
Show speed limits......................... 87
Show time of arrival...................... 86
Speed monitoring......................... 87
Speed profile ............................... 89
Speed-dependent volume .............. 88
Time format................................. 88
TMC............................................ 77
Recalculate Route...................... 77
Tuning ..................................... 77
Toll roads.................................... 90
Traffic information........................ 77
Tuning........................................ 77
Type of route............................... 89
Volume ....................................... 18
Warnings outside built-up areas...... 87
Warnings within built-up areas ....... 87
Settings......................................... 82
Show altitude and speed .................. 86
Show conditional speed limits ........... 87
Show duration of journey ................. 86
Show lane info................................ 87
Show remaining distance.................. 86
Show signposts............................... 86
Show speed limits ........................... 87
Show time of arrival ........................ 86
Simulation.................................56, 57
Skip route point.............................. 73
Skip stage...................................... 73
Software keyboard .......................... 20
Speed monitoring............................ 87
Speed profile.................................. 89
Speed-dependent volume................. 88
Structure of the manual ..................... 6
Support ........................................... 7
Symbols used in this manual...............6
Display........................................ 11
Entry field.................................... 11
Icon............................................ 11
Screen ........................................ 11
Terminology ................................... 11
Terms............................................ 11
Time format.................................... 88
TMC
Avoid Traffic Jam.....................75, 77
Follow Traffic Information .........75, 77
Information Selection...............75, 76
Recalculate Route......................... 77
Settings ...................................... 75
Symbols...................................... 20
TMC Settings................................ 77
Tuning ...................................77, 79
TMC .............................................. 20
TMC .............................................. 74
Toll roads....................................... 90
Trade marks.....................................7
Traffic information
Avoid Traffic Jam.....................75, 77
Follow Traffic Information .........75, 77
Information Selection...............75, 76
Recalculate Route......................... 77
TMC Settings...........................75, 77
Tuning ...................................77, 79
Traffic information......................20, 74
Tuning........................................... 77
Type of route.................................. 89
U
Unblock ......................................... 73
Used Terms.................................... 11
V
Voice command............................... 39
Volume.......................................... 18
T
Take me home................................ 39
Terminology
Button ........................................ 11
Dialog window.............................. 11
Index - 91 -
W
Warnings outside built-up areas ........ 87
Warnings within built-up areas.......... 87
Warranty..........................................7
 Loading...