

Page 1
CAUTION
Operator’s Manual
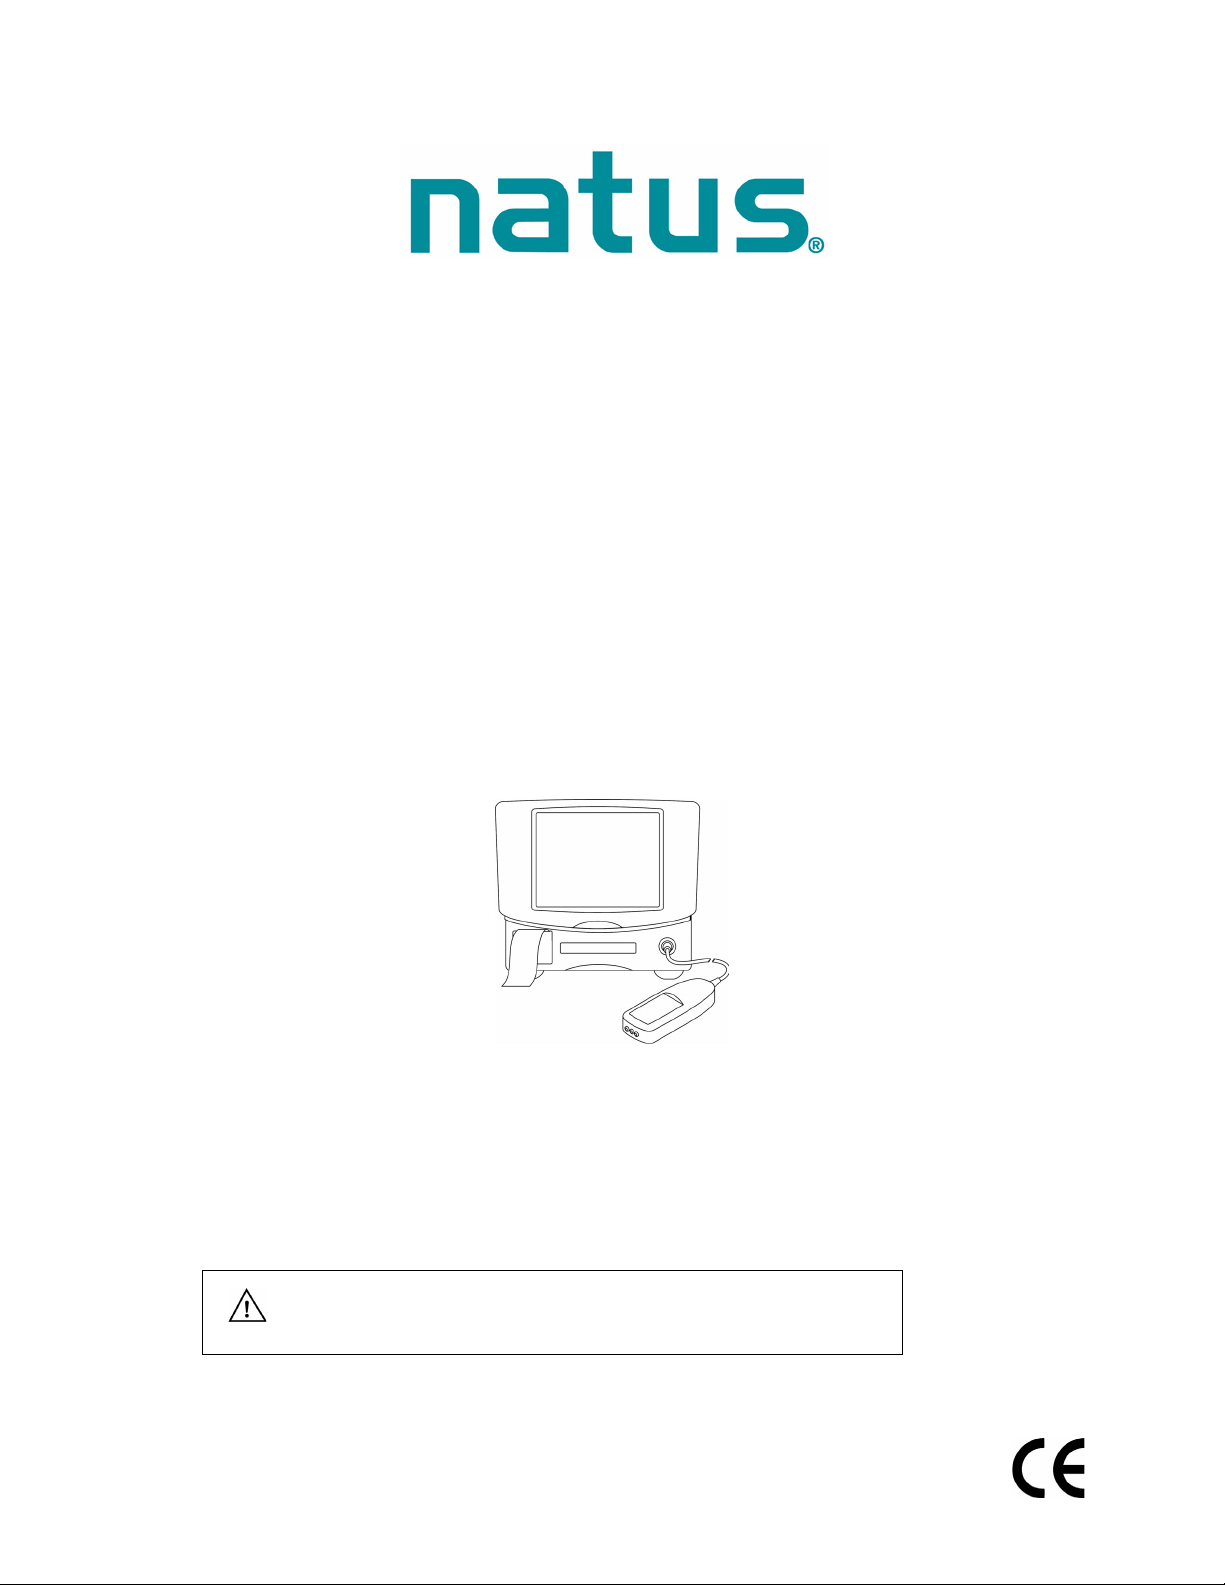
OLYMPIC CFM 6000
Version 2
Read and be familiar with this manual before operating this device.
To ensure operator, technician, and patient safety, use only as
specified in this manual.
602053A
DCN: 08-0175
0086
Page 2

Page 3

Product Manufacturer:
Natus Medical Incorporated
5900 First Avenue South
Seattle, WA 98108 USA
Toll-free: 1-800-308-8684 (US/Canada)
Phone: +1-650-802-0400 (international)
Customer Service Fax: +1-650-802-6620
Technical Service Fax: +1-650-802-8680
Any product vigilance related communications per 93/42/EEC Article 10 should be referred to:
European Union Authorized Representative
Natus Europe GmbH
Bärmannstrasse 38
D-81245 München, Germany
The information in this manual is subject to change without notice.
No part of this manual may be photocopied, reproduced, translated, or reduced to any electronic medium without the express
written permission of Natus Medical Incorporated.
All tradenames and trademarks mentioned herein are property of their respective owners.
The CFM 6000 software described in this manual is ©2003–2008 Natus Medical Incorporated.
© 2008 Natus Medical Incorporated. All rights reserved.
Page 4

Page 5

Contents
Introduction . . . . . . . . . . . . . . . . . . . . . . . . . . . . . . . . . . . . . . . 1
Indications for Use. . . . . . . . . . . . . . . . . . . . . . . . . . . . . . . . 1
Warnings and Precautions . . . . . . . . . . . . . . . . . . . . . . . . . .2
Conventions . . . . . . . . . . . . . . . . . . . . . . . . . . . . . . . . . . . . . 3
Symbols . . . . . . . . . . . . . . . . . . . . . . . . . . . . . . . . . . . . . . . . 3
CFM 6000 System . . . . . . . . . . . . . . . . . . . . . . . . . . . . . . . . . . 5
CFM 6000 Components. . . . . . . . . . . . . . . . . . . . . . . . . . . . 5
CFM Cart . . . . . . . . . . . . . . . . . . . . . . . . . . . . . . . . . . . . . . . . .6
CFM Cart Components . . . . . . . . . . . . . . . . . . . . . . . . . . . . 6
Using the CFM Cart. . . . . . . . . . . . . . . . . . . . . . . . . . . . . . .7
Olympic CFM 6000 Data Displays. . . . . . . . . . . . . . . . . . . . . 8
CFM Tracings . . . . . . . . . . . . . . . . . . . . . . . . . . . . . . . . . . .8
EEG Tracings. . . . . . . . . . . . . . . . . . . . . . . . . . . . . . . . . . . . 9
Impedance Tracings. . . . . . . . . . . . . . . . . . . . . . . . . . . . . . . 9
Starting and Stopping the CFM 6000 . . . . . . . . . . . . . . . . .10
Preparing the Patient — Applying Electrodes . . . . . . . . . .10
Operating the CFM 6000 . . . . . . . . . . . . . . . . . . . . . . . . . . .13
Understanding the CFM 6000 Screen . . . . . . . . . . . . . . . .13
Buttons . . . . . . . . . . . . . . . . . . . . . . . . . . . . . . . . . . . . 14
Alerts . . . . . . . . . . . . . . . . . . . . . . . . . . . . . . . . . . . . . . 14
Customizing Settings . . . . . . . . . . . . . . . . . . . . . . . . . . . . . 15
Changing Predefined (Standard) Markers . . . . . . . . . . 15
Changing the CFM Tracing Display Style . . . . . . . . . 16
Adjusting the System Date/Time . . . . . . . . . . . . . . . . 16
Language . . . . . . . . . . . . . . . . . . . . . . . . . . . . . . . . . . . 16
Changing the Operation Mode . . . . . . . . . . . . . . . . . .16
Changing Data Entry Capitalization . . . . . . . . . . . . . . 17
Changing Patient Information to Display . . . . . . . . . . 17
Recording a Session. . . . . . . . . . . . . . . . . . . . . . . . . . . . . . 17
Viewing an EEG Tracing. . . . . . . . . . . . . . . . . . . . . . . . . .18
Navigating an EEG Tracing . . . . . . . . . . . . . . . . . . . .19
Changing EEG Speed and Amplitude . . . . . . . . . . . . . 20
Entering Patient Information . . . . . . . . . . . . . . . . . . . . . . .20
Using Markers . . . . . . . . . . . . . . . . . . . . . . . . . . . . . . . . . . 21
Placing Markers . . . . . . . . . . . . . . . . . . . . . . . . . . . . . 21
Editing a Placed Marker . . . . . . . . . . . . . . . . . . . . . . . 22
Finding Placed Markers . . . . . . . . . . . . . . . . . . . . . . .22
Viewing Marker Details . . . . . . . . . . . . . . . . . . . . . . . 23
Opening a Session for Viewing . . . . . . . . . . . . . . . . . . . . .23
Using the CFM 6000 Printer . . . . . . . . . . . . . . . . . . . . . . .23
Printing a Tracing . . . . . . . . . . . . . . . . . . . . . . . . . . . .23
Replacing Printer Paper . . . . . . . . . . . . . . . . . . . . . . . 25
Managing Files . . . . . . . . . . . . . . . . . . . . . . . . . . . . . . . . .26
Archiving a Session to CD . . . . . . . . . . . . . . . . . . . . . 26
Restoring Sessions from CD . . . . . . . . . . . . . . . . . . . . 27
Deleting Files . . . . . . . . . . . . . . . . . . . . . . . . . . . . . . . 27
Checking Hard Disk Space . . . . . . . . . . . . . . . . . . . . .28
OLYMPIC CFM 6000 Operator’s Manual i
Page 6

Cleaning and Maintenance . . . . . . . . . . . . . . . . . . . . . . . . . 28
Cleaning the CFM 6000 and the CFM Cart . . . . . . . . . . . 28
Tightening the Tilt Adjustment Hinge . . . . . . . . . . . . . . . 29
Updating Software . . . . . . . . . . . . . . . . . . . . . . . . . . . . . . 29
Disposing of Product . . . . . . . . . . . . . . . . . . . . . . . . . . . . 30
Assembling the CFM Cart . . . . . . . . . . . . . . . . . . . . . . . . . . 30
Troubleshooting . . . . . . . . . . . . . . . . . . . . . . . . . . . . . . . . . . 33
Service . . . . . . . . . . . . . . . . . . . . . . . . . . . . . . . . . . . . . . . . . . 34
Replacement Parts . . . . . . . . . . . . . . . . . . . . . . . . . . . . . . . . 34
Contact Information . . . . . . . . . . . . . . . . . . . . . . . . . . . . . 34
CFM 6000 Catalog Items . . . . . . . . . . . . . . . . . . . . . . . . . 35
Standards and Compliance . . . . . . . . . . . . . . . . . . . . . . . . . 35
Specifications. . . . . . . . . . . . . . . . . . . . . . . . . . . . . . . . . . . . . 36
ii OLYMPIC CFM 6000 Operator’s Manual
Page 7

Introduction
This manual provides the necessary information for installing, maintaining, and operating
the Olympic CFM
function monitor (CFM) that monitors the state of the brain by acquiring an EEG signal
and passing it through a special algorithm to display a continuous view of global
electrocortical activity. It is suited for use in the NICU, ICU, PICU, emergency room,
operating room, and clinical research laboratory.
The CFM 6000 should be used only under the direct supervision of a licensed medical
practitioner who is trained in its operation and safe use.
Indications for Use
The Olympic CFM 6000 is intended to be used by a variety of clinicians for the acquisition
of electroencephalography (EEG) signals that can be used in conjunction with other
clinical data to:
Monitor the state of the brain.
Determine and monitor long-term the neurological status of patients who may have
6000 and the Olympic CFM cart. Olympic CFM 6000 is a cerebral
suffered an hypoxic-ischemic event.
Assist in the clinical management and treatment of a patient by monitoring
neurological status to indicate how the treatment affects the neurological status.
Assist in the prediction of neurological outcome.
Monitor and record frequency and intensity of seizures to assist in the management of
anticonvulsive therapy.
Assist in the prediction of the severity of hypoxic-ischemic encephalopathy (HIE) and
the long-term outcome in infants who have suffered an hypoxic-ischemic event.
OLYMPIC CFM 6000 Operator’s Manual 1
Page 8
WARNING
CAUTION
Warnings and Precautions
Electrical Grounding:
Always connect the system power cord directly to a hospital-grade
grounded power receptacle with a functional ground.
To avoid electrical shock hazard, never touch the open rear-panel
connectors and the patient at the same time. Always place connector
covers over their receptacles when not in use.
Internal Voltage:
To avoid electrical shock hazard, always turn off the CFM 6000 and unplug
its power cord before cleaning the outer surfaces of the device or
disassembling the device. For cleaning instructions, see Cleaning and
Maintenance on page 28.
Liquids & Gases:
Never use liquids on or near the CFM 6000. Fluid seepage into internal
components creates a potential shock hazard. Never operate the system if
internal components have been exposed to fluid.
Cables:
Use of cables that exceed the lengths or are of different types than noted
in the Specifications on page 36, may result in increased radio emissions
or decreased RF immunity.
Operation:
Only properly trained medical and service personnel should operate and
maintain the CFM 6000 and the CFM cart. As appropriate, maintain any records
that indicate training attendance and completion.
This device should only be used under the direct supervision of a licensed
medical practitioner.
Explosion hazard. Do not use in the presence of flammable anesthetics.
Service:
Only technically qualified personnel should perform service procedures. On
request, Natus Medical Incorporated will provide circuit diagrams, parts lists,
and instructions to assist qualified technical personnel to repair the CFM 6000
to the printed circuit board (PCB) level. To obtain service, see Service on
page 34.
Detachable Components:
Never autoclave the CFM 6000 or its components as doing so will cause
damage and void the warranty.
Electromagnetic Interference:
Operation of this device may affect or be affected by other nearby equipment
due to electromagnetic interference (EMI). If this occurs, place the devices
further apart, re-orient the device cabling, or plug the devices into separate
outlet circuit branches.
Medical electrical equipment needs special precautions regarding EMC and
needs to be installed and put into service according to the EMC information
provided in the accompanying documents.
Portable and mobile RF communications equipment can affect medical
electrical equipment.
2 OLYMPIC CF M 6000 Operator’s Manual
Page 9
CAUTION
NOTE
#
NOTICE!
CAUTION
WARNING
CONT’D
USB Devices:
To meet electrical safety requirements, USB devices used with the CFM 6000
must meet the requirements of IEC 60601-1. Alternately, if line connected and
approved to an appropriate national standard other than 60601-1, a separation
device must be used (refer to IEC 60601-1-1).
To avoid electrical shock hazard, ensure that the cover is securely placed over
the USB port connector when not in use, and never touch the connector and
patient simultaneously.
Product Disposal:
The fluorescent lamp in the LCD display contains a small amount of Mercury.
Follow your local ordinances and regulations for disposal.
Conventions
The following conventions are used in this manual:
Table 1
Convention Description
Conventions
Provides additional information to clarify a point.
Indicates situations that could result in damage to the equipment.
Indicates situations that, if not avoided, could result in minor to moderate injury
to the patient or operator.
Indicates situations that, if not avoided, could result in serious injury or death
to the patient or operator.
Symbols
The following symbols are used on the CFM 6000, its accessories, or packaging.
Table 2
Symbols
Symbol Definition Symbol Definition
Alternating current (AC) Equipotential ground
Atmospheric pressure Latex free
Attention, consult accompanying
documents
Authorized representative Manufacturer
Defibrillation proof type-BF and
complies with IEC Publication 601
Catalog number Network/Ethernet port
Lot — the manufacture r’s production
identification number
Mouse — this port is intended only
for use in Service mode
OLYMPIC CFM 6000 Operator’s Manual 3
Page 10
Table 2
Symbols, Continued
Symbol Definition Symbol Definition
Cart tilt Percent humidity
Cart raise/lower Mains power ON
CE mark Mains power OFF
Electrical shock hazard Serial number
Package of three electrodes,
Shipping specification
Silver/Silver Chloride (Ag/AgCl)
Bag of 20 electrode sets:
20 packages per bag
Box of 100 electrode sets: five
Single use only — discard after use,
do not sterilize
Storage specification
bags of electrodes per box
Foot activated Temperature
Fuse USB port — see the USB port
precautions on page 3
Ground Use by the expiration date
Input/output — RS-232 in/out serial
port
Use indoors at normal room
temperature and keep out of direct
sunlight
Keyboard — this port is intended
only for use in Service mode
4 OLYMPIC CF M 6000 Operator’s Manual
Page 11
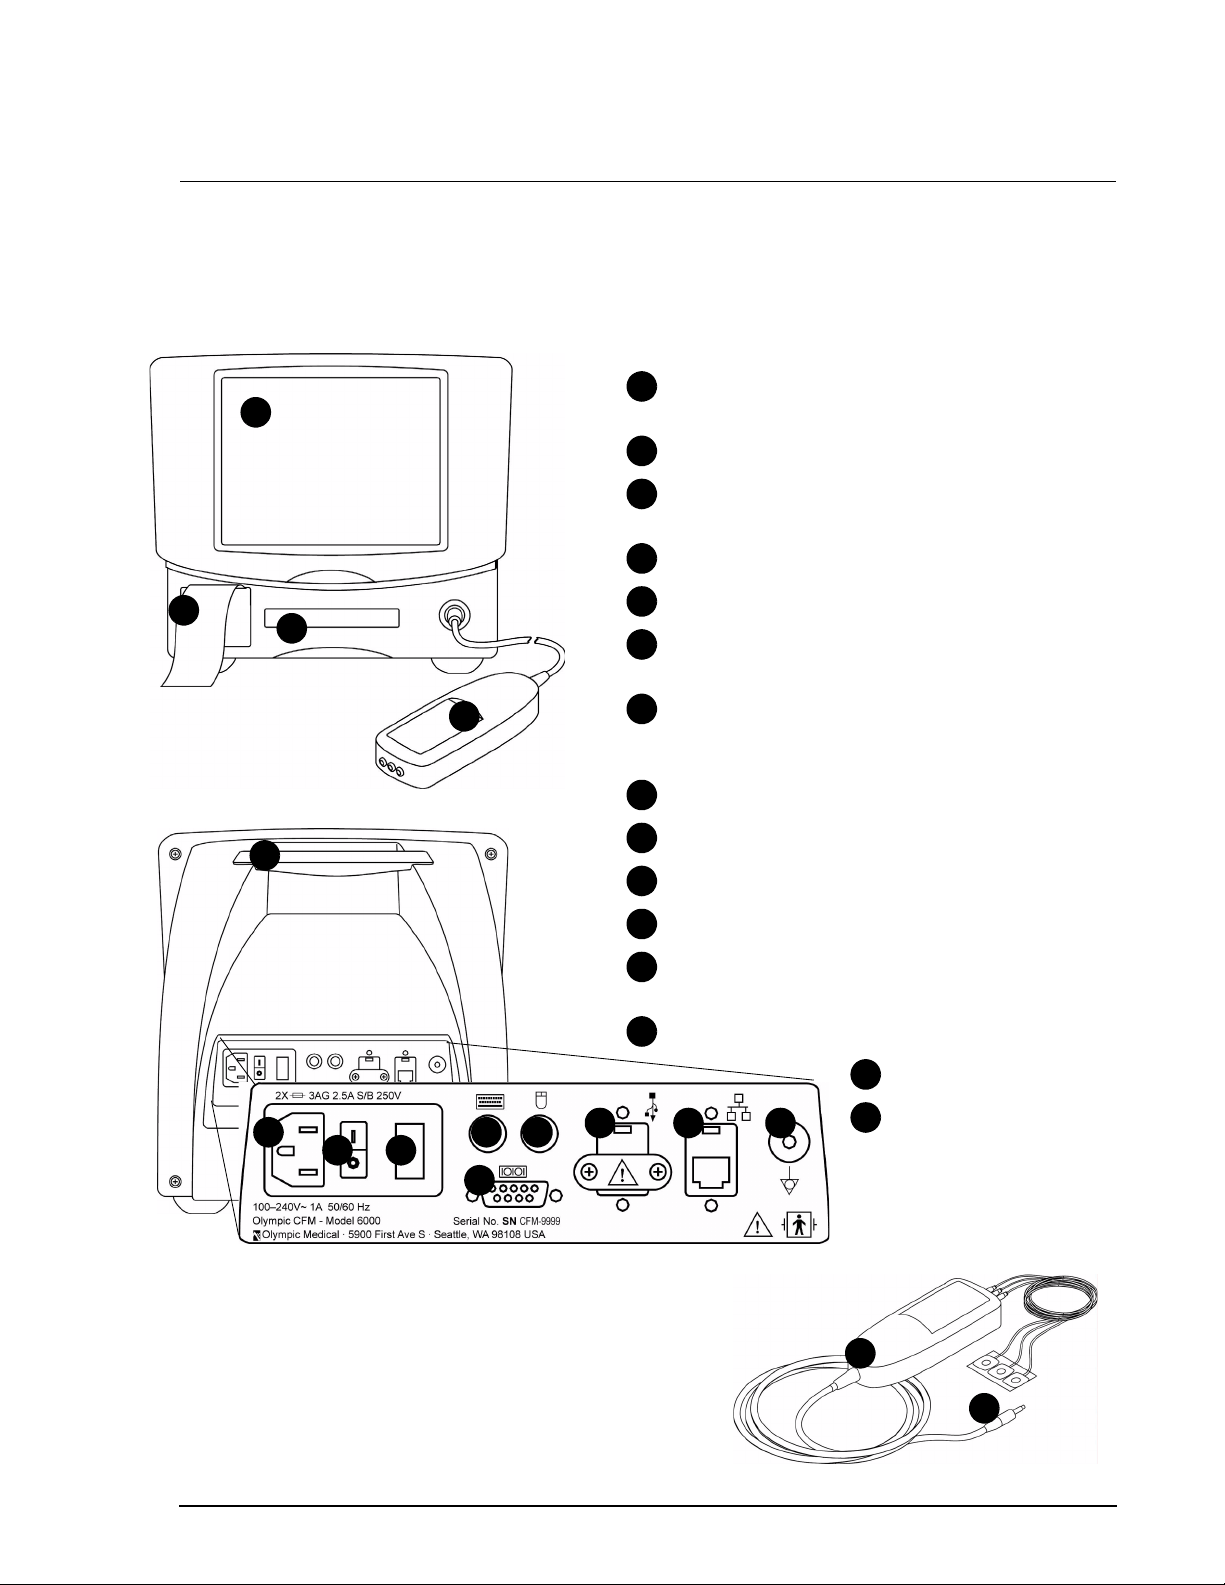
Touch screen: see Understanding the CFM 6000 Screen
on page 13
Printer: see Replacing Printer Paper on page 25
CD-RW drive: for archiving patient files to compact disc
and for updating software
Amplifier module: connects electrodes to the CFM 6000
Handle: use to carry the CFM 6000
Power cord receptacle: connects the CFM 6000 to a
hospital-grade electrical outlet via power cord
Power on/off switch: use to turn the CFM 6000 power ON
or OFF (see Starting and Stopping the CFM 6000 on
page 10)
Fuses
Serial I/O port: for future use
Keyboard port: for service use only
Mouse port: for future use only
USB port: for future use; shown with cover in place (see
the USB port precautions on page 3)
Network/Ethernet port: for future use
Equipotential ground
Electrodes with touch-proof
connectors: connect to the
amplifier module (hydrogel
electrodes shown)
1
2
34567891011
12
13
14
15
5
2
3
4
1
6
7 8
9
10 11
12 13 14
4
15
CFM 6000 System
The CFM 6000 comes fully assembled with all the accessories (electrodes, NuPrepTM skin
prep gel, printer paper, clips, and power cord) required to get started. Just plug in the power
cord and the amplifier module, and the device is ready to operate.
CFM 6000 Components
OLYMPIC CFM 6000 Operator’s Manual 5
Page 12
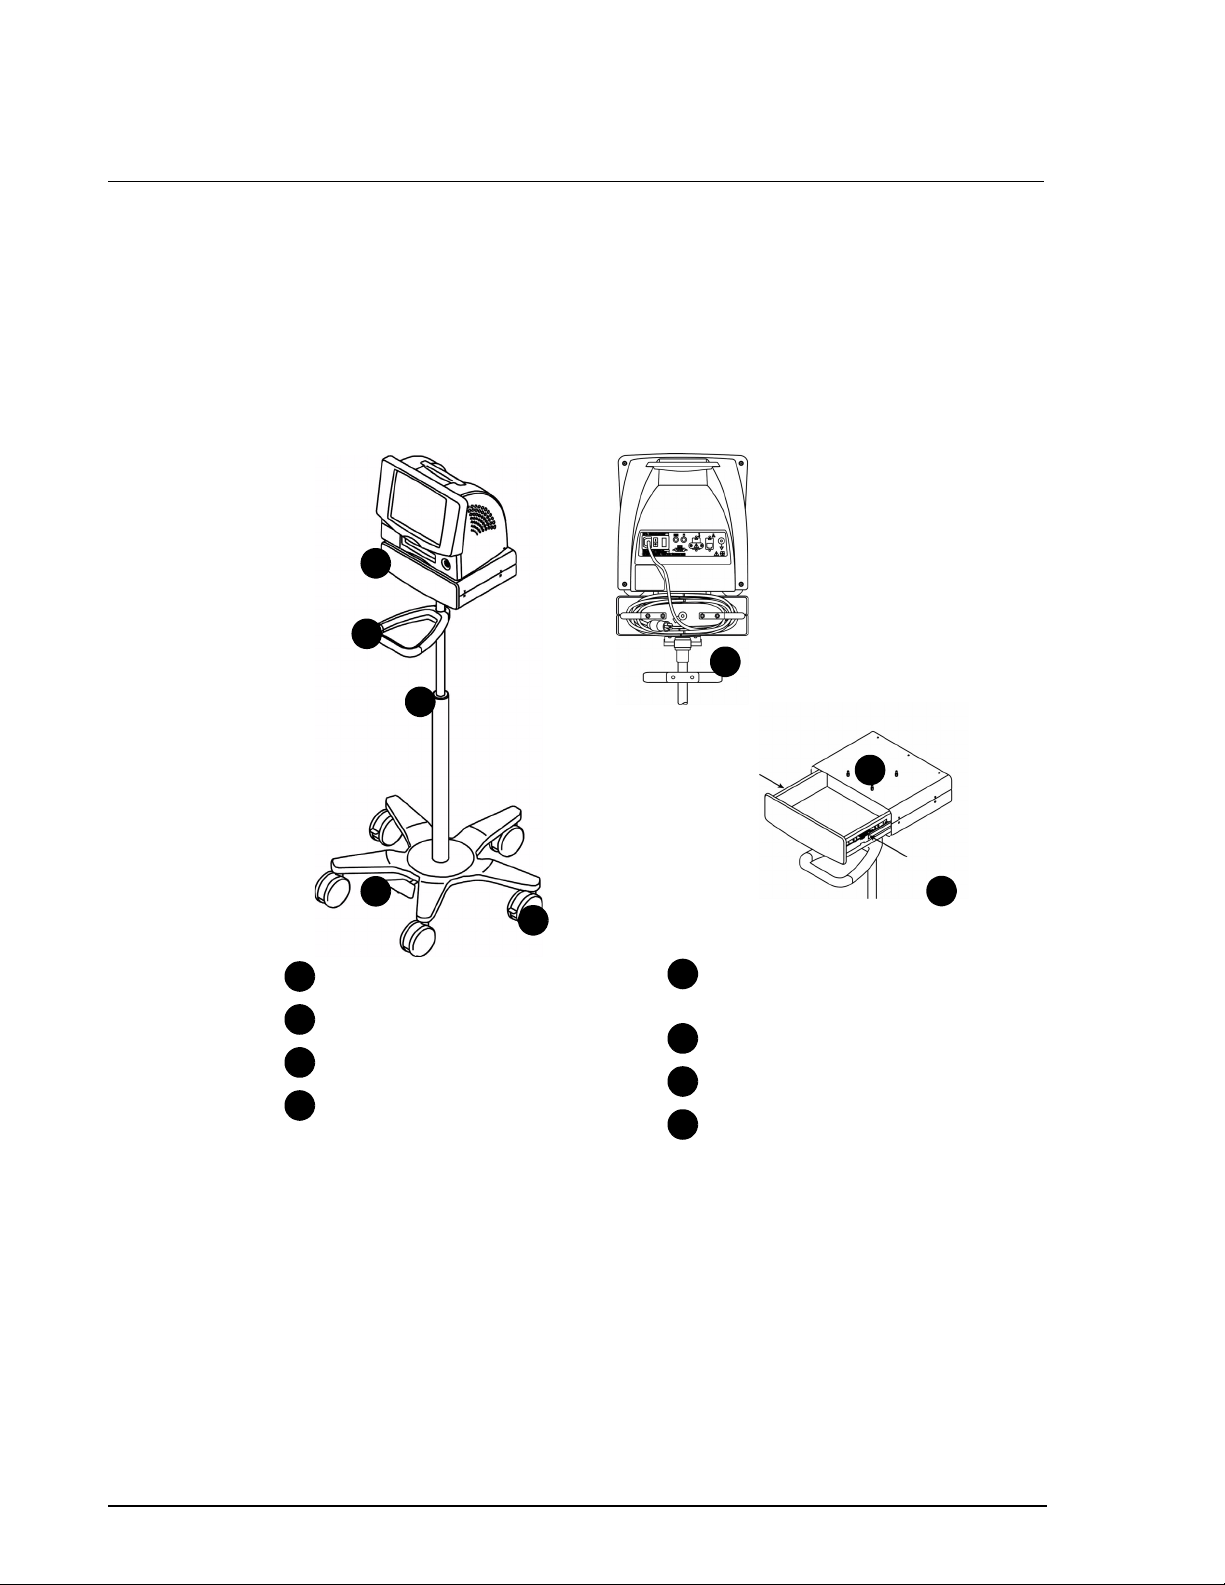
CFM Cart
Storage drawer
Handle
Post
Foot pedal – for height adjustment
1
2
3
4
2
5
4
1
Footprint base with five caster wheels,
two locking
Power cord clamp and cleats
Thumbscrews with spacers
Drawer slides
5
6
7
8
6
7
8
3
CFM Cart Components
The optional Olympic CFM cart is intended for use with the Olympic CFM 6000. The
cart makes it easy to use, move, and store the CFM
related accessories. For ordering information, see
6000 and provides storage space for
CFM 6000 Catalog Items on page 35.
For information about assembling the CFM cart, see Assembling the CFM Cart
on page 30.
6 OLYMPIC CF M 6000 Operator’s Manual
The storage drawer provides space for the following CFM 6000 accessories:
Amplifier module
Several packages of electrodes
A tube of electrode cream or NuPrep
Several blank CD-R discs
Skin Prep Gel
™
A roll of thermal imaging paper
Page 13
CAUTION
press up
to unlock
press down
to lock
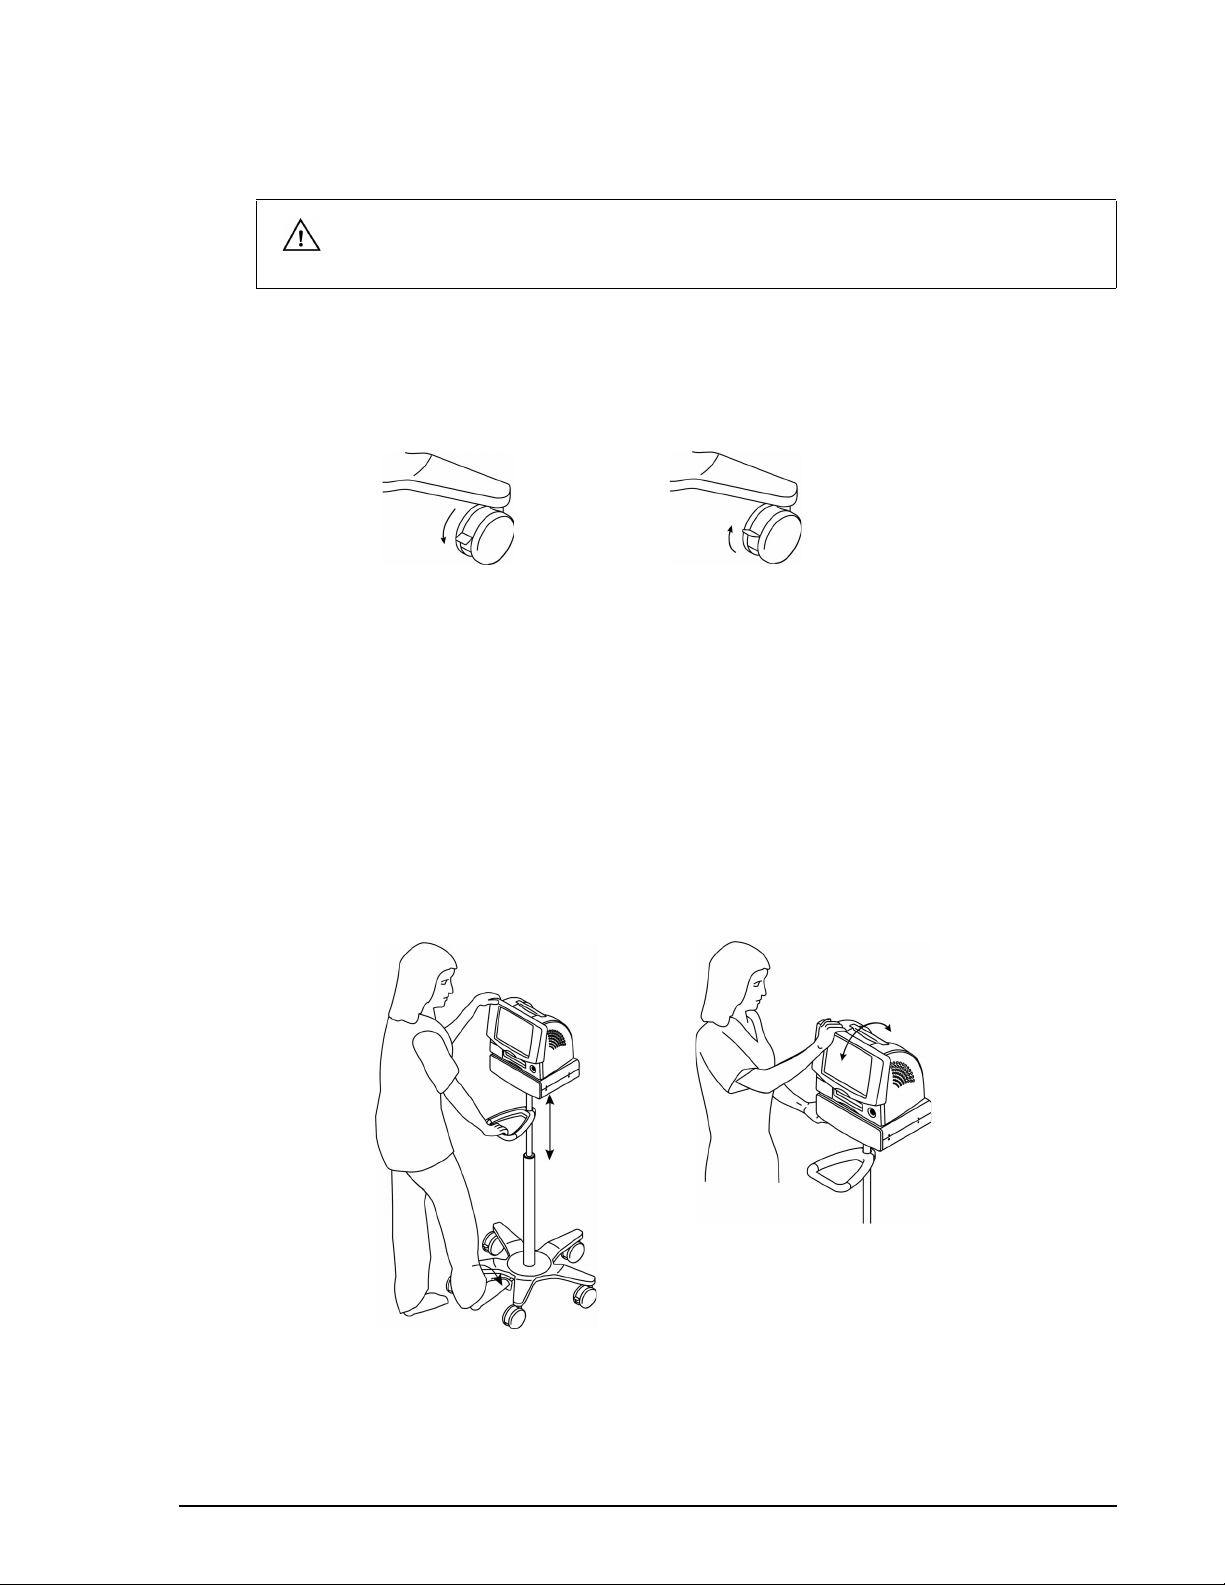
Using the CFM Cart
Keep the CFM cart caster wheels locked during use to prevent the CFM 6000 from pulling
on the electrode connections.
Periodically inspect the caster wheels to ensure that the locking mechanism works correctly.
To lock/unlock the two locking caster wheels:
Press the wheel lock down to lock the wheel.
Pull the wheel lock up to unlock the wheel.
Figure 1
Locking/unlocking the caster wheels
To adjust the height:
Press the foot pedal while pulling the handle up to raise the device.
Press the foot pedal while pushing the handle down to lower the device.
To tilt the drawer assembly and the CFM 6000:
With one hand on top of the CFM 6000 and the other on the bottom of the drawer,
firmly tilt the drawer forward or backward.
The drawer tilts up to 15º in either direction (up/down), allowing you to easily
change the viewing angle and optimize touch-screen access from a seated or
standing position.
Figure 2
Adjusting the height and tilt
To maneuver the CFM cart:
Use the handle to move or maneuver the cart.
OLYMPIC CFM 6000 Operator’s Manual 7
Page 14

To use the cart to transport the CFM 6000:
1 Unplug the power cord of the CFM 6000 from the power receptacle, and wrap the
excess cord around the cleats on the back of the drawer (see Figure 17 on page 33).
2 Ensure that the two locking wheels are in the unlocked position (see Figure 1).
3 Ensure that the CFM 6000 is not in a tilted position.
4 Ensure that the drawer is fully closed and latched.
5 Using the cart handle, push the cart forward.
Olympic CFM 6000 Data Displays
The Olympic CFM 6000 records and displays three types of tracings: CFM, EEG, and
impedance.
CFM Tracings
The CFM tracing indicates the overall electrocortical background activity of the brain by
recording amplitude-integrated electroencephalography (aEEG). The EEG signal is
filtered, rectified, and semi-logarithmically compressed. It is then displayed at a very slow
chart speed, 1
a low value indicates low activity. The CFM
tracing.
mm per minute. A high reading on the chart indicates a high level of activity;
6000 screen shows three hours of a CFM
The CFM 6000 may be applied at any time, or used continuously, to determine the
neurological status of a patient. A minimum of 20
make a determination of neurological status. However, when there is a question about the
presence of seizures, or potential changes in neurological status as a result of illness or
other clinical treatment, it is generally best to observe the record for a longer, continuous
period. The exact length of this period depends on the frequency of the seizures, or the
condition or treatment being monitored. The CFM may record continuously for up to 30
days.
A CFM tracing is created by the continuous up and down movement of a digital pen
responding to subtle variations in a brain's electrocortical activity. A tracing rises in
response to increased activity and drops in response to lowered activity according to a
fixed algorithm. With the pen moving at a very slow rate across the screen, 1 pixel width
of CFM tracing reflects about 15 seconds of data.
Previous versions of the Olympic CFM 6000 offered only one view, CFM Basic. The CFM
Basic view shows a series of vertical lines of different lengths, each of uniform density.
This view shows no variation in the color of the 'ink.' CFM
new and more sensitive view, CFM Insight. This view shows each vertical line with
variable density that reflects the relative amount of time the brain spends at different levels
of electrical activity, more closely approximating the trace generated by a CFM 5330
(Lectromed). Sometimes these two views are nearly identical; in other cases, Insight
provides a clear gray-scale effect where a dark central band of activity can be seen,
surrounded by lighter bands of activity above or below. This can be a valuable aid to
identification of artifacts and can help identify certain conditions more clearly. The
CFM
6000 now offers both views and the capability to toggle between them. The
following illustration shows a tracing with both views.
minutes of trace should be observed to
6000 version 2.0 introduces a
8 OLYMPIC CF M 6000 Operator’s Manual
Page 15

Figure 3
Basic and Insight views
EEG Tracings
The EEG tracing shows the underlying EEG detail that relates to the cursor position on the
CFM tracing. The EEG cursor on the CFM tracing represents 15 seconds. The EEG
window shows between 3 and 14 seconds of the EEG tracing at a time, depending on the
EEG speed setting. The EEG can help confirm seizures and other brain activity. Display
the EEG at a lower amplitude setting to see more detail; display it at a higher amplitude
setting to show only major events. For information about changing speed and amplitude
settings, see
The following illustration shows a CFM tracing with underlying EEG data.
Figure 4
Changing EEG Speed and Amplitude on page 20.
CFM tracing with EEG detail
Impedance Tracings
The impedance tracing indicates the connection quality (contact between the patient and
the electrodes) and distinguishes noise. Impedance greater than 20
electrodes should be reapplied or replaced. Occasional random spikes might occur when
electrode conductivity changes for brief moments. The Lead-Off alert appears and sounds
if the impedance becomes greater than 20
kΩ for more than three seconds.
Tip: To maintain good impedance when recording over long periods of time, it might be
necessary to reattach or replace the electrodes periodically.
The following illustration shows a CFM tracing with the associated impedance tracing.
Figure 5
CFM tracing with impedance
kΩ indicates that the
OLYMPIC CFM 6000 Operator’s Manual 9
Page 16

NOTE
#
NOTE
#
CAUTION
NOTE
#
Starting and Stopping the CFM 6000
To start the CFM 6000:
1 Attach the power cord to the rear panel of the device, and then connect it to a
hospital-grade electrical outlet. If the CFM 6000 is on a cart, lock the cart wheels.
2 Connect the amplifier module cord to the CFM 6000.
It is recommended that you connect the amplifier module to the CFM 6000 before placing
electrodes on the patient.
3 Press the power switch to the ON (|) position, and wait for the CFM 6000 main
screen to appear.
To shut down the CFM 6000:
If recording is in process, first touch 9
1 Press the CFM 6000 power switch to the OFF (O) position, and unplug the power
RECORD
to stop recording.
cord from the electrical outlet.
2 Remove the electrodes from the patient and discard the electrodes.
To avoid electrical shock hazard, ensure that the cover is placed over the USB port connector
when not in use, and never touch the connector and patient simultaneously. For additional USB
cautions, see page 3.
3 Unplug the amplifier module, and clean the device and module according to the
instructions in Cleaning and Maintenance on page 28.
Preparing the Patient — Applying Electrodes
Read the warnings and cautions on page 2 before operating this device.
To obtain assistance or reorder items, see Service on page 34 and Replacement Parts on
page 34.
Required items:
Electrodes — hydrogel or low-impedance needle
Skin prep gel, such as NuPrep
2x2 or 4x4 gauze pads (if using NuPrep skip prep gel)
10 OLYMPIC CFM 6000 Operator’s Manual
brand (if using hydrogel electrodes) (part no. 62060)
™
Page 17

CAUTION
NOTICE!
NOTE
#
Adhesive tape, Coban
wrap, or Kling® wrap (if using low-impedance needle
™
electrodes)
Medications may affect the patient’s record. Anticonvulsants or sedatives may transiently
suppress the CFM record. Administration of drugs or other clinical events should be noted
to facilitate interpretation of the record.
Poor electrode contact may cause high impedance. To ensure good electrode contact,
always prepare the patient’s skin before attaching the electrodes.
For instructions and warnings relating to cleaning agents and skin prep gel (for example,
alcohol wipes or NuPrep), consult the product instructions.
1 Verify that the amplifier module is connected to the CFM 6000 and that the
CFM 6000 is turned on.
2 Determine whether to place electrodes biparietally or frontally and whether to use
hydrogel or low-impedance electrodes, and then locate the areas of contact on the
patient’s head according to one of the following placement methods:
Depending on the type of electrodes used, color coding indicated below may not be applicable.
The BLACK electrode is the ground; the YELLOW electrode is placed on the patient’s right (left
when facing the patient); and the RED electrode is placed on the patient’s left (right when facing
the patient).
Placement method 1 — Biparietal placement for hydrogel or low-impedance
needle electrodes:
Figure 6
Biparietal placement
a Locate the vertex and identify a point 25 mm anterior to it. The BLACK
electrode (1) is to be placed at this location.
b Locate a point approximately 50 mm posterior to the vertex. The RED electrode
(2) is to be placed approximately 37 mm to the patient’s left of this point (right
if facing the patient).
c The YELLOW electrode (3) is to be placed approximately 75 mm to the
patient’s right of the red electrode (left if facing the patient).
OLYMPIC CFM 6000 Operator’s Manual 11
Page 18

NOTE
#
NOTE
#
NOTE
#
Placement method 2 — Frontal placement for hydrogel electrodes (use this
method if hair interferes with biparietal placement of hydrogel electrodes):
Figure 7
a The BLACK electrode (1) is to be placed at the center of the patient’s forehead
Frontal placement
as close to the hairline as possible.
b The YELLOW electrode (2) is to be placed approximately 37 mm to the
patient’s right of the center electrode (left if facing the patient).
c The RED electrode (3) is to be placed approximately 37 mm to the patient’s left
of the center electrode (right if facing the patient).
3 Visually examine the electrode package for damage before opening it. Remove the
electrode set from the package, and examine the electrodes and leads. If damage is
apparent, discard the set.
4 Clean and dry the areas of the patient’s head where the electrodes are to be placed.
Do not use alcohol for cleaning: alcohol can increase impedance.
It is recommended that you prep and place one electrode at a time when possible.
Where hair might present a barrier to good electrode contact, either shave the area or tamp
down the hair with water during cleaning, and then pat dry.
5 If using hydrogel electrodes, prepare the areas of contact prior to placement, as
follows:
a Apply a small dot of skin prep gel, such as NuPrep, to each area of contact. You
can use a 2x2 or 4x4 gauze pad to apply the NuPrep.
Always apply the skin prep gel directly to the skin. Never apply it directly to an electrode
because it can increase impedance.
b Vigorously rub the NuPrep over the skin for 20 to 30 seconds, removing the
surface layer of dead skin to improve conductivity. Ensure that the entire surface
area to be covered by the electrode is prepared.
c Thoroughly remove the NuPrep with a new, clean gauze pad, and make sure the
area is completely dry.
6 After the area is prepared, attach the electrodes, as follows:
For low-impedance electrodes, insert the needle subcutaneously up to the plastic
hub and secure as you would an IV.
For hydrogel electrodes, run a finger around the edges of the electrode for 20 to
30 seconds to ensure a secure seal.
12 OLYMPIC CFM 6000 Operator’s Manual
Page 19

NOTE
#
NAME or ID
DOB: 00/00/00 00:00
00/00/00
00:00:00
CFM
1005025105
IMPEDANCE
PLAYBACK RECORDING
0
100 50 25 10 5 0
00/00/00 00:00 DAY 0:00 00/00/00 00:00 DAY
9
RECORD
MARKER EEG PATIENT TOOLS
20 10 0
20100
00/00/00 00:00 DAY 0:00 00/00/00 00:00 DAY
marker
00:00
Patient display
Alert messages
System date/time
Trace day/time
Marker label
Impedance
display
Recording pen
Marker cursor
EEG cursor
(when the EEG
is displayed)
Marker time
CFM display
µV
k
Ω
LEAD OFF
7 Form a strain relief to minimize motion artifact by collecting the three leads into a
bundle and tying the bundle into a small, loose loop near the electrodes. The strain
relief loop should be as close to the electrodes as possible, while remaining isolated
from them. Secure the loop to the patient’s head with
desired, create a second strain relief loop near the amplifier end of the leads.
8 Connect the leads to the amplifier module, matching them to the corresponding
color-coded receptacles, and clip the amplifier module to the patient’s bedding.
Operating the CFM 6000
Read the warnings and cautions on page 2 before operating this device.
To obtain assistance or reorder items, see Service on page 34 and Replacement Parts on
page 34.
Understanding the CFM 6000 Screen
The following illustration shows the location of major types of information on the
CFM
6000 screen.
Coban™ or Kling® wrap. If
Figure 8
Main screen
OLYMPIC CFM 6000 Operator’s Manual 13
Page 20

Buttons
The following table describes the functions of buttons on the CFM 6000 screen. For
information about buttons used to navigate EEG tracings, see Viewing an EEG Tracing on
page 18.
Button Function
Print. Touch to print the displayed tracing.
Help. Touch to open Help.
Previous/next marker. Touch to move the display to the previous or next
off-screen marker. Touch and hold to jump to the beginning or end of the
tracing.
If you scroll during recording and want to return to
and hold the next marker button.
Auto-scroll. Touch to automatically scroll backward or forward through the
tracing. Touch again to stop scrolling. When recording, the display returns
from playback to real-time when the end of the trace is reached.
Scrollbar. Touch or drag the bar or touch the buttons to scroll backward or
forward through the tracing. Touch and hold to scroll quickly. When
recording, the display returns from playback to real-time when the end of the
trace is reached.
If you scroll during recording and want to return to
and hold the forward button until the end of the trace is reached or drag the
scrollbar all the way to the right.
real-time display, touch
real-time display, touch
EEG cursor or marker position. Touch to scroll the EEG cursor or a marker
cursor backward or forward in 15-second increments.
Close. Touch to close the active window.
More. Touch to expand the active window, showing additional functions if
available.
Less. Touch to reduce the active window. Some functions might no longer
show.
Alerts
Alerts are status messages that appear in color-coded boxes at the top of the CFM 6000
screen: green for normal, yellow for caution, red for stop and take action. For red alerts, a
dialog box describes the action that is needed. For these alerts, take the appropriate action
and press OK to close the dialog box, stop the alarm, and resume recording.
The possible alerts are the following:
Alert Meaning
CALIBRATING The system is performing a calibration check. A c
occurs each time recording is started. It is important to wait for
calibration to complete before attempting any other tasks.
CALIBRATION The calibration check failed.
replaced.
The amplifier module needs to be
alibration check
CHECK SUM The amplifier non-volatile RAM is corrupted. Th
needs to be replaced.
COMM ERROR A communication error occurred between the amplifier module
14 OLYMPIC CFM 6000 Operator’s Manual
an
d the CFM 6000. D
Replace the module if the problem is not corrected.
isconnect and reconnect the amplifier module.
e amplifier module
Page 21

Alert Meaning
CONNECTION The connection to the CFM 6000 is lost. The amplifier module might
have come loose. Check the connections to the amplifier and to the
patient.
LEAD OFF An electrode is disconnected, or there is poor contact between
the electrode and the patient. Press SILENCE to silence the alarm
for three minutes; press DISABLE to disable alarms for the remainder
of the session.
LOADING xx% A session is loading from the hard disk.
MAX SIZE The maximum size of the recording session has been reached.
OVERLOAD (Appears as a red line at the top of the CFM tracing.) The input level
PLAYBACK (Appears only during recording.) The data displayed on the screen
POWER INTERRUPT Power was interrupted or the system reset. Press
RECORDING CFM recording is in progress.
The maximum recording session is 30 days.
to the system is too high, and the CFM trace is locked above 100
µvolts.
is not real time. This alert appears when you scroll through the
tracing or when you view a static EEG tracing.
YES
to reload
the file/session. Press
NO
to return to the start screen.
Customizing Settings
Before beginning to record a patient session, customize the settings that are appropriate to
your facility. You can customize the following:
Predefined (standard) markers
CFM tracing display style
System date/time
Language
Operation mode (only for Natus Medical Incorporated service personnel)
Capitalization used for data entry
Types of patient information to be displayed while recording or viewing a patient
session
Changing Predefined (Standard) Markers
Markers are used to indicate the occurrence of significant events on CFM traces. You can
customize the standard markers that come with the CFM
facility. Changing a standard marker does not change any markers that were previously
applied to CFM tracings.
To change standard markers:
1 Touch
2 Touch
TOOLS
, and then touch
MARKERS
SETTINGS
.
, and then touch a marker label and use the displayed keyboard
buttons to edit it.
3 Touch
ACCEPT
to save the change, and close the
OLYMPIC CFM 6000 Operator’s Manual 15
6000 to meet the needs of your
TOOLS
window.
Page 22

NOTE
#
Tip: To confirm your changes and verify that all the predefined markers are correct for
your facility, touch
window.
MARKERS
and confirm the marker labels in the Standard Markers
Changing the CFM Tracing Display Style
Tracings can be displayed according to preference. You can choose between CFM Insight
(gray-scale) or CFM Basic (solid) and between light on a dark background or dark on a
light background.
To change the tracing display style:
1 Touch
2 Touch
and between
3 When finished, close the
TOOLS
, and then touch
DISPLAY
INSIGHT
SETTINGS
, and choose between
(gray-scale) and
TOOLS
window.
.
DARK TRACING
BASIC
(solid).
and
LIGHT TRACING
Adjusting the System Date/Time
1 Touch
2 Touch
3 Touch
touch
4 Touch
Time.
5 Touch
touch
6 Touch
touch
7 When finished, close the
TOOLS
DATE/TIME
TIME ZONE
ACCEPT
DAYLIGHT SAVINGS TIME
DATE
ACCEPT
TIME
ACCEPT
, and then touch
SETTINGS
.
, and select the format for the date.
to set the time zone relative to Greenwich Mean Time, and then
.
to activate or deactivate Daylight Savings
and use the provided calendar controls to set the system date, and then
.
and use the provided clock controls to set the system time, and then
.
TOOLS
window.
Language
To see CFM 6000 controls in a language other than English, customize the language
setting.
To change the default language:
1 Touch
2 Touch
After you install or update the system software, you need to reselect your preferred language.
3 When finished, close the
TOOLS
, and then touch
LANGUAGE
SETTINGS
.
, and select the desired language.
TOOLS
window.
Changing the Operation Mode
Service mode is reserved for use by Natus Medical Incorporated representatives. A
password is required to change the mode.
16 OLYMPIC CFM 6000 Operator’s Manual
Page 23

NOTE
#
Changing Data Entry Capitalization
On-screen controls are provided for entering data such as patient information and
marker labels. You can choose how you want this data to be capitalized by setting the
data entry options.
To set data entry options:
1 Touch
2 Touch
3 When finished, close the
TOOLS
, and then touch
OPTIONS
SETTINGS
.
, and select the type of capitalization to use.
TOOLS
window.
Changing Patient Information to Display
You can select the types of patient information to display on the CFM 6000 main screen
during session recording or viewing. Use this feature to suppress the display of all
patient information if you wish to protect the confidentiality of the patient.
To select patient information to display:
1 Touch
2 Touch
3 Select up to two types of patient information (such as patient name and date of
TOOLS
, and then touch
OPTIONS
SETTINGS
.
, and then enlarge the window:
birth) to display on the main screen, or touch to clear all fields to protect patient
confidentiality.
4 When finished, close the
TOOLS
window.
Recording a Session
As you record a patient’s brain activity, the data is stored on the internal hard disk and the
tracing is displayed on the screen. The default name for the file on the hard disk is cfm
followed by the system date and time, in the format: cfm_mm_dd_yy_hh_mm. You can
enter a patient name to make the file easier to locate for future viewing or archiving to CD.
See
Entering Patient Information on page 20 for instructions on entering patient
information.
The
RECORD
in place, you can pause and resume recording as often as desired, up to the maximum
recording session of 30 days.
button acts as a toggle to start and pause recording. Keeping the electrodes
The CFM 6000 hard drive can store approximately 20,000 hours of data. If you try to
save a file when the hard drive is full, an error occurs. For information about checking
available disk space or removing files to free up space, see Managing Files on page 26.
To monitor and record a patient’s brain activity:
1 Verify that the amplifier module is connected to the CFM 6000, the CFM 6000 is
turned on, and the electrode leads are connected to the amplifier module. The
electrodes should be attached to the patient as described in Preparing the Patient —
Applying Electrodes on page 10.
2 Touch
prompted to resume the session or start a new one. Touch
current session or
RECORD
. If a patient session is already displayed on the screen, you are
NEW
to start a new session.
RESUME
to continue the
OLYMPIC CFM 6000 Operator’s Manual 17
Page 24

CAUTION
NOTE
#
Alternatively, you can enter patient information and then start recording from the
Patient window. Touch
PATIENT
, touch
NEW
, and then touch
YES
to create a new
session. Enter patient information as described in Entering Patient Information on
YES
page 20, and then touch
END
active, touch
to terminate that session so that you can enter new patient
to start recording. If a different patient session is
information.
3 Wait for the yellow
RECORDING
green
Allow the calibration check to complete before touching controls to perform tasks.
CALIBRATING
alert at the top of the screen to change to a
alert before proceeding.
During recording, you can do the following:
Pause and then resume recording. If you resume a session, a restart marker is placed
after a 10-minute gap on the CFM tracing.
Enter patient data. (See Entering Patient Information on page 20.)
Print the tracing displayed on the screen. (See Printing a Tracing on page 23.)
Scroll through the tracing to review it. If you scroll during recording, the display
changes to playback mode. To return to the real-time display, scroll forward to the end
of the tracing. (See
Place markers on areas of interest. (See Using Markers on page 21.)
Suppress the display of patient information on the main screen to protect patient
confidentiality. (See
Understanding the CFM 6000 Screen on page 13.)
Changing Patient Information to Display on page 17.)
To stop or pause recording:
Touch 9
RECORD
.
To resume recording:
1 Touch
2 In the Resume Recording window, touch
RECORD
.
RESUME
To end a patient session:
1 Touch 9
2 Touch
It is recommended that you archive (backup to CD) each session when recording is complete.
See Archiving a Session to CD on page 26 for more information.
RECORD
PATIENT
.
, and then touch
END
.
Viewing an EEG Tracing
You can display the underlying EEG data that is associated with a CFM tracing. The EEG
can help confirm seizures and other brain activity or help identify artifacts.
During recording, you can monitor the live EEG, or you can view EEG data recorded
earlier in the session. You can change the EEG speed and amplitude to see more or less
detail.
18 OLYMPIC CFM 6000 Operator’s Manual
.
Page 25

DAY
00/00/00
00:00:00
EEG (µV)
9
LIVE
50 0 -50
500-50
EEG Display
Pen
EEG Position
Indicator
EEG cursor position
To view the EEG tracing:
With the patient’s CFM tracing displayed, touch
EEG
. When you open the EEG view
while recording when there is more the three hours of CFM data, the CFM 6000
ches to playback mode, so the displayed EEG data is not real-time.
swit
To monitor live EEG data while recording, touch
LIVE
to return to real-time display.
Navigating an EEG Tracing
To locate an area in the EEG tracing to view, you can touch the CFM tracing at the desired
location or use the navigation controls in the EEG window.
Figure 9 shows the EEG window. This window shows between 3 and 14 seconds of EEG
tracing, depending on the EEG speed setting. By default, it shows six seconds at 30
mm/second. See Changing EEG Speed and Amplitude o
changing the speed setting.
Figure 9
EEG window
n page 20 for instructions on
The following table describes the buttons and controls you can use to navigate the EEG
tracing.
Button Function
EEG cursor position. Touch to scroll the EEG cursor backward or forward in
the CFM tracing in 15-second increments.
Auto-scroll. Touch to automatically scroll backward or forward through the
EEG tracing. Touch again to stop scrolling.
Scroll about 2 seconds. Touch to scroll the EEG tracing backward or forward
in approximately 2-second increments. Touch and hold to scroll quickly
Scroll about 1/4 second. Touch to scroll the EEG tracing backward or
forward in approximately 1/4-second increments. Touch and hold to scroll
quickly.
When the EEG tracing is displayed, a red cursor marks the associated area in the CFM
tracing. This cursor represent 15 seconds of activity. The position of the EEG tracing
within the cursor is represented on the EEG position indicator, as illustrated below:
OLYMPIC CFM 6000 Operator’s Manual 19
Page 26

Figure 10
EEG Position Indicator
The EEG position indicator shows the following:
The pink area in the position indicator represents the 15 seconds marked by the cursor
in the CFM tracing.
The dark horizontal bar in the position indicator illustrates where the displayed EEG
tracing occurs within the cursor in the CFM tracing.
The length and width of the dark horizontal bar changes as EEG speed and amplitude
are changed. See
Changing EEG Speed and Amplitude on page 20 for instructions on
changing the speed and amplitude.
Changing EEG Speed and Amplitude
Modify the speed and amplitude to increase or decrease the level of detail displayed in the
EEG tracing.
To change the EEG speed or amplitude:
1 With the EEG tracing displayed, touch to enlarge the EEG window and display
the available options.
2 Select the desired speed in mm/sec. Increasing the speed decreases the amount of
EEG tracing displayed in the window; decreasing the speed increases the amount of
tracing displayed in the window.
3 Select the desired amplitude in µVolts. Amplitude indicates the upper and lower
boundaries of the tracing. Decreasing the amplitude setting shows more detail;
increasing the amplitude setting shows more major events.
4 Touch to reduce the EEG window and view the EEG tracing with the modified
settings.
Entering Patient Information
Patient information identifies a recording session, and includes patient name, patient ID,
date of birth, and time of birth. You can enter patient information before, during, or after
20 OLYMPIC CFM 6000 Operator’s Manual
Page 27
NOTE
#
recording. The patient name is used as the file name on the hard disk; if no patient name is
entered, a default file name is used. (See Recording a Session on
Once you enter patient ID, it cannot be changed.
page 17.)
If you do not want patient information to be displayed on the main screen while recording
or vie
wing a patient session, see Changing Patient Information to Display o
n page 17.
To enter patient information:
1 Touch
2 In the Patient window, touch a field to enter edit mode and use the provided controls
PATIENT
.
to enter data for each field desired.
3 Touch
ACCEPT
.
You can use the Patient feature to create a new session, end a session, or open a stored
session, as follows:
Use this To do this:
END
NEW
OPEN
4 When finished, close the Patient window.
To end the active session so that you can start a new session or open
another session.
To create a new patient session.
To open a stored session. When you select the session you want from the
list, the Information window opens briefly and then closes while the session
opens. If the session is long, it might take several minutes to open. To avoid
opening multiple files in sequence, take care to select a single session from
the list.
Once the session is open and the tracing is displayed, touch
again to enter patient information.
PATIENT
Using Markers
Markers can be used to identify events and areas of interest on a CFM tracing, such as
seizure activity, or to record treatments that affect brain activity, such as the administration
of anticonvulsant medication. Markers are indicated on a tracing by a dotted green line.
You can place markers while recording or reviewing a tracing, edit markers that are
alrea
dy placed, find markers that are already placed, and view details about placed
markers.
Placing Markers
You have the option of using a predefined (standard) marker or creating a customized,
single-use marker. You can place a marker while recording or later while reviewing a
session.
To place a marker:
1 Locate the general area of the tracing where you want to place the marker. If you are
reviewing a session, you might need to scroll to the area.
2 Touch
MARKERS
.
OLYMPIC CFM 6000 Operator’s Manual 21
Page 28

3 Touch
STANDARD
to use a predefined marker, or touch
CUSTOM
to create a new,
single-use marker. A red marker cursor appears at the right edge of the tracing.
4 Move the red marker cursor to the place of interest by touching the spot in the CFM
tracing. Fine-tune the placement by using the marker position scroll buttons to move
backward or forward in 15-second increments.
To place a marker on the next location added during recording, touch to the right of
the CFM pen.
5 If you are using a standard marker, touch the desired marker label. If you are adding
a custom marker, touch-type an event label (up to 11 characters) and description (up
to 40 characters), and then touch
6 When finished, close the Markers window.
ADD MARKER
.
Editing a Placed Marker
You can change the event label and description for markers that have already been placed
on a CFM tracing. The original event name and placement time and location are retained
in the marker’s permanent history. The marker location cannot be changed or deleted.
You can change the marker information directly
Tip: Si
nce markers cannot be deleted once placed, you can use one of the following
procedures to notate any markers that might have been placed in error.
from the tracing or from a list.
To change marker information from the tracing:
1 Touch the event label above the CFM tracing.
2 In the Edit Markers window, touch the label or description field and use the
displayed keyboard buttons to make the changes, and then touch
3 When finished, close the Edit Markers window.
ACCEPT
.
To change a marker from a list:
1 Touch
2 Sort the list by touching the column headers, if desired.
3 Touch the label of interest, and then touch
4 In the Edit Markers window, touch the label or description field, use the displayed
keyboard buttons to make the changes, and then touch
5 When finished, close the Edit Markers window.
MARKERS
, and then touch
LIST
.
EDIT
.
ACCEPT
.
Finding Placed Markers
At times you might need to find a marker that is not visible on the screen. Use one of the
following methods to find an off-screen marker.
To find an off-screen marker with scroll buttons:
Touch the previous or next off-screen marker button under the CFM tracing:
To find a marker from a list:
1 Touch
22 OLYMPIC CFM 6000 Operator’s Manual
MARKERS
, and then touch
LIST
.
Page 29

NOTE
#
NOTE
#
2 Sort the list by touching the column headers, if desired.
3 Scroll through the list and touch the marker of interest to move the display to that
marker. The marker is highlighted between red lines.
4 Close the Markers window.
Viewing Marker Details
When you see a marker of interest on a tracing, it might be helpful to see details such as
the description, the exact time the marker was placed, the exact position in the tracing, and
the original label if it was changed.
To view marker details:
On the CFM tracing, touch the marker label above the tracing.
- Or -
Touch
EDIT
MARKERS
.
, and then touch
LIST
. Select the marker of interest and touch
Opening a Session for Viewing
You can open any session that is saved on the hard disk at any time to view it. To restore
a session that is archived to a CD, see
If you wish to protect patient confidentiality, you can suppress the display of patient information
while viewing the patient session. See Changing Patient Information to Display on page 17 for
instructions.
To open a session from the hard disk:
1 Touch
PATIENT
, and then touch
is already open. In this case, touch
and then touch
2 Select the desired session from the list. If the session is long, it might take a few
PATIENT
again to select the session you want to view.
minutes to open.
To avoid opening multiple sessions in sequence, take care to select a single session from the
list.
- Or -
Restoring Sessions from CD on page 27.
OPEN
. If
OPEN
is not available, a patient session
END
and then
YES
to close the current session,
1 Touch
2 Select the desired session from the list, and then touch
TOOLS
, and then touch
FILES
.
DISPLAY
. If the session is
long, it might take a few minutes to open.
Using the CFM 6000 Printer
You can use the internal printer to print the portion of a tracing that is displayed on the
screen. You can also specify which combination of graphs — CFM, EEG, impedance
— to include in the print.
Printing a Tracing
When you print a tracing, only the portion displayed on the screen is printed.
OLYMPIC CFM 6000 Operator’s Manual 23
Page 30

To print a tracing:
1 Use the positioning buttons until the desired CFM and impedance tracing is
displayed.
2 If you want to include a specific area of EEG data, touch
EEG
and use the EEG
positioning buttons until the desired data is displayed.
3 Touch the print button at the top left of the screen: . The Print Graphs window
displays a print preview.
4 Touch to enlarge the window, and select the options to include:
PRINT INFORMATION
: Includes patient/file name and ID, patient’s date and
time of birth, print date and time, CFM software version, and amplifier module
serial number.
CFM GRAPH
EEG GRAPH
IMPEDANCE GRAPH
MARKER TEXT
: Includes only the markers and marker text that are displayed
on the screen. The marker text prints after the graphs.
5 Select the print size:
MAXIMUM SIZE
: When selected, this option prints graphs in a horizontal row.
When this option is not selected, graphs are printed in a vertical stack. You can
choose to print graphs vertically only when you select two graphs for printing.
INSIGHT
: When selected, this option prints graphs in gray-scale. When this
option is not selected, graphs are printed in the basic (solid) style.
6 Touch
PRINT
. After the data prints, carefully tear off the paper.
24 OLYMPIC CFM 6000 Operator’s Manual
Page 31

Slot
Roller
4
Place the paper in the printer
enclosure. With the paper feeding
from the bottom, ensure that it is
over the roller and slides down
through the slot in the service
access door.
Close the printer door, and then
close the service access door.
4
5
Open the service access door.
Press the bottom of the black switch
to open the printer door ( ).
1
2
3
3
2
1
Printer Door
Service Access Door
5
Replacing Printer Paper
Required items:
Thermal paper roll (for reorder information, see Service on page 34)
To replace the printer paper:
OLYMPIC CFM 6000 Operator’s Manual 25
Page 32

NOTE
#
NOTE
#
Managing Files
The hard disk in the CFM 6000 can store approximately 20,000 hours of data. If the hard
disk is full, an error occurs when you attempt to save another session. In this case, you can
archive sessions to CD and delete them from the hard disk to free up disk space. To
periodically check the percentage of free space on the hard disk, see
Space on page 28.
Although your facility can define standards as to when to archive sessions for inclusion in
patient records, it is recommended that you archive each session as you complete recording
it.
If you want to view sessions that are archived on a CD, you can restore them to the
6000 or use the CFM 6000 Viewer to restore and view them on a Microsoft®
CFM
Windows
computer.
®
Archiving a Session to CD
Archived patient sessions can be:
Included in the patient’s permanent record.
Stored on the facility network.
Shared with colleagues for diagnosis and other purposes. You can remove confidential
patient identification on archived files.
Checking Hard Disk
Restored and viewed on a Microsoft Windows computer by using the
CFM
6000 Viewer.
Required items:
Blank standard recordable CDs (CD-R), rated at least 24x speed, 700 MB
Long files might span multiple CD-Rs.
To archive sessions to CD:
You must stop recording before starting to archive sessions.
1 Touch
2 Scroll through the list and select the sessions to archive. Sort the list by touching the
TOOLS
, and then touch
FILES
.
column headers, if desired. If you need to view a session first, select only that
session and then touch
DISPLAY
. Sessions that are already archived to CD are
indicated by a CD icon ( ).
3 Touch
ARCHIVE
. The file names, number of sessions, and number of required CDs
are listed.
4 If patient sessions are to be shared with colleagues, protect patient confidentiality by
touching
SAVE PATIENT NAME AND ID
to clear it.
5 Touch
6 Insert a CD when prompted, and then touch
OK
to open the CD tray.
OK
you are prompted for each blank CD.
26 OLYMPIC CFM 6000 Operator’s Manual
. If the sessions span multiple CDs,
Page 33

NOTE
#
7 Label each CD when you remove it from the CD tray.
8 After archiving is complete, touch
PRINT
to print the list of archived sessions.
Restoring Sessions from CD
When you want to view a patient session that is archived on CD, first restore it to the
CFM
6000 hard disk.
To restore a patient session:
1 Touch
2 Touch
3 Select one or more files to restore. Sort the list by touching the column headings, if
TOOLS
OPEN TRAY
Sessions recorded on an prior version of CFM 6000 are indicated by
files are converted to version 2.x when they are restored.
, and then touch
to open the CD tray, insert the CD, and touch
RESTORE
.
CLOSE TRAY
CFM 1X
. These
desired.
4 Touch
5 Touch
START RESTORE
OK
to verify the sessions to be restored. If the archive spans multiple CDs,
.
you are prompted to insert each CD. When the restore is complete, verify that the
sessions were restored properly.
Deleting Files
After you archive sessions to CD, you can delete the files from the hard disk. If you delete
a file in error, you can recover it. You must stop recording the current patient session
before deleting files.
.
Permanently removing files from the hard disk to free up space is a 2-step process: deleting
the files and then removing them from the trash.
To delete files from the hard disk:
1 Touch
2 Select the files you want to delete. If you need to view a session first, select only
that session and then touch
3 Touch
TOOLS
DELETE
, and then touch
DISPLAY
, and then touch
FILES
.
.
OK
to delete the files.
To recover files deleted in error:
1 Touch
2 Touch
TOOLS
TRASH
, and then touch
SYSTEM
.
, and select the files you want to recover. If
TRASH
is unavailable,
first end the current patient session.
3 Touch
UN-DELETE
, and then touch OK to recover the files.
To permanently remove files from trash:
1 Touch
TOOLS
, touch
SYSTEM
, and then touch
TRASH
. If
TRASH
is unavailable,
first end the current patient session.
2 Select the files to be permanently removed, and then touch
DELETE ALL
to permanently remove all the files from the trash.
DELETE
. Touch
OLYMPIC CFM 6000 Operator’s Manual 27
Page 34

WARNING
CAUTION
NOTICE!
Checking Hard Disk Space
If you do not delete files after you archive patient data or do not permanently remove
files from trash, you might need to periodically check the amount of hard disk space
used so that you know when you need to free up space.
To check the amount of free disk space:
Touch
TOOLS
, touch
SYSTEM
disk space is in use, and how much space is used by deleted files in trash.
Cleaning and Maintenance
To avoid electrical shock hazard, always turn off the power and unplug the device prior
to cleaning the device.
To avoid damage to internal electronics and wiring, do not allow liquids to enter the
CFM 6000 enclosure or its vents.
Never autoclave the CFM 6000 or its components as doing so will cause damage and
void the warranty.
Only technically qualified personnel should perform service procedures. On request, Natus
Medical Incorporated will provide circuit diagrams, parts lists, and instructions to assist
qualified technical personnel to repair the CFM 6000 to the printed circuit board (PCB) level.
To obtain service, see Service on page 34.
To prevent bio-contamination, clean exterior of CFM per hospital guidelines.
, and then touch
HARD DISK
. You can see how much
Use of sodium hypochlorite (bleach) may damage the instrument surfaces.
Use only mild cleaning detergents; other cleaning agents may damage the exterior of the
CFM 6000 and the CFM cart.
Dilute cleaning agents according to their label instructions.
Cleaning the CFM 6000 and the CFM Cart
Required items:
Soft cloth
Mild cleaning disinfectant (for example, Virex
Sporicidin
cleaners)
®
To clean the CFM 6000:
1 Turn off the power and unplug the power cord before cleaning the outer surfaces of
the CFM 6000.
2 Using a soft cloth dampened with mild detergent, wipe the exterior of the
CFM 6000, including the touch screen, amplifier module, and power cable.
To clean the CFM Cart:
Using a soft cloth dampened with mild detergent or disinfectant, wipe the CFM cart,
including the handle, foot pedal, and both interior and exterior regions of the drawer.
Tb, Virustat®, Coverage®,
™
28 OLYMPIC CFM 6000 Operator’s Manual
Page 35

Use an Allen wrench to
tighten the screws on the
tilt adjustment hinge
Tightening the Tilt Adjustment Hinge
If the tilt adjustment of the CFM cart is loose — allowing the CFM 6000 to move backward
and forward too easily — the tilt adjustment hinge requires tightening.
Required items:
Allen wrench, small
To tighten the tilt adjustment hinge:
Using the Allen wrench, tighten the screws on the tilt adjustment hinge (see Figure 11).
Figure 11
Tightening the tilt adjustment hinge
Updating Software
Natus Medical Incorporated periodically updates and releases software for the CFM 6000.
To identify the software version on your CFM 6000:
Touch , and then touch
The About CFM message box shows the version and build number for the software
currently installed on your CFM 6000.
ABOUT CFM
.
To update software when version 2.0 or later is already installed:
1 Touch
2 Touch
3 Place the software disk in the CD tray, touch
TOOLS
OPEN TRAY
START UPDATE
4 After the CFM 6000 restarts, select from the following choices:
INSTALL
reformats the hard disk. Use this option when you have archived all patient
sessions and want to clean off the hard disk. You need to re-enter all custom
settings under
UPGRADE
it is recommended that you archive all patient sessions before upgrading.
FIELD SERVICE
servicing the device in accordance with the Olympic CFM 6000 Service
Manual.
, touch
SYSTEM
, and then touch
S/W UPDATES
.
to open the CD tray.
CLOSE TRAY
, and then touch
. The system automatically restarts.
. This option removes all system settings and patient sessions, and
TOOLS, SETTINGS
when you use this option.
. This option retains system settings and patient sessions. However,
. This option is to be used only when qualified personnel are
OLYMPIC CFM 6000 Operator’s Manual 29
Page 36

NOTE
#
Align the key
CALIBRATE. This option recalibrates the touch screen.
CANCEL. This option cancels the software update process. You need to restart
CFM 6000
the
by turning it off and back on.
Disposing of Product
The CFM 6000 and the CFM cart do not have any components that require special disposal
precautions, except as stated for electrodes. Thus, product disposal should be handled
according to national laws and regulations.
The fluorescent lamp in the LCD display contains a small amount of Mercury. Follow
local ordinances and regulations for disposal.
Assembling the CFM Cart
Required items:
Cart base with foot pedal, screws, and Allen wrenches (5/32 in. and 3/16 in.)
Cart post with handle and drawer assembly
To assemble the CFM cart:
1 Remove the cart components from the shipping boxes.
2 Place the cart post upside-down, with the drawer resting on the floor.
If the post is not at a 90º angle to the drawer, the tilt adjustment may require tightening.
Use the small Allen wrench to tighten the screws on the tilt adjustment hinge, which is
located on the underside of the drawer.
3 Place the cart base, wheels facing up, onto the post. Align the key on the base with
the key slot on the stand (see Figure 12).
Figure 12
Placing the cart base onto the post
4 Place the foot pedal on the handle-side of the base. Ensure that the foot pedal label
is facing the drawer, and then use the larger Allen wrench to securely tighten the
two screws (see Figure 13).
30 OLYMPIC CFM 6000 Operator’s Manual
Page 37

Lift the detent levers on both
sides of the drawer as you lift
the drawer up, off the slides.
NOTE
#
Figure 13
Securing the foot pedal
5 Carefully turn the stand over, leveraging the handle and the base.
To place the CFM 6000 on its cart:
1 Remove the drawer from the CFM cart:
a Open the drawer.
b Lift the detent levers on both sides of the drawer slides as you lift the drawer up
and off the slides (see Figure 14).
Figure 14
Removing the drawer
2 Remove the tape securing the thumbscrews, and ensure that the thumbscrew spacers
are not resting on the threads. The spacers should spin freely.
If the thumbscrew spacers rest on the threads, they act as a jam nut, preventing secure
placement of the CFM 6000 on the cart.
3 Place the CFM 6000 on the top of the drawer enclosure, visually aligning the device
to the thumbscrews (see Figure 15). The thumbscrew heads are located inside the
drawer cavity. To maintain balance, tighten the thumbscrews incrementally in a
circular or X-pattern.
OLYMPIC CFM 6000 Operator’s Manual 31
Page 38

First, place the CFM 6000 on the
top of the drawer enclosure,
visually aligning the device to the
thumbscrews.
Next, incrementally tighten
the thumbscrews in a
circular or X-pattern.
With the slides fully extended, place
the drawer down onto the slides.
Each slide locks in position in three
locations and an audible click
sounds.
Figure 15
Placing the CFM 6000 on its cart
4 Place the drawer into its cavity on the CFM cart (see Figure 16):
a Fully extend the slides.
b Place the drawer down onto the slides.
c Slide the drawer into position. An audible click indicates that the drawer is
locked into position. Confirm that the detent lever secures the drawer on both
slides (see Figure 16).
Figure 16
5 Secure the CFM’s power cord to the CFM cart:
a Plug the power cord into the power receptacle on the back of the CFM 6000.
b Unscrew the thumbscrew on the back of the drawer on the CFM cart (see
Installing the drawer
Figure 17). Select a cord clamp — small diameter for a European power cord, or
larger diameter for a North American power cord.
c Place the appropriate cord clamp on your power cord, and then tighten the
thumbscrew.
d Wrap any excess power cord around the cord cleats on the back of the drawer
(see Figure 17).
32 OLYMPIC CFM 6000 Operator’s Manual
Page 39

cord clamp and
thumbscrew
cord cleat
Figure 17
Securing the power cord to the CFM Cart
To check the function of the CFM cart:
1 Confirm that the height of the cart can be adjusted. While stepping on the foot
pedal, pull the handle up, and then push it down to ensure that the pole raises and
lowers (see Figure 2 on page 7).
2 Ensure that the tilt adjustment is firm. Place one hand on top of the CFM 6000 and
the other on the bottom of the drawer, and then firmly tilt the drawer forward and
backward (see Figure 2 on page 7).
3 Ensure that the drawer opens and closes with ease, and that it latches when in the
closed position.
4 Confirm that the two locking caster wheels lock and unlock (see Figure 1 on
page 7).
Troubleshooting
If you have problems when operating the CFM 6000, look in the following table for a
solution. If you cannot find a solution in this table, contact Olympic Medical.
Problem Possible Cause Solution
Screen frozen —
doesn’t respond
Screen is black No power Ensure that the power cord is plugged in and
Paper jam Paper misfeed Ensure that the paper is fed through the
System error Turn the power off, and then on.
If the problem persists, obtain technical
support from your Natus Medical
Incorporated representative.
the power is turned on.
Blown fuse Replace the fuse.
slot in the service access door.
Load the paper according to the
instructions in Replacing Printer Paper on
page 25.
OLYMPIC CFM 6000 Operator’s Manual 33
Page 40

NOTE
#
Problem Possible Cause Solution
Cannot open file Not a CFM file The CFM 6000 can only display files that
are in CFM format.
If a file was compressed using desktop
software, such as WinZip
decompress the file before restoring it to
the
CFM 6000.
File is corrupt Contact Technical Support.
or Stuffit®,
®
Service
Patient name and ID
missing from
restored file
High impedance Electrodes not seated Ensure that the electrodes are firmly adhered
Name and ID were
removed during archive
For confidentiality, patient data was removed
when the patient file was archived to CD-R.
to the patient’s head.
Do not use malfunctioning equipment. Biomedical technicians may perform in-field
service; refer to the Olympic CFM 6000 Service Manual for troubleshooting, repair
procedures, and parts ordering information.
To return the CFM 6000 for service:
1 Contact Natus Medical Incorporated or your local CFM 6000 distributor for return
merchandise authorization (RMA) and a shipping container.
2 Clean the device, and securely package it in the original shipping container, if
possible, and include:
a The completed RMA form.
b A purchase order (PO) number to cover the repair of any device not
under warranty .
3 Ship the equipment prepaid to Natus Medical Incorporated or your local distributor.
Replacement Parts
Use only Natus Medical–approved parts with the CFM 6000.
For a complete list of available parts and accessories, contact Olympic Medical or your
Olympic CFM 6000 distributor.
Contact Information
To order parts and accessories or to obtain service, contact:
In the United States and Canada
Natus Medical Incorporated
Toll-free: 1-800-308-8684 (U.S. and Canada)
Phone: +1-650-802-0400 (international)
Customer Service Fax: +1-650-802-6620
Technical Service Fax: +1-650-802-8680
34 OLYMPIC CFM 6000 Operator’s Manual
Page 41

In Asia and the European Union
Contact your Olympic CFM 6000 distributor.
CFM 6000 Catalog Items
When ordering, provide the item number to the customer service representative.
Table 3
Amplifier module clips, bag of 5 62065
Olympic CFM cart 62080
Electrode cream, 3.5-oz. tube 60119
Electrodes, disk (available only in the United
Electrodes, low-impedance (needle
Electrodes, low-impedance (needle
Electrodes, hydrogel: bag of 20 62050
Electrodes, hydrogel: box of 100 62051
NuPrep™ Skin Prep Paste, 4-oz. tube 62060
Paper: thermal, 50-mm wide roll 62066
Publication: An Atlas of Amplitude-Integrated EEGs in the Newborn 62070
Publication: Atlas of Neonatal Electroencephalography 62071
Accessories
Item Description Catalog Number
Standards and Compliance
Electrical Safety Standards and Classification
European Union Notice (EN) 60601-1-1 / International Electrotechnical Commission
(IEC) 60601-1, Amendments I and II
States) 60126
type): box of 10 62056
type): box of 50 62057
Canadian Standards Association (CSA) C22.2 No. 60601-1-M90
Underwriters Laboratory (UL) 2601-1
EMI/EMC
IEC 60601-1-2
Regulatory Classification
Food and Drug Administration (FDA), Class II
Health Canada, Therapeutic Products Directorate, Class III
European Union (EU) Medical Device Directive (MDD), Class IIb
OLYMPIC CFM 6000 Operator’s Manual 35
Page 42

Specifications
Intended Use
The Olympic CFM 6000 is intended to monitor
the state of the brain by acquisition of EEG
signals in the intensive care unit, operating
room, and for clinical research.
Dimensions
CFM 6000 Size
13.70-in. wide × 12.25-in. high × 11.25-in. deep
34.8-cm wide × 31.1-cm high × 28.6-cm deep
CFM 6000 Weight
17.5 lb 7.9 kg
CFM cart Size
38.75–49.75-in. high* × 25-in. diameter footprint
98.42–126.36-cm. high* × 63.5-cm. diameter footprint
*Adjustable, measurement to top of drawer.
CFM cart Weight
40 lb 18.1 kg
Computer and Connections
Display
SVGA video
Liquid-crystal display (LCD) touch screen
800 × 600 pixel resolution; 32-bit colors
Minimum viewing angle of 120 degrees
Printer Paper
Thermal paper roll, 50-mm wide
Five-year shelf life if stored at less than 77ºF (25ºC),
65% relative humidity
Image life approximately five years if stored at less
than 77ºF (25ºC), 45–65% relative humidity
CFM cart Features
Drawer tilts 15° forward and 15° backward
Five-legged base with swivel casters; two locking
casters
Convenient handle for pushing, pulling, and swivelling
Easy height adjustment with foot-actuated pedal
Storage drawer for keeping brain monitoring supplies
nearby and ready for use
Power Requirements
Voltage: 100–240 V~, universal input, single phase
Consumption: 1.0A
Frequency (current): 47–63 Hz
Ground
Does not exceed 0.2Ω (CFM 6000 and cord)
Fuses
Two (2) internal 3AG, 2.5A, Slo-Blo, 250 V~ with
external access
Environment
Processor
P5-266–MHz processor or equivalent
256-MB RAM
Internal Components
CD-RW drive; internal thermal printer
80-GB hard drive capacity (minimum)
External Connections
RS-232 I/O port
RJ-45 (10/100) Ethernet port
USB port for 60601-1–approved devices (see the USB
port precautions on
PS2 standard keyboard serial port
PS2 standard mouse serial port
Hospital-grade power cord
page 3)
Connecting Cables
Cables that connect to the I/O ports must be of
the
following types and no greater than the following
lengths:
USB: two meters, shielded
Serial: four meters, shielded
Ethernet: five meters, Category 5
Note: Mouse and keyboard ports are for service use only.
Temperature
Operating: 65–85°F 18–29°C
Shipping: -13–158°F -25–70°C
Storage: -13–113°F -25–45°C
Relative Humidity (RH)
Operating: 0–95%, non-condensing
Non-operating: 0–100%, condensing
Operating Altitude
Up to 6,560 ft. 2,000 m
Operating and Non-Operating Pressure
500–1060 hPa 14.7–31.3 inHg
60601 Classification Notes
Type of protection against electrical shock: Class I
equipment
Type BF patient-applied parts
Ordinary equipment (IXP0)
Not suitable for use in the presence of flammable
anesthetics
Continuous operation
OLYMPIC CFM 6000 Operator’s Manual 36
 Loading...