

Nicolet™ EEGwireless32/64 Amplifier
User Guide
April 27, 2015
User Guide
Part Number 269-641500 Rev 07
© 2013 - 2015 Natus Medical Incorporated or one of its subsidiaries. All rights reserved.
Natus is a registered trademark of Natus Medical Incorporated. All product names appearing on this document
are trademarks or registered trademarks owned, licensed to, promoted or distributed by Natus Medical
Incorporated, its subsidiaries or affiliates. All other trademarks are the property of their respective owners.
Nicolet EEGwireless32/64 Amplifier


Intended use statement
Preface
The device is intended to be used as a front end Nicolet EEGwireless32/64
amplifier with the Nicolet Neurodiagnostic system to record, measure, store,
analyze and display cerebral and extracerebral physiologic data for EEG and
Sleep studies with or without synchronous digital video. This data includes but is
not limited to EEG, EOG, EMG, ECG, respiration, body position, snore, heart
rate, oxygen saturation and other physiologic signals. All ages of patients are
served, including infants either within a medical facility or outside a medical
facility. It is intended for use only under the supervision of medically trained and
qualified professionals who will use all available information to aid in the
diagnosis of Sleep, Epilepsy and other related disorders. While the Nicolet
Neurodiagnostic systems are capable of displaying signals, such as Sp02 and
ECG, the system is NOT intended for monitoring such signals for the
preservation of life.
April 27, 2015 a

Nicolet Systems
Copyright
This manual contains proprietary information, which is protected by copyright
and may not be copied in whole or in part except with the prior written
permission of Natus Neurology Incorporated. The copyright and the foregoing
restrictions on the copyright use extend to all media in which this information is
preserved.
This copy of the User Manual shall be used only in accordance with the
conditions of sale of Natus Neurology Incorporated or its distributors.
Natus Neurology Incorporated makes no representations or warranties of any
kind whatsoever with respect to this document. Natus Neurology Incorporated
disclaims all liabilities for loss or damage arising out of the possession, sale, or
use of this document.
www.natus.com
Natus Neurology Incorporated
3150 Pleasant View Road
Middleton, WI 53562-3530
USA
About the Nicolet brand system
The range of Multimedia EEG Nicolet brand systems have been designed and
manufactured by Natus Neurology Incorporated, which has always had an
enviable reputation for innovation and quality of its products.
CE Mark
Compliant to Medical Device Directive 93/42/EEC
b April 27, 2015

Declaration of Conformity
R & TTE Directive - Radio and Telecommunications Terminal Equipment
Hereby, Natus Neurology Incorporated declares that the Nicolet EEGwireless32/
64 amplifier, it’s derivatives, and its accessories are in compliance with the
essential requirements and the other relevant provisions of Directive 1999/5/EC.
[The following signed (and translated) declaration of conformity]:
We, Natus Neurology Incorporated, at 3150 Pleasant View Road, Middleton, WI,
USA, declare under our own responsibility that the Nicolet EEGwireless32/64
amplifier to which this declaration refers conforms with the relevant standards or
other standardizing documents of EN 50371:2002 according to regulations in
Directive 1999/5/EC.
Dan Lombardi, 11 Oct 2010
Director of Hardware Development and Intellectual Property
Preface
Middleton, WI USA 53562
April 27, 2015 c
Nicolet Systems
FCC wireless compliance
FCC Identifier:
Name of Grantee:
Equipment Class:
FCC Rule Parts:
XGU-515-015X00A
Natus Neurology Incorporated
Digital transmission system
15C
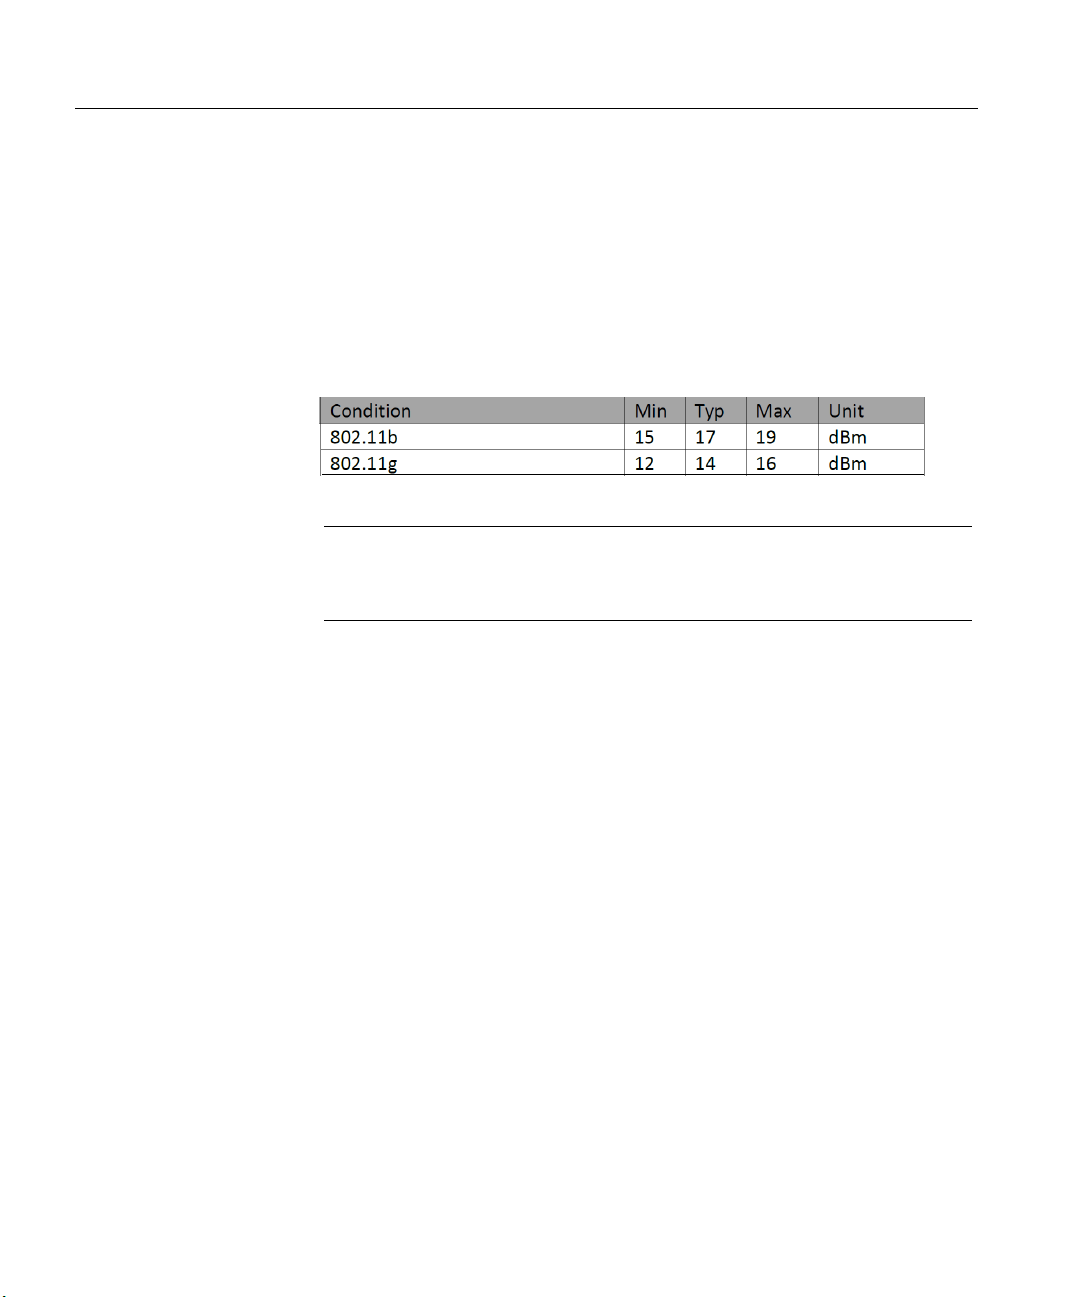
Frequency Range (MHz): 2412.0 - 2462.0
Transmission
Power Levels:
NOTE: The Nicolet EEGwireless32/64 amplifier is approved for body worn
application. With
transmitter enabled, the maximum spatial peak SAR
(Specific Absorption Rate) valueis 0.0154 W/kg.
THIS DEVICE COMPLIES WITH PART 15 OF THE FCC RULES. OPERATION IS
SUBJECT TO THE FOLLOWING TWO CONDITIONS: (1) THIS DEVICE MAY NOT
CAUSE HARMFUL INTERFERENCE, AND (2) THIS DEVICE MUST ACCEPT ANY
INTERFERENCE RECEIVED, INCLUDING INTERFERENCE THAT MAY CAUSE
UNDESIRED OPERATION.
THE MANUFACTURER IS NOT RESPONSIBLE FOR ANY RADIO OR TV
INTERFERENCE CAUSED BY UNAUTHORIZED MODIFICATIONS TO THIS
EQUIPMENT. SUCH MODIFICATIONS COULD VOID THE USER’S AUTHORITY T
OPERATE THE EQUIPMENT
This hardware uses the FreeRTOS operating system. Go to www.freertos.org for
more information.
d April 27, 2015
O
Safety summary
Preface
In this manual, two labels identify potentially dangerous or destructive
conditions and procedures:
The WARNING label identifies conditions or practices that may present danger
to the patient and/or user.
The CAUTION label identifies conditions or practices that could result in
damage to the equipment.
NOTE: Notes help you identify areas of possible confusion and avoid potential
problems during system operation.
Do NOT use cables with unattended and unsupervised children.
Do NOT wrap cables around your neck.
Keep batteries away from children.
Conductive parts or electrodes and their connectors, including the neutral
electrode for type BF or cf electroencephalographs are not to contact other
conductive parts and earth ground.
Do NOT use outside of the published specification ranges. Use of device
outside of the specified ranges may result in inaccurate results.
Do not wrap the Nicolet EEGwireless amplifier in blankets or place under
pillows during use.
April 27, 2015 e

Nicolet Systems
Use with other equipment
Defibrillators and High Frequency surgical equipment
The amplifier is not defibrillator proof. The system must be
disconnected from the patient prior to defibrillation.
MRI equipment
The Nicolet EEGwireless32/64 amplifier or patient electrodes
are not to be worn by a patient during an MRI study.
Other patient-connected equipment
When used simultaneously with other patient-connected
equipment, for example, a cardiac pacemaker or other electrical stimulator,
it is unlikely that a safety hazard will arise. However, always consult the
documentation supplied with the other patient-connected equipment to
ensure all hazards, warnings and cautions are considered before the
equipment is used with the amplifier.
It should be noted that other electrical stimulators can cause noise in the
EEG data.
f April 27, 2015

Read the Safety Reference guide
Please read the Additional Information and Safety Notes for Assorted Nicolet
Brand Products Reference Guide 269-594705 on CD part number 482-638702
thoroughly, paying special attention to the Safety information before applying
power to and using your Nicolet Brand system.
Fixed installation guide
Please see the Fixed Installation guide Section 3 - 269-620300 and Section 5 269-620500 for installation information.
IT requirements
Please see the Site IT Requirements document 269-644000 for information on
wired and wireless networking specifications for operation of the Nicolet
EEGwireless32/64 amplifier.
Preface
April 27, 2015 g
Nicolet Systems
Specification sheet
Inspecting the system
Recycling / disposal
Please see Specification sheet 169-438800 for information regarding technical
specifications of the EEGwireless32/64 amplifier.
Routinely check the instrument for exterior damage.
Follow your medical facilities safety guidelines.
Many local laws and regulations consider electric equipment-related waste
as hazardous or requiring special procedures to recycle or dispose of. This
includes batteries, printed circuit boards, electronic components, wiring and
other elements of electronic devices. Follow all of your respective local laws
and regulations for the proper disposal of batteries and any other parts of
your system, such as monitors, amplifiers, keyboards, electrodes, etc.D
Refer to the natus.com website for recommended instructions and addresses
for proper return or disposal of electronic wastes relating to Natus
Neurology Incorporated products in Europe and other localities.
The contact information for the Waste Electrical and Electronic
Equipment (WEEE) - In Europe
European authority representative
Natus Europe GmbH
Robert-Koch-Str. 1
82152 Planegg
Germany
h April 27, 2015
European Authorized Representative
Natus Europe GmbH
Robert-Koch-Str. 1
82152 Planegg
Germany
CE Mark
Compliant to Medical Device Directive 93/42/EEC
Technical support
Domestic International
Natus Neurology Incorporated
3150 Pleasant View Road
Middleton, WI USA 53562
1-800-356-0007
madison.helpdesk@natus.com
www.Natus.com
Preface
Natus Neurology Incorporated
Phone: 0049 (0) 180 501 5544
Fax: 0049 (0) 89 83942777
service.europe@natus.com
www.Natus.com
April 27, 2015 i
Nicolet Systems
Labels and symbols
The following labels and symbols may be affixed to the Nicolet EEGwireless32/64
system:
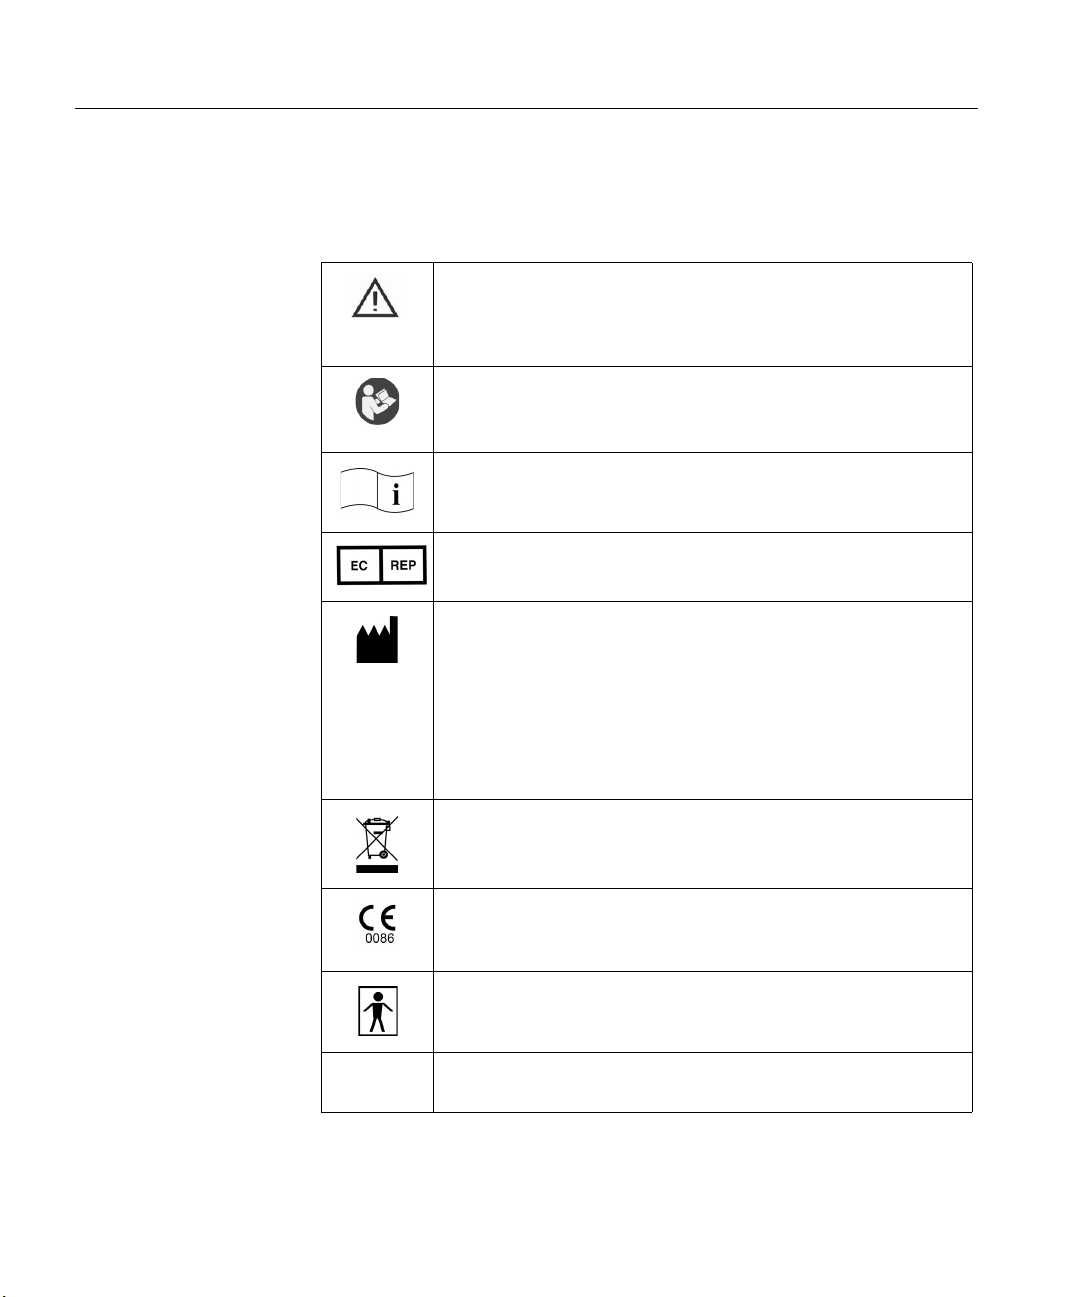
When applied on device: Attention: Consult Accompanying Documentation. (ISO 7000-0434A)
When used in documentation: Caution, Warning or Precaution follows.
Consult Operating Instructions. Failure to follow operating instructions
could place the patient or operator at risk. Image on blue background.
(ISO 7010 M002)
Consult Operating Instructions. (ISO 7000-1641)
European Authorized Representative.
Manufacturer.
Natus Neurology Incorporated
3150 Pleasant View Road
Middleton, WI USA 53562
608-829-8500
1 800-356-0007
Fax: 608-829-8589
www.natus.com
Disposal at end of operating life instructions.
CE Mark and Notified Body.
(Compliant to Medical Device Directive 93/42/EEC)
Type BF equipment.
RX Only
CAUTION: USA Federal law restricts this device to sale or on the
order of a licensed medical practitioner.
j April 27, 2015

Table of Contents
Intended use statement........................................................................................................................... a
Copyright.................................................................................................................................................b
About the Nicolet brand system ............................................................................................................ b
CE Mark .................................................................................................................................................. b
Declaration of Conformity ..................................................................................................................... c
R & TTE Directive - Radio and Telecommunications Terminal Equipment .................................... c
FCC wireless compliance ....................................................................................................................... d
Safety summary....................................................................................................................................... e
Use with other equipment .......................................................................................................................f
Defibrillators and High Frequency surgical equipment......................................................................f
MRI equipment...................................................................................................................................f
Other patient-connected equipment.................................................................................................... f
Read the Safety Reference guide ........................................................................................................... g
Fixed installation guide .......................................................................................................................... g
IT requirements ...................................................................................................................................... g
Specification sheet...................................................................................................................................h
Inspecting the system..............................................................................................................................h
Recycling / disposal................................................................................................................................. h
European Authorized Representative....................................................................................................i
CE Mark ................................................................................................................................................... i
Technical support..................................................................................................................................... i
Labels and symbols..................................................................................................................................j
April 27, 2015 1

Nicolet Systems
Introduction
About the Nicolet EEGwireless32/64 amplifier unit .........................................................................1-3
The Nicolet EEGwireless32/64 amplifier.......................................................................................1-3
Operating system ............................................................................................................................1-3
Power source...................................................................................................................................1-4
Communication...............................................................................................................................1-4
Memory card...................................................................................................................................1-4
Sampling rate ..................................................................................................................................1-4
Nicolet EEGwireless32/64 amplifier symbols and components .......................................................1-5
Activate the internal batteries.............................................................................................................1-6
Removing the electrode leads plastic cover .......................................................................................1-7
Separating the headbox from the Nicolet EEGwireless32/64 amplifier..........................................1-8
Headbox interchangeability ................................................................................................................1-8
Electrode labels.....................................................................................................................................1-9
Headbox dry erase label information..............................................................................................1-9
Inspecting the system .........................................................................................................................1-10
Cleaning instructions .........................................................................................................................1-10
Cleaning the Nicolet EEGwireless32/64 amplifier.......................................................................1-10
Cleaning the system ...................................................................................................................... 1-11
Cleaning the monitor screen .........................................................................................................1-11
Cleaning the keyboard ..................................................................................................................1-12
Cleaning the garment ....................................................................................................................1-12
Cleaning recording equipment and supplies after contact with Jacob Creutzfeld disease ...........1-12
Preventive maintenance.....................................................................................................................1-13
Using the garment
Cable and insert the Nicolet EEGwireless32/64 amplifier into the garment..................................2-3
Attaching the garment .........................................................................................................................2-6
Option 1 - Without optional second battery....................................................................................2-6
Option 2 - With optional second battery.........................................................................................2-7
2 April 27, 2015

Cabling the system
Power cable lengths .............................................................................................................................3-3
Power connector orientation...............................................................................................................3-3
Cabling the amplifier to be wireless with access point and hospital mains power (shown in battery
charging mode, fixed install) ..............................................................................................................3-4
Cabling the amplifier to be wireless with access point and Battery Power (shown with two battery
packs, WiFi - roaming mode) ............................................................................................................. 3-5
Cabling the cart based system, wired network communication to a desktop computer with power
supply and battery (cart mount, computer peripherals not shown) ...............................................3-6
Cabling the PanelPC with wired network communication and a supply or battery.....................3-7
Cabling the wired network communication to a laptop with power supply or battery ................ 3-8
Cabling the computer with video options..........................................................................................3-9
Cabling the amplifier for use with the configuration utility.......................................................... 3-10
Nicolet EEGwireless32/64 Amplifier Operation
General information ............................................................................................................................4-3
Turn on the amplifier...........................................................................................................................4-4
Error codes......................................................................................................................................4-4
Perform an impedance test from the amplifier.................................................................................4-5
Impedance indications ....................................................................................................................4-6
Stand Alone Mode feature (starting a recording from the amplifier)............................................. 4-7
Start a study from the amplifier .........................................................................................................4-8
Stop a study from the amplifier ..........................................................................................................4-8
Turn off the amplifier ..........................................................................................................................4-8
Memory capacity..................................................................................................................................4-9
Clearing the amplifier’s onboard memory........................................................................................4-9
Downloading data from the Amplifier to the PC ............................................................................ 4-11
Internal SpO2 operation ................................................................................................................... 4-11
Table of Contents
April 27, 2015 3

Nicolet Systems
Using the Nicolet brand system to setup and acquire EEG
Using the Nicolet brand system to setup and acquire EEG with the EEGwireless32/64 amplifier...
5-3
Wireless panel information .................................................................................................................5-3
Battery life ......................................................................................................................................5-4
Connection quality..........................................................................................................................5-4
Signal strength ................................................................................................................................5-4
Storage ............................................................................................................................................5-4
Catchup ...........................................................................................................................................5-4
Starting a study.....................................................................................................................................5-5
Select the amplifier for the study....................................................................................................5-5
Select a protocol..............................................................................................................................5-6
Change/View the sampling rate......................................................................................................5-6
Check the impedance ......................................................................................................................5-7
Impedance threshold check.............................................................................................................5-8
Start recording EEG........................................................................................................................5-9
Disconnecting from the system.......................................................................................................5-9
Optional steps ...............................................................................................................................5-10
Enabling automatic impedance testing after changing the montage.............................................5-10
Edit the parameters .......................................................................................................................5-10
Display the Reader window (optional) .........................................................................................5-14
Splitting long recordings into multiple files .................................................................................5-15
Data catch up......................................................................................................................................5-16
Data catch up (disconnected less than 10 minutes) .....................................................................5-17
Data catch up (disconnected more than 10 minutes) ...................................................................5-18
Changing the sampling rate ..........................................................................................................5-19
Wireless Operation
Wireless operation................................................................................................................................6-3
4 April 27, 2015

Using the EEGwireless32/64 Batteries
Internal batteries..................................................................................................................................7-3
The external battery charge indicators..............................................................................................7-3
Checking the batteries charges........................................................................................................... 7-4
Battery pack capacity ..........................................................................................................................7-5
Charging the external batteries ..........................................................................................................7-6
Replacing a worn out external battery ............................................................................................7-6
Charging the battery with a medical grade power supply ..............................................................7-7
Charging the battery from the amplifier with a medical grade power supply ................................7-7
Battery indications..........................................................................................................................7-8
Nicolet EEGwireless32/64 Amplifier Onboard Memory
Onboard memory.................................................................................................................................8-3
Data download rate.........................................................................................................................8-5
Example modes of operation............................................................................................................... 8-6
Mode 1: Wireless with external battery pack. ................................................................................8-6
Mode 2: Wireless with AC power...................................................................................................8-6
Mode 3: Wired network with external battery pack ....................................................................... 8-6
Mode 4: Wired network with AC power. .......................................................................................8-6
Table of Contents
User Configuration Utility
Setup......................................................................................................................................................9-3
Configuration Utility dialog ...........................................................................................................9-4
Electromagnetic Compatibility (EMC)
Electromagnetic Compatibility (EMC) Information......................................................................10-3
Nicolet EEGwireless32/64 Amplifier - Electromagnetic Compatibility (EMC) Information..... 10-6
Error Codes
Error codes ......................................................................................................................................... 11-3
Power LED color codes .....................................................................................................................11-4
April 27, 2015 5

Nicolet Systems
Frequently Asked Questions (FAQ)
Question 1: Why can't I select my amplifier from the amplifier selection screen? .....................12-3
Question 2: What happens if I try and review an exam that is incomplete?................................12-6
Question 3: How do I know if an exam has been completely downloaded by looking in NicVue?....
12-6
Question 4: Why does a single exam have multiple exam files? ....................................................12-6
Question 5: What is an "overflow error"? ......................................................................................12-7
Question 6: What if my memory card fills up and I am still recording?......................................12-7
6 April 27, 2015

1 Introduction
This guide describes how to operate the Nicolet EEGwireless32/64 amplifier in
conjunction with the Nicolet EEG system and software.
April 27, 2015 1-1

Nicolet Systems
Blank page.
1-2 April 27, 2015

About the Nicolet EEGwireless32/64 amplifier unit
The Nicolet EEGwireless32 and Nicolet EEGwireless64 amplifiers are unique
amplifiers and are referred to as Nicolet EEGwireless32/64 amplifier in this manual.
The Nicolet EEGwireless32/64 amplifier is a 32/64 channel EEG amplifier that
connects to a Nicolet Brand system via wireless transmission or a standard network
port. The Nicolet EEGwireless32/64 amplifier can be used in a hospital setting
without the addition of custom network infrastructure.
Introduction
The Nicolet EEGwireless32/64 amplifier
• captures all signals needed to perform LTM monitoring, EEG, Sleep studies,
research, Ambulatory and ICU monitoring.
• provides low signal amplification (alternating current ‘AC’ recording) of
physiological signals, and is designed specifically to amplify EEG and intracranial
EEG signals.
• provides wired Ethernet or wireless Ethernet transmission of digitized signals,
which interfaces to a Nicolet Acquisition system.
• provides a Stand Alone Mode feature for urgent recording situations.
• provides user selectable parameters including sampling rates and filters.
• includes built in SpO2, patient event button, and provides referential, bipolar
recording.
• the amplifier is compact and lightweight with a custom garment wearable by the
patient.
Operating system The Nicolet EEGwireless32/64 amplifier uses FreeRTOS™ as its operating system.
For FreeRTOS™ licensing details, please visit www.freertos.org/a00114.html.
FreeRTOS™ is a trademark of Real Time Engineers Ltd.
April 27, 2015 1-3

Nicolet Systems
Power source The Nicolet EEGwireless32/64 amplifier can derive its power from either an AC
outlet through the medical grade power supply, from one or two external battery
packs, or in the case of a fixed installation, wallplate power.
The Nicolet EEGwireless32/64 amplifier has a second power port, which allows the
addition of a second battery pack for longer recording time or a medical grade power
supply. If the medical grade power supply is plugged in while a battery is also
plugged in, the battery pack will charge.
There is an internal battery in the Nicolet EEGwireless32/64 amplifier that allows
switching the external battery pack while in the middle of a study. When the external
battery pack requires changing, it can be removed without interfering with the study
as long as it is replaced within 10 minutes of removal.
If an external battery or AC power is connected to the Nicolet EEGwireless32/64
amplifier, the internal battery will be charged.
Communication EEG data can be transmitted to the Nicolet acquisition system either by an Ethernet
cable or wirelessly using a recommended 802.11 b/g access point. The Nicolet
EEGwireless32/64 amplifier is IP addressable and can connect directly to a hospital
network or private LAN.
Memory card The Nicolet EEGwireless32/64 amplifier also provides onboard storage of EEG. The
Nicolet EEGwireless32/64 amplifier has an onboard memory card used to record
data. When the memory card reaches within 10 minutes of its capacity, the Nicolet
EEGwireless32/64 amplifier produces an audible alert.
Sampling rate The Nicolet EEGwireless32/64 amplifier provides selectable sampling rates from 128
Hz - 12000 Hz.
When operating at 12 kHz Sample Rate, ensure the electrode lead cover is connected.
Also, do not wrap the Nicolet EEGwireless32/64 amplifier in a blanket or place under
a pillow.
1-4 April 27, 2015
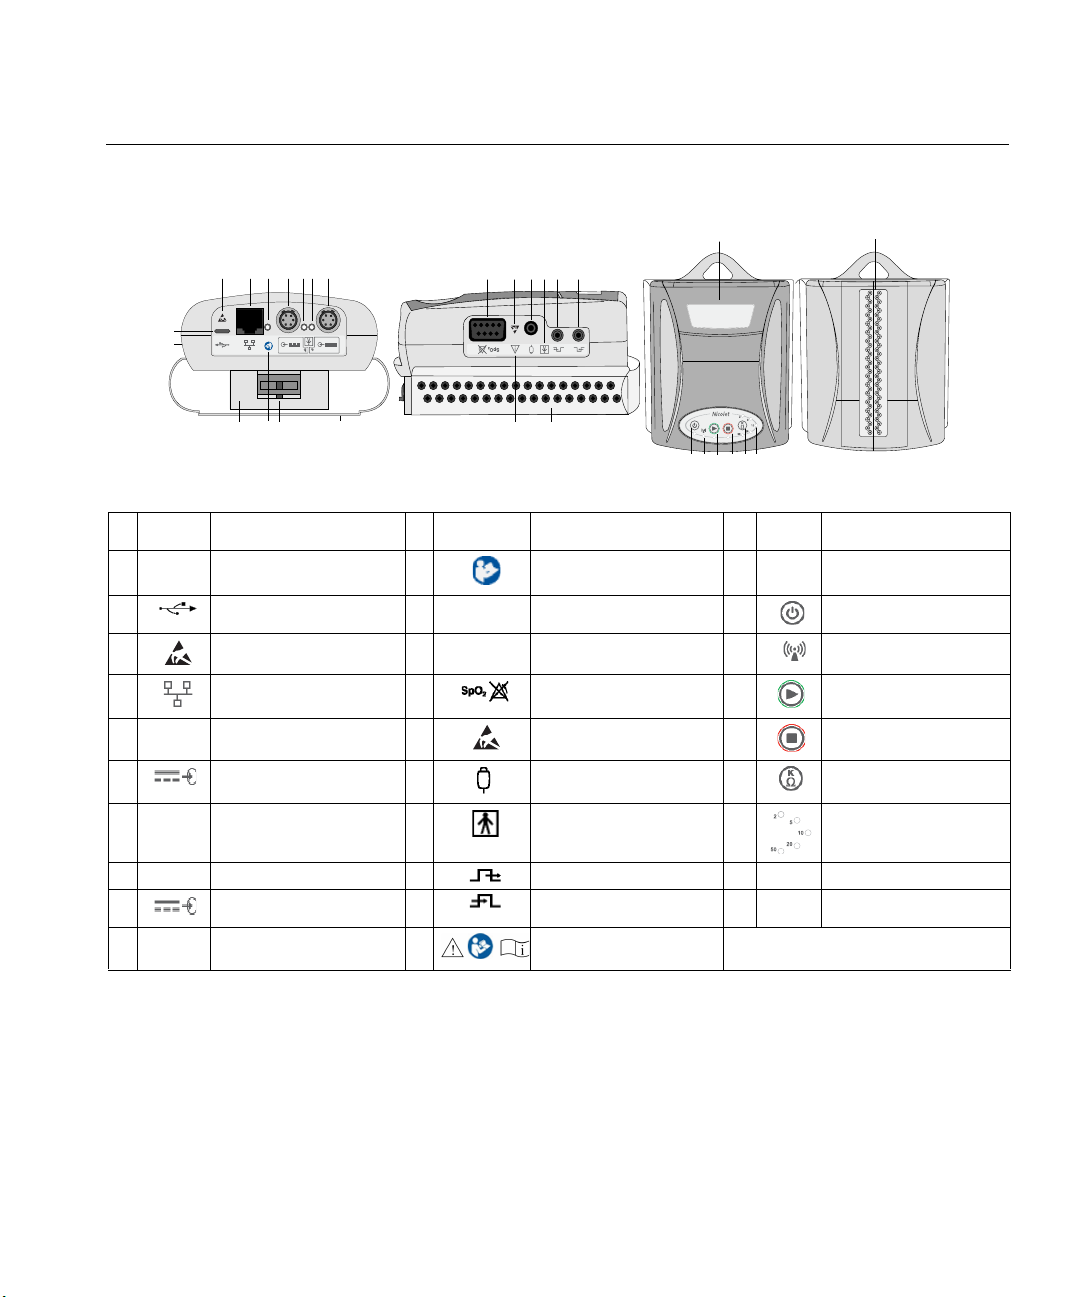
Nicolet EEGwireless32/64 amplifier symbols and components
To p
Bottom
Front
Back
Introduction
AB
E
H
F
D
С
B
A
J
K
Symbol Description Symbol Description Symbol Description
A-
B
C
D
E-
F
G-
Amplifier
Diagnostic port
Electrostatic sensitive
Network port
LED - Ethernet connectivity
Power input for external batteries
or power supply
LED - Power connectivity
I
G
L
M
K
L-
M-
N
O
P
Q
N O P
T
S
Q
R
U
V
Refer to page j in this manual.
Disconnect headbox latch
Electrode leads cover
SpO2
Electrostatic sensitive
Event button input
Type BF equipment
Nicolet wirelessEEG32A
W X Y
U-
V
W
X
Y
Z
AA
AA
Z
AC
Electrode inputs (each side)
Power on/off button
LED - Wireless transmission on
Start recording button
Stop recording button
Impedance check button
LEDs - Impedance range
H-
I
J-
LED - Power connectivity
Power input for external batteries
or power supply
32 or 64 headbox
R
S
T
Trigger output (for Photic, etc.)
Trigger input
Refer to page j in this manual.
AB -
AC -
Battery door, under headbox
LEDs - Impedance check
NOTE: External power from Inputs F and I are interchangeable between two external batteries and a medical power supply.
April 27, 2015 1-5
Nicolet Systems
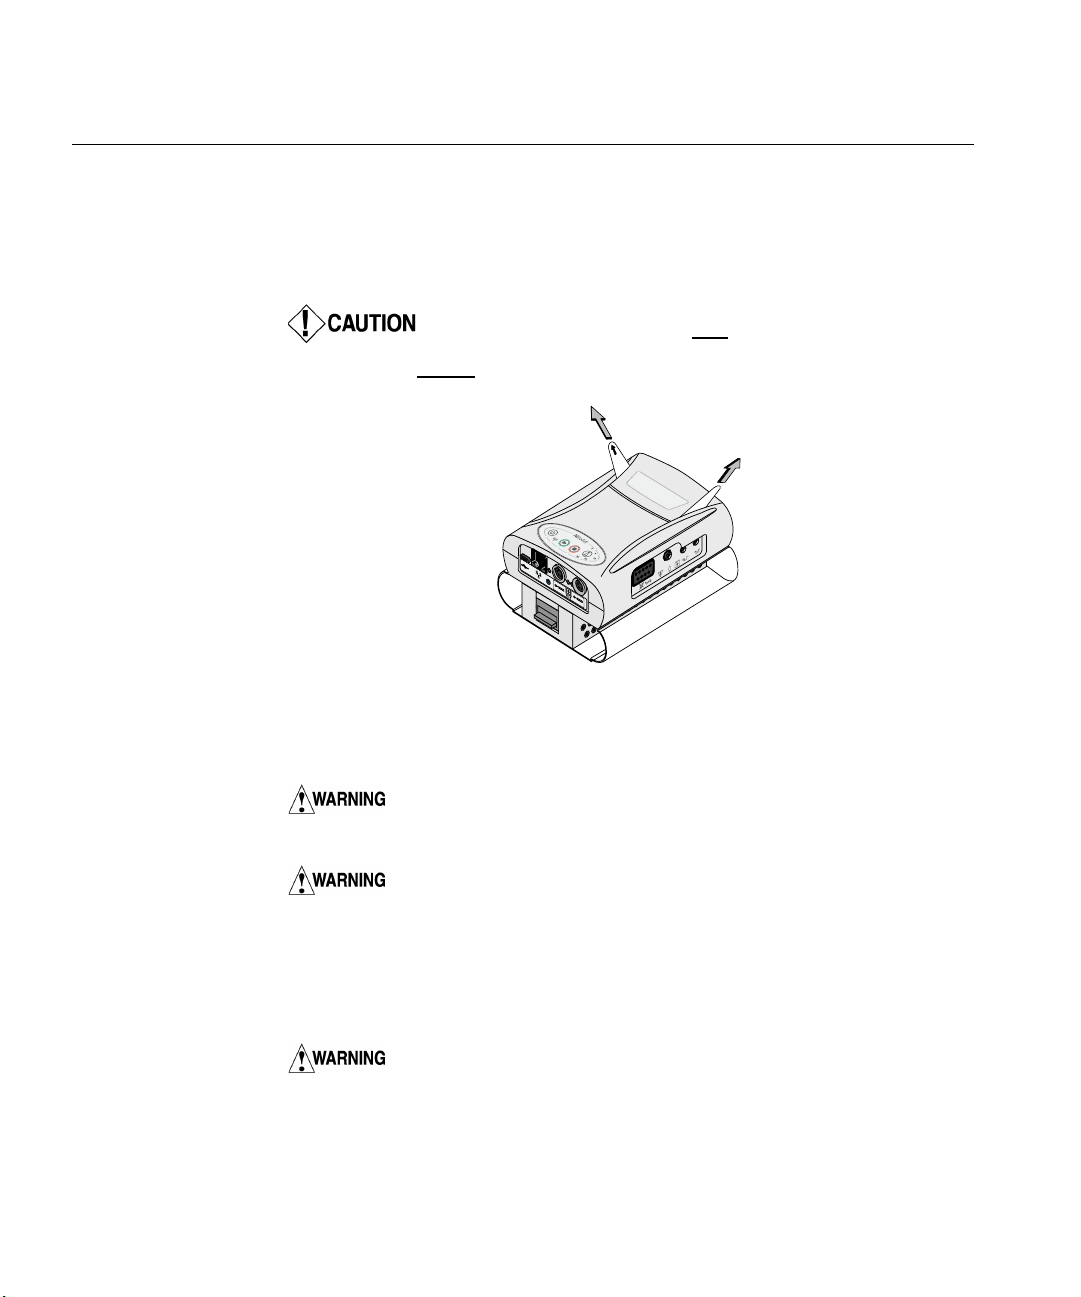
Activate the internal batteries
1. The first time the Nicolet EEGwireless32/64 amplifier is used, you must pull the
two plastic strips out from the battery compartment (Figure 1) to activate the
internal batteries for use with the Nicolet EEGwireless32/64 amplifier.
strip labeled
Pull the plastic strip labeled
2 second to guard against damaging the amplifier.
1 first and then pull the plastic
1
1
Nicolet EEGwireless32A
Figure 1
NOTE: The batteries arrive at 40%.
Contact Natus Neurology Incorporated customer service if you
believe your amplifier’s internal batteries need to be replaced.
If the amplifier is going to be stored for extended periods of time (>2
weeks) after pulling the plastic strips, it is recommended to connect the amplifier
to an AC power brick or an external battery pack so that the amplifier can be
used immediately when needed. If the amplifier will be stored on a cart that is
not powered, the amplifier needs to be connected to an external battery pack
during storage.
2
Do not transfer your amplifier’s internal batteries to another
amplifier.
1-6 April 27, 2015
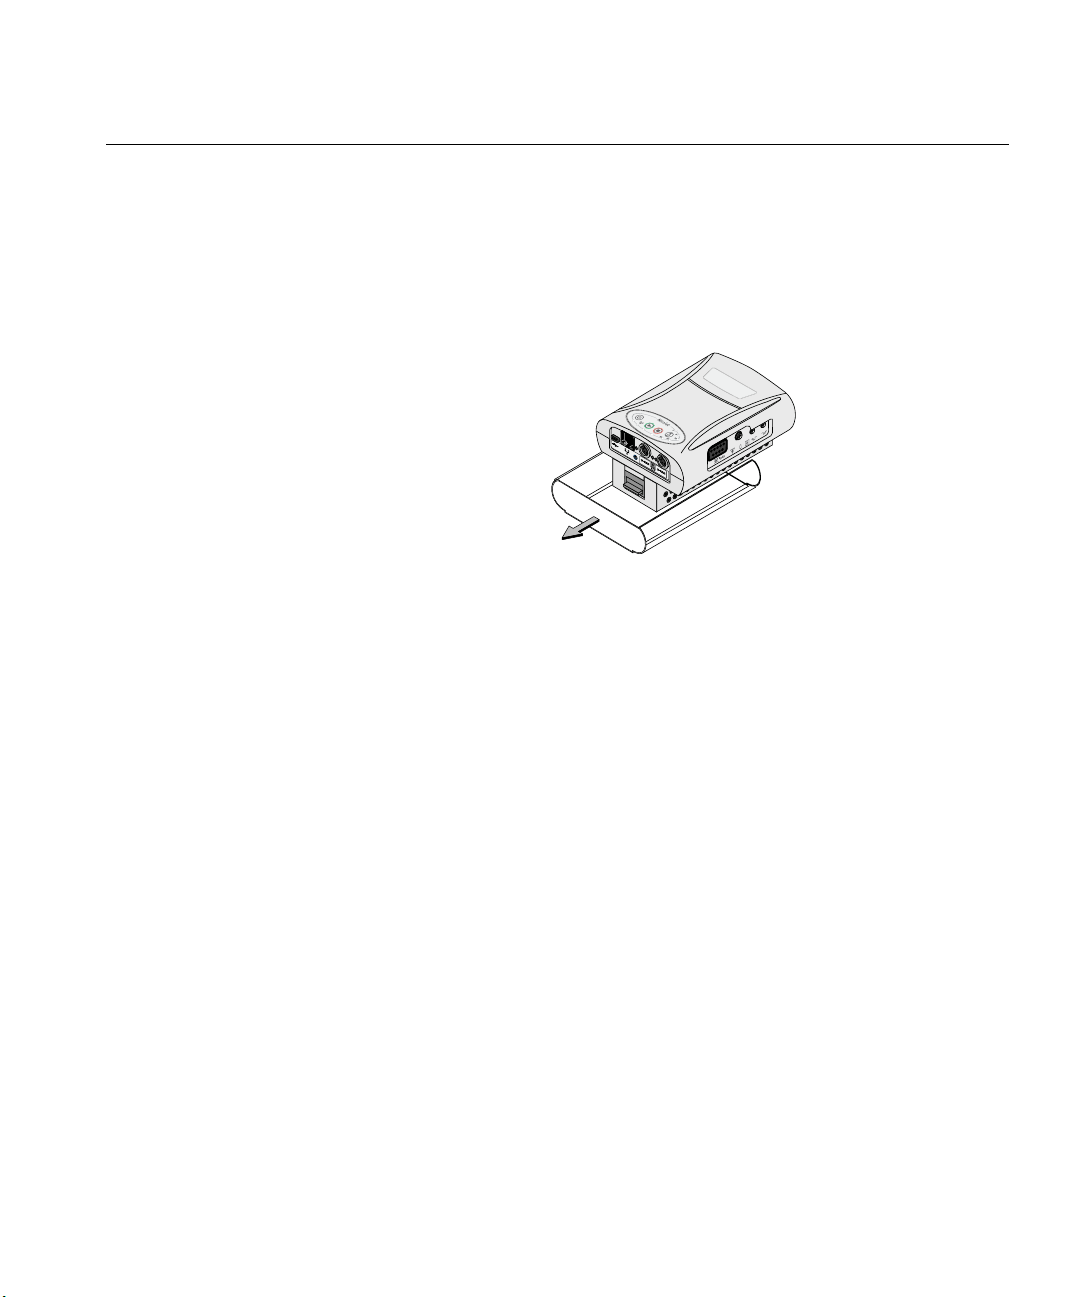
Removing the electrode leads plastic cover
Nicolet wirelessEEG32A
1. Grasp the plastic cover on both sides with one hand.
2. Grasp the Nicolet EEGwireless32/64 amplifier with the other hand.
3. Carefully slide the plastic cover off the Nicolet EEGwireless32/64 amplifier
(Figure 2).
Introduction
Figure 2
April 27, 2015 1-7
Nicolet Systems
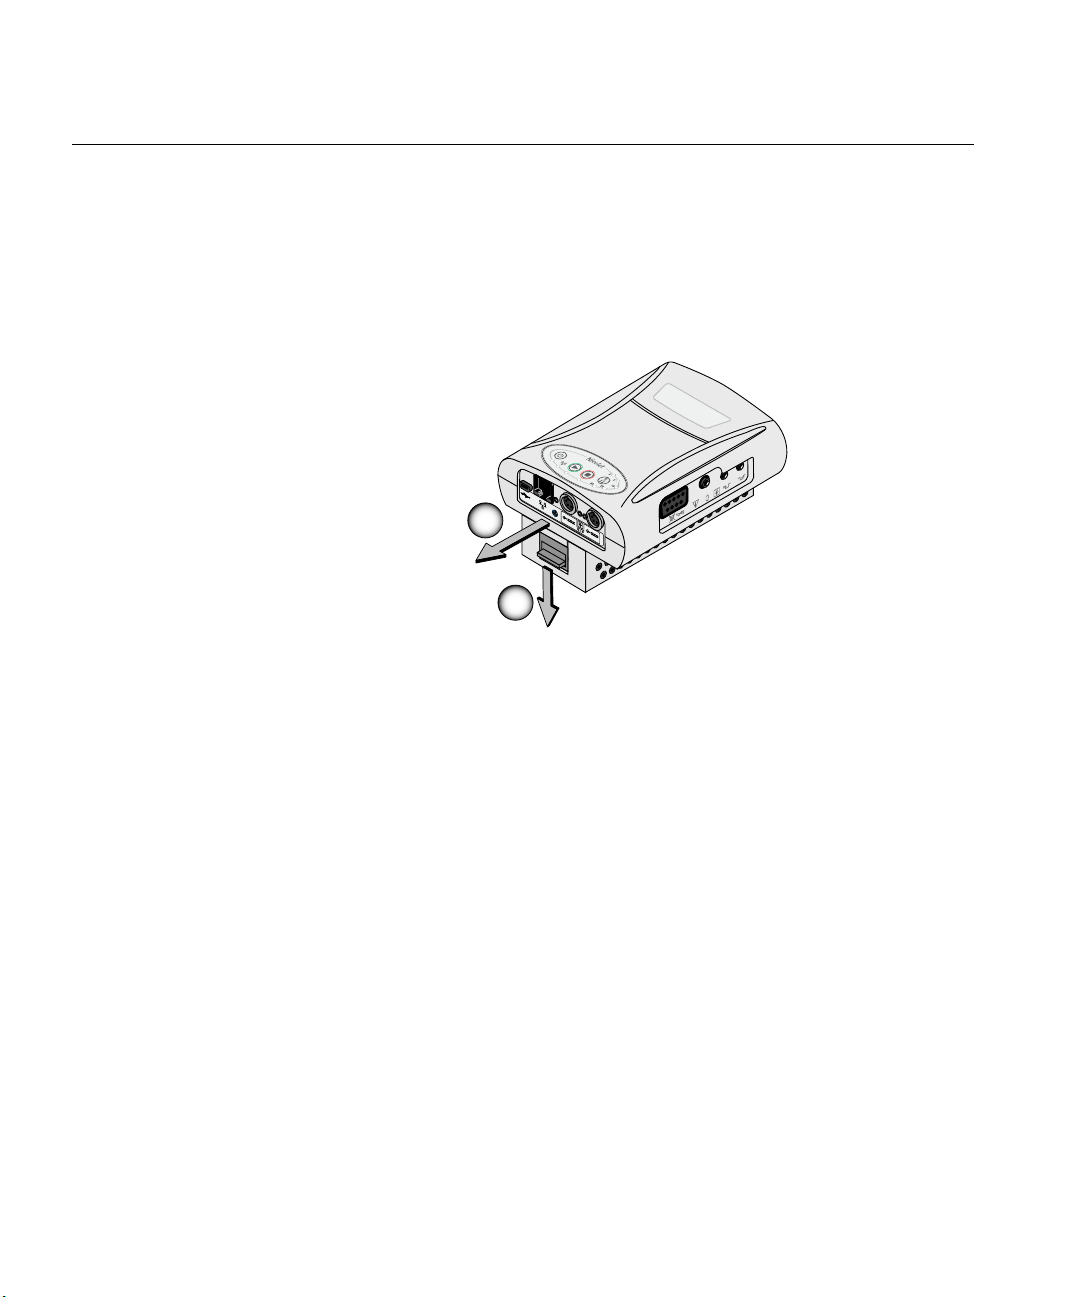
Separating the headbox from the Nicolet EEGwireless32/64 amplifier
1. Press downward on the release latch (Figure 1).
2. While firmly holding the Nicolet EEGwireless32/64 amplifier and headbox, pull
the headbox towards yourself.
3. Carefully lift off the Nicolet EEGwireless32/64 amplifier from the headbox.
Nicolet wirelessEEG32A
2
1
Figure 1
Headbox interchangeability
You cannot use a 64 channel headbox with a 32 channel amplifier, but you can use a
32 channel headbox with a 64 channel amplifier.
NOTE: Montage setups between 32 channel configurations and 64 channel
configurations are not interchangeable.
1-8 April 27, 2015
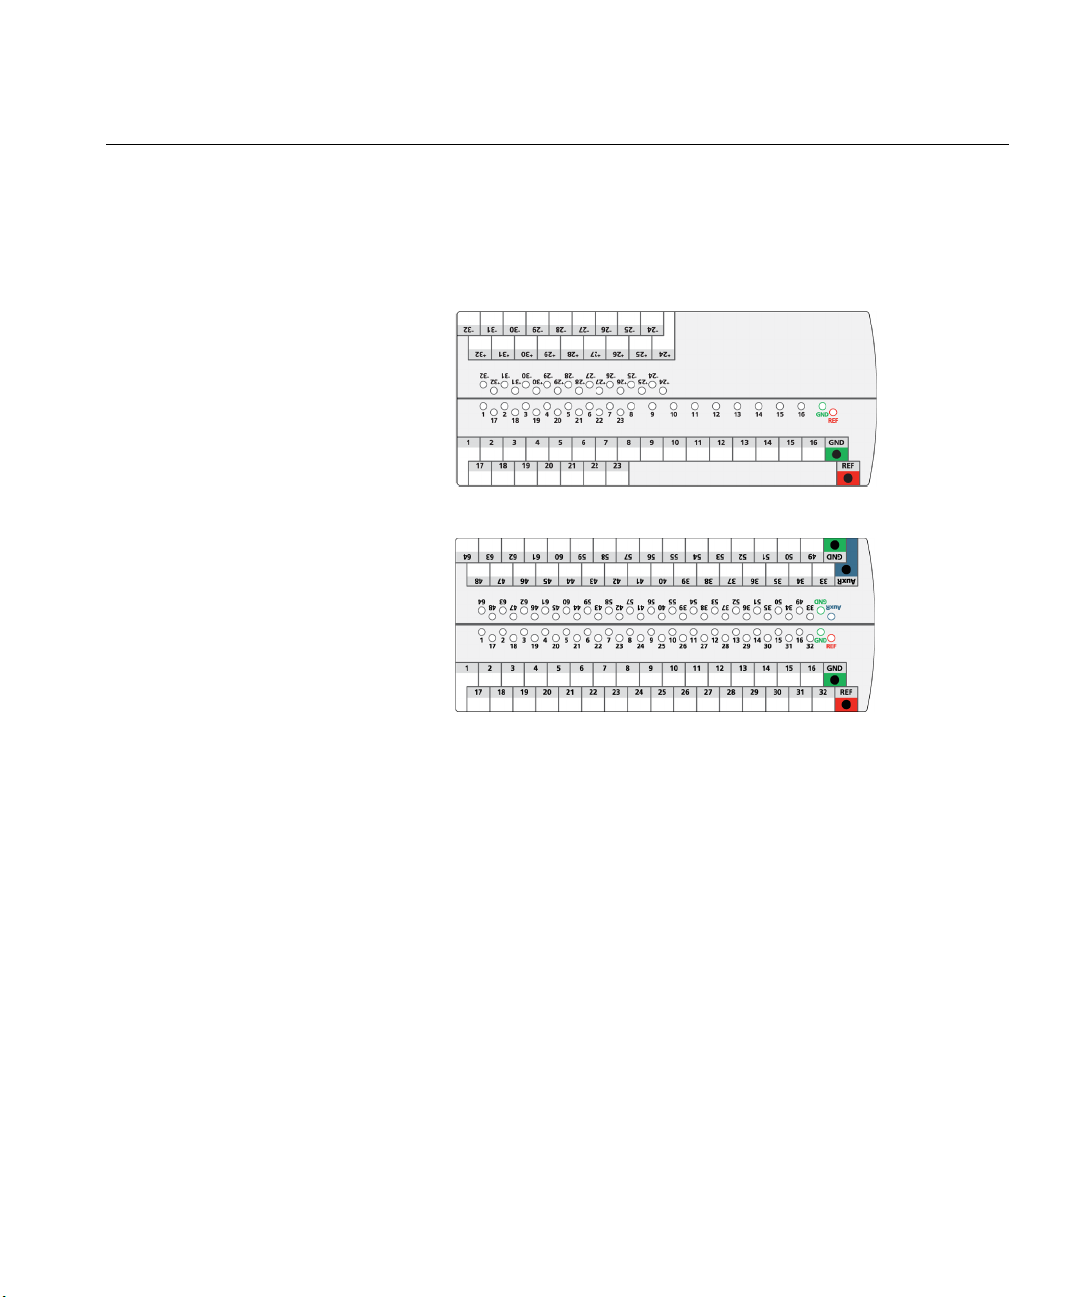
Electrode labels
Introduction
The electrode label has an area for writing customized electrode nomenclature. For
temporary markings, use an erasable dry marker. Use Isopropyl Alcohol to remove
the temporary markings from the labels.
Figure 1: 32 channel electrode label.
Figure 2: 64 channel electrode label.
NOTE: The two grounds are linked together in the Nicolet EEGwireless32/64
amplifier. You do not need to provide two grounds, but they are available for
redundancy. The auxiliary reference is currently disabled, but will be functional in
future releases.
Headbox dry erase label information
• Apply the label to the back of the Headbox.
• The overlay is removable and reusable.
• Use only dry erase markers & cleaners on overlay.
• DO NOT use permanent markers.
April 27, 2015 1-9

Nicolet Systems
Inspecting the system
Routinely check the system for exterior damage. Periodically check the system
ground integrity, the system leakage current and the leakage current of the Nicolet
EEGwireless32/64 amplifier and accessories.
Cleaning instructions
We recommend that you consult with your hospital infection control department and
follow all appropriate policies. Routine equipment cleaning recommendations are
provided below.
Cleaning the Nicolet EEGwireless32/64 amplifier
The Nicolet EEGwireless32/64 amplifier and accessories are classified as a
noncritical item for infection control purposes.
Do not use propanone (acetone) on any part of the equipment. No part of the system
may be autoclaved or sterilized by any means. According to the CDC, the proper
cleaning method for non-critical medical devices includes the following:
• A456-N
• A428-N
• Cavacide
• 3MQuat
• 70% isopropyl alcohol.
1-10 April 27, 2015

Introduction
Cleaning the system Turn OFF the system power before cleaning the instrument. Do not permit solutions
or cleaning agents to seep into the electronic portions of the system. Take special care
around controls, connectors and panel edges. Do not use any abrasive cleaners.
Remove any dust from the exterior of the system with a soft brush or clean cloth. Use
a brush to dislodge any dirt on or around the connectors and panel edges. Remove
stubborn dirt with a clean soft cloth slightly dampened with a mild detergent (soap)
or low level disinfectant detergent solution. Allow the items to air dry before next
use.
Use of detergent-disinfectants on skin may cause adverse reactions; therefore, gloves
are recommended when cleaning with these products.
Cleaning the monitor screen
When the monitor is on, the screen has a slight static charge, which attracts dust. To
remove any dust accumulation, wipe the display screen with a soft brush or lint-free
cloth. You may use an antistatic spray on the screen to reduce static buildup.
April 27, 2015 1-11
Nicolet Systems
Cleaning the keyboard
Cleaning the garment
Cleaning recording equipment and supplies after contact with Jacob Creutzfeld disease
Disinfect computer keyboards daily, when visibly soiled, or when they become
contaminated with blood. Quaternary ammonium-containing disinfectants may be
used on keyboard (Rutala et al. 2006).
Before using the disinfecting agent, perform a test on only one key
or on an old keyboard to guard against possible bleaching or discoloration of the
keys.
If a keyboard cover is used, Rutala et al. (2006) recommends it be disinfected daily.
We recommend that mobile computers used by patients be disinfected before the next
patient uses it.
Wash contaminated garments with laundry detergent and hot water or with a phenolic
household detergent. The garment should be washed and rinsed a second time without
the phenolic.
Air dry the garment only.
Ancillary electroneurodiagnostic supplies and equipment such as
cables, marking pencil, and recording instrument should be wiped down with
undiluted bleach or a 1 N sodium hydroxide solution (Airman 2000). If items
cannot be disinfected in this manner, they should be disposed of and not reused.
We recommend that you follow your internal infection control policies.
1-12 April 27, 2015

Preventive maintenance
Electrical safety testing is recommended. It is recommended a schedule be
established for these purposes, with at least an annual cleaning and safety
testing. This system does not require calibration unless otherwise stated.
Preventative maintenance does not require access to the interior of the
instrument and may be performed by the user. For this device, preventative
maintenance consists of periodically cleaning and inspecting the exterior of the
instrument.
It is recommended that all repairs be performed by a qualified Natus Neurology
Incorporated service representative only. You have the sole responsibility for any
malfunctions resulting from improper maintenance or repair by anyone other
than an authorized Natus Neurology Incorporated representative.
If the system is not functioning properly, do not operate it until all necessary
repairs are made and the unit is tested for proper functioning in accordance with
Natus Neurology Incorporated published specifications. It is recommended that
all repairs be performed by a qualified service representative only.
Introduction
Switch off all power to the system before attempting any service, maintenance,
or preventive maintenance.
If the system or any component is repaired, it is recommended that all system
functionality be checked and an electrical safety test be performed prior to
resuming use.
April 27, 2015 1-13

Nicolet Systems
Blank page.
1-14 April 27, 2015

2 Using the garment
This chapter describes how to use the Nicolet EEGwireless32/64 amplifier
garment as well as how to clean the garment.
April 27, 2015 2-1

Nicolet Systems
Blank page.
2-2 April 27, 2015

Cable and insert the Nicolet EEGwireless32/64 amplifier into the garment
1
- 1 -
NOTE: See the next chapter for additional cabling information.
1. Snap the battery pouch to the four snaps on the garment (Figure 1).
Garment
April 27, 2015 2-3

Nicolet Systems
- 3 -
5
6
7
3
4
2. (Optional) - Connect the optional battery cable extender(s) to the Nicolet
EEGwireless32/64 amplifier and then connect the battery cable(s) between the
extender cables and the battery(s), (Figure 2). Skip steps 3 and 4.
3. Connect the primary battery to the Nicolet EEGwireless32/64 amplifier (Figure
3).
4. Connect the second battery cable to the Nicolet EEGwireless32/64 amplifier if
using an optional second battery.
5. Connect the optional Patient Event button to the Nicolet EEGwireless32/64
amplifier.
6. Connect the optional SpO2 to the Nicolet EEGwireless32/64 amplifier.
7. Insert the Nicolet EEGwireless32/64 amplifier into the carrying case.
2-4 April 27, 2015

Garment
4
- 5 -
- 6 -
- 4 -
8
10
9
8. Fold the side flap over the front and snap (Figure 4).
9. Fold the bottom flap up (Figure 5).
10. Fold the top flap down and snap to the bottom flap (Figure 6).
April 27, 2015 2-5

Nicolet Systems
4
R1
L1
R2
L2
4
4
T1
B1
T2
B2
4
- 3 -
Attaching the garment
Ensure proper fit before using the
garment to guard against injury.
Option 1 - Without optional second battery
This option straps the Nicolet EEGwireless32/64
amplifier, headbox, battery pouch and electrode
sleeve to the patient.
Attach the garment to the patient
1. Clip the shoulder straps to the bottom fastening
loop (R1) for the right shoulder (Figure 1).
2. Hang the shoulder strap assembly over the
patient’s shoulder and clip the other end of the
shoulder strap to the top fastening loop (R2).
3. Repeat steps 1 (L1) and 2 (L2) for the left
shoulder strap.
4. Feed the electrode leads through the electrode
sleeve (4).
5. Adjust the straps as necessary for a snug fit.
Figure 1: Shoulder straps.
Attach the optional belt to the patient
1. Clip the belt to either the bottom (B1) or top (T1)
fastening loop as shown in Figure 2.
2. Wrap the belt behind the patient.
3. Clip the belt to the bottom (B2) or top (T2)
fastening loop.
4. Adjust the belt as necessary for a snug fit.
2-6 April 27, 2015
Figure 2: Belt.

Option 2 - With optional second battery
4
R1
L1
R2
L2
4
4
This option straps the Nicolet EEGwireless32/64
amplifier, headbox, battery pouch, electrode sleeve
and optional second battery to the patient.
Attach the garment to the patient
1. Clip the shoulder straps to the bottom fastening
loop (R1) for the right shoulder (Figure 1).
2. Hang the shoulder strap assembly over the
patient’s shoulder and clip the other end of the
shoulder strap to the top fastening loop (R2).
3. Repeat steps 1 (L1) and 2 (L2) for the left
shoulder strap.
4. Feed the electrode leads through the electrode
sleeve (4).
5. Adjust the straps as necessary for a snug fit.
Attach the optional second battery
NOTE: The belt battery can be the primary battery.
Garment
Figure 1: Shoulder straps.
1
4
1. Feed the belt through the belt loop (1) on the back
of the battery pouch (Figure 2).
1 1
2. Clip the belt strap to the bottom fastening loop (2).
3. Wrap the belt around the patient’s waist and clip
the belt to the other fastening loop (3).
2
4
4. Connect the battery cable to the optional second
battery (4).
5. Adjust the belt as necessary for a snug fit.
Figure 2: Optional second battery.
April 27, 2015 2-7
3
4

Nicolet Systems
Blank page.
2-8 April 27, 2015

3 Cabling the system
This chapter contains the cabling diagrams for the various configurations
available for use with the Nicolet EEGwireless32/64 amplifier.
NOTE: Connector styles in this chapter may vary from those shown.
April 27, 2015 3-1

Nicolet Systems
Blank page.
3-2 April 27, 2015

Power cable lengths
The battery cable lengths are 11 inches, 30 inches and 15 feet.
Power connector orientation
The power connection for this amplifier is a keyed push-in connector. The connector
has 2 built in keying notches, which are delineated by two arrows indicating the top of
the connector plug. This design is intended to guard against the power connector
being inserted in the wrong orientation, which can result in damage to the amplifier
and/or power connector. Refer to the figure below, which shows the proper
orientation of the power connector with the two arrows facing upwards before
plugging the connector into the battery, amplifier or wallplate.
EEGwireless32/64 Connections
1 wEEG wallplate
2 Battery/Charger
3 Nicolet EEGwireless amplifier
4 Align the two notches with the two connector grooves on the wEEG wallplate,
Battery/Charger and Nicolet EEGwireless amplifier before plugging in the connector.
April 27, 2015 3-3

Nicolet Systems
Cabling the amplifier to be wireless with access point and hospital mains power (shown in battery charging mode, fixed install)
Legend Description
A
B
C
D
E
G
H
Amplifier
Access point (connected to hospital network)
Antenna
Photic strobe (option)
Event button (option)
SpO2 (option)
F
Medical grade power supply (PSU-EEG64)
Battery with charger (Nicolet CHG1)
Hospital mains
I
Photic cable
J
3-4 April 27, 2015

EEGwireless32/64 Connections
Nicolet wirelessEEG32A
A
B
C
D
E
F
G
Cabling the amplifier to be wireless with access point and Battery Power (shown with two battery packs, WiFi - roaming mode)
Legend Description
Amplifier
A
Access point (connected to hospital network)
B
Antenna
C
Event button (option)
D
SpO2 (option)
E
Battery with charger (Nicolet CHG1)
F
Optional second battery with charger (Nicolet CHG1)
G
April 27, 2015 3-5

Nicolet Systems
Nic
olet wir
el
ess
EEG
3
2A
12345
1
2
3
A
B
C D
E
F
G
H
I
J
K
L
M
Cabling the cart based system, wired network communication to a desktop computer with power supply and battery (cart mount, computer peripherals not shown)
Legend Description Legend Description
A
B
C
D
E
G
H
Amplifier
Photic strobe (option)
Event button (option)
SpO2 (option)
Isolation transformer (Required with a Desktop
computer in a patient room)
Hospital mains
F
Medical grade power supply (PSU-EEG64)
Battery with charger (Nicolet CHG1)
J
K
L
M
1
2
3
Network switch
I
Computer
Monitor
Medical grade power supply (PSU-EEG64)
Photic cable
Connect to USB Port for power
Connect to LAN Port
Connect to hospital network
3-6 April 27, 2015

EEGwireless32/64 Connections
Nicolet wirelessEEG32A
1
2
12345
3
A
B
C
D
E
F
G
H
I
J
K
Cabling the PanelPC with wired network communication and a supply or battery
Legend Description Legend Description
Amplifier
A
Photic strobe (option)
B
Event button (option)
C
SpO2 (option)
D
Hospital mains
E
Medical grade power supply (PSU-EEG64)
F
Battery with charger (Nicolet CHG1)
G
NOTE: US and Canada are required to only use 115VAC input power on the Panel PC Power Pack.
H
I
J
K
1
2
3
Network switch
PanelPC
Medical grade power supply (PSU-EEG64)
Photic cable
Connect to USB Port for power
Connect to LAN Port
Connect to hospital network
April 27, 2015 3-7

Nicolet Systems
Nicolet wirelessEEG32A
1
2
12345
3
A
B
C
D
E
E
F
G
H
I
J
K
L
Cabling the wired network communication to a laptop with power supply or battery
Legend Description Legend Description
A
B
C
D
E
G
H
Amplifier
Photic strobe (option)
Event button (option)
SpO2 (option)
Hospital mains
Medical grade power supply (PSU-EEG64)
F
Battery with charger (Nicolet CHG1)
Network switch
I
J
K
L
1
2
3
Laptop Power Supply
Laptop
Medical grade power supply (PSU-EEG64)
Photic cable
Connect to Network Extender Card
Connect to USB Port (for switch power only)
Connect to hospital Network
NOTE: US and Canada are required to only use 115VAC input power on the Laptop Power Pack.
3-8 April 27, 2015

EEGwireless32/64 Connections
12345
1
A
B
C
D
E
F
H
I
J
K
L
1
2
3
4
G
G
2
3
4
5
Cabling the computer
with video options
Legend Description Legend Description
April 27, 2015 3-9
Isolation transformer
A
Access point (Wireless Amplifier option only)
B
Antenna
C
Computer
D
Ethernet to hospital network wallplate
E
F
G
H
I
Network switch
Audio
Mouse
Keyboard
Camera power supply
J
IR Illuminator (option)
K
Camera (option)
L
From wired amplifier
1
Connect to USB port for power
2
Digital Video - to Option 1 (4) or Option 2 (5)
3
Digital Video Option 1
4
Digital Video Option 2
5

Nicolet Systems
Nic
ol
et wireles
sEEG3
2A
A
C
B
D
Micro
USB cable
Cabling the amplifier for use with the configuration utility
Legend Description Legend Description
A
B
Amplifier
Hospital mains
Medical grade power supply (PSU-EEG64).
C
Computer
D
3-10 April 27, 2015

4 Nicolet EEGwireless32/64 Amplifier
Operation
This chapter describes how to operate the Nicolet EEGwireless32/64 amplifier.
Please see Chapter 5 for instructions on operating the Nicolet EEGwireless32/64
amplifier connected to a Nicolet brand system.
April 27, 2015 4-1

Nicolet Systems
Blank page.
4-2 April 27, 2015

General information
Nicolet EEGwireless32/64 Operation
The Nicolet EEGwireless32/64 amplifier includes safety features that assure that the
internal batteries always operate within their required temperature range and that the
surface temperature of the amplifier is always within regulatory requirements during
normal operation.
Please follow the following general guidelines when the Nicolet EEGwireless32/64
amplifier is worn by the patient:
1. Make sure the Nicolet EEGwireless32/64 amplifier is always visible to the
operator, e.g., worn outside a thicker robe or hanging from a bed-rail or head
board, either in the garment or the amplifier by itself.
2. Periodically check the LED indicators on the front of the Nicolet EEGwireless32/
64 amplifier; if the Power button LED turns mainly yellow instead of mainly
green, this is an early indication of increased operating temperature; this is no
problem by itself, but try to stabilize or decrease the ambient temperature. Refer to
the Power LED color code information in Chapter 11 for additional Power LED
conditions.
3. Always use the transparent headbox wiring cover.
April 27, 2015 4-3

Nicolet Systems
A
B
Turn on the amplifier
1. Press the Power button (A in Figure 1) for 3 - 5 seconds.
When power is turned on, the Power LED (B) illuminates.
Figure 1
Error codes Refer to the Error Codes chapter at the end of this manual for a description on how
the amplifier alerts you to an error and how to manage it.
4-4 April 27, 2015

Perform an impedance test from the amplifier
A
B
The Headbox connects to the amplifier and provides an interface for impedance
testing without using a Nicolet brand system.
NOTE: If you disconnect the Headbox from the Amplifier during an Impedance test
and then reconnect it, the LEDs on the Headbox will not reappear. You must restart
the Impedance test to illuminate the LEDs again.
1. Hold down the Impedance Check button (A in Figure 1) for 12 seconds to initiate
the impedance check.
2. Press the Impedance Check button repeatedly until the desired impedance range:
2, 5, 10, 20, 50 Kohms LED (B) illuminates.
NOTE: Range changes on release of the button.
3. Hold down the Impedance Check button again for 12 seconds to exit the
impedance check.
4. In a standalone mode, the impedance values are displayed on the amplifier but are
not recorded to the study. It is noted in the study that an impedance test was
performed.
Nicolet EEGwireless32/64 Operation
Figure 1
April 27, 2015 4-5

Nicolet Systems
A
Impedance indications
The LEDs (A in Figure 1) on the back of the Headbox indicate the impedance of the
connected electrodes within the range selected when the Impedance check button is
pushed.
Unlit Impedance LEDs identify “in range” electrode impedances.
Orange Impedance LEDs identify “out of range” electrode impedances.
For electrodes with ‘out of range’ impedances:
1. Check the electrode connections to the amplifier.
Electrodes with “out of range” impedances may appear noisier
than those with “in range” impedances.
2. Perform troubleshooting steps, if desired.
3. Repeat the impedance steps.
Figure 1
NOTE: This amplifier will always have the LEDs displayed Orange if they are not
connected. There is not a way to turn them off if the electrode is not used. This is
different than other Nicolet amplifiers where you could disable them if they were not
needed.
4-6 April 27, 2015

Nicolet EEGwireless32/64 Operation
Nicolet EEGwireless32A
A
B
Stand Alone Mode feature (starting a recording from the amplifier)
You can now start a study from the amplifier without having a Nicolet brand system
attached. This study doesn't have patient identification until it is connected to a
Nicolet brand system at which time you can register the amplifier and assign patient
demographic information in NicVue. If the amplifier has not been connected to a
Nicolet brand system, the patient information appears as all zeroes. You can acquire
multiple studies from a single patient when connected to a Nicolet brand system, all
data will appear with appropriate start and stop times and dates marked.
NOTE: To acquire data from another patient, you must first connect to a Nicolet
brand system and download all stored data before beginning a recording on a
second patient. Only one study can be performed on the amplifier before data is
cleared from memory. See Clearing the amplifier’s onboard memory later in this
chapter.
1. Press the Start Recording button for 3 - 5 seconds to start a study.
2. The Start Recording LED illuminates when the study starts (Figure 1).
A Start Recording button
B Start Recording LED
Figure 1
April 27, 2015 4-7

Nicolet Systems
A
B
Start a study from the amplifier
If you attempt to start a study and the Stop Recording button blinks (C in Figure 1),
that is an indication that data is present on the amplifier and you cannot start a study.
See Clearing the amplifier’s onboard memory section later in this chapter to clear
data from the amplifier.
1. Press the Start Study (Record) button (A in Figure 1) for 3 - 5 seconds to start a
study.
The Study Started LED (B) illuminates when the study starts.
Stop a study from the amplifier
1. Press the Stop Study button (C in Figure 1) for 12 seconds to stop a study.
The Study Stopped LED (D) illuminates and the Study Started LED (B) turns
off when the study stops.
A
B C D
Figure 1
Turn off the amplifier
1. Press the Power button (A in Figure 2) for 12 seconds.
When power is turned off, the Power LED (B) turns off.
Figure 2
4-8 April 27, 2015

Memory capacity
See Chapter 8 for information about memory capacity. When the amplifier has
approximately an hour of storage left, the green Record button displays a flashing
LED (button X on page 1-5) and an auditory warning sounds.
Clearing the amplifier’s onboard memory
While recording a study, the amplifier records all data collected to its onboard
memory. Data may be erased from this onboard memory only with user intervention.
The data must be erased before starting a new study or to continue an extended study.
If the amplifier’s data has not been cleared after an exam was completed, the
Amplifier Contains Data menu appears when attempting to start a recording. This
prompt shows the size of the exam located on the amplifier, the patient ID under
which it was recorded, and the start/stop time of the recording. There are three options
on this screen, which are detailed below.
Delete Data on Amplifier – This deletes the data on the amplifier and allows you to
start a recording.
Exit and Retrieve Data – This downloads the data to the currently selected Patient.
Choosing this option on a different patient will warn you that the Patient ID’s do not
match.
Nicolet EEGwireless32/64 Operation
Cancel – This option cancels the Amplifier Contains Data window. The recorder
will still continue to start, with this amplifier not available. The Amplifier Selection
menu and the Recorder will have to be closed.
April 27, 2015 4-9

Nicolet Systems
• If you know the Data has been successfully downloaded, you can press Delete Data
on Amplifier button and continue the recording as planned.
• If you’re unsure, and want to check that this patient ID has this exam on the PC, you
will have to check your patient/exam list and cancel the recording. This is done by
1. Select Cancel on this menu.
2. Select Cancel on the Amplifier Selection screen.
3. Close the recorder program using the X in the top right of the Amplifier
Selection screen.
This will return you to the patient list allowing you to search for the Patient ID
listed in the Amplifier Contains Data menu. If the full exam does not appear in
the patient list, you will have to download the data from the Amplifier to the PC.
4-10 April 27, 2015

Downloading data from the Amplifier to the PC
1. Locate the correct Patient ID in the Patient List.
2. Right-click patient name > Acquire > NicoletOne.
3. The Amplifier Contains Data dialogue box reappears, asking what you would like
to do with the Data on the Amplifier.
4. Select Exit and Retrieve Data.
NOTE: If the Patient ID’s do not match, you will receive a message warning that the
ID’s are different and if you want to proceed.
The Recorder window will open and close briefly, and the File Catch-up Details box
will show the status of the exam being copied from the Amplifier to the PC. You may
minimize this window, however closing it will stop this process. File Catch-up will
need to complete before using the Amplifier again. Once this process completes, you
can choose to Delete Data on Amplifier when starting a new exam.
NOTE: Choosing Exit and Retrieve Data in this fashion will download the EEG
data from the amplifier, and will not contain the annotations or events entered by the
technician at the beginning of the exam.
These annotations can be preserved by retrieving the data by reviewing the original
exam:
Nicolet EEGwireless32/64 Operation
1. Connect the amplifier to system. Ensure it is not currently recording, press the
Stop recording button on the amplifier if necessary.
2. Choose to review the original exam.
3. You will get a prompt stating that there is data on the amplifier and to Download
the data now, or to Mark the exam as complete.
4. Choose Download the data now. The Merge Process will start and append the
data to the end of this exam, including the original annotations/events.
Internal SpO2 operation
1. The amplifier supports the acquisition of SpO2 data. The amplifier has a built in
Nonin model for heart rate, pleth, SpO2. To acquire SpO2 data, connect a Nonin
finger probe with optional extension cables to the amplifier. Please refer to the
Nicolet Software Reference guide for instructions on using vital signs or an
external SpO2 device. See Amplifier symbols and components in Chapter 1 for
the connection port.
April 27, 2015 4-11

Nicolet Systems
Blank page.
4-12 April 27, 2015

5 Using the Nicolet brand system to
setup and acquire EEG
This Chapter describes how to operate the Nicolet EEGwireless32/64 amplifier
controls from the Nicolet brand system. Please see the previous chapter for
instructions on controlling the Nicolet EEGwireless32/64 amplifier without the
Nicolet brand system.
April 27, 2015 5-1

Nicolet Systems
Blank page.
5-2 April 27, 2015

Using the Nicolet system to setup and acquire EEG
Using the Nicolet brand system to setup and acquire EEG with the EEGwireless32/64 amplifier
This procedure describes using the Nicolet brand system to setup and acquire EEG.
For more information, please see the Nicolet Software Reference guide 269-604601
(CD part number 482-639403).
Wireless panel information
Figure 1 shows the Wireless information panel. The Wireless panel provides the
following information.
Figure 1: Wireless information panel.
April 27, 2015 5-3

Nicolet Systems
Battery life Each of the battery ports on the amplifier display either the total battery life
remaining, or “AC-Power” if the port is connected to AC Power. The Internal
indicator displays the internal battery life remaining.
Connection quality The Connection Quality indicator indicates the quality of the signal being received by
the amplifier
Signal strength The Signal Strength indicator indicates the strength (power) of the signal being
received by the amplifier.
Storage Both the maximum total storage on the amplifier’s onboard storage as well as the total
remaining storage are displayed. An estimate of the total storage time remaining,
given the current sampling rate, is also displayed.
Catchup A display indicating if the amplifier is In Range (connected) of the Acquisition
station or Out Of Range (disconnected) of the Acquisition station is located above
the “Catch-up Status” field. Live Data Delay indicates how much time lag there is
between live data and the data displayed on the Nicolet screen display. The time it
takes to show live data may be more or less than this time. File Split In indicates the
amount of time the amplifier can remain out of range before the current exam file is
split.
5-4 April 27, 2015

Starting a study
Using the Nicolet system to setup and acquire EEG
Select the amplifier for the study
To start a study while connected to a Nicolet acquisition station, either directly or
over a network, you must first select an amplifier from which to acquire EEG.
1. Each amplifier has a unique identifier (Figure 2). Select the amplifier from the
Wireless Panel dialog with the same identifier as your amplifier. If the dialog in
Figure 2 does not appear and you see an “Amplifier Disconnected,” select the
proper Protocol from the Protocol menu to view the wireless panel dialog.
Figure 2.
NOTE: In the event that the amplifier you select is still storing data from a previous
exam, you will see a prompt asking you to either download the data or erase the data
from the amplifier. If you choose to download the data, the amplifier will perform
data catch-up. See Data Catch-Up in this chapter for more information. Also see
Clearing the amplifier’s onboard memory in Chapter 4.
April 27, 2015 5-5

Nicolet Systems
Select a protocol To start an exam through the Nicolet brand system, you must first select a protocol to
run.
There are protocols specific to the amplifier that must be
selected to ensure proper operation.
1. From the Options menu, select Protocols.
2. Click Protocol > EEGwireless32 (or EEGwireless64) depending on the number
of channels with which your amplifier is configured.
3. The amplifier is ready to start acquiring data.
NOTE: If you change to a different protocol (e.g., 64 wireless to a 32 wireless) when
Powerloss Recovery is enabled, you will have a two minute delay before you can
proceed with the recording.
Change/View the sampling rate
The current sampling rate can be changed and viewed in Acquisition:
1. Select the Settings pane.
2. Select Amplifier.
The sampling rate can be viewed in Review:
1. Select Tools > Report > Wireless Audit Log.
- or -
2. Select View > Recorded Channels.
5-6 April 27, 2015

Using the Nicolet system to setup and acquire EEG
Check the impedance
NOTE: Skip step 13 if the Startup in Impedance mode checkbox was checked
earlier (Tools > Options > Acquisition tab). Checking this box causes the
Impedance window to appear automatically when you open the Recorder software.
Please refer to the Nicolet Brand System Software Reference Guide, Miscellaneous
Quick Steps
NOTE: If you disconnect the Headbox from the Amplifier during an Impedance test
and then reconnect it, the LEDs on the Headbox will not reappear. You must restart
the Impedance test to illuminate the LEDs again.
3. Select Impedance to display the Impedance Test window.
- or -
Select Acquisition > Impedance.
4. Select the acceptable impedance range:
Click on the Threshold show menu button and then select the desired
threshold value.
- or -
Enter a custom value.
chapter, Acquisition tab for additional information.
April 27, 2015 5-7

Nicolet Systems
5. The measured impedance values are displayed for each electrode.
• Electrodes with in range impedances are displayed in green.
• Electrodes that are out of range are displayed in red. Allow time for the
Impedance Test window to update as you work to lower impedances as
necessary.
6. When the impedances are in range, select Start.
7. The Recorder window appears with a watermark that says “Not Recording” and
with the EEG scrolling across the screen, but not yet being saved to the hard
drive. Select Record to start the recording unless the EEG was initiated
using “Quick Start”.
Impedance threshold check
The impedance threshold check can be performed either from the amplifier or from
the software. To check the impedance from the amplifier see Chapter 3.
8. Click on Options > Impedance Check.
9. Click Start Impedance Check.
10. The impedances are displayed on the Nicolet Acquisition screen.
5-8 April 27, 2015

Using the Nicolet system to setup and acquire EEG
Start recording EEG 11. If the Impedance Check panel was enabled to appear automatically when the
Recorder application was started, the system begins recording as soon as you
close the Impedance Check panel.
If the feature was not enabled, select Record start recording.
NOTE: Select Record again to stop recording EEG.
NOTE: If the patient goes out of range while performing an impedance check,
the impedance values will not be recorded.
Disconnecting from the system
In the event that the amplifier becomes disconnected from the Nicolet acquisition
station or the network, either accidentally or intentionally, the amplifier stores its
neurodiagnostic information onboard. For more information see the Catch-up section
in Chapter 3.
April 27, 2015 5-9

Nicolet Systems
Optional steps The following describes how to enable/edit various features/parameters available on
the Nicolet acquisition system.
Enabling automatic
impedance testing
The system can test the electrode impedances each time you change to a different
montage.
after changing the
montage
1. Select Settings and then Misc at the bottom of the Editor window.
- or -
Select Protocol > Settings and then Misc at the bottom of the Editor window.
2. Checkmark Automatic Impedance Test on Montage Change.
3. Select Save.
4. Select Close.
Edit the parameters Display the Control Panel
1. Select Panel .
2. Select View > Panel > Format to display the Format palette, which lets you
easily change the sensitivity, LFF, HFF, timebase, montage and the number of
channels displayed.
5-10 April 27, 2015

Using the Nicolet system to setup and acquire EEG
Select the montage
1. From the Control Panel, select the Montage button on the Format palette and
then select the desired montage.
- or -
Select Format > Montage and then select the desired montage.
- or -
Select the desired Montage shortcut button.
- or -
Right-click on the trace labels, select Montage and then select the desired
montage.
NOTE: If the Laplacian button becomes disabled:
1. Open the Calculated Channels editor.
2. Select one (and only one) sensor on the Head view.
3. The Laplacian sensor button will be enabled at this point. Once pressed, you
will be in the Laplacian mode. Subsequent sensor selections will be
weighted appropriately.
April 27, 2015 5-11

Nicolet Systems
Select the Sensitivity
1. From the Control Panel, select the Sensitivity button on the Format palette and
then select the desired sensitivity.
- or -
Select Montage > Sensitivity and then select the desired sensitivity.
- or -
Right-click on the trace labels, select All Traces > Sensitivity and then select
the desired sensitivity.
- or -
Right-click on the trace labels, select Adjust Selected and then select the desired
sensitivity.
Select the Timebase
1. From the Control Panel, select the Timebase button on the Format palette and
then select the desired timebase.
- or -
Select Montage > Timebase and then select the desired timebase.
- or -
Right-click on the trace labels, select All Traces > Timebase and then select the
desired timebase.
5-12 April 27, 2015

Using the Nicolet system to setup and acquire EEG
Select the High Cut/Low Cut filters
1. From the Control Panel, select the High Cut or Low Cut button on the Format
palette and then select the desired filter settings.
- or -
Select Montage > High Cut/Low Cut and then select the desired filter settings.
- or -
Right-click on the trace labels, select All Traces, select HighCut/LowCut and
then select the desired filter settings.
- or -
Right-click on the trace labels, select Adjust Selected, select HighCut/LowCut
and then select the desired filter settings.
Selecting additional Filters
In NicoletOne there is a dropdown list of high cut and low cut filters. Additional filter
settings may be selected, up to the Nyquist Rate (one half of the current sampling
frequency).
To select custom filter settings:
1. Right-click on the list of channels on the left hand side of the NicoletOne screen.
2. Select All Channels.
3. Select High Cut Filters or Low Cut Filters.
4. Choose Custom.
5. You can now enter a numerical value for the filter.
April 27, 2015 5-13

Nicolet Systems
Turn the Notch filter on
1. Select Notch .
- or -
Select Montage > Notch.
- or -
Right-click on the trace labels, select All Traces and then select Notch.
- or -
Right-click on the trace labels, select Adjust Selected and then select Notch.
Display the Reader
window
(optional)
1. Select Review to display the Reader window to the left of the Record
window if you want to review the EEG (or look back in the EEG) while it is
being recorded.
NOTE: The Reader window does not update automatically. To view the latest EEG
that was recorded, select End .
5-14 April 27, 2015

Using the Nicolet system to setup and acquire EEG
Splitting long recordings into multiple files
You can split the recording into multiple files at a specified time or at the end of a
predetermined file duration.
1. Select Settings and then select Misc at the bottom of the Editor window.
- or -
Select Protocol > Settings and then select Misc at the bottom of the Editor
window.
Splitting the recording at a specified file duration
a. Click on the Maximum File Duration radio button.
b. Select the file duration after which the file will close and a new file begins
storing data.
c. Select Save.
d. Select Close.
Splitting the recording at a specified time
a. Click on the Start New File at radio button.
b. Select the time of day (AM or PM) at which you want the file to close and a
new file begins storing data.
c. Select Save.
d. Select Close.
April 27, 2015 5-15

Nicolet Systems
Data catch up
In the event that the amplifier fails to communicate to the network or the acquisition
station being used to acquire data, the amplifier stores data locally. The amplifier has
onboard memory and stores all data acquired (EEG and Patient Event) to its onboard
memory. When the amplifier communication is restored to the network or acquisition
station, the data stored locally on the amplifier is transmitted along with the current
(live) data.
NOTE: The memory card for internal storage is not user accessible.
5-16 April 27, 2015

Using the Nicolet system to setup and acquire EEG
Data catch up
(disconnected
than 10 minutes)
less
The following applies to an amplifier wired to the Nicolet acquisition station with no
wireless capability.
NOTE: If the amplifier is in range of a wireless access point, disconnecting the
amplifier’s Ethernet cable will not result in an interruption of data to the Nicolet
acquisition station.
Scenario
The amplifier is acquiring data for a study and is connected either:
• directly to a Nicolet acquisition station
- or -
• to a network running the Nicolet acquisition station.
a. The Ethernet cable connecting the amplifier to the Nicolet acquisition station
is disconnected causing the Nicolet software to display an alert that a
disconnect has occurred.
b. The disconnect lasts less than 10 minutes. The default is 10 minutes.
c. The amplifier is reconnected to the network or to the same Nicolet
acquisition station to which it was initially connected.
d. After a moment, the Nicolet acquisition station displays that the amplifier
has been reconnected.
Do not stop acquisition from the Nicolet acquisition station until
data catchup is complete as indicated when the wireless panel displays ‘In
Range’ and the fast scrolling catchup eeg returns to live data.
April 27, 2015 5-17

Nicolet Systems
Data catch up
(disconnected
than 10 minutes)
more
The following applies to an amplifier wired to the Nicolet acquisition station or
operating in the Wireless mode.
NOTE: If the amplifier is in range of a wireless access point, disconnecting the
amplifier’s Ethernet cable will not result in an interruption of data to the Nicolet
acquisition station.
The amplifier is acquiring data for a study and is connected either:
• directly to a Nicolet acquisition station
- or -
• to a network running the Nicolet acquisition station
a. The Ethernet cable connecting the amplifier to the Nicolet acquisition station
is disconnected, causing the Nicolet software to display an alert that a
disconnect has occurred.
b. The disconnect lasts longer than 10 minutes.
c. The amplifier is reconnected to the network or to the same Nicolet
acquisition station to which it was initially connected.
d. After a moment, the Nicolet acquisition station displays that the amplifier
has been reconnected. A file split occurs when the amplifier comes back into
range.
e. Click the system tray icon to view the file catchup details including file
progress.
Do not stop acquisition from the Nicolet Acquisition station until
data catchup is complete as indicated by the file catchup details window that
appears in the system tray. Video will not be available, when reviewing the exam,
for the period of time the amplifier was disconnected.
5-18 April 27, 2015

Using the Nicolet system to setup and acquire EEG
Changing the sampling rate
1. Select Settings > Amplifier.
2. Select your sampling frequency from the "Common Sampling Rate" menu (Figure
1). You can select specific sampling frequencies between 128 Hz to 12000 Hz.
Figure 1.
NOTE: If you select a sampling rate over 4096 Hz while in the wireless mode, you
will be prompted to turn the wireless module off. If you choose not to turn it off, your
sampling rate will not be changed. If you choose to turn it off, in order to re-enable
the wireless module, you must power cycle the amplifier.
April 27, 2015 5-19

Nicolet Systems
5-20 April 27, 2015

6 Wireless Operation
April 27, 2015 6-1

Nicolet Systems
Blank page.
6-2 April 27, 2015

Wireless operation
Wireless Operation
The maximum wireless sampling rate is 4096Hz. If you select a sampling rate above
this, the Acquisition software will warn you that you need to turn off wireless in order
to sample at a higher rate. If you accept this change, you must power cycle the
amplifier in order to regain wireless connectivity.
Do not use the photic functionality of the wireless amplifier while transmitting
wirelessly. If you want to perform photic stimulation, connect the ethernet cable to the
Acquisition station or the network.
There is a 10 minute disconnected threshold that determines if a file split needs to be
done in order to retrieve data from the amplifier. If the amplifier becomes
disconnected from the Acquisition station and then is reconnected to the Acquisition
station and if the time the amplifier is disconnected plus the time it takes for
NicoletOne to download the data stored on the amplifier is greater than 10 minutes, a
file split will occur and a file catchup window will appear. Note that this 10 minute
threshold is not user configurable.
If the Acquisition station on which NicoletOne is running has a power outage,
NicoletOne will attempt to restart acquisition when power is restored to the
workstation. If the amplifier that you are using is out of range when NicoletOne
restarts, it will not restart acquisition on that amplifier. To restart acquisition:
1. Bring the amplifier back into range or tether the amplifier to the workstation.
2. Select the amplifier from the Amp Selection screen.
3. Restart acquisition.
If you check impedance while recording and out of range, upon coming back into
range, the study will display an overflow error and the recording may stop. To resume
recording, press the Record button in acquisition. Note that this does not happen
when file catchup is initiated after coming back in range.
If your wireless amplifier becomes disconnected for extended periods of time, you
may end up with a number of exam files in NicVue or Study Room. When this occurs,
you will not end up with a single continuous exam file representing the entire study.
Each exam segment marked as “DOWNLOADED” is a complete segment of the
exam. These “DOWNLOADED” files along with the most recently marked exam file
(which may be a downloaded file if the exam was stopped while the amplifier was
disconnected) comprise the entirety of the exam.
April 27, 2015 6-3

Nicolet Systems
Blank page.
6-4 April 27, 2015

7 Using the EEGwireless32/64
Batteries
This chapter contains information about the batteries that may be used with the
EEGwireless32/64 amplifier.
April 27, 2015 7-1

Nicolet Systems
Blank page.
7-2 April 27, 2015

Internal batteries
Contact Natus Neurology Incorporated Customer Service if you
believe your internal batteries need to be replaced.
The external battery charge indicators
The five LEDs on the battery charger indicate the current charge (in percent) as
shown in Figure 1.
Using the EEGwireless32/64 Batteries
Figure 1.
Legend Description
A Charger (Nicolet CHG1)
C Battery Test Button
B Battery (Nicolet BAT1)
April 27, 2015 7-3

Nicolet Systems
Checking the batteries charges
1. Display the Wireless Panel pane in the Panel on the right side of the Acquisition
window; click View > Panel > NicoletOne Wireless Amp Panel.
2. The percent of charge remaining is displayed in the Wireless Panel pane for Bat
A, Bat B, and Internal batteries.
Below is information regarding the run and life time of the batteries. Note that the
values here are only estimates. The actual run time and life of the batteries depend on
how the amplifier is used, how it is charged and other factors.
Battery Life
The following graph shows the expected capacity versus the number of charge cycles.
Note that this graph only reflects the capacity if the battery is discharged to 0% and
then charged to 100% for each cycle.
Figure 1 - Source: Tadiran Batteries LTD
7-4 April 27, 2015

Battery pack capacity
The table below indicate the approximate number of hours the amplifier can acquire
data without recharging the external battery pack.
NOTE: This is for a single battery pack; your battery life will approximately double
with 2 battery packs connected.
Using the EEGwireless32/64 Batteries
32 Channel 64 Channel
Sampling Rate
(Hz)
128 12.1 12.2 9.9 9.8
256 12.1 12.1 9.9 9.8
512 12.1 12.1 9.9 9.8
1024 12.0 12.1 9.9 9.8
2048 12.0 12.0 9.9 9.7
4096 12.0 11.9 9.9 9.7
6000 11.9 * 9.7 *
8000 11.8 * 9.6 *
10000 11.7 * 9.6 *
12000 10.2 * 7.4 *
Wired
(Hours)
Wireless
(Hours)
Wired
(Hours)
*-You cannot sample above 4096 Hz in the Wireless mode.
Wireless
(Hours)
April 27, 2015 7-5

Nicolet Systems
TEST
A
B
A
D
C
Charging the external batteries
While a medical power brick is attached and a battery pack is attached, that battery
pack will charge.
While an external battery pack or a medical power brick is connected, the internal
battery will charge.
NOTE: The internal and external batteries will never reach 100% charge (the battery
trickle charges).
The amplifier provides a continuous beeping when the external battery pack is below
20% charge, or if no external power is connected (running on internal batteries).
Replace the External batteries or the Recorder to a wall outlet.
Figure 1: External battery and charger.
Legend Description
A Charger (Nicolet CHG1)
B Battery (Nicolet BAT1)
C Tool removable
D Connector (To amplifier or power supply for charging the battery)
Replacing a worn out external battery
7-6 April 27, 2015
The charger can be removed from a worn battery and reused for a new battery.
1. Remove the charger securing screw (C) in Figure 1 above.
2. Slide the charger off from the battery.
3. Slide the charger on to the new battery.
4. Secure the charger securing screw (C) in Figure 1 above to the new battery.

Charging the battery
A
B
C
D
Nicolet wirelessEEG32A
A
B
C
D
E
with a medical grade
power supply
Charging the battery from the amplifier with a medical grade power supply
Using the EEGwireless32/64 Batteries
Figure 2
Legend Description
A Battery (Nicolet BAT1)
B Charger (Nicolet CHG1)
C Medical power supply (PSU-EEG64)
D Wallplate - Hospital mains
Figure 3
Legend Description
A Amplifier
April 27, 2015 7-7
B Charger (Nicolet CHG1)
C Battery (Nicolet BAT1)
D Medical power supply (PSU-EEG64)
E Wallplate - Hospital mains

Nicolet Systems
Battery indications
The amplifier's Power LED gives an indication of the current state of the
amplifiers batteries.
If the Power LED is green and blinks briefly every 5 seconds, the the amplifier has
external power and the internal batteries are charged.
If the Power LED is green and blinks yellow every 5 seconds, then the amplifier has
external power and the internal batteries are charging
If the Power LED is yellow and blinks every 5 seconds, then the amplifier is
operating on internal battery power only.
If the Power LED is yellow with no blinking, then the amplifier is operating on
internal batteries and the internal batteries are low and not charging.
7-8 April 27, 2015

8 Nicolet EEGwireless32/64 Amplifier
Onboard Memory
This chapter contains information about the Nicolet EEGwireless32/64 onboard
memory.
April 27, 2015 8-1

Nicolet Systems
Blank page.
8-2 April 27, 2015

Onboard memory
Onboard Memory
The amplifier has 32GB onboard memory that records neurodiagnostic information.
In the event that the amplifier fails to communicate to the network or the Acquisition
station being used to acquire data, the amplifier stores data locally. The onboard
memory stores all data acquired (EEG Pulse Oximetry, Impedance Tests and Patient
Event). When the amplifier communication is restored to the network or Acquisition
station, the data stored locally on the amplifier is transmitted along with the current
(live) data.
The data on this memory persists through power cycles. The amplifier can be
disconnected or out of range for approximately the amount of time shown below, for a
given channel count and sampling rate. When the amplifier has approximately an
hour of storage left, the green Record button displays a flashing LED (button X on
page 1-5) and an auditory warning sounds.
April 27, 2015 8-3

Nicolet Systems
IMPORTANT: If the amplifier fails to communicate (e.g., Out of Range) for a
period of more than 10 minutes (factory set) when performing data catchup, you
will not have video
with the EEG data.
32 Channels 64 Channels
Estimated
Data Storage
for 1 Hour
Storage at:
12000Hz 4.0 7 Hours 6.6 4 Hours
10000Hz 3.3 8 Hours 5.5 5 Hours
8000Hz 2.6 10 Hours 4.4 6 Hours
6000hz 2.0 14 Hours 3.3 8 Hours
4000Hz 1.3 21 Hours 2.2 12 Hours
2000Hz 0.7 1.5 Days 1.1 1 Day
1000Hz 0.3 3.5 Days 0.6 2 Days
512Hz 0.2 7 Days 0.3 4 Days
256Hz 0.1 14 Days 0.1 8 Days
128Hz 0.1 28 Days 0.1 16 Days
(Gbytes)
Estimated
Storage Time
with 32GB SD
Card
Estimated
Data Storage
for 1 Hour
(Gbytes)
Estimated
Storage Time
with 32GB SD
Card
8-4 April 27, 2015

Onboard Memory
If you are recording at high sampling rates, the exam files size will be very large. We
suggest you adjust your file split time and file process settings to compensate for this
additional size.
NOTE: The file size indicated by Nicolet in the Amp Contains Data window is not
the same as the .e file size on disk. The downloaded .e file will be approximately 70%
of what is indicated in the Amp Contains Data window.
Data download rate If your amplifier's onboard memory is full and you have the amplifier connected with
the ethernet cable directly to the Acquisition station, downloading the file will take at
least 50 minutes for 32 channels and 60 minutes for 64 channels.
April 27, 2015 8-5

Nicolet Systems
Example modes of operation
Mode 1: Wireless with external battery pack.
Mode 2: Wireless with AC power.
Mode 3: Wired network with external battery pack
Mode 4: Wired network with AC power.
This mode provides the most mobility within the wireless network range.
Example - The amplifier is wired and the patient wants to use the restroom. Use the
external battery.
Example - You want to change the sheets and need to disconnect the patient for a
period of time.
This mode is used to charge battery packs while recording data.
Example - You are wireless and need to go to a different floor for an ancillary
procedure, which does not have wireless access. You can use this mode.
Wired modes allow use of higher sampling rates.
Example - You are wired and want the patient to become mobile and still want to see
the data. If amplifier is configured with wireless settings disconnecting the network
cable will change the amplifiers communication method to wireless. You may
experience a brief disconnection time while switching over to wireless.
Wired modes allow use of higher sampling rates.
Example - You are operating the amplifier on a wired network and the amplifier
begins to run low on batteries. Connect the amplifier to AC power.
Example - Patient wants to go to sleep.
8-6 April 27, 2015
 Loading...