

Page 1
•
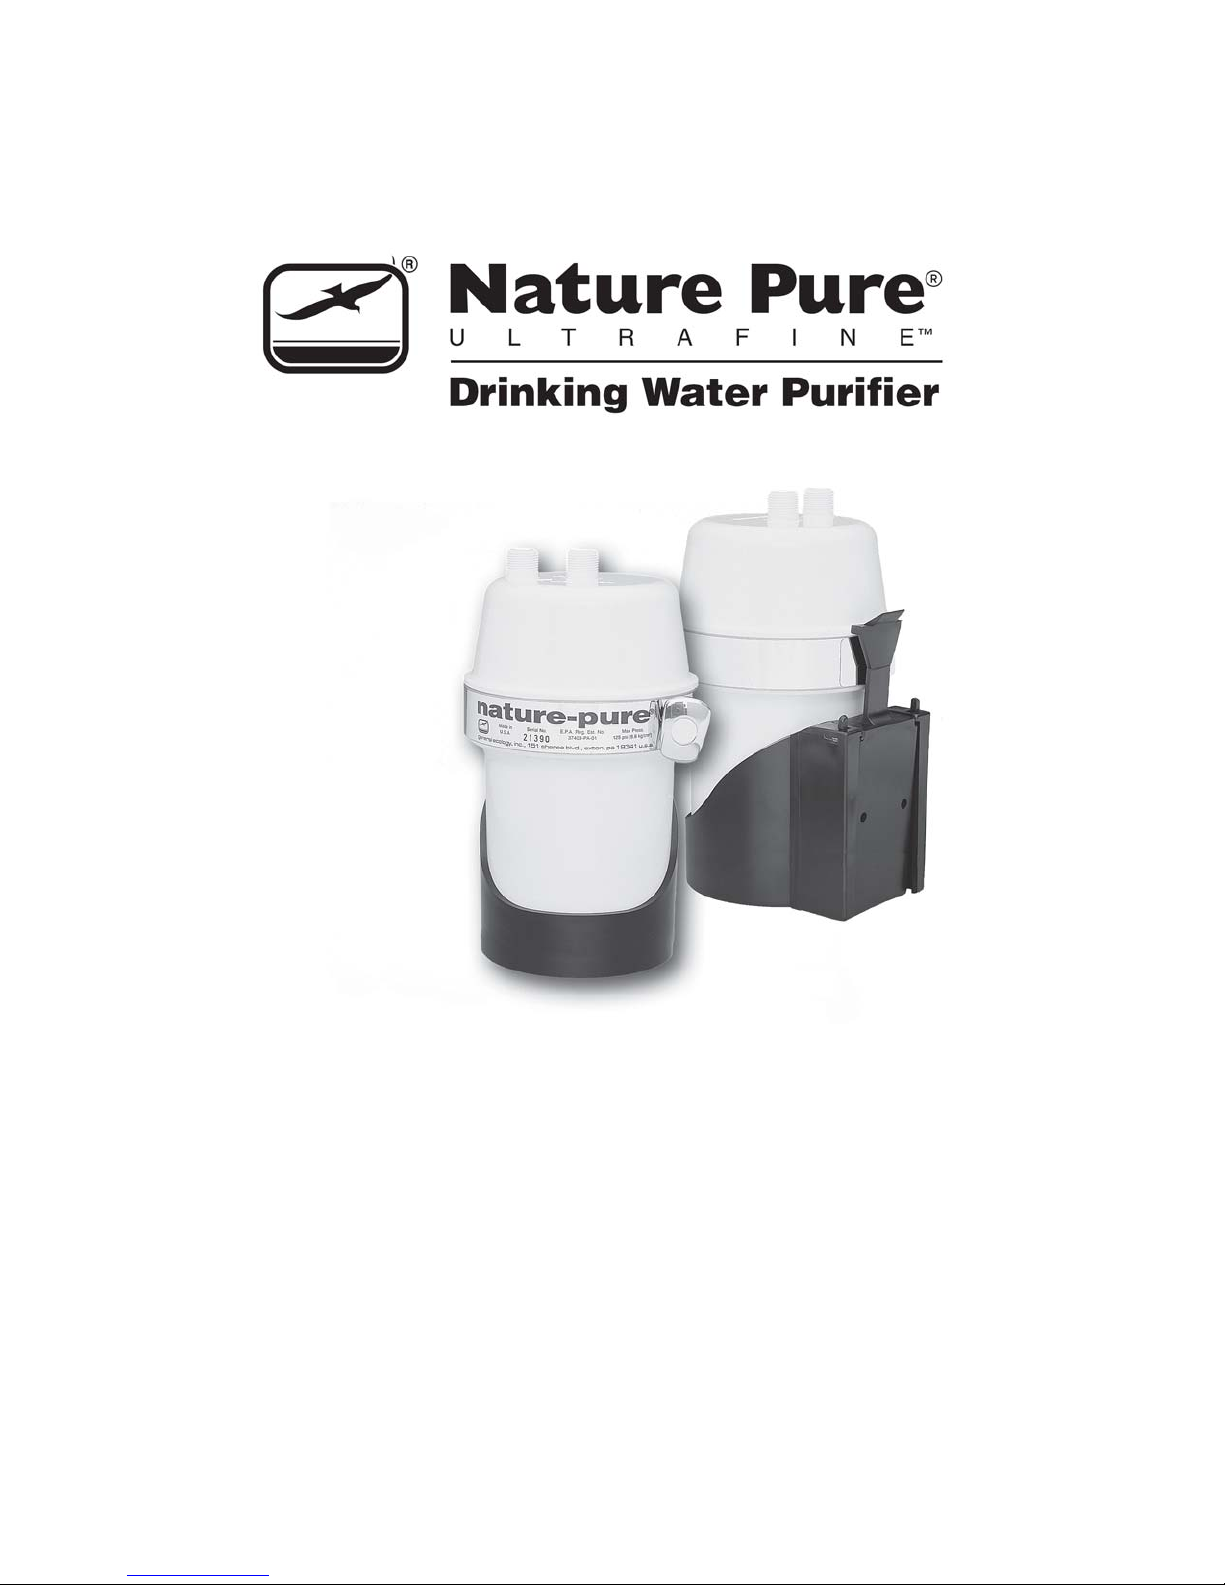
Purifies
Instantly and
Naturally,
Without
Adding
Chemicals
•
Compact,
Convenient
and Complete
•
Installs in
Minutes—
Reliable and
Simple to
Use—Just
Turn on the
Water
For RV and Marine Use Only
No more tank taste!
INSTALLATION INSTRUCTIONS
Better Than Bottled Water — At a Fraction of the Cost
Faucet and Basic In-line Models
Not for Residential Use
Page 2
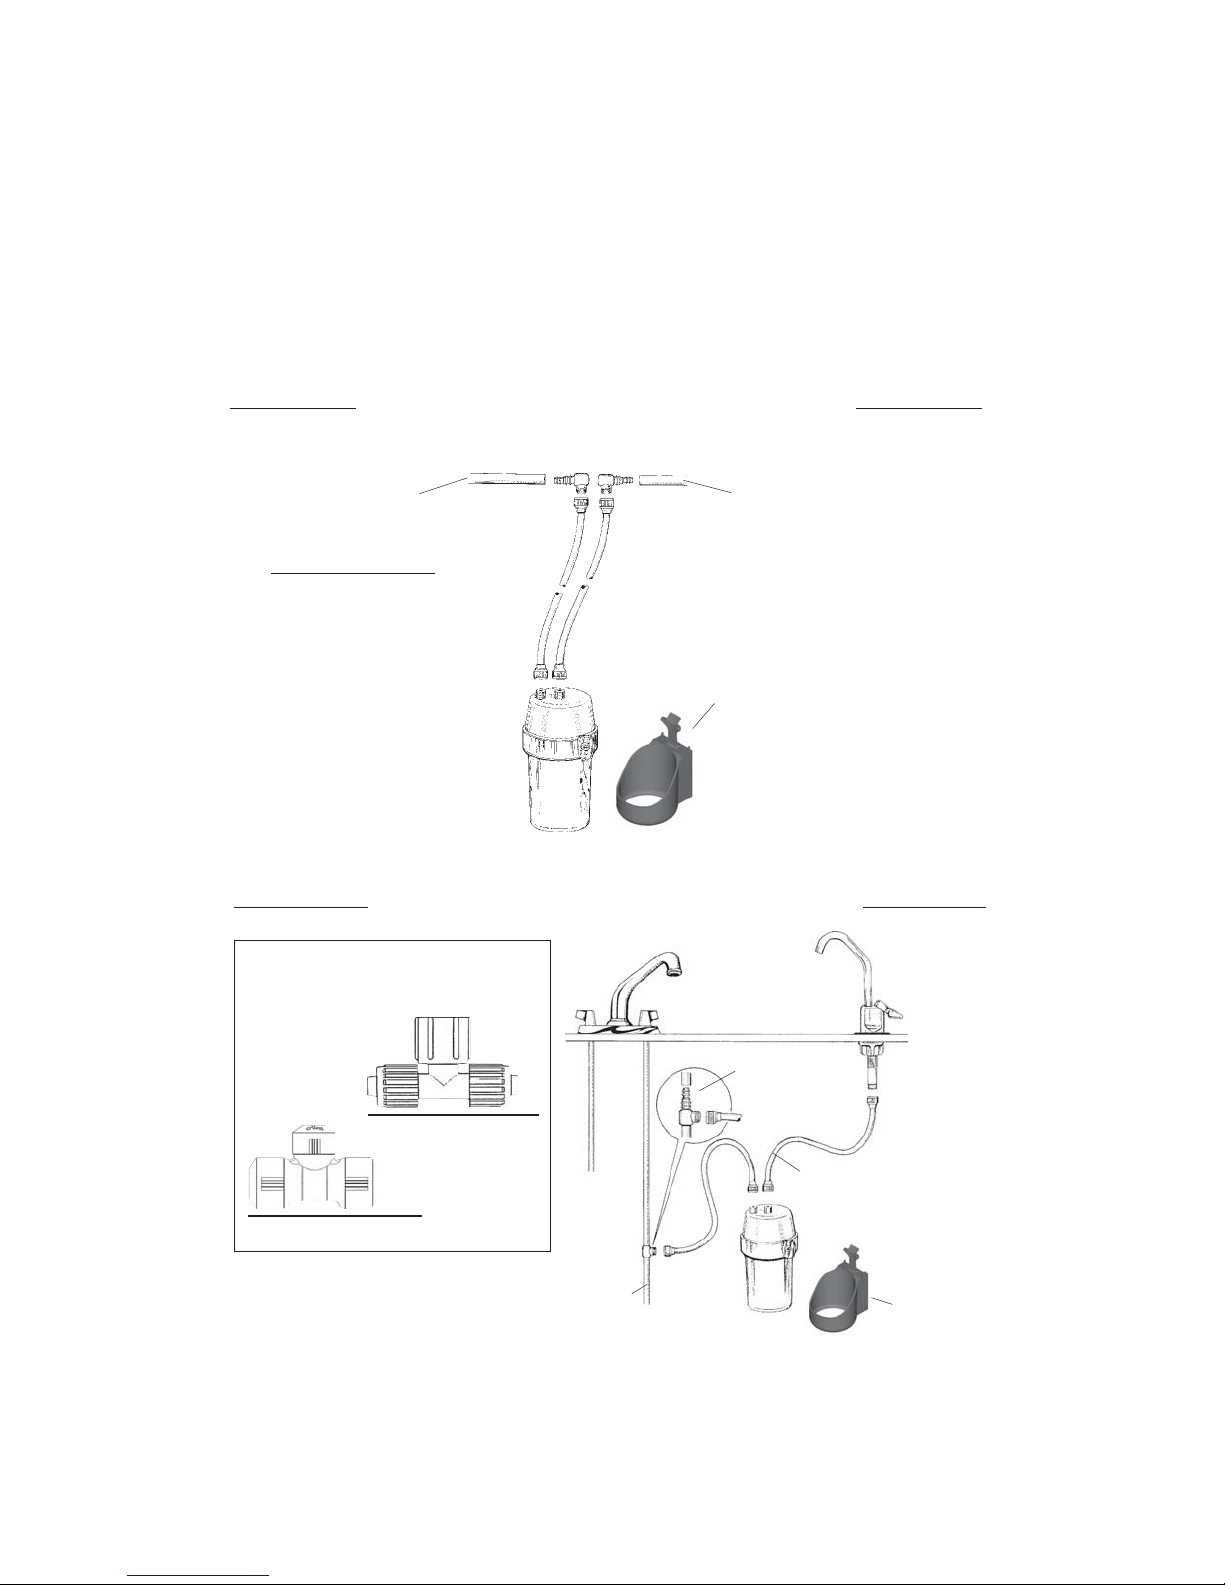
Your Nature Pure® purification unit will be ready to use immediately after
installation. The faucet is "top-mounting" and all connections, downstream of
the connection to your cold water line, are made using our "Quick and EasyTM"
installation lines. Please see the diagrams for each type of installation.
RV/Marine
IN-LINE MODEL INSTALLATION
insert elbows, secure with customer
cold water line
Helpful Hint #1
Install mounting bracket
by positioning on inside
wall of sink cabinet in a
location that allows easy
access for cartridge
replacement. Make sure
inlet and outlet connection
lines reach.
supplied hose clamps
inlet line
outlet line
cold water line to
pure water center
outlet
mounting bracket
IN-LINE MODEL INSTALLATION
Installed cold water supply lines vary by
manufacturer. If the supplied Nature
Pure Tee does not fit your configuration,
these should.
Flair-It™ Swivel
Tee
Hepworth Hep2O Tee
cold water line
RV/Marine
insert tee,
secure with
hose clamps
pure water hose line
from faucet to center
outlet
mounting
bracket
Page 3
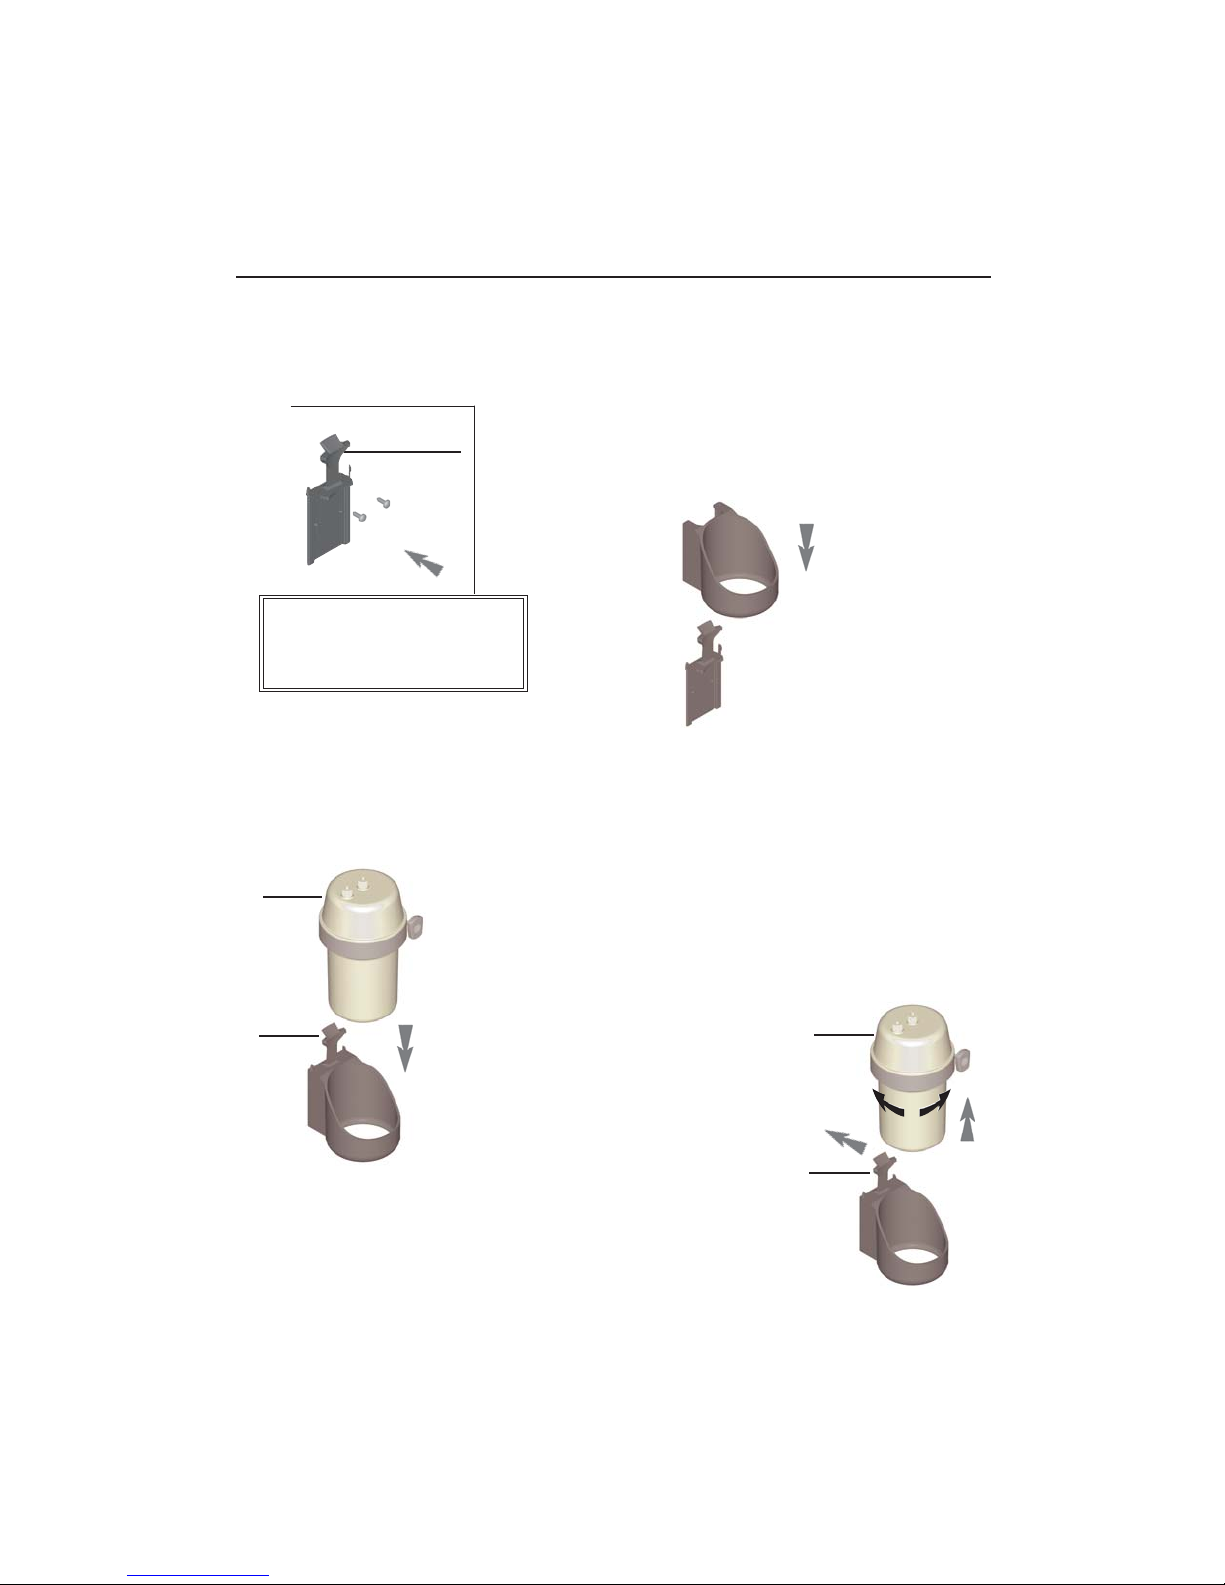
RV/MARINE MOUNTING BRACKET INSTALLATION
1.
Screw wall plate to wall
with the 2 screws supplied
with retainer latch up.
retainer latch
Note:
Be sure to leave enough
clearance when mounting wall
plate for placing and removing
unit with hoses attached.
2.
Slide the ring
bracket down onto the
wall plate until it snaps
into place as shown.
cover
retainer
latch
3.
Slide the nature pure
into the ring bracket until
the retainer latches over
the cover. The taper lock fit
will hold the unit securely.
4.
To remove the unit Push the retainer latch away
from cover - rotate and lift
the unit from the bracket.
cover
retainer
latch
Page 4
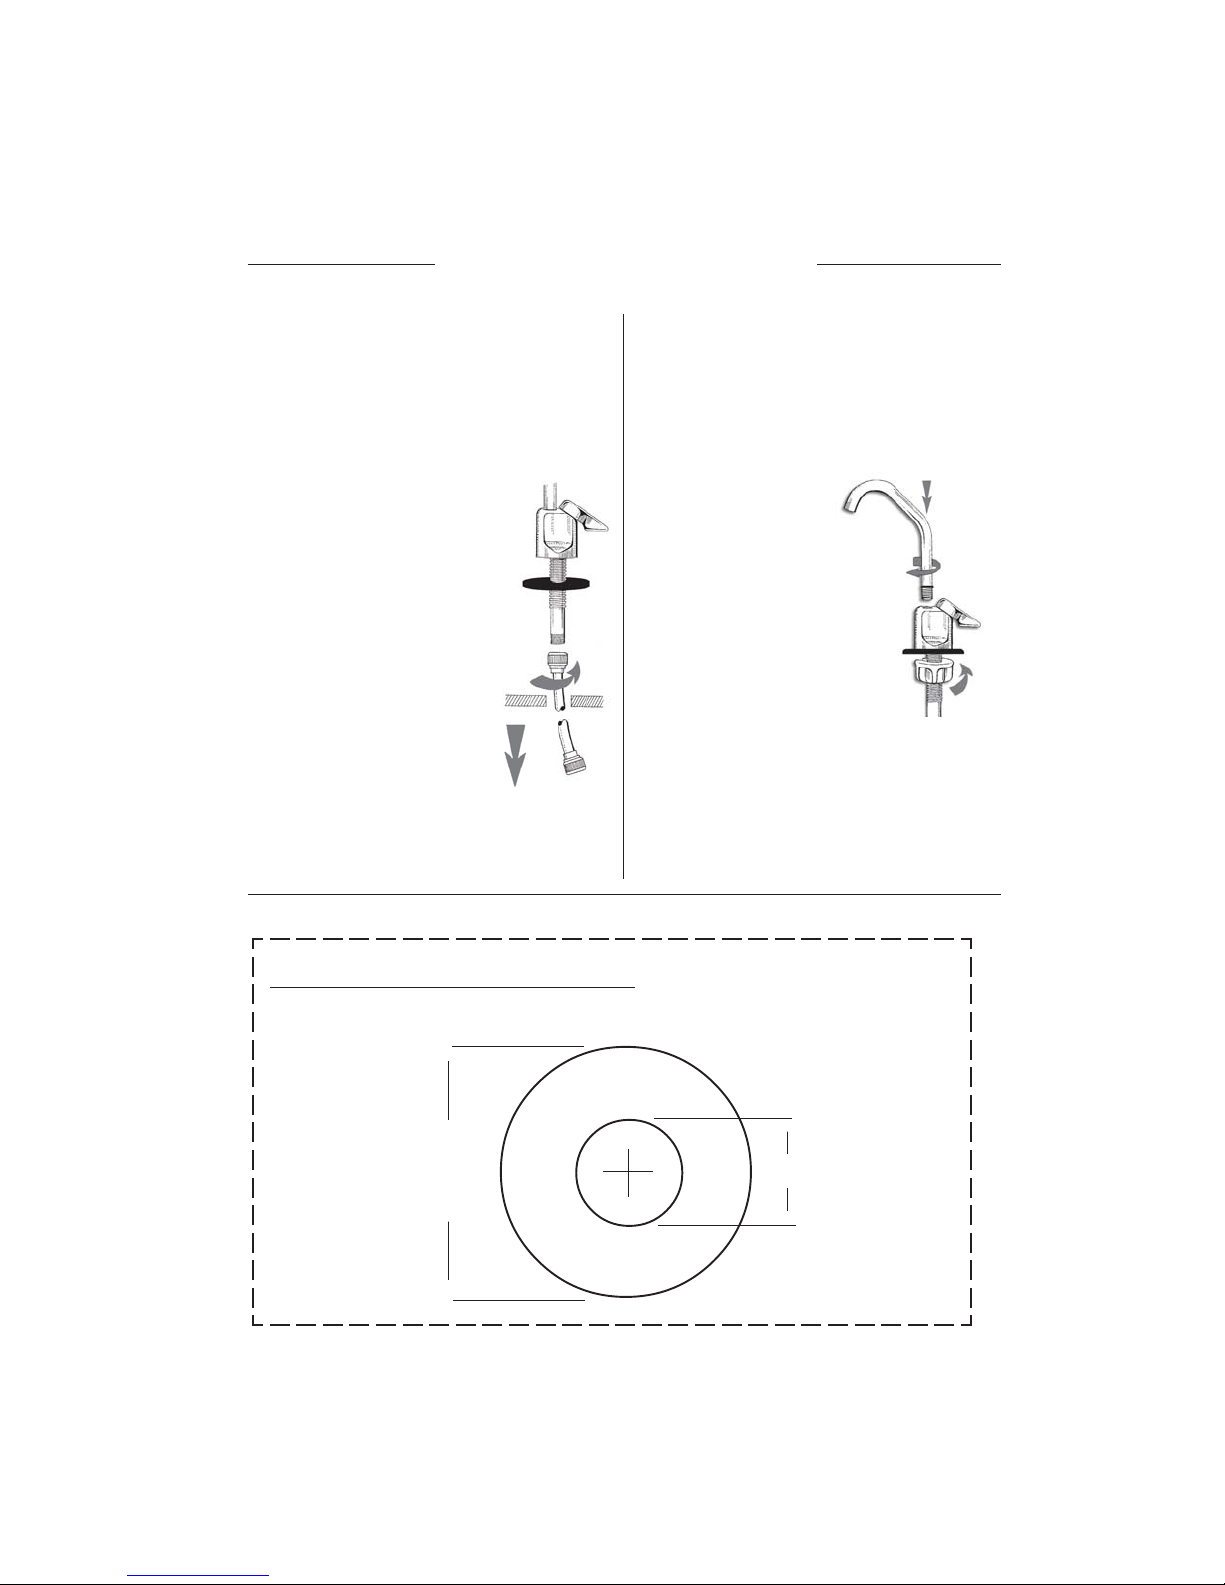
FAUCET INSTALLATION
1.
Determine faucet location and
cut a ¾" hole (fits up to a 1½" hole).
(We've included a handy Faucet
Mounting Template at the bottom of
this column.) Be sure to check for
proper clearance of faucet stem
underneath sink.
2.
Place faucet
stem through black
base gasket and
then securely hand
tighten hose onto
faucet stem.
3.
Drop free end
through mounting
hole.
4.
Position
faucet and hand
tighten (only) split
nut.
5.
Insert and rotate
patented threaded
taper fit spout.
Thread spout into
base, Do not over
tighten.
Faucet Mounting TFaucet Mounting T
Faucet Mounting T
Faucet Mounting TFaucet Mounting T
6
1¾"
6
emplateemplate
emplate
emplateemplate
Cut out and position
on sink ledge before
making hole.
6
¾"
6
Page 5
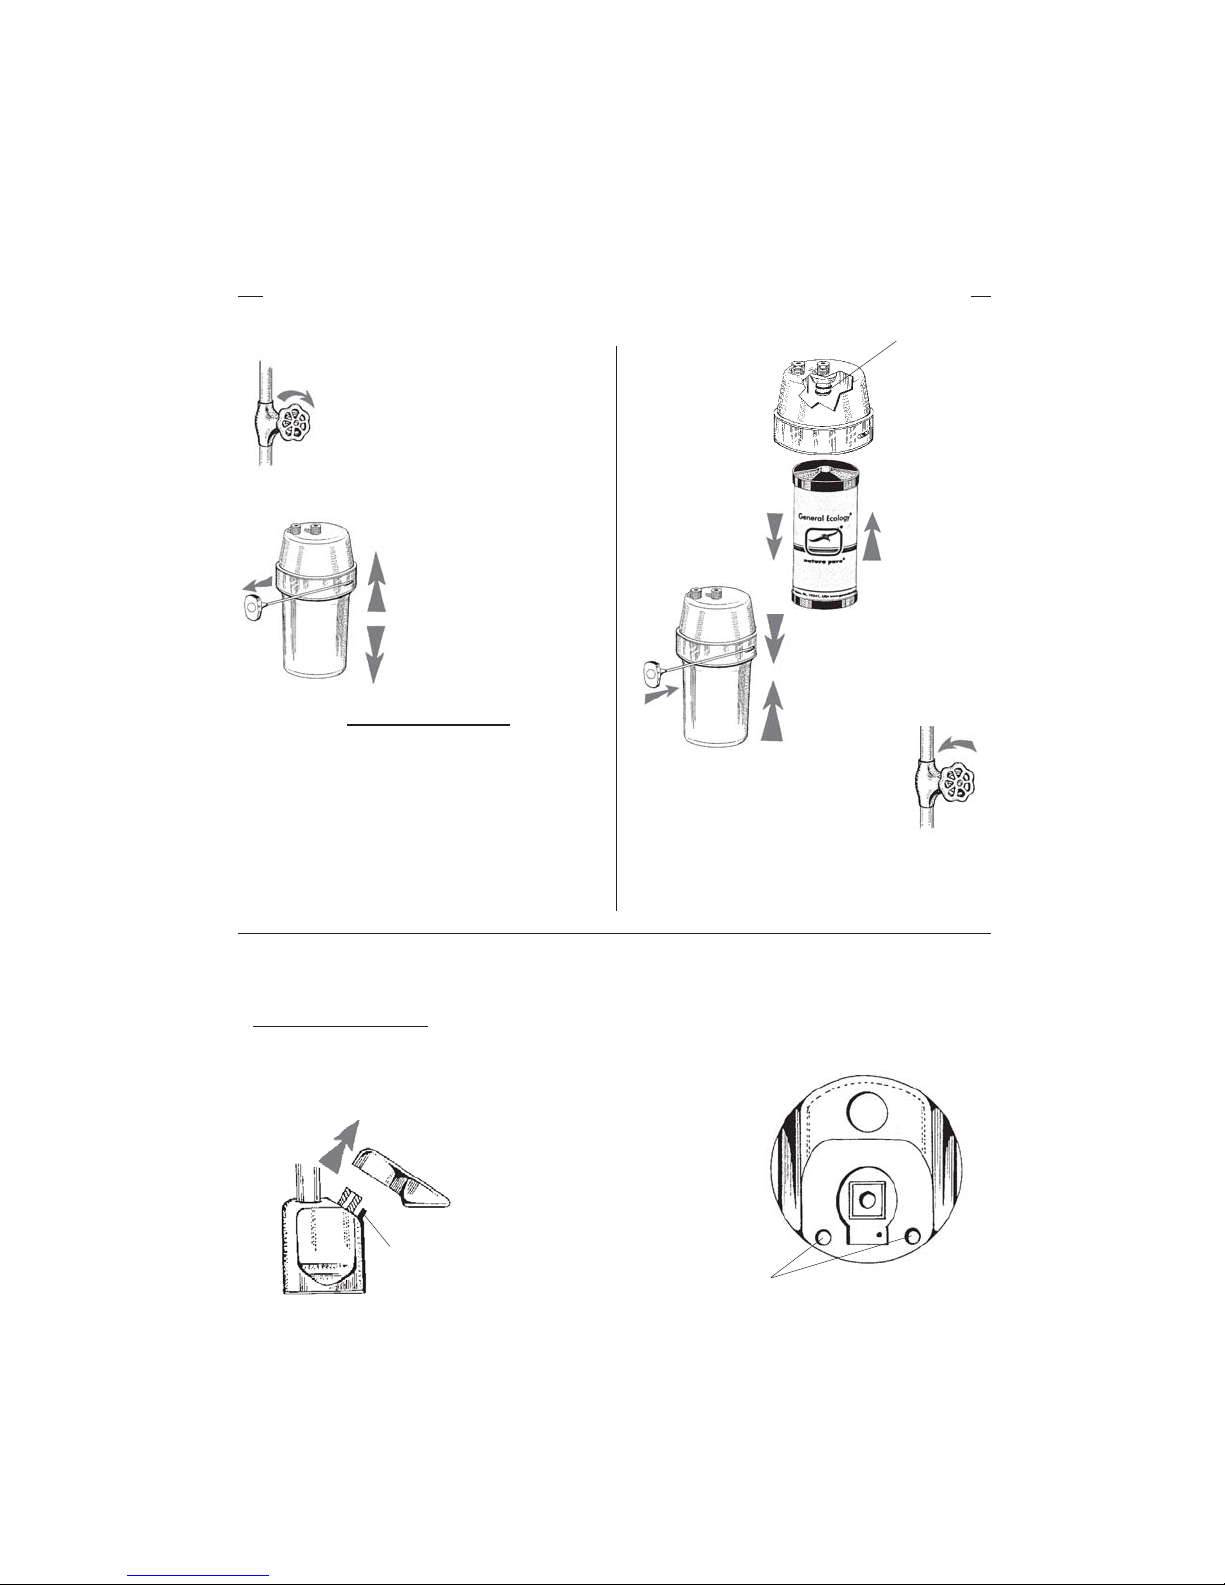
CARTRIDGE INSTALLATION & REPLACEMENT
**
*
When
1.
Turn off cold
water supply.
2.
Open faucet
(Faucet Model only).
Remove closure rod.
3.
Pull unit apart.
Helpful Hint #2
If you have difficulty separating
the cover from the bowl, water
pressure can help. Follow steps
1 & 2, but close the faucet. With
a pan ready to catch water from
the unit, slowly turn on the water
supply to the unit. Once the unit
begins to separate, turn off the
water supply.
4.
Remove
old cartridge
and insert
new one.
5.
unit. Replace
closure rod.
6.
Turn on cold water
supply with faucet open.
Run water through new
cartridge for 2- 3 minutes
to remove loose particles.
**
replacing
cartridge
apply light
coat of
petroleum
jelly on
o-rings.
Reassemble
Special NoteSpecial Note
Special Note
Special NoteSpecial Note
To change swing direction of the faucet
handle, move the pin under the handle.
Stainless steel pin
close-up of moveable pin
Pin adjustable to
right or left side
Page 6

USE AND CARE
Your water purifier is manufactured in the USA from the finest materials available. If
properly cared for, it will provide a lifetime of convenient, effective operation. To clean
faucet and unit surfaces properly, use a small amount of nonabrasive liquid detergent
and a soft wet cloth. Gently rub the soiled surface until the dirt is removed. Then rinse
clean and wipe with a dry soft cloth to remove water drops to prevent spotting.
Hard water may leave mineral deposits or "water spots" if not cleaned regularly.
These deposits may resist cleaning with simple liquid detergents, but usually can be
removed using a small amount of vinegar applied directly and rubbing with a soft
cloth. Chrome coatings should not be cleaned with abrasive or pumice type
cleansers. They may permanently scratch or otherwise damage the chrome coating.
The Structured Matrix
diminishes, or if tastes or odors are noticed or after 500 gallons. Cartridge life will
vary with water quality, but averages about 500 gallons.
For long term storage, remove cartridge from purifier and allow to air dry. Store in a
clean dry area.
Nature Pure housing has a 1 year limited manufacturer’s warranty and a rated 3-year
life expectancy. Please note this is a guideline only. Please check your housing for signs
of wear and tear that may indicate the need for replacement. Refer to warranty card for
specific terms and conditions.
WINTERIZING INSTRUCTIONS
Do not permit antifreeze to enter the Nature Pure® pressure vessel, hoses,
faucet or the Nature Pure cartridge.
1. Turn off water pressure pump.
2. Open faucet to relieve pressure.
3. Disconnect inlet line from tee or elbow. Cap the tee or elbow with a a"
compression cap nut. (#10 on Nature Pure parts list.) Drain Nature Pure pressure
vessel and hoses.
4. Remove and allow cartridge to air dry, then store in a dry environment away from
fumes, solvents or chemicals.
Note: Be sure to completely flush antifreeze from water system before reinstalling the
Nature Pure System. See instructions that came with your purifier.
TM
cartridge should be replaced when the water flow
To order a replacement cartridge call:
800-441-8166 EST M-F
For technical information call:
610-363-7900
Page 7
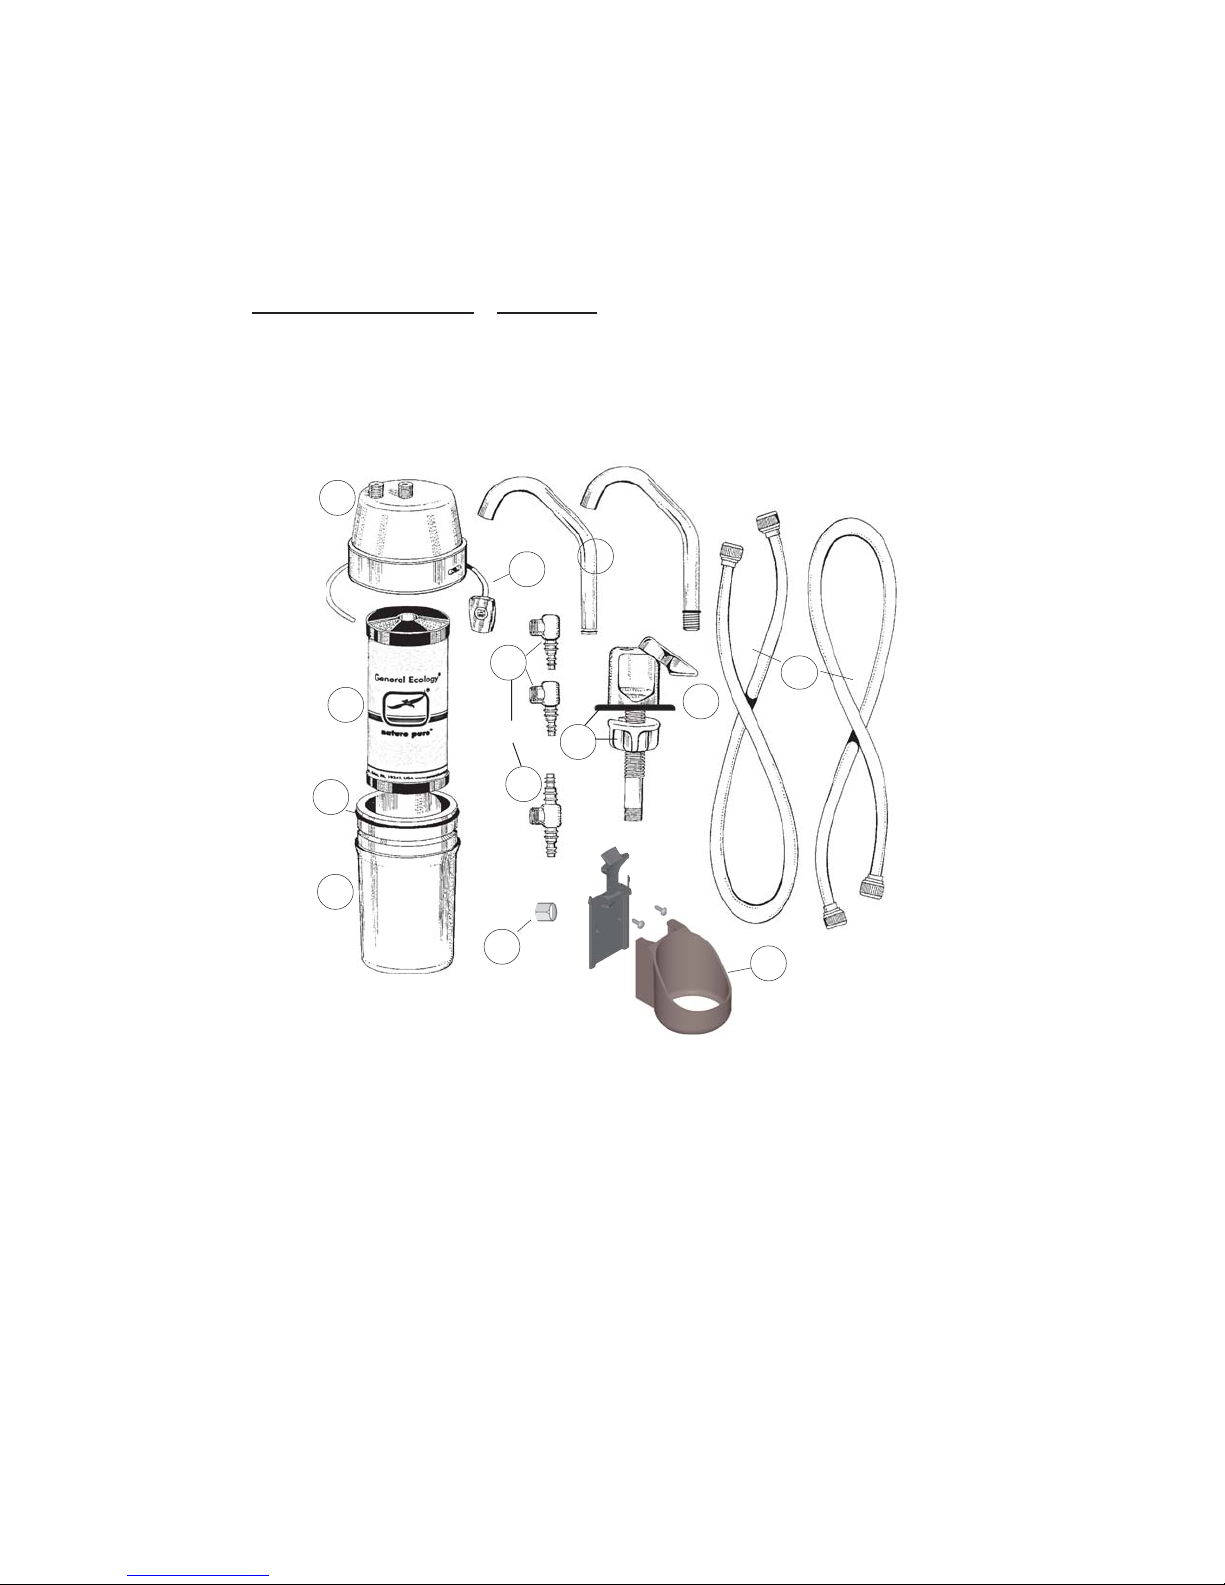
NATURE PURE® PARTS
Check the contents of this package for the parts listed. Should any
part be missing, contact the dealer who sold you your Nature Pure
system, or call 800-441-8166 EST M-F.
1
2
6
3
or
4
7
5
10
1. Cover
2. Closure Rod
3. Cartridge
4. Large O-ring Seal
5. Bowl
6. Elbows (In-line Model Only)
7. Plastic Tee (Faucet Model Only)
8
11
9
13
12
8. Faucet Spout - Threaded Spout
(Faucet Model Only).
9. Faucet Body (Faucet Model Only)
10. a" Compression Cap Nut (see
winterizing instructions)
11. 30" Hoses
12. RV/MARINE Mounting Bracket
with screws
13. Base gasket and split nut
Page 8
GENERAL ECOLOGY, INC.
151 Sheree Blvd.
Exton, PA 19341 U.S.A.
610 363-7900 • fax: 610 363-0412
www.generalecology.com
e-mail: [email protected]
European Office:
General Ecology Europe Ltd.
St. Andrews House, 26 Brighton Road
Crawley RH10 6AA U.K.
+44(0)1293 400644 • fax: +44(0)1293 539022
e-mail: [email protected]
OTHER GENERAL ECOLOGY PRODUCTS
Seagull®IV X-1F
Water Purifier
First Need® Deluxe
Portable Water Purifier
Made in the USA
EPA. EST. REG. NO. 37403-PA-01
® TM trademarks of General Ecology, Inc. © 2001 General Ecology, Inc. rev. B 11/06
Trav-L®-Pure
Portable Water Purifier
200150
 Loading...