

Page 1

Quick Start Guide
Compact FieldPoint
™
Mounting Accessories
for Stand-Alone Controllers
What You Need to Get Set Up
•cFP-21xx controller
• Number 2 Phillips screwdriver
Mounting the Controller on the Base
You can mount the cFP-21xx on a panel, on 35mm DIN rail, or on a desk or table.
Each mounting kit described in this document is shipped with a base which you
must fasten to the controller.
• Panel, DIN rail, or desktop
mounting accessory kit
Page 2
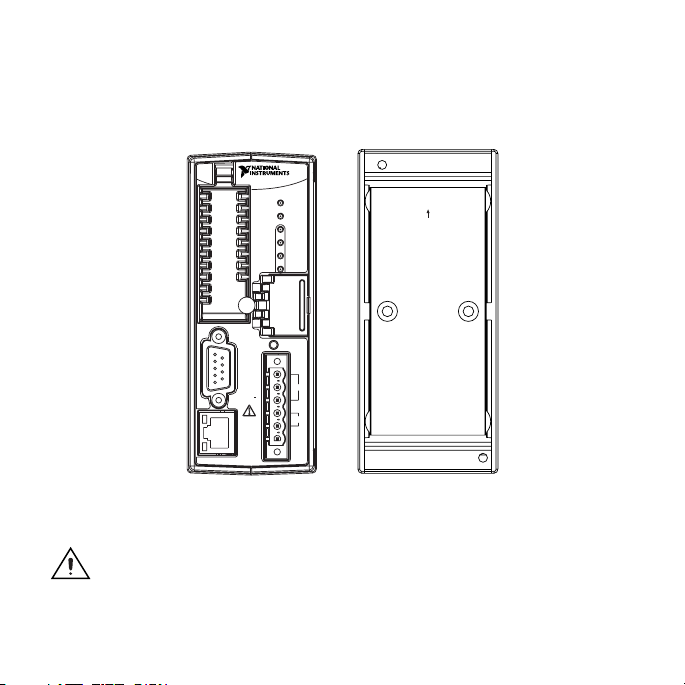
The following figure shows the proper orientation of the base in relation to the
controller.
Compact FieldPoint
xx
cFP-21
POWER
LINK
ACT
100 Mbps
COM 1/RS-232
INPUT
11-30 V--
1.5 A MAX
ETHERNET
RESET
STATUS
A
B
C
D
C
V1
V2
TOP
Caution Make sure that power is disconnected from the controller
before you mount it on the base.
Compact FieldPoint Mounting Accessories 2 ni.com
Page 3
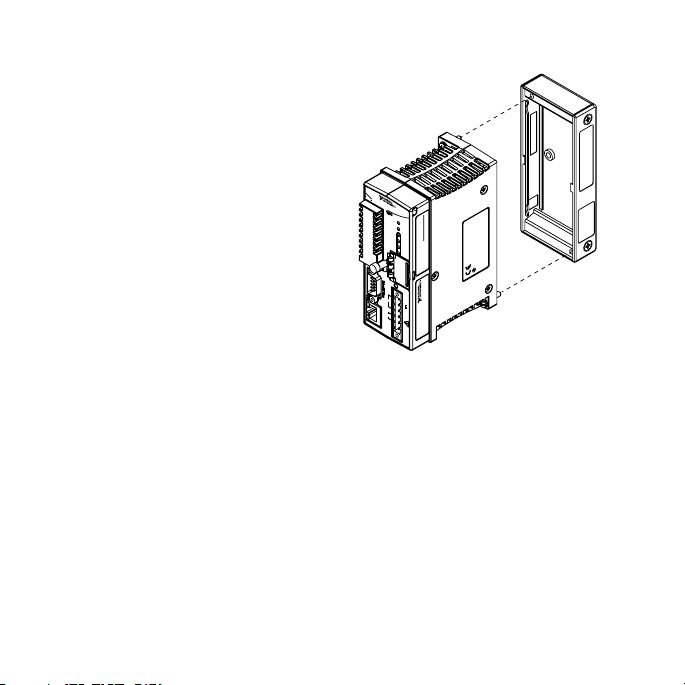
1. Align the captive screws on the
controller with the holes in the
base.
2. Using a number 2 Phillips
screwdriver with a shank of at
least 64 mm (2.5 in.) length,
tighten the captive screws to
1.1 N · m (10 lb · in.) of
torque.
T
O
P
188794C-01
C
o
m
pa
ct Fie
ld
po
int
IP ADDRESS:
P
O
W
E
R
S
T
A
T
U
S
A
B
C
D
R
E
S
E
T
C
V
1
INPUT
11-30V
1.5A MAX
100M
V
b
2
ps
ETHERNET
N114
© National Instruments Corporation 3 Compact FieldPoint Mounting Accessories
Page 4

Mounting the Controller on a Panel
1. Fasten the panel-mount plate to the back of the base using a number 2 Phillips
screwdriver and the 8-32 × 5/16 in. countersunk screws shipped with the kit.
IP ADDRESS:
N114
192839A
-01
Caution If you substitute other screws for the screws shipped with the
kit, do not use screws longer than 5/16 in. to fasten the panel-mount
plate to the base.
Compact FieldPoint Mounting Accessories 4 ni.com
Page 5

2. Bolt or screw the panel-mount plate to a panel.
Compact FieldPoint
cFP-2120
POWER
STATUS
A
B
C
D
RESET
COM 1/RS-232
C
INPUT
11-30 V
LINK
ACT
V1
V2
ETHERNET
100 Mbps
69.34 mm (2.730 in.)
1.5A MAX
101.60 mm
(4.000 in.)
45.72 mm
(1.800 in.)
© National Instruments Corporation 5 Compact FieldPoint Mounting Accessories
Page 6
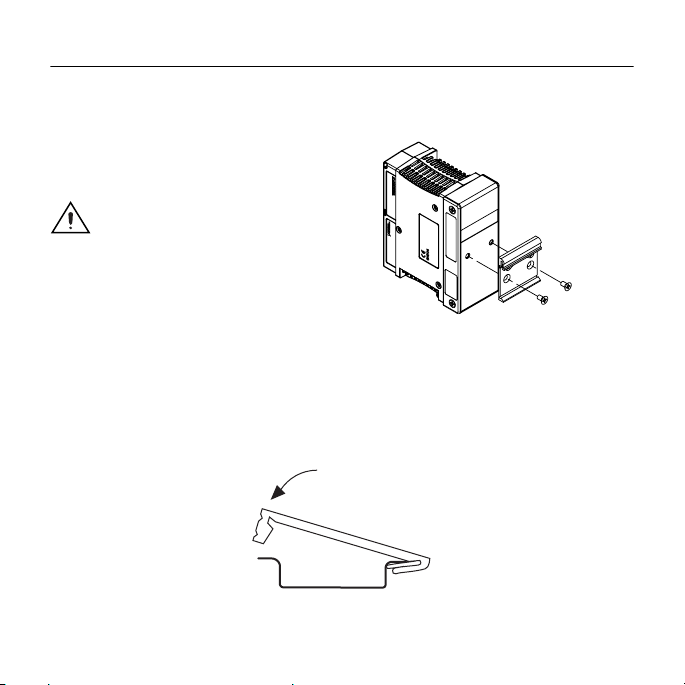
Mounting the Controller on a DIN Rail
1. Fasten the DIN rail clip to the
back of the base using a number
2 Phillips screwdriver and the
8-32 × 5/16 in. countersunk
screws shipped with the kit.
Caution If you substitute
other screws for the screws
shipped with the kit, do not
use screws longer than
5/16 in. to fasten the DIN
rail clip to the base.
2. Insert one edge of the DIN rail
into the deeper opening of the
DIN rail clip.
3. Press down firmly on the controller to compress the spring until the clip locks
in place on the DIN rail.
Compact FieldPoint Mounting Accessories 6 ni.com
Page 7

Mounting the Controller on a Desk or Table
1. Fasten the desktop mounting
bracket to the back of the
base using a number 2
Phillips screwdriver and the
8-32 × 5/16 in. panhead
screws shipped with the kit.
Caution If you substitute
other screws for the screws
shipped with the kit, do not
use screws longer than
5/16 in. to fasten the
bracket to the base.
© National Instruments Corporation 7 Compact FieldPoint Mounting Accessories
Page 8

2. Using a number 2 Phillips screwdriver, tighten the captive screws on the
two legs into the holes in the bracket.
Where to Go from Here
Refer to the cFP-21xx Quick Start Guide and the Measurement and Automation
Explorer Help for FieldPoint for information about connecting the cFP-21xx to
your network, wiring power, installing software, and configuring the cFP-21xx.
Compact FieldPoint Mounting Accessories 8 ni.com
Page 9

Where to Go for Support
The National Instruments Web site is your complete resource for technical
support. At
troubleshooting and application development self-help resources to email
and phone assistance from NI Application Engineers.
National Instruments corporate headquarters is located at 11500 North Mopac
Expressway, Austin, Texas, 78759-3504. National Instruments also has offices
located around the world to help address your support needs. For telephone
support in the United States, create your service request at
follow the calling instructions or dial 512 795 8248. For telephone support outside
the United States, contact your local branch office:
Australia 1800 300 800, Austria 43 0 662 45 79 90 0, Belgium 32 0 2 757 00 20,
Brazil 55 11 3262 3599, Canada 800 433 3488, China 86 21 6555 7838,
Czech Republic 420 224 235 774, Denmark 45 45 76 26 00, Finland 385 0 9 725 725 11,
France 33 0 1 48 14 24 24, Germany 49 0 89 741 31 30, India 91 80 51190000,
Israel 972 0 3 6393737, Italy 39 02 413091, Japan 81 3 5472 2970,
Korea 82 02 3451 3400, Lebanon 961 0 1 33 28 28, Malaysia 1800 887710,
Mexico 01 800 010 0793, Netherlands 31 0 348 433 466, New Zealand 0800 553 322,
Norway 47 0 66 90 76 60, Poland 48 22 3390150, Portugal 351 210 311 210,
Russia 7 095 783 68 51, Singapore 1800 226 5886, Slovenia 386 3 425 4200,
South Africa 27 0 11 805 8197, Spain 34 91 640 0085, Sweden 46 0 8 587 895 00,
Switzerland 41 56 200 51 51, Taiwan 886 02 2377 2222, Thailand 662 278 6777,
United Kingdom 44 0 1635 523545
ni.com/support you have access to everything from
ni.com/support and
© National Instruments Corporation 9 Compact FieldPoint Mounting Accessories
Page 10

National Instruments, NI, ni.com, and LabVIEW are trademarks of National Instruments Corporation. Refer to the Terms of Use section
on
ni.com/legal for more information about National Instruments trademarks. Other product and company names mentioned herein are
trademarks or trade names of their respective companies. For patents covering National Instruments products, refer to the appropriate location:
Help»Patents in your software, the
© 2005 National Instruments Corporation. All rights reserved.
patents.txt file on your CD, or ni.com/patents.
374250A-01 Sep05
 Loading...