


This g
as grill must be used only outdoors in a well-venlated space and must not be used inside a
building, garage, screened-in porch, gazebo or any other enclosed area.
Y SERIAL NUMBER LABEL FROM CARTON
APPL
Serial No.
XXXXXX000000
MODEL NO.
D
ANGER
IF Y
OU SMELL GAS:
• Shut o gas to the appliance.
• Exnguish any open ame.
• Open lid.
• If odor connues, keep away from the
appliance and immediately call your gas
supplier or re department.
410, 410SB
W
ARNING
Do not tr
reading the “LIGHTING” instrucons secon of
this manual.
Do not store or use gasoline or other ammable liquids or vapors in the vicinity of this
or any other appliance. An L.P. cylinder not
connected for use must not be stored in the
vicinity of this or any other appliance. If the
informaon in these instrucons is not followed exactly, a re or explosion may result,
causing property damage, personal injury or
death.
y to light this appliance without
Noce t
0359-11
o Installer: Leave these instrucons with the grill owner for future reference.
214 Ba
Fax: (705)725-2564 email: wecare@napoleonproducts.com web site: www.napoleongrills.com
Napoleon Appliance Corp.,
yview Dr., Barrie, Ontario, Canada L4N 4Y8 Phone: 1-866-820-8686
Z415-0002CE-DE/NL Feb 14/12
2
THANK Y
NAPOLE
ON products are designed with superior components and materials, and are assembled by trained crasmen who
OU FOR CHOOSING NAPOLEON
take great pride in their work. The burner and valve assembly are leak tested and test-red at a quality test staon. This
grill has be
en thoroughly inspected by a qualied technician before packaging and shipping to ensure that you, the customer,
receive the quality product you expect from NAPOLEON.
We at Napoleon are dedicated to you, “our valued customer.” It is our goal to provide you with the necessary tools for an
unforgeable grilling experience. This manual is provided to assist you in assuring your new grill is assembled, installed,
maintained and cared for properly. It is important to read and understand this enre manual before operang your new
grill to ensure you fully understand all the safety precauons and features your grill has to oer. By carefully following
these ins
please c
trucons, you will enjoy years of trouble-free grilling. If this product fails to meet your expectaons, for any rea
son,
all our customer care department at 1-866-820-8686 between 9 AM and 5 PM (Eastern Standard Time) or visit our
Website at www.napoleongrills.com.
Napoleon Gas Grill Pr
Condions And Limit
“N
NAPOLEON dealer and is subject to the following condions and limitaons:”
This factory warranty is non-transferable and may not be extended what-so-ever by any of our representaves.
The gas grill must be installed by a licensed, authorized service technician or contractor. Installaon must be done in accordance with the installaon
instrucons included with the product and all local and naonal building and re codes.
This limited warranty does not cover damages caused by misuse, lack of maintenance, grease res, hosle environments, accident, alteraons, abuse or
neglect and parts installed from other manufacturers will nullify this warranty.
This limited warranty further does not cover any scratches, dents, painted nishes, corrosion or discoloring by heat, abrasive and chemical cleaners, nor
chipping on porcelain enamel parts, nor any components used in the installaon of the gas grill.
Should deterioraon of parts occur to the degree of non-performance within the duraon of the warranted coverage, a replacement part will be provided.
In the
has been oper
Aer the rst year, with respect to this President’s Limited Lifeme Warranty NAPOLEON may, at its discreon, fully discharge all obligaons with respect to
this warranty by refunding to the original warranted purchaser the wholesale price of any warranted but defecve part(s).
NAPOLEON will not be responsible for the installaon, labor or any other costs or expenses related to the re-installaon of a warranted part, and such
expenses are not covered by this warranty.
Notwithstanding any provision contained in this President’s Limited Lifeme Warranty NAPOLEON’s responsibility under this warranty is dened as above
and it shall not in any event extend to any incidental, consequenal, or indirect damages.
This warranty denes the obligaon and liability of NAPOLEON with respect to the NAPOLEON gas grill and any other warranes expressed or implied with
respect to this product, its components or accessories are excluded.
NAPOLEON neither assumes, nor authorizes any third party to assume, on its behalf, any other liabilies with respect to the sale of this product.
NAPOLEON will not be responsible for: over ring, blow outs caused by environmental condions such as strong winds, or inadequate venlaon,
Any damages to the gas grill due to weather damage, hail, rough handling, damaging chemicals or cleaners will not be the responsibility of NAPOLEON.
The bill of sale or copy will be required together with a serial number and a model number when making any warranty claims from NAPOLEON.
NAPOLEON reserves the right to have its representave inspect any product or part prior to honoring any warranty claim.
NAPOLEON shall not be liable for any transportaon charges, labor costs, or export dues.
www.napoleongrills.com
esident’s Limited Warranty
NAPOLEON warrants the following materials and workmanship in your new NAPOLEON gas grill
against defects for 10 years. This covers aluminum castings (excluding paint), stainless
steel control panel (excluding screen printing) and stainless steel burners, subject to the
following conditions: During the first 5 years NAPOLEON will provide replacement parts at
our option free of charge. From the sixth year to the tenth year, NAPOLEON will provide
replacement parts at 50% of the current retail price.
Stainless steel or porcelain lid and base inserts, and lid handles are covered against
defects for 5 years, subject to the following conditions: During the first 3 years
NAPOLEON will provide replacement parts at our option free of charge. For the fourth and
fifth year, NAPOLEON will provide replacement parts at 50% of the current retail price.
All other components including stainless steel or porcelain sear plates, stainless steel
or cast iron cooking grids, valves, ignition system, temperature gauges, knobs, regulators,
casters, warming racks, hoses and connectors, fasteners and accessories are covered and
NAPOLEON will provide parts free of charge during the first year of the limited warranty.
NAPOLEON shall not be liable for any transportation charges, labor costs or export duties.
aons
APOLEON warrants its products against manufacturing defects to the original purchaser only, provided that the purchase was made through an autho
rst year only, this warranty extends to the replacement of warranted parts, which are defecve in material or workmanship provided that the prod
ated in accordance with the operaon instrucons and under normal condions.
riz
ed
uct

3
W
ARNING!
death. Read and follow all warnings and instrucons in this manual prior to operang grill.
Sa
fe Operang Pracces
• This g
• Read the enre instrucon manual before operang the gas grill.
• Under no circumstance should this gas grill be modied.
• Follow lighng instrucons carefully when operang grill.
• Gas must be turned o at the propane cylinder or at the natural gas supply valve when the gas grill is not
• Keep children and pets away from hot grill, DO NOT allow children to climb inside cabinet.
• Children should be supervised to ensure that they do not play with the appliance.
• This appliance is not intended for use by persons (including children) with reduced physical, sensory or
• Do not leave the grill unaended while in use.
• Do not move grill when hot or operang.
• This grill is for household use only.
• This gas grill must not be installed in or on recreaonal vehicles and/or boats.
• This gas grill must only be stored outdoors in a well-venlated area and must not be used inside a building,
• Maintain proper clearance to combusbles (16” (410mm) to rear of unit 7” (180mm) to sides). Addional
• At all mes keep the venlaon openings of the cylinder enclosure free and clear from debris.
• Do not operate unit under any combusble construcon.
• Do not locate in windy sengs. High winds adversely aect the cooking performance of the gas grill.
• When the gas grill is stored indoors, the propane cylinder must be disconnected from the grill and stored
• Inspect the gas line hose before each use. If there is evidence of excessive abrasion or wear, it must be
• Never store a spare LP gas cylinder under or near this grill.
• Never ll the cylinder beyond 80 % full.
• Do not aempt to use a cylinder, which is not equipped with a QCC1 type connecon.
• Leak test all connecons before inial use, even if the grill was purchased fully assembled, annually or
• Never use natural gas in a unit designed for liquid propane gas.
• Never use lighter uid in a gas grill.
• Use charcoal briquees only with a Napoleon charcoal tray designed for this unit.
• Burner controls must be o when turning supply cylinder on.
• Do not light burners with lid closed.
• Do not operate rear burner with main burners operang.
• The lid is to be closed during the preheat period.
• Do not route hose underneath drip pan-proper hose clearance to boom of unit must be maintained.
• Clean grease tray and sear plates regularly to avoid build-up, which may lead to grease res.
• Remove warming rack before lighng rear burner. The extreme heat will damage the warming rack.
• Ensure sear plates are posioned properly according to sear plate installaon instrucons.
• Do not use side shelves to store lighters, matches or any other combusbles.
• Keep gas line away from heated surfaces
• Keep any electrical supply cord away from water or heated surfaces.
• Inspect infrared burner venturi tube for spider webs and other obstrucons periodically. Clean the tubes
• The outdoor cooking gas grill and its individual shuto valve must be disconnected from the gas supply
• The outdoor cooking gas grill must be isolated from the gas supply piping system by closing its individual
as grill must be assembled exactly according to the instrucons in the manual. If the grill was store
assembled, you must review the assembly instrucons to conrm correct assembly and perform the required leak tests before operang the grill.
in use.
mental capabilies, or lack of experience and knowledge, unless they have been given supervision or
instrucon concerning use of the appliance by a person responsible for their safety.
garage, screened -in porch or any other enclosed area.
clearance 24” (610mm) is recommended near vinyl siding or panes of glass.
outdoors in a well-venlated area, disconnected cylinders must not be stored in a building, garage or other
enclosed area. Natural gas units must be disconnected from the supply when being stored indoors.
replaced before using the gas grill, with a replacement hose assembly specied by the grill manufacturer.
whenever any gas component has been replaced.
completely if you nd any such obstrucons.
piping system during any pressure tesng of that system at test pressures in excess of 0.5psi (3.5kPa).
manual shuto valve during any pressure tesng of the gas supply piping system at test pressures equal to
or less than 1/2 psi (3.5 kPa).
Failure to follow these instrucons could result in property damage, personal injury or
ww.napoleongrills.com
w
4
Correct Disposal Of This Product
This marking indic
EU. To prevent possible harm to the environment or human health from uncontrolled waste disposal, recycle
it responsibly to promote the sustainable reuse of material resources. To return your used device, please use
the return and collecon systems or contact the retailer where the product was purchased. They can take
this product for environmental safe recycling.
ates that this product should not be disposed with other household wastes throughout the
Gas Cylinder
Use only g
is 13kg, and for propane units is 6kg. Ensure that the cylinder can provide enough fuel to operate the appliance. If in doubt, check with your local gas supplier.
• Use cauon when handling the cylinder valve.
• Never connect a cylinder, which does not meet local codes.
All cylinders 7kg or larger must be placed outside the enclosure (under the right side shelf) on level ground.
Cylinders smaller than 7kg (maximum size 465mm high by 306mm wide) may be placed inside the enclosure,
on the right side of the boom shelf. Only cylinders connected to the appliance may be stored in the enclosure, or close to the appliance. Spare cylinders must not be stored in the enclosure, or in close proximity of
an operang unit. Cylinders must not be exposed to extreme heat or direct sunlight.
W
Hoses that contact high temperature surfaces may melt and leak, causing a re.
Cylinder Connecon: Ensure that the gas regulator hose is kink free. Remove the cap or plug from the cylin-
der fuel valve. Tighten regulator to cylinder valve. Leak test all joints prior to using the barbecue. A leak test
must be performed annually, and each me a cylinder is hooked up, or if a part of the gas system is replaced.
as cylinders, which meet naonal and regional codes. The minimum cylinder size for butane units
ARNING!
Ensur
e that the hose is routed to maintain proper clearance to the underside of the unit.
W
ARNING!
• Do not r
• Do not route hose between space in boom shelf and back panel.
• Do not route hose over top of back panel.
• Ensure all connecons are ghtened using two wrenches. Do not use Teon tape or pipe dope on any
hose connecon.
• Ensure the hose does not contact any high temperature surfaces, or it may melt and leak causing a re.
• Do not use enclosure to store excess hose, as there is a greater chance of the hose contacng a hot sur-
face, it may melt and leak causing a re.
oute hose underneath drip pan.
www.napoleongrills.com
Gas Hose
• If the hose and regulator are not included by the manufacturer, then only hoses and regulators which
meet naonal and regional codes are to be used.
• Ensure that the hose does not come into contact with grease, other hot drippings, or any hot surfaces on
the appliance.
• Check hose regularly. In the case of rips, melng or wear, replace hose before using the appliance.
• The recommended hose length is 0.5m. The hose must not be longer than 1.5m.
• Ensure that the hose is twist and kink free when installed.
• Replace the hose before expiry date printed on the hose.
echnical Data
T
The following table lists input values for the appliance.
Burner Orice Size (Gross) Heat Input (Total) Gas Usage (Total)
Main 1.07mm (#58) 12.0 kw 870 g/hr
Side 0.82mm 2.4 kw 174 g/hr
5
Cered Gases / Pressures - Check rang plate to ensure that it corresponds with following list.
tegory
Gas Ca
Gase
s / Pressures Butane 30mbar
Countries BE, BG, CY, DK,
I
3B/P(30)
Propane 30mbar
EE, FI, FR, GB,
HR, HU, IS, IT,
LT, LU, MT, NL,
NO, RO, SE, SI,
SK, TR
I
3+(28-30/37)I3B/P(37)
Butane 28-30mbar
Propane 37mbar
BE, CH, CY, CZ, ES,
FR, GB, GR, IE, IT,
LT, LU, LV, PT, SK, SI
Butane 37mbar
Propane 37mbar
PL AT, CH, DE, SK
I
3B/P(50)
Butane 50mbar
Propane 50mbar
Do not tamper with or modify regulator. Use only regulator which supply the pressure listed in the table
above. A regulator of 28 – 30 mbar must be used for butane or a 37 mbar regulator for propane. The grill is
equipped with an internal regulator. This internal regulator has an outlet pressure of 24.5 mbar for propane/
r
butane and must not be modied or adjusted. For replacement, use only the
egulator specied by the
manufacturer.
Leak T
ARNING!
W
esng Instrucons
A leak test must be performed annually and each me a cylinder is hooked up or if a part
of the gas system is replaced.
ARNING!
W
Never use an open ame to check for gas leaks. Be certain no sparks or open ames are in
the area while you check for leaks. Sparks or open ames will result in a re or explosion, damage to property, serious bodily injury, or death.
Leak tesng: This must be done before inial use, annually, and whenever any gas components are replaced
or serviced. Do not smoke while performing this test, and remove all sources of ignion. See Leak Tesng Diagram for areas to check. Turn all burner controls to the o posion. Turn gas supply valve on.
Brush a half-and-half soluon of liquid soap and water onto all joints and connecons of the regulator, hose,
manifolds and valves.
Bubbles will indicate a gas leak. Either ghten the loose joint or have the part replaced with one recommended by the Napoleon Customer Care department and have the grill inspected by a cered gas installer.
If the leak cannot be stopped, immediately shut o the gas supply, disconnect it, and have the grill inspected
by a cered gas installer or dealer. Do not use the grill unl the leak has been corrected.
ww.napoleongrills.com
w
6
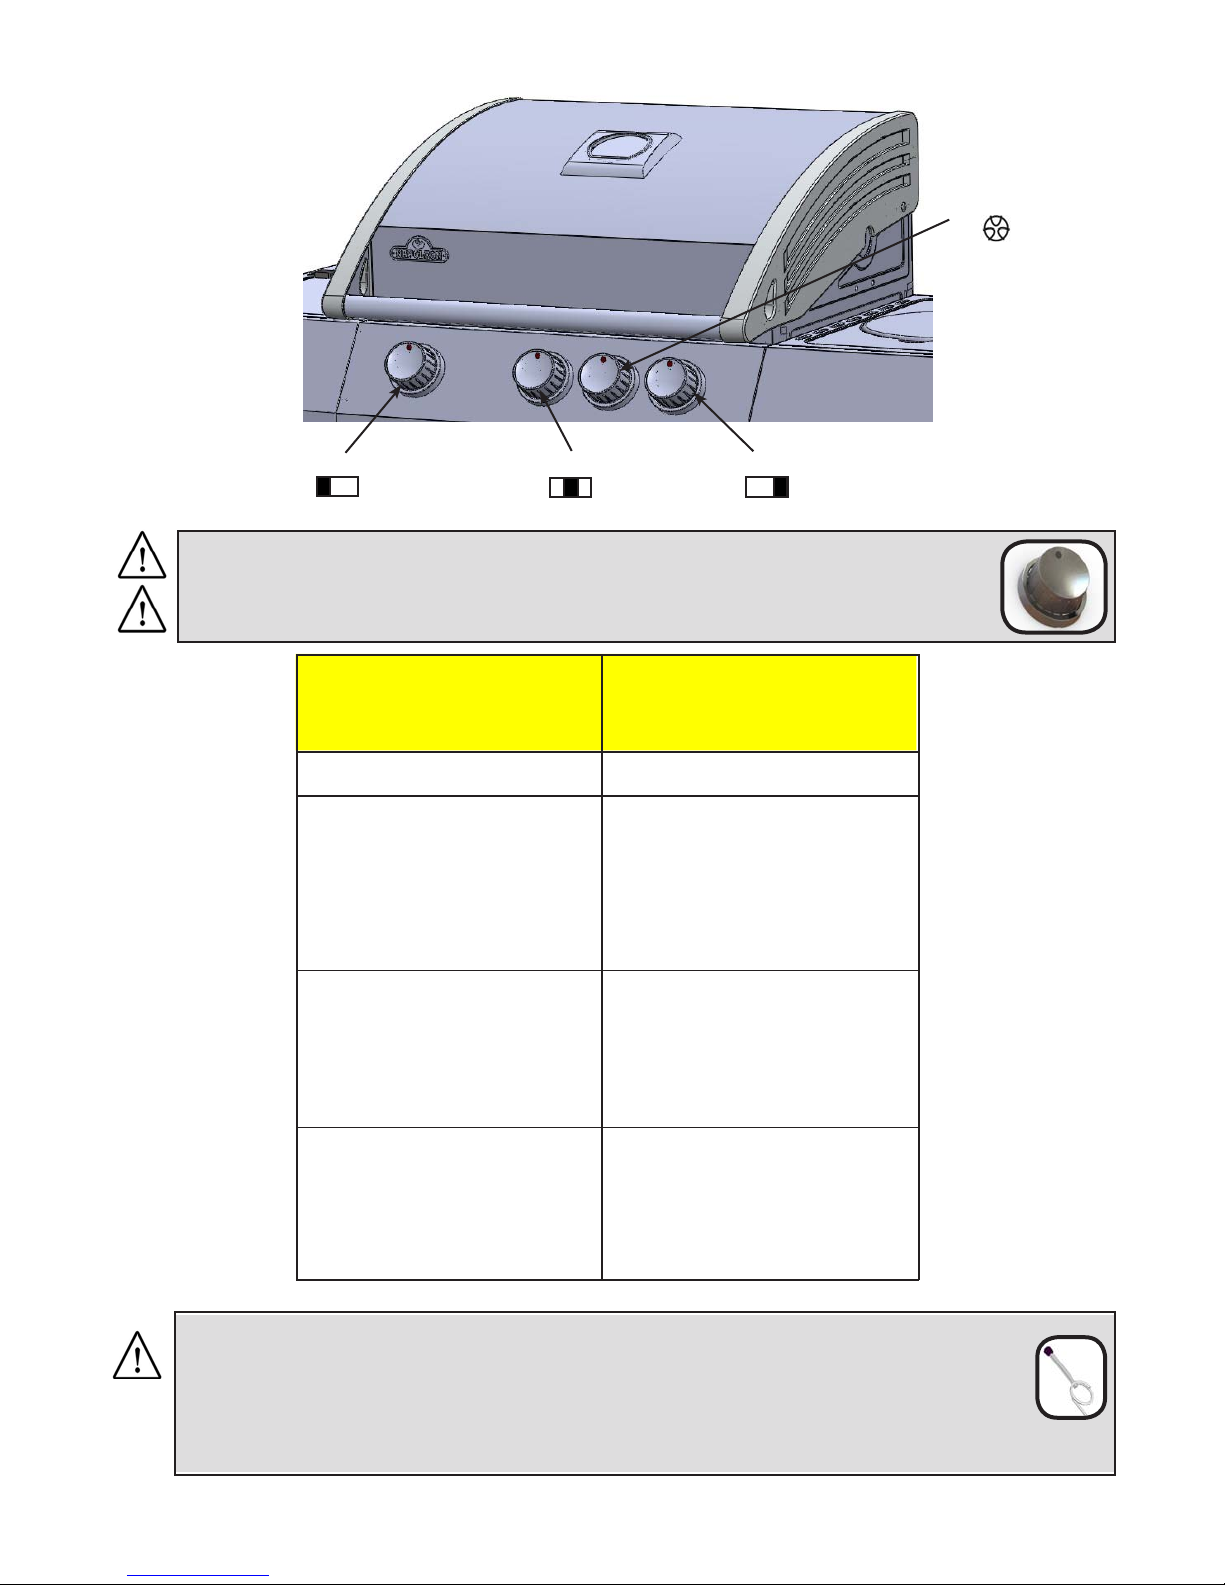
Lighng Instrucons
Le
W
ARNING!
Burner
Open lid
Centre Burner
Right Burner
O P
Side Burner
osion
ARNING!
W
e all burner controls are in the o posion. Turn on the gas supply valve.
Ensur
ube Burner
Main T
Lighng
1. Open grill lid. 1. Open side burner c
2. Push and turn any main burner
knob slowly to the ’hi’ posion. This
acon will ignite the pilot ame which
will in turn light the selected burner. If
the pilot lights, connue to push down
on the control knob unl the burner
lights and then release.
3. If the pilot does not ignite, then
immediately turn the control knob
back to the ‘o posion and repeat
step 1 several mes.
.
4. If the pilot and burner will not
ignite within 5 seconds, turn the
control knob to the ‘o’ posion and
wait 5 minutes for any excess gas to
dissipate. Either repeat steps 1 and 2
or light with a match.
2. Push and turn side burner control to
‘o’ posion and wait 5 minutes for any
Side Burner Lighng
(If equipped)
over.
high posion.
3. Press and hold
igniter buon unl burner lights, or
light by match
4. If the burner will not ignite within 5
seconds, turn the control knob to the
excess gas to dissipate. Either repeat
steps 2 and 3 or light with a match.
ARNING! If ligh
W
ng the unit with a match, clip the match into the supplied lighng rod. Hold
the lit match down through the grill and sear plate while turning the corresponding
burner valve to high.
www.napoleongrills.com
7
Oper
Inial Lighng: When lit for the rst me, the gas grill emits a slight odor. This is a normal temporary condion
caused by the “burn-in” of internal paints and lubricants used in the manufacturing process and does not occur
again. Simply run the main burners on high for approximately one-half hour.
Main Burner Use: When searing foods, we recommend preheang the grill by operang all main burners
in the high posion with the lid closed for approximately 10 minutes. Food cooked for short periods of me
(sh, vegetables) can be grilled with the lid open. Cooking with the lid closed will ensure higher, more even
temperatures that can reduce cooking me and cook meat more evenly. Food that has a cooking me longer
than 30 minutes, such as roasts, can be cooked indirectly (with the burner lit opposite to the food placement).
When cooking very lean meats, such as chicken breasts or lean pork, the grids can be oiled before pre-heang
to reduce scking. Cooking meat with a high degree of fat content can create are-ups. Either trim the fat or
reduce temperatures to inhibit this. Should a are-up occur, move food away from the ames and reduce the
heat. Leave the lid open. See Your All Season Grill cookbook by Napoleon for more detailed instrucons.
Direct Cooking: Place food to be cooked on the grill directly over the heat. This method is generally used for
searing or for foods that do not require prolonged cooking mes such as hamburgers, steaks, chicken pieces,
or vegetables. The food is rst seared to trap-in the juices and avor, and then the temperature is lowered to
nish cooking the food to your preference.
Indirect Cooking: With one or more burners operang, place food to be cooked on the grill over a burner that
is not operang. The heat circulates around the food, cooking slowly and evenly. Cooking with this method is
much the same as cooking in your oven and is generally used for larger cuts of meats such as roasts, chickens
or turkeys, but can also be used for cooking foods that are prone to are-ups or for smoking foods. Lower temperatures and slower cooking mes result in tender foods.
Rear Burner Use (If Equipped): Remove the warming rack prior to use. Cooking grids should also be removed
if they interfere with the rosserie. The rear burner is designed to be used in conjuncon with the rosserie
kit (included with most rear burner units) available from your dealer. See the rosserie kit assembly instrucons.
To use the counterbalance - remove the rosserie motor from the gas grill. Place the spit with meat being
cooked across the hangers inside the grill. The meat will naturally hang with the heavy side down. Tighten
the counterbalance arm and weight so the arm is facing up. Slide the counterweight in or out to balance the
load and ghten in place. Re-install the motor and begin cooking. Place a metal dish underneath the meat to
collect drippings for basng and naturally delicious gravy. Basng liquid may be added as required. To seal in
juices, rst operate rear burner on high unl brown, then reduce the heat to thoroughly cook foods. Keep the
lid closed for best results. Your roasts and fowl will brown perfectly on the outside and stay moist and tender
on the inside. For example, a 3 pound chicken on the rosserie will be done in approximately 1½ hours on
medium to high. See ‘Your all Season Grill’ cookbook by Napoleon for more detailed instrucons.
ang The Grill
W
ARNING!
components unless cleaned regularly. When nished cooking disassemble rosserie components, wash
thoroughly with warm soapy water and store indoors.
Flame Side Burner Use (if equipped): The side burner c
etc. For best performance, the gas grill should be located with the side burner protected from the wind. The
recommended pan diameter is
W
ARNING!
only.
ARNING!
W
ARNING!
W
Barbecue sauce and salt can be corrosive and will cause rapid deterioraon of the gas grill
Ne
Do not close the side burner lid while it is oper
Do not use side burner t
an be used like any stove top burner, for gravies, soups
60mm to 220mm.
ver grill food directly on the side burner grate. It is designed for use with pots and pans
ang or hot.
o deep fry foods as cooking with oil can create a dangerous situaon.
ww.napoleongrills.com
w
8
Main
We recommend this gas grill be thoroughly inspected and serviced annually by a qualied service person.
tenance / Cleaning Instrucons
WARNING! Always wear protecve gloves and safety glasses when cleaning your grill.
W
ARNING!
Avoid unprotected contact with hot surfaces. Ensure all burners are turned o. Clean grill in an area where
cleaning soluons will not harm decks, lawns, or paos. Do not use oven cleaner to clean any part of this
gas grill. Do not use a self-cleaning oven to clean cooking grids or any other parts of the gas grill. Barbecue sauce and salt can be corrosive and will cause rapid deterioraon of the gas grill components unless
cleaned regularly.
Note: Stainless steel tends to oxidize or stain in the presence of chlorides and suldes, parcularly in coastal
areas and other harsh environments, such as the warm, highly humid atmosphere around pools and hot tubs.
These stains could be perceived as rust, but can be easily removed or prevented. To provide stain prevenon
and removal, wash all stainless steel surfaces every 3-4 weeks or as oen as required with fresh water and/or
stainless steel cleaner.
ARNING!
W
sibility of burns, maintenance should be done only when the grill is cool. A leak test must be performed
annually and whenever any component of the gas train is replaced or gas smell is present.
Grids And Warming Rack: The grids and warming rack are best cleaned with a brass wire brush during the pre-
heang period. Steel wool can be used for stubborn stains. It is normal that stainless grids (if equipped) will
discolor permanently from regular usage due to the high temperature of the cooking surface.
Cast Iron Cooking Grids: The cast iron cooking grids supplied with your new grill oer superior heat retenon
and distribuon. By regularly seasoning your grids you are adding a protecve coang, which will aid in resisting corrosion and increase your grids non-sck capabilies.
First Time Use: Wash the cooking grids by hand with mild dish soap and water to remove any residue from
the manufacturing process (never wash in a dish washer). Rinse thoroughly with hot water and dry completely
with a so cloth. This is important to avoid moisture from entering the cast iron.
Seasoning: Using a so cloth, spread VEGETABLE SHORTENING over the enre grid surface ensuring all grooves
and corners are covered. Do not use salted fats such as buer or margarine. Pre-heat your grill for 15 minutes, then place the seasoned cooking grids in the grill. Turn the burner control knobs to medium with the
lid closed. Allow the cooking grids to heat for approximately one-half hour. Turn all the burners to the “OFF”
posion and turn the gas o at the source. Let the cooking grids stand unl cool. This procedure should be
repeated several mes throughout the season, although it is not required for daily use (follow daily usage
procedure below).
Daily Usage: Before pre-heang, and cleaning with a brass wire grill brush, coat the enre top surface of the
cooking grids with VEGETABLE SHORTENING. Pre-heat the grill and then brush away any unwanted residue
with a brass wire brush.
To avoid the possibility of burns, maintenance should be done only when the grill is cool.
Turn o the gas at the source and disconnect the unit before servicing. To avoid the pos-
Stainless Steel Cooking Grids: (upgrade kit available - see replacement parts list). Stainless steel cooking grids
are durable and corrosion resistant. They require less seasoning and maintenance than cast iron cooking grids.
It is recommended that you follow the daily usage procedure listed above although you may nd pre-heang
and cleaning your grids with a wire brush is sucient for your grilling needs.
Control Panel: The control panel text is printed directly on the stainless steel and with proper maintenance will
remain dark and legible. To clean the panel, use only warm soapy water or Connental brand stainless steel
cleaner available from your Napoleon dealer. Never apply abrasive cleaners on any stainless surfaces, especially the printed poron of the control panel or the prinng will gradually rub o.
Cleaning Inside The Gas Grill: Remove the cooking grids. Use a brass wire brush to clean loose debris from
the casng sides and underneath the lid. Scrape the sear plates with a puy knife or scraper, and use a wire
brush to remove the ash. Remove the sear plates and brush debris from the burners with the brass wire brush.
Sweep all debris from inside the gas grill into the drip pan.
Lights: To remove the lens from the light housing, insert a at screwdriver p between the lens and the housing and rock it gently. Do not touch the halogen bulb. The oil from your ngerps will reduce the life of the
bulb. To clean the lens, rst soak it in hot soapy water, then clean with a rag and non abrasive cleaner. To reinstall the lens, simply snap it back into the housing.
www.napoleongrills.com
9
Drip P
an: Accumulated grease is a re hazard. Clean the drip pan frequently (every 4 – 5 uses or as oen as re-
quired) to avoid grease buildup. Grease and excess drippings pass through to the drip pan, located beneath the
gas grill and accumulate in the disposable grease tray below the drip pan. To access the disposable grease tray
or to clean the drip pan, slide the drip pan free of the grill. Never line the drip pan with aluminum foil, sand or
any other material as this could prevent the grease from owing properly. The pan should be scraped out with
a puy knife or scraper. Replace the disposable grease tray every 2 – 4 weeks, depending on gas grill usage.
For supplies, see your Napoleon Gas Grill dealer.
Cleaning The Outer Grill Surface: Do not use abrasive cleaners or steel wool on any painted, porcelain or stainless steel parts of your Napoleon Grill. Doing so will scratch the nish. Exterior grill surfaces should be cleaned
with warm soapy water while the metal is sll warm to the touch. To clean stainless surfaces, use a stainless
steel or a non-abrasive cleaner. Always wipe in the direcon of the grain. Over me, stainless steel parts
discolor when heated, usually to a golden or brown hue. This discoloraon is normal and does not aect the
performance of the grill. Porcelain enamel components must be handled with addional care. The baked-on
enamel nish is glass-like, and will chip if struck. Touch-up enamel is available from your Napoleon Grill dealer.
WARNING! Hose: Check f
exist, do not use the gas grill. Have the part replaced by your Napoleon Gas Grill dealer or qualied gas
installer.
ube Burner: The burners are made from heavy wall 304 stainless steel, but extreme heat and a corrosive envi-
T
ronment can cause surface corrosion to occur. This can be removed with a brass wire brush.
AUTION!
C
Spiders and insects are aracted to the smell of propane and natural gas. The burner is equipped with an insect screen on the air shuer, which reduces the likelihood of insects building nests inside the burner but does
not enrely eliminate the problem. A nest or web can cause the burner to burn with a so yellow or orange
ame or cause a re (ashback) at the air shuer beneath the control panel. To clean the inside of the burner,
it must be removed from the gas grill: Remove the screw that aaches the burner to the back wall. Slide the
burner back and upwards to remove. Cleaning: Use a exible venturi tube brush to clean the inside of the
burner. Shake any loose debris from the burner through the gas inlet. Check the burner ports and valve orices
for blockages. Burner ports can close over me due to cooking debris and corrosion, use an opened paperclip
or the supplied port maintenance bit to clean them. Drill out blocked ports using this drill bit in a small cordless drill. The ports are easier to clean if the burner is removed from the grill, but it can also be done with the
burner installed. Do not ex the drill bit when drilling the ports, as this will cause the drill bit to break. This drill
is for burner ports only, not for the brass orices (jets) which regulate the ow into the burner. Take care not to
enlarge the holes. Ensure the insect screen is clean, ght, and free of any lint or other debris.
Reinstallaon: Reverse the procedure to reinstall the burner. Check that the valve enters the burner when
installing.
ware of Spiders.
Be
or abrasions, melng, cuts, and cracks in the hose. If any of these condions
W
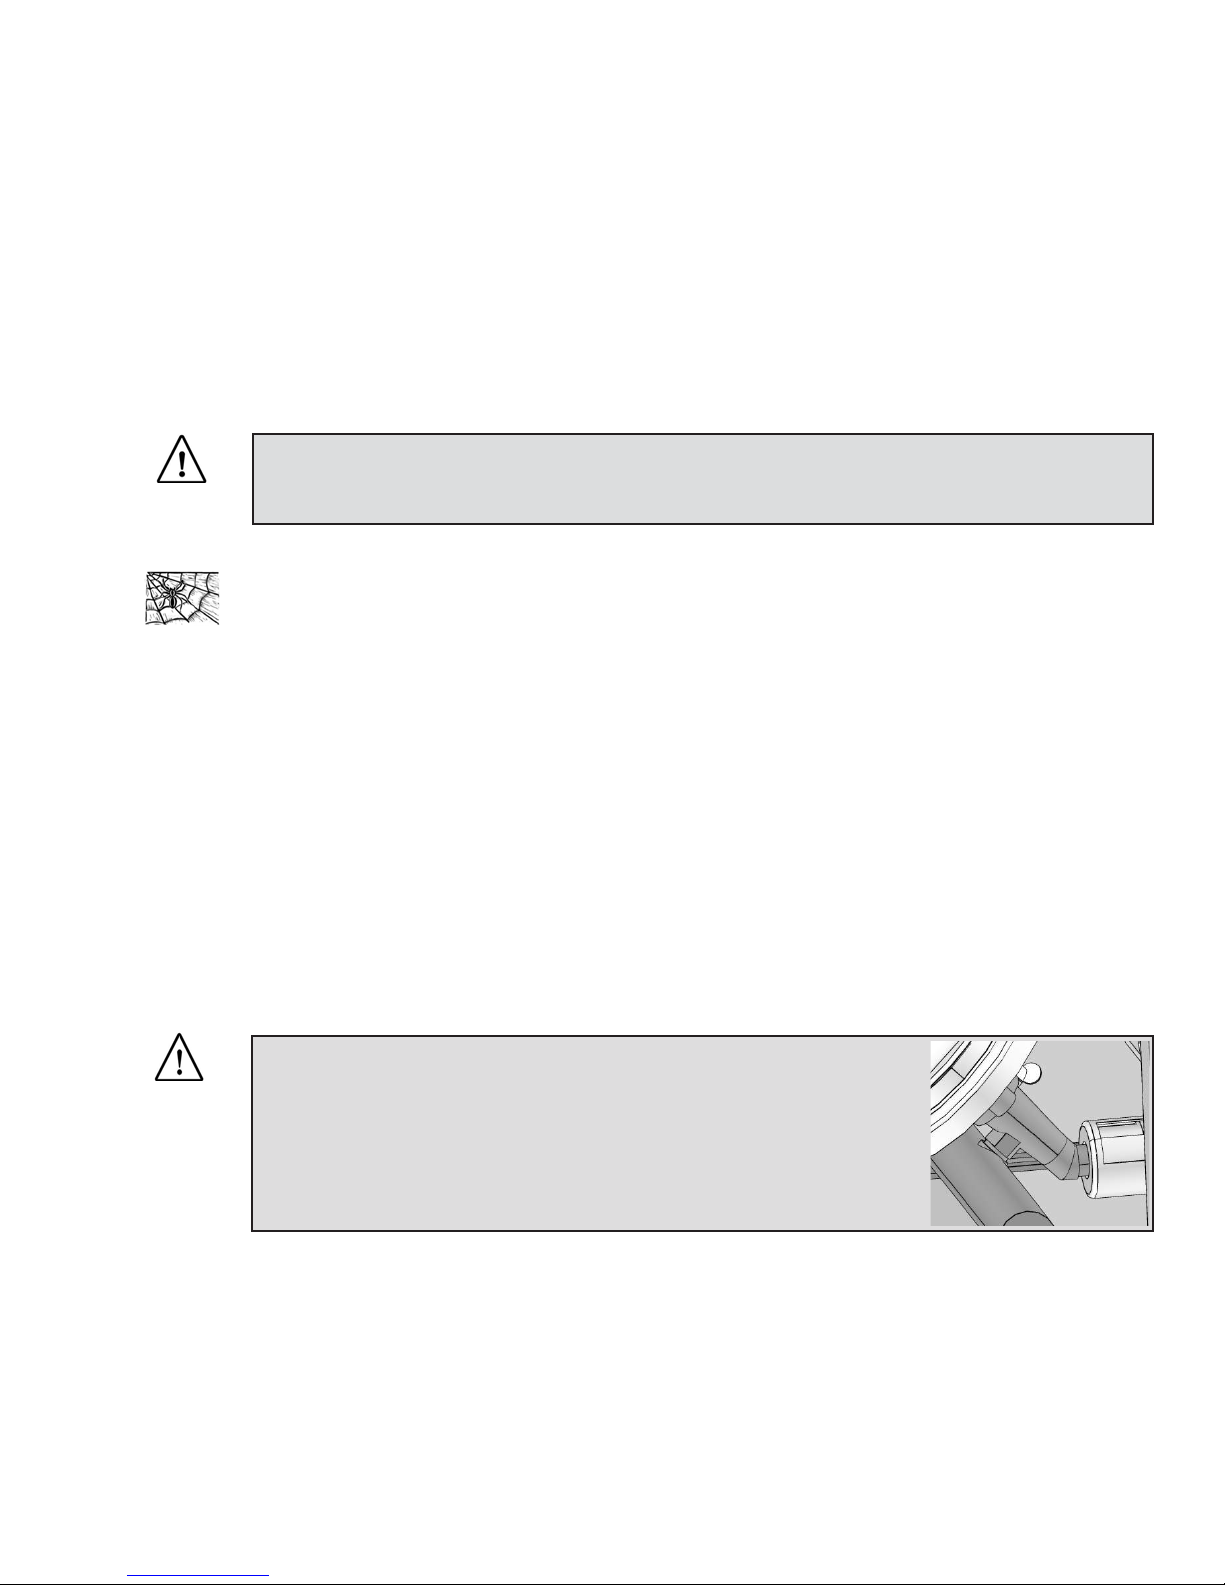
ARNING!
important that the valve/orice enters the burner tube before lighng your
gas grill. If the valve is not inside the burner tube a re or explosion could
occur.
Aluminum Cas
temperatures and weathering can cause oxidaon to occur on aluminum surfaces. This appears as white spots
on the casngs. To renish these areas, clean rst and sand lightly with ne sandpaper. Wipe the surface to
remove any residue and paint with high temperature barbecue paint. Protect surrounding areas from overspray. Follow the manufacture’s direcons for curing.
When reinstalling the burner aer cleaning it is very
ngs: Clean casngs periodically with warm soapy water. Aluminum will not rust, but high
ww.napoleongrills.com
w
10
roubleshoong
T
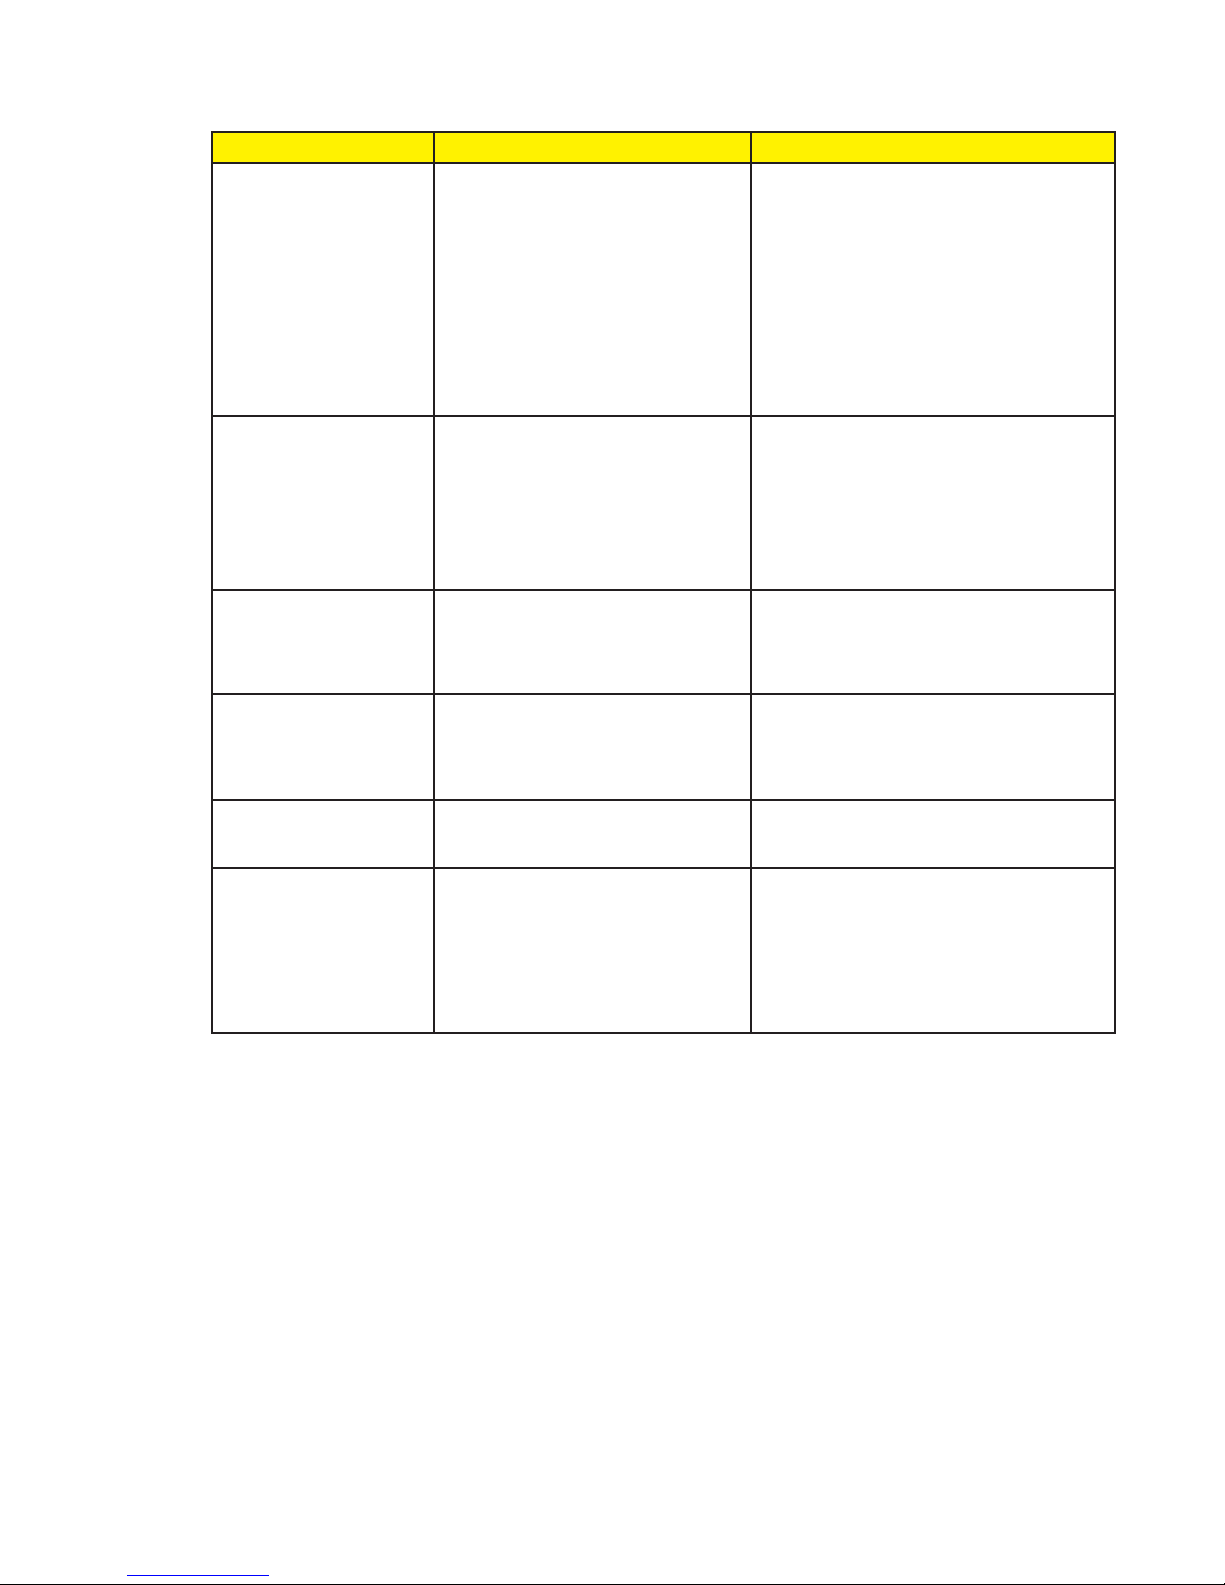
Problem Possible Causes Soluon
w heat / Low ame when
Lo
valve turned to high.
For propane - improper lighng
procedure.
Ensure lighng procedure is followed carefully.
All gas grill valves must be in the o posion
when the tank valve is turned on. Turn tank
on slowly to allow pressure to equalize. See
lighng instrucons.
For natural gas - undersized supply line.
For both gases - improper preheang.
Excessive are-ups/uneven
heat.
Burners burn with yellow
ame, accompanied by the
smell of gas.
Humming regulator. Normal occurrence on hot days. This is not a defect. It is caused by internal
Burners will not cross light
each other.
“Paint” appears to be
peeling inside lid or hood.
Improper preheang.
Excessive grease and ash build on sear
plates and in drip pan.
Possible spider web or other debris, or
improper air shuer adjustment.
Plugged ports at back of burner. Clean burner ports. See burner maintenance
Grease build-up on inside surfaces. This is not a defect. The nish on the lid and
Pipe must be sized according to installaon
code.
Preheat grill with both main burners on high
for 10 to 15 minutes.
Preheat grill with both main burners on high
for 10 to 15 minutes.
Clean sear plates and drip pan regularly. Do not
line pan with aluminum foil. Refer to cleaning
instrucons.
Thoroughly clean burner by removing. See
general maintenance instrucons.
vibraons in the regulator and does not aect
the performance or safety of the gas grill.
Humming regulators will not be replaced.
instrucons.
hood is porcelain, and will not peel. The
peeling is caused by hardened grease, which
dries into paint-like shards, that ake o.
Regular cleaning will prevent this. See cleaning
instrucons.
www.napoleongrills.com

11
KEEP Y
Or
OUR RECEIPT AS PROOF OF PURCHASE TO VALIDATE YOUR WARRANTY.
dering Replacement Parts
Warranty Informaon
MODEL:
DATE OF PURCHASE:
SERIAL NUMBER:
ecord informaon here for easy reference)
(R
Before contacng the Customer Care Department, check the NAC Website for more extensive cleaning, maintenance, troubleshoong and parts replacement instrucons at www.napoleongrills.com. Contact the factory
directly for replacement parts and warranty claims. Our Customer Care Department is available between 9
AM and 5 PM (Eastern Standard Time) at 1-866-820-8686 or fax at 1-705-727-4282. To process a claim, we
must be provided with the following informaon:
1. Model and serial number of the unit.
2. Part number and descripon.
3. A concise descripon of the problem (‘broken’ is not sucient).
4. Proof of purchase (photocopy of the invoice).
In some cases the Customer Care Representave could request to have the parts returned to the factory for
inspecon before providing replacement parts. These parts must be shipped prepaid to the aenon of the
Customer Care Department with the following informaon enclosed:
1. Model and serial number of the unit.
2. A concise descripon of the problem (‘broken’ is not sucient).
3. Proof of purchase (photocopy of the invoice).
4. Return Authorizaon Number - provided by the Customer Care Representave.
Before contacng customer care, please note that the following items are not covered by the warranty:
• Costs for transportaon, brokerage or export dues.
• Labor costs for removal and reinstallaon.
• Costs for service calls to diagnose problems.
• Discoloraon of stainless steel parts.
• Part failure due to lack of cleaning and maintenance, or use of improper cleaners (oven cleaner).
ww.napoleongrills.com
w
12
AUTION!
C
for your protecon. Although we make every eort to make the assembly process as problem free and
safe as possible, it is characterisc of fabricated steel parts that the edges and corners might be sharp and
could cause cuts if handled incorrectly.
During unpacking and assembly we recommended you wear work gloves and safety glasses
Geng Started
1. Remove all cart panels, hardware, and grill head from carton. Raise lid and remove any components
packed inside. Use the parts list to ensure all necessary parts are included.
2. Do not destroy packaging unl the grill has been fully assembled and operates to your sasfacon.
3. Assemble the grill where it is to be used, lay down cardboard or a towel to protect parts from being lost or
damaged while assembling.
4. Most stainless steel parts are supplied with a protecve plasc coang that must be removed prior to using grill.
5. Follow all instrucons in the order that they are laid out in this manual.
6. Two people are required to li the grill head onto the assembled cart.
If you have any quesons about assembly or grill operaon, or if there are damaged or missing parts please
call our Customer Care Department at 1-866-820-8686 between 9 AM and 5 PM (Eastern Standard Time).
OOLS REQUIRED FOR ASSEMBLY (tools not included)
T
3/8 “ and 5/8“
rench,
W
ratchet or driver
Fla
t and Philips
screwdrivers
Pliers
Hammer
www.napoleongrills.com

1. Caster Installaon
Attach (4) casters to the bottom shelf. Tighten securely.
5/8”(16mm)
13
6 x Z570-0027(1/4-20 x 3/8”)
2. Le
and Right Cart Panel Installaon
Install end cart panels ensuring slots in panel are to the top. Rest the panel on the bottom shelf and line up the
holes. Fasten using (6) 1/4-20 x 3/8” screws.
3/8”(10mm)
ww.napoleongrills.com
w

14
9 x N570-0042 (#10-24 x 3/8”)
3. R
ear Cart Panel Installaon
Fit the rear cart panel between the two end panels. Ensure the large holes in the rear panel are to the bottom
of cart as illustrated. Fasten using (9) #10-24 x 3/8” screws, three on each side.
4 x N570-0042 (#10-24 X3/ 8”)
4. Front Cabinet Support Installaon
Fasten top rail assembly to the front of the side panels using (4) #10 -24x 3/8” screws. For ease of installation
start all screws (4) #10-24 X3/ 8” before tightening.
www.napoleongrills.com
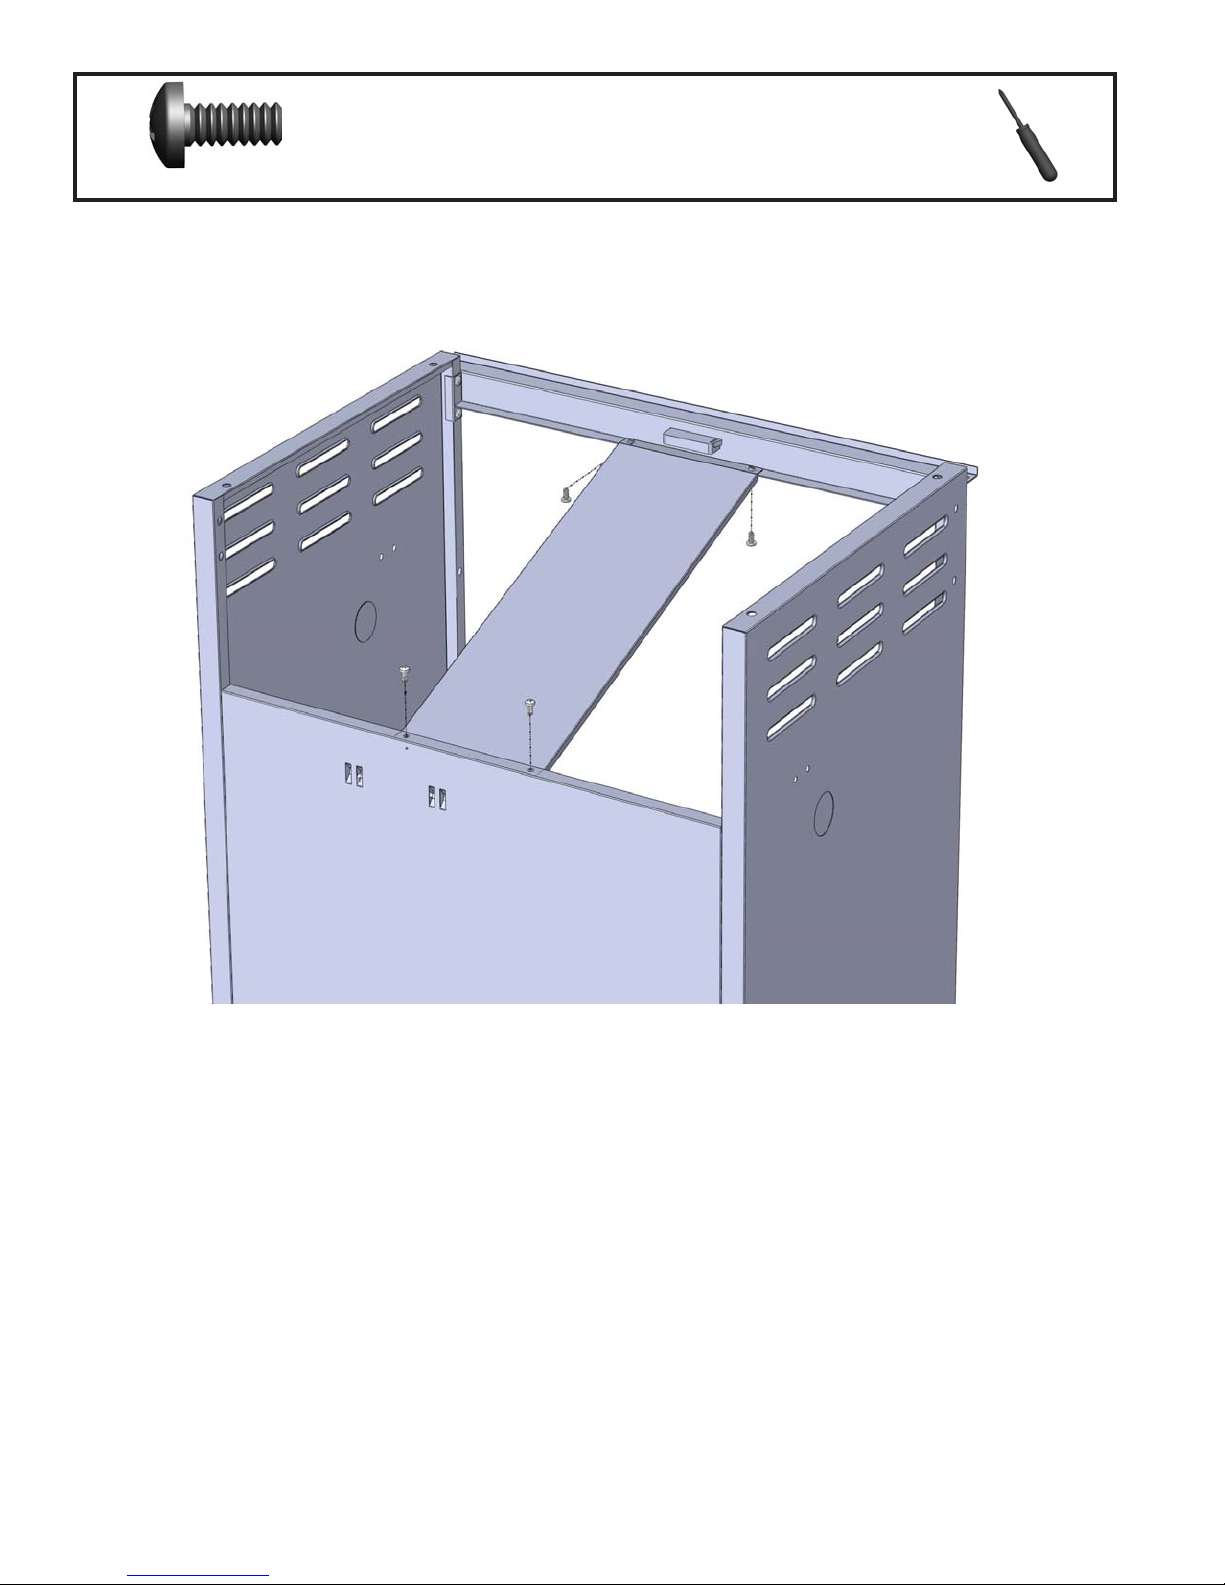
4 x N570-0042 (10-24 x 3/8”)
15
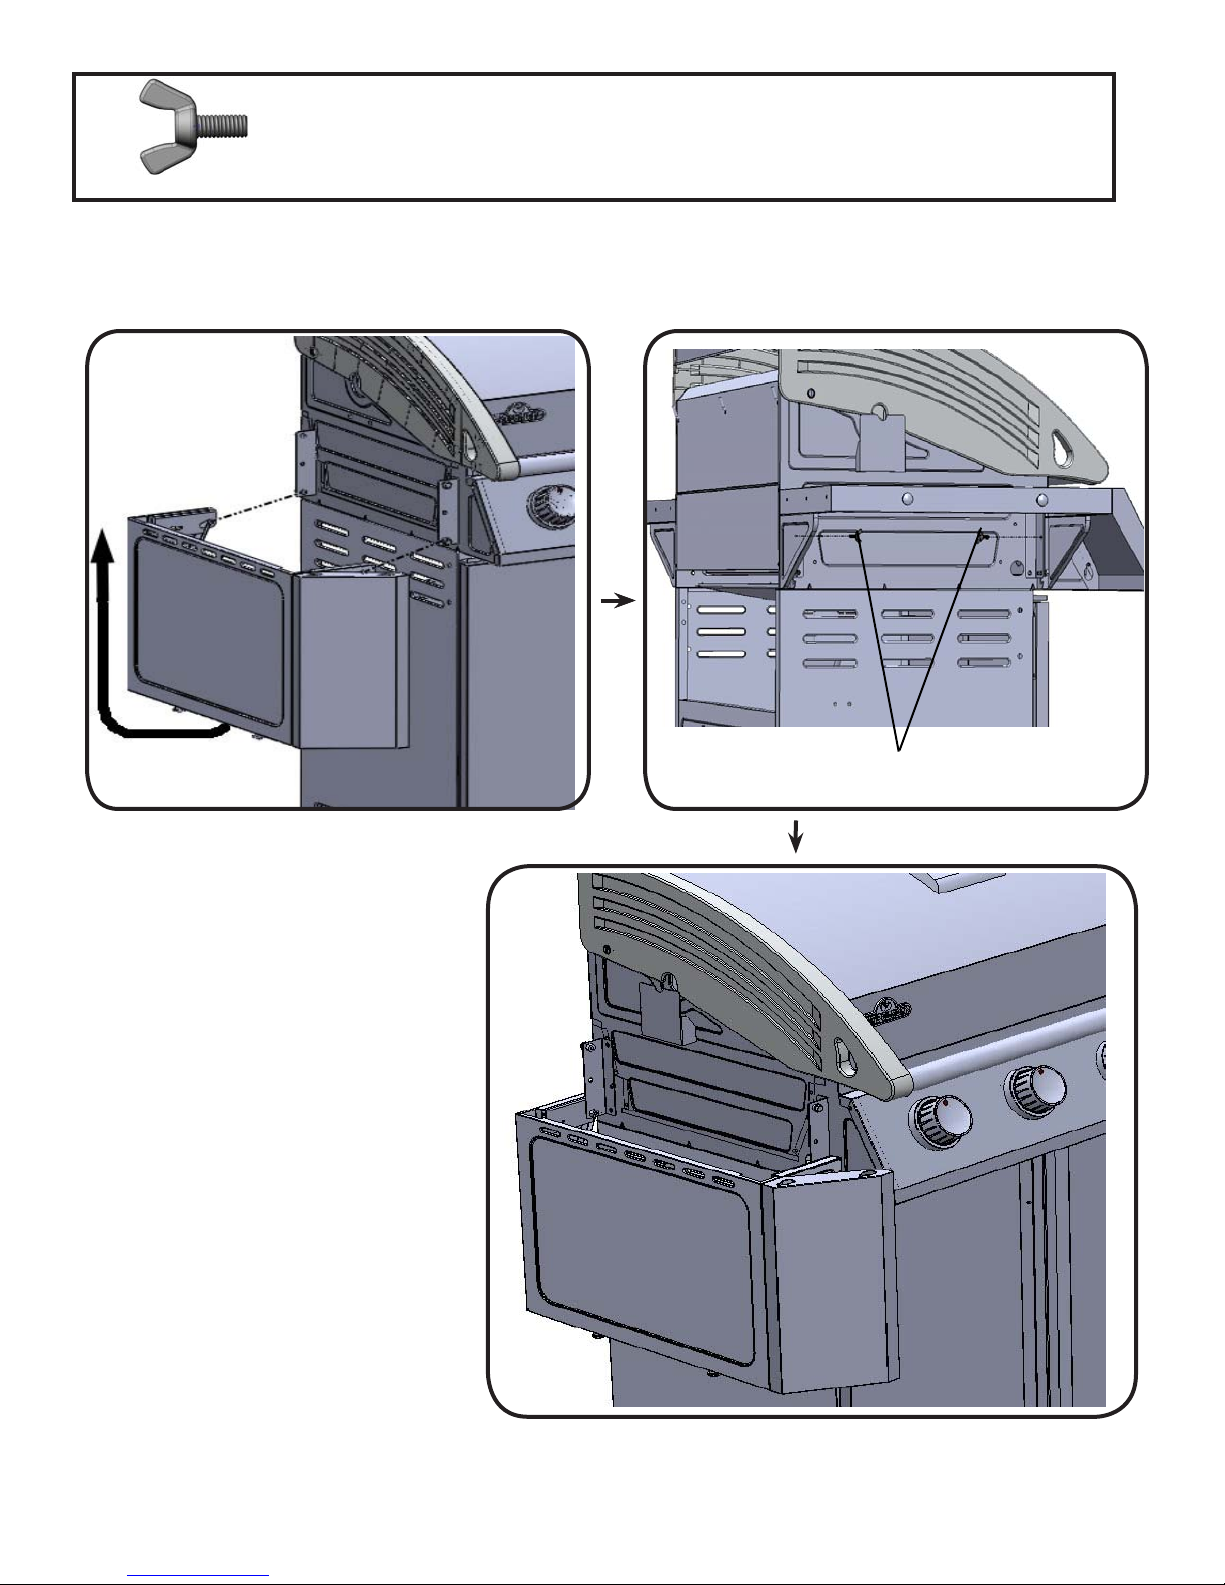
5. Hea
ach heat shield using (4) 10-24 x 3/8” screws. Aach one end under lip of back panel and other end to underside of front
A
cabinet support.
t Shield Installaon
Z415-0006 MAR 16/11

16
4 X Z570-0027(1/4-20 X 3/8”)
6. Grill Head Ins
T
o avoid assembly dicules, prior to mounng the grill head, remove zip e holding regulator/connector up under control
panel. This was installed at the factory to protect the regulator hose during shipping and is no longer required. (Take care
when removing the e not to damage the hose).
Li grill head and place on assembled cart, lining up holes in top of side cart panels with holes in boom of base. Fasten
from inside using (4) 1/4-20 x 3/8” screws, two per side.
wo people are required for this step.
T
tallaon
2 x Z570-0022 (M4X8mm)
3/8”(10mm)
-
All cylinder
s 7kg or larger must be placed outside the enclosure (under the right side shelf) on level
ground. The hose assembly must be routed through the knock out hole in the right side panel.
www.napoleongrills.com
F
asten regulator to side panel using
(2) M4 x 8 screws.
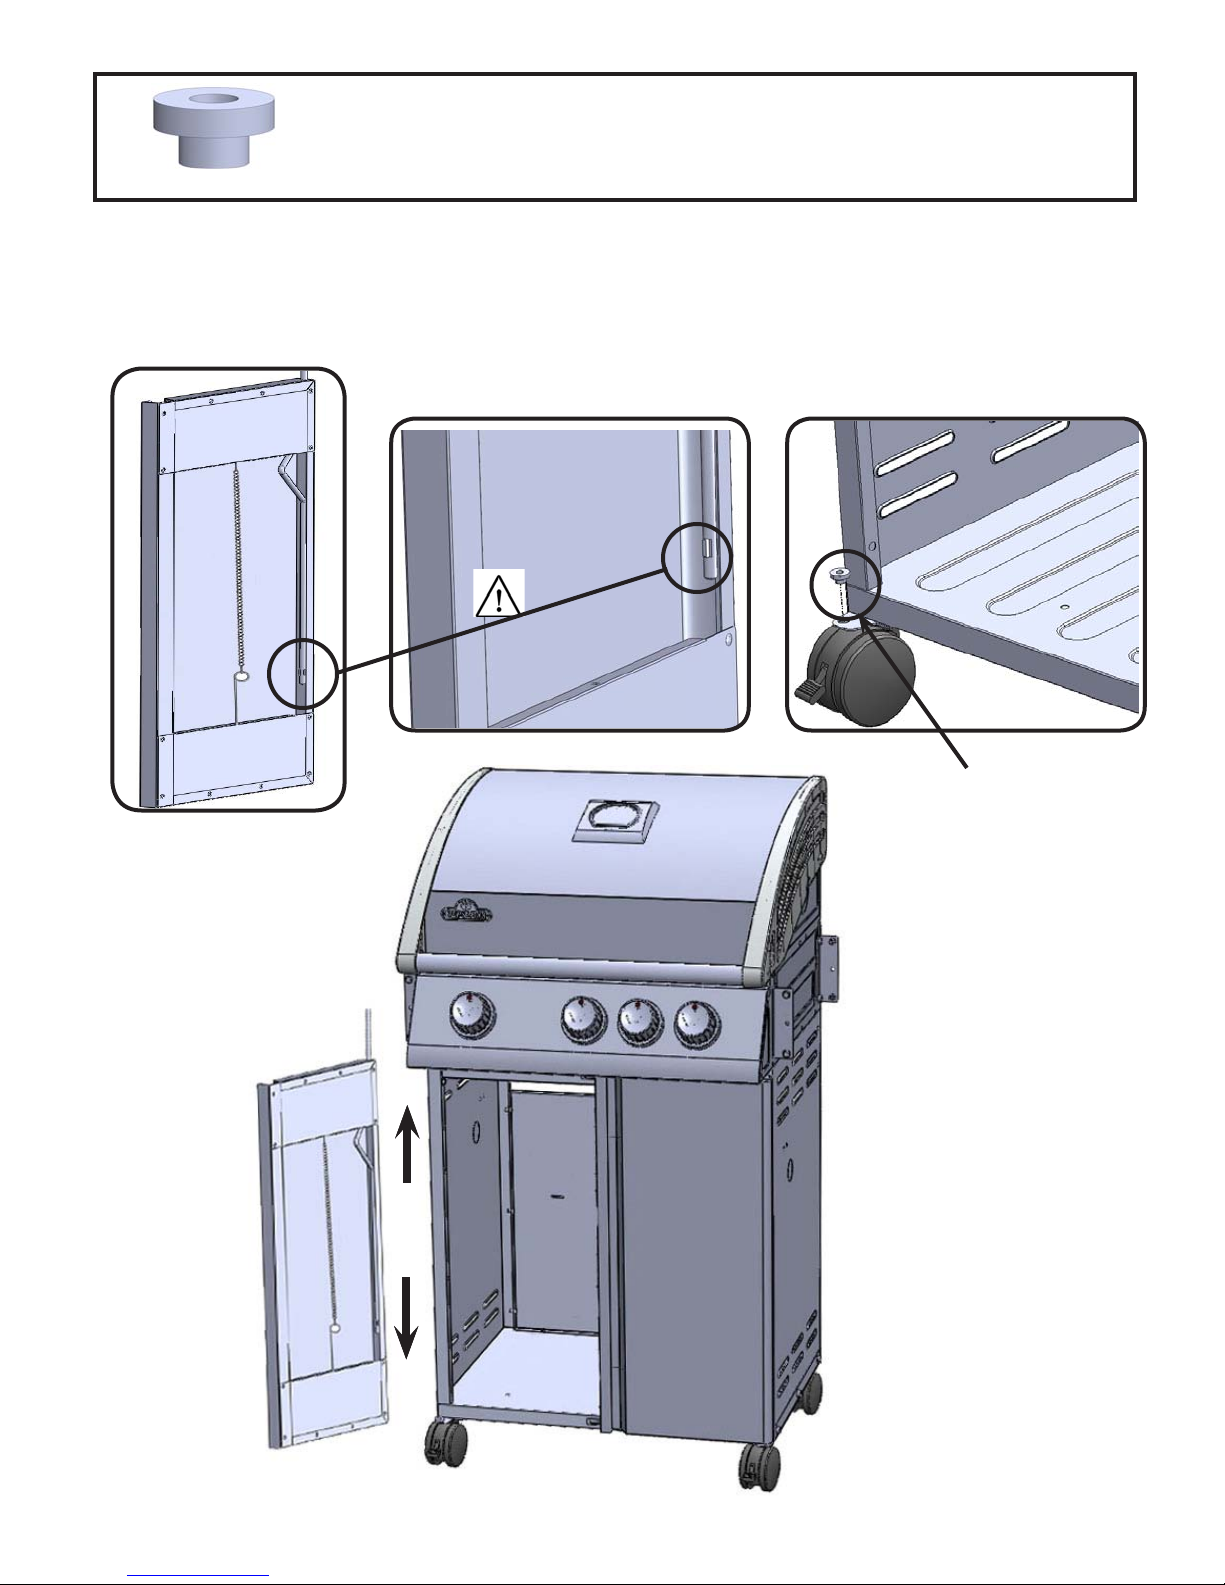
2 x N105-0011 (door bushing)
7. Cabinet Door Installaon
17
Insert pivot rod through hole on inside top of door. Holding the door in one hand, direct the pivot rod into the
hole in the underside of the front cabinet support. Once secure, let the rod slide down and through the hole
in the bottom of the door and into the bushing in the bottom shelf.
BushingBushing
ww.napoleongrills.com
w
18
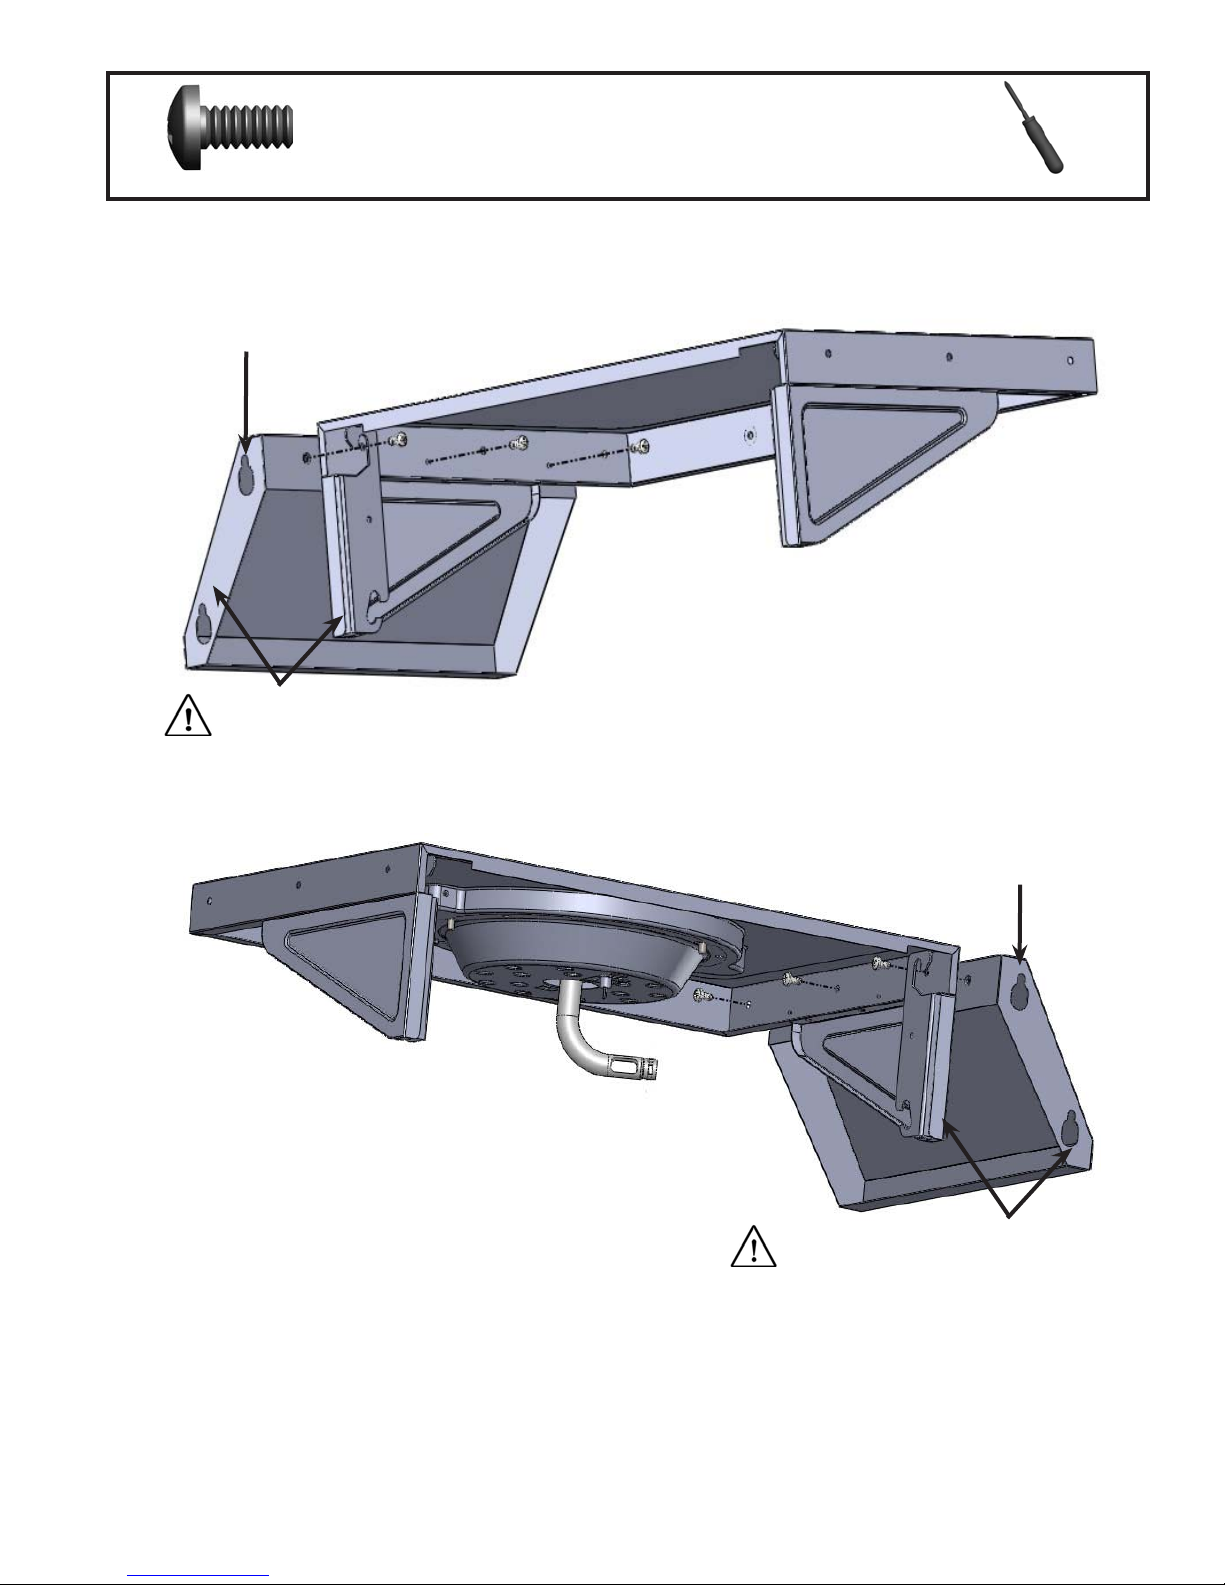
6 x N570-0042 (#10-24 x 3/8”)
8. Side Shelf
Use (6) #10-24×3/8" screws to assemble the side shelf front panels, (3) for each side shelf.
Surface with holes must be at bracket end of shelf.
Ensure these two surfaces are aligned.
Front Panel
tallaon
Ins
Surface with holes must be at bracket end of shelf.
Ensure these two surfaces are aligned.
www.napoleongrills.com
4X Z570-0026 (M5 X 9.5mm)
9. Side Shelf Installaon
Hook the shelf brackets onto the lower shoulder screws. Then pivot the shelf upwards and push down to engage.
19
The wing screws (2) can
be removed to fold the shelf
down when storing the unit.
(4) M5×9.5mm wing bolt,(2) each side.
ww.napoleongrills.com
w

20
1 x N160-0016 (clip)
10. Side Burner Ins
Fit orifice into burner tube and secure with hose retainer clip supplied. Attach wire from main unit to side
burner electrode.
tallaon
410SB MODEL
www.napoleongrills.com
21
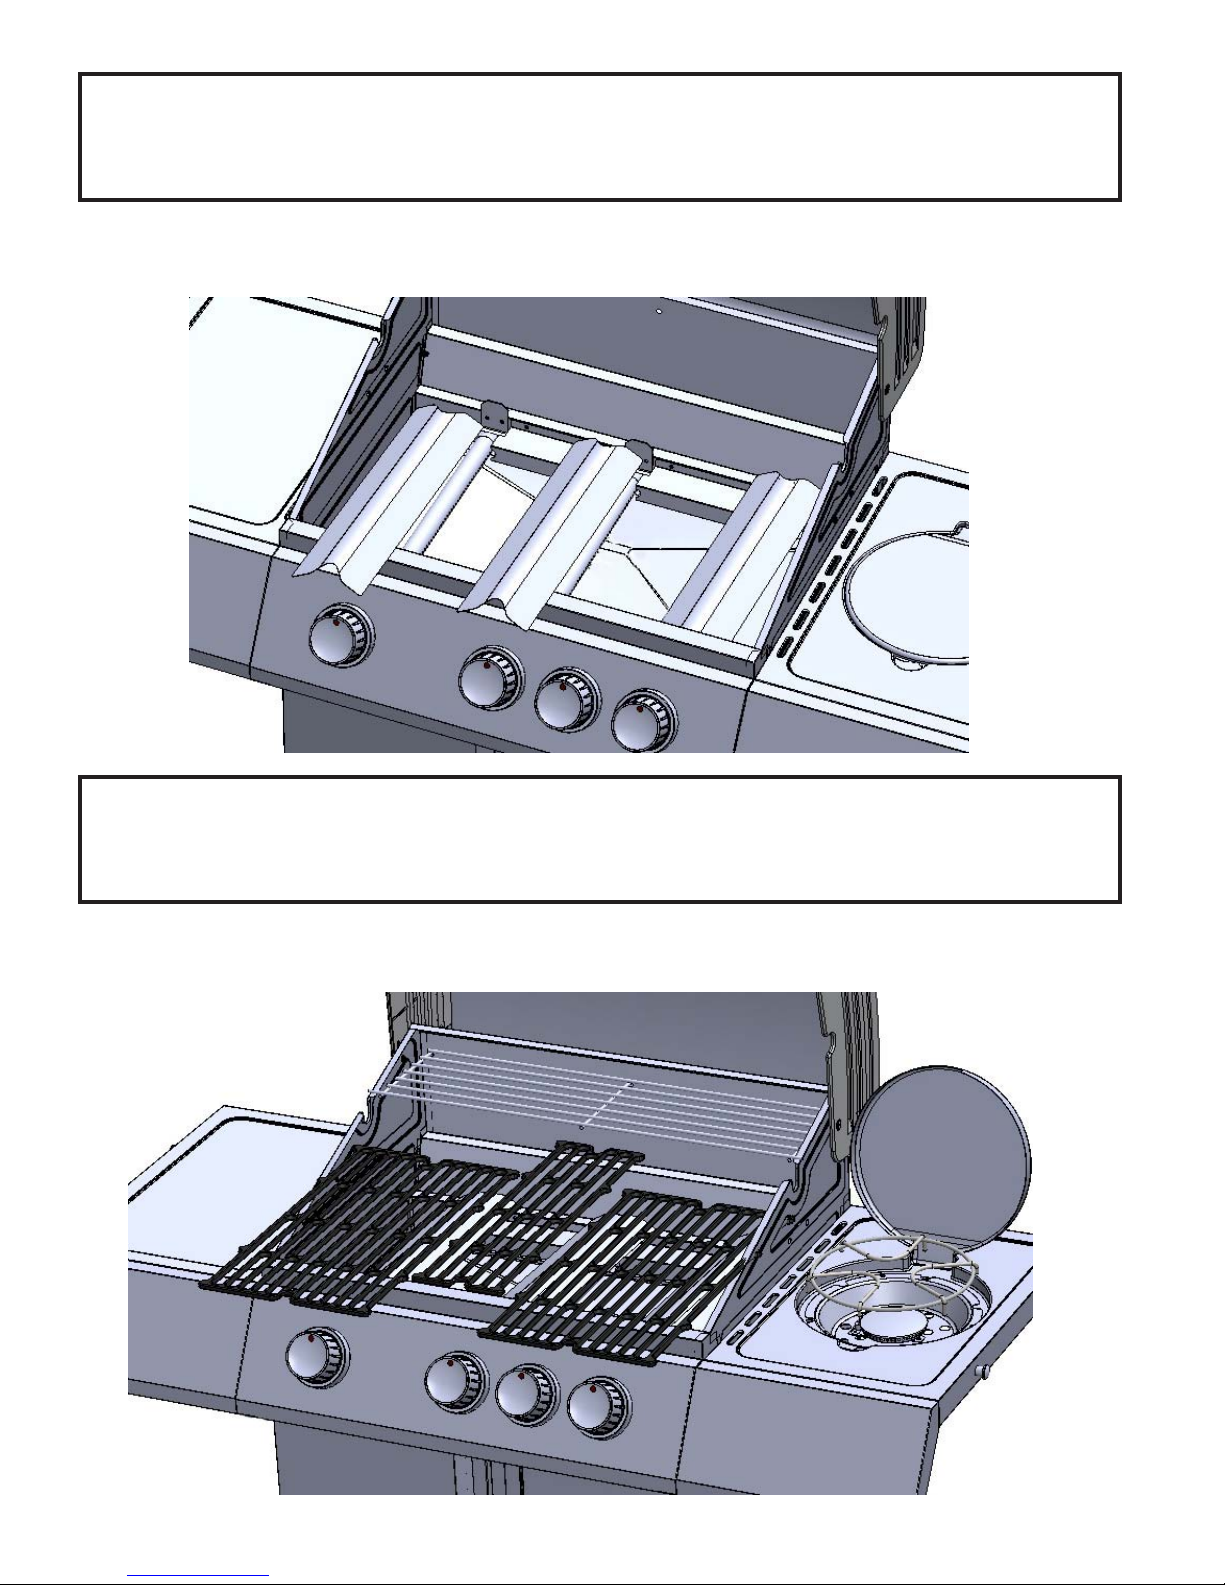
11. Sear Pla
Set sear plates into base, positioning one over each tube burner.
te Installaon
12. Grids and W
Position the grids and warming rack into base as shown.
arming Rack Installaon
ww.napoleongrills.com
w

22
13. Drip P
Slide drip pan into rear of base as shown. Ensure drip pan rests on rails at the bottom of base.
an Installaon
14. Grease Tray and Holder Installaon
Place aluminum grease tray into the grease tray holder and then clip the wire grease tray holder into the
bottom of the drip pan.
www.napoleongrills.com
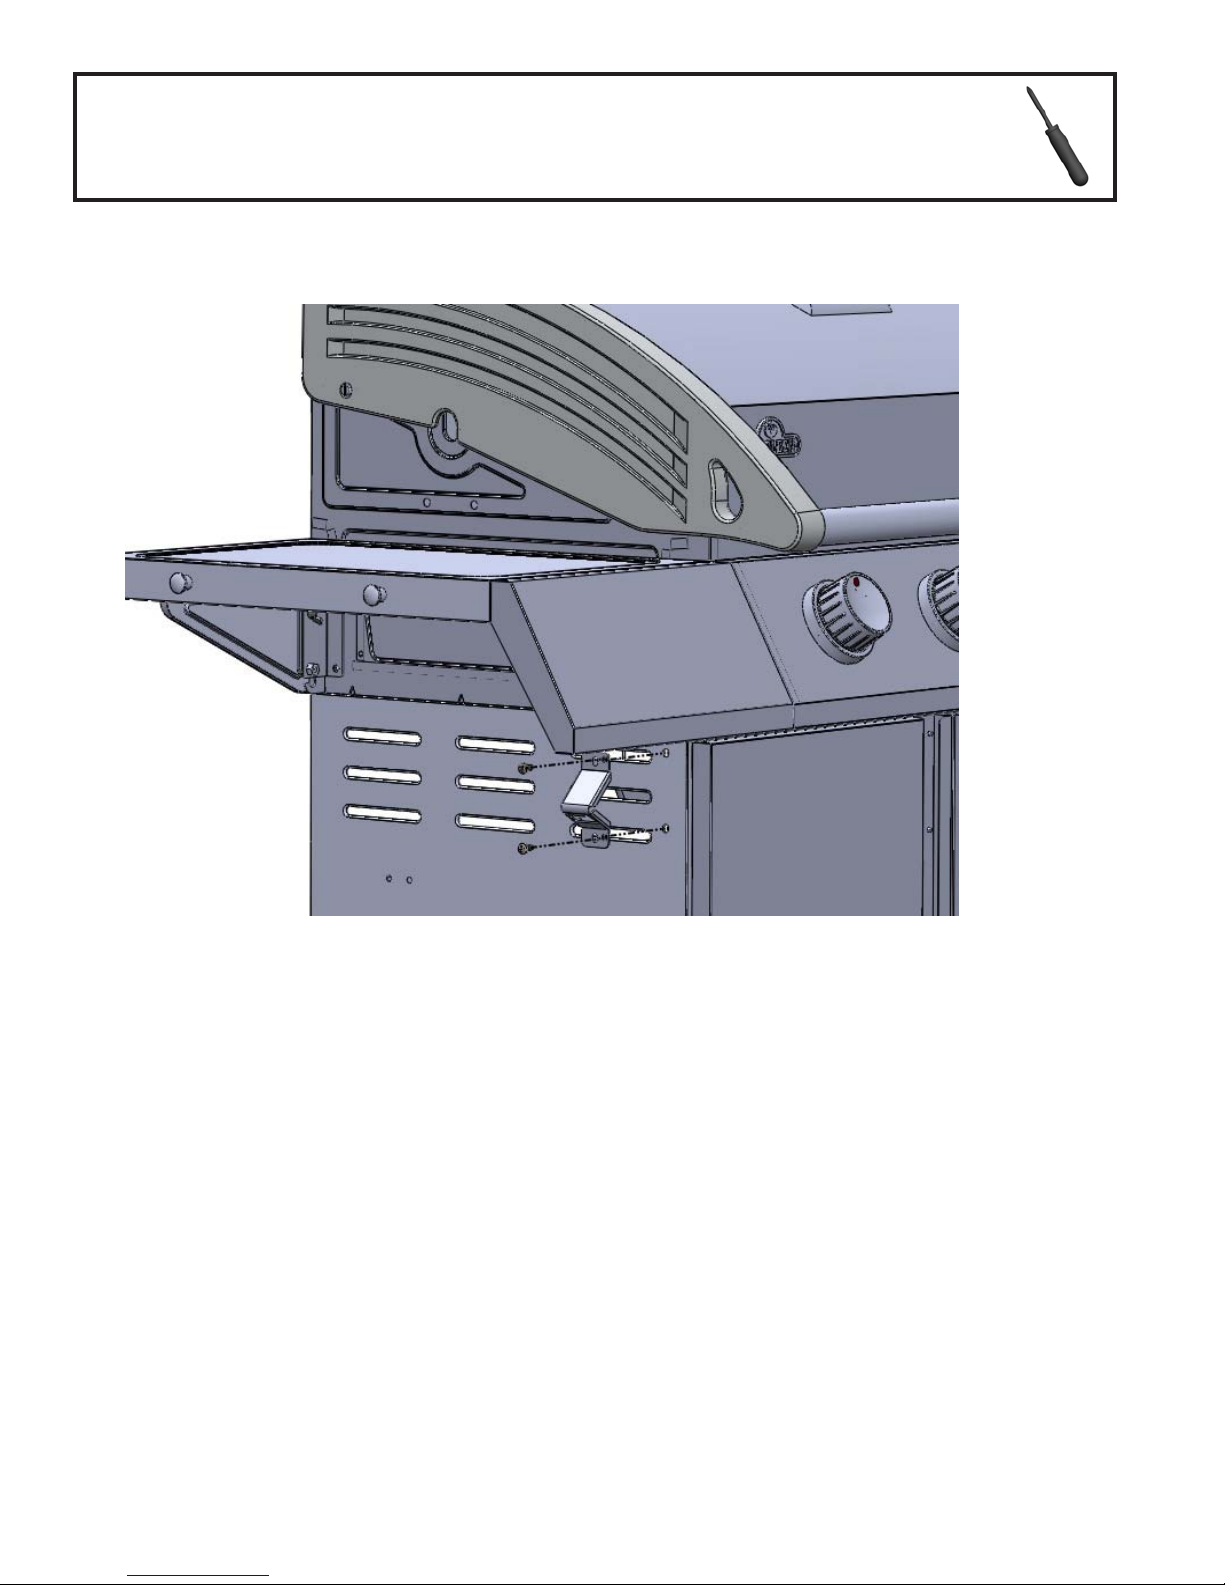
15.Bottle Opener Installation
Fasten bottle opener to the side panel using (2) #10-24×3/8” screws.
23
ww.napoleongrills.com
w

24
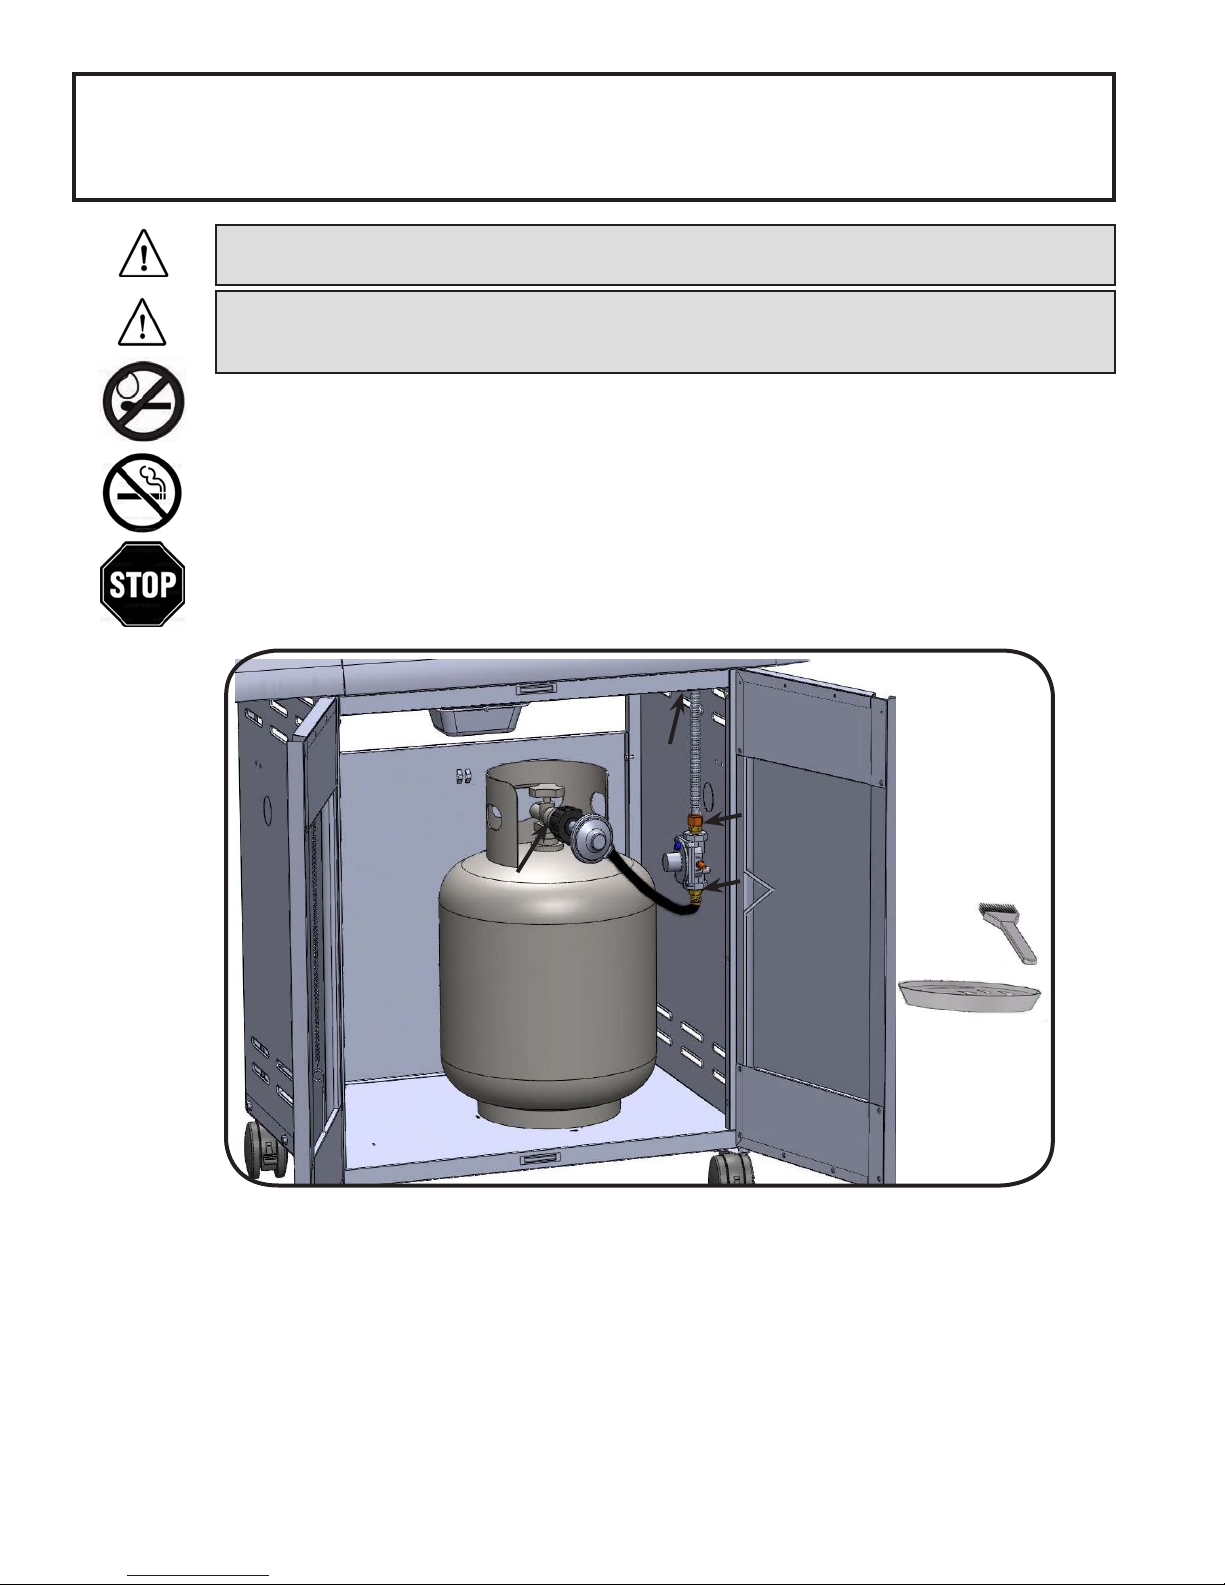
16.Proper Hose Connecon
All cylinder
ground. The hose assembly must be routed through the knock out hole in the right side panel.
www.napoleongrills.com
s 7kg or larger must be placed outside the enclosure (under the right side shelf) on level
25
Leak T
W
ARNING!
part of the gas system is replaced.
ARNING!
W
in the area while you check for leaks. Sparks or open ames will result in a re or explosion, damage to
property, serious bodily injury, or death.
Leak tesng: This must be done before inial use, annually, and whenever any gas components are replaced
or serviced. Do not smoke while performing this test, and remove all sources of ignion. See Leak Tesng
Diagram for areas to check. Turn all burner controls to the o posion. Turn gas supply valve on.
Brush a half-and-half soluon of liquid soap and water onto all joints and connecons of the regulator, hose,
manifolds and valves.
Bubbles will indicate a gas leak. Either ghten the loose joint or have the part replaced with one recommended by the Napoleon Customer Care department and have the grill inspected by a cered gas installer.
If the leak cannot be stopped, immediately shut o the gas supply, disconnect it, and have the grill inspected
by a cered gas installer or dealer. Do not use the grill unl the leak has been corrected.
esng Instrucons
A leak test must be performed annually and each me a cylinder is hooked up or if a
Never use an open ame to check for gas leaks. Be certain no sparks or open ames are
All cylinder
s 7kg or larger must be placed outside the enclosure (under the right side shelf) on level
ground. The hose assembly must be routed through the knock out hole in the right side panel.
ww.napoleongrills.com
w

26
www.napoleongrills.com
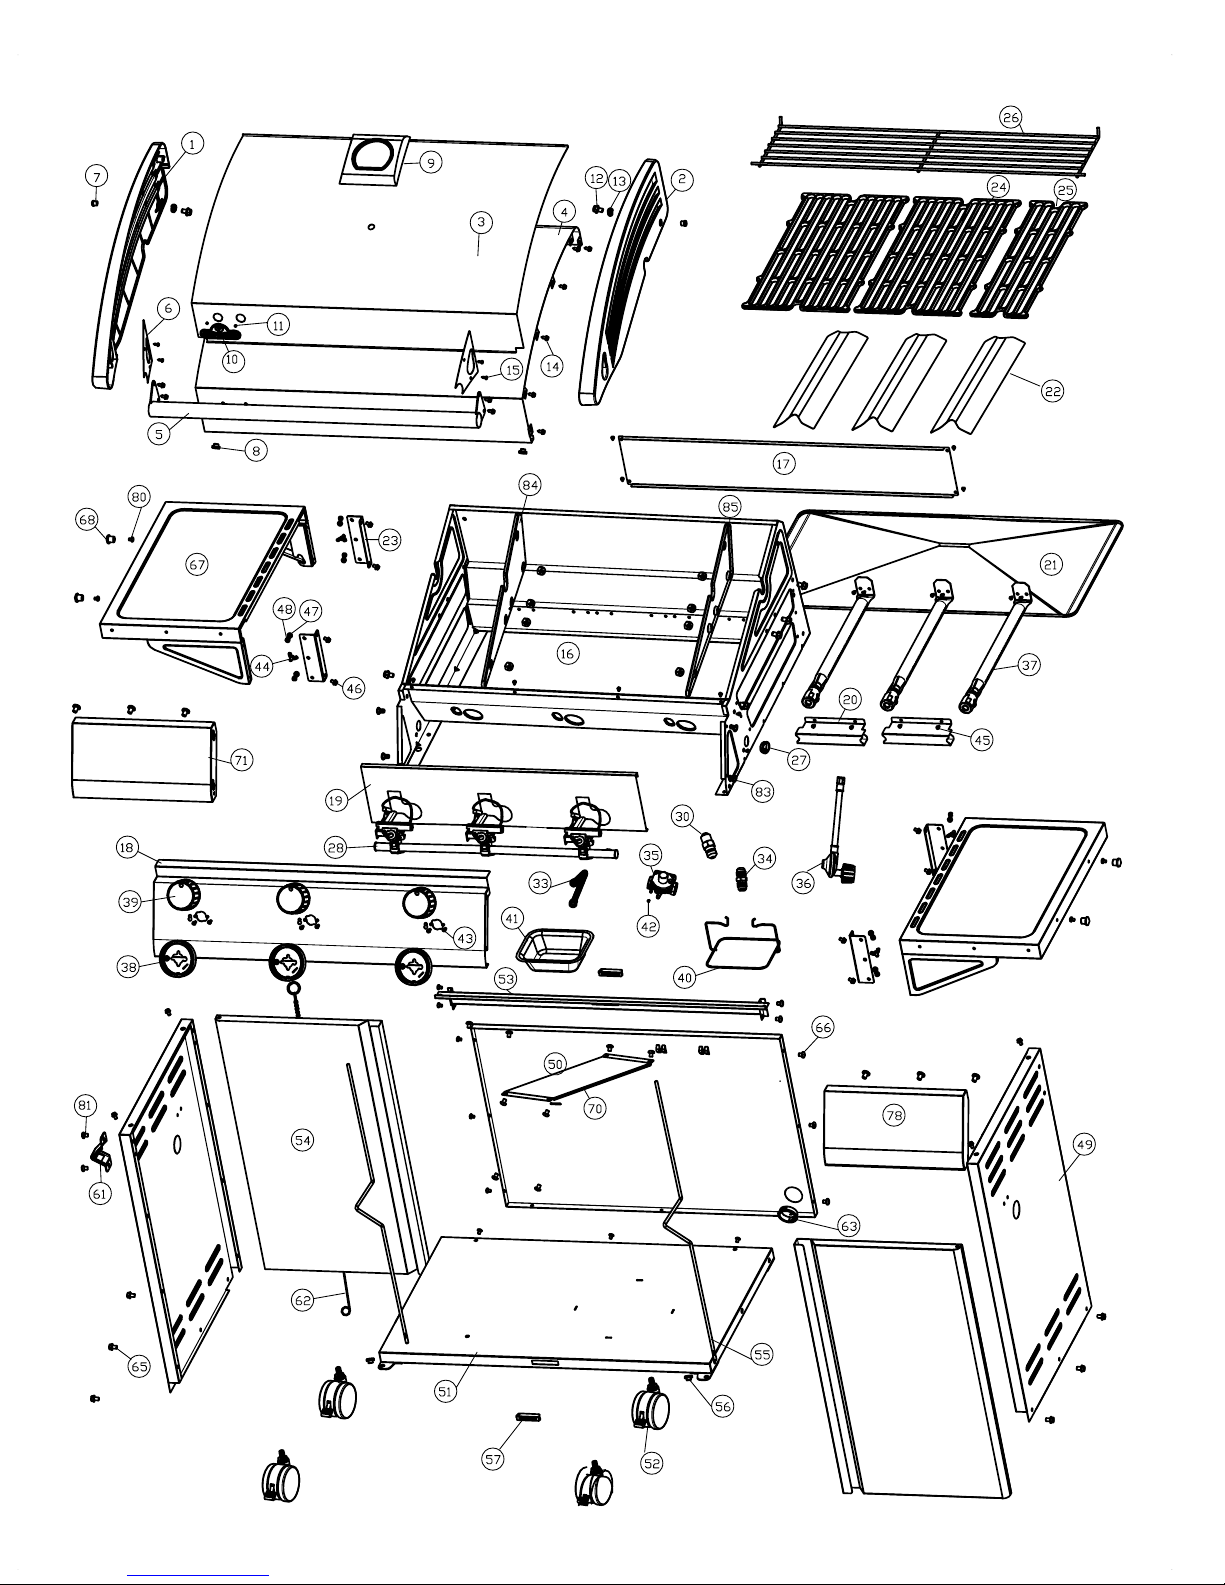
410 P
Item
1
2 Z135-0002 right side lid casting x
3 Z335-0002 lid insert x
4 Z585-0003 lid heat shield x
5 Z010-0003 lid handle x
6 Z080-0001 lid handle cover x
7 Z580-0001 lid pivot screw x
8 Z510-0003 black silicone lid bumper x
9 N685-0006 temperature gauge x
10 N385-0129 Napoleon logo x
11 W450-0005 logo spring clips x
12 Z570-0027 screw, 1/4-20 x 3/8" SS x
13 N735-0003 1/4" lockwasher x
14 N570-0080 screw, #14 x 1/2" x
15 Z570-0021 screw, #8 x 1/2"" x
16 Z010-0009 base assembly x
17 Z035-0008 base back cover x
18 Z475-0004 control panel x
19 Z585-0004 base heat shield x
20 Z080-0014 cross light bracket x
21 Z710-0002 drip pan x
22 Z305-0002 sear plate x
23 Z080-0009 side shelf support bracket x
24 Z305-0003 cooking grids - large x
25 Z305-0005 cooking grids - small x
26 Z305-0006 warming rack x
27 N105-0001 bushing, 0.875" x
28 Z010-0004P manifold assembly x
33 N720-0044 manifold flex connector x
34 W445-0021 fitting 3/8 flare to 1/2" pipe x
35 N530-0023 step down regulator x
36 N530-0032 regulator-DE x
37 Z100-0003 main burner x
38 N051-0006 control knob bezel x
39 N380-0016R control knob x
40 Z080-0013 grease tray holder x
41
42 Z570-0022 screw, M4 x 8mm x
43 N570-0078 screw, M4 x 8mm x
44 Z570-0026 wing screw, M5 x 9.5mm x
Part # Description
Z135-0001 left side lid casting x
N255-0014 adapter - DE/NL x
N530-0033 regulator-NL x
N530-0034 regulator-ES x
N530-0035 regulator-SE x
N530-0036 regulator-IT x
N530-0037 regulator-GB x
N530-0038 regulator-FR x
N345-0017 Hose-BE x
N185-0001
foil grease tray x
arts List
410
410 P
Item
45
46 Z570-0027 screw, 1/4-20 x 3/8" SS x
47 N570-0135 schoulder screw, M6 x 1/2" x
48 N450-0030 nut, M6 x
49 Z476-0001 cart side panel x
50 Z476-0005 cart back panel x
51 Z010-0011 cart bottom assembly x
52 Z130-0002 caster, 3" x
53 Z655-0002 cart front beam x
54 Z010-0014 door assembly x
55 N555-0036 door pivot rod x
56 N105-0011 door bushing x
57 N430-0002 magnetic catch x
61 Z080-0012 bottle opener x
62 N555-0025 lighting rod x
63 N105-0002 bushing, 1.5" x
65 Z570-0027 screw, 1/4-20 x 3/8" SS x
66 N570-0042 screw, 10-24 x 3/8" x
67 Z010-0018 side shelf x
68 N340-0006 tool hook x
70 Z585-0007S heat shield x
71 Z120-0002 left side shelf trim x
78 Z120-0001 right side shelf trim x
80 N570-0019 screw, 10-24 x 1/4" x
81 N570-0042 screw, 10-24 x 3/8" x
82 Z450-0009 10-24 nut x
83 Z570-0023 shoulder screw x
84 Z035-0012 base insert left x
85 Z035-0013 base insert right x
Part # Description
Z570-0021 screw, #8 x 1/2" x
Z370-0001 main blister pack x
64495-GB rotisserie kit ac
63410 vinyl cover ac
arts List
27
410
x-standard
ac-accessory
ww.napoleongrills.com
w
28
410 P
ARTS DIAGRAM
www.napoleongrills.com
410SB P
Item
1
2 Z135-0002 right side lid casting x
3 Z335-0002 lid insert x
4 Z585-0003 lid heat shield x
5 Z010-0003 lid handle x
6 Z080-0001 lid handle cover x
7 Z580-0001 lid pivot screw x
8 Z510-0003 black silicone lid bumper x
9 N685-0006 temperature gauge x
10 N385-0129 Napoleon logo x
11 W450-0005 logo spring clips x
12 Z570-0027 screw, 1/4-20 x 3/8" SS x
13 N735-0003 1/4" lockwasher x
14 N570-0080 screw, #14 x 1/2" x
15 Z570-0021 screw, #8 x 1/2"" x
16 Z010-0009 base assembly x
17 Z035-0008 base back cover x
18 Z475-0004SB control panel x
19 Z585-0004 base heat shield x
20 Z080-0014 cross light bracket x
21 Z710-0002 drip pan x
22 Z305-0002 sear plate x
23 Z080-0009 side shelf support bracket x
24 Z305-0003 cooking grids - large x
25 Z305-0005 cooking grids - small x
26 Z305-0006 warming rack x
27 N105-0001 bushing, 0.875" x
28 Z010-0004SBP manifold assembly x
29 N720-0055 side burner supply tube x
30 N455-0049 side burner orifice x
31 N160-0016 side burner orifice clip x
32 N750-0016 side burner electrode wire x
33 N720-0044 manifold flex connector x
34 W445-0021 fitting 3/8 flare to 1/2" pipe x
35 N530-0023 step down regulator x
36 N530-0032 regulator-DE x
37 Z100-0003 main burner x
38 N051-0006 control knob bezel x
39 N380-0016R control knob x
40 Z080-0013 grease tray holder x
Part # Description
Z135-0001 left side lid casting x
N255-0014 adapter - DE/NL x
N530-0033 regulator-NL x
N530-0034 regulator-ES x
N530-0035 regulator-SE x
N530-0036 regulator-IT x
N530-0037 regulator-GB x
N530-0038 regulator-FR x
N345-0017 Hose-BE x
arts List
410SB
ww.napoleongrills.com
w
29
30
410SB P
Item
41
42 Z570-0022 screw, M4 x 8mm x
43 N570-0078 screw, M4 x 8mm x
44 Z570-0026 wing screw, M5 x 9.5mm x
45 Z570-0021 screw, #8 x 1/2" x
46 Z570-0027 screw, 1/4-20 x 3/8" SS x
47 N570-0135 schoulder screw, M6 x 1/2" x
48 N450-0030 nut, M6 x
49 Z476-0001 cart side panel x
50 Z476-0005 cart back panel x
51 Z010-0011 cart bottom assembly x
52 Z130-0002 caster, 3" x
53 Z655-0002 cart front beam x
54 Z010-0014 door assembly x
55 N555-0029 door pivot rod x
56 N105-0011 door bushing x
57 N430-0002 magnetic catch x
61 Z080-0012 bottle opener x
62 N555-0025 lighting rod x
63 N105-0002 bushing, 1.5" x
65 Z570-0027 screw, 1/4-20 x 3/8" SS x
66 N570-0042 screw, 10-24 x 3/8" x
67 Z010-0018 side shelf x
68 N340-0006 tool hook x
69 Z710-0004 side burner plate x
70 Z585-0007S heat shield x
71 Z120-0002 left side shelf trim x
72 Z010-0019 side burner shelf x
73 Z335-0006 side burner lid x
74 Z580-0002 side burner lid pivot rod x
75 Z485-0001 clevis pin x
76 Z100-0002 side burner x
77 Z305-0008 side burner grate x
78 Z120-0001 right side shelf trim x
79 N570-0078 screw, M4 x 8mm x
80 N570-0019 screw, 10-24 x 1/4" x
81 N570-0042 screw, 10-24 x 3/8" x
82 Z450-0009 10-24 nut x
83 Z570-0023 shoulder screw x
84 Z035-0012 base insert left x
85 Z035-0013 base insert right x
Part # Description
N185-0001
Z370-0001 main blister pack x
64495-GB rotisserie kit ac
63410 vinyl cover ac
foil grease tray
arts List
410SB
x
x-standard
www.napoleongrills.com
ac-accessory

31
410SB P
ARTS DIAGRAM
ww.napoleongrills.com
w

_
A
32
FAX TO: 705 727 4282
CCESSORIES & PARTS ORDER FORM
PLEASE PRINT CLEARLY
CONTACT NAME:______________________________________________________________________
SHIP TO :_____________________________________________________________________________
_________________________________________________________________________________________
_________________________________________________________________________________________
_________________________________________________________________________________________
TEL :_________________________________ FAX :______________________________
EMAIL: __________________________________________________________________
VISA OR MASTERCARD # :_______________________________________
SIGNATURE:____________________________________________________________________________
QUANTITY
PART NUMBER DESCRIPTION
EXPIRY DATE: _____________
TAXES MAY APPLY
SHIPPING EXTRA
IF CONFIRMATION IS REQUIRED PLEASE INCLUDE A FAX NUMBER OR EMAIL ADDRESS
www.napoleongrills.com

Dieser Gasgrill darf nur an einem gut belü
Gebäude, einer Garage oder einem anderen geschlossenen Bereich.
eten Ort im Freien benutzt werden, nicht jedoch in einem
APPL
Y SERIAL NUMBER LABEL FROM CARTON
Serial No.
XXXXXX000000
MODEL NO.
GEFAHR
WENN E
• Gaszufuhr zum Gerät absperren.
• Flammen löschen.
• Haube önen.
• Wenn es weiterhin nach Gas riechen
sollt
den Gaslie
benachrichgen.
S NACH GAS RIECHT:
e, dem Gerät fernbleiben und unver
feranten oder die Feuerwehr
züglich
410, 410SB
A
CHTUNG
or dem Zünden dieses Geräts bie unbedingt
V
den Abschni „ZÜNDANLEITUNG” lesen.
In der Nähe dieses oder ander
eder Benzin noch andere brennbaren Flüssigkeiten
w
oder Gase gelagert werden. Dies gilt auch für
nich
t angeschlossene Gasaschen. Ein Nichtbefolgen
dieser Anleitung kann durch Brände oder Explosionen
zu Sachschäden und Körperverletzungen, auch zu
tödlichen, führen.
er Geräte dürfen
Bi
0359-11
Fax: (705)725-2564 email: wecare@napoleonproducts.com web site: www.napoleongrills.com
214 Ba
e Bewahren Sie Diese Anleitung Auf
Napoleon Appliance Corp.,
yview Dr., Barrie, Ontario, Canada L4N 4Y8 Phone: 1-866-820-8686
Z415-0002CE-DE/NL Feb 14/12

34
VIELEN DANK, DASS SIE SICH FÜR NAPOLEON ENTSCHIEDEN HABEN!
NAPOLE
unse
auf Dich
unserem geschulten Personal geprü, um sicherzustellen, dass unsere Kunden die hohe Qualität erhalten, die sie von allen
Napoleon-Produkten erwarten können.
Das höchste Ziel aller Napoleon-Mitarbeiter ist höchste Kundenzufriedenheit und wir möchten Ihnen die notwendigen
Werkzeuge zur Verfügung zu stellen, um ein unvergessliches Grillerlebnis zu erzielen. In diesem Handbuch nden Sie die
nögen Anweisungen für die sichere und ordnungsgemäße Montage, Installaon, Wartung und Pege Ihres Grills. Lesen
Sie
v
w
sein sollt
und 17.00 Uhr Eastern Standard Time oder besuchen Sie unsere Website.
Beschr
ON-Produkte werden ausschließlich mit Komponenten und Materialien von höchster Qualität hergestellt, die von
ren geschulten und qualitätsorienerten Technikern monert werden. Die Brenner und Venle werden vor Ausliefer
gkeit getestet und einem Zündtest unterzogen. Dieser Grill wurde vor Verpackung und Auslieferung gründlich von
diese Bedienungsanleitung vollständig durch und machen Sie sich mit allen Sicherheitshinweisen und den Gerätefunk
ertraut, bevor Sie Ihren neuen Grill in Betrieb nehmen. Bei genauer Befolgung aller Anweisungen in dieser Bedienung
sanleitung
erden Sie Ihren Grill über viele Jahre genießen können. Falls Sie aus irgendeinem Grund nicht mit unserem Produkt zufrie
en, wenden Sie sich bie an unseren Kundendienst unter der Telefonnummer +1-866-820-8686 zwischen 9 Uhr
änkte President-Garane auf Lebenszeit von Napoleon-Gasgrills
ung
onen
den
NAPOLEON g
Material- und Verarbeitungsmängeln ist, solange der Grill sich in seinem Besitz befindet. Diese Garantie
umfasst Aluminiumgussteile (ausschließlich Lackierung), Edelstahlbedienleiste (unbe druckt), und
Edelstahlbrenner unter den folgenden Bedingungen: In den ersten fünf (5) Jahren ab Kaufdatum ersetzt
NAPOLEON nach seinem Ermessen defekte Teile kostenlos. Ab dem sechsten bis zum zehnten Jahr ab
Kaufdatum ersetzt NAPOLEON defekte Teile gegen Zahlung von 50 % des aktuellen Verkaufspreises.
Die Garantie umfasst Hauben und Grilleinsätze aus Edelstahl oder Porzellan sowie Haubengriffe für 5 Jahre
unter den folgenden Bedingungen: In den ersten drei (3) Jahren ab Kaufdatum ersetzt NAPOLEON nach
seinem Ermessen defekte Teile kostenlos. Im vierten und fünften Jahr ab Kaufdatum ersetzt NAPOLEON
defekte Teile gegen Zahlung von 50 % des aktuellen Verkaufspreises.
Diese beschränkte Garantie umfasst alle anderen Komponenten einschließlich Edelstahl- oder
Porzellan-Flammenschutzeinsätze, Grillroste aus Edelstahl oder Gusseisen, Ventile, Zündsystem,
Thermometer, Bedienelemente, Druckregler, Lenkrollen, Warmhalteroste, Schlä uche und Anschlüsse,
Befestigungselemente und Zubehörteile und im ersten Jahr ab Kaufdatum den kostenlosen Ersatz defekter
Teile durch NAPOLEON.
Transportkosten, Arbeitskosten oder Exportzölle werden von NAPOLEON nicht erstattet.
Bedingung
N
sind. Dabei gelten folgende Bedingungen und Beschränkungen:
Die Herstellergarane ist nicht übertragbar und kann auf keinen Fall von einem unserer Vertreter verlängert werden.
Der Gasgrill muss v
so
Diese beschr
Missbrauch oder Vernachlässigung entstehen. Der Einbau von Ersatzteilen anderer Hersteller macht diese Garane null und nichg.
Weiterhin deckt diese beschränkte Garane Folgendes nicht ab: Kratzer, Beulen, Lackschäden, Korrosion oder Verfärbung durch Hitze oder scheuernde oder
chemische Reinigungsmiel, abgestoßene Porzellanemaille sowie Teile, die bei der Installaon des Gasgrill benutzt werden.
Sollte ein Teil in der Garanezeit soweit beeinträchgt werden, dass es seine Funkon nicht mehr erfüllt, wird ein Ersatzteil zur Verfügung gestellt.
Nur im ersten Jahr erstreckt sich diese Garane auf den Ersatz der garanerten Teile, wenn diese trotz Bedienung gemäß Bedienungsanleitung und unter
normalen Bedingungen Material- oder Verarbeitungsfehler aufweisen.
N
entledigen, indem sie dem Erstkäufer den Großhandelspreis eines defekten Garaneteils erstaen.
NAPOLEON ist nicht verantwortlich für Installaons-, Arbeits- oder sonsge Kosten oder Auslagen, die in Verbindung mit der Installaon eines Garaneteils
anfallen; solche Kosten sind nicht von dieser Garane gedeckt.
Ungeachtet der Besmmungen in dieser beschränkten President-Lebenszeitgarane beschränkt sich NAPOLEONs Verantwortung auf das Obige und deckt
auf keinen Fall etwaige Neben-, Folge- oder indirekte Schäden.
In diesen Garanebesmmungen werden NAPOLEONs Verpichtung und Haung bezüglich NAPOLEON-Gasgrills deniert. Sonsge ausdrücklichen oder
angenommenen Gewährleistungen bezüglich dieses Produkts, seiner Bauteile und seines Zubehörs sind ausgeschlossen.
Im Zusammenhang mit dem Verkauf dieses Produkts übernimmt NAPOLEON keine weiteren Verpichtungen und autorisiert auch Drie nicht dazu, in ihrem
Namen weitere Verpichtungen zu übernehmen. NAPOLEON ist nicht verantwortlich für Überbrennen, Ausblasen durch äußere Einüsse wie starke Winde,
unzureichende Belüung usw.
Für Beschädigungen des Gasgrills durch Weereinüsse, Hagel, schlechte Behandlung und schädliche Chemikalien oder Reinigungsmiel ist NAPOLEON
nicht verantwortlich.
Im Garanefall ist der Kaueleg oder eine Kopie davon zusammen mit der Serien- und der Modellnummer vorzulegen.
N
Die T
www.napoleongrills.com
arantiert dem Erstkäufer dieses NAPOLEON-Gasgrills, dass der Gasgrill für 10 Jahre frei von
en Und Beschränkungen
ur dem Erstkäufer und der das Gerät von einem NAPOLEON-Vertragshändler gekau hat, garanert NAPOLEON, dass ihre Produkte frei von Verarbei
on einem hierfür lizenzierten und autorisierten Techniker installiert werden. Die Installaon hat gemäß der mitgelieferten Installaon
wie der gesetzlichen Bau- und Brandschutzvorschrien zu erfolgen.
änkte Garane deckt keine Schäden, die durch unsachgemäße Bedienung, mangelhae Wartung, Febrände, Umwelteinüsse, Unfälle, Modikaonen,
ach dem ersten Jahr kann sich NAPOLEON gemäß dieser beschränkten President-Lebenszeitgarane nach eigenem Ermessen sämtlicher Garaneverpich
APOLEON behält sich im Fall eines Garaneanspruchs das Recht vor, das Produkt oder ein Teil des Produkts von einem Firmenvertreter inspizieren zu lassen.
ransport- und Arbeitskosten sowie etwaige Exportzölle trägt NAPOLEON nicht.
fehlern
tungs
sanleitung
tung
en

35
CHTUNG!
A
Ein Nich
tbefolgen dieser Anleitung kann durch Brände oder Explosionen zu Sachschäden
und Körperverletzungen, auch zu tödlichen, führen.
V
orsichtsmassnahmen
• Bei de
• Vor dem ersten Gebrauch des Grasgrills die gesamte Anleitung lesen.
• Auf keinen Fall darf dieser Gasgrill modiziert werden.
• Grill stets genau nach Anleitung zünden.
• Wenn der Gasgrill nicht benutzt wird, muss die Gaszufuhr an der Gasasche oder die Erdgaszuleitung abgesperrt
• Kinder und Hausere vom heißen Grill fernhalten, Kinder NICHT in den Unterschrank kleern lassen.
• Kinder vom Grill fernhalten oder beaufsichgen - dieses Gerät ist kein Spielzeug!
• Dieses Ger
• Den Grill niemals unbeaufsichgt lassen, wenn er in Betrieb ist.
• Den Grill nicht bewegen, solange er heiß oder in Betrieb ist.
• Dieser Grill ist nur für den Privatgebrauch besmmt.
• Dieser Gasgrill ist nicht zum Einbau in Wohnwagen/Wohnmobilen und/oder Booten vorgesehen.
• Diesen Gasgrill nur im Fr
• Ausr
• Stellen Sie sicher, dass die Lüungslöcher des Zylinders stets frei von Schmutz und Ablagerungen sind.
• Gerät niemals unter einer ungeschützten brennbaren baulichen Struktur aufstellen.
• Gerät nur an einem windgeschützten Ort aufstellen. Die Kochleistung des Gasgrills wird durch starke Windeinwirkung-
• Falls der Gasgrill im Innenbereich gelagert wird, muss die Propangasasche vom Grill enernt und im Freien an
• V
• Ersatz-Propangasaschen niemals unter oder in der Nähe des Grills auewahren.
• Die Gasasche niemals mehr bis als 80 % füllen.
• Versuchen Sie nicht, eine Gasasche zu verwenden, die nicht mit einer Verbindung vom Typ QCC1 ausgestaet ist.
• Vor der ersten Inbetriebnahme alle Anschlüsse auf Gaslecks prüfen, auch wenn der Grill vollständig monert geliefert
• Niemals ein für den Gebrauch mit üssigem Propangas ausgelegtes Gerät mit Erdgas betreiben.
• Niemals üssige Grillanzünder zum Anzünden eines Gasgrills verwenden.
• Holzkohlenbrikes nur mit einer für dieses Gerät vorgesehenen Napoleon-Holzkohlenwanne verwenden.
• Vor Önen der Gaszufuhr kontrollieren, dass die Brenner-Bedienelemente auf der Posion „OFF” (Aus) stehen.
• Brenner Niemals bei geschlossener Grillhaube zünden.
• Rückseigen Brenner nicht verwenden, wenn der Hauptbrenner in Betrieb ist.
• Grillhaube während der Vorwärmzeit geschlossen halten.
• Den Schlauch nich
• F
• V
• Korrekte Posion der Glühplaen kontrollieren. Folgen Sie hierzu den Installaonsanweisungen für die Glühplaen.
• Die Seit
• Gasleitung von allen Oberächen fernhalten, die heiß werden können.
• Elektrische Kabel von Wasser oder heißen Oberächen fernhalten.
• V
• Die R
• Der Außen-Gasgrill und das en
• Der Gasgrill fü
r Montage dieses Gasgrills müssen die Anweisungen im Handbuch genau befolgt werden. Falls der Grill vollstän
mon
ert auewahrt wurde, müssen die Montageanweisungen erneut überprü und die erforderlichen Prüfungen
auf Gaslecks durchgeführt werden, bevor der Grill in Betrieb genommen wird.
werden.
oder p
Auf
geschlossenen Bereich/Raum benutzen.
Zusätzlicher Abstand (610 mm) ist empfehlenswert, wenn das Gerät in der Nähe von Vinyl-Verkleidungen oder großen
Fensterscheiben aufgestellt wird.
beeinträchgt.
einergut belüeten Stelle auewahrt werden. Propangasaschen dürfen nicht in Gebäuden, Garagen oder anderen
geschlossenen Räumen gelagert werden.
or jeder Benutzung muss der Gasschlauch untersucht werden. Wenn der Schlauch stark abgerieben oder eingeschnien
ist, muss er vor Benutzung des Gasgrills mit einem vom Hersteller empfohlenen Schlauch ersetzt werden.
wurde. Führen Sie diesen Test jährlich oder nach dem Austausch einer Gaskomponente aus.
Geräteboden einhalten.
e-Auangbehälter und Glühplaen regelmäßig reinigen, um Feansammlungen zu vermeiden, die zu
Febrändenführen können.
or dem Anzünden des hinteren Brenners den Warmhalterost enernen. Der Warmhalterost kann durch die extreme
Hitze beschädigt werden.
verwenden.
enturirohrdüsen der Infrarotbrenner periodisch auf Spinnweben und Verstopfungen durch andere Objekte überprüfen.
Gassystem aus Gasdrücke von über 0,5 psi (3,5 kPa) geprü wird.
Verbindungsrohren getrennt werden, wenn das Gassystem aus Gasdrücke von über 0,5 psi (3,5 kPa) geprü wird.
ät ist für den Gebrauch durch Personen (einschließlich Kindern) mit eingeschränkten physischen, sen
sychischen Fähigkeiten bzw. ohne jegliche Erfahrung oder Vorwissen nur dann geeignet, wenn eine angemes
sicht oder ausführliche Anleitung zur Benutzung des Geräts durch eine verantwortliche Person sichergestellt ist.
eien an einer gut belüeten Stelle lagern. Niemals in einem Gebäude, einer Garage odereinem
eichenden Abstand zu brennbaren Materialien einhalten (410 mm zur Geräterückseite, 180 mm zu den Seitenteilen).
t unter der Auangschale durchführen – stets ausreichenden Abstand des Schlauches zum
enablagen nicht für die Auewahrung von Feuerzeugen, Streichhölzern oder anderen brennbaren Materialien
ohrdüsen vollständig reinigen, um alle Verstopfungen zu enernen.
tsprechende Sperrvenl müssen von Gaszufuhrsystem getrennt werden, wenn das
r den Gebrauch im Freien und das entsprechende Sperrvenl müssen vom Gaszufuhr und den
ww.napoleongrills.com
w
dig
sorischen
sene

36
E
ntsorgung von Altgeräten aus privaten Haushalten in der EU
Dieses S
zusammen mit dem Restmüll entsorgt werden darf. Die separate Sammlung und das Recyceln Ihrer alten
Elektrogeräte zum Zeitpunkt ihrer Entsorgung trägt zum Schutz der Umwelt bei und gewährleistet, dass sie
auf eine Art und Weise recycelt werden, die keine Gefährdung für die Gesundheit des Menschen und der
Umwelt darstellt. Es obliegt daher Ihrer Verantwortung, das Gerät an einer entsprechenden Rücknahmestelle
für die Entsorgung oder Wiederverwertung von Elektro- oder Elektronik-Altgeräten aller Art abzugeben oder
wenden Sie sich an den Händler, von dem das Produkt erworben wurde. Gemäß den lokalen Besmmungen
gewährleisten diese Stellen, dass das Gerät auf eine Art und Weise recycelt wird, die keine Gefährdung für
die Umwelt darstellt.
ymbol auf dem Produkt oder dessen Verpackung gibt an, dass das Produkt innerhalb der EU nicht
Gas
Es dürfen nur Gasaschen benutzt werden, die die einschlägigen gesetzlichen Besmmungen erfüllen. Die
Mindeslaschengröße bei Butan ist 13 kg, bei Propan 6 kg. Die Flasche muss eine für den Betrieb
aus
• Das Venl der Gasasche ist vorsichg zu behandeln.
• Eine Flasche, die die gesetzlichen Besmmungen nicht erfüllt, darf nicht angeschlossen werden.
Eine mehr als 7 kg (maximale Größe 465mm hoch durch ausgedehnte 306mm) fassende Flasche muss außer
der Einfassung (unter der rechten Seitenablage) auf ebenem Boden stehen. Kleinere Flaschen können
in
in der Einfassung oder nahe am Gerät stehen. Reserveaschen dürfen nicht in der Nähe eines betriebenen
Geräts gelagert werden. Gasaschen dürfen weder großer Hitze noch dem direkten Sonnenlicht ausgesetzt
werden.
A
der Schlauch heiße Flächen berührt, kann er schmelzen und undicht werden und einen Brand verursachen.
FLASCHENANSCHLUSS: Es ist sicherzustellen, dass der Gasreglerschlauch knickfrei ist. Kappe oder Stöpsel
vom Flaschenvenl enernen. Regler an das Flaschenvenl anschließen. Vor der Benutzung des Grills alle
Verbindungen auf Leckagen überprüfen. Ein Leckagetest muss jährlich, nach jedem Anschließen einer Flasche
und nach Auswechseln eines Gasbauteils durchgeführt werden..
A
aschen
reichende Gasmenge liefern können. Im Zweifelsfall wird der Gaslieferant mit Informaonen helfen.
nerhalb der Einfassung in der Aussparung im unteren Regal stehen. Nur angeschlossene Gasaschen dürfen
CHTUNG!
CHTUNG!
Der Schlauch muss den vorgeschriebenen Abstand zum Boden des Geräts haben. Wenn
halb
www.napoleongrills.com
• Schlauch nich
• Schlauch nicht im Zwischenraum zwischen dem unteren Regal und der hinteren Abdeckung verlegen.
• Schlauch nicht über die Oberseite der hinteren Abdeckung verlegen.
• Alle Schlauchanschlü
Dichtungski für die Rohrverbindungen verwenden.
• Den Schlauch v
• Ersatzschläuche nicht im Unterschrank des Grills auewahren, da hier größere Gefahr besteht, dass der
Schlauch mit einer heißen Oberäche in Kontakt kommen, schmelzen und zu einem Gasleck und Bränden
führen kann.
• Alle Verbindungen mit Seifenlauge auf Gaslecks überprüfen. Folgen Sie den Anweisungen für die Suche
nach Gaslecks in diesem Handbuch.
t unterhalb der Auangschale verlegen.
sse mit zwei Rohrschlüsseln fest anziehen. Kein Teon-Abdichtungsband oder
on heißen Oberächen fernhalten. Schmelzen des Schlauchs kann zu Bränden führen.

Gasschlauch
37
• Gehör
en Schlauch und Regler nicht zum Lieferumfang, dürfen nur solche Schläuche und Regler verwendet
werden, die die einschlägigen gesetzlichen Besmmungen erfüllen.
• Gerät nicht an eine permanente Gasversorgung anschließen.
• Der Schlauch darf nich
t mit Fe oder sonsgen heißen Flüssigkeiten oder Bauteilen des Geräts in Berührung
kommen.
• Schlauch r
egelmäßig überprüfen. Ein Schlauch, der Risse oder Schmelzstellen aufweist oder abgenutzt ist,
muss vor der nächsten Benutzung des Geräts ersetzt werden.
• Es wird eine Schlauchlänge von 0,5 m empfohlen. Der Schlauch darf nicht länger als 1,5 m sein.
• Beim Anschließen ist darauf zu achten, dass der Schlauch knickfrei und nicht verdreht ist.
• Der Schlauch ist vor dem aufgedruckten Ablaufdatum auszuwechseln.
egler
R
olgenden Tabelle sind die Anschlusswerte des Geräts aufgeführt.
In der f
Brenner Düsengrösse (Grob)Leistung
(Insgesamt)
Haupt
Seite
1.07mm (#58) 12.0 kw 870 g/hr
0.82mm 2.4 kw 174 g/hr
Gasverbrauch
(Insgesamt)
Zugelassene Gase / Druck - Die Werte Ihres Geräts stehen auf dem Typenschild.
ategorie
I
3B/P(30)
an 30mbar
Propane 30mbar
EE, FI, FR, GB,
HR, HU, IS, IT,
LT, LU, MT, NL,
NO, RO, SE, SI,
SK, TR
Gask
Gasdruck But
Länder BE, BG, CY, DK,
I
3+(28-30/37)I3B/P(37)
Butan 28-30mbar
Propane 37mbar
BE, CH, CY, CZ,
ES, FR, GB, GR, IE,
IT, LT, LU, LV, PT,
SK, SI
Butan 37mbar
Propane 37mbar
PL AT, CH, DE, SK
I
3B/P(50)
Butan 50mbar
Propane 50mbar
ehmen Sie keinerlei Änderungen am Druckregler vor. Nur Druckregler verwenden, die den in der
N
vorste
henden T
abelle angegebenen Druck bereitstellen. Für Butangas nur 28-30 mbar-Druckregler verwenden
oder für Propangas 37 mbar-Druckregler. Der Grill ist mit einem internen Druckregler ausgestaet. Der interne
egler hat einen Auslassdruck von 24,5 mbar für Propan-/Butangas und erford
Druckr
Anpassung. Er
Anleitung Für Die Leck
CHTUNG!
A
setzen Sie den Druckregler nur mit vom Hersteller vorgegebenen
ageprüfung
Ein Leckagetest muss vor der ersten Benutzung, jährlich und nach Auswechseln oder
ert
keine Modizierung oder
modellen.
Warten eines Gasbauteils durchgeführt werden.
ACHTUNG! Während der Prüfung ist Rauchen verboten. Alle Zündquellen sind zu enernen.
Leckageprüfung: Ein Leckagetest muss vor der ersten Benutzung, jährlich und nach Auswechseln oder Warten
eines Gasbauteils durchgeführt werden. Während der Prüfung ist Rauchen verboten. Alle Zündquellen sind zu
enernen. Die zu prüfenden Stellen sind auf der Leckageprüfzeichnung aufgeführt.
Alle Brenner abstellen. Flaschenvenl aufdrehen.
Seifenwasser (halb Wasser, halb Flüssigseife) auf alle Anschlüsse und Verbindungen an Regler, Schlauch,
Verteiler und Venle auragen.
Leckagen werden durch Blasenbildung angezeigt. Leckage durch Festdrehen des Anschlusses oder Austausch
des Teils durch ein vom Händler empfohlenes Teil beseigen.
Bleibt die Leckage bestehen, Flaschenvenl zudrehen, Regler abnehmen und Grill vom Gaslieferanten oder
Händler untersuchen lassen. Das Gerät darf erst wieder benutzt werden, wenn die Leckage behoben ist.
Gaszufuhr abstellen.
ww.napoleongrills.com
w

38
Zündanleitung
Seiten Brenner
Link
A
CHTUNG!
CHTUNG!
A
er
Brenner
Milerer
Haube önen.
St
ellen Sie sicher, dass alle Brenner-Bedienelemente auf „OFF” (Aus)
Brenner
gestellt sind, und önen Sie das Gasvenl an der Gasquelle.
Anzünden des Haup
1. Haube önen
2. Beliebiges Hauptbrenner-
Bedienelement drücken und langsam
auf Stufe „HI” (Hohe Flamme) drehen.
Hierdurch wird die Pilolamme
gezündet, welche wiederum den
ausgewählten Brenner entzündet.
Nach Zünden der Pilolamme das
Bedienelement weiterhin gedrückt
halten, bis der Brenner entzündet ist.
Lassen Sie das Bedienelement los,
wenn das Gas brennt.
3. Wenn der Pilot nicht zündet, das
Bedienelement SOFORT wieder auf
„OFF” (Aus) stellen und Schri 1
mehrmals wiederholen..
tbrenners
Anzünden der Seitenbrenner
1. Haube des Seit
2. Seitenbrenner-Bedienelement drücken
und langsam auf Stufe „HI” (Hohe Flamme)
3. Zündknopf drücken und gedrückt halten,
bis Brenner zündet; oder mit Streichholz
Rechter Brenner
(Falls vorhanden)
enbrenners önen.
drehen.
anzünden
Ausschalts
tellung
4. Falls Pilot und Brenner nicht
innerhalb von 5 SEKUNDEN zünden,
das Bedienelement auf „OFF” stellen
und 5 Minuten warten, damit sich
unverbranntes Gas verüchgen
kann. Danach die Schrie 1 und 2
wiederholen oder den Brenner mit
einem Streichholz entzünden.
CHTUNG!
A
Der hintere Brenner darf nicht zusammen mit dem Hauptbrenner benutzt
werden.
A
CHTUNG!
Streichholz in den
F
alls der Grill mit einem Streichholz angezündet wird, klemmen Sie das
mitg
elieferten Streichholzhalter ein. Das brennende Streichholz nach
unten halten, durch den Grill und die Glühplae führen und dabei das entsprechende
Brennervenl auf hohe Flamme drehen.
www.napoleongrills.com
4. Falls der Brenner nicht innerhalb von 5
SEKUNDEN zündet, das Bedienelement auf
„OFF” stellen und 5 Minuten warten, damit
sich unverbranntes Gas verüchgen kann.
Danach die Schrie 2 und 3 wiederholen
oder den Brenner mit einem Streichholz
entzünden.

:
Be
trieb Des Grillgeräts
Beim alle
der Innenlack
später nicht mehr auf. Vor der ersten Benutzung sollten Sie darum die Hauptbrenner etwa eine halbe Stunde
mit größter Hitze brennen lassen. Vor dem Grillen von
Schweineeisch ist es am besten, die Roste vor dem V
Grillen von sehr fettem Fleisch kann es zum Aufammen kommen. Um Aufammen zu verhindern, können Sie
Fett abschneiden oder mit niedrigerer Temperatur grillen. Wenn es zum Aufammen kommt, legen Sie das
Fleisch von der Flamme weg zur Seite und stellen die Temperatur herunter. Lassen Sie die Haube offen. Eine
detaillierte Anleitung nden Sie in Napoleons Grill-Kochbuch.
Grillen Mit Den Haup
Dafür werden alle Hauptbrenner auf die höchste Stufe gestellt und die Haube geschlossen. Kurz zu grillende
N
ahrungsmiel wie Fisch und Gemüse können bei oener Haube gegrillt werden. Beim Grillen bei geschlos
Haube is
gegrillt wird. Benögt ein Grillgut länger als 30 Minuten, wie z. B. ein Braten, so kann es indirekt gekocht
w
oder mageres Schweineeisch ist es am besten, die Roste vor dem Vorwärmen zu ölen, damit das Fleisch
nicht anklebt. Beim Grillen von sehr feem Fleisch kann es zum Auammen kommen. Um Auammen zu
verhindern, können Sie Fe abschneiden oder mit niedrigerer Temperatur grillen. Wenn es zum Auammen
kommt, legen Sie das Fleisch von der Flamme weg zur Seite und stellen die Temperatur herunter. Lassen Sie die
Haube oen. Eine detaillierte Anleitung nden Sie in Napoleons Grill-Kochbuch.
Direktes Garen: Grillgut direkt über der Wärmequelle auf den Grill legen. Diese Methode wird üblicherweise
zum Braten von Speisen verwendet, die keine langen Kochzeiten erfordern - Hamburger, Steaks, Geügel
Gemüse usw. Das Grillgut wird zunächst scharf angebraten, um Säe und Aromen im Grillgut „einzusiegeln”.
Anschließend wird die Temperatur verringert, um das Gericht punktgenau ferg zu garen.
Indirektes Garen: Hierbei kann nur einer oder auch mehrere Brenner verwendet werden. Grillgut über
einem nicht gezündeten Brenner auf den Grill legen. Die Wärme zirkuliert um das Grillgut und sorgt so für
langsames
übli
aber auch für die Zubereitung von Grillgut, das leicht zum Auammen führen kann. Aufgrund der niedrigeren
Temperaturen und längeren Kochzeiten ist dies die zuverlässigste Garmethode zum Grillen zarter und saiger
Fleischstücke..
Verwendung Des Rückseigen Brenners: (Falls vorhanden) Warmhalterost vor dem Betrieb enernen. Grill
sollten ebenfalls enernt werden, falls sie die Verwendung des Drehspießes behindern. Der rückseige
Brenner ist für den Einsatz mit dem Drehspieß-Set konzipiert, dass über Ihren Napoleon-Händler bezogen
werden kann. Siehe Anweisungen für die Montage des Drehspieß-Sets. Zur Verwendung des Gegengewichts
den Drehspießmotor vom Gasgrill enernen. Den Spieß mit dem Grillgut in die beiden Einhängevorrichtungen
an der Innenseite des Grills einlegen. Das Fleischstück wird naturgemäß mit der schwereren Seite nach unten
hängen. Arm und Gewicht des Gegengewichts anziehen, bis der Arm nach oben zeigt. Das Gegengewicht nach
innen oder außen verschieben, bis das Gewicht auf dem Spieß gleichmäßig verteilt ist und dann festdrehen.
Den Motor wieder aufsetzen und mit dem Grillen beginnen. Einen Auangbehälter unter dem Grillgut platz
Der aufgefangene Bratensa kann zum Bepinseln des Fleisches oder zur Herstellung einer köstlichen Soße
verwendet werden. Falls nög, zusätzliche Flüssigkeit zum Übergießen oder Bepinseln zufügen. Rückseigen
Brenner zunächst auf hoher Flamme betreiben, bis das Fleisch angebräunt ist und dann die Flamme reduz
um das Fleisch ferg zu garen. Auf diese Art wird das Grillgut versiegelt und das Fleisch bleibt zart und saig.
Die Grillhaube stets geschlossen halten, um ein opmales Kochergebnis zu erzielen. Braten und Geügel er
eine knusprigbraune Kruste und das Fleisch bleibt zart und saig. Beispielsweise benögt ein Brathuhn mit
einem Gewicht von 1,5 kg mit dem Drehspieß ca. 1½ Stunden (bei milerer bis hoher Flamme). Weitere
An
rersten Erhitzen gibt der Gasgrill einen leichten Geruch ab. Der Geruch wird durch das „Einbren
e und Verdunsten der Schmiermiel aus der Fergung verursacht, ist ganz normal und tri
magerem Fleisch wie Hähnchenbrust oder mageres
orwärmen zu ölen, damit das Fleisch nicht anklebt. Beim
tbrennern: Vor dem Anbraten von Grillgut wird 10 Minuten Vorwärmen empfohlen.
t die Temperatur gleichmäßiger und höher, sodass die Grillzeit kürzer ist und das Fleisch gleichmäßiger
erden (Braten neben den gezündeten Brenner stellen). Vor dem Grillen von magerem Fleisch wie Hähnchen
und gleichmäßiges Garen. Diese Kochmethode ist vergleichbar mit dem Garen im Backofen und wird
cherweise für größere Fleischstücke wie Braten, ganze Hähnchen oder Pute verwendet. Sie eignet sich
weisungen nden Sie im Napoleon-Grillkochbuch mit exklusiven Rezepten für alle Gelegenheiten.
nen”
sener
brus
stücke,
roste
ieren.
ieren,
halten
t
39
V
ORSICHT!
einzelner Bauteile führen, wenn keine regelmäßige Reinigung durchgeführt wird.
erwendung der Seitenbrenneramme: Der Seitenbrenner kann wie ein normales Gaskochfeld verwendet
V
werden und eignet sich zur Zubereitung von Soßen, Suppen usw. Der Gasgrill sollte so posioniert werden,
dass de
beeinträchgen können. Seitenbrenner NICHT zum Frieren verwenden, da das Kochen mit Öl zu gefährlichen
Bedingungen führen kann. Der empfohlene Durchmesser für Pfannen und Töpfe ist 60 bis 220 mm.
r Seitenbrenner möglichst windgeschützt ist, da starke Winde die Leistung des Seitenbrenners
A
CHTUNG!
mit Töpfen und Pfannen vorgesehen.
Barbecuesoße und Salz kann korrosiv wirken und schnell zur Korrosion des Grills und
Niemals Speisen dir
ekt auf den Seitenbrennerring auegen und grillen. Er ist nur zur Verwendung
ww.napoleongrills.com
w

40
ACHTUNG! Seit
A
CHTUNG!
Bedingungen führen kann.
artung, Pege Und Reinigung
W
Es wir
d empfohlen, diesen Gasgrill einmal im Jahr von einer Fachkra inspizieren und warten zu lassen.
enbrenner nicht schließen, solange der Grill in Betrieb oder noch heiß ist.
Seit
enbrenner NICHT zum Frieren verwenden, da das Kochen mit Öl zu gefährlichen
www.napoleongrills.com
ORSICHT!
V
werden.
ORSICHT!
V
berühren. Grill an einen Ort stellen, wo das Reinigungsmiel keinen Schaden anrichten kann (nicht auf die
Terrasse oder den Rasen). Kein Teil dieses Gasgrills darf mit Ofenreiniger gesäubert werden. Grillroste oder
andere Teile des Gasgrills nicht in einem selbstreinigenden Ofen säubern. Gasgrill regelmäßig reinigen, da
Barbecue-Sauce und Salz das Metall angreifen.
Hin
weis: In chlorid- und suldhalgen Umgebungen kann auch rosreier Stahl oxidieren oder Flecken
aufweisen. Dazu gehören insbesondere Küstenregionen und andere extreme Bedingungen, z. B. die nähere
Umgebung von Pools und Whirlpools, die von hoher Wärme und Lufeuchgkeit gekennzeichnet ist. Diese
Flecken werden manchmal mit Rost verwechselt, aber sie können einfach enernt und vermieden werden.
Reiben Sie alle rosreien Stahlächen alle 3 bis 4 Wochen mit Leitungswasser und einem Reinigungsmiel für
rosreien Stahl ab, um die Entstehung von Flecken zu verhindern.
ORSICHT!
V
vor dem Warten abkühlen lassen, damit es nicht zu Verbrennungen kommt. Jährlich und nach Auswechseln
eines Gasbauteils eine Leckageprüfung durchführen.
Grill- und W
reinigen. Verwenden Sie eine Grillbürste mit Messingborsten. Zur Enernung von hartnäckigen Flecken kann
St
ahlwolle verwendet werden. Aufgrund der hohen Temperaturen auf der Kochäche kommt es bei regelmäßigem,
normalem Gebrauch zu einer dauerhaen Verfärbung der Edelstahlroste (falls vorhanden).
Grillroste aus Gusseisen: Die Grillroste aus Gusseisen, mit denen Ihr neuer Grill standardmäßig ausgeliefert
wird, gewährleisten überdurchschniliche Speicherung und Verteilung von Wärme. Durch regelmäßige Pege
der Grillroste mit Öl bildet sich eine Schutzschicht, die den Grillrost besser vor Korrosion schützt und auch dessen
Anha-Eigenschaen noch weiter verbessert.
V
or der ersten Verwendung: Die Grillroste per Hand mit einem milden Spülmiel und Wasser reinigen, um
jegliche herstellungsbedingte Rückstände zu enernen. (Niemals in die Spülmaschine!) Sorgfälg mit heißem
Wasser abspülen und mit einem weichen Tuch vollständig abtrocknen. Dies ist wichg, um das Eindringen von
Feuchgkeit in das Gusseisen zu verhindern.
Einbr
ennen: Verwenden Sie ein weiches Tuch, um die gesamte Fläche des Grillrostes mit Panzenfe einzureiben.
Stellen Sie sicher, dass auch alle Aussparungen und Ecken mit einer Ölschicht bedeckt sind. Verwenden Sie
keine salzhalgen Fee, wie beispielsweise Buer oder Margarine. Heizen Sie den Grill 15 Minuten vor, und
platzieren Sie dann die mit Öl eingeriebenen Grillroste auf dem Grillgerät. Schließen Sie die Grillhaube, und
drehen Sie das Bedienelement auf milere Stufe. Lassen Sie die Grillroste für ca. eine halbe Stunde bei dieser
Temperatur auf dem Grill „einbrennen”. Stellen Sie dann alle Brenner auf „OFF” (Aus), und stellen Sie die
Gaszufuhr ab. Lassen Sie die Grillroste auf dem Grillgerät vollständig abkühlen. Während der Grillsaison sollte
dieser Vorgang mehrere Male wiederholt werden, um die Grillroste gut einzubrennen. Es ist jedoch nicht nög,
diesen Vorgang bei jedem Gebrauch zu wiederholen (Tipps zur täglichen Pege vor dem Grillen nden Sie
untenstehend).
V
or dem Grillen: Reiben Sie die Oberäche des Grillrostes vor dem Vorwärmen und Reinigen mit einer Mess
v
ollständig mit Panzenfe ein. Den Grill vorwärmen und alle Grillrückstände mit der Grillbürste (Messingborsten)
enernen.
Grillroste aus Edelstahl: (Upgrade-Kit zur Nachrüstung erhältlich – siehe Ersatzteilliste). Grillroste aus Edelstahl
sind von großer Lebensdauer und rostbeständig. Sie erfordern weniger Vorbehandlung und Pege als Grillroste
aus Gusse
ausreichend sein kann, die Grillroste nur vorzuwärmen und mit einer Drahtbürste zu reinigen.
edienleiste: Die Bedienleistenbeschriung wird direkt auf die Edelstahloberäche gedruckt und bei
B
sachgerechter Pege bleibt der Aufdruck dunkel und lesbar. Zur Reinigung der Bedienleiste warme Seifenlauge
oder Connental-Edelstahlreiniger verwenden. Connental-Edelstahlreiniger ist bei Ihrem Napoleon-Händler
erhältlich. Keine scheuernden Reinigungsmiel zur Reinigung von Edelstahlächen verwenden. Dies kann vor
allem auf der Bedienleiste zum Abrieb der aufgedruckten Beschriung führen.
Beim reinigungsanleitung sollten Arbeitshandschuhe und eine Schutzbrille getragen
Zum Reinigen müssen die Brenner ausgeschaltet sein. Heiße Flächen nicht ungeschützt
Gas
zufuhr vor den Wartungsarbeiten abstellen und Gerät von der Gaszufuhr trennen. Grill
armhalteroste: Grillroste und Warmhalterost sind am leichtesten während der Vorwärmphase zu
ing-Grillbür
isen. Sie sollten die obenstehenden Hinweisen zur täglichen Pege befolgen, obwohl es u. U.
ste

Das Inner
eichen Messingdrahtbürste von losem Schmutz befreien. Anbratplaen mit einem Spachtel oder Schaber
w
abkratzen, und die Asche mit einer Drahtbürste beseigen. Anbratplaen abnehmen, und die Brenner mit
ein
Anbratplaen wieder einsetzen und auf richge Posionierung achten (siehe Zusammenbauanleitung).
Lampen: Führen Sie die Spitze eines Schlitzschraubendrehers zwischen Leuchte und Fassung und bewegen Sie
diese leicht hin und her, um die Leuchte aus der Halterung zu entnehmen. Das Glas der Halogenlampe nicht
berühren! Durch Fingerabdrücke können Öle auf der Glasäche zurückbleiben und die Lebensdauer der Lampe
beeinträchgen. Tauchen Sie das Glas kurz in eine heiße Seifenlauge und reinigen Sie die Leuchte dann mit
einem Tuch und nicht scheuerndem Reinigungsmiel. Setzen Sie die Leuchte wieder in die Fassung ein. Die
Leuchte sollte einschnappen.
ropfpfanne : zum Reinigen herausziehen. Sie sollte nach vier- bis fünfmaligem Benutzen des Grills ausgeleert
T
erden. Das Fe läu durch die unter dem Gasgrill bendliche Tropfpfanne und sammelt sich in einer
w
Einweg-Feschale unterhalb der Tropfpfanne. Eine zu große Ansammlung von Fe stellt eine Feuergefahr dar.
Tropfpfanne nicht mit Alufolie oder Sand auskleiden, da das Fe am Durchießen gehindert wird. Pfanne mit
einem Spachtel oder Schaber auskratzen; Inhalt in die Einweg-Feschale fegen. Schale je nach Häugkeit der
Benutzung alle zwei bis vier Wochen auswechseln. Ersatzschalen gibt es beim Napoleon-Händler.
Reinigen Der Aussenseite Des Gasgrills: Lackierte, Porzellan- oder Rosreistahlteile nicht mit Scheuermieln
säubern. Die Porzellanemaille ist besonders vorsichg zu behandeln. Die Emaillebeschichtung ist wie Glas
und platzt beim Anschlagen leicht ab. Emaille-Reparaturmaterial ist von Ihrem Napoleon-Händler erhältlich.
Außenächen am besten in handwarmem Zustand mit warmem Seifenwasser reinigen. Rosreistahl mit einem
en
Struktur
sich unter Hitze goldfarben oder braun. Diese Verfärbung ist normal und beeinträchgt die Leistung des Grills
nicht.
e Des Gasgrills: Grillroste enernen. Gusseiserne Seiten und die Innenseite der Haube mit einer
er Messingdrahtbürste reinigen. Den Schmutz aus dem Inneren des Gasgrills in die Tropfpfanne fegen.
tsprechenden Reinigungsmiel oder einem nicht scheuernden Reinigungsmiel säubern. Stets in
tung wischen. Keine Stahlwolle verwenden, da sie Kratzspuren hinterlässt. Rosreistahl verfärbt
rich
41
V
ORSICHT!
dieser Defekte vorliegt,darf der Gasgrill nicht benutzt werden. Schlauch von Ihrem Napoleon-Händler oder
einem Fachbetrieb auswechseln lassen.
Brenner: sind aus dickwandigem Rosreistahl 304 hergestellt. Wegen der extremen Hitze und der Umweltein
treten trotzdem Korrosionen auf. Korrosion der Oberächen mit einer Messingdrahtbürste enernen. Verstope Auslässe mit einer geöneten Heklammer freimachen. Auslässe dabei nicht vergrößern.
Schlauch: auf Abrieb, Schmelz
stellen, Einschnie und Risse untersuchen. Wenn einer
üsse
VORSICHT! Passen Sie Von Den Spinnen Auf
Spinnen und Insekten werden von Propan- und Erdgasgeruch angelockt. Damit sie im Brenner keine Nester
bauen, ist der Lueinlass mit einem Insektengier versperrt, womit das Problem jedoch nicht 100%ig gelöst
ist. Ein Spinnennetz oder Nest verbrennt mit einer weichgelben oder orangefarbenen Flamme, oder es kommt
zu einem Feuer (Flammenrückschlag) an der Luzufuhr unter dem Bedienbre. Damit das Innere eines
Brenners gereinigt werden kann, muss er aus dem Gasgrill ausgebaut werden. Schraube in der Mie des
Brenners lösen. Brenner am hinteren Teil nach oben und herausheben. Innere des Brenners mit einer exi
Spezialbürste zum Reinigen von Venturirohren säubern. Den gelösten Schmutz durch den Gaseinlass aus
dem Brenner schüeln. Das Insektengier muss sauber, dicht und frei von Fusseln und sonsgem Schmutz
sein. Auch die Venldüsen müssen sauber sein. Es ist darauf zu achten, dass die Düsen beim Reinigen nicht
vergrößert werden. Brenner wieder einbauen. Beim Einbau muss die Düse in den Brenner geführt werden.
Brennerabdeckung aufsetzen und Befesgungsschrauben festschrauben.
W
ARNUNG!
unbedingt sicherstellen, dass das Venl/die Önung in das Brennerrohr führt,
bevor der Gasgrill angezündet wird. Wenn das Venl sich nicht innerhalb des
Brennerohrs bendet, kann es zu Brand oder Explosion kommen.
Bei der erneut
en Installaon des gereinigten Brenners
blen
Aluguss
Durch die hohen Temperaturen und die Umwelteinüsse kann es jedoch zu einem Oxidieren der Oberäche
kommen. Dies äußert sich als weiße Flecke auf dem Guss. Gussteile säubern und mit feinem Sandpapier
abschmirgeln. Schmirgelstaub abwischen, und Gussteile mit temperaturbeständiger Grillfarbe lackieren.
Benachbarte Teile abdecken, damit sie nicht mit Farbe besprüht werden. Gemäß Anweisung auf der Farbdose
trocknen lassen.
teile: regelmäßig mit warmem Seifenwasser säubern. Normalerweise rostet Aluminium nicht.
ww.napoleongrills.com
w

42
roubleshoong
T
Problem Possible Causes Soluon
w heat / Low ame
Lo
when valve turned to
high.
Bei Propangas – die
Anweisungen für das Anzünden
wurden nicht befolgt.
Die Anweisungen für das Anzünden genau befolgen. Alle
Gasgrillvenle müssen sich in der Stellung „OFF” (Aus)
benden, wenn das Venl für die Gaszufuhr geönet wird.
Die Gaszufuhr langsam önen, um Druckausgleich zu
ermöglichen. Siehe Anweisungen für das Anzünden.
Starkes Auammen,
ungleichmäßige Hitze.
Brenneramme gelblich,
und es riecht nach Gas.
Regler gibt ein
brummendes Geräusch
ab.
Flamme springt nicht auf
andere Brenner über.
Auf der Innenseite des
Deckels oder der Haube
scheint die „Farbe”
abzubläern.
Bei Erdgas – Leitung für die
Gaszufuhr zu klein.
Bei beiden Gasarten –
ungenügendes Vorheizen.
Falsches Vorwärmen.
Zu viel Fe und Asche auf
den Anbratplaen und in der
Tropfpfanne.
Spinnenweben oder
anderweige Verschmutzung.
Ist an heißen Tagen normal. Dies ist kein Defekt. Es wird durch Vibraonen im Regler
Löcher auf der Brennerrückseite
verstop.
Auf der Innenseite hat sich Fe
abgesetzt.
Rohrgröße muss den Installaonsvorschrien
entsprechen.
Beide Hauptbrenner einschalten und Grill auf hoher Stufe
10-15 Minuten vorheizen.
Grill mit beiden Hauptbrennern auf höchster Stufe 10-15
Minuten lang vorwärmen.
Anbratplaen und Tropfpfanne regelmäßig reinigen.
Tropfpfanne nicht mit Alufolie auslegen. Siehe
Reinigungsanleitung.
Brenner herausnehmen und gründlich reinigen. Siehe
allgemeine Wartungsanleitung.
erzeugt und beeinträchgt die Leistung und Sicherheit des
Grills nicht. Brummende Regler werden nicht ersetzt.
Gasaustrislöcher säubern. Siehe Wartungsanleitung,
Abschni Brenner.
Dies ist kein Defekt. Die Innenseite des Deckels oder der
Haube besteht aus einer Porzellanbeschichtung, die nicht
abbläern kann. Was abbläert, ist hart getrocknetes
Fe. Regelmäßiges Reinigen verhindert dies. Siehe
Reinigungsanleitung.
www.napoleongrills.com

EWAHREN SIE IHRE QUITTING ALS KAUFNACHWEIS AUF, UM IHREN GARANTIEANSPRUCH ZU VALIDIEREN.
B
BE
STELLUNG VON ERSATZTEILEN
43
GARANTIE
MODELL:
KAUFDATUM:
SERIENNUMMER:
(Alle für einen Garan
Bevor Sie sich mit dem Kundendienst in Verbindung setzen, besuchen Sie bie die NAC-Website unter
www.
napoleongrills.com,
und Ersatzteile zu erhalten. Setzen Sie sich direkt mit dem Werk in Verbindung, um Ersatzteile zu bestellen
und Garaneansprüche geltend zu machen. Unser Kundendienst ist zwischen 9 und 15 Uhr Eastern Standard
Time erreichbar. Telefonnummer: +1-866-820-8686, Faxnummer: +1-705-727-4282. Zur Bearbeitung eines
Garaneanspruchs bie die folgenden Informaonen bereithalten:
1. Modell- und Seriennummer des Geräts
2. Teilenummer und –beschreibung
3. Vollständige Beschreibung des Problems („kapu” ist nicht ausreichend)
-INFORMATIONEN
eanspruch benögten Informaonen hier aufzeichnen)
um ausführlichere Informaonen zu Reinigung, Wartung und Pege, Fehlerbe
hebung
4. Kaufnachweis (Fotokopie der Rechnung)
In manchen Fällen kann der Kundendienstbeauragte u. U. die Einsendung der Teile zur Überprüfung im Werk
verlangen, bevor Ersatzteile ausgeliefert werden. Die Teile müssen unter Vorauszahlung aller Transportkosten
und Angabe der folgenden Informaonen an den Kundendienst versandt werden:
1. Modell- und Seriennummer des Geräts
2. Vollständige Beschreibung des Problems („kapu” ist nicht ausreichend)
3. Kaufnachweis (Fotokopie der Rechnung)
4. Autorisierungscode für die Rücksendung. Diese erhalten Sie vom Kundendienstmitarbeiter.
Beachten Sie, dass die folgenden Teile nicht unter die Garane fallen, bevor Sie den Kundendienst kontakeren:
- Transportkosten, Courtage oder Exportzölle
- Arbeitskosten für Aus- und Einbau
- Telefonkosten für Anrufe zur Diagnose eines Problems
- Verfärbungen von Edelstahlteilen
- Teileversagen aufgrund von mangelnder Reinigung und Pege, oder Verwendung von falschen
Reinigungsmieln (Ofenreiniger)
ww.napoleongrills.com
w

44
CHTUNG!
A
eine Schutzbrille zu tragen. Wir unternehmen alle Anstrengungen, den Montageprozess so problemlos und
sicher wie möglich zu machen, doch bearbeitete Stahlteile haben üblicherweise scharfe Kanten und Ecken,
die zu Schniverletzungen führen können, wenn sie während der Montage unsachgemäß gehandhabt
werden.
E
rste Schrie
Wir emp
fehlen beim Entpacken des Geräts und bei der Montage Arbeitshandschuhe und
1. Alle P
2. Z
3. Den Grill
4. Die meis
5. Folgen Sie allen Anweisungen in diesem Handbuch in der angegebenen Reihenfolge.
6. Zwei Personen sind erforderlich, um den Grillaufsatz auf den monerten Wagen zu setzen.
Bei Fragen zur Montage oder zum Betrieb des Grills, oder bei beschädigten oder fehlenden Teilen, wenden
Sie sich an unseren Kundendienst unter +1-866-820-8686 zwischen 9 Uhr und 15 Uhr Eastern Standard Time.
E
rforderliche werkzeuge für die montage (werkzeuge nicht enthalten)
3/8“ and 5/8“
schr
oder ring-maulschlüssel
aneele für den Wagen, Hardware und Grilleinsatz aus dem Karton entnehmen. Haube önen und alle
darin verpackten Komponenten entnehmen. Anhand der Stückliste sicherstellen, dass alle nögen Teile
vorhanden sind.
erstören Sie die Verpackung nicht, bevor der Grill vollständig monert ist und zu Ihrer Zufriedenheit funkoniert.
an der Stelle moneren, wo er verwendet werden soll. Legen Sie Pappe oder ein Handtuch zurecht,
um während der Montage keine Teile zu verlegen oder zu beschädigen.
ten Edelstahlteile sind ab Werk mit einem schützenden Plasklm versehen, der vor Montage des
Grills abgezogen werden muss.
Hamer
auben
schlüssel
euzschlitzschrauben-
kr
dreher
Zangen
www.napoleongrills.com

5/8”(16mm)
45
1. Ins
6 x Z570-0027 (1/4-20 x 3/8”)
tallaon der Lenkrollen
Die (4) Lenkrollen am untersten Regalboden befestigen. Fest anziehen.
3/8”(10mm)
2. Ins
tallaon der linken und rechten Seitenpaneele des Wagens
Die Seitenp
untere
(6) 1/4-20 x 3/8 Zoll-Schrauben befestigen.
aneele des Wagens mit den Schlitzen nach oben installieren. Hierzu das Seitenpaneel auf den
n Regalboden aufsetzen und ausrichten, bis die vorgeboh rte n Löche r üb ereina nde r liegen. Mit se ch s
ww.napoleongrills.com
w

46
9 x N570-0042 (#10-24 x 3/8”)
3. Ins
tallaon des rückseigen Wagenpaneels
Rückseitiges Wagenpaneel zwischen den beiden Seitenpaneelen einpassen. Sicherstellen, dass sich die
großen Löcher wie abgebildet im rückseitigen Paneel unten befinden. Mit neun (9) Nr. 10-24 x
Schrauben befestigen, drei auf jeder Seite.
3/8-Zoll-
4 x N570-0042 (10-24 x 3/8”)
4. Ins
www.napoleongrills.com
tallaon der Vorderschrank – Stabilisierungsleiste
Die ob
ere Leistenbaugruppe mit vier (4) Nr. 10-24 x 3/8-Zoll-Schrauben an der Vorderseite der
Seitenpaneele befestigen. Alle vier (4) Nr. 10-24 x 3/8-Zoll-Schrauben zunächst nur lo se anziehen und erst
festdrehen, wenn der Schrank richtig montiert und ausgerichtet ist.

4 x N570-0042 (10-24 x 3/8”)
47
5. Ins
Hitz
Panels befesgen und das andere Ende an der Unterseite der Vorderschrank-Stabilisierungsleiste befesgen.
tallaon des Hitzeschilds
eschild für den Propangastank über dem Propangasaschen-Ring befesgen. Ein Ende unter der Lippe des rückseigen
ww.napoleongrills.com
w

48
4 x Z570-0027 (1/4-20 X 3/8”)
6. Ins
tallaon der Grillaufsatzes
ermeidung von Schwierigkeiten bei der Montage des Grillaufsatzes zunächst den Kabelbinder enernen, mit dem der
Zur V
egler/Anschluss unterhalb der Bedienleiste befesgt ist. Der Kabelbinder wird vor der Auslieferung ab Werk angebracht,
Druckr
n Schlauch des Druckreglers vor Beschädigung zu schützen und ist nicht weiter erforderlich. (Den Kabelbinder vorsich
um de
chschneiden, um den Schlauch nicht zu beschädigen.) Sicherstellen, dass sich der Druckregler in dem schmalen Raum
dur
zwischen dem Tank-Hitzeschild und der rechten Schrankseite bendet.
Den Grillaufsatz anheben und so auf den monerten Wagen platzieren, dass die oberen Löcher der Seitenpaneele genau
unter den Löchern des Aufsatzes liegen. Von der Innenseite mit vier 1/4-20 x 1/2“-Schrauben (zwei pro Seite) festdrehen.
FÜR DIE
SEN SCHRITT SIND ZWEI PERSONEN ERFORDERLICH
2 x Z570-0022 (M4X8mm)
3/8”(10mm)
g
aschen mit einem Gewicht von 7 kg oder mehr außerhalb des Schranks (unter dem rechten Seitenregal)
Gas
ebener
dig aufstellen. Die Schlauchinstallaon muss durch die vorgestanzte Önung im rechten Seiten
erfolgen.
www.napoleongrills.com
Druckregler mit zwei (2)M4 x 8-
Schrauben festdrehen.
paneel

2 x N105-0011 (buchse)
7. Installaon der Schranktür
hstange durch das Loch an der inneren Türoberseite führen. Tür mit einer Hand halten und Drehstange
Dre
in das vorgesehenen Loch an der Unterseite der Vorderschrank-Stabilisierungsleiste einsetzen. Wenn die
Drehstange sicher eingeführt ist, abwärts durch das Loch an der Türunterseite in die Türscharnier-Bu ch se
im unteren Regalboden gleiten lassen.
49
Buchse
ww.napoleongrills.com
w

50
6 x N570-0042 (#10-24 x 3/8”)
8.Ins
tallaon Des Vorderen Wagenpanee
Sech
s (6) Nr. 10-24 × 3/8-Zoll-Schrauben zur Montage des vordere n Seitenpaneele verwenden, drei (3) pro
Seitenregal.
Die Fläche mit den vorgebohrten Löchern muss sich am
Regalende mit Winkelhaltern befinden.
Sicherstellen, dass beide Flächen ausgerichtet sind.
ls
Die Fläche mit den vorgebohrten Löchern muss sich am
Regalende mit Winkelhaltern befinden.
Sicherstellen, dass beide Flächen ausgerichtet sind.
www.napoleongrills.com

4X Z570-0026 (M5 X 9.5mm)
51
9. Ins
tallaon der Seitenablage
Die Regal
drehen und nach unten drücken, bis es einrastet.
winkelhalter in die unteren Zapfenschrauben einführen. Das Regal mit einer Aufwärtsbewegung
(4)M4×9.5 mm Fl
ügelschrauben,(2) jeder seite.
Die beiden (2) Flügelschrauben können
entfernt werden, um das Regal zur
Aufbewahrung einzuklappen.
ww.napoleongrills.com
w

52
1 x N160-0016 (clip)
10. Ins
Öffnung in di
vom Verteiler mit der Elektrode des Seitenbrenners verbinden.
tallaon des Seitenbrenners
e Brennerleitung einpassen und mit dem beiliegenden Schlauchhalter-Clip sichern. Draht
410SB MODELLEN
www.napoleongrills.com

53
11. Ins
Flammenschutzeinsätze in Grilleinsatz einsetzen, jeweils einen über jedem Rohrbrenner.
tallaon von Glühplae
12. Ins
Grillroste u
tallaon Grill und Warmhalterost
nd Warmhalterost wie gezeigt in den Aufsatz einsetzen.
ww.napoleongrills.com
w

54
13. Ins
Auffangschal
Auffangschale leichtgängig auf den Schienen an der Aufsatzunterseite gleitet.
tallaon der Auangschale
e wie gezeigt in die Rückseite des Grillaufsatzes einschieben. Sicherstellen, das die
14. Ins
www.napoleongrills.com
tallaon des Fe-Auangbehälters und Halters
Den Aluminiu
der Unterseite der Auffangschale einstecken.
m-Fett-Auffangbehälter in den Halter einsetzen und den Halter für den Fett-Auffangbehälter an

2 x N570-0042 (#10-24 x 3/8”)
55
15.Installation Des
Den Fla
schenöffner mit zwei (2) Nr. 10-24 x 3/8-Zoll-Schrauben am Seitenregal befestigen.
Flaschenöffners
ww.napoleongrills.com
w

56
16.K
orrekter Schlauchanschluss
Gas
aschen mit einem Gewicht von 7 kg oder mehr außerhalb des Schranks (unter dem rechten Seitenregal)
ebener
erfolgen.
www.napoleongrills.com
dig aufstellen. Die Schlauchinstallaon muss durch die vorgestanzte Önung im rechten Seiten
paneel

57
Anleitung Für Die Leck
CHTUNG!
A
Warten eines Gasbauteils durchgeführt werden.
A
CHTUNG!
Leckageprüfung: Ein Leckagetest muss vor der ersten Benutzung, jährlich und nach Auswechseln oder Warten
eines Gasbauteils durchgeführt werden. Während der Prüfung ist Rauchen verboten. Alle Zündquellen sind zu
enernen. Die zu prüfenden Stellen sind auf der Leckageprüfzeichnung aufgeführt.
Alle Brenner abstellen. Flaschenvenl aufdrehen.
Seifenwasser (halb Wasser, halb Flüssigseife) auf alle Anschlüsse und Verbindungen an Regler, Schlauch,
Verteiler und Venle auragen.
Leckagen werden durch Blasenbildung angezeigt. Leckage durch Festdrehen des Anschlusses oder Austausch
des Teils durch ein vom Händler empfohlenes Teil beseigen.
Bleibt die Leckage bestehen, Flaschenvenl zudrehen, Regler abnehmen und Grill vom Gaslieferanten oder
Händler untersuchen lassen. Das Gerät darf erst wieder benutzt werden, wenn die Leckage behoben ist.
Gaszufuhr abstellen.
Ein Leckagetest muss vor der ersten Benutzung, jährlich und nach Auswechseln oder
Während der Prüfung ist Rauchen verboten. Alle Zündquellen sind zu enernen.
ageprüfung
Gasaschen mit einem Gewicht von 7 kg oder mehr außerhalb des Schranks (unter dem rechten Seiten
ebener
dig aufstellen. Die Schlauchinstallaon muss durch die vorgestanzte Önung im rechten Seiten
erfolgen.
paneel
ww.napoleongrills.com
w
regal)

58
www.napoleongrills.com
Position
1 Z135-0001
Z135-0002
2
Z335-0002
3
4
Z585-0003
5
Z010-0003
Z080-0001
6
Z580-0001
7
Z510-0003
8
N685-0006
9
N385-0129
10
11 W450-0005
12
Z570-0027
13
N735-0003
14
N570-0080
Z570-0021
15
Z010-0009
16
Z035-0008
17
Z475-0004
18
Z585-0004
19
20
Z080-0014
21
Z710-0002
22
Z305-0002
Z080-0009
23
Z305-0003
24
Z305-0005
25
Z305-0006
26
N105-0001
27
Z010-0004P
28
33
N720-0044
34
W445-0021
N255-0014
N530-0023
35
N530-0032 Druckregler - DE x
36
N530-0033 Druckregler -NL x
N530-0034 Druckregler -ES x
N530-0035 Druckregler -SE x
N530-0036 Druckregler -IT x
N530-0037 Druckregler -GB x
N530-0038 Druckregler -FR x
N345-0017 Schlauch-BE x
37 Z100-0003
N051-0006
38
N380-0016R
39
Z080-0013
40
N185-0001
41
42
Z570-0022
43
N570-0078
Z570-0026
44
410 Stücklis
Teilenr Beschreibung 410
Hauben‐Gussteil,links
Hauben‐Gussteil,rechts
Haubeneinsatz
HitzeschildHaube
Haubengriff
HaubengriffAbdeckung
PivotschraubeHaube
Silikon‐Haubenanschlagschutz,schwarz
Thermometer
Napoleon‐Logo
Logo‐Federclips
Schraube,1/4‐20x3/8Zoll,ES
1/4‐Zoll‐Federring
Schraube,Nr.14x1/2‐Zoll
Schraube,Nr.8x1/2‐Zoll
BaugruppeGrilleinsatz
Grilleinsatz,rückseitigeAbdeckung
Bedienleiste
HitzeschildGrilleinsatz
BefestigungfürQuerzündung
Auffangschale
Flammenschutzeinsatz
BefestigungfürSeitenpaneel
Grillroste‐groß
Grillroste‐klein
Warmhalterost
Buchse,0,875Zoll
Verteiler‐Baugruppe
Verteiler‐Flexverbindung
Bördel‐Rohrverschraubung,3/8‐nach1/2‐Zoll
Adapter‐DE/NL
Druckminderer/Druckregler
Hauptbrenner
Bedienelement‐Einfassung
Bedienelement
Fett‐Auffangbehälter
Aluminium‐Fett‐Auffangbehälter
Schraube,M4x8mm
Schraube,M4x8mm
Flügelschraube,M4x9,5mm
te
x
x
x
x
x
x
x
x
x
x
x
x
x
x
x
x
x
x
x
x
x
x
x
x
x
x
x
x
x
x
x
x
x
x
x
x
x
x
x
x

Position
45
46
47
48
49
50
51
52
53
54
55
56
57
61
62
63
65
66
67
68
70
71
78
80
81
82
83
84
85
410 Stücklis
Teilenr Beschreibung 410
Z570-0021
Z570-0027
N570-0135
N450-0030
Z476-0001
Z476-0005
Z010-0011
Z130-0002
Z655-0002
Z010-0014
N555-0036
N105-0011
N430-0002
Z080-0012
N555-0025
N105-0002
Z570-0027
N570-0042
Z010-0018
N340-0006
Z585-0007S
Z120-0002
Z120-0001
N570-0019
N570-0042
Z450-0009
Z570-0023
Z035-0012
Z035-0013
Z370-0001
64495-NL
63410
Schraube,Nr.8x1/2Zoll
Schraube,1/4‐20x3/8Zoll,ES
Zapfenschraube,M6x1/2Zoll
Mutter,M6
Wagenpaneel,seitlich
Wagenpaneel,Rückseite
BausatzWagen‐Unterseite
Lenkrolle,3Zoll
Wagen‐Vorderträger
Tür‐Baugruppe
Tür‐Drehstange
Türscharnier‐Buchse
Magnetschnapper
Flaschenöffner
Streichholzhalter
Buchse,1,5Zoll
Schraube,1/4‐20x3/8Zoll,ES
Schraube,10‐24x3/8Zoll
Seitenregal
Besteckhalter
Hitzeschild
Zierleiste,linkesSeitenregal
Zierleiste,rechtesSeitenregal
Schraube,10‐24x1/4Zoll
Schraube,10‐24x3/8Zoll
10‐24‐Mutter
Zapfenschraube
Grillaufsatz, links
Grillaufsatz, rechts
Montagematerial‐Blisterverpackung
Drehspieß‐Set
Vinyl‐Abdeckplane
te
59
x
x
x
x
x
x
x
x
x
x
x
x
x
x
x
x
x
x
x
x
x
x
x
x
x
x
x
x
x
x
ac
ac
x-standard
ac-zubehör
ww.napoleongrills.com
w

60
410- TEILE
ZEICHNUNG
www.napoleongrills.com

410SB Stückliste
Position Teilenr Beschreibung 410SB
1 Z135-0001
2
Z135-0002
Z335-0002
3
Z585-0003
4
Z010-0003
5
Z080-0001
6
Z580-0001
7
Z510-0003
8
9
N685-0006
10
N385-0129
W450-0005
11
Z570-0027
12
N735-0003
13
N570-0080
14
Z570-0021
15
16 Z010-0009
17
Z035-0008
18
Z475-0004SB
19
Z585-0004
Z080-0014
20
Z710-0002
21
Z305-0002
22
Z080-0009
23
Z305-0003
24
25
Z305-0005
26
Z305-0006
27
N105-0001
Z010-0004SBP
28
N720-0055
29
N455-0049
30
N160-0016
31
N750-0016
32
N720-0044
33
34
W445-0021
N255-0014
35
N530-0023
N530-0032 Druckregler - DE x
36
N530-0033 Druckregler -NL x
N530-0034 Druckregler -ES x
N530-0035 Druckregler -SE x
N530-0036 Druckregler -IT x
N530-0037 Druckregler -GB x
N530-0038 Druckregler -FR x
N345-0017 Schlauch-BE x
37 Z100-0003
N051-0006
38
N380-0016R
39
Z080-0013
40
Hauben‐Gussteil,links
Hauben‐Gussteil,rechts
Haubeneinsatz
HitzeschildHaube
Haubengriff
HaubengriffAbdeckung
PivotschraubeHaube
Silikon‐Haubenanschlagschutz,schwarz
Thermometer
Napoleon‐Logo
Logo‐Federclips
Schraube,1/4‐20x3/8Zoll,ES
1/4‐Zoll‐Federring
Schraube,Nr.14x1/2‐Zoll
Schraube,Nr.8x1/2‐Zoll
BaugruppeGrilleinsatz
Grilleinsatz,rückseitigeAbdeckung
Bedienleiste
HitzeschildGrilleinsatz
BefestigungfürQuerzündung
Auffangschale
Flammenschutzeinsatz
BefestigungfürSeitenpaneel
Grillroste‐groß
Grillroste‐klein
Warmhalterost
Buchse,0,875Zoll
Verteiler‐Baugruppe
SeitenbrennerGaszufuhrleitung
Seitenbrenneröffnung
Seitenbrenneröffnung,Clip
Seitenbrenneröffnung,Elektrodendraht
Verteiler‐Flexverbindung
Bördel‐Rohrverschraubung,3/8‐nach1/2‐Zoll
Adapter‐DE/NL
Druckminderer/Druckregler
Hauptbrenner
Bedienelement‐Einfassung
Bedienelement
Fett‐Auffangbehälter
x
x
x
x
x
x
x
x
x
x
x
x
x
x
x
x
x
x
x
x
x
x
x
x
x
x
x
x
x
x
x
x
x
x
x
x
x
x
x
x
ww.napoleongrills.com
w
61

62
Position
N185-0001
41
Z570-0022
42
N570-0078
43
44
Z570-0026
45
Z570-0021
46
Z570-0027
47
N570-0135
N450-0030
48
Z476-0001
49
Z476-0005
50
Z010-0011
51
Z130-0002
52
53
Z655-0002
54
Z010-0014
55
N555-0029
N105-0011
56
N430-0002
57
Z080-0012
61
N555-0025
62
N105-0002
63
65
Z570-0027
66
N570-0042
67
Z010-0018
N340-0006
68
Z710-0004 Seitenbrenner-Plateneinsatz x
69
70 Z585-0007S
Z120-0002
71
Z010-0019
72
73
Z335-0006
74
Z580-0002
75
Z485-0001
76
Z100-0002
Z305-0008
77
Z120-0001
78
N570-0078
79
N570-0019
80
N570-0042
81
82
Z450-0009
83
Z570-0023
Z035-0012
84
Z035-0013
85
Z370-0001
64495-NL
63410
410SB Stücklis
Teilenr Beschreibung 410SB
Aluminium‐Fett‐Auffangbehälter
Schraube,M4x8mm
Schraube,M4x8mm
Flügelschraube,M4x9,5mm
Schraube,Nr.8x1/2Zoll
Schraube,1/4‐20x3/8Zoll,ES
Zapfenschraube,M6x1/2Zoll
Mutter,M6
Wagenpaneel,seitlich
Wagenpaneel,Rückseite
BausatzWagen‐Unterseite
Lenkrolle,3Zoll
Wagen‐Vorderträger
Tür‐Baugruppe
Tür‐Drehstange
Türscharnier‐Buchse
Magnetschnapper
Flaschenöffner
Streichholzhalter
Buchse,1,5Zoll
Schraube,1/4‐20x3/8Zoll,ES
Schraube,10‐24x3/8Zoll
Seitenregal
Besteckhalter
Hitzeschild
Zierleiste,linkesSeitenregal
Seitenbrennerregal
Seitenbrennerhaube
Seitenbrennerhaube,Drehstange
Gabelkopfbolzen
Seitenbrenner
Seitenbrenner‐Ring
Zierleiste,rechtesSeitenregal
Schraube,M4x8mm
Schraube,10‐24x1/4Zoll
Schraube,10‐24x3/8Zoll
10‐24‐Mutter
Zapfenschraube
Grillaufsatz, links
Grillaufsatz, rechts
Montagematerial‐Blisterverpackung
Drehspieß‐Set
Vinyl‐Abdeckplane
te
x
x
x
x
x
x
x
x
x
x
x
x
x
x
x
x
x
x
x
x
x
x
x
x
x
x
x
x
x
x
x
x
x
x
x
x
x
x
x
x
x
ac
ac
x-standard
www.napoleongrills.com
ac-zubehör

63
410SB- TEILE
ZEICHNUNG
ww.napoleongrills.com
w

_
64
FAXNR.: 705 727 4282
BESTELLFORMULAR FÜR ZUBEHÖR UND ERSATZTEILE
BITTE IN DRUCKSCHRIFT AUSFÜLLEN
ANSPRECHPARTNER
LIEFERANSCHRIFT :_____________________________________________________________________________
_________________________________________________________________________________________
_________________________________________________________________________________________
_________________________________________________________________________________________
TELEFON :_________________________________ FAX :______________________________
EMAIL: __________________________________________________________________
KREDITKARTENNR. (VISA, MASTERCARD) :_______________________________
UNTERSCHRIFT:_____________________________________________________________________________
ANZAHL
:______________________________________________________________________
GÜLTIG BIS: _____________
TEILENUMMER BESCHREIBUNG
ARTIKEL KÖNNEN U. U. STEUERPFLICHIG SEIN
TRANSPORTKOSTEN NICHT ENTHALTEN
FALLS SIE EINE BESTÄTIGUNG WÜNSCHEN,BITTE FAXNUMMER ODER E-MAIL-ADRESSE ANGEBEN
www.napoleongrills.com

De
ze gasbarbecue mag alleen buiten op een goed verluchte plek worden gebruikt. Gebruik hem nooit
in een gebouw, garage of een andere gesloten ruimte.
Breng het serienummerlabel aan dat op de kartonnen doos staat
Serie Nr.
XXXXXX000000
Model Nr.
EVAAR
G
INDIEN U GAS RUIKT
:
• Sluit de gastoevoer naar het apparaat af.
• Doof open vlammen.
• Open het deksel.
• Blijf uit de buurt van het apparaat indien
u gas blij ruiken en neem onmiddellijk
c
ontact op met het gasbedrijf of de brandweer.
410, 410SB
AARSCHUWING
W
St
eek dit apparaat niet aan voordat u de
instruces van het hoofdstuk AANSTEKEN in
deze handleiding hebt gelezen.
Sla g
een benzine of andere ontvlambare
toen of dampen op of gebruik deze niet
is
vloe
in de buurt van dit of enig ander apparaat. Een
niet-gebruikte, losgekoppelde gases mag niet
in de buurt v
opg
eslagen. Indien deze aanwijzingen niet pre
w
orden opgevolgd, kan dat brand- of explosiegevaar
meebrengen en materiële schade, persoonlijk
letsel of de dood veroorzaken.
an dit of enig ander apparaat wor
den
cies
Be
0359-11
Fax: (705)725-2564 email: wecare@napoleonproducts.com web site: www.napoleongrills.com
214 Ba
waar Deze Handleiding Voor Referene
Napoleon Appliance Corp.,
yview Dr., Barrie, Ontario, Canada L4N 4Y8 Phone: 1-866-820-8686
Z415-0002CE-DE/NL Feb 14/12

66
HAR
TELIJK DANK VOOR HET KIEZEN VAN NAPOLEON
NAPOLEON-producten zijn gemaakt van onderdelen en materialen van superieure kwaliteit en zijn gemonteerd door
bekwame vakmensen die trots zijn op hun werk. De brander en de venelen zijn getest op lekkage en de kwaliteit van
de werking van het geheel is uitgetest in een teststaon. Deze grill is grondig geïnspecteerd door een erkende technicus
voordat het werd ingepakt en verscheept om u, de klant, ervan te verzekeren dat u het kwaliteitsproduct ontvangt zoals u
die verwacht van NAPOLEON.
apoleon stellen wij ons in dienst van u, “onze gewaardeerde klant”. Het is ons doel om u te voorzien van de noodzake
Bij N
lijk
hulpmiddelen voor een onvergetelijke grill-ervaring. Deze handleiding helpt u om ervoor te zorgen dat uw nieuwe grill op
de juiste manier wordt gemonteerd, geïnstalleerd, onderhouden en verzorgd. Het is belangrijk om deze hele handleiding te
lezen en te begrijpen voordat u aan de slag gaat met uw nieuwe grill om er zeker van te zijn dat u alle veiligheidsmaatre
g
elen
en funces begrijpt die uw grill te bieden hee. Door het zorgvuldig volgen van de instruces in deze handleiding zult u nog
jaren zorgeloos kunnen genieten van het grillen. Als wij om welke reden dan ook niet voldoen aan uw verwachngen, belt
u dan gerust naar onze klantenservice op 1-866-820-8686 tussen 9 AM en 5 PM (Eastern Standard me) of bezoek onze
website.
e
Beperk
NAPOLEON garandeert de volgende materialen en afwerking van uw nieuwe NAPOLEON gas grill tegen
defecten voor 10 jaar. Deze dekt aluminium gietstukken (behalve verf), roestvrij stalen bedieningspaneel (met
uitzondering van zeefdruk) en roestvrij stalen branders, mits aan de volgende voorwaarden is voldaan:
Gedurende de eerste 5 jaar zal NAPOLEON vervangende onderdelen van onze keuze gratis verstrekken.
Vanaf het zesde jaar tot het tiende jaar, zal NAPOLEON vervangende onderdelen op 50% van de
huidige verkoopprijs verstrekken.
Roestvrij stalen of porseleinen deksel en het inzetstuk voor de onderkant en de handgrepen van de deksel
zijn gedekt tegen gebreken gedurende 5 jaar, afhankelijk van de volgende voorwaarden: Tijdens de eerste 3
jaar zal NAPOLEON vervangende onderdelen naar onze keuze gratis verstrekken. Voor het vierde en vijfde
jaar, zal NAPOLEON vervangende onderdelen op 50% van de huidige verkoopprijs verstrekken.
Alle andere onderdelen van roestvrij staal of porseleinen schroeiplaten, roestvrij stalen of gietijzeren
grillroosters, kleppen, ontstekingsysteem, temperatuurmeters, knoppen, regelaars, wielen, warmhoudrekken,
slangen en aansluitingen, bevestigingsmiddelen en accessoires vallen onder de garantie en Napoleon zal
onderdelen gratis tijdens het eerste jaar van de beperkte garantie verstrekken.
NAPOLEON niet aansprakelijk worden gesteld voor eventuele transportkosten, loonkosten of grensbelasting.
V
“NAPOLE
NAPOLEON-handelaar.
De aanschaf moet voldoen aan de volgende voorwaarden en beperkingen: “Deze fabrieksgarane is niet overdraagbaar en mag op geen enkele manier door
onz
De installae moet worden uitgevoerd in overeenstemming met de met het product meegeleverde installae-instruces en met alle lokale en naonale
bouw- en brandreglementen.
De
misbruik of verwaarlozing, en het installeren van onderdelen van andere fabrikanten maakt deze garane ongeldig.
Deze beperkte garane dekt bovendien geen krassen, deuken, verf, roest of verkleuring door hie, schurende en chemische schoonmaakmiddelen, en dekt
ook niet het aladderen van geëmailleerde onderdelen of jdens de installae van de gasbarbecue gebruikte onderdelen.
Worden de onderdelen zoveel slechter dat ze jdens de duur van de beperkte garane niet meer werken, dan zal een vervangend onderdeel worden
geleverd.
Alle
w
N
de
onderdelen terug te betalen.
NAPOLE
gedekt onderdeel en deze onkosten worden niet door deze garane gedekt.
In afwijking van de bepalingen van deze beperkte levenslange garane van de president, wordt de verantwoordelijkheid van NAPOLEON volgens deze
garane gedenieerd als hierboven en wordt zij in geen geval uitgebreid tot enige incidentele, gevolg- of indirecte schade.
Deze garane bakent de verplichngen en de aansprakelijkheid van NAPOLEON af met betrekking tot NAPOLEON-gasbarbecues en enige andere expliciete
of impliciete garane aangaande dit product, zijn onderdelen of accessoires is uitgesloten.
NAPOLEON aanvaardt geen andere aansprakelijkheid met betrekking tot de verkoop van dit product en gee ook geen derde de toestemming om dergelijke
aansprakelijkheid voor haar te aanvaarden. NAPOLEON is niet verantwoordelijk voor: overgloeien, uitwaaien ten gevolge van weersomstandigheden zoals
sterke wind, of onvoldoende verluchng. Beschadiging van de gasbarbecue ten gevolge van het weer, hagel, ruwe behandeling, of schadelijke chemicaliën
of reinigingsmiddelen kan niet ten laste van NAPOLEON worden gelegd.
Bij het indienen van een claim bij NAPOLEON zijn de verkoopovereenkomst of een kopie ervan en het serie- en modelnummer vereist.
N
NAPOLE
www.napoleongrills.com
te Garane Napoleon Gasgrill
oorwaarden en beperkingen
ON garandeert haar producten tegen fabrieksfouten alleen tegenover de oorspronkelijke koper, mits zij werden aangescha via een erkende
e vertegenwoordigers worden verlengd. De gasbarbecue moet door een gemachgde, erkende onderhoudstechnicus of aannemer worden geïnstal
ze beperkte garane dekt geen schade ten gevolge van verkeerd gebruik, gebrekkig onderhoud, vetbrand, een vijandige omgeving, een ongeval, wijzigingen,
en jdens het eerste jaar omvat deze garane de vervanging van gegarandeerde defecte onderdelen met materiaal- of construcefouten mits het prod
erd bediend in overeenstemming met de bedieningsinstruces en onder normale omstandigheden.
a het eerste jaar kan NAPOLEON met betrekking tot deze beperkte levenslange garane van de president beslissen alle verplichngen af te wijzen aangaande
ze garane door aan de oorspronkelijke door deze garane gedekte koper de groothandelsprijs van de door de garane gedekte maar defecte
ON is niet verantwoordelijk voor de installae-, loon- of alle andere (on)kosten betreende het opnieuw installeren van een door de garane
APOLEON behoudt het recht het betreende product of onderdeel door haar vertegenwoordiger te laten controleren voordat een claim wordt gehonoreerd.
ON is niet verantwoordelijk voor transportkosten, loonkosten of uitvoerbelasngen.
leer
uct
d.

67
W
AARSCHUWING!
Indien deze aanwijzingen niet precies worden opgevolgd, kan dat brand- of
explosiegevaar meebrengen en materiële schade, persoonlijk letsel of de dood veroorzaken.
V
eiligheidsprakjken
ze gasgrill dient exact volgens de instruces in de gebruiksaanwijzing in elkaar te worden gezet. Indien de grill in
• De
de winkel in elkaar is gezet, dient u de montagevoorschrien door te nemen om vast te stellen dat de grill correct in
elkaar is gezet, en u dient de verplichte lektests uit te voeren voordat u de grill gebruikt.
• Lees voor gebruik van de grill de hele instrucehandleiding.
• Deze gasgrill dient onder geen enkele voorwaarde te worden gemodiceerd.
• Volg jdens gebruik van de grill de aansteekinstruces.
• Gastoevoer moet zijn dichtgedraaid bij de propaanes de grill niet gebruikt wordt.
• Houd kinderen en huisdieren op afstand van de hete grill. LAAT kinderen NIET in de behuizing van de grill klimmen.
• Laat de grill jdens gebruik niet onbeheerd achter.
• Kinderen dienen in de gaten gehouden te worden om ervoor te zorgen dat ze niet met het apparaat spelen.
• Dit appar
of mentale vermogens, of mensen met gebrek aan ervaring and kennis, tenzij ze onder toezicht staan van-, of na
instruce betreende het gebruik van het apparaat door de persoon die verantwoordelijk is voor hun veiligheid.
• Verplaats de grill niet als die heet of in gebruik is.
• Deze gasgrill moet niet worden geïnstalleerd in of op recreaeve voertuigen en/of boten.
• Deze grill is alleen bestemd voor huishoudelijk gebruik.
• Deze gasgrill moet uitsluitend worden opgeborgen in een goedgevenleerde omgeving en moet niet in een gebouw,
garage of welke afgesloten omgeving dan ook worden gebruikt.
• Houd v
In de buurt van vinyl of grote raamparjen wordt een extra afstand (610mm) aanbevolen.
• Houd de v
• Plaats de grill niet onder een onbeschermde brandbare construce.
• Niet plaatsen op winderige locaes. Sterke wind beïnvloedt de kookprestaes van de gasgrill negaef.
• Als de gasgrill binnenshuis wordt opgeborgen, dient de propaanes van de grill te worden ontkoppeld en buitenshuis
worden opgeborgen in een goed gevenleerde omgeving. Afgekoppelde essen mogen niet worden opgeborgen in
een gebouw, garage of andere afgesloten omgeving.
• Inspecteer de gasslang voor ieder gebruik. Als er sprake is van excessieve beschadiging of slijtage, dient het te worden
vervangen voordat de grill gebruikt wordt, voor een vervangende slang volgens opgave van de fabrikant.
• Bewaar nooit een extra LP gases onder of in de buurt van deze grill.
• Vul de cylinder nooit meer dan 80%.
• Gebruik geen cylinder die niet voorzien is van een QCC1 type verbinding.
• Controleer voor eerste gebruik alle koppelingen op lekkage, zelfs als de grill volledig gemonteerd was aangescha,
jaarlijks of iedere keer wanneer een gascomponent is vervangen.
• Gebruik nooit aardgas in een unit dat ontworpen is voor vloeibaar propaangas.
• Gebruik nooit ontstekingsvloeistof in een gasgrill.
• Gebruik uitsluitend houtbrikeen met een Napoleon houtskoolrek dat ontworpen is voor deze unit.
• Brandregelaars moeten uit staan wanneer de voorraades wordt opengedraaid.
• Brand geen brander met gesloten kap.
• Bedien geen achterbrander jdens een brandende hoofdbrander.
• Houd de kap gesloten jdens het voorverwarmen.
• Voer de slang niet onder de afdruipbak langs – de juiste afstand tot de onderkant van de unit moet in acht worden
genomen.
• Reinig de vetbak en schroeiplaten regelmag om het aanzeen van vet, dat tot vetbranden kan leiden, te voorkomen.
• Verwijder de warmhoudplaat voor het aansteken van de achterste brander. De extreme hie zal het warmhoudrek
beschadigen.
• Zorg ervoor dat de schroeiplaten worden geplaatst volgens de installae-instruces.
• Gebruik de zijplanken niet om een aansteker, lucifers of ander brandbaar materiaal op te plaatsen.
• Houd de gasaansluing op afstand van hete oppervlakken.
• Houd elektriciteitskabels op afstand van water of hete oppervlakken.
• Controleer de venturibuis van de infrarode brander regelmag op spinnenwebben en andere obstruces. Reinig de
buizen volledig als u dergelijke obstruces aantre.
• De g
gedurende druktests van dat systeem bij testdruk hoger dan 0.5psi (3.5kPa).
• De gasgrill voor de buitenkeuken moet geïsoleerd worden van het gastoevoersysteem door het afzonderlijke handmage
afsluitvenel te sluiten gedurende druktesten van het gastoevoersysteem bij testdruk hoger dan 1/2 psi (3.5.kPa).
aat is niet bedoeld voor gebruik door personen (inclusief kinderen) met verminderde lichamelijke, zintuiglijke
oldoende afstand tot brandbare materialen (410mm aan de achterkant van de grill 180mm aan beide zijkanten).
enlaeopeningen van de esruimte te allen jde vrij en schoon.
asgrill voor de buitenkeuken en het afzonderlijke afsluitvenel dienen te worden ontkoppeld van het gastoevoersysteem
ww.napoleongrills.com
w

68
Correct
ze aanduiding gee aan dat dit product in de gehele EU niet bij het overige huishoudelijke afval mag worden
De
gezet. Recycle het verantwoord ter bevordering van duurzaam hergebruik van grondstoen en ter voorkoming
van mogelijke schade aan het milieu en de volksgezondheid t.g.v. ongecontroleerde dumping. Gebruik a.u.b.
het teruggave- en verzamelsysteem, of neem contact op met de winkel waar u het product hee gekocht. Daar
kan men dit product op een milieuvriendelijke manier recyclen.
e verwijdering van dit product
Gas
Ge
13 kg w
es voldoende gas bevat voor een goede werking van het apparaat. Neem in geval van twijfel contact op met
het lokale gasbedrijf.
• Draai aljd voorzichg aan de gastoevoerkraan.
• Sluit nooit een niet-goedgekeurde gases aan op het apparaat.
Alle essen v
worden geplaatst. Flessen van minder dan 7 kg (maximum grooe 465mm hoog door brede 306mm) mogen
binne
essen mogen in de omkasng of naast de barbecue worden bewaard. Reserveessen mogen niet in de
buurt v
hie of direct zonlicht.
W
de onderkant van het apparaat. Slangen die in contact komen met hete oppervlakken kunnen smelten of
lekken, en zo een brand veroorzaken.
Aansluing Van De Gases: Zorg ervoor dat er geen kinken zijn in de slang van de gasregelaar. Verwijder de
dop of plug van de gastoevoerkraan. Bevesg de regelaar aan de gastoevoerkraan. Test alle verbindingen
op lekkage voordat u de barbecue gebruikt. De lektest moet op de volgende momenten worden uitgevoerd:
jaarlijks, telkens als een gases wordt aangesloten of wanneer een gasonderdeel werd vervangen.
W
es
bruik uitsluitend goedgekeurde gasessen. Een gases voor op butaan werkende apparaten moet mini
egen; voor op propaan werkende barbecues bedraagt het minimumgewicht 6 kg. Zorg ervoor dat de
an minimaal 7 kg moeten op een vlakke ondergrond buiten de omkasng (onder het rechterzijrek)
n de omkasng, in het gat van het onderste rek, worden geplaatst. Alleen op het apparaat aangesloten
an een werkend apparaat worden opgeslagen. Gasessen mogen niet worden blootgesteld aan overmage
org ervoor dat de gasslang zo loopt dat er voldoende afstand blij tegenover
AARSCHUWING!
AARSCHUWING!
Z
maal
• Geleid de slang nie
• Geleid de slang niet tussen de ruimte van de onderste plank en het achterpaneel.
• Geleid de slang over de bovenkant van het achterpaneel.
• Zorg ervoor dat alle slangverbindingen goed vastzien met behulp van twee slangklemmetjes. Gebruik
geen teon tape of lijm op de slangkoppelingen.
• Zorg ervoor dat de slang geen contact maakt met hete oppervlakken waardoor het zou kunnen smelten
of lekken waardoor brand kan ontstaan.
• Gebruik het afgesloten gedeelte niet om overtollige slang in op te bergen, aangezien er een grotere kans
bestaat op contact met een heet oppervlak, waardoor het kan smelten en lekken en
brand kan veroorzaken.
• Controleer alle koppelingen op lekkage met behulp van water en zeep, zoals vermeld
staat in de instruces in deze handleiding.
t langs de onderkant van de afdruipbak.
www.napoleongrills.com

Gasslang
69
• Indien de slang en de r
egelaar niet door de fabrikant worden meegeleverd, dan mogen alleen
goedgekeurde slangen en regelaars worden gebruikt.
• Sluit het apparaat niet aan op een permanente gasinstallae.
• Zorg ervoor dat de slang niet in contact komt met vet, ander heet braadvet of hete oppervlakken van de
barbecue.
• Con
troleer de slang regelmag. Indien hij gescheurd, gesmolten of versleten is, moet hij worden vervangen
voordat het apparaat opnieuw wordt gebruikt.
• De v
oor de slang aanbevolen lengte bedraagt 0,5 m. Hij mag niet langer dan 1,5 m zijn.
• Zorg ervoor dat er bij de installae geen verdraaiing of kinken zijn in de slang.
• Vervang de slang vóór de vervaldatum die erop vermeld staat.
R
egelaar
olgende tabel vindt u invoerwaarden voor het apparaat.
In de v
Brander Openingsgroote (Bruto)Warmte-Invoer Gasverbruik (Totaal)
Hoorander
Zijbrander
1.07mm (#58) 12.0 kw 870 g/hr
0.82mm 2.4 kw 174 g/hr
Gecerceerde gassen / drukwaarden – Controleer of de kenplaat overeenkomt met de volgende lijst.
I
Gassoort
Gassoort
n / drukwaarden Butaan 30mbar
n / drukwaarden Butaan 30mbar
Gasse
Gasse
Landen BE, BG, CY, DK,
Landen BE, BG, CY, DK,
I
3B/P(30)
3B/P(30)
Propaan 30mbar
Propaan 30mbar
EE, FI, FR, GB,
EE, FI, FR, GB,
HR, HU, IS, IT,
HR, HU, IS, IT,
LT, LU, MT, NL,
LT, LU, MT, NL,
NO, RO, SE, SI,
NO, RO, SE, SI,
SK, TR
SK, TR
I
I
3+(28-30/37)
3+(28-30/37)
Butaan 28-30mbar
Butaan 28-30mbar
Propaan 37mbar
Propaan 37mbar
BE, CH, CY, CZ, ES,
BE, CH, CY, CZ, ES,
FR, GB, GR, IE, IT,
FR, GB, GR, IE, IT,
LT, LU, LV, PT, SK, SI
LT, LU, LV, PT, SK, SI
I
I
3B/P(37)
3B/P(37)
Butaan 37mbar
Butaan 37mbar
Propaan 37mbar
Propaan 37mbar
PL AT, CH, DE, SK
PL AT, CH, DE, SK
I
I
3B/P(50)
3B/P(50)
Butaan 50mbar
Butaan 50mbar
Propaan 50mbar
Propaan 50mbar
Knoei niet met de regulator en breng geen veranderingen aan. Gebruik alleen regulators die druk leveren
oals aangegeven in de bovenstaande tabel. Een regulator van 28-30 mbar moet gebruikt worden
z
voor butaan of een 37 mbar regulator voor propaan. The grill is uitgevoerd met een interne regulator. Deze
interne regulator hee een uitloopdruk van 24.5 mbar voor propaan/butaan en
esteld. Vervang alleen met een door de fabrikant voorgeschreven regulator.
of bijg
truces I.V.M. Lektest
Ins
AARSCHUWING!
W
T
est het apparaat op lekkage vóór het eerste gebruik, jaarlijks en na vervanging
mag nie
t worden aangepast
of onderhoud van gasonderdelen.
AARSCHUWING!
W
Nie
t Op Lekkage Met Behulp Van Een Vuurtje. Rook niet jdens deze test en
verwijder alle ontstekingsbronnen.
LEKTEST: Test het apparaat op lekkage vóór het eerste gebruik, jaarlijks en na vervanging of onderhoud van
gasonderdelen. Rook niet jdens deze test en verwijder alle ontstekingsbronnen. Zie het schema in verband
met lektests voor de te controleren gedeelten.
Schakel alle branderknoppen uit. Draai de gastoevoerkraan open.
Breng met een borsteltje op alle verbindingen en aansluingen van de regelaar, slang, verdeelstukken en
kranen een oplossing van vloeibare zeep en water aan.
Luchtbellen wijzen op een gaslek. Draai het losse onderdeel vast of vervang het door een door de handelaar
aanbevolen stuk.
Als het lek niet kan worden gedicht, sluit dan de gastoevoer af, koppel deze af en laat de barbecue controleren
door het gasbedrijf of de handelaar. Gebruik het apparaat slechts nadat het lek werd gedicht.
Sluit de gastoevoer af.
ww.napoleongrills.com
w

70
Ins
truces I.V.M. Aansteken
Zij Br
ander
Linker
Brander
AARSCHUWING!
W
AARSCHUWING!
W
de gasto evoer van de gases open.
langzaam naar de stand “hi”. Deze
ace zal de waakvlam ontsteken
die op zijn beurt de geselecteerde
waakvlam brandt, ga dan verder
Midde
ls
te Burner
Open het deksel.
Zorg dat de brandregelaars in de stand “o” staan, draai
Ontsteking Hoofdbrander
1. Open he
2. Druk op de knop van de
hoofdbrander en draai die
hoofdbrander ontsteekt. Als de
met het naar beneden drukken
van de regelknop totdat de
brander brandt en laat dan los.
3. Als de brander niet tot
ontsteking komt, draai dan de
regelknop onmiddellijk naar de
stand “o” en herhaal stap 1
diverse keren.
t deksel.
Rechter
Brander
an Posie
V
Aansteken Zijbrander
(Als uitgerust)
1. Open deksel van de zijbrander.
2. Druk de regelknop van de
zijbrander in en draai die langzaam
naar de stand “hi”. Deze.
3. Houd de ontstekingsknop
Ingedrukt totdat de barbecue
Is aangestoken of steek aan
Met een lucifer.
4. Als de waakvlam en brander
de regelknop in de stand “o”
en wacht 5 minuten totdat het
Herhaal de stappen 1 en 2 of steek
W
AARSCHUWING!
hoofdbranders werkt.
W
AARSCHUWING!
de meegeleverde luciferhouder. Houd de aangestoken lucifer naar
beneden door de grill en schroeiplaat waarbij de bijbehorende
branderklep op “hi” wordt gezet.
www.napoleongrills.com
niet binnen 5 seconden tot
ontsteking komen, draai dan
vrijgekomen gas vervlogen is.
aan met een lucifer.
Gebruik de achterste brander niet wanneer een van de
Wanneer aangestoken met een lucifer, klem de lucifer in
4. Als de brander niet binnen 5
seconden tot ontsteking komt, draai
dan de regelknop in de stand “o”
en wacht 5 minuten totdat het
vrijgekomen gas vervlogen is. Herhaal
de stappen 2 en 3 of steek aan met
een lucifer.

Bediening V
anneer de gasbarbecue voor het eerst wordt aangestoken, zult u een geur ruiken. Dat is normaal en is maar
W
heel jdelijk. Het gaat om het “inbranden” van verf en smeermiddelen binnenin die werden gebruikt jdens
de produce. Dit gebeurt maar één keer. Laat de hoofdbranders ongeveer een half uur lang op de hoogste
stand aan staan. Bij het bereiden van bijzonder mager vlees zoals kippenborsten of mager varkensvlees mogen
de roosters vóór de voorverwarming eerst worden ingesmeerd met olie om te voorkomen dat het vlees blij
eraan kleven. Wanneer vlees met veel vet wordt klaargemaakt, kunnen vlammen opakkeren. Snijd het vet
weg of verlaag de temperatuur om opakkering te voorkomen. Gebeurt dit toch, plaats dan het voedsel weg
an de vlammen en verminder de temperatuur. Laat het deksel open. Raadpleeg het door Napoleon gepub
v
kookboek voor nadere gedetailleerde aanwijzingen.
bruik Van De Hoofdbranders: Bij het schroeien van voedsel is voorverwarming aanbevolen door alle hoofdbranders
Ge
a. 10 minuten lang in de hoge stand te plaatsen met het deksel gesloten. Voedsel dat niet lang hoe te wor
c
ekookt (vis, groenten), mag met het deksel open worden gebarbecued. Wanneer met het deksel gesloten
g
wordt gekookt, krijgt u hogere, evenrediger verdeelde temperaturen die de kookjd verminderen en het vlees
gelijkmager bakken. Voedsel met een kookjd van meer dan 30 minuten (bv. gebraad) kan indirect worden
klaargemaakt (met de brander die tegenover het voedsel ligt). Bij het bereiden van bijzonder mager vlees zoals
kippenborsten of mager varkensvlees mogen de roosters vóór de voorverwarming eerst worden ingesmeerd
met olie om te voorkomen dat het vlees blij eraan kleven. Wanneer vlees met veel vet wordt klaargemaakt,
kunnen vlammen opakkeren. Snijd het vet weg of verlaag de temperatuur om opakkering te voorkomen.
Gebeurt dit toch, plaats dan het voedsel weg van de vlammen en verminder de temperatuur. Laat het deksel
open. Raadpleeg het door Napoleon gepubliceerde kookboek voor nadere gedetailleerde aanwijzingen.
ect Koken: Plaats het op de grill te bereiden eten direct op de hie. Deze methode wordt over het alge
Dir
ebruikt voor het dichtschroeien of voor eten dat geen lange bereidingsjd vereist – hamburgers, steaks,
g
stukjes kip, groenten, enz. Het eten wordt eerst dichtgeschroeid om sappen en smaak vast te houden waarna
de temperatuur wordt verlaagd om het bereiden af te maken naar uw voorkeur.
Indirect Koken: Plaats het op de grill te bereiden eten bij één of meerdere werkende branders op één van
de branders die uit staat. De hie circuleert rondom het eten, waardoor het langzaam en gelijkmag wordt
be
reid. Deze bereidingswijze is vergelijkbaar met het bereiden in uw oven en wordt over het algemeen toege
op grotere stukken vlees zoals braadvlees, kip of kalkoen, maar kan ook worden toegepast op eten dat baat
he
e bij hogere vlammen. Deze bereidingswijze met lagere temperaturen en langere bereidingsjden result
in mals e
Gebruik Van De Achterste Brander: (Als uitgerust) Verwijder vóór gebruik het warmhoudrek. De grillroosters
moeten eveneens worden verwijderd als daarmee het spit wordt gehinderd. De achterste brander is bedoeld
voor gebruik met het meegeleverde spit. Zie de instruces i.v.m. het monteren van het spit. Verwijder voor
het gebruiken van het tegengewicht de motor van het spit uit de barbecue. Plaats het spit met het klaar te
maken vlees in de houders binnenin de barbecue. Het vlees gaat vanwege het gewicht met de zwaarste zijde
naar beneden hangen. Span de tegengewichtsarm en het gewicht aan zodat de arm naar boven wijst. Schuif
het tegengewicht voor evenwicht naar binnen of naar buiten en zet het vast. Monteer de motor opnieuw op
zijn plaats en begin te koken.
Plaats onderaan een bord om het vet op te vangen. U kunt dit over het vlees gieten of gebruiken als saus
zonder dat u er iets hoe aan toe te voegen. U kunt het eventueel aanlengen. Om het vlees lekker sappig te
houden, gebruikt u eerst de achterste brander in de hoge stand totdat het bruin wordt. Verminder vervolgens
de temperatuur en kook het voedsel gaar. Houd het deksel gesloten voor een beter resultaat. Gebraad en
gevogelte worden perfect bruin aan de buitenkant en blijven sappig en mals binnenin. Kip aan het spit van
ca. 1,5 kg bijvoorbeeld is in de middelste tot hoge stand gaar in ongeveer anderhalf uur. Raadpleeg het door
Napoleon gepubliceerde kookboek voor nadere gedetailleerde aanwijzingen.
ten, iedere keer dat u grillt.
an De Grill
liceer
meen
de
den
pas
eert
71
t
AARSCHUWING!
W
barbecue snel aan als deze niet regelmag worden schoongemaakt.
bruik van zijbrander: (Als uitgerust) De zijbrander kan worden gebruikt zoals de branders bovenaan een
Ge
fornuis, voor saus, soep etc. De gasbarbecue moet zodanig worden geplaatst dat de zijbrander uit de wind staat
zodat hij opmaal werkt. De aanbevolen pandiameter bedraagt 60 tot 220 mm.
AARSCHUWING!
W
voor poen en pannen.
W
AARSCHUWING!
W
AARSCHUWING!
situae kan leiden.
Barbecuesaus en z
ll nooit voedsel direct op het rooster van de zijbrander. Het is alleen bedoeld
Gri
Doe he
Ge
t deksel van de zijbrander niet dicht jdens gebruik of indien heet.
bruik de zijbrander niet voor het frituren omdat frituurvet tot een gevaarlijke
out kunnen corrosief zijn en tasten de onderdelen van de
ww.napoleongrills.com
w

72
Onderhoud / R
Wij r
aden aan deze gasbarbecue jaarlijks grondig te laten inspecteren en onderhouden door een bevoegd
servicemonteur.
AARSCHUWING!
W
schoonmaken.
AARSCHUWING!
W
onderhoudsbeurt. Onderhoud mag alleen w
mogelijke brandwonden te voorkomen. Barbecuesaus en zout kunnen corrosief zijn en tasten de onderdel
v
an de barbecue snel aan als deze niet regelmag worden schoongemaakt.
Not
a: roestvrijstaal hee de neiging om te roesten in de aanwezigheid van chloriden en sulden, in het bijzonder
in k
ustgebieden en andere ruwe gebieden zoals de warme, hoogvochge atmosfeer rond zwembaden en bub
De
ze vlekken lijken op roest, maar kunnen makkelijk worden verwijderd en voorkomen. Om zeker te zijn van
roestbestrijding, dient u alle roestvrijstalen oppervlakken elke 3-4 weken of zo vaak als nodig is met zoet water
en roestvrijstaalreiniger te wassen.
AARSCHUWING!
W
derhoudsbeurt. Onderhoud mag alleen w
on
mogelijke brandwonden te voorkomen. Een lektest moet jaarlijks en telkens als een gasonderdeel werd
vervangen, worden uitgevoerd.
R
oosters en verwarmingsrooster: De roosters en het verwarmingsrooster kunnen het beste schoongemaakt
w
orden met een koperen draadborstel jdens het voorverwarmen. Stalen wol kan gebruikt worden voor lastige
vlekken. Het is normaal dat de vlekkenloze roosters (als inbegrepen) permanent van kleur veranderen met
regelmag gebruik vanwege de hoge temperatuur van het kookoppervlak.
Mon
Sluit de g
einigings Instruces
teren werkhandschoenen en een veiligheidsbril te dragen wanneer het
Sluit de g
astoevoer af aan de bron en schakel het apparaat uit voor iedere
orden uitgevoerd wanneer de barbecue is afgekoeld, om
astoevoer af aan de bron en schakel het apparaat uit voor iedere
orden uitgevoerd wanneer de barbecue is afgekoeld, om
en
belbaden.
Giejzeren bereidingsroosters: De giejzeren bereidingsroosters van uw nieuwe barbecue houden de hie
goed vast en zorgen voor een zeer goede hieverdeling. Door de roosters regelmag met olie in te smeren
k
unt u een beschermlaag aanbrengen. Dit zal corrosie tegenwerken en de an-aanbak capaciteit van de roosters
verbeteren.
V
oor eerste gebruik: Was de bereidingsroosters met de hand met zacht afwasmiddel en water om restanten
van het produceproces te verwijderen (was nooit in de afwasmachine). Spoel goed af met warm water en
droog goed met een zachte doek. Dit is belangrijk om te voorkomen dat vocht het giejzer binnendringt.
B
eschermen met olie: Met gebruik van een zachte doek, bedek het volledige roosteroppervlak met VEGETARISCHE
OLIE inclusief alle groeven en hoeken. Gebruik geen gezouten vet zoals boter of margarine. Warm uw barbecue
voor gedurende 15 minuten, plaats vervolgens de met olie besmeerde bereidingsroosters in de barbecue. Zet
de controle knop van de brander op medium met de kap gesloten. Laat de bereidingsroosters gedurende
anderhalf uur opwarmen. Zet alle branders op ‘OFF’ en sluit het gas af bij de bron. Laat de bereidingsroosters
s
taan totdat ze afgekoeld zijn. Deze procedure moet verschillende keren herhaald worden gedurende het seizoen.
Het is niet vereist voor dagelijks gebruik (zie de procedure voor dagelijks gebruik hieronder)
Dagelijks gebruik: voorafgaand aan het voorverwarmen en het schoonmaken met een koperen barbecue
draadborstel, bedek de volledige oppervlakte van de bereidingsroosters met VEGETARISCHE OLIE. Warm de
barbecue voor en borstel vervolgens elk ongewild restant weg met de koperen draadborstel.
R
oestvrij stalen bereidingsroosters: (betere kit beschikbaar – zie de lijst met vervangingsonderdelen).
vrij
Roest
olie be
voor dagelijks gebruik volgt ondanks dat u het wellicht voldoende vindt om uw roosters voor te verwarmen en
schoon te maken met een draadborstel voor uw barbecue behoeen.
Bedieningspaneel: De tekst van het bedieningspaneel is te vinden op het roestvrije staal. Met de juiste zorg zal
het staal donker en leesbaar blijven. Om het paneel schoon te maken, gebruik uitsluitend warm zeepwater of
de Connental roestvrije staal reiniger verkrijgbaar bij de Napolean dealer. Gebruik geen schuurmiddelen op
roestvrije oppervlaktes, vooral niet op het tekst gedeelte van het bedieningspaneel, omdat de tekst na verloop
van jd er door zal vervagen.
s
talen bereidingsroosters zijn duurzaam en bestendig tegen corrosie. Deze roosters vragen minder
scherming en onderhoud dan de gie
jzeren bereidingsroosters. Het is aanbevolen dat u de procedure
www.napoleongrills.com

Reinigen Van De Binnenkant Van De Gasbarbecue: Verwijder de grillroosters. Verwijder met een zachte
koperen borstel de losse resten van de gegoten binnenzijden en van de binnenkant van het deksel. Schuur
de
kookplaten af met een stopverfmes of een schraapmesje en verwijder de as met een metalen borstel.
Ver
wijder de kookplaten en veeg de etensresten van de branders met een koperen borstel. Veeg alle zich in de
barbecue bevindende resten in de afneembare lekbak. Plaats de kookplaten opnieuw op de juiste plaats (lees
de montage-instruces voor de juiste oriëntae).
Verlichng: verwijder het glas van de lichtbak door een plae schroevendraaier voorzichg heen en weer te
bewegen tussen het glas en de lichtbak. Raak de halogeen lamp niet aan. De levensduur van de lamp wordt
orter door aanraking met de vingervetlaag. Maak het glas schoon door het onder te dompelen in heet
k
zeepwater; maak het dan schoon met een doekje en niet-schurend schoonmaakmiddel. Plaats het glas terug
door het simpelweg in de behuizing te klikken.
Lekbak: Schuif de lekbak uit om he
(om de 4 à 5 beurten) om vetophoping te voorkomen. Vet en ander overtollig braadvet komen in de lekbak
onderaan de gasbarbecue terecht en worden eronder in het disposable vetkommetje opgevangen. Opgehoopt
vet kan vuur vaen. Bekleed of vul de lekbak niet met aluminiumfolie of zand, omdat daarmee het vet niet
ong
ehinderd kan weglekken. De bak moet worden schoongeschraapt met een stopverfmes of een schraapmes
en alle r
te worden vervangen, aankelijk van de gebruiksfrequene. Neem voor benodigdheden contact op met uw
handelaar van Napoleon-gasbarbecues.
R
nie
ge
he
van de barbecue moet met lauw zeepwater worden schoongemaakt wanneer hij nog warm aanvoelt. Reinig
de roestvrijstalen oppervlakken met een schoonmaakmiddel voor roestvrij staal of met een niet-schurend
product. Veeg aljd schoon met de draad mee. Staalwol maakt krassen in de afwerking en mag niet worden
g
Dat is normaal en beïnvloedt de werking van de barbecue niet.
esten moeten in het disposable vetkommetje worden geveegd. Dit kommetje dient om de 2 à 4 weken
einigen Van De Buitenkant Van De Gasbarbecue: Reinig geverfde, geëmailleerde of roestvrijstalen onderdel
t met schurende schoonmaakmiddelen. Geëmailleerde onderdelen dienen extra voorzichg te worden
han
teerd. De aangebakken geëmailleerde afwerking lijkt op glas en schilfert wanneer men erop slaat. Om
t email te retoucheren kunt u contact opnemen met uw handelaar van Napoleon-gasbarbecues. De buitenkant
ebruikt. Roestvrijstalen onderdelen verkleuren (ze worden goudkleurig of bruin) wanneer ze worden opgewarmd.
t schoonmaken te vergemakkelijken. De bak moet vaak worden gereinigd
en
73
je
AARSCHUWING!
W
plekken. Gebruik de gasbarbecue niet indien de slang er zo uitziet. Laat het onderdeel vervangen door uw
Napoleon-handelaar in gasbarbecues of door een erkend gasinstallateur.
Buis Brander: De brander is vervaardigd uit dik roestvrij staal (type 304), maar vanwege de overmage hie en
de corrosieve omgeving zal zich blauwverkleuring voordoen. Verwijder de blauwverkleuring met een koperen
borstel.
L
ET OP!
Ontstop verstopte openingen met een open paperclip. Maak de branderopeningen niet groter. Spinnen en
insecten worden aangetrokken door de geur van propaan- en aardgas. De brander is op de venlaeklep
voorzien van een insectenscherm. Zo is de kans kleiner dat insecten in de brander nesten gaan bouwen,
hoewel het probleem niet volledig kan worden geëlimineerd. Nesten of spinnenwebben doen de brander met
een zachtgele of oranje vlam branden of veroorzaken brand (terugslag) ter hoogte van de venlaeklep onder
het bedieningspaneel. Indien u de brander binnenin wenst schoon te maken, moet hij eerst uit de barbecue
worden gehaald. Verwijder de zich in het midden van de brander bevindende schroef. Til de achterkant van de
brander omhoog om hem te verwijderen. Maak de binnenkant van de brander schoon met een soepele voor
venturibuizen bestemde borstel. Schud los afval uit de brander, door de gasinlaat. Zorg ervoor dat het insec
s
choon is, strak vastzit, lintvrij is en geen sporen vertoont van ander afval. Controleer ook of de venelopenin
schoon zijn. Maak de openingen niet groter. Plaats de brander terug op zijn plaats. Controleer of de klep in de
brander gaat wanneer u deze installeert.
AARSCHUWING!
W
brander na het reinigen, de/het klep/uiteinde de brander in gaat voordat u uw
gasgrill aansteekt. Als de klep niet in de brander zit, kan brand- of explosiegevaar
ontstaan.
Beware Van Spinnen
Slang: Con
He
t is erg belangrijk dat bij het herinstalleren van de
troleer op afgeschaafde, gesmolten, doorgesneden en gebarsten
tenscherm
gen
Aluminium Gietwerk: Maak het gietwerk regelmag schoon met lauw zeepwater. Aluminium roest niet, maar
vanwege de hoge temperaturen en de weerselementen, kan zich op aluminiumoppervlakken oxidae voordoen.
Op het gietwerk ziet u dan wie vlekken. Om het opnieuw zijn oorspronkelijk uitzicht te geven, kunt u die vlekken
afvegen en het gietwerk polijsten met jn schuurpapier. Veeg het oppervlak af om afval te verwijderen en verf het
met tegen hoge temperaturen bestendige, speciaal voor barbecues bestemde verf. Zorg ervoor dat dingen in de
omgeving niet mee besproeid worden. Volg de aanwijzingen van de spuitbus.
ww.napoleongrills.com
w

74
Probleemoplossing
Problem Mogelijke oorzaken Oplossing
Lag
e temperatuur / kleine
vlam wanneer klep in hoge
stand staat.
Propaan - Verkeerde manier van aansteken.
Volg zorgvuldig de instruces voor
aansteken op. Alle afsluiters van de
gasbarbecue moeten dicht zijn wanneer
de gaskraan wordt opengedraaid. Draai
de gases langzaam open met het oog
op gelijke druk. Zie de instruces i.v.m.
aansteken.
Aardgas – te kleine
toevoerleiding.
Beide gassoorten – onjuiste oorverwarming.
Overmag opakkerende
vlammen/warmte
onevenredig verdeeld.
Uit de branders komt een
gele vlam en u neemt ook
een gasgeur waar.
Zoemende regelaar. Normaal op warme dagen. Dit is geen mankement. Dit wordt
Onjuiste voorverwarming.
Te grote ophoping van vet en as op de
kookplaten en in de lekbak.
Mogelijke aanwezigheid van een spinnenweb
of ander afval.
De grooe van de leiding moet
overeenkomen met de installiecode.
De barbecue dient voorverwarmd te
worden met hoofdbranders in de hoge
stand gedurende 10 à 15 minuten.
De barbecue dient voorverwarmd te
worden met beide hoofdbranders in de
hoge stand gedurende 10 à 15 minuten.
Maak de kookplaten en de lekbak
regelmag schoon. Bekleed de bak
niet met aluminiumfolie. Zie de
reinigingsinstruces.
Verwijder de brander en maak hem
grondig schoon. Zie de algemene
onderhoudsinstruces.
veroorzaakt door de interne trillingen
in de regelaar en beïnvloedt niet
de werking of de veiligheid van de
gasbarbecue. Zoemende regelaars
worden niet vervangen.
De branders steken elkaar
niet aan.
De “verf” in het deksel of de
kap bladdert blijkbaar af.
www.napoleongrills.com
Verstopte openingen aan de achterzijde van de
brander.
Vetophoping op binnenzijde. Dit is geen mankement. De afwerking
Maak de branderopeningen schoon.
Zie de onderhoudsinstruces voor
branders.
van het deksel en de kap is van email en
bladdert niet af. Het aladderen wordt
veroorzaakt door verhard vet, dat in
de verfachge stukken droogt. Dit vet
schilfert af. Dat kan worden voorkomen
met regelmag reinigen. Zie de
reinigingsinstruces.

HOUD UW BON ALS BEWIJS VAN AANKOOP VOOR DE GELDIGHEID VAN UW GARANTIE
75
Bes
GARANTIE
MODEL:
AANKOOPDATUM:
SERIENUMMER:
(schrijf hier uw gegevens voor gemakkelijke referene)
Voordat u contact opneemt met de klantenservice, controleer de NAC website voor uitgebreidere reinig
onderhoud, het oplossen van problemen en de instruces voor het vervangen van onderdelen op www.
com. Neem direct contact op met de fabriek voor vervangende onderdelen of schadeclaims. De klantenser
is bereikbaar tussen 9 AM en 5 PM (Eastern Standard Time) op 1-866-820-8686 of fax op 1-705-727-4282.
Voor het aandelen van een schadeclaim, hebben wij de volgende gegevens nodig:
1. Model en serienummer van het apparaat.
2. Onderdeelnummer en beschrijving.
3. Een korte duidelijke omschrijving van het probleem (‘gebroken’ is niet voldoende).
tellen Van Reserveonderdelen
-INFORMATIE
ing,
napoleongrills.
vice
4. Bewijs van aankoop (kopie van de factuur).
In enkele gevallen kan de vertegenwoordiger van de klantenservice verzoeken de onderdelen naar de fabriek
terug te sturen voor onderzoek, voordat vervangende onderdelen worden geleverd. De onderdelen dienen
vooruitbetaald verscheept te worden ter aene van de klantenservice met de volgende gegevens:
1. Model en serienummer van het apparaat.
2. Een korte duidelijke omschrijving van het probleem (‘gebroken’ is niet voldoende).
3. Bewijs van aankoop (kopie van de factuur).
4. Retour autorisaenummer – verstrekt door de vertegenwoordiger van de klantenservice.
Let u er op, voordat u contact opneemt met de klantenservice, dat de volgende zaken niet door de garane
worden gedekt:
-transportkosten, provisie of exportbelasngen
-arbeidsloon voor het de- en herinstalleren
-kosten voor servicegesprekken om de problemen vast te stellen
-ontkleuring van roestvrijstalen onderdelen
-mankementen aan onderdelen door gebrek aan reiniging en onderhoud, of het gebruik van onjuiste reinigingsmiddelen
(ovenreiniger).
ww.napoleongrills.com
w

76
W
AARSCHUWING!
werkhandschoenen aan te trekken en een veiligheidsbril op te zeen. Hoewel we er alles aan doen om het
mon
tage proces zo goed en zo veilig mogelijk te maken, is het kenmerkend voor bewerkte stalen onderdel
da
t de uiteinden en hoeken scherp kunnen zijn en verwondingen kunnen veroorzaken als ze jdens de
montage niet op de juiste manier worden behandeld.
He
t is aanbevolen om jdens het uitpakken en monteren voor uw veiligheid
en
Aan De Slag
1. Haal alle onder
v
erpakte onderdelen uit de binnenkant. Gebruik de onderdelenlijst om ervoor te zorgen dat alle noodzakelijke
onderdelen aanwezig zijn.
2. V
ernieg het verpakkingsmateriaal niet totdat de grill volledig gemonteerd is en naar tevredenheid werkt.
3. Monteer de grill op de plaats waar die gebruikt gaat worden. Leg het karton of een handdoek op de grond
om de onderdelen te beschermen tegen verlies of beschadiging jdens montage.
4. De meeste roestvrijstalen onderdelen worden geleverd in een beschermende plasc laag die verwijderd
moet worden voordat de grill gebruikt wordt.
5. Volg alle instruces in de volgorde zoals die is uitgelegd in deze handleiding.
6. Er zijn twee mensen voor nodig om de grillbak op het gemonteerde onderstel te llen.
Als u vr
zijn, bel dan gerust onze klantenservice op 1-866-820-8686 tussen 9 AM en 5 PM Eastern Standard Time
agen hee over de montage of werking van de grill, of als er beschadigingen of ontbrekende on
delen van het onderstel, de behuizing en de grill uit het karton. Til het deksel op en haal alle
der
delen
Benodigd gereedschap v
3/8“ and 5/8“
auben-
schr
schlüssel
philips
schroevendraaier
oor montage (gereedschap niet meegeleverd)
Buig
tang
Hammer
www.napoleongrills.com

5/8”(16mm)
77
1. Installae w
Bevestig (4) wielen op de onderste plank. Zet ze stevig vast.
6 x Z570-0027 (1/4-20 x 3/8”)
ielen
3/8”(10mm)
2. Ins
tallae linker- en rechterpaneel onderstel
Installeer het achterpaneel en zorg dat de sleuven in het paneel naar boven zijn gericht. Zet het paneel op de
onderste plank en balanceer de gaten uit. Bevestig met behulp van (6) 1/4-20 x 3 / 8 "schroeven.
ww.napoleongrills.com
w

78
9 x N570-0042 (#10-24 x 3/8”)
3. Ins
tallae Achterpaneel Van De Wagen
Plaats het achterpaneel van de wagen tussen de twee zijpanelen. Zorg ervoor dat de grote gaten in de
achterwand aan de onderkant zijn zoals geillustreerd. Bevestig met behulp van (9) # 10-24 x 3 / 8 "schroeven,
drie aan elke kant.
4 x N570-0042 (10-24 x 3/8”)
4. Ins
tallae kaststeun voorkant
Bevestig de gemonteerde bovenrails aan de voorzijde van de zijpanelen met behulp van (4) # 10-24x 3 / 8 "
schroeven. Voor gemakkelijke installatie start met alle schroeven (4) # 10-24 x3 / 8 " alvorens vast te schroeven.
www.napoleongrills.com

4 x N570-0042 (10-24 x 3/8”)
79
5. Ins
Maak het hieschild met (4) 10-24 x3/8“ schroeven. Maak het ene uiteinde vast onder de velsrand in het gemaakte gat en
het andere uiteinde aan de onderkant van de kaststeun.
tallae hieschild
ww.napoleongrills.com
w

80
4 x Z570-0027 (1/4-20 X 3/8”)
6. Ins
tallae Grillbak
Om ins
tallaeproblemen te voorkomen, dient u de opbinddraad die de regulator/verbinder op z’n plaats houdt onder het
c
ontrolepaneel te verwijderen, voordat u het grillgedeelte installeert. Dit was in de fabriek geïnstalleerd om de regulatorslang
jdens transport te beschermen en is niet langer nodig. (Zorg ervoor dat u de slang niet beschadigd als u opbinddraad
verwijderd). Laat de regulator in de kleine opening tussen de het hieschild van de tank en de rechterkant van de behuizing
zakken.
Breng het grillgedeelte omhoog en plaats het op de geassembleerde wagen, zodat de openingen aan de bovenkant van de
zijp
anelen samenvallen met de openingen in de onderkant van de bodem. Maak het vanuit de binnenkant vast met (4) 1/4-20 x 1/2”
schroeven, twee aan elke kant.
r zijn voor deze stap twee mensen nodig
E
2 x Z570-0022 (M4X8mm)
3/8”(10mm)
Alle cilinder
s van 7kg of meer, dienen waterpas buiten de afgesloten ruimte (onder de plaat aan de rechterkant) te worden geplaatst. De geassembleerde slang dient door het te maken gat in het rechterpaneel
te worden geleid.
www.napoleongrills.com
Bevesg regulator ann
zijpaneel
behulp van (2) M4 x 8” schroeven.

2 x N105-0011 (doorvoer)
7. Installae kastdeur
Plaats de draaistang door het gat aan de bovenkant van de binnenkant van de deur. Houdt de deur in 1 hand,
dan plaats de draaistang in het gat aan de onderzijde van de voorkant van de kast. Eenmaal veilig te stellen, laat
de stang naar beneden schuiven en door het gat in de onderkant van de deur en in de bus in de onderste plank.
81
Doorvoer
ww.napoleongrills.com
w

82
6 x N570-0042 (#10-24 x 3/8”)
8.Ins
tallae Van De Z
Gebruik (6) # 10-24 × 3 / 8 " schroeven voor iedere zijplank om deze aan de voorkant monteren (3).
Het oppervlak met gaten moet aan het beugeleinde
van de plank zijn.
Zorgen dat deze twee oppervlakken op een lijn zijn.
ijblank aan he
t Voorpaneel
Het oppervlak met gaten moet aan het beugeleinde
van de plank zijn.
Zorgen dat deze twee oppervlakken op een lijn zijn.
www.napoleongrills.com

4X Z570-0026 (M5 X 9.5mm)
83
9. Side Shelf Installae Z
Haak de beugels van de planken op de onderste haken.
ijplank
(4) M5×9.5mm vleugelschroeven,(2) elke kant.
De vleugelschroeven (3) kunnen
worden verwijderd om de plank neer te
klappen voor de opslag van het apparaat.
ww.napoleongrills.com
w

84
1 x N160-0016 (klem)
10. Ins
Plaats de uitstroomopening in de pijp van de brander en bevestig de slang stevig met borgring. Bevestig de
draad van het apparaat naar de elektrode van de zijbrander.
tallae zijbrander
410SB MODELLEN
www.napoleongrills.com

85
11. Ins
Plaats de schroeiplaten in de voet, en plaats deze over elke buisbrander.
tallae schroeiplaat
12. Ins
Plaats de roosters en warmhoudrekken in de voet zoals getoond.
tallae grill en warmhoudrooster.
ww.napoleongrills.com
w

86
13. Installae druippan
Schuif de druippan in de achterkant van de voet zoals getoond. Zorg dat de druippan rust op de rails
aan de onderkant van de voet.
14. Gr
www.napoleongrills.com
ease Tray and Holder Installae Ve
Plaats aluminium vetopvangbak in de houder voor de vetopvangbak en bevestig vervolgens de draad van
de vetopvangbak aan de bodem van de druippan.
topvangbak

2 x N570-0042 (#10-24 x 3/8”)
15. Installae flesopener
Bevestig de flesopener aan de zijkant met behulp van (2) # 10-24 × 3 / 8 "schroeven.
87
ww.napoleongrills.com
w

88
16.Juis
te Verbinding
Slang
Alle cilinder
terkant) te worden geplaatst. De geassembleerde slang dient door het te maken gat in het rechterpaneel
te worden geleid.
www.napoleongrills.com
s van 7kg of meer, dienen waterpas buiten de afgesloten ruimte (onder de plaat aan de rech-

Ins
truces I.V.M. Lektest
89
AARSCHUWING!
W
of onderhoud van gasonderdelen.
W
AARSCHUWING!
verwijder alle ontstekingsbronnen.
LEKTEST: Test het apparaat op lekkage vóór het eerste gebruik, jaarlijks en na vervanging of onderhoud van
gasonderdelen. Rook niet jdens deze test en verwijder alle ontstekingsbronnen. Zie het schema in verband
met lektests voor de te controleren gedeelten.
Schakel alle branderknoppen uit. Draai de gastoevoerkraan open.
Breng met een borsteltje op alle verbindingen en aansluingen van de regelaar, slang, verdeelstukken en
kranen een oplossing van vloeibare zeep en water aan.
Luchtbellen wijzen op een gaslek. Draai het losse onderdeel vast of vervang het door een door de handelaar
aanbevolen stuk.
Als het lek niet kan worden gedicht, sluit dan de gastoevoer af, koppel deze af en laat de barbecue controleren
door het gasbedrijf of de handelaar. Gebruik het apparaat slechts nadat het lek werd gedicht.
Sluit de gastoevoer af.
est het apparaat op lekkage vóór het eerste gebruik, jaarlijks en na vervanging
T
t Op Lekkage Met Behulp Van Een Vuurtje. Rook niet jdens deze test en
Nie
Alle cilinder
s van 7kg of meer, dienen waterpas buiten de afgesloten ruimte (onder de plaat aan de rechterkant) te worden geplaatst. De geassembleerde slang dient door het te maken gat in het rechterpaneel
te worden geleid.
ww.napoleongrills.com
w

90
www.napoleongrills.com
410 Onderdelenlijs
Item
1
2 Z135-0002 rechterkant van gegoten deksel x
3 Z335-0002 inlegstuk voor deksel x
4 Z585-0003 hitteschild deksel x
5 Z010-0003 handvat van deksel x
6 Z080-0001 handvat van bedekking voor deksel x
7 Z580-0001 scharnierschroef voor deksel x
8 Z510-0003 bumper van zwarte siliconen deksel x
9 N685-0006 temperatuurmeter x
10 N385-0129 Napoleon logo x
11 W450-0005 veerklemmen logo x
12 Z570-0027 schroef, 1/4-20 x 3 / 8 "SS x
13 N735-0003 1 / 4" borgring x
14 N570-0080 schroef, # 14 x 1 / 2" x
15 Z570-0021 schroef, # 8 x 1 / 2 "" x
16 Z010-0009 montage van de basis x
17 Z035-0008 bedekking voor achterkant basis x
18 Z475-0004 bedieningspaneel x
19 Z585-0004 hitteschild basis x
20 Z080-0014 cross light bracket x
21 Z710-0002 druippan x
22 Z305-0002 schroeiplaat x
23 Z080-0009 steunbeugel zijplank x
24 Z305-0003 grillroosters - groot x
25 Z305-0005 grillroosters - klein x
26 Z305-0006 warmhoudrek x
27 N105-0001 doorvoerbus, 0,875 " x
28 Z010-0004P verdeelstuk x
33 N720-0044 voorgegoten spruitstuk x
34 W445-0021 3/8 flare-verbinding tot 1/2 " pijp x
35 N530-0023 neerwaartse regelaar x
36 N530-0032 regelaar -DE x
37 Z100-0003 hoofdbrander x
38 N051-0006 ring bedieningsknop x
39 N380-0016R bedieningsknop x
40 Z080-0013 houder vetopvangbak x
41
42 Z570-0022 schroef, M4 x 8mm x
43 N570-0078 schroef, M4 x 8mm x
44 Z570-0026 vleugelschroef M5 x 9,5 mm x
Onderdeel # Beschrijving
Z135-0001 linkerkant van gegoten deksel x
N255-0014 adapter - DE / NL x
N530-0033 regelaar - NL x
N530-0034 regelaar -ES x
N530-0035 regelaar -SE x
N530-0036 regelaar -IT x
N530-0037 regelaar - GB x
N530-0038 regelaar - FR x
N345-0017 slang-BE x
N185-0001
folie vetopvangbak x
t
410

410 Onderdelenlijs
Item
45
46 Z570-0027 schroef, 1/4-20 x 3 / 8 "SS x
47 N570-0135 schouder schroef M6 x 1 / 2 " x
48 N450-0030 moer, M6 x
49 Z476-0001 zijpaneel wagen x
50 Z476-0005 achterpaneel wagen x
51 Z010-0011 montage van onderkant wagen x
52 Z130-0002 wiel, 3 " x
53 Z655-0002 voorbalk wagen x
54 Z010-0014 montage deur x
55 N555-0036 draaistang voor deur x
56 N105-0011 ring deur x
57 N430-0002 magneetsluiting x
61 Z080-0012 flesopener x
62 N555-0025 staafverlichting x
63 N105-0002 ring, 1.5 " x
65 Z570-0027 schroef, 1/4-20 x 3 / 8 "SS x
66 N570-0042 schroef, 10-24 x 3 / 8 " x
67 Z010-0018 zijplank x
68 N340-0006 gereedschapshaak x
70 Z585-0007S hiteschild x
71 Z120-0002 richel linkerzijde plank x
78 Z120-0001 richel rechterkant plank x
80 N570-0019 schroef, 10-24 x 3 / 8 " x
81 N570-0042 schroef, 10-24 x 3 / 8 " x
82 Z450-0009 10-24 moer x
83 Z570-0023 schouderschroef x
84 Z035-0012 linker inzetstuk bodem x
85 Z035-0013 rechterinzetstuk bodem x
Onderdeel # Beschrijving
Z570-0021 schroef, # 8 x 1 / 2 " x
Z370-0001 voornaamste blisterverpakking x
64495-NL rotisserie kit ac
63410 vinyl bedekking ac
t
91
410
x-standard
ac-accessorie
ww.napoleongrills.com
w

92
410 DIA
GRAM ONDERDELEN
www.napoleongrills.com

410SB Onderdelenlijst
Item
1 Z135-0001 linkerkant van gegoten deksel x
2 Z135-0002 rechterkant van gegoten deksel x
3 Z335-0002 inlegstuk voor deksel x
4 Z585-0003 hitteschild deksel x
5 Z010-0003 handvat van deksel x
6 Z080-0001 handvat van bedekking voor deksel x
7 Z580-0001 scharnierschroef voor deksel x
8 Z510-0003 bumper van zwarte siliconen deksel x
9 N685-0006 temperatuurmeter x
10 N385-0129 Napoleon logo x
11 W450-0005 veerklemmen logo x
12 Z570-0027 schroef, 1/4-20 x 3 / 8 "SS x
13 N735-0003 1 / 4" borgring x
14 N570-0080 schroef, # 14 x 1 / 2" x
15 Z570-0021 schroef, # 8 x 1 / 2 "" x
16 Z010-0009 montage van de basis x
17 Z035-0008 bedekking voor achterkant basis x
18 Z475-0004SB bedieningspaneel x
19 Z585-0004 hitteschild basis x
20 Z080-0014 cross light bracket x
21 Z710-0002 druippan x
22 Z305-0002 schroeiplaat x
23 Z080-0009 steunbeugel zijplank x
24 Z305-0003 grillroosters - groot x
25 Z305-0005 grillroosters - klein x
26 Z305-0006 warmhoudrek x
27 N105-0001 doorvoerbus, 0,875 " x
28 Z010-0004SBP verdeelstuk x
29 N720-0055 toevoerbuis zijbrander x
30 N455-0049 opening zijbrander x
31 N160-0016 clip opening zijbrander x
32 N750-0016 lasdraad zijbrander x
33 N720-0044 voorgegoten spruitstuk x
34 W445-0021 3/8 flare-verbinding tot 1/2 " pijp x
35 N530-0023 neerwaartse regelaar x
36 N530-0032 regelaar -DE x
37 Z100-0003 hoofdbrander x
38 N051-0006 ring bedieningsknop x
39 N380-0016R bedieningsknop x
40 Z080-0013 houder vetopvangbak x
Onderdeel # Beschrijving 410SB
N255-0014 adapter - DE / NL x
N530-0033 regelaar - NL x
N530-0034 regelaar -ES x
N530-0035 regelaar -SE x
N530-0036 regelaar -IT x
N530-0037 regelaar - GB x
N530-0038 regelaar - FR x
N345-0017 slang-BE x
ww.napoleongrills.com
w
93

94
410SB Onderdelenlijst
Item
41
42 Z570-0022 schroef, M4 x 8mm x
43 N570-0078 schroef, M4 x 8mm x
44 Z570-0026 vleugelschroef M5 x 9,5 mm x
45 Z570-0021 schroef, # 8 x 1 / 2 " x
46 Z570-0027 schroef, 1/4-20 x 3 / 8 "SS x
47 N570-0135 schouder schroef M6 x 1 / 2 " x
48 N450-0030 moer, M6 x
49 Z476-0001 zijpaneel wagen x
50 Z476-0005 achterpaneel wagen x
51 Z010-0011 montage van onderkant wagen x
52 Z130-0002 wiel, 3 " x
53 Z655-0002 voorbalk wagen x
54 Z010-0014 montage deur x
55 N555-0029 draaistang voor deur x
56 N105-0011 ring deur x
57 N430-0002 magneetsluiting x
61 Z080-0012 flesopener x
62 N555-0025 staafverlichting x
63 N105-0002 ring, 1.5 " x
65 Z570-0027 schroef, 1/4-20 x 3 / 8 "SS x
66 N570-0042 schroef, 10-24 x 3 / 8 " x
67 Z010-0018 zijplank x
68 N340-0006 gereedschapshaak x
69 Z710-0004 plaat zijbrander x
70 Z585-0007S hiteschild x
71 Z120-0002 richel linkerzijde plank x
72 Z010-0019 plank zijbrander x
73 Z335-0006 deksel zijbrander x
74 Z580-0002 draaistang zijbrander deksel x
75 Z485-0001 trekpen x
76 Z100-0002 zijbrander x
77 Z305-0008 rooster zijbrander x
78 Z120-0001 richel rechterkant plank x
79 N570-0078 schroef, M4 x 8mm x
80 N570-0019 schroef, 10-24 x 3 / 8 " x
81 N570-0042 schroef, 10-24 x 3 / 8 " x
82 Z450-0009 10-24 moer x
83 Z570-0023 schouderschroef x
84 Z035-0012 linker inzetstuk bodem x
85 Z035-0013 rechterinzetstuk bodem x
Onderdeel # Beschrijving 410SB
N185-0001
Z370-0001 voornaamste blisterverpakking x
64495-NL rotisserie kit ac
63410 vinyl bedekking ac
folie vetopvangbak
x
x-standard
www.napoleongrills.com
ac-accessorie

410SB DIA
95
GRAM ONDERDELEN
ww.napoleongrills.com
w

V
_
96
Fax naar: 705 727 4282
Bestelformulier voor Accessoires en Onderdelen
A.u.b. schrijf in blokletters
Naam:______________________________________________________________________
Verstuur naar :_____________________________________________________________________________
_________________________________________________________________________________________
_________________________________________________________________________________________
_________________________________________________________________________________________
Tel :_________________________________ Fax :______________________________
Email: __________________________________________________________________
isa of Mastercard Nummer:_______________________________________Vervaldatum: _____________
Handtekening:____________________________________________________________________________
Aantal
Onderdeelnummer Omschrijving
Belasting kan worden toegepast
Mogelijk extra vervoerskosten
Als u een bevestiging wilt, wilt u dan zo vriendelijk zijn een fax nummer of een e-mail adres aan te geven.
www.napoleongrills.com


 Loading...