

Page 1
333 Bayview Avenue, Amityville, New York 11701
For Sales and Repairs, (800) 645-9445
For Technical Service, (800) 645-9440 or visit us at
(Note: Technical Service is for security professionals only)
http://tech.napcosecurity.com/
Publicly traded on NASDAQ Symbol: NSSC
NAPCO iBridgeVideo IBV-DBELL
Video Doorbell
Installation Guide
© NAPCO 2018
WI2304LF 7/18
Description
The NAPCO IBV-DBELL is an HD Infrared power-wired Wi-
Fi outdoor motion-activated Video Doorbell that allows the
viewing of live and recorded video clips through the iBridgeVi-
deo App (Android or iOS). Its integral PIR and two-way
audio connects to your smartphone, allowing for motiontriggered video clip email notifications. To activate the doorbell, you first need an active NAPCO ComNet Dealer account
at www.NapcoComNet.com.
Up to 1080P HD video talk with 140° horizontal angle
IR powered night vision
PIR detection with 3 configurable zones
Work with existing mechanical/electronic chime
Easy installation (Wi-Fi), wide voltage power supply
2-Way talk over the Internet, cloud storage
Included Components
IBV-DBELL Video Doorbell
Chime Kit Module
Mounting Hardware
Mounting Bracket
Mounting Tools
Quick Install Summary:
a. Activate doorbell at www.NapcoComNet.com.
b. Remove power to the doorbell at the breaker.
c. Wire the doorbell and install the Chime Kit module.
d. Power the doorbell (do not mount fully).
e. Install the iBridgeVideo app on your smart device.
f. Launch the iBridgeVideo app and log in.
g. Use the iBridgeVideo app to add and configure the door-
bell.
h. Fully mount the doorbell (finish step "d").
Doorbell and Chime Kit Installation
Installing the Door Bell
1. Remove power to the doorbell at the breaker.
2. Remove the existing wired external doorbell push button from its installation surface and disconnect its two
wires.
3. Place the oval hole in the Mounting Bracket over the
two doorbell wires. Ensure the Mounting Bracket's two
mounting holes are at the top. Using the level to ensure horizontal mounting, mark the location of the three
mounting holes.
4. On brick, stucco, or concrete, use a small drill bit to drill
holes in the mounting surface, and install the anchors
(anchors not needed if mounting on wood or siding).
Secure the Mounting Bracket to the mounting surface
NAPCO iBridgeVideo IBV-DBELL Installation Guide 1
(see Installation Exploded
View on page 7).
5. Connect the existing doorbell
wiring to the IBV-DBELL terminals, then feed the wires
back into the wall. Note:
Wires are non-polarized,
therefore either wire can be
connected to either IBV-
DBELL terminal.
Installing the Chime Module
Non-Polarized Terminals
Installing the Chime Kit module (used only when connecting IBV-DBELL to a wired doorbell chime) helps maintain the correct power to trigger your existing home wired
doorbell chime mechanism.
1. Ensure that the doorbell circuit is unpowered (remove
power at the breaker).
2. Locate the existing internal doorbell chime mechanism
and remove its cover.
3. On the side of the Chime Kit module is a socket; insert
the harness plug into this socket until it snaps in place.
4. Inside the existing internal doorbell chime mechanism
are two wires that are connected to two terminals (one
terminal is usually labeled "FRONT" and the other is
usually labeled "TRANS" or "COMM"). Without removing the existing wires, simply loosen each terminal and
connect one Chime Kit wire to one terminal, and the
other Chime Kit wire to the other terminal.
5. Restore power at the breaker. Ensure the LED at the
front of the IBV-DBELL lights. Note: It might take a
couple of minutes for the IBV-DBELL to fully power
up.
Follow the Doorbell Enrollment process (detailed in the
next section, below) to enroll your IBV-DBELL into
your iBridgeVideo account.
After the IBV-DBELL is fully enrolled, secure the IBV
-DBELL to its Mounting Bracket by sliding the top
of the unit into the protruding tab at the top of the
Mounting Bracket, and secure the bottom of the unit
with the screw provided.
Bottom Screw
Page 2
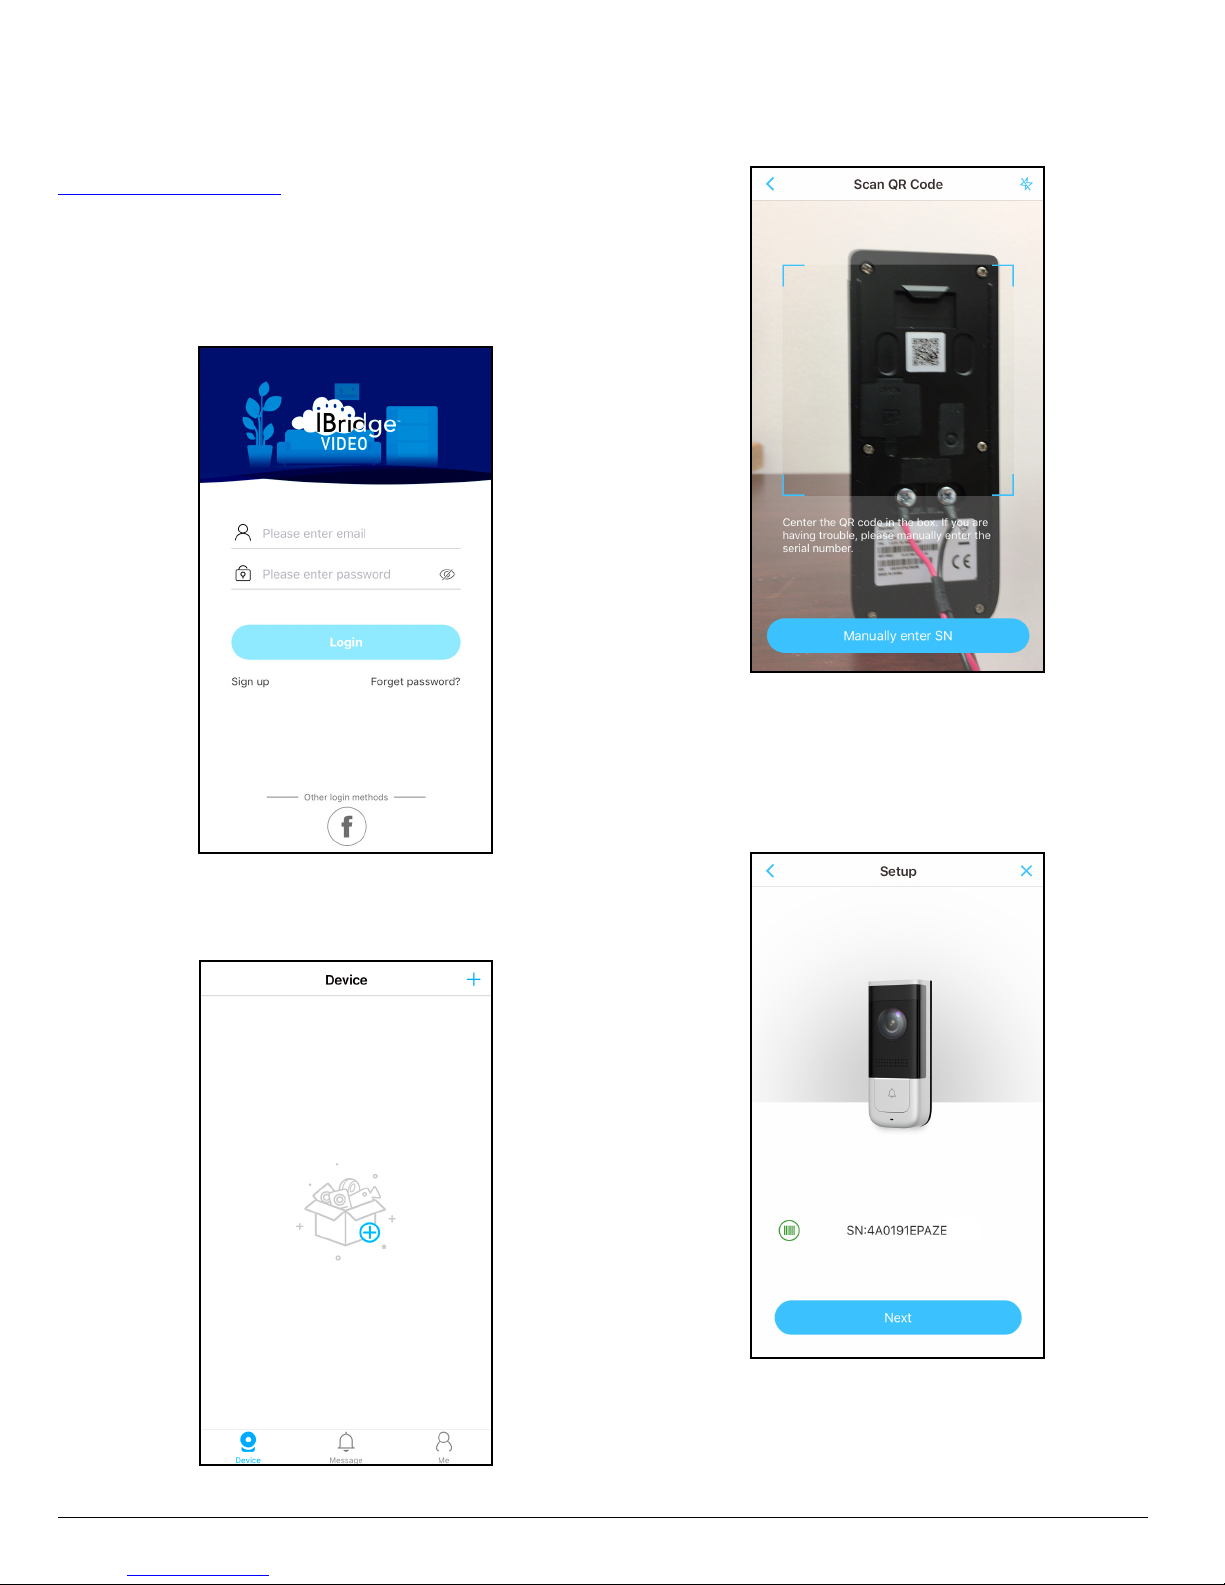
Doorbell Enrollment Using the App
The following steps display Android screen images (iOS devices are similar). Perform the following procedure only after
the doorbell(s) have been activated at
www.NapcoComNet.com. In addition, the doorbell must be
powered (as detailed above) and its blue LED must be flashing continuously. Proceed as follows:
1. Connect your smart device to the local Wi-Fi network.
2. Open the iBridgeVideo app. Type a Username (use
your full email address) and Password and tap Login.
3. Tap "+" to add the doorbell.
4. Scan the QR code located on the back of the doorbell,
then tap OK. If you have trouble scanning the code,
tap Manually e nter SN and type the serial number.
5. Tap Next to connect the doorbell to the Wi-Fi network.
2 NAPCO iBridgeVideo IBV-DBELL Installation Guide
Page 3

6. Enable your doorbell "hotspot": With the doorbell LED
flashing (indicating it is not yet connected to a network), press and release the "Reset" button located on
the back of your doorbell (see diagram on page 7).
The doorbell will beep 3 times and its LED will begin to
scroll. Tap Next.
7. Connect your smart device to your doorbell: Tap Next,
as shown in the image below.
Temporarily go into your smart device "Wi-Fi Settings"
and select the doorbell from the Wi-Fi list, as shown in
the following example image:
(With iOS smart devices)
(With iOS smart devices)
Then return to the app (the screen shown under step
7) and tap Next.
8. Tap to select the name of the 2.4GHz Wi-Fi network to
which you wish to connect your doorbell.
NAPCO iBridgeVideo IBV-DBELL Installation Guide 3
Page 4

9. Type the SSID password of the Wi-Fi network. If you
wish to see the password characters, tap the "eye"
icon to the right of the Password field. To have the
app remember this password, check Save pa ssword.
When finished, tap Connect (the LED start flashing).
Important: Be sure the password is typed correct-
ly or the doorbell will not connect to your wireless network. You can always select another network by tapping Select other network.
10. Wait for the Wi-Fi connection process to complete
(see image below). If the connection is successful,
the LED on the face of the doorbell will stop flashing
and will turn on solid blue. Tap Yes to continue. If
the attempted connection is unsuccessful, try again
by tapping Add Again. Note: It may take up to a
minute to establish a connection.
If Doorbell Does Not Connect (LED keeps Flashing)
Check the Wi-Fi signal strength from the doorbell location
using the smart device to ensure there is sufficient Wi-Fi
signal strength (3 bars or more is recommended). Also
verify the Wi-Fi password for the SSID selected. If needed, tap the Add Again button to repeat steps 6-11.
11. After the confirmation screen appears (below) indicating a successful Wi-Fi connection, confirm your Time
Zone by tapping the arrow located to the right and
selecting the from the pull-down list. You can also
enable Daylight Saving Time (DST). To save these
time settings when connecting to future devices, enable Set to defa ult and tap Next.
12. Test the system by pressing the "Call Push Button" (see
diagram on page 7). Live video feed will appear.
4 NAPCO iBridgeVideo IBV-DBELL Installation Guide
Page 5

To program your IBV-DBELL to trigger a new or exist-
ing wired doorbell chime mechanism (mechanical or electronic), proceed as follows:
13. In the previous screen, tap the "gear" icon (located at
the top right of the screen shown in step
12). When the De vice Info screen opens,
tap Link Chime.
14. Tap + New Link.
15. To link to a wireless IBV-CHIME, select it from the
list and tap Save. Note: The IBV-CHIME must be
enrolled before it will appear in the list (refer to the
IBV-CHIME User's Guide).
If using the existing wired doorbell chime mechanism
(mechanical or electronic), tap Link Third Pa rty Chime
located at the bottom of the screen that appears.
16. Tap to select the type of wired doorbell chime mechanism, either Electronic Chime or Mechanical Chime,
then tap OK.
NAPCO iBridgeVideo IBV-DBELL Installation Guide 5
Page 6

Set Up Motion Detection
Motion Detection allows the app to send notifications
and video clips when movement is sensed in a selected
area.
1. In the Device "Home" screen, tap the "
open the Device Info screen.
Note: You can tap the ">" icon or anywhere on the
title bar to open this screen.
2. Tap PIR Area.
3. In the detection area image, "tap and hold" the
"zoom" sliding scale at left to increase or decrease
the detection range. Selected zones of sensitivity
will turn blue.
You can disable a particular zone by tapping it; tap
again to re-enable the zone.
4. When finished, tap the "save" (floppy disk icon) located at the top right to save your settings.
>" icon to
How to Answer a Doorbell
When the doorbell rings, your smart device will receive a
notification:
Mute Accept Hang up
Tap Accept (green telephone icon) and a live streaming
video will appear on your smart device:
How to Program a New Wi-Fi SSID
If you change your Wi-Fi network (for example, you re-
place your wireless router), and you need to reconnect
your doorbell to your new network:
1. In the main Device screen that displays all of your
video devices, tap to select the doorbell video
thumbnail that indicates "Offline".
2. Tap the Settings gear icon to open the Device Info
screen (shown below).
3. Tap Delete Device to remove the doorbell from your
iBridgeVideo app.
4. Turn to page 2 and follow steps 3-10 in the section
"Doorbell Enrollment Using the App" to re-enroll
your doorbell.
6 NAPCO iBridgeVideo IBV-DBELL Installation Guide
Page 7

Reset to Factory Default Settings
The doorbell MUST be powered before proceeding.
If the doorbell LED is blinking or scrolling:
Press and hold the Reset button until the LED turns on
solid (about 15-20 seconds), then release button.
If the doorbell LED is on solid:
Press and hold the Reset button until the LED turns off
momentarily and then turns on solid (approximately 1520 seconds), then release button.
Notes:
1. Listen for a small "pop" from the doorbell speaker that
occurs a few seconds after releasing the Reset button.
This "pop" confirms the doorbell is rebooting.
2. If you hear 3 quick beeps after you release the Reset
button, then you did not hold the button long enough to
reset the doorbell (repeat the reset procedure).
Blue LED Status Indications
When the doorbell is powered and operating normally, the
blue LED remains on solid. Other LED indications are:
Blue Scrolling ......................... Calling
............................................... During Wi-Fi Enrollment
Blue Solid ............................... Talking
Blue Flashing ......................... No Network Connection
Specifications
Video Compression .............. H.264
Image Sensor ....................... 1/2.9" 2MP
Lens ...................................... 1.9mm
Angle of View ........................ H: 140°
Day/Night .............................. ICR, 5m
Audio Compression .............. G.711
Audio Input............................ Omnidirectional Mic
Audio Output ......................... Built-in Speaker
Bidirectional Talk .................. Supports Dual-way Bi-directional talk
Operation Mode
Keypad ................................. Single Mechanical Button
Motion Detection ................... PIR, 5m, H: 120°
Network
Wi-Fi ..................................... IEEE802.11b/g/n, 2.4GHz
General
Ingress Protection ................. IP55
Memory Slot.......................... Micro SD, Max 64GB
Installation ............................ Surface
Material ................................. Plastic
Power Supply ........................ 16-24VAC or 12-24VDC
Power Consumption ............. Standby<3W, Work <5W
Environment Temperature .... -20°C ~ 50°C (-4°F ~ 122°F)
Dimensions ........................... 119.0mm×47.0mm×29.0mm
(4.7 in. x 1.9 in. x 1.1 in.)
Weight .................................. 200g (7.1 oz.)
Working Humidity .................. 10% ~ 95%RH
Installation Exploded View
IBV-DBELL Parts
1
2
3
4
5
6
NAPCO iBridgeVideo IBV-DBELL Installation Guide 7
8
9
3
7
10
11
12
1. PIR
2. Camera Lens
3. Infrared Light (2)
4. Loudspeaker
5. Indicator LED
6. Call Push Button
7. Microphone
8. "Protruding tab" for mounting
9. Micro SD Card Slot (not used)
10. QR Code
11. Reset Button
12. Screw Terminals for Power
Input
Page 8

WIRING DIAGRAMS
For existing electronic or
mechanical home doorbell
chime box mechanisms,
Chime Kit Module and AC
power adapter.
Existing Doorbell
Transformer
16–24VAC
Electronic or
Mechanical
Door Chime
Chime Kit
For existing wireless home
doorbell chime mechanisms
and AC power adapter.
Also compatible with 1224VCD transformers.
Existing
Doorbell
Transformer
16–24VAC
or
12-24VDC
NAPCO LIMITED WARRANTY
NAPCO SECURITY SYSTEMS, INC. (NAPCO) warrants its
products to be free from manufacturing defects in materials and
workmanship for twelve months following the date of
manufacture. NAPCO will, within said period, at its option, repair
or replace any product failing to operate correctly without charge
to the original purchaser or user.
This warranty shall not apply to any equipment, or any part
thereof, which has been repaired by others, improperly installed,
improperly used, abused, altered, damaged, subjected to acts of
God, or on which any serial numbers have been altered, defaced
or removed. Seller will not be responsible for any dismantling or
reinstallation charges.
THERE ARE NO WARRANTIES, EXPRESS OR IMPLIED,
WHICH EXTEND BEYOND THE DESCRIPTION ON THE FACE
HEREOF. THERE IS NO EXPRESS OR IMPLIED WARRANTY
OF MERCHANTABILITY OR A WARRANTY OF FITNESS FOR
A PARTICULAR PURPOSE. ADDITIONALLY, THIS
WARRANTY IS IN LIEU OF ALL OTHER OBLIGATIONS OR
LIABILITIES ON THE PART OF NAPCO.
Any action for breach of warranty, including but not limited to
any implied warranty of merchantability, must be brought within
the six months following the end of the warranty period. IN NO
CASE SHALL NAPCO BE LIABLE TO ANYONE FOR ANY
CONSEQUENTIAL OR INCIDENTAL DAMAGES FOR BREACH
OF THIS OR ANY OTHER WARRANTY, EXPRESS OR
IMPLIED, EVEN IF THE LOSS OR DAMAGE IS CAUSED BY
THE SELLER'S OWN NEGLIGENCE OR FAULT.
In case of defect, contact the security professional who
installed and maintains your security system. In order to exercise
the warranty, the product must be returned by the security
professional, shipping costs prepaid and insured to NAPCO.
After repair or replacement, NAPCO assumes the cost of
returning products under warranty. NAPCO shall have no
obligation under this warranty, or otherwise, if the product has
been repaired by others, improperly installed, improperly used,
abused, altered, damaged, subjected to accident, nuisance,
flood, fire or acts of God, or on which any serial numbers have
been altered, defaced or removed. NAPCO will not be
responsible for any dismantling, reassembly or reinstallation
charges.
This warranty contains the entire warranty. It is the sole
warranty and any prior agreements or representations, whether
oral or written, are either merged herein or are expressly
cancelled. NAPCO neither assumes, nor authorizes any other
8 NAPCO iBridgeVideo IBV-DBELL Installation Guide
person purporting to act on its behalf to modify, to change, or to
assume for it, any other warranty or liability concerning its
products.
In no event shall NAPCO be liable for an amount in excess of
NAPCO's original selling price of the product, for any loss or
damage, whether direct, indirect, incidental, consequential, or
otherwise arising out of any failure of the product. Seller's
warranty, as hereinabove set forth, shall not be enlarged,
diminished or affected by and no obligation or liability shall arise
or grow out of Seller's rendering of technical advice or service in
connection with Buyer's order of the goods furnished hereunder.
NAPCO RECOMMENDS THAT THE ENTIRE SYSTEM BE
COMPLETELY TESTED WEEKLY.
Warning: Despite frequent testing, and due to, but not limited
to, any or all of the following; criminal tampering, electrical or
communications disruption, it is possible for the system to fail to
perform as expected. NAPCO does not represent that the
product/system may not be compromised or circumvented; or
that the product or system will prevent any personal injury or
property loss by burglary, robbery, fire or otherwise; nor that the
product or system will in all cases provide adequate warning or
protection. A properly installed and maintained alarm may only
reduce risk of burglary, robbery, fire or otherwise but it is not
insurance or a guarantee that these events will not occur.
CONSEQUENTLY, SELLER SHALL HAVE NO LIABILITY FOR
ANY PERSONAL INJURY, PROPERTY DAMAGE, OR OTHER
LOSS BASED ON A CLAIM THE PRODUCT FAILED TO GIVE
WARNING. Therefore, the installer should in turn advise the
consumer to take any and all precautions for his or her safety
including, but not limited to, fleeing the premises and calling
police or fire department, in order to mitigate the possibilities of
harm and/or damage.
NAPCO is not an insurer of either the property or safety of the
user's family or employees, and limits its liability for any loss or
damage including incidental or consequential damages to
NAPCO's original selling price of the product regardless of the
cause of such loss or damage.
Some states do not allow limitations on how long an implied
warranty lasts or do not allow the exclusion or limitation of
incidental or consequential damages, or differentiate in their
treatment of limitations of liability for ordinary or gross
negligence, so the above limitations or exclusions may not apply
to you. This Warranty gives you specific legal rights and you may
also have other rights which vary from state to state.
Wireless
Door Chime
 Loading...