

Nakamichi Shockwafe Pro 7.1 User Manual
USER GUIDE
Our one-stop support solution:
www.nakamichi-usa.com/faq
Phone Support: (415) 805 6913
(Weekdays 10am - 7pm PST; Weekends 10am - 5pm PST)

Package Contents ...............................................................................................................4
Control and Connections.....................................................................................................5
Setting up the SHOCKWAFE PRO 7.1 System .................................................................8
Setting your TV................................................................................................................. 13
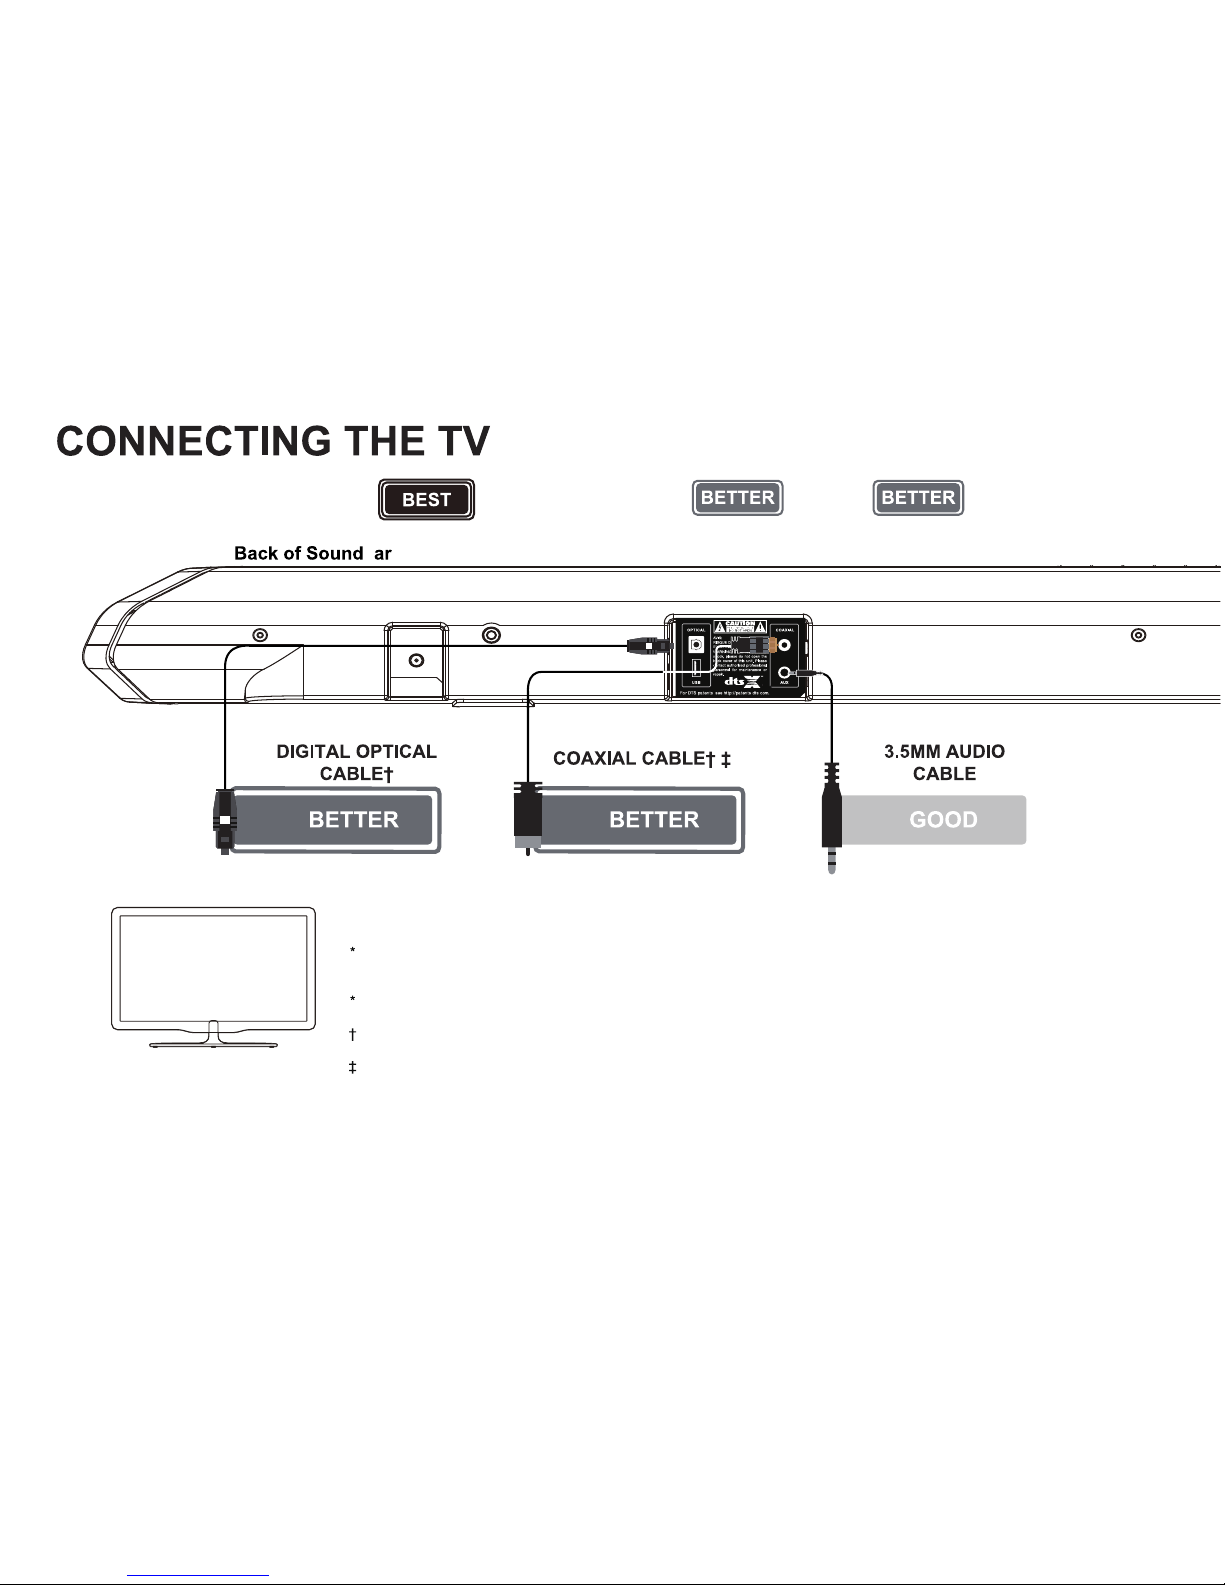
Connecting theTV ............................................................................................................ 14
Advance Setup: Non-HDMI ............................................................................................. 16
Advance Setup: HDMI...................................................................................................... 17
One Device Setup ............................................................................................... 18
Two Device Setup................................................................................................ 19
Three Device Setup............................................................................................. 20
Four Device Setup (4K TV) ................................................................................ 21
Four Device Setup (1080p and below) ............................................................... 22
Audio Settings for Streaming Devices.............................................................................. 23
Using the Remote............................................................................................................. 24
Accessing SOURCE on your Remote .............................................................................. 25
Accessing SETUP on your Remote.................................................................................. 26
Accessing MENU on your Remote................................................................................... 27
Accessing INFO on your Remote..................................................................................... 28
Accessing Audio Settings on your Remote ...................................................................... 29
Saving Audio Setting to System Memory......................................................................... 30
Accessing ROOM SIZE on your Remote ......................................................................... 31
Using Bluetooth Mode ...................................................................................................... 32
Re-linking the Subwoofer with the Soundbar ................................................................... 33
Wall-Mounting the Soundbar............................................................................................ 34
Wall Mounting the Satellite Speakers............................................................................... 36
Firmware Upgrade............................................................................................................ 37
Help & Troubleshooting .................................................................................................... 38
Warranty Information & Customer Support ...................................................................... 39
Glossary ........................................................................................................................... 40
Specification ..................................................................................................................... 42
Legal & Compliance ......................................................................................................... 43
TABLE OF CONTENTS
3

4
Soundbar Power Adapter
(Length: 5 feet)
2 x Satellite Speaker Audio Cables
(Length 32.8 ft. each)
(Length: 5 ft.)
(Length: 5 ft.)
Digital Optical cable
12 x Wall Screws
12 x Screws Brackets
2 x Mounting Screws
4 x Mounting Screws
6 x Soundbar
and Satellite
(Length: 5 ft.)
1 x Subwoofer Power Cable
1 x Soundbar Power Cable
(Soundbar) (Satellite Speakers)
Wall Mount
Brackets
Mounting Guide
(Length: 4 ft.)
3.5mm Audio Cable
1 x SHOCKWAFE PRO 7.1
Soundbar
1 x Wireless Subwoofer
BLUETOOTH / USB MODE ONLY
HDMI 2 HDMI 3
CENTR
CENTR
+
+++
+
+ +
+
MOVIE
ENTER
TAINMENT
LED
SIZE
MUSIC
V S D
CLEAR VOICE
SETUP
RETURN INFO
LED DIMMER
BASS VOL
MENU
ENTER
STEREOPURE DIRECT DSP OFF
SUR
ON
OFF
TREB
TREB
LIP
SYNC
AUTO
VOL
SB L/R
SB L/R
S L/R
S L/R
LIP
SYNC
OPTICAL
2
AUX
SYSTEM MEMORY
HDMI
ARC
HDMI 4 COAXIAL
USB
1
NIGHT
ROOM SIZE
DIALOG
CONTROL
1 x Remote Control
with Batteries

HDMI OUT [1]
(ARC TO TV)
HDMI IN [4]
(Compatible with
HDCP 2.2, 4K HDR
Pass-thru)
HDMI IN [2]
(Compatible with
HDCP 2.2, 4K
HDR Pass-thru)
HDMI IN [3]
(Compatible with
HDCP 2.2, 4K
HDR Pass-thru)
USB Music Playback
(WAV & MP3) and Firmware
Upgrade
OPTICAL
Digital Optical
Audio input
AUX
Analog Audio Input
(Stereo 3.5mm)
COAXIAL
Digital Coaxial
Audio input
5
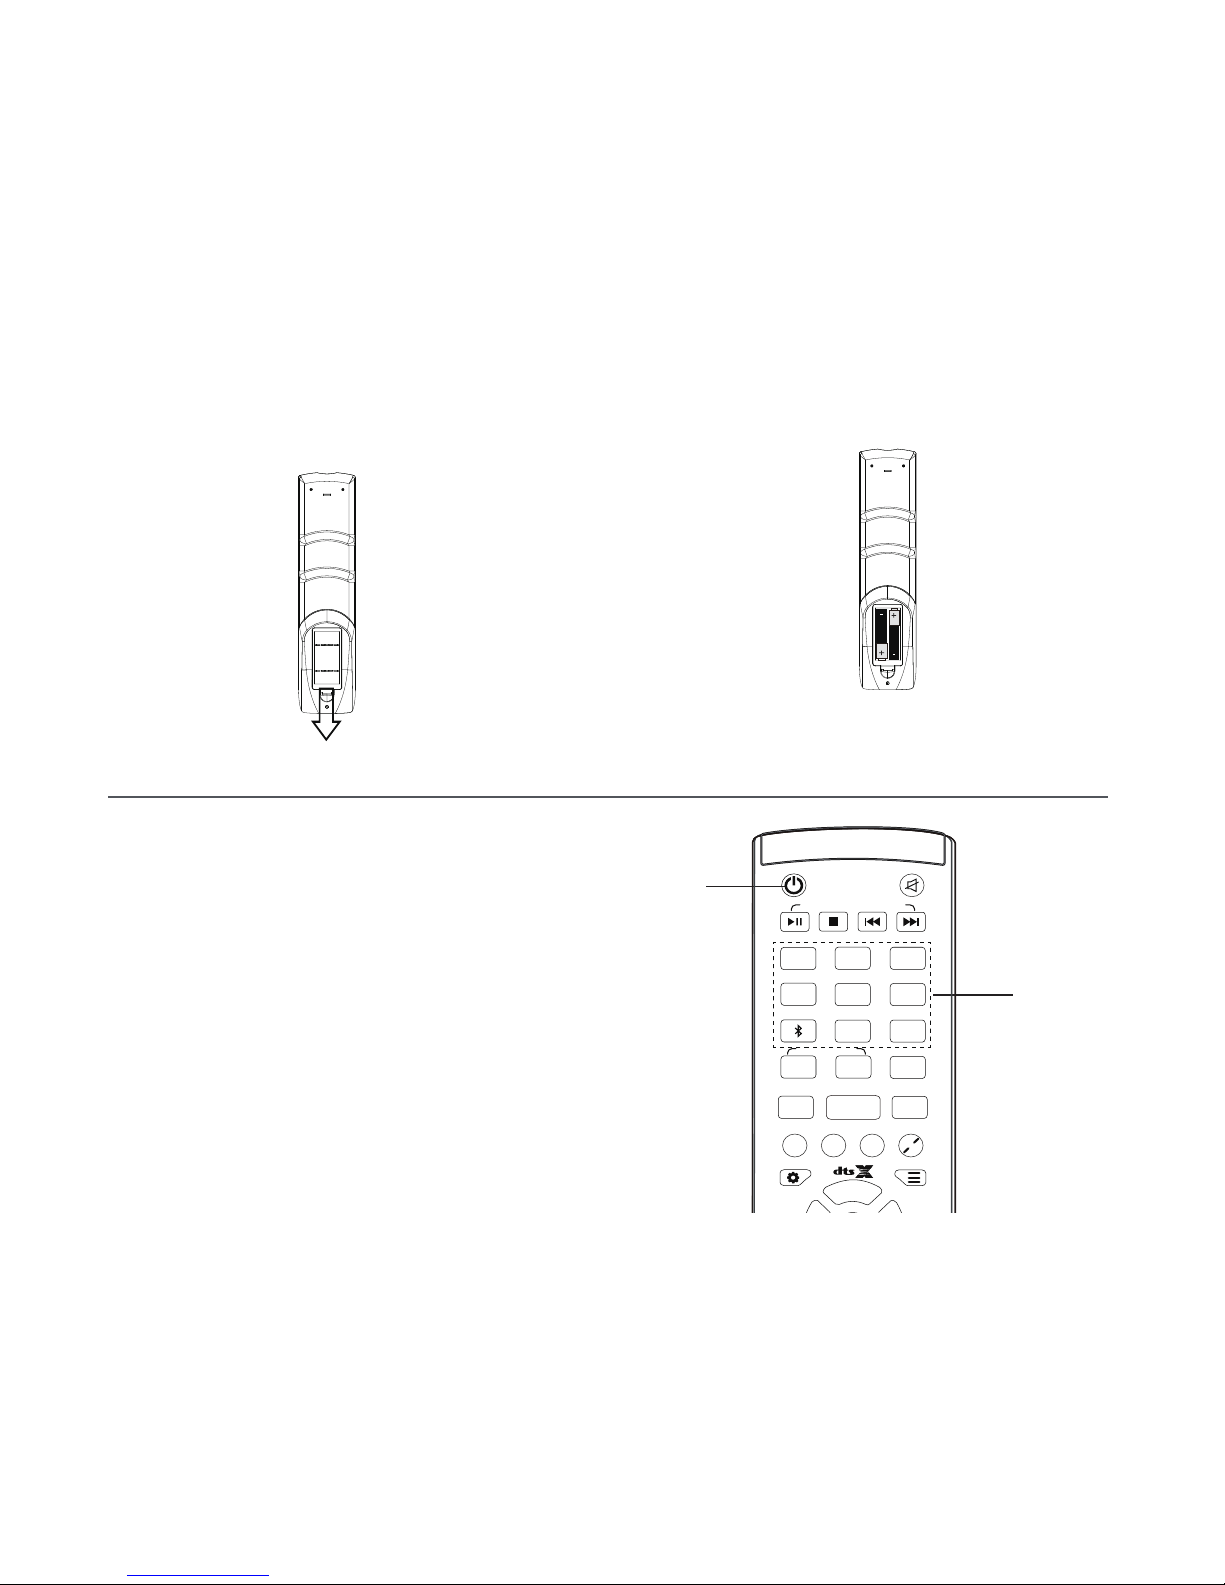
b
DC IN
Power Supply
PRO 7.1 Ch
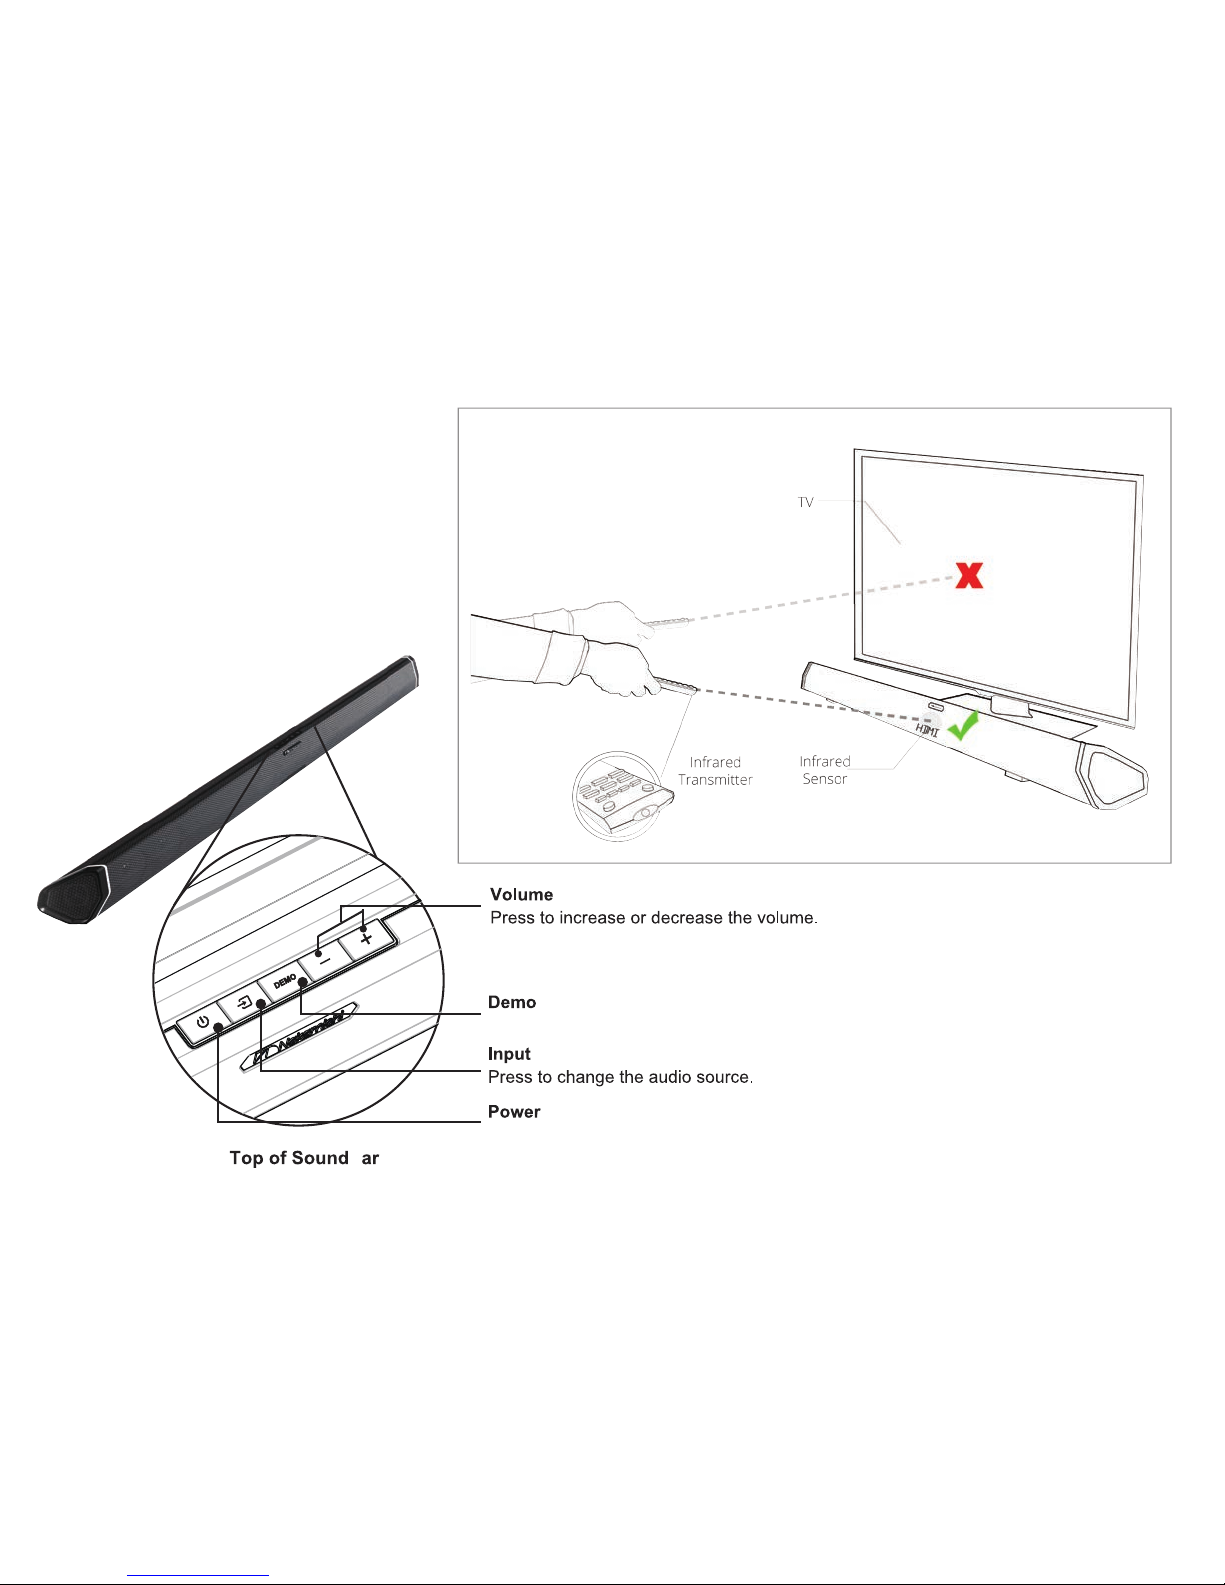
Press to turn ON Soundbar or go to STANDBY mode.
Press to play NAKAMICHI audio test tone on each channel.
b
REMOTE ANGLE
Tilt the remote downwards by
15-25 degrees for best response
(as if you are aiming the remote
slightly towards the ground).
6
7
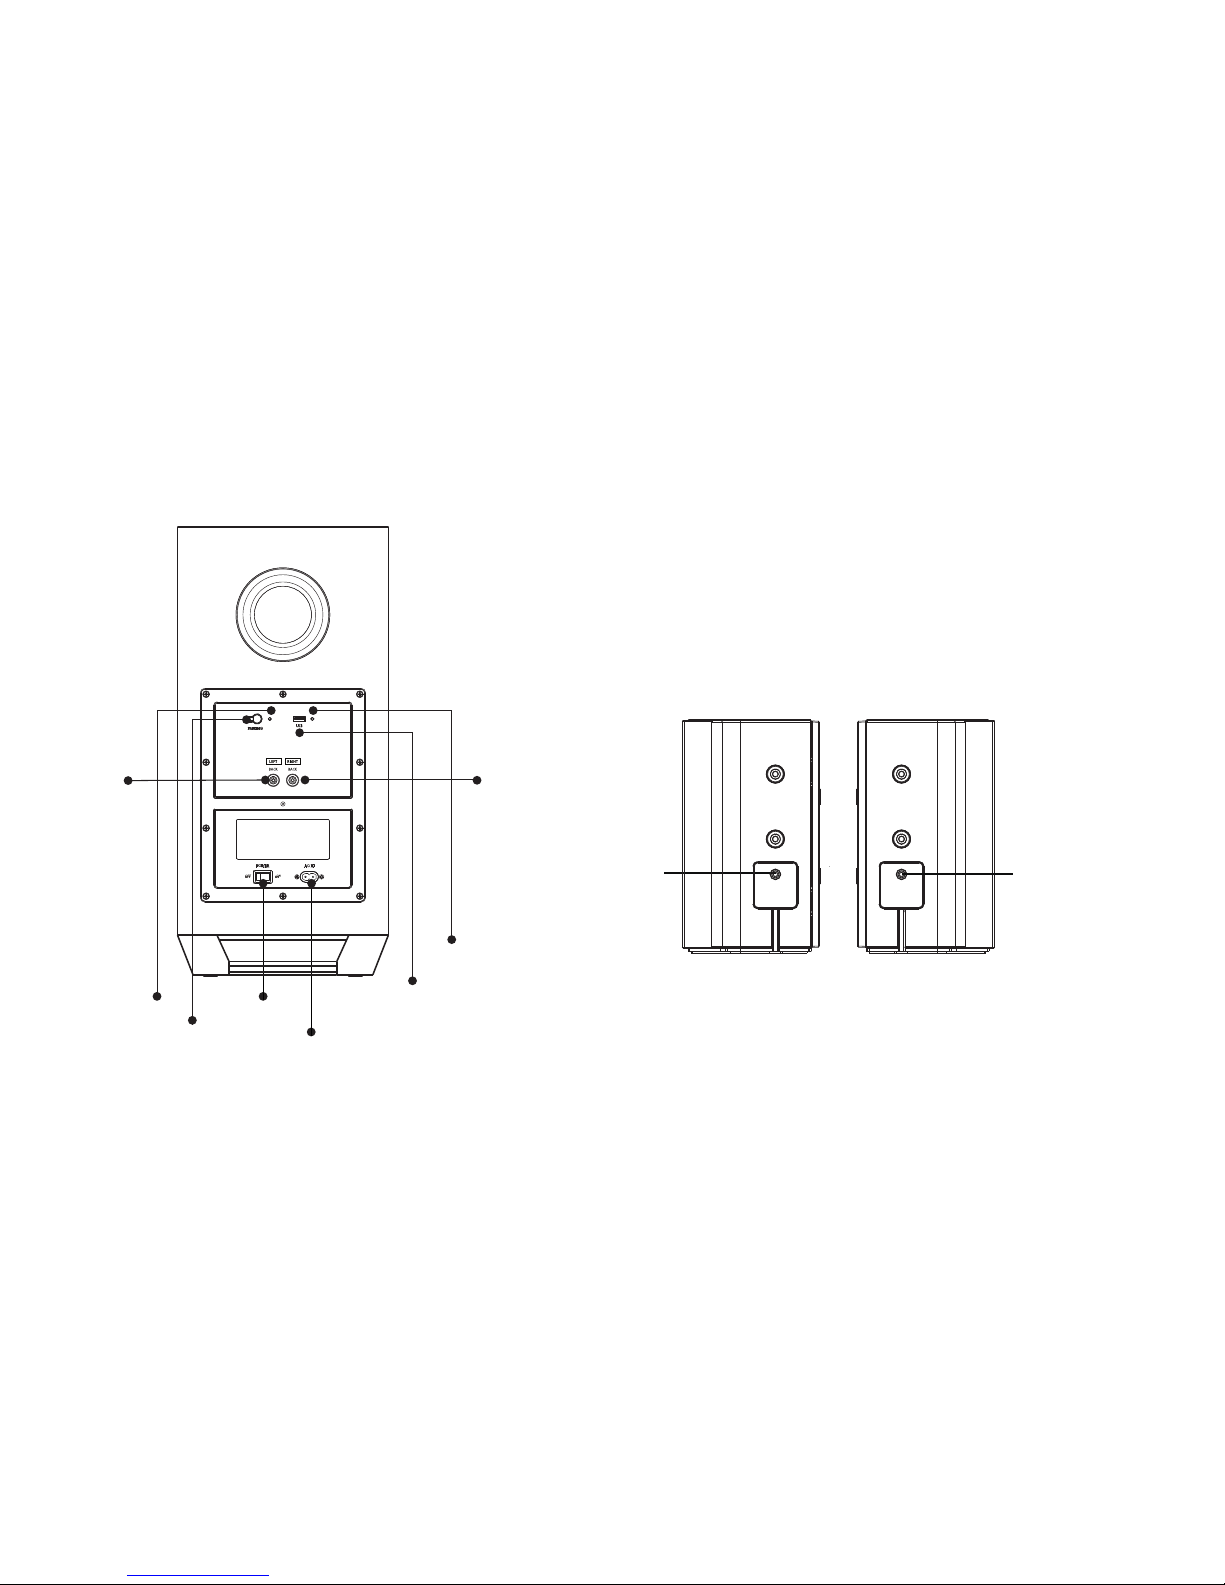
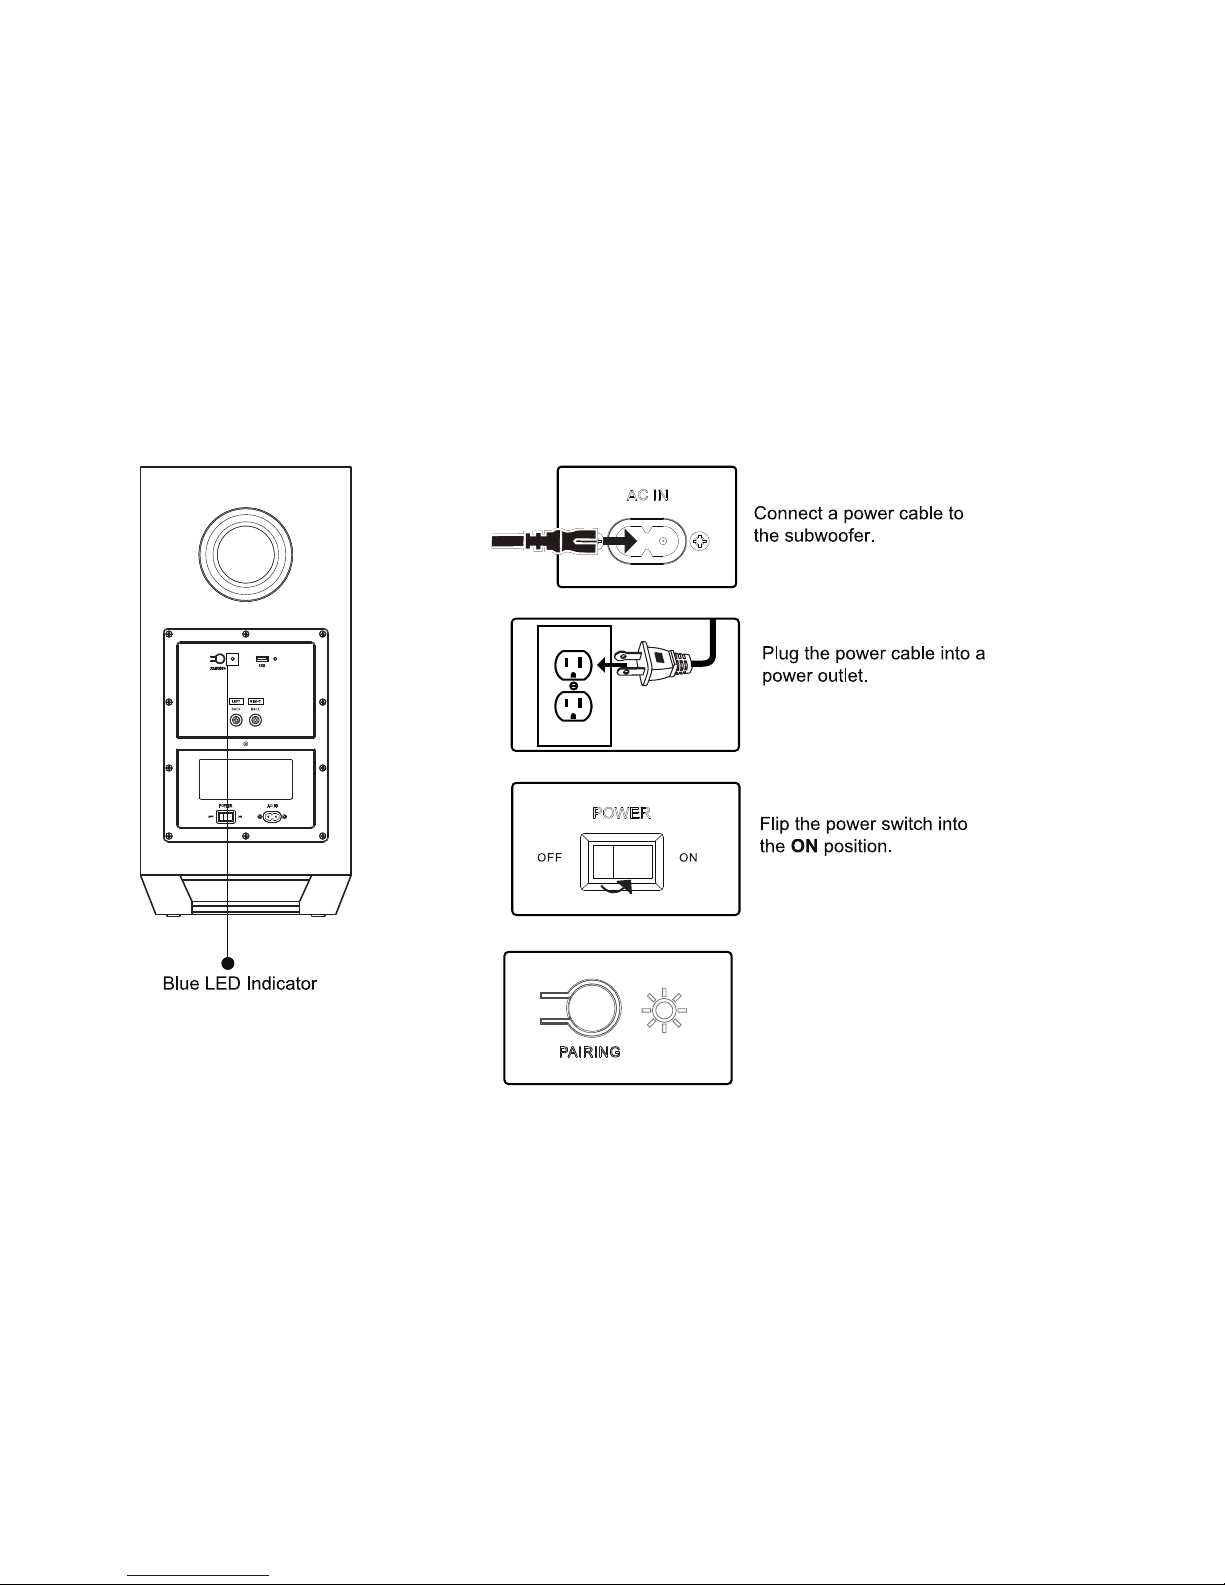
Back of Subwoofer
Pairing
LED indicator
Pairing Button
Power Switch
USB IN
(For Firmware upgrade only)
RED LED Indicator
(Firmware upgrade indicator)
Back of Satellite Speakers
Satellite Speaker Port
(Connects to Subwoofer)
Satellite Speaker Port
(Connects to Subwoofer)
LEFT RIGHT
Connect to
LEFT BACK
Satellite
Speaker
Connect to
RIGHT BACK
Satellite Speaker
Power Port

1 SETTING UP THE SHOCKWAFE PRO SYSTEM
8
Diagram on the right is the recommended speaker placement with optimal distance. Actual distance can vary based on actual room layout.
9 ft (2.5m)
Min. Distance
Note:
Illustration is not to scale. Speaker stands are not included.
Surround back speaker drivers should be at ear level and pointed right at the listener’s sitting area.
6.5 ft (2m)
Option B
Option B
6.5 ft (2m)
Option A (Recommended) Option A (Recommended)
135
O
- 150
O
135O - 150
O
Min. Min.

Back of Soundbar
Plug the power adapter to the sound bar
and into an electrical outlet.
9
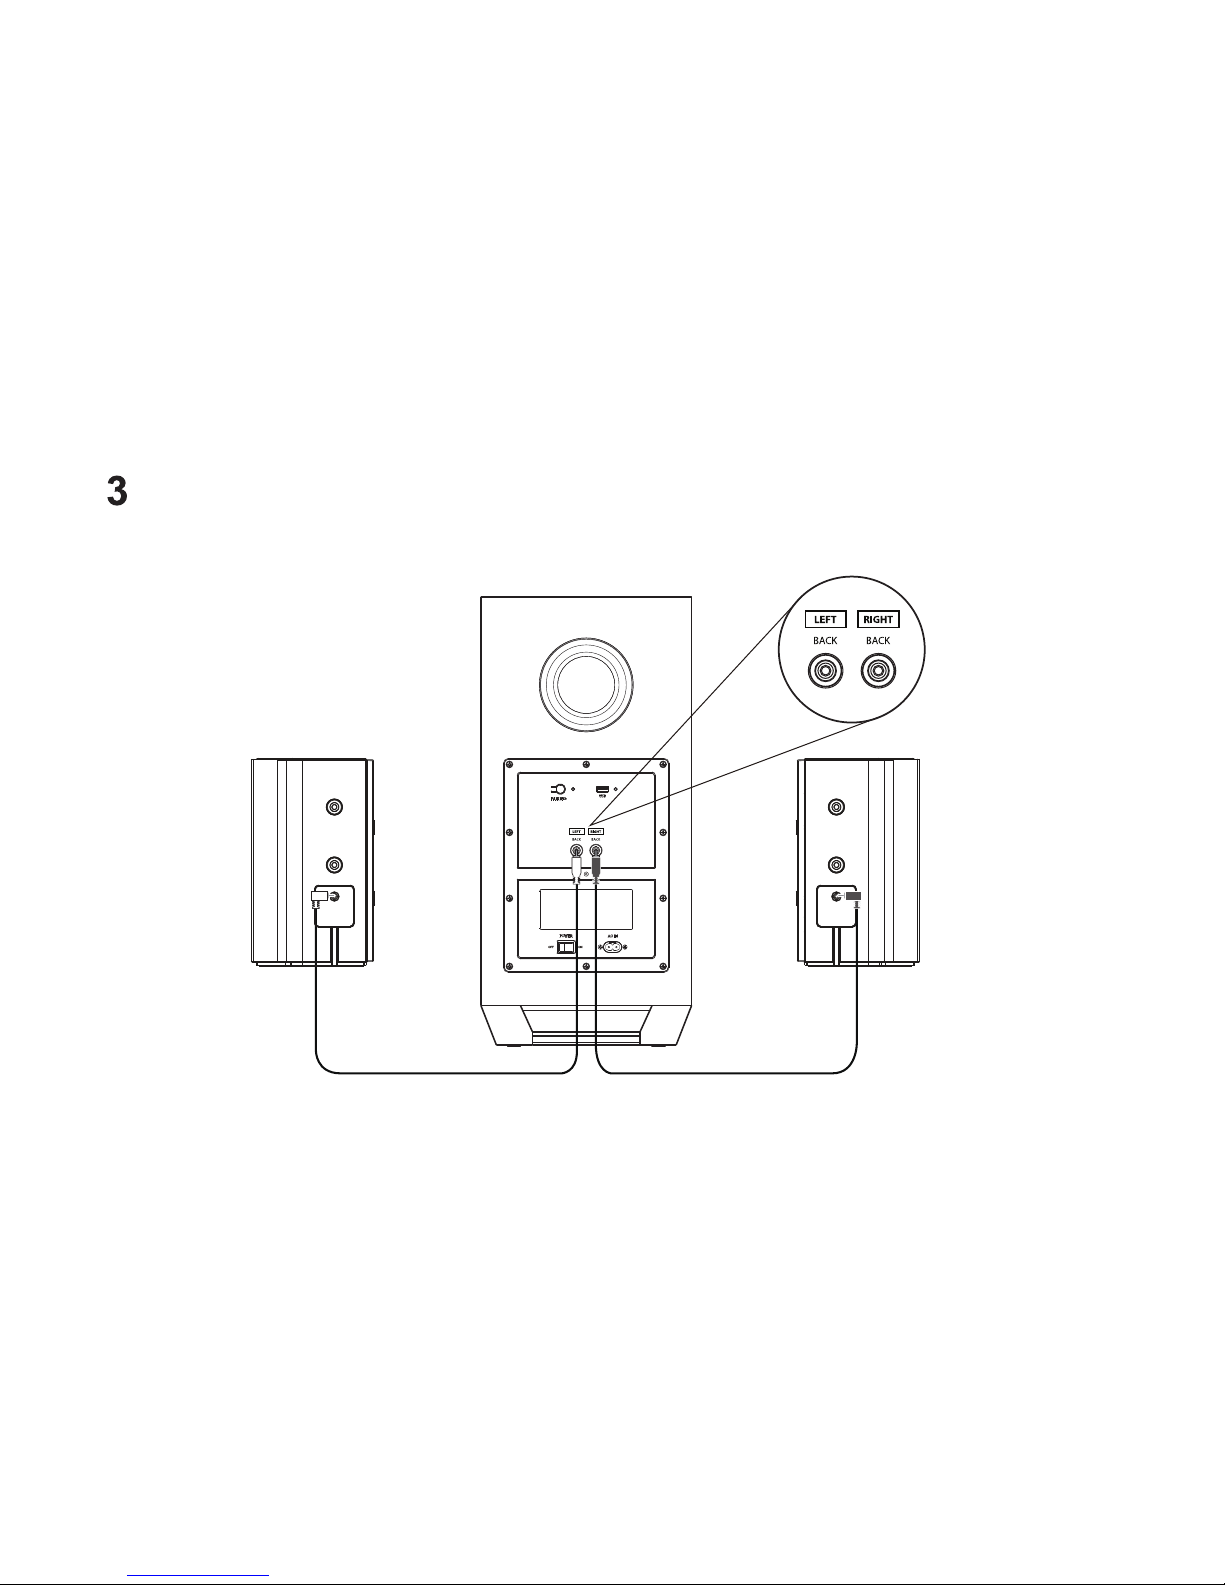
Connect the Surround LEFT and RIGHT BACK satellite speakers to the subwoofer using the included satellite
speaker audio cables.
10
LEFT RIGHT
11
4
5
6
7
Blinking Blue Light: subwoofer is in
pairing mode.
Blue Light Stays On: subwoofer
successfully paired.
Note: If the Blue LED light stays blinking, press and hold
pairing button until Blue LED light start blinking fast
to establish wireless connection to the subwoofer.
Power
Remove the battery cover by
pulling it out from the remote.
8 9
10
Top
Insert the included batteries in the
accessories and gently push the
battery cover back into place.
Turn your soundbar on by pressing the Power
button. Use respective input keys to select an
audio input source to be played.
BLUETOOTH / USB MODE ONLY
Source
Top
+
SETUP MENU
V S D
CLEAR VOICE STEREO PURE DIRECT DSP OFF
SYSTEM MEMORY
DSP
HDMI 2HDMI
3
MOVIE
ENTER
TAINMENT
MUSIC
OPTICAL
2
AUX
HDMI
ARC
HDMI
4
COAXIAL
USB
1
NIGHT
12
13
*More set-up on HDMI-CEC, visit: www.nakamichi-usa.com/cec
From the SYSTEM menu, enable CEC and ARC
(SAC) functions.
From the CEC menu, select Device Discovery to
register the soundbar with the TV.
(whichever is available)
You will need to connect your soundbar to you TV’s HDMI
ARC port using a high speed HDMI 2.0 cable.
14
b
Options for connecting your TV: HDMI (See Next Page), OPTICAL , COAXIAL
!
Note: Be sure to connect to an audio output port on TV, not an audio input port.
Not all TVs have the audio outputs shown above. To connect the soundbar directly to your other devices
(Blu-ray player, game system, etc.) see your device’s user manual.
Cable appearance may dier from the ones supplied.
If there is no audio during the setup, see page 40 for Help & Troubleshooting
Cable not included
 Loading...