

SETTING UP YOUR
HOME THEATER
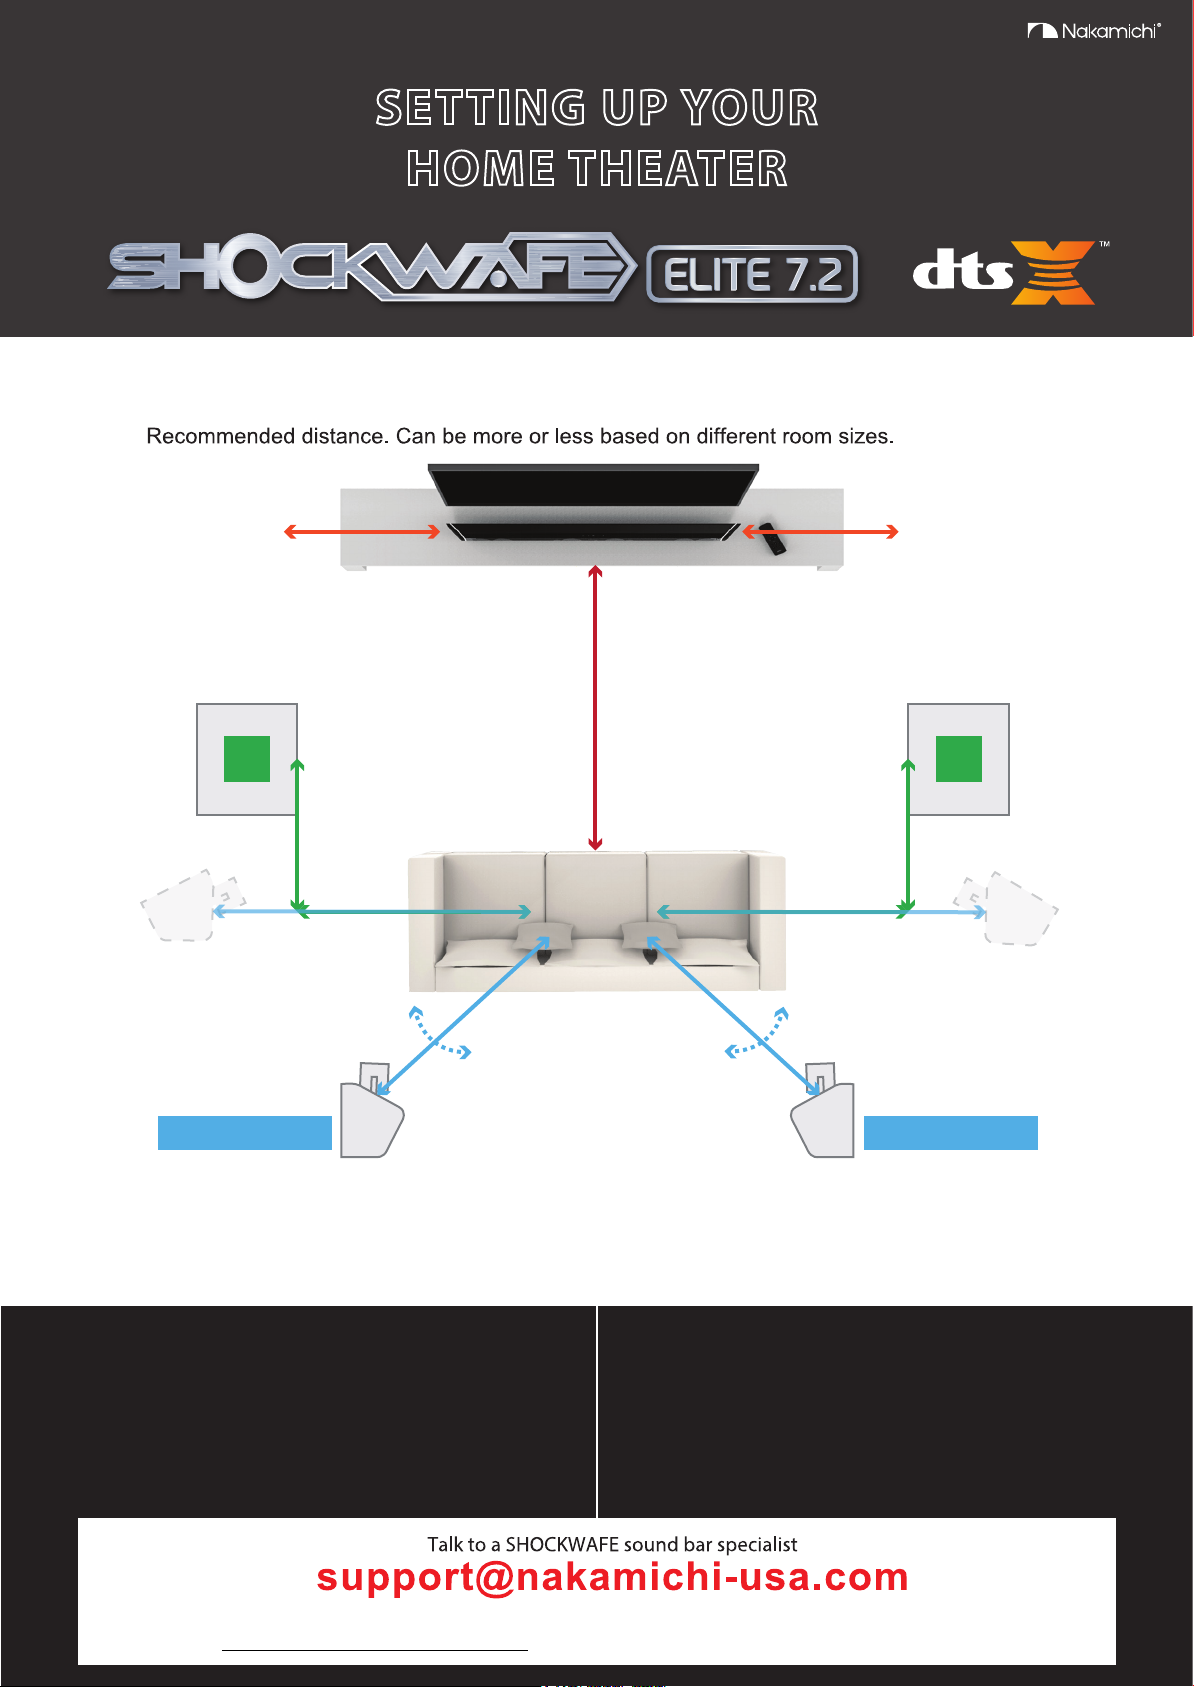
1. Surround soundbar system placement
3.2 ft (1m)
Clearance
9 ft (2.5m)
Sub
Left
3.2 ft (1m)
5 ft (1.5m)
6.5 ft (2m)
o o
90 -110
6.5 ft (2m) 6.5 ft (2m)
Surround Back Left Surround Back Right
Distance
3.2 ft (1m)
Clearance
3.2 ft (1m)
5 ft (1.5m)
o o
90 -110
Sub
Right
6.5 ft (2m)
Option BOption B
Option A (Recommended)Option A (Recommended)
Note:
Illustration is not to scale. Speaker stands are not included.
Surround back speaker drivers should be at ear level and pointed right at the listener’s sitting area.
STOP
PLEASE DO NOT
RETURN THIS UNIT
Talk to a SHOCKWAFE sound bar specialist
24HRS
RESPONSE TIME
GUARANTEED
OR LESS
support@nakamichi-usa.com
Web Support: www.nakamichi-usa.com/helpdesk Phone Support: (415) 805 6913 (Mon - Fri 10am - 7pm PST)
Web support: www.nakamichi-usa.com/faq Phone Support: (415) 805 6913
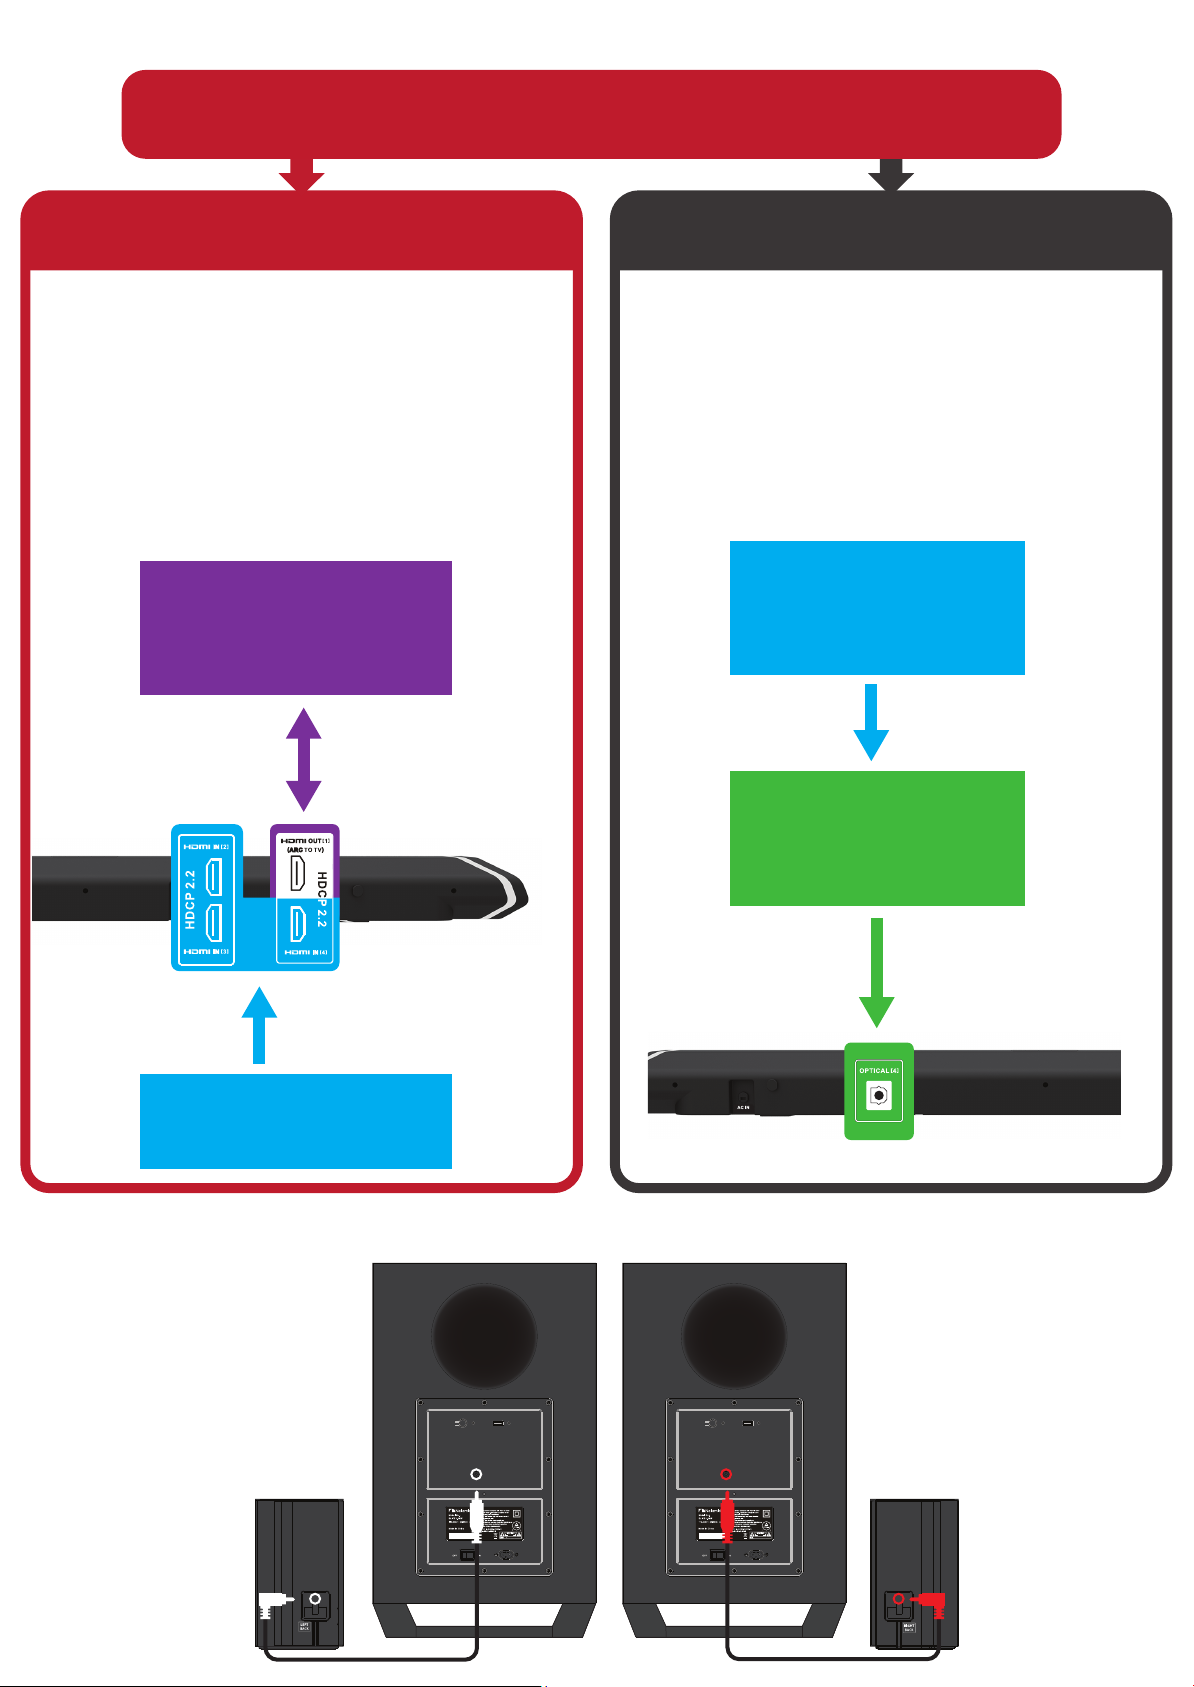
2. Connecting with a TV and other devices
2AGB6SWPRO51
®
®
Is the HDMI IN jack on your TV labeled ARC?
YES NO
Connect source devices such as a Blu-ray Disc
player, cable box, or satellite box to any of the
HDMI IN jacks (HDMI 2/3/4) on the Sound Bar. If
source devices are currently connected to a TV,
disconnect them from the TV and connect them
directly to the Soundbar to get the highest quality
surround sound of Dolby Audio, DTS-HD Master
Audio and DTS-X.
TV HDMI ARC Connection to Soundbar.
TV
(ARC)
ARC
SHOCKWAFE
SHOCKWAFE PRO 5.1
,Dolby Audio and the
®
®
2AGB6SWPRO51
double-D
1612
If the TV is not compatible with HDMI ARC,
connect the TV’s OPTICAL OUTPUT jack to the
Sound Bar’s OPTICAL INPUT.
Note :
Make sure that the cables are firmly inserted.
Devices
HDMI
TV
(Optical)
Back of Sound Bar
OPTICAL
HDMI
AVIS:
RISQUE DE CHOC
ELECTRIQUE / NE PAS OUVRIR
DTS, the Symbol, and DTS-HD are registered trademarks of DTS, Inc.
Devices
120V~60Hz 0.6A
Back of Sound Bar
3. Setting up satellite speakers to the subwoofer
LEFT Back Satellite speaker to
LEFT Subwoofer.
USB
PAIRING
USB
PAIRING
RIGHT Back Satellite speaker
to RIGHT Subwoofer.
POWER
AC IN POWER
AC IN

PAIRING
USB
Setting up the
2AGB6SWPRO51
®
®
SHOCKWAFE
SHOCKWAFE PRO 5.1
,Dolby Audio and the
double-D
1612
RISQUE DE CHOC
ELECTRIQUE / NE PAS OUVRIR
AVIS:
DTS, the Symbol, and DTS-HD are registered trademarks of DTS, Inc.
4. 5.
remote control
Turning on the TV
+
-
+
6. Turning on the Shockwafe Elite 7.2
Back of BOTH Subwoofer
(1) Connect the AC power cords of the
120V~60Hz 0.6A
POWER
AC IN
Flip the power switch into
the ON position.
soundbar and wireless subwoofers.
(2) Press (power) on the remote
control of the sound bar.
(3) The front panel display lights up.
(4) Confirm that the power indicator of
the subwoofer is lit in BLUE LED.
(5) Turn on the source device.
Power ON
7. Listening to your soundbar system
To listen to the audio of the TV
POWER
ON/OFF
INPUT
SELECTION
BLUETOOTH / USB MODE ONLY
HDMI
HDMI 2 HDMI 3
ARC
OPTICAL
HDMI 4 COAXIAL
AUX
SYSTEM MEMORY
2
1
MUSIC
MOVIE
CLEAR VOICE
STEREO PURE DIRECT DSP OFF
V S D
SETUP
+
ENTER
RETURN INFO
DIALOG CONTROL
BASS VOL
CENTR
CENTR
S L/R
S L/R
SIZE
+
ROOM SIZE
LED
LED DIMMER
TREB
+
+
TREB
SB L/R
+
+
SB L/R
USB
NIGHT
ENTER
TAINMENT
DSP
MENU
+
LIP
SYNC
LIP
SYNC
ON
SUR
OFF
SUR
VOL +/-
+
Select the desired program using the remote control of the TV.
(1) The screen switches to the television programming and the TV
audio is output to the Sound Bar.
(2) If there is no sound, press HDMI ARC on the remote control of
the Sound Bar until “ARC” appears in the front LED Display panel.
To enjoy an input device other than the TV
Select the HDMI input or Digital (Optical/Coaxial) input using the
Sound Bar remote control.
(1) The Sound Bar will change input according to your selection.
Input selection will appear in the front LED Display panel
Adjust the volume
(1) Adjust the volume by pressing Vol +/− on the remote control of
the Sound Bar.
(2) Adjust the volume of the subwoofer by pressing Bass +/− on the
remote control of the Soundbar.
(3) For details on the EQs adjustment, refer to “Accessing EQs on
your Remote pg. 28” in the User Manual (separate document).
Note:
When using HDMI 2/3/4 via HDMI ARC to your TV, make sure that
the TV’s source is switch to the HDMI ARC.
Setup completed! Enjoy!

SETTING UP YOUR HOME THEATER
Troubleshooting
No TV sound is output from the system, or no picture is displayed on the TV.
• Press HDMI ARC on the remote control of the Sound Bar until “ARC” appears in the front panel
display on the Sound Bar.
• Make sure that the input and output of the HDMI jacks on the Sound Bar are correct.
• Disconnect the cables that are connected between the TV and the Sound Bar, then connect them
firmly again. Disconnect the AC power cords of the TV and the Sound Bar from the AC outlets
(mains), then connect them again.
• Depending on the order in which you turn on the TV and the Sound Bar, the Sound Bar may enter
muting mode and “Mute” may appear in the front panel display. In this case, turn on the TV first, then
the Sound Bar.
• When the TV and the Sound Bar are connected via an HDMI cable, enable the HDMI-CEC control
for HDMI function on the TV. For details on the TV’s settings, refer to the operating instructions
supplied with the TV. For more information about the Sound Bar HDMI-CEC control for HDMI function,
refer to the User Manual - Advance Setup: HDMI pg. 17 (separate document).
• Check the sound setting of the TV. When the TV is connected to the Sound Bar, change the audio
setting on the TV to external speakers.
No picture or sound from the device connected to the system is output.
• Press input source on the remote control of the Sound Bar until the input connecting the desired
device appears on the front panel display of the Sound Bar.
• Make sure that the input and output of the HDMI jacks on the Sound Bar are correct.
• Disconnect the cables connected to the system, and then connect them again. Make sure that the
cables are firmly inserted.
No sound or only a very low-level sound is heard from the subwoofer.
• Press Vol +/− on the remote control of the Sound Bar to increase the volume.
• If experiencing any audio cuts or static,check your audio format and make sure that it is set to
BITSTREAM not PCM. Refer to www.helpdesk.nakamichi-usa.com/audio-settings
If the problem is not solved even though you have tried the measures above, refer to “Help & Troubleshooting, pg. 37” in the User manual (separate document).
STOP
PLEASE DO NOT
RETURN THIS UNIT
24HRS
RESPONSE TIME
GUARANTEED
OR LESS
Talk to a SHOCKWAFE sound bar specialist
support@nakamichi-usa.com
Web support: www.nakamichi-usa.com/faq Phone Support: (415) 805 6913 (Mon - Fri 10am - 7pm PST)
 Loading...