


O W N E R S M A N U A L
P r e a m p l i f i e r s

1.0 Equipment installation
1
Normally your Naim equipment will have been installed by the dealer who sold
it to you even if you live outside their immediate vicinity. Your dealer is
responsible for making sure that the system sounds exactly as it should and
information given here is not intended to reduce this responsibility in any way.
page
1 1.0 Equipment Installation
1.1 cables and
connections
2 2.0 Getting Started
2.1 switching on and off
2.2 running in
2.3 mains supply
2.4 siting the equipment
2.5 if you have a problem
3 3.0 Warnings
4 4.0 Connection
4.1 mains lead
4.2 non-rewireable mains
plugs
4.3 fuse carrier
4.4 plug fuses
5 nac 52
8 nac 82
12 nac 102
15 nac 112
18 narcom 2 remote handset
20 EC Declaration of Conformity
to Appropriate Standards
1.1 cables and connections
Please do not modify the standard interconnect cables supplied with your Naim
equipment. This is important for safety as well as performance. One end of each
cable is marked with a band to establish its correct orientation. The band always
marks the end that connects to the signal source.
Loudspeaker leads are also very important. Naim loudspeaker cable is correct for
your system and your dealer will make up leads to suit your equipment
installation. The leads should each be at least 3.5 metres long and of equal
length. The recommended maximum is 20 metres. Loudspeaker leads are, like
interconnect leads, directional, and should be connected so that the printed
arrow points towards the speakers. Using alternative loudspeaker cable will
degrade performance, and may even damage your amplifier. An exception to
these loudspeaker cable constraints is the nap 6-50 multi-room power
amplifier. The nap 6-50 is designed to be tolerant of both a wide variety of cable
types, and cable runs well in excess of 20m. The loudspeaker connectors supplied
with all Naim amplifiers and loudspeakers have been specifically designed to
make a robust mechanical connection. It is essential that these are used in order
to comply with current European safety regulations.
All the plugs and sockets supplied with your Naim equipment have been chosen
because they make the best possible connection for their purpose. A poor
contact will degrade the signal substantially and plugs and sockets should look
clean and free from corrosion. The easiest way to clean them is to switch off the
equipment, pull the plugs out of their sockets, and push them back in again.
Special contact cleaners and contact enhancers should not be used as they tend
to deposit a film which is very difficult to remove and may degrade the sound.

2.0 Getting Started
2.1 switching on and off
Source components and power supplies for cd players, tuners, preamplifiers and crossovers
should be switched on before switching on the amplifier(s). Always switch the amplifier(s)
off and wait about a minute for its power supply capacitors to discharge before
connecting or disconnecting any leads. Always use the power switch on the product rather
than a mains outlet switch.
2.2 running in
Your Naim equipment will take a considerable time to run-in before it performs at its best.
The duration varies, but under some conditions you will find that the sound continues to
improve for as much as five weeks. Better and more consistent performance will be
achieved if the system is left switched on for long periods. It is worth remembering
however that all electronic equipment can be damaged by lightning. Please read the
warnings section.
2.3 mains supply
Where fused plugs are used 13 amp fuses should be fitted. Fuses of a lower rating will fail
after a period of use.
A hi-fi system usually shares a mains circuit with other household equipment some of
which can cause distortion of the mains waveform. In some Naim equipment such
distortion can lead to a mechanical hum from the transformers. The hum is not
transmitted through the speakers and has no effect on the performance of the system but
is purely local to the transformer itself. A separate fused mains circuit (like that reserved
for electric cookers) may reduce transformer hum. Such a circuit (ideally with a 30 or 45
Amp rating) will also have a lower impedance, supply cleaner power, and consequently
improve system performance.
Do not wire voltage dependent resistors or noise suppressors into mains plugs. They
degrade the mains supply and the sound.
2.4 siting the equipment
Power supplies and amplifiers should be located a reasonable distance away from other
equipment. This separation will stop transformer radiation causing hum audible from the
loudspeakers. The minimum recommended distance is 300mm (12 inches), and that
allowed by the standard interconnect lead is the maximum.
Some Naim equipment is extremely heavy. Ensure than your equipment rack or table can
easily support the weight and is stable.
2.5 if you have a problem
Legal consumer protection varies from country to country. In most territories a dealer
must be prepared to take back any Naim equipment he has sold you if he cannot make it
work to your satisfaction in your own home. A problem may be due to a fault in any part
of the system or its installation so it is essential to make full use of your local dealer’s
diagnostic skills on site. Please contact your local distributor, or Naim at the address in
the back of this manual, if any difficulties cannot be resolved. Some Naim equipment is
made in special versions for different territories and this makes it impracticable to arrange
international guarantees. Please establish the guarantee arrangements with your own
dealer at the time of sale. We are always available to offer help and advice.
It is essential that repairs and updates are only carried out by an authorised Naim dealer,
or at the factory by Naim itself. Many components are made, tested or matched specially
for Naim and appropriate replacements are often unobtainable from non-specialist
sources.
2

3.0 Warnings
Naim equipment is designed to offer the finest sound quality that can be achieved,
avoiding compromise wherever possible. This can lead to circumstances that may be
unfamiliar. The material that follows contains advice specifically related to Naim
equipment as well as more general warnings about the use of domestic audio products.
Please read it carefully.
The transformers in Naim power amplifiers and power supplies may sometimes make a
mechanical noise caused by distortion of the mains waveform. Naim transformers are
large in size and have heavy gauge secondary windings making them relatively sensitive
to such distortion. A separate mains circuit for your hi-fi system may reduce the effect
while also giving an overall improvement in sound quality. It may be necessary however
to take account of mechanical transformer noise when siting your equipment.
In some circumstances, depending on where you live and the earthing arrangements in
your home, you may experience radio frequency interference. Controls on broadcasting in
some territories allow very high levels of radio frequency radiation and both the choice
and exact siting of equipment may be critical. If there is a known problem in your locality
it is advisable to arrange for a home demonstration before purchase to find out if Naim
equipment is likely to be affected. Susceptibility to radio frequency interference is related
to the wide internal bandwidth necessary for high sound quality. Systems incorporating
moving coil phono preamplifiers and active crossovers are more likely to suffer. A radio
frequency filter kit is available for some Naim equipment but sound quality will be
progressively compromised as more elements of the kit are fitted. In situations of extreme
radio interference Naim equipment may be unsuitable.
Your Naim hi-fi system can be damaged by lightning. Power amplifiers are particularly at
risk and should be turned off when there is risk of lightning strike. For complete protection
all mains plugs and any aerial cables should be disconnected when not in use.
Equipment must not be exposed to dripping or splashing and no objects filled with liquid,
such as vases, should be placed on the equipment.
important
In order to comply with current
European safety regulations it is
essential that the Naim loudspeaker
connectors supplied with amplifiers
and loudspeakers are used.
Do not under any circumstances
allow anyone to modify your Naim
equipment without first checking
with the factory, your dealer, or
your distributor. Unauthorised
modifications will invalidate your
guarantee.
For your own safety do not under
any circumstances open Naim
equipment without first
disconnecting the mains.
The following label is attached to
all mains powered equipment:
3

4.0 Connection
4.1 mains lead
As the colours of the wires in the mains lead of this apparatus may not correspond with
the coloured markings identifying the terminals in your plug proceed as follows:
The wire which is coloured GREEN-AND-YELLOW must be connected to the terminal in
the plug which is marked by the letter E or by the safety earth symbol or coloured green
or green-and-yellow.
The wire which is coloured BLUE must be connected to the terminal in the plug which is
marked with the letter N or coloured black.
The wire which is coloured BROWN must be connected to the terminal in the plug which
is marked with the letter L or coloured red.
4.2 non-rewireable mains plugs
If a non-rewireable plug is cut from a mains lead (for whatever purpose) the plug MUST
be disposed of in a way to render it totally unusable. Considerable shock hazard exists if
the cut-off plug is inserted into a mains outlet.
4.3 fuse carrier
Should the plug fuse carrier be damaged or lost, the correct replacement must be obtained
from your dealer or from Naim direct. Do not use the plug until the fuse carrier is replaced.
4.4 plug fuses
Replace only with ASTA or BS 1362 approved fuses.
note
This equipment has been tested and found to comply with the relevant EMC and Safety Standards,
and, where applicable, also complies with the limits for a class B digital device, pursuant to Part
15 of the FCC Rules.
These limits are designed to provide reasonable protection against harmful interference in a
residential installation. This equipment generates, uses and can radiate radio frequency and, if not
installed and used in accordance with the instructions, may cause harmful interference to radio
communications. However, there is no guarantee that interference will not occur in a particular
installation. If this equipment does cause harmful interference to radio or television reception,
which can be determined by turning off and on, the user is encouraged to try to correct the
interference by one or more of the following measures:
• Reorient or relocate the receiving antenna.
• Increase the separation between the equipment and the receiver.
• Connect the equipment into an outlet on a circuit different from that to which the receiver is
connected.
• Consult your Naim dealer or an experienced radio/TV technician for help.
4

nac 52 operation
power supplies
The nac 52 does not incorporate an internal power supply and can be used only in conjunction with a
supercap power supply.
listening and recording
The input selector buttons are arranged along the uppermost bank of buttons. They control which
source is to be routed to the power amplifier and the loudspeakers, for listening. Below them, in the
lower bank, are a corresponding array of buttons which choose the source component to be routed to
the preamplifier’s recording outputs. One component (for example, the record player) can therefore be
listened to whilst the output from another (say, the tuner) can be recorded onto a tape recorder. It is
possible to lock the record controls and prevent accidental de-selection during recording. Record-lock
is switched on or off by depressing the source mono button four times within six seconds.
mute and mono facilities
To the left of each bank of buttons there are two further buttons labelled mute and mono. These work
independently: for example the mute button in the lower (recording) bank does not affect the signal
that is chosen via the upper (source) buttons, and vice versa. Operating the mono button on the source
bank will not affect the record circuits. To select either function press the relevant button once. To
cancel that function press the button again.
preamplifier inputs
Input 1 is a high level input, but can be converted into a phono input by fitting plug in boards. Please
see your dealer for further details.
Input 2 is a standard high level input. Before using, see the section “input socket 2” below.
Input 3 is a standard high level input.
Inputs 4, 5 and 6 are standard high level inputs and also have record output facilities, so these should
be assigned to your tape recorder, cassette deck or VCR.
input socket 2 to expand input capabilities
Please note that input 2 is provided with two sockets. Use socket 2a for connecting your usual
ancillary equipment. The extra socket (2b) is for the Prefix or Stageline phono stage. Only one of these
sockets may be used at a time, for safety as well as performance. Your preamplifier will have a
protective cover fitted over the extra socket. If you wish to use it, it is advisable to refit the protective
cover over the socket that will now be unused, to prevent mistakes.
remote control
For operation of the nac 52 using the NARCOM 2 remote handset please see pages 18 and 19
5
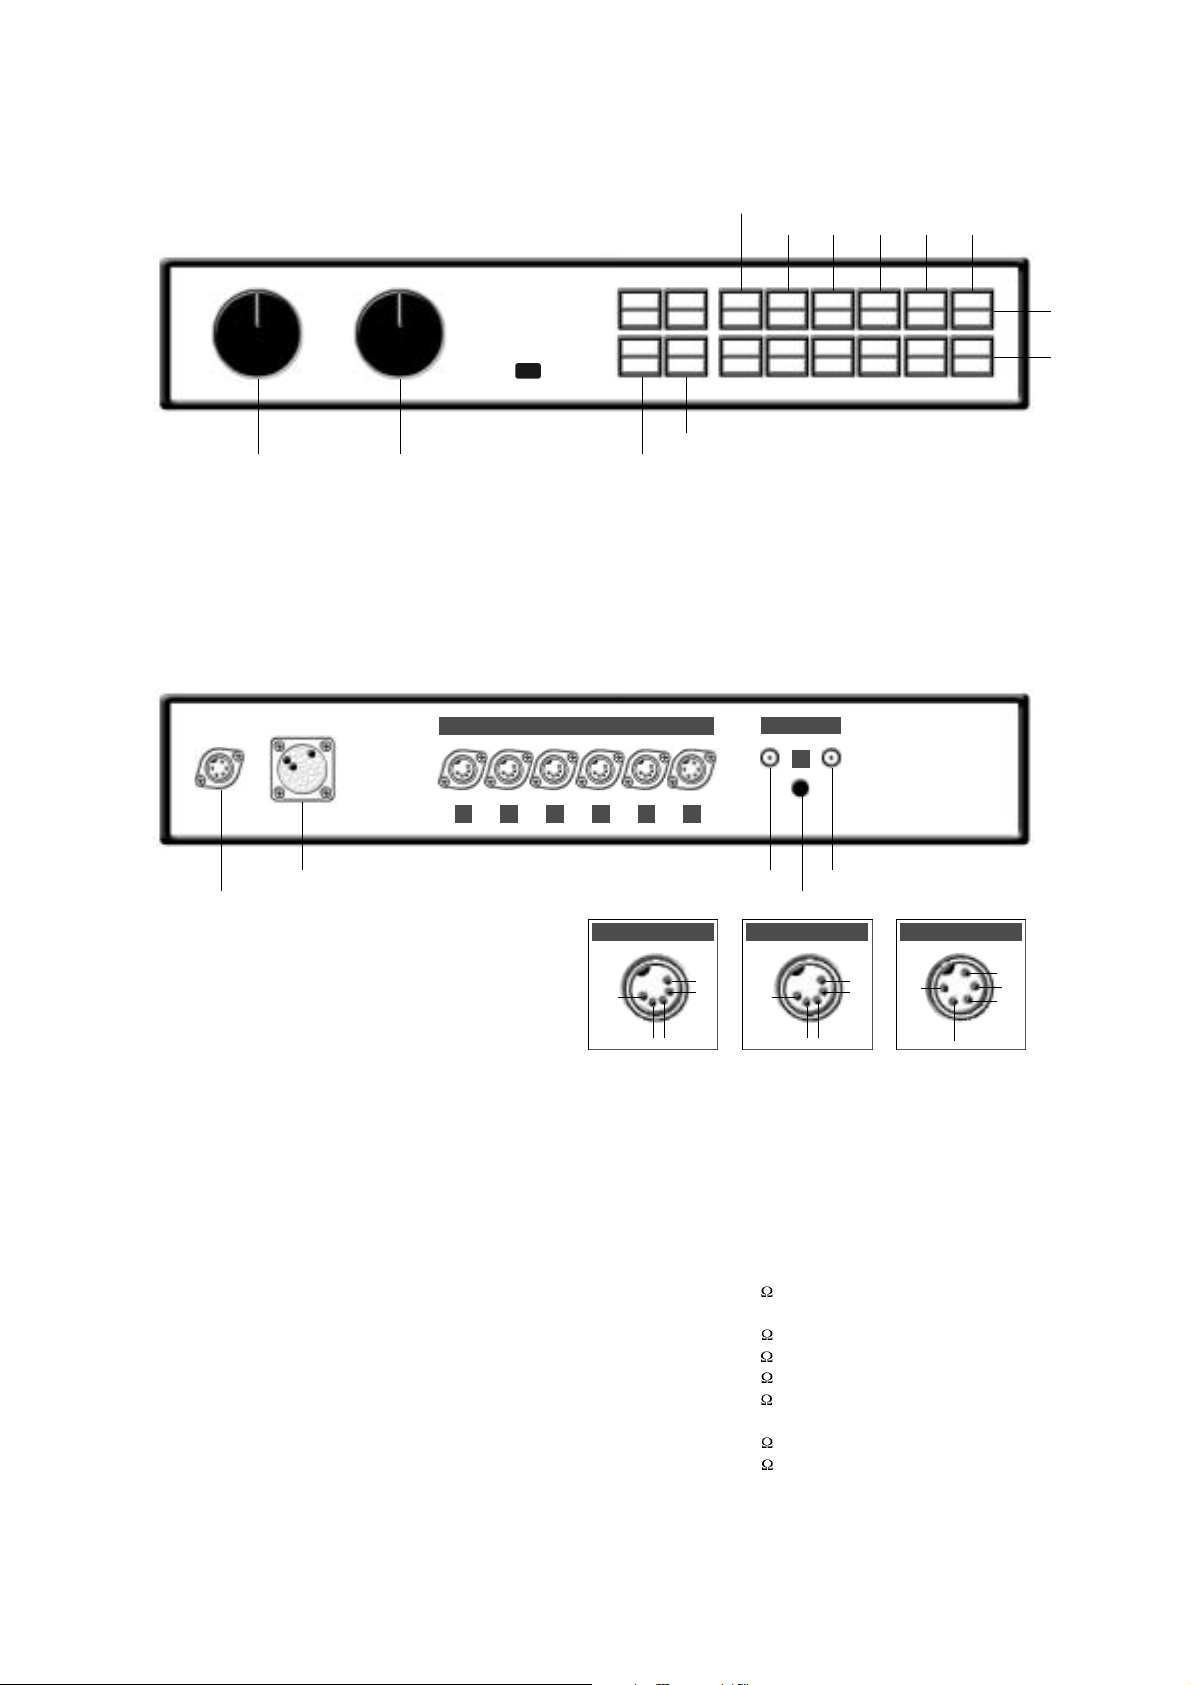
nac 52 front
volume
nac 52 rear
inputs
1 2(a/b) 3 4 5 6
source
record
mute
balance mono
high level inputs
6 5 4 3 2a 2b
audio power supply
digital power supply
inputs 6, 5 & 4 input 2b
ch1
ch2
Specifications
nac 52
High level input sensitivities 75mV, 100k
Phono input options
Moving Magnet N 2mV, 47k
Moving Coil S 100µV, 470
Moving Coil K 100µV, 560
Moving Coil E 400µV, 560
Overload margin (all inputs, all audio frequencies) 40dB
Main output level 0.775V, <50
Tape output level 75mV, 600
Case size (H x W x D) 76 x 430 x 300mm
phono input
ch 1 left ch 2 right
inputs 3 & 2a
ch1
ch2
ch1
-ve
1
phono ground
ch2
-ve
nc
+ve
nc
ch2
+ve
ch1
-ve
6

nac 52 connection to supercap power supply
to nap 135, & 500
power amplifiers
mains input
bnc plug assembly
bnc plugs are employed for phono inputs on the nac 52, 82 and 102. To wire a bnc
plug proceed as follows in conjunction with the illustrations opposite:
Place the clamp nut and plain gasket over the cable and cut back the cable outer
sheath 9mm.
Comb out the copper braid and insert the ferrule,
Trim the core insulation to 4mm and apply a thin layer of solder to the cable centre
conductor.
Mount the rear insulator over the core insulation and solder the male contact to the
core conductor.
Slide the clamp nut and plain gasket up to the ferrule and fit the front insulator
onto the male contact.
Slide the plug body over the assembly and tighten using the clamp nut.
to nap 140, 150, 180 &
250 power amplifiers
cable
direction
marker
clamp
nut
ferrule
plain
gasket
solder to cable before final asssembly
male
contact
rear
insulator
trim braid to here
Interconnect Cables
4 to 4 pin DIN
5 to 5 pin DIN
Burndy
plug body
front
insulator
4mm
0.5mm
7

nac 82 operation
power supplies
The nac 82 does not incorporate an internal power supply. It must be used in conjunction with either
a naim power amplifier incorporating a preamp power supply or with a supercap, hi-cap or flatcap 2
power supply.
listening and recording
The input selector buttons are arranged along the uppermost bank of buttons. They control which
source is to be routed to the power amplifier and the loudspeakers, for listening. Below them, in the
lower bank, are a corresponding array of buttons which choose the source component to be routed to
the preamplifier’s recording outputs. One component (for example, the record player) can therefore be
listened to whilst the output from another (say, the tuner) can be recorded onto a tape recorder. It is
possible to lock the record controls and prevent accidental de-selection during recording. Record-lock
is switched on or off by depressing the source mono button four times within six seconds.
mute and mono facilities
To the left of each bank of buttons there are two further buttons labelled mute and mono. These work
independently: for example the mute button in the lower (recording) bank does not affect the signal
that is chosen via the upper (source) buttons, and vice versa. Operating the mono button on the
source bank will not affect the record circuits. To select either function press the relevant button once.
To cancel that function press the button again.
preamplifier inputs
Input 1 is a high level input, but can be converted into a phono input by fitting plug in boards. Please
see your dealer for further details.
Inputs 2 and 3 are standard high level inputs.
Inputs 4, 5 and 6 are standard high level inputs and also have record output facilities, so these should
be assigned to your tape recorder, cassette deck or VCR.
connecting to an active system
Please note, an additional separate power supply is required to power the snaxo crossover, i.e. three
hi-caps for a system where two are already employed to power the nac82, or two supercaps where
one is already employed for the preamplifier. For further information please refer to your dealer.
remote control
For operation of the nac 82 using the NARCOM 2 remote handset please see pages 18 and 19.
bnc plugs
For notes on wiring bnc plugs please see page 7.
8
8

nac 82 front
volume
nac 82 rear
inputs
1 2 3 4 5 6
source
record
mute
balance mono
high level inputs
outputs
6 5 4 3 2
napsc
Specifications
nac 82
Line input sensitivities 75mV, 100k
Phono input options
Moving Magnet N 2mV, 47k
Moving Coil S 100µV, 470
Moving Coil K 100µV, 560
Moving Coil E 400µV, 560
Overload margin (all inputs, all audio frequencies) 40dB
Main output level 0.775V, <50
Tape output level 75mV, 600
Case size (H x W x D) 76 x 430 x 300mm
phono input
1
ch 1 left ch 2 right
phono ground
inputs 6, 5 & 4
ch1
ch1
ch2
ch2
-ve
inputs 3 & 2
ch1
ch2
-ve
nc
nc
9

nac 82 connection to one power amplifier with internal power supply
all link plugs fitted
to napsc
to nap 140, 150, &
180 power amplifiers
note
The napsc power supply must be connected at all times to the nac 82.
nac 82 connection to one hi-cap (or flatcap 2)
link plug removed
to napsc
mains input
link plug fitted
to nap 140, 150, 180 &
250 power amplifiers
to nap 135 & 500
power amplifiers
1 0

nac 82 connection to two hi-caps (or flatcaps)
all link plugs removed
to napsc
mains input
to nap 135 & 500
power amplifiers
to nap 140, 150, 180 &
250 power amplifiers
note
If multiple power supplies are used to operate one preamplifier they must be of the same
type. Sound quality will be severely impaired if power supplies are mixed.
nac 82 connection to supercap
all link plugs removed
to napsc
mains input
cable
direction
marker
Interconnect Cables
4 to 4 pin DIN
5 to 5 pin DIN
mains input
to nap 140, 150, 180 &
250 power amplifiers
to nap 135 & 500
power amplifiers
1 1
1 1

nac 102 operation
power supplies
The nac 102 does not incorporate an internal power supply. It must be used in conjunction with either
a naim power amplifier incorporating a preamp power supply or with a supercap, hi-cap or flatcap 2
power supply.
preamplifier inputs
Inputs 1a, 2 and 3 are standard high level inputs.
Alternatively, input1 can be converted into a phono input. A simple modification enables a range of
plug in boards to be fitted. Connection is then made via the BNC sockets (1b). Please see your dealer
for further details.
Inputs 4, 5 and 6 are standard high level inputs and also have record output facilities, so these should
be assigned to your tape recorder, cassette deck or VCR.
tape facilities and monitor button
The tape monitor button (mon) allows you to listen to the output of a tape recorder while recording,
which can be useful with a 3-head tape machine to monitor the “off-tape” signal. The source for
recording is chosen by the input selector buttons.
Operating the monitor button during recording allows the output from the tape machine connected
to input 4 to be heard, unless input 4 is chosen on the input selector switch, i.e. for tape to tape
recording, in which case the output of the tape machine connected to input 5 will be heard. No
monitor facility is available on input 6.
With the mute button selected there will be no output to the loudspeakers, from any input. This will
not affect any recordings taking place at the same time.
remote control
For operation of the nac 102 with the NARCOM 2 remote handset please see pages 18 and 19.
Note: As there is no mono facility available on the nac102, the “mono” facility on the remote handset
operates the tape monitor circuit.
bnc plugs
For notes on wiring bnc plugs please see page 7.
1 2

nac 102 front
volume
nac 102 rear
inputs
1 2 3 4 5 6
mute
balance monitor
outputs
6 5 4 3 2 1a
napsc (optional)
high level inputs
Specifications
nac 102
Line input sensitivities 75mV, 100k
Phono input options
Moving Magnet N 2mV, 47k
Moving Coil S 100µV, 470
Moving Coil K 100µV, 560
Moving Coil E 400µV, 560
Overload margin (all inputs, all audio frequencies) 40dB
Main output level 0.775V, <50
Tape output level 75mV, 600
Case size (H x W x D) 76 x 430 x 300mm
phono input
1b
ch 1 left ch 2 right
phono ground
ch1
ch2
-ve
ch1
ch2
ch1
ch2
inputs 3, 2 & 1ainputs 6, 5 & 4
nc
nc
-ve
1 31 3

nac 102 connection to one power amplifier with internal power supply
link plugs fitted
napsc (optional) to nap 140, 150, &
180 power amplifiers
nac 102 connection to hi-cap (or flatcap 2)
link plugs removed
napsc
(optional)
1 4
mains input
note
When using a hi-cap without the optional napsc, the large link plug must be fitted.
to nap 140, 150, 180 &
250 power amplifiers
to nap 135 & 500
power amplifiers
cable
direction
marker
Interconnect Cables
4 to 4 pin DIN
5 to 5 pin DIN

nac 112 operation
power supplies
The nac 112 does not incorporate an internal power supply. It must be used in conjunction with either
a naim power amplifier incorporating a preamp power supply or with a supercap, hi-cap or flatcap 2
power supply.
inputs
The nac 112 has 6 inputs - cd, tuner, tape, A/V, aux 1 and aux 2 . The tape, a/v and aux 1 all have
record output facilities for a cassette deck or VCR, etc. The aux 2 input is provided with two sockets.
Use the right hand socket (when viewed from the rear) for connecting conventional ancillary
equipment. The extra (left hand) socket is for use with separate phono stage, such as the Prefix or
Stageline or a Headline headphone amplifier. Only one of the aux 2 sockets may be used at a time damage may result if both sockets are used simultaneously. As supplied, the nac 112 has a protective
cover fitted over the extra socket. If this socket is to be used it is advisable to refit the protective cover
over the unused socket.
tape and monitor functions
The tape monitor (mon) button allows the output of a 3-head tape machine to be heard while
recording in order to check the “off-tape” signal. The source for recording is chosen by the input
selector buttons in the normal way.
Pressing the monitor button during recording allows the output from a 3-head tape machine
connected to either tape, A/V or AUX 1 to be heard. After pressing “mon”, select whichever one of
these your tape machine is connected to. A second press of the monitor button returns the amp to
normal position.
mute function
Pressing the mute button reduces the output from the loudspeakers to zero. (This will not affect any
recordings taking place at the same time).
channel balance
Channel balance adjustment on the nac 112 is operated electronically within the amplifier and is
controlled by the remote handset only. Please see the handset instructions on pages 18 and 19.
input level adjustment
Each nac 112 input can be adjusted so that the volume level from each source is similar in normal use.
The remote handset controls and enables this function. Please see the handset instructions on pages
18 and 19.
remote control
For operation of the nac 112 with the NARCOM 2 remote handset please see pages 18 and 19.
Note: As there is no mono facility available on the nac112, the “mono” facility on the remote handset
operates the tape monitor circuit.
1 51 5

nac 112 front
mutemon cd tuner tape a/v aux 1 aux 2
volume
note
The nac 112 features various technologies to reduce microphonic effects, in particular a compliant mounting
for the main circuit boards and the DIN sockets on the rear. Some movement of the board and sockets when
connecting/disconnecting is normal.
nac 112 rear with connection to power amplifier with internal power supply
link plug & cover fitted
to nap 140, 150, &
180 power amplifiers
note
The aux 2 input is provided with two sockets. The left hand socket, fitted on
delivery with a blanking cover, is intended for use with a Stageline or Prefix
phono stage and incorporates an appropriate DC power supply.
Specifications
nac 112
Line input sensitivities 75mV, 100k
Overload margin (all inputs, all audio frequencies) 35dB
Main output level 0.775V, <50
Tape output level 75mV, 600
Case size (H x W x D) 58.4 x 432 x 301mm
tape, a/v & aux 1
inputs
ch1
ch2
-ve
ch1
ch2
cdtunertapea/vaux 1aux 2
cd, tuner & aux 2
inputs
ch1
ch2
-ve
nc
nc
1 6

nac 112 connected to flatcap 2
cover fitted
power mains input
to nap 140, 150, 180 &
250 power amplifiers
to nap 135 & 500
power amplifiers
cable
direction
marker
for CD5, headline or
stageline. Additional
interconnects required.
Interconnect Cables
4 to 4 pin DIN
5 to 5 pin DIN
1 71 7

narcom 2 remote handset
NARCOM 2 is a multi-functional remote control handset designed to be used with Naim Audio CD
players, integrated amplifiers, pre-amplifiers and preset tuners. The handset control configuration is
based around three types of keys: System Component Keys, Global Keys and Soft Keys.
n 2
System
Component
Keys
Global Keys
(Amplifier)
Global Keys
(CD Player)
Global Keys
(Tuner)
Soft Keys
1 System Component Keys
These keys switch the operation of the “Soft Keys” into modes appropriate to each system component
(preamp, CD or tuner).
preamp: Switches the action of the Soft Keys to that appropriate for an integrated or pre-amplifier.
cd: Switches the action of the Soft Keys to that appropriate for a CD player.
tuner: Switches the action of the Soft Keys to that appropriate for a preset tuner.
2 Global Keys
These keys operate specific component functions regardless of the System Component Key setting.
preamp
vol (up and down): Adjusts the amplifier output volume and the volume control
position.
mute: Reduces the amplifier output volume to zero. A second press restores
the volume. The mute button on the amplifier will illuminate when mute
is selected.
bal (left and right): Adjusts the output channel balance.
Some Naim amplifiers have control of balance available only from the
remote handset. On these products the balance will automatically “centre”
as it reaches the mid point. Balance centring is indicated by a flashing
volume control indicator. To resume adjustment once the balance has
centred, bal key must be released and re-pressed.
mon: The mon button enables the output of a 3-head tape machine to be heard
while recording in order to check the “off-tape” signal. The source to be
recorded is chosen by the input selector buttons in the normal way.
After pressing mon, select the input to which your machine is connected.
A second operation of the mon key restores normal output.
compact disc
prev: Selects the previous track. From a stopped position prev will select the last
track.
next: Selects the next track.
stop: Stops the CD. Holding the stop key for more than a second will also cancel
previously set-up program and display preferences.
play: Plays the CD. Pressing play while a track is playing will return the player
to the beginning of that track.
<<: Fast reverses the CD when in play mode.
>>: Fast forwards the CD when in play mode.
repeat: Puts the CD into repeat mode. A complete disc or programmed disc
selection will repeat until stop is pressed.
pause: Pauses a playing CD. Pressing pause a second time will start the disc again.
1 8
1 8
tuner
mode: Switches the tuner sequentially through “frequency”, “scan” and “preset”
modes. Modes are indicated on the tuner display.
up & down: These keys both have three possible functions depending upon the selection of the
mode key. In frequency mode the up and down keys adjust the tuning frequency
in 50kHz steps. In scan mode the up and down keys will cause the tuner to
search for stations. In preset mode the up and down keys will tune to the next
numbered preset.
mono: Toggles between mono and stereo operation. The tuner display will indicate stereo
when both stereo operation is selected and a stereo signal is received. The mono
button on the tuner will illuminate when mono is selected.

3 Soft Keys
These keys operate functions depending on the System Component Key setting.
numeric keypad: In preamp mode the numeric keys will switch between the amplifier inputs
(1 - cd, 2 - tuner, 3 - tape, 4 - av, 5 - aux 1, 6 - aux 2). In cd mode the numeric keys will select tracks.
In tuner mode the numeric keys will select tuner presets or can be used directly to input station
frequencies.
prog: In preamp mode the prog key function varies depending upon the specific amplifier model in
use. Firstly, some models incorporate a programmable volume control system that enables different
source component output levels to be matched. Secondly, some models incorporate optional
automatic source switching which will switch the input of the amplifier as soon as any handset key
appropriate to a particular source is operated. For example, if the tuner input is selected on the
amplifier and the CD play key is operated on the handset, the amplifier will switch to the CD input.
Thirdly, if you have a surround sound processor connected to the A/V input, the volume control on the
amplifier can be disabled, allowing the processor to take over control of the output level from the
power amplifier stage (unity gain).
To program the volume control for each input first set the volume control to a comfortable listening
level with the loudest source (probably CD). Enter program mode by pressing and holding the prog key
until the amplifier volume control indicator flashes. Select the input to be adjusted using the handset
and use the vol up and down keys to set the volume to a comfortable listening level. The amplifier
volume control will not rotate during this operation. Select a further input to adjust. To exit program
mode press and hold the prog key until the volume control indicator stops flashing, or operate any
control on the amplifier.
To access automatic source switching enter program mode as described above. Use the handset mon
key to toggle automatic switching on and off. The mon button on the amplifier will illuminate when
source switching is automated. Exit program mode as above.
To utilise the surround sound processor unity gain function, enter program mode as described above.
Use the handset mute key to toggle the function on and off. The mute button on the amplifier will
illuminate when unity gain is selected. Exit program mode as above. The unity gain function should
only be used where the amplifier is used in a correctly configured A/V system. Damage may result
if the unity gain feature is used inappropriately.
To return to the default settings, press and hold the prog key until the amplifier volume control
indicator flashes. Press and hold disp key until the volume control indicator stops flashing.
In cd mode the prog key enables specific CD tracks and their play order to be selected. To select a play
order select a track number from the numeric keypad followed by the prog key until the desired
selection is complete. During selection, the track number indicated in the player display will be
followed by either “P”, “-” or a space. “P” indicates that the track is already selected. “-” indicates that
the track can be selected. A space indicates that there is no more memory available.
The prog key can also be used to delete tracks from a play order. To delete a track, press and hold the
prog key until the prog indicator in the CD display illuminates then delete the track or tracks using the
numeric keypad followed each time by a further operation of the prog key. During deletion the track
number indicated in the player display will be followed by either “C”, “-” or a space. “C” indicates that
the track is already deleted. “-” indicates that the track can be deleted. A space indicates that there
is no more memory available.
The play order can be reviewed by pressing prog while the player is either stopped or playing. The
player display will then scroll through the selected tracks. The progindicator on the player display will
illuminate when a play order has been programmed. To clear memory press and hold the stop key.
In tuner mode the prog key enables specific FM station frequencies to be assigned to preset memory.
To assign a station to a preset first tune manually by inputting the station frequency directly from the
numeric keypad or by using the up or down keys (or scan). Press and hold the prog key on the handset.
The tuner is now in preset programming mode - the preset indicator will flash and the display will
show “— —”. Press the desired preset number from the numeric keypad. The display will show “—” or
“P” if the preset number is already in use. Exit from program mode and save the new or overwritten
preset by pressing and holding the prog key. To exit program mode without saving (or overwriting) a
preset, select “0 0” on the numeric keypad. To erase a preset number, select the preset and press and
hold the display key. To clear all preset numbers press and hold the program key followed by the
display key.
d i s p l a y : In cd mode the d i s p l a y key will scroll through these options: tracks (“time” indicator off),
time (“ t i m e ” indicator on) and display off. In tuner mode the display key will simply toggle between
on and off.
1 9

EC Declaration of Conformity to
Appropriate Standards
Manufacturer
Naim Audio Limited
Southampton Road
Salisbury England
SP1 2LN
Products
nac 52, 82, 102 and 112 preamplifiers
Safety
HD 195-S6
EN 60 065
EMC
Emissions Tested to EN 55013
Sound and television broadcast receivers and associated equiment
Immunity Tested to EN55020
Electromagnetic immunity of broadcast receivers and associated equipment
In accordance with CISPR 16-1
Radio disturbance and immunity measuring apparatus
CISPR 16-2
Methods of measurement of disturbances and immunity
IEC 801-2 8KV (air gap)
4KV (contact)
(performance criterion B)
IEC 801-3 3V/m 20dB
(performance criterion A)
IEC 801-4 1KV (AC lines)
0.5KV (signal lines)
(performance criterion B)
2 02 0
OWNPR •issue 3 •May 2001
Naim Audio Southampton Road Salisbury England SP1 2LN
Tel: +44 (0)1722 332266 www.naim-audio.com
 Loading...