

Page 1

DACV1
QUICK START GUIDE • KURZANLEITUNG • GUIDE DE MISE EN ROUTE RAPIDE
SNELSTARTGIDS • GUÍA DE INICIO RÁPIDO • GUIDA RAPIDA
PRZEWODNIK SZYBKIEGO STARTU • КРАТКОЕ РУКОВОДСТВО ПОЛЬЗОВАТЕЛЯ
快速入门指南 • 빠른 시작 가이드
ENGLISH • DEUTSCH • FRANÇAIS • NEDERLANDS • ESPAÑOL
ITALIANO • POLSKI • РУССКИЙ • 中文 • 한국어
Page 2
DAC-V1 Quick Start Guide English
1. Introduction
The DAC-V1 is a six input digital to analogue converter and audio preamplifier designed to
handle audio from S/PDIF digital sources or directly from a computer USB interface. When
connected to a computer via USB, the DAC-V1 will behave as an external sound output device
and be accessible to a wide variety of audio playback applications.
The DAC-V1 incorporates stereo DIN and RCA phono analogue outputs, a front panel 6.3mm
jack headphone output, and a volume control. DAC-V1 operation and setup is achieved via its
front panel controls and the supplied remote handset.
2. Installing and Connecting
Important: If your DAC-V1 is to be used with a computer running Windows OS, the
DAC-V1 Driver application must be installed and configured in the Windows Sound Control Panel
before the DAC-V1 is connected via USB. Download the file, double-click on the
DAC-V1 Driver icon and carefully follow the installation instructions. The driver application can
be downloaded from: www.naimaudio.com/hifi-products/pdt-type/DAC-V1
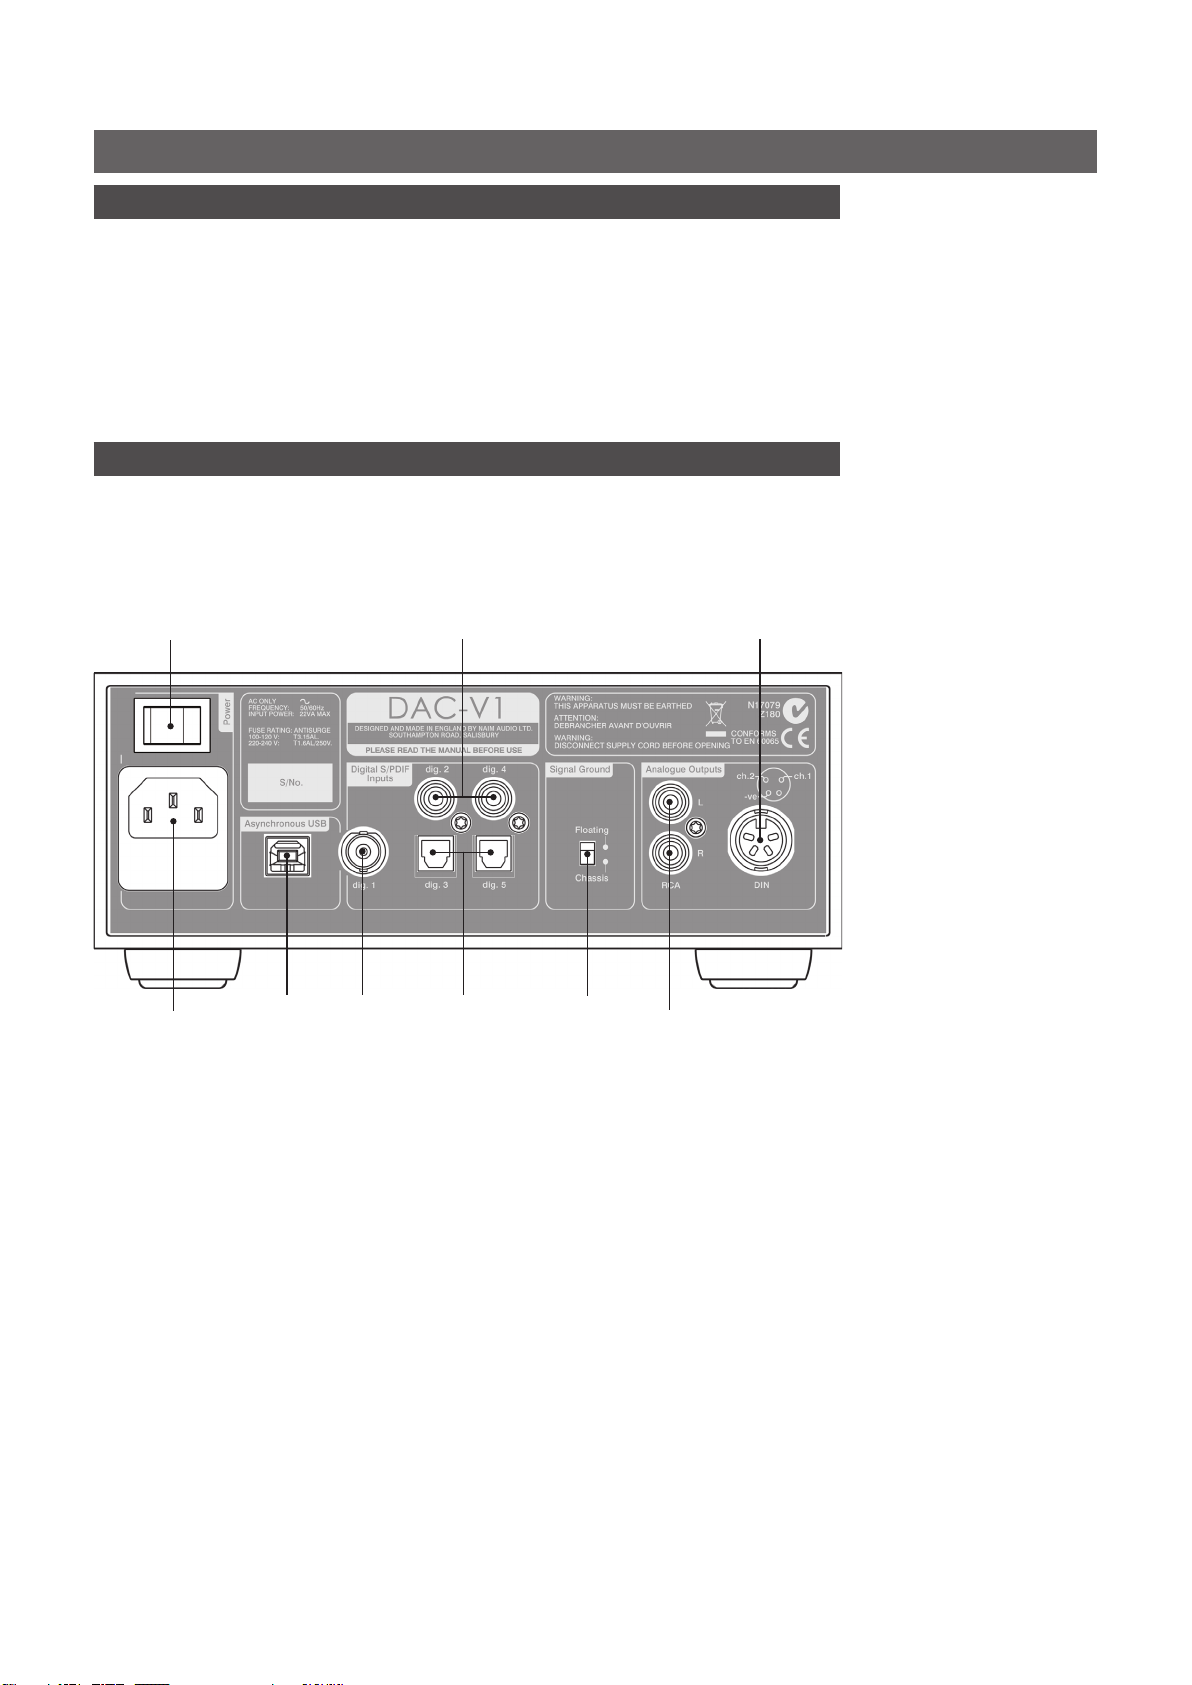
power
switch
mains input
and fuse
USB
input
inputs 2 & 4
input 1
(BNC)
(coaxial)
inputs 3 & 5
(optical)
signal
ground
switch
analogue
output (DIN)
analogue output
(RCA)
Note: The DAC-V1 Driver
application is compatible with
Windows Vista and above only.
Note: The DAC-V1 will only
function correctly with Mac OS
X versions 10.7.x and above.
• Stand your DAC-V1 on an appropriate, stable surface. Make sure it is well ventilated.
• Check that the mains supply specified on the DAC-V1 rear panel is appropriate for your territory.
Connect the DAC-V1 to the mains using the supplied cable but do not switch it on until all other
connections have been made and, if appropriate, the DAC-V1 Windows OS driver application
has been installed on the USB connected computer.
• Identify the Signal Ground Switch and select the chassis option unless the
DAC-V1 is connected in a hi-fi system incorporating another earthed source component (all
Naim CD players, for example), or mains “hum” is audible through the loudspeakers when the
DAC-V1 is switched on.
• Connect one of the DAC-V1 analogue outputs to a power amplifier or preamplifier input as
required. If the option is available on the pre or power amplifier, DIN socket connections should
be used in preference to RCA phono sockets. The DIN and RCA phono socket options should
not be connected or used simultaneously.
• If the DAC-V1 is to be used for the replay of audio files stored on a computer, connect the
computer, via one of its USB sockets, to the DAC-V1 using an A-B type USB cable. For optimum
audio performance the USB connection from the computer to the
DAC-V1 should be direct rather than via any “hub” device. The USB cable used should be no
longer than 3m.
Full DAC-V1 installation and operational information can be found in the Reference Manual available at:
www.naimaudio.com/support/manuals. The Window OS DAC-V1 Driver application can be found at:
www.naimaudio.com/hifi-products/pdt-type/DAC-V1
Note: The DAC-V1 will only
function correctly with USB 2.x
or 3.x interface sockets.
Note: If your DAC-V1 is to
be connected to a futher
“downstream” preamplifier, the
DAC-V1 output volume should
be fixed by selecting the Fixed
Output option in the Preamp
Out setup menu (see Section
4). If headphones are used with
the DAC-V1 while Fixed Output
is selected, volume control
will be restored while the
headphones are plugged-in.
Page 3

DAC-V1 Quick Start Guide English
• If any S/PDIF digital audio sources are to be used with the DAC-V1 connect them to one of the
DAC-V1 inputs. The DAC-V1 provides a variety of digital input socket types with the BNC socket
option likely to provide the highest potential sound quality.
3. Switching On and Getting Started
Important: If using Windows OS on the USB connected computer, do not switch-on the
DAC-V1 without first installing the DAC-V1 Driver application.
• Once all connections have been made, switch on your DAC-V1 using the rear panel mains
switch. The DAC-V1 will display a welcome screen and select its USB input by default.
• To select DAC-V1 inputs use either the front panel input buttons or the remote handset USB or
numbered keys. The remote handset 5 and 6 keys can also be used to scroll through input
selections. Current input selection is indicated in the DAC-V1 display.
• If the DAC-V1 USB input is to be used, launch the USB connected computer’s sound setup
control or preference panel and select the DAC-V1 as the sound output device. With the DACV1 selected the audio playback application can be launched. Depending on the functionality
of the playback application, the DAC-V1 handset volume and keys may be able to control
application output volume and play/pause. Select the PC Volume option in the USB Volume
DAC-V1 setup menu (see Section 4).
• If DAC-V1 S/PDIF inputs are to be used simply select the appropriate input and play the
programme material from the digital audio source.
• To control DAC-V1 volume use either the front panel volume control or the remote handset vol+
and vol- keys. Volume level is shown in the DAC-V1 display.
Note: If the DAC-V1 has been
previously used it will default
when switched on to the last
input selected.
Note: The default audio
playback applications for
Windows and OS X computers
are usually Windows Media
Player and iTunes. However,
a wide variety of alternative
applications can be used
which may provide enhanced
functionality and superior audio
performance.
4. Setup Mode
• A variety of setup parameters can be accessed via DAC-V1 setup
mode. Enter setup mode by pressing the handset setup key. To
navigate around the setup menus use the handset navigation (5
6 3 4) keys. Select options by pressing the key. Exit setup
mode by pressing the setup ke y.
• The top level setup menu provides four items:
Settings: Provides access to six menus covering input renaming, preamp output options,
headphone setup, USB volume control, display behaviour and keyboard identification.
BitPerfect: Enables the use of “bit perfect” test files located on the USB connected computer to
ensure that the playback application and USB connection provide optimum sound quality. A full
description of the Bit Perfect test procedure and test file availability can be found in the DAC-V1
Reference Manual.
USB Status: Displays DAC-V1 USB input connection data and information.
Firmware: Displays DAC-V1 operating firmware details and provides options for
factory default reset and firmware update.
4 Settings
BitPerfect
USB Status
Firmware
Note: The keyboard
identification setup menu
is provided to enable USB
connected OS X computers
correctly to identify the control
characteristics of the DAC-V1.
The DAC-V1 behaves in part like
a multimedia keyboard that
can send volume, play, pause,
next, and previous commands
to the computer. When an OS X
computer is first connected to a
DAC-V1, it may ask for specific
key-stokes to be sent to identify
the “keyboard” layout. The
DAC-V1 keyboard setup menu
enables the appropriate keystrokes to be sent.
Full DAC-V1 installation and operational information can be found in the Reference Manual available at:
www.naimaudio.com/support/manuals. The Window OS DAC-V1 Driver application can be found at:
www.naimaudio.com/hifi-products/pdt-type/DAC-V1
Page 4
DAC-V1 Kurzanleitung Deutsch
1. Einleitung
Der DAC-V1 ist ein Digital-Analog-Wandler mit sechs Eingängen und Vorstufenfunktion.
Er nimmt Audiosignale von Digitalquellen (S/PDIF) oder direkt von einer Computer-USBSchnittstelle entgegen. Wenn der DAC-V1 über USB mit einem Computer verbunden ist,
fungiert er als externes Audioausgabegerät für Wiedergabeprogramme.
Der DAC-V1 besitzt zwei Stereo-Analogausgänge (DIN bzw. Cinch), einen frontseitigen
Kopfhörerausgang (6,3-mm-Klinkenbuchse) und eine Lautstärkeregelung. Der DAC wird über die
Fronttasten und die im Lieferumfang enthaltene Fernbedienung konfiguriert und bedient.
2. Installieren und Anschließen
Wichtig: Wenn Sie Ihren DAC-V1 in Verbindung mit einem Computer verwenden wollen, der das
Betriebssystem Windows nutzt, müssen Sie vor dem Anschließen des Geräts an den USB-Eingang
das DAC-V1-Treiberprogramm installieren und die Windows-Audioeinstellungen entsprechend konfigurieren. Laden Sie dazu die Programmdatei herunter, klicken Sie auf das Programm-Icon und folgen
Sie den Anweisungen. Das DAC-V1-Treiberprogramm kann unter folgender Adresse heruntergeladen
werden: www.naimaudio.com/hifi-products/pdt-type/DAC-V1
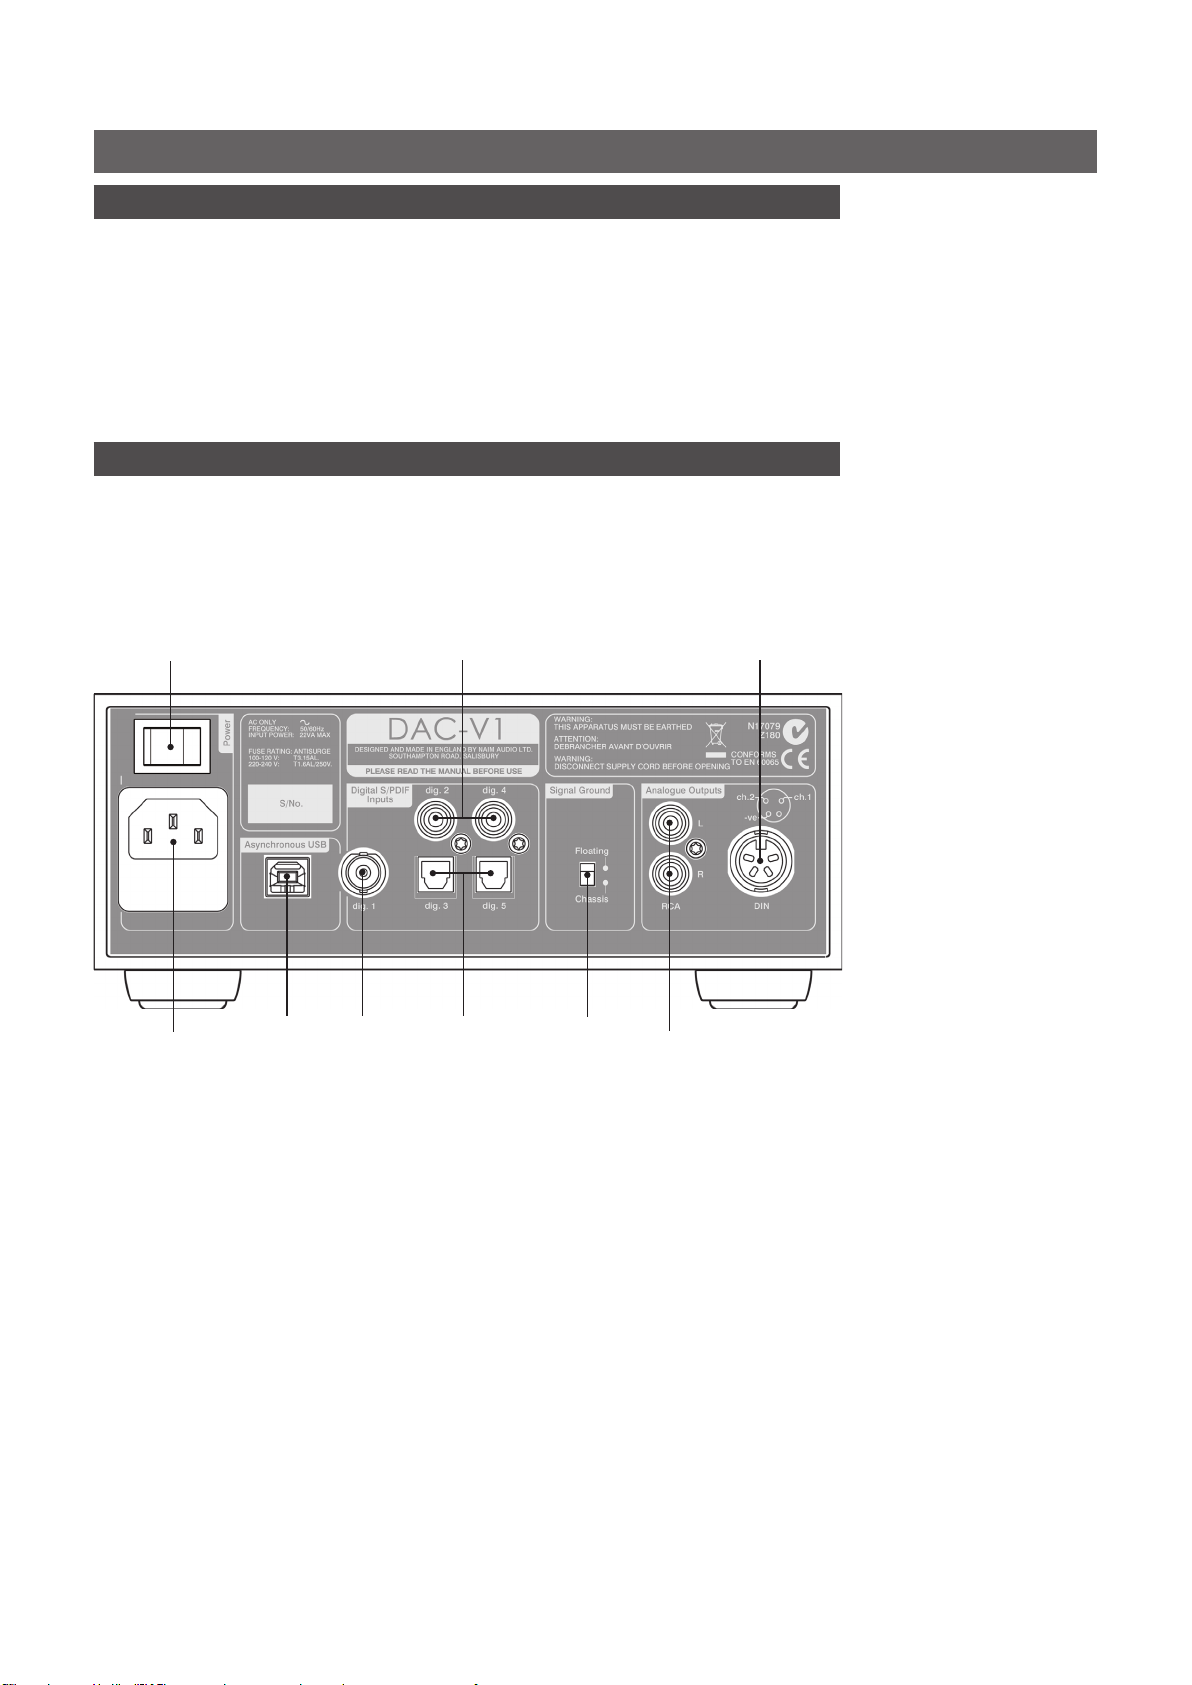
Netz-
schalter
Netzanschluss
und Sicherung
USBEingang
Eingang 2 und
4 (koaxial)
Eingang
1 (BNC)
Eingang 3 und
5 (optisch)
Masseschalter
Analogausgang
(DIN)
Analogausgang
(Cinch)
Hinweis: Das DAC-V1-
Treiberpogramm ist mit dem
Betriebssystem Windows Vista
und höher kompatibel.
Hinweis: Der DAC-V1
funktioniert nur mit MacOS-Version 10.7.x und höher
korrekt.
• Stellen Sie den DAC-V1 auf eine geeignete, stabile Fläche und achten Sie darauf, dass er
ausreichend belüftet ist.
• Vergewissern Sie sich, dass die an der Rückseite des DAC-V1 angegebene Netzspannung mit
der in Ihrem Land üblichen Netzspannung übereinstimmt. Verwenden Sie das mitgelieferte
Netzkabel, um den DAC-V1 an das Stromnetz anzuschließen; schalten Sie das Gerät jedoch
erst ein, wenn alle anderen benötigten Kabel angeschlossen sind und ggf. das DAC-V1Treiberprogramm auf dem über USB angeschlossenen Windows-Computer installiert wurde.
• Stellen Sie den Masseschalter auf „Chassis“, es sei denn, der DAC-V1 wird in einer Musikanlage
verwendet, an die bereits ein geerdetes Quellgerät (z.B. ein Naim-CD-Spieler) angeschlossen ist,
oder es ist nach dem Einschalten ein Brummen über die Lautsprecher zu hören.
• Verbinden Sie einen der Analogausgänge mit einer Vorstufe oder einer Endstufe. Wenn die
Vor- bzw. Endstufe einen DIN-Eingang besitzt, sind die DIN-Anschlüsse vorzuziehen. Die beiden
Analogausgänge des DAC-V1 sollten nie gleichzeitig angeschlossen sein.
• Wenn auf einem Computer gespeicherte Audiodateien über den DAC-V1 abgespielt werden sollen, schließen Sie eine der USB-Buchsen des Computers über ein A/B-USB-Kabel an den DAC-V1
an. Die beste Klangqualität lässt sich erzielen, wenn Sie den Computer direkt statt über einen
USB-Hub anschließen. Das USB-Kabel sollte nicht länger als 3 m sein.
Weitere Informationen zu Installation und Bedienung finden Sie unter
www.naimaudio.com/support/manuals. Das DAC-V1-Treiberprogramm finden Sie unter:
www.naimaudio.com/hifi-products/pdt-type/DAC-V1
Hinweis: Der DAC-V1 funkti-
oniert nur mit USB-2.x- oder
-3.x-Schnittstellen korrekt.
Hinweis:Wenn Sie den DAC-V1
an eine Vorstufe anschließen wollen, sollten Sie seine
Ausgangslautstärke festsetzen. Wählen Sie dazu Sie im
Menü „Vorstufenausgang“
die Option „Feste Lautstärke“
aus (siehe Abschnitt 4).
Wenn ein Kopfhörer in
der Kopfhörerbuchse des
DAC-V1 steckt, ist die
Lautstärkeregelung des DAC-V1
jedoch wieder aktiv.
Page 5

DAC-V1 Kurzanleitung Deutsch
• Wenn Digitalgeräte mit dem DAC-V1 verwendet werden sollen, schließen Sie die Geräte an die
Digitaleingänge an. Die Eingänge sind unterschiedlich ausgeführt; die beste Klangqualität lässt
sich in der Regel über den BNC-Eingang erzielen.
3. Einschalten und erste Schritte
Wichtig: Wenn auf dem über USB verbundenen Computer das Betriebssystem Windows läuft,
installieren Sie das DAC-V1-Treiberprogramm, bevor Sie den DAC-V1 einschalten.
• Wenn Sie alle benötigten Kabel in die entsprechenden Buchsen gesteckt haben, betätigen Sie
den Netzschalter an der Rückseite des DAC-V1, um das Gerät einzuschalten. Der DAC-V1 zeigt
daraufhin eine Begrüßungsseite an und schaltet auf den Eingang USB.
• Um einen DAC-V1-Eingang auszuwählen, drücken Sie eine der Eingangstasten an der Gerätefront
bzw. die Eingangstaste USB oder eine der Zifferntasten an der Fernbedienung. Außerdem lassen
sich die Eingänge auch mit den Fernbedienungstasten 5 und 6 durchlaufen. Das Frontdisplay
des DAC-V1 zeigt an, welcher Eingang ausgewählt ist.
• Wenn Sie den USB-Eingang des DAC-V1 nutzen wollen, wählen Sie in der Audiokonfiguration
des angeschlossenen Computers als Audioausgabegerät den DAC-V1 aus. Starten Sie dann
das gewünschte Wiedergabeprogramm. Manche Wiedergabeprogramme reagieren auf die
Lautstärkeregelung und die Play/Pause-Taste ( ) der DAC-V1-Fernbedienung, wenn der DAC-V1
entsprechend konfiguriert wurde (im Setup-Menü USB Volume (USB-Lautstärke) die Option PC
Volume (PC-Lautstärke) auswählen; siehe Abschnitt 4).
• Um einen der S/PDIF-Eingänge des DAC-V1 zu nutzen, wählen Sie einfach den gewünschten
Eingang aus und spielen Sie über das digitale Quellgerät das Programmmaterial ab.
• Die Lautstärke des DAC-V1 lässt sich über den Drehregler an der Gerätefront oder die
Fernbedienungstasten vol+ und vol- regeln. Das Frontdisplay des DAC-V1 zeigt die gewählte
Lautstärke an.
Hinweis: Wenn der DAC-V1
bereits verwendet wurde,
schaltet er beim Einschalten
auf den zuletzt ausgewählten
Eingang.
Hinweis: Die Standard-
Wiedergabeprogramme der
Betriebssysteme Windows und
OS X sind Windows Media
Player bzw. iTunes. Es gibt
jedoch zahlreiche Alternativen,
die einen größeren
Funktionsumfang und höhere
Klangqualität bieten können.
4. Setup-Modus
• Über den Setup-Modus des DAC-V1 können Sie auf eine Reihe von
Konfigurationsparametern zugreifen. Drücken Sie die Setup-Taste
an der Fernbedienung, um den Setup-Modus zu starten. Verwenden
Sie die Navigationstasten (5 6 3 4), um sich durch die Menüs
zu bewegen, und die Play/Pause-Taste ( ), um Ihre Auswahl zu
bestätigen. Drücken Sie erneut die Setup-Taste, um den SetupModus zu beenden.
• Das Menü der obersten Ebene enthält vier Optionen:
Settings (Einstellungen): Gibt Ihnen Zugriff auf sechs Untermenüs, die Folgendes betreffen:
Umbenennung von Eingängen, Vorstufenausgänge, Kopfhörer, USB-Lautstärke, Display und
Tastaturerkennung.
BitPerfect (Bitperfekt): Ermöglicht es, mithilfe von bitperfekten, auf dem angeschlossenen
Computer gespeicherten Testdateien zu überprüfen, ob das Wiedergabeprogramm und die
USB-Verbindung optimale Klangqualität bieten. Weitere Informationen hierzu finden Sie in der
ausführlichen Bedienungsanleitung.
USB-Status: Zeigt Informationen zum USB-Eingang des DAC-V1 und der bestehenden
Verbindung an.
Firmware: Zeigt an, welche Firmware-Version installiert ist, und bietet die Möglichkeit, den
DAC-V1 auf die Werkseinstellungen zurückzusetzen oder die Firmware zu updaten.
4 Settings
BitPerfect
USB Status
Firmware
Hinweis: Das Setup-Menü zur
Tastaturerkennung ermöglicht
es einem über USB angeschlossenen Computer, die
Steuerbefehle des DAC-V1 korrekt zuzuordnen.
Der DAC-V1 verhält sich teilweise wie eine Multimedia-Tastatur,
die Befehle wie „Lautstärke
erhöhen“, „Lautstärke verringern“, „Play“, „Pause“, „Nächster
Titel“ und „Vorheriger Titel“ an
den Computer senden kann.
Wenn Sie einen OS-X-Computer
zum ersten Mal an den DACV1 anschließen, fordert das
Betriebssystem Sie ggf. auf,
bestimmte Tastaturbefehle
zu senden, damit es die
„Tastaturbelegung“ des DAC-V1
erkennt. Das Setup-Menü zur
Tastaturerkennung ermöglicht
es Ihnen, diese Befehle an den
Computer zu senden.
Weitere Informationen zu Installation und Bedienung finden Sie unter
www.naimaudio.com/support/manuals. Das DAC-V1-Treiberprogramm finden Sie unter:
www.naimaudio.com/hifi-products/pdt-type/DAC-V1
Page 6
DAC-V1 Guide de mise en route rapide Français
1. Introduction
Le DAC-V1 est un convertisseur numérique-analogique et un préamplificateur audio à six
entrées, conçu pour traiter des signaux audio des sources numériques S/PDIF ou directement
de l’interface USB d’un ordinateur. Quand il est connecté à un ordinateur via USB, le DAC-V1
se comportera comme une unité de sortie du son externe et pourra être utilisé pour une large
gamme d’applications de lecture audio.
Le DAC-V1 est équipé de sorties analogiques stéréo DIN et RCA phono, une prise jack
6,3mm pour sortie casque sur le panneau avant et un contrôle de volume. Le réglage et le
fonctionnement du DAC-V1 s’effectuent grâce aux commandes sur son panneau avant et à la
télécommande fournie.
2. Installation et connexion
Important: Si votre DAC-V1 doit être utilisé avec un ordinateur opérant sous Windows OS,
l’application pilote DAC-V1 doit être installée et configurée dans la rubrique son du Panneau de
Configuration de Windows avant que le DAC-V1 ne soit connecté par USB. Téléchargez le fichier,
double-cliquez sur l’icône Driver DAC-V1 et suivez attentivement les instructions d’installation. Le
pilote peut être téléchargé à partir de: www.naimaudio.com/hifi-products/pdt-type/DAC-V1
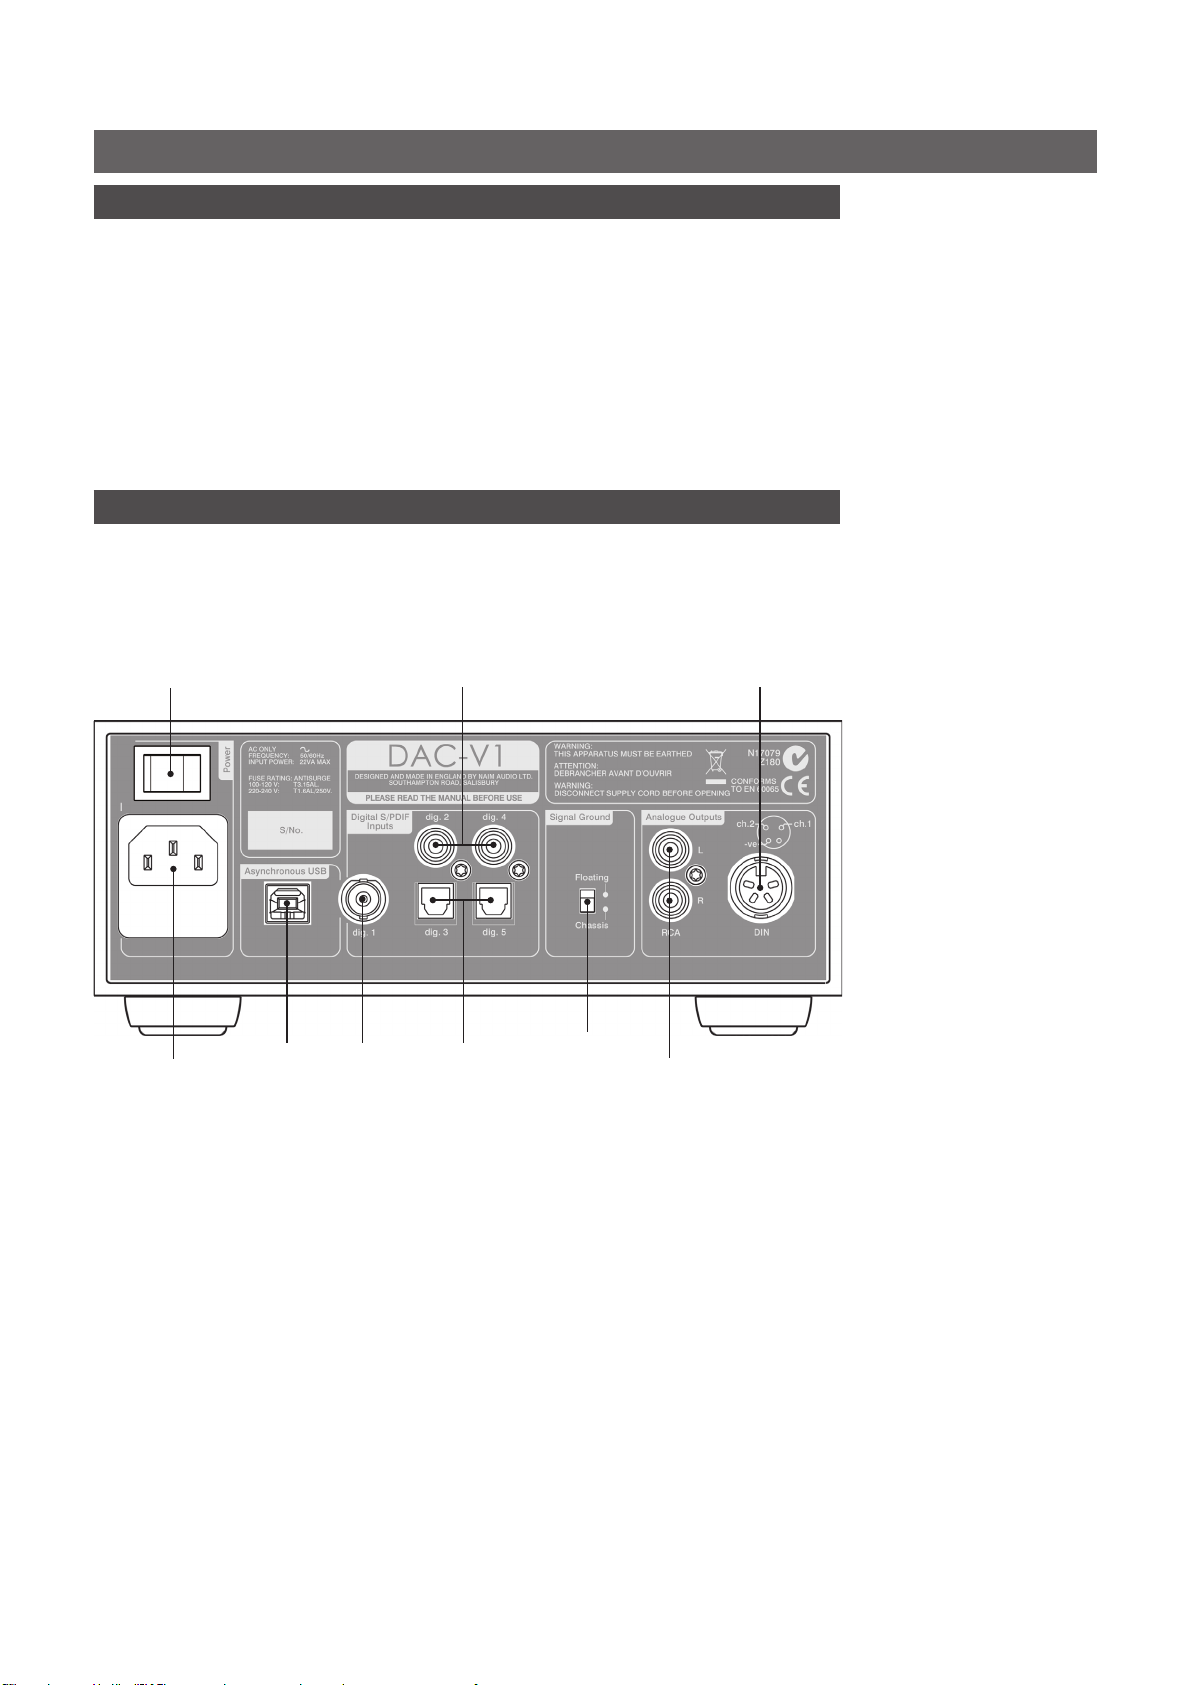
Interrupteur
M/A
Entrée secteur
et fusible
Entrée
USB
Entrées 2 & 4
(coaxiales)
Entrée 1
(BNC)
Entrées 3 & 5
(optiques)
Sortie analogique
Commutateur Masse
signal
(DIN)
Sortie analogique
(RCA)
Note: L’application pilote
DAC-V1 est compatible avec
les versions Windows Vista ou
ultérieures uniquement
Note: Le DAC-V1 ne
fonctionnera correctement
qu’avec les versions Mac OS X
10.7.x ou ultérieures.
• Posez votre DAC-V1 sur une surface stable appropriée. Assurez-vous qu’il est bien ventilé.
• Vérifiez que l’alimentation secteur spécifiée sur le panneau arrière du DAC-V1 est appropriée à votre
territoire. Connectez le DAC-V1 au secteur en utilisant le câble fourni, mais ne le mettez pas sous
tension avant d’avoir effectué toutes les autres connexions et, si nécessaire, installé l’application pilote
DAC-V1 Windows OS sur l’ordinateur connecté par USB.
• Identifiez le Commutateur Masse Signal et sélectionnez l’option chassis sauf si le DAC-V1 est
connecté dans un système hi-fi comportant un autre composant source mis à la terre (tous les
lecteurs CD Naim, par exemple), ou si un ronflement lié au secteur est audible à travers les
enceintes quand le DAC-V1 est sous tension.
• Connectez une des sorties analogiques du DAC-V1 à une entrée d’un amplificateur de
puissance ou d’un préamplificateur, selon vos besoins. Si la possibilité en est offerte sur le
préamplificateur ou l’amplificateur de puissance, les prises de connexion DIN doivent être
utilisées de préférence aux prises phono RCA. Les prises DIN et RCA phono ne doivent pas être
connectées ou utilisées simultanément.
• Si le DAC-V1 doit être utilisé pour la lecture de fichiers audio enregistrées sur un ordinateur,
connectez l’ordinateur, par une de ses prises USB, au DAC-V1 en utilisant un câble USB de type
A-B. Pour une performance audio optimale, la connexion USB de l’ordinateur au DAC-V1 doit être
Les informations complètes sur l’installation et le fonctionnement du DAC-V1 se trouvent dans le Manuel
de Référence disponible sur: www.naimaudio.com/support/manuals. L’application pilote Windows OS
DAC-V1 est disponible sur: www.naimaudio.com/hifi-products/pdt-type/DAC-V1
Note: Le DAC-V1 ne
fonctionnera correctement
qu’avec des prises d’interface
USB 2.x ou 3.x.
Note: Si votre DAC-V1 doit être
connecté à un préamplificateur
plus “en aval”, le volume de
sortie du DAC-V1 doit être fixé
en sélectionnant l’option Sortie
Fixe dans le menu de réglage
Preamp Out (voir Section 4).
Si un casque audio est utilisé
avec le DAC-V1 pendant que
Sortie Fixe est sélectionnée,
le contrôle du volume sera
restauré pendant que le casque
est branché.
Page 7

DAC-V1 Guide de mise en route rapide Français
directe, plutôt que via un concentrateur (“hub”) quelconque. Le câble USB utilisé ne devrait pas
dépasser 3m.
• Si des sources audio numériques S/PDIF doivent être utilisées avec le DAC-V1, connectez-les à une
des entrées du DAC-V1. Le DAC-V1 fournit un choix de types de prises d’entrées numériques, dont la
prise BNC; celle-ci a le potentiel d’offrir la qualité de son la plus élevée.
3. Mise sous tension et démarrage
Important: Si vous utilisez Windows OS sur l’ordinateur connecté par USB, ne mettez pas le DAC-
V1 sous tension avant d’avoir d’abord installé l’application pilote DAC-V1.
• Une fois que toutes les connexions ont été effectuées, mettez votre DAC-V1 sous tension en
utilisant l’interrupteur M/A du panneau arrière. Le DAC-V1 affichera un écran de bienvenue et
sélectionnera son entrée USB par défaut.
• Pour sélectionner les entrées du DAC-V1, utilisez soit les boutons d’entrée du panneau avant,
soit les touches numérotées ou la touche USB de la télécommande. Les touches 5 et 6 de la
télécommande peuvent aussi être utilisées pour faire défiler les sélections d’entrée. La sélection
d’entrée en cours est indiquée sur l’affichage du DAC-V1.
• Si l’entrée USB du DAC-V1 doit être utilisée, lancez la commande de réglage du son ou le
panneau de préférence de l’ordinateur connecté par USB et sélectionnez le DAC-V1 comme
l’unité de sortie du son. Maintenant que le DAC-V1 est sélectionné, l’application de lecture audio
peut être lancée. Selon la fonctionnalité de l’application de lecture, les touches volume et
de la télécommande du DAC-V1 peuvent permettre le contrôle du volume de sortie et de la
fonction lire/pause de l’application. Sélectionnez l’option Volume PC dans le menu de réglage
Volume USB du DAC-V1 (Voir Section 4).
• Si les entrées S/PDIF du DAC-V1 doivent être utlisées, sélectionnez simplement l’entrée
appropriée et lancez la lecture du programme à partir de la source audio numérique.
• Pour contrôler le volume du DAC-V1, utilisez le contrôle de volume du panneau avant ou les
touches vol+ ou vol- de la télécommande. Le niveau de volume est indiqué sur l’affichage du
DAC-V1.
Note: Si le DAC-V1 a déjà
été utilisé, il se règlera par
défaut sur la dernière entrée
sélectionnée quand il sera mis
sous tension.
Note: Les applications de
lecture audio par défaut
pour les ordinateurs opérant
sous Windows et OS X sont
habituellement Windows
Media Player et iTunes.
Cependant, une grande
variété d’applications
alternatives pouvant offrir
des fonctionnalités et une
performance audio supérieures
peuvent être utilisées.
4. Mode réglage
• Divers paramètres de réglage sont accessibles grâce au mode
réglage du DAC-V1. Entrez en mode réglage en appuyant sur la
touche setup de la télécommande. Pour naviguer dans les menus
de réglage, utilisez les touches (5 6 3 4) de navigation de la
télécommande. Sélectionnez les options en appuyant sur la touche
. Pour sortir du mode réglage, appuyez sur la touche setup de la
télécommande.
• Le menu de réglage de premier niveau présente quatre éléments:
Settings (Réglages): Offre accès à six menus couvrant la renomination des entrées, les options
de sortie préampli, le réglage du casque, le contrôle du volume USB, le comportement de
l’affichage et l’identification du clavier.
BitPerfect: Permet l’utilisation de fichiers test “bit perfect” localisés sur l’ordinateur connecté
par USB pour s’assurer que l’application de lecture et la connexion USB produisent une qualité
de son optimale. Pour une description complète de la procédure de test Bit Perfect et savoir où
trouver les fichiers test, reportez-vous au Manuel de Référence du DAC-V1.
USB Status (Statut USB): Affiche les informations et données relatives à la connexion de l’entrée
USB du DAC-V1.
Firmware: Affiche les détails relatifs au firmware (micrologiciel) exécuté par le DAC-V1 et offre
des options de réinitialisation aux réglages usine et de mise à jour de micrologiciel.
4 Settings
BitPerfect
USB Status
Firmware
Note: Le menu de réglage
Identification du clavier a
pour fonction de permettre
aux ordinateurs sous OS
X connectés par USB
d’identifier correctement les
caractéristiques du contrôle du
DAC-V1.
Le DAC-V1 se comporte en
partie comme un clavier
multimédia qui peut envoyer
des commandes de volume,
lecture, pause, suivant et
précédent à l’ordinateur. Quand
un ordinateur sous OS X est
connecté pour la première fois
au DAC-V1, il peut demander
d’envoyer des frappes de
touches spécifiques afin
d’identifier la disposition du
“clavier”. Le menu de réglage
Identification du clavier permet
d’envoyer les frappes de
touches appropriées.
Les informations complètes sur l’installation et le fonctionnement du DAC-V1 se trouvent dans le Manuel
de Référence disponible sur: www.naimaudio.com/support/manuals. L’application pilote Windows OS
DAC-V1 est disponible sur: www.naimaudio.com/hifi-products/pdt-type/DAC-V1
Page 8

DAC-V1 Snelstartgids Nederlands
1. Inleiding
De DAC-V1 is een digitaal-naar-analoog converter en voorversterker met zes ingangen, die is
bedoeld om geluid van S/PDIF digitale bronnen of rechtstreeks via de USB-interface van een
computer te verwerken. Wanneer de DAC-V1 via USB op een computer is aangesloten, werkt
hij als een extern geluidsuitvoerapparaat en kan hij door allerlei verschillende audioapplicaties
worden gebruikt.
De DAC-V1 heeft stereo DIN en RCA phono analoge uitgangen, een hoofdtelefoonuitgang
van 6,3 mm op het voorpaneel, en een volumeregeling. De DAC-V1 kan worden bediend
en ingesteld met de bedieningselementen op het voorpaneel en de meegeleverde
afstandsbediening.
2. Installeren en aansluiten
Belangrijk: als de DAC-V1 wordt gebruikt met een computer waarop het Windows-
besturingssysteem draait, dan moet u het stuurprogramma voor de DAC-V1 installeren en
configureren via de geluidsregeling van Windows voordat u de DAC-V1 via USB aansluit.
Download het bestand, dubbelklik op het pictogram van het DAC-V1-stuurprogramma en volg de
installatie-instructies zorgvuldig. U kunt het stuurprogramma downloaden via: www.naimaudio.
com/hifi-products/pdt-type/DAC-V1
aan/uit-
schakelaar
USB-
netvoedingsingang
en zekering
• Plaats de DAC-V1 op een geschikt, stabiel oppervlak. Zorg dat het apparaat goed is
geventileerd.
• Controleer dat de netvoeding zoals gespecificeerd op het achterpaneel van de DAC-V1
geschikt is voor uw regio. Sluit de DAC-V1 met de meegeleverde kabel op de netvoeding aan,
maar schakel het apparaat pas in nadat alle andere aansluitingen zijn gemaakt en, indien van
toepassing, het Windows-stuurprogramma voor de DAC-V1 is geïnstalleerd op de via USB
aangesloten computer.
• Zoek de schakelaar Signal Ground en selecteer de optie chassis, tenzij de DAC-V1 is
aangesloten op een hifisysteem met een andere geaarde broncomponent (alle cd-spelers
van Naim, bijvoorbeeld) of er via de luidsprekers brom te horen is wanneer de DAC-V1 is
ingeschakeld.
• Sluit een van de analoge uitgangen van de DAC-V1 zo nodig aan op een eindversterker- of
voorversterkeringang. Als de voor- of eindversterker DIN-aansluitingen heeft, moeten in plaats
van RCA phono-aansluitingen bij voorkeur DIN-aansluitingen worden gebruikt. De DIN- en
RCA phono-aansluitingen mogen nooit gelijktijdig zijn aangesloten en mogen nooit gelijktijdig
worden gebruikt.
ingang
ingang 2 en
4 (coaxiaal)
ingang 1
(BNC)
ingang 3 en
5 (optisch)
signal
ground
analoge uitgang
(DIN)
analoge uitgang
(RCA)
Opmerking: het
stuurprogramma voor de DACV1 is alleen compatibel met
Windows Vista en hoger.
Opmerking: de DAC-V1 kan
alleen goed werken met Mac
OS X versie 10.7.x en hoger.
Opmerking: de DAC-
V1 kan alleen goed
werken met USB 2.x- of
3.x-interfaceaansluitingen.
Opmerking: als de DAC-V1
moet worden aangesloten op
een voorversterker verderop in
het systeem, dan moet een vast
uitgangsvolume voor de DACV1 worden ingesteld door de
optie Vaste Uitgang te kiezen in
het instelmenu Voorversterker
Uit (zie hoofdstuk 4). Als met
de DAC-V1 een hoofdtelefoon
wordt gebruikt wanneer Vaste
Uitgang is geselecteerd, wordt
de volumeregeling hersteld
zolang de hoofdtelefoon is
aangesloten.
Volledige informatie over het installeren en bedienen van de DAC-V1 vindt u in de referentiehandleiding
op: www.naimaudio.com/support/manuals. Het Windows-stuurprogramma voor de DAC-V1 is te vinden
op: www.naimaudio.com/hifi-products/pdt-type/DAC-V1
Page 9

DAC-V1 Snelstartgids Nederlands
• Als de DAC-V1 wordt gebruikt om op een computer opgeslagen audiobestanden af te spelen,
moet de computer met gebruik van een type A-B USB-kabel via een van zijn USB-aansluitingen
op de DAC-V1 worden aangesloten. Voor de beste geluidsprestatie moet de computer
rechtstreeks via USB op de DAC-V1 zijn aangesloten, niet via een hub. De gebruikte USB-kabel
mag niet langer zijn dan 3 meter.
• Als er S/PDIF digitale geluidsbronnen met de DAC-V1 worden gebruikt, moeten deze op een
van de ingangen van de DAC-V1 worden aangesloten. De DAC-V1 biedt verschillende digitale
aansluitingsmogelijkheden, maar de BNC-aansluiting biedt waarschijnlijk de hoogst mogelijke
geluidskwaliteit.
3. Inschakelen en aan de slag
Belangrijk: als op de via USB aangesloten computer een Windows-besturingssysteem draait, dient u eerst
het stuurprogramma voor de DAC-V1 te installeren, pas dan mag u de DAC-V1 inschakelen.
• Wanneer u alle aansluitingen hebt gemaakt, schakelt u de DAC-V1 in met de aan/uit-schakelaar
op het achterpaneel van het apparaat. De DAC-V1 opent een welkomstscherm en selecteert
standaard zijn USB-ingang.
• U kunt ingangen van de DAC-V1 selecteren via de ingangstoetsen op het voorpaneel of de USB- of
cijfertoetsen op de afstandsbediening. De toetsen 5 en 6 op de afstandsbediening kunnen
ook worden gebruikt om door de beschikbare ingangen te bladeren. Op het display van de DAC-V1
wordt aangegeven welke ingang is geselecteerd.
• Als de USB-ingang van de DAC-V1 moet worden gebruikt, moet u op de via USB aangesloten
computer de geluidsinstellingen of het voorkeurenvenster openen en de DAC-V1 als het
geluidsuitvoerapparaat selecteren. Wanneer de DAC-V1 is geselecteerd, kan de audioapplicatie
worden gestart. Afhankelijk van de functionaliteit van de audioapplicatie, kunnen de
volumetoetsen en de toets op de afstandsbediening van de DAC-V1 worden gebruikt om het
volume van de audioapplicatie te regelen en het afspelen te starten of onderbreken. Selecteer
de optie PC Volume in het instelmenu USB Volume van de DAC-V1 (zie hoofdstuk 4).
• Als de S/PDIF-ingangen van de DAC-V1 moeten worden gebruikt, kiest u gewoon de gewenste
ingang en speelt u het programmamateriaal van de digitale geluidsbron af.
• U kunt het volume van de DAC-V1 regelen via de volumeregeling op het voorpaneel of de
toetsen vol+ en vol- op de afstandsbediening. Op het display van de DAC-V1 wordt het
geselecteerde volumeniveau weergegeven.
Opmerking: als de DAC-
V1 reeds eerder is gebruikt,
schakelt het apparaat
standaard over naar de laatst
gekozen ingang.
Opmerking: de standaard
audioapplicaties voor
computers waarop Windows
of OS X draait, zijn doorgaans
Windows Media Player en
iTunes. Er kunnen echter
allerlei andere applicaties
worden gebruikt, die mogelijk
betere functionaliteit en een
hogere geluidskwaliteit bieden.
4. Instelmodus
• Via de instelmodus van de DAC-V1 krijgt u toegang tot
uiteenlopende instelparameters. Druk op de afstandsbediening
op de toets setup om over te schakelen naar de instelmodus.
Gebruik op de afstandsbediening de toetsen 5 6 3 4 om
door de instelmenu’s te bladeren. Gebruik de toets om opties
te selecteren. U sluit de instelmodus af door de toets setup in te
drukken.
• Het eerste instelmenu biedt vier opties:
Settings (Instellingen): geeft toegang tot zes menu’s. Hierin kunt u ingangen een nieuwe naam
geven, uitgangsopties voor de voorversterker selecteren, een hoofdtelefoon instellen, het USBvolume regelen, het display instellen en een toetsenbord identificeren.
BitPerfect: bedoeld om BitPerfect testbestanden te gebruiken die zijn opgeslagen op de via USB
aangesloten computer. Zo kunt u controleren dat de audioapplicatie en USB-aansluiting een
optimale geluidskwaliteit bieden. Een volledige omschrijving van de BitPerfect testprocedure en
testbestanden is te vinden in de referentiehandleiding van de DAC-V1.
USB-status: toont gegevens en informatie over de USB-ingangaansluiting van de DAC-V1.
Firmware: toont gegevens over de firmware van de DAC-V1 en opties voor het herstellen van de
fabrieksinstellingen en firmware-updates.
Volledige informatie over het installeren en bedienen van de DAC-V1 vindt u in de referentiehandleiding
op: www.naimaudio.com/support/manuals. Het Windows-stuurprogramma voor de DAC-V1 is te vinden
op: www.naimaudio.com/hifi-products/pdt-type/DAC-V1
4 Settings
BitPerfect
USB Status
Firmware
Opmerking: via het instelmenu
Toetsenbordidentificatie kunnen via USB aangesloten computers waarop OS X draait de
bedieningseigenschappen van
de DAC-V1 identificeren.
De DAC-V1 werkt tot op zekere
hoogte als een multimediatoetsenbord dat opdrachten voor
volume, afspelen, onderbreken,
volgende en vorige naar de
computer kan sturen. Wanneer
een computer waarop OS X
draait voor de eerste keer op
een DAC-V1 wordt aangesloten,
vraagt deze waarschijnlijk om
specifieke toetsaanslagen om
de indeling van het toetsenbord
te identificeren. De benodigde
toetsaanslagen kunnen via het
toetsenbordinstelmenu van de
DAC-V1 worden verzonden.
Page 10

DAC-V1 Guía de inicio rápido Español
1. Introducción
El DAC-V1 es un convertidor digital a analógico de seis entradas y preamplificador de audio
diseñado para aceptar audio desde fuentes digitales S/PDIF o directamente desde la interfaz
USB de un ordenador. Al conectarlo a un ordenador vía USB, el DAC-V1 se comportará
como un dispositivo externo de salida de audio y será accesible para una gran variedad de
aplicaciones de reproducción de audio.
El DAC-V1 incorpora salidas estereofónicas analógicas DIN y RCA, una salida en el panel
frontal con clavija de 6,3 mm para auriculares y un control de volumen. El funcionamiento y la
configuración del DAC-V1 se hacen vía los controles del panel frontal y el mando a distancia
suministrado.
2. Instalación y conexión
Importante: Si su DAC-V1 va a utilizarse con un ordenador que trabaje con Windows OS, debe
instalarse y configurarse la aplicación DAC-V1 Driver en el panel de control de sonido de Windows
antes de conectar el DAC-V1 vía USB. Descargue el archivo, haga doble clic en el icono DAC-V1
Driver y siga cuidadosamente las instrucciones de instalación. La aplicación del controlador puede
descargarse desde: www.naimaudio.com/hifi-products/pdt-type/DAC-V1
interruptor de encendido
entrada de corriente y fusible
entrada
USB
entradas 2 y 4
(coaxiales)
entrada 1
(BNC)
entradas 3 y
5 (ópticas)
salida analógica (DIN)
interruptor
de tierra de
la señal
salida analógica
(RCA)
Nota: La aplicación DAC-V1
Driver solo es compatible con
Windows Vista y superiores.
Nota: El DAC-V1 solo
funcionará correctamente con
Mac OS X en versiones 10.7.x y
superiores.
• Apoye su DAC-V1 sobre una superficie estable y apropiada. Asegúrese de que está bien
ventilado.
• Compruebe que la alimentación de red especificada en el panel trasero del DAC-V1 es la adecuada
en su territorio. Conecte el DAC-V1 a la red usando el cable suministrado, pero no lo encienda hasta
haber hecho las demás conexiones y, si procede, haber instalado la aplicación del controlador para
DAC-V1 Windows OS en el ordenador conectado vía USB.
• Identifique el interruptor de tierra de la señal y seleccione la opción chasis, salvo si el DACV1 está conectado a un sistema de alta fidelidad que incluya otro componente con la fuente
puesta a tierra (cualquier reproductor Naim de CD, por ejemplo), o se oirá un “zumbido” en los
altavoces al encender el DAC-V1.
• Conecte una de las salidas analógicas del DAC-V1 a una entrada de un amplificador de potencia
o de un preamplificador, según sea necesario. Si la opción está disponible en el preamplificador
o en el amplificador de potencia, deberá usar preferentemente las conexiones en la base DIN a
las bases de audio RCA. Las opciones de bases DIN y audio RCA no deben conectarse ni usarse
simultáneamente.
• Si el DAC-V1 va a utilizarse para la reproducción de archivos de audio almacenados en un
ordenador, conecte el ordenador, vía uno de las tomas USB, al DAC-V1 usando un cable USB
tipo A-B. Para un rendimiento de audio óptimo, la conexión USB del ordenador al DAC-V1 debe
Información completa sobre la instalación y el funcionamiento del DAC-V1 puede encontrarse en el Manual
de referencia, disponible en: www.naimaudio.com/support/manuals. La aplicación de Windows OS DAC-V1
Driver se puede encontrar en: www.naimaudio.com/hifi-products/pdt-type/DAC-V1.
Nota: El DAC-V1 solo
funcionará correctamente con
tomas de interfaz USB 2.x o
3.x.
Nota: Si su DAC-V1
va a conectarse a un
preamplificador adicional para
la señal de bajada, el volumen
de salida del DAC-V1 debe
fijarse seleccionando la opción
Salida Fija en el menú de
configuración de la Salida del
preamplificador (véase Sección
4). Si se usan auriculares
con el DAC-V1 mientras está
seleccionada la Salida Fija,
habrá que restaurar el control
de volumen con los auriculares
enchufados.
Page 11

DAC-V1 Guía de inicio rápido Español
ser directa en vez de vía cualquier dispositivo “concentrador”. El cable USB usado no debe
sobrepasar los 3 m.
• Si va a usarse con el DAC-V1 alguna fuente de audio digital S/PDIF, conéctela a una de las
entradas del DAC-V1. El DAC-V1 tiene varios tipos de tomas de entrada digital, siendo la opción de
la toma BNC la que probablemente dará la mejor calidad de sonido.
3. Encendido y puesta en marcha
Importante: Si usa Windows OS en el ordenador conectado vía USB, no encienda el DAC-V1 sin
instalar antes la aplicación DAC-V1 Driver.
• Una vez hechas todas las conexiones, encienda su DAC-V1 usando el interruptor de red en el
panel posterior. El DAC-V1 mostrará una pantalla de bienvenida y seleccionará por defecto la
entrada USB.
• Para seleccionar las entradas al DAC-V1 use los botones de entrada del panel delantero, o
el mando USB a distancia o las teclas numéricas. Las teclas 5 y 6 del mando a distancia
pueden usarse también para desplazarse por la selección de entradas. La entrada seleccionada
actualmente está indicada en la pantalla del DAC-V1.
• Si va a utilizarse la entrada USB al DAC-V1, arranque el control de configuración del sonido
del ordenador, conectado al USB, o el panel de preferencias y seleccione el DAC-V1 como el
dispositivo de salida del sonido. Con el DAC-V1 seleccionado, se puede arrancar la aplicación
de reproducción de audio. Según la funcionalidad de la aplicación de reproducción, las teclas
de volumen y en el mando a distancia del DAC-V1 podrán controlar el volumen de salida y la
reproducción/pausa. Seleccione la opción PC Volume (Volumen PC) en el menú de configuración
del DAC-V1 USB Volume (Volumen USB) (véase Sección 4).
• Si van a usarse las entradas S/PDIF al DAC-V1, basta seleccionar la entrada apropiada y
reproducir el material del programa desde la fuente de audio digital.
• Para controlar el volumen del DAC-V1, use el control de volumen del panel delantero o las teclas
vol+ y vol- del mando a distancia. El nivel del volumen se muestra en la pantalla del DAC-V1.
Nota: Si el DAC-V1 se ha usado
previamente, al encenderlo irá
por defecto a la última entrada
seleccionada.
Nota: Las aplicaciones de
reproducción de audio por
defecto para ordenadores
con Windows y OS X son,
normalmente, Windows
Media Player e iTunes. No
obstante, puede usarse una
gran variedad de aplicaciones
alternativas que pueden
proporcionar una funcionalidad
mejorada y mejores
prestaciones de audio.
4. Modo configuración
• Vía el modo configuración del DAC-V1 se puede acceder a diversos
parámetros de configuración. Entre en el modo configuración
pulsando la tecla configuración en el mando a distancia. Para
navegar por los menús de configuración, use las teclas de
navegación (5 6 3 4) en el mando a distancia. Seleccione las
opciones pulsando la tecla. Salga del modo configuración pulsando
la tecla .
• El menú de configuración del nivel más alto proporciona cuatro elementos:
Settings (Valores de ajuste): Proporciona acceso a seis menús que cubren: cambio de nombre
de las entradas, opciones de salida del preamplificador, configuración de los auriculares, control
de volumen USB, comportamiento de la pantalla e identificación del teclado.
BitPerfect: Activa el uso de los archivos de prueba bit perfect ubicados en el ordenador
conectado vía USB para asegurar que la aplicación de reproducción y la conexión USB
proporcionan la calidad de sonido óptima. Una descripción completa del procedimiento de
prueba Bit Perfect y de la disponibilidad de archivos de prueba puede encontrarse en el manual
de Referencia del DAC-V1.
USB Status (Estado USB): Presenta los datos y la información de la conexión USB de entrada al
DAC-V1.
Firmware: Presenta los detalles del firmware operativo del DAC-V1 y proporciona opciones para
restablecer por defecto los valores de fábrica y para actualización del firmware.
4 Settings
BitPerfect
USB Status
Firmware
Nota: El menú de configuración
para la identificación del
teclado se ha provisto para
activar correctamente los
ordenadores OS X conectados
vía USB para que identifiquen
las características de control
del DAC-V1.
El DAC-V1 se comporta,
en parte, como un teclado
multimedia que puede enviar al
ordenador instrucciones sobre
volumen, reproducción, pausa,
siguiente y anterior. Cuando
se conecta por primera vez
un ordenador OS X al DACV1, puede solicitar el envío
de determinadas pulsaciones
de teclas para identificar la
distribución del “teclado”. El
menú de configuración del DACV1 permite que se envíen las
pulsaciones adecuadas.
Información completa sobre la instalación y el funcionamiento del DAC-V1 puede encontrarse en el Manual
de referencia, disponible en: www.naimaudio.com/support/manuals. La aplicación de Windows OS DAC-V1
Driver se puede encontrar en: www.naimaudio.com/hifi-products/pdt-type/DAC-V1.
Page 12

DAC-V1 Guida Rapida Italiano
1. Introduzione
Il DAC-V1 è un preamplificatore-convertitore digitale/analogico con sei ingressi progettato
per gestire l’audio proveniente da sorgenti digitali S/PDIF o direttamente dall’interfaccia USB
di un computer. Se è collegato a un computer tramite USB, il DAC-V1 si comporterà come una
scheda audio esterna e sarà accessibile a un’ampia serie di applicazioni per la riproduzione
audio.
Il DAC-V1 comprende uscite analogiche stereo DIN e phono RCA, un’uscita per le cuffie
sul pannello frontale con jack da 6,3 mm e il controllo del volume. Il funzionamento e
le impostazioni del DAC-V1 avvengono tramite i controlli del pannello frontale e con il
telecomando fornito.
2. Installazione e connessione
Importante: se il vostro DAC-V1 verrà utilizzato con un computer con sistema operativo
Windows, è necessario installare e configurare il driver del DAC-V1 nel pannello di controllo del
suono di Windows prima di collegare il DAC-V1 tramite USB. Scaricate il file, fate doppio clic
sull’icona DAC-V1 Driver e seguite attentamente le istruzioni per l’installazione. Il driver può
essere scaricato da: www.naimaudio.com/hifi-products/pdt-type/DAC-V1
interruttore di
accensione
ingresso
alimentazione
e fusibile
ingresso
USB
ingressi 2 & 4
(coassiali)
ingresso 1
(BNC)
ingressi 3 & 5
(ottici)
interruttore
messa a
terra
uscita analogica
(DIN)
uscita analogica
(RCA)
Nota: Il driver del DAC-V1 è
compatibile solo con Windows
Vista e successivi.
Nota: Il DAC-V1 funziona
correttamente solo con le
versioni Mac OS X 10.7 e
successive.
• Posizionate il DAC-V1 su un’adeguata superficie stabile. Assicuratevi che la ventilazione sia
sufficiente.
• Controllate che l’alimentazione della rete elettrica specificata sul pannello posteriore del DACV1 sia adatta al vostro paese. Collegate il DAC-V1 alla rete elettrica utilizzando il cavo fornito,
ma non accendetelo fino a che non sono state realizzate anche tutte le altre connessioni e, se
necessario, è stato installato il driver per Windows del DAC-V1 sul computer collegato via USB.
• Identificate l’interruttore della messa a terra e selezionate l’opzione “chassis” a meno che il
DAC-V1 non sia collegato a un sistema hi-fi comprendente un altro componente con messa a
terra (tutti i lettori CD Naim, per esempio), oppure se si udirà il ronzio dell’alimentazione nei
diffusori.
• Collegate una delle uscite analogiche del DAC-V1 all’ingresso di un amplificatore o a un
preamplificatore come richiesto. Se l’opzione è disponibile sul pre o sul finale, è preferibile
utilizzare le prese DIN rispetto alle prese phono RCA. Le prese di uscita phono RCA e DIN non
devono essere collegate contemporaneamente.
• Se il DAC-V1 verrà utilizzato per la riproduzione di file audio memorizzati su computer, collegate
il computer tramite una delle sue prese USB al DAC-V1 utilizzando un cavo USB di tipo A-B. Per
Tutte le informazioni relative all’installazione e al funzionamento del DAC-V1 sono riportate nel Manuale di
istruzioni disponibile online su: www.naimaudio.com/support/manuals. L’applicazione per il driver del DAC-
V1 per Windows e OS è reperibile su: www.naimaudio.com/hifi-products/pdt-type/DAC-V1
Nota: Il DAC-V1 funzionerà
correttamente solo con prese
USB 2.x o 3.x.
Nota: Se il vostro DAC-V1
sarà collegato a un altro
preamplificatore in cascata,
l’uscita del volume deve
essere resa fissa selezionando
l’opzione Uscita fissa del menù
di impostazione dell’uscita
del preamplificatore (cfr.
capitolo 4). Se con il DAC-V1
utilizzate delle cuffie mentre
è selezionata l’uscita fissa,
il controllo del volume verrà
ripristinato quando le cuffie
sono inserite.
Page 13

DAC-V1 Guida Rapida Italiano
ottenere un’ottima prestazione audio, è preferibile che la connessione USB dal computer al DACV1 sia diretta e non avvenga tramite un dispositivo che funge da “hub”. Il cavo USB utilizzato non
deve essere più lungo di 3 m.
• Se si utilizzano sorgenti audio digitali S/PDIF collegatele a uno degli ingressi del DAC-V1. Il
DAC-V1 fornisce un’ampia serie di tipi di prese per gli ingressi digitali inclusa la presa BNC che
probabilmente fornirà la migliore qualità sonora.
3. Accensione e avvio
Importante: se sul computer collegato utilizzate Windows come sistema operativo, non
accendete il DAC-V1 prima di aver installato il driver del DAC-V1.
• Dopo aver effettuato tutte le connessioni, accendete il DAC-V1 con l’apposito interruttore
presente sul pannello posteriore. Il DAC-V1 visualizza una schermata di benvenuto e seleziona il
suo ingresso USB di default.
• Per selezionare gli ingressi del DAC-V1 utilizzate i tasti sul pannello frontale, il telecomando USB
o i tasti numerici. I tasti 5 e 6 del telecomando possono essere utilizzati anche per scorrere la
selezione degli ingressi. L’ingresso selezionato è indicato sul display del DAC-V1.
• Se utilizzate l’ingresso USB del DAC-V1, lanciate l’applicazione di controllo del suono sul computer
collegato tramite USB o il pannello delle preferenze e selezionate il DAC-V1 come scheda audio di
uscita. Dopo aver selezionato il DAC-V1, è possibile lanciare l’applicazione di riproduzione audio.
A seconda delle funzionalità dell’applicazione di riproduzione, il volume del DAC-V1 e i tasti del
telecomando potranno controllare anche il volume di uscita dell’applicazione e le funzioni play/
pause. Selezionate l’opzione del volume del PC nel menù di impostazione Volume USB del DAC-V1
(cfr. capitolo 4).
• Se si utilizzano gli ingressi S/PDIF del DAC-V1, è sufficiente selezionare l’ingresso appropriato e
avviare la riproduzione dalla sorgente audio digitale.
• Per regolare il volume del DAC-V1, utilizzate il controllo del volume sul pannello frontale o i tasti
vol- o vol+ del telecomando. Il livello del volume è visualizzato sul display del DAC-V1.
Nota: Se il DAC-V1 è stato
utilizzato in precedenza, al
momento della riaccensione
sceglierà l’ultimo ingresso
selezionato.
Nota: Le applicazioni di
riproduzione audio di default
per computer con sistema
operativo Windows e OS
X sono in genere Windows
Media Player e iTunes. È
tuttavia possibile utilizzare
un’ampia varietà di applicazioni
alternative in grado di
fornire funzionalità migliori e
prestazioni audio superiori.
4. Modalità impostazione
• È possibile accedere ai diversi parametri d’impostazione dal menù
d’impostazione del DAC-V1. Entrate in modalità impostazione
premendo il tasto di impostazione sul telecomando. Per navigare
nei menù d’impostazione utilizzate i tasti di navigazione del
telecomando (5 6 3 4). Selezionate le opzioni premendo
il tasto . Per uscire dal menù d’impostazione, premete il tasto
d’impostazione.
• Il menù d’impostazione di livello più alto fornisce quattro opzioni:
Impostazioni (Settings): dà accesso a sei menù comprendenti la rinomina dell’ingresso,
le opzioni di uscita preamp, l’impostazione delle cuffie, il controllo del volume USB, il
comportamento del display e l’identificazione della tastiera.
Bit Perfect: consente l’utilizzo dei file di test “bit perfect” memorizzati sul computer collegato
tramite USB per assicurare che l’applicazione di riproduzione e la connessione USB diano
la massima qualità sonora. La descrizione completa della procedura del test Bit Perfect e la
disponibilità del file di test sono riportati nel Manuale di istruzioni del DAC-V1.
Stato USB (USB Status): visualizza i dati e le informazioni sulla connessione dell’ingresso USB del
DAC-V1.
Firmware: visualizza i dettagli del firmware presente nel DAC-V1 e fornisce le opzioni di
ripristino delle impostazioni di fabbrica e dell’aggiornamento del firmware.
4 Settings
BitPerfect
USB Status
Firmware
Nota: Il menù di impostazione
di identificazione della tastiera
è presente affinché i computer
OS X collegati tramite USB
possano identificare in modo
corretto le caratteristiche di
controllo del DAC-V1.
Il DAC-V1 si comporta come
una tastiera multimedia in
grado di inviare al computer
i comandi relativi a volume,
riproduzione, pausa, successivo
e precedente. Quando un
computer OS X viene collegato
al DAC-V1 per la prima
volta, è possibile che chieda
combinazioni di tasti specifici
da inviare per identificare il
layout della tastiera. Il menù
d’impostazione della tastiera
del DAC-V1 attiva i tasti corretti
da inviare.
Tutte le informazioni relative all’installazione e al funzionamento del DAC-V1 sono riportate nel Manuale di
istruzioni disponibile online su: www.naimaudio.com/support/manuals. L’applicazione per il driver del DAC-
V1 per Windows e OS è reperibile su: www.naimaudio.com/hifi-products/pdt-type/DAC-V1
Page 14

DAC-V1 Przewodnik Szybkiego Startu Polski
1. Wprowadzenie
DAC-V1 jest konwerterem cyfrowo-analogowym z sześcioma wejściami cyfrowymi oraz
przedwzmacniaczem audio, przeznaczonym do przetwarzania sygnałów dźwiękowych
pochodzących ze źródeł cyfrowych podłączonych do wejść S/PDIF lub bezpośrednio z komputera
za pośrednictwem złącza USB. Po podłączeniu DAC-V1 do komputera poprzez USB, będzie on
działał jako urządzenie wyjściowe dla zewnętrznych sygnałów dźwiękowych i będzie dostępny dla
szerokiego zakresu aplikacji do odtwarzania audio.
DAC-V1 posiada wyjścia analogowe stereo DIN i RCA phono, 6,3mm wyjście słuchawkowe typu
jack na przednim panelu oraz pokrętło do regulacji głośności. Obsługę i ustawienia DAC-V1
wykonuje się za pośrednictwem elementów sterowania na jego przednim panelu i przy pomocy
pilota zdalnego sterowania dołączonego do produktu.
2. Instalacja i połączenie
Ważne: Jeżeli DAC-V1 ma być używany z komputerem z systemem Windows OS, aplikacja sterownika
DAC-V1 musi być zainstalowana i skonfigurowana w panelu sterowania systemu Windows, przed
podłączeniem DAC-V1 za pomocą wejścia USB. W tym celu należy pobrać plik, kliknąć dwa razy na
ikonę sterownika DAC-V1 i postępować według instrukcji instalacji. Aplikację sterownika można
pobrać ze strony internetowej: www.naimaudio.com/hifi-products/pdt-type/DAC-V1
główny włącznik/
wyłącznik
wejście sieciowe i
bezpiecznik
wejście
USB
wejścia 2 i 4
(koaksjalne)
wejście 1
(BNC)
wejścia 3 i 5
(optyczne)
wyjście analogowe
przełącznik
sygnału uziemienia
(DIN)
wyjście analogowe
(RCA)
Uwaga: Aplikacja sterownika
DAC-V1 jest kompatybilna tylko
z Windows Vista i nowszymi
wersjami oprogramowania.
Uwaga: DAC-V1 będzie działać
prawidłowo tylko z systemem Mac
OS X w wersji 10.7.x i nowszej.
• Należy rozpocząć od ustawienia DAC-V1 na stabilnej powierzchni. Należy upewnić się, że będzie on w
tym miejscu dobrze wentylowany.
• Następnie należy upewnić się, że napięcie sieciowe zaznaczone na tylnym panelu DAC-V1 jest
odpowiednie dla danego kraju. Po sprawdzeniu, należy podłączyć DAC-V1 do sieci za pomocą
dołączonego kabla. Natomiast nie należy włączać go do momentu, gdy wszystkie inne połączenia
zostaną zakończone oraz w stosownych przypadkach, do czasu zainstalowania aplikacji sterownika w
systemie operacyjnym Windows w komputerze połączonym za pomocą USB.
• Należy zidentyfikować Przełącznik Sygnału Uziemienia na tylnym panelu i przełączyć go na opcję
„chassis” chyba, że DAC-V1 jest połączony z systemem hi-fi zawierającym inny element z uziemieniem
(na przykład wszystkie odtwarzacze CD firmy Naim), lub po włączeniu DAC-V1 słyszalne jest „buczenie”
dochodzące z głośników.
• Należy połączyć jedno z wyjść analogowych DAC-V1 z wejściem wzmacniacza mocy lub
przedwzmacniacza. Jeżeli na przedwzmacniaczu lub wzmacniaczu mocy istnieje możliwość wyboru, do
instalacji należy użyć gniazda połączeniowego DIN w odróżnieniu od gniazda RCA. Nie należy łączyć ani
stosować jednoczenie w DAC-V1 opcji połączenia z gniazdem DIN i RCA phono.
• Jeżeli DAC-V1 ma być używany do odtwarzania plików audio zapisanych na komputerze, należy
podłączyć dany komputer, za pośrednictwem jednego z gniazd USB, do DAC-V1 za pomocą kabla USB
Pełna instalacja DAC-V1 oraz informacje operacyjne można znaleźć w Instrukcji Obsługi dostępnej na stronie
internetowej: www.naimaudio.com. Aplikację Windows OS sterownika DAC-V1 można znaleźć na:
www.naimaudio.com/hifi-products/pdt-type/DAC-V1
Uwaga: DAC-V1 będzie działać
prawidłowo tylko z gniazdami USB
interfejs 2.x. lub 3.x.
Uwaga: Jeżeli DAC-V1 ma być
dodatkowo połączony z dalszym
przedwzmacniaczem, pokrętło
do regulacji głośności sygnału
wyjściowego audio z DAC-V1
powinno być ustawione przez
wybranie opcji Fixed Output (Stałe
Wyjście) w menu ustawień Preamp
Out (Wyjście Przedwzmacniacza)
(patrz rozdział 4). Jeżeli słuchawki
w DAC-V1 będą używane w
momencie, gdy wybrana została
opcja Stałego Wyjścia, regulacja
głośności będzie przywrócona po
podłączeniu słuchawek.
Page 15

DAC-V1 Przewodnik Szybkiego Startu Polski
typu A-B. W celu uzyskania optymalnej jakości dźwięku połączenie kablem USB pomiędzy komputerem
a DAC-V1 powinno być bezpośrednie, a nie za pośrednictwem jakiegokolwiek „koncentratora”.
Zastosowany kabel USB nie powinien być dłuższy niż 3m.
• W przypadku użycia dowolnego cyfrowego źródła dźwięku S/PDIF, należy podłączyć je do jednego
z wejść na DAC-V1. DAC-V1 zawiera różne typy cyfrowych gniazd wejścia z opcją gniazda BNC, które
potencjalnie zapewni najwyższą jakość dźwięku.
3. Włączenie urządzenia i rozpoczęcie użytkowania
Ważne: W przypadku korzystania z systemu operacyjnego Windows na komputerze podłączonym
poprzez USB, nie należy włączać DAC-V1 bez uprzedniego zainstalowania aplikacji sterownika DAC-V1.
• Gdy wszystkie połączenia zostaną zakończone, należy włączyć DAC-V1 za pomocą głównego włącznika
na tylnym panelu. DAC-V1 podświetli wówczas swój ekran na przednim panelu i automatycznie
wybierze wejście USB.
• W celu wyboru wejść na DAC-V1, należy użyć przycisków wejść na przednim panelu, lub przycisków
numerycznych i przycisku USB na pilocie zdalnego sterowania. Przyciski (5) i (6) na pilocie mogą
by również wykorzystane do przewijania listy wejść. Aktualnie wybrane wejście będzie pokazane na
wyświetlaczu DAC-V1.
• W celu korzystania z wejścia USB na DAC-V1, należy uruchomić kontrolę ustawień dźwięku lub panel
preferencji podłączonego poprzez USB komputera, i wybrać DAC-V1 jako urządzenie wyjściowe
audio. W tym momencie aplikacja odtwarzania dźwięku może zostać uruchomiona. W zależności od
funkcjonalności aplikacji odtwarzania, przyciski głośności oraz ( ) na pilocie DAC-V1, będą w stanie
kontrolować poziom głośności oraz funkcję odtwarzanie/pauza aplikacji. Należy wybrać opcję PC Volume
(Głośność Komputera) w menu ustawień USB Volume (Głośność USB) na DAC-V1 (patrz rozdział 4).
• W przypadku użycia wejść S/PDIF na DAC-V1, należy wybrać odpowiednie wejście i rozpocząć
odtwarzanie programu z cyfrowego źródła dźwięku.
• Do kontroli głośności DAC-V1 należy wykorzystać pokrętło głośności na przednim panelu lub przycisków
vol+ i vol- na pilocie zdalnego sterowania. Poziom głośności będzie pokazany na wyświetlaczu DAC-V1.
Uwaga: W przypadku
wcześniejszego korzystania z
DAC-V1, ostatnio wybrane wejście
zostanie domyślnie zapamiętane
i wybrane przy ponownym
włączeniu.
Uwaga: Windows Media Player i
iTunes są zazwyczaj domyślnymi
aplikacjami odtwarzania
dźwięku dla komputerów z
oprogramowaniem Windows
i OS X. Jednakże istnieje wiele
różnorodnych, alternatywnych
aplikacji, które mogą być użyte
do zwiększenia funkcjonalności i
jakości dźwięku.
4. Tryb ustawień
• Różne parametry konfiguracji są dostępne w trybie ustawień DACV1. Należy wejść w tryb ustawień poprzez naciśnięcie przycisku setup
na pilocie. Do nawigacji menu ustawień należy użyć przycisków
nawigacyjnych (5 6 3 4) na pilocie. W celu wyboru danej opcji,
należy nacisnąć przycisk ( ). Aby wyjść z trybu ustawień należy
ponownie nacisnąć przycisk setup na pilocie.
• Pierwszy poziom w menu ustawień składa się z czterech pozycji:
Settings (Ustawienia): Zapewnia dostęp do sześciu menu obsługujących opcję nazywania wejścia, opcję
wyjścia przedwzmacniacza, ustawienia słuchawek, regulację głośności za pośrednictwem połączenia USB,
sposób wyświetlania informacji na wyświetlaczu oraz identyfikację klawiatury.
BitPerfect: Umożliwia wykorzystanie plików testowych „bit perfect”, znajdujących się w komputerze
połączonym za pośrednictwem kabla USB, w celu zapewnienia, że aplikacja odtwarzania i połączenie USB
gwarantuje optymalną jakość dźwięku. Pełny opis procedury testowej Bit Perfect oraz informacje na temat
dostępności pliku testowego można znaleźć w Instrukcji Obsługi DAC-V1.
USB Status (Stan USB): Wybranie tej opcji umożliwia wyświetlenie danych oraz informacji na temat
połączenia z wejściem USB w DAC-V1.
Firmware (Oprogramowanie Sprzętowe): Wybranie tej opcji umożliwia wyświetlenie szczegółowych
informacji na temat programu pracującego w DAC-V1 oraz zapewnia możliwość wybrania opcji do
domyślnego zerowania i aktualizacji oprogramowania sprzętowego.
4 Settings
BitPerfect
USB Status
Firmware
Uwaga: Menu ustawień
identyfikacji klawiatury umożliwia
komputerom z oprogramowaniem
OS X, podłączonym poprzez USB,
poprawną identyfikację cech
sterowania DAC-V1.
DAC-V1 zachowuje się częściowo
jak klawiatura multimedialna,
która może wysyłać do komputera
polecenia regulacji głośności,
odtwarzania, pauzy, przejścia do
następnego lub do poprzedniego
utworu. W przypadku podłączenia
komputera z oprogramowaniem
OS X po raz pierwszy, DACV1 może poprosić o podanie
specjalnej kolejności wciskania
klawiszy (key-strokes), w celu
zidentyfikowania klawiatury. Menu
konfiguracji klawiatury DAC-V1
umożliwia wysłanie odpowiedniej
identyfikacji „kolejności klawiszy”
(key-strokes).
Pełna instalacja DAC-V1 oraz informacje operacyjne można znaleźć w Instrukcji Obsługi dostępnej na stronie
internetowej: www.naimaudio.com. Aplikację Windows OS sterownika DAC-V1 można znaleźć na:
www.naimaudio.com/hifi-products/pdt-type/DAC-V1
Page 16

Краткое руководство по эксплуатации устройства DAC-V1 РУССКИЙ
1. Введение
Устройство DAC-V1 представляет собой предусилитель/преобразователь цифрового сигнала (6 форматов) в аналоговый
и предназначено для обработки аудиосигнала с цифровых источников S/PDIF или напрямую с компьютера через USBинтерфейс. При подключении к компьютеру с помощью USB-интерфейса
DAC-V1 действует как внешнее звуковыводящее устройство, которое доступно для различных программ, воспроизводящих
аудиосигнал.
Устройство DAC-V1 включает аналоговые стереовыходы DIN и RCA, выходной разъем для наушников 6,3 мм на передней
панели и регулятор громкости. Эксплуатация и настройка DAC-V1 выполняются с помощью элементов управления на
передней панели или прилагаемого пульта дистанционного управления.
2. Установка и подключение
Важно:
Если устройство DAC-V1 планируется использовать на компьютере с ОС Windows, перед
подключением устройства с помощью USB-интерфейса необходимо установить драйвер (программу
DAC-V1 Driver) и настроить его в панели управления Windows (раздел «Звук»). Загрузите файл
драйвера, дважды щелкните по значку DAC-V1 Driver и следуйте инструкциям по установке.
Загрузить программу-драйвер можно по следующему адресу: www.naimaudio.com/hifi-products/pdttype/DAC-V1
выключатель
питания
входы 2 и 4
(коаксиальные)
аналоговый
выход (DIN)
Примечание:
V1 Driver совместима только с
Windows Vista и более поздними
версиями ОС Windows.
Примечание:
V1 работает корректно только в
Mac OS X 10.7 и более поздних
версиях операционной системы
Mac OS.
Программа DAC-
Программа DAC-
USB-вход
разъем для шнура
электропитания с предохранителем
• Установите устройство DAC-V1 на прочной ровной поверхности, обеспечив надлежащую вентиляцию.
• Проверьте, соответствует ли номинальное значение электропитания, указанное на задней панели
устройства DAC-V1, параметрам электросети. С помощью прилагаемого кабеля подключите DAC-V1 к
источнику электропитания, однако не включайте устройство до тех пор, пока не будут подключены все
прочие провода, а также (если это требуется) не будет установлен драйвер DAC-V1 для ОС Windows на
компьютере, подключенному к устройству с помощью USB-интерфейса.
• Найдите переключатель заземления сигнала (Signal Ground Switch) и выберите опцию Chassis
(«Корпус»), за исключением случаев, когда устройство DAC-V1 подключено к Hi-Fi системе, включающей
другой компонент с заземленным источником сигнала (например, к любому из проигрывателей
CD-дисков Naim), или если при включении DAC-V1 в динамиках слышно «гудение» от сети
электропитания.
• При необходимости соедините один из аналоговых выходов устройства DAC-V1 со входом усилителя
или предусилителя. Если соответствующая опция доступна на усилителе или предусилителе,
рекомендуется использовать для подключения разъемы DIN, а не RCA. Не рекомендуется соединять DIN
и RCA, а также одновременно использовать оба типа разъемов.
• Если устройство DAC-V1 планируется использовать для воспроизведения аудиофайлов на компьютере,
следует подключить его к одному из USB-разъемов компьютера с помощью USB-кабеля типа A-B. Для
оптимального качества воспроизводимого звука USB-соединение между компьютером и устройством
вход 1
(BNC)
входы 3 и 5
(опционально)
переключатель
заземления
сигнала
аналоговый выход (RCA)
Примечание:
Устройство DACV1 работает корректно только
при подключении к компьютеру
с помощью интерфейса USB 2.x
или 3.x.
Примечание:
Если устройство
DAC-V1 планируется далее
подключить к предусилителю,
выходную громкость устройства
следует зафиксировать,
выбрав опцию Fixed Output
(«Фиксированный выход»)
в меню настройки Preamp
Out («Выход предусилителя»)
(см. раздел 4). Если при
выбранной опции Fixed
Output с устройством DACV1 используются наушники,
возможность регулировать
громкость возобновляется при
подключении наушников.
Подробные сведения об установке и эксплуатации устройства DAC-V1 см. в «Справочном руководстве», доступном
по следующему адресу: www.naimaudio.com/support/manuals. Программу DAC-V1 Driver для ОС Window можно
скачать по адресу: www.naimaudio.com/hifi-products/pdt-type/DAC-V1
Page 17

Краткое руководство по эксплуатации устройства DAC-V1 РУССКИЙ
DAC-V1 должно быть прямым, т.е. без использования устройств типа «концентратор». Длина USB-кабеля,
соединяющего аппаратуру, не должна превышать 3 м.
• Если планируется использовать с устройством DAC-V1 какие-либо источники цифрового сигнала S/PDIF,
их следует подключить к одному из входов DAC-V1. Устройство предлагает на выбор различные типы
входных разъемов, при этом максимально возможное качество звука обычно достигается при использовании разъема BNC.
3. Включение и начало работы
Важно:
Если на компьютере, подключенном к устройству DAC-V1 с помощью USB-интерфейса,
используется ОС Windows, включать устройство следует только после установки программы DAC-V1
Driver.
• После подключения всей аппаратуры включите устройство DAC-V1 с помощью расположенного на
задней панели выключателя питания. На DAC-V1 отобразится «Окно приветствия», по умолчанию
устройство выберет вход USB.
• Для выбора входов DAC-V1 используйте кнопки ввода на передней панели, клавишу USB или цифровые
клавиши на пульте дистанционного управления. Цифровые клавиши «5» и «6» на пульте ДУ также можно
использовать для прокрутки списка входов. Выбранный в данный момент вход отображается на экране
устройства DAC-V1.
• Если планируется использовать USB-вход устройства DAC-V1, запустите на компьютере, подключенном
к устройству с помощью USB-интерфейса, средство настройки звука или откройте панель настроек и
выберите в качестве выходного аудиоустройства DAC-V1. Выбрав DAC-V1, вы сможете запустить программу для воспроизведения звука, использующую данное устройство. В некоторых из таких программ
можно использовать клавиши регулировки громкости и клавишу на пульте ДУ от устройства для
управления выходной громкостью программы, а также для запуска/приостановки воспроизведения.
Следует выбрать опцию PC Volume («Громкость ПК») в меню настройки USB Volume («Громкость
USB») устройства DAC-V1 (см. раздел 4).
• Если планируется использовать входы S/PDIF устройства DAC-V1, просто выберите нужный вход и нач-
ните воспроизведение содержимого с источника цифрового сигнала.
• Для регулировки уровня громкости устройства DAC-V1 используйте кнопки громкости на передней
панели или клавиши «Vol+» и «Vol-» на пульте ДУ. Уровень громкости отображается на экране DAC-V1.
4. Режим настройки
• В режиме настройки устройства DAC-V1 доступны разнообразные пара-
метры настройки. Чтобы войти в режим настройки, нажмите клавишу
Setup («Настройка»). Для перехода между различными меню настройки
используйте навигационные клавиши на пульте (5 6 3 4). Выбор
нужной опции выполняется с помощью нажатия соответствующей клавиши. Для выхода из режима настройки нажмите клавишу .
• Меню настройки высшего уровня включает четыре элемента:
Settings (Параметры): доступ к шести группам меню, позволяющим переименовывать входы,
настраивать выходы предусилителя, настраивать использование наушников, регулировать громкость
USB-соединения, настраивать отображение действий с устройством на экране и идентифицировать
клавиатуру.
BitPerfect: позволяет использовать проверочные файлы bit perfect, расположенные на компьютере,
подключенном к устройству с помощью USB-интерфейса, а также проверять с их помощью,
обеспечивают ли программа для воспроизведения звука и USB-соединение оптимальное качество
звучания. Полное описание тестовой процедуры Bit Perfect и доступа к проверочным файлам
приводится в «Справочном руководстве» к устройству DAC-V1.
USB Status (Состояние USB): данные/сведения о входном USB-соединении устройства DAC-V1.
Firmware (Микропрограмма0): данные об управляющем микропрограммном обеспечении
устройства DAC-V1, возможность сбросить настройки до стандартных заводских и обновить версию
микропрограммы.
4 Settings
BitPerfect
USB Status
Firmware
Примечание:
Если вы ранее
уже включали устройство DACV1, при включении по умолчанию будет активирован последний выбранный вход.
Примечание:
По умолчанию
программами для воспроизведения аудиофайлов на
компьютере под управлением
операционных систем Windows
и OS X являются проигрыватель Windows Media и iTunes
соответственно. Возможно
также использование любых
альтернативных приложений,
способных предложить более
широкий выбор функций и
более качественное воспроизведение.
Примечание:
Меню настройки
идентификации клавиатуры
позволяет определять элементы управления устройством
DAC-V1 на компьютере с операционной системой OS X,
подключенном к устройству с
помощью USB-интерфейса.
Своими функциями устройство
DAC-V1 частично напоминает
мультимедийную клавиатуру,
которая может передавать на
компьютер команды для управления громкостью, запуска/
приостановки воспроизведения и перехода к следующему/
предыдущему элементу списка.
При первом подключении компьютера с операционной системой OS X к устройству DAC-V1
он может запрашивать нажатие
конкретных клавиш для идентификации схемы «клавиатуры».
Меню настройки клавиатуры
DAC-V1 позволяет передавать
на компьютер сигналы нажатия
соответствующих клавиш.
Подробные сведения об установке и эксплуатации устройства DAC-V1 см. в «Справочном руководстве», доступном
по следующему адресу: www.naimaudio.com/support/manuals. Программу DAC-V1 Driver для ОС Window можно
скачать по адресу: www.naimaudio.com/hifi-products/pdt-type/DAC-V1
Page 18

DAC-V1 快速入门指南 中文
1. 介绍
DAC-V1是具有六个输入的数字模拟转换器及音频前置放大器,用以处理来自S/PDIF数字信号源或直
接来自电脑USB接口的音频。当通过USB连接到电脑时,DAC-V1将作为外部声音输出装置,并可以
访问非常广泛的音频播放应用程序。
DAC-V1采用了立体声DIN和RCA音频模拟输出、前面板6.3mm插孔耳机输出以及音量控制。通过其
前面板控制和随机提供的遥控器可以对DAC-V1进行操作和设置。
2. 安装和连接
重要提示:
必须在
双击
www.naimaudio.com/hifi-products/pdt-type/DAC-V1
电源开关
如果您的
Windows
DAC-V1
DAC-V1
将在运行
声音控制面板中安装和配置
驱动器图标,然后小心按照安装说明进行操作。可以从:
电源输入和
保险丝
Windows
DAC-V1
输入2和4
(同轴)
输入1(BNC)USB输入
操作系统的电脑上使用,在通过
驱动应用程序。如果下载文件,
输入3和5
(光纤)
下载驱动应用程序。
信号接地
开关
USB连接DAC-V1
模拟输出
(DIN)
模拟输出
(RCA)
之前,
注意: DAC-V1
与
Windows Vista
兼容。
注意: DAC-V1可在Mac OS X
10. 7. x
驱动应用程序仅
及以上版本
及以上版本正常使用。
• 将DAC-V1放置在合适的稳定表面上。请确保通风良好。
• 检查DAC-V1后面板上指定的主电源是否适合您所在的地区。用随机提供的导线将DAC-V1连接到电
源,但在所有其他连接接好以及(如果适用)DAC-V1 Windows操作系统驱动应用程序已经在USB
连接的电脑中安装好后再打开它。
• 识别“信号接地开关”,选择机箱选项,除非DAC-V1连接了装配有另一个接地源组件 (例如,全部
Naim之CD播放器)的高保真音响系统,或打开DAC-V1后通过扩音器会听到电源的“嗡嗡”声。
• 根据需要将DAC-V1模拟输出之一连接到功率放大器或前置放大器输入。如果前置放大器或功率放大
器上有该选项,应优先于RCA唱机插座选用DIN插座连接。不应同时连接或使用DIN插座和RCA唱
机插座。
• 如果DAC-V1用于播放存储在电脑上的音频文件,使用一根A-B型USB导线通过一个USB插口将电脑
连接到DAC-V1。为了获得最佳音频效果,从电脑到DAC-V1应通过USB直接连接,而不是通过任何“
交换”设备。使用的USB导线应不长于3m。
• 如果要与DAC-V1同时使用S/PDIF数字音频源,将它们连接到DAC-V1输入之一。DAC-V1提供了带有
BNC插座选项的多种数字输入插座类型可能会获得最佳音质。
注意: DAC-V1仅对USB 2.x或3.x
接口插座正常工作。
注意:
如果需将
游”前置放大器,选择前置放大
器输出设置菜单(见第4节)中
的固定输出选项将固定
的输出音量。如果选择固定输出
后在
DAC-V1
使用耳机,插入耳
机将保存音量控制。
DAC-V1
连接“下
DAC-V1
可以在www.naimaudio.com/support/manuals提供的参考手册中找到完整的DAC-V1安装和操作信息。
可以在www.naimaudio.com/hifi-products/pdt-type/DAC-V1找到Window操作系统DAC-V1驱动程序。
Page 19

DAC-V1 快速入门指南 中文
注意:
3. 打开并启动
重要提示:
动应用程序。
• 做好全部所连接后,用后面板的电源开关打开DAC-V1。DAC-V1将显示欢迎画面,并将在默认情况
• 用前面板输入按钮或遥控器USB或数字键选择DAC-V1输入。也可以用遥控器 5 和 6 键滚动显示
• 如果要使用DAC-V1的USB输入,启动USB所连接电脑的声音设置控制或偏好设定面板,并选择
• 如果要使用DAC-V1的S/PDIF输入,仅需选择适当的输入从数字音频源播放节目素材。
• 如需控制DAC-V1音量,请使用前面板音量控制或遥控器的“音量+”、“音量-”键。在DAC-V1显示屏上
如果在连接了
下选择其USB输入。
输入选择。电流输入选择在DAC-V1显示屏上显示。
DAC-V1作为声音输出设备。选择DAC-V1后,音频播放应用程序会被启动。根据播放应用程序的
功能,DAC-V1听筒音量和 按键也可以用来控制应用程序的输出音量和播放/暂停。USB音量
DAC-V1设置菜单中选择PC音量选项(见第4节)。
显示音量水平。
USB
的电脑上使用
Windows
操作系统,打开
DAC-V1
之前首先要安装
DAC-V1
驱
4. 设置模式
• 通过DAC-V1设置模式可以访问各种设置参数。按遥控器设置键进入设
置模式。如需浏览设置菜单,请使用遥控器导航 (5 6 3 4) 键。
按 键选择选项。按设置键退出设置模式。
• 顶层设置菜单提供了四个项目:
4 Settings
BitPerfect
USB Status
Firmware
如果先前使用了
启动后最后一次选择的输入将成
为默认输入。
注意: Windows和OS X
默认音频播放应用程序通常为
Windows
然而,可以使用提供增强功能
和优越音频效果的各种替代应
用程序。
媒体播放器和
DAC-V1
电脑的
iTunes
,
。
设置 (Settings): 提供到六个菜单的访问途径,即,输入重命名、前置放大器输出选项、耳机设
置、USB音量控制、显示行为和键盘识别。
比特完美 (BitPerfect): 允许使用USB所连接电脑储存的“比特完美”测试文件,以确保播放应用程序
和USB连接能提供最佳音质。比特完美测试程序和测试文件的可用性可以在DAC-V1参考手册找到完
整描述。
USB状态 (USB Status): 显示DAC-V1 USB输入连接数据和信息。
固件 (Firmware): 显示DAC-V1操作固件的细节,并提供出厂默认值重设和固件更新选项。
注意:
本机提供了键盘标识设置
菜单,以使连接了
USB
能够正确识别
制特性。
DAC-V1
的部分功能就像多媒体
键盘,可以向电脑发送音量、
播放、暂停、下一个、前一个
命令。
OS X
DAC-V1
时,电脑可能要求发送
特定的按键以识别“键盘”布局。
通过
DAC-V1
以发送相应按键。
OS X
电脑的
DAC-V1
的控
电脑第一次连接到
键盘设置菜单,可
可以在www.naimaudio.com/support/manuals提供的参考手册中找到完整的DAC-V1安装和操作信息。
可以在www.naimaudio.com/hifi-products/pdt-type/DAC-V1找到Window操作系统DAC-V1驱动程序。
Page 20

DAC-V1 빠른 시작 가이드 한국어
1. 소개
DAC-V1은 6개의 입력단을 갖춘 DAC 겸 프리앰프로서, S/PDIF 디지털 신호로 출력된 오디오나
컴퓨터의 USB 인터페이스에서 직접 출력된 오디오를 처리하도록 설계되었습니다. USB를 통해 컴퓨터에
연결한 DAC-V1은 외부 오디오 출력 장치처럼 동작하며, 매우 다양한 오디오 재생 응용 프로그램을 통해
이용할 수 있습니다.
DAC-V1에는 스테레오 DIN 및 RCA 포노 아날로그 출력 단자와 전면 패널 6.3mm 잭 헤드폰 출력
단자, 그리고 음량 조절부가 있습니다. DAC-V1은 전면 패널 조작부와 동봉된 리모콘을 통해 조작 및
설정합니다.
참고:
2. 설치 및 연결
중요:
DAC-V1을 Windows OS가 설치된 컴퓨터와 함께 사용하려면, DAC-V1을 USB를 통해 연결하기
전에 DAC-V1 드라이버 응용 프로그램을 설치하고 Windows 소리 제어판에서 구성해야 합니다. 파일을
다운로드하고 DAC-V1 드라이버 아이콘을 두 번 클릭한 후 설치 지침을 잘 따르십시오. 드라이버 응용
프로그램 다운로드 주소: www.naimaudio.com/hifi-products/pdt-type/DAC-V1
전원 스위치
2, 4번 입력(
동축)
아날로그 출력
(DIN)
DAC-V1 드라이버 응용
프로그램은 Windows Vista
이상에서만 호환됩니다.
참고:
DAC-V1은 Mac OS X
10.7.x 버전 이상을 사용해야만
올바로 작동합니다.
전원 입력 단
자 및 퓨즈
• DAC-V1을 적당한 안정적인 표면 위에 올려 놓으십시오. 반드시 환기가 잘 되는 곳에 놓으십시오.
• DAC-V1의 뒷면에 기재되어 있는 전원 규격이 사용 지역에 맞는지 확인하십시오. DAC-V1을 동봉된
케이블을 사용하여 전원에 연결하되, 다른 연결을 모두 마치고 해당될 경우 USB로 연결한 컴퓨터에
DAC-V1 Windows OS 드라이버 응용프로그램을 설치할 때까지 전원을 켜지 마십시오.
• 신호 접지(Signal Ground) 스위치를 찾아서 DAC-V1을 다른 소스기기(예: 모든 Naim CD 플레이어)가
접지되어 있는 하이파이 시스템에 연결했거나 DAC-V1의 전원을 켰을 때 스피커를 통해 “웅”하는 전원
노이즈가 들리는 경우를 제외하고 항상 chassis(섀시)로 설정하십시오.
• DAC-V1의 아날로그 출력 단자 하나를 필요에 따라 파워앰프 또는 프리앰프 입력 단자에 연결하십시오.
프리 또는 파워 앰프에서 선택이 가능할 경우, RCA 포노 단자보다 DIN 소켓 연결을 우선적으로
사용해야 합니다. DIN 및 RCA 포노 소켓 옵션을 동시에 연결하거나 사용해서는 안 됩니다.
• DAC-V1을 컴퓨터에 저장된 오디오 파일을 재생하는 용도로 사용하려면, 컴퓨터를 USB 소켓 하나를
통해 A-B 타입 USB케이블을 사용하여 DAC-V1에 연결하십시오. USB를 통해 컴퓨터를 DAC-V1에
연결했을 때 최적의 음질을 얻으려면 “허브” 장치를 통해 연결하지 말고 직접 연결해야 합니다. 3m보다
긴 USB 케이블을 사용하지 마십시오.
• S/PDIF 디지털 오디오 신호를 DAC-V1과 함께 사용하려면 신호를 DAC-V1 입력 단자 하나에
연결하십시오. DAC-V1에는 다양한 종류의 디지털 입력 소켓이 있으며, 그 중 BNC 소켓이 잠재적으로
최상의 음질을 제공할 수 있습니다.
USB 입
력
1번 입력
(BNC)
3, 5번 입력
(광)
신호 접지
스위치
아날로그 출력
(RCA)
참고:
DAC-V1은 USB 2.x
또는 3.x 인터페이스 소켓을
사용해야만 올바로 작동합니다.
참고:
IDAC-V1을 시스템 구성의
더 “아래쪽”에 있는 프리앰프에
연결하려면, 프리앰프 출력 설정
메뉴에서 고정 출력 옵션을 선택
(4장 참조)하여 DAC-V1 출력의
음량을 고정시켜야 합니다. 고정
출력이 선택된 상태에서 DAC-V1
을 헤드폰과 함께 사용하면
헤드폰이 꽂혀 있는 동안 음량
조절 기능을 사용할 수 있습니다.
DAC-V1의 설치 및 사용에 관한 전체 설명은 다음 주소에서 제공되는 참고 설명서를 참조하십시오:
www.naimaudio.com/support/manuals Window OS용 DAC-V1 드라이버 응용 프로그램은 다음 주소에서 받을
수 있습니다: www.naimaudio.com/hifi-products/pdt-type/DAC-V1
Page 21

DAC-V1 빠른 시작 가이드 한국어
참고:
3. 전원 켜고 시작하기
중요:
USB로 연결한 컴퓨터에 Windows OS가 설치되어 있으면 DAC-V1 드라이버 응용 프로그램을
설치하기 전에 DAC-V1의 전원을 켜지 마십시오.
DAC-V1을 이전에 사용한
적이 있으면, 전원을 켤 때
마지막으로 선택했던 입력으로
기본 설정됩니다.
• 모든 연결을 마친 후에, 뒷면에 있는 전원 스위치를 사용하여 DAC-V1의 전원을 켜십시오. DAC-V1에
시작 화면이 표시되고 USB가 기본 입력으로 선택됩니다.
• DAC-V1 입력을 선택하려면 전면 패널의 입력 버튼이나 리모콘의 USB 또는 숫자 버튼을 사용하십시오.
리모콘의 5 및 6 버튼을 사용하여 선택 가능한 입력을 스크롤할 수도 있습니다. 현재 선택된 입력은
DAC-V1 디스플레이에 표시됩니다.
• DAC-V1의 USB 입력을 사용하려면, USB로 연결한 컴퓨터의 소리 설정 제어 또는 환경설정 창을 열고
DAC-V1을 음성 출력 장치로 선택하십시오. DAC-V1을 선택하면 오디오 재생 응용 프로그램을 시작할
수 있습니다. 재생 프로그램의 기능에 따라, DAC-V1 리모콘의 음량 및 버튼을 사용하여 응용
프로그램의 출력 음량과 재생/일시정지 기능을 제어할 수도 있습니다. DAC-V1의 USB Volume (USB
음량) 설정 메뉴에서 PC Volume (PC 음량) 옵션을 선택하십시오(4장 참조).
• DAC-V1의 S/PDIF 입력을 사용하려면, 간단히 해당 입력을 선택하고 디지털 오디오 소스의 프로그램을
재생하십시오.
• DAC-V1의 음량을 조절하려면 전면 패널의 음량 조절부나 리모콘의 vol+(음량+) 및 vol-(음량-) 버튼을
사용하십시오. DAC-V1의 디스플레이에 음량이 표시됩니다.
4. 설정 모드
• DAC-V1의 설정 모드에서는 다양한 설정 매개변수에 접근할 수
있습니다. 리모콘 설정 버튼을 눌러 설정 모드로 전환하십시오. 설정
메뉴를 탐색하려면 리모콘의 이동 (5 6 3 4) 버튼을 사용하십시오.
옵션을 선택하려면 버튼을 누르십시오. 설정 버튼을 누르면 설정
모드가 종료됩니다.
4 Settings
BitPerfect
USB Status
Firmware
참고:
Windows 및 OS X
컴퓨터의 기본 오디오 재생
응용프로그램은 일반적으로
Windows Media Player와
iTunes입니다. 그러나, 향상된
기능과 더 뛰어난 음질을
지원하는 다양한 응용 프로그램을
대신 사용할 수도 있습니다.
• 최상위 설정 메뉴에는 4개 항목이 있습니다:
Settings (설정): 입력 이름바꾸기, 프리앰프 출력 옵션, 헤드폰 설정, USB 음량 조절, 디스플레이 동작
및 키보드 식별 등의 6개 메뉴를 이용할 수 있습니다.
BitPerfect: USB로 연결된 컴퓨터에 있는 “bit perfect” 검사 파일을 사용하여 재생 응용 프로그램과
USB 연결이 최적의 음질을 제공하도록 보장할 수 있습니다. Bit Perfect 검사 절차와 검사 파일의
제공에 관한 전체 설명은 DAC-V1 참고 설명서를 참조하십시오.
USB Status (USB 상태): DAC-V1의 USB 입력 연결 데이터 및 정보를 표시합니다.
Firmware (펌웨어): DAC-V1 작동 펌웨어에 대한 상세정보를 표시하고 출고 시 기본 설정 초기화 및
펌웨어 업데이트 옵션을 제공합니다.
참고:
키보드 식별 설정 메뉴는
USB로 연결한 OS X 컴퓨터가
DAC-V1의 제어 특성을 올바로
식별할 수 있도록 하기 위해
제공됩니다.
DAC-V1은 부분적으로 음량,
재생, 일시정지, 다음 및 이전
명령을 컴퓨터로 전송할 수
있는 멀티미디어 키보드처럼
동작합니다. OS X 컴퓨터를
DAC-V1에 처음 연결하면, “
키보드” 레이아웃을 식별하기
위해 특정한 키를 입력하여
전송할 것을 요청할 수 있습니다.
해당 키는 DAC-V1 키보드 설정
메뉴를 통해 입력하여 전송할 수
있습니다.
DAC-V1의 설치 및 사용에 관한 전체 설명은 다음 주소에서 제공되는 참고 설명서를 참조하십시오:
www.naimaudio.com/support/manuals Window OS용 DAC-V1 드라이버 응용 프로그램은 다음 주소에서 받을
수 있습니다: www.naimaudio.com/hifi-products/pdt-type/DAC-V1
Page 22

Naim Audio Limited, Southampton Road, Salisbury, England SP1 2LN
Tel: +44 (0)1722 426600 Fax: +44 (0)871 2301012 W: www.naimaudio.com
Part No. 12-001-0194 Iss. 2B
 Loading...