

Page 1

User Guide
AMPLIFIER - NAIT 50
Page 2

Page 3

English 2
Français 12
Deutsch 22
Nederlands 32
Español 42
Italiano 52
Polski 62
Русский 72
中文 82
繁體中文 92
한국어 102
ภาษาไทย 112
122
Page 4
Introduction
Note: All safety warnings
can be found in the safety
manual.
Welcome to your new Naim integrated amplier. Like all Naim Audio products,
the NAIT 50 puts musical performance rst. To help it realise its full potential,
it is important to follow the simple installation and usage guidelines covered in
this manual. We start with some product and set-up essentials, before moving
on to more detailed information in Section 4.
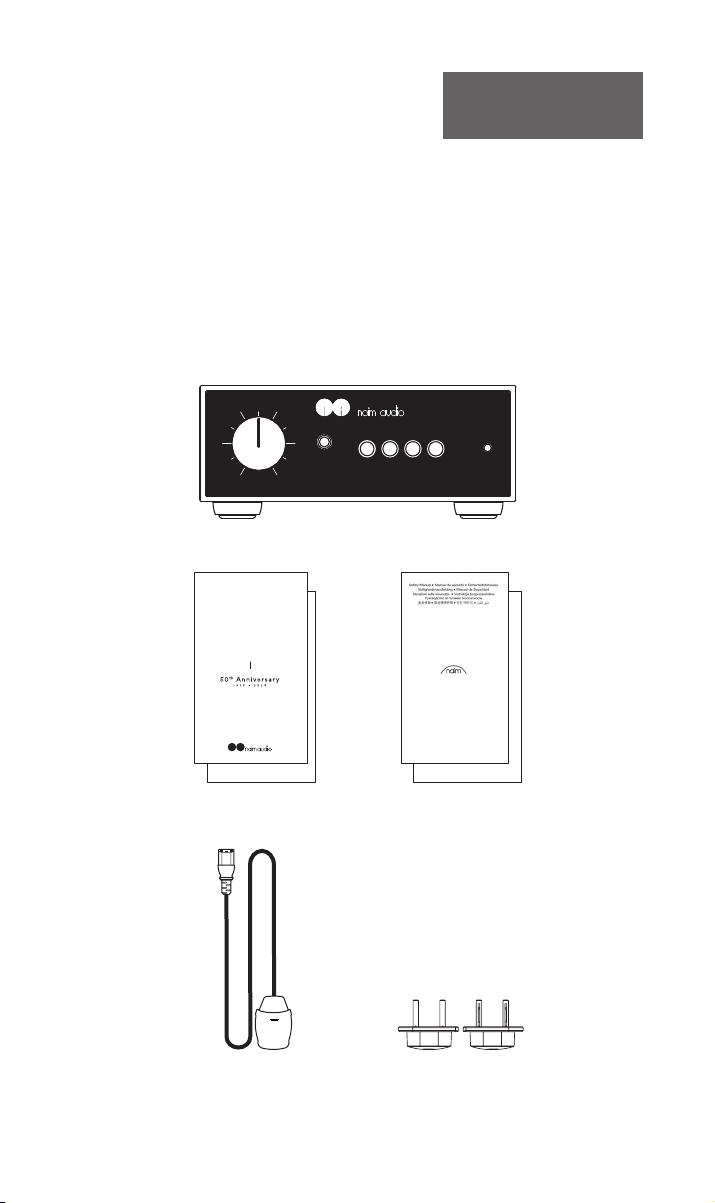
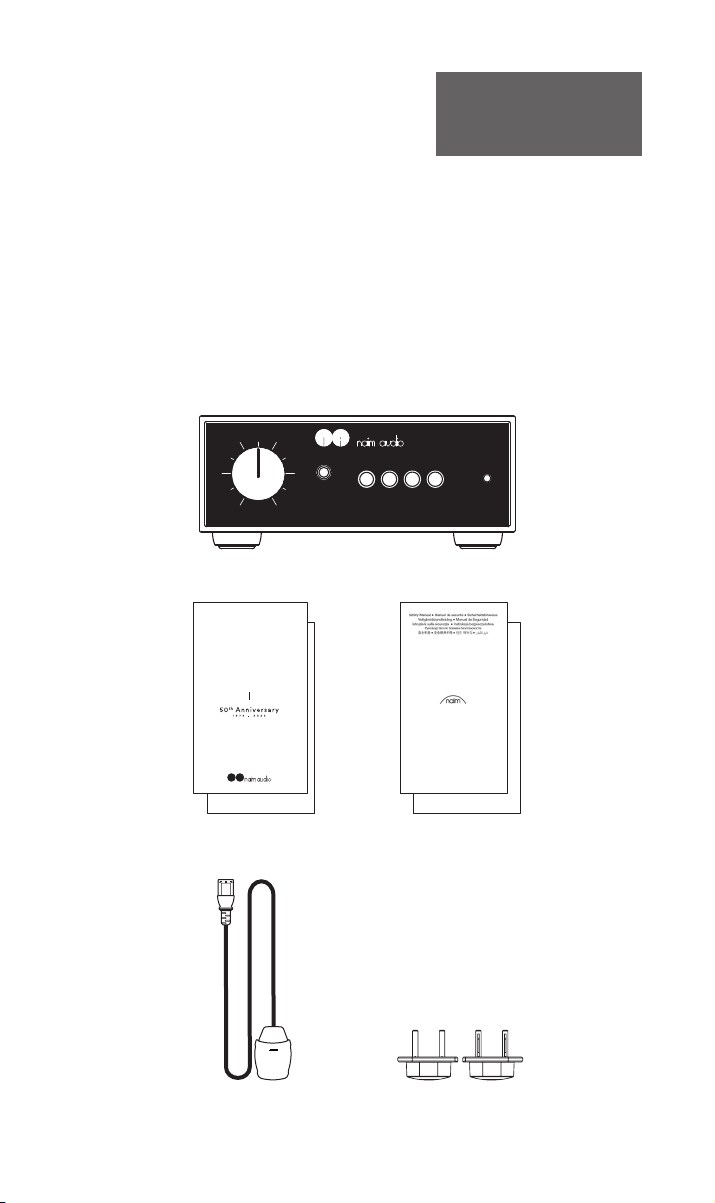
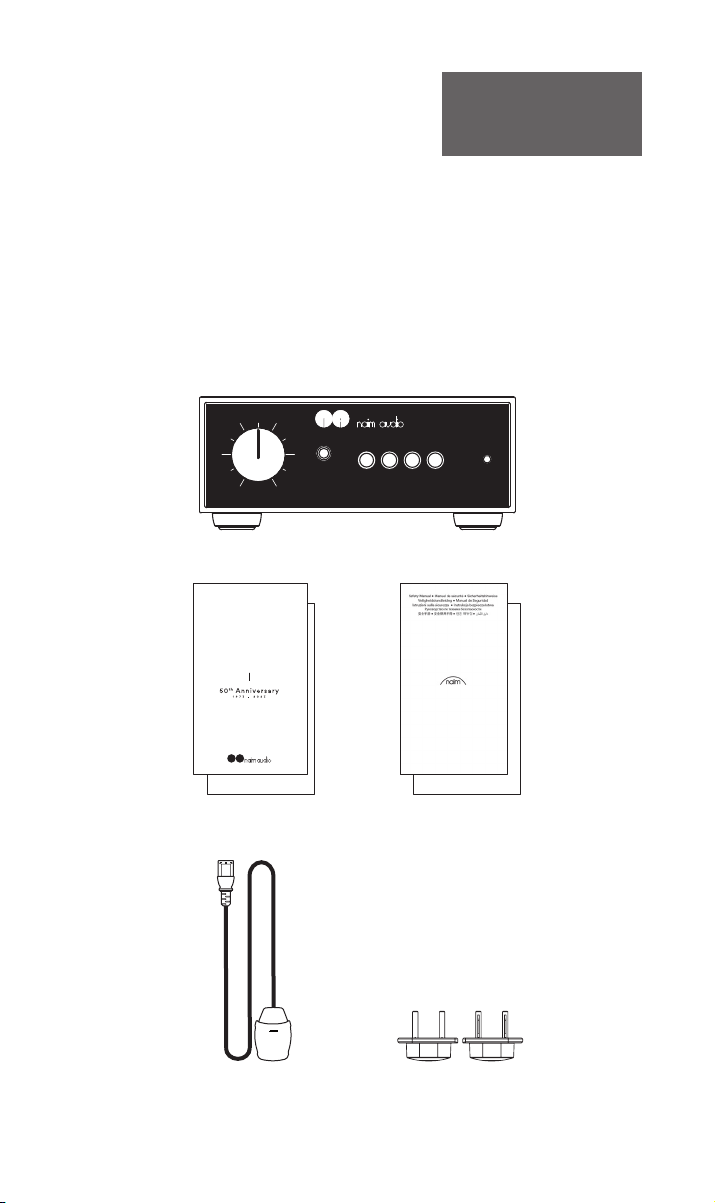
1. What’s in the Box
volume
headphone
phono stream aux mains
1x NAIT 50
User Guide
AMPLIFIER - NAIT 50
power
1x Information Booklet 1x Safety Manual
1x Power Cable 2x Speaker Connectors
(pre-installed to unit)
2
Page 5

2. The Heritage of Naim’s Integrated Ampliers
Our story begins with one man’s passion for music and weaves its way through
ve decades and a raft of iconic product launches to the present day.
Naim Audio founder Julian Vereker MBE (1945-2000) was a racing car driver,
entrepreneur and self-taught engineer with a deep passion for music. Spending
his spare time listening to and recording his friends playing live in the 1960s,
Julian found that playback on his system at home fell woefully short of the
experience he craved.
Not content with second best he decided to design his own ampliers
and loudspeakers, ignoring accepted wisdom and focusing on aspects
of performance that made music burst to life. These rst designs laid the
foundations for a range of iconic and award-winning hi- products that still
resonate 50 years on.
Designed exclusively for Naim’s 50th anniversary and limited to only 1,973
units, at a glance the Nait 50 looks identical to the Nait 1. However, upon closer
inspection the front and rear are high quality anodised aluminium, the knob is
machined from solid to aid vibration dampening, the balanced control has been
swapped for a headphone socket and the LED changed to white.
Internally, the changes truly bring the Nait 50 into its own. The input selection
uses y-by-wire control to signicantly reduce the signal path length and
the new headphone amplier has been lifted from the NSC 222. The all-new
exclusive discrete transistor MM phono stage honours the famous Nait 1 sound,
working alongside the power amplier that has been lifted from the NAP 250
(2023).
The Nait 50 is a true audiophile integrated amplier, only in miniature.
For a further dive into the history and heritage
of the Nait across Naim’s 50 year history,
scan the QR code below.
3
Page 6
Left Right
Speakers
WARNING: Do not replace supplied loudspeaker
plugs with individual 4mm plugs
WARNING: Disconnect power
before opening
AC ONLY ∿
FUSE RATING:
ANTISURGE
INPUT POWER: 73VA
Power
S/No.
NAIT 50
DESIGNED AND MADE IN THE UK BY
NAIM AUDIO, SALISBURY, SP1 2LN
110-120 V: T2AL
220-240 V: T1AL
FREQUENCY: 50/60Hz
Aux Stream
Ground
MM Phono
L
R
Instant on
Off
On
Analogue InputsAnalogue Inputs
L
R
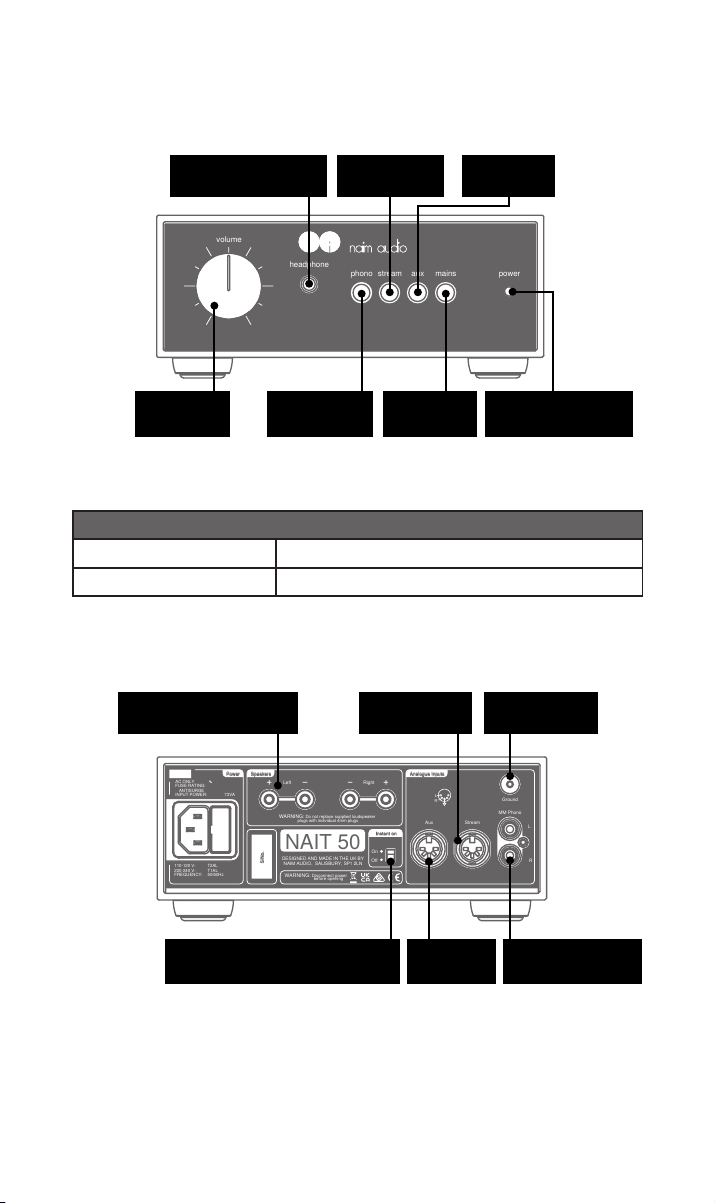
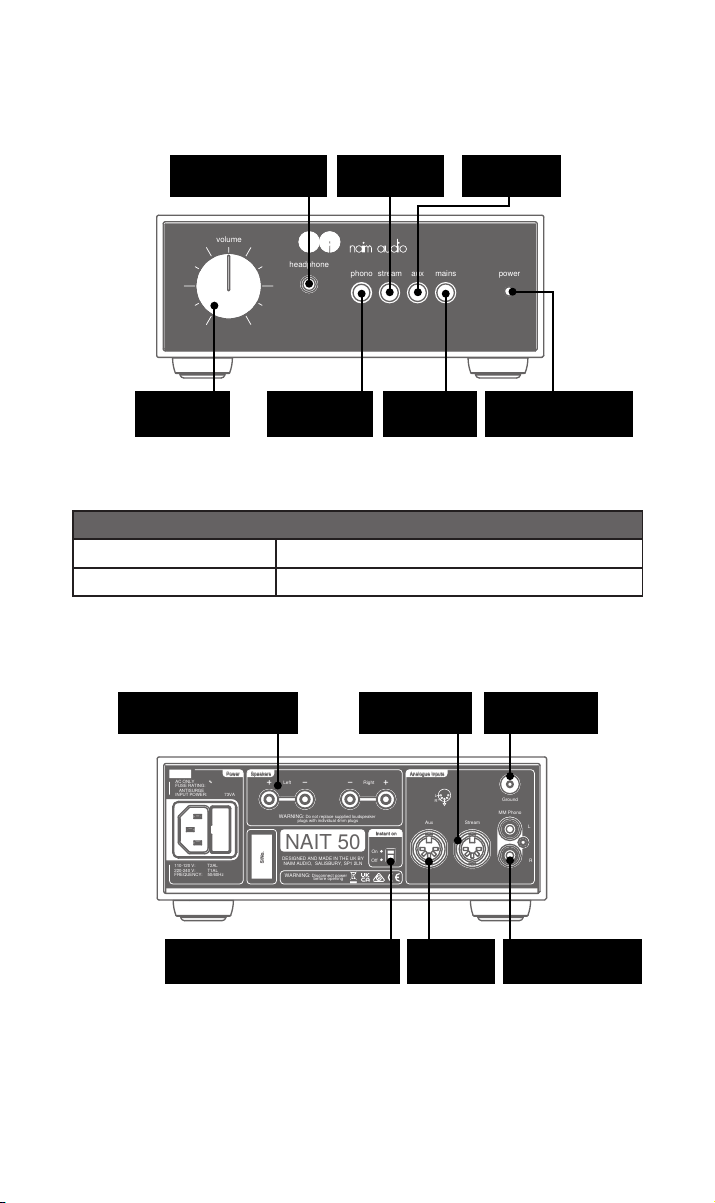
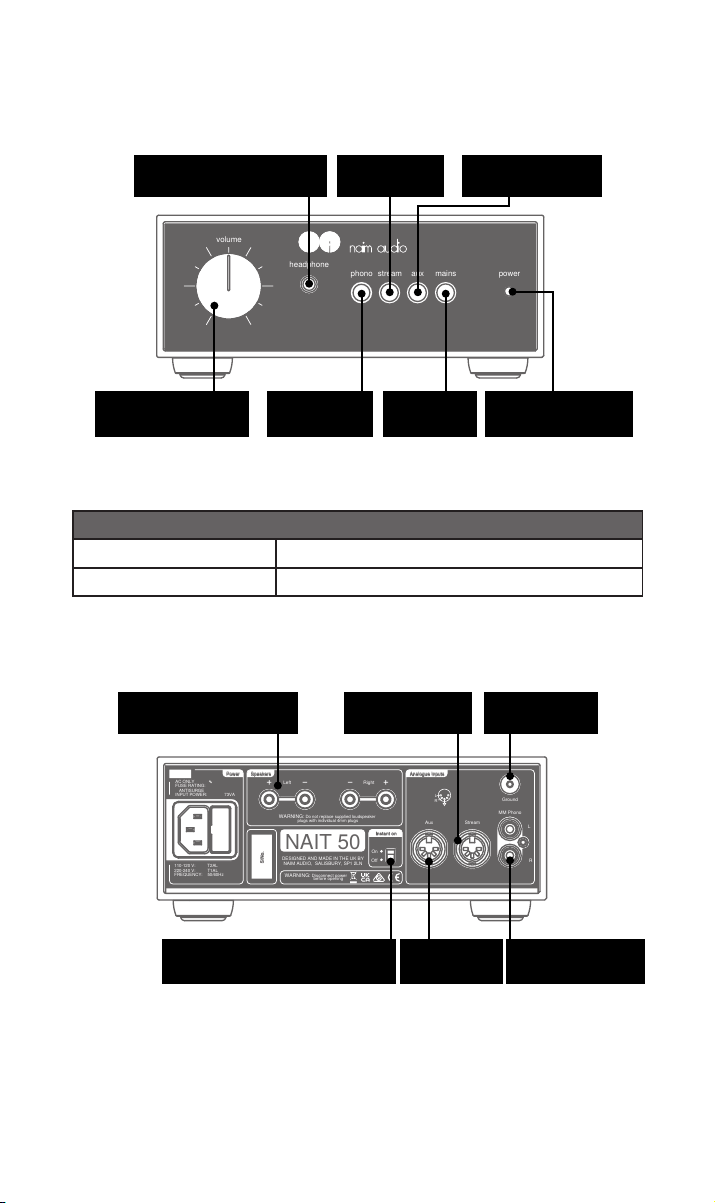
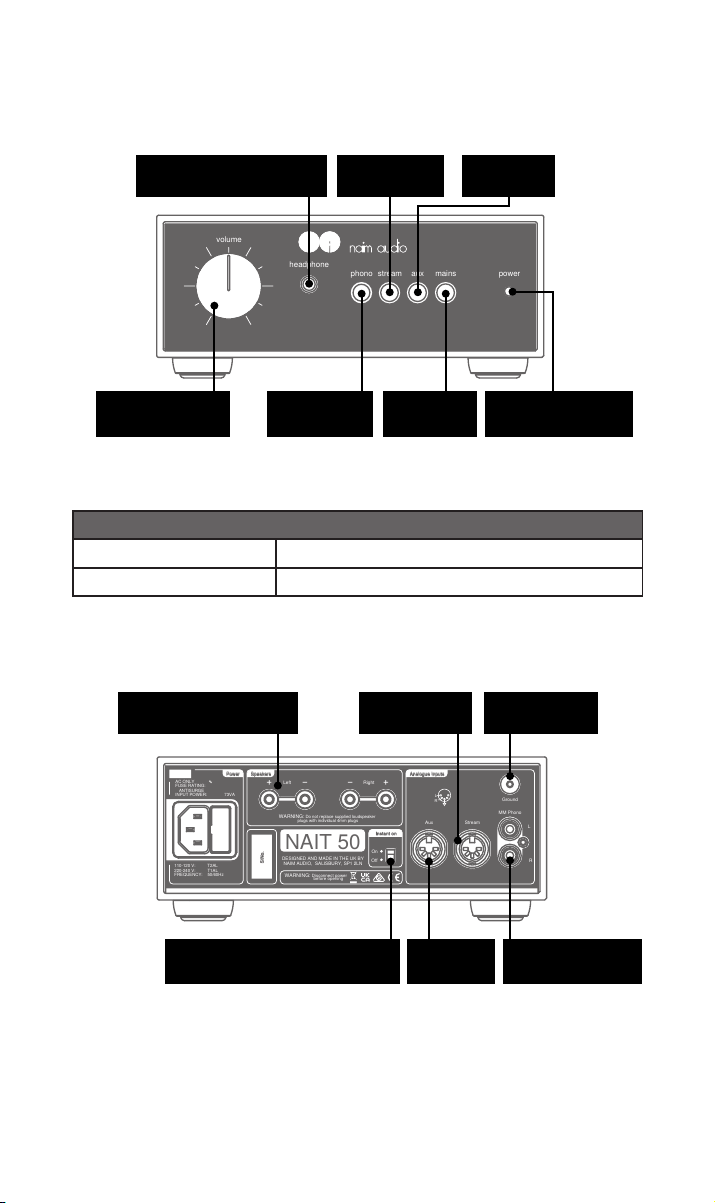
3. Features and Connections
volume
headphone
phono stream aux mains
power
Headphone output
1/4" (6.35mm) jack
Volume
control
LED Brightness Specications
Bright
Dim
Loudspeaker sockets
(Left +/-; Right -/+)
Stream input
button
Phono input
button
NAIT 50 active
NAIT 50 in standby
Standby
button
Stream input
Aux input
button
Standby/On
Turntable
ground
LED
4
Aux input Instant on/Auto standby switch
Phono input
Page 7
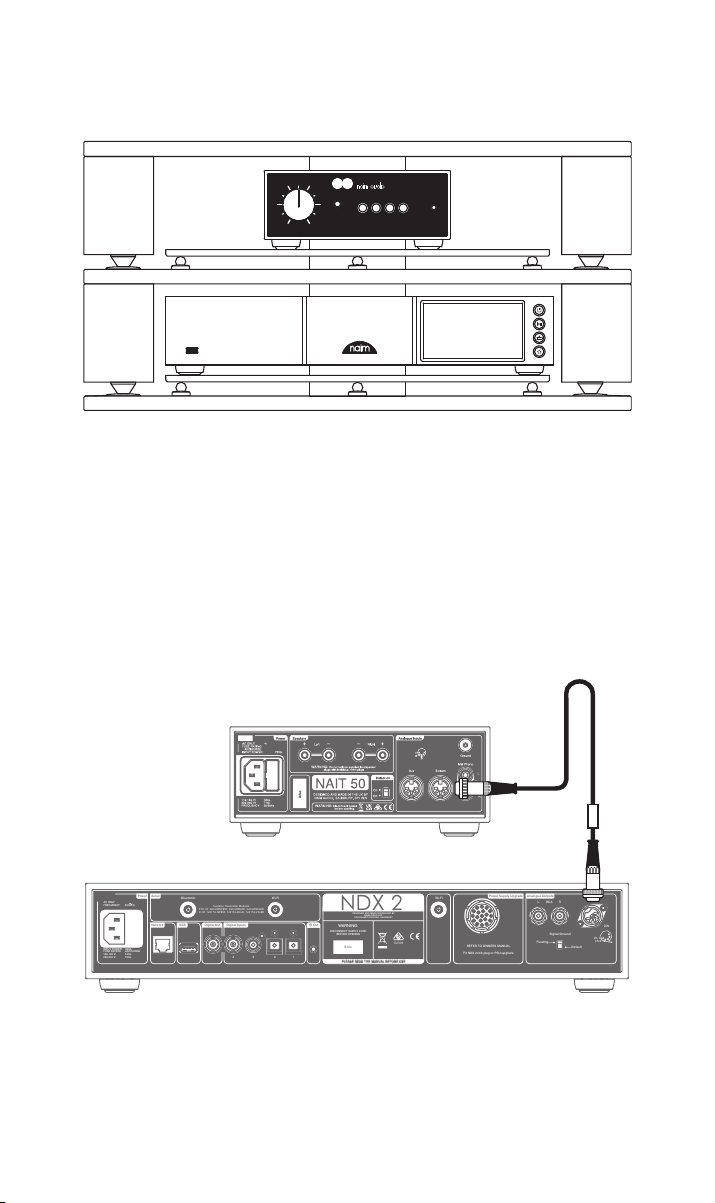
4. Set-up
PLEASE READ THE MANUAL BEFORE USE
S/No.
Bluetooth
Wi-Fi
Contains Transmitter Modules
FCC ID: 2ACURNP800, 2ACURBLUE, 2ACURZIGEE
IC ID: 12217A-NP800, 12217A-BLUE, 12217A-ZIGEE
REFER TO OWNERS MANUAL
Fit NDX 2 link plug or PSU upgrade
Power Supply Upgrade
2 1
3
Network
Aerial
Power
Analogue Outputs
DIN
L R
Default
Floating
RCA
ch.1
NDX 2
WARNING:
DISCONNECT SUPPLY CORD
BEFORE OPENING
DESIGNED AND MADE IN ENGLAND BY
NAIM AUDIO LTD.
SOUTHAMPTON ROAD, SALISBURY
E2378
ch.2
-ve
Signal Ground
USB
4
Wi-Fi
IR Out
IR Out
Digital Out
INPUT POWER: 60VA
FUSE RATING: ANTISURGE
100-120 V: T4AL.
220-240 V: T2AL.
AC ONLY
FREQUENCY: 50/60Hz
Digital Inputs
PLEASE READ THE MANUAL BEFORE USE
S/No.
Wi-Fi
Contains Transmitter Modules
FCC ID: 2ACURNP800, 2ACURBLUE, 2ACURZIGEE
IC ID: 12217A-NP800, 12217A-BLUE, 12217A-ZIGEE
REFER TO OWNERS MANUAL
Fit NDX 2 link plug or PSU upgrade
Power Supply Upgrade
2 1
3
Analogue Outputs
DIN
L R
Default
Floating
RCA
ch.1
NDX 2
WARNING:
DISCONNECT SUPPLY CORD
BEFORE OPENING
DESIGNED AND MADE IN ENGLAND BY
NAIM AUDIO LTD.
SOUTHAMPTON ROAD, SALISBURY
E2378
ch.2
-ve
Signal Ground
4
Wi-Fi
IR Out
IR Out
Digital Out
Digital Inputs
volume
headphone
phono stream aux mains
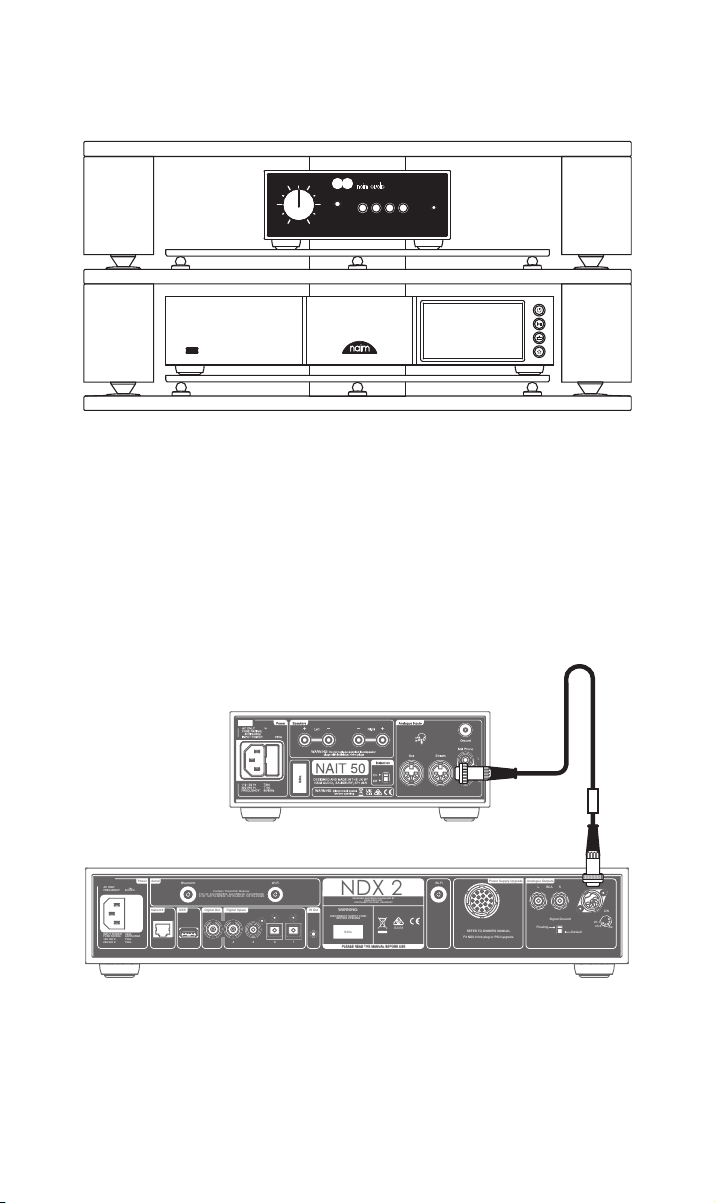
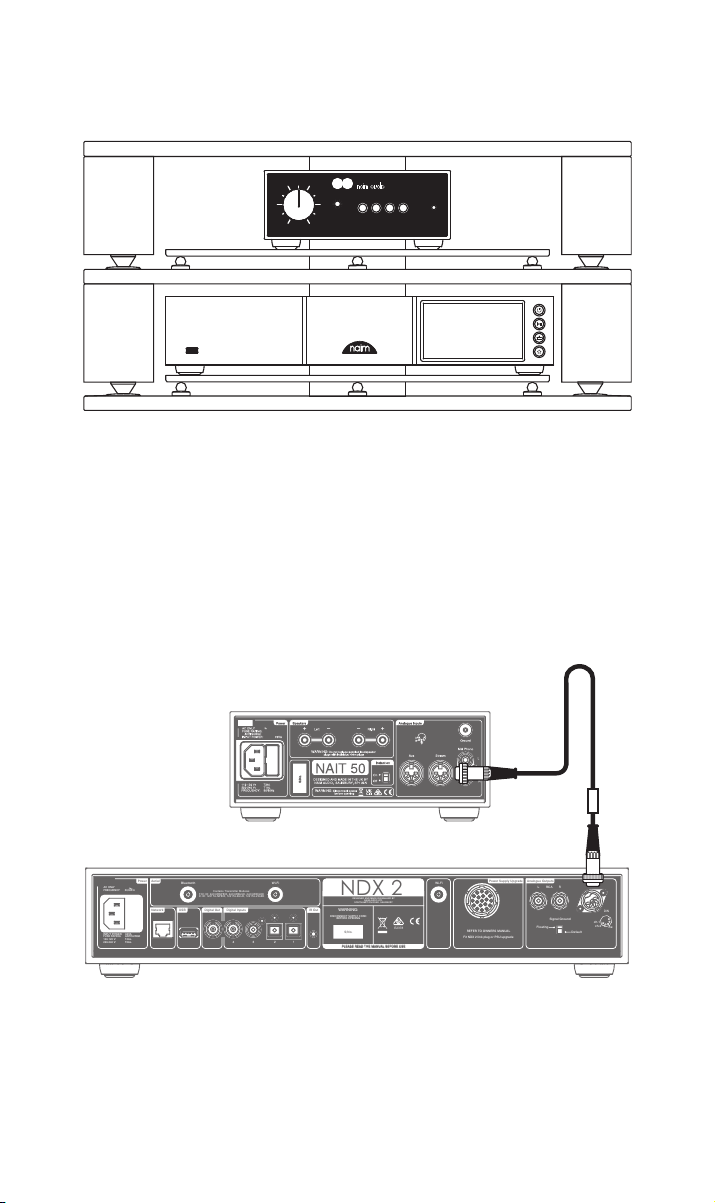
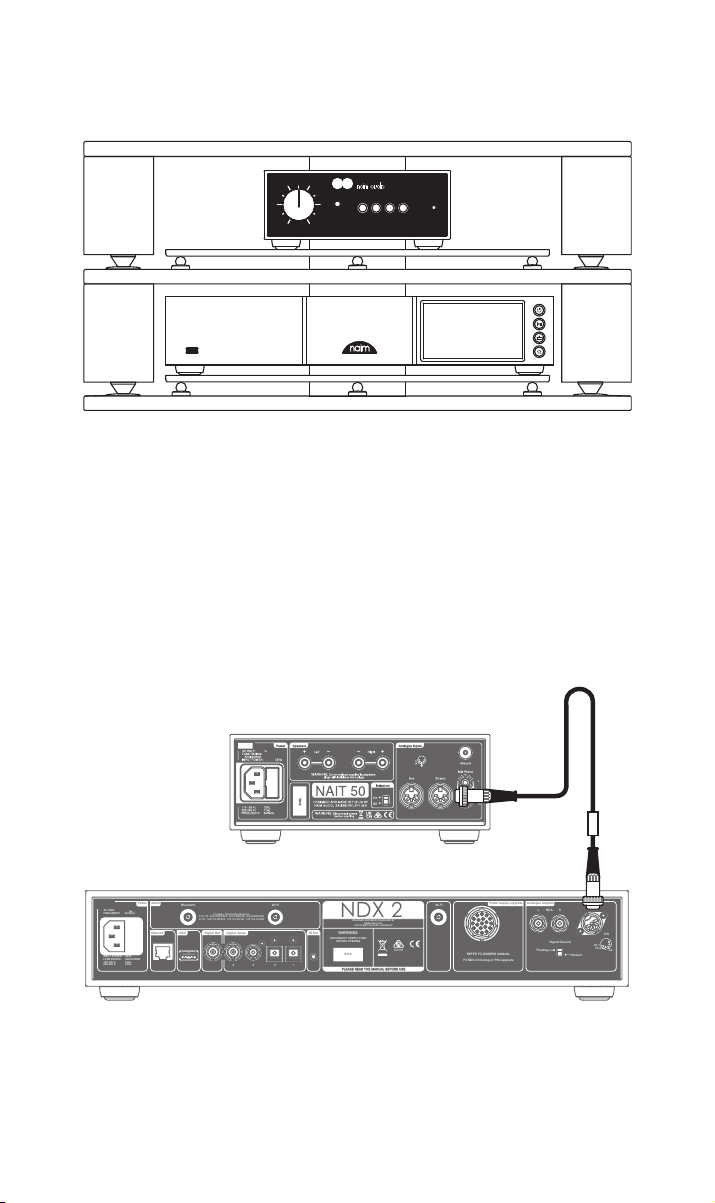
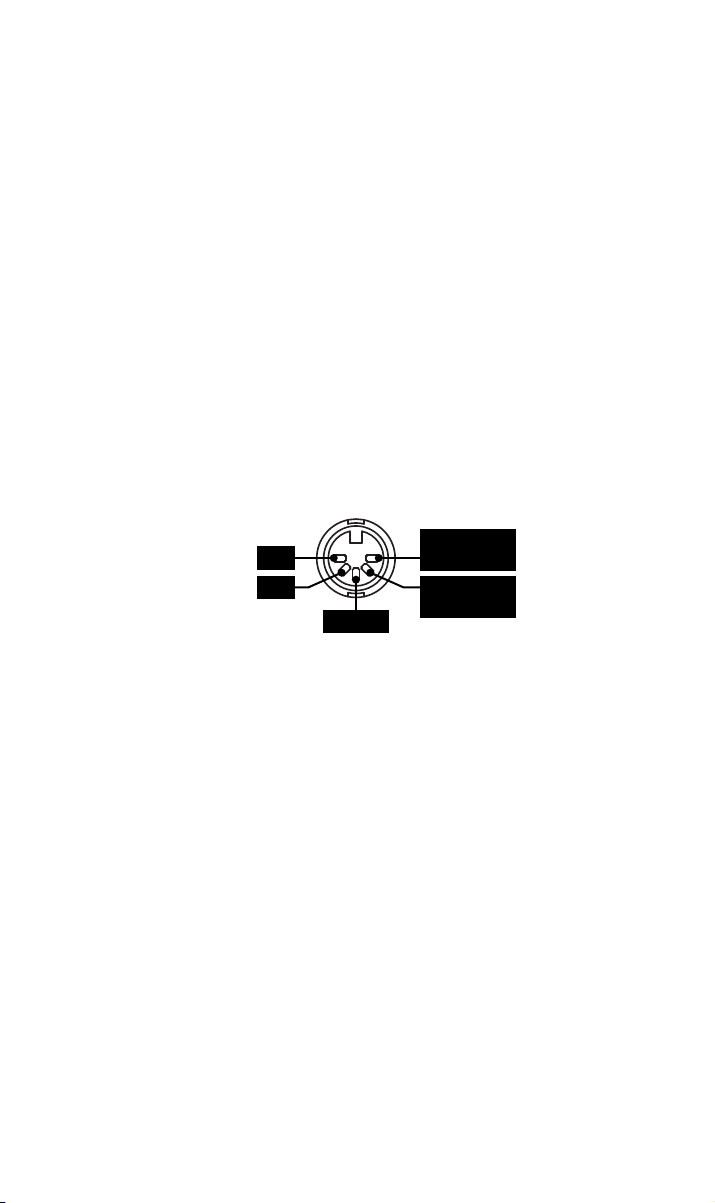
Your NAIT 50 must be connected to a source (such as the NDX2 or your
turntable), but before you do, please ensure both components are in their nal
positions and disconnected from mains power.
For optimum performance, use a dedicated hi- support – ideally Naim Fraim –
with the NAIT 50 sited above the source, as shown.
For more information, see section 5.1
Ensure all equipment is o before connecting.
power
Connect the DIN interconnect cable supplied with the NDX2 to the Stream
input of the NAIT 50.
5
Page 8
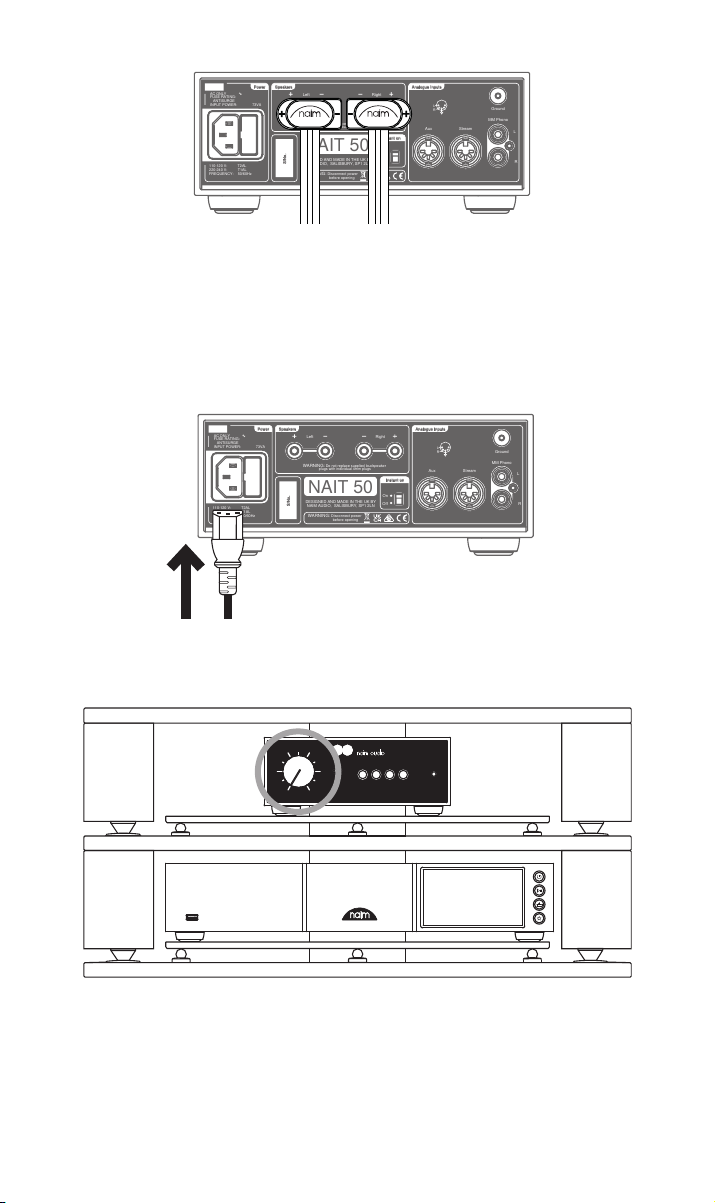
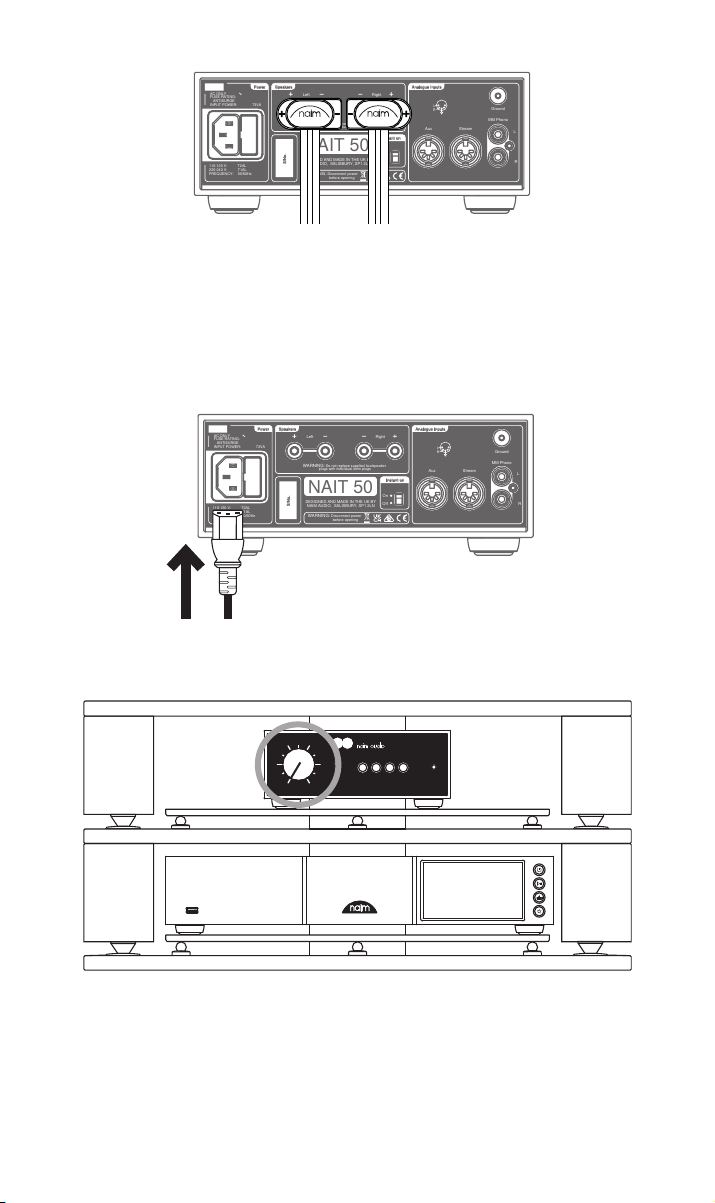
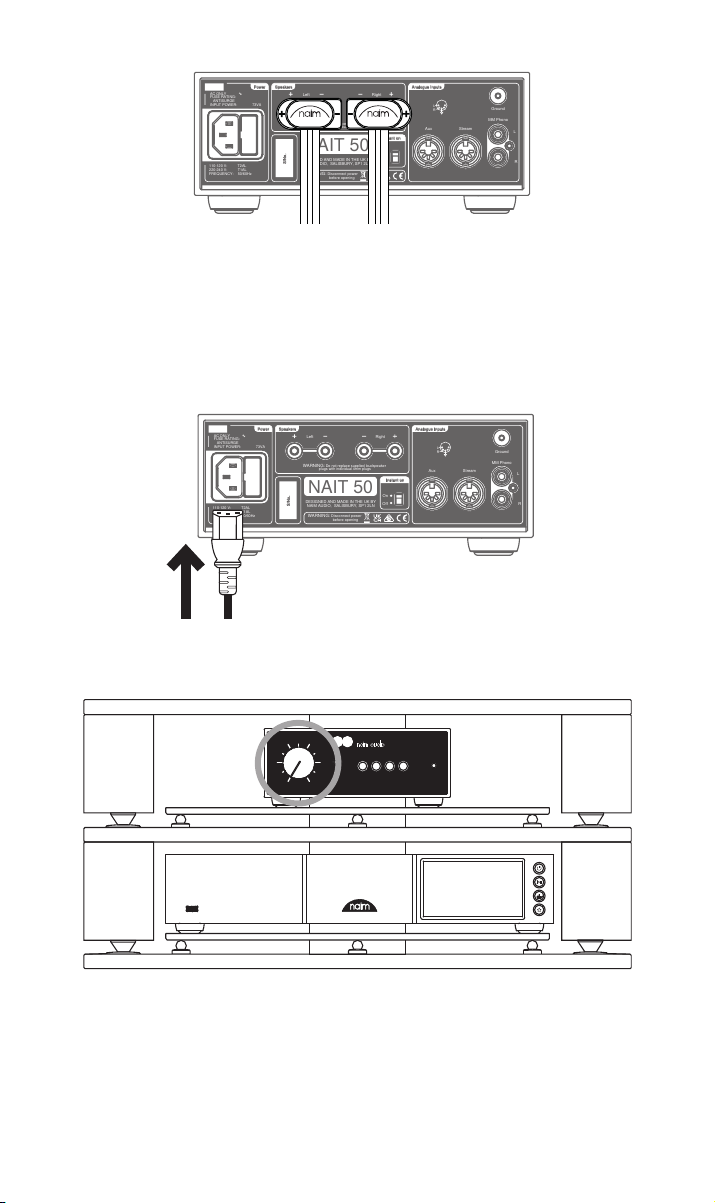
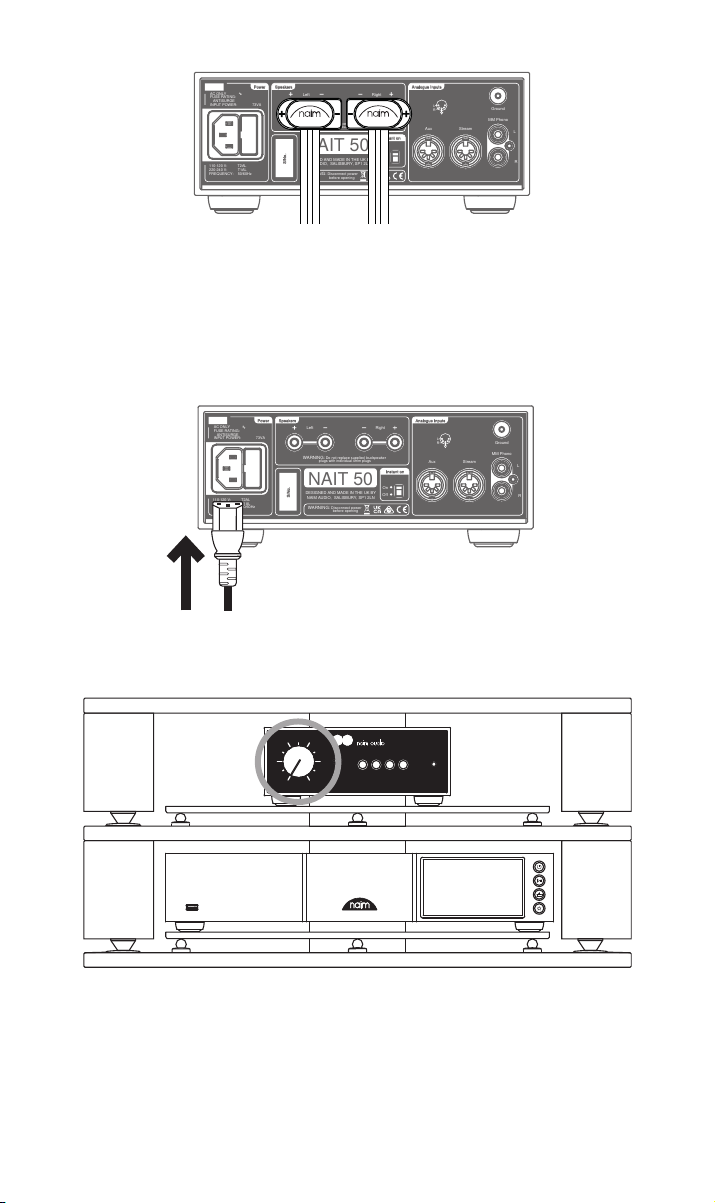
Connect speaker cables to the NAIT 50, ensuring each cable is connected to
Left Right
Speakers
WARNING: Do not replace supplied loudspeaker
plugs with individual 4mm plugs
WARNING: Disconnect power
before opening
AC ONLY ∿
FUSE RATING:
ANTISURGE
INPUT POWER: 73VA
Power
S/No.
NAIT 50
DESIGNED AND MADE IN THE UK BY
NAIM AUDIO, SALISBURY, SP1 2LN
110-120 V: T2AL
220-240 V: T1AL
FREQUENCY: 50/60Hz
Aux Stream
Ground
MM Phono
L
R
Instant on
Off
On
Analogue InputsAnalogue Inputs
L
R
Left Right
Speakers
WARNING: Do not replace supplied loudspeaker
plugs with individual 4mm plugs
WARNING: Disconnect power
before opening
AC ONLY ∿
FUSE RATING:
ANTISURGE
INPUT POWER: 73VA
Power
S/No.
NAIT 50
DESIGNED AND MADE IN THE UK BY
NAIM AUDIO, SALISBURY, SP1 2LN
110-120 V: T2AL
220-240 V: T1AL
FREQUENCY: 50/60Hz
Aux Stream
Ground
MM Phono
L
R
Instant on
Off
On
Analogue InputsAnalogue Inputs
L
R
the correct speaker and both are in phase.
For more information, see section 5.3.
Finally, connect the power cable to the NAIT 50.
volume
headphone
phono stream aux mains
power
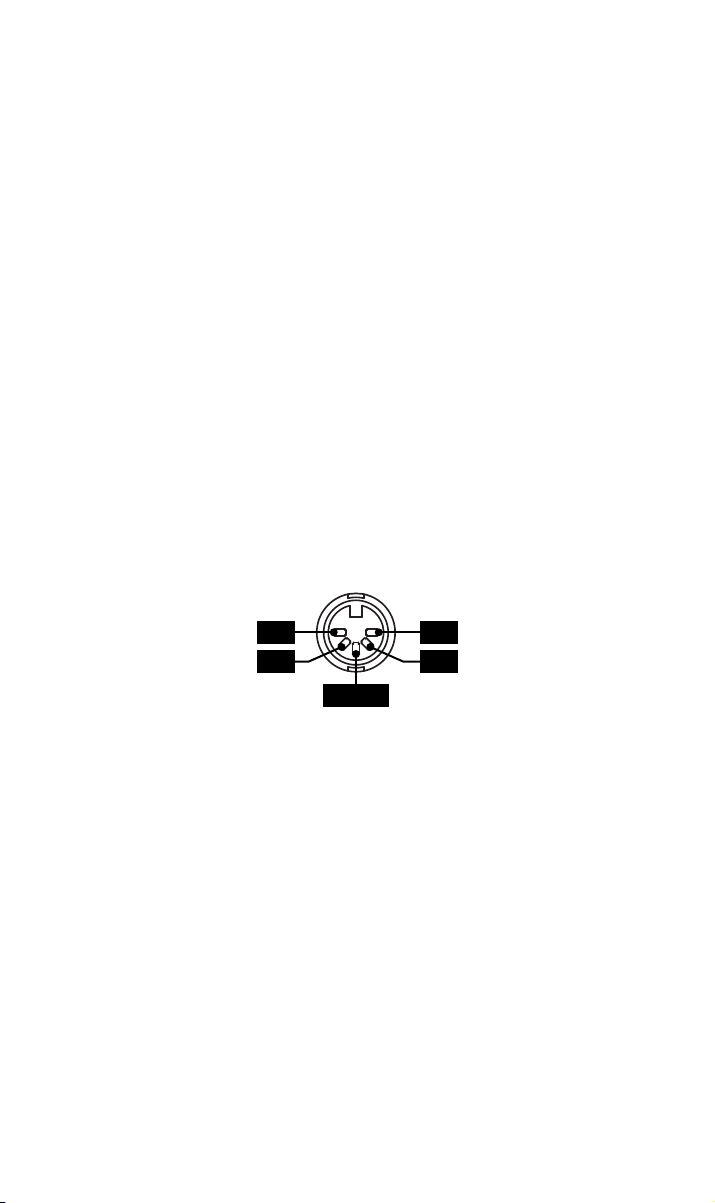
Check that the volume is at minimum, then turn on the source and, lastly, the
NAIT 50.
For more information, see section 5.4
6
Page 9
5. Tips on Installing and Using your NAIT 50
We know you are eager to enjoy your new NAIT 50, but we promise it will sound even
better once you have followed these guidelines, all designed to help you experience your
integrated amplier without compromise.
5.1 Unboxing and Positioning
For optimum performance, use your Naim products on a dedicated hi- equipment rack –
ideally the Naim Fraim or Fraim Lite – to minimise vibrations that can aect sound.
No room for a rack? Consider placing your NAIT 50 on a Fraim glass shelf on a suitable
piece of furniture, to provide solid but discreet support.
Never stack Naim products on top of each other, and if you are placing them side-byside, please leave some distance between the units. Equally, connected products should
not sit too far apart: the maximum separation distance is that allowed by the supplied
interconnect lead.
To reduce the risk of audible hum from the loudspeakers do not place power supplies or
power ampliers close to source components.
5.2 Input Connection Details
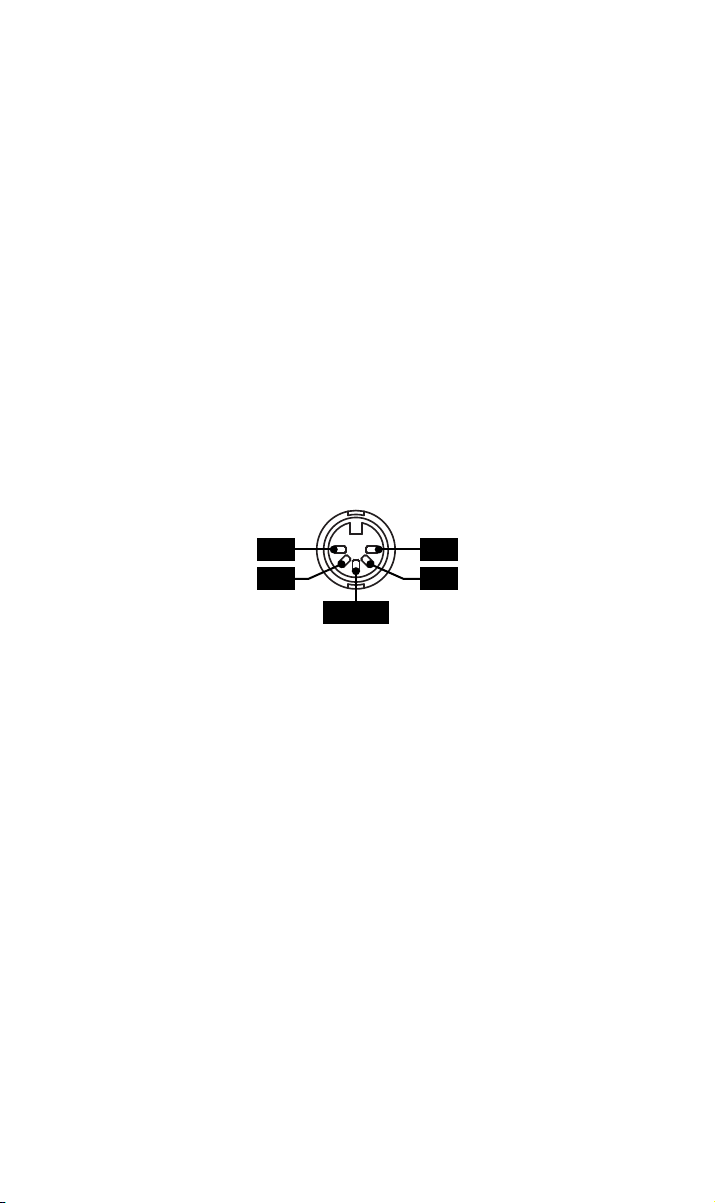
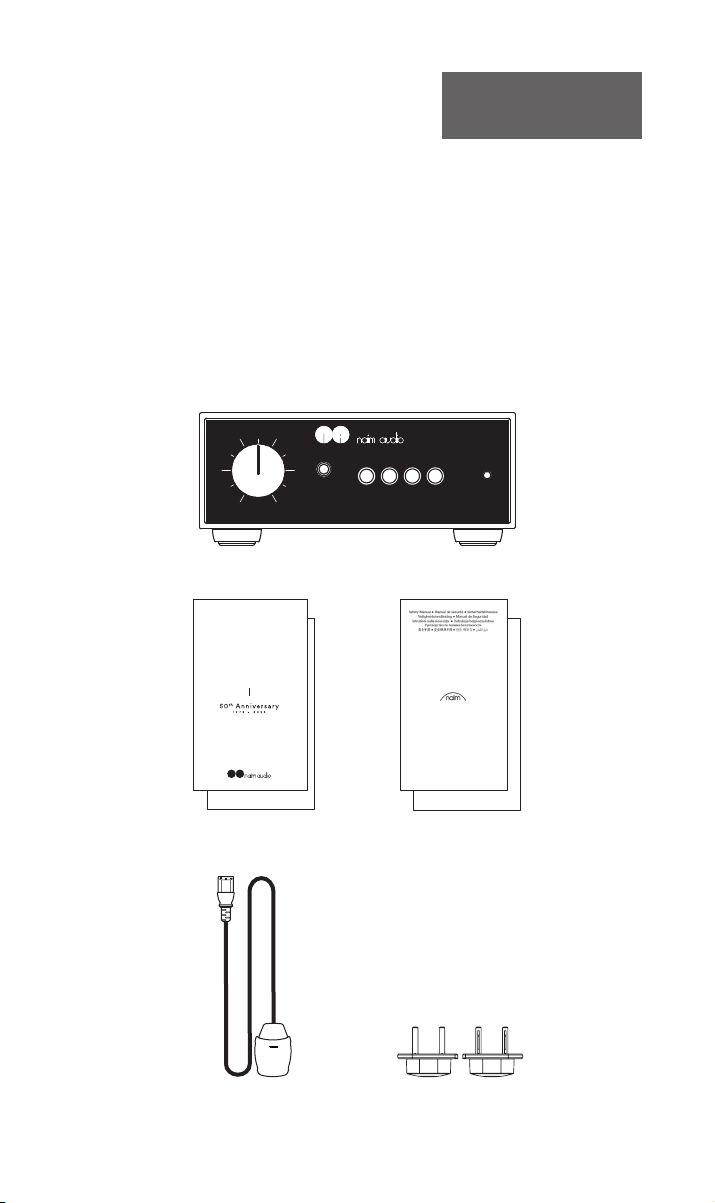
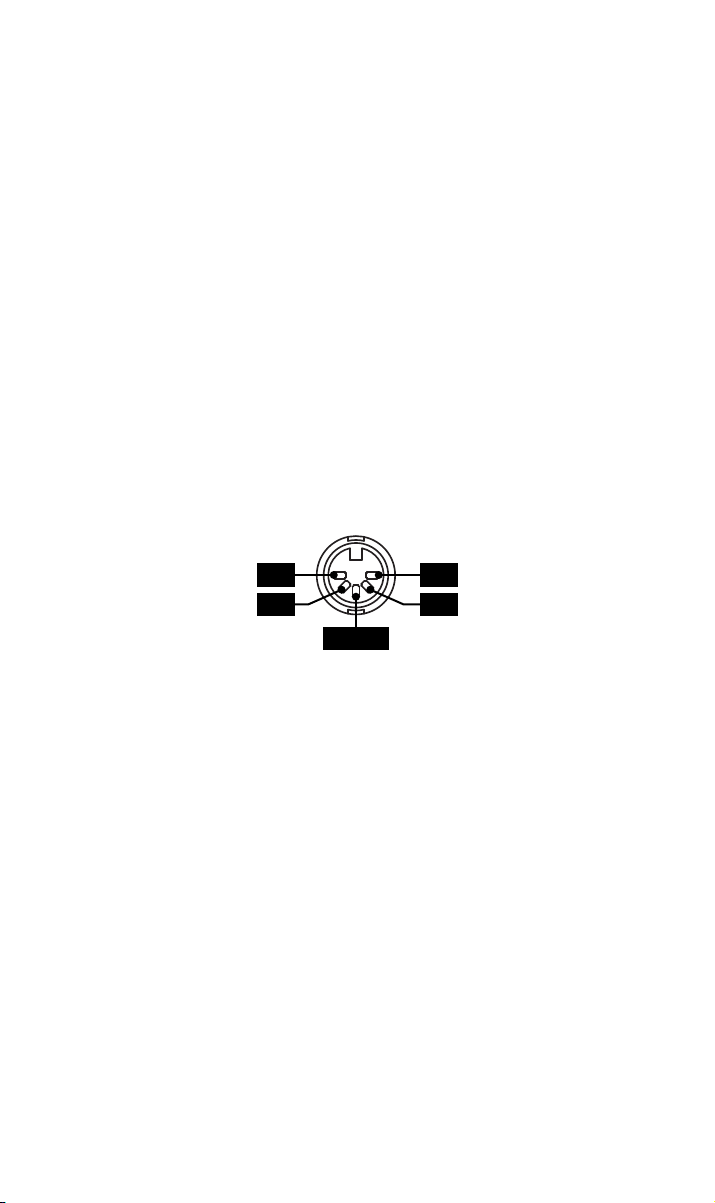
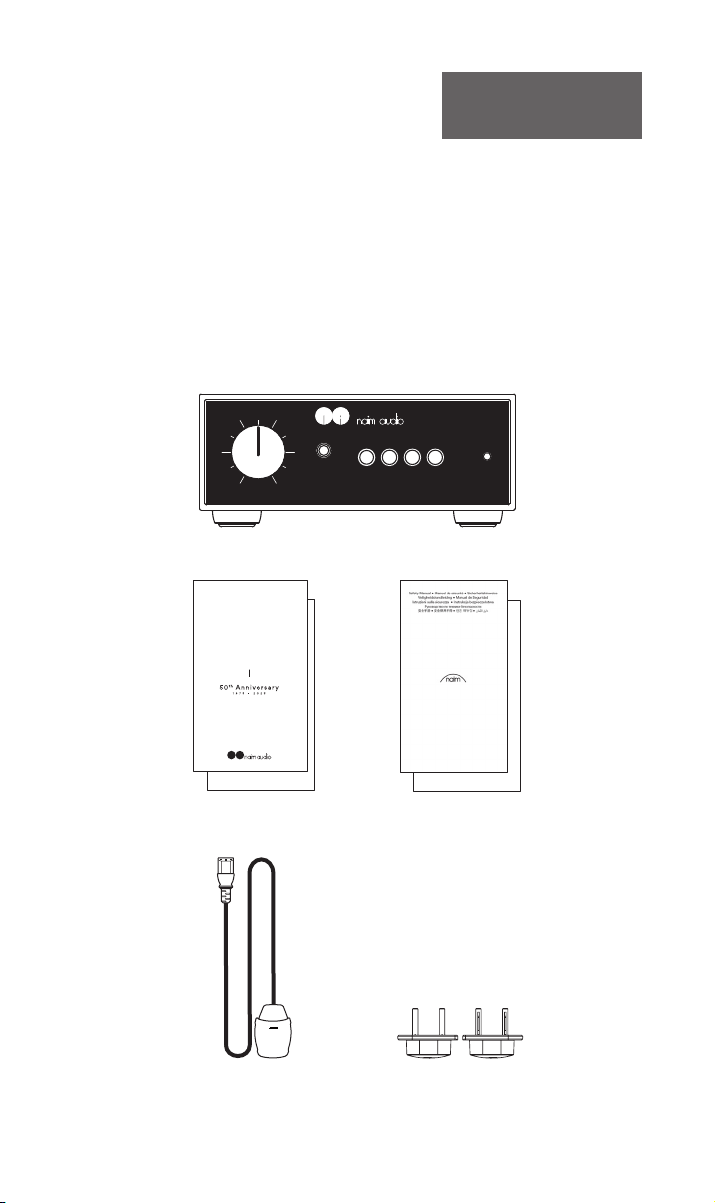
The NAIT 50 has DIN inputs for line level sources and RCA connectors for turntables.
L nc
ncR
Ground
5.3 Loudspeaker Cable and Connectors
For optimum performance, use Naim NAC A5 speaker cable.
Using cables from other manufacturers may hinder performance or even damage the
integrated amplier.
Naim NAC A5 cable is directional and should be connected so that the arrows printed on
the insulation point towards the loudspeakers. The Naim loudspeaker connectors supplied
comply with European safety regulations and must be used.
It is important that your pair of loudspeaker cables are the same length, with a
recommended maximum length of 20m.
Unlike some earlier Naim designs, we do not mandate a minimum speaker cable length,
but would still suggest you avoid sub-2m lengths.
Ensure when connecting speakers that they are ‘in phase’ – meaning the amplier’s
positive loudspeaker output is connected to the positive loudspeaker input – and that the
left and right outputs go to the correct speaker.
7
Page 10

5.4 Powering Up/Down
Once all your input and output connections are made, connect the supplied mains lead to
your NAIT 50 and to mains power.
Please note: your source - such as a streamer or CD player – and any associated external
power supplies should be switched on before you switch on your NAIT 50.
You can now power up the NAIT 50 by simply pressing Standby button on the front panel
of the integrated amplier.
5.5 Standby Power Settings
By default, the NAIT 50 is set to ‘Auto Standby’ - it automatically enters Standby mode
(where it consumes less than 0.5W of power) within 19 minutes of inactivity. Music Sensing
will wake the amp from Standby when it detects an input signal.
For the optimum sound quality, switch the Standby setting on the rear panel to ‘Instant on’,
which keeps all sensitive audio circuits permanently powered up.
6. Mains Power, Earthing and More
Use only the mains leads and plugs supplied with your NAIT 50, or the upgrade Naim
Power-Line mains cable.
Where fused plugs are used, 13 amp fuses should be tted.
Do not wire voltage dependent resistors or noise suppressors into mains plugs; they
degrade the mains supply and the sound.
6.1 Earthing
In order to avoid hum loops, the signal ground of the whole system should be connected to
the mains earth in one place. Typically, this is at the primary source.
For example, a Naim streamer has a ground lift switch. Set this to “default” if no other
source connects mains earth to signal ground. This setting will give best sound quality.
6.2 Non-rewireable mains plugs
If a non-rewireable mains plug is cut from a mains lead (for whatever purpose) the plug
MUST be disposed of in a way to render it totally useless.
Considerable electric shock hazard exists if the cut-o plug is inserted into a mains outlet.
6.3 Mains Circuits and Interference
A hi- system usually shares a mains power circuit with other household equipment,
some of which can cause distortion that may manifest as mechanical hum from mains
transformers, including the transformer in your NAIT 50.
Transformer hum is not transmitted through the speakers and has no eect on the
performance of the system; however, careful positioning of your Naim system may reduce
it, as may a separate, dedicated mains circuit. Such a dedicated circuit will also generally
improve system performance. Only seek advice on the installation of a separate mains
circuit from a qualied electrician.
8
Page 11

6.4 Lightning Precautions
Your Naim system should be turned o and fully disconnected from mains power when
there is a risk of a lightning strike, to protect from potential damage.
7. Further Tips and Advice
Now you have all the essentials sorted, let us move onto a few more things that you can do
to optimise the performance of your new NAIT 50.
7.1 Running In
Naim products are hand-crafted from a carefully selected range of high-quality
components. Your NAIT 50 will sound superb out of the box, but its performance may
improve further still as all these various components power up and interact in their rst
few weeks of use. Keeping your system powered up will assist this process.
7.2 Cleaning Your Product and Connections
Naim recommends using a soft cloth to lightly dust any product surfaces. Cleaning
products may contain ingredients that can adversely aect cosmetic surface treatments
and coatings.
Keep interconnect plugs and sockets clean and free from corrosion. The easiest way to
achieve this is to fully power o your Naim product (and any connected equipment),
unplug all connections from their sockets and rmly push them in again. Contact cleaners
and so-called ‘enhancers’ should not be used, as they can leave deposits that can degrade
the sound of your system.
8. Support
Consumer protection varies from country to country. In most territories, the retailer you
bought your Naim product from should be your primary contact if you are experiencing
problems with your unit.
A problem may be due to a fault in the system or its installation, so it is essential to make
full use of your dealer’s diagnostic skills. You can nd a range of support articles for each
Naim product online at naimaudio.com
If you are still experiencing an issue with your Naim product, contact us directly for help
and advice, at [email protected]
9. Service and Updates
Any repairs or hardware updates should only be made by an authorised Naim service
centre or at the Naim HQ itself. Many components are custom made, tested or matched
and appropriate replacements are often unobtainable from other sources.
Please contact your local Naim retailer with any service or repair queries.
9
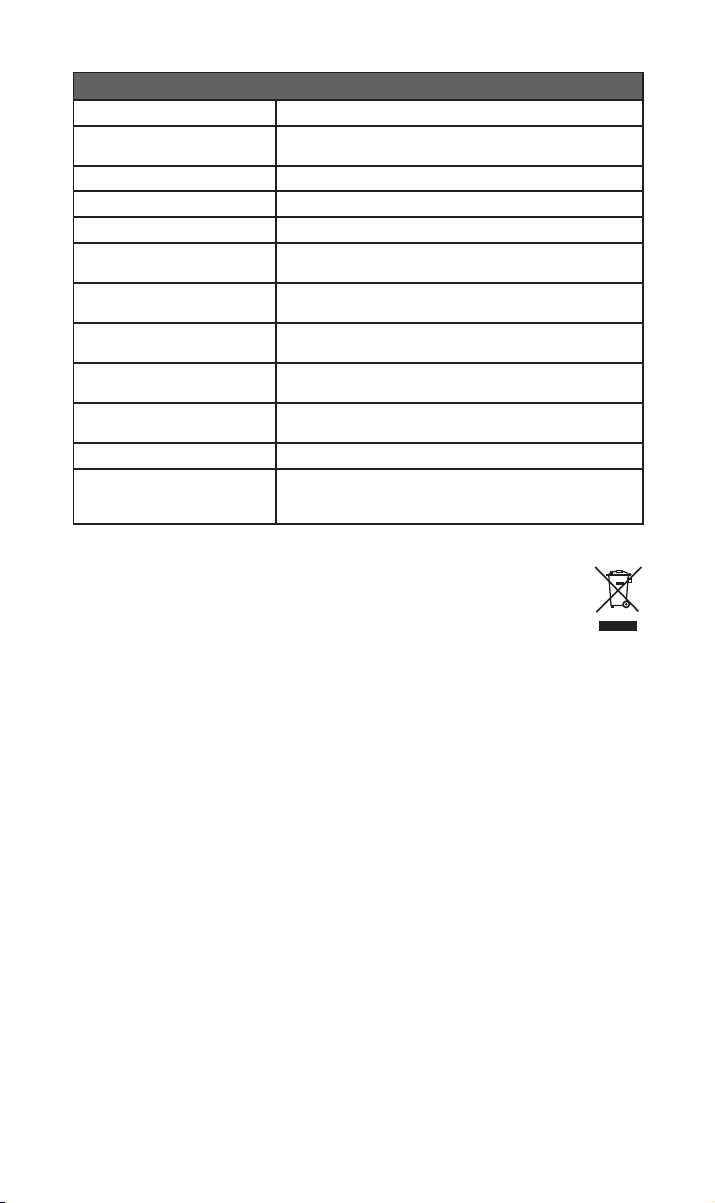
Page 12

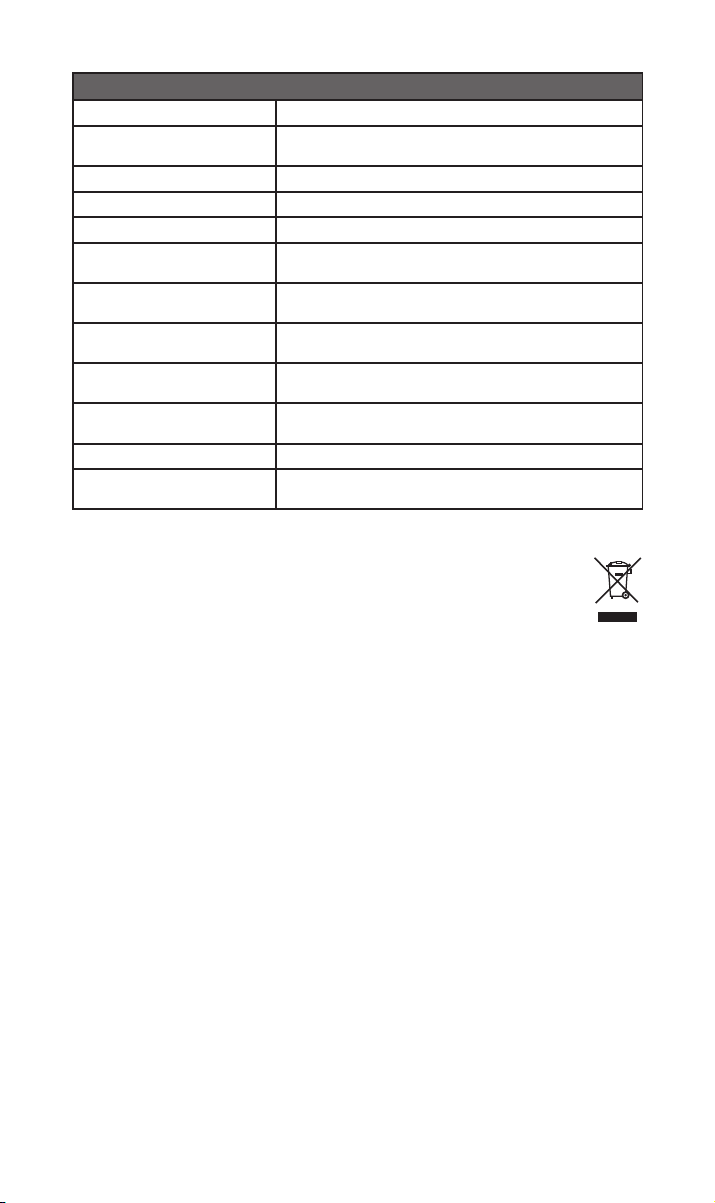
10. Specications
Audio Specications
Power Output (Speakers) 25 Watts into 8 @0.1% THD+N @ 230VAC
Power Output (Headphones) 1.5W into 16
Gain Phono stage: 40dB (@1kHz RIAA)
Inputs 2x Stereo 5 pin DIN, 47k line level
Frequency Response Via line: -3dB @ 4Hz to 45kHz
Hardware Specications
Dimensions (H x W x D) 87 × 207 × 321mm (including feet)
Weight 4.5kg (amplier only)
Passive Consumption 20W (idle)
Standby Consumption <0.5W (auto standby with music sensing)
Mains Supply 110V - 120V, 220V - 240V 50/60Hz
Fuse 230V = T1AL (anti-surge) ; 115V = T2AL (anti-surge)
Finish ‘Chrome bumper’
Operating Temperature 5-35°C
Storage Operating Temperature 0-50°C
1/4" (6.35mm) Jack
Pre-amp stage (and headphones): 16dB
Power amp stage: 29dB
1x Stereo RCA 47k, 5mV MM level
Via phono: -3dB @ 6Hz to 30kHz
Front and rear - black aluminium anodised
Cover - black powder coat
10
Page 13
Extended Specications
Power Output 40 Watts 4 @0.1% THD+N @ 230VAC
Burst Power into 2 (1kHz for
20mS, repeat 500mS IHF)
Peak Current into 1 (1kHz 1mS) +/-15 amps peak (225W peak power)
Max Power Consumption 160VA full power 4 2-channels driven
Power Consumption (Loud) 73VA at 2x 1/8th full power 8R
THD+N at 2/3rds Full Power
8@1kHz
Input Signal for Clipping
(volume at max)
Signal to Noise Ratio Ref 1W 8
A-weighted
Signal to Noise Ratio Ref 25W 8
A-weighted
Crosstalk 85dB Line 1kHz ref 25W 8
Damping Factor into 8 36
Control On product only (no remote), 3 input buttons, standby, auto mute
60 Watts 2 @1% THD+N
0.015%
88mV Line
710uV Phono
80dB Line, 1V input
78dB Phono ref 5mV input
93dB Line, 1V input
84dB Phono ref 5mV input
80dB phono
headphones, auto standby defeat switch on rear
12. Product Recycling
Products that display the crossed-out wheeled bin logo cannot be disposed of
as domestic waste. These products must be disposed of at facilities capable of
recycling them and appropriately handling any waste by-products.
Contact your local authority for details of the nearest such facility.
Appropriate recycling and waste disposal helps conserve resources and
protects the environment from contamination.
11
Page 14
Introduction
Remarque: Tous les
avertissements de sécurité
se trouvent dans le manuel
de sécurité agréé.
Bienvenue et félicitations pour l’achat de votre nouvel amplicateur intégré
Naim. Comme tous les produits NaimAudio, le NAIT50 a été pensé pour
vous faire proter d’une exceptionnelle performance musicale. Pour exploiter
pleinement son potentiel, il est important de suivre les consignes d’installation
et d’utilisation indiquées dans ce manuel. Nous présentons dans un premier
temps des informations élémentaires relatives au produit et à sa mise en place,
avant d’aborder les informations plus détaillées à la section4.
1. Liste des éléments fournis
volume
headphone
phono stream aux mains
1x NAIT 50
User Guide
power
AMPLIFIER - NAIT 50
1x Documentation 1x Manuel de sécurité
1x Câble d’alimentation 2x Connecteurs d’enceinte
(Pré-installés sur l’appareil)
12
Page 15

2. L’histoire des amplicateurs intégrés Naim
Notre histoire a débuté avec la passion d’un homme pour la musique et s’est
poursuivie pendant cinquante années au cours desquelles de nombreux
produits aussi innovants que cultes ont vu le jour.
Pilote automobile, entrepreneur, ingénieur autodidacte et fondateur de Naim,
Julian Vereker MBE (1945-2000) était un vrai passionné de musique. Passant
son temps libre aux concerts de ses amis qu’il enregistrait dans les années
1960, Julian a rapidement constaté que l’écoute, une fois chez lui, était loin de
lui procurer les sensations et les plaisirs qu’il attendait.
Ne voulant rien de moins que la perfection, il se mit en tête de concevoir
ses propres amplicateurs et enceintes, s’aranchissant des codes d’alors
et privilégiant les aspects qui permettraient à chaque son de donner vie à la
musique, sans compromis. Ces premiers modèles ont posé les bases d’une
gamme de produits Hi-Fi cultes et primés qui ont encore toute leur place
aujourd’hui, 50 ans plus tard.
Conçu exclusivement pour le 50ème anniversaire de Naim et limité à 1 973
exemplaires, le Nait 50 ressemble, de prime abord, à s’y méprendre au Nait 1.
Mais à y regarder de plus près, les panneaux avant et arrière sont en aluminium
anodisé de grande qualité, le bouton de volume est usiné dans la masse à partir
d’un bloc d’aluminium an d’atténuer les vibrations, la commande de balance a
été remplacée par une prise casque, tandis que la LED est désormais blanche.
À l’intérieur, les modications apportées font du Nait 50 un produit à part
entière. La sélection d’entrée fait appel à un dispositif électrique an de réduire
considérablement la longueur du trajet du signal, et le nouvel amplicateur
casque a été inspiré du NSC 222. Le tout nouveau discret et exclusif
préamplicateur phono MM à transistor rend hommage au son du célèbre
Nait 1, rehaussé par l’amplicateur de puissance inspiré du NAP 250 (2023).
Malgré sa petite taille, le Nait 50 est un véritable amplicateur intégré qui fera
le bonheur des audiophiles.
Pour en savoir plus sur les origines et l’héritage
de Nait à travers les 50 ans d’histoire de Naim,
scannez le code QR ci-dessous.
13
Page 16
Left Right
Speakers
WARNING: Do not replace supplied loudspeaker
plugs with individual 4mm plugs
WARNING: Disconnect power
before opening
AC ONLY ∿
FUSE RATING:
ANTISURGE
INPUT POWER: 73VA
Power
S/No.
NAIT 50
DESIGNED AND MADE IN THE UK BY
NAIM AUDIO, SALISBURY, SP1 2LN
110-120 V: T2AL
220-240 V: T1AL
FREQUENCY: 50/60Hz
Aux Stream
Ground
MM Phono
L
R
Instant on
Off
On
Analogue InputsAnalogue Inputs
L
R
3. Caractéristiques et ports de connexion
volume
headphone
phono stream aux mains
power
Casque 6,35mm
Contrôle du
volume
Luminosité de la LED
Forte
Faible
Prises Enceinte
(Gauche +/-; Droite -/+)
Prise de sortie
l’entrée Phono
Bouton de
l’entrée Stream
Bouton de
NAIT 50 en marche
NAIT 50 en veille
Entrée Stream Terre Platine
Bouton de
veille
Bouton de
l’entrée Aux
Veille/Marche
LED
14
Commutateur Démarrage
immédiat/Veille auto
Entrée Aux
Entrée Phono
Page 17
4. Mise en place
PLEASE READ THE MANUAL BEFORE USE
S/No.
Bluetooth
Wi-Fi
Contains Transmitter Modules
FCC ID: 2ACURNP800, 2ACURBLUE, 2ACURZIGEE
IC ID: 12217A-NP800, 12217A-BLUE, 12217A-ZIGEE
REFER TO OWNERS MANUAL
Fit NDX 2 link plug or PSU upgrade
Power Supply Upgrade
2 1
3
Network
Aerial
Power
Analogue Outputs
DIN
L R
Default
Floating
RCA
ch.1
NDX 2
WARNING:
DISCONNECT SUPPLY CORD
BEFORE OPENING
DESIGNED AND MADE IN ENGLAND BY
NAIM AUDIO LTD.
SOUTHAMPTON ROAD, SALISBURY
E2378
ch.2
-ve
Signal Ground
USB
4
Wi-Fi
IR Out
IR Out
Digital Out
INPUT POWER: 60VA
FUSE RATING: ANTISURGE
100-120 V: T4AL.
220-240 V: T2AL.
AC ONLY
FREQUENCY: 50/60Hz
Digital Inputs
PLEASE READ THE MANUAL BEFORE USE
S/No.
Wi-Fi
Contains Transmitter Modules
FCC ID: 2ACURNP800, 2ACURBLUE, 2ACURZIGEE
IC ID: 12217A-NP800, 12217A-BLUE, 12217A-ZIGEE
REFER TO OWNERS MANUAL
Fit NDX 2 link plug or PSU upgrade
Power Supply Upgrade
2 1
3
Analogue Outputs
DIN
L R
Default
Floating
RCA
ch.1
NDX 2
WARNING:
DISCONNECT SUPPLY CORD
BEFORE OPENING
DESIGNED AND MADE IN ENGLAND BY
NAIM AUDIO LTD.
SOUTHAMPTON ROAD, SALISBURY
E2378
ch.2
-ve
Signal Ground
4
Wi-Fi
IR Out
IR Out
Digital Out
Digital Inputs
volume
headphone
phono stream aux mains
Votre NAIT50 doit être raccordé à une source (comme le NDX2 ou votre
platine) mais assurez-vous préalablement que les deux composants se trouvent
à leur emplacement dénitif et qu’ils sont débranchés.
Pour une performance optimale, utilisez un support hi- dédié (de préférence
NaimFraim) et placez le NAIT 50 au-dessus de la source, comme illustré ici.
Pour plus d'informations, voir la section5.1
Avant de procéder au raccordement, vériez que tous les équipements sont
éteints.
power
Branchez le câble d’interconnexion DIN fourni avec le NDX2 à l’entrée Stream
du NAIT 50.
15
Page 18
Branchez les câbles d’enceinte au NAIT50, en veillant à ce que chacun des
Left Right
Speakers
WARNING: Do not replace supplied loudspeaker
plugs with individual 4mm plugs
WARNING: Disconnect power
before opening
AC ONLY ∿
FUSE RATING:
ANTISURGE
INPUT POWER: 73VA
Power
S/No.
NAIT 50
DESIGNED AND MADE IN THE UK BY
NAIM AUDIO, SALISBURY, SP1 2LN
110-120 V: T2AL
220-240 V: T1AL
FREQUENCY: 50/60Hz
Aux Stream
Ground
MM Phono
L
R
Instant on
Off
On
Analogue InputsAnalogue Inputs
L
R
Left Right
Speakers
WARNING: Do not replace supplied loudspeaker
plugs with individual 4mm plugs
WARNING: Disconnect power
before opening
AC ONLY ∿
FUSE RATING:
ANTISURGE
INPUT POWER: 73VA
Power
S/No.
NAIT 50
DESIGNED AND MADE IN THE UK BY
NAIM AUDIO, SALISBURY, SP1 2LN
110-120 V: T2AL
220-240 V: T1AL
FREQUENCY: 50/60Hz
Aux Stream
Ground
MM Phono
L
R
Instant on
Off
On
Analogue InputsAnalogue Inputs
L
R
câbles soit raccordé à la bonne enceinte et à ce que les deux soient en phase.
Pour plus d'informations, voir la section5.3.
Enn, branchez le câble d’alimentation au NAIT50.
volume
headphone
phono stream aux mains
power
Vériez que le volume est au minimum, puis allumez la source et enn le NAIT
50.
Pour plus d'informations, voir la section5.4
16
Page 19
5. Conseils d’installation et d’utilisation de votre
NAIT50
Nous savons que vous avez hâte d’utiliser votre nouveau NAIT50, mais prenez le temps de
respecter les consignes suivantes car elles favoriseront l’obtention d'un son optimal et vous
aideront à proter au mieux de votre amplicateur intégré.
5.1 Déballage et mise en place
Pour garantir un niveau de performance optimal, placez vos produits Naim sur un support
dédié pour les équipements hi- (de préférence NaimFraim ou FraimLite), an de
minimiser les vibrations susceptibles d’altérer la qualité du son.
Vous n’avez pas la place d’installer un tel support? Vous pouvez placer votre NAIT50
sur une étagère en verre Fraim posée sur un meuble adéquat. Vous obtenez ainsi une
installation stable et discrète.
N’empilez jamais des produits Naim les uns sur les autres. Si vous placez des composants
côte-à-côte, laissez un peu d’espace entre eux. De même, des produits raccordés entre
eux ne doivent pas être trop éloignés les uns des autres. La distance maximale est celle
permise par le câble d’interconnexion fourni.
An de réduire le risque de bourdonnement audible provenant des enceintes, évitez de
placer les alimentations ou les amplicateurs de puissance à proximité des composants
source.
5.2 Informations relatives à la connexion des entrées
Le NAIT 50 est doté d’entrées DIN pour les entrées de niveau ligne et de prises RCA pour
les platines.
Gch nc
ncDte
Terre
5.3 Câble et connecteurs d’enceintes
Pour une performance optimale, utilisez le câble d’enceinte Naim NAC A5.
L’utilisation de câbles d’autres marques peut dégrader la performance, voire endommager
l’amplicateur intégré.
Le câble Naim est directionnel et doit être orienté de sorte que les èches imprimées sur
l’isolation soient dirigées vers les enceintes. Les connecteurs d’enceintes Naim livrés sont
conformes à la réglementation européenne sur la sécurité, et doivent être impérativement
utilisés.
Il est important que les deux câbles d’enceinte soient de la même longueur. La longueur
maximale recommandée est de 20m.
Contrairement à certains modèles Naim antérieurs, nous ne xons pas de longueur de
câble d’enceinte minimale mais suggérons tout de même d’éviter des longueurs inférieures
à 2mètres.
Lors du branchement des enceintes, vériez qu’elles sont bien «en phase», ce qui signie
que la sortie d’enceinte positive de l’amplicateur est reliée à l’entrée d’enceinte positive,
et que les sorties gauche et droite sont raccordées à la bonne enceinte.
17
Page 20

5.4 Mise en marche / Arrêt
Une fois que tous vos branchements d’entrée et de sortie sont réalisés, raccordez le cordon
d’alimentation fourni à votre NAIT50 et au secteur.
À noter: avant d’allumer le NAIT50, vous devez allumer votre source (telle qu’un streamer
ou un lecteur CD) et les alimentations secteur externes associées.
Pour pouvez maintenant allumer le NAIT 50. Il sut pour cela d’appuyer sur le bouton
Veille du panneau avant de l’amplicateur intégré.
5.5 Réglages de la mise en veille
Par défaut, le NAIT50 est conguré pour entrer en veille automatique (Auto standby):
il passe automatiquement en mode veille au bout de 19minutes d’inactivité. Dans ce
mode, il consomme moins de 0,5W. La détection de musique (Music Sensing) réveille
l’amplicateur dès que celui-ci détecte un signal d’entrée.
Pour une qualité de son optimale, sur le panneau arrière, réglez le mode de veille en
démarrage instantané (Instant on) de sorte que tous les circuits audio sensibles restent
allumés en permanence.
6. Alimentation secteur, mise à la terre et autres
considérations
Utilisez uniquement les câbles et les ches secteur fournis avec votre NAIT50 ou le câble
d’alimentation Naim Power-Line de mise à niveau.
En cas d’utilisation de ches munies d’un fusible intégré, ce dernier doit être taré à
13ampères.
Ne câblez pas de résistances sensibles à la tension, ni de réducteur de bruit au niveau des
prises secteur, car ceux-ci dégradent l’alimentation et le son.
6.1 Mise à la terre
An d’éviter les boucles de bourdonnement, la masse du signal du système complet ne
doit être reliée à la terre du secteur (masse) qu’à un seul endroit, généralement au niveau
de la source principale.
Par exemple, un streamer Naim est équipé d’un commutateur de masse. Si aucune autre
source ne relie la masse de l’alimentation à la masse du signal, réglez cette position par
défaut. Ce réglage vous assurera une qualité sonore optimale.
6.2 Prises secteur moulées (non démontables)
Si, pour une raison quelconque, le câble d’alimentation est sectionné an de déposer la
prise secteur moulée, la prise doit IMPÉRATIVEMENT être éliminée d’une manière qui la
rend complètement inutilisable.
L’insertion d’une prise sectionnée dans une prise murale présente un risque élevé
d’électrocution.
6.3 Circuits secteur et interférences
Les systèmes hi- partagent généralement le circuit d’alimentation secteur avec d’autres
appareils ménagers, dont certains peuvent entraîner des déformations susceptibles
de se manifester sous forme de bourdonnement mécanique dans les transformateurs
d’alimentation, y compris dans le transformateur de votre NAIT50.
18
Page 21

Le bourdonnement des transformateurs n’est pas transmis par les enceintes et n’exerce
aucune inuence sur les performances du système; cependant, un bon positionnement
de votre système Naim peut réduire ce phénomène, tout comme l’utilisation d’un circuit
secteur séparé. En général, un tel circuit dédié améliore également les performances du
système. Pour tout conseil sur l’installation d’un circuit secteur séparé, demander l’avis
d’un électricien qualié.
6.4 Précautions contre la foudre
Votre système Naim doit être éteint et débranché du secteur lorsqu’il y a un risque d’orage,
an de le protéger contre d’éventuels dommages.
7. Autres astuces et conseils
À présent que vous avez pris connaissance des consignes les plus importantes, voici
quelques recommandations pour optimiser les performances de votre nouveau NAIT50.
7.1 Rodage
Les produits Naim sont fabriqués à la main à partir d’un ensemble de composants de
qualité soigneusement choisis. La qualité de son de votre NAIT50 est excellente dès
la première utilisation mais elle peut continuer de s’améliorer au fur et à mesure que
ses divers composants montent en puissance et interagissent, au cours des premières
semaines d’utilisation. Des performances meilleures et plus homogènes sont obtenues
lorsque le matériel est laissé allumé.
7.2 Nettoyage du produit et des branchements
Naim recommande d’utiliser exclusivement un chion doux pour épousseter délicatement
les surfaces du produit. Les produits nettoyants peuvent contenir des composants
susceptibles de dégrader les revêtements et les traitements de surface de nition.
Veillez à ce que les ches et prises d’interconnexion restent propres et exemptes de
corrosion. Pour cela, le moyen le plus simple consiste à éteindre votre produit Naim (et tout
équipement raccordé), à débrancher tous les raccordements de leurs prises et à bien les
renfoncer. Il convient de ne pas utiliser de nettoyants pour contacts ou d’«améliorateurs»,
car ils peuvent déposer des résidus susceptibles de dégrader le son de votre système.
8. Support
La protection des consommateurs varie d’un pays à l’autre. Dans la plupart des pays, le
revendeur auprès duquel vous avez acheté votre produit Naim doit être votre principal
interlocuteur en cas de problèmes avec votre appareil.
Un problème peut être dû à un défaut du système ou à son installation, il est donc essentiel
d’avoir recours aux compétences de diagnostic de votre revendeur. Vous trouverez sur le
site naimaudio.com une série d’articles concernant l’assistance pour les diérents produits
Naim.
Si le problème persiste avec votre produit Naim, contactez-nous directement pour obtenir
de l’aide et des conseils, à l’adresse suivante:[email protected]
9. Réparation et mises à jour
Toutes les réparations et mises à jour matérielles doivent impérativement être réalisées
par un centre de service Naim agréé ou par le siège de Naim lui-même. De nombreux
composants sont spéciquement fabriqués, testés ou appariés et il est souvent impossible
de se procurer des pièces de rechange appropriées auprès d’autres sources.
Veuillez contacter votre revendeur Naim local pour toute demande concernant l’entretien
ou les réparations.
19
Page 22

10. Spécications
Spécications audio
Puissance de sortie (Enceintes) 25Watts sous 8 @0,1% THD+N @ 230VAC
Puissance de sortie (Casque) 1,5W sous 16
Gain Étage phono: 40dB (@1kHz RIAA)
Entrées 2x Stéréo 5broches DIN, niveau ligne 47 k
Réponse en fréquence Via ligne: -3dB @ 4 Hz à 45 kHz
Spécications matérielles
Dimensions (HxLxP) 87 × 207 × 321 mm (pieds inclus)
Poids 4,5kg (amplicateur uniquement)
Consommation passive 20 W (veille)
Consommation en veille <0,5W (veille auto avec détection de musique)
Tension de secteur 110V - 120V, 220V - 240V 50/60Hz
Fusible 230V = T1AL (protection contre les surtensions) ; 115V = T2AL
Finition «Pare-chocs chromé»
Température de fonctionnement 5-35°C
Température de stockage 0-50°C
Prise 6,35mm
Étage «pre-amp» (et casque): 16 dB
Étage Ampli de puissance: 29 dB
1 x Stéréo RCA 47 k, 5mV MM niveau
Via phono: -3dB @ 6 Hz à 30 kHz
(protection contre les surtensions)
Avant et arrière - aluminium noir anodisé
Boîtier - Revêtement en poudre noir
20
Page 23

Spécications étendues
Puissance de sortie 40 Watts 4 @0.1% THD+N @ 230VAC
Puissance transitoire sous 2
(1kHz pour 20mS, répétition
500mS IHF)
Courant de crête sous 1
(1kHz 1mS)
Consommation d’énergie
maximale
Consommation électrique (Fort) 73VA à 2× 1/8 pleine puissance 8R
THD+N à 2/3 pleine puissance
8 @1kHz
Signal d’entrée pour écrêtage
(volume au maximum)
Rapport signal/bruit Réf. 1W 8
pondéré A
Rapport signal/bruit Réf. 25W 8
pondéré A
Diaphonie Ligne 85dB 1kHz réf. 25W 8
Facteur d’amortissement sous 8 36
Commande Sur le produit uniquement (pas de télécommande), 3boutons
60 Watts 2 @1% THD+N
Crête +/-15A (puissance de crête 225W)
160VA pleine puissance 4 alimentation par 2 canaux
0,015 %
Ligne 88mV
Phono 710uV
Ligne 80dB, Entrée 1V
Phono 78dB réf. entrée 5mV
Ligne 93dB, Entrée 1V
Phono 84dB réf. entrée 5mV
Phono 80dB
d’entrée, veille, sourdine auto casque, commutateur annulation
veille auto à l’arrière
12. Consignes de recyclage du produit
Les produits comportant le logo de la poubelle à roues barrée ne peuvent pas
être éliminés en tant qu’ordures ménagères. Ces produits doivent être éliminés
par des organismes capables de les recycler et de traiter les éventuels sousproduits résiduels.
Contactez votre autorité locale pour obtenir les coordonnées du site le plus proche.
L’élimination et le recyclage corrects des ordures contribuent à la conservation des
ressources et à la protection de l’environnement contre les contaminations.
21
Page 24
Einführung
Hinweis: Alle
Sicherheitshinweise nden
Sie im Sicherheitshandbuch.
Wir beglückwünschen Sie zu Ihrem neuen integrierten Verstärker von Naim.
Wie bei allen Produkten von Naim Audio steht auch bei dem NAIT 50 die
musikalische Leistung an vorderster Stelle. Um das volle Potenzial der Endstufe
auszuschöpfen, sollten die einfachen Installations- und Nutzungsrichtlinien in
diesem Handbuch befolgt werden. Wir beginnen mit einigen grundlegenden
Informationen zum Produkt und zur Einrichtung, bevor wir in Abschnitt 4 zu
genaueren Informationen übergehen.
1. Kartoninhalt
volume
headphone
phono stream aux mains
1x NAIT 50
User Guide
power
22
22
AMPLIFIER - NAIT 50
1Xx Informationsheft 1x Sicherheitshandbuch
1x Netzkabel 2x Lautsprecheranschlüsse
(am Gerät vorinstalliert)
Page 25

2. Das Erbe der integrierten Verstärker von Naim
Unsere Geschichte beginnt mit der Leidenschaft eines Mannes für die
Musik und zieht sich durch fünf Jahrzehnte und eine Reihe von legendären
Produkteinführungen bis in die heutige Zeit.
Julian Vereker MBE (1945-2000), Gründer von Naim Audio, war Rennfahrer,
Unternehmer und autodidaktischer Ingenieur mit einer großen Leidenschaft
für Musik. Als Julian in den 1960er Jahren seine Freizeit damit verbrachte,
seine Freunde live spielen zu hören und aufzunehmen, stellte er fest, dass die
Wiedergabe auf seiner Anlage zu Hause nicht dem Erlebnis entsprach, das er
sich wünschte.
Da er sich nicht mit dem Mittelmaß zufrieden geben wollte, beschloss er,
seine eigenen Verstärker und Lautsprecher zu entwickeln, wobei er sich nicht
an die gängigen Weisheiten hielt, sondern sich auf die Aspekte der Leistung
konzentrierte, die die Musik zum Leben erweckten. Diese ersten Entwürfe
legten den Grundstein für eine Reihe von legendären und preisgekrönten HiFiProdukten, die auch 50 Jahre später noch Kultstatus besitzen.
Der exklusiv für das 50-jährige Jubiläum von Naim entwickelte und auf nur
1.973 Stück limitierte Nait 50 sieht auf den ersten Blick genauso aus wie der
Nait 1. Bei näherer Betrachtung fällt jedoch auf: Die Vorder- und Rückseite
ist aus hochwertigem, eloxiertem Aluminium gefertigt, der Drehknopf ist
aus Vollaluminium gefräst, um die Vibrationsdämpfung zu unterstützen, der
Balanceregler wurde gegen eine Kopfhörerbuchse ausgetauscht und die LED
erstrahlt nun in Weiß.
Überzeugend sind auch die Änderungen im Inneren des Nait 50. Die
Eingangswahl erfolgt per Fly-by-Wire-Steuerung, um die Länge des Signalwegs
deutlich zu reduzieren, und der neue Kopfhörerverstärker wurde vom NSC
222 übernommen. Die brandneue, exklusive MM-Phonostufe mit diskreten
Transistoren ist eine Hommage an den berühmten Nait 1 und arbeitet mit der
Endstufe aus dem NAP 250 (2023) zusammen.
Der Nait 50 ist ein echter audiophiler integrierter Verstärker, nur eben im
Miniaturformat.
Weitere Informationen nden
Sie unter
23
23
Page 26
Left Right
Speakers
WARNING: Do not replace supplied loudspeaker
plugs with individual 4mm plugs
WARNING: Disconnect power
before opening
AC ONLY ∿
FUSE RATING:
ANTISURGE
INPUT POWER: 73VA
Power
S/No.
NAIT 50
DESIGNED AND MADE IN THE UK BY
NAIM AUDIO, SALISBURY, SP1 2LN
110-120 V: T2AL
220-240 V: T1AL
FREQUENCY: 50/60Hz
Aux Stream
Ground
MM Phono
L
R
Instant on
Off
On
Analogue InputsAnalogue Inputs
L
R
3. Funktionen und Anschlüsse
volume
headphone
phono stream aux mains
power
Kopfhörerausgang
6,35mm Klinkenbuchse
Lautstärkeregelung
LED-Helligkeitsspezikationen
Hell
Dunkel
Lautsprecherbuchsen
(Links +/-; Rechts -/+)
Stream-
Eingangstaste
Phono-
Eingangstaste
NAIT 50 aktiv
NAIT 50 im Standby-Modus
Standby-
Stream-Eingang
Taste
AUX-Eingangstaste
LED
Standby/On
Erdung
Plattenspieler
24
AUX-Eingang Schalter Instant on/Auto Standby
Phono-Eingang
Page 27
4. Einrichtung
PLEASE READ THE MANUAL BEFORE USE
S/No.
Bluetooth
Wi-Fi
Contains Transmitter Modules
FCC ID: 2ACURNP800, 2ACURBLUE, 2ACURZIGEE
IC ID: 12217A-NP800, 12217A-BLUE, 12217A-ZIGEE
REFER TO OWNERS MANUAL
Fit NDX 2 link plug or PSU upgrade
Power Supply Upgrade
2 1
3
Network
Aerial
Power
Analogue Outputs
DIN
L R
Default
Floating
RCA
ch.1
NDX 2
WARNING:
DISCONNECT SUPPLY CORD
BEFORE OPENING
DESIGNED AND MADE IN ENGLAND BY
NAIM AUDIO LTD.
SOUTHAMPTON ROAD, SALISBURY
E2378
ch.2
-ve
Signal Ground
USB
4
Wi-Fi
IR Out
IR Out
Digital Out
INPUT POWER: 60VA
FUSE RATING: ANTISURGE
100-120 V: T4AL.
220-240 V: T2AL.
AC ONLY
FREQUENCY: 50/60Hz
Digital Inputs
PLEASE READ THE MANUAL BEFORE USE
S/No.
Wi-Fi
Contains Transmitter Modules
FCC ID: 2ACURNP800, 2ACURBLUE, 2ACURZIGEE
IC ID: 12217A-NP800, 12217A-BLUE, 12217A-ZIGEE
REFER TO OWNERS MANUAL
Fit NDX 2 link plug or PSU upgrade
Power Supply Upgrade
2 1
3
Analogue Outputs
DIN
L R
Default
Floating
RCA
ch.1
NDX 2
WARNING:
DISCONNECT SUPPLY CORD
BEFORE OPENING
DESIGNED AND MADE IN ENGLAND BY
NAIM AUDIO LTD.
SOUTHAMPTON ROAD, SALISBURY
E2378
ch.2
-ve
Signal Ground
4
Wi-Fi
IR Out
IR Out
Digital Out
Digital Inputs
volume
headphone
phono stream aux mains
Ihr NAIT50 muss an eine Quelle (z.B. den NDX2 oder Ihren Plattenspieler)
angeschlossen werden. Stellen Sie vorher jedoch sicher, dass sich beide
Komponenten in ihrer endgültigen Position benden und vom Stromnetz
getrennt sind.
Verwenden Sie für eine optimale Leistung eine spezielle HiFi-Halterung (z.B.
Naim Fraim) und platzieren Sie den NAIT50 wie abgebildet über der Quelle.
Weitere Informationen nden Sie in Abschnitt 5.1
Vergewissern Sie sich vor dem Anschließen, dass alle Geräte ausgeschaltet
sind.
power
Schließen Sie das mit dem NDX2 mitgelieferte DIN-Verbindungskabel an den
Stream-Eingang des NAIT50 an.
25
Page 28
Schließen Sie die Lautsprecherkabel an den NAIT50 an. Jedes Kabel sollte an
Left Right
Speakers
WARNING: Do not replace supplied loudspeaker
plugs with individual 4mm plugs
WARNING: Disconnect power
before opening
AC ONLY ∿
FUSE RATING:
ANTISURGE
INPUT POWER: 73VA
Power
S/No.
NAIT 50
DESIGNED AND MADE IN THE UK BY
NAIM AUDIO, SALISBURY, SP1 2LN
110-120 V: T2AL
220-240 V: T1AL
FREQUENCY: 50/60Hz
Aux Stream
Ground
MM Phono
L
R
Instant on
Off
On
Analogue InputsAnalogue Inputs
L
R
Left Right
Speakers
WARNING: Do not replace supplied loudspeaker
plugs with individual 4mm plugs
WARNING: Disconnect power
before opening
AC ONLY ∿
FUSE RATING:
ANTISURGE
INPUT POWER: 73VA
Power
S/No.
NAIT 50
DESIGNED AND MADE IN THE UK BY
NAIM AUDIO, SALISBURY, SP1 2LN
110-120 V: T2AL
220-240 V: T1AL
FREQUENCY: 50/60Hz
Aux Stream
Ground
MM Phono
L
R
Instant on
Off
On
Analogue InputsAnalogue Inputs
L
R
den richtigen Lautsprecher angeschlossen und beide gleichphasig sein.
Weitere Informationen nden Sie in Abschnitt 5.3
Schließen Sie abschließend das Netzkabel an den NAIT50 an.
volume
headphone
phono stream aux mains
power
Vergewissern Sie sich, dass die Lautstärke auf Minimum eingestellt ist, und
schalten Sie dann die Quelle und schließlich den NAIT 50ein.
Weitere Informationen nden Sie in Abschnitt 5.4
26
Page 29
5. Tipps zur Installation und Verwendung des NAIT 50
Wir wissen, dass Sie sich auf Ihren neuen NAIT50 sehr freuen! Dennoch versprechen
wir Ihnen bei Umsetzung der folgenden Hinweise, dass Sie den integrierten Verstärker in
seinem vollen Umfang erleben werden.
5.1 Unboxing und Positionierung
Um eine optimale Leistung zu erzielen, sollten Sie für Ihre Naim-Produkte ein spezielles
HiFi-Regal verwenden, idealerweise den Naim Fraim oder Fraim Lite. Diese Regale dienen
der Minimierung von Vibrationen, die den Klang beeinträchtigen können.
Sie haben keinen Platz für ein Regal? Stellen Sie Ihren NAIT 50 auf ein Fraim-Glasregal auf
einem geeigneten Möbelstück. Dies dient einem soliden, aber schlichten Halt.
Stapeln Sie Naim-Produkte niemals übereinander; stellen Sie sie nebeneinander und
lassen Sie bitte etwas Abstand zwischen den Geräten. Ebenso sollten die angeschlossenen
Produkte nicht zu weit voneinander entfernt sein: Der maximale Abstand ist der, den das
mitgelieferte Verbindungskabel zulässt.
Um das Risiko von hörbarem Brummen aus den Lautsprechern zu verringern, sollten Sie
Netzteile oder Leistungsverstärker nicht in der Nähe von Quellkomponenten aufstellen.
5.2 Angaben zum Eingangsanschluss
Der NAIT50 hat DIN-Eingänge für Line-Pegel-Quellen und RCA-Anschlüsse für
Plattenspieler.
L nc
ncR
Masse
5.3 Lautsprecherkabel und -anschlüsse
Verwenden Sie für eine optimale Leistung das Lautsprecherkabel Naim NACA5.
Die Verwendung von Kabeln anderer Hersteller kann die Leistung beeinträchtigen oder
den integrierten Verstärker sogar beschädigen.
Das Naim NACA5-Kabel ist richtungsgebunden und sollte so angeschlossen werden,
dass die auf der Isolierung aufgedruckten Pfeile in Richtung der Lautsprecher zeigen.
Die mitgelieferten Naim-Lautsprecheranschlüsse entsprechen den europäischen
Sicherheitsvorschriften und müssen verwendet werden.
Es ist wichtig, dass Ihre beiden Lautsprecherkabel die gleiche Länge haben, wobei eine
maximale Länge von 20m empfohlen wird. Die beiden Lautsprecherkabel sollten die
gleiche Länge bis zu max. 20m haben.
Im Gegensatz zu einigen früheren Naim-Designs schreiben wir keine Mindestlänge für
Lautsprecherkabel vor, empfehlen aber dennoch, keine Längen unter 2 m zu verwenden.
Achten Sie beim Anschließen der Lautsprecher darauf, dass diese „gleichphasig“
sind, d. h. der positive Lautsprecherausgang des Verstärkers ist mit dem positiven
Lautsprechereingang verbunden, und dass der linke und der rechte Ausgang mit dem
richtigen Lautsprecher verknüpft sind.
27
Page 30

5.4 Einschalten/Ausschalten
Sobald alle Eingangs- und Ausgangsverbindungen hergestellt sind, schließen Sie das
mitgelieferte Netzkabel an Ihren NAIT 50 und an das Stromnetz an.
Hinweis: Ihre Quelle, wie z. B. ein Streamer oder CD-Player, und alle zugehörigen externen
Netzteile sollten eingeschaltet sein, bevor Sie Ihren NAIT 50 einschalten.
Sie können den NAIT50 nun einschalten, indem Sie einfach die Standby-Taste an der
Vorderseite des integrierten Verstärkers drücken.
5.5 Einstellung der Standby-Leistung
Standardmäßig ist der NAIT50 auf „Auto Standby“ eingestellt. Er geht nach 19 Minuten
Inaktivität automatisch in den Standby-Modus über (in dem er weniger als 0,5W Strom
verbraucht). Die Music Sensing-Funktion weckt den Verstärker aus dem Standby-Modus,
wenn er ein Eingangssignal empfängt.
Zur Erzielung einer optimalen Klangqualität schalten Sie die Standby-Einstellung auf der
Rückseite des Geräts auf „Instant on“, wodurch alle empndlichen Audioschaltungen
permanent eingeschaltet bleiben.
6. Netzstrom, Erdung und mehr
Verwenden Sie nur das mit dem NAIT 50 mitgelieferte Netzkabel und Stecker oder das
verbesserte PowerLine-Netzkabel von Naim.
Bei der Verwendung von gesicherten Steckern sollten Sicherungen mit 13 Ampere
eingesetzt werden.
Schließen Sie keine spannungsabhängigen Widerstände oder Rauschunterdrücker an
Netzstecker an. Diese beeinträchtigen die Netzversorgung und den Klang.
6.1 Erdung
Um Brummschleifen zu vermeiden, sollte die Signalmasse des gesamten Systems an
einer Stelle mit der Netzerde verbunden werden. Dies geschieht üblicherweise an der
Primärquelle.
Ein Naim-Streamer hat zum Beispiel einen Groundlift-Schalter. Stellen Sie diesen auf
die „Standard-Funktion“, wenn keine andere Quelle die Netzerde mit der Signalmasse
verbindet. Bei dieser Einstellung wird die beste Klangqualität erreicht.
6.2 Nicht wieder anschließbare Netzstecker
Wenn ein nicht wieder anschließbarer Netzstecker von einem Netzkabel abgekappt
wird (zu welchem Zweck auch immer), MUSS der Stecker so entsorgt werden, dass er
keinesfalls mehr verwendet werden kann.
Es besteht erhebliche Stromschlaggefahr, wenn der abgekappte Stecker in eine
Netzsteckdose gesteckt wird.
6.3 Hauptstromkreise und Störungen
Eine HiFi-Anlage teilt sich meist einen Netzstromkreis mit anderen Haushaltsgeräten, von
denen einige Verzerrungen verursachen können, die sich als mechanisches Brummen von
Netztransformatoren, unter anderem auch des Transformators in Ihrem NAIT50, äußern
können.
Das Brummen des Transformators wird nicht über die Lautsprecher übertragen und hat
keinen Einuss auf die Leistung des Systems; eine sorgfältige Aufstellung Ihres NaimSystems kann das Brummen jedoch reduzieren, ebenso wie ein separater, spezieller
Netzstromkreis. Ein solcher dedizierter Schaltkreis verbessert im Allgemeinen auch die
Systemleistung. Ziehen Sie zur Installation eines separaten Hauptstromkreises einen
Elektronikfachexperten hinzu.
28
Page 31

6.4 Vorkehrungen gegen Blitzschlag
Ihr Naim-System sollte bei Blitzeinschlaggefahr ausgeschaltet und vollständig vom
Stromnetz getrennt werden, um es vor möglichen Schäden zu schützen.
7. Weitere Tipps und Empfehlungen
Nachdem wir nun das Wichtigste geklärt haben, wollen wir uns nun einigen weiteren
Dingen widmen, um die Leistung Ihres neuen NAIT 50 zu optimieren.
7.1 Einlaufzeit
Naim-Produkte werden aus sorgfältig ausgewählten, hochwertigen Komponenten
handgefertigt. Ihr NAIT 50 wird gleich nach dem Auspacken hervorragend klingen,
aber seine Leistung kann noch weiter verbessert werden, wenn all diese verschiedenen
Komponenten in den ersten Wochen der Nutzung eingeschaltet werden und sich
gegenseitig beeinussen. Bei eingeschaltetem System wird dieser Prozess unterstützt.
7.2 Reinigung Ihres Produkts und der Anschlüsse
Naim empehlt, ein weiches Tuch zu verwenden, um die Oberächen des Geräts leicht
abzustauben. Reinigungsmittel können Inhaltsstoe enthalten, die sich negativ auf
kosmetische Oberächenbehandlungen und Beschichtungen auswirken können.
Halten Sie Anschlussstecker und -buchsen sauber und korrosionsfrei. Dies erreichen Sie
am einfachsten, indem Sie Ihr Naim-Produkt (und alle angeschlossenen Geräte) vollständig
ausschalten, alle Anschlüsse aus den Buchsen ziehen und sie wieder fest einstecken.
Es sollten keine Kontaktreiniger und „Enhancer" verwendet werden, da die abgelagerte
Filmschicht den Klang beeinträchtigen kann.
8. Support
Der Verbraucherschutz variiert je nach Land. In den meisten Ländern sollte der Händler,
bei dem Sie Ihr Naim-Produkt gekauft haben, Ihr Hauptansprechpartner sein, wenn Sie
Probleme mit Ihrem Gerät haben.
Ein Problem kann auf einen Fehler im System oder in der Installation hinweisen. Daher
sollten Sie unbedingt die Diagnosefähigkeiten Ihres Händlers voll ausschöpfen. Auf
naimaudio.com nden Sie für jedes Naim-Produkt eine Reihe von Begleitartikeln.
Wenn Sie weiterhin Probleme mit Ihrem Naim-Produkt haben, kontaktieren Sie uns direkt
unter: [email protected].
9. Wartung und Updates
Reparaturen oder Hardware-Updates sollten nur von einer autorisierten Naim-Servicestelle
oder in der Naim-Zentrale selbst durchgeführt werden. Viele Komponenten werden
kundenspezisch angefertigt, getestet oder aufeinander abgestimmt und geeignete
Ersatzteile sind oft nicht aus anderen Quellen zu erhalten.
Bitte wenden Sie sich bei Service- oder Reparaturanfragen an Ihren Naim-Fachhändler vor Ort.
29
Page 32

10. Technische Daten
Audio-Spezikationen
Leistung (Lautsprecher) 25Watt bei 8 @0,1% THD+N @ 230VAC
Leistung (Kopfhörer) 1,5Watt bei 16
Verstärkung Phonostufe: 40dB (@1kHz RIAA)
Eingänge 2x Stereo 5-polig DIN, 47k Line-Pegel
Übertragungsbereich Über Line: -3dB @ 4Hz bis 45kHz
Hardware-Spezikationen
Abmessungen (H x B x T) 87 × 207 × 321mm (einschließlich Füße)
Gewicht 4,5kg (nur Verstärker)
Passiver Stromverbrauch 20W (Leerlauf)
Stromverbrauch im
Standby-Modus
Netzspannung 110V - 120V, 220V - 240V 50/60Hz
Sicherung 230V = T1AL (Überspannungsschutz); 115V = T2AL (Überspan-
Gehäusefarbe „Chromstoßstangen“
Betriebstemperatur 5-35°C
Lagertemperatur 0-50°C
6,35mm Klinkenbuchse
Vorverstärkerstufe (und Kopfhörer): 16dB
Endstufe: 29dB
1x Stereo RCA 47k, 5mV MM-Pegel
Über Phono: -3dB @ 6Hz bis 30kHz
<0,5W (Auto-Standby mit Music Sensing)
nungsschutz)
Vorder- und Rückseite – schwarz eloxiertes Aluminium
Abdeckung – schwarze Pulverbeschichtung
30
Page 33
Erweiterte Spezikationen
Leistung 40Watt 4 @0,1% THD+N @ 230VAC
Burst-Leistung bei 2 (1kHz für
20mS, Wiederholung 500mS IHF)
Spitzenstrom bei 1 (1kHz 1mS) +/-15 Ampere Spitze (225W Spitzenleistung)
Maximaler Stromverbrauch 160VA volle Leistung 4 2-Kanal-Betrieb
Stromverbrauch (laut) 73VA bei 2x 1/8 der vollen Leistung 8R
THD+N bei 2/3 der vollen Leistung
8@1kHz
Eingangssignal für Clipping
(Max. Lautstärke)
Signal-Rausch-Verhältnis Ref. 1W
8 A-bewertet
Signal-Rausch-Verhältnis Ref. 25W
8 A-bewertet
Crosstalk 85dB Line 1kHz Ref. 25W 8
Dämpfungsfaktor bei 8 36
Steuerung Nur am Gerät (keine Fernbedienung), 3 Eingangstasten, Standby,
60Watt 2 @1% THD+N
0,015%
88mV Line
710uV Phono
80dB Line, 1V Eingang
78dB Phono Ref. 5mV Eingang
93dB Line, 1V Eingang
84dB Phono Ref. 5mV Eingang
80dB Phono
automatische Stummschaltung des Kopfhörers, Schalter für
automatische Standby-Abschaltung auf der Rückseite
12. Produktrecycling
Produkte mit dem durchgestrichenen Mülltonne-mit-Rädern-Logo können nicht
über den Hausmüll entsorgt werden. Diese Produkte müssen in Müllanlagen
entsorgt werden, die in der Lage sind, sie wiederzuverwerten und eventuelle
Nebenprodukte angemessen zu behandeln.
Wenden Sie sich an Ihre örtliche Behörde, um Informationen über die nächstgelegene
Müllanlagen zu erhalten.
Sachgerechtes Recycling und Abfallentsorgung helfen, Ressourcen zu schonen und die
Umwelt vor Verunreinigungen zu schützen.
31
Page 34
Inleiding
Opmerking: Alle
veiligheidswaarschuwingen
zijn te vinden in de
veiligheidshandleiding.
Welkom bij uw nieuwe geïntegreerde versterker van Naim. Net als bij alle
andere producten van Naim Audio staan ook bij de NAIT 50 muzikale prestaties
voorop. Om zijn volledige potentieel te realiseren, is het belangrijk dat u de in
deze handleiding verstrekte eenvoudige richtlijnen voor installatie en gebruik
volgt. We beginnen met enkele essentiële punten over het product en de
plaatsing daarvan en in hoofdstuk 4 geven we u meer gedetailleerde informatie.
1. Wat is er in de verpakking geleverd?
volume
headphone
phono stream aux mains
1x NAIT 50
User Guide
power
32
AMPLIFIER - NAIT 50
1x Informatieboekje 1x Veiligheidshandleiding
1x Voedingskabel 2x Luidsprekeraansluitingen
(reeds op de eenheid
geïnstalleerd)
Page 35

2. De geschiedenis van geïntegreerde versterkers
van Naim
Ons verhaal begint met één man die een passie voor muziek had en baant zich
door vijftig jaren en een hele reeks iconische productlanceringen een weg naar
vandaag.
Julian Vereker MBE (1945-2000), de oprichter van Naim Audio, was een
autocoureur, entrepreneur en een autodidactisch technicus met een diepe
passie voor muziek. Hij bracht zijn vrije tijd door luisterend naar zijn vrienden
die in de jaren 1960 live speelden en nam hun muziek enthousiast op. Maar
Julian vond dat het systeem bij hem thuis hem allesbehalve de ervaring bood
waar hij zo naar verlangde.
Ontevreden met inferieure geluidskwaliteit begon hij zijn eigen versterkers en
luidsprekers te ontwerpen, waarbij hij algemeen aanvaarde wijsheid negeerde
en zich concentreerde op aspecten van prestaties die muziek helemaal tot
leven brachten. Deze eerste ontwerpen legden de basis voor een reeks
iconische en bekroonde hi-producten die 50 jaar later nog steeds weerklank
vinden.
De Nait 50, exclusief ontworpen voor de 50e verjaardag van Naim en
geproduceerd in een beperkte editie van slechts 1973 eenheden, lijkt op het
eerste gezicht identiek aan de Nait 1. Maar bij nadere inspectie zien we dat de
voor- en achterkant zijn gemaakt van hoogwaardig geanodiseerd aluminium, de
volumeknop is machinaal vervaardigd uit massief aluminium om trillingen beter
te dempen, de balansregeling is vervangen door een hoofdtelefoonaansluiting
en de LED is nu wit.
Aan de binnenkant blijkt de Nait 50 een klasse apart. De ingangselectie
gebruikt elektrische besturing om het signaalpad aanzienlijk korter te maken en
de nieuwe hoofdtelefoonversterker is uit de NSC 222 overgenomen. De geheel
nieuwe exclusieve en discrete transistor MM Phono-trap is een eerbetoon aan
het beroemde Nait 1-geluid en werkt samen met de eindversterker die uit de
NAP 250 (2023) afkomstig is.
De Nait 50 is een geïntegreerde versterker van topklasse, maar dan in
miniatuurformaat.
Kijk voor uitgebreide
informatie op
33
Page 36
Left Right
Speakers
WARNING: Do not replace supplied loudspeaker
plugs with individual 4mm plugs
WARNING: Disconnect power
before opening
AC ONLY ∿
FUSE RATING:
ANTISURGE
INPUT POWER: 73VA
Power
S/No.
NAIT 50
DESIGNED AND MADE IN THE UK BY
NAIM AUDIO, SALISBURY, SP1 2LN
110-120 V: T2AL
220-240 V: T1AL
FREQUENCY: 50/60Hz
Aux Stream
Ground
MM Phono
L
R
Instant on
Off
On
Analogue InputsAnalogue Inputs
L
R
3. Kenmerken en aansluitingen
volume
headphone
phono stream aux mains
power
Uitgang voor hoofdtelefoon
6,35 mm jack
Volumeregeling
Specicaties helderheid van LEDs
Helder
Gedimd
Luidsprekeraansluitingen
(Links +/-; Rechts -/+)
Stream-
ingangsknop
Phono-
ingangsknop
NAIT 50 actief
NAIT 50 in stand-by
Stream-ingang
Stand-
bytoets
Aux-
ingangsknop
Stand-by/Aan
Aarding
draaitafel
LED
34
Knop voor direct aan/autom.
stand-by
Aux-ingang
Phono-ingang
Page 37
4. Instellen
PLEASE READ THE MANUAL BEFORE USE
S/No.
Bluetooth
Wi-Fi
Contains Transmitter Modules
FCC ID: 2ACURNP800, 2ACURBLUE, 2ACURZIGEE
IC ID: 12217A-NP800, 12217A-BLUE, 12217A-ZIGEE
REFER TO OWNERS MANUAL
Fit NDX 2 link plug or PSU upgrade
Power Supply Upgrade
2 1
3
Network
Aerial
Power
Analogue Outputs
DIN
L R
Default
Floating
RCA
ch.1
NDX 2
WARNING:
DISCONNECT SUPPLY CORD
BEFORE OPENING
DESIGNED AND MADE IN ENGLAND BY
NAIM AUDIO LTD.
SOUTHAMPTON ROAD, SALISBURY
E2378
ch.2
-ve
Signal Ground
USB
4
Wi-Fi
IR Out
IR Out
Digital Out
INPUT POWER: 60VA
FUSE RATING: ANTISURGE
100-120 V: T4AL.
220-240 V: T2AL.
AC ONLY
FREQUENCY: 50/60Hz
Digital Inputs
PLEASE READ THE MANUAL BEFORE USE
S/No.
Wi-Fi
Contains Transmitter Modules
FCC ID: 2ACURNP800, 2ACURBLUE, 2ACURZIGEE
IC ID: 12217A-NP800, 12217A-BLUE, 12217A-ZIGEE
REFER TO OWNERS MANUAL
Fit NDX 2 link plug or PSU upgrade
Power Supply Upgrade
2 1
3
Analogue Outputs
DIN
L R
Default
Floating
RCA
ch.1
NDX 2
WARNING:
DISCONNECT SUPPLY CORD
BEFORE OPENING
DESIGNED AND MADE IN ENGLAND BY
NAIM AUDIO LTD.
SOUTHAMPTON ROAD, SALISBURY
E2378
ch.2
-ve
Signal Ground
4
Wi-Fi
IR Out
IR Out
Digital Out
Digital Inputs
volume
headphone
phono stream aux mains
De NAIT 50 moet worden aangesloten op een bron (zoals de NDX2 of uw
draaitafel) maar voordat u dat doet, moet u er eerst voor zorgen dat beide
componenten op hun denitieve plek staan en van de netvoeding zijn
afgesloten.
Voor optimale prestaties gebruikt u een speciale hi-steun, bij voorkeur de
Naim Fraim, met de NAIT 50 zoals afgebeeld boven de bron geplaatst.
Zie hoofdstuk 5.1 voor meer informatie
Zorg dat alle apparaten zijn uitgeschakeld alvorens ze aan te sluiten.
power
Sluit de met de NDX2 meegeleverde DIN-verbindingskabels aan op de
Stream-ingang van de NAIT 50.
35
Page 38
Sluit de luidsprekerkabels aan op de NAIT 50; let er hierbij op dat elke kabel op
Left Right
Speakers
WARNING: Do not replace supplied loudspeaker
plugs with individual 4mm plugs
WARNING: Disconnect power
before opening
AC ONLY ∿
FUSE RATING:
ANTISURGE
INPUT POWER: 73VA
Power
S/No.
NAIT 50
DESIGNED AND MADE IN THE UK BY
NAIM AUDIO, SALISBURY, SP1 2LN
110-120 V: T2AL
220-240 V: T1AL
FREQUENCY: 50/60Hz
Aux Stream
Ground
MM Phono
L
R
Instant on
Off
On
Analogue InputsAnalogue Inputs
L
R
Left Right
Speakers
WARNING: Do not replace supplied loudspeaker
plugs with individual 4mm plugs
WARNING: Disconnect power
before opening
AC ONLY ∿
FUSE RATING:
ANTISURGE
INPUT POWER: 73VA
Power
S/No.
NAIT 50
DESIGNED AND MADE IN THE UK BY
NAIM AUDIO, SALISBURY, SP1 2LN
110-120 V: T2AL
220-240 V: T1AL
FREQUENCY: 50/60Hz
Aux Stream
Ground
MM Phono
L
R
Instant on
Off
On
Analogue InputsAnalogue Inputs
L
R
de juiste luidspreker wordt aangesloten en dat beide in fase zijn aangesloten.
Zie hoofdstuk 5.3 voor meer informatie.
Sluit tot slot de voedingskabel op de NAIT 50 aan.
volume
headphone
phono stream aux mains
power
Controleer dat het volume op zijn laagst staat, zet daarna de bron aan en zet
tot slot de NAIT 50 aan.
Zie hoofdstuk 5.4 voor meer informatie
36
Page 39
5. Tips voor installatie en gebruik van de NAIT 50
We weten dat u staat te popelen om van uw nieuwe NAIT 50 te genieten, maar we beloven
u dat hij nog beter zal klinken als u deze richtlijnen volgt, die allemaal zijn bedoeld om u te
helpen uw geïntegreerde versterker optimaal te gebruiken.
5.1 Uitpakken en plaatsen
Voor optimale prestaties gebruikt u de producten van Naim op een speciaal rek voor hiapparatuur, bij voorkeur de Naim Fraim of Fraim Lite, om trillingen die een eect op het
geluid kunnen hebben tot een minimum te beperken.
Geen ruimte voor een rek? Plaats de NAIT 50 dan op een Fraim glazen plank op een
geschikt meubelstuk, zodat het apparaat stevig maar discreet wordt ondersteund.
Stapel producten van Naim nooit op elkaar en als u ze naast elkaar plaatst, zorg dan dat er
wat afstand tussen de eenheden is. Evenzo mogen op elkaar aangesloten producten niet te
ver van elkaar af staan. De maximale afstand is de lengte van de verbindingskabel.
Om het risico van brom via de luidsprekers tot een minimum te beperken, moeten
voedingseenheden en versterkers niet te dicht bij de broncomponenten worden geplaatst.
5.2 Ingangen aansluiten
De NAIT 50 heeft DIN-ingangen voor line-level bronnen en RCA-aansluitingen voor
draaitafels.
niet
L
A
Aarde
aangesloten
niet
aangesloten
5.3 Luidsprekerkabels en stekkers
Voor optimale prestaties gebruikt u de Naim NAC A5-luidsprekerkabel.
Kabels van andere producten kunnen afbreuk doen aan de prestaties of de geïntegreerde
versterker zelfs beschadigen.
Naim NAC A5-kabel kan in slechts één richting worden aangesloten en wel zo,
dat de pijlen die op het isolatiepunt zijn geprint in de richting van de luidsprekers
wijzen. De verstrekte luidsprekeraansluitingen van Naim voldoen aan de Europese
veiligheidsvoorschriften en het is zaak dat u altijd deze aansluitingen gebruikt.
Het is belangrijk dat de twee luidsprekerkabels even lang zijn, maximaal 20 meter.
In tegenstelling tot bepaalde oudere producten van Naim, geven we geen aanbevelingen
wat betreft de minimale lengte van de luidsprekerkabels, maar we raden u aan kabels
korter dan 2 meter te vermijden.
Let er bij het aansluiten van de luidsprekers op dat deze ‘in fase’ zijn aangesloten.
Dit betekent dat de positieve luidsprekeruitgang van de versterker is aangesloten op
de positieve luidsprekeringang, en dat de linker- en rechteruitgangen naar de juiste
luidspreker gaan.
37
Page 40

5.4 In-/uitschakelen
Wanneer alle in- en uitgangen zijn aangesloten, sluit u de meegeleverde netvoedingskabel
aan op de NAIT 50 en een stopcontact.
Let op: de bron, zoals een streamer of cd-speler, en bijbehorende externe
voedingseenheden moeten worden ingeschakeld voordat u de NAIT 50 aanzet.
U kunt de NAIT 50 nu aanzetten door gewoon op de Standby-knop op het voorpaneel van
de geïntegreerde versterker te drukken.
5.5 Instellingen stand-by vermogen
Standaard is de NAIT 50 ingesteld op ‘Auto Stand-by’, wat betekent dat hij binnen 19
minuten van inactiviteit automatisch overschakelt naar stand-by (in deze modus verbruikt
hij minder dan 0,5 watt). Music Sensing activeert de versterker uit stand-by wanneer het
apparaat een ingangssignaal waarneemt.
Voor optimale geluidskwaliteit stelt u de knop voor stand-by op het achterpaneel in op
‘Instant on’, zodat alle gevoelige audiocircuits permanent geactiveerd zijn.
6. Netvoeding, aarding en meer
Gebruik alleen de met de NAIT 50 geleverde netvoedingskabel en stekkers, of de
opgewaardeerde Naim Power-Line-voedingskabel.
Wanneer stekkers met een zekering worden gebruikt, moeten zekeringen van 13 ampère
worden aangebracht.
Nooit spanningsafhankelijke weerstandjes of ruisonderdrukkers op de netstekker
aansluiten; deze hebben een negatieve invloed op de netvoeding en de geluidskwaliteit.
6.1 Aarding
Om brom te voorkomen, moet de signaalaarding van het hele systeem op één plaats op de
netvoedingsaarding worden aangesloten. Doorgaans is dat bij de primaire bron.
Een Naim-streamer heeft bijvoorbeeld een ground/lift-schakelaar. Stel deze in op “default”
als geen andere bron de netvoedingsaarding met de signaalaarding verbindt. Deze
instelling biedt de beste geluidskwaliteit.
6.2 Vaste netstekkers
Als een vaste netstekker van de netvoedingskabel wordt afgeknipt (om wat voor reden dan
ook), MOET deze stekker onbruikbaar worden gemaakt en worden weggeworpen.
Er ontstaat een groot risico van elektrische schok wanneer de afgeknipte stekker in een
stopcontact wordt gestoken.
6.3 Voedingscircuits en storing
Een hi-systeem deelt normaal gesproken een netvoedingscircuit met andere
huishoudelijke apparaten. Sommige daarvan kunnen vervorming veroorzaken die zich
manifesteert als mechanische brom van netvoedingstransformatoren, inclusief de
transformator in de NAIT 50.
Brom van de transformator wordt niet via de luidsprekers uitgezonden en heeft geen
eect op de prestatie van het systeem; zorgvuldige plaatsing van het Naim-systeem of het
gebruik van een apart voedingscircuit kan het brommen echter verminderen. Een dergelijk
apart circuit zorgt bovendien voor betere systeemprestaties. Vraag een gediplomeerd
elektricien om advies over het installeren van een apart voedingscircuit.
38
Page 41

6.4 Voorzorgsmaatregelen bij bliksem
Uw Naim-systeem moet worden uitgeschakeld en helemaal van de netvoeding worden
afgesloten als er een risico van blikseminslag bestaat; dit om potentiële schade te
voorkomen.
7. Verdere tips en advies
Nu u alle essentiële stappen hebt uitgevoerd, gaan we verder met een paar dingen die u
kunt doen om de prestaties van uw nieuwe NAIT 50 te optimaliseren.
7.1 Inspelen
De producten van Naim zijn met de hand gemaakt met gebruik van zorgvuldig gekozen,
hoogwaardige componenten. De NAIT 50 klinkt meteen fantastisch, maar de prestaties
kunnen verder worden verbeterd wanneer al deze verschillende componenten worden
ingeschakeld en in de eerste paar weken van gebruik samenwerken. Dit proces verloopt
beter als u uw systeem aan laat staan.
7.2 Het product en de aansluitingen schoonmaken
Naim raadt aan een zachte doek te gebruiken om de oppervlakken van het product licht af
te stoen. Reinigingsproducten bevatten mogelijk ingrediënten die een nadelige invloed
kunnen hebben op cosmetische oppervlaktebehandelingen en coatings.
Houd verbindingsstekkers en ingangen altijd schoon en roestvrij. De makkelijkste manier
om dit te bereiken, is door uw Naim-product (en aangesloten apparatuur) helemaal uit te
zetten, alle stekkers uit hun ingangen te halen en deze er weer stevig insteken. Gebruik
geen contactreinigers en zogenaamde ‘enhancers’ aangezien die resten kunnen achterlaten
die afbreuk doen aan het geluid van uw systeem.
8. Support
De bescherming van de consument varieert van land tot land. In de meeste regio’s is de
winkel waar u uw Naim-product hebt gekocht uw eerste aanspreekpunt als u problemen
hebt met uw apparaat.
Problemen kunnen het gevolg zijn van een fout in het systeem of de installatie en het is
derhalve essentieel dat u de diagnostische vaardigheden van uw leverancier optimaal
benut. Ook kunt u online een reeks artikelen voor elk Naim-product raadplegen op
naimaudio.com
Als u nog steeds problemen hebt met uw Naim-product, dan kunt u voor hulp en advies
rechtstreeks contact met ons opnemen via [email protected]
9. Onderhoud en updates
Reparaties en hardware-updates mogen uitsluitend worden uitgevoerd door een
door Naim goedgekeurd onderhoudscentrum of in het hoofdkantoor van Naim. Veel
componenten zijn op maat gemaakt, getest of op elkaar afgestemd en het is vaak niet
mogelijk om geschikte vervangingen bij andere bronnen te kopen.
Voor vragen over onderhoud en reparaties neemt u contact op met uw plaatselijke Naimleverancier.
39
Page 42

10. Specicaties
Audiospecicaties
Uitgangsvermogen (luidsprekers) 25 watt naar 8 bij 0,1% THD+N bij 230 VAC
Uitgangsvermogen
(hoofdtelefoon)
Versterking Phono-trap: 40 dB (bij 1 kHz RIAA)
Ingangen 2x Stereo 5-pins DIN, 47k line-level
Frequentierespons Via Line: -3 dB bij 4 Hz tot 45 kHz
Hardwarespecicaties
Afmetingen (h x b x d) 87 × 207 × 321 mm (inclusief poten)
Gewicht 4,5 kg (alleen versterker)
Passief verbruik 20 W (inactief)
Stand-by verbruik <0,5 W (autom. stand-by met muziekdetectie)
Netvoeding 110 V - 120 V, 220 V - 240 V 50/60 Hz
Zekering 230 V = T1AL (anti-piek); 115 V = T2AL (anti-piek)
Afwerking ‘Chroom bumper’
Bedrijfstemperatuur 5-35°C
Opslagtemperatuur 0-50°C
1,5 W naar 16
6,35 mm jack
Trap voorversterker (en hoofdtelefoon): 16 dB
Trap eindversterker: 29 dB
1x Stereo RCA 47k, 5 mV MM level
Via Phono: -3 dB bij 6 Hz tot 30 kHz
Voor- en achterkant – zwart aluminium geanodiseerd
Behuizing – zwart, met poeder gecoat
40
Page 43

Uitgebreide specicaties
Geleverd vermogen 40 watt naar 4 bij 0,1% THD+N bij 230 VAC
Burst-vermogen naar 2
(1 kHz gedurende 20 mS, herhaal
500 mS IHF)
Piekstroom naar 1 (1 kHz 1 mS) +/-15 amp. piek (225 W piekvermogen)
Max. stroomverbruik 160 VA volledig vermogen 4 2-kanaals aangedreven
Stroomverbruik (luid) 73 VA bij 2x 1/8 van volledig vermogen 8R
THD+N op 2/3 van volledig vermogen 8 bij 1 kHz
Ingangsignaal voor clipping
(op max. volume)
Signaal-ruisverhouding Ref 1 W 8
A-gewogen
Signaal-ruisverhouding Ref 25 W 8
A-gewogen
Crosstalk 85 dB Line 1 kHz ref 25 W 8
Dempingsfactor naar 8 36
Bediening Alleen op product (niet de afstandsbediening), 3 ingangsknop-
60 watt 2 bij 1% THD+N
0,015%
88 mV Line
710 uV Phono
80 dB Line, 1 V ingang
78 dB Phono ref 5 mV ingang
93 dB Line, 1 V ingang
84 dB Phono ref 5 mV ingang
80 dB Phono
pen, stand-by, autom. demping hoofdtelefoon, bypass-schakelaar autom. stand-by aan de achterkant
12. Product recyclen
Producten waarop het logo van een kliko met een kruis erdoorheen staat
afgebeeld, kunnen niet worden weggeworpen
als huishoudelijk afval. Deze producten moeten worden ingeleverd op locaties
waar ze kunnen worden gerecycled en waar eventuele bijkomstige afvalproducten correct
kunnen worden verwerkt.
Neem contact op met uw lokale afvalverwerkingsbedrijf voor meer informatie over een
dergelijke locatie bij u in de buurt.
Door afval op geschikte wijze te recyclen en weg te werpen, helpt u natuurlijke bronnen te
behouden en milieuvervuiling te voorkomen.
41
Page 44
Introducción
Nota: Todas las advertencias
de seguridad se encuentran
en el manual de seguridad.
Le presentamos su nuevo amplicador integrado de Naim. Como todos los
productos de Naim Audio, el NAIT50 pone el sonido por encima de todo.
Para alcanzar todo su potencial, es importante seguir las sencillas pautas
de instalación y uso recogidas en este manual. Comenzaremos con algunos
aspectos básicos del producto y su conguración, para proporcionarle después
información más detallada en el apartado 4.
1. Contenido de la caja
volume
headphone
phono stream aux mains
1 NAIT 50
User Guide
power
42
42
AMPLIFIER - NAIT 50
1 folleto de información 1 manual de seguridad
1 cable de alimentación 2 conectores para el altavoz
(preinstalados en la unidad)
Page 45

2. La tradición de los amplicadores integrados
de Naim
Nuestra historia comienza con la pasión por la música de un hombre y
se desarrolla a lo largo de cinco décadas y una serie de lanzamientos de
productos emblemáticos hasta nuestros días.
Julian Vereker MBE (1945-2000), el fundador de Naim, fue piloto de carreras,
empresario e ingeniero autodidacta con una profunda pasión por la música. Al
pasar su tiempo libre escuchando y grabando los conciertos de sus amigos en
la década de 1960, Julian descubrió que la reproducción de su sistema en casa
no era la experiencia que esperaba.
No contento con ser el segundo mejor, decidió diseñar sus propios
amplicadores y altavoces. Para ello, dejó atrás las viejas costumbres y se
centró en los aspectos de rendimiento que hacían que la música cobrara vida.
Estos primeros diseños sentaron las bases de una gama de productos de alta
delidad icónicos y galardonados que siguen haciendo eco 50 años después.
El Nait 50, diseñado exclusivamente para el 50.º aniversario de Naim y limitado
a solo 1973 unidades, parece idéntico al Nait 1 a simple vista. Sin embargo,
tras una inspección más detallada, la parte frontal y trasera son de aluminio
anodizado de alta calidad, el botón del volumen está mecanizado directamente
sobre aluminio sólido para amortiguar las vibraciones, el control de balance se
ha sustituido por una toma de auriculares y el LED se ha cambiado a blanco.
En su interior, estos cambios hacen que el Nait 50 sea realmente único. La
selección de entrada utiliza el mando con tecnología y-by-wire («pilotaje por
cable») para reducir de manera signicativa la longitud de la ruta de señal.
Además, el nuevo amplicador de auriculares se ha tomado del NSC 222. El
nuevo y exclusivo preamplicador de fono de transistor MM discreto, junto al
amplicador de potencia que se ha extraído del NAP 250 (2023), hace honor al
famoso sonido del Nait 1.
En denitiva, el Nait 50 es un auténtico amplicador integrado audiólo, solo
que en miniatura.
Para más información,
visite
43
43
Page 46
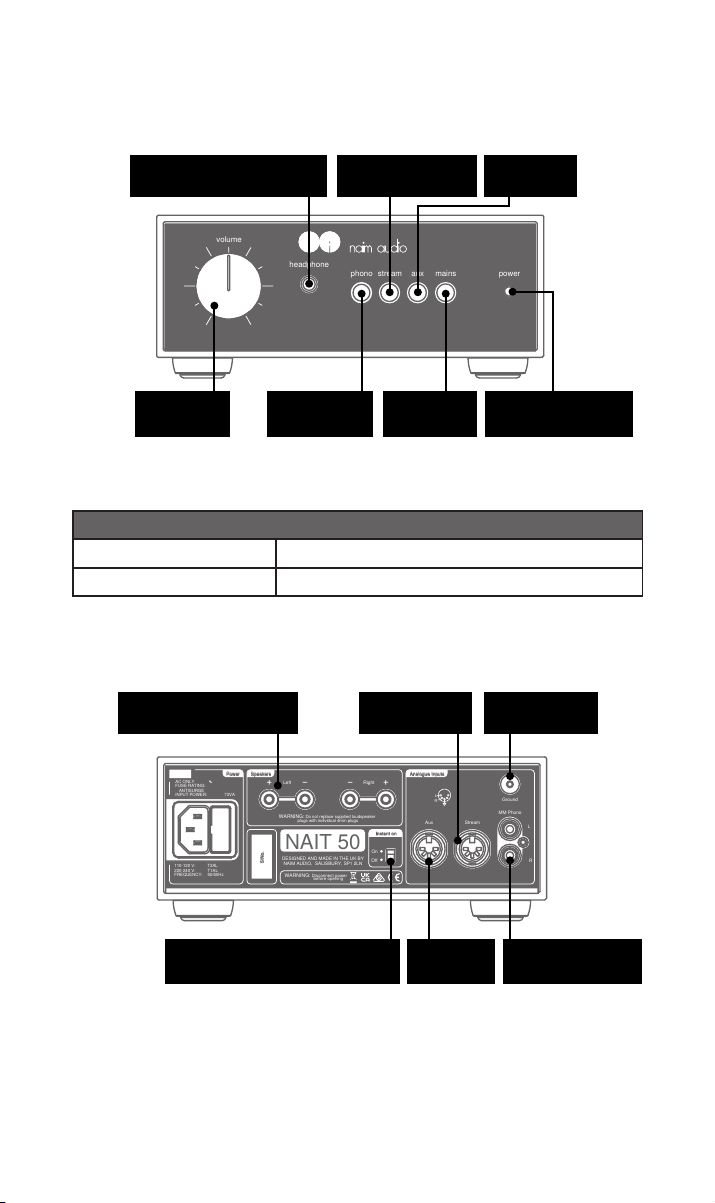
Left Right
Speakers
WARNING: Do not replace supplied loudspeaker
plugs with individual 4mm plugs
WARNING: Disconnect power
before opening
AC ONLY ∿
FUSE RATING:
ANTISURGE
INPUT POWER: 73VA
Power
S/No.
NAIT 50
DESIGNED AND MADE IN THE UK BY
NAIM AUDIO, SALISBURY, SP1 2LN
110-120 V: T2AL
220-240 V: T1AL
FREQUENCY: 50/60Hz
Aux Stream
Ground
MM Phono
L
R
Instant on
Off
On
Analogue InputsAnalogue Inputs
L
R
3. Características y conexiones
volume
headphone
phono stream aux mains
power
Salida para auriculares
con toma de 6,35mm (1/4")
Control de
volumen
Especicaciones del brillo LED
Brillante
Ten ue
Tomas de los altavoces
(Left +/-; Right -/+)
Botón de entrada
para la transmisión
Botón de
entrada del
fono
NAIT 50 activo
NAIT 50 en espera
Entrada para la
Botón de
espera
transmisión
Botón de
entrada AUX
LED
En espera/encendido
Toma de tierra
del tocadiscos
44
Interruptor Instant On/Auto
Standby
Entrada
AUX
Entrada del fono
Page 47
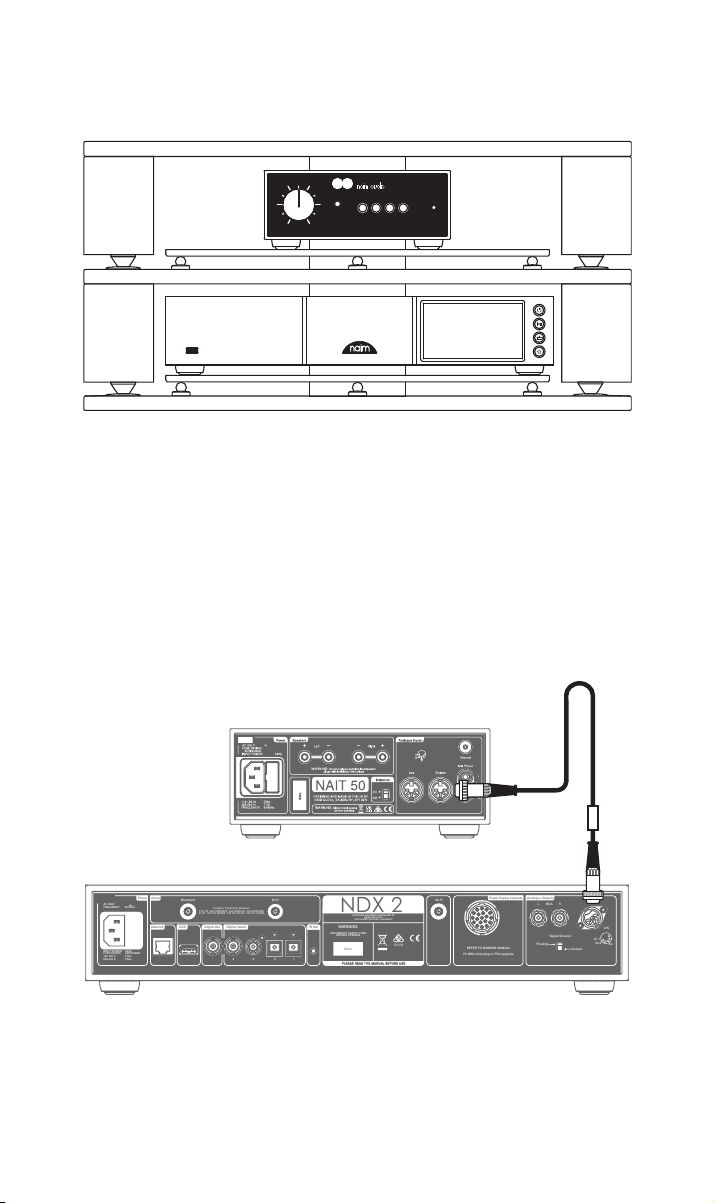
4. Conguración
PLEASE READ THE MANUAL BEFORE USE
S/No.
Bluetooth
Wi-Fi
Contains Transmitter Modules
FCC ID: 2ACURNP800, 2ACURBLUE, 2ACURZIGEE
IC ID: 12217A-NP800, 12217A-BLUE, 12217A-ZIGEE
REFER TO OWNERS MANUAL
Fit NDX 2 link plug or PSU upgrade
Power Supply Upgrade
2 1
3
Network
Aerial
Power
Analogue Outputs
DIN
L R
Default
Floating
RCA
ch.1
NDX 2
WARNING:
DISCONNECT SUPPLY CORD
BEFORE OPENING
DESIGNED AND MADE IN ENGLAND BY
NAIM AUDIO LTD.
SOUTHAMPTON ROAD, SALISBURY
E2378
ch.2
-ve
Signal Ground
USB
4
Wi-Fi
IR Out
IR Out
Digital Out
INPUT POWER: 60VA
FUSE RATING: ANTISURGE
100-120 V: T4AL.
220-240 V: T2AL.
AC ONLY
FREQUENCY: 50/60Hz
Digital Inputs
PLEASE READ THE MANUAL BEFORE USE
S/No.
Wi-Fi
Contains Transmitter Modules
FCC ID: 2ACURNP800, 2ACURBLUE, 2ACURZIGEE
IC ID: 12217A-NP800, 12217A-BLUE, 12217A-ZIGEE
REFER TO OWNERS MANUAL
Fit NDX 2 link plug or PSU upgrade
Power Supply Upgrade
2 1
3
Analogue Outputs
DIN
L R
Default
Floating
RCA
ch.1
NDX 2
WARNING:
DISCONNECT SUPPLY CORD
BEFORE OPENING
DESIGNED AND MADE IN ENGLAND BY
NAIM AUDIO LTD.
SOUTHAMPTON ROAD, SALISBURY
E2378
ch.2
-ve
Signal Ground
4
Wi-Fi
IR Out
IR Out
Digital Out
Digital Inputs
volume
headphone
phono stream aux mains
El NAIT 50 debe conectarse a una fuente (como el NDX2 o su tocadiscos), pero
antes de hacerlo, asegúrese de que ambos componentes están en su posición
denitiva y desconectados de la red eléctrica.
Para un rendimiento óptimo, utilice un soporte de alta delidad especíco
(idealmente el Naim Fraim), con el NAIT 50 situado encima de la fuente como
se muestra en la imagen.
Para más información, consulte el apartado 5.1.
Asegúrese de que todo el equipo esté apagado antes de conectarlo.
power
Conecte el cable de interconexión DIN suministrado con el NDX2 a la entrada
para la transmisión del NAIT 50.
45
Page 48
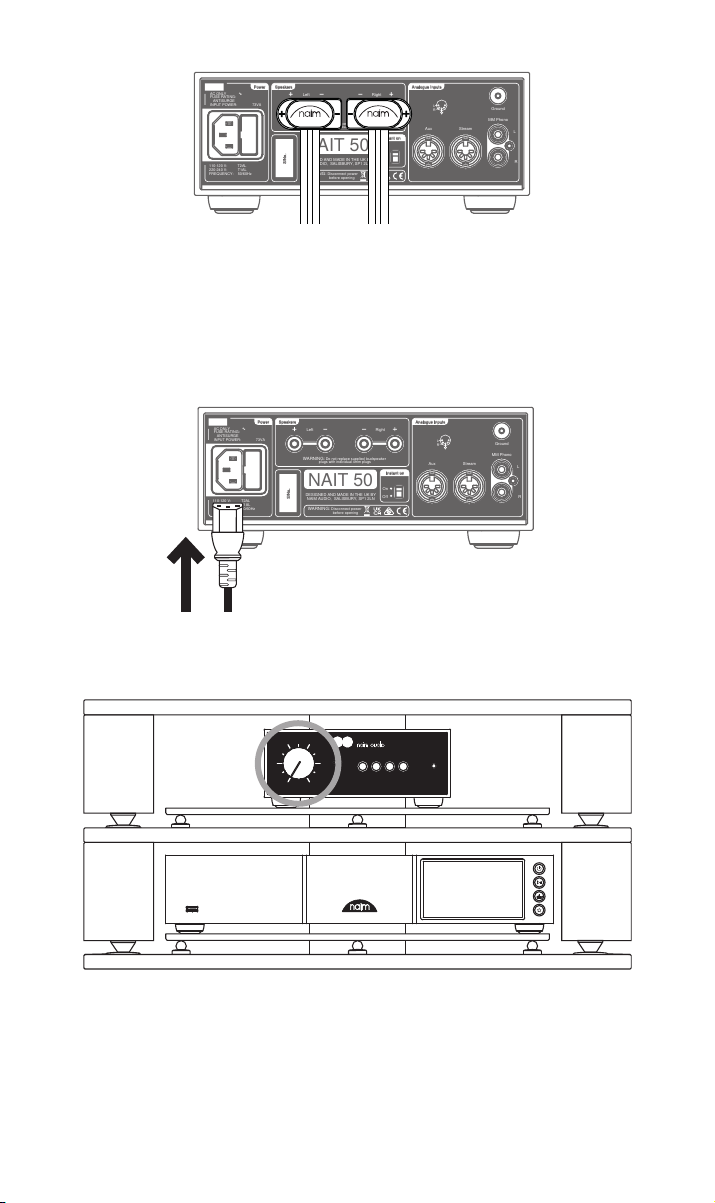
Conecte los cables del altavoz al NAIT 50 y asegúrese de que cada uno esté
Left Right
Speakers
WARNING: Do not replace supplied loudspeaker
plugs with individual 4mm plugs
WARNING: Disconnect power
before opening
AC ONLY ∿
FUSE RATING:
ANTISURGE
INPUT POWER: 73VA
Power
S/No.
NAIT 50
DESIGNED AND MADE IN THE UK BY
NAIM AUDIO, SALISBURY, SP1 2LN
110-120 V: T2AL
220-240 V: T1AL
FREQUENCY: 50/60Hz
Aux Stream
Ground
MM Phono
L
R
Instant on
Off
On
Analogue InputsAnalogue Inputs
L
R
Left Right
Speakers
WARNING: Do not replace supplied loudspeaker
plugs with individual 4mm plugs
WARNING: Disconnect power
before opening
AC ONLY ∿
FUSE RATING:
ANTISURGE
INPUT POWER: 73VA
Power
S/No.
NAIT 50
DESIGNED AND MADE IN THE UK BY
NAIM AUDIO, SALISBURY, SP1 2LN
110-120 V: T2AL
220-240 V: T1AL
FREQUENCY: 50/60Hz
Aux Stream
Ground
MM Phono
L
R
Instant on
Off
On
Analogue InputsAnalogue Inputs
L
R
conectado al correcto y de que ambos estén en fase.
Para más información, consulte el apartado 5.3.
Por último, conecte el cable de alimentación al NAIT 50.
volume
headphone
phono stream aux mains
power
Compruebe que el volumen está al mínimo, encienda la fuente y, por último, el
NAIT 50.
Para más información, consulte el apartado 5.4.
46
Page 49
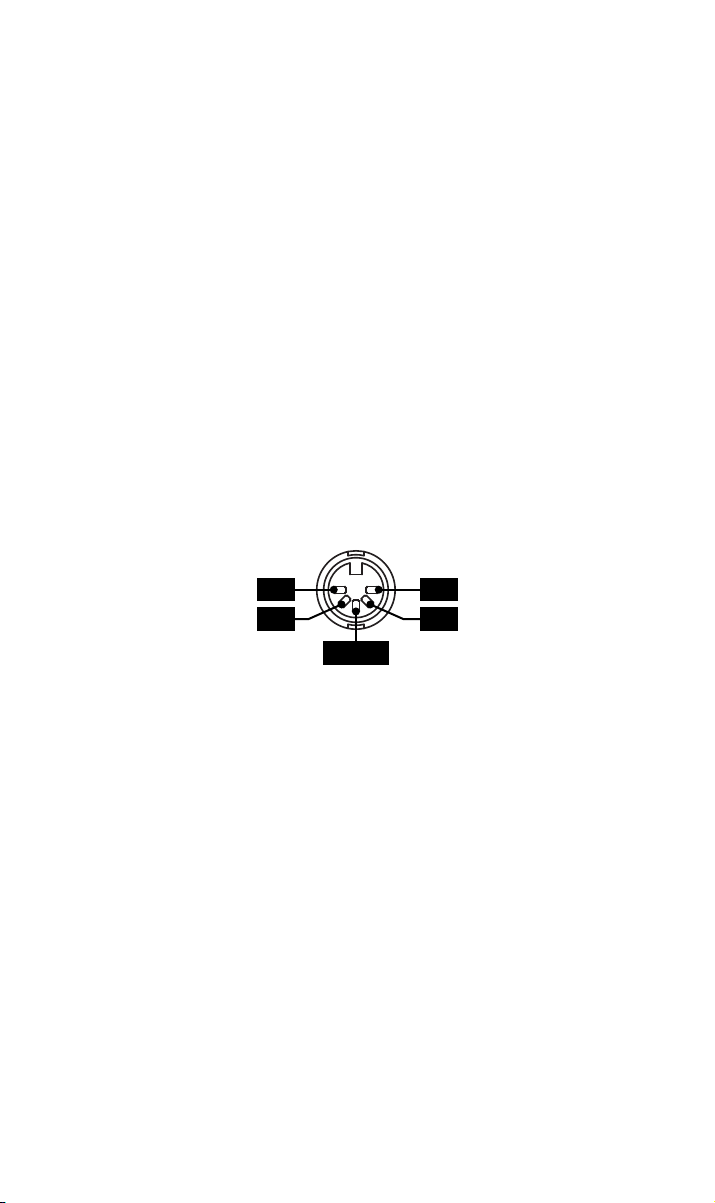
5. Consejos de instalación y uso del NAIT 50
Sabemos que está deseando disfrutar de su nuevo NAP 50, pero le aseguramos que sonará
aún mejor si sigue estas pautas, que se han diseñado para que utilice su amplicador
integrado sin riesgos.
5.1 Desembalaje y colocación
Para obtener un rendimiento óptimo, utilice los productos Naim en un bastidor para
equipos de alta delidad especíco (el ideal sería Naim Fraim o Fraim Lite) para minimizar
las vibraciones que pueden afectar al sonido.
¿No tiene espacio para un bastidor? Considere la posibilidad de colocar su NAIT 50 sobre
un estante de vidrio Fraim en un mueble adecuado para proporcionarle un soporte sólido
y discreto.
No apile nunca los productos Naim uno encima del otro, y si los coloca al lado, deje
cierta distancia entre ellos. Asimismo, los equipos conectados no deben estar demasiado
separados: la distancia máxima de separación es la que permite el cable de interconexión
suministrado.
Para reducir el riesgo de zumbido audible desde los altavoces, no coloque las fuentes de
alimentación y los amplicadores de potencia cerca de los componentes de fuente.
5.2 Información de la conexión de entrada
El NAIT 50 cuenta con entradas DIN para fuentes a nivel de línea y conectores RCA para
tocadiscos.
L nc
ncR
Tierra
5.3 Cable y conectores del altavoz
Para un rendimiento óptimo, utilice el cable de altavoz Naim NAC A5.
El uso de cables de otros fabricantes puede perjudicar el rendimiento o incluso dañar el
amplicador integrado.
El cable Naim NAC A5 es direccional y debe conectarse de forma que las echas impresas
en el aislamiento apunten hacia los altavoces. Los conectores de los altavoces Naim
suministrados cumplen la normativa europea de seguridad y, por tanto, son los que deben
utilizarse.
Es importante que los cables de los altavoces tengan la misma longitud, hasta un máximo
recomendado de 20m.
A diferencia de algunos diseños anteriores de Naim, no exigimos una longitud mínima del
cable del altavoz, pero le sugerimos que evite longitudes inferiores a 2m.
Cuando conecte los altavoces, asegúrese de que estén "en fase", es decir, que la salida
positiva del altavoz esté conectada a la entrada positiva del altavoz, y que las salidas
izquierda y derecha vayan al altavoz correcto.
47
Page 50

5.4 Encendido y apagado
Cuando haya preparado todas las conexiones de entrada y salida, conecte el cable de
alimentación suministrado al NAIT 50 y a la red eléctrica.
Tenga en cuenta que su fuente, como una unidad de transmisión o un reproductor de CD,
y cualquier fuente de alimentación externa asociada deben estar encendidas antes de
encender su NAIT 50.
Una vez hecho esto, puede encender el NAIT 50 con tan solo pulsar el botón «Standby» del
panel frontal del amplicador integrado.
5.5 Conguración de la energía de reserva
Por defecto, el NAIT 50 está congurado en «Auto Standby», es decir, entra
automáticamente en el modo Standby (en el que consume menos de 0,5W de potencia)
tras 19minutos de inactividad. El sensor de música activará el amplicador del modo
Standby cuando detecte una señal de entrada.
Para obtener una calidad de sonido óptima, cambie el ajuste del modo Standby del
panel trasero a "Instant on", que mantiene todos los circuitos de audio sensibles
permanentemente encendidos.
6. Alimentación de red, toma de tierra y más
Utilice solo los cables de alimentación y los enchufes de red suministrados con el NAIT 50
o el cable de alimentación Naim Power-Line.
Si se emplean fusibles, deben instalarse de 13A.
No conecte resistencias eléctricas que dependan de la tensión ni supresores de ruido en
los enchufes de red, ya que degradan el suministro eléctrico y el sonido.
6.1 Toma de tierra
Para evitar zumbidos, la señal de tierra de todo el sistema debe conectarse a la puesta a
tierra de red solo en un lugar. Lo normal es que esto se haga en la fuente principal.
Por ejemplo, una unidad de transmisión Naim cuenta con un interruptor Ground Lift.
Ajústelo a «Default» si no hay otra fuente que conecte la puesta a tierra de la red a la
puesta a tierra de la señal. Este ajuste proporcionará la mejor calidad de sonido.
6.2 Enchufes de red no desmontables
Si se corta un enchufe no desmontable de un cable de alimentación (por el motivo que
sea), el enchufe DEBERÁ desecharse de forma que quede totalmente inservible.
Existe un riesgo de descarga eléctrica considerable si se inserta el enchufe cortado en la
toma de red.
6.3 Circuitos e interferencias de red
Los sistemas de alta delidad suelen compartir la red de alimentación con otros
electrodomésticos. Algunos de ellos pueden provocar distorsiones que se maniestan
como un zumbido mecánico de los transformadores de alimentación, como el
transformador del NAIT50.
El zumbido del transformador no se transmite por los altavoces y no tiene ningún efecto en
el rendimiento del sistema, pero puede reducirlo si coloca de forma adecuada su sistema
Naim con un circuito de alimentación especíco independiente. Un circuito especíco
de este tipo también suele mejorar el rendimiento del sistema. Para la instalación de un
circuito de alimentación independiente, solicite consejo a un electricista cualicado.
48
Page 51

6.4 Precauciones contra los rayos
Cuando exista riesgo de tormenta eléctrica, su sistema Naim deberá estar apagado y
totalmente desconectado de la red de suministro para protegerlo de posibles daños.
7. Más consejos y sugerencias
Ahora que ya tiene todo lo esencial resuelto, pasaremos a otras aspectos que puede tener
en cuenta para optimizar el rendimiento de su nuevo NAIT50.
7.1 Funcionamiento
Los productos Naim se fabrican a mano con una cuidadosa selección de componentes de
alta calidad. Su NAIT50 tendrá un sonido magníco nada más sacarlo de la caja, pero su
rendimiento puede mejorar aún más a medida que todos estos componentes se activen e
interactúen durante las primeras semanas de uso. Mantener el sistema encendido ayudará
en este proceso.
7.2 Limpieza del producto y conexiones
Naim recomienda usar un paño suave para retirar el polvo de las supercies del equipo.
Los productos de limpieza contienen ingredientes que pueden afectar negativamente a los
tratamientos y acabados de la supercie.
Mantenga las clavijas y las conexiones limpias y libres de corrosión. La forma más sencilla
de hacerlo es apagar completamente su equipo Naim (y cualquier otro equipo conectado),
desenchufar todas las conexiones de sus tomas y volver a introducirlas rmemente. No se
deben utilizar limpiadores de contactos ni otros productos «mejoradores», ya que pueden
dejar restos que podrían deteriorar el sonido de su sistema.
8. Asistencia
La protección del consumidor varía de un país a otro. En la mayoría de países, el
distribuidor donde adquirió su producto Naim será su contacto principal en caso de
problemas con la unidad.
Los problemas pueden deberse a fallos del sistema o de la instalación, por lo que es
esencial emplear al máximo las capacidades de diagnóstico de su proveedor. Puede
encontrar en línea varios artículos de ayuda para cada producto Naim en naimaudio.com
Si sigue teniendo problemas con su producto Naim, póngase en contacto con nosotros
directamente para obtener ayuda y asesoramiento en [email protected]
9. Servicio y actualizaciones
Las reparaciones y las actualizaciones de hardware solo pueden llevarse a cabo en centros
de servicio autorizados Naim o en la propia sede central de Naim. Muchos componentes
se fabrican, se prueban y se adaptan a medida, y a menudo no es posible conseguir de
otras fuentes las piezas de repuesto adecuadas.
Para cualquier solicitud de servicio o reparación, póngase en contacto con su distribuidor
local Naim.
49
Page 52

10. Especicaciones
Especicaciones técnicas de sonido
Potencia de salida (altavoces) 25vatios a 8 @0,1% THD+N @ 230VCA
Potencia de salida (auriculares) 1,5W a 16
Ganancia Preamplicador de fono: 40dB (@1kHz RIAA)
Inputs 2 DIN estéreo de 5 pines, a nivel de línea de 47 k
Respuesta de frecuencia A través de la línea: -3dB @ 4Hz a 45kHz
Especicaciones técnicas del hardware
Dimensiones (Altura x Ancho x
Profundidad)
Peso 4,5kg (solo el amplicador)
Consumo pasivo 20 W (en reposo)
Consumo en reserva <0,5W (modo de espera automático con detección de música)
Suministro de red: 110V - 120V, 220V - 240V 50/60Hz
Fusible 230V = T1AL (contra sobretensiones); 115V = T2AL (contra
Acabado « parachoques cromado »
Temperatura de funcionamiento 5-35°C
Temperatura de almacenamiento 0-50°C
Toma de 6,35mm (1/4")
Etapa de preamplicación (y auriculares): 16 dB
Etapa de amplicador de potencia: 29 dB
1 RCA estéreo 47k, nivel MM 5mV
A través del fono: -3dB @ 6Hz a 30kHz
87 × 207 × 321 mm (incluyendo las patas)
sobretensiones)
Parte delantera y trasera: aluminio anodizado negro
Cubierta: recubrimiento en polvo negro
50
Page 53
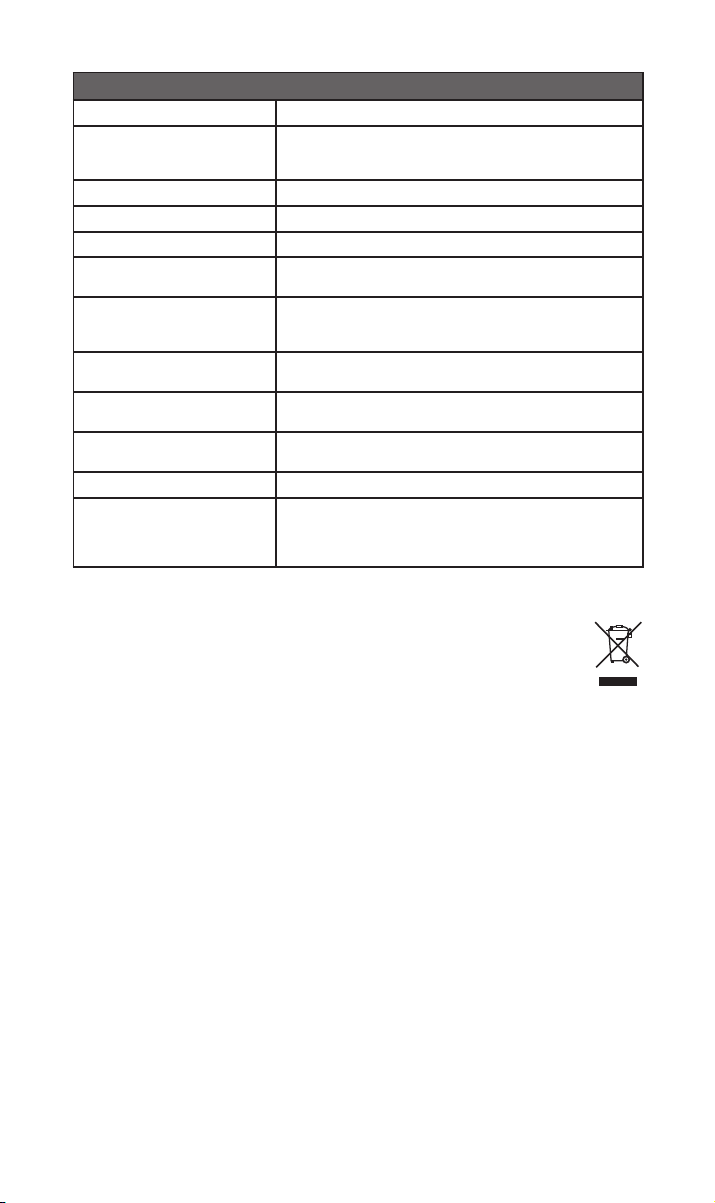
Más especicaciones técnicas
Salida de potencia 40vatios a 4 @0,1% THD+N @ 230VCA
Potencia de arranque en 2
(1kHz durante 20mS, repetición
500mS IHF)
Valor de pico en 1 (1kHz 1mS) +/-15 amperios de pico (225W de valor de pico)
Consumo máximo 160VA a plena potencia 4, 2 canales accionados
Consumo (alto) 73VA a 2x 1/8 de la potencia máxima 8R
THD+N a 2/3 de la potencia
máxima 8@1kHz
Señal de entrada para la
saturación
(volumen al máximo)
Radio de señal de ruido de 1W 8
ponderada en A
Radio de señal de ruido de 25W
8 ponderada en A
Diafonía 85 dB de la línea 1kHz en 25W 8
Factor de amortiguación en 8 36
Control Solo en el producto (sin mando a distancia), 3 botones
60 vatios 2 @1% THD+N
0,015%
88mV en línea
710uV en el fono
Entrada 80dB de la línea, 1V
Entrada 78dB del fono de 5mV
Entrada 93dB de la línea, 1V
Entrada 84dB del fono de 5mV
80 dB en el fono
de entrada, modo de espera, auriculares con silenciador
automático, interruptor de desactivación automática del modo
de espera en la parte trasera
12. Reciclaje del producto
Los productos con el logotipo del contenedor tachado no pueden eliminarse
como
residuos domésticos. Estos productos deben eliminarse en centros capacitados
para reciclar y tratar adecuadamente los residuos.
Póngase en contacto con su autoridad local para informarse sobre el centro más cercano.
Eliminar y reciclar los residuos adecuadamente contribuye a preservar los recursos y a
prevenir la contaminación medioambiental.
51
Page 54
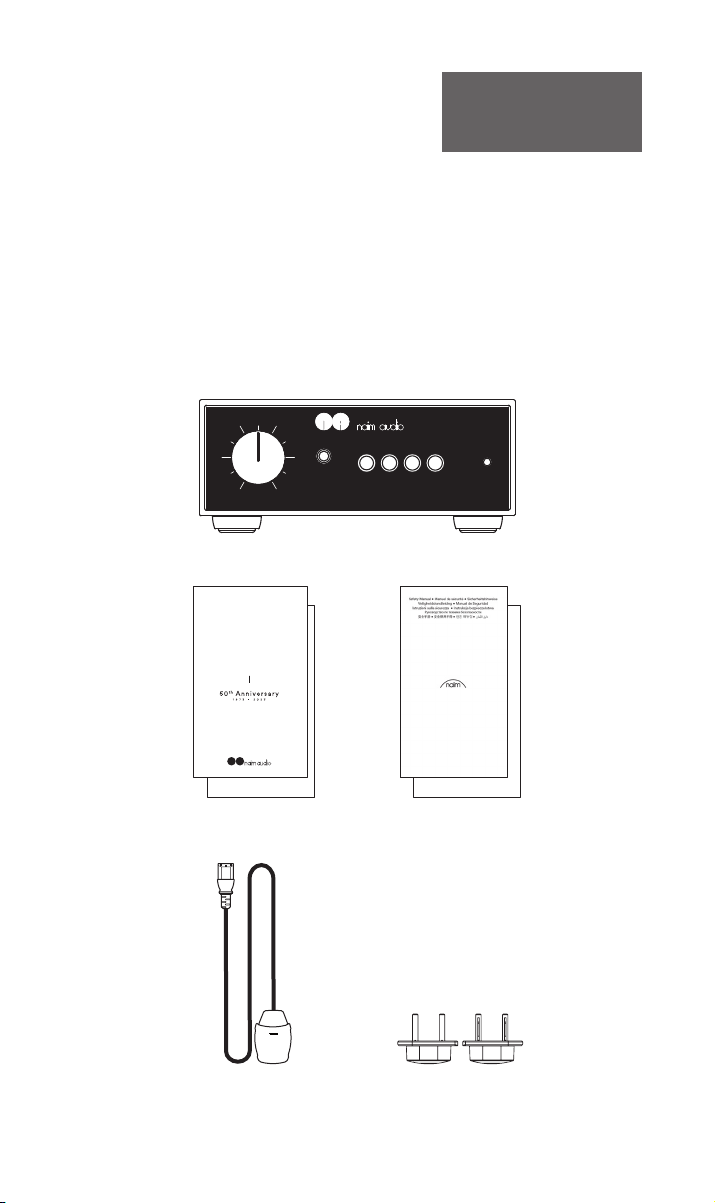
Introduzione
Nota: per una versione
completa degli avvertimenti
di sicurezza, consultare il
manuale di sicurezza.
Ti presentiamo il tuo nuovo amplicatore integrato Naim. Come tutti i prodotti
Naim Audio, il NAIT 50 mette le performance musicali in primo piano. Per
aiutare a comprendere il suo pieno potenziale, è importante attenersi alle
linee guida per un’installazione e un utilizzo semplici coperte nel presente
manuale. Iniziamo con alcuni aspetti indispensabili relativi al prodotto e alla
congurazione prima di passare a informazioni più dettagliate nella Sezione 4.
1. Contenuto della confezione
volume
headphone
phono stream aux mains
1x NAIT 50
User Guide
power
52
AMPLIFIER - NAIT 50
1x Libretto informativo 1x Manuale di sicurezza
1x Cavo di alimentazione 2x Connettori degli altoparlanti
(pre-installato sull’unità)
Page 55

2. La storia degli amplicatori integrati Naim
La nostra storia ha inizio dalla passione di un uomo per la musica e si dipana
per cinque decenni e una serie impressionante di prodotti iconici, no ad
arrivare ai giorni nostri.
Il fondatore di Naim Audio, Julian Vereker MBE (1945-2000), era un pilota di
auto da corsa, un imprenditore e un ingegnere autodidatta con una grande
passione per la musica. Negli anni ‘60, era solito passare il suo tempo libero
ascoltando e registrando gli spettacoli dal vivo dei suoi amici. Ma Julian scoprì
che la riproduzione di musica del suo stereo non era all’altezza dell’esperienza
che tanto desiderava.
Insoddisfatto, decise di non accontentarsi e iniziò così a progettare i
propri amplicatori e diusori, ignorando le nozioni accettate all’epoca e
concentrandosi sugli aspetti della performance che secondo lui rendevano la
musica davvero viva. Questi primissimi progetti costituirono la base di tutta
una serie di prodotti hi- premiati e riconosciuti come standard del settore
tutt’oggi, a 50 anni di distanza.
Il Nait 50 è stato ideato appositamente per celebrare il cinquantesimo
anniversario di Naim, con una tiratura limitata di sole 1973 unità. A un primo
sguardo, potrebbe sembrare identico al Nait 1. Tuttavia, se lo si osserva più
attentamente, si vedrà che i lati anteriore e posteriore sono in alluminio
anodizzato di alta qualità, la manopola in alluminio è lavorata dal pieno per un
maggiore smorzamento delle vibrazioni, i comandi di bilanciamento sono stati
sostituiti da una presa per cue e il LED adesso è bianco.
Le modiche interne fanno del Nait 50 un dispositivo davvero a sé stante.
La selezione dell’ingresso utilizza un comando y-by-wire per ridurre
notevolmente la lunghezza del percorso del segnale, mentre il nuovo
amplicatore per cue è stato prelevato dall’NSC 222. Il nuovissimo ed
esclusivo stadio phono MM a transistor discreti rende omaggio al celebre
suono del Nait 1 e lavora in sinergia con l’amplicatore di potenza prelevato dal
NAP 250 del 2023.
Il Nait 50 è un amplicatore integrato per veri appassionati, in miniatura.
Tutte le informazioni sono
riportare sul sito
53
Page 56
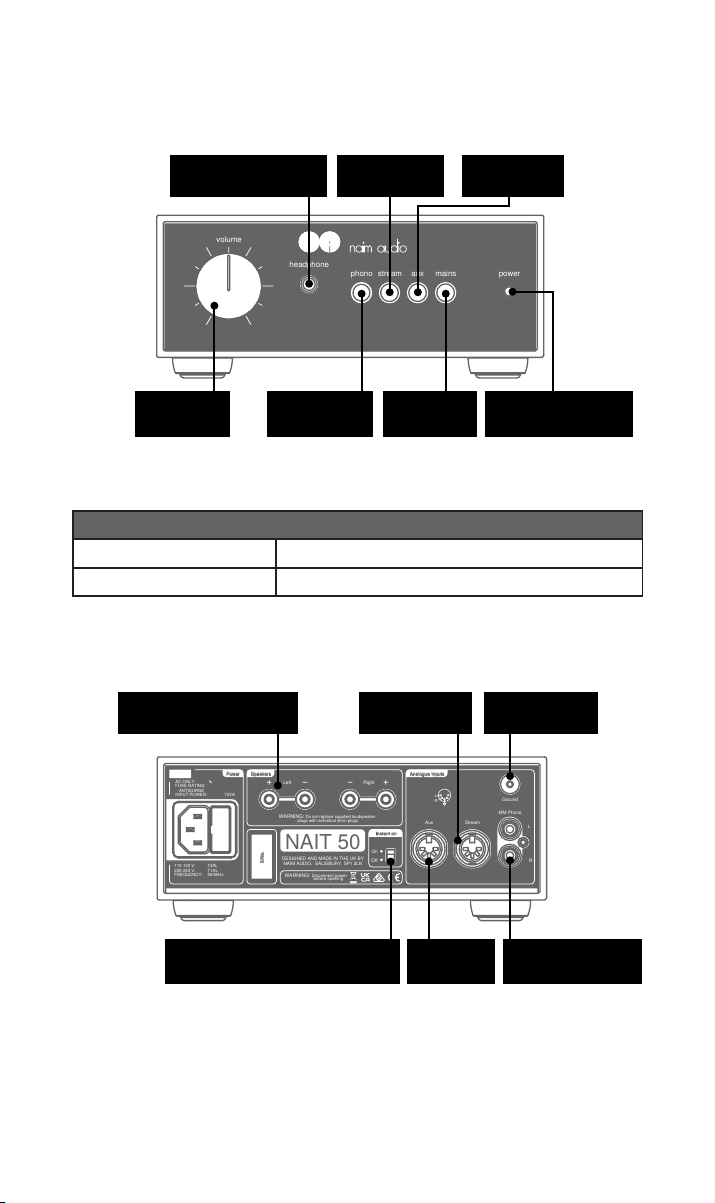
Left Right
Speakers
WARNING: Do not replace supplied loudspeaker
plugs with individual 4mm plugs
WARNING: Disconnect power
before opening
AC ONLY ∿
FUSE RATING:
ANTISURGE
INPUT POWER: 73VA
Power
S/No.
NAIT 50
DESIGNED AND MADE IN THE UK BY
NAIM AUDIO, SALISBURY, SP1 2LN
110-120 V: T2AL
220-240 V: T1AL
FREQUENCY: 50/60Hz
Aux Stream
Ground
MM Phono
L
R
Instant on
Off
On
Analogue InputsAnalogue Inputs
L
R
3. Caratteristiche e collegamenti
volume
headphone
phono stream aux mains
power
Uscita cuffie
Jack da 6,35 mm
Controllo del
volume
Speciche di luminosità del LED
Luminoso
Luce attenuata
Prese diffusori
(Destra +/-; Sinistra -/+)
Tasto ingresso
Tasto ingresso
phono
NAIT 50 attivo
NAIT 50 in standby
Tasto ingresso
stream
Pulsante di
standby
aux
LED
Standby/Accensione
Ingresso stream Terra giradischi
54
Interruttore di accensione
istantanea/standby automatico
Ingresso
aux
Ingresso phono
Page 57
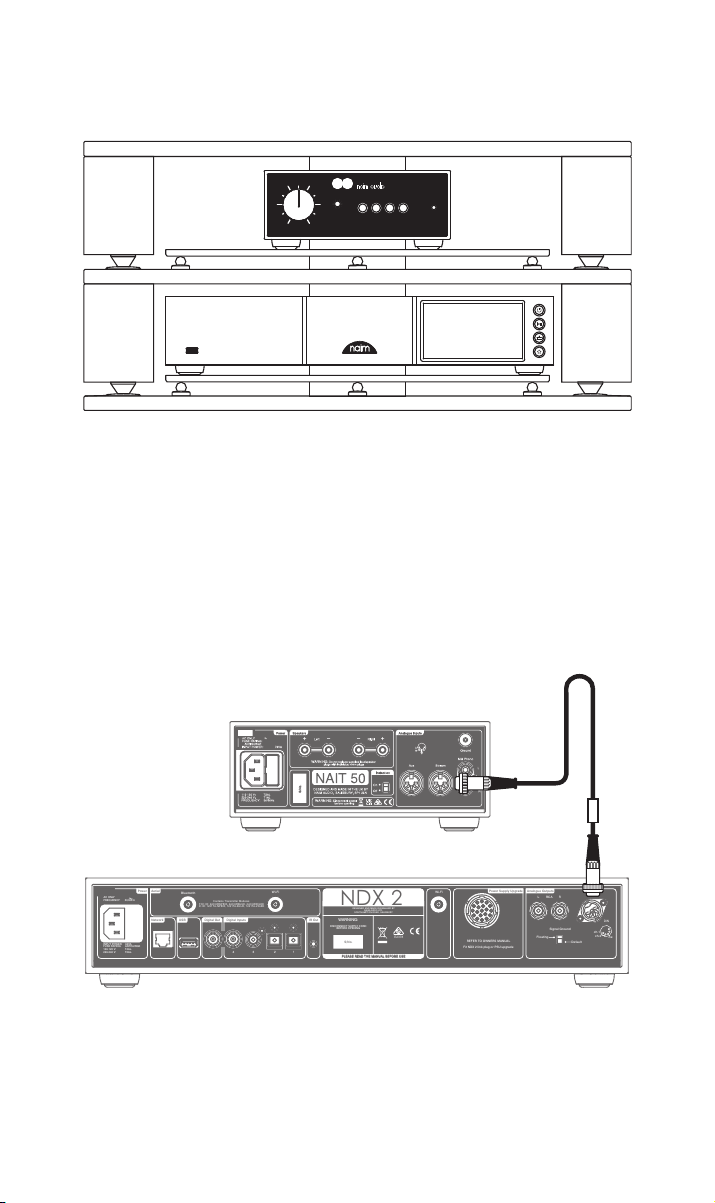
4. Preparazione
PLEASE READ THE MANUAL BEFORE USE
S/No.
Bluetooth
Wi-Fi
Contains Transmitter Modules
FCC ID: 2ACURNP800, 2ACURBLUE, 2ACURZIGEE
IC ID: 12217A-NP800, 12217A-BLUE, 12217A-ZIGEE
REFER TO OWNERS MANUAL
Fit NDX 2 link plug or PSU upgrade
Power Supply Upgrade
2 1
3
Network
Aerial
Power
Analogue Outputs
DIN
L R
Default
Floating
RCA
ch.1
NDX 2
WARNING:
DISCONNECT SUPPLY CORD
BEFORE OPENING
DESIGNED AND MADE IN ENGLAND BY
NAIM AUDIO LTD.
SOUTHAMPTON ROAD, SALISBURY
E2378
ch.2
-ve
Signal Ground
USB
4
Wi-Fi
IR Out
IR Out
Digital Out
INPUT POWER: 60VA
FUSE RATING: ANTISURGE
100-120 V: T4AL.
220-240 V: T2AL.
AC ONLY
FREQUENCY: 50/60Hz
Digital Inputs
PLEASE READ THE MANUAL BEFORE USE
S/No.
Wi-Fi
Contains Transmitter Modules
FCC ID: 2ACURNP800, 2ACURBLUE, 2ACURZIGEE
IC ID: 12217A-NP800, 12217A-BLUE, 12217A-ZIGEE
REFER TO OWNERS MANUAL
Fit NDX 2 link plug or PSU upgrade
Power Supply Upgrade
2 1
3
Analogue Outputs
DIN
L R
Default
Floating
RCA
ch.1
NDX 2
WARNING:
DISCONNECT SUPPLY CORD
BEFORE OPENING
DESIGNED AND MADE IN ENGLAND BY
NAIM AUDIO LTD.
SOUTHAMPTON ROAD, SALISBURY
E2378
ch.2
-ve
Signal Ground
4
Wi-Fi
IR Out
IR Out
Digital Out
Digital Inputs
volume
headphone
phono stream aux mains
Il NAIT 50 deve essere collegato a una sorgente (ad es. NDX2 o giradischi);
tuttavia, prima di procedere, si prega di accertarsi che entrambi i componenti
siano nelle rispettive posizioni nali e scollegati dalla rete elettrica.
Per delle prestazioni ottimali, servirsi di un supporto hi- dedicato, in misura
ideale Naim Fraim, con il NAIT 50 ubicato sopra la sorgente, come mostrato.
Per ulteriori informazioni, consultare la Sezione 5.1.
Assicurarsi che tutte le apparecchiature siano spente prima di realizzare i
collegamenti.
power
Collegare il cavo di interconnessione DIN in dotazione con l'NDX2 all'ingresso
stream del NAIT 50.
55
Page 58
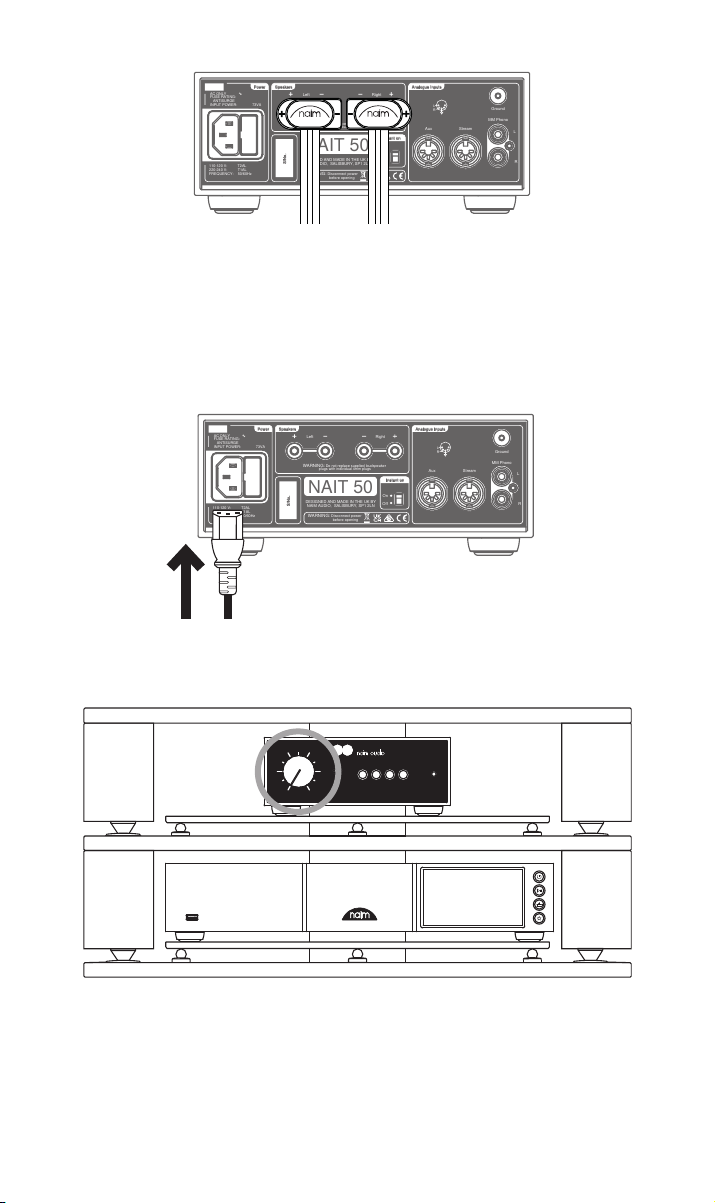
Collegare i cavi degli altoparlanti al NAIT 50, accertandosi che ciascun cavo sia
Left Right
Speakers
WARNING: Do not replace supplied loudspeaker
plugs with individual 4mm plugs
WARNING: Disconnect power
before opening
AC ONLY ∿
FUSE RATING:
ANTISURGE
INPUT POWER: 73VA
Power
S/No.
NAIT 50
DESIGNED AND MADE IN THE UK BY
NAIM AUDIO, SALISBURY, SP1 2LN
110-120 V: T2AL
220-240 V: T1AL
FREQUENCY: 50/60Hz
Aux Stream
Ground
MM Phono
L
R
Instant on
Off
On
Analogue InputsAnalogue Inputs
L
R
Left Right
Speakers
WARNING: Do not replace supplied loudspeaker
plugs with individual 4mm plugs
WARNING: Disconnect power
before opening
AC ONLY ∿
FUSE RATING:
ANTISURGE
INPUT POWER: 73VA
Power
S/No.
NAIT 50
DESIGNED AND MADE IN THE UK BY
NAIM AUDIO, SALISBURY, SP1 2LN
110-120 V: T2AL
220-240 V: T1AL
FREQUENCY: 50/60Hz
Aux Stream
Ground
MM Phono
L
R
Instant on
Off
On
Analogue InputsAnalogue Inputs
L
R
collegato all’altoparlante corretto ed entrambi siano in fase.
Per ulteriori informazioni, consultare la Sezione 5.3.
Inne, collegare il cavo dell'alimentazione al NAIT 50.
volume
headphone
phono stream aux mains
power
Controllare che il volume sia al minimo, quindi accendere la sorgente e, inne,
accendere il NAIT 50.
Per ulteriori informazioni, consultare la Sezione 5.4.
56
Page 59
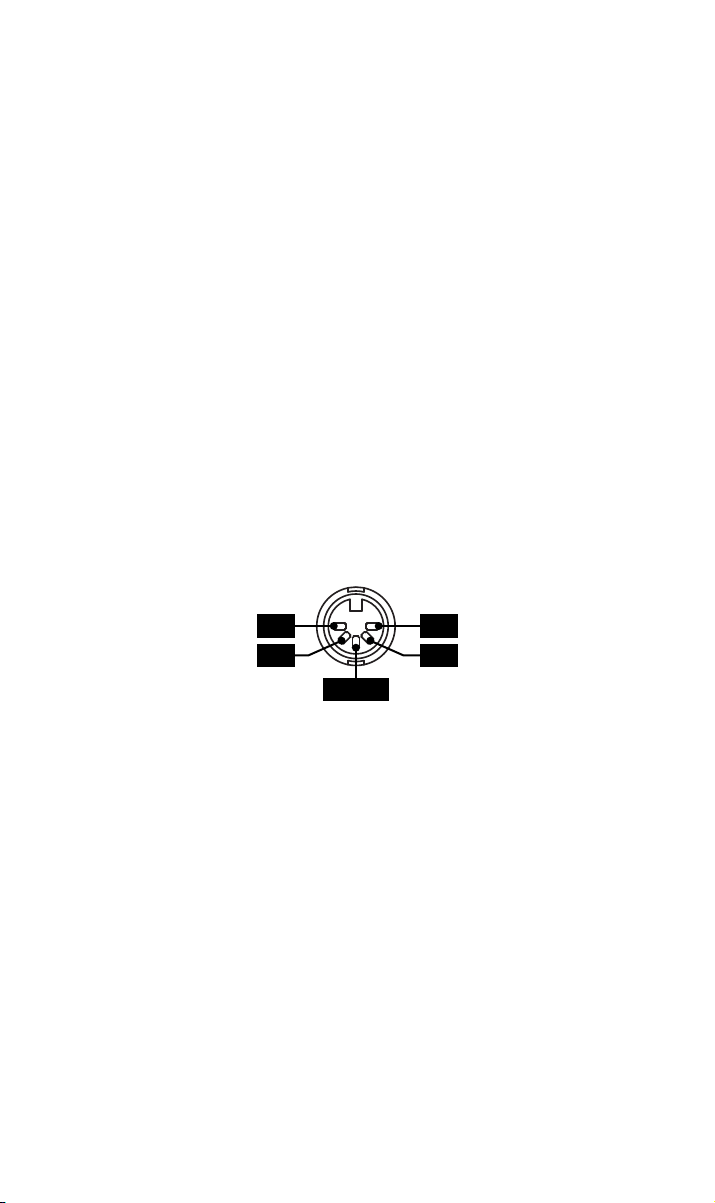
5. Suggerimenti sull’installazione e sull’utilizzo
del NAIT 50
Sappiamo che desideri ardentemente trarre vantaggio da tutti i beneci del tuo nuovo
NAIT 50, ma ti promettiamo che l’audio sarà persino migliore dopo aver seguito queste
linee guida, tutte studiate per aiutarti a provare l’esperienza del tuo amplicatore integrato
senza compromessi.
5.1 Disimballaggio e collocazione
Per delle prestazioni ottimali, utilizzare i propri prodotti Naim su uno scaale dedicato per
apparecchiature hi-, idealmente Naim Fraim o Fraim Lite, al ne di ridurre al minimo le
vibrazioni che possono inuire sull’audio.
Non c’è spazio per lo scaale? Invitiamo gli utenti a considerare di posizionare il NAIT 50
su un ripiano di vetro Fraim, su un mobile idoneo, al ne di garantire un sostegno solido ma
discreto.
Non impilare mai i prodotti Naim uno sopra l’altro; inoltre, se sono collocati a anco, si
prega di lasciare uno spazio tra le unità. In egual misura, i prodotti collegati non devono
essere posizionati a una distanza eccessiva: la distanza di separazione massima è quella
consentita dal cavo di collegamento in dotazione.
Per ridurre il rischio di ronzio dagli altoparlanti, si prega di non posizionare gli alimentatori
o gli amplicatori di potenza in prossimità di componenti sorgente.
5.2 Dettagli del collegamento d’ingresso
Il NAIT 50 ha ingressi DIN per sorgenti di livello di linea e connettori RCA per giradischi.
L nc
ncR
Terra
5.3 Connettori e cavi degli altoparlanti
Per ottenere prestazioni ottimali, utilizzare cavi per altoparlanti Naim NAC A5.
Utilizzare cavi di altri fabbricanti potrebbe pregiudicare le prestazioni o addirittura
danneggiare l'amplicatore integrato.
Il cavo Naim NAC A5 è direzionale e deve essere collegato di modo che le frecce stampate
sul materiale isolante puntino in direzione dei diusori. I connettori per diusori Naim di
serie sono conformi alle norme di sicurezza europee e devono essere utilizzati.
È importante che i cavi in coppia dei diusori siano della stessa lunghezza, no al massimo
consigliato di 20m.
Diversamente dai design Naim precedenti, non prestabiliamo una lunghezza minima per il
cavo dell’altoparlante, tuttavia suggeriamo di evitare lunghezze inferiori a 2m.
Quando si collegano gli altoparlanti, assicurarsi che siano “in fase”, in altre parole, l’uscita
positiva dell’amplicatore è collegata all’ingresso positivo dell’altoparlante, e che le uscite
a sinistra e a destra siano dirette verso l’altoparlante corretto.
57
Page 60

5.4 Accensione/Spegnimento
Una volta realizzati tutti i collegamenti in ingresso e uscita, collegare il cavo di rete di serie
al NAIT 50 e alla rete elettrica.
Nota bene: la sorgente, come ad esempio un dispositivo di streaming o lettore CD, ed
eventuali alimentatori esterni associati devono essere accesi prima di accendere il proprio
NAIT 50.
Ora è possibile accendere il NAIT 50 semplicemente premendo il tasto Standby sul
pannello anteriore dell’amplicatore integrato.
5.5 Impostazione energetica standby
Per impostazione predenita, il NAIT 50 è congurato su “standby automatico”; infatti,
passa automaticamente alla modalità di standby (laddove consuma meno di 0,5W di
potenza) entro 19 minuti di inattività. Il rilevamento della musica riattiverà l’amplicatore
dalla modalità di standby quando individua un segnale in ingresso.
Per la migliore qualità del suono, attivare l’impostazione di standby sul pannello posteriore
selezionando “Instant on” (accensione istantanea), che tiene tutti i circuiti audio sensibili
permanentemente attivi.
6. Rete elettrica, messa a terra e altre informazioni
Usare solo i cavi di alimentazione e i connettori di serie con il NAIT 50, oppure il cavo di
alimentazione Naim Power-Line aggiornato.
Laddove siano utilizzati dei fusibili, si raccomanda di utilizzare fusibili con un valore di
13Amp.
Non cablare resistenze dipendenti di tensione o soppressori di rumore ai connettori di rete,
in quanto diminuiscono il valore nominale della corrente elettrica e del suono.
6.1 Messa a terra
Per evitare il rumore di alternata, la massa del segnale dell'intero impianto deve essere
collegata alla messa a terra in un solo punto. Generalmente, questa è la sorgente primaria.
Ad esempio, un dispositivo di streaming Naim ha un interruttore Ground Lift. Impostare
quest’ultimo su “Default” se nessun'altra sorgente collega la terra alla massa del segnale.
Questa impostazione consente di fornire la migliore qualità del suono.
6.2 Connettori di rete termoformati
Se il connettore di rete termoformato viene tagliato dal cavo di alimentazione (per qualsiasi
motivo), il connettore DEVE essere smaltito in modo da renderlo totalmente inservibile.
Se un connettore tagliato viene inserito in una presa elettrica, il rischio di incorrere in
scariche elettriche è considerevole.
6.3 Circuiteria elettrica e interferenza
Solitamente, un impianto hi- condivide un circuito di rete elettrica con altri
elettrodomestici, alcuni dei quali possono causare una distorsione che può manifestarsi
sotto forma di un ronzio meccanico dai trasformatori di corrente, compreso il
trasformatore nel NAIT 50.
Il ronzio di un trasformatore non viene trasmesso attraverso gli altoparlanti e non ha
alcun eetto sulle prestazioni dell’impianto; tuttavia, una collocazione attenta del proprio
impianto Naim potrebbe ridurlo, così come potrebbe una circuiteria elettrica dedicata
a parte. Tale circuito dedicato migliorerà inoltre le prestazioni generali del sistema. Per
ottenere opportuni suggerimenti sull'installazione di un circuito di corrente separato, si
consiglia di consultare un elettricista qualicato.
58
Page 61

6.4 Precauzioni contro i fulmini
Il proprio impianto Naim deve essere spento e completamente scollegato dalla rete
elettrica, qualora sussista il rischio di fulmini, al ne di proteggerlo da potenziali danni.
7. Ulteriori suggerimenti e consigli
Ora che si hanno a disposizione tutti gli elementi essenziali, passiamo ad alcuni altri aspetti
che si potrebbero considerare al ne di ottimizzare le prestazioni del nuovo NAIT 50.
7.1 Rodaggio
I prodotti Naim sono realizzati a mano in seguito a un’attenta selezione di componenti di
alta qualità. Appena uscito dalla sua scatola, il NAIT 50 presenterà un suono accattivante,
ma le sue prestazioni possono migliorare sensibilmente dal momento che tutti questi
diversi componenti si attivano e interagiscono nelle loro prime settimane di utilizzo.
Mantenendo il sistema acceso è possibile agevolare questo processo.
7.2 Pulizia del prodotto e dei collegamenti
Naim consiglia di utilizzare esclusivamente un panno morbido per spolverare
delicatamente le superci del prodotto. Eventuali prodotti per la pulizia utilizzati
potrebbero contenere ingredienti dannosi per i rivestimenti e i trattamenti cosmetici delle
superci.
Le spine e le prese di collegamento devono essere sempre tenute pulite e senza tracce
di corrosione. Il modo più semplice per ottenere questo risultato è spegnere il proprio
prodotto Naim (ed eventuali apparecchiature collegate), scollegare tutti i collegamenti
dalle rispettive prese e premerli di nuovo fermamente. Detergenti per contatti o cosiddetti
“enhancer” non devono essere utilizzati, dal momento che possono lasciare dei residui che
inuiscono negativamente sul suono del proprio impianto.
8. Assistenza
La legge sulla tutela dei consumatori varia di stato in stato. Nella maggior parte dei
territori, il rivenditore presso cui è stato acquistato il prodotto Naim deve essere il primo
punto di contatto qualora si abbiano problemi con la propria unità.
Un problema può essere causato da un guasto dell’impianto o dalla sua installazione. È
quindi essenziale fare pieno adamento sull'esperienza e le conoscenze tecniche del
rivenditore. È possibile trovare una serie di articoli di supporto per ciascun prodotto Naim
online su naimaudio.com
Qualora si continuino ad avere problemi con il proprio prodotto Naim, si prega di
contattarci direttamente per richiedere una consulenza o aiuto, scrivendo all’indirizzo
[email protected]
9. Assistenza e aggiornamenti
Eventuali interventi di riparazione o aggiornamenti dell’hardware devono essere eseguiti
esclusivamente da un centro di assistenza autorizzato Naim oppure presso la sede
principale di Naim. Molti componenti sono personalizzati e collaudati e molto spesso non è
possibile ottenere ricambi adeguati da altre fonti.
Rivolgersi al proprio rivenditore locale Naim con eventuali richieste di assistenza o
riparazione.
59
Page 62
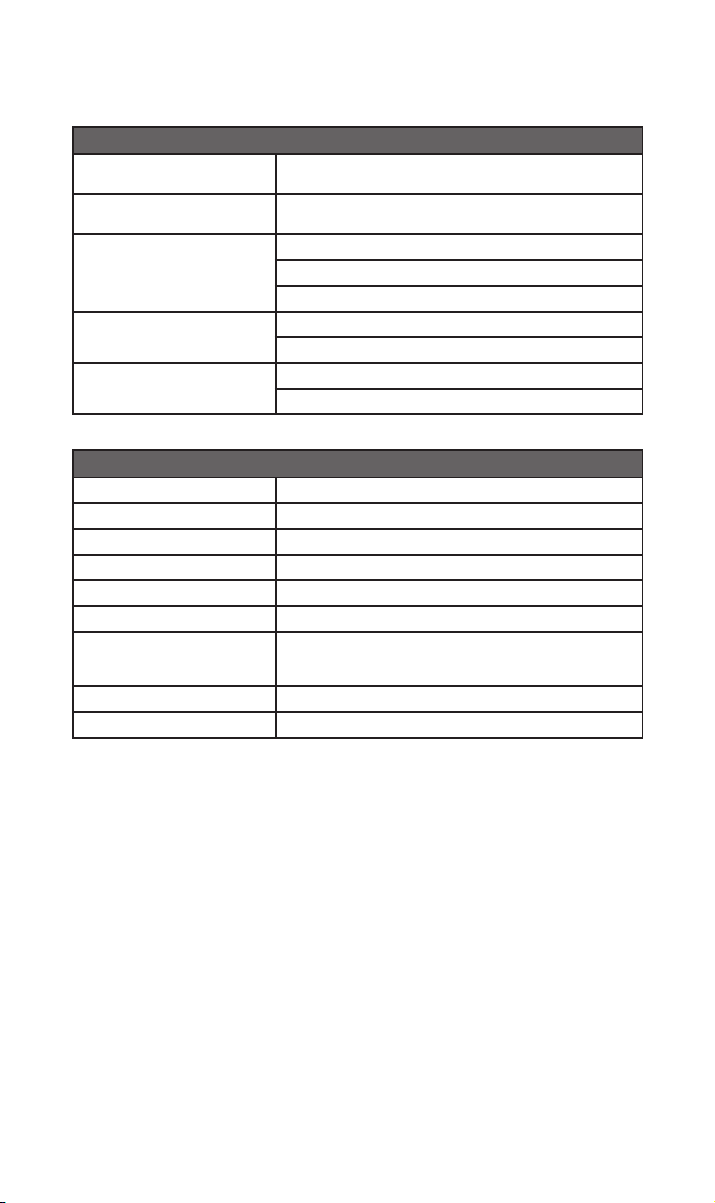
10. Speciche
Speciche audio
Uscita di alimentazione
(altoparlanti)
Uscita di alimentazione (cue) 1,5 W su 16
Guadagno Stadio phono: 40 dB (a 1 kHz RIAA)
Ingressi 2x stereo a 5 pin DIN, 47k linea
Risposta in frequenza Via linea: -3 dB a 4 Hz-45 kHz
Speciche hardware
Dimensioni (A x L x P) 87 × 207 × 321 mm (inclusi i piedini)
Peso 4,5 kg (solo amplicatore)
Consumo passivo 20 W (al minimo)
Consumo in standby < 0,5 W (standby automatico con rilevamento musica)
Alimentazione elettrica 110 V - 120 V, 220 V - 240 V 50/60 Hz
Fusibile 230 V = T1AL (ritardato); 115 V = T2AL (ritardato)
Finitura "Chrome bumper"
Temperatura di funzionamento 5-35 °C
Temperatura di conservazione 0-50 °C
25 W su 8 a 0,1% THD+N a 230 V CA
Jack da 6,35 mm
Stadio pre-amp (e cue): 16 dB
Stadio power-amp: 29 dB
1x stereo RCA 47k, 5 mV MM
Via phono: -3 dB a 6 Hz-30 kHz
Anteriore e posteriore - alluminio nero anodizzato
Coperchio - rivestimento in polvere nera
60
Page 63
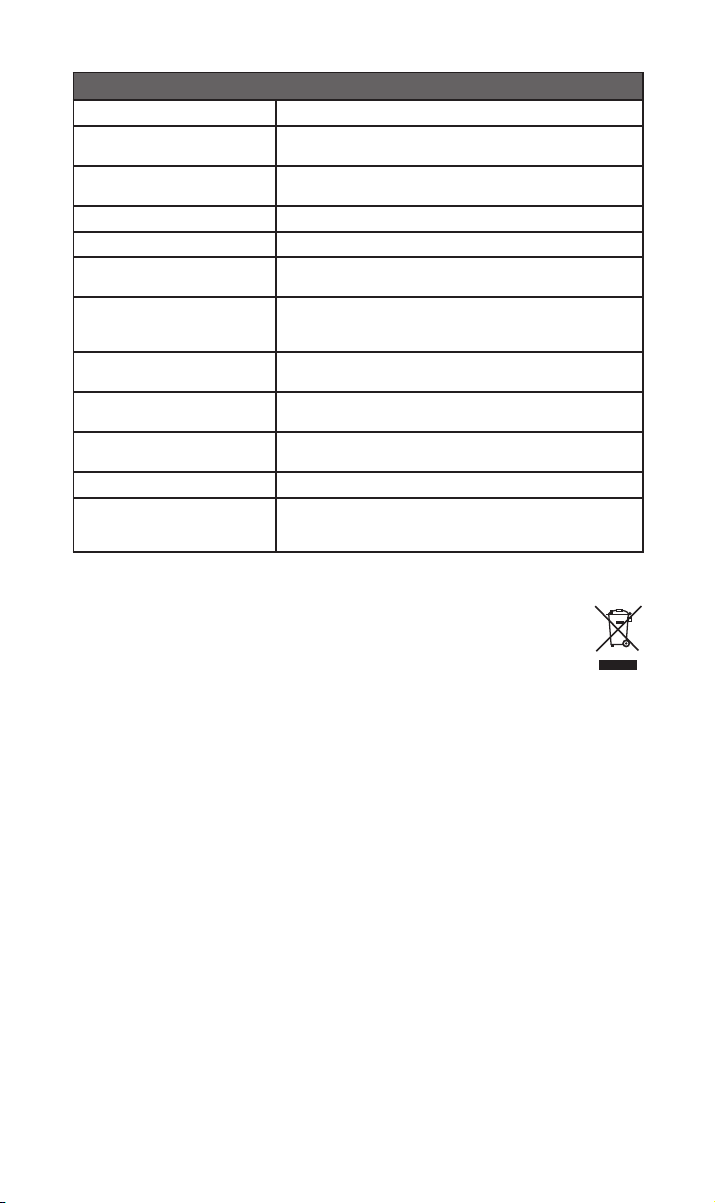
Speciche ulteriori
Uscita di alimentazione 40 W 4 a 0,1% THD+N a 230 V CA
Potenza di burst su 2 (1 kHz per
20 mS, ripetizione 500 mS IHF)
Corrente di picco su 1
(1 kHz 1 mS)
Consumo energetico max. 160 VA 4 2 canali
Consumo energetico (alto volume) 73 VA a 2x 1/8 potenza piena 8R
THD+N a 2/3 potenza piena 8
a 1 kHz
Segnale di ingresso per screstatura
(volume al max.)
Rapporto segnale-rumore - 1 W
8 ponderato A
Rapporto segnale-rumore - 25 W
8 ponderato A
Diafonia 85 dB linea 1 kHz - 25 W 8
Fattore di smorzamento su 8 36
Controllo Solamente sul prodotto (non è dotato di telecomando), 3 tasti
60 W 2 a 1% THD+N
+/-15 amp (potenza di picco 225 W)
0,015%
88 mV linea
710 uV phono
80 dB linea, ingresso 1 V
78 dB phono, ingresso 5 mV
93 dB linea, ingresso 1 V
84 dB phono, ingresso 5 mV
80 dB phono
d'input, standby, controllo audio cue automatico, interruttore
annullamento standby automatico sul retro
12. Riciclaggio del prodotto
I prodotti che riportano il simbolo del bidone crociato non possono essere
smaltiti come riuti domestici. Tali prodotti devono essere smaltiti presso gli
opportuni centri di riciclaggio e opportunamente trattati.
Per maggiori informazioni sul centro di smaltimento più vicino contattare le autorità locali.
Uno smaltimento e riciclaggio appropriati aiutano la conservazione e prevengono eventuali
contaminazioni delle risorse ambientali.
61
Page 64
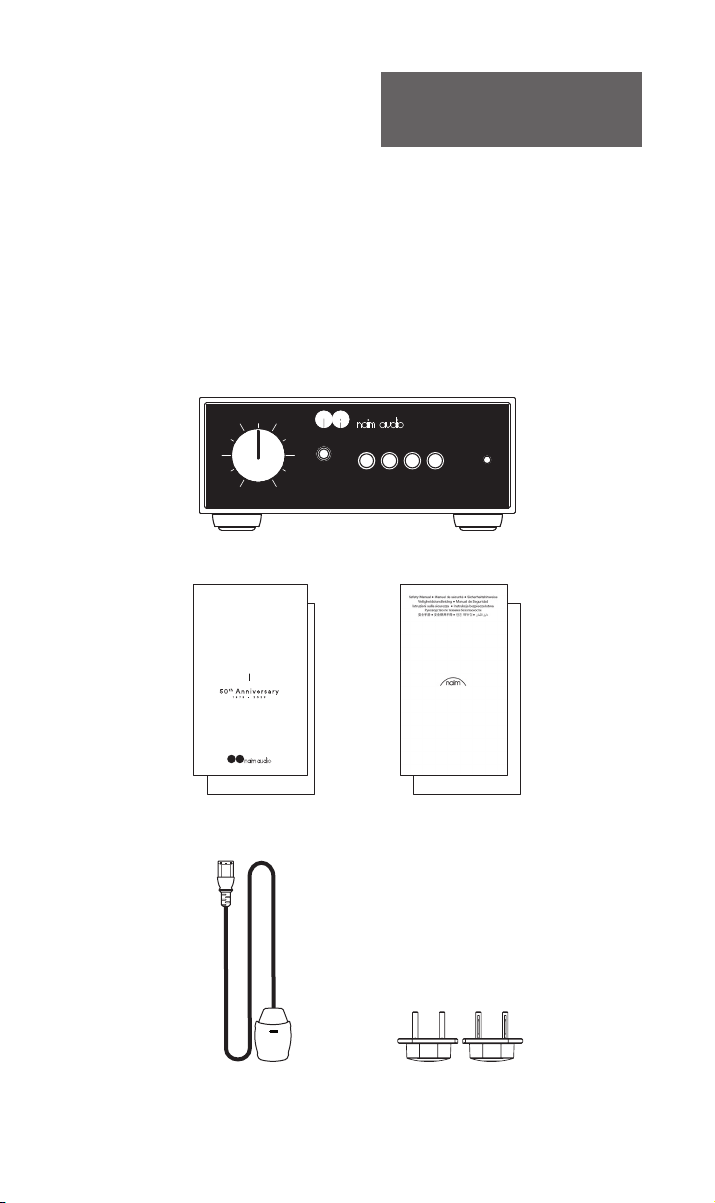
Wprowadzenie
Uwaga: Wszystkie ostrzeżenia
dotyczące bezpieczeństwa można
znaleźć w instrukcji bezpieczeństwa.
Przedstawiamy nowy wzmacniacz zintegrowany Naim. Jak wszystkie produkty
Naim Audio, NAIT 50 stawia na pierwszym miejscu brzmienie muzyczne. Aby
w pełni wykorzystać jego potencjał, należy postępować zgodnie z prostymi
wytycznymi dotyczącymi instalacji i użytkowania zawartymi w niniejszej
instrukcji. Na początku przedstawimy kilka podstawowych informacji o
produkcie i konguracji, a następnie przejdziemy do bardziej szczegółowych
informacji w rozdziale 4.
1. Zawartość opakowania
volume
headphone
phono stream aux mains
1x NAIT 50
User Guide
power
62
AMPLIFIER - NAIT 50
1x broszura informacyjna
1 x instrukcja
bezpieczeństwa
1x przewód zasilania 2x złącza głośnikowe
(fabrycznie zainstalowane
w urządzeniu)
Page 65

2. Dziedzictwo wzmacniaczy zintegrowanych Naim
Nasza historia zaczęła się od pasji muzycznej jednego człowieka, trwa już od
pięciu dekad i do dnia dzisiejszego przyniosła wiele kultowych produktów.
Założyciel Naim Audio, Julian Vereker MBE (1945-2000), był kierowcą
wyścigowym, przedsiębiorcą i inżynierem samoukiem bez reszty
zafascynowanym muzyką. Spędzając wolny czas na słuchaniu i nagrywaniu
swoich przyjaciół grających na żywo w latach sześćdziesiątych, Julian odkrył,
że odtwarzanie nagrań na domowym sprzęcie jest odległe od doświadczenia,
którego pragnął.
Szukając ideału, postanowił zaprojektować własne wzmacniacze i kolumny
głośnikowe, odrzucając przyjęte dogmaty i skupiając się na tych aspektach
brzmienia, które sprawiały, że muzyka tętniła życiem. Te pierwsze projekty
położyły podwaliny pod gamę kultowych i wielokrotnie nagradzanych
produktów hi-, które po 50 latach nadal cieszą się uznaniem.
Zaprojektowany specjalnie z okazji 50-lecia rmy Naim i limitowany do
zaledwie 1973 sztuk, Nait 50 na pierwszy rzut oka wygląda identycznie jak Nait
1. Jednak po bliższym przyjrzeniu się, można zauważyć, że przód i tył wykonano
z wysokiej jakości anodyzowanego aluminium, zaś pokrętło głośności z litego
aluminium, co poprawia tłumienie drgań, sterowanie balansem zastąpiono
gniazdem słuchawkowym, a dioda LED świeci się na biało.
Bardziej znaczące zmiany kryją się we wnętrzu Nait 50. Do wyboru wejść
wykorzystano sterowanie y-by-wire, aby istotnie zmniejszyć długość ścieżki
sygnału, a nowy wzmacniacz słuchawkowy pochodzi z NSC 222. Całkowicie
nowy, wyjątkowy dyskretny tranzystorowy stopień gramofonowy MM
odwzorowuje słynne brzmienie Nait 1, współpracując z końcówką mocy, która
została przeniesiona z modelu NAP 250 (2023).
Nait 50 to prawdziwy audiolski wzmacniacz zintegrowany, tyle że w
miniaturze.
W celu uzyskania szczegółowych informacji
należy odwiedzić stronę internetową
63
Page 66
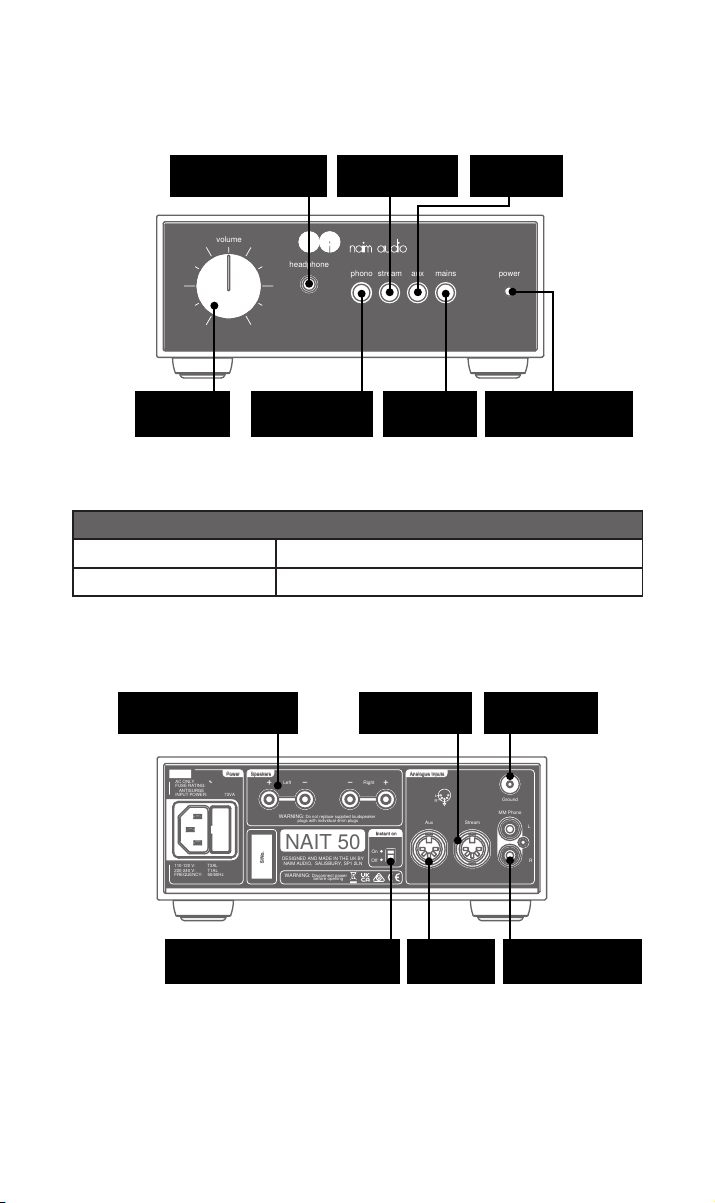
Left Right
Speakers
WARNING: Do not replace supplied loudspeaker
plugs with individual 4mm plugs
WARNING: Disconnect power
before opening
AC ONLY ∿
FUSE RATING:
ANTISURGE
INPUT POWER: 73VA
Power
S/No.
NAIT 50
DESIGNED AND MADE IN THE UK BY
NAIM AUDIO, SALISBURY, SP1 2LN
110-120 V: T2AL
220-240 V: T1AL
FREQUENCY: 50/60Hz
Aux Stream
Ground
MM Phono
L
R
Instant on
Off
On
Analogue InputsAnalogue Inputs
L
R
3. Budowa i złącza
volume
headphone
phono stream aux mains
power
Wyjście słuchawkowe
jack 6,35 mm
Sterowanie
głośnością
Specykacja jasności LED
Jasna
Ciemna
Gnizada głośnikowe
(Lewe +/-; Prawe -/+)
Przycisk wejścia
strumieniowego
Przycisk wejścia
gramofonowego
NAIT 50 aktywny
NAIT 50 w trybie gotowości
strumieniowe
Przycisk
gotowości
Wejście
Przycisk
wejścia AUX
LED
Gotowość/Włączony
Uzimienie
gramofonu
64
Przełącznik Instant On/Auto
Standby
Wejście
AUX
Wejście
gramofonowe
Page 67
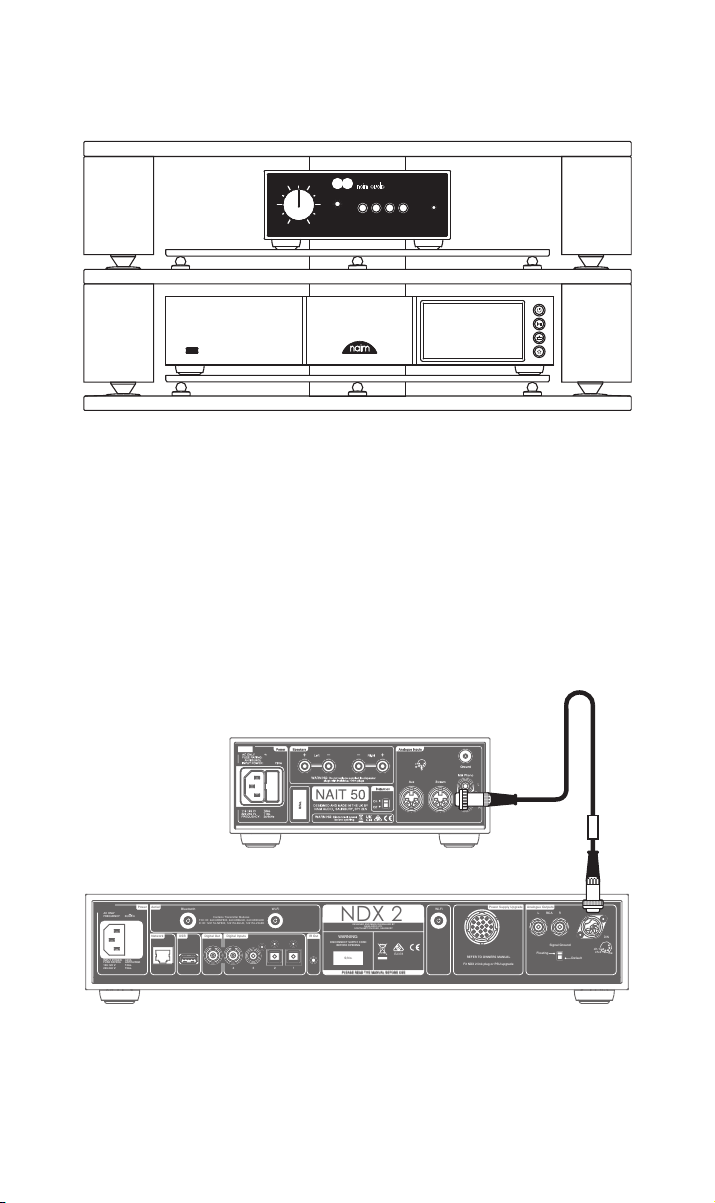
4. Konguracja
PLEASE READ THE MANUAL BEFORE USE
S/No.
Bluetooth
Wi-Fi
Contains Transmitter Modules
FCC ID: 2ACURNP800, 2ACURBLUE, 2ACURZIGEE
IC ID: 12217A-NP800, 12217A-BLUE, 12217A-ZIGEE
REFER TO OWNERS MANUAL
Fit NDX 2 link plug or PSU upgrade
Power Supply Upgrade
2 1
3
Network
Aerial
Power
Analogue Outputs
DIN
L R
Default
Floating
RCA
ch.1
NDX 2
WARNING:
DISCONNECT SUPPLY CORD
BEFORE OPENING
DESIGNED AND MADE IN ENGLAND BY
NAIM AUDIO LTD.
SOUTHAMPTON ROAD, SALISBURY
E2378
ch.2
-ve
Signal Ground
USB
4
Wi-Fi
IR Out
IR Out
Digital Out
INPUT POWER: 60VA
FUSE RATING: ANTISURGE
100-120 V: T4AL.
220-240 V: T2AL.
AC ONLY
FREQUENCY: 50/60Hz
Digital Inputs
PLEASE READ THE MANUAL BEFORE USE
S/No.
Wi-Fi
Contains Transmitter Modules
FCC ID: 2ACURNP800, 2ACURBLUE, 2ACURZIGEE
IC ID: 12217A-NP800, 12217A-BLUE, 12217A-ZIGEE
REFER TO OWNERS MANUAL
Fit NDX 2 link plug or PSU upgrade
Power Supply Upgrade
2 1
3
Analogue Outputs
DIN
L R
Default
Floating
RCA
ch.1
NDX 2
WARNING:
DISCONNECT SUPPLY CORD
BEFORE OPENING
DESIGNED AND MADE IN ENGLAND BY
NAIM AUDIO LTD.
SOUTHAMPTON ROAD, SALISBURY
E2378
ch.2
-ve
Signal Ground
4
Wi-Fi
IR Out
IR Out
Digital Out
Digital Inputs
volume
headphone
phono stream aux mains
NAIT 50 musi być podłączony do źródła (np. NDX2 lub gramofon), ale zanim
to zrobisz, upewnij się, że oba urządzenia są ustawione na swoich miejscach i
odłączone od zasilania.
Aby zapewnić optymalne działanie, należy użyć specjalistycznego regału hi-
– najlepiej Naim Fraim – i ustawić NAIT 50 nad urządzeniem źródłowym, jak
pokazano na rysunku.
Więcej informacji w części 5.1
Przed podłączeniem upewnij się, że wszystkie urządzenia są wyłączone.
power
Podłącz kabel połączeniowy DIN dostarczony z NDX2 do wejścia
strumieniowego NAIT 50.
65
Page 68
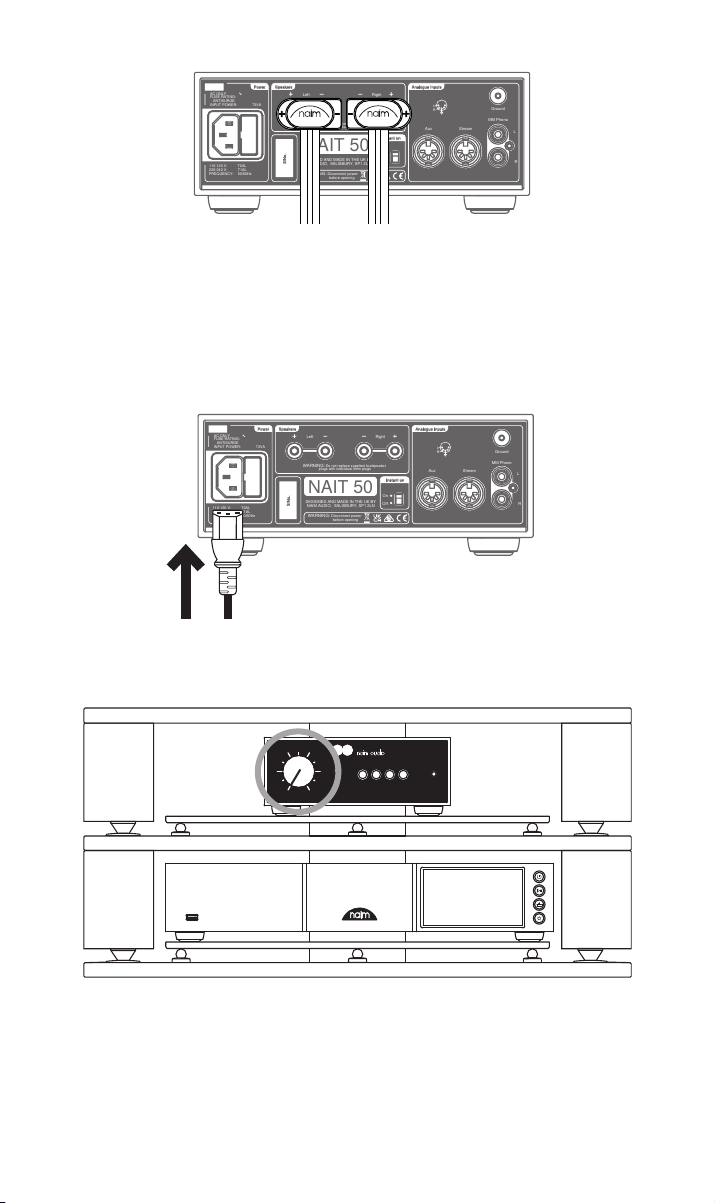
Podłącz kable głośnikowe do NAIT 50, upewniając się, że każdy z nich jest
Left Right
Speakers
WARNING: Do not replace supplied loudspeaker
plugs with individual 4mm plugs
WARNING: Disconnect power
before opening
AC ONLY ∿
FUSE RATING:
ANTISURGE
INPUT POWER: 73VA
Power
S/No.
NAIT 50
DESIGNED AND MADE IN THE UK BY
NAIM AUDIO, SALISBURY, SP1 2LN
110-120 V: T2AL
220-240 V: T1AL
FREQUENCY: 50/60Hz
Aux Stream
Ground
MM Phono
L
R
Instant on
Off
On
Analogue InputsAnalogue Inputs
L
R
Left Right
Speakers
WARNING: Do not replace supplied loudspeaker
plugs with individual 4mm plugs
WARNING: Disconnect power
before opening
AC ONLY ∿
FUSE RATING:
ANTISURGE
INPUT POWER: 73VA
Power
S/No.
NAIT 50
DESIGNED AND MADE IN THE UK BY
NAIM AUDIO, SALISBURY, SP1 2LN
110-120 V: T2AL
220-240 V: T1AL
FREQUENCY: 50/60Hz
Aux Stream
Ground
MM Phono
L
R
Instant on
Off
On
Analogue InputsAnalogue Inputs
L
R
podłączony do właściwego głośnika i oba są w fazie.
Więcej informacji w części 5.3.
Na koniec podłącz przewód zasilający do NAIT 50.
volume
headphone
phono stream aux mains
power
Sprawdź, czy głośność jest na minimum, następnie włącz urządzenie źródłowe
i na koniec NAIT 50.
Więcej informacji w części 5.4
66
Page 69
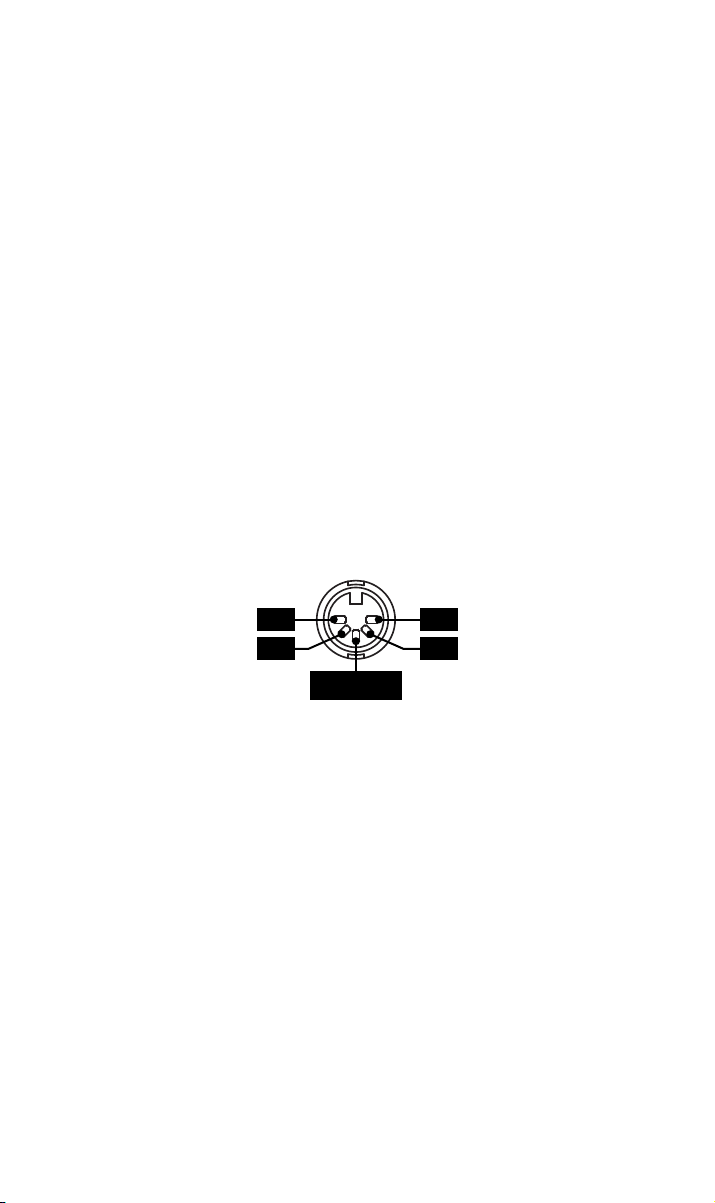
5. Wskazówki dotyczące instalacji i użytkowania
NAIT 50
Wiemy, że nie możesz się doczekać, aby cieszyć się swoim nowym wzmacniaczem
NAIT 50, ale obiecujemy, że będzie on brzmiał jeszcze lepiej, gdy zastosujesz się do
poniższych wskazówek, które pomogą w wykorzystaniu pełnych możliwości wzmacniacza
zintegrowanego.
5.1 Rozpakowanie i ustawienie
Aby zapewnić optymalne działanie ustaw urządzenia Naim na specjalistycznym regale
na sprzęt hi- – najlepiej Fraim Naim lub Fraim Lite – aby zminimalizować wibracje, które
mogą wpływać na dźwięk.
Brak miejsca na regał? Warto rozważyć umieszczenie NAIT 50 na szklanej półce Fraim na
odpowiednim meblu, aby zapewnić solidne, ale dyskretne podparcie.
Nigdy nie stawiaj produktów Naim jeden na drugim, a jeśli umieszczasz je obok siebie,
pozostaw pewien odstęp między urządzeniami. Z drugiej strony podłączone produkty nie
powinny znajdować się zbyt daleko od siebie: maksymalna odległość między nimi jest taka,
na jaką pozwala dostarczony przewód połączeniowy.
Aby zmniejszyć ryzyko wystąpienia słyszalnego szumu z głośników, nie należy umieszczać
zasilaczy ani wzmacniaczy mocy w pobliżu komponentów źródłowych.
5.2 Szczegóły połączeń wejściowych
NAIT 50 ma wejścia DIN dla źródeł sygnału o poziomie liniowym oraz złącza RCA dla
gramofonów.
L nc
ncR
Uziemienie
5.3 Kable i złącza głośnikowe
Aby uzyskać optymalną wydajność, użyj kabla głośnikowego Naim NAC A5.
Używanie kabli innych producentów może pogorszyć parametry lub nawet uszkodzić
wzmacniacz zintegrowany.
Kabel Naim NAC A5 jest kierunkowy i powinien być podłączony tak, aby strzałki
nadrukowane na izolacji wskazywały w kierunku głośników. Dostarczone złącza
głośnikowe Naim spełniają europejskie przepisy bezpieczeństwa i muszą być stosowane.
Ważne jest, aby oba przewody głośnikowe były tej samej długości, do zalecanej
maksymalnej długości 20 m.
W odróżnieniu od niektórych wcześniejszych konstrukcji Naim, nie narzucamy minimalnej
długości przewodu głośnikowego, ale sugerujemy unikać kabli krótszych niż 2 m.
Podczas podłączania głośników należy upewnić się, że są one w fazie – co oznacza,
że dodatnie wyjście głośnikowe wzmacniacza jest podłączone do dodatniego wejścia
głośnikowego – oraz że lewe i prawe wyjście są podłączone do odpowiednich głośników.
67
Page 70

5.4 Włączanie/Wyłączanie
Po wykonaniu wszystkich połączeń wejściowych i wyjściowych, podłącz dostarczony
przewód zasilający do NAIT 50 i do gniazdka elektrycznego.
Uwaga: Żródła – takie jak streamer lub odtwarzacz CD – i wszelkie związane z nim
zewnętrzne zasilacze powinny być włączone przed włączeniem NAIT 50.
Teraz możesz włączyć NAIT 50, naciskając po prostu przycisk Standby na przednim panelu
wzmacniacza zintegrowanego.
5.5 Ustawienia stanu gotowości
Domyślnie, NAIT 50 jest ustawiony w trybie „Auto Standby” – automatycznie przechodzi w
tryb gotowości (w którym pobiera mniej niż 0,5 W) po 19 minutach bezczynności. Funkcja
Music Sensing wybudza wzmacniacz z trybu czuwania, gdy wykryty zostanie sygnał
wejściowy.
Aby uzyskać najwyższą jakość dźwięku, należy zmienić ustawienie trybu gotowości na
panelu tylnym na „Instant on” (natychmiastowe włączenie), dzięki czemu wszystkie czułe
obwody audio będą stale zasilane.
6. Zasilanie sieciowe, uziemienie i inne
Podłączenie musi być wykonane przy użyciu przewodu i wtyczki sieciowej dostarczonej
wraz z NAIT 50 lub kabla sieciowego Naim Power-Line.
Jeśli wtyczka zawiera wbudowany bezpiecznik, jego wartość znamionowa musi wynosić
13A.
W obwodzie wtyczki sieciowej nie należy umieszczać rezystorów nieliniowych ani
reduktorów szumu. Obniżają one jakość zasilania i dźwięku.
6.1 Uziemienie
Aby uniknąć tętnienia, uziemienie całego systemu powinno być podłączone do uziemienia
tylko w jednym punkcie. Zazwyczaj jest to główne źródło.
Przykładowo, streamer Naim posiada przełącznik uziemienia. Ustaw go w pozycji „default”,
jeśli żadne inne źródło nie łączy uziemienie sieci z uziemieniem sygnału. To ustawienie
zapewnia najlepszą jakość dźwięku.
6.2 Wtyczki sieciowe wbudowane w kablu
Jeśli zintegrowana wtyczka elektryczna zostanie odcięta od przewodu sieciowego (z
dowolnego powodu), MUSI zostać zutylizowana, ponieważ nie będzie nadawać się do
użytku.
Włożenie odciętej wtyczki do gniazdka elektrycznego grozi porażeniem prądem.
6.3 Obwody zasilania sieciowego i interferencja
System hi- zazwyczaj dzieli obwód zasilania z innymi urządzeniami domowymi, a niektóre
z nich mogą powodować zniekształcenia, objawiające się jako mechaniczne buczenie
transformatorów sieciowych, w tym transformatora wewnątrz NAIT 50.
Buczenie transformatora nie jest emitowane przez głośniki i nie ma wpływu na działanie
systemu; można jednak mu przeciwdziałać, zmieniając położenie systemu Naim lub
odseparowując obwód zasilania sieciowego. Taki wydzielony układ poprawi też ogólną
wydajność systemu. Szczegółowych porad dotyczących wykonania oddzielnego obwodu
zasilania sieciowego może udzielić wykwalikowany elektryk.
68
Page 71

6.4 Środki ochrony przeciwprzepięciowej
System Naim powinien być wyłączony i całkowicie odłączony od sieci zasilającej, gdy
istnieje ryzyko uderzenia pioruna, w celu ochrony przed potencjalnymi uszkodzeniami.
7. Dodatkowe wskazówki i porady
Po omówieniu najważniejszych kwestii, możemy przedstawić kilka rzeczy, które możesz
zrobić, aby zoptymalizować działanie nowego NAIT 50.
7.1 Docieranie
Produkty Naim są wykonywane ręcznie ze starannie dobranej gamy wysokiej jakości
komponentów. NAIT 50 będzie brzmiał znakomicie po wyjęciu z pudełka, ale jego
brzmienie może się jeszcze poprawić, gdy wszystkie te różne komponenty będą zasilane
i będą współpracować w ciągu pierwszych kilku tygodni użytkowania. Utrzymywanie
systemu pod napięciem ułatwi ten proces.
7.2 Czyszczenie urządzenia i połączeń
Firma Naim zaleca używanie miękkiej chusteczki, aby lekko odkurzyć wszystkie
powierzchnie produktu. Środki czyszczące mogą zawierać składniki, które mogą mieć
negatywny wpływ na kosmetyczne środki powierzchniowe i powłoki.
Wtyki i gniazda połączeniowe muszą być utrzymywane w czystości i bez korozji.
Najprostszym sposobem osiągnięcia tego celu jest całkowite wyłączenie zasilania
urządzenia Naim (i wszelkich podłączonych urządzeń), odłączenie wszystkich połączeń
z gniazd i ponowne ich mocne wciśnięcie. Nie należy stosować środków do czyszczenia
styków oraz tak zwanych „ulepszaczy”, ponieważ mogą one pozostawiać osady, które
mogą pogorszyć brzmienie systemu.
8. Wsparcie
Ochrona konsumenta różni się w zależności od kraju. W większości krajów głównym
partnerem kontaktowym w przypadku problemów z urządzeniem powinien być
sprzedawca, u którego zakupiono produkt rmy Naim.
Problem może wynikać z usterki w systemie lub nieprawidłowości instalacji, co
sprzedawca powinien ustalić, korzystając z własnych umiejętności diagnostycznych.
Na stronie internetowej naimaudio.com można znaleźć wiele artykułów dotyczących
wszystkich produktów Naim.
Jeśli nadal masz problem z produktem Naim, skontaktuj się z nami bezpośrednio, aby
uzyskać pomoc i poradę, pod adresem [email protected].
9. Serwis i modernizacja
Wszelkie naprawy lub aktualizacje sprzętu powinny być wykonywane wyłącznie przez
autoryzowany punkt serwisowy rmy Naim lub w centrali rmy Naim. Wiele podzespołów
jest wykonywanych, testowanych i dopasowywanych indywidualnie i uzyskanie ich
zamienników z innych źródeł jest często niemożliwe.
W przypadku pytań dotyczących serwisu lub naprawy prosimy o kontakt z lokalnym
sprzedawcą produktów Naim.
69
Page 72

10. Dane techniczne
Specykacja dźwięku
Moc wyjściowa (głośniki) 25 W przy 8 , 0,1% THD+N, 230 V AC
Moc wyjściowa (słuchawki) 1,5 W przy 16
Wzmocnienie Stopień gramofonowy: 40 dB (przy 1 kHz RIAA)
Wejścia 2x stereo 5-stykowe złącze DIN, poziom liniowy 47k
Pasmo przenoszenia Przez wyjście liniowe: -3 dB od 4 Hz do 45 kHz
Specykacja sprzętowa
Wymiary (wys. x szer. x gł.) 87 × 207 × 321 mm (z nóżkami)
Masa 4,5 kg (tylko wzmacniacz)
Pasywne zużycie energii 20 W (w stanie bezczynności)
Zużycie energii w stanie gotowości
Zasilanie sieciowe 110 V - 120 V, 220 V - 240 V 50/60 Hz
Bezpiecznik 230 V = T1AL (przeciwprzepięciowy) ; 115 V = T2AL (przeciwprze-
Wykończenie „Chrome bumper”
Temperatura pracy 5-35°C
Temperatura przechowywania 0-50°C
Jack 6,35 mm
Stopień przedwzmacniacza (i słuchawki): 16 dB
Stopień wzmacniacza mocy: 29 dB
1x stereo RCA 47k, poziom 5 mV MM
Przez wyjście gramofonowe: -3 dB od 6 Hz do 30 kHz
< 0,5 W (automatyczny tryb czuwania z wykrywaniem muzyki)
pięciowy)
Przód i tył – czarne anodowane aluminium
Pokrywa – czarny lakier proszkowy
70
Page 73

Rozszerzone dane techniczne
Moc wyjściowa 40 W przy 4, 0,1% THD+N, 230 V AC
Moc w trybie burst dla 2 (1 kHz
przez 20 ms, powtórzenie 500
ms IHF)
Prąd szczytowy dla 1 (1 kHz 1 ms) +/-15 A maks. (moc szczytowa 225 W)
Maks. zużycie energii 160 VA pełnej mocy 4 przy 2 kanałach
Zużycie energii (głośno) 73 VA przy 2x 1/8 pełnej mocy 8R
THD+N przy 2/3 pełnej mocy 8
,1 kHz
Sygnał wejściowy do obcięcia
(maks. głośność)
Stosunek sygnał/szum, w odniesieniu do 1 W 8 A-ważone
Stosunek sygnał/szum, w odniesieniu do 25 W 8 A-ważone
Przesłuch 85 dB wyj. liniowe, 1 kHz w odniesieniu do 25 W 8
Współczynnik tłumienia do 8 36
Sterowanie Tylko na produkcie (bez pilota), 3 przyciski wejściowe, prze-
60 W przy 2 , 1% THD+N
0,015%
88 mV wyj. liniowe
710 uV wyj. gramofonowe
80 dB wyj. liniowe, wej. 1 V
78 dB wyj. gramofonowe w odniesieniu do wej. 5 mV
93 dB wyj. liniowe, wej. 1 V
84 dB wyj. gramofonowe w odniesieniu do wej. 5 mV
80 dB wyj. gramofonowe
łącznik trybu gotowości, automatyczne wyciszanie słuchawek,
wyłączanie trybu gotowości z tyłu
12. Utylizacja zużytego produktu
Produktów na których znajduje się logo z przekreślonym pojemnikiem na odpady
nie można wyrzucać razem
z odpadami komunalnymi. Produkty te należy utylizować w zakładach zdolnych
do ich recyklingu i odpowiedniego przetwarzania wszelkich będących odpadami
produktów ubocznych.
Aby dowiedzieć się gdzie znajduje się najbliższy zakład tego typu, skontaktuj się z
lokalnymi władzami.
Odpowiedni recykling i utylizacja odpadów pozwalają na oszczędzanie zasobów i chronią
środowisko przed zanieczyszczeniem.
71
Page 74
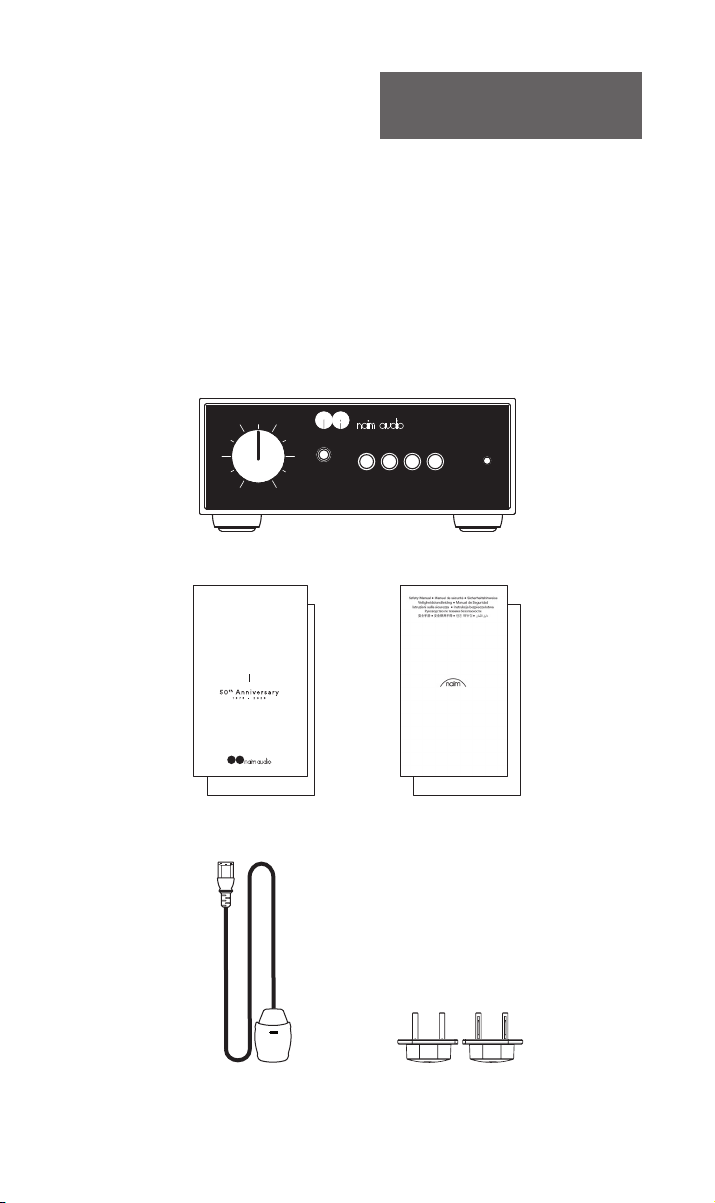
Введение
Примечание: все инструкции по
технике безопасности приводятся в
руководстве по технике безопасности.
Представляем новый интегральный усилитель Naim. Как и вся остальная
продукция Naim Audio, NAIT 50 предназначен для повышения качества
воспроизведения музыки. Чтобы полностью реализовать его потенциал,
важно следовать простым инструкциям по установке и эксплуатации,
приведенным в данном руководстве. Сначала мы рассмотрим несколько
основных моментов, связанных с изделием и настройкой, а затем перейдем к
подробной информации в 4-м разделе.
1. Что входит в комплект?
volume
headphone
phono stream aux mains
1 NAIT 50
User Guide
power
72
AMPLIFIER - NAIT 50
1 информационная
брошюра
1 руководство по технике
безопасности
1 кабель питания 2 переходника для подключения
акустической системы
(установлены производителем)
Page 75

2. Интегральные усилители Heritage от Naim
Начало нашей истории положила страсть одного человека к музыке, и за
эти пять десятилетий нам удалось создать целый пантеон легендарных
продуктов.
Основатель Naim Audio, кавалер ордена Британской империи Джулиан
Верекер (1945–2000 гг.) был автогонщиком, предпринимателем и инженеромсамоучкой, который не мыслил свою жизнь без музыки. В 1960-х годах
Джулиан в свободное время слушал и записывал живые выступления
друзей. Он обнаружил, что качество звука, который воспроизводит домашняя
аудиосистема, катастрофически не дотягивает до его стандартов.
Джулиан не был готов мириться с компромиссами, поэтому разработал
собственные усилители и акустические системы, отказавшись от готовых
решений и сосредоточившись на технических аспектах, позволявших
воспроизводить музыку как можно более достоверно. Его первые наработки
положили начало целому ряду легендарных продуктов hi-fi, которые и
сегодня, 50 лет спустя, вызывают резонанс.
Юбилейный усилитель Nait 50, выпущенный ограниченным тиражом из 1973
экземпляров к 50-летию компании, на первый взгляд ничем не отличается
от Nait 1. Но рассмотрим его повнимательнее: передняя и задняя панели
изготовлены из высококачественного анодированного алюминия, регулятор
громкости произведен из увесистого алюминия, что помогает погасить
вибрацию, регулятор баланса заменен входом для наушников, а цвет
светодиодного индикатора изменен на белый.
Но действительно уникальным Nait 50 делает его техническая начинка.
Реле выбора входа основано на электродистанционном управлении,
сокращающем сроки передачи сигнала, а новый усилитель для наушников
основан на технологии, реализованной в NSC 222. Совершенно новая
разработка, эксклюзивный дискретный транзистор фонокорректора MM
обеспечивает качество звука, полученное в знаменитом Nait 1, а усилитель
мощности позаимствован у модели NAP 250 (2023 год).
Nait 50 — это настоящий аудиофильский интегральный усилитель в
миниатюрном размере.
Более подробная информация
приведена на сайте
73
Page 76
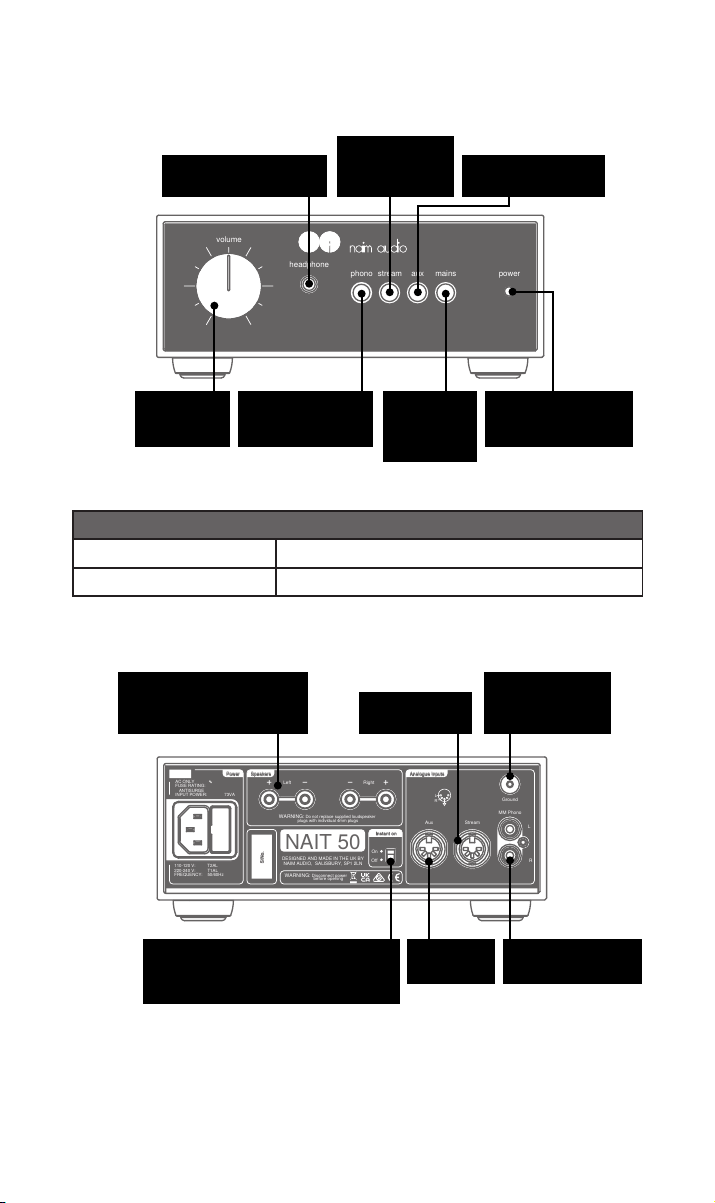
Left Right
Speakers
WARNING: Do not replace supplied loudspeaker
plugs with individual 4mm plugs
WARNING: Disconnect power
before opening
AC ONLY ∿
FUSE RATING:
ANTISURGE
INPUT POWER: 73VA
Power
S/No.
NAIT 50
DESIGNED AND MADE IN THE UK BY
NAIM AUDIO, SALISBURY, SP1 2LN
110-120 V: T2AL
220-240 V: T1AL
FREQUENCY: 50/60Hz
Aux Stream
Ground
MM Phono
L
R
Instant on
Off
On
Analogue InputsAnalogue Inputs
L
R
3. Функции и подключения
volume
headphone
phono stream aux mains
power
Кнопка
Выход для наушников,
6,35 мм, Jack
включения
входа стримера
Кнопка включения
входа Aux
Регулировка
громкости
включения входа
фонокорректора
Описание показаний индикатора
Яркий свет индикатора
Приглушенный свет индикатора
Разъемы для подключения
громкоговорителей
(левый +/-; правый -/+)
Переключатель Instant On/Auto
Standby (быстрое включение/
автоматический режим ожидания)
Кнопка
Кнопка
Standby
(Режим
ожидания)
NAIT 50 работает
NAIT 50 в режиме ожидания
Вход Stream
Вход Aux
Индикатор
режима ожидания/
работы устройства
Заземление
винилового
проигрывателя
Вход Phono
74
Page 77
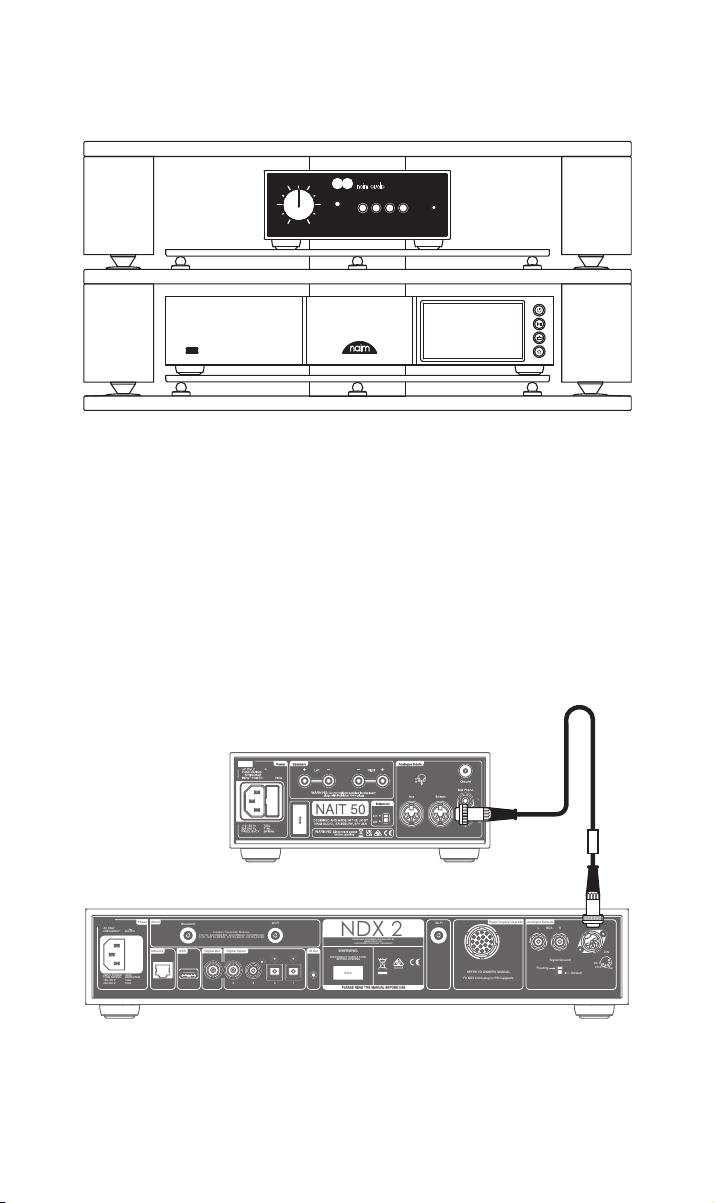
4. Настройка
PLEASE READ THE MANUAL BEFORE USE
S/No.
Bluetooth
Wi-Fi
Contains Transmitter Modules
FCC ID: 2ACURNP800, 2ACURBLUE, 2ACURZIGEE
IC ID: 12217A-NP800, 12217A-BLUE, 12217A-ZIGEE
REFER TO OWNERS MANUAL
Fit NDX 2 link plug or PSU upgrade
Power Supply Upgrade
2 1
3
Network
Aerial
Power
Analogue Outputs
DIN
L R
Default
Floating
RCA
ch.1
NDX 2
WARNING:
DISCONNECT SUPPLY CORD
BEFORE OPENING
DESIGNED AND MADE IN ENGLAND BY
NAIM AUDIO LTD.
SOUTHAMPTON ROAD, SALISBURY
E2378
ch.2
-ve
Signal Ground
USB
4
Wi-Fi
IR Out
IR Out
Digital Out
INPUT POWER: 60VA
FUSE RATING: ANTISURGE
100-120 V: T4AL.
220-240 V: T2AL.
AC ONLY
FREQUENCY: 50/60Hz
Digital Inputs
PLEASE READ THE MANUAL BEFORE USE
S/No.
Wi-Fi
Contains Transmitter Modules
FCC ID: 2ACURNP800, 2ACURBLUE, 2ACURZIGEE
IC ID: 12217A-NP800, 12217A-BLUE, 12217A-ZIGEE
REFER TO OWNERS MANUAL
Fit NDX 2 link plug or PSU upgrade
Power Supply Upgrade
2 1
3
Analogue Outputs
DIN
L R
Default
Floating
RCA
ch.1
NDX 2
WARNING:
DISCONNECT SUPPLY CORD
BEFORE OPENING
DESIGNED AND MADE IN ENGLAND BY
NAIM AUDIO LTD.
SOUTHAMPTON ROAD, SALISBURY
E2378
ch.2
-ve
Signal Ground
4
Wi-Fi
IR Out
IR Out
Digital Out
Digital Inputs
volume
headphone
phono stream aux mains
NAIT 50 необходимо подключить к источнику звука (например, к стримеру
NDX2 или виниловому проигрывателю). Перед подключением убедитесь, что
оба компонента находятся в конечном положении и отключены от сети.
Для обеспечения оптимальной работы устройства используйте специальную
стойку для оборудования hi-fi (наилучший вариант— Naim Fraim). Усилитель
NAIT 50 должен быть установлен над источником звука, как показано на
рисунке.
См. подробную информацию в разделе 5.1.
power
Перед подключением убедитесь, что все оборудование выключено.
Подсоедините входящий в комплект поставки NDX2 кабель с разъемом DIN к
входу Stream устройства NAIT 50.
75
Page 78
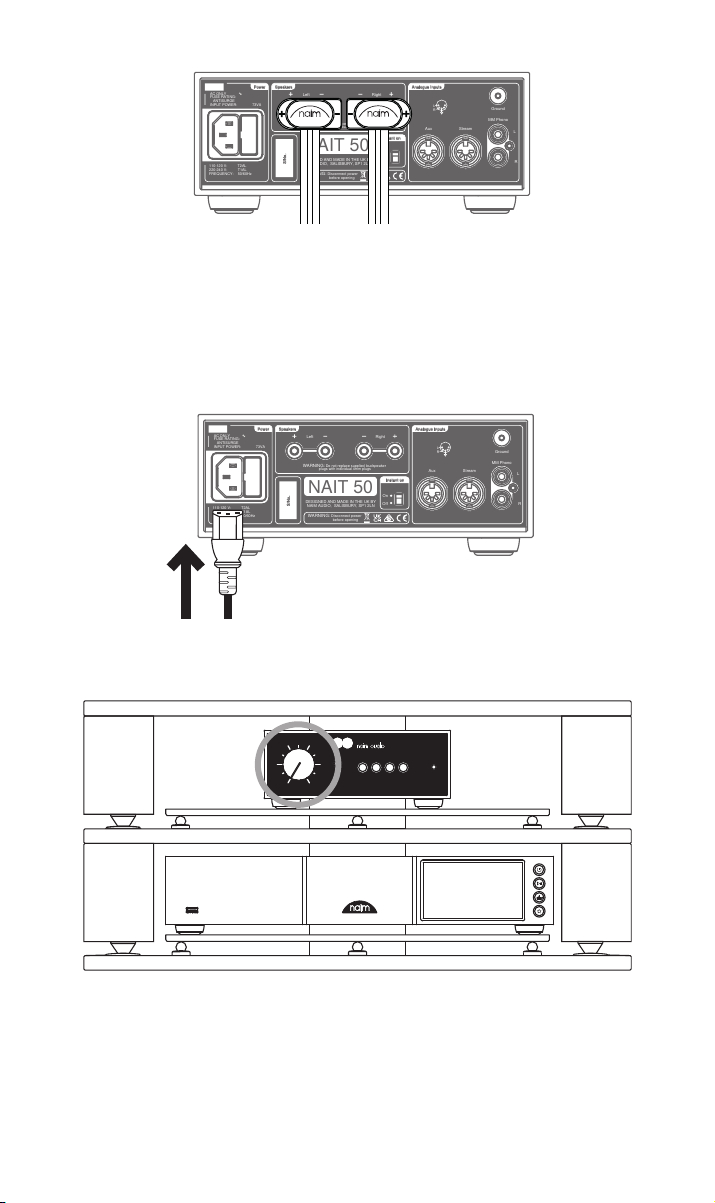
Подсоедините акустические кабели к NAIT 50, убедившись, что каждый из
Left Right
Speakers
WARNING: Do not replace supplied loudspeaker
plugs with individual 4mm plugs
WARNING: Disconnect power
before opening
AC ONLY ∿
FUSE RATING:
ANTISURGE
INPUT POWER: 73VA
Power
S/No.
NAIT 50
DESIGNED AND MADE IN THE UK BY
NAIM AUDIO, SALISBURY, SP1 2LN
110-120 V: T2AL
220-240 V: T1AL
FREQUENCY: 50/60Hz
Aux Stream
Ground
MM Phono
L
R
Instant on
Off
On
Analogue InputsAnalogue Inputs
L
R
Left Right
Speakers
WARNING: Do not replace supplied loudspeaker
plugs with individual 4mm plugs
WARNING: Disconnect power
before opening
AC ONLY ∿
FUSE RATING:
ANTISURGE
INPUT POWER: 73VA
Power
S/No.
NAIT 50
DESIGNED AND MADE IN THE UK BY
NAIM AUDIO, SALISBURY, SP1 2LN
110-120 V: T2AL
220-240 V: T1AL
FREQUENCY: 50/60Hz
Aux Stream
Ground
MM Phono
L
R
Instant on
Off
On
Analogue InputsAnalogue Inputs
L
R
них подключен к соответствующему громкоговорителю и оба находятся в
фазе.
См. подробную информацию в разделе 5.3.
Наконец, подключите силовой кабель к NAIT 50.
volume
headphone
phono stream aux mains
power
Удостоверьтесь в том, что уровень громкости установлен на минимум, затем
включите источник звука и только потом NAIT 50.
См. подробную информацию в разделе 5.4.
76
Page 79
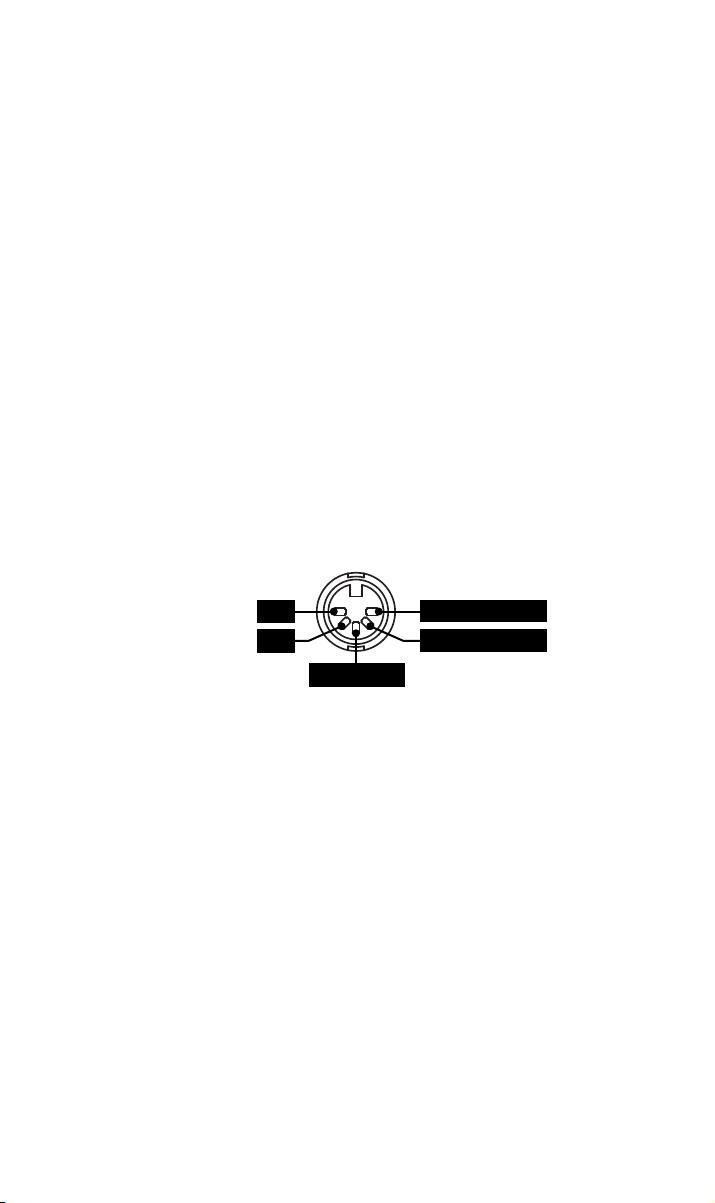
5. Рекомендации по установке и эксплуатации NAIT
50
Как бы ни хотелось как можно скорее приступить к эксплуатации нового устройства,
необходимо соблюсти приведенные далее рекомендации, составленные в целях
обеспечения безупречного качества работы интегрального усилителя NAIT 50.
5.1 Распаковка и установка
Для обеспечения оптимального воспроизведения продукция Naim должна
устанавливаться на специальной стойке для hi-fi оборудования (в идеале Naim Fraim
или Fraim Lite), чтобы минимизировать вибрации, могущие повлиять на звук. Нет места
для стойки? Установите NAIT 50 на стеклянную полку Fraim, помещенную на подходящую
мебель, чтобы обеспечить надежную и незаметную поддержку.
Запрещается устанавливать изделия Naim друг на друга, а если они размещаются рядом
друг с другом, то между ними должен обеспечиваться достаточный зазор. Кроме того,
подключенные устройства не должны располагаться слишком далеко друг от друга:
максимальное расстояние между ними ограничивается длиной соединительного кабеля
из комплекта поставки.
Чтобы минимизировать риск возникновения слышимого шума с колонок, не следует
размещать источники питания или усилители мощности вблизи силовых элементов.
5.2 Типы входов
Для подключения линейных источников звука предусмотрены входы DIN, для
виниловых проигрывателей— гнезда RCA.
L
R
Заземление
Не используется
Не используется
5.3 Акустические кабели и переходники для громкоговорителей
Для достижения оптимальных рабочих характеристик используйте акустический кабель
Naim NAC A5. Использование кабелей других производителей может ухудшить рабочие
характеристики устройства и даже привести к повреждению интегрального усилителя.
Naim NAC A5 является направленным кабелем, поэтому при его подключении
стрелки на изоляционном покрытии должны указывать в сторону громкоговорителей.
Включенные в комплект поставки переходники для громкоговорителей соответствуют
европейским стандартам безопасности и должны использоваться в обязательном
порядке.
Важно, чтобы оба акустических кабеля были одинаковой длины. Рекомендуемая
максимальная длина кабеля— 20 м. В отличие от некоторых предыдущих моделей
Naim мы не устанавливаем минимальную длину акустического кабеля, но рекомендуем
использовать кабели длиной не менее 2 м.
При подключении динамиков убедитесь, что они находятся «в фазе». Это означает, что
положительный выход усилителя для динамика подключен к положительному входу
динамика, а левый и правый выходы соединены с соответствующими динамиками.
5.4 Включение/выключение питания
После выполнения всех входных и выходных соединений подключите включенный в
комплект поставки силовой кабель к NAIT 50 и к электросети.
77
Page 80

Обратите внимание: источник звука (например, стример или проигрыватель компактдисков) и все подключенные внешние источники питания должны быть включены до
включения NAIT 50.
Теперь NAIT 50 готов к подаче питания. Для этого нажмите кнопку Standby на
фронтальной панели интегрального усилителя.
5.5 Настройки питания в режиме ожидания
По умолчанию NAIT 50 настроен на автоматический переход в режим ожидания: режим
ожидания (потребление менее 0,5 Вт) включается автоматически после 19 минут
бездействия устройства. Функция Music Sensing (Распознавание музыки) выводит
усилитель из режима ожидания, когда он регистрирует входной сигнал.
Для достижения оптимального качества звука переключите «Режим ожидания» на
задней панели в режим «Быстрое включение», при котором питание постоянно подается
на все чувствительные контуры для аудиосигналов.
6. Сетевое питание, заземление и другая
информация
Используйте только силовые кабели и штекеры, входящие в комплект поставки NAIT 50,
либо более совершенный силовой кабель Naim Power-Line.
При использовании штекеров с предохранителями следует применять 13-амперные
предохранители.
Не соединяйте проводом нелинейные резисторы или шумоподавители с сетевыми
вилками; это приведет к перебоям в подаче питания и ухудшению качества звука.
6.1 Заземление
Во избежание появления земляных петель и вызываемого ими фона, сигнальное
заземление всей системы должно быть соединено с заземлением электропитания
только в одной точке. Как правило, это делается на первичном источнике.
Например, стример Naim оснащен переключателем разрыва земли. Установите
значение «по умолчанию», если никакой другой источник не соединяет заземление
питающей сети с сигнальной землей. Такая настройка обеспечит наилучшее качество
звука.
6.2 Неразборные сетевые вилки
Если неразборная вилка отсоединена от силового кабеля (независимо от причины),
ее ОБЯЗАТЕЛЬНО необходимо утилизировать таким способом, чтобы ни при каких
обстоятельствах не допустить повторного использования.
При подключении обрезанной вилки в розетку существует высокая опасность
поражения электрическим током .
6.3 Цепи и помехи
Система hi-fi обычно подключается к той же цепи, что и другие бытовые приборы.
Некоторая бытовая техника может вызывать искажения, проявляющиеся в виде
механического шума сетевых трансформаторов, включая трансформатор, которым
оснащен NAIT 50.
Шум от трансформатора не передается через колонки и не влияет на
производительность системы, но его можно снизить, тщательно продумав расположение
системы Naim, а также за счет использования отдельной цепи питания. Использование
отдельной цепи питания, как правило, позволяет улучшить рабочие характеристики
устройства. Для получения консультации по установке отдельной цепи питания следует
обратиться к квалифицированному электрику.
78
Page 81

6.4 Меры предосторожности при грозе
Систему Naim следует выключить и отключить от сети при угрозе поражения молнией,
чтобы предотвратить возможное повреждение.
7. Дополнительные рекомендации и указания
После ознакомления с основной информацией об устройстве предлагаем перейти
к изучению расширенных настроек, которые помогут оптимизировать рабочие
характеристики NAIT 50.
7.1 Приработка
Продукция Naim изготавливается вручную из тщательно отобранных
высококачественных компонентов. NAIT 50 обеспечивает превосходное качество звука
сразу после распаковки, но после подачи питания на компоненты устройства и их
приработки в течение первых нескольких недель качество звука еще более улучшается.
Этому процессу способствует постоянное питание системы.
7.2 Очистка устройства и соединений
Naim рекомендует ограничиться очисткой поверхностей устройства от пыли с
помощью мягкой ткани. Чистящие средства могут содержать ингредиенты, способные
отрицательно влиять на косметическую обработку поверхности и покрытия.
Следите за чистотой соединительных штекеров и розеток и не допускайте
возникновения коррозии. Самый простой способ – полностью выключите питание
устройства Naim (и подключенного оборудования), извлеките все разъемы из гнезд
и плотно установите их на место. Не следует использовать очистители контактов и
усиливающие агенты, так как могут образоваться отложения, которые снизят качество
воспроизведения вашей системы.
8. Поддержка
В зависимости от страны принципы защиты прав потребителей могут быть различными.
В большинстве стран при возникновении проблем с устройством следует обращаться к
продавцу, у которого было приобретено оборудование Naim.
Проблема может быть связана с неисправностью системы или неправильной
установкой, поэтому важно в полной мере использовать диагностические возможности
вашего дилера. На веб-сайте naimaudio.com можно найти статьи для каждого изделия
Naim
Если вы еще не решили проблему с устройством Naim, свяжитесь с нами напрямую для
консультации и получения помощи по адресу электронной почты support@naimaudio.
com
9. Обслуживание и обновления
Любые работы по ремонту и модернизации аппаратных средств должны выполняться
только в авторизованных сервисных центрах Naim или в штаб-квартире Naim. Многие
компоненты изготавливаются на заказ, тестируются или специально подбираются,
поэтому подходящие запасные детали часто невозможно получить из других источников.
По всем вопросам, касающимся обслуживания и ремонта, обращайтесь к местному
представителю Naim.
79
Page 82

10. Технические характеристики
Характеристики аудиосигнала
Выходная мощность
(громкоговорители)
Выходная мощность (наушники) 1,5 Вт на нагрузке 16Ω
Усиление Фонокорректор: 40 дБ (при 1 кГц RIAA)
Входы 2 Stereo, 5-штырьковый DIN, линейный 47 кГц
Диапазон частот: Линейные входы: -3 дБ в диапазоне от 4 Гц до 45 кГц
Аппаратные характеристики
Габариты (В x Ш x Г)
Вес
Энергопотребление в состоянии
покоя:
Энергопотребление в режиме
ожидания
Силовое питание 110–120 В, 220–240 В, 50/60 Гц
Предохранитель 230В = T1AL (с задержкой срабатывания) ; 115В = T2AL (с
Материалы поверхности Хромированный бампер
Температурный режим эксплуатации
Температурный режим хранения 0–50°C
25 Вт на нагрузке 8Ω @0,1% THD+N @ 230VAC
6,35 мм, Jack
Режим предварительного усиления (и наушники): 16 дБ
Режим усиления мощности: +29 дБ
1 стереовхода RCA, 47 кГц, 5 мВ (MM)
Входы Phono: -3 дБ в диапазоне от 6 Гц до 30 кГц
87 x 207 x 321 мм (включая опору)
4,5 кг (вес усилителя)
20 Вт (во время простоя)
<0,5 Вт (автоматический режим ожидания с функцией распознавания сигнала)
задержкой срабатывания)
Фронтальные и задние панели из черного анодированного
алюминия
Корпус— черное порошковое покрытие
5–35°C
80
Page 83

Расширенные технические характеристики
Выходная мощность
Burst Power при 2Ω (1 кГц для 20
мс, повторно 500мс IHF)
Пиковая мощность при 1Ω (1
кГц, 1мс)
Максимальная потребляемая
мощность
Потребляемая мощность (высокий уровень громкости)
THD+N при 2/3 мощности на
нагрузке 8Ω @1 кГц
Входящий сигнал для клиппинга
(максимальный уровень громкости)
Отношение сигнал/шум, ref. 1Вт
на нагрузке 8Ω, A-взвешенное
Отношение сигнал/шум, ref. 1Вт
на нагрузке 8Ω, A-взвешенное
Перекрестные помехи 85 дБ, линейный, 1 кГц, ref. 25Вт при 8Ω
Коэффициент демпфирования на
нагрузке 8Ω
Управление Все органы управления находятся на устройстве (возможность
40 Вт на нагрузке 4Ω при 0,1% THD+N при 230VAC
60 Вт на нагрузке 2Ω при 1% THD+N
+/-15 ампер пикового тока (225Вт пиковое потребление)
160ВА при полной мощности, на нагрузке 4Ω, 2канала
73ВА при 2 x 1/8 полной мощности, 8R
0,015%
88 мВ, линейный
710uV, Phono
80 дБ, линейный, 1В по входу
78 дБ, Phono, ref. 5 мВ по входу
93 дБ, линейный, 1В по входу
78 дБ, Phono, ref. 5 мВ по входу
80 дБ, Phono
36
удаленного управления устройством отсутствует): 3 кнопки
выбора входа, кнопка включения режима ожидания, кнопка автоматического отключения подачи звука в наушники, переключатель автоматического режима ожидания на задней панели
12. Вторичная переработка продукта
Продукты, которые имеют изображение перечеркнутого мусорного бака, не
могут быть утилизированы
вместе с бытовыми отходами. Эти продукты должны быть утилизированы на
объектах, способных осуществлять их обработку с целью повторного использования с
соответствующей утилизацией побочных продуктов.
Свяжитесь с местным органом власти для получения информации о ближайшем
подобном объекте.
Надлежащая переработка и утилизация отходов позволяет экономить ресурсы и
защищает окружающую среду от загрязнения.
81
Page 84
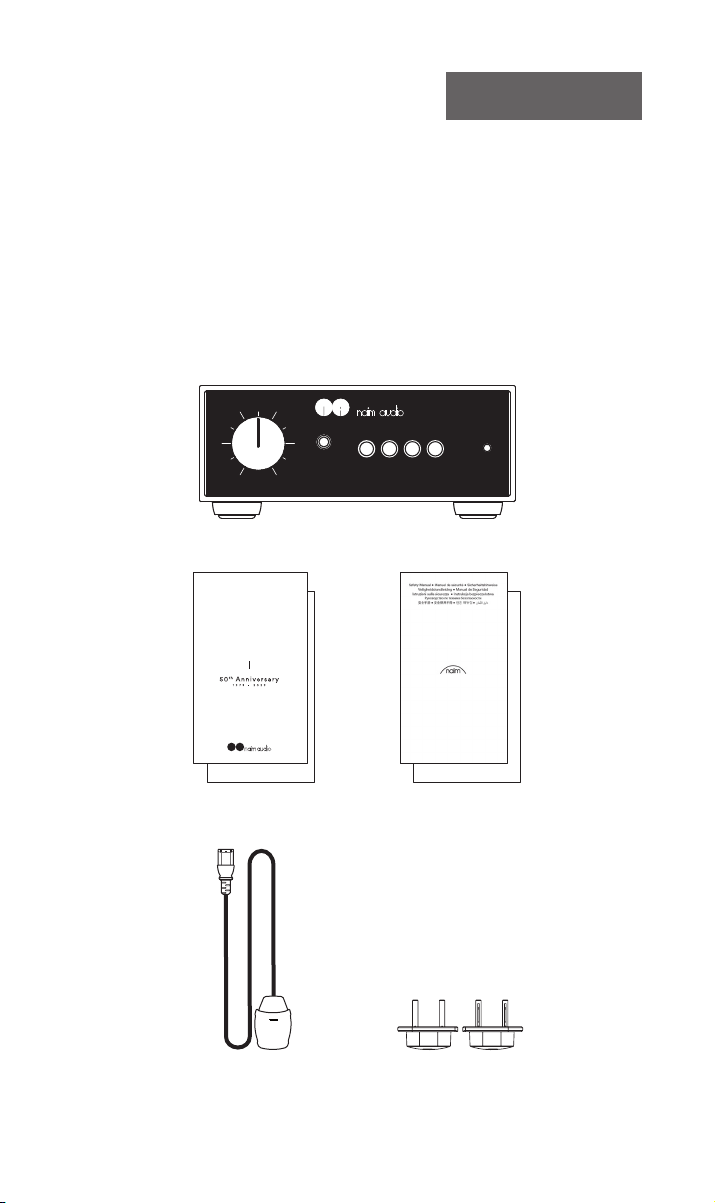
简介
注意:完整的安全警告可参阅
《安全手册》。
欢迎使用全新的Naim集成式放大器。与所有Naim Audio产品一样,NAIT 50将音
乐性能放在首位。为帮助产品发挥全部潜力,请务必遵循本手册中介绍的简单安
装和使用指南。我们首先了解一些产品和设置要点,然后在第 4 节中介绍更详细
的信息。
1.包装盒内容
volume
headphone
phono stream aux mains
NAIT 50x1
User Guide
AMPLIFIER - NAIT 50
power
82
82
信息手册x1 安全手册x1
电源线x1
扬声器连接器x2
(预装在装置上)
Page 85

2. Naim集成式放大器的发展历程
故事缘起于一个人对音乐的热爱,经过五十年的辛勤耕耘至今,我们已经推出了
众多标志性产品。
Naim Audio创始人朱利安·韦雷克(Julian Vereker MBE,1945-2000)是一位
热爱音乐的赛车手、实业家,也是一位自学成才的工程师。20世纪60年代,朱利
安把业余时间用在了聆听和录制朋友们的现场演出,但他发现自己家中的设备播
放出来的音乐与他渴望的效果相差甚远。
他不想勉强迁就,于是决定挑战公认的常理,自己设计放大器和扬声器,致力于
让音乐迸发出活力。最初的设计为后续的创新奠定了基础,催生出一系列杰出的
获奖高保真产品,对50年后的今天仍有重要影响。
Nait 50专门为纪念Naim创立50周年而打造,限量发售1973台,一眼望去与当初的
Nait 1如出一辙。但是,细看会发现它前后均采用高品质阳极氧化铝,旋钮由整块
铝材加工而成,有利于降低震动,均衡控制成为耳机插座,LED灯也改为白色。
内部的改变才是Nait 50真正的魅力所在。输入选择采用fly-by-wire控制,极大缩
短了信号路径,并且采用NSC 222的新耳机放大器。全新的独家分离式晶体管MM
唱机台与来自NAP 250(2023年)的功率放大器并肩运行,致敬Nait 1的声音传
奇。
尽管身材小巧,但Nait 50是一款名副其实的发烧级集成式放大器。
需了解有关详情,请登陆
83
Page 86
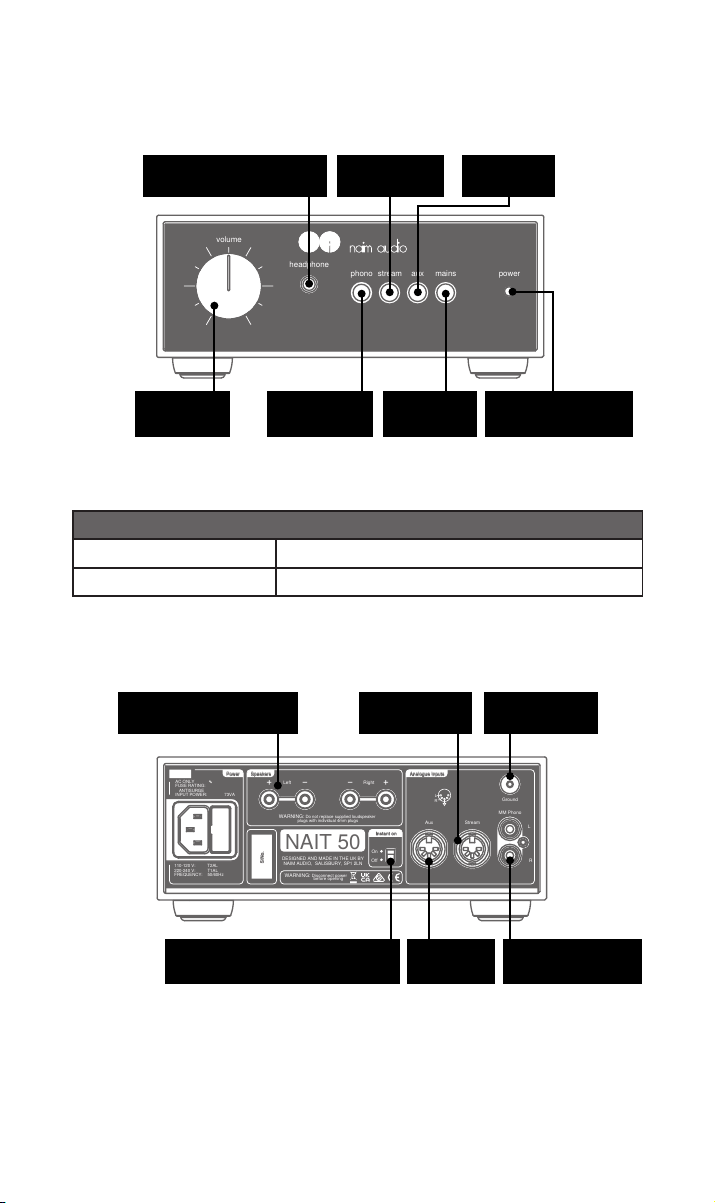
Left Right
Speakers
WARNING: Do not replace supplied loudspeaker
plugs with individual 4mm plugs
WARNING: Disconnect power
before opening
AC ONLY ∿
FUSE RATING:
ANTISURGE
INPUT POWER: 73VA
Power
S/No.
NAIT 50
DESIGNED AND MADE IN THE UK BY
NAIM AUDIO, SALISBURY, SP1 2LN
110-120 V: T2AL
220-240 V: T1AL
FREQUENCY: 50/60Hz
Aux Stream
Ground
MM Phono
L
R
Instant on
Off
On
Analogue InputsAnalogue Inputs
L
R
3.功能和连接
volume
headphone
phono stream aux mains
power
LED亮度规格
明亮
暗淡
耳机输出
1/4英寸(6.35毫米)插孔
音量控制 待机按钮
唱机输入按钮
流媒体输入
按钮
NAIT 50开机
NAIT 50待机
扬声器接口
(左 +/-; 右 -/+)
流媒体输入 唱机台
音频输入
按钮
LED
待机/开机
84
音频输入 即时开机/自动待机开关
唱机输入
Page 87
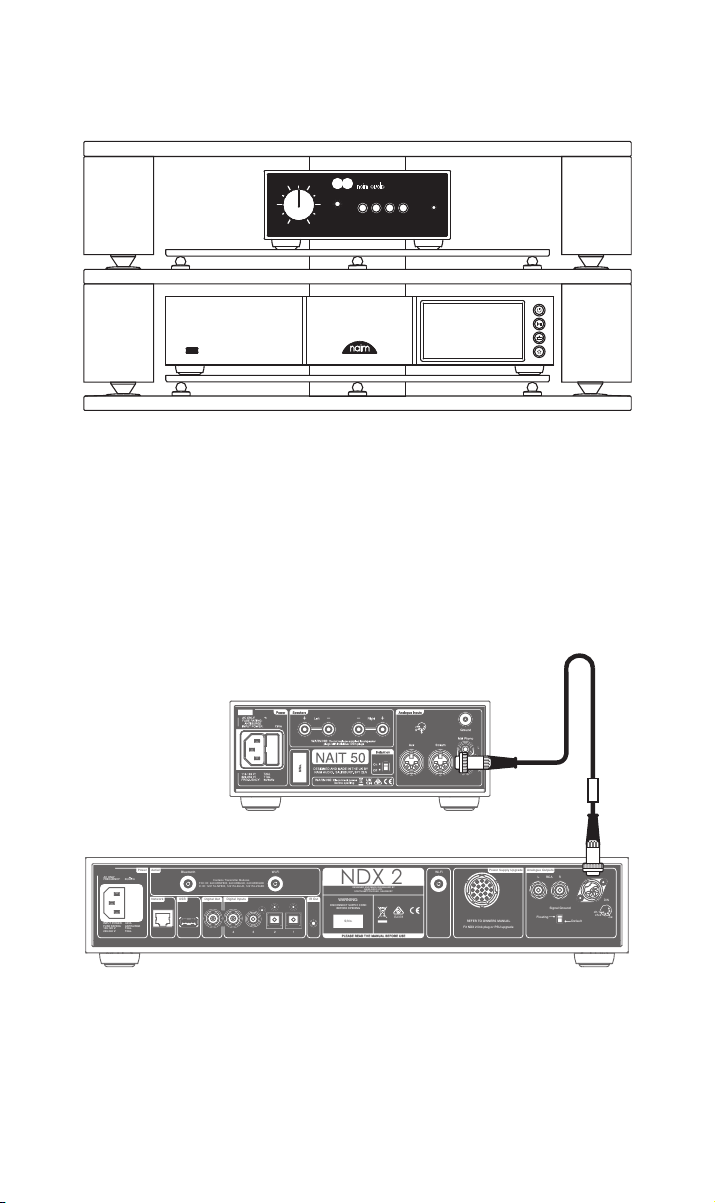
4.设置
PLEASE READ THE MANUAL BEFORE USE
S/No.
Bluetooth
Wi-Fi
Contains Transmitter Modules
FCC ID: 2ACURNP800, 2ACURBLUE, 2ACURZIGEE
IC ID: 12217A-NP800, 12217A-BLUE, 12217A-ZIGEE
REFER TO OWNERS MANUAL
Fit NDX 2 link plug or PSU upgrade
Power Supply Upgrade
2 1
3
Network
Aerial
Power
Analogue Outputs
DIN
L R
Default
Floating
RCA
ch.1
NDX 2
WARNING:
DISCONNECT SUPPLY CORD
BEFORE OPENING
DESIGNED AND MADE IN ENGLAND BY
NAIM AUDIO LTD.
SOUTHAMPTON ROAD, SALISBURY
E2378
ch.2
-ve
Signal Ground
USB
4
Wi-Fi
IR Out
IR Out
Digital Out
INPUT POWER: 60VA
FUSE RATING: ANTISURGE
100-120 V: T4AL.
220-240 V: T2AL.
AC ONLY
FREQUENCY: 50/60Hz
Digital Inputs
PLEASE READ THE MANUAL BEFORE USE
S/No.
Wi-Fi
Contains Transmitter Modules
FCC ID: 2ACURNP800, 2ACURBLUE, 2ACURZIGEE
IC ID: 12217A-NP800, 12217A-BLUE, 12217A-ZIGEE
REFER TO OWNERS MANUAL
Fit NDX 2 link plug or PSU upgrade
Power Supply Upgrade
2 1
3
Analogue Outputs
DIN
L R
Default
Floating
RCA
ch.1
NDX 2
WARNING:
DISCONNECT SUPPLY CORD
BEFORE OPENING
DESIGNED AND MADE IN ENGLAND BY
NAIM AUDIO LTD.
SOUTHAMPTON ROAD, SALISBURY
E2378
ch.2
-ve
Signal Ground
4
Wi-Fi
IR Out
IR Out
Digital Out
Digital Inputs
volume
headphone
phono stream aux mains
您的NAIT 50必须连接到(例如NDX2或唱机)音源,但在此之前,请确保两个组
件都处于最终位置并与主电源断开连接。
为了获得最佳性能,请使用专用的高保真支架(最好是 Naim Fraim),NAIT 50
位于音源上方,如图所示。
更多信息,请参见第5.1节
连接前确保所有设备均已关闭。
power
将NDX2附带的DIN互连缆线连接到NAIT 50的流媒体输入。
85
Page 88
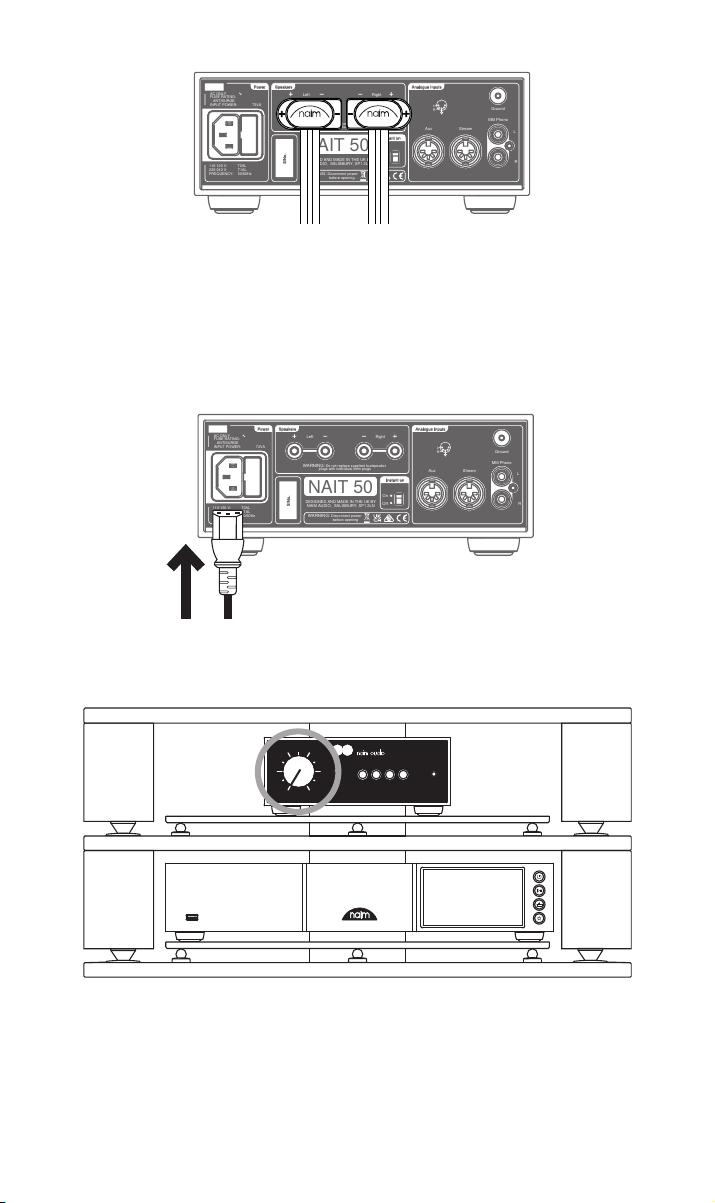
将扬声器缆线连接到 NAIT 50,确保每根缆线都连接到正确的扬声器,并且均处
Left Right
Speakers
WARNING: Do not replace supplied loudspeaker
plugs with individual 4mm plugs
WARNING: Disconnect power
before opening
AC ONLY ∿
FUSE RATING:
ANTISURGE
INPUT POWER: 73VA
Power
S/No.
NAIT 50
DESIGNED AND MADE IN THE UK BY
NAIM AUDIO, SALISBURY, SP1 2LN
110-120 V: T2AL
220-240 V: T1AL
FREQUENCY: 50/60Hz
Aux Stream
Ground
MM Phono
L
R
Instant on
Off
On
Analogue InputsAnalogue Inputs
L
R
Left Right
Speakers
WARNING: Do not replace supplied loudspeaker
plugs with individual 4mm plugs
WARNING: Disconnect power
before opening
AC ONLY ∿
FUSE RATING:
ANTISURGE
INPUT POWER: 73VA
Power
S/No.
NAIT 50
DESIGNED AND MADE IN THE UK BY
NAIM AUDIO, SALISBURY, SP1 2LN
110-120 V: T2AL
220-240 V: T1AL
FREQUENCY: 50/60Hz
Aux Stream
Ground
MM Phono
L
R
Instant on
Off
On
Analogue InputsAnalogue Inputs
L
R
于同相状态。
更多信息,请参见第5.3节。
最后,将电源线连接到 NAIT 50。
volume
headphone
phono stream aux mains
power
检查音量处于最小位置,然后打开音源,最后打开NAIT 50。
更多信息,请参见第5.4节
86
Page 89
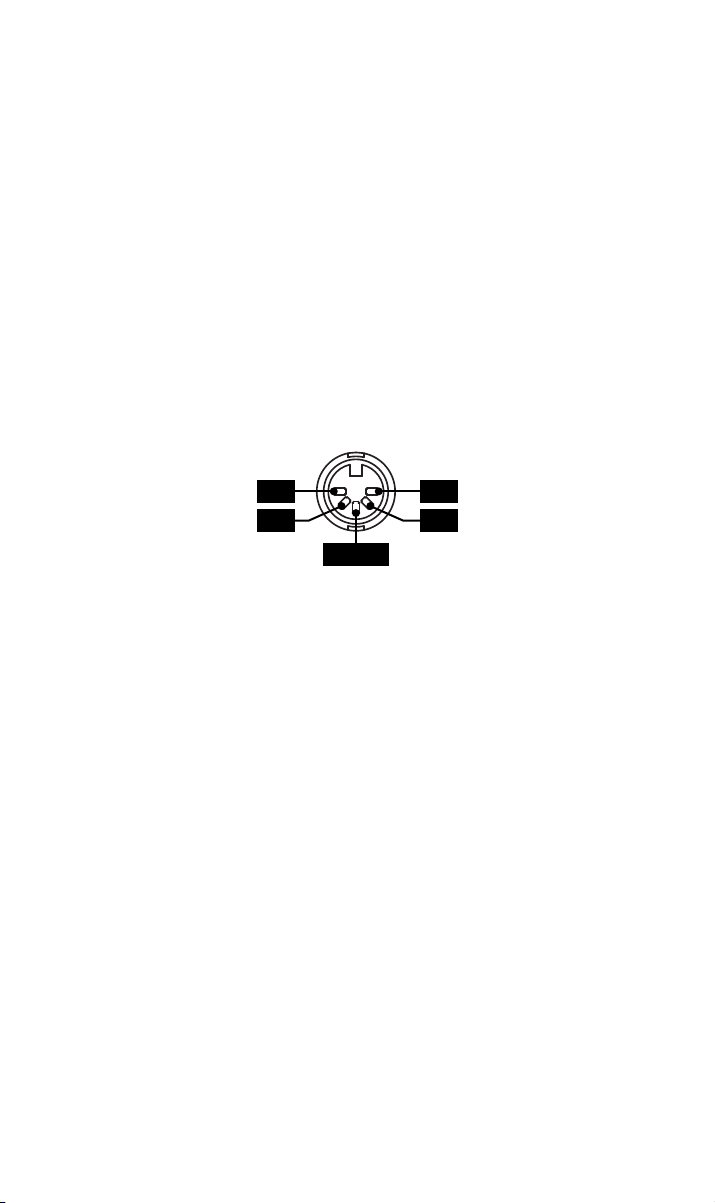
5.NAIT 50安装和使用技巧
我们知道您已迫不及待地想要享受全新的 NAIT 50 了,但我们保证,只要遵循下列指引,它
将获得更好的音质水平,这些指引旨在帮助您充分体验您的集成式放大器。
5.1 拆箱和放置
为获得最佳性能,请将您的 Naim 产品放置在专用的高保真设备架上(最好是 Naim Fraim 或
Fraim Lite),以尽量减少可能影响声音的振动。
没有空间放置支架?考虑将您的NAIT 50放在合适家具的Fraim玻璃搁板上,以提供坚固但隐
蔽的支撑。
切勿将 Naim 产品堆叠在一起,如果将它们并排放置,请在产品之间留出一些距离。同样,
相连接的产品不应离得太远:最大间隔距离应为随附的互连导线所允许的距离。
为降低扬声器发出嗡嗡声的风险,请勿将电源或功率放大器靠近源组件放置。
5.2 输入连接详细信息
NAIT 50具有用于线路电平音源的DIN输入和用于唱机的RCA连接器。
左
右
接地
nc
nc
5.3 扬声器缆线和连接器
要获得更佳的性能,请使用Naim NAC A5扬声器缆线。
使用其他制造商生产的缆线可能影响性能甚至损坏集成式放大器。
Naim NAC A5缆线具有方向性,连接时应将绝缘层上的箭头指向扬声器。附带的Naim扬声器
连接器符合欧盟安全法规,必须使用。
需要注意,一对扬声器的缆线长度要相同,建议不超过 20m。
与一些早期的 Naim 设计不同,我们没有规定最小的扬声器缆线长度,但仍建议您避免使用
低于 2m 的长度。
确保在连接扬声器时它们是“同相”的,即放大器的扬声器正输出连接到扬声器正输入,并
且左右输出分别连接到正确的扬声器上。
87
Page 90

5.4 上电/断电
完成所有输入和输出连接后,将随附的电源线连接到 NAIT 50 和主电源。
请注意:在打开 NAIT 50 之前,您的音频源(例如流媒体或 CD 播放器)以及任何相关的外部
电源都应打开。
只需按下集成式放大器前面板上的待机按钮即可打开NAIT 50。
5.5 待机功率设置
NAIT 50默认设置为“自动待机”——不工作19分钟后,它会自动进入待机模式(功耗低于
0.5W)。音乐感应会在检测到输入信号时将放大器从待机状态唤醒。
为获得最佳音质,可以将后面板上的待机设置切换为“即时启动”,这样可以使所有敏感音
频电路永久通电。
6.主电源、接地及其他
仅使用NAIT 50随附的电源线和插头,或升级的Naim Power-Line电源线。
在使用保险丝插头的位置,应安装 13 安培的保险丝。
请勿将电压相关电阻器或噪声抑制器连接到电源插头中;它们会降低主电源和声音。
6.1 接地
为避免回路噪音,整个系统的信号接地应在一个地方与电源接地相连。通常,这个地方在主
电源处。
例如,Naim 串流装置有一个接地开关。如果没有其他来源将电源接地连接到信号接地,则应
将此功能设置为“默认”。此设置将提供最佳音质。
6.2 不可重新接线的电源插头
如果从电源线切断不可重新接线的主插头(无论出于什么目的),必须以使其完全无用的方
式处理插头。
如果将切断插头插入电源插座,则存在极大的触电危险。
6.3 电源电路和干扰
高保真音响系统通常与其他家用设备共用主电源电路,其中一些设备会导致失真,可能表现
为电源变压器产生的机械嗡嗡声,包括NAIT 50中的变压器。
变压器嗡嗡声不会通过扬声器传输,对系统性能没有任何影响;不过,精心挑选 Naim 系统
的放置位置可能减少嗡嗡声,独立的专用电源电路也可达到此效果。这种专用电路通常能够
提升系统性能。有关安装独立电源电路的建议,请仅咨询合格的电工。
88
Page 91

6.4 防雷措施
当存在雷击风险时,您的 Naim 系统应关闭并与主电源完全断开,防止出现潜在的损坏。
7.其他提示及建议
现在您已经整理了所有要点,让我们继续执行一些操作以优化新 NAIT 50 的性能。
7.1 试运行
Naim 产品由一系列精心挑选的高品质组件手工打造而成。您的 NAIT 50 开箱即用功能听起来
很棒,但所有这些不同组件在使用的最初几周内启动并相互作用后,其性能可能会进一步提
高。保持系统处于通电状态将有助于此过程。
7.2 清洁产品和连接组件
Naim建议使用软布轻轻擦拭产品表面。清洁产品可能含有对外观表面处理和涂层有不良影响
的成分。
互连插头和插座应保持清洁且无腐蚀。最简单的方法是完全关闭您的 Naim 产品(和任何连
接的设备),将所有连接组件从插座上拔下,然后再次将它们牢牢地插入。不应使用接触清
洁剂和所谓的“增强剂”,因为残留的沉积物可能会降低系统的声音。
8.支持
消费者保护条例因国家/地区而异。在大多数地区,如果您的产品出现问题,您购买 Naim 产
品的零售商应该是您的主要联系人。
问题可能是由于系统或其安装故障所致,因此充分利用经销商的诊断技能至关重要。您可以
在 naimaudio.com 上找到一系列有关 Naim 产品的支持文章
如果您的 Naim 产品仍有问题,请通过 [email protected] 直接联系我们寻求帮助和
建议
9.服务和更新
任何维修或硬件更新只能由授权的 Naim 服务中心或在 Naim 总部进行。许多组件都是经过测
试或匹配的定制件,通常无法从其他来源获得适当的替换件。
如有任何服务或维修问题,请联系您当地的 Naim 零售商。
89
Page 92

10.规格
音频规格
功率输出(扬声器)
功率输出(耳机) 1.5 W转换为6Ω
增益 唱机台:40 dB (@1kHz RIAA)
输入 立体声5针DIN x 2,47 k线路电平
频率响应 通过线路:-3 dB @ 4 Hz至45 kHz
硬件规格
尺寸(高 x 宽 x 深)
重量
被动功耗 20 W(闲置)
待机功耗 <0.5 W(自动待机带有音乐感应)
电源 110 V - 120 V,220 V - 240 V 50/60 Hz
保险丝 230 V = T1AL (防喘振);115 V = T2AL (防喘振)
外观 “镀铬减震器”
运行温度 5-35°C
储存温度 0-50°C
25 W转换为8Ω @0.1% THD+N @ 230VAC
1/4英寸(6.35毫米)插头
前置放大器平台(和耳机)16 dB
功率放大器平台:29 dB
立体声RCA 47 K x 1,5 mV MM电平
通过唱机:-3 dB @ 6 Hz至30 kHz
87 x 207 x 321 mm(包括支脚)
4.5千克(仅放大器)
前后 - 黑色阳极氧化铝
机盖 - 黑色粉末涂层
90
Page 93

扩展规格
功率输出
脉冲功率转换为2Ω (1kHz为
20mS,重复500mS IHF)
峰值电流转换为1Ω(1kHz 1mS) +/-15 放大峰值(225 W峰值功率)
最大功耗 160 VA全功率 4Ω 2通道驱动
功耗(大声) 2x时为73 VA,1/8全功率 8R
2/3全功率时为THD+N 8Ω@1kHz 0.015%
剪切的输入信号
(最大音量)
信噪比参照1W 8ΩA-加权 80 dB线路,1 V输入
信噪比参照25W 8ΩA-加权 93 dB线路,1 V输入
串扰 85 dB线路1 kHz参照25 W 8Ω
阻尼系数转换为8Ω 36
控制 仅位于产品上(无遥控器),3个输入按钮、待机、自动静音耳
40 W 4Ω @0.1% THD+N @ 230VAC
60 W 2Ω @1% THD+N
88 mV线路
710 uV唱机
78 dB唱机参照5 mV输入
84 dB唱机参照5 mV输入
80 dB唱机
机、 后侧自动待机失败开关
12.产品回收
带有轮式垃圾桶打叉标志的产品不能作为生活垃圾处理。
as domestic waste. 这些产品必须在能够回收利用并适当处理任何废物副产品的机
构中进行处理。recycling them and appropriately handling any waste
by-products. 请联系当地的相关部门,了解距您最近的此类机构的详细信息。
适当的回收和废物处理有助于优化资源并保护环境免受污染。protects the environment
from contamination.
91
Page 94
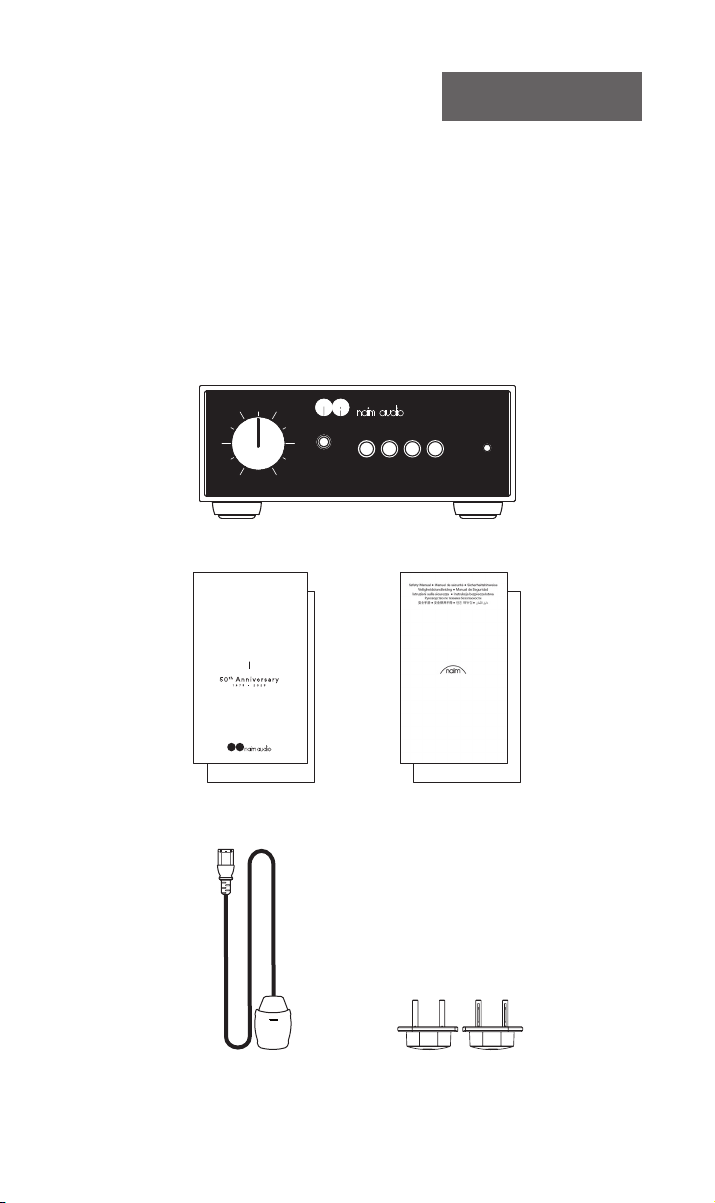
簡介
注意:如需瞭解所有安全警
告,請參閱安全使用手冊。
歡迎使用全新 Naim 集成放大器。與所有 Naim Audio 產品一樣,NAIT 50 以音樂
效能作為優先考慮因素。為了實現該產品的全部潛能,請務必按照本手冊中提供
的簡單安裝與使用指南進行操作。我們先開始瞭解一些產品和設定要點,然後再
進入第 4 節瞭解詳細資訊。
1.包裝內的物品
volume
headphone
phono stream aux mains
1 臺NAIT 50
User Guide
AMPLIFIER - NAIT 50
power
92
1 本資訊小冊子 1 本安全使用手冊
1 條電源線 2 個揚聲器連接器
(已預先安裝至裝置)
Page 95

2. Naim 集成放大器的傳承
我們的故事,源於一個男人對音樂的熱情,歷經五十年的時間,憑藉一系列經典
產品的發佈,交織出其音響事業之路,並且一直走到今天。
Naim Audio 的創辦人 Julian Vereker 勳爵 (1945-2000) 對音樂充滿熱情。他曾經
是一位賽車手,也是一名企業家,並自學成為工程師。1960 年代,Julian 利用空
餘時間聆聽和錄製友人的現場演奏,但他發現,家中系統的回放效果並不理想,
遠遠達不到他所渴求的體驗。
他不甘於退而求其次,於是決定設計自己的放大器和揚聲器。他敢於挑戰公認的
智慧,專注於各方面效能的研究,務求讓音效能直擊人心。這些最初的設計為高
保真產品奠定了基礎,往後陸續有一系列屢獲殊榮的經典產品誕生,而這些產品
在 50 年後仍然能夠產生影響。
Nait 50 專為紀念 Naim 50 周年而設計,限量 1,973 部。乍看之下,Nait 50 與
Nait 1 的外觀完全相同,但細看就會發現,產品前後都是優質陽極氧化鋁,音量
旋鈕採用實心鋁結構,有助於減震,平衡控制已被換成耳機插孔,而 LED 燈則變
成了白色。
內部的轉變則為 Nait 50 帶來了真正屬於自己的特質。輸入選擇採用線傳飛控
(Fly-by-wire) 技術,訊號路徑長度得以大幅減少,而全新的耳機放大器則是從
NSC 222 升級而來。全新的獨家分立式晶體管 MM 唱頭放大器致敬卓著的 Nait 1
音效,並配合從 NAP 250 (2023) 升級而來的功率放大器一起運作。
Nait 50 是一款真正的音響發燒友級別集成放大器,僅推出微型版。
有關詳細信息,請訪問
93
Page 96
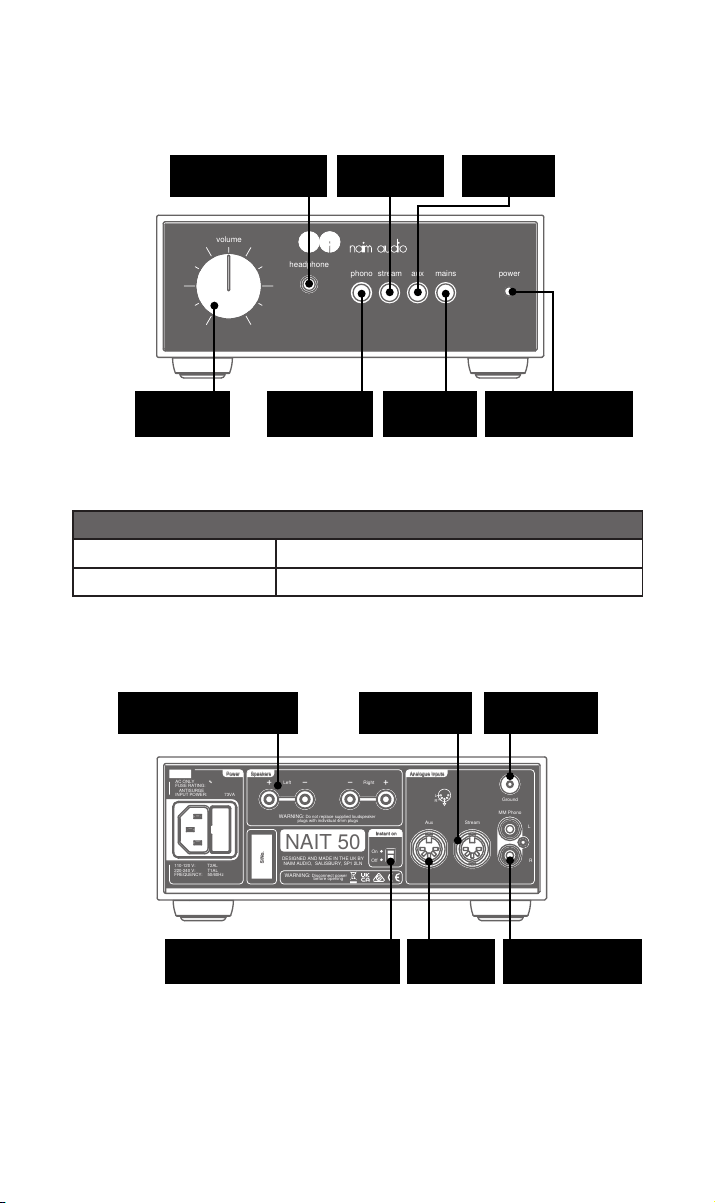
Left Right
Speakers
WARNING: Do not replace supplied loudspeaker
plugs with individual 4mm plugs
WARNING: Disconnect power
before opening
AC ONLY ∿
FUSE RATING:
ANTISURGE
INPUT POWER: 73VA
Power
S/No.
NAIT 50
DESIGNED AND MADE IN THE UK BY
NAIM AUDIO, SALISBURY, SP1 2LN
110-120 V: T2AL
220-240 V: T1AL
FREQUENCY: 50/60Hz
Aux Stream
Ground
MM Phono
L
R
Instant on
Off
On
Analogue InputsAnalogue Inputs
L
R
3.功能與連接
volume
headphone
phono stream aux mains
power
LED 亮度規格
明亮
暗淡
耳機輸出
6.35mm 插孔
音量控制 待命按鈕
唱頭輸入按鈕
串流輸入按鈕
NAIT 50 使用中
NAIT 50 待命中
揚聲器插座
(左 +/-;右 -/+)
串流輸入 轉盤接地
Aux 輸入
按鈕
LED
待命/開
94
Aux 輸入 瞬動/自動待命開關
唱頭輸入
Page 97
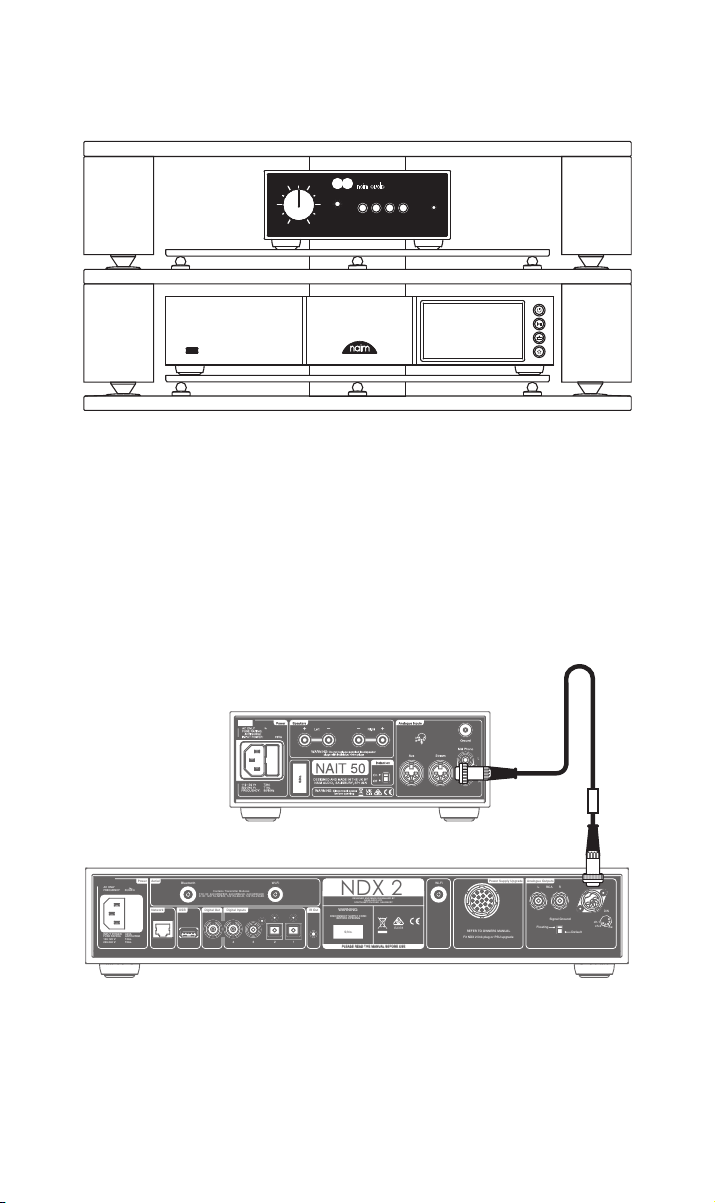
4.設定
PLEASE READ THE MANUAL BEFORE USE
S/No.
Bluetooth
Wi-Fi
Contains Transmitter Modules
FCC ID: 2ACURNP800, 2ACURBLUE, 2ACURZIGEE
IC ID: 12217A-NP800, 12217A-BLUE, 12217A-ZIGEE
REFER TO OWNERS MANUAL
Fit NDX 2 link plug or PSU upgrade
Power Supply Upgrade
2 1
3
Network
Aerial
Power
Analogue Outputs
DIN
L R
Default
Floating
RCA
ch.1
NDX 2
WARNING:
DISCONNECT SUPPLY CORD
BEFORE OPENING
DESIGNED AND MADE IN ENGLAND BY
NAIM AUDIO LTD.
SOUTHAMPTON ROAD, SALISBURY
E2378
ch.2
-ve
Signal Ground
USB
4
Wi-Fi
IR Out
IR Out
Digital Out
INPUT POWER: 60VA
FUSE RATING: ANTISURGE
100-120 V: T4AL.
220-240 V: T2AL.
AC ONLY
FREQUENCY: 50/60Hz
Digital Inputs
PLEASE READ THE MANUAL BEFORE USE
S/No.
Wi-Fi
Contains Transmitter Modules
FCC ID: 2ACURNP800, 2ACURBLUE, 2ACURZIGEE
IC ID: 12217A-NP800, 12217A-BLUE, 12217A-ZIGEE
REFER TO OWNERS MANUAL
Fit NDX 2 link plug or PSU upgrade
Power Supply Upgrade
2 1
3
Analogue Outputs
DIN
L R
Default
Floating
RCA
ch.1
NDX 2
WARNING:
DISCONNECT SUPPLY CORD
BEFORE OPENING
DESIGNED AND MADE IN ENGLAND BY
NAIM AUDIO LTD.
SOUTHAMPTON ROAD, SALISBURY
E2378
ch.2
-ve
Signal Ground
4
Wi-Fi
IR Out
IR Out
Digital Out
Digital Inputs
volume
headphone
phono stream aux mains
您的 NAIT 50 必須與音源連接(例如 NDX2 或您的轉盤),但是在您進行連接
前,請確保組件均位於其最終位置並斷開主電源連線。
如需獲得最佳效能,請使用專用高保真支架 – 理想為 Naim Fraim – NAIT 50位
於音源上方(如圖所示)。
如需瞭解詳細資訊,請參閱第 5.1 節。
確保所有設備在連接前均為關閉狀態。
power
將 NDX2 隨附的 DIN 連接纜線與 NAIT 50 的串流輸入端連接。
95
Page 98
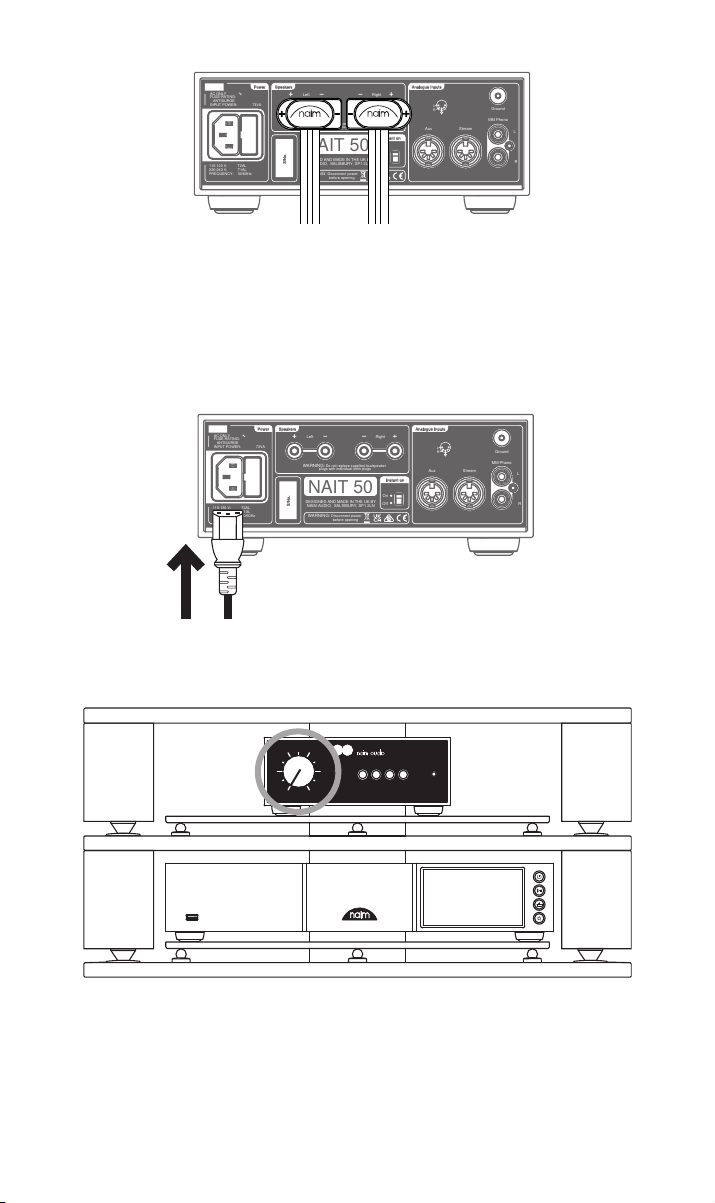
將揚聲器纜線與 NAIT 50 連接,並確保每一條纜線均與正確的揚聲器連接,且兩
Left Right
Speakers
WARNING: Do not replace supplied loudspeaker
plugs with individual 4mm plugs
WARNING: Disconnect power
before opening
AC ONLY ∿
FUSE RATING:
ANTISURGE
INPUT POWER: 73VA
Power
S/No.
NAIT 50
DESIGNED AND MADE IN THE UK BY
NAIM AUDIO, SALISBURY, SP1 2LN
110-120 V: T2AL
220-240 V: T1AL
FREQUENCY: 50/60Hz
Aux Stream
Ground
MM Phono
L
R
Instant on
Off
On
Analogue InputsAnalogue Inputs
L
R
Left Right
Speakers
WARNING: Do not replace supplied loudspeaker
plugs with individual 4mm plugs
WARNING: Disconnect power
before opening
AC ONLY ∿
FUSE RATING:
ANTISURGE
INPUT POWER: 73VA
Power
S/No.
NAIT 50
DESIGNED AND MADE IN THE UK BY
NAIM AUDIO, SALISBURY, SP1 2LN
110-120 V: T2AL
220-240 V: T1AL
FREQUENCY: 50/60Hz
Aux Stream
Ground
MM Phono
L
R
Instant on
Off
On
Analogue InputsAnalogue Inputs
L
R
條纜線均為同相。
如需瞭解詳細資訊,請參閱第 5.3 節。
最後,將電源線與 NAIT 50 連接。
volume
headphone
phono stream aux mains
power
檢查音量是否調校至最低,然後開啟音源,最後才開啟 NAIT 50。
如需瞭解詳細資訊,請參閱第 5.4 節。
96
Page 99
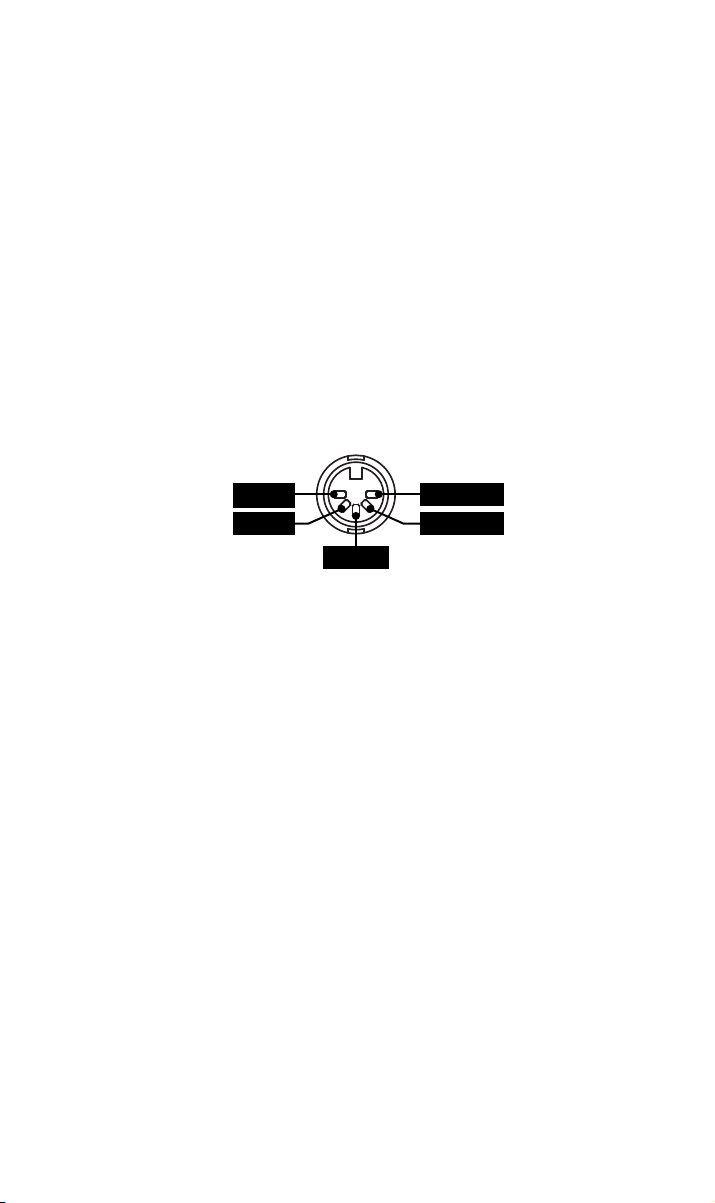
5.NAIT 50 安裝與使用貼士
我們知道您想立即體驗全新 NAIT 50,但如果您按照本指南進行操作,一定會獲得更加完美的
音效,所有設計旨在為您提供完美的集成放大器使用體驗。
5.1 開箱與放置
爲了獲得最佳效能,請在專用的高保真設備支架上使用您的 Naim 產品 - 理想支架為 Naim
Fraim 或 Fraim Lite - 以將可能影響聲音的振動最小化。
沒有安裝支架的空間?可考慮將 NAIT 50 放置在位於合適家具上的 Fraim 玻璃架上,以提供
堅實有力的支撐。
請勿將 Naim 產品堆放在一起,如果您要將它們並排放置,請在裝置之間留出一定距離。同
樣,相互連接的產品不應該相距太遠:最大分隔距離不可超過隨附連接線的長度。
為降低揚聲器發出雜音的風險,請勿將電源或功率放大器放置在靠近音源組件的位置。
5.2 輸入連接詳情
NAIT 50 具備適用於線路位準音源的 DIN 輸出,以及適用於轉盤的 RCA 連接器。
L(左)
接地
nc(常閉)
nc(常閉)R(右)
5.3 揚聲器纜線和連接器
如需獲得最佳效能,請使用 Naim NAC A5 揚聲器纜線。
使用其他製造商的纜線可能會影響效能,甚至可能會損壞集成放大器。
Naim NAC A5 纜線是分方向的。連接時,絕緣層上所印的箭頭應該要指向揚聲器。隨附的
Naim 揚聲器連接器符合歐洲的安全規例,必須使用。
重要的是,您的兩條揚聲器纜線長度應當相同,建議的最大長度爲 20 米。
與早期的 Naim 設計不同,我們沒有規定最小的揚聲器纜線長度,但仍然建議纜線長度不應
少於 2 米。
確保它們在與揚聲器連接時為同相 – 也就是說放大器的正極揚聲器輸出端口連接到正極揚聲
器輸入端口 – 並且左右輸出端口連接到正確的揚聲器。
97
Page 100

5.4 通電/斷電
所有輸入和輸出連接完成後,將隨附的主電源線連接至您的 NAIT 50 和主電源。
請注意:在您開啟 NAIT 50 前,您的音源 – 如音樂串流器或 CD 播放器 – 以及任何相關的外
部供電器應當開啟。
您現在只需按下集成放大器前方面板上的待命按鈕,即可接通 NAIT 50 的電源。
5.5 待命電源設定
根據預設,NAIT 50 設定為「自動待命」– 如非活動狀態持續達 19 分鐘,可自動進入待命模
式(耗電量低於 0.5W)。當偵測到輸入訊號時,音樂感應功能可將放大器從待命狀態喚醒。
為了呈現最佳音效品質,將後方面板上的待命設定切換為「瞬動」,使所有感應式音訊電路
始終處於通電狀態。
6.主電源、接地配置及更多
僅使用 NAIT 50 隨附的主電源線和插頭或升級的 Naim Power-Line 專用主電源線。
使用帶熔斷器插頭時,應安裝額定值為 13 安培的熔斷器。
請勿將接線電壓依賴性電阻或噪聲抑制器連接到主電源插頭上;否則會降低主電源供應水平
和音效品質。
6.1 接地
為了避免重複噪聲,整個系統的訊號接地應在一個地方與總接地系統相連。通常,它位於主
音源處。
例如,Naim 音樂串流器有一個接地開關。如果沒有其他音源將總接地系統與訊號接地連接,
應將此設定為「預設」。該設定可提供最佳音效品質。
6.2 不可重新接線的主電源插頭
如果不可重新接線的主電源插頭與主電源線的連線斷開(無論出於何種目的),則必須將該
插頭完全棄置。
如果將斷開後的插頭插入主電源插座,則存在極大的觸電危險。
6.3 主電源電路和干擾
高保真系統通常與其他家用設備共用一個主電源電路,其中一些設備可能會導致失真,具體
表現為主電源變壓器(包括 NAIT 50 中的變壓器)產生機械性噪聲。
變壓器的噪聲不透過揚聲器傳輸,因此不影響系統效能;但小心放置 Naim 系統可降低此噪
聲,因為它是一個單獨專用的主電源電路。這種專用電路通常也會提高系統效能。如需安裝
單獨主電源電路,應向有資格的電工徵求意見。
98
 Loading...