

Page 1

User Guide
PREAMPLIFIER - NAC 332
Page 2

Page 3

Contents
Section Page
Introduction 1
1. What’s in the box 1
2. Getting to know your NAC 332 2
3. NAC 332 setup essentials 3
4. NAC 332 detailed setup 6
5. Tips on installing and using your NAC 332 8
6. Mains power, earthing and more 10
7. Further tips and advice 11
8. Support 11
9. Service and updates 11
10. Specications 12
11. Product recycling 12
Page 4
Introduction
Please Note: Full safety
warnings can be found in
the Statutory Safety Manual.
Welcome to your new Naim preamplier. Like all Naim Audio products, the NAC 332
puts musical performance rst. To help realise its full potential, it is important to follow
the simple installation and usage guidelines covered in this manual. We start with some
product and setup essentials, before moving onto more detailed information in Section 5.
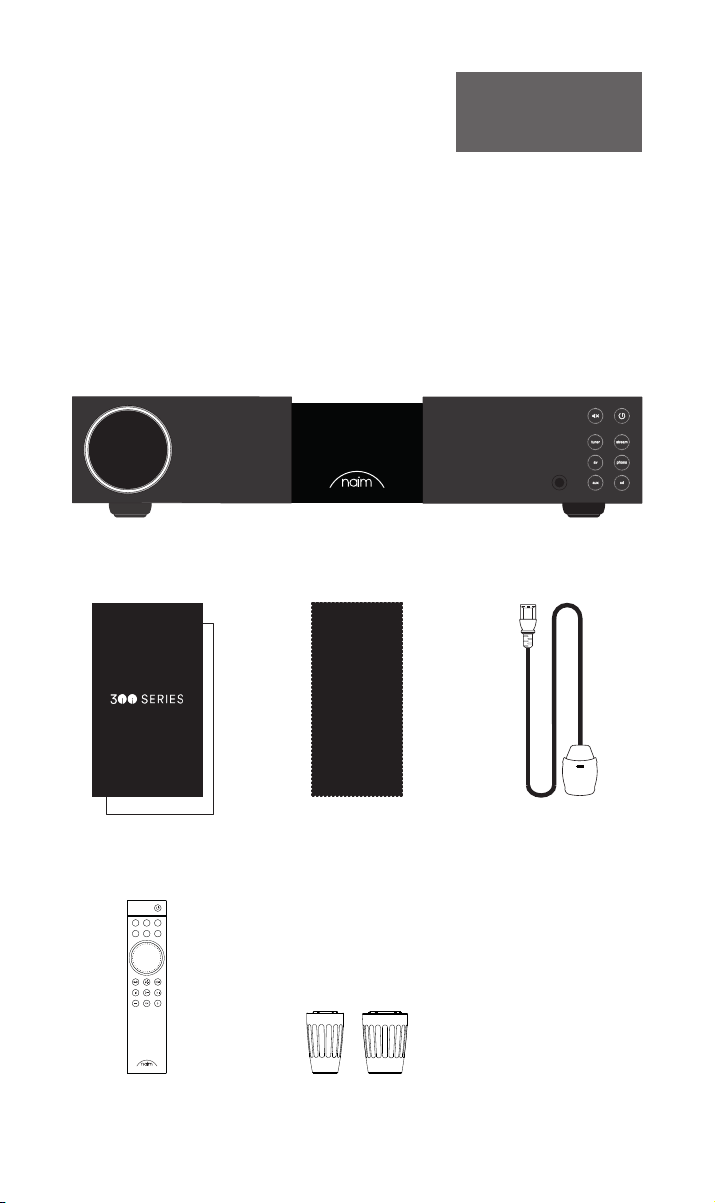
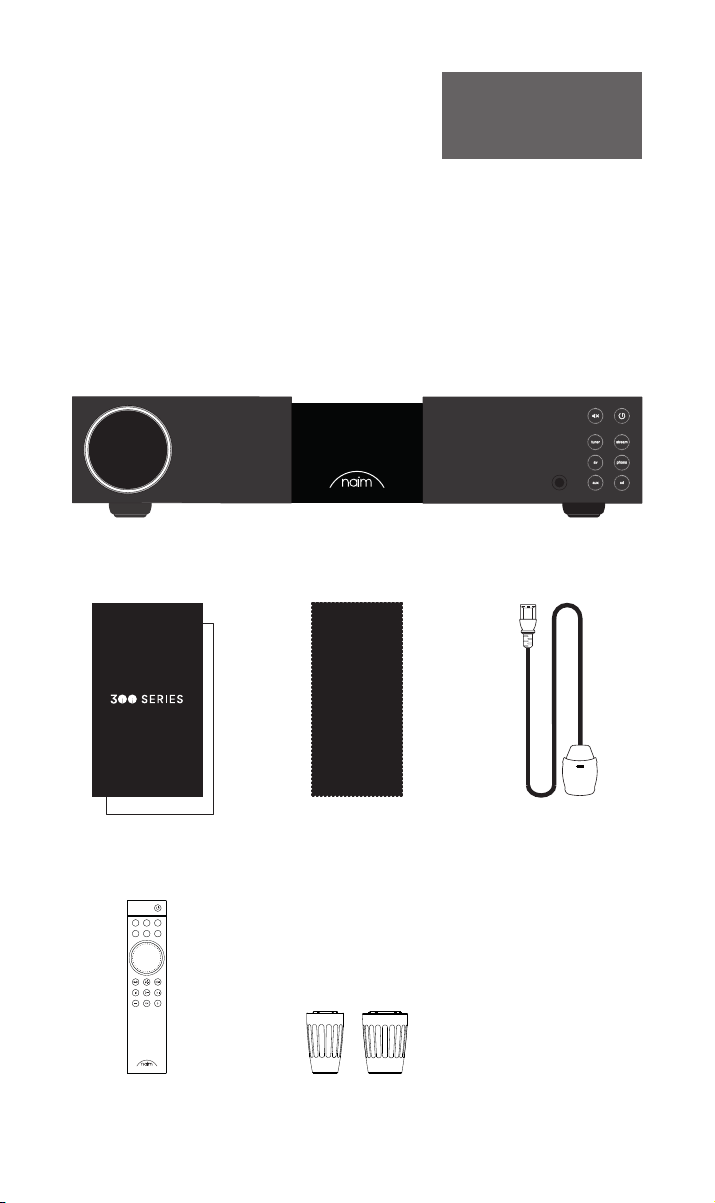
1. What’s in the box
1x NAC 332
1x Document pack
cd
stream
phono
tuner
av aux
1x Cleaning cloth 1x Power-Line Lite
1x Remote control 2x Link plugs
11
Page 5
WARNING:Disconnect power before opening
AC ONLY
FUSE RATING: ANTISURGE
1 0-120 V:1 T4AL
2 0-240 V:2 T2AL
FREQUENCY: 0 60Hz5 /
I 70VANPUT POWER:
Power
300 SERIES
PREAMPLIFIER
NAC 332
DESIGNED AND MADE IN THE UK
BY NAIM AUDIO, SALISBURY, SP1 2LN
/ .oNS
Ground
Power Supply Upgrade
Preamp Outputs
AnalogueInputs
Ground
Default
R L
R
L
RCA
XLR
Refer to User Manual
Type 3
Type 4
Remote
in
Remote
out
Auto
standby
Instant
on
1
2
Control
USB
update
Brightness
Reset/
On
RCA
output
O
3
4
6
AnalogueInputs
R
R
R
L
L
L
5
8
7
1
2
R
L
R
L
Contains FCC ID: 2ACURZIGEE IC ID: 12217A-ZIGEE
Refer to User Manual
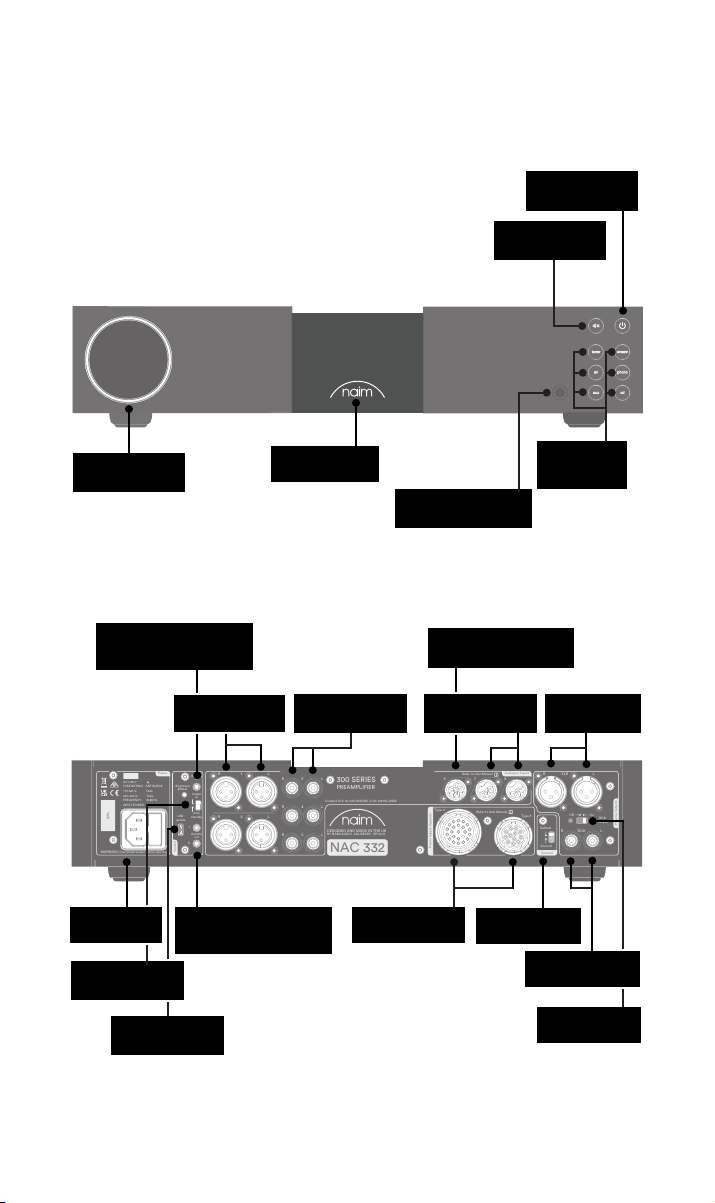
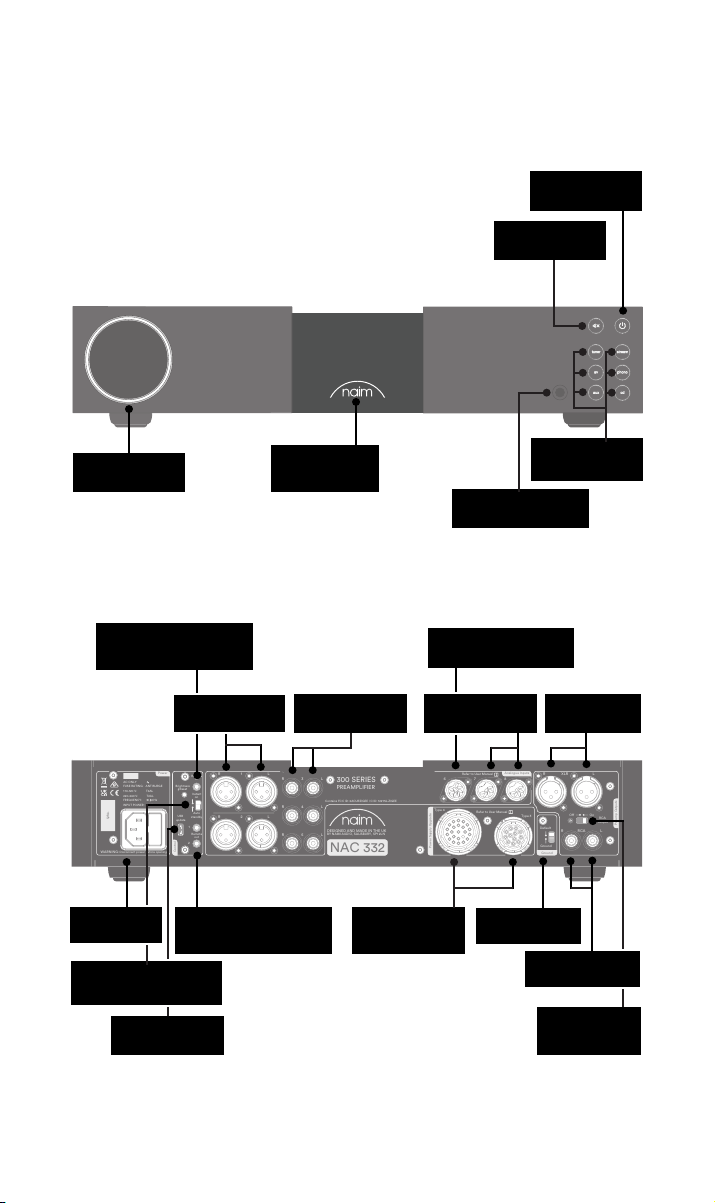
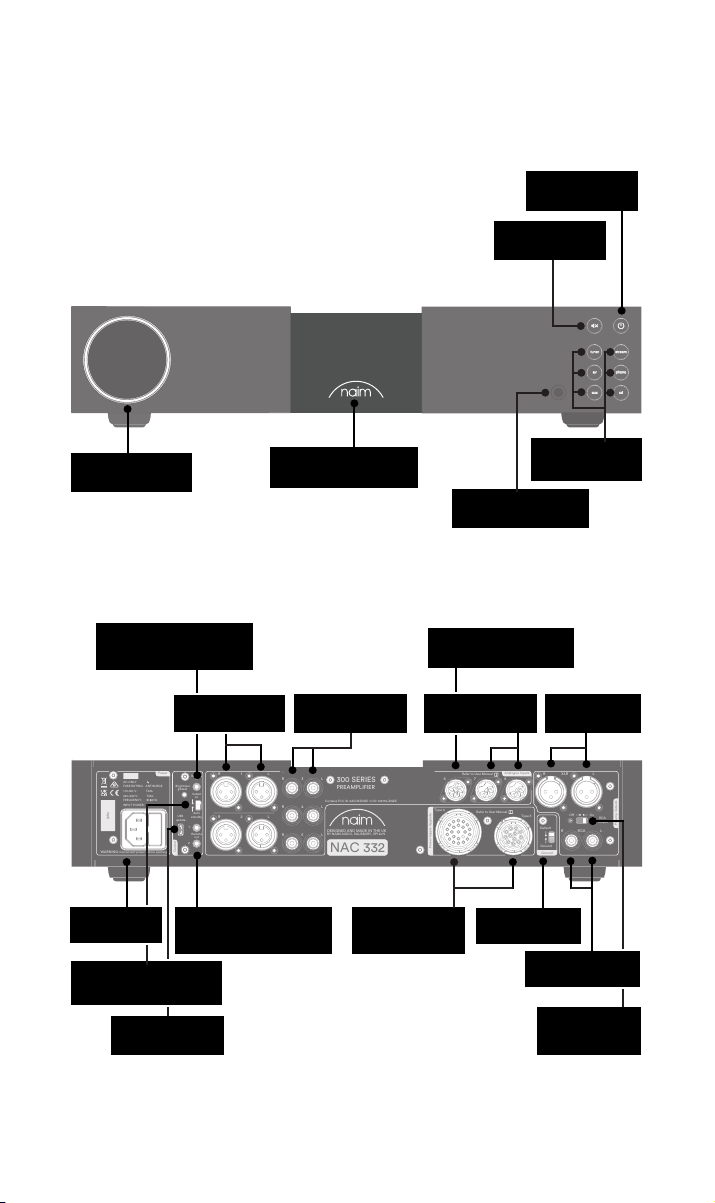
2. Getting to know your NAC 332
Standby button
Mute button
Volume control
Remote in
(3.5mm jack electrical and
Mini-TOSLINK optical)
Mains input
& fuse
Standby/
instant on switch
(3.5mm jack electrical and
USB upgrade
socket
Backlit, dimmable
XLR inputs
Remote out
Mini-TOSLINK optical)
logo
RCA inputs
Headphone 6.35mm
jack output
Power supply
upgrade sockets
DIN input for
NVC TT phono stage
DIN inputs
Signal ground
switch
RCA unbalanced
Input selection
buttons
XLR balanced
output
output
RCA output
on/off switch
22
Page 6
3. NAC 332 setup essentials
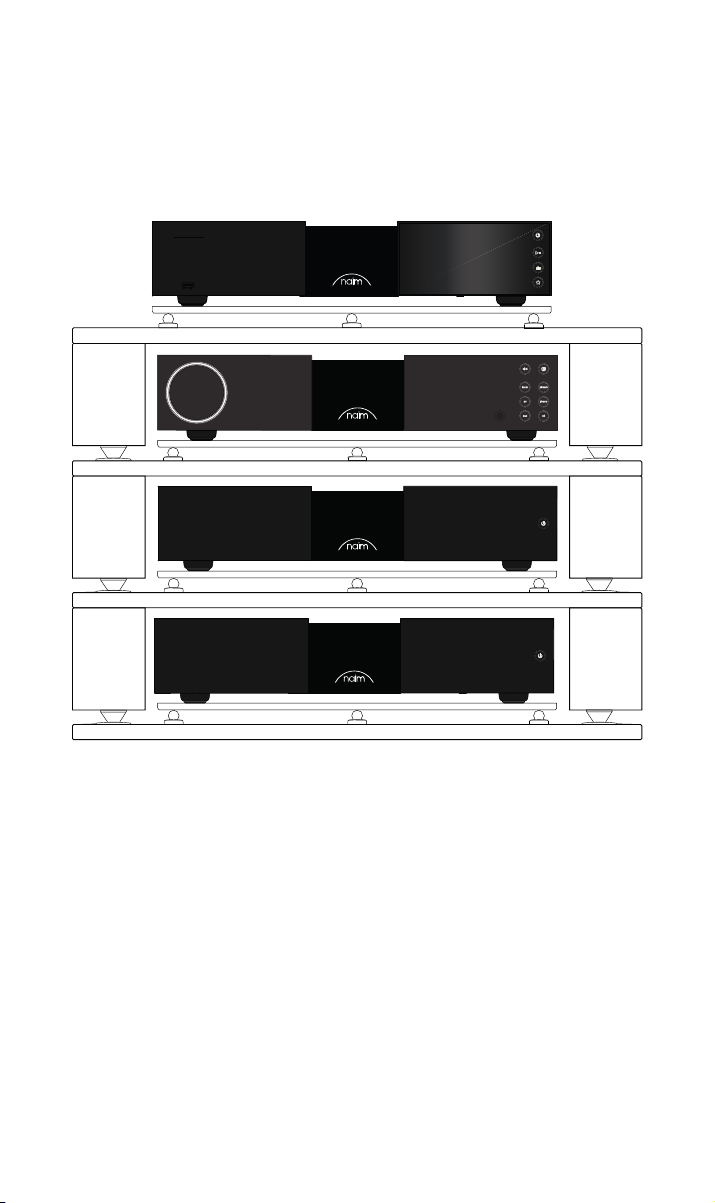
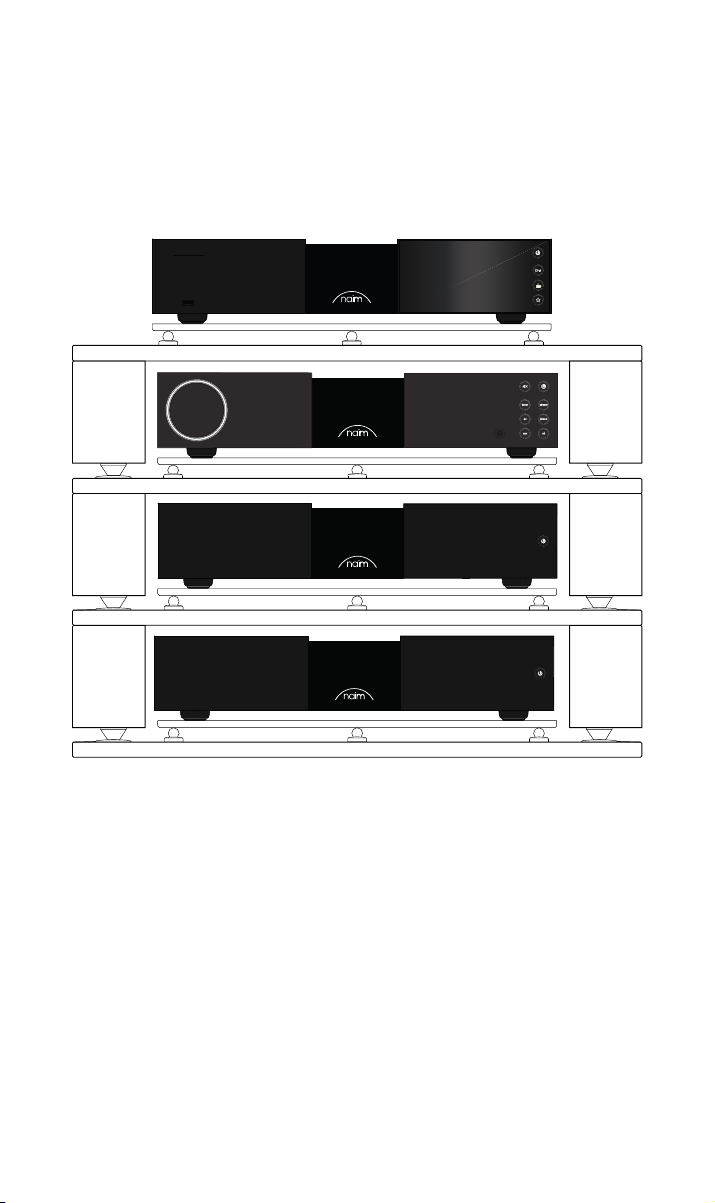
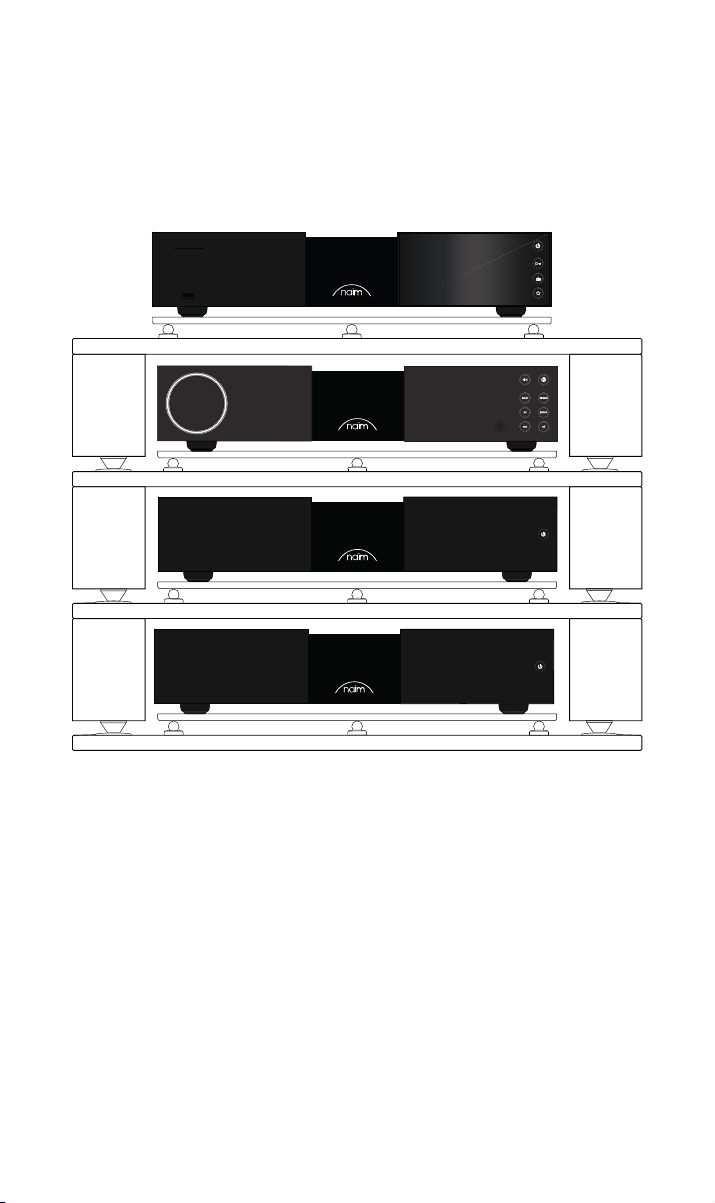
Your NAC 332 needs to be connected to one or more sources and to a power amplier
(such as the matching NSS 333 streamer and a pair of NAP 350 Power Ampliers), but
before you do, please ensure all components are in their nal positions and disconnected
from mains power.
For optimum performance, use a dedicated hi- support – ideally Naim Fraim – with the
preamplier sited above the power ampliers, as shown.
You will also need speakers with cables.
33
Page 7
3.1 Connecting your NAC 332 to the NAP 350 power ampliers
WARNING:
Disconnect power before opening
AC ONLY
FUSE RATING: ANTISURGE
1 0-120 V:1 T4AL
2 0-240 V:2 T2AL
FREQUENCY: 0 60Hz5 /
I 70VANPUT POWER:
Power
300 SERIES
PREAMPLIFIER
NAC 332
DESIGNED AND MADE IN THE UK
BY NAIM AUDIO, SALISBURY, SP1 2LN
/ .oNS
Ground
Power Supply Upgrade
Preamp Outputs
AnalogueInputs
Ground
Default
R L
R
L
RCA
XLR
Refer to User Manual
Type 3
Type 4
Remote
in
Remote
out
Auto
standby
Instant
on
1
2
Control
USB
update
Brightness
Reset/
On
RCA
output
O
3
4
6
AnalogueInputs
R
R
R
L
L
L
5
8
7
1
2
R
L
R
L
Contains FCC ID: 2ACURZIGEE IC ID: 12217A-ZIGEE
Refer to User Manual
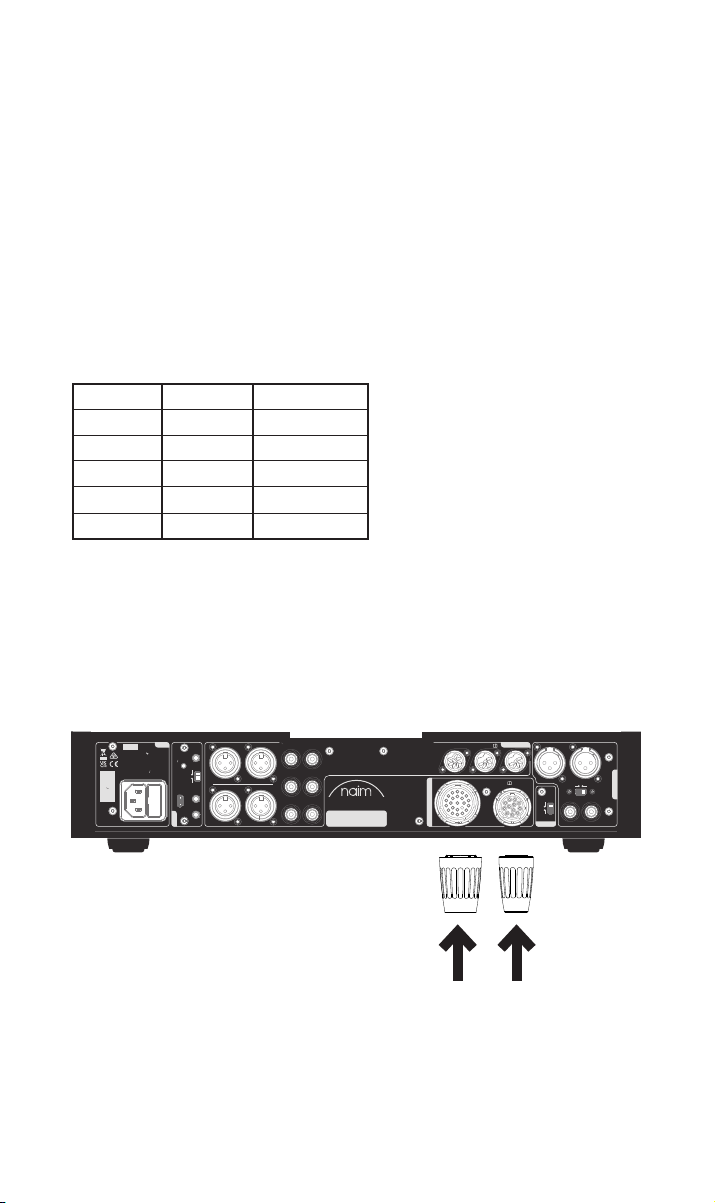
Connect two XLR cables (supplied with the NAP 350) from the XLR outputs of the
NAC 332 to the XLR inputs of each NAP 350. Ensure the cables are channel-matched: the
pre-amplier left output is connected to the power amplier driving the left speaker and
the same for the right. Please ensure that the XLR plugs are inserted correctly, which is
achieved with the Naim logo on the plug facing upwards.
Connect the system automation cables (supplied with the NAP 350) between the
NAC 332 Remote Out terminals and the Remote In terminals on the NAP 350.
3.2 Connect your source components
Connect your source components to the NAC 332 inputs as required. The front panel
buttons may be assigned to select any input, see section 4.2
The factory default assignments are:
Tuner Input 3 RCA
Stream Input 7 5 pin DIN
AV Input 4 RCA
Phono Input 6 8 pin DIN
AUX Input 1 XLR
CD Input 8 5 pin DIN
3.3 Powering up
Once you have connected your sources and the NAC 332 to the power ampliers, there
are just a few more simple steps to take before you can power up your NAC 332 and start
playing music.
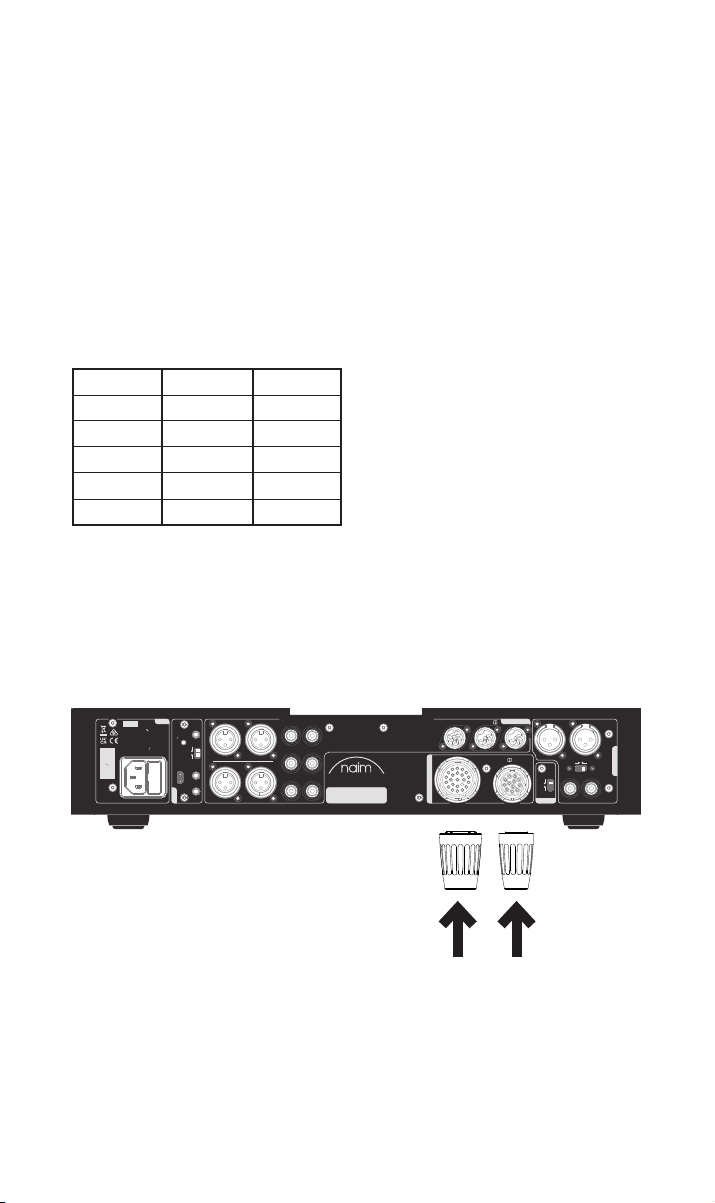
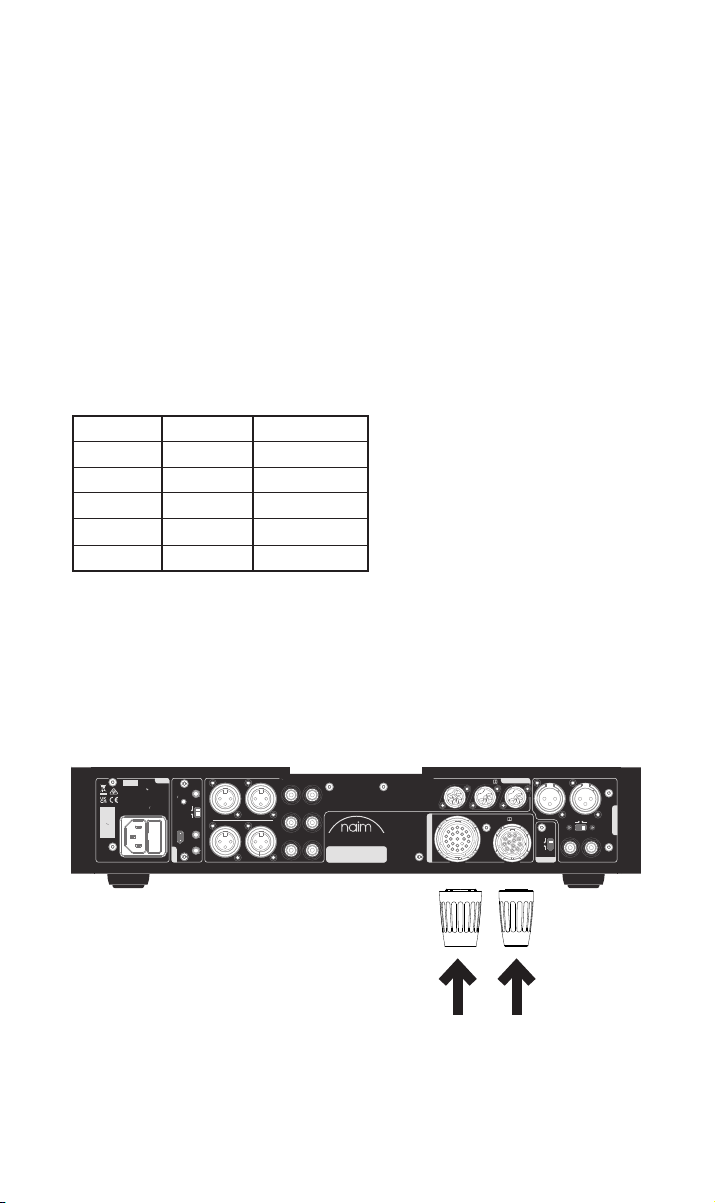
Connect the two supplied link plugs to the NAC 332 power supply upgrade sockets.
44
Page 8
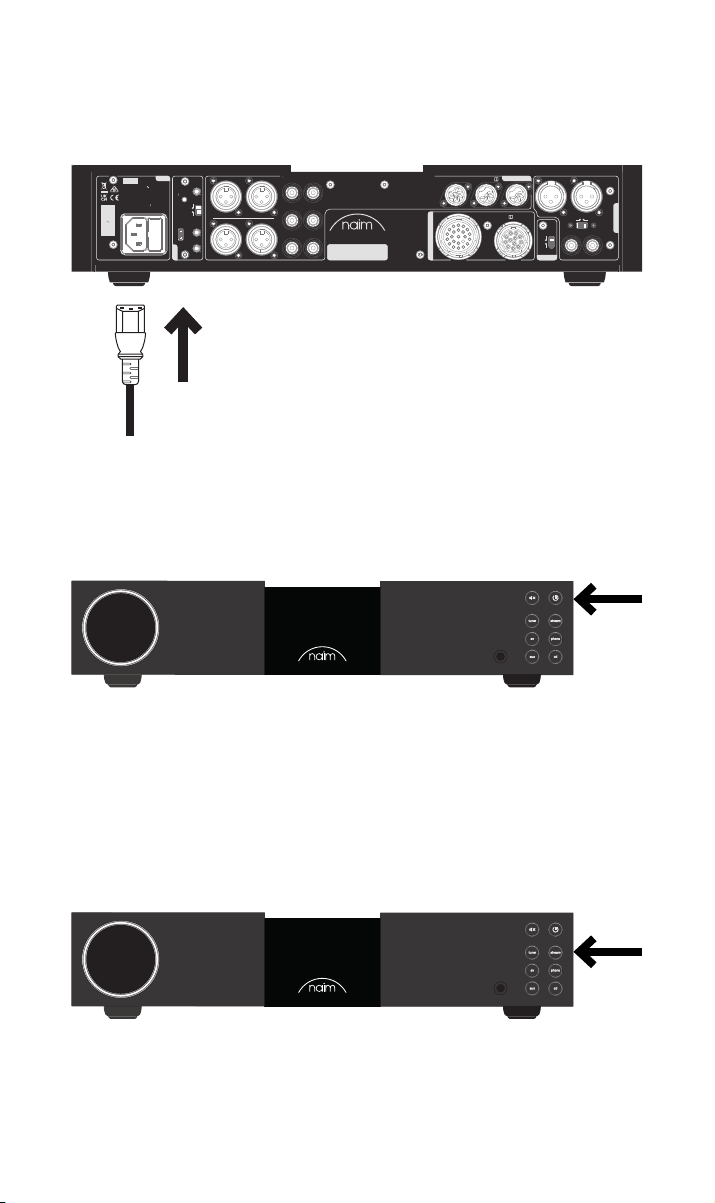
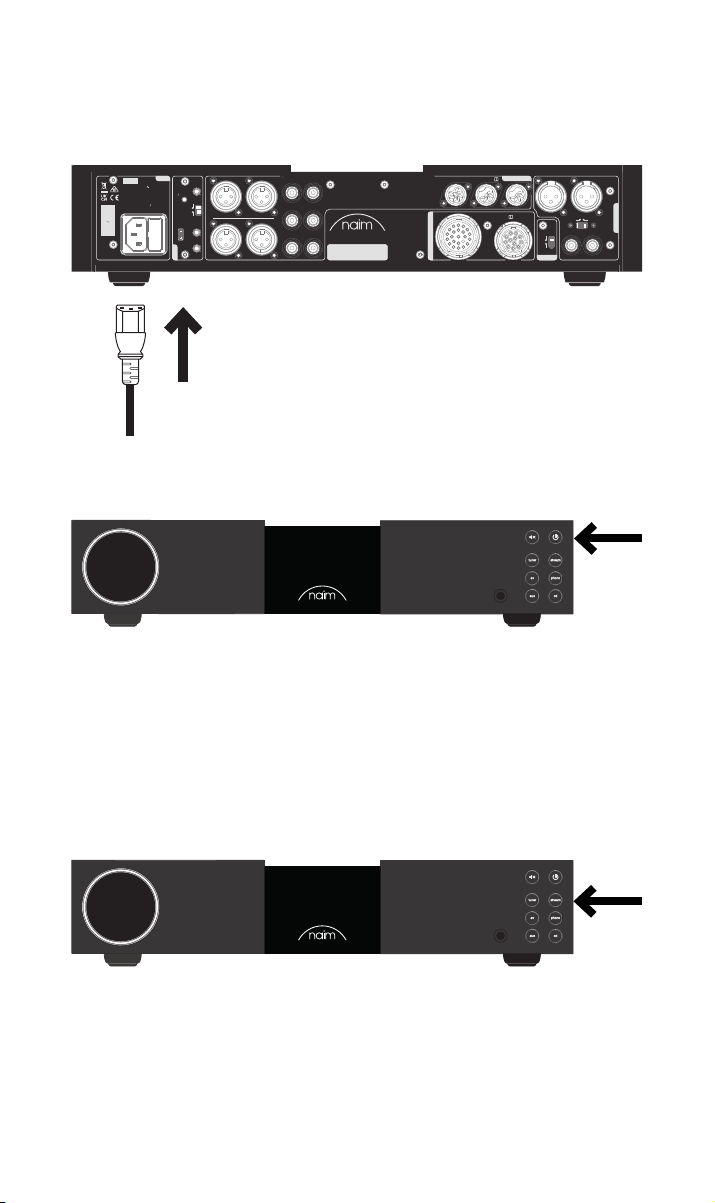
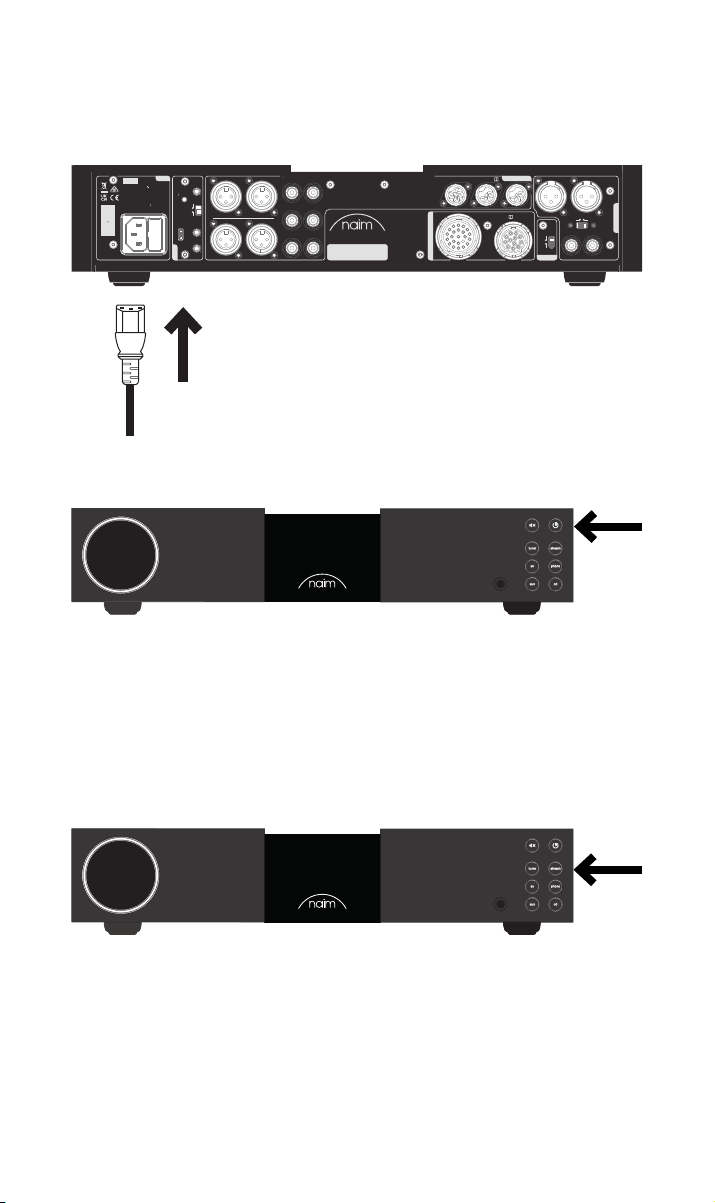
Connect the power cable to the NAC 332’s power socket and then to mains power.
AC ONLY
FUSE RATING: ANTISURGE
1 0-120 V:1 T4AL
2 0-240 V:2 T2AL
FREQUENCY: 0 60Hz5 /
I 70VANPUT POWER:
/ .oNS
WARNING:Disconnect power before opening
Power
Brightness
Reset/
USB
update
Control
1
L
R
Remote
in
Instant
on
Auto
standby
R
2
1
Remote
out
2
L
R
3
300 SERIES
PREAMPLIFIER
Contains FCC ID: 2ACURZIGEE IC ID: 12217A-ZIGEE
L
R
4
L
DESIGNED AND MADE IN THE UK
BY NAIM AUDIO, SALISBURY, SP1 2LN
5
L
R
NAC 332
Type 4
Power Supply Upgrade
AnalogueInputs
AnalogueInputs
Refer to User Manual
7
Refer to User Manual
8
Type 3
6
R
Default
Ground
Ground
XLR
O
R L
RCA
L
On
RCA
output
Switch on your NAC 332 by pressing the standby button on the top right side of the front
panel.
3.4 Pairing the remote control
Once your NAC 332 is switched on, you will need to pair the remote control.
Insert the provided batteries into the remote control handset.
Pressing any of the front panel input buttons (except standby) will enable remote pairing
mode for 30 seconds.
Preamp Outputs
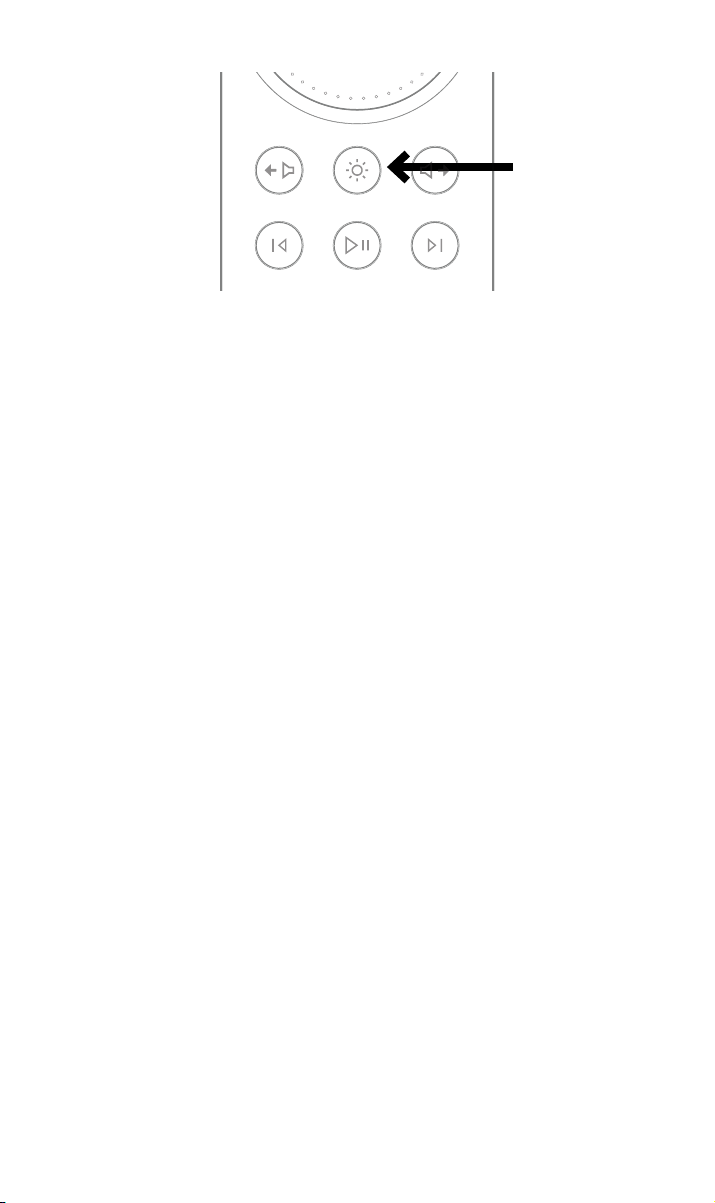
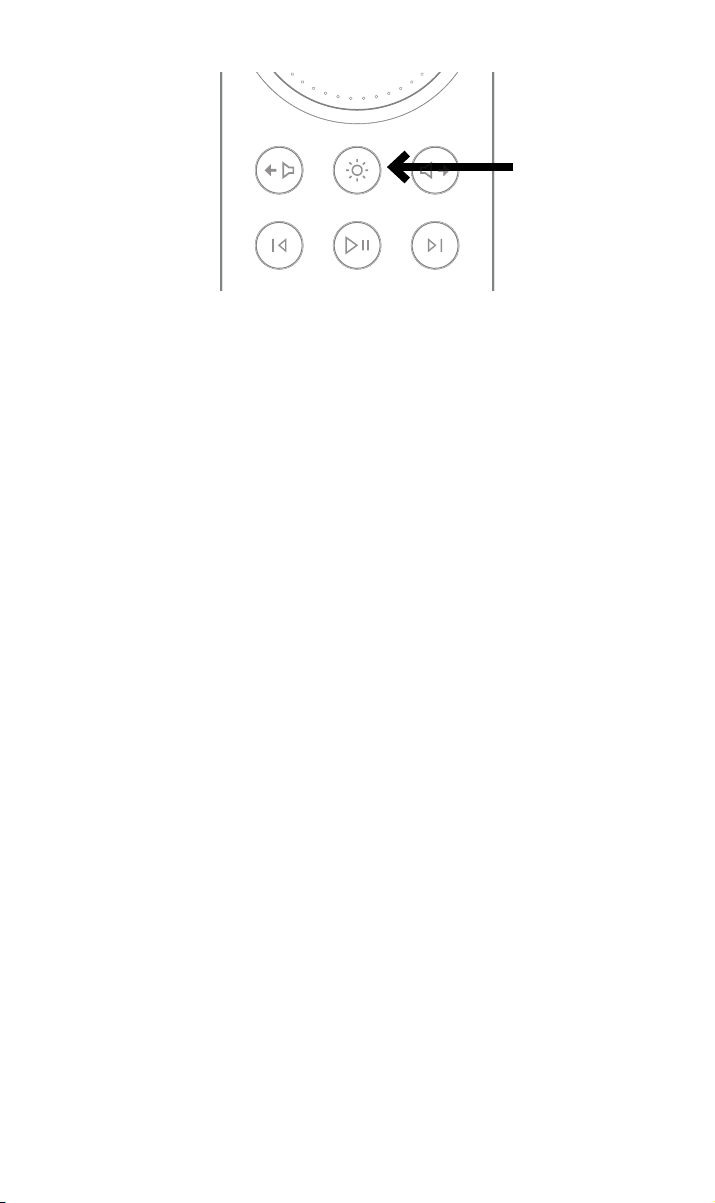
Press and hold the brightness button on the remote control handset for 3 seconds.
55
Page 9
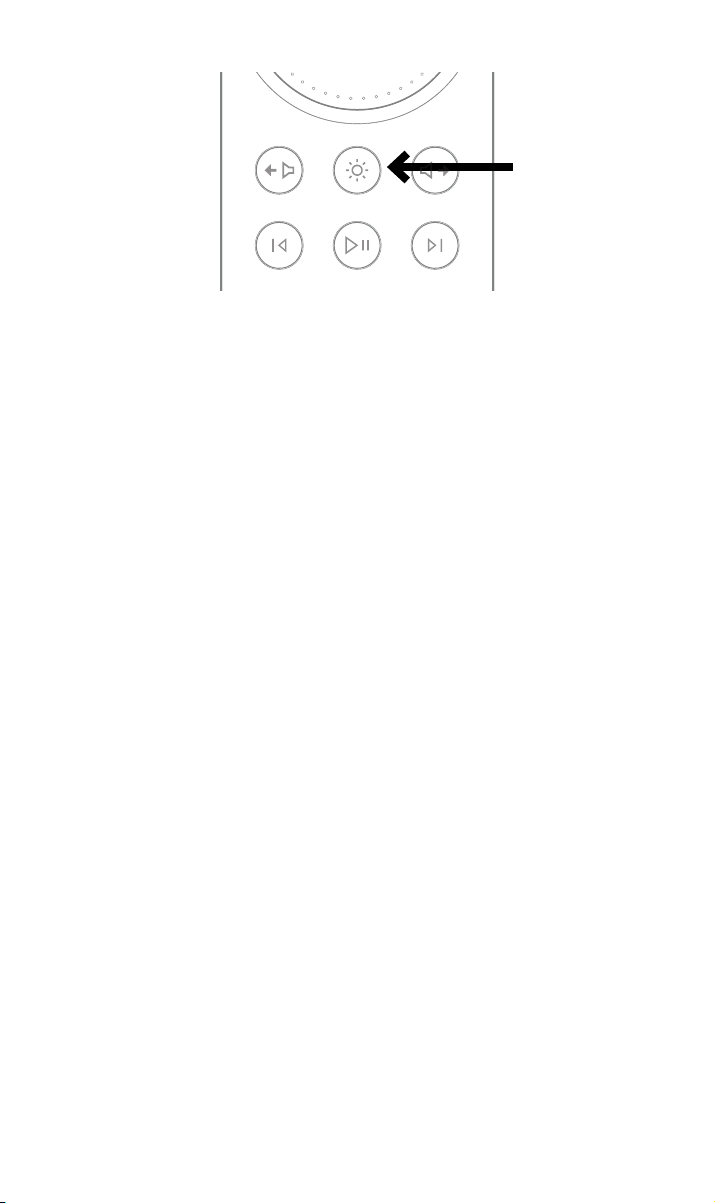
The volume ring on the remote will chase when in pairing mode and then stop at the
stream
phono
cd
tuner
av aux
current volume setting when paired.
The remote is now paired to the unit and ready to use.
4. NAC 332 detailed setup
4.1 Using Naim power ampilers without balanced inputs
If an older Naim power amplier is being used a set of appropriately wired cables will be
required.
If the RCA unbalanced outputs are to be used (for example to connect a sub woofer) the
rear panel “RCA output” switch should be set to the “On” position.
4.2 Input re-assignment
Any combination of six of the eight physical inputs can be directly selected from the front
panel or remote control buttons. A setup mode is used to change the assignment of the
physical inputs to the buttons.
To enter setup mode press the front panel button of the rst input to be adjusted until the
button starts to ash.
The volume knob leds show segments indicating the possible input assignment, with the
currently selected input shown by brighter LEDs.
While in setup mode the selected source shown by the volume knob LEDs will be heard
playing.
Turning the volume knob changes the input assigned to the ashing input.
While in setup mode press any other source button to adjust the assignment for that input.
To exit setup mode press the ashing input button until it stops ashing.
The mute button continues to work as normal while in setup mode.
4.3 Input trim adjustment
The relative level of each input can be adjusted over a range of -10dB to +10dB to equalise
the volume level between sources.
This is adjusted while in setup mode, so rst press the input button to be adjusted until the
button ashes.
A second press of the button will change to trim setting mode. The LEDs on the volume
control will indicate the current trim setting.
66
Page 10

Turning the volume knob will change the trim setting; the source being adjusted will be
playing so you can decide on the level required.
When satised with the setting, a press of the button will return to the input mapping
display, or a long press will exit setup mode.
4.4 AV xed gain (unity gain)
This mode is only applicable to the AV input. The input trim, headroom and balance
settings will be ignored while AV xed gain mode is active.
Volume control changes cannot be made using the remote or the volume dial of the NAC
332 when in this mode. The output signal will be at the same volume as the input signal.
Fixed gain is set while in setup mode, so rst press and hold the front panel AV input
button until the button ashes.
A second press of the button will change to trim setting mode. The LEDs on the volume
control will indicate the current trim setting.
Then, using the volume control turn the dial to maximum (far right) until a solid LED block
is present.
To exit setup mode press the AV input button until it stops ashing.
4.5 Maximum volume function
This mode allows the user to set the overall maximum volume level to prevent accidental
selection of high-volume levels.
This is adjusted while in maximum volume setup mode, so rst press and hold the front
panel mute button. The mute button will ash and the volume dial LED will change when
activated.
Then, turn the volume control dial either left or right to edit the Maximum Volume value.
To set the maximum volume for headphones, insert the headphone jack, the volume
dial will change to show the headphone maximum allowed volume, then use the volume
control to select the desired maximum volume.
Removing the headphone jack will revert the volume dial to showing the main maximum
volume.
When satised with the setting, exit setup mode by pressing the mute button until it stops
ashing.
77
Page 11
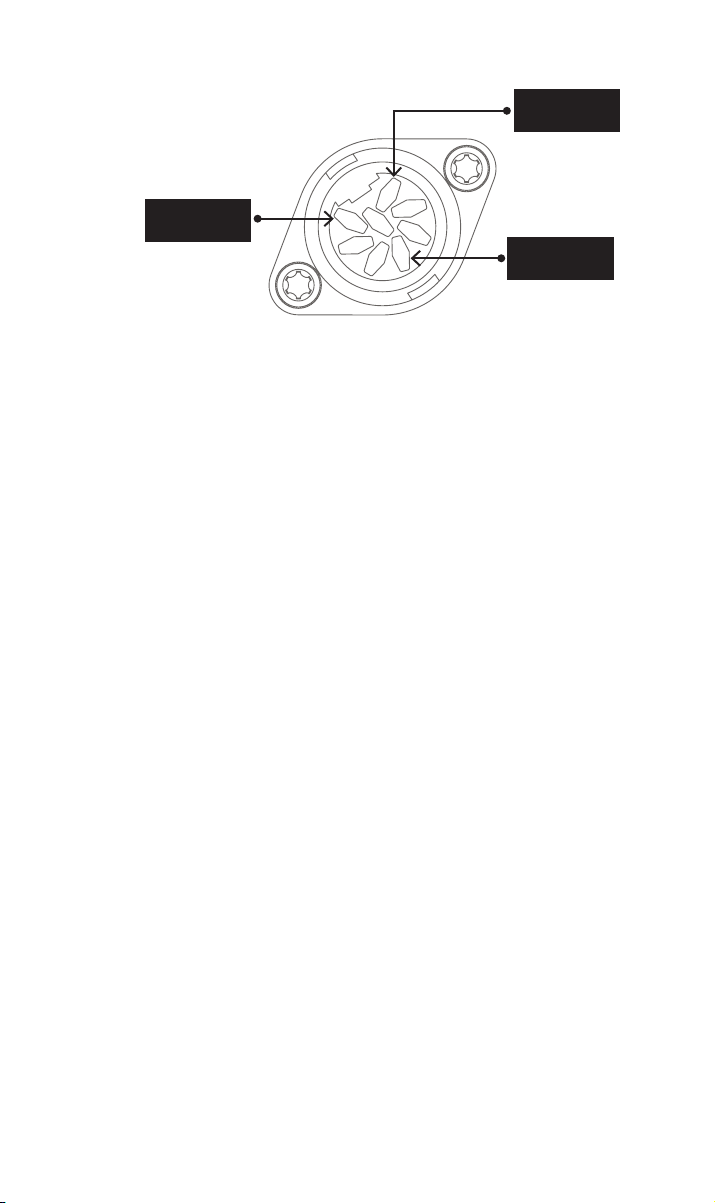
Type 1: 8 pin DIN
-18V 300mA
+18V 300mA
Ground
4.6 Extra DIN input functions
Input 6 (8 pin DIN) is compatible with 5 pin DIN leads and can also directly power a Naim
NVC TT phono stage.
Input 8 (5 pin DIN) has line level outputs mirroring the currently selected source. Note that
when this input is selected the source connected will be mirrored, so beware of feedback
loops if using a recording source.
4.7 Using headphones
The headphone output is capable of driving most headphones to very high volume levels.
While the headphone’s plug is inserted the preamp’s main outputs will be muted.
The headphone output has a separate volume setting. When headphones are inserted the
volume will be set to the level last used with headphones. When they are removed the
volume will be set back to the level last used with speakers.
5. Tips on installing and using your NAC 332
We know you are eager to enjoy your new NAC 332, but we promise it will sound even
better once you have followed these guidelines, all designed to help you experience your
preamplier without compromise.
5.1 Unboxing and positioning
Your NAC 332 uses high-quality components, including a substantial power transformer
and durable aluminium casing. That means the NAC 332 weighs in at 11kg, so please take
care when lifting or moving it, and ensure the surface you plan to place it on is stable and
can support its weight.
For optimum performance, use your Naim products on a dedicated hi- equipment rack
– ideally the Naim Fraim or Fraim Lite – to minimise vibrations that can aect sound. No
room for a rack? Consider placing your NAC 332 on a Fraim glass shelf on a suitable piece
of furniture, to provide solid but discreet support.
Never stack Naim products on top of each other, and if you are placing them side-by- side,
please leave some distance between the units.
To reduce the risk of audible hum from the loudspeakers do not place power supplies or
power ampliers close to source or preamplier components.
5.2 Input connection details
The NAC 332 features several source connection options. For the best sound quality, we
recommend you use the DIN inputs.
88
Page 12

5.3 System automation
When using the NAC 332 with a compatible streamer and power amplier – such as the
NSS 333 and NAP 350 – you can synchronise power on/o and logo brightness across your
system by connecting the NAC 332 with the optical system automation cables supplied
with the NAP 350.
The NSS 333 and NAC 332 use the Zigbee system to synchronise their functions. Press
any button (except standby) on the front panel of the NSS 333 and NAC 332 to pair them
together.
Use the ‘Remote Out’ terminals on the NAC 332 to link the ‘Remote in’ terminals on the
NAP 350. It is possible to link further power ampliers using the ‘Remote out’ terminals of
the NAP 350.
If you require a longer distance between your NAC 332 and the NAP 350 than the supplied
cable allows for, you can use a replacement 3.5mm to 3.5mm optical cable to the required
length. It is also possible to use standard analogue cables with 3.5mm connectors, but an
optical cable oers the best performance.
5.4 Powering up/down
Once all your input and output connections are made, connect the supplied mains lead to
your NAC 332 and to mains power.
You can now power up the NAC 332 by pressing the standby button.
If the NSS 333, NAC 332 and a pair of NAP 350 units is connected via System Automation
they will switch on in sequence.
It is the same procedure to switch o your NAC 332: turn o your NSS 333, NAC 332 and
NAP 350 connected via System Automation, by simply pressing the standby button on the
front panel of the NSS 333 or NAC 332, which will put your complete system into standby.
Avoid using a mains outlet switch to turn your ampliers o.
5.5 Standby power settings
The NAC 332 has three power levels: standby, standby with instant on and powered for
normal use.
‘Standby’ mode has an overall power consumption of less than 0.5W. The NAC 332 can be
woken up by pressing the standby button or from the remote control.
‘Standby with instant on’ leaves the NAC 332 fully powered, but with the logo turned o.
‘Powered for normal use’ In this mode the NAC 332 uses about 20W.
By default, the NAC 332 rear panel switch is set to ‘auto standby’ - it automatically enters
standby mode after a period not exceeding 20 minutes of inactivity. For the optimum
sound quality set the switch to the “instant on” position. This will keep the NAC 332
permanently powered up. With the switch in this position, if the standby button is pressed,
the NAC 332 will remain powered up, but the logo will turn o.
5.6 Naim logo brightness settings
You can choose the brightness level of the LED indicators and Naim logo on your NAC 332
using the brightness buttons on the rear panel and the remote control. If you are using
Naim NAC 332 and NAP 350 ampliers connected via System Automation the brightness
of all logos will be synchronised.
99
Page 13

5.7 Using the NPX 300 power supply
The NPX 300 power supply is an optional system upgrade. If adding the NPX 300 power
supply to the NAC 332, rst turn the whole system o. Remove the mains cable from the
NAC 332 – it is not required when the unit is powered by the NPX 300.
Add the NPX 300 to the equipment stand and remove the two link plugs from the NAC 332
rear panel.
Connect the un-banded end of the two Burndy cables to the NPX 300. Connect the two
banded ends to the NAC 332. Ensure all the locking rings are tightened fully. Try to “dress”
the cables so they hang as loosely as possible and without touching the stands or the wall
– this will be easier if they are formed to roughly the required shape before connecting
either end.
Connect the power lead to the NPX 300’s power socket and then to mains power. Turn the
rest of the system back on.
Turn the NAC 332 back on by pressing the standby button.
6. Mains power, earthing and more
Use only the mains leads and plugs supplied with your NAC 332, or the upgrade Naim
Power-Line mains cable. Where fused plugs are used, 13-Amp fuses should be tted. Do
not wire voltage dependent resistors or noise suppressors into mains plugs; they degrade
the mains supply and the sound.
6.1 Earthing
In order to avoid hum loops, the signal ground of the whole system should be connected
to the mains earth in one place. Typically, this is at the primary source. The NAC 332
preamplifer has a ground lift switch. Set this to “Default” if the primary source connects
mains earth to signal ground. If no source connects mains earth to signal ground set it to
the “Ground” position.
6.2 Non-rewirable mains plugs
If a non-rewirable plug is cut from a mains lead (for whatever purpose) the plug MUST be
disposed of in a way to render it totally useless. Considerable shock hazard exists if the
cut-o plug is inserted into a mains outlet.
6.3 Mains circuits and interference
A hi- system usually shares a mains power circuit with other household equipment,
some of which can cause distortion that may manifest as mechanical hum from mains
transformers, including the large transformer in your NAC 332.
Transformer hum is not transmitted through the speakers and has no eect on the
performance of the system; however, careful positioning of your Naim system may
reduce it, as may a separate, dedicated mains circuit. Such a circuit (ideally with a 30 or
45-Amp rating) will also generally improve system performance. Only seek advice on the
installation of a separate mains circuit from a qualied electrician.
6.4 Lightning precautions
Your Naim system should be turned o and fully disconnected from mains power when
there is a risk of a lightning strike, to protect from potential damage.
1010
Page 14

7. Further tips and advice
Now you have all the essentials sorted, let us move onto a few more things that you can do
to optimise the performance of your new NAC 332.
7.1 Running in
Naim products are hand-crafted from a carefully selected range of high-quality
components. Your NAC 332 will sound superb out of the box, but its performance may
improve further still as all these various components power up and interact in their rst
few weeks of use. Keeping your system powered up will assist this process.
7.2 Cleaning your product and connections
Naim recommends using only the supplied cleaning cloth to lightly dust any product
surfaces. Cleaning products may contain ingredients that can adversely aect cosmetic
surface treatments and coatings.
Keep interconnect plugs and sockets clean and free from corrosion. The easiest way to
achieve this is to fully power o your Naim product (and any connected equipment),
unplug all connections from their sockets and rmly push them in again. Contact cleaners
and so-called ‘enhancers’ should not be used, as they can leave deposits that can degrade
the sound of your system.
7.3 Resetting your NAC 332
To reset your NAC 332 to the factory default settings press and hold the “Brightness/
Reset” button on the rear panel for at least 3 seconds. The NAC 332 with return to a
standby state and all settings will be returned to the factory defaults. Note that this will
include unpairing the remote control and Zigbee System Automation device.
8. Support
Consumer protection varies from country to country. In most territories, the retailer you
bought your Naim product from should be your primary contact if you are experiencing
problems with your unit. A problem may be due to a fault in the system or its installation,
so it is essential to make full use of your dealer’s diagnostic skills.
You can nd a range of support articles for each Naim product online at Naimaudio.com
If you are still experiencing an issue with your Naim product, contact us directly for help
and advice, at [email protected]
9. Service and updates
Any repairs or hardware updates should only be made by an authorised Naim service
centre or at the Naim HQ itself. Many components are custom made, tested or matched
and appropriate replacements are often unobtainable from other sources. Please contact
your local Naim retailer with any service or repair queries.
1111
Page 15

10. Specications
300 Series Preamplifier - NAC 332
Audio inputs:
Audio outputs:
Update: Micro USB
Remote In: 1 × 3.5mm jack – electrical and Mini-TOSLINK optical
Remote Out: 2 × 3.5mm jack – electrical and Mini-TOSLINK optical
Power consumption:
Dimensions (H x W x D): 91.5 × 432 × 317.5 mm (including feet)
Weight: 11kg
Mains supply: 115V or 230V, 50/60Hz
3 x DIN
2 x XLR pair
3 x RCA pair
1 x XLR pair
1 x RCA pair
1 × 6.35mm headphone jack
1 x Line level output on Input 8 (5 pin DIN)
Typical use: 20W
Standby: <0.5W
11. Product recycling
Products that display the crossed-out wheeled bin logo cannot be disposed of
as domestic waste. These products must be disposed of at facilities capable of
recycling them and appropriately handling any waste by-products.
Contact your local authority for details of the nearest such facility.
Appropriate recycling and waste disposal helps conserve resources and protects the
environment from contamination.
1212
Page 16

Page 17

Table des matières
Section Page
Introduction
1. Liste des éléments fournis
2. Découverte du NAC 332
3. Informations de base sur l’installation du NAC332
4. Conguration détaillée du NAC 332
5. Conseils pour l’installation et l’utilisation de
votre NAC 332
6. Alimentation secteur, mise à la terre et plus
7. Autres astuces et conseils
8. Support
1
1
2
3
6
8
10
11
11
9. Réparation et mises à jour
10. Spécications techniques
11. Consignes de recyclage du produit
11
12
12
Page 18
Introduction
À noter : tous les avertissements
de sécurité se trouvent dans le
manuel de sécurité
Bienvenue et félicitations pour l’achat de votre nouveau préamplicateur Naim. Comme
tous les produits Naim Audio, le NAC 332 donne la priorité absolue à la performance
musicale. Pour l’aider à déployer tout son potentiel, il est important de suivre les consignes
simples pour l’installation et l’utilisation qui sont fournies dans ce manuel. Nous allons
commencer par quelques informations de base concernant le produit et la mise en place,
avant de passer à des informations plus détaillées à la section 5.
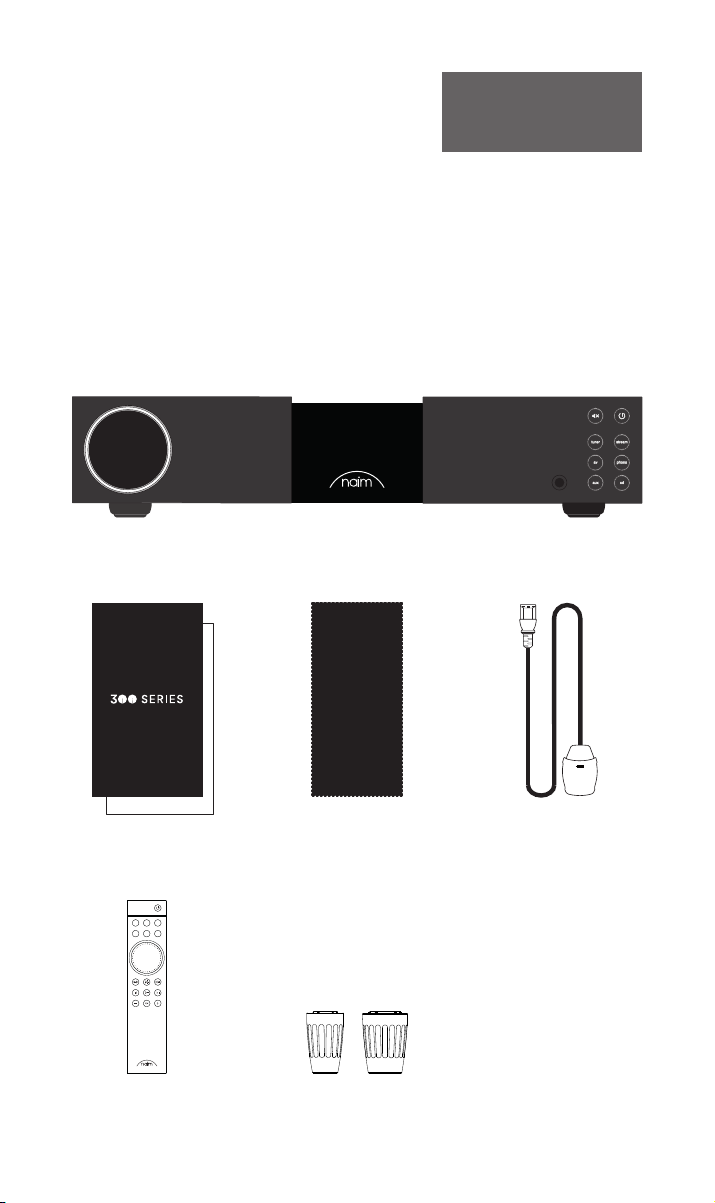
1. Liste des éléments fournis
1x NAC 332
1x Documentation
cd
stream
phono
tuner
av aux
1x Chion nettoyant 1x Power-Line Lite
1x Télécommande 2x Fiches cavalier
11
Page 19
WARNING:Disconnect power before opening
AC ONLY
FUSE RATING: ANTISURGE
1 0-120 V:1 T4AL
2 0-240 V:2 T2AL
FREQUENCY: 0 60Hz5 /
I 70VANPUT POWER:
Power
300 SERIES
PREAMPLIFIER
NAC 332
DESIGNED AND MADE IN THE UK
BY NAIM AUDIO, SALISBURY, SP1 2LN
/ .oNS
Ground
Power Supply Upgrade
Preamp Outputs
AnalogueInputs
Ground
Default
R L
R
L
RCA
XLR
Refer to User Manual
Type 3
Type 4
Remote
in
Remote
out
Auto
standby
Instant
on
1
2
Control
USB
update
Brightness
Reset/
On
RCA
output
O
3
4
6
AnalogueInputs
R
R
R
L
L
L
5
8
7
1
2
R
L
R
L
Contains FCC ID: 2ACURZIGEE IC ID: 12217A-ZIGEE
Refer to User Manual
2. Découverte du NAC 332
Bouton de veille
Bouton Mute
(muet)
Contrôle du
volume
Entrée à distance (port jack
3,5 mm en électrique et
Mini-TOSLINK en optique)
Entrée secteur
et fusible
Interrupteur Standby
(mise en veille) / Instant
on (démarrage immédiat)
Sortie à distance (port jack
3,5 mm en électrique et
Mini-TOSLINK en optique)
Entrée de mise à
niveau USB
Entrées XLR
Logo à variation
d’intensité,
rétroéclairé
Entrées RCA
Entrées de
mise à niveau
d’alimentation
Sortie casque jack
6,35 mm
Entrée DIN pour étage
phono NVC TT
Entrées DIN
Interrupteur
masse signal
symétrique RCA
Interrupteur On/
Boutons de
sélection des
entrées
Sortie XLR
symétrique
Sortie non
Off (marche/
arrêt) RCA
22
Page 20
3. Informations de base sur l’installation du NAC332
Votre NAC 332 doit être raccordé à une ou plusieurs sources et à un amplicateur de
puissance (comme le NSS 333 et les NAP 350 correspondants) mais, avant de le faire, vous
devez vous assurer que tous les composants se trouvent à leur emplacement dénitif et
sont débranchés du secteur.
Pour des performances optimales, utilisez un support hi- dédié (idéalement Naim Fraim)
et placez le préamplicateur au-dessus des amplicateurs de puissance, comme illustré.
Vous aurez également besoin d’enceintes avec des câbles.
33
Page 21
3.1 Raccordement du NAC 332 aux amplicateurs de puissance
WARNING:
Disconnect power before opening
AC ONLY
FUSE RATING: ANTISURGE
1 0-120 V:1 T4AL
2 0-240 V:2 T2AL
FREQUENCY: 0 60Hz5 /
I 70VANPUT POWER:
Power
300 SERIES
PREAMPLIFIER
NAC 332
DESIGNED AND MADE IN THE UK
BY NAIM AUDIO, SALISBURY, SP1 2LN
/ .oNS
Ground
Power Supply Upgrade
Preamp Outputs
AnalogueInputs
Ground
Default
R L
R
L
RCA
XLR
Refer to User Manual
Type 3
Type 4
Remote
in
Remote
out
Auto
standby
Instant
on
1
2
Control
USB
update
Brightness
Reset/
On
RCA
output
O
3
4
6
AnalogueInputs
R
R
R
L
L
L
5
8
7
1
2
R
L
R
L
Contains FCC ID: 2ACURZIGEE IC ID: 12217A-ZIGEE
Refer to User Manual
NAP350
Branchez deux câbles XLR (fournis avec les NAP 350) entre les sorties XLR du NAC 332 et
l’entrée de chaque NAP 350. Vériez que les câbles sont bien appariés : la sortie gauche
du préamplicateur avec l’amplicateur de puissance pour l’enceinte de gauche, et la
même chose côté droit. Veillez à ce que les ches XLR soient insérées correctement, ce
qui est le cas quand le logo Naim de la che est vers le haut.
Branchez les câbles d’automatisation système (fournis avec les NAP 350) entre les ports de
sortie à distance du NAC 332 et les ports d’entrée à distance des NAP 350.
3.2 Branchement de vos composants sources
Branchez vos composants sources aux entrées du NAC 332 comme requis. Il est possible
d’aecter les boutons en façade à l’entrée de son choix, comme expliqué à la section 4.2
Les aectations par défaut sont les suivantes :
Tuner Entrée 3 RCA
Stream Entrée 7 DIN 5 broches
AV Entrée 4 RCA
Phono Entrée 6 DIN 8 broches
AUX Entrée 1 XLR
CD Entrée 8 DIN 5 broches
3.3 Mise en marche
Une fois que vous avez raccordé vos sources et le NAC 332 aux amplicateurs de
puissance, il ne reste plus que quelques étapes simples avant de pouvoir mettre en marche
le NAC 332 et lancer la musique.
Branchez les deux ches cavalier fournies sur les ports de mise à niveau d’alimentation du
NAC 332.
44
Page 22
Branchez le câble d’alimentation au connecteur d’alimentation du NAC 332 puis au secteur.
AC ONLY
FUSE RATING: ANTISURGE
1 0-120 V:1 T4AL
2 0-240 V:2 T2AL
FREQUENCY: 0 60Hz5 /
I 70VANPUT POWER:
/ .oNS
WARNING:Disconnect power before opening
Power
Brightness
Reset/
USB
update
Control
1
L
R
Remote
in
Instant
on
Auto
standby
R
2
1
Remote
out
2
L
R
3
300 SERIES
PREAMPLIFIER
Contains FCC ID: 2ACURZIGEE IC ID: 12217A-ZIGEE
L
R
4
L
DESIGNED AND MADE IN THE UK
BY NAIM AUDIO, SALISBURY, SP1 2LN
5
L
R
NAC 332
Type 4
Power Supply Upgrade
AnalogueInputs
AnalogueInputs
Refer to User Manual
7
Refer to User Manual
8
Type 3
6
R
Default
Ground
Ground
XLR
O
R L
RCA
L
On
RCA
output
Mettez en marche votre NAC 332 en appuyant sur le bouton de veille situé en haut à
droite, en façade.
3.4 Appariement de la télécommande
Une fois votre NAC 332 allumé, vous devez apparier la télécommande. Insérez les piles
fournies dans le corps de la télécommande.
Pour activer le mode appariement de la télécommande, il sut d’appuyer sur l’un des
boutons d’entrée en façade pendant 30 secondes.
Preamp Outputs
Maintenez le bouton de réglage de la luminosité de la télécommande enfoncé pendant
3 secondes.
55
Page 23
L’anneau de volume sur la télécommande s’allumera de façon rotative durant l’appariement
stream
phono
cd
tuner
av aux
puis s’arrêtera sur le volume actuel une fois l’appariement terminé.
La télécommande est à présent appariée avec l’appareil et prête à être utilisée.
4. Conguration détaillée du NAC 332
4.1 Utilisation d’amplicateurs de puissance sans entrées symétriques
Si vous utilisez un ancien modèle d’amplicateur de puissance, un jeu de câbles
correctement branchés sera nécessaire.
Si vous devez utiliser les sorties non symétriques RCA (par exemple pour raccorder un
caisson de grave), vous devriez mettre l’interrupteur « RCA output » (sortie RCA) en
position « On » (marche) sur la face arrière.
4.2 Réaectation des entrées
Six entrées au choix parmi les huit entrées physiques peuvent être directement
sélectionnées depuis les boutons de la télécommande ou en façade. Un mode
conguration permet de modier l’aectation des entrées physiques des boutons.
Pour passer en mode conguration, appuyez sur le bouton de la première entrée à
modier en façade, jusqu’à ce qu’il commence à clignoter.
Les LED du bouton de volume montrent des segments indiquant l’aectation possible de
l’entrée, l’entrée actuellement sélectionnée étant quant à elle indiquée par des LED plus
lumineuses.
En mode conguration, on peut entendre fonctionner la source sélectionnée montrée par
les LED du bouton de volume.
Si vous tournez le bouton de volume, cela modiera l’entrée aectée à l’entrée qui
clignote.
Pendant que vous êtes en mode conguration, appuyez sur le bouton d’une autre source
pour régler l’aectation pour cette entrée. Pour quitter le mode conguration, appuyez sur
le bouton clignotant de l’entrée jusqu’à ce qu’il cesse de clignoter.
Le bouton Mute (muet) continue de fonctionner de la façon habituelle dans le mode
conguration.
4.3 Ajustement du volume
Le niveau relatif de chaque entrée peut être ajusté sur une plage comprise entre -10 dB et
+10 dB, an d’égaliser le niveau de volume entre les sources.
Ce réglage s’eectue en mode conguration. Vous devez donc commencer par appuyer
sur le bouton de l’entrée à ajuster jusqu’à ce qu’il commence à clignoter.
66
Page 24

Appuyez une nouvelle fois sur le bouton pour passer en mode d’ajustement du volume. Les
LED du bouton de contrôle de volume indiqueront le réglage actuel du volume.
Si vous faites tourner le bouton de volume, le réglage du volume changera et la source en
cours de réglage fonctionnera pour vous permettre de décider quel niveau sonore vous
souhaitez dénir.
Une fois le réglage terminé, appuyez sur le bouton pour revenir à l’indication de
l’aectation des entrées ou maintenez le bouton enfoncé pour quitter le mode
conguration.
4.4 Gain xe AV (gain unitaire)
Ce mode est uniquement applicable à l’entrée AV. Les réglages de volume, marge et
balance V2 peuvent également être ignorés quand un mode de gain xe AV est actif.
Dans ce mode, le réglage de volume ne peut pas être modié avec la télécommande ou
le cadran de volume du NAC 332. Le signal de sortie sera au même volume que le signal
d’entrée.
Le gain xe est réglé en mode de conguration, alors appuyez sur le bouton d’entrée AV
du panneau avant, et maintenez-le enfoncé, jusqu’à ce que le bouton clignote.
Appuyez une nouvelle fois sur le bouton pour passer en mode d’ajustement du volume. Les
LED du bouton de contrôle de volume indiqueront le réglage actuel du volume.
Ensuite, utilisez la commande du volume pour tourner le cadran au maximum (à fond à
droite) jusqu’à ce qu’il y ait un bloc LED constamment allumé.
Pour quitter le mode conguration, appuyez sur le bouton de l’entrée AV jusqu’à ce qu’il
cesse de clignoter.
4.5 Fonction de volume maximum
Ce mode permet à l’utilisateur de congurer le niveau de volume maximum d’ensemble
pour empêcher la sélection accidentelle de niveaux de volume élevés.
Ceci est ajusté en mode de conguration de volume maximum, alors appuyez sur le
bouton silencieux du panneau avant et maintenez-le enfoncé. Le bouton de silencieux
clignotera et les LED du cadran de volume changeront une fois le bouton activé.
Ensuite, tournez le cadran de la commande de volume vers la gauche ou vers la droite pour
modier la valeur maximum du volume.
Pour régler le volume maximum pour les casques, insérez le jack pour casque. Le cadran
du volume changera pour montrer le volume maximum autorisé du casque. Utilisez ensuite
la commande du volume pour sélectionner le volume maximum souhaité.
Enlevez le jack du casque pour que le cadran du volume recommence à indiquer le volume
maximum principal.
Lorsque vous êtes satisfait du réglage, sortez du mode de conguration en appuyant sur le
bouton de silencieux jusqu’à ce qu’il arrête de clignoter.
77
Page 25

Type 1 : DIN 8 broches
-18 V 300 mA
+18 V 300 mA
Terre
4.6 Fonctions supplémentaires des entrées DIN
L’entrée 6 (DIN 8 broches) est compatible avec les câbles DIN 5 broches et peut aussi
alimenter directement un étage phono Naim NVC TT
L’entrée 8 (DIN 5 broches) ore des sorties de niveau ligne reétant la source actuellement
sélectionnée. Veuillez noter que lorsque cette entrée est sélectionnée, la source connectée
sera reétée. Si vous utilisez une source d’enregistrement, il faut donc faire attention aux
boucles de rétroaction.
4.7 Utilisation d’un casque
La sortie casque a un réglage de volume distinct. Lorsqu’un casque est branché, le volume
est réglé au dernier niveau sonore utilisé avec un casque. Lorsqu’il est débranché, le
volume revient au dernier niveau sonore utilisé avec les enceintes.
5. Conseils pour l’installation et l’utilisation de votre
NAC 332
Nous savons que vous êtes impatient de proter de votre nouveau NAC 332, mais
nous vous promettons qu’il vous orira un son encore meilleur si vous appliquez bien
ces consignes. Elles vous aideront à retirer la meilleure expérience possible de votre
préamplicateur.
5.1 Déballage et mise en place
Votre NAC 332 est fabriqué à partir de composants de qualité supérieure, avec un
transformateur robuste et un boîtier en aluminium solide. De ce fait, le NAC 332 pèse
11 kg. Soyez prudent lorsque vous le soulevez ou le déplacez et veillez à ce que la surface
où vous l’installerez soit stable et capable de supporter son poids.
Pour atteindre un niveau de performance optimal, utilisez vos produits Naim sur un
support dédié pour les équipements hi- (idéalement Naim Fraim ou Fraim Lite), an de
minimiser les vibrations susceptibles d’altérer la qualité du son. Vous n’avez pas la place
d’installer un tel support ? Vous pouvez placer votre NAC 332 sur une étagère en verre
Fraim posée sur un meuble adapté, an de créer une installation solide mais discrète.
N’empilez jamais des produits Naim les uns au-dessus des autres. Si vous placez des
composants côte-à-côte, laissez un peu d’écart entre eux.
An de réduire le risque de ronement audible au niveau des enceintes, il ne faut pas
placer les alimentations ou les amplicateurs de puissance à proximité des composants
source ou du préamplicateur.
5.2 Informations sur la connexion des entrées
Le NAC 332 ore plusieurs possibilités de connexion à une source. Pour obtenir la
meilleure qualité de son, nous vous recommandons d’utiliser les entrées DIN.
88
Page 26

5.3 Automatisation du système
Si vous utilisez le NAC 332 avec un amplicateur de puissance et un streamer compatibles,
comme le NSS 333 et le NAP 350, vous pouvez synchroniser la mise en marche / l’arrêt et
la luminosité du logo sur l’ensemble de votre système en raccordant le NAC 332 avec les
câbles d’automatisation système optique fournis avec les NAP 350.
Le NSS 333 et le NAC 332 utilisent le système Zigbee pour synchroniser leurs fonctions.
Utilisez les ports « Remote Out » (sortie à distance) du NAC 332 pour raccorder les ports
« Remote in » (entrée à distance) des NAP 350. Il est possible de raccorder d’autres
amplicateurs de puissance avec les ports « Remote Out » du NAP 350.
Si vous avez besoin de plus de distance entre votre NAC 332 et les NAP 350 que ce que
permet le câble fourni, vous pouvez utiliser à la place un câble optique 3,5 mm vers 3,5
mm orant la longueur voulue. Il est également possible d’utiliser des câbles analogiques
standard avec des connecteurs de 3,5 mm, mais un câble optique ore de meilleures
performances.
5.4 Mise en marche / Arrêt
Une fois que tous vos branchements d’entrée et de sortie sont réalisés, raccordez le cordon
d’alimentation fourni à votre NAC 332 et au secteur.
Vous pouvez à présent mettre en marche le NAC 332 en appuyant sur le bouton de veille.
Si le NSS 333, le NAC 332 et les NAP 350 sont raccordés via l’automatisation système, ils
se mettront en marche l’un après l’autre.
La procédure est la même pour éteindre votre NAC 332 : pour arrêter le NSS 333, le
NAC332 et les NAP 350 raccordés via l’automatisation système, il sut d’appuyer sur le
bouton de veille en façade du NSS 33 ou du NAC 332 pour mettre en veille l’ensemble du
système. Évitez d’utiliser un interrupteur de prise murale pour éteindre vos amplicateurs.
5.5 Réglages de la mise en veille
Le NAC 332 a trois niveaux de fonctionnement : veille, veille avec démarrage immédiat et
alimentation pour utilisation normale.
En mode « Standby » (veille), la consommation d’énergie totale est inférieure à 0,5 W.
Le NAC 332 peut être remis en marche en appuyant sur le bouton de veille ou avec la
télécommande.
En mode « Standby with instant on » (veille avec démarrage immédiat), le NAC 332 est
allumé mais le logo est éteint. En mode « Powered for normal use » (alimentation pour
utilisation normale), le NAC 332 consomme 20 W environ.
Par défaut, l’interrupteur sur la face arrière du NAC 332 est en mode « auto standby »
(veille automatique) : il bascule automatiquement vers le mode veille après 20 minutes
d’inactivité maximum. Pour bénécier de la meilleure qualité de son, mettez l’interrupteur
en position « instant on » (démarrage immédiat). Ainsi, le NAC 332 restera sous tension en
permanence. Lorsque l’interrupteur est dans cette position, quand l’utilisateur appuie sur
le bouton de mise en veille, le NAC 332 reste allumé mais le logo s’éteint.
5.6 Paramètres de luminosité du logo Naim
Vous pouvez choisir le niveau de luminosité des indicateurs LED et du logo Naim sur
votre NAC 332 à l’aide des boutons de réglage de la luminosité sur la face arrière et sur la
télécommande. Si vous utilisez des amplicateurs Naim NAC 332 et NAP 350 raccordés
via le câble d’automatisation système, la luminosité de tous les logos sera synchronisée.
99
Page 27

5.7 Utilisation de l’alimentation NPX 300
L’alimentation NPX 300 est une mise à niveau optionnelle du système. Pour raccorder
l’alimentation NPX 300 au NAC 332, commencez par éteindre l’ensemble du système.
Détachez le câble secteur du NAC 332 – il ne sera plus nécessaire une fois l’appareil
alimenté par le NPX 300.
Placez l’alimentation NPX 300 sur le support d’équipement.
Retirez les deux cavaliers du panneau arrière du NAC 332.
Branchez l’extrémité non liée des deux câbles Burndy au NPX 300. Branchez les deux
extrémités liées au NAC 332. Assurez-vous que les bagues de verrouillage soient bien
serrées. Essayez de « former » les câbles pour qu’ils pendent aussi librement que possible,
sans toucher les supports ou les murs
– cette étape sera plus simple si vous leur donnez à peu près la forme souhaitée avant de
brancher chaque extrémité.
Branchez le câble d’alimentation au connecteur d’alimentation du NPX 300 puis au secteur.
Rallumez le reste du système.
Rallumez le NAC 332 en appuyant sur le bouton de veille.
6. Alimentation secteur, mise à la terre et plus
Utilisez uniquement les câbles et les ches secteur fournis avec votre NAC 332 ou le
câble d’alimentation Naim Power-Line de mise à niveau. En cas d’utilisation de prises
avec fusibles intégrés, ces derniers doivent être tarés à 13 ampères. Ne pas câbler de
résistances sensibles à la tension, ni de réducteur de bruit au niveau des prises secteur, car
ceux-ci dégradent l’alimentation et le son.
6.1 Mise à la terre
An d’éviter les boucles de masse, la masse du signal de l’ensemble du système doit être
raccordée à la masse en un seul point, généralement au niveau de la source principale. Le
préamplicateur NAC 332 est équipé d’un commutateur de masse. Si la source principale
relie la masse de l’alimentation à la masse du signal, choisissez la position « Default »
(par défaut). Si aucune source ne relie la masse de l’alimentation à la masse du signal,
choisissez la position « Ground » (masse).
6.2 Prises secteur moulées (non démontables)
Si, pour une raison quelconque, le câble d’alimentation est sectionné an de déposer la
prise secteur moulée, la prise doit IMPERATIVEMENT être éliminée d’une manière qui la
rend complètement inutilisable. L’insertion d’une prise avec un câble sectionné dans une
prise murale présente un fort risque d’électrocution.
6.3 Circuits secteur et interférences
Un système hi- partage généralement un circuit d’alimentation secteur avec d’autres
équipements ménagers, dont certains peuvent causer des distorsions susceptibles
de se manifester sous forme de ronement mécanique au niveau des transformateurs
d’alimentation. Cela peut arriver à l’imposant transformateur de votre NAC 332.
Le ronement du transformateur n’est pas transmis par les enceintes et n’a aucun eet
sur les performances du système ; cependant, un bon positionnement de votre système
Naim peut le réduire, tout comme l’utilisation d’un circuit secteur séparé. Un tel circuit
(idéalement de 30 ou 45 ampères) améliorera généralement aussi les performances du
système. Si vous souhaitez demander conseil pour l’installation d’un circuit secteur séparé,
contactez impérativement un électricien qualié.
6.4 Précautions contre la foudre
Your Naim system should be turned o and fully disconnected from mains power when
there is a risk of a lightning strike, to protect from potential damage.
1010
Page 28

7. Autres astuces et conseils
À présent que vous avez pris connaissance des consignes les plus importantes, voici
quelques recommandations pour optimiser les performances de votre nouveau NAC 332.
7.1 Rodage
Les produits Naim sont fabriqués à la main à partir d’un ensemble soigneusement choisi
de composants de qualité. La qualité de son de votre NAC 332 est excellente dès le départ
mais elle peut encore s’améliorer au fur et à mesure que ses divers composants montent
en puissance et interagissent, au cours des premières semaines d’utilisation. Ce processus
sera d’autant plus ecace que vous garderez votre système en fonctionnement.
7.2 Nettoyage du produit et des branchements
Naim recommande d’utiliser uniquement le chion de nettoyage fourni pour épousseter en
douceur les surfaces du produit. Les produits nettoyants peuvent contenir des ingrédients
susceptibles de dégrader les revêtements et les traitements de surface de nition.
Veillez à ce que les ches et prises d’interconnexion restent propres et exemptes de
corrosion. Pour cela, le moyen le plus simple consiste à éteindre complètement votre
produit Naim (et les équipements raccordés), à débrancher tous les raccordements
de leurs prises et à bien les rebrancher à nouveau. Il ne faut pas utiliser de nettoyants
pour contacts ou fd’« améliorateurs », car ils peuvent laisser des dépôts susceptibles de
dégrader le son de votre système.
7.3 Réinitialisation de votre NAC 332
Pour réinitialiser votre NAC 332 et rétablir les paramètres par défaut, maintenez enfoncé le
bouton « Brightness/ Reset » (luminosité / réinitialisation) situé à l’arrière pendant au moins
3 secondes. Le NAC 332 repassera en veille et tous les paramètres reviendront aux valeurs
par défaut. Veuillez noter que cela entraînera le désappariement de la télécommande et du
système d’automatisation système Zigbee.
8. Support
La protection des consommateurs varie d’un pays à l’autre. Dans la plupart des pays, le
revendeur auprès duquel vous avez acheté votre produit Naim doit être votre principal
interlocuteur en cas de problèmes avec votre appareil. Un problème peut être dû à
un défaut du système ou à son installation, il est donc essentiel d’avoir recours aux
compétences de diagnostic de votre revendeur.
Vous pourrez trouver une série d’articles concernant l’assistance des diérents produits
Naim en ligne, sur le site Naimaudio.com
Si vous avez toujours des dicultés avec votre produit Naim, contactez-nous directement
pour obtenir de l’aide et des conseils, à l’adresse [email protected]
9. Réparation et mises à jour
Toutes les réparations et mises à jour matérielles doivent impérativement être réalisées
par un centre de service Naim agréé ou par le siège de Naim lui-même. De nombreux
composants sont fabriqués, testés ou appariés sur mesure et les pièces de rechange
appropriées sont souvent impossibles à obtenir auprès d’autres sources. Veuillez contacter
votre revendeur Naim local pour toute demande concernant l’entretien ou les réparations.
1111
Page 29

10. Spécications
Préamplificateur 300 Series - NAC 332
Entrées audio :
Sorties audio :
Mise à jour : Micro USB
Entrée à distance : 1 x port jack 3,5 mm en électrique et Mini-TOSLINK en optique
Sortie à distance : 2 x port jack 3,5 mm en électrique et Mini-TOSLINK en optique
Consommation : Utilisation standard : 20 W Mode veille : <0,5 W
Dimensions (Haut. x Larg.
x Prof.) :
Poids : 11 kg
Tension secteur : 115 V ou 230 V ; 50/60 Hz
3 x DIN
2 x paire XLR
3 x paire RCA
1 x paire XLR
1 x paire RCA
1 x jack pour casque 6,35 mm
1 x sortie de niveau ligne sur l’entrée 8 (DIN 5 broches)
91,5 × 432 × 317,5 mm (pieds inclus)
11. Consignes de recyclage du produit
Les produits identiés du logo de la poubelle à roulettes barrée ne peuvent pas
être éliminés en tant qu’ordures ménagères. Ces produits doivent être éliminés
par des organismes capables de les recycler et de traiter les éventuels sousproduits résiduels.
Contactez votre autorité locale pour obtenir les coordonnées du site le plus proche.
L’élimination et le recyclage corrects des ordures contribuent à la conservation des
ressources et à la protection de l’environnement contre les contaminations.
1212
Page 30

Page 31

Inhalt
Abschnitt Seite
Einführung 1
1. Kartoninhalt 1
2. Mehr über Ihren NAC 332 erfahren 2
3. Einrichtung des NAC 332 3
4. Detaillierte Einrichtung des NAC 332 6
5. Tipps zur Installation und Verwendung des NAC 332 8
6. Netzstrom, Erdung und mehr 10
7. Weitere Tipps und Empfehlungen 11
8. Support 11
9. Wartung und Updates 11
10. Technische Eigenschaften 12
11. Produktrecycling 12
Page 32
Einführung
Hinweis: Alle
Sicherheitshinweise finden Sie
im gesetzlich vorgeschriebenen
Sicherheitshandbuch.
Willkommen bei Ihrer neuen Vorstufe von Naim. Wie bei allen Produkten von Naim
Audio steht auch bei dem NAC 332 die musikalische Leistung an vorderster Stelle. Um
das volle Potenzial der Endstufe auszuschöpfen, sollten die einfachen Installations- und
Nutzungsrichtlinien in diesem Handbuch befolgt werden.
gebrauchsanweisung. Wir beginnen mit einigen grundlegenden Informationen zum
Produkt und zur Einrichtung, bevor wir in Abschnitt 5 zu genaueren Informationen
übergehen.
1. Kartoninhalt
1x NAC 332
1x Gebrauchsanleitung
cd
stream
phono
tuner
av aux
1x Reinigungstuch 1x Power-Line Lite
1x Fernbedienung 2x Verbindungsstecker
11
Page 33
WARNING:Disconnect power before opening
AC ONLY
FUSE RATING: ANTISURGE
1 0-120 V:1 T4AL
2 0-240 V:2 T2AL
FREQUENCY: 0 60Hz5 /
I 70VANPUT POWER:
Power
300 SERIES
PREAMPLIFIER
NAC 332
DESIGNED AND MADE IN THE UK
BY NAIM AUDIO, SALISBURY, SP1 2LN
/ .oNS
Ground
Power Supply Upgrade
Preamp Outputs
AnalogueInputs
Ground
Default
R L
R
L
RCA
XLR
Refer to User Manual
Type 3
Type 4
Remote
in
Remote
out
Auto
standby
Instant
on
1
2
Control
USB
update
Brightness
Reset/
On
RCA
output
O
3
4
6
AnalogueInputs
R
R
R
L
L
L
5
8
7
1
2
R
L
R
L
Contains FCC ID: 2ACURZIGEE IC ID: 12217A-ZIGEE
Refer to User Manual
2. Mehr über Ihren NAC 332 erfahren
Standby-Taste
Stummschalttaste
Lautstärkeregelung
Remote In (3,5mm
Klinkenbuchse elektrisch
und Mini-TOSLINK optisch)
Netzeingang &
Sicherung
Schalter für Standby/
Sofortiges Einschalten
und Mini-TOSLINK optisch)
USB-
Upgradebuchse
Hintergrundbeleuchtetes,
dimmbares Logo
XLR Eingänge
Remote Out (3,5mm
Klinkenbuchse elektrisch
Cinch-Eingänge
Steckdosen-
Upgradebuchse
Auswahltasten für
Kopfhörerausgang,
(6,35mm-Klinke)
DIN-Eingang für NVC TT
Phonostufe
DIN Eingänge
Masseschalter
RCA-Ausgang
(symmetrisch)
RCA-Ausgang
Ein/Aus-Schalter
Eingänge
XLR-Ausgang
(symmetrisch)
22
Page 34
3. Einrichtung des NAC 332
Ihr NAC 332 muss an einen oder mehrere Leistungsverstärker (z. B. die passenden NSS333
und NAP 350) angeschlossen werden. Stellen Sie vorher jedoch sicher, dass sich alle
Komponenten in ihrer endgültigen Position benden und vom Stromnetz getrennt sind.
erwenden Sie für eine optimale Leistung eine spezielle HiFi-Halterung (z. B. Naim Fraim)
und platzieren Sie die Vorstufen wie abgebildet über den Leistungsverstärker.
Außerdem benötigen Sie Lautsprecher mit Kabeln.
33
Page 35
3.1 Anschluss des NAC 332 an den Leistungsverstärker NAP 350
WARNING:
Disconnect power before opening
AC ONLY
FUSE RATING: ANTISURGE
1 0-120 V:1 T4AL
2 0-240 V:2 T2AL
FREQUENCY: 0 60Hz5 /
I 70VANPUT POWER:
Power
300 SERIES
PREAMPLIFIER
NAC 332
DESIGNED AND MADE IN THE UK
BY NAIM AUDIO, SALISBURY, SP1 2LN
/ .oNS
Ground
Power Supply Upgrade
Preamp Outputs
AnalogueInputs
Ground
Default
R L
R
L
RCA
XLR
Refer to User Manual
Type 3
Type 4
Remote
in
Remote
out
Auto
standby
Instant
on
1
2
Control
USB
update
Brightness
Reset/
On
RCA
output
O
3
4
6
AnalogueInputs
R
R
R
L
L
L
5
8
7
1
2
R
L
R
L
Contains FCC ID: 2ACURZIGEE IC ID: 12217A-ZIGEE
Refer to User Manual
Verbinden Sie zwei XLR-Kabel (im Lieferumfang des NAP 350 enthalten) von den XLRAusgängen des NAC 332 an den Eingang des NAP 350. Die Kabel müssen kanalangepasst
sein: Der linke Ausgang des Vorverstärkers ist mit dem Leistungsverstärker verbunden, der
den linken Lautsprecher ansteuert; das Gleiche gilt für den rechten. Bitte stellen Sie sicher,
dass die XLR-Stecker korrekt eingesteckt sind, d. h. das Naim-Logo auf dem Stecker muss
nach oben zeigen.
Schließen Sie die Systemautomatisierungskabel (im Lieferumfang des NAP 350 enthalten)
zwischen den Remote Out-Anschlüssen des NAC 332 und an den Remote In-Anschlüssen
des NAP 350 an.
3.2 Anschluss von Quellen
Schließen Sie Ihre Quellen wie erforderlich an die Eingänge des NAC 332 an. Die Tasten
auf der Vorderseite können einem beliebigen Eingang zugewiesen werden, siehe
Abschnitt 4.2
Die werkseitigen Standardzuordnungen sind:
Tuner Eingang 3 RCA
Stream Eingang 7 5-poliger DIN
AV Eingang 4 RCA
Phono Eingang 6 8-poliger DIN
AUX Eingang 1 XLR
CD Eingang 8 5-poliger DIN
3.3 Einschalten
Nachdem Sie Ihre Quellen und den NAC 332 an die Leistungsverstärker angeschlossen
haben, sind nur noch einige wenige, einfache Schritte notwendig, bevor Sie Ihren NAC 332
einschalten und mit der Musikwiedergabe beginnen können.
Verbinden Sie die beiden mitgelieferten Bildsteckern mit den Buchsen für die Aufrüstung
des NAC 332-Netzteils.
44
Page 36
Schließen Sie das Netzkabel an die Steckdose des NAC 332 und dann an das Stromnetz
an.
AC ONLY
FUSE RATING: ANTISURGE
1 0-120 V:1 T4AL
2 0-240 V:2 T2AL
FREQUENCY: 0 60Hz5 /
I 70VANPUT POWER:
/ .oNS
WARNING:Disconnect power before opening
Power
Brightness
Reset/
USB
update
Control
1
L
R
Remote
in
Instant
on
Auto
standby
R
2
1
Remote
out
2
L
R
3
300 SERIES
PREAMPLIFIER
Contains FCC ID: 2ACURZIGEE IC ID: 12217A-ZIGEE
L
R
4
L
DESIGNED AND MADE IN THE UK
BY NAIM AUDIO, SALISBURY, SP1 2LN
5
L
R
NAC 332
Type 4
Power Supply Upgrade
AnalogueInputs
AnalogueInputs
Refer to User Manual
7
Refer to User Manual
8
Type 3
6
R
Default
Ground
Ground
XLR
O
R L
RCA
L
On
RCA
output
Schalten Sie Ihren NAC 332 ein, indem Sie die Standby-Taste oben rechts auf der
Vorderseite drücken.
3.4 Koppeln der Fernbedienung
Sobald Ihr NAC 332 eingeschaltet ist, müssen Sie die Fernbedienung koppeln. Legen Sie
die mitgelieferten Batterien die Fernbedienung ein.
Durch Drücken einer beliebigen Eingangstaste auf der Vorderseite wird für 30 Sekunden
der Fernkopplungsmodus aktiviert.
Preamp Outputs
Halten Sie die Helligkeitstaste auf der Fernbedienung 3 Sekunden lang gedrückt.
55
Page 37
Der Lautstärkering auf der Fernbedienung läuft im Kopplungsmodus durch und stoppt
stream
phono
cd
tuner
av aux
dann bei der aktuellen Lautstärkeeinstellung, wenn die Kopplung abgeschlossen ist.
Die Fernbedienung ist nun mit dem Gerät gekoppelt und einsatzbereit.
4. Detaillierte Einrichtung des NAC 332
4.1 Verwendung von Naim-Endstufen ohne symmetrische Eingänge
Wenn Sie eine älteren Leistungsverstärker von Naim verwenden, benötigen Sie
entsprechend drahtgebundene Kabel.
Wenn die unsymmetrischen Cinch-Ausgänge verwendet werden sollen (z. B. zum
Anschluss eines Subwoofers), muss der Schalter „RCA output“ (Cinch-Ausgang) auf der
Rückseite auf „On“ (Einschalten) gestellt werden.
4.2 Neuzuordnung von Eingängen
Eine beliebige Kombination von sechs der acht physischen Eingänge kann direkt über das
Bedienfeld oder die Fernbedienungstasten ausgewählt werden. Ein Einrichtungsmodus
dient dazu, die Zuordnung der physischen Eingänge zu den Tasten zu ändern.
Um in den Einrichtungsmodus zu gelangen, drücken Sie die Taste auf der Vorderseite des
ersten einzustellenden Eingangs, bis diese beginnt zu blinken.
Die LEDs des Lautstärkereglers zeigen Segmente an, die die mögliche Eingangszuordnung
angibt, wobei der aktuell ausgewählte Eingang durch hellere LEDs dargestellt wird.
Im Einrichtungsmodus wird die ausgewählte Quelle, die durch die LEDs des
Lautstärkereglers angezeigt wird, abgespielt.
Durch Drehen des Lautstärkereglers wird der dem blinkenden Eingang zugewiesene
Eingang geändert.
Drücken Sie im Einrichtungsmodus eine beliebige andere Quellentaste, um die Zuordnung
für diesen Eingang anzupassen. Um den Einrichtungsmodus zu verlassen, drücken Sie die
blinkende Eingabetaste, bis sie nicht mehr blinkt.
Die Stummschalttaste funktioniert im Einrichtungsmodus weiterhin wie gewohnt.
4.3 Einstellung des Eingangsablängens
Der relative Pegel jedes Eingangs kann in einem Bereich von -10dB bis +10dB eingestellt
werden, um den Lautstärkepegel zwischen den Quellen auszugleichen.
Dieser wird im Einrichtungsmodus eingestellt, drücken Sie daher zuerst die Eingabetaste,
bis die Taste zu blinken beginnt.
66
Page 38

Ein zweiter Tastendruck wechselt in den Modus in den Einstellungsmodus des Ablängens.
Die LEDs auf dem Lautstärkeregler zeigen die aktuelle Ablängeneinstellung an.
Durch Drehen des Lautstärkereglers wird die Ablängeneinstellung geändert; die
einzustellende Quelle wird abgespielt, so dass Sie den gewünschten Pegel kongurieren
können.
Sind Sie mit der Einstellung zufrieden, kehren Sie durch Drücken der Taste zur Anzeige der
Eingangszuordnung zurück. Sie können aber auch den Einstellungsmodus durch langes
Drücken verlassen.
4.4 AV Festverstärkung (Einheitsverstärkung)
Dieser Modus ist nur auf den AV-Eingang anwendbar. Die Einstellungen für die
Eingangsanpassung, den Headroom und die Balance werden ignoriert, wenn der Modus
AV Festverstärkung aktiv ist.
In diesem Modus kann die Lautstärke nicht mit der Fernbedienung oder dem
Lautstärkeregler des NAC 332 geändert werden. Das Ausgangssignal wird mit der gleichen
Lautstärke wie das Eingangssignal ausgegeben.
Die Festverstärkung wird im Setup-Modus eingestellt. Halten Sie also zunächst die AVEingangstaste auf der Vorderseite gedrückt, bis die Taste blinkt.
Ein zweiter Tastendruck wechselt in den Modus in den Einstellungsmodus des Ablängens.
Die LEDs auf dem Lautstärkeregler zeigen die aktuelle Ablängeneinstellung an.
Drehen Sie dann mit dem Lautstärkeregler den Regler auf Maximum (ganz rechts), bis ein
LED-Block leuchtet.
Um den Setup-Modus zu verlassen, drücken Sie die AV-Eingabetaste, bis sie nicht mehr
blinkt.
4.5 Funktion Maximale Lautstärke
In diesem Modus kann der Benutzer die maximale Gesamtlautstärke einstellen, um zu
verhindern, dass versehentlich zu hohe Lautstärken gewählt werden.
Die Einstellung erfolgt im Modus „Maximale Lautstärke“, d. h. Sie müssen zunächst die
Stummschalttaste auf der Vorderseite drücken und gedrückt halten. Die Stummschalttaste
blinkt und die LEDs des Lautstärkereglers ändern sich, wenn sie aktiviert sind.
Drehen Sie dann den Lautstärkeregler entweder nach links oder nach rechts, um den Wert
für die maximale Lautstärke zu ändern.
Um die maximale Lautstärke für Kopfhörer einzustellen, stecken Sie die Kopfhörerbuchse
ein. Der Lautstärkeregler zeigt die maximal zulässige Lautstärke für Kopfhörer an.
Verwenden Sie dann den Lautstärkeregler, um die gewünschte maximale Lautstärke
einzustellen.
Wenn Sie die Kopfhörerbuchse entfernen, zeigt der Lautstärkeregler wieder die maximale
Lautstärke für die Hauptlautstärke an.
Wenn Sie mit der Einstellung zufrieden sind, verlassen Sie den Setup-Modus, indem Sie
die Stummschalttaste drücken, bis sie nicht mehr blinkt.
77
Page 39

Typ 1: 8-poliger DIN
-18V 300mA
+18V 300mA
Masse
4.6 Zusätzliche DIN-Eingangsfunktionen
Eingang 6 (8-poliger DIN-Eingang) ist mit 5-poligen DIN-Kabeln kompatibel und kann auch
direkt eine Naim NVC TT-Phonostufe versorgen
Eingang 8 (5-polig DIN) hat Line-Level-Ausgänge, die die aktuell gewählte Quelle spiegeln.
Beachten Sie, dass bei Auswahl dieses Eingangs die angeschlossene Quelle gespiegelt wird;
beachten Sie also die Rückkopplungsschleifen bei Verwendung einer Aufnahmequelle.
4.7 Verwendung von Kopfhörer
Mit dem Kopfhörerausgang können die meisten Kopfhörer mit sehr hohen Lautstärken
betrieben werden. Während der Stecker des Kopfhörers eingesteckt ist, werden die
Hauptausgänge des Vorverstärkers stummgeschaltet.
Der Kopfhörerausgang hat eine separate Lautstärkeeinstellung. Beim Einsetzen der
Kopfhörer wird die Lautstärke auf den zuletzt mit Kopfhörern verwendeten Pegel
eingestellt. Wenn sie entfernt werden, wird die Lautstärke auf den zuletzt mit Lautsprechern
verwendeten Pegel zurückgesetzt.
5. Tipps zur Installation und Verwendung des
NAC332
Wir wissen, dass Sie sich auf Ihrer neuen NAC 332 sehr freuen! Dennoch versprechen wir
Ihnen bei Umsetzung der folgenden Hinweise, dass Sie die Vorstufe in ihrem vollen Umfang
erleben werden.
5.1 Unboxing und Positionierung
In Ihrem NAC 332 kommen hochwertige Komponenten zum Einsatz, darunter ein
beachtlicher Leistungstransformator und ein robustes Aluminiumgehäuse. Das bedeutet,
dass der NAC 332 11 kg wiegt. Seien Sie daher vorsichtig, wenn Sie ihn anheben oder
bewegen, und stellen Sie sicher, dass die Oberäche, auf der Sie ihn aufstellen möchten,
stabil ist und sein Gewicht tragen kann.
Um eine optimale Leistung zu erzielen, sollten Sie für Ihre Naim-Produkte ein spezielles HiFiRegal verwenden
– idealerweise den Naim Fraim oder Fraim Lite. Diese Regale dienen der Minimierung von
Vibrationen, die den Klang beeinträchtigen können. Sie haben keinen Platz für ein Regal?
Stellen Sie Ihren NAC 332 auf ein Fraim-Glasregal auf einem geeigneten Möbelstück. Dies
dient einem soliden, aber schlichten Halt.
Stapeln Sie Naim-Produkte niemals übereinander; stellen Sie sie nebeneinander und lassen
Sie bitte etwas Abstand zwischen den Geräten.
Um das Risiko von hörbarem Brummen aus den Lautsprechern zu verringern, sollten Sie
Netzteile oder Leistungsverstärker nicht in der Nähe von Quell- oder Vorstufenkomponenten
aufstellen.
88
Page 40

5.2 Angaben zum Eingangsanschluss
Der NAC 332 verfügt über mehrere Anschlussmöglichkeiten für Quellen. Für die beste
Klangqualität empfehlen wir Ihnen, die DIN-Eingänge zu verwenden.
5.3 Automatisierung:
Wenn Sie den NAC 332 mit einem kompatiblen Streamer und Leistungsverstärker (wie
den NSS 333 und NAP 350) verwenden, können Sie das Ein- und Ausschalten sowie die
Helligkeit des Logos in Ihrem gesamten System synchronisieren, indem Sie den NAC332
mit dem optischen Systemautomatisierungskabeln verbinden, das mit dem NAP 350
geliefert wird.
Das NSS 333 und das NAC 332 verwenden das Zigbee-System zur Synchronisierung ihrer
Funktionen.
Verwenden Sie die „Remote Out“-Anschlüsse des NAC 332, um die „Remote In“Anschlüsse des NAP 350 zu verbinden. Über den „Remote Out“-Anschlüssen des NAP 350
können weitere Leistungsverstärker angeschlossen werden.
Wenn Sie eine größere Entfernung zwischen Ihrem NAC 332 und dem NAP 350
benötigen, als das mitgelieferte Kabel zulässt, können Sie ein optisches 3,5-mm-auf-3,5mm-Ersatzkabel in der erforderlichen Länge verwenden. Es ist auch möglich, analoge
Standardkabel mit 3,5-mm-Steckern zu verwenden, aber ein optisches Kabel bietet die
beste Leistung.
5.4 Einschalten/Ausschalten
Sobald alle Eingangs- und Ausgangsverbindungen hergestellt sind, schließen Sie das
mitgelieferte Netzkabel an Ihren NAC 332 und an das Stromnetz an.
Indem Sie die Standby-Taste drücken, können Sie den NAC 332 nun einschalten.
Wenn der NSS 333, der NAC 332 und der NAP 350 über die Automatisierung
angeschlossen sind, schalten sie sich nacheinander ein.
Die Vorgehensweise zum Ausschalten des NAC 332 ist dieselbe: Schalten Sie den
NSS333, den NAC 332 und den über die Automatisierung angeschlossenen NAP 350
aus, und drücken Sie einfach die Standby-Taste an der Vorderseite des NSS 333 oder des
NAC332, wodurch Ihr gesamtes System in den Standby-Modus versetzt wird. Schalten Sie
die Verstärker möglichst nicht mit einem Netzschalter aus.
5.5 Einstellungen der Standby-Leistung
Der NAC 332 verfügt über drei Leistungsstufen: Standby-Modus, Standby-Modus mit
sofortigem Einschalten und Stromversorgung für den normalen Betrieb.
Der „Standby“-Modus hat einen Gesamtstromverbrauch von unter 0,5W. Sie können den
NAC 332 nun einschalten, indem Sie die Standby-Taste drücken.
Bei der Einstellung „Standby with instant on“ (Standby-Modus mit sofortigem Einschalten)
wird der NAC 332 vollständig mit Strom versorgt, das Logo ist jedoch ausgeschaltet. Bei
der Einstellung „Powered for normal use“ (Stromversorgung für den normalen Betrieb)
verbraucht der NAC 332 etwa 20 W.
Standardmäßig ist der Schalter auf der Rückseite des NAC 332 auf „Auto-Standby“
eingestellt, d. h. er schaltet nach maximal 20 Minuten Inaktivität automatisch in den
Standby-Modus. Für eine optimale Klangqualität stellen Sie den Schalter auf die Position
„instant on“ (Sofortiges Einschalten). Dadurch bleibt der NAC 332 ständig eingeschaltet.
Wenn sich der Schalter in dieser Position bendet und die Standby-Taste gedrückt wird,
bleibt der NAC 332 eingeschaltet, aber das Logo wird ausgeschaltet.
5.6 Helligkeitseinstellung des Naim-Logos
Sie können die Helligkeit der LED-Anzeigen und des Naim-Logos auf Ihrem NAC 332 mit
den Helligkeitstasten auf der Rückseite und auf der Fernbedienung einstellen. Wenn Sie
die Naim-Verstärker NAC 332 und NAP 350 verwenden, die über die Automatisierung
angeschlossen sind, wird die Helligkeit aller Logos synchronisiert.
99
Page 41

5.7 Verwendung des NPX 300-Netzteils
Das NPX 300-Netzteil ist ein optionales System-Upgrade. Möchten Sie das Netzteil
NPX300 zum NAC 332 hinzufügen? Dann schalten Sie zunächst das gesamte System aus.
Entfernen Sie das Netzkabel vom NAC 332; es wird nicht benötigt, wenn das Gerät über
den NPX 300 mit Strom versorgt wird.
Platzieren Sie den NPX 300 auf den Geräteständer.
Entfernen Sie die beiden Verbindungsstecker an der Rückseite des NAC 332.
Verbinden Sie das ungebänderte Ende der beiden Burndy-Kabel mit dem NPX 300.
Verbinden Sie die beiden gebänderten Enden mit dem NAC 332. Ziehen Sie alle
Sicherungsringe fest an. „Verkleiden“ Sie die Kabel so, dass sie möglichst locker hängen,
ohne die Ständer oder die Wand zu berühren.
Dies geht leichter, wenn Sie sie vor dem Anschließen der beiden Enden ungefähr in die
gewünschte Form bringen.
Schließen Sie das Netzkabel an die Steckdose des NPX 300 und dann an das Stromnetz an.
Schalten Sie den Rest des Systems wieder ein.
Sie können den NAC 332 nun einschalten, indem Sie die Standby-Taste drücken.
6. Netzstrom, Erdung und mehr
Verwenden Sie nur das mit dem NAC 332 mitgelieferte Netzkabel und Stecker oder
das verbesserte PowerLine-Netzkabel von Naim. Bei der Verwendung von gesicherten
Steckern sollten Sicherungen mit 13 Ampere eingesetzt werden. Schließen Sie keine
spannungsabhängigen Widerstände oder Rauschunterdrücker an Netzstecker an. Diese
beeinträchtigen die Netzversorgung und den Klang.
6.1 Erdung
Um Brummschleifen zu vermeiden, sollte die Signalmasse des gesamten Systems an
einer Stelle mit der Netzerde verbunden werden. Dies geschieht üblicherweise an der
Primärquelle. Der Vorverstärker NAC 332 verfügt über einen Groundlift-Schalter. Stellen
Sie diesen auf die „Default“ (Standard-Funktion), wenn die Hauptquelle die Netzerde
mit der Signalmasse verbindet. Wenn keine Quelle die Netzerde mit der Signalmasse
verbindet, stellen Sie den Schalter auf die Position „Ground“ (Masse).
6.2 Nicht wieder anschließbare Netzstecker
Wenn ein nicht wieder anschließbarer Stecker von einem Netzkabel abgekappt wird (zu
welchem Zweck auch immer), MUSS der Stecker so entsorgt werden, dass er keinesfalls
mehr verwendet werden kann. Es besteht erhebliche Stromschlaggefahr, wenn der
abgeschaltete Stecker in eine Netzsteckdose gesteckt wird.
6.3 Hauptstromkreise und Störungen
Eine HiFi-Anlage teilt sich meist einen Netzstromkreis mit anderen Haushaltsgeräten, von
denen einige Verzerrungen verursachen können, die sich als mechanisches Brummen von
Netztransformatoren, unter anderem auch des großen Transformators in Ihrem NAC 332,
äußern können.
Das Brummen des Transformators wird nicht über die Lautsprecher übertragen und hat
keinen Einuss auf die Leistung des Systems; eine sorgfältige Aufstellung Ihres NaimSystems kann das Brummen jedoch reduzieren, ebenso wie ein separater, spezieller
Netzstromkreis. Ein solcher Stromkreis (idealerweise mit Bemessungsdaten von 30 oder
45 Ampere) verbessert hauptsächlich auch die Systemleistung. Ziehen Sie zur Installation
eines separaten Hauptstromkreises einen Elektronikfachexperten hinzu.
6.4 Vorkehrungen gegen Blitzschlag
Ihr Naim-System sollte bei Blitzeinschlaggefahr ausgeschaltet und vollständig vom
Stromnetz getrennt werden, um es vor möglichen Schäden zu schützen.
1010
Page 42

7. Weitere Tipps und Empfehlungen
Nachdem wir nun das Wichtigste geklärt haben, wollen wir uns nun einigen weiteren
Dingen widmen, um die Leistung Ihres neuen NAC 332 zu optimieren.
7.1 Einlaufzeit
Naim-Produkte werden aus sorgfältig ausgewählten, hochwertigen Komponenten
handgefertigt. Ihr NAC 332 wird gleich nach dem Auspacken hervorragend klingen,
aber seine Leistung kann noch weiter verbessert werden, wenn all diese verschiedenen
Komponenten in den ersten Wochen der Nutzung eingeschaltet werden und sich
gegenseitig beeinussen. Bei eingeschaltetem System wird dieser Prozess unterstützt.
7.2 Reinigung Ihres Produkts und der Anschlüsse
Naim empehlt, nur das mitgelieferte Reinigungstuch zu verwenden, um die Oberächen
des Geräts leicht abzustauben. Reinigungsmittel können Inhaltsstoe enthalten, die
sich negativ auf kosmetische Oberächenbehandlungen und Beschichtungen auswirken
können.
Halten Sie Anschlussstecker und -buchsen sauber und korrosionsfrei. Dies erreichen Sie
am einfachsten, indem Sie Ihr Naim-Produkt (und alle angeschlossenen Geräte) vollständig
ausschalten, alle Anschlüsse aus den Buchsen ziehen und sie wieder fest einstecken.
Es sollten keine Kontaktreiniger und „Enhancer” verwendet werden, da die abgelagerte
Filmschicht den Klang beeinträchtigen kann.
7.3 Zurücksetzen Ihres NAC 332
Um Ihren NAC 332 auf die Werkseinstellungen zurückzusetzen, halten Sie mindestens 3
Sekunden lang die Taste „Brightness/ Reset“ (Zurücksetzen) auf der Rückseite gedrückt.
Der NAC 332 kehrt in den Standby-Zustand zurück und alle Einstellungen werden auf die
Werkseinstellungen zurückgesetzt. Beachten Sie, dass dies auch die Entkopplung der
Fernbedienung und des Zigbee-Automatisierungsgeräts miteinbezieht.
8. Support
Der Verbraucherschutz variiert je nach Land. In den meisten Ländern sollte der Händler,
bei dem Sie Ihr Naim-Produkt gekauft haben, Ihr Hauptansprechpartner sein, wenn Sie
Probleme mit Ihrem Gerät haben. Ein Problem kann auf einen Fehler im System oder in der
Installation hinweisen. Daher sollten Sie unbedingt die Diagnosefähigkeiten Ihres Händlers
voll ausschöpfen.
Auf Naimaudio.com nden Sie für jedes Naim-Produkt eine Reihe von Begleitartikeln.
Wenn Sie weiterhin Probleme mit Ihrem Naim-Produkt haben, kontaktieren Sie uns direkt
unter: [email protected].
9. Wartung und Updates
Reparaturen oder Hardware-Updates sollten nur von einer autorisierten Naim-Servicestelle
oder in der Naim-Zentrale selbst durchgeführt werden. Viele Komponenten werden
kundenspezisch angefertigt, getestet oder aufeinander abgestimmt und geeignete
Ersatzteile sind oft nicht aus anderen Quellen zu erhalten. Bitte wenden Sie sich bei
Service- oder Reparaturanfragen an Ihren Naim-Fachhändler vor Ort.
1111
Page 43

10. Technische Daten
Vorstufe der 300er Serie – NAC 332
Audioeingänge:
Audioausgänge:
Update: Micro-USB
Remote In: 1 × 3,5mm Klinkenbuchse elektrisch und Mini-TOSLINK optisch
Remote Out: 2 × 3,5mm Klinkenbuchse elektrisch und Mini-TOSLINK optisch
Stromverbrauch: Typische Anwendung: 20W Standby: <0,5W
Abmessungen (H x B x T): 91,5 × 432 × 317,5mm (einschließlich Füße)
Gewicht: 11kg
Netzspannung: 115 V oder 230V, 50/60Hz
3 x DIN
2 x XLR-Paar
3 x Cinch-Paar
1 x XLR-Paar
1 x Cinch-Paar
1 x Kopfhörerbuchse 6,35mm
1 x Line-Level-Ausgang an Eingang 8 (5-polig DIN)
11. Produktrecycling
Produkte mit dem durchgestrichenen Mülltonne-mit-Rädern-Logo können nicht
über den Hausmüll entsorgt werden. Diese Produkte müssen in Müllanlagen
entsorgt werden, die in der Lage sind, sie wiederzuverwerten und eventuelle
Nebenprodukte angemessen zu behandeln.
Wenden Sie sich an Ihre örtliche Behörde, um Informationen über die nächstgelegene
Müllanlagen zu erhalten.
Sachgerechtes Recycling und Abfallentsorgung helfen, Ressourcen zu schonen und die
Umwelt vor Verunreinigungen zu schützen.
1212
Page 44

Page 45

Inhoud
Hoofdstuk Pagina
Inleiding 1
1. Wat is meegeleverd? 1
2. Kennismaking met de NAC 332 2
3. Essentiële informatie over plaatsing van de NAC332 3
4. Gedetailleerde instelling van de NAC 332 6
5. Tips voor installatie en gebruik van de NAC332 8
6. Netvoeding, aarding en meer 10
7. Verdere tips en advies 11
8. Support 11
9. Onderhoud en updates 11
10. Specicaties 12
11. Product recyclen 12
Page 46
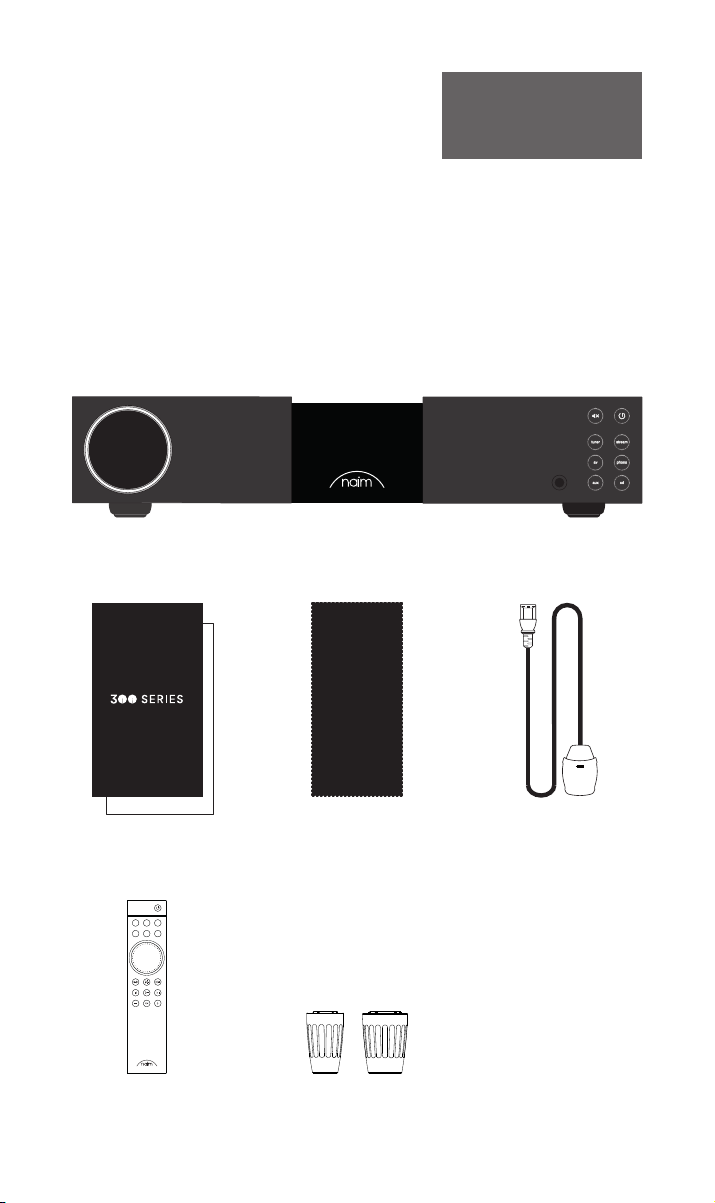
Inleiding
Let op: Volledige
veiligheidswaarschuwingen
zijn te vinden in de wettelijk
verplichte veiligheidshandleiding.
Welkom bij uw nieuwe voorversterker van Naim. Net als bij alle andere producten van
Naim Audio staan ook bij de NAC 332 muzikale prestaties voorop. Om zijn volledige
potentieel te realiseren, is het belangrijk dat u de in deze handleiding verstrekte
eenvoudige richtlijnen voor installatie en gebruik volgt.
Handmatig. We beginnen met enkele essentiële punten over het product en de plaatsing
daarvan en in hoofdstuk 5 geven we u meer gedetailleerde informatie.
1. Wat is meegeleverd?
1x NAC 332
1x Documentatiepakket
cd
stream
phono
tuner
av aux
1x Reinigingsdoek 1x Power-Line Lite
1x Afstandsbediening 2x ‘Link Plug’ stekkers
11
Page 47
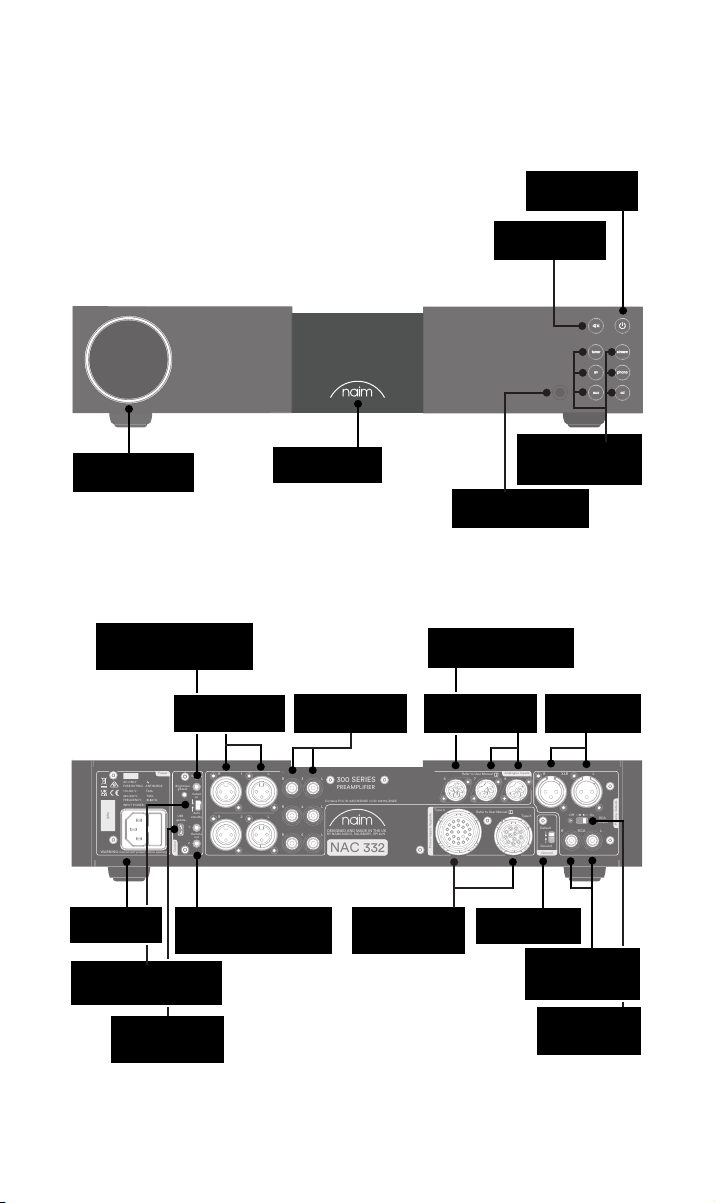
WARNING:Disconnect power before opening
AC ONLY
FUSE RATING: ANTISURGE
1 0-120 V:1 T4AL
2 0-240 V:2 T2AL
FREQUENCY: 0 60Hz5 /
I 70VANPUT POWER:
Power
300 SERIES
PREAMPLIFIER
NAC 332
DESIGNED AND MADE IN THE UK
BY NAIM AUDIO, SALISBURY, SP1 2LN
/ .oNS
Ground
Power Supply Upgrade
Preamp Outputs
AnalogueInputs
Ground
Default
R L
R
L
RCA
XLR
Refer to User Manual
Type 3
Type 4
Remote
in
Remote
out
Auto
standby
Instant
on
1
2
Control
USB
update
Brightness
Reset/
On
RCA
output
O
3
4
6
AnalogueInputs
R
R
R
L
L
L
5
8
7
1
2
R
L
R
L
Contains FCC ID: 2ACURZIGEE IC ID: 12217A-ZIGEE
Refer to User Manual
2. Kennismaking met de NAC 332
Stand-bytoets
De toets Mute
Volumeregeling
Remote in (3,5mm jack
elektrisch en Mini-
TOSLINK optisch)
Netvoeding en
zekering
De schakelaar Standby/
Instant on
Aansluiting voor
USB-upgrade
Backlit, dimbaar
XLR-ingangen
Remote Out (3,5mm
jack elektrisch en Mini-
TOSLINK optisch)
logo
RCA-ingangen
Ingangen voor
opgewaardeerde
voedingseenheid
ingangskeuzetoetsen
Hoofdtelefoon 6,35mm
jack
DIN-ingang NVC TT
phono-trap
DIN-ingangen
De schakelaar
Signal Ground
ongebalanceerde
XLR
gebalanceerde
uitgang
RCA
uitgang
RCA-uitgang
aan/uit-
schakelaar
22
Page 48
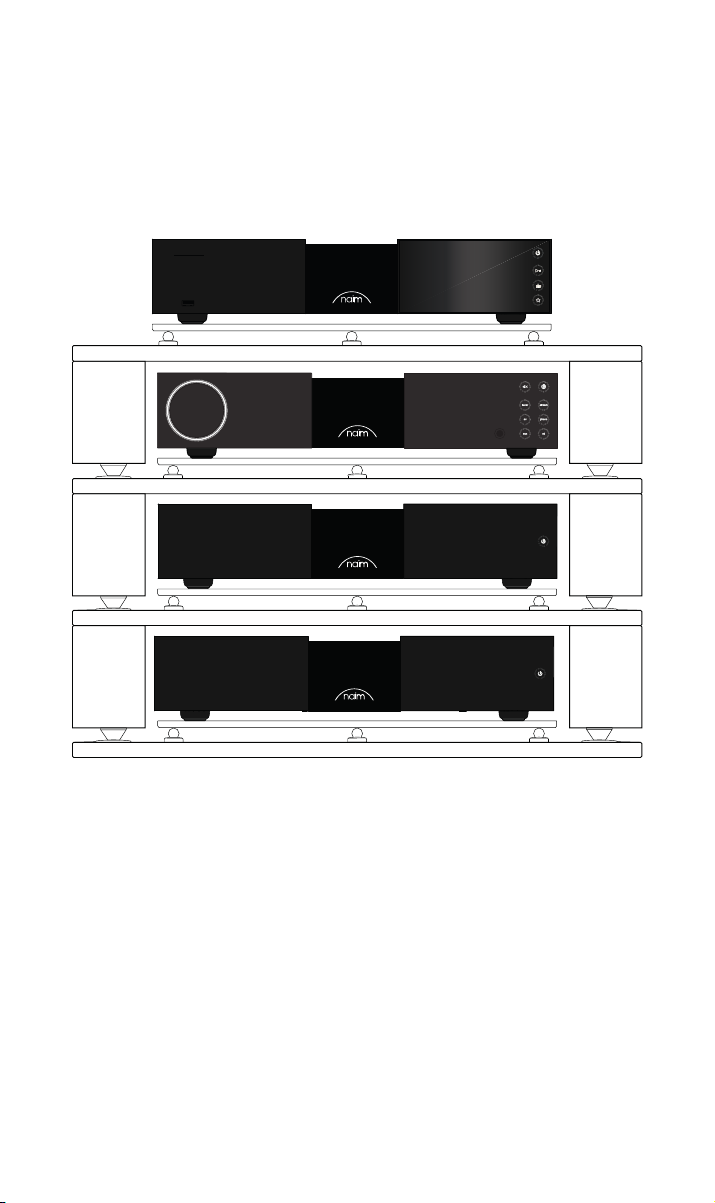
3.Essentiële informatie over plaatsing van de
NAC 332
De NAC 332 moet op een of meerdere bronnen en een eindversterker (zoals de
bijbehorende NSS 333 en NAP 350’s) worden aangesloten. Maar voordat u dat doet,
moet u er eerst voor zorgen dat alle componenten op hun denitieve plek staan en van de
netvoeding zijn afgesloten.
Voor optimale prestaties gebruikt u een speciale hi-steun, bij voorkeur de Naim Fraim,
met de voorversterker zoals afgebeeld boven de eindversterkers geplaatst.
U hebt ook luidsprekers met kabels nodig.
33
Page 49
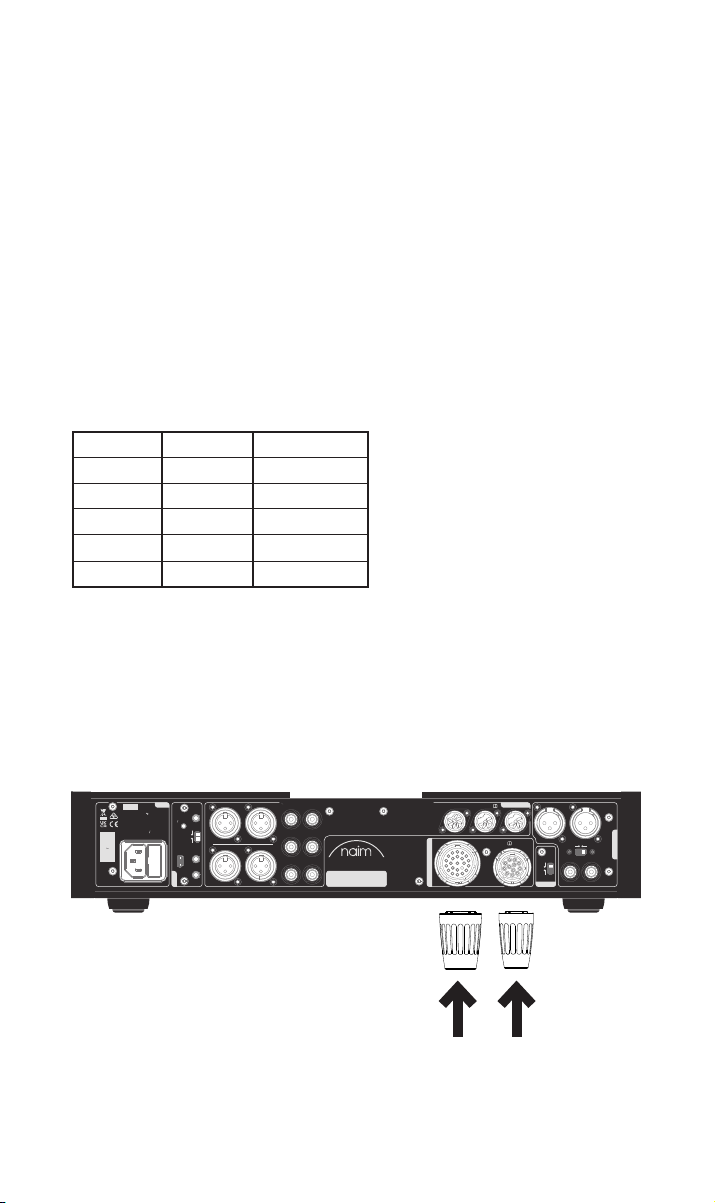
3.1 De NAC 332 aansluiten op de NAP 350 eindversterkers
WARNING:
Disconnect power before opening
AC ONLY
FUSE RATING: ANTISURGE
1 0-120 V:1 T4AL
2 0-240 V:2 T2AL
FREQUENCY: 0 60Hz5 /
I 70VANPUT POWER:
Power
300 SERIES
PREAMPLIFIER
NAC 332
DESIGNED AND MADE IN THE UK
BY NAIM AUDIO, SALISBURY, SP1 2LN
/ .oNS
Ground
Power Supply Upgrade
Preamp Outputs
AnalogueInputs
Ground
Default
R L
R
L
RCA
XLR
Refer to User Manual
Type 3
Type 4
Remote
in
Remote
out
Auto
standby
Instant
on
1
2
Control
USB
update
Brightness
Reset/
On
RCA
output
O
3
4
6
AnalogueInputs
R
R
R
L
L
L
5
8
7
1
2
R
L
R
L
Contains FCC ID: 2ACURZIGEE IC ID: 12217A-ZIGEE
Refer to User Manual
Sluit de twee XLR-kabels (met de NAP 350’s geleverd) van de XLR-uitgangen van de
NAC 332 aan op de ingang van elke NAP 350. Zorg dat de kabels op het juiste kanaal
worden aangesloten: de linkeruitgang van de voorversterker wordt aangesloten op de
eindversterker die de linkerluidspreker aandrijft en de rechteruitgang op de eindversterker
die de rechterluidspreker aandrijft. Controleer of de XRL-kabels goed zijn aangesloten; dit
is het geval als het logo op de aansluiting naar boven wijst.
Sluit de kabels voor systeemautomatisering (geleverd met de NAP 350’s) aan op de
aansluitingen Remote Out van de NAC 332 en de aansluitingen Remote In van de
NAP350’s.
3.2 De broncomponenten aansluiten
Sluit de broncomponenten zoals nodig aan op de ingangen van de NAC 332. De toetsen
op het voorpaneel kunnen worden ingesteld om elke gewenste ingang te selecteren, zie
hoofdstuk 4.2
In de fabriek zijn standaard de volgende ingangen aan deze toetsen toegewezen:
Tuner Ingang 3 RCA
Streamen Ingang 7 5-pins DIN
AV Ingang 4 RCA
Phono Ingang 6 8-pins DIN
AUX Ingang 1 XLR
CD Ingang 8 5-pins DIN
3.3 Inschakelen
Wanneer u de bronnen hebt aangesloten en de NAC 332 op de eindversterkers hebt
aangesloten, zijn er verder nog maar een paar eenvoudige stappen voordat u de NAC 332
kunt inschakelen en muziek kunt gaan afspelen.
Sluit de twee meegeleverde ‘link plug’ stekkers aan op de ingangen voor de
opgewaardeerde voedingseenheid van de NAC 332.
44
Page 50
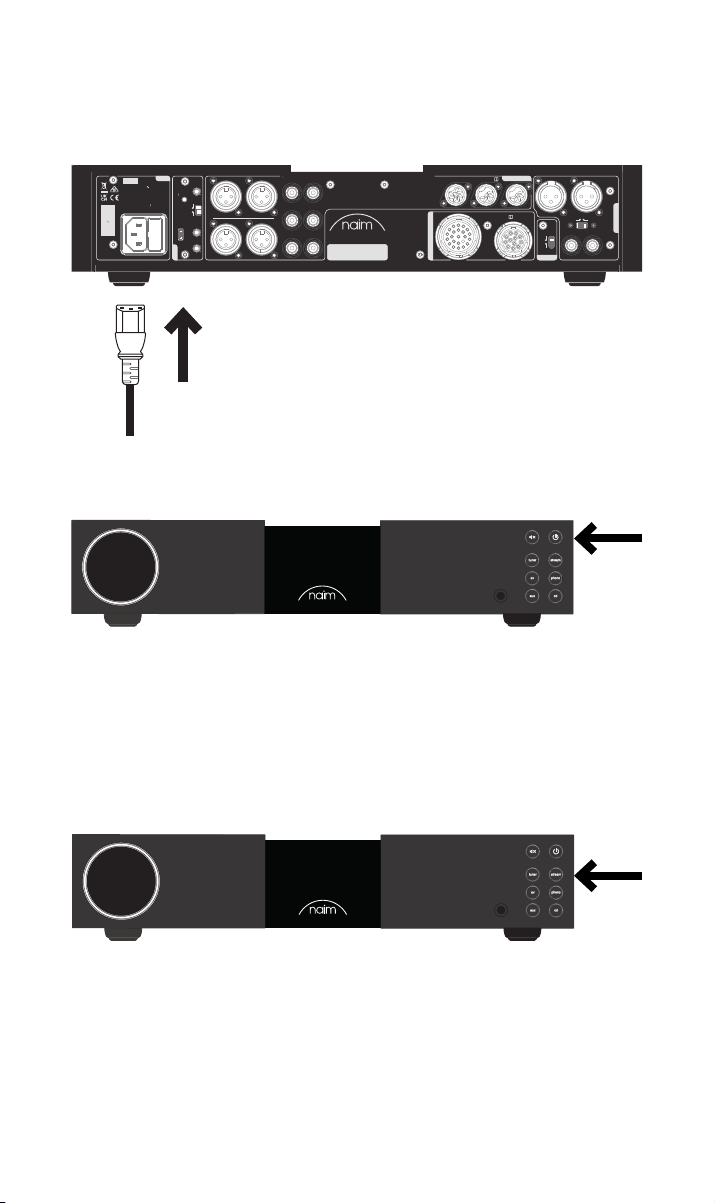
Sluit de voedingskabel aan op de netvoedingsingang van de NAC 332 en steek vervolgens
de stekker in het stopcontact.
AC ONLY
FUSE RATING: ANTISURGE
1 0-120 V:1 T4AL
2 0-240 V:2 T2AL
FREQUENCY: 0 60Hz5 /
I 70VANPUT POWER:
/ .oNS
WARNING:Disconnect power before opening
Power
Brightness
Reset/
USB
update
Control
1
L
R
Remote
in
Instant
on
Auto
standby
R
2
1
Remote
out
2
L
R
3
300 SERIES
PREAMPLIFIER
Contains FCC ID: 2ACURZIGEE IC ID: 12217A-ZIGEE
L
R
4
L
DESIGNED AND MADE IN THE UK
BY NAIM AUDIO, SALISBURY, SP1 2LN
5
L
R
NAC 332
Type 4
Power Supply Upgrade
AnalogueInputs
AnalogueInputs
Refer to User Manual
7
Refer to User Manual
8
Type 3
6
R
Default
Ground
Ground
XLR
O
R L
RCA
L
On
RCA
output
Preamp Outputs
Zet de NAC 332 aan door de Stand-bytoets rechtsboven aan het voorpaneel in te drukken.
3.4 De afstandsbediening koppelen
Wanneer de NAC 332 is ingeschakeld, moet u de afstandsbediening koppelen. Plaats de
meegeleverde batterijen in de afstandsbediening.
Druk op een van de ingangstoetsen op het voorpaneel om de koppelmodus 30 seconden
te activeren.
Houd de helderheidstoets op de afstandsbediening 3 seconden ingedrukt.
55
Page 51
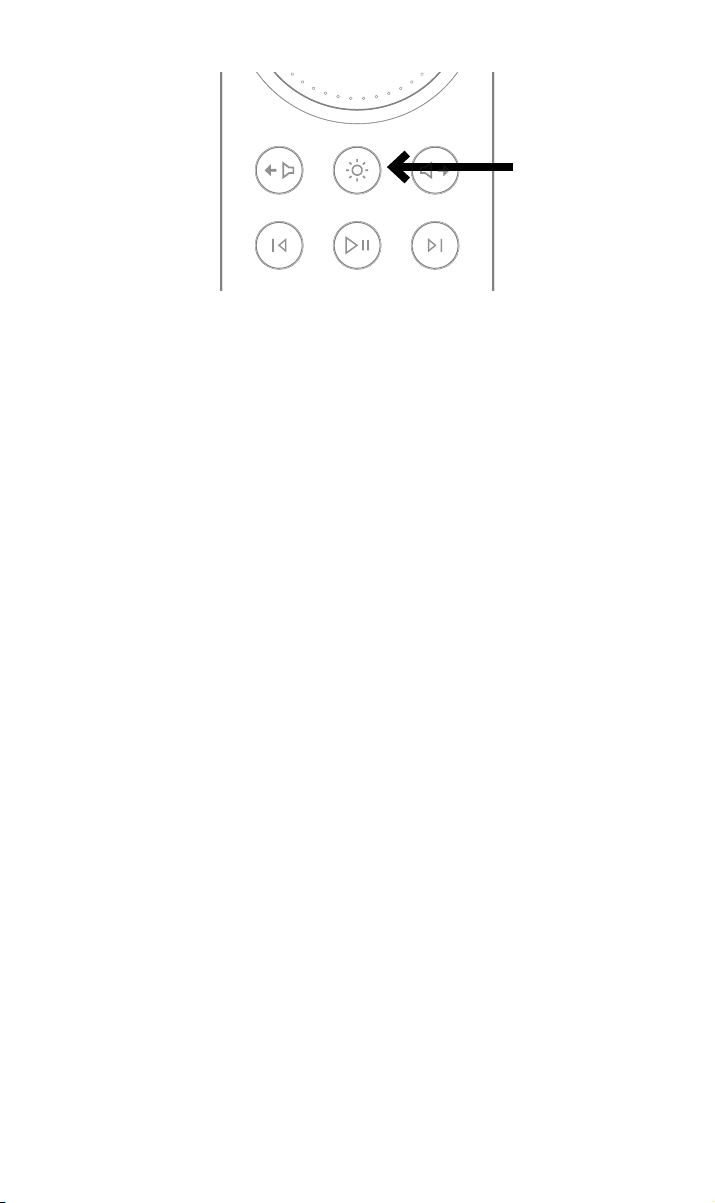
De volumering op de afstandsbediening draait in de koppelmodus en stopt op de huidige
stream
phono
cd
tuner
av aux
volume-instelling wanneer de afstandsbediening is gekoppeld.
De afstandsbediening is nu aan het apparaat gekoppeld en klaar voor gebruik.
4. Gedetailleerde instelling van de NAC 332
4.1 Naim-eindversterkers zonder gebalanceerde ingangen gebruiken
Als een oudere eindversterker van Naim wordt gebruikt, hebt u een gepaste set kabels
nodig.
Als de RCA ongebalanceerde uitgangen moeten worden gebruikt (bijvoorbeeld om een
subwoofer aan te sluiten) moet de schakelaar ‘RCA output’ (RCA-uitgang) in de stand ‘On’
worden gezet om deze uitgangen te activeren.
4.2 Ingangen opnieuw toewijzen
Via de toetsen op het voorpaneel of de afstandsbediening kunnen zes van de acht fysieke
ingangen in elke gewenste combinatie worden geselecteerd. Er wordt een instelmodus
gebruikt om de toewijzing van de fysieke ingangen aan de toetsen te veranderen.
Om de instelmodus te activeren, houdt u op het voorpaneel de toets die is toegewezen aan
de eerste ingang die u wilt wijzigen ingedrukt totdat die toets begint te knipperen.
De leds van de volumeknop tonen segmenten die aangeven welke ingangen er aan de
toets kunnen worden toegewezen, en helderdere leds geven aan welke ingang momenteel
is geselecteerd.
In de instelmodus hoort u de geselecteerde bron, die door de leds op de volumeknop
wordt aangegeven.
Draai aan de volumeknop om de aan de knipperende toets toegewezen ingang te
veranderen.
Druk in de instelmodus op een andere brontoets om de daaraan toegewezen ingang te
veranderen. U sluit de instelmodus af door de knipperende ingangstoets ingedrukt te
houden totdat het knipperlichtje stopt.
De toets Mute blijft in de instelmodus als normaal werken.
4.3 Ingangsvolume aanpassen
Het relatieve volumeniveau van elke ingang kan worden afgesteld binnen een bereik van
-10dB tot +10dB om het volumeniveau van de bronnen gelijk te stellen.
Deze aanpassing gebeurt in de instelmodus, dus druk eerst op de ingangstoets die u wilt
afstellen totdat de toets gaat knipperen.
Druk nogmaals op de toets om de volume-instelmodus te activeren. De leds op de
volumeregeling geven de huidige instelling aan.
66
Page 52

Draai aan de volumeknop om de instelling aan te passen. De bron die wordt afgesteld,
wordt afgespeeld zodat u het juiste volumeniveau kunt bepalen.
Wanneer u tevreden bent met de instelling, drukt u op de toets om terug te keren naar het
instelscherm, of houdt u de toets ingedrukt om de instelmodus af te sluiten.
4.4 AV vaste versterking (unity gain)
Deze modus is alleen van toepassing voor de AV-ingang. Wanneer de Av-vasteversterkingsmodus actief is, worden de instellingen voor de ingangsvolume, extra
bandbreedte en balans genegeerd.
In deze modus kan het volume niet met de afstandsbediening of de volumeknoppen
van de NAC 332 worden gewijzigd. Het uitgangssignaal is dan hetzelfde volume als het
ingangssignaal.
Vaste versterking wordt ingesteld in de instellingen, dus druk eerst op de AV-ingangsknop
op de voorzijde en houd deze vast tot het lampje begint te knipperen.
Druk nogmaals op de toets om de volume-instelmodus te activeren. De leds op de
volumeregeling geven de huidige instelling aan.
Draai vervolgens de volumeknop helemaal open (naar rechts), tot een dicht ledblokje
verschijnt.
Sluit de instelmodus af door de knipperende AV-ingangstoets ingedrukt te houden totdat
het knipperlichtje stopt.
4.5 Instellen maximaal volume
Met deze modus kan de gebruiker het maximale volumeniveau instellen, om te voorkomen
dat het geluid per ongeluk te hard wordt gezet.
Dit wordt ingesteld in de instellingen, dus druk eerst op de mute-knop op de voorzijde
en houd deze vast. De mute-knop gaat knipperen en de ledlampjes van de volumeknop
veranderen wanneer deze modus actief is.
Draai de volumeknop vervolgens naar links of rechts om het maximale volumeniveau in te
stellen.
Om het maximale volumeniveau in te stellen voor een hoofdtelefoon verbindt u de
hoofdtelefoon via de jack-aansluiting. De volumeknop verandert om aan te geven wat het
maximale toegestane volumeniveau is, waarna u het gewenste maximale volumeniveau in
kunt stellen.
Wanneer de hoofdtelefoon weer wordt ontkoppeld, toont de volumeknop het algemene
maximale volume.
Indien u tevreden bent over de instellingen, verlaat dan de instellingsmodus door de muteknop ingedrukt te houden tot deze stopt met knipperen.
77
Page 53

Type 1: 8-pins DIN
-18V 300mA
+18V 300mA
Aarde
4.6 Extra functies voor de DIN-ingang
Ingang 6 (8-pins DIN) is geschikt voor gebruik met 5-pins DIN-kabels en kan ook
rechtstreeks voeding verschaen aan een Naim NVC TT phono-trap.
Ingang 8 (5-pins DIN) heeft line-level uitgangen die de momenteel geselecteerde bron
weerspiegelen. Als deze ingang is geselecteerd, wordt de daarop aangesloten bron
weerspiegeld, dus houd rekening met feedback-lussen wanneer u een opnamebron
gebruikt.
4.7 Een hoofdtelefoon gebruiken
Via de hoofdtelefoonuitgang kunnen de meeste hoofdtelefoons op zeer hoog volume
worden gebruikt. Als de stekker van de hoofdtelefoon in deze uitgang zit, zijn de
hoofduitgangen van de voorversterker gedempt.
De hoofdtelefoonuitgang heeft een aparte volume-instelling. Wanneer er een
hoofdtelefoon wordt aangesloten, is het volume ingesteld op het niveau dat het laatst met
een hoofdtelefoon was gebruikt. Wanneer de hoofdtelefoon wordt verwijderd, wordt het
volume weer ingesteld op het niveau dat het laatst met luidsprekers was gebruikt.
5. Tips voor installatie en gebruik van de NAC 332
We weten dat u staat te popelen om van uw nieuwe NAC 332 te genieten, maar we
beloven u dat hij nog beter zal klinken als u deze richtlijnen volgt, die allemaal zijn bedoeld
om u te helpen uw voorversterker optimaal te gebruiken.
5.1 Uitpakken en plaatsen
Uw NAC 332 bestaat uit hoogwaardige onderdelen, waaronder een krachtige
voedingstransformator en een duurzame aluminium behuizing. Hierdoor weegt de
NAC 332 11 kg, dus wees voorzichtig bij het optillen of verplaatsen ervan, en zorg ervoor
dat het oppervlak waar hij op wordt geplaatst stabiel is en dit gewicht kan dragen.
Voor optimale prestaties gebruikt u de producten van Naim op een speciaal rek voor hiapparatuur, bij voorkeur de Naim Fraim of Fraim Lite, om trillingen die een eect op het
geluid kunnen hebben tot een minimum te beperken. Geen ruimte voor een rek? Plaats de
NAC 332 dan op een Fraim glazen plank op een geschikt meubelstuk, zodat het apparaat
stevig maar discreet wordt ondersteund.
Stapel producten van Naim nooit op elkaar en als u ze naast elkaar plaatst, zorg dan dat er
wat afstand tussen de eenheden is.
Om het risico van brom via de luidsprekers tot een minimum te beperken, moeten
voedingseenheden en eindversterkers niet te dicht bij de broncomponenten of
voorversterker worden geplaatst.
88
Page 54

5.2 Ingangen aansluiten
De NAC 332 heeft diverse opties om bronnen aan te sluiten. Voor de beste geluidskwaliteit
raden wij u aan de DIN-ingangen te gebruiken.
5.3 Systeem automatiseren
Wanneer u de NAC 332 gebruikt met een geschikte streamer en eindversterker, zoals de
NSS 333 en NAP 350, kunt u voeding aan/uit en de helderheid van het logo in uw systeem
synchroniseren door de apparaten met de optische kabels voor systeemautomatisering die
met de NAP 350’s werden geleverd op elkaar aan te sluiten.
De NSS 333 en NAC 332 gebruiken het Zigbee-systeem om hun functies te
synchroniseren.
Sluit de kabels van de aansluitingen ‘Remote Out’ van de NAC 332 aan op de aansluitingen
‘Remote In’ van de NAP 350’s. Het is mogelijk om verdere eindversterkers aan te sluiten
met gebruik van de aansluitingen ‘Remote Out’ van de NAP 350.
Als u een langere afstand tussen de NAC 332 en de NAP 350’s nodig hebt dan met de
meegeleverde kabel mogelijk is, kunt u een andere 3,5 mm naar 3,5 mm optische kabel van
de gewenste lengte gebruiken. U kunt ook standaard analoge kabels met 3,5 mm stekkers
gebruiken, maar een optische kabel biedt de beste prestaties.
5.4 In-/uitschakelen
Wanneer alle in- en uitgangen zijn aangesloten, sluit u de meegeleverde netvoedingskabel
aan op de NAC 332 en een stopcontact.
U kunt de NAC 332 nu inschakelen door de Stand-bytoets in te drukken.
Als de NSS 333, NAC 332 en NAP 350’s zijn aangesloten via Systeem automatiseren,
worden deze op volgorde ingeschakeld.
Het is dezelfde procedure om de NAC 332 uit te zetten: zet de via Systeem automatiseren
aangesloten NSS 333, de NAC 332 en de NAP 350’s uit door de stand-bytoets
op het voorpaneel van de NSS 333 of NAC 332 in te drukken. Het hele systeem gaat dan
in stand-bymodus. Schakel de versterkers niet uit door de stekker uit het stopcontact te
halen.
5.5 Instellingen voor stand-by vermogen
De NAC 332 heeft drie vermogensniveaus: stand-by, stand-by met Instant on (meteen
ingeschakeld) en ingeschakeld voor normaal gebruik.
In stand-by gebruikt het apparaat minder dan 0,5 watt. De NAC 332 kan worden
geactiveerd met een druk op de Stand-bytoets op het voorpaneel of via de
afstandsbediening.
In stand-by met ‘Instant on’ staat de NAC 332 gewoon aan, maar is logolampje uit. Als de
NAC 332 is ingeschakeld voor normaal gebruik verbruikt het apparaat ongeveer 20 watt.
Standaard is de schakelaar op het achterpaneel van de NAC 332 ingesteld op ‘automatisch
stand-by’. Dit betekent dat het apparaat wanneer het maximaal 20 minuten lang niet
is gebruikt automatisch in stand-by gaat. Voor een optimale geluidskwaliteit zet u de
schakelaar in de stand ‘Instant on’. De NAC 332 is dan permanent ingeschakeld. Met
de schakelaar in deze stand blijft de NAC 332 ingeschakeld als de stand-bytoets wordt
ingedrukt, maar gaat het logolampje uit.
5.6 Helderheidsinstellingen voor het Naim-logo
U kunt de helderheid van de leds en het Naim-logo op de NAC 332 instellen met de toets
‘Brightness’ op het achterpaneel en de helderheidstoets op de afstandsbediening. Als u de
Naim NAC 332 en NAP 350 eindvertsterkers via Systeem automatiseren gebruikt, wordt
de helderheid van alle logo’s gesynchroniseerd.
99
Page 55

5.7 De NPX 300-voedingseenheid gebruiken
De NPX 300-voedingseenheid is een optionele systeemupgrade. Als u de
NPX300-voedingseenheid met de NAC 332 wilt gebruiken, moet u het systeem eerst
helemaal uitschakelen. Haal de netvoedingskabel uit de NAC 332, deze is niet nodig als
het apparaat wordt gevoed via de NPX 300.
Zet de NPX 300 op de standaard.
Verwijder de twee ‘link plug’ stekkers uit het achterpaneel van de NAC 332.
Sluit het uiteinde zonder bandje van de twee Burndy-kabels aan op de NPX 300. Sluit de
twee uiteinden met bandje aan op de NAC 332. Zorg dat alle borgringen helemaal zijn
vastgezet. Probeer de kabels zo te plaatsen, dat ze zo los mogelijk hangen, zonder de
standaard of de muur te raken.
Dit is makkelijker als ze in ongeveer de juiste vorm worden gelegd voordat de uiteinden
worden aangesloten.
Sluit de voedingskabel aan op de netvoedingsingang van de NPX 300 en steek vervolgens
de stekker in het stopcontact. Zet de rest van het systeem weer aan.
Zet de NAC 332 weer aan door de Stand-bytoets in te drukken.
6. Netvoeding, aarding en meer
Gebruik alleen de met de NAC 332 geleverde netvoedingskabel en stekkers, of de
opgewaardeerde Naim Power-Line-voedingskabel. Wanneer stekkers met een zekering
worden gebruikt, moeten zekeringen van 13 ampère worden aangebracht. Nooit
spanningsafhankelijke weerstandjes of ruisonderdrukkers op de netstekker aansluiten;
deze hebben een negatieve invloed op de netvoeding en de geluidskwaliteit.
6.1 Aarding
Om brom te voorkomen, moet de signaalaarding van het hele systeem op één plaats op
de netvoedingsaarding worden aangesloten. Doorgaans is dat bij de primaire bron. De
NAC 332 voorversterker heeft een ground/lift-schakelaar. Stel deze in op “Default” als de
hoofdbron de netvoedingsaarding met de signaalaarding verbindt. Als geen enkele bron
de netvoedingsaarding met de signaalaarding verbindt, zet u deze schakelaar in de stand
“Ground”.
6.2 Vaste netstekkers
Als een vaste netstekker van de netvoedingskabel wordt afgeknipt (om wat voor reden
dan ook), MOET deze stekker onbruikbaar worden gemaakt en worden weggeworpen.
Er ontstaat een groot risico van elektrische schok wanneer de afgeknipte stekker in een
stopcontact wordt gestoken.
6.3 Voedingscircuits en storing
Een hi-systeem deelt normaal gesproken een netvoedingscircuit met andere
huishoudelijke apparaten. Sommige daarvan kunnen vervorming veroorzaken die zich
manifesteert als mechanische brom van netvoedingstransformatoren, inclusief de grote
transformator in de NAC 332.
Brom van de transformator wordt niet via de luidsprekers uitgezonden en heeft geen
eect op de prestatie van het systeem; zorgvuldige plaatsing van het Naim-systeem of het
gebruik van een apart voedingscircuit kan het brommen echter verminderen. Een dergelijk
circuit (bij voorkeur van 30 of 45 ampère) verbetert doorgaans ook de systeemprestaties.
Vraag een gediplomeerd elektricien om advies over het installeren van een apart
voedingscircuit.
1010
Page 56

6.4 Voorzorgsmaatregelen bij bliksem
Uw Naim-systeem moet worden uitgeschakeld en helemaal van de netvoeding worden
afgesloten als er een risico van blikseminslag bestaat; dit om potentiële schade te
voorkomen.
7. Verdere tips en advies
Nu u alle essentiële stappen hebt uitgevoerd, gaan we verder met een paar dingen die u
kunt doen om de prestaties van uw nieuwe NAC 332 te optimaliseren.
7.1 Inlopen
De producten van Naim zijn met de hand gemaakt met gebruik van zorgvuldig gekozen,
hoogwaardige componenten. De NAC 332 klinkt meteen fantastisch, maar de prestaties
kunnen verder worden verbeterd wanneer al deze verschillende componenten worden
ingeschakeld en in de eerste paar weken van gebruik samenwerken. Dit proces verloopt
beter als u uw systeem aan laat staan.
7.2 Het product en de aansluitingen schoonmaken
Naim raadt aan alleen de meegeleverde reinigingsdoek te gebruiken om de oppervlakken
van het product licht af te stoen. Reinigingsproducten bevatten mogelijk ingrediënten
die een nadelige invloed kunnen hebben op cosmetische oppervlaktebehandelingen en
coatings.
Houd verbindingsstekkers en ingangen altijd schoon en roestvrij. De makkelijkste manier
om dit te bereiken, is door uw Naim-product (en aangesloten apparatuur) helemaal
uit te zetten, alle stekkers uit hun ingangen te halen en deze er weer stevig insteken.
Gebruik geen contactreinigers en zogenaamde ‘enhancers’ aangezien die resten kunnen
achterlaten die afbreuk doen aan het geluid van uw systeem.
7.3 De NAC 332 resetten
Om de standaardinstellingen van de NAC 332 te resetten houdt u de schakelaar
“Brightness/ Reset” op het achterpaneel minstens 3 seconden lang ingedrukt. De NAC 332
schakelt weer over naar stand-by en alle instellingen worden gereset. Houd er rekening
mee dat dan ook de afstandsbediening en de Zigbee Systeemautomatisering worden
ontkoppeld.
8. Support
De bescherming van de consument varieert van land tot land. In de meeste regio’s is de
winkel waar u uw Naim-product hebt gekocht uw eerste aanspreekpunt als u problemen
hebt met uw apparaat. Problemen kunnen het gevolg zijn van een fout in het systeem of
de installatie en het is derhalve essentieel dat u de diagnostische vaardigheden van uw
leverancier optimaal benut.f
Ook kunt u online een reeks artikelen voor elk Naim-product raadplegen op
Naimaudio.com
Als u nog steeds problemen hebt met uw Naim-product, dan kunt u voor hulp en advies
rechtstreeks contact met ons opnemen via [email protected]
9. Onderhoud en updates
Reparaties en hardware-updates mogen uitsluitend worden uitgevoerd door een
door Naim goedgekeurd onderhoudscentrum of in het hoofdkantoor van Naim. Veel
componenten zijn op maat gemaakt, getest of op elkaar afgestemd en het is vaak niet
mogelijk om geschikte vervangingen bij andere bronnen te kopen. Voor vragen over
onderhoud en reparaties neemt u contact op met uw plaatselijke Naim-leverancier.
1111
Page 57

10. Specicaties
300 Serie Voorversterker – NAC 332
Audio-ingangen:
Audio-uitgangen:
Update: Micro-USB
Remote In: 1 × 3,5mm jack – elektrisch en Mini-TOSLINK optisch
Remote Out: 2 × 3,5mm jack – elektrisch en Mini-TOSLINK optisch
Stroomverbruik: Gemiddeld gebruik: 20W Stand-by: < 0,5W
Afmetingen (h x b x d): 91,5 × 432 × 317,5mm (inclusief poten)
Gewicht: 11kg
Netvoeding: 115V of 230V, 50/60Hz
3 x DIN
2 x XLR paar
3 x RCA paar
1 x XLR paar
1 x RCA paar
1 × 6,35mm jack hoofdtelefoon
1 x Line-level-uitgang op Ingang 8 (5-pins DIN)
11. Product recyclen
Producten waarop het logo van een kliko met een kruis erdoorheen staat
afgebeeld, kunnen niet worden weggeworpen als huishoudelijk afval. Deze
producten moeten worden ingeleverd op locaties waar ze kunnen worden
gerecycled en waar eventuele bijkomstige afvalproducten correct kunnen worden
verwerkt.
Neem contact op met uw lokale afvalverwerkingsbedrijf voor meer informatie over een
dergelijke locatie bij u in de buurt.
Door afval op geschikte wijze te recyclen en weg te werpen, helpt u natuurlijke bronnen te
behouden en milieuvervuiling te voorkomen.
1212
Page 58

Page 59

Índice
Sección Página
Introducción 1
1. Contenido de la caja 1
2. Conozca su NAC 332 2
3. Conguración básica del NAC 332 3
4. Conguración detallada del NAC 332 6
5. Consejos de instalación y uso de su NAC 332 8
6. Alimentación de red, puesta a tierra y más 10
7. Otros consejos y sugerencias 11
8. Asistencia 11
9. Servicio y actualizaciones 11
10. Especicaciones 12
11. Reciclaje del producto 12
Page 60
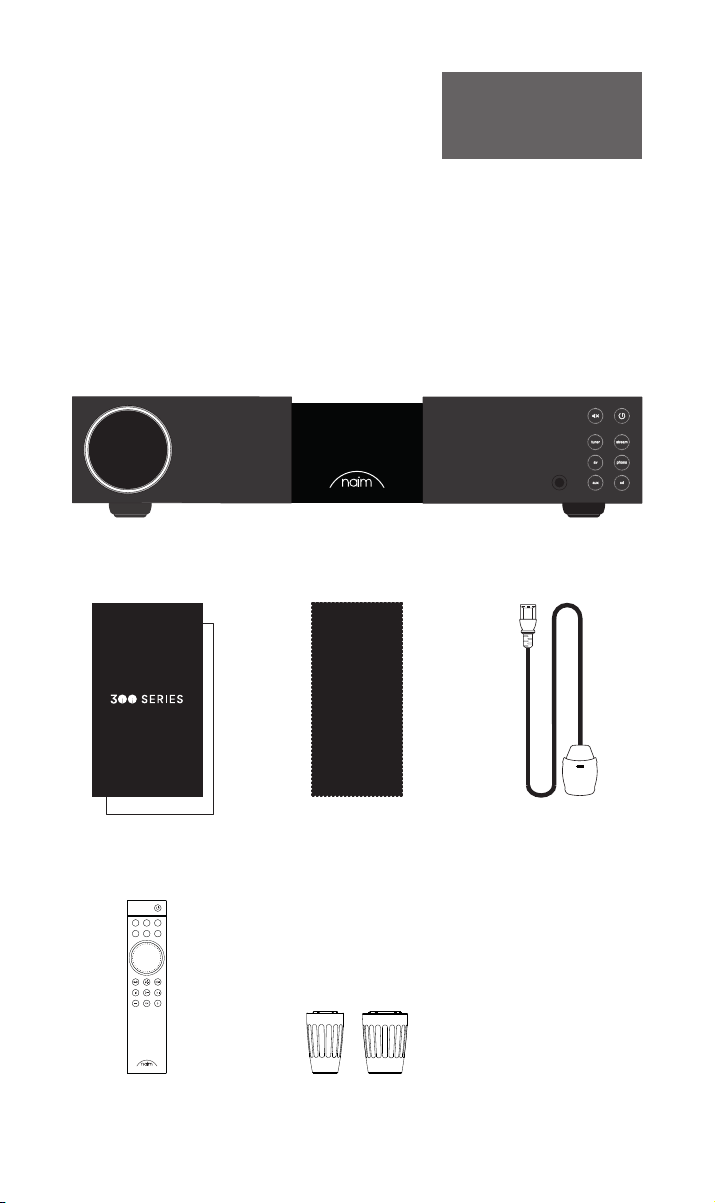
Introducción
Nota: Todas las advertencias
de seguridad se encuentran
en el manual de seguridad
reglamentario.
Le presentamos su nuevo preamplicador Naim. Como todos los productos de Naim
Audio, el NAC 332 pone el sonido por encima de todo. Para alcanzar todo su potencial,
es importante seguir las sencillas pautas de instalación y uso recogidas en este manual.
Comenzaremos con algunos aspectos básicos del producto y su conguración, para
proporcionarle después información más detallada en el
apartado 5.
1. Contenido de la caja
1x NAC 332
1x Paquete documentación
cd
stream
phono
tuner
av aux
1x Paño de limpieza 1x Power-Line Lite
1x Mando a distancia 2x Link Plugs
11
Page 61
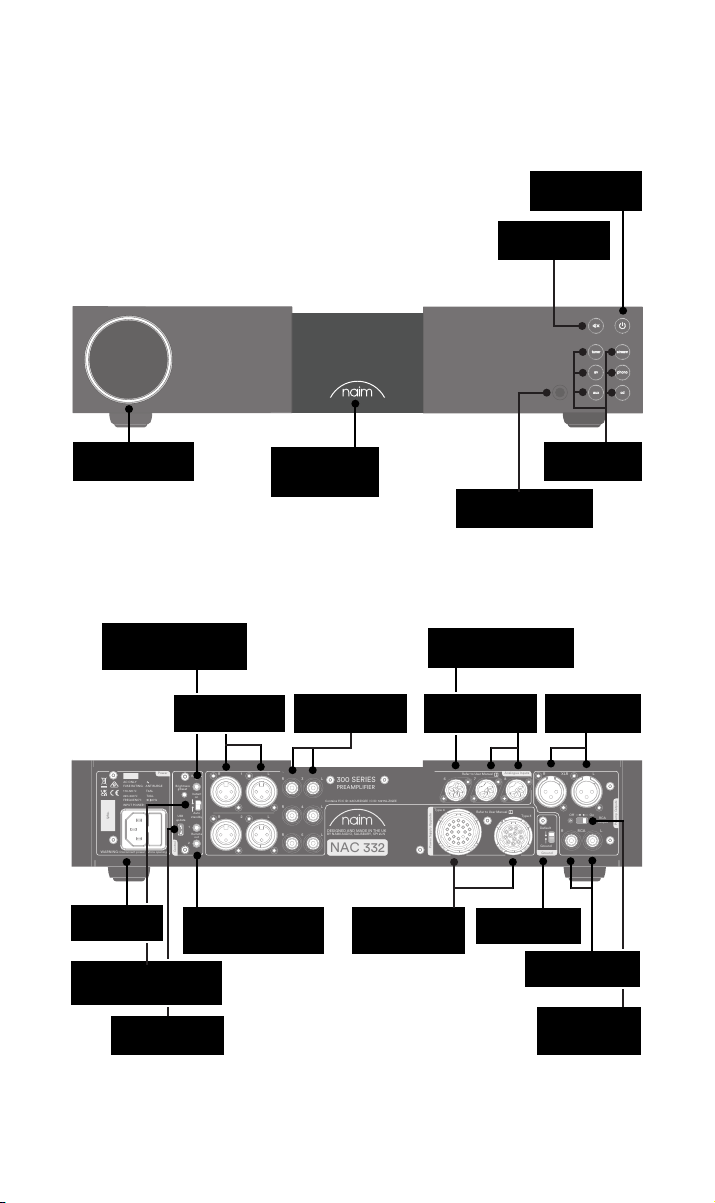
WARNING:Disconnect power before opening
AC ONLY
FUSE RATING: ANTISURGE
1 0-120 V:1 T4AL
2 0-240 V:2 T2AL
FREQUENCY: 0 60Hz5 /
I 70VANPUT POWER:
Power
300 SERIES
PREAMPLIFIER
NAC 332
DESIGNED AND MADE IN THE UK
BY NAIM AUDIO, SALISBURY, SP1 2LN
/ .oNS
Ground
Power Supply Upgrade
Preamp Outputs
AnalogueInputs
Ground
Default
R L
R
L
RCA
XLR
Refer to User Manual
Type 3
Type 4
Remote
in
Remote
out
Auto
standby
Instant
on
1
2
Control
USB
update
Brightness
Reset/
On
RCA
output
O
3
4
6
AnalogueInputs
R
R
R
L
L
L
5
8
7
1
2
R
L
R
L
Contains FCC ID: 2ACURZIGEE IC ID: 12217A-ZIGEE
Refer to User Manual
2. Conozca su NAC 332
Botón de espera
Botón silencio
Control de volumen
Entrada remota (jack
3,5 mm eléctrica y Mini-
TOSLINK óptica)
Entrada de red
y fusible
Interruptor de puesta en
espera/encendido
3,5 mm eléctrica y Mini-
Toma especial USB
Logotipo con
retroiluminación
Entradas XLR
Salida remota (jack de
TOSLINK óptica)
ajustable
Entradas RCA
Entradas
especiales de
alimentación
Salida auriculares jack
6,35 mm
Entrada DIN para etapa
de fono NVC TT
Entradas DIN
Interruptor de
tierra de la señal
Salida RCA no
Interruptor on/off
Botones de
selección de las
entradas
Salida
balanceada
XLR
balanceada
salida RCA
22
Page 62
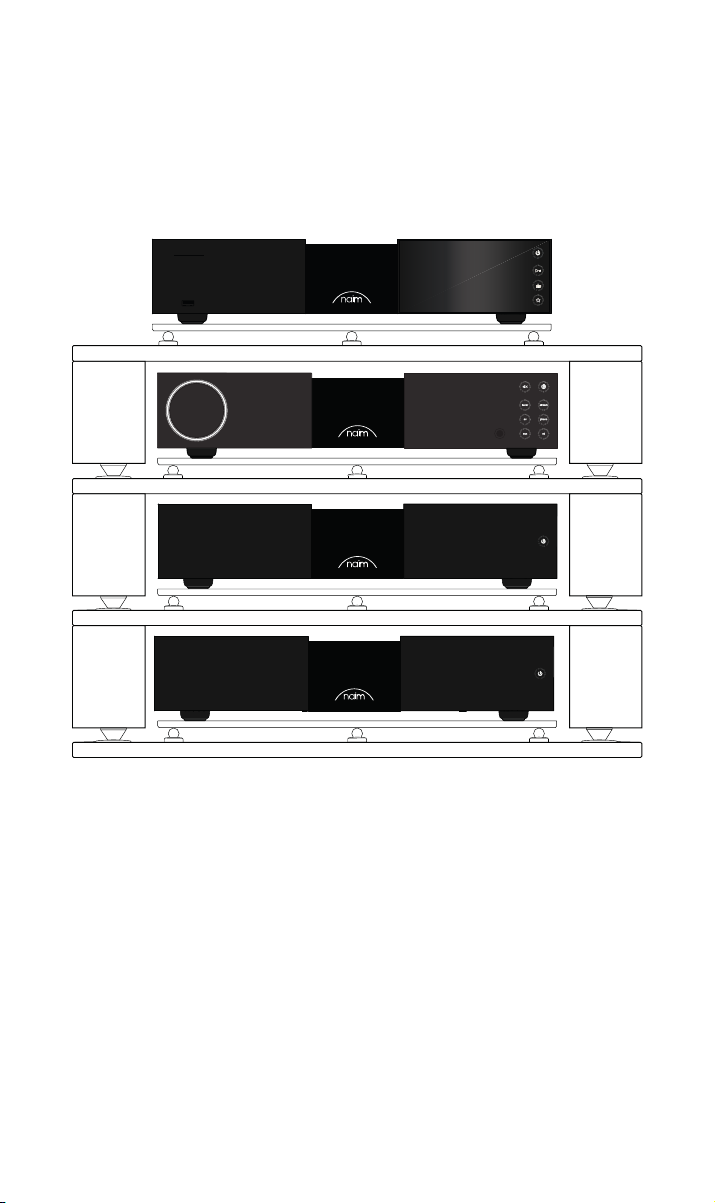
3. Conguración básica del NAC 332
El NAC 332 debe conectarse a una o más fuentes y a un amplicador de potencia (por
ejemplo, un NSS 333 y uno o más NAP 350), pero antes de hacerlo, asegúrese de que
todos los componentes están en su posición denitiva y desconectados de la red eléctrica.
Para un rendimiento óptimo, utilice un soporte de alta delidad especíco (idealmente
el Naim Fraim), con el preamplicador situado encima de los amplicadores de potencia
como se muestra en la imagen.
También necesitará altavoces con cables.
33
Page 63
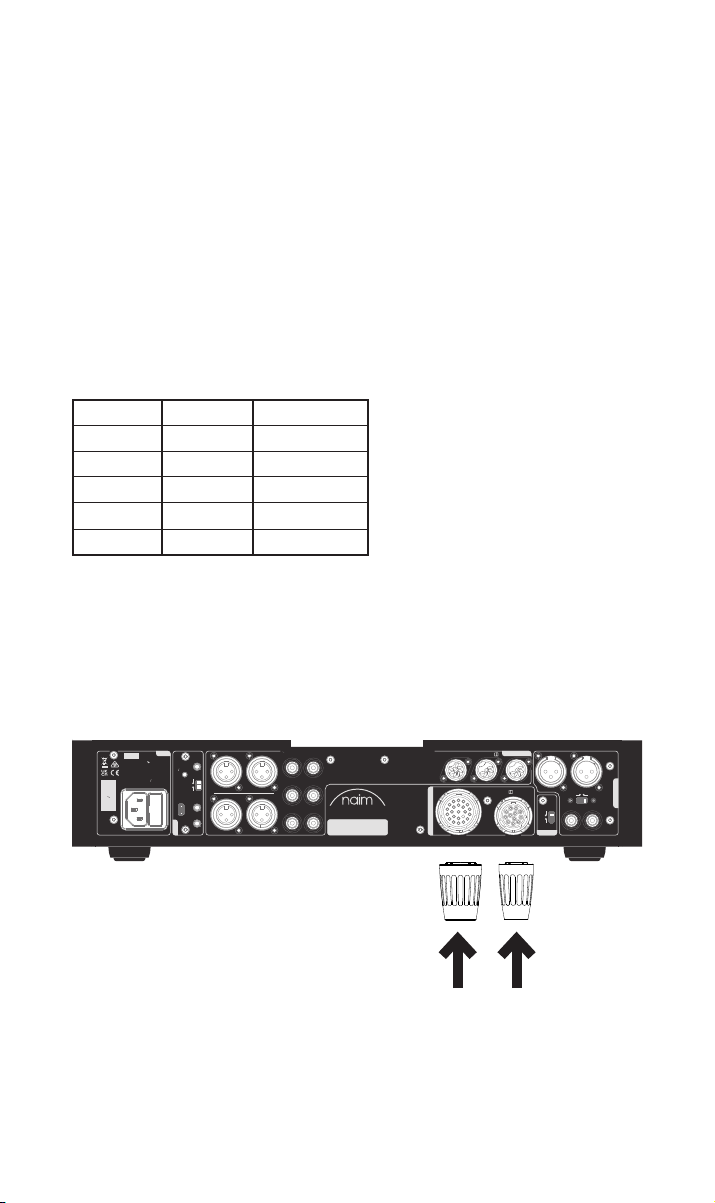
3.1 Conexión del NAC 332 a los amplicadores de potencia NAP 350
WARNING:
Disconnect power before opening
AC ONLY
FUSE RATING: ANTISURGE
1 0-120 V:1 T4AL
2 0-240 V:2 T2AL
FREQUENCY: 0 60Hz5 /
I 70VANPUT POWER:
Power
300 SERIES
PREAMPLIFIER
NAC 332
DESIGNED AND MADE IN THE UK
BY NAIM AUDIO, SALISBURY, SP1 2LN
/ .oNS
Ground
Power Supply Upgrade
Preamp Outputs
AnalogueInputs
Ground
Default
R L
R
L
RCA
XLR
Refer to User Manual
Type 3
Type 4
Remote
in
Remote
out
Auto
standby
Instant
on
1
2
Control
USB
update
Brightness
Reset/
On
RCA
output
O
3
4
6
AnalogueInputs
R
R
R
L
L
L
5
8
7
1
2
R
L
R
L
Contains FCC ID: 2ACURZIGEE IC ID: 12217A-ZIGEE
Refer to User Manual
Conecte dos cables XLR (suministrados con los NAP 350) entre las salidas XLR del
NAC332 y las entradas de cada NAP 350. Asegúrese de que los cables se corresponden
con los canales : la salida izquierda (left) del preamplicador se conecta con el
amplicador de potencia que alimenta el altavoz izquierdo, y lo mismo para el derecho
(right). Asegúrese de introducir correctamente los conectores XLR, con el logotipo Naim
del conector orientado hacia arriba.
Conecte el cable de automatización (suministrado con los NAP 350) entre los terminales
«Remote Out» (salida remota) del NAC 332 y los terminales «Remote In» (entrada remota)
de los NAP 350.
3.2 Conexión de sus componentes fuente
Conecte al NAC 332 los componentes fuente que necesite. Los botones del panel frontal
pueden asignarse para seleccionar cualquiera de las entradas (ver apartado 4.2).
En fábrica se asignan por defecto del siguiente modo:
Tuner Entrada 3 RCA
Stream Entrada 7 DIN de 5 polos
AV Entrada 4 RCA
Fono Entrada 6 DIN de 8 polos
AUX Entrada 1 XLR
CD Entrada 8 DIN de 5 polos
3.3 Encendido
Después de conectar las fuentes y los amplicadores de potencia al NAC 332, solo tendrá
que seguir unos pocos pasos sencillos para encender el NAC 332 y empezar a utilizarlo.
Conecte los dos conectores Link Plug suministrados en las entradas especiales de
alimentación del NAC 332.
44
Page 64
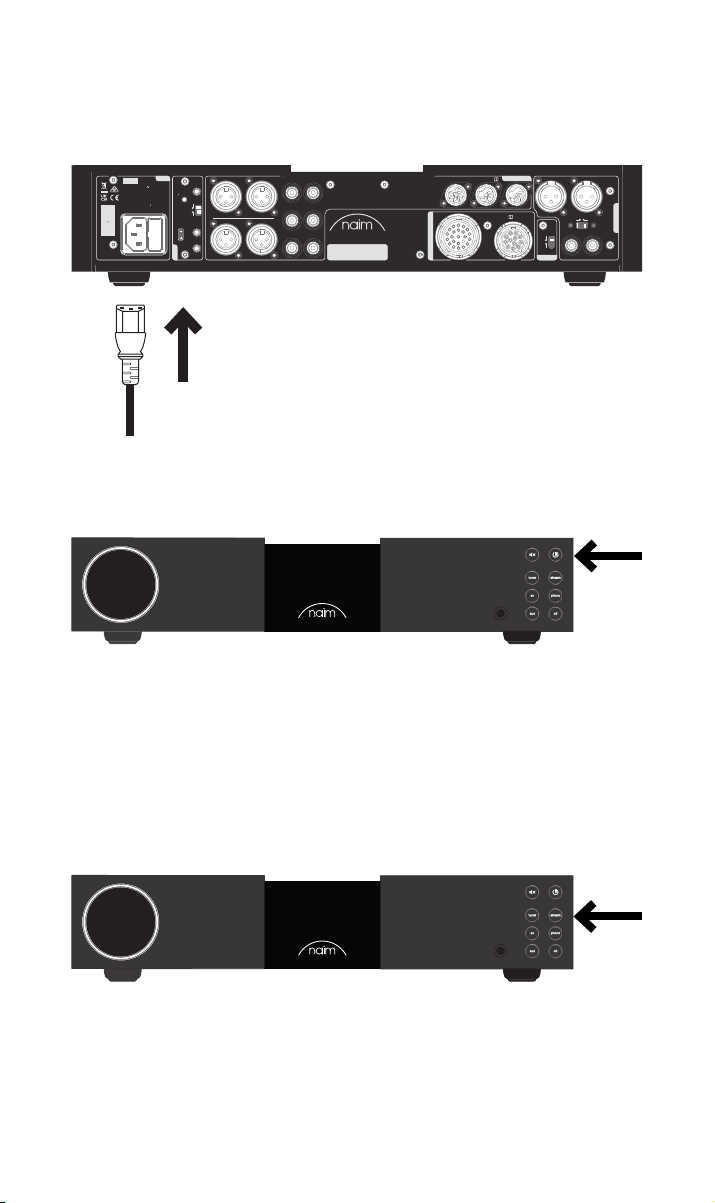
Conecte el cable de alimentación a la toma de alimentación del NAC 332 y después a la
red eléctrica.
AC ONLY
FUSE RATING: ANTISURGE
1 0-120 V:1 T4AL
2 0-240 V:2 T2AL
FREQUENCY: 0 60Hz5 /
I 70VANPUT POWER:
/ .oNS
WARNING:Disconnect power before opening
Power
Brightness
Reset/
USB
update
Control
1
L
R
Remote
in
Instant
on
Auto
standby
R
2
1
Remote
out
2
L
R
3
300 SERIES
PREAMPLIFIER
Contains FCC ID: 2ACURZIGEE IC ID: 12217A-ZIGEE
L
R
4
L
DESIGNED AND MADE IN THE UK
BY NAIM AUDIO, SALISBURY, SP1 2LN
5
L
R
NAC 332
Type 4
Power Supply Upgrade
AnalogueInputs
AnalogueInputs
Refer to User Manual
7
Refer to User Manual
8
Type 3
6
R
Default
Ground
Ground
XLR
O
R L
RCA
L
On
RCA
output
Preamp Outputs
Encienda el NAC 332 pulsando el botón de puesta en espera en la parte superior derecha
del panel frontal.
3.4 Emparejamiento del mando a distancia
Cuando haya encendido el NAC 332, deberá emparejar el mando a distancia.
Introduzca las pilas suministradas en el mando a distancia.
Pulsando cualquiera de los botones de entrada del panel frontal, se activará el modo de
emparejamiento del mando a distancia durante 30 segundos.
Mantenga pulsado el botón de brillo del mando a distancia durante 3 segundos.
55
Page 65
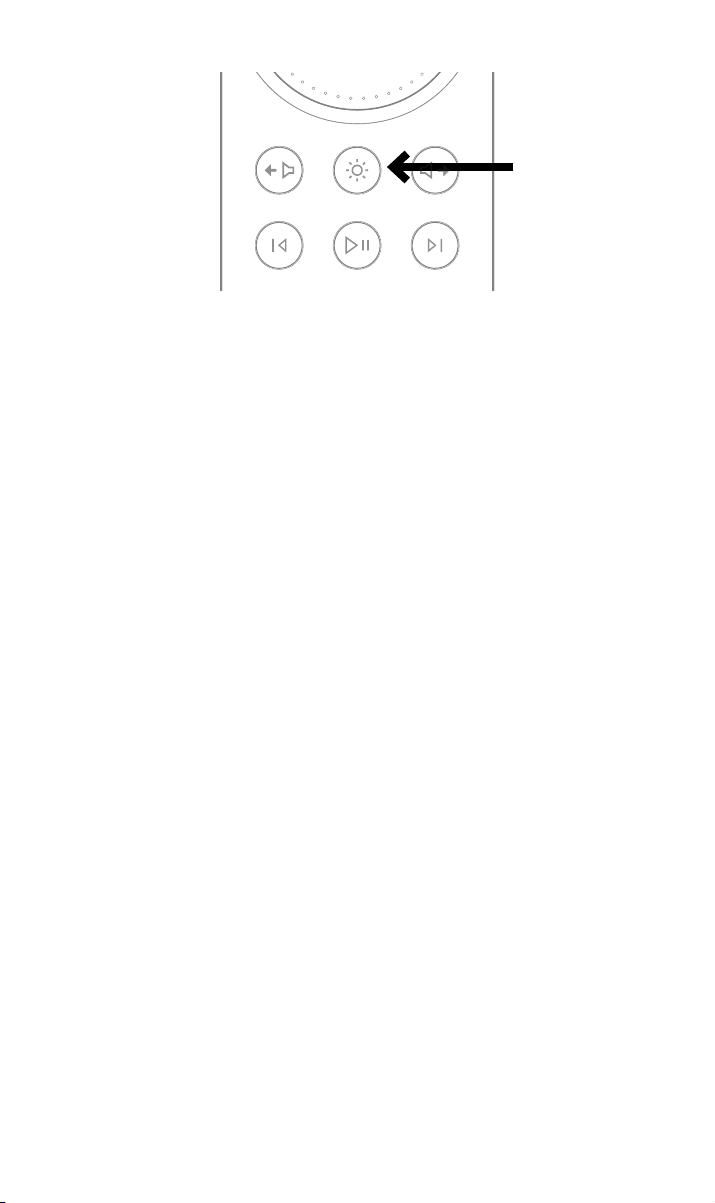
El control de volumen del mando a distancia se activará durante el emparejamiento y se
stream
phono
cd
tuner
av aux
detendrá al volumen actual cuando esté emparejado.
El mando estará ahora emparejado con la unidad y listo para utilizarse.
4. Conguración detallada del NAC 332
4.1 Uso de los amplicadores de potencia Naim sin entradas
balanceadas
Si utiliza un amplicador Naim más antiguo, necesitará un conjunto de conexiones
cableadas adecuadamente.
Si va a utilizar las salidas RCA no balanceadas (para conectar un subwoofer, por ejemplo),
el interruptor «RCA output» (salida RCA) del panel trasero deberá estar en la posición
«On».
4.2 Reasignación de entradas
Es posible seleccionar directamente cualquier combinación de seis de las ocho entradas
físicas con los botones del panel frontal o del mando a distancia. Para modicar la
asignación de las entradas físicas a los botones se utiliza el modo de conguración.
Para entrar en el modo de conguración, pulse en el panel frontal el botón de la primera
entrada que desea modicar hasta que el botón empiece a parpadear.
Los ledes del control de volumen mostrarán con sectores las entradas que se pueden
asignar, y la entrada seleccionada tendrá los ledes más intensos.
En el modo de conguración, se escuchará la entrada seleccionada que indican los ledes
del control de volumen.
La entrada asignada al botón que parpadea cambiará al girar el control de volumen.
Mientras esté en el modo de conguración, puede pulsar cualquiera de los botones de
las fuentes para asignarle una entrada. Para salir del modo de conguración, mantenga
pulsado el botón de entrada que parpadea hasta que deje de parpadear.
El botón de silencio («Mute») seguirá funcionando normalmente en el modo de
conguración.
4.3 Ajuste del volumen de entrada
Los niveles relativos de las entradas se pueden ajustar en un intervalo de -10 dB a +10 dB
para equilibrar el volumen de las fuentes.
Este ajuste se lleva a cabo en el modo de conguración, por lo que deberá pulsar el botón
de la entrada que desea ajustar hasta que parpadee.
66
Page 66

Pulsando nuevamente el botón entrará en el modo de ajuste de volumen. Los ledes del
control de volumen indicarán el ajuste de volumen actual.
El ajuste cambiará al girar el control de volumen, y la fuente ajustada se escuchará para
que pueda decidir el nivel deseado.
Cuando el ajuste sea satisfactorio, pulse una vez el botón para volver a la pantalla de
asignación de entradas, o manténgalo pulsado para salir del modo de conguración.
4.4 AV ganancia ja (ganancia unitaria)
Este modo solo es aplicable a la entrada AV. Cuando el modo de ganancia ja (AV) está
activado, se ignoran los ajustes de volumen de entrada, reserva de potencia y balance.
En este modo no se puede cambiar el volumen ni con el mando a distancia ni con el control
de volumen del NAC 332. La señal de salida tendrá el mismo volumen que la de entrada.
La ganancia ja se selecciona en el modo de conguración, para ello, mantenga pulsado el
botón de entrada AV del panel frontal hasta que parpadee.
Pulsando nuevamente el botón entrará en el modo de ajuste de volumen. Los ledes del
control de volumen indicarán el ajuste de volumen actual.
A continuación, haga girar el control de volumen al máximo (hacia la derecha), hasta que
aparezca un bloque led sólido.
Para salir del modo de conguración, pulse el botón de entrada AV hasta que deje de
parpadear.
4.5 Función de volumen máximo
Este modo permite al usuario denir el volumen máximo total para evitar la selección
accidental de volúmenes más altos.
El ajuste se realiza en el modo de volumen máximo, para ello, mantenga pulsado el botón
de silencio («mute») del panel frontal. Cuando se activa este modo, el botón de silencio
(«mute») parpadea y los ledes del control de volumen cambian.
A continuación, haga girar el control de volumen hacia la izquierda o hacia la derecha para
modicar el volumen máximo.
Para ajustar el volumen máximo con auriculares, introduzca la clavija de los auriculares y,
cuando el control de volumen cambie para mostrar el volumen máximo permitido, hágalo
girar para seleccionar el volumen máximo deseado.
Al retirar la clavija de los auriculares, el control de volumen volverá a mostrar el volumen
máximo principal.
Cuando esté satisfecho con los ajustes, salga del modo de conguración pulsando el botón
de silencio («mute») hasta que deje de parpadear.
77
Page 67

Tipo 1: DIN de 8 pines
-18 V 300 mA
+18 V 300 mA
Tierra
4.6 Funciones adicionales de las entradas DIN
La entrada 6 (DIN de 8 polos) es compatible con los cables DIN de 5 polos y también
puede alimentar directamente una etapa de fono Naim NVC TT.
La entrada 8 (DIN de 5 polos) tiene salidas de línea que duplican la fuente seleccionada.
Recuerde que cuando seleccione esta entrada se duplicará la fuente conectada, por lo
que deberá tener cuidado con los bucles de retroalimentación si utiliza una fuente de
grabación.
4.7 Uso de auriculares
La salida de auriculares puede alimentar la mayoría de los auriculares con niveles muy
altos de volumen. Cuando la clavija de los auriculares esté insertada, las salidas principales
del preamplicador estarán silenciadas.
La salida de auriculares tiene un control de volumen independiente. Cuando los auriculares
estén conectados, el ajuste de volumen será el mismo que utilizó la última vez con los
auriculares. Cuando los desconecte, el volumen volverá al nivel que utilizó la última vez
con los altavoces.
5. Consejos de instalación y uso del NAC 332
Sabemos que está deseando disfrutar de su nuevo NAC 332, pero le aseguramos que
sonará aún mejor si sigue estos consejos, pensados para que disfrute plenamente de su
preamplicador.
5.1 Desembalaje y colocación
El NAC 332 tiene componentes de alta calidad, incluido un sólido transformador de
potencia y una carcasa de aluminio resistente. Es por eso que el NAC 332 pesa 11 kg, así
que tenga cuidado al levantarlo o moverlo, y asegúrese de que la supercie sobre la que
piensa colocarlo es estable y puede soportar su peso.
Para un resultado óptimo, utilice los equipos Naim en un bastidor especíco para equipos
de alta delidad (idealmente el Naim Fraim o el Fraim Lite) para minimizar vibraciones que
puedan afectar al sonido. ¿No tiene espacio para un bastidor? Considere la posibilidad
de colocar su NAC 332 sobre un estante de vidrio Fraim en un mueble adecuado para
proporcionarle un soporte sólido y discreto.
No apile nunca los equipos Naim unos encima de otros, y si los coloca al lado, deje cierta
distancia entre ellos.
Para reducir el riesgo de zumbidos en los altavoces, no ponga las fuentes de alimentación
ni los amplicadores de potencia cerca de las fuentes de audio o de los preamplicadores.
88
Page 68

5.2 Conexiones de entrada
El NAC 332 cuenta con múltiples opciones de conexión externa. Para disfrutar de la mejor
calidad sonora, recomendamos utilizar las entradas DIN.
5.3 Automatización del sistema
Si utiliza el NAC 332 con un reproductor de música en streaming y un amplicador de
potencia compatibles, como el NSS 333 y el NAP 350, puede sincronizar el encendido/
apagado y el brillo del logotipo de todo el sistema conectando el NAC 332 con el cable
óptico de automatización suministrado con los NAP 350.
El NSS 333 y el NAC 332 utilizan el sistema Zigbee para sincronizar sus funciones.
Conecte los terminales «Remote Out» (salida remota) del NAC 332 a los terminales
«Remote In» (entrada remota) del NAP 350. Puede conectar más amplicadores de
potencia en los terminales «Remote Out» (salida remota) del NAP 350.
Si requiere una distancia entre el NAC 332 y los NAP 350 mayor de la que permite el cable
suministrado, puede sustituirlo por un cable óptico de 3,5 mm a 3,5 mm de la longitud
necesaria. También es posible utilizar cables analógicos estándar con conectores de 3,5
mm, pero un cable óptico proporcionará el mejor rendimiento.
5.4 Encendido y apagado
Cuando haya realizado todas las conexiones de entrada y salida, conecte el cable de
alimentación suministrado a su NAC 332 y a la red de suministro.
Ahora, puede encender el NAC 332 pulsando el botón de puesta en espera.
Si el NSS 333, el NAC 332 y los NAP 350 están conectados a través del sistema de
automatización, se encenderán de forma secuencial.
El procedimiento es el mismo para apagar el NAC 332: para apagar el NSS 333, el
NAC332 y los NAP 350 conectados a través del sistema de automatización, solo tiene que
pulsar el botón de puesta en espera del panel frontal del NSS 333 o del NAC 332, con lo
que todo el sistema entrará en el modo de espera. Evite utilizar el interruptor de la toma de
corriente para apagar sus amplicadores.
5.5 Ajustes energía en modo de espera
El NAC 332 tiene cuatro niveles de consumo: espera, espera con encendido instantáneo y
alimentación para uso normal.
En el modo «Standby» (de espera), el consumo de energía total es inferior a 0,5 W. El
NAC 332 puede reactivarse pulsando el botón de puesta en espera o desde el mando a
distancia.
En el modo «Standby with instant on» (de espera con encendido instantáneo), el NAC332
está completamente alimentado, pero con el logotipo apagado. Modo «Powered for
normal use» (de alimentación para uso normal). En modo de funcionamiento normal, el
NAC 332 consume unos 20 W.
Por defecto, el NAC 332 está congurado en modo «auto standby» (de puesta en espera
automática), es decir, entra automáticamente en el modo de espera tras 20 minutos de
inactividad. Para una calidad sonora óptima, ponga el interruptor en la posición «Instant
on» (encendido instantáneo). Así, el NAC 332 permanecerá siempre alimentado. Con
el interruptor en esta posición, cuando pulse el botón de puesta en espera el NAC 332
permanecerá alimentado, pero con el logotipo apagado.
5.6 Ajustes de brillo del logotipo Naim
El nivel de brillo de los indicadores led y el logotipo Naim del NAC 332 se pueden ajustar
con los botones de brillo del panel trasero o desde el mando a distancia. Si utiliza el Naim
NAC 332 con amplicadores NAP 350 conectados a través del sistema de automatización,
el brillo de todos los logotipos estará sincronizado.
99
Page 69

5.7 Uso de la fuente de alimentación NPX 300
La fuente de alimentación NPX 300 es una mejora opcional del sistema. Para añadir una
fuente de alimentación NPX 300 al NAC 332, apague primero todo el sistema. Desenchufe
el cable de alimentación del NAC 332, ya que no es necesario cuando la unidad está
alimentada por la NPX 300.
Coloque la NPX 300 en el soporte de equipos.
Retire los dos conectores Link Plug del panel trasero del NAC 332.
Conecte el extremo sin banda de los dos cables Burndy a la NPX 300. Conecte los dos
extremos con banda al NAC 332. Asegúrese de que todas las anillas de seguridad estén
rmemente apretadas. Procure «acomodar» los cables de forma que cuelguen lo más
holgadamente posible y sin tocar los soportes o la pared.
Esto resultará más sencillo si les da aproximadamente la forma necesaria antes de
conectar los extremos.
Conecte el cable de alimentación a la toma de alimentación de la NPX 300 y después a la
red eléctrica. Vuelva a encender el resto del sistema.
Vuelva a encender el NAC 332 pulsando el botón de puesta en espera.
6. Alimentación de red, puesta a tierra y más
Utilice solo los cables de alimentación y los enchufes de red suministrados con el
NAC332, o el cable de alimentación Naim Power-Line. Si se emplean enchufes con fusible,
este deberá ser de 13 A. No conecte resistencias eléctricas que dependan de la tensión ni
supresores de ruido en los enchufes de red, ya que degradan el suministro eléctrico y el
sonido.
6.1 Puesta a tierra
Para evitar zumbidos debidos a bucles de masa, la tierra de la señal de todo el sistema
debe conectarse a la toma de tierra de red en un único punto. Lo normal es que esto se
haga en la fuente principal. El preamplicador NAC 332 cuenta con un interruptor de
tierra. Póngalo en «Default» (posición normal) si en la fuente principal la toma de tierra
de red está en contacto con la tierra de la señal. Si la toma de tierra de red no está en
contacto con la tierra de la señal en ninguna fuente, póngalo en la posición «Ground»
(tierrra).
6.2 Enchufes de red no desmontables
Si se corta un enchufe no desmontable de un cable de alimentación (por el motivo que
sea), el enchufe deberá desecharse de forma que quede totalmente inservible. Existe un
riesgo de descarga considerable si el enchufe cortado se inserta en la toma de red.
6.3 Circuitos de alimentación e interferencias
Los sistemas de alta delidad suelen compartir la red de alimentación con otros
electrodomésticos. Algunos de ellos pueden provocar distorsiones que se maniestan
como un zumbido mecánico de los transformadores de alimentación, como el
transformador principal del NAC 332.
El zumbido del transformador no se transmite por los altavoces y no tiene ningún efecto
en el rendimiento del sistema, pero puede reducirlo colocando adecuadamente su sistema
Naim y usando un circuito de alimentación especíco independiente. Dicho circuito
(con un valor ideal de 30 o 45 A) también mejorará el rendimiento del sistema de manera
general. Para la instalación de un circuito de alimentación independiente, solicite consejo
a un electricista cualicado.
6.4 Precauciones contra los rayos
Cuando exista riesgo de tormenta eléctrica, su sistema Naim deberá estar apagado y
totalmente desconectado de la red de suministro para protegerlo de posibles daños.
1010
Page 70

7. Más consejos y sugerencias
Ahora que ya tiene todo lo esencial resuelto, pasaremos a otras cosas que puede hacer
para optimizar el rendimiento de su nuevo NAC 332.
7.1 Rodaje
Los productos Naim se fabrican a mano con una cuidadosa selección de componentes de
alta calidad. Su NAC 332 tendrá un sonido magníco nada más sacarlo de la caja, pero su
rendimiento puede mejorar aún más a medida que todos estos componentes se activen e
interactúen durante las primeras semanas de uso. Mantener el sistema encendido ayudará
en este proceso.
7.2 Limpieza del equipo y de las conexiones
Naim recomienda usar únicamente el paño de limpieza incluido para retirar el polvo de
las supercies del equipo. Los productos de limpieza contienen ingredientes que pueden
afectar negativamente a los tratamientos y acabados de la supercie.
Mantenga las clavijas y las conexiones limpias y libres de corrosión. La forma más sencilla
de hacerlo es apagar completamente su equipo Naim (y cualquier otro equipo conectado),
desenchufar todas las conexiones de sus tomas y volver a introducirlas rmemente. No se
deben utilizar limpiadores de contactos ni otros productos «mejoradores», ya que pueden
dejar restos que podrían deteriorar el sonido de su sistema.
7.3 Restablecimiento del NAC 332
Para restablecer los ajustes predeterminados de su NAC 332, mantenga pulsado el botón
«Brightness/Reset» (brillo/reinicio) del panel trasero durante al menos 3 segundos. El
NAC 332 volverá a entrar en el modo de espera y se restablecerán todos los ajustes
predeterminados de fábrica. Tenga en cuenta que con ello se desemparejarán el mando a
distancia y el sistema de automatización Zigbee.
8. Asistencia
La protección del consumidor varía de un país a otro. En la mayoría de los países, el
distribuidor donde adquirió su producto Naim será su contacto principal en caso de
problemas con la unidad. Los problemas pueden deberse a fallos del sistema o de la
instalación, por lo que es esencial emplear al máximo las capacidades de diagnóstico de
su proveedor.
Puede encontrar en línea varios artículos de ayuda para cada producto Naim en
Naimaudio.com
Si sigue teniendo problemas con su producto Naim, póngase en contacto directamente
con nosotros para obtener ayuda y asesoramiento en [email protected]
9. Servicio y actualizaciones
Las reparaciones y las actualizaciones de hardware solo pueden llevarse a cabo en centros
de servicio autorizados Naim o en la propia sede central de Naim. Muchos componentes
se fabrican, se prueban y se adaptan a medida, y a menudo no es posible conseguir de
otras fuentes las piezas de repuesto adecuadas. Para cualquier solicitud de servicio o
reparación, póngase en contacto con su distribuidor local Naim.
1111
Page 71

10. Especicaciones
300 Series Preamplifier - NAC 332
Entradas de audio:
Salidas de audio:
Actualizar: Micro-USB
Entradas remotas: 1 jack 3,5 mm eléctrica y Mini-TOSLINK óptica
Salidas remotas: 2 jack 3,5 mm eléctricas y Mini-TOSLINK ópticas
Consumo de potencia: Uso típico: 20 W En espera: < 0,5 W
Dimensiones (Al x An x P): 91,5 × 432 × 317,5 mm (incluyendo las patas)
Peso: 11 kg
Suministro de red: 115 V o 230 V; 50/60 Hz
3 DIN
2 XLR (par)
3 RCA (par)
1 XLR (par)
1 RCA (par)
1 jack para auriculares de 6,35 mm
1 salida de línea en la entrada 8 (DIN de 5 polos)
11. Reciclaje del producto
Los productos con el logotipo del contenedor tachado no pueden eliminarse como
residuos domésticos. Estos productos deben eliminarse en centros capacitados
para reciclar y tratar adecuadamente los residuos.
Póngase en contacto con las autoridades local para informarse sobre el centro de
tratamiento más cercano.
Eliminar y reciclar los residuos adecuadamente contribuye a preservar los recursos y a
prevenir la contaminación medioambiental.
1212
Page 72

Page 73

Indice
Sezione Pagina
Introduzione
1. Contenuto della confezione
2. Primi passi con il NAC 332
3. Elementi essenziali per la congurazione del NAC332
4. Congurazione dettagliata del NAC 332
5. Suggerimenti sull’installazione e sull’utilizzo del NAC 332
6. Rete elettrica, messa a terra e altre informazioni
7. Ulteriori suggerimenti e consigli
8. Assistenza
9. Assistenza e aggiornamenti
1
1
2
3
6
8
10
11
11
11
10. Speciche
11. Riciclaggio del prodotto
12
12
Page 74
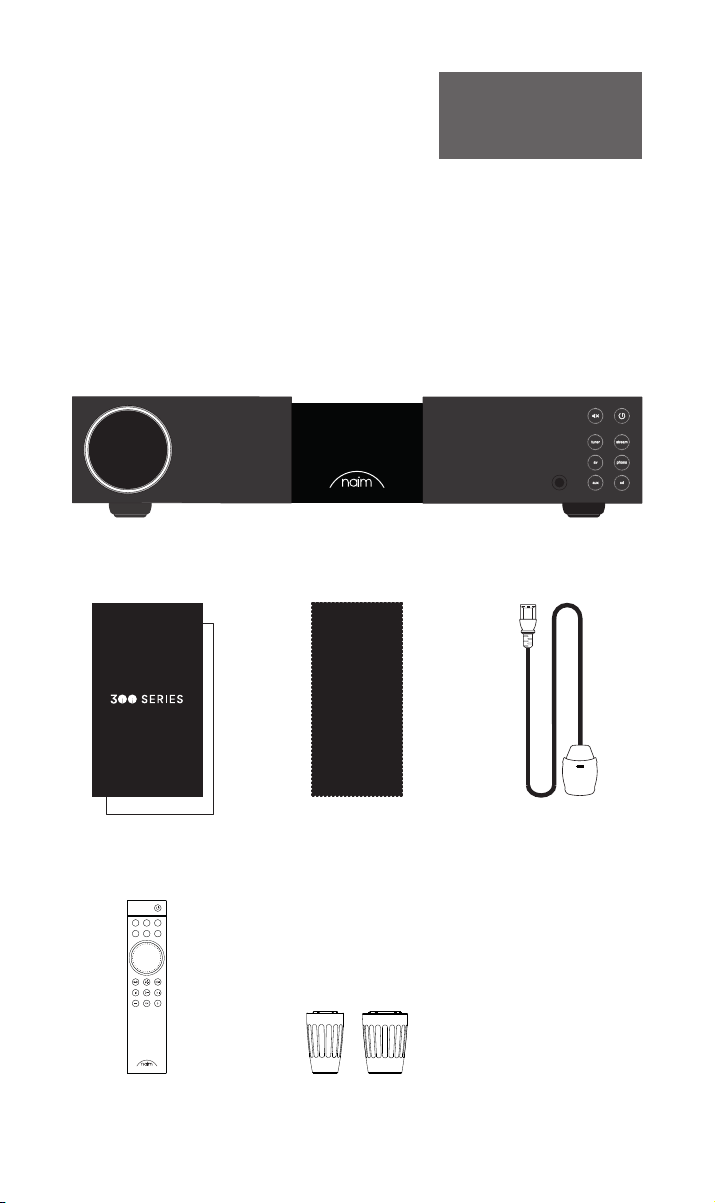
Introduzione
Nota bene: per una versione
completa degli avvertimenti di
sicurezza, consultare il manuale di
sicurezza prescritto dalla legge.
Ti presentiamo il tuo nuovo preamplicatore Naim. Come tutti i prodotti Naim Audio, il
NAC 332 mette le performance musicali in primo piano. Per aiutare a comprendere il suo
pieno potenziale, è importante attenersi alle linee guida per un’installazione e un utilizzo
semplici coperte nel presente
manuale. Iniziamo con alcuni aspetti indispensabili relativi al prodotto e alla congurazione
prima di passare a informazioni più dettagliate nella Sezione 5.
1. Contenuto della confezione
1x NAC 332
1x Documentazione
cd
stream
phono
tuner
av aux
1x Panno di pulizia 1x Power-Line Lite
1x Comando a distanza 2x Connettori di collegamento
1
Page 75
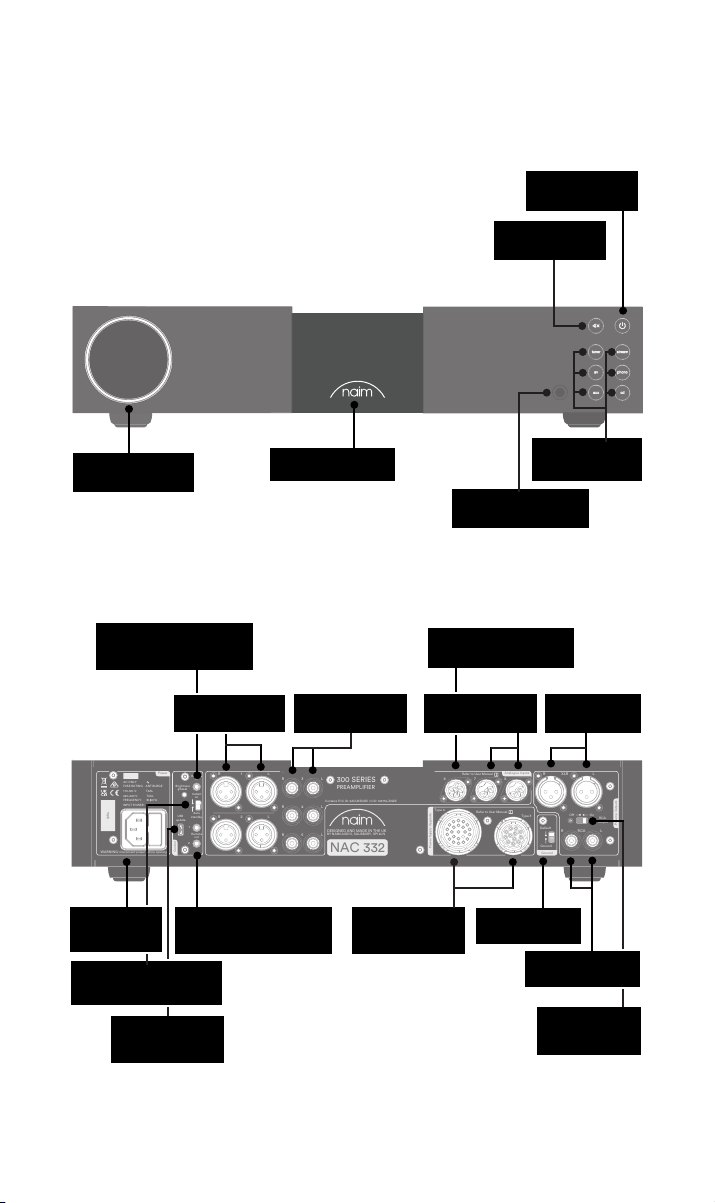
WARNING:Disconnect power before opening
AC ONLY
FUSE RATING: ANTISURGE
1 0-120 V:1 T4AL
2 0-240 V:2 T2AL
FREQUENCY: 0 60Hz5 /
I 70VANPUT POWER:
Power
300 SERIES
PREAMPLIFIER
NAC 332
DESIGNED AND MADE IN THE UK
BY NAIM AUDIO, SALISBURY, SP1 2LN
/ .oNS
Ground
Power Supply Upgrade
Preamp Outputs
AnalogueInputs
Ground
Default
R L
R
L
RCA
XLR
Refer to User Manual
Type 3
Type 4
Remote
in
Remote
out
Auto
standby
Instant
on
1
2
Control
USB
update
Brightness
Reset/
On
RCA
output
O
3
4
6
AnalogueInputs
R
R
R
L
L
L
5
8
7
1
2
R
L
R
L
Contains FCC ID: 2ACURZIGEE IC ID: 12217A-ZIGEE
Refer to User Manual
2. Primi passi con il NAC 332
Pulsante di
standby
Tasto di
tacitazione
Controllo del
volume
Ingresso remoto (jack da
3,5 mm elettrico e Mini-
TOSLINK ottico)
Fusibile e
ingresso
alimentazione
Interruttore di standby/
accensione istantanea
Presa di
aggiornamento
USB
Logo retroilluminato,
Ingressi XLR
Uscita remota (jack da
3,5 mm elettrico e Mini-
TOSLINK ottico)
regolabile
Ingressi RCA
Prese
aggiornamento
alimentazione
Tasti di selezione
Uscita jack da 6,35 mm
per le cuffie
Ingresso DIN per stadio
fono NVC TT
Ingressi DIN
Interruttore di
massa segnale
bilanciata RCA
Interruttore on/
off uscita RCA
ingresso
Uscita
bilanciata XLR
Uscita non
2
Page 76
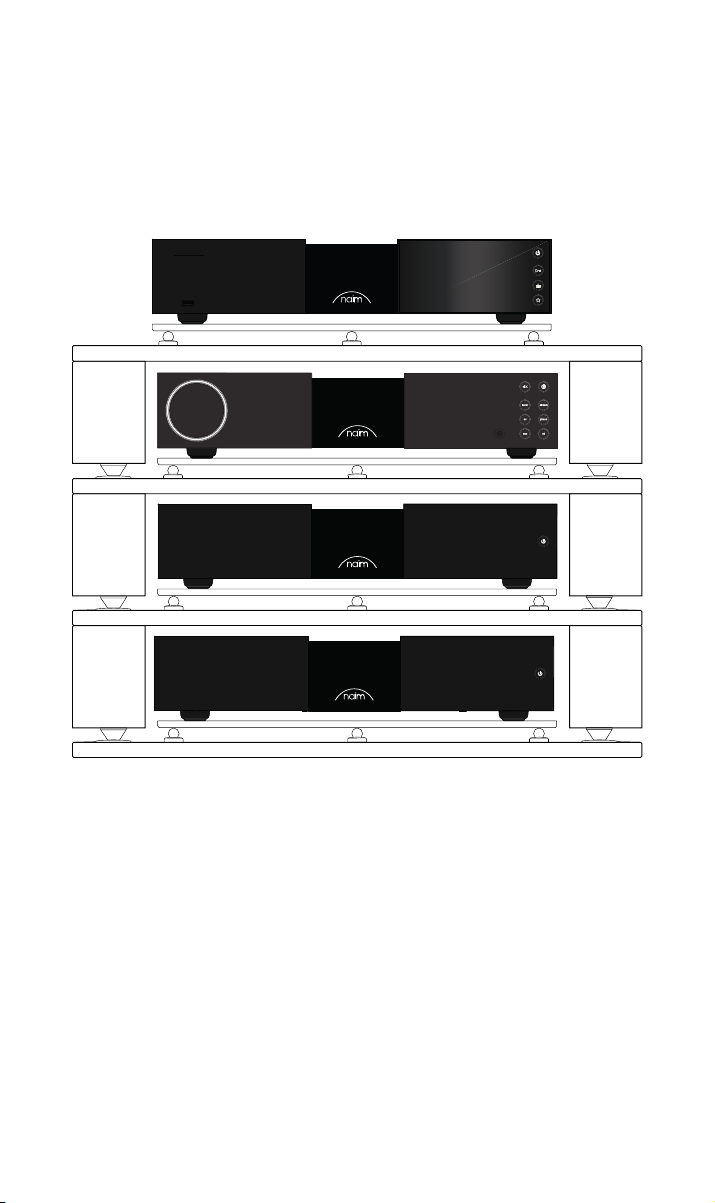
3. Elementi essenziali per la congurazione del
NAC 332
Il NAC 332 deve essere collegato a una o diverse sorgenti e a un amplicatore di potenza
(ad es. il NSS 333 e i NAP 350 corrispondenti); tuttavia, prima di procedere, si prega di
accertarsi che tutti i componenti siano nelle rispettive posizioni nali e scollegati dalla rete
elettrica.
Per delle prestazioni ottimali, servirsi di un supporto hi- dedicato, in misura ideale Naim
Fraim, con il pre-amplicatore ubicato sopra gli amplicatori di potenza, come mostrato.
Sono anche richiesti degli altoparlanti con cavi.
3
Page 77
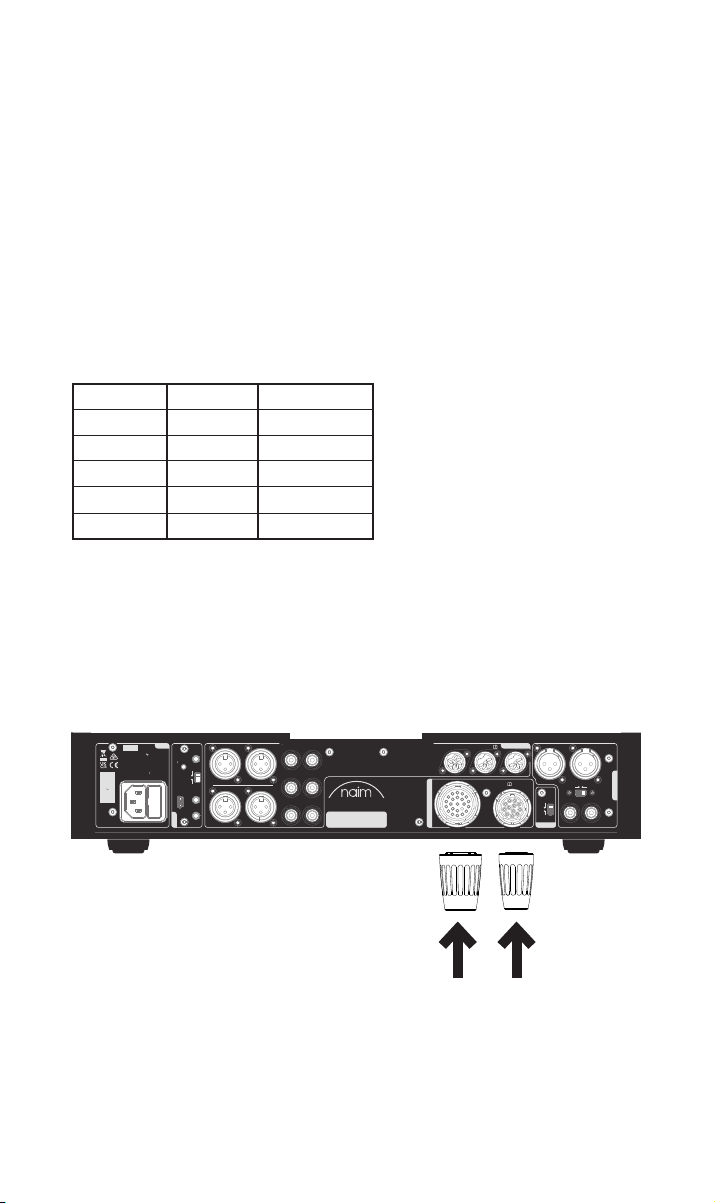
3.1 Collegamento del NAC 332 agli amplicatori di potenza NAP 350
WARNING:
Disconnect power before opening
AC ONLY
FUSE RATING: ANTISURGE
1 0-120 V:1 T4AL
2 0-240 V:2 T2AL
FREQUENCY: 0 60Hz5 /
I 70VANPUT POWER:
Power
300 SERIES
PREAMPLIFIER
NAC 332
DESIGNED AND MADE IN THE UK
BY NAIM AUDIO, SALISBURY, SP1 2LN
/ .oNS
Ground
Power Supply Upgrade
Preamp Outputs
AnalogueInputs
Ground
Default
R L
R
L
RCA
XLR
Refer to User Manual
Type 3
Type 4
Remote
in
Remote
out
Auto
standby
Instant
on
1
2
Control
USB
update
Brightness
Reset/
On
RCA
output
O
3
4
6
AnalogueInputs
R
R
R
L
L
L
5
8
7
1
2
R
L
R
L
Contains FCC ID: 2ACURZIGEE IC ID: 12217A-ZIGEE
Refer to User Manual
Collegare i due cavi XLR (di serie con i NAP 350) dalle uscite XLR del NAC 332 all’ingresso
di ciascun NAP 350. Accertarsi che i cavi abbiano una corrispondenza tra canali:
l’uscita sinistra del preamplicatore è collegata all’amplicatore di potenza che attiva
l’altoparlante sinistro e lo stesso per il lato destro. Assicurarsi che le spine XLR siano
inserite correttamente, ovvero che il logo Naim riportato sulla spina sia rivolto verso l’alto.
Collegare i cavi di automazione del sistema (di serie con i NAP 350) tra i terminali di uscita
remota del NAC 332 e i terminali di ingresso remoto sui NAP 350.
3.2 Collegamento dei componenti sorgente
Collegare i componenti sorgente agli ingressi NAC 332 come richiesto. I tasti del pannello
anteriore possono essere assegnati per selezionare qualsiasi ingresso, consultare la
sezione 4.2
Gli abbinamenti per impostazione predenita di fabbrica sono:
Sintonizzatore Ingresso 3 RCA
Streaming Ingresso 7 DIN 5 pin
AV Ingresso 4 RCA
Phono Ingresso 6 DIN 8 pin
AUX Ingresso 1 XLR
CD Ingresso a 8 DIN 5 pin
3.3 Accensione
Una volta collegate le sorgenti e il NAC 332 agli amplicatori di potenza, sono necessari
soltanto dei piccoli passaggi aggiuntivi prima di accedere il NAC 332 e iniziare lo streaming
musicale.
Collegare i due connettori di collegamento di serie alle prese di aggiornamento
dell’alimentazione del NAC 332.
4
Page 78
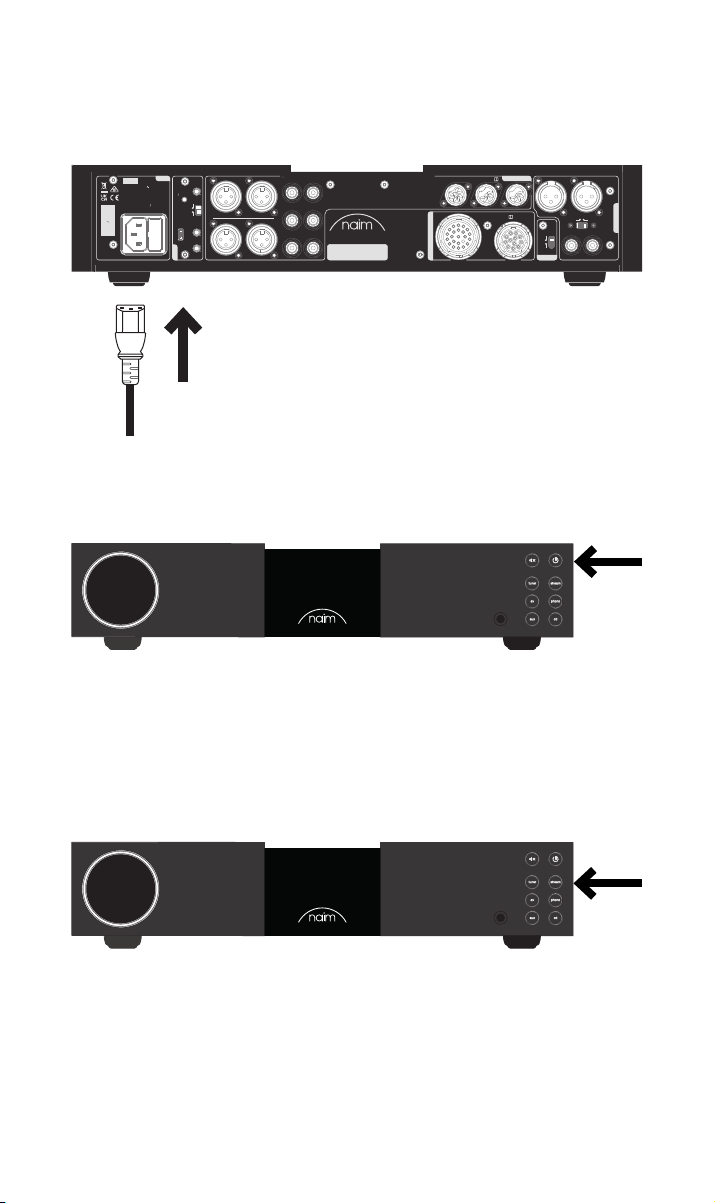
Collegare il cavo dell’alimentazione alla presa di alimentazione del NAC 332, quindi alla
rete elettrica.
AC ONLY
FUSE RATING: ANTISURGE
1 0-120 V:1 T4AL
2 0-240 V:2 T2AL
FREQUENCY: 0 60Hz5 /
I 70VANPUT POWER:
/ .oNS
WARNING:Disconnect power before opening
Power
Brightness
Reset/
USB
update
Control
1
L
R
Remote
in
Instant
on
Auto
standby
R
2
1
Remote
out
2
L
R
3
300 SERIES
PREAMPLIFIER
Contains FCC ID: 2ACURZIGEE IC ID: 12217A-ZIGEE
L
R
4
L
DESIGNED AND MADE IN THE UK
BY NAIM AUDIO, SALISBURY, SP1 2LN
5
L
R
NAC 332
Type 4
Power Supply Upgrade
AnalogueInputs
AnalogueInputs
Refer to User Manual
7
Refer to User Manual
8
Type 3
6
R
Default
Ground
Ground
XLR
O
R L
RCA
L
On
RCA
output
Accendere il NAC 332 premendo il tasto di standby, sul lato destro in alto sul pannello
anteriore.
3.4 Abbinamento del telecomando
Una volta che il NAC 332 è stato acceso, sarà indispensabile abbinare il telecomando.
Inserire le batterie in dotazione nel telecomando.
Premendo uno qualsiasi dei tasti d’input sul pannello anteriore, sarà possibile attivare la
modalità di abbinamento a distanza per 30 secondi.
Preamp Outputs
Tenere premuto il tasto della luminosità sul telecomando per 3 secondi.
5
Page 79
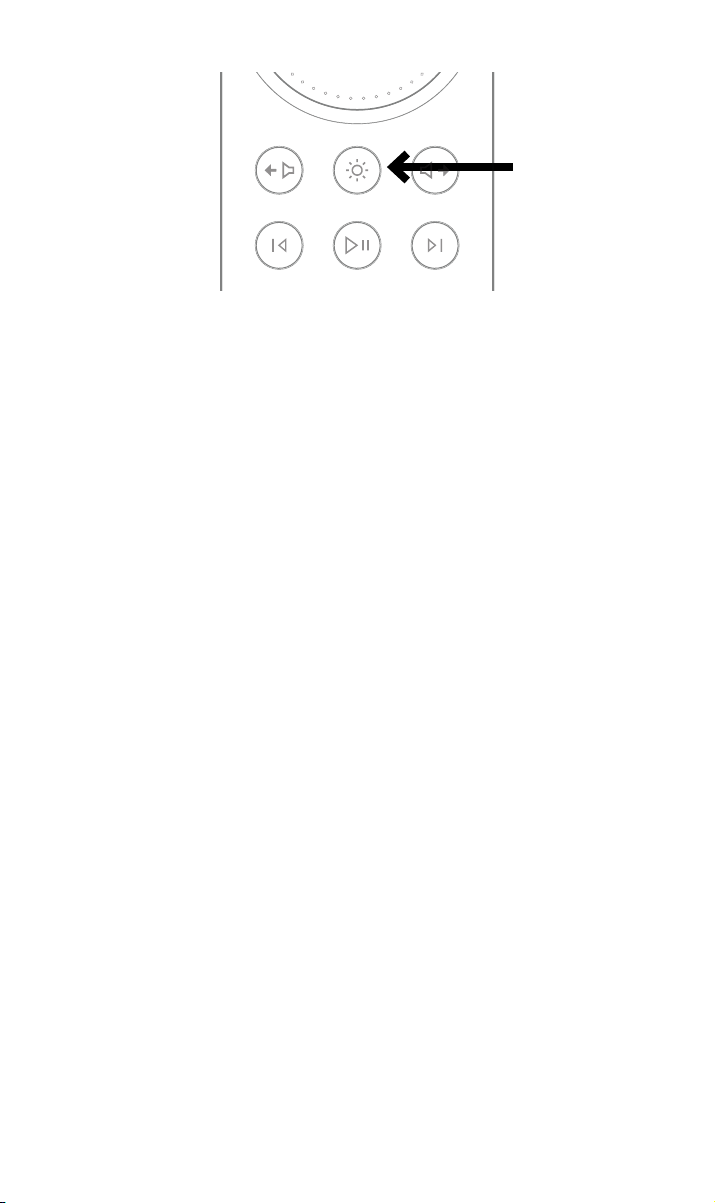
L’anello del volume sul telecomando si illuminerà quando in modalità di abbinamento e si
stream
phono
cd
tuner
av aux
arresterà all’impostazione attuale di volume quando abbinato.
Ora, il telecomando è abbinato all’unità e pronto all’uso.
4. Congurazione dettagliata del NAC 332
4.1 Utilizzo degli amplicatori di potenza Naim senza ingressi bilanciati
Se si sta utilizzando un amplicatore di potenza Naim più vecchio, sarà richiesto un set di
cavi cablati in misura adeguata.
Se si devono utilizzare le uscite sbilanciate RCA (ad es. per collegare un subwoofer),
l’interruttore “RCA output” (Uscita RCA) sul pannello posteriore deve essere impostato in
posizione “On”.
4.2 Riassegnazione degli ingressi
L’eventuale combinazione di sei degli otto ingressi sici può essere selezionata
direttamente con i tasti del pannello anteriore o del telecomando. Una modalità di
congurazione trova impiego per modicare l’assegnazione degli ingressi sici ai tasti.
Per accedere alla modalità di congurazione, premere il tasto del pannello anteriore del
primo ingresso da regolare, no a quando il tasto non inizia a lampeggiare.
I LED della manopola del volume mostrano dei segmenti che indicano la possibile
assegnazione dell’ingresso, con l’ingresso attualmente selezionato mostrato dai LED più
luminosi.
Mentre in modalità di congurazione, la sorgente selezionata mostrata dai LED della
manopola del volume sarà riconosciuta tramite un tono acustico.
Ruotando la manopola del volume, è possibile cambiare l’ingresso assegnato all’ingresso
lampeggiante.
Mentre in modalità di congurazione, premere qualsiasi altro tasto sorgente per regolare
l’assegnazione a quell’ingresso. Per uscire dalla modalità di congurazione, premere il
tasto d’ingresso lampeggiante, no a quando non smette di lampeggiare.
Il tasto di tacitazione continua a funzionare normalmente mentre è in modalità di
congurazione.
4.3 Regolazione del trim d’ingresso
Il livello relativo di ciascun ingresso può essere regolato in una gamma da -10 dB a +10 dB,
per equalizzare il livello di volume tra sorgenti.
Questo può essere regolato mentre in modalità di congurazione, pertanto premere prima
il tasto d’ingresso da regolare no a quando lampeggia.
6
Page 80

Una seconda pressione del tasto consentirà di cambiare la modalità d’impostazione del
trim. I LED sul comando del volume indicheranno l’attuale impostazione del trim.
Ruotando la manopola del volume, si cambierà l’impostazione del trim; la sorgente in fase
di regolazione sarà riprodotta, quindi è possibile decidere il livello richiesto.
Una volta soddisfatti dell’impostazione, premendo brevemente il tasto sarà possibile
tornare al display di mappatura degli ingressi, oppure premendo a lungo, si uscirà dalla
modalità di congurazione.
4.4 Integrazione AV (guadagno unitario)
Questa modalità è applicabile unicamente all’ingresso AV. Le impostazioni di trim,
headroom e bilanciamento vengono ignorate quando la modalità guadagno sso AV è
attiva.
Non è possibile cambiare il volume utilizzando il telecomando o la manopola del NAC 332
quando ci si trova in questa modalità. Il segnale di uscita avrà lo stesso volume di quello di
entrata.
Il guadagno sso si imposta dalla modalità di congurazione: tenere innanzitutto premuto
il tasto dell’ingresso AV sul pannello anteriore no a quando non lampeggia.
Una seconda pressione del tasto consentirà di cambiare la modalità d’impostazione del
trim. I LED sul comando del volume indicheranno l’attuale impostazione del trim.
Poi, utilizzando il comando del volume, girare la manopola al massimo (all’estrema destra)
no a quando i LED non si stabilizzano.
Per uscire dalla modalità di congurazione, premere il tasto dell’ingresso AV, no a quando
non smette di lampeggiare.
4.5 Funzione volume massimo
Questa modalità consente all’utente di impostare il volume massimo generale per
prevenire la scelta accidentale di livelli sonori elevati.
Questo comando si imposta nella modalità di congurazione del volume massimo: tenere
innanzitutto premuto il tasto del mute sul pannello anteriore. Il tasto lampeggia e il LED
della manopola del volume cambia all’attivazione.
Quindi, ruotare la manopola di comando del volume verso sinistra o verso destra per
modicare il valore del volume massimo.
Per impostare il volume massimo delle cue, inserire il jack delle cue: la manopola del
volume cambierà, mostrando il volume massimo consentito per le cue; utilizzare quindi il
comando del volume per impostarlo sul livello massimo desiderato.
Togliendo il jack delle cue, la manopola del volume torna a mostrare il volume massimo
principale.
Quando l’impostazione è corretta, uscire dalla modalità di congurazione premendo il
tasto mute no a quando non smette di lampeggiare.
7
Page 81

Type 1: DIN 8 pin
-18 V 300 mA
+18 V 300 mA
Massa
4.6 Funzioni aggiuntive dell’ingresso DIN
L’ingresso 6 (DIN a 8 pin) è compatibile con i cavi DIN a 5 pin e può anche alimentare
direttamente uno stadio fono Naim NVC TT.
L’ingresso 8 (DIN a 5 pin) ha uscite di livello di linea che rispecchiano la sorgente
attualmente selezionata. Si noti che, quando si seleziona questo ingresso, la sorgente
collegata sarà rispecchiata, pertanto si deve essere consapevoli dei ritorni di audio se si
usa una sorgente di registrazione.
4.7 Impiego delle cue
L’uscita delle cue è in grado di attivare la maggior parte delle cue a livelli di volume
molto elevati. Mentre il connettore delle cue è inserito, le uscite principali del
preamplicatore saranno tacitate.
L’uscita delle cue ha un’impostazione a parte del volume. Quando le cue sono inserite,
il volume sarà impostato all’ultimo livello usato con le cue. Quando sono rimosse, il
volume sarà ripristinato all’ultimo livello usato con gli altoparlanti.
5. Suggerimenti sull’installazione e sull’utilizzo del
NAC 332
Sappiamo che desideri ardentemente trarre vantaggio da tutti i beneci del tuo nuovo
NAC 332, ma ti promettiamo che l’audio sarà persino migliore dopo aver seguito queste
linee guida, tutte studiate per aiutarti a provare l’esperienza del tuo preamplicatore senza
compromessi.
5.1 Disimballaggio e collocazione
NAC 332 sfrutta componenti di alta qualità, tra cui un notevole trasformatore di potenza
e una struttura in alluminio ad elevata resistenza. Per questo motivo NAC 332 arriva al
peso di 11 kg, quindi occorre prestare attenzione quando lo si solleva o lo si sposta, nonché
assicurarsi che la supercie su cui si prevede di posizionarlo sia stabile e in grado di
sostenere il suo peso.
Per garantire prestazioni ottimali, invitiamo gli utenti a usare i prodotti Naim su
scaalature dedicate alle apparecchiature hi- – idealmente Naim Fraim o Fraim Lite – per
ridurre al minimo le vibrazioni che inuiscono sul suono. Non c’è spazio per lo scaale?
Invitiamo gli utenti a considerare di posizionare il NAC 332 su un ripiano di vetro Fraim, su
un mobile idoneo, al ne di garantire un sostegno solido ma discreto.
Non impilare mai i prodotti Naim uno sopra l’altro; inoltre, se sono collocati a anco, si
prega di lasciare uno spazio tra le unità.
Per ridurre il rischio di ronzio dagli altoparlanti, si prega di non posizionare gli alimentatori
o gli amplicatori di potenza in prossimità di sorgente o componenti del preamplicatore.
8
Page 82

5.2 Dettagli del collegamento d’ingresso
Il NAC 332 presenta numerose opzioni di collegamento esterno della sorgente. Per la
migliore qualità dell’audio, consigliamo di utilizzare gli ingressi DIN.
5.3 Automazione del sistema
Quando si utilizza il NAC 332 con un dispositivo di streaming e un amplicatore di potenza
compatibili, come il NSS 333 e il NAP 350, è possibile sincronizzare l’accensione/lo
spegnimento e la luminosità del logo in tutto l’impianto collegando il NAC 332 con i cavi
ottici di automazione del sistema di serie con i NAP 350.
Il NSS 333 e NAC 332 utilizzano il sistema Zigbee per sincronizzare le loro funzioni.
Servirsi dei terminali “Remote Out” (Uscita remota) sul NAC 332 per collegare i terminali
“Remote In” (Ingresso remoto) sui NAP 350. È possibile collegare altri amplicatori di
potenza impiegando i terminali “Remote Out” (Uscita remota) del NAP 350.
Se è necessaria una distanza maggiore tra il NAC 332 e i NAP 350 rispetto alla lunghezza
consentita dal cavo di serie, è possibile impiegare un cavo ottico sostitutivo da 3,5 mm a
3,5 mm alla lunghezza desiderata. È anche possibile utilizzare cavi analogici standard con
connettori di 3,5 mm, sebbene un cavo ottico ora le prestazioni migliori.
5.4 Accensione/Spegnimento
Una volta realizzati tutti i collegamenti in ingresso e uscita, collegare il cavo di rete di serie
al NAC 332 e alla rete elettrica.
Ora è possibile accendere il NAC 332 premendo il tasto di standby.
Se il NSS 333, il NAC 332 e i NAP 350 sono collegati mediante l’automazione del sistema,
questi si accenderanno in sequenza.
Si tratta della stessa procedura per spegnere il NAC 332: spegnere il NSS 333, NAC 332 e
i NAP 350 collegati tramite l’automazione del sistema - semplicemente premendo il tasto
di standby sul pannello anteriore del NSS 333 o NAC 332, che metterà l’intero impianto
in standby. Evitare di utilizzare un interruttore su presa elettrica per spegnere i propri
amplicatori.
5.5 Impostazione energetica standby
Il NAC 332 dispone di tre livelli di alimentazione: standby, standby con accensione
istantanea e acceso per il normale utilizzo.
La modalità “standby” ha un consumo energetico complessivo inferiore a 0,5 W. Il
NAC332 può essere attivato premendo il tasto di standby oppure dal telecomando.
“Standby with instant on” (Standby con accensione istantanea) lascia il NAC 332
completamente acceso, ma con il logo spento. “Powered for normal use” (Acceso per il
normale utilizzo): nel normale utilizzo, il NAC 332 assorbe circa 20 W.
Per impostazione predenita, l’interruttore sul pannello posteriore del NAC 332 è
impostato su “Auto standby” (Standby automatico). Entra automaticamente nella modalità
di standby dopo un periodo che non supera 20 minuti d’inattività. Per la qualità dell’audio
ottimale, impostare l’interruttore sulla posizione “Instant on” (Accensione istantanea).
Questo tiene il NAC 332 costantemente acceso. Con l’interruttore in questa posizione, se
si preme il tasto di standby, il NAC 332 rimarrà acceso, ma il logo si spegnerà.
5.6 Impostazioni di luminosità del logo Naim
È possibile scegliere il livello di luminosità degli indicatori a LED e del logo Naim sul
NAC332, servendosi dei tasti della luminosità sul pannello posteriore e sul telecomando.
Se si usano gli amplicatori NAC 332 e NAP 350 Naim collegati mediante automazione del
sistema, è possibile sincronizzare la luminosità di tutti i logo.
9
Page 83

5.7 Utilizzo dell’alimentatore NPX 300
L’alimentatore NPX 300 è un aggiornamento opzionale del sistema. Se si aggiunge
l’alimentatore NPX 300 al NAC 332, è prima indispensabile spegnere l’intero impianto.
Rimuovere il cavo di rete dal NAC 332; non è necessario quando l’unità è alimentata dal
NPX 300.
Aggiungere il NPX 300 al supporto dell’apparecchiatura.
Rimuovere i due connettori di collegamento dal pannello posteriore del NAC 332.
Collegare l’estremità senza nastro dei due cavi Burndy al NPX 300. Collegare le due
estremità con nastro al NAC 332. Accertarsi che gli anelli di bloccaggio siano serrati
completamente. Tentare di “rivestire” i cavi, di modo che siano sospesi i più lenti possibili,
senza toccare i supporti o la parete – quest’operazione sarà più semplice se sono formati
alla forma richiesta prima di collegare entrambe le estremità.
Collegare il cavo dell’alimentazione alla presa di alimentazione del NPX 300, quindi alla
rete elettrica. Accendere nuovamente la parte restante dell’impianto.
Accendere nuovamente il NAC 332, premendo il tasto di standby.
6. Rete elettrica, messa a terra e altre informazioni
Usare solo i cavi di alimentazione e i connettori di serie con il proprio NAC 332,
oppure il cavo di alimentazione Naim Power-Line aggiornato. Laddove siano utilizzati
dei fusibili, si raccomanda di utilizzare fusibili con un valore di 13 Amp. Non cablare
resistenze dipendenti di tensione o soppressori di rumore ai connettori di rete, in quanto
diminuiscono il valore nominale della corrente elettrica e del suono.
6.1 Messa a terra
Per evitare il rumore di alternata, la massa del segnale dell’intero impianto deve essere
collegata alla messa a terra in un solo punto. Generalmente, questa è la sorgente primaria.
Il preamplicatore NAC 332 ha un interruttore Ground Lift. Impostare quest’ultimo su
“Default” (Impostazione predenita) se la sorgente primaria collega la terra alla massa
del segnale. Se nessun’altra sorgente collega la terra alla massa del segnale, impostarla in
posizione “Ground” (Massa).
6.2 Connettori di rete termoformati
Se il connettore termoformato viene tagliato dal cavo di alimentazione (per qualsiasi
motivo), il connettore DEVE essere smaltito in modo da renderlo totalmente inservibile. Se
un connettore tagliato viene inserito in una presa elettrica, il rischio di incorrere in scariche
elettriche è considerevole.
6.3 Circuiteria elettrica e interferenza
Solitamente, un impianto hi- condivide un circuito di rete elettrica con altri
elettrodomestici, alcuni dei quali possono causare una distorsione che può manifestarsi
sottoforma di un ronzio meccanico dai trasformatori di corrente, compreso il grande
trasformatore nel NAC 332.
Il ronzio di un trasformatore non viene trasmesso attraverso gli altoparlanti e non ha
alcun eetto sulle prestazioni dell’impianto; tuttavia, una collocazione attenta del proprio
impianto Naim potrebbe ridurlo, così come potrebbe una circuiteria elettrica dedicata
a parte. Tale circuito (idealmente con una portata di 30 o 45 Amp) migliorerà inoltre
le prestazioni generali del sistema. Si consiglia di consultare un elettricista qualicato
soltanto per ottenere opportuni suggerimenti sull’installazione di un circuito di corrente
separato.
6.4 Precauzioni contro i fulmini
Il proprio impianto Naim deve essere spento e completamente scollegato dalla rete
elettrica, qualora sussista il rischio di fulmini, al ne di proteggerlo da potenziali danni.
10
Page 84

7. Ulteriori suggerimenti e consigli
Ora che si hanno a disposizione tutti gli elementi essenziali, passiamo ad alcuni altri aspetti
che si potrebbero considerare al ne di ottimizzare le prestazioni del nuovo NAC 332.
7.1 Rodaggio
I prodotti Naim sono realizzati a mano in seguito a un’attenta selezione di componenti di
alta qualità. Appena uscito dalla sua scatola, il NAC 332 presenterà un suono accattivante,
ma le sue prestazioni possono migliorare sensibilmente dal momento che tutti questi
diversi componenti si attivano e interagiscono nelle loro prime settimane di utilizzo.
Mantenendo il sistema acceso è possibile agevolare questo processo.
7.2 Pulizia del prodotto e dei collegamenti
Naim consiglia di utilizzare esclusivamente il panno per pulizia in dotazione per spolverare
delicatamente le superci del prodotto. Eventuali prodotti per la pulizia utilizzati
potrebbero contenere ingredienti dannosi per i rivestimenti e i trattamenti cosmetici delle
superci.
Le spine e le prese di collegamento devono essere sempre tenute pulite e senza tracce
di corrosione. Il modo più semplice per ottenere questo risultato è spengendo il proprio
prodotto Naim (ed eventuali apparecchiature collegate), scollegare tutti i collegamenti
dalle rispettive prese e premerli di nuovo fermamente. Detergenti per contatti o cosiddetti
“enhancer” non devono essere utilizzati, dal momento che possono lasciare dei residui che
inuiscono negativamente sul suono del proprio impianto.
7.3 Ripristino del NAC 332
Per ripristinare il NAC 332 alle impostazioni predenite, tenere premuto il tasto
“Brightness/Reset” (Luminosità/Ripristino) sul pannello posteriore per almeno 3 secondi.
Il NAC 332 tornerà nello stato di standby e tutte le impostazioni saranno ripristinate alle
impostazioni predenite di fabbrica. Si noti che quest’operazione include lo scollegamento
dal telecomando e dal dispositivo di automazione del sistema Zigbee.
8. Assistenza
La legge sulla tutela dei consumatori varia di stato in stato. Nella maggior parte dei
territori, il rivenditore presso cui è stato acquistato il prodotto Naim deve essere il primo
punto di contatto qualora si abbiano problemi con la propria unità. Un problema può
essere causato da un guasto dell’impianto o dalla sua installazione. È quindi essenziale fare
pieno adamento sull’esperienza e le conoscenze tecniche del rivenditore.
È possibile trovare una serie di articoli di supporto per ciascun prodotto Naim online su
Naimaudio.com
Qualora si continuino ad avere problemi con il proprio prodotto Naim, si prega di
contattarci direttamente per richiedere una consulenza o aiuto, scrivendo all’indirizzo
[email protected]
9. Assistenza e aggiornamenti
Eventuali interventi di riparazione o aggiornamenti dell’hardware devono essere eseguiti
esclusivamente da un centro di assistenza autorizzato Naim oppure presso la sede
principale di Naim. Molti componenti sono personalizzati e collaudati e molto spesso non
è possibile ottenere ricambi adeguati da altre fonti. Rivolgersi al proprio rivenditore locale
Naim con eventuali richieste di assistenza o riparazione.
11
Page 85

10. Speciche
Preamplificatore serie 300 - NAC 332
3 x DIN
Ingressi audio:
Salidas de audio:
Aggiornamento: Micro-USB
Ingresso remoto: 1 x jack da 3,5 mm – elettrico e Mini-TOSLINK ottico
Uscita remota: 2 x jack da 3,5 mm – elettrico e Mini-TOSLINK ottico
Assorbimento elettrico: Uso tipico: 20 W Standby: <0,5W
Dimensioni (A x L x P): 91,5 × 432 × 317,5 mm (inclusi i piedini)
Peso: 11 kg
Alimentazione elettrica: 115 V o 230 V, 50/60 Hz
2 x coppia XLR
3 x coppia RCA
1 x coppia XLR
1 x coppia RCA
1 x jack per cue da 6,35 mm
1 x uscita di livello di linea su ingresso 8 (DIN a 5 pin)
11. Riciclaggio del prodotto
I prodotti che riportano il simbolo del bidone crociato non possono essere smaltiti
come riuti domestici. Tali prodotti devono essere smaltiti presso gli opportuni
centri di riciclaggio e opportunamente trattati.
Per maggiori informazioni sul centro di smaltimento più vicino contattare le autorità locali.
Uno smaltimento e riciclaggio appropriati aiutano la conservazione e prevengono eventuali
contaminazioni delle risorse ambientali.
12
Page 86

Page 87

Spis treści
Rozdział Strona
Wstęp
1. Zawartość opakowania
2. Zapoznanie z NAC 332
3. Podstawy konguracji NAC 332
4. Szczegółowa konguracja NAC 332
5. Wskazówki dotyczące instalacji i użytkowania NAC 332
6. Zasilanie sieciowe, uziemienie i inne
7. Dodatkowe wskazówki i porady
8. Wsparcie
9. Serwis i modernizacja
1
1
2
3
6
8
10
11
11
11
10. Dane techniczne
11. Utylizacja zużytego produktu
12
12
Page 88
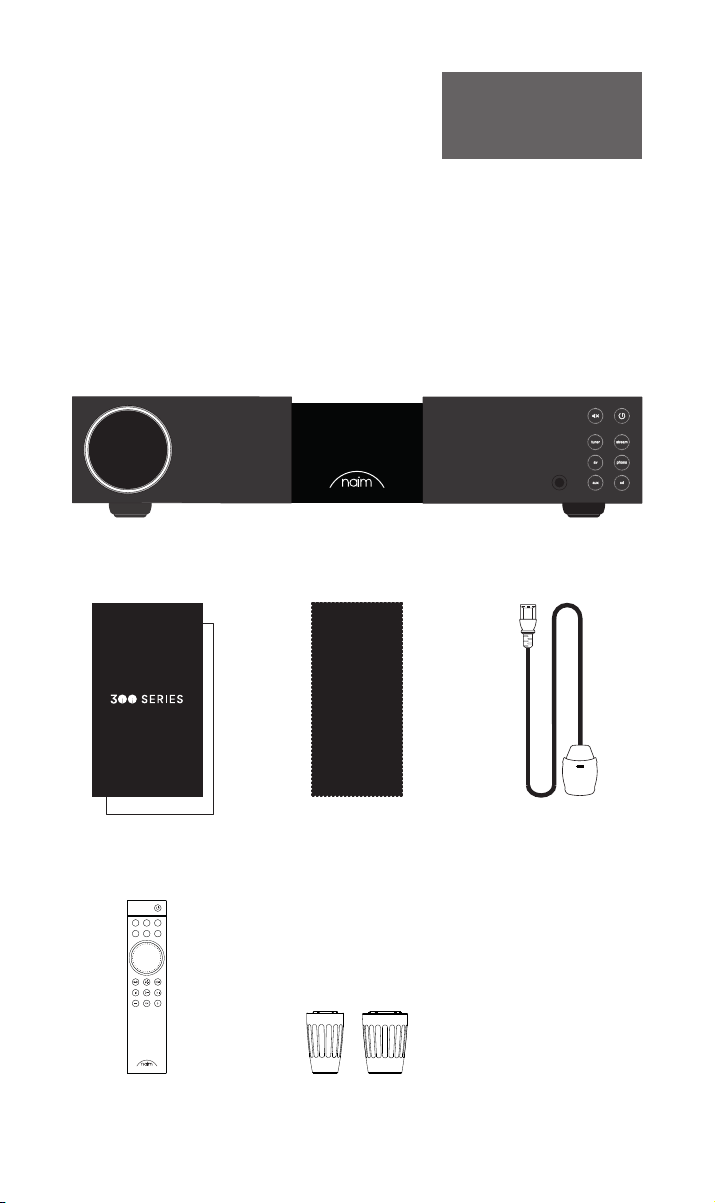
Wstęp
Uwaga: Pełna treść zasad
bezpieczeństwa i ostrzeżeń
zawarta jest w instrukcji
bezpieczeństwa.
Przedstawiamy nowy przedwzmacniacz Naim. Jak wszystkie produkty Naim Audio,
NAC332 stawia na pierwszym miejscu brzmienie muzyczne. Aby w pełni wykorzystać
jego potencjał, należy postępować zgodnie z prostymi wytycznymi dotyczącymi instalacji i
użytkowania zawartymi w niniejszej instrukcji.
Na początku przedstawimy kilka podstawowych informacji o produkcie i konguracji, a
następnie przejdziemy do bardziej szczegółowych informacji w rozdziale 5.
1. Zawartość opakowania
1x NAC 332
1x Pakiet dokumentacji
cd
stream
phono
tuner
av aux
1x Chusteczka do czyszczenia 1x Przewód zasilania Lite
1x Pilot zdalnego sterowania 2x Zaślepki gniazd
11
Page 89
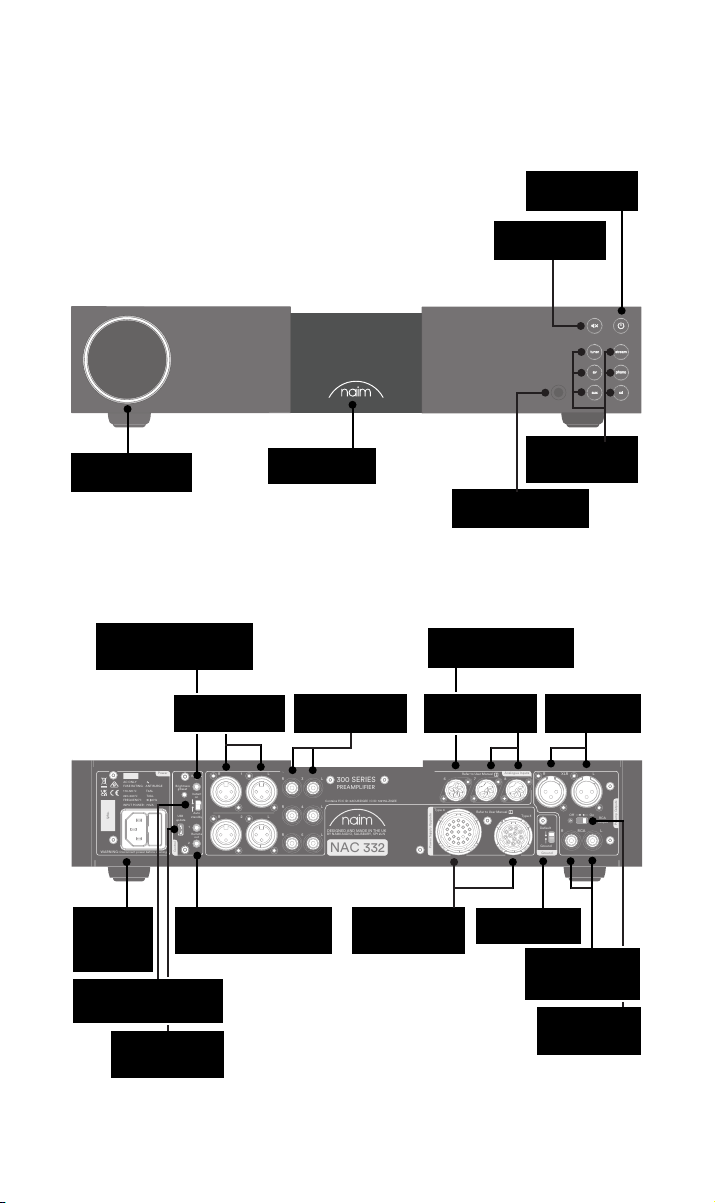
WARNING:Disconnect power before opening
AC ONLY
FUSE RATING: ANTISURGE
1 0-120 V:1 T4AL
2 0-240 V:2 T2AL
FREQUENCY: 0 60Hz5 /
I 70VANPUT POWER:
Power
300 SERIES
PREAMPLIFIER
NAC 332
DESIGNED AND MADE IN THE UK
BY NAIM AUDIO, SALISBURY, SP1 2LN
/ .oNS
Ground
Power Supply Upgrade
Preamp Outputs
AnalogueInputs
Ground
Default
R L
R
L
RCA
XLR
Refer to User Manual
Type 3
Type 4
Remote
in
Remote
out
Auto
standby
Instant
on
1
2
Control
USB
update
Brightness
Reset/
On
RCA
output
O
3
4
6
AnalogueInputs
R
R
R
L
L
L
5
8
7
1
2
R
L
R
L
Contains FCC ID: 2ACURZIGEE IC ID: 12217A-ZIGEE
Refer to User Manual
2. Zapoznanie z NAC 332
Przycisk gotowości
Przycisk
wyciszenia
bezpiecznik
Sterowanie
głośnością
Wejście Remote in
(elektryczne jack 3,5mm i
optyczne Mini-TOSLINK)
Wejście i
zasilania
sieciowego
Gotowość/Włączenie
Gniazdo USB do
aktualizacji
Podświetlane,
ściemniane logo
Wejścia XLR
Wyjście Remote out
(elektrone jack 3,5mm i
optyczne Mini-TOSLINK)
Wejścia RCA
modernizacyjne
Gniazda
zasilacza
Przyciski wyboru
Wyjście słuchawkowe
jack 6,35mm
Wejście DIN dla stopnia
gramofonowego NVC TT
Wejścia DIN
Przełącznik
sygnał/masa
Niezbalansowane
wyłącznik RCA
wejścia
Zbalansowane
wyjście XLR
wyjście RCA
Włącznik/
22
Page 90
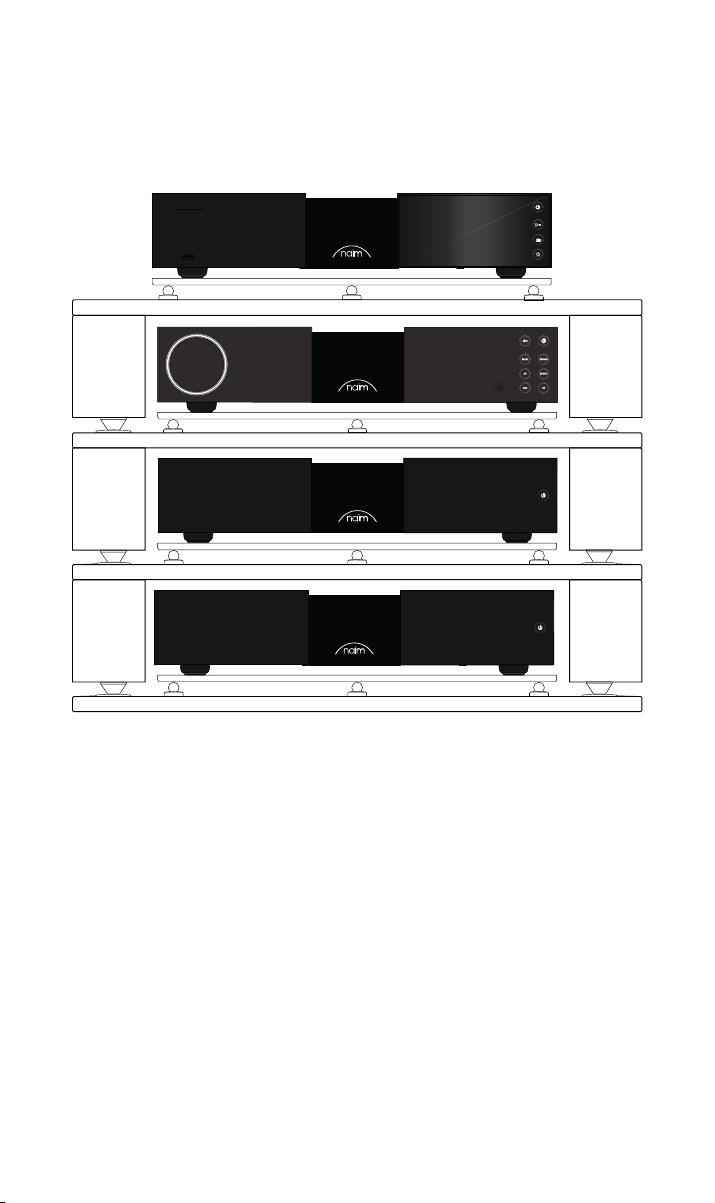
3. Podstawy konguracji NAC 332
NAC 332 musi być podłączony do jednego lub kilku źródeł oraz do wzmacniaczy mocy
(np. dopasowane NSS 333 NAP i NAP 350), ale zanim to zrobisz, upewnij się, że wszystkie
urządzenia są ustawione na swoich miejscach i odłączone od zasilania.
Aby zapewnić optymalne działanie, należy użyć specjalistycznego regału hi- – najlepiej
Naim Fraim – i ustawić przedwzmacniacz nad wzmacniaczami mocy, jak pokazano na
rysunku.
Potrzebne będą również głośniki z przewodami.
33
Page 91
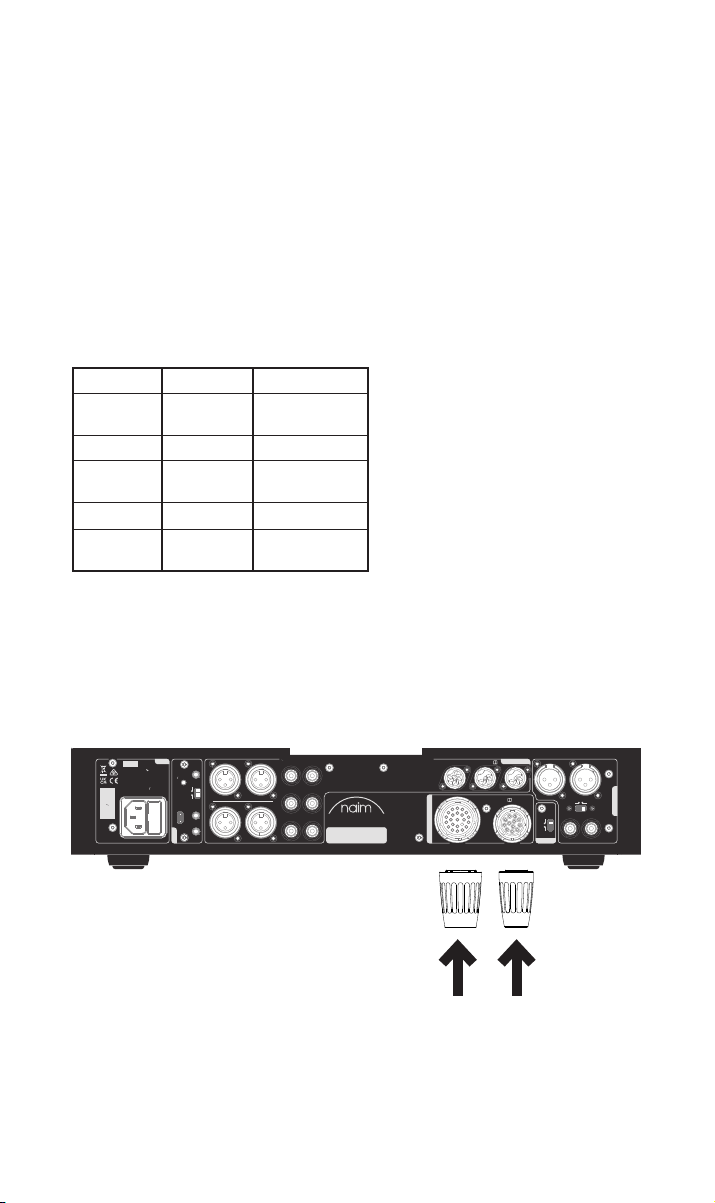
3.1 Podłączenie NAC 332 do wzmacniaczy mocy NAP 350
WARNING:
Disconnect power before opening
AC ONLY
FUSE RATING: ANTISURGE
1 0-120 V:1 T4AL
2 0-240 V:2 T2AL
FREQUENCY: 0 60Hz5 /
I 70VANPUT POWER:
Power
300 SERIES
PREAMPLIFIER
NAC 332
DESIGNED AND MADE IN THE UK
BY NAIM AUDIO, SALISBURY, SP1 2LN
/ .oNS
Ground
Power Supply Upgrade
Preamp Outputs
AnalogueInputs
Ground
Default
R L
R
L
RCA
XLR
Refer to User Manual
Type 3
Type 4
Remote
in
Remote
out
Auto
standby
Instant
on
1
2
Control
USB
update
Brightness
Reset/
On
RCA
output
O
3
4
6
AnalogueInputs
R
R
R
L
L
L
5
8
7
1
2
R
L
R
L
Contains FCC ID: 2ACURZIGEE IC ID: 12217A-ZIGEE
Refer to User Manual
Podłącz dwa kable XLR (dostarczone z NAP 350) z wyjść XLR NAC 332 do wejść obu
NAP350. Upewnij się, że kable są podłączone do tych samych kanałów:
lewe wyjście przedwzmacniacza do wzmacniacza mocy obsługującego lewy głośnik i
analogicznie dla prawego. Upewnij się, że wtyczki XLR są włożone poprawnie, czyli tak, by
logo Naim na wtyczce było u góry.
Podłącz kable automatyzacji systemu (dostarczone z NAP 350) do wyjść Remote Out w
NAC 332 i wejść Remote In w obu NAP 350.
3.2 Podłaczenie komponentów źródłowych
Podłącz komponenty źródłowe do wejść NAC 332 zgodnie z wymaganiami. Przyciski na
panelu przednim mogą być przypisane do wyboru dowolnego wejścia, patrz punkt 4.2
Domyślne przypisania fabryczne są następujące:
Tuner Wejście 3 RCA
Strumień
AV Wejście 4 RCA
Chinch
AUX
CD
Wejście 7 5-stykowe złącze
DIN
Wejście 6 8-stykowe złącze
DIN
Wejście 1 XLR
Wejście 8 5-stykowe złącze
DIN
3.3 Włączanie
Po podłączeniu źródeł oraz NAC 332 do wzmacniaczy mocy jest jeszcze tylko kilka
prostych kroków, które należy wykonać przed włączeniem NAC 332 i rozpoczęciem
odtwarzania muzyki.
Podłącz dwie dostarczone zaślepki do gniazd modernizacyjnych zasilania NAC 332.
44
Page 92
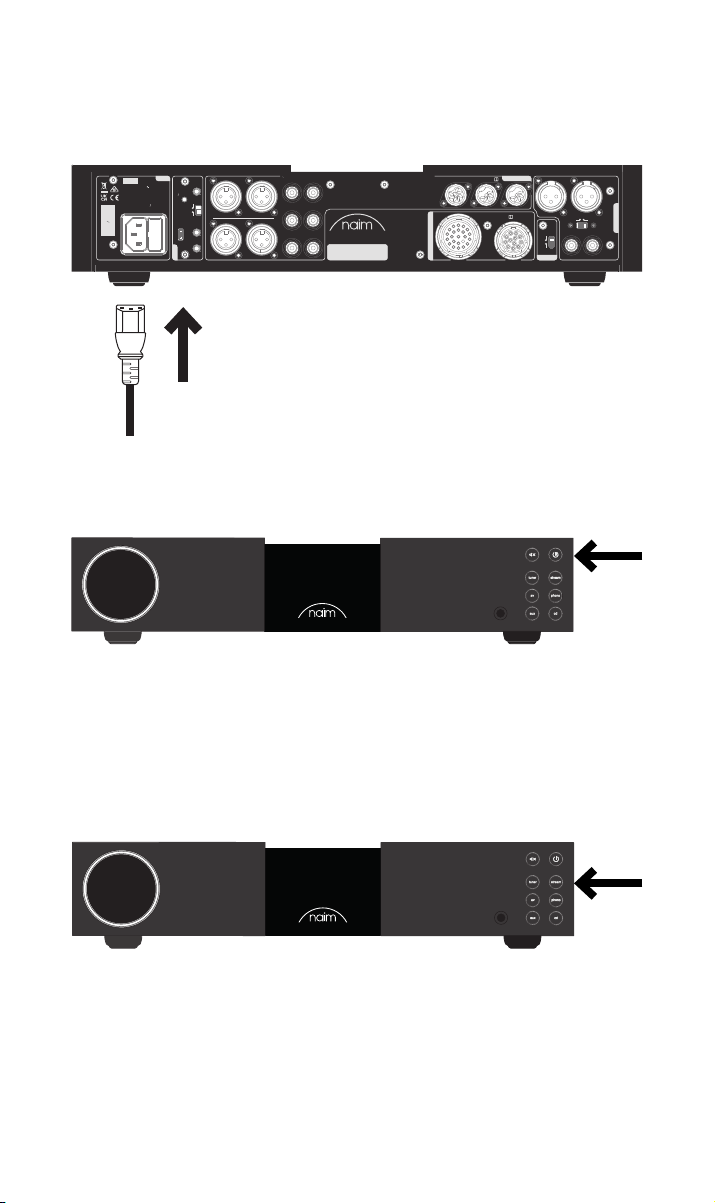
Podłącz kabel zasilający do gniazda zasilania NAC 332, a następnie do gniazdka
sieciowego.
AC ONLY
FUSE RATING: ANTISURGE
1 0-120 V:1 T4AL
2 0-240 V:2 T2AL
FREQUENCY: 0 60Hz5 /
I 70VANPUT POWER:
/ .oNS
WARNING:Disconnect power before opening
Power
Brightness
Reset/
USB
update
Control
1
L
R
Remote
in
Instant
on
Auto
standby
R
2
1
Remote
out
2
L
R
3
300 SERIES
PREAMPLIFIER
Contains FCC ID: 2ACURZIGEE IC ID: 12217A-ZIGEE
L
R
4
L
DESIGNED AND MADE IN THE UK
BY NAIM AUDIO, SALISBURY, SP1 2LN
5
L
R
NAC 332
Type 4
Power Supply Upgrade
AnalogueInputs
AnalogueInputs
Refer to User Manual
7
Refer to User Manual
8
Type 3
6
R
Default
Ground
Ground
XLR
O
R L
RCA
L
On
RCA
output
Preamp Outputs
Włącz NAC 332, naciskając włącznik w górnym prawym rogu panelu przedniego.
3.4 Parowanie pilota
Po włączeniu NAC 332 trzeba sparować z nim pilota zdalnego sterowania. Włóż dołączone
baterie do pilota zdalnego sterowania
Naciśnięcie dowolnego przycisku na panelu przednim spowoduje włączenie na 30 sekund
trybu parowania pilota zdalnego sterowania.
Naciśnij i przytrzymaj przez 3 sekundy przycisk jasności na pilocie.
55
Page 93
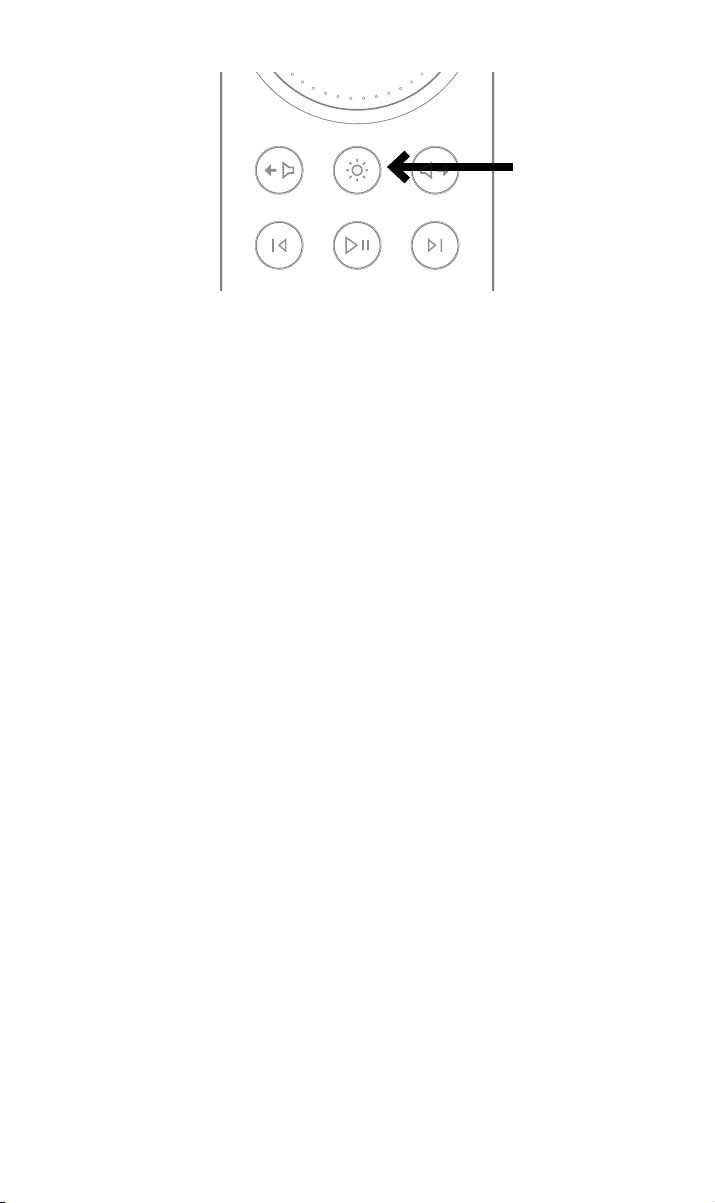
W trybie parowania pierścień głośności na pilocie będzie wirował, a następnie zatrzyma
stream
phono
cd
tuner
av aux
się na bieżącym ustawieniu głośności, co oznacza sparowanie.
Po wykonaniu tej czynności pilot jest sparowany z urządzeniem i gotowy do użytku.
4. Szczegółowa konguracja NAC 332
4.1 Używanie wzmacniaczy mocy Naim bez wejść zbalansowanych
Jeśli używany jest starszy wzmacniacz mocy Naim, konieczny będzie zestaw odpowiednio
przygotowanych kabli.
Jeśli mają być używane niezbalansowane wyjścia RCA (na przykład do podłączenia
subwoofera), przełącznik „RCA output” na panelu tylnym powinien być ustawiony w
pozycji „On”.
4.2 Zmiana przypisania wejść
Dowolną kombinację sześciu z ośmiu zycznych wejść można wybrać bezpośrednio za
pomocą przycisków na panelu przednim lub na pilocie. Do zmiany przyporządkowania
wejść zycznych do przycisków służy tryb ustawień.
Aby wejść w tryb konguracji, należy na panelu przednim nacisnąć i przytrzymać przycisk
odpowiedniego wejścia, aż zacznie on migać.
Na diodach pokrętła głośności pojawiają się segmenty wskazujące możliwe przypisanie
wejścia, przy czym aktualnie wybrane wejście jest pokazywane przez jaśniejsze diody.
W trybie konguracji będzie odtwarzany dźwięk ze źródła wskazywanego przez diody LED
pokrętła głośności.
Obracanie pokrętła głośności powoduje zmianę wejścia przypisanego do migającego
wejścia.
W trybie konguracji naciśnij dowolny inny przycisk źródła, aby zmienić przypisanie dla
tego wejścia. Aby wyjść z trybu konguracji, należy nacisnąć i przytrzymać migający
przycisk wejścia, aż przestanie migać.
W trybie konguracji przycisk wyciszenia działa w normalny sposób.
4.3 Dostosowanie poziomu wejścia
Względny poziom każdego wejścia można regulować w zakresie od -10 dB do +10 dB w
celu wyrównania poziomu głośności pomiędzy źródłami.
Regulacja odbywa się w trybie konguracji, dlatego najpierw należy nacisnąć i
przytrzymać przycisk wejścia, które ma być regulowane, aż przycisk zacznie migać.
Drugie naciśnięcie przycisku spowoduje przejście do trybu dostosowania poziomu. Diody
LED na pokrętle głośności wskażą aktualne ustawienie dostosowania poziomu.
66
Page 94

Obrócenie pokrętła głośności spowoduje zmianę ustawienia dostosowania poziomu; w
trakcie tej operacji będzie odtwarzany dźwięk z regulowanego źródła.
Po dokonaniu ustawień naciśnięcie przycisku spowoduje powrót do wyświetlania
przyporządkowania wejść, zaś długie naciśnięcie wyjście z trybu konguracji.
4.4 Stałe wzmocnienie AV
Tryb dotyczy tylko wejścia AV. Kiedy tryb stałego wzmocnienia AV jest włączony,
ustawienia regulacji redukcji wejścia, rezerwy i balansu nie są brane pod uwagę.
W tym trybie niemożliwe jest sterowanie głośnością przy pomocy pilota albo pokrętła
głośności NAC 332. Sygnał wyjściowy będzie tej samej głośności co sygnał wejściowy.
Stałe wzmocnienie jest ustawiane w trybie konguracji, dlatego w pierwszej kolejności
wciśnij i przytrzymaj przycisk wejścia AV na przednim panelu, aż zacznie migać.
Drugie naciśnięcie przycisku spowoduje przejście do trybu dostosowania poziomu. Diody
LED na pokrętle głośności wskażą aktualne ustawienie dostosowania poziomu.
Przekręć pokrętło sterowania głośnością do maksimum (do końca w prawo), aż zapalą się
wszystkie diody LED.
Aby wyjść z trybu konguracji, wciśnij przycisk wejścia AV, aż przestanie migać.
4.5 Funkcja maksymalnej głośności
Tryb pozwala użytkownikowi ustawić ogólny maksymalny poziom głośności, aby zapobiec
przypadkowemu wybraniu wysokiego poziomu głośności.
Regulacja jest możliwa w trybie konguracji maksymalnej głośności, dlatego w pierwszej
kolejności wciśnij i przytrzymaj przycisk wyciszenia na przednim panelu. Przycisk
wyciszenia zacznie migać, a diody LED na pokrętle głośności zmienią wygląd w momencie
aktywacji.
Przekręć pokrętło sterowania głośnością w lewo albo w prawo, aby zmienić wartość
maksymalnej głośności.
Aby ustawić maksymalną głośność słuchawek, podłącz słuchawki. Pokrętło głośności
zmieni wygląd, pokazując maksymalną dozwoloną głośność słuchawek. Przy pomocy
pokrętła głośności ustaw wybraną maksymalną głośność.
Po odłączeniu słuchawek pokrętło głośności będzie znowu pokazywać główną
maksymalną głośność.
Po ustawieniu wybranej głośności wyjdź z trybu konguracji, wciskając przycisk
wyciszenia, aż przestanie migać.
77
Page 95

Typ 1: 8-stykowe złącze DIN
-18V 300mA
+18V 300mA
Uziemienie
4.6 Dodatkowe funkcje wejść DIN
Wejście 6 (8-stykowe złącze DIN) jest kompatybilne z 5-stykowymi przewodami DIN i
może również bezpośrednio zasilać stopień gramofonowy Naim NVC TT.
Wejście 8 (5-stykowe złącze DIN) ma wyjścia o poziomie liniowym odzwierciedlające
aktualnie wybrane źródło. Należy pamiętać, że po wybraniu tego wejścia podłączone
źródło będzie odwzorowane, więc należy uważać na pętle sprzężenia zwrotnego w
przypadku korzystania ze źródła nagrywania.
4.7 Korzystanie ze słuchawek
Wyjście słuchawkowe jest w stanie obsługiwać większość słuchawek do bardzo wysokich
poziomów głośności. Po wetknięciu wtyczki słuchawek wyjścia główne przedwzmacniacza
będą wyciszone.
Wyjście słuchawkowe ma osobne ustawienie głośności. Po podłączeniu słuchawek
głośność zostanie ustawiona na poziomie ostatnio używanym dla słuchawek. Po
podłączeniu słuchawek głośność zostanie ustawiona na poziomie ostatnio używanym dla
głośników.
5. Wskazówki dotyczące instalacji i użytkowania
NAC 332
Wiemy, że nie możesz się doczekać, aby cieszyć się swoim nowym przedwzmacniaczem
NAC 332, ale obiecujemy, że będzie on brzmiał jeszcze lepiej, gdy zastosujesz się do
poniższych wskazówek, które pomogą w wykorzystaniu pełnych możliwości wzmacniacza
mocy.
5.1 Rozpakowanie i ustawienie
Twój NAC 332 składa się z elementów wysokiej jakości, takich jak potężny transformator
mocy i trwała aluminiowa obudowa. Oznacza to, że NAC 332 waży 11 kg, dlatego należy
zachować ostrożność przy jego podnoszeniu lub przenoszeniu oraz upewnić się, że
powierzchnia, na której ma zostać umieszczony, jest stabilna i może utrzymać jego ciężar.
Aby zapewnić optymalne działanie ustaw urządzenia Naim na specjalistycznym regale
na sprzęt hi- – najlepiej Fraim Naim lub Fraim Lite – aby zminimalizować wibracje, które
mogą wpływać na dźwięk. Brak miejsca na regał? Warto rozważyć umieszczenie NAC332
na szklanej półce Fraim na odpowiednim meblu, aby zapewnić solidne, ale dyskretne
podparcie.
Nigdy nie stawiaj produktów Naim jeden na drugim, a jeśli umieszczasz je obok siebie,
pozostaw pewien odstęp między urządzeniami.
Aby zmniejszyć ryzyko wystąpienia słyszalnego szumu z głośników, nie należy
umieszczać zasilaczy ani wzmacniaczy mocy w pobliżu komponentów źródłowych lub
przedwzmacniacza.
88
Page 96

5.2 Szczegóły połączeń wejściowych
NAC 332 ma kilka opcji połączeń źródłowych. Aby uzyskać najlepszą jakość dźwięku,
zalecamy korzystanie z wejść DIN.
5.3 Automatyzacja systemu
W przypadku korzystania z NAC 332 z kompatybilnym urządzeniem strumieniującym i
wzmacniaczem mocy – takim jak NSS 333 i NAP 350 – można zsynchronizować włączanie/
wyłączanie zasilania i jasność logo w całym systemie, łącząc NAC 332 za pomocą
dołączonego kabla optycznego automatyzacji systemu dostarczonego z NAP 350.
NSS 333 i NAC 332 wykorzystują system Zigbee do synchronizacji funkcji.
Wystarczy połączyć gniazda Remote Out NAC 332 z gniazdami Remote In obu NAP 350.
Istnieje możliwość podłączenia kolejnych wzmacniaczy mocy za pomocą gniazda Remote
Out wzmacniacza NAP 350.
Jeśli wymagana jest większa odległość między NAC 332 a NAP 350 niż pozwala na to
dostarczony kabel, można zamiennie użyć kabla optycznego 3,5mm na 3,5mm o wymaganej
długości. Możliwe jest również użycie standardowych kabli analogowych ze złączami 3,5
mm, ale kabel optyczny zapewnia najlepsze działanie.
5.4 Włączanie/Wyłączanie
Po wykonaniu wszystkich połączeń wejściowych i wyjściowych, podłącz dostarczony
przewód zasilający do NAC 332 i do gniazdka elektrycznego.
Następnie można włączyć NAC 332 poprzez naciśnięcie przycisku gotowości.
Jeżeli NSS 333, NAC 332 i NAP350 są podłączone przez system automatyzacji, włączą się
jednocześnie.
Procedura wyłączania NAC 332 jest taka sama: aby wyłączyć NSS 333, NAC 332 i NAP350
podłączone przez system automatyzacji, wystarczy nacisnąć przycisk gotowości.
na panelu przednim NSS 333 lub NAC 332, co spowoduje przejście całego systemu w
stan czuwania. Unikaj wyłączania wzmacniaczy za pomocą przełącznika w gniazdku
elektrycznym.
5.5 Ustawienia stanu gotowości
NAC 332 ma trzy poziomy zasilania: czuwanie, czuwanie z natychmiastowym włączeniem
oraz zasilanie do normalnego użytku.
W trybie „Standby” (Czuwanie) całkowity pobór mocy nie przekracza 0,5 W. NAC 332
może zostać wybudzony poprzez naciśnięcie przycisku gotowości lub z pilota zdalnego
sterowania.
„Standby with instant on” (Czuwanie z natychmiastowym włączeniem) oznacza pełne
zasilanie NAC332, ale z wyłączonym podświetleniem logo. W trybie „Powered for normal
use” (Zasilanie do normalnego użytku) NAC 332 zużywa około 20W.
Domyślnie, przełącznik na tylnym panelu NAC 332 jest ustawiony w położeniu „auto
standby” (automatyczny tryb gotowości) – czyli automatycznie przechodzi w odpowiedni
tryb gotowości po 20 minutach bezczynności. Dla uzyskania optymalnej jakości dźwięku
ustaw przełącznik w pozycji „instant on” (natychmiastowe włączenie). Dzięki temu NAC332
będzie stale zasilany Gdy przełącznik znajduje się w tej pozycji, po naciśnięciu przycisku
gotowości NAC 332 pozostanie włączony, ale podświetlenie logo zostanie wyłączone.
5.6 Ustawienia jasności logo Naim
Można wybrać poziom jasności diod LED i logo Naim na NAC 332 za pomocą przycisków
jasności na panelu tylnym oraz pilocie zdalnego sterowania. Jeśli używasz Naim NAC 332 i
wzmacniaczy NAP 350 połączonych poprzez system automatyzacji, jasność wszystkich logo
będzie zsynchronizowana.
99
Page 97

5.7 Korzystanie z zasilacza NPX 300
Zasilacz NPX 300 jest opcjonalną modernizacją systemu. Przed dodaniem zasilacza NPX 300
do NAC 332, należy najpierw wyłączyć cały system. Odłącz kabel sieciowy od NAC332 –
nie jest on wymagany, gdy urządzenie jest zasilane przez NPX 300.
Ustaw NPX 300 na regale na sprzęt.
Usuń dwie zaślepki gniazd z tylnego panelu NAC 332.
Podłącz nieoznaczone taśmą końcówki obu kabli Burndy do NPX 300. Podłącz dwie
oznaczone taśmą końcówki do NAC 332. Upewnij się, że wszystkie pierścienie
zabezpieczające są całkowicie dokręcone. Postaraj się tak ułożyć kable, aby zwisały jak
najluźniej i nie dotykały regału ani ściany – będzie to łatwiejsze, jeśli przed połączeniem obu
końców zostaną one uformowane do mniej więcej wymaganego kształtu.
Podłącz przewód zasilający do gniazda zasilania NPX 300, a następnie do gniazdka
sieciowego. Ponownie włącz pozostałe komponenty systemu.
Włącz ponownie NAC 332, naciskając przycisk gotowości.
6. Zasilanie sieciowe, uziemienie i inne
Podłączenie musi być wykonane przy użyciu przewodu i wtyczki sieciowej dostarczonej
wraz z NAC 332 lub kabla sieciowego Naim Power-Line. Jeśli wtyczka zawiera wbudowany
bezpiecznik, jego wartość znamionowa musi wynosić 13 A. W obwodzie wtyczki sieciowej
nie należy umieszczać rezystorów nieliniowych ani reduktorów szumu. Obniżają one jakość
zasilania i dźwięku.
6.1 Uziemienie
Aby uniknąć tętnienia, uziemienie całego systemu powinno być podłączone do uziemienia
tylko w jednym punkcie. Zazwyczaj jest to główne źródło. Przedwzmacniacz NAC 332
ma przełącznik uziemienia. Ustaw go w pozycji „Default” (Domyślnie), jeśli główne źródło
łączy uziemienie sieci z uziemieniem sygnału. Jeśli żadne źródło nie łączy uziemienia sieci z
uziemieniem sygnału, ustaw go w pozycji „Ground” (Uziemienie).
6.2 Wtyczka sieciowa wbudowana w kablu
Jeśli zintegrowana wtyczka elektryczna zostanie odcięta od przewodu sieciowego (z
dowolnego powodu), musi zostać zutylizowana, ponieważ nie będzie nadawać się do użytku.
Włożenie odciętej wtyczki do gniazdka elektrycznego grozi porażeniem prądem.
6.3 Obwody zasilania sieciowego i interferencja
System hi- zazwyczaj dzieli obwód zasilania z innymi urządzeniami domowymi, a niektóre
z nich mogą powodować zniekształcenia, objawiające się jako mechaniczne buczenie
transformatorów sieciowych, w tym dużego transformatora NAC 332.
Buczenie transformatora nie jest emitowane przez głośniki i nie ma wpływu na działanie
systemu; można jednak mu przeciwdziałać, zmieniając położenie systemu Naim lub
odseparowując obwód zasilania sieciowego. Posiadanie takiego obwodu (najlepiej o
prądzie znamionowym 30 lub 45 A) będzie miało też ogólnie pozytywny wpływ na działanie
systemu. Szczegółowych porad dotyczących wykonania oddzielnego obwodu zasilania
sieciowego może udzielić wykwalikowany elektryk.
6.4 Środki ochrony przeciwprzepięciowej
System Naim powinien być wyłączony i całkowicie odłączony od sieci zasilającej, gdy
istnieje ryzyko uderzenia pioruna, w celu ochrony przed potencjalnymi uszkodzeniami.
1010
Page 98

7. Dodatkowe wskazówki i porady
Po omówieniu najważniejszych kwestii, możemy przedstawić kilka rzeczy, które możesz
zrobić, aby zoptymalizować działanie nowego NAC 332.
7.1 Wygrzewanie
Produkty Naim są wykonywane ręcznie ze starannie dobranej gamy wysokiej jakości
komponentów. NAC 332 będzie brzmiał znakomicie po wyjęciu z pudełka, ale jego
brzmienie może się jeszcze poprawić, gdy wszystkie te różne komponenty będą zasilane i
będą współpracować w ciągu pierwszych kilku tygodni użytkowania. Utrzymywanie systemu
pod napięciem ułatwi ten proces.
7.2 Czyszczenie urządzenia i połączeń
Firma Naim zaleca używanie wyłącznie dostarczonej chusteczki do czyszczenia, aby lekko
odkurzyć wszystkie powierzchnie produktu. Środki czyszczące mogą zawierać składniki,
które mogą mieć negatywny wpływ na kosmetyczne środki powierzchniowe i powłoki.
Wtyki i gniazda połączeniowe muszą być utrzymywane w czystości i bez korozji.
Najprostszym sposobem osiągnięcia tego celu jest całkowite wyłączenie zasilania
urządzenia Naim (i wszelkich podłączonych urządzeń), odłączenie wszystkich połączeń
z gniazd i ponowne ich mocne wciśnięcie. Nie należy stosować środków do czyszczenia
styków oraz tak zwanych „ulepszaczy”, ponieważ mogą one pozostawiać osady, które mogą
pogorszyć brzmienie systemu.
7.3 Resetowanie NAC 332
Aby przywrócić ustawienia domyślne urządzenia NAC 332 należy nacisnąć przycisk
„Brightness/Reset” (Jasność/Reset) na panelu tylnym i przytrzymać go przez 3 sekundy.
NAC 332 powróci do stanu gotowości, a wszystkie ustawienia zostaną przywrócone
do domyślnych ustawień fabrycznych. Należy pamiętać, że spowoduje to odłączenie
sparowanego pilota i urządzenia automatyzacji systemu Zigbee.
8. Wsparcie
Ochrona konsumenta różni się w zależności od kraju. W większości krajów głównym
partnerem kontaktowym w przypadku problemów z urządzeniem powinien być sprzedawca,
u którego zakupiono produkt rmy Naim. Problem może wynikać z usterki w systemie
lub nieprawidłowości instalacji, co sprzedawca powinien ustalić, korzystając z własnych
umiejętności diagnostycznych.
Na stronie internetowej Naimaudio.com można znaleźć wiele artykułów dotyczących
wszystkich produktów Naim.
Jeśli nadal masz problem z produktem Naim, skontaktuj się z nami bezpośrednio, aby
uzyskać pomoc i poradę, pod adresem [email protected]
9. Serwis i modernizacja
Wszelkie naprawy lub aktualizacje sprzętu powinny być wykonywane wyłącznie przez
autoryzowany punkt serwisowy rmy Naim lub w centrali rmy Naim. Wiele podzespołów
jest wykonywanych, testowanych i dopasowywanych indywidualnie i uzyskanie ich
zamienników z innych źródeł jest często niemożliwe. W przypadku pytań dotyczących
serwisu lub naprawy prosimy o kontakt z lokalnym sprzedawcą produktów Naim
1111
Page 99

10. Dane techniczne
Przedwzmacniacz serii 300 – NAC 332
Wejścia audio:
Wyjścia audio:
Aktualizacja: Micro-USB
Gniazdo Remote In: 1 × 3,5mm jack – elektryczne i optyczne Mini-TOSLINK
Gniazdo Remote Out: 2 × 3,5mm jack – elektryczne i optyczne Mini-TOSLINK
Pobór mocy: Typowe używanie: 20W, tryb czuwania: < 0,5W
Wymiary (wys. x szer.
x gł.)
Waga: 11kg
Źródło prądu: 115V lub 230V, 50/60Hz
3 x DIN
2 x para XLR
3 x para RCA
1 x para XLR
1 x para RCA
1 x słuchawkowe jack 6,35mm
1 x Wyjście poziomu liniowego na wejściu 8 (5-stykowe złącze DIN)
91,5 × 432 × 317,5mm (z nóżkami)
11. Utylizacja zużytego produktu
Produktów na których znajduje się logo z przekreślonym pojemnikiem na odpady
nie można wyrzucać razem
z odpadami komunalnymi. Produkty te należy utylizować w zakładach zdolnych
do ich recyklingu i odpowiedniego przetwarzania wszelkich będących odpadami
produktów ubocznych.
Aby dowiedzieć się gdzie znajduje się najbliższy zakład tego typu, skontaktuj się z
lokalnymi władzami.
Odpowiedni recykling i utylizacja odpadów pozwalają na oszczędzanie zasobów i chronią
środowisko przed zanieczyszczeniem.
1212
Page 100

 Loading...