

Page 1

Reference Manual – English
Mu-so and Mu-so Qb
Page 2

Contents
Section Page Section Page
Introduction 1
1. Getting Started 1
1.1 Installation 2
Diagram 1 – Mu-so
Mu-so underside connections 3
Diagram 2 – Mu-so
Mu-so side panel features 3
Diagram 3 – Mu-so Qb
Mu-so Qb connection panel 4
1.2 Switch On and Standby 4
2. Network Connection 5
2.1 Wireless Network Connection 5
Diagram 4
Naim App Welcome screen 5
Diagram 5
Wireless Accessory Conguration 6
Diagram 6
Wi-Fi key sharing 6
Diagram 7
Setup web page - Overview 7
Diagram 8
Setup web page - Network 8
2.2 Wired Network Connection 8
3. Bluetooth Connection 9
Diagram 9
Bluetooth setup 9
Diagram 16
TIDAL stream playing 15
Diagram 17
iRadio input 15
Diagram 18
Local inputs 15
5.2 The Mu-so Remote Control Handset 16
Diagram 19
Mu-so remote handset 16
5.3 The Naim App 17
Diagram 20
Naim App Setup 17
Diagram 21
Naim App Home 17
Diagram 22
Naim App
Settings 18
6. Installation Notes 19
6.1 Handling Mu-so 19
6.2 Cleaning Mu-so 19
6.3 Grille Replacement 19
6.4 Firmware Update 19
6.5 Lightning Precautions 19
6.6 Defaults 19
6.7 Problems? 19
6.8 Service and Contact 19
7. Specications 20
4. Music Sources 10
4.1 Local Sources 10
4.2 iRadio 10
4.3 Audio Streams 10
5. Control 12
5.1 The Touch Panel and Rotary Control 12
Diagram 10
Touch Panel and Rotary Control 13
Diagram 11
Touch Standby to switch on and o
Turn the rotary control to adjust volume 13
Diagram 12
Bluetooth stream playing 13
Diagram 13
UPnP™ stream playing 14
Diagram 14
AirPlay stream playing 14
Diagram 15
Spotify® Connect stream playing 14
8. Acknowledgements 21
Page 3

Introduction
Welcome to Mu-so® and congratulations on your purchase. Mu-so and Mu-so Qb bring renowned Naim Audio
performance to compact, all-in-one music players for the rst time and combine exceptional performance with a
comprehensive collection of audio inputs and sources. With Mu-so and Mu-so Qb you can:
• Listen to thousands of internet radio stations.
• Play audio using AirPlay®.
• Play audio using Spotify® Connect (a Spotify® Premium subscription is required) and TIDAL (a TIDAL
subscription is required).
• Play audio wirelessly using Bluetooth® with AAC and aptX® encoding from any compatible playback device.
• Play audio from UPnP™ music servers.
• Play audio from, or stream audio to, other Naim streaming products.
• Play audio stored on your iPod®, iPhone®, iPad® and other USB memory devices via a USB connection.
• Play analogue or digital audio using a wired connection from any playback device with a suitable audio
output socket.
1. Getting Started
This manual provides comprehensive information on all
Mu-so and Mu-so Qb features and facilities and will enable
you to setup your Mu-so or Mu-so Qb perfectly to integrate
with your existing home entertainment systems and media.
If you wish to play some music immediately, the Quick Start
Guide found within its document pack will guide you quickly
through the process of network and Bluetooth connection.
If you have questions not answered within these pages help
can be found at: www.naimaudio.com/mu-so-support, by
email at mu-sosupport@naimaudio.com, or by calling:
+44 (0)333 321 9923 (UK)
+1 800 961 5681 (USA and Canada).
Mu-so and Mu-so Qb can be controlled from their combined
touch panel and rotary control or the free Naim iOS or
Android app. Mu-so is also supplied with a remote control
handset that provides a basic set of control functions. The
handset can be purchased as an accessory to work with
Mu-so Qb.
The Naim App oers the most comprehensive set of control
and setup facilities and we strongly recommend that before
you begin to use your Mu-so or Mu-so Qb you download
and install the app on your iOS or Android device. The Naim
App can be found easily in both the iTunes App Store and
Google Play Store.
Note: The Naim App requires iOS version 7.1 or later, or
Android version 4.0 or later.
1
Page 4

1. Getting Started
1.1 Installation
Mu-so and Mu-so Qb are designed to be located either on a
table, a furniture unit or a wall shelf. If a shelf is to be used
be sure that it is able to support the weight.
Important: Items of any weight placed on the Mu-so or
Mu-so Qb top surface may damage its nish.
Important: Never place any item containing liquid, such
as a vase, a cup or a glass, on the Mu-so or Mu-so Qb
top surface.
1.1.1 Mu-so Connections
A connection panel located on the Mu-so underside
incorporates a mains input socket, a wired network socket,
and a TosLink optical digital audio socket intended for the
connection of external digital audio sources; a CD player for
example. The underside connection panel is illustrated in
Diagram 1.
Important: Take great care when lifting and carrying
Mu-so, and when accessing the underside connection
sockets. Do not stand Mu-so on its front grille or either
end panel, or invert it fully to stand on its top panel.
Mu-so can be stood temporarily on its rear heatsink
in order to gain access to the underside connection
sockets. Ensure however that the heatsink is protected
from damage.
• A multicolour status indicator. See Section 2 for
information on indicator colours.
• A 3.5mm jack analogue audio socket for the
connection of external analogue audio sources.
Note: Mu-so will automatically select its analogue input
when a plug is inserted in the socket.
• A USB socket for the connection of USB memory
hardware and iOS audio playback devices.
1.1.3 Mu-so Qb Connections and Installation Features
Mu-so Qb connection and installation facilities can be found
on its rear panel. These include:
• A mains input socket.
Note: Mu-so Qb is supplied with a mains cable
appropriate for the territories in which it is sold.
• A USB socket for the connection of USB memory
hardware and iOS audio playback devices.
• A wired network socket.
• A TosLink optical digital audio socket intended for the
connection of external digital audio sources.
• A 3.5mm jack analogue audio socket for the
connection of external analogue audio sources.
• A Wi-Fi set up and factory defaults pin-hole button. See
section 2.1 for more on Wi-Fi set up, and Section 6.6 for
more on returning Mu-so Qb to its default settings.
If your Mu-so is to use a wired network connection begin by
connecting a standard Ethernet cable to the network socket.
Otherwise, rst connect Mu-so to a suitable mains supply
using the supplied mains cable.
Note: Mu-so is supplied with a mains cable appropriate
for the territories in which it is sold.
1.1.2 Mu-so Side Panel Features
The Mu-so right-hand side panel, illustrated in Diagram 2,
also incorporates some connection and installation facilities.
These include:
• A Wi-Fi set up and factory defaults pin-hole button.
See Section 2.1 for more on Wi-Fi set up, and see
Section 6.6 for more on returning a Mu-so to its default
settings.
• A multicolour status indicator. See Section 2 for
information on indicator colours.
The Mu-so Qb connection panel is illustrated in Diagram 3.
2
Page 5
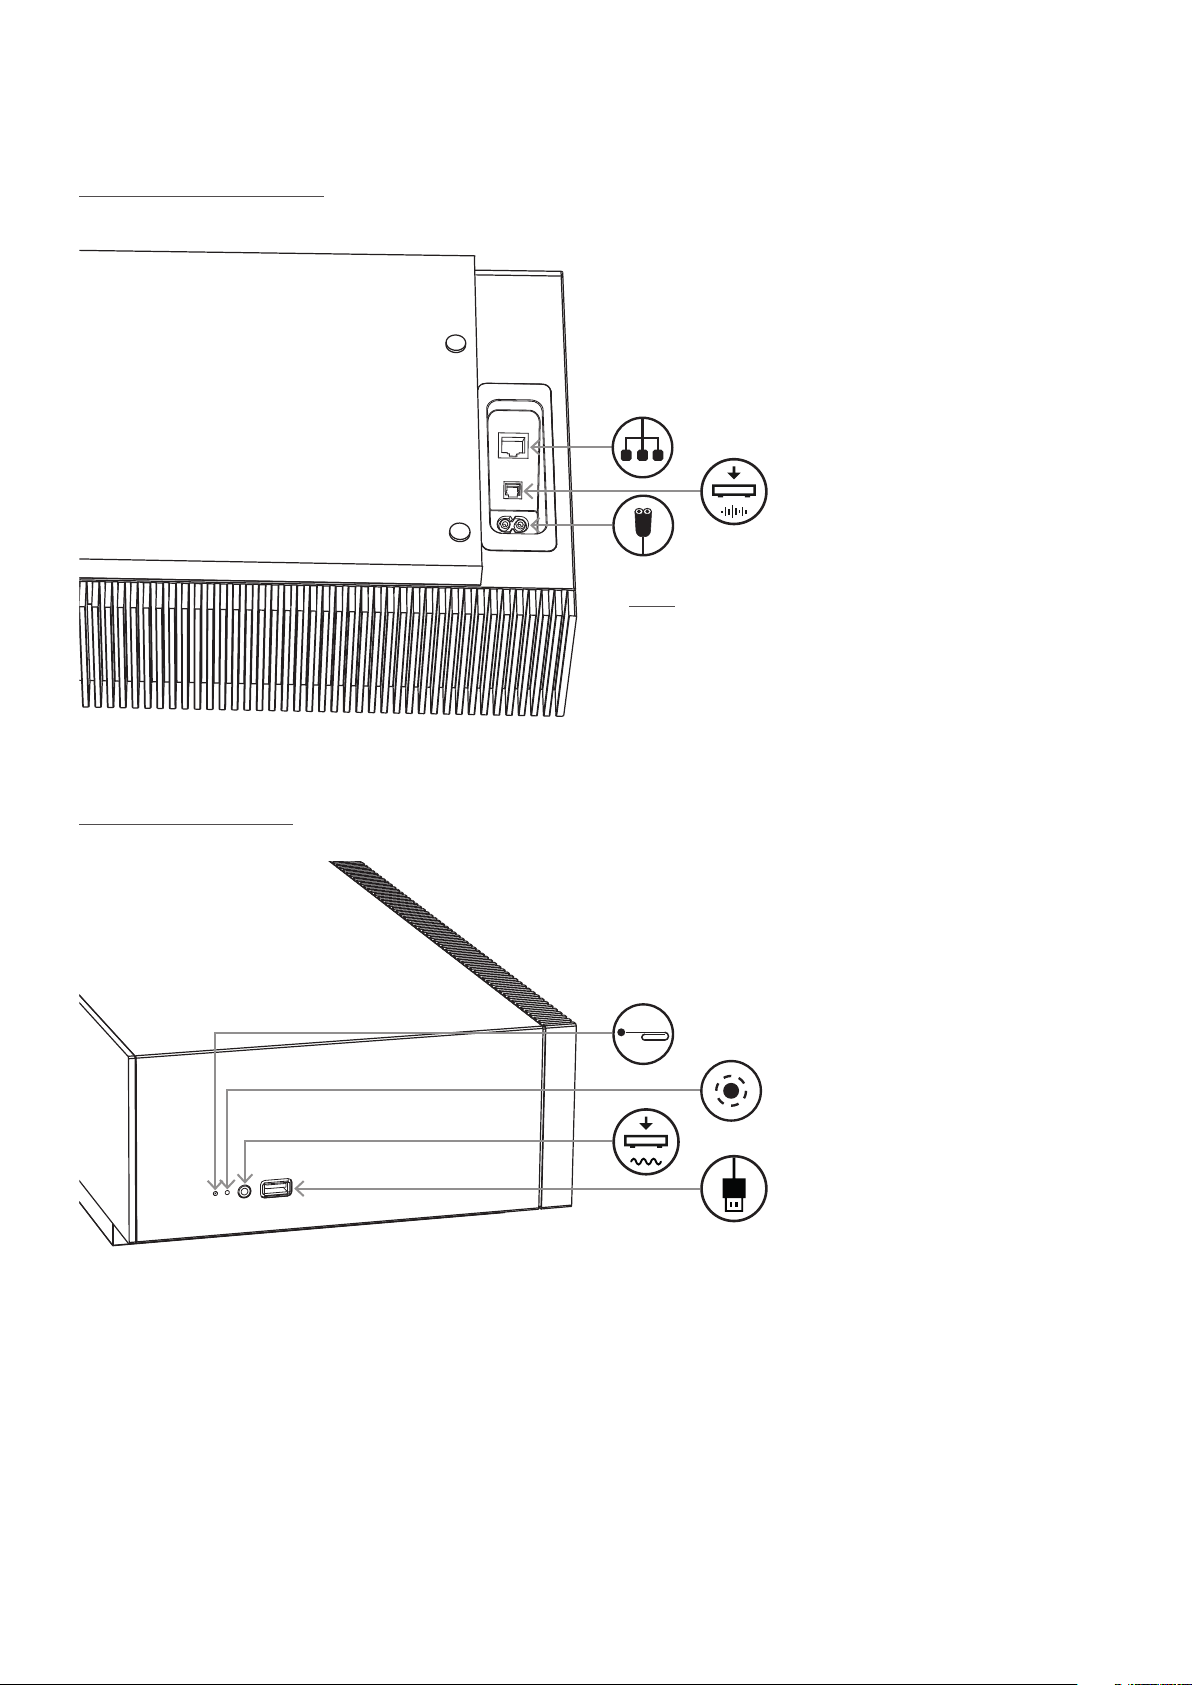
Diagram 1 – Mu-so Mu-so underside connections
Diagram 2 – Mu-so Mu-so side panel features
1. Getting Started
Network socket
Digital audio input socket
Mains power socket
Note: Take great care when accessing the underside
connection sockets. Do not stand Mu-so on its front grille
or either end panel, or invert it fully to stand on its top
panel. Mu-so can be stood temporarily on its rear heatsink
in order to gain access to the underside connection
sockets. Ensure however that the heatsink is protected
from damage.
Pin-hole button
Status indicator
Analogue audio input socket
USB audio input socket
3
Page 6
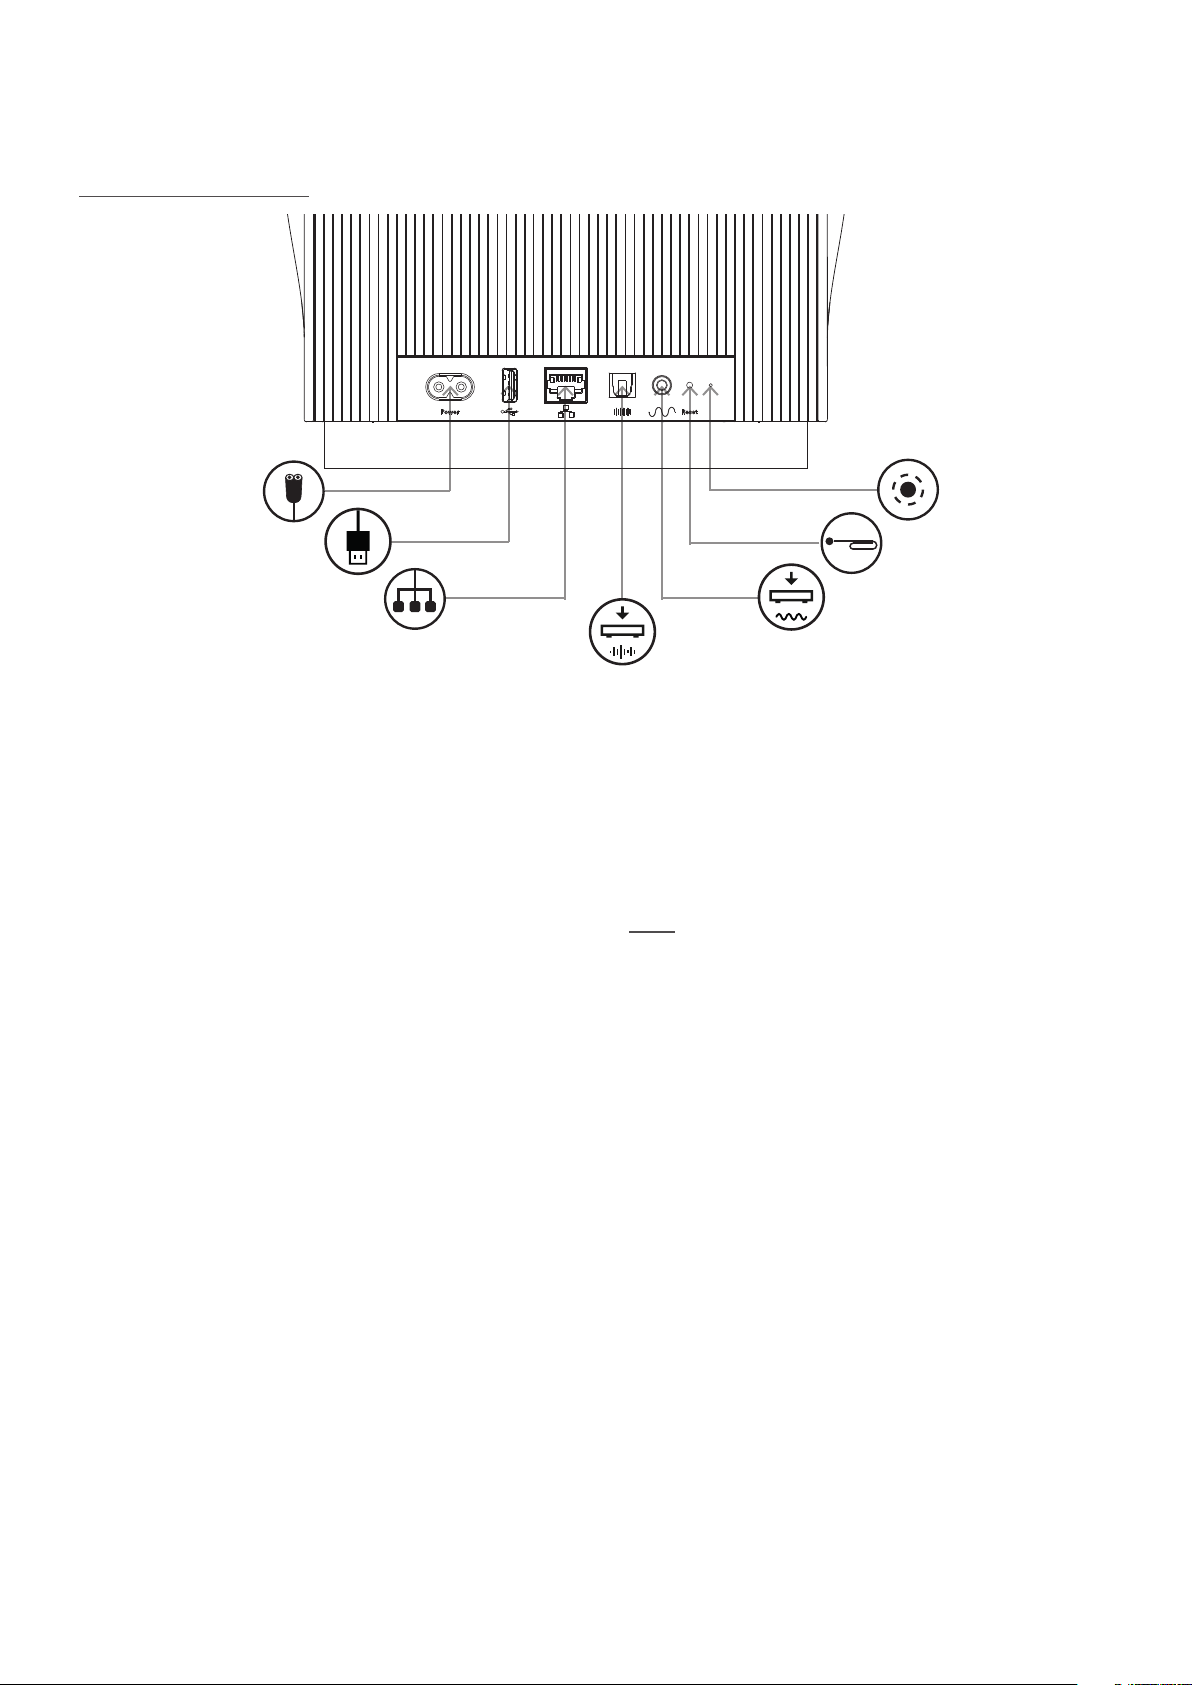
Diagram 3 – Mu-so Qb Mu-so Qb connection panel
1. Getting Started
Mains power socket
USB audio input socket
Network socket
1.2 Switch On and Standby
Mu-so and Mu-so Qb will immediately switch-on when
connected to a mains supply.
There are two standby modes: standby and deep sleep. In
standby mode network and Bluetooth connections remain
operational to enable Mu-so and Mu-so Qb to “wake”
automatically when in receipt of a Naim App control
command or a music stream. In deep sleep mode network
and Bluetooth functions will shut-down in order to reduce
power consumption to a minimum.
• To switch Mu-so or Mu-so Qb into standby mode tap
the touch panel Standby icon. Tap the Standby icon to
leave standby mode.
Status indicator
Pin-hole button
Analogue audio input socket
Digital audio
input socket
• To switch Mu-so or Mu-so Qb into deep sleep mode
touch and hold the touch panel Standby icon, or press
and hold the Mu-so handset Standby button. The
display segment above the Standby icon will ash as
deep sleep mode is engaged. Touch the Standby icon
or handset button again to wake from deep sleep.
Note: If unused for 20 minutes Mu-so and Mu-so Qb
automatically enter standby mode. The auto standby time
can be adjusted via the Naim App Settings menus.
4
Page 7

2. Network Connection
In order to play streamed audio les and internet radio
stations Mu-so and Mu-so Qb must be connected to the
internet via a local network router. Connection to the router
may be wired or wireless.
The following Section 2 paragraphs are equally
applicable to both Mu-so and Mu-so Qb and describe
the procedures for wireless and wired connection.
Note: Mu-so is congured by default to communicate
with home networks automatically using the standard
DHCP protocol. Mu-so can be congured to use a xed IP
address via is internal web setup pages. See Section 2.2
for more information.
Note: If your Mu-so has been previously used it is
good practice to return it to its default settings before
attempting to connect it to your network. The factory
default procedure will erase any existing user and network
settings and restore the default iRadio presets. See
Section 6.6 for more information.
2.1.1: Wireless Setup Using the Naim App
The Naim App incorporates a wireless setup routine that
will guide you through the process of connecting Mu-so
wirelessly to your local network. If you have not already
downloaded and installed the Naim App you should do so
now. Follow the steps below to implement the Naim App
wireless setup routine.
• Ensure that the iOS or Android device on which you
have installed the Naim App is connected to the same
wireless network you wish your Mu-so to use.
• Open the Naim App and select Setup new Mu-so.
• Follow the on-screen instructions to connect Mu-so to
the wireless network. Diagram 4 illustrates the Naim
App setup page.
Diagram 4 Naim App Welcome screen
Rooms
The status indicator adjacent to the pin-hole button
illuminates to indicate dierent network and functional
states. The illumination is listed in the following table:
Illumination Network and Functional State
O Deep sleep/o
White Network connected
Orange No network
Orange (ashing) Network connection starting
Purple Wireless connection congured
but network not found
Purple (ashing) Wireless setup mode
Blue Firmware update underway or
unit in recovery mode
Red (ashing) System fault or amplier overload
(contact your retailer or Mu-so
support)
2.1 Wireless Network Connection
In order for Mu-so to connect to the internet via a local
wireless network it must be congured with the wireless
network name (SSID) and password (security key). There
are three dierent methods achieving this. The method
you choose will depend on personal preference and
convenience.
Setup new Mu-so
Note: Mu-so is compatible with the 802.11b and 802.11g
Wi-Fi standards.
Note: Mu-so cannot connect to a “hidden” wireless
network.
5
Page 8

2. Network Connection
2.1.2: Wi-Fi Setup Using iOS Wireless Accessory
Conguration
Mu-so can take advantage of the Wireless Accessory
Conguration feature incorporated in iOS version 7
or later. Wireless Accessory Conguration enables a
wireless capable product such as Mu-so to be congured
automatically to join the same wireless network as the iOS
mobile device. To use Wireless Accessory Conguration
follow the steps below:
• Ensure that the wireless network that your iOS device
is connected to is the one you wish your Mu-so to use.
• Ensure Mu-so is connected to a mains power supply
and not in standby mode. Ensure no network cable is
connected.
• Using the pin-tool supplied or a straightened paperclip,
briey press the pin-hole button to engage wireless set
up mode. The status indicator will ash purple.
Note: If your Mu-so is previously unused it may start up in
wireless set up mode with the indicator ashing purple.
• Open the wi- settings menu of the iOS device and
scroll down the display. Select the SET UP NEW
AIRPLAY SPEAKER item and follow the steps described.
Diagram 5 illustrates the wi- settings menu.
• The Wireless Accessory Conguration procedure will
now automatically send the network name and security
key that the iOS device is using to your Mu-so and
set up its wi-
conguration.
2.1.3: Wireless Setup Using iOS Wi-Fi Key Sharing
Mu-so can take advantage of the Wi-Fi Key Sharing feature
incorporated in iOS version 6 or later. Wi-Fi Key Sharing
enables a wireless capable product such as Mu-so to
connect via USB to an iOS device and automatically copy
the network name and security key that the device is using.
To use Wi-Fi Key Sharing follow the steps below:
• Ensure that the wireless network that your iOS device
is connected to is the one you wish your Mu-so to use.
• Ensure Mu-so is connected to a mains power supply
and not in standby mode. Ensure no network cable is
connected.
• Connect the iOS device to the Mu-so USB socket. The
iOS device must be switched on and unlocked.
• Using the pin-tool supplied or a straightened paperclip
briey press the pin-hole button. The status indicator
will ash purple.
• A dialogue window will display on the iOS device
screen requesting permission to share Wi-Fi settings.
Select “Allow”. Diagram 6 illustrates the dialogue
window
• After approximately 30 seconds Mu-so will be available
for wireless streaming on your home network. The
Mu-so status indicator will illuminate white.
• The Mu-so status
indicator will
stop ashing and
illuminate white
when the wireless
connection has
been successfully
established.
Diagram 5
Wireless Accessory
Conguration
Note: Wireless
Accessory
Conguration is only
available with iOS
Version 7 or later.
Diagram 6 Wi-Fi key sharing
Note: Wi-Fi Key
Sharing is only
available with iOS
Version 6 or later.
6
Page 9

2. Network Connection
2.1.4: Wireless Setup Using a Wireless Connection
When not connected to a local wireless network, Mu-so
can broadcast its own wireless signal that can be used to
access its internal web setup page. The name and password
of the wireless network you wish Mu-so to connect to can
be specied on the setup page. To access the Mu-so setup
page wirelessly follow the steps below.
• Using the pin-tool supplied, or a straightened paper
clip, briey press the pin-hole button. The status
indicator will change colour and ash.
Note: The Mu-so wireless network broadcast will switch
o automatically after 30 minutes. It can be re-started by
pressing the pin-hole button again.
Open the computer, laptop, tablet or smart phone wireless
setup page or control panel and look for a local wireless
network called ‘Mu-so-XXXX-Setup’. This is a wireless
network generated by Mu-so itself that enables temporary
connection for setup purposes.
Note: The default Mu-so network and Bluetooth name
incorporates the last four characters of the unique MAC
address printed on a label on the underside of each unit.
• Close the computer, laptop, tablet or smart phone
wireless setup page or control panel.
• Open a web browser window on the computer, laptop,
tablet or smart phone and type 192.168.1.12 in the
address bar. Press return or select “Go”.
• The browser will display the Mu-so Setup page. In the
‘Network’ tab, select the wireless network you wish
Mu-so to use and enter the password in the appropriate
dialogue box. Select Enter. Diagram 7 illustrates the
Mu-so Setup page home screen.
• Close the browser window.
• Return to the computer, laptop, tablet or smart phone
wireless setup page or control panel and re-connect to
your local network.
• After a few moments your Mu-so should be available
for wireless streaming on your home network. The
Mu-so status indicator will illuminate white.
Select the Mu-so wireless network and connect to it. No
password will be required.
Note: Windows may require conrmation of network type.
Select “Home”.
Diagram 7 Setup web page - Overview
7
Page 10

2. Network Connection
2.2 Wired Network Connection
To connect Mu-so to a local network using a wired
connection follow the steps below:
• Disconnect Mu-so from mains power.
• Connect Mu-so to your local network router using a
standard Ethernet cable.
After a few moments Mu-so should be available for
streaming on your home network. The Mu-so status
indicator will illuminate white.
Note: Mu-so can be congured to use a static IP address
if required via the Advanced Settings tab on its setup
page. Diagram 8 illustrates the setup page.
Diagram 8 Setup web page - Network
8
Page 11

3. Bluetooth Connection
In addition to playing streamed audio via a local network,
Mu-so and Mu-so Qb can play audio over a Bluetooth
wireless connection from appropriately equipped playback
devices.
The following Section 3 paragraphs are equally
applicable to both Mu-so and Mu-so Qb.
Mu-so is congured by default with an “open” Bluetooth
connection so does not require “pairing” with a specic
playback device. To connect to a Bluetooth playback device
open the playback device Bluetooth setup page and select
Mu-so BT XXXX or Mu-so Qb BT XXXX in the list of available
devices. After a short delay Mu-so will be available to the
audio apps on the device for playback selection.
Note: Bluetooth wireless connections have a relatively
limited range. A maximum of around 10 metres is typical
in domestic environments, however physical obstructions
in the transmission path may result in reduced range.
Note: The default Mu-so network and Bluetooth name
incorporates the last four characters of the unique MAC
address printed on a label on the underside of each unit
adjacent to the mains input socket.
Mu-so simultaneously. If a ninth device is paired the oldest
paired device will be deleted.
Note: Mu-so can be forced to disconnect and delete a
paired Bluetooth device via the Naim App settings menus.
Diagram 9 illustrates Mu-so Bluetooth setup on an Android
mobile device. Bluetooth setup on an iOS device is similar.
Diagram 9 Bluetooth setup
Bluetooth connection can be switched to a secure format
via the Settings menu of the Naim App. A secure Bluetooth
connection means that connected devices need to be
specically “paired” in order to stream audio. To switch to
secure Bluetooth connection follow the steps below:
• Open the Naim App settings menu and select Input
Settings > Bluetooth Security. Select Bluetooth
Security “on”.
• Touch and hold the Mu-so touch panel input icon until
the Bluetooth icon begins to blink.
• Open your Bluetooth playback device Bluetooth
settings page and select “Mu-so-XXXX”.
Your Mu-so and playback device will now be securely
paired. No other Bluetooth device will be able to connect to
Mu-so unless it is similarly paired.
Note: If multiple devices are paired, Mu-so will play from
the rst device from which it receives a stream. If you
wish to stream from a dierent paired device, the rst
device must be disconnected.
Note: Up to eight Bluetooth devices can be paired with
9
Page 12

4. Music Sources
Mu-so and Mu-so Qb can play audio from a wide variety of
sources, however the way they behave with each one varies.
The following paragraphs describe dierent types of source
and the manner in which Mu-so and Mu-so Qb handle them.
The following Section 4 paragraphs are equally
applicable to both Mu-so and Mu-so Qb.
4.1 Local Sources
Local sources are those for which source devices are
connected directly to a Mu-so input socket. They comprise
the analogue and digital audio inputs and the USB audio
input.
Local sources can be selected from the Mu-so touch panel
interface or using the Naim App. The analogue source input
is automatically selected when a plug is inserted in the
Mu-so analogue input socket.
Note: The Mu-so digital audio input is a TosLink socket
compatible with S/PDIF digital audio signals. Many CD
players incorporate an appropriate digital audio output.
The behaviour of USB devices connected to Mu-so, and
access to audio les they hold, varies depending on their
type.
Audio les stored on USB memory devices can be browsed
and selected for playback only by using the Naim App.
Once playback is underway however the Mu-so touch panel
and handset can also be used to select play/pause, next or
previous.
Audio les stored on iOS devices can be played through the
Mu-so USB input either under the local control of the iOS
device or using the Naim App. In some cases, once playback
is underway, the Mu-so touch panel can also be used to
select play/pause, next or previous.
Up to 40 preset iRadio stations can be stored using the Naim
App, the rst ve of which are automatically made available
for selection from the Mu-so touch panel. The identity of
rst ve can be altered using the Naim App.
4.3 Audio Streams
Mu-so streaming sources comprise AirPlay, Bluetooth,
Spotify® Connect, TIDAL, UPnP™ and Multiroom.
4.3.1 AirPlay and Bluetooth streams
AirPlay and Bluetooth cannot be selected from the Mu-so
touch panel or the Naim App but are selected automatically
when Mu-so receives a stream initiated from an appropriate
playback app. The AirPlay or Bluetooth icons will illuminate
on the Mu-so touch panel to indicate selection.
To play an AirPlay or Bluetooth stream, open the appropriate
playback app on the streaming device (a Windows or OS X
computer or an iOS or Android tablet or phone) and select
Mu-so as the playback device.
Note: More information on Airplay and Bluetooth can be
found at:
www.apple.com/airplay
www.bluetooth.com
4.3.2 Spotify® Connect streams
Spotify® Connect can be selected from the Naim App but
will also select and play automatically when Mu-so receives
a Spotify® Connect stream initiated from the Spotify® app.
The Spotify® Connect icon will illuminate on the Mu-so
touch panel to indicate selection.
To play a Spotify® Connect stream, open the Spotify®
application on the streaming device (your Windows or OS X
computer or your iOS or Android tablet or phone) and select
Mu-so for playback.
Note: Most UMS (Universal Mass Storage) USB devices
are compatible with the Mu-so USB input. Mobile devices
using the Android operating system are not compatible
with the Mu-so USB input.
Mu-so can play audio les stored on USB memory hardware
and playback devices in the following formats: MP3, ALAC,
AAC, FLAC, WMA, WAV, AIFF or Ogg Vorbis.
4.2 iRadio
iRadio preset stations can be selected from the Naim App
or from the Mu-so touch panel by repeated touches of the
radio icon. However, iRadio station browse, search and
preset store functions are only available using the Naim
App.
Note: More information on Spotify® Connect can be
found at: www.spotify.com/connect
4.3.3 TIDAL streams
TIDAL is available as a Mu-so input on the Naim App
however there is no TIDAL icon on the Mu-so touch panel.
To play a TIDAL stream, select the TIDAL input on the Naim
App, sign-in to your TIDAL account and select music to play.
Note: More information on TIDAL can be found at:
www.tidal.com
10
Page 13

4. Music Sources
4.3.4 UPnP™ streams
The Mu-so UPnP™ input enables Mu-so to play audio les
stored on UPnP™ servers such as the Naim UnitiServe,
network servers with integrated UPnP™ software, or on
Windows and OS X computers. The Mu-so UPnP™ input
is selected automatically when in receipt of a stream from
a server. UPnP™ le browsing can be carried out using
the Naim App. Once playback has been initiated by a play
command on the Naim App, the Mu-so touch panel, play/
pause, next and previous controls can also be used to
control playback.
Mu-so can play UPnP™ streamed audio les in the following
formats: MP3, ALAC, AAC, FLAC, WMA, WAV, AIFF or Ogg
Vorbis. Files must be free of any digital rights management
playback restrictions.
Note: Windows Media™ Player version 11 or above
incorporates built in UPnP™ support. A variety of
third party UPnP™ applications are available that are
compatible with both Windows and OS X operating
systems.
Note: More information on UPnP™ servers and networks
can be found in the Naim knowledge base via:
www.naimaudio.com/customer-support
4.3.5 Multiroom streams
Multiroom enables Mu-so to play audio from, and broadcast
audio to, Naim streamer products connected to the same
local network.
Note: In addition to Mu-so, Naim multiroom streamer
products include the, NDX, ND5 XS, NAC-N 272, NAC-N
172 XS, SuperUniti, NaimUniti, UnitiQute and UnitiLite.
The Mu-so multiroom input is selected automatically when
in receipt of a stream initiated from a remote Naim streamer.
Mu-so can be disconnected from a multiroom stream by
pressing either its touch panel or Naim App pause buttons,
or by selecting an alternative input.
Note: The Mu-so multiroom input can be disabled via
the Naim App Settings menu. Disabling the Multiroom
input can be useful to prevent other users in a household
inadvertently playing audio through it.
To broadcast Mu-so audio to a remote Naim streamer,
select the Naim App Now Playing screen and touch the
multiroom icon ( ) alongside the volume slider. Touching
the multiroom icon will open a dialogue window that
enables other streamers connected to the same network to
be selected. Up to four remote streamers can be connected
simultaneously. Remote streamer volume control is also
provided if available.
Note: The Mu-so local analogue and digital inputs and its
Airplay and Bluetooth streaming inputs are not available
for multiroom broadcast.
11
Page 14

5. Control
Mu-so and Mu-so Qb can be controlled from their
touch panel or the Naim App. The Naim App oers a
comprehensive set of control and setup facilities and we
recommend that before you begin to use your Mu-so or
Mu-so Qb you download and install the app on your iOS or
Android device. The Naim App can be found easily in both
the iTunes App Store and Google Play Store.
Mu-so is also supplied with a remote control handset that
provides a basic set of control functions. The handset can
be purchased as an accessory to work with Mu-so Qb.
The three control interfaces are described in the following
paragraphs.
5.1 The Touch Panel and Rotary Control
The touch panel display and rotary control enable selection
of inputs and control of volume. Illumination display around
the rotary control also indicates startup, streaming and
operational processes.
To begin, touch the display Standby icon to wake Mu-so
from standby. The touch panel, illustrated in Diagrams 10 to
18, incorporates the following control features:
• Audio playback touch icons across the centre of the
panel enable selection of play, pause, previous and
next.
The iRadio input is selected by touching the radio icon.
Mu-so will initially play the last radio station selected. If
this is one of the ve Mu-so radio presets, one of the ve
upper circumference segments will illuminate. Subsequent
touches of the radio icon will select the next iRadio preset.
Note: iRadio station browsing and preset management
functions are only available using the Naim App.
When one of the Mu-so local inputs is selected by touching
the input icon, one of the three upper circumference
segments will illuminate to indicate selection of either the
analogue input, USB input or digital input. Subsequent
touches of the input icon will select the next local input.
Note: Mu-so will automatically select its analogue input
when a connection plug is inserted in the socket.
Note: While the Mu-so USB input can be selected from
the touch panel, audio le browsing and selection
functions are only available using the Naim App.
• The metallic outer section of the touch panel rotates to
adjust volume. While volume adjustment is underway
the circumference indicators illuminate progressively
to indicate volume level.
Note: Mu-so audio playback controls will only operate on
USB and streaming audio sources and only once play has
been initiated from the Naim App.
• Above the playback icons are icons that illuminate to
indicate the identity of a currently playing stream.
• In the lower half of the touch panel, radio and input
touch icons indicate and enable the selection of the
iRadio and local input sockets (analogue, USB and
digital).
Note: AirPlay, Bluetooth, Spotify® Connect and TIDAL
streams cannot be selected from the touch panel but
are selected automatically when Mu-so is in receipt of
a stream. Touch panel icons indicate the selection of
AirPlay, Spotify®, Bluetooth and UPnP™ streams.
Note: There is no TIDAL icon on the Mu-so touch panel.
• Around the circumference of the touch panel are
eleven indicator segments that illuminate to indicate
volume level, radio preset selection and local input
selection.
12
Page 15

5. Control
Diagram 10 Touch Panel and Rotary Control
Note: Mu-so touch panel icons become selectively touchactive and illuminate depending on the input selected or
playing. The touch panel in Diagram 10 shows all icons
illuminated simultaneously for explanatory purposes only.
Standby icon
Streaming icons
UPnP™, AirPlay, Bluetooth, Spotify®.
Transport icons
previous, play/pause, next.
Input icons
iRadio, local inputs (analogue, USB, digital).
Multifunction indication segments
volume, iRadio presets, local inputs.
Diagram 11
Touch Standby to switch on and o
Turn the rotary control to adjust volume
Section 5 diagrams are equally applicable to both Mu-so
and Mu-so Qb.
Note: Touch and hold Standby to switch Mu-so to deep
sleep mode. Touch Standby again to awake.
The Standby icon dims
when the unit is operational.
Volume indication
Diagram 12 Bluetooth stream playing
Note: Transport icons are only illuminated and touchactive once playback has been initiated from the Naim
App or directly from a Bluetooth playback device.
Bluetooth icon illuminated
Transport icons illuminated
13
Page 16

Diagram 13 UPnP™ stream playing
Note: Transport icons are only illuminated and touchactive once playback has been initiated from the Naim
App or directly from a UPnP™ playback device.
UPnP™ icon illuminated
Transport icons illuminated and active
Diagram 14 AirPlay stream playing
5. Control
Note: Transport icons are only illuminated and touchactive once playback has been initiated from the Naim
App or directly from an AirPlay playback device.
AirPlay icon illuminated
Transport icons illuminated and active
Diagram 15 Spotify® Connect stream playing
Note: Transport icons are only illuminated and touchactive once playback has been initiated from the Naim
App or directly from a Spotify® Connect playback device.
Spotify® icon illuminated
Transport icons illuminated and active
14
Page 17

Diagram 16 TIDAL stream playing
Note: There is no TIDAL icon on the Mu-so touch panel.
Transport icons are only illuminated and touch-active
once playback has been initiated from the Naim App.
Transport icons illuminated and active
Diagram 17 iRadio input
5. Control
Note: Touch the radio icon to select presets sequentially.
iRadio preset one selected
Radio icon illuminated
Diagram 18 Local inputs
Note: Transport icons are only illuminated and touchactive with the USB local input, and only when playback
has been initiated from the Naim App or the USB device
itself.
USB input selected
P3
P2
P4
P1 P5
Transport icons illuminated and active
Input icon illuminated
15
Page 18

5. Control
5.2 The Mu-so Remote Control Handset
Note: Mu-so Qb is not supplied with a remote control
handset but is enabled for remote control. Mu-so
remote control handsets are available for purchase as an
accessory or replacement from: www.naimaudio.com
Mu-so is supplied with a remote control handset that
provides access to basic control functions. The handset
battery is ready-tted, however an insulating tab must
be removed before the handset can be used. Remove the
battery cover and pull the transparent tab away from the
battery.
Diagram 19 Mu-so remote handset
Unreliable operation of the remote handset is most likely
duo to an exhausted battery. Replacement batteries of the
CR2032 type required are widely available. Take care to t
the replacement battery with the correct polarity.
The remote control handset is illustrated and its button
functions annotated in Diagram 19.
Standby
Select previous input
Volume up
Skip backwards
Volume down
Select previous iRadio preset
mute/un-mute audio
input
radio
Select next input
Play/pause
Skip forwards
Select next iRadio preset
Select Mu-so illumination scheme
16
Page 19

5. Control
5.3 The Naim App
The Naim App behaves identically with Mu-so and
Mu-so Qb.
The Naim App comprises pages dedicated to each of the
Mu-so streaming sources and inputs and pages dedicated
to Mu-so setup. The Naim App is intuitive in use and its
capabilities and philosophies are best learned by using it to
congure Mu-so to suit your needs. To begin using the
Naim App follow the steps below:
• Download and install the Naim App on your iOS or
Android device.
• Ensure that the device is connected to the same
network as the Mu-so and open the Naim App.
• From the Settings menu select Mu-so to connect the
app. Diagram 20 illustrates selection of Mu-so from the
Naim App setup page.
Note: If you have multiple Naim streaming products
connected to your network they will be listed for selection
in the Naim App setup page. The correct unit can be
identied either by its product name or, in the case of
multiple identical products, by the rst four characters
of each units’ unique MAC addresses appended to its
product name. The individual Mu-so MAC address can be
found on the serial number label axed to its underside.
Note: The Naim App Settings menu enables Mu-so and
Naim streaming product default names to be changed.
Designating each Mu-so or streamer with a name that
reects their location will help make multiroom control
more satisfying and intuitive. See Section 5.3.2.
5.3.1 Selecting Inputs from the Naim App
With your Mu-so selected, the Naim App Input icons will
congure to reect the inputs available. Select the required
input. Diagram 21 illustrates the Naim App home page and
Input icons.
Diagram 21 Naim App Home
Rooms
Setup new Mu-so
Diagram 20 Naim App Setup
Rooms
Setup new Mu-so
If a streaming source such as AirPlay or Spotify® is selected
automatically on Mu-so by the presence of a stream, the
Naim App display will switch to the appropriate streaming
source page and oer the controls available to that stream
type. If an alternative source is selected using the Naim App
the stream playback will stop and Mu-so will disconnect
from the stream source.
Note: Only one instance of the Naim App can be
connected to a single Mu-so at any time.
17
Page 20

5. Control
5.3.2 Setup using the Naim App
The Naim App provides comprehensive access to all Mu-so
and Mu-so Qb setup parameters. All the setup parameters
and functions are listed in the following paragraphs.
Diagram 22 illustrates the Naim App Settings page.
The Settings menu provides ten items: Standby, Loudness,
Alarm clock, Lighting, Styles, Input settings, Room position,
Other settings, Register your product and About.
Standby
Switches Mu-so into standby mode.
Loudness
Loudness applies a bass boost that decreases as volume
is increased. By compensating for the ear’s reduced bass
sensitivity at low volume levels, loudness compensation can
make low volume listening more satisfying.
Alarm Clock
Enables a Mu-so Alarm Clock function to be programmed.
Note: Mu-so can only use audio from its local inputs
(Analogue or Digital) or its iRadio presets as alarm signals.
If an alarm is critical you must be certain that a suitable
alarm signal will be playing at the programmed alarm
time.
Lighting
Lighting provides four illumination schemes oering options
of brightness and activity.
Styles
Styles enables various Naim App background colour options
to be selected.
Input settings
Input settings item provides a variety of options tailored to
each type of input.
Room position
Room position enables adjustment of Mu-so tonal balance
to compensate for the proximity of walls and other large
surfaces. If Mu-so is placed on a shelf, for example, tonal
adjustment can be useful in reducing the bass boost that
naturally results from such a location.
Other settings
The Other settings menu provides access to a variety of app
interface and conguration options.
Register your product
Opens the Mu-so product registration page of the Naim
website.
Diagram 22 Naim App Settings
About
The About menu provide third party licence information and
information on Mu-so rmware and connection status.
18
Page 21

6. Installation Notes
6.1 Handling Mu-so
Take great care when lifting, carrying and inverting
Mu-so to access the mains power, network and digital audio
sockets.
Do not invert your Mu-so or Mu-so Qb so that weight is
borne by its top surface or touch panel. Damage to the
touch panel or top surface nish may result. Do not stand
Mu-so or Mu-so Qb on either end panel or grilles.
6.2 Cleaning Mu-so
Your Mu-so should not need cleaning beyond dusting.
Do not use wax or solvent based cleaning products. If
necessary, a damp cloth may be used on the external
casework, however it is important that all liquids are kept
away from the touch panel and rotary control.
6.3 Grille Replacement
The standard Mu-so and Mu-so Qb black grilles can be
replaced with a range of coloured grilles available through
your local Naim retailer or at: www.naimaudio.com/mu-so.
• To remove the Mu-so grille grasp both ends of the grille
simultaneously and gently pull the grille away from the
Mu-so body.
To t a Mu-so grille, line-up the grille studs with the
xing holes and gently push the grille home. Ensure
that the grille is in the correct orientation. The grille
curve runs from top left to bottom right.
• To remove the Mu-so Qb grille rst gently peel the top
rear corner of one side grille away from the Mu-so Qb
body. Once the rear edge of one side grille is released,
repeat with the other side. With both sides released the
grille can be gently pulled away from the front.
Important: Never switch o your Mu-so or Mu-so Qb or
disconnect it from the mains supply or network while a
rmware update procedure is underway.
Note: The Naim App rmware update routine can also be
used to check that the currently installed rmware is up
to date.
Note: The Mu-so setup web page also includes a rmware
update link. This should be used only on the advice of
Naim support sta.
6.5 Lightning Precautions
Mu-so and Mu-so Qb can be damaged by lightning and
should be turned o and disconnected from the mains and
any wired connection when there is risk of lightning.
6.6 Defaults
To return your Mu-so or Mu-so Qb to its default settings
use the pin-tool supplied (or a straightened paperclip) to
press and hold the pin-hole button adjacent to the status
indicator (see Diagrams 2 and 3 respectively for Mu-so and
Mu-so Qb). Hold the button pressed for six seconds. Mu-so
or Mu-so Qb will return to its default settings and restart.
The rotary control and logo illumination will ash while the
factory default procedure is underway.
6.7 Problems?
Consumer protection varies from country to country. In
most territories a retailer must be prepared to take back any
equipment sold if it cannot be made to work satisfactorily.
A problem may be due to a fault in the product or its
installation. Please contact your local distributor, or Naim
Audio directly, if any diculties cannot be resolved. Contact
Naim Audio directly for help and advice if necessary.
To t a Mu-so Qb grille rst line-up the front grille
studs and xing holes and gently push the front section
of the grille home. Next similarly t the forward half of
one side grille followed by its rear edge. Repeat with
the other side grille.
Note: Do not touch any of the drive-units while the grilles
are removed.
6.4 Firmware Update
Updated Mu-so and Mu-so Qb rmware may be released
from time to time. Updated rmware may introduce new
features or modify existing behaviour or performance. The
Naim App incorporates a rmware update routine in its
Settings menu.
6.8 Service and Contact
It is essential that repairs are only carried out by an
authorised Naim retailer or at the Naim Audio factory. Direct
contact to Naim for service or update information should be
made initially through Customer Services:
info@naimaudio.com
For help with Mu-so or Mu-so Qb installation and operation
please visit: www.naimaudio.com/mu-so-support
For email support contact:
mu-sosupport@naimaudio.com
For telephone support call:
+44 (0)333 321 9923 (UK)
+1 800 961 5681 (USA and Canada)
Please quote the product serial number (found on its
underside panel) in all correspondence.
19
Page 22

7. Specifications
Audio Inputs: AirPlay, Spotify® Connect, TIDAL,
Internet Radio, UPnP,™ and Naim
Multiroom via Ethernet or Wi-Fi
Bluetooth (with aptX)
USB/iOS (USB Type-A socket)
Digital: Optical S/PDIF (TosLink)
up to 96kHz
Analogue: 3.5mm jack
Audio formats: WAV, FLAC and AIFF
up to 24bit/192kHz
ALAC (Apple Lossless)
up to 24bit/96kHz
MP3
up to 48kHz, 320kbit (16 bit)
AAC
up to 48kHz, 320kbit (16bit)
OGG and WMA
up to 48kHz (16bit)
Bluetooth SBC, AAC and aptX
Note: All formats to 48kHz maximum over wireless
network.
Internet radio: vTuner premium
Connectivity: Ethernet (10/100Mbps)
Wi-Fi (802.11b/g)
Bluetooth
RC5 remote-control
Speaker system: Mu-so: Dual three-way. Reex
loading.
Mu-so Qb: Dual two-way with mono
subwoofer. Dual ABR loading.
Amplication: Mu-so: 6 × 75 Watts into 6 Ohms
Mu-so Qb: 4 × 50 Watts into 6 Ohms
1 × 100 Watts into 3 Ohms
Dimensions: Mu-so: 122mm (4.8”) x 628mm (24.7”)
x 256mm (10.1”)
Mu-so Qb: 210mm (8.25”) x 218mm
(8.60”) x 212mm (8.35”)
Weight: Mu-so: 13.0kg (28.7lb)
Mu-so Qb: 5.6kg (12.3lb)
Finish: Brushed aluminium casework, silver
anodised heatsink, black fabric grille.
Grille options in Deep Blue, Vibrant
Red, Burnt Orange.
CE Declaration of Conformity
Naim Audio declares that Naim Audio products are in conformance with:
Low Voltage Directive 2014/35/EU
Electromagnetic Compatibility Directive 2014/30/EU
Restriction of Hazardous Substances (RoHS2) Directive 2011/65/EU
Waste of Electrical and Electronic Equipment Directive 2012/19/EU
Energy related Product Directive 2009/125/EC
Radio & Telecommunications Terminal Equipment (R&TTE) Directive
1999/5/EC
Naim Audio Ltd. declares that Mu-so is in compliance with the essential
requirements and relevant provisions of Directive 1999/5/EC.
Naim Audio products comply with the following standards:
EN60065 - Audio, video and similar electronic apparatus - Safety
requirements
EN55013 - Sound and television broadcast receivers and associated
equipment - Radio disturbance characteristics
EN55020 - Sound and television broadcast receivers and associated
equipment - Immunity characteristics
EN61000-3-2 - Mains harmonics current emissions
EN61000-3-3 - Mains icker emissions
Power consumption: Mu-so: Typical use: 17W, Standby
mode: < 4W, Deep sleep: < 0.5W
Mu-so Qb: Typical use: 15W, Standby
mode: < 4W, Deep sleep: < 0.5W
Mains supply: 100V, 115V or 230V, 50/60Hz
Products that display the crossed-out wheeled bin logo
cannot be disposed of as domestic waste. These products
must be disposed of at facilities capable of re-cycling
them and appropriately handling any waste by-products.
Contact your local authority for details of the nearest such
facility. Appropriate recycling and waste disposal helps
conserve resources and protects the environment from contamination.
Naim Audio oers a ‘take back” scheme as part of its commitment to
the Waste of Electrical and Electronic Equipment Directive 2012/19/
EU. Customers wishing to return products for disposal may do so by
sending them to the address below. Products returned for disposal
must be clearly and unambiguously marked, “For disposal under WEEE
Directive”.
20
Page 23

8. Acknowledgements
mu-so® is a registered trademark of Naim Audio Ltd. Registered in the
United Kingdom and other countries.
Mu-so works with iPhone 5s, iPhone 5c, iPhone 5, iPhone 4s and
iPhone 4, iPad mini and iPod touch (5th generation).
Mu-so Qb works with iPhone 6 Plus, iPhone 6, iPhone 5s, iPhone 5c,
iPhone 5, iPhone 4s, iPad Air 2, iPad Air, iPad mini 3, iPad mini 2, iPod
touch (5th generation) and iPod nano (7th generation).
AirPlay works with iPhone, iPad, and iPod touch with iOS 4.3.3 or later,
Mac with OS X Mountain Lion, and Mac and PC with iTunes 10.2.2 or
later.
AirPlay, iPad, iPhone and iPod are trademarks of Apple Inc., registered in
the U.S. and other countries.
The Bluetooth® word mark and logos are registered trademarks owned
by Bluetooth SIG, Inc. and any use of such marks by Naim Audio Ltd.
is under licence. Other trademarks and trade names are those of their
respective owners.
© 2012 CSR plc and its group companies.
The aptX® mark and the aptX logo are trade marks of CSR plc or one of
its group companies and may be registered in one or more jurisdictions.
Wi-Fi® logo is a registered trademark of Wi-Fi Alliance.
UPnP™ is a trademark of the UPnP™ Forum.
This product incorporates Spotify® software which is subject to 3rd
party licences found here:
www.spotify.com/connect/third-party-licenses
Go Deeper
naimaudio.com
Naim Audio Ltd., Southampton Road, Salisbury, England SP1 2LN
T: +44 (0)333 321 9923 (UK), +1 800 961 5681 (USA and Canada) E: mu-sosupport@naimaudio.com W: www.naimaudio.com
Document part No. 12-001-0280 Issue 3i
 Loading...