


MVIX Wireless Hi-Def Multimedia Player
User Guide
www.mvixusa.com
www.mvix.co.kr
© Mvix(USA), Inc.
X Unicorn Information System

Congratulations
on your purchase of Mvix® Wireless, Hi-Definition Multimedia Player and Welcome to the Mvix® Family !
The Mvix HD Multimedia Player is a portable player that allows vivid and crisp playback of dozens of multimedia files. You can now enjoy your favorite movies, home videos, digital music and digital photos on TV or Home-theater System. The Mvix Player brings all digital content to your living room so that you can enjoy movies, music and photos with your near and dear ones.
Mvix Players incorporate state-of-the-art technology, commonly used in high-end computing and consumer electronic solutions. The highly-refined manufacturing process, timeless engineering and careful quality control have resulted in a product of the highest long-term aesthetic and commercial value. We hope you will find the Mvix player to be a rewarding experience and a worthy investment.
We have made this manual as short as possible so that it is practical for someone to read it carefully and thoroughly. Please take the time to do this now and feel free to follow the instructions with your unit as you read through the manual.
You’ve selected one of the best-built, best-backed products available today. With its comprehensive manufacturer’s warranty, you can be assured that your player will provide consistent playback and viewing entertainment through many years of use. We’ll do everything in our power to keep you happy with your purchase for many years to come.
You can count on our uncompromising commitment to your total satisfaction.
All of this is our way of saying welcome – and thanks for investing in Mvix® - a brand that cares about customer satisfaction.
Y |
Unicorn Information System |

Table of Contents
|
Chapter 1 |
Safety & Precautions |
|
|
1.1 |
Do’s and Don’ts |
Page.5 |
||
1.2 |
Limitations and Usage Precautions |
Page.6 |
||
|
|
|
|
|
|
Chapter 2 |
Introduction |
|
|
2.1 |
Introducing the Wireless MVIX Hi-Def Multimedia Player |
Page.7 |
||
2.2 |
Technical Specifications |
Page.8 |
||
2.3 |
Package Contents |
Page.9 |
||
2.4 |
Getting Familiar with your Unit |
Page.10 |
||
|
|
|
|
|
|
Chapter 3 |
Basic Setup |
|
|
3.1 |
Connections |
|
|
|
|
|
3.11 Audio and Video Connection Setup |
Page.13 |
|
3.2 |
Installing an Internal Hard Disk Drive |
|
|
|
|
|
3.21 Inserting the Hard Disk |
Page.14 |
|
|
|
3.22 Formatting the Hard Disk |
Page.15 |
|
|
|
3.23 Transferring files to the Hard Disk through USB |
Page.18 |
|
3.3 |
The SETUP Menu |
Page.19 |
||
|
|
|
|
|
|
Chapter 4 |
Connecting to your PC through a Network |
|
|
4.1 |
Setting up Network Sharing using Windows XP on your PC |
Page.24 |
||
4.2 |
Wired Network Connections |
Page.30 |
||
4.3 |
Wireless Network |
Page.31 |
||
|
|
|
|
|
|
Chapter 5 |
Media Playback |
|
|
5.1 |
Video Playback |
Page.33 |
||
5.2 |
Audio Playback |
Page.36 |
||
5.3 |
Image Playback |
Page.38 |
||
5.4 |
Mixed-Media Playback |
Page.39 |
||
5.5 |
Using MY LIST for Media Playback |
Page.40 |
||
|
|
|
|
|
|
Chapter 6 |
How do I…? |
|
|
6.1 |
… play music files randomly or in shuffle mode? |
Page.41 |
||
6.2 |
… create a playlist or MY LIST? |
Page.41 |
||
6.3 |
… play a video in a loop or continuous repeat? |
Page.41 |
||
6.4 |
… play music while watching photo slideshow? |
Page.41 |
||
6.5 |
… change the subtitle language? |
Page.41 |
||
6.6 |
… backup and play a DVD? |
Page.41 |
||
|
|
|
|
|
|
Chapter 7 |
Firmware Upgrading |
Page.42 |
|
|
Troubleshooting |
|
Page.43 |
|
|
Limited Warranty |
|
Page.44 |
|
|
Copyright and Legal Attributions |
Page.45 |
||
|
Contact Information |
|
Page.46 |
|
|
Glossary |
|
Page.47 |
|
|
|
|
|
|
|
|
Z |
Unicorn Information System |
|

|
|
ͥͩΡΒΘΖ |
|
|
|
ͥͪΡΒΘΖ |
|
|
|
ͦ͡ΡΒΘΖ |
|
|
|
ͦ͢ΡΒΘΖ |
|
|
|
ͦͣΡΒΘΖ |
|
|
|
ͦͤΡΒΘΖ |
|
|
|
ͦͥΡΒΘΖ |
|
|
|
|
|
|
|
|
|
|
͚͢ |
ͦͦΡΒΘΖ |
|
|
͚ͣ |
ͦͧΡΒΘΖ |
|
|
Ά΄ ͑ |
ͦͩΡΒΘΖ |
|
|
|
ͦͪΡΒΘΖ |
|
|
|
|
|
|
|
|
|
|
͚͑͢ΈΚΟΕΠΨΤ͑ͪͩ΄ ͠; ͑ |
ͧ͡ΡΒΘΖ |
|
|
͚ͣ͑ΈΚΟΕΠΨΤ͑ͣ͡͡͡͠Ή ͣͤ͑͠͡͡ |
ͧͣΡΒΘΖ |
|
|
|
|
|
|
|
|
|
|
͚͑͢ΈΚΟΕΠΨΤ͑ͪͩ΄ ͠; |
ͧͪΡΒΘΖ |
|
|
͚ͣ͑ΈΚΟΕΠΨΤ͑ͣ͡͡͡͠Ή ͣͤ͠͡͡ |
ͨͣΡΒΘΖ |
|
|
|
|
|
|
|
ͨͪΡΒΘΖ |
|
|
|
|
|
|
|
ͩ͡ΡΒΘΖ |
|
|
|
ͩͤΡΒΘΖ |
|
|
|
ͩͦΡΒΘΖ |
|
|
|
ͩͧΡΒΘΖ |
|
|
|
ͩͨΡΒΘΖ |
|
|
|
|
|
|
|
|
|
|
͚͑͢΅· |
ͩͩΡΒΘΖ |
|
|
͚ͣ͑ |
ͩͪΡΒΘΖ |
|
|
͚ͤ͑ |
ͪ͡ΡΒΘΖ |
|
|
͚ͥ͑ |
ͪ͢ΡΒΘΖ |
|
|
͚ͦ͑ |
ͪͣΡΒΘΖ |
|
|
|
ͪͤΡΒΘΖ |
|
|
|
|
|
|
|
|
|
|
|
ͪͥΡΒΘΖ |
|
|
|
ͪͦΡΒΘΖ |
|
|
|
|
|
|
|
ͪͧΡΒΘΖ |
|
|
|
|
|
|
|
ͪͨΡΒΘΖ |
|
|
|
ͪͩΡΒΘΖ |
|
|
|
ͪͪΡΒΘΖ |
|
|
|
|
|
[ |
Unicorn Information System |
||

Chapter 1: Safety & Precautions
1.1 Do’s and Don’ts
Do’s
Unplug the player during lightning storms or when unused for long periods of time.
Do not defeat the safety purpose of the polarized or grounding-type plug. A polarized plug has two blades with one wider tha n the
other. The wide blade is provided for your safety. If the provided plug does not fit into your outlet, consult an electrician for replacement of the obsolete outlet.
Protect the power cord from being walked on or pinched, particularly at plugs, or at the point where they exit from the player.
When connecting or disconnecting AV cables, disconnect the power first.
Do read all safety information and follow all instructions in this user manual.
When cleaning the Mvix product, disconnect the power and then wipe the unit with a soft piece of dry cloth. Do not use any chemicals or sprays for cleaning.
Visit mvixusa.com for additional product information & for troubleshooting.
Don’ts
Don’t expose your MVIX unit to heat sources or high temperatures.
Don’t expose your MVIX unit to water, oil, dust or magnetic materials.
Don’t block the vents. Free airflow should be maintained around the unit.
Don’t attempt disassembling or remodeling the unit.
Don’t drop the MVIX unit. This might cause irreversible damage to the unit and the Hard Drive.
Do not touch the power plug with wet hands or use defective power cables & electric outlets. Doing so might result in electric shock or fire. Only use attachments / accessories specified by the manufacturer.
Do not mix batteries (old and new or carbon and alkaline, etc.) in the Mvix Remote Control. Remove batteries when the unit is not used for a long time.
\ |
Unicorn Information System |

Chapter 1: Safety & Precautions
1.2 Limitations and Usage Precautions
Please read the following Limitations and Usage Precautions before using your Mvix player.
While Mvix players support dozens of file formats and codec, they are not intended to work with every codec-variation.
Mvix players provide limited support to standardized versions of codec as stated in the Technical Specifications of this manual.
Turn off your Mvix player when connecting or disconnecting USB devices. Failure to do so may result in malfunction and/or loss of data on your USB device.
We strongly recommend backing-up your data or media files stored on the Mvix-HDD. Power surge, HDD-failure, accidental deletions are common causes of data loss. Place your Mvix player away from magnetic sources.
Mvix supports 3.5” Hard Disk Drives only. Kindly ensure that the jumper setting on your Hard-disk Drive (HDD) is set to MASTER or SINGLE before installing it in the Mvix Player. Some HDDs (depending on the manufacturer) may work with the SLAVE or CABLE SELECT (CS) jumper combination. If your PC fails to recognize Mvix as an external storage device, try changing the setting to SLAVE or CS. Do not forget to format and partition your HDD after installing it in the Mvix player. “Primary Partition” is recommended when creating two or more partitions within a single Hard Disk Drive.
When connected to the computer through the USB cable the Mvix player works like an external USB storage device (During this operation, there is no video/audio playback). To resume playback mode, disconnect the USB cable connected to your PC and turn on the Mvix player.
The network capability of the Mvix player is designed to work with Windows-based Operating System (OS) and its Network Sharing capability. Depending on the OS and Network environment, Network-Sharing may not work reliably. This issue can be caused by a variety of factors beyond the functionality of the Mvix player.
The supplied cables and accessories are recommended for customized best performance of the Mvix Media Player. Using any other (after-market) cables or accessories may not provide best performance
In order to unplug your Mvix Media Player, press the STOP button before removing cables or turning off the power.
Do NOT open the unit and service or modify the basic assembly. Do NOT modify the firmware of the Mvix unit. Improper or unauthorized repair will VOID your warranty coverage.
] |
Unicorn Information System |
Chapter 2: Introduction
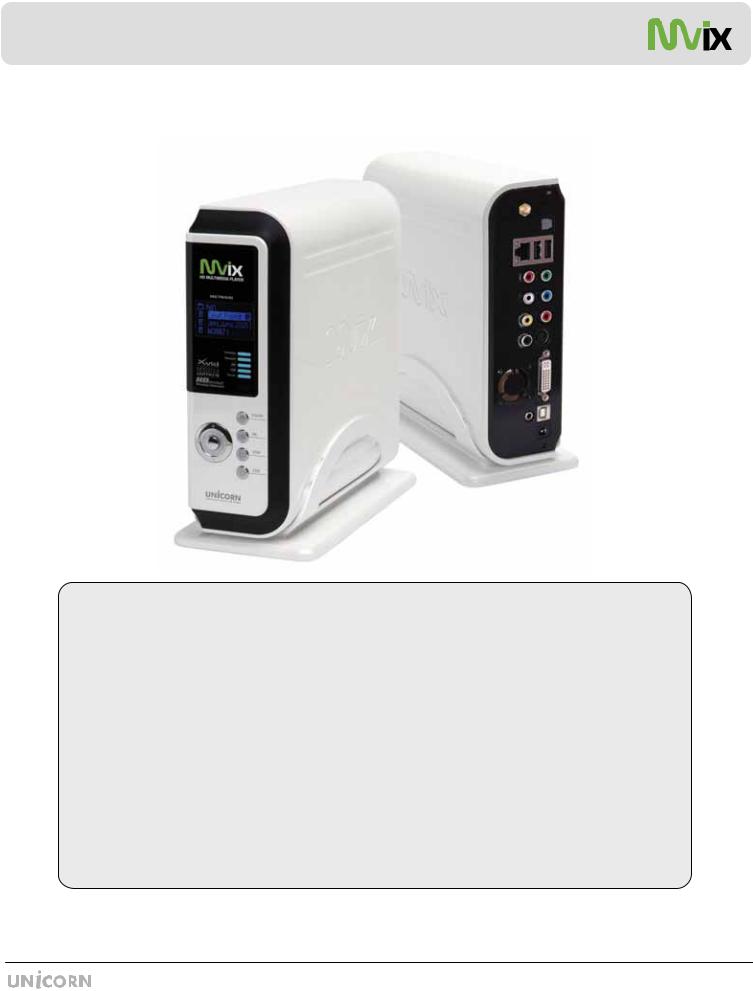
2.1 Introducing the Wireless MVIX Hi-Def Multimedia Player
HD Playback: The Mvix player supports a max resolution of 1920 x 1080 Progressive Scan video output providing Hi-Definition display of clear and crisp picture quality.
Video / Movie File Player: Supports various video file formats, including DivX® (3/4/5), Xvid, MPEG, WMV-9, ASF(WMV9), DAT, DVD(IFO, VOB), ISO as well as HD-level TP, TS, TRP etc. Convenient Automatic Decoding and Bookmarking of multiple files within a folder.
Audio Jukebox: A perfect music jukebox that supports multiple audio formats: MP3, AC3, WMA, DTS with digital audio output and down-mixing capability.
Digital Photo Album: Supports multiple image formats. Now your entire family can enjoy the digital photo slide-show on the big screen TV.
Network Capable Decoding: Supports streaming of media files on the network.
HD DVI Interface: Produces digital video signals to enjoy high quality, vivid, Hi-Def video.
USB-Host: Supports TWO USB2.0 Ports. USB-Host functionality allows easy connection to External Storage (e.g. Flash Drive or External HDD) or an External DVD-ROM.
^ |
Unicorn Information System |

Chapter 2: Introduction
2.2 Technical Specifications
Product Name |
Mvix MX-760HD Wireless Hi-Definition Media Player |
||
|
|
|
|
Processor |
SEM8621L (By Sigma Designs) |
||
|
|
|
|
Memory |
64MB (RAM), 8MB (Flash) |
||
|
|
|
|
Operating System |
ucLinux |
|
|
|
|
|
|
|
Video |
DivX® (3/4/5), AVI, Xvid, MPEG, MPG, VCD(DAT), DVD(VOB, IFO), WMV(WMV-9), |
|
|
ASF(WMV-9), TP, TS, TRP |
||
Supported Files & |
|
||
Audio |
MP3, WMA, AAC, OGG, PCM, AC3, DTS decoding including down-mixing, DTS pass through |
||
Formats |
|||
|
Image |
BMP, JPEG/JPG, PNG |
|
|
|
|
|
Video Output |
Composite, S-Video, Component, and DVI. |
||
|
|
|
|
Audio Output |
Analog |
Stereo RCA, 5.1 channel RCA |
|
|
|
||
Digital |
Coaxial, Optical |
||
|
|||
|
|
|
|
TV System |
NTSC, PAL, or AUTO |
||
|
|
|
|
|
HD COMPONENT Y, Pb, Pr (480p, 720p,1080) / HD DVI (480, 720,1080i, 1080p) |
||
|
|
|
|
Hi-Def Decoding |
WMV, ASF, AVI and MP4 formats |
||
|
|
||
|
MPEG-2 MPat HL(720P/1,080I)MPEG-4 ASPat L5 (720p) and WMV9 MPat ML (720p) |
||
|
|
|
|
Audio Decoding |
MPEG-1 and MPEG-2 Layers I, II and III (MP3), MPEG-2 BC multi-channel layers I, II and III, MPEG-2 and |
||
MPEG-4 AAC-LC,WMA9 and WMA9 Pro decoding |
|||
|
|||
Networking |
Wire |
Ethernet (10/100) LAN via RJ-45 Port |
|
|
|
||
Wireless |
Wireless LAN : 802.11b/g or Pre-N MIMO(option) |
||
|
|||
|
|
|
|
Network Security |
Wireless: WEP, and MAC-address Filtering |
||
|
|
|
|
|
Wireless : IEEE802.11b/g, 5dBi antenna (SMA type) |
||
Network Protocol |
Wire : 10/100Mbps Fast Ethernet (RJ45) |
||
|
TCP/IP (DHCP client mode, Manual IP mode) |
||
Hard-Disk Type |
3.5” Internal IDE(PATA) |
||
|
|
|
|
USB Interface |
USB2.0 host, USB2.0 Slave |
||
|
|
|
|
Power |
AC-DC Adapter 12V, 2.5A |
||
|
|
|
|
Dimension |
187mm(W) X 193mm(H) X 58mm(D) or 7.4”(W) x 7.6”(H) x 2.3”(D) |
||
|
|
|
|
Specifications subject to change without prior notice
_ |
Unicorn Information System |

Chapter 2: Introduction
2.3 Package Contents
MX-760HD |
Remote Control |
Stand |
5dBi Antenna |
|
|
|
|
A/V Cable |
Power Adaptor |
Power Cable |
USB Cable |
|
|
|
|
User Manual |
Driver CD |
` |
Unicorn Information System |
Chapter 2: Introduction
2.3 Getting Familiar with your unit
Front View
1Navigation / Toggle Switch
2Power Button
3Select / OK Button
4Stop Button
5Setup Button
6LCD Screen
XW |
Unicorn Information System |
Chapter 2: Introduction
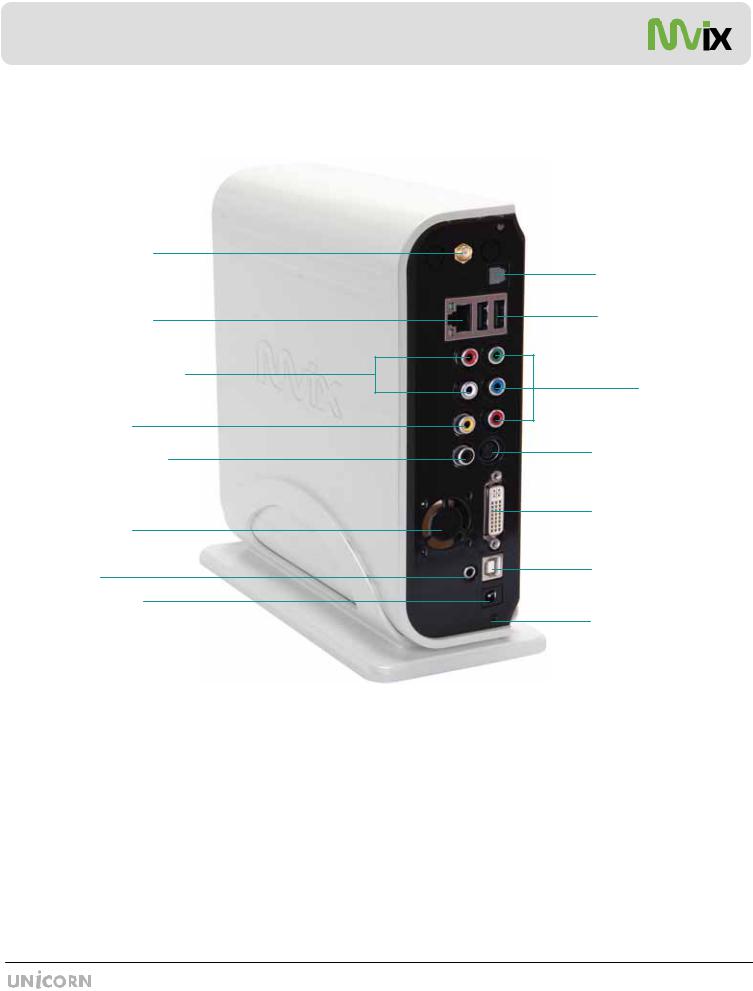
Rear View
1 |
Wireless Antennae Jack |
|
9 |
S-video Port |
2 |
Optical (Audio) Port |
10 |
DVI Port |
|
|
|
|
|
|
3 |
10/100 Mbps (RJ45) LAN |
|
11 |
High Velocity Fan |
4 |
USB 2.0 Host A-Type 2 |
12 |
USB 2.0 Slot |
|
|
|
|
|
|
5 |
Stereo RCA Port |
|
13 |
External Infra-Red Jack |
6 |
Component Port |
14 |
Power |
|
|
|
|
|
|
7 |
Composite Port |
|
15 |
Case Clamp Screw |
|
|
|
|
|
8Coaxial Cable Jack
XX |
Unicorn Information System |
Chapter 2: Introduction
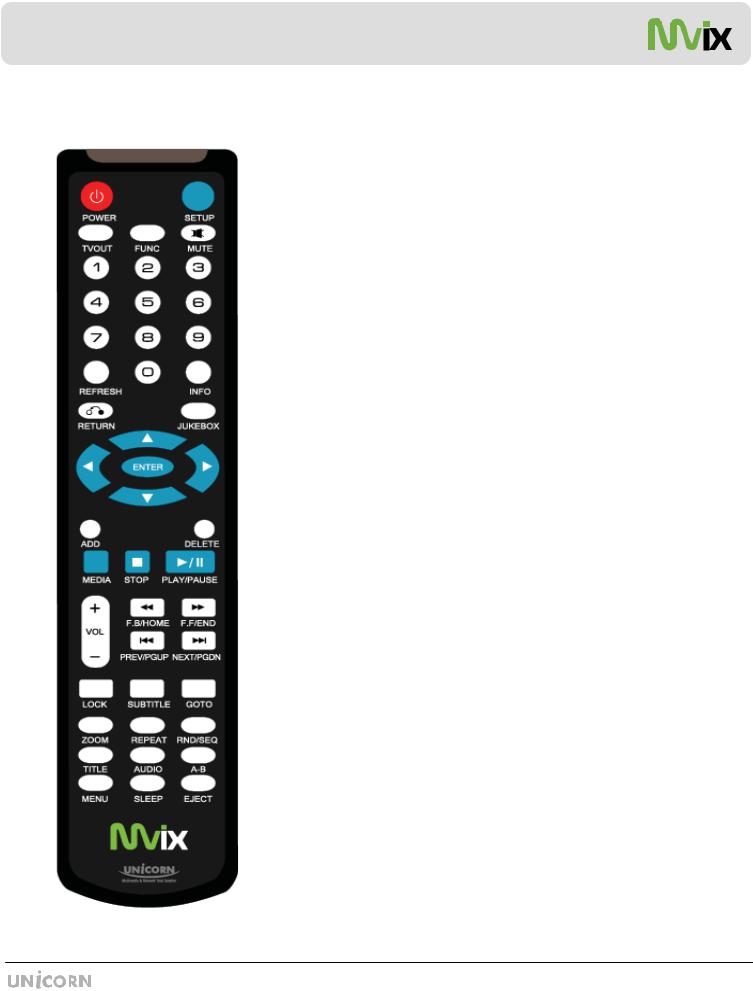
Mvix Remote Control
POWER |
Toggle Unit Power (ON / OFF) |
SETUP |
Enter Setup Menu, Apply/Confirm Setup Settings |
|
|
TVOUT |
Toggle Video Output Modes |
FUNC |
Display Control Options (Vol, Contrast, Subtitle etc..) |
|
|
MUTE |
Stop Audio Output from the Player |
(ARROW) |
Cursor Navigation Arrow Buttons |
|
|
REFRESH |
Refresh Shared-Folder / Directory Contents |
INFO |
Display Media File Information |
|
|
RETURN |
Return to Previous Screen / Folder |
JUKEBOX |
Toggle Jukebox Display Options (Audio Only) |
|
|
ENTER |
Enter / Play (Individual file) / Select the Highlighted Selection |
ADD |
Add the file to MY LIST |
|
|
DELETE |
Delete file from MY LIST |
MEDIA |
Toggle Media List (Video / Audio / Photo / Mixed) |
|
|
STOP |
Stop Playback |
PLAY / PAUSE |
Play (Continuous-Sequential Play) / Pause Playback |
|
|
VOL + / - |
Volume (Increase / Decrease) |
FF / End |
Fast Forward Playback. Scroll to end of File List. |
|
|
FB / Home |
Fast Backwards / Rewind Playback. Scroll to beginning of File List. |
PREV / PGUP |
Previous Chapter / File / Page Up on List |
|
|
NEXT / PGDN |
Next Chapter / File / Page Down on List |
LOCK |
Set Folder Password (Folder access Control) |
|
|
SUBTITLE |
Subtitle ON / OFF, Change Settings |
GOTO |
Time-Stamp based Search and FF/FR. |
|
|
ZOOM |
Zoom Video Playback |
REPEAT |
Repeat Media file(s) Playback |
|
|
RND/SEQ |
Switch between Random – Sequential Playback. |
TITLE |
Display DVD / VCD Title Screen on Main Menu Screen |
|
|
AUDIO |
Display a list of AUDIO files & start JUKEBOX |
A-B |
Repeat one Small Segment of a Media File |
|
|
MENU |
DVD / VCD Menu Screen (Chapters, Extras etc.) |
SLEEP |
Set Sleep Timer |
|
|
EJECT |
Eject CD or DVD ROM drive (USB host) |
|
|
XY |
Unicorn Information System |

Chapter 3: Basic Setup
3.1Connection
3.11Audio & Video Connection Setup
MX-760HD to TV :
Video Connections
MX760HD |
TV |
Y/Pb/Pr |
Y/Pb/Pr |
Video |
Video |
|
|
S-Video |
S-Video |
R/L |
R/L |
DVI |
DVI |
|
|
MX-760HD to Home Theater :
Audio Connections
MX760HD |
Home Theater |
Coaxial  Coaxial
Optical  Optical
R/L |
R/L |
MX-760HD Back Panel
Audio Connection Options
Video Connection Options
XZ |
Unicorn Information System |

Chapter 3: Basic Setup
3.2Installing an Internal Hard Disk Drive
3.21Inserting the Hard Disk
NOTE: Before Installing, ensure that the jumpers on your HDD are set to MASTER or SINGLE. Hard Disks with CABLE SELECT jumper settings may not work in Mvix Hi-Def Multimedia Player.
1.Locate the casing screw and turn it in clockwise direction.
2.Open the casing cover of the Mvix Player.
3.Gently lift the slide-panel cover as shown
4.Gently press the enclosure bracket
5.Slide the Hard Drive in the space so as to snugly fit the HDD in the enclosure brackets.
6.Release the bracket to secure the HDD in position.
7.Connect the TWO cables to your HDD. - HDD Data Cable (Flat Grey Cable) and 4-pin Power Cable.
8.Slide the side panel cover back into place and lock the enclosure using the case screw button at the back.
X[ |
Unicorn Information System |

Chapter 3: Basic Setup
3.22 Formatting the Hard Disk
Formatting and Partitioning the HDD using Win 2K/XP
The drive is initially not visible in Windows Explorer. For the drive t o been seen in Windows Explorer it needs to be configured via the disk management Utility. Win-XP will normally recognize the unfor matted /unpartitioned drive when you open disk management and start the wizard.
1. Right click on “My Computer”. Choose “Manage” from
the pop up menu and “Computer Management” window
will appear. Under “Storage”, choose the “Disk Management”
folder.
2. The disk list will appear on the right side of the
“Computer Management” windows. Right click the Mvix
HDD (marked as “Unallocated HDD”) from the list and
from the pop up menu choose “New Partition” to make
partitions on the chosen disk.
3. The New Partition Wizard opens up. Click Next.
X\ |
Unicorn Information System |
Chapter 3: Basic Setup
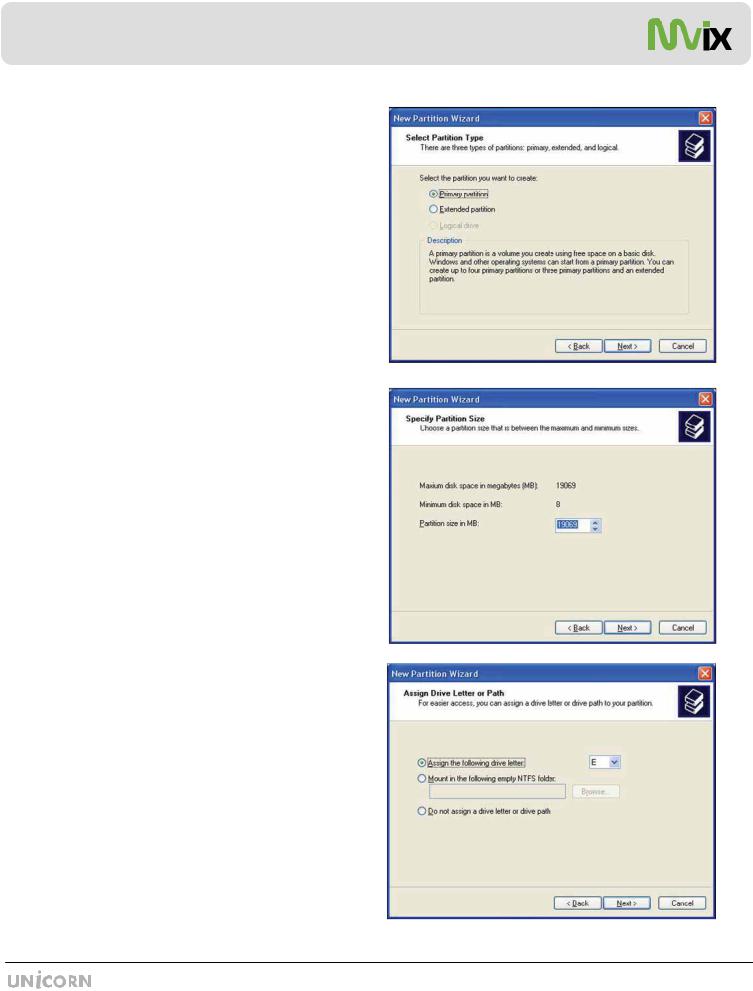
4.Select the appropriate Partition Type. Choose Primary partition.
Primary –Normal selection for less than 4 partitions.
Extended – Used for 4 or more partitions.
5.Select the Partition Size. If you want one partition, simply click “Next”.
Set the size of the partition (The full drive capacity is the default). If the full Partition Size is not used, right click on the remaining free space once the wizard has completed to partition that space. Repeat the Partition Wizard until the drive is how you want it.
Remember: For the FAT32 Formatting, Partition Size is limited to 32GB
6.Select the Driver letter. This allows you to select the drive letter for this partition. This will be the identification label of your Mvix HDD on your PC. We recommend that you do not change anything on this screen and simply press “Next”.
X]
Unicorn Information System

Chapter 3: Basic Setup
7.Select the Partition Format. NTFS is the default format type in Windows XP, but FAT32 is popular for users that dual boot between XP and 9X. There is a limit that Windows XP cannot create a partition larger than 32 GB using FAT32.If you want the FAT32, Partition Size is limited to 32GB.
8.When the formatting is completed, detailed information will appear as shown. Click the “FINISH” button to complete the work.
9. Once the drive has been initialized, partitioned, and formatted it will display as a healthy drive with the size and type of partition below the volume name and drive letter.
There is no limit on the number of folders / sub-folders that can be created within the Mvix-HDD. The access or seek-time increases significantly if number of folders > 6400.
The Mvix player recognizes file and folder names up to 256 characters.
X^ |
Unicorn Information System |

Chapter 3: Basic Setup
3.23 Transferring files to the Hard Disk through USB
When connected to your PC, the Mvix Player works exactly like an external storage device (e.g. USB Flash drive).
1.Power OFF the Mvix Media Player
2.Connect the USB2.0 Slave Port to the USB Port of your PC via a USB2.0 A-B Cable.
3.Power ON the Mvix Media Player.
4.Your PC will recognize the new external USB drive**.
5.Simply drag and drop your media files from your PC to the Mvix Multimedia Player. It works exactly like any other external storage device.
**If your PC fails to recognize the Mvix Media Player when connected via USB, check the jumper settings on the installed HDD.
Try and test the jumpers in the following order:
MASTER or SINGLE jumper setting
CABLE SELECT (CS) jumper setting
SLAVE jumper setting
Complete Remove all jumpers.
USB Host Functionality: The Mvix player also provides a USB-host port built upon a full speed, USB 2.0 compliant host/function processor. USB-host (also referred to as USB-OTG or USB-On-the-Go) allows communication between two USB devices. You can connect any external storage device (e.g. Flash drive) or an external DVD-ROM and play video files residing on these external devices. You can even connect your Digital Camera to directly transfer digital images/pictures from the camera to the HDD residing inside Mvix player.
Turn off your Mvix player before connecting your external device to the player.
Some 2.5” external-HDD may require additional power to the external HDD to be recognized. Use the AC-adapter included with your 2.5” external HDD to enable its use with the Mvix player.
X_ |
Unicorn Information System |

Chapter 3: Basic Setup
3.3 The SETUP Menu
Before using the Mvix player, you may need to configure the
Mvix player to work with your Display (TV) and Network Setup.
Press SETUP menu on the Mvix Remote to view the setup options on the main panel. The main panel displays options to configure settings for TV, Network, Wireless, Media file playback settings and some Miscellaneous settings for the Mvix Player.
To apply SETUP settings, select the option and press SETUP on the Mvix Remote.
Use the navigation button on the Mvix Remote to select the TV icon/option. This option allows you to configure your video-out settings.
Use the right-arrow button on the Mvix Remote to navigate to the main panel and select configuration option. Press ENTER on each configuration to view available setup options.
SPDIF out: DownMix and Passthrough
Audio Channel: 2 Channels and 5+1 Channels.
Video Out: S-Video, Component, DVI etc.
TV Standard: PAL versus NTSC (USA customers use NTSC)
TV Type: 4:3 versus 16:9 (If using Widescreen Display / TV use 16:9)
Use the left -arrow button on the Mvix Remote to navigate back to the left-side column.
From the left-side navigation column, select NETWORK Setup.
Press ENTER / SELECT on the Mvix Remote.
Enable: Wired / Wireless (Choose Wired versus Wireless Network)
Address Setup: Auto vs Manual (Choose manual to enter IP Address,
Netmask and Gateway manually)
IP Address: (IP address is set automatically, if Address Setup is AUTO)
Netmask: Subnet Mask setup
Gateway: (If using Router, use IP address of the router)
MAC Address : Displays MAC address information (Wired / Wireless)
Wire Apply: Displays Wired Network Status: Success vs Fail
Wireless Apply: Apply Displays Wireless Network status: Success vs Fail (If Wireless Appy is selected, the System automatically moves to next
screen… <see next page>)
( Select Wire Apply or Wireless Apply to apply settings or Press SETUP on Mvix Remote to Apply these settings.)
X` |
Unicorn Information System |
Chapter 3: Basic Setup
If Wireless Network is selected in the previous step, the
Wireless Network Setup screen is displayed in this step.
(Use navigation arrow button on Mvix Remote to select each setup options, Use ENTER button to display options)
ESSID: (Manually enter the Wireless Signal Name or SSID of your network router).
Channel: (Unless using a Peer-to-Peer network, do not change anything). Encryption (WEP): (Only select when using WEP security setting on your network router. Select NONE, if the router runs without encyrption)
WEP Key: If using WEP encryption (above), manually enter WEP key.
Apply: Displays Wireless Network status : Success versus Fail
( Select Apply to apply settings or Press SETUP on Mvix Remote to Apply these settings.)
Use the left-arrow button on the Mvix remote to navigate back to the left-side column.
From the left-side navigation column, select PLAYBACK Setup.
Use the arrow keys and press ENTER / SELECT on the Mvix
Remote.
Video Display: Original (Letterbox), Expand (Pan-Scan), Full Screen (Modify display size)
Sub Position: Top, Middle, Bottom (Select the display position of subtitles during playback)
Sub Size: Small or Large (Select Subtitle Size)
Sub Color: (Select from a list of over 10 subtitle colors)
Slide Interval:3 sec, 5 sec, 10 sec or 20 sec (Select slide show interval for image file playback)
Use the left-arrow button on the Mvix Remote to navigate back to the left-side column.
From the left-side navigation column, select MISC Setup. Use the arrow keys and press ENTER / SELECT on the Mvix Remote.
OSD Language: Korean vs English (Menu Language)
Sound Effect: ON vs OFF (Setup various sound effects)
Change Admin Password: (Password setup: 4-digits)
Select Background: (select JPEG file as wallpaper)
Use Def. Background: (Use original/default image as wallpaper)
Show Firmware Ver: (Verify / Confirm Firmware Version)
Factory Reset: (Reset the unit to Factory Default)
Firmware Upgrade: (Select to upgrade firmware)
YW |
Unicorn Information System |

Chapter 3: Basic Setup
PASSWORD FUNCTIONS:
In order to password-protect folders, you will first need to setup Admin Password.
Default Admin Password: 0000 (4-zeros) Recommended: Change Admin Password when installing the Mvix Unit.
ADMIN PASSWORD: _________________
(Use this space to write/safekeep new admin password) Admin Password is also required for Factory Reset operation.
Perform a Hardware Reboot if Admin Password is lost
In order to password-protect individual folders:
1. Using navigation button on the Mvix Remote, select the folder to protect.
2. Press LOCK button on your Mvix Remote
3. Enter the Admin Password
4. Set Folder Password
To remove/undo Folder Password:
1. Navigate to the folder and press LOCK.
2. Enter the Admin Password
3. Remove Folder Password
w T G G G G G G G
YX |
Unicorn Information System |
Chapter 3: Basic Setup
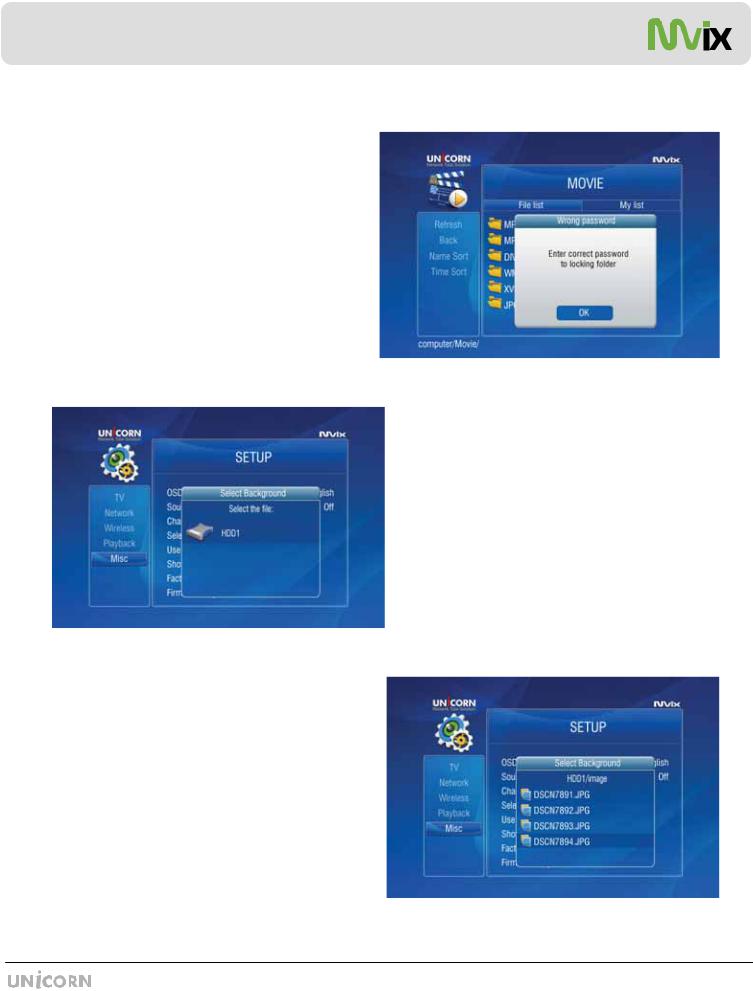
To access a password-protected folder:
1.Using the arrow-buttons on the Mvix Remote, navigate to the folder and press ENTER / SELECT.
2.An Enter-Password prompt will popup. Enter the folder
password to access the folder contents.
3.Inputting an incorrect password displays the warning as shown.
NOTE: Folder Passwords are CASE SENSITIVE
The wallpaper files can be selected from the local Mvix-HDD, USB-Host Storage or Network-Shared folder on the PC.
Maximum resolution of a digital image file that can be used as a Background Wallpaper: 1920 x 1080
Browse, select and press ENTER / SELECT the image file. The Background Wallpaper will be applied.
In order to revert to the Default Background, choose “Use Def. Background” under MISC setup.
MODIFY BACKGROUND WALLPAPER:
Background wallpaper of the setup menu and playback screens can be changed as per user preference.
Under MISC setup, navigate and choose “Select Background”. A Select Background file popup allows browsing and choosing a JPEG/JPG, BMP, PNG file. Any of these digital image files can be applied as a wallpaper
YY |
Unicorn Information System |

Chapter 3: Basic Setup
CAUTION: Avoid Choosing a “bright” image as the Background Wallpaper. Menu items may not be visible on a bright background.
If a bright image is accidentally chosen, perform a Hardware
Reset to revert to original, Factory-Default Background.
FACTORY RESET FUNCTION:
The Factory Reset function is provided under the MISC setup menu to revert setup settings to Factory-Default condition.
To perform Factory Reset:
1. Navigate to MISC Setup menu using the Mvix Remote, select FACTORY RESET.
2. Enter Admin Password when prompted.
3. Select YES, Press ENTER / SELECT.
CAUTION: Factory Reset Function cannot be performed without the correct ADMIN PASSWORD.
Remember to store the ADMIN PASSWORD, if changed.
Original, Default Admin Password: 0000
HARDWARE RESET/REBOOT PROCEDURE:
A Hardware Reboot may be required if the player fails to perform reliably. Hardware Reboot may also be needed if the Admin Password is forgotten, lost or misplaced.
1.Power off the Mvix Player completely. Remove the power cord from the player.
2.Simultaneously press the STOP and OK buttons on the unit (not on the Remote). Wait for 10-seconds
3.Plug-In the power cable. Wait for 10 seconds.
4.Turn the unit ON.
5.The unit Reboots and returns to Factory Default condition.
YZ |
Unicorn Information System |
Chapter 4: Connecting Mvix to a Network
4.1 Setting Network Sharing using Windows XP on your PC
In order to connect your Mvix Player to your local area network or to an individual PC, we need to configure the Internet Protocol on your PC:
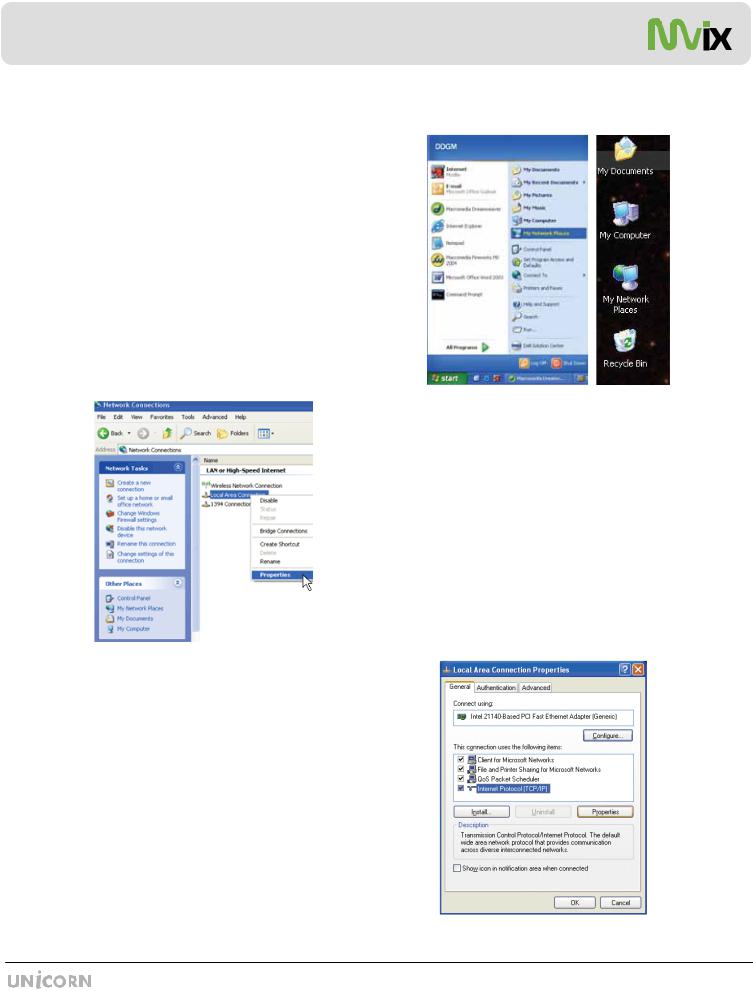
On your Win-XP PC, Click START.
Right-click on MY NETWORK PLACES, and
Select PROPERTIES
Alternatively, if the “MY NETWORK PLACES” icon is visible on your Desktop, simply right click on the Icon and Select Properties.
Navigate to Local Area Connection. Right click on it and
left click Properties.
The Local Area Connection Properties window is displayed. Right click the Connection and hit 'Properties'. The window on the right opens up.
Select Internet Protocol (TCP/IP) and click INSTALL.
Y[ |
Unicorn Information System |

Chapter 4: Connecting Mvix to a Network
Click / Select PROTOCOL and Select ADD
Select Network Protocol Window opens up as shown here.
Click the NWLink IPX/SPX/NetBIOS Compatible Transport
Protocol and click OK.
Two NWLink items are added to the connection's Properties
As shown, two NWLink items are added to the connection's
Properties.
Verify that the NWlink protocol has been installed and click
CLOSE.
Y\ |
Unicorn Information System |
Chapter 4: Connecting Mvix to a Network
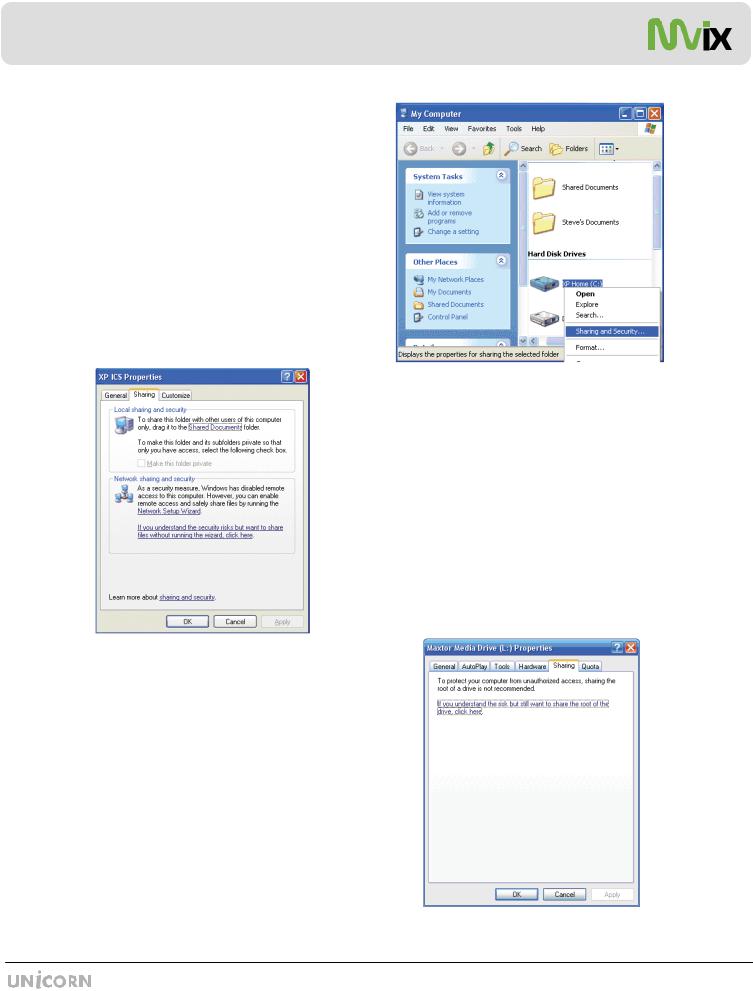
Setting Up Folder / Drive Sharing on Win-XP PC:
Right-click the folder or drive that you want to share, and then click SHARING AND SECURITY.
Tip: If you want to share your entire My Documents folder, open My Documents, and then click the UP button on the toolbar. You can then select the My Documents folder.
If you are sharing a Drive, under the the Sharing tab, click:
If you understand the risk but still want to share the root of the drive, click here.
Click on the warning message link to expose the sharing options. Assuming you already have your internet connection configured and firewall settings in place, you can choose the
Just Enable File Sharing option (unless you already enabled file sharing previously) When you finish, your computer should be prepared to share files on the network.
Under Network Sharing and Security Section:
If you see a message that reads, As a security measure, Windows has disabled remote access to this computer.
Click the Network Setup Wizard link and follow the instructions
Y] |
Unicorn Information System |

Chapter 4: Connecting Mvix to a Network
Under the Sharing tab, as shown in the picture, you can do one of the following:
Share this folder on the network - This allows you to share the contents of the drive or folder available to other users on the network. Choose a Sharing name that you will like to see on your TV Display.
Allow network users to change my files
- This allows network users to change files over the network.
Click on APPLY and then select OK
A hand will appear under the folder icon, indicating that the
folder is shared.
In Windows XP Pro, you may also need to define the users who can have access to these shared folders and files.
In order to use folder sharing with Mvix, it is recommended to provide guest access to the shared folders.
Right Click on MY COMPUTER and Select MANAGE.
Click on the ‘+’ next to LOCAL USERS AND GROUPS.
Select USERS.
Note the Red ‘X’ sign next to GUEST.
Double click on the GUEST account and Click ENABLE.
Y^ |
Unicorn Information System |
Chapter 4: Connecting Mvix to a Network
Disabling Windows Firewall:
Network Sharing makes it possible for home and small office users to share the Local Area Network (LAN). In order to prevent unsolicited network traffic on this LAN, Windows XP protects the connections via the Internet Connection Firewall (ICF). ICF is automatically turned on in Win-XP (SP2). If the ICF is turned on on your PC, your Mvix player may not be able to access files residing on your PC. Follow this procedure to disable it:
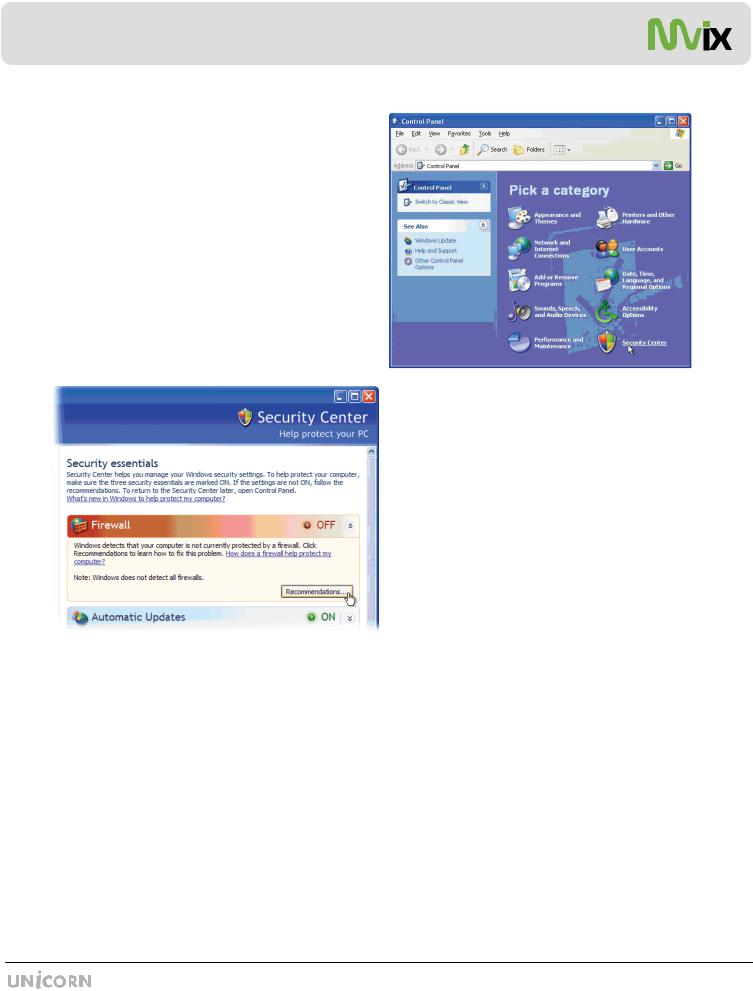
Click the START menu button, and click CONTROL PANEL.
In the CONTROL PANEL, click SECURITY CENTER.
In the Windows Security Center window, click Windows
Firewall.
In the Windows Firewall window, select OFF to disable the Windows Firewall and click OK.
Close the remaining Windows Security Center window and the Control Panel.
Remember: Turning OFF Windows Firewall is not recommended by Microsoft. Disable the Windows Firewall at your own Risk.
Troubleshooting:
In certain Win-XP setups/installations, the Network Sharing procedure may not work correctly. According to Microsoft, to run Network sharing (share files, etc.) you only need one NetBIOS protocol. The NetBIOS protocols are: NetBEUI, IPX/SPX, and TCP/IP. If you have already installed IPX/SPX (previous pages), you should be fine. However, sometimes it may not work and may require installation of the NETBEUI protocol. The files necessary for installing the NetBEUI protocol on Windows XP are
Netnbf.inf and Nbf.sys. Windows XP Pro does not come with the NetBEUI protocol installed. These files are available on your Windows XP CD-ROM.
NetBEUI stands for NetBIOS Enhanced User Interface. NetBEUI (NBF) is a non-routable protocol suitable for small networks. It is a simple protocol that is based on local computer names (no IP addresses like TCP/IP). NetBEUI has less overhead, so it is very efficient in small networks (less then 10 computers), and it is actually faster then TCP/IP.
NOTE: Support for this protocol in Microsoft Windows has been discontinued.
Y_ |
Unicorn Information System |

Chapter 4: Connecting Mvix to a Network
Installing NETBEUI Protocol
As in the previous Protocol installation procedure, open the NETWORK COMPONENT TYPE window.
(START -> Right Click on MY NETWORK PLACES, Select PROPERTIES. In LOCAL AREA CONNECTIONS window, Select INTERNET PROTOCOL (TCP/IP) and click INSTALL).
Select Protocol and Click ADD.
Insert the Win-XP Professional CD into the CDROM – Browse to
CD drive :\VALUEADD\MSFT\NET\NETBEUI, select
NETNBF.inf,
Click on the file and click Install.
Restart your computer if you receive a prompt to complete the installation.
Note: In case of Windows XP Pro, you may need
Administrator Access to install this protocol.
Select HAVE DISK - > Click BROWSE (note: NetBEUI is not on the list...yet)
Y` |
Unicorn Information System |
 Loading...