

Mvix MV5000U, MV4000U User Manual

MviX Multimedia Player
MV5000U & MV4000U
MviX Multimedia Player
Model NO. MV-5000U
Model NO. MV-4000U
USERS
MANUAL
1

Table of Contents
MV5000U & MV4000U
MviX Multimedia Player
Introduction ……………………………………………………………………… 3page
Package Contents ……………………………………………………………………… 4page
Front and Rear Panel ……………………………………………………………………… 5page
Feature ……………………………………………………………………… 6page
Specification ……………………………………………………………………… 7page
Warning ……………………………………………………………………… 8page
Remote Control ……………………………………………………………………… 9page
How to assemble & insert HDD ……………………………………………………………………… 10page
Installation and connection
Connection with composite TV output ……………………………………………………………………… 13page
Connection to S-Video output ……………………………………………………………………… 13page
Connection to component output ……………………………………………………………………… 14page
Connection to 2ch of normal TV ……………………………………………………………………… 14page
Connection to coaxial output ……………………………………………………………………… 15page
Connection to optical output ……………………………………………………………………… 15page
Connection to computer ……………………………………………………………………… 16page
MviX Setup Menu
Audio/Video Setup ……………………………………………………………………… 17page
Misc Setup ……………………………………………………………………… 18page
Firmware Setup ……………………………………………………………………… 19page
Play all kinds of Media File ……………………………………………………………………… 20page
Play Video File ……………………………………………………………………… 21page
Play Audio File ……………………………………………………………………… 22page
Play Photo File ……………………………………………………………………… 23page
Firmware Upgrade ……………………………………………………………………… 24page
USB Connection with PC ……………………………………………………………………… 25page
Partitioning & Formatting
Windows98/ME User ……………………………………………………………………… 26page
Windows2000/XP User ……………………………………………………………………… 31page
Warranty Information ……………………………………………………………………… 36page
Contact information ……………………………………………………………………… 37page
2

MviX Multimedia Player
Congratulations ! On your purchase of Mvix Multimedia Player.
You can now enjoy your favorite movies, home videos, digital music and digital photos on TV or Home-theater System.
Mvix Player brings all digital media to your living room so that youcan now enjoy with your near and dear ones.
MV5000U & MV4000U
MviX Multimedia Player
Here are some things to note before you start us ing your pl ayer:
1. Remove the thin film on the side panels of your Mvix Multimedia Player. This film is provided to protect the
Mvix surfaces from scratches and dust and to ensure that it reaches you in an A-Ok condition.
2. Install the HDD as recommended in the Users Manual. The Mvix Multimedia Player does NOT come with an
installed Hard Disk Drive (HDD). Kindly ensure that you use “Master or Single” jumper settings.
3. Format and Partition your HDD after installation, before you can use transfer files onto your Mvix Multimedia
Player. Please refer to your users manual for details on “How to Format and Partition a HDD?”
You’ve selected one of the best-built, best-backed products available today in this product category. We’ll do
everything in our power to keep you happy with your purchase for years to come. You can count on our
uncompromising commitment to your total satisfaction.
Please feel free to contact us at unicorn@eunicorn.co.kr or support@mvixusa.com if you have any questions.
We’d be delighted to hear from you !
3

Package Contents
MV-5000U MV-4000U Stand
12V Adapter Adapter Cable Remote control
MV5000U & MV4000U
MviX Multimedia Player
USB Data Cable A/V Cable Driver CD
User Manual Bag (Only for MV-5000U)
4

Front and Rear Panels
FRONT
[Only for MV-5000U]
BACK VIEW
MV5000U & MV4000U
MviX Multimedia Player
5

Features
Enjoy your movies on TV
You can enjoy your favorite movies and home videos on TV or Projector. MviX Multimedia Player supports most of
the popular video formats including MPEG1, MPEG2, MPEG4, AVI, DivX3.11, 4x, 5x, XviD, DVD(IFO, VOB),
VCD(DAT) etc.
Digital Music Box
MviX Multimedia Player can play various audio/music files such as AC3, MP2, MP3, DTS pass through, WMA,
OGG through the TV speaker or your existing audio system.
Portable Digital Photo Album
MviX can play digital photo files and display them to TV or projector. Store JPEG photos directly from a PC
through the USB2.0 interface and enjoy a slide show without using a computer
Portable HDD Storage
MviX uses 3.5" HDD and it works just like an external USB2.0 hard drive whe n connect it to a PC. The USB2.0
interface supports data transfer rates of 480Mbps.
Easy Firmware Upgrading
MviX is based on highly scaleable technology. You can download latest firmware from our website and upgrade
the your multimedia player by connecting it to a PC. Firmware Upgrades provide support for all the latest DivX
file formats.
MV5000U & MV4000U
MviX Multimedia Player
FM Transmitter [Only for MV-5000U]
MviX has an internal FM Transmitter module to broadcast audio via FM frequency (four channels). Oh! and you
don't need audio cables anymore!
Car Pack [Optional]
MviX also can be used in car with car pack. It contains Auto-power adapter, External IR cable, cassette deck and
audio cable.
6
Specifications
Video MPEG1/2, Div3.11, Div4.0, Div5.0, Divx, Xvid, DVD(IFO, VOB), VCD(DAT), M2V
Supported File
Formats
Audio AC3, MP2, MP3, DTS pass through, Ogg, WMA, MPGA, MPA
Photo JPEG
USB 2.0 (Cypress chipset)
Component Video : RCA Y, Pr, Pb
MV5000U & MV4000U
MviX Multimedia Player
Input & Output
User Interface
FM Transmitter
[Only for MV-5000U]
Operating
System
Partition Type FAT32, NTFS
Power External 12V/2.5A DC adapter
Supported
Languages
Dimensions 5.71 x 6.3 x 2.05 (inches) or 145 x 160 x 52 (mm)
Retail Kit
Includes
Composite Video : RCA and S-Video
Audio : RCA L//R, Coaxial, Optical
IR-Ext
Full Featured IR-Remote control
Buttons : Power, Play, Stop, Cancel , Up, Down, Left, Right
LCD panel (128X64) – Only for MV-5000U
Even Band : 88.0MHz, 88.4MHz, 88.8MHz, 89.2MHz
Odd Band : 87.7MHz, 88.1MHz, 88.5MHz, 88.9MHz
Windows 98se, ME, 2000, XP or later
Various languages 'smi, sub, srt' file
MVIX Media Player (MV-5000U/ MV-4000U),
AC Power Adapter
RCA 2-CH, AV Cables,
USB Cable (for PC),
Carry-on Bag [Only for MV-5000U],
Manual,
Driver CD
7

WARNING !
MV5000U & MV4000U
MviX Multimedia Player
Safety Instructions
The MviXMedia player cannot detect unformatted hard-disc drives (HDDs). Make sure that the HDD is formatted.
01
Please read instructions on “Partitioning and Formatting” in this manual.
Do NOT expose your MviX Media Player to heat, dust, humidity or magnetic field. We strongly recommend you to
02
backup your data. We are do not assume responsibility for corruption, damage or loss of files on your HDD.
Do NOT unplug your Media Player’s while a file is playing. It may result in loss or corruption of data or files.
03
Be careful while handling and moving your MviX Media Player. The player may be damaged by dropping, hard
04
impact, or shock.
Do NOT install your media player near any heat sources such as radiators, heat registers, stoves, or other
05
apparatus (including sound amplifiers) that produce heat.
Unplug your Media player during lightning storms or when unused for long periods of time.
06
Do NOT touch your MviX Media Player with wet hands. It may cause electric shock. Clean only with dry cloth. Do
07
not place any sources of danger on your Media Player (e.g. liquid filled objects, vases, lighted candles etc.).
Do NOT disassemble the Media Player. It may cause damage to you your MviX Media Player.
08
While using this media player in a car, we recommend you to use the supplied cigarette lighter jack (optional). We
09
are not responsible for damage or loss of data by using some other after-marketcigarette lighter jack.
Do not block any ventilation openings of your MviXMedia Player. HDD operation requires adequate air-circulation
for proper functioning. Do not operate the media player in an enclosed cabinet. Allow about 10 cm (4 inches) of free
10
space around the player for adequate ventilation.
WARNING: To reduce the risk of fire or electric shock, do not
expose this appliance to rain or moisture.
8

Remote Control
MV5000U & MV4000U
MviX Multimedia Player
1. Power ON or OFF
2. Setup
3. Change the VIDEO OUT mode
4. Mute
5. Number Keys
6. Function Key
7. Goto
8. Title for DVD
9. Show the info for file playing
10. Menu for DVD
11. Navigation – Arrow Keys
12. ENTER to confirm the selection
13. Play Lists
14. Bookmark
15. Stop
16. Play
17. Volume -/+
18. Pause
19. Fast Forward / Reverse
20. Rotation to rotate the picture
21. Skip backward and forward
22. MEDIA switch from
MIXED -> VIDEO -> AUDIO -> PHOTO -> MIXED
23. FM Transmitter
24. Random
25. AUDIO select the audio track
26. Zoom
27. SUB-T select the subtitles
28. RETURN to the last folder
29. A-B setup repeat segment
30. Page Up
31. Repeat
32. Page Down
9
How to Assemble & Insert HDD
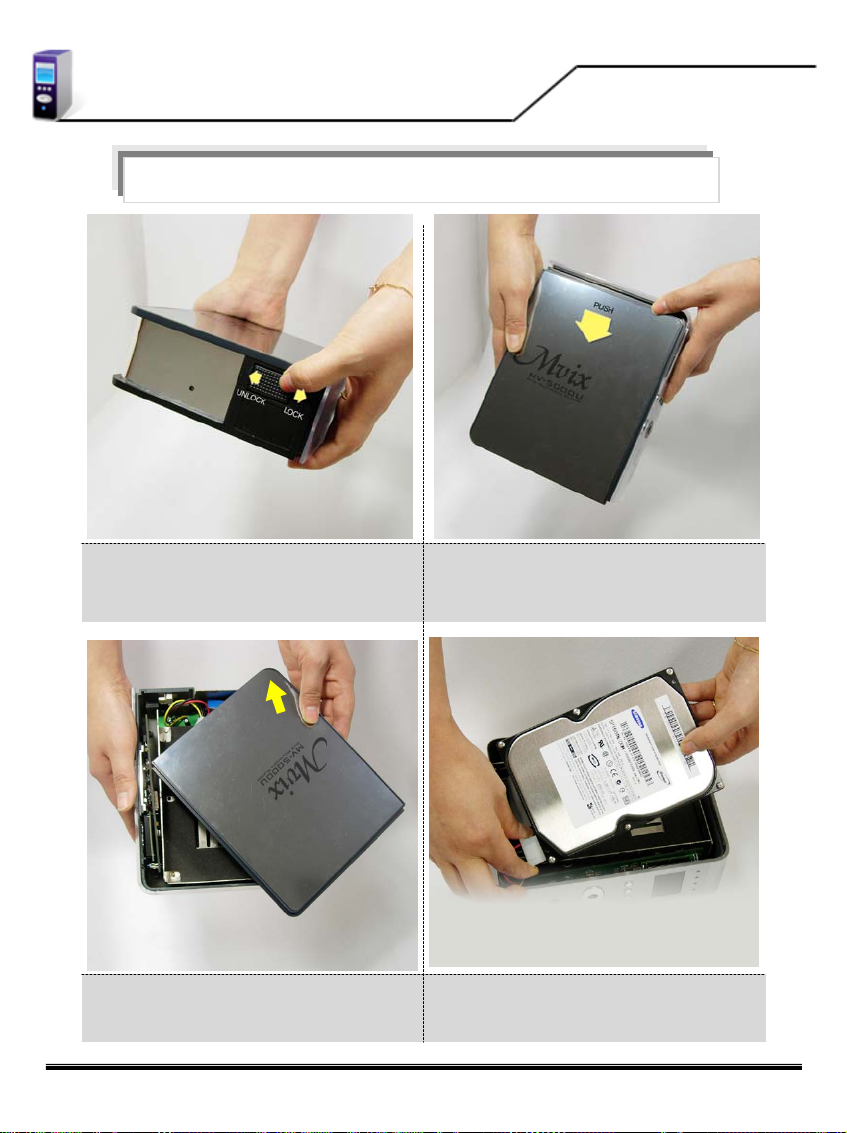
Warning: It is of utmost importance that the installation process be conducted in a non-static environment.
Always ground yourself by touching any metal object before opening your MVIX Multimedia player.
1. Slide the lock toward the “UNLOCK” direction 2. Once unlocked, slide the top-cover as shown above.
MV5000U & MV4000U
MviX Multimedia Player
Open here
3. Open the top-cover. 4. Connect the 4-pin power cable using the white plug.
Take note of the shape of the power cable plug. The plug
can only be inserted in one direction.
10
How to Assemble & Insert HDD
MV5000U & MV4000U
MviX Multimedia Player
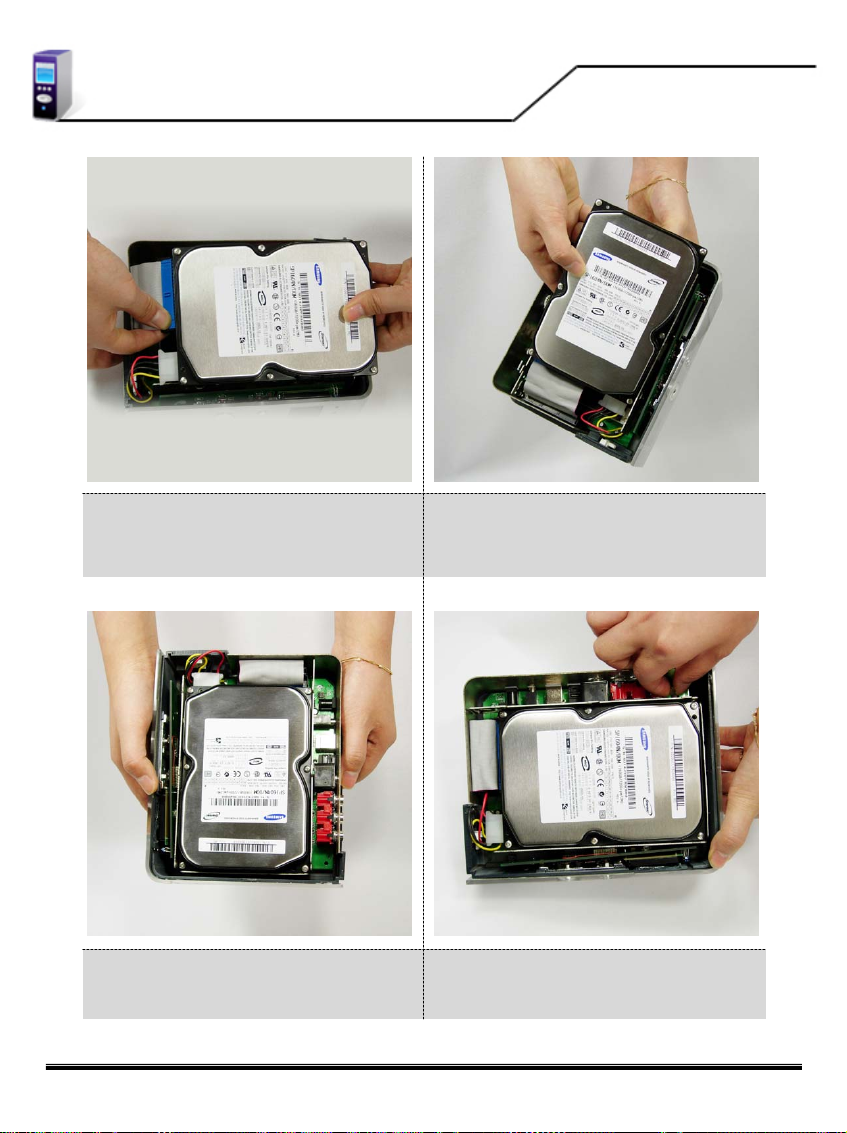
5. Connect flat IDE cable. Again examine the socket of the
IDE cable. The IDE cables socket can only be inserted in
one direction.
7. Once inserted, the HDD should snugly fit between the
brackets as shown.
6. Carefully insert the HDD inside the MviXcase as shown
above.
8. Prepare and fasten the HDD to the bracket with two
screws (supplied).
11

How to Assemble & Insert HDD
MV5000U & MV4000U
MviX Multimedia Player
9. Once secured, slide the top-cover as shown above 10. Slide and close the lock toward the “LOCK” direction
12
 Loading...