

Mvix BOX User Manual
Unicorn Information System
To get Mvixbox’s Quick Guide please visit www.mvix.net or copy it from installation CD
User Guide
http://www.mvix.net
1

Unicorn Information System
Table of Contents
Chapter 1. User Guide
1.1 WebDisk Execution
1.1.1 Login and Join
1.1.2 Executing Main Functions
1.1.2-1 WebDisk Explorer
1.1.2-2 Web Explorer
1.1.2-3 Window Explorer
1.1.2-4 Connector for Mac
1.1.3 Folder Definition
1.2 Run Wizard
1.2.1 Create User
1.2.1-1 Create General User
1.2.1-2 Create Guest User
1.2.2 Create Group
1.2.3 Create Shared Folder
1.2.3-1 Share with a specific user
1.2.3-2 Share with all users
1.3 Using WebDisk Explorer
1.3.1 Menu Definition
1.3.2 File Management
1.3.2-1 Creating Folder
1.3.2-2 Changing File/Folder Name
1.3.2-3 Deleting File/Folder
1.3.2-4 Moving File/Folder
1.3.2-5 File/Folder Upload
1.3.2-6 File/Folder Download
1.3.2-7 Upload/Download Environment Setting
1.3.3 Sharing Folder
1.3.3-1 Sharing Folder Setup
1.3.3-2 Shard Folder Setup
1.3.3-3 Changing Shared Folder Setup
1.3.3-4 Deleting Shared Folder Setup
1.3.3-5 Clearing Shared Folder Setup
1.3.4 Secure Folder
1.3.4-1 Definition of Secure Folder
1.3.4-2 Secure Folder Password Management
1.3.4-3 Using Secure Folder
1.3.4-4 Secure Folder file/folder Management
1.3.4-5 Secure Folder file/folder Upload/Download
2

Unicorn Information System
Table of Contents
Chapter 1. User Guide
1.3.5 OPEN(public) Folder
1.3.6 System Folder(USB Auto Copy & Homepage)
1.3.6-1 USB Auto Copy
1.3.6-2 Personal Homepage
1.4 Using WebExplorer
1.4.1 File Management
1.4.1-1 File/Folder Upload
1.4.1-2 File/Folder Download
1.4.2 Sharing Folder
1.4.3 Attaching File
1.5 Using Window Explorer
1.5.1 Disk Connection
1.5.1-1 Connecting Disk
1.5.1-2 Using Disk
1.6 Using PC Backup
1.6.1 Run backup wizard
1.6.2 Check backup progressing status
1.6.3 Manage backup profile
1.7 Using Note/Mail
1.7.1 Sending Note/Mail
1.7.2 From Message Management
1.7.3 To Message Management
1.8 BitTorrent/RSS
1.8.1 Torrent File Download
1.8.2 Torrent Command Button
1.8.3 File download using RSS Reader
1.9 Blog
1.9.1 What is Blogging API?
1.9.2 Blog Menu
1.9.3 Create Blog
1.9.4 My Blog
1.9.5 Write Blog & WebDisk File link
3

Unicorn Information System
Table of Contents
1.10 Service Request
1.10.1 Application for Service and Cancellation
1.11 Guest User
1.11.1 Adding Guest User
1.12 Modify my information
Chapter 2. Administrator Guide
2.1 Administrator Execution
2.2 User Management
2.2.1 User Management
2.2.1-1 User Management List
2.2.1-2 User Management Function
2.2.1-3 User Search
2.2.2 Applicant
2.2.2-1 Applicant Management List
2.2.2-2 Applicant Management Function
2.2.2-3 Applicant Search
2.2.3 Guest User Management
2.2.4 Group Management
2.2.4-1 Group Management List
2.2.4-2 Group Addition
2.2.4-3 Group Search
2.3 Webdisk Management
2.3.1 Registration Option
2.3.1-1 Registration Option Setup
2.3.1-2 Setup per Option
2.3.2 Service Status
2.3.3 Board
2.3.4 OPEN(public) Folder
2.4 System Management
2.4.1 System Information
2.4.2 System Management
2.4.3 Service Management
2.4.4 Disk Management
2.4.4-1 Disk & Volume Info.
2.4.4-2 Adding Disk
4

Unicorn Information System
Table of Contents
Chapter 2. Administrator Guide
2.5 Network Management
2.5.1 Network Setup
2.5.2 Setting up DDNS
2.6 Password Initialization
Appendix.
A. Upgrade
B. Installing Printer Server
C. Using USB wireless LAN card
D. How to Check IP Address of Mvixbox
E. Backup and Recovery
F. Using DDNS
G. Using iTunes
H. Adding Hard disk
I. In case error message is displayed(in some OS, such as Vista, etc.)
J. USB Auto copy and Personal Homepage
K. Application
L. FAQ
M. Troubleshooting
N. Limited Warranty
O. Copyright & Legal Attributions
P. Contact Information
Q. Glossary
5
Unicorn Information System
1.1 WebDisk Execution
1.1.1 Login and Join
1 2
3
1
2
3
1. [Log In] The administrator's ID and password are
‘sysadmin’ and sysadmin, respectively. The ‘sysadmin’
account is given to the owners of the device, allowing
them to use all administrator functions as well as
ordinary user functions.
2. [Password Initialization] In case manager forgets the
secret number, it can be format for secret number.
Secret number will be changed same as ID.
1. Rapid Box sends to ‘sysadmin’ those files uploaded
by anybody. It is a convenient function to get a file
from an unauthorized user.
1. To make a user account other than ‘sysadmin’, join
the membership and get permission from ‘sysadmin’.
2. Click the ‘Register’ button on the left to move to the
membership registration page.
1. Input IP address and domain name of applicable
equipment on internet web browser.
ex)http://192.168.0.7 or http://shinsun.mvix.net]
* It is easy to use domain name. Please refer the
establishment guide and manager function for the
domain establishment method.
2. Input the storing folder name when you uploading.
Present date and time will be input for basic details.
3. After you choose file and click the upload button, it will
be uploaded your requested folder name in RapidBox
folder of manager.
4. You can upload maximum 8 by using ADD button, you
can upload by 2 GB total capacity at once.
Chapter 1. User Guide
6
Unicorn Information System
- The main page after login consists of the following:
1. Top of Screen
▪ Product Logo: Click product logo to move to main page at all times.
2. Top Left
▪ Basic Image: Image can be changed as desired by the user in ‘my profile’.
▪ My Profile: Password and basic image, etc. can be changed.
▪ Basic capacity-related information is provided.
3. Bottom Left:
▪ You download WebDisk interface adapter. In case you use WebDisk interface adapter, you can execute WebDisk
Explore or Windows Explorer directly without connecting website.
4. Top Right : Main function icons are showed.
▪ Web Disk Explorer, Web Explorer, Window Explorer, Blog, BitTorrent, RSS Menu and so on.
▪You can use manager menu when you log-in by using sysadmin ID. Service Request menu can be used only for general
user.
5. Bottom Right
▪ You can check new patch information in connection with patch upgrade and web board of Mvixbox.
▪ You can immediately check new listings in the web board through which information can be shared with Mvixbox users.
1
2 4
5
3
Chapter 1. User Guide
7
Unicorn Information System
1.1.2-1 WebDisk Explorer
1. When executing Web Disk explorer, Web Disk
explorer automatically activates. Server login takes
place at the same times as execution. Therefore, there
is no need for any additional login.
2. Once Web Disk explorer is opened, it can be used
separately from the web browser.
4. ‘Run' button at the bottom is activated when clicking
Login button after entering ID, password and server
address in which web disk is installed while 'Web Disk
Explorer' tab is selected.
5. Web disk explorer is executed by clicking ‘Run' button.
1.1.2 Executing Main Function
3. Also, Web Disk explorer can be executed after login
through a WEBDISK Connector shortcut icon in
desktop of PC.
Chapter 1. User Guide
8
Unicorn Information System
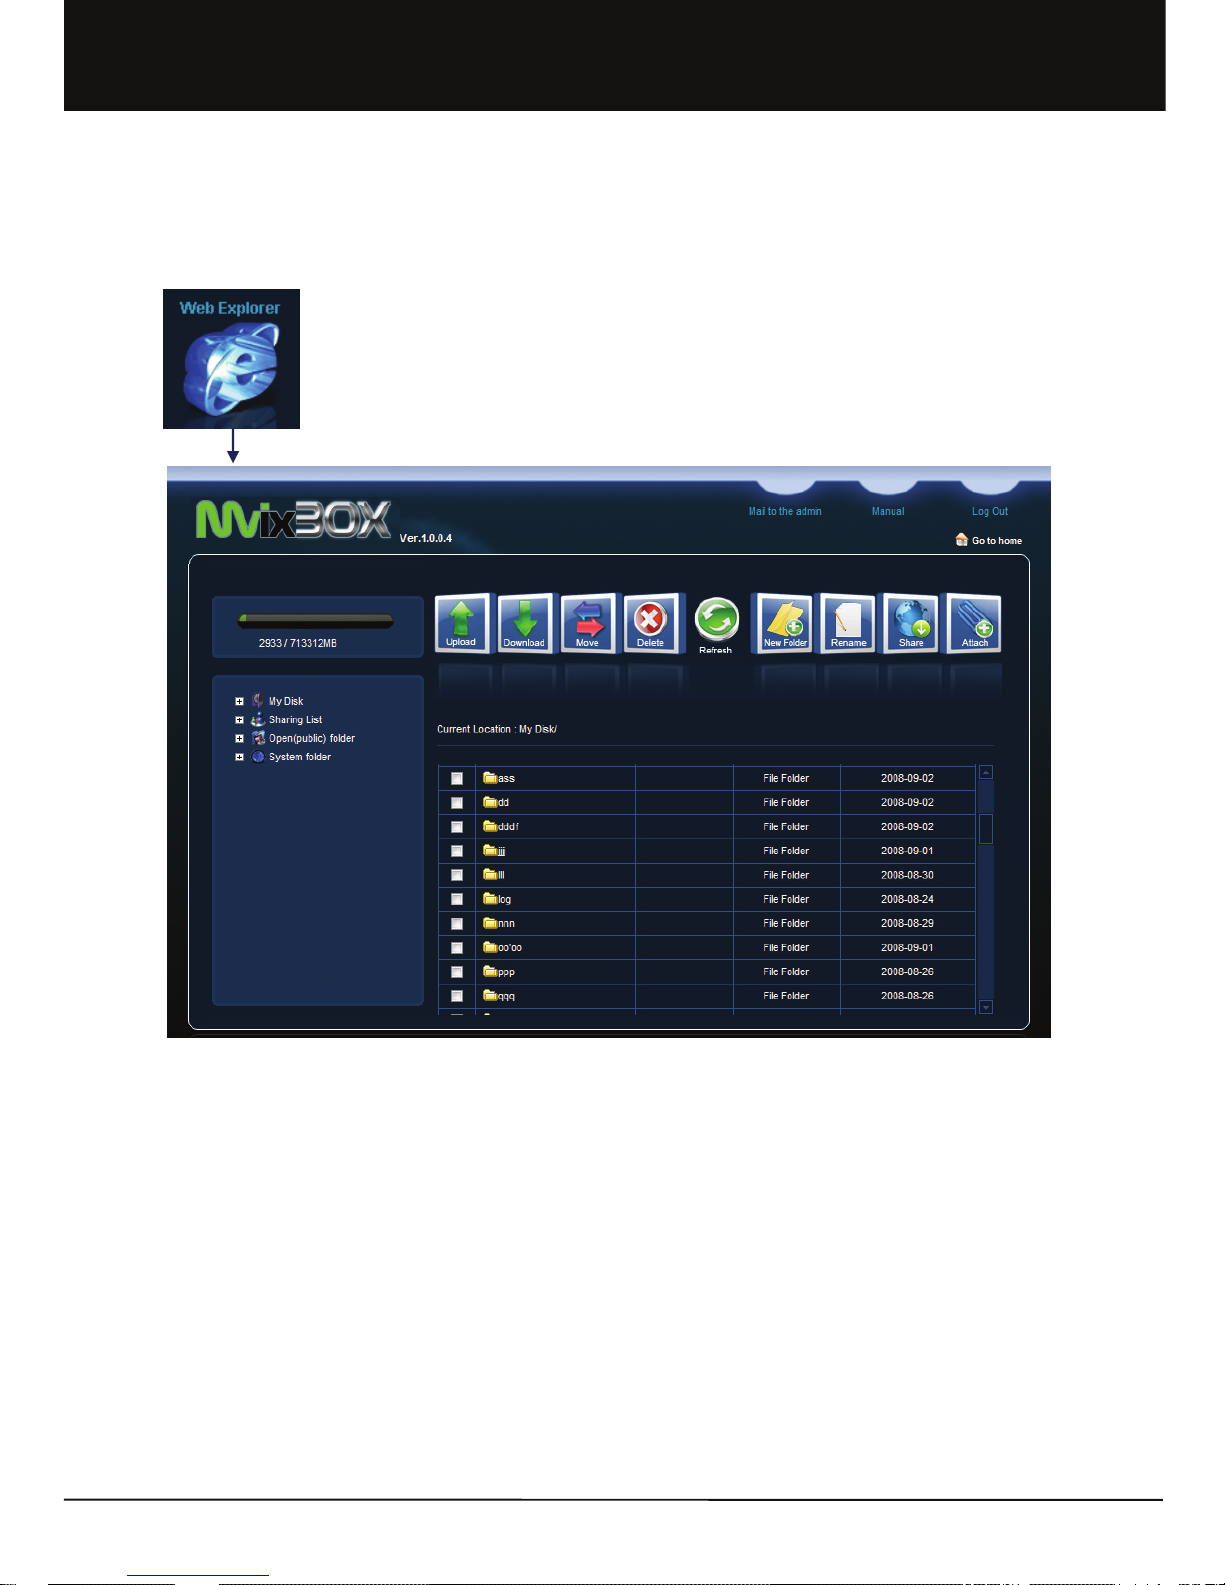
1.1.2-2 Web Explorer
1.1.2 Executing Main Function
1. Web Explorer can manage My Disk only using the web browser without requiring additional program. Therefore,
Web Explorer can be used not only in the Windows operating system, but also in Macintosh and Linux.
2. Web Explorer is similar to Web Disk explorer. It is largely divided into ① a folder tree, ② menu and ③ File/
Folder list parts.
Chapter 1. User Guide
9
Unicorn Information System
1. When executing Window Explorer, the Window
Explorer Connector is executed.
2. WebDisk can be connected to the Window
Explorer drive or can be released.
4. ‘Run' button at the bottom is activated when clicking
Login button after entering ID, password and server
address in which web disk is installed while 'Window
Explorer' tab is selected.
5. Click ‘Run' button to execute window explorer.
1.1.2-3 Window Explorer
1.1.2 Executing Main Function
3. Also, Web Disk explorer can be executed after
login through a WEBDISK Connector shortcut
icon in desktop of PC.
Chapter 1. User Guide
10
Unicorn Information System
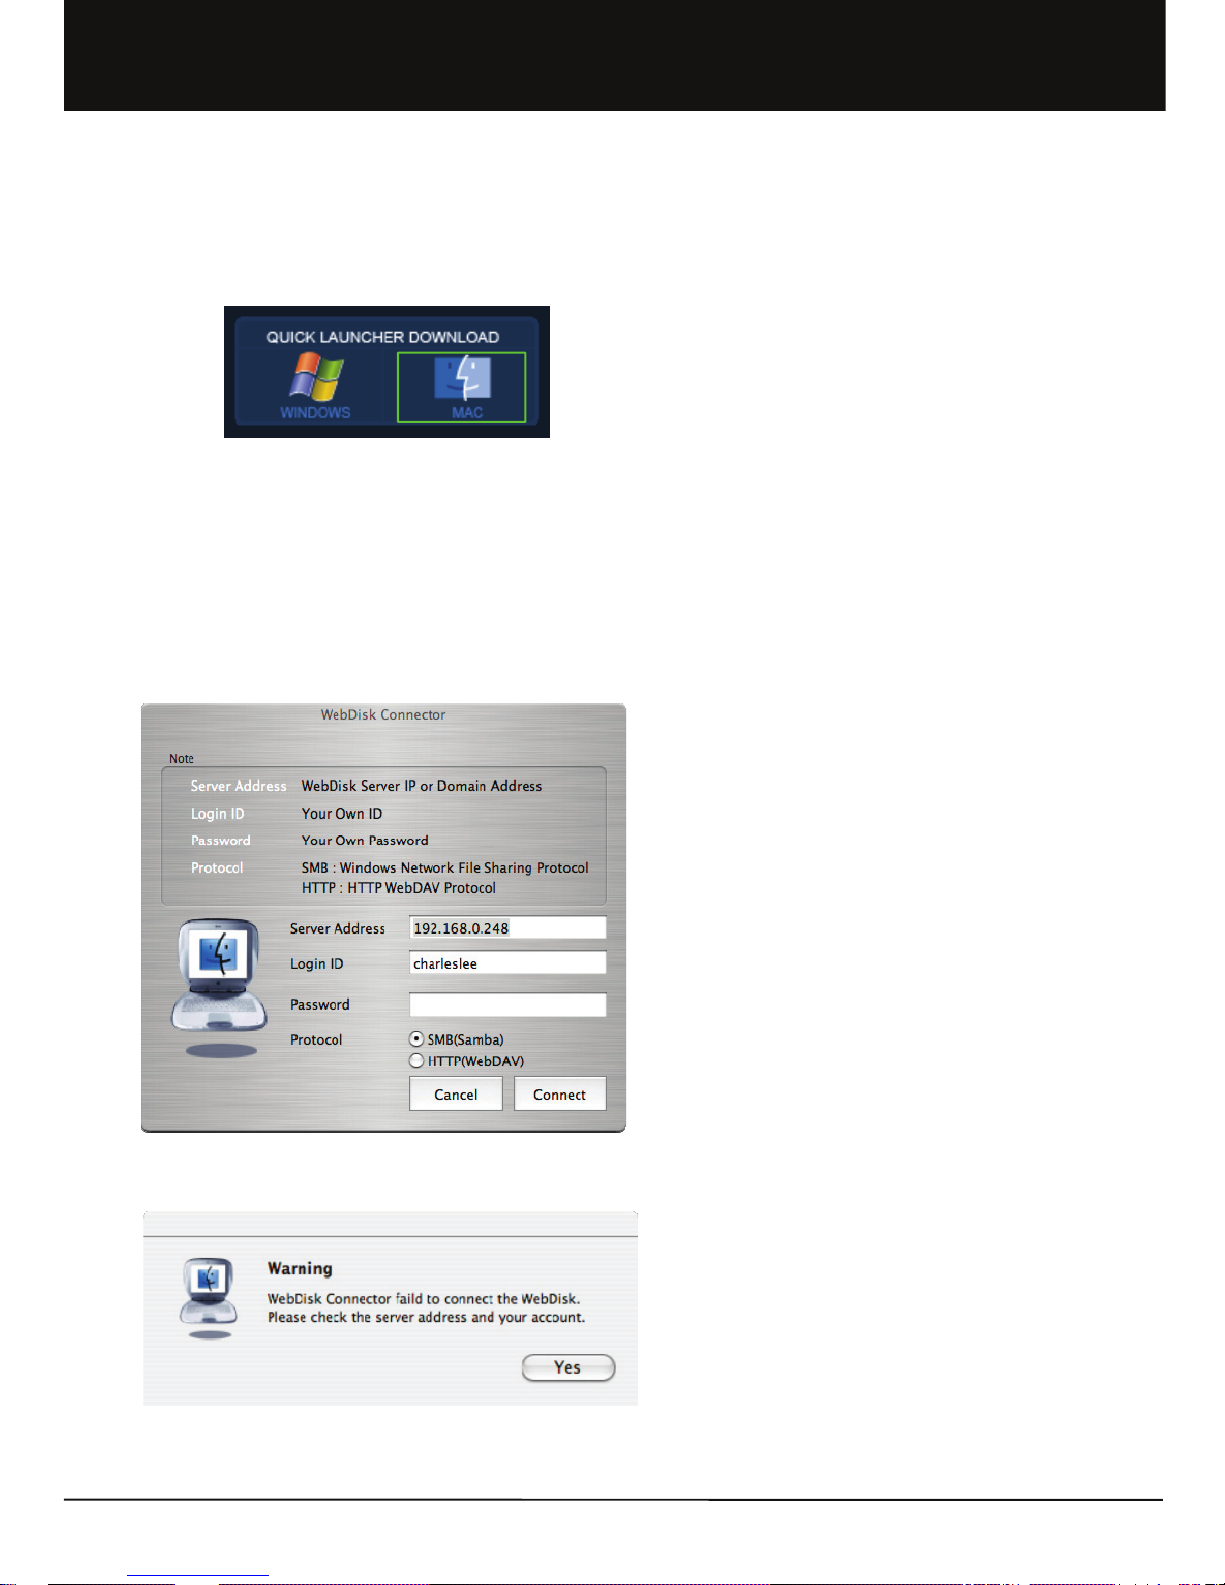
1. Download WebDisk Connector from Quick Launcher
Download in the main screen after login.
2. Double click the downloaded image file
(WebDiskConnector.dmg ). Image is mounted in finder.
3. Drag and drop WebDiskConnector to application program
folder.
4. Web disk connector for Mac supports Power PC line of Mac
and Intel of OSX 10.2.8 or higher. It is not operated in Mac
operating system before OSX 10.2.8 version.
5. Execute the function by double-clicking WebDiskConnector
in application program folder.
6. Enter the following particulars in main screen.
a. Server Address : Enter address of device to be connected.
b. Login ID : Enter login ID.
c. Password : Enter password for login.
d. Protocol : Select connection protocol. There are two types
of connection protocol, such as SMB and HTTP.
- SMB : This is windows network share protocol. It is
recommended for use in case device is in the
same network as my Macintosh computer.
Although this protocol is fast in transmission
speed, there is a high possibility of this protocol
becoming blocked by firewall during connection
from the outside.
- HTTP : This is WebDAV protocol. It is recommended for
use in case device is in external network.
Although this protocol is rather slow in
transmission speed, there is a low possibility of
this protocol becoming blocked by firewall even
during connection from the outside.
7. Web disk login begins when clicking 'Connect' button.
8. When connection succeeds, program is automatically closed
and My Disk area located in web disk is mounted in finder.
9. If connection fails, check if input values are correct, if there
are no problems in network connection and if device state is
normal.
10. All values entered with the exception of password are
automatically saved and displayed again in the next
execution.
1.1.2-4 Connector for Mac
1.1.2 Executing Main Function
Chapter 1. User Guide
11
Unicorn Information System
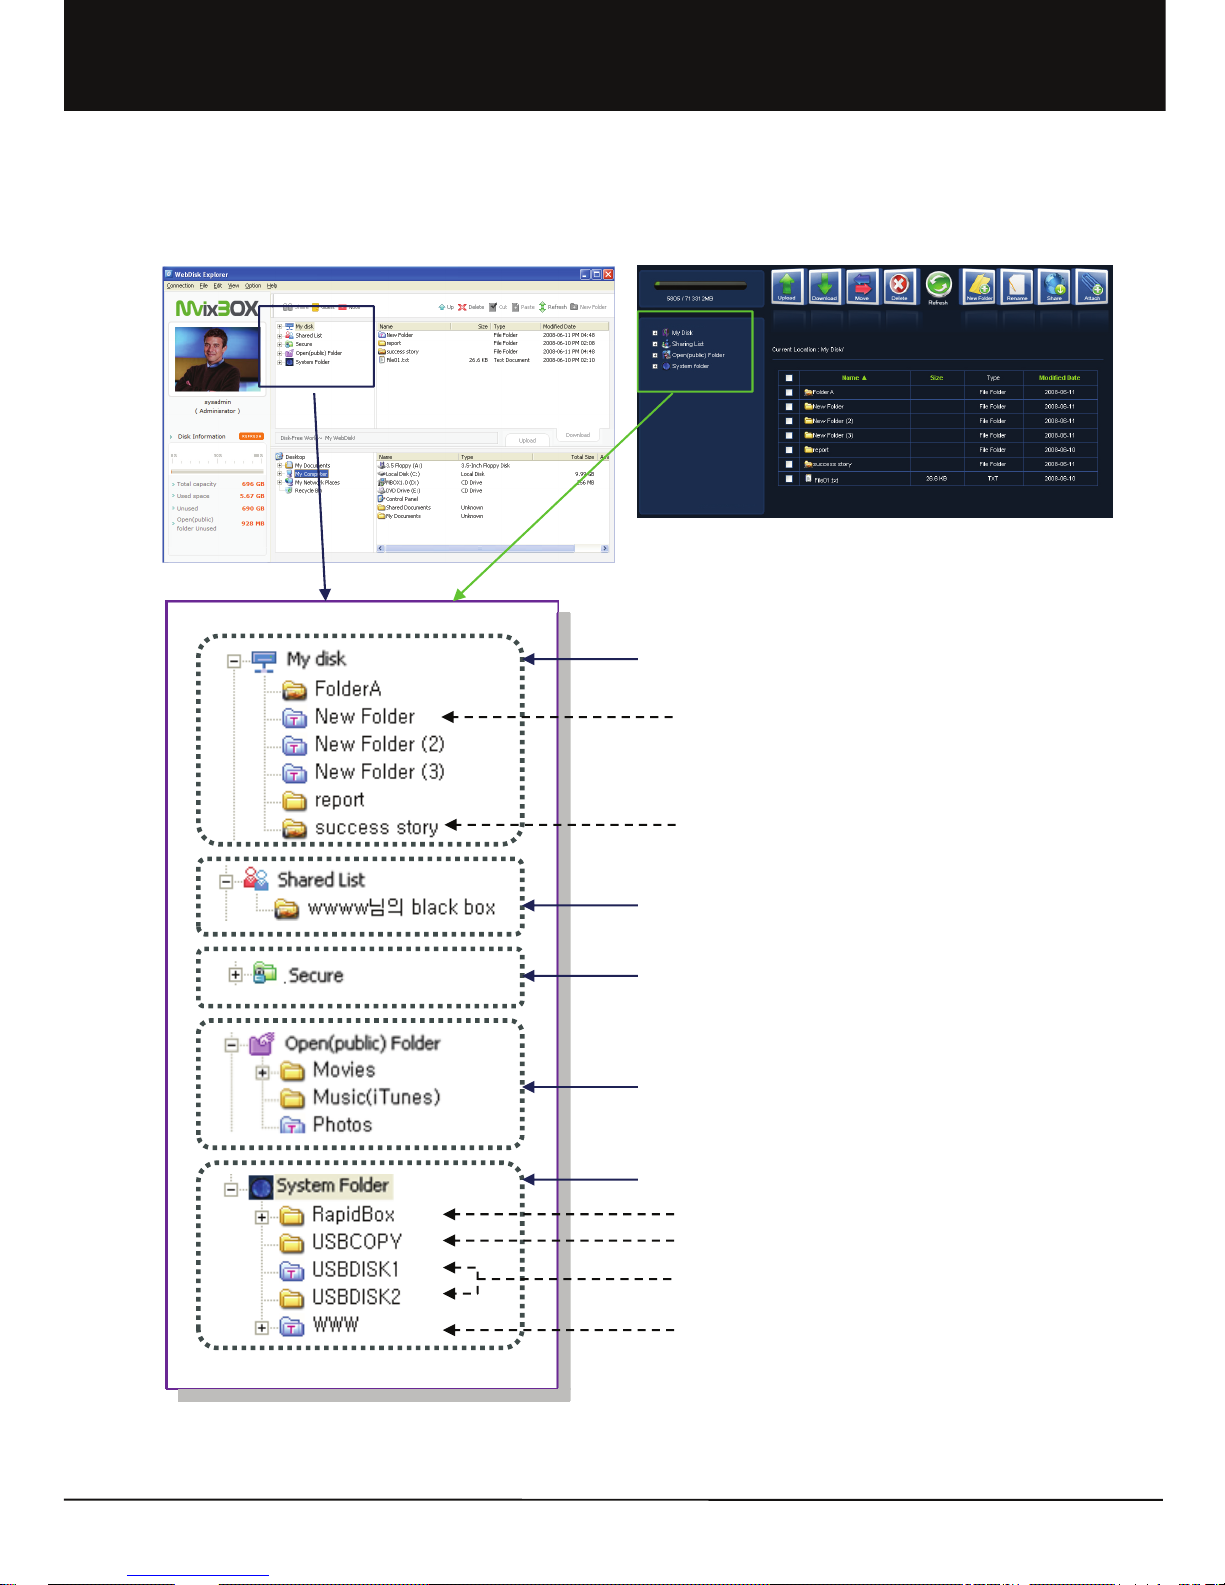
1.1.3 Folder Definition
Folder for all user can share
Music(iTunes) Folder – Linked with iTunes Program
Upload execlusive folder, Upload for user without account
Folder for hacking protection
Store by using data encryption
Possible to use after input password
USB exterior equipment
It appears when the equipment is connected.
Shared folder that other user approved me to share
Homepage basic folder
Private homepage using is possible when you put
homepage file on this folder.
Backup folder when USB Auto copy
New folder and corrected folder of folder contents is
changed folder shape as T shape.
-Shared folder that I approve to share to other User
-Assign Authority Establishment per group, user, and
Guest user.
-Authority Establishment for read, write, read/write.
Private WebDisk Folder
sysadim execlusive folder (only use for sysadmin)
WebDisk Explorer Web Explorer
Chapter 1. User Guide
12

Unicorn Information System
1.2 Run Wizard
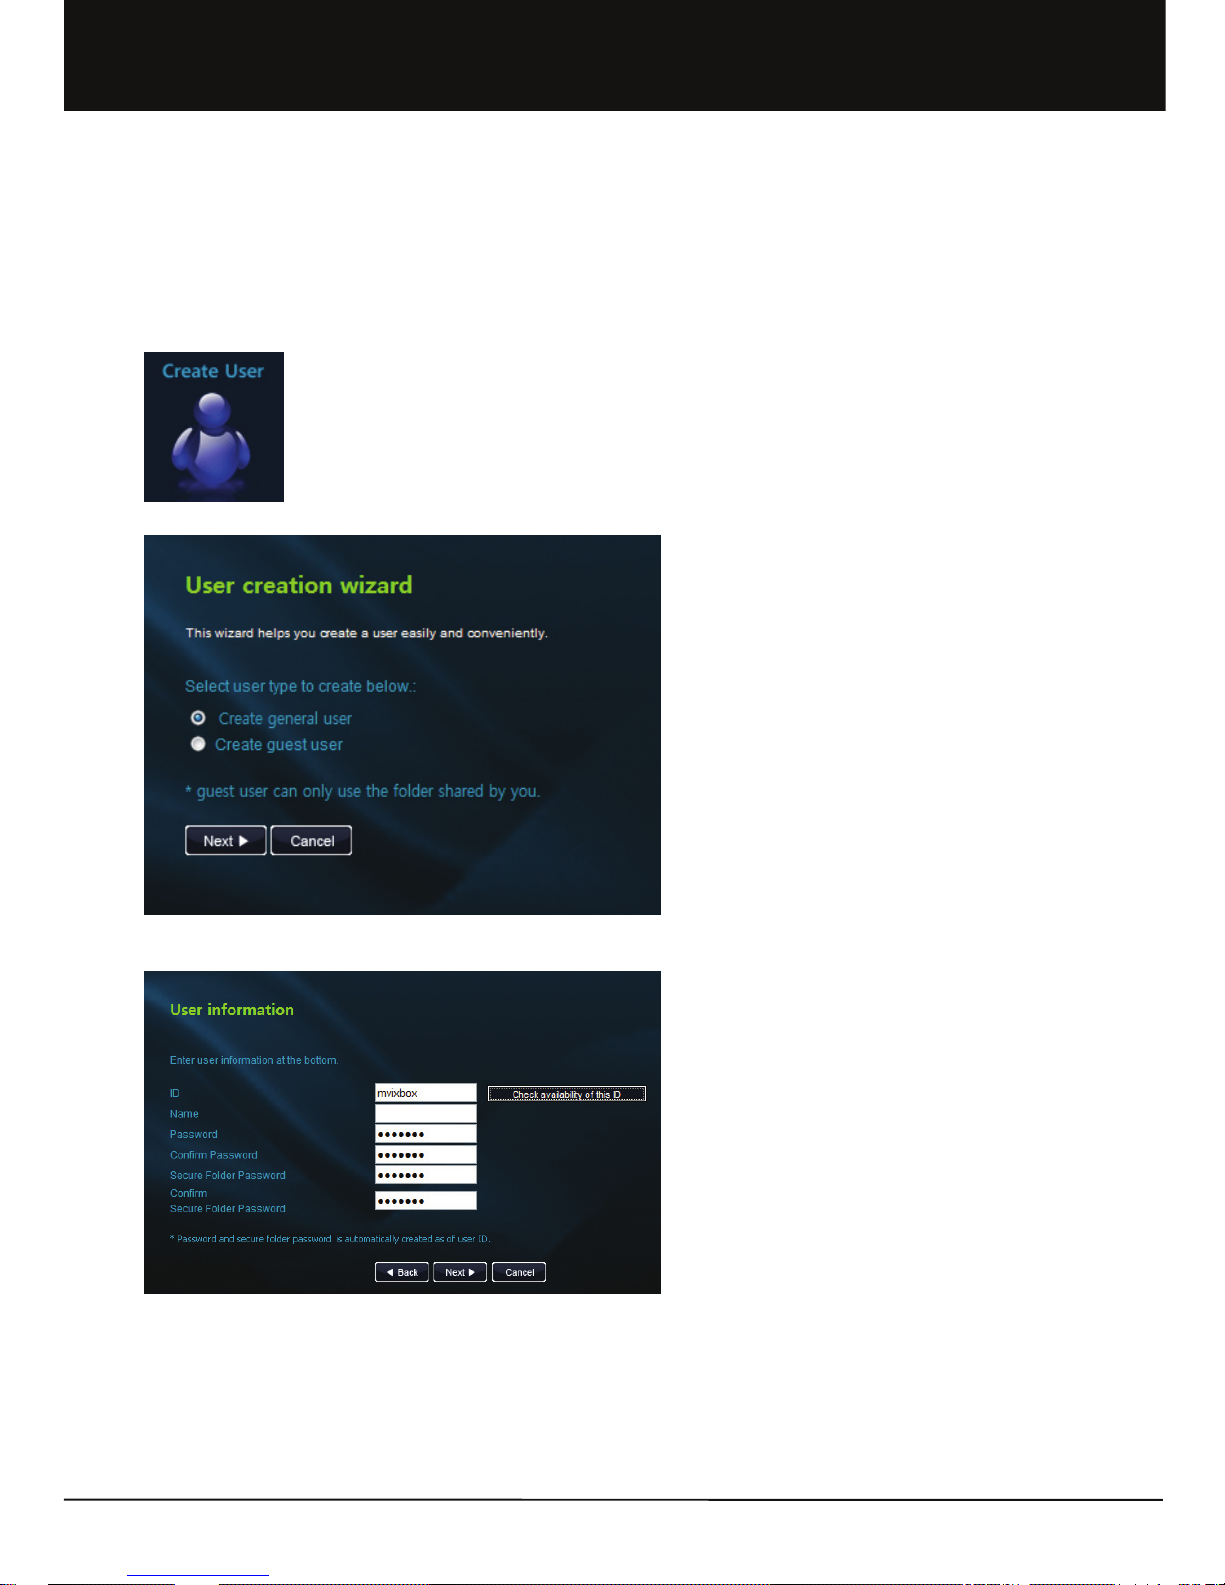
1.2.1 Create User
1. Login with admin. ID for easy and fast creation of general user and temporary user by using 'user creation' wizard in the
main page.
2. General users can create Guest user by using ‘Guest user' wizard in the main page.
Chapter 1. User Guide
13
Unicorn Information System
1.2.1-1 Create General User
‘Create general user’ is the exclusive authority of administrator. Administrator can easily create user by using 'user
creation' wizard in the main page without moving to admin. menu.
Chapter 1. User Guide
14
1. After login with admin. ID, click 'Create user' icon in
the main page and move to 'user creation wizard'
page.
2. Select 'create general user' in the user type to be
created.
3. Enter user information. Password and secure folder
password are automatically created as of user ID.
Unicorn Information System
Chapter 1. User Guide
15
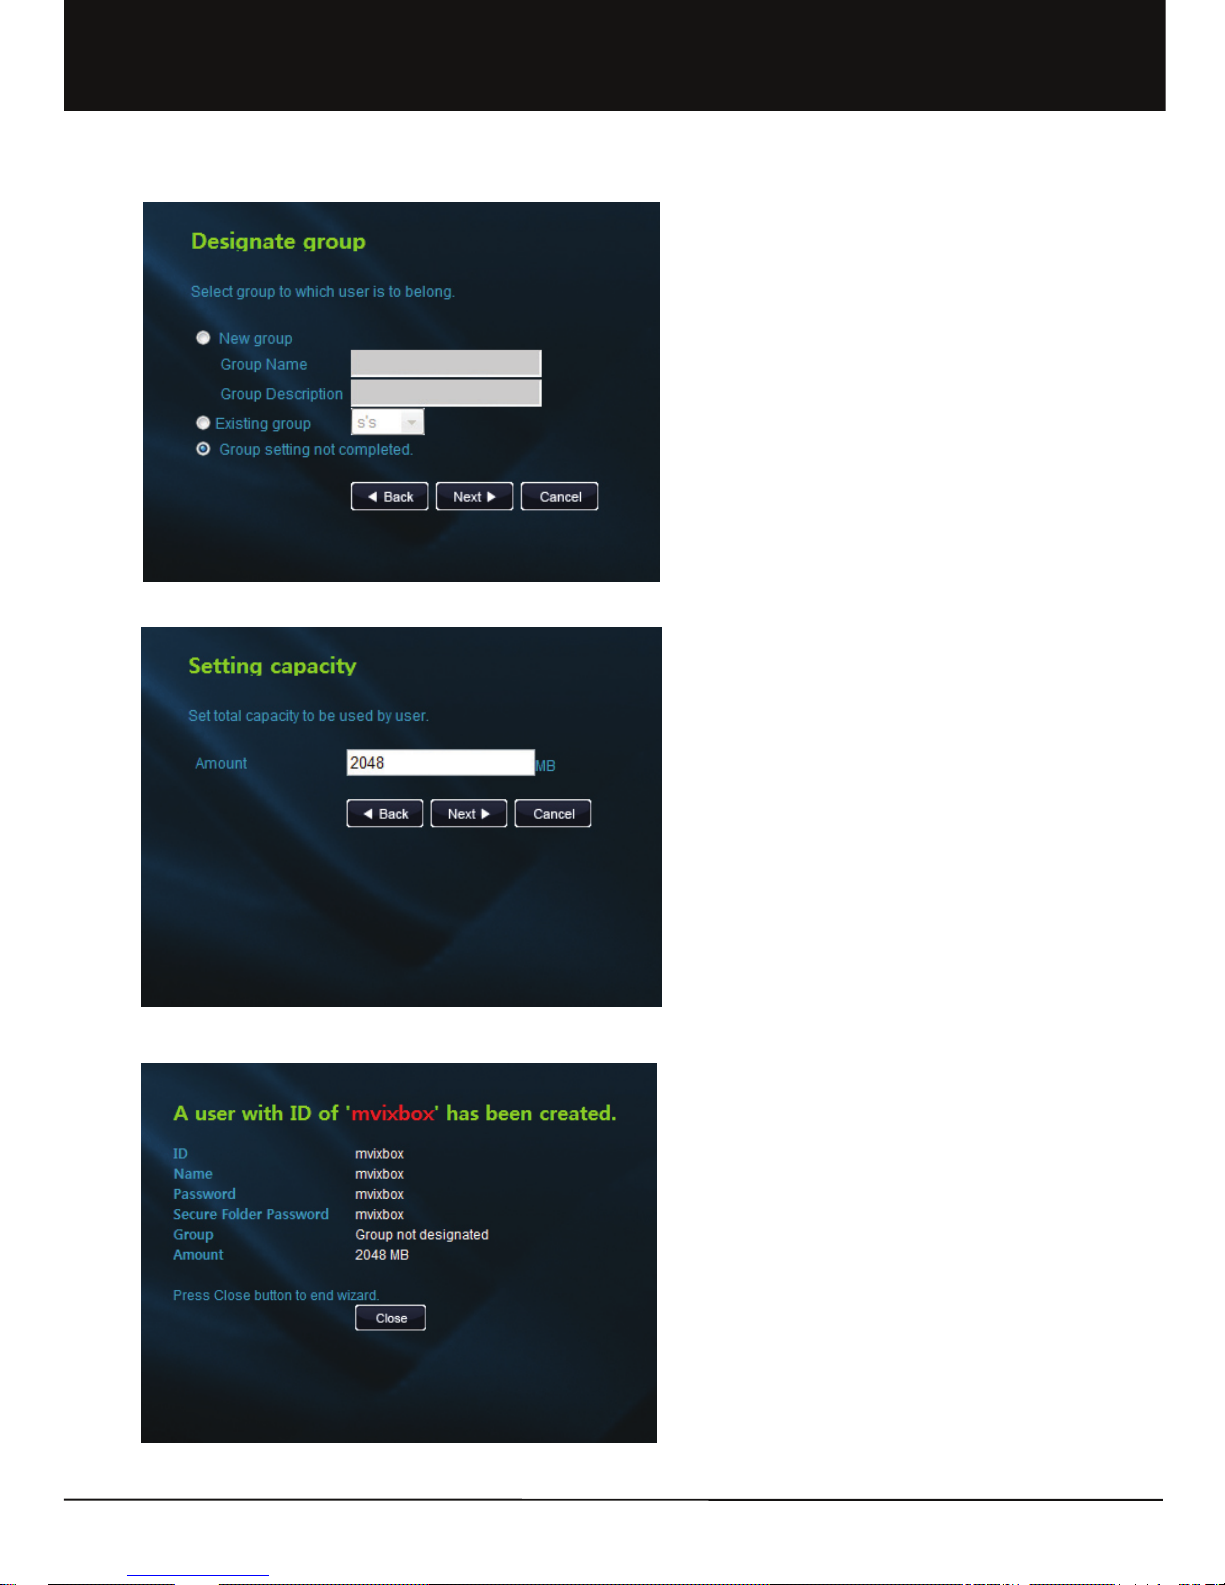
4. Select group to which user is to belong.
① In case of new group creation, enter group name and
description and press Next button.
② To select an existing group, select a group in the
selection box.
③ It is not necessary to set a group if not separately
designating a group.
5. Set total capacity to be used by user.
6. Check the newly created user information. Press
Close button to end wizard.
Unicorn Information System
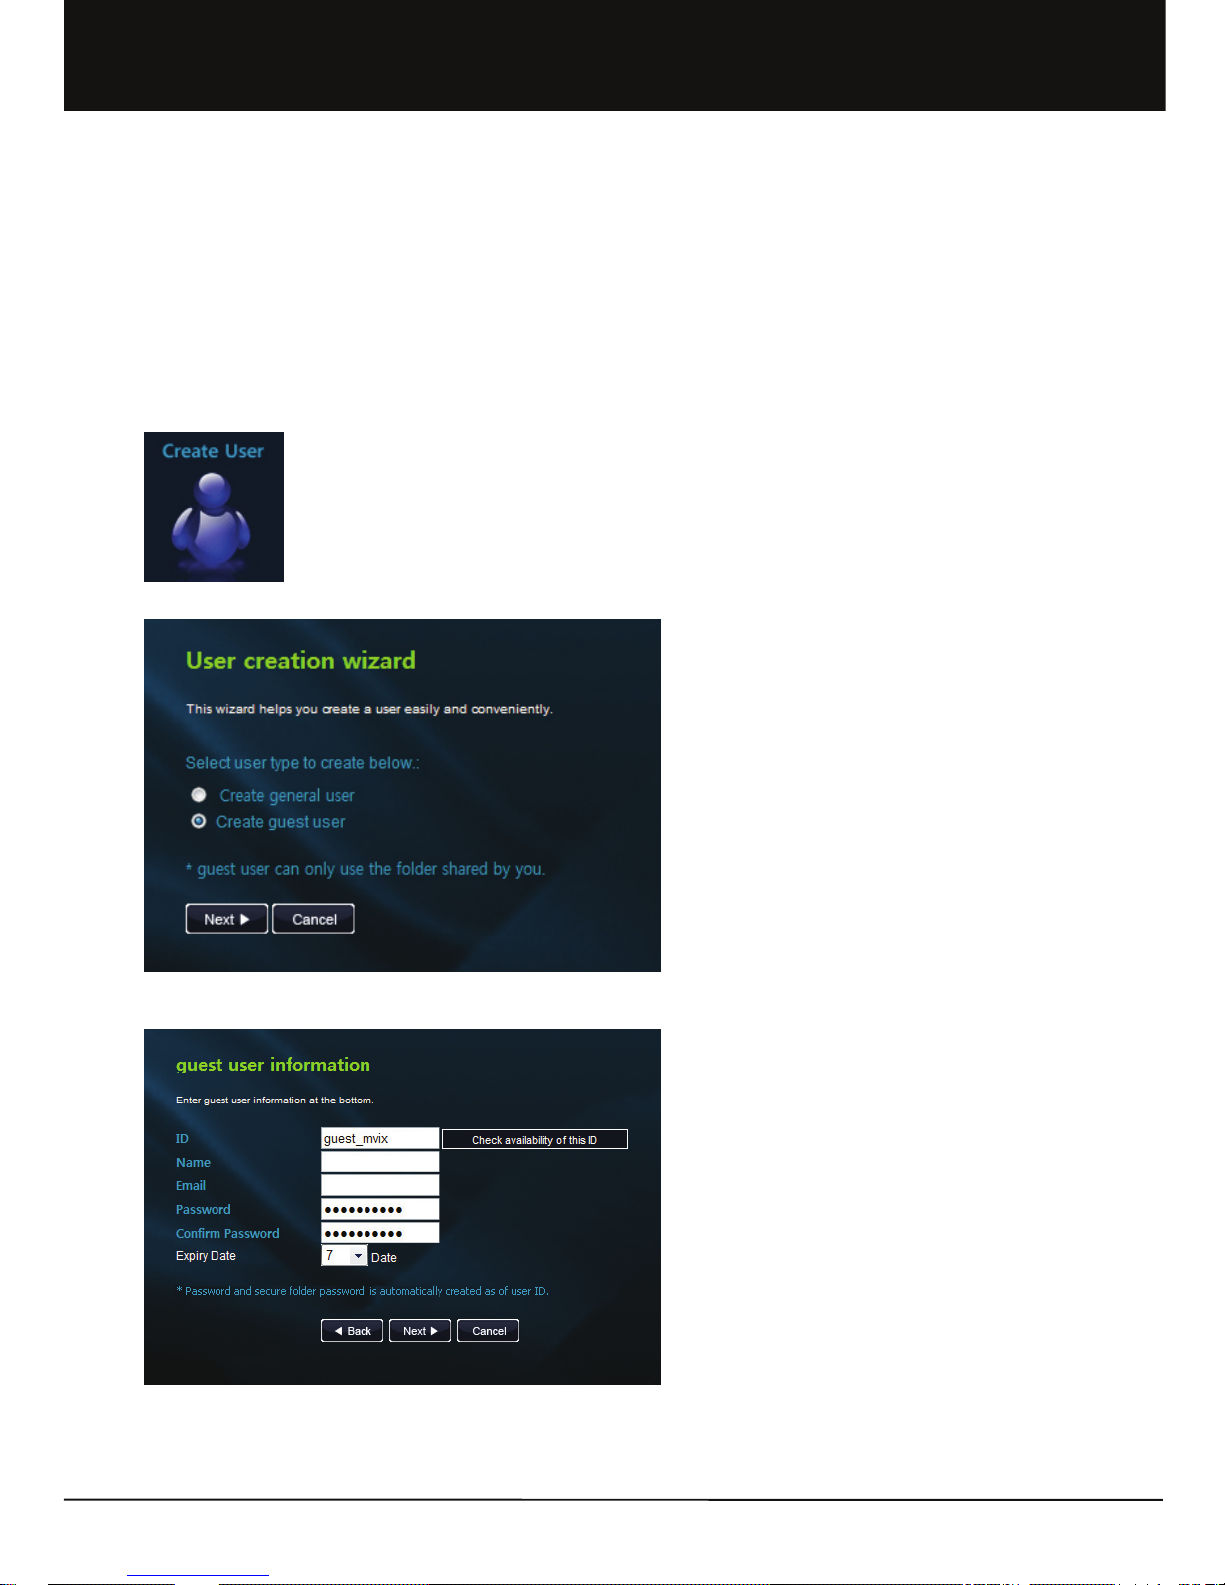
1.2.1-2 Create Guest User
It is possible to conveniently share folder with a specific person not registered as a user by creating a Guest user. Both
admin. account and general user account can create and delete Guest user.
Guest user can only use the folder shared by the person who created the Guest user.
[Create Guest user in admin. mode]
Chapter 1. User Guide
16
1. After login with admin. ID, click 'Create user' icon in
the main page to move to 'user creation wizard' page.
2. Select 'create guest user' in the user type to be
created.
3. Enter guest user information. Password is
automatically created as of user ID. After setting valid
term for folder sharing by guest user, click Next button.
Unicorn Information System
Chapter 1. User Guide
17
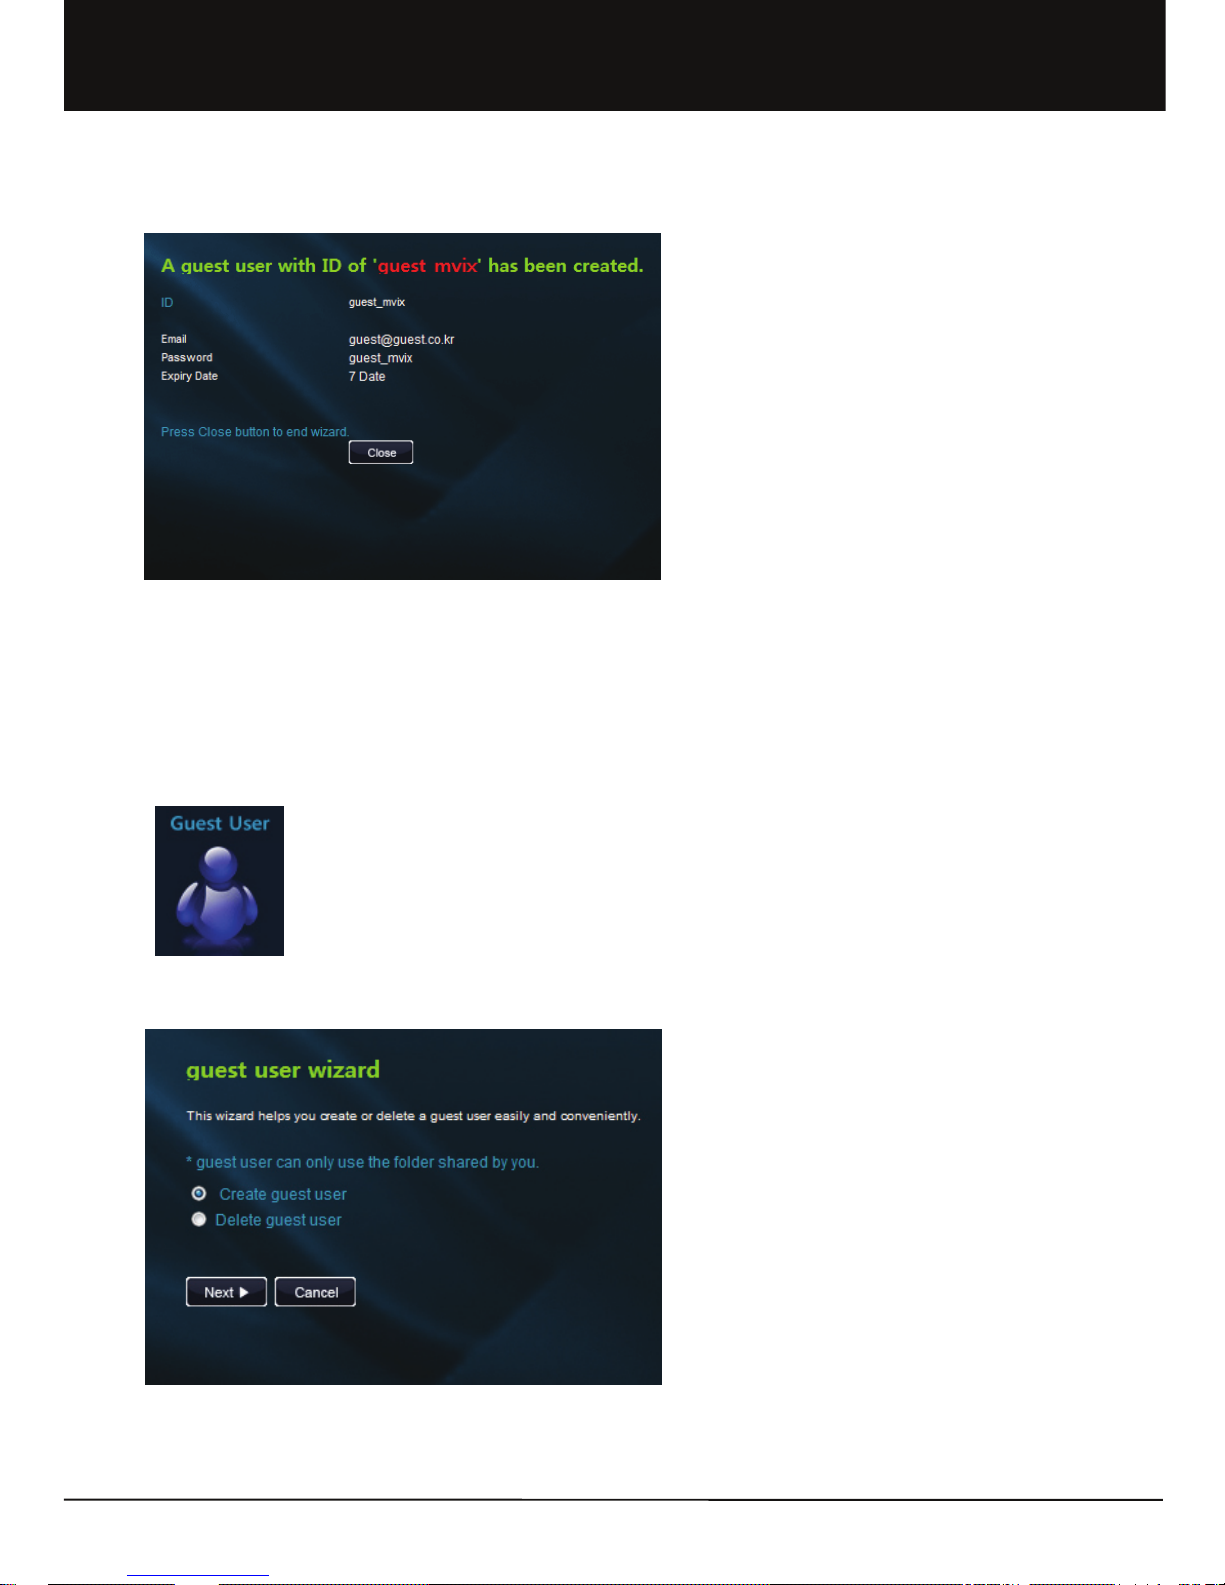
4. Check the newly created guest user information. Press
Close button to end wizard.
1. After login, select 'guest user' icon in the main page to
move to 'guest user wizard' page.
2. Select 'Create guest user' menu to create a guest user.
The following stages are the same as those of creating a
guest user in admin. mode. Refer to the previous page.
[Create guest user in user mode]

Unicorn Information System
Chapter 1. User Guide
18
1. Select 'Delete guest user' menu to delete guest user.
2. A list of the guest users created is displayed. Select
the guest user to be deleted and click Next button.
3. After checking the guest user deleted, press Close
button to end wizard.
[Delete guest user in user mode]
Unicorn Information System
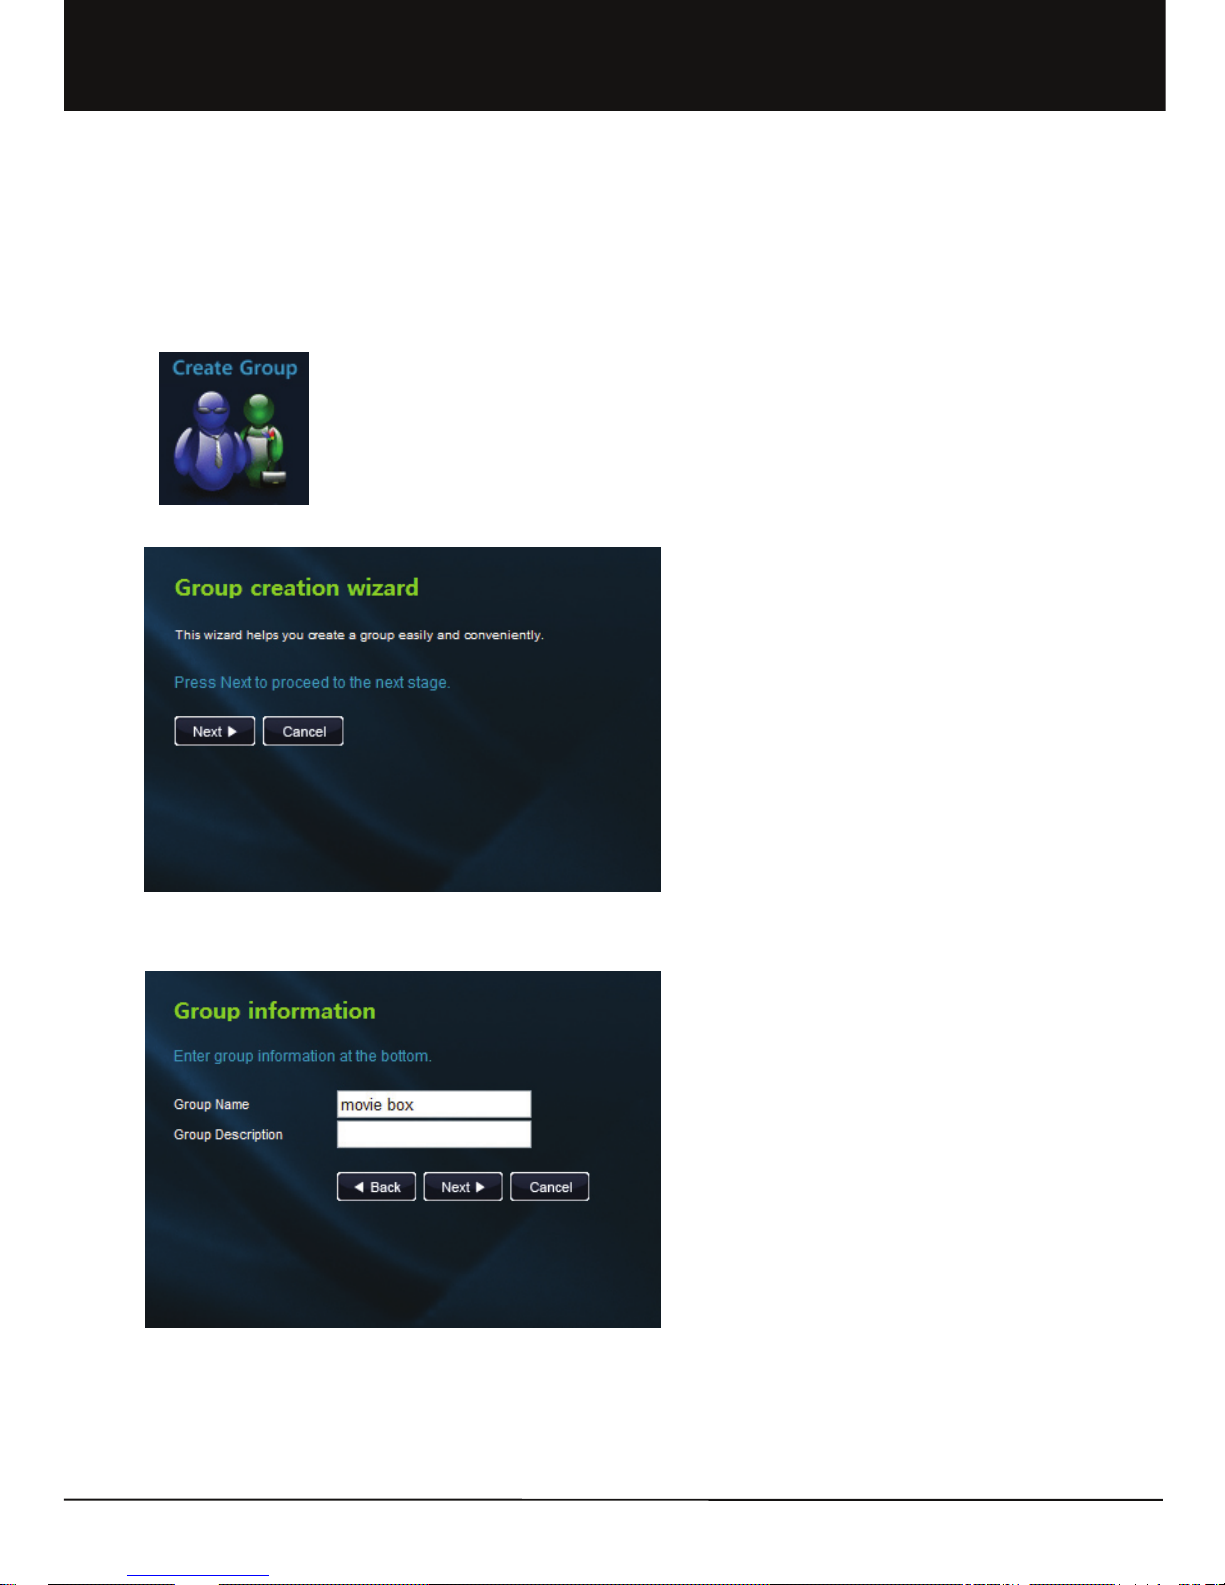
1.2.2 Create Group
Create group menu is the exclusive authority of administrator. Administrator can conveniently create a group by using
wizard without moving to admin. page.
Chapter 1. User Guide
19
1. After login with admin. ID, select 'Create group' icon in
the main page.
2. Move to group creation wizard page. Press Next
button to proceed to the next stage.
3. After entering name and description of the group to be
created, click Next button.
Unicorn Information System
Chapter 1. User Guide
20
4. When a list of the registered users is created, select
the user to be added to the group. It is possible for a
single user to join multiple groups.
5. After checking the created group, press Close button
to end wizard.
Unicorn Information System
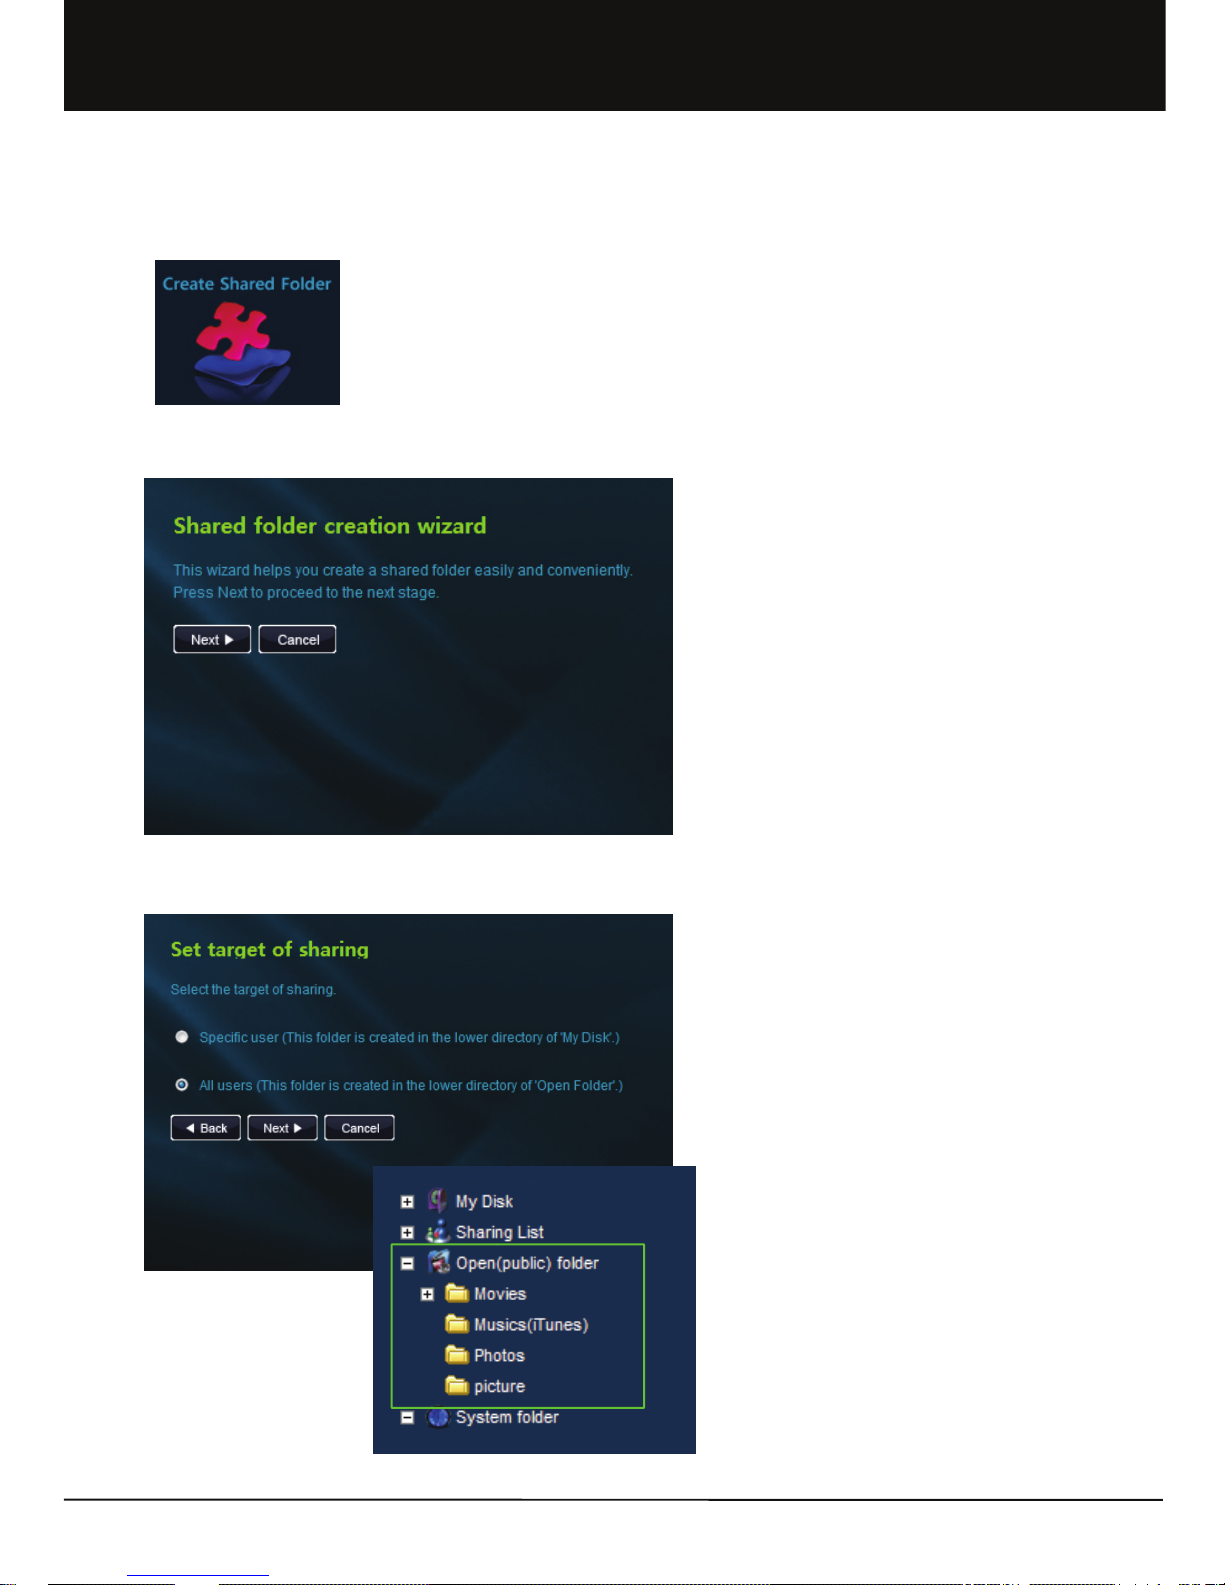
1.2.3 Create Shared Folder
It is possible to easily and conveniently create a shared folder by using shared folder wizard. Shared folder can be shared
with a specific person designated by user or with all users registered in the equipment.
Location of shared folder is determined according to the type of sharing.
1.2.3-1. Share with a specific user
Chapter 1. User Guide
21
1. After login, click 'Create shared folder' icon in the main
page.
2. Move to shared folder creation wizard page. Press
Next button to proceed to the next stage.
3. Select 'specific user' in the target of sharing. Folder
shared with a specific user is created in the lower
directory of 'My Disk'.
Unicorn Information System
Chapter 1. User Guide
22
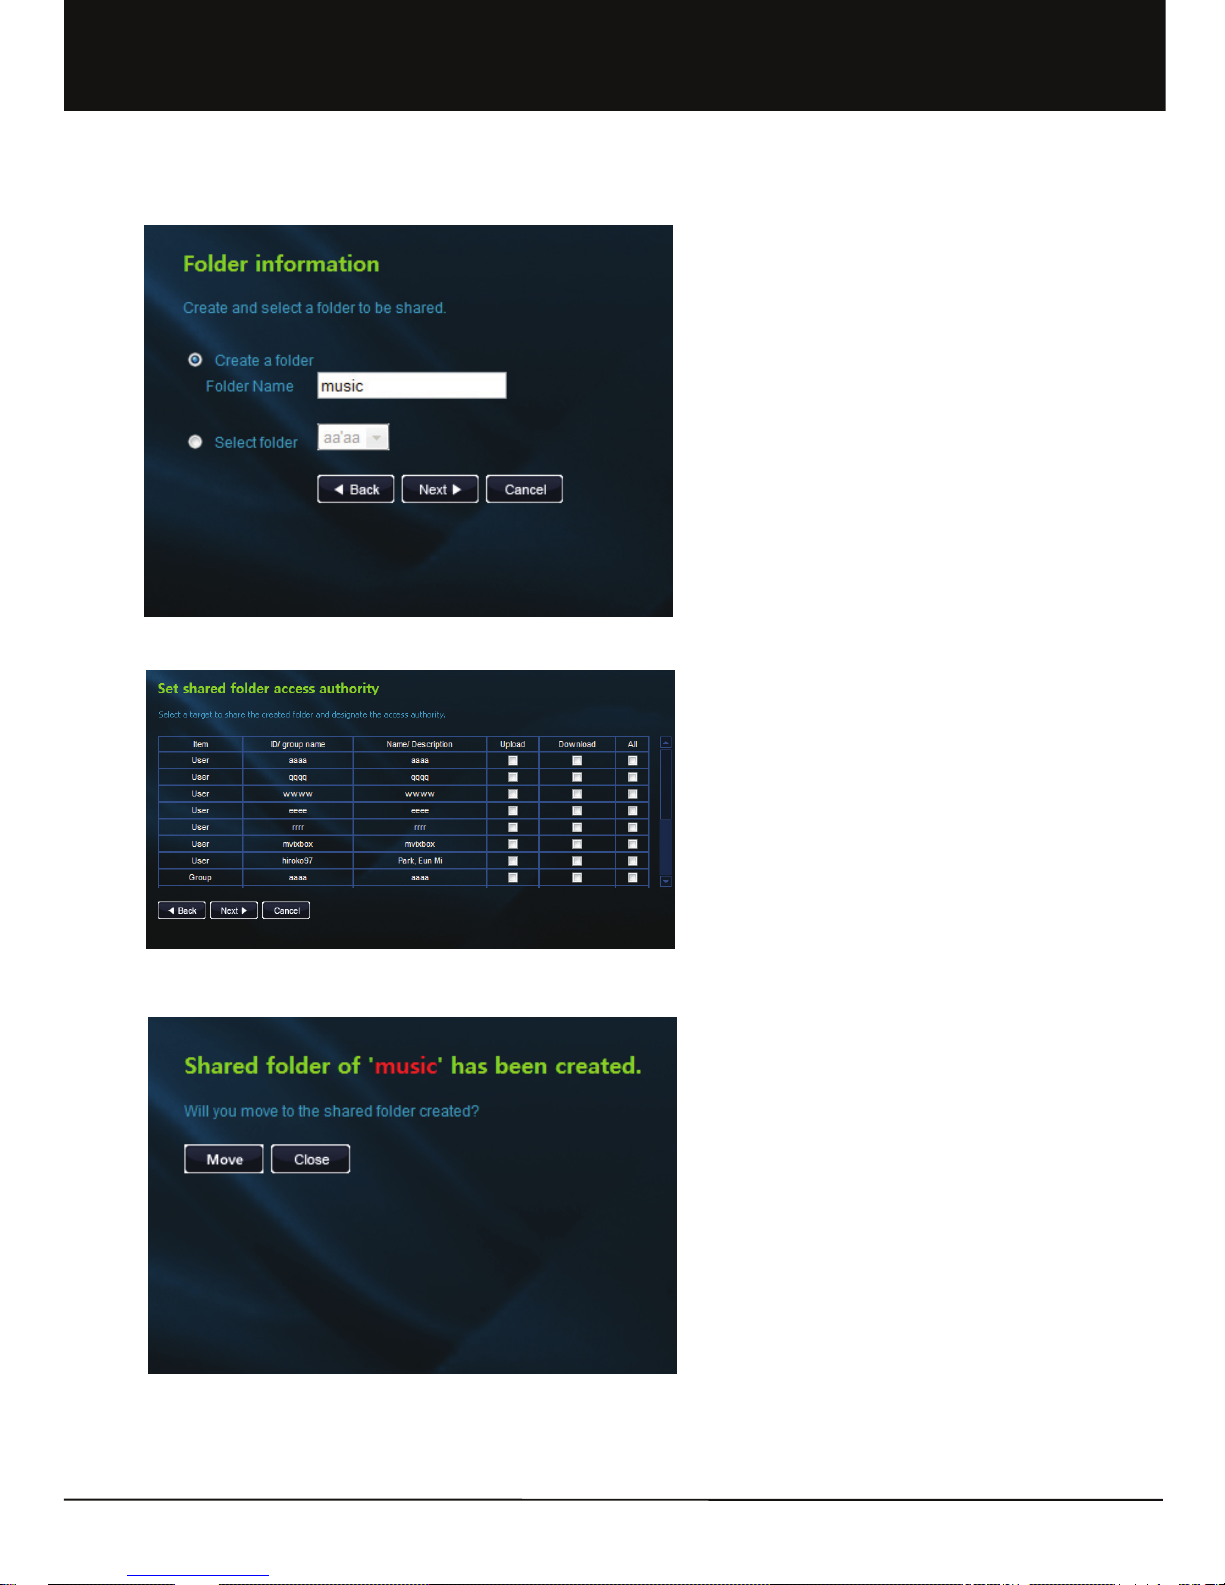
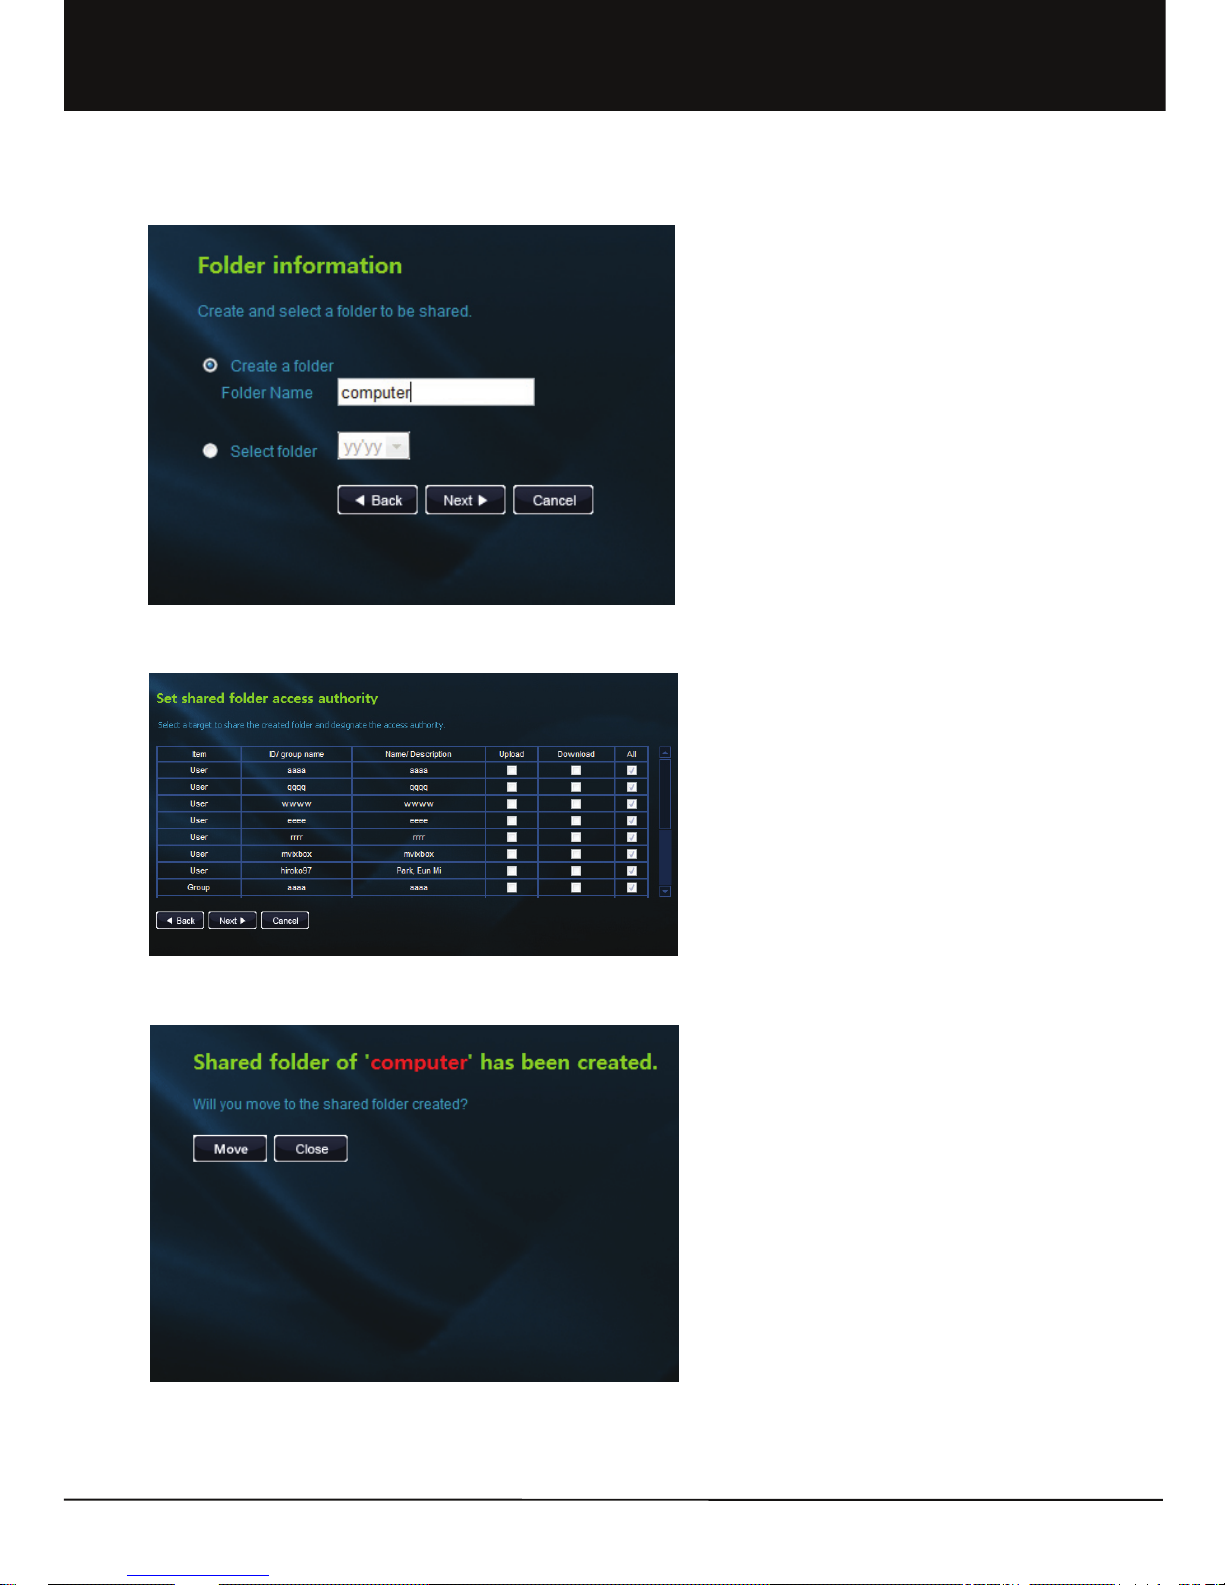
4. Select the folder to be shared. To create and share a
new folder, select 'Create folder' and enter the folder
name. To share an already existing folder, select a
folder in 'Select folder'.
5. Lists per users/ groups/ guest users are displayed.
Select a target to share the created folder and
designate the access authority. Authority designation
is possible per upload, download and upload/
download.
6. Check the shared folder created. Press move button
to move to the shared folder created. Press Close
button to end wizard.
Unicorn Information System
Chapter 1. User Guide
23
1. After login, click 'Create shared folder' icon in the main
page.
2. Move to shared folder creation wizard page. Press
Next button to proceed to the next stage.
3. Select 'all users' in the target of sharing. The folder
shared with all users is created in the lower directory
of 'Open Folder'.
1.2.3-2 Share with all users
Unicorn Information System
Chapter 1. User Guide
24
4. Select the folder to be shared. To create a folder
shared with all users, an existing folder cannot be
selected.
5. In shared folder access authority, upload and
download authorities are set to all users.
6. Check the shared folder created. Click Move button to
move to the shared folder created. Press Close button
to end wizard.
Unicorn Information System
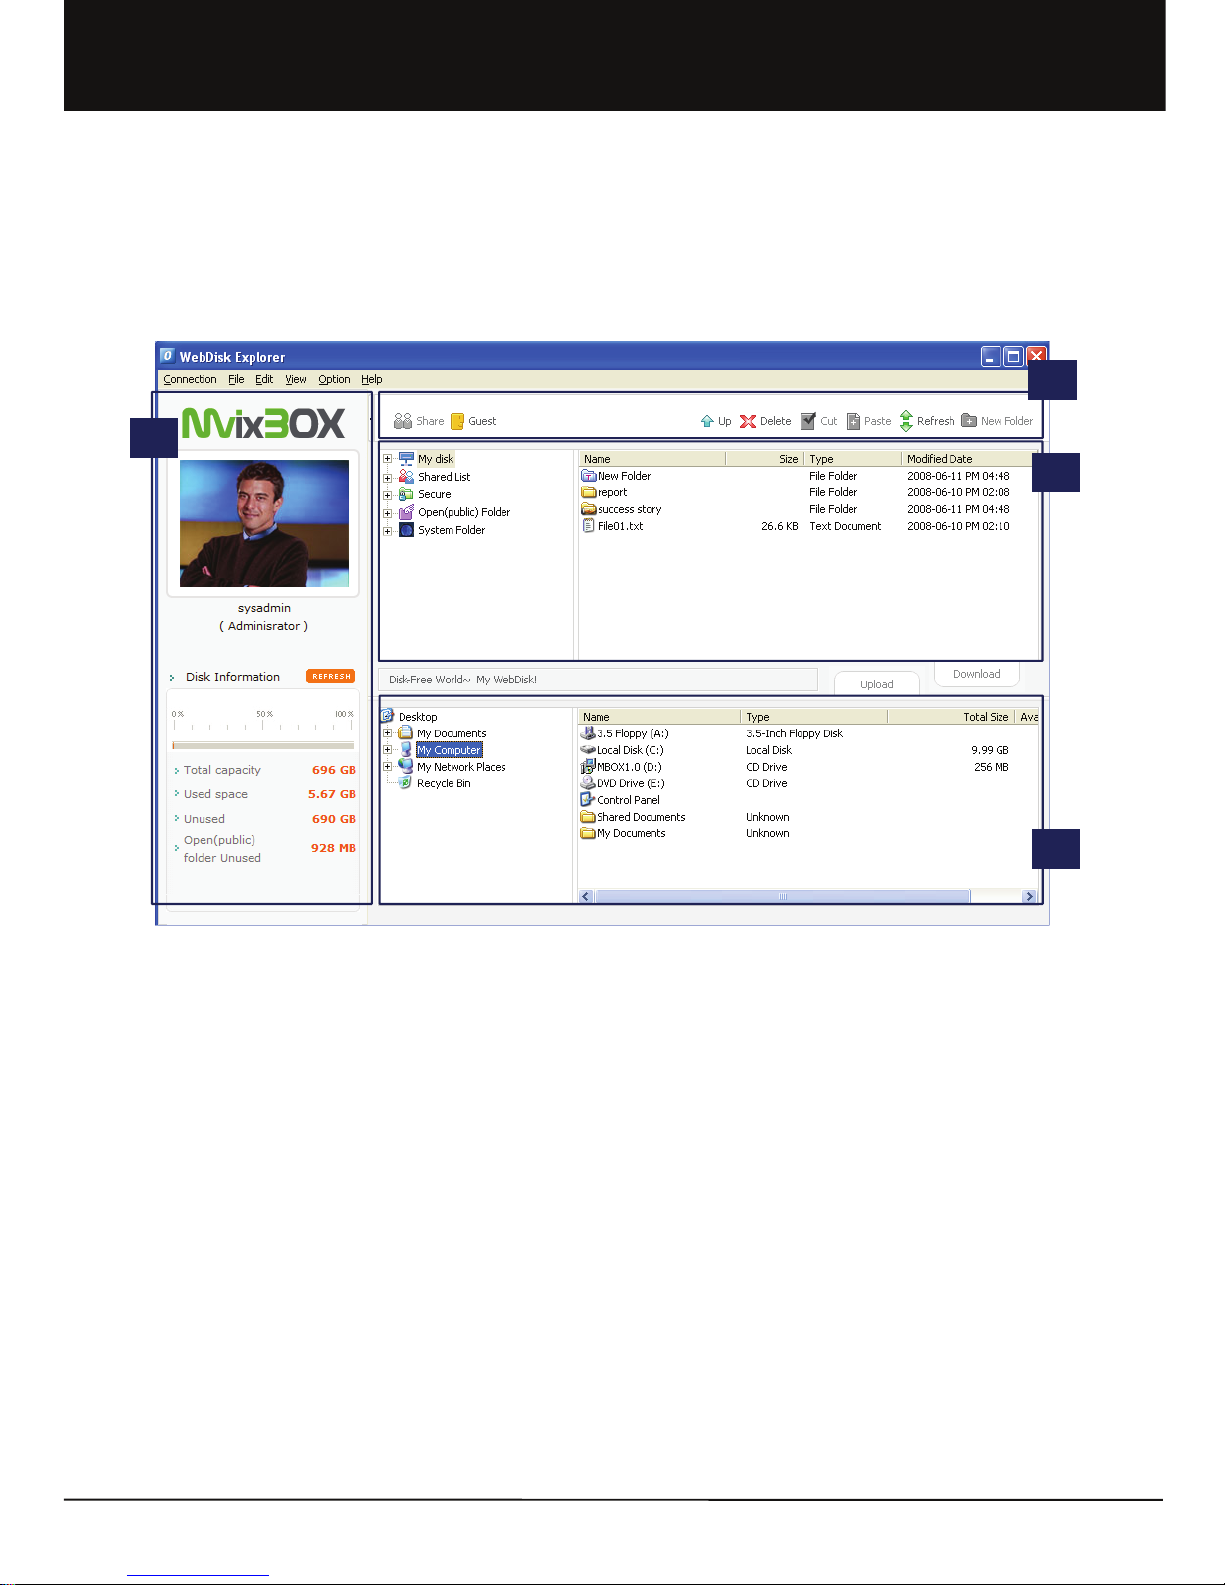
1.3 Using WebDisk Explorer
1.3.1 Menu Definition
1. WebDisk Explorer can be only used in windows operating system. So if you want to use another OS, please use Web
Explorer or Windows Explorer.
2. WebDisk Explorer is similar to Windows explorer. It is largely divided into ① personal and Disk information ② menu
③ WenDisk Side File/ Folder list and 4 local PC parts.
Chapter 1. User Guide
25
1
2
3
3
Unicorn Information System
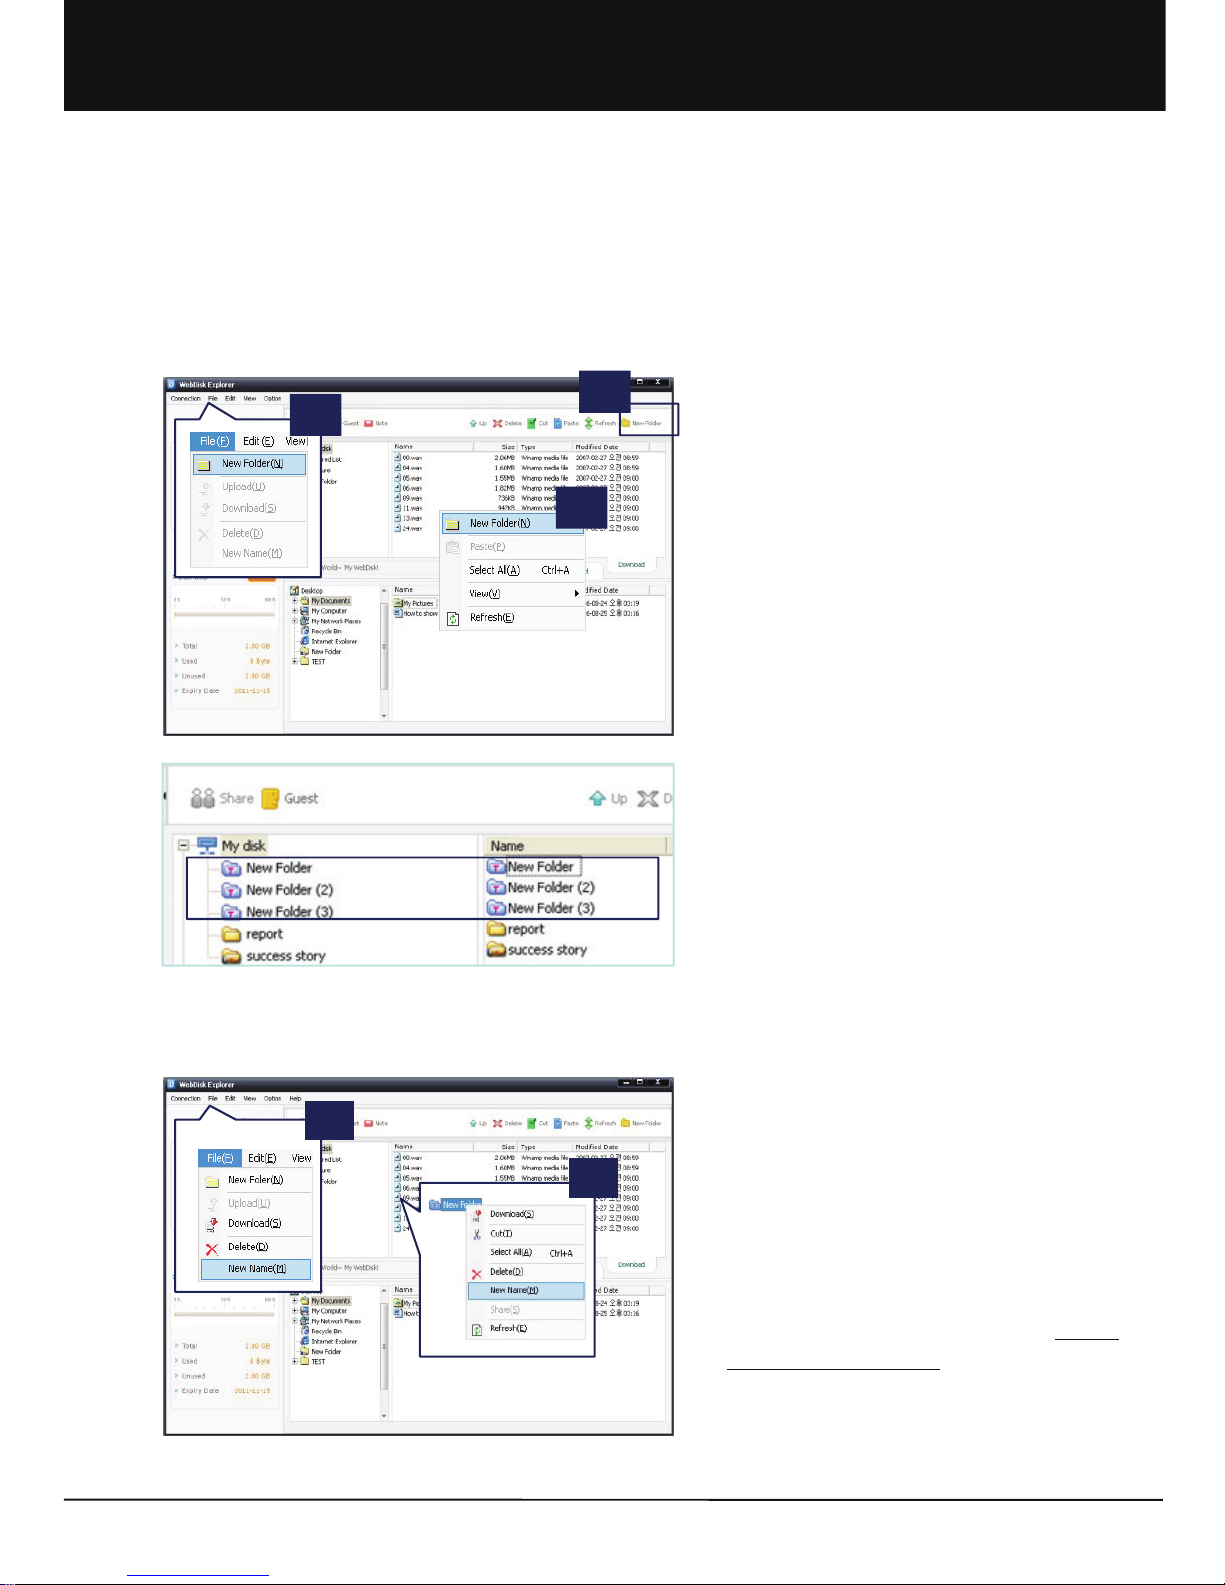
1.3.2-2 Changing File/Folder Name
1. New folders are created in 3 ways, such as ① by
selecting ‘New Folder’ in the File menu, ②
selecting ‘New Folder’ after clicking right-mouse
on the place where a new folder is to be created or ③
clicking the New Folder icon.
2. A new folder is created with the basic name of ‘New
Folder’. The name can be changed by the user.
3. If a ‘New Folder’ already exists, new folders are
created with names followed by numbers, such as
‘New Folder (2)’, ‘New Folder (3)’, etc.
1. After selecting a file or folder for name change, ①
right-click on the mouse to execute a name
change. Or, ② select ‘Change Name’ in the File
menu to change the name of File/ Folder. (Or Press
F2 after selecting that folder.)
2. The changed name can be immediately checked in
the File/ Folder list.
1.3 Using WebDisk Explorer
1.3.2 File Management
1.3.2-1 Creating Folder
1
2
3
1
2
Chapter 1. User Guide
26
Unicorn Information System
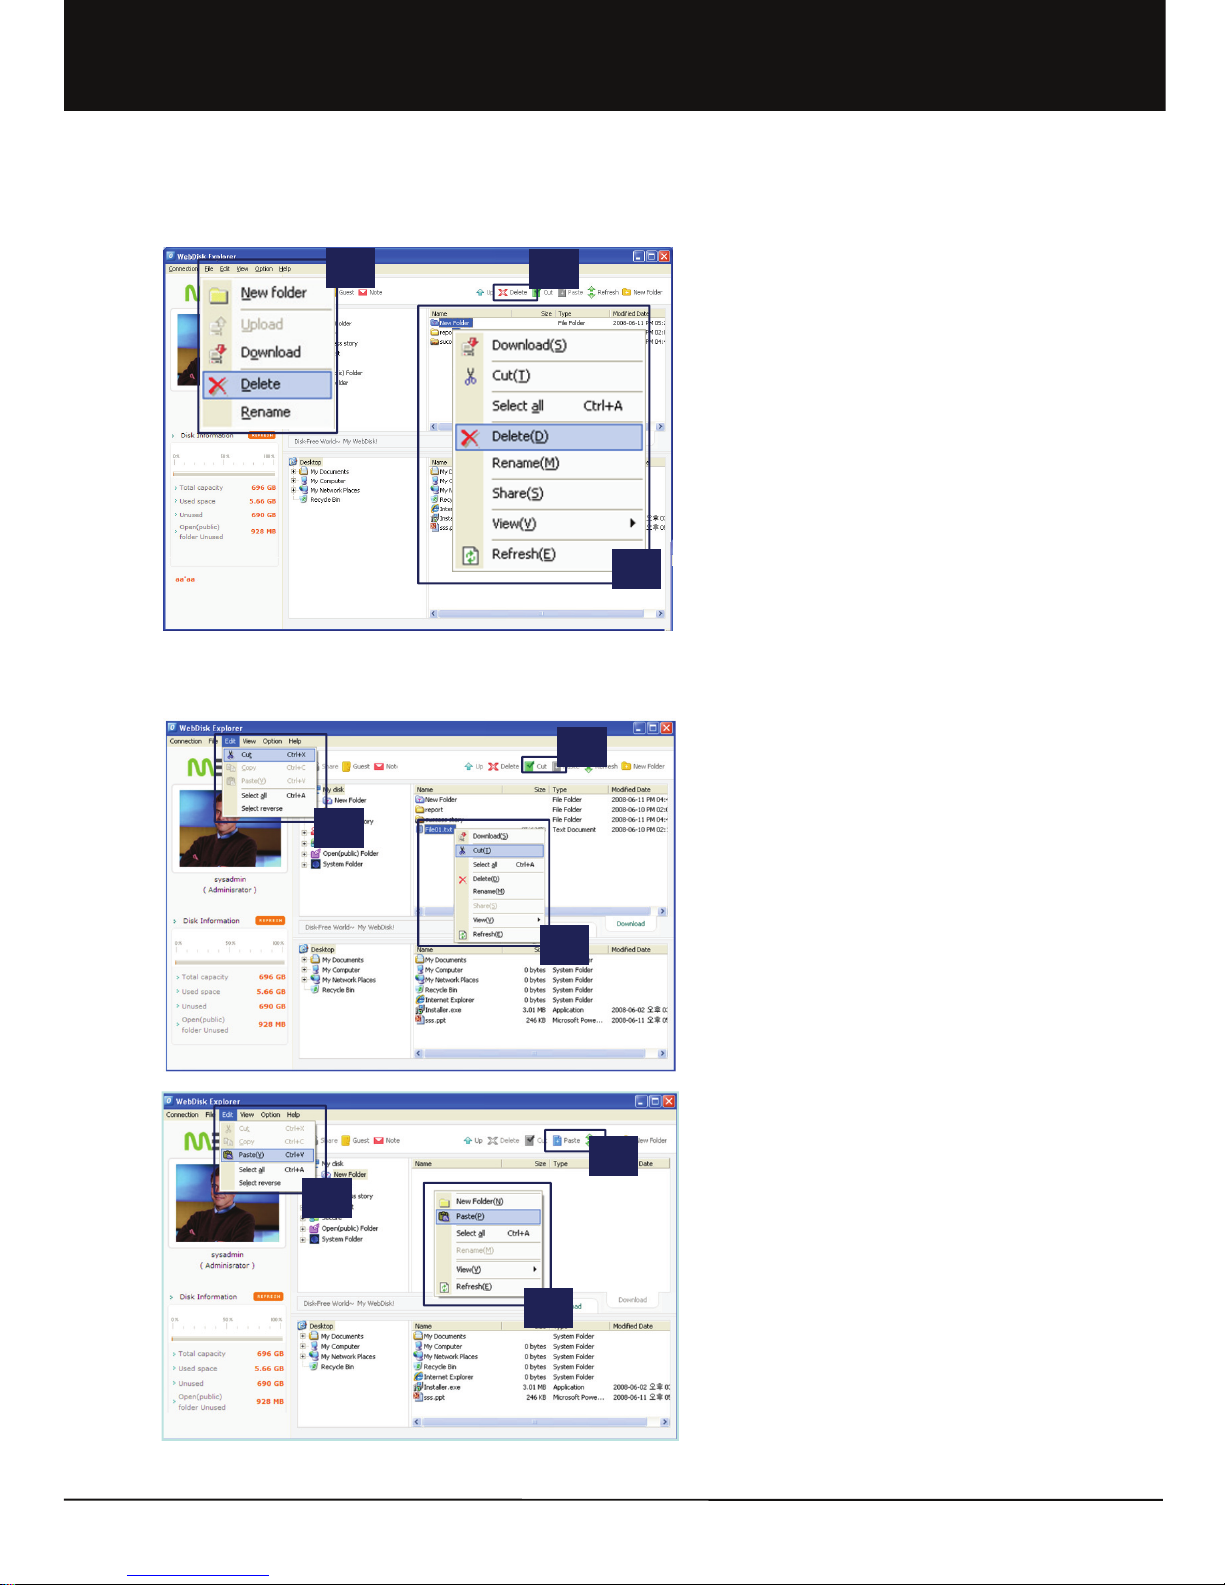
1. There are 3 ways of deleting a file or folder. After
selecting the file or folder to be deleted, ① select
‘Delete’ in the File menu, or ② right-click the
mouse and select ‘Delete’. The last method is ③ to
click the ‘Delete’ icon.
2. Deleted files cannot be restored. Be careful when
deleting files.
1. Files or folders can be moved in three ways.
2. First, cut out the file or folder to be moved using ‘Cut’.
After selecting the file or folder to be deleted, ① ‘Cut’
in the Edit menu, or ② right-click the mouse and
select ‘cut’. The last method is ③ to click the ‘Cut’
icon.
3. Then, paste the cut file or folder in the desired
destination. ① ‘Paste’ in the Edit menu, or ② right-
click the mouse and select ‘Paste’. The last
method is ③ to click the ‘Paste’ icon.
4. Only the moving of a File/ Folder is possible. Copying
is not possible.
1.3.2-3 Deleting File/Folder
1.3.2-4 Moving File/Folder
3
1
2
3
1
2
3
1
2
Chapter 1. User Guide
27

Unicorn Information System
1. This function is to upload files or folders in My Disk to
a storage space in the Internet.
2. To upload a file or folder, first select the file or folder
to be uploaded. ① Click ‘Upload’ in the File menu
or ② drag & drop by the mouse. Also, a file or
folder upload can be done by ③ clicking the
‘Upload’ icon.
3. Upload window to check the list of files to be
uploaded and an upload progress status is created.
4. In the File list, results of file transfers can be
checked. In the upload progress status, transfer
speed and overall progress rate can be checked.
5. In the list of transfer files in the upload window,
specific files can be deleted from the upload list or
upload priority can be adjusted by using the Delete
button and up/ down arrow buttons.
6. Uploading of the file in transfer stops if you click the
Stop button.
7. Transfer begins again when clicking the Upload button
again. A suspended file transfer can be transferred
again from the last part of the file previously uploaded.
8. Upload is completed when selecting ‘Exit when
transfer completed’ at the bottom of the upload
window. Then, the upload window will automatically be
closed.
1.3.2-5 File/Folder Upload
1
2
3
Chapter 1. User Guide
28
Unicorn Information System
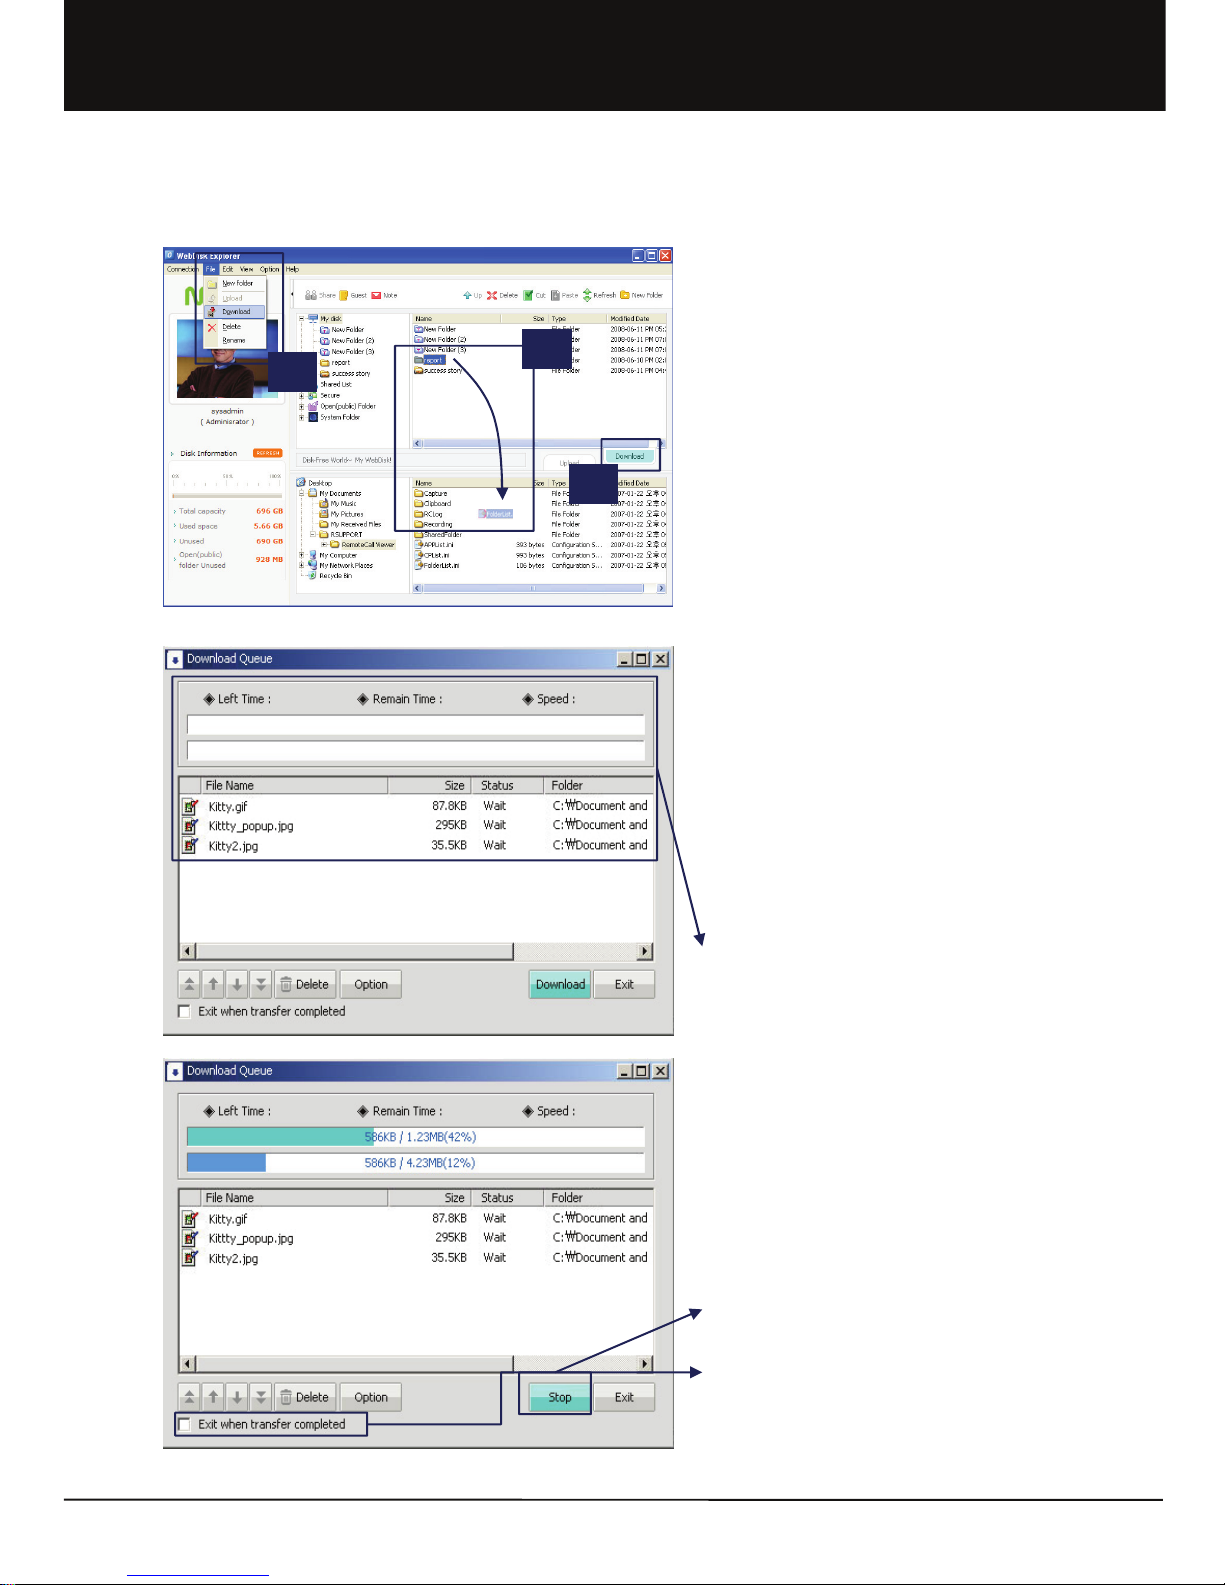
1. This function is to download files which are saved in
the Internet storage space into my own disk.
2. To download a file or folder, first select the file or
folder to be downloaded. ① Click ‘Download’ in the
File menu, ② drag & drop by the mouse or ③ by
clicking on the Download’ icon.
3. A Download window to check the list of files for
download and the download progress status is
created.
4. In the File list, results of the file transfer can be
checked. In the Download Progress window, the
transfer speed and overall progress rate can be
checked.
5. Downloading of a file or folder temporarily pauses if
you click the Stop button.
6. If you select ‘Exit when transfer complete’d at the
bottom of the window, after finishing transfer the
download window will be closed automatically.
1.3.2-6 File/Folder Download
1
2
3
Chapter 1. User Guide
29
Unicorn Information System
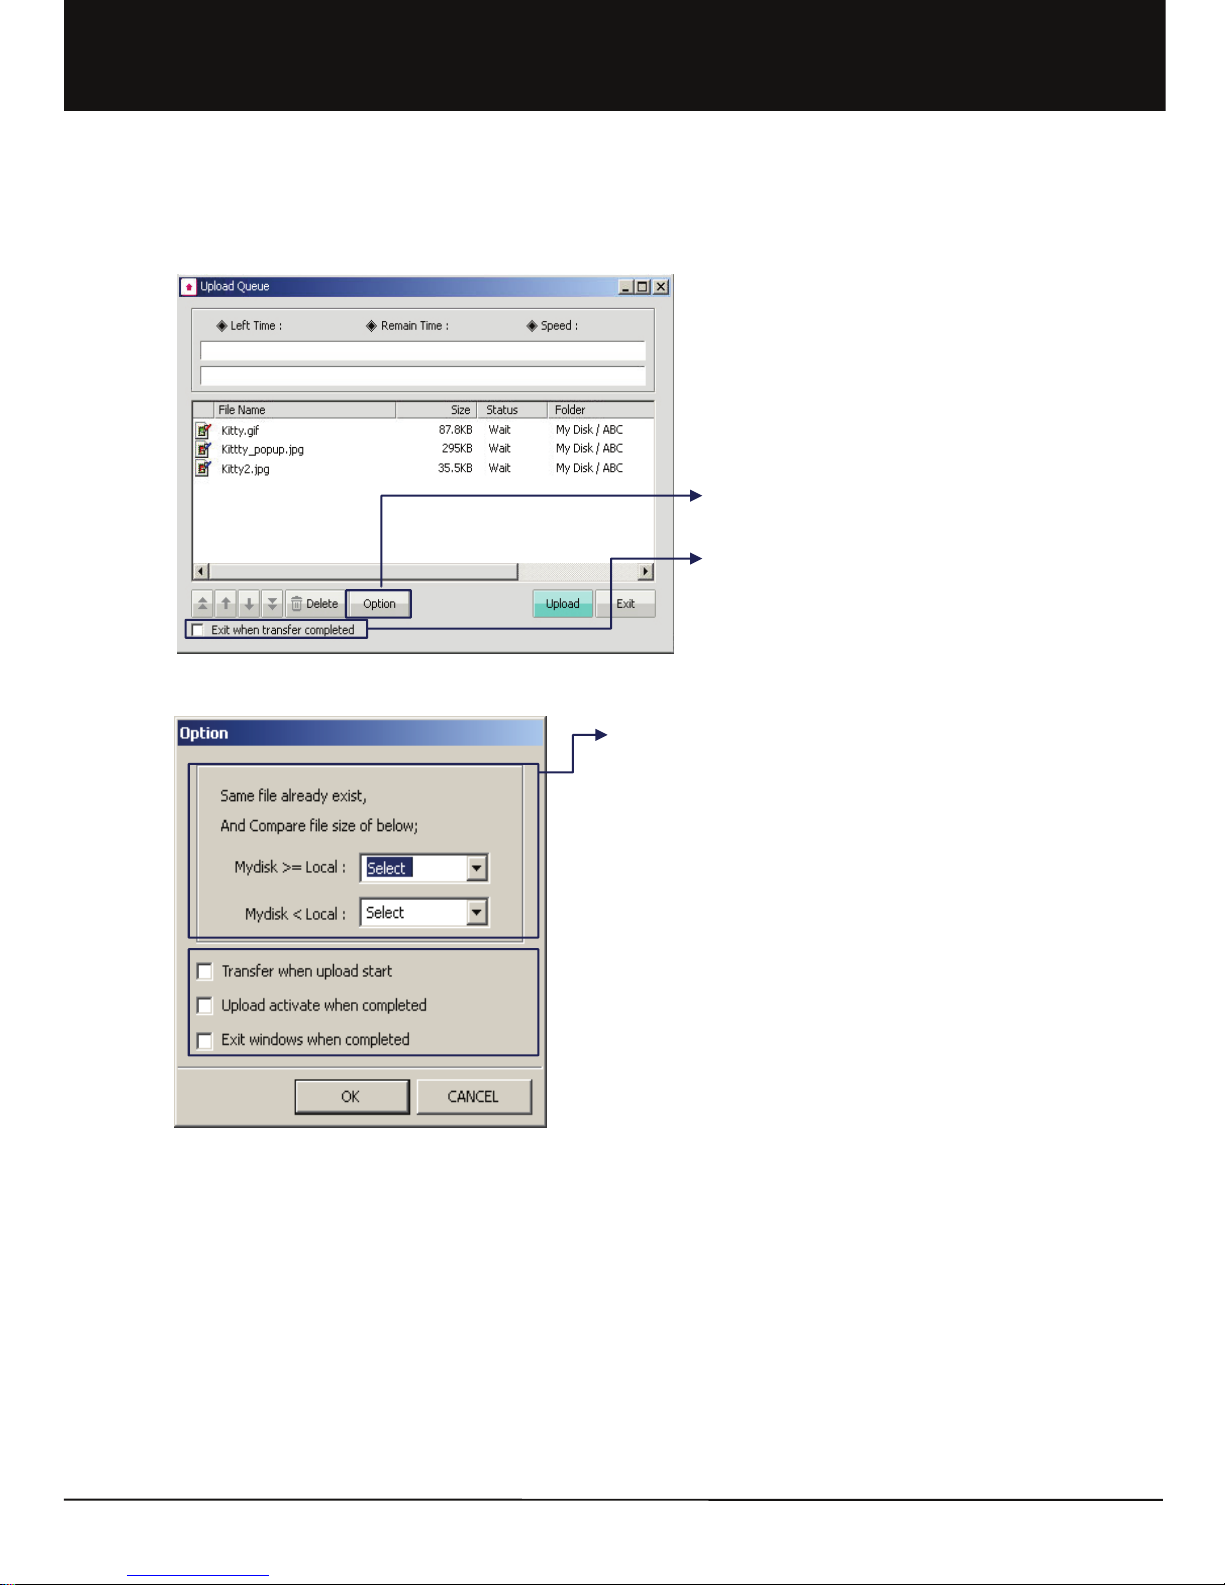
1. This function is to set the environment for upload and
download in the Upload and Download window.
2. Exit When Transfer Completed : Selection can be
made to automatically close the transfer window after
upload/ download. Clear this selection in order to
check the transfer status after transfer completion
per file.
3. When there are files of the same name, file size is compared. If
Mydisk file is larger than or the same as the file to be transmitted,
select one from the 3 options of Select, Overwrite, Skip to enable
upload/ download. If Mydisk file is smaller than the file to be
transmitted, select one from the 4 options of Select, Overwrite,
Resume and Skip to enable upload/ download.
a. ‘Select’ queries user about the method of processing in case there
are repetitive files.
b. ‘Overwrite’ overwrites the file to be uploaded or downloaded on
the existing file.
c. ‘Resume’ resumes the file to be uploaded or downloaded from the
last part of the existing file.
d. ‘Skip’ skips the file to be uploaded or downloaded in case there are
same files.
4. When the ‘Transfer when upload start’ is automatically selected, the
transfer window is activated and upload/ download automatically
starts even if the Upload/ Download button is not clicked.
5. Select ‘Upload/Download Activate when completed’ to display
transfer window after completion of transfer at the front of the
window to check transfer completion status.
6. Select ‘Exit windows when completed’ to automatically close the
system after completion of transmission. This function is useful
when uploading/ downloading large-capacity files before going to
bed.
1.3.2-7 upload/download Environment setting
Chapter 1. User Guide
30
 Loading...