

Page 1
User’s Guide
Zephyr TS
Preliminary
Page 2

Page 3

User’s Guide Zephyr TS
AP-75390 - Revision 1.0 3
2
Copyright notice
COPYRIGHT © 19/2/10 Mutoh Europe nv All rights reserved.
Mutoh Europe nv reserves the right to modify the information contained in this manual at any
time without prior notice.
This document may not be reproduced by any means, in whole or in part, without written
permission of the copyright owner.
Mutoh furnished this document to support the Zephyr TS series printers. In consideration of
the furnishing of the information contained in this document, the party to whom it is given,
assumes its custody and control and agrees to the following:
The information herein contained is given in confidence, and any part thereof shall not be
copied or reproduced without written consent of Mutoh Europe nv
This document or the contents herein under no circumstances shall be used in the
manufacture or reproduction of the article shown and the delivery of this document shall not
constitute any right or license to do so.
AdditionalLicensingprovisionsforMicrosoftWindowsXP embedded runtime
licenses
The following additional licensing provisions apply to the licensed product as indicated above
and are an addition to the terms of Mutoh’s Microsoft OEM Customer License Agreement for
Embedded Systems (“Agreement”). Capitalized terms used below and not otherwise defined
have the meaning set forth in the general terms and conditions of the agreement. These
applicable additional licensing provisions shall supersede any inconsistent terms contained in
the general terms and conditions of the agreement.
You are licensed to use the software to provide only the limited functionality (specific tasks or
processes) for which the device has been designed and marketed by Mutoh. This license
specifically prohibits any other use of the software programs or functions, or inclusion of
additional software programs or functions that do not directly support the limited functionality
on the Zephyr TS.
Backup copy. You may make one (1) backup copy of the software. You use this backup
copy solely for your archival purposes and to reinstall the software on the Zephyr TS. Except
as expressly provided in this End User License agreement (EULA) or by local law, you may
not otherwise make copies of the software including the printed materials accompanying the
software. You may not loan, rent, lend or otherwise transfer the backup copy to another user.
No rental / commercial hosting. You may not rent, lease, lend or provide commercial
hosting services with the software to others.
Page 4

User’s Guide Zephyr TS
4 AP-75390 - Revision 1.0
Trademarks. This EULA does not grant you any rights in connection with any trademarks or
service marks of Mutoh Europe nv, MS Microsoft Corporation or their affiliates and suppliers.
Recovery media. If software is provided by Mutoh Europe nv on separate media and labelled
“Recovery Media” you may use the Recovery Media solely to restore or reinstall the software
originally installed on the device.
Notice regarding security. To help protect against breaches of security and malicious
software, periodically back up your data.
19 February 2010
Published: Mutoh Europe nv, Archimedesstraat 13, B-8400 Oostende, BELGIUM
www.mutoh.eu
IMPORTANT NOTICE
Trademarks mentioned in this guide
Mutoh, Zephyr TS are registered trademarks or product names of Mutoh Europe nv.
Windows95, Windows98, Windows NT4.0, Windows2000, Windows XP, and MS-DOS are
registered trademarks or product names of Microsoft Corporation.
Other company and product names may be registered trademarks or product names.
Note
The product and the contents of this publication may be changed without prior
notification.
Mutoh Europe nv has made the best efforts to keep this publication free from
errors, but if you find any uncertainties or misprints, please contact the reseller
from which you bought this equipment or email us: technical.news@mutoh.eu
.
Mutoh Europe nv shall not be liable for any damages or troubles resulting from
the use of this equipment or this guide.
Page 5

User’s Guide Zephyr TS
AP-75390 - Revision 1.0 - 19/2/10 5
Table of contents
Chapter 1 Safety instructions . . . . . . . . . . . . . . . . . . . . . . . . . . 11
1.1 Compliance with the following regulations . . . . . . . . . . . . . . 11
1.2 Handling inks + waste . . . . . . . . . . . . . . . . . . . . . . . . . . . . . . . . . . . . . . 13
1.3 UV-curing system . . . . . . . . . . . . . . . . . . . . . . . . . . . . . . . . . . . 15
1.4 Warnings, cautions and notes. . . . . . . . . . . . . . . . . . . . . . . . . 16
1.5 Safety instructions . . . . . . . . . . . . . . . . . . . . . . . . . . . . . . . . . . 16
1.6 Safety labels . . . . . . . . . . . . . . . . . . . . . . . . . . . . . . . . . . . . . . . 18
Chapter 2 Zephyr TS documentation . . . . . . . . . . . . . . . . . . . . 21
2.1 Working with the User’s Guide . . . . . . . . . . . . . . . . . . . . . . . . 21
2.2 Working with the help file. . . . . . . . . . . . . . . . . . . . . . . . . . . . . 22
Chapter 3 Product overview . . . . . . . . . . . . . . . . . . . . . . . . . . . 25
3.1 Front view . . . . . . . . . . . . . . . . . . . . . . . . . . . . . . . . . . . . . . . . . 26
Detailed picture of the emergency stop and light switch . . . . . . . . 28
3.2 Rear view . . . . . . . . . . . . . . . . . . . . . . . . . . . . . . . . . . . . . . . . . . 29
3.3 Using the footpedal. . . . . . . . . . . . . . . . . . . . . . . . . . . . . . . . . . 30
3.4 Installation environment. . . . . . . . . . . . . . . . . . . . . . . . . . . . . . 31
Environmental requirements . . . . . . . . . . . . . . . . . . . . . . . . . . . . . . . 31
Dust free state . . . . . . . . . . . . . . . . . . . . . . . . . . . . . . . . . . . . . . . . . . . 31
Network requirements . . . . . . . . . . . . . . . . . . . . . . . . . . . . . . . . . . . . 32
Printer dimensions . . . . . . . . . . . . . . . . . . . . . . . . . . . . . . . . . . . . . . . 33
Page 6

User’s Guide Zephyr TS
AP-75390 - Revision 1.0 - 19/2/10 6
Chapter 4 Basics . . . . . . . . . . . . . . . . . . . . . . . . . . . . . . . . . . . . 35
4.1 Workflow . . . . . . . . . . . . . . . . . . . . . . . . . . . . . . . . . . . . . . . . . . 39
4.2 Switching the Power ON / OFF . . . . . . . . . . . . . . . . . . . . . . . . 40
Switching the power ON. . . . . . . . . . . . . . . . . . . . . . . . . . . . . . . . . . . 40
Switching the power OFF. . . . . . . . . . . . . . . . . . . . . . . . . . . . . . . . . . 45
4.3 Emergency Shutdown . . . . . . . . . . . . . . . . . . . . . . . . . . . . . . . 48
Emergency capping procedure . . . . . . . . . . . . . . . . . . . . . . . . . . . . . 50
4.4 How to navigate the User Interface . . . . . . . . . . . . . . . . . . . . . 53
Job management tab . . . . . . . . . . . . . . . . . . . . . . . . . . . . . . . . . . . . . 53
Maintenance tab . . . . . . . . . . . . . . . . . . . . . . . . . . . . . . . . . . . . . . . . . 54
Media control tab. . . . . . . . . . . . . . . . . . . . . . . . . . . . . . . . . . . . . . . . . 54
Calibration tab . . . . . . . . . . . . . . . . . . . . . . . . . . . . . . . . . . . . . . . . . . . 55
Ink tab . . . . . . . . . . . . . . . . . . . . . . . . . . . . . . . . . . . . . . . . . . . . . . . . . . 55
Statistics tab. . . . . . . . . . . . . . . . . . . . . . . . . . . . . . . . . . . . . . . . . . . . . 56
Setup tab . . . . . . . . . . . . . . . . . . . . . . . . . . . . . . . . . . . . . . . . . . . . . . . 57
Non assigned tabs . . . . . . . . . . . . . . . . . . . . . . . . . . . . . . . . . . . . . . . 58
Status bar. . . . . . . . . . . . . . . . . . . . . . . . . . . . . . . . . . . . . . . . . . . . . . . 59
4.5 Loading media. . . . . . . . . . . . . . . . . . . . . . . . . . . . . . . . . . . . . . 61
Loading roll media. . . . . . . . . . . . . . . . . . . . . . . . . . . . . . . . . . . . . . . . 62
Loading sheet or rigid media . . . . . . . . . . . . . . . . . . . . . . . . . . . . . . . 70
4.6 Unloading media. . . . . . . . . . . . . . . . . . . . . . . . . . . . . . . . . . . . 78
4.7 Feeding media. . . . . . . . . . . . . . . . . . . . . . . . . . . . . . . . . . . . . . 79
Feeding media forwards / backwards by step. . . . . . . . . . . . . . . . . 79
Feeding media continuously forward / backward . . . . . . . . . . . . . . 80
Return to the print position. . . . . . . . . . . . . . . . . . . . . . . . . . . . . . . . . 81
4.8 Unwinding and winding up the media. . . . . . . . . . . . . . . . . . . 83
4.9 Manually media cutting . . . . . . . . . . . . . . . . . . . . . . . . . . . . . . 84
4.10 Media Settings. . . . . . . . . . . . . . . . . . . . . . . . . . . . . . . . . . . . . . 85
Preview settings . . . . . . . . . . . . . . . . . . . . . . . . . . . . . . . . . . . . . . . . . 85
Page 7

User’s Guide Zephyr TS
AP-75390 - Revision 1.0 - 19/2/10 7
Media details . . . . . . . . . . . . . . . . . . . . . . . . . . . . . . . . . . . . . . . . . . . . 89
Media control settings. . . . . . . . . . . . . . . . . . . . . . . . . . . . . . . . . . . . . 92
4.11 Preparations before printing . . . . . . . . . . . . . . . . . . . . . . . . . . 97
Using the media retainers . . . . . . . . . . . . . . . . . . . . . . . . . . . . . . . . . 97
Checking the temperature and pressure settings. . . . . . . . . . . . . . 99
Performing a nozzle check . . . . . . . . . . . . . . . . . . . . . . . . . . . . . . . 101
Set the correct distance adjust (step). . . . . . . . . . . . . . . . . . . . . . . 106
Setting the correct head gap . . . . . . . . . . . . . . . . . . . . . . . . . . . . . . 114
4.12 Using the job manager . . . . . . . . . . . . . . . . . . . . . . . . . . . . . . 118
Importing a file into the job pool . . . . . . . . . . . . . . . . . . . . . . . . . . . 118
Viewing the import queue . . . . . . . . . . . . . . . . . . . . . . . . . . . . . . . . 123
Previewing the imported file . . . . . . . . . . . . . . . . . . . . . . . . . . . . . . 125
Viewing and editing the job properties. . . . . . . . . . . . . . . . . . . . . . 126
Adding copies in the print pool . . . . . . . . . . . . . . . . . . . . . . . . . . . . 134
Deleting print jobs from the job pool. . . . . . . . . . . . . . . . . . . . . . . . 135
Deleting print jobs from the job pool when done . . . . . . . . . . . . . 136
Working with the autopilot . . . . . . . . . . . . . . . . . . . . . . . . . . . . . . . . 137
Adding items to the print queue . . . . . . . . . . . . . . . . . . . . . . . . . . . 138
Adding copies in the print queue. . . . . . . . . . . . . . . . . . . . . . . . . . . 140
Setting the print job sequence. . . . . . . . . . . . . . . . . . . . . . . . . . . . . 141
Aborting copies . . . . . . . . . . . . . . . . . . . . . . . . . . . . . . . . . . . . . . . . . 144
Pausing the current print job . . . . . . . . . . . . . . . . . . . . . . . . . . . . . . 146
Pausing the print queue . . . . . . . . . . . . . . . . . . . . . . . . . . . . . . . . . . 148
Removing items from the job queue. . . . . . . . . . . . . . . . . . . . . . . . 149
4.13 Checking the status . . . . . . . . . . . . . . . . . . . . . . . . . . . . . . . . 151
Checking the print status . . . . . . . . . . . . . . . . . . . . . . . . . . . . . . . . . 151
Estimated time of arrival. . . . . . . . . . . . . . . . . . . . . . . . . . . . . . . . . . 154
4.14 Viewing the job action history . . . . . . . . . . . . . . . . . . . . . . . . 155
4.15 Refilling the ink . . . . . . . . . . . . . . . . . . . . . . . . . . . . . . . . . . . . 156
Checking the ink status . . . . . . . . . . . . . . . . . . . . . . . . . . . . . . . . . . 157
Ink refill . . . . . . . . . . . . . . . . . . . . . . . . . . . . . . . . . . . . . . . . . . . . . . . . 160
Working with Mutoh’s Smartchip management system. . . . . . . . 162
Page 8

User’s Guide Zephyr TS
8 AP-75390 - Revision 1.0 - 19/2/10
4.16 Transportation. . . . . . . . . . . . . . . . . . . . . . . . . . . . . . . . . . . . . 165
Short distance transportation . . . . . . . . . . . . . . . . . . . . . . . . . . . . . 165
Medium-distance transportation for short term. . . . . . . . . . . . . . . 165
Medium-Long distance transportation for long-term . . . . . . . . . . 166
Chapter 5 User preferences . . . . . . . . . . . . . . . . . . . . . . . . . . 167
5.1 Setting unassigned tabs. . . . . . . . . . . . . . . . . . . . . . . . . . . . . 169
5.2 User interface setup . . . . . . . . . . . . . . . . . . . . . . . . . . . . . . . . 170
Language and input settings . . . . . . . . . . . . . . . . . . . . . . . . . . . . . . 172
Keyboard preference . . . . . . . . . . . . . . . . . . . . . . . . . . . . . . . . . . . . 173
Mouse settings . . . . . . . . . . . . . . . . . . . . . . . . . . . . . . . . . . . . . . . . . 175
Time and date . . . . . . . . . . . . . . . . . . . . . . . . . . . . . . . . . . . . . . . . . . 176
Creating and restoring a parameter backup . . . . . . . . . . . . . . . . . 177
Enabling/disabling the confirmation dialogue on startup. . . . . . . 179
5.3 Network setup . . . . . . . . . . . . . . . . . . . . . . . . . . . . . . . . . . . . . 180
TCP/IP setup . . . . . . . . . . . . . . . . . . . . . . . . . . . . . . . . . . . . . . . . . . . 182
Vnc server . . . . . . . . . . . . . . . . . . . . . . . . . . . . . . . . . . . . . . . . . . . . . 183
5.4 Making job management settings . . . . . . . . . . . . . . . . . . . . . 184
Autopilot priority settings . . . . . . . . . . . . . . . . . . . . . . . . . . . . . . . . . 185
Engine settings . . . . . . . . . . . . . . . . . . . . . . . . . . . . . . . . . . . . . . . . . 188
5.5 Media setup . . . . . . . . . . . . . . . . . . . . . . . . . . . . . . . . . . . . . . . 190
Media settings . . . . . . . . . . . . . . . . . . . . . . . . . . . . . . . . . . . . . . . . . . 192
Last loaded media. . . . . . . . . . . . . . . . . . . . . . . . . . . . . . . . . . . . . . . 199
Clipping margins . . . . . . . . . . . . . . . . . . . . . . . . . . . . . . . . . . . . . . . . 199
Media load settings. . . . . . . . . . . . . . . . . . . . . . . . . . . . . . . . . . . . . . 199
5.6 Heater setup . . . . . . . . . . . . . . . . . . . . . . . . . . . . . . . . . . . . . . 200
5.7 UV setup . . . . . . . . . . . . . . . . . . . . . . . . . . . . . . . . . . . . . . . . . 204
Chapter 6 Printer statistics . . . . . . . . . . . . . . . . . . . . . . . . . . . 207
6.1 Usage . . . . . . . . . . . . . . . . . . . . . . . . . . . . . . . . . . . . . . . . . . . . 208
Page 9

User’s Guide Zephyr TS
AP-75390 - Revision 1.0 - 19/2/10 9
UV statistics . . . . . . . . . . . . . . . . . . . . . . . . . . . . . . . . . . . . . . . . . . . . 210
Motor statistics. . . . . . . . . . . . . . . . . . . . . . . . . . . . . . . . . . . . . . . . . . 212
Disk space . . . . . . . . . . . . . . . . . . . . . . . . . . . . . . . . . . . . . . . . . . . . . 213
Usage statistics . . . . . . . . . . . . . . . . . . . . . . . . . . . . . . . . . . . . . . . . . 213
6.2 Event log . . . . . . . . . . . . . . . . . . . . . . . . . . . . . . . . . . . . . . . . . 214
6.3 Information . . . . . . . . . . . . . . . . . . . . . . . . . . . . . . . . . . . . . . . 215
Chapter 7 Periodical maintenance . . . . . . . . . . . . . . . . . . . . . 217
7.1 Done by end user . . . . . . . . . . . . . . . . . . . . . . . . . . . . . . . . . . 218
Overview. . . . . . . . . . . . . . . . . . . . . . . . . . . . . . . . . . . . . . . . . . . . . . . 219
Depending on print volume and media . . . . . . . . . . . . . . . . . . . . . 220
Daily maintenance. . . . . . . . . . . . . . . . . . . . . . . . . . . . . . . . . . . . . . . 224
Weekly maintenance . . . . . . . . . . . . . . . . . . . . . . . . . . . . . . . . . . . . 235
Bi weekly maintenance. . . . . . . . . . . . . . . . . . . . . . . . . . . . . . . . . . . 241
Monthly maintenance . . . . . . . . . . . . . . . . . . . . . . . . . . . . . . . . . . . . 244
7.2 Done by an Authorized Mutoh Technician . . . . . . . . . . . . . . 251
Chapter 8 Troubleshooting . . . . . . . . . . . . . . . . . . . . . . . . . . . 253
8.1 Nozzle recovery procedure . . . . . . . . . . . . . . . . . . . . . . . . . . 255
8.2 UV lamp alignment . . . . . . . . . . . . . . . . . . . . . . . . . . . . . . . . . 258
8.3 Verifying the heads. . . . . . . . . . . . . . . . . . . . . . . . . . . . . . . . . 262
Headslant adjustment procedure . . . . . . . . . . . . . . . . . . . . . . . . . . 262
Front and back adjustment procedure . . . . . . . . . . . . . . . . . . . . . . 264
Uni-directional adjustment procedure . . . . . . . . . . . . . . . . . . . . . . 269
Bi-directional adjustment procedure. . . . . . . . . . . . . . . . . . . . . . . . 278
8.4 Error messages. . . . . . . . . . . . . . . . . . . . . . . . . . . . . . . . . . . . 287
Internal hardware error. . . . . . . . . . . . . . . . . . . . . . . . . . . . . . . . . . . 287
Internal software error . . . . . . . . . . . . . . . . . . . . . . . . . . . . . . . . . . . 287
Internal hardware / software error. . . . . . . . . . . . . . . . . . . . . . . . . . 287
Dongle related error . . . . . . . . . . . . . . . . . . . . . . . . . . . . . . . . . . . . . 287
Page 10

User’s Guide Zephyr TS
10 AP-75390 - Revision 1.0 - 19/2/10
Print engine software error / Print swathe timeout error . . . . . . . 288
Emergency stop / emergency switch related errors. . . . . . . . . . . 288
Water level error . . . . . . . . . . . . . . . . . . . . . . . . . . . . . . . . . . . . . . . . 288
UV related errors. . . . . . . . . . . . . . . . . . . . . . . . . . . . . . . . . . . . . . . . 289
Print head control system error. . . . . . . . . . . . . . . . . . . . . . . . . . . . 290
Chapter 9 List of keyboard short cuts . . . . . . . . . . . . . . . . . . 291
Page 11
1
User’s Guide Zephyr TS
Safety instructions
AP-75390 - Revision 1.0 11
Chapter 1 Safety instructions
This chapter explains the installation of Zephyr TS, warning terms that operators need to
know, caution items and warning labels on the printer main unit.
1.1 Compliance with the following regulations
Important
When installing and operating this printer, be sure to follow the directions and
warnings in this guide.
The CE marking is a mandatory European marking for certain
product groups to indicate conformity with the essential health and
safety requirements set out in European Directives.
By affixing the CE marking, the manufacturer, his authorized
representative, or the person placing the product on the market or
putting it into service ensures that the item meets all the essential
requirements of all applicable EU directives and that the applicable
conformity assessment procedures have been applied.
Your product is designed and manufactured with high-quality
materials and components, which can be recycled and reused.
When this crossed-out wheeled bin submenu is attached to a
product, it means the product is covered by the European Directive
2002/96/EC - WEEE regulation.
Please inform yourself about the local separate collection system for
electrical and electronic products.
Please act according to local rules and do not dispose of your old
products with your normal household waste. The correct disposal of
your old product will help prevent potential negative consequences
for the environment and human health.
Page 12
User’s Guide Zephyr TS
Safety instructions
12 AP-75390 - Revision 1.0
This product is tested and approved by the Canadian Standards
Association (CSA), this to provide increased assurance of quality and
safety.
The product is tested according to IEC60950.
This standard tries to cover all safety aspects.
Mechanical, electrical
Choice of components
Choice of materials: flammability!
Connectors, cables …
Fire enclosure
This means the product is safe for users, service personnel and
production personnel.
CSA International certification is not a legal commitment but it
assures the quality and safety of the machine.
FCC
This equipment has been tested and found to comply with the limits
for a Class A digital device, pursuant to Part 15 of the FCC Rules.
These limits are designed to provide reasonable protection against
harmful interference when the equipment is operated in a commercial
environment. This equipment generates, uses, and can radiate radio
frequency energy and, if not installed and used in accordance with
the instruction manual, may cause harmful interference to radio
communications. Operation of this equipment in a residential area is
likely to cause harmful interference in which case the user will be
required to correct the interference at his own expense.
ICES
This Class A digital apparatus complies with Canadian ICES-003.
Page 13

User’s Guide Zephyr TS
Safety instructions
AP-75390 - Revision 1.0 13
1
1.2 Handling inks + waste
Before handling inks/ cleaning and their waste, CAREFULLY READ THE MATERIAL
SAFETY DATA SHEETS (MSDS) and the labels for important health, safety and
environmental information. Post these documents in the work area as required by federal or
local law. All safety data sheets are periodically updated. These sheets and their translations
can be found on www.mutoh.eu
Engineering measures:
Although no Volatile Organic Compounds are released, please do work with forced
ventilation to prevent contact with ink mist/dust.
It's recommended to be equipped with an eyewash-shower.
Personal protection:
General: Keep away from foodstuffs, beverages. Always wash your hands before breaks
and at the end of work.
Protection of hands: The operator must wear suitable gloves. The selection of gloves
depends on the level of exposure. (nitrile for short-exposure times, butyl rubber gloves for
long-time exposure). Always ensure that gloves are free from defects and that they are
stored and used correctly. Exact breakthrough time has to be obtained from the
manufacturer of the gloves. Wash hands after removal of gloves.
Eye protection: Wear UV suitable safety glasses. Avoid contact lenses.
Body protection: Wear protective work clothing with long sleeves; disposable overalls are
preferable. Immediately remove all soiled and contaminated clothing. Avoid jewellery and
watches because ink can be trapped between skin and jewellery which can lead to
irritation.
Important
Both UV-inks as well as the UV-curing lamps can be harmful if not handled
correctly. Follow these instructions carefully for maximum safety.
Caution
Acrylates are skin and/or eye sensitizers. Since acrylates do not evaporate,
they will remain on the skin or clothes for extended periods. This long term
exposure, caused by the non-volatility, can give rise to dermatitis. It is
essential that the given protection measures are always followed.
Important
When handling inks, it is recommended that the operator wears nitrile rubber
gloves, a protective apron and UV suitable safety glasses with side shields.
Page 14

User’s Guide Zephyr TS
Safety instructions
14 AP-75390 - Revision 1.0
Handling ink:
Only use original manufacturer's ink and appropriate cleaning liquid. Before filling the ink,
shake it gently. Doing so will preserve print quality.
When ink is moved from a cold place to warm place, keep the ink for three hours or more
in the new printing environment before printing.
When refilling ink, use original manufacturer's ink. This printer is designed to use original
ink. If you use inks which are not produced by the original manufacturer:
printing might become blurred
curing (speeds) might be a problem
any problems caused by using ink other than those recommended above will not be
covered by the warranty, and repair expenses will have to be paid by the customer.
For handling waste: see section 13 on the MSDS-sheet. Recommendation: dispose of
product according to federal, state, provincial and local regulations.
Do not store ink/waste in direct sunlight to prevent the ink from curing.
Waste tank has to be opaque, preferably black.
Never fill the waste tank completely because of possible swelling due to curing. Leave 4
cm open on top.
Inks / Waste
General advice: wear safety glasses and gloves
After spill: remove contaminated clothing.
After inhalation: if difficulties occur after vapour/aerosol has been inhaled, remove to
fresh air and seek medical attention.
After skin contact: wash thoroughly with soap and water.
After eye contact: wash affected eyes for at least 15 minutes under running water
while eyelids held open.
After swallowing: rinse mouth and drink plenty of water. Never induce vomiting. Seek
medical attention.
Page 15

User’s Guide Zephyr TS
Safety instructions
AP-75390 - Revision 1.0 15
1
1.3 UV-curing system
UV-lamps hazards:
The UV-curing system generates hazardous amounts of thermal and UV-energies.
Radiation range of Mutoh UV-lamp: 200-460nm. Special protection for eyes and skin is
essential. Long sleeved work clothes and gloves are essential to reduce the skin's
exposure to the UV emissions.
Always wear safety glasses to protect against the radiation range of the UV-lamp.
Recommended are the glasses of 3M type 2802. Eye damage and burning of the skin can
occur with even brief direct exposure to UV light.
NEVER LOOK DIRECTLY IN THE UV-LAMP.
The exposure to UV-light is the worst for individuals in seated position. (Table height of 117
cm). Do not sit within 3 meters of the printer and do not look at the UV lamps if your eyes
are positioned below the level of the printer table. Serious injuries can result from
prolonged exposure, especially when unshielded.
UV lamps operate at very high temperatures (approx. 800°C). Therefore, never touch a
lamp which has been in operation. Let the lamp cool before any maintenance. Skin contact
with the UV lamps must be avoided. Compounds from the skin when lamps are hot will
form permanent etching on the quartz surface that can decrease the UV energy
transmission. Installation of the lamp: before the installation make sure that the quartz
surface is clean. Use a damp cloth (if necessary with a small amount of isopropanol) to
degrease the quartz surface. Never touch the quartz surface with bare hands. This can
cause changes in the spectrum of the lamp.
Mercury: The UV lamp contains a small amount of mercury which is toxic when inhaled or
ingested. If a cold lamp is broken, carefully clean up the spill with sulphur and then dispose
of it, according to local regulations regarding mercury disposal. When a lamp in operation
breaks, the mercury will be evaporated and removed by the forced ventilation.
Ozone: Ozone is a toxic gas which the UV lamps create. As the lamp warms up, it briefly
passes through a section of the light spectrum which excites oxygen molecules enough to
create ozone. Once a UV lamp has completely warmed up, only very small amounts of
ozone are present. This amount will be fully removed by the forced ventilation.
Measurements show that the generated amount of ozone is below the exposure limits.
Maintenance:
Always wear glasses, gloves and protective clothing to protect against the ink and the
UV-emissions
When maintenance station is open to clean the heads, do not touch the UV lamp as it
can be hot.
Use gloves to remove cured ink in maintenance station or somewhere else
Dispose the cured ink according to federal, state, provincial and local regulations
Important
Handle both the UV-inks and the UV-curing lamps correctly, it can be harmful.
Always print with closed covers. Never look directly into the UV-lamp during
operation.
Page 16
User’s Guide Zephyr TS
Safety instructions
16 AP-75390 - Revision 1.0
1.4 Warnings, cautions and notes
Safety terms in this manual and the contents of warning labels attached to the printer are
categorized into the following three types, depending on the degree of risk (or the scale of
accident).
Read the following explanations carefully and follow the instructions in this manual.
1.5 Safety instructions
Machines must be installed by an authorized Mutoh technician according to Mutoh's
Installation Guide, also after moving machines to another location; maintenance needs
to be done according the periodical maintenance described in the User’s Guide.
To prevent fire or electrical shock, never use a power supply source other than the one
rated for the printer in the country where you purchased the printer.
To prevent fire or electrical shock, machines must be connected to a properly grounded
electrical power outlet. Do not connect the power cable to a power strip or a power source
shared by other electrical devices. Be sure to insert the power plug completely into the
power source.
It is recommended to use the provided power cable. If another power cable is used, make
sure that it fulfils the specifications set by Mutoh Europe nv. To prevent fire or electrical
shocks, follow the instructions below when handling the power cable:
Do not cut or modify the cable.
Do not put heavy objects on the cable.
Do not bend, twist, knot or pull the cable.
Do not wire the cable near equipment that generates heat.
Do not use the cable with any other electrical device
Do not handle the cable with wet hands
Be aware of all caution and warning labels to avoid potentially hazardous situations.
Do not place the printer in the following areas. Doing so may result in the printer tipping or
falling over and causing injury.
Unstable surfaces
Sloping floors
Areas subject to vibration by other equipment
Safety terms Details
Important Must be followed carefully to avoid death or serious bodily injury.
Caution
Must be observed to avoid bodily injury (moderate or light) or damage to
your equipment.
Notes
Contains important information and useful tips on the operation of your
printer.
Page 17

User’s Guide Zephyr TS
Safety instructions
AP-75390 - Revision 1.0 17
1
Do not place the printer in humid and dusty areas or in areas exposed to flammables.
Doing so may result in electrical shock or fire.
Do not cover the ventilation hole(s) of your printer with cloth, such as a blanket or table
cloth. Doing so could obstruct ventilation and could cause fire.
Do not insert or drop metal or inflammable objects into openings, such as ventilation
outlets. Doing so may result in electrical shock and fire.
Stop using your printer if a liquid has been spilled into it. This may cause electrical shock,
fire or damage to the electronics. Switch the printer off as soon as possible, unplug the
power cord, and contact your local Mutoh dealer.
Be sure to power OFF the printer and unplug the power cable from the outlet before
cleaning the printer. Use a damp cloth to clean the printer. Do not use thinner, benzene,
alcohol or other active agents. Doing so may result in damage or paint peeling from the
casing.
Do not tilt the printer when it is loaded with ink. Doing so may cause ink to leak inside the
printer. Movement after installation is also not covered by the warranty.
When cutting the roll media, be careful that you handle correct. Incorrect handling can
result in injury to the hands and fingers from the razor blade.
To prevent back pains and other injuries, always work with at least 4 people to unpack or
move the printer. Keep the printer horizontally during transportation
Do NOT transport the printer to another room without contacting your local Authorized
Mutoh Dealer.
Page 18
User’s Guide Zephyr TS
Safety instructions
18 AP-75390 - Revision 1.0
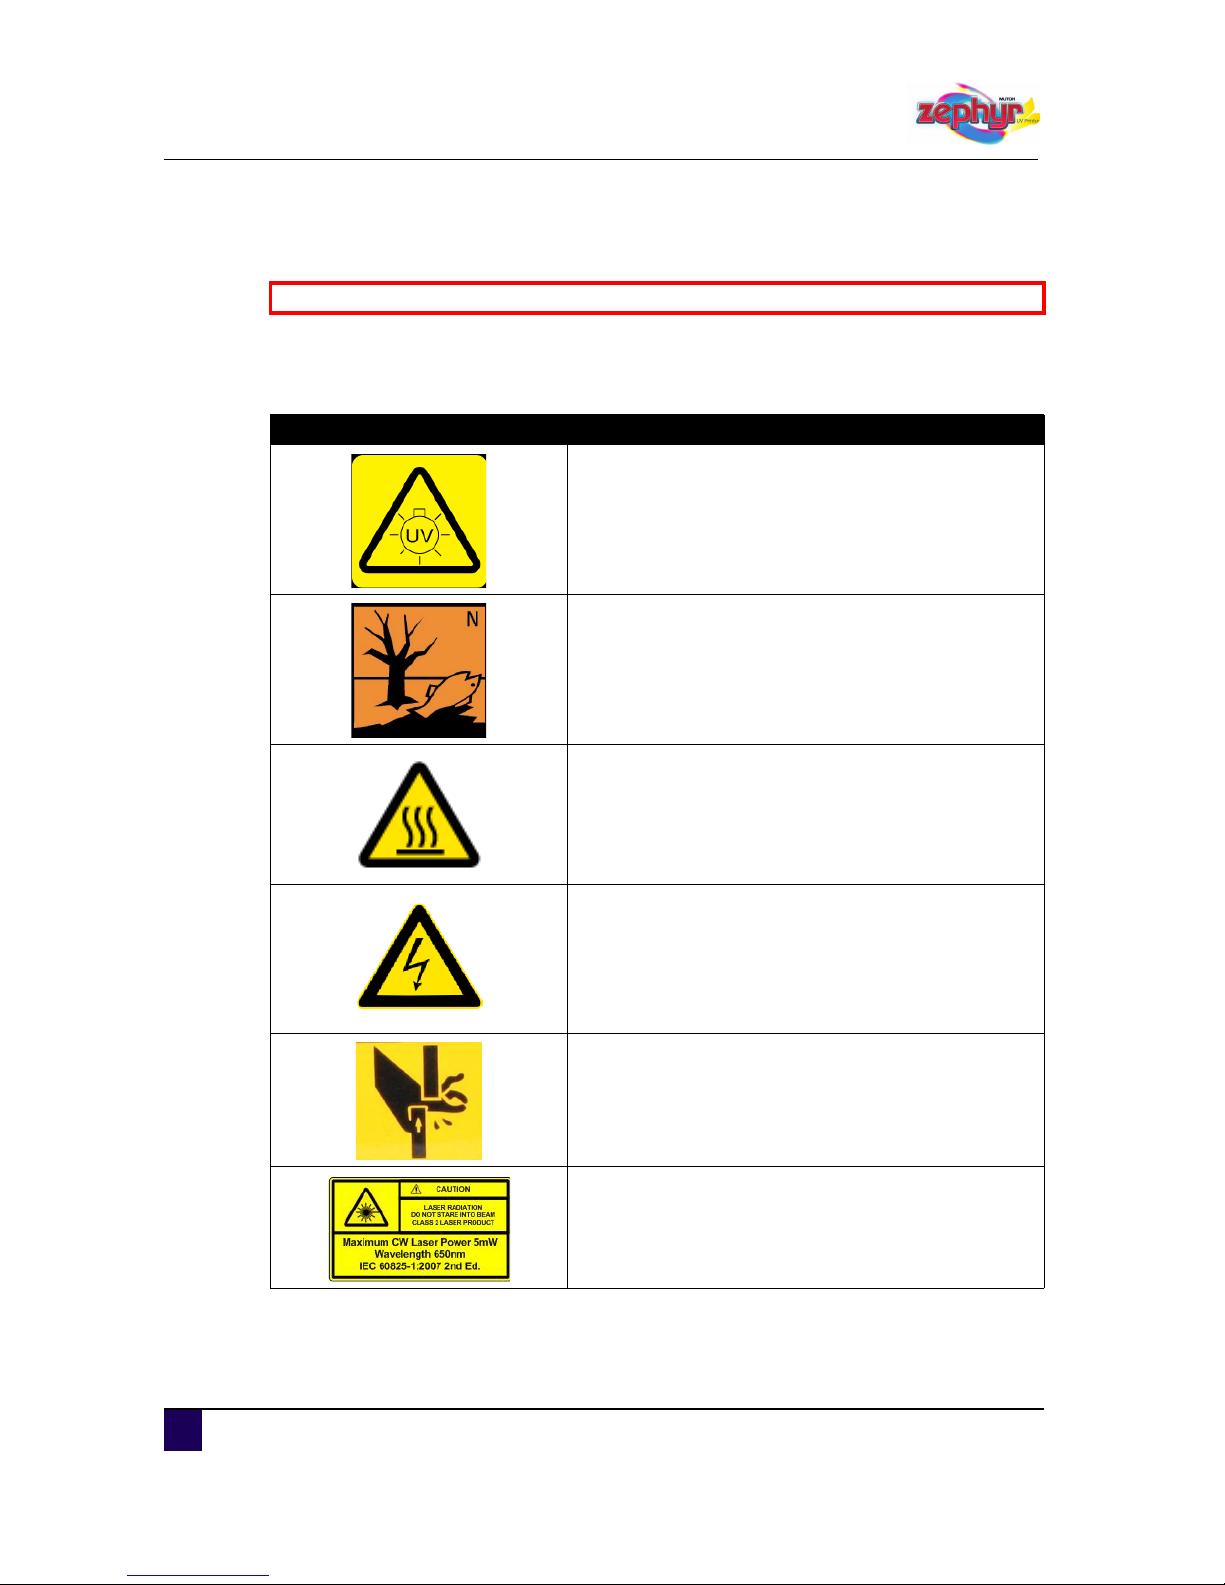
1.6 Safety labels
A safety label is used on parts of the printer which especially need your attention. Understand
the locations and the descriptions of the danger associated with each label before operating
the printer.
Be sure to read and understand the safety warnings before handling the printer.
Label Description
The Zephyr TS is an UV printer. This means that the
printer is equipped with UV lights. Ultra Violet light will
lead to damage of the eyes when staring into it. Make
sure to wear proper protection glasses.
The disposal materials of the Zephyr TS are harmful to
the environment. For more information about disposal,
please refer to section 13 on the MSDS sheet.
Informs that the area can be very hot. Be careful not to
burn your hands.
High voltage warning
This label warns you to be careful not to pinch your
fingers.
The Zephyr TS is equipped with a laser. Make sure not
to stare into the laser. Staring into the laser will lead to
eye damage.
Page 19
User’s Guide Zephyr TS
Safety instructions
AP-75390 - Revision 1.0 19
1
Warning label concerning the power supply.
Indicates that this part is harmful to you. Wear proper
protection to prevent injuries.
Always wear gloves when performing actions in this
area.
Always wear safety goggles when performing actions in
this area.
Label Description
Caution
This unit has two power supply cords.
To reduce the risk of electrical shock,
Disconnect both power supply cords
Before servicing
Page 20

User’s Guide Zephyr TS
Safety instructions
20 AP-75390 - Revision 1.0
Page 21
User’s Guide Zephyr TS
Zephyr TS documentation
AP-75390 - Revision 1.0 21
2
Chapter 2 Zephyr TS
documentation
2.1 Working with the User’s Guide
In this chapter we will explain how to get the most out of this manual.
For your comfort we made this manual interactive, and so we will deliver this manual in a
digital version and not in a hard copy.
Throughout this manual we have provided links where required. Click on a link, to jump to the
corresponding chapter in this manual.
For example: Click on Safety instructions on page11
with the left mouse button and you will
jump back to the first chapter of this manual called Safety Instructions.
Depending on your type of PDF reader and your settings, you will see an extra window called
Bookmarks.
Another feature in this manual is the interactive index.
The index works in the same way as a link. Search for a specific word, click on the page
number and you automatically jump to the corresponding chapter.
These bookmarks represent all chapters and sub-chapters
of this manual.
When you just start reading this manual, you will only find
the main chapters with a “+” sign by their side.
Click on the “+” sign, to open the bookmark and show all
sub-chapters.
Click on the bookmark to jump to the corresponding chapter.
Page 22

User’s Guide Zephyr TS
Zephyr TS documentation
22 AP-75390 - Revision 1.0
2.2 Working with the help file
The Zephyr TS interface also includes a help file. To access it, click on the ?keyin the upper
right corner of the title bar.
At the left side of the help file you will see 4 tabs. A contents tab, index tab, search tab and a
favourites tab.
The contents tab provides you an overview of the major chapters in this help file.
When you start the help file, you will only find the main chapters with a “+” sign by their side.
Click on the “+” sign to open the bookmark and show all sub-chapters.
Scroll through them and click on a bookmark to jump immediately to the corresponding
chapter.
If you search for a specific word, use the Index tab. There are two methods of working with the
index.
The first method is scrolling through the list. Double click on the item to jump to the
corresponding chapter.
The second method is via keywords. If you are looking for a certain word, type it, and if the
subject you are looking for is integrated in the index it will highlight in the index list.
Double-click the item or click display to show the topic.
Page 23
User’s Guide Zephyr TS
Zephyr TS documentation
AP-75390 - Revision 1.0 23
2
Another way to find information is to use the ‘search function’ in the help file. Type in a
keyword, and click the list topics button or press enter. You will now get a complete list of
topics where your keyword appears. Double-click an item, or click the display button to
display the topic.
If you have a certain topic that you consult frequently, the favourites tab will come in handy.
Navigate to the topic, click the favourites tab and click the add tab. This topic is now added to
your favourites. Click on the remove or display button to remove or display your favourite
topic.
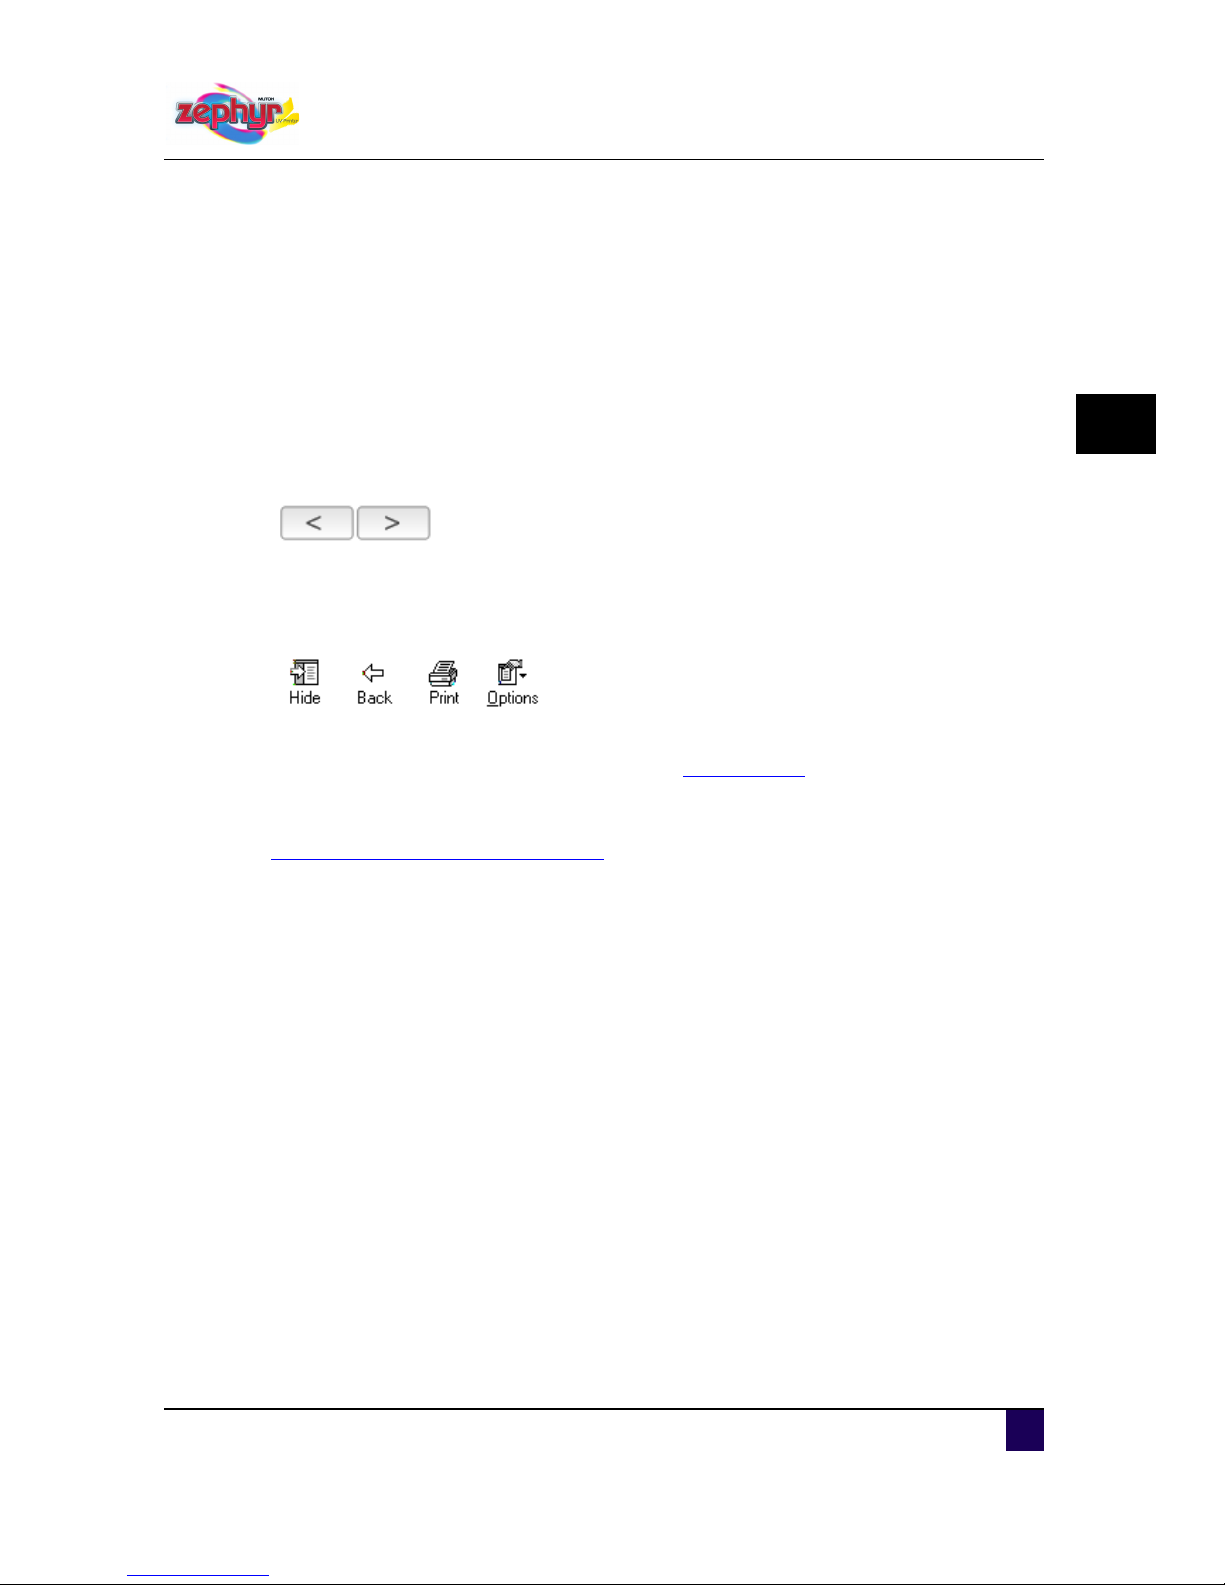
To easily read the help file page per page, you can use the forward and backward buttons.
Pressing these buttons will automatically put you through to the next or previous page.
When clicking multiple links for more information, you can go back to your main topic with the
back button in the title bar.
For the latest up-to-date manuals, please refer to www.mutoh.eu
.
We hope you will find this manual easy to work with. If you experience any problem or miss
information concerning the manual, do not hesitate to contact us.
Please email to: Technical.news@mutoh.eu
Page 24

User’s Guide Zephyr TS
Zephyr TS documentation
24 AP-75390 - Revision 1.0
Page 25

User’s Guide Zephyr TS
Product overview
AP-75390 - Revision 1.0 25
3
Chapter 3 Product overview
Front view . . . . . . . . . . . . . . . . . . . . . . . . . . . . . . . . . . . . . . . . . . . . . . . . . . 26
Detailed picture of the emergency stop and light switch . . . . . . . . . . . . . . . . . 28
Rear view. . . . . . . . . . . . . . . . . . . . . . . . . . . . . . . . . . . . . . . . . . . . . . . . . . . 29
Using the footpedal . . . . . . . . . . . . . . . . . . . . . . . . . . . . . . . . . . . . . . . . . . 30
Installation environment . . . . . . . . . . . . . . . . . . . . . . . . . . . . . . . . . . . . . . 31
Environmental requirements . . . . . . . . . . . . . . . . . . . . . . . . . . . . . . . . . . . . . . 31
Recommended environment . . . . . . . . . . . . . . . . . . . . . . . . . . . . . . . . . . 31
Variation rate . . . . . . . . . . . . . . . . . . . . . . . . . . . . . . . . . . . . . . . . . . . . . . 31
Storage environment of ink. . . . . . . . . . . . . . . . . . . . . . . . . . . . . . . . . . . . 31
Dust free state . . . . . . . . . . . . . . . . . . . . . . . . . . . . . . . . . . . . . . . . . . . . . . . . . 31
Network requirements . . . . . . . . . . . . . . . . . . . . . . . . . . . . . . . . . . . . . . . . . . . 32
Printer dimensions . . . . . . . . . . . . . . . . . . . . . . . . . . . . . . . . . . . . . . . . . . . . . . 33
Page 26
User’s Guide Zephyr TS
Product overview
26 AP-75390 - Revision 1.0
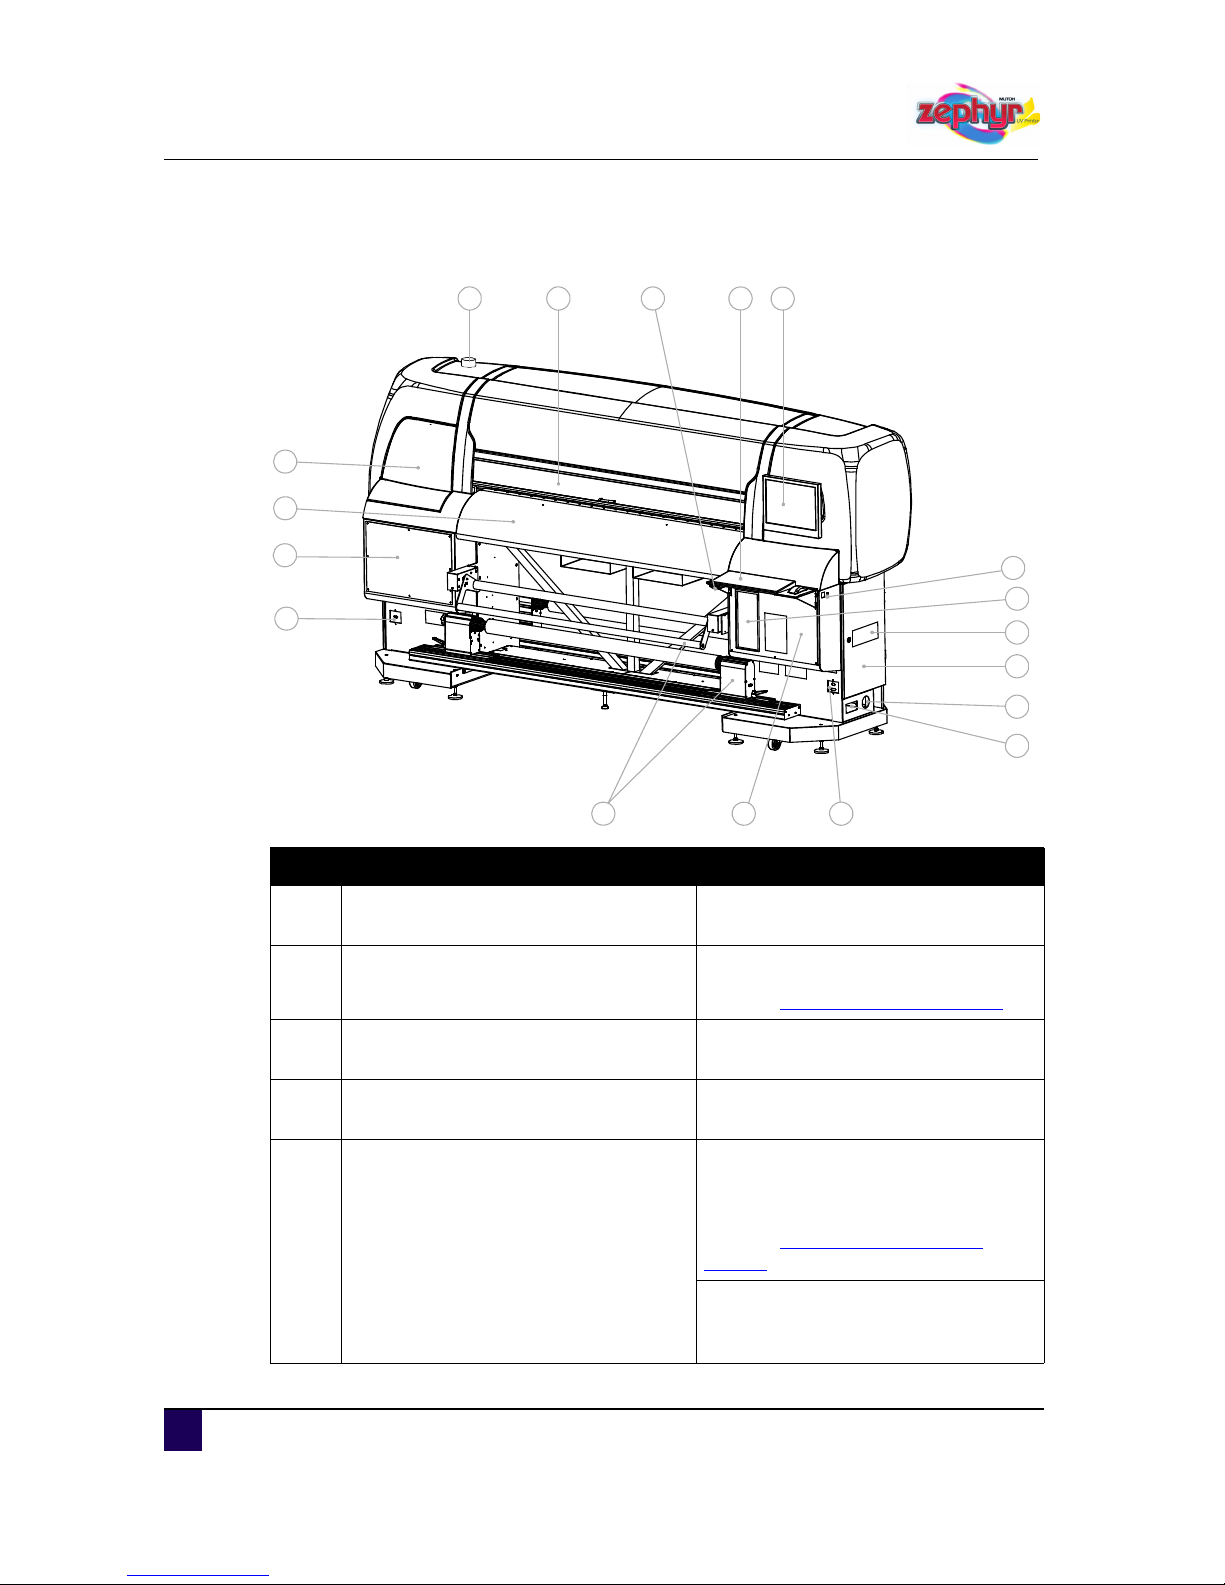
3.1 Front view
1
2
3
4
5
6
7
8
9
10
1112
13
14
15
16
17
18
N° Description Extended description
1 Front cover
Keeps the operator safe from the
moving parts of the printer.
2 Smart chip card reader slot
To load ink volume using a smart chip.
Refer to Refilling the ink on page156
3 Keyboard and mouse
The keyboard and mouse are used to
interact with the User Interface.
4 Monitor
The monitor displays all necessary
information to operate the Zephyr TS.
5
Emergency stop
&
Light switch
If a situation requires an immediate
shutdown of all printer activities, push
the emergency stop without hesitation.
Refer to Emergency Shutdown on
page48
The Zephyr TS is equipped with a light
system for better visuals on the current
print operation.
Page 27

User’s Guide Zephyr TS
Product overview
AP-75390 - Revision 1.0 27
3
6 PC
The PC runs the User Interface, which
is necessary to operate the Zephyr TS.
7 Ventilation cover
To transfer the heat coming from the
electronics box.
8 Electronics cover
To access the printer electronics.
For service technicians only.
9 Power switch
To power On and OFF the Zephyr TS.
Refer to Switching the Power ON / OFF
on page40
10 Circuit breakers
This is an automatically operated
electrical switch designed to protect the
electrical circuit from damage caused
by overload or short circuit.
11
Connector front right foot pedal
&
Connector front winder
One of the four connection points to
connect the foot pedal.
Connection point to connect the front
winder.
12 Service cover
Access to PC and UV unit.
This cover is for service technicians
only.
13 Winder 100
To wind or unwind roll media up to 100
kg.
14 Connector front left foot pedal
One of the four connection points to
connect the foot pedal.
15 Service cover Access to ink regulation system.
16 Heater plate
Supports and heats the media during
printing.
17 Left maintenance cover Cover to access the maintenance area.
18 Air purification outlet
When using a local air purification
system, connect it to this outlet.
N° Description Extended description
Page 28
User’s Guide Zephyr TS
Product overview
28 AP-75390 - Revision 1.0
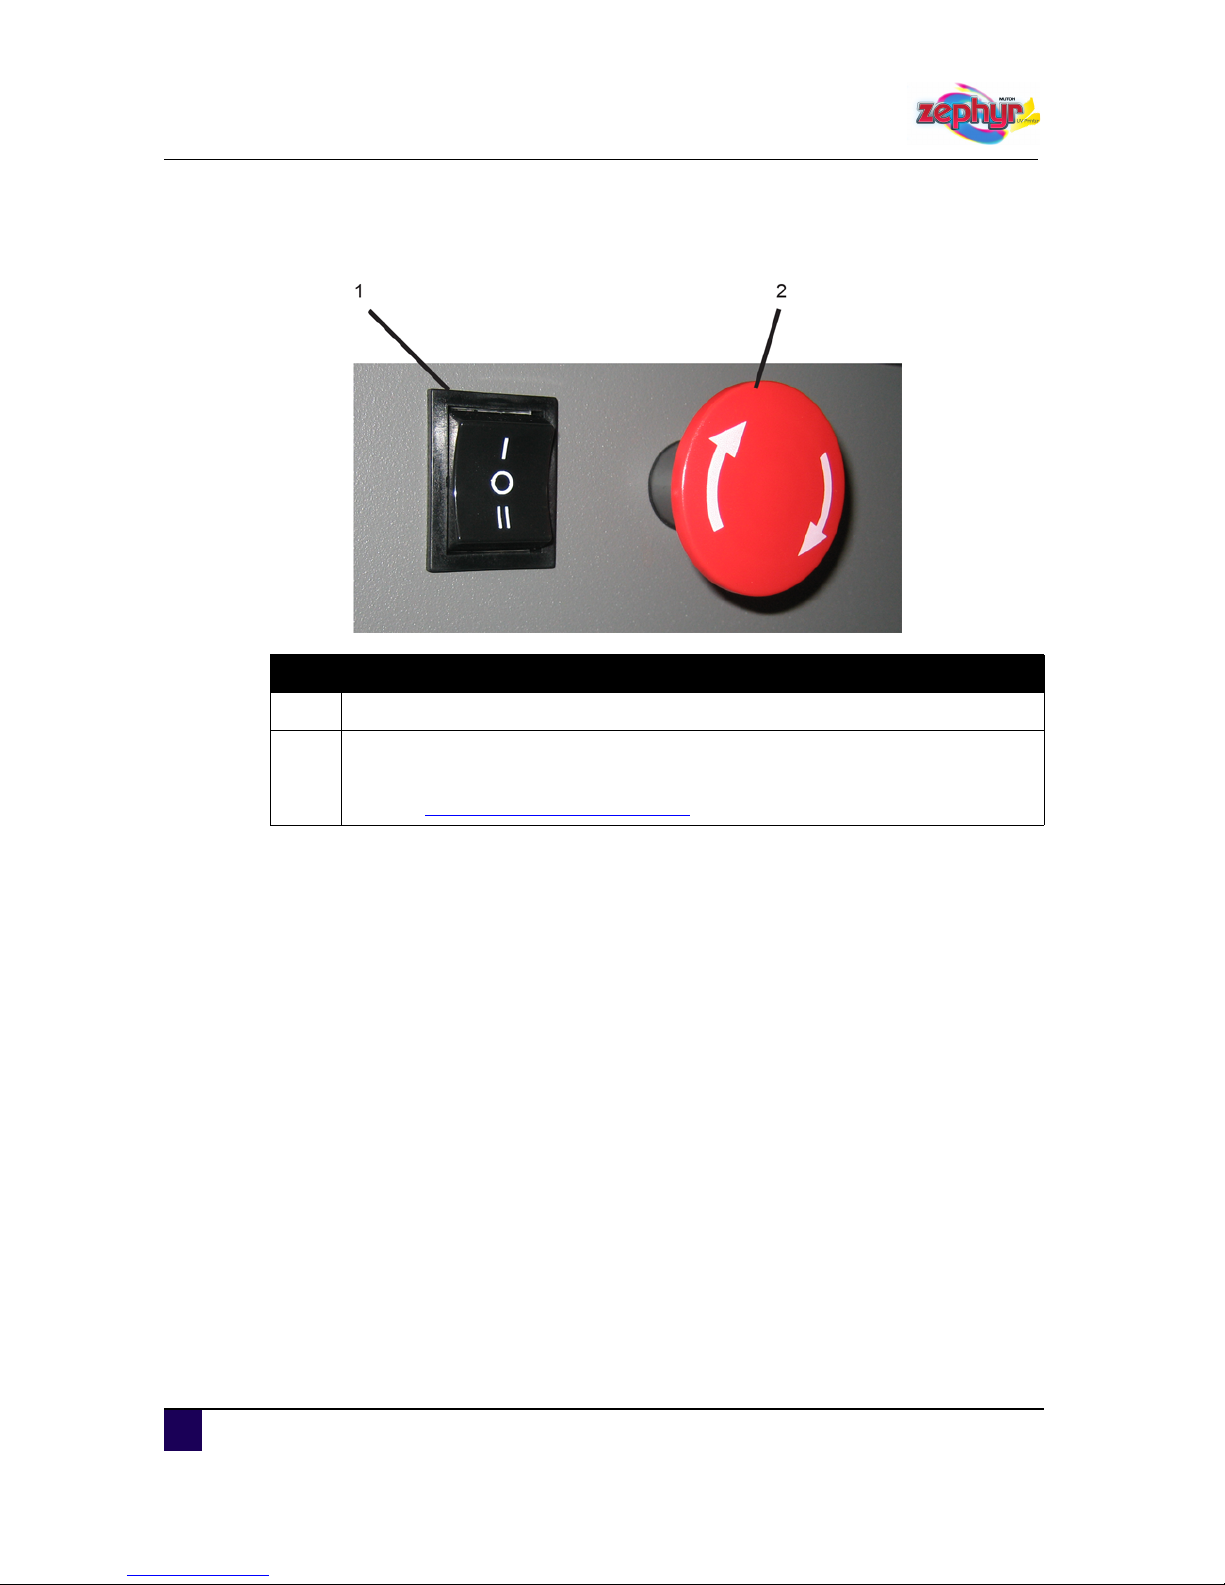
3.1.1 Detailed picture of the emergency stop and light switch
N° Description
1 To switch ON or OFF the Zephyr TS light system.
2
If a situation requires an immediate shutdown of all printer activities, push the
emergency stop without hesitation.
Refer to Emergency Shutdown on page48
Page 29
User’s Guide Zephyr TS
Product overview
AP-75390 - Revision 1.0 29
3
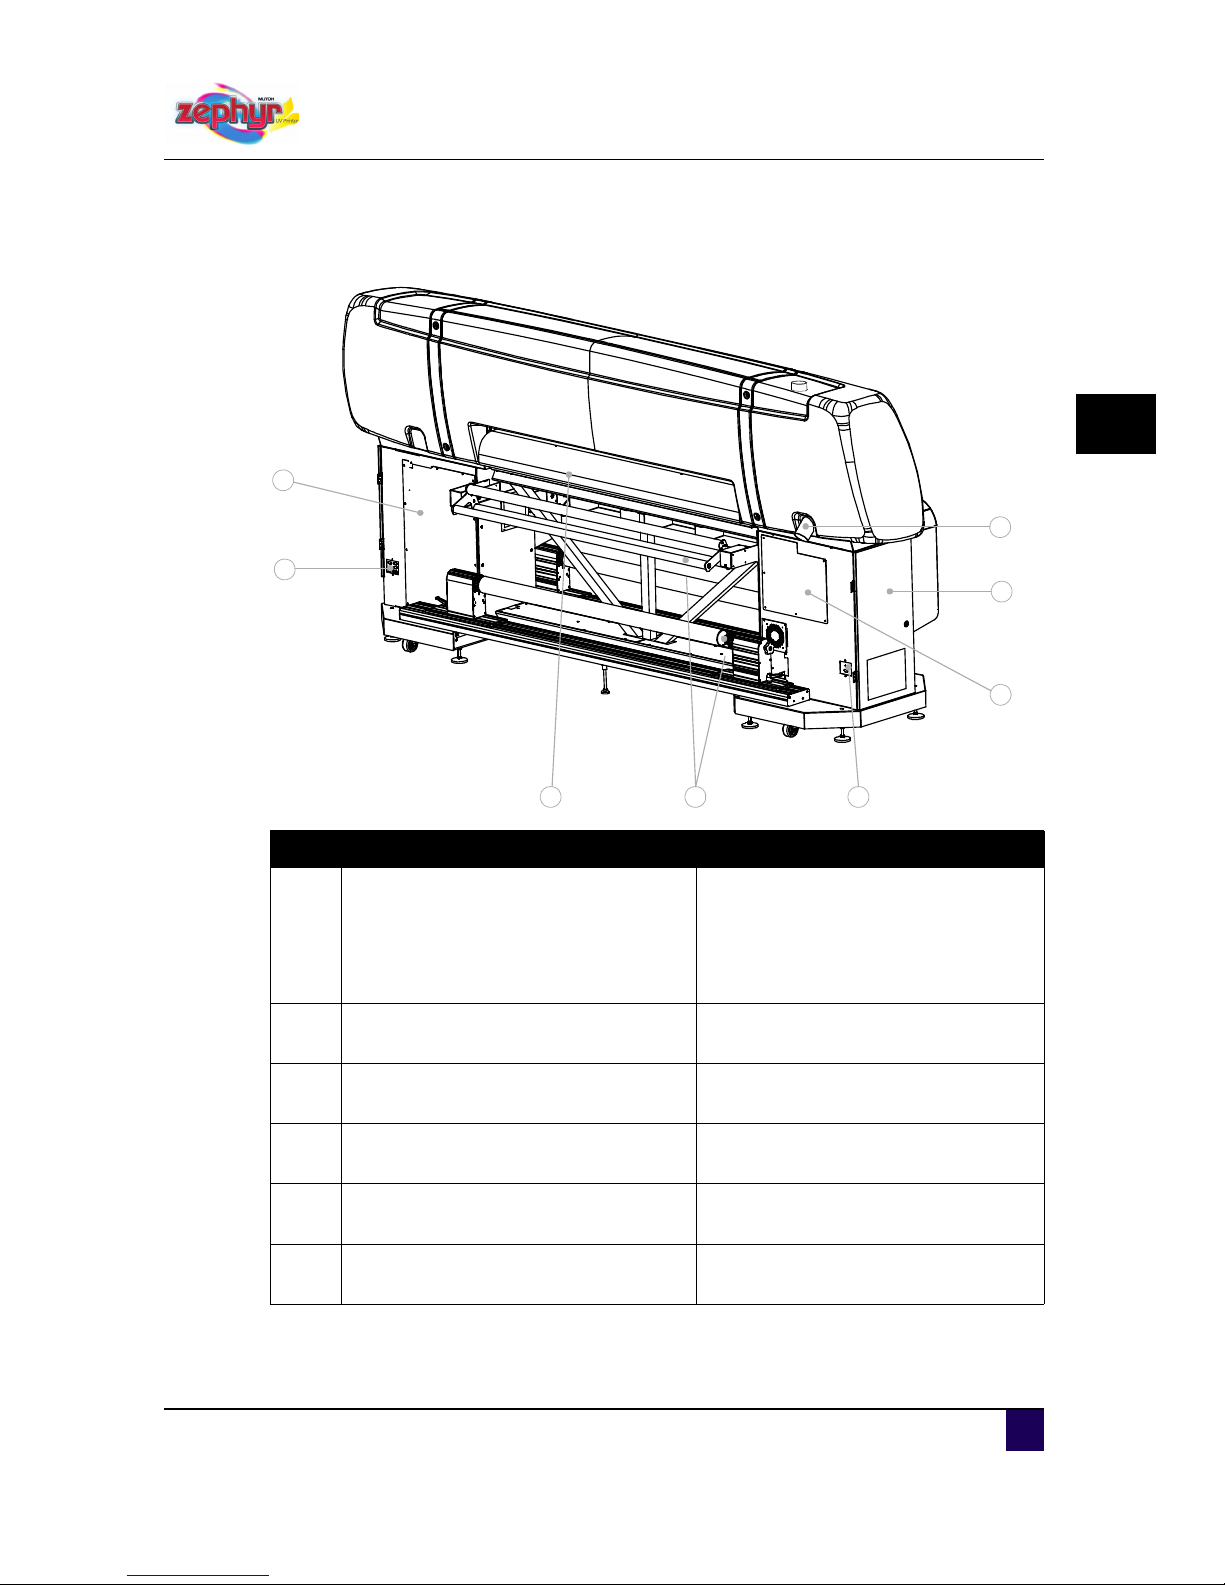
3.2 Rear view
mu
1
2
3
4
5
6
7
8
N° Description Extended description
1 APS connection tube
Connect your APS system to the
connection tube for optimal air
purification.
Refer to the Zephyr TS Installation
Guide and the APS User’s Guide.
2 Ink supply cover
Access to ink bottles, degasser pump
and ink temperature regulator.
3 Service cover
Access to ink filters.
For service technicians only.
4 Connector rear left foot pedal
Connection point to connect the foot
pedal.
5 Unwinder
To wind or unwind roll media up to 100
kg.
6 Heater plate
Supports and heats the media during
printing.
Page 30
User’s Guide Zephyr TS
Product overview
30 AP-75390 - Revision 1.0
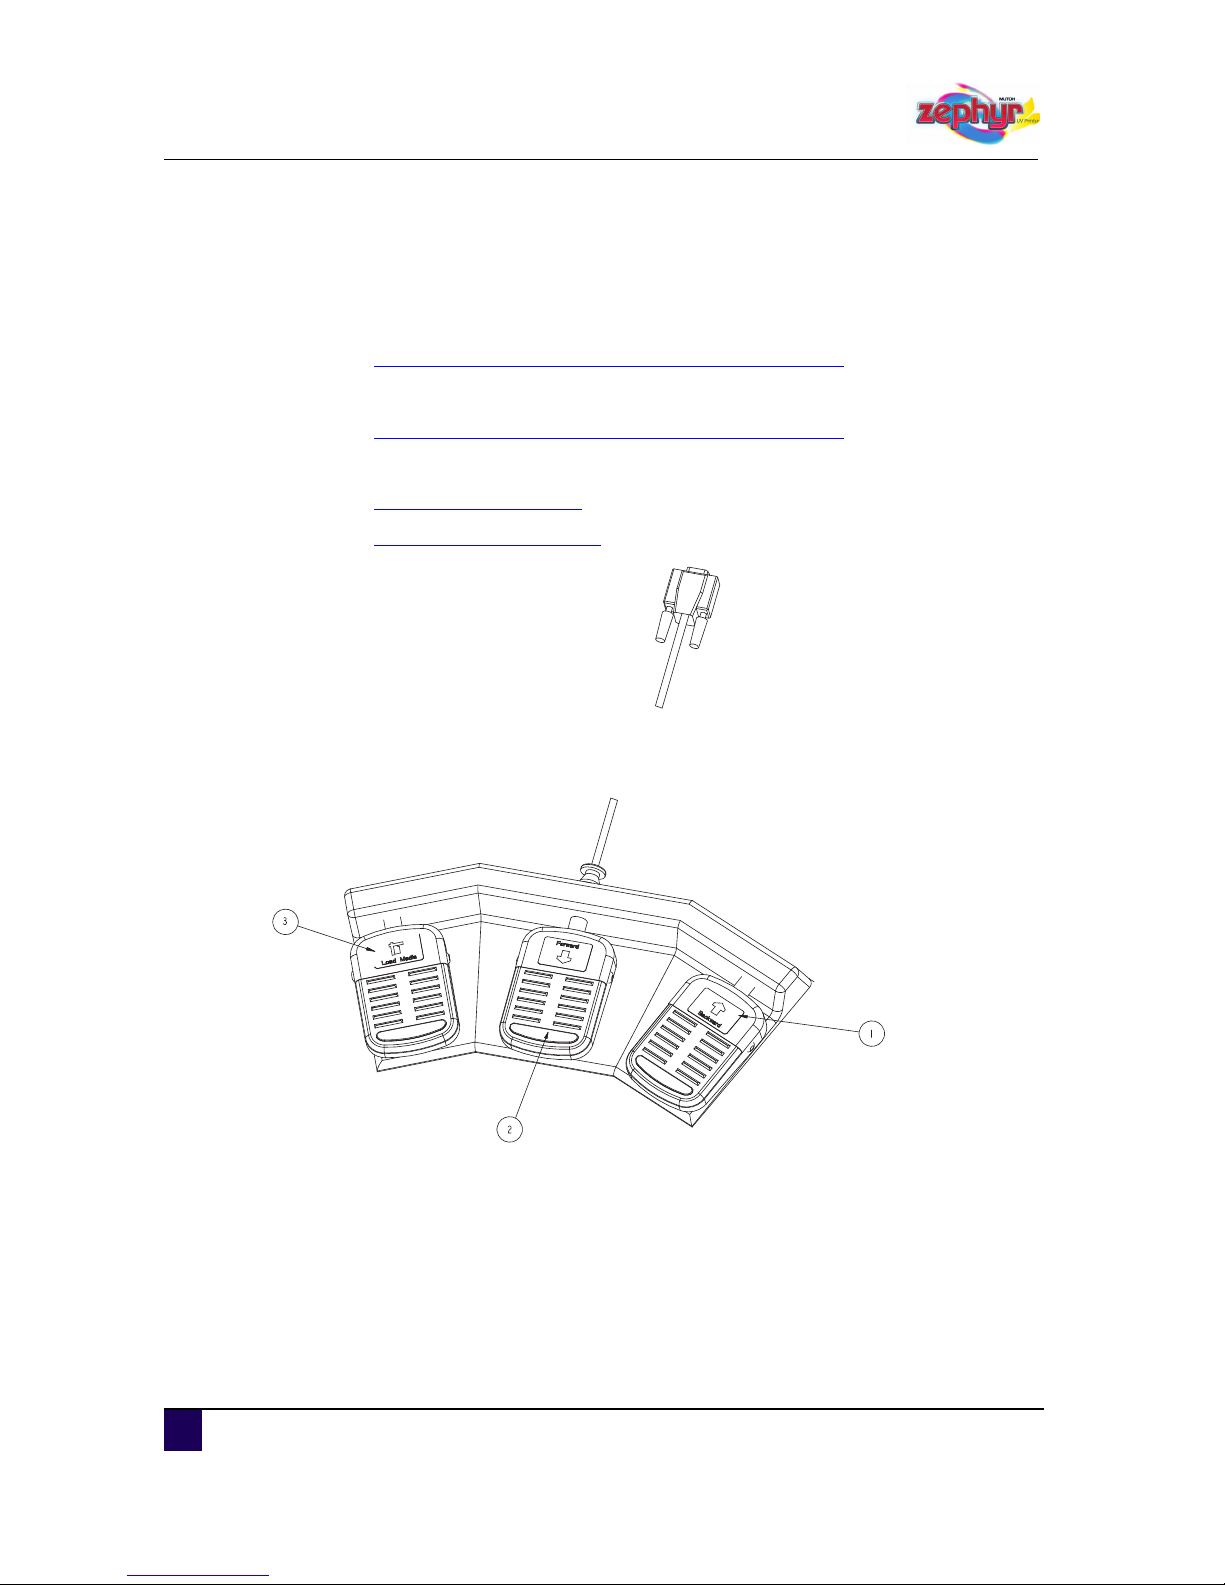
3.3 Using the footpedal
The footpedal consists out of 3 pedals. Each pedal starts a different operation.
Use pedal 1 to feed the media backwards.
Refer to Feeding media continuously forward / backward on page80
Use pedal 2 to feed the media forward.
Refer to Feeding media continuously forward / backward on page80
Use pedal 3 to load or unload media.
Refer to Loading media on page61
Refer to Unloading media on page78
Page 31

User’s Guide Zephyr TS
Product overview
AP-75390 - Revision 1.0 31
3
3.4 Installation environment
3.4.1 Environmental requirements
In order to obtain optimum output quality, it is very important that your room meets following
conditions:
Recommended environment
Temperature: 18 °C to 30°C
Humidity: RH 40% to 65% non-condensing
Variation rate
Temperature: 2 °C per hour
Humidity: RH 5% per hour
Storage environment of ink
Temperature: 5°C to 35°C
3.4.2 Dust free state
The area where installing the printer must be reasonably free of dust and other airborne
particles. Do not place the printer in a carpeted area or where using sanders or trimmers.
Page 32

User’s Guide Zephyr TS
Product overview
32 AP-75390 - Revision 1.0
3.4.3 Network requirements
The printer requires a standard Ethernet cable to connect to the customer’s 100/1000 Base-T
or GigaBit network.
Both the printer and the host computer require an RJ-45 Ethernet cable to connect them to
the customer’s network. The printer’s network interface is capable of GigaBit transfer speeds
but will also communicate with a 100/1000 Base-T network.
It is strongly recommended to:
connect the RIP directly to the network.
connect the printer directly to the network.
The network connection between rip and network and printer and network:
Ethernet Gbit Category 5E (GBit) or higher.
It is strongly recommended to use a pre-manufactured patch cable, no self made cables,
to ensure proper connection.
Page 33

User’s Guide Zephyr TS
Product overview
AP-75390 - Revision 1.0 33
3
3.4.4 Printer dimensions
The Zephyr TS needs to be installed in a room large enough to perform following actions
normally:
Loading media
Filling the ink bottles
Installing the optional rigid printing tables and/or APS
Maintenance done by the end user or an authorized Mutoh technician
We recommend a minimum area of 6 m x 5 m
1
2
3
4
5
6
N° Description
1 Zephyr TS UV Printer
2 Inlet power cable
3 Outlet for Air Purification System with diameter of 150 mm
4 Front rigid printing table (OPTIONAL)
5 Rear rigid printing table (OPTIONAL)
6 Air Purification System - Filter 05 (OPTIONAL)
Page 34

User’s Guide Zephyr TS
Product overview
34 AP-75390 - Revision 1.0
Page 35

User’s Guide Zephyr TS
Basics
AP-75390 - Revision 1.0 35
4
Chapter 4 Basics
Workflow . . . . . . . . . . . . . . . . . . . . . . . . . . . . . . . . . . . . . . . . . . . . . . . . . . . 39
Switching the Power ON / OFF . . . . . . . . . . . . . . . . . . . . . . . . . . . . . . . . . 40
Switching the power ON . . . . . . . . . . . . . . . . . . . . . . . . . . . . . . . . . . . . . . . . . 40
Starting up from a windows based environment. . . . . . . . . . . . . . . . . . . . 44
Switching the power OFF. . . . . . . . . . . . . . . . . . . . . . . . . . . . . . . . . . . . . . . . . 45
Emergency Shutdown . . . . . . . . . . . . . . . . . . . . . . . . . . . . . . . . . . . . . . . . 48
Emergency capping procedure . . . . . . . . . . . . . . . . . . . . . . . . . . . . . . . . . . . . 50
How to navigate the User Interface. . . . . . . . . . . . . . . . . . . . . . . . . . . . . . 53
Job management tab . . . . . . . . . . . . . . . . . . . . . . . . . . . . . . . . . . . . . . . . . . . . 53
Maintenance tab . . . . . . . . . . . . . . . . . . . . . . . . . . . . . . . . . . . . . . . . . . . . . . . 54
Media control tab . . . . . . . . . . . . . . . . . . . . . . . . . . . . . . . . . . . . . . . . . . . . . . . 54
Calibration tab . . . . . . . . . . . . . . . . . . . . . . . . . . . . . . . . . . . . . . . . . . . . . . . . . 55
Ink tab . . . . . . . . . . . . . . . . . . . . . . . . . . . . . . . . . . . . . . . . . . . . . . . . . . . . . . . 55
Statistics tab. . . . . . . . . . . . . . . . . . . . . . . . . . . . . . . . . . . . . . . . . . . . . . . . . . . 56
Setup tab . . . . . . . . . . . . . . . . . . . . . . . . . . . . . . . . . . . . . . . . . . . . . . . . . . . . . 57
Non assigned tabs . . . . . . . . . . . . . . . . . . . . . . . . . . . . . . . . . . . . . . . . . . . . . . 58
Status bar. . . . . . . . . . . . . . . . . . . . . . . . . . . . . . . . . . . . . . . . . . . . . . . . . . . . . 59
Loading media . . . . . . . . . . . . . . . . . . . . . . . . . . . . . . . . . . . . . . . . . . . . . . 61
Loading roll media . . . . . . . . . . . . . . . . . . . . . . . . . . . . . . . . . . . . . . . . . . . . . . 62
Loading sheet or rigid media . . . . . . . . . . . . . . . . . . . . . . . . . . . . . . . . . . . . . . 70
Aligning the rigid media using the alignment pin . . . . . . . . . . . . . . . . . . . 75
Aligning the rigid media using the guiding profile . . . . . . . . . . . . . . . . . . . 76
Unloading media. . . . . . . . . . . . . . . . . . . . . . . . . . . . . . . . . . . . . . . . . . . . . 78
Feeding media . . . . . . . . . . . . . . . . . . . . . . . . . . . . . . . . . . . . . . . . . . . . . . 79
Feeding media forwards / backwards by step . . . . . . . . . . . . . . . . . . . . . . . . . 79
Feeding media continuously forward / backward. . . . . . . . . . . . . . . . . . . . . . . 80
Using the media tab . . . . . . . . . . . . . . . . . . . . . . . . . . . . . . . . . . . . . . . . . 80
Page 36

User’s Guide Zephyr TS
Basics
36 AP-75390 - Revision 1.0
Using the status bar . . . . . . . . . . . . . . . . . . . . . . . . . . . . . . . . . . . . . . . . . 81
Using the keyboard arrows. . . . . . . . . . . . . . . . . . . . . . . . . . . . . . . . . . . . 81
Return to the print position. . . . . . . . . . . . . . . . . . . . . . . . . . . . . . . . . . . . . . . . 81
Using the media tab . . . . . . . . . . . . . . . . . . . . . . . . . . . . . . . . . . . . . . . . . 82
Using the status bar . . . . . . . . . . . . . . . . . . . . . . . . . . . . . . . . . . . . . . . . . 82
Unwinding and winding up the media . . . . . . . . . . . . . . . . . . . . . . . . . . . 83
Manually media cutting . . . . . . . . . . . . . . . . . . . . . . . . . . . . . . . . . . . . . . . 84
Media Settings . . . . . . . . . . . . . . . . . . . . . . . . . . . . . . . . . . . . . . . . . . . . . . 85
Preview settings. . . . . . . . . . . . . . . . . . . . . . . . . . . . . . . . . . . . . . . . . . . . . . . . 85
Media preview settings. . . . . . . . . . . . . . . . . . . . . . . . . . . . . . . . . . . . . . . 87
Job preview settings. . . . . . . . . . . . . . . . . . . . . . . . . . . . . . . . . . . . . . . . . 88
Media details . . . . . . . . . . . . . . . . . . . . . . . . . . . . . . . . . . . . . . . . . . . . . . . . . . 89
Media details when loading sheets or rigid media . . . . . . . . . . . . . . . . . . 89
Changing media details . . . . . . . . . . . . . . . . . . . . . . . . . . . . . . . . . . . . . . 91
Media control settings . . . . . . . . . . . . . . . . . . . . . . . . . . . . . . . . . . . . . . . . . . . 92
Vacuum settings . . . . . . . . . . . . . . . . . . . . . . . . . . . . . . . . . . . . . . . . . . . . 92
Tensioning settings. . . . . . . . . . . . . . . . . . . . . . . . . . . . . . . . . . . . . . . . . . 93
Lever pressure settings . . . . . . . . . . . . . . . . . . . . . . . . . . . . . . . . . . . . . . 96
Preparations before printing . . . . . . . . . . . . . . . . . . . . . . . . . . . . . . . . . . . 97
Using the media retainers . . . . . . . . . . . . . . . . . . . . . . . . . . . . . . . . . . . . . . . . 97
Checking the temperature and pressure settings . . . . . . . . . . . . . . . . . . . . . . 99
Performing a nozzle check. . . . . . . . . . . . . . . . . . . . . . . . . . . . . . . . . . . . . . . 101
Using the calibration tab. . . . . . . . . . . . . . . . . . . . . . . . . . . . . . . . . . . . . 102
Using the maintenance tab. . . . . . . . . . . . . . . . . . . . . . . . . . . . . . . . . . . 104
Set the correct distance adjust (step) . . . . . . . . . . . . . . . . . . . . . . . . . . . . . . 106
How to determine and change the step . . . . . . . . . . . . . . . . . . . . . . . . . 107
How to change the step on the fly . . . . . . . . . . . . . . . . . . . . . . . . . . . . . 112
Setting the correct head gap . . . . . . . . . . . . . . . . . . . . . . . . . . . . . . . . . . . . . 114
Saving an alignment. . . . . . . . . . . . . . . . . . . . . . . . . . . . . . . . . . . . . . . . 116
Loading an alignment . . . . . . . . . . . . . . . . . . . . . . . . . . . . . . . . . . . . . . . 117
Using the job manager. . . . . . . . . . . . . . . . . . . . . . . . . . . . . . . . . . . . . . . 118
Importing a file into the job pool . . . . . . . . . . . . . . . . . . . . . . . . . . . . . . . . . . . 118
Page 37

User’s Guide Zephyr TS
Basics
AP-75390 - Revision 1.0 37
4
Importing by copy . . . . . . . . . . . . . . . . . . . . . . . . . . . . . . . . . . . . . . . . . . 119
Importing by link . . . . . . . . . . . . . . . . . . . . . . . . . . . . . . . . . . . . . . . . . . . 121
Import via drag and drop . . . . . . . . . . . . . . . . . . . . . . . . . . . . . . . . . . . . 122
Viewing the import queue . . . . . . . . . . . . . . . . . . . . . . . . . . . . . . . . . . . . . . . 123
Previewing the imported file. . . . . . . . . . . . . . . . . . . . . . . . . . . . . . . . . . . . . . 125
Viewing and editing the job properties. . . . . . . . . . . . . . . . . . . . . . . . . . . . . . 126
General. . . . . . . . . . . . . . . . . . . . . . . . . . . . . . . . . . . . . . . . . . . . . . . . . . 128
Advanced . . . . . . . . . . . . . . . . . . . . . . . . . . . . . . . . . . . . . . . . . . . . . . . . 130
Restoring job properties . . . . . . . . . . . . . . . . . . . . . . . . . . . . . . . . . . . . . 133
Adding copies in the print pool. . . . . . . . . . . . . . . . . . . . . . . . . . . . . . . . . . . . 134
Deleting print jobs from the job pool . . . . . . . . . . . . . . . . . . . . . . . . . . . . . . . 135
Deleting print jobs from the job pool when done . . . . . . . . . . . . . . . . . . . . . . 136
Working with the autopilot . . . . . . . . . . . . . . . . . . . . . . . . . . . . . . . . . . . . . . . 137
Adding items to the print queue . . . . . . . . . . . . . . . . . . . . . . . . . . . . . . . . . . . 138
Adding copies in the print queue . . . . . . . . . . . . . . . . . . . . . . . . . . . . . . . . . . 140
Setting the print job sequence . . . . . . . . . . . . . . . . . . . . . . . . . . . . . . . . . . . . 141
When not working with the autopilot function . . . . . . . . . . . . . . . . . . . . . 141
When working with the autopilot function . . . . . . . . . . . . . . . . . . . . . . . . 142
Aborting copies . . . . . . . . . . . . . . . . . . . . . . . . . . . . . . . . . . . . . . . . . . . . . . . 144
Pausing the current print job . . . . . . . . . . . . . . . . . . . . . . . . . . . . . . . . . . . . . 146
Pausing the print queue. . . . . . . . . . . . . . . . . . . . . . . . . . . . . . . . . . . . . . . . . 148
Removing items from the job queue . . . . . . . . . . . . . . . . . . . . . . . . . . . . . . . 149
Remove 1 item . . . . . . . . . . . . . . . . . . . . . . . . . . . . . . . . . . . . . . . . . . . . 149
Remove all items . . . . . . . . . . . . . . . . . . . . . . . . . . . . . . . . . . . . . . . . . . 150
Checking the status . . . . . . . . . . . . . . . . . . . . . . . . . . . . . . . . . . . . . . . . . 151
Checking the print status . . . . . . . . . . . . . . . . . . . . . . . . . . . . . . . . . . . . . . . . 151
Print job status . . . . . . . . . . . . . . . . . . . . . . . . . . . . . . . . . . . . . . . . . . . . 151
Estimated time of arrival . . . . . . . . . . . . . . . . . . . . . . . . . . . . . . . . . . . . . . . . 154
Viewing the job action history. . . . . . . . . . . . . . . . . . . . . . . . . . . . . . . . . 155
Refilling the ink. . . . . . . . . . . . . . . . . . . . . . . . . . . . . . . . . . . . . . . . . . . . . 156
Checking the ink status . . . . . . . . . . . . . . . . . . . . . . . . . . . . . . . . . . . . . . . . . 157
Verifying the ink level . . . . . . . . . . . . . . . . . . . . . . . . . . . . . . . . . . . . . . . 157
Page 38

User’s Guide Zephyr TS
Basics
38 AP-75390 - Revision 1.0
Verifying the chip volume . . . . . . . . . . . . . . . . . . . . . . . . . . . . . . . . . . . . 159
Ink refill. . . . . . . . . . . . . . . . . . . . . . . . . . . . . . . . . . . . . . . . . . . . . . . . . . . . . . 160
Working with Mutoh’s Smartchip management system . . . . . . . . . . . . . . . . . 162
Transportation . . . . . . . . . . . . . . . . . . . . . . . . . . . . . . . . . . . . . . . . . . . . . 165
Short distance transportation . . . . . . . . . . . . . . . . . . . . . . . . . . . . . . . . . . . . . 165
Medium-distance transportation for short term . . . . . . . . . . . . . . . . . . . . . . . 165
Medium-Long distance transportation for long-term . . . . . . . . . . . . . . . . . . . 166
Page 39

User’s Guide Zephyr TS
Basics
AP-75390 - Revision 1.0 39
4
4.1 Workflow
Be sure to read and understand the safety warnings before handling the printer.
Workflow reference
Step 1: Power ON the printer. Switching the power ON on page40
Step 2: Open the 4 ink valves.
Step 3: Clean the head. Cleaning the heads on page224
Step 4: Load media. Loading media on page61
Step 5: Perform a nozzle check. Performing a nozzle check on page101
Step 6: Perform a distance adjust. Set the correct distance adjust (step) on
page106
Step 7: Send a file from the rip to the printer. Importing a file into the job pool on
page118
Step 8: Edit the job properties if necessary. Viewing and editing the job properties
on page126
Step 9: Add the sent print file to the print queue. Adding items to the print queue on
page138
The print operation starts.
Page 40

User’s Guide Zephyr TS
Basics
40 AP-75390 - Revision 1.0
4.2 Switching the Power ON / OFF
This section describes how to power ON and OFF the Zephyr TS. When switching ON the
printer, the computer automatically starts the software. From the monitor, the operator has
access to the printer’s User Interface (UI).
4.2.1 Switching the power ON
See also
Safety instructions on page11
Starting up from a windows based environment on page44
Emergency Shutdown on page48
Cleaning the heads on page224
Cleaning the receiver box on page232
Checking the temperature and pressure settings on page99
Heater settings on page203
Adjusting the throttle on page242
Performing a nozzle check on page101
Be sure to read and understand the safety warnings before handling the printer.
Important
If a situation requires an immediate shutdown of all activities, push the
emergency stop.
Refer to Emergency Shutdown on page48
Note
Before powering ON, make sure that loose objects such as clothing, tools and
cleaning materials are not interfering with the printer mechanisms.
Page 41

User’s Guide Zephyr TS
Basics
AP-75390 - Revision 1.0 41
4
Power ON the printer according to the procedure below:
Step 1: Ensure that the power plug is properly seated.
Step 2: Switch ON the power switch located at the right bottom side of the printer.
Step 3: If it is not already on, switch ON the monitor.
Step 4: During the start-up procedure, the monitor displays the boot splash.
While displaying the boot splash you have 3 options:
ENTER: pressing the [ENTER] key on the keyboard will immediately start up
the User interface.
ESCAPE: pressing the [ESCAPE] key on your keyboard will result in starting
up in a windows based environment. The User interface will not start up.
Refer to Starting up from a windows based environment on page44
Automatic start-up: If you do not touch the enter or the escape key, the printer
will automatically continue to start up.
Step 5: Open the left maintenance cover and open the ink valves when the printer message
appears.
Step 6: Once the ink valves are open, click continue.
O
F
F
ON
Page 42

User’s Guide Zephyr TS
Basics
42 AP-75390 - Revision 1.0
Step 7: Leave the printer idle for 30 minutes. This is necessary to:
ensure nozzle stability
degass the ink
warm up the heads to the requested temperature (± 43 °C).
Refer to Checking the temperature and pressure settings on page99
The last 10 minutes you can also define the heater settings. This way you can
immediately start printing once the time has passed.
Refer to Heater settings on page203
Step 8: The initialization of the printer is complete once the monitor displays the Zephyr TS
User Interface.
Note
Make sure the heaters are not operating the complete half hour. If heating it so
long, Feed the media forward before using it. This to prevent that media curls
lead to head strikes.
Note
The jobs you have loaded previous times, will remain in the job pool if you did
not delete them.
Page 43

User’s Guide Zephyr TS
Basics
AP-75390 - Revision 1.0 43
4
Step 9: Perform a head cleaning.
Refer to Cleaning the heads on page224
Step 10: Take out the receiver box and clean it.
Refer to Cleaning the receiver box on page232
Step 11: Place the receiver box back.
Position it so that the back of the receiver box is against the metal buffer.
Step 12: Verify that the value of the ink system pressure is -52.5 mbar ± 0.5.
Refer to Checking the temperature and pressure settings on page99
Step 13: Position the media retainers correctly.
Refer to Using the media retainers on page97
Step 14: Perform a nozzle check to verify if the nozzles are in good shape.
Refer to Performing a nozzle check on page101
Step 15: If necessary, perform a head cleaning.
Refer to Cleaning the heads on page224
Page 44

User’s Guide Zephyr TS
Basics
44 AP-75390 - Revision 1.0
Starting up from a windows based environment
If the Zephyr TS is already ON, but you ended up in a windows based environment, you can
still start up the User interface. Proceed as described below.
Step 1: Double click the bootsplash icon.
Step 2: The operation panel displays the boot splash.
While displaying the boot splash you have 3 options:
Step 3: The User Interface starts up in the same way as when starting up normally.
Option Description
Enter
Pressing the [ENTER] key on the keyboard will immediately start up the
User interface.
Escape
Pressing the [ESCAPE] key on your keyboard will result in starting up in
a windows based environment. The User interface will not start up, and
the printer will not operate
Automatic
start-up
If you do not touch the enter or the escape key, the printer will
automatically continue to start up.
Page 45

User’s Guide Zephyr TS
Basics
AP-75390 - Revision 1.0 45
4
4.2.2 Switching the power OFF
See also
Safety instructions on page11
Performing a nozzle check on page101
Unloading media on page78
Cleaning the heads on page224
Cleaning the receiver box on page232
Step 1: Verify that all printing operations are stopped.
Step 2: Perform a nozzle check and verify that all nozzles are available.
Refer to Performing a nozzle check on page101
Step 3: In case not all nozzles are available, perform a head cleaning.
Refer to Cleaning the heads on page224
Step 4: Remove the media.
Refer to Unloading media on page78
Step 5: Open the left maintenance cover.
Step 6: Close the 4 ink valves.
The ink valves are closed if the handles are horizontal positioned.
Step 7: Clean out the receiver box if necessary.
Refer to Cleaning the receiver box on page232
Be sure to read and understand the safety warnings before handling the printer.
Page 46

User’s Guide Zephyr TS
Basics
46 AP-75390 - Revision 1.0
Step 8: In the statusbar, click the Shutdown button to shutdown the printer.
A message window appears.
Click the Printer button to shutdown the complete Zephyr TS.
Click the Software button to shutdown the software.
If you choose to shutdown the software, you will end up in a Windows based
environment.
Refer to Starting up from a windows based environment on page44
When powering OFF the printer, a new window appears. This window shows you the
progress of the UV lights cooling down, and asks if you did close the ink valves.
Page 47

User’s Guide Zephyr TS
Basics
AP-75390 - Revision 1.0 47
4
Step 9: As soon as the UV lamps are cooled down, switch OFF the power switch located at
the right bottom side of the printer.
Step 10: Switch OFF all optional devices such as Air Purification Systems.
Note
It is very important to let the UV lamps cool down before switching OFF the
power switch.
If you do switch OFF the printer before the UV lamps cooled down, the life time
of the UV lamp will drastically decrease.
O
F
F
ON
Page 48

User’s Guide Zephyr TS
Basics
48 AP-75390 - Revision 1.0
4.3 Emergency Shutdown
See also
Safety instructions on page11
Emergency capping procedure on page50
Switching the power OFF on page45
Switching the power ON on page40
The procedure below describes all necessary actions when an emergency occurs.
Step 1: Push the emergency stop located on the right side of the Zephyr TS.
Be sure to read and understand the safety warnings before handling the printer.
Important
If a situation requires an immediate shutdown of all printer activities, push the
emergency stop without hesitation.
Caution
All printer operations will stop immediately.
The shutters close so there is no contact between the UV lamps and the media.
Page 49

User’s Guide Zephyr TS
Basics
AP-75390 - Revision 1.0 49
4
Step 2: Close the 4 ink valves to prevent ink leaks.
The ink valves are closed if the handles are horizontal positioned.
Step 3: Proceed with the emergency capping.
Refer to Emergency capping procedure on page50
Step 4: Turn the emergency stop clockwise to release it.
All printer activities will remain stopped.
If the operation panel displays an error, click OK to try to re-initialize the software.
If the re-initialization does not work, minimize the User Interface to see the
desktop. In the task bar, right click on the tray icon and choose “KillAll”.
Step 5: Restart the software.
If the operation panel displays an error, shut down the printer.
Refer to Switching the power OFF on page45
Step 6: Leave the printer for 1 minute before restarting it.
Refer to Switching the power ON on page40
Important
Make sure to solve the situation that caused the emergency shutdown before
resetting the emergency button.
Page 50

User’s Guide Zephyr TS
Basics
50 AP-75390 - Revision 1.0
4.3.1 Emergency capping procedure
See also
Safety instructions on page11
Switching the power OFF on page45
Step 1: Switch OFF the power switch of the Zephyr TS.
Refer to Switching the power OFF on page45
Step 2: Open the left maintenance cover.
Be sure to read and understand the safety warnings before handling the printer.
Caution
When an emergency occurs, place the emergency capping to prevent that ink
cures into the print head.
O
F
F
ON
Page 51

User’s Guide Zephyr TS
Basics
AP-75390 - Revision 1.0 51
4
Step 3: Close the 4 ink valves to prevent ink leaks.
The ink valves are closed if the handles are horizontally positioned.
Step 4: Take the emergency capping in the middle, and push the spring downwards.
Note
In case the carriage stands over the print platform, open the front cover and
move it to the left side of the printer.
Page 52

User’s Guide Zephyr TS
Basics
52 AP-75390 - Revision 1.0
Step 5: Slide the emergency capping over the receiver box guidance.
Step 6: Release the emergency capping spring.
The emergency capping is now protecting the heads.
Page 53

User’s Guide Zephyr TS
Basics
AP-75390 - Revision 1.0 53
4
4.4 How to navigate the User Interface
The User Interface has 8 tabs located at the top of the display. You access each with a click
of the mouse or use the corresponding [F] key. Once you have chosen a specific, the
corresponding window opens.
The picture below displays the tab bar.
Each tab is divided into different status windows and toolbars. The toolbars are used to run
the different operations use the status windows to get information concerning the printer.
Below you will find an overview of the different tabs and the corresponding procedures.
4.4.1 Job management tab
Use the job management tab to:
Import a picture into the job pool.
Importing a file into the job pool on page118
View and edit job properties.
Viewing and editing the job properties on page126
Delete a picture in the job pool.
Deleting print jobs from the job pool on page135
Add items to the print queue.
Adding items to the print queue on page138
Add multiple copies to the print queue.
Adding copies in the print pool on page134
Abort print job.
Aborting copies on page144
Viewing the job action history
Viewing the job action history on page155
Page 54

User’s Guide Zephyr TS
Basics
54 AP-75390 - Revision 1.0
4.4.2 Maintenance tab
Use the maintenance tab to:
Perform a head purge.
Cleaning the heads on page224
Perform a nozzle check.
Performing a nozzle check on page101
4.4.3 Media control tab
Use the media control tab to:
Load media.
Loading media on page61
Unload media.
Unloading media on page78
Feed media.
Feeding media on page79
Set the media settings.
Media Settings on page85
Page 55

User’s Guide Zephyr TS
Basics
AP-75390 - Revision 1.0 55
4
4.4.4 Calibration tab
Use the Calibration tab to:
Perform a nozzle check.
Performing a nozzle check on page101
Check the UniDir and BiDir alignment.
Uni-directional adjustment procedure on page269
Bi-directional adjustment procedure on page278
Perform a distance adjust.
Set the correct distance adjust (step) on page106
UV lamp alignment
UV lamp alignment on page258
Check the head slant alignment.
Headslant adjustment procedure on page262
Check the front and back alignment.
Front and back adjustment procedure on page264
Making settings to print on of rigids
Unloading media on page78
4.4.5 Ink tab
Use the ink tab to:
Load ink.
Refilling the ink on page156
Check the ink status.
Verifying the ink level on page157
Check the head temperature.
Checking the temperature and pressure settings on page99
Check the cooling system temperature.
Checking the temperature and pressure settings on page99
Checking the ink system pressure.
Checking the temperature and pressure settings on page99
Checking the degasser pressure.
Checking the temperature and pressure settings on page99
Page 56

User’s Guide Zephyr TS
Basics
56 AP-75390 - Revision 1.0
4.4.6 Statistics tab
Use the Statistics tab to:
Get feedback about the total print surface.
Usage statistics on page213
Get feedback on the amount of printed jobs.
Usage statistics on page213
Get feedback on the amount of imported jobs.
Usage statistics on page213
Reset the UV lamp counter
UV statistics on page210
Verify the disk space.
Disk space on page213
Get feedback on UV statistics.
UV statistics on page210
Get feedback on motor statistics.
Motor statistics on page212
View the event log.
Event log on page214
Get information concerning the serial numbers.
Information on page215
Get information concerning the software version.
Information on page215
Page 57

User’s Guide Zephyr TS
Basics
AP-75390 - Revision 1.0 57
4
4.4.7 Setup tab
Use the Setup tab to:
Set the language.
Language and input settings on page172
Set the keyboard preference.
Keyboard preference on page173
Set time and date.
Time and date on page176
Set the mouse settings.
Mouse settings on page175
Create or restore a parameter backup.
Creating and restoring a parameter backup on page177
Set the network settings.
Network setup on page180
Make job management settings
Making job management settings on page184
Set the user preference media settings.
Media setup on page190
Set the heater settings.
Heater setup on page200
Set the UV settings.
UV setup on page204
Page 58

User’s Guide Zephyr TS
Basics
58 AP-75390 - Revision 1.0
4.4.8 Non assigned tabs
There are 3 un assigned tabs. These tabs can personalised for procedures you often use.
For example:
Nozzle check
Performing a nozzle check on page101
Return to print position
Return to the print position on page81
Abort job
Aborting copies on page144
Pause job
Pausing the current print job on page146
Pausing the print queue on page148
Load media
Loading media on page61
Unload media
Unloading media on page78
Page 59

User’s Guide Zephyr TS
Basics
AP-75390 - Revision 1.0 59
4
4.4.9 Status bar
At the bottom of the display you find a status bar which returns in each tab.
By clicking on a certain item, you will immediately jump to the corresponding section in the
user interface.
Fox example, by clicking on the status symbol of the heater, you jump to the setup tab -
categories window ==> Heaters.
N° Description Function
1 Time
Shows you the current time.
Refer to Time and date on page176
Shows how long the printer is powered on between the
brackets.
2 Print Status
Displays the status of the printer. Depending on the status,
you will get a different message.
Refer to Checking the print status on page151
3 Heater Status
Displays the status of the heaters (°C)
Refer to Heater setup on page200
4 UV lamp status
Displays the current status of the UV lamp.
Depending on the status, you will get a different message.
Refer to UV setup on page204
5 Status cooling system
Displays the current temperature and status of the cooling
system.
Refer to Checking the temperature and pressure settings on
page99
6 Ink status
Displays the current status of each colour. Depending on
the status, you will get a different message.
Refer to Checking the ink status on page157
Page 60

User’s Guide Zephyr TS
Basics
60 AP-75390 - Revision 1.0
7
Media feed
backwards
Feeds the media backwards. Selectable in each tab,
except while printing.
Refer to Feeding media on page79
8
Return to print
position
To return to the print position. Selectable in each tab,
except while printing.
Refer to Feeding media on page79
9 Media feed forward
Feeds the media forward. Selectable in each tab, except
while printing.
Refer to Feeding media on page79
Note
In case an error occurs, an envelope will appear in the status bar. Double click
the envelope to read the error message.
In case a cover is open, a printer symbol will appear in the status bar. This icon
will disappear as soon as you close the corresponding cover.
When importing a pre-ripped file, an import button appears in the statusbar.
Click this button to open the import queue.
N° Description Function
Page 61

User’s Guide Zephyr TS
Basics
AP-75390 - Revision 1.0 61
4
4.5 Loading media
This chapter explains how to load media properly. Depending on your choice of media, there
are two options:
Loading sheet or rigid media.
Refer to Loading sheet or rigid media on page70
Loading roll media.
Refer to Loading roll media on page62
Be sure to read and understand the safety warnings before handling the printer.
Note
When not printing for a long period and leaving the Zephyr TS powered ON, it is
best to unload the media. If media stays loaded in the printer, the media will
become wrinkled.
Page 62

User’s Guide Zephyr TS
Basics
62 AP-75390 - Revision 1.0
4.5.1 Loading roll media
See also
Switching the power ON on page40
Tensioning settings on page93
Vacuum settings on page92
Feeding media on page79
Using the footpedal on page30
Using the media retainers on page97
Step 1: Verify that the printer is ON.
Refer to Switching the power ON on page40
Step 2: Open the front cover.
Be sure to read and understand the safety warnings before handling the printer.
Important
Be sure to read and understand all safety warnings.
Take appropriate safety measures when working with the Zephyr TS.
Page 63

User’s Guide Zephyr TS
Basics
AP-75390 - Revision 1.0 63
4
Step 3: Verify if the roll media is inside or outside printable. This affects the installation
method on the unwinder.
Step 4: Verify how you want the media to be wound up at the front. This affects the
installation method on the winder.
OUTSIDE PRINTABLE MEDIA
INSIDE PRINTABLE MEDIA
Front
Rear
Front
Rear
N° Description
1 Roll unit
2 Empty core
3 Front tensioning bar
Page 64

User’s Guide Zephyr TS
Basics
64 AP-75390 - Revision 1.0
Make sure the tensioning settings and vacuum settings are OK for your purpose.
Refer to Tensioning settings on page93
Refer to Vacuum settings on page92
Consider the printer specifications before loading roll media.
Depending on how you want to wind up the media, select the correct tensioning
settings.
Step 5: Loosen the handles to move the roll units left and right until the roll media core fits.
Step 6: Install the media between the two roll units at the back of the machine.
Metrical Imperial
Maximum loading capacity 100 kg 220 lb
Maximum media width 1651 mm 65”
Inner core diameter 50,8 mm or 76.2 mm 2” or 3”
Page 65

User’s Guide Zephyr TS
Basics
AP-75390 - Revision 1.0 65
4
Step 7: Move the media roll and roll units to the right position and tighten them with the
handles.
To do so, position the left and right roll unit on the same distance from the 0I0
label.
Step 8: Tighten the wheel at the side to fix the media core between the 2 roll units.
Step 9: Feed the media forward with the foot pedal.
Refer to Using the footpedal on page30
X
Y
Note
Do not load media before the first or further than the last media pinch roller.
Page 66

User’s Guide Zephyr TS
Basics
66 AP-75390 - Revision 1.0
Step 10: Load the media through the rear tensioning bar, over the print platform, under the
pressure rollers as shown below.
Step 11: Go to the front side of the printer.
Step 12: Install an empty core between the front roll units in the same way as described
above.
Make sure the core is longer than the media width.
Note
Make sure to remove the media retainers. These will obstruct the smooth media
loading.
N° Description
1 Roll Unit
2 Media roll
3 Rear tensioning bar
4 Print platform and pressure rollers
Page 67

User’s Guide Zephyr TS
Basics
AP-75390 - Revision 1.0 67
4
Step 13: Open the media control tab via:
Clicking on the media control tab.
How to navigate the User Interface on page53
Pushing the middle foot pedal.
Using the footpedal on page30
The monitor displays the following screen.
Step 14: Click load media.
Step 15: If preferred, you can set the media name.
Step 16: Fill in the thickness of the media in the media details window.
Step 17: Select the checkbox automatic width measurement.
Page 68

User’s Guide Zephyr TS
Basics
68 AP-75390 - Revision 1.0
Step 18: Select the media type you are using. In this case select roll.
Step 19: To obtain an equal tension, pull the media on the front of the printer until the rear
tensioning system gently hits the back.
Step 20: Set the media control settings as preferred.
Step 21: Media control settings on page92
Step 22: Close the front cover.
Step 23: Press the foot pedal while holding the media.
Refer to Using the footpedal on page30
The pressure rollers move downwards and the media is loaded.
Step 24: Feed the media until you are able to stick it to the front core.
Step 25: Cut the front side of the media into a V-shape. This to become an equal tension on
the media when loaded.
Step 26: Tighten the media to the core with one single tape.
Note
Position the media retainers to prevent media curls causing head strikes.
Refer to Using the media retainers on page97
Page 69

User’s Guide Zephyr TS
Basics
AP-75390 - Revision 1.0 69
4
Note
When printing on certain types of roll media, it might happen that the media is
to stiff. This could lead to an improper functioning rear winder. If this is the
case, add some extra weight to the rear winder for proper functioning.
Note
Before starting a print job, make sure to set the correct distance adjust for the
loaded media.
Refer to Set the correct distance adjust (step) on page106
In case of working with cockling sensitive or furry media, adjust the head gap.
Refer to Setting the correct head gap on page114
Page 70

User’s Guide Zephyr TS
Basics
70 AP-75390 - Revision 1.0
4.5.2 Loading sheet or rigid media
See also
Switching the power ON on page40
How to navigate the User Interface on page53
Using the footpedal on page30
Step 1: Verify that the printer is ON.
Refer to Switching the power ON on page40
Step 2: Install the rigid printing tables.
Refer to Installation Guide rigid printing tables heater
Step 3: Open the front cover.
Be sure to read and understand the safety warnings before handling the printer.
Note
We recommend to work with Mutoh’s rigid printing tables when printing on
rigid materials.
Please refer to the installation guide of the rigid printing tables for more
information.
Note
Keep in mind that the minimum media width is A4 (210 mm - 8.27”).
Page 71

User’s Guide Zephyr TS
Basics
AP-75390 - Revision 1.0 71
4
Step 4: Make sure the media guidance bar is installed.
Step 5: Load the rigid media onto the rear table according to the preferred procedure.
Using the alignment pins and dowels.
Refer to Aligning the rigid media using the alignment pin on page75
Using the guiding profile.
Refer to Aligning the rigid media using the guiding profile on page76
Step 6: Position the front guidance (left and right) on top of the media and fix them.
Page 72

User’s Guide Zephyr TS
Basics
72 AP-75390 - Revision 1.0
Step 7: Lower the front alignment sensor and position the media against it.
Step 8: Close the front cover.
Step 9: By lowering the front alignment sensor, the monitor displays the media control
screen.
Step 10: Click on load media.
The monitor displays the following screen:
Step 11: Fill in the thickness of the media in the media details window.
Note
Make sure to keep the media against the two dowels at the back.
Note
In case the edges of the rigid media are slightly curled, increase the current
thickness with 0.2 mm. This to prevent head strikes.
Page 73

User’s Guide Zephyr TS
Basics
AP-75390 - Revision 1.0 73
4
Step 12: Select the checkbox automatic width measurement.
Step 13: Select the media type you are using. In this case select cutsheet / rigid.
Step 14: Fill in the media settings in the media details window.
Step 15: Set the media control settings as preferred.
Refer to Media control settings on page92
Step 16: Open the front cover and lift up the front alignment sensor.
Step 17: Close the front cover.
Note
In case you prefer to measure the media manually, you need to fill in all
settings.
Page 74

User’s Guide Zephyr TS
Basics
74 AP-75390 - Revision 1.0
Step 18: When all settings are filled in, click the OK button.
The pressure rollers will move downwards
Step 19: In case of using the dowels on the rear table, remove them.
Determine the top of your rigid media.
Unloading media on page78
The media loading procedure is finished
Note
Before starting a print job, make sure to set the correct distance adjust for the
loaded media.
Refer to Set the correct distance adjust (step) on page106
In case of working with cockling sensitive or furry media, adjust the head gap.
Refer to Setting the correct head gap on page114
Note
In case of using the alignment ruler, you do not need to uninstall it.
Page 75

User’s Guide Zephyr TS
Basics
AP-75390 - Revision 1.0 75
4
Aligning the rigid media using the alignment pin
Position the alignment pin as far as possible. This to align the media in the best
possible way.
Determine if you need to use only the alignment pin or the extra dowels as
well. Load the media against the alignment pins, in case half of a pinch roller
is not on the media, use the dowels.
1
2
1
2
1
2
N° Description
1 Rigid media
2 Pressure rollers
Page 76

User’s Guide Zephyr TS
Basics
76 AP-75390 - Revision 1.0
Aligning the rigid media using the guiding profile
In case you prefer to work with the guiding profile, load the guiding profile onto the alignment
pins.
Page 77

User’s Guide Zephyr TS
Basics
AP-75390 - Revision 1.0 77
4
Step 1: Load the rigid media against the guiding profile.
Page 78

User’s Guide Zephyr TS
Basics
78 AP-75390 - Revision 1.0
4.6 Unloading media
See also
Switching the power ON on page40
Using the footpedal on page30
Feeding media on page79
This chapter describes how to properly unload your media.
Step 1: Verify that the printer is ON
Refer to Switching the power ON on page40
Step 2: Open the media control tab by:
Clicking the media control tab.
Pushing the middle foot pedal.
Using the footpedal on page30
The monitor displays the following screen.
Step 3: Click on Unload media.
Step 4: The pressure rollers will raise.
Step 5: Feed the media backwards with the foot pedal to roll it up to the core.
Refer to Feeding media on page79
Step 6: Unload the media.
Step 7: Store the media properly.
Be sure to read and understand the safety warnings before handling the printer.
Page 79

User’s Guide Zephyr TS
Basics
AP-75390 - Revision 1.0 79
4
4.7 Feeding media
This chapter explains how to feed the media. As you will read below, there are several options
to feed the media. Please select the option of your preference.
4.7.1 Feeding media forwards / backwards by step
See also
Checking the print status on page151
Loading media on page61
Step 1: Verify that:
The printer is currently not operating.
Refer to Checking the print status on page151
The media is properly loaded.
Refer to Loading media on page61
Step 2: Click the media control tab.
The media control window opens.
Step 3: Fill in the distance you want to feed the media in the media feed window.
Step 4: Each time you click the Forward or Backward key, the media will be fed the set
distance.
Be sure to read and understand the safety warnings before handling the printer.
Page 80

User’s Guide Zephyr TS
Basics
80 AP-75390 - Revision 1.0
4.7.2 Feeding media continuously forward / backward
There are several ways to feed the media continuously:
Using the foot pedal.
Refer to Using the footpedal on page30
Using the keyboard arrows.
Refer to Using the keyboard arrows on page81
Using the media tab.
Refer to Using the media tab on page80
Using the status bar at the bottom of the User Interface.
Refer to Using the status bar on page81
Using the media tab
If you are using the media control tab, proceed as follows.
Step 1: Verify that:
The printer is currently not operating.
Refer to Checking the print status on page151
The media is properly loaded.
Refer to Loading media on page61
Step 2: Click the media control tab.
The media control window opens.
Be sure to read and understand the safety warnings before handling the printer.
Page 81

User’s Guide Zephyr TS
Basics
AP-75390 - Revision 1.0 81
4
Step 3: Click Forward or Backward to feed the media.
As long as you hold the button, the media will be fed.
Using the status bar
Click on the Forward or Backward symbol in the statusbar to feed the media continuously.
Refer to Status bar on page59
Using the keyboard arrows
Click the [UP] or [DOWN] arrow on your keyboard to feed the media continuously.
To do so, make sure that:
The media is properly loaded.
Loading media on page61
The printer is currently not operating.
Checking the print status on page151
4.7.3 Return to the print position
As soon as you click this button, the media goes to the position where the printer stopped
printing.
There are several options to return the media to the print position:
Using the foot pedal.
Refer to Using the footpedal on page30
Using the media tab.
Refer to Using the media tab on page82
Using the status bar on the bottom of the User Interface.
Be sure to read and understand the safety warnings before handling the printer.
Page 82

User’s Guide Zephyr TS
Basics
82 AP-75390 - Revision 1.0
Refer to Using the status bar on page82
Using a Non assigned tab.
Refer to Non assigned tabs on page58
Using the media tab
If you are using the media tab, proceed as follows.
Step 1: Verify that:
The printer is currently not operating.
Refer to Checking the print status on page151
The media is properly loaded.
Refer to Loading media on page61
Step 2: Click the media control tab.
The media control window opens.
Step 3: Click return to print position to feed the media to the print position.
Using the status bar
Click Return to print position in the statusbar to return the media to its print position.
Refer to Status bar on page59
Page 83

User’s Guide Zephyr TS
Basics
AP-75390 - Revision 1.0 83
4
4.8 Unwinding and winding up the media
This subchapter explains how to unwind or wind up the media onto a specific media core
once it is no longer loaded in the printer.
Please follow the procedure below for more information.
Step 1: Click media control.
The media control window opens.
Step 2: Click Unload media.
The media tensioning control is now available.
Depending on which media core you want to control, click the correct button.
Note
Another method is operating the foot pedals.
Refer to Using the footpedal on page30
Page 84

User’s Guide Zephyr TS
Basics
84 AP-75390 - Revision 1.0
4.9 Manually media cutting
This subchapter explains how to manually cut media.
Step 1: Verify that there are no printing or other operations in progress.
Step 2: Feed the media forward so that the print job passes the B heater.
Step 3: Open the front cover.
Step 4: Place the Mutoh paper cutter to the frontside of the B heater and cut the roll media
1
2
N° Description
1 Mutoh paper cutter
2 B heater (= Fixer)
Note
When loading new roll media, make sure that the front edge of the media is cut
straight.
Note
Be aware that cutting the media in combination with the return to print position
feature is risky. This because the printer does not know where you have cut the
media.
Page 85

User’s Guide Zephyr TS
Basics
AP-75390 - Revision 1.0 85
4
4.10 Media Settings
You can make several media settings. Follow the procedure below to set all media settings
correctly.
See also
Loading media on page61
Media preview settings on page87
Job preview settings on page88
Media details on page89
4.10.1 Preview settings
With this menu you can choose either to show or hide the media and job preview settings.
Step 1: Click the media control tab.
Step 2: Verify that the media is correctly loaded.
Refer to Loading media on page61
Step 3: Click Load media.
Be sure to read and understand the safety warnings before handling the printer.
Page 86

User’s Guide Zephyr TS
Basics
86 AP-75390 - Revision 1.0
The media load window opens.
Step 4: In the preview settings window, you will make different settings concerning media
and job preview settings.
Refer to Media preview settings on page87
Refer to Job preview settings on page88
Note
In case this window does not yet appear, load media first according to Loading
media on page61.
Page 87

User’s Guide Zephyr TS
Basics
AP-75390 - Revision 1.0 87
4
Media preview settings
Select this option to show the preview on the required media or on the current media.
Note
This function gives you for example the ability to see if a file is not too large to
print on the current media.
Function Description
Show the required media Shows you a preview of the file on the required media.
Show current media Shows you a preview of the file on the current media
Note
If you notice a grey zone on the right side of the file. It means that the
pre-ripped width of the file is larger than the width of the current media.
If this is the case, the file will be clipped.
Refer to Media details on page89
Page 88

User’s Guide Zephyr TS
Basics
88 AP-75390 - Revision 1.0
Job preview settings
In the job preview settings, you have 3 options.
Note
The media settings will appear in the media details window in case the
pre-ripped file has media settings attached.
Refer to Media details on page89
Function Description
No Job preview Choose this option if you do not need a preview.
Show the next job in
the queue
Shows a preview of the next job in line.
Show another job
If you select the option “Show another job” you need to browse to
the job you prefer. To browse to the job you need, click on the button
at the right side, and select the file. The job preview will appear.
Page 89

User’s Guide Zephyr TS
Basics
AP-75390 - Revision 1.0 89
4
4.10.2 Media details
This chapter describes how to set the media details. This will be helpful when you want to
change the pre-ripped media settings or when loading sheet media.
Media details when loading sheets or rigid media
Please read this chapter to know what settings you need.
Step 1: Verify that the media is properly loaded.
Step 2: Click Load media.
The media load window opens.
Be sure to read and understand the safety warnings before handling the printer.
Page 90

User’s Guide Zephyr TS
Basics
90 AP-75390 - Revision 1.0
Step 3: In the media details window, you can make various settings.
Name Description
Media name
Current /measured media: you are free to give a name to the media.
Requested media: If the RIP file contains media information, the
name will appear.
Media type
Current /measured media: Choose which kind of media you are
using. You can choose either Roll media or Cut sheet / rigid media.
Requested media: If the RIP file contains media information, the
media type will appear.
Media width
Current /measured media: Displays the media width automatically if
measuring the media automatically. If measuring the media
manually, you need to fill it in.
Requested media: If the RIP file contains media information, the
media width will appear.
Position
Only available when the Automatic width measurement checkbox is
not selected.
Current /measured media: Displays the media position automatically
if measuring the media automatically. If measuring the media
manually, you need to fill it in.
Media length
Current /measured media: For future use.
Requested media: If the RIP file contains media information, the
media length will appear.
Media thickness
Current /measured media: Fill in the media thickness.
Requested media: If the RIP file contains media information, the
media thickness will appear.
Page 91

User’s Guide Zephyr TS
Basics
AP-75390 - Revision 1.0 91
4
Changing media details
Follow the procedure below to see how to change the media settings.
Step 1: In the preview settings window, select show current media and show another job.
Click Browse to select the job you want to print.
Step 2: If there are contradictions between the required and the current media, you will see
them in the media details window.
Step 3: When clicking OK, a warning message appears asking if you are sure you want to
work with the conflicting media.
Note
Notice in the example above that the current media is smaller than the
requested.
If you do not choose a different media, the print file will be clipped.
Page 92

User’s Guide Zephyr TS
Basics
92 AP-75390 - Revision 1.0
4.10.3 Media control settings
Step 1: Click the media control tab.
Step 2: Verify that the media is properly loaded.
Refer to Loading media on page61
Step 3: Click Load media.
The media load window opens.
Vacuum settings
Step 1: In the media control window, you are able to make 2 settings concerning the
vacuum.
Use the Mode setting to set when the vacuum has to operate.
Be sure to read and understand the safety warnings before handling the printer.
Mode Description
Always
The vacuum will always operate, whether there is media loaded
or not.
Never
The vacuum will never operate, no matter whether there is media
loaded or not.
During print The vacuum will operate as soon as the printer starts printing.
When media loaded
The vacuum will operate, as soon as the media is loaded.
Loading media on page61
When media detected
The vacuum will operate as soon as the media detection sensor
detects the media.
Page 93

User’s Guide Zephyr TS
Basics
AP-75390 - Revision 1.0 93
4
Use the Force setting to set the vacuum force. Slide the bar to adjust the force.
Tensioning settings
When working with the Unw/W100, there are some settings that need to be made. Please
read the next chapter to know how to operate the Unw/W100.
Step 1: In the media control window, you are able to make 3 settings concerning the
tensioning.
Use the Mode option to set which winder has to operate.
Note
Another possibility to make these adjustments is via the Setup tab.
Refer to Media settings on page192
Mode Description
None None of the winders will operate.
Both Both the winders will operate.
Front Only the front winder will operate.
Rear Only the rear winder will operate.
Page 94

User’s Guide Zephyr TS
Basics
94 AP-75390 - Revision 1.0
Use the Direction front and Direction rear option to define how the media has to be
unwound and wound up.
Check whether the media is inside or outside printable. This affects the uwinding
method on the unwinder.
Mode Description
Direction Front Inside Choose this option if you want to wind the printed media inside.
Direction Front Outside Choose this option if you want to wind the printed media outside.
Direction Rear Inside Choose this option if you are using inside printable media.
Direction Rear Outside Choose this option if you are using outside printable media.
N° Description
1 Roll unit
2 Media roll
3 Rear tensioning bar
4 Print platform and pressure rollers
Page 95

User’s Guide Zephyr TS
Basics
AP-75390 - Revision 1.0 95
4
Check whether the media has to be wound up with the printside inside or
outside. This affects the winding method on the winder.
N° Description
1 Roll unit
2 Empty core
3 Front tensioning bar
Note
another possibility is via the Setup tab.
Refer to Media settings on page192
Note
Try to avoid rolling media onto a core with printed media on. The media might
become wound up improperly.
Page 96

User’s Guide Zephyr TS
Basics
96 AP-75390 - Revision 1.0
Lever pressure settings
Step 1: In the media control window, you are able to select different lever pressure settings.
Click on the lever pressure setting to open the drop down menu.
Step 2: Lower the pressure rollers to activate the lever pressure adjustment.
Mode Description
Low
Use this setting for soft media or when the levers leave a
mark.
Normal This should be the standard setting
Medium Use this setting for heavy or smooth rigids
High Use this setting for really smooth rigids
Note
As a general rule you can state that when the smoothness and / or the weight of
the media increases, the lever pressure should also increase.
Page 97

User’s Guide Zephyr TS
Basics
AP-75390 - Revision 1.0 97
4
4.11 Preparations before printing
4.11.1 Using the media retainers
Use the media retainers to keep the media edges flat. This to prevent head crashes when the
printer is operating. Follow the instructions below to use the media retainers.
Step 1: Verify that the media is loaded properly.
Refer to Loading media on page61
Step 2: Open the front cover.
Step 3: Attach the media retainers to the print platform.
Step 4: At the bottom side of the print platform, fix the media retainer with the spring to the
bracket.
Be sure to read and understand the safety warnings before handling the printer.
Page 98

User’s Guide Zephyr TS
Basics
98 AP-75390 - Revision 1.0
Step 5: Position the media retainers to both sides of the media.
Step 6: Close the front cover.
Note
We recommend an overlap of 5 - 10 mm.
Page 99

User’s Guide Zephyr TS
Basics
AP-75390 - Revision 1.0 99
4
4.11.2 Checking the temperature and pressure settings
This chapter describes how to verify the temperature settings of both the head and the
cooling system and how to verify the negative pressure of the system.
Step 1: Click the Ink tab.
Step 2: In the categories window, click on Ink.
Be sure to read and understand the safety warnings before handling the printer.
Note
It is very important that the system reaches the correct temperature before
printing. The printer will not work properly, until the water had reached it’s
correct temperature.
Page 100

User’s Guide Zephyr TS
Basics
100 AP-75390 - Revision 1.0
The ink status window appears. In this window you are able to verify:
The temperature of the heads
The cooling system
The pressure of the ink system
The pressure of the degasser.
Note
To obtain optimal printing quality, the following values need to be reached
before starting printing.
The temperature of the cooling system must be ± 43°C
The temperature of each head must be ± 43°C.
The ink system pressure must be -52.5 mbar ± 0.5.
The degasser pressure must be between 800 and 900 mbar.
The ink sub pressure pump must be 50% ± 5.
In case it exceeds, refer to Adjusting the throttle on page242
 Loading...