

MUTOH XpertJet XPJ-1641SR, XpertJet XPJ-1682SR Training Manual
Training Manual
History
Rev.
Date
To Table of Contents
Date
1.00
26.July.2019
◆First version
Rev.1.00
26.July.2019
MUTOH INDUSTRIES LTD
CSTM-XPJ16xxSR(E)_1.00 CONFIDENTIAL Page.
1
Reference
Table of contents (1/2)
To Table of Contents
Reference Material
Item
Operation Manual
Installation Manual
(Startup Guide)
Maintenance Manual
[XPJ-1641SR]
Maintenance Manual
[XPJ-1682SR]
Main Firmware
[XPJ-1641SR]
Main Firmware
[XPJ-1682SR]
H-CONT Firmware
[XPJ-1641SR/XPJ-1682SR]
Number
XPJ16xxSRE-A-01
XPJ16xxSRE-Q-01
XPJ1641SRE-M-00
XPJ1682SRE-M-00
XPJ1641SR_V100.jfl
XPJ1682SR_V100.jfl
new_misc_qj_V600.mfl
Remark
Language: English
Language: English
Language: English
Language: English
ver.1.00
ver.1.01
ver.6.00
1.Product Feature
1.1.Product Feature P.4
2.Road Map
2.1.VJ&XPJ Road Map P.5
3.Specifications of this product
3.1. List of Specifications P.6
4.Introduction
4.1. Precautions P.9
4.2. Name of each part P.10
4.3. Front Panel P.13
4.4. System Configurations of this product P.15
4.5. Warning Labels P.16
4.6. Instruction Precautions P.18
5.Unpacking and Initial Setup
5.1.Site Preparation P.19
5.2.Unpacking P.20
5.3.Assembling P.23
5.4. Connecting Power and Network P.26
5.5. Printer Initial Setup P.28
5.6. Test Printing P.34
5.7. Nozzle check and cleaning P.39
5.8. Setting the Printing Precision P.40
5.9. Advanced settings P.52
CSTM-XPJ16xxSR(E)_1.00 CONFIDENTIAL Page.
6.Ink
6.1.MS41 ink P.55
6.2.Ink System P.56
6.3.Sub Tank P.58
6.4.Error Message display (Ink) P.59
2
Table of contents (2/2)
13.5. Periodic Maintenance Kit (1/1)
To Table of Contents
7.Carriage
7.1.Carriage Assy P.60
7.2.Changing the Head Height P.61
7.3.Cutting media P.61
7.4.Color Sensor P.63
8.Print Head
8.1.Print Head P.65
8.2.Maintenance Parts P.66
8.3.Replacing print head [XPJ-1641SR] P.68
8.4.Replacing print head [XPJ-1682SR] P.70
9.Printing
9.1.User Type P.72
9.2.Print Mode
9.3.Effect P.79
9.4.Recommended Media P.80
10.Advanced Operations
10.1.Introduction P.81
10.2.Menu 1: Setup P.84
10.3.Menu 2: Test Print P.96
10.4.Menu 3: Cleaning P.97
10.5.Menu 4: Menu Option P.98
10.6.Menu 5: System Info. P.99
10.7.Menu 6: Sleep Mode P.99
10.8.Menu 7: Display P.100
10.9.Menu 8: Job Status P.101
P.76
11.User Maintenance
11.1.Instruction Before Purchase P.102
11.2.Maintenance P.103
11.3.Checking ink and replacing ink bag P.103
11.4.Emptying waste ink tank P.106
11.5.Head cleaning P.107
11.6.Cleaning of cleaning wiper P.108
11.7.Cleaning around the capping unit P.110
11.8.Cleaning around the print head P.111
11.9.Cleaning around the color sensor P.112
11.10.Inside cleaning P.114
11.11.Replacing absorption material for the flushing box P.115
11.12.Replacing cutter P.117
11.13.Replacing the cleaning wiper P.118
11.14.Moving or transporting the printer P.120
11.15.Long-term storage P.121
12.Engineer Maintenance
12.1.Removing Covers P.125
12.2.Electric Wiring Diagram [Board] P.134
12.3.Electric Wiring Diagram [FFC] P.135
12.4.Lifetime replacement parts P.137
12.5.Periodic replacement parts P.137
12.6.Self-Diagnosis Function Mode P.138
13.Maintenance Parts
13.1.Print Head P.145
13.2.Board P.146
12.3.FFC P.148
13.4.Motor P.149
13.5.Periodic Maintenance Kit P.150
CSTM-XPJ16xxSR(E)_1.00 CONFIDENTIAL Page.
3
1. Product Feature
1.1. Product Feature
Product Outline
◇ Successor model to VJ-1624X and VJ-1638X.
◇ Adopted a new platform which gives flexibility to develop water-based printer,
UV printer, or printer with new print head.
Product Feature
◆ The new cosmetic refreshes the look of VJ printer series.
◆ The new capacitive touch switch improves visibility and operability to light up
active keys by LED.
◆ The new MS41 eco-solvent ink achieves cost reduction and maintains the
same print quality as conventional ink.
◆ High-capacity ink holder with front access improves usability.
◆ Both operation panel and MSM remote panel support multiple languages (8
languages).
◆ The new spindle less roll media holder allows hassle-free media replacement.
◆ The main board box is located on the rear of the printer to improve
operability and provide easy cable connection without blocking media path.
◆ The built-in color sensor achieves automatic Bi-D adjustment to reduce
calibration time and variation between operators.
To Table of Contents
◆ Offer two lineups; the single head printer for first-time user, the dual head
printer for high productivity.
◆ The individual head cleaning mode is available in the dual head printer to
reduce ink loss.
◆ The print platform LED lighting improves visibility for maintenance and print
inspection during printing.
◆ Two types of ink adapters are available; existing 2000 ml ink bag case and
newly developed 1000 ml ink bag case.
CSTM-XPJ16xxSR(E)_1.00 CONFIDENTIAL Page.
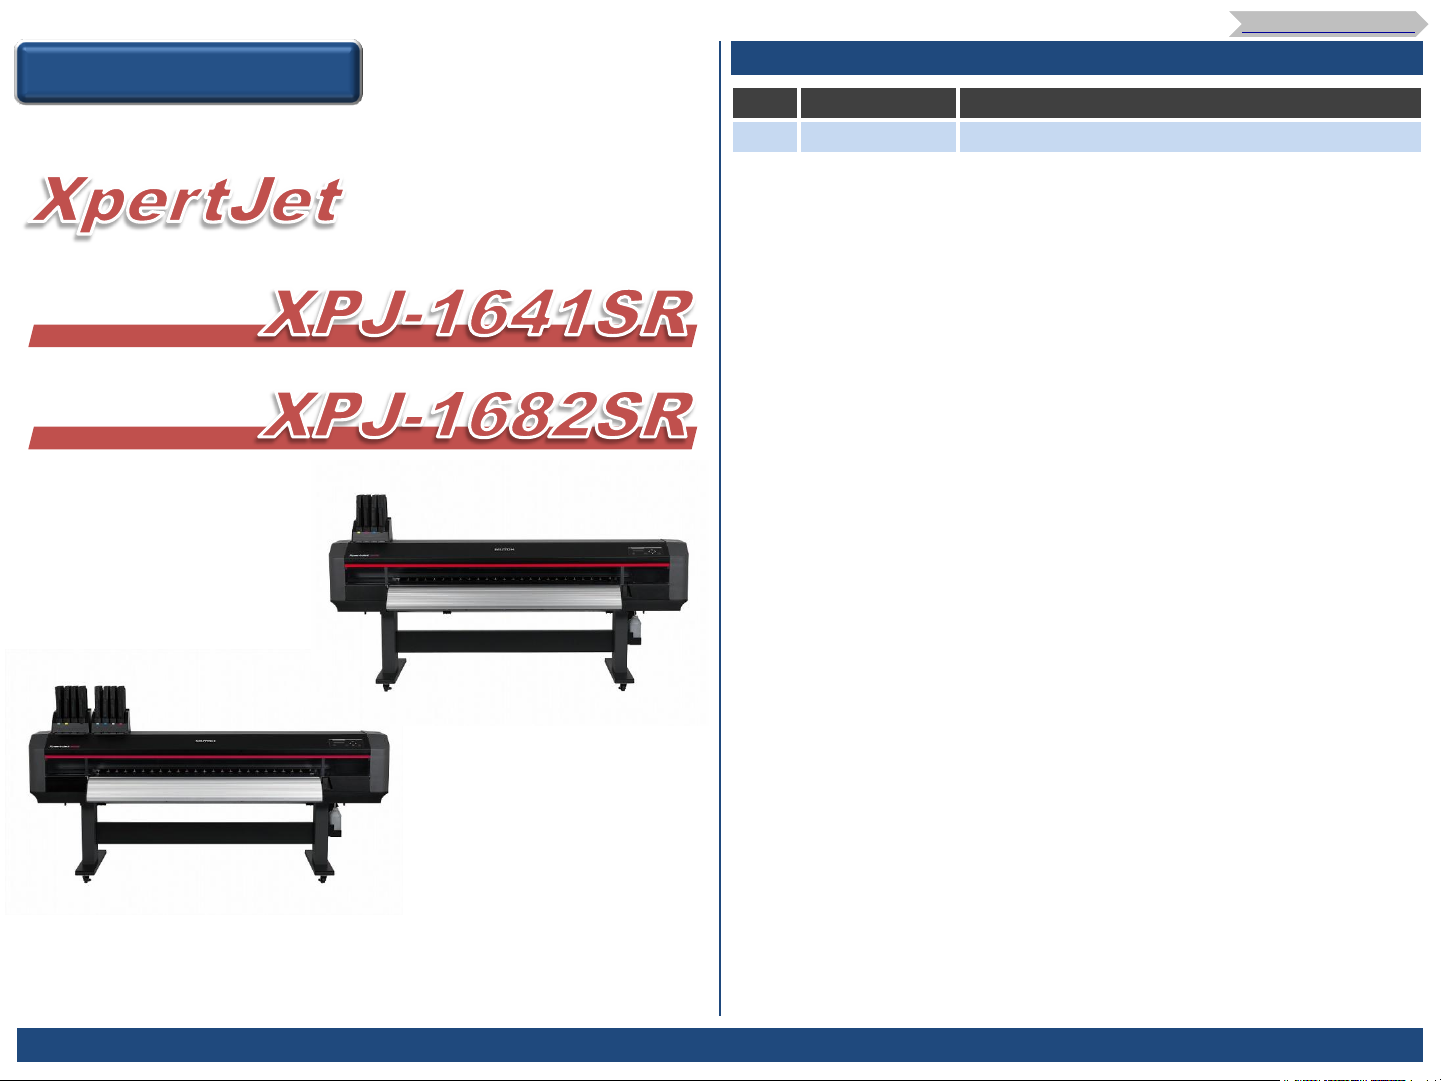
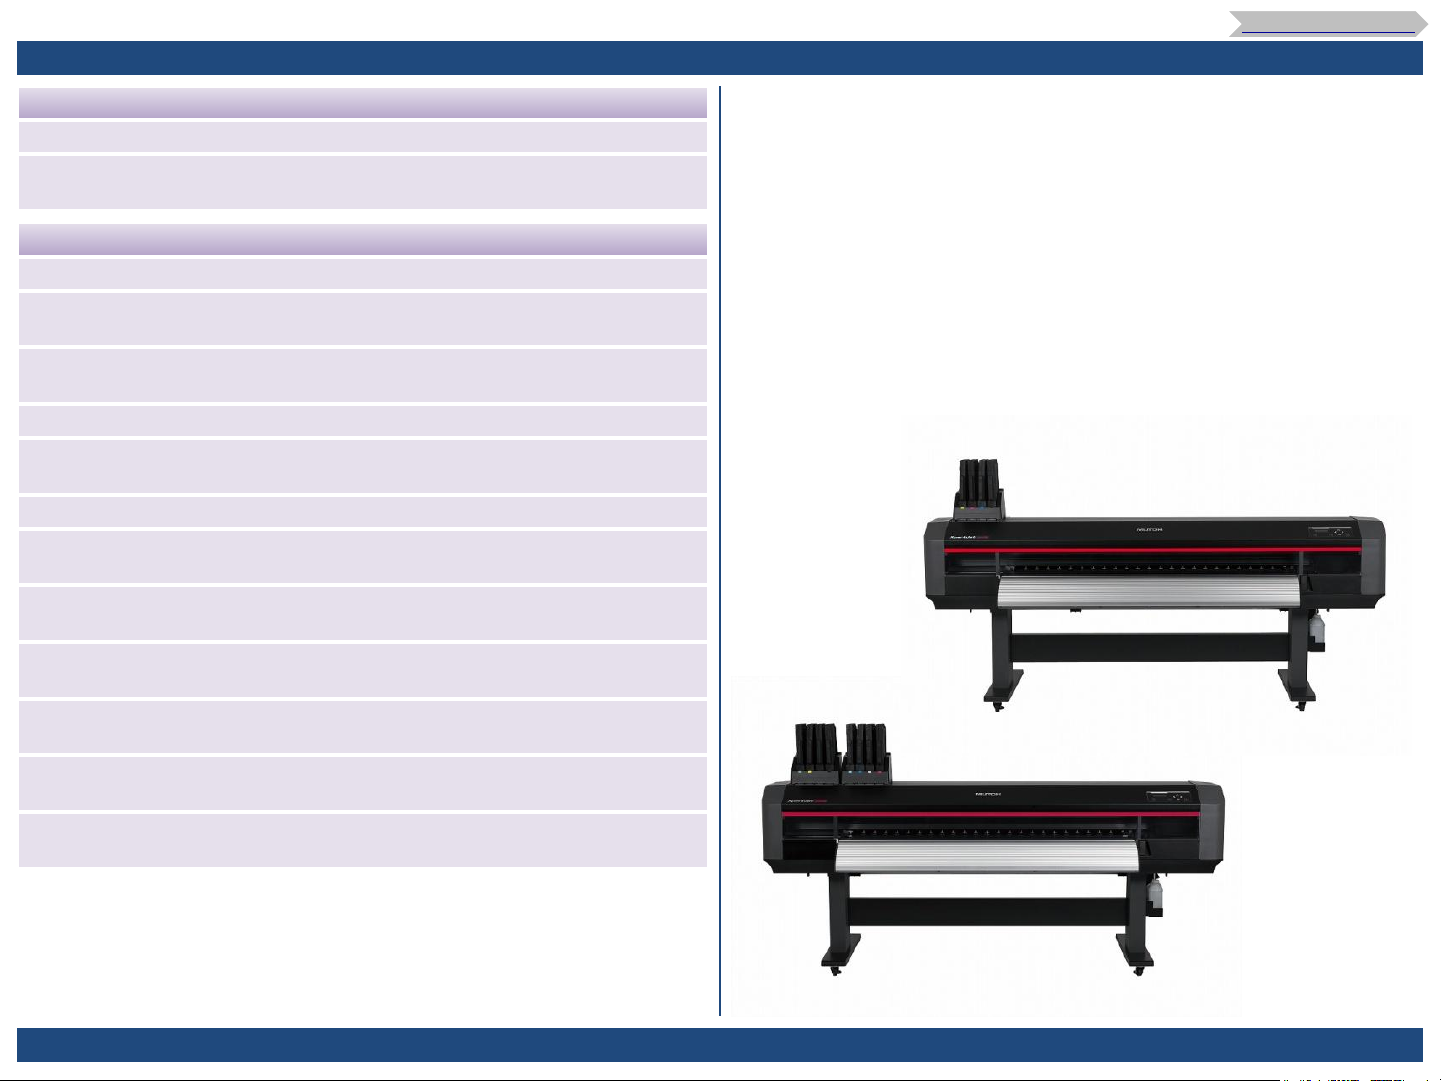
XpertJet
XPJ-1641SR
XpertJet
XPJ-1682SR
4
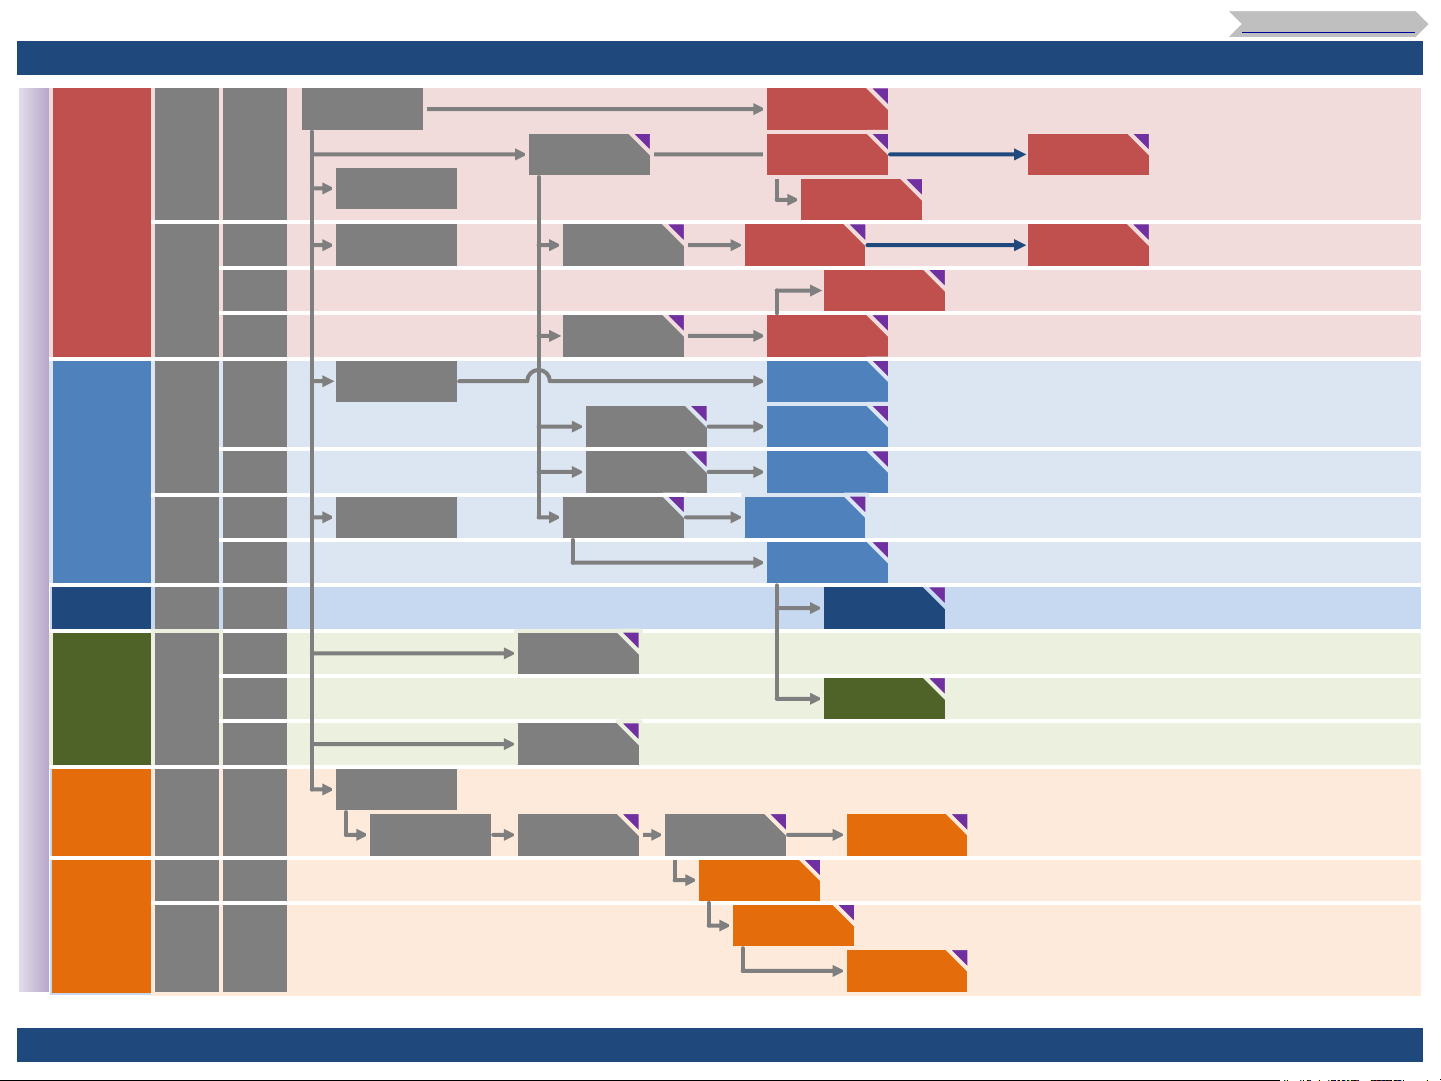
2. Road Map
2.1. VJ&XPJ Road Map
To Table of Contents
Eco
Solvent
Aqueous
Dye-
Sublimation
Textile
VJ&XPJ series 【System more than 1.6m】
MP
UV
Single
head
Double
head
Single
head
Double
head
Four
head
Double
head
Single
head
Single
head
Double
head
1.6m
1.6m
1.9m
2.6m
1.6m
1.9m
1.6m
1.9m
1.9m
1.6m
1.9m
2.6m
1.6m
1.6m
1.6m
VJ-1604
IH-47V [2006]
VJ-1614
IH-47V [2007]
VJ-1618
IA0460 [2007]
VJ-1604W
IH-47V [2007]
VJ-1618W
IA0460 [2007]
VJ-1608
IH-47V [2007]
VJ-1608H
IA0460 [2009]
VJ-1624
IA5540 [2011]
VJ-1638
IA5540 [2011]
VJ-2638
IA5540 [2011]
VJ-1624W
IA5540 [2012]
VJ-1924W
IA5540 [2012]
VJ-1638W
IA5540 [2011]
VJ-1628TD
IA5540 [2010]
VJ-2628TD
IA5540 [2010]
VJ-1608HS
IA0460 [2010]
VJ-1638X
IA5540 [2013]
VJ-1638WX
IA5540 [2013]
VJ-1617H
IA5540 [2012]
VJ-1626UH
IA5540 [2014]
VJ-1638UH
IA5540 [2016]
VJ-1604X
IH-47V [2015]
VJ-1624X
IA5540 [2015]
VJ-1628X
IA5540 [2015]
VJ-1938X
IA5540 [2016]
VJ-2638X
IA5540 [2015]
VJ-1604WX
IH-47V [2015]
VJ-1624WX
IA5540 [2015]
VJ-1924WX
IA5540 [2015]
VJ-1938WX
IA5540 [2015]
VJ-1948WX
IA5540 [2016]
VJ-1938TX
IA5540 [2016]
VJ-1627MH
IA5540 [2017]
VJ-1638UR
IA5540 [2017]
XPJ-1641SR
IA5540 [2019]
XPJ-1682SR
IA5540 [2019]
CSTM-XPJ16xxSR(E)_1.00 CONFIDENTIAL Page.
5
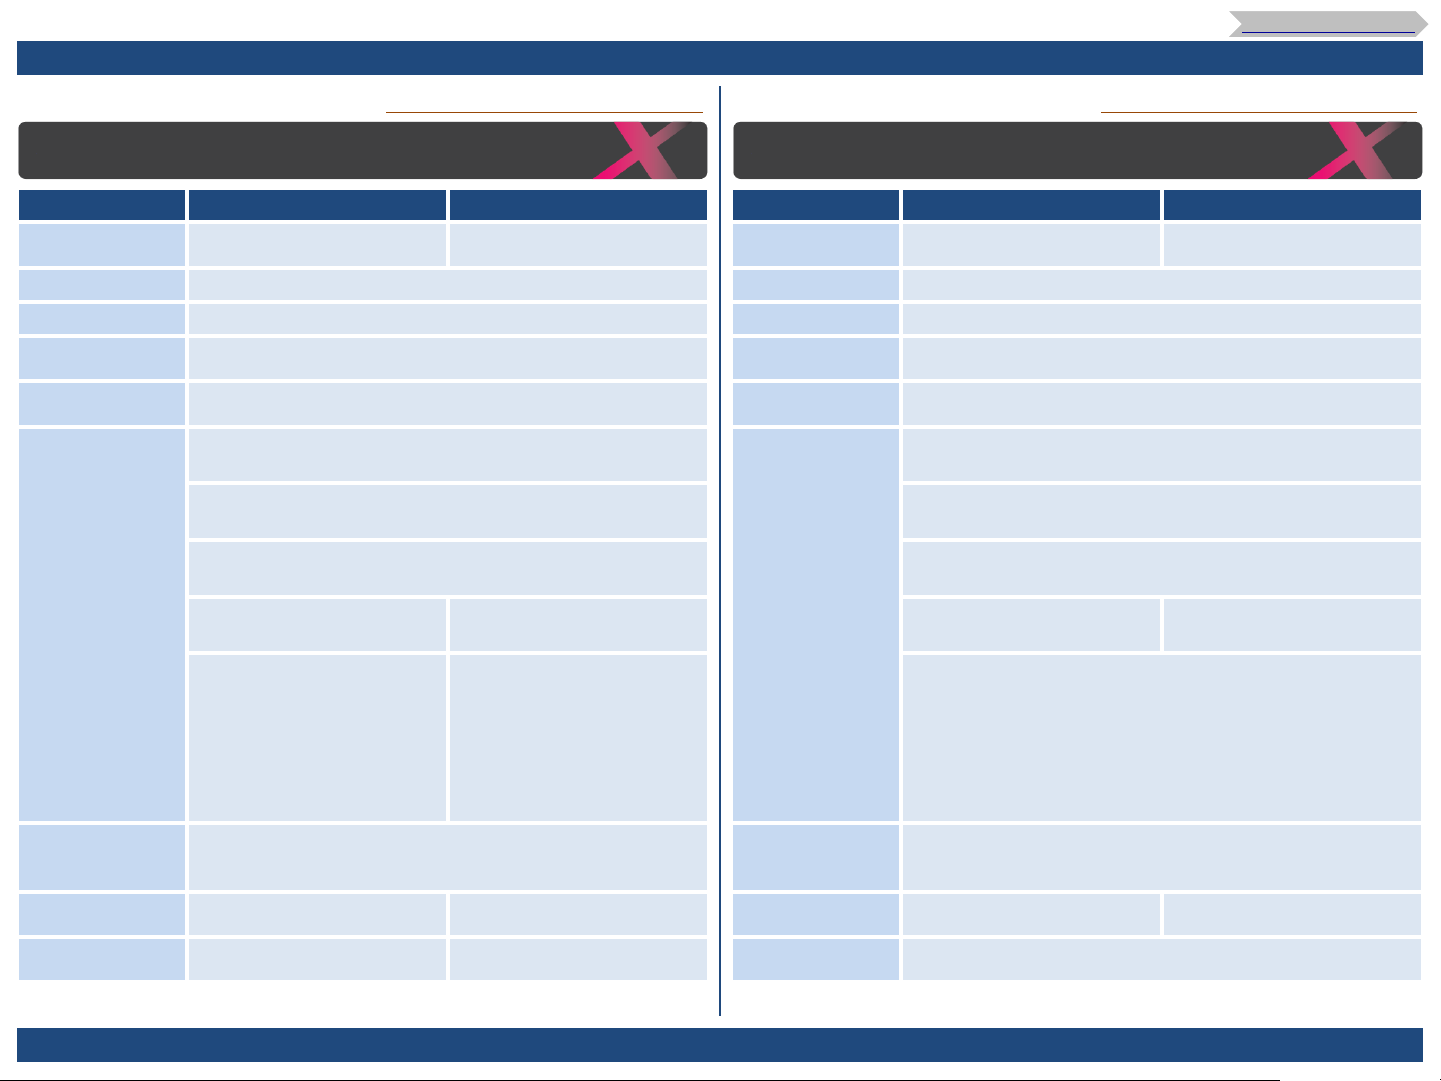
3. Specifications of this product
3.1. List of Specifications (1/3)
To Table of Contents
VJ-1624X vs XPJ-1641SR VJ-1638X vs XPJ-1682SR
Specifications of this product
item ValueJet (VJ-1624X) XpertJet (XPJ-1641SR) ValueJet (VJ-1638X) XpertJet (XPJ-1682SR)
Model Name VJ-1624X
Print method On demand piezo method On demand piezo method
Drive method Firmware servo/DC motor drive Firmware servo/DC motor drive
Media feed
method
Media hold down
system
Conditions of
usable
media
(S/N: HU6U******)
Multipoint pressurizing Grid roller system Multipoint pressurizing Grid roller system
Pressure roller down system by manual lever Pressure roller down system by manual lever
● Media outer diameter
Φ150mm or less
● Media core diameter
2inches or 3inches
● Weight
30kg or less
● Width
900mm ~ 1,625mm
● Maximum thickness
0.3mm(when the head
height is set to Low)
1.3mm(when the head
height is set to High)
cf. Operation Manual(Rev.01-p.161) cf. Operation Manual(Rev.01-p.161)
Specifications of this product
item
VJ-1641SR
(S/N: JF6U******)
●
Width ● Width
500mm ~ 1,625mm
●
Maximum thickness
0.3mm(when the head
height is set to Low)
1.3mm(when the head
height is set to Mid)
2.8mm(when the head
height is set to High)
Model Name
Print method
Drive method
Media feed
method
Media hold down
system
Conditions of
usable
media
VJ-1638X
(S/N: HF6U******)
● Media outer diameter
Φ150mm or less
● Media core diameter
2inches or 3inches
● Weight
30kg or less
900mm ~ 1,625mm
●
Maximum thickness
0.3mm(when the head height is set to Low)
1.3mm(when the head height is set to Mid)
2.8mm(when the head height is set to High)
VJ-1681SR
(S/N: JE6U******)
●
Width
500mm ~ 1,625mm
Maximum
Printable
Width
Maximum print
length
Head height
adjustment
1,615mm Maximum
200m 1,500m Maximum print
Two-level adjustment of Low
and High
Three-level adjustment of Low,
Mid, and High
CSTM-XPJ16xxSR(E)_1.00 CONFIDENTIAL Page.
Printable
Width
length
Head height
adjustment
6
1,615mm
200m 1,500m
Three-level adjustment of Low, Mid, and High
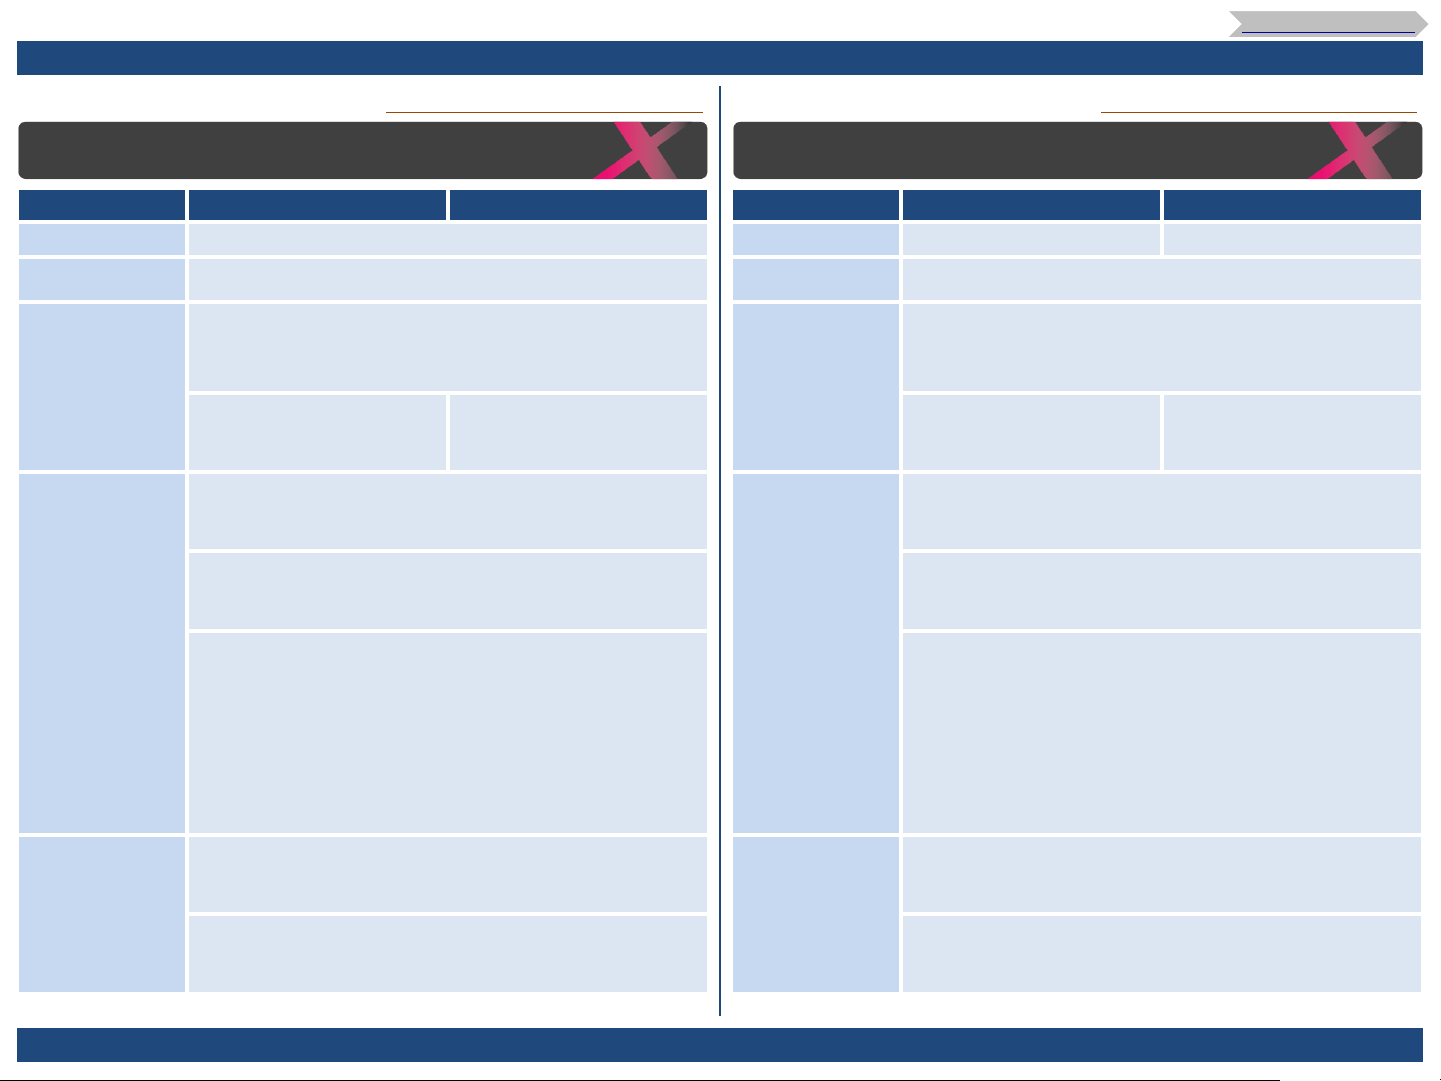
3. Specifications of this product
3.1. List of Specifications (2/3)
To Table of Contents
VJ-1624X vs XPJ-1641SR
cf. Operation Manual(Rev.01-p.161) cf. Operation Manual(Rev.01-p.161)
VJ-1638X vs XPJ-1682SR
Specifications of this product Specifications of this product
item ValueJet (VJ-1624X) XpertJet (XPJ-1641SR) item ValueJet (VJ-1638X) XpertJet (XPJ-1682SR)
Interface Ethernet(10/100BASE-TX) Interface Ethernet(10/100BASE-TX) Gb-Ethernet (1000BASE-T)
Waste ink tank 2,000ml tank is attached to the printer. Empty the tank when
Ink ● Color
Environmental
conditions
Power supply
specifications
needed.
4 colors (Black, Cyan, Magenta, Yellow)
● Type
220ml/440ml ink cartridge
1,000ml ink bag
● Printer Operation Environment
Temperature 20 to 32℃, humidity 40 to 60%
No condensation
● Recommended Printing Environment
Temperature 22 to 30℃, humidity 40 to 60%
No condensation
● Printer Storage Environment
Storage without ink charging: up to 6 months
Temperature -20 to +60℃, humidity 20 to 80%
No condensation
Storage with ink charging: up to 1 week
Temperature -10 to +40℃, humidity 20 to 60%
No condensation
Storage up to 4 days maximum when stored between
※
32℃ to 40℃ .
● MAIN
Voltage: AC 100V to 120V ±10% / AC 200V to 240V ±10%
Frequency: 50/ 60Hz ±1Hz
●
Type ● Type
1,000ml ink bag
(Cleaner is 300ml)
Waste ink tank 2,000ml tank is attached to the printer. Empty the tank when
Ink ● Color
Environmental
conditions
Power supply
specifications
needed.
4 colors (Black, Cyan, Magenta, Yellow)
7 colors (Black, Cyan, Magenta, Yellow, Light Cyan, Light
Magenta, Light Black)
●
Type
220ml/440ml ink cartridge
1,000ml ink bag
● Printer Operation Environment
Temperature 20 to 32℃, humidity 40 to 60%
No condensation
● Recommended Printing Environment
Temperature 22 to 30℃, humidity 40 to 60%
No condensation
● Printer Storage Environment
Storage without ink charging: up to 6 months
Temperature -20 to +60℃, humidity 20 to 80%
No condensation
Storage with ink charging: up to 1 week
Temperature -10 to +40℃, humidity 20 to 60%
No condensation
Storage up to 4 days maximum when stored between
※
32℃ to 40℃ .
● MAIN
Voltage: AC 100V to 120V ±10% / AC 200V to 240V ±10%
Frequency: 50/ 60Hz ±1Hz
1,000ml ink bag
(Cleaner is 300ml)
● HEATER
Voltage: AC 100V to 120V ±10% / AC 200V to 240V ±10%
Frequency: 50/ 60Hz ±1Hz
CSTM-XPJ16xxSR(E)_1.00 CONFIDENTIAL Page.
● HEATER
Voltage: AC 100V to 120V ±10% / AC 200V to 240V ±10%
Frequency: 50/ 60Hz ±1Hz
7

3. Specifications of this product
3.1. List of Specifications (3/3)
To Table of Contents
VJ-1624X vs XPJ-1641SR VJ-1638X vs XPJ-1682SR
cf. Operation Manual(Rev.01-p.162) cf. Operation Manual(Rev.01-p.162)
Specifications of this product Specifications of this product
item ValueJet (VJ-1624X) XpertJet (XPJ-1641SR) item ValueJet (VJ-1638X) XpertJet (XPJ-1682SR)
consumption
Power
consumption
● AC 100V to 120V ● AC 100V to 120V Current
MAIN: 12A or below
HEATER: 12A or below
MAIN: 10A or below
HEATER: 6.5A or below
● Operation
MAIN:
1100W or below
HEATER:
1200W or below
1,261 mm 1,428 mm
2,698mm 2,750 mm
885.5mm 895 mm
MAIN: 9A or below
HEATER: 10A or below
● AC 200V to 240V ● AC 200V to 240V
MAIN: 6A or below
HEATER: 5A or below
● Height ● Height Dimensions
● Width ● Width
● Depth ● Depth
consumption
Power
consumption
MAIN: 12A or below
HEATER: 12A or below
MAIN: 10A or below
HEATER: 6.5A or below
● Operation
MAIN:
1100W or below
HEATER:
1200W or below
1,261 mm 1,428 mm
2,698mm 2,750 mm
885.5mm 895 mm
● AC 100V to 120V ● AC 100V to 120V Current
MAIN: 9A or below
HEATER: 10A or below
● AC 200V to 240V ● AC 200V to 240V
MAIN: 6A or below
HEATER: 5A or below
● Height ● Height Dimensions
● Width ● Width
● Depth ● Depth
● Main body ● Main body Weight
126kg 142kg
● Stand ● Stand
34kg 32kg
CSTM-XPJ16xxSR(E)_1.00 CONFIDENTIAL Page.
● Main body ● Main body Weight
153kg 146kg
● Stand ● Stand
34kg 32kg
8
4. Introduction
4.1. Precautions (1/1)
cf. Operation Manual(Rev.01-p.20)
Introduction
Precautions
Please use this product at least once a week
If the printer is not used for a long time, the print head nozzles can get clogged
・
causing damage to the printer.
Please handle ink bag carefully
Before using an ink bag, make sure to read the Safety Data Sheet (SDS). ・
Do not disassemble Ink bag. ・
Ink may come into contact with your eyes or skin, causing irritation or allergic
reaction.
Wear protective gloves, glasses, and mask when handling ink bags. ・
Avoid contact with your eyes or on your skin. ・
If in your eye or on your skin, immediately wash with water.
It could cause bloodshot eyes or light inflammation.
Should any anomalies occur, immediately seek medical attention.
To Table of Contents
Conduct periodic maintenance
This product requires regular user maintenance.
Run a nozzle check before and after printing. ・
If nozzle missing is found, run a head cleaning.
Clean the cleaning wiper and around the print head once a week. ・
If you are not using the printer for an extended period*, run a head cleaning once
・
a week.
If you may not be able to perform weekly head cleaning, perform [Longstore]
*"Extended period" means one to four weeks.
Clean inside of your printer once a month. ・
Regularly check the waste ink tank and empty the tank as needed. ・
Some parts need to be replaced periodically
In this product, there are some parts required to be replaced after a long-term use.
User replaceable parts: Absorption material for the flushing box, Cutter, Cleaning
・
wiper
Parts required to be replaced by service personnel: Motors, Pumps, Print heads ・
DO NOT drop or hit an ink bag. ・
Ink may leak from the bag.
Be sure to use the ink before it expires. ・
The expired ink should be disposed of as industrial waste.
The empty ink bag should be put in a plastic bag and should be disposed of
according to the local regulations.
MUTOH strongly recommends to use genuine ink. ・
This printer is designed to bring out the best performance when using with the
MUTOH genuine ink.
Non-MUTOH ink may cause print defects or damage to the printer.
CSTM-XPJ16xxSR(E)_1.00 CONFIDENTIAL Page.
9
4. Introduction
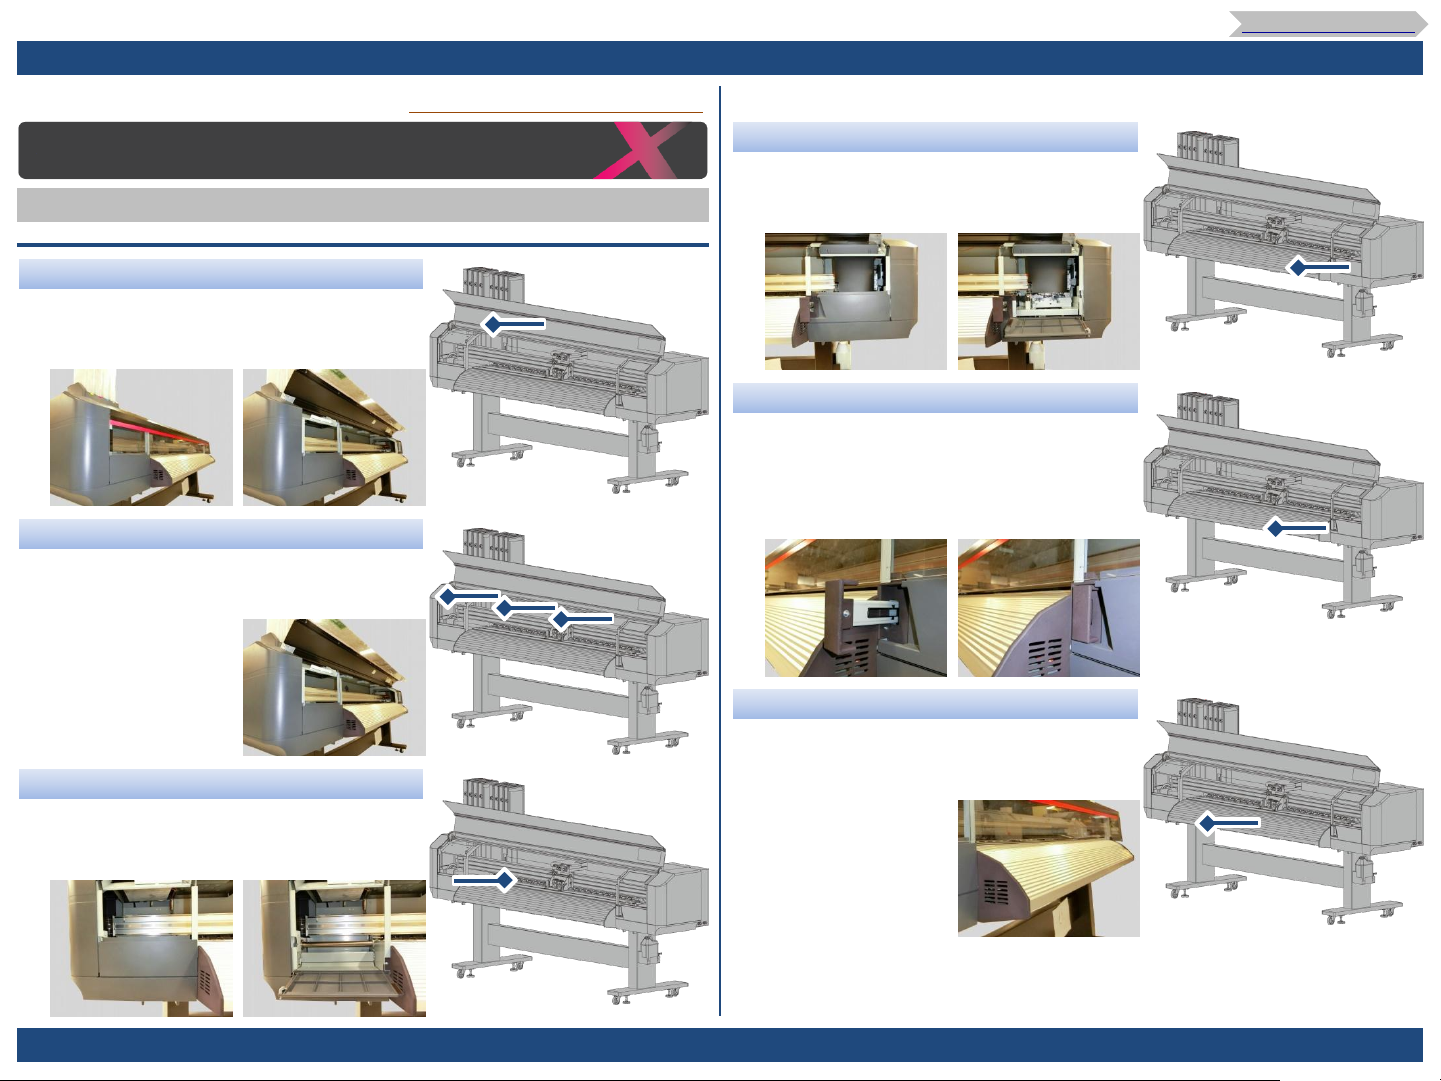
4.2. Name of each part (1/4)
Introduction
Main components of your printer
Front side ◆
Front cover
Open this cover when loading a roll media or
removing a media jam.
It is normally closed.
Internal LED lights
The lights allows you to inspect inside of the
printer or your print during printing.
To Table of Contents
cf. Operation Manual(Rev.01-p.9)
Maintenance cover R
Open this cover for cleaning or replacing
consumables.
It is normally closed.
Media feed lever
Push the lever to lower the pressure rollers to
keep the media flat while printing.
Pull it to release the media.
The hold down pressure can be changed between
High and Normal using this lever.
Maintenance cover L
Open this cover for cleaning.
It is normally closed.
CSTM-XPJ16xxSR(E)_1.00 CONFIDENTIAL Page.
Media guide
Front media path that the heater is installed inside
to dry the print.
10
4. Introduction
4.2. Name of each part (2/4)
Introduction
Main components of your printer
Front side ◆
Waste ink tank
Collect waste ink produced during printing and
cleaning cycle.
Empty the tank as needed.
Stand
Adjuster
To Table of Contents
cf. Operation Manual(Rev.01-p.9)
Pressure rollers
Keep the media in place to ensure proper feeding.
The hold down pressure can be individually
reduced or canceled by slide lock levers on the
pressure rollers.
◆XPJ-1641SR ◆XPJ-1682SR
Edge holder
Place it on the edge of the media to prevent
media curl while printing.
While not printing, slide them to the left and right
side edges of the platen.
Carriage
The print head is installed on the carriage.
◆XPJ-1641SR ◆XPJ-1682SR
CSTM-XPJ16xxSR(E)_1.00 CONFIDENTIAL Page.
Platen
Media is printed on here.
There is an adsorption fan inside.
11
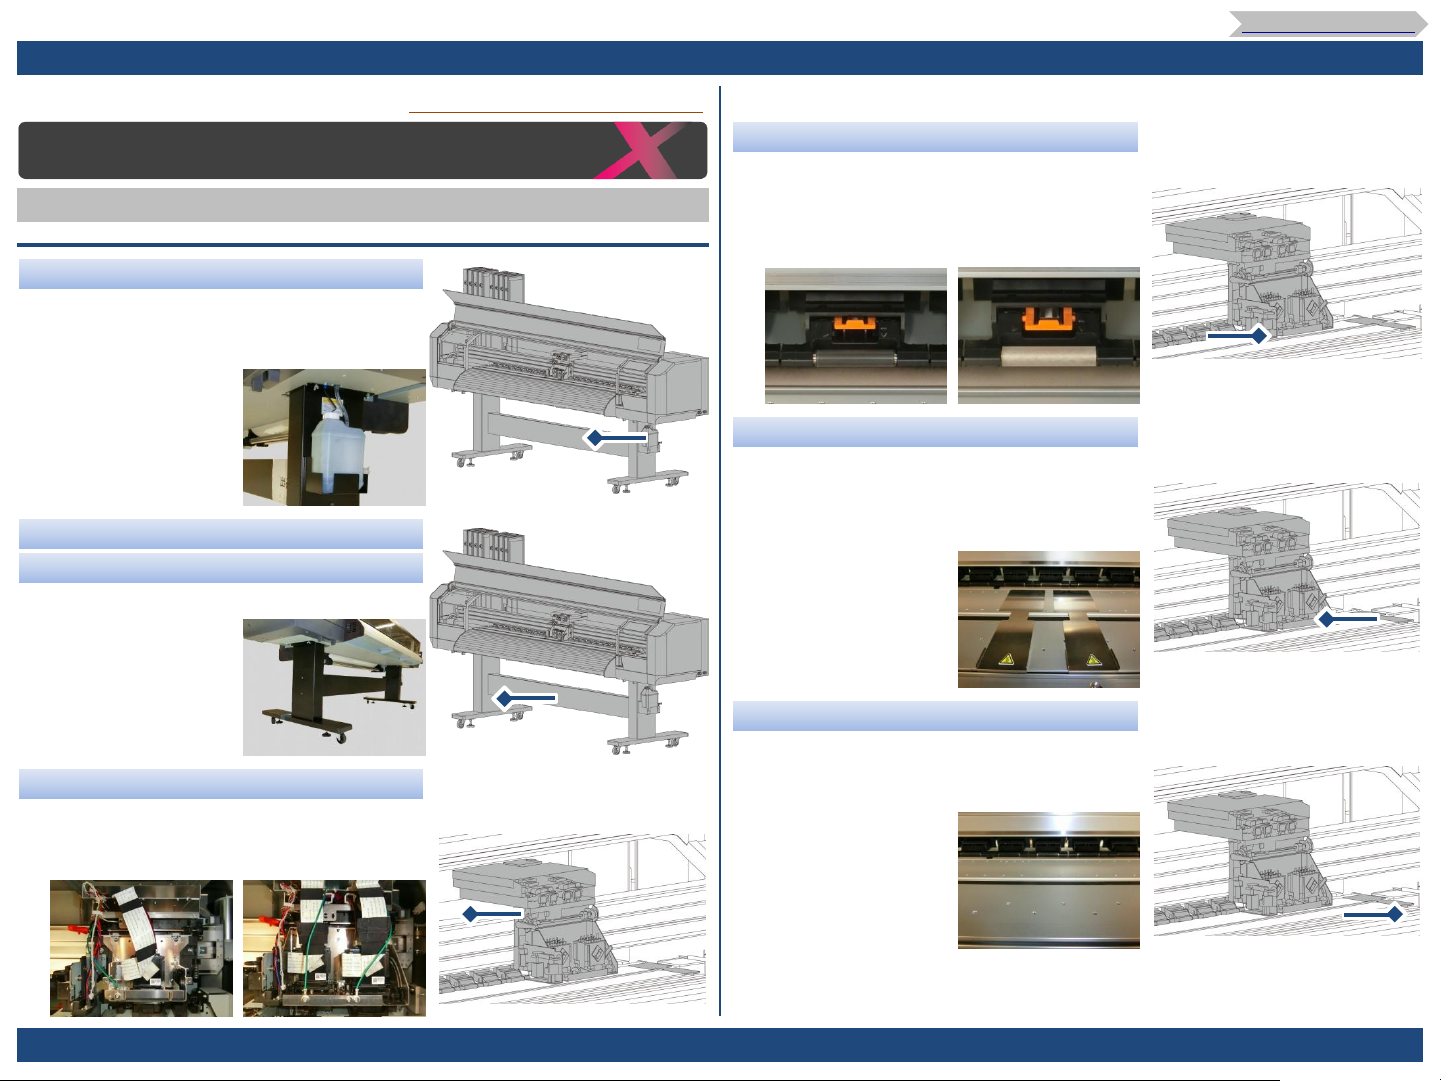
4. Introduction
4.2. Name of each part (3/4)
Introduction
Main components of your printer
Front side ◆
Cutter
Automatically cut the media after printing.
To Table of Contents
cf. Operation Manual(Rev.01-p.9)
Rear side ◆
Ink slots
Insert an ink bag case into the slot.
(Illustration: XPJ-1682SR)
◆XPJ-1641SR ◆XPJ-1682SR
Media cut groove
Manually cut the media along the groove.
CSTM-XPJ16xxSR(E)_1.00 CONFIDENTIAL Page.
Media feed slot
Insert the front edge of the media into this slot
and pass it to the front side to load it into the
printer.
Media guide
Pass a roll media through the media guide.
12

4. Introduction
4.2. Name of each part (4/4)
To Table of Contents
4.3. Front Panel (1/2)
cf. Operation Manual(Rev.01-p.10)
Introduction
Introduction
Main components of your printer Main components of your printer
Rear side ◆
Media feed lever
Hold down or release the media.
This lever is interlocked with the media feed lever
on the front side.
Roll media holder
Attach the media flanges to both ends of a roll
media and load it onto the roll media holder.
Front Panel ◆
The printer has a touch-screen panel located on the front right of the printer. The active
keys are lit up on the panel for guidance.
Tap: Lightly touch the key with your finger, then immediately release. ・
Long-touch: Keep touching the key. ・
①
②
③
Status Bar ①
Indicates the printer status by LED light.
Working normally: Solid green ・
Error/Alert state: Solid red (error) or flash red (alert) ・
Display ②
Displays the printer status, setting menu, errors and so on.
④
⑤
⑥
⑦
cf. Operation Manual(Rev.01-p.10)
AC inlet
Network interface cable connector
CSTM-XPJ16xxSR(E)_1.00 CONFIDENTIAL Page.
[Home] Key ③
Access to or exit the menu.
[Cancel] key ④
Pause the print job. While pausing, tap the key again to resume
・
printing.
While the printer is not printing, tap the key to cut the media. ・
13
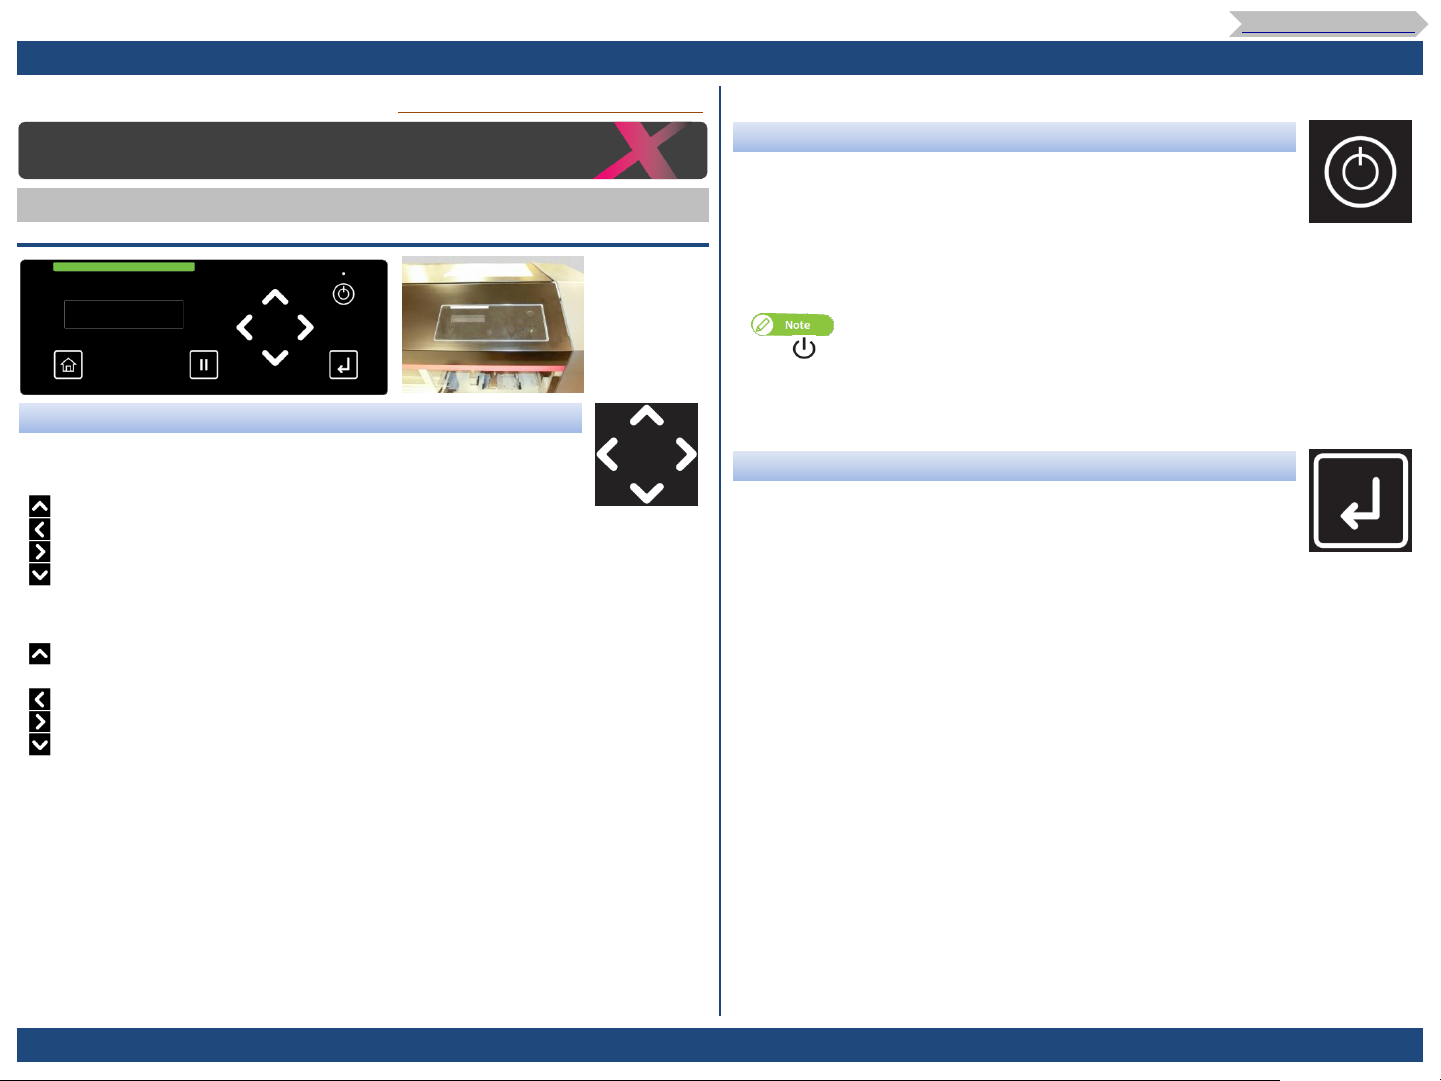
4. Introduction
4.3. Front Panel (2/2)
Introduction
Main components of your printer
Front Panel ◆
①
⑥
cf. Operation Manual(Rev.01-p.11)
[Power] button ⑥
Long press to power on the printer. ・
The Power LED (above the Power button) turns on with a solid
white light.
While the power is on, long press the button to power off the
・
printer.
In the Off state, the Power LED lights off.
To Table of Contents
②
③
Arrow keys: ⑤
When you have entered the setup menu, the arrow keys are used to
select a menu or enter a value.
Go to the previous item.
key:
Return to the upper level menu without saving the change.
key:
Go to the sub menu.
key:
Go to the next item.
key:
While the printer is in standby mode, it is used to feed media, run a
nozzle check, or perform head cleaning.
Feed the media backward.
key:
Long-touch to feed it with high speed.
Tap to run a nozzle check.
key:
Tap to perform cleaning.
key:
Feed the media forward.
key:
Long-touch to feed it with high speed.
④
⑤
⑦
The symbol means “standby”.
Even the Power LED turns off, the device still consumes some power
unless the power cords are disconnected.
This state is referred to as the power being “off” in this Manual.
[Enter] key ⑦
Use the Enter key to select a menu or confirm a value.
While the printer warms up, tap the Enter key to start printing
・
immediately before fully warming up.
CSTM-XPJ16xxSR(E)_1.00 CONFIDENTIAL Page.
14
4. Introduction
4.4. System Configurations of this product(1/2)
cf. Operation Manual(Rev.01-p.14)
Introduction
System configurations of this product
To Table of Contents
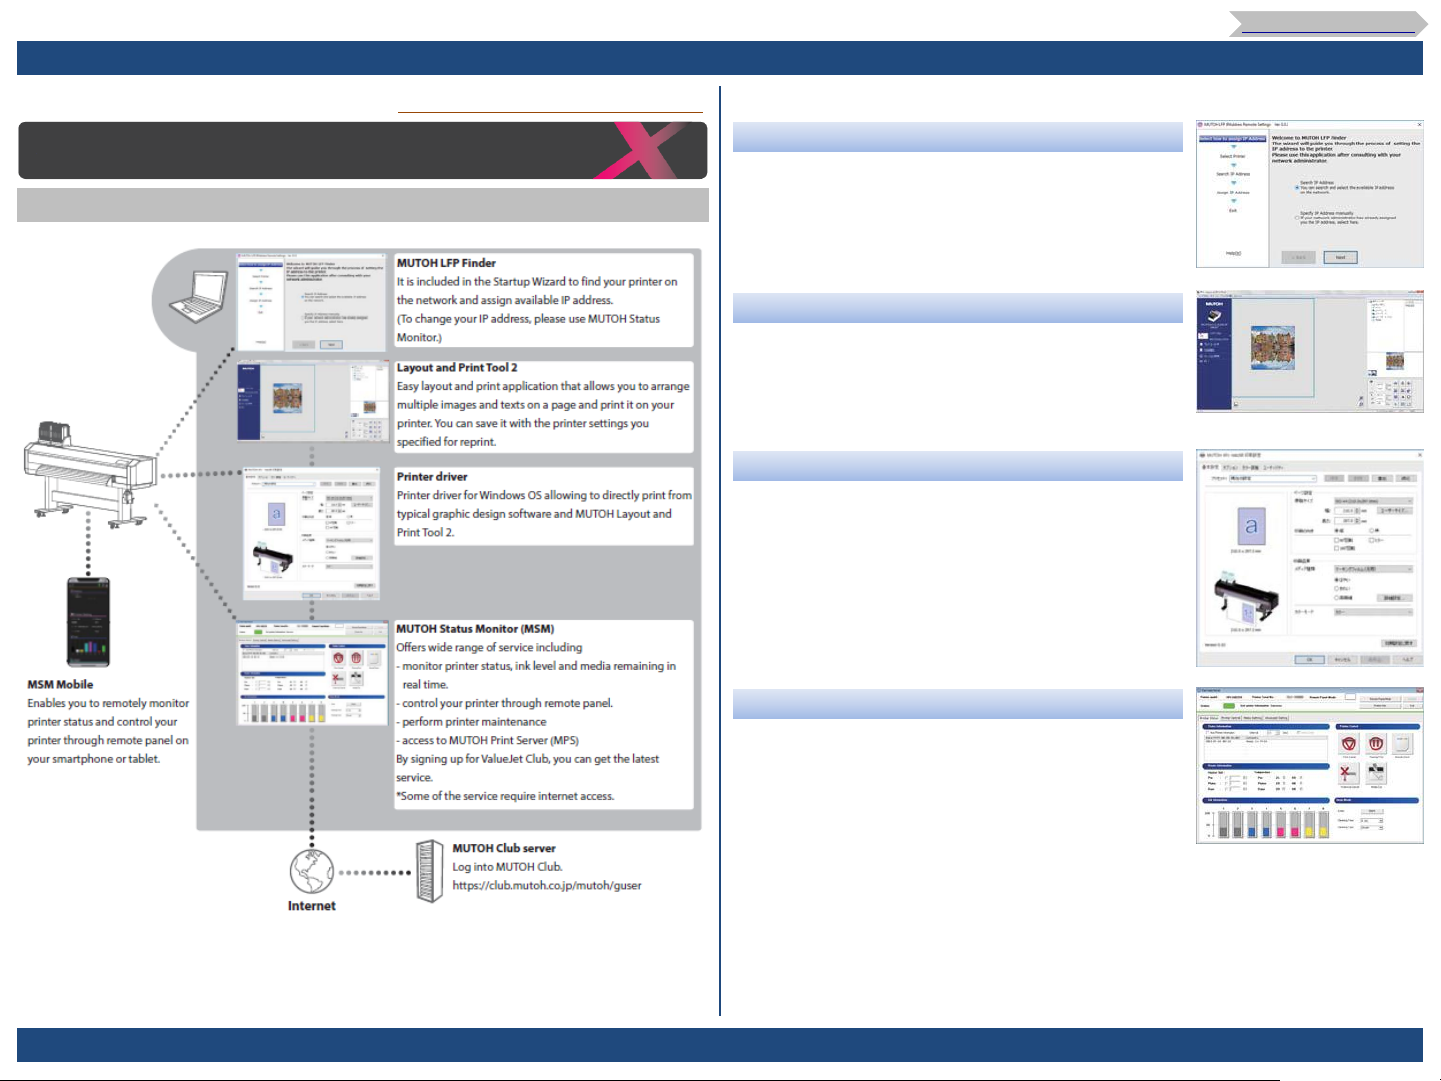
Mutoh LFP Finder
It is included in the Startup Wizard to find your printer
on the network and assign available IP address.
(To change your IP address, please use MUTOH Status
Monitor.)
Layout and Print Tool 2
Easy layout and print application that allows you to
arrange multiple images and texts on a page and print
it on your printer.
You can save it with the printer settings you specified
for reprint.
Printer driver
Printer driver for Windows OS allowing to directly print
from typical graphic design software and MUTOH Layout
and Print Tool 2.
CSTM-XPJ16xxSR(E)_1.00 CONFIDENTIAL Page.
Mutoh Status Monitor (MSM)
Offers wide range of service including
By signing up for MUTOH Club, you can get the latest
service.
monitor printer status, ink level and media remaining
・
in real time.
control your printer through remote panel. ・
access to MUTOH Print Server (MPS) ・
Some of the service require internet access. ※
15
4. Introduction
4.4. System Configurations of this product(2/2)
To Table of Contents
4.5. Warning Labels (1/3)
cf. Operation Manual(Rev.01-p.14)
Introduction
System configurations of this product
MUTOH Club
By signing up for MUTOH Club, it offers free useful
contents including
download the latest version of application, operation
・
manual
download media profile ・
check printer information ・
(printer information uploaded through MSM can be
viewed)
<Print Support Software>
To get the best out of this product, use the MUTOH Print Server (MPS) function
available from MUTOH
You can download the latest version of MSM from the MUTOH Club Server.
(To use MPS, specify the output port of RIP software to MPS.)
✔ Mutoh LFP Finder
✔ Printer driver
✔ Mutoh Status Monitor (MSM)
(Mutoh Print Server (MPS))
✔ Layout and Print Tool 2
cf. Startup Guide(Rev.01-p.44)
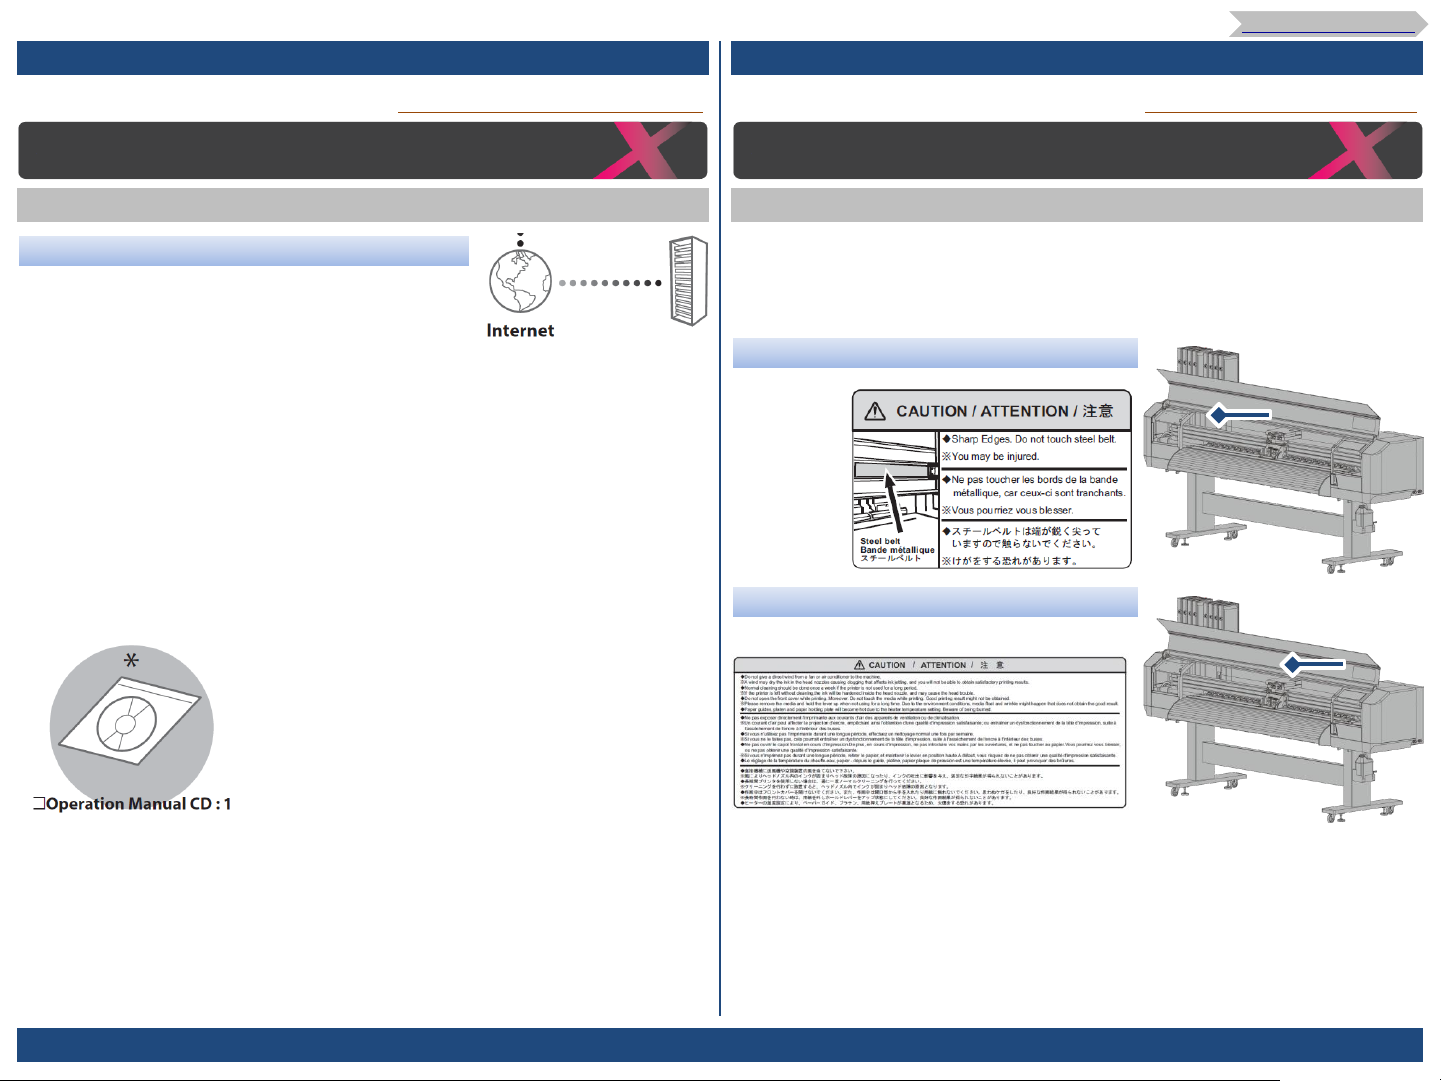
Safety Precautions
Warning Labels
Warning labels are applied onto the product where special attention is required.
Read the messages on the labels and always follows the instructions.
If the labels are peeled off or become dirty, contact your local MUTOH dealer to get new
one.
Cut Hazard Label for Steel Belt
Printer Safe Handling Label
CSTM-XPJ16xxSR(E)_1.00 CONFIDENTIAL Page.
16
4. Introduction
4.5. Warning Labels (2/3)
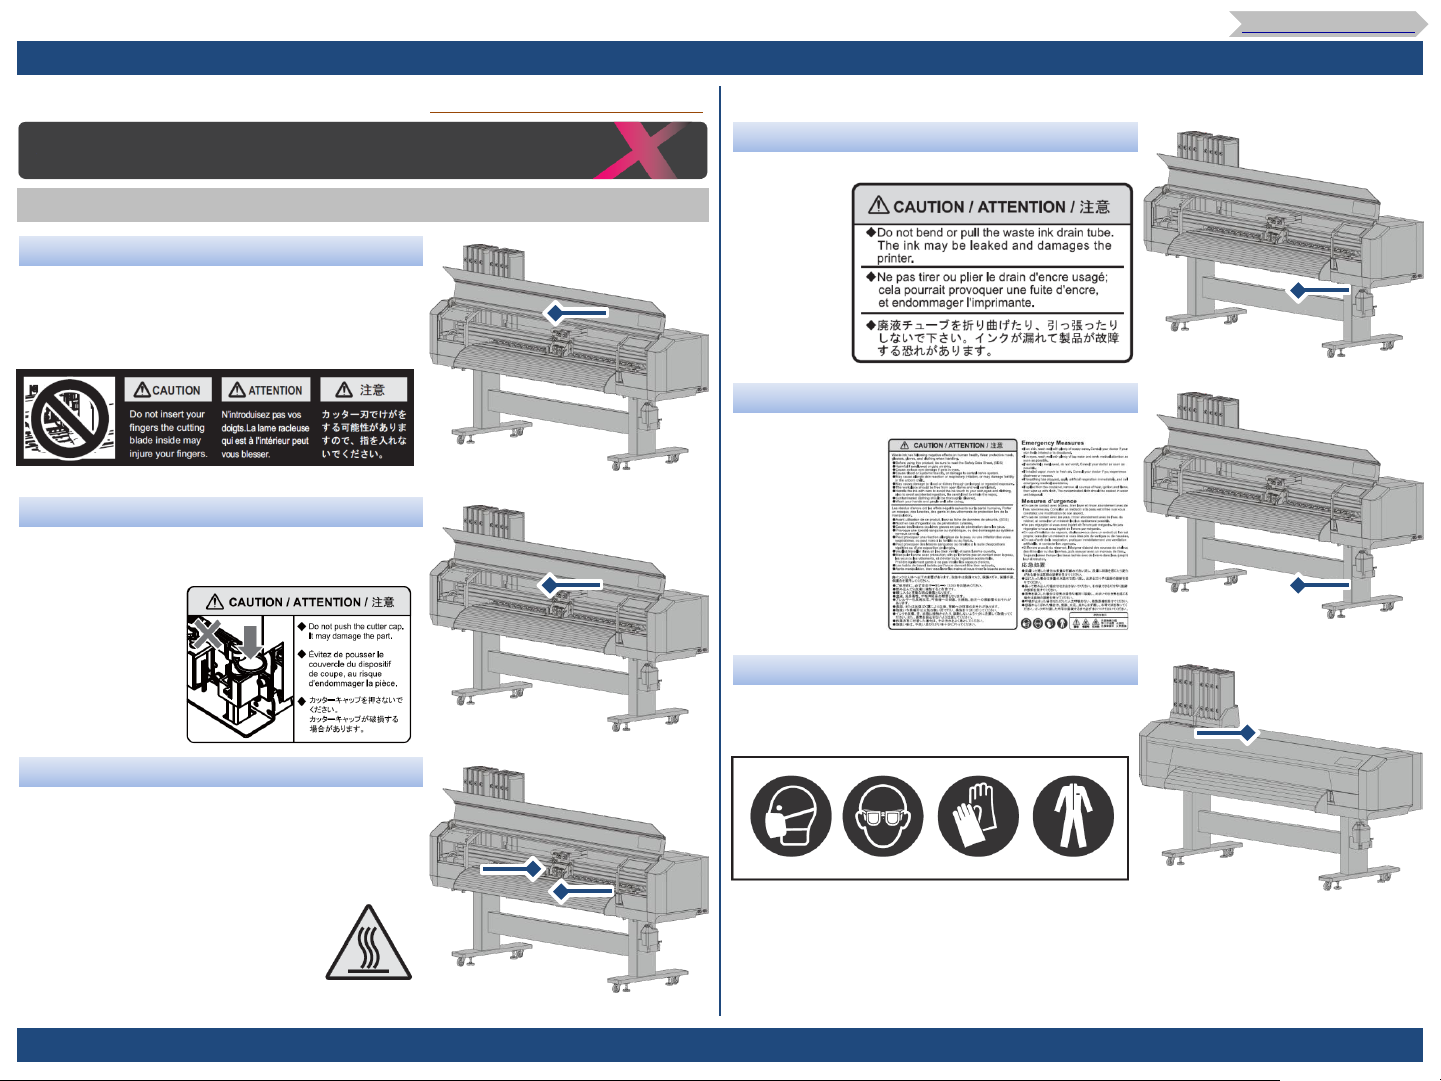
Safety Precautions
Warning Labels
Cut Hazard Label for Cutter
Cutter Cap Caution Label
When replacing a cutter blade, do not push the
cutter cap.
To Table of Contents
cf. Startup Guide(Rev.01-p.44)
Caution Label for Waste Ink Drain Tube Handling
Waste Fluid Caution Label
Hot Surface Caution Label
The surface may get hot and may cause burn injury.
Do not touch with your hand for at least 30
minutes after turning off the printer.
CSTM-XPJ16xxSR(E)_1.00 CONFIDENTIAL Page.
Protective equipment label
(Mask / Glasses / Gloves / Protective clothing)
Wear protective equipment when handling ink.
17
4. Introduction
4.5. Warning Labels (3/3)
To Table of Contents
4.6. Instruction Precautions (1/1)
Safety Precautions
Warning Labels
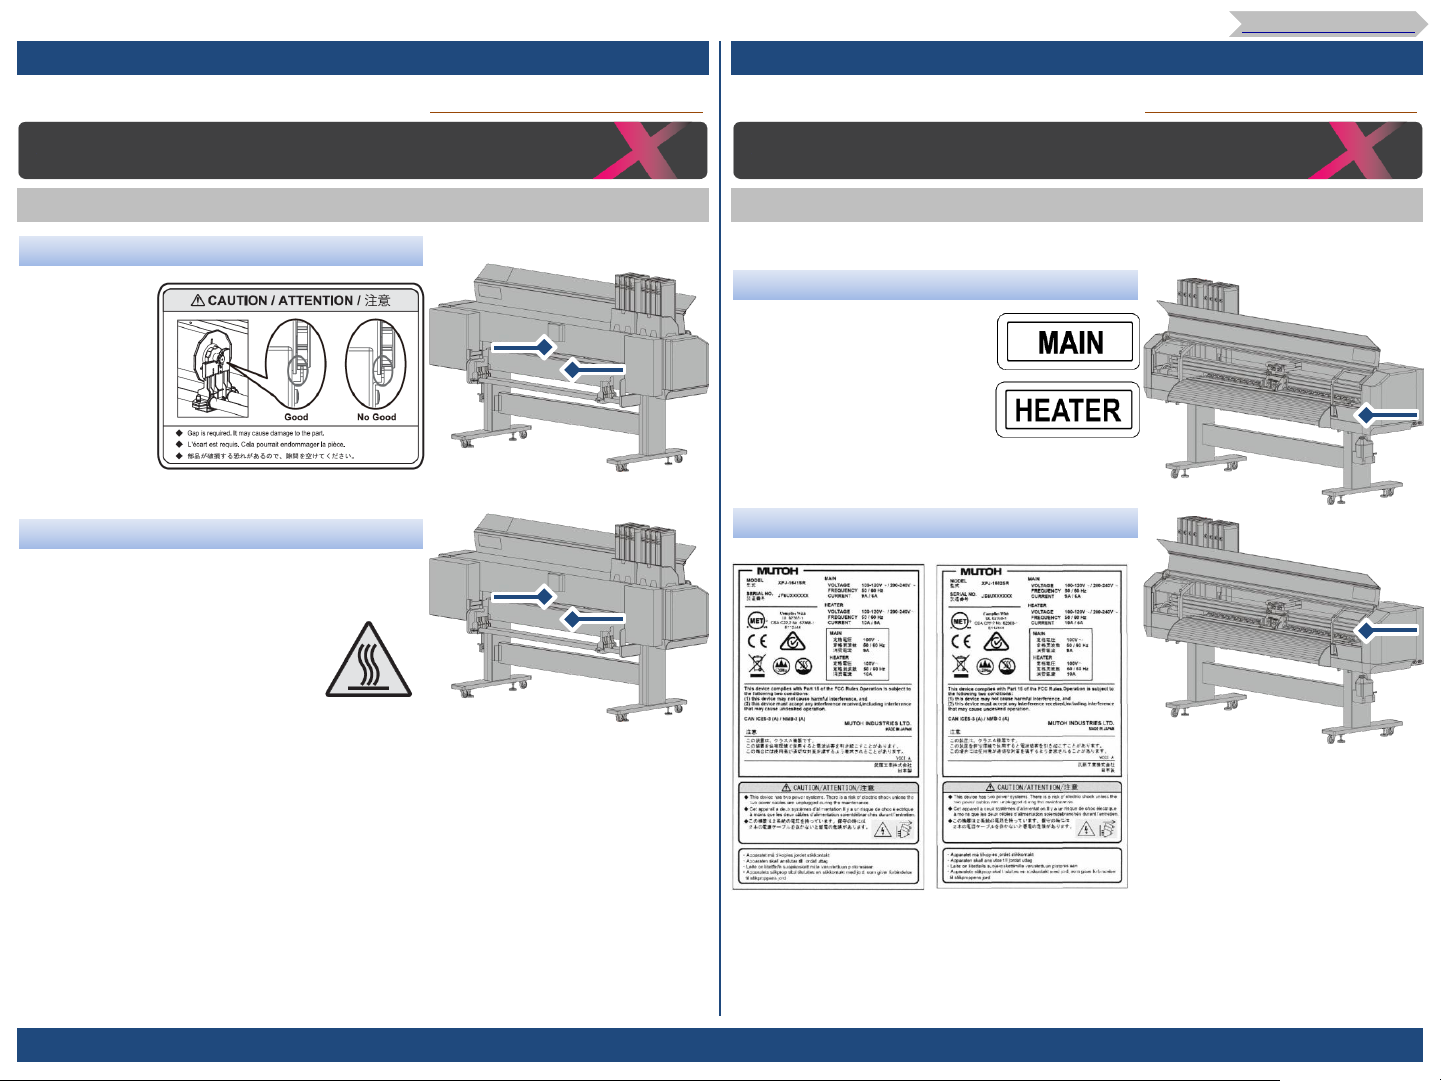
Loading Position Caution Label
Hot Surface Caution Label
The surface may get hot and may cause burn injury.
Do not touch with your hand for at least 30
minutes after turning off the printer.
cf. Startup Guide(Rev.01-p.44)
cf. Startup Guide(Rev.01-p.45)
Safety Precautions
Instruction Labels
The following instructions labels are applied onto the printer to ensure the proper use.
AC Inlet Label
●MAIN
●HEATER
Rated nameplate
◆XPJ-1641SR
◆XPJ-1682SR
CSTM-XPJ16xxSR(E)_1.00 CONFIDENTIAL Page.
◆XPJ-1682SR
18
5. Unpacking and Initial Setup
5.1. Site Preparation (1/2)
To Table of Contents
cf. Startup Guide(Rev.01-p.2)
Site Preparation
Installation Location Requirements
Choose the location which satisfies the requirements below.
・ The floor must be level.
・ Avoid vibration from the neighboring devices.
・ Low humidity and free from dust.
・ Less chance of temperature and humidity changes.
・ Avoid direct sunlight.
・ Avoid water.
・ Avoid direct air onto the printer.
・ Low levels of electromagnetic waves.
・ Choose the floor that can safely support the weight of this product.
The total weight of printer and stand is 280 kg.
If the floor does not have sufficient load capacity, it can lead to injury from a fall.
This equipment is not suitable for use in locations where children are likely to
・
be present.
・ Keep the work area well ventilated while operating.
Ink odor may cause health problem such as headache, dizziness, or dull.
If you experience these symptoms, stop printer operation and move to fresh air.
Seek medical attention if vomit persists.
cf. Startup Guide(Rev.01-p.2)
Minimum Space Requirements
The following space is required for installation.
Printer Size
Width x Depth
Height
*1 When installing ink bag cases.
The room height should be at least
1,760mm.
: 2,750mm x 895mm
: 1,611mm *1
Power Specification
The installation site must meet the power specification and environmental
requirements below.
・ Printer:
Input voltage: AC 100V to 120V±10% / AC 200V to 240V±10%
Input frequency: 50 / 60Hz ±1Hz
Input load current: 9 A (AC 100V - 120V), 6 A (AC 200V - 240V)
・ Heater:
Input voltage: AC 100V to 120V±10% / AC 200V to 240V±10%
Input frequency: 50 / 60Hz ±1Hz
Input load current: 10 A (AC 100V - 120V), 5 A (AC 200V - 240V)
CSTM-XPJ16xxSR(E)_1.00 CONFIDENTIAL Page.
This product has two power cords for printer and heater and requires the total
load current as follows:
・ XPJ-1641SR/XPJ-1682SR: 19 A (AC 100V - 120V),11 A (AC 200V - 240V)
If the total current exceeds the maximum capacity of the wall outlet with two or
more jacks, connect one of the two power plugs into another wall outlet.
19
5. Unpacking and Initial Setup
5.1. Site Preparation (2/2)
To Table of Contents
5.2. Unpacking (1/4)
Site Preparation
Environmental Requirements
・ Operating condition:
Temperature :
Humidity
・ Printing Condition:
Temperature :
Humidity
・ Change rate:
Temperature
Humidity
・ Printer Storage Condition:
Without ink filled: Up to 6 months
Temperature
Humidity
With ink filled: Up to 1 week
Temperature
Humidity
20℃ to 32℃
: 40% to 60%, non condensing
22℃ to 30℃
: 40% to 60%, non condensing
: No more than 2℃ per 1 hour
: No more than 5% per 1 hour
: -20℃ to 60℃
: 20% to 80%, non condensing
: -10℃ to 40℃
: 20% to 80%, non condensing
※.
Storage up to 4 days maximum when stored between 32 ℃ to
40℃.
cf. Startup Guide(Rev.01-p.3)
cf. Startup Guide(Rev.01-p.4)
Unpacking
Unpacking Preparation
Before unpacking, read the instructions below and prepare the necessary items.
・ Minimum 4 people are required for unpacking, assembling and installation.
・ The items listed below are required for installation and initial setup.
・ Ink Storage Condition:
Black / Cyan / Magenta / Yellow/ Light Cyan / Light Magenta / Light Black
(1,000ml each)
Temperature
Humidity
Cleaning bag (300ml)
Temperature
Humidity
: -20℃ to 40℃
: 5% to 85%, non condensing
: -5℃ to 40℃
Storage up to 6 months maximum when stored between -5℃ to
※.
5℃ or 30 ℃ to 40℃.
: 80% or less, non condensing
CSTM-XPJ16xxSR(E)_1.00 CONFIDENTIAL Page.
20
5. Unpacking and Initial Setup
5.2. Unpacking (2/4)
To Table of Contents
cf. Startup Guide(Rev.01-p.4)
Unpacking
Use the designated power cords.
Failure to do so may result in electric shock or fire.
Your computer must meet the following minimum requirements:
・ OS: Windows 10 (64bit), Windows 8/8.1 (64bit), Windows 7 (64bit)
・ CPU: Intel (R) Core (TM) i5 / i7
・ Memory: 8GB minimum
・ Network:
XPJ-1641SR: Use a network port that supports Ethernet port, Ethernet cable
(Category 5 or later)
XPJ-1682SR: Use a network port that supports Gigabit Ethernet port, Gigabit
Ethernet cable (Category 6 or later)
Items marked with an asterisk (*) above are accessories or supplies.
cf. Startup Guide(Rev.01-p.5)
Unpacking the printer
Unpack the product.
・ Minimum four people are required for unpacking and moving this product.
・ When taking out the product from the packing box, remove the plastic sheet
wrapped around the product, then take out the product.
Failure to do so may cause slip and damage to the product.
・ Keep the product level while moving it.
[1] Open the packing box and take out the items listed below.
CSTM-XPJ16xxSR(E)_1.00 CONFIDENTIAL Page.
21
5. Unpacking and Initial Setup
5.2. Unpacking (3/4)
To Table of Contents
Unpacking
Unpacking the printer
[2] Check that the following items are included.
cf. Startup Guide(Rev.01-p.6)
cf. Startup Guide(Rev.01-p.7)
Unpacking Stand
[1] Open the packing box and take out the items listed below.
Items marked with an asterisk (*) above are in the accessory box.
CSTM-XPJ16xxSR(E)_1.00 CONFIDENTIAL Page.
22
5. Unpacking and Initial Setup
5.2. Unpacking (4/4)
To Table of Contents
5.3. Assembling (1/4)
Unpacking
Unpacking Stand
[2] Check that the following items are included.
cf. Startup Guide(Rev.01-p.7)
cf. Startup Guide(Rev.01-p.8)
Assembling
Assembling Stand
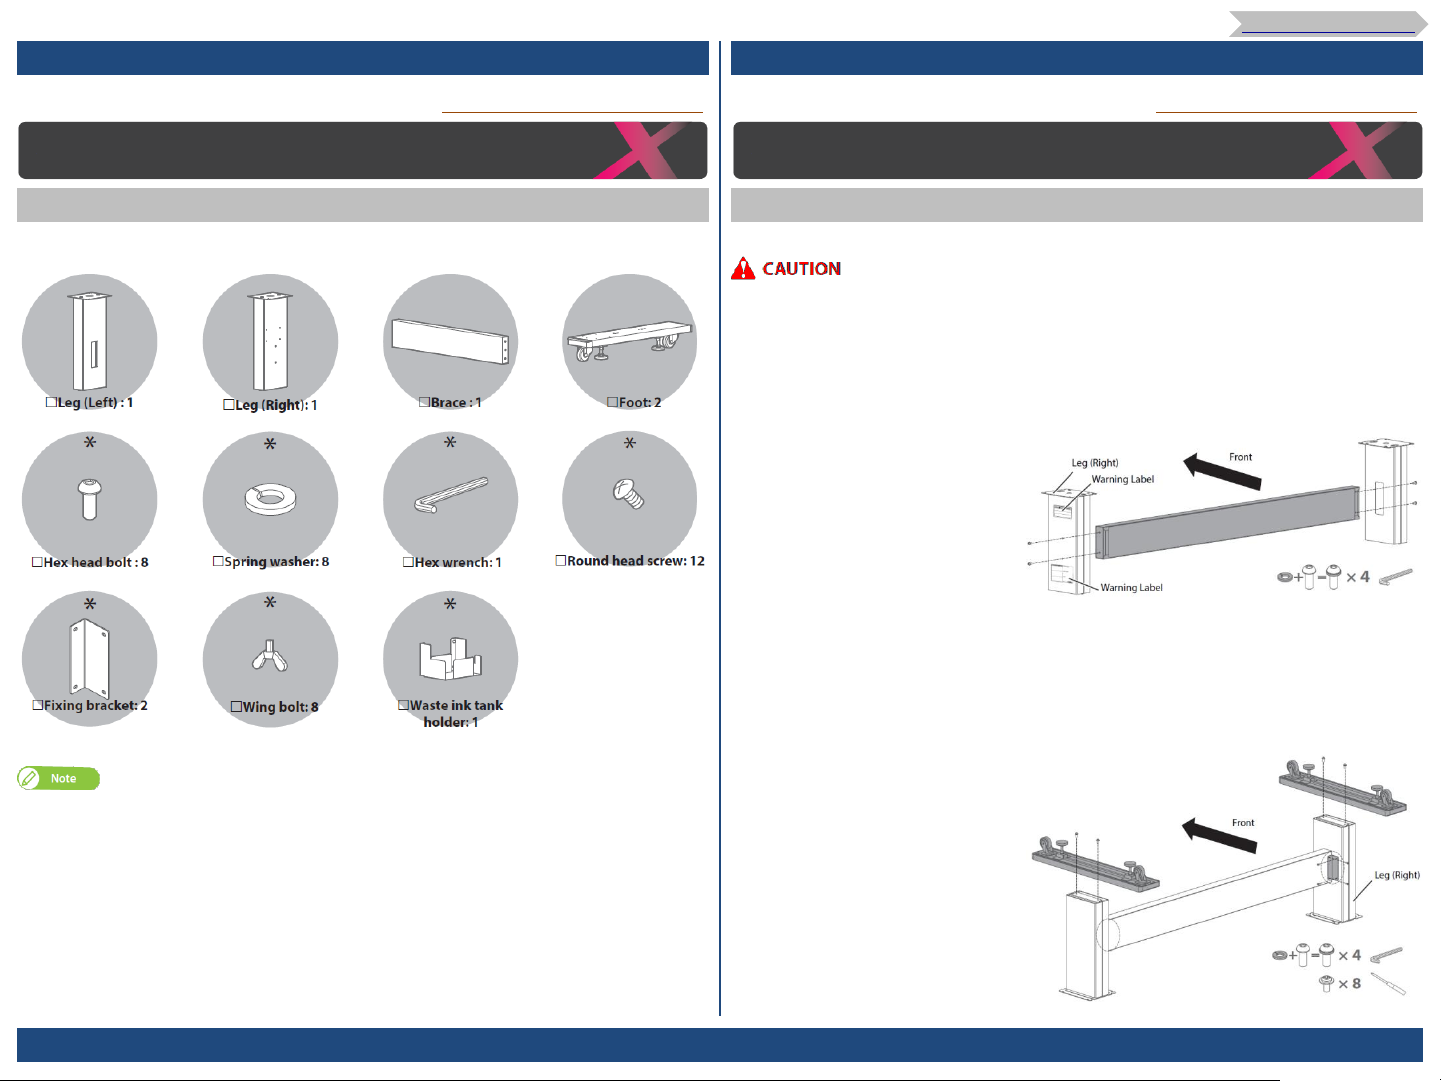
Follow the steps below to assemble the stand.
・ Minimum two people are required for assembling the stand.
[1] Attach the left leg and right leg to the brace.
・ Face the groove on the brace toward the rear side of the printer and attach it to
both legs.
・ The leg with two warning labels attached is the right leg.
・ Put the spring washers on the hex head screws (4 each), then tighten the screws.
[2] Attach the foot to the leg.
・ Face the screw holes on the foot toward the front side of the printer and attach it
to the leg.
・ Put the spring washers on the hex head screws (4 each), then tighten the screws.
・ Use the round head screws (×8) to fix the fixing brackets (×2) on the brace and
both legs.
Items marked with an asterisk (*) above are in the accessory box.
CSTM-XPJ16xxSR(E)_1.00 CONFIDENTIAL Page.
23
5. Unpacking and Initial Setup
5.3. Assembling (2/4)
To Table of Contents
cf. Startup Guide(Rev.01-p.9)
Assembling
Assembling Stand
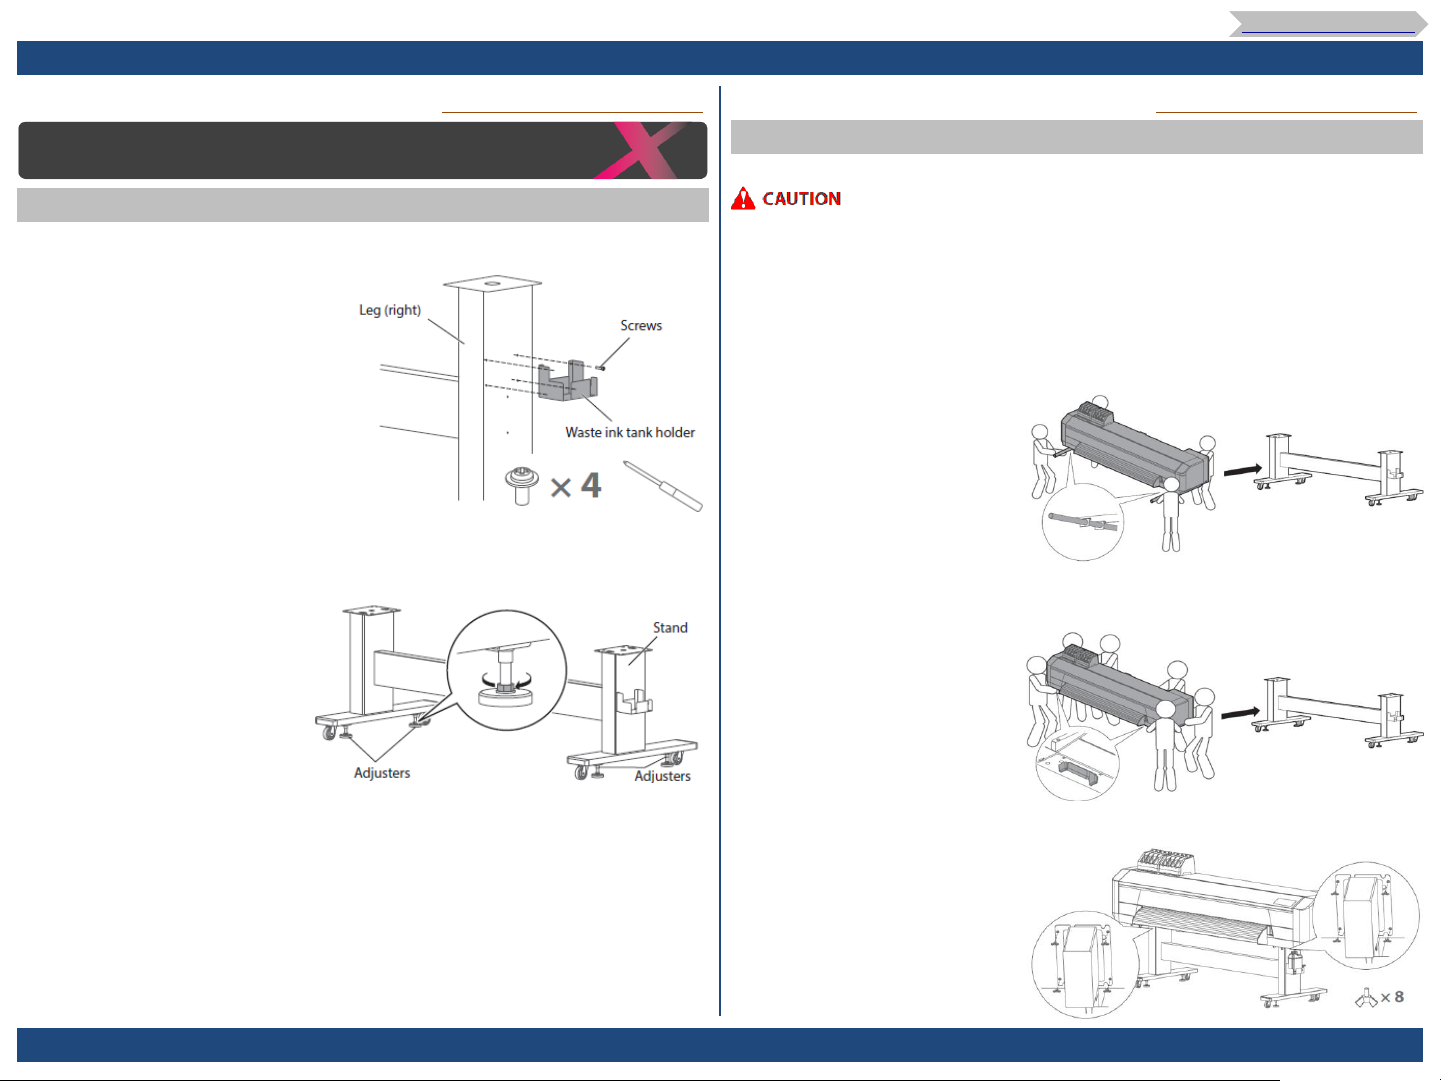
[3] Use the round head screws (×4) to attach the waste ink tank holder to the right leg.
[4] Shake the stand to make sure that each part is firmly attached.
[5] Turn the leveling adjusters (×4) as shown on the left until the stand does not move.
cf. Startup Guide(Rev.01-p.9)
Attaching Printer
Follow the steps below to attach the printer to the stand.
・ Minimum four people are required for this process.
・ When taking out the product from the packing box, remove the plastic sheet
wrapped around the product, then take out the product.
Failure to do so may cause slip and damage to the product.
・ Keep the product level while attaching.
[1] Lift the printer with at least four people and mount it on the stand.
・ Use two lifting bars to insert into the guide holes at the bottom left and right of
the printer, and lift up on the stand.
(If you do not have lifting bars) Lift the printer with at least four people and mount
it on the stand.
・ Use the handholds at the front bottom of the printer.
CSTM-XPJ16xxSR(E)_1.00 CONFIDENTIAL Page.
[2] Use the wing bolts (×8) and attach the printer to the stand.
24
5. Unpacking and Initial Setup
5.3. Assembling (3/4)
To Table of Contents
cf. Startup Guide(Rev.01-p.10)
Assembling
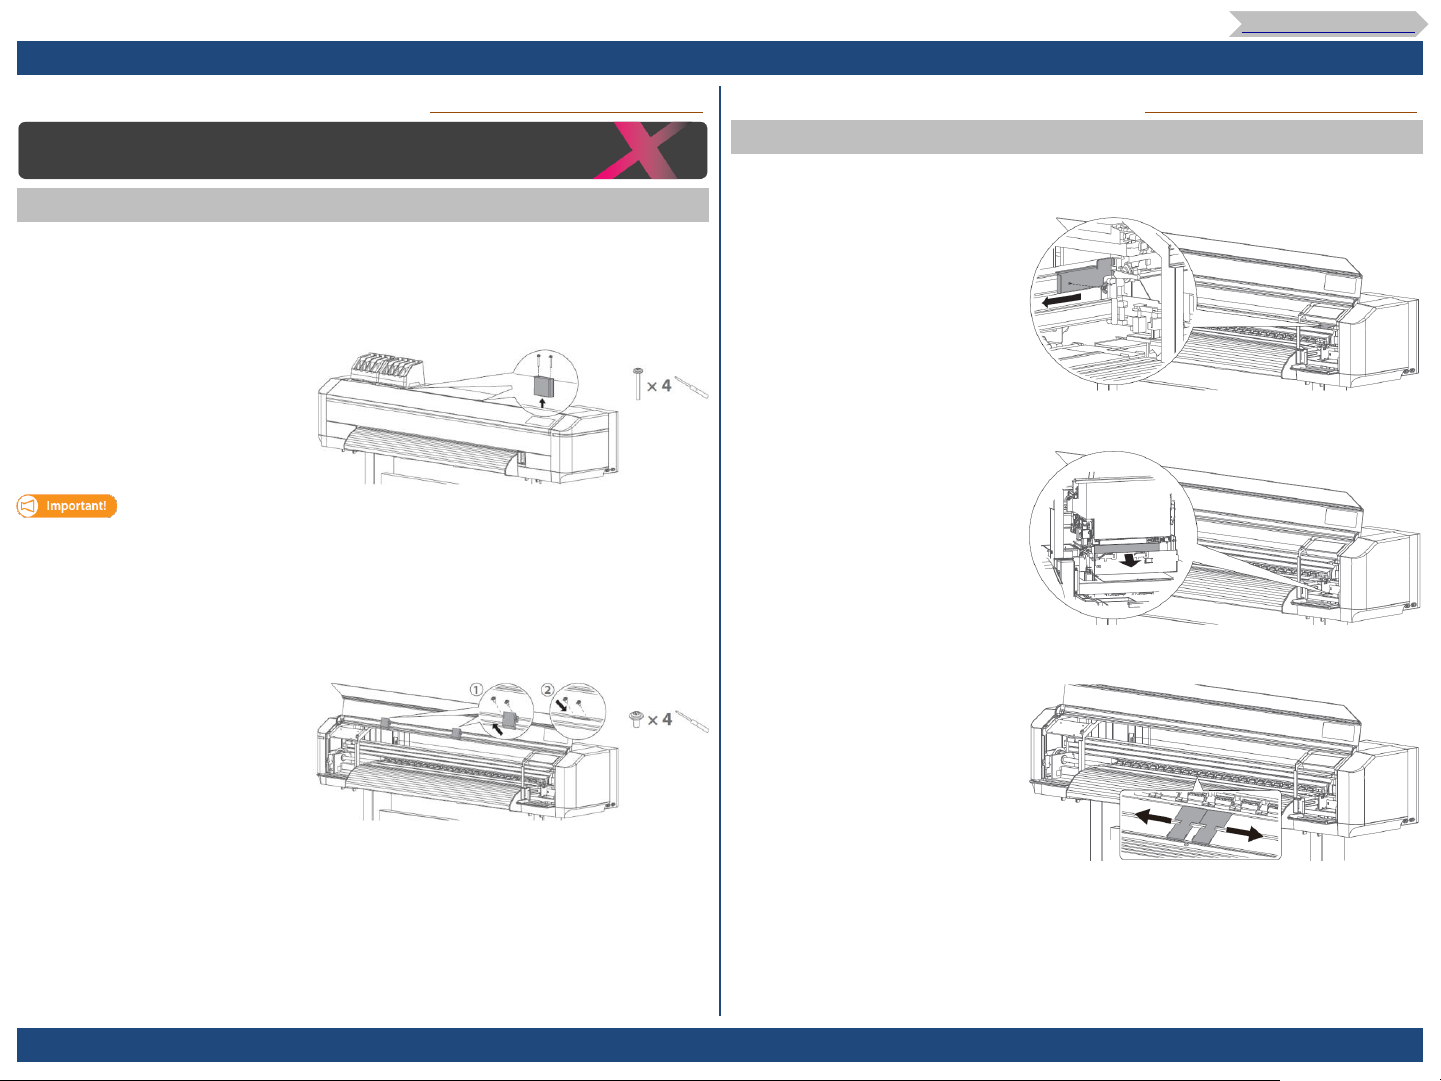
Removing Packing Materials
Remove packing materials from the product.
[1] Remove the packing tapes from all the covers.
[2] (XPJ-1682SR only) Remove two screws each (M3 x 45) to remove two front cover
locks.
Make sure to remove two front cover locks before opening the front cover.
Otherwise it will cause damage to the cover.
[3] (XPJ-1682SR only)
①: Open the front cover and remove two screws each (M4x8) to remove two front
cover lock plates.
②: Use the screws just removed to fasten to the mounting holes on the printer.
cf. Startup Guide(Rev.01-p.11)
Removing Packing Materials
[4] Open the front cover. Remove the wing bolt to remove the shipping bracket from
the carriage.
[5] (XPJ1682SR only)Remove the tape, then remove the packing material from the
bottom of the carriage.
[6] Remove the tape, and move the edge holders to the left and the right edge.
CSTM-XPJ16xxSR(E)_1.00 CONFIDENTIAL Page.
25
5. Unpacking and Initial Setup
5.3. Assembling (4/4)
To Table of Contents
5.4. Connecting Power and Network (1/2)
cf. Startup Guide(Rev.01-p.12)
Assembling
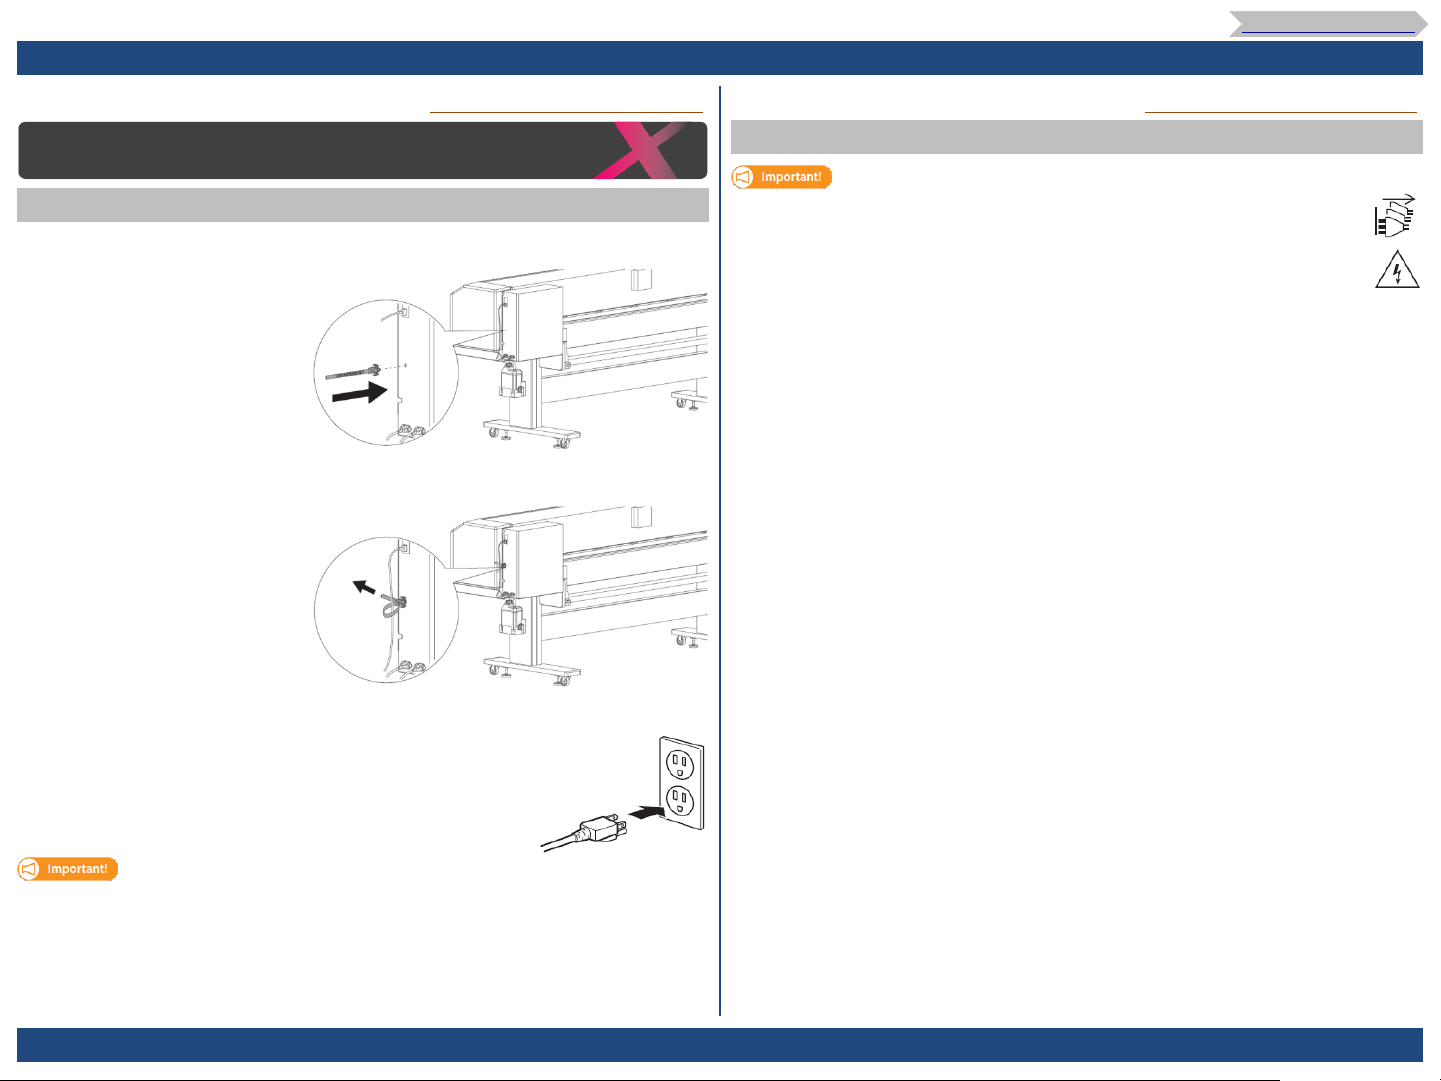
Attaching Waste Ink Tank
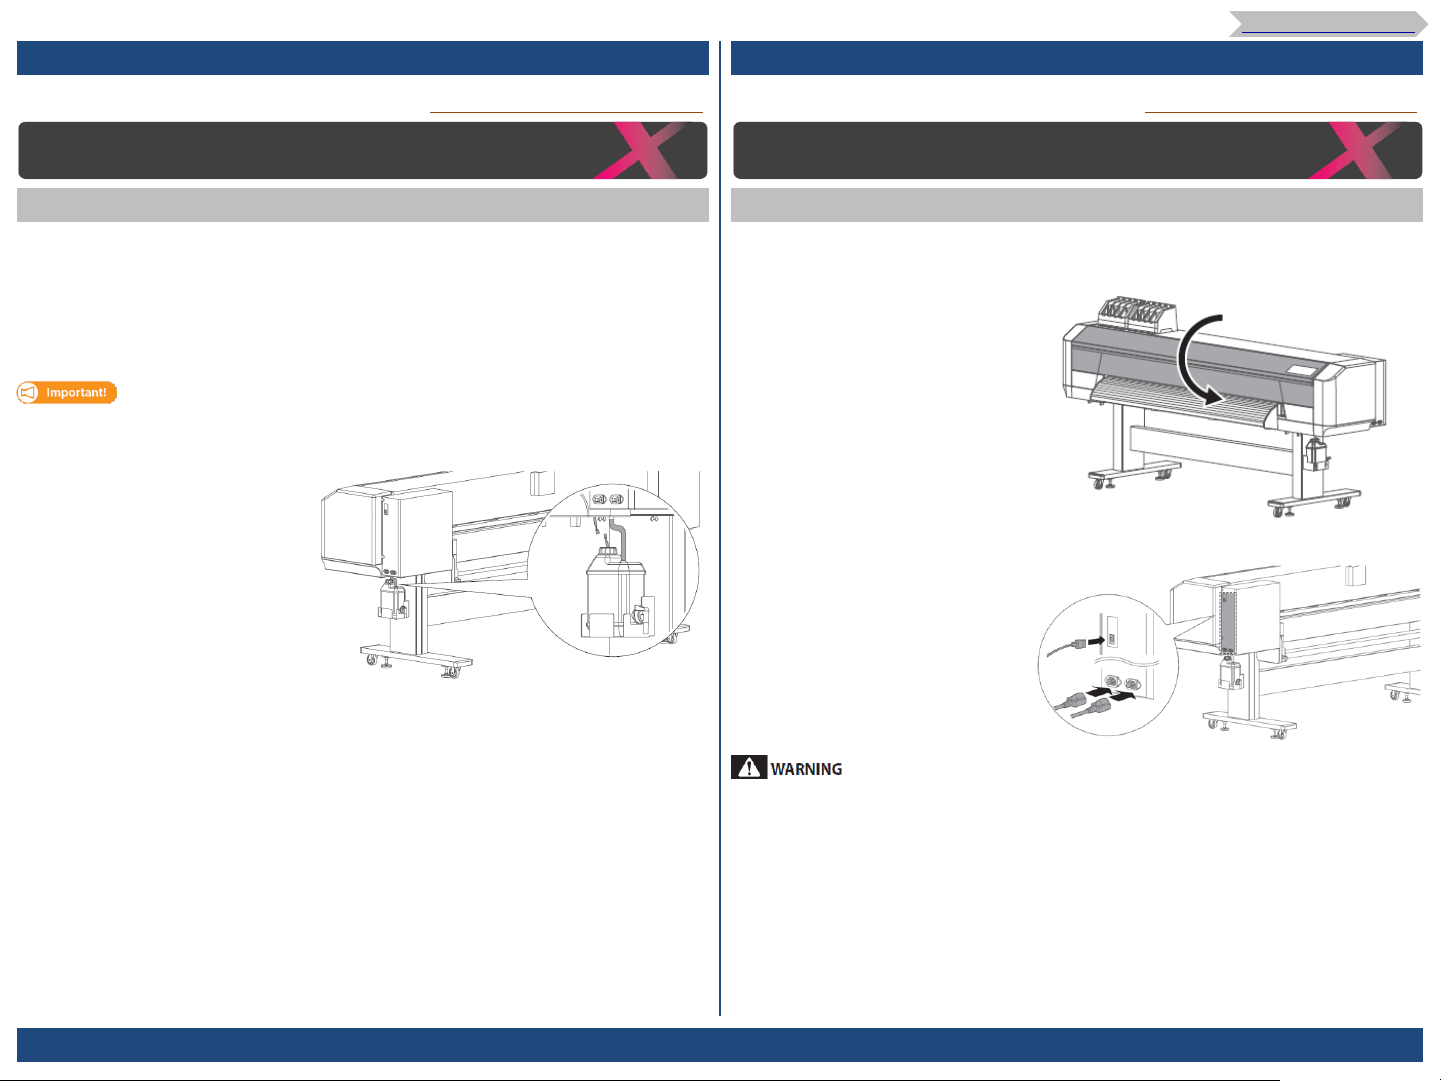
Attach the waste ink tank to the printer.
[1] Place the waste ink tank on the waste ink tank holder.
[2] Use the waste ink tank tube to connect the waste ink tank to the printer.
・ Cover up the connector of the tank with the tube.
Connect the waste ink sensor cable to the waste ink sensor connector.
Check that the connector of the tank is fully covered with the tube.
Failure to do so may cause ink spillage.
cf. Startup Guide(Rev.01-p.13)
Connecting Power and Network
Connect Power Cords and Ethernet Cable
Follow the steps below to connect the power cords and Ethernet cable.
[1] Check that the front cover is closed.
[2] Connect two power cords and a Ethernet cable to the printer.
CSTM-XPJ16xxSR(E)_1.00 CONFIDENTIAL Page.
Make sure to plug two power cords into the wall outlets with the same voltage.
Failure to do so may cause damage to the electrical circuit.
26
5. Unpacking and Initial Setup
5.4. Connecting Power and Network (2/2)
To Table of Contents
cf. Startup Guide(Rev.01-p.14)
Connecting Power and Network
Connect Power Cords and Ethernet Cable
[3] Insert the tip of the cable tie into the hole on the printer to attach it.
[4] Use the cable tie to secure the Ethernet cable to the printer.
cf. Startup Guide(Rev.01-p.14)
Connect Power Cords and Ethernet Cable
Electric shock hazard.
This printer has two power cords.
To unplug from the wall outlet, make sure to unplug both of them.
[3] Plug two power cords into the wall outlets respectively.
To plug into one wall outlet with two or more jacks, check that the total current
does not exceed the maximum capacity of the wall outlet.
If exceeded, connect one of the two power plugs into another wall outlet.
CSTM-XPJ16xxSR(E)_1.00 CONFIDENTIAL Page.
27

5. Unpacking and Initial Setup
5.5. Printer Initial Setup (1/7)
To Table of Contents
cf. Startup Guide(Rev.01-p.15)
Printer Initial Setup
Initial Setup Flow via Startup Wizard
Here is how to get started with your printer.
Use one of the following methods to run the initial setup.
・ Follow the instructions in the Startup Wizard to set up the settings via computer.
・ Follow the instructions in this Guide to set up the settings from operation panel.
cf. Startup Guide(Rev.01-p.16)
Powering on - Installing MSM
To run the initial setup through the Startup Wizard on MSM, install MSM on your
computer.
Then follow the Startup Wizard to run the initial setup.
・ Make sure to install MSM stored in the supplied CD.
[1] Check that the front cover is closed.
[2] Long press the Power button on the front panel.
・ The Power LED (above the Power button) lights up.
・ The printer will start mechanical initialization.
Once the Power LED lights up, release the Power button.
[3] Use the Ethernet cable to connect the printer to your computer
[4] Insert the supplied CD into the CD-ROM drive.
・ The Startup Wizard will start up automatically.
・ If the Startup wizard does not automatically start,
right click the icon of CDROM drive, open the
contents of CD with [Open], and double click
MpTotalInst.exe.
[5] Follow the instructions on the Startup Wizard to setup.
・ When setup is complete, carry out test printing.
CSTM-XPJ16xxSR(E)_1.00 CONFIDENTIAL Page.
・ Please keep the supplied CD at hand. You will need it for reinstallation.
・ If lost, you can download from MUTOH Club (user registration is required).
(MUTOH Club) https://club.mutoh.co.jp/mutoh/guser
28

5. Unpacking and Initial Setup
5.5. Printer Initial Setup (2/7)
To Table of Contents
Printer Initial Setup
Initial Setup Flow via Operation Panel
cf. Startup Guide(Rev.01-p.17)
cf. Startup Guide(Rev.01-p.18)
Step 1 Powering on - Initial settings on the front panel
Power on the printer and configure the initial settings on the front panel.
[1] Check that the front cover is closed.
[2] Long press the Power button on the front panel.
・ The Power LED (above the Power button) lights up.
・ The printer will start mechanical initialization.
Once the Power LED lights up, release the Power button.
[3] Use to select the language.
Tap [Enter].
[4] Tap [Enter].
[5] Tap [Enter].
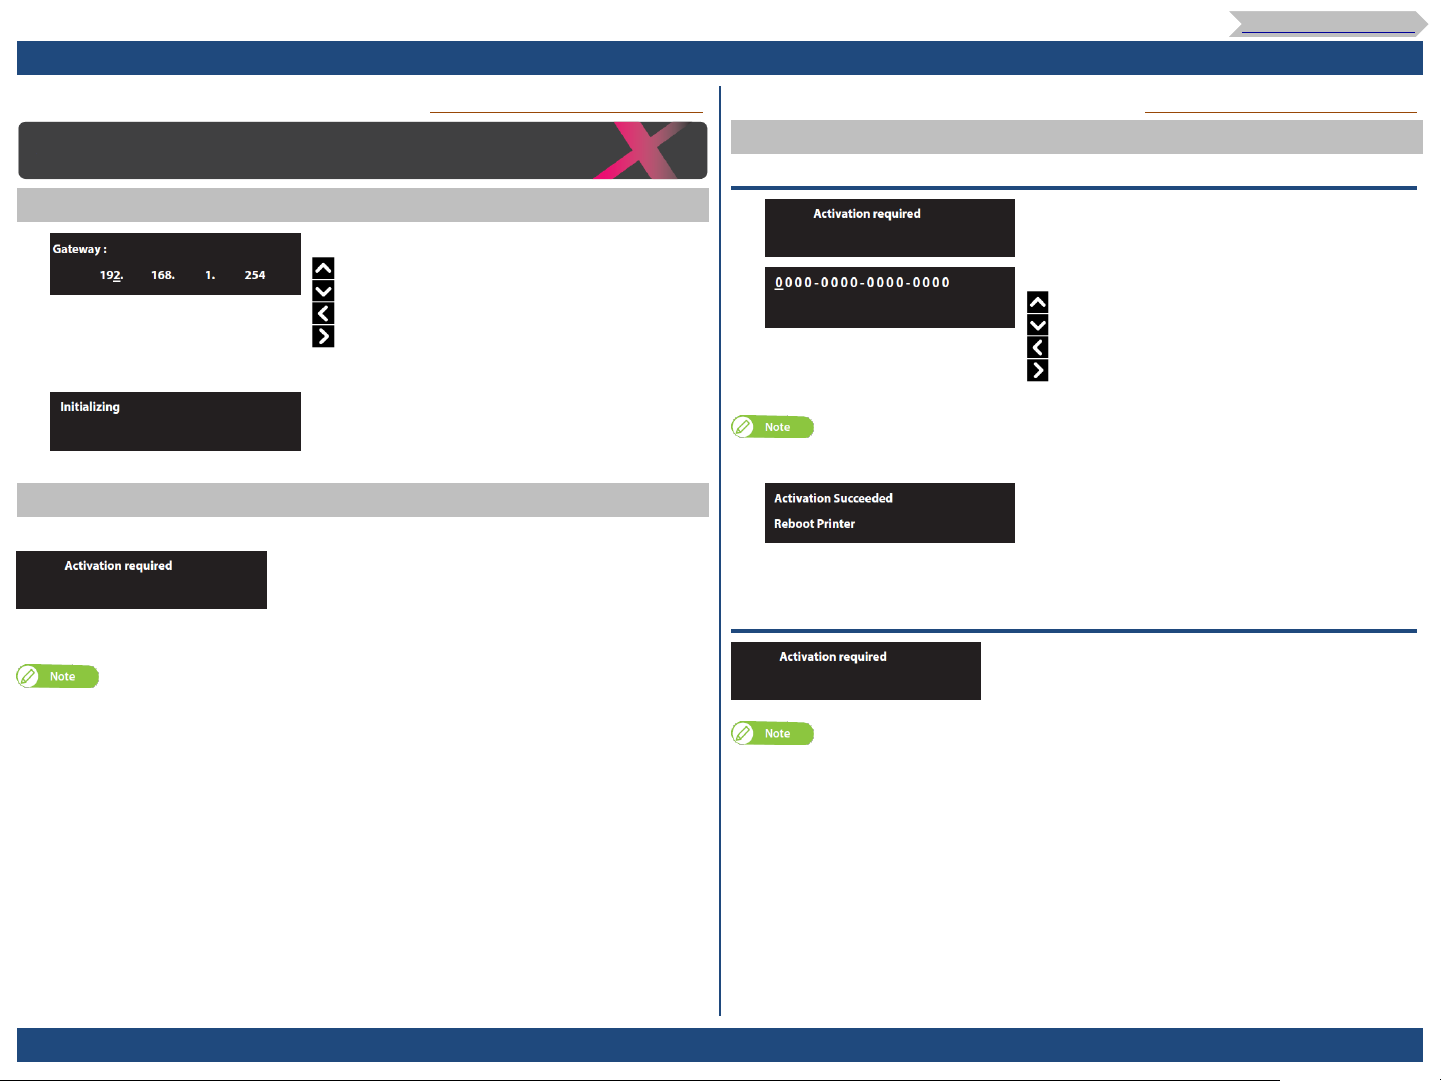
[6] Sets the IP address of the printer.
key: Increase the number.
key: Decrease the number.
key: Move the cursor to the previous digit.
key: Move the cursor to the next digit.
Tap [Enter] after entering each digit.
CSTM-XPJ16xxSR(E)_1.00 CONFIDENTIAL Page.
[7] Sets the subnet mask of the printer.
key: Increase the number.
key: Decrease the number.
key: Move the cursor to the previous digit.
key: Move the cursor to the next digit.
Tap [Enter] after entering each digit.
29
5. Unpacking and Initial Setup
5.5. Printer Initial Setup (3/7)
To Table of Contents
cf. Startup Guide(Rev.01-p.19)
Printer Initial Setup
Step 1 Powering on - Initial settings on the front panel
[8] Sets the gateway.
key: Increase the number
key: Decrease the number.
key: Move the cursor to the previous digit.
key: Move the cursor to the next digit.
Tap [Enter] after entering each digit.
[9] The printer will start mechanical initialization.
Step 2 Activation
Follow the steps below to perform activation.
When the message on the left appears, use one of the
following
methods to activate the printer.
"Activation through the front panel" →
"Activation through Internet" →
While “Activation required” is displayed, you can return the initial setting flow (e.g. IP
Address etc.) by tapping [Home] key.
cf. Startup Guide(Rev.01-p.20)
Step 2 Activation
Activation through the front panel
[1] When the message on the left appears, tap
[2] Enter the 16-digit activation code.
To obtain the activation code, please contact your local MUTOH dealer to send it by
email.
[3] When the message on the left appears, long press
Activation through Internet
[Enter].
key: Increase the number.
key: Decrease the number.
key: Move the cursor to the previous digit.
key: Move the cursor to the next digit.
Tap [Enter] after entering each digit.
the Power button to power off the printer.
When the message “Power Off” appears on the
・
panel, release the Power button.
Wait for a few seconds and long press the Power
button to reboot the printer.
When the message on the left appears on the front
panel, follow the instructions on the Printer Activation
Guide to activate the printer.
CSTM-XPJ16xxSR(E)_1.00 CONFIDENTIAL Page.
To obtain the activation code and the Printer Activation Guide, access to MUTOH Club
from the following URL and click “Register” to complete the user registration.
https://club.mutoh.co.jp/mutoh/guser/
30
 Loading...