

Page 1
User’s Guide
For Maintenance Kits, Spares,
Service and Support
Call: +44 (0) 1628 588755
E-mail: [email protected]
Page 2

Page 3

Users Guide Viper TX Softsign
AP-75360 - Revision 1.2 3
Copyright notice
COPYRIGHT © 25/5/10 Mutoh Belgium nv All rights reserved.
Mutoh Belgium nv reserves the right to modify the information contained in this manual at any
time without prior notice.
This document may not be reproduced by any means, in whole or in part, without written
permission of the copyright owner.
Mutoh furnished this document to support the Viper TX Softsign series printers. In
consideration of the furnishing of the information contained in this document, the party to
whom it is given, assumes its custody and control and agrees to the following:
The information herein contained is given in confidence, and any part thereof shall not be
copied or reproduced without written consent of Mutoh Belgium nv
This document or the contents herein under no circumstances shall be used in the
manufacture or reproduction of the article shown and the delivery of this document shall not
constitute any right or license to do so.
25 May 2010
Published: Mutoh Belgium nv, Archimedesstraat 13, B-8400 Oostende, BELGIUM
©©©ò³«¬±¸ò»«
Page 4
Users Guide Viper TX Softsign
4 AP-75360 - Revision 1.2
IMPORTANT NOTICE
Trademarks mentioned in this guide
Mutoh, Viper TX Softsign are registered trademarks or product names of Mutoh Belgium
nv.
Windows95, Windows98, Windows NT4.0, Windows2000, Windows XP, and MS-DOS are
registered trademarks or product names of Microsoft Corporation.
Other company and product names may be registered trademarks or product names.
Ò±¬»
The product and the contents of this publication may be changed without prior
notification.
Mutoh Belgium nv has made the best efforts to keep this publication free from
errors, but if you find any uncertainties or misprints, please contact the reseller
from which you bought this equipment or email us: ¬»½¸²·½¿´ò²»©-೫¬±¸ò»«.
Mutoh Belgium nv shall not be liable for any damages or troubles resulting
from the use of this equipment or this guide.
Page 5

Users Guide Viper TX Softsign
AP-75360 - Revision 1.2 - 25/5/10 5
Table of contents
Chapter 1 Safety instructions . . . . . . . . . . . . . . . . . . . . . . . . . . 11
1.1 Compliance with the following regulations . . . . . . . . . . . . . . 12
1.2 Handling inks and waste . . . . . . . . . . . . . . . . . . . . . . . . . . . . . 13
1.3 Warnings, cautions and notes. . . . . . . . . . . . . . . . . . . . . . . . . 13
1.4 Safety instructions . . . . . . . . . . . . . . . . . . . . . . . . . . . . . . . . . . 14
1.5 Safety labels . . . . . . . . . . . . . . . . . . . . . . . . . . . . . . . . . . . . . . . 16
Chapter 2 Product overview . . . . . . . . . . . . . . . . . . . . . . . . . . . 19
2.1 Front view . . . . . . . . . . . . . . . . . . . . . . . . . . . . . . . . . . . . . . . . . 20
2.2 Rear view . . . . . . . . . . . . . . . . . . . . . . . . . . . . . . . . . . . . . . . . . . 22
2.3 Emergency stops . . . . . . . . . . . . . . . . . . . . . . . . . . . . . . . . . . . 24
2.4 Winding system. . . . . . . . . . . . . . . . . . . . . . . . . . . . . . . . . . . . . 26
Front section . . . . . . . . . . . . . . . . . . . . . . . . . . . . . . . . . . . . . . . . . . . . 27
Rear section . . . . . . . . . . . . . . . . . . . . . . . . . . . . . . . . . . . . . . . . . . . . . 28
2.5 Operation panel. . . . . . . . . . . . . . . . . . . . . . . . . . . . . . . . . . . . . 29
Keys . . . . . . . . . . . . . . . . . . . . . . . . . . . . . . . . . . . . . . . . . . . . . . . . . . . 29
LCD and LEDs . . . . . . . . . . . . . . . . . . . . . . . . . . . . . . . . . . . . . . . . . . 30
2.6 Installation environment. . . . . . . . . . . . . . . . . . . . . . . . . . . . . . 31
Installation environment requirements . . . . . . . . . . . . . . . . . . . . . . . 31
End location requirements . . . . . . . . . . . . . . . . . . . . . . . . . . . . . . . . . 32
Air purification . . . . . . . . . . . . . . . . . . . . . . . . . . . . . . . . . . . . . . . . . . . 33
Network requirements . . . . . . . . . . . . . . . . . . . . . . . . . . . . . . . . . . . . 35
Compressed air requirements . . . . . . . . . . . . . . . . . . . . . . . . . . . . . . 35
Page 6

Users Guide Viper TX Softsign
AP-75360 - Revision 1.2 - 25/5/10 6
Chapter 3 Printer handling . . . . . . . . . . . . . . . . . . . . . . . . . . . . 37
3.1 Printing workflow . . . . . . . . . . . . . . . . . . . . . . . . . . . . . . . . . . . 40
3.2 Switching the Power ON / OFF . . . . . . . . . . . . . . . . . . . . . . . . 41
Switching the power ON. . . . . . . . . . . . . . . . . . . . . . . . . . . . . . . . . . . 41
Switching the power OFF. . . . . . . . . . . . . . . . . . . . . . . . . . . . . . . . . . 43
Restart the machine after an emergency stop . . . . . . . . . . . . . . . . 44
3.3 Perfect fabric handling . . . . . . . . . . . . . . . . . . . . . . . . . . . . . . . 45
Ink gutter. . . . . . . . . . . . . . . . . . . . . . . . . . . . . . . . . . . . . . . . . . . . . . . . 45
Fabric retainers . . . . . . . . . . . . . . . . . . . . . . . . . . . . . . . . . . . . . . . . . . 46
Ink absorbents . . . . . . . . . . . . . . . . . . . . . . . . . . . . . . . . . . . . . . . . . . . 47
Head tactile sensor . . . . . . . . . . . . . . . . . . . . . . . . . . . . . . . . . . . . . . . 48
3.4 Handy menu features . . . . . . . . . . . . . . . . . . . . . . . . . . . . . . . . 49
Adjustable head height. . . . . . . . . . . . . . . . . . . . . . . . . . . . . . . . . . . . 49
Capskip. . . . . . . . . . . . . . . . . . . . . . . . . . . . . . . . . . . . . . . . . . . . . . . . . 49
Continue feed for fixing . . . . . . . . . . . . . . . . . . . . . . . . . . . . . . . . . . . 50
Equal heating up of the heat fixation unit . . . . . . . . . . . . . . . . . . . . 51
3.5 Handling and loading fabrics. . . . . . . . . . . . . . . . . . . . . . . . . . 53
Cautions on handling fabrics . . . . . . . . . . . . . . . . . . . . . . . . . . . . . . . 53
Cautions on storing fabrics . . . . . . . . . . . . . . . . . . . . . . . . . . . . . . . . 53
Loading fabric . . . . . . . . . . . . . . . . . . . . . . . . . . . . . . . . . . . . . . . . . . . 54
3.6 Features to improve print quality . . . . . . . . . . . . . . . . . . . . . . 70
Nozzlecheck. . . . . . . . . . . . . . . . . . . . . . . . . . . . . . . . . . . . . . . . . . . . . 70
Head cleaning . . . . . . . . . . . . . . . . . . . . . . . . . . . . . . . . . . . . . . . . . . . 72
Fabric feed compensation (step) . . . . . . . . . . . . . . . . . . . . . . . . . . . 73
Pause option . . . . . . . . . . . . . . . . . . . . . . . . . . . . . . . . . . . . . . . . . . . . 77
3.7 Set ideal heat fixation unit temperature . . . . . . . . . . . . . . . . . 78
Testing condition . . . . . . . . . . . . . . . . . . . . . . . . . . . . . . . . . . . . . . . . . 78
Overview tables . . . . . . . . . . . . . . . . . . . . . . . . . . . . . . . . . . . . . . . . . . 79
Artefacts . . . . . . . . . . . . . . . . . . . . . . . . . . . . . . . . . . . . . . . . . . . . . . . . 81
Determining my softsign settings for my fabric . . . . . . . . . . . . . . . . 84
Blank tables . . . . . . . . . . . . . . . . . . . . . . . . . . . . . . . . . . . . . . . . . . . . . 87
Page 7

Users Guide Viper TX Softsign
AP-75360 - Revision 1.2 - 25/5/10 7
3.8 Replacing the ink cassettes . . . . . . . . . . . . . . . . . . . . . . . . . . . 88
3.9 Replacing the waste bottle. . . . . . . . . . . . . . . . . . . . . . . . . . . . 89
3.10 Relocating or transporting the printer . . . . . . . . . . . . . . . . . . 90
Relocating the printer . . . . . . . . . . . . . . . . . . . . . . . . . . . . . . . . . . . . . 90
Transporting the printer . . . . . . . . . . . . . . . . . . . . . . . . . . . . . . . . . . . 90
Chapter 4 Periodical maintenance . . . . . . . . . . . . . . . . . . . . . . 93
4.1 Done by the end user . . . . . . . . . . . . . . . . . . . . . . . . . . . . . . . . 94
Overview. . . . . . . . . . . . . . . . . . . . . . . . . . . . . . . . . . . . . . . . . . . . . . . . 94
Maintenance kits and cleaning . . . . . . . . . . . . . . . . . . . . . . . . . . . . . 95
Daily maintenance at shutdown . . . . . . . . . . . . . . . . . . . . . . . . . . . . 96
Weekly maintenance . . . . . . . . . . . . . . . . . . . . . . . . . . . . . . . . . . . . 101
Other maintenance . . . . . . . . . . . . . . . . . . . . . . . . . . . . . . . . . . . . . . 106
4.2 Done by an authorized Mutoh technician . . . . . . . . . . . . . . . 111
Overview. . . . . . . . . . . . . . . . . . . . . . . . . . . . . . . . . . . . . . . . . . . . . . . 111
Partnumbers of the maintenance kits. . . . . . . . . . . . . . . . . . . . . . . 111
Chapter 5 Printer menu . . . . . . . . . . . . . . . . . . . . . . . . . . . . . . 113
5.1 How to work in the menu . . . . . . . . . . . . . . . . . . . . . . . . . . . . 116
Main screen . . . . . . . . . . . . . . . . . . . . . . . . . . . . . . . . . . . . . . . . . . . . 116
Menu screen . . . . . . . . . . . . . . . . . . . . . . . . . . . . . . . . . . . . . . . . . . . 117
Changing between the screens. . . . . . . . . . . . . . . . . . . . . . . . . . . . 118
5.2 Operation panel in standby mode . . . . . . . . . . . . . . . . . . . . . 119
[F1] - Feeding fabric and Step Adjust. . . . . . . . . . . . . . . . . . . . . . . 119
[F2] - Cleaning the heads. . . . . . . . . . . . . . . . . . . . . . . . . . . . . . . . . 120
[F3] - cancel . . . . . . . . . . . . . . . . . . . . . . . . . . . . . . . . . . . . . . . . . . . . 121
[F4] - Fabric load . . . . . . . . . . . . . . . . . . . . . . . . . . . . . . . . . . . . . . . . 121
[ENTER] - Print mode check . . . . . . . . . . . . . . . . . . . . . . . . . . . . . . 122
Page 8

Users Guide Viper TX Softsign
8 AP-75360 - Revision 1.2 - 25/5/10
5.3 Operating panel during printing . . . . . . . . . . . . . . . . . . . . . . 123
Printing 1/5 . . . . . . . . . . . . . . . . . . . . . . . . . . . . . . . . . . . . . . . . . . . . . 123
Printing 2/5 and 3/5 . . . . . . . . . . . . . . . . . . . . . . . . . . . . . . . . . . . . . . 125
Printing 4/5 . . . . . . . . . . . . . . . . . . . . . . . . . . . . . . . . . . . . . . . . . . . . . 125
Printing 5/5 . . . . . . . . . . . . . . . . . . . . . . . . . . . . . . . . . . . . . . . . . . . . . 126
5.4 Menu overview (1/7 - 7/7) . . . . . . . . . . . . . . . . . . . . . . . . . . . . 127
5.5 Setup menu 1/7 . . . . . . . . . . . . . . . . . . . . . . . . . . . . . . . . . . . . 128
InkStatus. . . . . . . . . . . . . . . . . . . . . . . . . . . . . . . . . . . . . . . . . . . . . . . 128
OriginSet. . . . . . . . . . . . . . . . . . . . . . . . . . . . . . . . . . . . . . . . . . . . . . . 129
TestPrint . . . . . . . . . . . . . . . . . . . . . . . . . . . . . . . . . . . . . . . . . . . . . . . 130
FabricSet . . . . . . . . . . . . . . . . . . . . . . . . . . . . . . . . . . . . . . . . . . . . . . 131
5.6 Setup menu 2/7 . . . . . . . . . . . . . . . . . . . . . . . . . . . . . . . . . . . . 134
PrintMode . . . . . . . . . . . . . . . . . . . . . . . . . . . . . . . . . . . . . . . . . . . . . . 134
Command. . . . . . . . . . . . . . . . . . . . . . . . . . . . . . . . . . . . . . . . . . . . . . 142
Layout . . . . . . . . . . . . . . . . . . . . . . . . . . . . . . . . . . . . . . . . . . . . . . . . . 143
Function . . . . . . . . . . . . . . . . . . . . . . . . . . . . . . . . . . . . . . . . . . . . . . . 144
5.7 Setup menu 3/7 . . . . . . . . . . . . . . . . . . . . . . . . . . . . . . . . . . . . 145
RollSetup . . . . . . . . . . . . . . . . . . . . . . . . . . . . . . . . . . . . . . . . . . . . . . 145
Centronics . . . . . . . . . . . . . . . . . . . . . . . . . . . . . . . . . . . . . . . . . . . . . 145
Network. . . . . . . . . . . . . . . . . . . . . . . . . . . . . . . . . . . . . . . . . . . . . . . . 146
5.8 Setup menu 4/7 . . . . . . . . . . . . . . . . . . . . . . . . . . . . . . . . . . . . 148
Utility . . . . . . . . . . . . . . . . . . . . . . . . . . . . . . . . . . . . . . . . . . . . . . . . . . 148
Initialization . . . . . . . . . . . . . . . . . . . . . . . . . . . . . . . . . . . . . . . . . . . . 154
5.9 Setup menu 5/7 . . . . . . . . . . . . . . . . . . . . . . . . . . . . . . . . . . . . 155
DataDump . . . . . . . . . . . . . . . . . . . . . . . . . . . . . . . . . . . . . . . . . . . . . 155
InkManager . . . . . . . . . . . . . . . . . . . . . . . . . . . . . . . . . . . . . . . . . . . . 155
5.10 Setup menu 6/7 . . . . . . . . . . . . . . . . . . . . . . . . . . . . . . . . . . . . 161
Head Unlock . . . . . . . . . . . . . . . . . . . . . . . . . . . . . . . . . . . . . . . . . . . 161
WiperClean . . . . . . . . . . . . . . . . . . . . . . . . . . . . . . . . . . . . . . . . . . . . 162
TankChange . . . . . . . . . . . . . . . . . . . . . . . . . . . . . . . . . . . . . . . . . . . 162
TubingFlush . . . . . . . . . . . . . . . . . . . . . . . . . . . . . . . . . . . . . . . . . . . . 162
Page 9

Users Guide Viper TX Softsign
AP-75360 - Revision 1.2 - 25/5/10 9
5.11 Setup menu 7/7 . . . . . . . . . . . . . . . . . . . . . . . . . . . . . . . . . . . . 163
VersionCheck . . . . . . . . . . . . . . . . . . . . . . . . . . . . . . . . . . . . . . . . . . 163
Area. . . . . . . . . . . . . . . . . . . . . . . . . . . . . . . . . . . . . . . . . . . . . . . . . . . 163
Chapter 6 Fixation unit control panel overview . . . . . . . . . . 165
6.1 Introduction . . . . . . . . . . . . . . . . . . . . . . . . . . . . . . . . . . . . . . . 166
6.2 Start-up screen . . . . . . . . . . . . . . . . . . . . . . . . . . . . . . . . . . . . 166
6.3 Mainscreen . . . . . . . . . . . . . . . . . . . . . . . . . . . . . . . . . . . . . . . 167
Manual . . . . . . . . . . . . . . . . . . . . . . . . . . . . . . . . . . . . . . . . . . . . . . . . 168
Automatic . . . . . . . . . . . . . . . . . . . . . . . . . . . . . . . . . . . . . . . . . . . . . . 169
Settings. . . . . . . . . . . . . . . . . . . . . . . . . . . . . . . . . . . . . . . . . . . . . . . . 170
Heating settings. . . . . . . . . . . . . . . . . . . . . . . . . . . . . . . . . . . . . . . . . 172
Machine parameters . . . . . . . . . . . . . . . . . . . . . . . . . . . . . . . . . . . . . 173
Plotter leds off . . . . . . . . . . . . . . . . . . . . . . . . . . . . . . . . . . . . . . . . . . 175
Chapter 7 Troubleshooting . . . . . . . . . . . . . . . . . . . . . . . . . . . 177
7.1 Introductions . . . . . . . . . . . . . . . . . . . . . . . . . . . . . . . . . . . . . . 179
7.2 Failures and malfunctions of the printer . . . . . . . . . . . . . . . 179
7.3 Error messages printer. . . . . . . . . . . . . . . . . . . . . . . . . . . . . . 186
Status messages. . . . . . . . . . . . . . . . . . . . . . . . . . . . . . . . . . . . . . . . 186
Message type error and solutions. . . . . . . . . . . . . . . . . . . . . . . . . . 187
Data errors . . . . . . . . . . . . . . . . . . . . . . . . . . . . . . . . . . . . . . . . . . . . . 188
Command errors . . . . . . . . . . . . . . . . . . . . . . . . . . . . . . . . . . . . . . . . 188
Errors requiring a restart . . . . . . . . . . . . . . . . . . . . . . . . . . . . . . . . . 188
7.4 Error messages fixation unit . . . . . . . . . . . . . . . . . . . . . . . . . 190
Page 10

Users Guide Viper TX Softsign
10 AP-75360 - Revision 1.2 - 25/5/10
Page 11
1
Users Guide Viper TX Softsign
Safety instructions
AP-75360 - Revision 1.2 11
Chapter 1 Safety instructions
Compliance with the following regulations . . . . . . . . . . . . . . . . . . . . . . . 12
Handling inks and waste . . . . . . . . . . . . . . . . . . . . . . . . . . . . . . . . . . . . . . 13
Warnings, cautions and notes . . . . . . . . . . . . . . . . . . . . . . . . . . . . . . . . . 13
Safety instructions . . . . . . . . . . . . . . . . . . . . . . . . . . . . . . . . . . . . . . . . . . . 14
Safety labels . . . . . . . . . . . . . . . . . . . . . . . . . . . . . . . . . . . . . . . . . . . . . . . . 16
This chapter explains the installation of Viper TX Softsign, warning terms that operators need
to know, caution items and warning labels on the printer main unit.
׳°±®¬¿²¬
When installing and operating this printer, be sure to follow the directions and
warnings in this guide.
Page 12
Users Guide Viper TX Softsign
Safety instructions
12 AP-75360 - Revision 1.2
1.1 Compliance with the following regulations
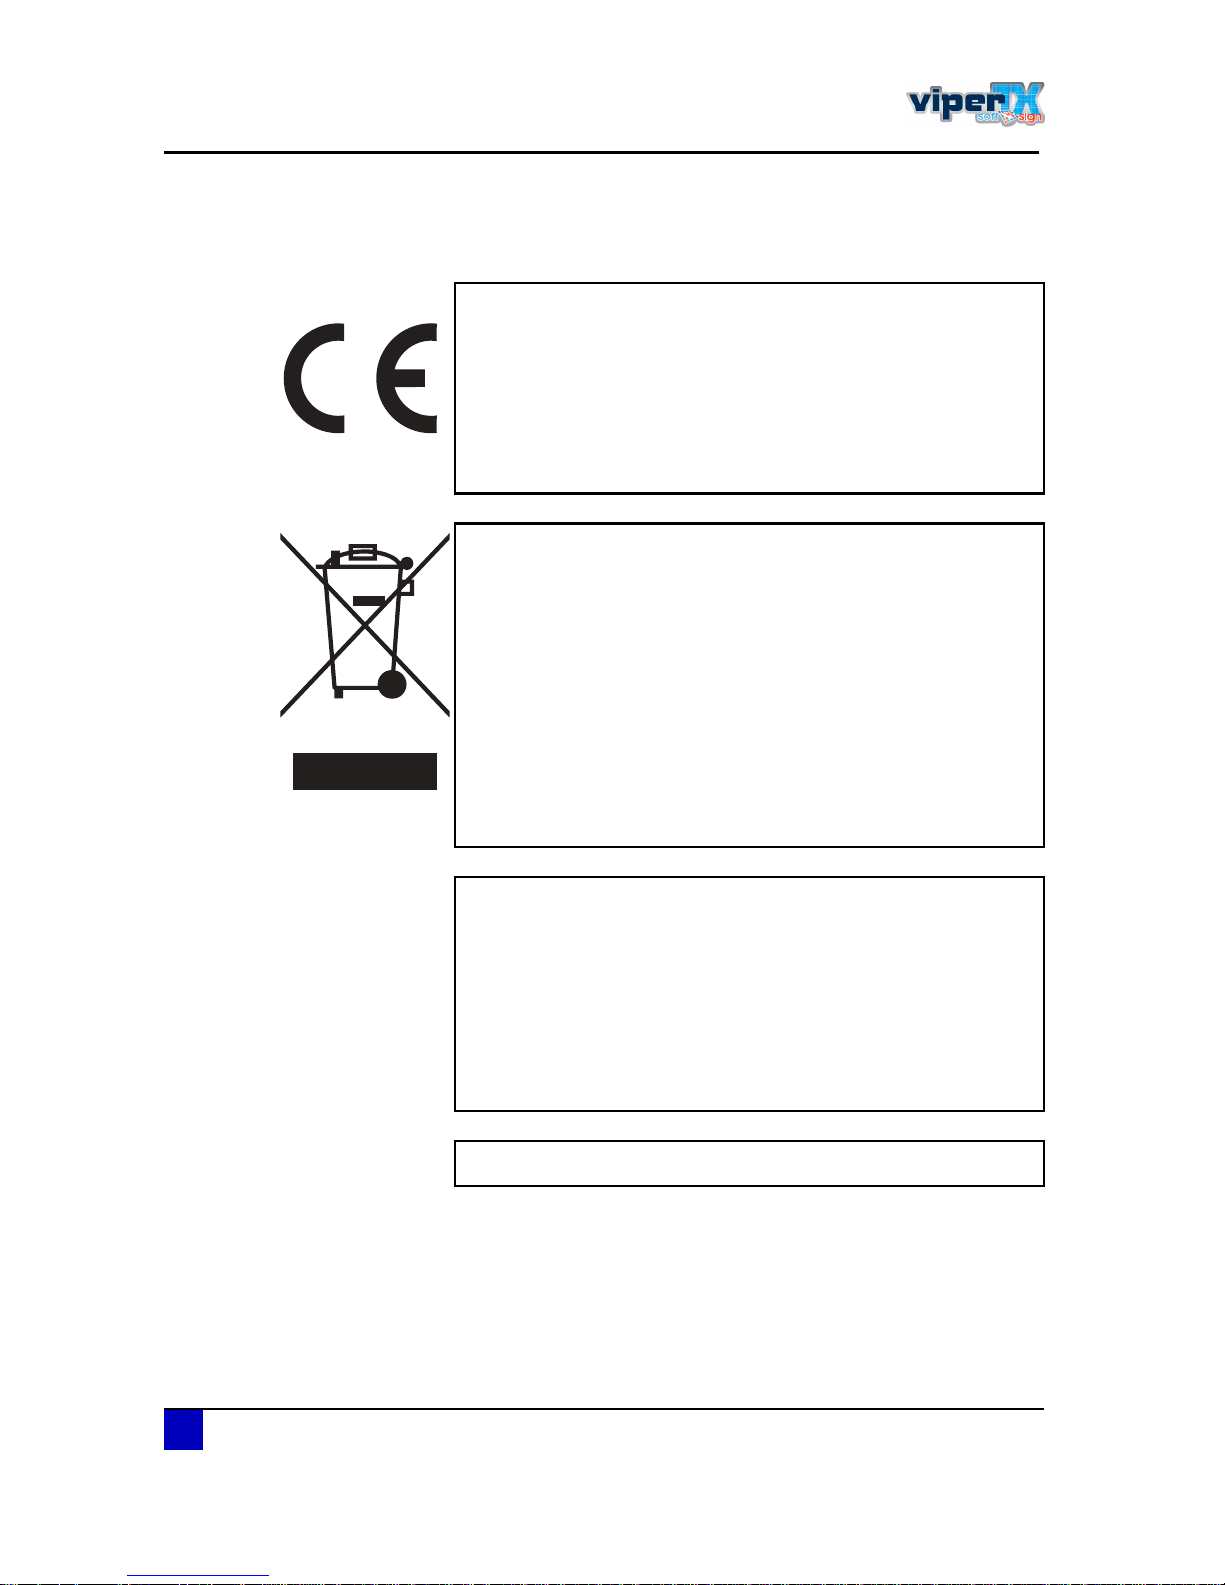
The CE marking is a mandatory European marking for certain
product groups to indicate conformity with the essential health and
safety requirements set out in European Directives.
By affixing the CE marking, the manufacturer, his authorized
representative, or the person placing the product on the market or
putting it into service ensures that the item meets all the essential
requirements of all applicable EU directives and that the applicable
conformity assessment procedures have been applied.
Your product is designed and manufactured with high-quality
materials and components, which can be recycled and reused.
When this crossed-out wheeled bin submenu is attached to a
product, it means the product is covered by the European Directive
2002/96/EC - WEEE regulation.
Please inform yourself about the local separate collection system for
electrical and electronic products.
Please act according to local rules and do not dispose of your old
products with your normal household waste. The correct disposal of
your old product will help prevent potential negative consequences
for the environment and human health.
FCC
This equipment has been tested and found to comply with the limits
for a Class A digital device, pursuant to Part 15 of the FCC Rules.
These limits are designed to provide reasonable protection against
harmful interference when the equipment is operated in a commercial
environment. This equipment generates, uses, and can radiate radio
frequency energy and, if not installed and used in accordance with
the instruction manual, may cause harmful interference to radio
communications. Operation of this equipment in a residential area is
likely to cause harmful interference in which case the user will be
required to correct the interference at his own expense.
ICES
This Class A digital apparatus complies with Canadian ICES-003.
Page 13
Users Guide Viper TX Softsign
Safety instructions
AP-75360 - Revision 1.2 13
1
1.2 Handling inks and waste
Before handling inks/ cleaning and their waste, CAREFULLY READ THE MATERIAL
SAFETY DATA SHEETS (MSDS) and the labels for important health, safety and
environmental information. Post these documents in the work area as required by federal or
local law. All safety data sheets are periodically updated. These sheets and their translations
can be found on ©©©ò³«¬±¸ò»«
Only use original manufacturer's ink and appropriate cleaning liquid. Before installing an
ink holder, shake it gently. Doing so will preserve print quality.
When ink is moved from a cold place to a warm place, keep the ink for three hours or more
in the new printing environment before printing.
Do not disassemble ink holder. Otherwise, ink may get in your eyes or on your skin. A
disassembled ink holder cannot be used either.
When refilling ink, use original manufacturer's ink. Our Mutoh printers are designed to use
original ink. If you use ink which are not produced by the original manufacturer:
printing might become blurred and the end of the ink in the holder might not be
detected correctly
Any problems caused by using an ink holder other than those recommended above will
not be covered by the warranty, and repair expenses will be paid by the customer.
For handling waste: see section 13 on the MSDS-sheet
Inks / Waste
General advice: wear safety glasses and gloves especially when handling the waste
ink.
After spill: remove contaminated clothing.
After inhalation: if difficulties occur after vapour/aerosol has been inhaled, remove to
fresh air and seek medical attention.
After skin contact: wash thoroughly with soap and water.
After eye contact: wash affected eyes for at least 15 minutes under running water
while the eyelids are held open.
After swallowing: rinse mouth and drink plenty of water. Never induce vomiting.
1.3 Warnings, cautions and notes
Safety terms in this manual and the contents of warning labels attached to the printer are
categorized into the following three types, depending on the degree of risk (or the scale of
accident).
Read the following explanations carefully and follow the instructions in this manual.
Safety terms Details
Important Must be followed carefully to avoid death or serious bodily injury.
Caution
Must be observed to avoid bodily injury (moderate or light) or damage to
your equipment.
Notes
Contains important information and useful tips on the operation of your
printer.
Page 14

Users Guide Viper TX Softsign
Safety instructions
14 AP-75360 - Revision 1.2
1.4 Safety instructions
Machines must be installed according to Mutoh's Installation Guide also after moving
machines to another location; maintenance needs to be done according to the service
manual.
To prevent fire or electrical shock, never use a power supply source other than the one
rated for the product in the country where you purchased the product.
Use only the provided power cable. To prevent fire or electrical shock, follow the
instructions below when handling the power cable:
Do not cut or modify the cable.
Do not put heavy objects on the cable.
Do not bend, twist, knot or pull the cable.
Do not wire the cable near equipment that generates heat.
Do not use the cable with any other electrical device
Do not handle the cable with wet hands
Be aware of all caution and warning labels to avoid potentially hazardous situations.
To prevent fire or electrical shock, machines must be connected to a properly grounded
electrical power outlet. Do not connect the power cable to a power strip or a power source
shared by other electrical devices.
Make sure that no foreign substances such as dust etc. are stuck to the power plug.
Make sure that the power plug is firmly inserted to the edge of the power socket.
Do not disable any safety precautions systems.
Do not operate the unit unless all parts are mounted.
The heat fixation unit can reach high temperatures (up to 200°C). Do not touch! Doing so
can cause severe burn wounds.
Do not place the machine in the following areas. Doing so may result in the machine
tipping or falling over and causing injury.
Unstable surfaces
Sloping floors
Areas subject to vibration by other equipment
Do not stand on or place heavy objects on your machine. Doing so may result in the
machine tipping or falling over and causing injury.
Do not place the machine in humid and dusty areas or in areas exposed to flammables.
Doing so may result in electrical shock or fire.
Do not cover the ventilation hole of your machine with cloth, such as a blanket or table
cloth. Doing so could obstruct ventilation and cause fire.
Do not insert or drop metal or inflammable objects into openings, such as ventilation
outlets. Doing so may result in electrical shock and fire.
Stop using your machine if a liquid has been spilled into it. This may cause electrical shock
or fire. Switch the machine off as soon as possible, unplug the power cord, and contact
your local MUTOH dealer.
Page 15

Users Guide Viper TX Softsign
Safety instructions
AP-75360 - Revision 1.2 15
1
Be sure to power OFF the machine and unplug the power cable from the outlet before
cleaning the machine. Use a damp cloth to clean the machine. Do not use thinner,
benzene, alcohol or other active agents. Doing so may result in damage or paint peeling
from the casing.
Do not bend or pull the waste fluid tube. Doing so may cause waste fluid to leak out and
malfunction of the product.
Do not tilt the machine, place it against a wall or turn it upside down. Doing so may cause
ink to leak inside the machine. Movement after transport is also not covered by the
warranty.
To prevent back pains and other injuries, always work with at least 4 people to unpack or
move the machine. Keep the machine horizontally during transportation.
Do NOT transport the machine to another room without contacting your local Authorized
Mutoh Dealer.
Page 16
Users Guide Viper TX Softsign
Safety instructions
16 AP-75360 - Revision 1.2
1.5 Safety labels
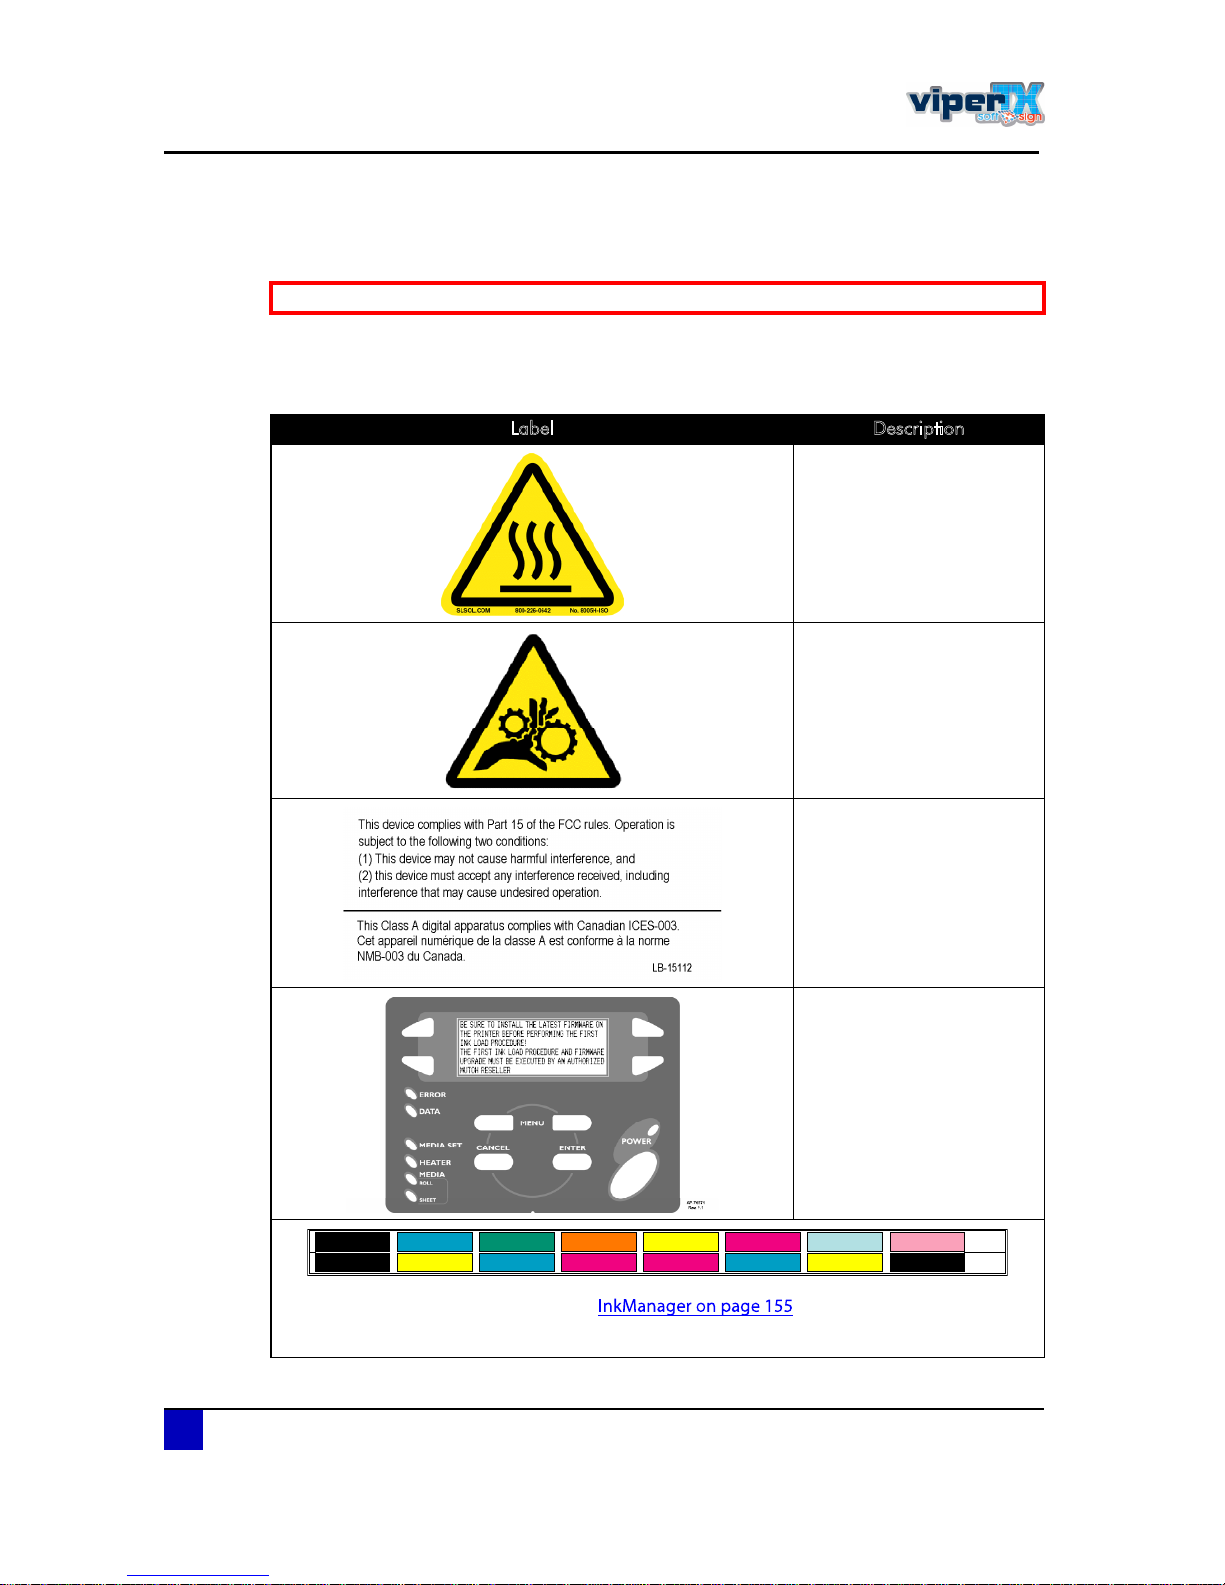
A safety label is used on parts of the printer which especially need your attention. Understand
the locations and the descriptions of the danger associated with each label before operating
the printer.
Be sure to read and understand the safety warnings before handling the printer.
Label Description
Informs that the area can be
very hot. Be careful not to
burn your hands.
Moving parts can crush. Be
careful not to crush your
fingers.
Lock out the power before
servicing.
The device is a Class A
digital apparel which
complies with Part 15 of the
FCC rules and Canadian
ICES-003
It is very important to have
the latest firmware installed
on your printer before
performing the first ink load.
Bugfixes or other innovative
features may be
implemented in a newer
firmware.
Refer to
Ink label order label. To know in which order the ink cassettes have to be inserted.
ïÝïØ
Û¨¬®òî¨ì
Þ´¿½µ
Þ´¿½µ
Þ´¿½µ
ï¨è
Ç»´´±©
ݧ¿²
Ó¿¹»²¬¿
Í°±¬½±´±® î
Ç»´´±©
Ó¿¹»²¬¿
Ó¿¹»²¬¿
Ç»´´±© ݧ¿²
ݧ¿²
Í°±¬½±´±® ï Í°±¬½±´±® í
Í°±¬½±´±® ì
Page 17
Users Guide Viper TX Softsign
Safety instructions
AP-75360 - Revision 1.2 17
1
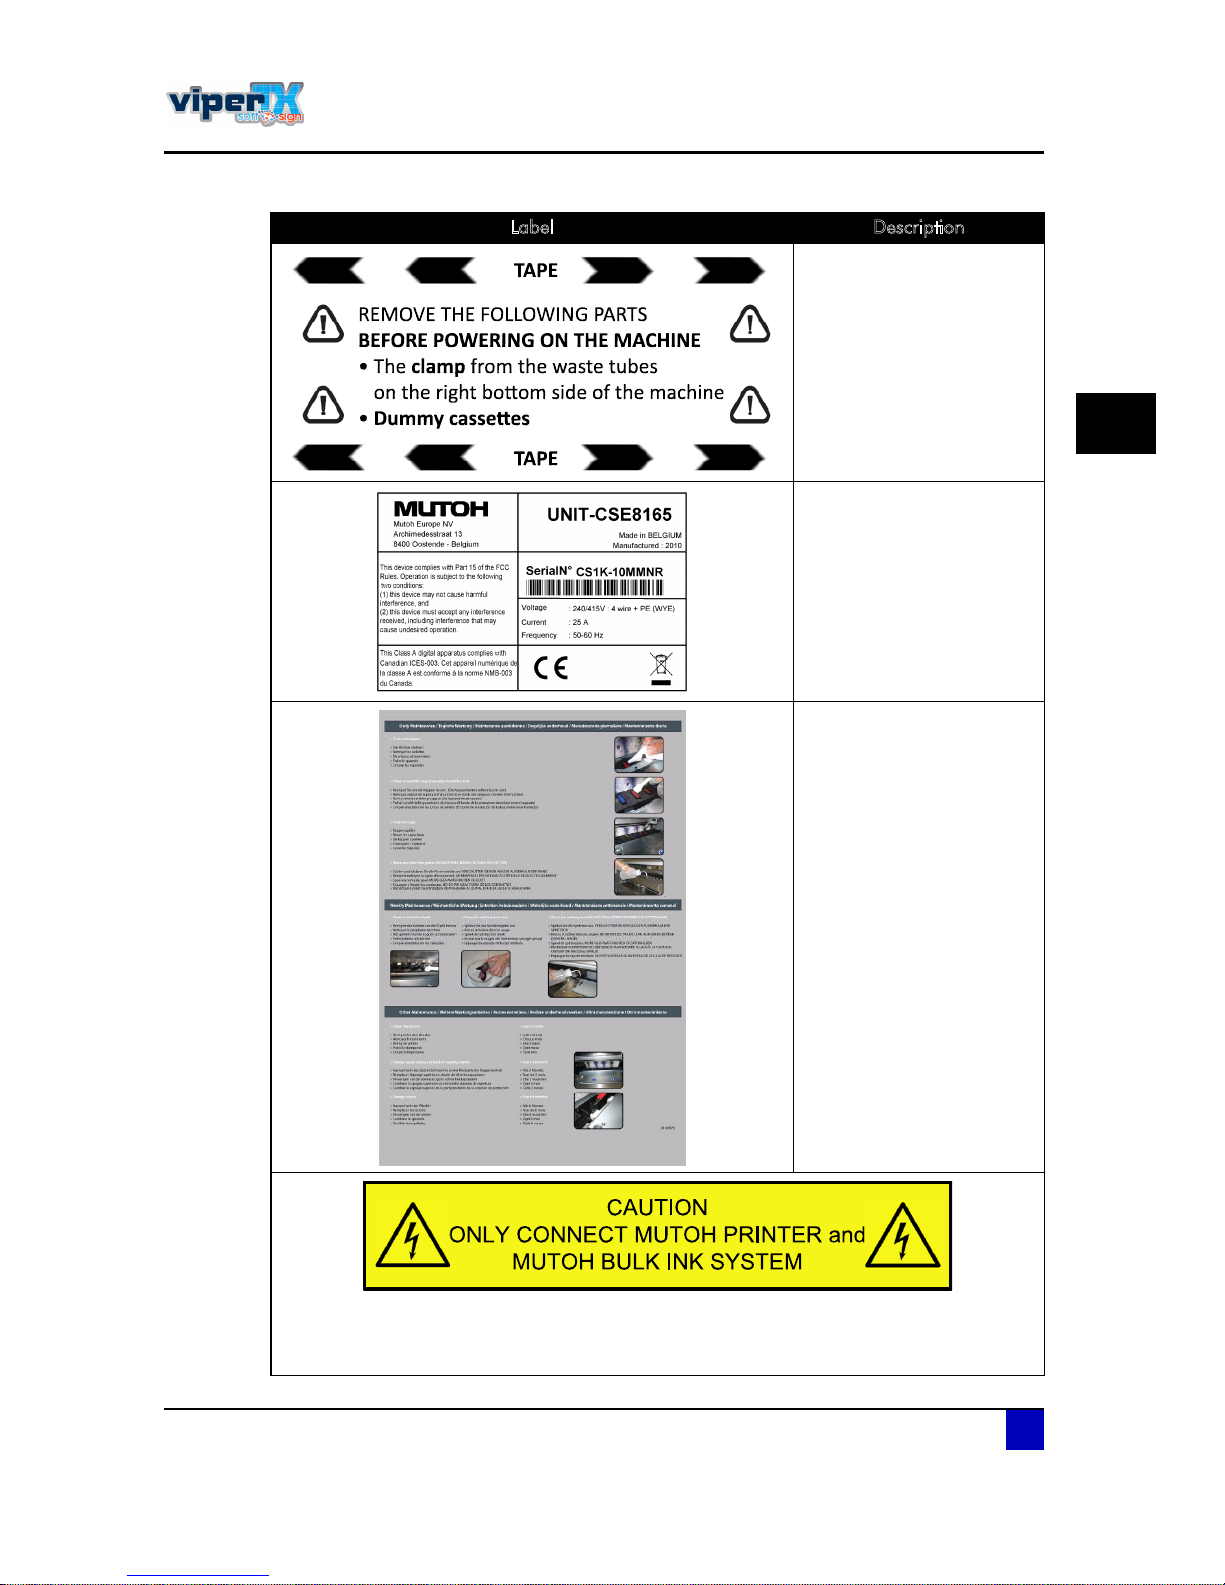
Some parts need to be
removed first before
powering ON the print.
Serial label of the machine.
An overview of all the
necessary periodical
maintenance by the end
user. Be sure to perform the
maintenance properly.
The Viper TX Softsign is foreseen from a multiple socket. It is NOT the purpose to connect
to this socket all kind of electrical equipment. Otherwise the system will be overloaded and
fuses might blow.
Label Description
Page 18

Users Guide Viper TX Softsign
Safety instructions
18 AP-75360 - Revision 1.2
Page 19

Users Guide Viper TX Softsign
Product overview
AP-75360 - Revision 1.2 19
2
Chapter 2 Product overview
Front view . . . . . . . . . . . . . . . . . . . . . . . . . . . . . . . . . . . . . . . . . . . . . . . . . . 20
Rear view. . . . . . . . . . . . . . . . . . . . . . . . . . . . . . . . . . . . . . . . . . . . . . . . . . . 22
Emergency stops . . . . . . . . . . . . . . . . . . . . . . . . . . . . . . . . . . . . . . . . . . . . 24
Winding system . . . . . . . . . . . . . . . . . . . . . . . . . . . . . . . . . . . . . . . . . . . . . 26
Front section . . . . . . . . . . . . . . . . . . . . . . . . . . . . . . . . . . . . . . . . . . . . . . . . . . 27
Rear section . . . . . . . . . . . . . . . . . . . . . . . . . . . . . . . . . . . . . . . . . . . . . . . . . . . 28
Operation panel . . . . . . . . . . . . . . . . . . . . . . . . . . . . . . . . . . . . . . . . . . . . . 29
Keys . . . . . . . . . . . . . . . . . . . . . . . . . . . . . . . . . . . . . . . . . . . . . . . . . . . . . . . . . 29
LCD and LEDs . . . . . . . . . . . . . . . . . . . . . . . . . . . . . . . . . . . . . . . . . . . . . . . . 30
Installation environment . . . . . . . . . . . . . . . . . . . . . . . . . . . . . . . . . . . . . . 31
Installation environment requirements . . . . . . . . . . . . . . . . . . . . . . . . . . . . . . . 31
End location requirements . . . . . . . . . . . . . . . . . . . . . . . . . . . . . . . . . . . . . . . . 32
Air purification . . . . . . . . . . . . . . . . . . . . . . . . . . . . . . . . . . . . . . . . . . . . . . . . . 33
Network requirements . . . . . . . . . . . . . . . . . . . . . . . . . . . . . . . . . . . . . . . . . . . 35
Compressed air requirements . . . . . . . . . . . . . . . . . . . . . . . . . . . . . . . . . . . . . 35
Page 20
Users Guide Viper TX Softsign
Product overview
20 AP-75360 - Revision 1.2
2.1 Front view
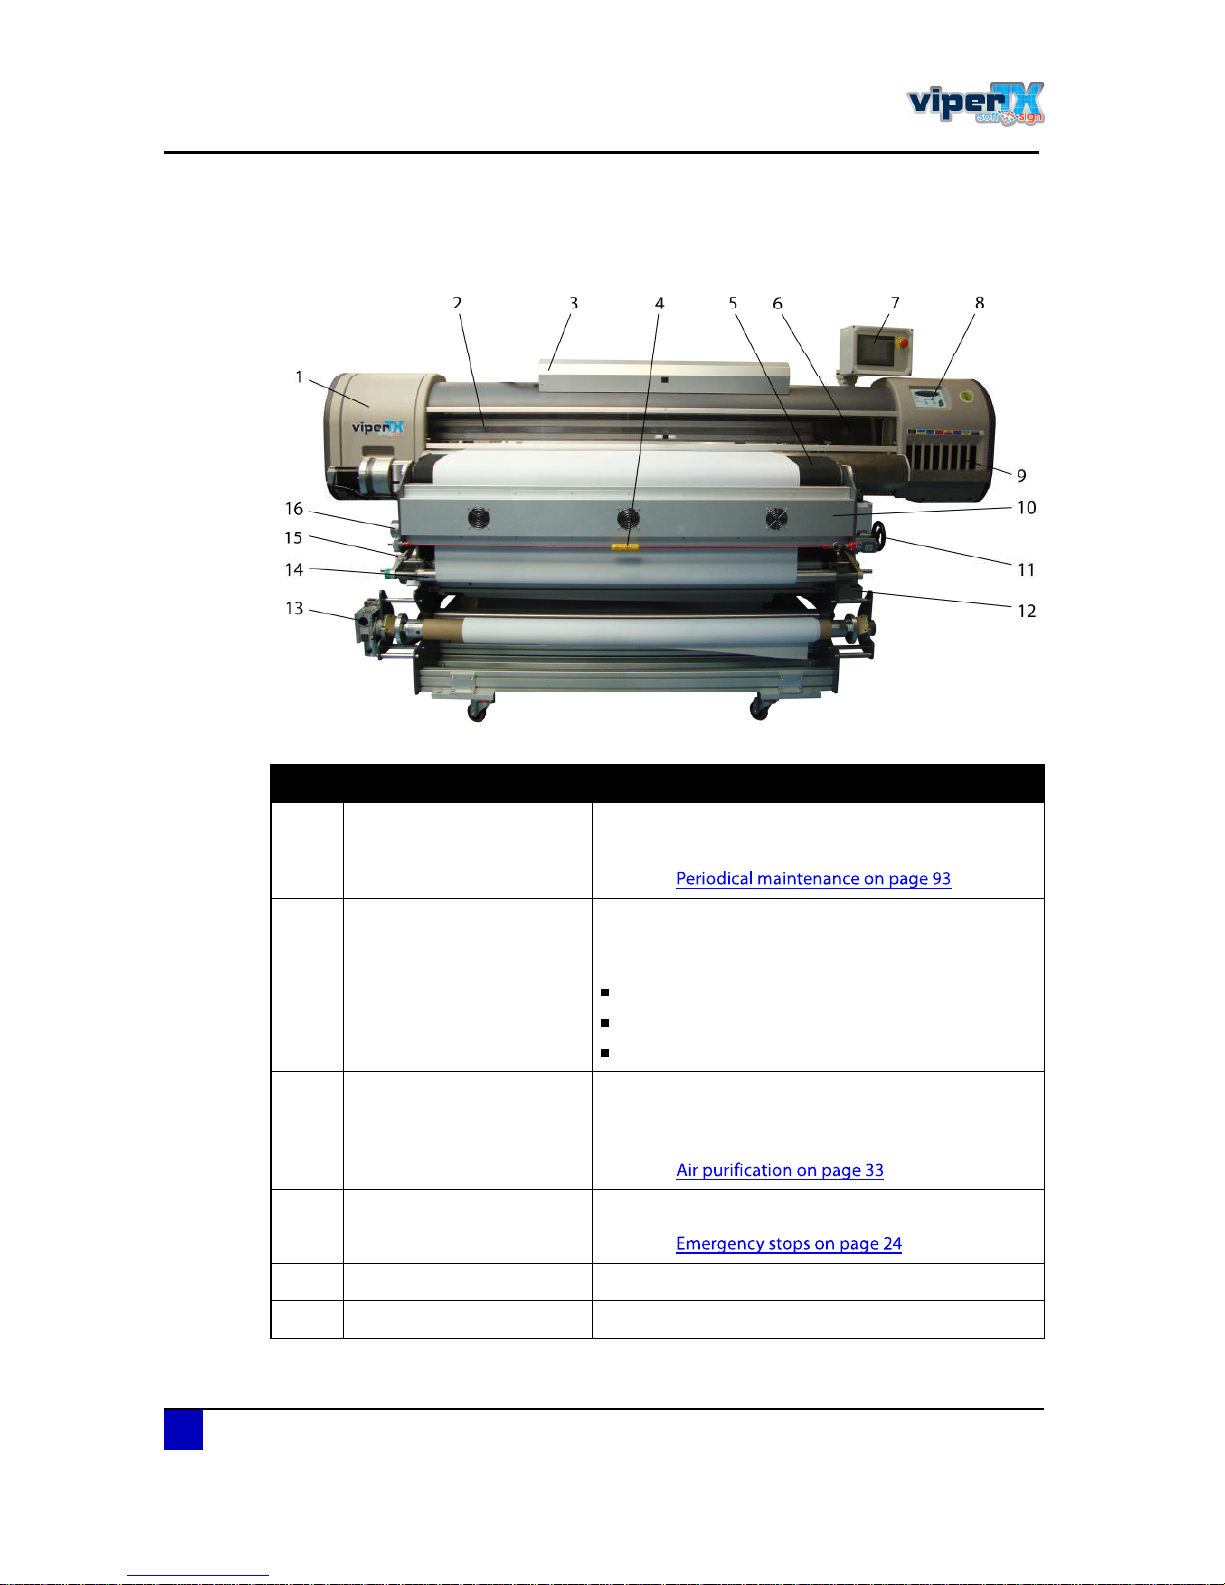
N° Description Extended description
ï Maintenance cover
Cover which can be opened easily to perform the
periodical maintenance
Refer to
î Front cover
Keeps the operator safe from the drive parts of the
printer while it is operating. Only open and/or close
the cover to perform following operations:
Fabric setting and replacement
Maintenance of the printer
Cleaning the printer
í Fabric dust collection unit
Connect Mutohs APS system or your local system
to this unit to collect the dust particles coming loose
during printing.
Refer to
ì Emergency cord
Pull this cord in an emergency situation.
Refer to
ë Feeding belt To transport the fabric.
ê Carriage Incorporates 8 drop-on-demand micro piezo heads.
Page 21
Users Guide Viper TX Softsign
Product overview
AP-75360 - Revision 1.2 21
2
é Fixation unit control panel
To make various settings regarding the complete
fixation unit.
Refer to Ú·¨¿¬·±² «²·¬ ½±²¬®±´ °¿²»´ ±ª»®ª·»© ±²
è Printer control panel
To make various settings regarding the printer and to
check the printing progress.
Refer to
ç Cartridge slots Eight slots for the cartridges.
ïð Dryer To dry the fabric printed.
ïï Threading bar wheel
Control the threading bar which will guide the fabric
around the heat fixation unit without burning your
hands.
Refer to Ù«·¼» º¿¾®·½ ¬¸®±«¹¸ ¬¸» º®±²¬ -·¼» ±º ¬¸»
ïî Waste bottle
To collect the waste ink generated during printing.
Refer to
ïí Winding unit
To wind up the fabric.
Refer to
ïì Front tensioning system
To keep the fabric under constant tension.
Refer to
ïë heat fixation unit
The ink on the fabric will be fixated during the
contact time with the heat fixation unit.
ïê APS outlet
During the fixation process of directly printed fabric,
hot fumes and vapours will be released. Connect
Mutohs APS system or your local system to this
outlet to collect to extract these substances.
Refer to
N° Description Extended description
Page 22
Users Guide Viper TX Softsign
Product overview
22 AP-75360 - Revision 1.2
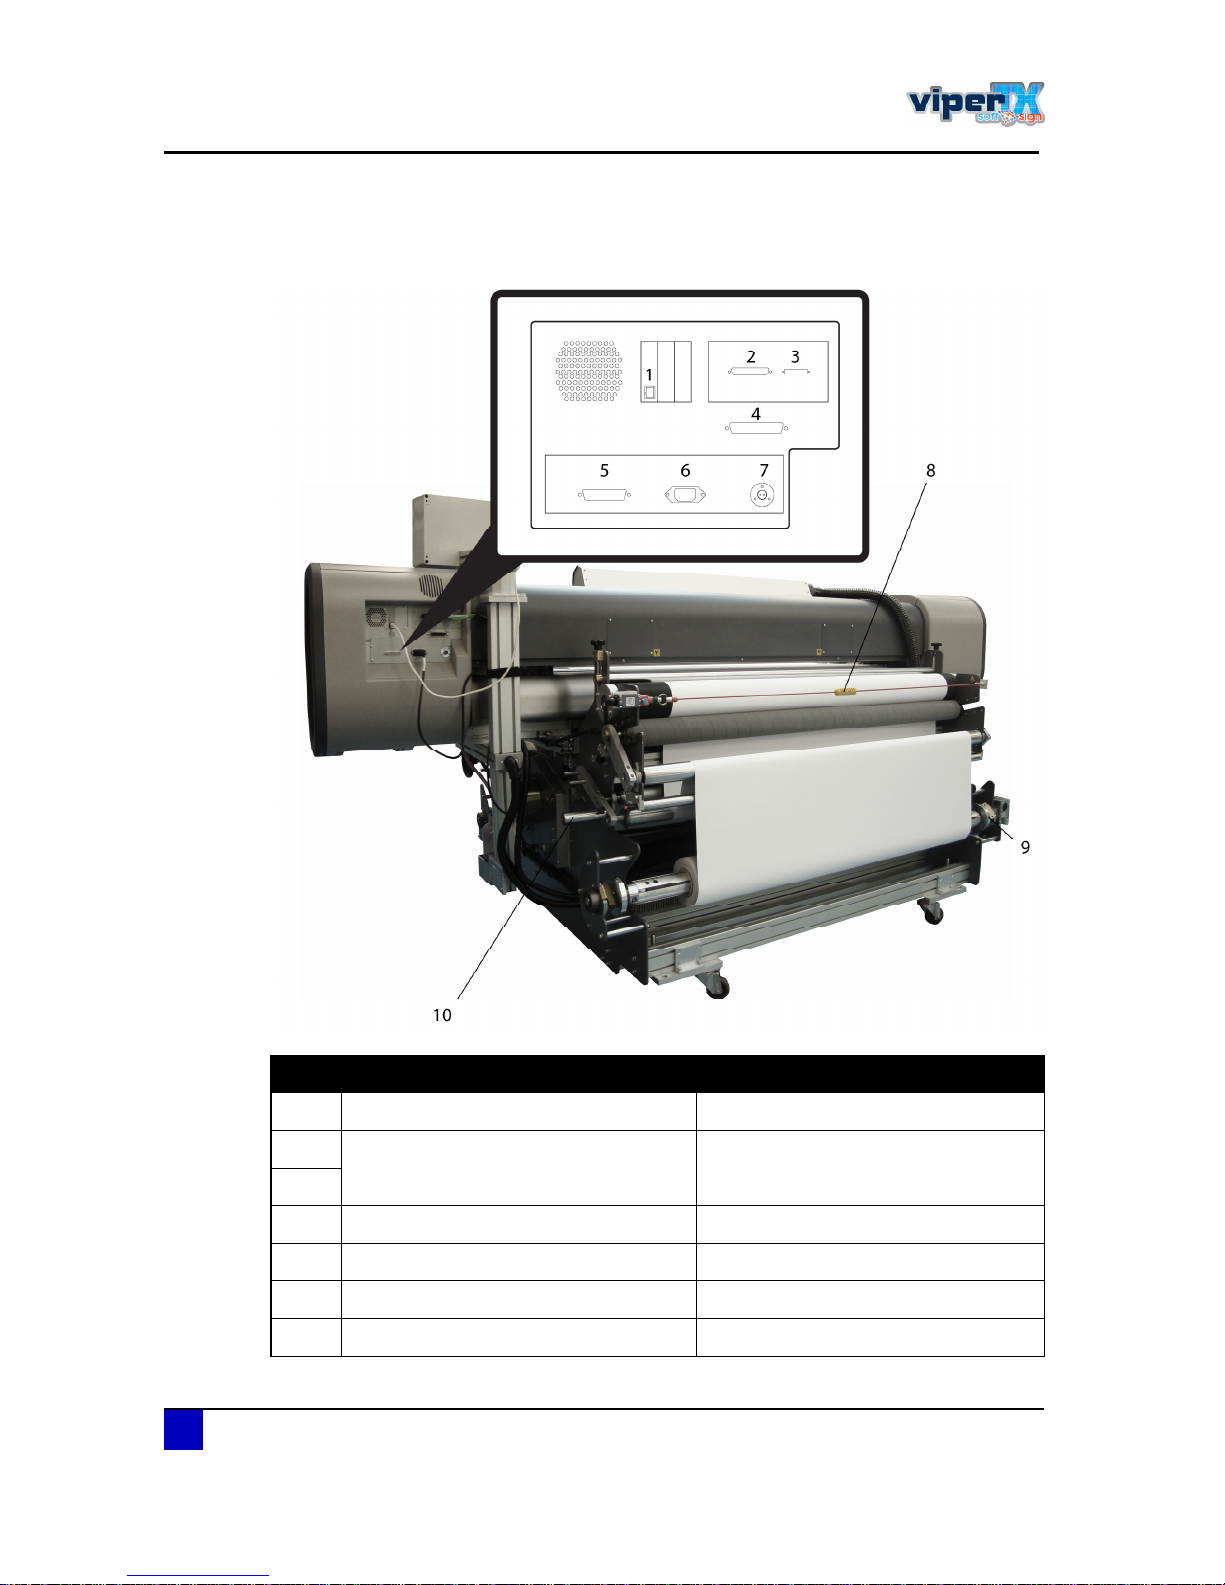
2.2 Rear view
N° Description Extended description
ï Network interface connector -
î
Communication between printer and
fixation unit.
Always keep these 2 cables connected,
otherwise the machine will not work.
í
ì Centronics connector -
ë Bulk ink system connector -
ê Power cable connector -
é Footswitch connector -
Page 23
Users Guide Viper TX Softsign
Product overview
AP-75360 - Revision 1.2 23
2
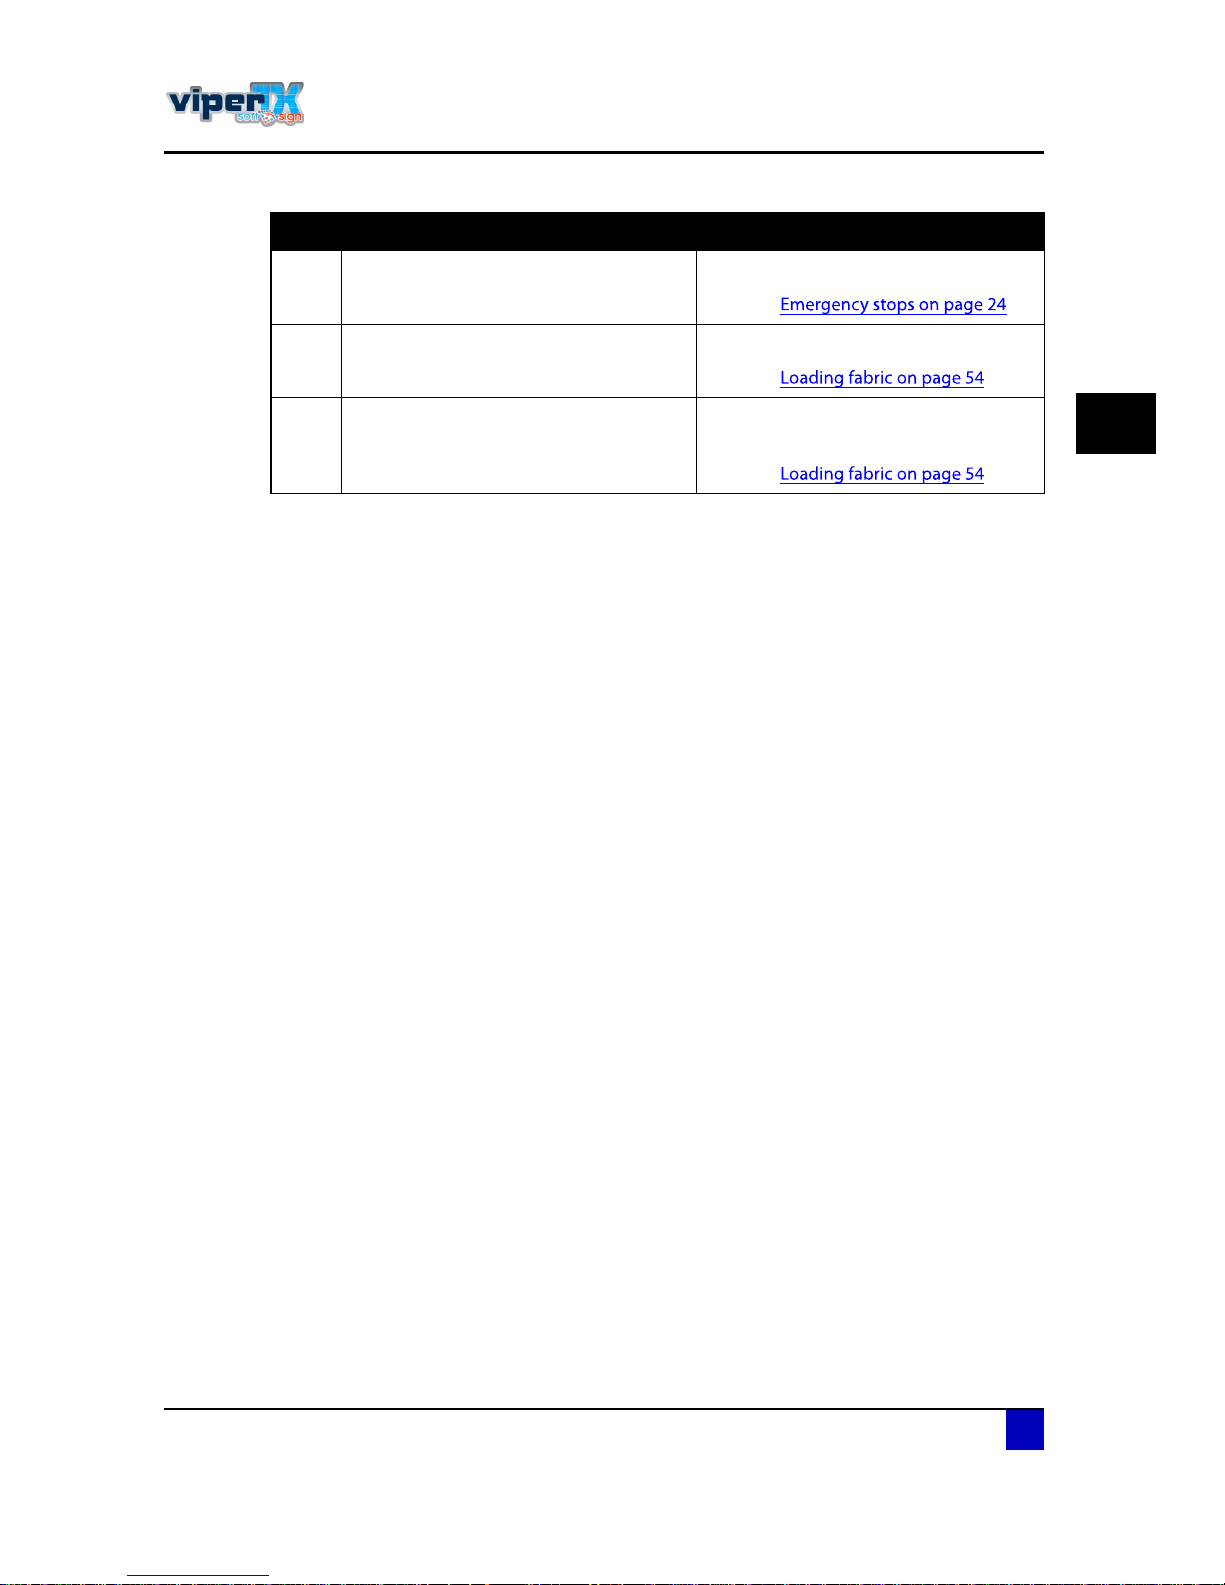
è Emergency cord
Pull this cord in an emergency situation.
Refer to
ç Unwinding unit
To unwind the fabric.
Refer to
ïð Rear tensioning system
To keep the fabric under constant
tension.
Refer to
N° Description Extended description
Page 24
Users Guide Viper TX Softsign
Product overview
24 AP-75360 - Revision 1.2
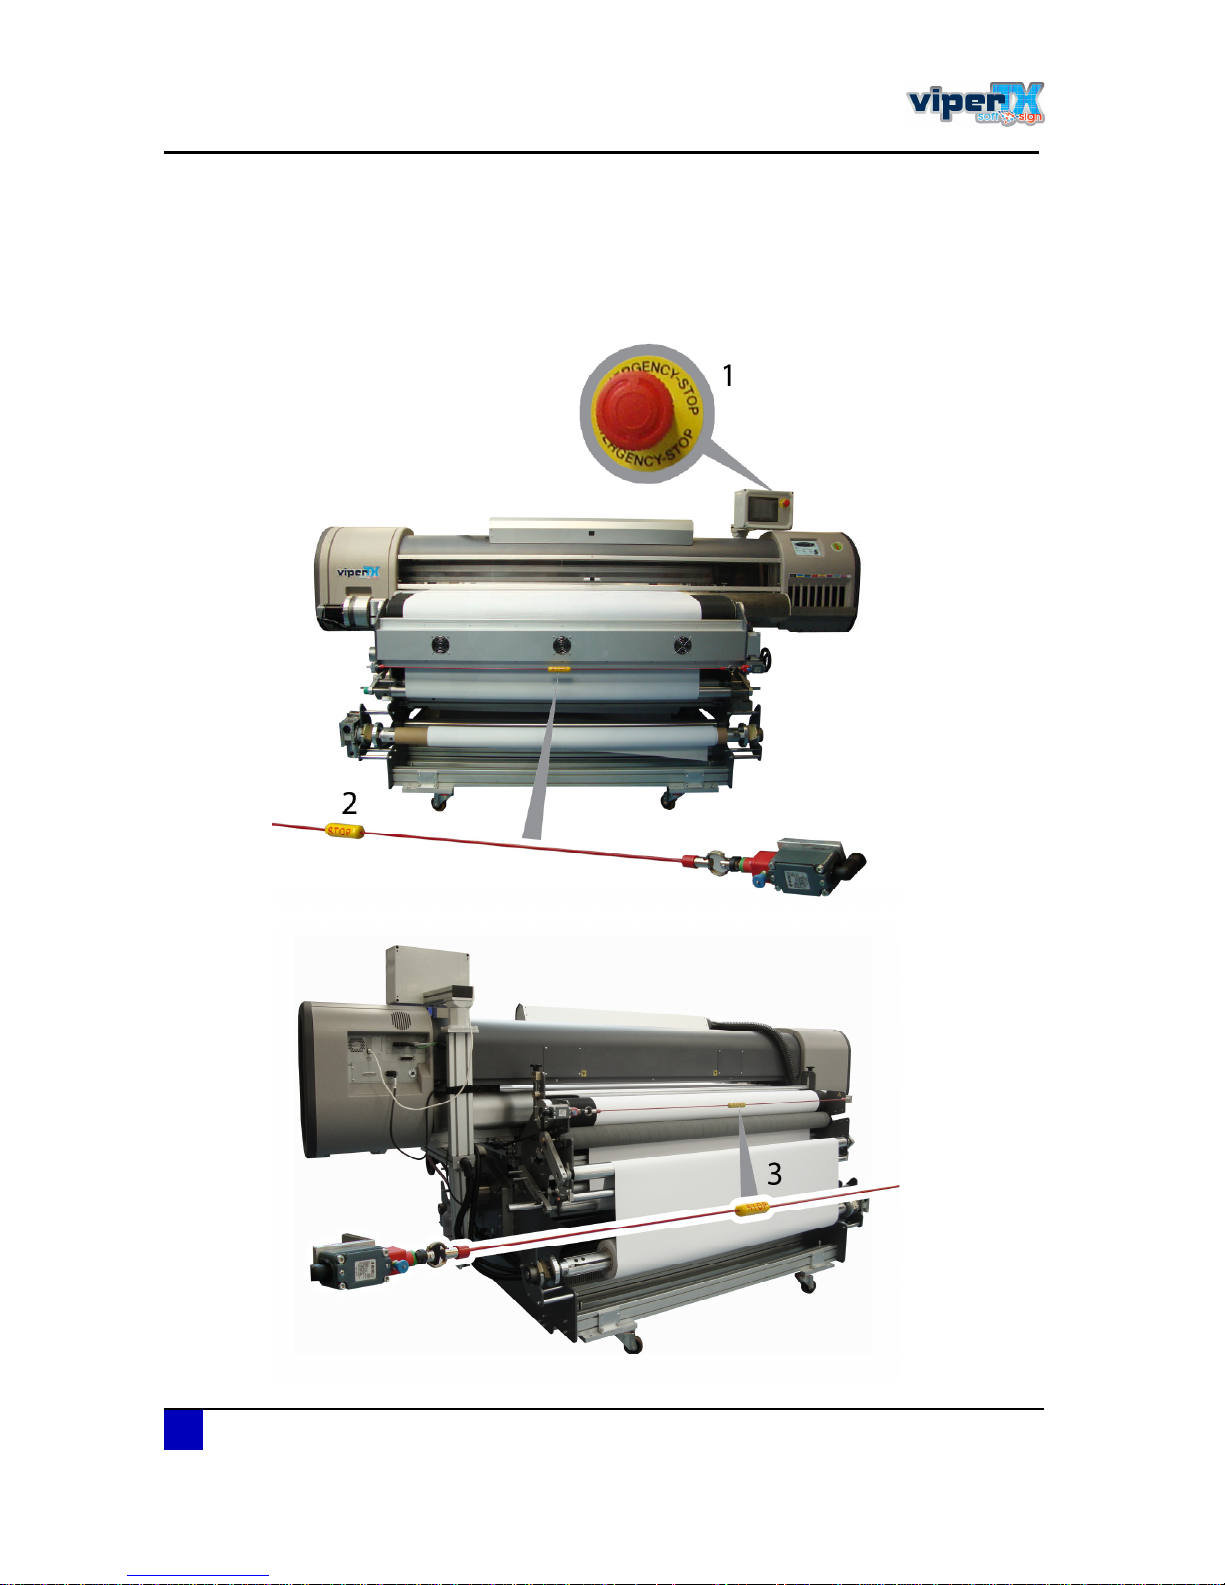
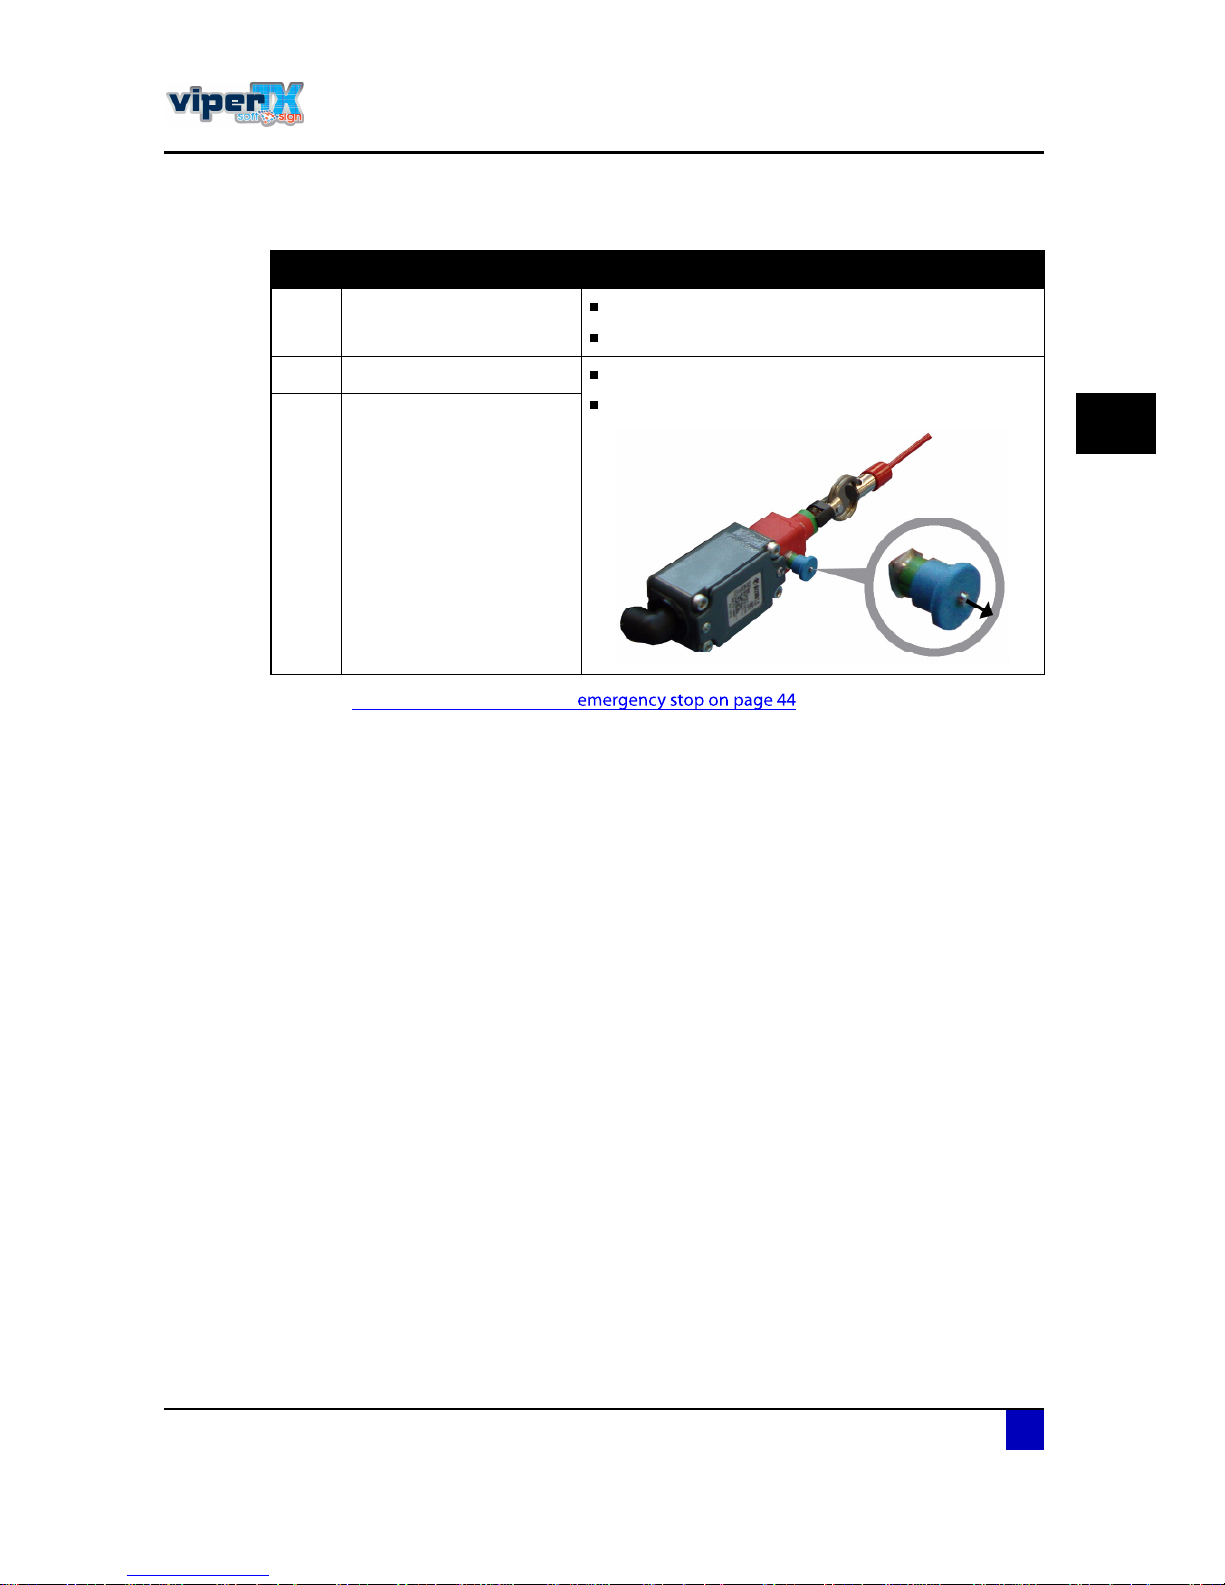
2.3 Emergency stops
The Viper TX Softsign is foreseen from 3 emergency stops. Push or pull one of them if a
situation requires an immediate shutdown of all activities,
Page 25
Users Guide Viper TX Softsign
Product overview
AP-75360 - Revision 1.2 25
2
See also λ-¬¿®¬ ¬¸» ³¿½¸·²» ¿º¬»® ¿²
N° Description Extended description
ï Emergency button
Push the button to activate the emergency stop.
Pull the button to deactivate the emergency stop.
î Emergency cord front Pull the cord to activate the emergency stop.
Pull the knob to deactivate the emergency stop.
í Emergency cord rear
Page 26
Users Guide Viper TX Softsign
Product overview
26 AP-75360 - Revision 1.2
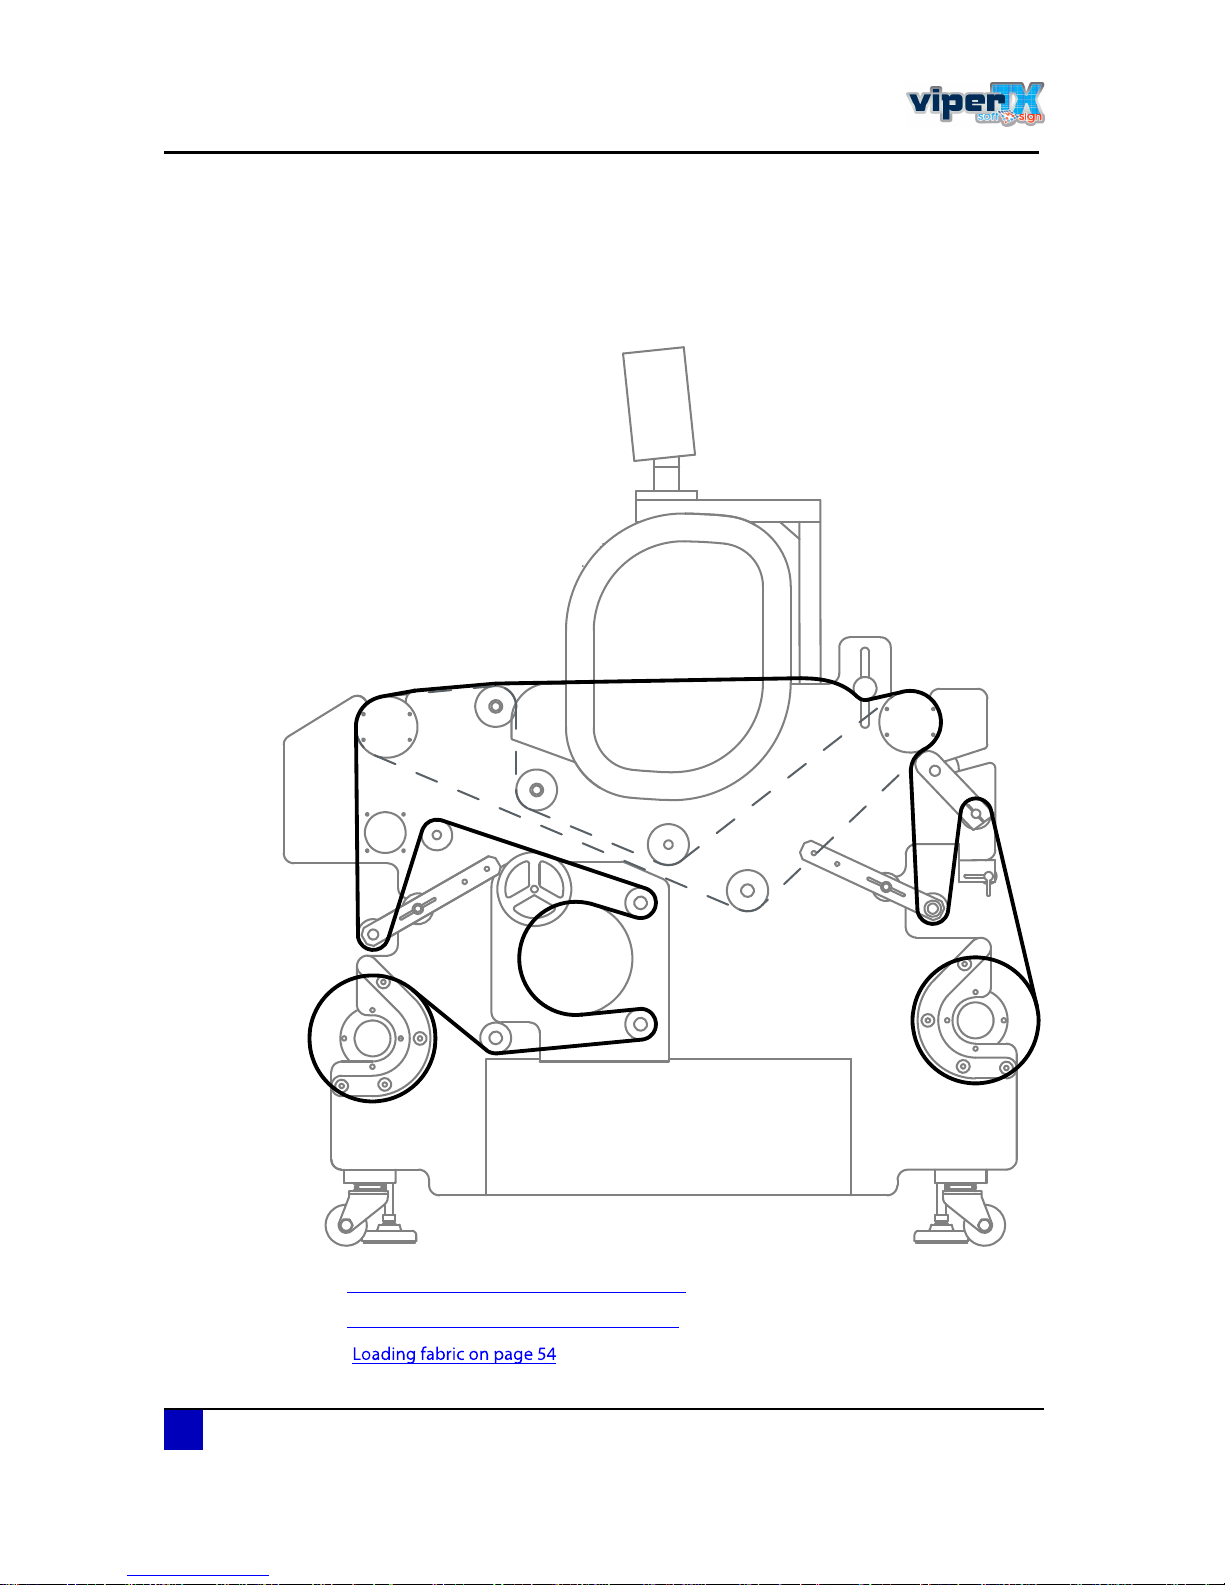
2.4 Winding system
Loading fabric on a Viper TX Softsign is rather complex, therefore, it is important for you to
know the different parts of the winding and fixation unit.
Refer to É·²¼·²¹ -§-¬»³ â Ú®±²¬ -»½¬·±² ±² °¿¹» îé
Refer to É·²¼·²¹ -§-¬»³ â λ¿® -»½¬·±² ±² °¿¹» îè
See also
Page 27
Users Guide Viper TX Softsign
Product overview
AP-75360 - Revision 1.2 27
2
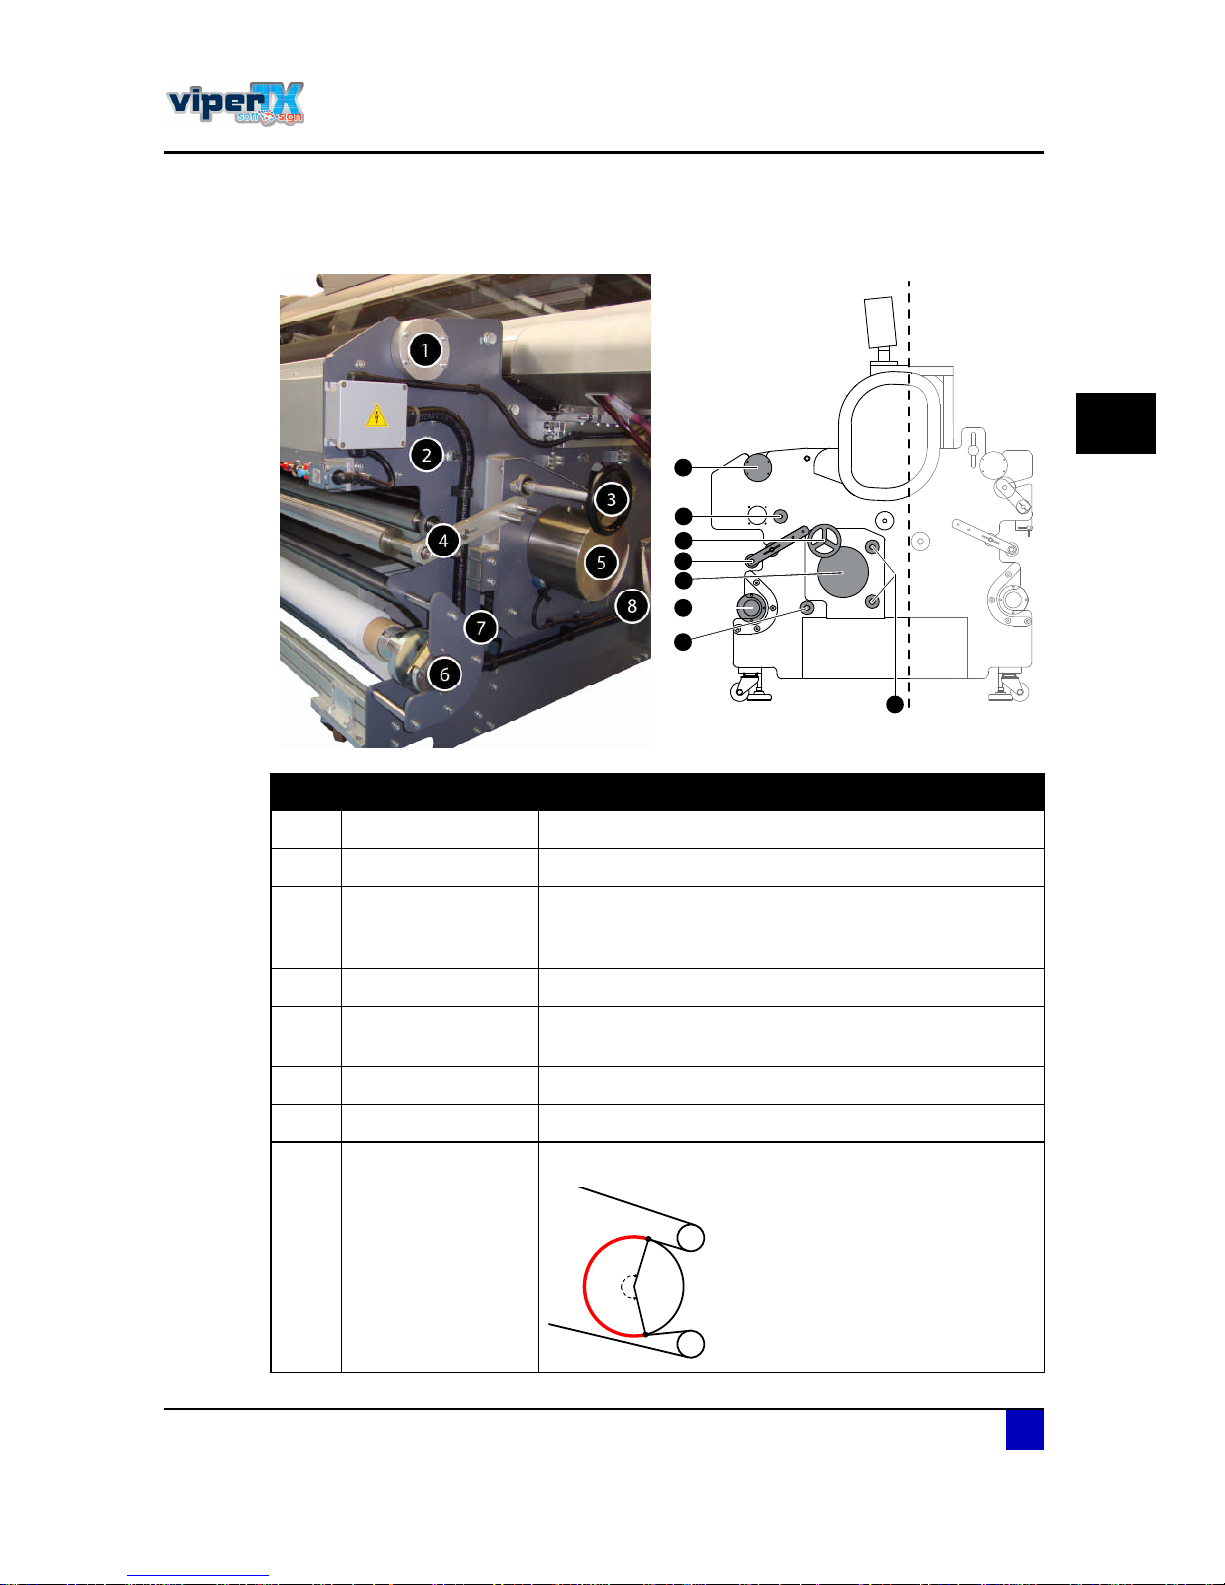
2.4.1 Front section
N° Description Extended description
ï Drive belt - front Guides the fabric through the printer
î Static dancer bar Keeps the fabric under constant pressure.
í Threading bar wheel
To guide the fabric around the heat fixation unit and static
tensioning bars (8) to avoid touching the heated heat
fixation unit.
ì Front dancer bar Keeps the fabric under constant pressure.
ë heat fixation unit
The printed ink will be fixed on the fabric during the contact
time with the heat fixation unit.
ê Roll unit - winder Fabric winding system with pneumatic shaft.
é Static tensioning bar To put extra pressure on the fabric (inside printable fabric)
è Static tensioning bar
To be sure the contact area on the heat fixation unit is 240°
ï
î
í
ì
ë
ê
é
è
îìðp
Page 28
Users Guide Viper TX Softsign
Product overview
28 AP-75360 - Revision 1.2
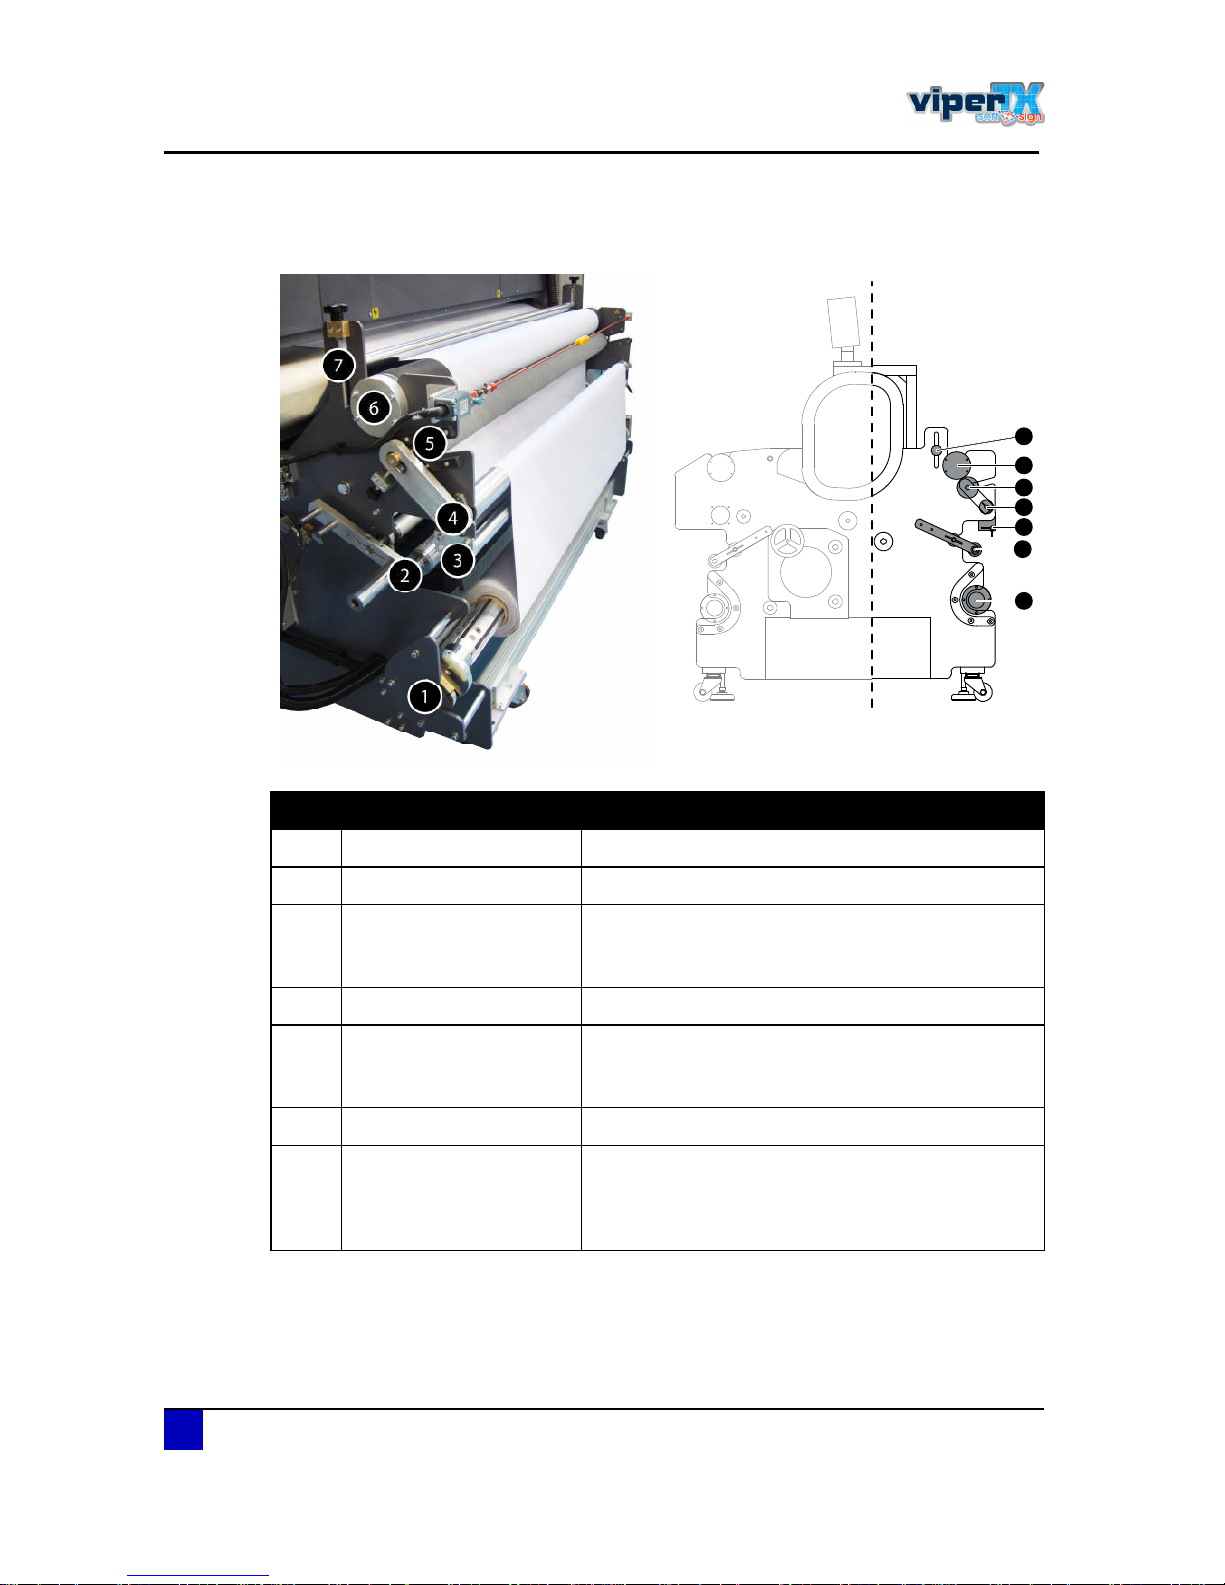
2.4.2 Rear section
N° Description Extended description
ï Roll unit - unwinder Fabric unwinding system with pneumatic shaft
î Rear dancer bar Keeps the fabric under constant pressure.
í Adjustable deflection bar
This bar can be adjusted left and right. This to be able
to load fabric which has not an equal tension on both
sides.
ì Static dancer bar Put extra pressure on the fabric.
ë Adjustable pressure roll
This roll will push the fabric against the drive belt.
Depending on the fabric, more or less pressure need
to be applied.
ê Drive belt - rear Guides the fabric through the printer and keeps it flat.
é Adjustable pressure bar
Higher or lower the bar on both sides to lower or
higher the pressure on the fabric and contact surface
with the drive belt. Lower the bar at one side to solve
wrinkling of the fabric.
ï
î
í
ì
ë
ê
é
Page 29
Users Guide Viper TX Softsign
Product overview
AP-75360 - Revision 1.2 29
2
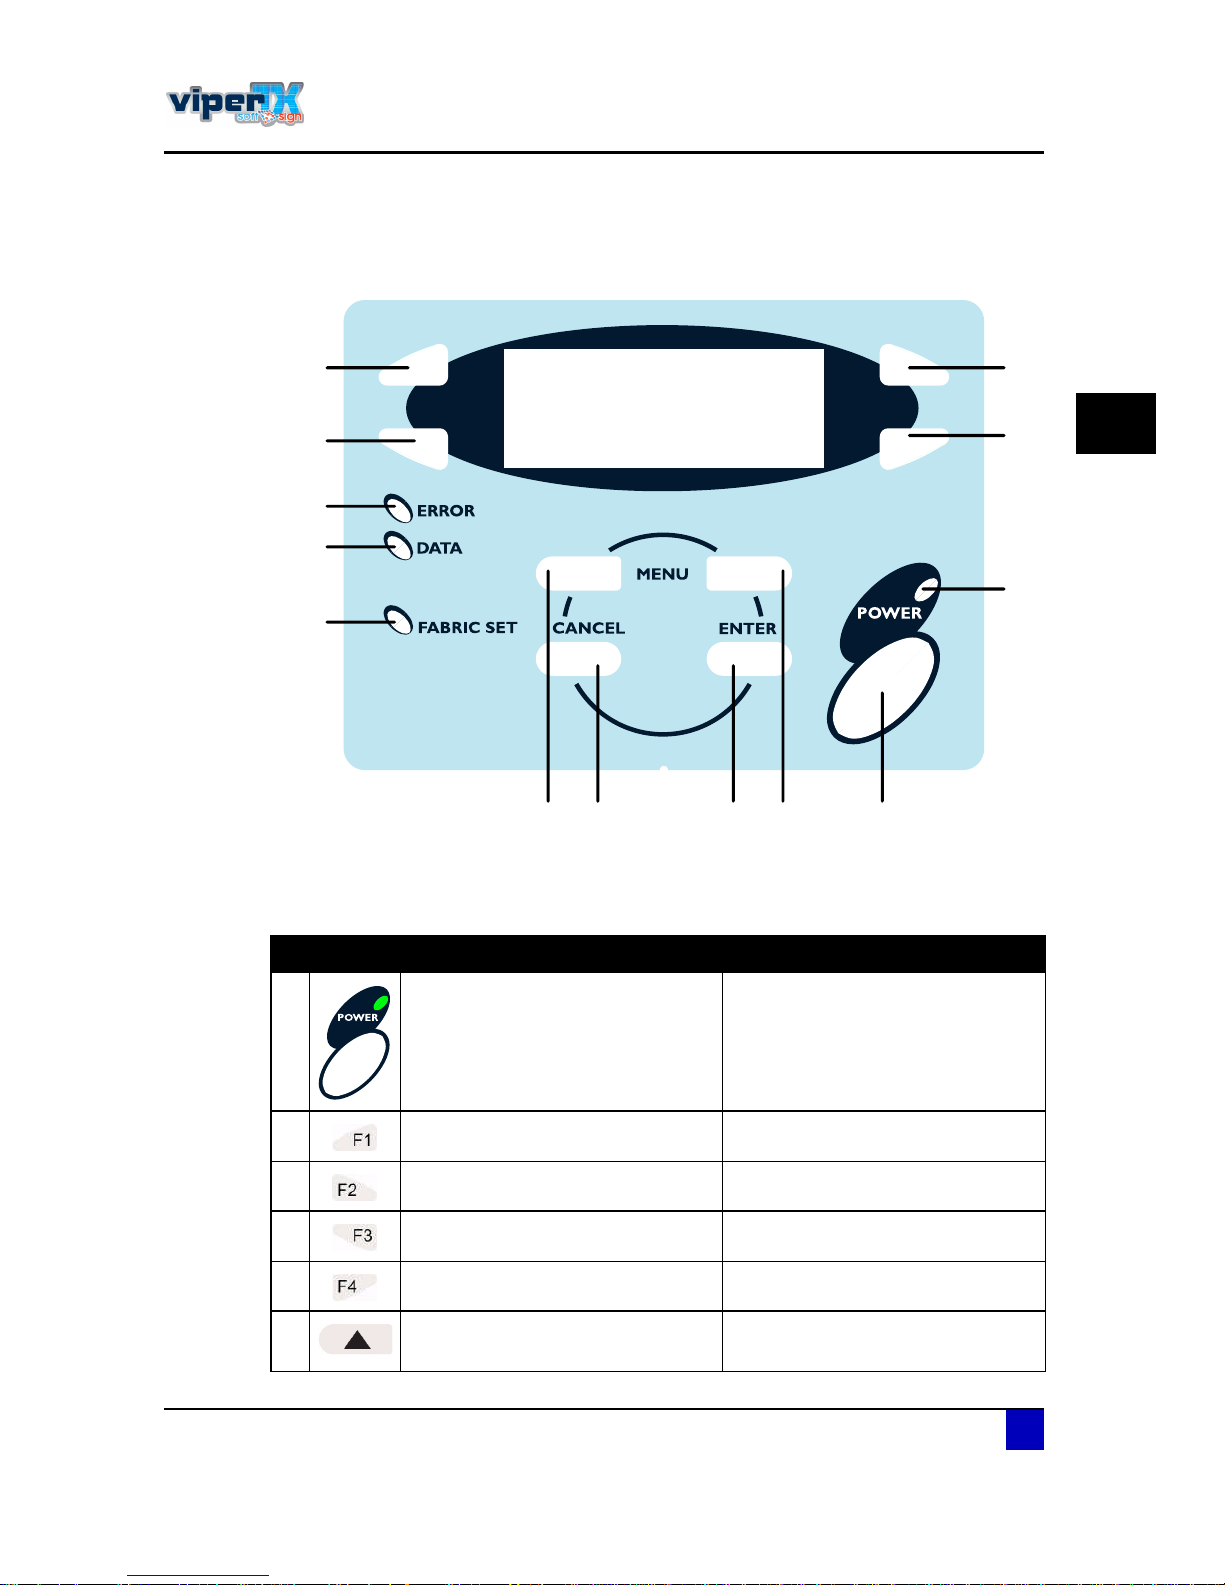
2.5 Operation panel
2.5.1 Keys
é èç ê
ïð
ïï
ïî
ïí
ï
î
ì
í
ë
N° Name In the main screen In the setup menu
ï Switch the power ON/OFF Switch the power ON/OFF
î Executes the function assigned to F1 Executes the function assigned to F1
í Executes the function assigned to F2 Executes the function assigned to F2
ì Executes the function assigned to F3 Executes the function assigned to F3
ë Executes the function assigned to F4 Executes the function assigned to F4
ê
Changes the LCD monitor display to
the setup menu status
Change the menu in reverse order
Page 30
Users Guide Viper TX Softsign
Product overview
30 AP-75360 - Revision 1.2
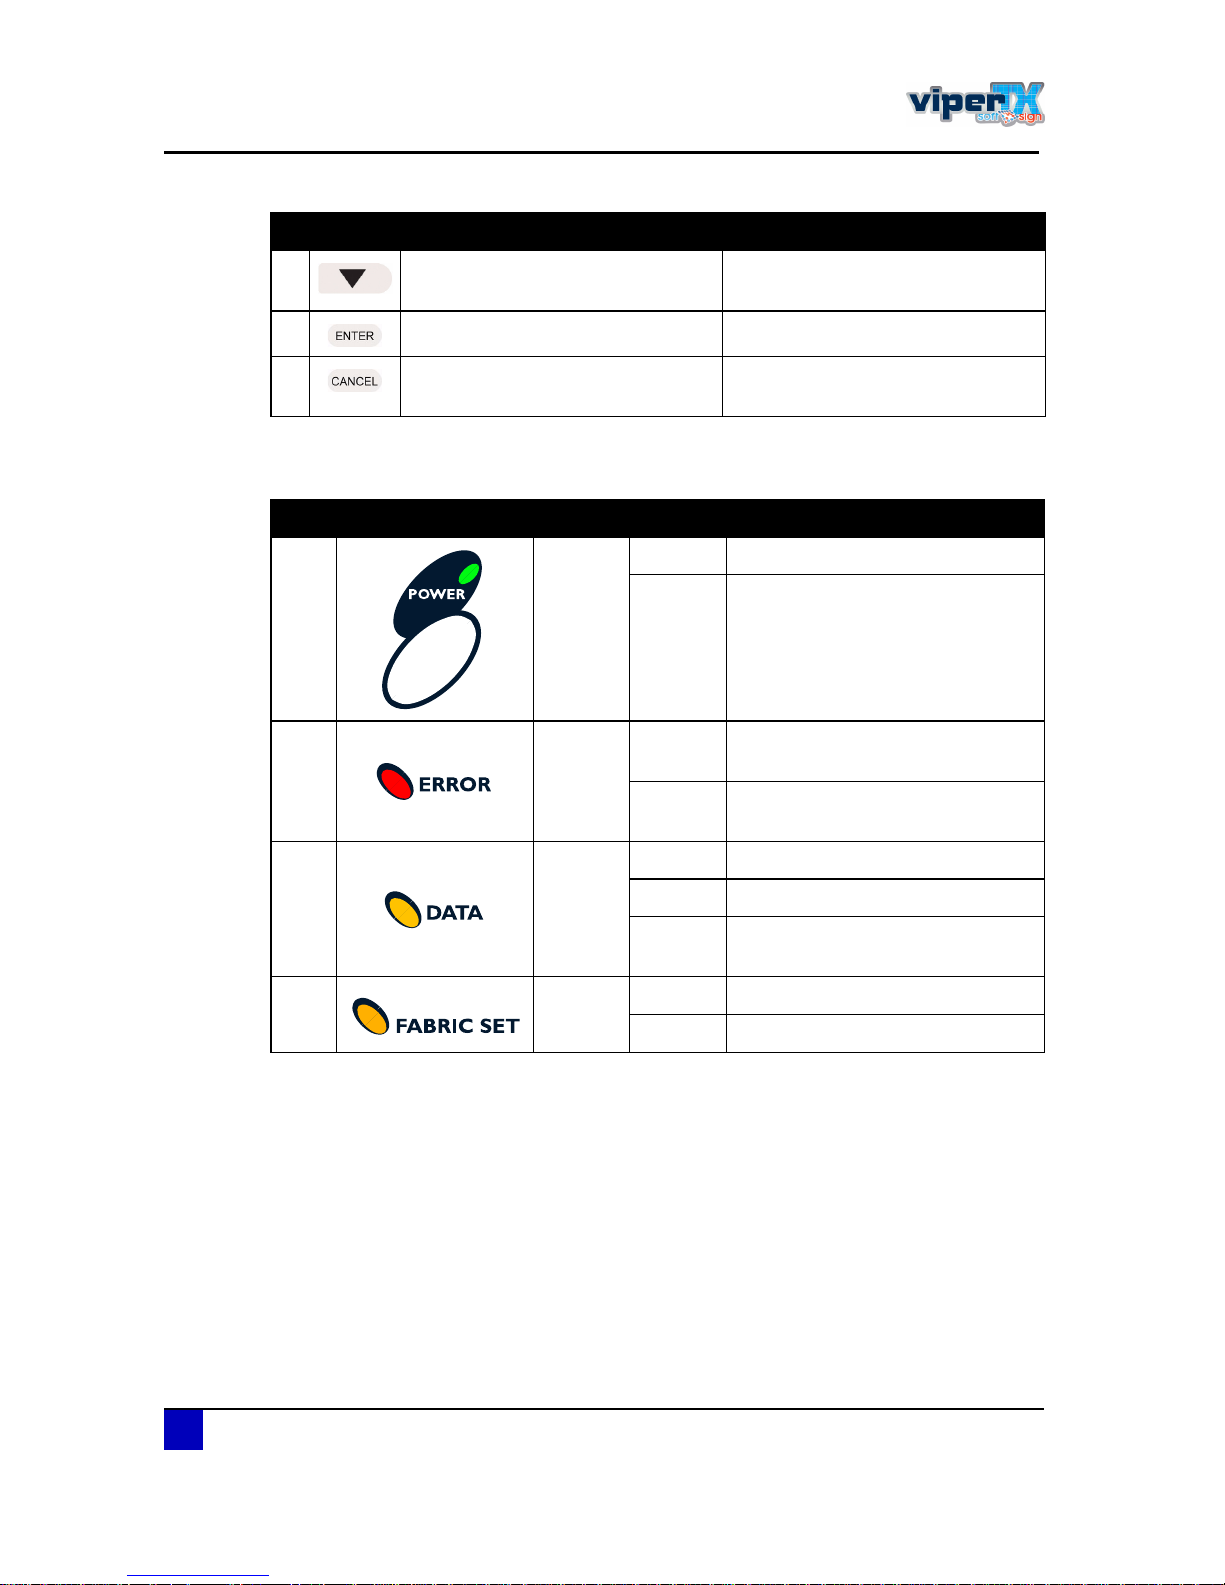
2.5.2 LCD and LEDs
é
Changes the LCD monitor display to
the setup menu status
Change the menu in forward order
è Display the current print mode Confirm a new value, feature change
ç -
Declines a new value, feature
change
N° Name Colour Status In the setup menu
10 Green
ON The printer is ON
OFF The printer is OFF
11 Red
Flashing
An error has occurred. The content
will be displayed on the LCD monitor
OFF
Either there is no error or the power
is off.
12 Orange
ON The printer receives print data.
Flashing The printer analyses received data.
OFF
The printer waits to receive print
data.
13 Orange
ON Fabric has not been loaded.
OFF fabric has not been loaded.
N° Name In the main screen In the setup menu
Page 31
Users Guide Viper TX Softsign
Product overview
AP-75360 - Revision 1.2 31
2
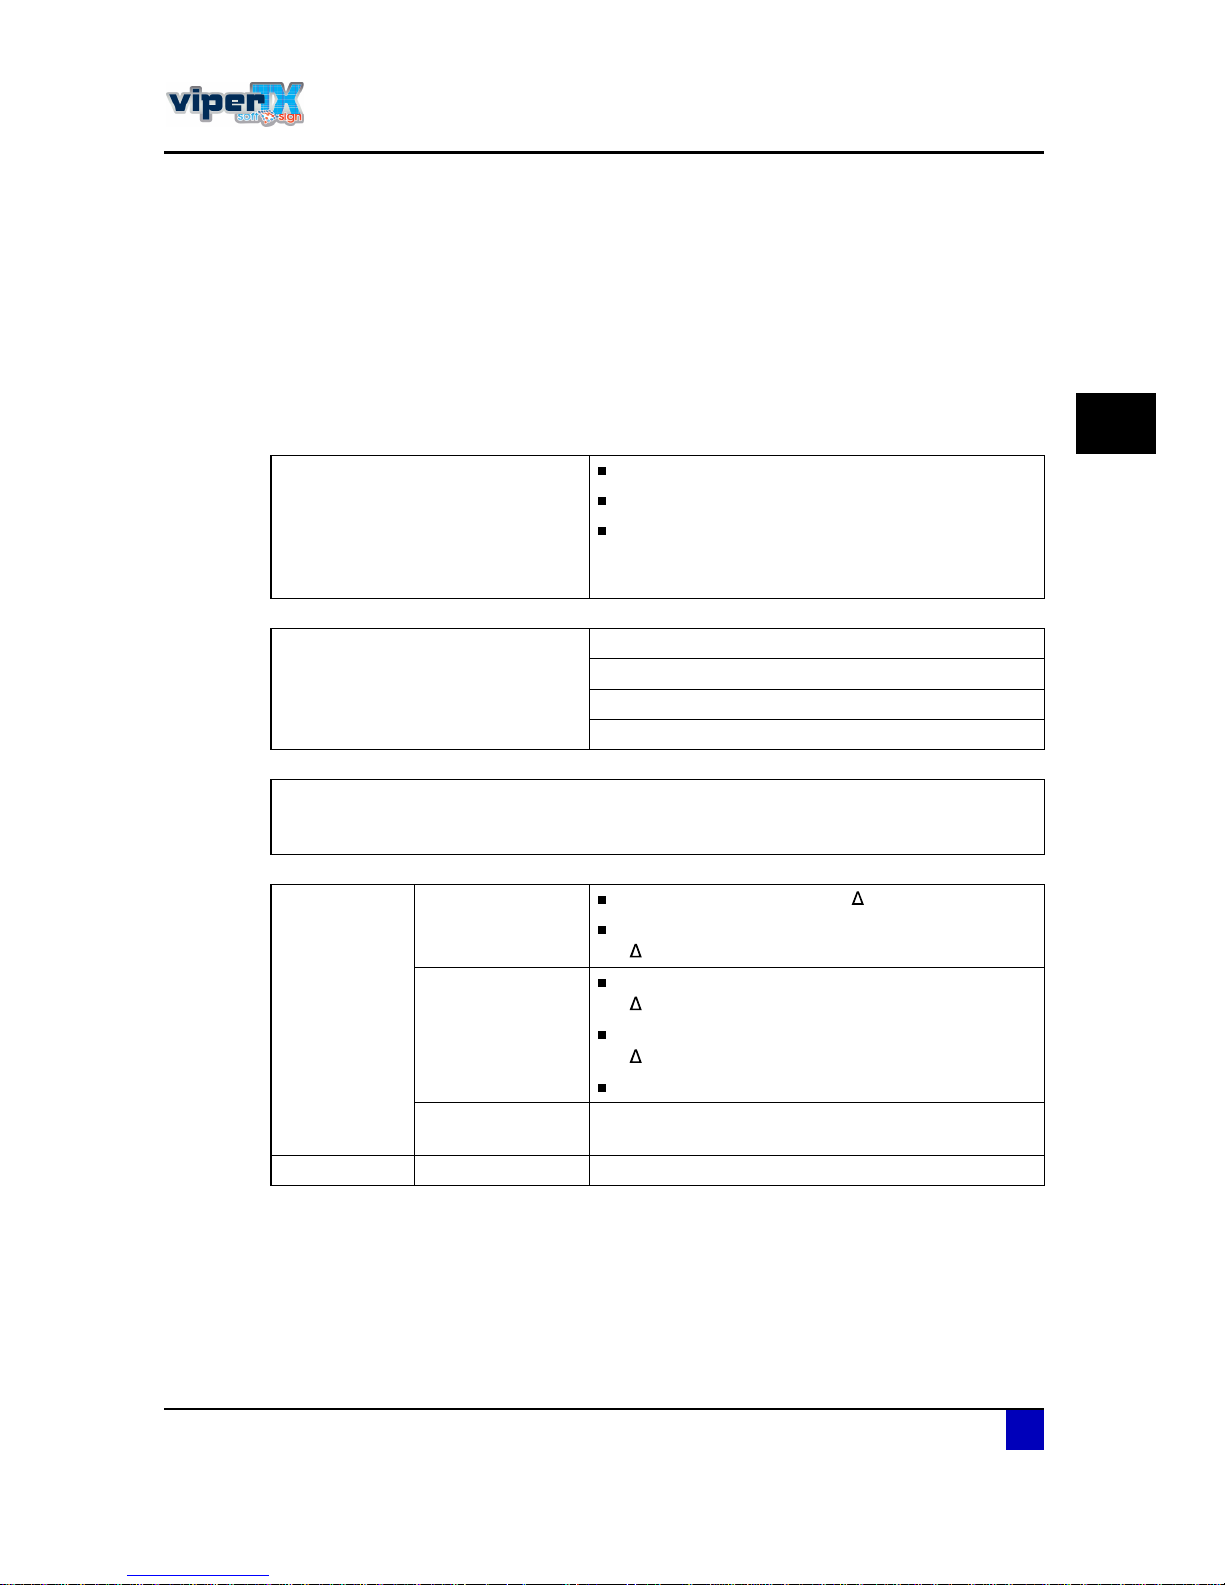
2.6 Installation environment
It is very important that the installation environment fulfils following conditions to obtain a
good print quality:
2.6.1 Installation environment requirements
Choose a place for printer installation following the requirements in the table below.
(*) Using non Mutoh inks may narrow down the print engine working environment window.
Floor load capacity
Machine weight: ± 850 kg
Maximum weight with 1 roll of fabric: ± 950 kg
Maximum weight with 2 rolls of fabric: ± 1050 kg
Be aware that this weight is divided over the 4
wheels ==> ± 262,5 kg for each wheel.
Power requirements
Voltage 240/415V: 4 wire + PE (WYE)
Frequency 50-60 Hz
Current 25 A
Consumption 5000 W
In order to protect the printer for over currents, short circuits and earth faults, the
building installation must be equipped with an automatic breaker double pole of 20 A
and an earth leakage switch of 300 mA.
Ambient
conditions
Print engine
working
environment (*)
Temperature: 19°C - 26°C ( t
max
2 °C/h)
Relative humidity: 30 - 60 %RH
( RH
max
5% RH/h - no condensation)
Mutoh Water
based Direct
Disperse Ink
Allowed Temperature Range: 19 - 26 °C
( t
max
2 °C/h)
Relative Humidity Range: 40 - 60%RH
( RH
max
5% RH/h - no condensation)
Recommended: 20 °C / 45% RH
Storage
environment of ink
Temperature: 5°C - 30°C
Machine size L x W x H 3,07 m x 1,55 m x 1,69 m
Page 32
Users Guide Viper TX Softsign
Product overview
32 AP-75360 - Revision 1.2
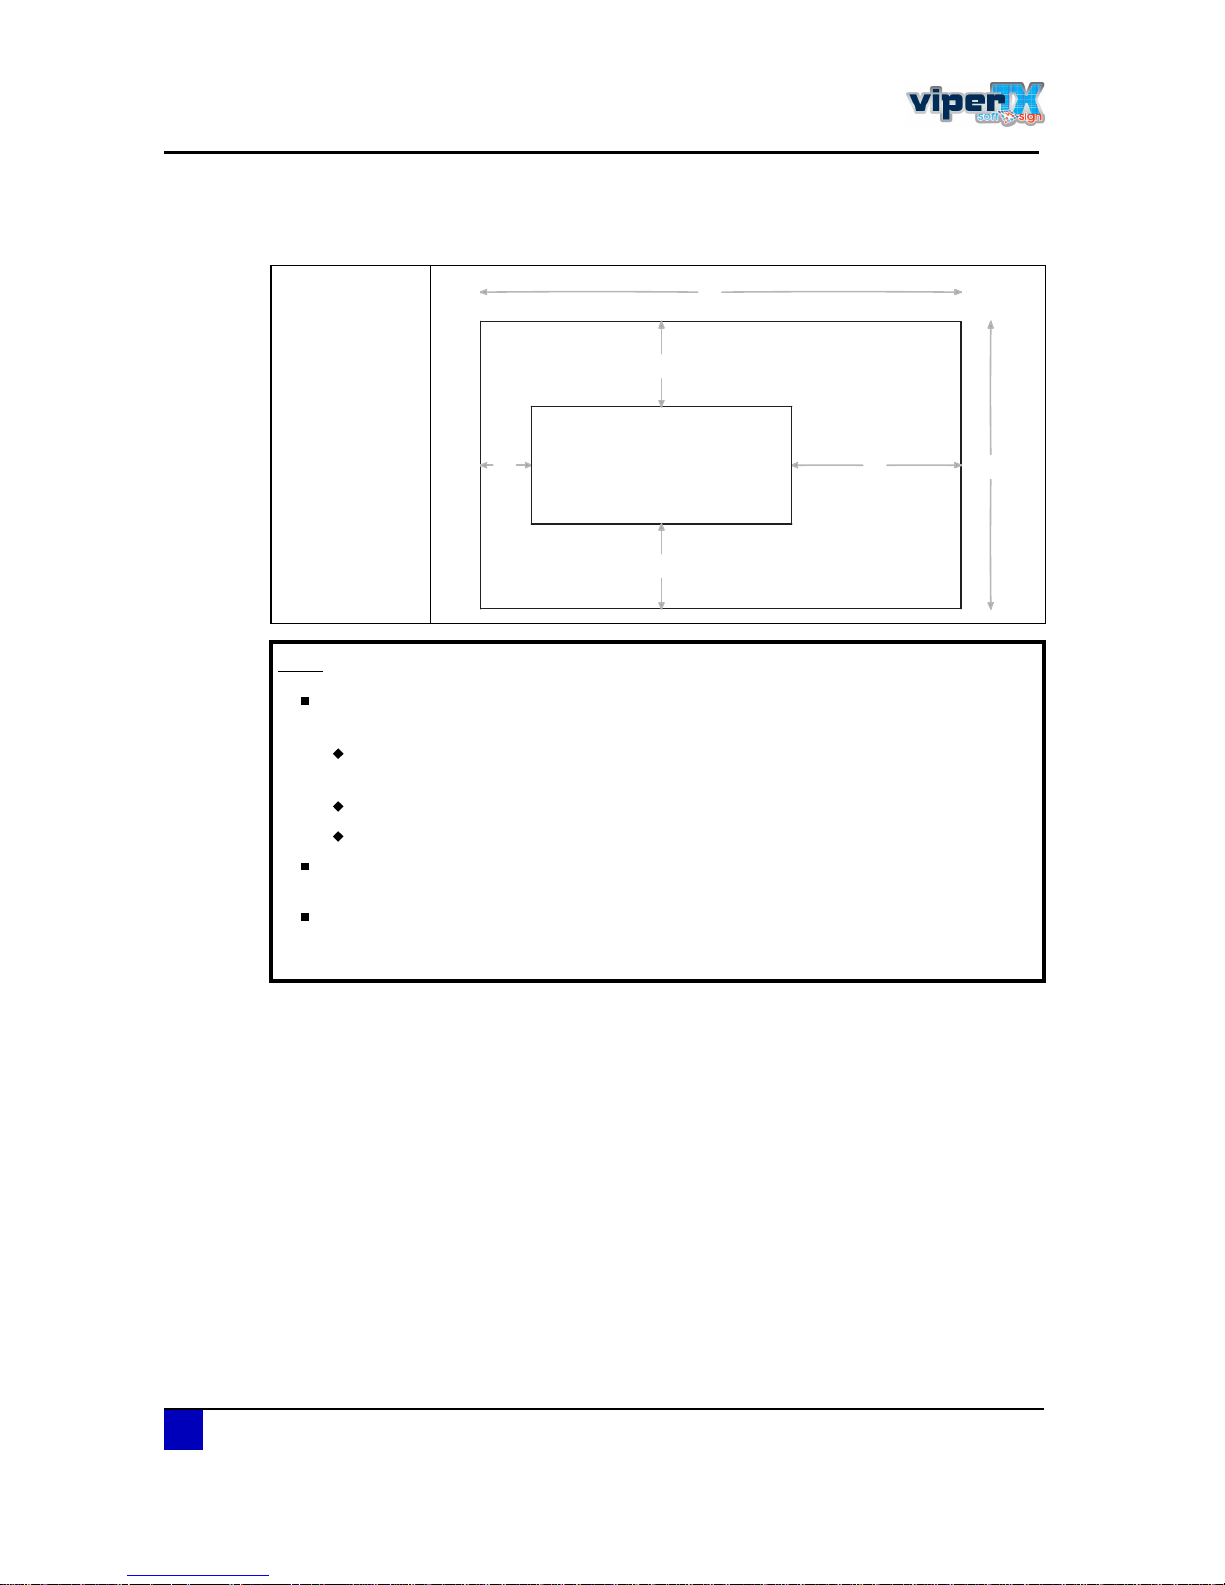
2.6.2 End location requirements
A = 1 m
B = 1 m
C = 0,6 m
D = 2 m
E = 5,7 m
F = 3,4 m
Ò±¬»
Avoid the following temperature and humidity conditions. Otherwise, printed
images will appear differently from what you expect:
Places where sudden changes in temperature and humidity are expected, even
though the condition is within the range written above.
Places where direct sunlight or excessive lighting are experienced.
Places where air conditioners blow directly.
Mutoh recommends installing the printer where air conditioning can be
adjusted easily.
Please note that some inks require a humidity of more than 50% , other inks can
be used at 30% humidity. Please contact your ink supplier for optimum printing
conditions.
ß
Þ
Ý
Ü
Û
Ú
Page 33
Users Guide Viper TX Softsign
Product overview
AP-75360 - Revision 1.2 33
2
2.6.3 Air purification
During the fixation process of directly printed fabrics, depending on the ink type and fabric
used, hot fumes and vapours will be released. These substances need to be extracted using
an air purification system.
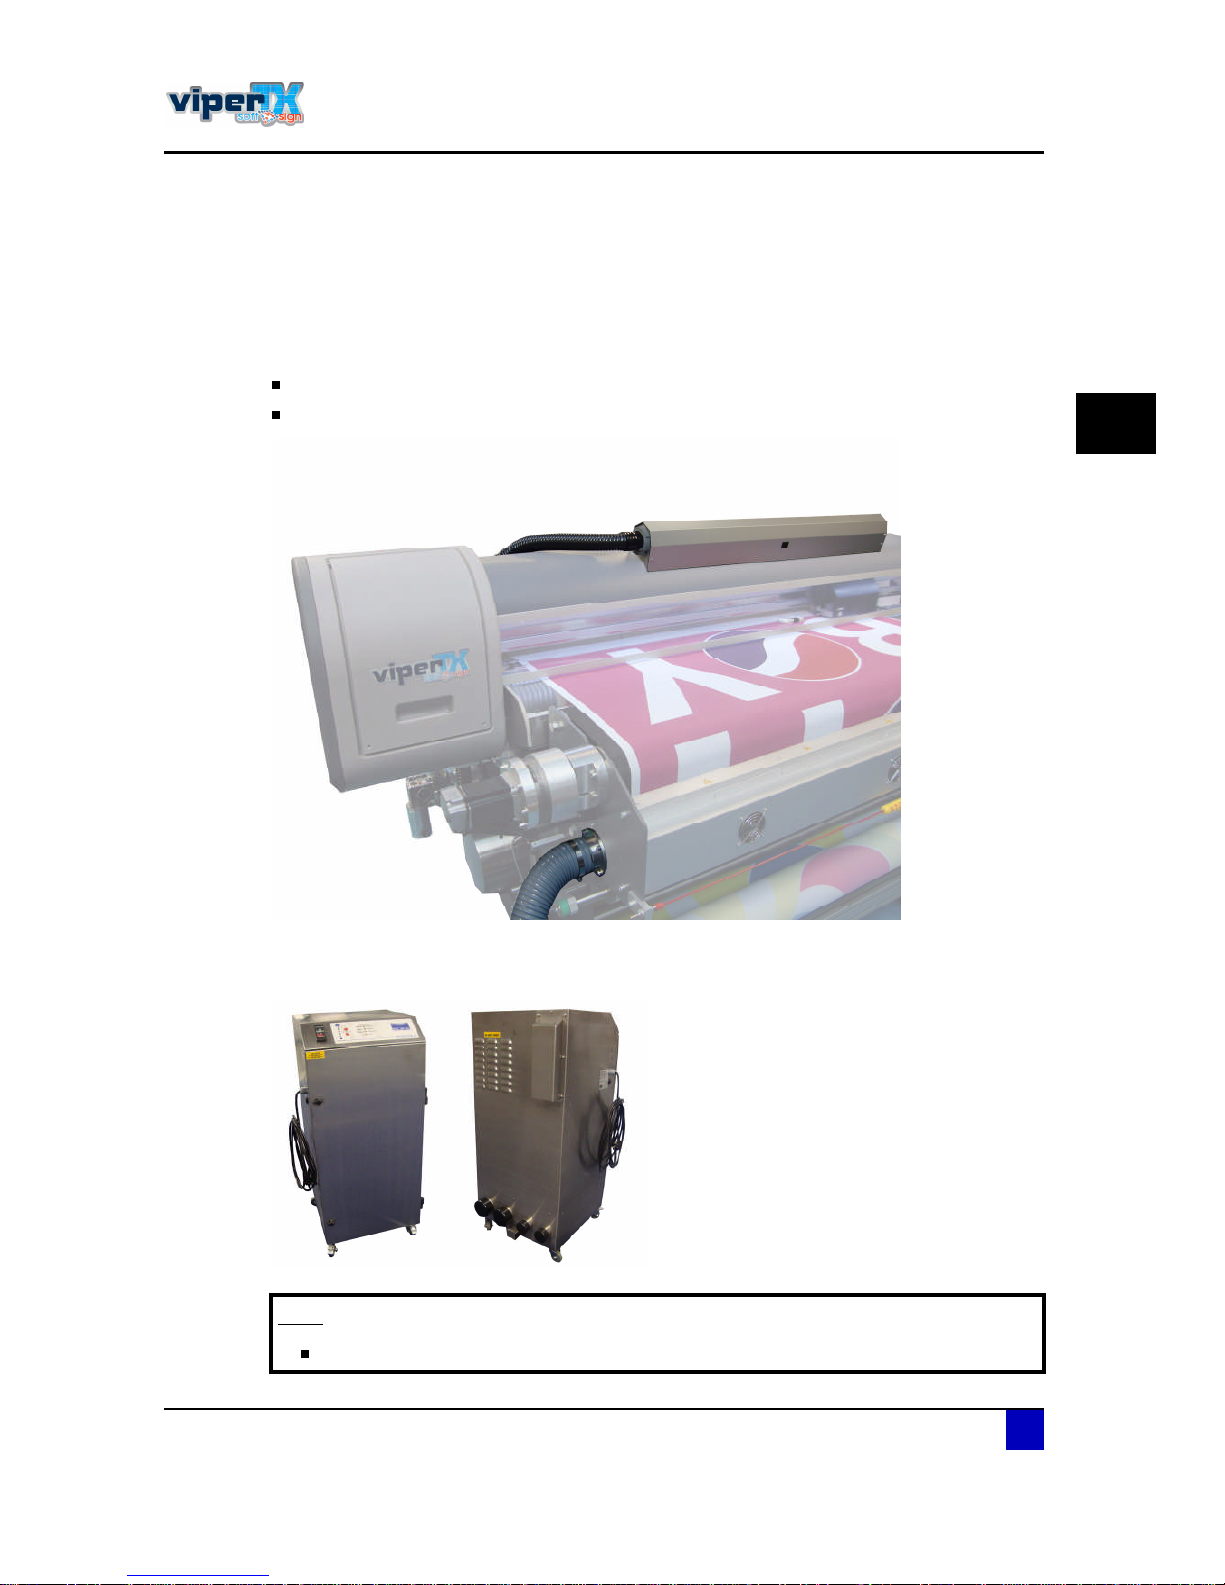
The Viper TX Softsign has two outlets installed.
One on top of the machine (fabric dust collection module) with a diameter of 50 mm.
One at the side of the dryer in front of the machine with a diameter of 75 mm.
There are two options to purify the air:
ïò Mutohs optional APS
Ò±¬»
Please note that the filters necessary for this unit should be ordered separately
Page 34
Users Guide Viper TX Softsign
Product overview
34 AP-75360 - Revision 1.2
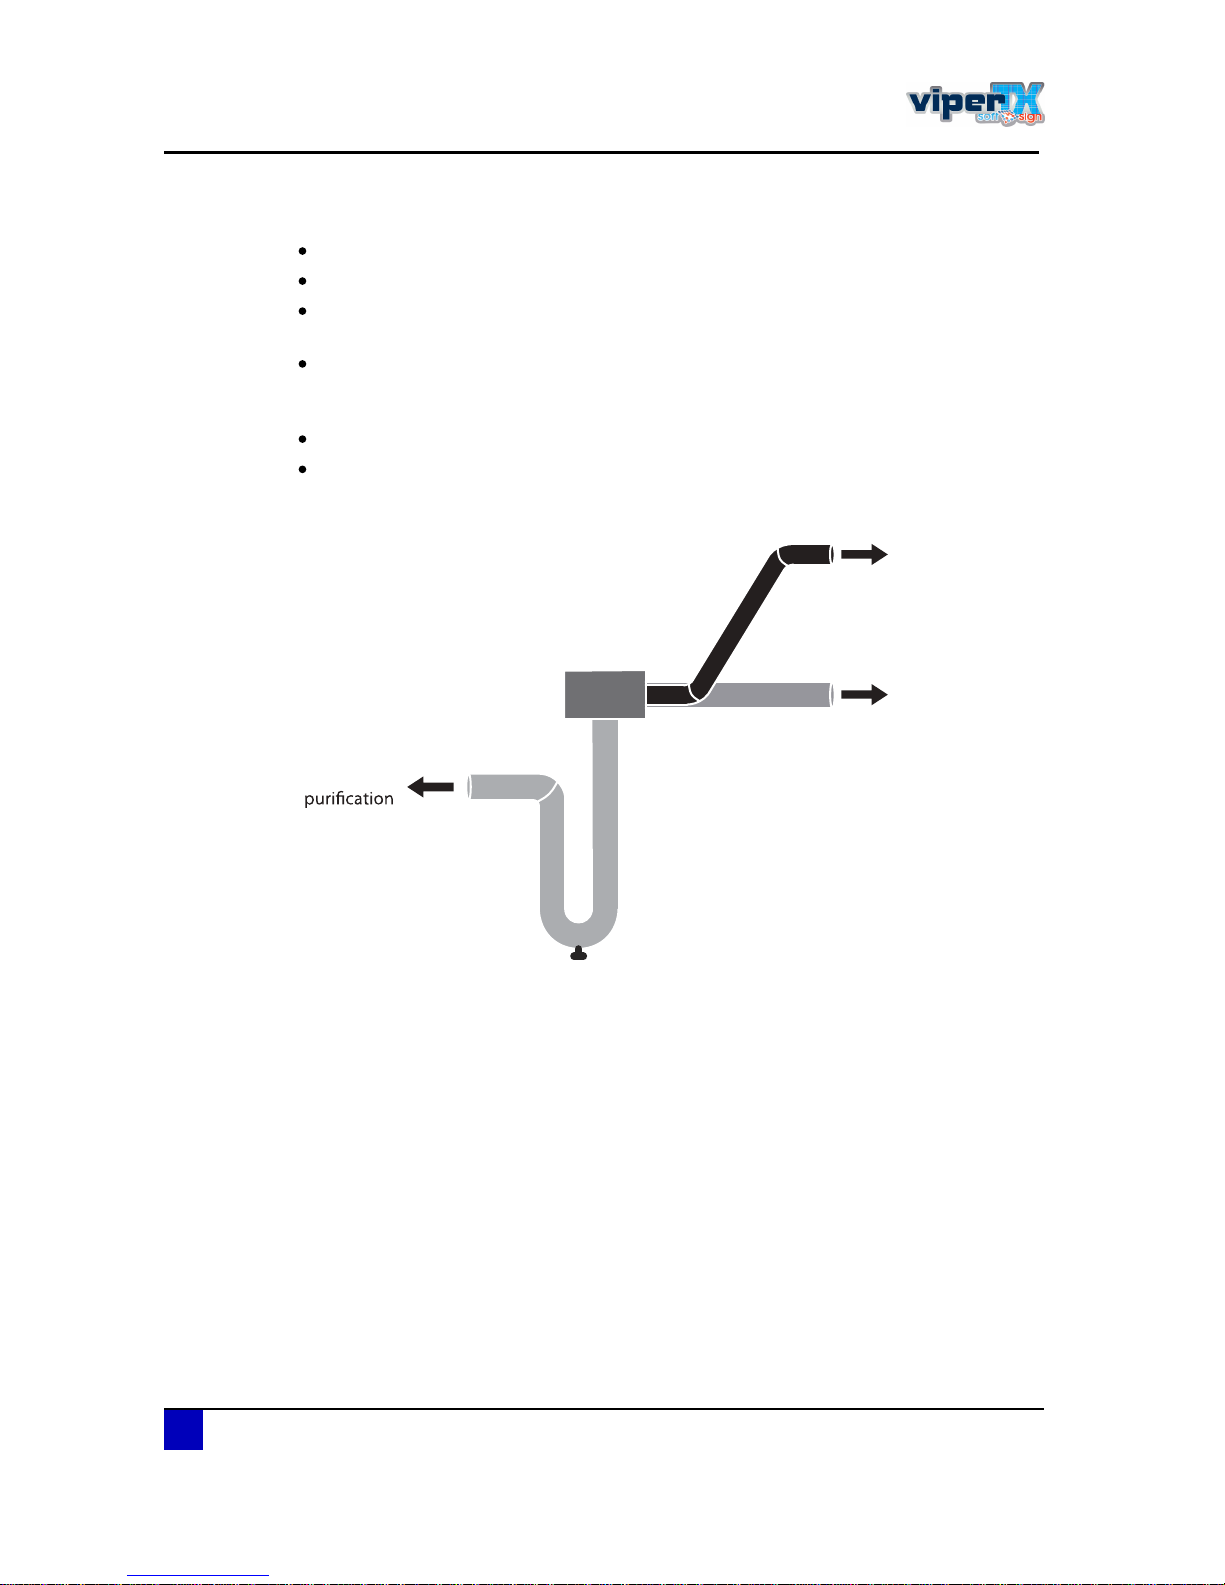
îò Local air purification system meeting the following requirements:
A flowrate up to 380m³/h.
Possibility to lead the hot fumes and vapours directly outside.
The system may not be connected to another machine or area. Otherwise you might
lead the fumes and condense into other areas.
The system is not lying higher than the attaching points of the Viper TX SoftSign.The
hot fumes and vapours will condensate and run back into the machine and eventually
damage the Viper TX Softsign.
You have a T fitting available to connect as well the 50 mm and 75 mm diameter hoses.
The hose connect to the T fitting need a valve to drain the condense (manually each
day or automatically).
½±²²»½¬ ¬±
º¿¾®·½ ¼«-¬
½±´´»½¬±®
H ëð ³³
½±²²»½¬ ¬±
¼®§»® -§-¬»³
H éë ³³
½±²²»½¬ ¬±
´±½¿´ ¿·®
-§-¬»³
Page 35
Users Guide Viper TX Softsign
Product overview
AP-75360 - Revision 1.2 35
2
2.6.4 Network requirements
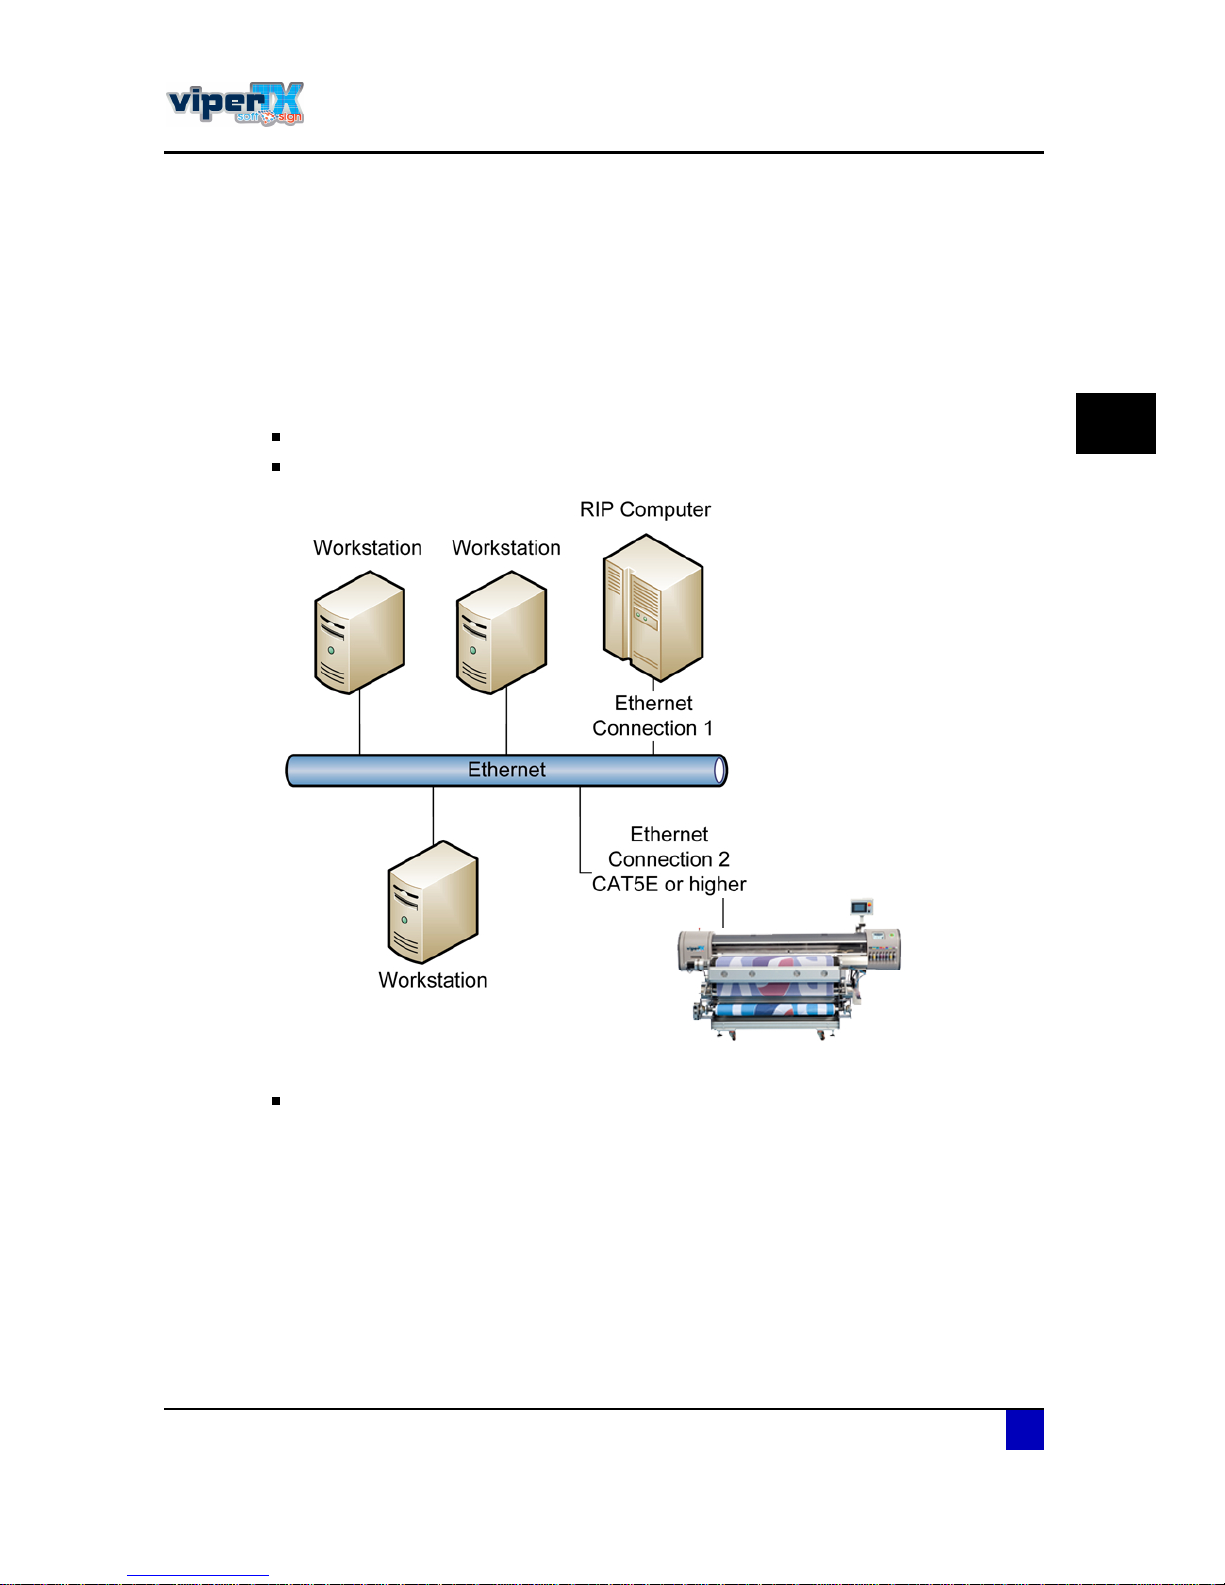
The printer requires a standard Ethernet cable to connect to the customers 100/1000 Base-T
or GigaBit network.
Both the printer and the host computer require an RJ-45 Ethernet cable to connect them to
the customers network. The printers network interface is capable of GigaBit transfer speeds
but will also communicate with a 100/1000 Base-T network.
It is strongly recommended to:
connect the RIP directly to the network.
connect the printer directly to the network.
The preferred cable is:
Ethernet Gbit Category 5E (GBit) or higher.
It is strongly recommended to use a pre-manufactured patch cable, no self made cables, to
ensure proper connection.
2.6.5 Compressed air requirements
The printer itself does not requires compressed air. The winding system however is foreseen
from to pneumatic shafts. Apply compressed air to expand these shafts and to fix the fabric
cores securely.
A standard compressor with a maximum pressure of 8 bar will be enough.
Page 36

Users Guide Viper TX Softsign
Product overview
36 AP-75360 - Revision 1.2
Page 37

Users Guide Viper TX Softsign
Printer handling
AP-75360 - Revision 1.2 37
3
Chapter 3 Printer handling
Printing workflow . . . . . . . . . . . . . . . . . . . . . . . . . . . . . . . . . . . . . . . . . . . . 40
Switching the Power ON / OFF . . . . . . . . . . . . . . . . . . . . . . . . . . . . . . . . . 41
Switching the power ON . . . . . . . . . . . . . . . . . . . . . . . . . . . . . . . . . . . . . . . . . 41
Switching the power OFF. . . . . . . . . . . . . . . . . . . . . . . . . . . . . . . . . . . . . . . . . 43
Restart the machine after an emergency stop . . . . . . . . . . . . . . . . . . . . . . . . . 44
Perfect fabric handling. . . . . . . . . . . . . . . . . . . . . . . . . . . . . . . . . . . . . . . . 45
Ink gutter . . . . . . . . . . . . . . . . . . . . . . . . . . . . . . . . . . . . . . . . . . . . . . . . . . . . . 45
Purpose . . . . . . . . . . . . . . . . . . . . . . . . . . . . . . . . . . . . . . . . . . . . . . . . . . 45
Fabric retainers . . . . . . . . . . . . . . . . . . . . . . . . . . . . . . . . . . . . . . . . . . . . . . . . 46
Purpose . . . . . . . . . . . . . . . . . . . . . . . . . . . . . . . . . . . . . . . . . . . . . . . . . . 46
Installation procedure . . . . . . . . . . . . . . . . . . . . . . . . . . . . . . . . . . . . . . . . 46
Ink absorbents . . . . . . . . . . . . . . . . . . . . . . . . . . . . . . . . . . . . . . . . . . . . . . . . . 47
Purpose . . . . . . . . . . . . . . . . . . . . . . . . . . . . . . . . . . . . . . . . . . . . . . . . . . 47
Installation procedure . . . . . . . . . . . . . . . . . . . . . . . . . . . . . . . . . . . . . . . . 47
Maintenance . . . . . . . . . . . . . . . . . . . . . . . . . . . . . . . . . . . . . . . . . . . . . . . 47
Head tactile sensor . . . . . . . . . . . . . . . . . . . . . . . . . . . . . . . . . . . . . . . . . . . . . 48
Purpose . . . . . . . . . . . . . . . . . . . . . . . . . . . . . . . . . . . . . . . . . . . . . . . . . . 48
Restart procedure . . . . . . . . . . . . . . . . . . . . . . . . . . . . . . . . . . . . . . . . . . . 48
Handy menu features . . . . . . . . . . . . . . . . . . . . . . . . . . . . . . . . . . . . . . . . . 49
Adjustable head height . . . . . . . . . . . . . . . . . . . . . . . . . . . . . . . . . . . . . . . . . . 49
Capskip . . . . . . . . . . . . . . . . . . . . . . . . . . . . . . . . . . . . . . . . . . . . . . . . . . . . . . 49
Continue feed for fixing . . . . . . . . . . . . . . . . . . . . . . . . . . . . . . . . . . . . . . . . . . 50
Equal heating up of the heat fixation unit . . . . . . . . . . . . . . . . . . . . . . . . . . . . . 51
Handling and loading fabrics . . . . . . . . . . . . . . . . . . . . . . . . . . . . . . . . . . 53
Cautions on handling fabrics . . . . . . . . . . . . . . . . . . . . . . . . . . . . . . . . . . . . . . 53
Cautions on storing fabrics . . . . . . . . . . . . . . . . . . . . . . . . . . . . . . . . . . . . . . . 53
Loading fabric . . . . . . . . . . . . . . . . . . . . . . . . . . . . . . . . . . . . . . . . . . . . . . . . . 54
Install an empty core and roll of fabric . . . . . . . . . . . . . . . . . . . . . . . . . . . 54
Page 38

Users Guide Viper TX Softsign
Printer handling
38 AP-75360 - Revision 1.2
Make the correct settings on the fixation unit control panel . . . . . . . . . . . 56
Guide fabric through the rear side of the printer . . . . . . . . . . . . . . . . . . . . 58
Guide fabric through the front side of the printer . . . . . . . . . . . . . . . . . . . 62
Adjust the tension . . . . . . . . . . . . . . . . . . . . . . . . . . . . . . . . . . . . . . . . . . . 68
Features to improve print quality . . . . . . . . . . . . . . . . . . . . . . . . . . . . . . . 70
Nozzlecheck. . . . . . . . . . . . . . . . . . . . . . . . . . . . . . . . . . . . . . . . . . . . . . . . . . . 70
Head cleaning . . . . . . . . . . . . . . . . . . . . . . . . . . . . . . . . . . . . . . . . . . . . . . . . . 72
Fabric feed compensation (step) . . . . . . . . . . . . . . . . . . . . . . . . . . . . . . . . . . . 73
Basics about the step . . . . . . . . . . . . . . . . . . . . . . . . . . . . . . . . . . . . . . . . 73
Underfeed. . . . . . . . . . . . . . . . . . . . . . . . . . . . . . . . . . . . . . . . . . . . . . . . . 73
Overfeed. . . . . . . . . . . . . . . . . . . . . . . . . . . . . . . . . . . . . . . . . . . . . . . . . . 73
Repeatability step . . . . . . . . . . . . . . . . . . . . . . . . . . . . . . . . . . . . . . . . . . . 74
Determining and setting the correct step . . . . . . . . . . . . . . . . . . . . . . . . . 74
Change the step on-the-fly . . . . . . . . . . . . . . . . . . . . . . . . . . . . . . . . . . . . 76
Pause option . . . . . . . . . . . . . . . . . . . . . . . . . . . . . . . . . . . . . . . . . . . . . . . . . . 77
Set ideal heat fixation unit temperature . . . . . . . . . . . . . . . . . . . . . . . . . . 78
Testing condition . . . . . . . . . . . . . . . . . . . . . . . . . . . . . . . . . . . . . . . . . . . . . . . 78
Overview tables . . . . . . . . . . . . . . . . . . . . . . . . . . . . . . . . . . . . . . . . . . . . . . . . 79
Print speed table. . . . . . . . . . . . . . . . . . . . . . . . . . . . . . . . . . . . . . . . . . . . 79
heat fixation unit temperature table . . . . . . . . . . . . . . . . . . . . . . . . . . . . . 79
Contact time table. . . . . . . . . . . . . . . . . . . . . . . . . . . . . . . . . . . . . . . . . . . 80
Artefacts. . . . . . . . . . . . . . . . . . . . . . . . . . . . . . . . . . . . . . . . . . . . . . . . . . . . . . 81
Shrinkage . . . . . . . . . . . . . . . . . . . . . . . . . . . . . . . . . . . . . . . . . . . . . . . . . 81
Ghosting . . . . . . . . . . . . . . . . . . . . . . . . . . . . . . . . . . . . . . . . . . . . . . . . . . 81
Wash fastness (discolouring) . . . . . . . . . . . . . . . . . . . . . . . . . . . . . . . . . . 82
Determining my softsign settings for my fabric . . . . . . . . . . . . . . . . . . . . . . . . 84
Tools necessary . . . . . . . . . . . . . . . . . . . . . . . . . . . . . . . . . . . . . . . . . . . . 84
Workflow. . . . . . . . . . . . . . . . . . . . . . . . . . . . . . . . . . . . . . . . . . . . . . . . . . 85
Blank tables . . . . . . . . . . . . . . . . . . . . . . . . . . . . . . . . . . . . . . . . . . . . . . . . . . . 87
Replacing the ink cassettes . . . . . . . . . . . . . . . . . . . . . . . . . . . . . . . . . . . 88
Replacing the waste bottle . . . . . . . . . . . . . . . . . . . . . . . . . . . . . . . . . . . . 89
Page 39

Users Guide Viper TX Softsign
Printer handling
AP-75360 - Revision 1.2 39
3
Relocating or transporting the printer . . . . . . . . . . . . . . . . . . . . . . . . . . . 90
Relocating the printer . . . . . . . . . . . . . . . . . . . . . . . . . . . . . . . . . . . . . . . . . . . . 90
Transporting the printer . . . . . . . . . . . . . . . . . . . . . . . . . . . . . . . . . . . . . . . . . . 90
Switching from ink to shipping liquid. . . . . . . . . . . . . . . . . . . . . . . . . . . . . 90
Packing the machine . . . . . . . . . . . . . . . . . . . . . . . . . . . . . . . . . . . . . . . . 92
Page 40
Users Guide Viper TX Softsign
Printer handling
40 AP-75360 - Revision 1.2
3.1 Printing workflow
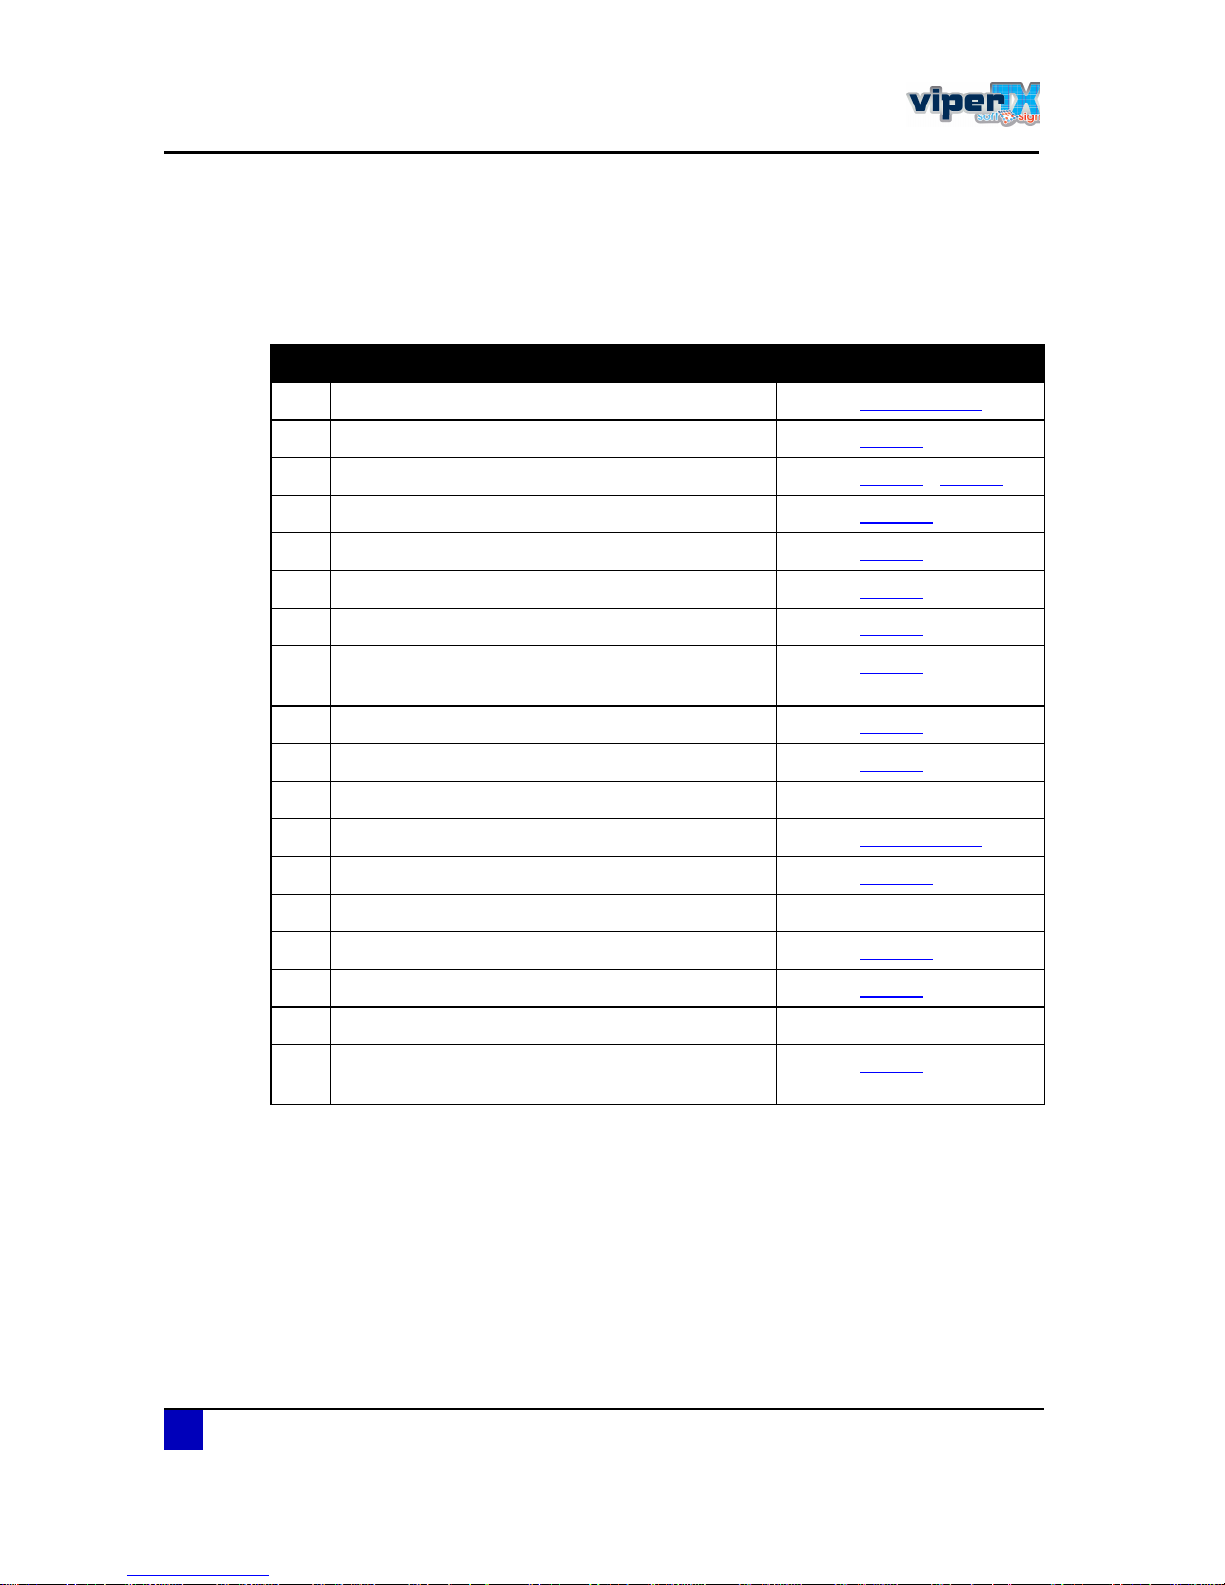
Before the first jobs rolls out of your printer, a lot of things should be done and decided. Find
below a schematic overview.:
Step Action to be taken Link
ï Select the fabric you want to print on Refer to ©©©ò³«¬±¸ò»«
î Load the fabric Refer to °¿¹» ëì
í Install the fabric retainers and/or absorbents Refer to °¿¹» ìê - °¿¹» ìé
ì Fabric detection Refer to °¿¹» ïîï
ë Perform a nozzlecheck Refer to °¿¹» éð
ê Perform a cleaning (if necessary) Refer to °¿¹» éî
é Set the step correctly Refer to °¿¹» éí
è
Enable CapSkip function if printing multiple files at
the same speed
Refer to °¿¹» ìç
ç Choose ideal heat fixation unit temperature Refer to °¿¹» éè
ïð Start heat fixation unit stabilisation Refer to °¿¹» ëï
ïï Select image to print -
ïî Load dedicated profile and rip the image Refer to ©©©ò³«¬±¸ò»«
ïí Decide which weaving pattern to use Refer to °¿¹» ïíè
ïì Sent the file to the printer -
ïë Check if the set temperature has been reached yet Refer to °¿¹» ïéî
ïê Stop heat fixation unit stabilisation Refer to °¿¹» ëï
ïé Start printing -
ïè
Enable Feed to fix feature when this is the last file
you are printing @ this speed.
Refer to °¿¹» ëð
Page 41
Users Guide Viper TX Softsign
Printer handling
AP-75360 - Revision 1.2 41
3
3.2 Switching the Power ON / OFF
This section describes how to power ON and OFF the Viper TX Softsign.
3.2.1 Switching the power ON
Power ON the printer according to the procedure below:
ͬ»° ïæ Switch ON the main switch at the left side of the machine.
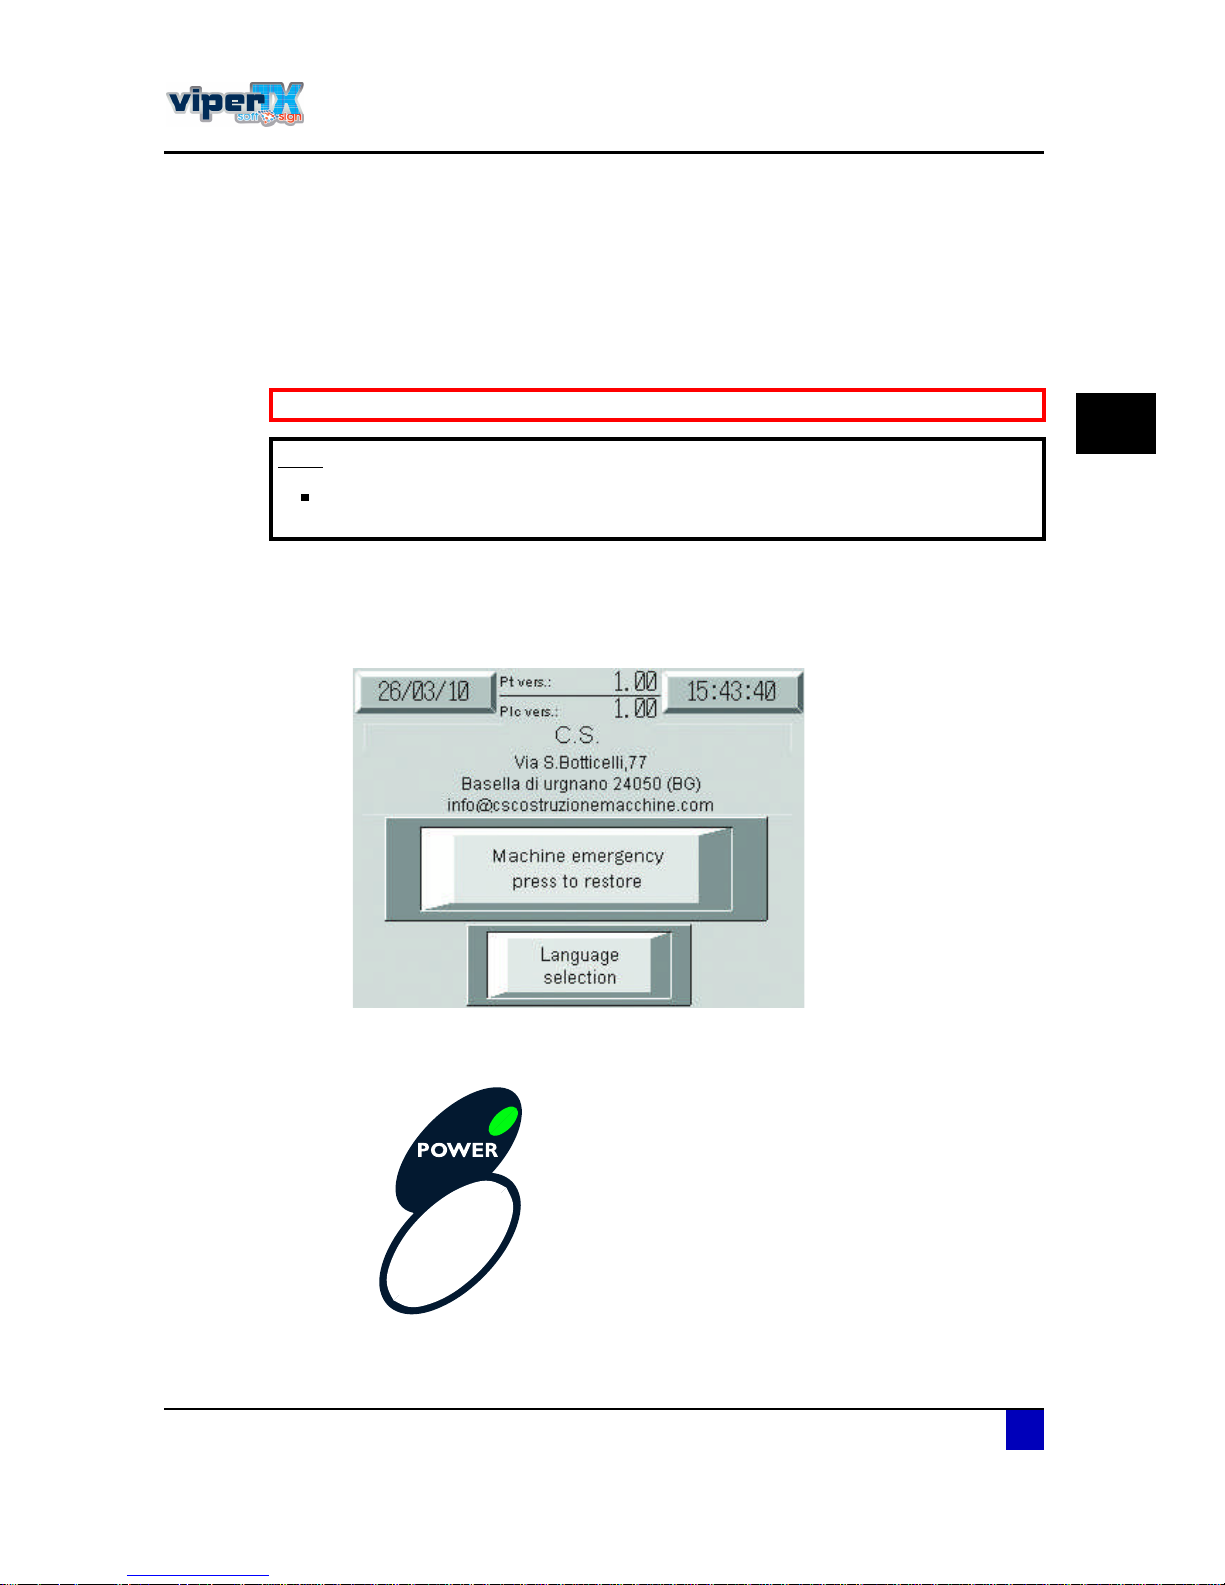
ͬ»° îæ The fixation unit control panel will start up. After initialization, the following screen
will be displayed:
ͬ»° íæ Push the machine emergency press to restore button to reset the emergency circuit.
ͬ»° ìæ Push the power button on the printer unit control panel.
Be sure to read and understand the safety warnings before handling the printer.
Ò±¬»
Before powering ON, make sure that loose objects such as clothing, tools and
cleaning materials are not interfering with the printer mechanisms.
Page 42
Users Guide Viper TX Softsign
Printer handling
42 AP-75360 - Revision 1.2
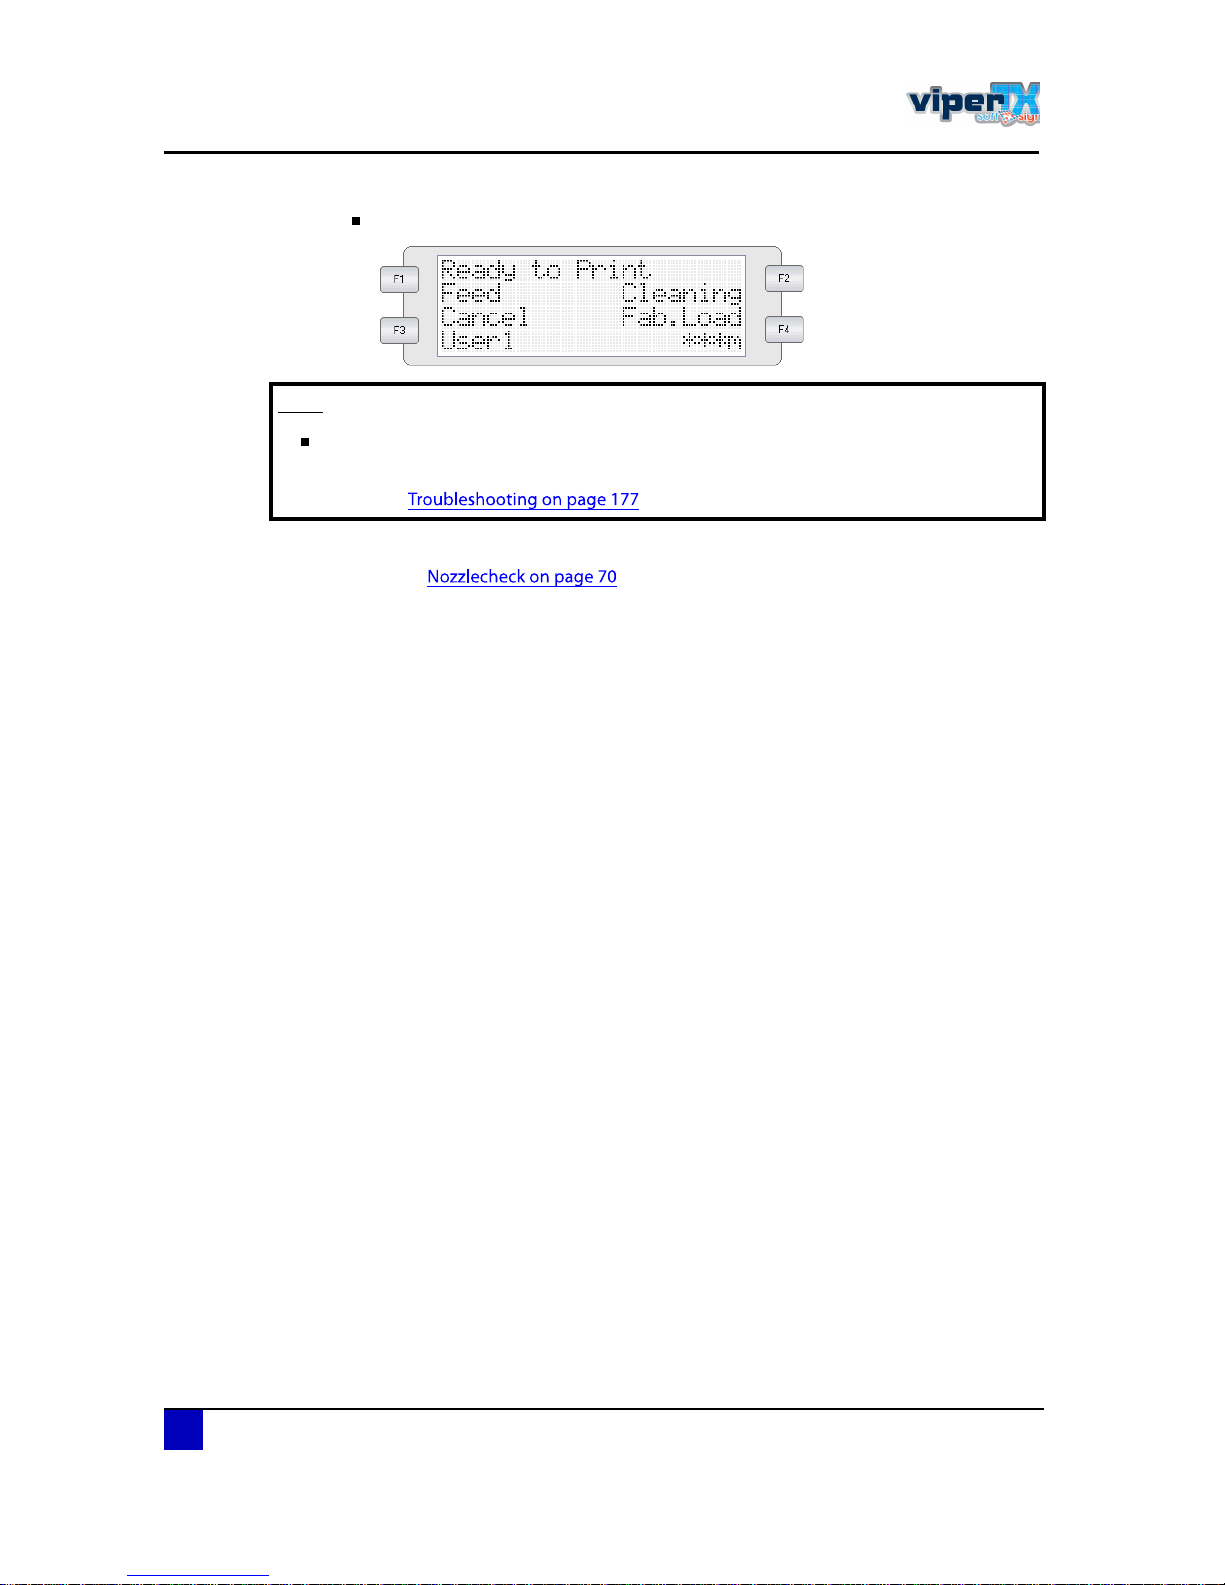
After complete initialization, the main screen will be displayed
ͬ»° ëæ Before start printing, be sure to perform a nozzle check.
Refer to
Ò±¬»
If there are any problems during the initial start-up operation, the printer will
display a message, and the operation may stop.
Refer to and take the appropriate actions.
Page 43
Users Guide Viper TX Softsign
Printer handling
AP-75360 - Revision 1.2 43
3
3.2.2 Switching the power OFF
Power OFF the printer according to the procedure below:
ͬ»° ïæ Perform the periodical maintenance before powering OFF the machine.
Refer to
ͬ»° îæ Power OFF the printer first by pushing the power button.
ͬ»° íæ As soon as the printer unit is completely shut down, power OFF the fixation unit by
turning the mainswitch to OFF.
Be sure to read and understand the safety warnings before handling the printer.
Page 44
Users Guide Viper TX Softsign
Printer handling
44 AP-75360 - Revision 1.2
3.2.3 Restart the machine after an emergency stop
If a situation requires an immediate shutdown of all activities, push the emergency stop or pull
the emergency cords at the front and rear of the machine.
Refer to
Please follow the procedure below to start-up the printer after an emergency stop.
ͬ»° ïæ Remove all fabrics which can obstruct the print head.
ͬ»° îæ Power OFF the printer unit. The fixation unit does not need to be restarted.
ͬ»° íæ Deactivate the emergency stop(s)
Pull out the stop on the fixation unit control panel.
Pull out the knob of the front and or rear emergency cords
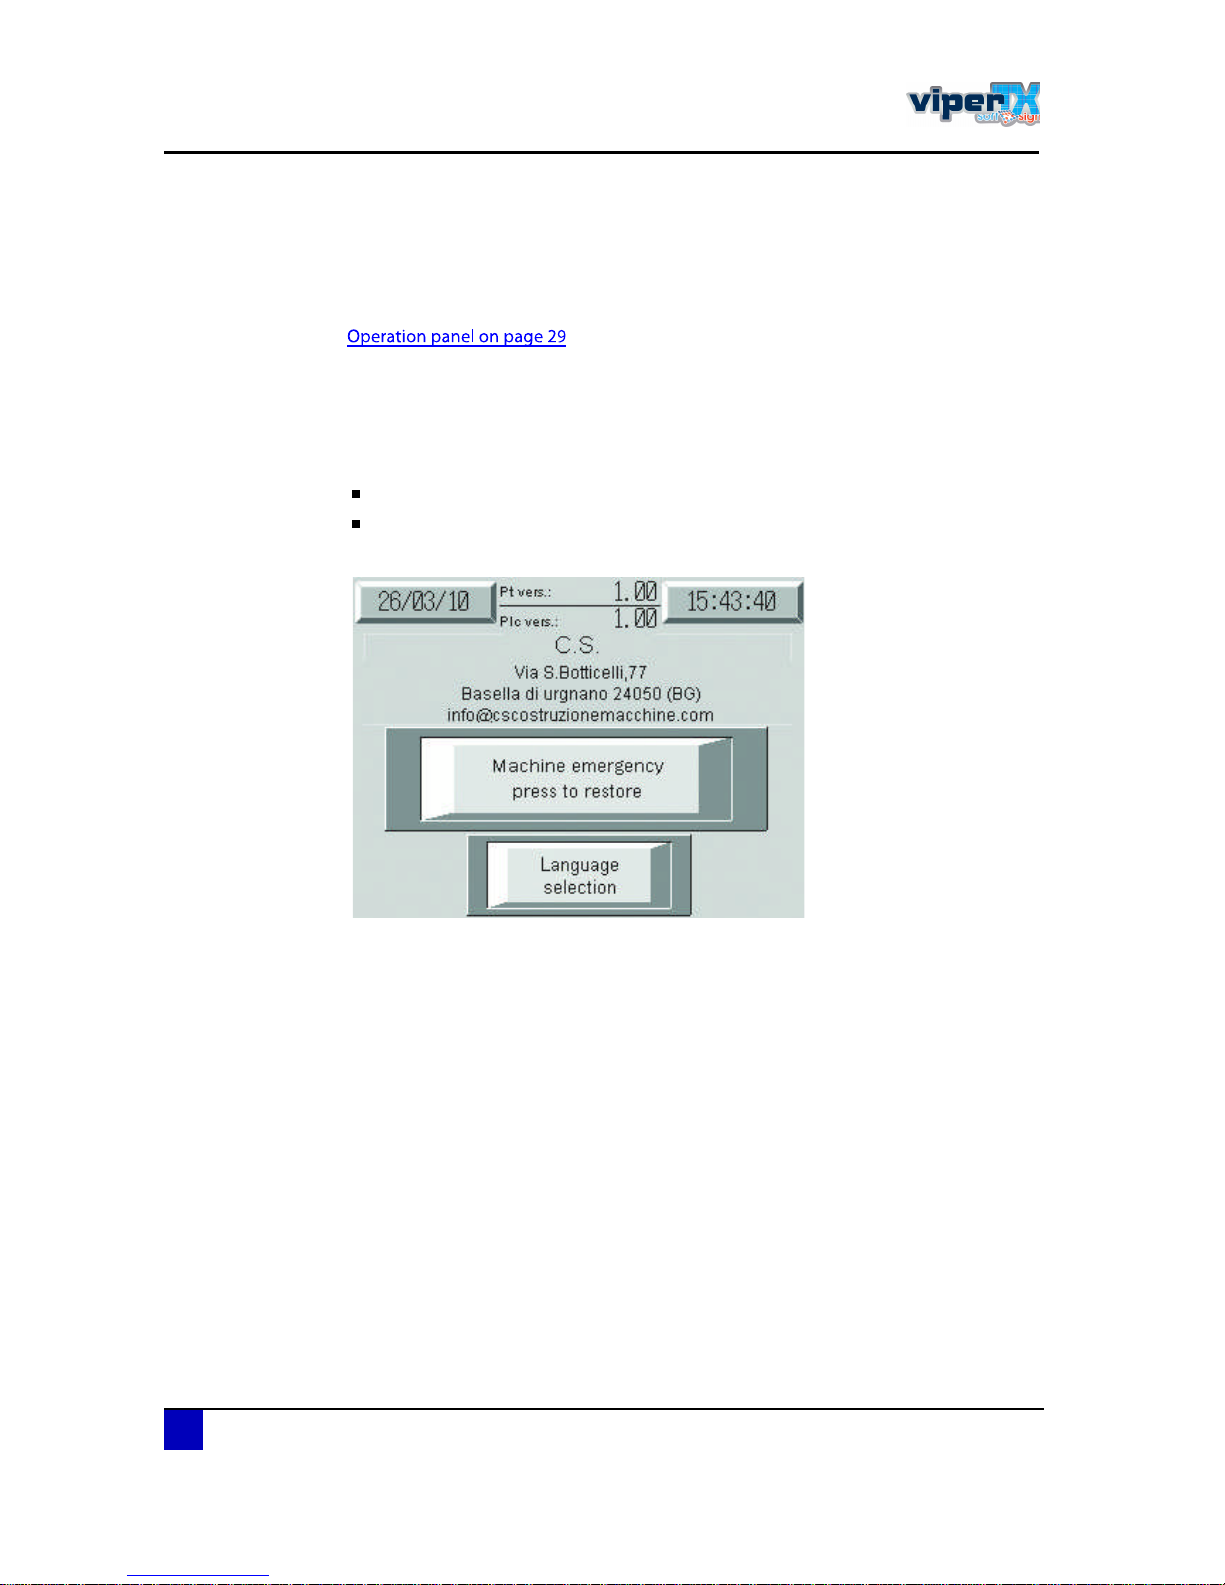
ͬ»° ìæ Push the machine emergency press to restore button to reset the emergency circuit.
ͬ»° ëæ Power ON the printer unit and wait until it is completely initialized to finalize the
restart procedure.
Page 45
Users Guide Viper TX Softsign
Printer handling
AP-75360 - Revision 1.2 45
3
3.3 Perfect fabric handling
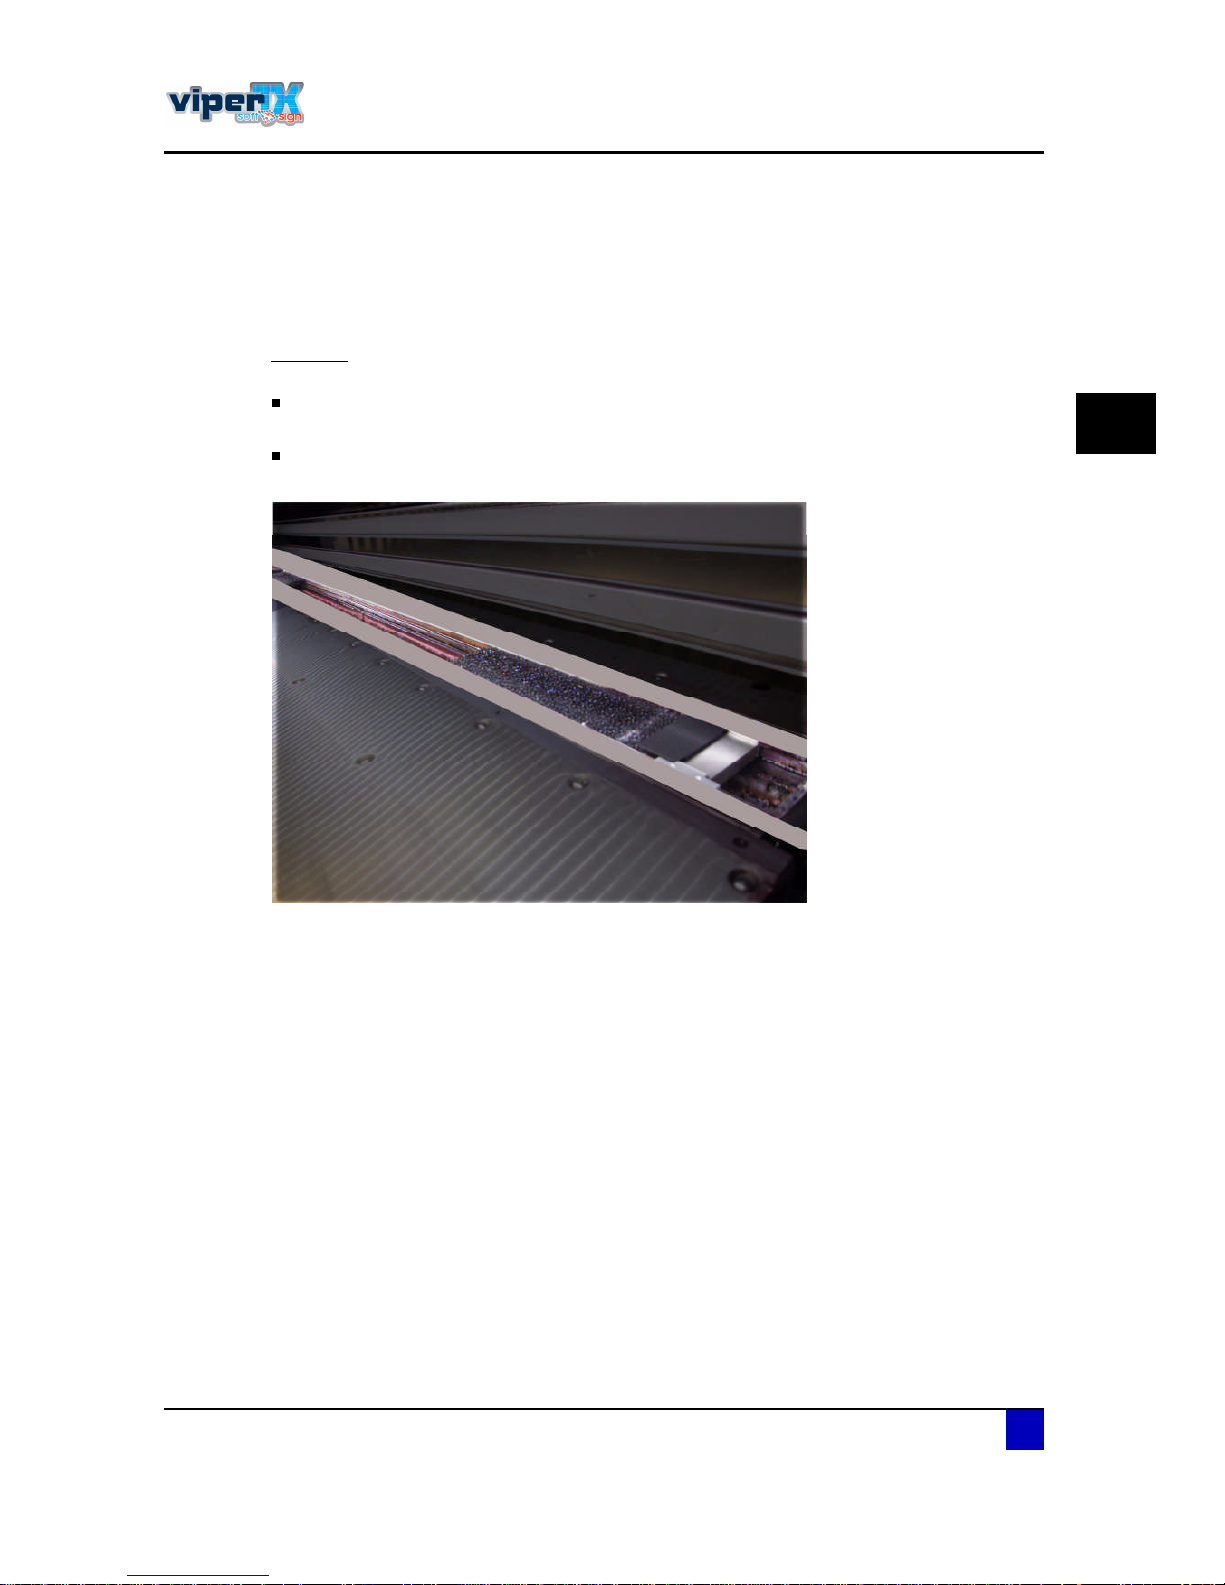
3.3.1 Ink gutter
Purpose
The gutter inhibits smearing of the ink at the backside of the fabric allowing printing onto
fabrics with an open structure.
Ink printed through the fabric will be received in an ink gutter and will be drained away to
the waste bottle.
Page 46
Users Guide Viper TX Softsign
Printer handling
46 AP-75360 - Revision 1.2
3.3.2 Fabric retainers
Purpose
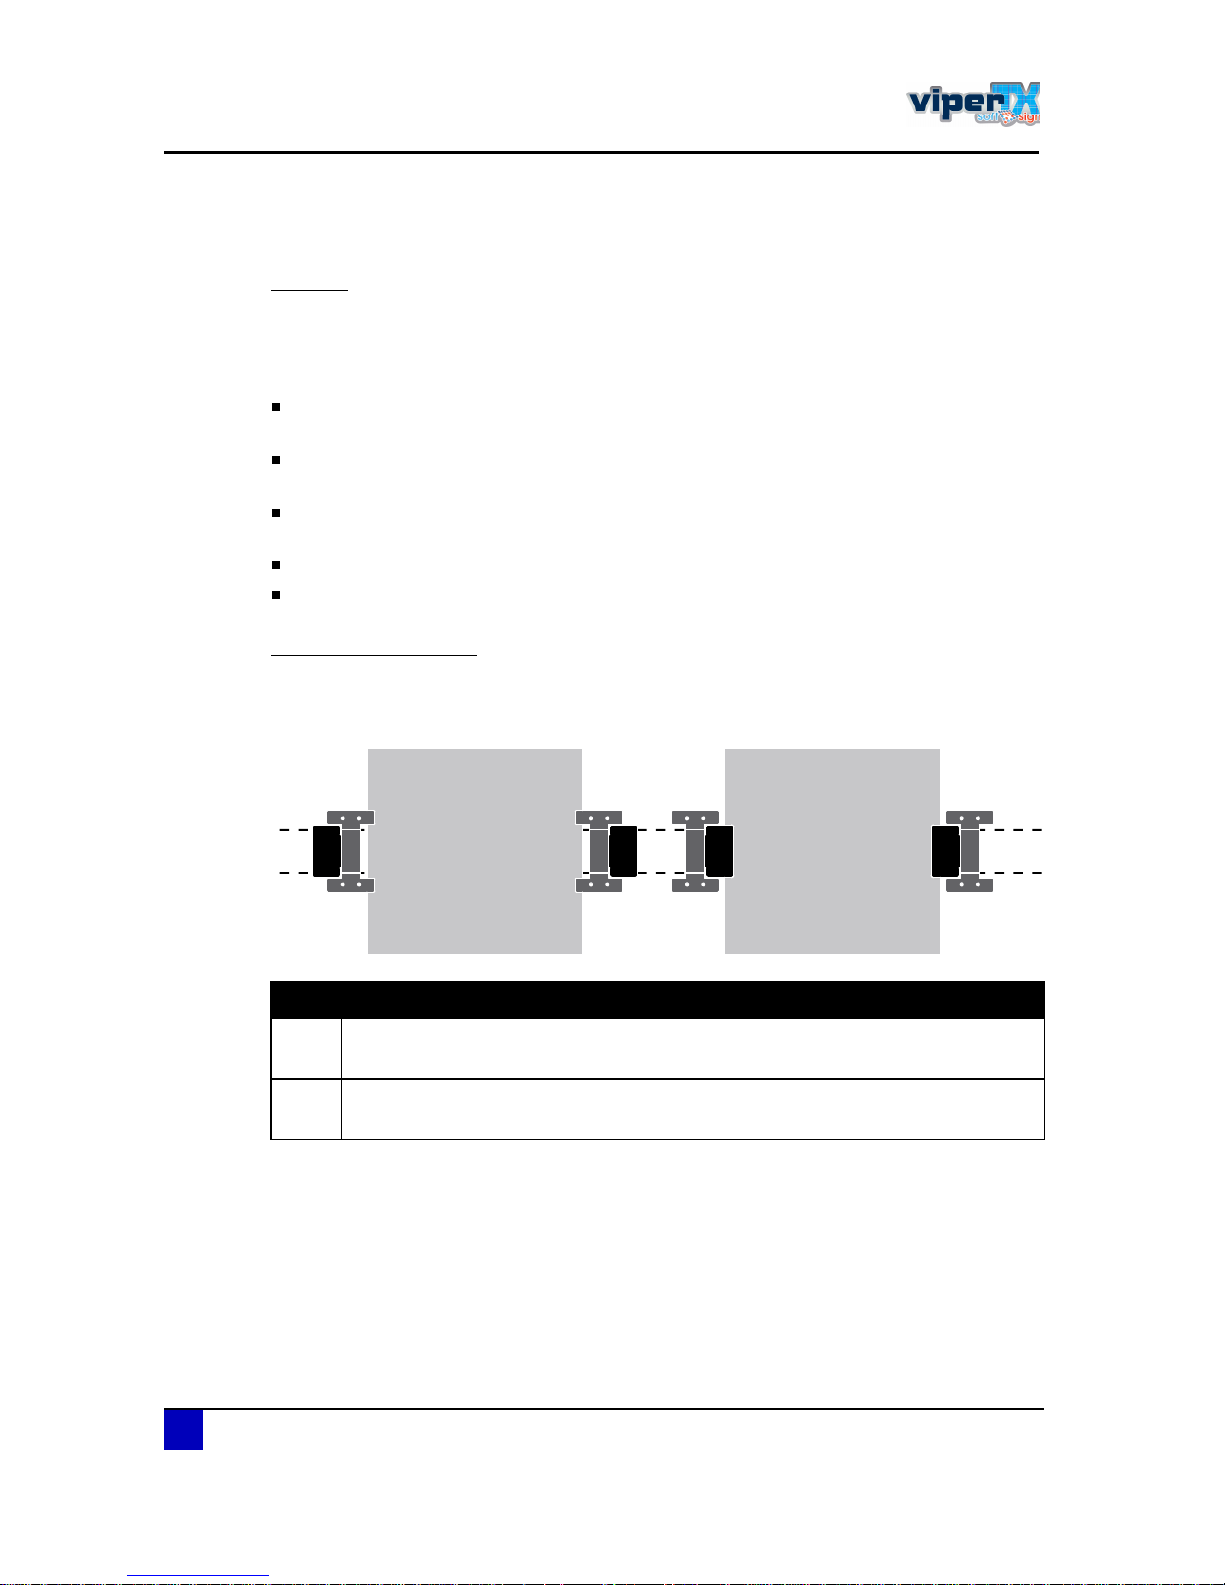
Fabric retainers has been developed to avoid that the edges of the fabrics curl up and cause
headstrikes and a bad printing output. They fit in the gutter and leave space at the bottom for
the ink to flow away to the waste bottle.
Always use the fabric retainers when the fabric has rough finished borders (fabric
without self edges).
Make sure you place the fabric retainers before you perform the fabric detection,
otherwise the printer will print onto the fabric retainers.
Verify if the fabric retainers are firmly fixed inside the gutter to prevent contact with the
print head.
Make sure the fabric's border is positioned under the top plate of the fabric retainer.
Make sure the fabric does not sag or catch the fabric retainer.
Installation procedure
The fabric retainers have 2 usable sides. Depending on the type of fabric, the retainer should
be installed according to it as you can see below:
ï î
N° Description
ï
For fabrics which have sharp and straight edges.
Edge-to-edge printing will be possible.
î
For hairy fabrics with curling edges.
Edge-to-edge printing will be impossible.
Page 47
Users Guide Viper TX Softsign
Printer handling
AP-75360 - Revision 1.2 47
3
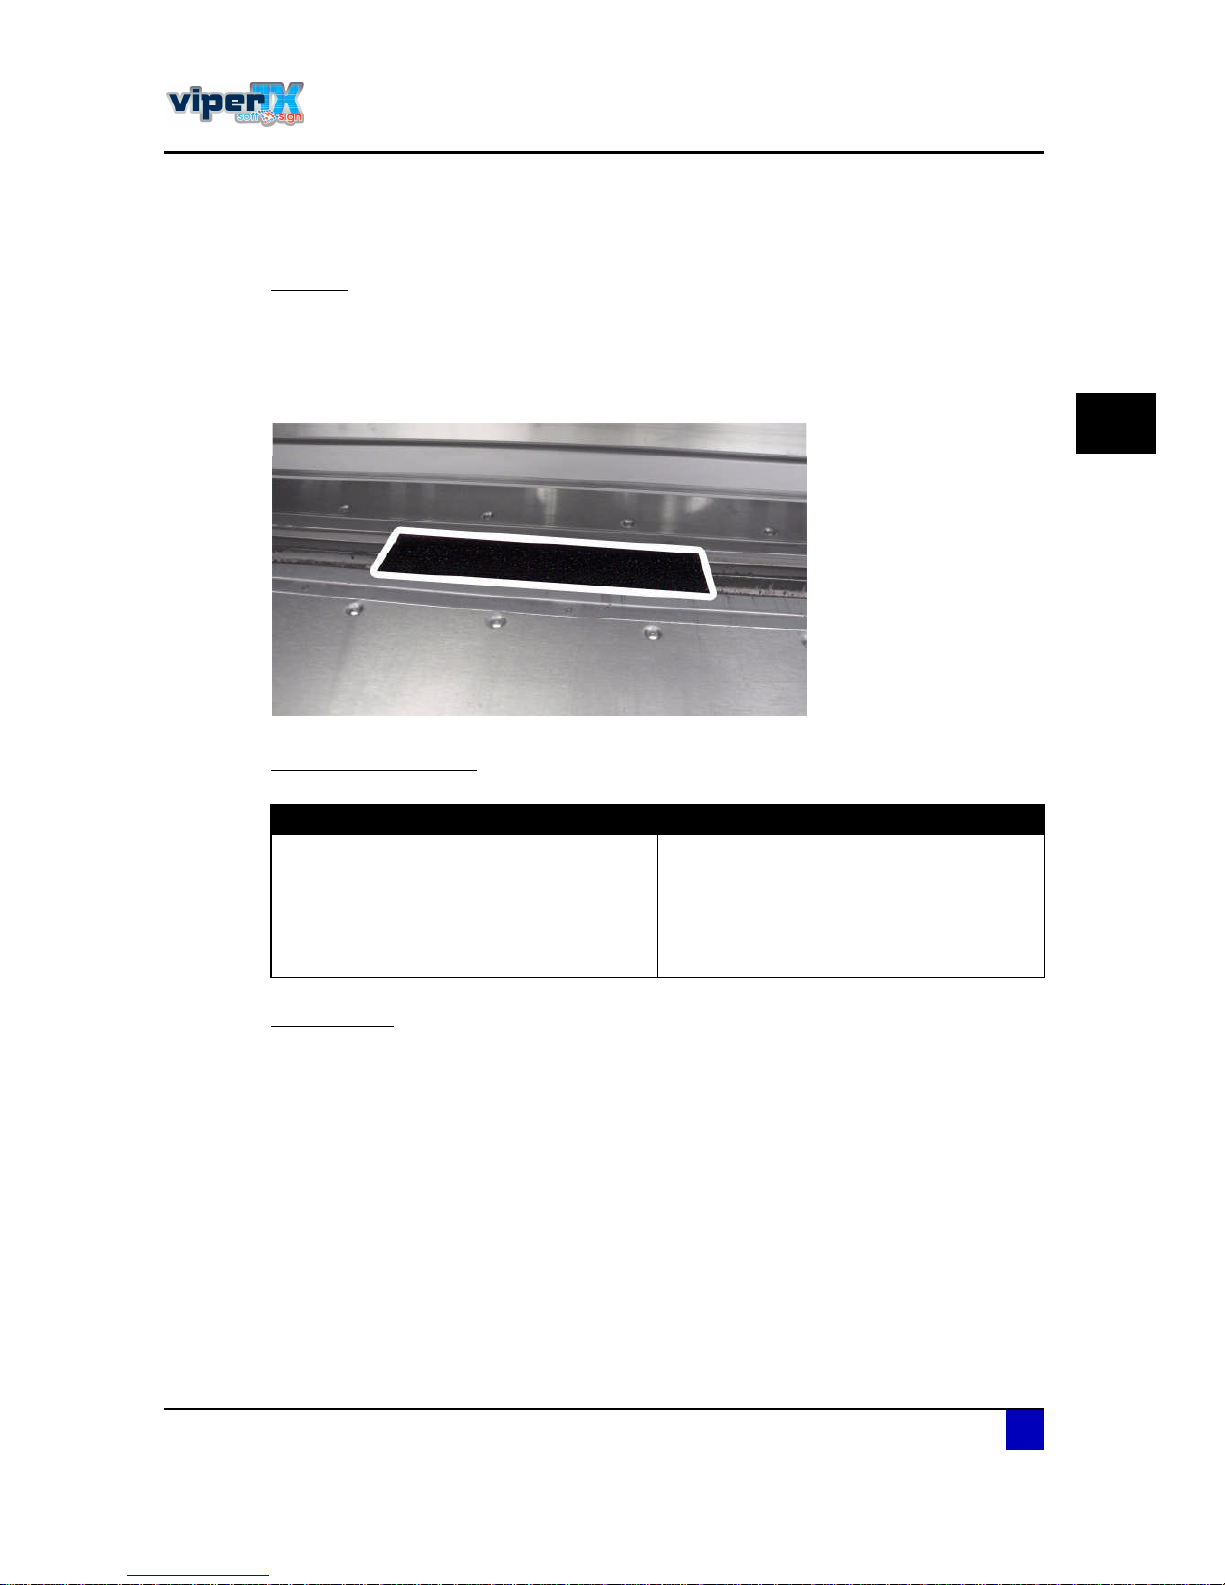
3.3.3 Ink absorbents
Purpose
These absorbents are developed to absorb the ink spoiled at the edges of the fabrics. This
tool is meant for especially edge-to-edge printing. It is also possible to install the absorbents
for standard printing (with margin) when you do not (need to) use the fabric retainers.
Consequently for fabrics with self edges.
Installation procedure
Maintenance
Rinse the absorbent with water when it is saturated with ink.
Edge-to-edge printing Regular printing
When printing edge-to-edge, you will print
wider than the fabric width. Maximum 5 cm
at both sides. Position the absorbent until
you have an extra 1 cm. So in this case 6
cm.
When leaving a margin while printing and
you do not (need to) use the fabric retainers,
it is recommended to install the absorbents
under the left and right edge of the fabric.
Make sure that there is 2 cm of the
absorbent visible.
Page 48
Users Guide Viper TX Softsign
Printer handling
48 AP-75360 - Revision 1.2
3.3.4 Head tactile sensor
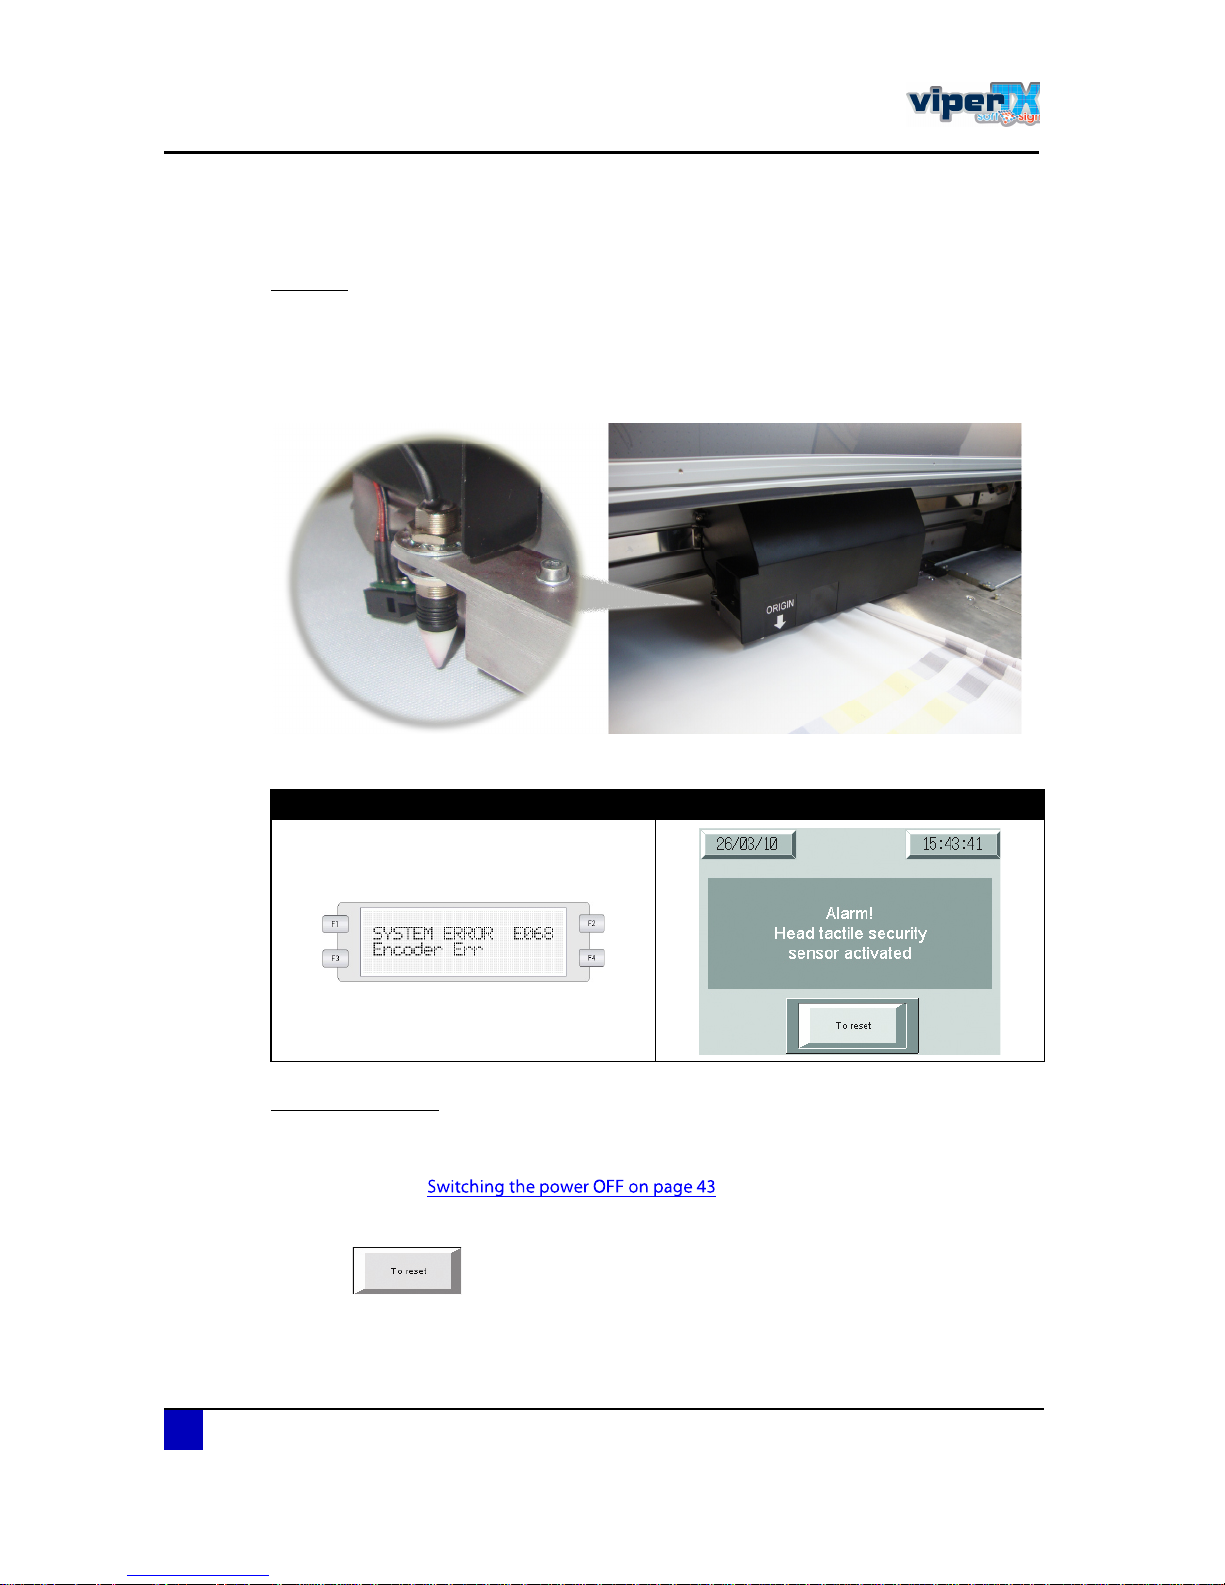
Purpose
It might be possible that the fabric starts to cockle during printing. To avoid that the heads
crash against the piled up fabric, a head tactile sensor is installed on the side of the carriage.
As soon as this sensor is activated (touches fabric or an other obstacle), as well the carriage
as the winding system will stop immediately.
As well the printer as fixation unit will go in error:
Restart procedure
ͬ»° ïæ Power OFF the printer.
Refer to
ͬ»° îæ Press the button to reset on the fixation unit control panel.
ͬ»° íæ Remove the jammed fabric and manually push back the carriage to its home
position.
ͬ»° ìæ Restart the printer.
Printer panel Fixation unit control panel
Page 49
Users Guide Viper TX Softsign
Printer handling
AP-75360 - Revision 1.2 49
3
3.4 Handy menu features
3.4.1 Adjustable head height
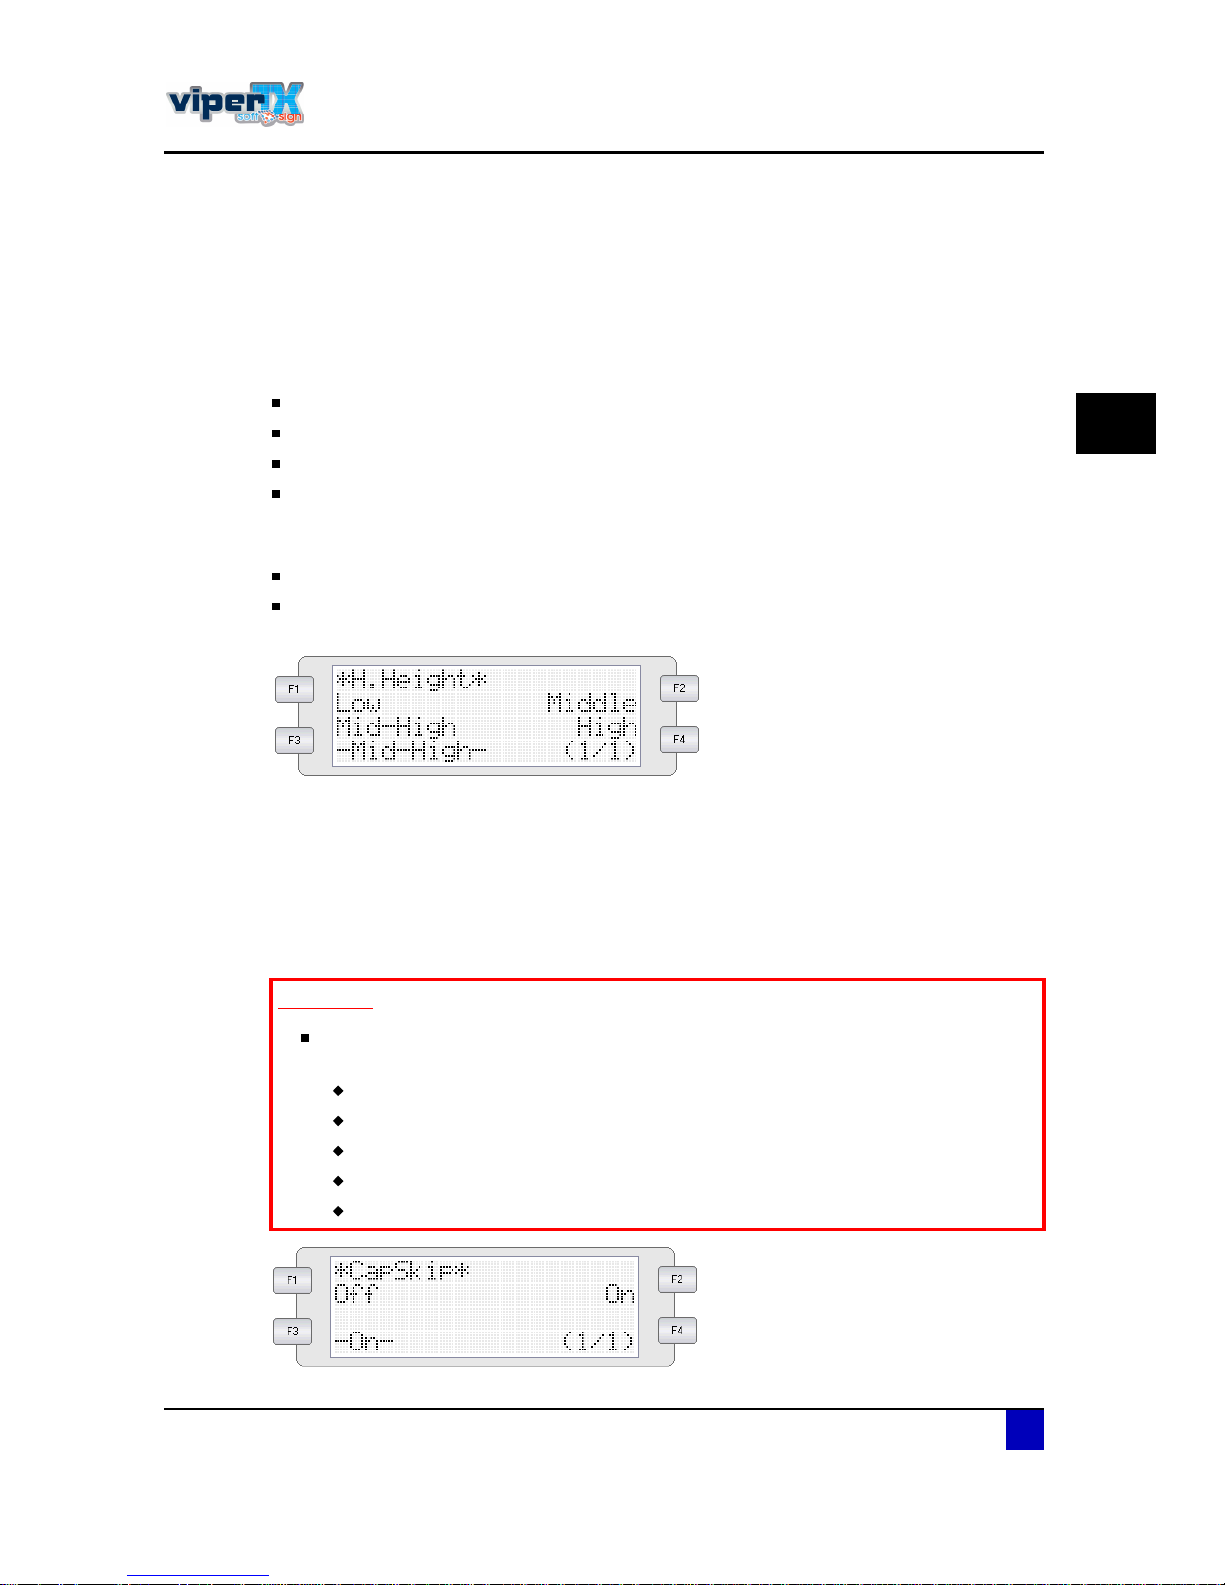
Some fabrics are very hairy and could touch the heads during printing. Therefore, different
head heights can be set:
Low (1,2 mm)
Middle (2,0 mm)
Mid-High (3,0 mm)
High (4,0 mm)
Set the distance (head height) between the print head and the fabric in relation to the amount
of fibres sticking out of the fabric
Always try to work with the lowest head height to obtain the best printing quality.
When the printheads touch the fabric or the fabric fibres while printing, set the head height
one setting higher.
3.4.2 Capskip
Default, after each job the carriage caps in to its home position. However, when printing
multiple jobs after each other, this is a waste of time and of continuity. When enabling this
function, the capping routine will be postponed for 15 seconds. If a new job is sent within this
time interval, the carriage will not cap in.
׳°±®¬¿²¬
Use this function only for print files with the same print speeds!Otherwise you
will have the following scenario:
Print job 1 @ speed of job 1
Fix part of printed job 1 @ speed of job 1
Print job 2 @ speed of job 2
Fix part of printed job 1 @ speed of job 2
Fix part of printed job 2 @ speed of job 2
Page 50
Users Guide Viper TX Softsign
Printer handling
50 AP-75360 - Revision 1.2
3.4.3 Continue feed for fixing
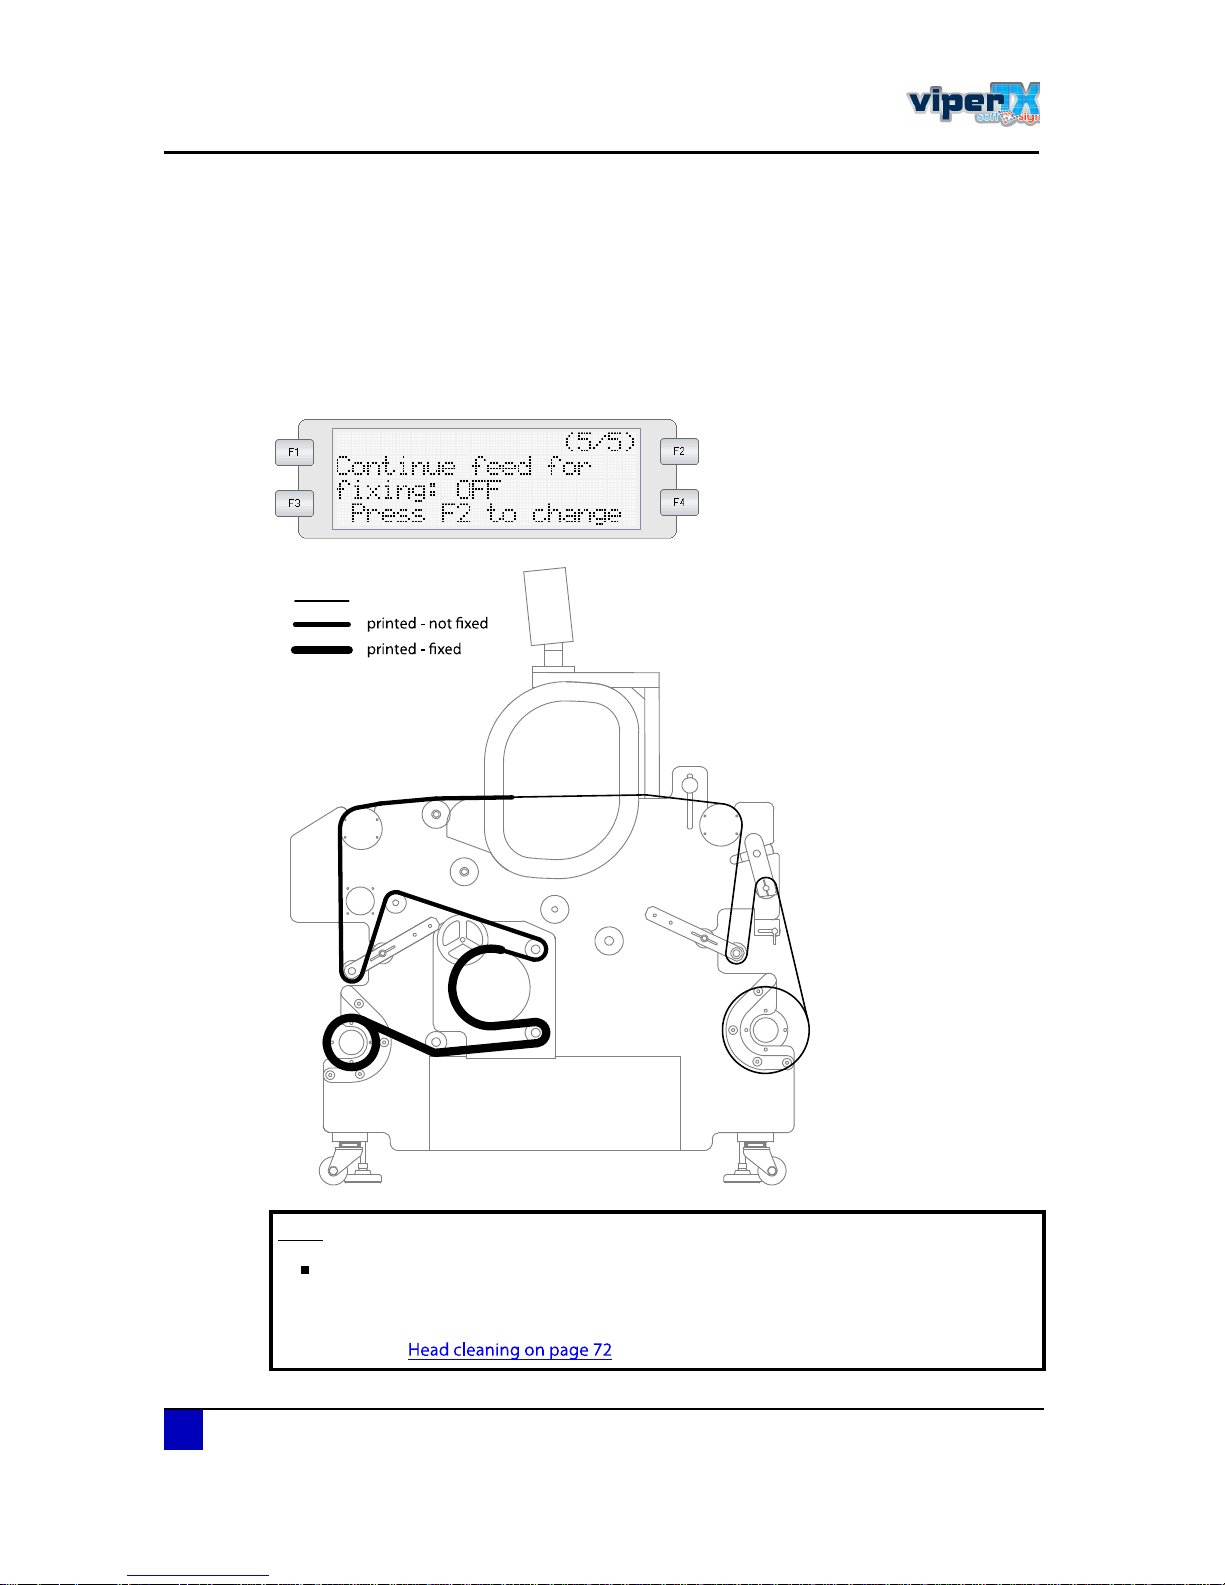
Standard, the fixation unit will stop feeding the fabric as from the moment the printer has
finished printing. This means that the last printed part will not be fixed by the heat fixation unit.
Therefore, this function can be enabled using the F2 key. When you change the parameter to
ON, the fixation unit will feed the fabric at the average printing speed of this job until
everything is fixed (approximately 3 meter). Thus, the speed of feeding depends on the print
mode chosen for this job.
²±¬ °®·²¬»¼
Ò±¬»
It is recommended to perform a normal cleaning as from the moment the
complete print has been fixed. This because the heads will stay uncapped for a
while.
Refer to
Page 51
Users Guide Viper TX Softsign
Printer handling
AP-75360 - Revision 1.2 51
3
3.4.4 Equal heating up of the heat fixation unit
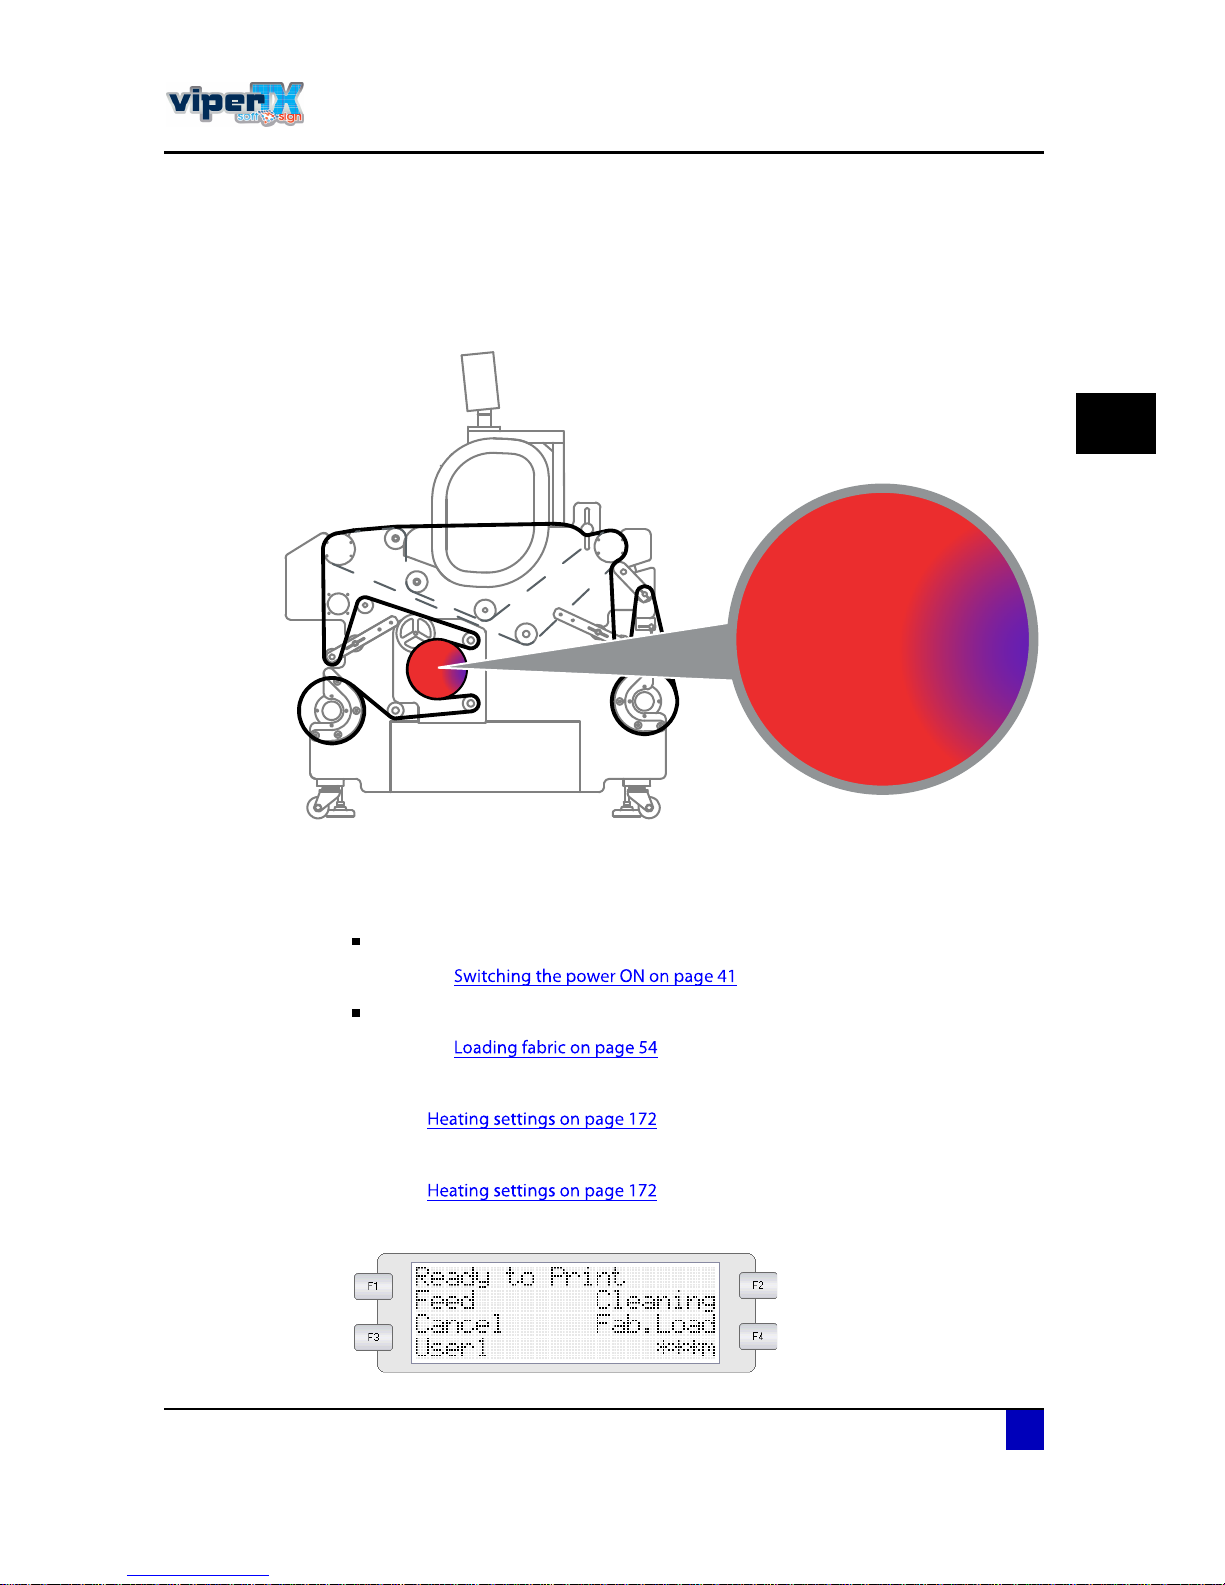
Before starting to print, it is very important that the heat fixation unit has an equal temperature
all around and inside. When heating up the heat fixation unit without moving it, the part where
fabric is loaded will be hotter than the other part (as visualised below).
To avoid this symptom, a special feature (calender stabilization) has been implemented in the
printer firmware. Follow the procedure below to know how to use this feature:
ͬ»° ïæ Be sure that
the fixation unit as printer units have been powered ON correctly.
Refer to
a roll of fabric is loaded correctly.
Refer to
ͬ»° îæ Set the temperature on the fixation unit control panel
Refer to
ͬ»° íæ Enable the calender heating system
Refer to
ͬ»° ìæ Be sure that the main menu is displayed on the printer menu.
½¿´»²¼»®
Page 52
Users Guide Viper TX Softsign
Printer handling
52 AP-75360 - Revision 1.2
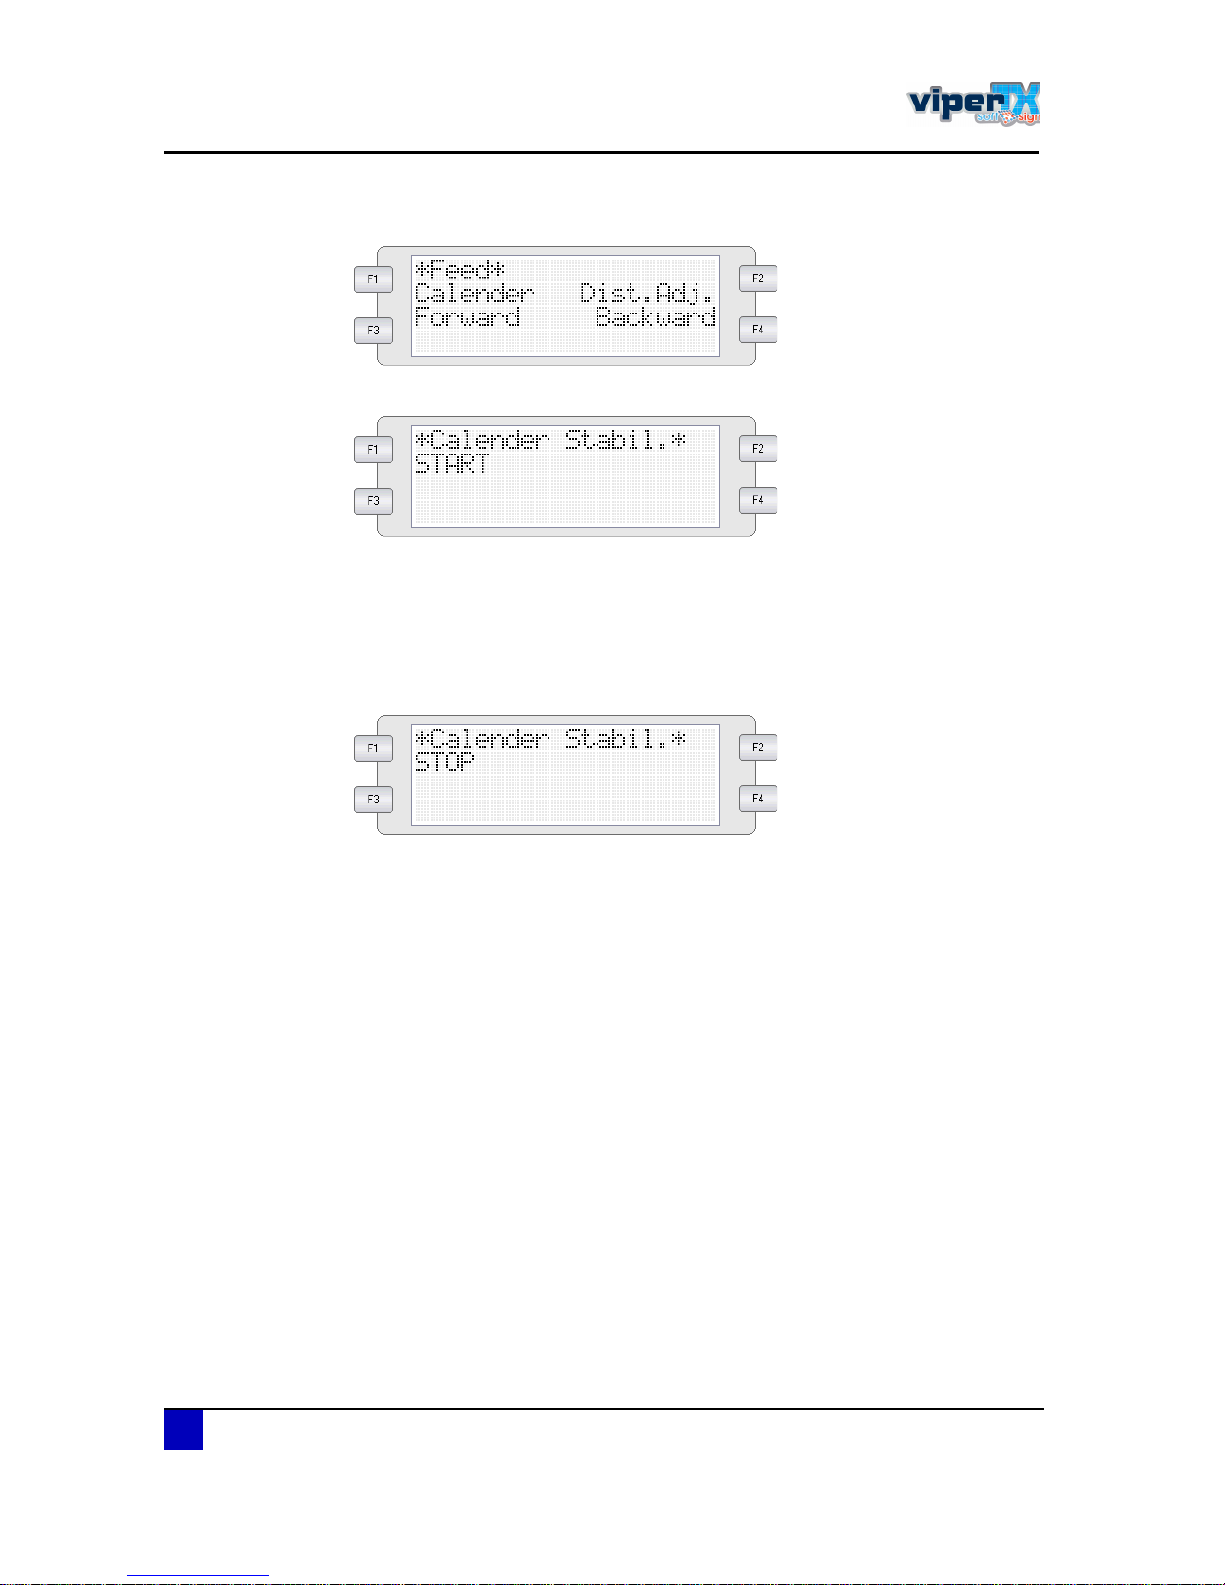
ͬ»° ëæ Press F1 to open the Feed menu.
ͬ»° êæ Press F1 to open the Calender menu.
m
ͬ»° éæ Press F1 to start the equal heating up cycle.
ͬ»° èæ The fabric will be continuously fed forward and reverse for 1,5 meter. During this
cycle, the heat fixation unit will turn also which will result in an equal heating up of
the heat fixation unit at all sides.
ͬ»° çæ Press F1 again to stop the heating up cycle. The fabric will be fed to the original
starting position again.
Page 53
Users Guide Viper TX Softsign
Printer handling
AP-75360 - Revision 1.2 53
3
3.5 Handling and loading fabrics
Loading and handling fabrics is one of the most important actions to take before you are able
to print. When the fabrics are not loaded properly, undesirable outputs could be the result.
3.5.1 Cautions on handling fabrics
Use fabric in an appropriate environment. Following are the appropriate temperature and
humidity ranges for printing.
Refer to the fabric supplier information to know the printable side of the fabric.
Please note that some inks require a humidity of more than 55%, other inks can be used at
30% humidity. Please contact your ink supplier for optimum printing conditions.
Do not touch the printable side of the fabric. Moisture or oil from hands affects the printing
quality.
Don't keep fabric in a wet or humid place because this can make the fabric bleed.
3.5.2 Cautions on storing fabrics
When storing fabric, pay attention to the following notes:
Store the fabric in horizontal position.
Place the fabric 24h before printing in the printing room.
Temperature Humidity
Recommended printing conditions 18°C - 30°C 35% to 80% without condensation
Rate of change within 2°C per hour within 5% per hour
Page 54
Users Guide Viper TX Softsign
Printer handling
54 AP-75360 - Revision 1.2
3.5.3 Loading fabric
Install an empty core and roll of fabric
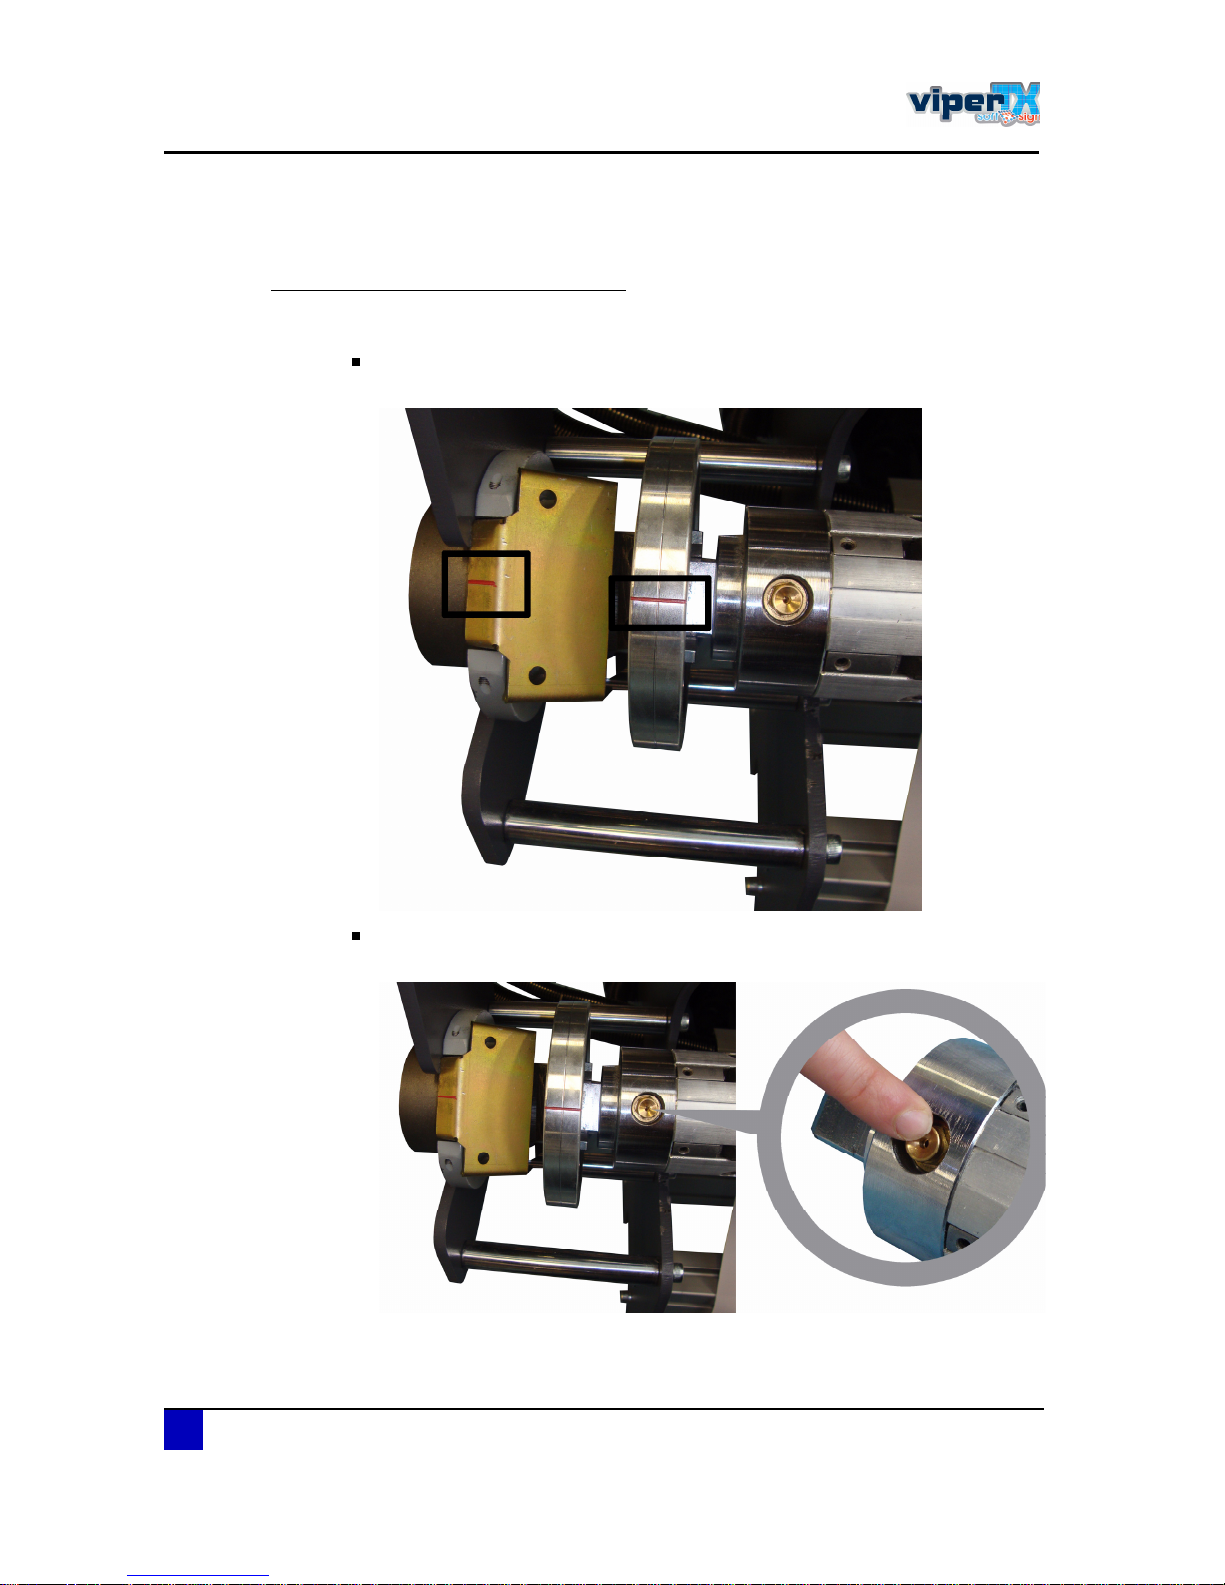
ͬ»° ïæ Remove the front and rear pneumatic shafts as follows:
Rotate the shaft using the fixation unit control panel (manual - inside or outside
unwinding) until the two red stripes are in one line.
In case there is a core installed, push the valve to remove the pressure on the
shaft.
Page 55
Users Guide Viper TX Softsign
Printer handling
AP-75360 - Revision 1.2 55
3
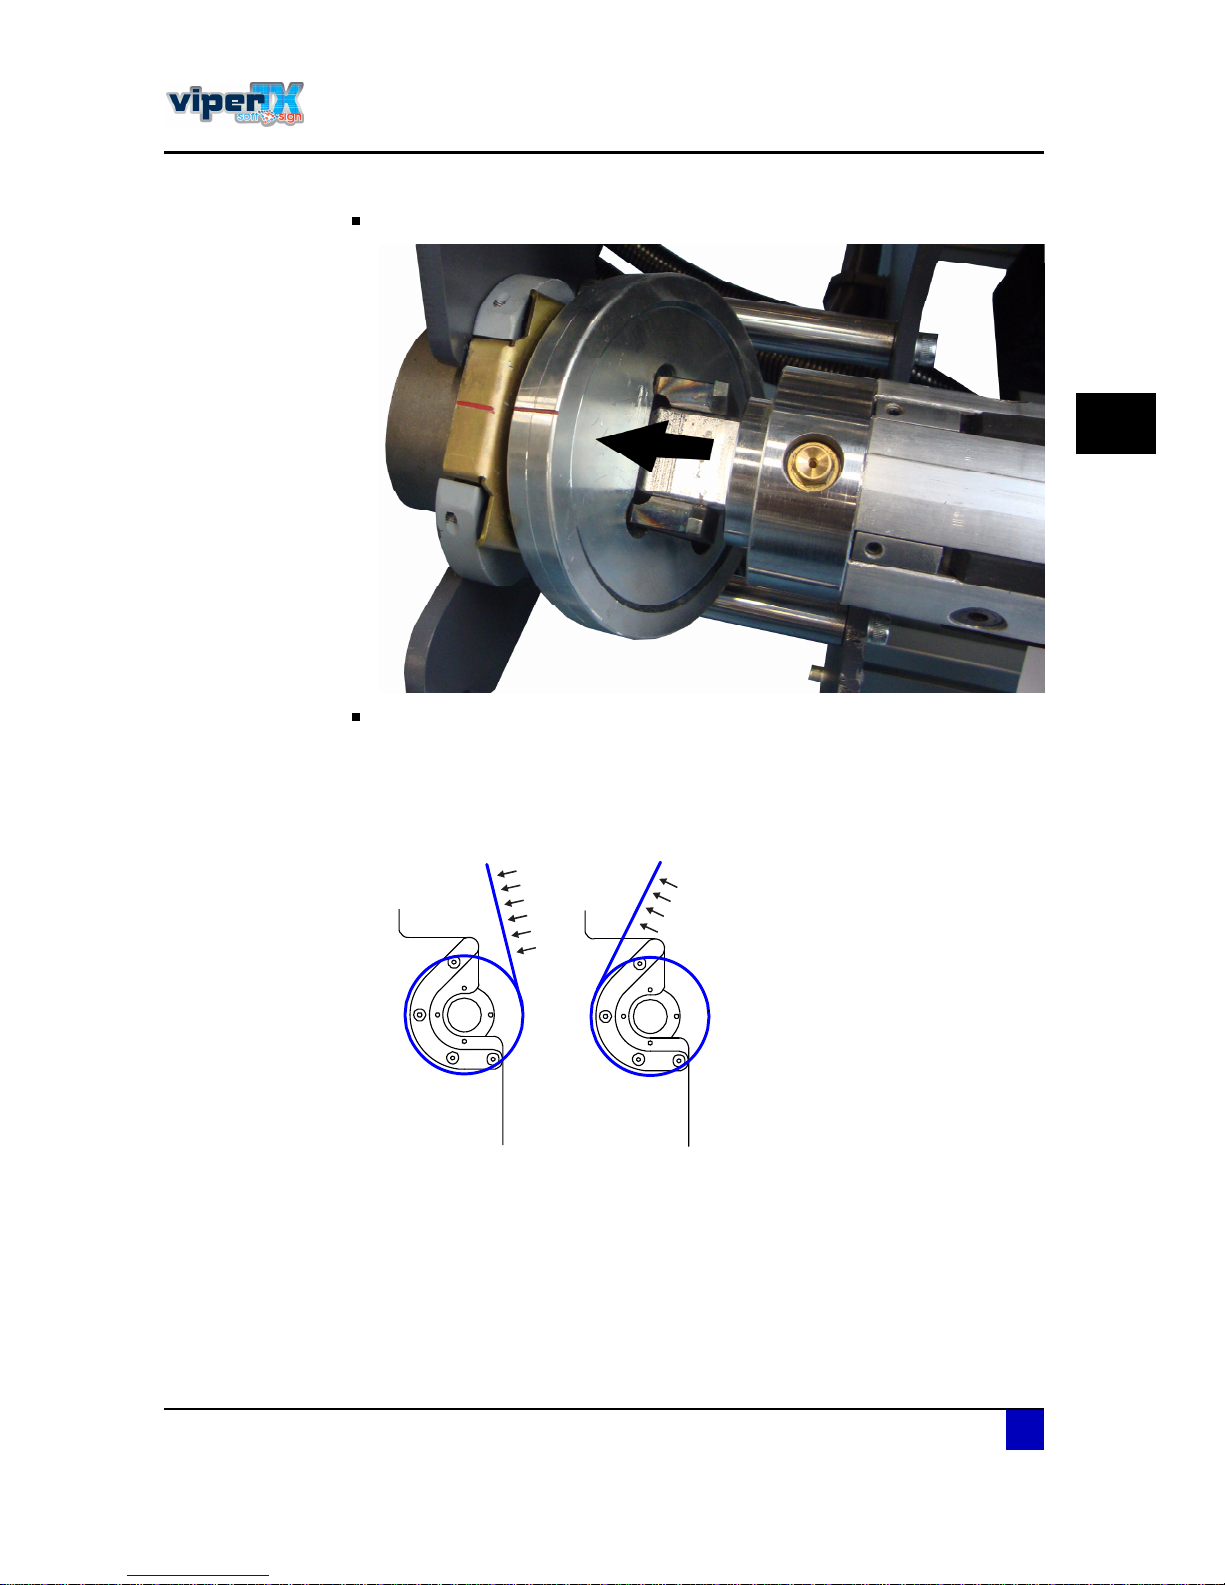
Push the left and right flanges to the outside.
Remove the shaft.
ͬ»° îæ Install an empty core on the front shaft and a roll of fabric on the rear shaft. Pay
attention that the roll of fabric is loaded correctly since fabrics are either inside or
outside printable.
ͬ»° íæ Reinstall the pneumatic shafts. Verify that the roll of fabric and empty core are
centre loaded.
TIP: You can measure the distance between the core and side plate of the Viper TX
Softsign at the front and rear, these distances should be the same.
ͬ»° ìæ Close the flanges of the unwinder roll unit.
p
±«¬-·¼» °®·²¬·²¹ ·²-·¼» °®·²¬·²¹
Page 56
Users Guide Viper TX Softsign
Printer handling
56 AP-75360 - Revision 1.2
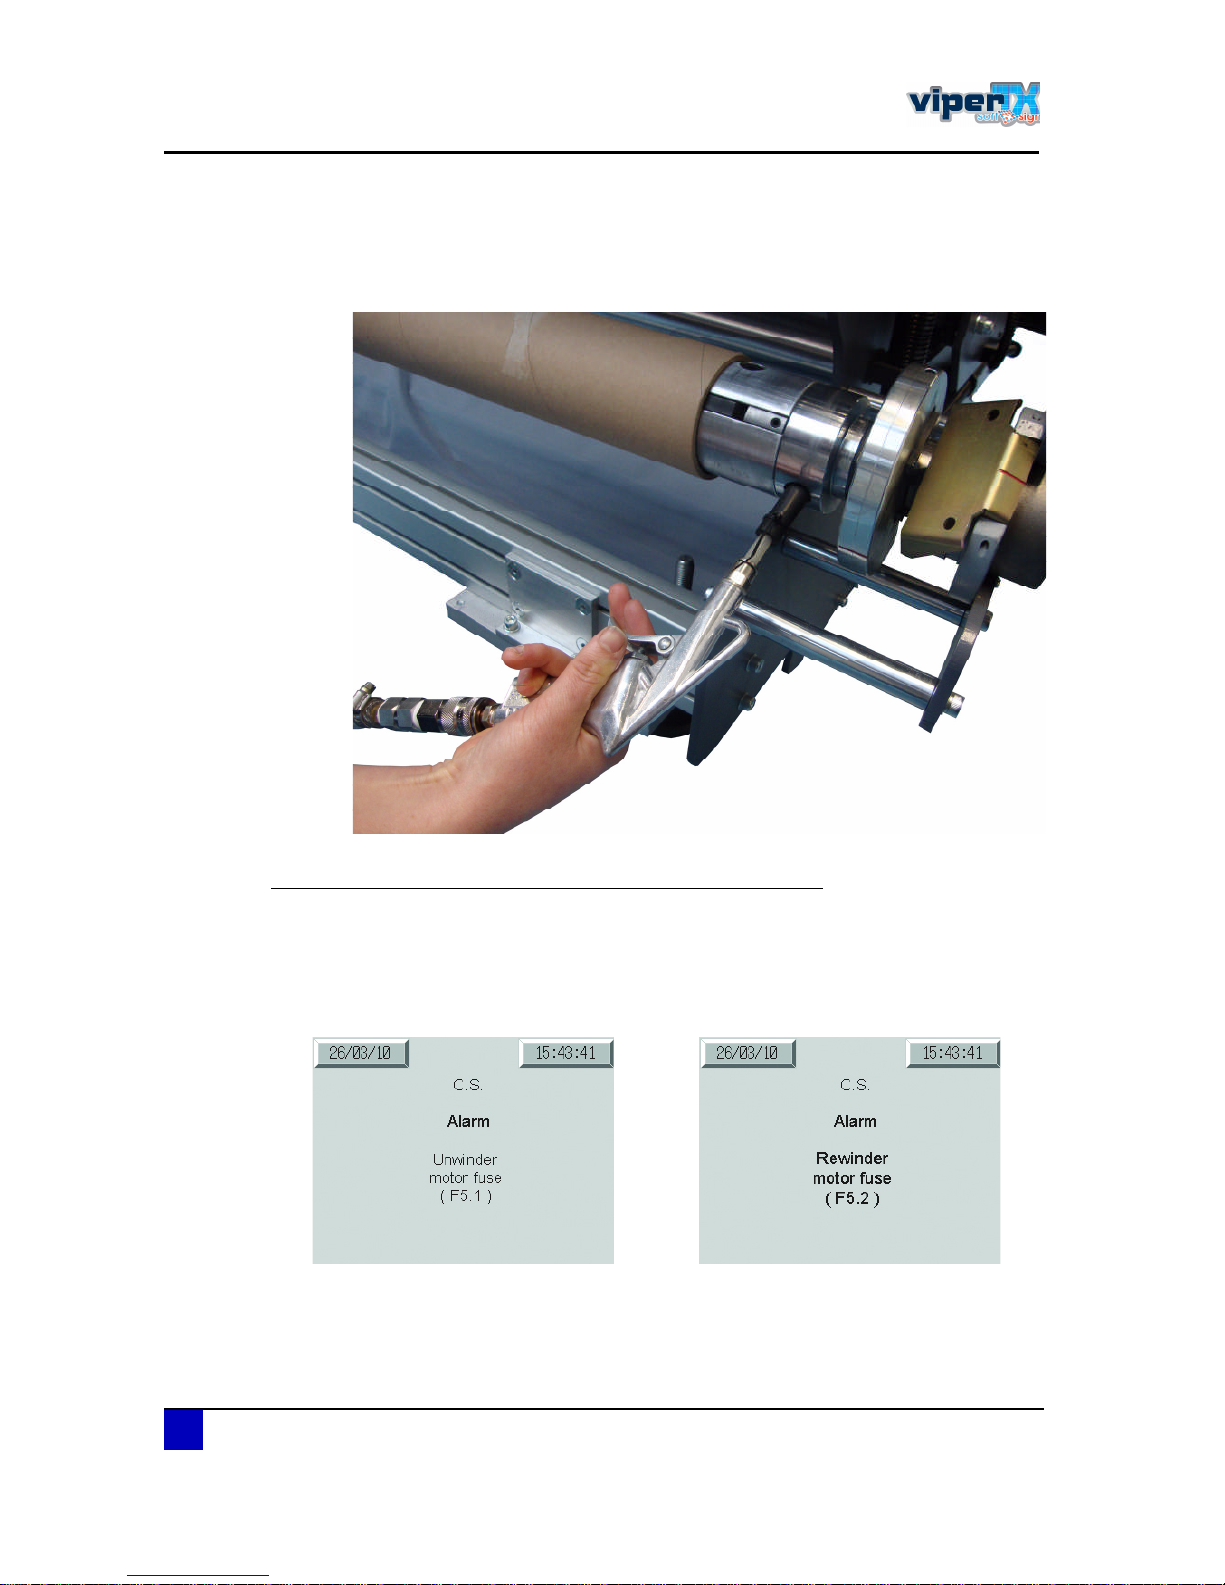
ͬ»° ëæ Apply compressed air to the front shaft until the empty core can not move anymore.
During the fabric loading process, it is important for the core of fabric to be
able to move slightly, therefore, do not already apply compressed air to the
rear shaft.
Make the correct settings on the fixation unit control panel
Before loading the fabric through the printer, it is very important to make the correct settings.
This to be sure all shaft are turning in the correct direction during fabric transport. In case you
have made the wrong settings, the motor fuses may blow. The following error will be
displayed on the fixation unit control panel in that case.
Page 57
Users Guide Viper TX Softsign
Printer handling
AP-75360 - Revision 1.2 57
3
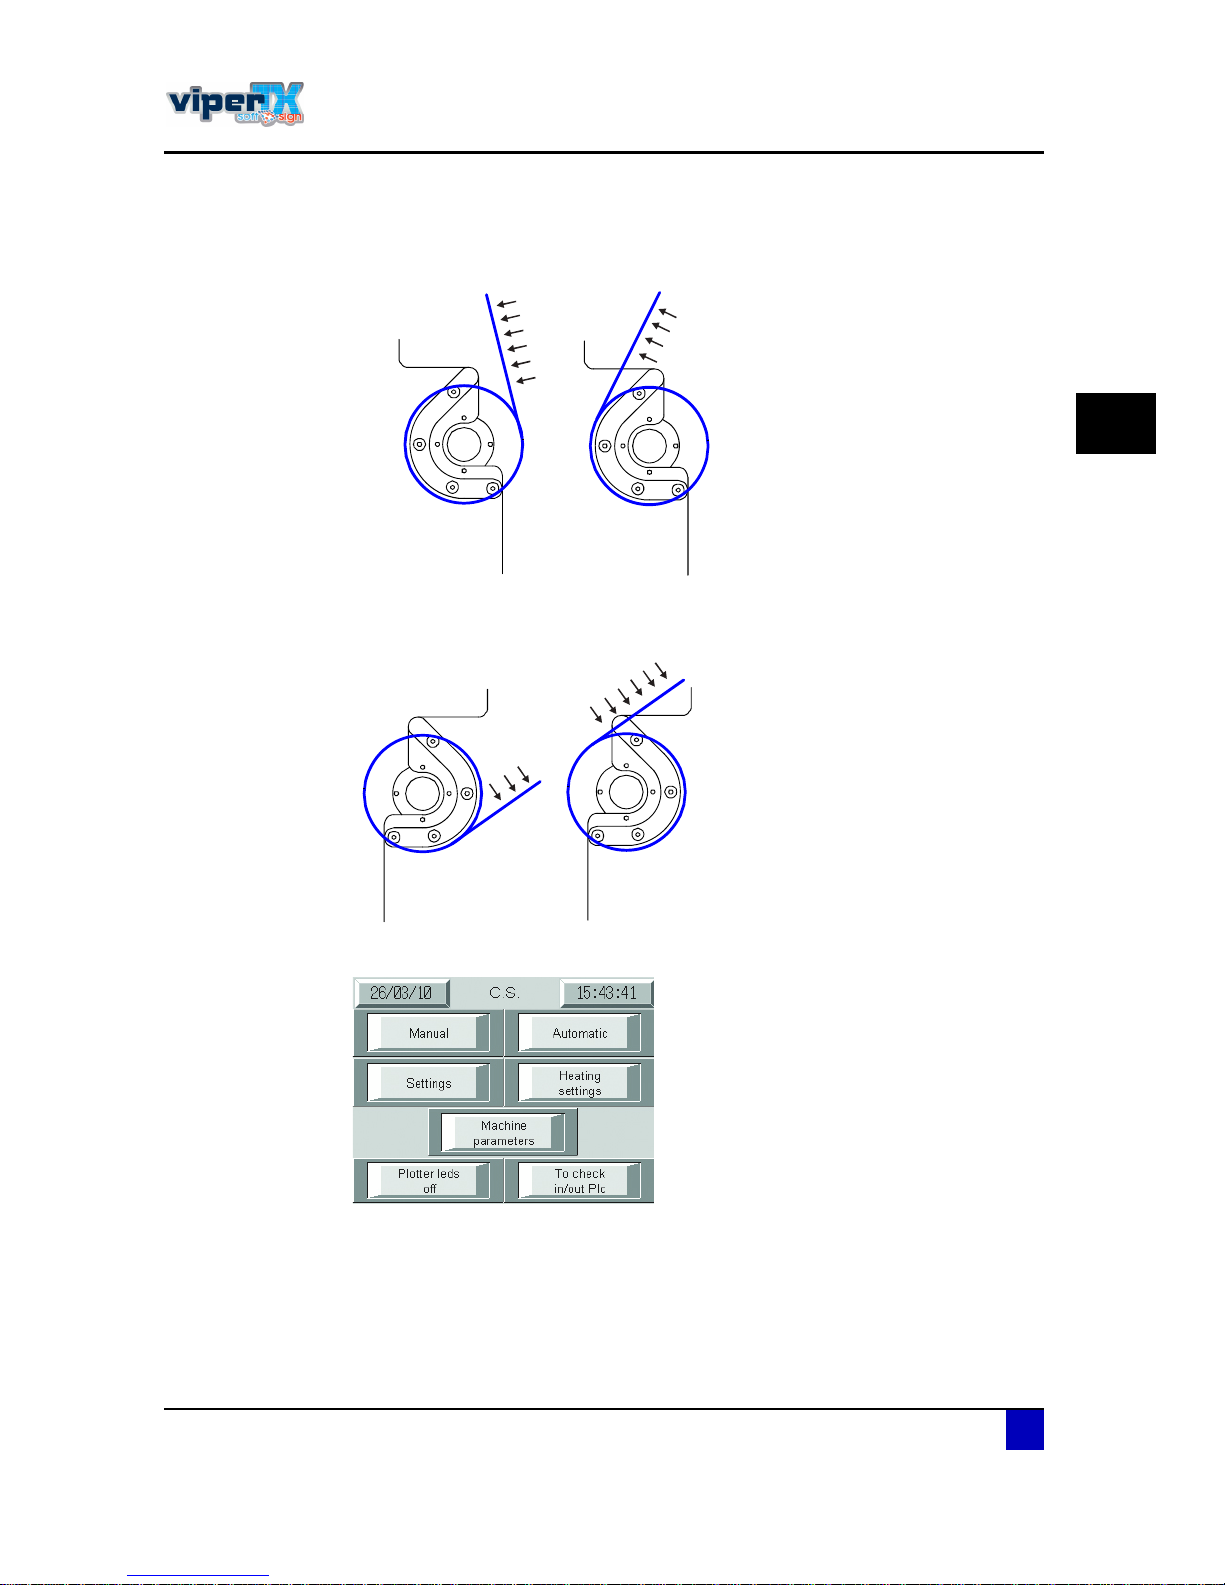
ͬ»° ïæ First of all you will have to know if the fabric is inside or outside printable.
ͬ»° îæ Secondly you need to know if you want to wind up the fabric inside or outside.
ͬ»° íæ Select settings in the mainscreen of the fixation unit control panel.
±«¬-·¼» °®·²¬·²¹ ·²-·¼» °®·²¬·²¹
·²-·¼» ©·²¼·²¹ ±«¬-·¼» ©·²¼·²¹
Page 58
Users Guide Viper TX Softsign
Printer handling
58 AP-75360 - Revision 1.2
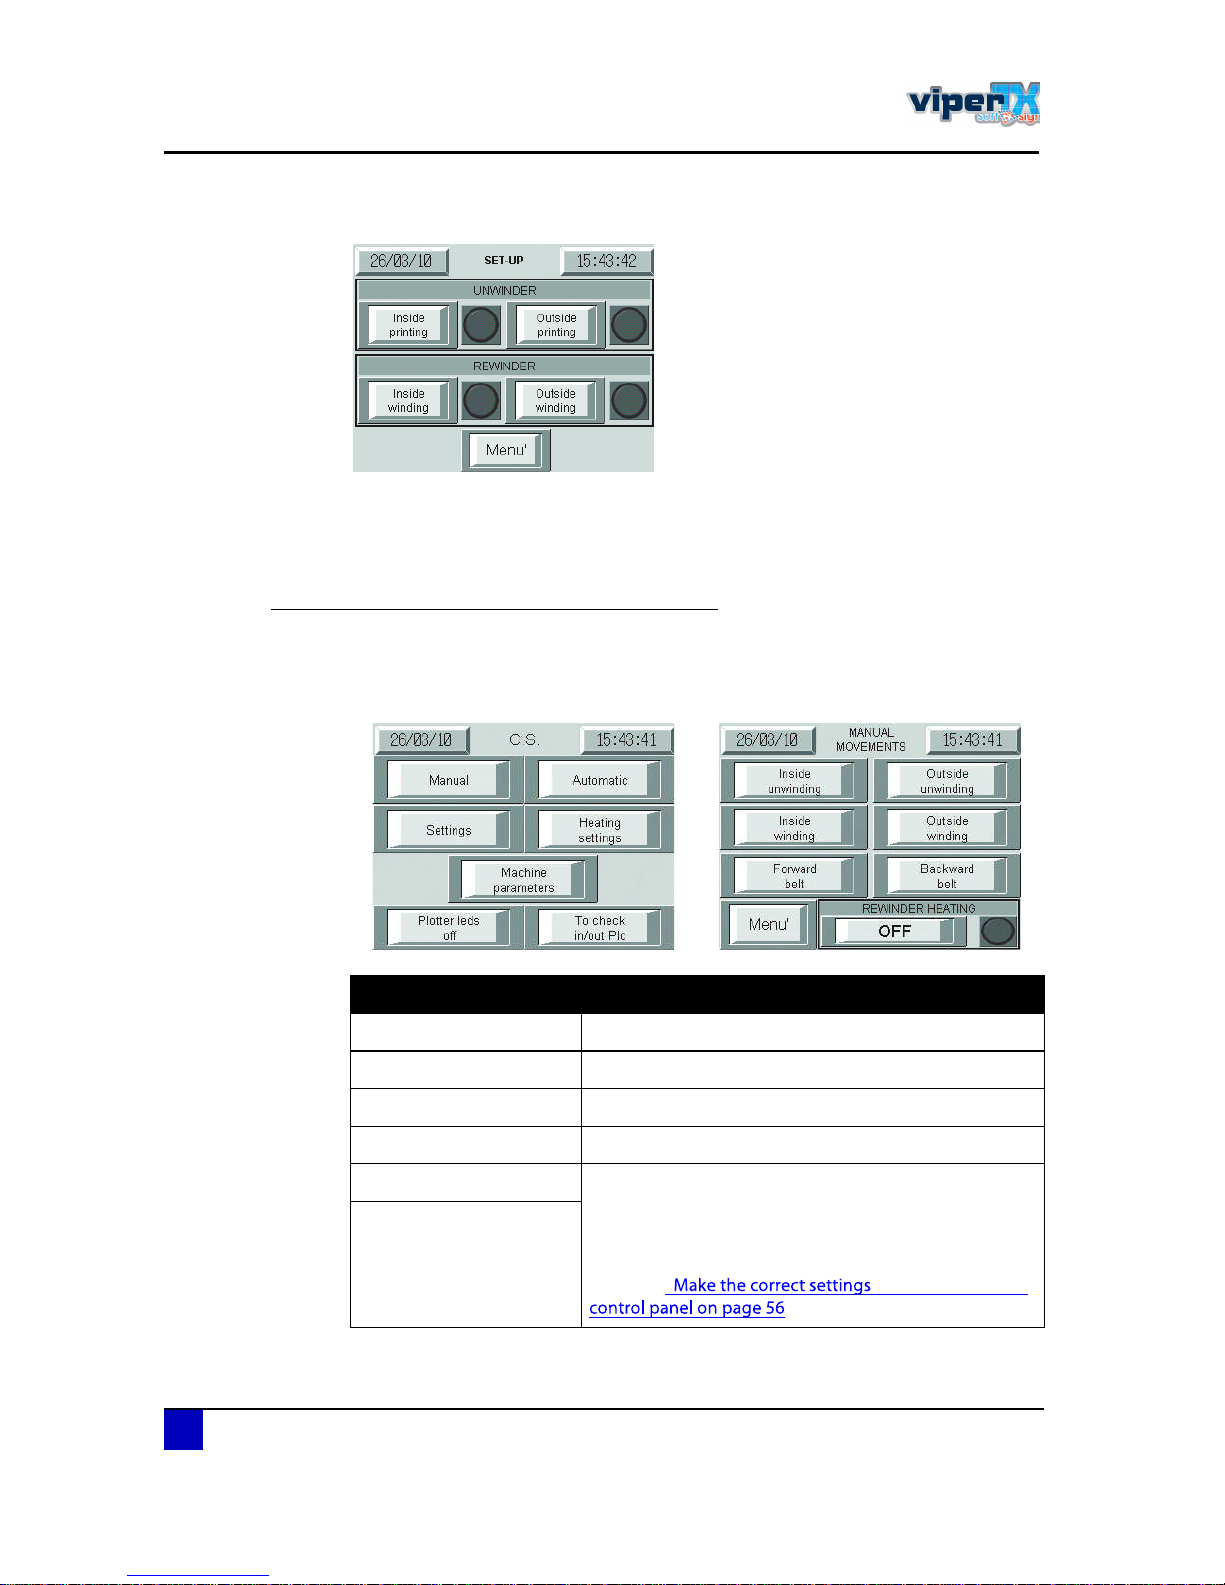
ͬ»° ìæ Select the correct configuration.
ͬ»° ëæ Go back to the main menu.
ͬ»° êæ As from now, the unwinder and winder will turn in the correct direction when feeding
the fabric.
Guide fabric through the rear side of the printer
ͬ»° ïæ Turn the fixation unit control panel to the back of the machine.
ͬ»° îæ Push on manual in the main screen to open the manual movements screen.
Description Function
Inside unwinding Unwind fabric which is inside printable
Outside unwinding Unwind fabric which is outside printable
Inside winding -
Outside winding -
Forward belt Rotate the belt forwards/backwards. The other shafts
will turn automatically in the correct direction on
condition the fabric depending settings are set
correctly
Refer to ±² ¬¸» º·¨¿¬·±² «²·¬
Backward belt
Page 59
Users Guide Viper TX Softsign
Printer handling
AP-75360 - Revision 1.2 59
3
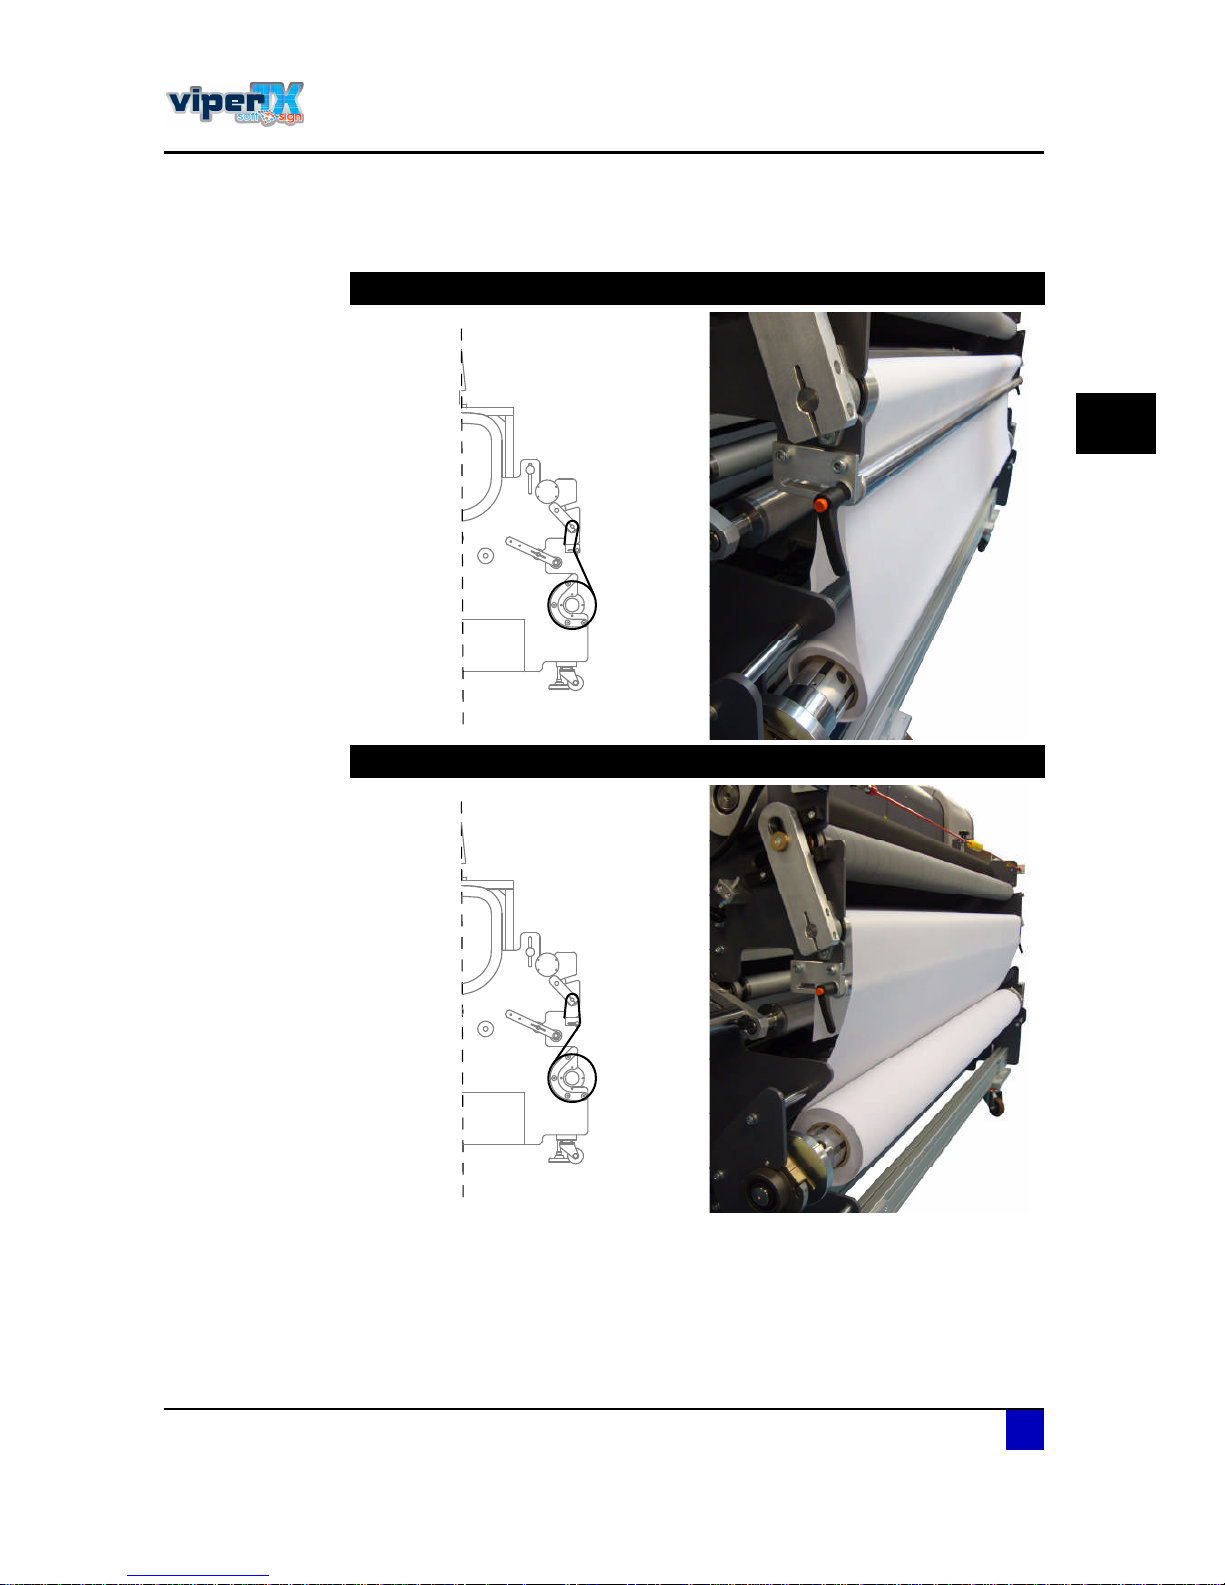
ͬ»° íæ Unwind the fabric and guide it behind the adjustable deflection bar and over the
static dancer bar.
Outside printable fabric
Inside printable fabric
Page 60
Users Guide Viper TX Softsign
Printer handling
60 AP-75360 - Revision 1.2
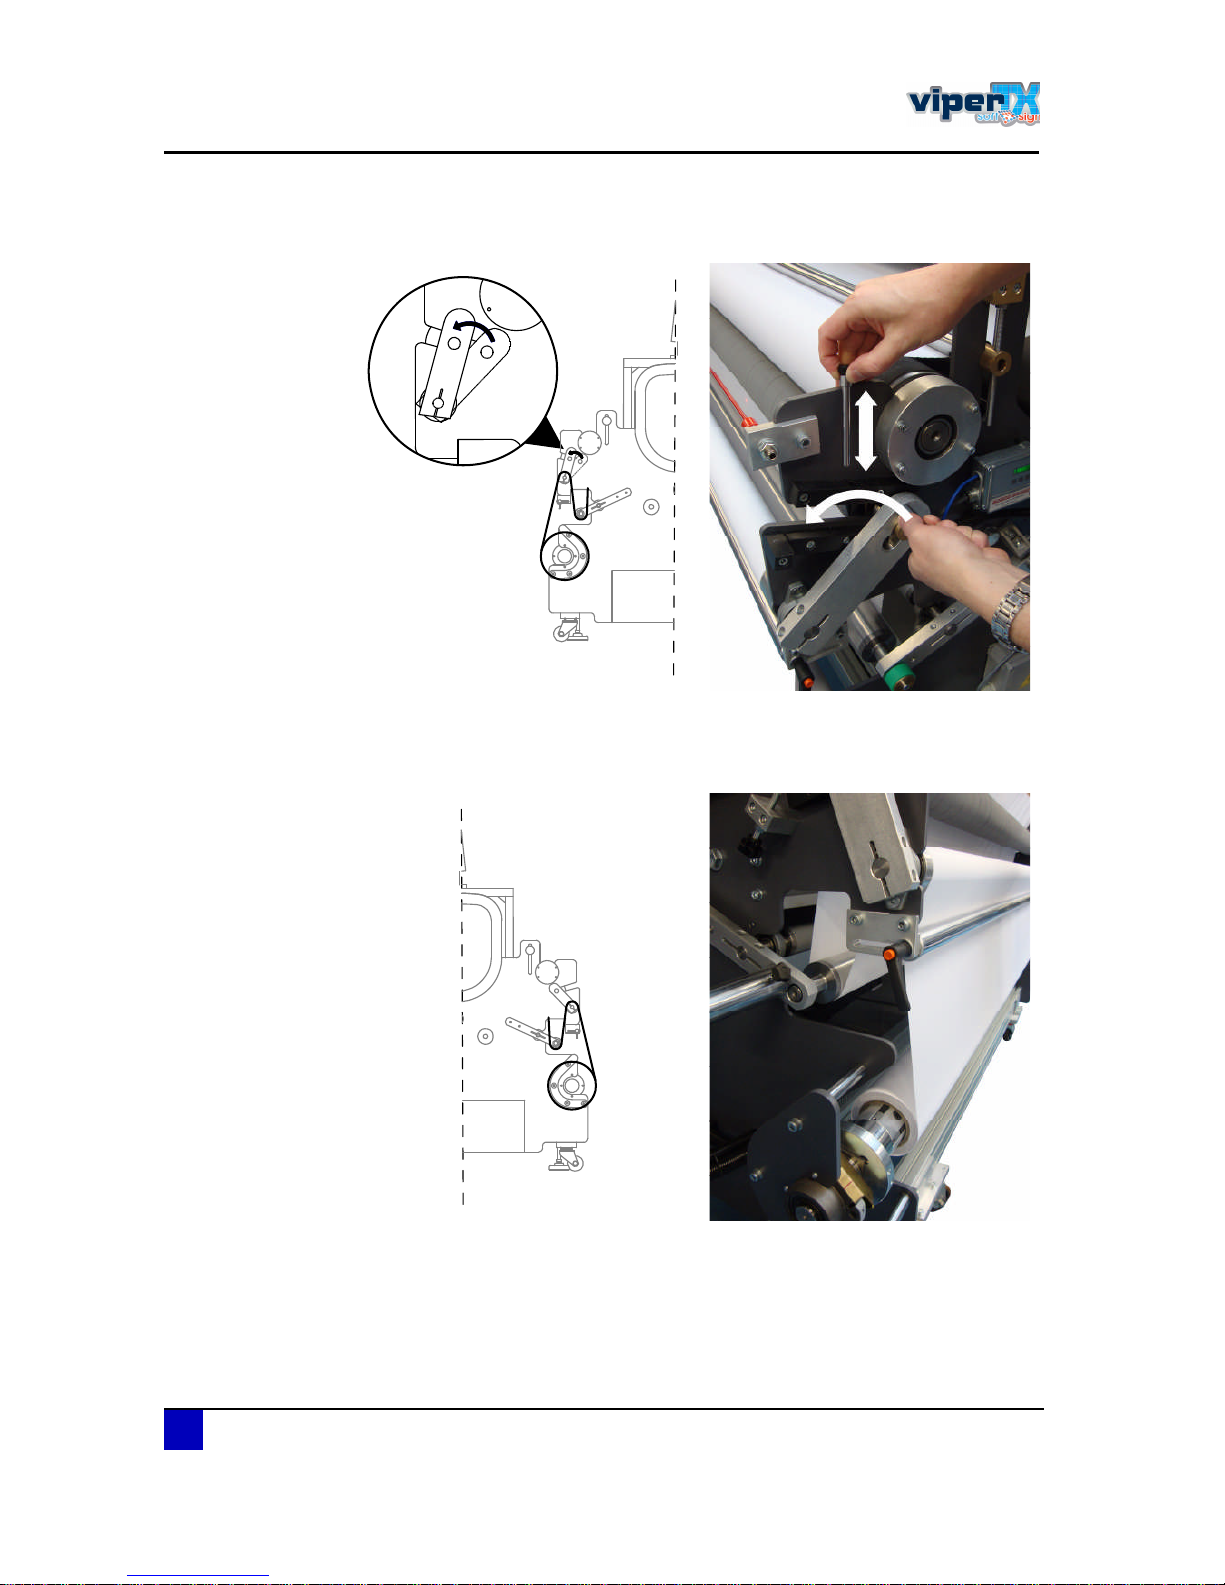
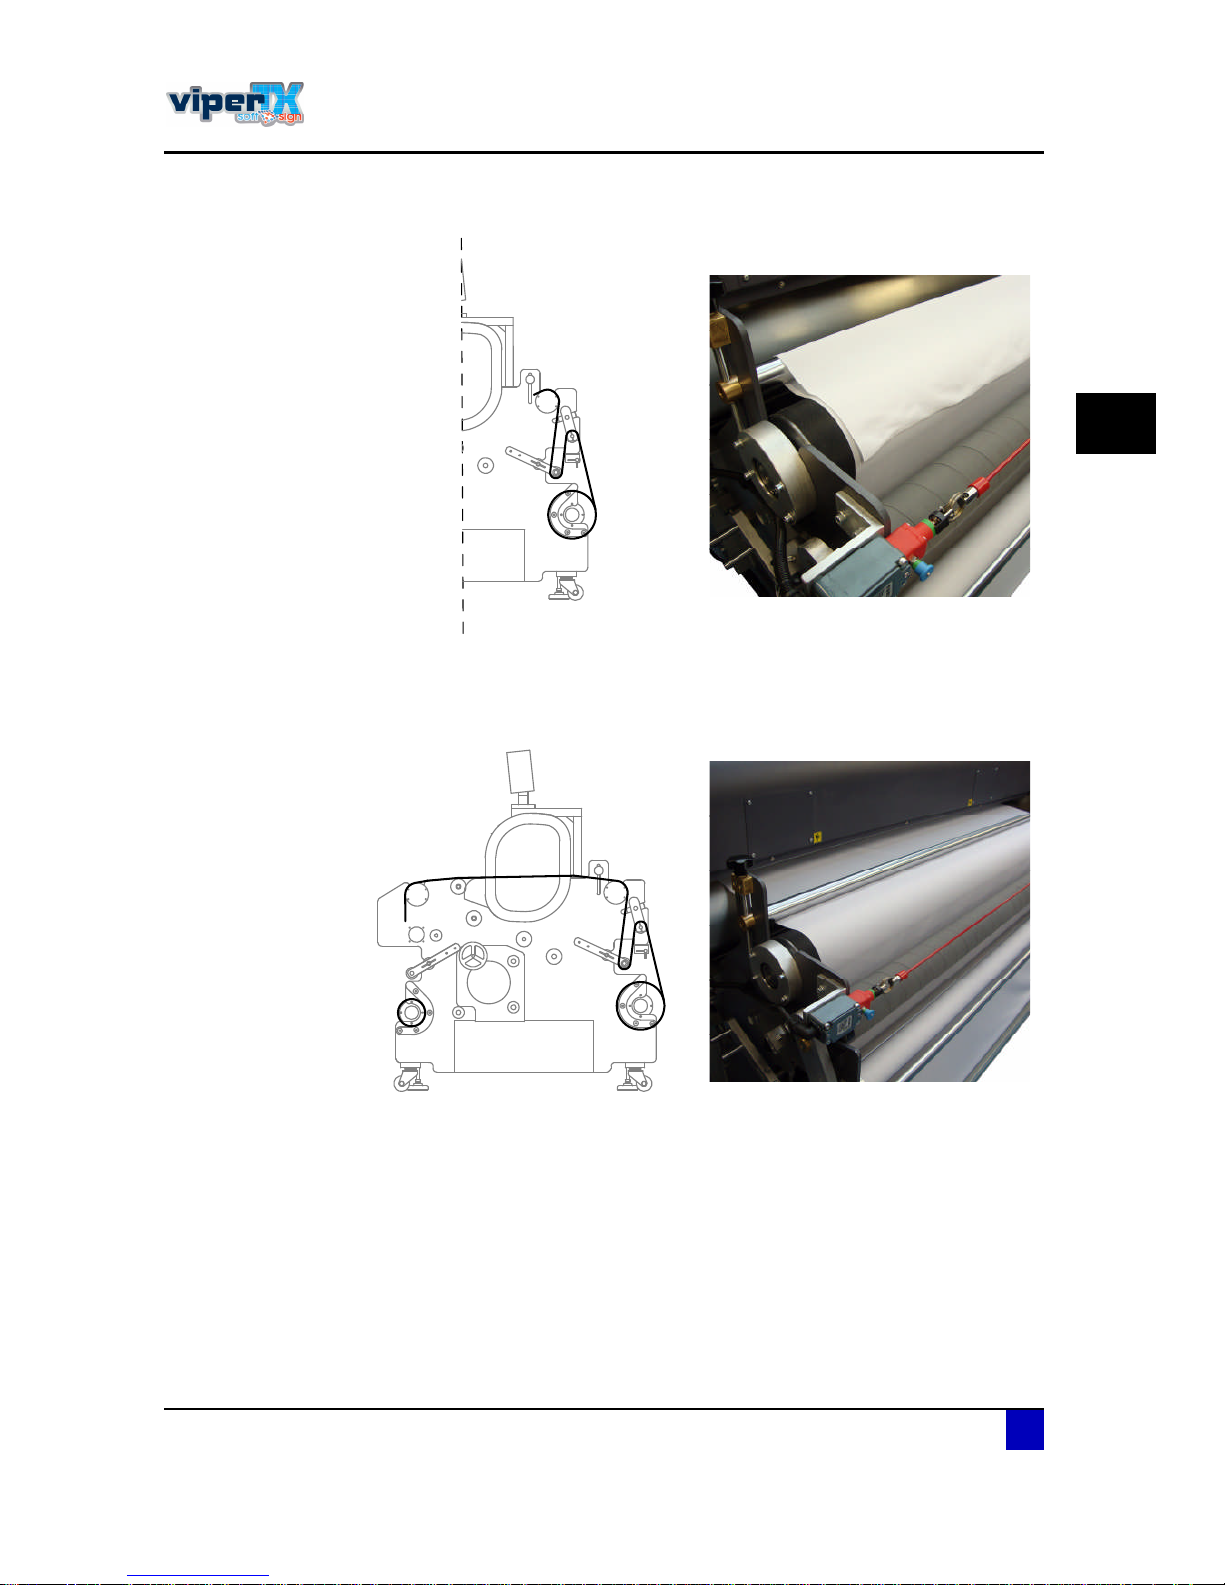
ͬ»° ìæ Open the adjustable pressure roller and lock it using the pin.
ͬ»° ëæ Unwind the fabric and guide it around the rear dancer bar and in between the
adjustable pressure roller and drive belt.
Page 61
Users Guide Viper TX Softsign
Printer handling
AP-75360 - Revision 1.2 61
3
ͬ»° êæ Guide the fabric under the adjustable pressure bar and through the printer to the
front. Be careful that the fabric does not get stuck in the gutter.
ͬ»° éæ Turn the fixation unit control panel to the front of the machine.
Page 62
Users Guide Viper TX Softsign
Printer handling
62 AP-75360 - Revision 1.2
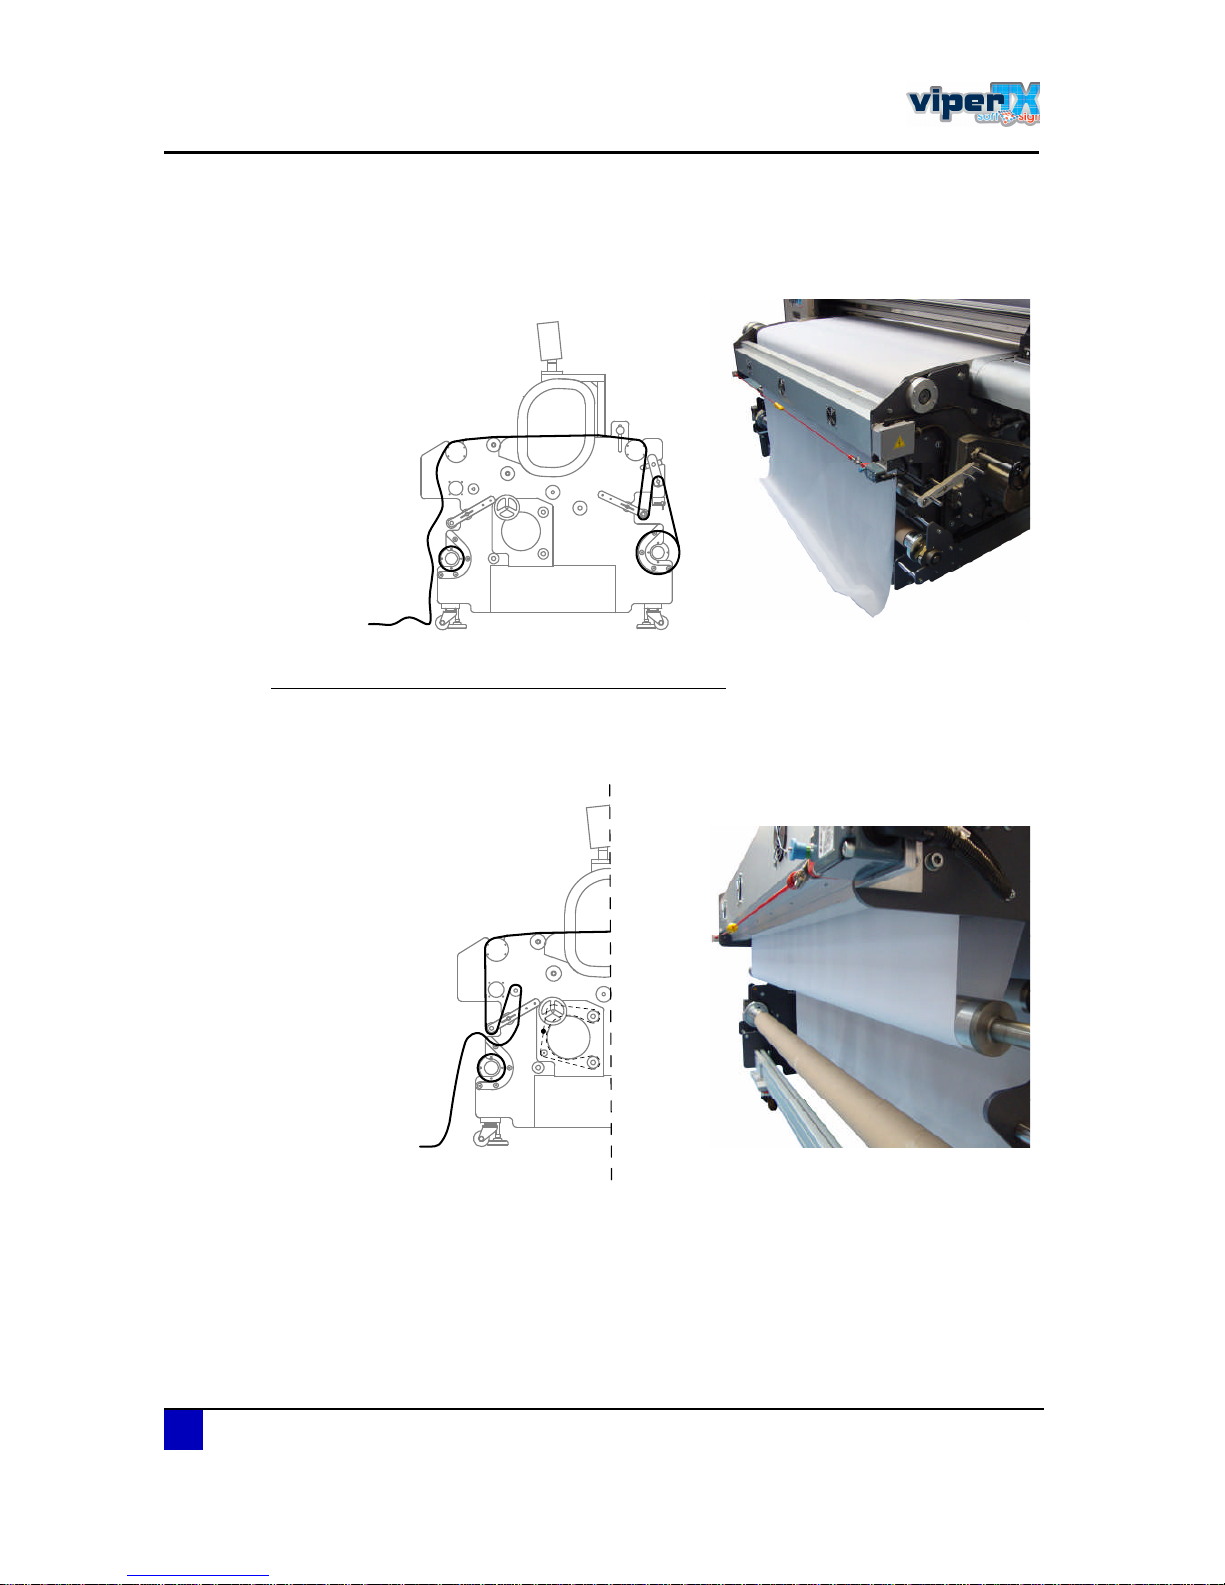
ͬ»° èæ Move the belt forward using the fixation unit control panel until there is a loop of
fabric at the front.
Guide fabric through the front side of the printer
ͬ»° ïæ Guide the fabric under the front dancer bar and over the static dancer bar.
Page 63
Users Guide Viper TX Softsign
Printer handling
AP-75360 - Revision 1.2 63
3
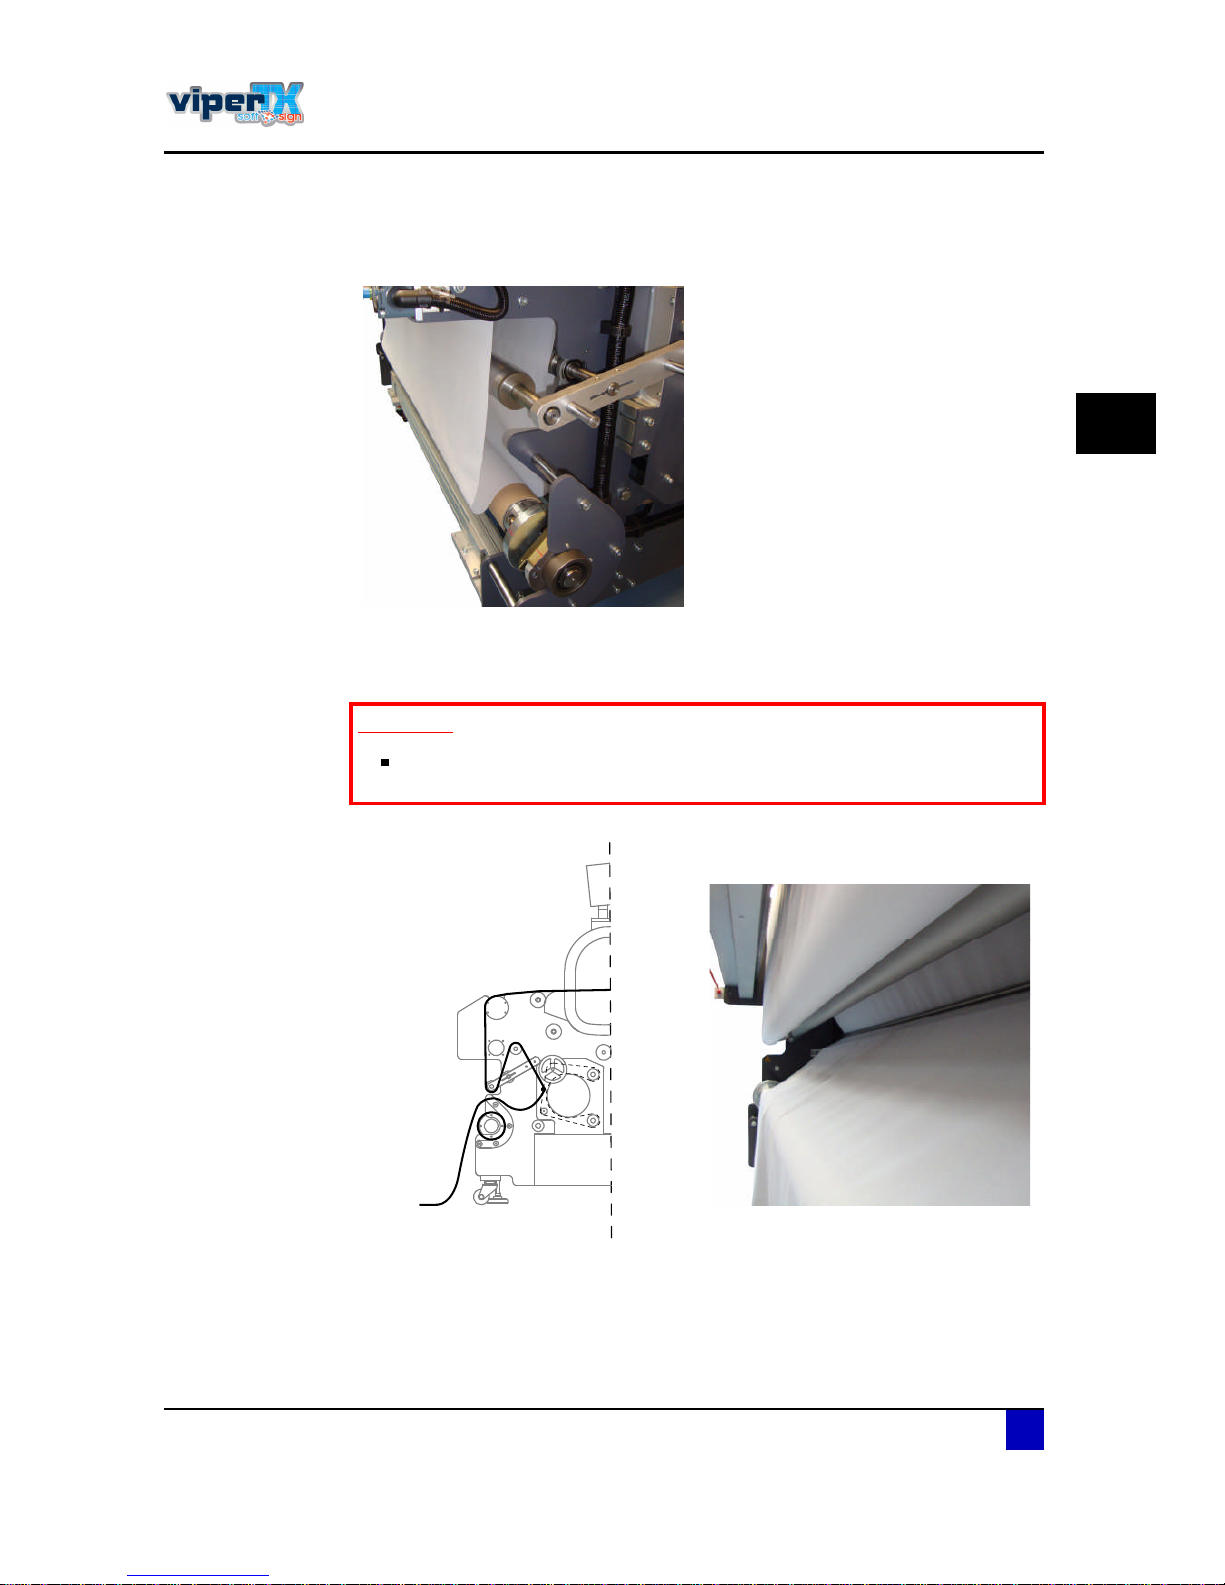
ͬ»° îæ Move the belt forward until there is a loop of fabric, enough to load over the
threading bar (± 100 cm).
ͬ»° íæ Rotate the wheel at the side of the machine until the threading bar is visible.
ͬ»° ìæ Lay the fabric over the threading bar.
׳°±®¬¿²¬
Be careful not to burn your hands. The heat fixation unit can reach
temperatures up to 200°C
Page 64
Users Guide Viper TX Softsign
Printer handling
64 AP-75360 - Revision 1.2
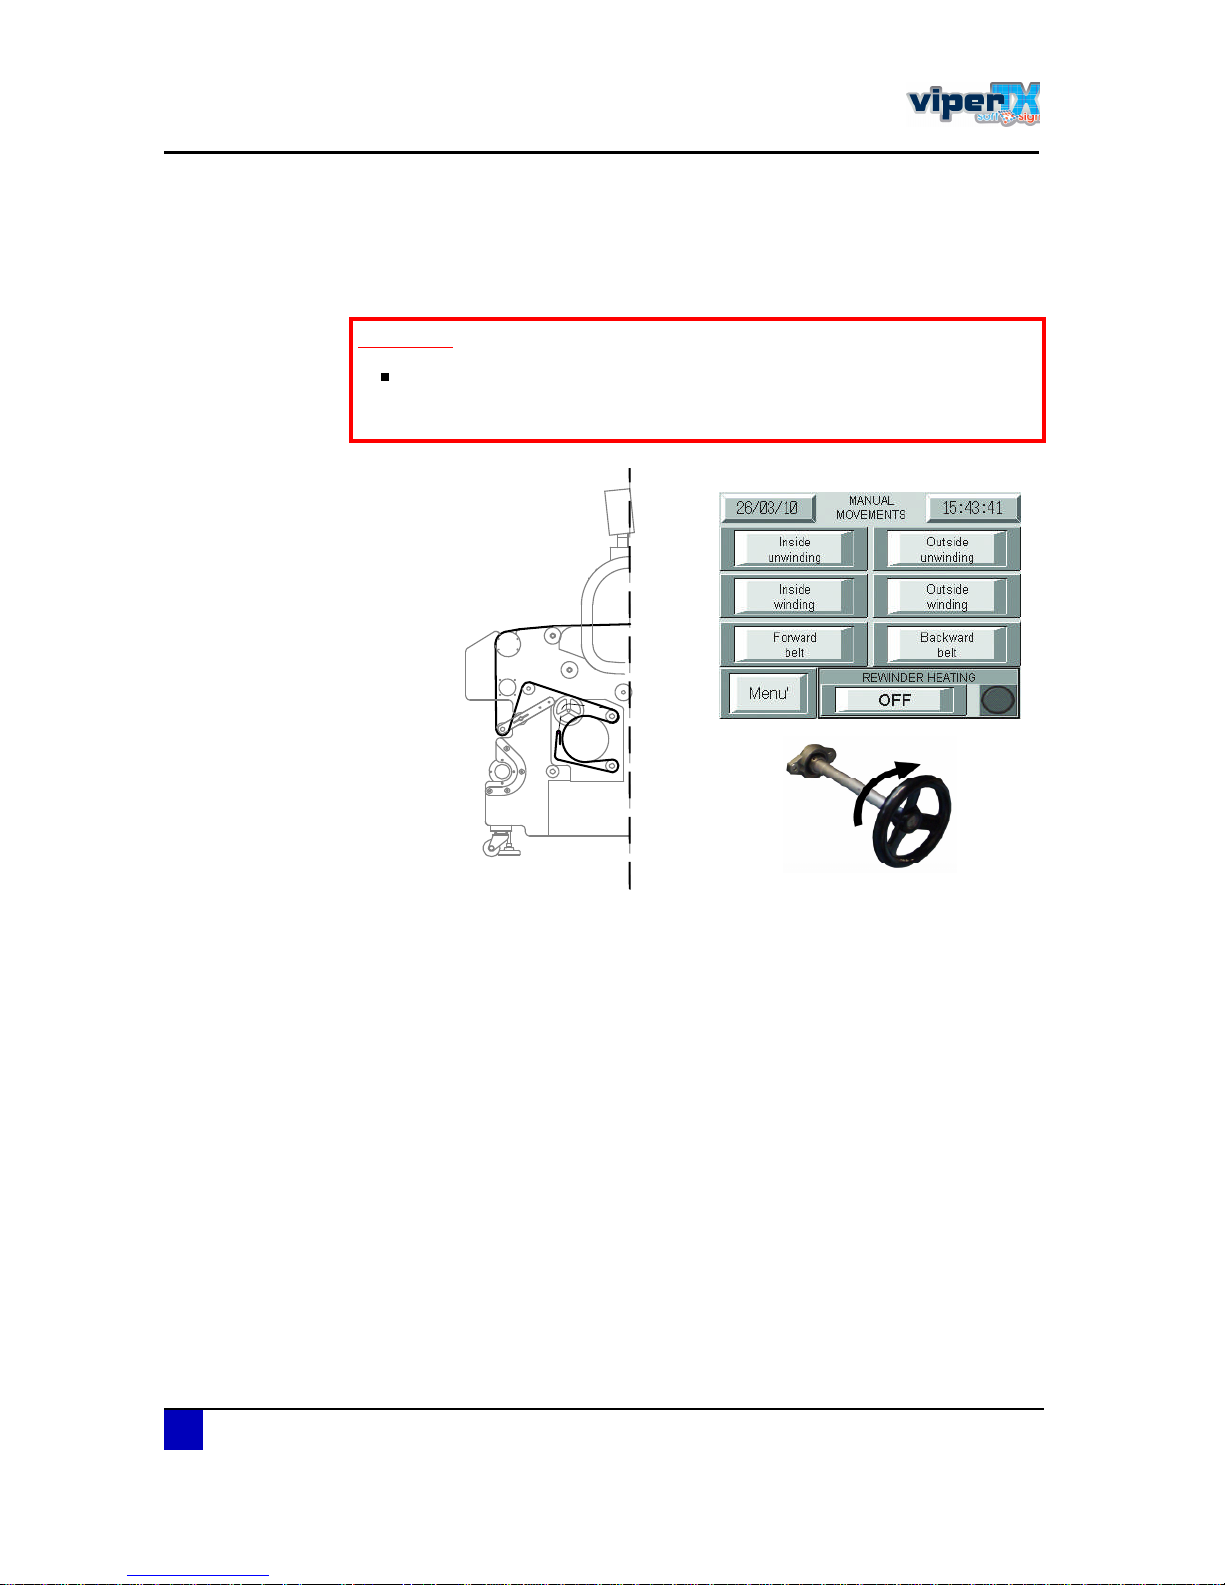
ͬ»° ëæ Be sure to always have enough fabric left before turning the wheel. Otherwise, the
fabric will slip of the threading bar and you will have to perform this procedure again.
Turn the wheel of the threading bar and move the belt forward at the same time to
guide the fabric around the heat fixation unit.
׳°±®¬¿²¬
Stop turning the wheel as from the moment you feel any sign of
torsion to avoid breaking the chain. Try to feed extra media to solve
this issue.
Page 65
Users Guide Viper TX Softsign
Printer handling
AP-75360 - Revision 1.2 65
3
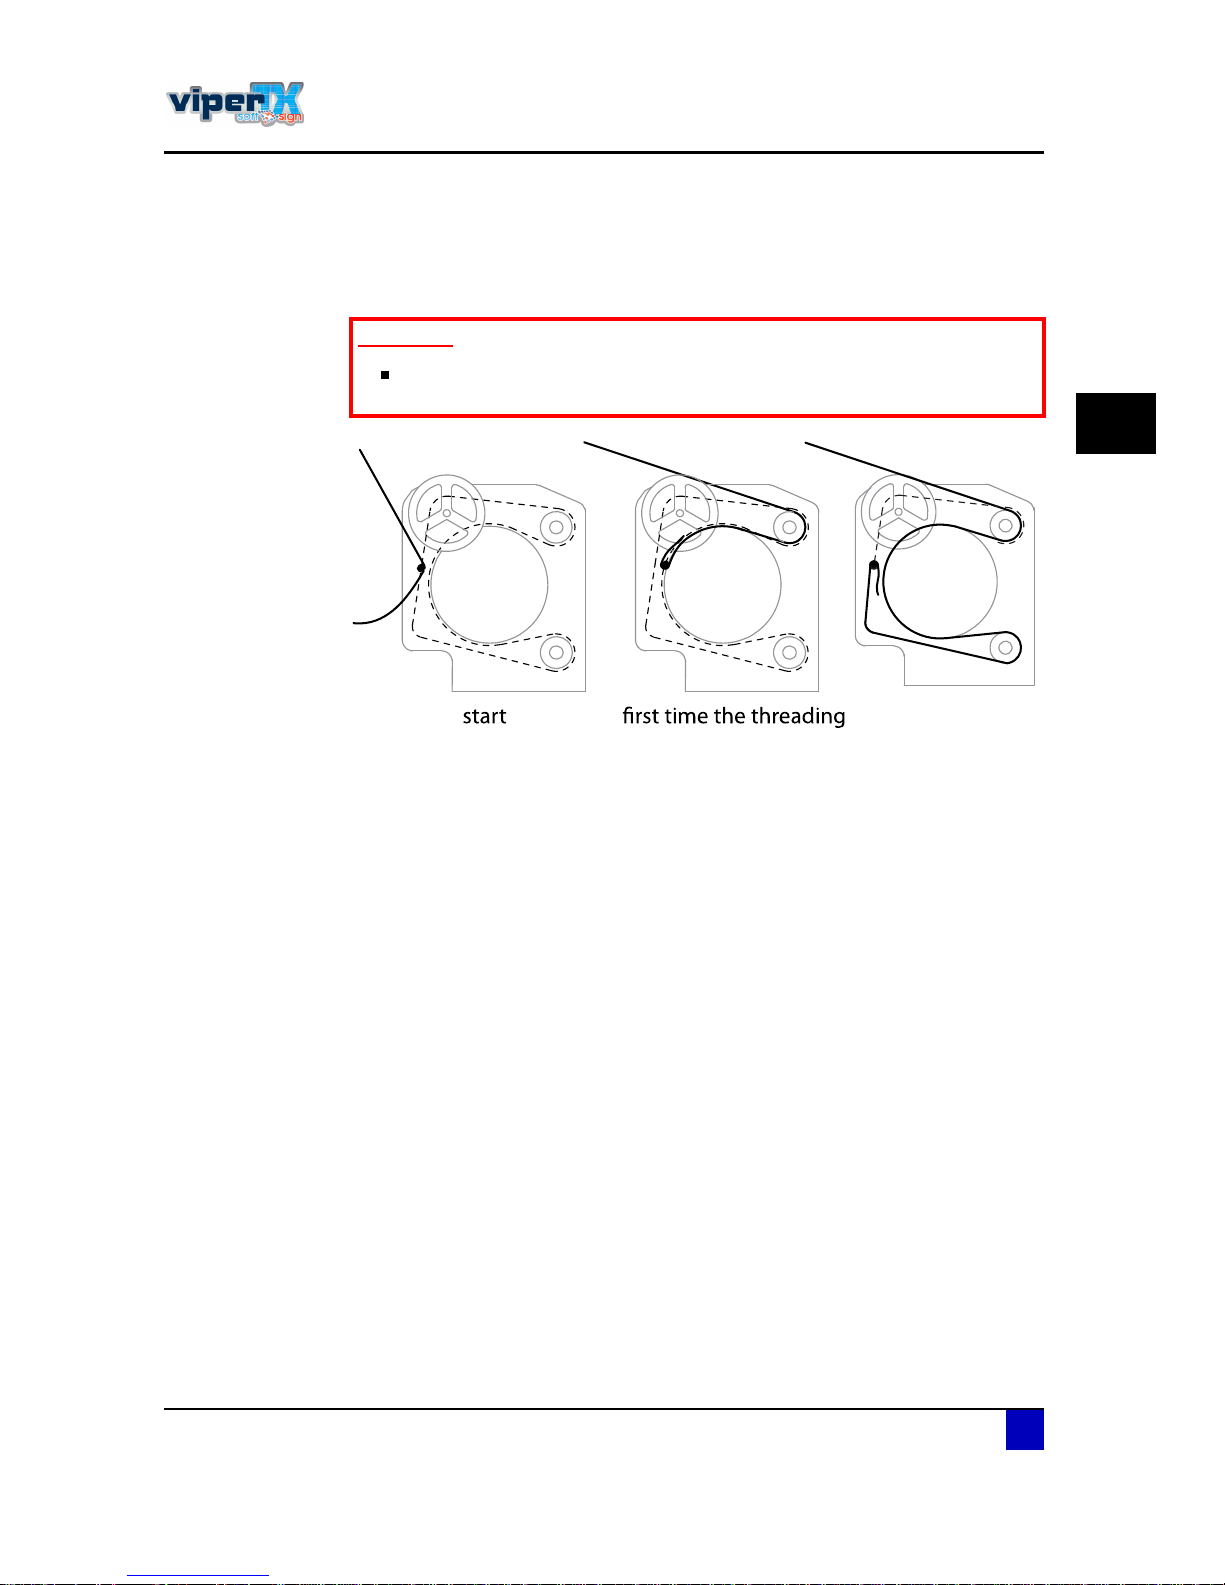
ͬ»° êæ Loosen the fabric from the threading bar as soon as the complete cycle has been
passed through. Concretely, the second time you see the threading bar again. The
first time you see the threading bar appear, there will be no fabric loaded around the
complete heat fixation unit as you can see in the images below.
׳°±®¬¿²¬
Be careful not to burn your hands. The heat fixation unit can reach
temperatures up to 200°C
¾¿® °¿---»-
»²¼
Page 66
Users Guide Viper TX Softsign
Printer handling
66 AP-75360 - Revision 1.2
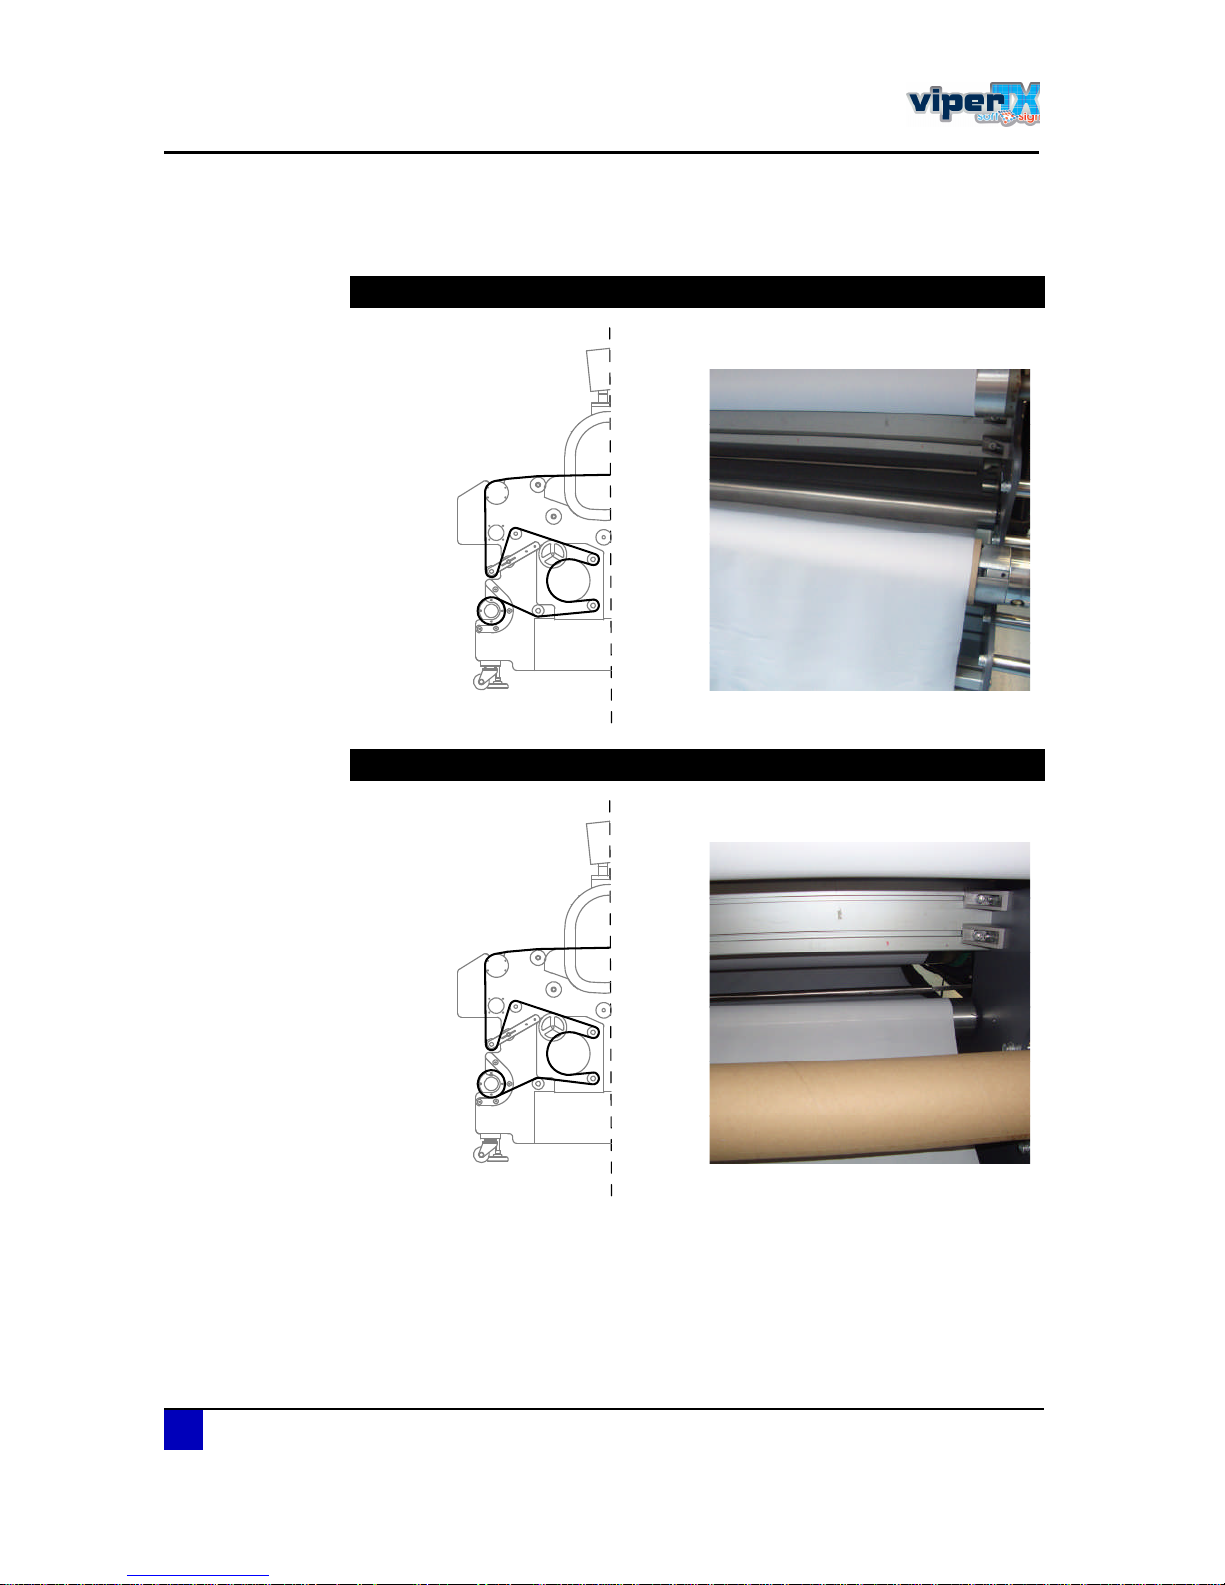
ͬ»° éæ Depending on the way you want to wind up the fabric, guide the fabric under or over
the static tensioning bar and tighten it to the empty core.
Outside winding
Inside winding
Page 67
Users Guide Viper TX Softsign
Printer handling
AP-75360 - Revision 1.2 67
3
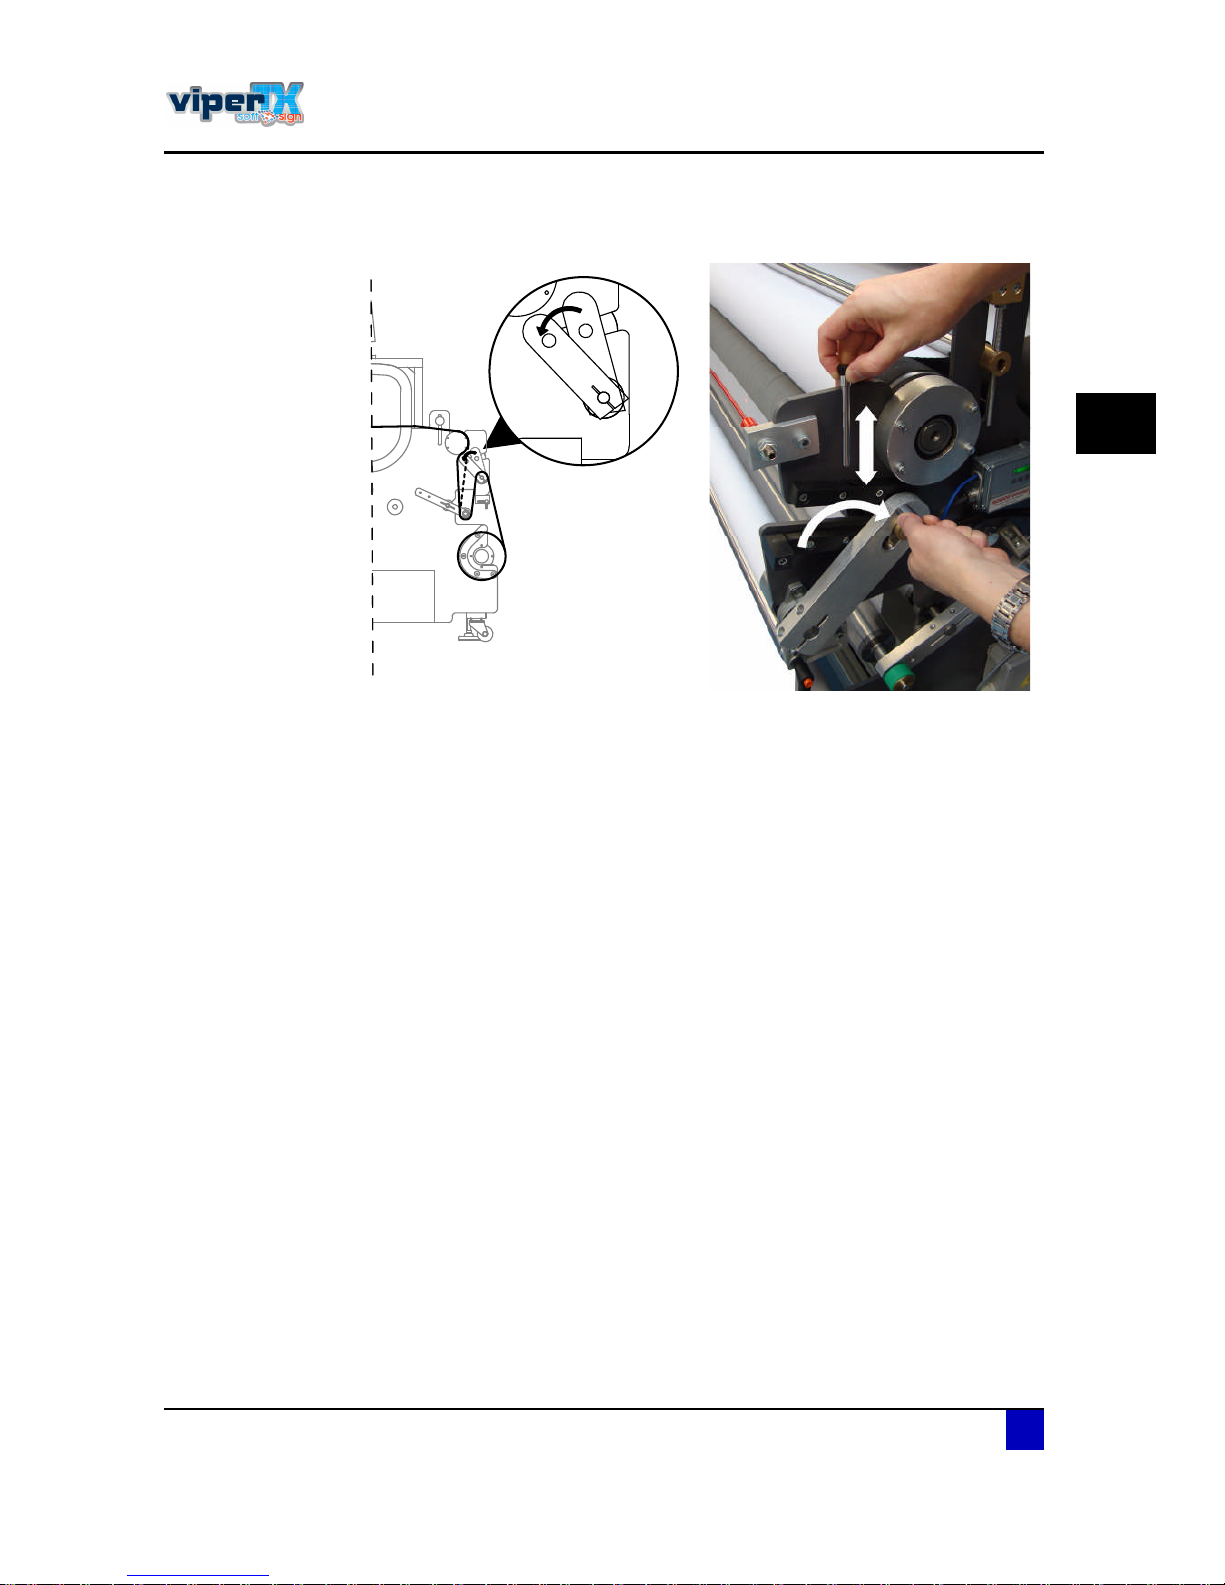
ͬ»° èæ Close the adjustable pressure roller and lock it using the pin.
ͬ»° çæ Apply compressed air to the rear shaft until the roll of fabric can not move anymore.
Page 68
Users Guide Viper TX Softsign
Printer handling
68 AP-75360 - Revision 1.2
Adjust the tension
Because of the many (dancer) shafts, a constant tension on the fabric will be created along
the complete fabric transport. However, depending from the type of fabric loaded, some
finetuning of the tension may be necessary. Note that these adjustments are trial and error
based. It is not possible to predefine all settings for each type of fabric.
The following shafts can be adjusted:
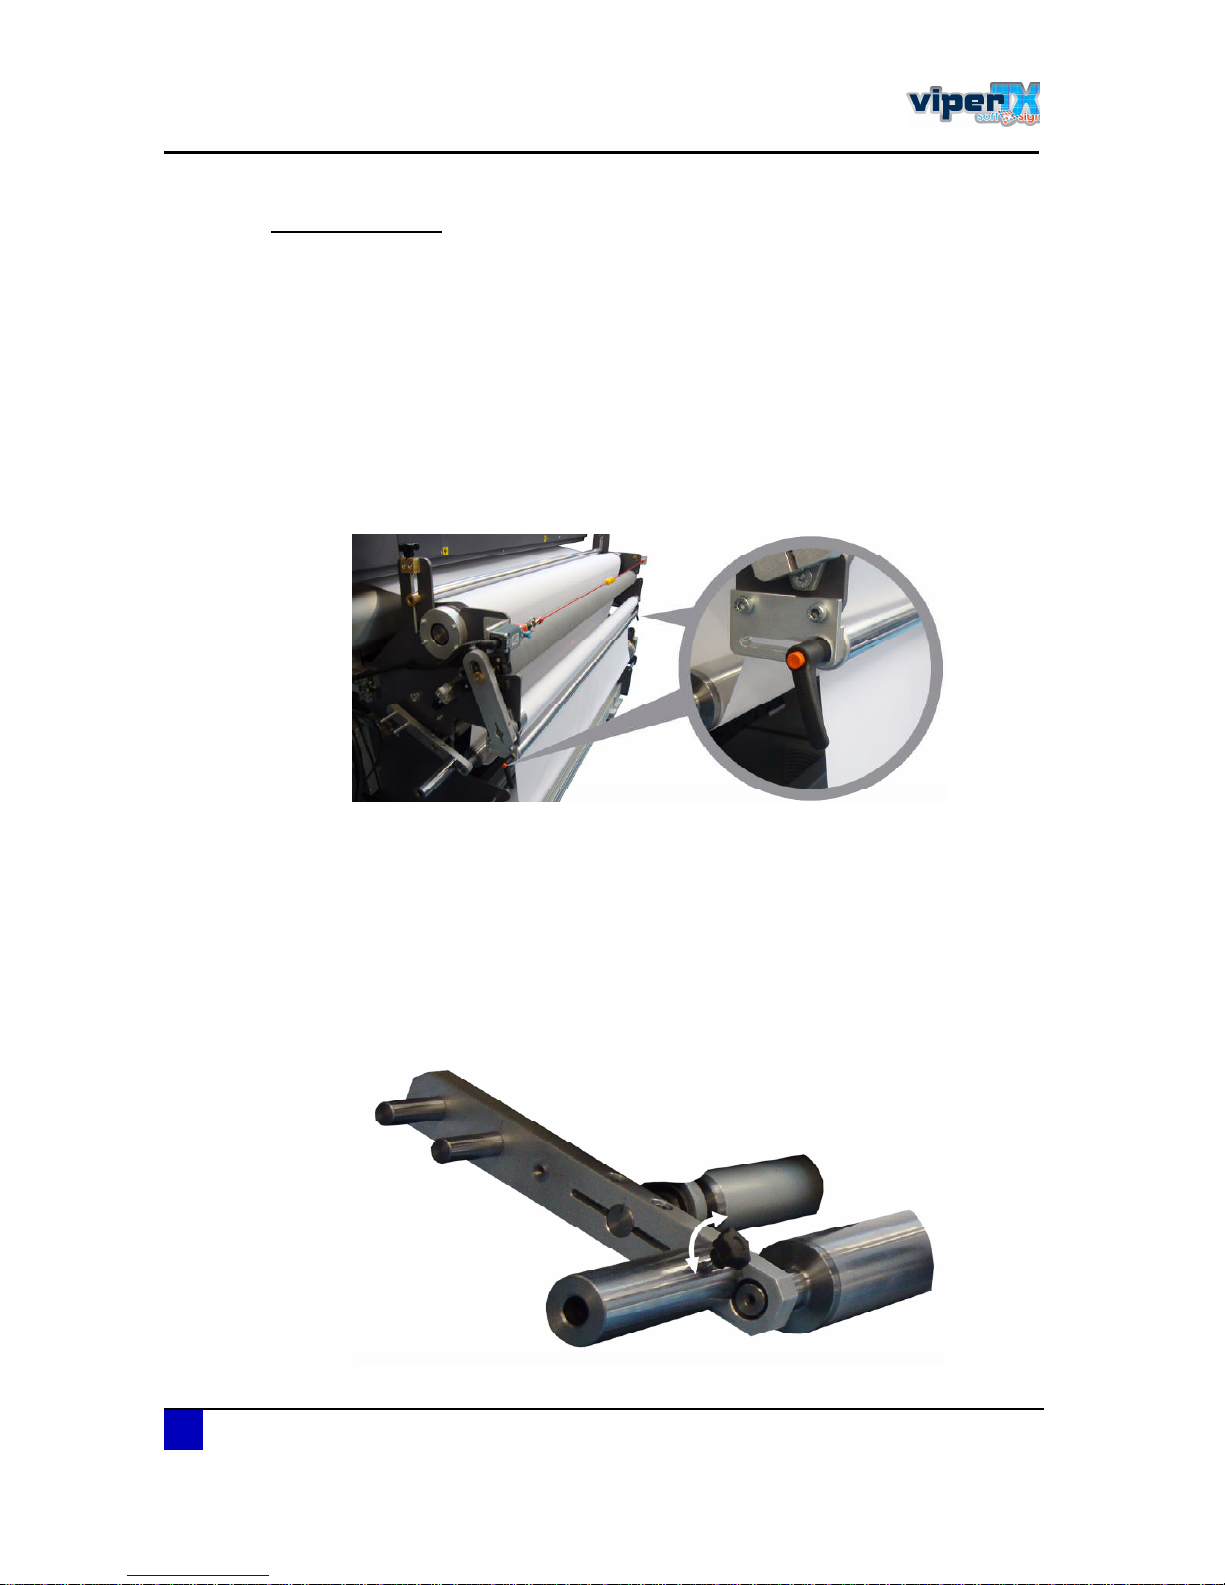
ïò Deflection bar
If you notice that the roll of fabric has been rolled up more tightly at one side, you will have to
overcome this by adjusting the deflection bar. This bar can be adjusted separately at the left
and right side to put more pressure on one of the sides.
ͬ»° ïæ Unlock the bar with the handles left and right.
ͬ»° îæ Position the deflection bar according your needs.
ͬ»° íæ Fix the bar with the handles.
îò Dancer bar
To increase or decrease the pressure of the front and rear dancer bar, tubular weights can be
mounted on one of the 3 positions.
ͬ»° ïæ Decide where to install the weights.
ͬ»° îæ Install the weights and fix them with the screw.
Page 69
Users Guide Viper TX Softsign
Printer handling
AP-75360 - Revision 1.2 69
3
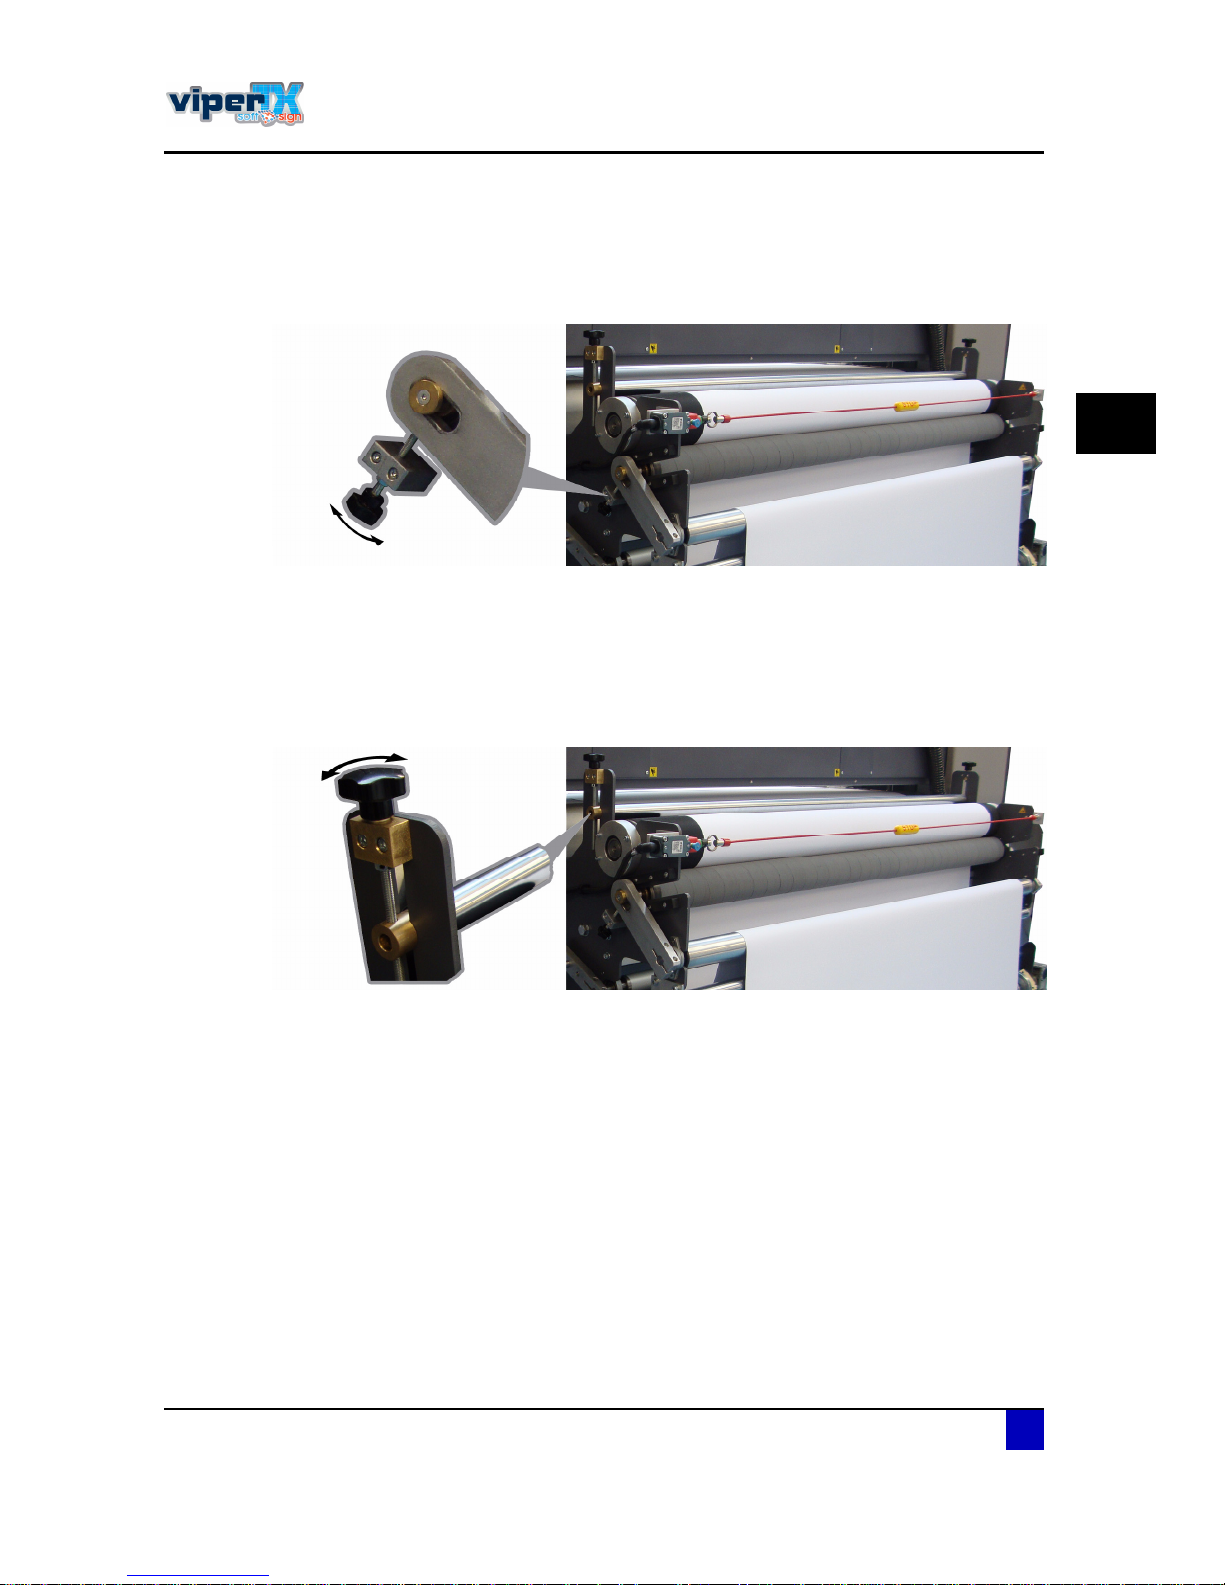
íò Pressure roller
The pressure roller will push the fabrics against the drive belt. The drive belt will guide the
fabric trough the printer. Therefore, the applied pressure is very important. You can adjust the
pressure by turning the adjustment screws on both left and right side of the shaft.
ìò Pressure bar
The last shaft which can influence the behaviour of the fabric before being printed is the
pressure bar. Higher or lower the bar on both sides to lower or higher the pressure on the
fabric and contact surface with the drive belt. Lower the bar at one side to solve wrinkling of
the fabric.
Page 70
Users Guide Viper TX Softsign
Printer handling
70 AP-75360 - Revision 1.2
3.6 Features to improve print quality
Before starting to print it is necessary to check a few things. In this chapter you can read
which handlings should or can be done to improve overall print quality.
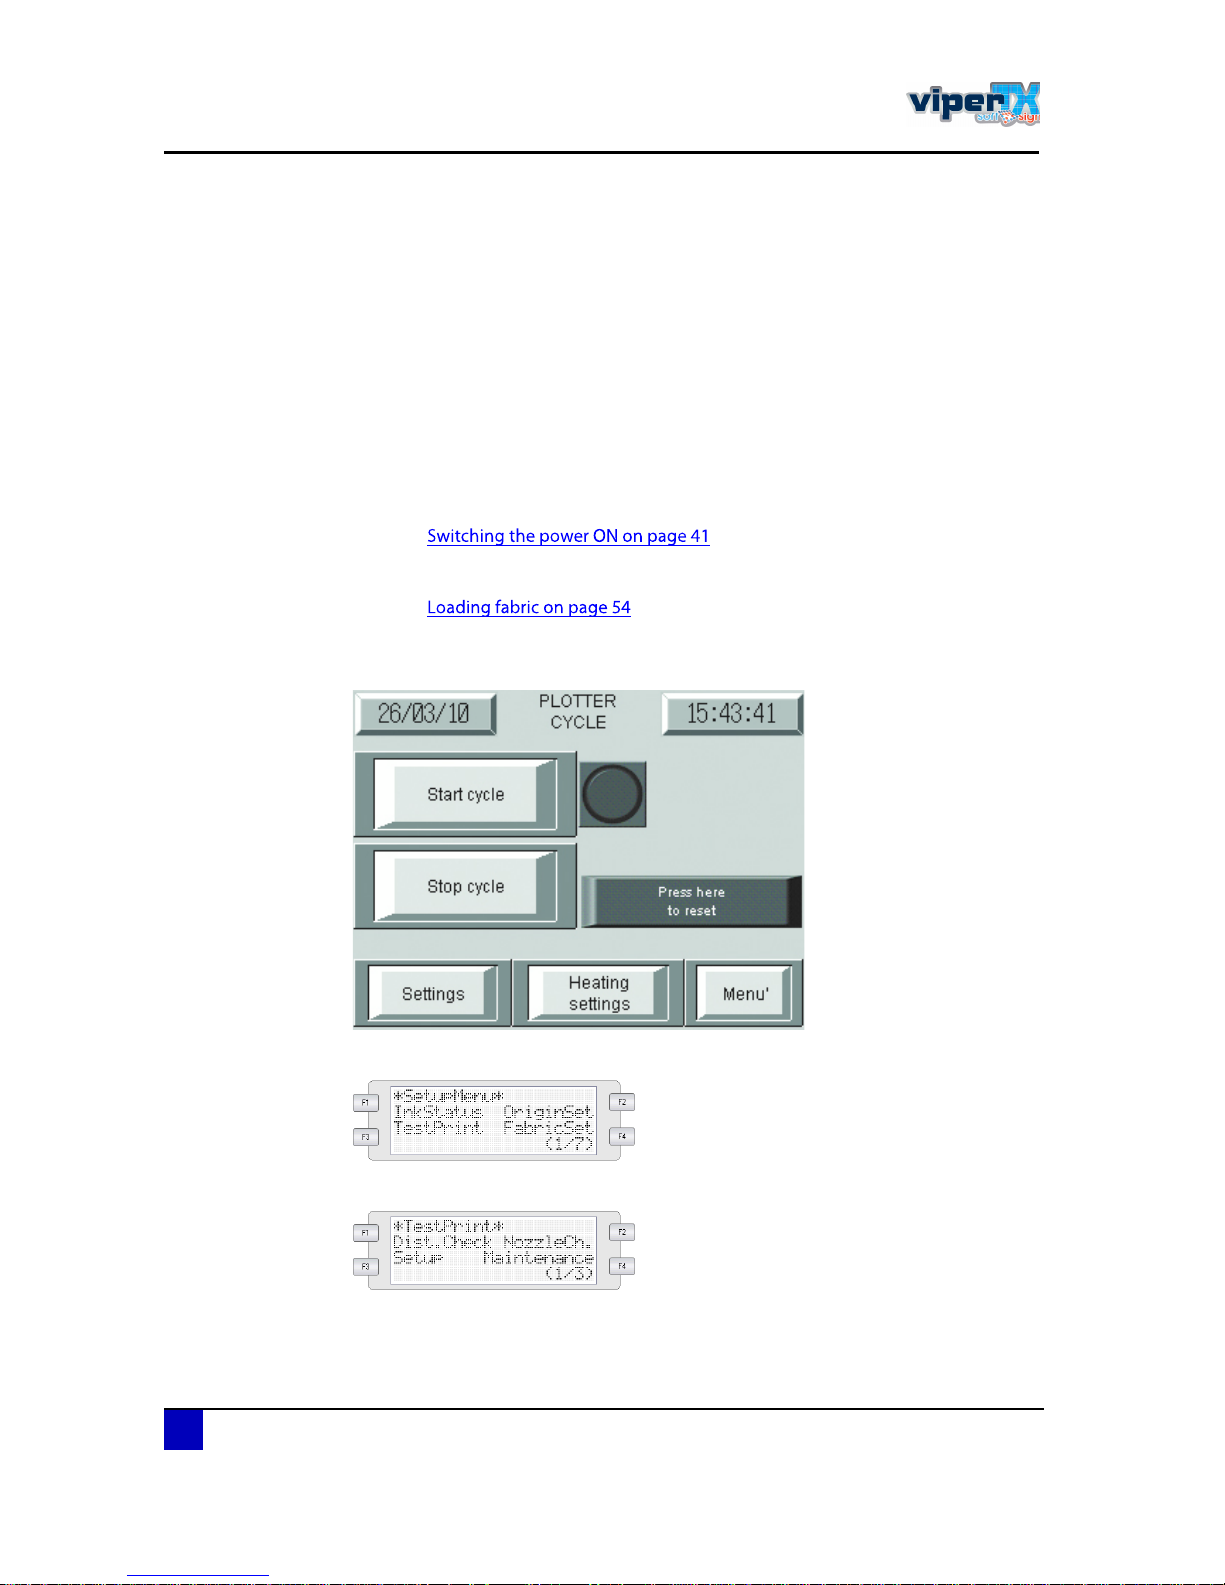
3.6.1 Nozzlecheck
One of the most important issues is that all nozzles are present before you start printing. If
there are some nozzles blocked, a bad output, resulting in lines in the print, will be obtained.
To avoid that, before every job, print a nozzlecheck as follows:
ͬ»° ïæ Power ON the printer
Refer to
ͬ»° îæ Load fabric
Refer to
ͬ»° íæ Start the belt system
Mainscreen > Automatic > Start cycle
ͬ»° ìæ Go to setupmenu 1/7
ͬ»° ëæ Press F3 to open the test printing menu
Page 71
Users Guide Viper TX Softsign
Printer handling
AP-75360 - Revision 1.2 71
3
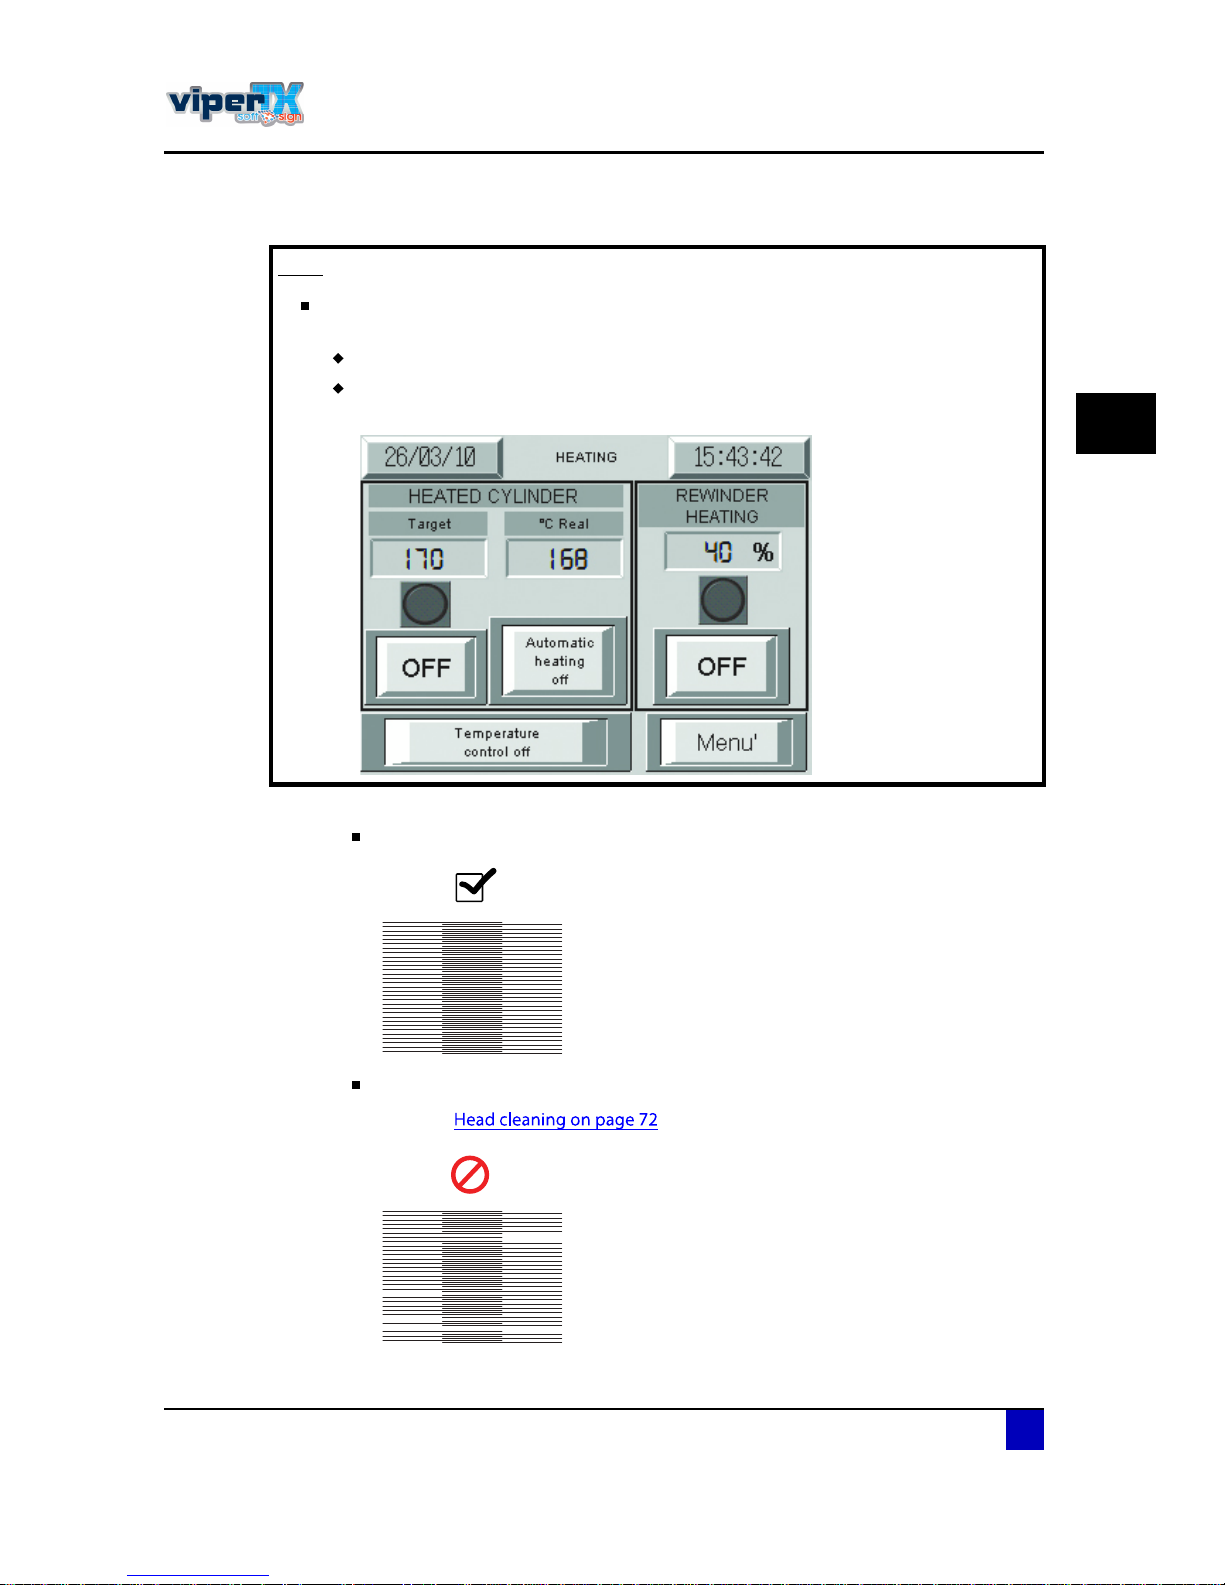
ͬ»° êæ Press F2 to print a nozzlecheck.
ͬ»° éæ Evaluate the pattern.
If all nozzles are present. You can proceed with your job.
If some nozzles are missing. Perform a head cleaning.
Refer to
Ò±¬»
It might be possible that the printer pauses until the heat fixation unit is at
temperature. Now you can do one of the 2 options:
Wait until the heat fixation unit is at temperature
Go to mainscreen > heating settings > temperature control off to start the print without
waiting for the heat fixation unit to heat up.
Page 72
Users Guide Viper TX Softsign
Printer handling
72 AP-75360 - Revision 1.2
3.6.2 Head cleaning
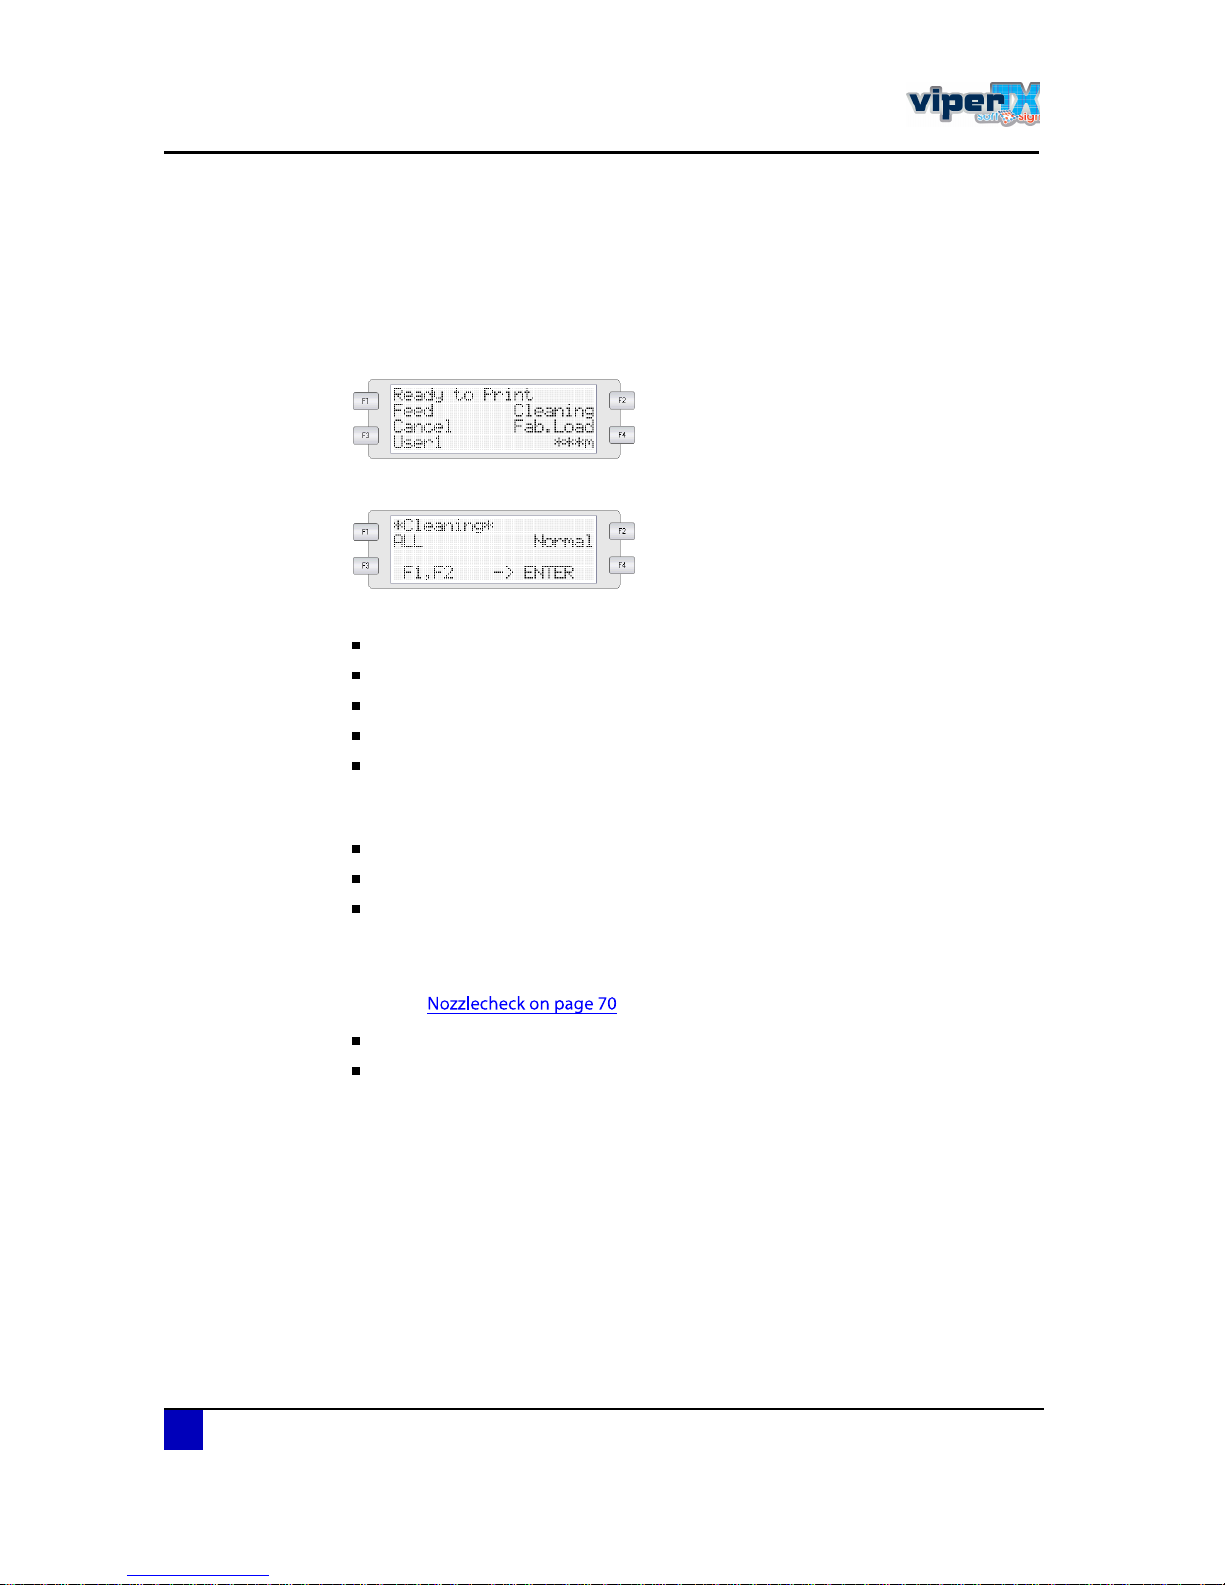
When there are some missing (clogged) nozzles, a head cleaning should be performed. It is
not necessary to clean all the heads at once. You will have the possibility to select which
heads should be cleaned and with which power.
ͬ»° ïæ Be sure that the printer is in normal status.
ͬ»° îæ Press F2 to open the cleaning menu.
ͬ»° íæ Select which heads should be cleaned with F1
ALL
Pump 1
Pump 2
Pump 3
Pump 4
ͬ»° ìæ Select the power of the cleaning depending on the quantity of missing nozzles with
F2
Little
Normal
Powerful
ͬ»° ëæ Press enter to start the cleaning procedure.
ͬ»° êæ Perform another nozzlecheck to verify that all nozzles are back.
Refer to
If all nozzles are present. You can proceed with your job.
If some nozzles are missing. Perform another head cleaning.
Page 73
Users Guide Viper TX Softsign
Printer handling
AP-75360 - Revision 1.2 73
3
3.6.3 Fabric feed compensation (step)
Obtaining constant printing quality on a wide-format Piezo inkjet printer is not only determined
by the working environment, the RIP, the profiles, the inks and the fabrics which are used.
One of the key factors for obtaining constant output quality is the correct distance adjustment,
also called step, on your Mutoh inkjet printer.
Basics about the step
Every image is printed in several print passes. After every pass, the fabric is fed an amount of
millimetres. When the step is not set correctly, the passes will overlap each other or will not
be printed precisely next to each other, which results in white bands between two print
passes.
Therefore a function, distance adjust (or step), is added to the menu to control this feed
operation.
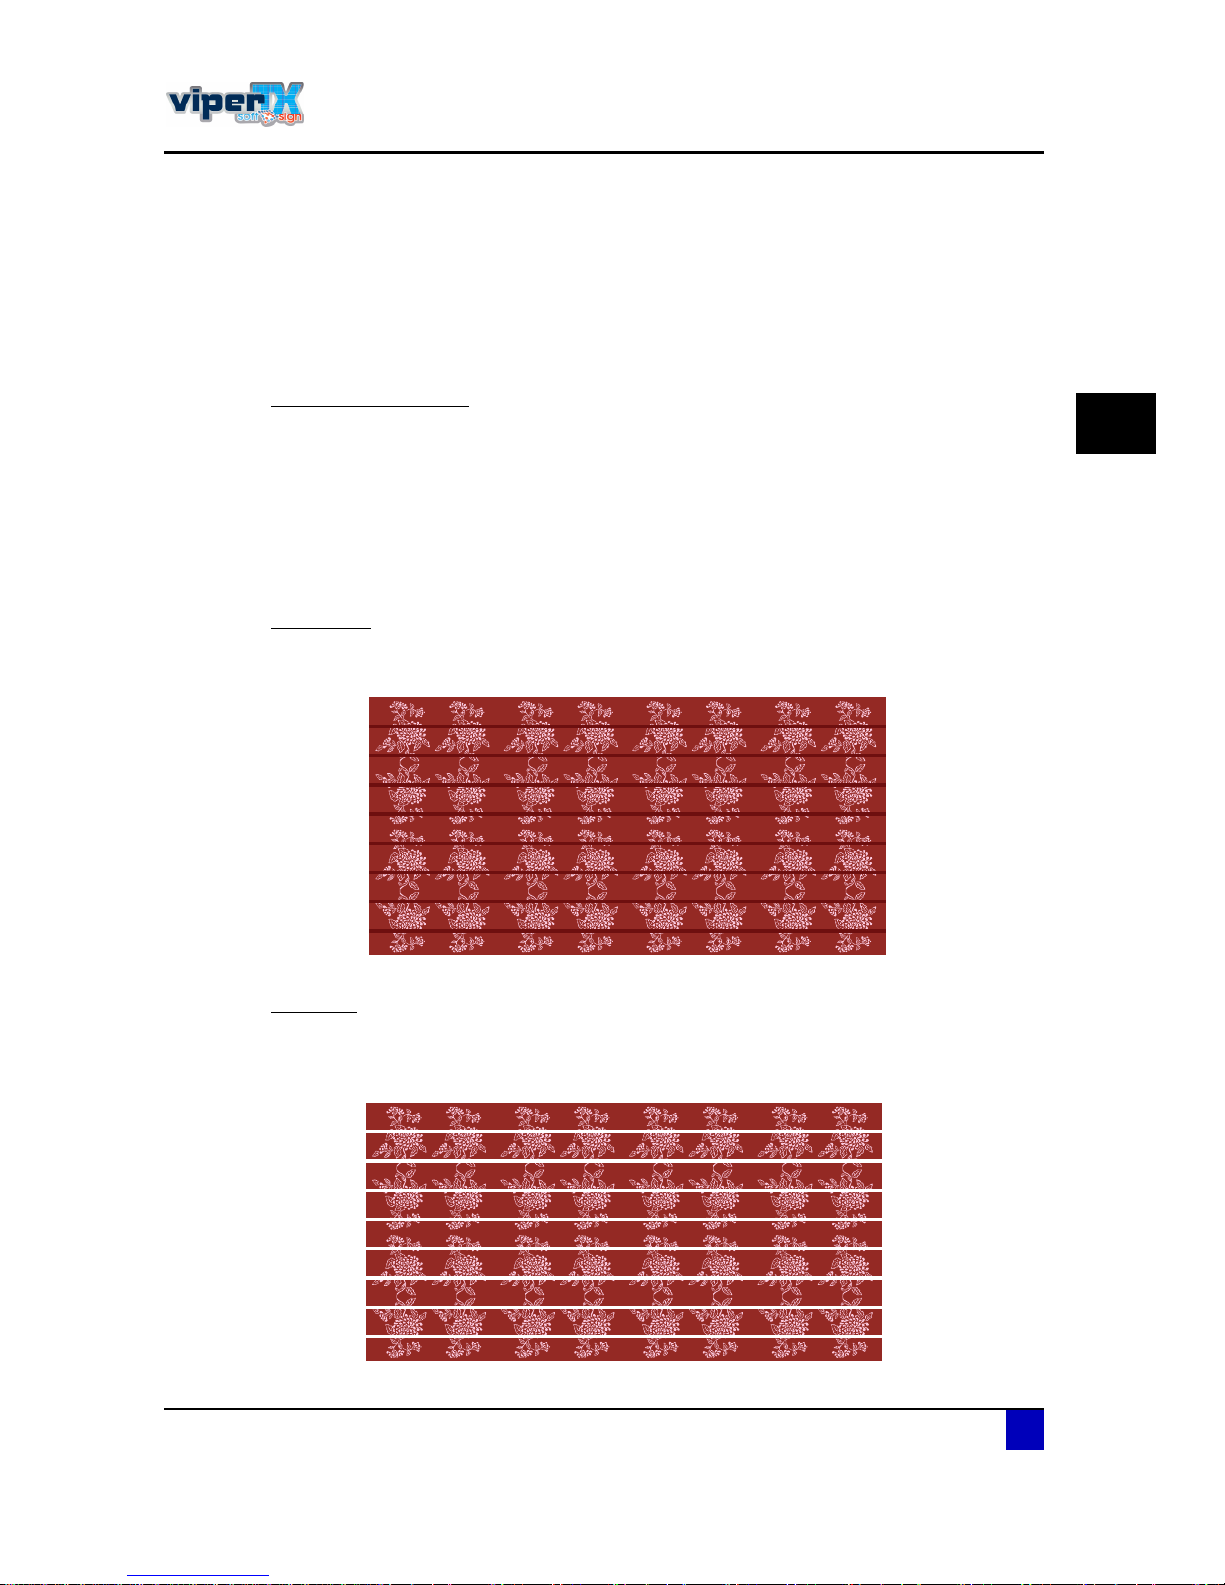
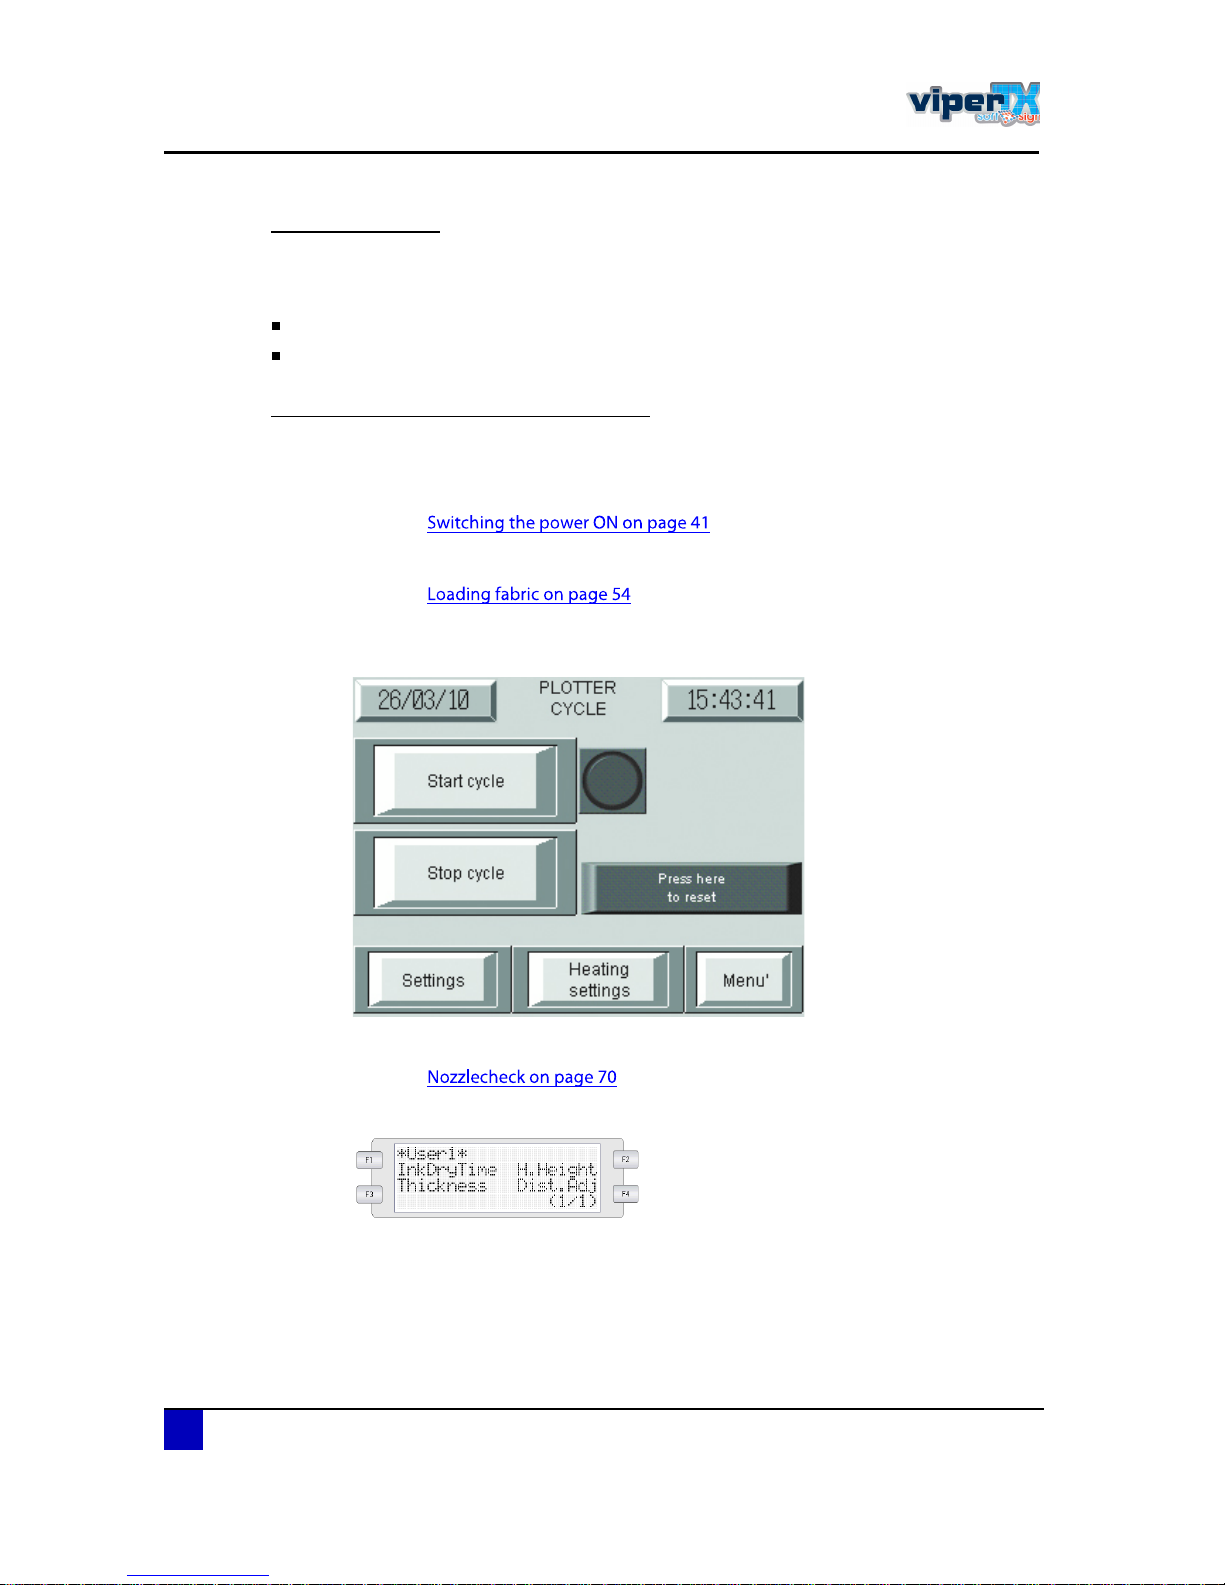
Underfeed
Step between the print passes is too small which results in the passes to overlap each other.
Overfeed
Step between the print passes is too large which results in the passes to be printed too far
from each other.
Ю·²¬ °¿-- ï
Ю·²¬ °¿-- î
Ю·²¬ °¿-- è
Ю·²¬ °¿-- ç
ò
ò
ò
Ю·²¬ °¿-- ï
Ю·²¬ °¿-- î
Ю·²¬ °¿-- è
Ю·²¬ °¿-- ç
ò
ò
ò
Page 74
Users Guide Viper TX Softsign
Printer handling
74 AP-75360 - Revision 1.2
Repeatability step
It is recommended to start printing with a step of 100% and to adjust it afterwards. Once a
step is set for a particular fabric, it will not change on the following conditions:
The step is only applicable on the printer in question and not interchangeable.
The fabric manufacturer does not change any specifications of the fabrics.
Determining and setting the correct step
The procedure below will explain how to change and interpret the step.
ͬ»° ïæ Power ON the printer
Refer to
ͬ»° îæ Load fabric
Refer to
ͬ»° íæ Start the belt system
Mainscreen > Automatic > Start cycle
ͬ»° ìæ Verify that all nozzles are present.
Refer to
ͬ»° ëæ Go to Menu 1/7 > FabricSet > Fabric > Userx >Dist. Adj (F4).
Page 75
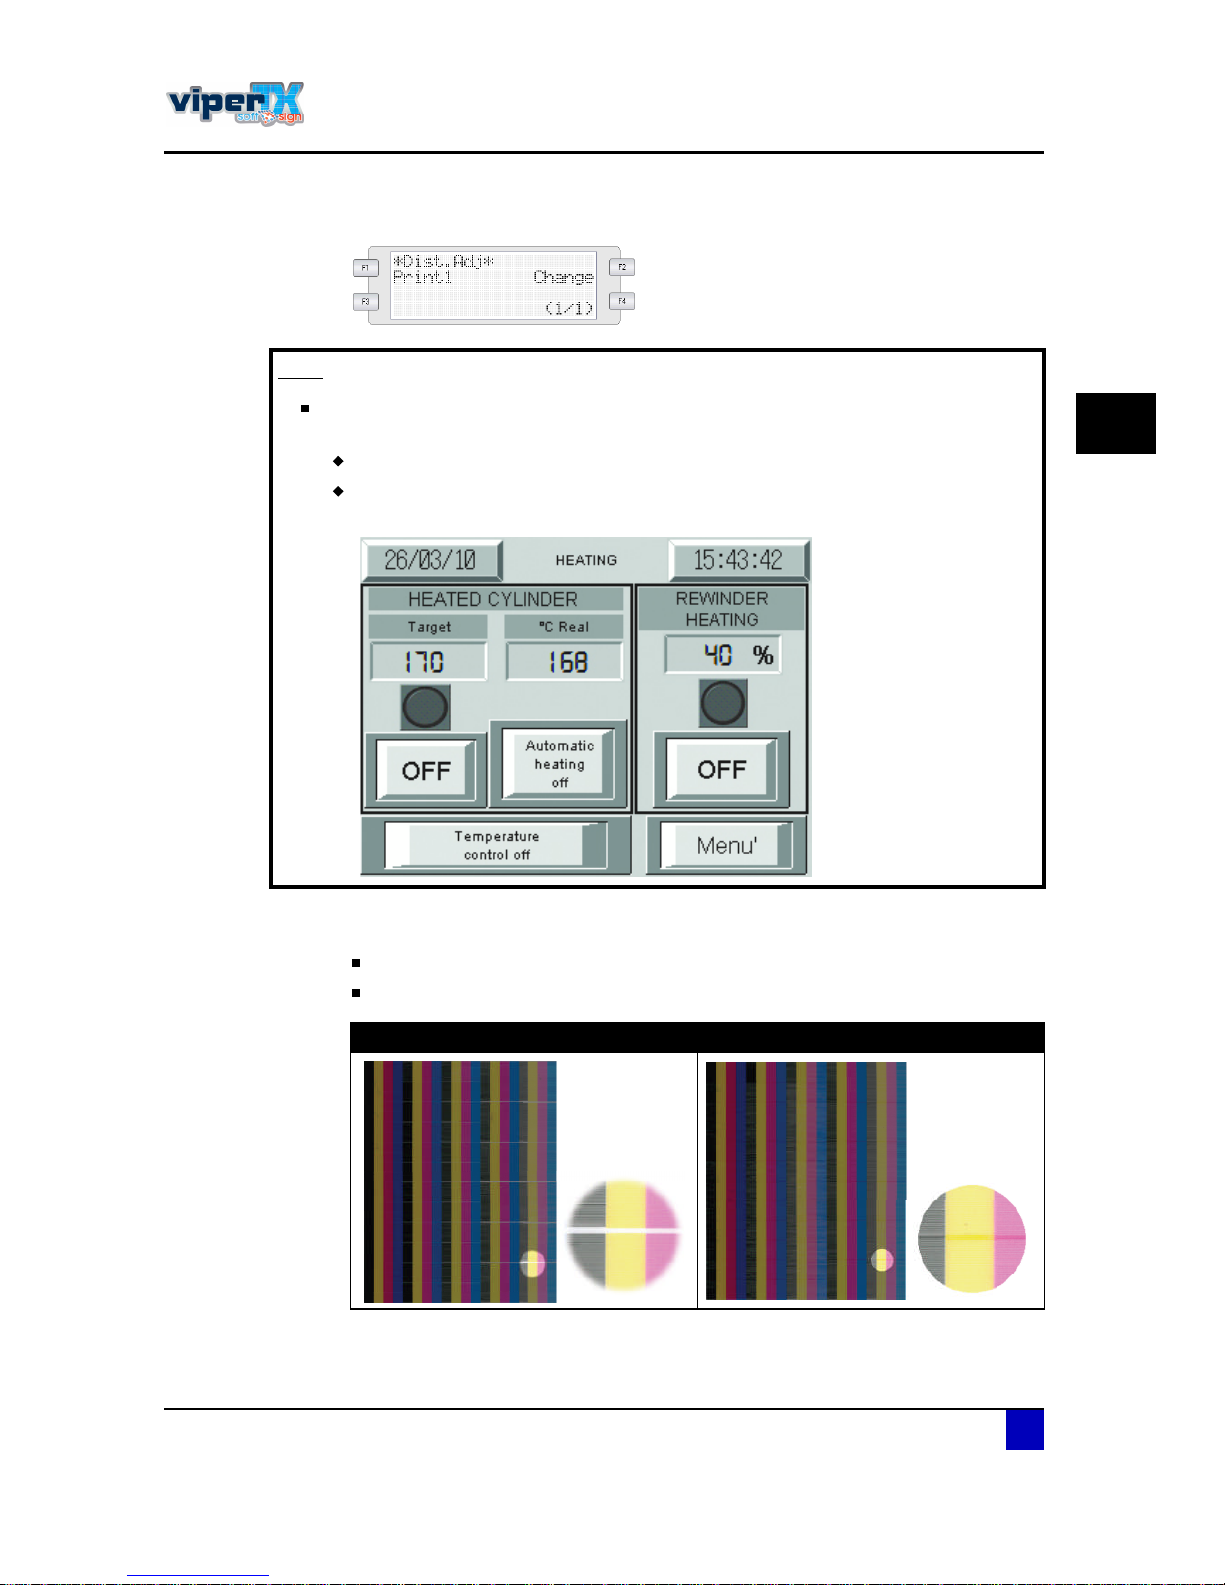
Users Guide Viper TX Softsign
Printer handling
AP-75360 - Revision 1.2 75
3
ͬ»° êæ Press F1 to print the test pattern.
ͬ»° éæ To evaluate the test pattern, you should look for gaps or overlaps between the
different passes.
In case of overfeed > decrease the step
In case of underfeed > increase the step
Ò±¬»
It might be possible that the printer pauses until the heat fixation unit is at
temperature. Now you can do one of the 2 options:
Wait until the heat fixation unit is at temperature
Go to mainscreen > heating settings > temperature control off to start the print without
waiting for the heat fixation unit to heat up.
Overfeed Underfeed
Page 76
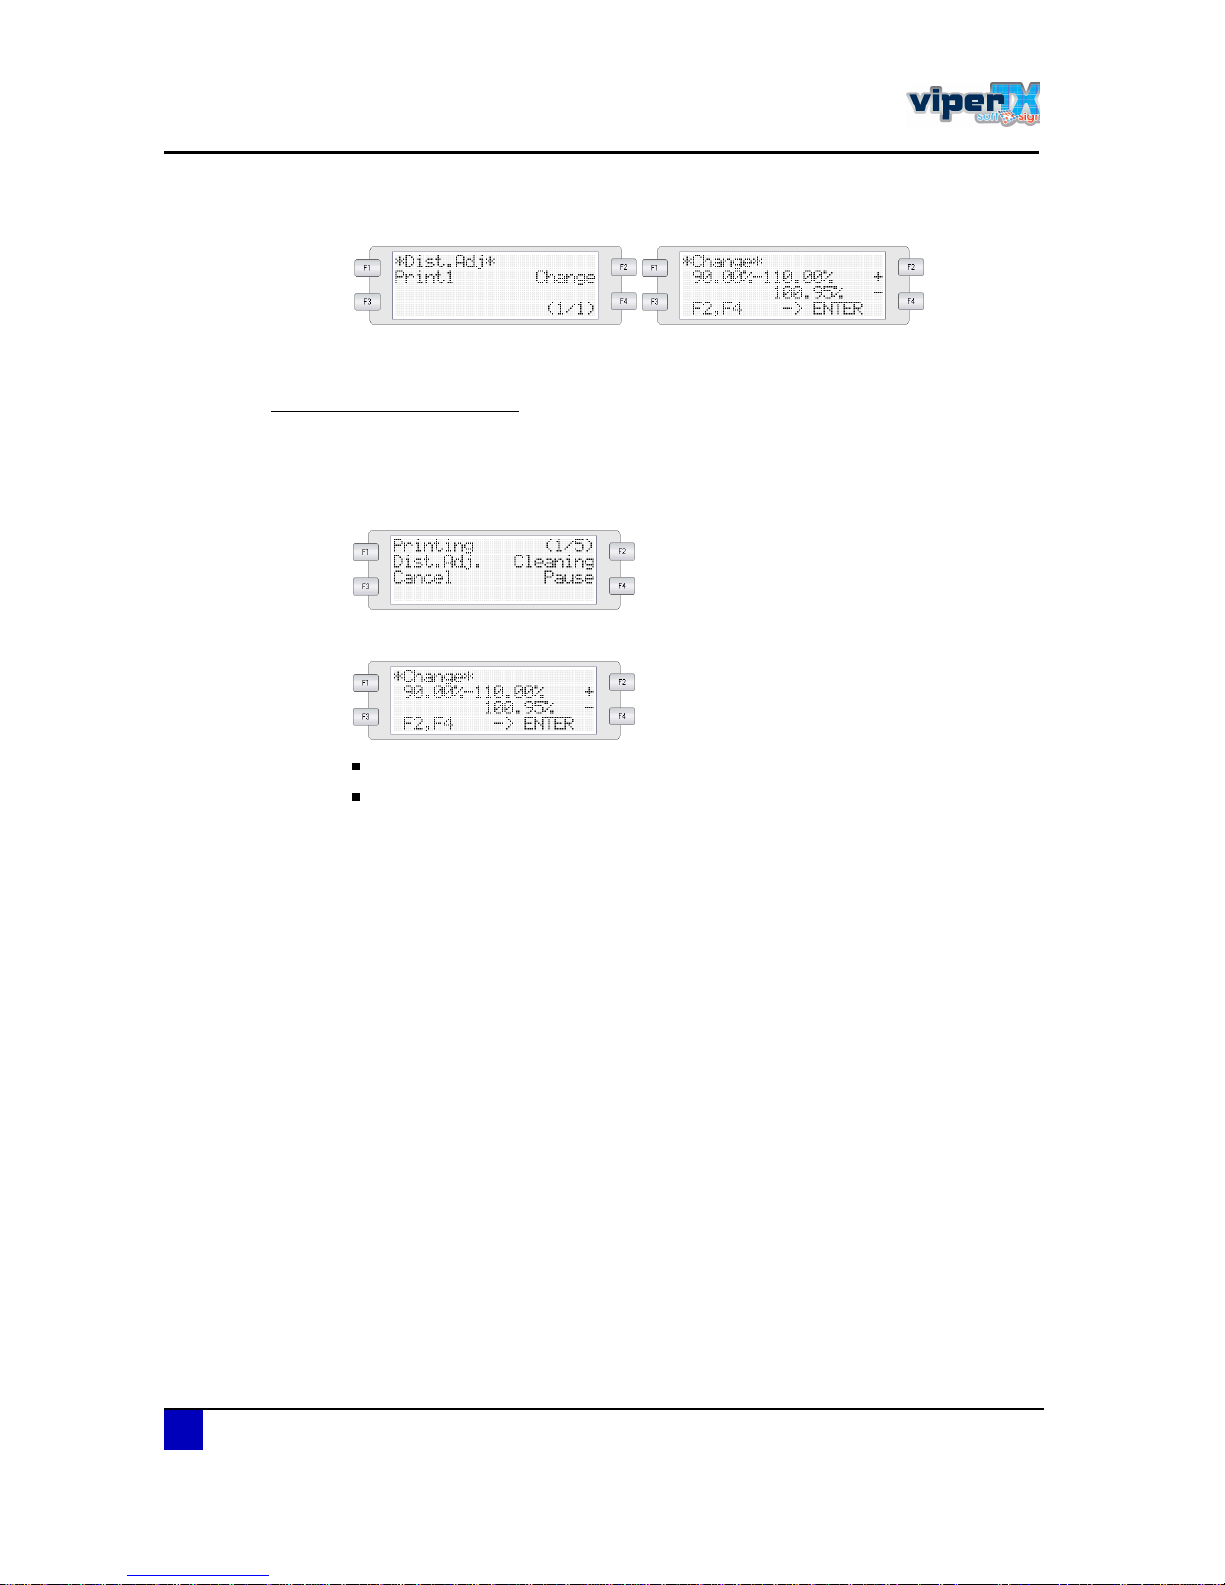
Users Guide Viper TX Softsign
Printer handling
76 AP-75360 - Revision 1.2
ͬ»° èæ Change the step is necessary with F2
ͬ»° çæ Print the test pattern again until no gap or overlap is visible anymore.
Change the step on-the-fly
However it is recommended to determine the step before you start a job on a new fabric, it is
also possible to adjust the step while printing as follows:
ͬ»° ïæ Press F1 while printing.
ͬ»° îæ Press F2 or F4 to change the step.
Raise the value when there are overlaps (underfeed)
Lower the value when there are gaps visible (overfeed)
ͬ»° íæ Press enter to save the changes.
Page 77
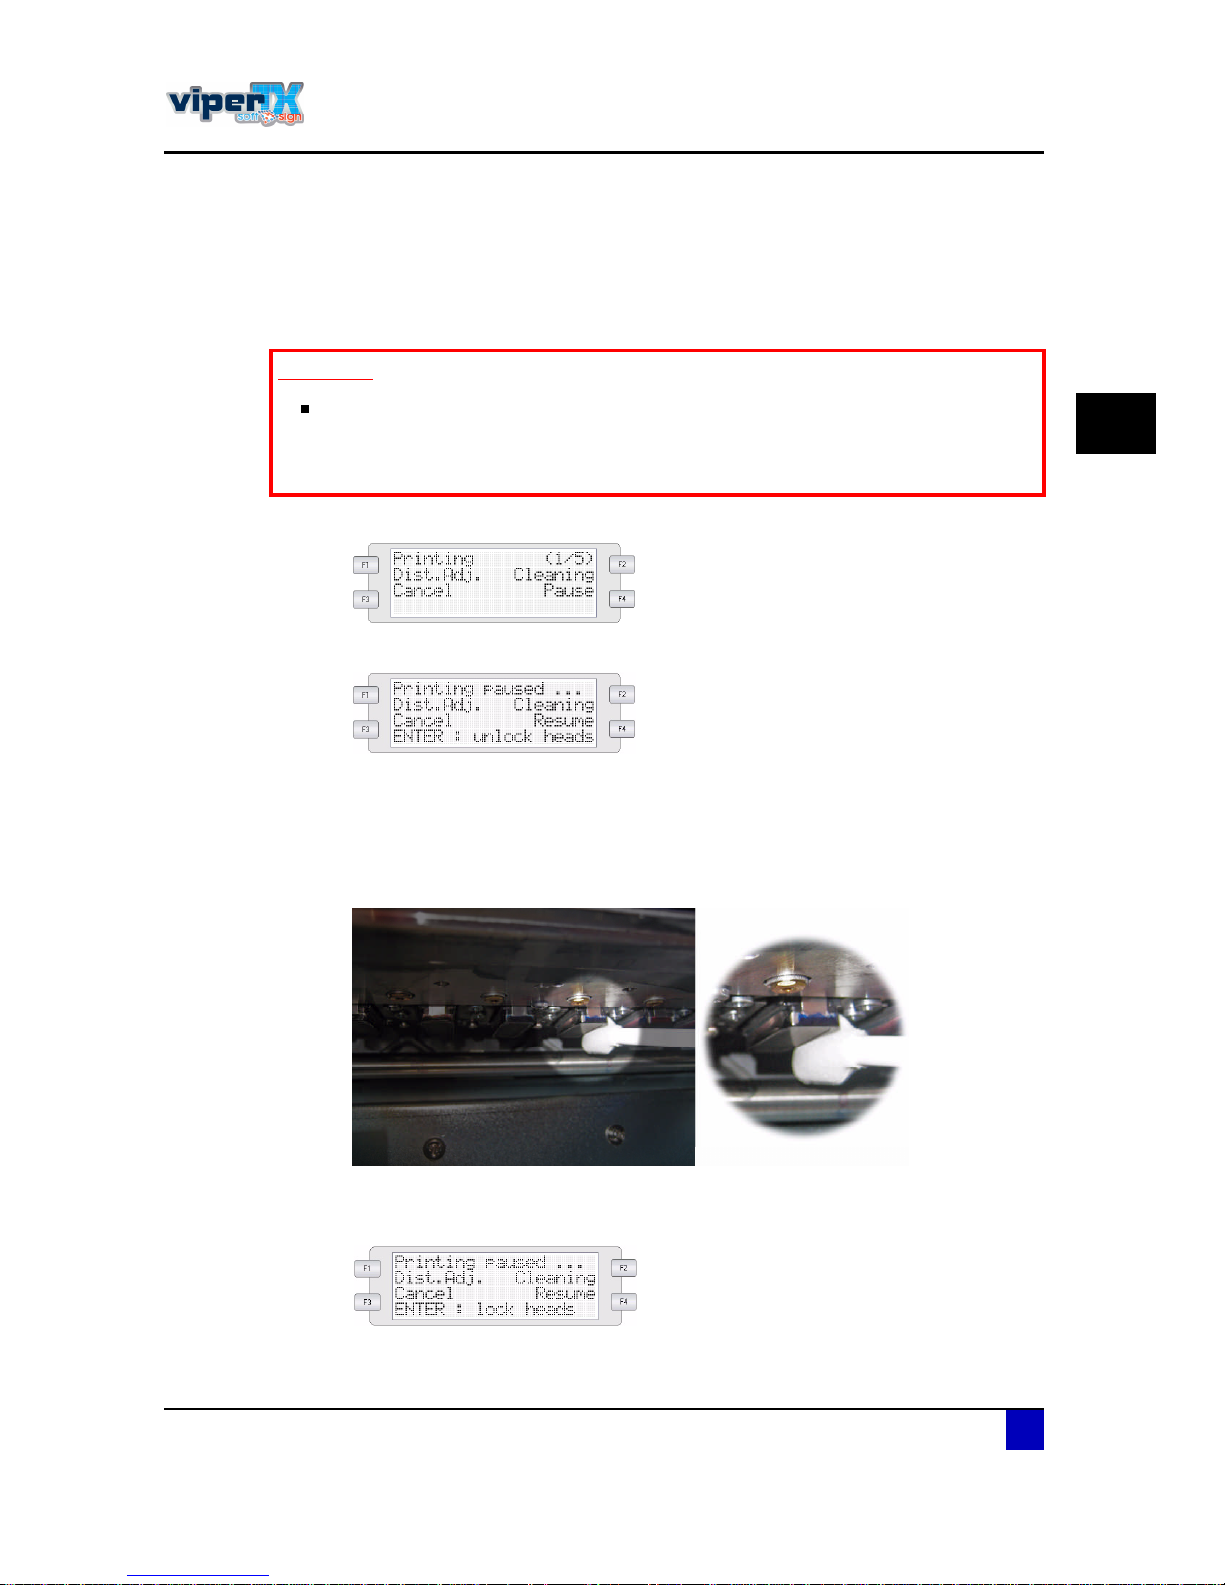
Users Guide Viper TX Softsign
Printer handling
AP-75360 - Revision 1.2 77
3
3.6.4 Pause option
When printing on hairy fabrics, it might be possible that some fibres stick to the print heads
and build-up which could lead to a bad print result. When this occurs, it is possible to pause
the job and clean the heads as follows:
ͬ»° ïæ Press F4 to pause the job.
ͬ»° îæ Press enter to unlock the carriage.
ͬ»° íæ Open the front and left maintenance cover.
ͬ»° ìæ Slide the carriage into the left maintenance area.
ͬ»° ëæ Clean the edges of the heads with a cleaning swab wetted with Mutoh waterbased
textile cleaning. Be sure not to touch nor clean the nozzle plate to avoid damage
and bad printing quality.
ͬ»° êæ Close the front and left maintenance cover.
ͬ»° éæ Press enter to make the carriage go back to its home position.
f
ͬ»° èæ Press F4 to resume printing.
׳°±®¬¿²¬
The fabric loading system does not move anymore, which means that a piece
of the printed fabric (± 60 cm) will be fixed for a longer time of the rest. This
could lead into output mismatches. Therefore, avoid pausing the printer during
a long job.
Page 78
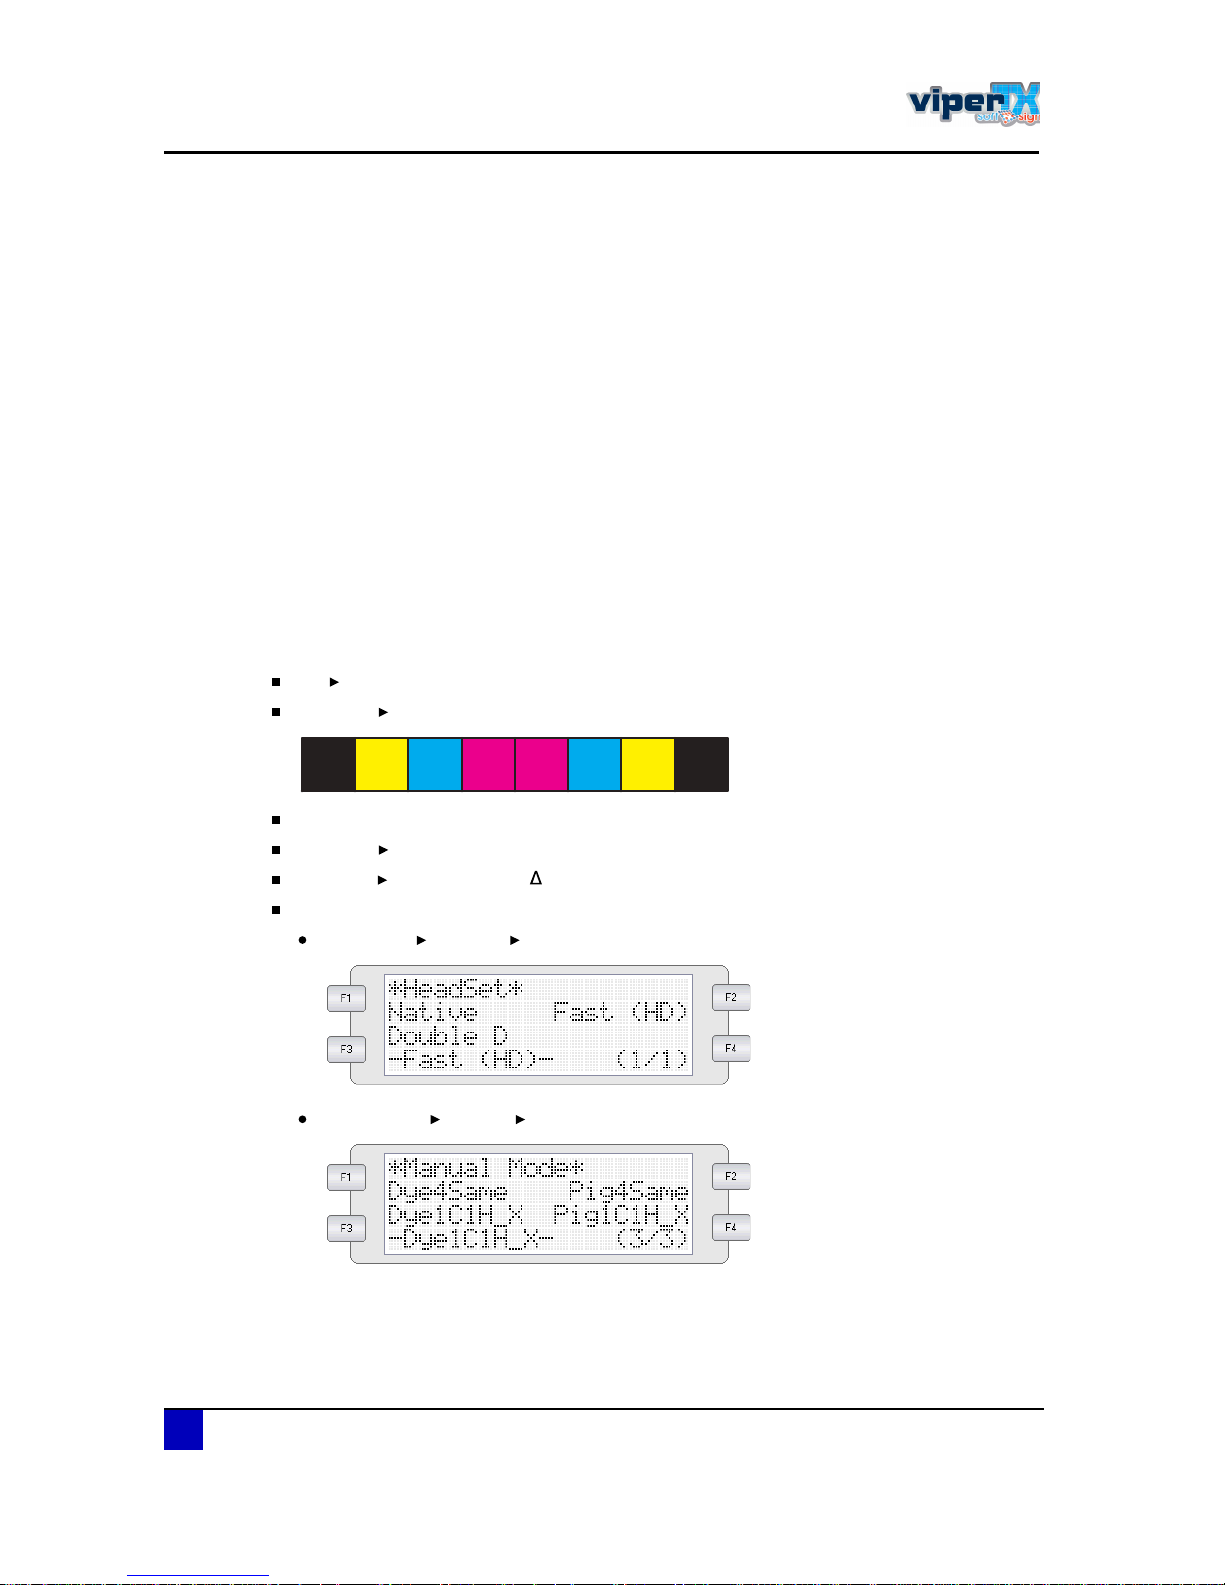
Users Guide Viper TX Softsign
Printer handling
78 AP-75360 - Revision 1.2
3.7 Set ideal heat fixation unit temperature
Various parameters play a key role in determining the output result on your Viper TX Softsign: the fabric
choice, the ink selection, the heat fixation unit temperature...
The last parameter may appear to be the most challenging to determine because it is influenced by
variables such as print speed (proportional with the contact time on the heat fixation unit), fabric (weight,
composition) and room temperature.
Via this chapter we would like to learn you...
òòò how to use the overview tables provided by Mutoh.
òòò how to determine the Viper TX Softsign settings for the fabric of your choice.
òòò how to handle artefacts such as shrinkage, ghosting and wash fastness.
òòò how to setup your personal overview table.
3.7.1 Testing condition
We have tested the fabrics in the following configuration:
Ink Mutoh Water-Based Direct Disperse ink
Ink order KYCMMCYK
65 machine, printed at full width
Room T° 24°C
Humidity 40% - 60% RH ( RH
max
5% RH/h - no condensation)
Machine settings
PrintMode Headset Fast HD
Inkmanager Manual Dye1C1H_X
Õ Ç Ó ÝÝ Ó ÕÇ
Page 79
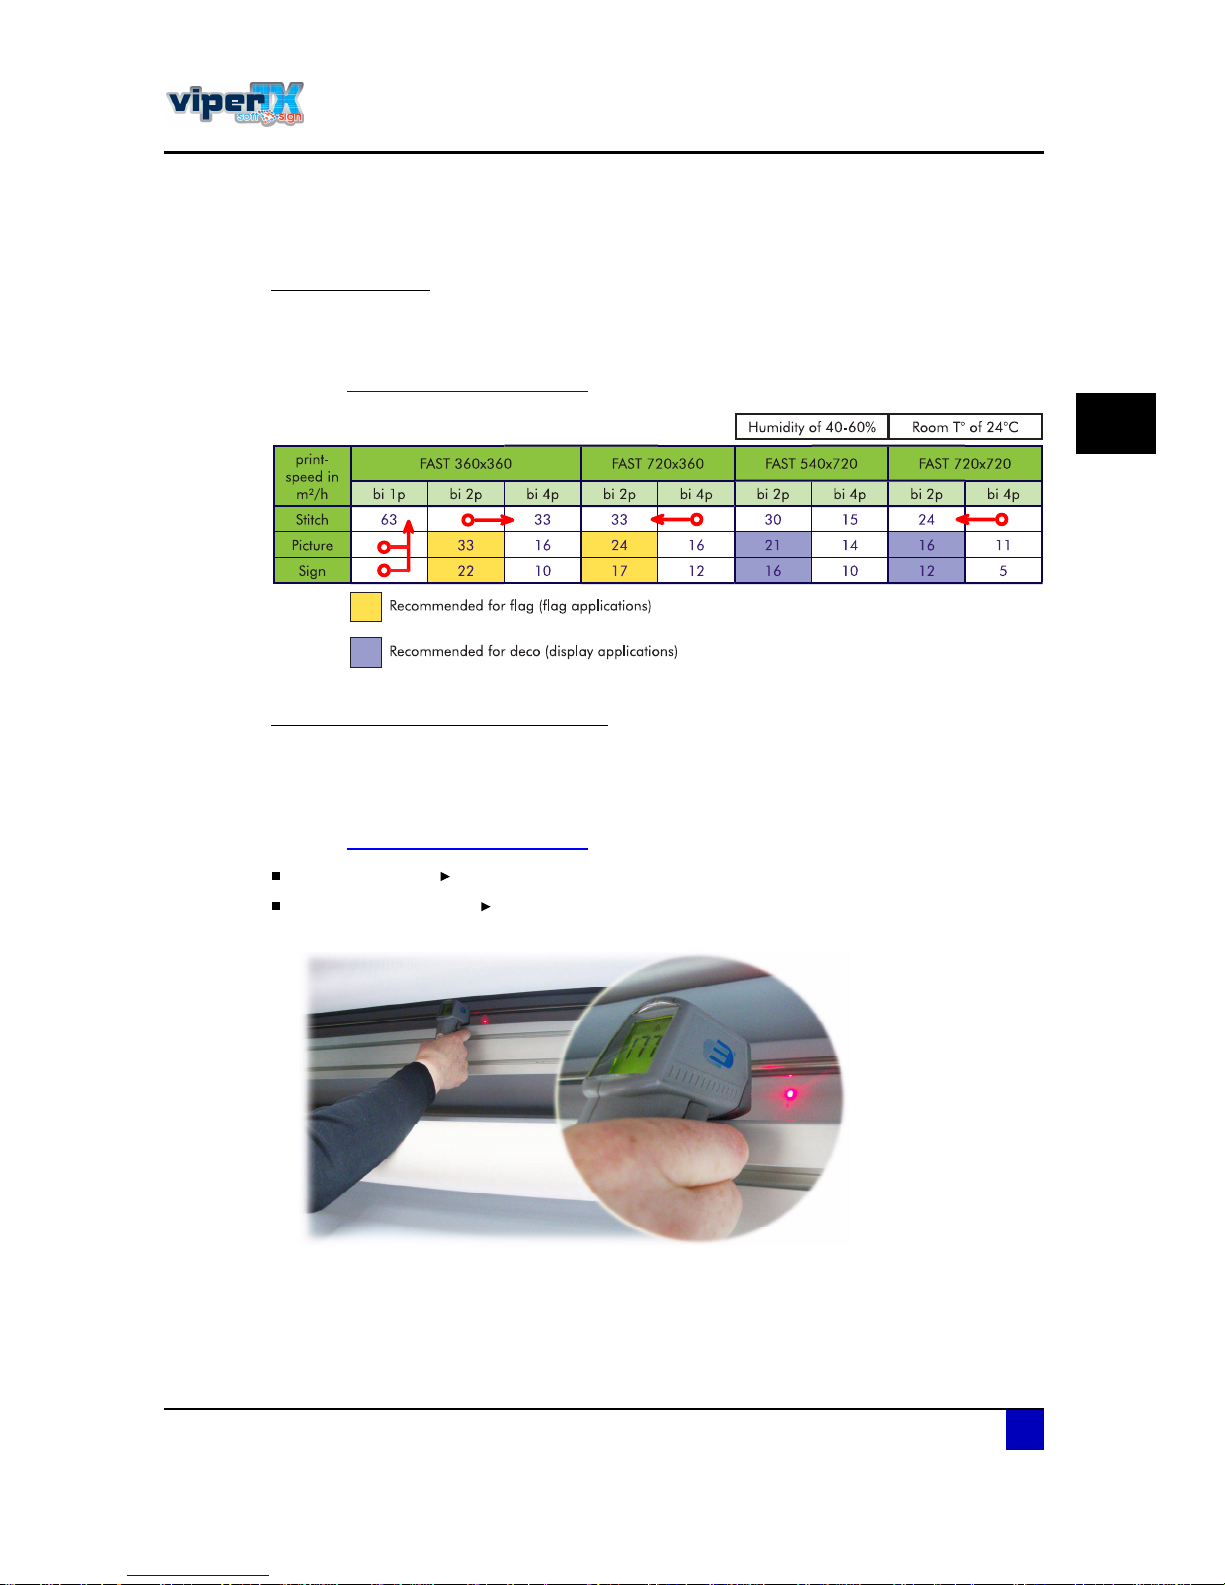
Users Guide Viper TX Softsign
Printer handling
AP-75360 - Revision 1.2 79
3
3.7.2 Overview tables
Print speed table
The table below gives you an overview of the printspeeds (m²/h) of each print mode according
to the conditions mentioned earlier.
Refer to Ì»¬·²¹ ½±²¼·¬·±² ±² °¿¹» éè
heat fixation unit temperature table
The table below gives you an overview of the heat fixation unit temperatures to be set when
printing at different speeds on different kinds of fabric according to the conditions mentioned
earlier.
Refer to Ì»¬·²¹ ½±²¼·¬·±² ±² °¿¹» éè
Set calender T° The temperature to be set on the fixation unit control panel.
Real T° of calender The actual temperature of the calender measured on the fabric
using a temperature gun.
Page 80
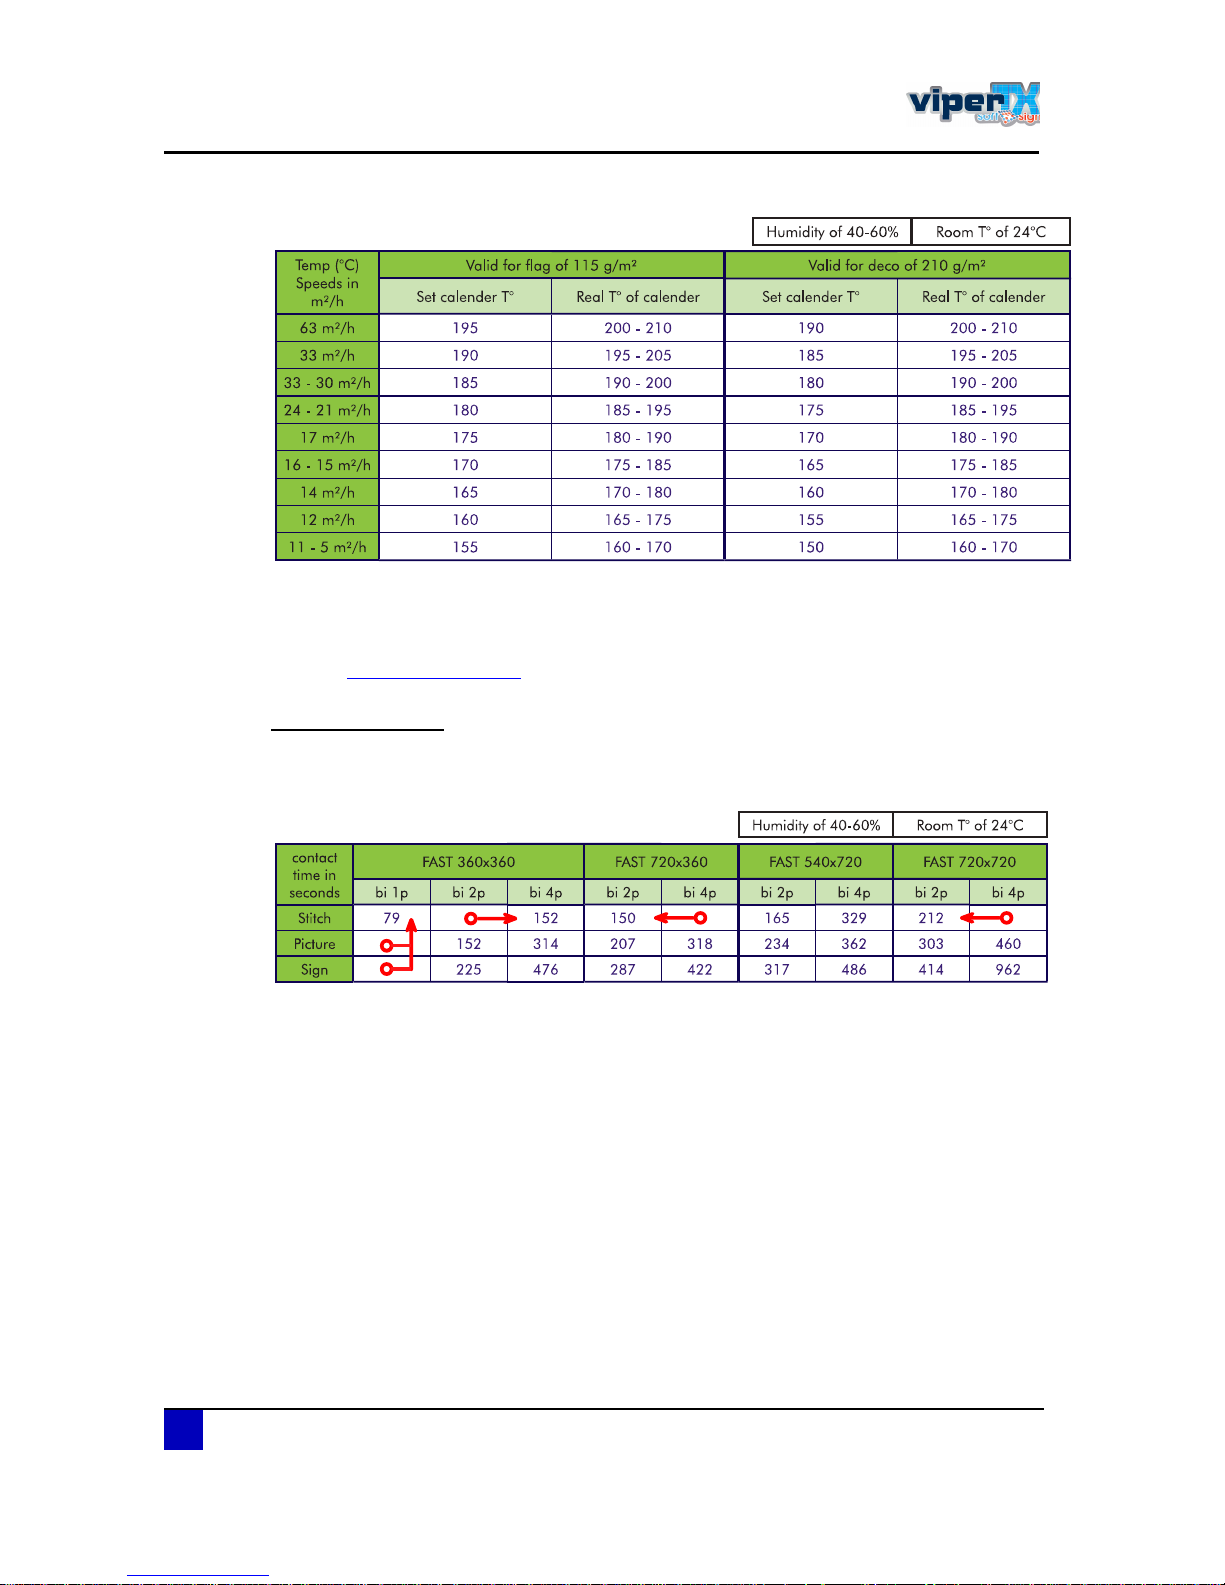
Users Guide Viper TX Softsign
Printer handling
80 AP-75360 - Revision 1.2
This table should be used in the first place as a guideline. As from the moment you have
picked a temperature, you will have to check the result yourself and look for possible
artefacts.
Refer to ß®¬»º¿½¬ ±² °¿¹» èï
Contact time table
This table gives you an overview of the fabric contact time (in seconds) in all print modes
available in the Viper TX Softsign. This table is purely informative.
Page 81
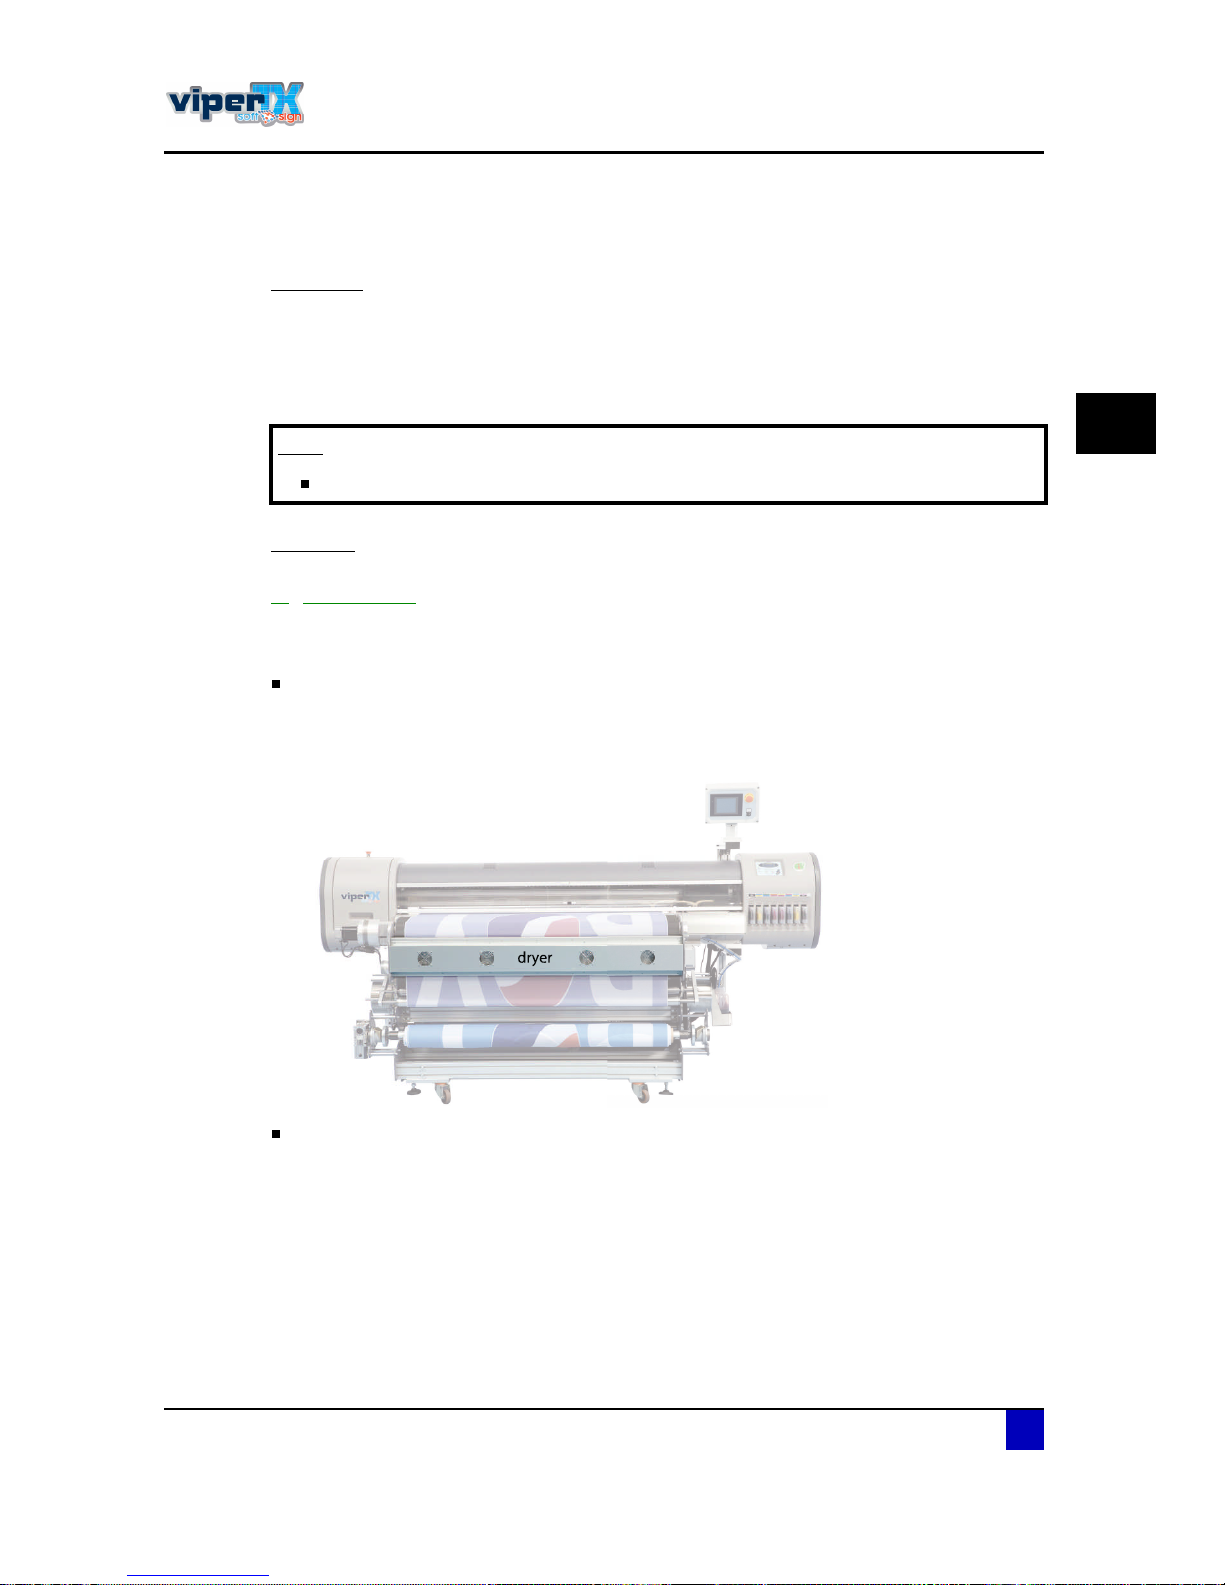
Users Guide Viper TX Softsign
Printer handling
AP-75360 - Revision 1.2 81
3
3.7.3 Artefacts
Shrinkage
During the fixing routine, the fabric is exposed to high heat for a long time which may shrink
the fabric. The allowed shrinkage of a fabric is person and job dependent. As standard we
take a maximum of 1-3%. If the fabric shrinks too much, try decreasing the heat fixation
unit temperature by 10°C.
Ghosting
1) General info
Ghosting is an unintended faint image around printed areas. Ghosting can appear because of
2 reasons:
The dryer temperature is too low.
Not all the water was evaporated before the fabrics went over the heat fixation unit. The
water will transform into steam because of the heat fixation unit heat. The steam takes
along a part of the colorant and is responsible for possible ghosting.
The heat fixation unit temperature is too high.
If the heat fixation unit is set too hot, part of the colorant may become volatile and is not
properly retained by the fabric. This also shows up as ghosting.
Ò±¬»
Be sure that the fabric you are buying has been pre-shrunk / heatset.
Page 82
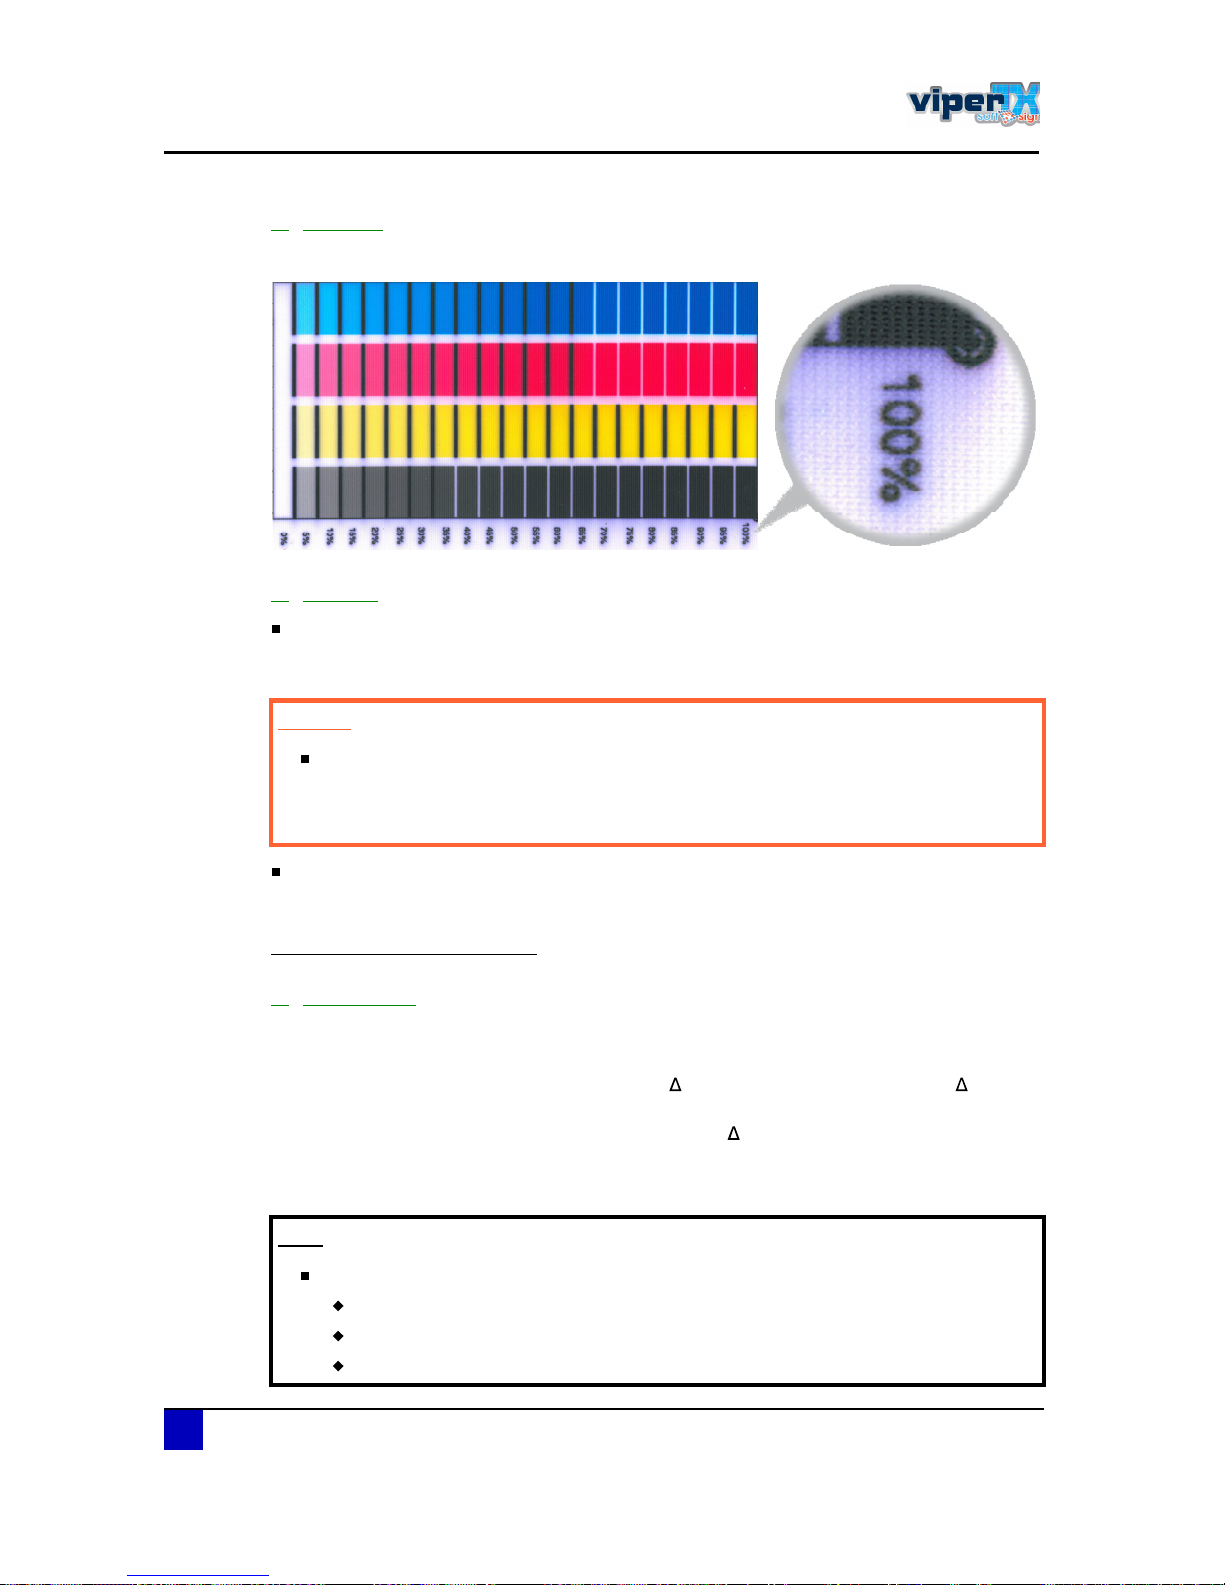
Users Guide Viper TX Softsign
Printer handling
82 AP-75360 - Revision 1.2
2) Example
This artefact is most likely perceived around text, lines and around the edges of solid planes.
3) Solution
Use a temperature gun to check the temperature of the fabric close to the dryer. This
temperature should be in the range of 90 - 100°C. If this is not the case, try increasing the
dryer intensity.
Try decreasing the heat fixation unit temperature by 10°C and reprint the job until the
ghosting disappears.
Wash fastness (discolouring)
1) General info
Wash fastness is a measurement for the degree of fixing. If the ink is not fixed completely on
the fabric, there will be a colour difference after washing the fabric.
A difference between colours is expressed in E. More specific, we are using E94as a
reference to partially account for perceptual non-uniformities of the human eye. The result is a
numeric value. After a successful fixation process, the E94should not be larger than 2 after
washing.
The colour difference can be measured using a spectrophotometer and the suitable software.
Ý¿«¬·±²
Be sure not to increase the dryer temperature too much. The dryer should not
get initiate the fixation process of the ink on the fabric already. Visually check
the colours before and after the fabric has passed the dryer. If you notice a
colour difference, decrease the dryer temperature.
Ò±¬»
The following values are used for factor K in our calculations:
kL= 1
K1= 0,045
K2= 0,015
Page 83
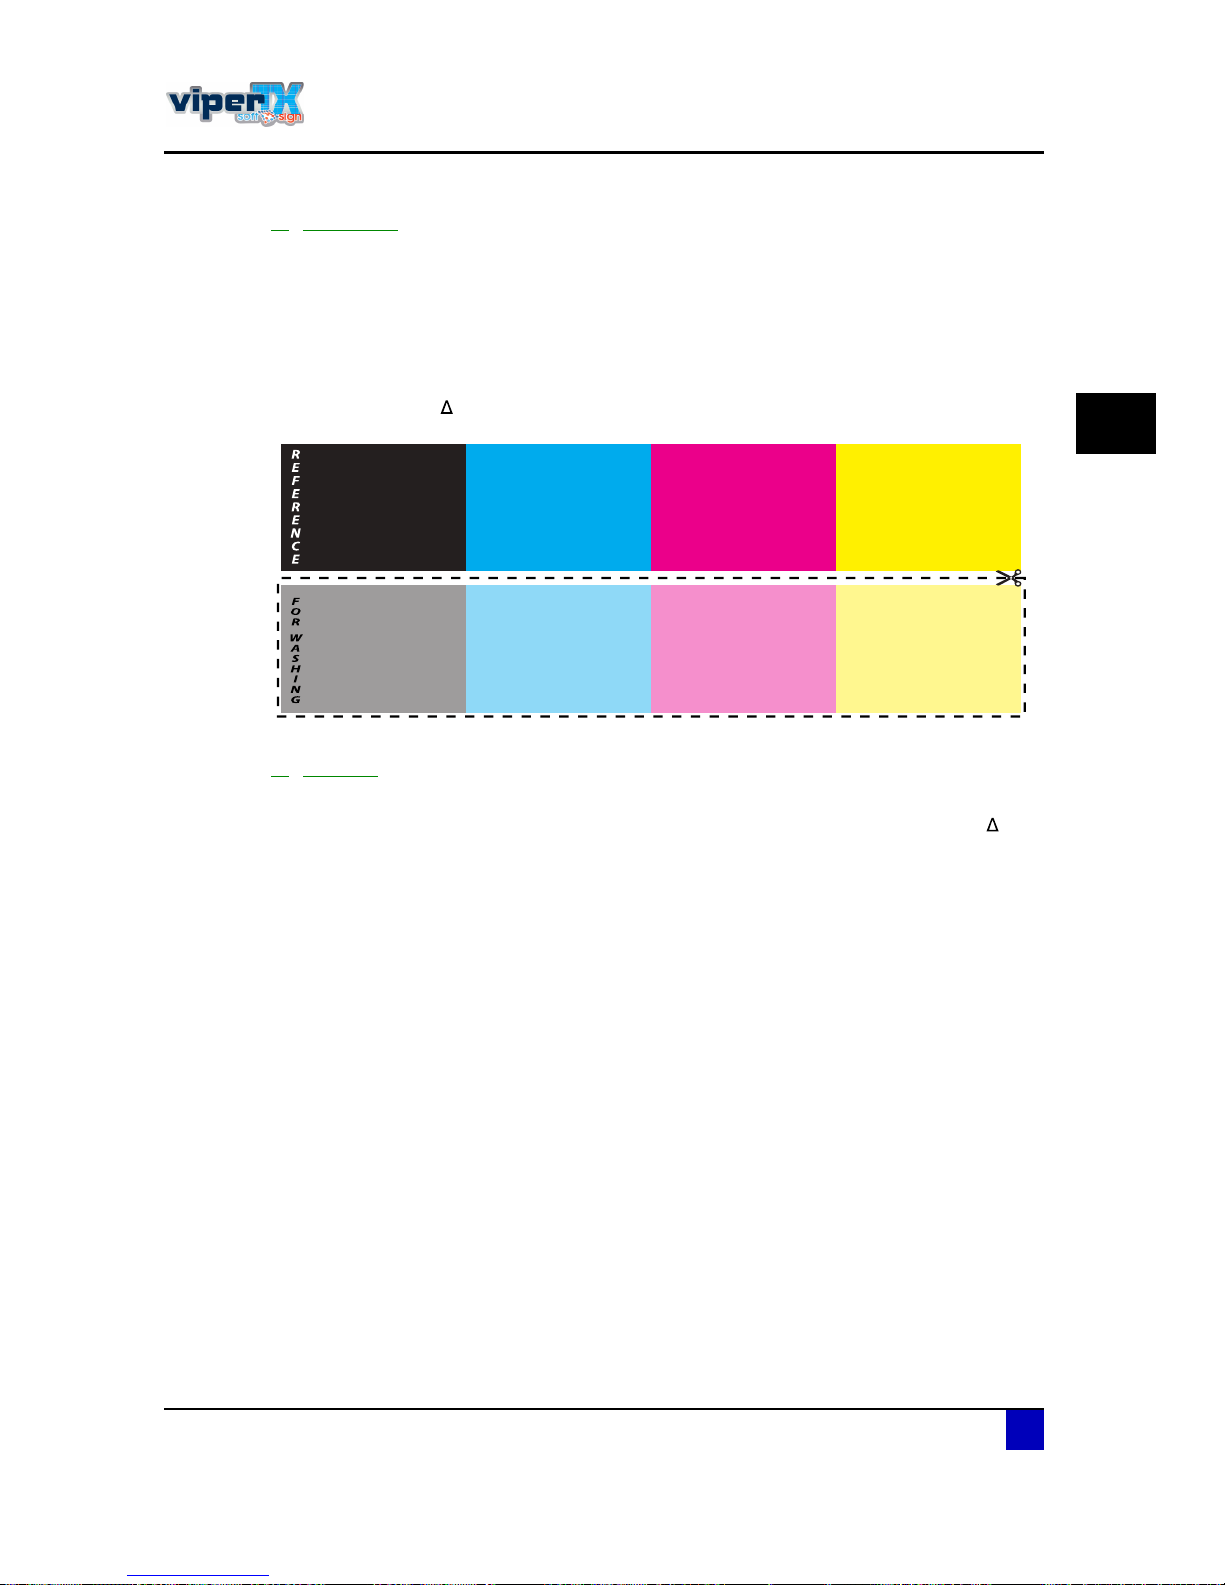
Users Guide Viper TX Softsign
Printer handling
AP-75360 - Revision 1.2 83
3
2) Procedure
ͬ»° ïæ Cut off a piece of the print.
ͬ»° îæ Fill a closable bowl with 25 cl of tapwater. Do not use soap.
ͬ»° íæ Put the fabric in the bowl and close it.
ͬ»° ìæ Shake the bowl. Do not scrub.
ͬ»° ëæ Remove the fabric and let it dry completely.
ͬ»° êæ Check the E94between the reference and washed fabric.
3) Solution
If you are able to wash out the ink, it means that the ink is not completely fixed to the fabric.
Try increasing the heat fixation unit temperature by 10°C and reprint the job until E94<
2.
Page 84
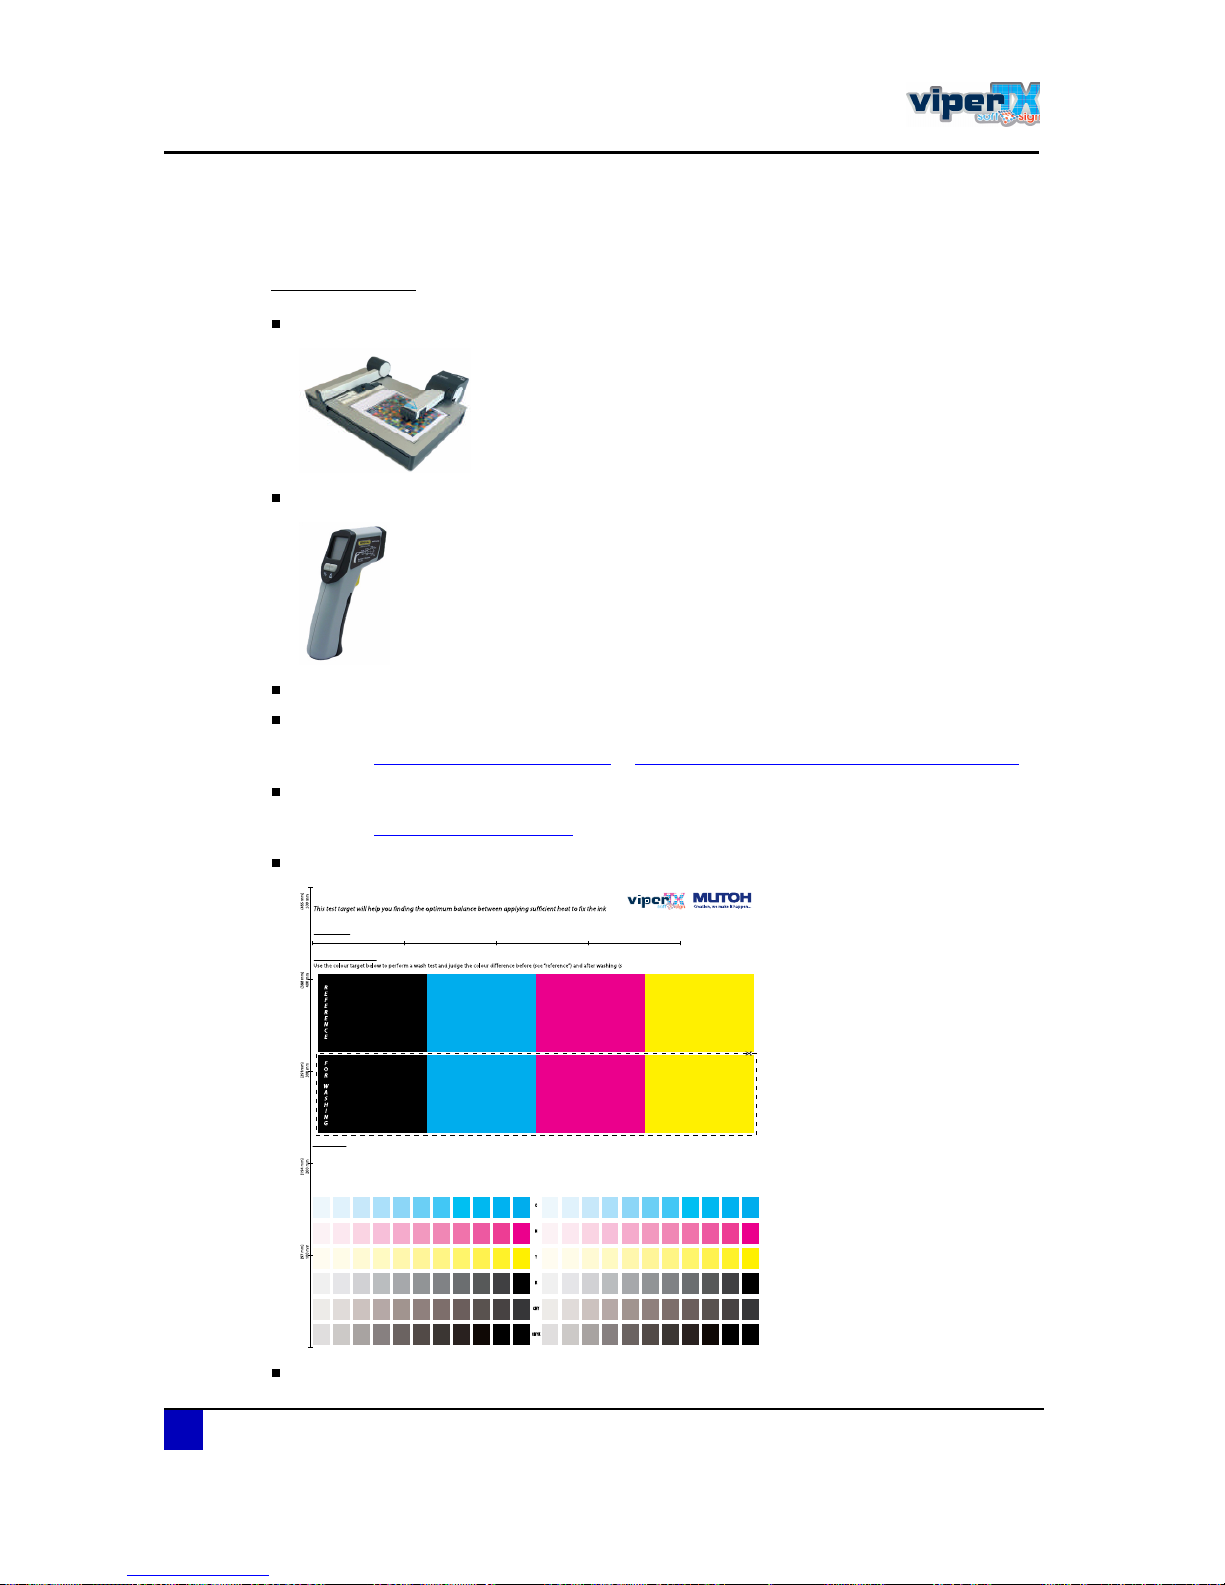
Users Guide Viper TX Softsign
Printer handling
84 AP-75360 - Revision 1.2
3.7.4 Determining my softsign settings for my fabric
Tools necessary
Spectrophotometer suitable for measuring colour differences on fabric
Temperature gun
Closable bowl with 25 cl of tapwater to wash a part of the printed fabric
Mutoh speed and temperature table
Refer to Ю·²¬ °»»¼ ¬¿¾´» ±² °¿¹» éç & ¸»¿¬ º·¨¿¬·±² «²·¬ ¬»³°»®¿¬«®» ¬¿¾´» ±² °¿¹» éç
Personal blank table
Refer to Þ´¿²µ ¬¿¾´» ±² °¿¹» èé
Mutoh test file which can be found on the installation CD.
Fabric with a known weight (g/m²)
ЙЯНШЧТЩЪЯНМТЫНН
НШОЧТХЯЩЫ
ЩШСНМЧТЩ
МЫИМЧФЫ НШОЧТХЯЩЫ с ЙЯНШЧТЩ ЪЯНМТЫНН с ЩШСНМЧТЩ ÌÛÍÌ
øçé³³÷
ïðð³³
øïçì³³÷
îðð³³
øîçï³³÷
íðð³³
øíèè³³÷
ìðð³³
ш©¿-¸·²¹º¿-¬²»--ч ¿²¼ ¿°°´§·²¹ ¬±± ³«½¸¸»¿¬ ½¿«-·²¹ ¹¸±-¬·²¹ ±® «²¿½½»°¬¿¾´» -¸®·²µ¿¹»ш³¿¨т нычт Р´»¿-» °®·²¬ ¿¬ пррыт
Ë-»¬¸» ¬»-¬ ¿®»¿ ¾»´±© ¬± ·²-°»½¬ ¬¸» ¿°°»¿®¿²½» ±º ¹¸±-¬·²¹ ø«²·²¬»²¼»¼ º¿·²¬ ·³¿¹» ¿®±«²¼ °®·²¬»¼ ¿®»¿-÷ ¾»¬©»»² ½±´±«® °¿¬½
¸»-¿²¼ ¿®±«²¼ ¬»¨¬ò ̸» ·²¬»²¬·±² ·- ¬± -»» ¿ -¸¿®°
±«¬´·²»¿²¼ -°»½µ´» º®»» ©¸·¬» ¿®»¿ò
Ù¸±-¬·²¹ á øÕ÷ Ù¸±-¬·²¹ á шЭУЗч Ù¸±-¬·²¹ á
шЭУЗХч
»» º±® ©¿¸·²¹÷ò
О»¿´¼·-¬¿²½» шЮЫЪСОЫч
У·²·³«³¿´´±©»¼ ¼· -¬¿²½»ш ЯЪМЫОч
Page 85
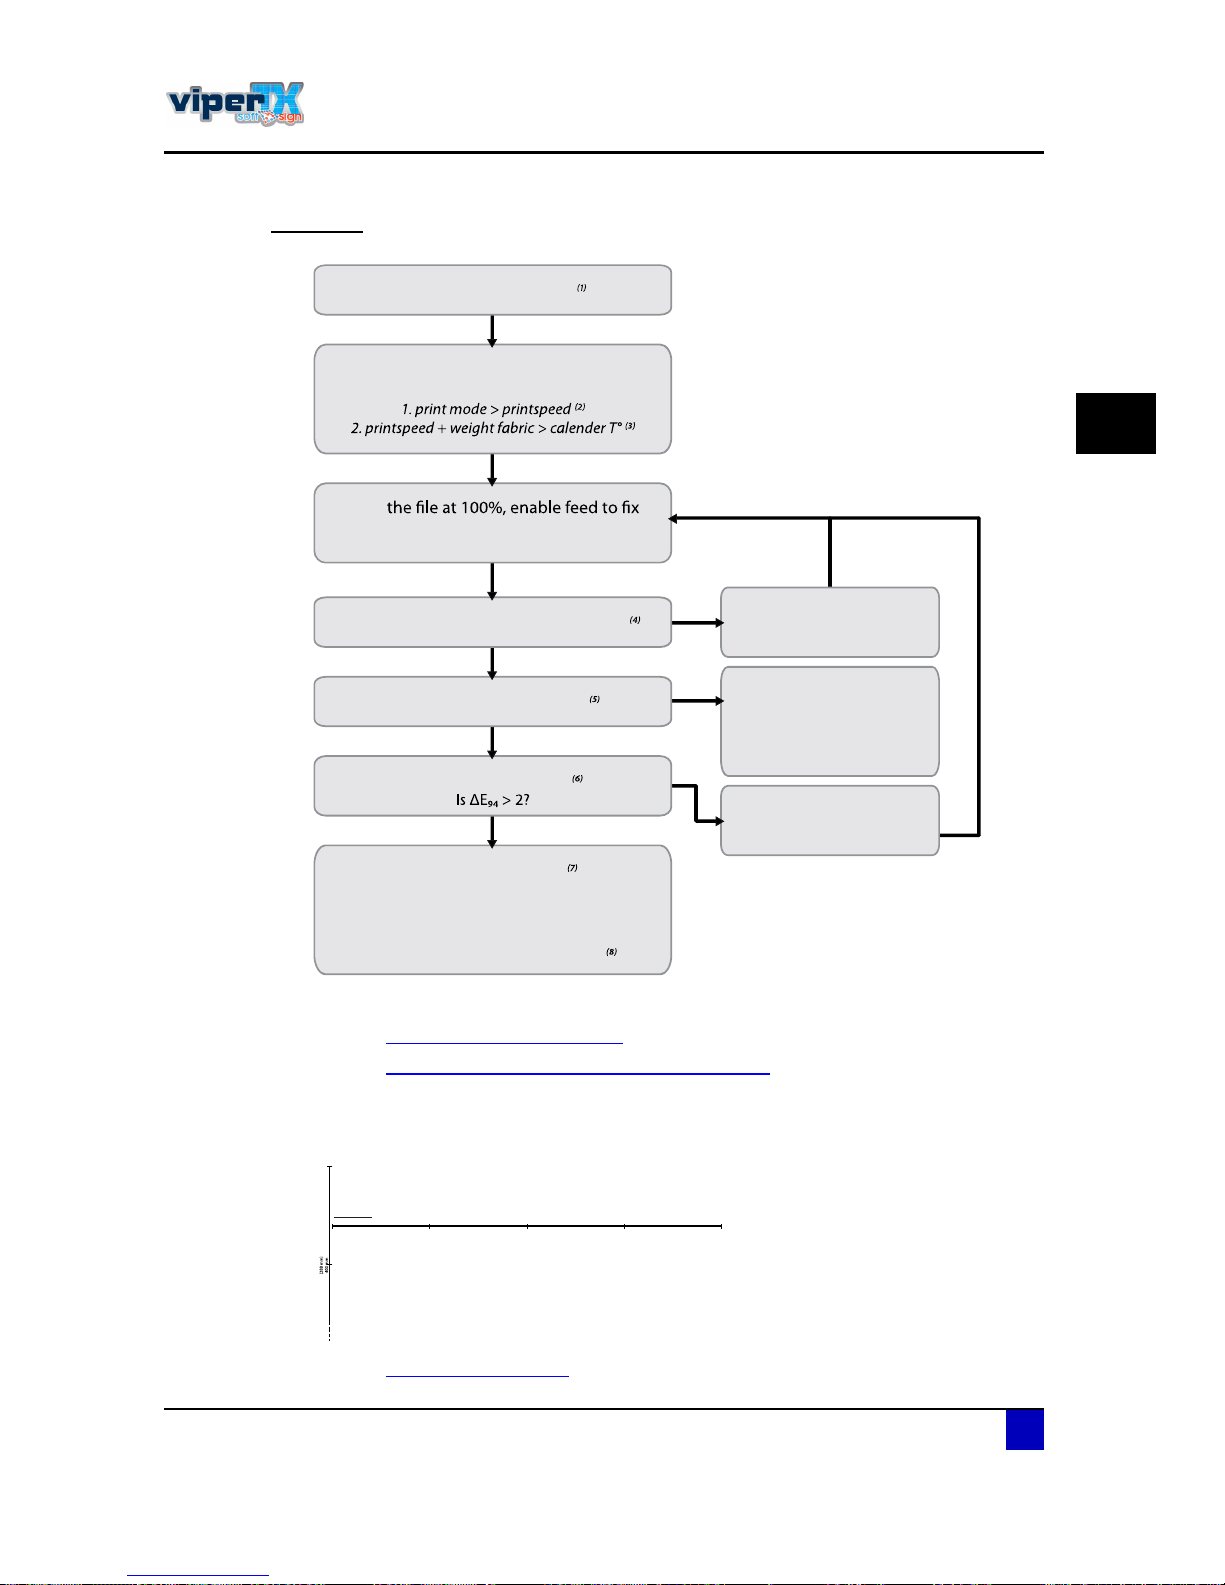
Users Guide Viper TX Softsign
Printer handling
AP-75360 - Revision 1.2 85
3
Workflow
z
(1)
Please make sure to use the correct profile for the print mode you have chosen.
(2)
Refer to Ю·²¬ °»»¼ ¬¿¾´» ±² °¿¹» éç
(3)
Refer to ¸»¿¬ º·¨¿¬·±² «²·¬ ¬»³°»®¿¬«®» ¬¿¾´» ±² °¿¹» éç
(4)
There are two rulers printed on the test pattern (horizontal and vertical). Measure the
length and height and verify that the minimum allowed distance (= real distance - 3%)
has not been exceeded .
Refer to ͸®·²µ¿¹» ±² °¿¹» èï
ݸ±±-» §±«® РОЧТМ УСЬЫ
РОЧТМ
¿²¼ ©¿·¬ «²¬·´ ·¬ ¸¿- ½±³°´»¬»´§ °¿--»¼
¬¸» ½¿´»²¼»®
ЪЧФФ ЧТ МШЫ ЮФЯТХ МЯЮФЫ
ïò α±³ ¬»³°»®¿¬«®»
îò Ú¿¾®·½ ©»·¹¸¬
íò Í»¬ ½¿´»²¼»® Ìp
ìò λ¿´ ¬»³°»®¿¬«®» à ½¿´»²¼»®
Ü·¼ ¬¸» º¿¾®·½ НШОЧТХ ³±®» ¬¸¿² пуныб
ЬЫЭОЫЯНЫ ¬¸» ½¿´»²¼»®
¬»³°»®¿¬«®» ©·¬¸ ïðpÝ
ЧТЭОЫЯНЫ ¬¸» ½¿´»²¼»®
¬»³°»®¿¬«®» ©·¬¸ ïðpÝ
ЬЫЭОЫЯНЫ ¬¸» ½¿´»²¼»®
¬»³°»®¿¬«®» ©·¬¸ ïðpÝ
±® ЧТЭОЫЯНЫ ¬¸» ¼®§»®
·²¬»²-·¬§ øo çð ó ïððpÝ÷
ܱ»- ЩШСНМЧТЩ ¿°°»¿®á
л®º±®³ ¬¸» ÉßÍØ ¬»-¬ò
Í»¬ ®»½±³³»²¼»¼ ЭЯФЫТЬЫО МЫУРЫОЯМЛОЫ
¾§ ³»¿²- ±º ¬¸» ¼»´·ª»®¼ ¬¿¾´»-
Ç
Ç
Ç
Ò
Ò
Ò
НШОЧТХЯЩЫ
øçé³³÷
ïðð³³
øïçì³³÷
îðð³³
øîçï³³÷
íðð³³
øíèè³³÷
ìðð³³
Page 86
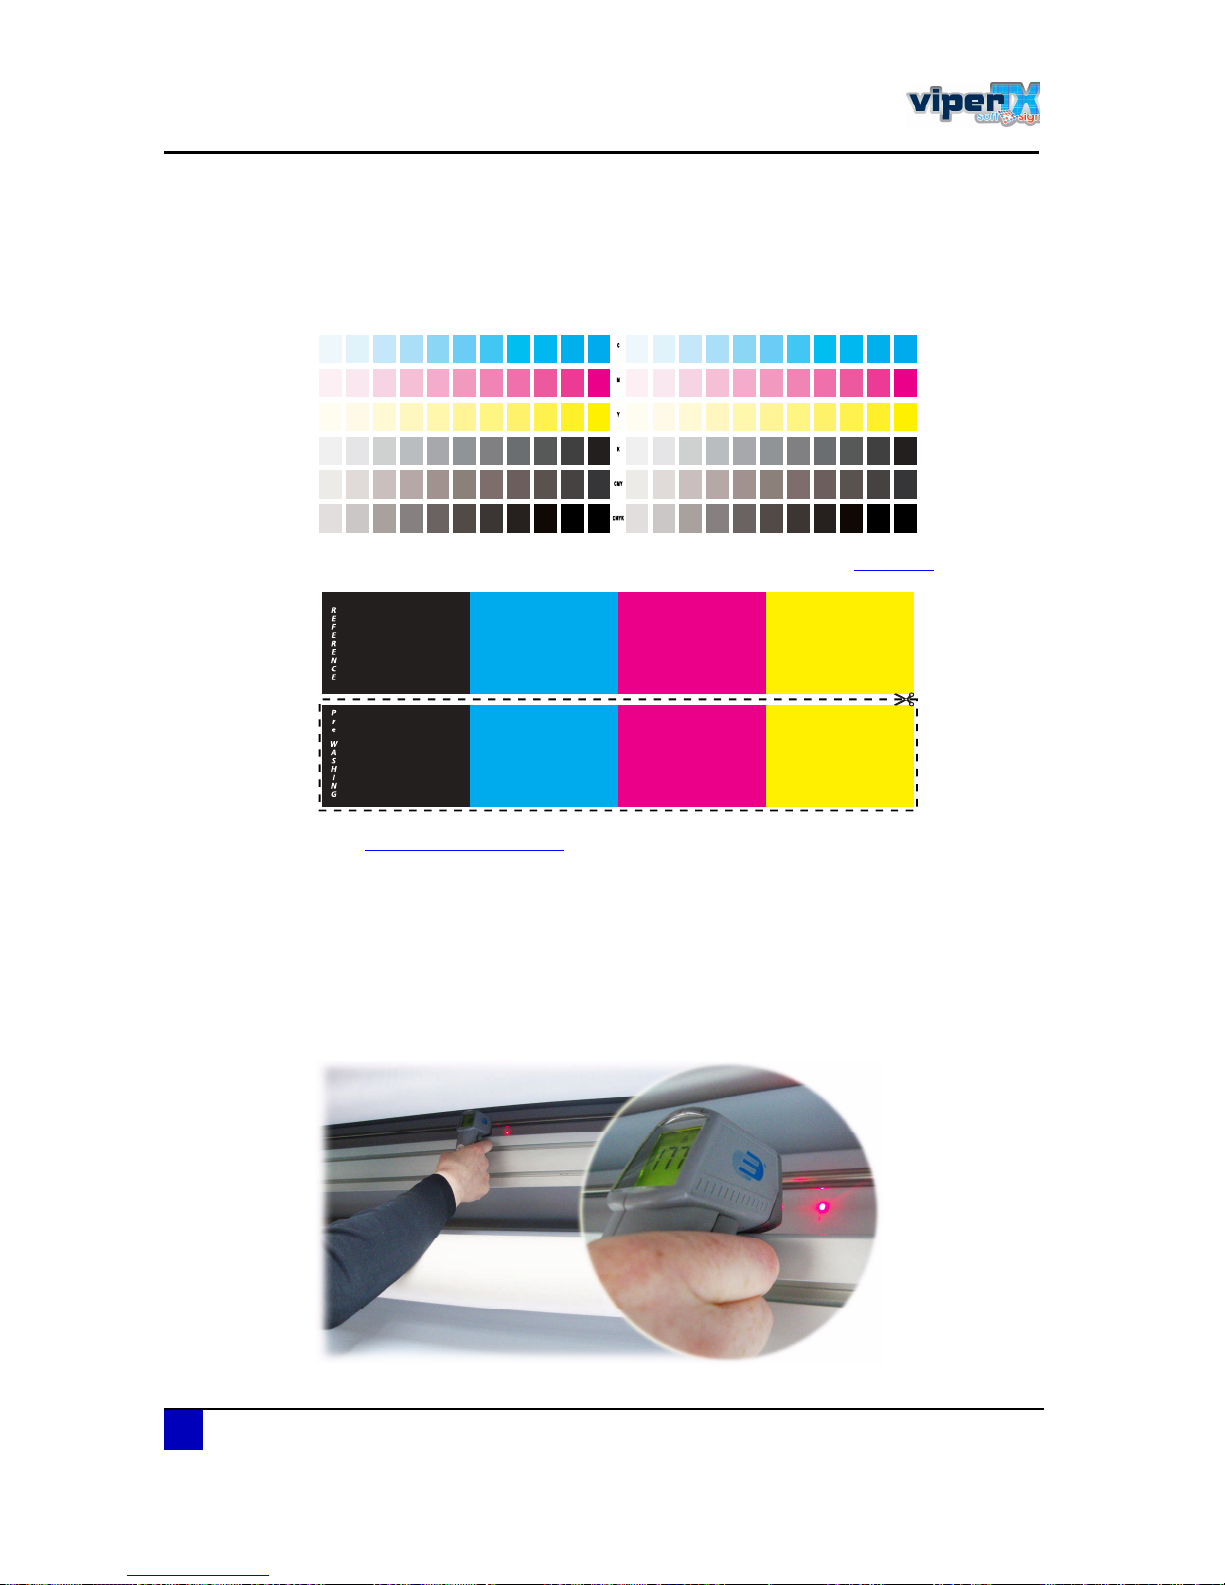
Users Guide Viper TX Softsign
Printer handling
86 AP-75360 - Revision 1.2
(5)
Check this part of the test file for ghosting. Pay extra attention to the text, lines and the
edges of the solid planes. The intention is to see a sharp outline and speckle free white
area.
(6)
Cut out the fabric on the dotted line and wash it according to this Ю±½»¼«®»
(7)
Refer Þ´¿²µ ¬¿¾´» ±² °¿¹» èé
(8)
The set T° of the calender will not be the same as the real T° because of different factors
such as fabric thickness and room temperature. For example, it might be possible that
you will have to set the T° of the calender 5°C higher when the room T° drops with 2°C.
The measured T° however, should always be the same under all conditions. Use a
temperature gun to measure the real T° of the fabric on the heat fixation unit and set the
heat fixation unit temperature accordingly, each time the room T° changes.
TIP: Be sure to measure perpendicularly, directly on the fabric and as close as
possible to the fabric as you can see in the image below:
Ù¸±-¬·²¹ á øÕ÷ Ù¸±-¬·²¹ á шЭУЗч Ù¸±-¬·²¹ á шЭУЗХч
Page 87
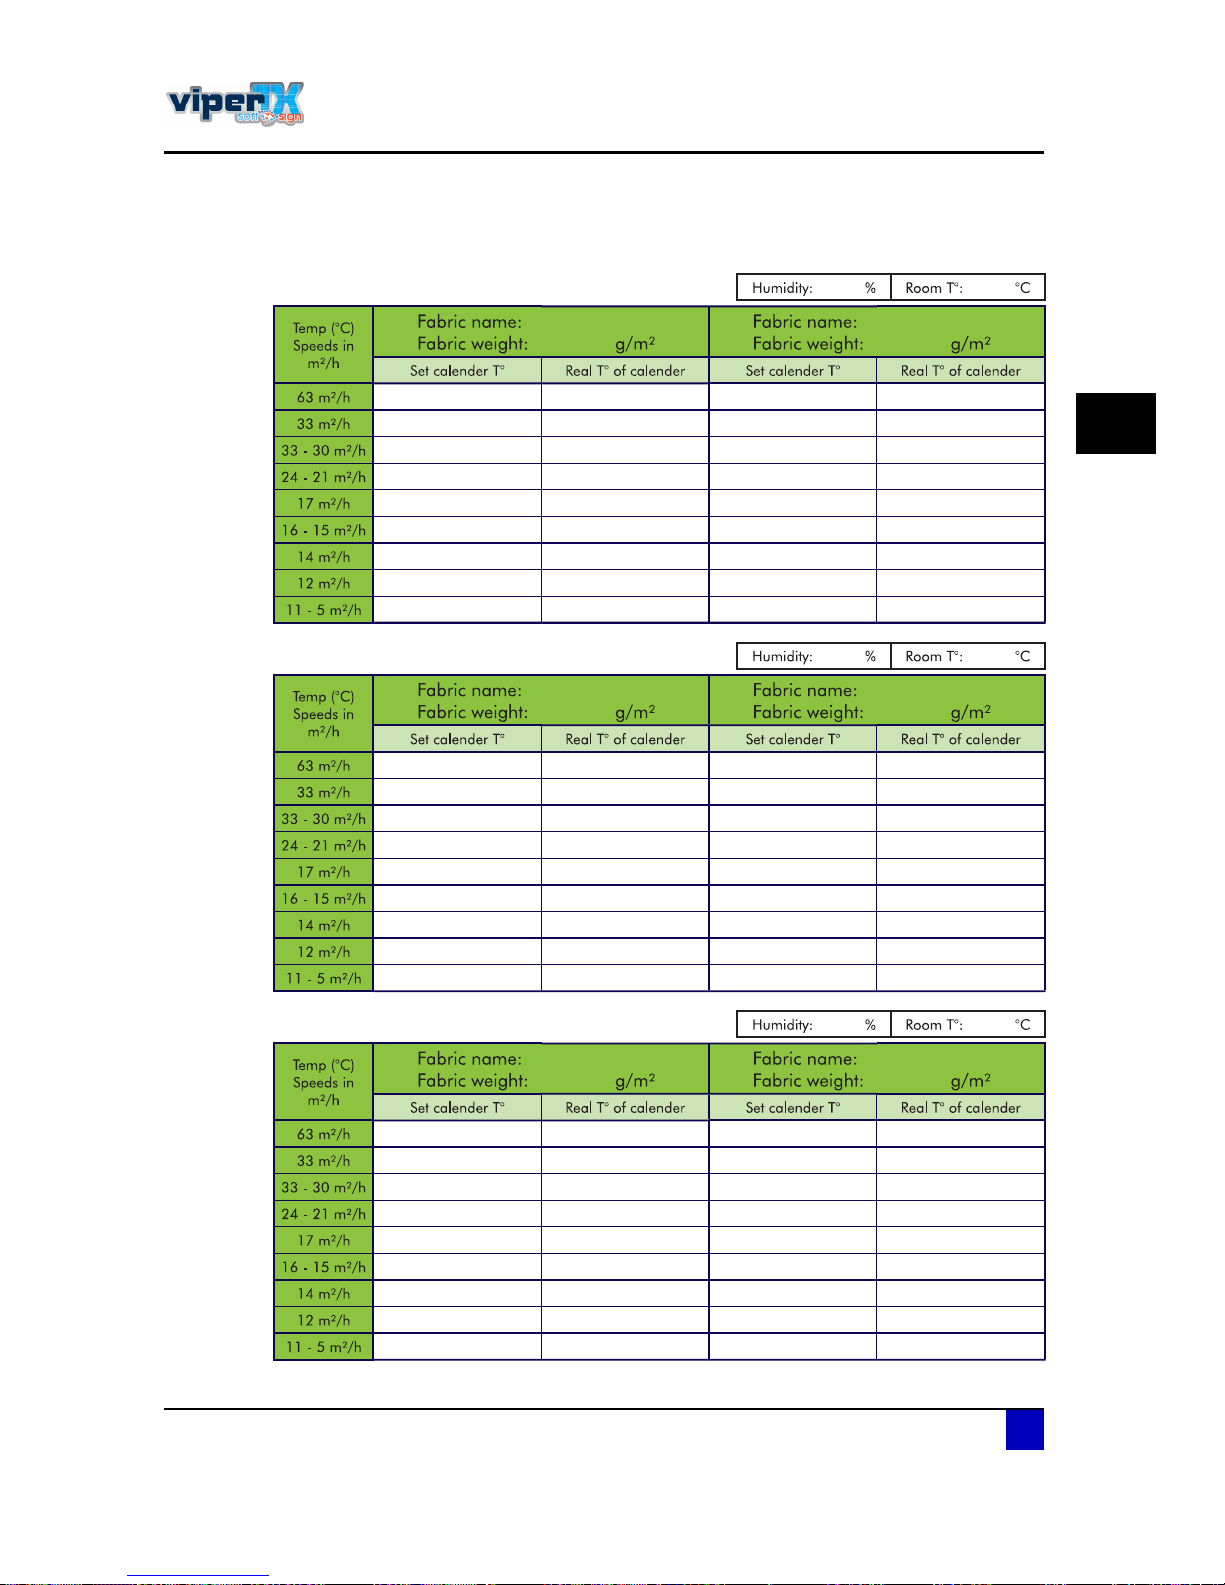
Users Guide Viper TX Softsign
Printer handling
AP-75360 - Revision 1.2 87
3
3.7.5 Blank tables
Page 88
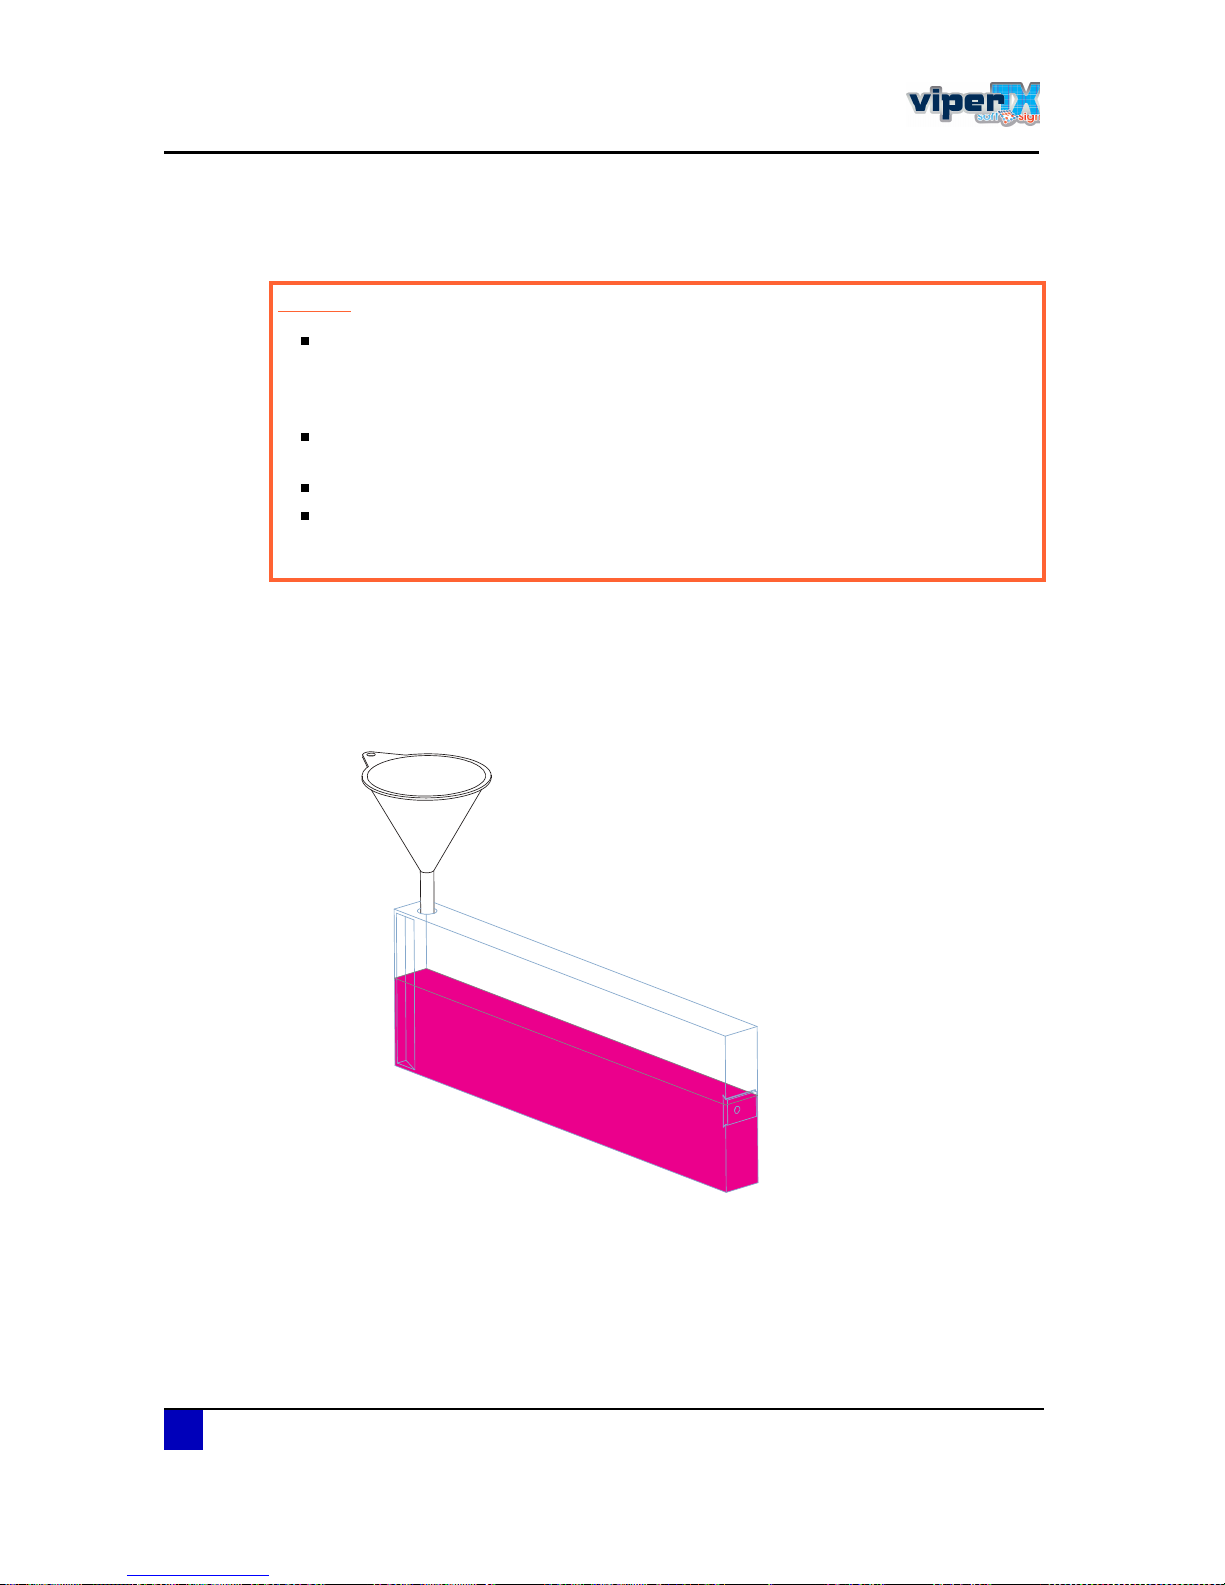
Users Guide Viper TX Softsign
Printer handling
88 AP-75360 - Revision 1.2
3.8 Replacing the ink cassettes
Follow the steps below to fill the ink cassettes.
ͬ»° ïæ Pull out the little plug on the top of the open cassette.
ͬ»° îæ Place the funnel in the opening of the cassette.
ͬ»° íæ Fill the cassette to a level of 60 - 62 mm (measured from the bottom of the cassette)
to obtain perfect printing quality.
ͬ»° ìæ Make sure that the operation panel returns to normal status.
Ý¿«¬·±²
When handling ink cassettes, be careful that ink does not get in your eyes or
on your skin. However, if this happens, flush immediately with water.
Otherwise, your eyes may become congested or inflamed slightly. If you feel
discomfort, consult a doctor immediately.
Do not disassemble ink cassettes. Otherwise, ink may get in your eyes or on
your skin.
Do not shake ink cassettes strongly. Otherwise, ink may leak.
Before using the ink and cleaning cassettes, be sure to read and understand
the MSDS (material safety data sheets) which come together with the ink and
cleaning cassettes.
Page 89
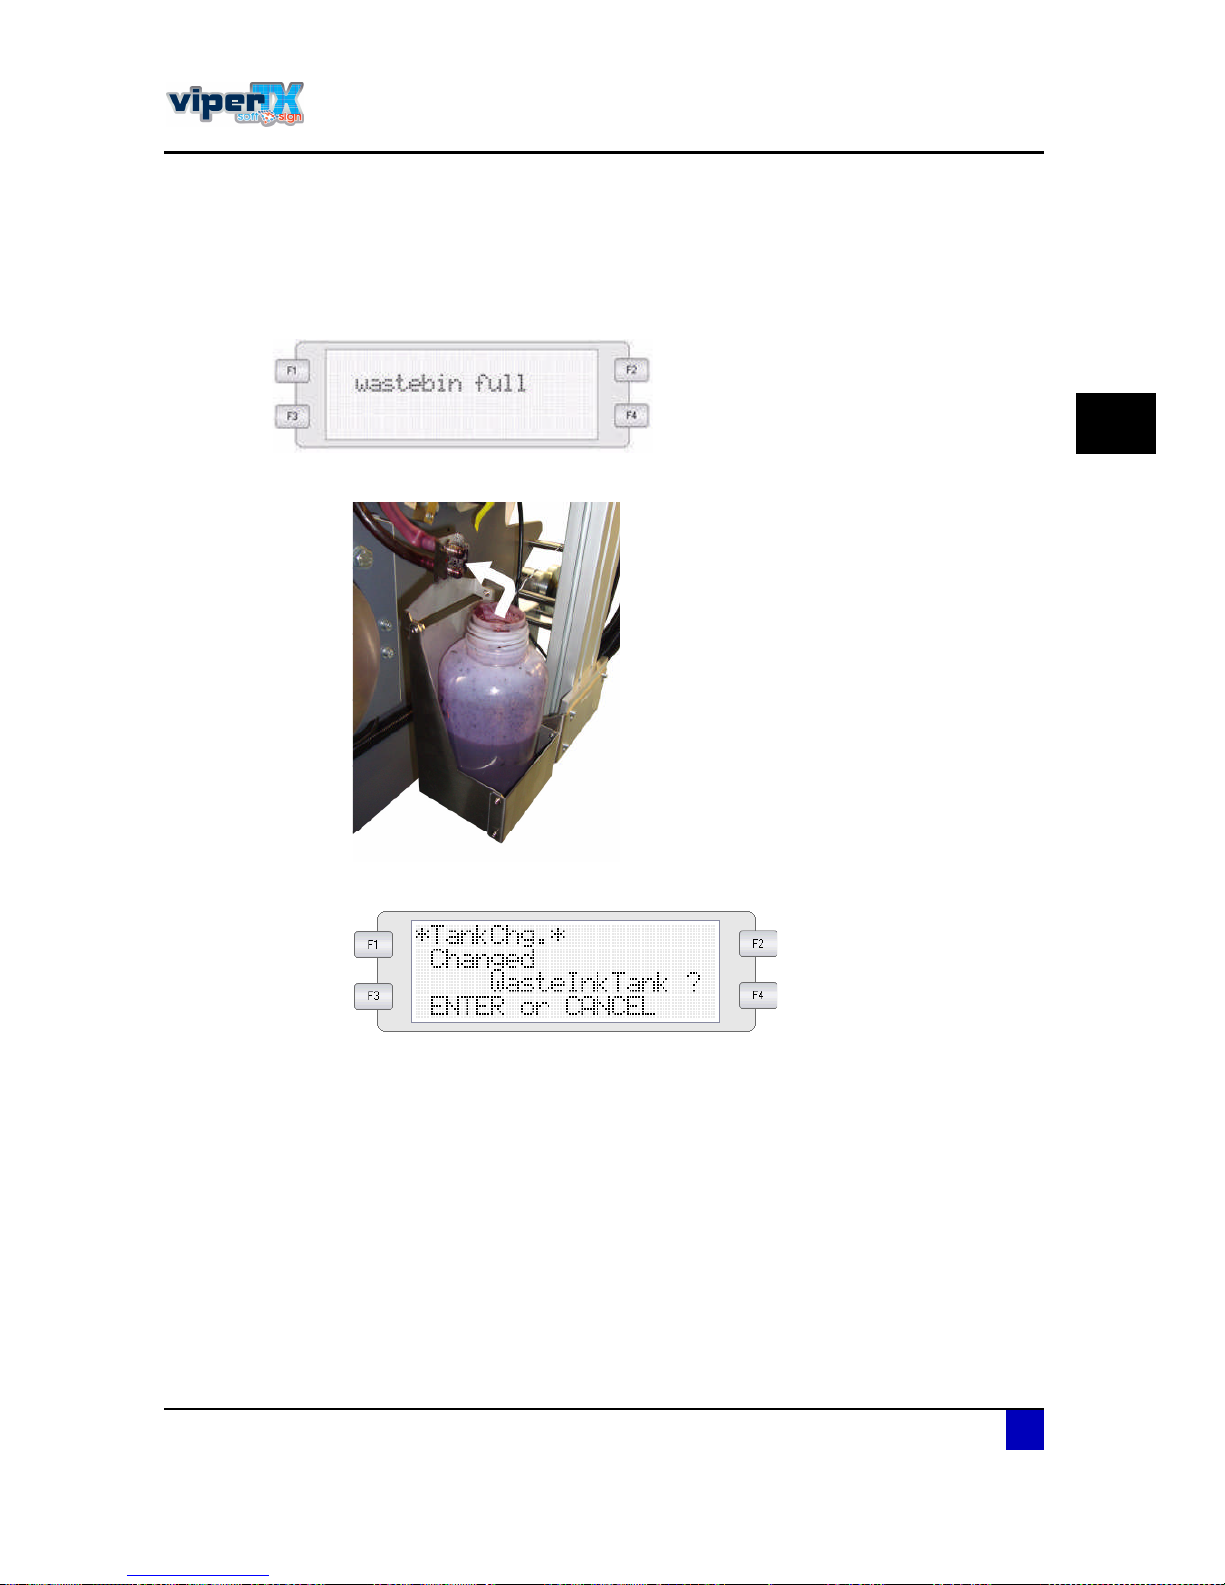
Users Guide Viper TX Softsign
Printer handling
AP-75360 - Revision 1.2 89
3
3.9 Replacing the waste bottle
As from the moment the following message is displayed, the waste bottle need to be
replaced.
ͬ»° ïæ Open the lid and remove the waste bottle.
ͬ»° îæ As soon as the waste bottle has been removed, the following message appears
ͬ»° íæ Pour the waste liquid in another bottle and dispose it according to the local
regulations.
ͬ»° ìæ Replace the waste bottle.
ͬ»° ëæ Be sure to close the lid.
ͬ»° êæ Press ENTER to confirm that waste bottle is empty.
Page 90

Users Guide Viper TX Softsign
Printer handling
90 AP-75360 - Revision 1.2
3.10 Relocating or transporting the printer
3.10.1 Relocating the printer
It is most likely that the printer has to be relocated to another place within the firm. Follow the
procedure below to ensure no ink is leaking out of the printer and no mechanical objects get
broken during the transfer.
ͬ»° ïæ Switch OFF the printer and main switch.
ͬ»° îæ Remove all cables.
ͬ»° íæ Lock the carriage with the special bracket that comes with a new unit. If you have
lost the bracket, you can use tape so that the carriage can no longer move.
ͬ»° ìæ Take out all ink cassettes and replace them with dummy cassettes.
Dummy cassettes can be ordered at your Mutoh distributor.
ͬ»° ëæ Empty the waste bottle.
ͬ»° êæ Clamp all waste tubings. Clamps can be ordered at Mutoh distributor
ͬ»° éæ Secure all the covers which can be opened with tape. Use a tape that does not
leave any glue marks after removal.
ͬ»° èæ Secure all bars and shafts.
ͬ»° çæ Remove the waste bottle or secure it with tape.
ͬ»° ïðæ Tape the cassettes to the printer to fix them during the transfer.
ͬ»° ïïæ Turn in all levelling feet.
3.10.2 Transporting the printer
Please follow the procedure below to prepare your printer to be transported to another
location, such as an exhibition or other company.
Switching from ink to shipping liquid
To ensure that no ink is spoiled during transport, all ink should be replaced with shipping liquid
as follows:
ͬ»° ïæ Be sure that the waste bottle is empty.
ͬ»° îæ Power ON the printer.
ͬ»° íæ Remove the ink cassettes.
Ò±¬»
By relocating the printer, we mean moving the printer to another place within
the firm. Please refer to when moving the
printer to an exhibition or other firm.
Page 91
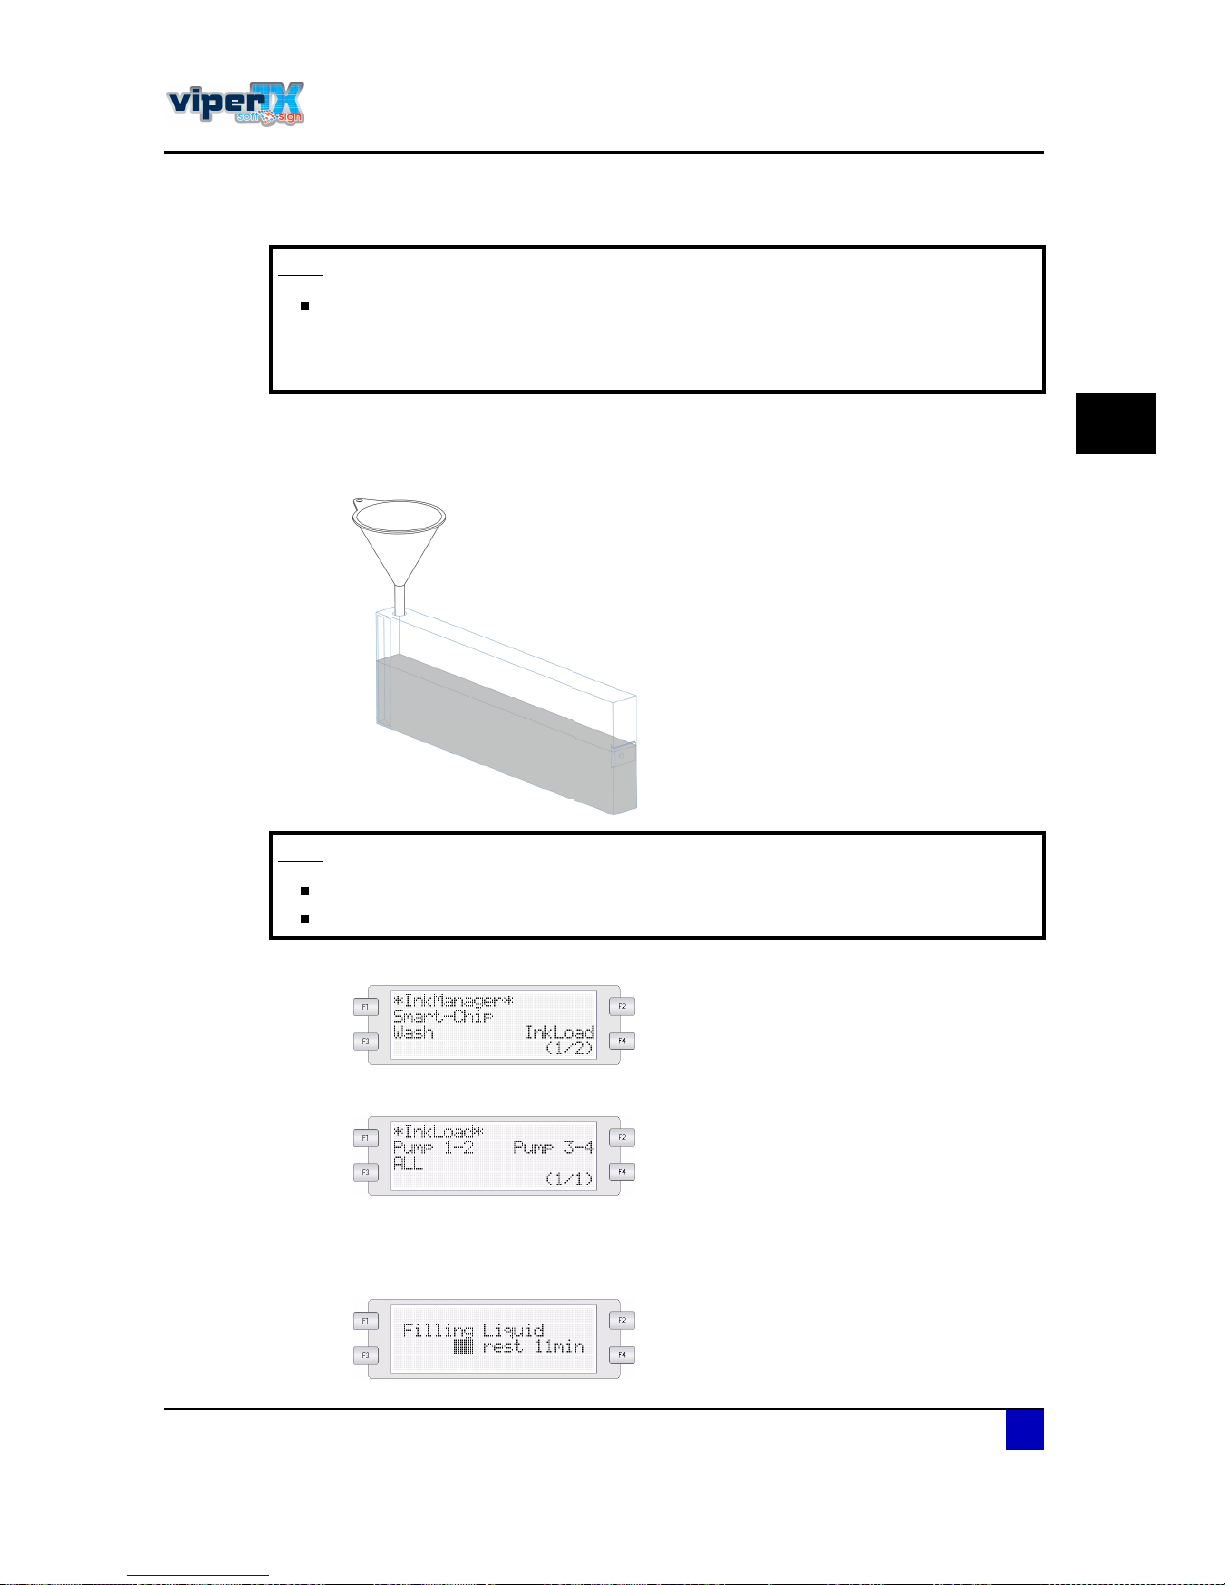
Users Guide Viper TX Softsign
Printer handling
AP-75360 - Revision 1.2 91
3
ͬ»° ìæ Insert 8 open ink cassettes.
ͬ»° ëæ Pull out the little plug on the top of the open cassette.
ͬ»° êæ Place the funnel in the opening of the cassette.
ͬ»° éæ Fill the cassette half with Mutoh water based cleaning.
ͬ»° èæ Go to menu InkManager.
ͬ»° çæ Select InkLoad.
ͬ»° ïðæ Select all.
ͬ»° ïïæ The pumps of the printer will be activated for 11 minutes. This is the time necessary
to switch between the ink loaded and Mutoh water based textile cleaning.
Ò±¬»
The Viper TX Softsign is shipped with 16 open cassettes. Eight cassettes are
used for the ink and the other 8 can be used for this procedure. It is no problem
to switch from Mutoh water based cleaning and Mutoh shipping liquid. These
liquids are fully compatible.
Ò±¬»
Mutoh water based textile cleaning can be order in bottles of1/2; 1 and 2 litres.
The part numbers are respectively MY-80844, MY-80845 and MY-80846.
Page 92
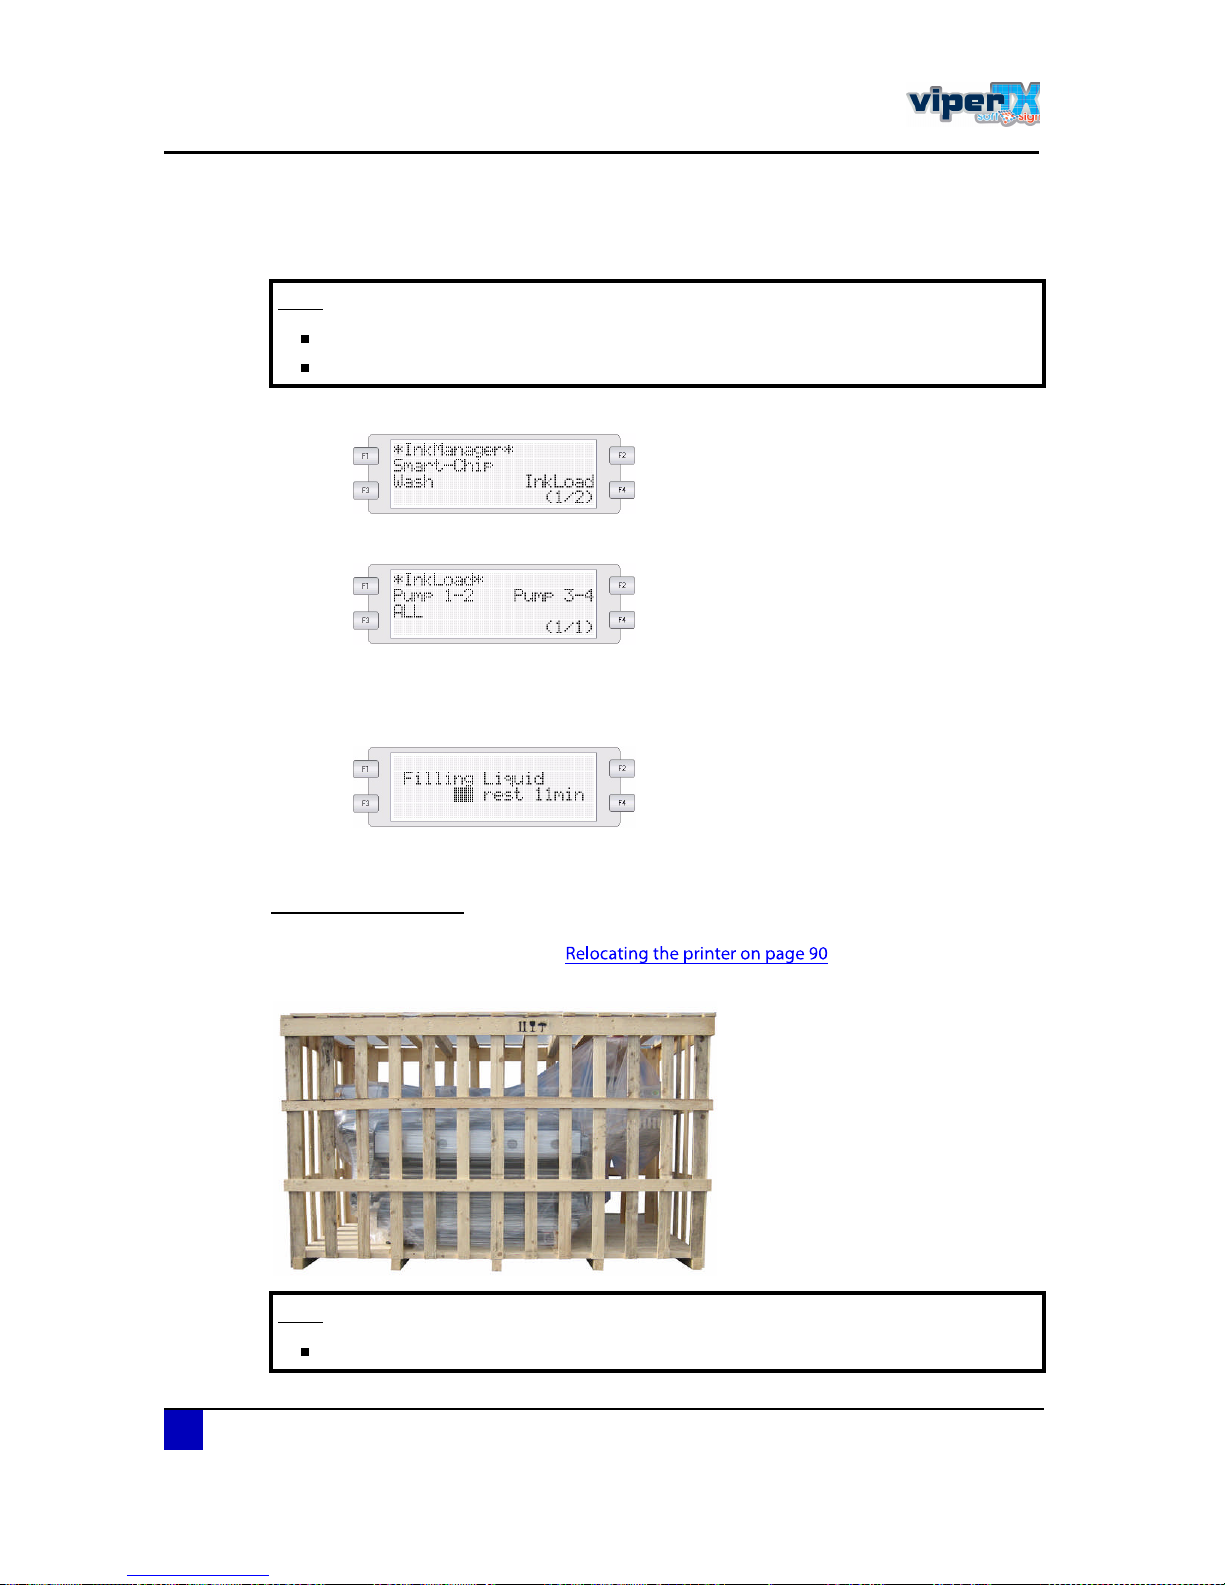
Users Guide Viper TX Softsign
Printer handling
92 AP-75360 - Revision 1.2
ͬ»° ïîæ As from the moment the main screen appears, the first switch has been completed.
ͬ»° ïíæ Empty the cassettes and fill them half with Mutoh shipping liquid.
ͬ»° ïìæ Go to menu InkManager.
ͬ»° ïëæ Select InkLoad.
ͬ»° ïêæ Select all.
ͬ»° ïéæ The pumps of the printer will be activated for 11 minutes. This is the time necessary
to switch between Mutoh water based textile cleaning and Mutoh shipping liquid.
ͬ»° ïèæ As from the moment the main screen appears, the machine is ready to be packed.
Packing the machine
Follow the procedure described for and pack the machine in
its original box to protect it from vibration or impact.
Ò±¬»
Mutoh shipping liquid can be order in a bottles 2 litres.
The part number is MY-80847.
Ò±¬»
Contact a Mutoh dealer for assistance
Page 93

Users Guide Viper TX Softsign
Periodical maintenance
AP-75360 - Revision 1.2 93
4
Chapter 4 Periodical
maintenance
Done by the end user . . . . . . . . . . . . . . . . . . . . . . . . . . . . . . . . . . . . . . . . . 94
Overview . . . . . . . . . . . . . . . . . . . . . . . . . . . . . . . . . . . . . . . . . . . . . . . . . . . . . 94
Maintenance kits and cleaning. . . . . . . . . . . . . . . . . . . . . . . . . . . . . . . . . . . . . 95
Contents . . . . . . . . . . . . . . . . . . . . . . . . . . . . . . . . . . . . . . . . . . . . . . . . . . 95
Good shape kit . . . . . . . . . . . . . . . . . . . . . . . . . . . . . . . . . . . . . . . . . . . . . 95
Partnumbers available kits and cleaning . . . . . . . . . . . . . . . . . . . . . . . . . 96
Daily maintenance at shutdown . . . . . . . . . . . . . . . . . . . . . . . . . . . . . . . . . . . . 96
Clean the wipers . . . . . . . . . . . . . . . . . . . . . . . . . . . . . . . . . . . . . . . . . . . . 96
Perform a tubing flush . . . . . . . . . . . . . . . . . . . . . . . . . . . . . . . . . . . . . . . 97
Clean the caps in the maintenance station. . . . . . . . . . . . . . . . . . . . . . . . 98
Rinse and clean the gutter . . . . . . . . . . . . . . . . . . . . . . . . . . . . . . . . . . . 100
Rinse fabric dust collection unit sponges . . . . . . . . . . . . . . . . . . . . . . . . 100
Weekly maintenance . . . . . . . . . . . . . . . . . . . . . . . . . . . . . . . . . . . . . . . . . . . 101
Clean around bottom of the heads . . . . . . . . . . . . . . . . . . . . . . . . . . . . . 101
Clean spitting box mesh . . . . . . . . . . . . . . . . . . . . . . . . . . . . . . . . . . . . . 102
Rinse spitting box waste tube. . . . . . . . . . . . . . . . . . . . . . . . . . . . . . . . . 103
Cleaning the bars . . . . . . . . . . . . . . . . . . . . . . . . . . . . . . . . . . . . . . . . . . 104
Cleaning the heat fixation unit . . . . . . . . . . . . . . . . . . . . . . . . . . . . . . . . 105
Other maintenance . . . . . . . . . . . . . . . . . . . . . . . . . . . . . . . . . . . . . . . . . . . . 106
Clean the printer . . . . . . . . . . . . . . . . . . . . . . . . . . . . . . . . . . . . . . . . . . . 106
Replace capping station absorbent . . . . . . . . . . . . . . . . . . . . . . . . . . . . 106
Replace wipers . . . . . . . . . . . . . . . . . . . . . . . . . . . . . . . . . . . . . . . . . . . . 108
Done by an authorized Mutoh technician . . . . . . . . . . . . . . . . . . . . . . . 111
Overview . . . . . . . . . . . . . . . . . . . . . . . . . . . . . . . . . . . . . . . . . . . . . . . . . . . . 111
Partnumbers of the maintenance kits . . . . . . . . . . . . . . . . . . . . . . . . . . . . . . 111
Page 94
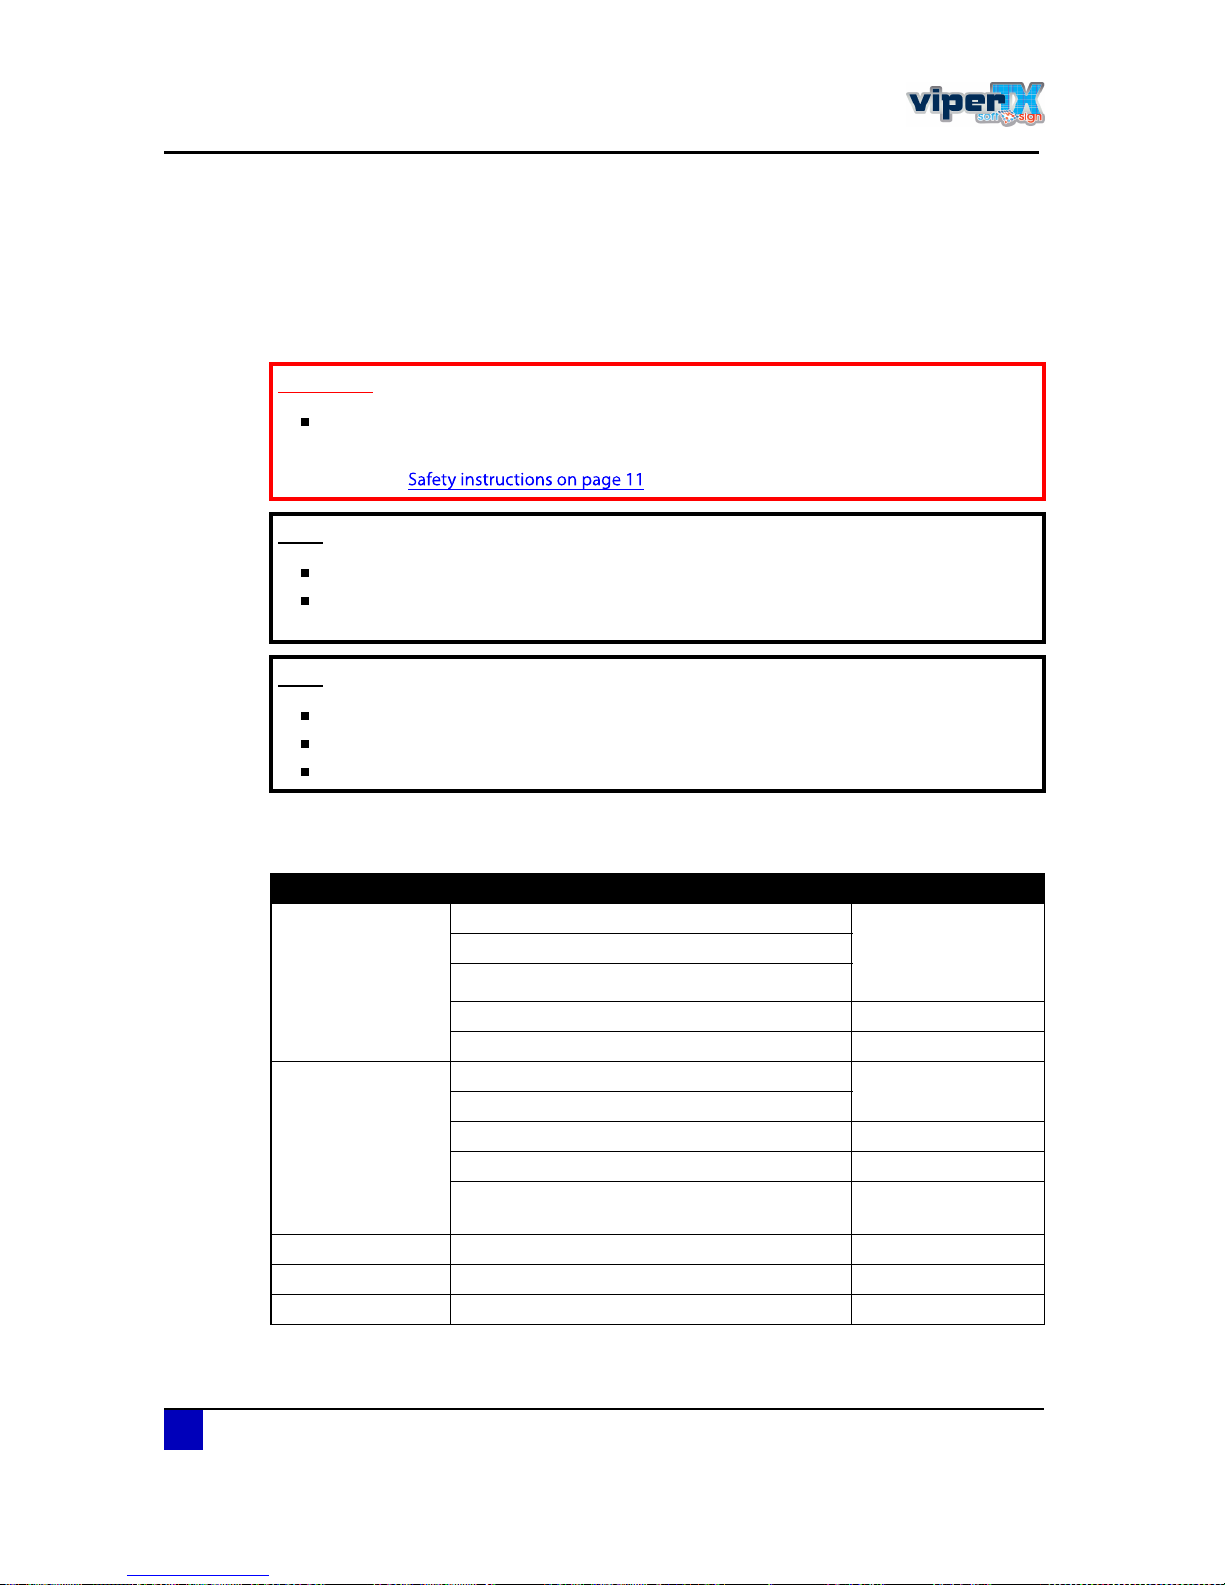
Users Guide Viper TX Softsign
Periodical maintenance
94 AP-75360 - Revision 1.2
4.1 Done by the end user
Printing directly on textiles produces dust around the printing area. To keep the printer in best
working condition this dust needs to be removed periodically. A kit with cleaning materials is
developed to clean the printer parts on a regular basis.
4.1.1 Overview
׳°±®¬¿²¬
Be sure to read and understand the safety issues that need to be taken into
account when working with inks and machine parts.
Refer to
Ò±¬»
Please use Original Mutoh spare parts.
Any problems caused by use of non-original Mutoh inks, spare parts,
consumables,... will not be covered by the warranty.
Ò±¬»
This maintenance is based on use:
8 hours / day, 5 days / week and 44 weeks / year.
If a machine is used more, maintenance periods will come earlier.
Frequency Procedure Tools necessary
Daily at shutdown
Clean the wipers Mutoh waterbased
textile cleaning +
swabs, pipettes,
polyknit wipers.
Perform a tubing flush
Clean the caps in the maintenance station
Rinse and clean the gutter Water and cloth
Rinse fabric dust collection unit sponges Water
Weekly
Clean around bottom of the heads
Mutoh waterbased
textile cleaning
Clean spitting box mesh
Rinse spitting box waste tube Water
Clean the media bars water based cleaning
Clean the heat fixation unit
Stainless steel
cleaner & polish
Monthly Clean the printer Cloth and water
Every 3 months Replace capping station absorbent Absorbent
Every 6 months Replace wipers Wipers
Page 95
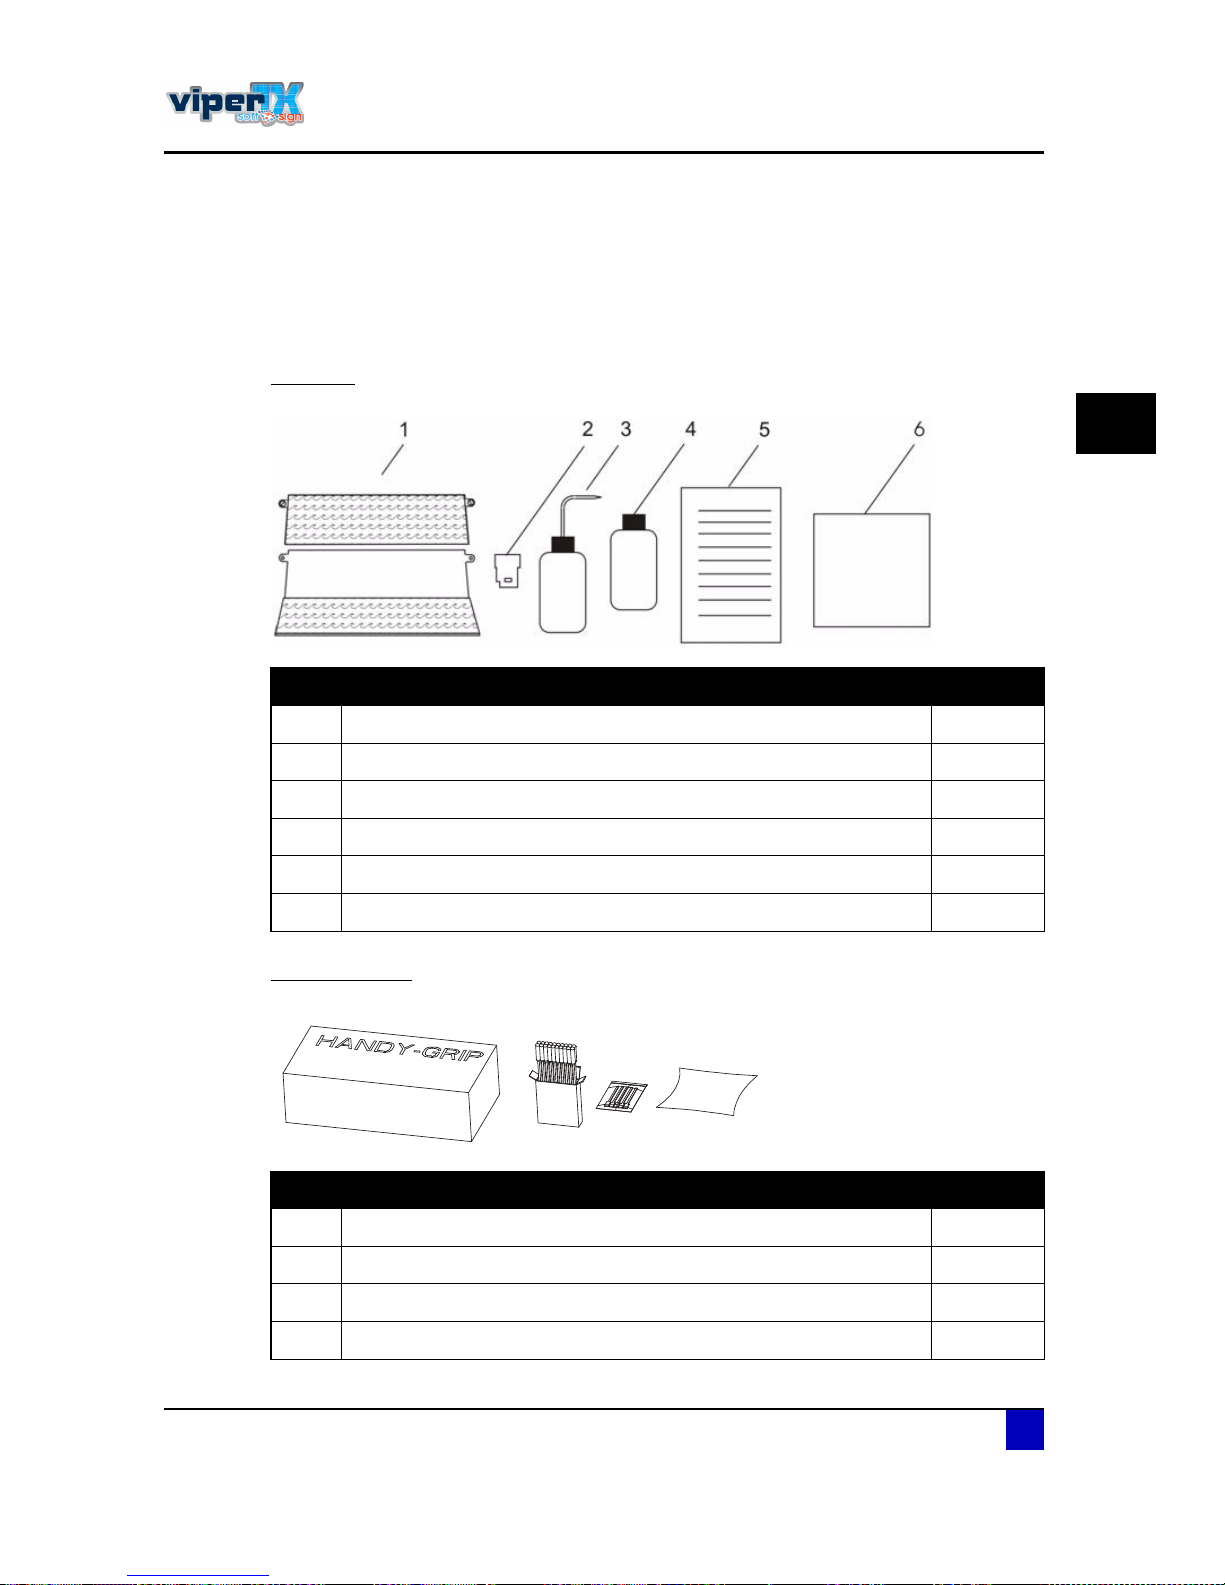
Users Guide Viper TX Softsign
Periodical maintenance
AP-75360 - Revision 1.2 95
4
4.1.2 Maintenance kits and cleaning
To have all the necessary tools at hand to be able to perform the periodical maintenance, a kit
has been made available. This kit will have enough tools to maintain your printer for 6
months.
Contents
Good shape kit
N° Description Qty
ï Absorbent change plate 2
î Wipers 4
í Rinse bottle 500 ml 1
ì Mutoh waterbased textile cleaning liquid of 500 ml 2
ë Instruction sheet 1
ê Good shape kit 1
N° Description Qty
ï Gloves 300
î Pipettes 12
í Swabs 150
ì Polyknit wipers 300
Page 96
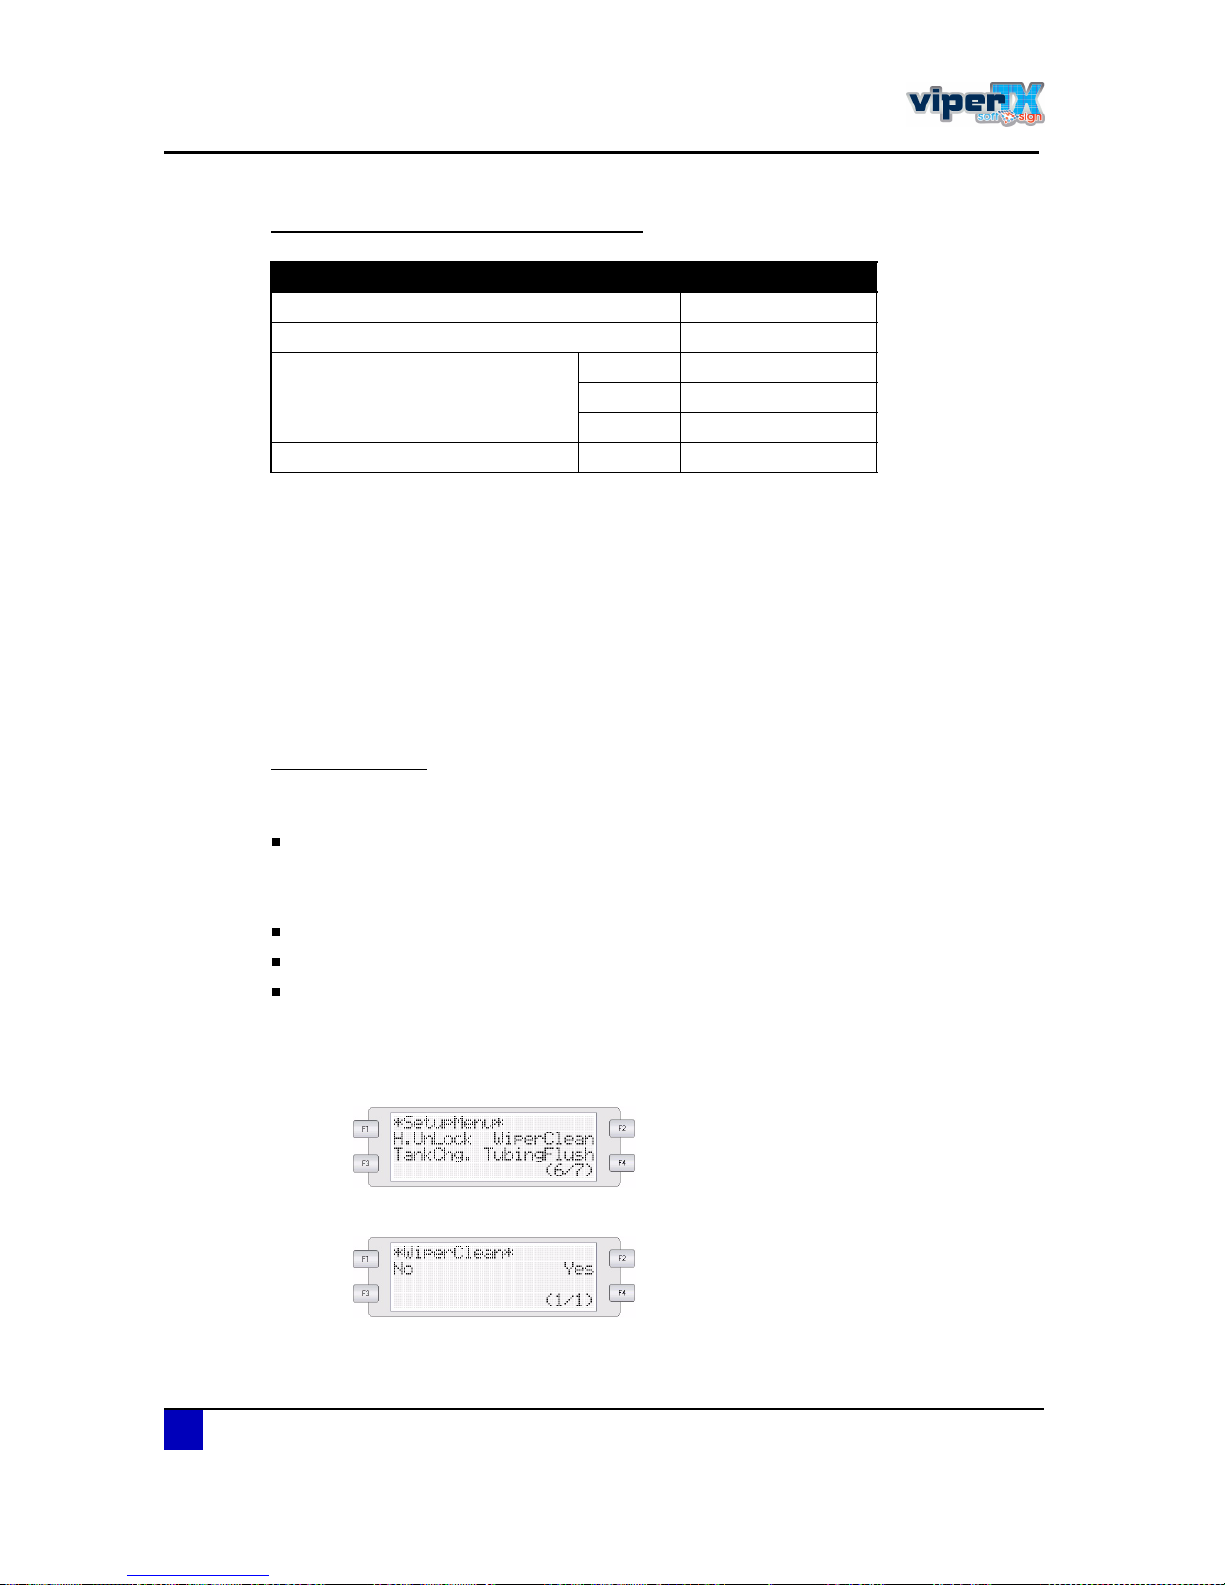
Users Guide Viper TX Softsign
Periodical maintenance
96 AP-75360 - Revision 1.2
Partnumbers available kits and cleaning
4.1.3 Daily maintenance at shutdown
If some nozzles are missing or misfiring, perform cleaning cycles until all nozzles are in good
shape. We advise to run a normal or a powerful cleaning cycle to recover the nozzles. At the
beginning of the day, be sure to clean the wipers. This is required to make the wipers more
elastic and to be sure that all dried ink particles are gone before the first wipe in the morning.
Please see below to know how to clean the wipers. At the end of the day, when you will shut
down the printer, the ink also needs to be removed from other parts, so it cannot harden.
Otherwise, some parts will break down or cause bad print quality.
Clean the wipers
When
Before shutting down the printer in the evening
Tools necessary
Mutoh waterbased textile cleaning
Polyknit wiper
Gloves
Procedure
ͬ»° ïæ Power ON the printer and browse to the wiperclean menu.
ͬ»° îæ Press F2 to unlock the carriage.
ͬ»° íæ Open the front cover.
Part Partnumber
Maintenance cycle 6 months KY-80249
Good shape kit KY-80228
Mutoh waterbased textile cleaning
500 ml MY-80844
1000 ml MY-80845
2000 ml MY-80846
Mutoh shipping liquid 2000 ml MY-80467
Page 97
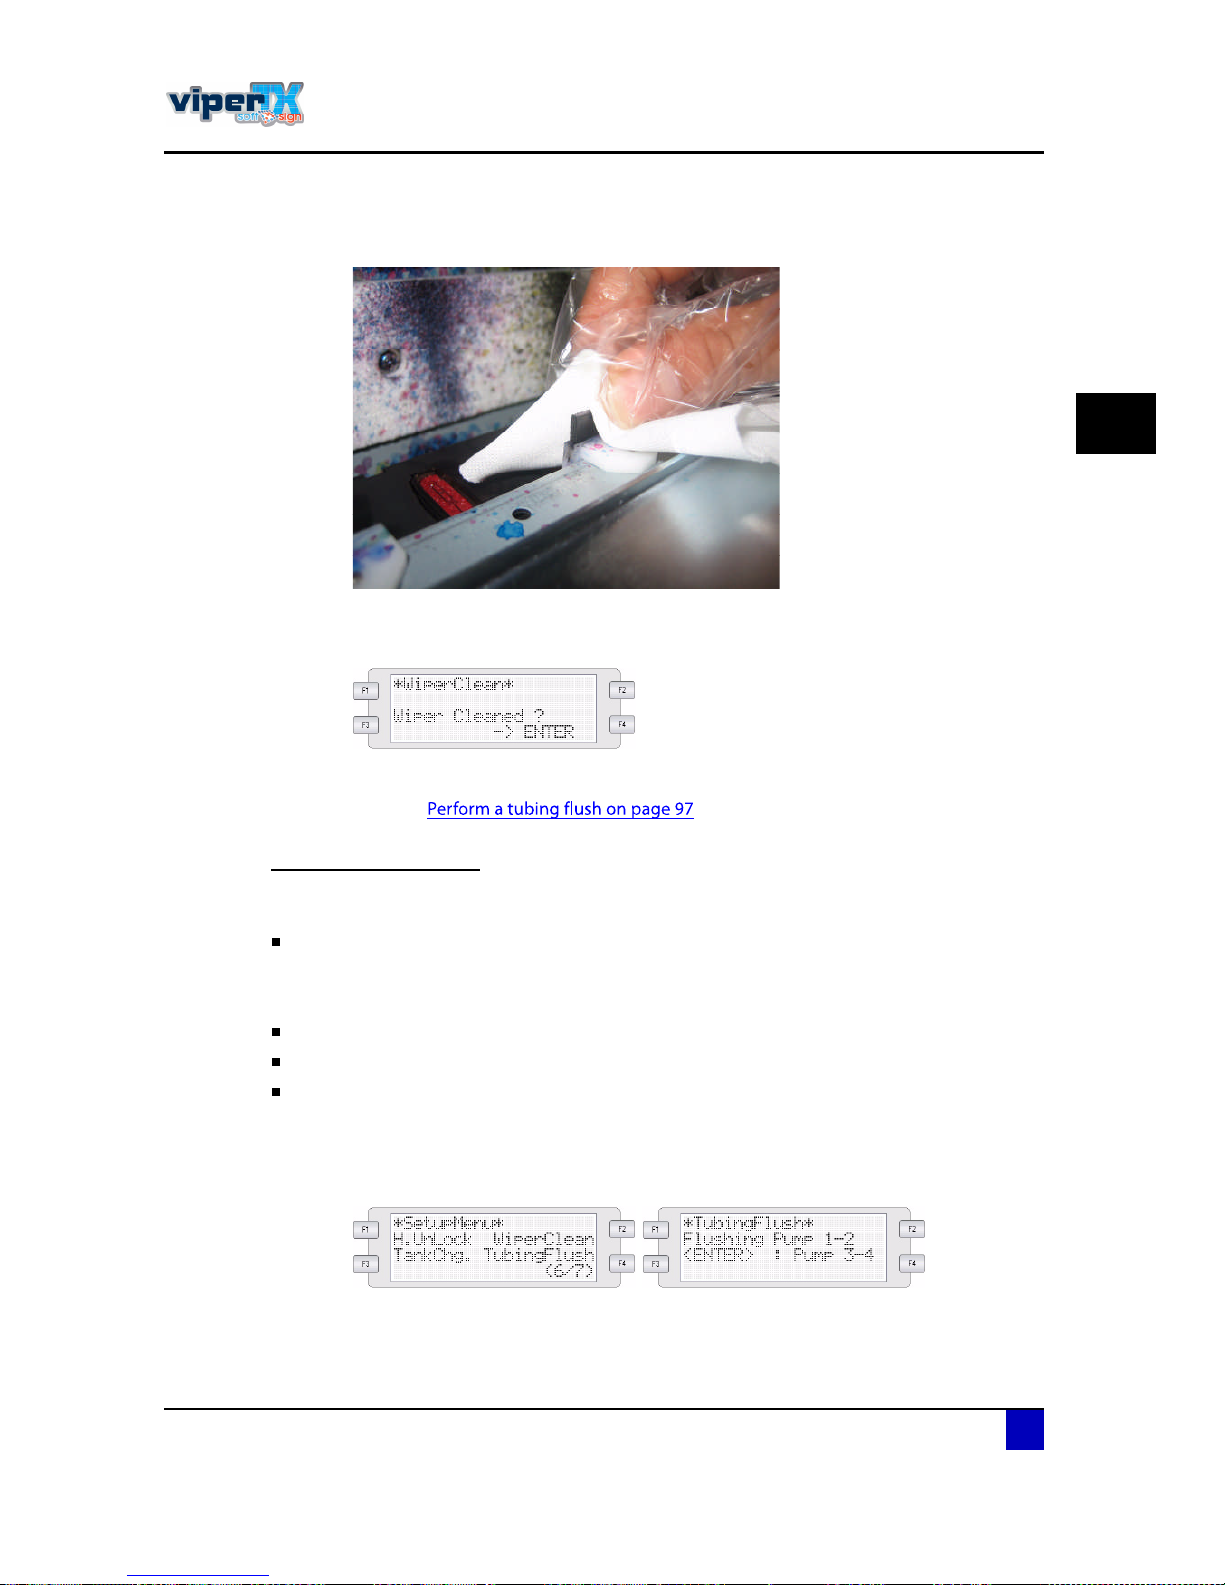
Users Guide Viper TX Softsign
Periodical maintenance
AP-75360 - Revision 1.2 97
4
ͬ»° ìæ Clean the wipers with a polyknit wiper. Use some Mutoh waterbased textile cleaning
to remove the ink.
ͬ»° ëæ Close the front cover.
ͬ»° êæ Press enter to make the carriage go back to its home position.
ͬ»° éæ Perform a tubingflush
Refer to
Perform a tubing flush
When
After cleaning the wipers
Tools necessary
Mutoh waterbased textile cleaning
Pipette
Gloves
Procedure
ͬ»° ïæ Browse to the tubingflush menu.
z
ͬ»° îæ Press F4 to start the tubingflush. The carriage will move away from the capping
station and the pumps will be activated automatically.
Page 98
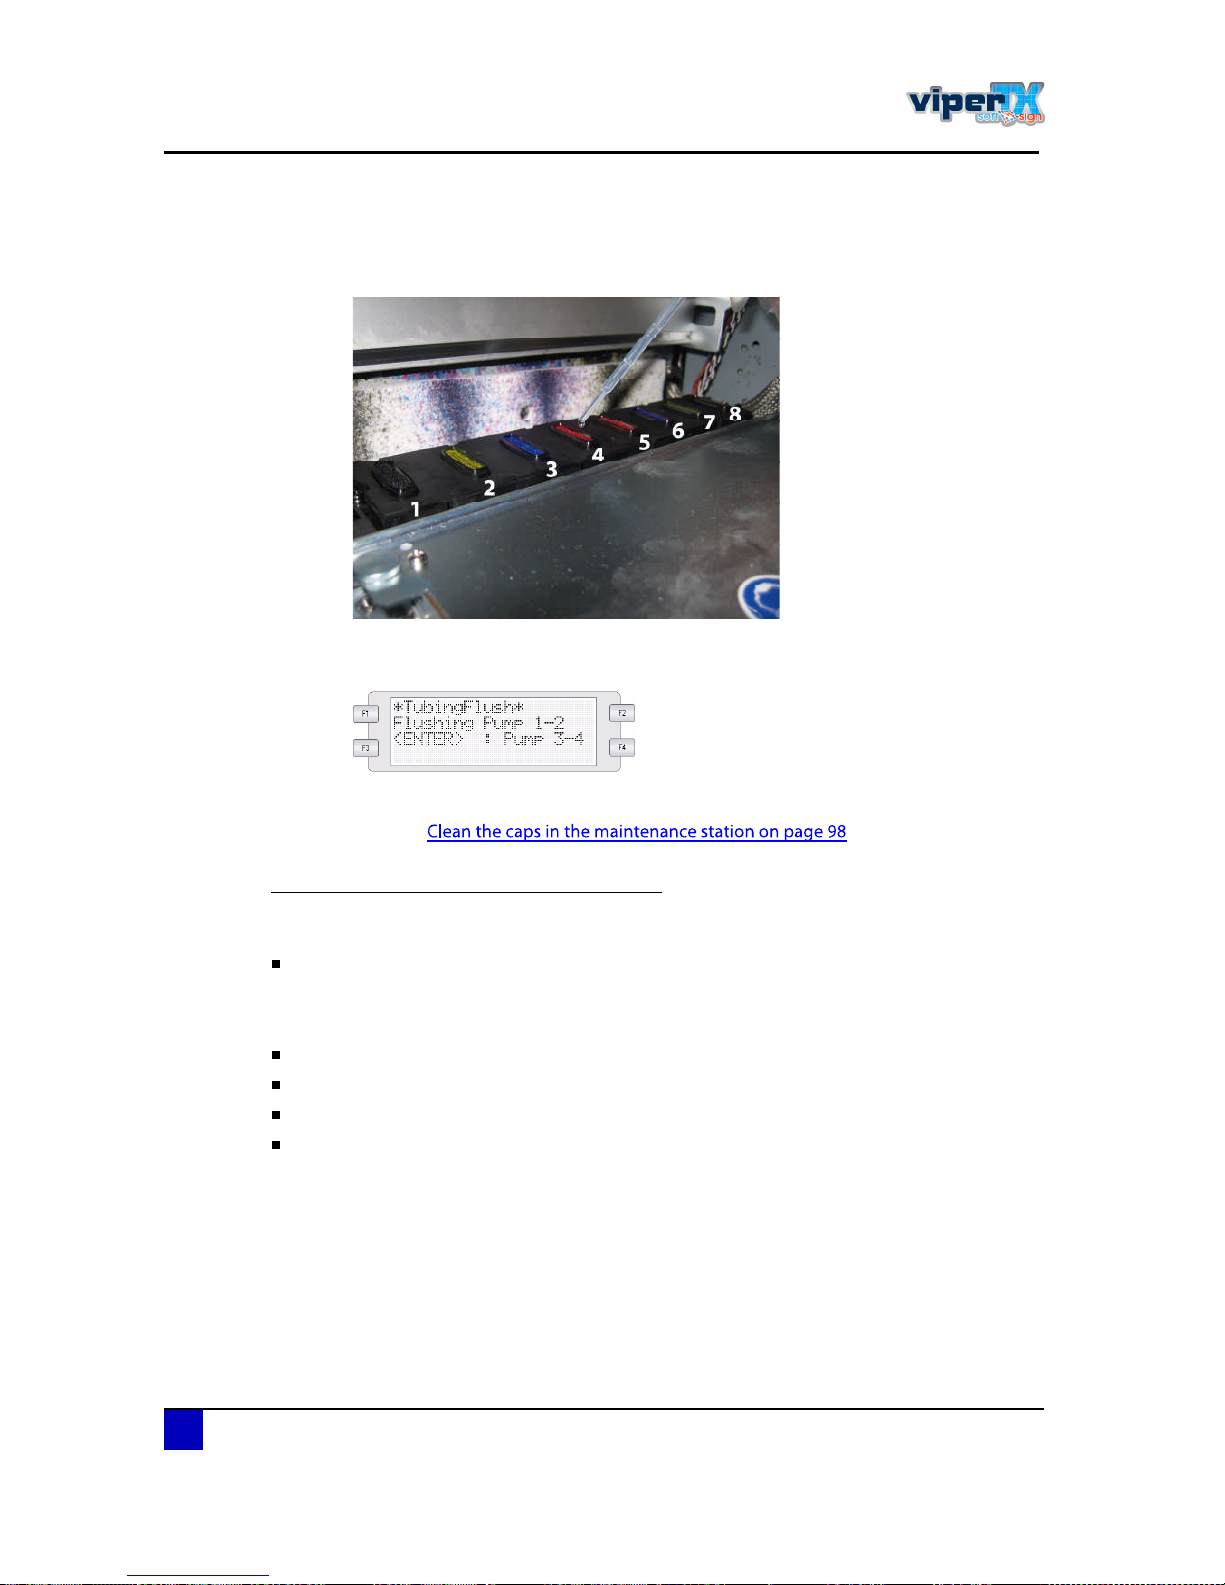
Users Guide Viper TX Softsign
Periodical maintenance
98 AP-75360 - Revision 1.2
ͬ»° íæ Open the front cover.
ͬ»° ìæ Inject Mutoh waterbased textile cleaning in cap 2, 3, 6, 7(cycle 1) using a pipette until
the caps do not change colour anymore.
ͬ»° ëæ Press enter to activate the pumps of cap 1, 4, 5, 8 (cycle 2) and inject cleaning in the
same way.
ͬ»° êæ Clean the edges of the caps in the maintenance station
Refer to
Clean the caps in the maintenance station
When
After a tubingflush
Tools necessary
Mutoh waterbased textile cleaning
Cleaning swab
Polyknit wiper
Gloves
Page 99
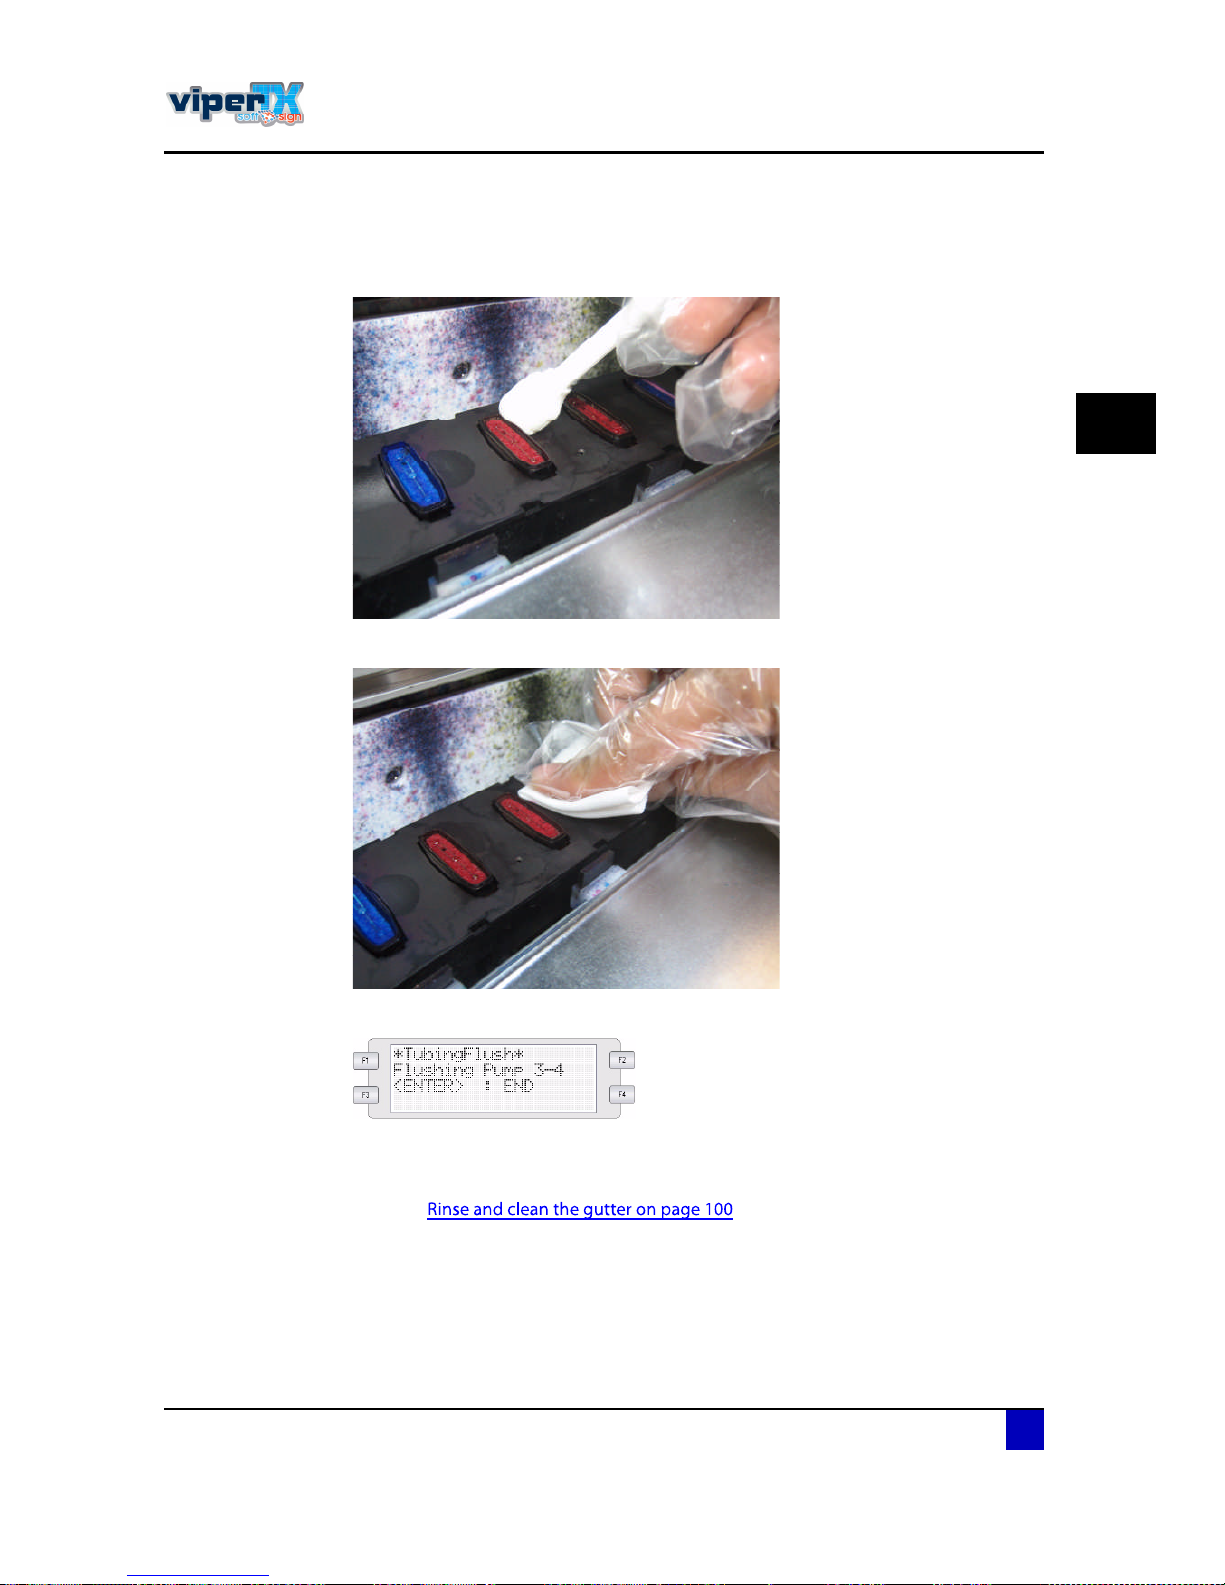
Users Guide Viper TX Softsign
Periodical maintenance
AP-75360 - Revision 1.2 99
4
Procedure
ͬ»° ïæ Clean the edges of the caps with a cleaning swab and use some Mutoh waterbased
textile cleaning if necessary.
ͬ»° îæ Clean the area around the caps with a polyknit wiper.
ͬ»° íæ Press enter to end the tubingflush.
ͬ»° ìæ Shut down the printer.
ͬ»° ëæ Rinse and clean the gutter
Refer to
Page 100
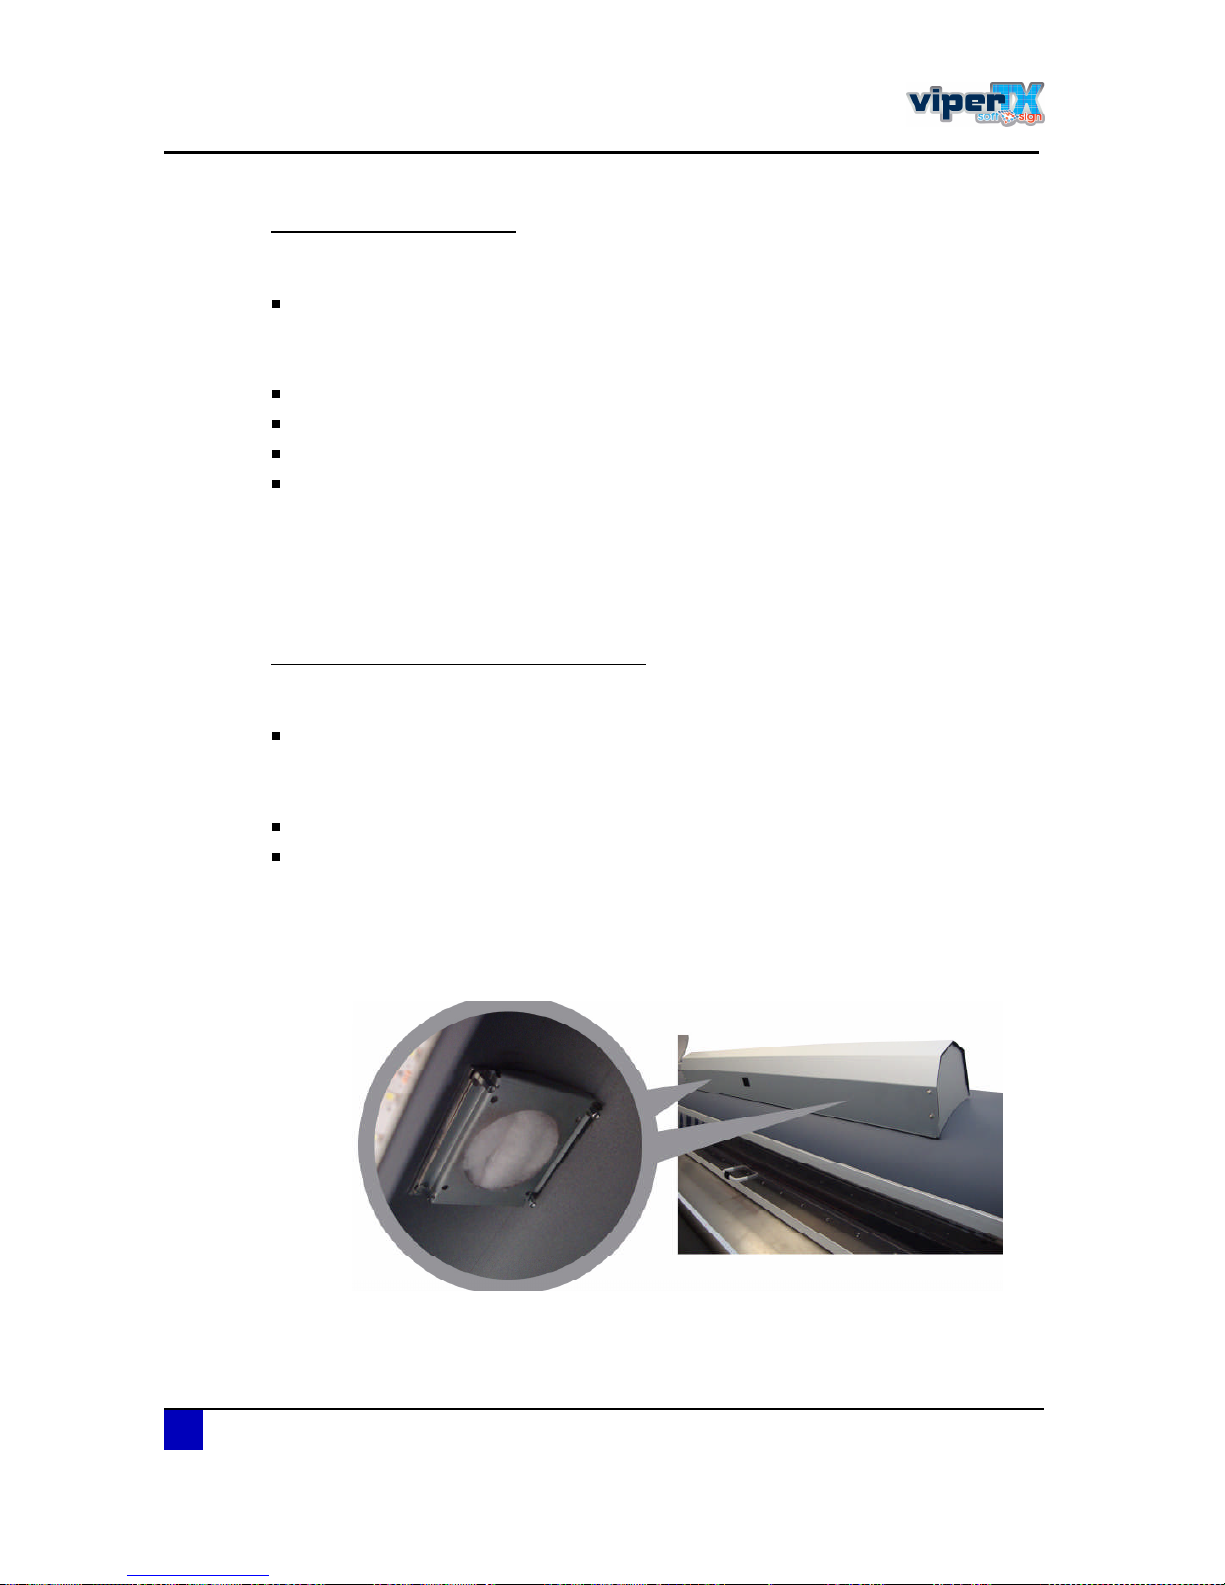
Users Guide Viper TX Softsign
Periodical maintenance
100 AP-75360 - Revision 1.2
Rinse and clean the gutter
When
After cleaning the caps
Tools necessary
Water
Rinse bottle
Gloves
Paper
Procedure
ͬ»° ïæ Drain the gutter with water using the rinsing bottle.
ͬ»° îæ Dry the gutter with some paper until it is dry and clean.
Rinse fabric dust collection unit sponges
When
After shutting down the machine in the evening
Tools necessary
Water
2 clean sponges
Procedure
ͬ»° ïæ Open the front cover.
ͬ»° îæ Remove the two sponges installed in the fabric dust collector.
ͬ»° íæ Replace them with 2 clean sponges.
ͬ»° ìæ Wash out the dirty sponges with water and let them dry. These sponges replace the
two sponges just installed.
 Loading...