

Page 1
User’s Guide
Viper TX 100
For Maintenance Kits, Spares,
Service and Support
Call: +44 (0) 1628 588755
E-mail: [email protected]
Page 2

Page 3

Us er s Gu id e Viper TX 10 0
A P -7 5350 -Revis ion 1. 1 3
2
C opyrig h tN otice
C O P YRIGH T © 2 0 10 M u toh E u rope nv A llrights res erved .
M u tohE u rope nv res erves the rightto mod ify the information c ontained in this m anu alatany
tim e withou tpriornotic e.
This d oc u m entm ay notbe reprod u c ed by any means , in whole orin part, withou twritten
perm is s ion ofthe c opyrightowner.
This d oc u m entis fu rnis hed to su pportthe M u toh V iperTX 1 0 0 s eries printe rs . In
c onsid eration ofthe fu rnis hing ofthe information c ontained in this d oc u m ent, the party to
whom itis given, as s u m es its c u s tod yand c ontroland agree s to the following:
The information herein c ontained is given in c onfid enc e, and any partthereofs hallnotbe
c opie d orre prod u c ed withou twritten c ons entofM u tohEu rope nv
This d oc u m entorthe c ontents herein u nd erno c irc u ms tanc es s hallbe u s ed in the
manu fac tu re orreprod u c tion ofthe artic le s hown and the d elivery ofthis d oc u m ents hallnot
c ons titu te any rightorlic ens e to d o s o.
A pril2 0 1 0
P u blis hed : M u toh E u rope nv, A rc him ed es s traat13, B -8 400 O os tend e, B EL GIUM
Page 4

Us er s Gu id e V iper TX 1 0 0
4 A P -7 5350 -Revis ion 1. 1
Page 5

Users G uide Viper TX 100
A P -7 5350 - Rev ision 1.1- 1/4/10 5
Ta bleof contents
C h a pter1 Sa fetyinstructions. . . . . . . . . . . . . . . . . . . . . . . . . . . 9
1.1 C om plia ncew ith th efollow ing reg ula tions . . . . . . . . . . . . . . 11
1.2 H a ndling inksa ndw a ste. . . . . . . . . . . . . . . . . . . . . . . . . . . . . . 12
1.3 W a rning s, ca utionsa ndnotes. . . . . . . . . . . . . . . . . . . . . . . . . 13
1.4 Sa fetyinstru ctions . . . . . . . . . . . . . . . . . . . . . . . . . . . . . . . . . . 14
1.5 W a rning la bels. . . . . . . . . . . . . . . . . . . . . . . . . . . . . . . . . . . . . . 16
C h a pter2 P roductov erv iew . . . . . . . . . . . . . . . . . . . . . . . . . . . 19
2.1 P a rtna m esa ndfunctions. . . . . . . . . . . . . . . . . . . . . . . . . . . . . 20
Front....................................................20
Rear ....................................................21
Heater system............................................22
Operation panel ..........................................23
Winding system ..........................................25
C h a pter3 B a sics . . . . . . . . . . . . . . . . . . . . . . . . . . . . . . . . . . . . 27
3.1 Sw itch ing th epow erO N / O F F . . . . . . . . . . . . . . . . . . . . . . . . . 29
Switching the power ON ...................................29
Switching the power OFF ..................................30
Switching ON-OFF the power of the winding system ...........31
3.2 P erfectm edia h a ndling . . . . . . . . . . . . . . . . . . . . . . . . . . . . . . . 32
Unwinder / winder 100 .....................................32
Switchable print platform ...................................33
Pressure rollers disabler tool ...............................36
Media Retainers ..........................................38
Ink absorbents ...........................................41
Page 6

Users G uide Viper TX 100
A P -7 5350 - Rev ision 1.1- 1/4/10 6
Adjustable head height ....................................41
Extra fans ...............................................42
Extra Tensioning Tool (ETT) ...............................42
Media core braces ........................................42
3.3 H a ndling a ndloa ding m edia . . . . . . . . . . . . . . . . . . . . . . . . . . . 44
Overview ................................................44
Cautions on handling media ................................45
Precaution on storing media................................45
Loading media ...........................................46
3.4 F ea turesto im prov eth eprintqua lity . . . . . . . . . . . . . . . . . . . 6 0
Nozzlecheck .............................................60
Head cleaning............................................61
Media feed compensation (step) ............................62
3.5 Refilling th e ink ca ssettes . . . . . . . . . . . . . . . . . . . . . . . . . . . . 6 6
3.6 Sw itch ing betw een ink config ura tions . . . . . . . . . . . . . . . . . . 6 7
3.7 Sw itch ing ink types(D ispersedye Directdisperse) . . . . . 6 9
3.8 Repla cing th ew a stebottle. . . . . . . . . . . . . . . . . . . . . . . . . . . . 7 1
Replacement Procedures ..................................71
3.9 Reloca ting a ndtra nsporting th eprinter. . . . . . . . . . . . . . . . . 7 3
Relocating the printer......................................73
Transporting the printer ....................................74
C h a pter4 P eriodica lm a intena nce . . . . . . . . . . . . . . . . . . . . . . 7 7
4.1 D oneby th eenduser . . . . . . . . . . . . . . . . . . . . . . . . . . . . . . . . 7 8
Overview ................................................79
User and good shape kit ...................................80
Daily Maintenance ........................................81
Weekly maintenance ......................................87
Monthly maintenance......................................89
Six monthly maintenance ..................................91
Page 7

Users G uide Viper TX 100
A P -7 5350 - Rev ision 1.1- 1/4/10 7
4.2 D oneby a n a uth orizedM utoh tech nicia n . . . . . . . . . . . . . . . . 9 3
Overview ................................................93
Part numbers of the maintenance kits........................93
C h a pter5 P rinterm enu . . . . . . . . . . . . . . . . . . . . . . . . . . . . . . . 9 5
5.1 H ow to w orkin th em enu . . . . . . . . . . . . . . . . . . . . . . . . . . . . . 9 9
Main screen..............................................99
Menu screen ............................................100
Changing between the screens ............................101
5.2 O pera tion pa nelin sta ndby m ode . . . . . . . . . . . . . . . . . . . . . 102
[F1] - Feeding and Step Adjust ............................102
[F2] - Cleaning the heads .................................103
[F3] - Controlling the heater elements.......................103
[F4] - Operating the pressure rollers ........................105
[ENTER] - Print mode check ..............................106
5.3 O pera ting pa nelduring printing . . . . . . . . . . . . . . . . . . . . . . . 107
Printing menu ...........................................107
Printing menu ...........................................109
Printing menu ...........................................109
5.4 M enu ov erv iew . . . . . . . . . . . . . . . . . . . . . . . . . . . . . . . . . . . . . 110
5.5 S etup m enu 1/7 . . . . . . . . . . . . . . . . . . . . . . . . . . . . . . . . . . . . 111
Ink config ...............................................111
Origin set menu .........................................112
Test print menu..........................................113
Media set menu .........................................114
5.6 Setup m enu 2/7 . . . . . . . . . . . . . . . . . . . . . . . . . . . . . . . . . . . . 124
Print mode ..............................................124
Command setup menu ...................................132
Layout setup menu ......................................134
Function setup menu .....................................135
5.7 Setup m enu 3/7 . . . . . . . . . . . . . . . . . . . . . . . . . . . . . . . . . . . . 136
Page 8

Users G u ide Viper TX 100
8 A P -7 5350 - Rev ision 1.1- 1/4/10
Roll setup menu .........................................136
Centronics menu ........................................137
Network setting menu ....................................137
5.8 Setup m enu 4/7 . . . . . . . . . . . . . . . . . . . . . . . . . . . . . . . . . . . . 140
Utility menu .............................................140
Initialize setup menu .....................................150
5.9 Setup M enu 5/7 . . . . . . . . . . . . . . . . . . . . . . . . . . . . . . . . . . . . 155
Data dump menu ........................................155
Ink Manager menu .......................................155
5.10 Setup m enu 6 /7 . . . . . . . . . . . . . . . . . . . . . . . . . . . . . . . . . . . . 158
Manual Maintenance menu ...............................158
Tubing Flush menu ......................................159
Head Unlock menu ......................................159
Tankchange menu .......................................159
5.11 Setup m enu 7 /7 . . . . . . . . . . . . . . . . . . . . . . . . . . . . . . . . . . . . 16 0
Version Check menu .....................................160
Area ...................................................161
C h a pter6 Troublesh ooting . . . . . . . . . . . . . . . . . . . . . . . . . . . 16 3
6 .1 Introduction . . . . . . . . . . . . . . . . . . . . . . . . . . . . . . . . . . . . . . . 16 5
6 .2 F a iluresa ndm a lfunctionsof th eprinter. . . . . . . . . . . . . . . . 16 6
6 .3 Erro rm essa g es. . . . . . . . . . . . . . . . . . . . . . . . . . . . . . . . . . . . 17 3
Status messages ........................................173
Message type error display and solutions ...................174
Data error display and solutions............................175
Command error display and solutions.......................175
Error requiring a restart ...................................176
External errors ..........................................177
6 .4 W h en m edia ja m soccur. . . . . . . . . . . . . . . . . . . . . . . . . . . . . 17 8
How to remove a piece of media ...........................178
Page 9

Us er s Gu id e V iper TX 1 0 0
C hapter1 S afety ins tru c tions
A P -7 5350 -Revis ion 1. 1 9
1
C hapter1 S afety instructions
C om plia ncew ith th efollow ing reg ula tions. . . . . . . . . . . . . . . . . . . . . . . 11
H a ndling inksa ndw a ste . . . . . . . . . . . . . . . . . . . . . . . . . . . . . . . . . . . . . . 12
W a rning s, ca utionsa ndnotes . . . . . . . . . . . . . . . . . . . . . . . . . . . . . . . . . 13
Sa fetyinstru ctions. . . . . . . . . . . . . . . . . . . . . . . . . . . . . . . . . . . . . . . . . . . 14
W a rning la bels . . . . . . . . . . . . . . . . . . . . . . . . . . . . . . . . . . . . . . . . . . . . . . 16
Page 10

Us er s Gu id e V iper TX 1 0 0
C hapter1 S afety ins tru c tions
10 A P -7 5350 -Revis ion 1. 1
This c hapterexplains the ins tallation ofV iperTX 10 0 , warning term s thatoperators need to
know, c au tion item s and warninglabels on the printerm ain u nit.
׳°±®¬¿²¬
W h en insta lling a ndo pera ting th is p rinter, besureto follow th e directio nsa n d
w a rnin g sin th is g uide.
Page 11
Us er s Gu id e V iper TX 1 0 0
C hapter1 S afety ins tru c tions
A P -7 5350 -Revis ion 1. 1 11
1
1.1 C om pliance w ith th e follow ing regulations
The C E m arking is a mand atory Eu ropean markingforc ertain
prod u c tgrou ps to ind ic ate c onform ity with the es s entialhe althand
s afety req u irem ents s etou tin E u rope an D irec tives .
B y affixing the C E marking, the manu fac tu rer, his au thorized
repres entative, orthe pers on plac ing the prod u c ton the m arketor
pu ttingitinto s ervic e ens u res thatthe ite m m eets allthe es s ential
requ irem ents ofallapplic able EU d ire c tives and thatthe applic able
c onformity as s e s s m entproc ed u re s have been applied .
You rprod u c tis d es igned and m anu fac tu red with high-q u ality
materials and c omponents , whic hc an be rec yc led and reu s ed .
W hen this c ros s ed -ou twheeled bin s u bm enu is attac hed to a
prod u c t, itm eans the prod u c tis c overe d by the E u ropean D irec tive
2 0 02 /96/E C -W E EE regu lation.
P leas e inform you rs elfabou tthe loc als eparate c ollec tion s ys tem for
elec tric aland elec tronic prod u c ts .
P lease ac tac c ord ing to loc alru les and d o notd is pos e ofyou rold
prod u c ts with you rnormalhou s e hold was te. The c orrec td is pos alof
you rold prod u c twillhe lppreventpotentialnegative c ons eq u enc es
forthe e nvironmentand hu man health.
F C C
This e q u ipmenthas be en tes ted and fou nd to c omply with the lim its
fora C las s A d igitald evic e, pu rs u antto P art1 5 ofthe FC C Ru le s .
Thes e limits are d es igned to provid e reas onable protec tion agains t
harmfu linterferenc e when the equ ipm entis operated in ac omm erc ial
environment. This eq u ipm entgenerates , u s es , and c an rad iate rad io
frequ enc y energy and , ifnotins talled and u s ed in ac c ord anc e with
the ins tru c tion manu al, may c au s e harmfu linte rfere nc e to rad io
c ommu nic ations . O peration ofthis equ ipm entin ares id entialarea is
likely to c au s e harm fu linterferenc e in whic h c as e the u s erwillbe
requ ire d to c orrec tthe interferenc e athis own expens e.
IC ES
This C las s A d igitalapparatu s c omplies with C anad ian IC E S -0 0 3.
Page 12

Us er s Gu id e V iper TX 1 0 0
C hapter1 S afety ins tru c tions
12 A P -7 5350 -Revis ion 1. 1
1.2 H and ling inks and w aste
B efore hand linginks /c leaningand theirwas te, C A REFUL L Y RE A D TH E M A TERIA L
S A FETY D A TA S H E ETS (M S D S )and the labels forim portanthealth, s afety and
environmentalinform ation. P ostthes e d oc u ments in the workarea as req u ired by fed eralor
loc allaw. A lls afety d ata s heets are period ic ally u pd ated . Thes e s heets and theirtranslations
c an be fou nd on ©©©ò³«¬±¸ò»«
O nly u s e originalmanu fac tu rer's ink and appropriate c leaning liq u id . B efore ins talling an
inkhold er, s hake itgently. D oing s o willpres erve printq u ality.
W hen inkis moved from ac old plac e to a warm plac e, kee pthe inkforthree hou rs ormore
in the new printing environmentbefore printing.
D o notd is as semble ink hold er. O therwis e, ink m ay getin you r eyes oron you r s kin. A
d is as s em bled inkhold erc annotbe u s ed either.
W hen refilling ink, u s e originalm anu fac tu rer's ink. O u rM u toh printers are d es igned to u s e
originalink. Ifyou u s e inkwhic h are notprod u c ed by the originalmanu fac tu rer:
printingmightbec ome blu rred and the end ofthe inkin the hold erm ightnotbe
d etec ted c orrec tly
A nyproblems c au s ed by u s ingan inkhold erotherthan thos e rec omm end ed above will
notbe c overed by the warranty, and repairexpens es willbe paid by the c u s tomer.
Forhand lingwas te: s ee s ec tion 13 on the M S D S -s he et
Inks /W as te
G enera la dv ice: wearsafety glas s es and gloves es pe c ially whe n hand ling the was te
ink.
A fterspill: rem ove c ontaminated c lothing.
A fterinh a la tion: if d iffic u lties oc c u rafterinhaling vapou r/aeros ol, rem ove to fres hair
and s eek m ed ic alattention.
A fterskin conta ct: was hthorou ghly with s oapand water.
A ftereyeconta ct: was h affec ted eyes foratleast15 minu tes u nd erru nning water
while the e yelid s are held ope n.
A ftersw a llow ing : rins e mou th and d rinkplenty ofwater. N everind u c e vomiting.
Page 13

Us er s Gu id e V iper TX 1 0 0
C hapter1 S afety ins tru c tions
A P -7 5350 -Revis ion 1. 1 13
1
1.3 W arnings,cautions and notes
S afety term s in this m anu aland the c ontents ofwarning labels attac hed to the printerare
c ategorized into the following three type s , d epend ing on the d egree ofris k(orthe s c ale of
ac c id ent).
Read the following explanations c arefu lly and follow the ins tru c tions in this manu al.
S a fety term s Deta ils
Im porta nt M u s tbe followed c arefu lly to avoid d eath ors eriou s bod ily inju ry.
C a ution
M u s tbe obs erved to avoid bod ily inju ry (mod erate orlight)ord amage to
you requ ipm e nt.
N o tes
C ontains importantinformation and u s efu ltips on the operation ofyou r
printer.
Page 14

Us er s Gu id e V iper TX 1 0 0
C hapter1 S afety ins tru c tions
14 A P -7 5350 -Revis ion 1. 1
1.4 S afety instructions
M a ch inesm ustbein sta lleda ccording to M uto h 'sI nsta lla tion G uidea lso a fterm ov ing
m a ch ines to a noth erloca tion;m a intena nceneedsto bedonea ccording to th e serv ice
m a nua l.
To preventfire or elec tric als hoc k, neveru s e a powers u pply s ou rc e othe r than the one
rated forthe prod u c tin the c ou ntry where you pu rc has ed the prod u c t.
Us e only the provid ed power c able. To prevent fire or elec tric als hoc k, follow the
ins tru c tions below whe n hand ling the powerc able:
D o notc u tormod ify the c able.
D o notpu theavyobjec ts on the c able.
D o notbend , twis t, knotorpu llthe c able.
D o notwire the c able neareq u ipmentthatgenerate s heat.
D o notu s e the c able with any otherelec tric ald evic e
D o nothand le the c able withwethand s
B e aware ofallc au tion and warninglabels to avoid potentially hazard ou s s itu ations .
To preventfire orelec tric als hoc k, m ac hines m u s tbe c onnec ted to a properly grou nd ed
elec tric alpowerou tle t. D o notc onnec tthe powerc able to a powers trip ora powers ou rc e
s hared by otherele c tric ald evic es .
M ake s u re thatno foreign s u bs tanc es s u c has d u s tetc . are s tu c kto the powerplu g.
M ake s u re thatthe powerplu g is firmly ins erted to the ed ge ofthe powers oc ket.
D o notd is able any s afety pre c au tions s ys tem s .
D o notoperate the u nitu nles s allparts are mou nted .
D o notplac e the mac hine in the following areas . D oing s o may res u ltin the m ac hine
tipping orfalling overand c au s inginju ry.
Uns table s u rfac es
S lopingfloors
A reas s u bjec tto vibration byothereq u ipment
D o nots tand on or plac e heavy objec ts on you r mac hine. D oing s o may res u ltin the
mac hine tippingorfalling overand c au s ing inju ry.
D o notplac e the mac hine in hu mid and d u s ty areas orin areas expos ed to flamm ables .
D oings o mayre s u ltin elec tric als hoc korfire.
D o notc over the ventilation hole of you r mac hine with c loth, s u c h as a blanketortable
c loth. D oing s o c ou ld obs tru c tventilation and c au s e fire.
D o notins ertor d rop metalor inflammable objec ts into openings , s u c h as ventilation
ou tle ts . D oing s o may res u ltin ele c tric als hoc kand fire.
S topu s ingyou rmac hine ifa liqu id is s pilled into it. This m ay c au s e elec tric als hoc korfire.
S witc hthe mac hine off as s oon as pos s ible, u nplu g the powerc ord , and c ontac tyou rloc al
M u toh d ealer.
Page 15

Us er s Gu id e V iper TX 1 0 0
C hapter1 S afety ins tru c tions
A P -7 5350 -Revis ion 1. 1 15
1
B e s u re to power O FF the m ac hine and u nplu g the power c able from the ou tletbefore
c leaning the m ac hine. Us e a d amp c loth to c lean the m ac hine. D o notu s e thinner,
benzene, alc oholorotherac tive agents . D oing s o m ay res u ltin d amage orpaintpeeling
from the c as ing.
D o notbend orpu llthe was te flu id tu be. D oing s o may c au s e was te flu id to leak ou tand
malfu nc tion ofthe prod u c t.
D o nottiltthe mac hine, plac e itagains ta wallortu rn itu ps id e d own. D oings o may c au s e
ink to leak ins id e the m ac hine. M ovem entafter trans portis als o notc overed by the
warranty.
To preventbac kpains and otherinju ries , always workwith atleas t4 pe ople to u npac k or
move the mac hine. Keepthe m ac hine horizontally d u ring transportation.
D o N O T trans portthe m ac hine to another room withou tc ontac ting you rloc alA u thorized
M u toh D ealer.
Page 16
Us er s Gu id e V iper TX 1 0 0
C hapter1 S afety ins tru c tions
16 A P -7 5350 -Revis ion 1. 1
1.5 W arning labels
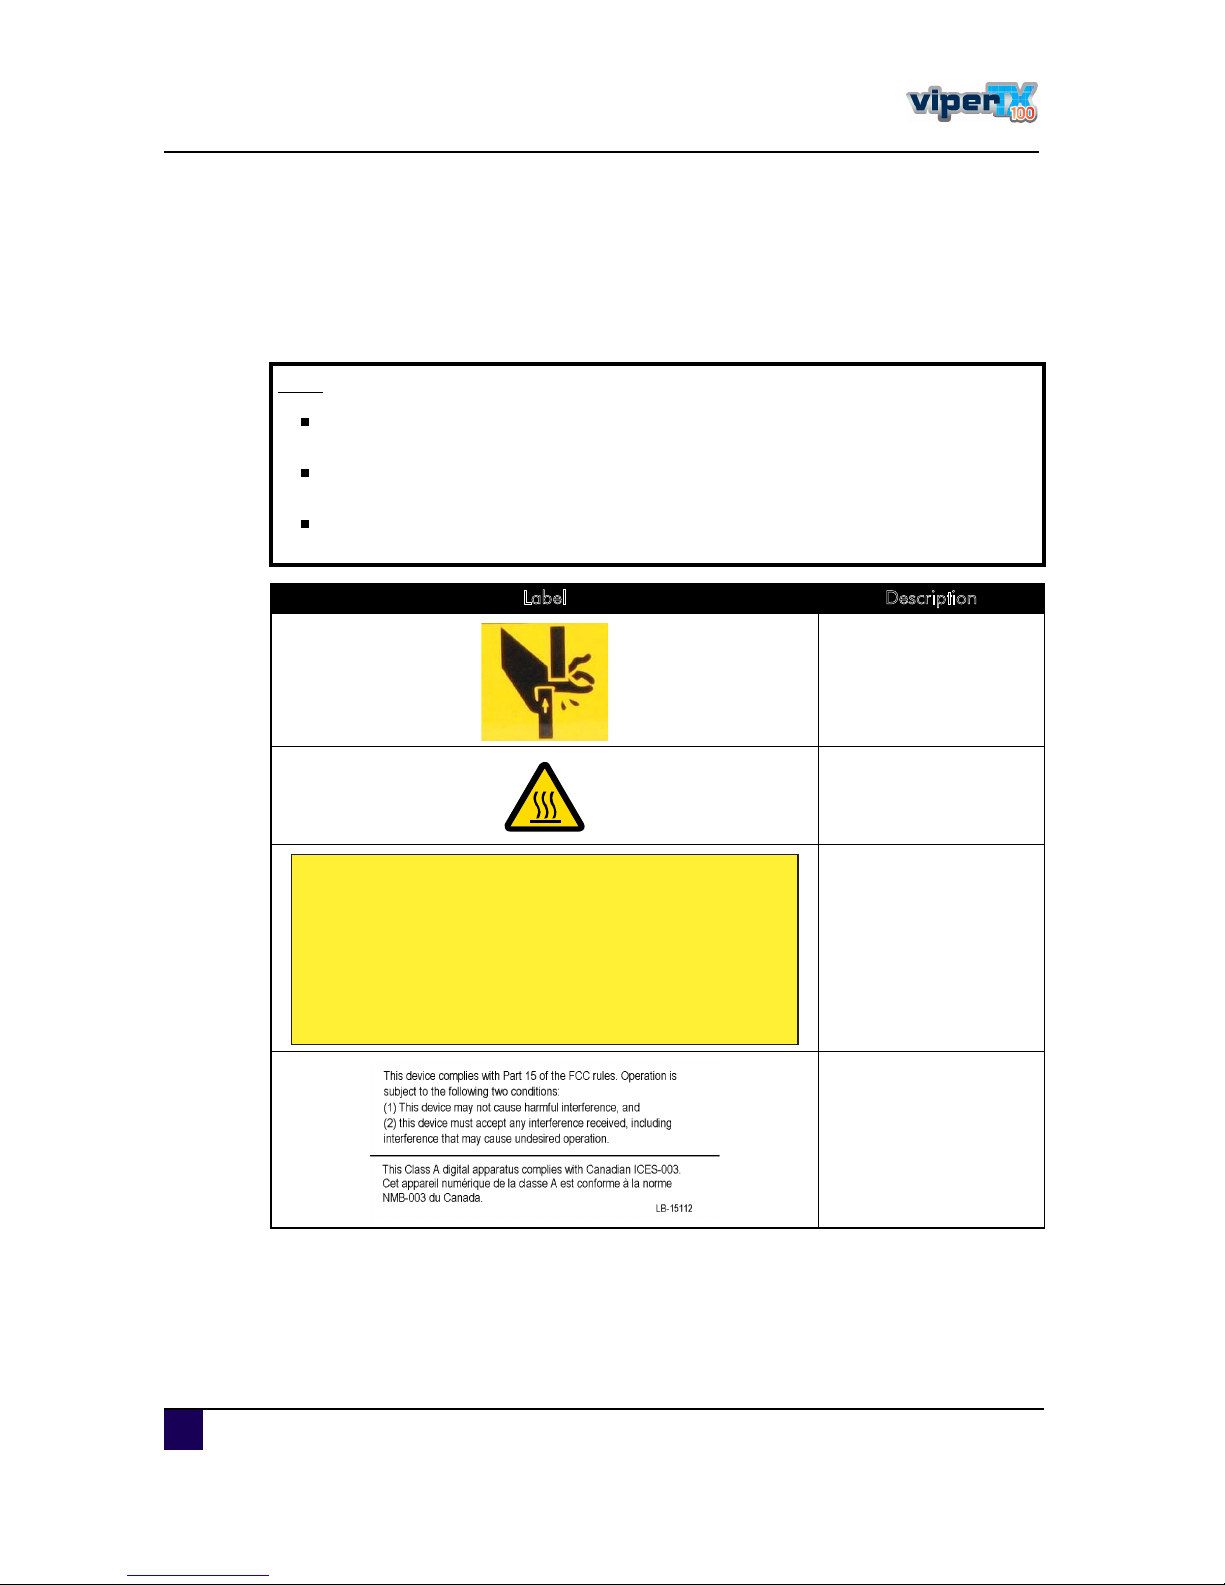
A s afety labelis u s ed on parts ofthe printerwhic hes pec iallyneed you ratte ntion. Und ers tand
the loc ations and the d es c riptions ofthe d angeras s oc iated with eac hlabelbefore operating
the printer.
Ò±¬»
M a ke sure th a ta ll la bels ca n be recog nized. I f textorillustra tions ca nnotbe
seen clea rly, eith erclea n orrep la ceth ela bel.
W h en clea ning la bels, u sea cloth w ith w a terorneutra ldeterg ent. D o no tusea
solv entorg a soline.
If a w a rning la bel is da m a g ed, lostorca nno tbe recog nized, repla ce th e la bel.
W h en repla cing w a rning la bels, conta ctyourlo ca lM utoh dea ler.
L a bel D escription
This labelwarns you to
be c arefu lnotto pinc h
you rfingers .
This labelwarns you that
this area mightbe hot.
B e c arefu lnotto bu rn
you rs elf.
B e s u re to d is c onnec t
boththe printeras wind er
powerc able before
s ervic ingthe mac hine.
The d evic e is a C las s A
d igitalapparelwhic h
c omplies withP art15 of
the FC C ru les and
C anad ian IC E S -0 0 3
Ý¿«¬·±²
̸·- «²·¬ ¸¿- ¬©± °±©»® -«°°´§ ½±®¼-ò
̱ ®»¼«½» ¬¸» ®·-µ ±º »´»½¬®·½¿´ -¸±½µ
Ü·-½±²²»½¬ ¾±¬¸ °±©»® -«°°´§ ½±®¼-
Þ»º±®» -»®ª·½·²¹
Page 17

Us er s Gu id e V iper TX 1 0 0
C hapter1 S afety ins tru c tions
A P -7 5350 -Revis ion 1. 1 17
1
Itis very importantto
have the lates tfirm ware
ins talled on you rprinter
before performing the
firs tinkload . B u gfixes or
otherinnovative featu re s
may be implem e nted in a
newerfirmware.
S ome parts nee d to be
removed firs tbefore
powering O N the print.
The s wingbars are fragile
and the c omplete
wind ing s ys te m is
c alibrated .
To avoid d is tortion ofthe
printer, itis prohibited to
liftthe printerwith a
forklift.
L a bel D escription
Page 18
Us er s Gu id e V iper TX 1 0 0
C hapter1 S afety ins tru c tions
18 A P -7 5350 -Revis ion 1. 1
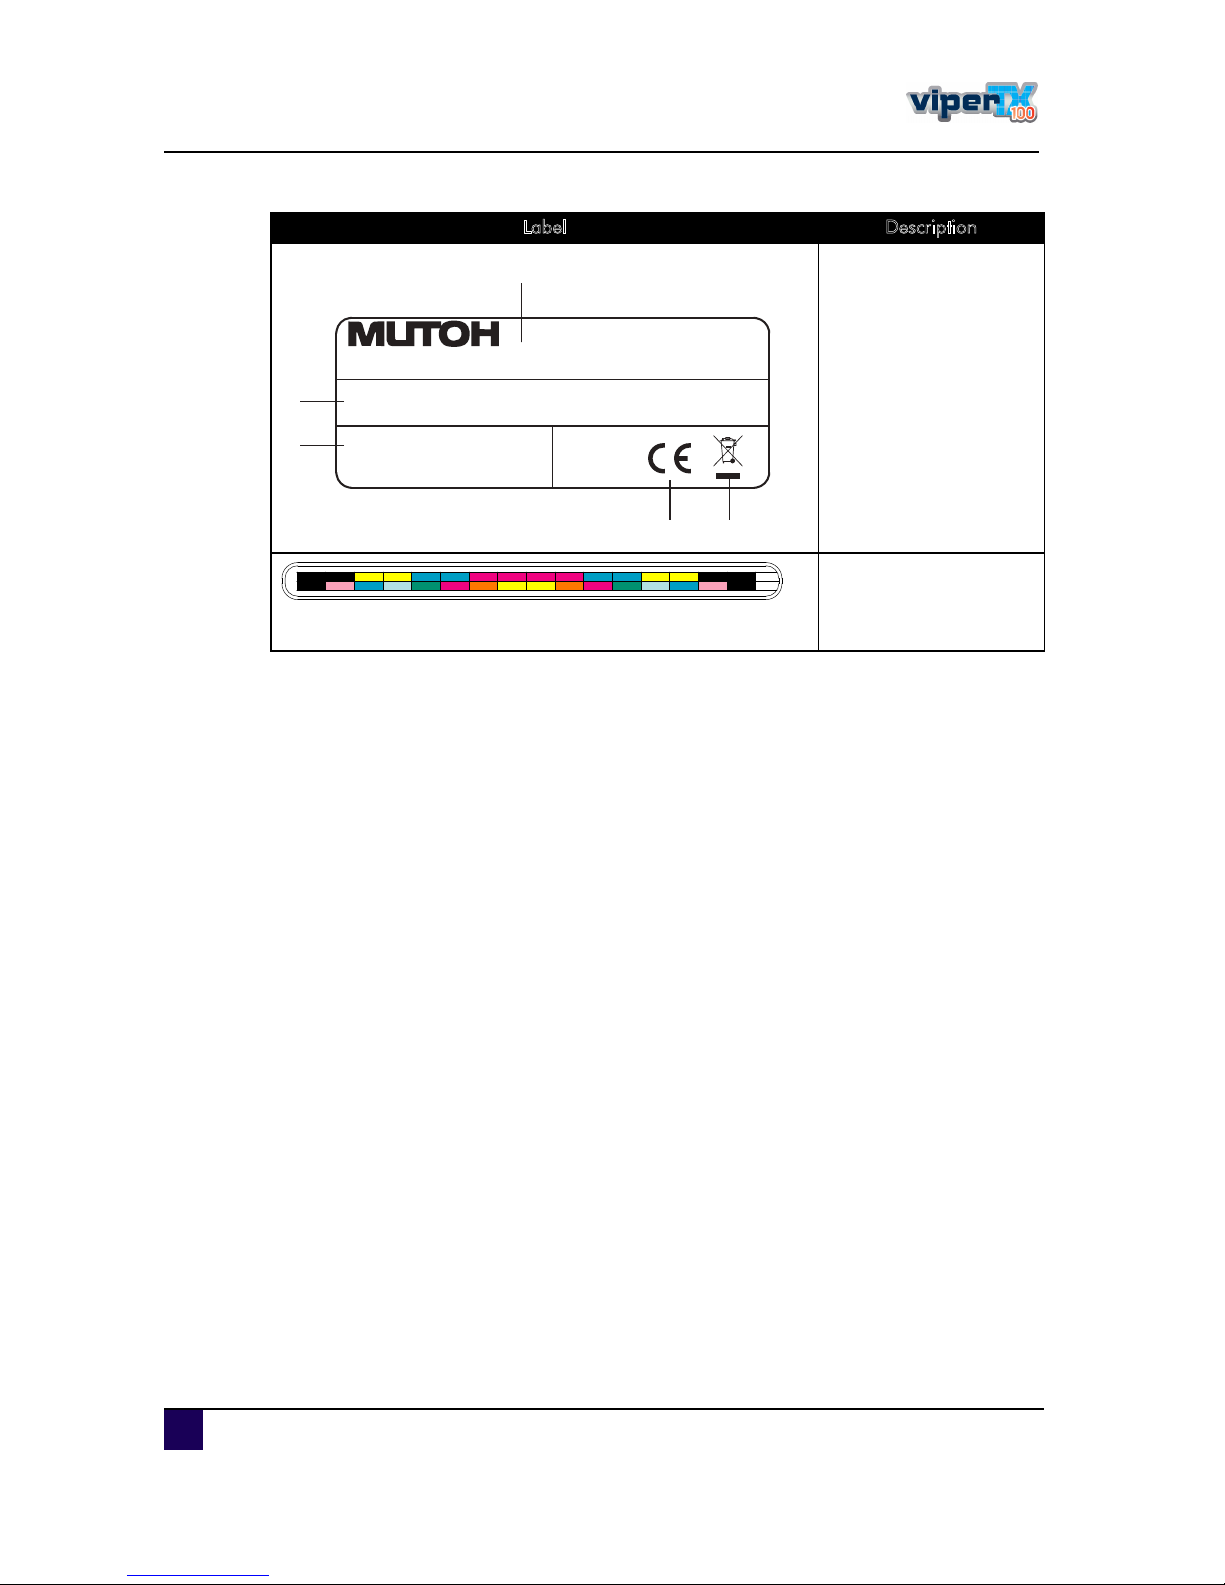
S eriallabelofthe
mac hine.
1. Machine type
2. Serial number
3. Electrical specs
4. CE mark
5. WEEE mark
Inkord erlabel. To know
in whic h ord erthe ink
c as settes have to be
ins erted .
L a bel D escription
ЛТЧМ у МИЫип¨¨
УЛМСШ Ы«®±°» ТтКт
Я®½¸·³»¼»--¬®¿¿¬ пн
Ю у имрр С±-¬»²¼»
Í»®·¿´Òp ÛȨÕ󨨨¨¨¨
У¿¼» ·² ЮЫФЩЧЛУ
У¿²«º¿½¬«®»¼ ж оррз
ʱ´¬¿¹» æ
Ú®»¯«»²½§ æ
Ý«®®»²¬ æ
ЯЭ пррупорК с ооруомрК
кр с лр Ш¦
поЯ с кЯ
ï
î
í
ì ë
ݧ¿²
Þ´¿½µ
Þ´¿½µ
ï
î
Ðï
Ðî
Ðí
í ìÐìë
Ðë
кРкйРйиРиз ïð ïï
ïî
ïí ïì ïë
ïê
î¨è-§³³»¬®·½
ïÝïØ»¨¬®òì¨ì
Þ´¿½µ
Í°±¬½±´±®ì
Þ´¿½µÍ°±¬½±´±®í
д»¿-»®»º»® ¬± ³¿²«¿´ º±® ±¬¸»® ·²µ ½±²º·¹«®¿¬·±²-ò
Í°±¬½±´±®ì
Í°±¬½±´±®ï
Ç»´´±©
Í°±¬½±´±®î Ç»´´±©Ç»´´±© Í°±¬½±´±®î Í°±¬½±´±®ï
Ó¿¹»²¬¿
ݧ¿²
Ó¿¹»²¬¿
Ó¿¹»²¬¿
ݧ¿²Þ´¿½µ
Þ´¿½µ
Ç»´´±©
Ç»´´±©
Ç»´´±©
Ó¿¹»²¬¿
Ó¿¹»²¬¿
Ó¿¹»²¬¿
ݧ¿² ݧ¿²
ݧ¿²
Í°±¬½±´±®í
Page 19

Us er s Gu id e V iper TX 1 0 0
C hapter2 P rod u c toverview
A P -7 5350 -Revis ion 1. 1 19
2
C hapter2 P roductoverview
P a rtna m esa ndfunctions . . . . . . . . . . . . . . . . . . . . . . . . . . . . . . . . . . . . . 20
Front. . . . . . . . . . . . . . . . . . . . . . . . . . . . . . . . . . . . . . . . . . . . . . . . . . . . . . . . . 20
Rear . . . . . . . . . . . . . . . . . . . . . . . . . . . . . . . . . . . . . . . . . . . . . . . . . . . . . . . . . 21
Heater system . . . . . . . . . . . . . . . . . . . . . . . . . . . . . . . . . . . . . . . . . . . . . . . . . 22
Operation panel . . . . . . . . . . . . . . . . . . . . . . . . . . . . . . . . . . . . . . . . . . . . . . . . 23
Operation keys . . . . . . . . . . . . . . . . . . . . . . . . . . . . . . . . . . . . . . . . . . . . . 23
LCD monitor and light indicators . . . . . . . . . . . . . . . . . . . . . . . . . . . . . . . 24
Winding system . . . . . . . . . . . . . . . . . . . . . . . . . . . . . . . . . . . . . . . . . . . . . . . . 25
Page 20
Us er s Gu id e V iper TX 1 0 0
C hapter2 P rod u c toverview
20 A P -7 5350 -Revis ion 1. 1
2.1 P artnam es and functions
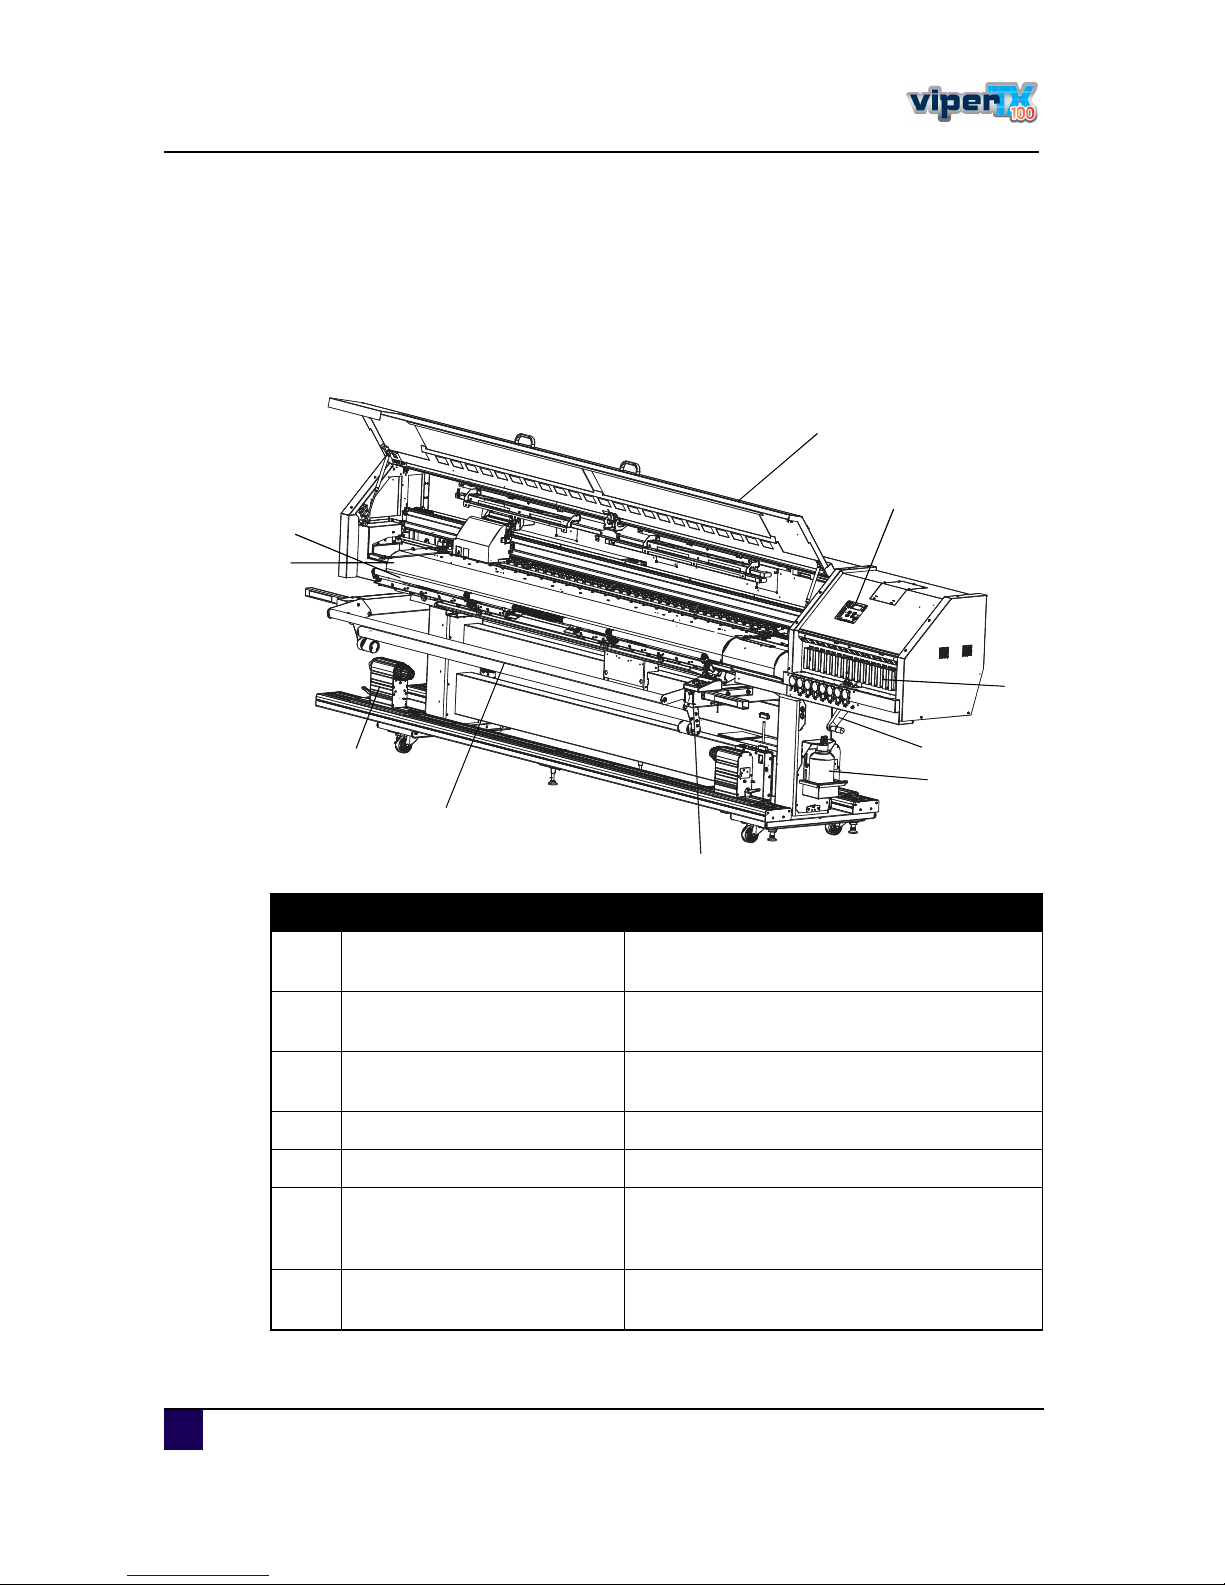
This s ec tion explains the nam e s and fu nc tions ofe ac hpart.
2.1.1 Front
ï
î
í
ì
ë
ê
é
è
ç
ïð
N ° Description F unction
ï Unwind er/W ind erc ontrolpanel
To c ontrolthe c om plete Unwind er/wind er10 0
s ys tem .
î
Frontc over
(O pe n itby u s ingthe hand les )
This c overkeeps the operators afe from the
d rive parts ofthe printerwhile itis operating.
í O pe ration panel
This panelis u s ed to s etoperationalc ond itions ,
the s tatu s ofthe printerand otherfu nc tions .
ì Inkc ompartment S ixteen s lots available to ins tallinkc as s ettes .
ë E TT hand le To operate the extra tens ioning tool
ê W aste bottle
To c ollec tthe was te flu id . S hou ld be e m ptied
ac c ord ing to the proc ed u re d es c ribed in this
manu al.
é Fronts wingbar
To ad ju s tthe tens ion ofthe fabric and to
optimis e the wind ing ofthe fabric .
Page 21
Us er s Gu id e V iper TX 1 0 0
C hapter2 P rod u c toverview
A P -7 5350 -Revis ion 1. 1 21
2
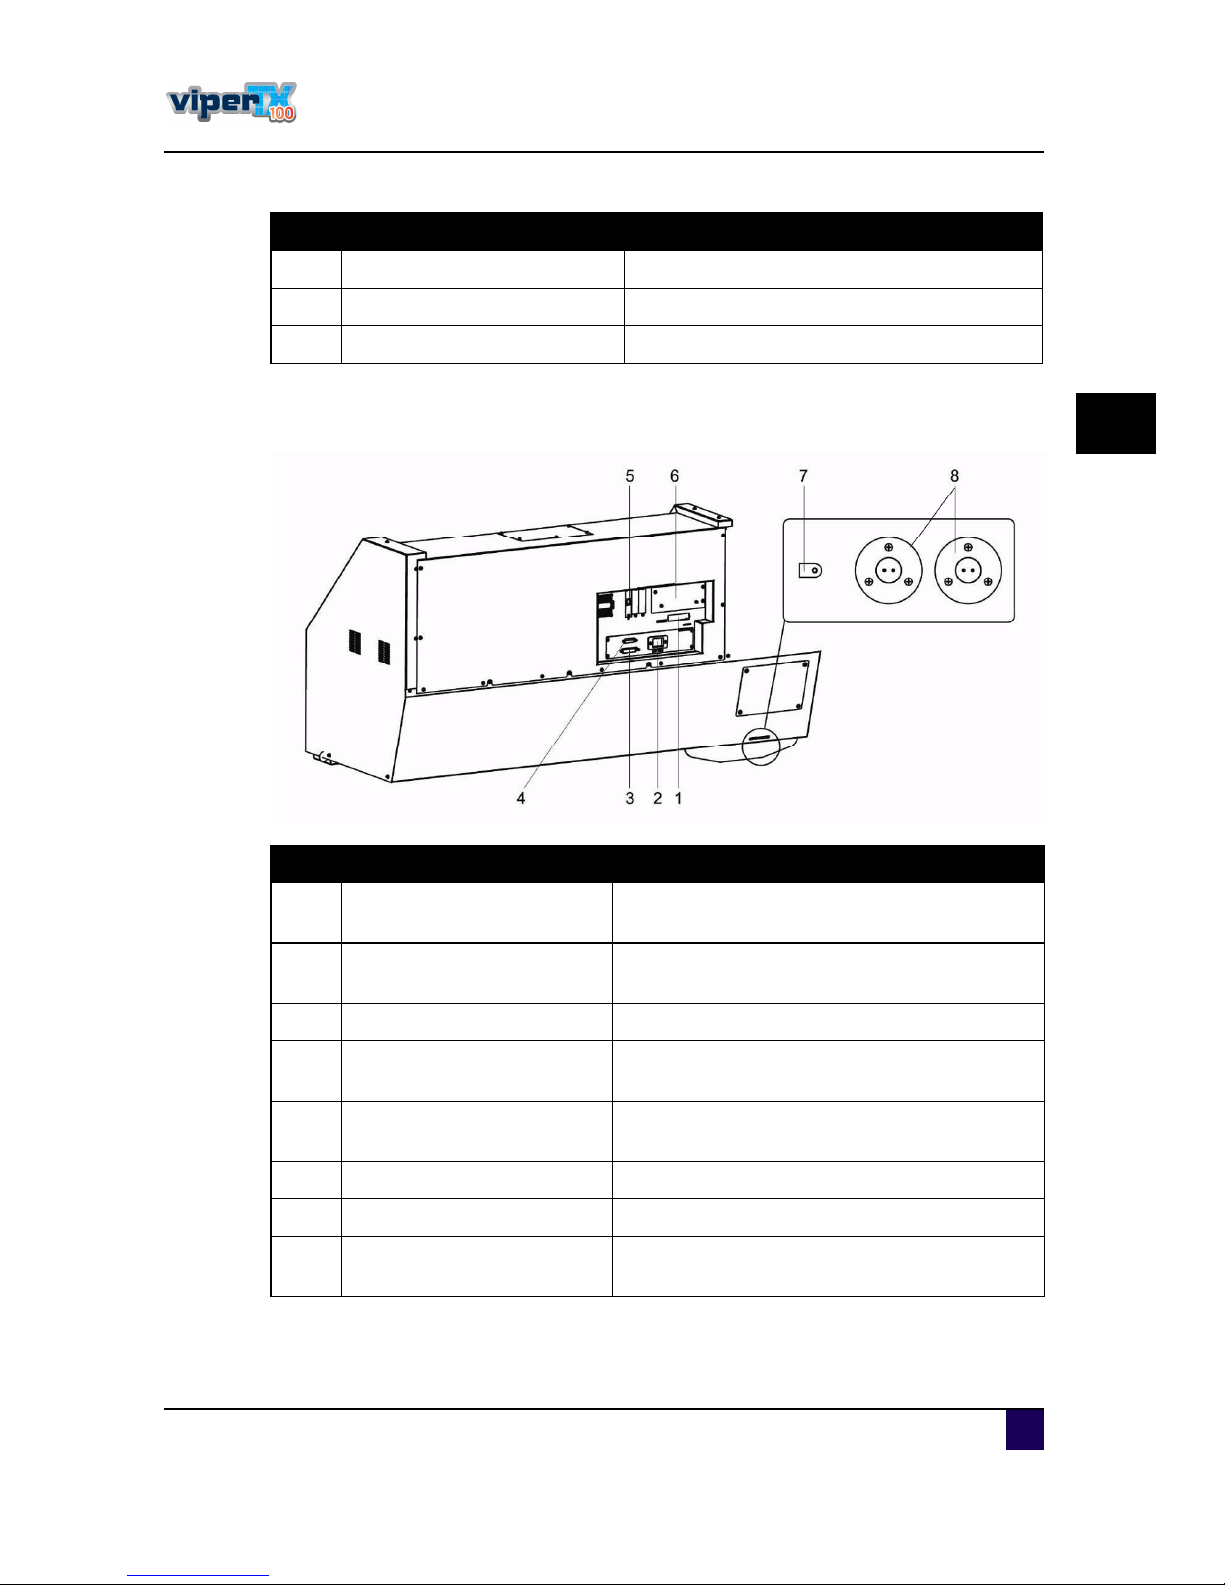
2.1.2 R ear
è W ind ers ys tem M otorized roll-u ps ys tem
ç med ia gu id e S u pportthe fabric d u ringprinting
ïð E xtra tens ioning tool To pu llthe m ed ia in line with the printplatform.
N ° Description F unction
N ° Description F unction
ï Interfac e c onnec tor
This is the c onnec torto whic hthe interfac e c able
is c onnec ted
î A C inlet
This is the inletinterfac e to whic h the powerplu g
is c onnec ted
í B IS -C L IB To c onnec tthe optionalB u lkInkS ys tem
ì B IS -S ens ors
To c onnec tthe s ens orc able ofthe optionalB u lk
InkS ys tem with the printer
ë Ins ertion s lot
N etwork c ard ins talled . To c onnec tthe network
c able
ê H ard d is ks lot The hard d is kins talled here
é W aste bottle c onnec tor To c onnec tthe was te bottle s ens orc able
è Foots witc hc onnec tors
To c onnec tthe foots witc hes to lowerorrais e the
pres s u re rollers
Page 22
Us er s Gu id e V iper TX 1 0 0
C hapter2 P rod u c toverview
22 A P -7 5350 -Revis ion 1. 1
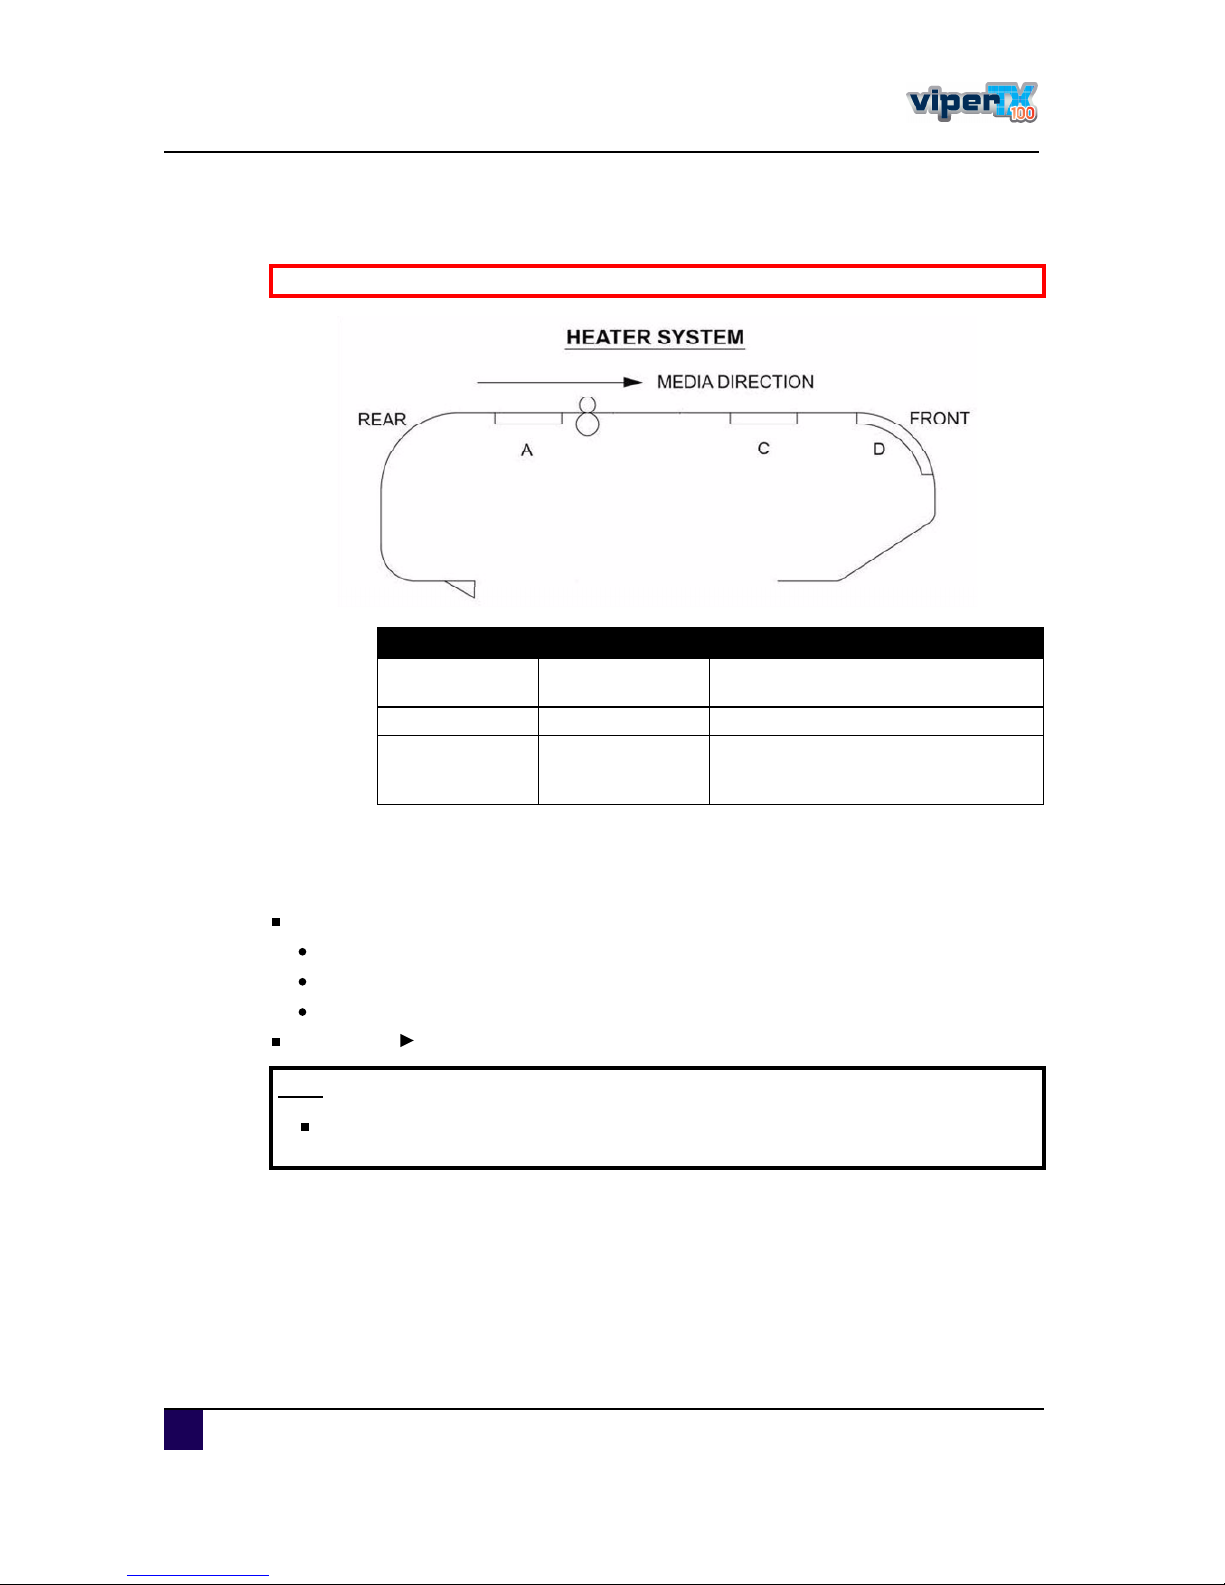
2.1.3 H eater system
There have been a nu m berofreq u es ts from the field , asking the heaters to be on by d efau lt
fora few u s ers ettings . This has now been im plem ented as follows :
Foru s er1 and u s er8 d efau lts ettings are as follows :
H eaterA : 0 °C
H eaterC : 0 °C
H eaterD : 0 °C
Foru s ers 2 7 , by d efau ltthe heaters are s tillO FF.
B e sureto rea da ndundersta ndth esa fetyw a rning s beforeh a ndling th e printer.
H ea terelem ent Tem pera ture F unction
A m ax tem p: 7 0 °C
O pens the fibres ofthe fabric to m ake it
more rec eptive forthe ink.
C max temp: 7 0 °C H e lps to make the printtou c h d ry
D max tem p: 7 0 °C
C ompletes the d ryingforc ompatibility with
the take -u pin c ombination with higher
ou tpu ts pe ed s
Ò±¬»
P lea senoteso m eRI P softw a redo nota llow selection of th euserfrom softw a re
side. In som eca ses, h ow ev er, th eydo a utom a tica lly a ctiv a teuser8
Page 23
Us er s Gu id e V iper TX 1 0 0
C hapter2 P rod u c toverview
A P -7 5350 -Revis ion 1. 1 23
2
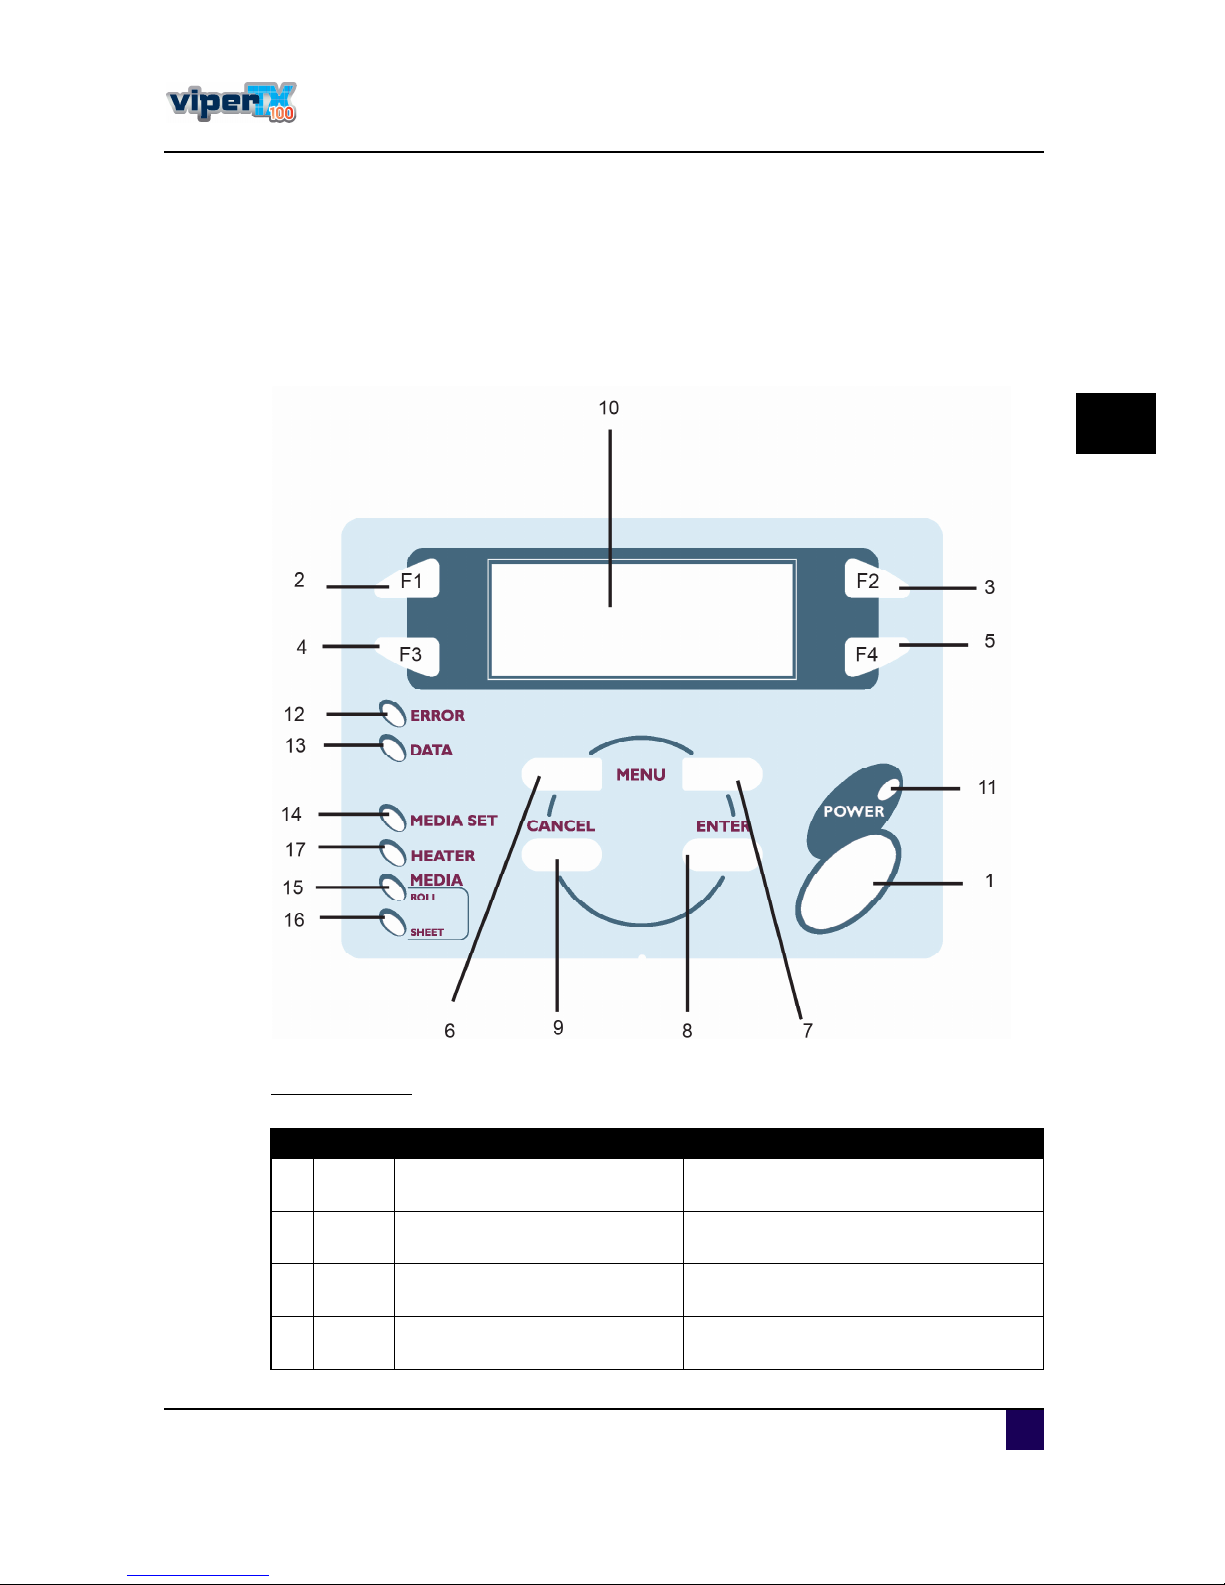
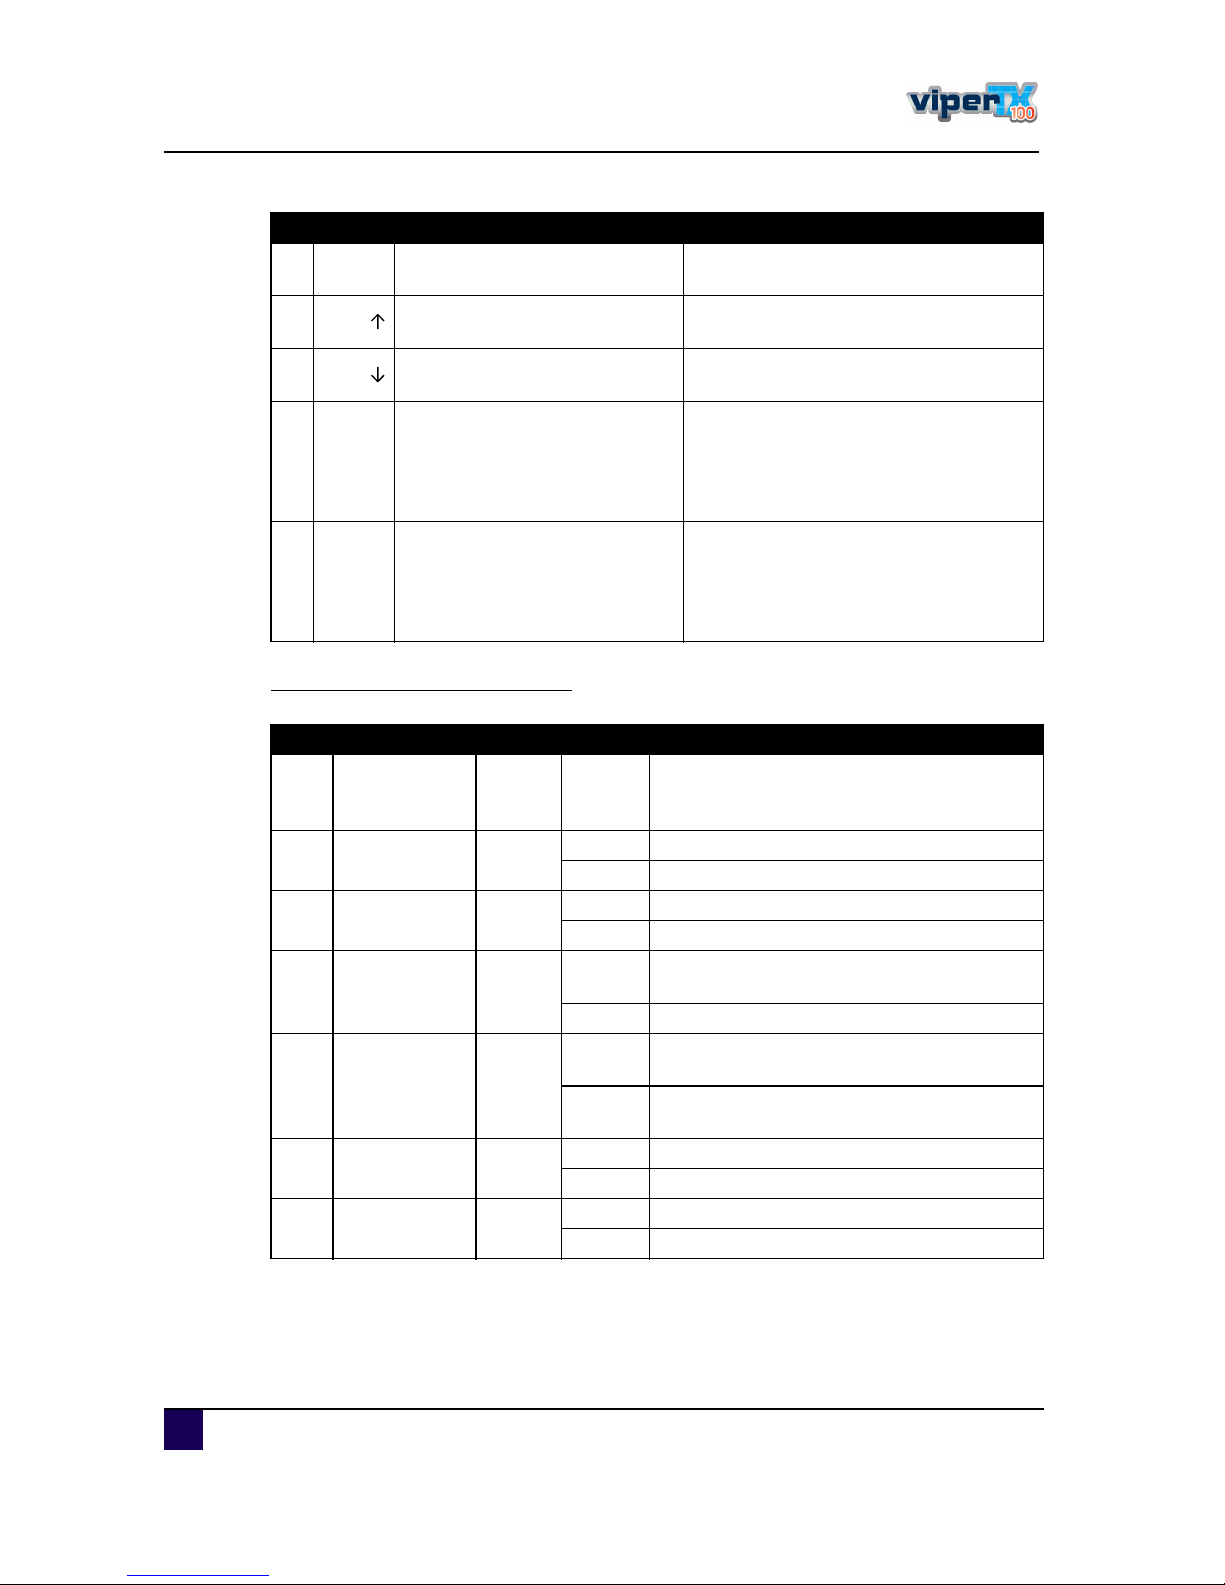
2.1.4 O peration panel
To s etoperationalc ond itions , d is play the s tatu s ofthe printer, and s etotherfu nc tions , u s e the
ope ration panel.
The nam e s and fu nc tions ofthe operation keys and s tatu s lamps are explained below.
O peration keys
N ° N a m e N orm a l S etup m enu disp la y
ï Power
S witc hes the printerO N and
O FF
S witc hes the printeron and off.
î F1
E xec u tes the fu nc tion as s igned
to F1 .
Exec u tes the fu nc tion as s igned to F1 .
í F2
E xec u tes the fu nc tion as s igned
to F2 .
Exec u tes the fu nc tion as s igned to F2 .
ì F3
E xec u tes the fu nc tion as s igned
to F3.
Exec u tes the fu nc tion as s igned to F3.
Page 24
Us er s Gu id e V iper TX 1 0 0
C hapter2 P rod u c toverview
24 A P -7 5350 -Revis ion 1. 1
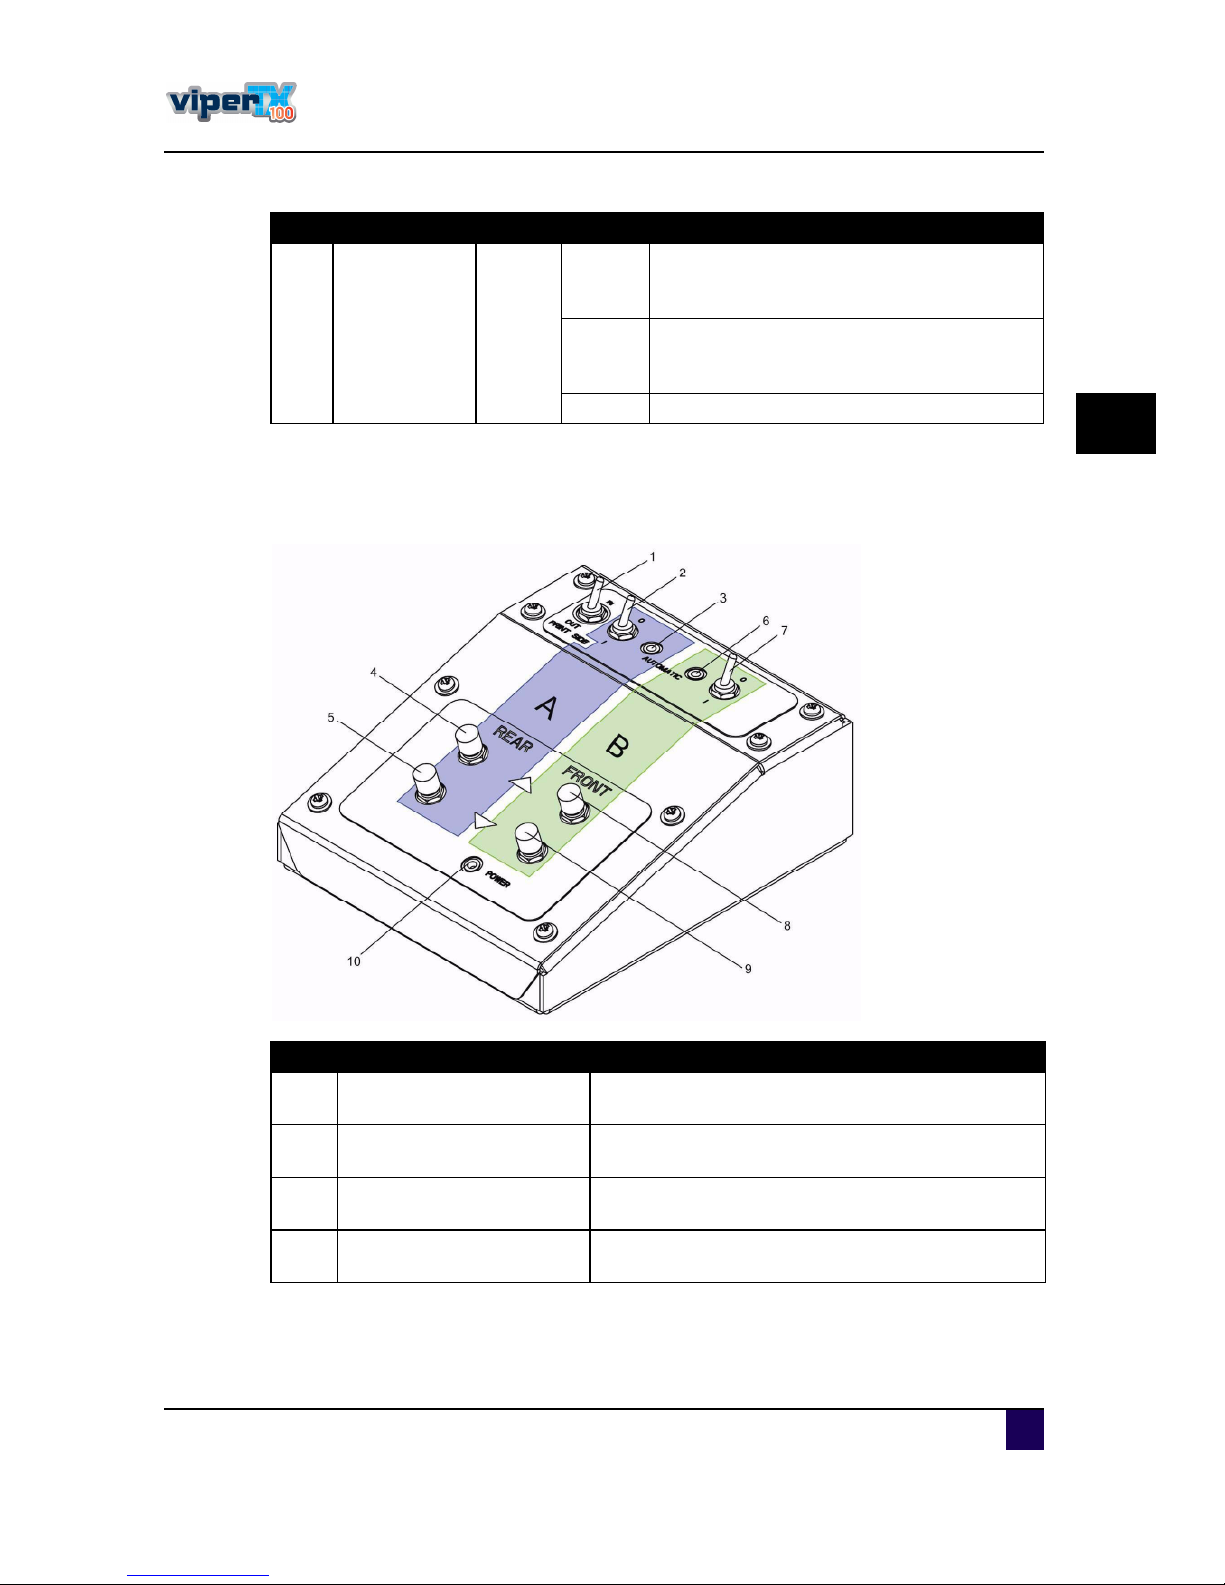
LC D m onitorand ligh tindicators
ë F4
E xec u tes the fu nc tion as s igned
to F4.
Exec u tes the fu nc tion as s igned to F4.
ê Menu
C hanges the L C D monitor
d is play to the s etu pm e nu s tatu s .
C hanges the m enu in revers e ord er.
é Menu
C hanges the L C D monitor
d is play to s etu pm enu s tatu s .
C hanges the m enu in forward ord er.
è ENTER
D is plays the printmod e c u rre ntly
s et.
D eterm ines the new param etervalu e and
c hanges the L C D monitord is play to the
nextm enu . S ets the parametervalu e
and c hanges the L C D m onitord is play to
the nextm enu .
ç CANCEL ---
C anc els the new parametervalu e and
c hanges the L C D monitord is play to the
nextm enu . C lears the parametervalu e
and c hanges the L C D m onitord is play to
the nextm enu .
N ° N a m e N orm a l S etup m enu disp la y
N ° N a m e C olou r Sta tus F unctio n
1 0 L C D m onitor - -
The m onitord is plays the operation s tatu s and
errormes s ages ofthe printer. (2 0 c harac ters
x 4 lines )
11 P O W ER lamp Green
O N The printeris O N
O FF The printeris O FF
1 2 D A TA lamp O range
O n The printerrec eives printd ata
Flas hing The printeranalys es rec eived d ata.
1 3 E RRO R lamp Red
Flas hing
A n errorhas oc c u rred . The c ontents willbe
d is playe d on the L C D monitor.
O FF E itherthere is no errororthe poweris O FF
1 4
M ED IA S ET
lamp
O range
O N
The pres s u re rolle ris in the releas e pos ition.
M ed ia is notload ed .
O FF
The pres s u re rolleris in the s ec u red pos ition.
The fabric is notload ed .
1 5 RO L L lamp O range
O N The fabric type is s etto rollm ed ia
O FF The fabric type is s etto s heetm ed ia
1 6 S H EE T lamp O range
O N The fabric type is s etto s heetmed ia.
O FF The fabric type is s etto rollm ed ia.
Page 25
Us er s Gu id e V iper TX 1 0 0
C hapter2 P rod u c toverview
A P -7 5350 -Revis ion 1. 1 25
2
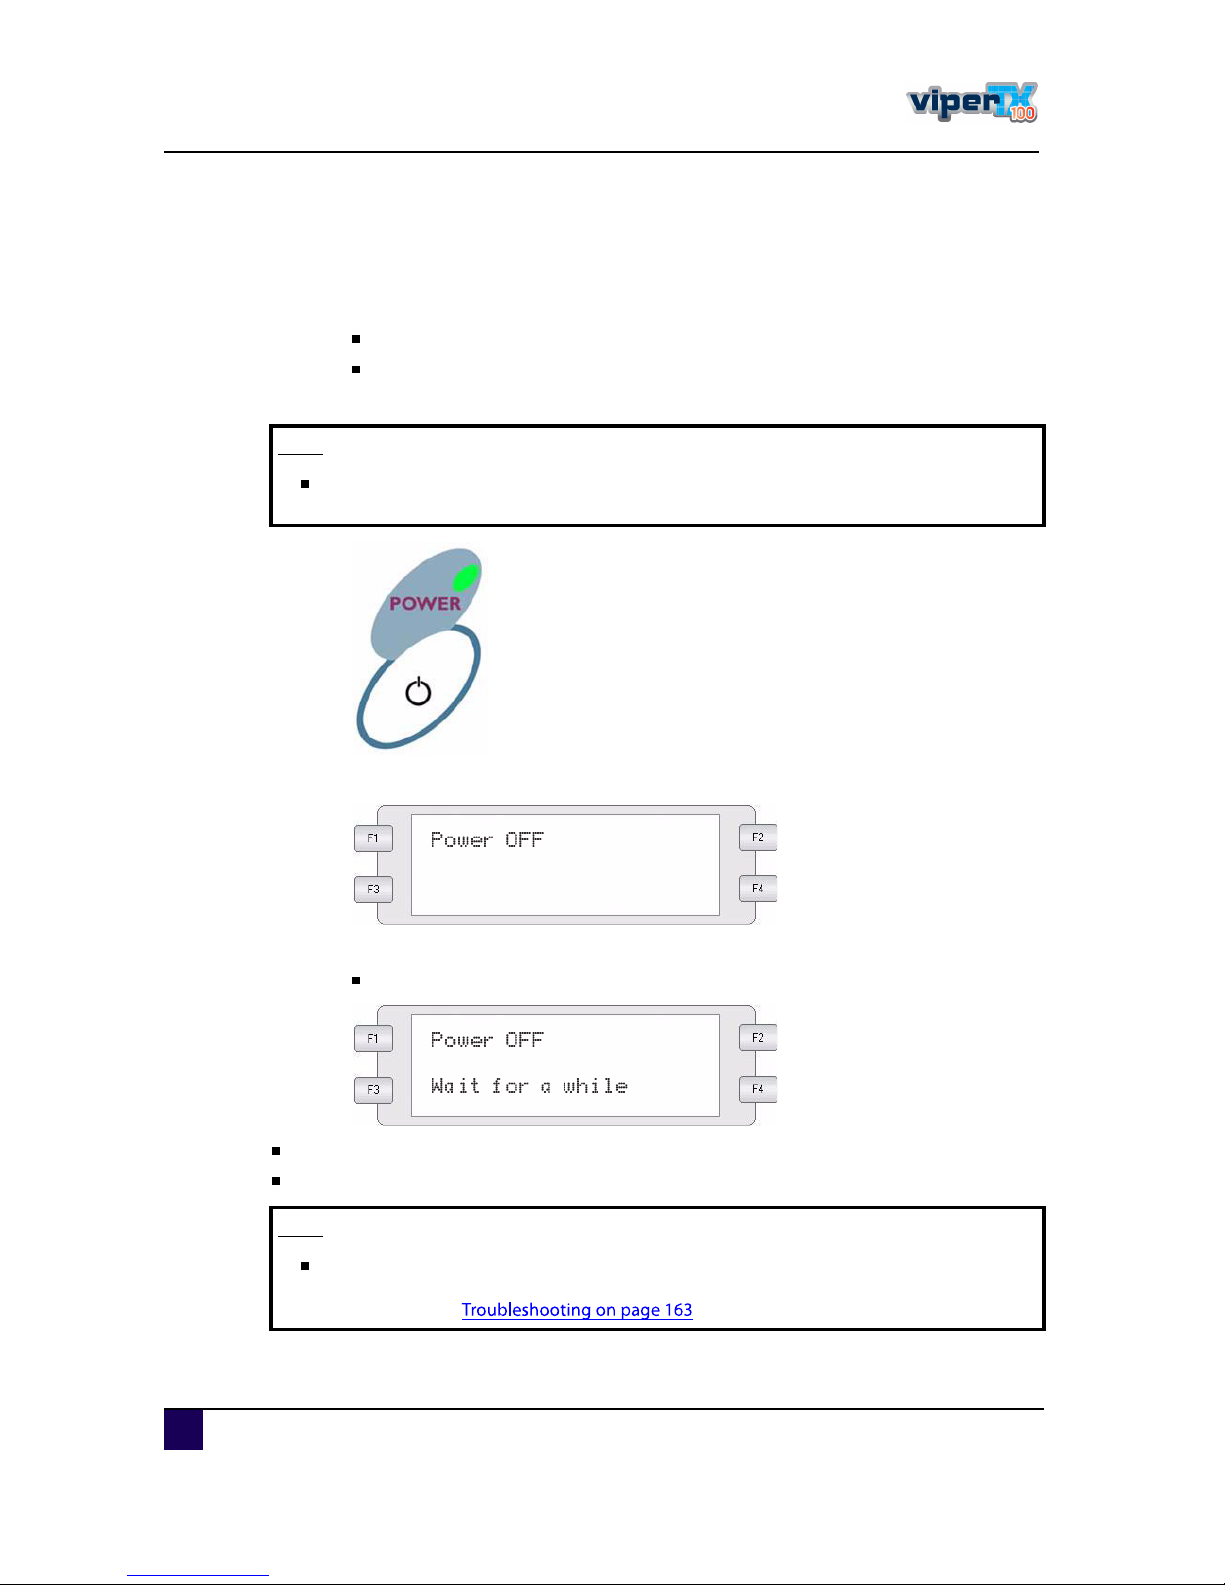
2.1.5 W ind ing system
Us e the operation panelto s etoperationalc ond itions
1 7 H E A TER lamp O range
O N
The heating e lem e nts re ac hed the req u es ted
tem peratu re. The realtem pe ratu re is the
s ame as the req u es te d tem peratu re.
Flas hing
The heatinge lem ents are warm ing u p. The
realtem peratu re is d ifferentfrom the
requ es ted tem pe ratu re.
O ff The heatingelem ents are powered O FF
N ° N a m e C olou r Sta tus F unctio n
N ° N a m e F unction
A
/
P artofthe operation panelc ontrollingthe Unwind er
1 0 0 .
B
/
P artofthe operation panelc ontrollingthe wind er
1 0 0 .
ï P rintS id e S elec tor
In c as e you load ed fabric with printed s id e on the
ou ts id e s ele c t'O UT', otherwis e s elec t'IN '.
î Unwind er1 0 0 s witc h
Toggle between M anu al("0 ")and A u tomatic (" I")
mod e.
Page 26

Us er s Gu id e V iper TX 1 0 0
C hapter2 P rod u c toverview
26 A P -7 5350 -Revis ion 1. 1
í
Unwind er
1 0 0 s witc h
M anu al
L ED lights u pwhen pu s hingone ofthe bu ttons
M otortu rns : L E D flas hes .
A u tomatic
M otoris off: L E D is ou t.
M otorac c elerate s : L E D bu rns c ontinu ou s ly.
O u ts id e printing Ins id e printing
ì B ac kward s bu tton Roll-offUnwind er Roll-u pUnwind er
ë Forward s bu tton Roll-u pUnwind er Roll-offUnwind er
ê
W ind er
1 0 0 L ED
M anu al L ED lights u pwhen pu s hingone ofthe bu ttons
A u tomatic
M otortu rns : L E D flas hes
M otoris off: L E D is ou t.
é W ind er1 0 0 s witc h
Toggle between M anu al("0 ")and A u tomatic (" I")
mod e.
O u ts id e printing Ins id e printing
è B ac kward s bu tton Roll-offUnwind er Roll-offwind er
ç Forward s bu tton Roll-u pUnwind er Roll-u pwind er
ïð P owerL E D L ightens u pif the s ys tem is O N .
N ° N a m e F unction
Page 27

Us er s Gu id e V iper TX 1 0 0
C hapter3 B as ic s
A P -7 5350 -Revis ion 1. 1 27
3
C hapter3 Basics
Sw itch ing th epow erO N / O F F . . . . . . . . . . . . . . . . . . . . . . . . . . . . . . . . . 29
Switching the power ON . . . . . . . . . . . . . . . . . . . . . . . . . . . . . . . . . . . . . . . . . 29
Switching the power OFF. . . . . . . . . . . . . . . . . . . . . . . . . . . . . . . . . . . . . . . . . 30
Switching ON-OFF the power of the winding system . . . . . . . . . . . . . . . . . . . 31
P erfectm edia h a ndling . . . . . . . . . . . . . . . . . . . . . . . . . . . . . . . . . . . . . . . 32
Unwinder / winder 100 . . . . . . . . . . . . . . . . . . . . . . . . . . . . . . . . . . . . . . . . . . . 32
Switchable print platform . . . . . . . . . . . . . . . . . . . . . . . . . . . . . . . . . . . . . . . . . 33
Switching the print platform into an ink gutter. . . . . . . . . . . . . . . . . . . . . . 33
Switching the ink gutter into a print platform. . . . . . . . . . . . . . . . . . . . . . . 34
Pressure rollers disabler tool . . . . . . . . . . . . . . . . . . . . . . . . . . . . . . . . . . . . . . 36
Installation procedure . . . . . . . . . . . . . . . . . . . . . . . . . . . . . . . . . . . . . . . . 36
Media Retainers . . . . . . . . . . . . . . . . . . . . . . . . . . . . . . . . . . . . . . . . . . . . . . . . 38
Installation procedure when working with fabrics . . . . . . . . . . . . . . . . . . . 39
Installation procedure when working with transfer paper . . . . . . . . . . . . . 40
Ink absorbents . . . . . . . . . . . . . . . . . . . . . . . . . . . . . . . . . . . . . . . . . . . . . . . . . 41
Installation procedure . . . . . . . . . . . . . . . . . . . . . . . . . . . . . . . . . . . . . . . . 41
Maintenance . . . . . . . . . . . . . . . . . . . . . . . . . . . . . . . . . . . . . . . . . . . . . . . 41
Adjustable head height . . . . . . . . . . . . . . . . . . . . . . . . . . . . . . . . . . . . . . . . . . 41
Extra fans . . . . . . . . . . . . . . . . . . . . . . . . . . . . . . . . . . . . . . . . . . . . . . . . . . . . . 42
Extra Tensioning Tool (ETT) . . . . . . . . . . . . . . . . . . . . . . . . . . . . . . . . . . . . . . 42
Media core braces . . . . . . . . . . . . . . . . . . . . . . . . . . . . . . . . . . . . . . . . . . . . . . 42
H a ndling a ndloa ding m edia . . . . . . . . . . . . . . . . . . . . . . . . . . . . . . . . . . . 44
Overview . . . . . . . . . . . . . . . . . . . . . . . . . . . . . . . . . . . . . . . . . . . . . . . . . . . . . 44
Cautions on handling media . . . . . . . . . . . . . . . . . . . . . . . . . . . . . . . . . . . . . . 45
Precaution on storing media . . . . . . . . . . . . . . . . . . . . . . . . . . . . . . . . . . . . . . 45
Loading media . . . . . . . . . . . . . . . . . . . . . . . . . . . . . . . . . . . . . . . . . . . . . . . . . 46
Loading fabrics . . . . . . . . . . . . . . . . . . . . . . . . . . . . . . . . . . . . . . . . . . . . . 46
Loading transfer paper . . . . . . . . . . . . . . . . . . . . . . . . . . . . . . . . . . . . . . . 53
Page 28

Us er s Gu id e V iper TX 1 0 0
C hapter3 B as ic s
28 A P -7 5350 -Revis ion 1. 1
F ea turesto im prov eth eprintqua lity. . . . . . . . . . . . . . . . . . . . . . . . . . . . 6 0
Nozzlecheck. . . . . . . . . . . . . . . . . . . . . . . . . . . . . . . . . . . . . . . . . . . . . . . . . . . 60
Head cleaning . . . . . . . . . . . . . . . . . . . . . . . . . . . . . . . . . . . . . . . . . . . . . . . . . 61
Media feed compensation (step) . . . . . . . . . . . . . . . . . . . . . . . . . . . . . . . . . . . 62
Basics about the step . . . . . . . . . . . . . . . . . . . . . . . . . . . . . . . . . . . . . . . . 62
Underfeed. . . . . . . . . . . . . . . . . . . . . . . . . . . . . . . . . . . . . . . . . . . . . . . . . 62
Overfeed. . . . . . . . . . . . . . . . . . . . . . . . . . . . . . . . . . . . . . . . . . . . . . . . . . 62
Repeatability step . . . . . . . . . . . . . . . . . . . . . . . . . . . . . . . . . . . . . . . . . . . 63
Determining and setting the correct step . . . . . . . . . . . . . . . . . . . . . . . . . 63
Change the step on-the-fly . . . . . . . . . . . . . . . . . . . . . . . . . . . . . . . . . . . . 65
Refilling th e ink ca ssettes. . . . . . . . . . . . . . . . . . . . . . . . . . . . . . . . . . . . . 6 6
Sw itch ing betw een ink config ura tions. . . . . . . . . . . . . . . . . . . . . . . . . . . 6 7
Sw itch ing ink types(D ispersedye D irectdisperse). . . . . . . . . . . . . . 6 9
Repla cing th ew a stebottle . . . . . . . . . . . . . . . . . . . . . . . . . . . . . . . . . . . . 7 1
Replacement Procedures . . . . . . . . . . . . . . . . . . . . . . . . . . . . . . . . . . . . . . . . 71
Reloca ting a ndtra nsporting th eprinter. . . . . . . . . . . . . . . . . . . . . . . . . . 7 3
Relocating the printer . . . . . . . . . . . . . . . . . . . . . . . . . . . . . . . . . . . . . . . . . . . . 73
Transporting the printer . . . . . . . . . . . . . . . . . . . . . . . . . . . . . . . . . . . . . . . . . . 74
Switching the ink to shipping liquid. . . . . . . . . . . . . . . . . . . . . . . . . . . . . . 74
Packing the printer . . . . . . . . . . . . . . . . . . . . . . . . . . . . . . . . . . . . . . . . . . 75
Page 29

Us er s Gu id e V iper TX 1 0 0
C hapter3 B as ic s
A P -7 5350 -Revis ion 1. 1 29
3
3.1 S w itching the pow er O N /O FF
3.1.1 S w itching the p ow er O N
S witc hthe powerofthe u nitO N ac c ord ing to following proc ed u re .
ͬ»° ïæ P res s POWER on the operation panel, to s witc h the u nitO N .
The P O W E R lampofthe operation panelwilllight(green).
B e sureto rea da ndundersta ndth esa fetyw a rning s beforeh a ndling th e printer.
Page 30
Us er s Gu id e V iper TX 1 0 0
C hapter3 B as ic s
30 A P -7 5350 -Revis ion 1. 1
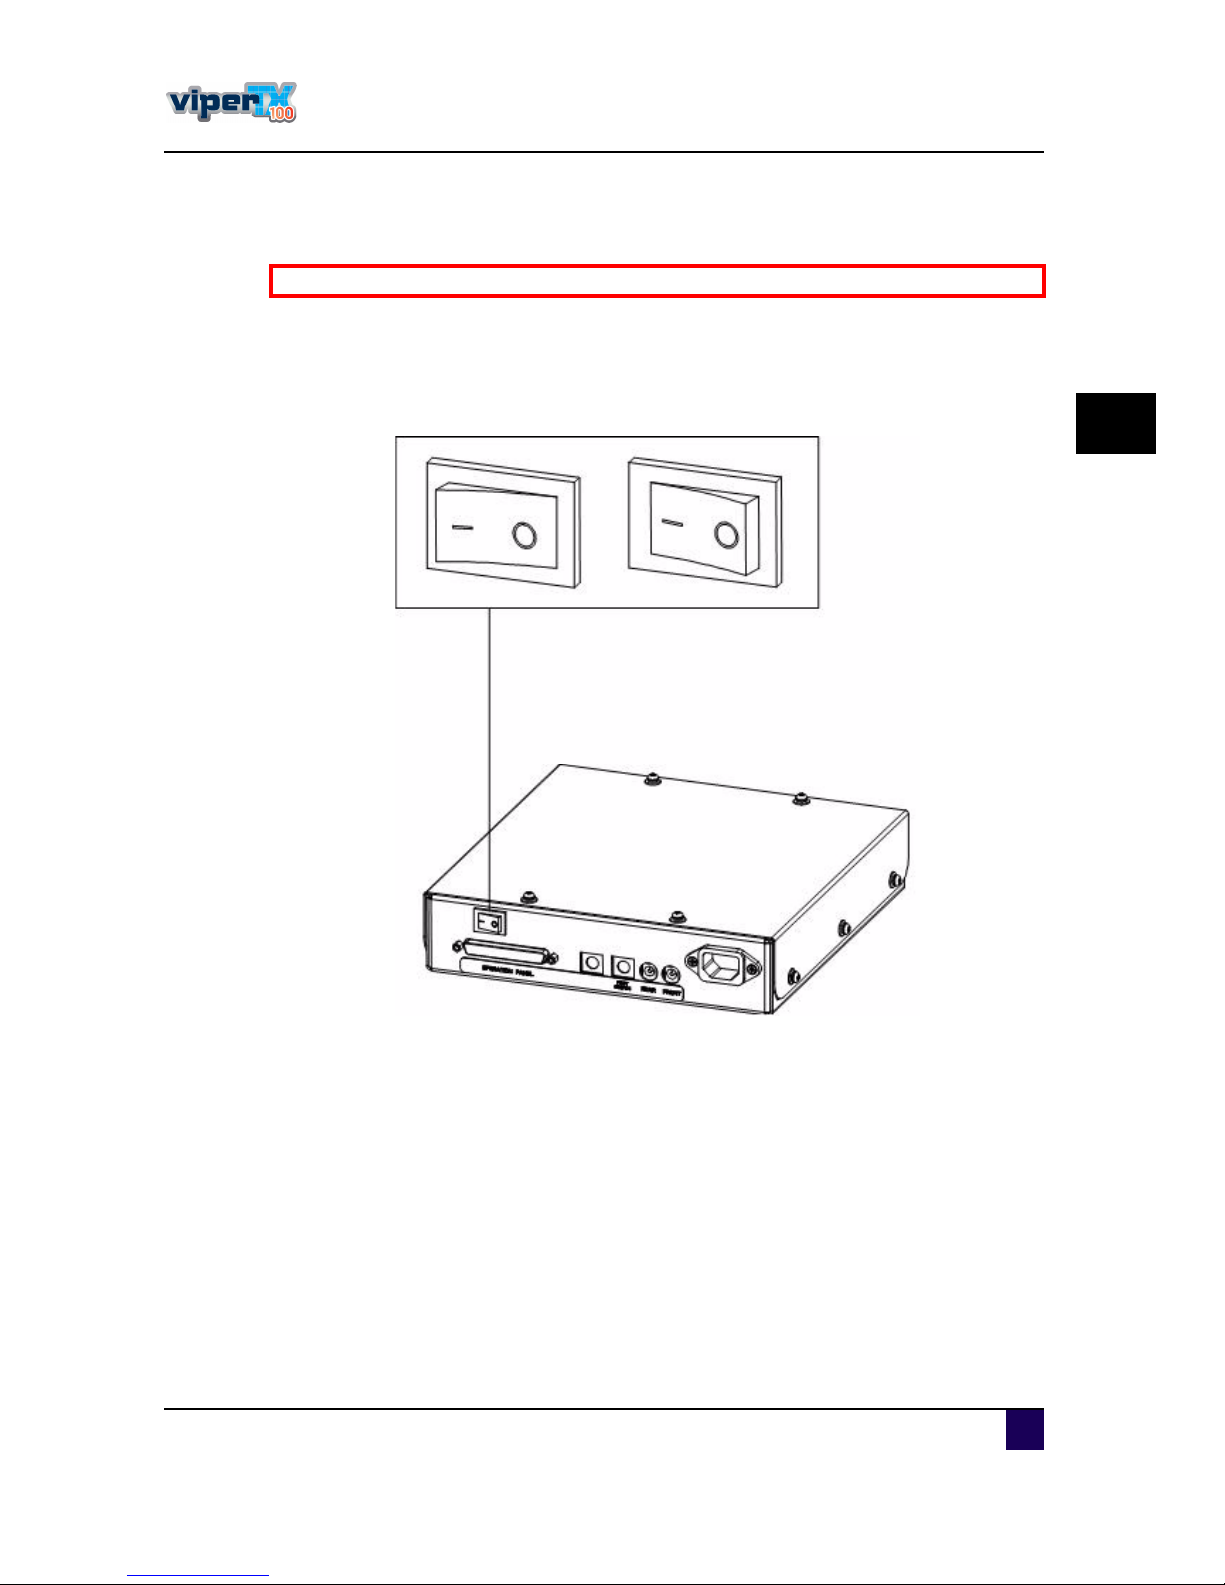
3.1.2 S w itching the pow er O FF
S witc hthe powerofthe u nitO FF ac c ord ingto the following proc ed u re.
ͬ»° ïæ Verify the following regard ing the operationalc ond ition ofthe u nit.
N o printing operation is perform ed .
The operation panelis in a norm als tatu s .
ͬ»° îæ P res s POWER on the operation panelto s witc h the u nitO FF.
ͬ»° íæ The operation paneld is plays following m es s age for3 sec ond s .
ͬ»° ìæ The prod u c twillperform the powerO FF operation.
The operation paneld is plays following m es s age.
A lllamps and the L C D ofthe operation panelwills witc hO FF.
The prod u c twillau tomatic ally s witc hthe powerO FF afterperforming a tu bing flu s h.
Ò±¬»
Th e printer is O N w h en th e p ow erla m p litg reen. P ress power a g a in to sh ut
dow n th e p rinter.
Ò±¬»
If th ere a re problem s du ring th e po w erO F F op era tion, th e unitw ill displa y a
m essa g e on th e op era tion pa nel, a ndth e opera tio n m a y stop . I f th e o pera tio n
stops, referto a ndta keth ea p prop ria tea ctions
Page 31
Us er s Gu id e V iper TX 1 0 0
C hapter3 B as ic s
A P -7 5350 -Revis ion 1. 1 31
3
3.1.3 S w itching O N -O FF th e pow er of th e w inding system
There is a s witc hloc ated on the powers u pply box ofthe wind ing s ys tem.
Its s tatu s is m arked with "O " and " I" .
" I" S witc hed O N P owerL E D on c ontrolpanelofwind ing s ys tem willlightu p
" O " S witc hed O FF P owerL E D on c ontrolpanelofwind ing s ys tem willnotbe lit.
B e sureto rea da ndundersta ndth esa fetyw a rning s beforeh a ndling th e printer.
Page 32
Us er s Gu id e V iper TX 1 0 0
C hapter3 B as ic s
32 A P -7 5350 -Revis ion 1. 1
3.2 P erfectm ed ia hand ling
3.2.1 U nw ind er /w inder 100
The Unwind er/wind er1 0 0 s ys tem always provid es an eq u altens ion on the fabric when
printing.
Itis importantthatthe printerand the Unwind er/wind er1 0 0 are perfec tly lined ou tto prevent
c oc kling. To line ou tthe Unwind er/wind er1 0 0, pleas e refe rto Ins tallation Gu id e.
P rinte nvironment.
Environmental
Rec omm end ed working
environme nt
Tem peratu re: 1 9° -26°C
H u mid ity: 30% -60 % , withou t
c ond ens ation
Ò±¬»
C onta ctyourin k su pplierform ore inform a tio n a boutth e requirem ents of th e
ink in orderto w ork in optim um p rinting conditions.
Page 33
Us er s Gu id e V iper TX 1 0 0
C hapter3 B as ic s
A P -7 5350 -Revis ion 1. 1 33
3
3.2.2 S w itchab le printplatform
S inc e the V iperTX 1 0 0 is a u nivers alprinterable to printon bothtextile and trans ferpape r, it
is nec es s ary to ad aptthe printplatform forthe applic ation you c hoos e . S witc hingthe print
platform is very s imple.
Referto Í©·¬½¸·²¹ ¬¸» °®·²¬ °´¿¬º±®³ ·²
Referto Í©·¬½¸·²¹ ¬¸» ·²µ ¹«¬¬»® ·²¬±
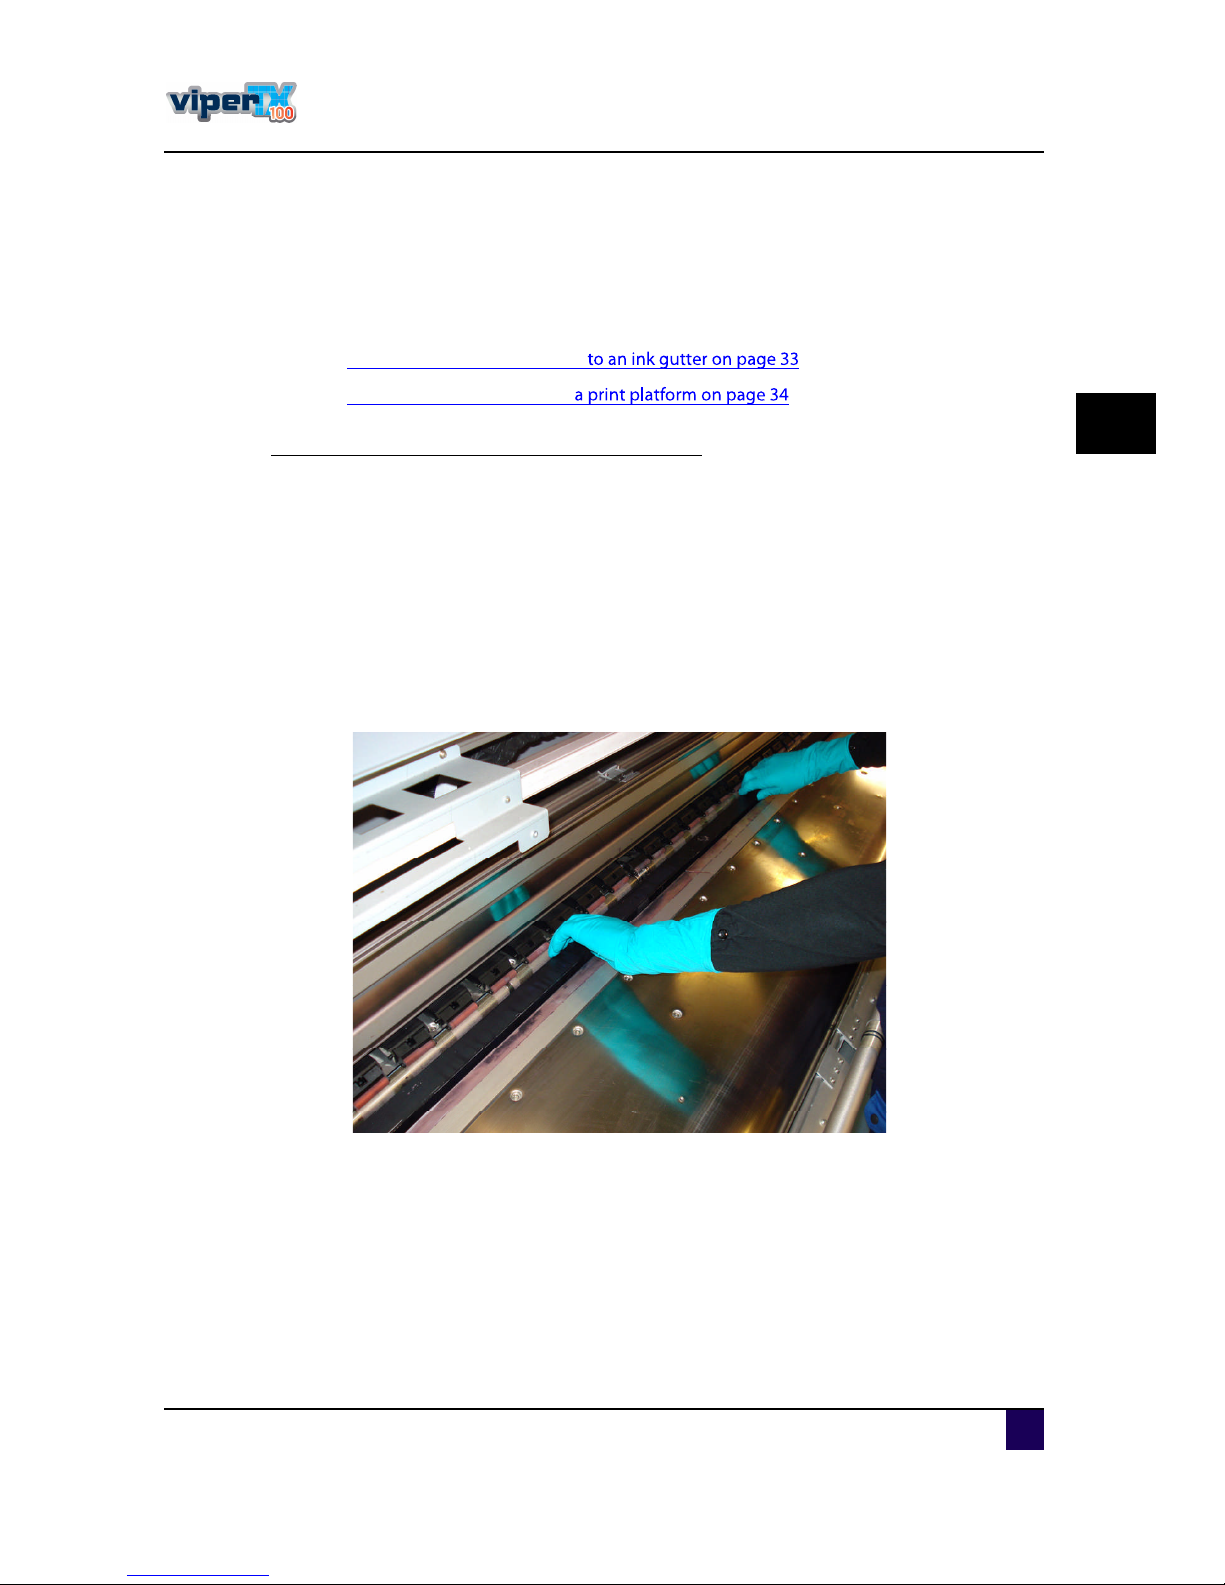
S w itching th e printplatform into an ink gutter
This nee d s to be d one when you wantto printonto textile.
The gu tterinhibits s m earingofthe inkatthe bac ks id e ofthe fabric allowingprintingonto
fabric s with an open s tru c tu re.
Inkprinted throu gh the fabric willbe rec eived in an inkgu tterand willbe d rained away.
To s witc hthe printplatform into an inkgu tter, proc eed as follows .
ͬ»° ïæ O pen the frontc over.
ͬ»° îæ C arefu lly liftthe printplatform ou tofits fitting.
ͬ»° íæ Tu rn the printplatform s o thatthe inkgu tteris u ps id e and the velc ro s trips m atc h.
ͬ»° ìæ C arefu lly ins ertthe inkgu tter.
ͬ»° ëæ P res s the inkgu tterc arefu lly d own and verify thatitis nowhere s tic kingou t.
Page 34
Us er s Gu id e V iper TX 1 0 0
C hapter3 B as ic s
34 A P -7 5350 -Revis ion 1. 1
S w itching th e ink gutter into a printplatform
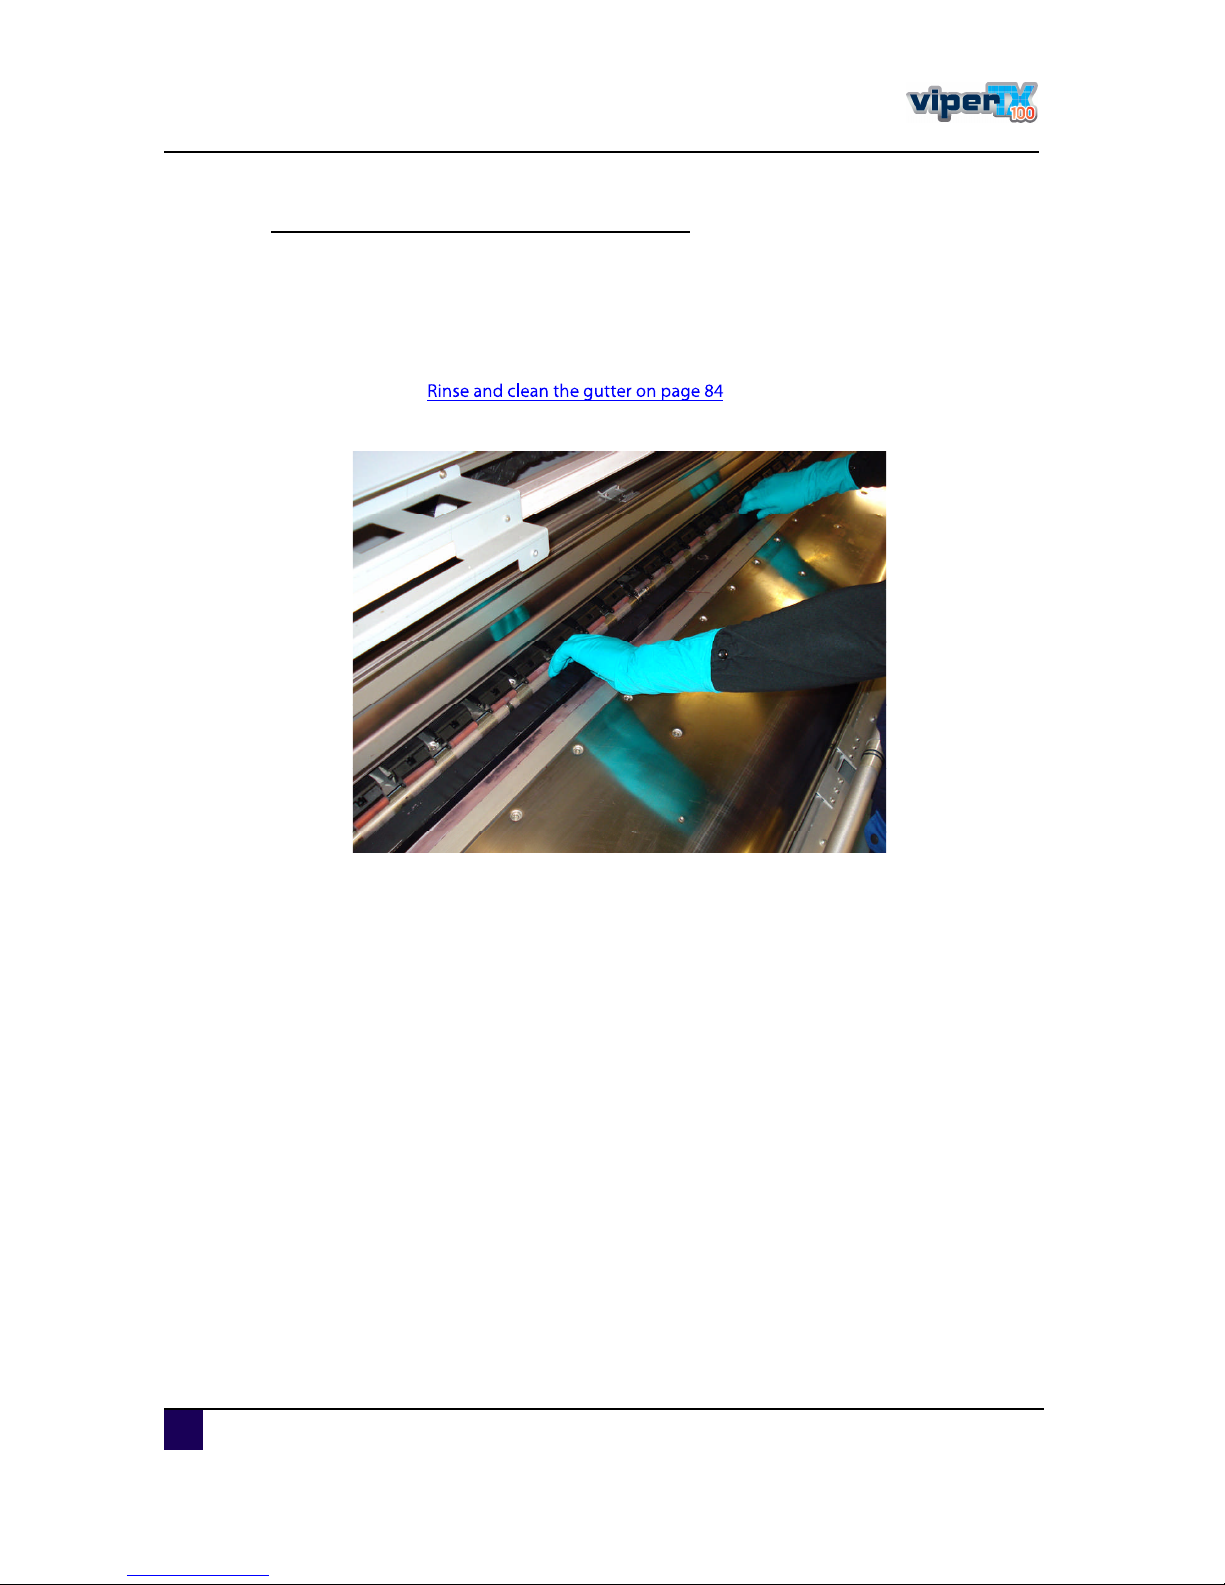
This nee d s to be d one whe n you wantto printonto trans ferpaper. To s witc h the inkgu tter
into a printplatform , proc eed as follows .
ͬ»° ïæ O pen the frontc over.
ͬ»° îæ Rins e and c lean the inkgu tter.
Referto
ͬ»° íæ C arefu lly liftthe inkgu tterou tofits fitting.
ͬ»° ìæ Tu rn the inkgu tters o thatthe printplatform is atthe u ps id e.
Page 35
Us er s Gu id e V iper TX 1 0 0
C hapter3 B as ic s
A P -7 5350 -Revis ion 1. 1 35
3
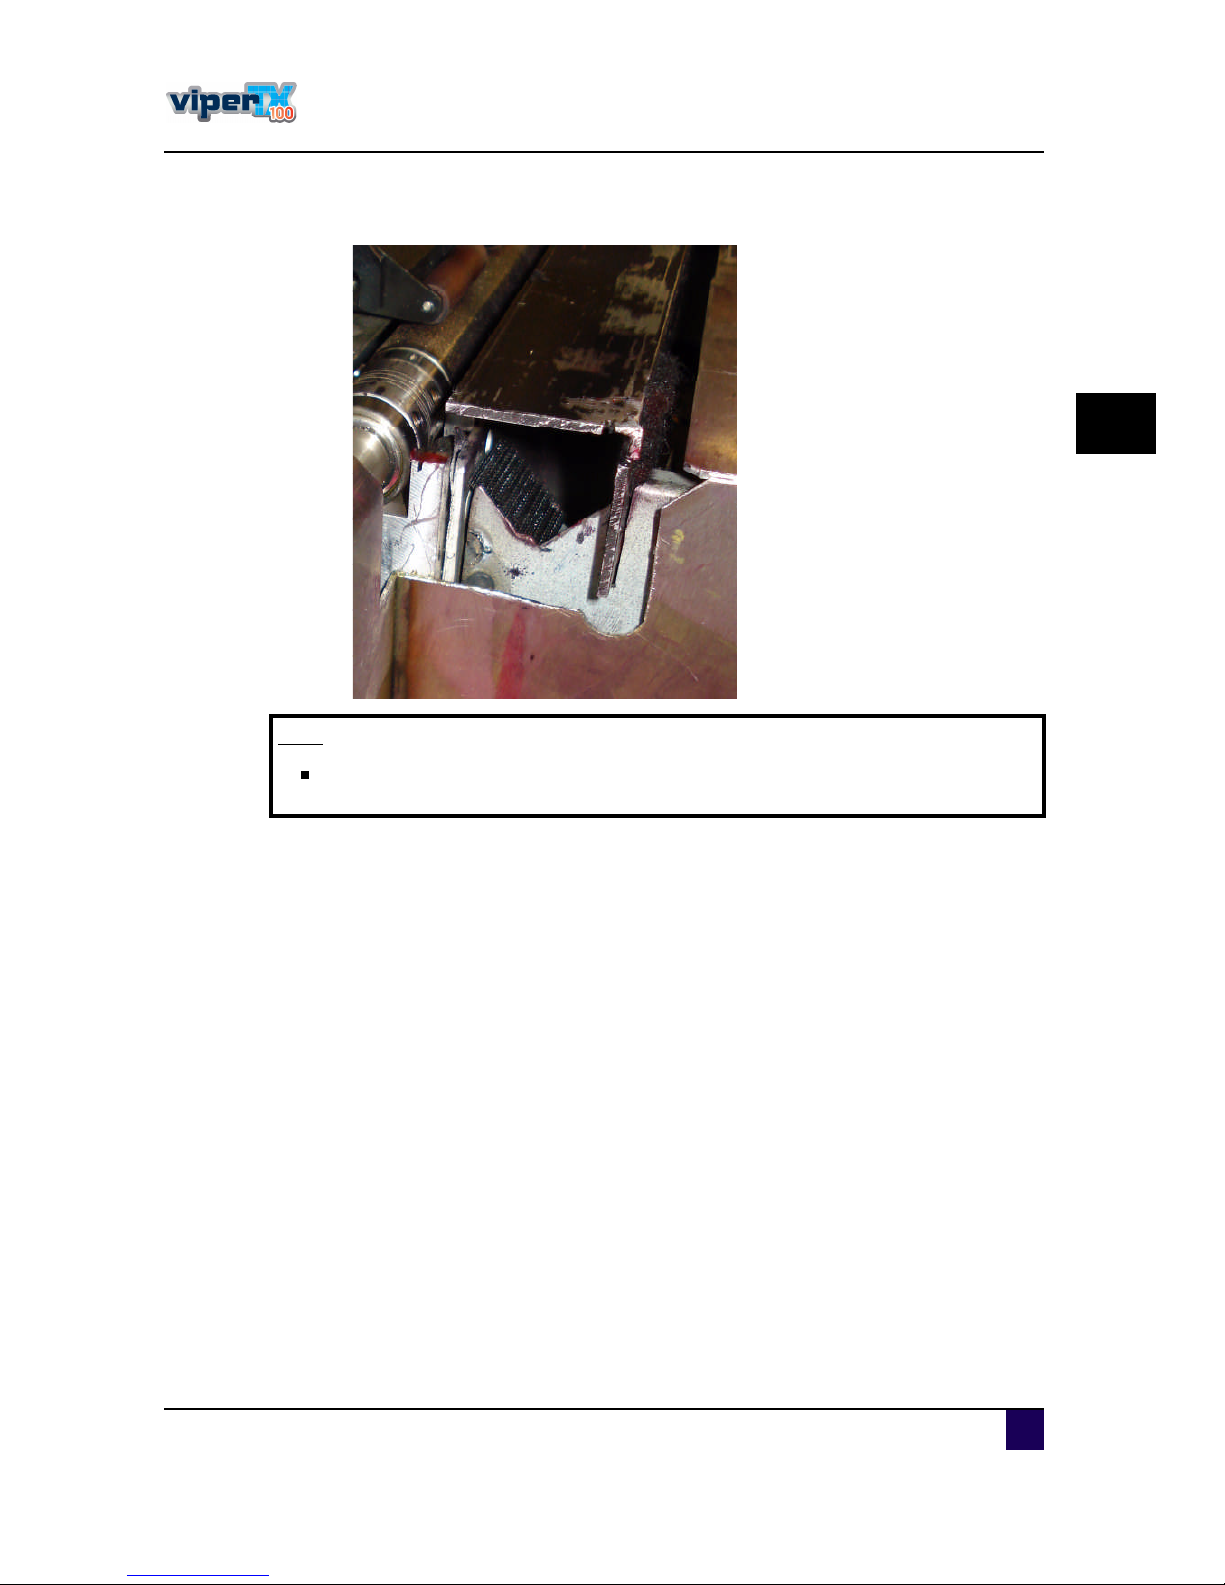
ͬ»° ëæ C arefu lly ins ertthe s id e ofthe printplatform into the fitting.
ͬ»° êæ P res s the printplatform c are fu lly d own and verify thatitis nowhere s tic kingou t.
Ò±¬»
Th e edg es of th e printpla tform m ustbe clea n in order to positio n th e print
pla tform correctly.
Page 36
Us er s Gu id e V iper TX 1 0 0
C hapter3 B as ic s
36 A P -7 5350 -Revis ion 1. 1
3.2.3 P ressure rollers disabler tool
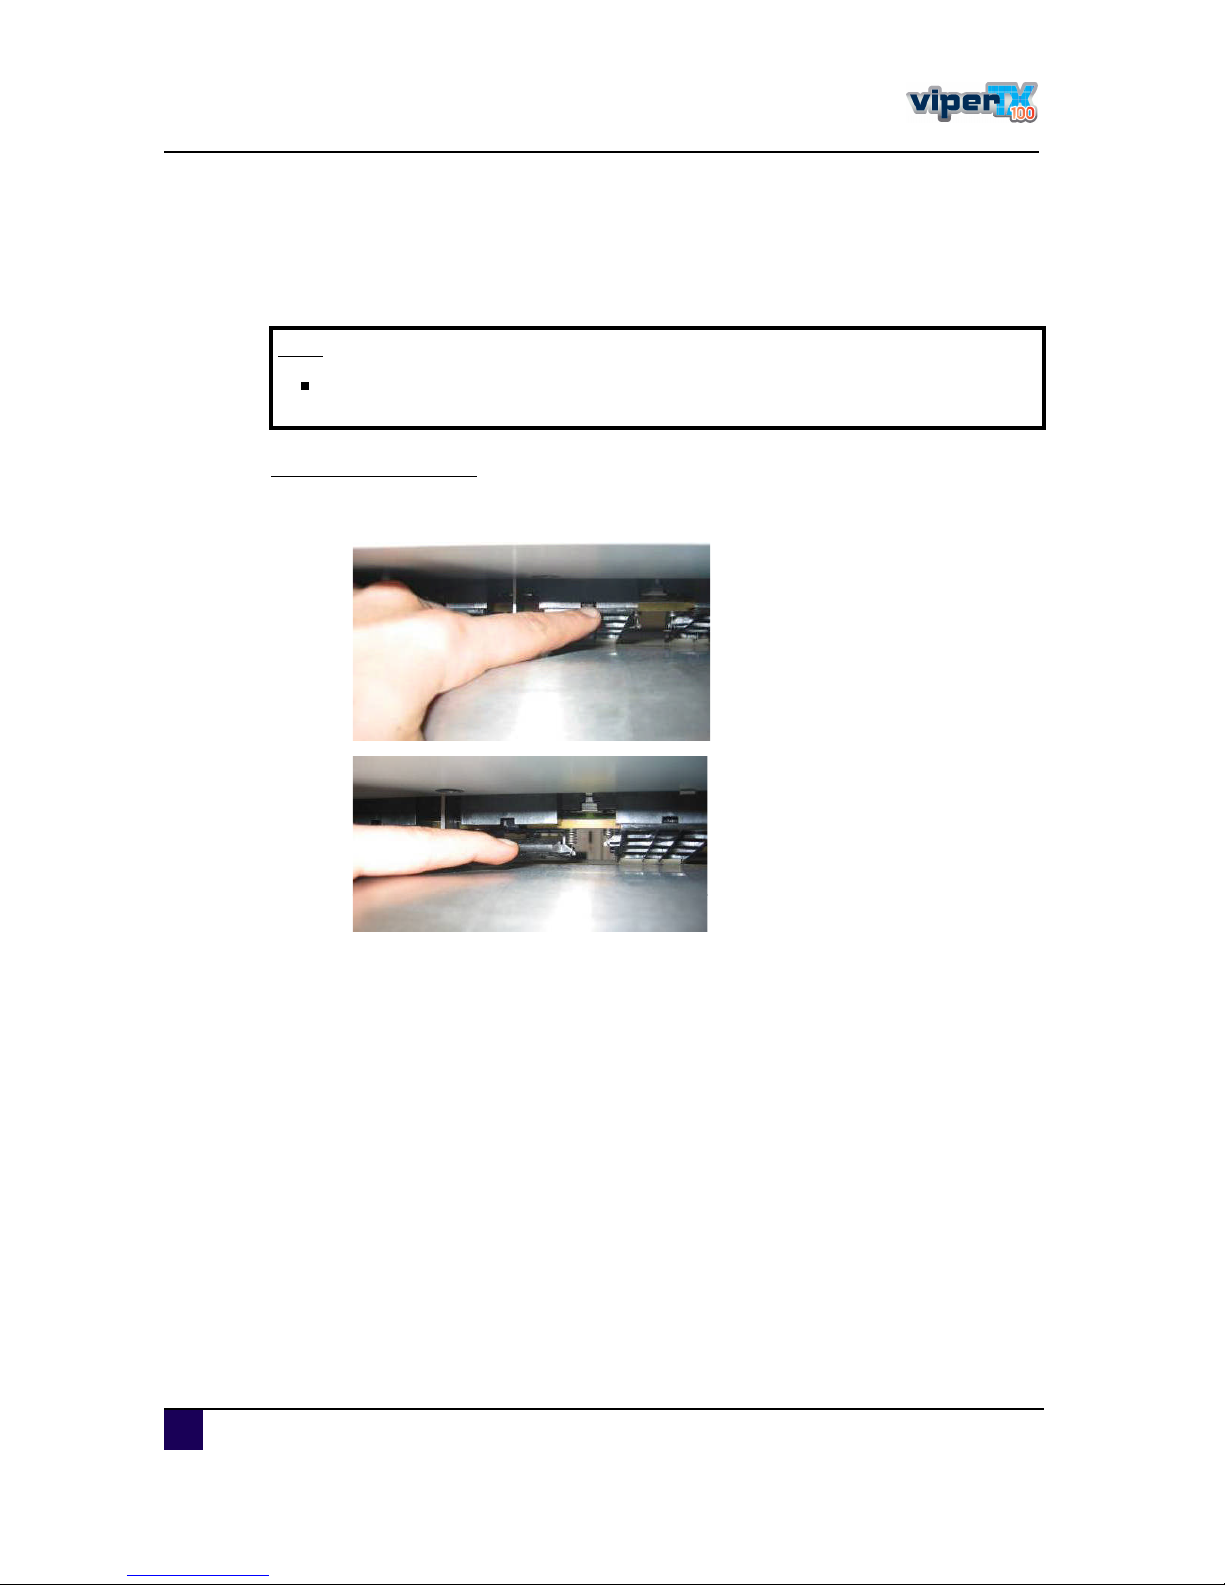
The pres s u re rollerd is ablertoolallows a pres s u re rollerto be lifted while printing, thu s
provid ingthe nec es s ary s pac e forthe m ed ia to expand .
Installation procedure
ͬ»° ïæ P u llthe pres s u re roller(you wantto d is able )d own.
ͬ»° îæ P lac e the pres s u re rollerd is ablertoolin the s pac e c reated whe n pu llingthe
pres s u re rolle rd own.
Ò±¬»
W e recom m endu sing 2-3pressurerollersdisa blertools on both edg es o f th e
m edia .
Page 37
Us er s Gu id e V iper TX 1 0 0
C hapter3 B as ic s
A P -7 5350 -Revis ion 1. 1 37
3
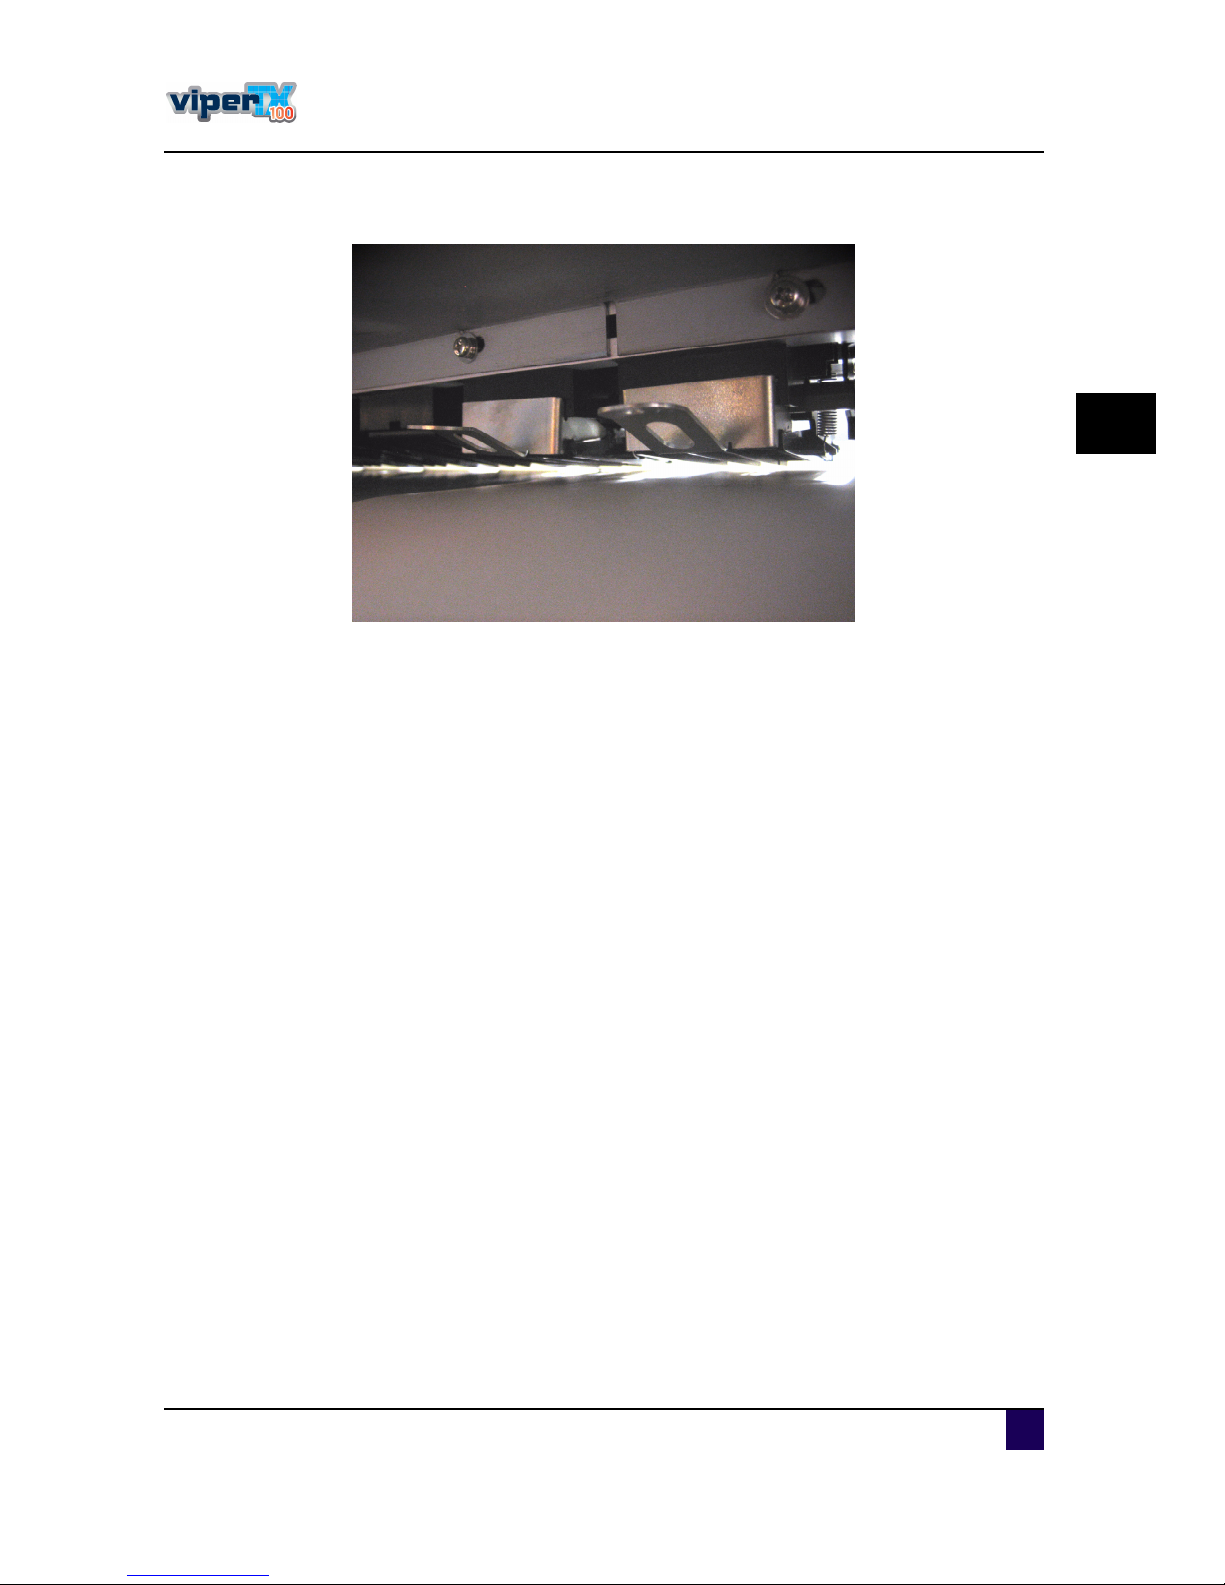
ͬ»° íæ The pre s s u re rolle rd is ablertoolis now pos itioned as follows :
Page 38
Us er s Gu id e V iper TX 1 0 0
C hapter3 B as ic s
38 A P -7 5350 -Revis ion 1. 1
3.2.4 M edia R etainers
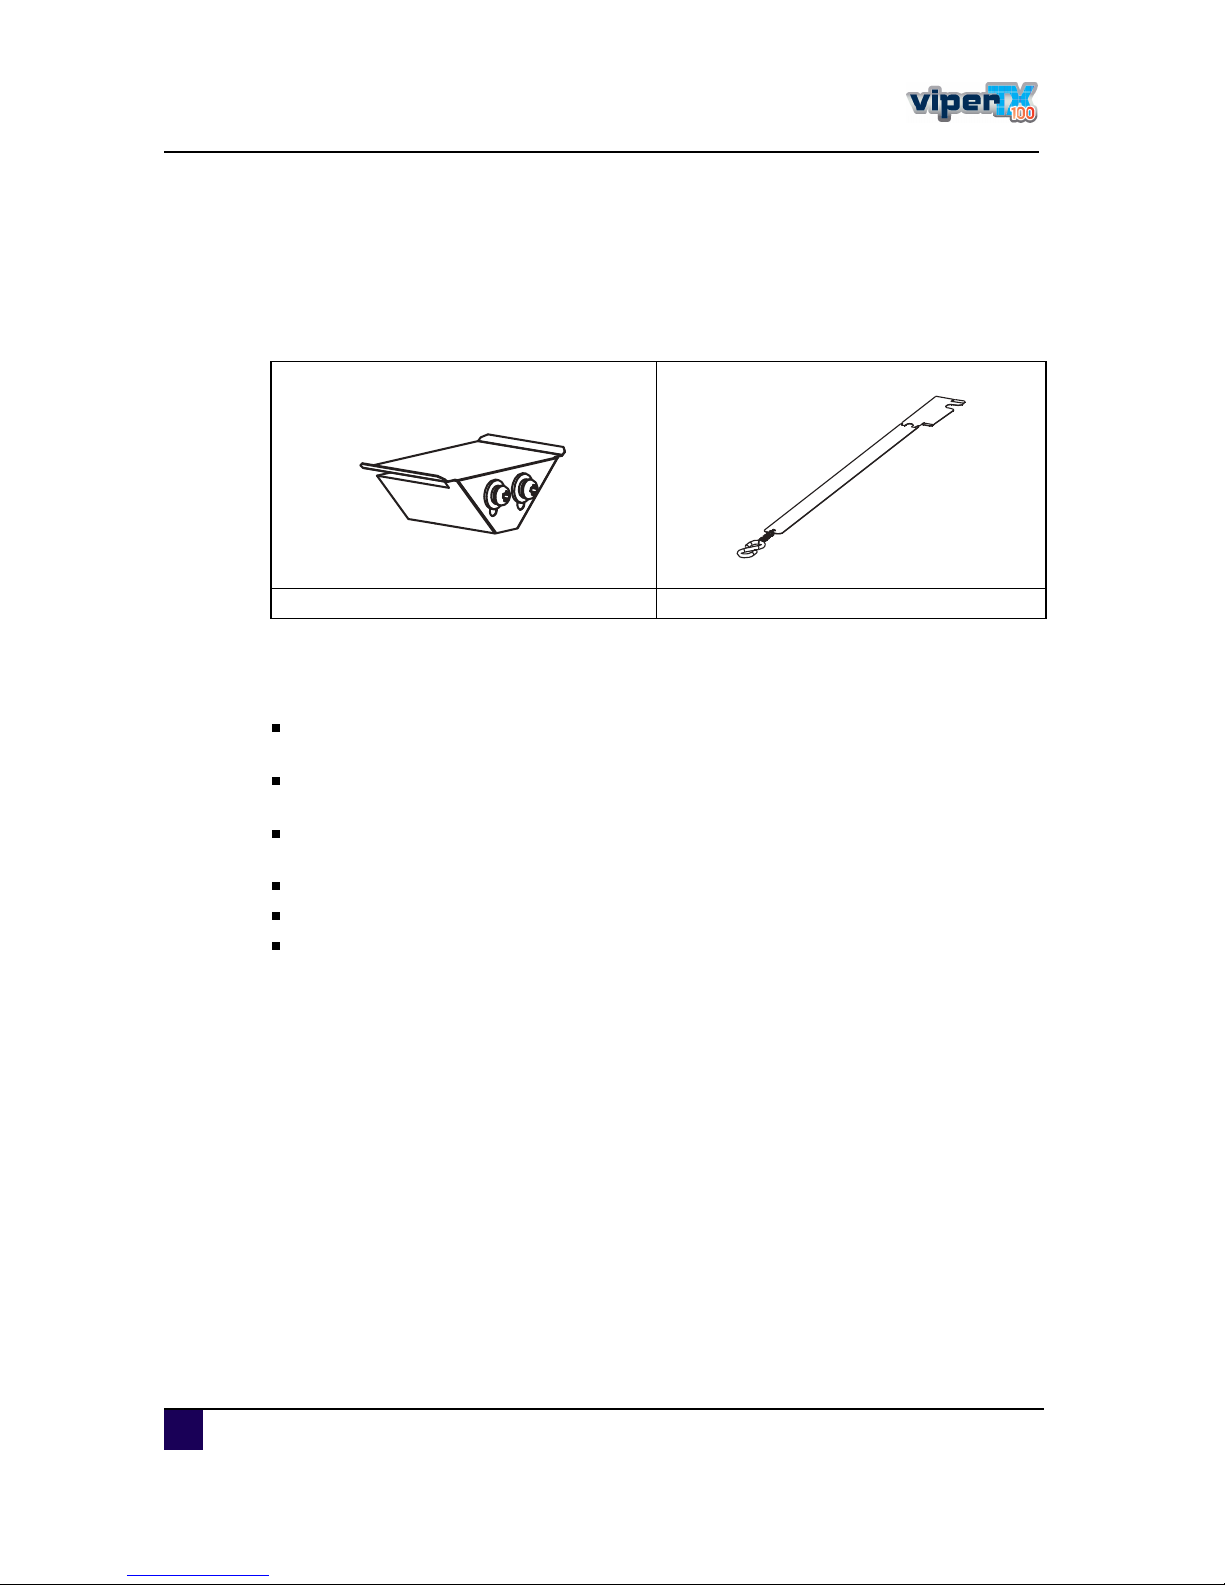
The Vipe rTX 1 0 0 c ontains two kind ofm ed ia retainers . O ne type ofm ed ia retainers forwhen
workingwith trans ferpaperand anothertype forwhen workingwith fabric s .
B oth type ofm ed ia retainers are d eveloped to avoid thatthe ed ges ofthe fabric s ortrans fer
paperc u rlu pand c au s e head strikes whic h c ou ld c au s e bad printing ou tpu t.
A lw a ys use th e m edia reta iners w h en th e m edia (tra nsfer pa p er a nd fa bric) h a v e
roug h finish edbo rders.
W hen c hoos inged ge printing, the m ed ia retainers c an'tbe u s ed .
In c as e ofed ge printingon textile, m ake u s e ofthe inkabs orbers .
Verify if the m ed ia retainers are firm ly fixed ins id e the gu tter to preventc ontac twith the
printhe ad .
M ake s u re the bord erofthe med ia is pos itioned u nd erthe topplate ofthe m ed ia retainer.
M ake s u re the med ia d oes nots ag orc atc h the m ed ia retainer.
M ake s u re you plac e the m e d ia retainers before you perform the med ia d etec tion,
otherwis e the printerwillprintonto the m ed ia retainers .
M ed ia retainerwhe n workingwith fabric M ed ia retainerwhen working with trans fer
Page 39
Us er s Gu id e V iper TX 1 0 0
C hapter3 B as ic s
A P -7 5350 -Revis ion 1. 1 39
3
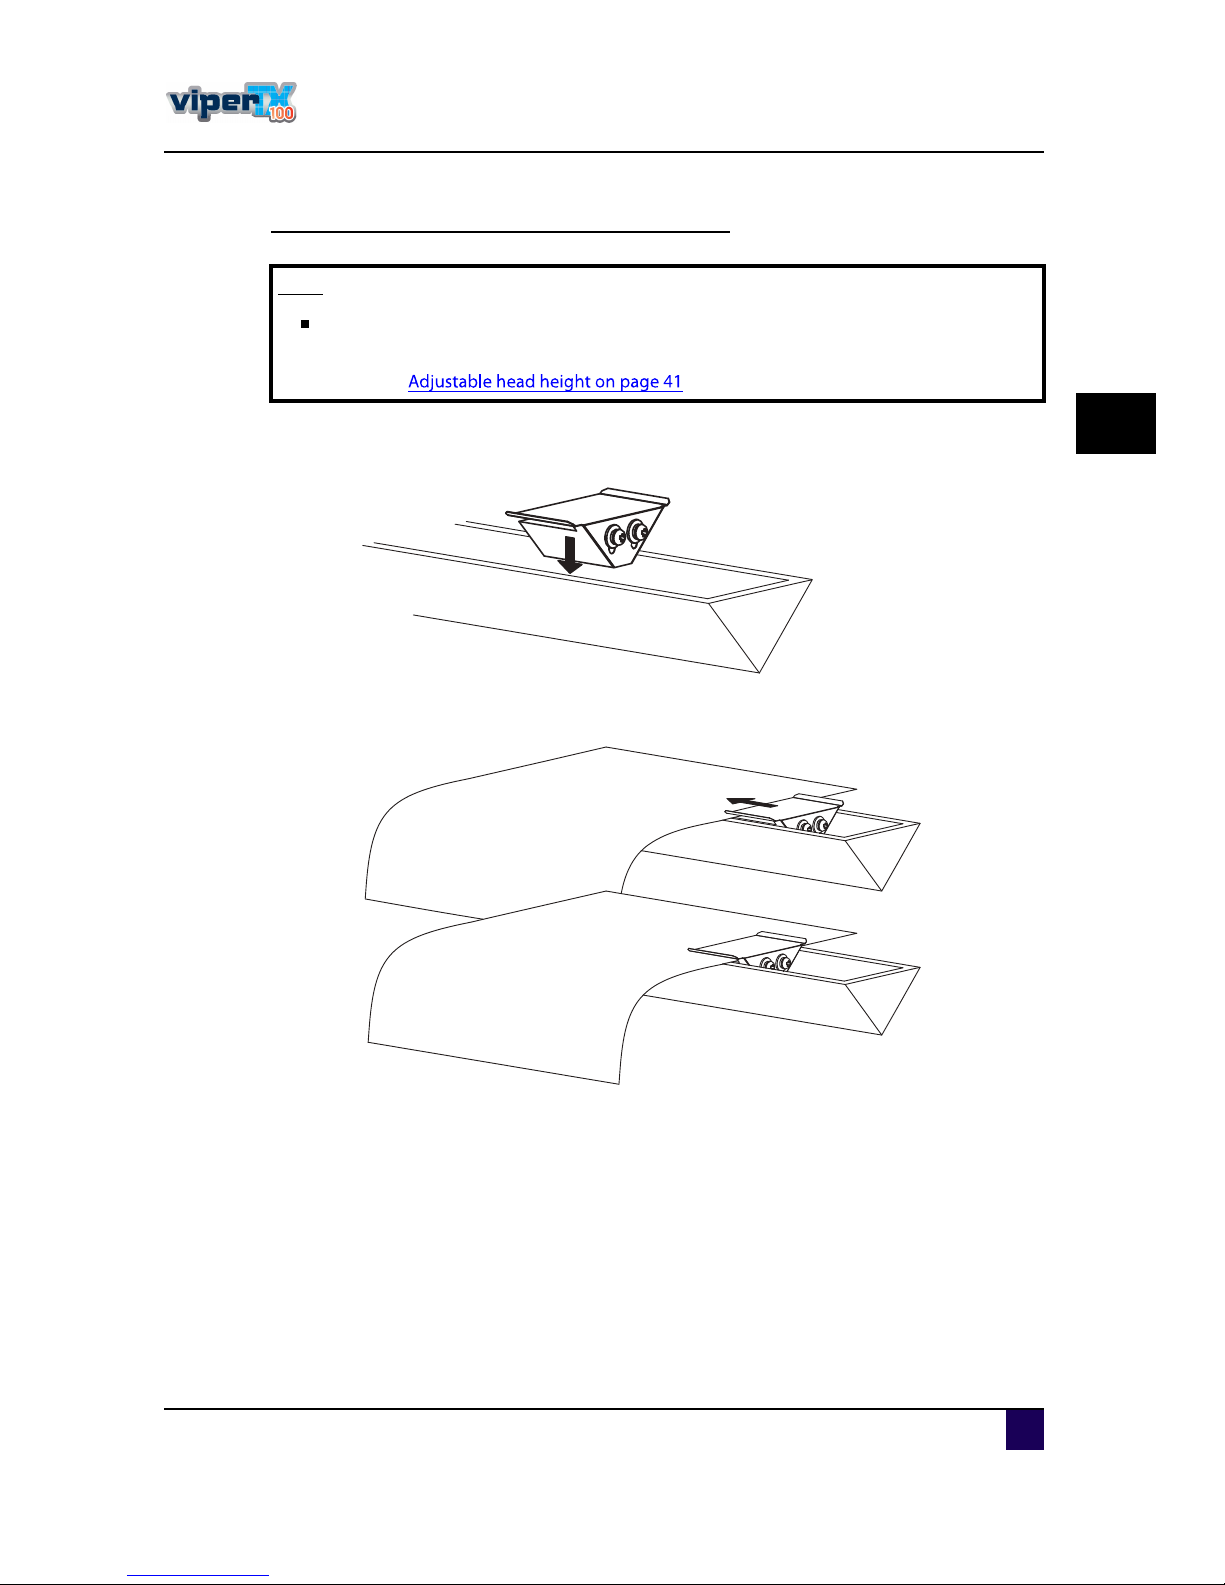
Installation procedure w h e n w o rking w ith fabrics
ͬ»° ïæ O pen the frontc over.
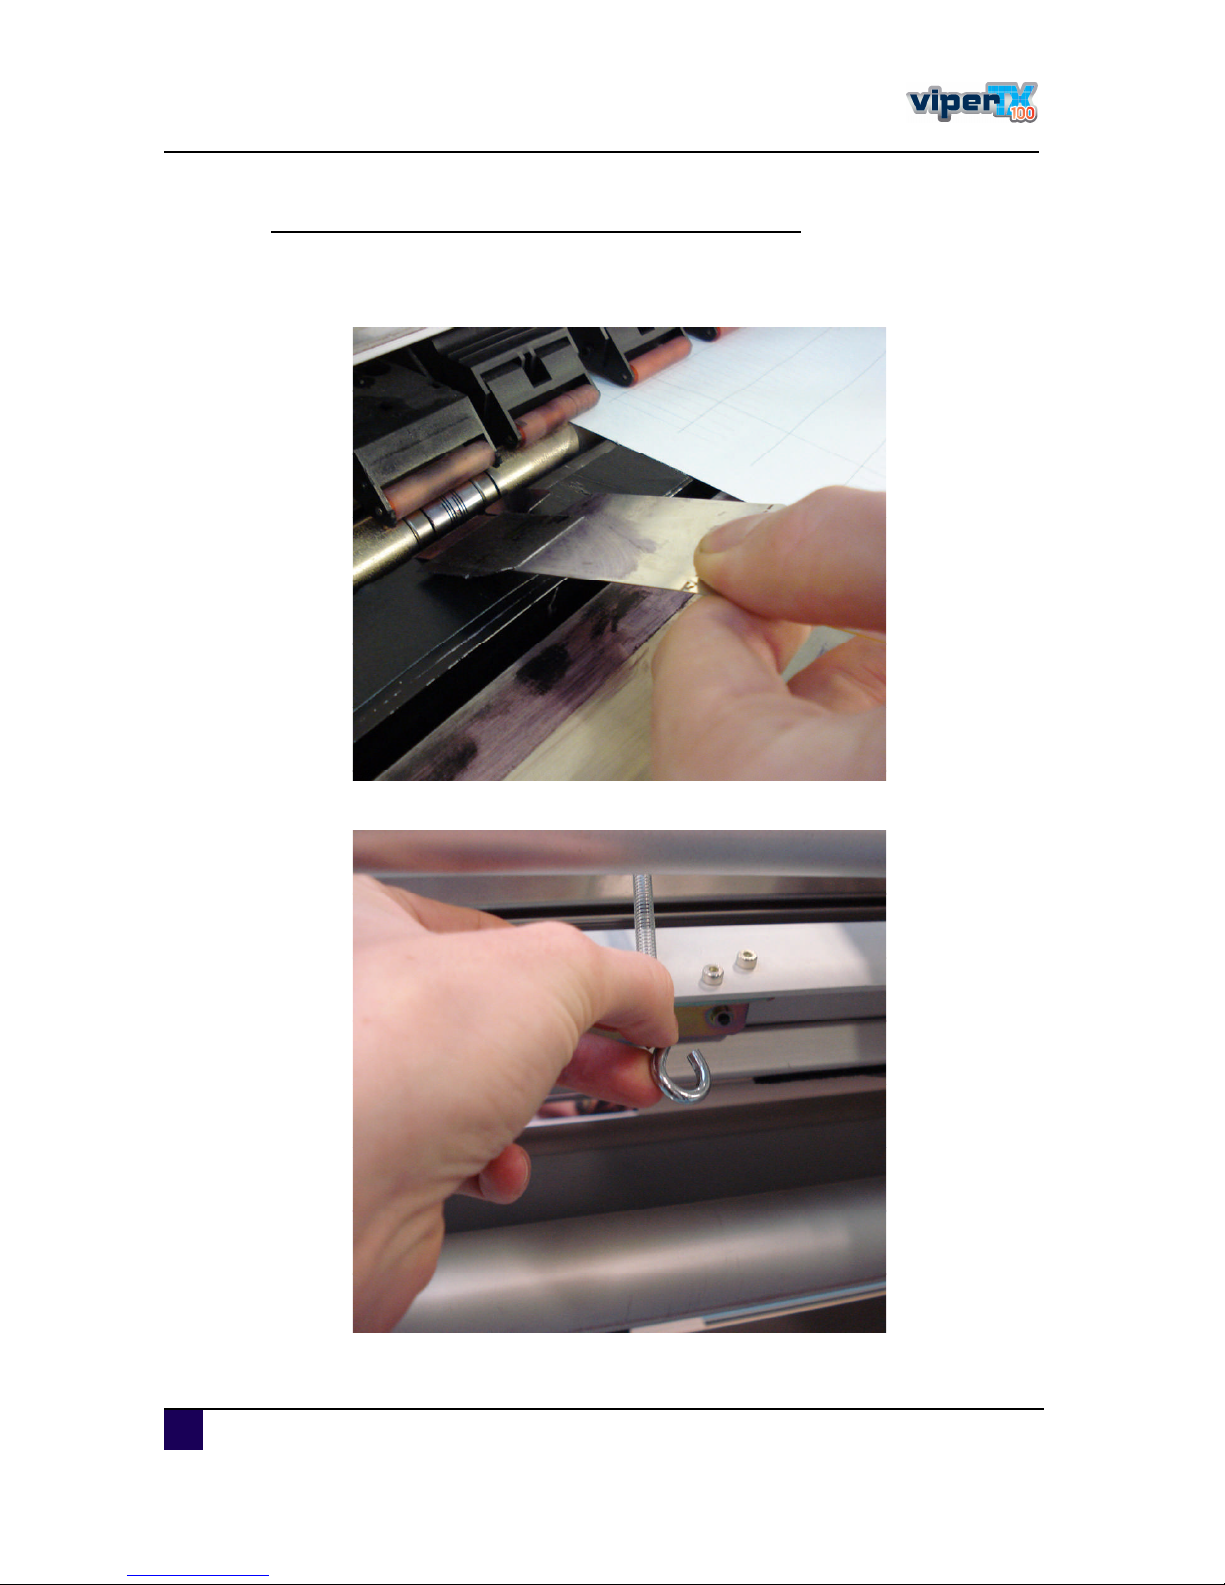
ͬ»° îæ Ins tallthe fabric retainers in the gu tter.
ͬ»° íæ P lac e the bord erofthe fabric u nd er the fabric s retainer top plate.
Ò±¬»
In ca se you a dju stth e h eig h tof th e m edia reta iner, m a ke sure itdoes not
interferew ith th eprinth ea d.
Referto
Page 40
Us er s Gu id e V iper TX 1 0 0
C hapter3 B as ic s
40 A P -7 5350 -Revis ion 1. 1
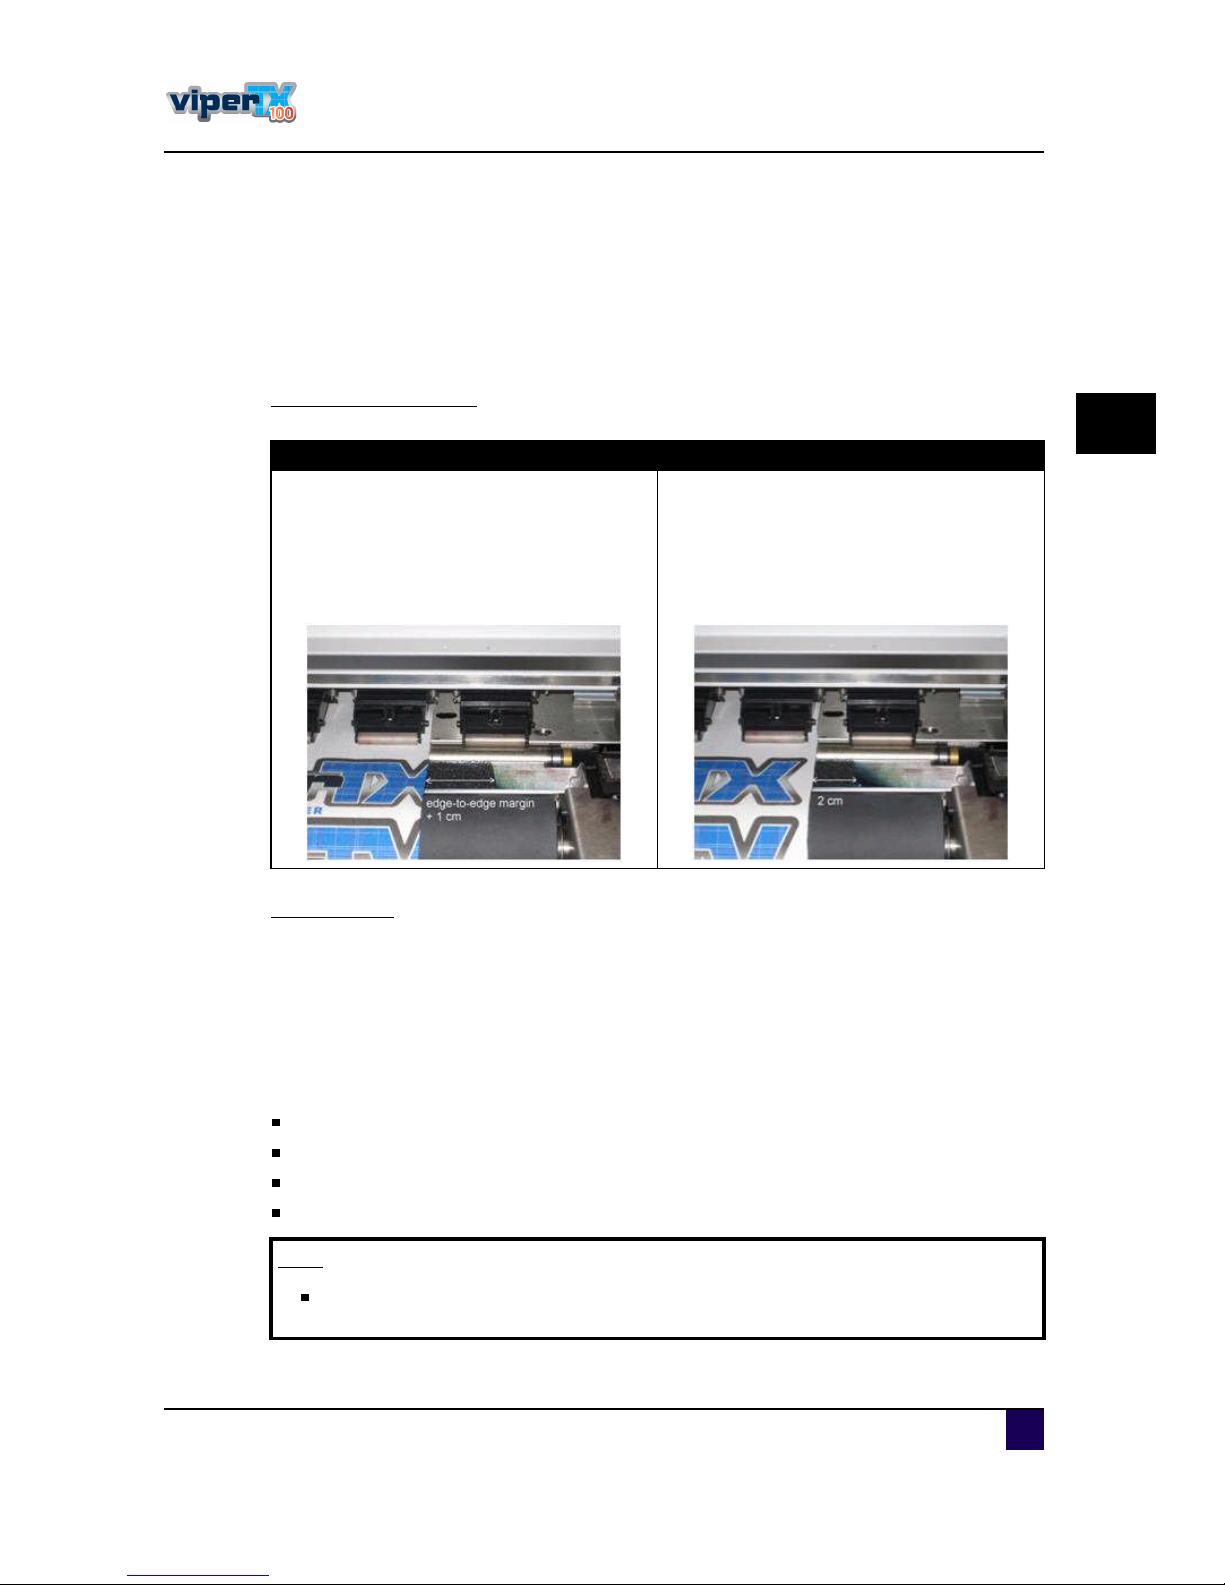
Installation proced ure w hen w orking w ith transfer paper
ͬ»° ïæ O pen the frontc over.
ͬ»° îæ H ookthe med ia retainerto the printplatform .
ͬ»° íæ A ttac h the others id e ofthe m ed ia retainerto the ETT.
Page 41
Us er s Gu id e V iper TX 1 0 0
C hapter3 B as ic s
A P -7 5350 -Revis ion 1. 1 41
3
3.2.5 Ink absorbents
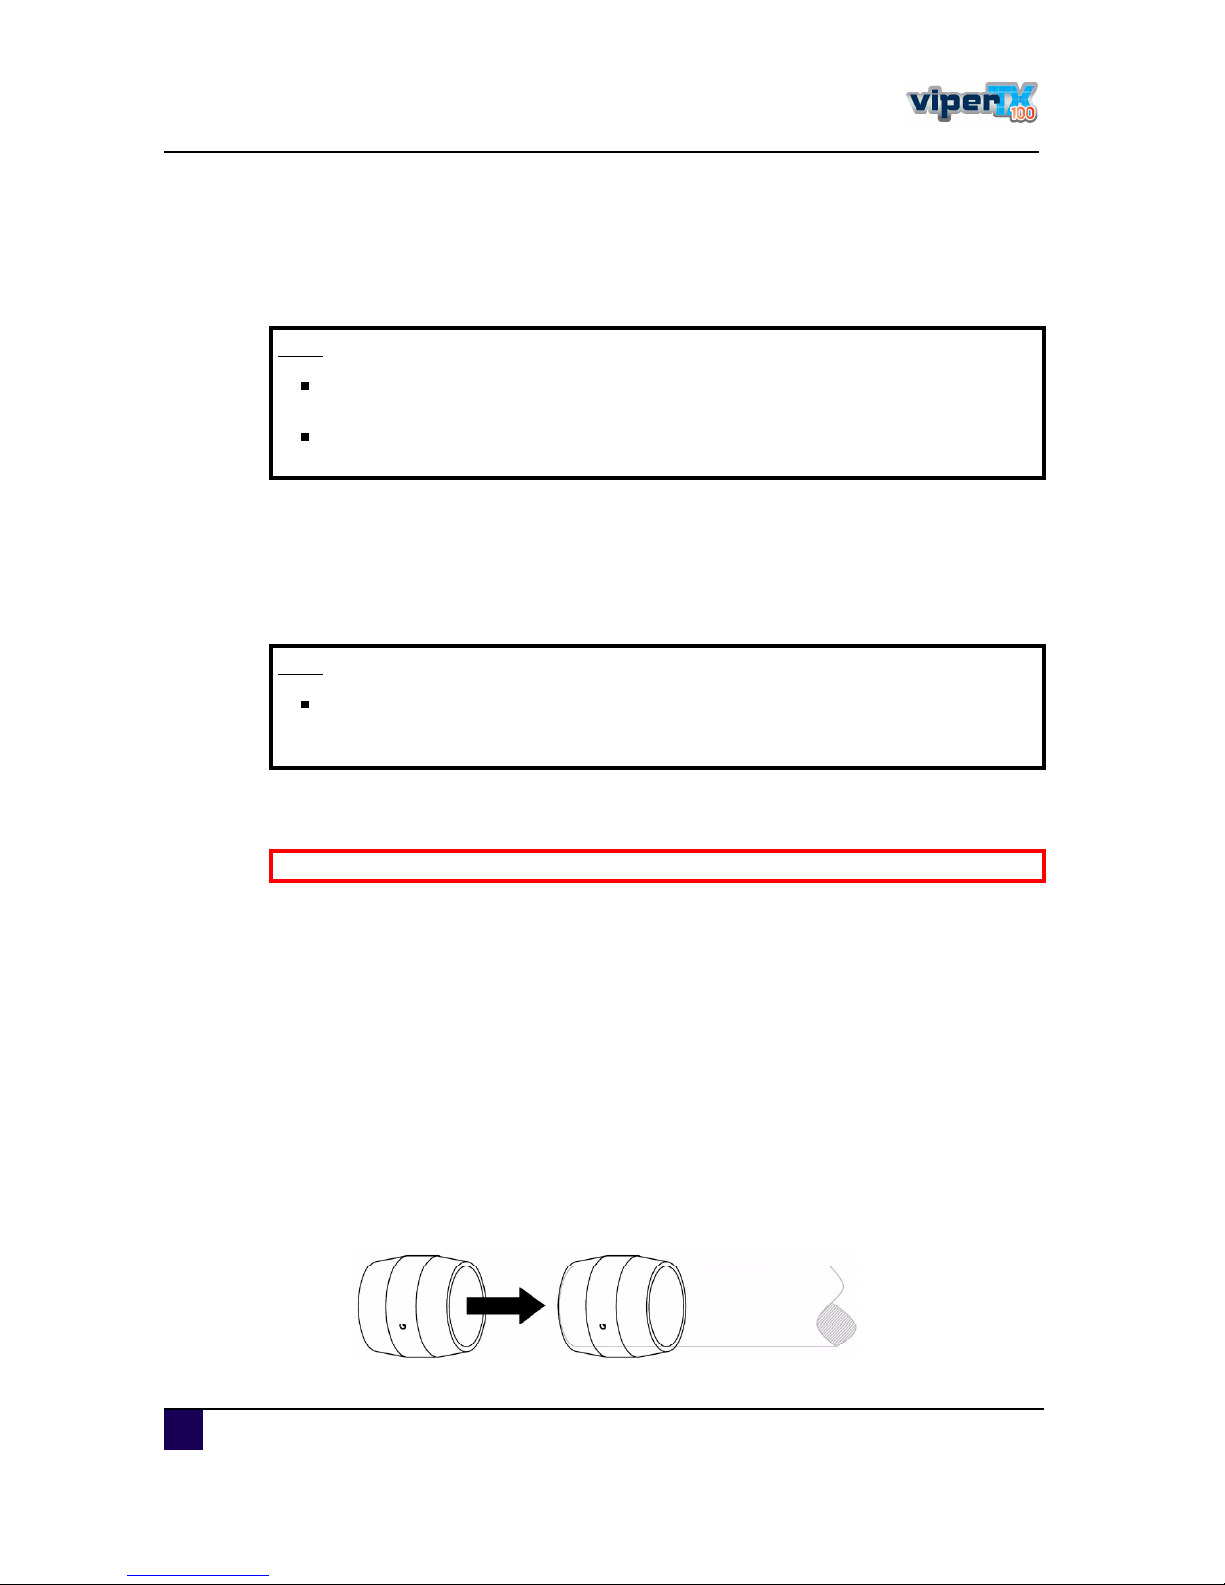
Thes e abs orbents are d eveloped to abs orb the inks poiled atthe ed ges ofthe fabric s . This
toolis m e antfores pec ially ed ge-to-ed ge printingon s elfed ge fabric s . Itis als o pos s ible to
ins tallthe abs orbents fors tand ard printing (with margin)when you d o not(need to)u s e the
fabric retainers . C ons eq u ently forfabric s withs elfed ges .
Installation procedure
M aintenance
Rins e the abs orbentwith waterwhen itis s atu rated with ink.
3.2.6 Adjustab le head h eigh t
S ome fabric s are very hairy and c ou ld tou c h the head s d u ringprinting. Therefore, d ifferent
head heights c an be s et:
L ow (1 , 2 m m)
M id d le (2, 0 m m)
M id -high(3, 0 mm )
H igh (4, 0 m m )
Edg e-to-edg eprinting Reg ula rprintin g
W hen printing ed ge-to-ed ge, you willprint
wid erthan the fabric wid th. M aximu m 5 c m
atboths id es . P os ition the abs orbentu ntil
you have an extra 1 c m. S o in this c as e 6
c m.
W hen leavinga margin while printing and
you d o not(need to)u s e the fabric retainers ,
itis rec omm e nd ed to ins tallthe abs orbents
u nd erthe leftand righted ge ofthe fabric .
M ake s u re thatthere is 2 c m ofthe
abs orbentvis ible.
Ò±¬»
W e recom m endyo u to useth e low estp o ssible h ea dh eig h t. Th isto obta in th e
bestprinting q ua lity.
Page 42
Us er s Gu id e V iper TX 1 0 0
C hapter3 B as ic s
42 A P -7 5350 -Revis ion 1. 1
3.2.7 E xtra fans
The ViperTX 1 0 0 is eq u ippe d with extra fans to kee p the trans ferpaperflaton the print
platform .
3.2.8 E xtra T ensionin g Tool(ET T )
W hen working with transferpaper, the Extra Tens ion Toolpu lls the trans ferpaperin line with
the printplatform. The tens ion on the s id es is always biggerthan in the mid d le. A s a res u lt
pos s ible c u rls are s traightened .
3.2.9 M edia core braces
M ed ia c ore brac es are d eveloped to preventthe med ia c ores to bend while printing. This
c ou ld c au s e bad printqu ality ormed ia s lant.
From the mom entthe c ore is large rthan 2 0 50 m m , we rec omm end ins talling the brac e. D o
N O Tins tallthe brac e whe n the c ore is s mallerthan 2 0 50 m m .
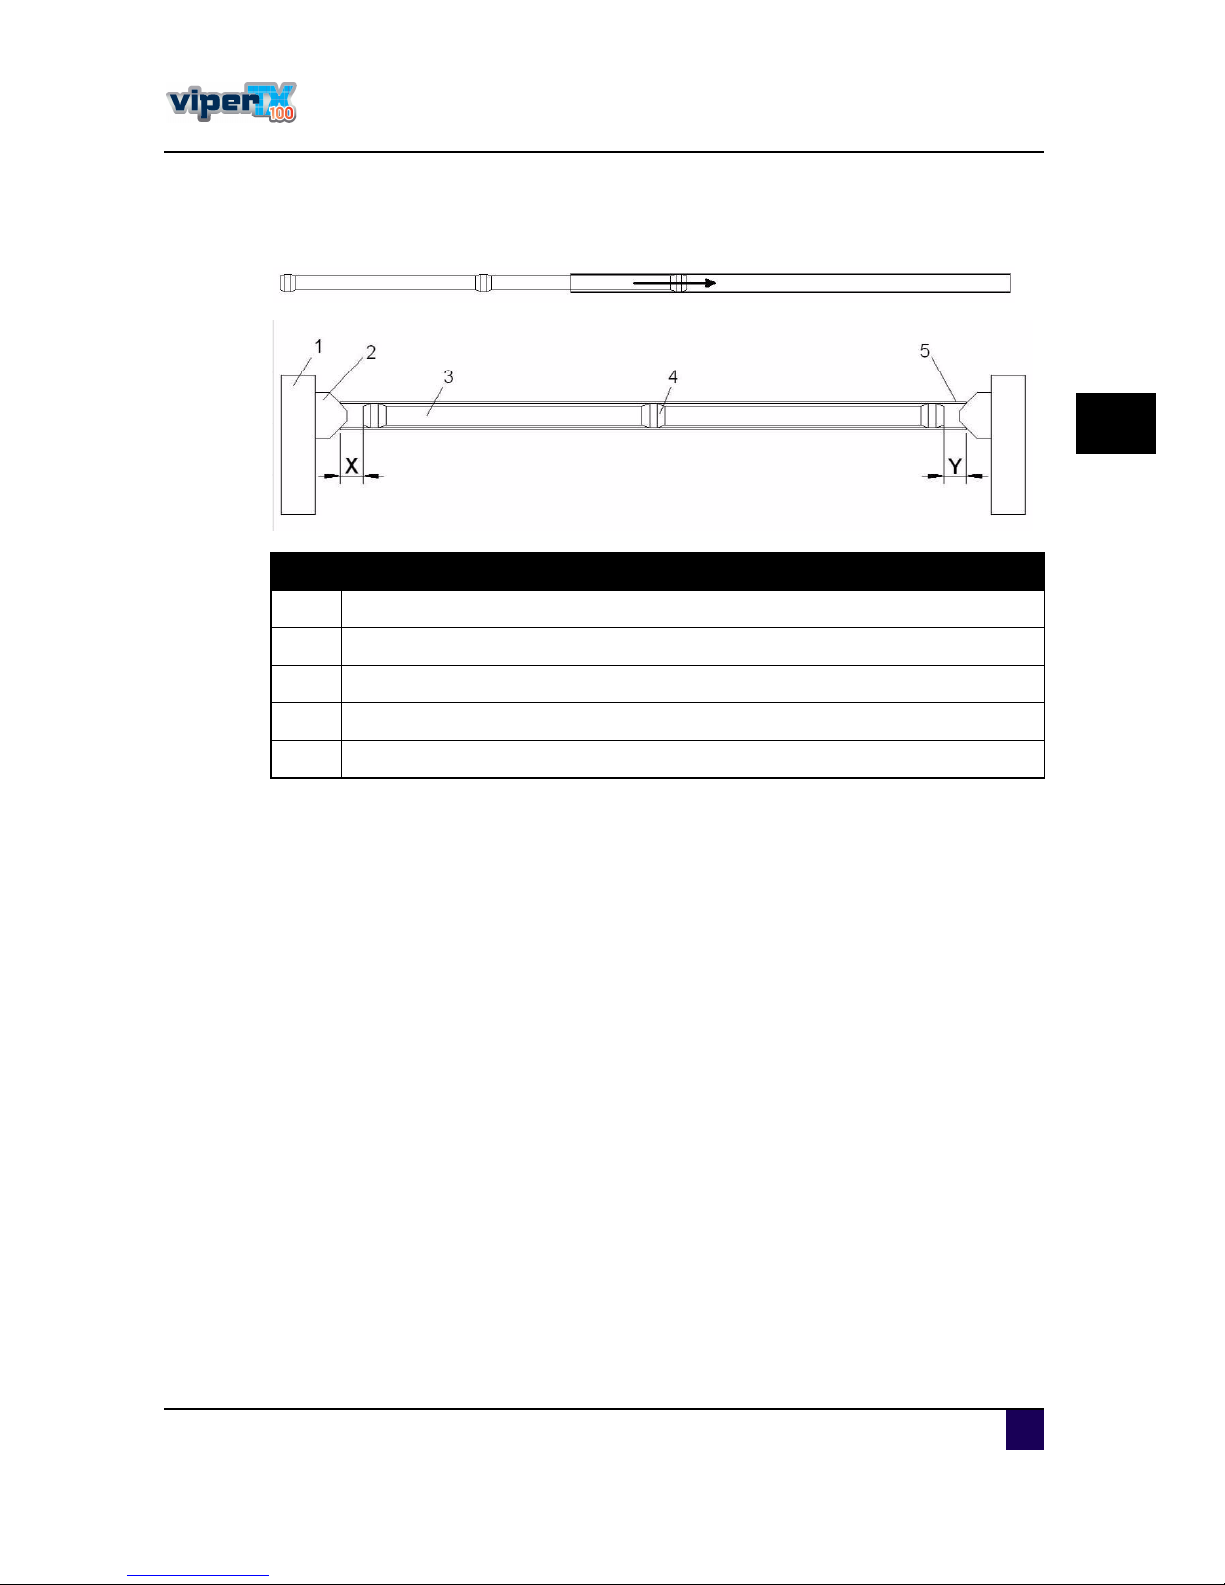
In the pac kagingbox ofthe m ac hine you willfind two c ores and two med ia c ore brac es with
s pac ers . The re are alread y 3 s pac ers ins talled perbrac e with an ou terd iameterof7 4 m m . In
the box there are 6 s pac ers of7 6 mm .
P lease follow the ins tru c tions below to ins talland u s e the brac es c orrec tly.
ͬ»° ïæ Firs tc hec kwhic hs pac erfits the bes tin the u s ed c ore. Ifthis one is notins talled yet,
remove the ins talled one with a H exagon W renc h 2 m m and installthe c orrec tone
as s hown below.
Ò±¬»
Th efa ns w ill a utom a tica lly sw itch on oroff dep ending o n th e a p plica tio n you
h a v eselected.
In ca se of selecting th e a pp lica tion tra nsfer, th e extra fa n s w ill be sw itch edon.
In ca seof selecting th e directtextile a pplica tion, th e fa nsw illbe sw itch edoff.
Ò±¬»
A lw a ysm a kesu re th a tth ecom plete w ith o f th e tra nsferpa perissupp ortedby
th eE TT(th em iddle pa rtisexpa nda blea n drem ov a ble). Th eedg eso f th em edia
m ustcom e5m m furth erth a n th eedg eof th eExtra Ten sioning Too l.
B e sureto rea da ndundersta ndth esa fetyw a rning s beforeh a ndling th e printer.
Page 43
Us er s Gu id e V iper TX 1 0 0
C hapter3 B as ic s
A P -7 5350 -Revis ion 1. 1 43
3
ͬ»° îæ P u s h the brac e in the c ore.
B e s u re thatthe d is tanc e X is the s am e as Y (pic tu re 2 )and atleas t7 5 mm .
N ° Description
ï Rollu nit
î P ositioningc one
í M ed ia c ore brac e of1 90 0 m m
ì S pac er
ë C ore ofminimu m 2 0 50 m m
Page 44
Us er s Gu id e V iper TX 1 0 0
C hapter3 B as ic s
44 A P -7 5350 -Revis ion 1. 1
3.3 H and ling and load ing m ed ia
3.3.1 O verview
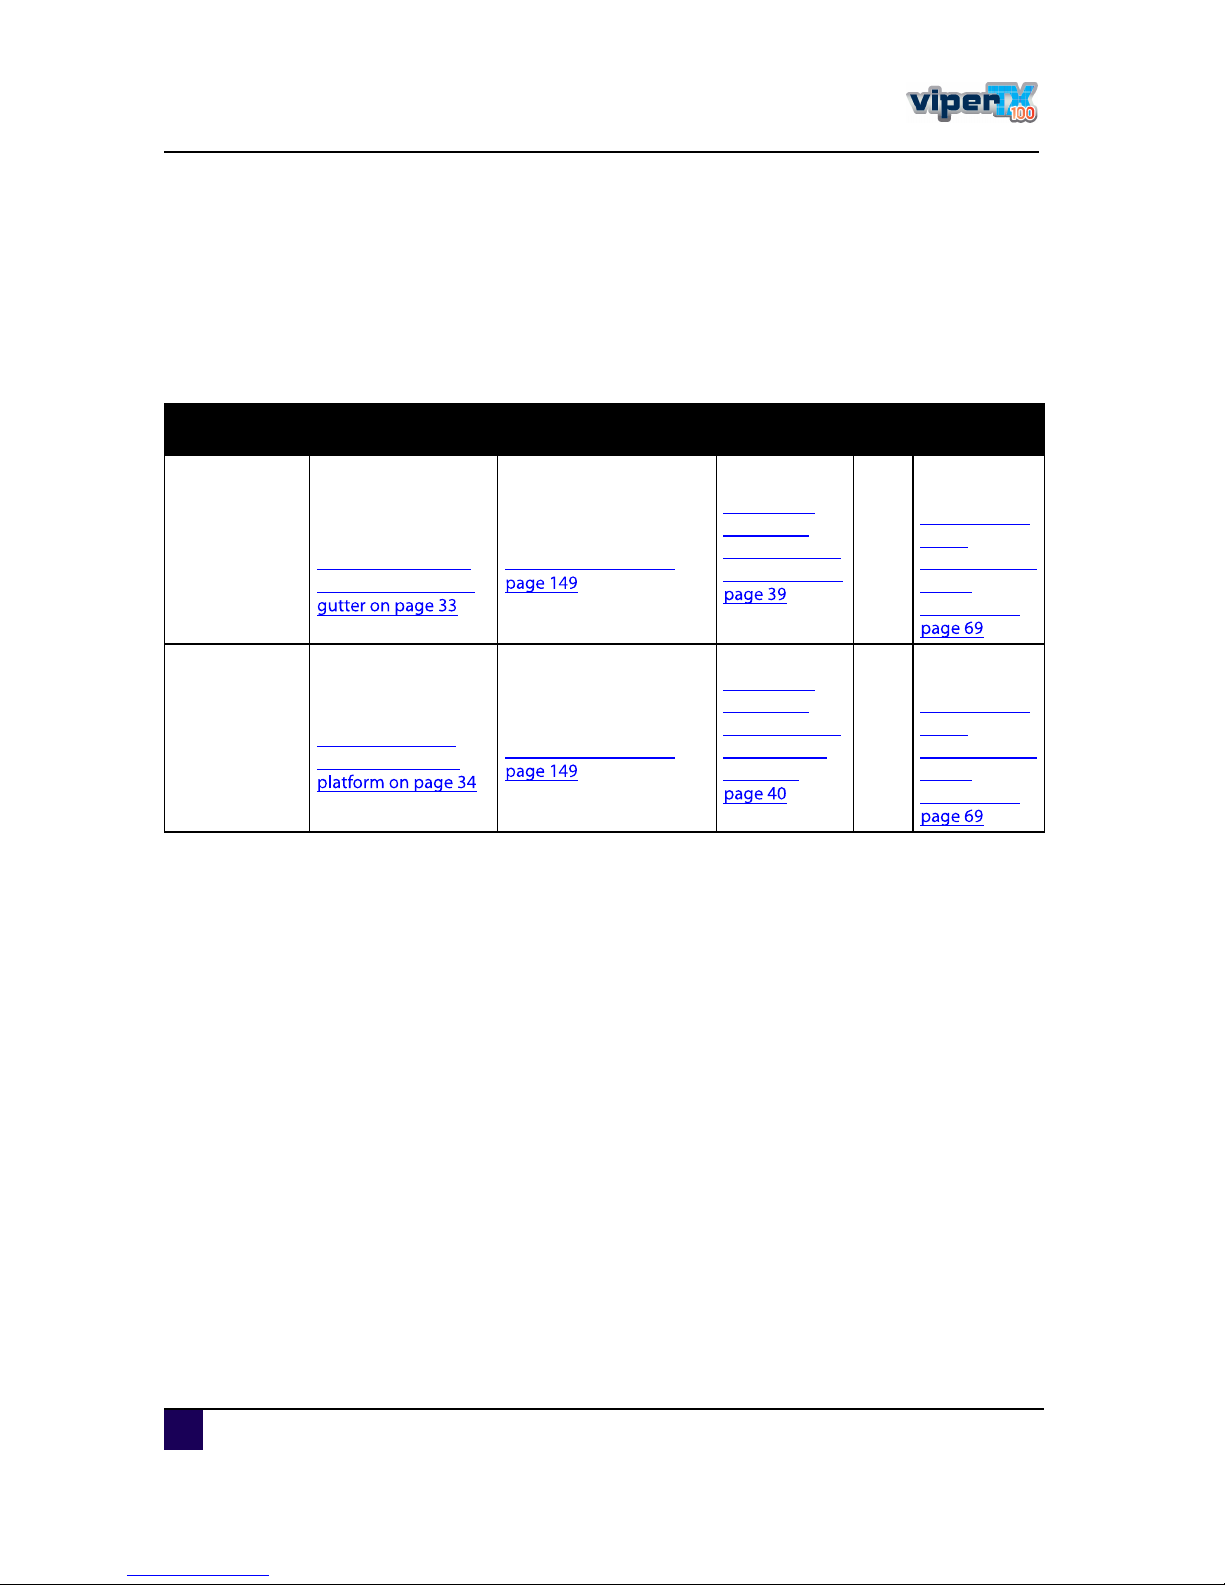
The table below gives you a q u ic koverview ofthe items thatneed s to be c hec ked oru s ed
when printingon textile oron transferpaper.
P osition p rin t
pla tform
A p plica tio n m enu Typ em edia
reta iners
ETT Typ eink
Textile
Trans form the print
platform into an ink
gu tter.
Í©·¬½¸·²¹ ¬¸» °®·²¬
°´¿¬º±®³ ·²¬± ¿² ·²µ
S etthe applic ation
menu to D irec t.
ß°°´·½¿¬·±² ³»²« ±²
ײ-¬¿´´¿¬·±²
°®±½»¼«®»
©¸»² ©±®µ·²¹
©·¬¸ º¿¾®·½- ±²
O FF
D irec t
d is pers e
Í©·¬½¸·²¹ ·²µ
¬§°»øÜ·-°»®-» ¼§»á
Ü·®»½¬
¼·-°»®-»÷ ±²
Trans ferpaper
Us e the regu larprint
platform
Í©·¬½¸·²¹ ¬¸» ·²µ
¹«¬¬»® ·²¬± ¿ °®·²¬
S etthe applic ation
menu to trans fer.
ß°°´·½¿¬·±² ³»²« ±²
ײ-¬¿´´¿¬·±²
°®±½»¼«®»
©¸»² ©±®µ·²¹
©·¬¸ ¬®¿²-º»®
°¿°»® ±²
O N
D ye
s u blim ation
Í©·¬½¸·²¹ ·²µ
¬§°»øÜ·-°»®-» ¼§»á
Ü·®»½¬
¼·-°»®-»÷ ±²
Page 45

Us er s Gu id e V iper TX 1 0 0
C hapter3 B as ic s
A P -7 5350 -Revis ion 1. 1 45
3
3.3.2 C aution s on h and ling m ed ia
W hen you hand le med ia, pleas e pay attention to the following:
Us e rec omm e nd ed med ia in an appropriate environment. Following are the appropriate
tem peratu re and hu m id ity ranges forprinting.
D o notu s e c reased , d amaged , torn, c u rled , orwrapped m ed ia.
The s ize of the rec omm end ed m ed ia c an c hange ata fixed ratio ac c ord ing to the
tem peratu re c hanges of the working environm ent. B efore u s ing me d ia, plac e itin the
working environmentforatleas t30 m inu tes , to have itmatc h to the tem peratu re of the
workingarea.
P rinting before the m e d ia c ou ld ac c omm od ate to the printing environme ntm ay c au s e
med ia jams d u e to s lippage orc reas es . This als o ad vers ely affec ts the q u ality ofprinting.
M ed ia has a printable s id e and a non-printable s id e. If you printon a notprintable s id e,
blu rring m ay oc c u r.
D o nottou c h the printable s id e of med ia. M ois tu re or oilfrom hand s affec ts the printing
qu ality.
D o notleave the printerforalongtime with m ed ia load ed . The med ia may c u rlres u ltingin
mis alignment, med ia jam s , ord ec reas ed printingq u ality. In partic u lar, avoid this in winter
ord ry s eas ons .
D o notlos e the box orwrappingbag fors toringm e d ia.
3.3.3 P recautio n on storing m ed ia
W hen s toringm ed ia, pay attention to the following:
D o nots tore m ed ia in hightemperatu re, high hu m id ity, ord irec ts u nlight.
D o nots tore m ed ia vertic ally.
S tore s heetme d ia in the originalbagafteru npac king.
Unu s ed rollmed ia mu s tbe rem oved from the s c roller, rewou nd tightly, and s tored in
the originalwrapping bagand box.
D o notwetm ed ia.
Tem pera ture H um idity
Rec omm end ed working
environme nt
1 9 -2 6°C 40 -60 %
Rate ofc hange W ithin 2 °C perhou r W ithin 5% perhou r
Page 46
Us er s Gu id e V iper TX 1 0 0
C hapter3 B as ic s
46 A P -7 5350 -Revis ion 1. 1
3.3.4 Loading m ed ia
D epe nd ingon the type ofm ed ia you are u s ing (transferpaperortextile)refe rto the c orrec t
proc ed u re.
Referto
Referto
Loading fabrics
ͬ»° ïæ Verify that:
the printplatform is s witc hed into the inkgu tter.
Referto Í©·¬½¸·²¹ ¬¸» °®·²¬ °´¿¬º±®³ ·²
the applic ation menu is s witc hed to d irec t
Referto
the printerand UW /W 1 0 0 are both O N,
the frontc overofthe printeris open, and
the pres s u re rollers are in the UP pos ition.
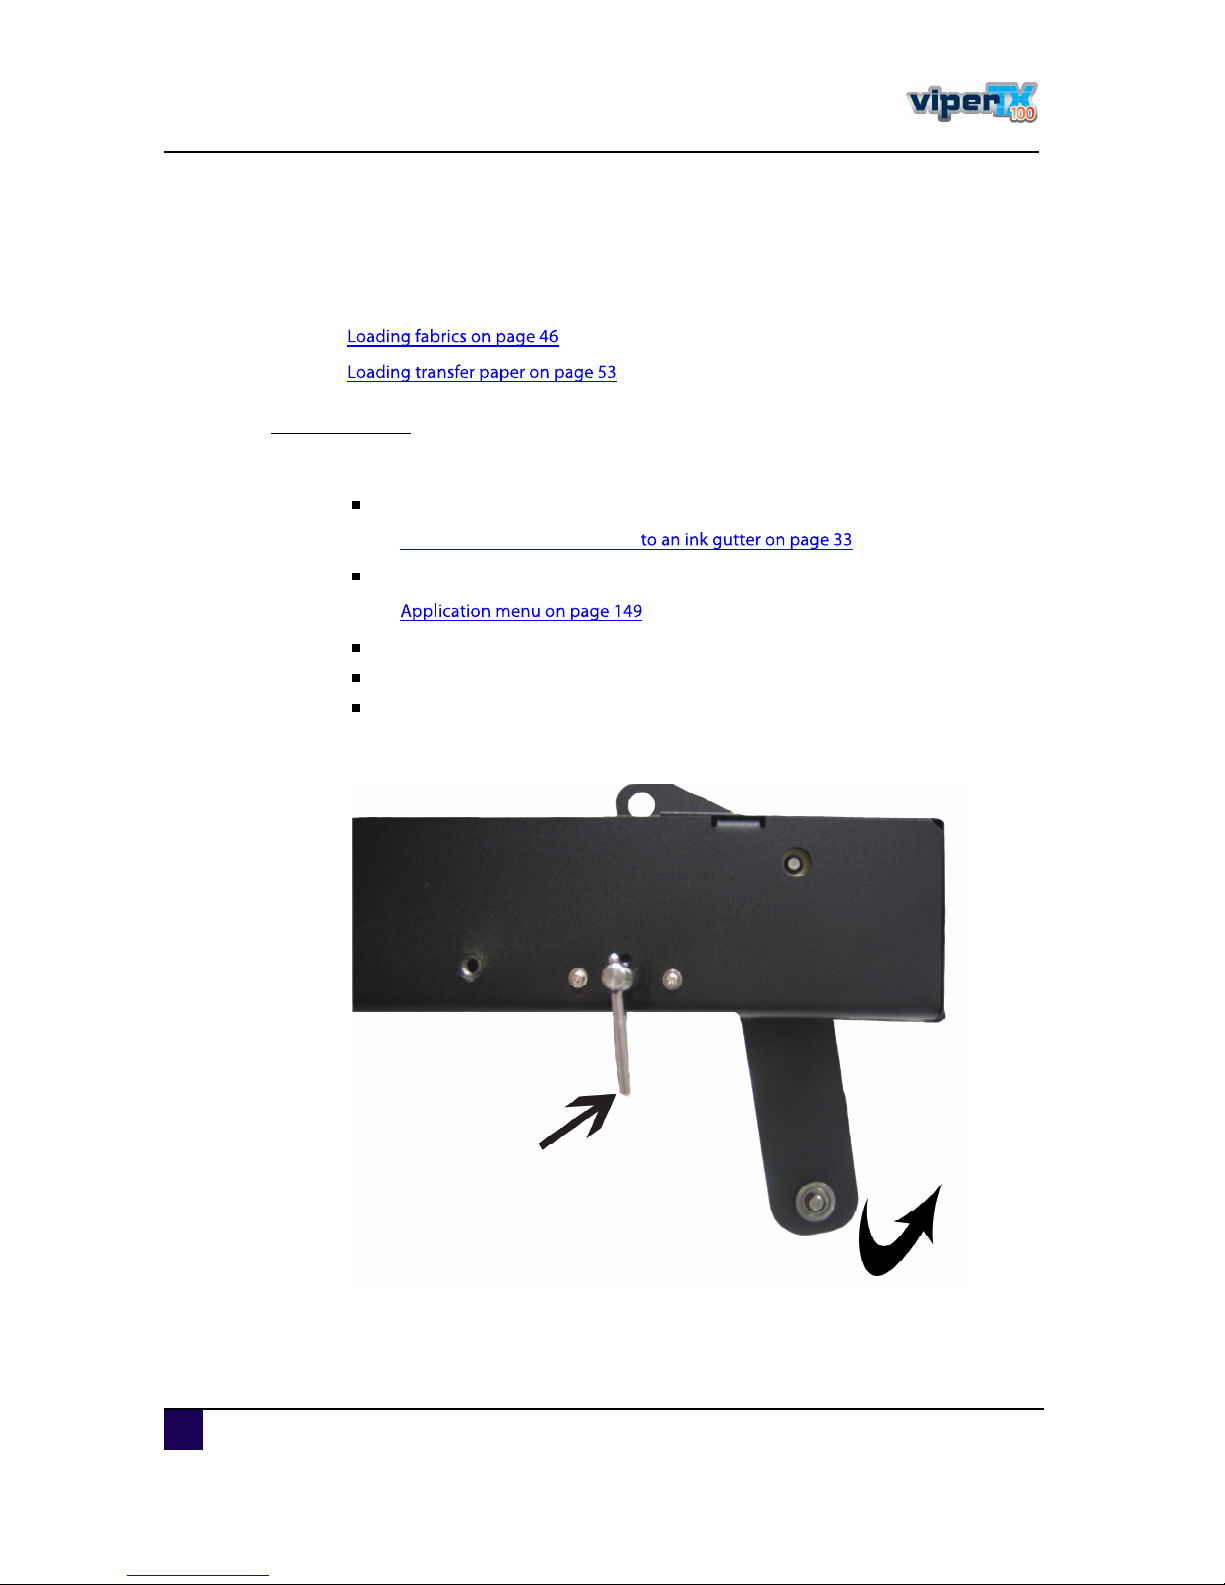
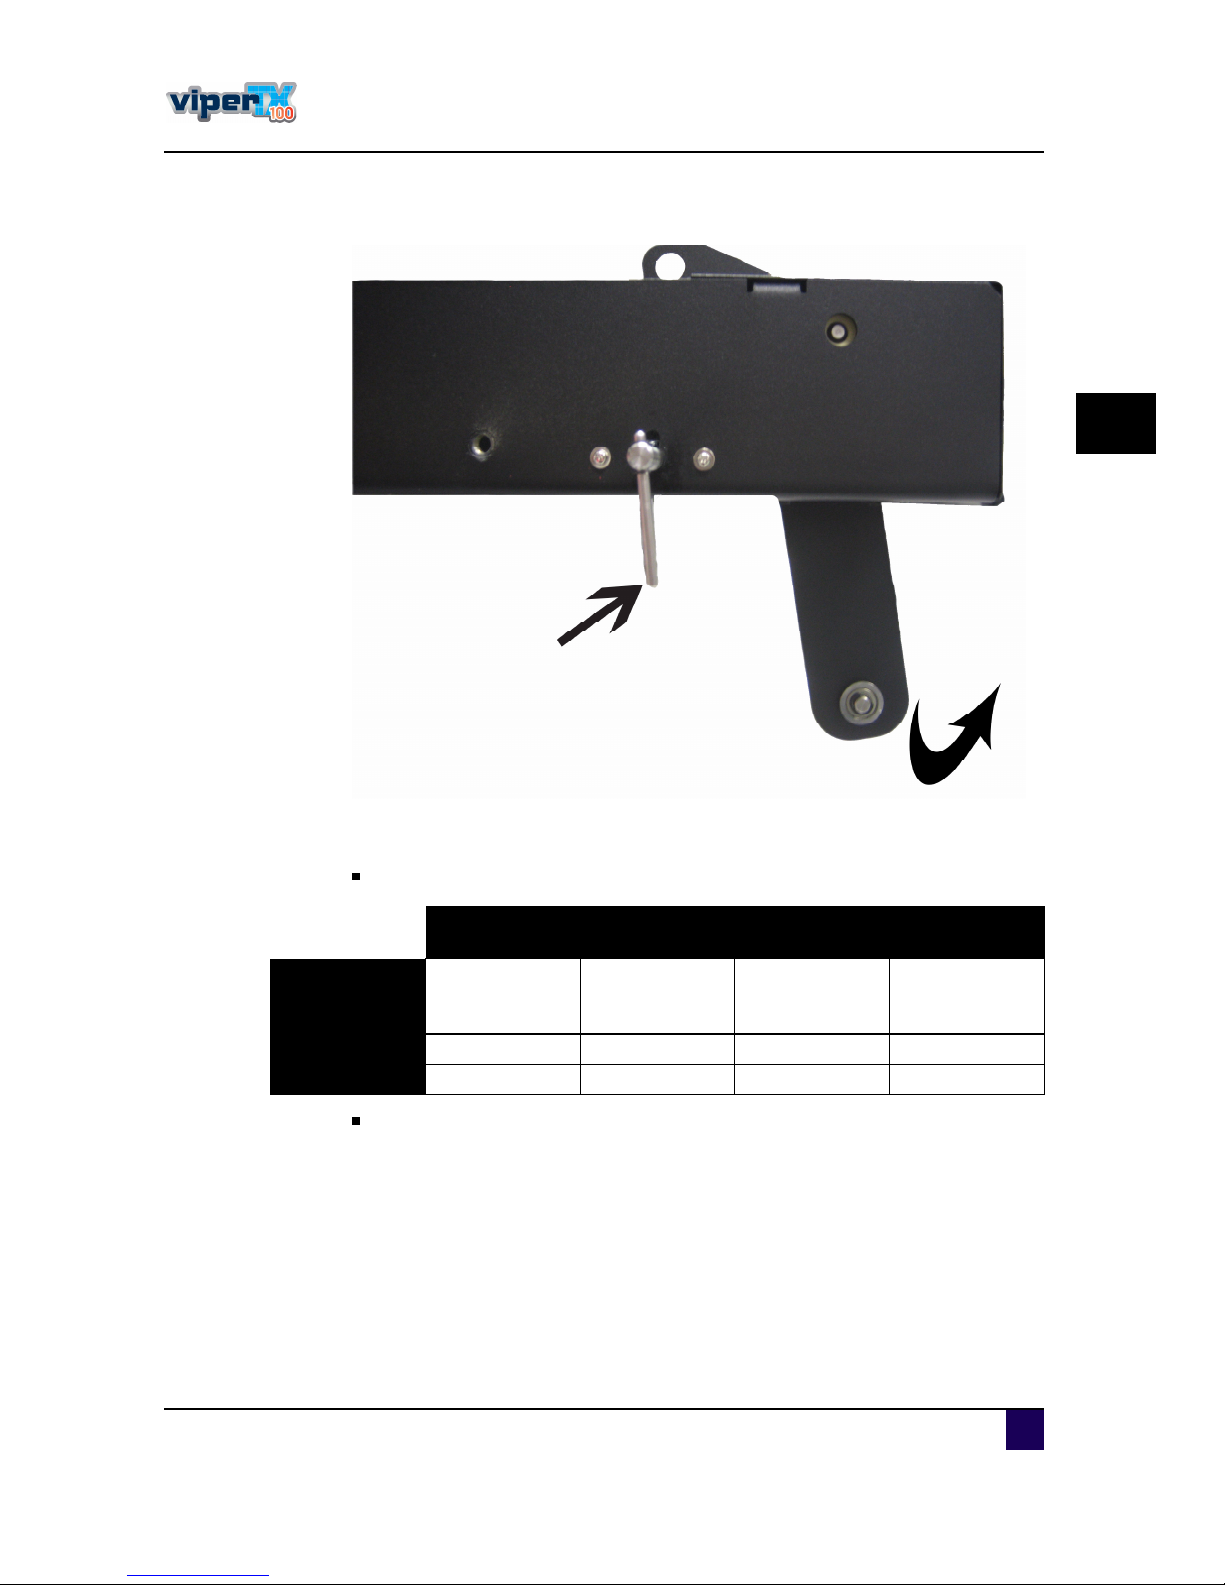
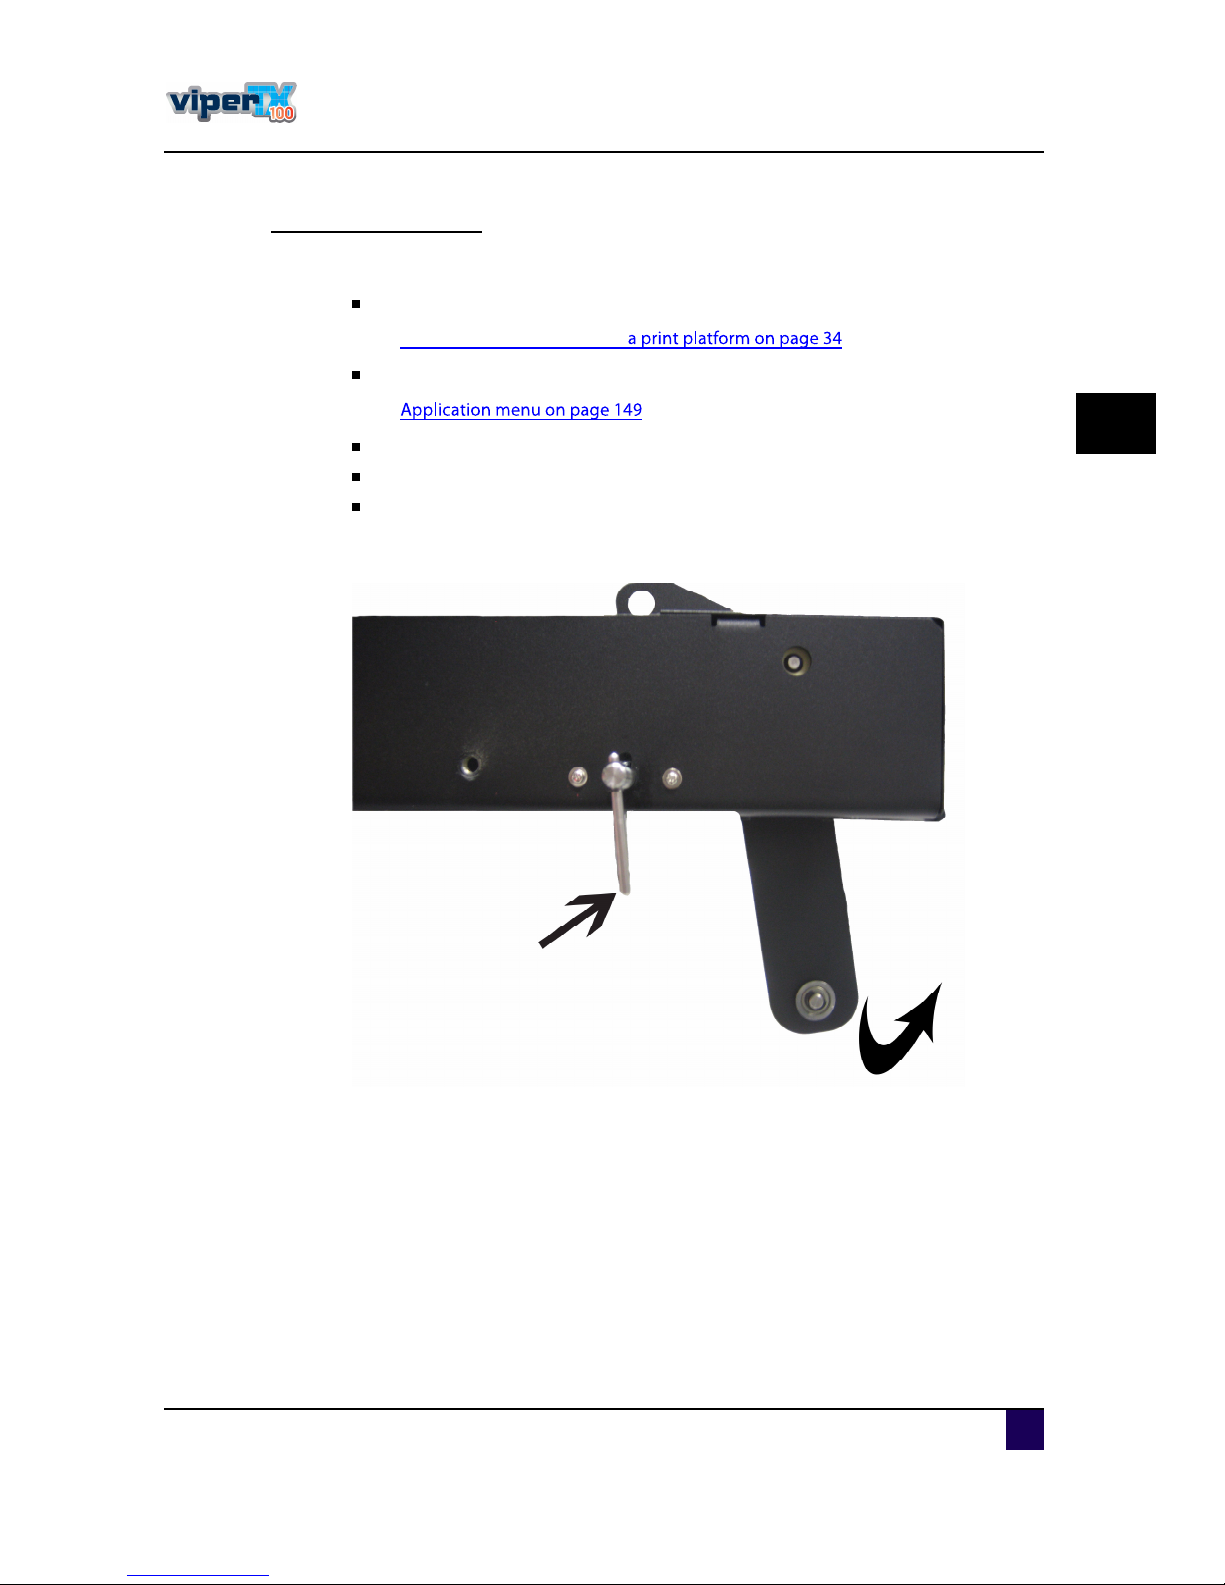
ͬ»° îæ S etthe fronts wingbarin the u ppos ition and fix the pos ition with the 2 loc king pens
le ftand right.
Page 47
Us er s Gu id e V iper TX 1 0 0
C hapter3 B as ic s
A P -7 5350 -Revis ion 1. 1 47
3
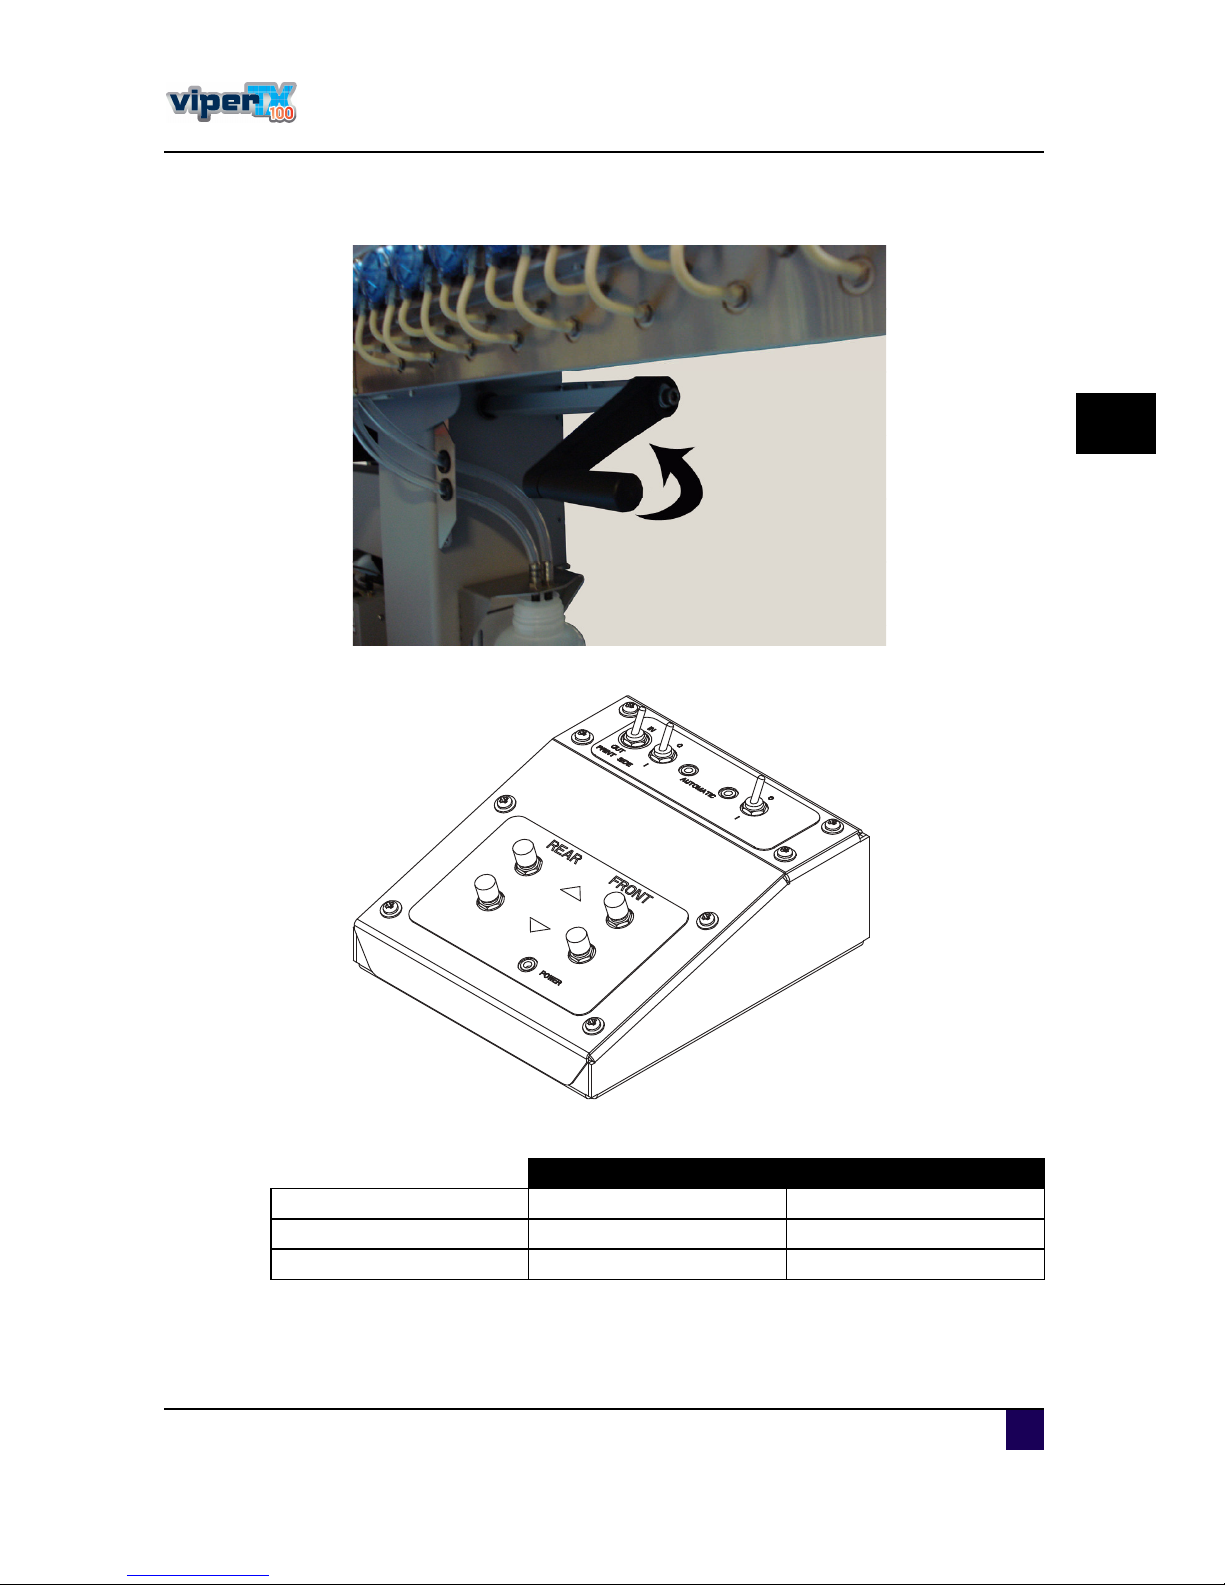
ͬ»° íæ M ake s u re the ETT is pos itioned bac kward s .
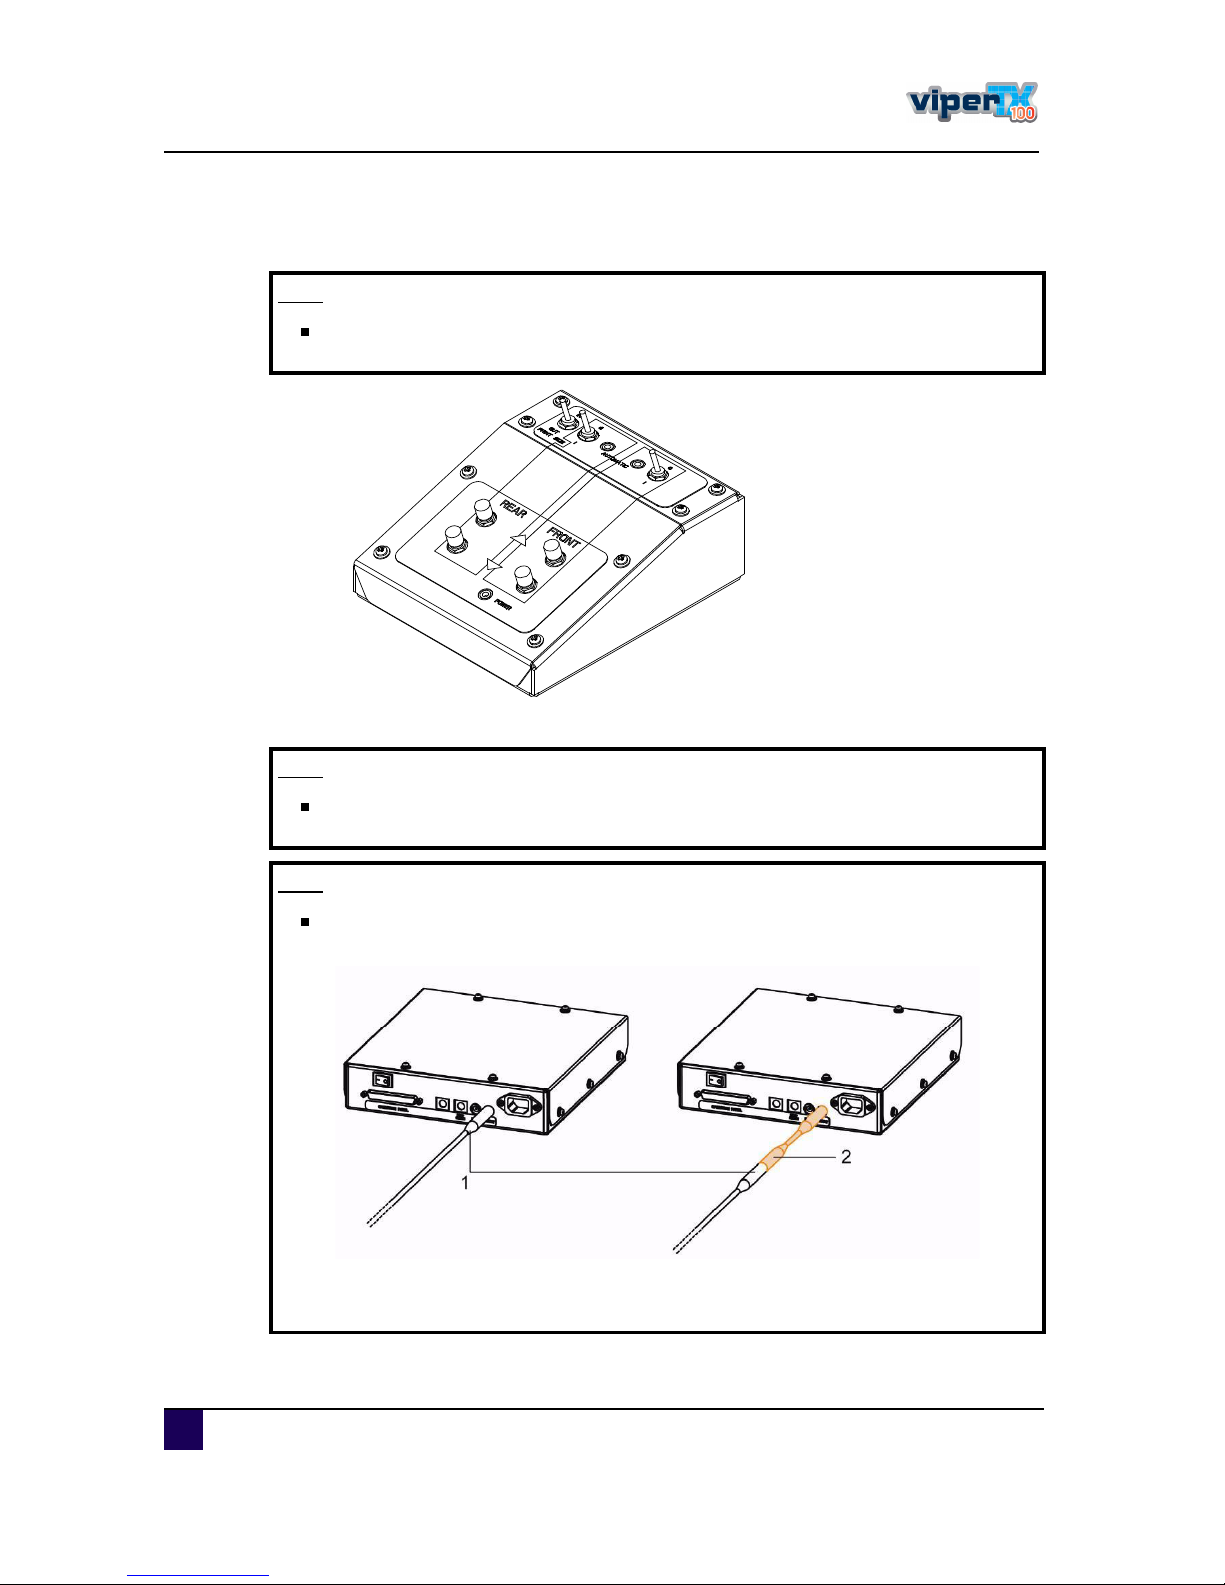
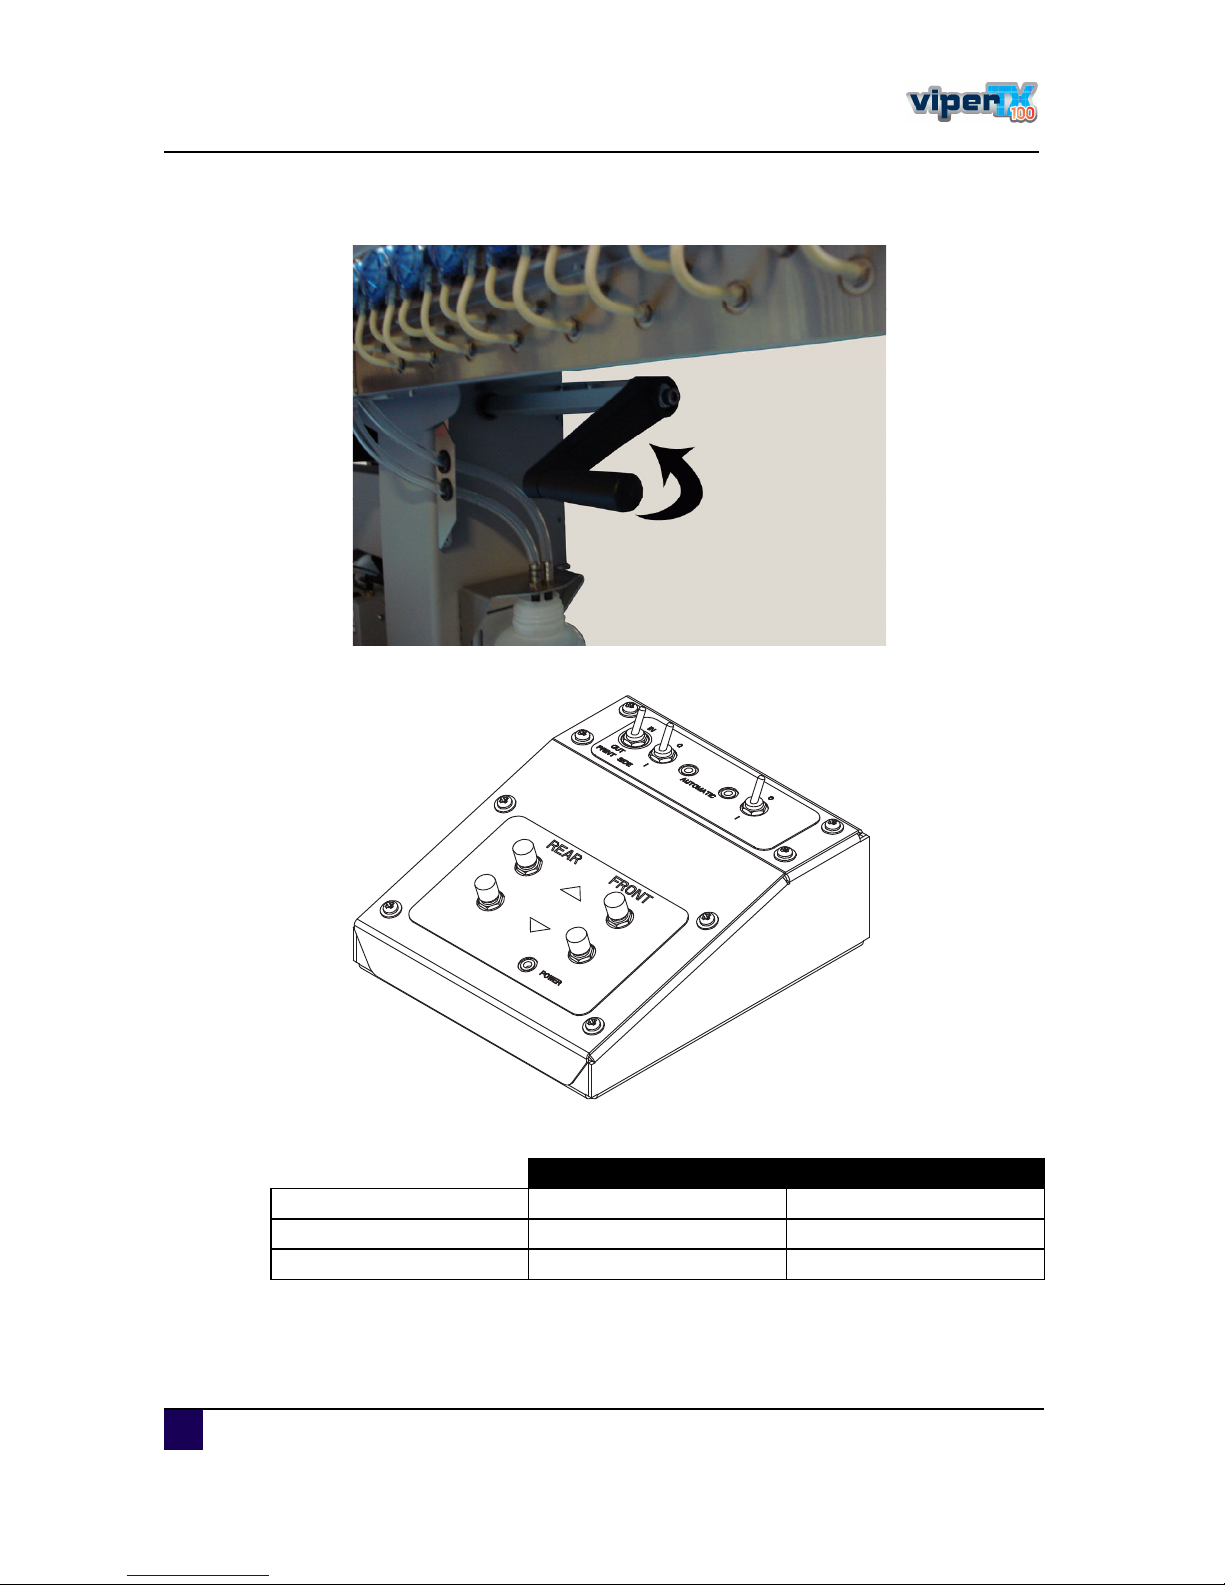
ͬ»° ìæ P u tboththe rearwind erbu tton and the frontwind erto manu al(0 ).
ͬ»° ëæ C ons id erthe s pec ific ations ofthe printe rbefore load ing fabric s .
ͬ»° êæ Remove the pac kagingofthe fabric .
M etrica l I m peria l
M axim u m load ingc apac ity 1 0 0 kg 2 2 0 lb
M axim u m fabric wid th 2 60 4 mm 10 2 . 5 in
Inner core d iameter 50 ,8 mm or 76,2 mm 2 or 3
Page 48
Us er s Gu id e V iper TX 1 0 0
C hapter3 B as ic s
48 A P -7 5350 -Revis ion 1. 1
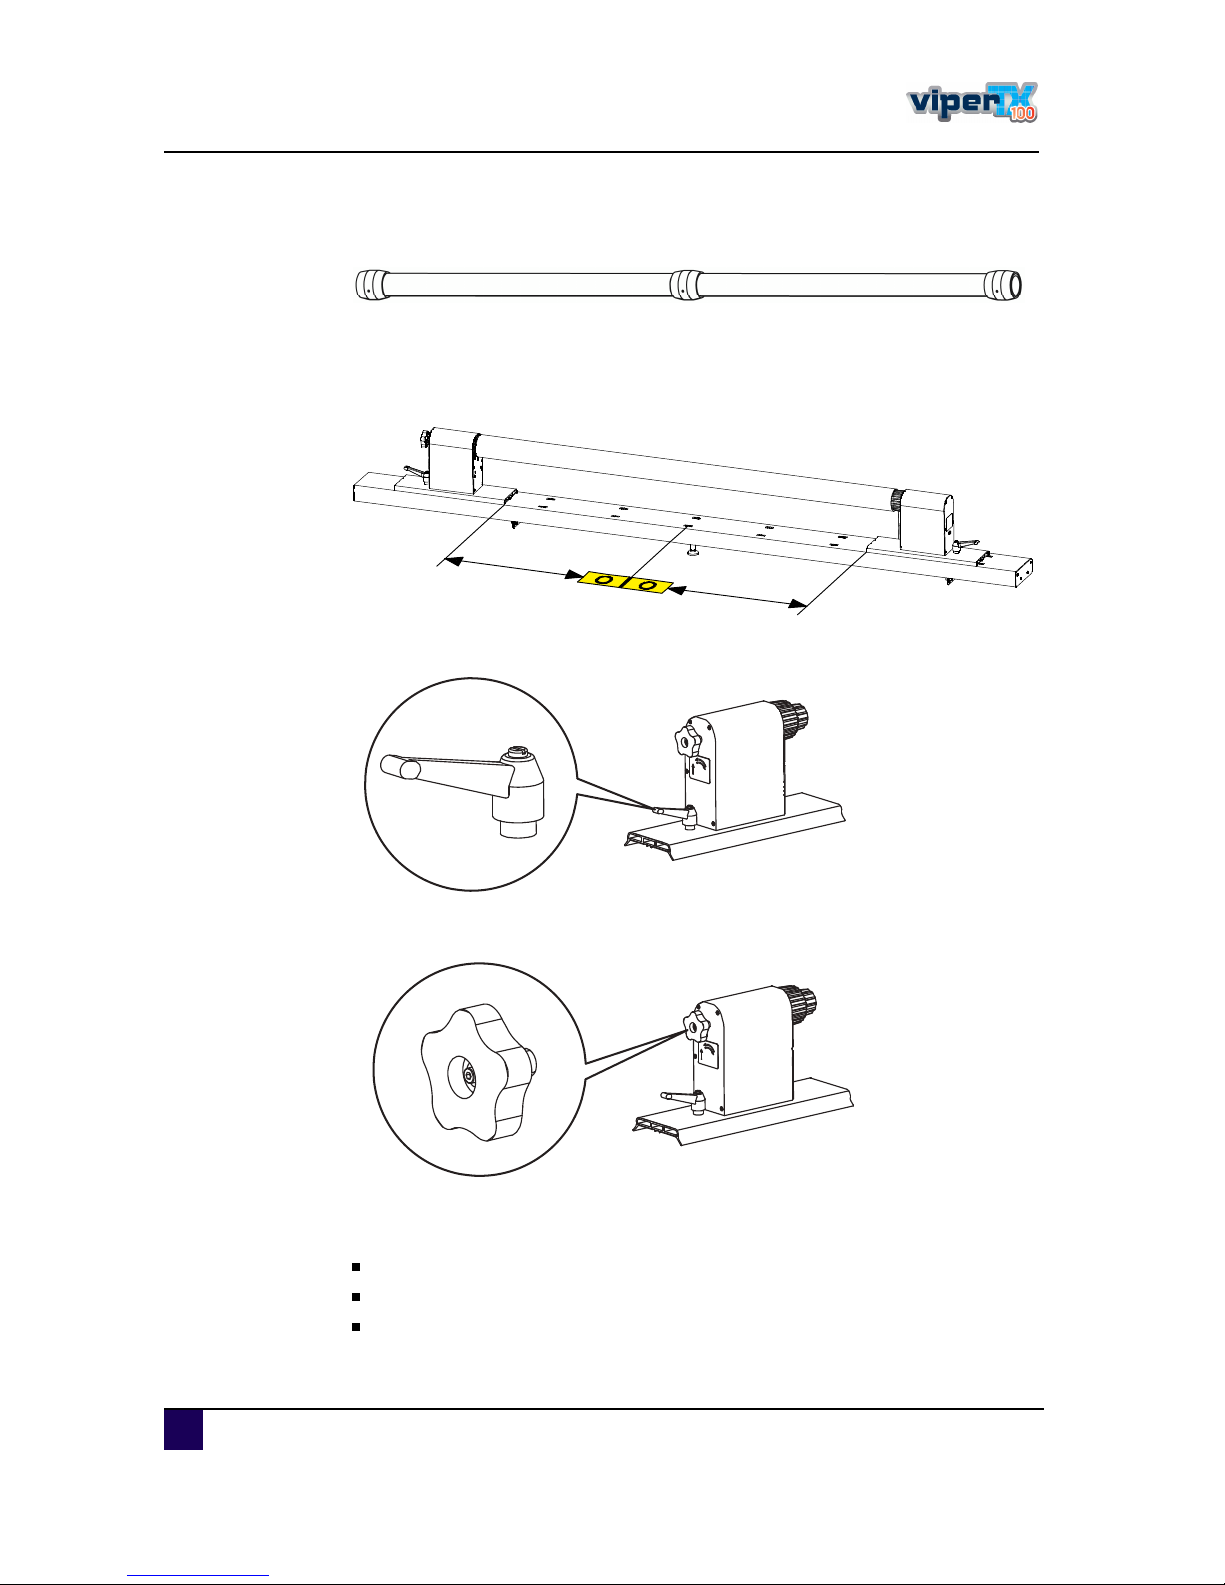
ͬ»° éæ Ins talla m ed ia c ore brac e in c as e the m ed ia is wid erthan 20 50 m m . This to pre vent
thatthe med iabend s .
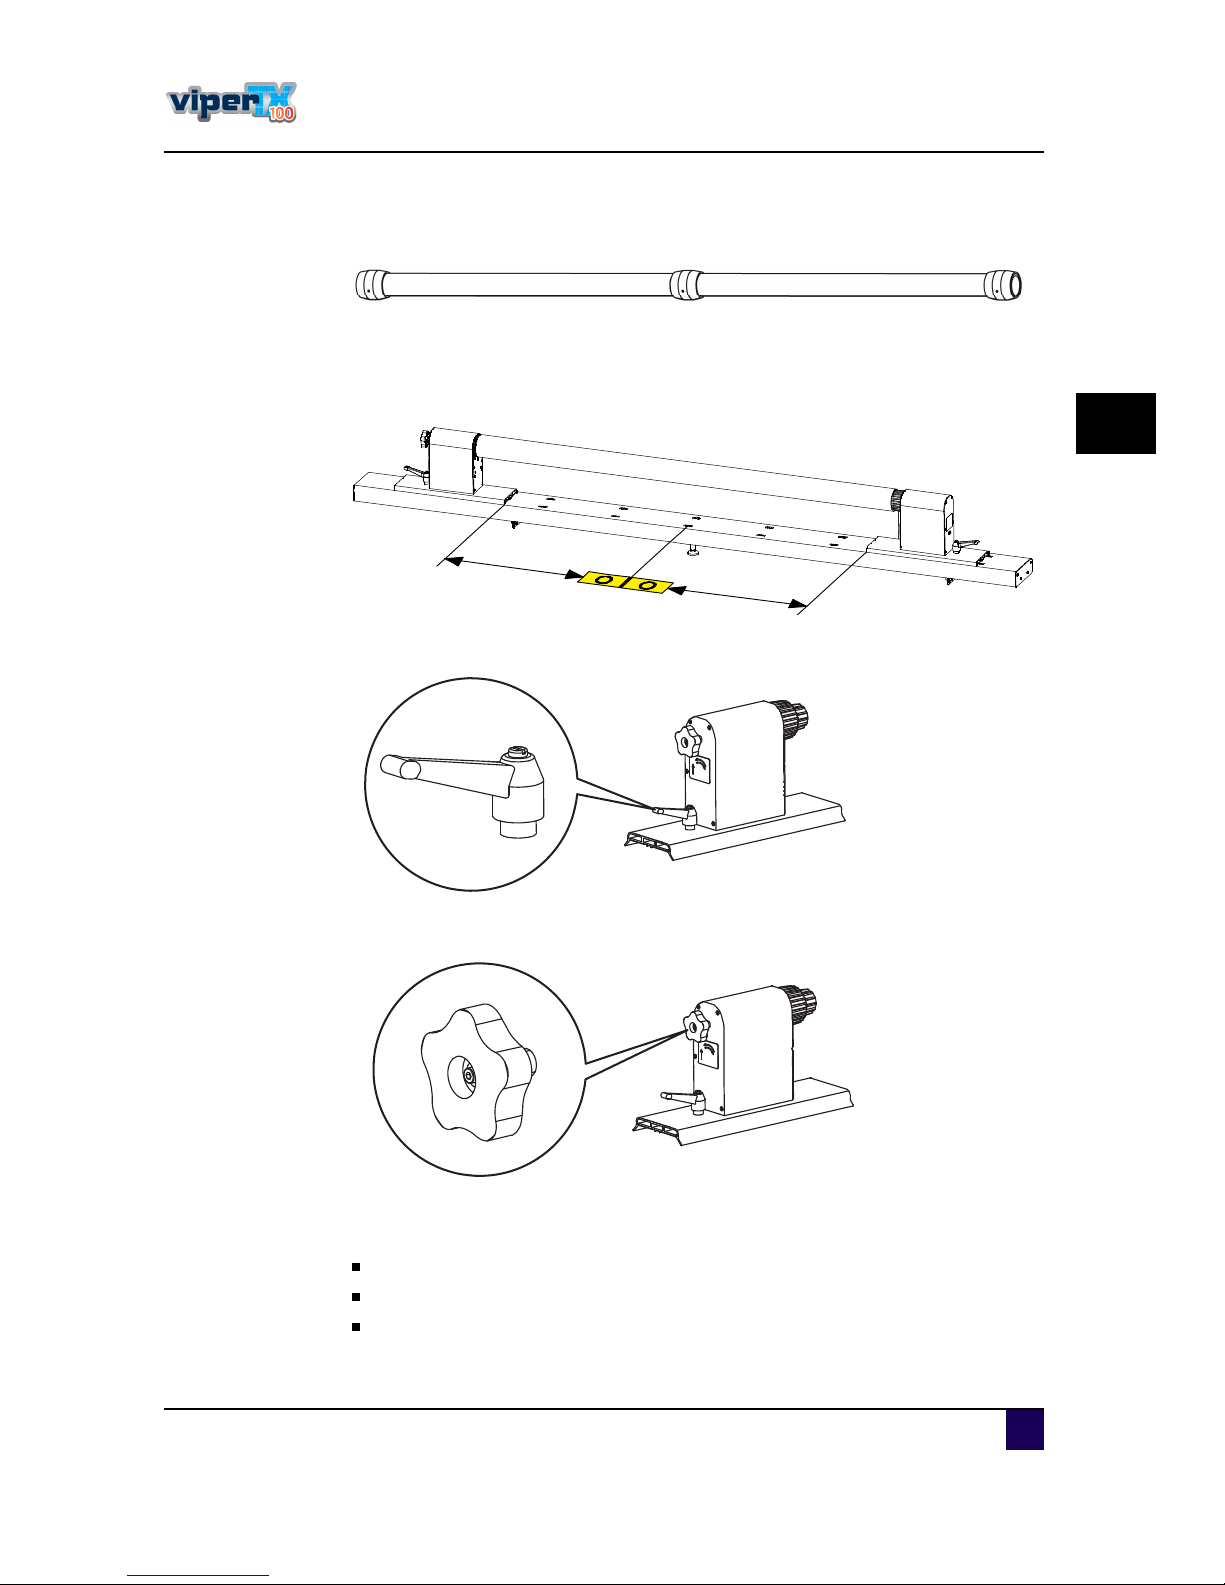
ͬ»° èæ In the bac kofthe printe r, load the fabric rollbetween the 2 rollhold eru nits .
ͬ»° çæ M ove the fabric s and rollu nits to the mid d le and tighten them withthe hand les .
Verific ation is eas y via the yellow labels on the wind ingrails . Ju s tmou ntthe leftand
rightrollu niton the s ame d is tanc e (x and y)from the 0 I0 labe l.
ͬ»° ïðæ Fix the pos ition ofthe rollm ed ia hold ers with the hand les .
ͬ»° ïïæ Tighten the whe elatthe s id e to fix the c ore between the two rollu nits .
ͬ»° ïîæ Ins tallan em pty c ore between the frontrollu nits in the s ame way as d es c ribed
above.
M ake s u re the c ore is longe rthan the wid th ofthe fabric .
L oad itc entralas d es c ribed in pre viou s s tep.
Tighten the wheelatthe s id e to fix the c ore between the two rollu nits .
ͬ»° ïíæ A tthe bac kofthe printer, u s e the foots witc h to releas e s ome fabric .
È
Ç
Page 49
Us er s Gu id e V iper TX 1 0 0
C hapter3 B as ic s
A P -7 5350 -Revis ion 1. 1 49
3
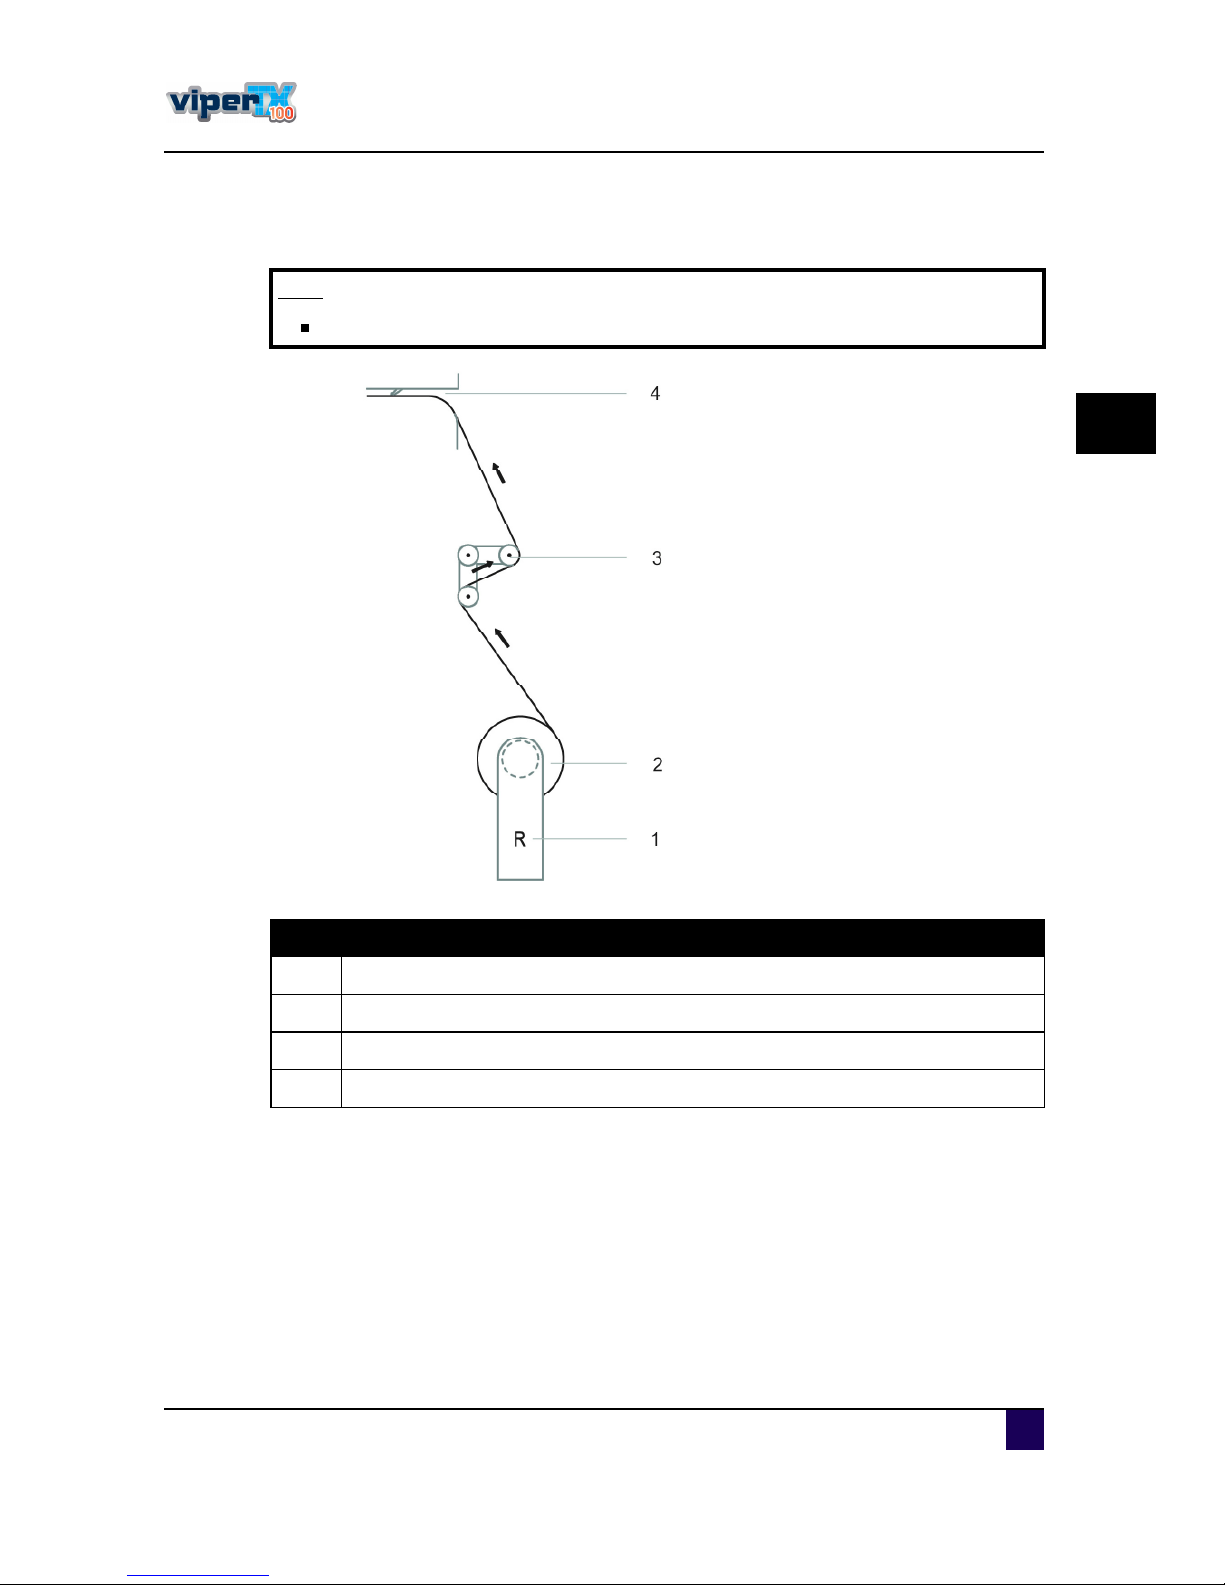
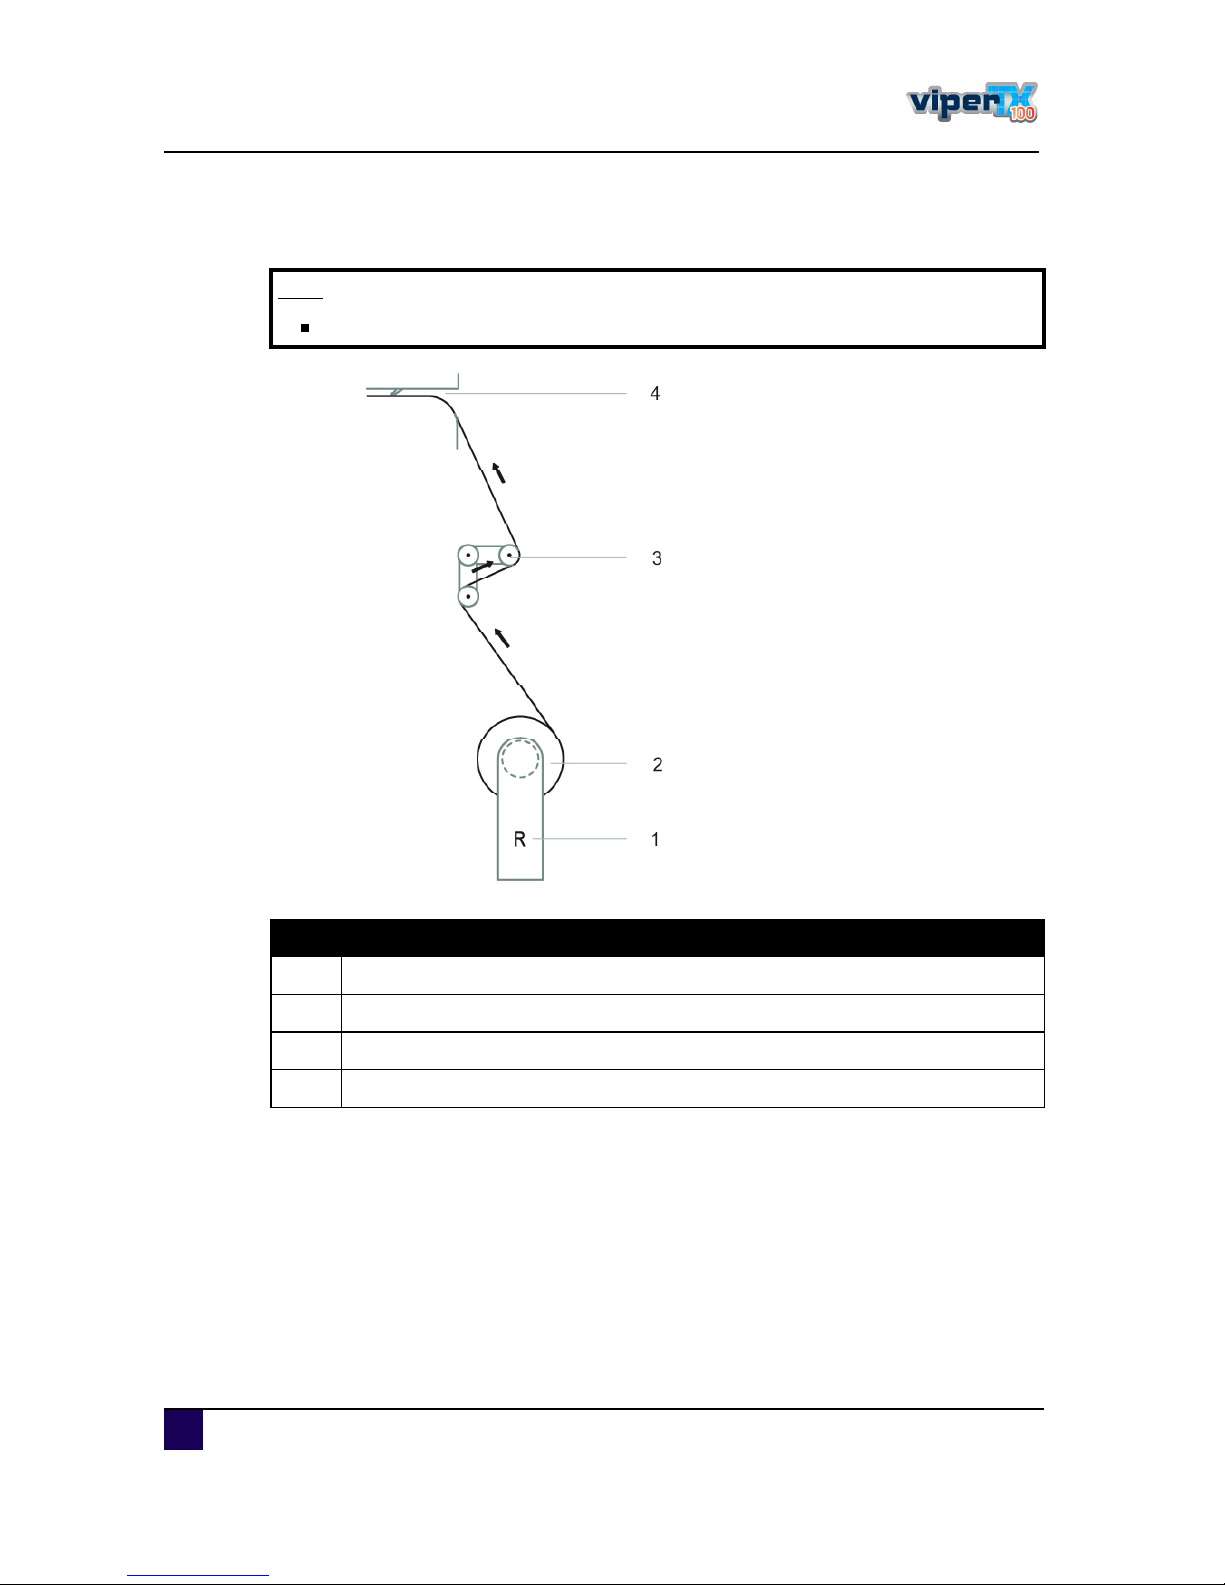
ͬ»° ïìæ L oad the fabric s throu ghthe rears wingbar, overthe printplatform, u nd erthe
pres s u re rolle rs as s hown below.
ͬ»° ïëæ Forease ofworking, lowerthe pres s u re rollers with the footped al.
ͬ»° ïêæ W hen in the frontofthe printer, rais e the pres s u re rollers and take the c entre ofthe
fabric s . P u llits traightd own u ntilthe reartens ioning s ys tem g entlyhits the bac kof
the mac hine. This to bec ome an equ alte ns ion.
Ò±¬»
M a kesureto rem ov eth efa bric reta iners.
N ° Description
ï RollUnit
î Fabric s
í Rears wingbar
ì P rintplatform and pres s u re rolle rs
Page 50
Us er s Gu id e V iper TX 1 0 0
C hapter3 B as ic s
50 A P -7 5350 -Revis ion 1. 1
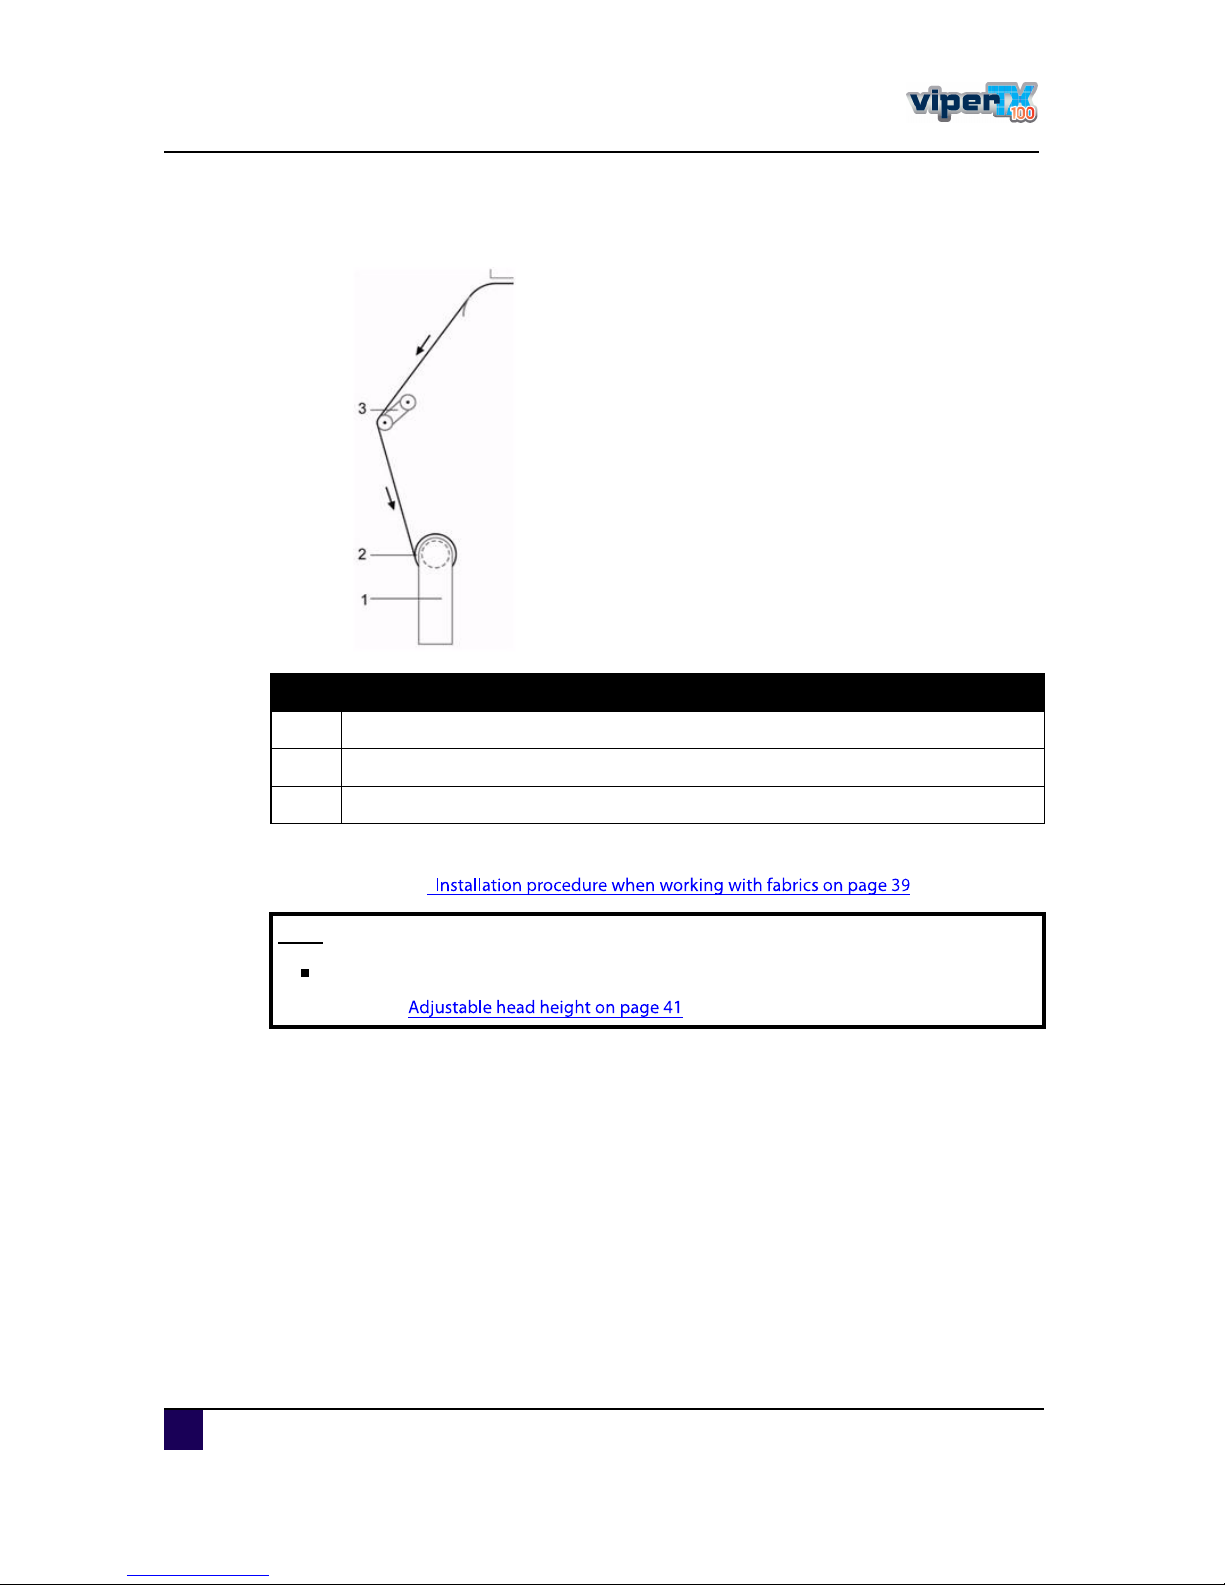
ͬ»° ïéæ Tape the fabric to the c ore ins talled between the frontrollu nits . M ake s u re to have
an equ altens ion on both s id es ofthe fabric s .
ͬ»° ïèæ Ins tallthe fabric retainers ifnec es s ary.
Referto
ͬ»° ïçæ C los e the frontc over.
ͬ»° îðæ L owerthe pres s u re rollers by pres s ingF4 oru s ingthe footped al.
N ° Description
ï RollUnit
î Em pty c ore
í Fronts wingbar
Ò±¬»
M a kesureth e fa bric reta inersa re notin terfering w ith th eprinth ea d.
Referto
Page 51
Us er s Gu id e V iper TX 1 0 0
C hapter3 B as ic s
A P -7 5350 -Revis ion 1. 1 51
3
ͬ»° îïæ L oos en the fronts wingbar.
ͬ»° îîæ D ec id e whic hkind ofm ed ia meas u rem ents hou ld be d one. The following profiles
are available.
The rollto rollprofile is the rec omm end ed s ettingwhen working with rollm ed ia.
P res s enter to s tartthe fabric initialization
O F F RollLeftRig h t Roll
L eftRig h tTop
Rollto roll
M ea surem ent
N one (* )
L eft
Right
L eft
Right
Top
L eft
Right
Ta keUp Notu s ed Notu s ed Notu s e d Us ed
S la n tC h eck N o Yes Yes Yes
Page 52
Us er s Gu id e V iper TX 1 0 0
C hapter3 B as ic s
52 A P -7 5350 -Revis ion 1. 1
ͬ»° îíæ Set both the wind er and u nwind er to au tomatic (I). The front and rear tens ioning
s ys tem willgo to its initialpos ition.
ͬ»° îìæ Ins tallation ofthe fabric s is c ompleted .
Ò±¬»
M a kesureto setth e control pa nelo f th ew inding system to th ecorrectprinting
m eth od. (o utsideorinside, depending on yourm edia ).
Ò±¬»
M a kesureto m ea sureth eh eig h tof th efa bric correctlyin orderto prev enth ea d
cra sh es.
Ò±¬»
W ith a sm a llinterv ention itispo ssibleto rev erseyourw inding directio n. M ount
th etw istca blebetw een th econtrolboxa ndth efron tm otorizedu nitca ble.
1 = N ormalwind ingd irec tion
2 = Twis ted m otorc able attac he d
Page 53
Us er s Gu id e V iper TX 1 0 0
C hapter3 B as ic s
A P -7 5350 -Revis ion 1. 1 53
3
Loading transfer paper
ͬ»° ïæ Verify that:
the inkgu tteris s witc hed into the printplatform .
Referto Í©·¬½¸·²¹ ¬¸» ·²µ ¹«¬¬»® ·²¬±
the applic ation menu is s witc hed to trans fer.
Referto
the printerand UW /W 1 0 0 are both O N,
the frontc overofthe printeris open, and
the pres s u re rollers are in the UP pos ition.
ͬ»° îæ S etthe fronts wingbarin the u ppos ition and fix the pos ition with the 2 loc king pens
le ftand right.
Page 54
Us er s Gu id e V iper TX 1 0 0
C hapter3 B as ic s
54 A P -7 5350 -Revis ion 1. 1
ͬ»° íæ M ake s u re the ETT is pos itioned bac kward s .
ͬ»° ìæ P u tboththe rearwind erbu tton and the frontwind erto manu al(0 ).
ͬ»° ëæ C ons id erthe s pec ific ations ofthe printe rbefore load ing transferpaper.
ͬ»° êæ Remove the pac kagingofthe fabric .
M etrica l I m peria l
M axim u m load ingc apac ity 1 0 0 kg 2 2 0 lb
M axim u m m ed ia wid th 2 60 4 m m 1 0 2. 5 in
Inner core d iameter 50 ,8 mm or 76,2 mm 2 or 3
Page 55
Us er s Gu id e V iper TX 1 0 0
C hapter3 B as ic s
A P -7 5350 -Revis ion 1. 1 55
3
ͬ»° éæ Ins talla m ed ia c ore brac e in c as e the m ed ia is wid erthan 20 50 m m . This to pre vent
thatthe med iabend s .
ͬ»° èæ In the bac kofthe printer, load the trans fe rpaperrollbetween the 2 rollhold eru nits .
ͬ»° çæ M ove the trans ferpaperand rollu nits to the mid d le and tighten them with the
hand les . Verific ation is eas y via the yellow labels on the wind ing rails . Ju s tm ou nt
the leftand rightrollu niton the s ame d is tanc e (x and y)from the 0 I0 label.
ͬ»° ïðæ Fix the pos ition ofthe rollm ed ia hold ers with the hand les .
ͬ»° ïïæ Tighten the whe elatthe s id e to fix the c ore between the two rollu nits .
ͬ»° ïîæ Ins tallan em pty c ore between the frontrollu nits in the s ame way as d es c ribed
above.
M ake s u re the c ore is longerthan the wid th ofthe trans ferpaper.
L oad itc entralas d es c ribed in pre viou s s tep.
Tighten the wheelatthe s id e to fix the c ore between the two rollu nits .
ͬ»° ïíæ A tthe bac kofthe printer, u s e the foots witc hto rele as e s ome trans ferpaper.
È
Ç
Page 56
Us er s Gu id e V iper TX 1 0 0
C hapter3 B as ic s
56 A P -7 5350 -Revis ion 1. 1
ͬ»° ïìæ L oad the trans ferpaperthrou ghthe rearswingbar, overthe printplatform , u nd erthe
pres s u re rolle rs as s hown below.
ͬ»° ïëæ Foreas e ofworking, lowerthe pres s u re rollers with the footped aland go to the
frontofthe printer.
ͬ»° ïêæ W hen in frontofthe printe r, rais e the pres s u re rolle rs and pos ition the E TTc orrec tly,
s o thatthe c om plete length ofthe transferpaperis c overed by the ETT.
ͬ»° ïéæ Take the c entre ofthe transferpaper. P u llits traightd own u ntilthe reartens ioning
s ys tem g ently hits the bac kofthe mac hine. This to bec ome an equ altens ion.
Ò±¬»
M a kesureto rem ov eth em edia reta iners.
N ° Description
ï RollUnit
î trans ferpaper
í Rears wingbar
ì P rintplatform and pres s u re rolle rs
Page 57
Us er s Gu id e V iper TX 1 0 0
C hapter3 B as ic s
A P -7 5350 -Revis ion 1. 1 57
3
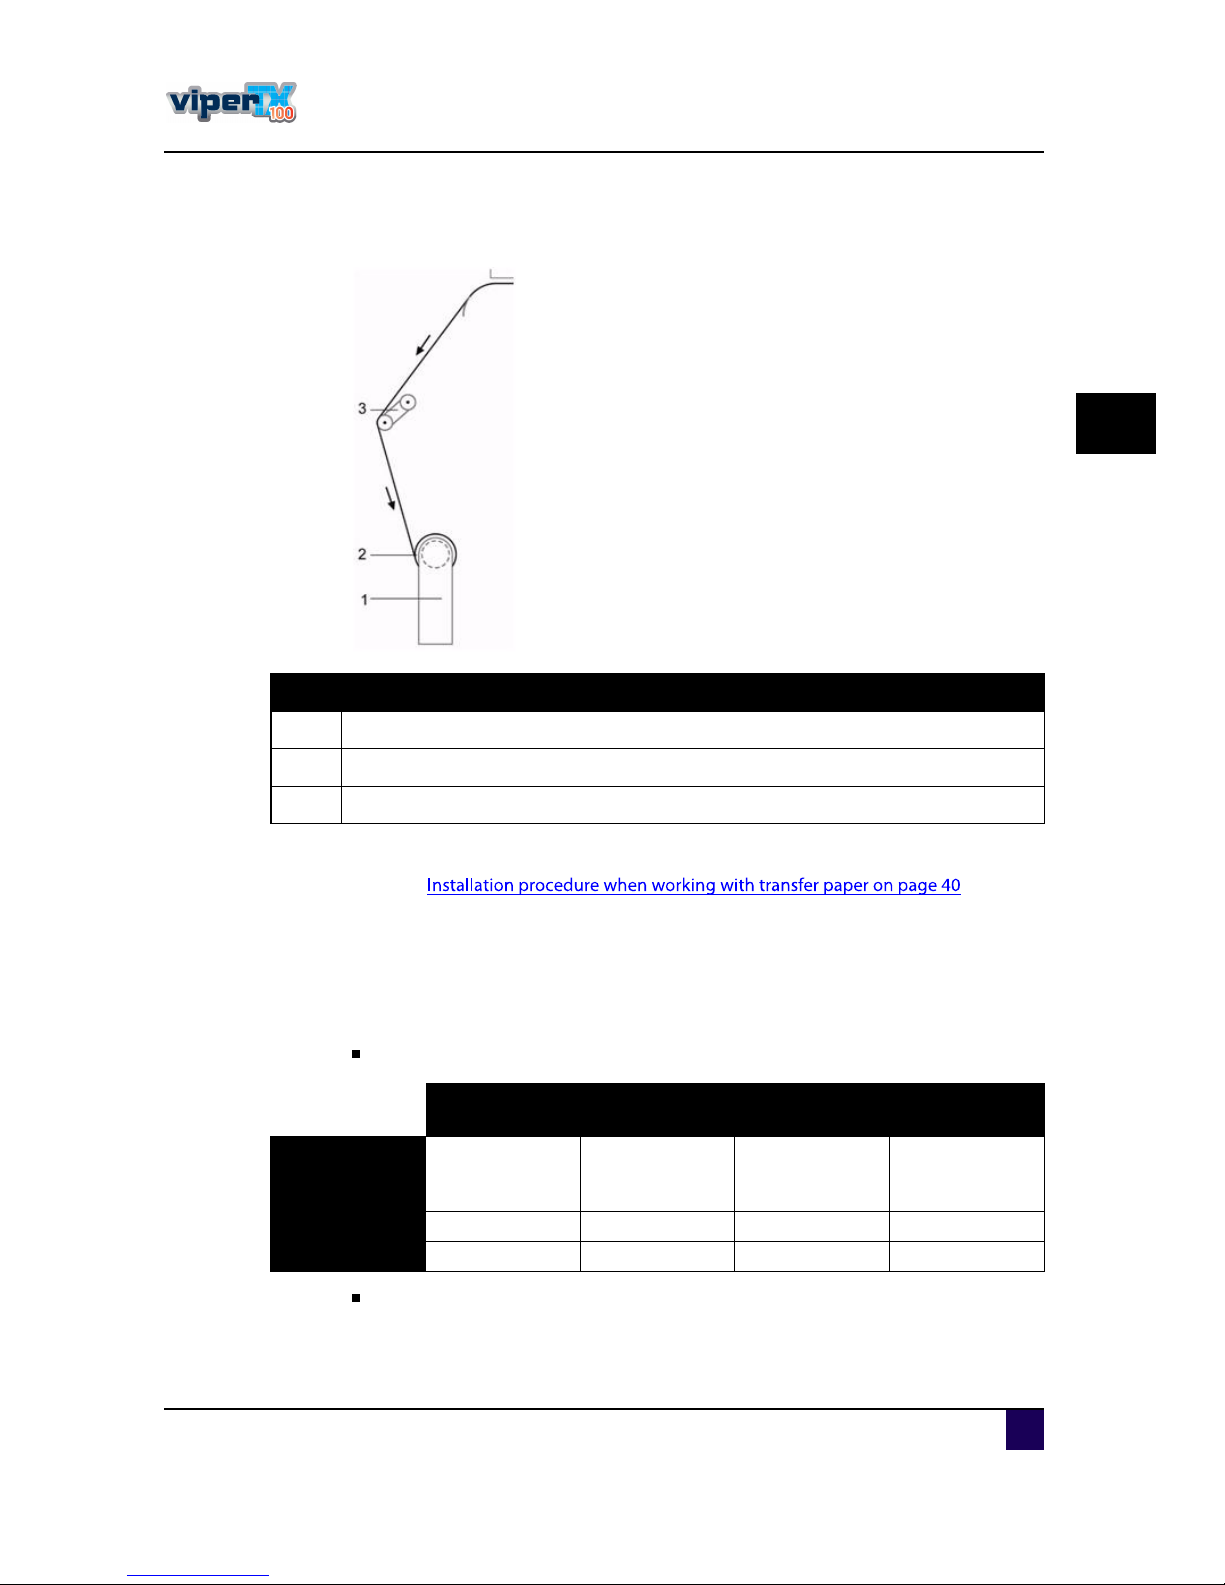
ͬ»° ïèæ Tape the trans ferpaperto the c ore ins talled between the frontrollu nits . M ake s u re
to have an equ altens ion on both s id es ofthe trans ferpaper.
ͬ»° ïçæ Ins tallthe m ed ia retainers ifnec es s ary.
Referto
ͬ»° îðæ C los e the frontc over.
ͬ»° îïæ L owerthe pres s u re rollers by pres s ingF4 oru s ingthe footped al.
ͬ»° îîæ D ec id e whic hkind ofm ed ia meas u rem ents hou ld be d one. The following profiles
are available.
The rollto rollprofile is the rec omm end ed s ettingwhen working with rollm ed ia.
P res s enter to s tartthe med ia initialization.
N ° Description
ï RollUnit
î Em pty c ore
í Fronts wingbar
O F F RollLeftRig h t Roll
L eftRig h tTop
Rollto roll
M ea surem ent
N one (* )
L eft
Right
L eft
Right
Top
L eft
Right
Ta keUp Notu s ed Notu s ed Notu s e d Us ed
S la n tC h eck N o Yes Yes Yes
Page 58
Us er s Gu id e V iper TX 1 0 0
C hapter3 B as ic s
58 A P -7 5350 -Revis ion 1. 1
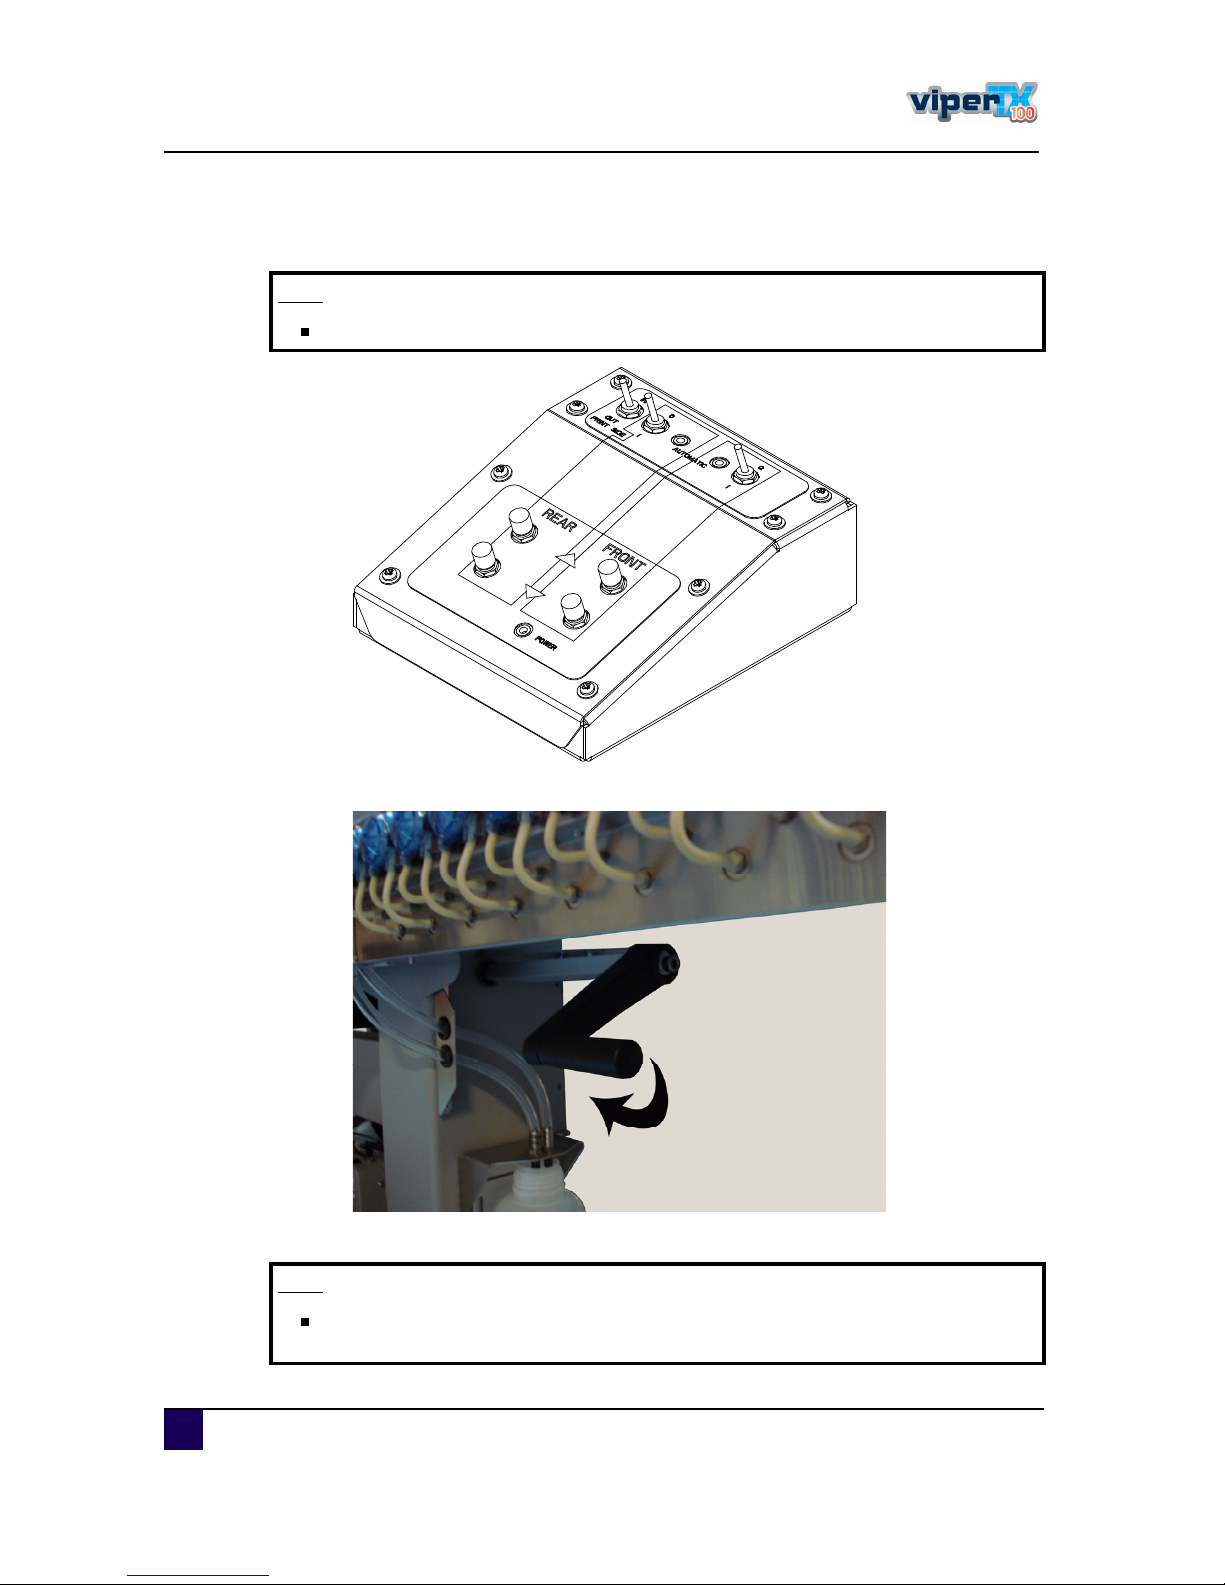
ͬ»° îíæ Set both the wind er and u nwind er to au tomatic (I). The front and rear tens ioning
s ys tem willgo to its initialpos ition.
ͬ»° îìæ P u llou tthe ETT with the hand le.
ͬ»° îëæ Ins tallation ofthe trans ferpaperis c om pleted .
Ò±¬»
M a kesureto setth e control pa nelof th e w inding system to outsideprinting .
Ò±¬»
M a ke sure to m ea sure th e h eig h tof th e m edia correctly in orderto p rev ent
h ea dcra sh es.
Page 59
Us er s Gu id e V iper TX 1 0 0
C hapter3 B as ic s
A P -7 5350 -Revis ion 1. 1 59
3
Ò±¬»
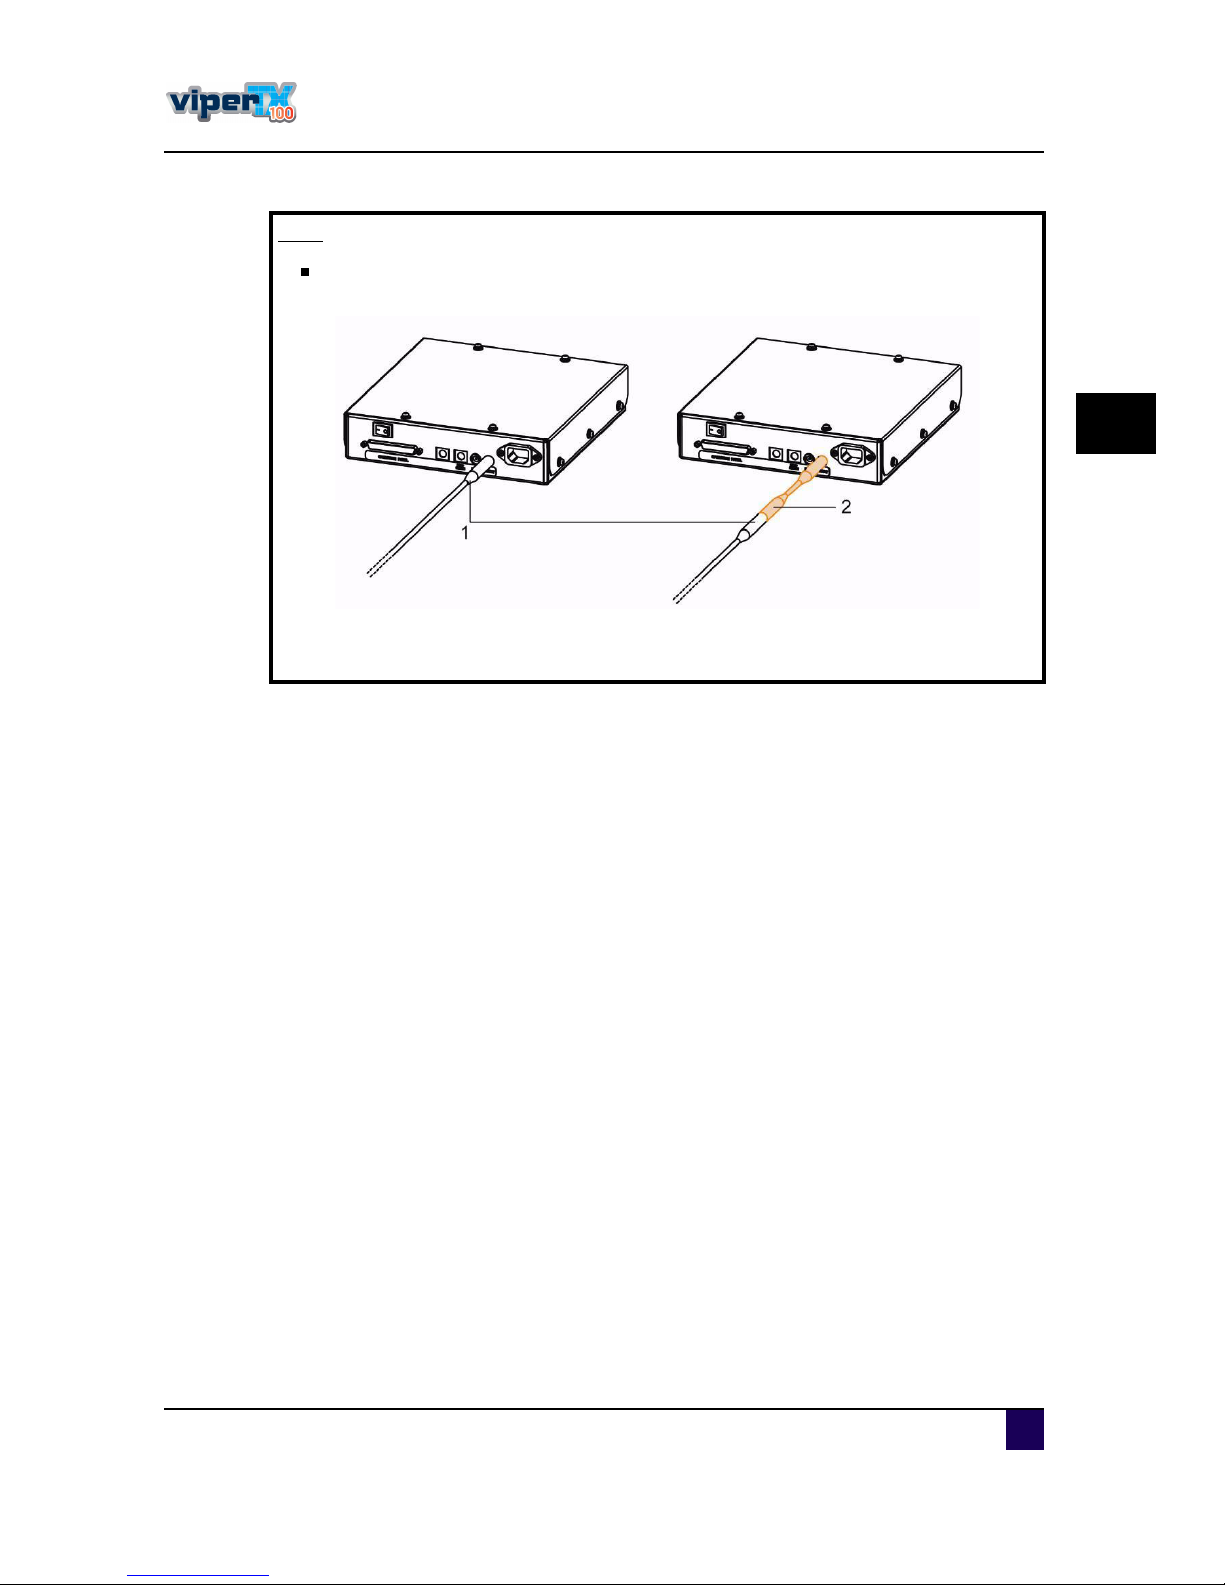
W ith a sm a llinterv ention itispo ssibleto rev erseyourw inding directio n. M ount
th etw istca blebetw een th econtrolboxa ndth efron tm otorizedu nitca ble.
1 = N ormalwind ingd irec tion
2 = Twis ted m otorc able attac he d
Page 60
Us er s Gu id e V iper TX 1 0 0
C hapter3 B as ic s
6 0 A P -7 5350 -Revis ion 1. 1
3.4 Features to im prove the printquality
3.4.1 N ozzlecheck
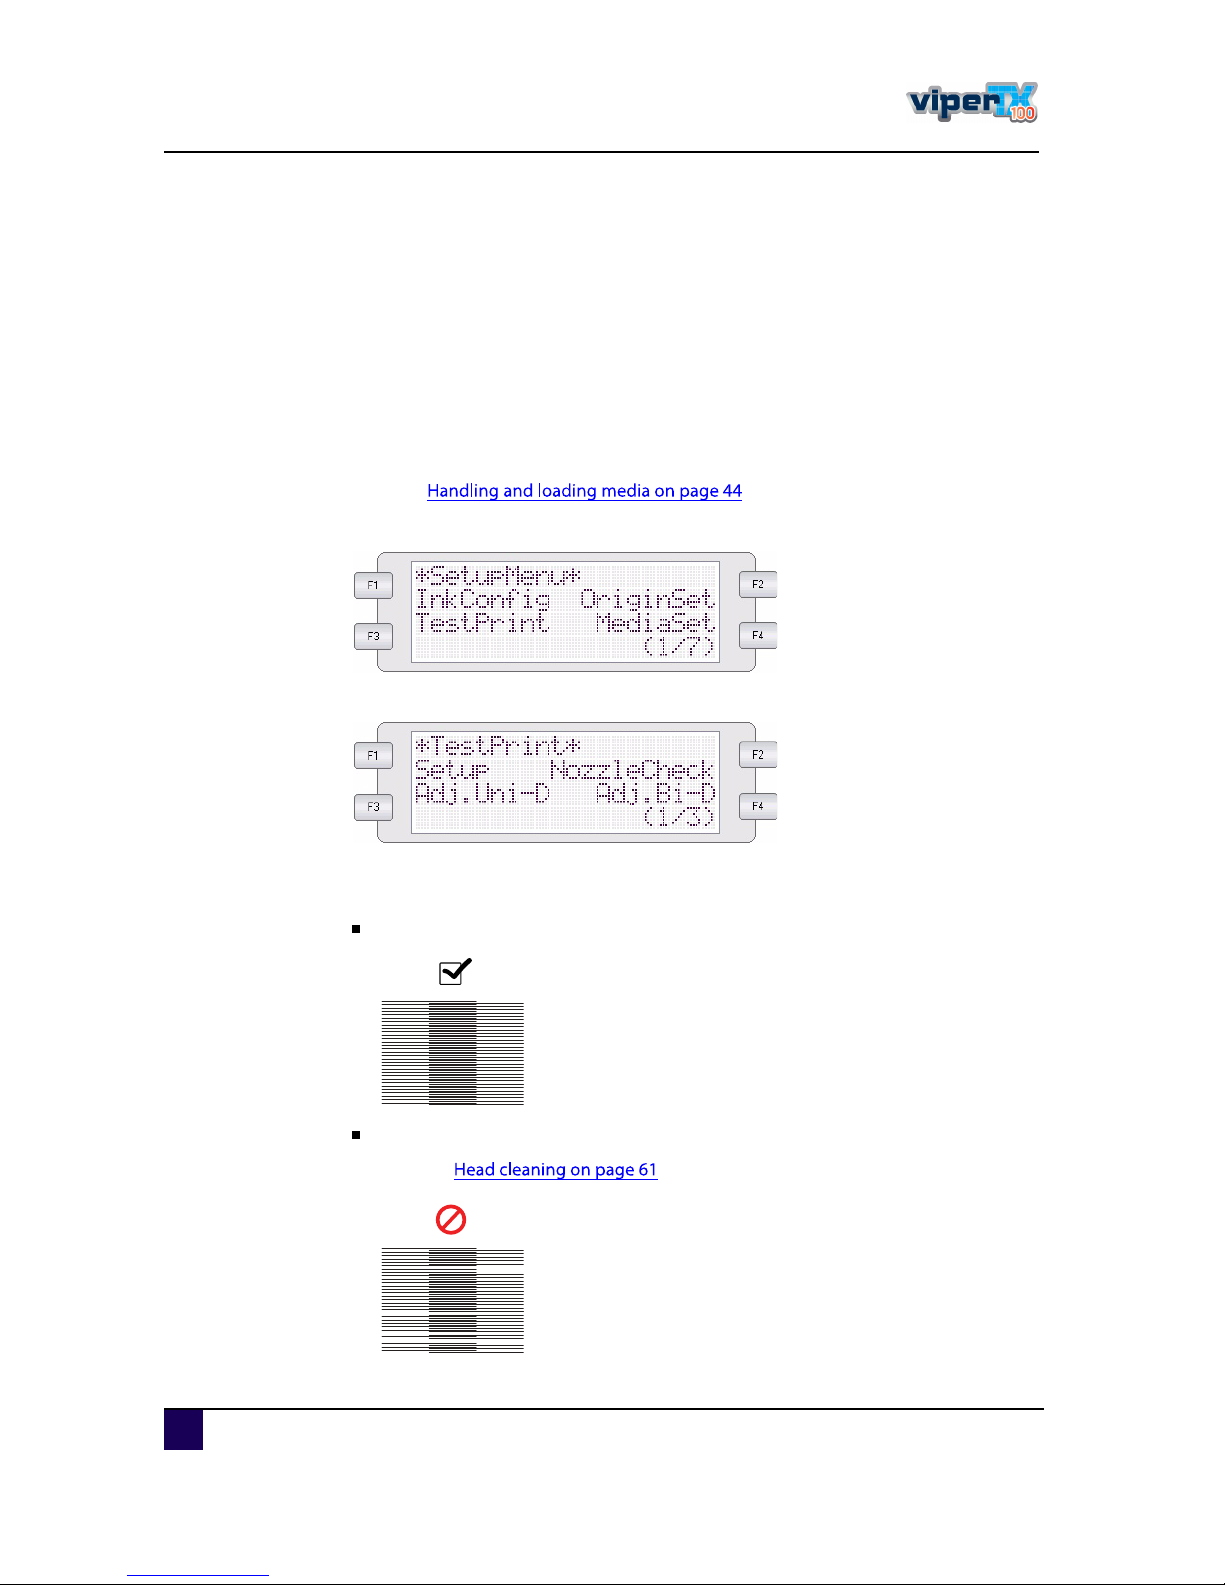
O ne ofthe m ostim portantis s u es is thatallnozzles are pres entbefore you s tartprinting. If
there are s om e nozzles bloc ked , a bad ou tpu t, res u lting in lines in the print, willbe obtained .
To avoid that, before every job, printa nozzlec he c kas follows :
ͬ»° ïæ P owerO N the printe r.
ͬ»° îæ L oad med ia.
Referto
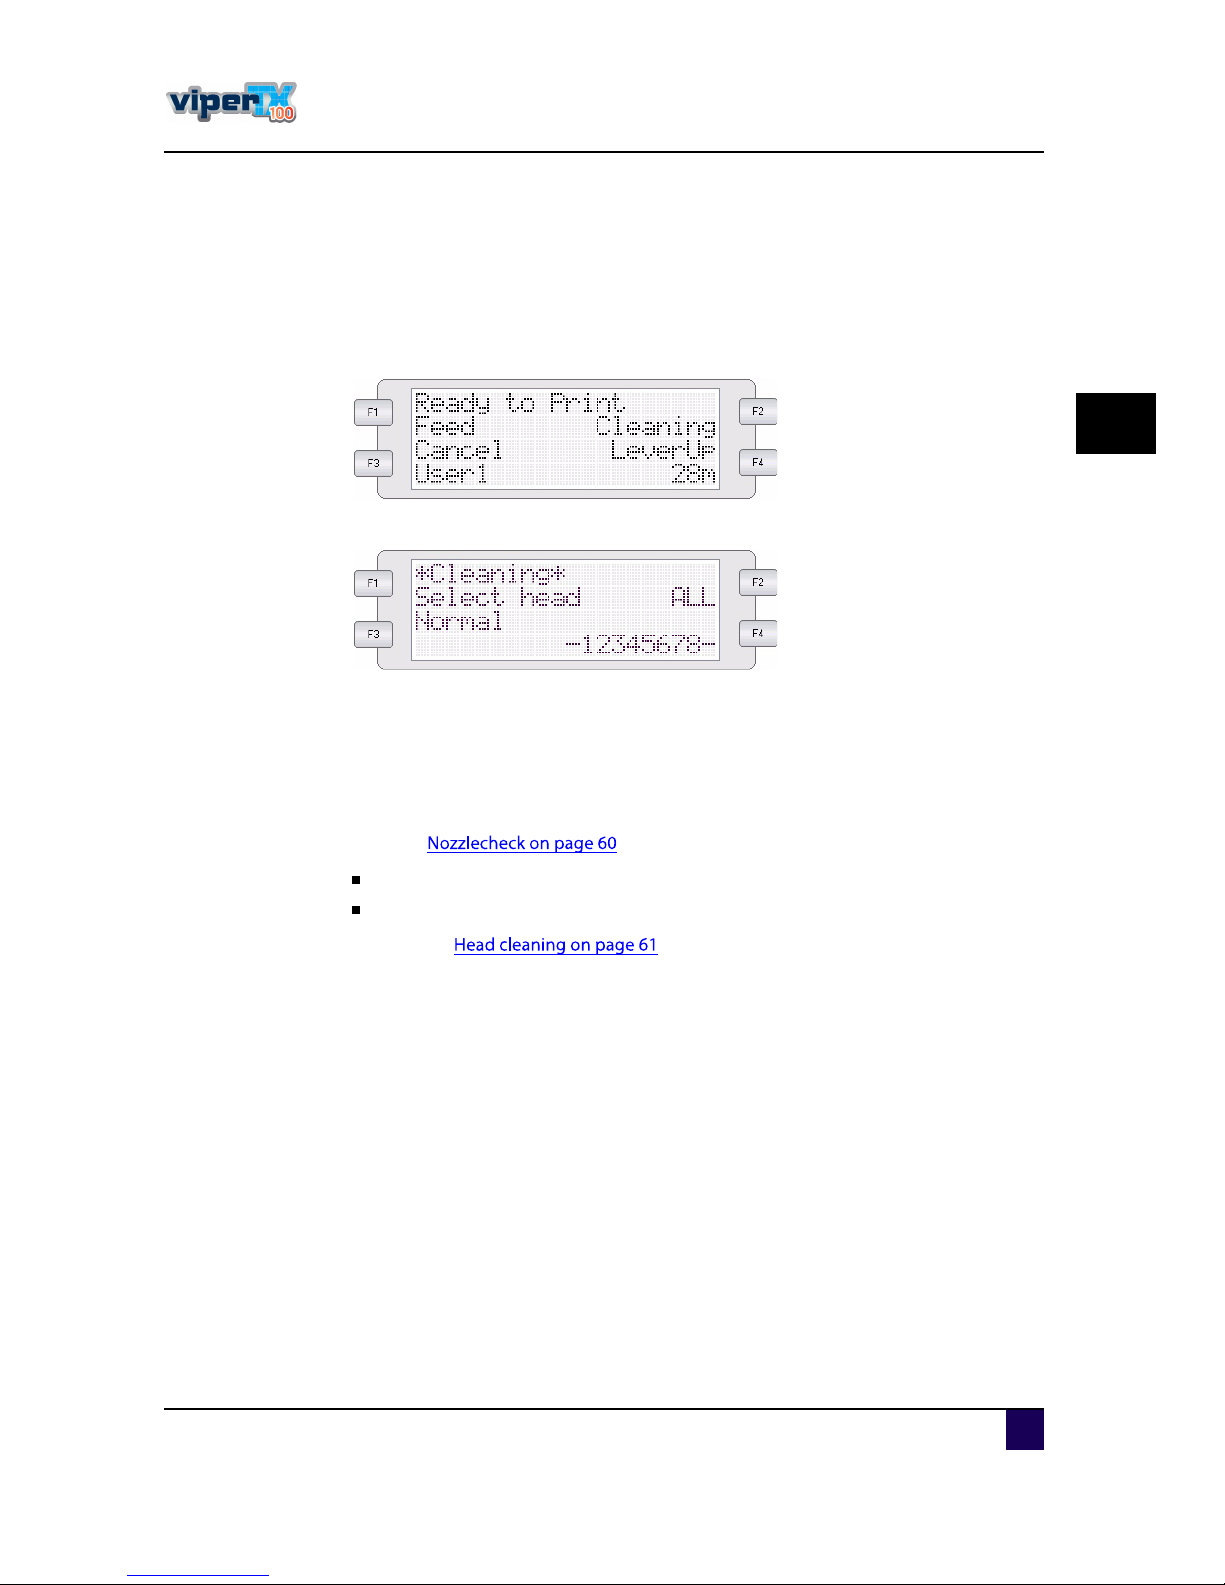
ͬ»° íæ Go to setupmenu 1/7
ͬ»° ìæ P res s F3 to open the tes tprinting m enu
ͬ»° ëæ P res s F2 to printa nozzlec hec k.
ͬ»° êæ E valu ate the pattern.
Ifallnozzles are pres ent. You c an proc e ed with you rjob.
Ifs ome nozzle s are mis s ing. P erform a head c leaning.
Referto
Page 61
Us er s Gu id e V iper TX 1 0 0
C hapter3 B as ic s
A P -7 5350 -Revis ion 1. 1 6 1
3
3.4.2 H ead cleaning
W hen there are s om e mis s ing(c logged )nozzles , a he ad c leaning s hou ld be pe rform ed . Itis
notnec es s ary to c lean allthe head s atonc e. Y ou willhave the pos s ibility to sele c twhic h
head s s hou ld be c le aned and with whic hpower.
ͬ»° ïæ B e s u re thatthe printeris in normals tatu s .
ͬ»° îæ P res s F2 to open the c leaning m e nu .
ͬ»° íæ S elec twhic h head s s hou ld be c leaned with F1.
ͬ»° ìæ S elec tthe powerofthe c leaningd epend ing on the q u antity ofm is s ing nozzles with
F2.
ͬ»° ëæ P res s enter to s tartthe c leaningproc ed u re.
ͬ»° êæ P erform anothernozzlec hec kto verify thatallnozzles are bac k.
Referto
Ifallnozzles are pres ent. You c an proc e ed with you rjob.
Ifs ome nozzle s are mis s ing. P erform anotherhe ad c leaning.
Referto
Page 62
Us er s Gu id e V iper TX 1 0 0
C hapter3 B as ic s
6 2 A P -7 5350 -Revis ion 1. 1
3.4.3 M ed ia feed com pensation (step)
O btainingc ons tantprintingq u ality is notonly d eterm ined by the working environment, the
RIP , the profile s , the inks and the fabric s whic h are u s ed . O ne ofthe ke y fac tors forobtaining
c ons tantou tpu tq u ality is the c orrec td is tance ad ju s tment, als o called s tep.
Basics ab outth e step
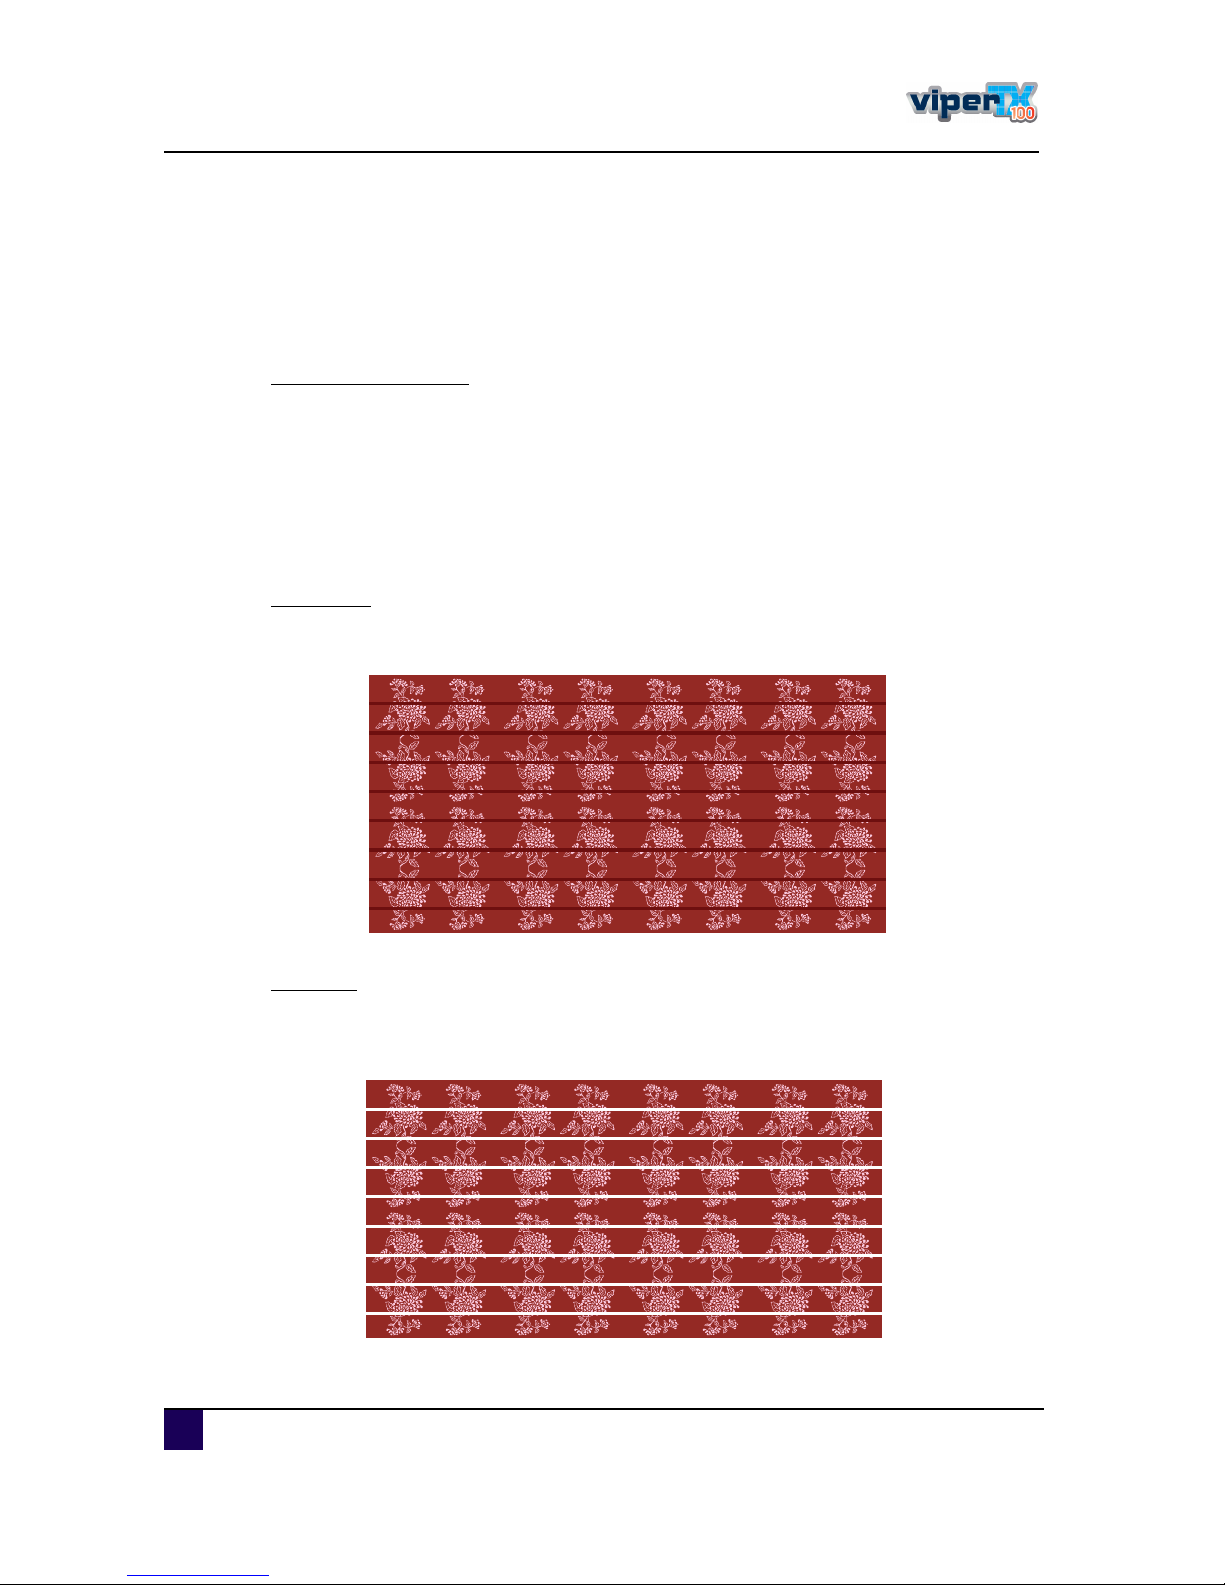
E very image is printed in s everalprintpas s es . A fterevery pass , the fabric is fed an amou ntof
millim etres . W hen the s tepis nots etc orrec tly, the pass es willoverlapeac hotherorwillnot
be printed prec is ely nextto eac h other, whic h re s u lts in white band s between two print
pas s es .
Therefore a fu nc tion, d is tanc e ad ju s t(ors tep), is ad d ed to the menu to c ontrolthis feed
ope ration.
U nderfeed
S tep between the printpas s es is too s m allwhic h res u lts in the pas s es to overlapeac h other.
O verfeed
S tep between the printpas s e s is too large whic hres u lts in the pas s es to be printed too far
from eac hother.
Ю·²¬ °¿-- ï
Ю·²¬ °¿-- î
Ю·²¬ °¿-- è
Ю·²¬ °¿-- ç
ò
ò
ò
Ю·²¬ °¿-- ï
Ю·²¬ °¿-- î
Ю·²¬ °¿-- è
Ю·²¬ °¿-- ç
ò
ò
ò
Page 63
Us er s Gu id e V iper TX 1 0 0
C hapter3 B as ic s
A P -7 5350 -Revis ion 1. 1 6 3
3
R epeatability step
Itis rec omm end ed to startprinting with a s tepof1 0 0 % and to ad ju s titafterward s. O nc e a
s tepis s etfora partic u larfabric , itwillnotc hange on the following c ond itions :
The s tep is only applic able on the printerin qu es tion and notinterc hangeable.
The fabric manu fac tu rerd oes notc hange anys pec ific ations ofthe fabric s .
The u nwind er/wind er1 0 0 is u s ed .
D eterm inin g and setting th e correctstep
The proc ed u re below willexplain how to c hange and interpretthe s tep.
ͬ»° ïæ P owerO N the printe r.
ͬ»° îæ L oad a rollofm ed ia and be s u re to tighte n itto an em pty c ore in the front. This
bec au s e the s tep willbe d ifferentwhen printingroll-to-rollorroll-to-s heet.
Referto
ͬ»° íæ Verify thatallnozzles are pres ent.
Referto
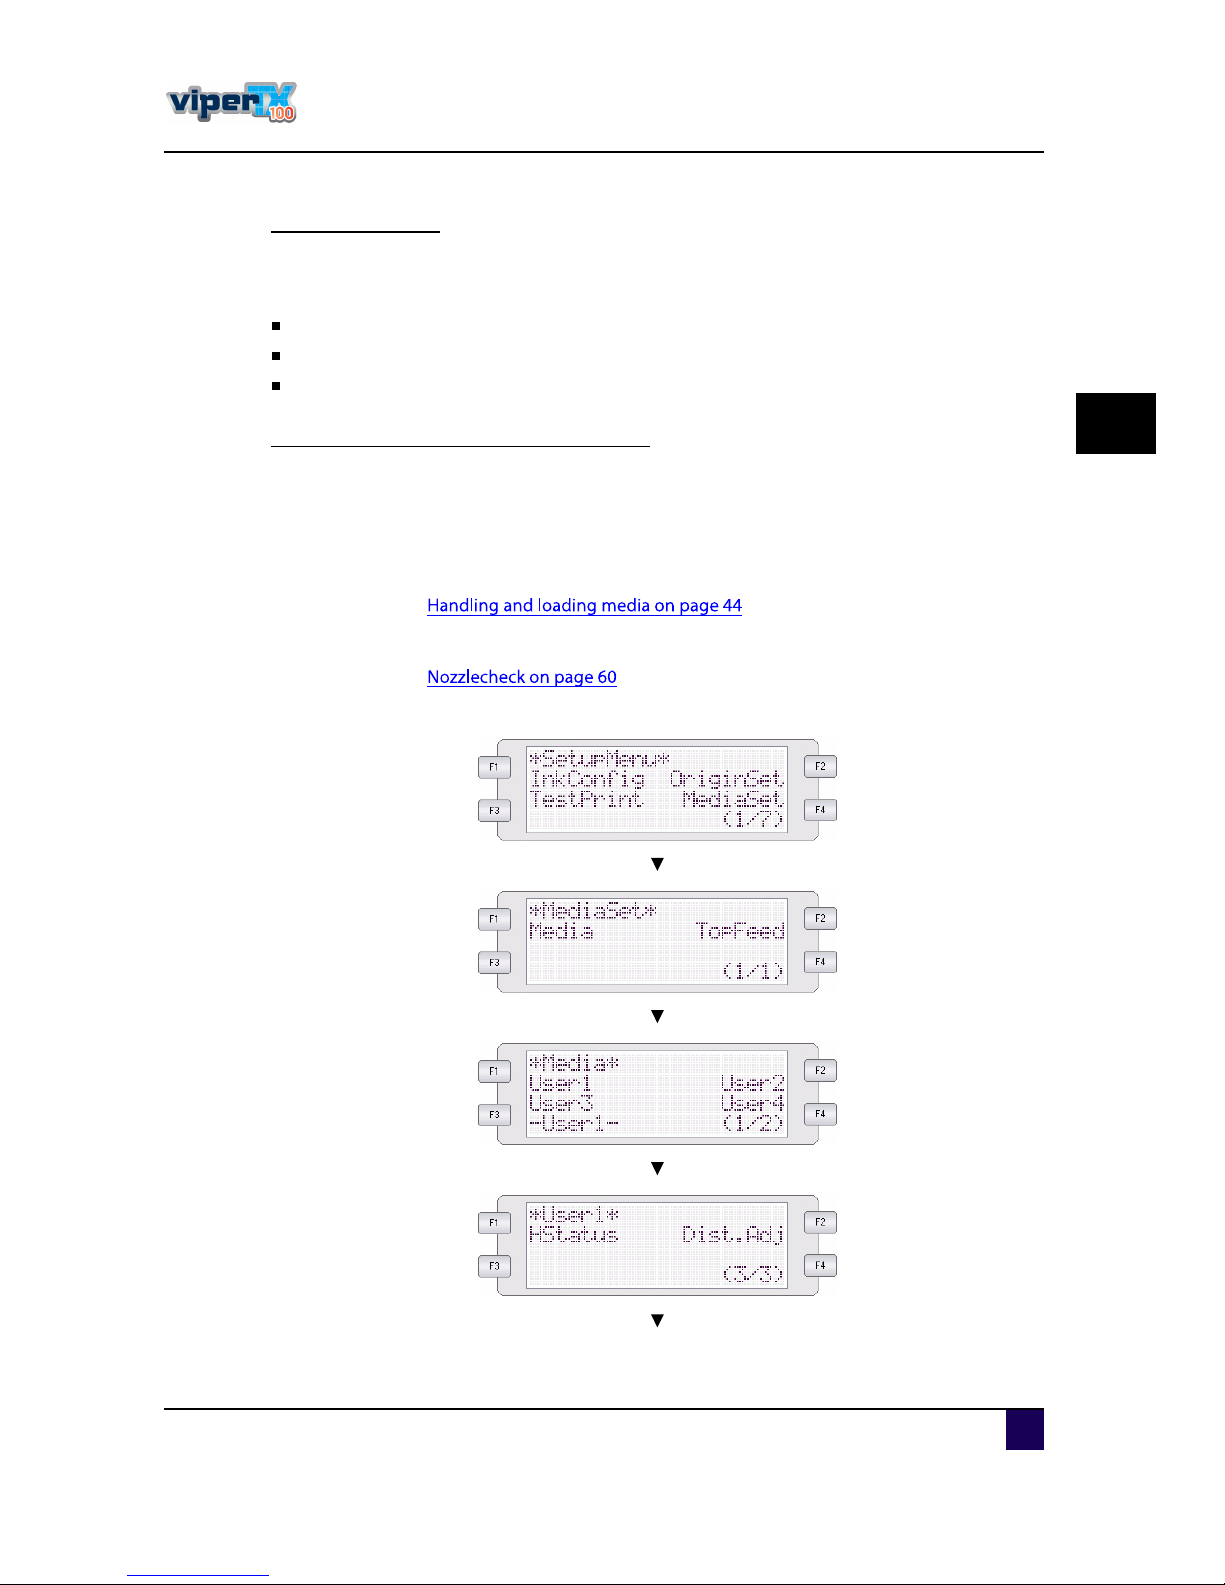
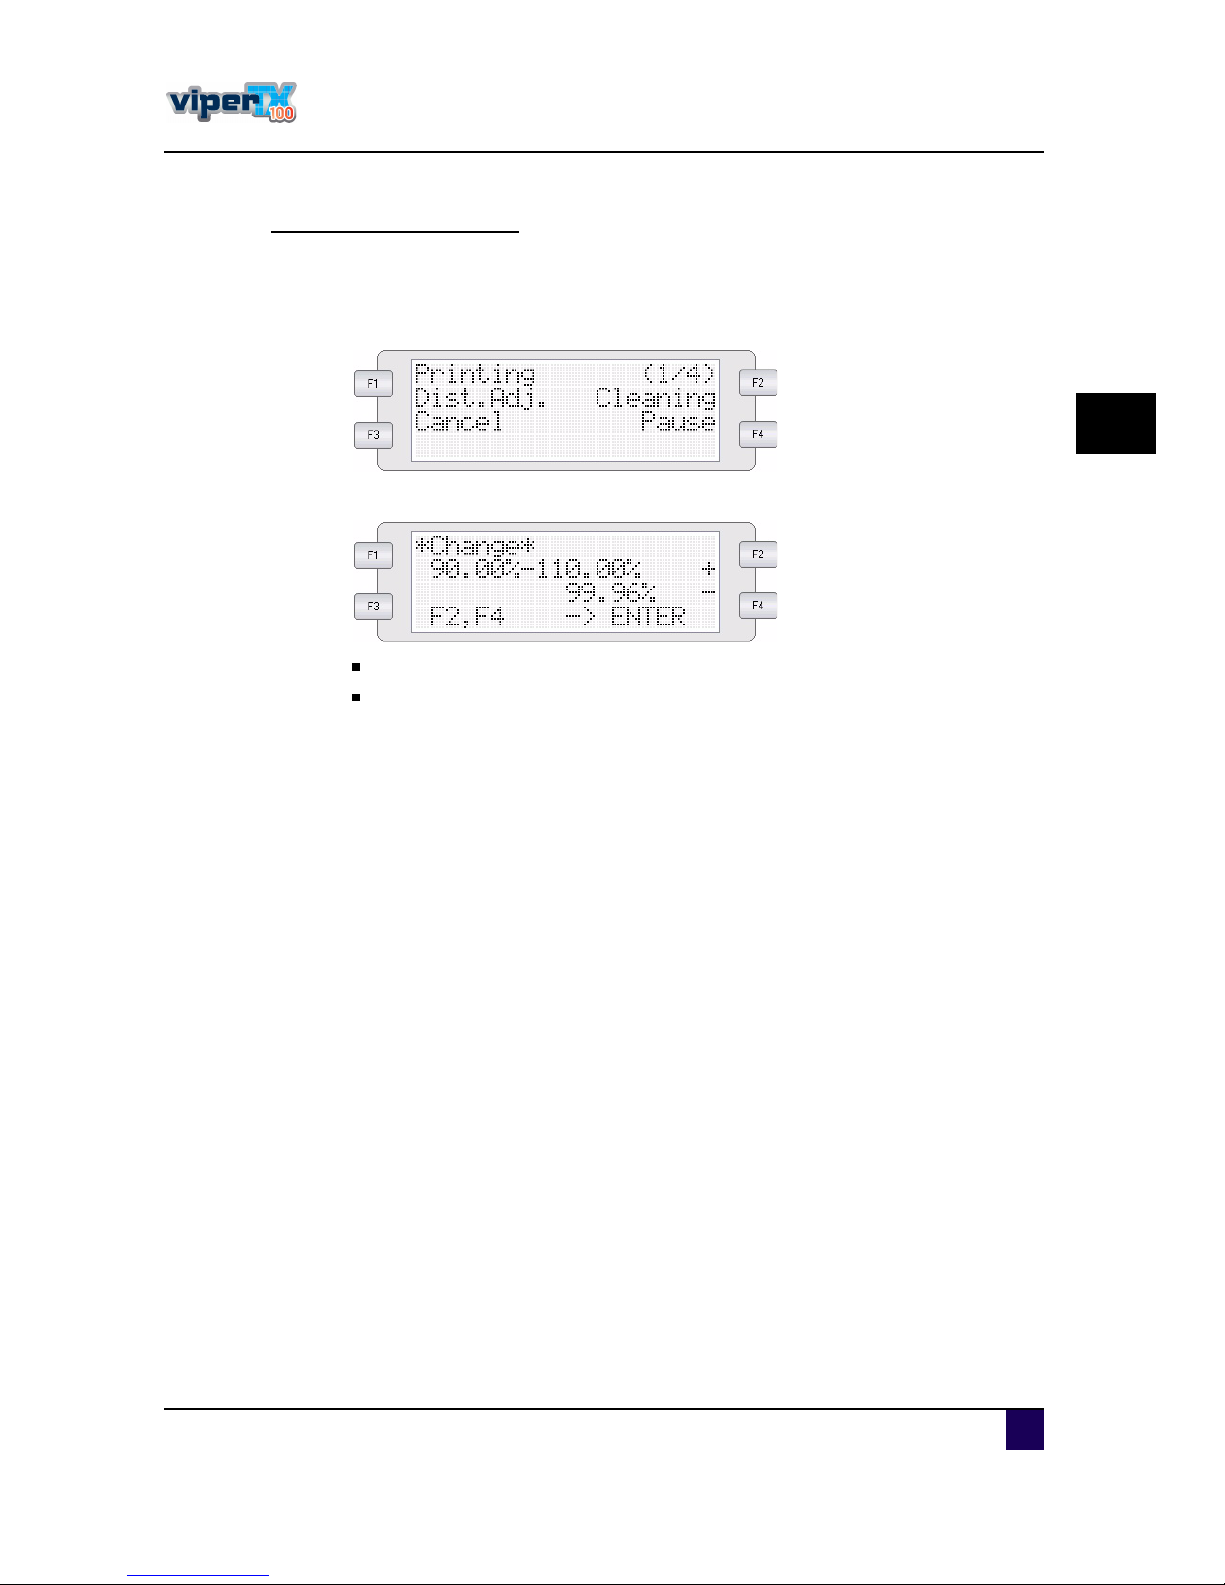
ͬ»° ìæ Go to the D is t. A d j. m enu as follows .
Page 64
Us er s Gu id e V iper TX 1 0 0
C hapter3 B as ic s
6 4 A P -7 5350 -Revis ion 1. 1
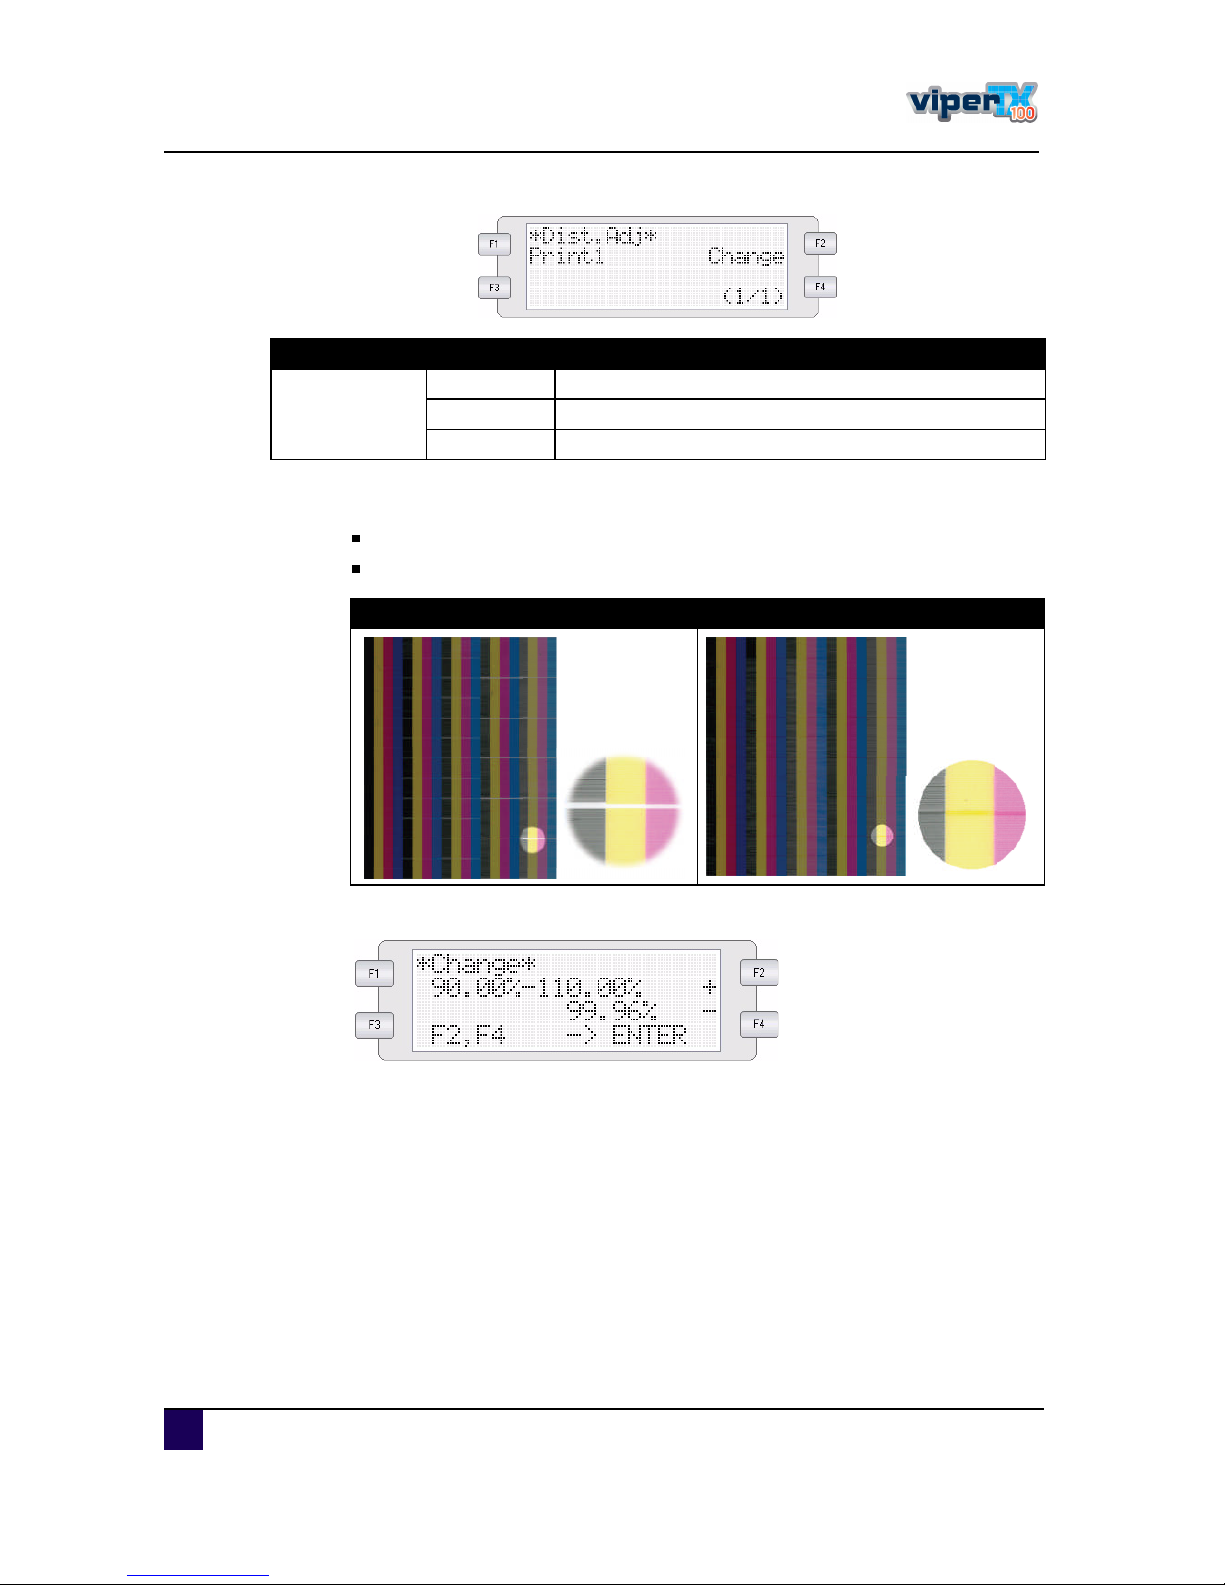
ͬ»° ïæ To evalu ate the tes tpattern, you s hou ld lookforgaps oroverlaps between the
d iffe rentpass es .
In c as e ofoverfeed > d ec reas e the s tep
In c as e ofu nd erfeed > inc reas e the s te p
ͬ»° îæ C hange the s tepis nec es s ary with F2.
ͬ»° íæ P rintthe tes tpattern again u ntilno gaporoverlap is vis ible anym ore.
Setup item s P a ra m eters Description
D is t. A d j.
P rint1 P rintthe tes tfile with intervals of± 0 . 10 %
C hange C hange the s te p (90 . 00 % -11 0 . 0 0 %)
- Cancel: to shiftto the previou s hierarc hy menu .
O v erfeed Underfeed
Page 65
Us er s Gu id e V iper TX 1 0 0
C hapter3 B as ic s
A P -7 5350 -Revis ion 1. 1 6 5
3
C hange th e step o n -th e-fly
H oweveritis rec om m end ed to d eterm ine the s tepbefore you s tarta job on a new med ia, itis
als o pos s ible to ad ju s tthe s tepwhile printing as follows :
ͬ»° ïæ P res s F1 while printing.
ͬ»° îæ P res s F2 orF4 to c hange the s tep.
Rais e the valu e when there are overlaps (u nd erfeed ).
L owerthe valu e when there are gaps vis ible (overfeed ).
ͬ»° íæ P res s enter to s ave the c hanges .
Page 66
Us er s Gu id e V iper TX 1 0 0
C hapter3 B as ic s
6 6 A P -7 5350 -Revis ion 1. 1
3.5 R efilling the ink cassettes
Follow the s teps below to refillthe inkc as s ettes .
ͬ»° ïæ Ifthe printe ris s witc hed O N , m ake s u re that
printingorotheroperations are notperform e d .
the d is play on the operation panels hows the norm als tate.
the M ED IA S ET lighton the operation panelgoes off.
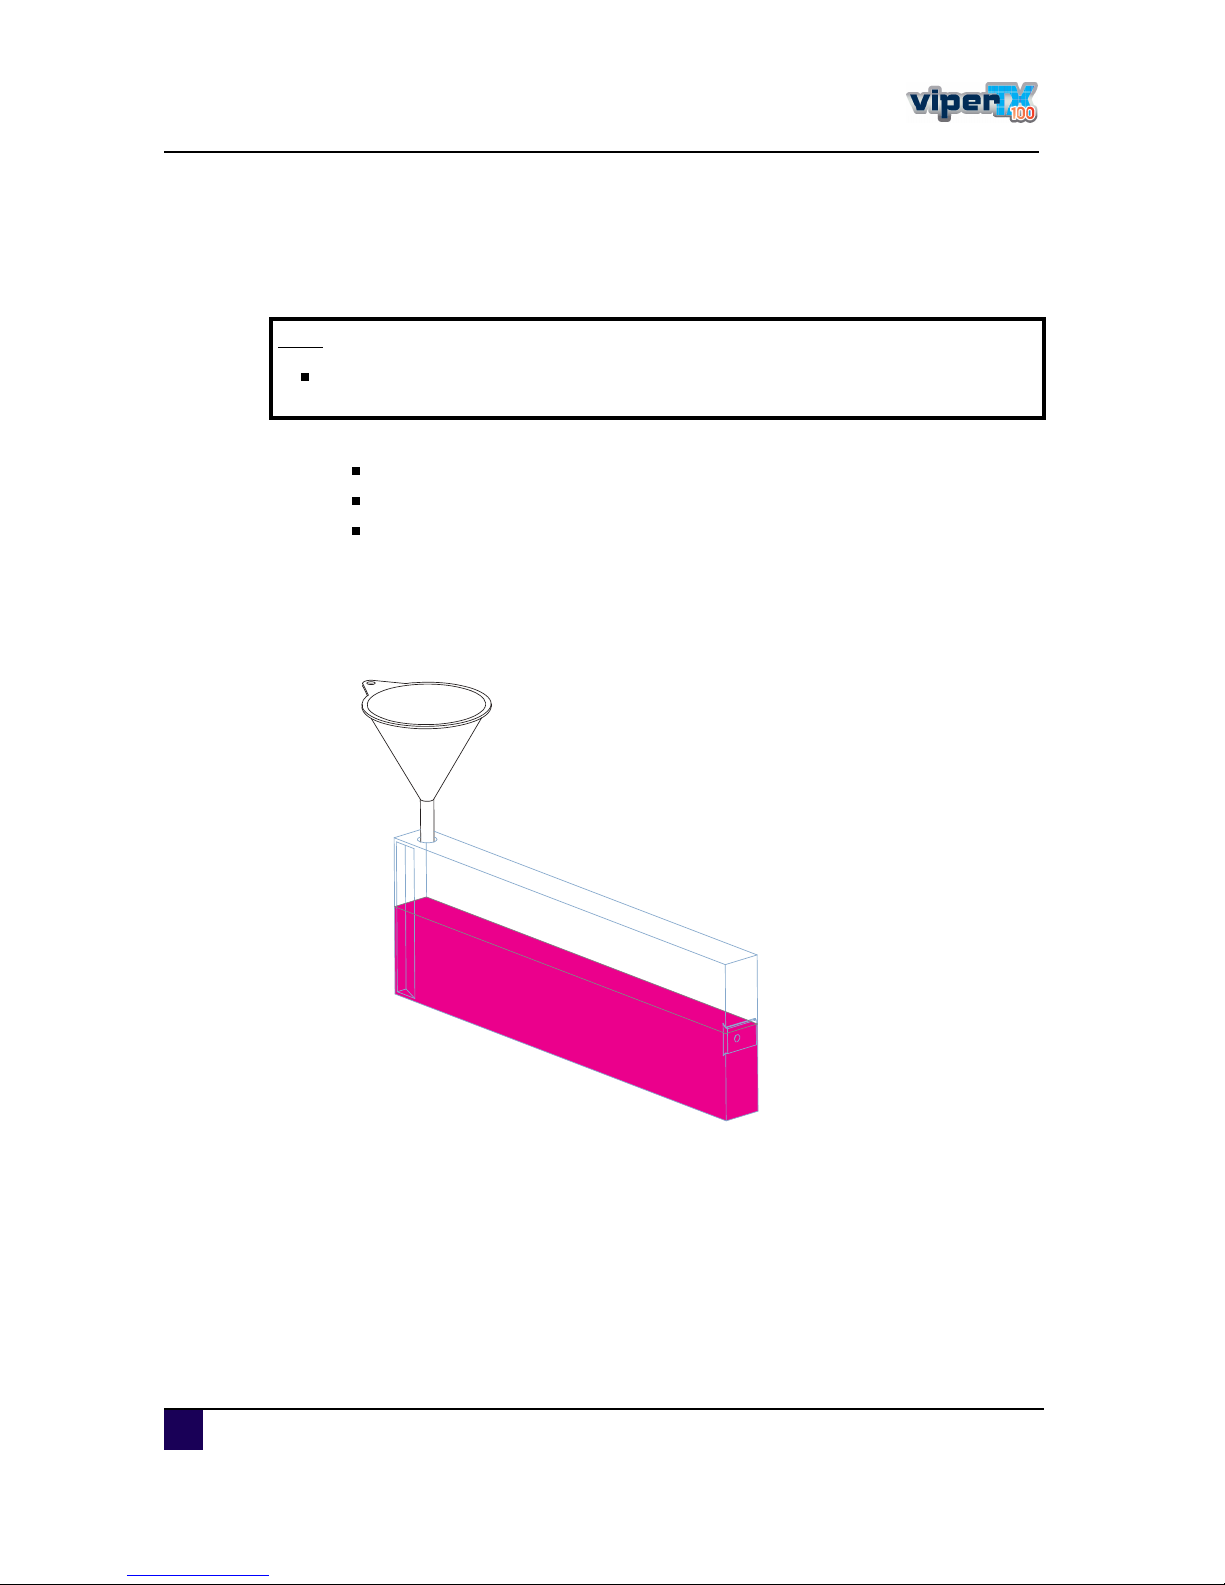
ͬ»° îæ P u llou tthe little plu g on the topofthe ope n c as s ette.
ͬ»° íæ P lac e the fu nnelin the openingofthe c as s ette.
ͬ»° ìæ Fill the cas s ette to a leve l of 60 62 mm (m easu red from bottom ofc as s ette)to
obtain perfec tprintingq u ality.
Ò±¬»
Do notdisa ssem ble th e ink ca ssettes. D isa ssem bles ink ca ssettes w ill no
lon g erw ork prop erly.
Page 67
Us er s Gu id e V iper TX 1 0 0
C hapter3 B as ic s
A P -7 5350 -Revis ion 1. 1 6 7
3
3.6 S w itching betw een ink configurations
ͬ»° ïæ M ake s u re the was te bottle is empty
ͬ»° îæ Remove allc as s ettes .
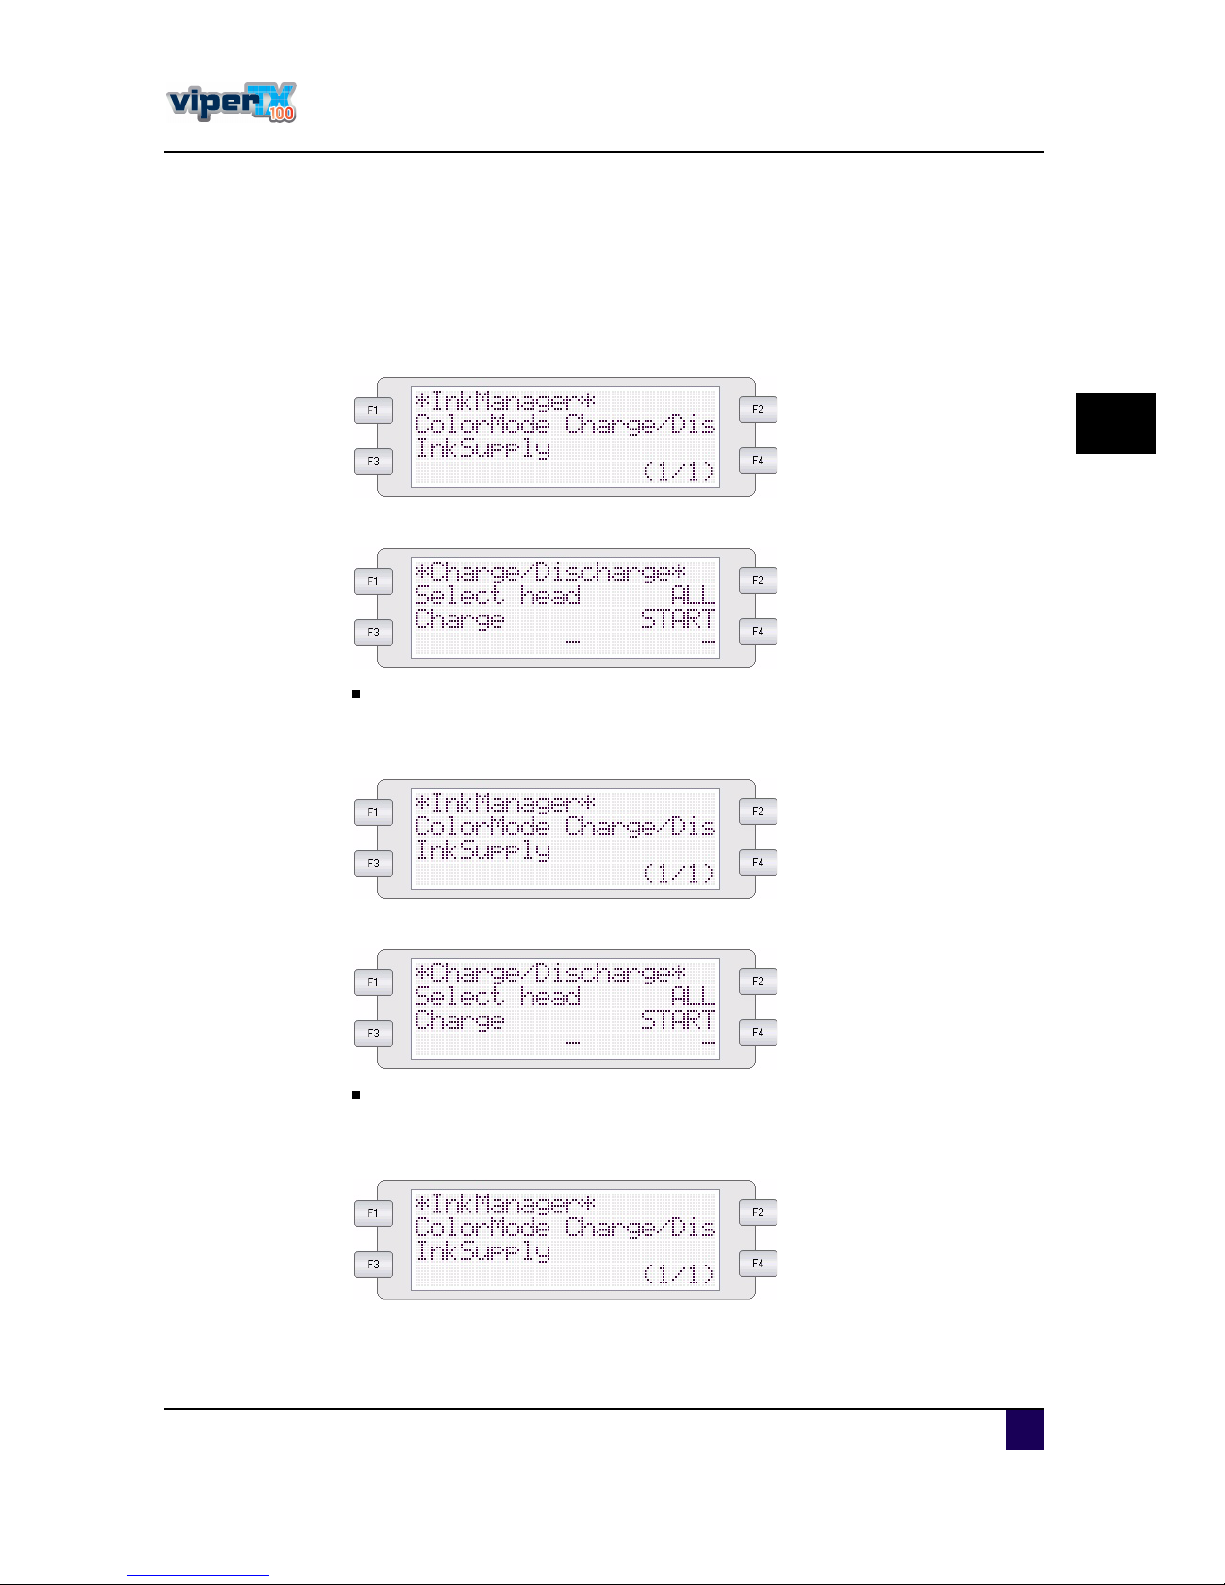
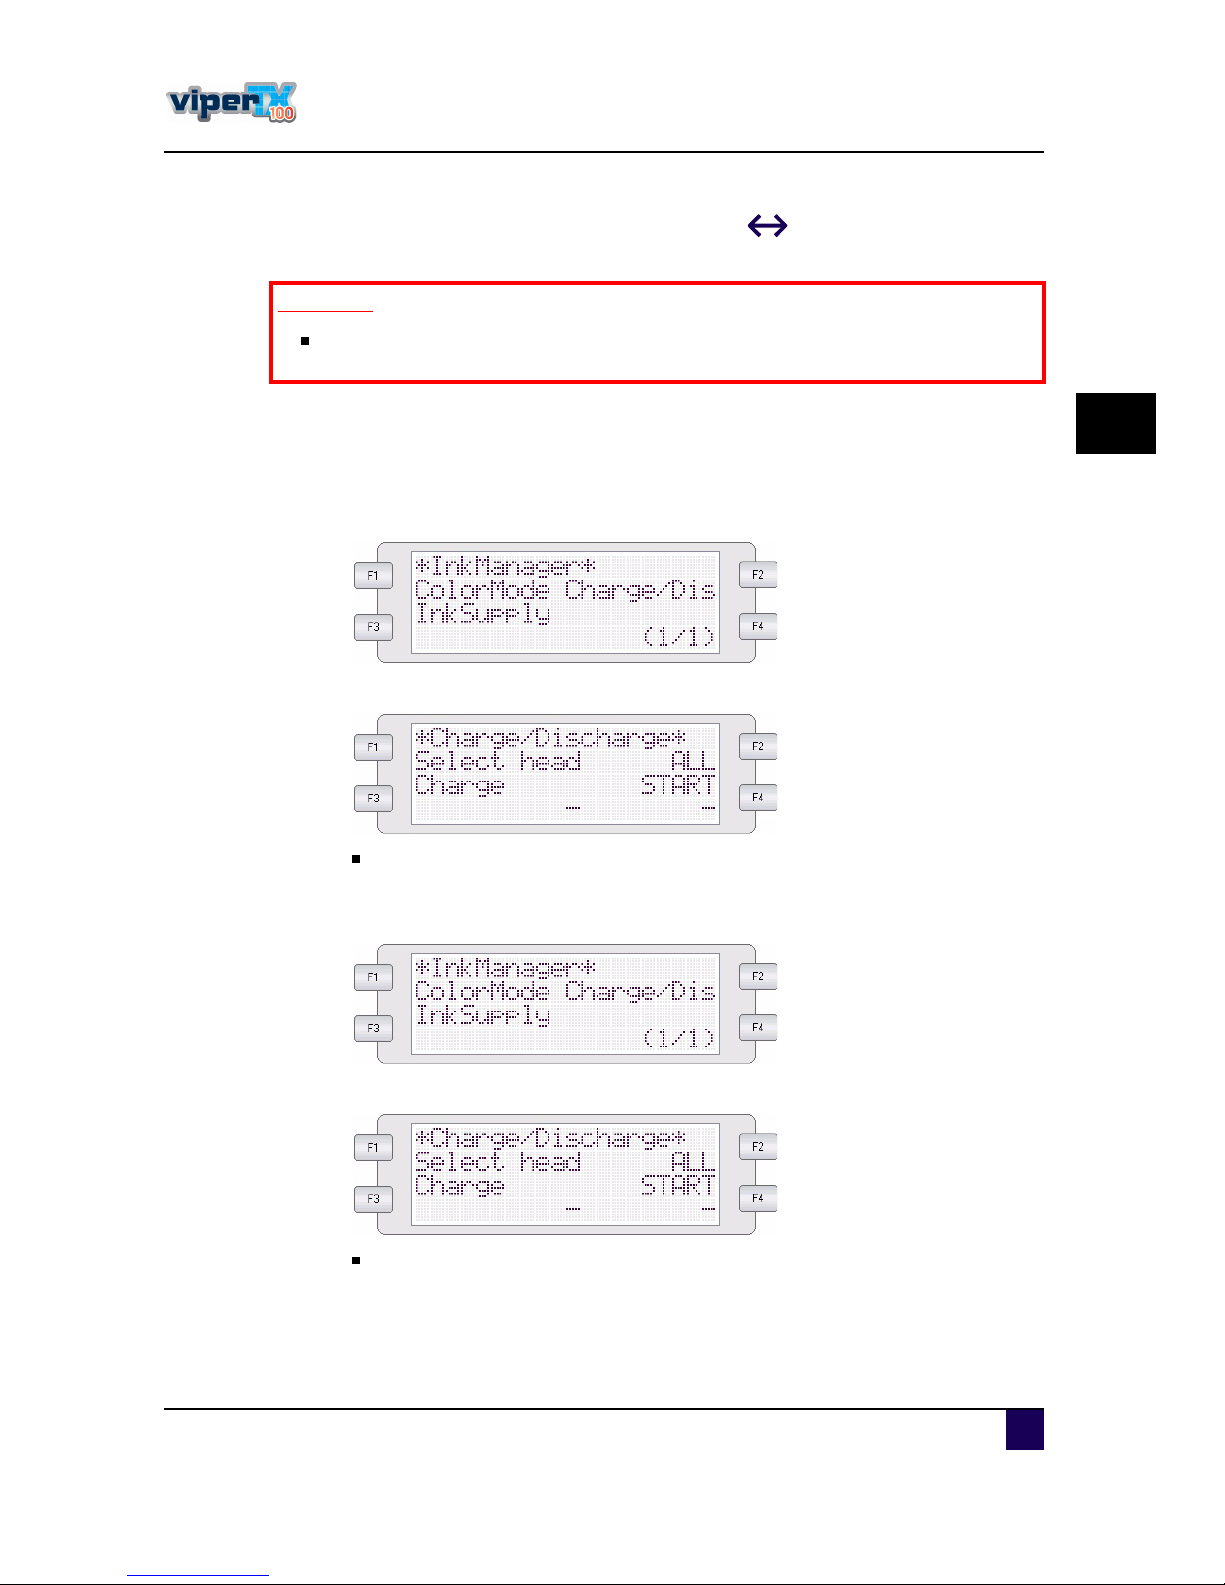
ͬ»° íæ Go to the InkManager menu .
ͬ»° ìæ S elec tC harge/D is c harge.
S elec tallhead s and s tartthe d is c harge proc ed u re for±1 5s ec .
ͬ»° ëæ Ins ertopen c as s ettes filled with M u tohwater-bas ed textile c leaningliq u id .
ͬ»° êæ Go to the InkManager menu .
ͬ»° éæ S elec tC harge/D is c harge.
S elec tallhead s and s tartthe c harge proc ed u re for±8 0 .
ͬ»° èæ P u llou tallc as s ettes .
ͬ»° çæ Go to the InkManager menu .
Page 68
Us er s Gu id e V iper TX 1 0 0
C hapter3 B as ic s
6 8 A P -7 5350 -Revis ion 1. 1
ͬ»° ïðæ S elec tC harge/D is c harge.
S elec tallhead s and s tartthe d is c harge proc ed u re .
ͬ»° ïïæ Ins ertthe open c as s ettes and fillthe m to the c onfigu ration you want.
Referto form oreinform a tio n.
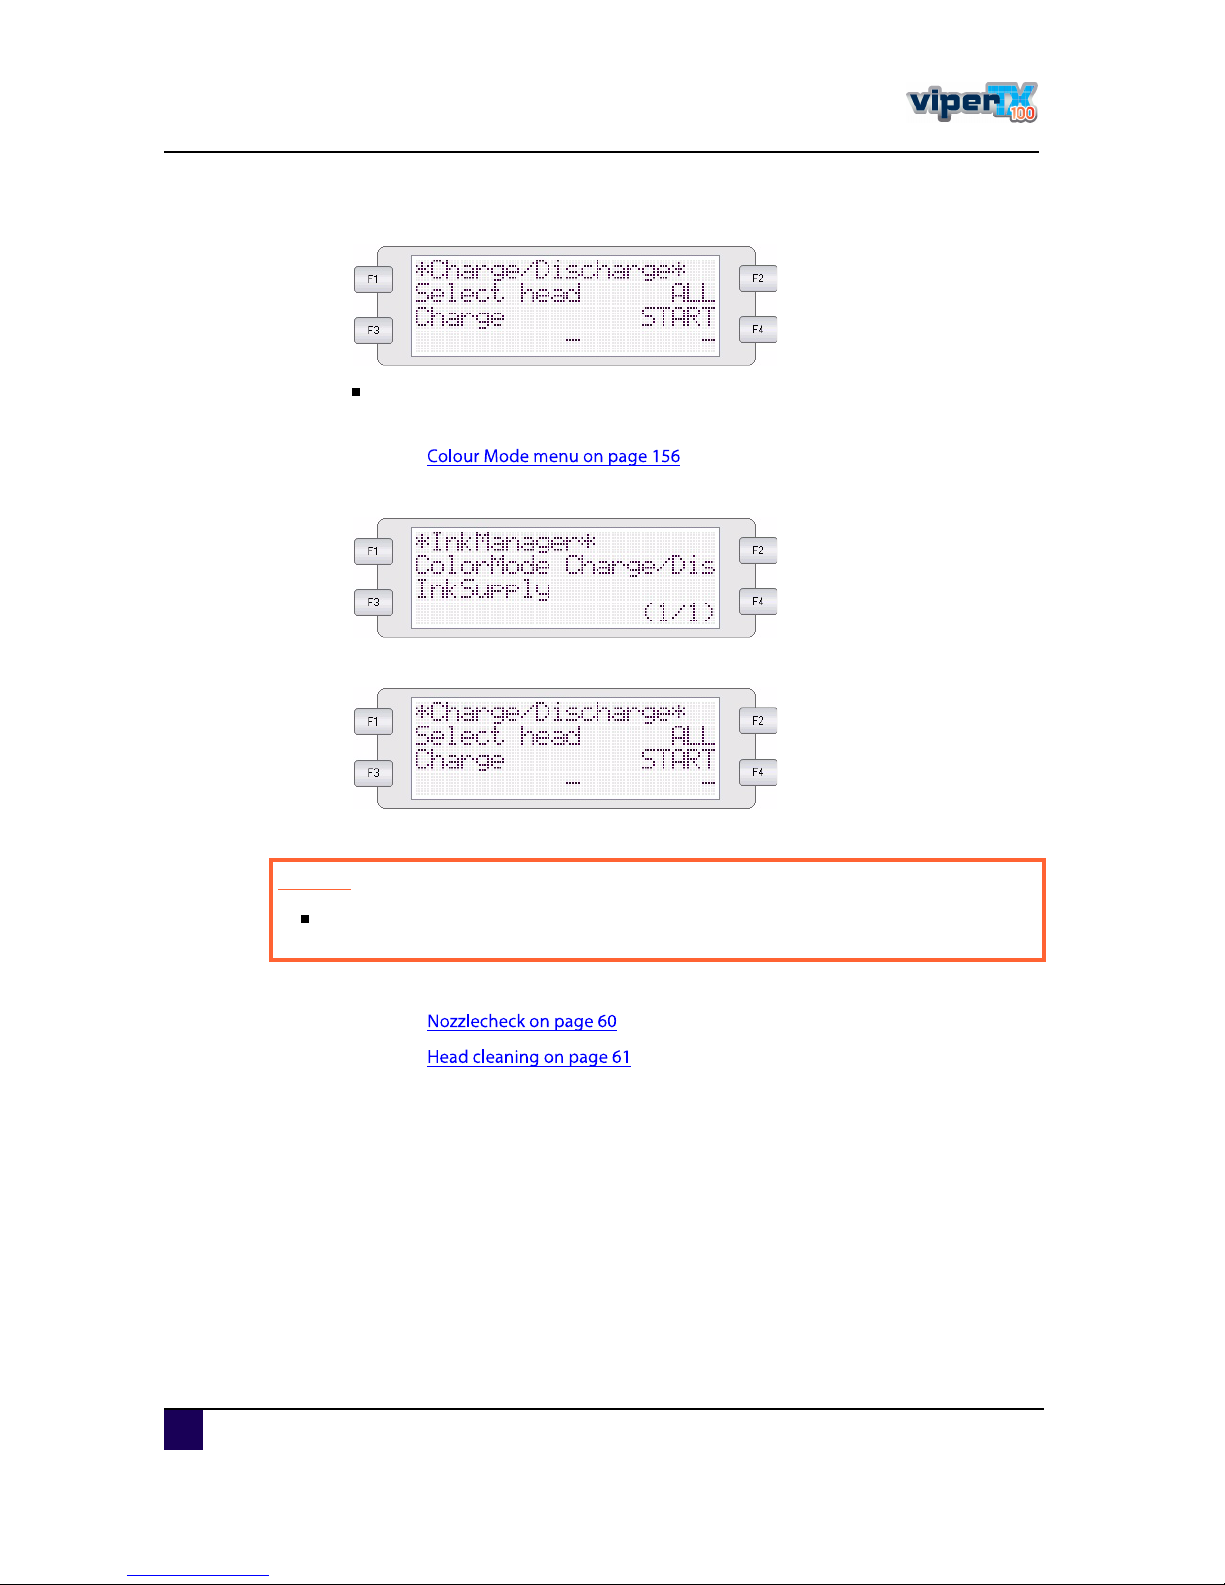
ͬ»° ïîæ Go to the InkManager menu .
ͬ»° ïíæ S elec tC harge/D is c harge.
ͬ»° ïìæ S elec tallhead s and s tartthe c harge proc ed u re.
ͬ»° ïëæ P erform a nozzle c hec kand perform a head c leaningifnec es s ary.
Referto
Referto
Ý¿«¬·±²
P lea se w a ita tlea st30 m inutes before printing a fterloa ding in k. Th is to a llow
th eink to settlein th eprinth ea ds.
Page 69
Us er s Gu id e V iper TX 1 0 0
C hapter3 B as ic s
A P -7 5350 -Revis ion 1. 1 6 9
3
3.7 S w itching ink types (D isperse d ye D irectdisperse)
S inc e the V iperTX 10 0 is a u nivers alprinter, itis pos s ible to s witc hbetween 2 inktypes .
P le ase follow the proc ed u re below.
ͬ»° ïæ M ake s u re the was te bottle is empty
ͬ»° îæ Remove allc as s ettes .
ͬ»° íæ Go to the InkManager menu .
ͬ»° ìæ S elec tC harge/D is c harge.
S elec tallhead s and s tartthe d is c harge proc ed u re .
ͬ»° ëæ Ins ertopen c as s ettes filled with M u tohwater-bas ed textile c leaningliq u id .
ͬ»° êæ Go to the InkManager menu .
ͬ»° éæ S elec tC harge/D is c harge.
S elec tallhead s and s tartthe c harge proc ed u re.
ͬ»° èæ P u llou tallc as s ettes .
׳°±®¬¿²¬
B eforesw itch ing betw een th e ink typ es, rea da ndundersta ndth e M SD S sh eet
w h ich g oestog eth erw ith th eink.
Page 70
Us er s Gu id e V iper TX 1 0 0
C hapter3 B as ic s
7 0 A P -7 5350 -Revis ion 1. 1
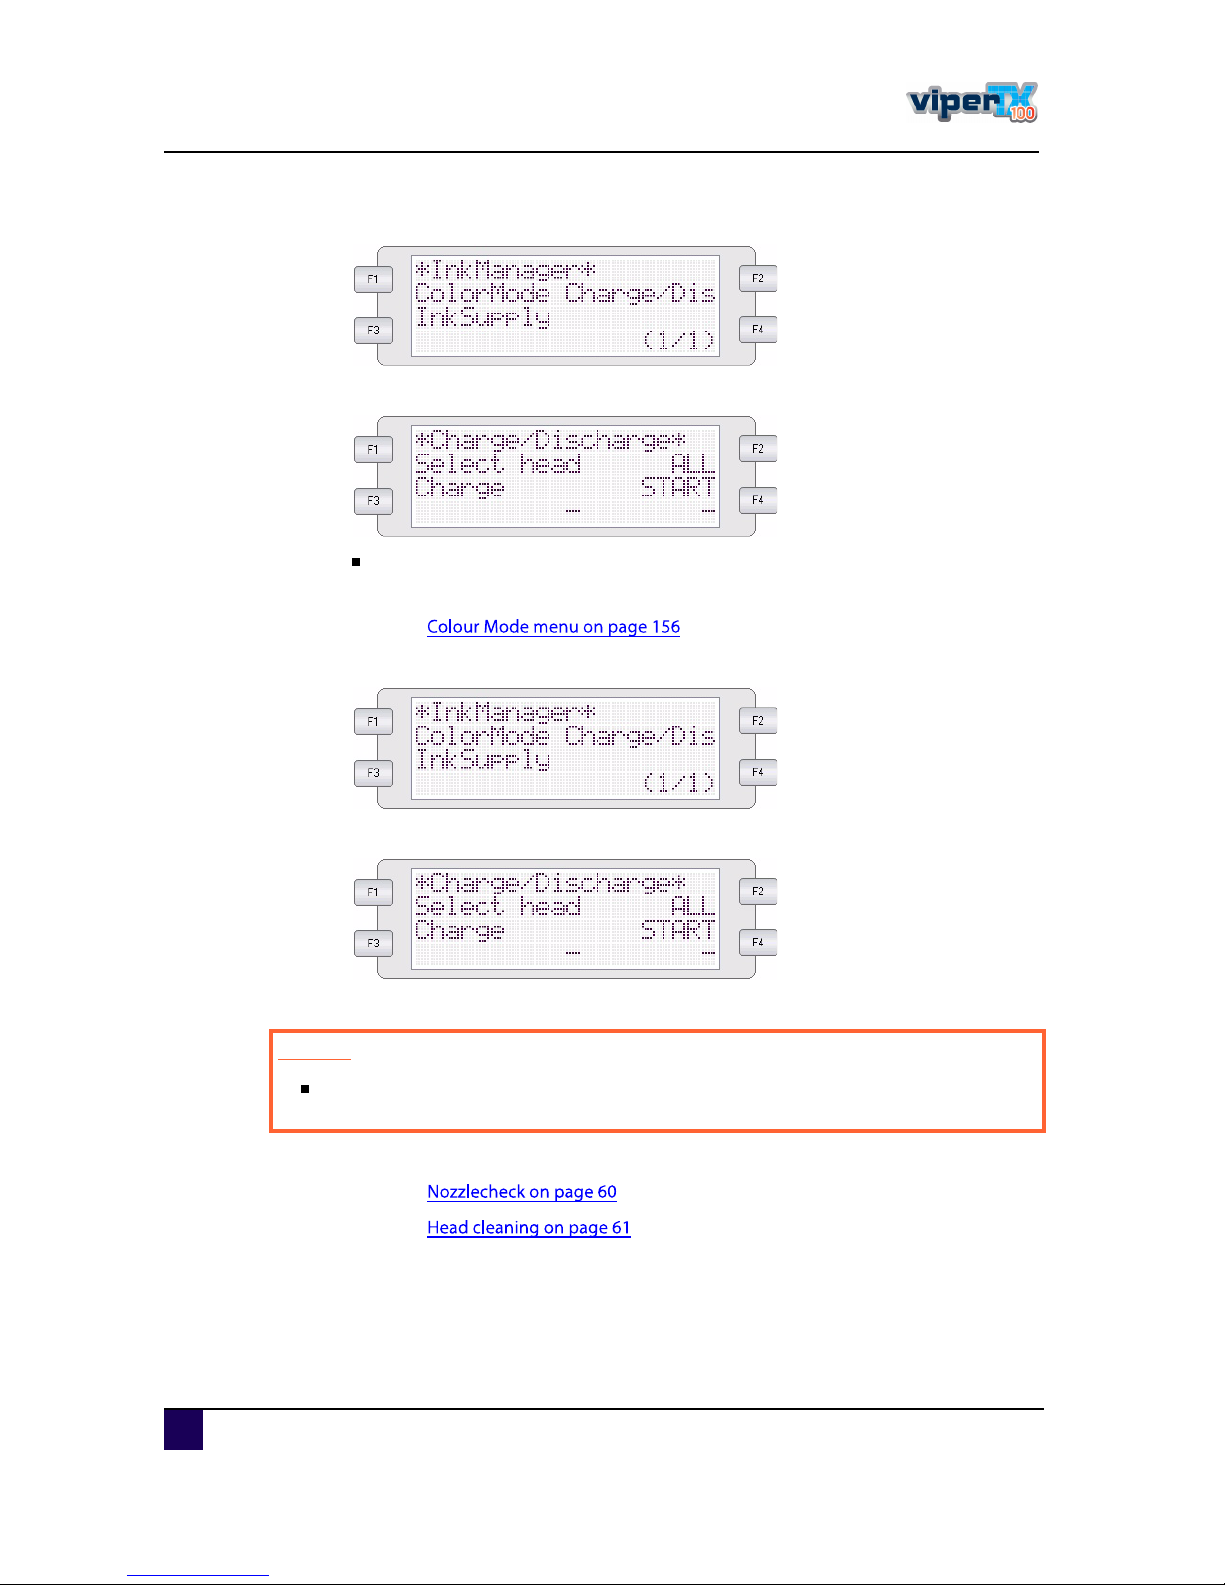
ͬ»° çæ Go to the InkManager menu .
ͬ»° ïðæ S elec tC harge/D is c harge.
S elec tallhead s and s tartthe d is c harge proc ed u re .
ͬ»° ïïæ Ins ertthe open c as s ettes and fillthe m to the c onfigu ration you want.
Referto form oreinform a tio n.
ͬ»° ïîæ Go to the InkManager menu .
ͬ»° ïíæ S elec tC harge/D is c harge.
ͬ»° ïìæ S elec tallhead s and s tartthe c harge proc ed u re.
ͬ»° ïëæ P erform a nozzle c hec kand perform a head c leaningifnec es s ary.
Referto
Referto
Ý¿«¬·±²
P lea se w a ita tlea st30 m inutes before printing a fterloa ding in k. Th is to a llow
th eink to settlein th eprinth ea ds.
Page 71
Us er s Gu id e V iper TX 1 0 0
C hapter3 B as ic s
A P -7 5350 -Revis ion 1. 1 7 1
3
3.8 R eplacing the w aste bottle
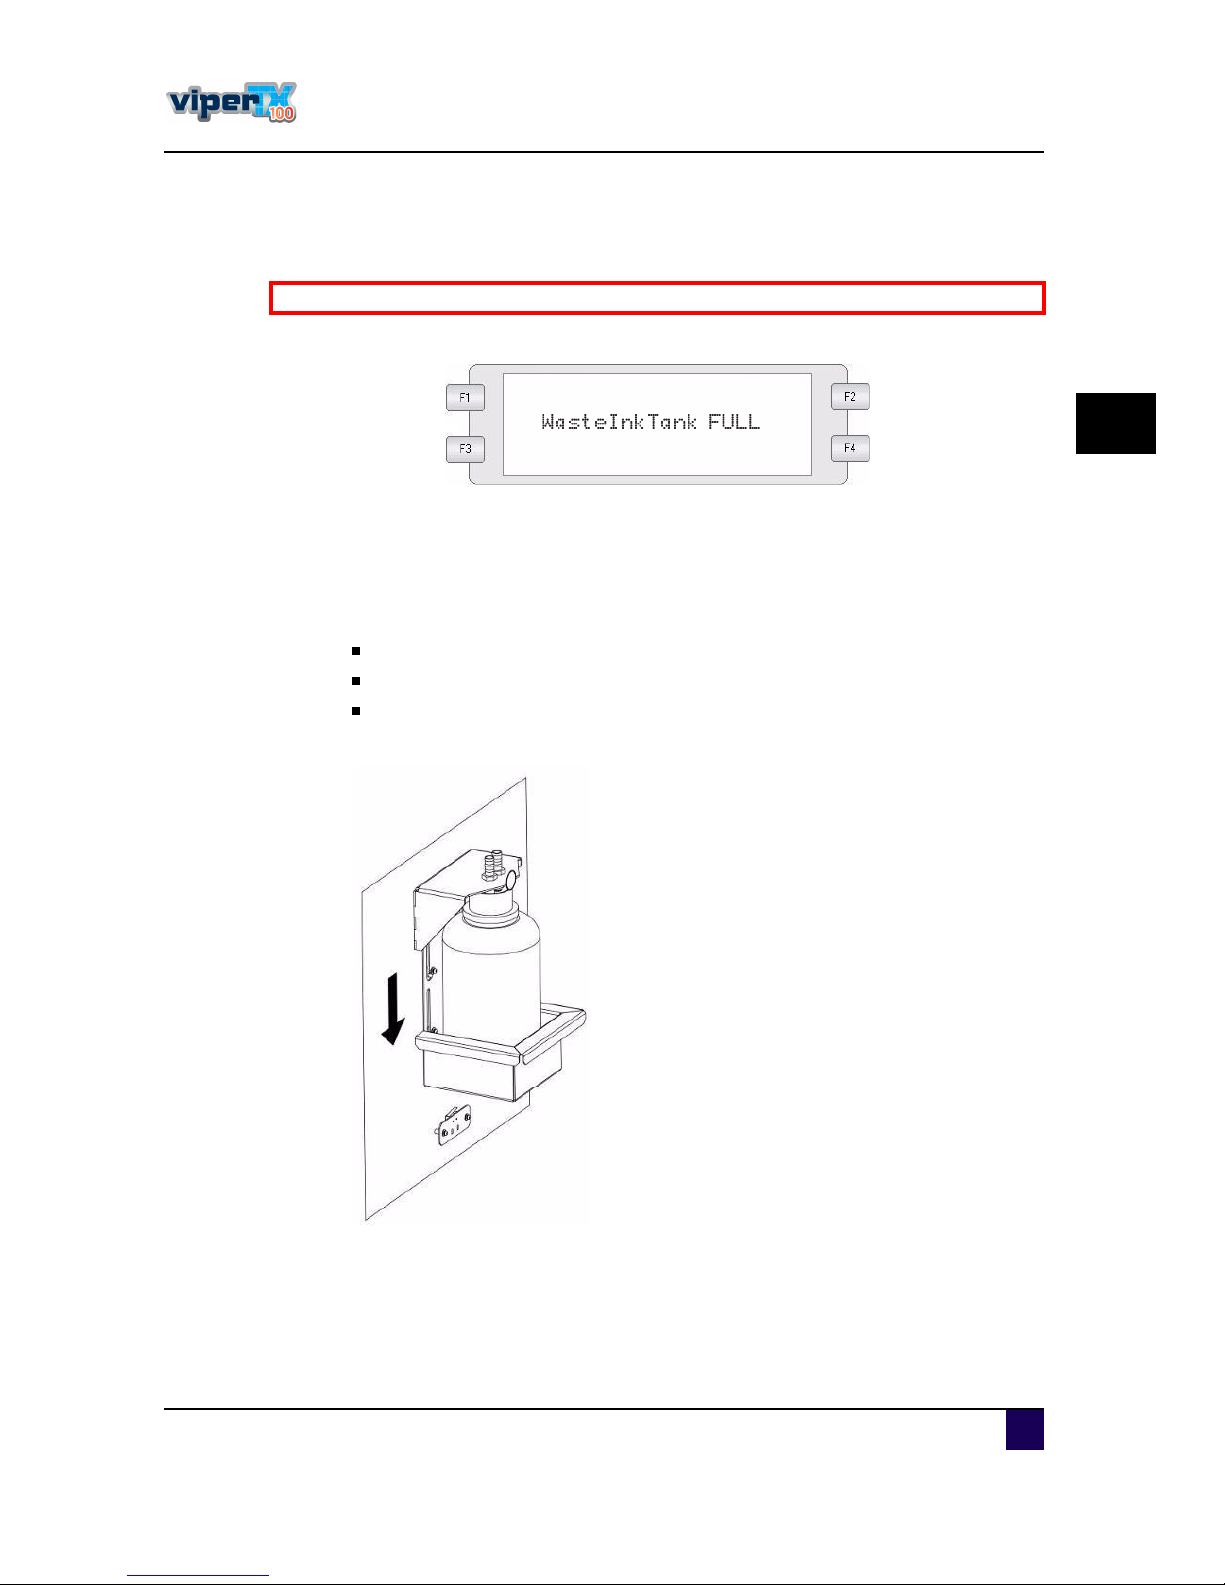
Replac e the was te bottle when the was te bottle is fu ll. A mes s age willappearon the d is play.
3.8.1 R eplacem entP rocedures
Follow the s teps below to replac e the was te bottle.
ͬ»° ïæ C hec kthe following ifthe powerofthe printeris O N .
P rinteris notprinting.
O peration panelis in norm als tatu s .
M ed ia s etting lighton the ope ration panelis O FF.
ͬ»° îæ L owerthe was te inktanktray.
B e sureto rea da ndundersta ndth esa fetyw a rning s beforeh a ndling th e printer.
Page 72
Us er s Gu id e V iper TX 1 0 0
C hapter3 B as ic s
7 2 A P -7 5350 -Revis ion 1. 1
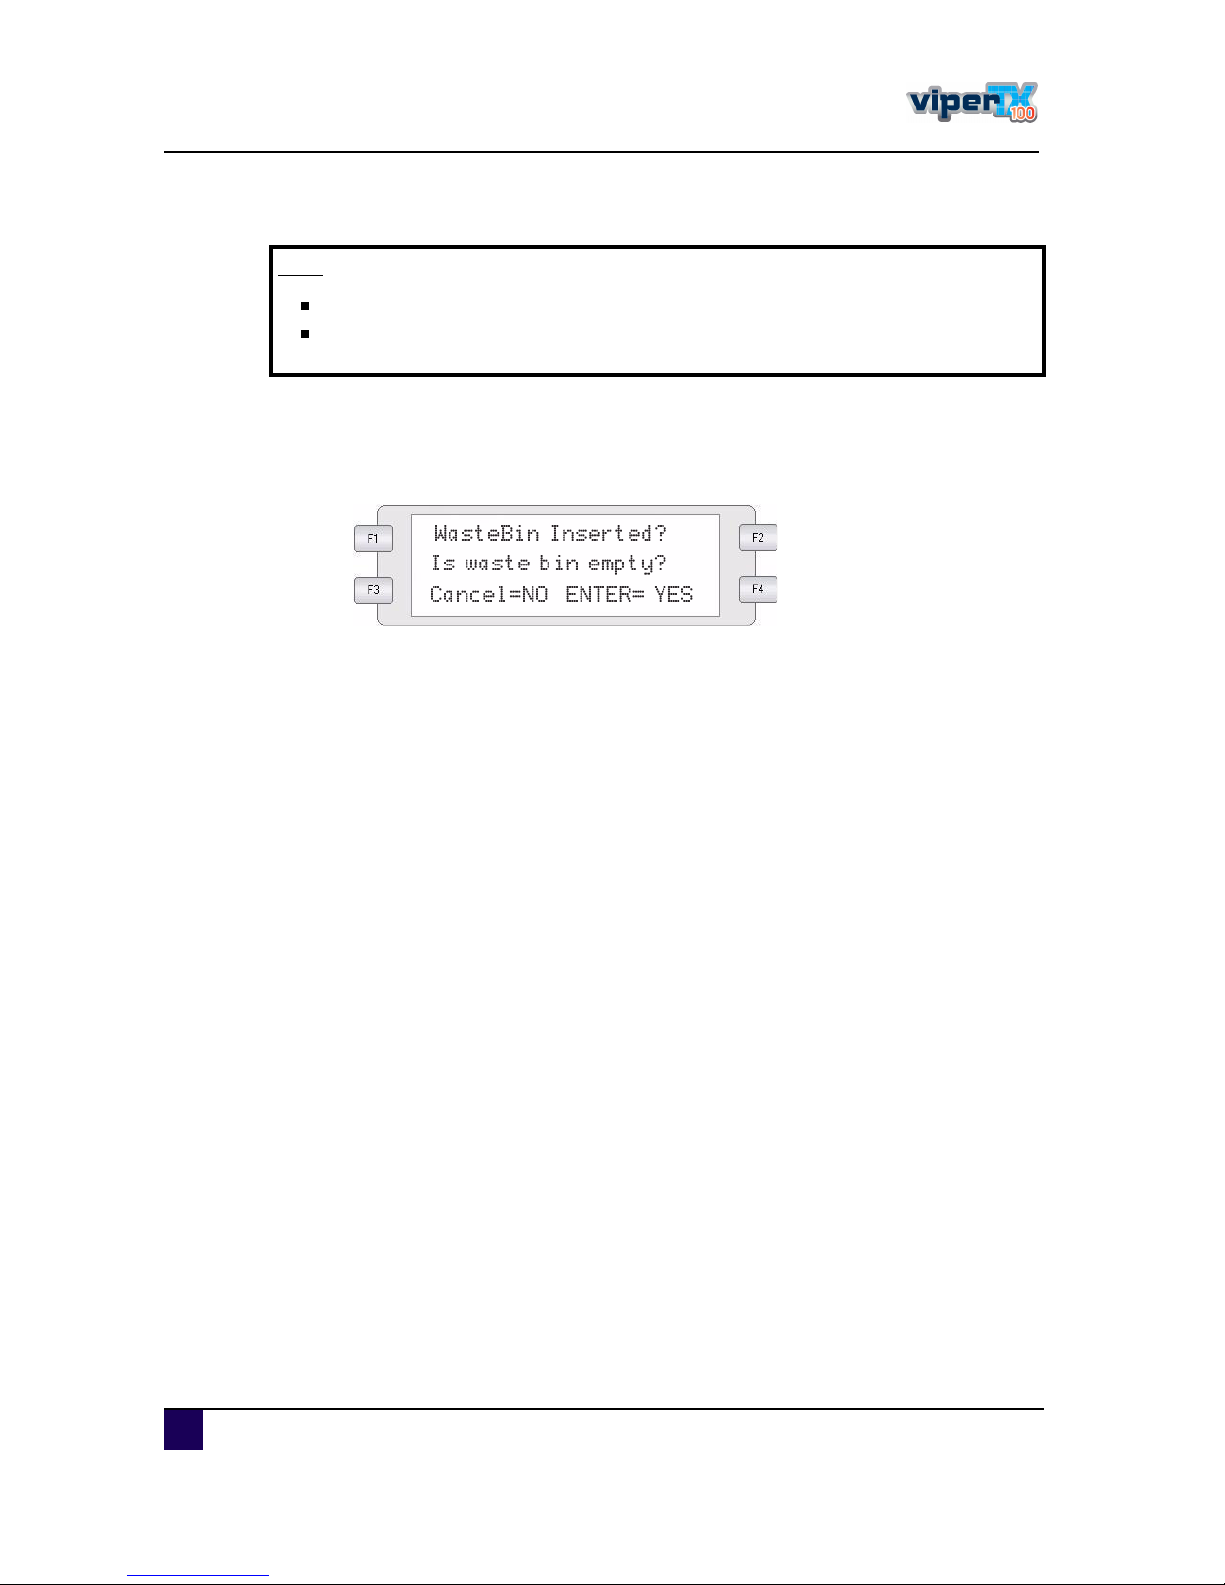
ͬ»° íæ Remove the was te inkbottle and plac e an empty was te inkbottle.
ͬ»° ìæ Replac e the fu llone with an em pty one and em pty the fu llone.
ͬ»° ëæ Replac e the was te inkbottle and gu id e the was te inktanktray bac kto its home
pos ition.
ͬ»° êæ Followingm es sage willbe d is played afterreplac em ent.
Ò±¬»
F ollow th e lo ca lreg ula tionsw h en dispo sing th ew a ste ink.
Th ecou nterof th e w a ste bottlew illberesetfrom th e m om en tth e tra y relea ses
th esensor. So besureto em pty th e w a steta nk, oth erw iseitw ill ov erflow .
Page 73

Us er s Gu id e V iper TX 1 0 0
C hapter3 B as ic s
A P -7 5350 -Revis ion 1. 1 7 3
3
3.9 R elocating and transporting th e printer
3.9.1 R elocating the printer
Itis pos s ible thatyou mightwantto reloc ate the printe r. Follow the proc ed u re be low to ens u re
nothinggets broken d u ringthe reloc ation.
Y ou c an reloc ate the ViperTX 1 0 0 withou tmaking any c leanings ! Ifyou d o flu s hou tallink,
the printerhas to be s tarted u pnextd ay again.
Ifthe u nitwillnotbe u s ed form any d ays itis bes tN O Tto flu s h orc lean the head s. This to
preventthatthe he ad s d ry ou t.
ͬ»° ïæ S witc h off the printer.
ͬ»° îæ Remove allc ables .
ͬ»° íæ L oc kthe c arrierwith the s pec ialbrac ketthatc om es with a new u nit. If you los tthe
brac ket, you c an u s e tape s o thatthe c arriage c an no longe rm ove.
ͬ»° ìæ Take ou tallinkc as s ettes and replac e them with d u mm y c as s ettes .
Thes e d u m my c as s ettes c an be ord ered atyou rM u toh d is tribu tor.
ͬ»° ëæ E m pty the was te bottle.
ͬ»° êæ C le an the gu tterand e m pty the was te tray.
Referto
Referto
ͬ»° éæ C lamp allwas te tu bes .
C lamps c an be ord ered atyou rM u toh d is tribu tor
ͬ»° èæ S ec u re allc overs whic h c an be ope ned with tape, u s e a tape thatd oes notleave
anyglu e m arks afterremoval.
ͬ»° çæ Ifre loc atingthe printeron its s tand , s ec u re the u nwind er/wind ers wingbars with
tape.
ͬ»° ïðæ Remove the was te bottle ors ec u re itwithtape.
ͬ»° ïïæ P u ttape overthe frontofthe c as s ettes s o thatthe c as s ettes c annotc ome ou tof
theirs lotd u ringtransport.
ͬ»° ïîæ Tu rn in alllevelling feetofboth the printeras ofthe Unwind er/wind er1 0 0.
Ò±¬»
B y reloca ting th e prin ter, w e m ea n m ov ing th e prin terto a noth erpla ce w ith in
th efirm .
Ò±¬»
A fterw a rds, reinsta ll th eprintera ccording to th eI nsta lla tion G uide.
M a kesureth a tth e ink g u tterispo sition edcorrectly.
P lea seconta ctyourloca lM utoh dea lerform oreinform a tio n.
Page 74
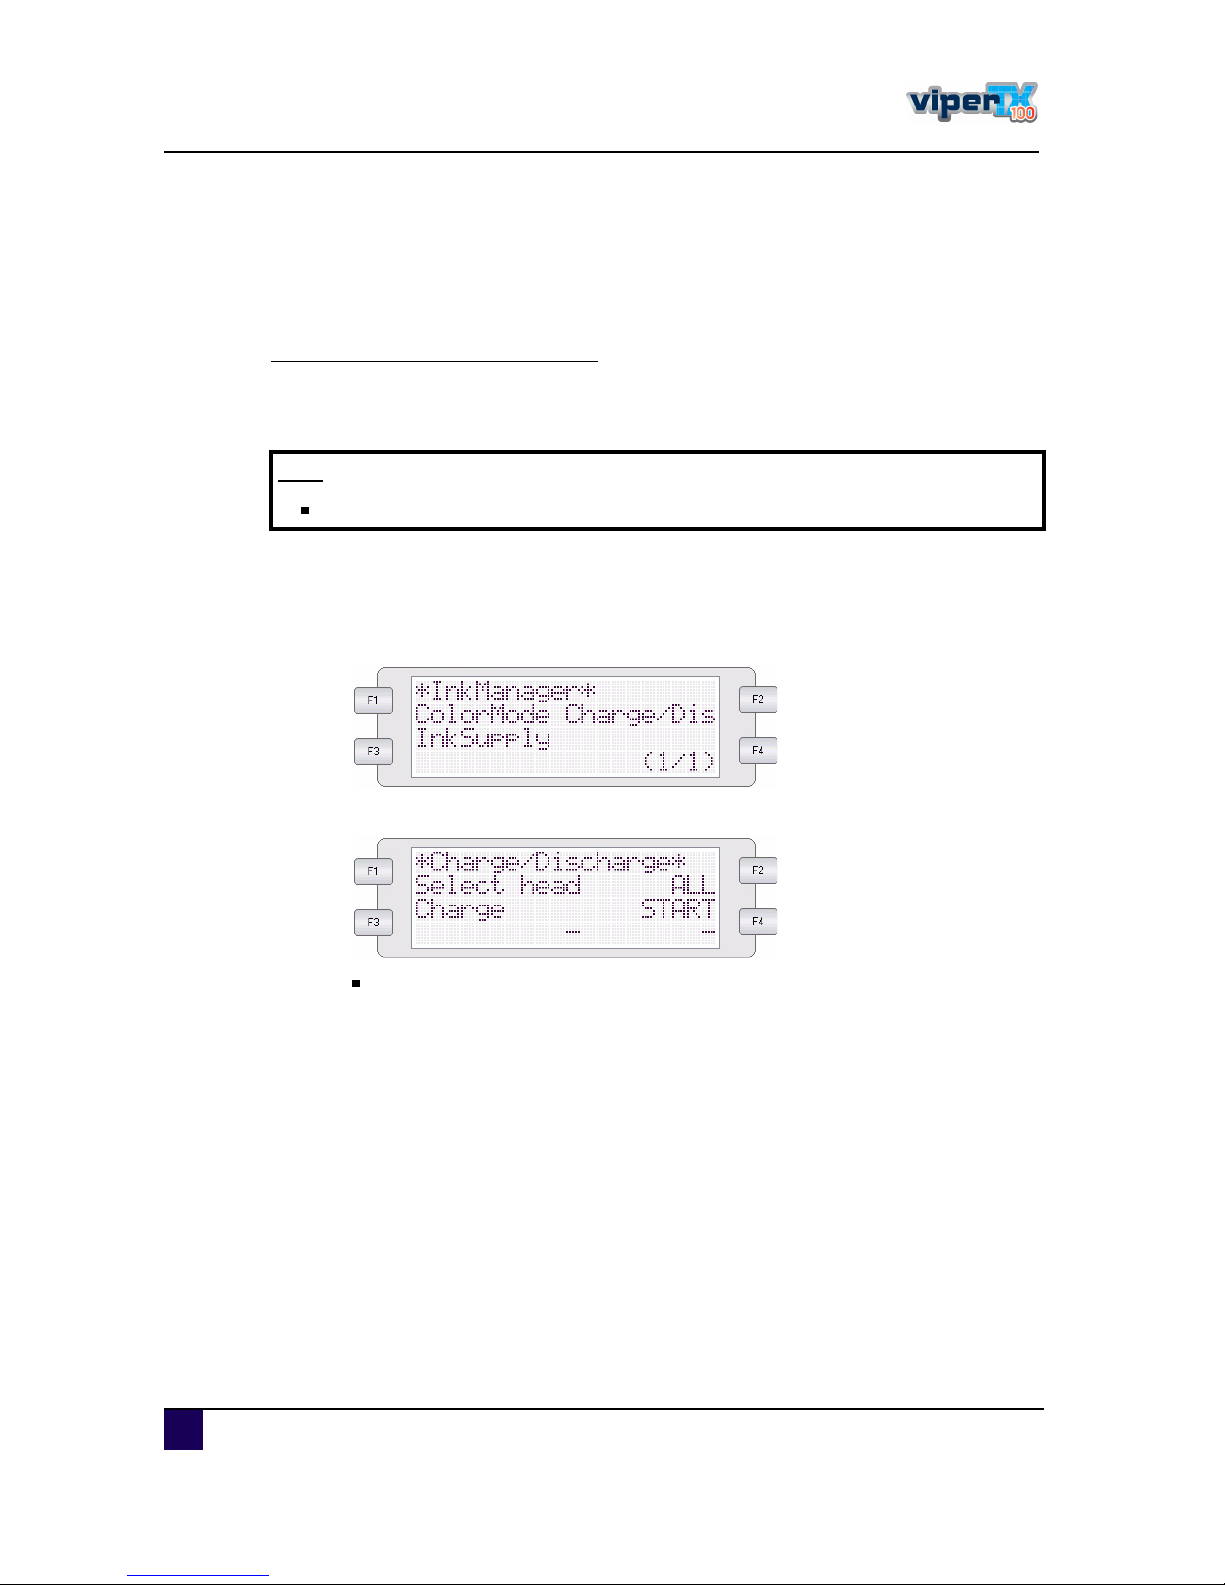
Us er s Gu id e V iper TX 1 0 0
C hapter3 B as ic s
7 4 A P -7 5350 -Revis ion 1. 1
3.9.2 T ransporting the printer
P le ase follow the proc ed u re below to prepare you rprinterto be trans ported to another
loc ation, s u c has an exhibition.
S w itchin g th e ink to shippin g liq uid
To ens u re thatno inkis s poiled d u ringtrans portation, allinks hou ld be replac e with s hipping
liqu id as follows .
ͬ»° ïæ B e s u re thatthe was te bottle is em pty.
ͬ»° îæ P owerO N the printe r.
ͬ»° íæ Remove allinkc as s ettes .
ͬ»° ìæ Go to the InkManager menu .
ͬ»° ëæ S elec tC harge/D is c harge.
S elec tallhead s and s tartthe d is c harge proc ed u re .
ͬ»° êæ Ins ert1 6 open inkc as s ettes .
ͬ»° éæ P u llou tthe little plu g on topofthe open c as s ette.
ͬ»° èæ P lac e the fu nnelin the openingofthe c as s ette.
ͬ»° çæ Fillthe c as s ette halfwith M u tohwaterbas ed c leaning.
ͬ»° ïðæ S elec tthe c harge option and s tartthe c harge proc ed u re.
ͬ»° ïïæ This to s witc h between the inkload ed and the M u tohwate rbased textile c leaning.
ͬ»° ïîæ A s from the momentthe m ain s c reen appears , the firs ts witc his c omplete.
ͬ»° ïíæ Remove allc as s ettes .
ͬ»° ïìæ E m pty the c as s ettes and fillthem with M u tohs hipping liq u id .
Ò±¬»
B e a w a renotto lea v eth eprinteron w a terba sedclea ning w h en tra n sporting .
Page 75
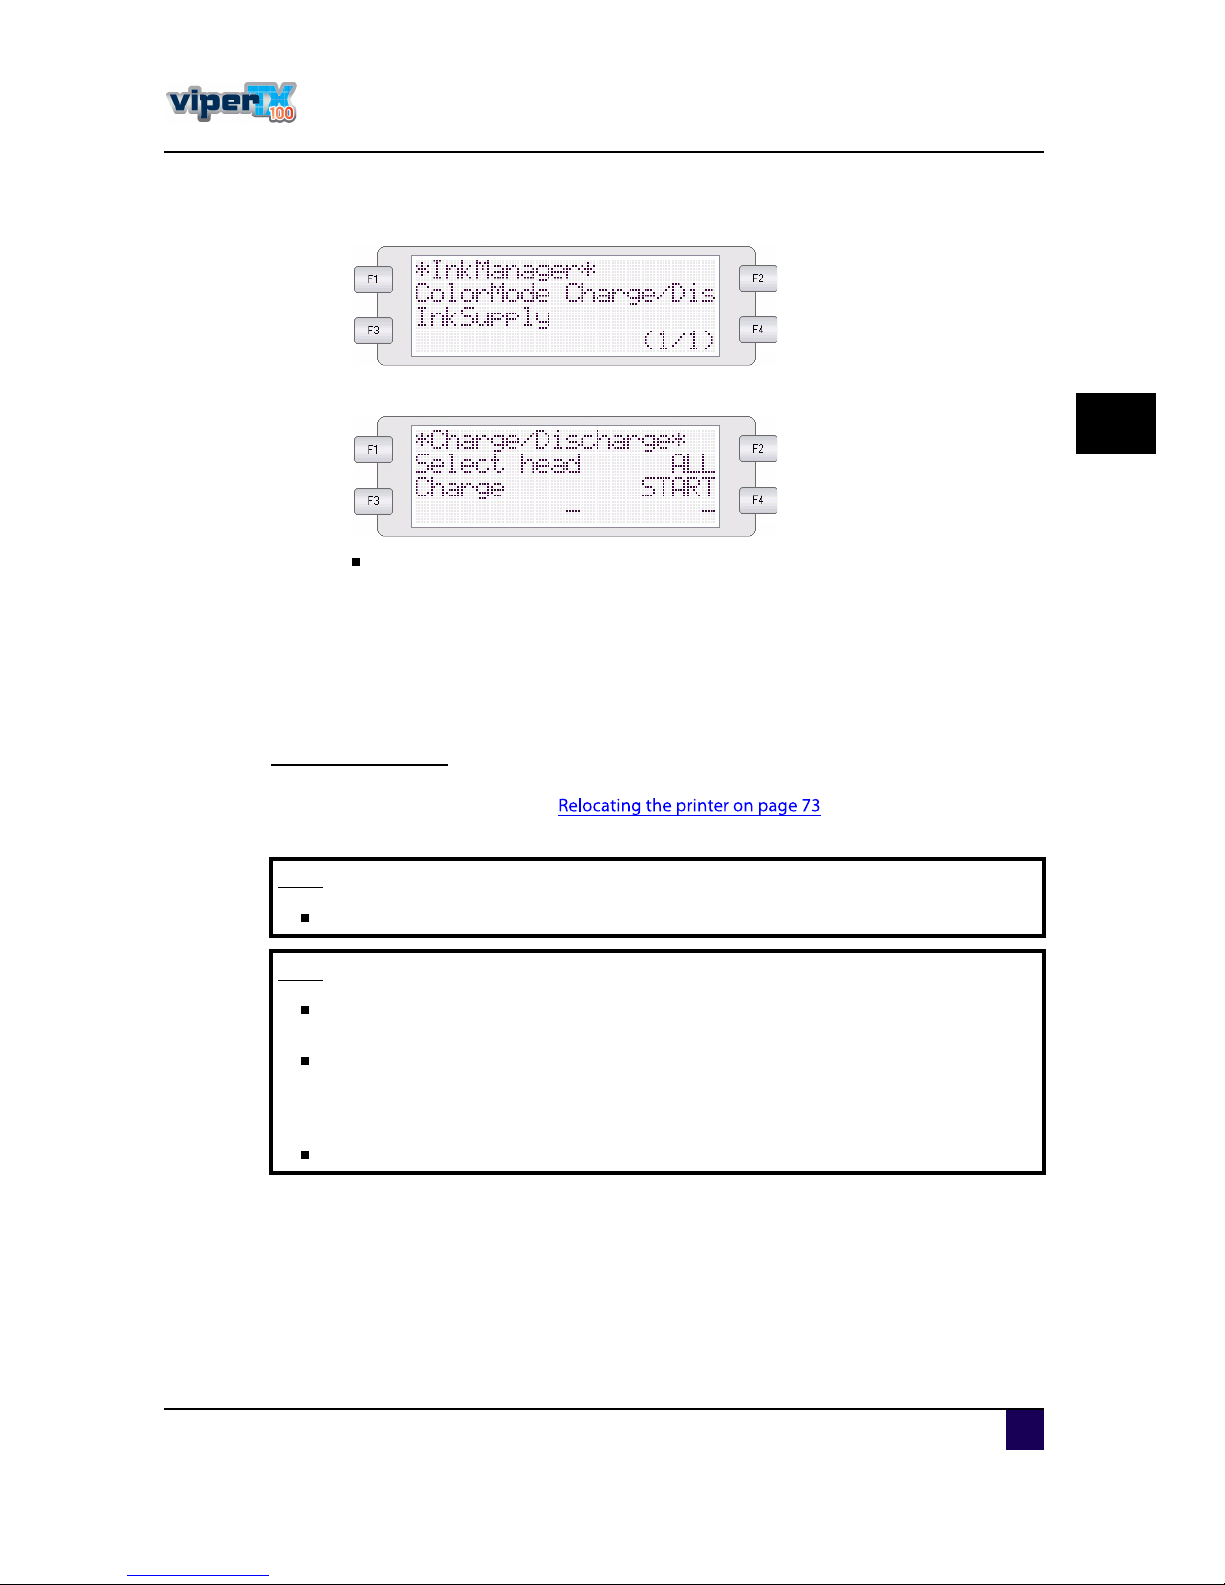
Us er s Gu id e V iper TX 1 0 0
C hapter3 B as ic s
A P -7 5350 -Revis ion 1. 1 7 5
3
ͬ»° ïëæ Go to the InkManager menu .
ͬ»° ïêæ S elec tC harge/D is c harge.
S elec tallhead s and s tartthe d is c harge proc ed u re .
ͬ»° ïéæ O nc e the d is c harge proc ed u re is d one, ins ertc as s ettes with M u tohs hippingliq u id ,
s elec tthe c harge option and s tartthe c harge proc ed u re.
ͬ»° ïèæ This to s witc hbetween the c leaning liq u id and the M u tohs hippingliq u id .
ͬ»° ïçæ A s from the momentthe m ain s c reen appears , the s ec ond s witc his c omplete.
ͬ»° îðæ The printe ris now read y to pac k.
P acking th e p rinter
Follow the proc ed u re d es c ribed in and pac kthe printerin its
originalbox to protec titfrom vibration orimpac t.
Ò±¬»
C onta ctyourlo ca lM utoh dea lerfora ssista nce.
Ò±¬»
A ftertra nspo rting th e printer, reinsta ll th e printera ccordin g to th e insta lla tion
proceduredescribedin th eI nsta lla tion G u ide.
M a ke sure th a tth e ink g utteris positioned correctly. A n incorrectpositio ned
g u ttercouldlea dto h ea dstrikes.
Referto th e in sta lla tion g uide to know h ow to position th eg u ttercorrectly.
P lea seconta ctyourloca lM utoh dea lerform oreinform a tio n.
Page 76

Us er s Gu id e V iper TX 1 0 0
C hapter3 B as ic s
7 6 A P -7 5350 -Revis ion 1. 1
Page 77

Us er s Gu id e V iper TX 1 0 0
C hapter4 P eriod ic alm aintenanc e
A P -7 5350 -Revis ion 1. 1 7 7
4
C hapter4 P eriodical
m aintenance
Donebyth eenduser. . . . . . . . . . . . . . . . . . . . . . . . . . . . . . . . . . . . . . . . . 7 8
Overview . . . . . . . . . . . . . . . . . . . . . . . . . . . . . . . . . . . . . . . . . . . . . . . . . . . . . 79
User and good shape kit . . . . . . . . . . . . . . . . . . . . . . . . . . . . . . . . . . . . . . . . . 80
Good shape kit . . . . . . . . . . . . . . . . . . . . . . . . . . . . . . . . . . . . . . . . . . . . . 80
Daily Maintenance . . . . . . . . . . . . . . . . . . . . . . . . . . . . . . . . . . . . . . . . . . . . . . 81
Cleaning the wipers . . . . . . . . . . . . . . . . . . . . . . . . . . . . . . . . . . . . . . . . . 81
Perform a tubing flush . . . . . . . . . . . . . . . . . . . . . . . . . . . . . . . . . . . . . . . 82
Clean the caps . . . . . . . . . . . . . . . . . . . . . . . . . . . . . . . . . . . . . . . . . . . . . 83
Rinse and clean the gutter . . . . . . . . . . . . . . . . . . . . . . . . . . . . . . . . . . . . 84
Clean out the waste tray. . . . . . . . . . . . . . . . . . . . . . . . . . . . . . . . . . . . . . 85
Weekly maintenance . . . . . . . . . . . . . . . . . . . . . . . . . . . . . . . . . . . . . . . . . . . . 87
Clean around the bottom of the heads . . . . . . . . . . . . . . . . . . . . . . . . . . . 87
Clean spitting box mesh and rinse the spitting box waste tube . . . . . . . . 88
Monthly maintenance . . . . . . . . . . . . . . . . . . . . . . . . . . . . . . . . . . . . . . . . . . . . 89
Clean the printer (inside - outside) . . . . . . . . . . . . . . . . . . . . . . . . . . . . . . 89
Change pump tubing . . . . . . . . . . . . . . . . . . . . . . . . . . . . . . . . . . . . . . . . 89
Six monthly maintenance . . . . . . . . . . . . . . . . . . . . . . . . . . . . . . . . . . . . . . . . . 91
Change the wipers . . . . . . . . . . . . . . . . . . . . . . . . . . . . . . . . . . . . . . . . . . 91
Donebya n a uth orizedM utoh tech nicia n . . . . . . . . . . . . . . . . . . . . . . . . 9 3
Overview . . . . . . . . . . . . . . . . . . . . . . . . . . . . . . . . . . . . . . . . . . . . . . . . . . . . . 93
Part numbers of the maintenance kits . . . . . . . . . . . . . . . . . . . . . . . . . . . . . . . 93
Page 78
Us er s Gu id e V iper TX 1 0 0
C hapter4 P eriod ic alm aintenanc e
7 8 A P -7 5350 -Revis ion 1. 1
4.1 D one by the end user
B e s u re to perform you rm ainte nanc e as s hown below. A good maintenanc e ofthe V iperTX
1 0 0 is very im portantto obtain M u toh q u ality and to avoid s om e parts (even head s )get
d am aged .
P leas e find below more d etails abou tthe d aily, wee kly and m onthly m aintenanc e.
׳°±®¬¿²¬
B e su re to rea d a nd understa nd th e sa fety issues th a tneed to be ta ken into
a ccountw h en w orking w ith in ksa ndm a ch in epa rts.
Referto
Ò±¬»
A ny problem s ca u sed by using no n-orig ina l M utoh inks, spa re pa rts,
consu m a bles, ... w illnotbecov eredby th ew a rra n ty.
Ò±¬»
Th ism a intena nceis ba sedon use:
8 hou rs /d ay, 5 d ays /weekand 44 weeks /year.
Ifa mac hine is u s ed m ore, maintenanc e period s willc ome earlier.
Page 79
Us er s Gu id e V iper TX 1 0 0
C hapter4 P eriod ic alm aintenanc e
A P -7 5350 -Revis ion 1. 1 7 9
4
4.1.1 O verview
P rocedure F requ ency L ink
C lean the wipers
D aily
P erform a tu bing flu s h
C lean the c aps
Rins e and c lean the gu tter
C lean ou tthe was te tray
C lean arou nd the bottom ofthe
head s
W ee kly
Ý´»¿² ¿®±«²¼ ¬¸» ¾±¬¬±³ ±º ¬¸» ¸»¿¼- ±²
C lean s pittingbox m es h and rins e
the s pitting box was te tu be.
Ý´»¿² -°·¬¬·²¹ ¾±¨ ³»-¸ ¿²¼ ®·²-» ¬¸»
C hange pu m p tu bing
M onthly
C lean the printer(ins id e -ou ts id e)
Ý´»¿² ¬¸» °®·²¬»® ø·²-·¼» ó ±«¬-·¼»÷ ±²
C hange the wipers H alfyearly
Page 80

Us er s Gu id e V iper TX 1 0 0
C hapter4 P eriod ic alm aintenanc e
8 0 A P -7 5350 -Revis ion 1. 1
4.1.2 U serand goo d shape kit
This kitc ontains allnec es s ary item s to maintain you rprinterfor6 months .
G ood shape kit
N ° Description Q ty
ï S pec ialwipe r
8
î Ins tru c tion s heetwiper
1
í 50 0 m lwater-bas ed textile c le aning
2
ì P u m p tu bing
50
ë Good s hape kit
1
ê Ins tru c tion s heet
1
N ° Description Q ty
ï Gloves
30 0
î P ipe tte 1 0 m l
12
í S wabs
50
ì P olyknitwiper
30 0
Page 81
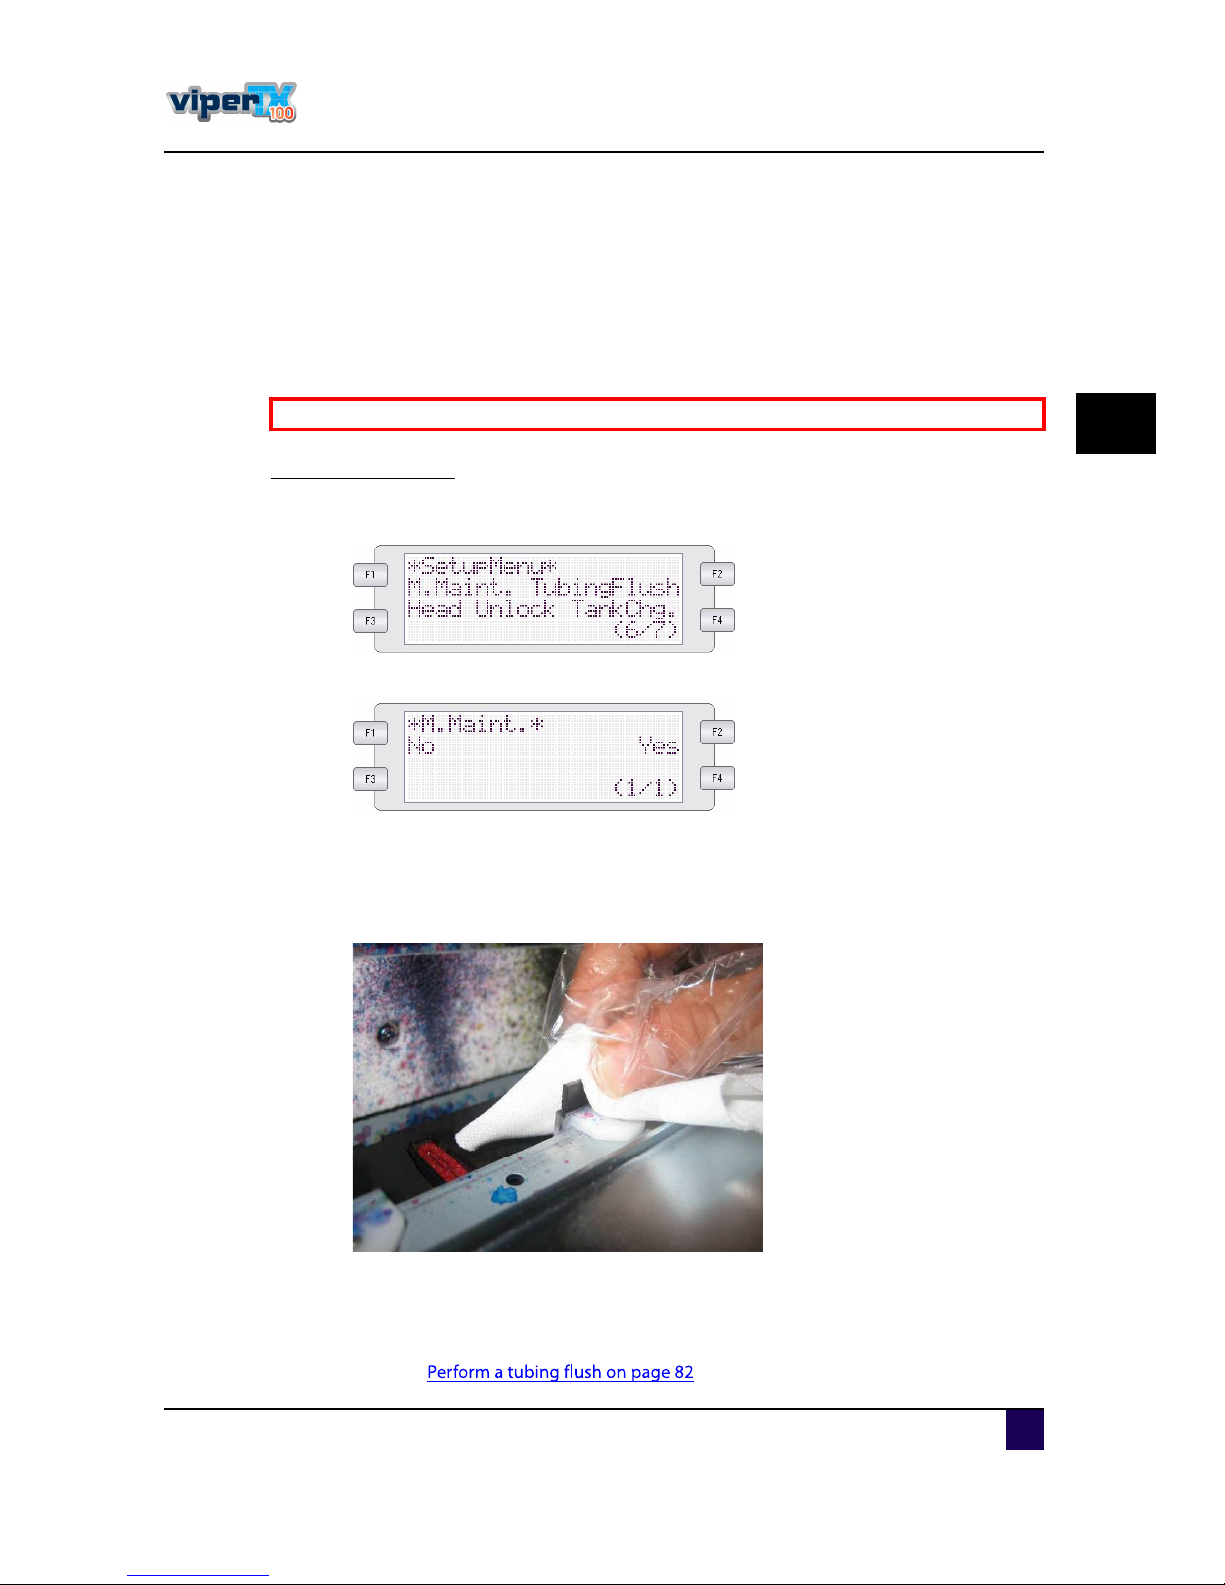
Us er s Gu id e V iper TX 1 0 0
C hapter4 P eriod ic alm aintenanc e
A P -7 5350 -Revis ion 1. 1 8 1
4
4.1.3 D aily M aintenance
Ifs ome nozzles are mis s ingormis firing, perform c leaningc yc les u ntilallnozzles are in good
s hape. W e ad vis e to ru n anorm alora powerfu lc leaning c yc le to rec overthe nozzles . A tthe
end ofthe d ay, be s u re to c lean the wipers . This is req u ired to make the wipe rs m ore
elas tic and to be s u re thatalld ried inkpartic les are gone before the firs twipe in the m orning.
C lean ing th e w ipers
ͬ»° ïæ P owerO N the printerand brows e to M . M aintenanc e.
ͬ»° îæ P res s F1 to enterthe m anu alm aintenanc e menu .
ͬ»° íæ P res s F2 to u nloc kthe he ad s and releas e the wiperarm.
ͬ»° ìæ O pen the frontc over.
ͬ»° ëæ C lean the wipers with a polyknitwiper. Us e s ome M u tohwaterbas ed textile
c leaning to remove the ink.
ͬ»° êæ C los e the frontc over.
ͬ»° éæ P res s ENTER to make the c arriage go bac kto its hom e pos ition.
ͬ»° èæ P erform a tu bing flu s h.
Referto
B e sureto rea da ndundersta ndth esa fetyw a rning s beforeh a ndling th e printer.
Page 82
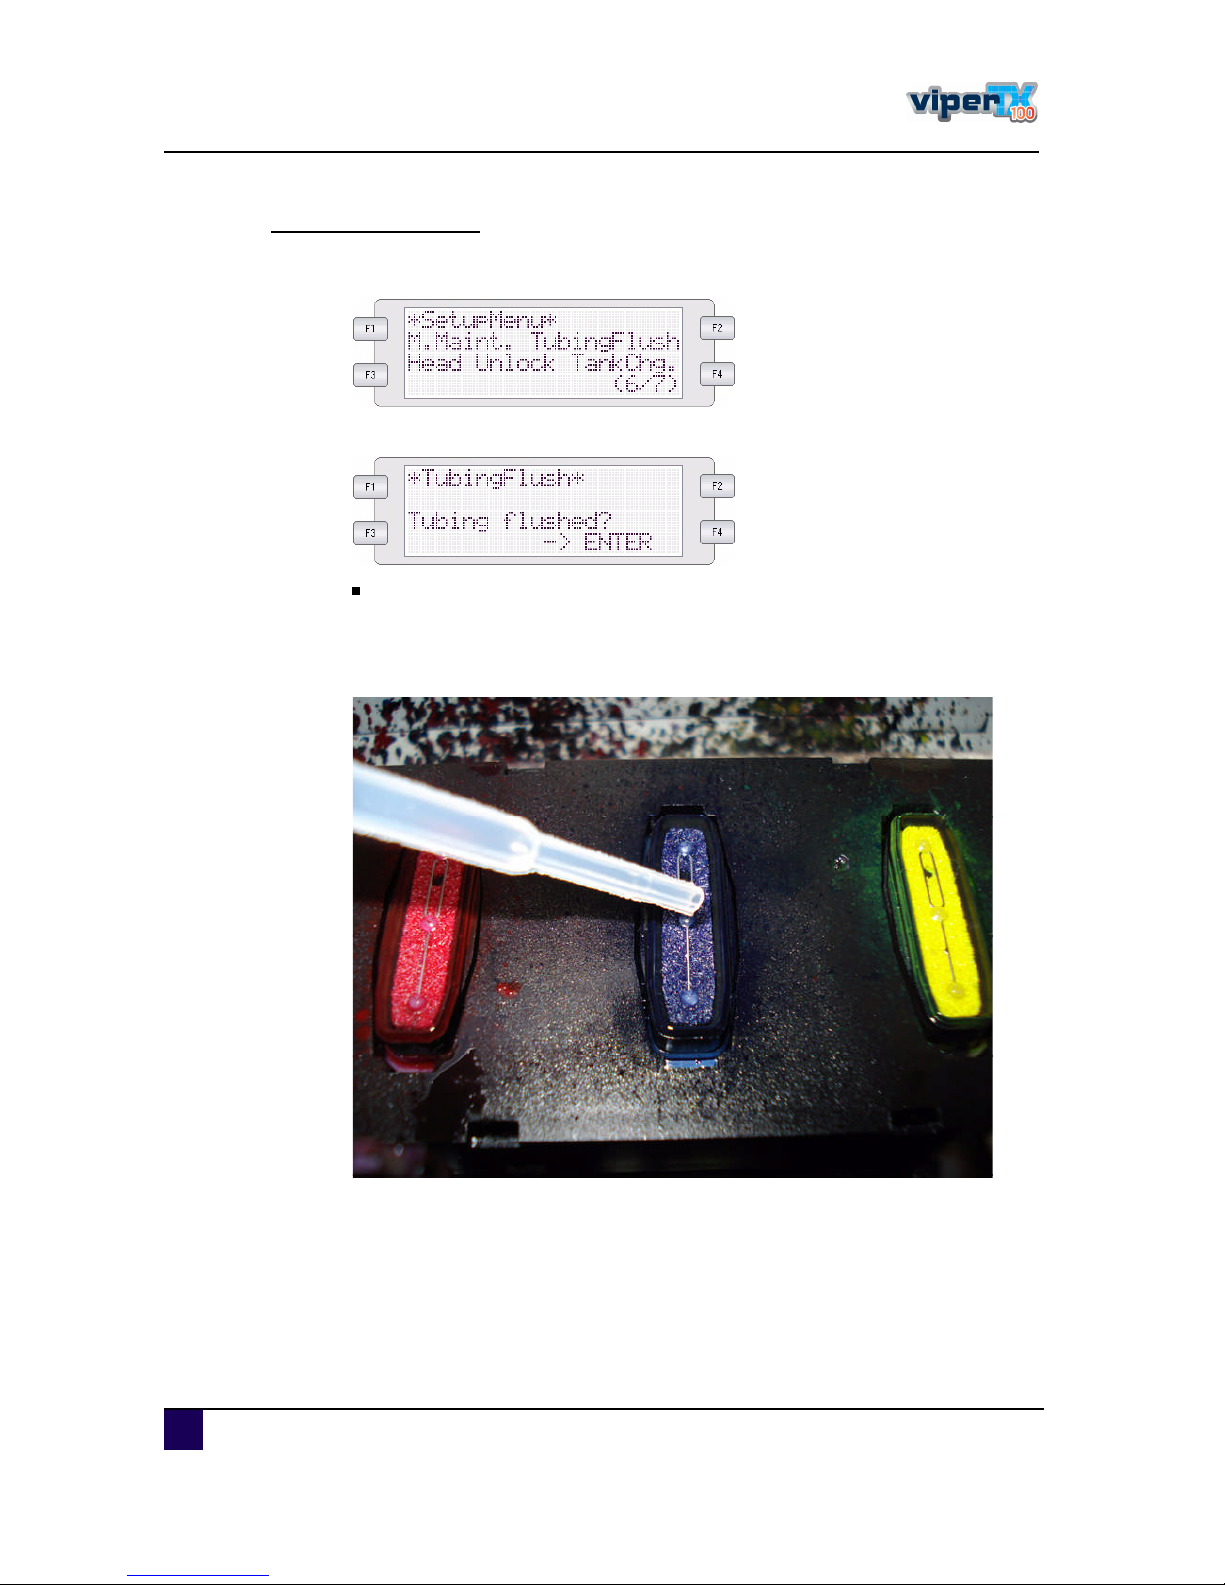
Us er s Gu id e V iper TX 1 0 0
C hapter4 P eriod ic alm aintenanc e
8 2 A P -7 5350 -Revis ion 1. 1
P erform a tubing flush
ͬ»° ïæ B rows e to the tu bing flu s hm enu
ͬ»° îæ P re s s F2 to open the s u b m enu .
The head u nloc ks and allthe pu m ps s tartoperating.
ͬ»° íæ O pen the frontc over.
ͬ»° ìæ Inje c tc leaningliq u id in the c aps by way ofa pipette u ntilthe c aps d o notc hange
c olou r. B e c arefu lnotto s poilc leaningnearthe c aps .
ͬ»° ëæ W hen d one, pres s ENTER to E N D the Tu bingFlu s h.
ͬ»° êæ C los e the frontc over.
Page 83
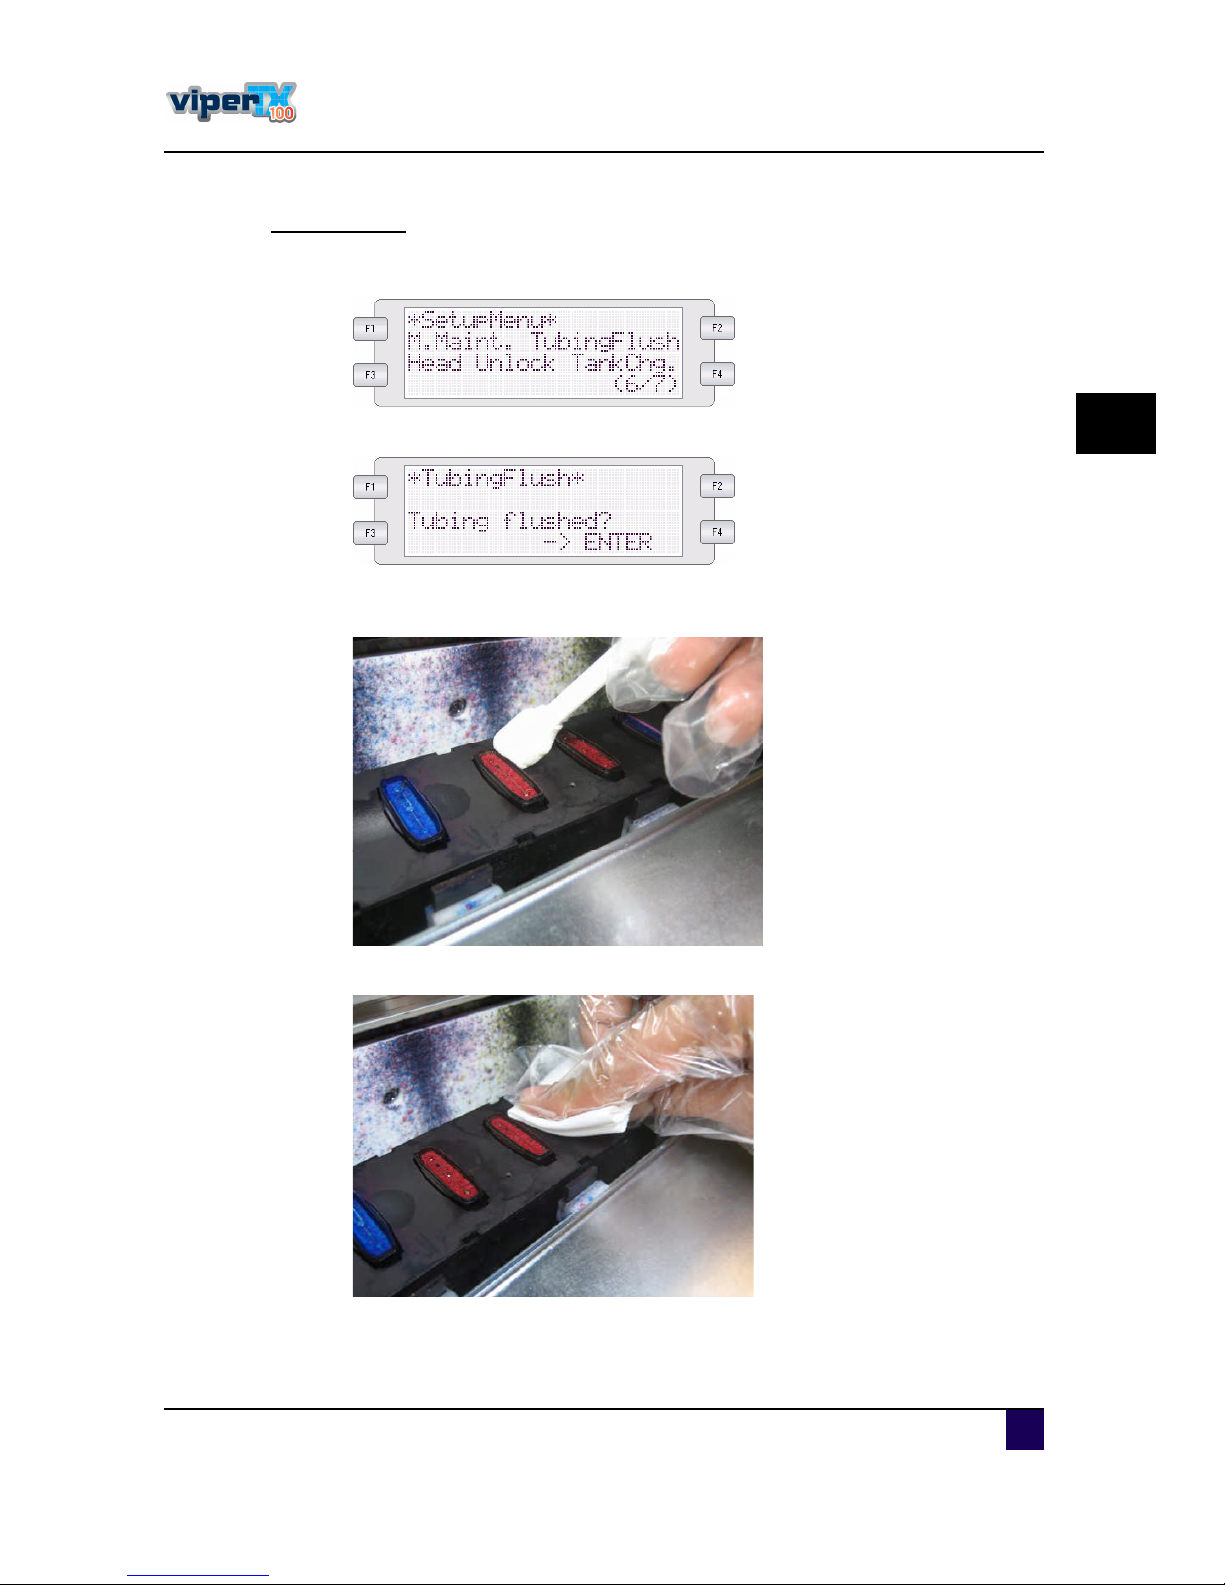
Us er s Gu id e V iper TX 1 0 0
C hapter4 P eriod ic alm aintenanc e
A P -7 5350 -Revis ion 1. 1 8 3
4
C lean the caps
ͬ»° ïæ B rows e to the tu bing flu s hm enu .
ͬ»° îæ P res s F2 to open the s u b m enu .
ͬ»° íæ C le an the ed ges ofthe c aps witha c leanings wab and u s e s ome M u tohwaterbas ed
textile c le aning ifnec es s ary.
ͬ»° ìæ C le an the area arou nd the c aps with a polyknitwiper.
ͬ»° ëæ P res s ENTER to end the tu bingflu s h.
Page 84
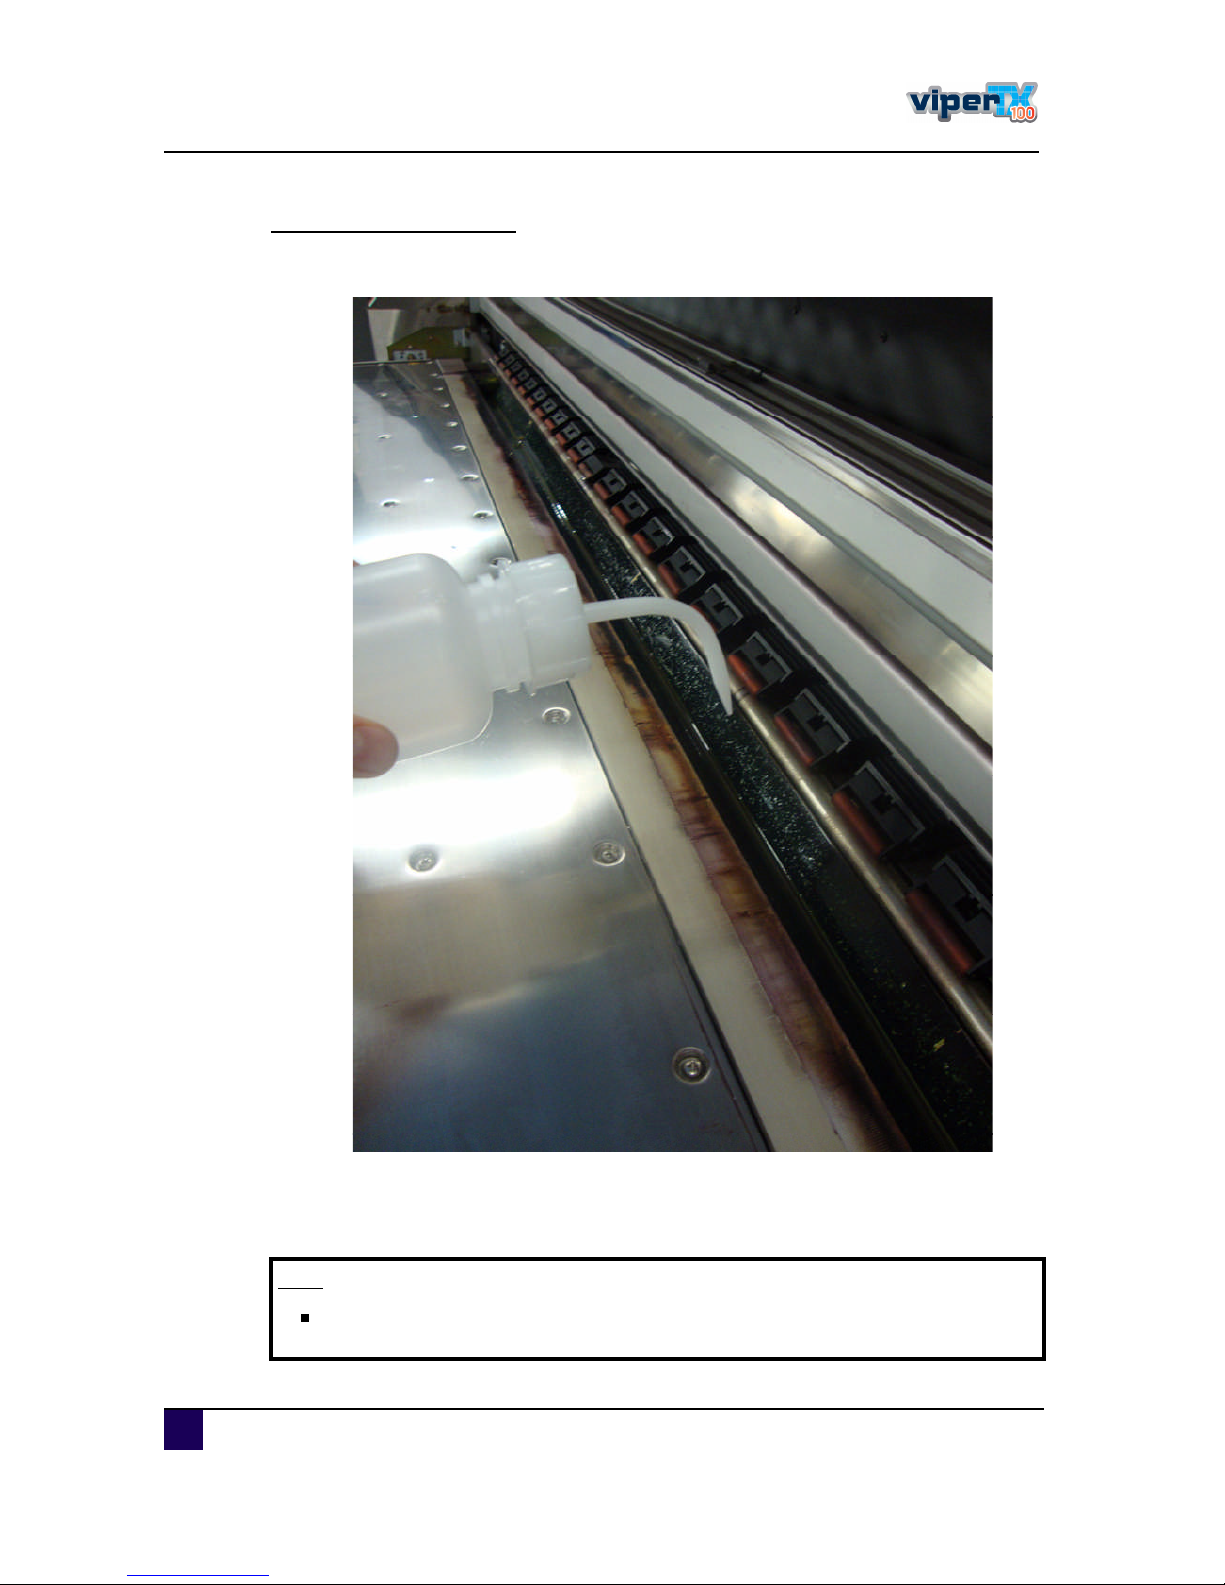
Us er s Gu id e V iper TX 1 0 0
C hapter4 P eriod ic alm aintenanc e
8 4 A P -7 5350 -Revis ion 1. 1
R inse and clean th e gutter
ͬ»° ïæ D rain the gu tterwith wateru s ing the rins ing bottle.
ͬ»° îæ S weep with s ome paperallm ois tto the leftmaintenanc e s id e s o ite nd s u p in the
was te tray.
ͬ»° íæ D ry the gu tterwith s ome paperu ntilitis d ry and c lean.
Ò±¬»
A fterclea nin g th e g utter, v erify if itis still lying prop erly?A n im p roper lying
g u tterw ill lea dto h ea dstrikes.
Page 85
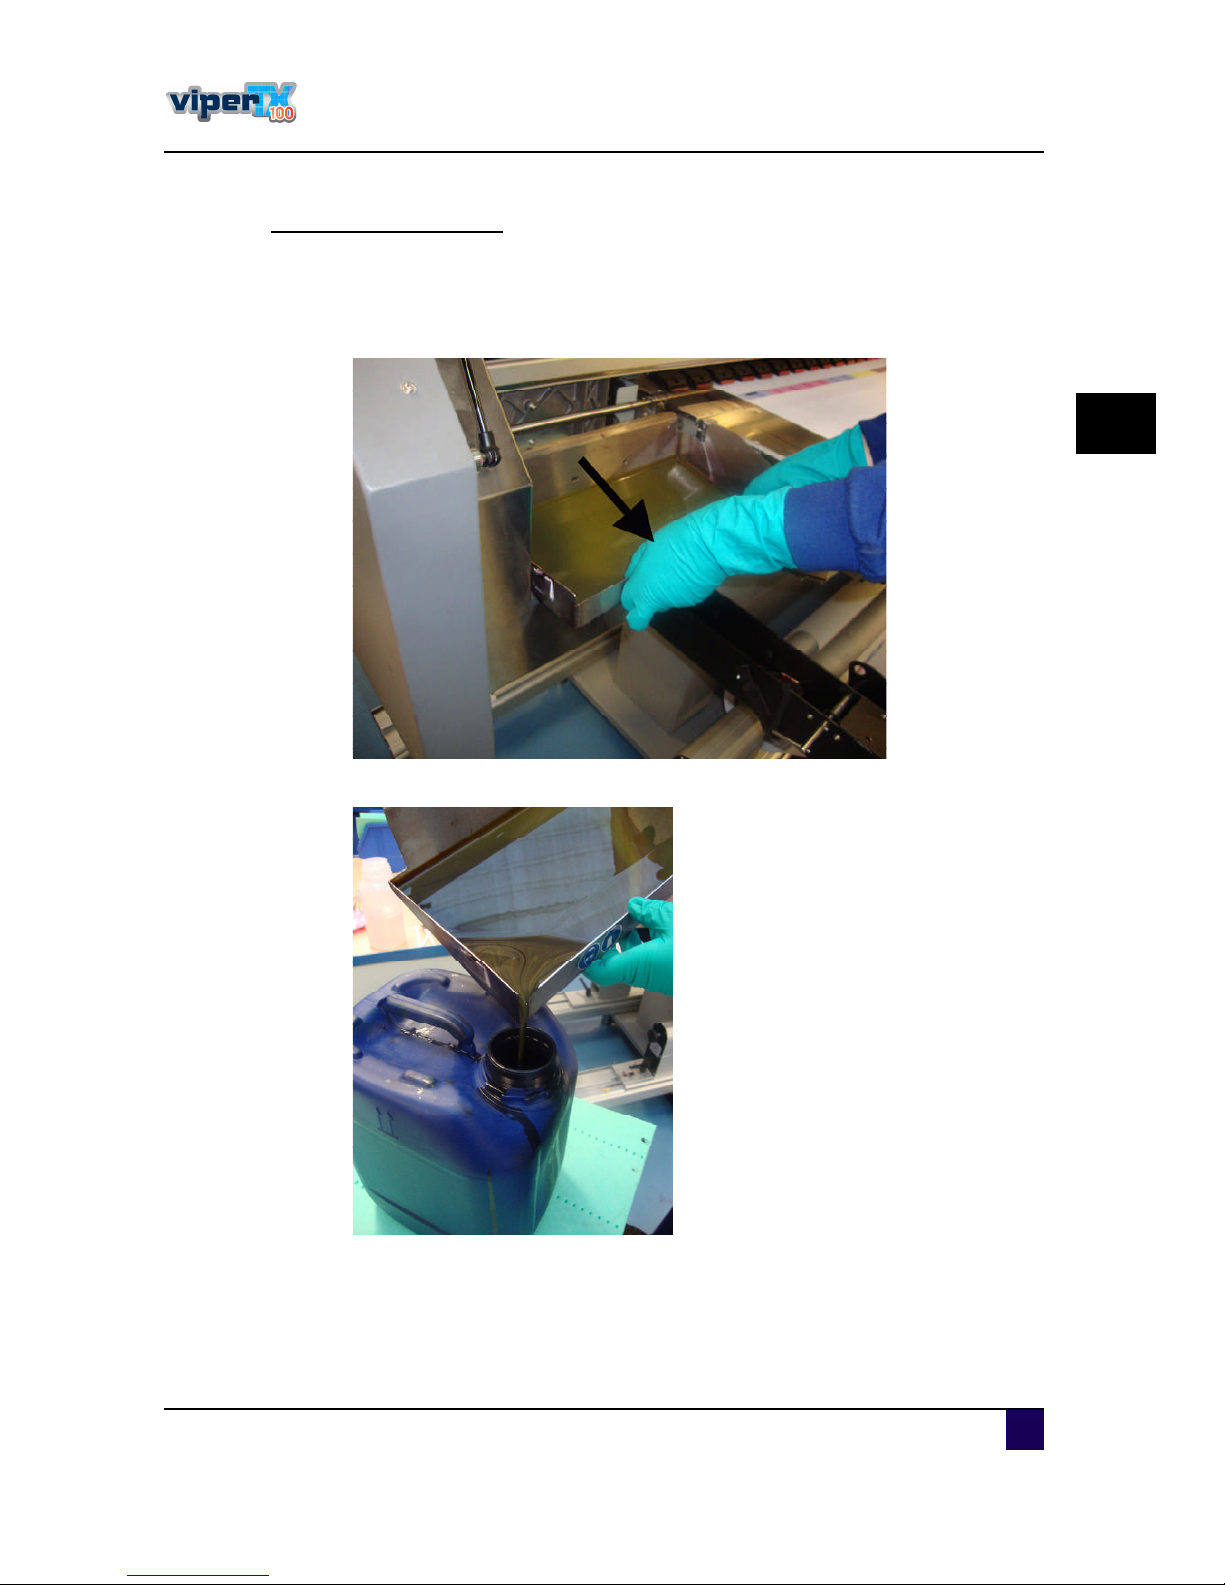
Us er s Gu id e V iper TX 1 0 0
C hapter4 P eriod ic alm aintenanc e
A P -7 5350 -Revis ion 1. 1 8 5
4
C lean outthe w aste tray.
ͬ»° ïæ O pen the frontc over.
ͬ»° îæ Remove the 2 s c rews hold ing the was te tray.
ͬ»° íæ C arefu lly pu llthe was te trayforward to rem ove it.
ͬ»° ìæ P ou raway the was te flu id ac c ord ing to loc alru les and regu lations .
Page 86
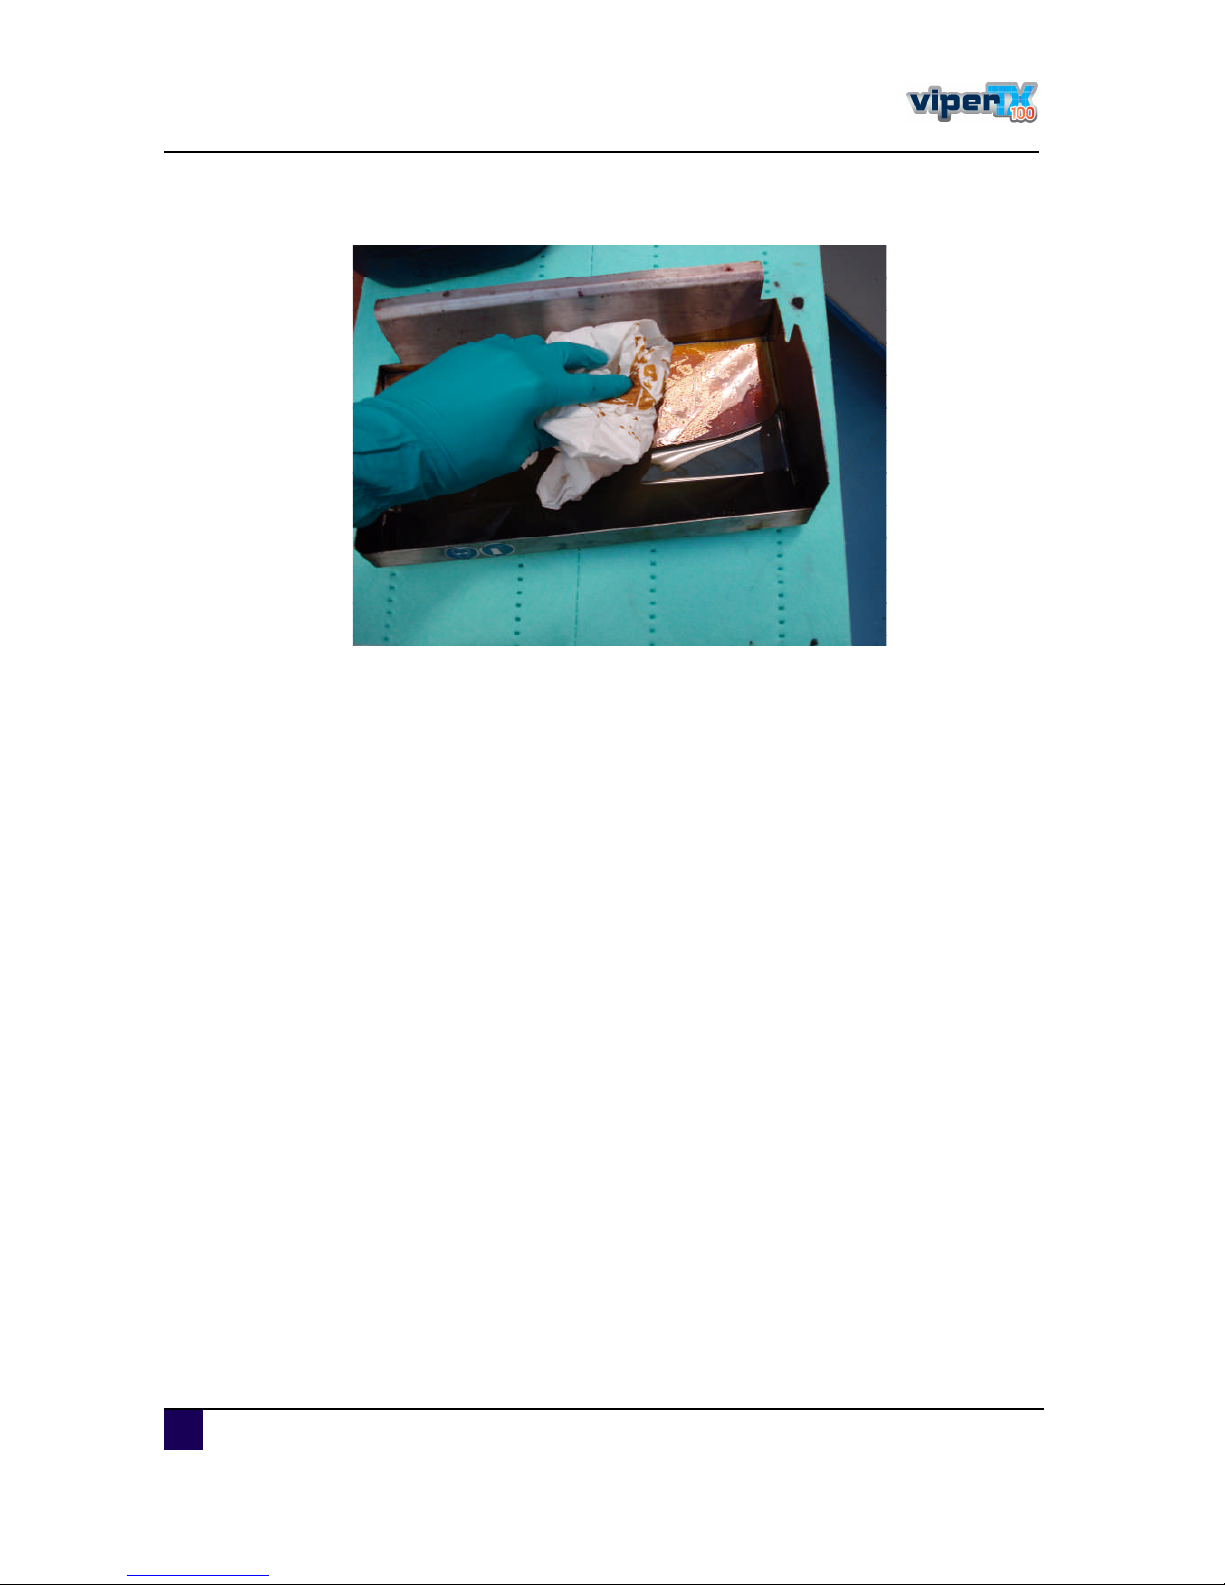
Us er s Gu id e V iper TX 1 0 0
C hapter4 P eriod ic alm aintenanc e
8 6 A P -7 5350 -Revis ion 1. 1
ͬ»° ëæ C le an ou tthe was te tray withs ome paper.
ͬ»° êæ P lac e the was te traybac kinto the printerand fas ten itwiththe 2 s c rews .
ͬ»° éæ C los e the frontc over.
Page 87
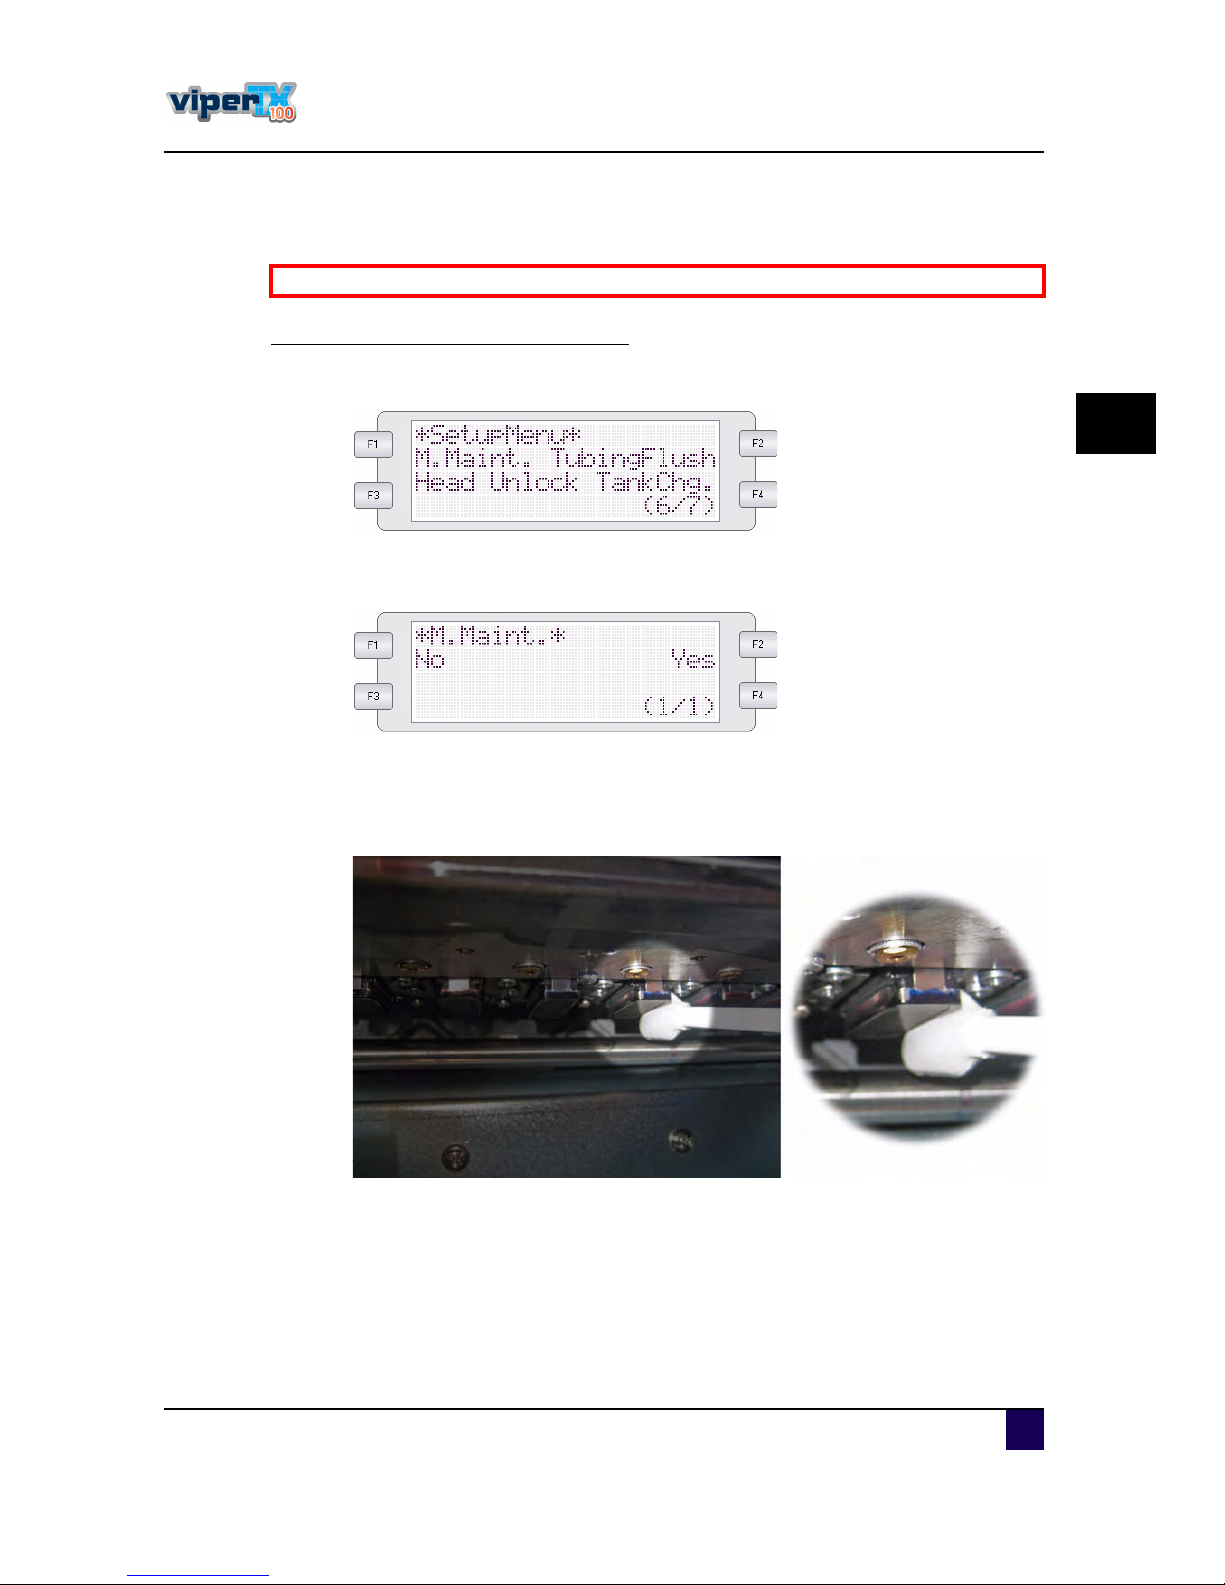
Us er s Gu id e V iper TX 1 0 0
C hapter4 P eriod ic alm aintenanc e
A P -7 5350 -Revis ion 1. 1 8 7
4
4.1.4 W eekly m aintenance
C lean aroun d th e b ottom of th e h eads
ͬ»° ïæ P owerO N the printerand brows e to the m anu alm aintenanc e menu .
ͬ»° îæ P res s F1 to ente rthe s u b menu .
ͬ»° íæ The printhead m oves to the m anu alm aintenanc e s tation onc e you pres s F2.
ͬ»° ìæ O pen the frontc over.
ͬ»° ëæ C le an the ed ges ofthe head s with a c leaning s wab mois tened withM u toh water
bas ed textile c leaning. B e s u re notto tou c h norc lean the nozzle plate to avoid
d am age and bad printing qu ality.
ͬ»° êæ O nc e the m aintenanc e is d one, c los e the frontc over. and pres s ENTER.
B e sureto rea da ndundersta ndth esa fetyw a rning s beforeh a ndling th e printer.
Page 88
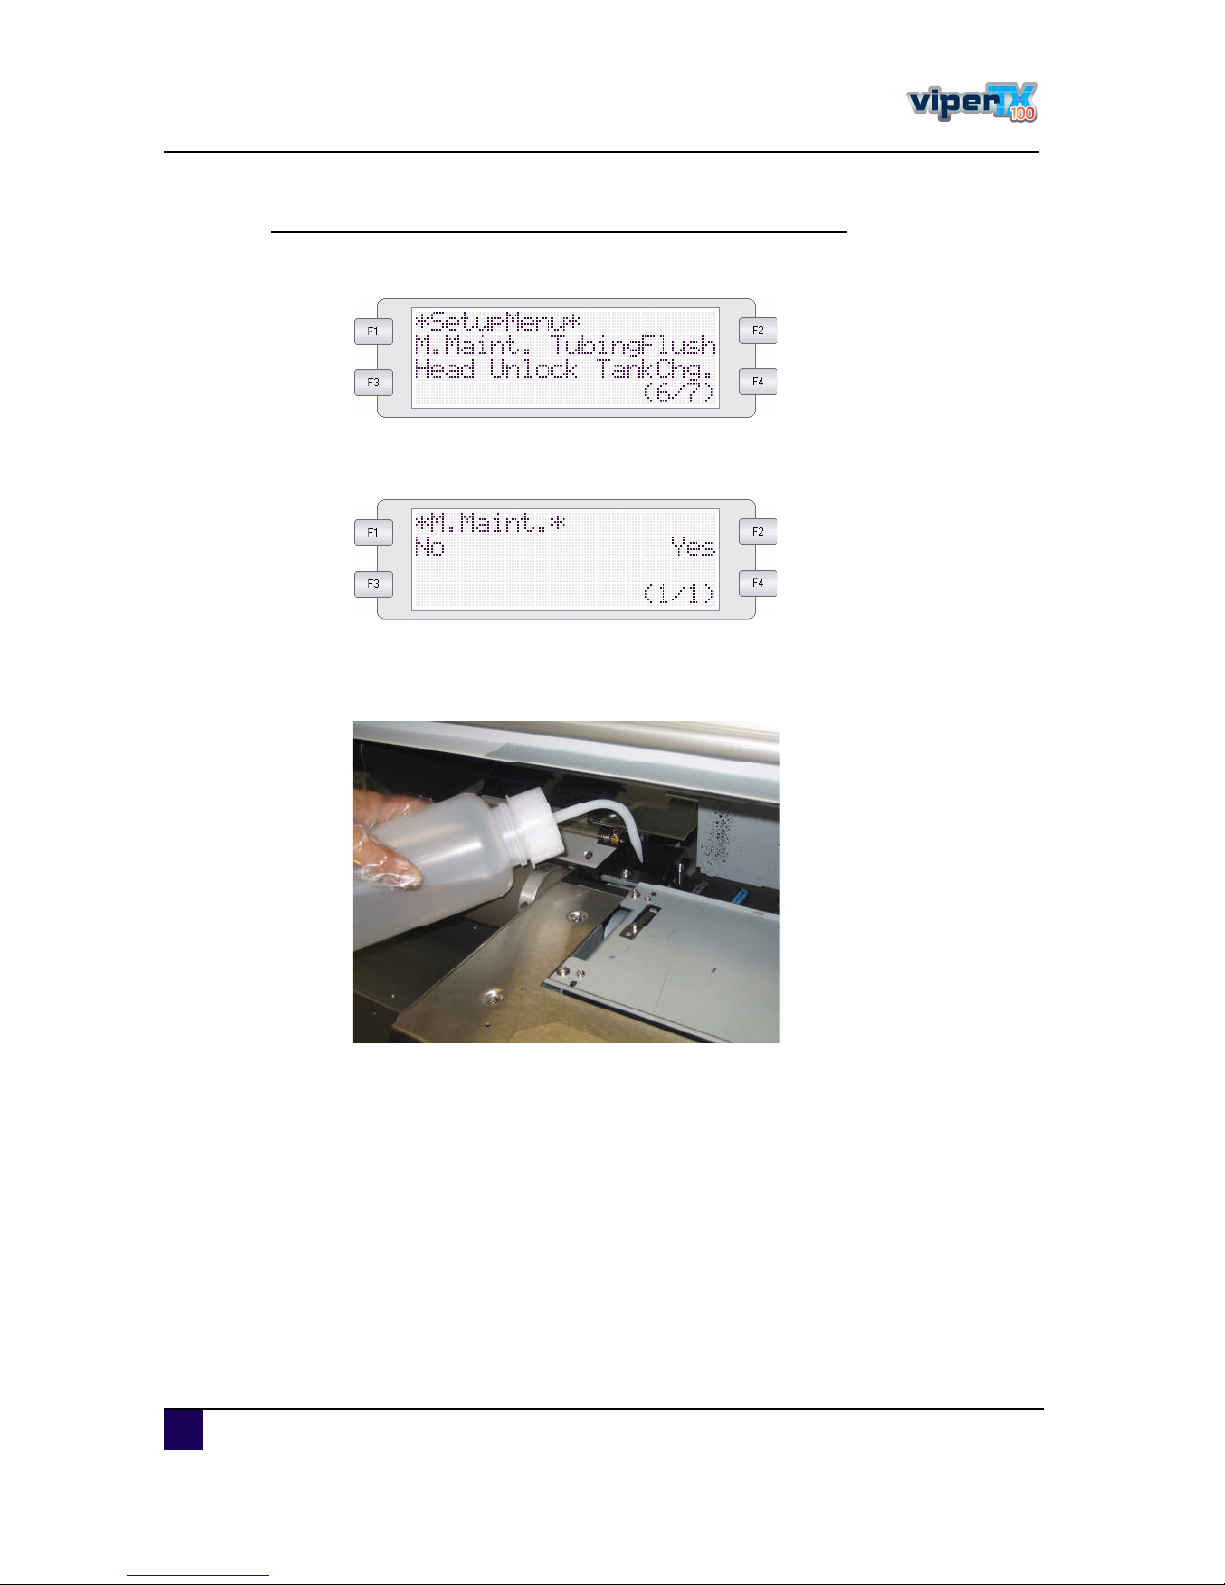
Us er s Gu id e V iper TX 1 0 0
C hapter4 P eriod ic alm aintenanc e
8 8 A P -7 5350 -Revis ion 1. 1
C lean spitting b ox m esh and rinse the spitting b ox w aste tube
ͬ»° ïæ P owerO N the printerand brows e to the m anu alm aintenanc e menu .
ͬ»° îæ P res s F1 to ente rthe s u b menu .
ͬ»° íæ P res s F2 to move the head to the manu almaintenanc e s tation.
ͬ»° ìæ O pen the frontc over.
ͬ»° ëæ Rins e the mes hwith M u tohwaterbas ed textile c leaningu s inga pipe tte. D o this u ntil
allthe inkis rem oved .
ͬ»° êæ O nc e the m aintenanc e is d one, c los e the frontc over. and pres s ENTER.
Page 89
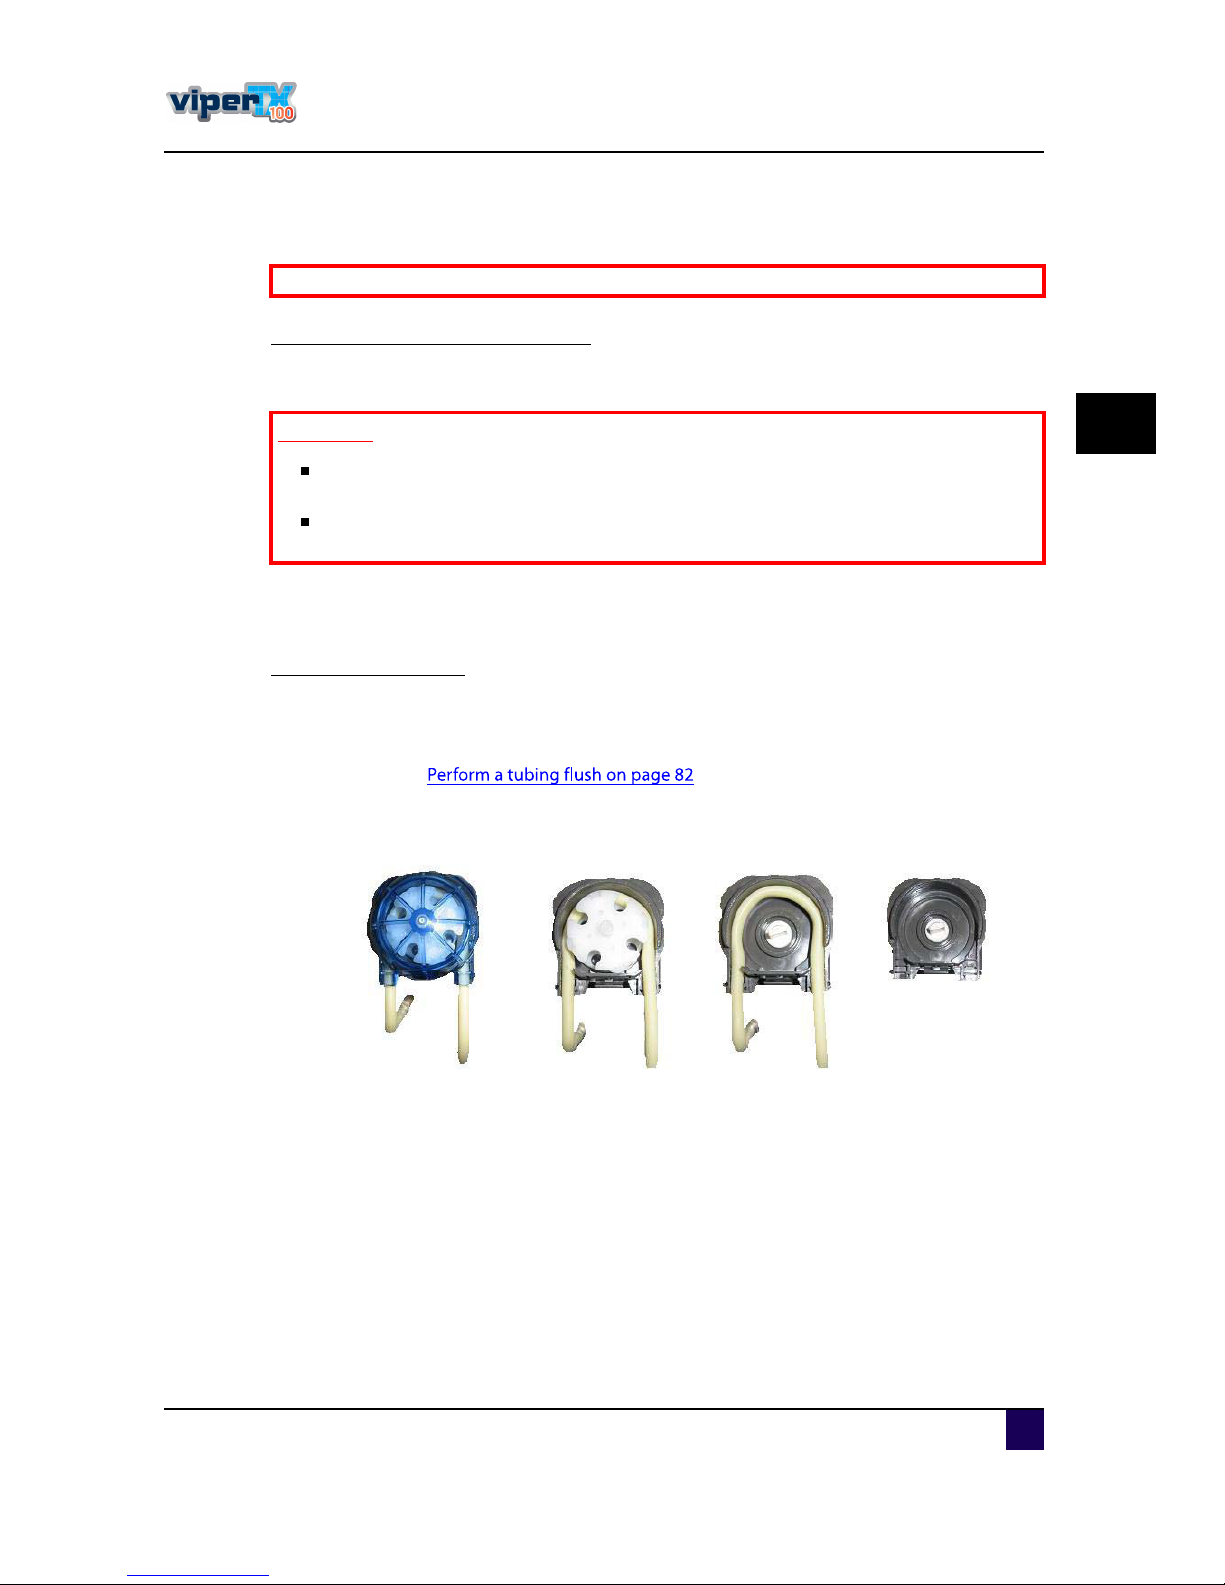
Us er s Gu id e V iper TX 1 0 0
C hapter4 P eriod ic alm aintenanc e
A P -7 5350 -Revis ion 1. 1 8 9
4
4.1.5 M onthly m aintenance
C lean the printer (inside -outsid e)
ͬ»° ïæ Remove d u s tand s mu d ges from the c overs with a wets oftc loth.
ͬ»° îæ Us e a s oftbru s hto c arefu lly c lean away d u s t, d irtand inkmis t.
ͬ»° íæ W ipe offthe pres s u re rollers with a hu mid c loth.
C hange pum p tub ing
ͬ»° ïæ B efore replac ing the tu bing, be s u re to perform a tu bingflu s h. A fterward s , s witc hoff
the printer.
Referto
ͬ»° îæ C overthe floorwith a towelbec au s e itis pos s ible thats ome flu id willleak.
ͬ»° íæ Remove the c apfrom the pu m p and rem ove tu bing.
ͬ»° ìæ Replac e the old tu bing with a new one and reins tallthe blu e c ap.
B e sureto rea da ndundersta ndth esa fetyw a rning s beforeh a ndling th e printer.
׳°±®¬¿²¬
Do notuse th inner, benzen e, a lcoh ol or oth er a ctiv e a g ents. D o in g so m a y
resu ltin da m a g eo rpa intpeeling fro m th e ca sting .
B e ca reful notto spill liquidinside th e printer. Do ing so m a y resultin a sh o rt
circuit.
Page 90
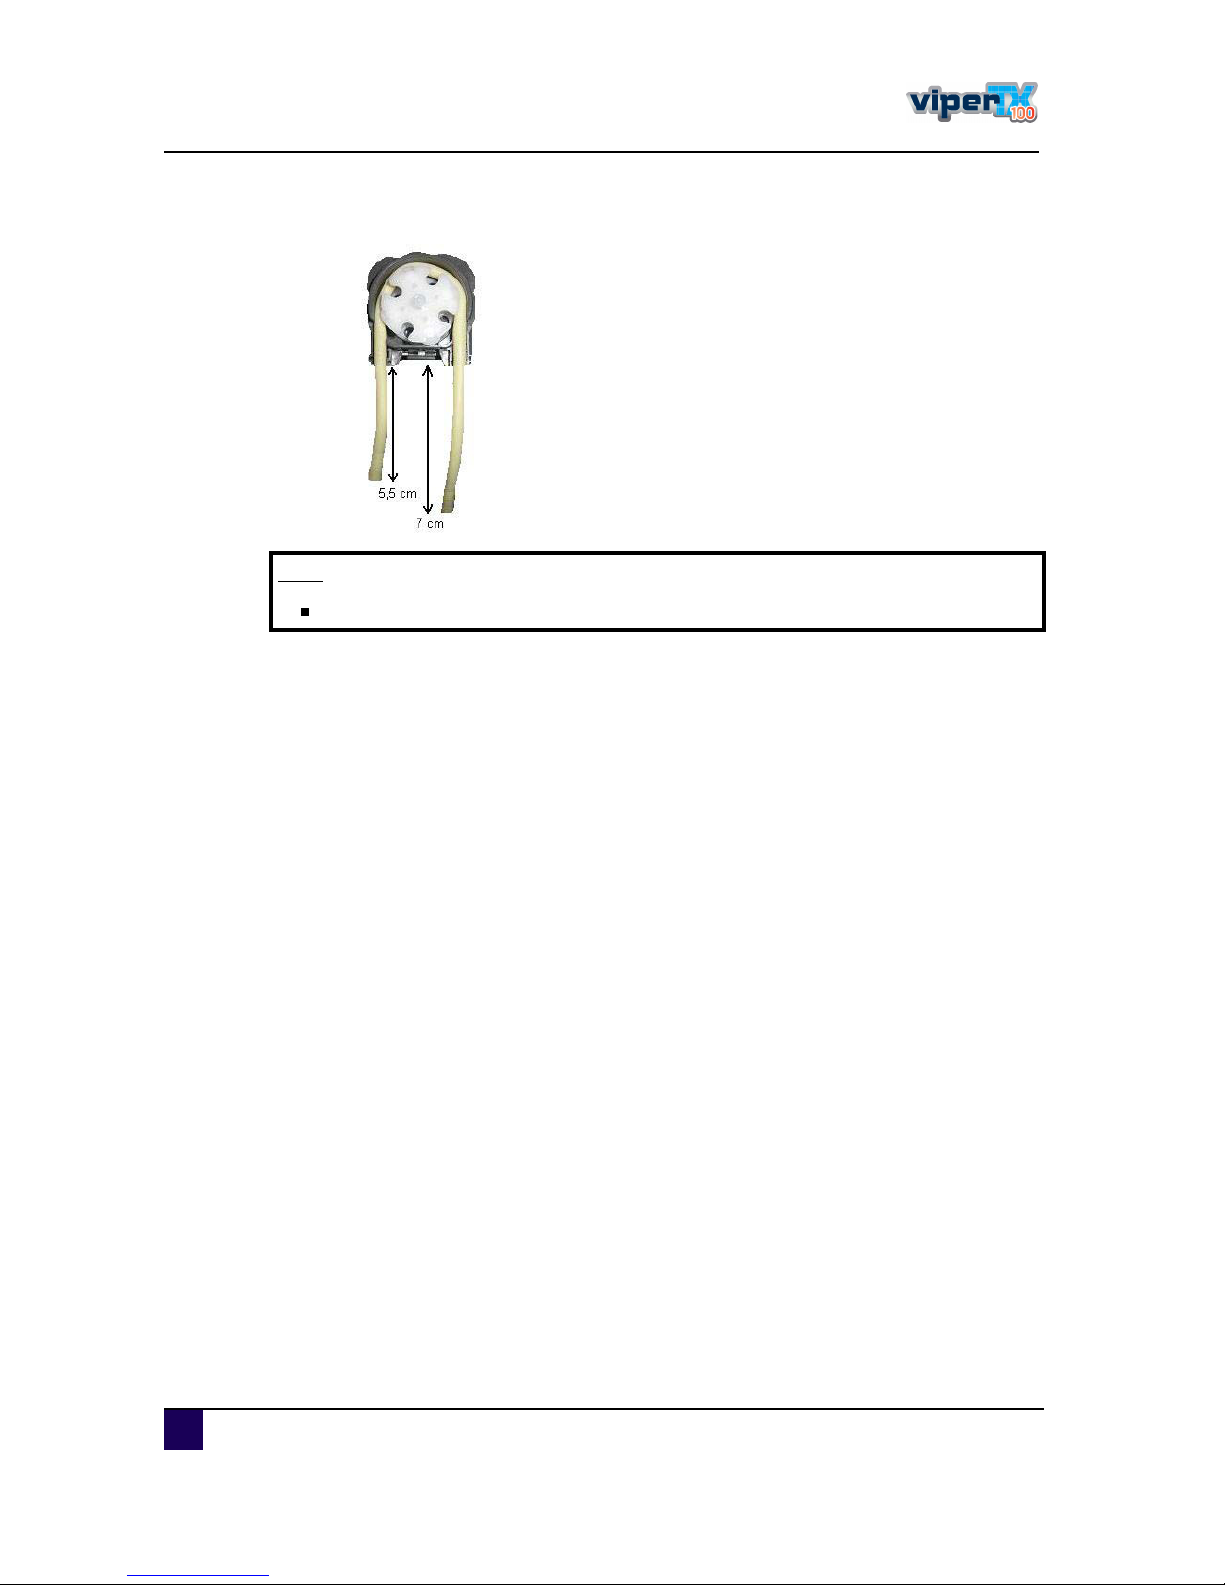
Us er s Gu id e V iper TX 1 0 0
C hapter4 P eriod ic alm aintenanc e
9 0 A P -7 5350 -Revis ion 1. 1
ͬ»° ëæ W hen replac ing the tu bing, pu tthe tu bing 3 to 5 tim es on the nipples .
Ò±¬»
B e sureth a tth etu bin g isnotw rinkled.
Page 91
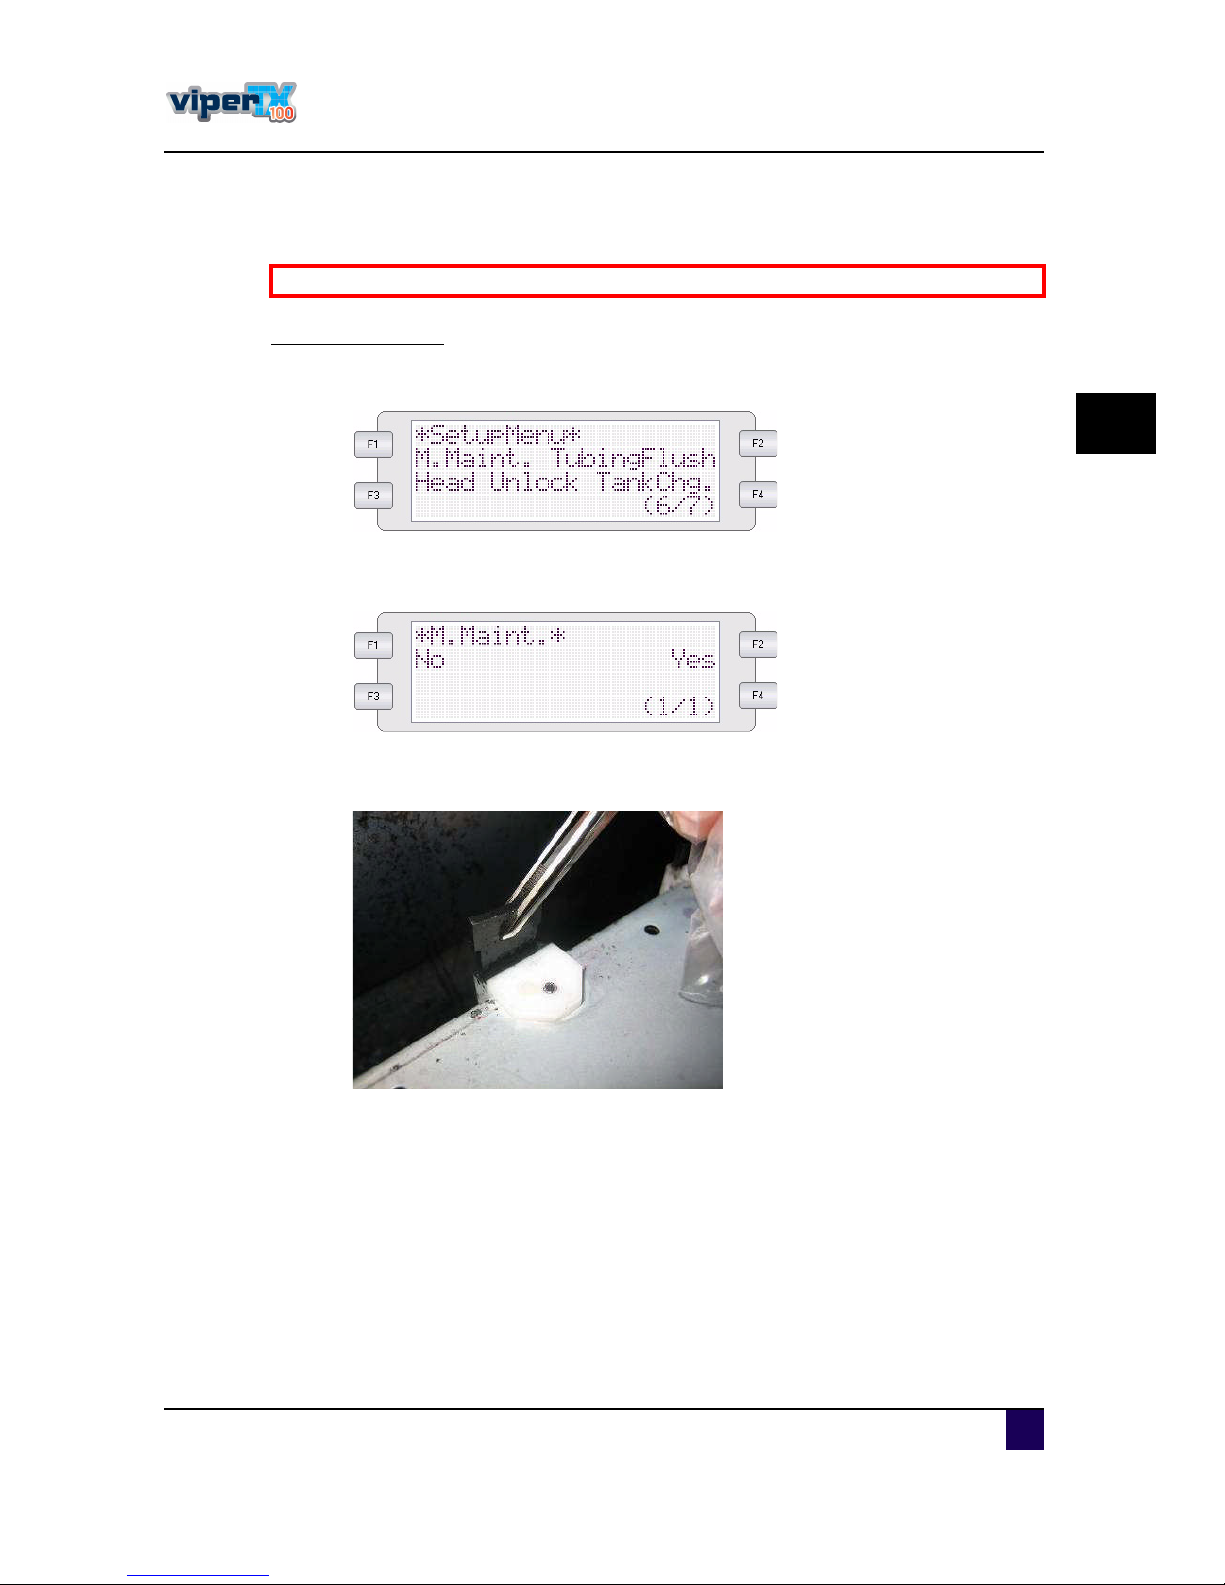
Us er s Gu id e V iper TX 1 0 0
C hapter4 P eriod ic alm aintenanc e
A P -7 5350 -Revis ion 1. 1 9 1
4
4.1.6 S ix m onthly m aintenance
C hange th e w ipers
ͬ»° ïæ P owerO N the printerand brows e to the m anu alm aintenanc e menu .
ͬ»° îæ P res s F1 to ente rthe s u b menu .
ͬ»° íæ P res s F2 to move the head to the manu almaintenanc e s tation.
ͬ»° ìæ O pen the frontc over.
ͬ»° ëæ Remove the old wipers with a pairoftweezers .
B e sureto rea da ndundersta ndth esa fetyw a rning s beforeh a ndling th e printer.
Page 92
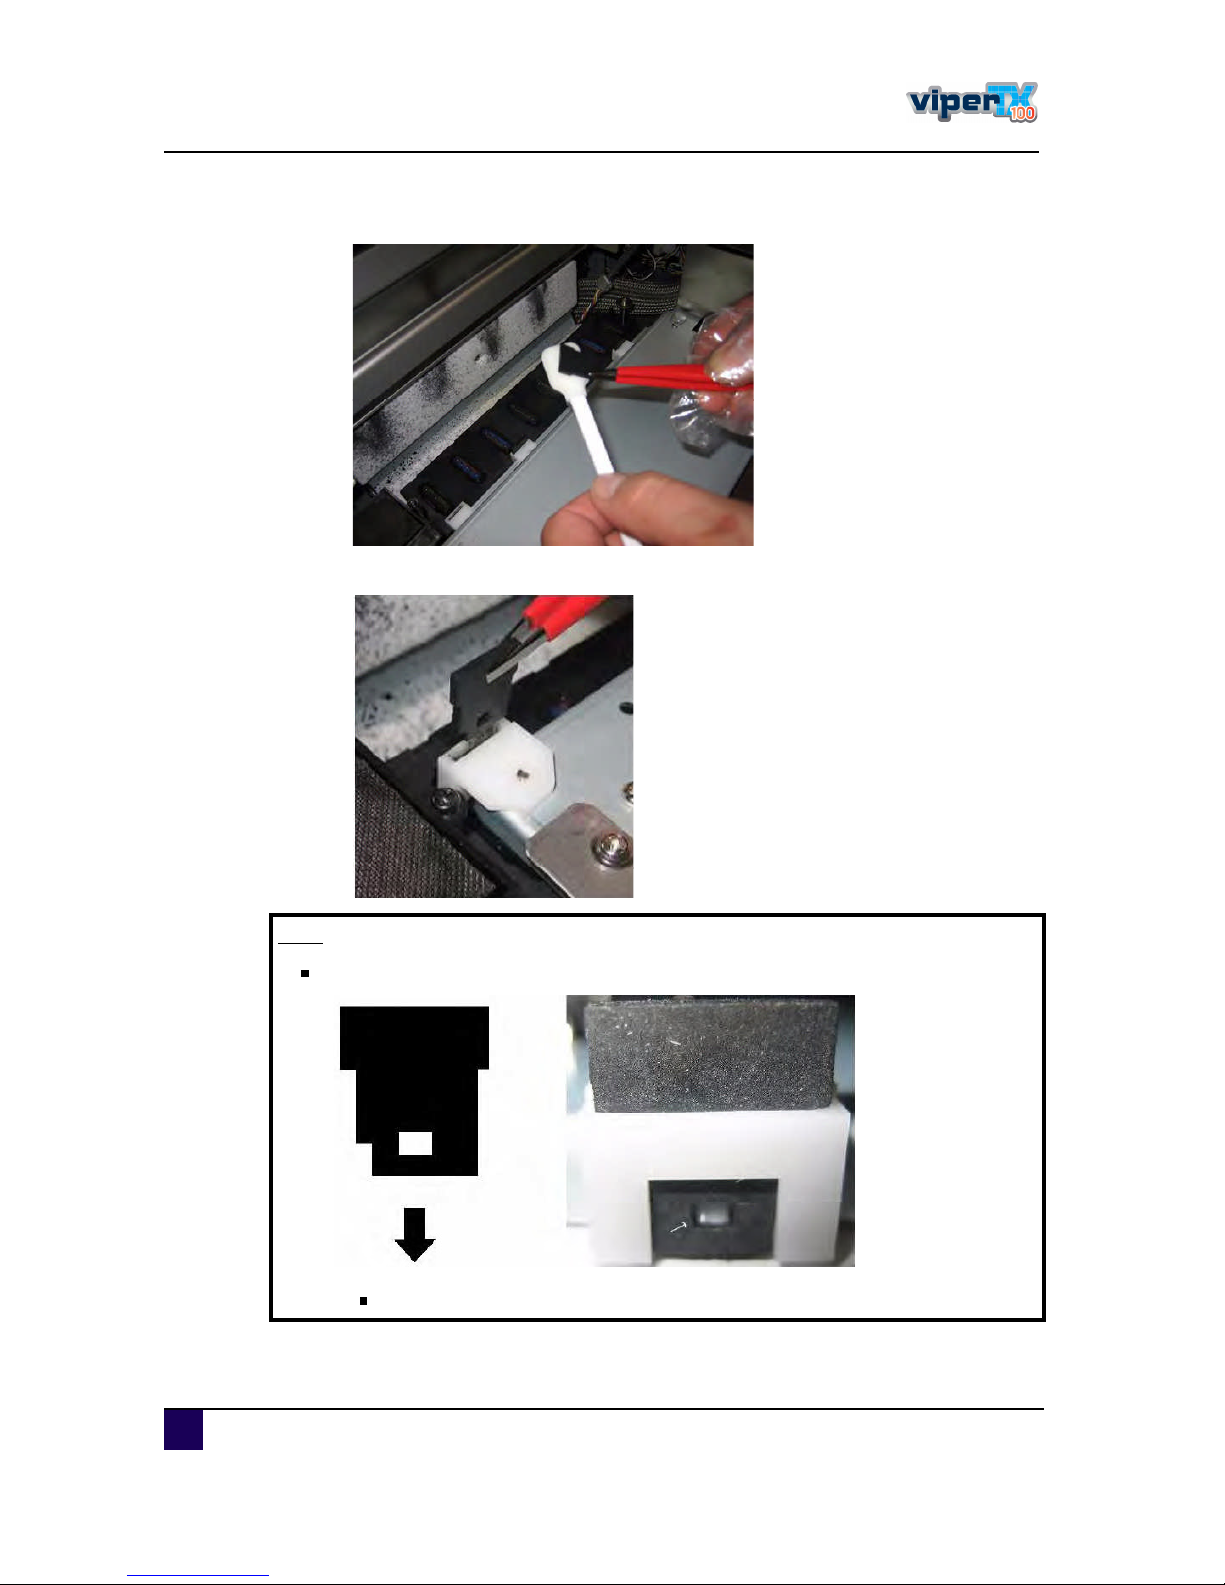
Us er s Gu id e V iper TX 1 0 0
C hapter4 P eriod ic alm aintenanc e
9 2 A P -7 5350 -Revis ion 1. 1
ͬ»° êæ B efore inserting a new wiper, m ois ten the wiperwith c leaningliq u id .
ͬ»° éæ Ins ertthe m ois tened wiperwith a pairoftweezers .
ͬ»° èæ C los e the frontc over.
ͬ»° çæ P res s ENTER to make the c arriage go bac kto its home pos ition.
Ò±¬»
M a kesureto insertth ew ipercorrectly a ssh ow n below .
O rientation ofthe wiperwhen s tand ing in frontofthe printer.
Page 93
Us er s Gu id e V iper TX 1 0 0
C hapter4 P eriod ic alm aintenanc e
A P -7 5350 -Revis ion 1. 1 9 3
4
4.2 D one by an authorized M utoh technician
This s ec tion d es c ribes the period ic als ervic es whic hs hou ld O N L Y be d one by an A u thorized
M u toh Tec hnic ian. This period ic als ervic e e ns u res s table printou tqu ality ofthe m ac hine.
4.2.1 O verview
4.2.2 P artnum bers ofthe m aintenance kits
M aintenanc e c yc le kit6 months KY -8 0 2 51
M aintenanc e c yc le kit1 2 m onths KY -8 0 2 2 8
Ò±¬»
A ny problem s ca u sed by using no n-orig ina l M utoh inks, spa re pa rts,
consu m a bles, ... w illnotbecov eredby th ew a rra n ty.
Ò±¬»
Th ism a intena nceis ba sedo n use8 h ours/ da y, 5da ys/ w eek a nd44w eeks/
yea r.
If a m a ch ine isu sedm ore, m a inten a ncep erio ds w illcom eea rlier.
N ° P rocedure F req uency
ï C hange abs orbentu nd erwas te bottle
H alfyearly
î C hange abs orbentin m ainte nanc e s tation
í C hange abs orbentbehind m aintenanc e s tation
ì C hange s pitting box m es h
ë A pply greas e on head u p-d own c am m s when need ed
ê A pply greas e on Y-motorbeltwhen need ed
é A pply greas e on rollerpath c arriage when need ed
è A pply greas e on c apping s tation c am m + gears when nee d ed
ç M ou s s e forflatc ables
ïð C hange s pitting box +tu be + L c onnec tion
Yearly
ïï C hange wiperarm + wipers
ïî C hange d ampers
ïí C hange c apas s y
ïì C hange was te tu bingfrom c ollec tor=> was te bottle.
Page 94

Us er s Gu id e V iper TX 1 0 0
C hapter4 P eriod ic alm aintenanc e
9 4 A P -7 5350 -Revis ion 1. 1
Page 95

Us er s Gu id e V iper TX 1 0 0
C hapter5 P rinterm enu
A P -7 5350 -Revis ion 1. 1 9 5
5
C hapter5 P rinter m enu
H ow to w orkin th em enu . . . . . . . . . . . . . . . . . . . . . . . . . . . . . . . . . . . . . . 9 9
Main screen . . . . . . . . . . . . . . . . . . . . . . . . . . . . . . . . . . . . . . . . . . . . . . . . . . . 99
Menu screen . . . . . . . . . . . . . . . . . . . . . . . . . . . . . . . . . . . . . . . . . . . . . . . . . 100
Changing between the screens . . . . . . . . . . . . . . . . . . . . . . . . . . . . . . . . . . . 101
From main screen to menu screen. . . . . . . . . . . . . . . . . . . . . . . . . . . . . 101
From menu screen to main screen. . . . . . . . . . . . . . . . . . . . . . . . . . . . . 101
O pera tion pa nel in sta ndbym ode. . . . . . . . . . . . . . . . . . . . . . . . . . . . . . 102
[F1] - Feeding and Step Adjust . . . . . . . . . . . . . . . . . . . . . . . . . . . . . . . . . . . 102
[F2] - Cleaning the heads. . . . . . . . . . . . . . . . . . . . . . . . . . . . . . . . . . . . . . . . 103
[F3] - Controlling the heater elements . . . . . . . . . . . . . . . . . . . . . . . . . . . . . . 103
Change the Pre-heater temperature. . . . . . . . . . . . . . . . . . . . . . . . . . . . 104
Change the dryer temperature . . . . . . . . . . . . . . . . . . . . . . . . . . . . . . . . 104
Change the dryer temperature . . . . . . . . . . . . . . . . . . . . . . . . . . . . . . . . 104
Activate/ deactivate heaters. . . . . . . . . . . . . . . . . . . . . . . . . . . . . . . . . . 105
PrintStart. . . . . . . . . . . . . . . . . . . . . . . . . . . . . . . . . . . . . . . . . . . . . . . . . 105
[F4] - Operating the pressure rollers . . . . . . . . . . . . . . . . . . . . . . . . . . . . . . . 105
[ENTER] - Print mode check . . . . . . . . . . . . . . . . . . . . . . . . . . . . . . . . . . . . . 106
O pera ting pa nelduring p rinting . . . . . . . . . . . . . . . . . . . . . . . . . . . . . . . 107
Printing menu . . . . . . . . . . . . . . . . . . . . . . . . . . . . . . . . . . . . . . . . . . . . . . . . . 107
[F1] - On the fly step adjustments. . . . . . . . . . . . . . . . . . . . . . . . . . . . . . 107
[F2] - Cleaning . . . . . . . . . . . . . . . . . . . . . . . . . . . . . . . . . . . . . . . . . . . . 107
[F3] - Adjust heaters . . . . . . . . . . . . . . . . . . . . . . . . . . . . . . . . . . . . . . . . 108
Pause / Resume . . . . . . . . . . . . . . . . . . . . . . . . . . . . . . . . . . . . . . . . . . . 108
Printing menu . . . . . . . . . . . . . . . . . . . . . . . . . . . . . . . . . . . . . . . . . . . . . . . . . 109
Printed length . . . . . . . . . . . . . . . . . . . . . . . . . . . . . . . . . . . . . . . . . . . . . 109
Printing menu . . . . . . . . . . . . . . . . . . . . . . . . . . . . . . . . . . . . . . . . . . . . . . . . . 109
Job dimensions. . . . . . . . . . . . . . . . . . . . . . . . . . . . . . . . . . . . . . . . . . . . 109
M enu ov erv iew . . . . . . . . . . . . . . . . . . . . . . . . . . . . . . . . . . . . . . . . . . . . . 110
Page 96

Us er s Gu id e V iper TX 1 0 0
C hapter5 P rintermenu
9 6 A P -7 5350 -Revis ion 1. 1
Setup m enu 1/7 . . . . . . . . . . . . . . . . . . . . . . . . . . . . . . . . . . . . . . . . . . . . . 111
Ink config . . . . . . . . . . . . . . . . . . . . . . . . . . . . . . . . . . . . . . . . . . . . . . . . . . . . 111
Origin set menu . . . . . . . . . . . . . . . . . . . . . . . . . . . . . . . . . . . . . . . . . . . . . . . 112
Test print menu . . . . . . . . . . . . . . . . . . . . . . . . . . . . . . . . . . . . . . . . . . . . . . . 113
Media set menu . . . . . . . . . . . . . . . . . . . . . . . . . . . . . . . . . . . . . . . . . . . . . . . 114
Media menu . . . . . . . . . . . . . . . . . . . . . . . . . . . . . . . . . . . . . . . . . . . . . . 115
InkDry menu . . . . . . . . . . . . . . . . . . . . . . . . . . . . . . . . . . . . . . . . . . . . . . 117
Head Height menu . . . . . . . . . . . . . . . . . . . . . . . . . . . . . . . . . . . . . . . . . 117
Vacuum menu . . . . . . . . . . . . . . . . . . . . . . . . . . . . . . . . . . . . . . . . . . . . 118
Fan Mode menu . . . . . . . . . . . . . . . . . . . . . . . . . . . . . . . . . . . . . . . . . . . 118
Thickness menu . . . . . . . . . . . . . . . . . . . . . . . . . . . . . . . . . . . . . . . . . . . 119
Heater A menu . . . . . . . . . . . . . . . . . . . . . . . . . . . . . . . . . . . . . . . . . . . . 119
Heater C menu . . . . . . . . . . . . . . . . . . . . . . . . . . . . . . . . . . . . . . . . . . . . 120
Heater D menu . . . . . . . . . . . . . . . . . . . . . . . . . . . . . . . . . . . . . . . . . . . . 120
HStatus menu . . . . . . . . . . . . . . . . . . . . . . . . . . . . . . . . . . . . . . . . . . . . . 121
Distance adjust menu . . . . . . . . . . . . . . . . . . . . . . . . . . . . . . . . . . . . . . . 122
Change media feed compensation value menu . . . . . . . . . . . . . . . . . . . 122
Top feed menu . . . . . . . . . . . . . . . . . . . . . . . . . . . . . . . . . . . . . . . . . . . . 123
Setup m enu 2/7 . . . . . . . . . . . . . . . . . . . . . . . . . . . . . . . . . . . . . . . . . . . . . 124
Print mode . . . . . . . . . . . . . . . . . . . . . . . . . . . . . . . . . . . . . . . . . . . . . . . . . . . 124
Condition menu . . . . . . . . . . . . . . . . . . . . . . . . . . . . . . . . . . . . . . . . . . . 125
Printing direction menu . . . . . . . . . . . . . . . . . . . . . . . . . . . . . . . . . . . . . . 126
HeadSet menu . . . . . . . . . . . . . . . . . . . . . . . . . . . . . . . . . . . . . . . . . . . . 127
Head speed menu . . . . . . . . . . . . . . . . . . . . . . . . . . . . . . . . . . . . . . . . . 127
Repeat printing menu . . . . . . . . . . . . . . . . . . . . . . . . . . . . . . . . . . . . . . . 128
Count menu . . . . . . . . . . . . . . . . . . . . . . . . . . . . . . . . . . . . . . . . . . . . . . 128
Interval time menu . . . . . . . . . . . . . . . . . . . . . . . . . . . . . . . . . . . . . . . . . 129
Weaving menu - i² . . . . . . . . . . . . . . . . . . . . . . . . . . . . . . . . . . . . . . . . . 130
ScanWidth . . . . . . . . . . . . . . . . . . . . . . . . . . . . . . . . . . . . . . . . . . . . . . . 131
Command setup menu. . . . . . . . . . . . . . . . . . . . . . . . . . . . . . . . . . . . . . . . . . 132
Print step menu . . . . . . . . . . . . . . . . . . . . . . . . . . . . . . . . . . . . . . . . . . . 132
Image resolution menu . . . . . . . . . . . . . . . . . . . . . . . . . . . . . . . . . . . . . . 133
Online timer menu . . . . . . . . . . . . . . . . . . . . . . . . . . . . . . . . . . . . . . . . . 133
Layout setup menu . . . . . . . . . . . . . . . . . . . . . . . . . . . . . . . . . . . . . . . . . . . . 134
Page 97

Us er s Gu id e V iper TX 1 0 0
C hapter5 P rinterm enu
A P -7 5350 -Revis ion 1. 1 9 7
5
Joint printing menu . . . . . . . . . . . . . . . . . . . . . . . . . . . . . . . . . . . . . . . . . 134
Function setup menu . . . . . . . . . . . . . . . . . . . . . . . . . . . . . . . . . . . . . . . . . . . 135
CMYK menu . . . . . . . . . . . . . . . . . . . . . . . . . . . . . . . . . . . . . . . . . . . . . . 135
Setup m enu 3/7 . . . . . . . . . . . . . . . . . . . . . . . . . . . . . . . . . . . . . . . . . . . . . 136
Roll setup menu . . . . . . . . . . . . . . . . . . . . . . . . . . . . . . . . . . . . . . . . . . . . . . . 136
Roll media length menu . . . . . . . . . . . . . . . . . . . . . . . . . . . . . . . . . . . . . 136
Centronics menu . . . . . . . . . . . . . . . . . . . . . . . . . . . . . . . . . . . . . . . . . . . . . . 137
Network setting menu . . . . . . . . . . . . . . . . . . . . . . . . . . . . . . . . . . . . . . . . . . 137
IP address menu . . . . . . . . . . . . . . . . . . . . . . . . . . . . . . . . . . . . . . . . . . 138
Subnet mask menu. . . . . . . . . . . . . . . . . . . . . . . . . . . . . . . . . . . . . . . . . 138
Gateway menu . . . . . . . . . . . . . . . . . . . . . . . . . . . . . . . . . . . . . . . . . . . . 139
Setup m enu 4/7 . . . . . . . . . . . . . . . . . . . . . . . . . . . . . . . . . . . . . . . . . . . . . 140
Utility menu . . . . . . . . . . . . . . . . . . . . . . . . . . . . . . . . . . . . . . . . . . . . . . . . . . 140
ErrorDisplay menu . . . . . . . . . . . . . . . . . . . . . . . . . . . . . . . . . . . . . . . . . 141
Power on cleaning menu . . . . . . . . . . . . . . . . . . . . . . . . . . . . . . . . . . . . 142
Media width menu . . . . . . . . . . . . . . . . . . . . . . . . . . . . . . . . . . . . . . . . . 142
Start position menu. . . . . . . . . . . . . . . . . . . . . . . . . . . . . . . . . . . . . . . . . 143
Smart Top Menu . . . . . . . . . . . . . . . . . . . . . . . . . . . . . . . . . . . . . . . . . . . 144
Auto cleaning Menu . . . . . . . . . . . . . . . . . . . . . . . . . . . . . . . . . . . . . . . . 145
Cap Cycle menu . . . . . . . . . . . . . . . . . . . . . . . . . . . . . . . . . . . . . . . . . . . 145
SlantCheck menu . . . . . . . . . . . . . . . . . . . . . . . . . . . . . . . . . . . . . . . . . . 146
HeaterTest menu . . . . . . . . . . . . . . . . . . . . . . . . . . . . . . . . . . . . . . . . . . 146
Edge printing menu . . . . . . . . . . . . . . . . . . . . . . . . . . . . . . . . . . . . . . . . 147
Auto media measure menu . . . . . . . . . . . . . . . . . . . . . . . . . . . . . . . . . . 148
Remote panel menu . . . . . . . . . . . . . . . . . . . . . . . . . . . . . . . . . . . . . . . . 148
Remote connection menu. . . . . . . . . . . . . . . . . . . . . . . . . . . . . . . . . . . . 148
Language menu . . . . . . . . . . . . . . . . . . . . . . . . . . . . . . . . . . . . . . . . . . . 148
Application menu . . . . . . . . . . . . . . . . . . . . . . . . . . . . . . . . . . . . . . . . . . 149
Initialize setup menu . . . . . . . . . . . . . . . . . . . . . . . . . . . . . . . . . . . . . . . . . . . 150
All Initialize menu . . . . . . . . . . . . . . . . . . . . . . . . . . . . . . . . . . . . . . . . . . 151
Media setup Initialize menu . . . . . . . . . . . . . . . . . . . . . . . . . . . . . . . . . . 151
Printing mode initialize menu . . . . . . . . . . . . . . . . . . . . . . . . . . . . . . . . . 151
Command setup Initialize menu . . . . . . . . . . . . . . . . . . . . . . . . . . . . . . . 152
Layout Setup Initialize menu . . . . . . . . . . . . . . . . . . . . . . . . . . . . . . . . . 152
Page 98

Us er s Gu id e V iper TX 1 0 0
C hapter5 P rintermenu
9 8 A P -7 5350 -Revis ion 1. 1
Function setup Initialize menu . . . . . . . . . . . . . . . . . . . . . . . . . . . . . . . . 152
Roll media setup Initialize menu. . . . . . . . . . . . . . . . . . . . . . . . . . . . . . . 153
Centronics Initialize menu . . . . . . . . . . . . . . . . . . . . . . . . . . . . . . . . . . . 153
Network Initialize menu . . . . . . . . . . . . . . . . . . . . . . . . . . . . . . . . . . . . . 153
Utility Initialize menu . . . . . . . . . . . . . . . . . . . . . . . . . . . . . . . . . . . . . . . . 154
Setup M enu 5/7 . . . . . . . . . . . . . . . . . . . . . . . . . . . . . . . . . . . . . . . . . . . . . 155
Data dump menu . . . . . . . . . . . . . . . . . . . . . . . . . . . . . . . . . . . . . . . . . . . . . . 155
Ink Manager menu . . . . . . . . . . . . . . . . . . . . . . . . . . . . . . . . . . . . . . . . . . . . . 155
Colour Mode menu . . . . . . . . . . . . . . . . . . . . . . . . . . . . . . . . . . . . . . . . . 156
Charge / Discharge Menu. . . . . . . . . . . . . . . . . . . . . . . . . . . . . . . . . . . . 157
Ink Supply Menu . . . . . . . . . . . . . . . . . . . . . . . . . . . . . . . . . . . . . . . . . . . 157
Setup m enu 6 /7 . . . . . . . . . . . . . . . . . . . . . . . . . . . . . . . . . . . . . . . . . . . . . 158
Manual Maintenance menu . . . . . . . . . . . . . . . . . . . . . . . . . . . . . . . . . . . . . . 158
Tubing Flush menu . . . . . . . . . . . . . . . . . . . . . . . . . . . . . . . . . . . . . . . . . . . . 159
Head Unlock menu . . . . . . . . . . . . . . . . . . . . . . . . . . . . . . . . . . . . . . . . . . . . 159
Tankchange menu . . . . . . . . . . . . . . . . . . . . . . . . . . . . . . . . . . . . . . . . . . . . . 159
Setup m enu 7 /7 . . . . . . . . . . . . . . . . . . . . . . . . . . . . . . . . . . . . . . . . . . . . . 16 0
Version Check menu . . . . . . . . . . . . . . . . . . . . . . . . . . . . . . . . . . . . . . . . . . . 160
Master. . . . . . . . . . . . . . . . . . . . . . . . . . . . . . . . . . . . . . . . . . . . . . . . . . . 160
Slaves. . . . . . . . . . . . . . . . . . . . . . . . . . . . . . . . . . . . . . . . . . . . . . . . . . . 160
Config . . . . . . . . . . . . . . . . . . . . . . . . . . . . . . . . . . . . . . . . . . . . . . . . . . . 161
Area . . . . . . . . . . . . . . . . . . . . . . . . . . . . . . . . . . . . . . . . . . . . . . . . . . . . . . . . 161
Page 99
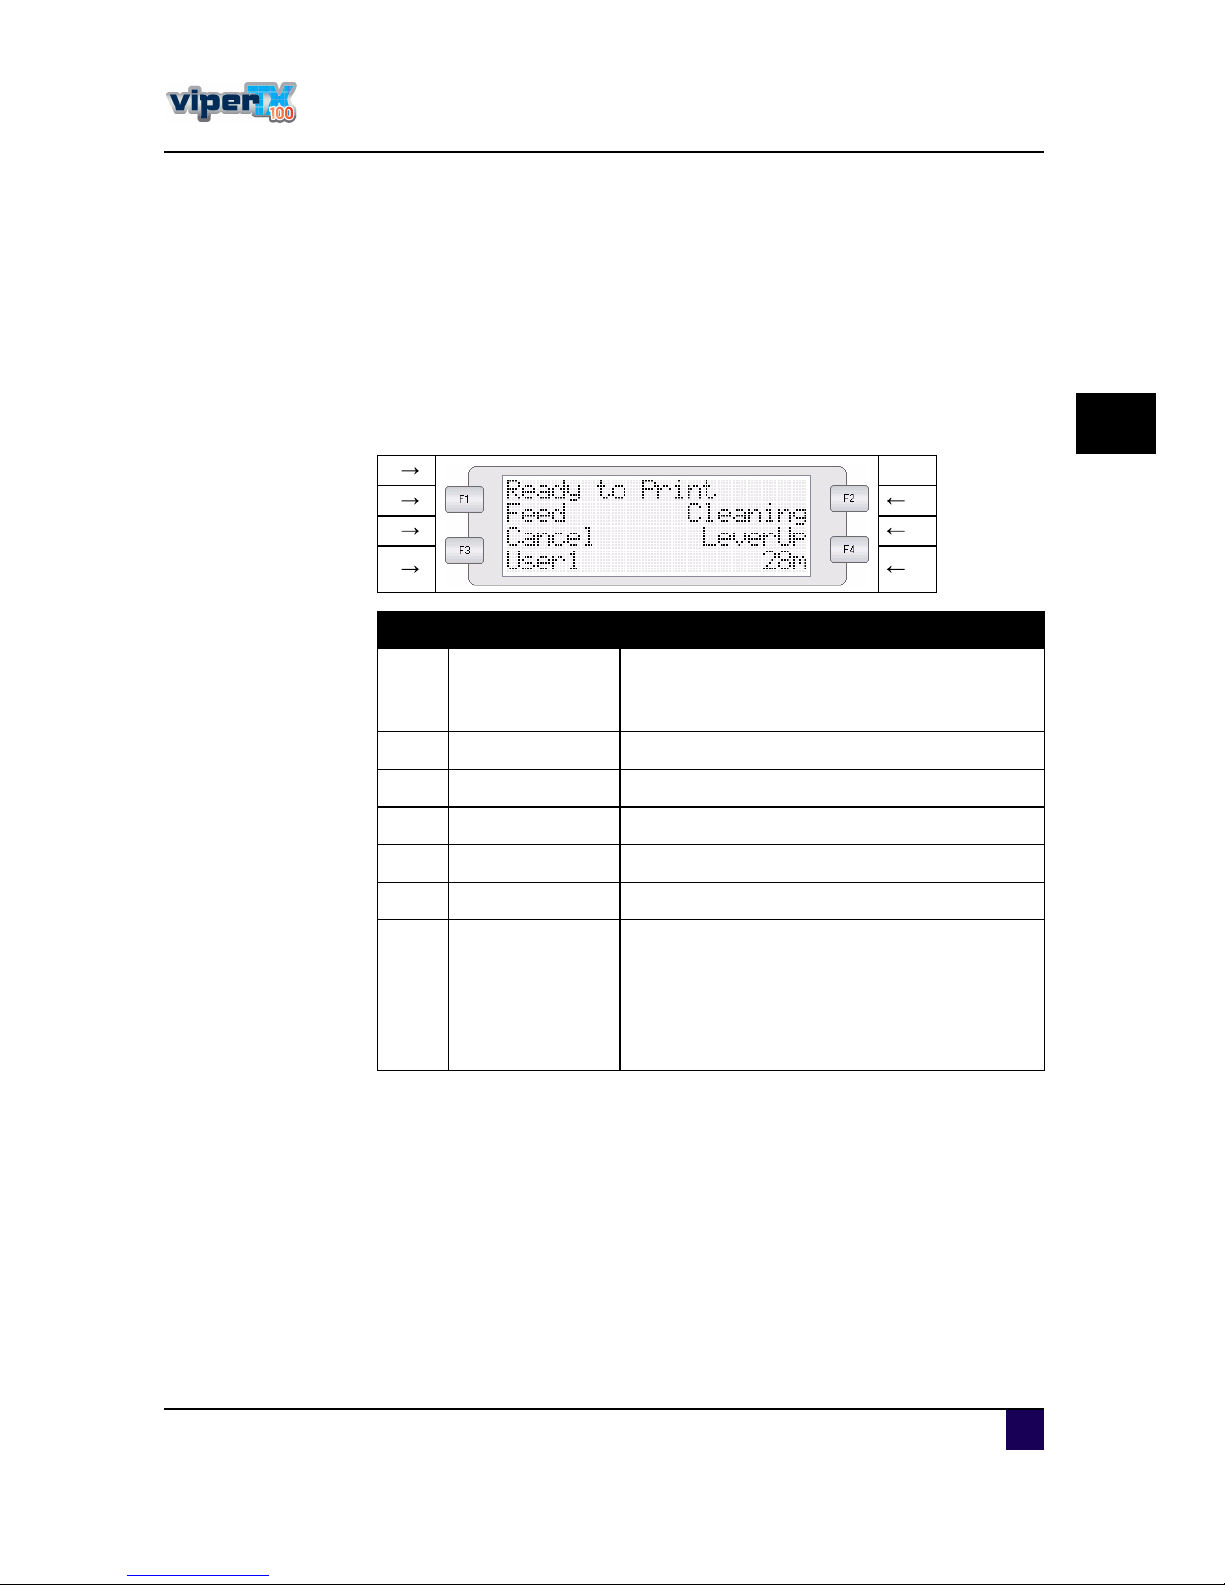
Us er s Gu id e V iper TX 1 0 0
C hapter5 P rinterm enu
A P -7 5350 -Revis ion 1. 1 9 9
5
5.1 H ow to w ork in the m enu
P leas e find below allnec es s ary inform ation on how to s witc h, s e lec tand c anc elme nu item s .
5.1.1 M ain screen
W hen powering O N the printer, itwill(when no errors oc c u r)s tartu pin its m ain s c reen. The
fu nc tion ofeac h key is explained below.
1
2 3
4 5
6 7
N ° P osition Description
ï 1s tline
D is plays the c u rrents tatu s ofthe printer.
D epe nd ingon the s tatu s , the c ontents m ay be
d is played in 2 to 4 lines .
î L eftof2nd line D is plays the fu nc tion as s igned to F1.
í Rightof2 nd line D is plays the fu nc tion as s igned to F2.
ì L eftof3rd line Dis plays the fu nc tion as s igned to F3.
ë Rightof3rd line D is plays the fu nc tion as s igned to F4.
ê L eftof4th line Dis plays the c u rrently s etm ed ia type.
é Rightof4thline
D is plays the approxim ate amou ntofre m aining
med ia thatis c u rrently s et. (Unit: m )
H owever, the amou ntis d is played only when
either" Rollm ed ia 1 " , "Rollm ed ia 2 " , or" Roll
med ia 3" is s elec ted in the Rollmed ia s etting
menu .
Page 100
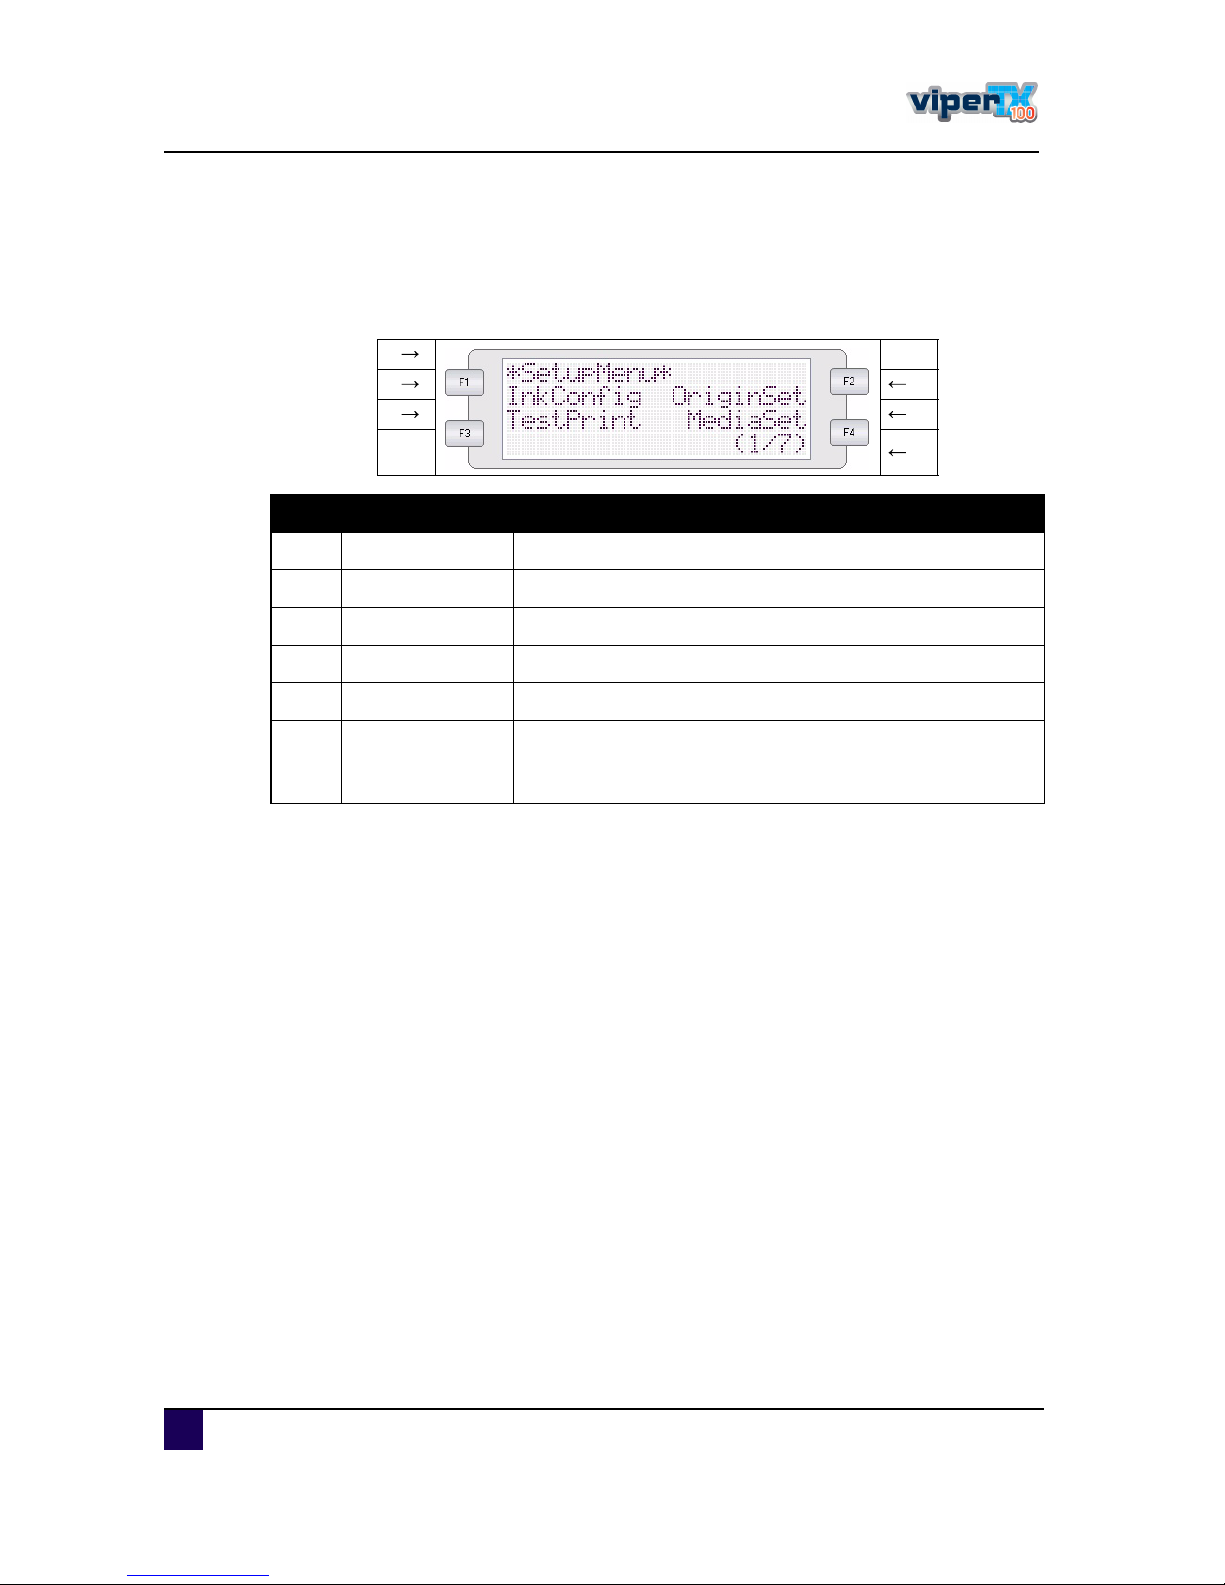
Us er s Gu id e V iper TX 1 0 0
C hapter5 P rintermenu
100 A P -7 5350 -Revis ion 1. 1
5.1.2 M enuscreen
In the S etu pM e nu , c hanges c an be m ad e to the printers ettings .
The c ontentd is playe d on the L C D monitoris as follows :
1
2 3
4 5
6
N ° P osition Description
ï 1 s tline D is plays the s etting m enu name c u rre ntly set.
î L eftof2 nd line D is plays the fu nc tion as s igned to F1.
í Rightof2 nd line D is plays the fu nc tion as s igned to F2.
ì L eftof3rd line D is plays the fu nc tion as s igned to F2.
ë Rightof3rd line D is plays the fu nc tion as s igned to F4.
ê 4th line
D is plays the c u rrently available fu nc tions ofF1 to F4.
D is plays the page s tatu s ifthere are mu ltiple pages forthe
c u rrently d is played s etting m e nu .
 Loading...