

MUTOH ValueJet VJ-1638UR Operation Manual

VJ-1638UR
Operation Manual
Operations and Maintenance Methods
• Unauthorized copying or duplication of the whole or part of the contents of this manual is prohibited.
• Every care has been taken in writing the contents of this manual, but please contact MUTOH or the dealer you purchased the
product from if you find any unclear, erroneous or otherwise unsatisfactory content in the manual.
• Please be aware that MUTOH will not be liable in any way for failures or accidents that result from handling or operating the
printer according to any procedures other than those set forth in this manual.
• Company names and product names that appear in this manual are registered trademarks of the respective companies.

For Users in Europe
The CE marking is a mandatory European marking for certain product groups to indicate conformity
with the essential health and safety requirements set out in European Directives.
By affixing the CE marking, the manufacturer, his authorized representative, or the person placing the
product on the market or putting it into service ensures that the item meets all the essential
requirements of all applicable EU directives and that the applicable conformity assessment
procedures have been applied.
For Users in the United States
This equipment has been tested and found to comply with the limits for a Class A digital device, pursuant to Part 15 of the
FCC Rules.
These limits are designed to provide reasonable protection against harmful interference when the equipment is operated in
a commercial environment.
This equipment generates, uses, and can radiate radio frequency energy and, if not installed and used in accordance with the
instruction manual, may cause harmful interference to radio communications.
Operation of this equipment in a residential area is likely to cause harmful interference in which case the user will be required
to correct the interference at his own expense.

Contents
Chapter 1 Basic Operations
Introduction . . . . . . . . . . . . . . . . . . . . . . . . . . . . . . . . . . . . . . . . . . . . . . . . . . . . . . . . . . . . . . . . . 9
Name of each part. . . . . . . . . . . . . . . . . . . . . . . . . . . . . . . . . . . . . . . . . . . . . . . . . . . . . . . . . . . . . . . . . . . . . . . . . . . . . . . . . . . . . . . . . 9
Menu chart. . . . . . . . . . . . . . . . . . . . . . . . . . . . . . . . . . . . . . . . . . . . . . . . . . . . . . . . . . . . . . . . . . . . . . . . . . . . . . . . . . . . . . . . . . . . . . . 12
System configurations of this product. . . . . . . . . . . . . . . . . . . . . . . . . . . . . . . . . . . . . . . . . . . . . . . . . . . . . . . . . . . . . . . . . . . . . 16
Connecting to a Computer. . . . . . . . . . . . . . . . . . . . . . . . . . . . . . . . . . . . . . . . . . . . . . . . . . . . . . . . . . . . . . . . . . . . . . . . . . . . . . . . 17
Launching/Displaying/Finishing ValueJet Status Monitor (VSM) . . . . . . . . . . . . . . . . . . . . . . . . . . . . . . . . . . . . . . . . . . . . 18
Launching ValueJet Layer Editor . . . . . . . . . . . . . . . . . . . . . . . . . . . . . . . . . . . . . . . . . . . . . . . . . . . . . . . . . . . . . . . . . . . . . . . . . . 19
Printing area . . . . . . . . . . . . . . . . . . . . . . . . . . . . . . . . . . . . . . . . . . . . . . . . . . . . . . . . . . . . . . . . . . . . . . . . . . . . . . . . . . . . . . . . . . . . . 20
Requirements for usable media . . . . . . . . . . . . . . . . . . . . . . . . . . . . . . . . . . . . . . . . . . . . . . . . . . . . . . . . . . . . . . . . . . . . . . . . . . . 21
Cautions in using this product . . . . . . . . . . . . . . . . . . . . . . . . . . . . . . . . . . . . . . . . . . . . . . . . . . . . . . . . . . . . . . . . . . . . . . . . . . . . 22
Powering ON / OFF . . . . . . . . . . . . . . . . . . . . . . . . . . . . . . . . . . . . . . . . . . . . . . . . . . . . . . . . . . 25
Turning the power ON. . . . . . . . . . . . . . . . . . . . . . . . . . . . . . . . . . . . . . . . . . . . . . . . . . . . . . . . . . . . . . . . . . . . . . . . . . . . . . . . . . . . 25
Turning the power OFF . . . . . . . . . . . . . . . . . . . . . . . . . . . . . . . . . . . . . . . . . . . . . . . . . . . . . . . . . . . . . . . . . . . . . . . . . . . . . . . . . . . 25
Sleep Mode . . . . . . . . . . . . . . . . . . . . . . . . . . . . . . . . . . . . . . . . . . . . . . . . . . . . . . . . . . . . . . . . . 27
Loading the media . . . . . . . . . . . . . . . . . . . . . . . . . . . . . . . . . . . . . . . . . . . . . . . . . . . . . . . . . . 29
Loading Roll Media onto the Roll media holder . . . . . . . . . . . . . . . . . . . . . . . . . . . . . . . . . . . . . . . . . . . . . . . . . . . . . . . . . . . . 29
Loading Roll Media into the printer . . . . . . . . . . . . . . . . . . . . . . . . . . . . . . . . . . . . . . . . . . . . . . . . . . . . . . . . . . . . . . . . . . . . . . . 31
After loading the media... . . . . . . . . . . . . . . . . . . . . . . . . . . . . . . . . . . . . . . . . . . . . . . . . . . . . . . . . . . . . . . . . . . . . . . . . . . . . . . . . . 33
Nozzle check and cleaning . . . . . . . . . . . . . . . . . . . . . . . . . . . . . . . . . . . . . . . . . . . . . . . . . . . 35
Nozzle check . . . . . . . . . . . . . . . . . . . . . . . . . . . . . . . . . . . . . . . . . . . . . . . . . . . . . . . . . . . . . . . . . . . . . . . . . . . . . . . . . . . . . . . . . . . . . 35
Cleaning . . . . . . . . . . . . . . . . . . . . . . . . . . . . . . . . . . . . . . . . . . . . . . . . . . . . . . . . . . . . . . . . . . . . . . . . . . . . . . . . . . . . . . . . . . . . . . . . . 37
Setting the Printing Precision . . . . . . . . . . . . . . . . . . . . . . . . . . . . . . . . . . . . . . . . . . . . . . . . 38
Head adjustment . . . . . . . . . . . . . . . . . . . . . . . . . . . . . . . . . . . . . . . . . . . . . . . . . . . . . . . . . . . . . . . . . . . . . . . . . . . . . . . . . . . . . . . . . 38
Print quality adjustment . . . . . . . . . . . . . . . . . . . . . . . . . . . . . . . . . . . . . . . . . . . . . . . . . . . . . . . . . . . . . . . . . . . . . . . . . . . . . . . . . . 40
Media feed adjustment . . . . . . . . . . . . . . . . . . . . . . . . . . . . . . . . . . . . . . . . . . . . . . . . . . . . . . . . . . . . . . . . . . . . . . . . . . . . . . . . . . . 42
Changing the Head Height . . . . . . . . . . . . . . . . . . . . . . . . . . . . . . . . . . . . . . . . . . . . . . . . . . . . . . . . . . . . . . . . . . . . . . . . . . . . . . . 44
Operating from Operation panel . . . . . . . . . . . . . . . . . . . . . . . . . . . . . . . . . . . . . . . . . . . . . 45
Feeding media . . . . . . . . . . . . . . . . . . . . . . . . . . . . . . . . . . . . . . . . . . . . . . . . . . . . . . . . . . . . . . . . . . . . . . . . . . . . . . . . . . . . . . . . . . . 45
Pausing / Restarting printing. . . . . . . . . . . . . . . . . . . . . . . . . . . . . . . . . . . . . . . . . . . . . . . . . . . . . . . . . . . . . . . . . . . . . . . . . . . . . . 45
Canceling printing. . . . . . . . . . . . . . . . . . . . . . . . . . . . . . . . . . . . . . . . . . . . . . . . . . . . . . . . . . . . . . . . . . . . . . . . . . . . . . . . . . . . . . . . 46
Cutting media . . . . . . . . . . . . . . . . . . . . . . . . . . . . . . . . . . . . . . . . . . . . . . . . . . . . . . . . . . . . . . . . . . . . . . . . . . . . . . . . . . . . . . . . . . . . 46
What you can do on the operation panel during printing . . . . . . . . . . . . . . . . . . . . . . . . . . . . . . . . . . . . . . . . . . . . . . . . . . 47
3

Chapter 2 Advanced Operations
Introduction . . . . . . . . . . . . . . . . . . . . . . . . . . . . . . . . . . . . . . . . . . . . . . . . . . . . . . . . . . . . . . . . 51
Operating the keys to use the menus . . . . . . . . . . . . . . . . . . . . . . . . . . . . . . . . . . . . . . . . . . . . . . . . . . . . . . . . . . . . . . . . . . . . . 51
Panel setup menu. . . . . . . . . . . . . . . . . . . . . . . . . . . . . . . . . . . . . . . . . . . . . . . . . . . . . . . . . . . . . . . . . . . . . . . . . . . . . . . . . . . . . . . . 52
Menu 1: Sleep Mode . . . . . . . . . . . . . . . . . . . . . . . . . . . . . . . . . . . . . . . . . . . . . . . . . . . . . . . . 56
Menu 2: User Type . . . . . . . . . . . . . . . . . . . . . . . . . . . . . . . . . . . . . . . . . . . . . . . . . . . . . . . . . . 57
Menu 3: Setup . . . . . . . . . . . . . . . . . . . . . . . . . . . . . . . . . . . . . . . . . . . . . . . . . . . . . . . . . . . . . . 70
Set 1: Side Margin . . . . . . . . . . . . . . . . . . . . . . . . . . . . . . . . . . . . . . . . . . . . . . . . . . . . . . . . . . . . . . . . . . . . . . . . . . . . . . . . . . . . . . . . 70
Set 2: Output Mode . . . . . . . . . . . . . . . . . . . . . . . . . . . . . . . . . . . . . . . . . . . . . . . . . . . . . . . . . . . . . . . . . . . . . . . . . . . . . . . . . . . . . . 70
Set 3: Method of Cut . . . . . . . . . . . . . . . . . . . . . . . . . . . . . . . . . . . . . . . . . . . . . . . . . . . . . . . . . . . . . . . . . . . . . . . . . . . . . . . . . . . . . 71
Set 4: Origin. . . . . . . . . . . . . . . . . . . . . . . . . . . . . . . . . . . . . . . . . . . . . . . . . . . . . . . . . . . . . . . . . . . . . . . . . . . . . . . . . . . . . . . . . . . . . . 72
Set 5: Head Travel . . . . . . . . . . . . . . . . . . . . . . . . . . . . . . . . . . . . . . . . . . . . . . . . . . . . . . . . . . . . . . . . . . . . . . . . . . . . . . . . . . . . . . . . 72
Set 6: Multi Strike. . . . . . . . . . . . . . . . . . . . . . . . . . . . . . . . . . . . . . . . . . . . . . . . . . . . . . . . . . . . . . . . . . . . . . . . . . . . . . . . . . . . . . . . . 73
Set 7: Slant Check . . . . . . . . . . . . . . . . . . . . . . . . . . . . . . . . . . . . . . . . . . . . . . . . . . . . . . . . . . . . . . . . . . . . . . . . . . . . . . . . . . . . . . . . 74
Set 8: Single Head . . . . . . . . . . . . . . . . . . . . . . . . . . . . . . . . . . . . . . . . . . . . . . . . . . . . . . . . . . . . . . . . . . . . . . . . . . . . . . . . . . . . . . . . 74
Set 9: Nozzle Select. . . . . . . . . . . . . . . . . . . . . . . . . . . . . . . . . . . . . . . . . . . . . . . . . . . . . . . . . . . . . . . . . . . . . . . . . . . . . . . . . . . . . . . 75
Set 10: Roll Length . . . . . . . . . . . . . . . . . . . . . . . . . . . . . . . . . . . . . . . . . . . . . . . . . . . . . . . . . . . . . . . . . . . . . . . . . . . . . . . . . . . . . . . 75
Set 11: FrontInterlace. . . . . . . . . . . . . . . . . . . . . . . . . . . . . . . . . . . . . . . . . . . . . . . . . . . . . . . . . . . . . . . . . . . . . . . . . . . . . . . . . . . . . 76
Set 12: CR Maintenance . . . . . . . . . . . . . . . . . . . . . . . . . . . . . . . . . . . . . . . . . . . . . . . . . . . . . . . . . . . . . . . . . . . . . . . . . . . . . . . . . . 77
Set 13: Ink Status . . . . . . . . . . . . . . . . . . . . . . . . . . . . . . . . . . . . . . . . . . . . . . . . . . . . . . . . . . . . . . . . . . . . . . . . . . . . . . . . . . . . . . . . . 77
Set 14: Life Times. . . . . . . . . . . . . . . . . . . . . . . . . . . . . . . . . . . . . . . . . . . . . . . . . . . . . . . . . . . . . . . . . . . . . . . . . . . . . . . . . . . . . . . . . 78
Set 15: Header Dump. . . . . . . . . . . . . . . . . . . . . . . . . . . . . . . . . . . . . . . . . . . . . . . . . . . . . . . . . . . . . . . . . . . . . . . . . . . . . . . . . . . . . 79
Set 16: Exhaust Fan. . . . . . . . . . . . . . . . . . . . . . . . . . . . . . . . . . . . . . . . . . . . . . . . . . . . . . . . . . . . . . . . . . . . . . . . . . . . . . . . . . . . . . . 79
Set 17: White Maintenance . . . . . . . . . . . . . . . . . . . . . . . . . . . . . . . . . . . . . . . . . . . . . . . . . . . . . . . . . . . . . . . . . . . . . . . . . . . . . . . 80
Set 18: Start Feed. . . . . . . . . . . . . . . . . . . . . . . . . . . . . . . . . . . . . . . . . . . . . . . . . . . . . . . . . . . . . . . . . . . . . . . . . . . . . . . . . . . . . . . . . 80
Set 19: Initialization . . . . . . . . . . . . . . . . . . . . . . . . . . . . . . . . . . . . . . . . . . . . . . . . . . . . . . . . . . . . . . . . . . . . . . . . . . . . . . . . . . . . . . 80
Set 20: Spitting. . . . . . . . . . . . . . . . . . . . . . . . . . . . . . . . . . . . . . . . . . . . . . . . . . . . . . . . . . . . . . . . . . . . . . . . . . . . . . . . . . . . . . . . . . . 81
Set 21: Temporary. . . . . . . . . . . . . . . . . . . . . . . . . . . . . . . . . . . . . . . . . . . . . . . . . . . . . . . . . . . . . . . . . . . . . . . . . . . . . . . . . . . . . . . . 82
4
Menu 4: Test Print. . . . . . . . . . . . . . . . . . . . . . . . . . . . . . . . . . . . . . . . . . . . . . . . . . . . . . . . . . . 83
Test 1: Nozzle Check. . . . . . . . . . . . . . . . . . . . . . . . . . . . . . . . . . . . . . . . . . . . . . . . . . . . . . . . . . . . . . . . . . . . . . . . . . . . . . . . . . . . . . 83
Test 2: Nozzle Check B. . . . . . . . . . . . . . . . . . . . . . . . . . . . . . . . . . . . . . . . . . . . . . . . . . . . . . . . . . . . . . . . . . . . . . . . . . . . . . . . . . . . 83
Test 3: Mode Print . . . . . . . . . . . . . . . . . . . . . . . . . . . . . . . . . . . . . . . . . . . . . . . . . . . . . . . . . . . . . . . . . . . . . . . . . . . . . . . . . . . . . . . . 84
Test 4: Setup List . . . . . . . . . . . . . . . . . . . . . . . . . . . . . . . . . . . . . . . . . . . . . . . . . . . . . . . . . . . . . . . . . . . . . . . . . . . . . . . . . . . . . . . . . 84
Test 5: Palette . . . . . . . . . . . . . . . . . . . . . . . . . . . . . . . . . . . . . . . . . . . . . . . . . . . . . . . . . . . . . . . . . . . . . . . . . . . . . . . . . . . . . . . . . . . . 85
Test 6: Head Adjust. . . . . . . . . . . . . . . . . . . . . . . . . . . . . . . . . . . . . . . . . . . . . . . . . . . . . . . . . . . . . . . . . . . . . . . . . . . . . . . . . . . . . . . 86
Menu 5: Cleaning . . . . . . . . . . . . . . . . . . . . . . . . . . . . . . . . . . . . . . . . . . . . . . . . . . . . . . . . . . . 88
Menu 6: Menu Option . . . . . . . . . . . . . . . . . . . . . . . . . . . . . . . . . . . . . . . . . . . . . . . . . . . . . . . 89
Menu 7: Maintenance . . . . . . . . . . . . . . . . . . . . . . . . . . . . . . . . . . . . . . . . . . . . . . . . . . . . . . . 90
Maintenance 1: Daily Maintenance . . . . . . . . . . . . . . . . . . . . . . . . . . . . . . . . . . . . . . . . . . . . . . . . . . . . . . . . . . . . . . . . . . . . . . . 90
Maintenance 2: Plug Life . . . . . . . . . . . . . . . . . . . . . . . . . . . . . . . . . . . . . . . . . . . . . . . . . . . . . . . . . . . . . . . . . . . . . . . . . . . . . . . . . 90
Maintenance 3: Ink Discharge. . . . . . . . . . . . . . . . . . . . . . . . . . . . . . . . . . . . . . . . . . . . . . . . . . . . . . . . . . . . . . . . . . . . . . . . . . . . . 91

Menu 8: Version. . . . . . . . . . . . . . . . . . . . . . . . . . . . . . . . . . . . . . . . . . . . . . . . . . . . . . . . . . . . . 92
Menu 9: Initial . . . . . . . . . . . . . . . . . . . . . . . . . . . . . . . . . . . . . . . . . . . . . . . . . . . . . . . . . . . . . . 92
Initial 1: Language . . . . . . . . . . . . . . . . . . . . . . . . . . . . . . . . . . . . . . . . . . . . . . . . . . . . . . . . . . . . . . . . . . . . . . . . . . . . . . . . . . . . . . . . 92
Initial 2: Length. . . . . . . . . . . . . . . . . . . . . . . . . . . . . . . . . . . . . . . . . . . . . . . . . . . . . . . . . . . . . . . . . . . . . . . . . . . . . . . . . . . . . . . . . . . 92
Initial 3: IP Address . . . . . . . . . . . . . . . . . . . . . . . . . . . . . . . . . . . . . . . . . . . . . . . . . . . . . . . . . . . . . . . . . . . . . . . . . . . . . . . . . . . . . . . 93
Initial 4: Subnet Mask . . . . . . . . . . . . . . . . . . . . . . . . . . . . . . . . . . . . . . . . . . . . . . . . . . . . . . . . . . . . . . . . . . . . . . . . . . . . . . . . . . . . . 93
Initial 5: Gateway . . . . . . . . . . . . . . . . . . . . . . . . . . . . . . . . . . . . . . . . . . . . . . . . . . . . . . . . . . . . . . . . . . . . . . . . . . . . . . . . . . . . . . . . . 93
Initial 6: Alert Buzzer . . . . . . . . . . . . . . . . . . . . . . . . . . . . . . . . . . . . . . . . . . . . . . . . . . . . . . . . . . . . . . . . . . . . . . . . . . . . . . . . . . . . . . 94
Menu 10: Job Status . . . . . . . . . . . . . . . . . . . . . . . . . . . . . . . . . . . . . . . . . . . . . . . . . . . . . . . . . 94
Chapter 3 Maintenance
Maintenance. . . . . . . . . . . . . . . . . . . . . . . . . . . . . . . . . . . . . . . . . . . . . . . . . . . . . . . . . . . . . . . . 96
Wearing the gloves and goggles . . . . . . . . . . . . . . . . . . . . . . . . . . . . . . . . . . . . . . . . . . . . . 97
How to wear the supplied gloves . . . . . . . . . . . . . . . . . . . . . . . . . . . . . . . . . . . . . . . . . . . . . . . . . . . . . . . . . . . . . . . . . . . . . . . . . 97
Agitating ink. . . . . . . . . . . . . . . . . . . . . . . . . . . . . . . . . . . . . . . . . . . . . . . . . . . . . . . . . . . . . . . . 98
Agitating ink . . . . . . . . . . . . . . . . . . . . . . . . . . . . . . . . . . . . . . . . . . . . . . . . . . . . . . . . . . . . . . . . . . . . . . . . . . . . . . . . . . . . . . . . . . . . . 98
Checking and replacing ink . . . . . . . . . . . . . . . . . . . . . . . . . . . . . . . . . . . . . . . . . . . . . . . . . 101
Checking ink level . . . . . . . . . . . . . . . . . . . . . . . . . . . . . . . . . . . . . . . . . . . . . . . . . . . . . . . . . . . . . . . . . . . . . . . . . . . . . . . . . . . . . . . 101
When it becomes time to replace ink. . . . . . . . . . . . . . . . . . . . . . . . . . . . . . . . . . . . . . . . . . . . . . . . . . . . . . . . . . . . . . . . . . . . . 102
Replacing ink. . . . . . . . . . . . . . . . . . . . . . . . . . . . . . . . . . . . . . . . . . . . . . . . . . . . . . . . . . . . . . . . . . . . . . . . . . . . . . . . . . . . . . . . . . . . 102
Replacing Adapter’s plug for High capacity ink pack adapter . . . . . . . . . . . . . . . . . . . . . . . . . . . . . . . . . . . . . . . . . . . . . . 105
Emptying waste fluid tank . . . . . . . . . . . . . . . . . . . . . . . . . . . . . . . . . . . . . . . . . . . . . . . . . . 106
Emptying waste fluid tank . . . . . . . . . . . . . . . . . . . . . . . . . . . . . . . . . . . . . . . . . . . . . . . . . . . . . . . . . . . . . . . . . . . . . . . . . . . . . . . 106
Daily Maintenance . . . . . . . . . . . . . . . . . . . . . . . . . . . . . . . . . . . . . . . . . . . . . . . . . . . . . . . . . 109
Flow of Daily Maintenance. . . . . . . . . . . . . . . . . . . . . . . . . . . . . . . . . . . . . . . . . . . . . . . . . . . . . . . . . . . . . . . . . . . . . . . . . . . . . . . 109
Preparing for Daily Maintenance . . . . . . . . . . . . . . . . . . . . . . . . . . . . . . . . . . . . . . . . . . . . . . . . . . . . . . . . . . . . . . . . . . . . . . . . . 110
Performing Daily Maintenance . . . . . . . . . . . . . . . . . . . . . . . . . . . . . . . . . . . . . . . . . . . . . . . . . . . . . . . . . . . . . . . . . . . . . . . . . . . 112
Continuously using printer after daily maintenance. . . . . . . . . . . . . . . . . . . . . . . . . . . . . . . . . . . . . . . . . . . . . . . . . . . . . . . 117
Cleaning each part . . . . . . . . . . . . . . . . . . . . . . . . . . . . . . . . . . . . . . . . . . . . . . . . . . . . . . . . . 119
Head cleaning. . . . . . . . . . . . . . . . . . . . . . . . . . . . . . . . . . . . . . . . . . . . . . . . . . . . . . . . . . . . . . . . . . . . . . . . . . . . . . . . . . . . . . . . . . . 119
Inside cleaning . . . . . . . . . . . . . . . . . . . . . . . . . . . . . . . . . . . . . . . . . . . . . . . . . . . . . . . . . . . . . . . . . . . . . . . . . . . . . . . . . . . . . . . . . . 121
Replacing consumable parts . . . . . . . . . . . . . . . . . . . . . . . . . . . . . . . . . . . . . . . . . . . . . . . . 122
Replacing absorption material for the flushing box . . . . . . . . . . . . . . . . . . . . . . . . . . . . . . . . . . . . . . . . . . . . . . . . . . . . . . . 122
Replacing Cutter . . . . . . . . . . . . . . . . . . . . . . . . . . . . . . . . . . . . . . . . . . . . . . . . . . . . . . . . . . . . . . . . . . . . . . . . . . . . . . . . . . . . . . . . 126
Replacing the cleaning wiper . . . . . . . . . . . . . . . . . . . . . . . . . . . . . . . . . . . . . . . . . . . . . . . . . . . . . . . . . . . . . . . . . . . . . . . . . . . . 128
5

Moving or transporting the printer. . . . . . . . . . . . . . . . . . . . . . . . . . . . . . . . . . . . . . . . . . 130
Moving the printer . . . . . . . . . . . . . . . . . . . . . . . . . . . . . . . . . . . . . . . . . . . . . . . . . . . . . . . . . . . . . . . . . . . . . . . . . . . . . . . . . . . . . . 130
Transporting the printer. . . . . . . . . . . . . . . . . . . . . . . . . . . . . . . . . . . . . . . . . . . . . . . . . . . . . . . . . . . . . . . . . . . . . . . . . . . . . . . . . 131
Performing initial charging after head cleaning . . . . . . . . . . . . . . . . . . . . . . . . . . . . . . . . . . . . . . . . . . . . . . . . . . . . . . . . . . 132
Chapter 4 Appendix
Messages and Error Messages . . . . . . . . . . . . . . . . . . . . . . . . . . . . . . . . . . . . . . . . . . . . . . 136
Status messages . . . . . . . . . . . . . . . . . . . . . . . . . . . . . . . . . . . . . . . . . . . . . . . . . . . . . . . . . . . . . . . . . . . . . . . . . . . . . . . . . . . . . . . . 136
Error message display and remedies . . . . . . . . . . . . . . . . . . . . . . . . . . . . . . . . . . . . . . . . . . . . . . . . . . . . . . . . . . . . . . . . . . . . . 138
Error requiring restart . . . . . . . . . . . . . . . . . . . . . . . . . . . . . . . . . . . . . . . . . . . . . . . . . . . . . . . . . . . . . . . . . . . . . . . . . . . . . . . . . . . 140
Troubleshooting . . . . . . . . . . . . . . . . . . . . . . . . . . . . . . . . . . . . . . . . . . . . . . . . . . . . . . . . . . . 141
Installation and initial setup troubleshooting. . . . . . . . . . . . . . . . . . . . . . . . . . . . . . . . . . . . . . . . . . . . . . . . . . . . . . . . . . . . . 141
Boot-up troubleshooting . . . . . . . . . . . . . . . . . . . . . . . . . . . . . . . . . . . . . . . . . . . . . . . . . . . . . . . . . . . . . . . . . . . . . . . . . . . . . . . . 142
Media-related troubleshooting . . . . . . . . . . . . . . . . . . . . . . . . . . . . . . . . . . . . . . . . . . . . . . . . . . . . . . . . . . . . . . . . . . . . . . . . . . 143
Printing-related troubleshooting . . . . . . . . . . . . . . . . . . . . . . . . . . . . . . . . . . . . . . . . . . . . . . . . . . . . . . . . . . . . . . . . . . . . . . . . 145
The media is jammed . . . . . . . . . . . . . . . . . . . . . . . . . . . . . . . . . . . . . . . . . . . . . . . . . . . . . . . . . . . . . . . . . . . . . . . . . . . . . . . . . . . 148
Specifications of this product . . . . . . . . . . . . . . . . . . . . . . . . . . . . . . . . . . . . . . . . . . . . . . . 150
List of specifications. . . . . . . . . . . . . . . . . . . . . . . . . . . . . . . . . . . . . . . . . . . . . . . . . . . . . . . . . . . . . . . . . . . . . . . . . . . . . . . . . . . . . 150
Options / Supply list. . . . . . . . . . . . . . . . . . . . . . . . . . . . . . . . . . . . . . . . . . . . . . . . . . . . . . . . 152
Revision History . . . . . . . . . . . . . . . . . . . . . . . . . . . . . . . . . . . . . . . . . . . . . . . . . . . . . . . . . . . 152
6

Chapter 1 Basic Operations
Introduction . . . . . . . . . . . . . . . . . . . . . . . . . . . . . . . . . . . . . . . . . . . . . . . . . . . . . 9
Name of each part . . . . . . . . . . . . . . . . . . . . . . . . . . . . . . . . . . . . . . . . . . . . . . . . . . . . . . . . . . . . . . 9
Menu chart . . . . . . . . . . . . . . . . . . . . . . . . . . . . . . . . . . . . . . . . . . . . . . . . . . . . . . . . . . . . . . . . . . . . 12
System configurations of this product . . . . . . . . . . . . . . . . . . . . . . . . . . . . . . . . . . . . . . . . . . 16
Connecting to a Computer . . . . . . . . . . . . . . . . . . . . . . . . . . . . . . . . . . . . . . . . . . . . . . . . . . . . . 17
Launching/Displaying/Finishing ValueJet Status Monitor (VSM). . . . . . . . . . . . . . . . . . 18
Launching ValueJet Layer Editor . . . . . . . . . . . . . . . . . . . . . . . . . . . . . . . . . . . . . . . . . . . . . . . . 19
Printing area . . . . . . . . . . . . . . . . . . . . . . . . . . . . . . . . . . . . . . . . . . . . . . . . . . . . . . . . . . . . . . . . . . . 20
Requirements for usable media. . . . . . . . . . . . . . . . . . . . . . . . . . . . . . . . . . . . . . . . . . . . . . . . . 21
Cautions in using this product . . . . . . . . . . . . . . . . . . . . . . . . . . . . . . . . . . . . . . . . . . . . . . . . . . 22
Powering ON / OFF. . . . . . . . . . . . . . . . . . . . . . . . . . . . . . . . . . . . . . . . . . . . . . 25
Turning the power ON . . . . . . . . . . . . . . . . . . . . . . . . . . . . . . . . . . . . . . . . . . . . . . . . . . . . . . . . . 25
Turning the power OFF. . . . . . . . . . . . . . . . . . . . . . . . . . . . . . . . . . . . . . . . . . . . . . . . . . . . . . . . . 25
Sleep Mode . . . . . . . . . . . . . . . . . . . . . . . . . . . . . . . . . . . . . . . . . . . . . . . . . . . . . 27
Loading the media . . . . . . . . . . . . . . . . . . . . . . . . . . . . . . . . . . . . . . . . . . . . . . 29
Loading Roll Media onto the Roll media holder. . . . . . . . . . . . . . . . . . . . . . . . . . . . . . . . . . 29
Loading Roll Media into the printer . . . . . . . . . . . . . . . . . . . . . . . . . . . . . . . . . . . . . . . . . . . . . 31
After loading the media.... . . . . . . . . . . . . . . . . . . . . . . . . . . . . . . . . . . . . . . . . . . . . . . . . . . . . . . 33
Nozzle check and cleaning . . . . . . . . . . . . . . . . . . . . . . . . . . . . . . . . . . . . . . 35
Nozzle check. . . . . . . . . . . . . . . . . . . . . . . . . . . . . . . . . . . . . . . . . . . . . . . . . . . . . . . . . . . . . . . . . . . 35
Cleaning . . . . . . . . . . . . . . . . . . . . . . . . . . . . . . . . . . . . . . . . . . . . . . . . . . . . . . . . . . . . . . . . . . . . . . . 37
Setting the Printing Precision. . . . . . . . . . . . . . . . . . . . . . . . . . . . . . . . . . . . 38
Head adjustment . . . . . . . . . . . . . . . . . . . . . . . . . . . . . . . . . . . . . . . . . . . . . . . . . . . . . . . . . . . . . . 38
Print quality adjustment. . . . . . . . . . . . . . . . . . . . . . . . . . . . . . . . . . . . . . . . . . . . . . . . . . . . . . . . 40
Media feed adjustment. . . . . . . . . . . . . . . . . . . . . . . . . . . . . . . . . . . . . . . . . . . . . . . . . . . . . . . . . 42
Changing the Head Height . . . . . . . . . . . . . . . . . . . . . . . . . . . . . . . . . . . . . . . . . . . . . . . . . . . . . 44
Operating from Operation panel . . . . . . . . . . . . . . . . . . . . . . . . . . . . . . . . 45
Feeding media . . . . . . . . . . . . . . . . . . . . . . . . . . . . . . . . . . . . . . . . . . . . . . . . . . . . . . . . . . . . . . . . . 45
Pausing / Restarting printing . . . . . . . . . . . . . . . . . . . . . . . . . . . . . . . . . . . . . . . . . . . . . . . . . . . 45
Canceling printing . . . . . . . . . . . . . . . . . . . . . . . . . . . . . . . . . . . . . . . . . . . . . . . . . . . . . . . . . . . . . 46
Cutting media . . . . . . . . . . . . . . . . . . . . . . . . . . . . . . . . . . . . . . . . . . . . . . . . . . . . . . . . . . . . . . . . . 46
What you can do on the operation panel during printing . . . . . . . . . . . . . . . . . . . . . . . . 47
7

8
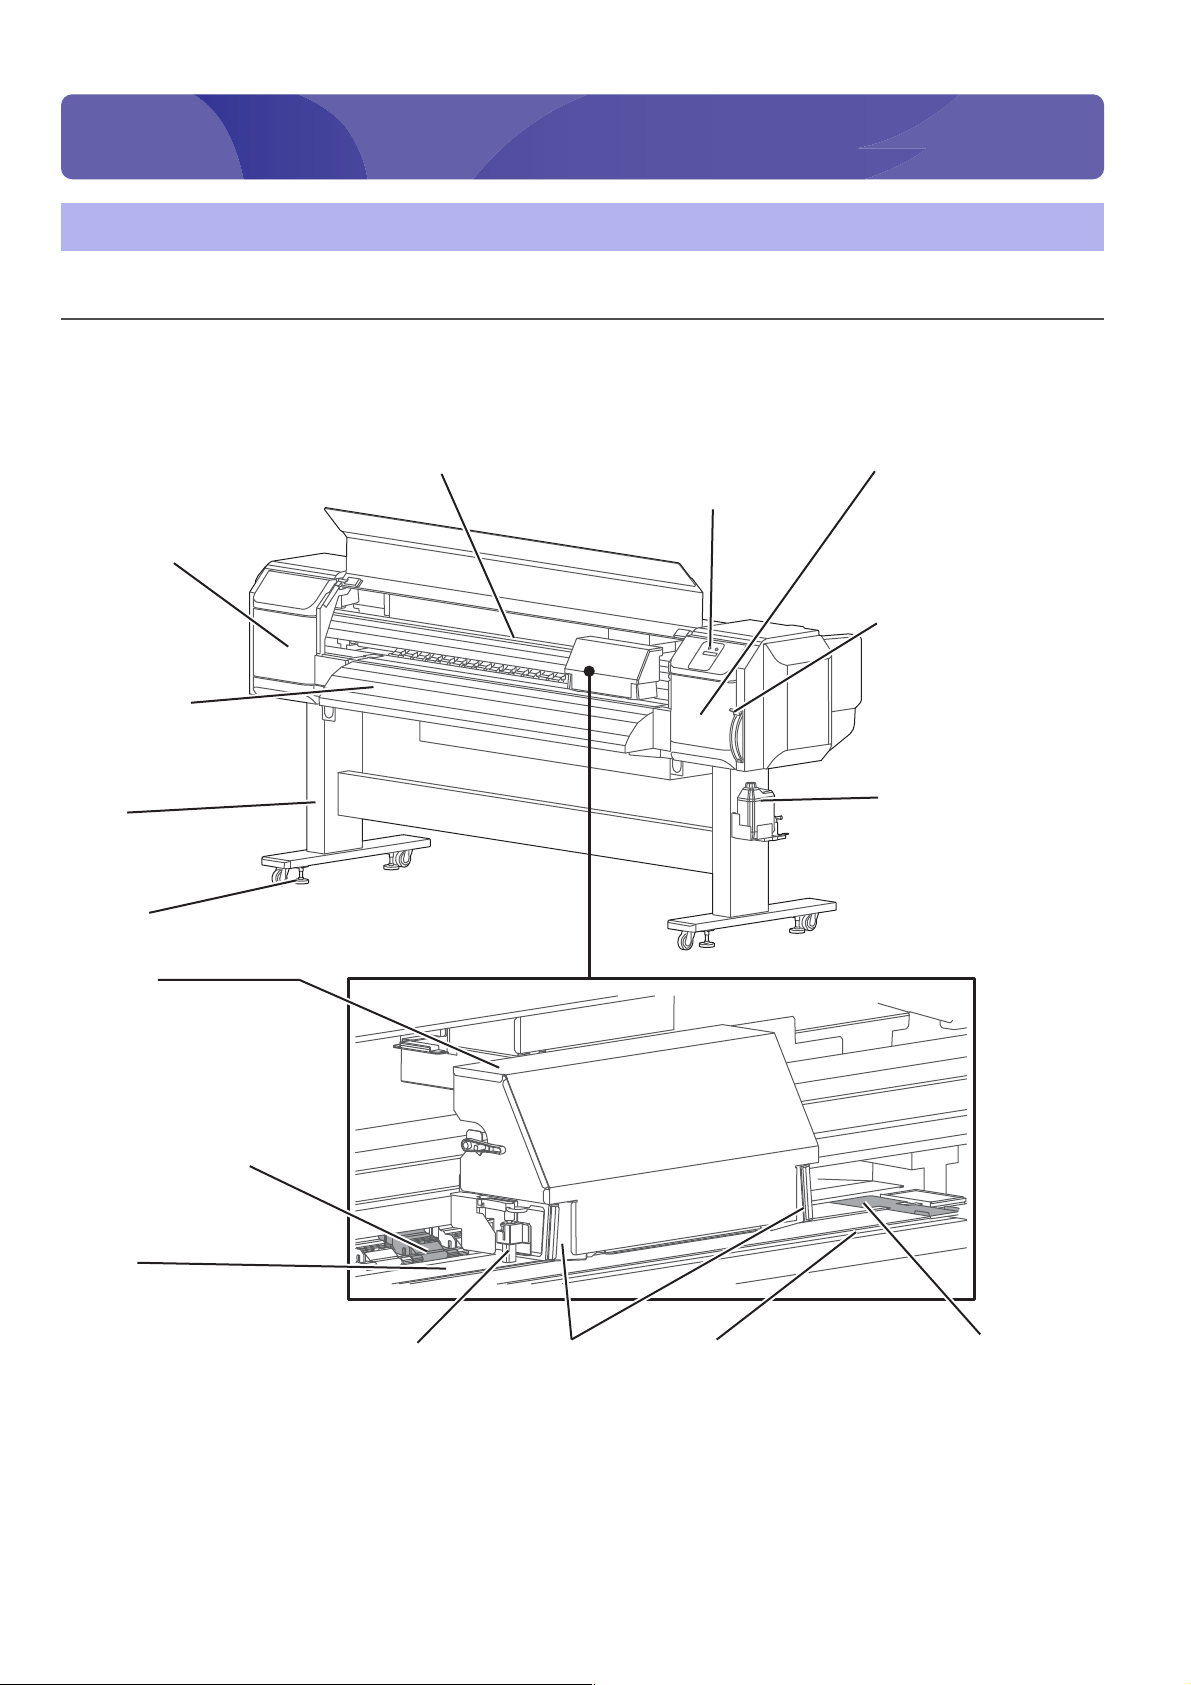
1Introduction
Introduction
Media holder
Located at the edge of the
media and it protects the
media from being lifted.
(located on both edges.)
Media loading lever
Used for fixing or releasing
the media.
Lower Lever further to fix
the media firmly.
Operation panel
⇒Operation panel P. 11
Front cover
Open and close this cover when
media is loaded or jammed.
It is normally closed.
Maintenance cover R
Open and close this cover
when cleaning or replacing
consumables.
It is normally closed.
Waste fluid tank
Used for collecting waste
fluid discharged from the
printer.
Remove the waste liquid
before it becomes full.
Maintenance cover L
Open and close this cover when
cleaning or replacing consumables.
It is normally closed.
Media guide
This is a passage for the
media.
Stand
Adjuster
Media cut groove
Used to cut media straight.
Cutter
Pressurizing rollers
Press and hold the whole
media when printing.
Platen
Media is printed on here.
There is an adsorption
fan inside.
Carriage
Contains the print
head, the LED pointer
and UV-LED unit.
UV-LED unit
Name of each part
Printer’s main body (Front side)
Name of each part 9
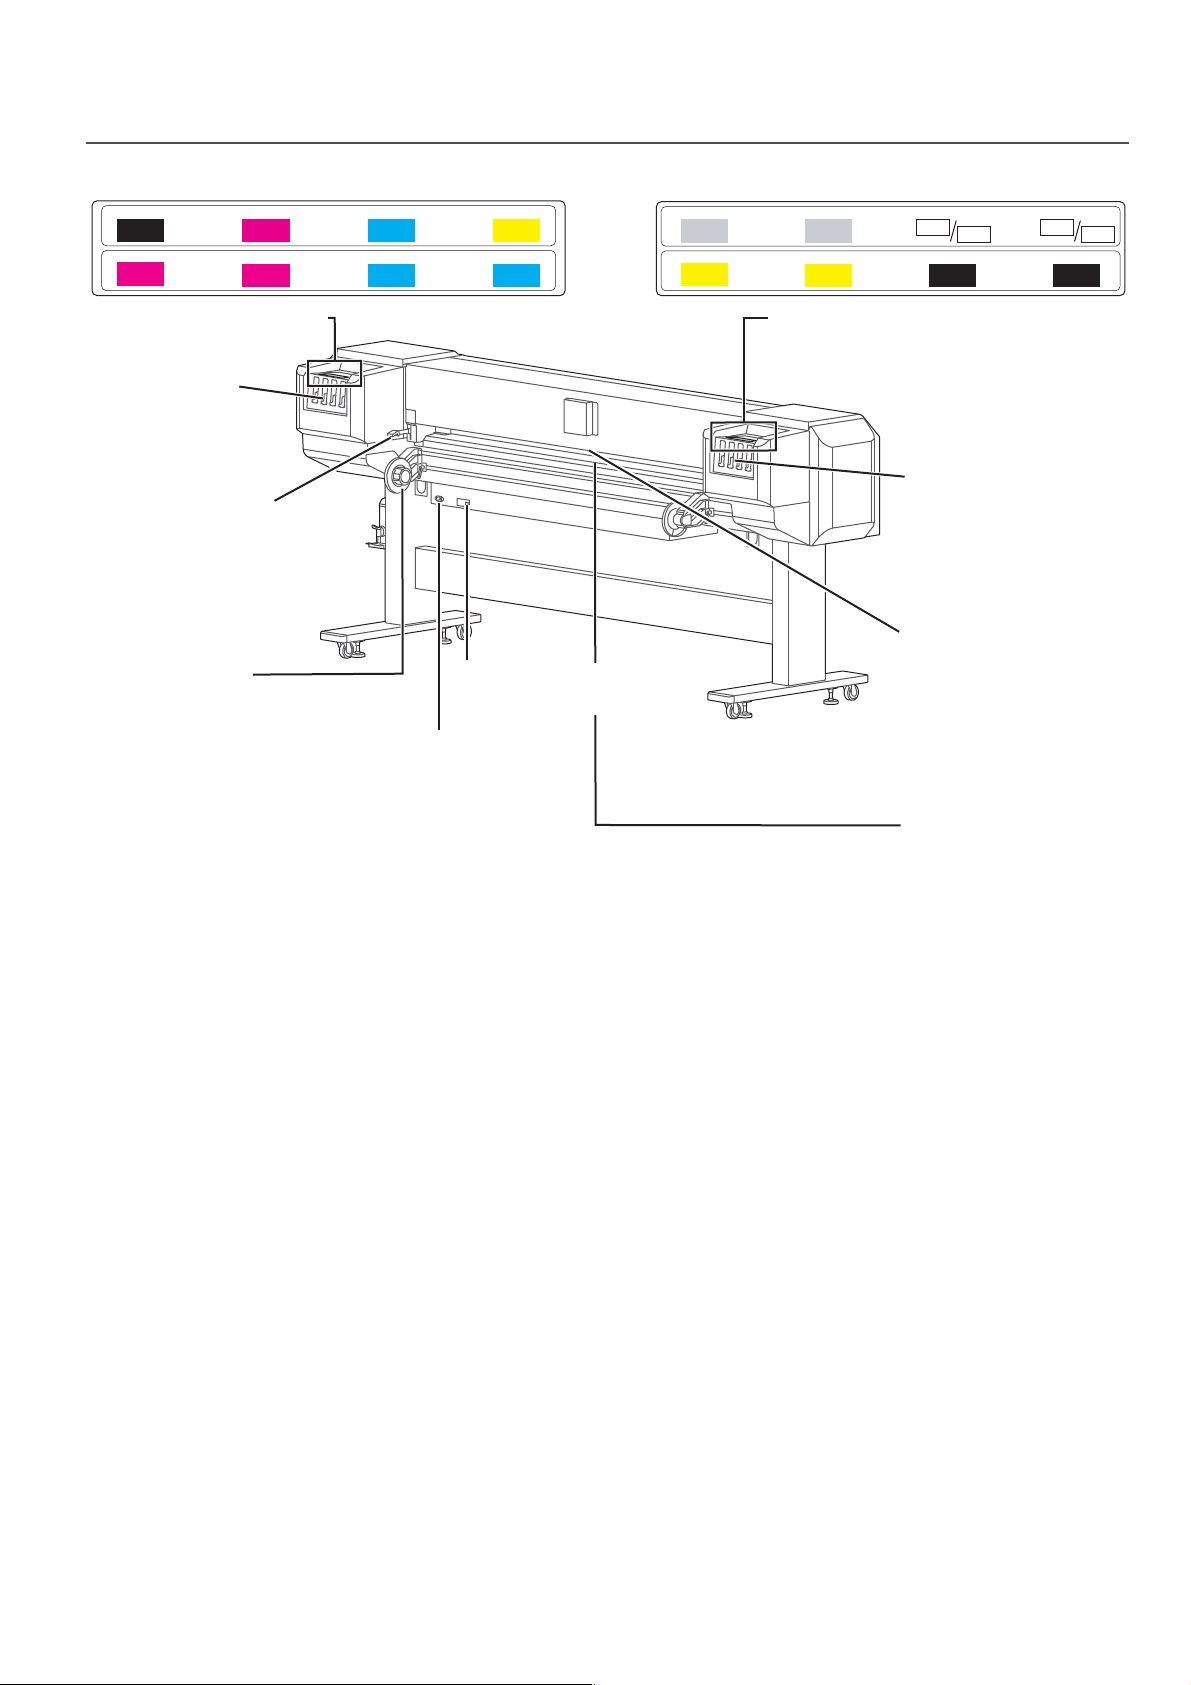
Printer’s main body (Rear side)
Ink color indicating labels Ink color indicating labels
Cartridge slots
Cartridge slots
Install ink cartridges / High
capacity ink pack adapters.
Media loading lever
Used for xing or releasing the
media. This lever is interlocked
with the media loading lever
on the front side.
Roll media holder
Load the roll media.
Equipped with Flanges to
attach the roll media and
Fixing levers to x Roll
media holders.
Media feed slot
When setting the media,
insert the media here and
pass the media to the front
side.
Media guide
This is a passage for the
media.
AC inlet
4 colors
6 / 5 colors
slot 5 slot 6 slot 7
slot 7slot 5 slot 6
Wh
KY K
Va
Va
Y
Va
Wh
slot 8
slot 8
CL CL
slot 1 slot 2 slot 3
slot 3slot 1 slot 2
C
CM C
KK
M
M
Y
slot 4
slot 4
4 colors
6 / 5 colors
Network interface
cable connector
10 Name of each part
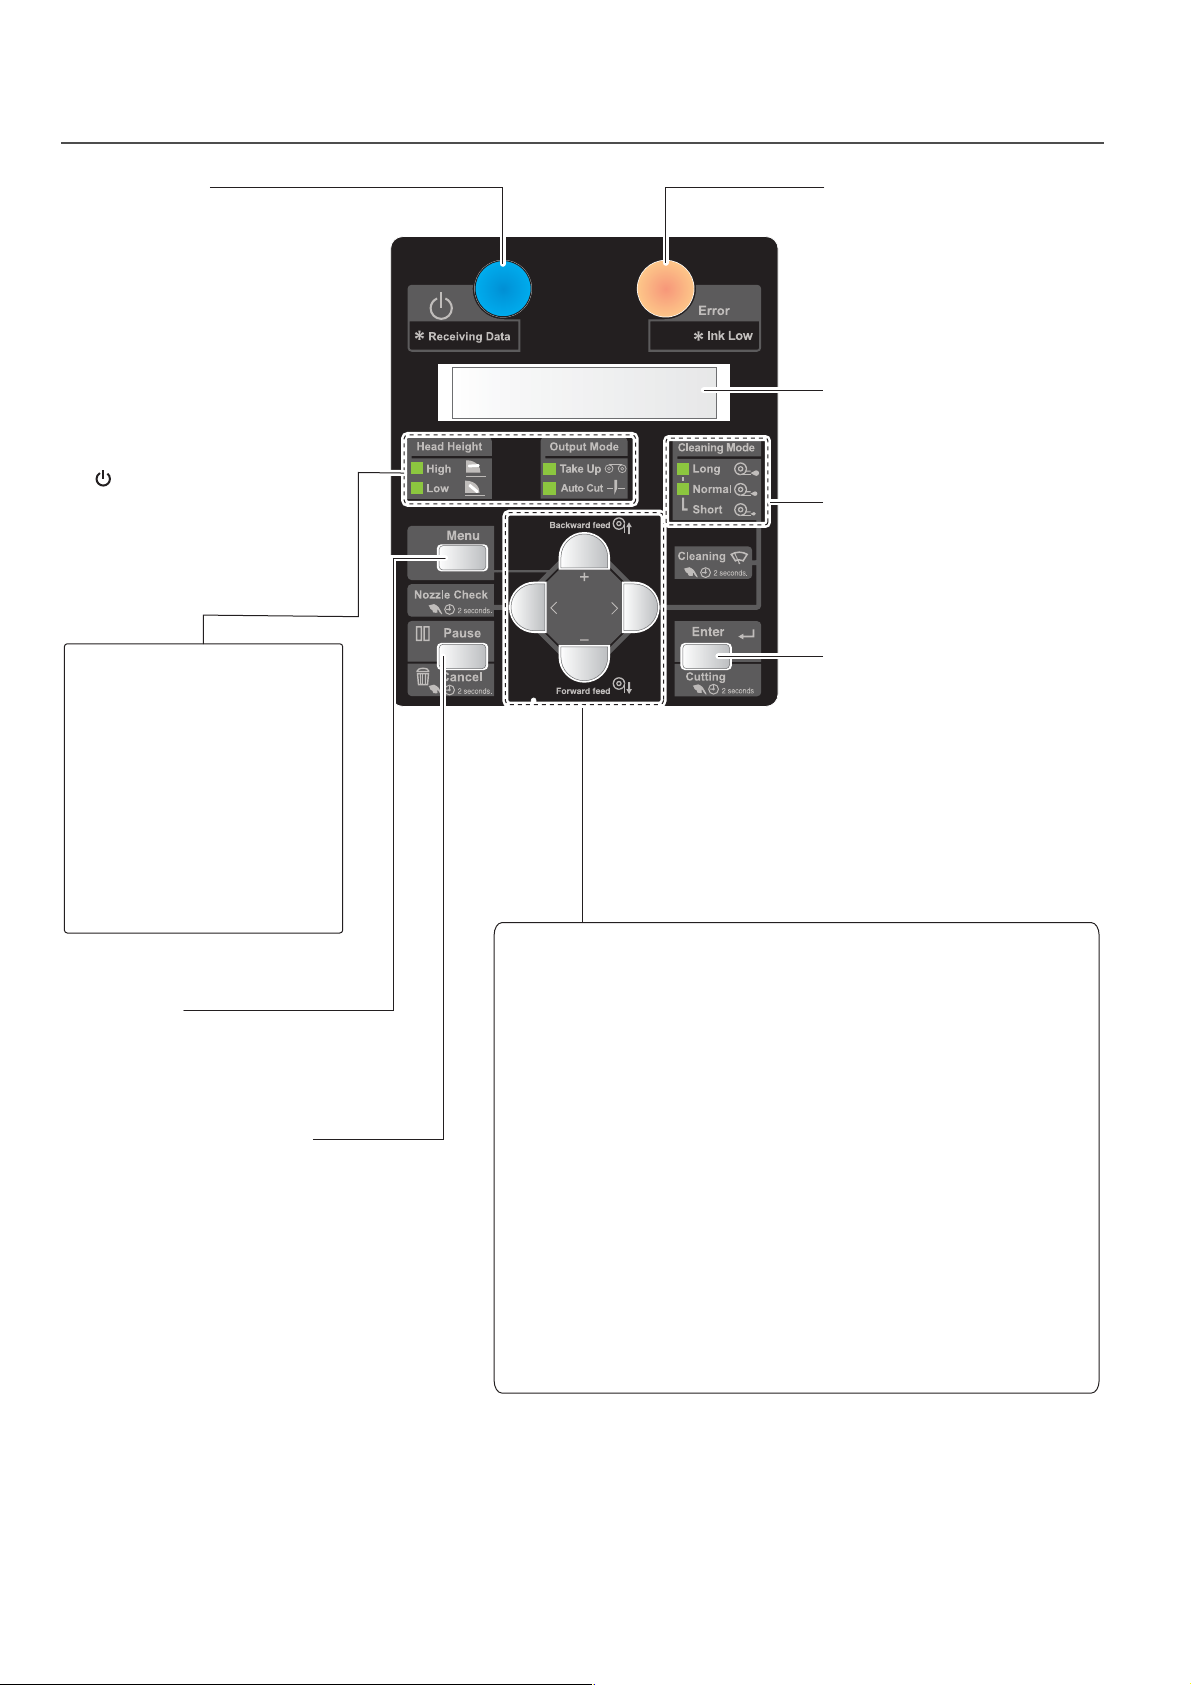
Operation panel
Power button
・Pressing this turns the power on.
Lights steady in blue when the
power is on.
・Pressing this once more turns the
power off. Is unlit when the power
is off.
・Flashes while data is being
received, in the sleep mode, and at
other times.
[Reference]
The symbol means “standby”. Even when
the power button is not turned on, the printer
consumes a tiny amount of power so long as
the power cable is connected. This state is
referred to as the power being “off” in this
Manual.
[Head Height]
・High setting: High indicator is ON.
・Low setting: Low indicator is ON
[Take up]
Lights steady green when the
Output mode is set to “Take-up”.
[Auto Cut]
Lights steady green when the
Output mode is set to “Auto Cut”.
indicator
indicator
indicator
[Menu] key
Used for accessing and exiting the
menu.
[Pause]
・Press this key to pause printing.
・
Holding this key pressed down
for two seconds or longer will
cancel the print job and delete
the data received.
When setting the menu:
・
Cancels a change of a setting
value.
[Cancel]
/
key
[+]
key /
[Backward feed]
Media is fed in the backward
direction.
When setting the menu:
・Press this to move to another
menu item
・Press this to change a set value.
[-]
key /
[Forward feed]
Media is fed in the forward
direction.
When setting the menu:
・Press this to move to another
menu item
・Press this to change a set value.
key
key
Error indicator
・Lights up in orange when an error
has occurred or a cover is open.
・Flashes when the ink is low.
Display
Displays the printer status, setting
menu, errors and so on.
[Cleaning Mode]
Light steady green to indicate the
head cleaning mode.
[Enter]
When you have set a media in
place, pressing and holding this
down for two seconds or longer will
run a media cut.
When setting the menu:
・Press this to go to the menu item
・Press this to confirm a set value.
[<] key /
Pressing and holding this down for
two seconds or longer will run a
nozzle check.
When setting the menu:
・Press this to change a set value.
[>]
・For changing the cleaning mode.
・Pressing and holding this down
When setting the menu:
・Press this to move to a lower level of
・Press this to change a set value.
key
you select.
[Nozzle Check]
[Cleaning Mode]
key /
for two seconds or longer will
execute head cleaning.
menu items.
indicators
key
key
Name of each part 11
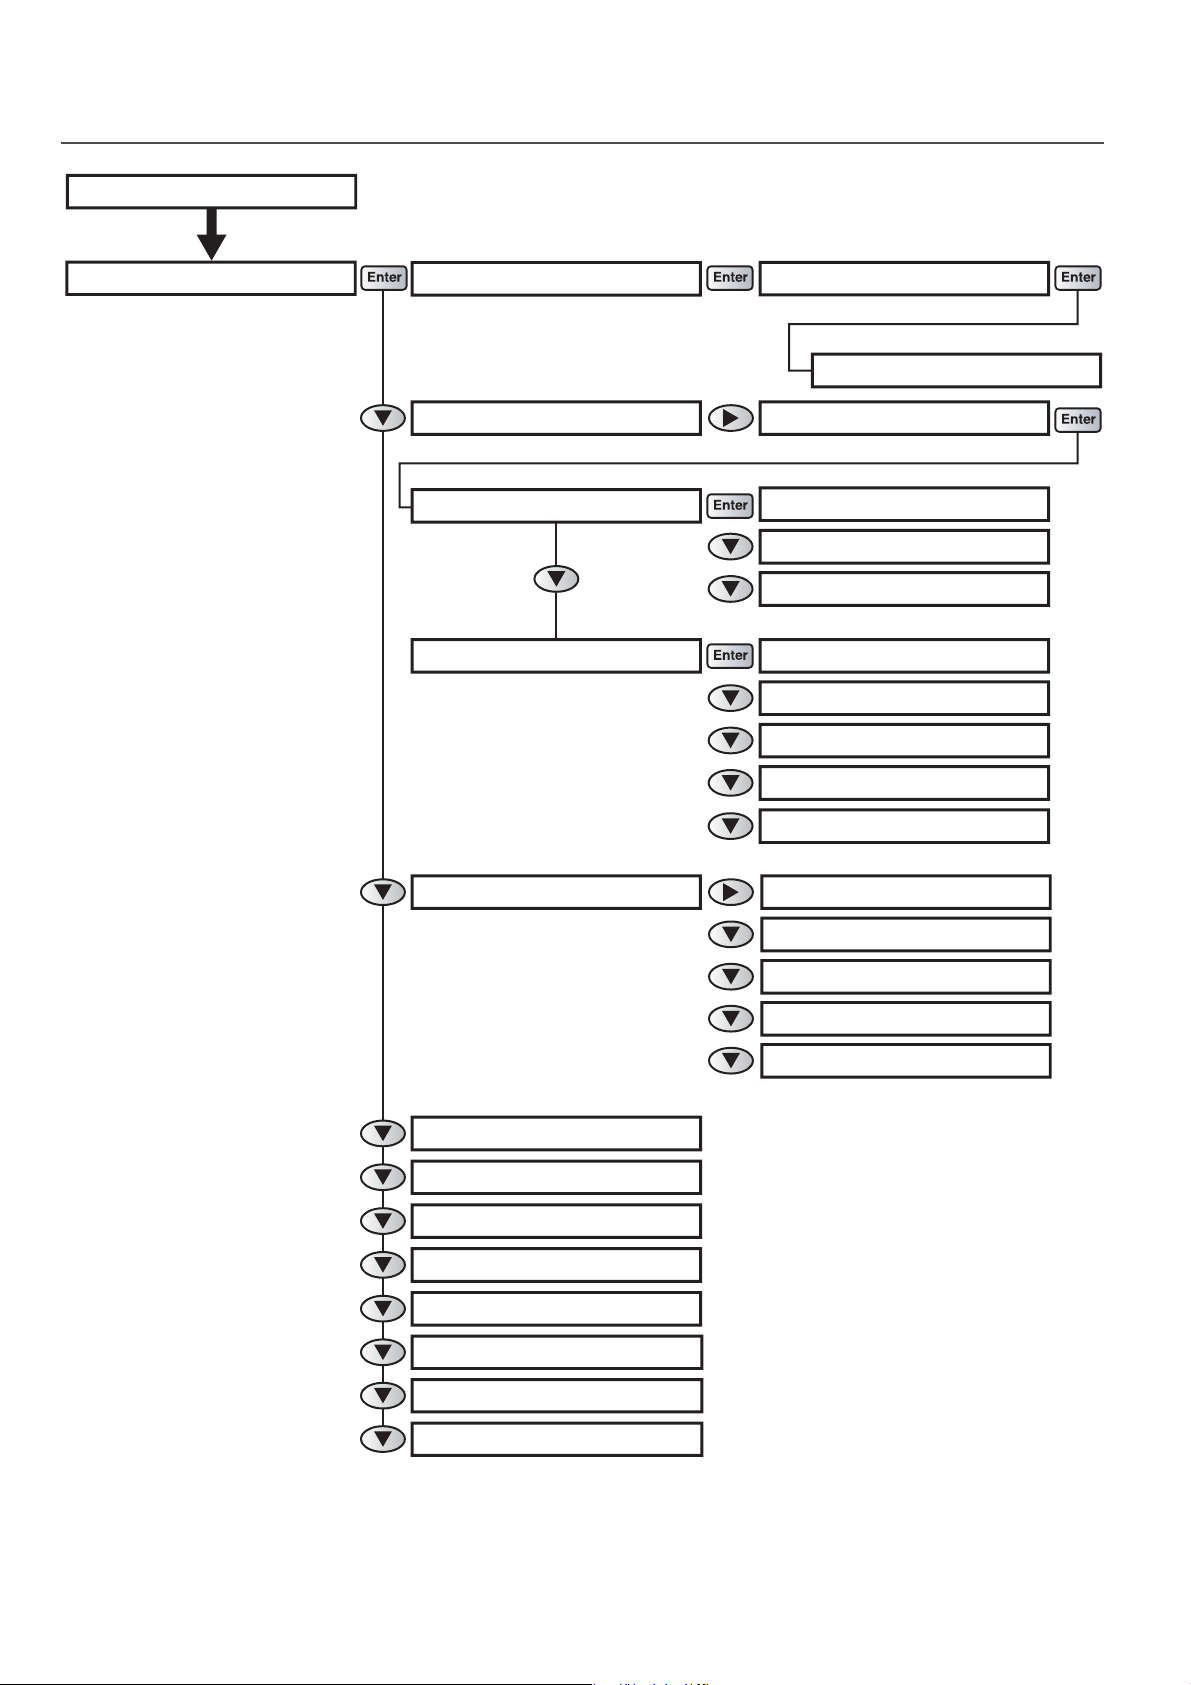
Menu chart
Sleep Mode: Start
Menu 1: Sleep Mode >
Menu 2: User Type >
Menu 3: Setup >
Menu 5: Cleaning >
Menu 6: Menu Option >
Menu 7: Maintenance >
To Setting Menu 3
Menu8: Version>
Menu 9: Initial >
To Setting Menu 3
Menu 10: Job Status >
To Setting Menu 3
Menu 4: Test Print >
To Setting Menu 3
To Setting Menu 2
Set 1: Side Margin
Set 4: Origin
Set 2: Output Mode
Set 3: Method of Cut
セット4:メディアケンシュツSet 5: Head Travel
セット4:メディアケンシュツSet 6: Multi Strike
セット4:メディアケンシュツSet 7: Slant Check
セット4:メディアケンシュツSet 8: Single Head
セット4:メディアケンシュツSet 9: Print Nozzle
セット4:メディアケンシュツSet 10: Roll Length
セット4:メディアケンシュツSet 11: FrontInterlace
セット4:メディアケンシュツSet 12: CR Maintenance
セット4:メディアケンシュツSet 13: Ink Status
セット4:メディアケンシュツSet 14: Life Times
セット4:メディアケンシュツSet 15: Header Dump
Set 16: Exhaust Fan
セット4:メディアケンシュツ
Set 17: White Maint.
セット4:メディアケンシュツ
Set 18: Start Feed
セット4:メディアケンシュツ
Set 19: Initialization
セット4:メディアケンシュツ
Set 20: Spitting
セット4:メディアケンシュツ
Set 21: Temporary
Setting menu 1
12 Menu chart
Setting menu 2
* *> 1 : Print Mode
* *> 2 : Adjust Print >
User : Type 1
* *> 8 : Pass Wait
* *> 3 : PF Adjust >
* *> 9 : Add Y Layer
* *> 10 :
UserCopy
* *> 4 : Vacuum Fan
* *> 5 : Thickness
* *> 6 : Media Initial
* *> 7 : Media Width
Mode : Graphics 2 - >
Eect : Fine & Fog
PF 1 : Initial Print
PF 2 : Initial Change
PF 3 : Confirm Print
PF 4 : Micro Print
PF 5 : Micro Change
Menu 2 : User Type
Thickness : 170 μm
Adj. Print 1 : Standard
Adj. 1 : Confirm Ptn.
Adj. 2 : Rough Pattern
Adj. 3 : Fine Pattern
Adj. 1 : Confirm Ptn.Adj. Print 2 : Custom
Adj. 2 : RoughPtn. ALL
Adj. X : FinePattern X
Adj. X : RoughPattern X
Adj. 9 : FinePtn. ALL
* *> 11 :
Initial
Menu chart 13
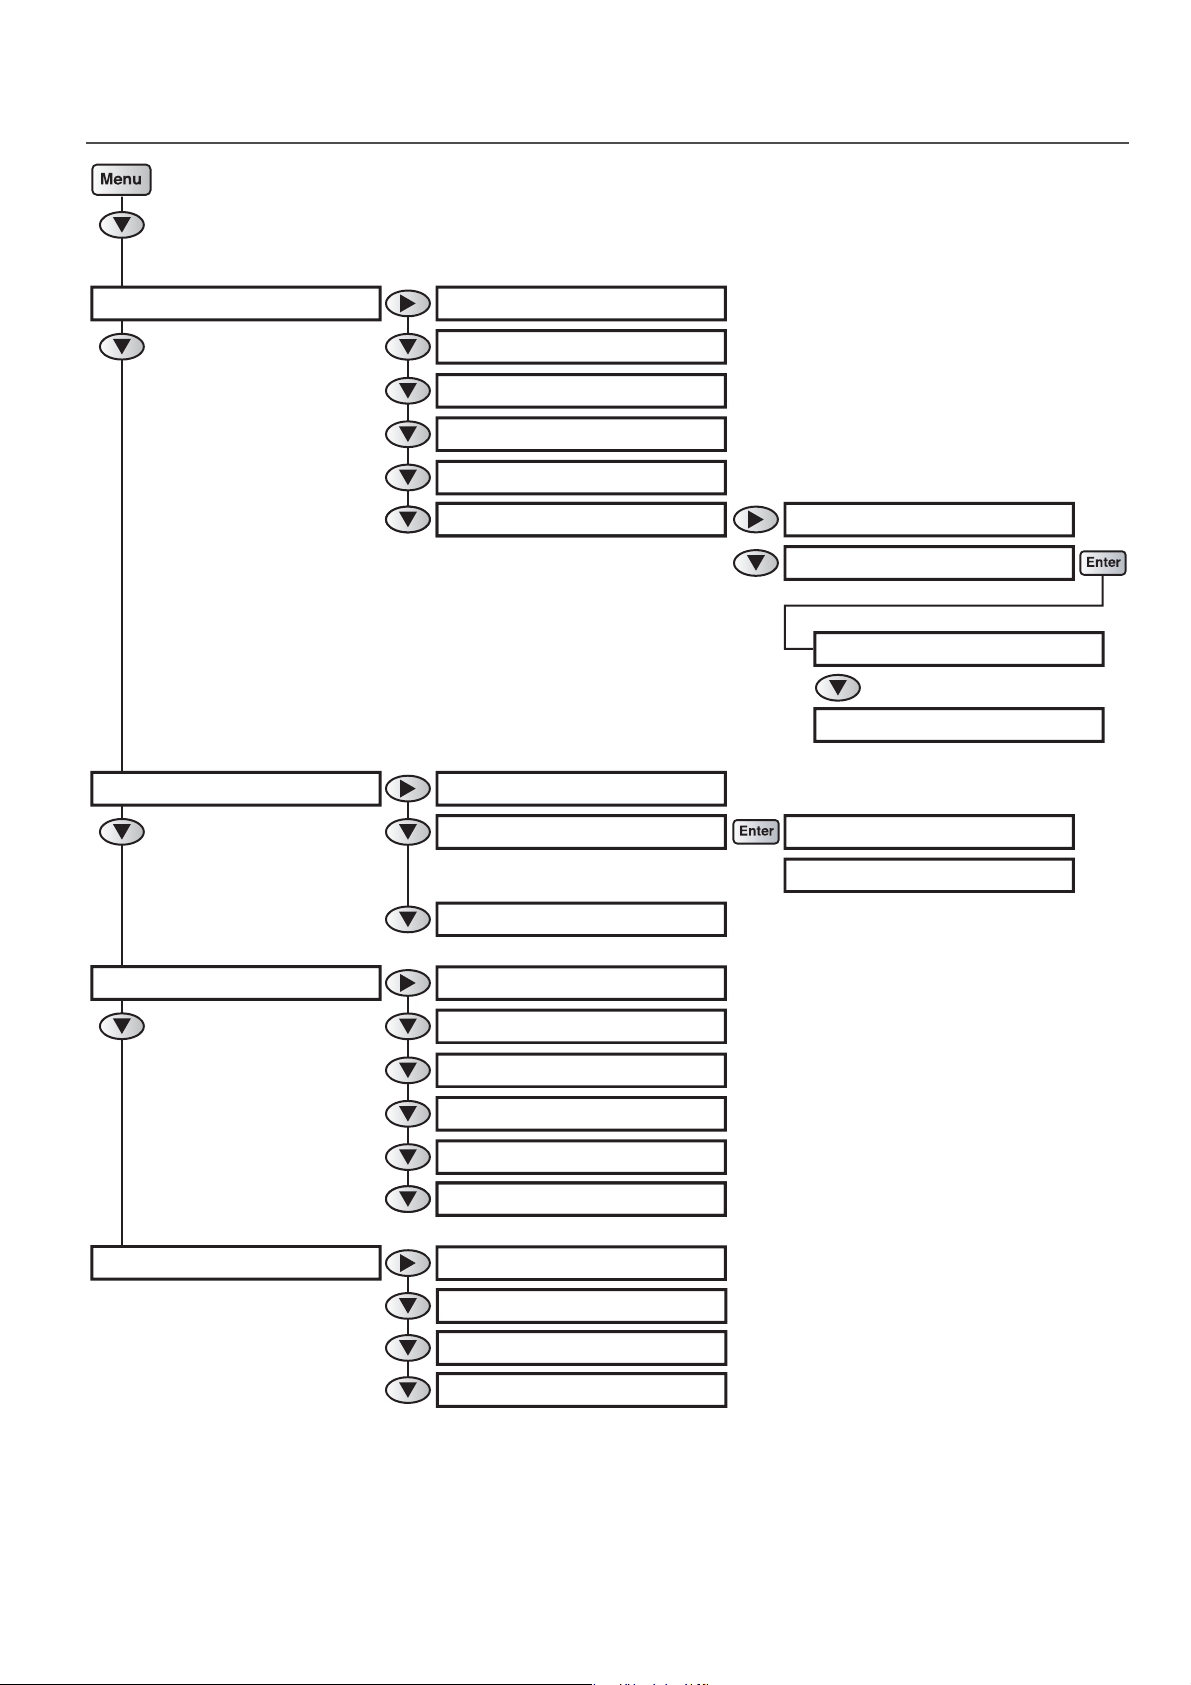
Setting menu 3
From Setting Menu 1
Test 1: Nozzle Check
Test 2: Nozzle Check B
Menu 4: Test Print >
Test 5: Palette
Test 3: Mode Print
Test 4: Setup List
Test 6: HeadAdjust >
Initial 1: Language
Initial 2: Length
Menu 9: Initial >
Initial 5: Gateway
Initial 3: IP Address
Initial 4: Subnet Mask
Initial 6: Alert Buzzer
HeadAdj. 1 : Standard
HeadAdj. 2 : Custom
Adj. X : Fine Pattern X
Adj 1 : Fine Ptn. ALL
Mnt. 1: Daily Maintenance
Mnt. 2: Plug Life
Menu 7: Maintenance >
Mnt. 3: Ink Discharge
Plug 1 : Comrm
Plug 2 : Init.
ToDoLength : ***.*m
Done : ***.*m
Remain : ***.*m
Job Status : Completed
Menu 10: Job Status >
14 Menu chart
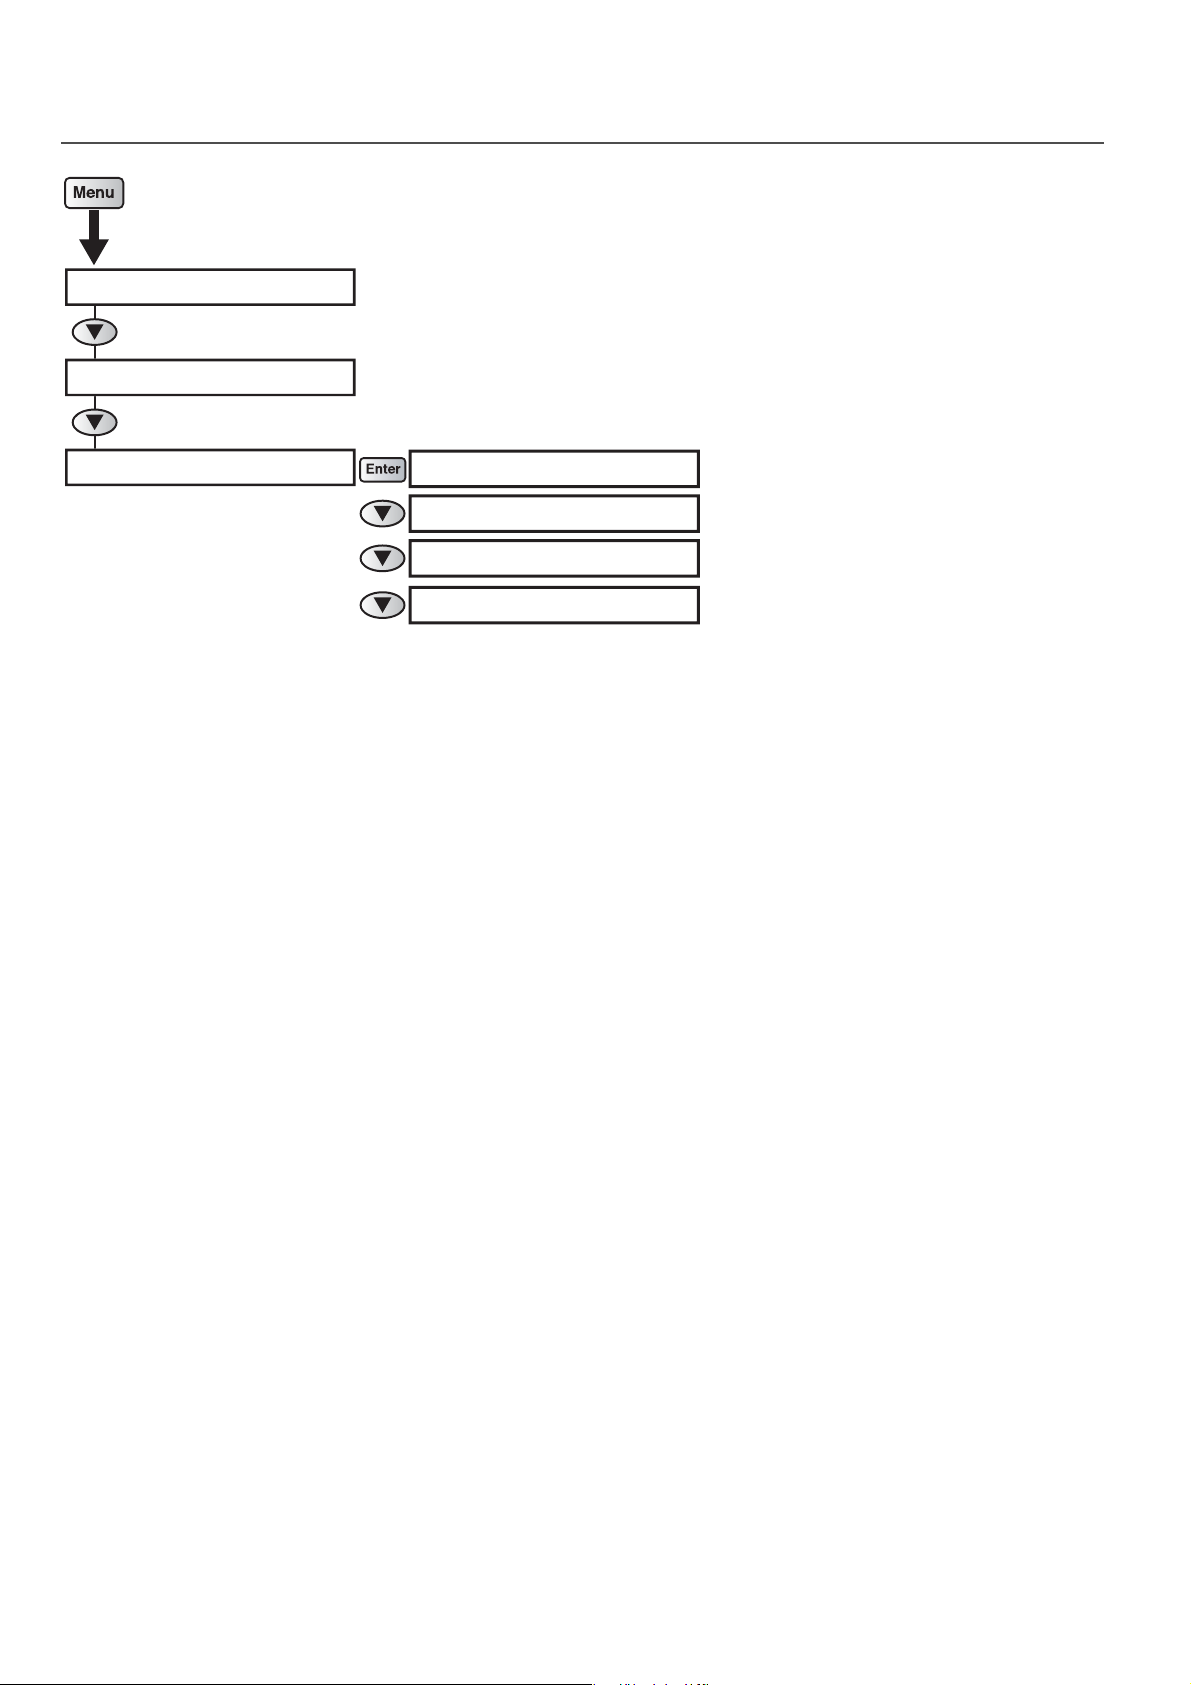
Menu during printing
Menu 1 : PF Micro Adj.
Menu 2 : Backup
Menu 3 : Job Status
ToDoLength : XXX.X mm
Done : XXX.X mm
Remain : XXX.X mm
Remain Time : XXXX min
Menu chart 15
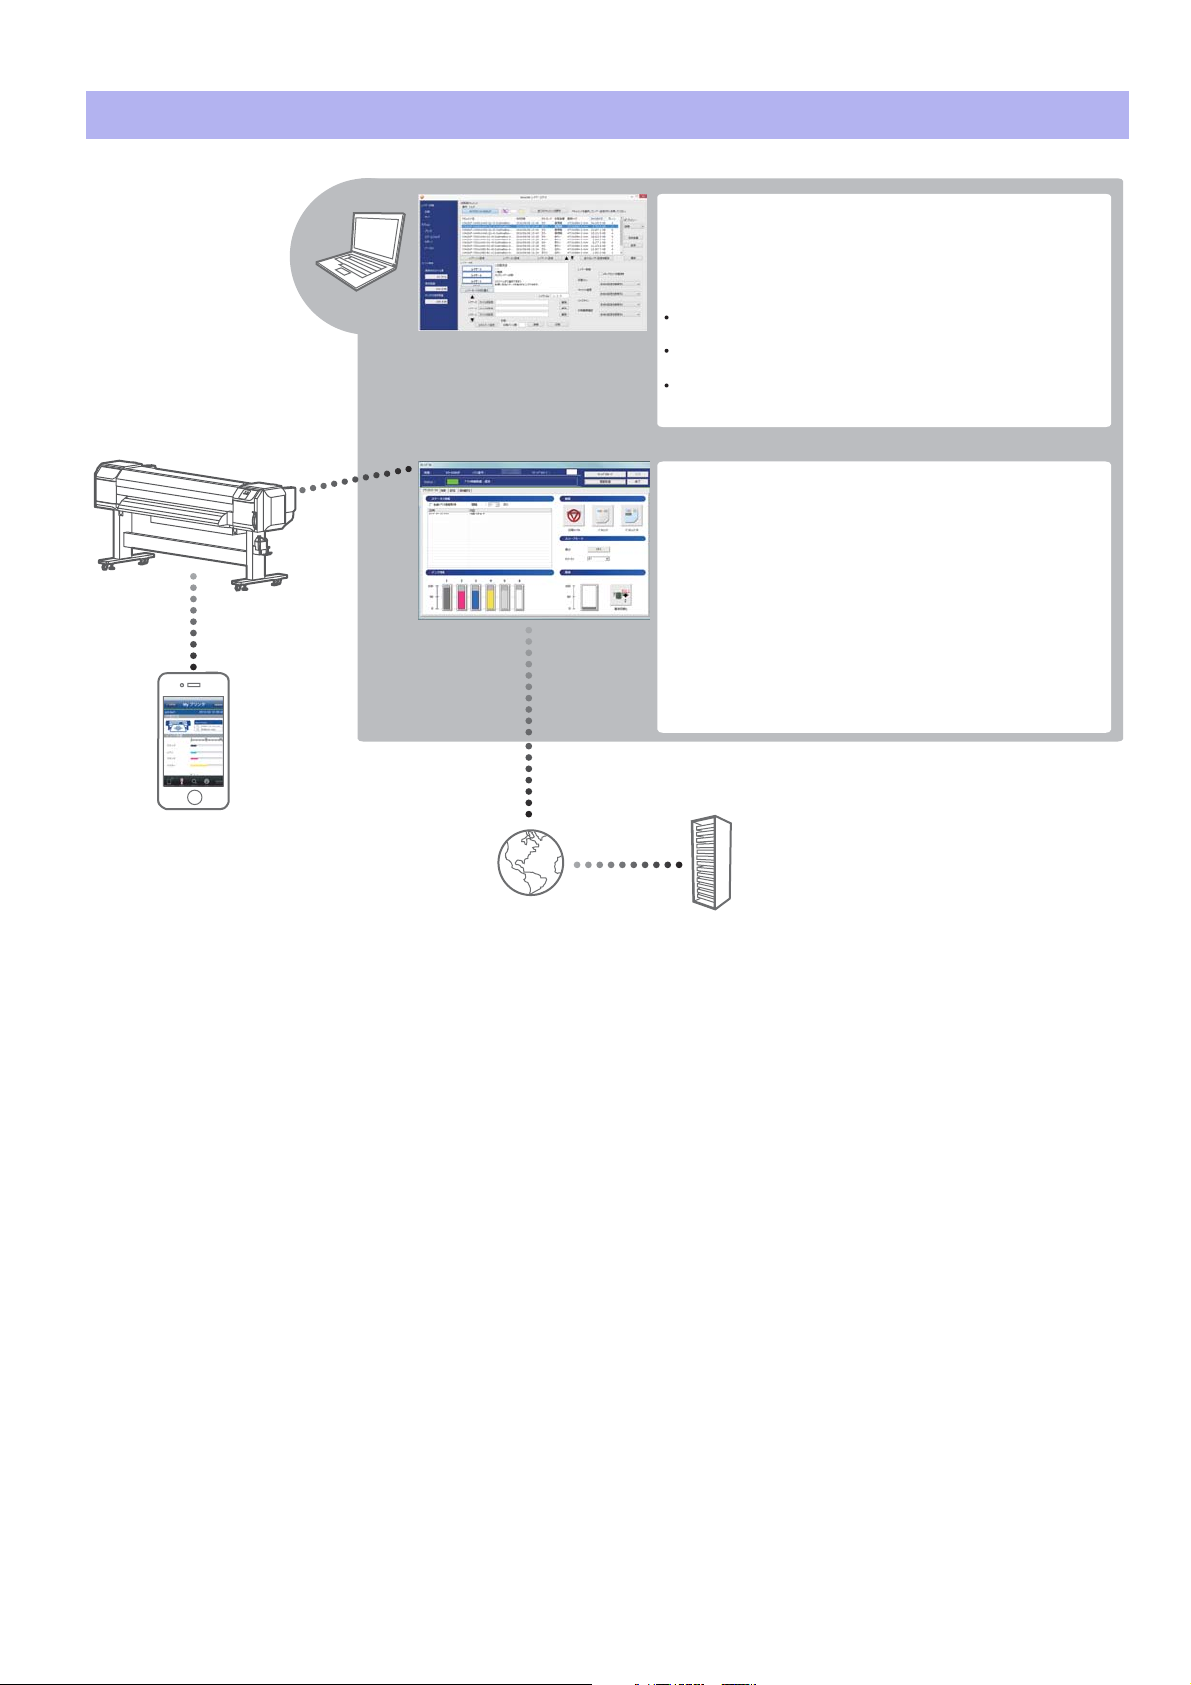
System configurations of this product
<Print Support Software>
To get the best out of this product, use the ValueJet Print Server (VPS) function
available from ValueJet Status Monitor (VSM).
You can download the latest version of VSM from the ValueJet Club Server.
(To use VPS, specify the output port of RIP software to VPS.)
ValueJet Status Monitor (VSM)
Linking with a printer driver, a status check or maintenance
of the printer can be conducted.
When user registration is done to the ValueJet Club*
1
, the
latest service can be always provided.
Main functions:
• Status monitor
• Remote panel
• VPS (ValueJet Print Server)
VSM Mobile
Status check and remote control of
ValueJet can be done from personal
digital assistance like your iPhone
and Android.
Main functions:
• Status monitor
• Remote panel
*
1
ValueJet Club
This Web service provides free useful contents to ValueJet users.
Have user registration done to use various services.
Main functions:
• Downloading the latest application and manual
• Downloading media proles
• Printer status check (When using the printer information
supplying service of VSM)
ValueJet Club server
Connect to the ValueJet Club.
https://valuejetclub.mutoh.co.jp/mutoh/guser
Internet
ValueJet Layer Editor
Mutoh layer printing application that enhances layer
printing capability.
Main functions:
Converts multiple data into a single print data set.
Enables reutilization of layer print data.
Prevents interruption by other print jobs, erroneous
operations, etc.
16 System configurations of this product
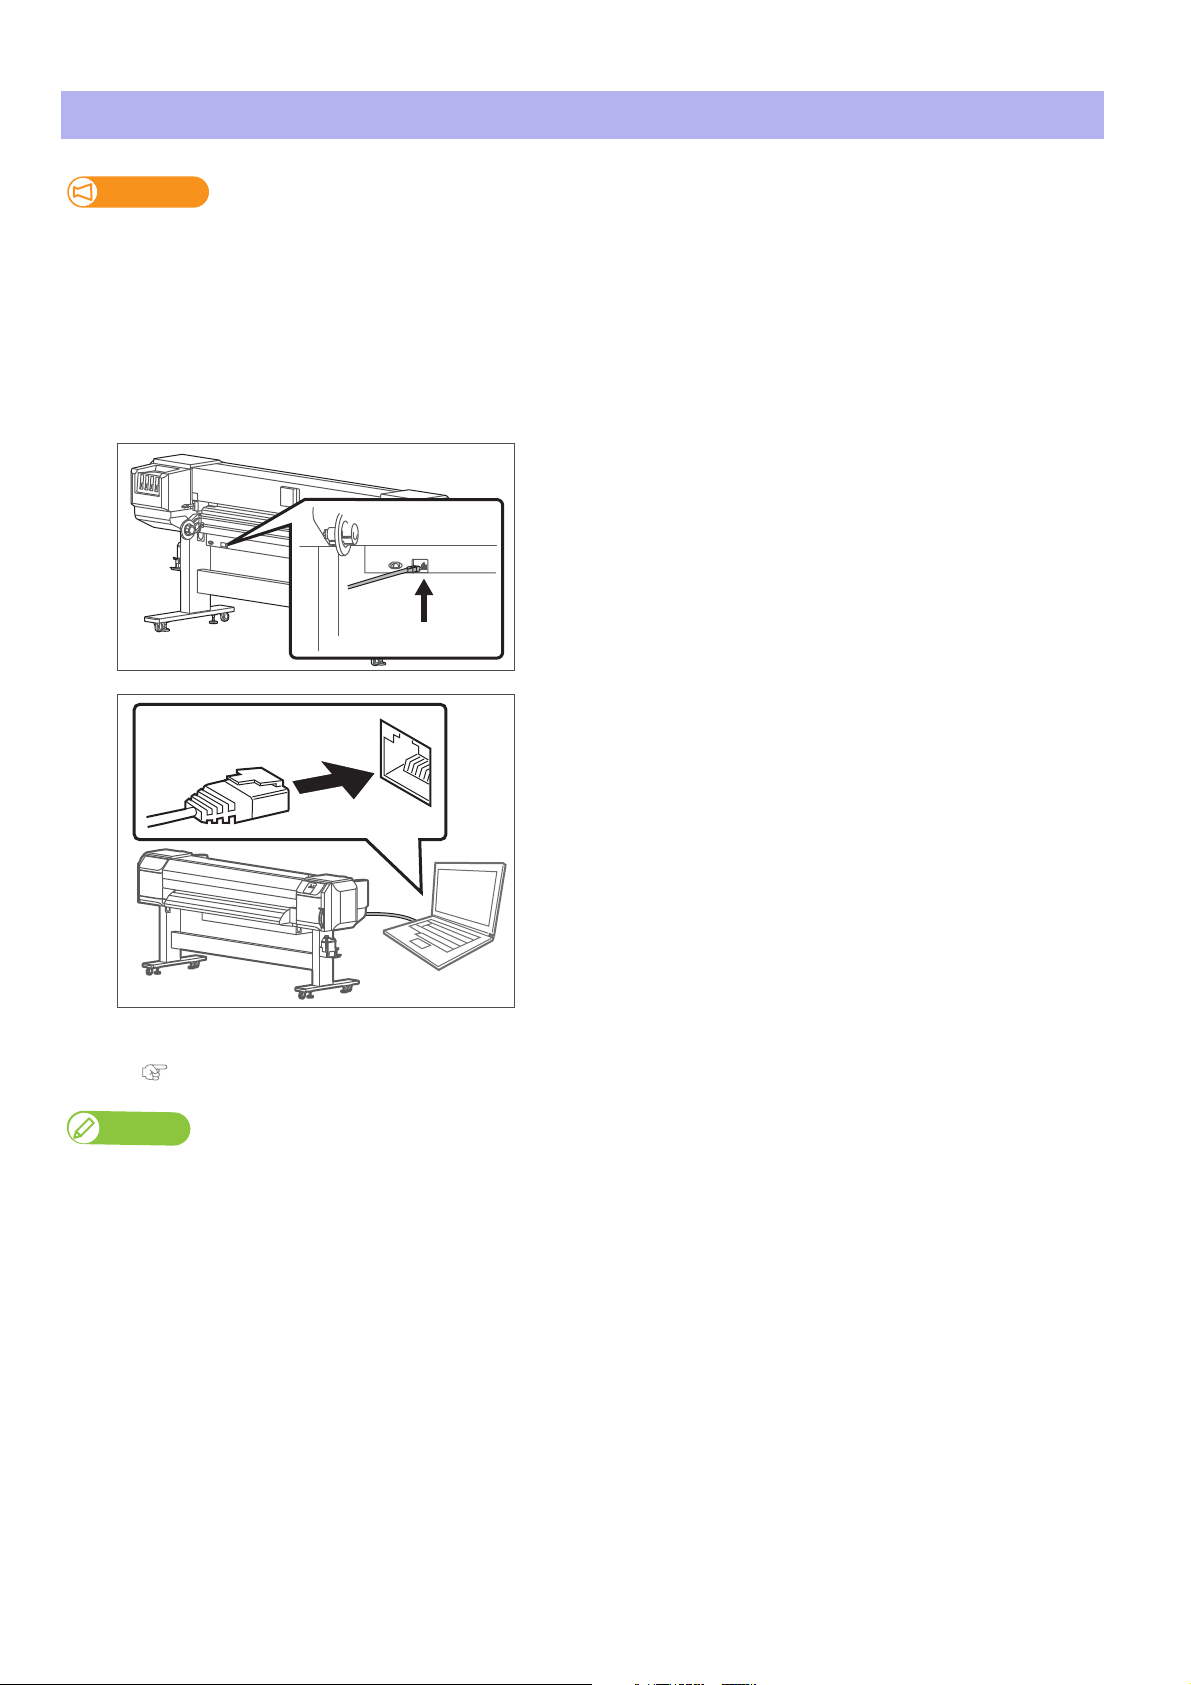
Connecting to a Computer
Important!
Make sure your computer meets the following requirements.
• OS: Windows 10 (64bit), Windows 8/8.1 (64bit), Windows 7 (64bit)
• CPU: Intel (R) Core (TM) i5 / i7
• Memory: No less than 8G byte
• Network: Use a network port that supports Gigabit Ethernet, and an Ethernet cable that supports Category 6 Gigabit Ethernet
or later.
[1]
[2]
Connect the Gigabit Ethernet cable to the product.
Connect the Gigabit Ethernet cable to the computer.
[3]
Use the printer operation panel to set the IP address, subnet mask and gateway.
"Initial 3: IP Address" P. 93, "Initial 4: Subnet Mask" P. 93, "Initial 5: Gateway" P. 93
Note
• The above illustration is the example of peer-to-peer connection between this product and computer.
Connection method differs depending on the usage environment.
• If you use the product with a LAN, connect the cable so that the computer and printer are on the same subnet.
Connecting to a Computer 17

Launching/Displaying/Finishing ValueJet Status Monitor (VSM)
Note
Launching VSM
Windows 8 / Windows 8.1
• In the [Start] screen, click [Desktop].
• Double click the VSM icon on the Desktop.
Windows 10 / Windows 7
Double click the VSM icon on the Desktop.
Launching from the Start Menu of Windows
• Windows 8 / Windows 8.1
Right click somewhere the [Start] screen tiles are not displayed to display the application bar, and click [All Apps].
•Windows 10 / Windows 7
From the [Start] menu, click [All Programs] (or [All Apps]) - [MUTOH] - [ValueJet Status Monitor].
Displaying VSM
Double click the VSM icon in the task tray.
Displaying remote panel
The remote panel is used to view this product’s status or operate.
Click [Remote Panel].
• The remote panel opens.
18 Launching/Displaying/Finishing ValueJet Status Monitor (VSM)

Finishing VSM
Right click the VSM icon in the task tray, and click [Exit].
Note
When using normally, do not finish VSM. When closing the VSM window, click [Settings] - [Close].
Windows 8.1
Click the Down Arrow in the [Start] screen.
Click [ValueJet Status Monitor].
Launching ValueJet Layer Editor
Windows 8 / Window 8.1
Display the charm bar on the desktop, and then click [Search].
Enter “ValueJet Layer Editor”, and then click .
Click the “ValueJet Layer Editor” icon displayed in the search result.
Windows 10 / Windows 7
From the [Start] menu, click [All Programs] (or [All Apps]) – [MUTOH] – [ValueJet Layer Editor] in order.
Launching ValueJet Layer Editor 19

Printing area
Printing is always started from Origin position (print start point).
See the figure below as example.
Printable Area
c
b=5 mm to 25 mm
a=5 mm *
1
c=5 mm
d=5 mm to 25 mm
bd
a
*1 The value of “a” will be 15 mm in the following cases:
• Immediately after media initialization
• When feeding the media by using the [Backward] key
The value of “a” will be 40 mm in the following cases:
Media feeding direction
• When Media Initial menu is set to “Top&Width”
• After cutting the media
20 Printing area

Requirements for usable media
Media that meet the requirements below can be used with this printer.
Usable sizes
Outer diameter 150 mm or less
Media tube
diameter
Weight 30 kg or less
Maximum
width
Minimum
width
Maximum
thickness
Important!
The default setting for the head height is “Low”.
When the head height is set to “Low”, the maximum available media thickness is 0.3 mm.
2 inches or 3 inches
1,625 mm
182 mm
1.3 mm (When the head height is set to “High”)
Cautions for handling media
To achieve expected print quality, follow the instructions below.
Failure to follow these instructions could result in damage to the printer.
• Use media with no wrinkle, fold or curl.
• Do not use heat-sensitive media.
The heat given off by the UV rays could deform such media.
• Do not use media that are liable to reflect the UV light.
The reflective UV light can cure the ink on the print head.
Requirements for usable media 21

Cautions in using this product
Do not turn the power off
Use the printer with its power turned permanently on. When you are not using the printer, always leave the power on and put
the printer into the sleep mode while not in use. In the sleep mode, the printer will periodically circulate the ink inside the printer
and carry out head cleaning automatically. If you do not put the printer into the sleep mode, the ink inside the printer could
settle out and/or coagulate, causing poor image quality or printer failure.
Important!
If you need to leave the printer unused for extended period of times (more than one month), please contact your local MUTOH
dealer.
Agitate the ink cartridges (ink bags)
Before installing a new ink cartridge (ink bag), invert the ink cartridge (ink bag) back and forth to agitate ink.
Periodical ink agitation is also required when prompted on the operation panel.
Otherwise, the ink inside the cartridges (bags) settles or coagulates and may cause poor print quality or a malfunction.
Please use this product periodically
It is recommended to use this product once a week.
When left unused for a long time, the print head nozzles can get clogged causing damage.
Conduct periodic maintenance
This product requires daily maintenance.
• Perform the Nozzle check before and after printing.
If nozzle missing is found, conduct a head cleaning.
• Make sure to perform daily maintenance after you finish printing for the day.
Failure to perform daily maintenance may affect print quality or result in damage to the printer.
"Daily Maintenance" P. 109
• Drain waste fluid in the waste fluid tank periodically before it becomes full.
• When this product is not used for a long time (a week or more), conduct a head cleaning once a week.
• Clean its inside once a month.
22 Cautions in using this product

Please handle ink cartridge (ink bag) carefully
• Before operation, make sure to read the Material Safety Data Sheet (SDS).
• Do not disassemble Ink cartridge (Ink bag).
If disassembled, there is a possibility that ink might come into contact with your eyes or skin.
• When handling the ink cartridge (ink bag), be careful not to let the ink get in your eyes or on your skin.
If the ink gets in your eye or on your skin, immediately wash it off with water.
If not, it could cause bloodshot eyes or light inflammation. Should any anomalies occur, immediately seek medical
attention.
Some parts need to be replaced periodically
In this product, there are some parts required to be replaced after a long-term use.
• Parts required to be replaced by users:
Absorption material for the flushing box, Cutter, Cleaning wiper
• Parts required to be replaced by service personnel:
Various motors, Pumps, Print heads, UV-LED lamp filter, UV-LED unit
Cautions in using this product 23
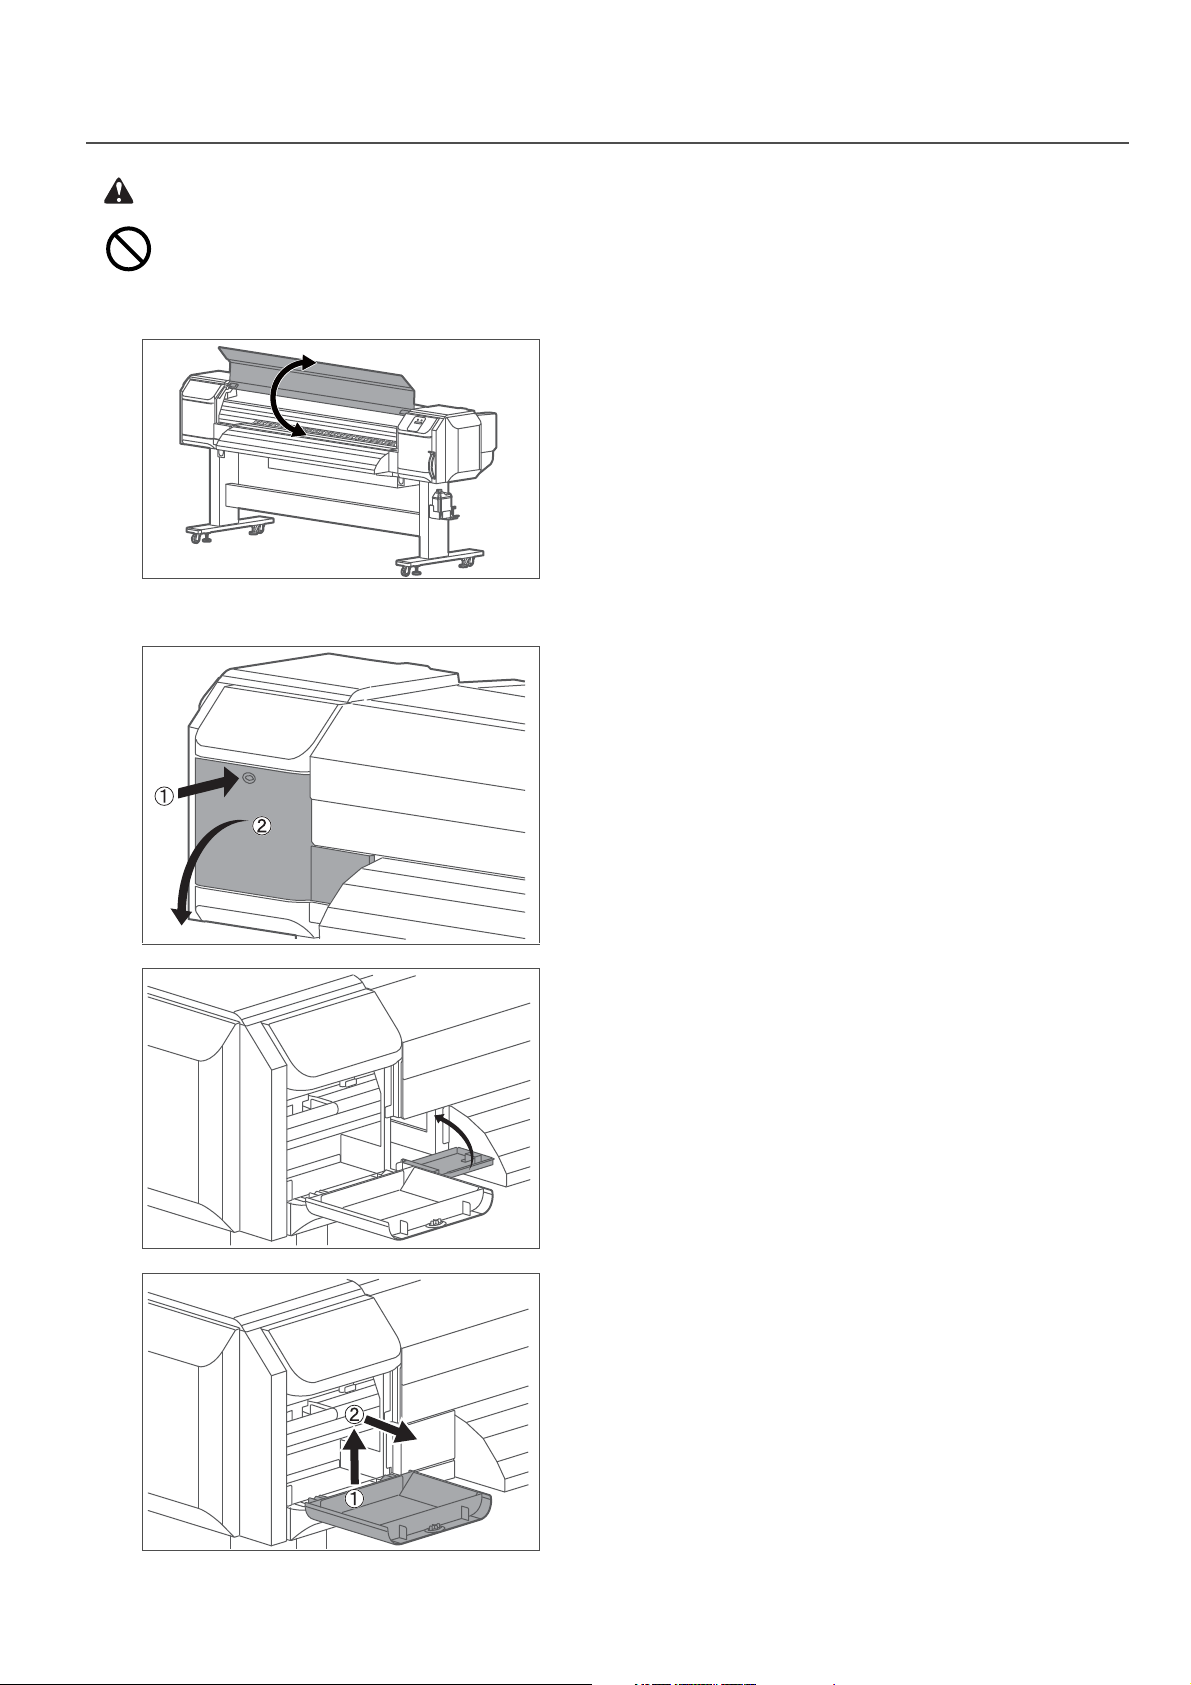
Handling front cover and maintenance cover
CAUTION
Do not force the front cover closed. It will close by its own weight.
If excessive force is applied to the cover, it will shorten its life or will damage to the printer.
<Opening and closing the front cover>
<Detaching the Left Maintenance cover>
Open / Close the front cover gently.
[1]
[2]
Open the maintenance cover.
Close the cover next to the maintenance cover.
[3]
24 Cautions in using this product
Detach the maintenance cover.
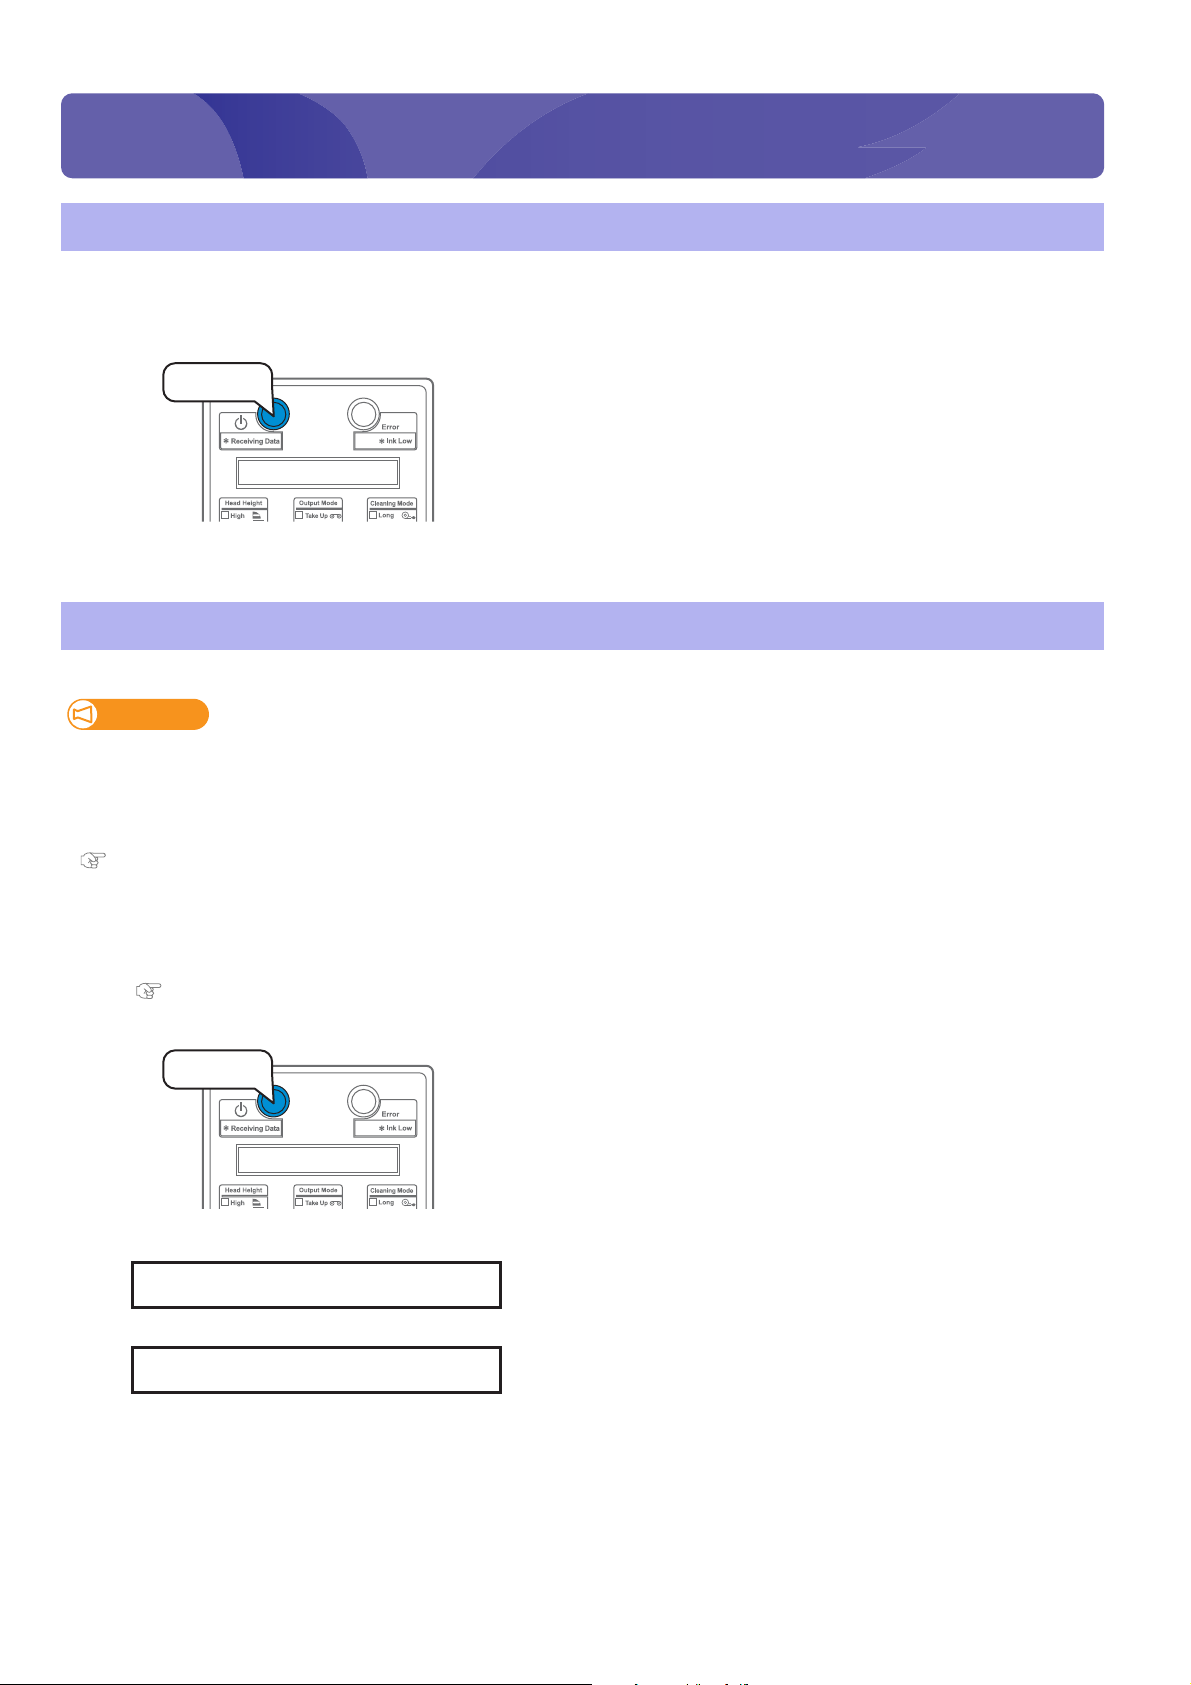
1 Powering ON / OFF
Powering ON / OFF
Press!
Press!
Daily Maint. : Start
Wait for a while
Turning the power ON
[1]
[2]
Close the front cover.
Press the power button to turn the power ON.
• The blue light becomes ON.
• This product starts its initialization operations.
Turning the power OFF
Important!
Use the printer with its power turned permanently on. When you are not using the printer, always leave the power on and put the
printer into the sleep mode while not in use.
If you do not put the printer into the sleep mode, the ink inside the printer could settle out and/or coagulate, causing poor image
quality or printer failure.
"Sleep Mode" P. 27
[1]
[2]
[3]
[4]
Check that the printer completes printing and no media is loaded.
Prepare items required for daily maintenance.
"Preparing for Daily Maintenance" P. 110
Press the power button to turn the power OFF.
• This product starts its powering off operations.
• The blue light becomes OFF.
Press the [Enter] key.
• The carriage and cleaning wiper move to gain access to daily
maintenance.
Turning the power ON 25

[5]
Daily Maint. : End
Cleaning ** %
Power Off Printer
The message on the left will appear.
• You can start daily maintenance.
"Performing Daily Maintenance" P. 112
• After the daily maintenance is complete, press the [Enter] key.
The printer automatically performs the “Short” cleaning.
After the “Short” cleaning, the printer will start turning off.
26 Turning the power OFF
1Sleep Mode
Sleep Mode
Menu1: Sleep Mode >
SleepMode: Start
Start Sleep Mode?
When you are not using the printer, always leave the power on and put the printer into the sleep mode while not in use. If you
do not put the printer into the sleep mode, the ink inside the printer could settle out and/or coagulate, causing poor image
quality or printer failure.
Make sure to follow the instructions on the operation panel to perform daily maintenance.
The following operations are performed during sleep mode.
• Automatic Head cleaning by timer set in the “SetTimer” menu.
• Ink circulation (every 3.5 hours).
• “Little Charge” (once a week).
Important!
To leave the printer in sleep mode for seven days or more, perform followings once a week:
• Check the ink level and replace the relevant ink cartridge (ink bag) if “Ink Low” is displayed.
• Agitate the ink cartridges (ink bags).
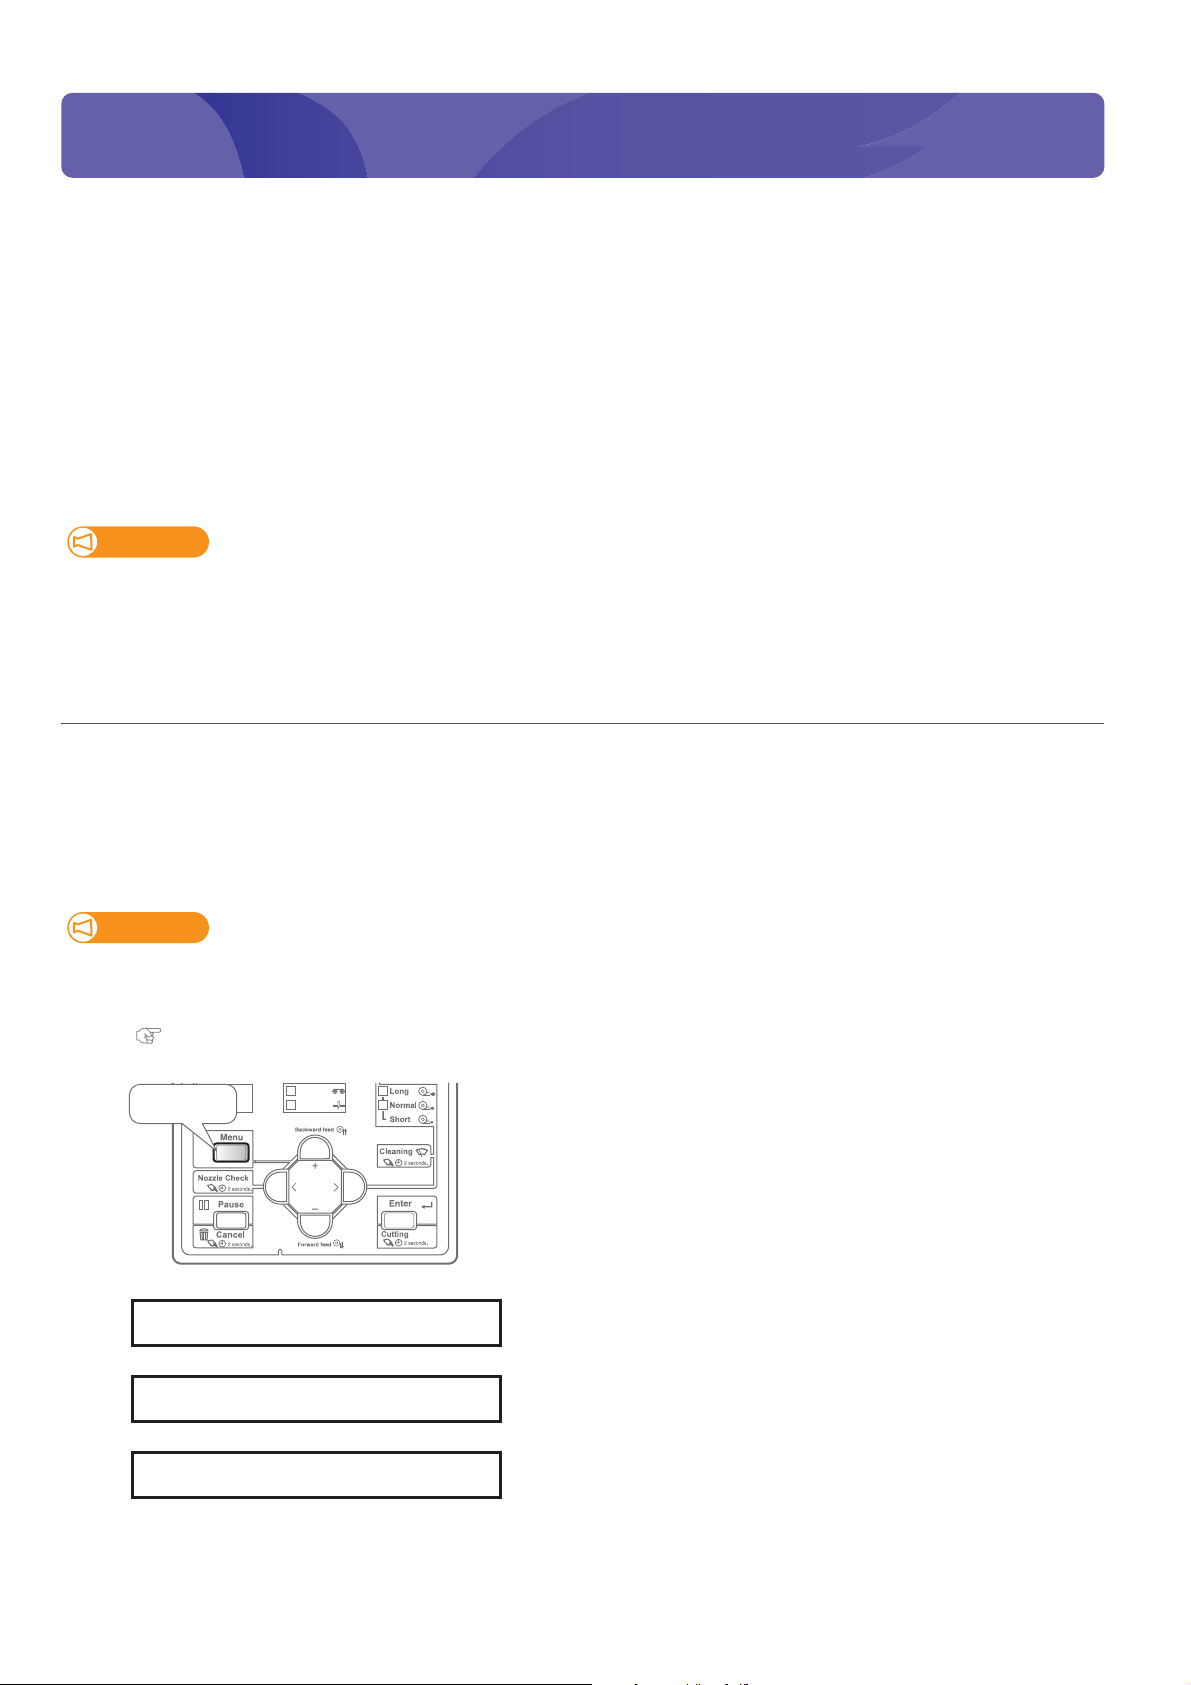
Steps
[1]
Make sure that the printer’s operating condition is as follows:
• The front cover and the maintenance cover are closed.
• No media is loaded.
• The remaining ink level is sufficient.
• The waste ink tank has enough space.
Important!
If you are going to use the sleep mode for a prolonged period of time, first empty the waste ink tank.
[2]
[3]
[4]
Prepare items required for daily maintenance.
"Preparing for Daily Maintenance" P. 110
Press!
1
2
Take Up
Auto Cut
Press the [Menu] key.
Press the [>] key.
[5]
[6]
Press the [Enter] key.
Press the [Enter] key.
Turning the power OFF 27

[7]
Note
Daily Maint. : Start
Wait for a while
Daily Maint. : End
Cleaning ** %
Restart - > Enter
Press the [Enter] key.
• The table, carriage and cleaning wiper move to gain access to daily
maintenance.
[8]
• The power button flashes in blue while the printer is in the sleep mode.
• Depending on the elapsed time from the previous automatic maintenance, the printer may automatically execute head cleaning and/or
ink charging, etc., when it exits the sleep mode. Such operation does not depend on the sleep mode settings. It is an automatic
maintenance function of the printer.
The message on the left will appear.
• You can start daily maintenance.
"Performing Daily Maintenance" P. 112
• After the daily maintenance is complete, press the [Enter] key.
The printer automatically performs the “Short” cleaning.
The sleep mode will start.
• To exit the sleep mode, press the [Enter] key.
28 Turning the power OFF
1Loading the media
Loading the media
Loading Roll Media onto the Roll media holder
Important!
Depending on the type of the media, we recommend that two or more persons set the media.
[1]
[2]
[3]
Loosen Fixing levers on the Roll media holders (both left and right) on
the back of the printer.
Set the distance between Roll media holders wider than the actual
width of the roll media to be set.
Tighten Fixing lever of Roll media holder (left) and fix the Roll media
holder (left).
[4]
Set the roll media to Roll media holder (left).
Loading Roll Media onto the Roll media holder 29
[5]
Attach Roll media holder (right) to the roll media and tighten Fixing
lever.
[6]
[7]
Loosen the Fixing levers of the right and left Roll media holders, move
the roll media to the center.
Press Roll media holder toward the printer and fix the Fixing levers.
Note
When tightening Fixing lever, press Roll media holder toward the printer.
If you do not press Roll media holder, Fixing lever may not be completely locked
because of the weight of the roll media.
30 Loading Roll Media onto the Roll media holder
 Loading...