

Page 1
MUTOH Belgium nv
Archimedesstraat 13
8400 Oostende - Belgium
www.mutoh.eu
Tel +32(0)59 56 14 00
Fax +32(0)59 80 71 17
BTWBE 0441.745.423
RPR Oostende
AP-76942_Rev 1.0 Page 1/19
Dear customer,
Each ink has its own specific drying speed and drying characteristics, which has a n influ en ce on
its periodical maintenance cycle.
To maximise the life-time of all parts which are exposed to ink, it is crucial to carry out some easy
but important maintenance.
The most important maintenance act ion s ar e:
Wash away ink remainders from parts which are not (easily) accessible, avoiding that the ink
dries out, possibly causing blockage.
Regularly remove ink remainders from accessible parts.
Hereafter, tailored to each ink type, you will find simple guidelines explaining how you can
maintain excellent print quality and avoid that parts wear untimely.
Overview
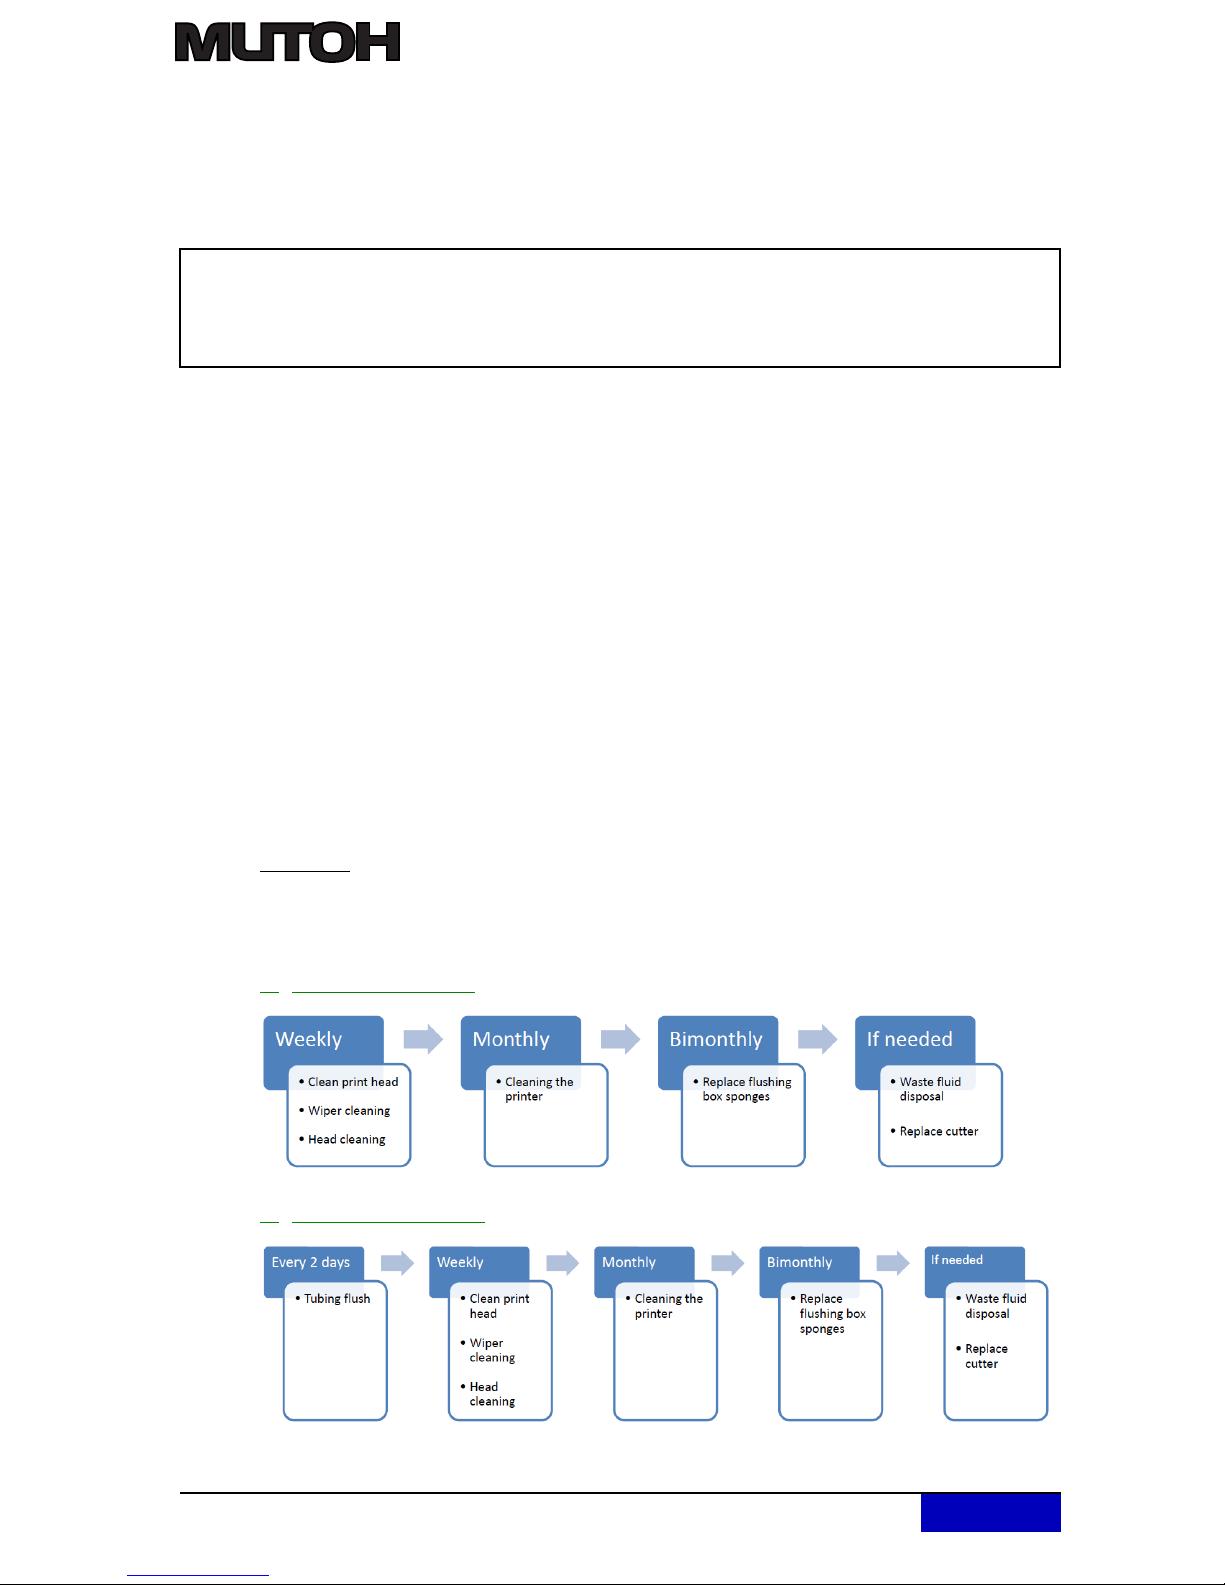
When using the VJ-1614 it is important to perform periodic maintenance. This will help you
maintaining excellent output quality and avoid parts to wear untimely. Depending on your current
ink setup, follow the required periodical maintenance scheme.
1) When using Eco ink
2) When using UMS ink
ValueJet 1614
Regular maintenance using Mutoh UMS or Eco-Ultra ink
Page 2
Page 2/19 AP-76942_Rev 1.0
Items needed
Important
Please be aware that next to this periodical maintenance, a certified Mutoh
Technician needs to perform yearly maintenance as well. Please contact your
Authorised Mutoh Reseller for more information.
Important
Please keep in mind to use the correct cleaning fluid
Eco Ultra cleaning
Used to start up new printers.
Used to perform periodical main te na n ce when printer is loaded with Eco ink
UMS cleaning
Used to perform periodical main te na n ce when printer is loaded with UMS ink
Part number Description Quantity
PJ-GLOV Glove 100
PP-10001 Cleaning s
tick 50
PP-10030 Kit Pipette 10 ml 6
DG-40317 Flushing absorbent 5
VJ-CB Cutter 1
KY-14044 Poly-knit wiper 30
CL-90250 Eco Ultra cleaning liquid 250 ml
RJ80UMS-100-CLN UMS cleaning liquid 1 litre
Page 3
AP-76942_Rev 1.0 Page 3/19
1 Performing a tubing flush
(1) Cleaning frequency
Once every two days
(2) Cleaning procedures
Use UMS cleaning liquid to perform a tubing flush when working with UMS ink.
Step 1: If the printer is powered ON, make sure that printing or other operations are not in
progress.
Step 2: Display the CR Maintenance menu
Press the [Menu] key
“Menu1: Setup>” is displayed.
The operation panel shifts to the Setup menu display.
Press [>].
“Set1: User Type” is displayed.
Press [+] or [–] to select “Set20: CR Maintenance”.
Press [Enter]
“CR Mainte.: Start” is displayed.
The display enters the CR Maintenance menu.
Step 3: Press the [Enter] key
Maintenance starts.
The print head moves to the left.
“CR Maintenance: End” is displayed.
Step 4: Press the [▼] key
The pumps start pumping.
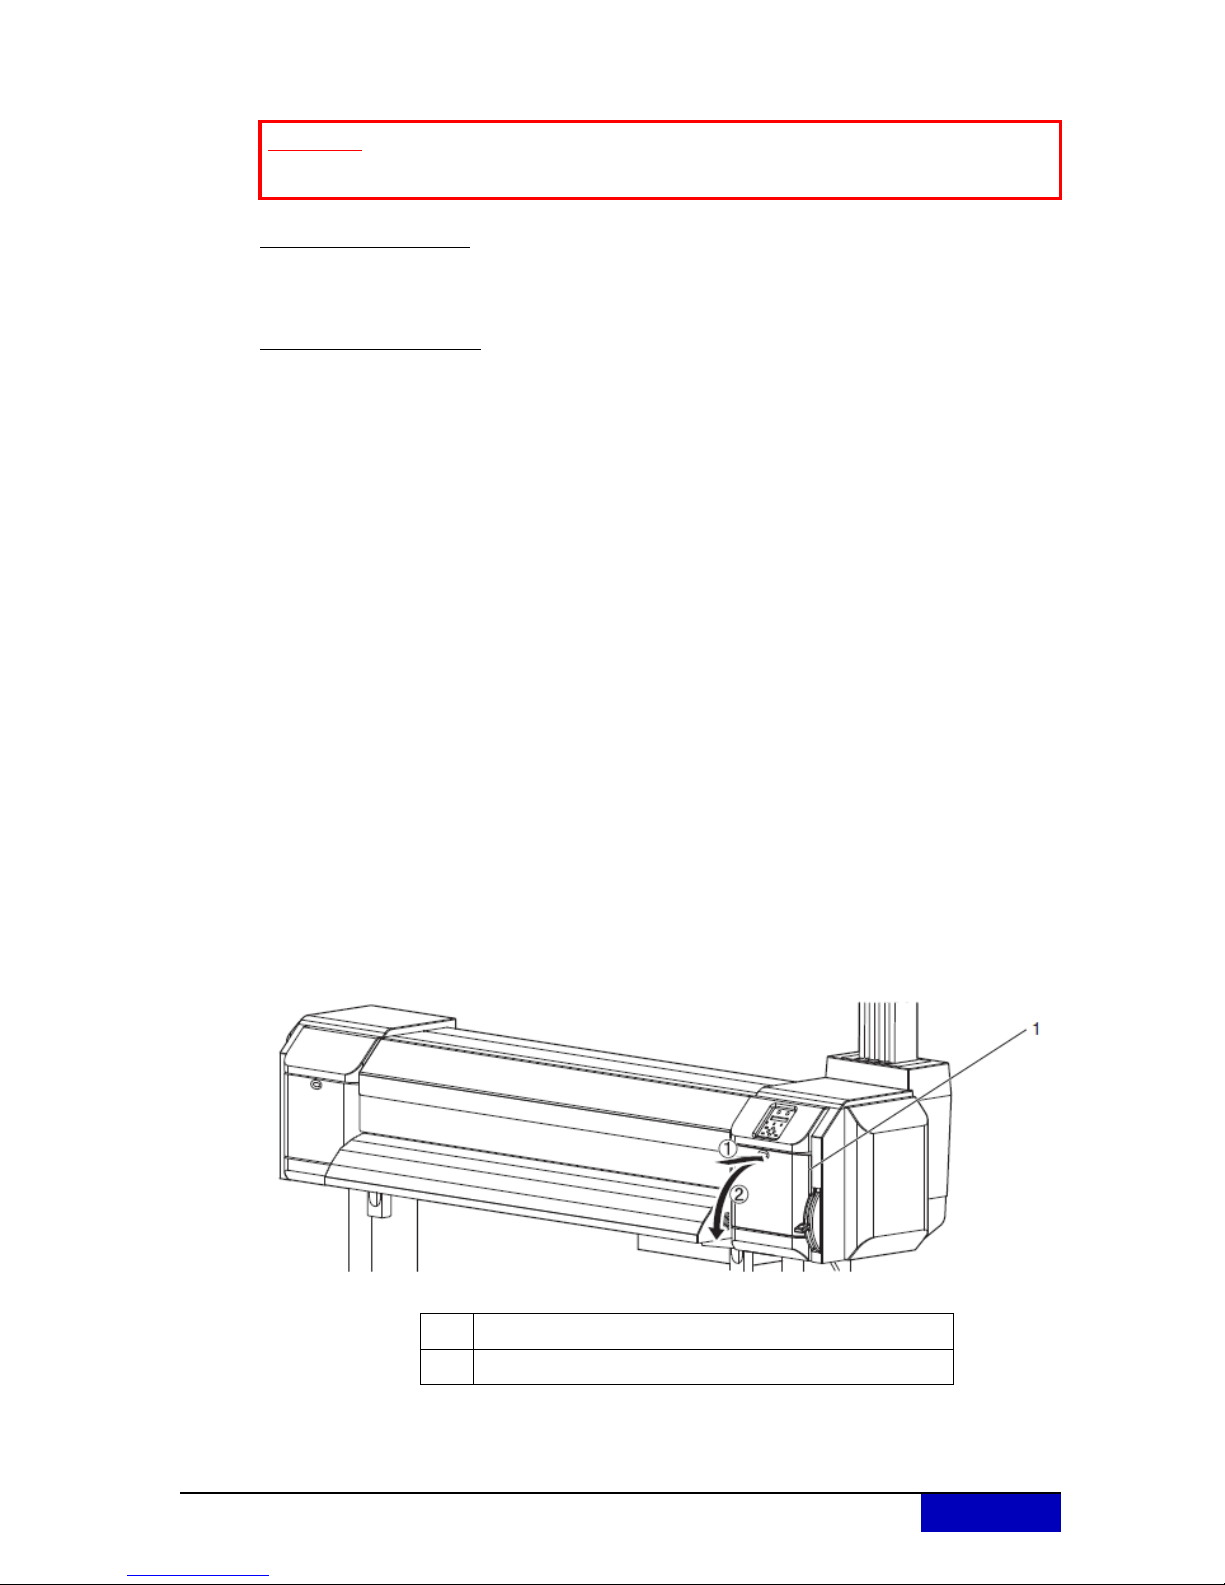
Step 5: Open the maintenance cover at the right side of th e pr int er.
Important
Only needed when working with UMS ink!
No. Name
1 Maintenance cover
Page 4
Page 4/19 AP-76942_Rev 1.0
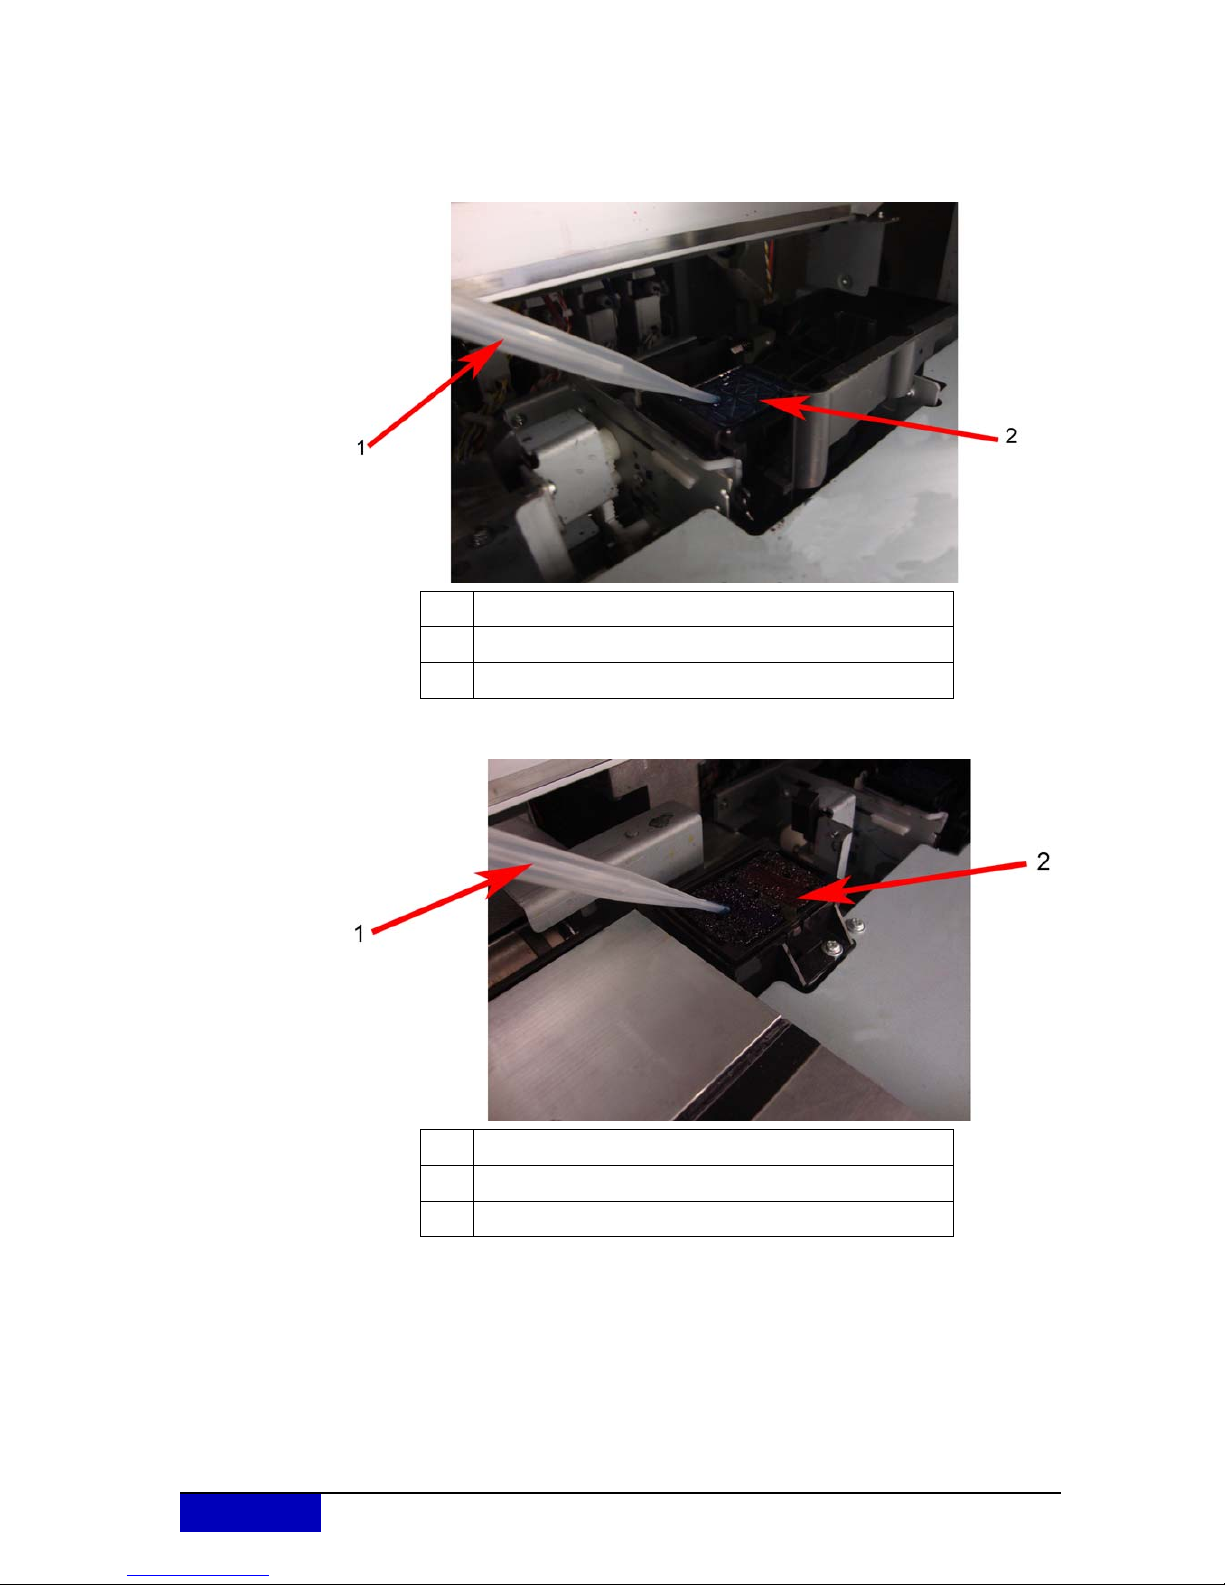
Step 6: Using a pipette filled with UMS cleaning liquid, drip about 5 ml of cleaning liquid onto
the head cap unit as shown in the illustration. The cleaning liquid will be sucked into the
capping unit and the connected tubing. It will remove ink remainders and prevent
blocking of the tubing. Also drip some cleaning liquid onto the right flushing-box
sponge.
Also drip some cleaning liquid onto the flushing box sponge.
Step 7: Press the [▼] key once again to stop the pumps.
If you do not press [▼], pumping stops automatically after 60 seconds.
Step 8: Press the [ENTER] key
The print head returns to the capping position.
“CR Mainte.: Start” is displayed.
Step 9: Press the [Menu] key.
The tube flush procedure is completed.
No. Name
1 Pipette
2 Head cap unit
No. Name
1 Pipette
2 Flushing-box sponge
Page 5

AP-76942_Rev 1.0 Page 5/19
2 Cleaning around the print head
(1) Cleaning frequency
On a weekly basis, check if foreign substances (ink clots that can cause missing dots or ink
leakage) are attached around the print head. If it is the case, remove them as described.
(2) Cleaning procedures
Step 1: If the printer is powered ON, make sure that printing or other operations are not in
progress.
Step 2: Display the CR Maintenance menu
Press the [Menu] key
“Menu1: Setup>” is displayed.
The operation panel shifts to the Setup menu display.
Press [>].
“Set1: UserType” is displayed
Press [+] or [–] to select “Set20: CR Maintenance”.
Press [Enter].
“CR Mainte.: Start” is displayed.
The display enters the CR Maintenance menu.
Step 3: Press the [Enter] key
Maintenance starts.
The print head moves to the left.
“CR Maintenance: End” is displayed
Step 4: Open the left maintenance cover.
Note
Before cleaning around the print head, read this procedure thoroughly to fully
understand it, and clean promptly and correctly.
While cleaning around the print head, the print head cap is removed, therefore
cleaning must be done before the print head dries.
Leaving the print head at the replacement position for a long time, may result in
clogging of the print head. Please limit to 15 minutes
Use the cleaning stick to clean around the print head.
Page 6
Page 6/19 AP-76942_Rev 1.0
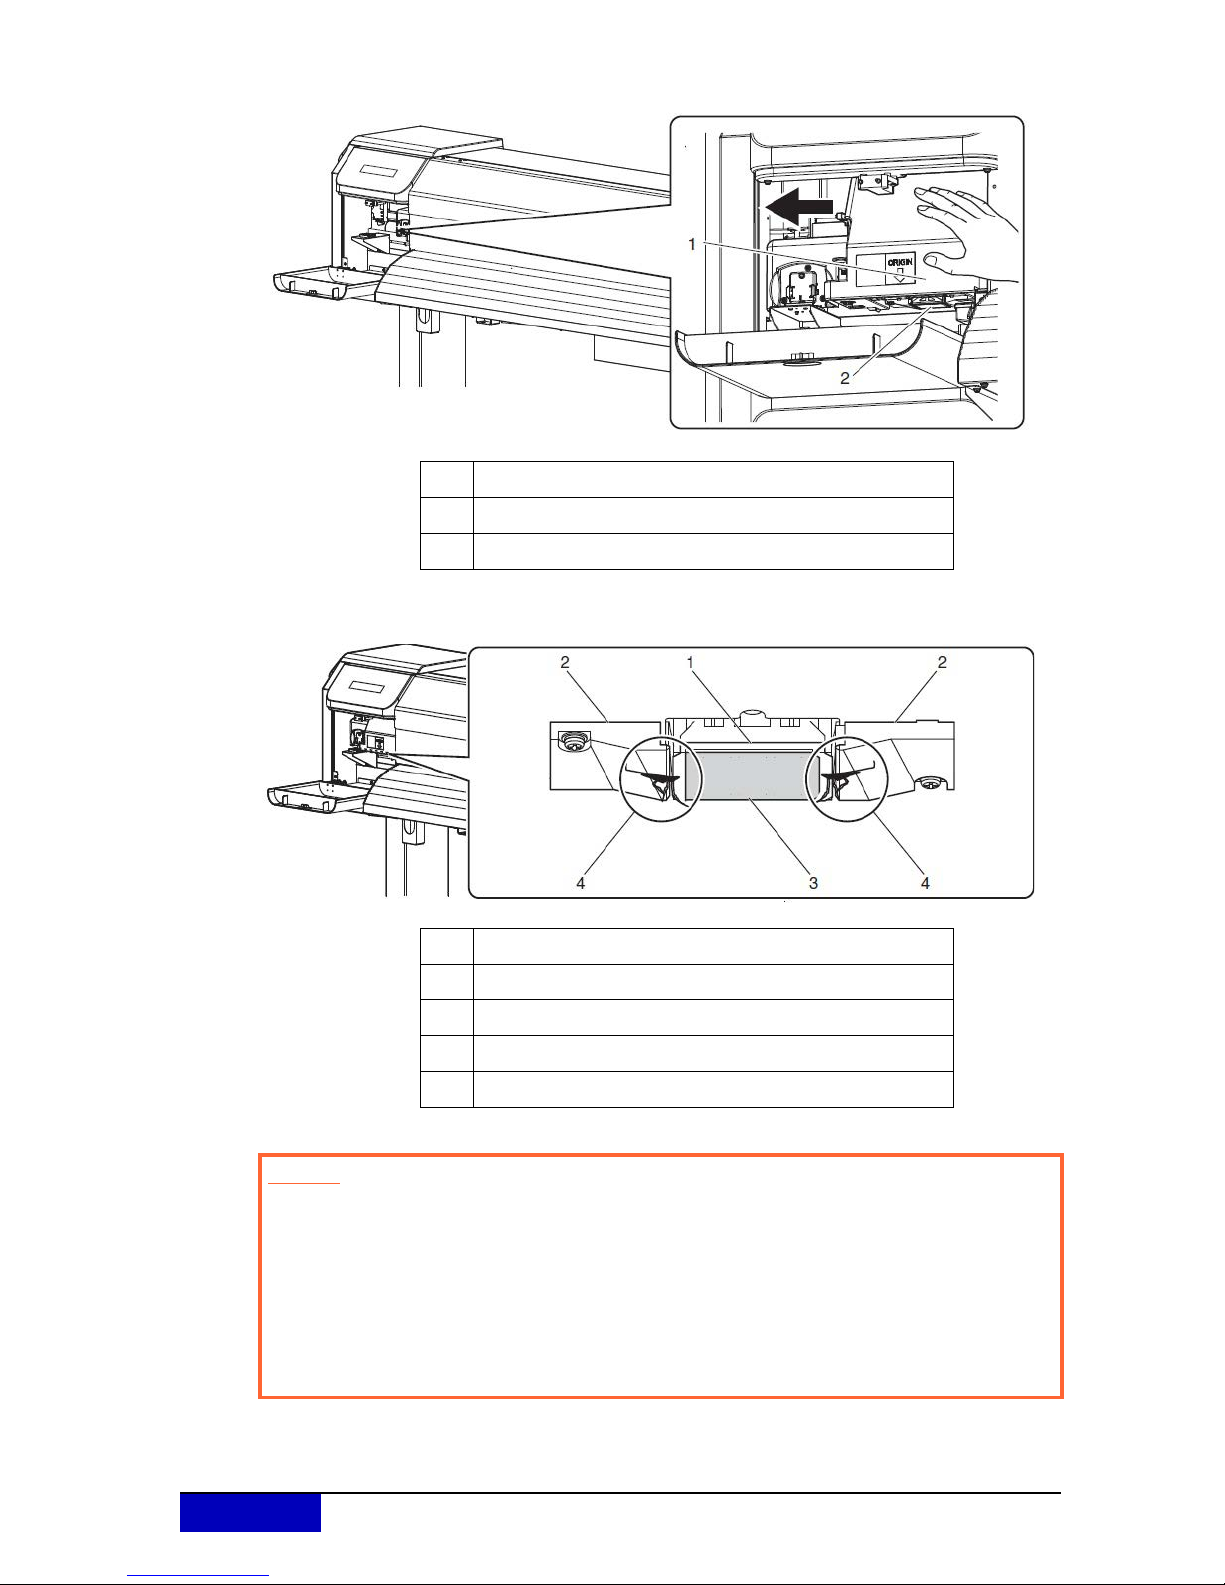
Step 5: Move the print head manually so that you have a clear view on the print head.
Step 6: Use a
penlight, etc. to check if any foreign substances, such as dust or ink are attached
to the following places.
No. Name
1 Print head section
2 Circumference of the print head
No. Name
1 Around the print head
2 Head guide
3 Nozzle plate
4 Dust, ink clots, etc.
Caution
When cleaning around the print head,
Do not touch the nozzle plate. Doing so may damage the print head.
Do not touch the tip of the cleaning stick. The print head may be damaged because of
skin oil.
Never put water, etc. on the tip of the cleaning stick. Doing so may damage the print
head.
Do not reuse the cleaning stick. The attached dust, etc may damage the print head.
Page 7

AP-76942_Rev 1.0 Page 7/19
Step 7: When some foreign substance such as dust or ink clot is attached, use the cleaning
stick to remove it. To facilitate this action you can moisten the cleaning stick with
suitable cleaning liquid.
Step 8: Close the left
maintenance cover firmly to make sure it is locked.
Step 9: Press the [Enter] key
The print head returns to its original position.
“CR Mainte.: Start” is displayed.
Step 10: Press the [Cancel] key
Cleaning around the print head is complete.
No. Name
1 Around the print head
2
H
ead guide
3 Nozzle plate
4 Cleaning stick
Page 8

Page 8/19 AP-76942_Rev 1.0
3 Cleaning the cleaning wiper
(1) Cleaning frequency
Once a week, or when blurs or lacking parts appear on printed media after head cleaning.
(2) Cleaning procedures
Use the cleaning stick moistened with suitable cleaning liquid to clean the cleaning wiper.
Step 1: If the printer is powered ON, make sure that printing or other operations are not in
progress.
Step 2: Display the CR Maintenance menu
Press the [Menu] key
“Menu1: Setup>” is displayed.
The operation panel shifts to the Setup menu display.
Press [>].
“Set1: User Type” is displayed.
Press [+] or [–] to select “Set20: CR Maintenance”.
Press [Enter].
“CR Mainte.: Start” is displayed.
The display enters the CR Maintenance menu.
Important
Please make sure the wiper is in optimal condition. If you do not clean the wiper
regularly, ink residue will stick to the wiper (as shown below), which will lead to
bad printing quality.
Page 9

AP-76942_Rev 1.0 Page 9/19
Step 3: Press the [Enter] key
Maintenance starts.
The print head moves to the left.
The cleaning wiper shifts towards the front.
“CR Maintenance: End” is displayed
Step 4: Open the maintenance cover at the right side of th e pr int er.
No. Name
1 Maintenance cover
Caution
When cleaning the cleaning wiper
Do not touch the cleaning wiper and head cap unit with your hands.
Head cleaning may not be performed correctly because of skin oil.
Make sure to wipe the print head using the cleaning stick.
A cleaning stick moistened with water may cause the print head to clog. When
moistening, always use the cleaning liquid matching your ink type.
Do not reuse the cleaning s tick.
The attached dust, etc may damage the print head.
Page 10

Page 10/19 AP-76942_Rev 1.0
Step 5: Use a cleaning stick moistened with a suitable cleaning liquid to remove the ink and
dust on the cleaning wiper.
Front side of the cleaning wiper:
Remove the ink and dust in the horizontal direction.
k
Cleaning wiper back side:
Remove the ink and dust in the upper direction.
Step 6: Close the ri
ght maintenance cover.
Close the cover firmly until it is locked.
Step 7: Press the [Enter] key
The print head returns to its original position.
The cleaning wiper returns to the original posit ion .
“CR Mainte.: Start” is displayed.
Step 8: Press the [Menu] key
Cleaning the cleaning wiper is complete.
No. Name
1 Cleaning wiper
2
Clean
ing stick
3 Head cap unit
No. Name
1 Cleaning wiper
2
Clean
ing stick
3 Head cap unit
Page 11

AP-76942_Rev 1.0 Page 11/19
4 Head cleaning
If printed data is blurred or lacks part of it, perform a cleaning sequence as described below.
When not using the printer for a long period (2 weeks or more), perform head cleaning.
If not performing head cleaning, the print head is clogged. Doing a head cleaning will
preserve print quality.
Remove media when cleaning.
Cleaning with media loaded may lead to contact between the print head and media.
Step 1: Check that the media loading lever is lowered.
Step 2: Press the [>] key on the operation panel to select the cleaning mode.
Step 3: Press the [Cleaning] key on the operation panel for at least two seconds.
Start Head cleaning.
“Cleaning **%” is displayed
If blurs or lacking parts on printed media do not disappear with one time of head
cleaning, perform strong cleaning.
If blurs or lacking parts in printed media do not disappea r with several times of head
cleaning, refer to the chapter “Troubleshooting” in the Users Guide, and take
appropriate measures.
Important
Please be aware that in case your printe r is loade d with UMS ink, it is nec essar y to
perform a tubing flush after a head cleaning.
Page 12

Page 12/19 AP-76942_Rev 1.0
5 Cleaning the printer
Periodic (every month) cleaning is necessary to keep the printer in good condition.
Cleaning the outer case
Wipe out dust and dirt attached to the outer case by using a soft cloth.
Cleaning the inside of the printer
Step 1: Open the front cover.
Step 2: Remove paper powder and dust attached to the pressure rollers using a soft brush.
Do not blow paper powder inside the printer using tools such as an air duster.
It may cause an abnormal noise from the inside of the printer.
Important
Do not insert or drop metal or flammable object s into the print er through openings
such as a vent.
It could lead to an electric shock or fire.
If foreign substances or liquids such as water entered the printer, do not use the
printer as it is.
It could lead to an electric shock or fire.
Immediately turn OFF the power switch, disconnect the power plug from the
electric socket, and contact your local MUTOH dealer.
When cleaning the printer, be sure to turn OFF the power and disconnect the
power plug.
Do not use volatile solvents such as thinner, benzene, or alcohol.
These solvents could damage the paint.
Be careful that no moisture enters the printer.
There is a possibility that the el ec tric circuit inside the printer is short circuited.
Do not open covers attached using screws under any circumstances.
This may cause an electric shock or a malfunction.
No. Name
1 Pressure rollers
Page 13

AP-76942_Rev 1.0 Page 13/19
Step 3: Apply a damp and tightly squeezed soft cloth to wipe out paper powder and ink
attached to the platen and media guide.
Step 4: Appl
y a damp and tightly squeezed soft cloth to wipe of f the di rt of the unp ainted (silver
colour) area in the centre of the grid roller.
No. Name
1Platen
2 M
edia guide
No. Name
1 Grid roller
Page 14

Page 14/19 AP-76942_Rev 1.0
6 Replacing the flushing box sponges
(1) Replacement time
Replace the flushing-box sponges in the following situations:
When the flushing-box sponge is deformed or saturated
When ink is spattered on the media.
When more than two months have passed since the last replacement.
(2) Replacing steps
You need to inspect 2 flushing-box sponges, 1 on the left side and 1 on the right side of the
printer. Please be aware the flushing-box sponge on the left side is less frequently used. Due to
this you do not need to replace the 2 flushing-box sponges at the same time.
(2-a) Replacement procedure
Step 1: If the printer is powered ON, make sure that printing or other operations are not in
progress.
Step 2: Display the CR Maintenance Menu.
Press the [Menu] key.
“Menu1: Setup>” is displayed.
The operation panel shifts to the Setup menu display.
Press the [>] key.
“Set 1: User Type” is displayed.
Press the [+] key or [–] key to select “Set20: CR Maintenance”.
Press the [Enter] key.
“CR Mainte.: Start” is displayed.
The display enters the CR Maintenance menu.
Step 3: Press the [Enter] key.
Maintenance process starts.
The print head moves to the left.
“CR Maintenance: End” is displayed.
Step 4: Open the front cover.
Replace the flushing-box sponge in a short time.
Leaving the print head at the replacement position for a long time, may result in
clogging of the print head. Please limit to 15 minutes (Refer to topic 2 (2).
No. Name
1 Flushing-box sponge on the right
2
F
lushing-box sponge on the left
Page 15

AP-76942_Rev 1.0 Page 15/19
Step 5: Use tweezers to remove the flushing-box sponge.
Step 6: Install the ne
w flushing-box sponge.
Step 7: Close the front cover.
Step 8: Press the [Enter] key.
The print head returns to its original position.
“CR Mainte.: Start” is displayed.
Step 9: Press the [Menu] key.
Flushing-box sponge replacement is complete.
N° Name
1 Flushing boxes
2 Flush
ing-box sponges
Caution
Do not drop waste fluid when replacing the flushing-box sponges.
If waste fluid comes into contact with the grid roller, the surface of the grid roller
will be damaged, and the media feed function may be affected.
Page 16

Page 16/19 AP-76942_Rev 1.0
7 Disposal of waste fluids
(1) Disposal timing
Dispose of waste fluids in the following cases:
When the waste fluid tank is more than half full.
When “Waste Ink Tank Full” is displayed
(2) Disposal method
Step 1: Please have an empty container such as a supply waste fluid bottle, to contain the
waste fluid.
Step 2: Put some protective material on the floor under the waste fluid tank.
Step 3: Open the waste fluid tap, and transfer the waste fluid to the container.
When transferring the waste fluid to the empty container, the waste fluid may
spatter.
Make sure to put the container close to the waste fluid tap.
Step 4: Af
ter p
ouring the waste fluid to the empty container, close the waste fluid tap securely.
Step 5: Wipe the opening of the waste fluid tap with a cloth, etc.
Step 6: Dispose of the waste fluid as an industrial waste product.
Disposal of waste fluids is completed.
Important
Please dispose according to local rules and regulations. For details, please
verify the corresponding safety data sheet MSDS on the Mutoh website.
Disposal can be found in section 13 of the SDS.
No. Name
1 Waste fluid tap
2 E
mpty container
Page 17

AP-76942_Rev 1.0 Page 17/19
8 Replacing the cutter
(1) Replacement time
Replace the cutter when the following situatio n occurs:
When the media is not cut smoothly
When the cut surface is feathered, etc.
(2) Replacing steps
Step 1: If the printer is powered ON, make sure that printing or other operations are not in
progress.
Step 2: Display the CR Maintenance menu
Press the [Menu] key
“Menu1: Setup>” is displayed.
The operation panel shifts to the Setup menu display.
Press [>].
“Set1: User Type” is displayed
Press [+] or [–] to select “Set20: CR Maintenance”.
Press [Enter].
“CR Mainte.: Start” is displayed
The display enters the CR Maintenance menu.
Step 3: Press [Enter].
Maintenance starts.
The print head moves to the left of the printer (cutter replacement position).
“CR Maintenance: End” is displayed
Step 4: Open the maintenance cover at the left side of the printer.
Note
Replace the cutter in a short time.
Leaving the print head at the cutter replacement position for a long time may
result in clogging of the print head. Please limit to 15 minutes.
Page 18

Page 18/19 AP-76942_Rev 1.0
Step 5: Press the tab of the cutter gently, turn the cutter holder in the direction as illustrated
below.
Do not press the tab of the cutter strongly or suddenly let it go.
There is a spring in the cutter holder and it may pop out.
Do not push the cutter all the way in.
The cutter blade may damage the inside of the printer.
Step 6: Remove the cutter.
Used cutter should be put in a plastic bag, etc, and dispo se d of in complia nc e
with local ordinance and instructions of local authorities.
No. Name
1 Cutter holder
2 Cutter holder lever
Caution
Do not touch the blade edge. It may cause an injury.
Do not touch the cutter blade edge with a hard substance or drop the cutter.
The cutter blade may be damaged or chipped.
No. Name
1 Cutting blade
Page 19

AP-76942_Rev 1.0 Page 19/19
Step 7: Install a new cutter.
Make sure that the spring in the cutter holder does not fly out while installing.
Step 8: Pres
s the tab of the cutter gently, return the cutter holder to its initial position.
Do not press the tab of the cutter strongly or suddenly let it go.
There is a spring in the cutter holder and it may pop out.
Do not push the cutter all the way in.
The cutter blade may damage the inside of the printer.
Refer to the illustrations below and install the cutter holder correctly.
If it is not installed correctly, it may cause an error.
If an error occurs, check if the cutter holder is installed correctly.
Step 9: Close the ma
intena
nce cover.
Step 10: Press the [Enter] key
The print head returns to its original position.
“CR Mainte.: Start” is displayed
Step 11: Press the [Menu] key
Cutter replacement is complete.
No. Name
1 Cutting blade
No. Name
1 Cutter holder
2
C
utter holder lever
Copyright Mutoh Belgium. All rights reserved. Unauthorised copying or distribution prohibited.
Written approval required from Mutoh Belgium.
 Loading...