


User’s Guide
ValueJet 1608 HS
Downloaded From ManualsPrinter.com Manuals

Downloaded From ManualsPrinter.com Manuals

User’s Guide ValueJet 1608 HS
Copyright notice
COPYRIGHT © 7/4/11 Mutoh Belgium nv All rights reserved.
Mutoh Belgium nv reserves the right to modify the information contained in this manual at any
time without prior notice.
This document may not be reproduced by any means, in whole or in part, without written
permission of the copyright owner.
This document is furnished to support the Mutoh ValueJet 1608 HS series printers. In
consideration of the furnishing of the information contained in this document, the party to
whom it is given, assumes its custody and control and agrees to the following:
The information herein contained is given in confidence, and any part thereof shall not be
copied or reproduced without written consent of Mutoh Belgium nv
This document or the contents herein under no circumstances shall be used in the
manufacture or reproduction of the article shown and the delivery of this document shall not
constitute any right or license to do so.
7 April 2011
Published: Mutoh Belgium nv, Archimedesstraat 13, B-8400 Oostende, BELGIUM
www.Mutoh.eu
IMPORTANT NOTICE
For users in Europe
This is a Class A product approved for industrial environments.
In a domestic environment this product may cause radio interference in which case you may
be required to take adequate measures.
Change the direction of the receiving antenna or feeder.
AP-75810 - Revision 2.0 3
Downloaded From ManualsPrinter.com Manuals
User’s Guide ValueJet 1608 HS
Trademarks mentioned in this guide
Mutoh, ValueJet 1608 HS, Spitfire, VJ-1608 are registered trademarks or product names
of Mutoh Belgium nv
Other company and product names may be registered trademarks or product names.
Note
The product and the contents of this publication may be changed without prior
notification.
Mutoh Belgium nv has made the best efforts to keep this publication free from
errors, but if you find any uncertainties or misprints, please call us or the
reseller from which you bought this equipment.
Mutoh Belgium nv shall not be liable for any damages or troubles resulting
from the use of this equipment or this guide.
4 AP-75810 - Revision 2.0
Downloaded From ManualsPrinter.com Manuals

User’s Guide ValueJet 1608 HS
Table of contents
Chapter 1 Safety instructions . . . . . . . . . . . . . . . . . . . . . . . . . . . 9
1.1 Compliance with the following regulations . . . . . . . . . . . . . . . 9
1.2 Managing VOCs. . . . . . . . . . . . . . . . . . . . . . . . . . . . . . . . . . . . . 10
1.3 Handling inks / cleaning or waste fluids (cleaning & ink). . . 11
1.4 Warnings, cautions and notes. . . . . . . . . . . . . . . . . . . . . . . . . 12
1.5 Safety instructions . . . . . . . . . . . . . . . . . . . . . . . . . . . . . . . . . . 13
1.6 Warning labels. . . . . . . . . . . . . . . . . . . . . . . . . . . . . . . . . . . . . . 15
Handling the operation procedure labels. . . . . . . . . . . . . . . . . . . . . 15
Location and type of warning labels. . . . . . . . . . . . . . . . . . . . . . . . . 16
Chapter 2 Product overview . . . . . . . . . . . . . . . . . . . . . . . . . . . 19
2.1 Features . . . . . . . . . . . . . . . . . . . . . . . . . . . . . . . . . . . . . . . . . . . 20
2.2 Names of parts and functions . . . . . . . . . . . . . . . . . . . . . . . . . 21
Front section . . . . . . . . . . . . . . . . . . . . . . . . . . . . . . . . . . . . . . . . . . . . 21
Rear section. . . . . . . . . . . . . . . . . . . . . . . . . . . . . . . . . . . . . . . . . . . . . 22
Operation panel. . . . . . . . . . . . . . . . . . . . . . . . . . . . . . . . . . . . . . . . . . 23
Chapter 3 Basics . . . . . . . . . . . . . . . . . . . . . . . . . . . . . . . . . . . . 27
3.1 Switching the power ON/OFF. . . . . . . . . . . . . . . . . . . . . . . . . . 29
Switching the power ON. . . . . . . . . . . . . . . . . . . . . . . . . . . . . . . . . . . 29
Switching the power OFF. . . . . . . . . . . . . . . . . . . . . . . . . . . . . . . . . . 30
3.2 Loading media. . . . . . . . . . . . . . . . . . . . . . . . . . . . . . . . . . . . . . 32
loading rigid media . . . . . . . . . . . . . . . . . . . . . . . . . . . . . . . . . . . . . . . 32
Loading roll media. . . . . . . . . . . . . . . . . . . . . . . . . . . . . . . . . . . . . . . . 37
Setting media type . . . . . . . . . . . . . . . . . . . . . . . . . . . . . . . . . . . . . . . 40
AP-75810 - Revision 2.0 - 7/4/11 5
Downloaded From ManualsPrinter.com Manuals

User’s Guide ValueJet 1608 HS
3.3 Perfect media handling. . . . . . . . . . . . . . . . . . . . . . . . . . . . . . . 42
Unwinder / Winder 100 / T-winder 30. . . . . . . . . . . . . . . . . . . . . . . . 42
Rigid printing tables . . . . . . . . . . . . . . . . . . . . . . . . . . . . . . . . . . . . . . 42
Media retainers . . . . . . . . . . . . . . . . . . . . . . . . . . . . . . . . . . . . . . . . . . 42
Head height adjustment . . . . . . . . . . . . . . . . . . . . . . . . . . . . . . . . . . . 46
Adjusting the pressure on the media . . . . . . . . . . . . . . . . . . . . . . . . 48
Heater settings . . . . . . . . . . . . . . . . . . . . . . . . . . . . . . . . . . . . . . . . . . 50
3.4 Using the air heater. . . . . . . . . . . . . . . . . . . . . . . . . . . . . . . . . . 59
Filter connection . . . . . . . . . . . . . . . . . . . . . . . . . . . . . . . . . . . . . . . . . 59
Setting the Air nozzle pressure . . . . . . . . . . . . . . . . . . . . . . . . . . . . . 60
3.5 Replacing the ink bags. . . . . . . . . . . . . . . . . . . . . . . . . . . . . . . 61
3.6 Emptying the waste bottle . . . . . . . . . . . . . . . . . . . . . . . . . . . . 66
3.7 Transfer and transportation. . . . . . . . . . . . . . . . . . . . . . . . . . . 67
Transferring the printer. . . . . . . . . . . . . . . . . . . . . . . . . . . . . . . . . . . . 67
Transporting the printer . . . . . . . . . . . . . . . . . . . . . . . . . . . . . . . . . . . 68
3.8 Longstore. . . . . . . . . . . . . . . . . . . . . . . . . . . . . . . . . . . . . . . . . . 69
Longstore procedure. . . . . . . . . . . . . . . . . . . . . . . . . . . . . . . . . . . . . . 69
Chapter 4 Preparations before printing . . . . . . . . . . . . . . . . . . 71
4.1 General info on usable media . . . . . . . . . . . . . . . . . . . . . . . . . 72
Media compatibility . . . . . . . . . . . . . . . . . . . . . . . . . . . . . . . . . . . . . . . 72
Printing area. . . . . . . . . . . . . . . . . . . . . . . . . . . . . . . . . . . . . . . . . . . . . 73
Notes on handling media . . . . . . . . . . . . . . . . . . . . . . . . . . . . . . . . . . 74
Notes on storing media . . . . . . . . . . . . . . . . . . . . . . . . . . . . . . . . . . . 74
4.2 Test print . . . . . . . . . . . . . . . . . . . . . . . . . . . . . . . . . . . . . . . . . . 75
Overview and functions of the test prints. . . . . . . . . . . . . . . . . . . . . 75
Performing a Test print. . . . . . . . . . . . . . . . . . . . . . . . . . . . . . . . . . . . 76
Nozzle Check. . . . . . . . . . . . . . . . . . . . . . . . . . . . . . . . . . . . . . . . . . . . 78
Mode Print . . . . . . . . . . . . . . . . . . . . . . . . . . . . . . . . . . . . . . . . . . . . . . 78
Setup print . . . . . . . . . . . . . . . . . . . . . . . . . . . . . . . . . . . . . . . . . . . . . . 79
Palette print . . . . . . . . . . . . . . . . . . . . . . . . . . . . . . . . . . . . . . . . . . . . . 80
AP-75810 - Revision 2.0 - 7/4/11 6
Downloaded From ManualsPrinter.com Manuals

User’s Guide ValueJet 1608 HS
4.3 Set the correct distance adjust (Step). . . . . . . . . . . . . . . . . . . 81
Basics about the step . . . . . . . . . . . . . . . . . . . . . . . . . . . . . . . . . . . . . 81
4.4 Adjust print . . . . . . . . . . . . . . . . . . . . . . . . . . . . . . . . . . . . . . . . 85
Chapter 5 Printer menu . . . . . . . . . . . . . . . . . . . . . . . . . . . . . . . 89
5.1 How to work in the menu . . . . . . . . . . . . . . . . . . . . . . . . . . . . . 91
Normal mode . . . . . . . . . . . . . . . . . . . . . . . . . . . . . . . . . . . . . . . . . . . . 91
Setup menu display . . . . . . . . . . . . . . . . . . . . . . . . . . . . . . . . . . . . . . 91
Changing the printer status . . . . . . . . . . . . . . . . . . . . . . . . . . . . . . . . 92
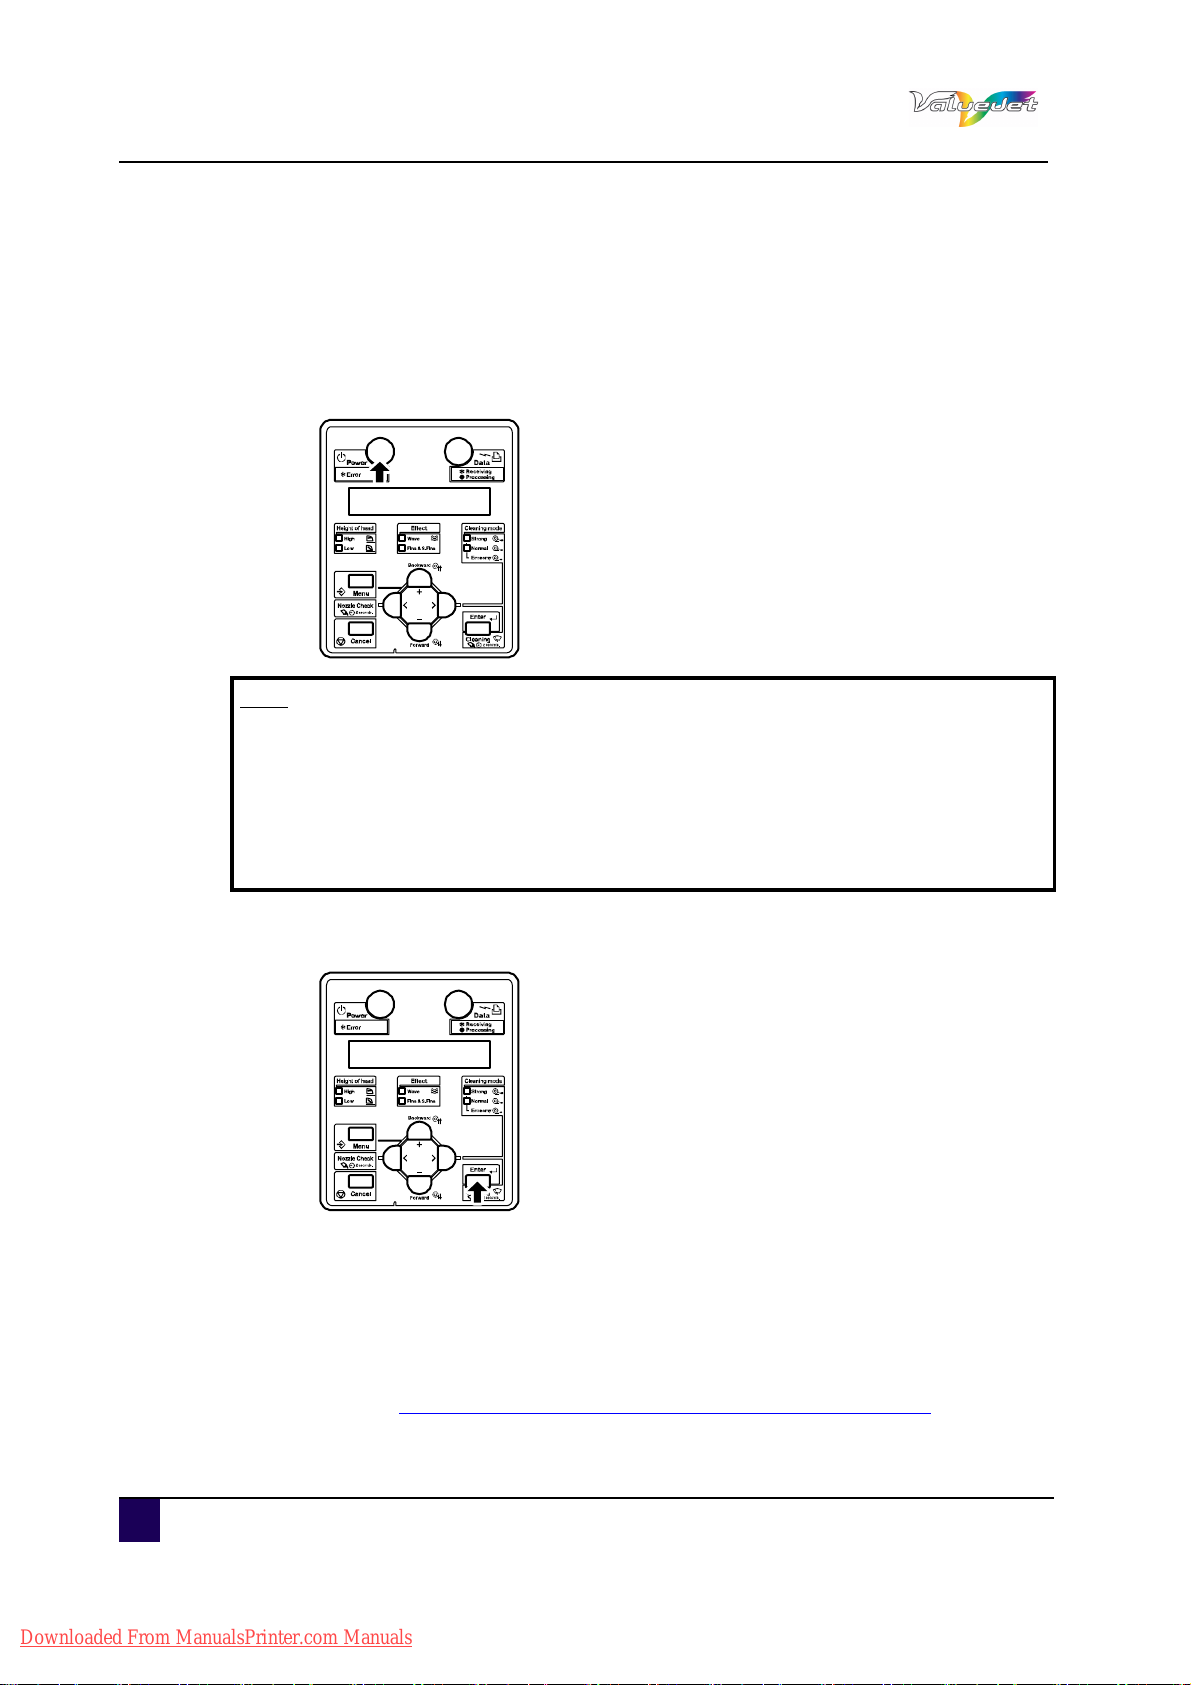
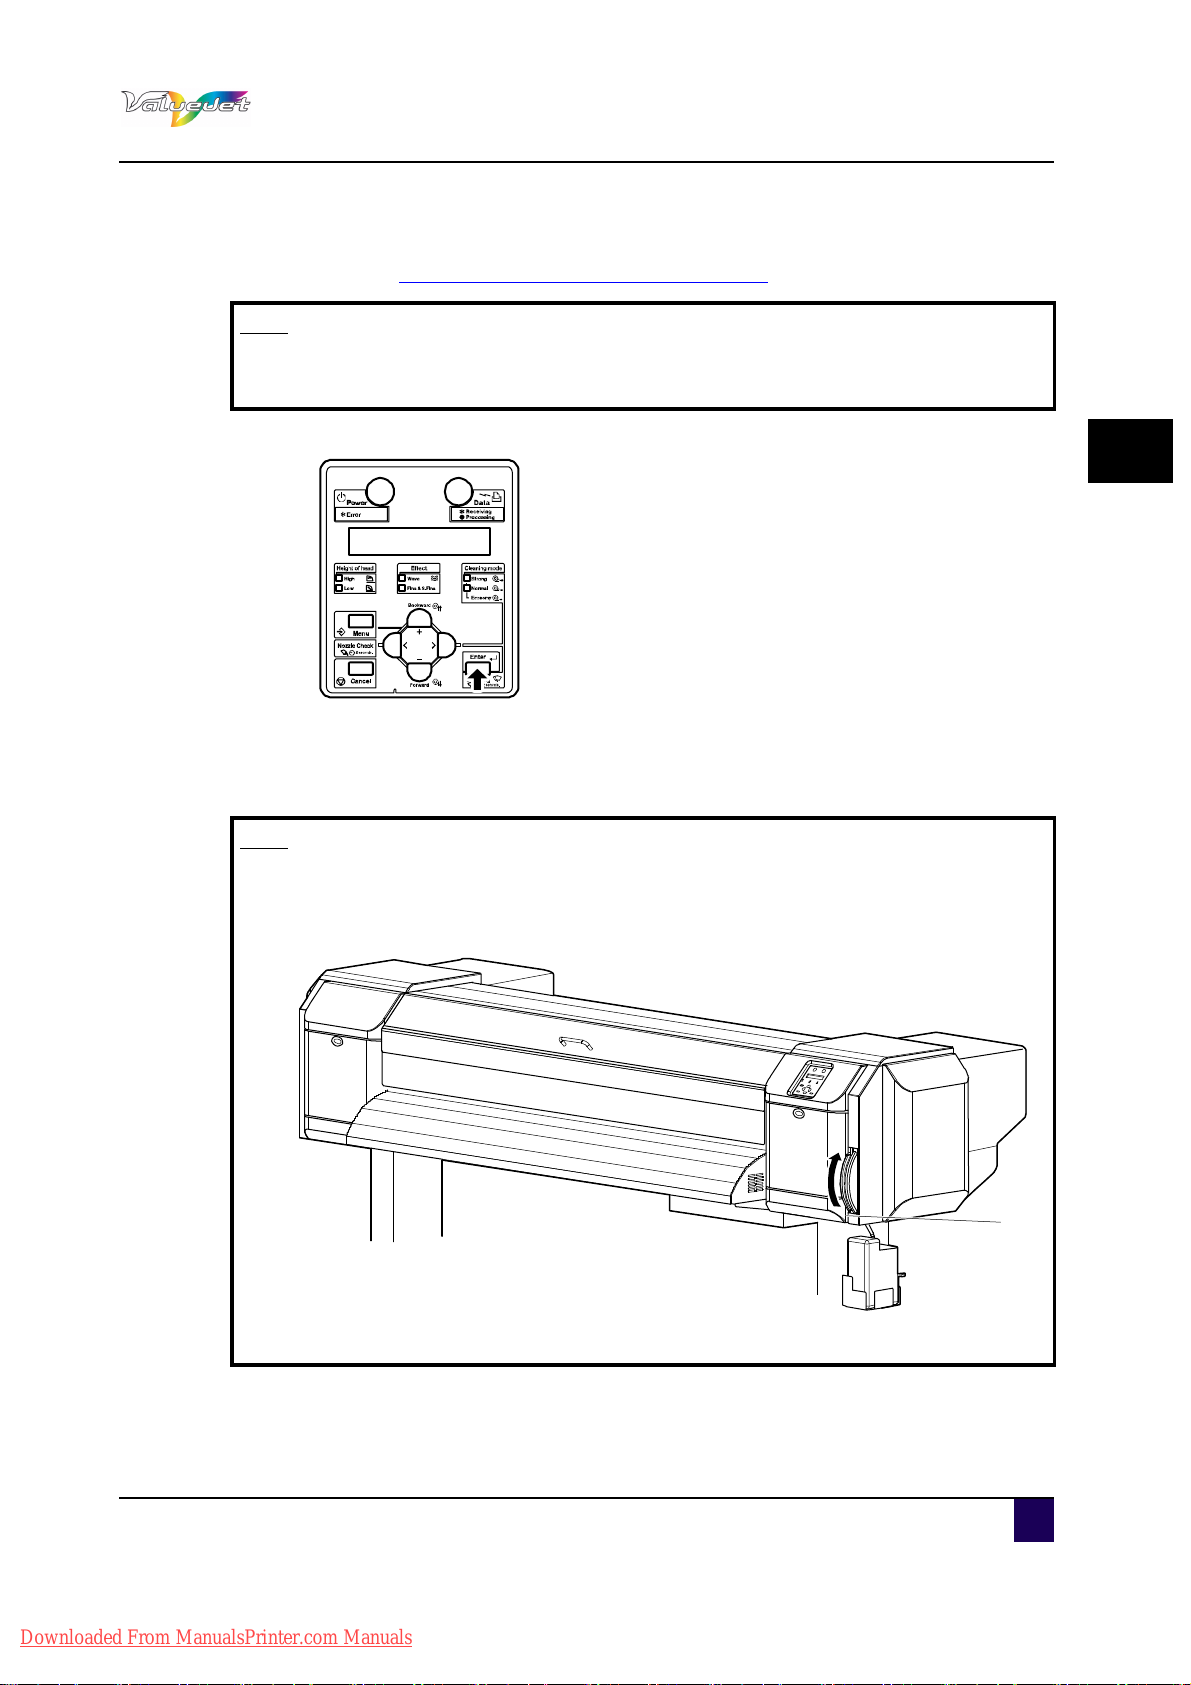
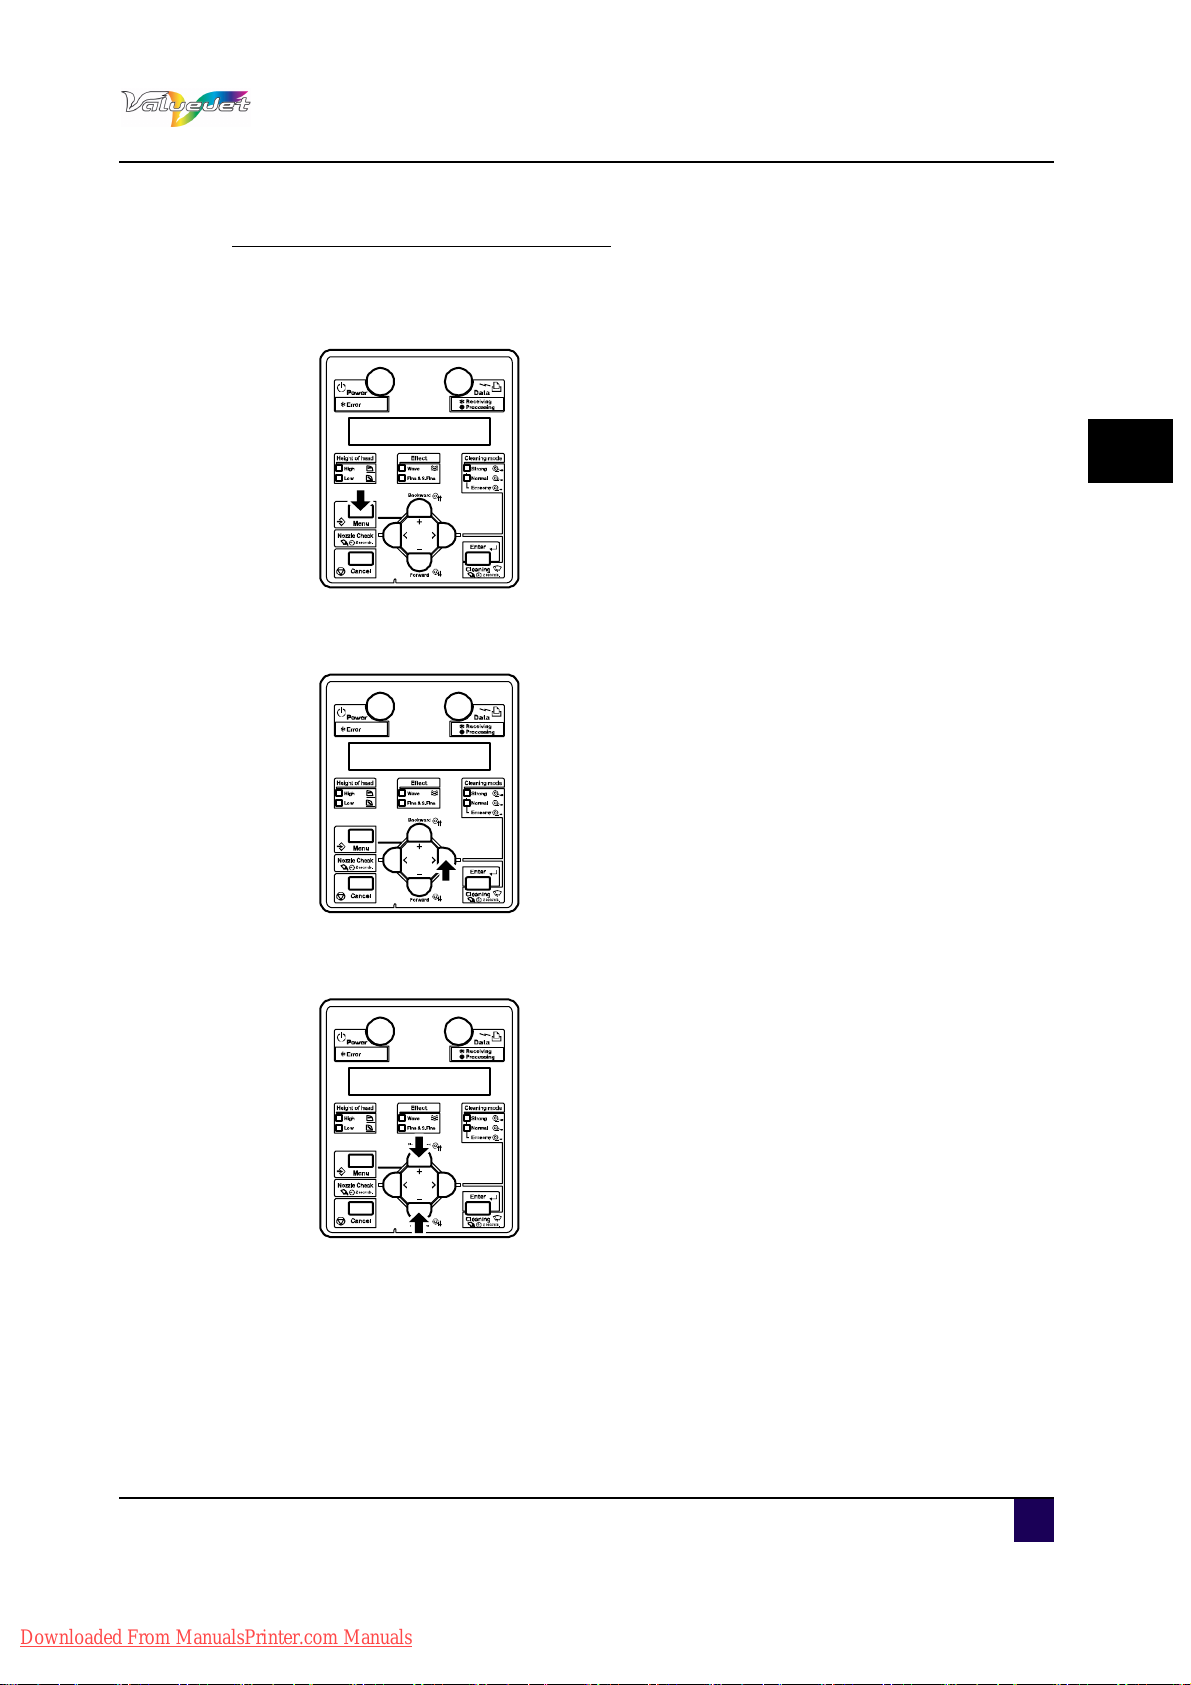
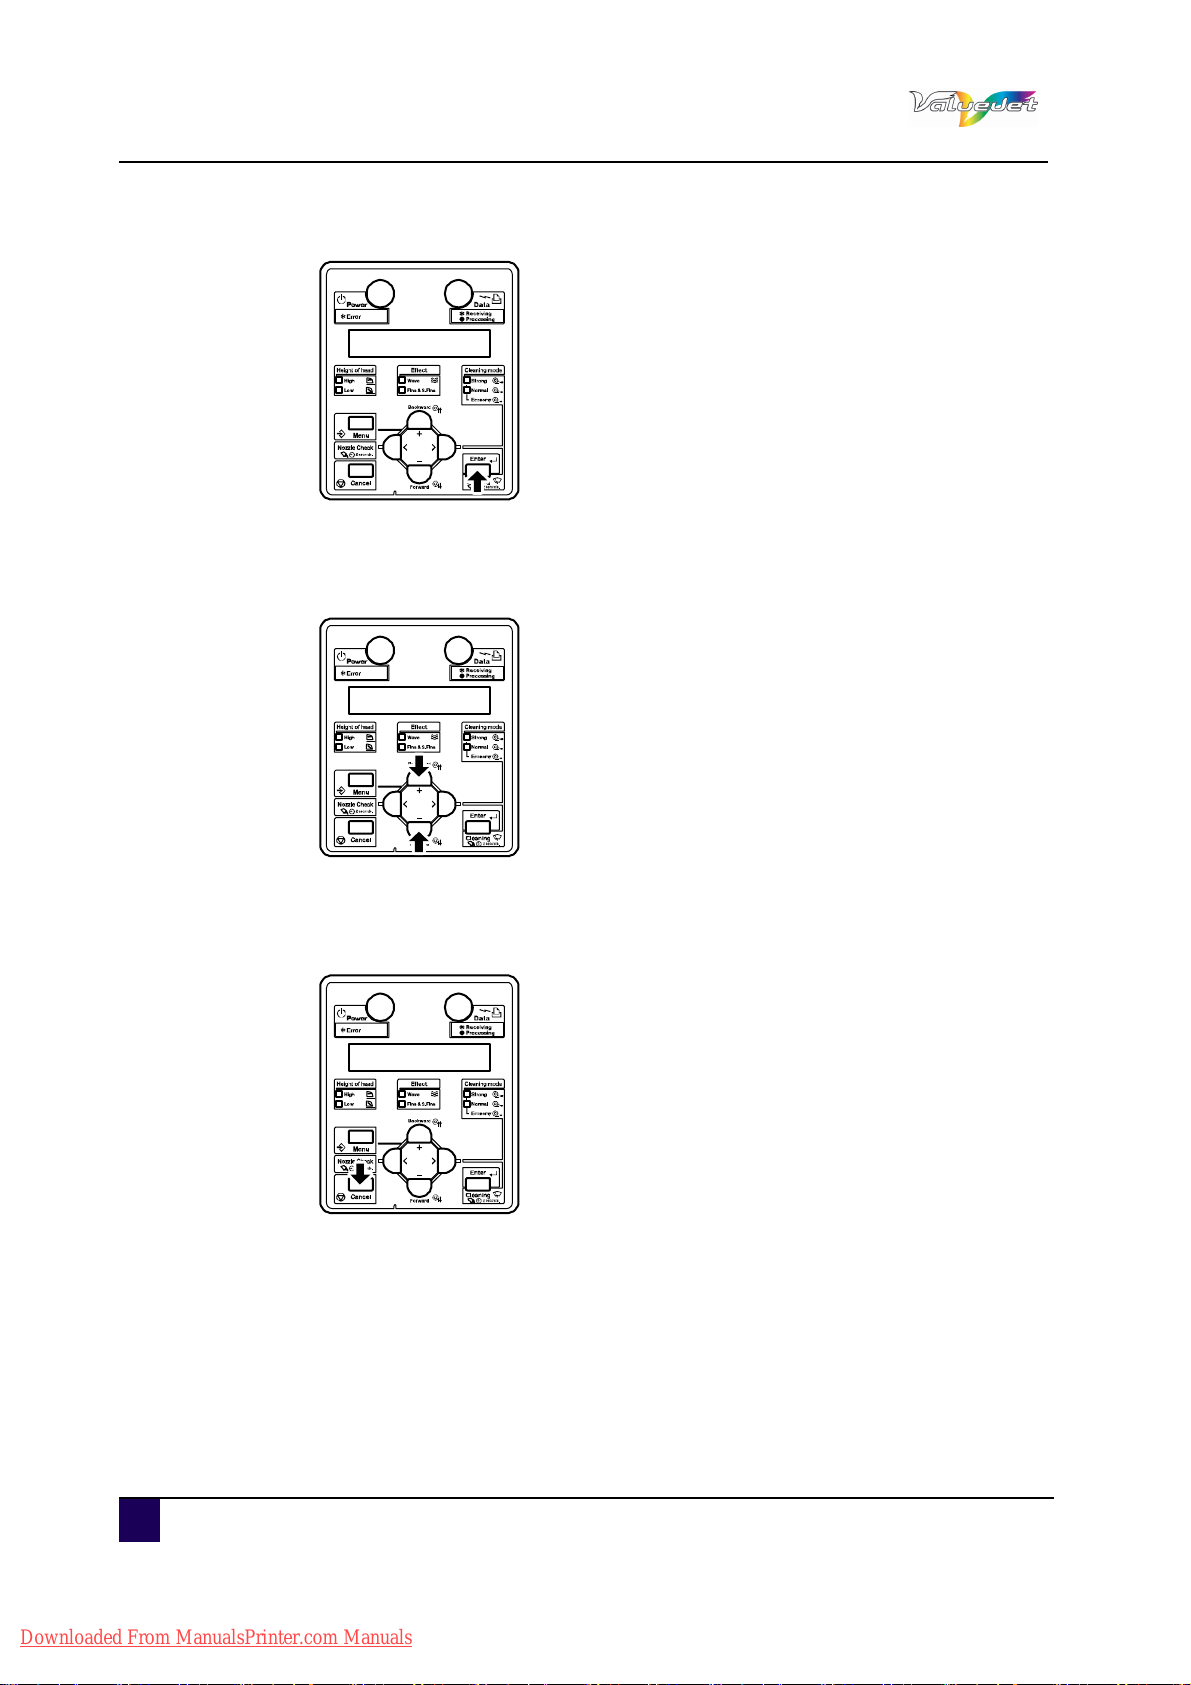
5.2 Operating from the operation panel . . . . . . . . . . . . . . . . . . . . 93
Feeding media. . . . . . . . . . . . . . . . . . . . . . . . . . . . . . . . . . . . . . . . . . . 93
Stop printing operation . . . . . . . . . . . . . . . . . . . . . . . . . . . . . . . . . . . . 94
Cutting media. . . . . . . . . . . . . . . . . . . . . . . . . . . . . . . . . . . . . . . . . . . . 95
Changing and confirming settings while printing . . . . . . . . . . . . . . 96
Pause printing . . . . . . . . . . . . . . . . . . . . . . . . . . . . . . . . . . . . . . . . . . . 98
5.3 Menu setup on the operation panel. . . . . . . . . . . . . . . . . . . . . 99
Panel setup menu overview . . . . . . . . . . . . . . . . . . . . . . . . . . . . . . . 99
Menu setup procedure . . . . . . . . . . . . . . . . . . . . . . . . . . . . . . . . . . . . 99
Menu overview . . . . . . . . . . . . . . . . . . . . . . . . . . . . . . . . . . . . . . . . . 101
5.4 Panel Setup Menu . . . . . . . . . . . . . . . . . . . . . . . . . . . . . . . . . . 105
Menu 1: Setup . . . . . . . . . . . . . . . . . . . . . . . . . . . . . . . . . . . . . . . . . . 105
Menu 2 - 5 . . . . . . . . . . . . . . . . . . . . . . . . . . . . . . . . . . . . . . . . . . . . . 131
Menu 7: Version . . . . . . . . . . . . . . . . . . . . . . . . . . . . . . . . . . . . . . . . 132
Menu 8: Sleep mode. . . . . . . . . . . . . . . . . . . . . . . . . . . . . . . . . . . . . 132
Chapter 6 Periodical maintenance . . . . . . . . . . . . . . . . . . . . . 135
6.1 Done by end user . . . . . . . . . . . . . . . . . . . . . . . . . . . . . . . . . . 136
Keeping optimum printing conditions . . . . . . . . . . . . . . . . . . . . . . . 137
Cleaning the printer. . . . . . . . . . . . . . . . . . . . . . . . . . . . . . . . . . . . . . 138
Cleaning the outer case . . . . . . . . . . . . . . . . . . . . . . . . . . . . . . . . . . 138
Cleaning the inside of the printer . . . . . . . . . . . . . . . . . . . . . . . . . . 138
AP-75810 - Revision 2.0 - 7/4/11 7
Downloaded From ManualsPrinter.com Manuals

User’s Guide ValueJet 1608 HS
Head cleaning . . . . . . . . . . . . . . . . . . . . . . . . . . . . . . . . . . . . . . . . . . 141
Cleaning the cleaning wiper and around the print head . . . . . . . 143
Draining condensated water . . . . . . . . . . . . . . . . . . . . . . . . . . . . . . 150
Replacing the spitting box sponges . . . . . . . . . . . . . . . . . . . . . . . . 152
Cleaning the timing fence . . . . . . . . . . . . . . . . . . . . . . . . . . . . . . . . 156
Cleaning the P-rear sensor surface . . . . . . . . . . . . . . . . . . . . . . . . 157
6.2 Done by Authorized Mutoh Technician. . . . . . . . . . . . . . . . . 158
Chapter 7 Troubleshooting . . . . . . . . . . . . . . . . . . . . . . . . . . . 159
7.1 Malfunctions and failures. . . . . . . . . . . . . . . . . . . . . . . . . . . . 161
Problems in installation and introduction . . . . . . . . . . . . . . . . . . . . 161
Cannot print at all . . . . . . . . . . . . . . . . . . . . . . . . . . . . . . . . . . . . . . . 162
Media-related troubleshooting. . . . . . . . . . . . . . . . . . . . . . . . . . . . . 164
Printing-related troubleshooting . . . . . . . . . . . . . . . . . . . . . . . . . . . 167
Air pressure related troubleshooting . . . . . . . . . . . . . . . . . . . . . . . 170
7.2 Error messages. . . . . . . . . . . . . . . . . . . . . . . . . . . . . . . . . . . . 171
Status messages. . . . . . . . . . . . . . . . . . . . . . . . . . . . . . . . . . . . . . . . 171
Error message display and remedies. . . . . . . . . . . . . . . . . . . . . . . 174
Data error display and solutions . . . . . . . . . . . . . . . . . . . . . . . . . . . 176
Command error display and remedies. . . . . . . . . . . . . . . . . . . . . . 176
Error requiring restart . . . . . . . . . . . . . . . . . . . . . . . . . . . . . . . . . . . . 177
7.3 The media is jammed . . . . . . . . . . . . . . . . . . . . . . . . . . . . . . . 178
Removing Thick Media. . . . . . . . . . . . . . . . . . . . . . . . . . . . . . . . . . . 178
Removing Roll Media . . . . . . . . . . . . . . . . . . . . . . . . . . . . . . . . . . . . 178
8 AP-75810 - Revision 2.0 - 7/4/11
Downloaded From ManualsPrinter.com Manuals

User’s Guide ValueJet 1608 HS
Safety instructions
Chapter 1 Safety instructions
This chapter explains the safety of the printer, warning terms that operators need to know,
caution items and warning labels on the printer main unit.
Important
When operating this printer, be sure to follow the directions and warnings in
this guide.
1.1 Compliance with the following regulations
The CE marking is a mandatory European marking for certain
product groups to indicate conformity with the essential health and
safety requirements set out in European Directives.
1
By affixing the CE marking, the manufacturer, his authorized
representative, or the person placing the product on the market or
putting it into service ensures that the item meets all the essential
requirements of all applicable EU directives and that the applicable
conformity assessment procedures have been applied.
Your product is designed and manufactured with high-quality
materials and components, which can be recycled and reused.
When this crossed-out wheeled bin submenu is attached to a
product, it means the product is covered by the European Directive
2002/96/EC - WEEE regulation.
Please inform yourself about the local separate collection system for
electrical and electronic products.
Please act according to local rules and do not dispose of your old
products with your normal household waste. The correct disposal of
your old product will help prevent potential negative consequences
for the environment and human health.
AP-75810 - Revision 2.0 9
Downloaded From ManualsPrinter.com Manuals

User’s Guide ValueJet 1608 HS
Safety instructions
1.2 Managing VOCs
Using Mutoh printers with Bio Solvent Inks, volatile organic compounds will be
released. (VOCs)
In order to protect human health and the environment, VOCs must be managed. This
means VOCS need to be controlled and complying with all local, state and federal
environmental, occupational health, and safety regulations on VOCs in the atmosphere
and in the workplace is needed.
The amount of released VOCs depends on multiple factors: room volume, unforced
ventilation, print mode, number of printers in the room, heaters settings, kind of media,
use of extra dryers, print production…
Because of differences in local regulations and working conditions, it's recommended
to consult a local consultancy agency to determine the regulations involved. An
acknowledge laboratory can determine the total amount of released VOCs in the
atmosphere and in the workplace. Consequently they can determine if forced
ventilation for occupational health and air pollution control devices are needed. An
engineering firm could be consulted on the installation of the ventilation system where
prints are produced, handled and stored.
10 AP-75810 - Revision 2.0
Downloaded From ManualsPrinter.com Manuals

User’s Guide ValueJet 1608 HS
Safety instructions
1.3 Handling inks / cleaning or waste fluids (cleaning & ink)
Before handling inks/ cleaning and their waste, do carefully read the MSDS-sheet and
the container labels for important health, safety and environmental information.
Only use original manufacturer's ink and appropriate cleaning liquid.
Before installing the ink pack, shake it gently. Doing so will preserve print quality.
To avoid ink separation, please remove and shake all ink packs gently once a week. To
gently shake the ink packs, rotate them side to side at least 2 or 3 times. Then, turn the ink
pack upside down and rotate side to side another 2 or 3 times.
When moving ink from a cold place to warm place, keep the ink for three hours or more in
the new printing environment before printing.
Inks
General advice: wear safety glasses and gloves especially when handling the waste
ink.
After spill: remove contaminated clothing.
After inhalation: if difficulties occur after vapour/aerosol has been inhaled, remove to
fresh air and seek medical attention.
After skin contact: wash thoroughly with soap and water.
After eye contact: wash affected eyes for at least 15 minutes under running water while
eyelids held open.
After swallowing: rinse mouth and drink plenty of water. Never induce vomiting.
Do not disassemble ink container. Otherwise, ink may get in your eyes or on your skin.
Also a disassembled ink container can not be used.
When refilling ink, use original manufacturer's ink. This printer is designed to use genuine
ink. When using non-original manufacturer’s ink,
printing might become blurred and the end of the ink in the container might not be
detected correctly
any problems caused by using ink other than those recommended above will not be
covered by the warranty, and repair expenses will be paid by the customer.
For handling waste: see section 13 on the MSDS-sheet
1
AP-75810 - Revision 2.0 11
Downloaded From ManualsPrinter.com Manuals
User’s Guide ValueJet 1608 HS
Safety instructions
1.4 Warnings, cautions and notes
Safety terms in this manual and the contents of warning labels attached to the printer are
categorized into the following three types, depending on the degree of risc (or the scale of
accident).
Read the following explanations carefully and follow the instructions in this manual.
Safety terms Details
Important Must be followed carefully to avoid death or serious bodily injury.
Caution
Notes
Must be observed to avoid bodily injury (moderate or light) or damage to
your equipment.
Contains important information and useful tips on the operation of your
printer.
12 AP-75810 - Revision 2.0
Downloaded From ManualsPrinter.com Manuals

1.5 Safety instructions
Machines must be installed according to Mutoh’s Installation Guide also after moving
machines to another location; maintenance needs to be done according to the
maintenance manual.
To prevent fire or electrical shock, never use a power supply source other than the one
rated for the product in the country where you purchased the product.
To prevent fire or electrical shock, machines must be connected to a properly grounded
electrical power outlet. Do not connect the power cable to a power strip or a power source
shared by other electrical devices.
Make sure that no foreign substances such as dust etc. are stuck to the power plug.
Make sure that the power plug is firmly inserted to the edge of the power socket.
Use only the provided power cable. To prevent fire or electrical shock, follow the
instructions below when handling the power cable:
Do not cut or modify the cable.
Do not put heavy objects on the cable.
Do not bend, twist, knot or pull the cable.
Do not wire the cable near equipment that generates heat.
Do not use the cable with any other electrical device.
Do not handle the cable with wet hands.
Be aware of all caution and warning labels to avoid potentially hazardous situations.
Do not disable any safety precautions systems.
Do not operate the unit unless all parts are mounted.
Do not stand on or place heavy objects on your machine. Doing so may result in the
machine tipping or falling over and causing injury.
Do not place the machine in humid and dusty areas or in areas exposed to flammables.
Doing so may result in electrical shock or fire.
Do not place the machine in the following areas. Doing so may result in the machine
tipping or falling over and causing injury.
Unstable surfaces
Sloping floors
Areas subject to vibration by other equipment.
Do not cover the ventilation hole of your machine with cloth, such as a blanket or table
cloth. Doing so could obstruct ventilation and cause fire.
Do not insert or drop metal or inflammable objects into openings, such as ventilation
outlets. Doing so may result in electrical shock and fire.
Do not touch the media guide during printing. It is hot and may cause a burn.
Do not touch the media feed slot, platen or media guide while heaters are operating. They
are hot and may cause a burn.
Keep the machine horizontally during transportation.
User’s Guide ValueJet 1608 HS
Safety instructions
1
AP-75810 - Revision 2.0 13
Downloaded From ManualsPrinter.com Manuals

User’s Guide ValueJet 1608 HS
Safety instructions
To prevent back pains and other injuries, always work with at least 4 people to unpack or
move the machine.
Stop using your machine if a liquid has been spilled into it. This may cause electrical shock
or fire. Switch the machine off as soon as possible, unplug the power cord, and contact
your local Mutoh dealer.
Be sure to power OFF the machine and unplug the power cable from the outlet before
cleaning the machine. Use a damp cloth to clean the machine. Do not use thinner,
benzene, alcohol or other active agents. Doing so may result in damage or paint peeling
from the casing.
Do not bend or pull the waste fluid tube. Doing so may cause waste fluid to leak out and
malfunction of the product.
Do not tilt the machine, place it against a wall or turn it upside down. Doing so may cause
ink to leak inside the machine. Movement after transport is also not covered by the
warranty.
When cutting roll media, be careful of the following. Incorrect handling can result in injury
to the hands and fingers from the razor blade.
When holding the media, do not place fingers over the media cut groove.
Move the razor blade slowly along the media cutting groove.
Do NOT transport the machine to another room without contacting your local Authorized
Mutoh Dealer.
14 AP-75810 - Revision 2.0
Downloaded From ManualsPrinter.com Manuals
1.6 Warning labels
Be sure to read and understand the safety warnings before handling the printer.
A warning label is used on parts of the printer which especially need your attention.
Understand the locations and the descriptions of the danger associated with each label
before operating the printer.
1.6.1 Handling the operation procedure labels
Note
Check whether all the warning labels can be read. If the letters or illustrations
on the label are not clear, remove the dirt from the label.
Use cloth, water and mild detergent to remove the dirt from the label. avoid
either organic solvents or gasoline.
if warning labels need to be replaced, contact your local Mutoh dealer.
User’s Guide ValueJet 1608 HS
Safety instructions
1
AP-75810 - Revision 2.0 15
Downloaded From ManualsPrinter.com Manuals
User’s Guide ValueJet 1608 HS
4
6
Safety instructions
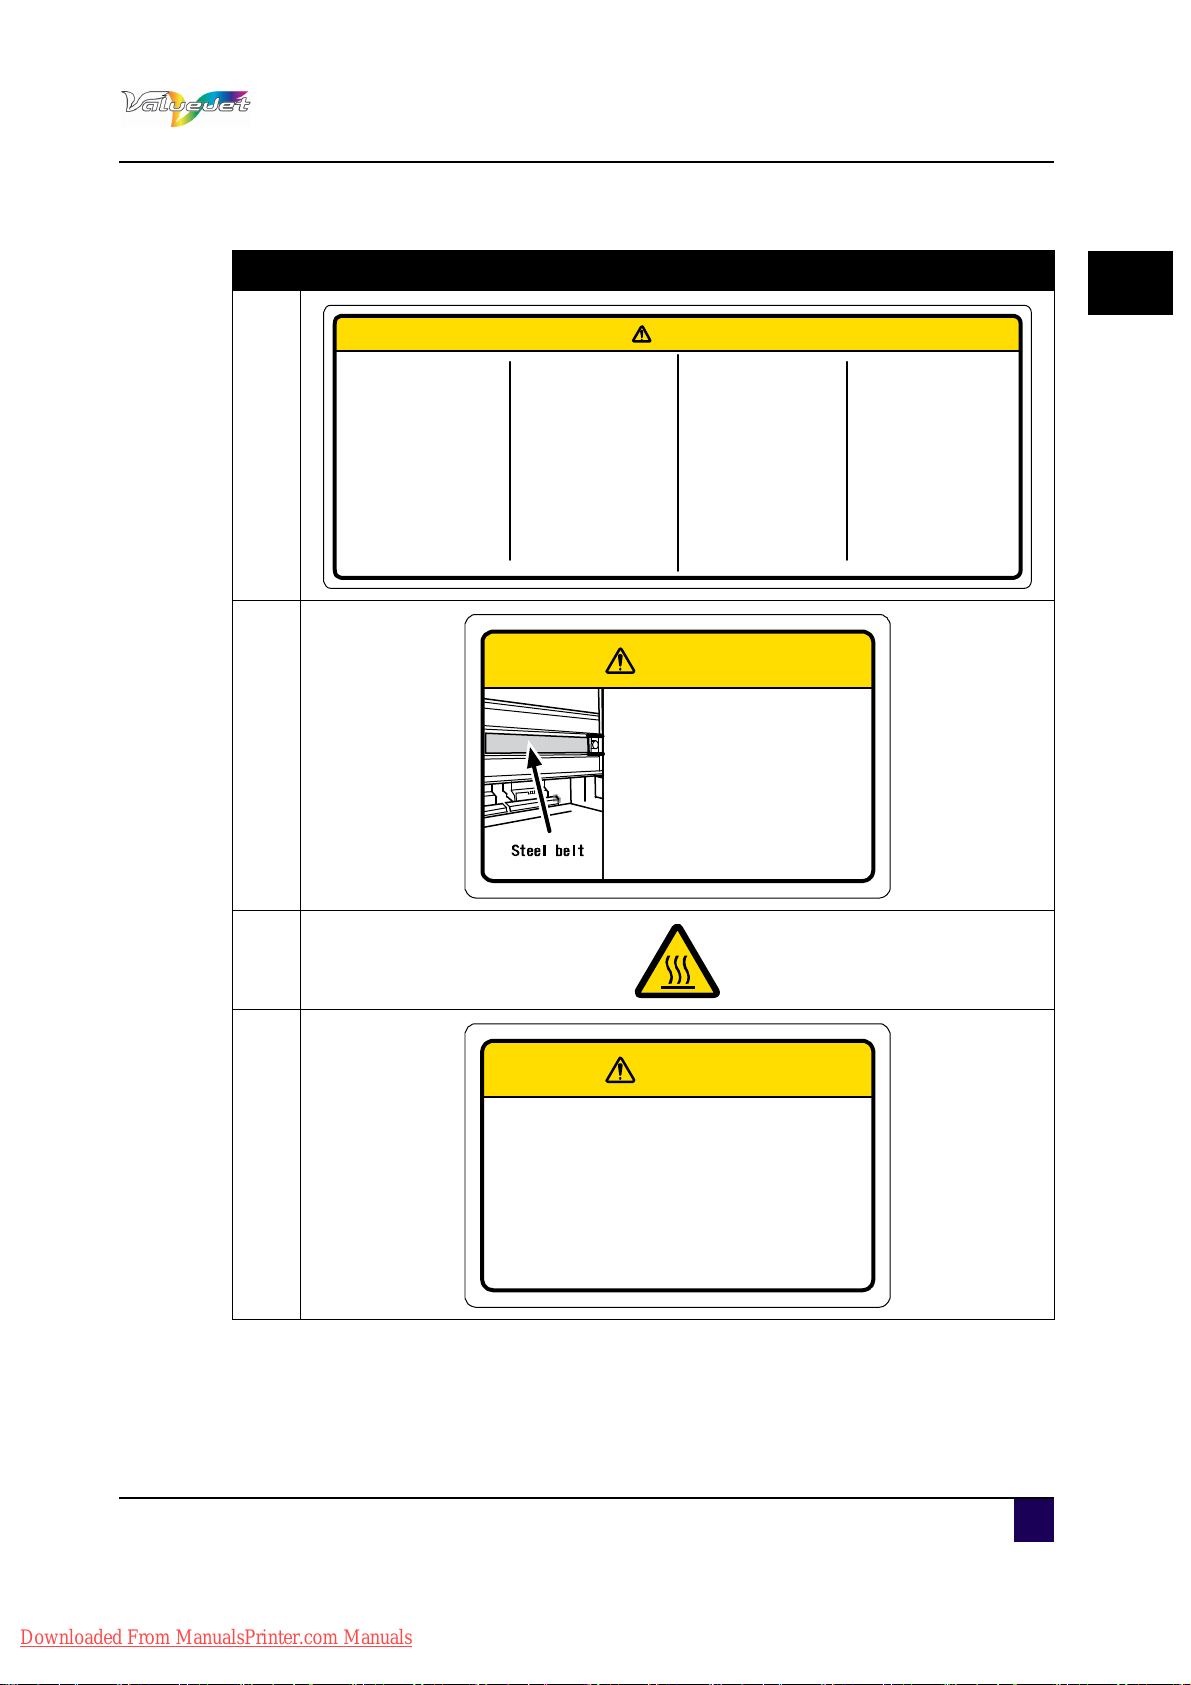
1.6.2 Location and type of warning labels
16 AP-75810 - Revision 2.0
Downloaded From ManualsPrinter.com Manuals
User’s Guide ValueJet 1608 HS
◆Do not open thefront cover while
printing.
Moreover. Do not touch the media while
printing.
Good printing result might not be
obtained.
※Pleaseremovethemediaandholdthe
lever upwhen not usingfor a longtime.
Due to the environment conditions,
media floatand wrinkle mighthappen
that does notobtain the goodresult.
注 意
◆作画中はフロントカバーを開けないで
ください。
また、作画中は開口部から手を入れた
り用紙に触れないでください。
思わぬケガをしたり、良好な作画結果
が得られないことがあります。
※長時間作画を行わない時は、用紙を外
しホールドレバーをアップ状態にして
ください。
良好な作画結果が得られないことがあ
ります。
◆Paper guides,platenand paper holding
plate willbecome hot dueto the heater
temperature setting.
Beware ofbeing burned.
◆ヒーターの温度設定により、ペーパ-
ガイド、プラテン、用紙押えプレート
が高温となるため、火傷をする恐れが
あります。
◆Normal cleaning should be done once
a week if the printer is notu sedfor a
long period.
※If the printer is left without cleaning,the
ink willb ehardened inside the head
nozzl e,and may cause the he ad
trouble.
◆長期間プリンタを使用しない場合は、
週に一度ノーマルクリーニングを行って
ください。
※クリーニングを行わずに放置すると、
ヘッドノズル内でインクが固まりヘッド
故障の原因となります。
◆Do not give adirect wind from a fan or
air conditioner to the machine.
※A wind may dry theink in the head
no zzles causi ng clog ging t hat affe cts
ink jetting,and yo uw illno t be able to
obtain satisfactory printing results.
◆直接機械に送風機や空調装置の風を当て
ないで下さい。
※風によりヘッドノズル内のインクが固ま
りヘッド故障の原因になったり、インク
の吐出に影響を与え、満足な印字結果が
得られないことがあります。
CAUTION
◆Sharp Edges
Do not touch steel belt.
※You may be injured.
スチールベルト
◆スチールベルトは端が鋭く尖って
いますので触らないでください。
※けがをする恐れがあります。
注 意
CAUTION
◆Do not bend or pull the waste ink drain tube.
The ink may be leaked and damages the
printer.
◆廃液チューブを折り曲げたり、引っ張ったり
しないで下さい。インクが漏れて製品が故障
する恐れがあります。
注 意
CAUTION
Safety instructions
N° Description
1
2
1
3
4
AP-75810 - Revision 2.0 17
Downloaded From ManualsPrinter.com Manuals
User’s Guide ValueJet 1608 HS
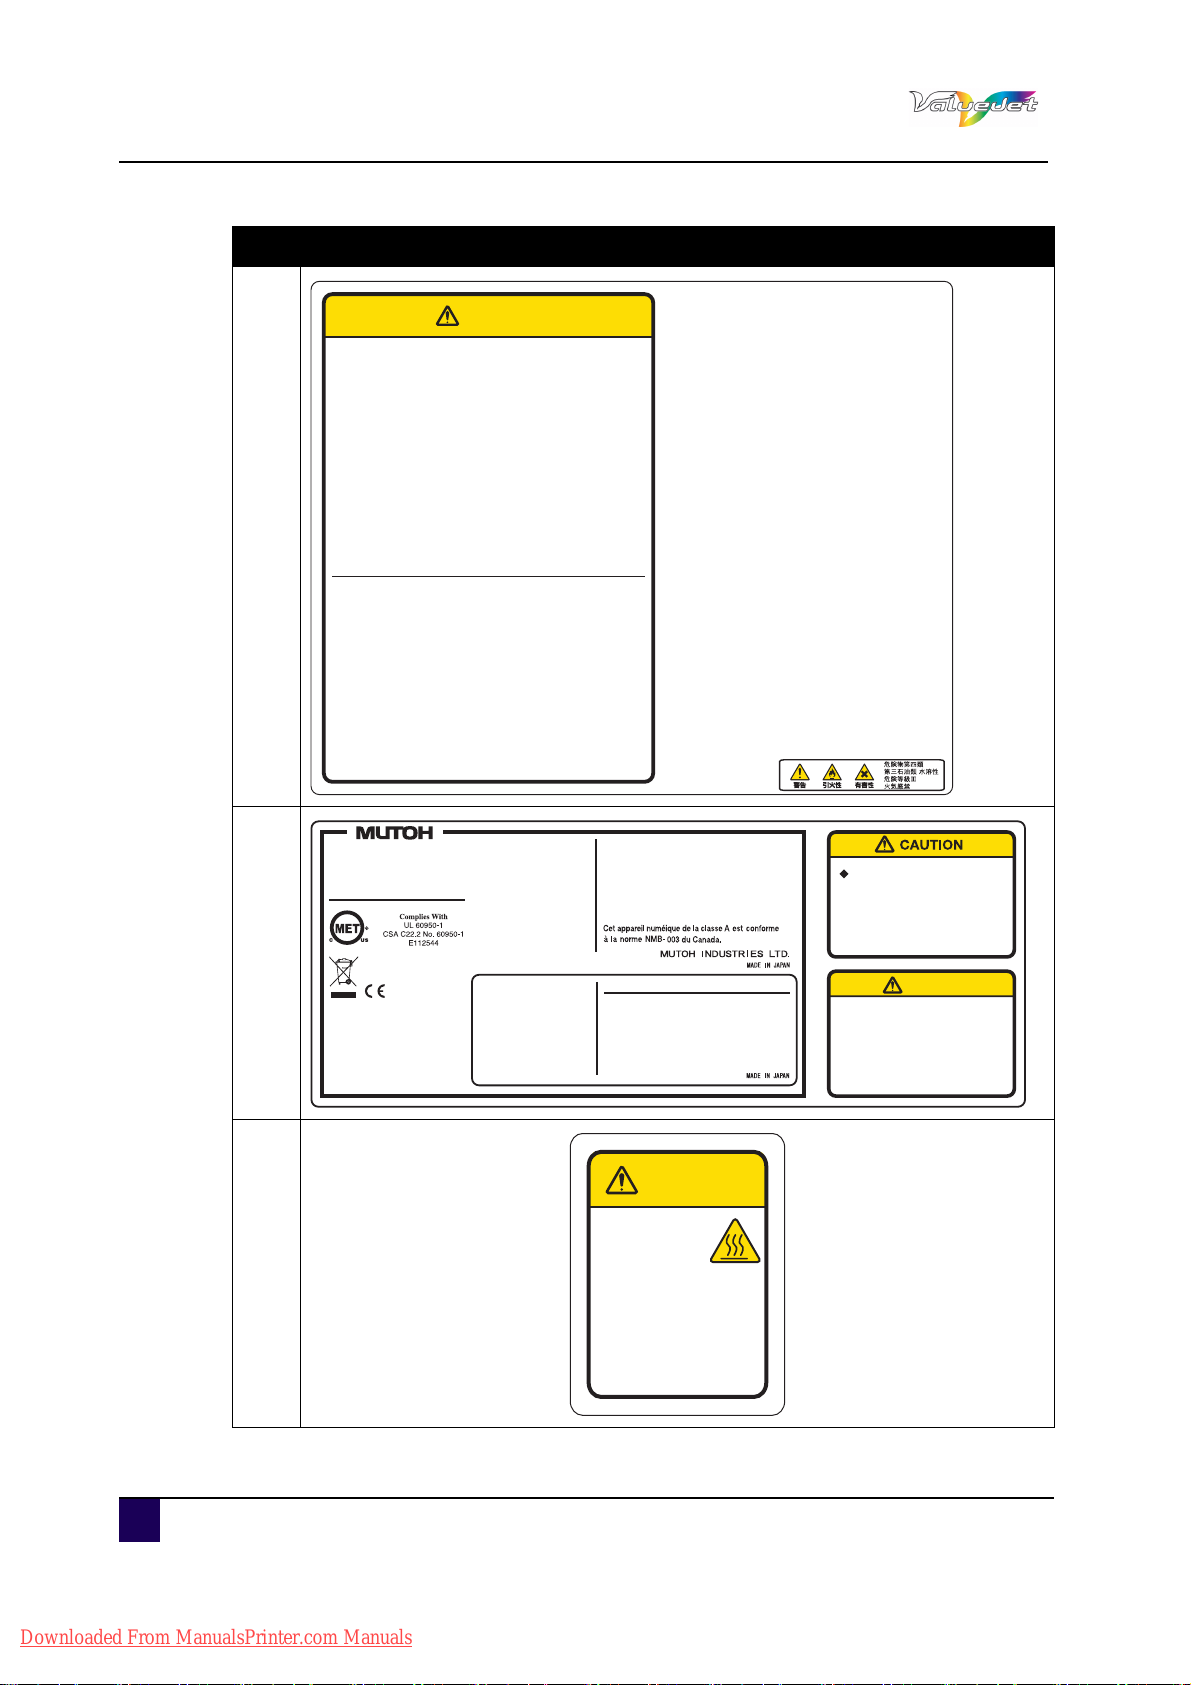
This device has three power
systems. There is a risk of electric
shock unless the three power
cables are unplugged during the
maintenance.
MODEL
SERIAL NO.
VJ-1608HS
GN6X XXXXXX
MAIN
VOLTAGE
FREQUENCY
AC 100-240V
50 / 60 Hz
CURRENT 9A - 5A
HEATER 1 / HEATER 2
VOLTAGE
FREQUENCY
AC 100-240V
50 / 60 Hz
CURRENT 10A - 5A
型式
製造番号
This Class A digital apparatus complies with Canadian
ICES-003.
This device complies with Part 15 of the FCC Rules.
Operation is subject to the following two conditions:
(1) this device may not cause harmful interference, and
(2) this device must accept any interference received,
including interference that may cause undesired
operation.
MAIN
定格電圧
定格周波数
AC 100V
50 / 60 Hz
消費電流 9A
HEATER 1 / HEATER 2
定格電圧
定格周波数
AC 100V
50 / 60 Hz
消費電流 10A
注意
この装置は、クラスA情報技術装置です。
この装置を家庭環境で使用すると電波妨害を
引き起こすことがあります。
この場合には使用者が適切な対策を講ずるよう
要求されることがあります。 VCCI-A
武藤工業株式会社
◆この機器は3系統の電源を持っ
ています。
保守の時には3本の電源ケーブ
ルを抜かないと感電の危険があ
ります。
注 意
◆Hot surface,be
careful not to
burn your fingers!
◆この面は大変熱くなっ
ています。
火傷をしないよう注意
してください。
注 意
CAUTION
Safety instructions
N° Description
CAUTION
注 意
●Before using this product,please be sure to read the Material
Safety Data Sheet (MSDS).
●The workplace should be free from open flame and well
ventilated.
●Please handle the ink with care to avoid the ink touch to your
skin,eyes and clothing,also to avoid accidental ingestion.
Be careful not to inhale the steam.
●Please wear a protective mask,eyewear,gloves, long sleeves
and long trousers to avoid contact with the ink during the
operation.
●Work clothes that soiled with the ink should be thoroughly
cleaned.
●Please wash your hands and gargle well after using.
5
●Do not bring food near.
●Please store out of reach of children.
●Do not use for anything other than VJ.
●ご使用前に、必ず製品安全データシート (MSDS) をお読みくだ
さい。
●取扱い作業場所は火気の無い所で行い、換気を十分に行ってく
ださい。
●インクを皮膚、目、衣服に接触させたり、誤飲しないよう十分
に注意して取扱ってください。
また、蒸気を吸込まないよう注意してください。
●取扱中はなるべくインクとの接触を避けるため、保護マスク、
保護メガネ、保護手袋、長袖、長ズボン等を着用してください。
●作業衣等に付着した場合は、その汚れをよく落としてください。
●取扱い後は、手洗い及びうがいを十分に行ってください。
●食品に近づけないでください。
●子供の手の届かないところへ保管してください。
●VJ以外には使用しないでください。
Emergency Measures
●If it sticks to your skin,wash well with plenty of soapy
water.
Consult your doctor if your skin feels imitated or is
discolored.
●If it gets in your eyes,wash well with plenty of tap water
and see your doctor as soon as possible.
●If accidentally swallowed,do not vomit.
Consult your doctor as soon as possible.
●If you inhaled the steam,move to clean air and consult
your doctor if you feel giddy or nauseous.
●If breathing has stopped,apply artificial respiration
immediately, and get anemergency medication.
●If spilled from the container,remove heat sources,
sparks and flame first,then wipe up with cloth.
Used cloths containing ink should be soaked in
water until disposal.
応急処置
●皮膚に付着した場合は多量の石鹸水で洗い流し、皮膚に
刺激を感じたり変化がある場合は医師の診断を受けてく
ださい。
●目に入った場合は多量の水道水で洗い流し、出来るだけ
早く医師の診断を受けてください。
●誤って飲み込んだ場合は吐き出さないでください。
その後できるだけ早く医師の診断を受けてください。
●蒸気を吸入した場合は空気の清浄な場所に移動し、めま
いや吐き気を感じる場合は医師の診断を受けてください。
●呼吸が止まった場合はただちに人工呼吸を行い、救急医
療を受けてください。
●容器からこぼれた場合は、熱源、火花、炎からまず離し、
布等で拭き取ってください。インクが付着した布等は廃
棄するまで必ず水につけておいてください。
6
7
Downloaded From ManualsPrinter.com Manuals
18 AP-75810 - Revision 2.0

User’s Guide ValueJet 1608 HS
Product overview
Chapter 2 Product overview
Features. . . . . . . . . . . . . . . . . . . . . . . . . . . . . . . . . . . . . . . . . . . . . . . . . . . . 20
Names of parts and functions . . . . . . . . . . . . . . . . . . . . . . . . . . . . . . . . . . 21
Front section . . . . . . . . . . . . . . . . . . . . . . . . . . . . . . . . . . . . . . . . . . . . . . . . . . 21
Rear section. . . . . . . . . . . . . . . . . . . . . . . . . . . . . . . . . . . . . . . . . . . . . . . . . . . 22
Operation panel . . . . . . . . . . . . . . . . . . . . . . . . . . . . . . . . . . . . . . . . . . . . . . . . 23
Operation keys . . . . . . . . . . . . . . . . . . . . . . . . . . . . . . . . . . . . . . . . . . . . . 24
Display section . . . . . . . . . . . . . . . . . . . . . . . . . . . . . . . . . . . . . . . . . . . . . 25
2
AP-75810 - Revision 2.0 19
Downloaded From ManualsPrinter.com Manuals

User’s Guide ValueJet 1608 HS
Product overview
2.1 Features
This section explains the main features of the printer.
High-speed output
The new type print head achieves high-speed output.
Wide variety of compatible media
The thickness of the media is automatically detected. This printer supports media with a
minimum thickness of 0.08 mm and a maximum of 10.0 mm.
It is compatible with media widths up to 1615 mm.
Vibrant colour reproduction
Four colours of ink are used for printing in order to reproduce sharp and vivid colours.
This printer uses 880 ml of large capacity ink bags with a dedicated S/C card.
Use of variable dots can also improve colour reproduction.
Multi-heater
Heaters are installed at three locations (Pre Heater, Platen Heater, Drier) allowing the ink to
fix better on media and dry quickly.
The built-in air heater improves fixing and drying of the ink on thick media.
Effective use of media
A JOG feature is provided to allow setting the print starting position as required.
Printing can be performed on media that has already been printed on. This allows effective
use of left margins.
20 AP-75810 - Revision 2.0
Downloaded From ManualsPrinter.com Manuals
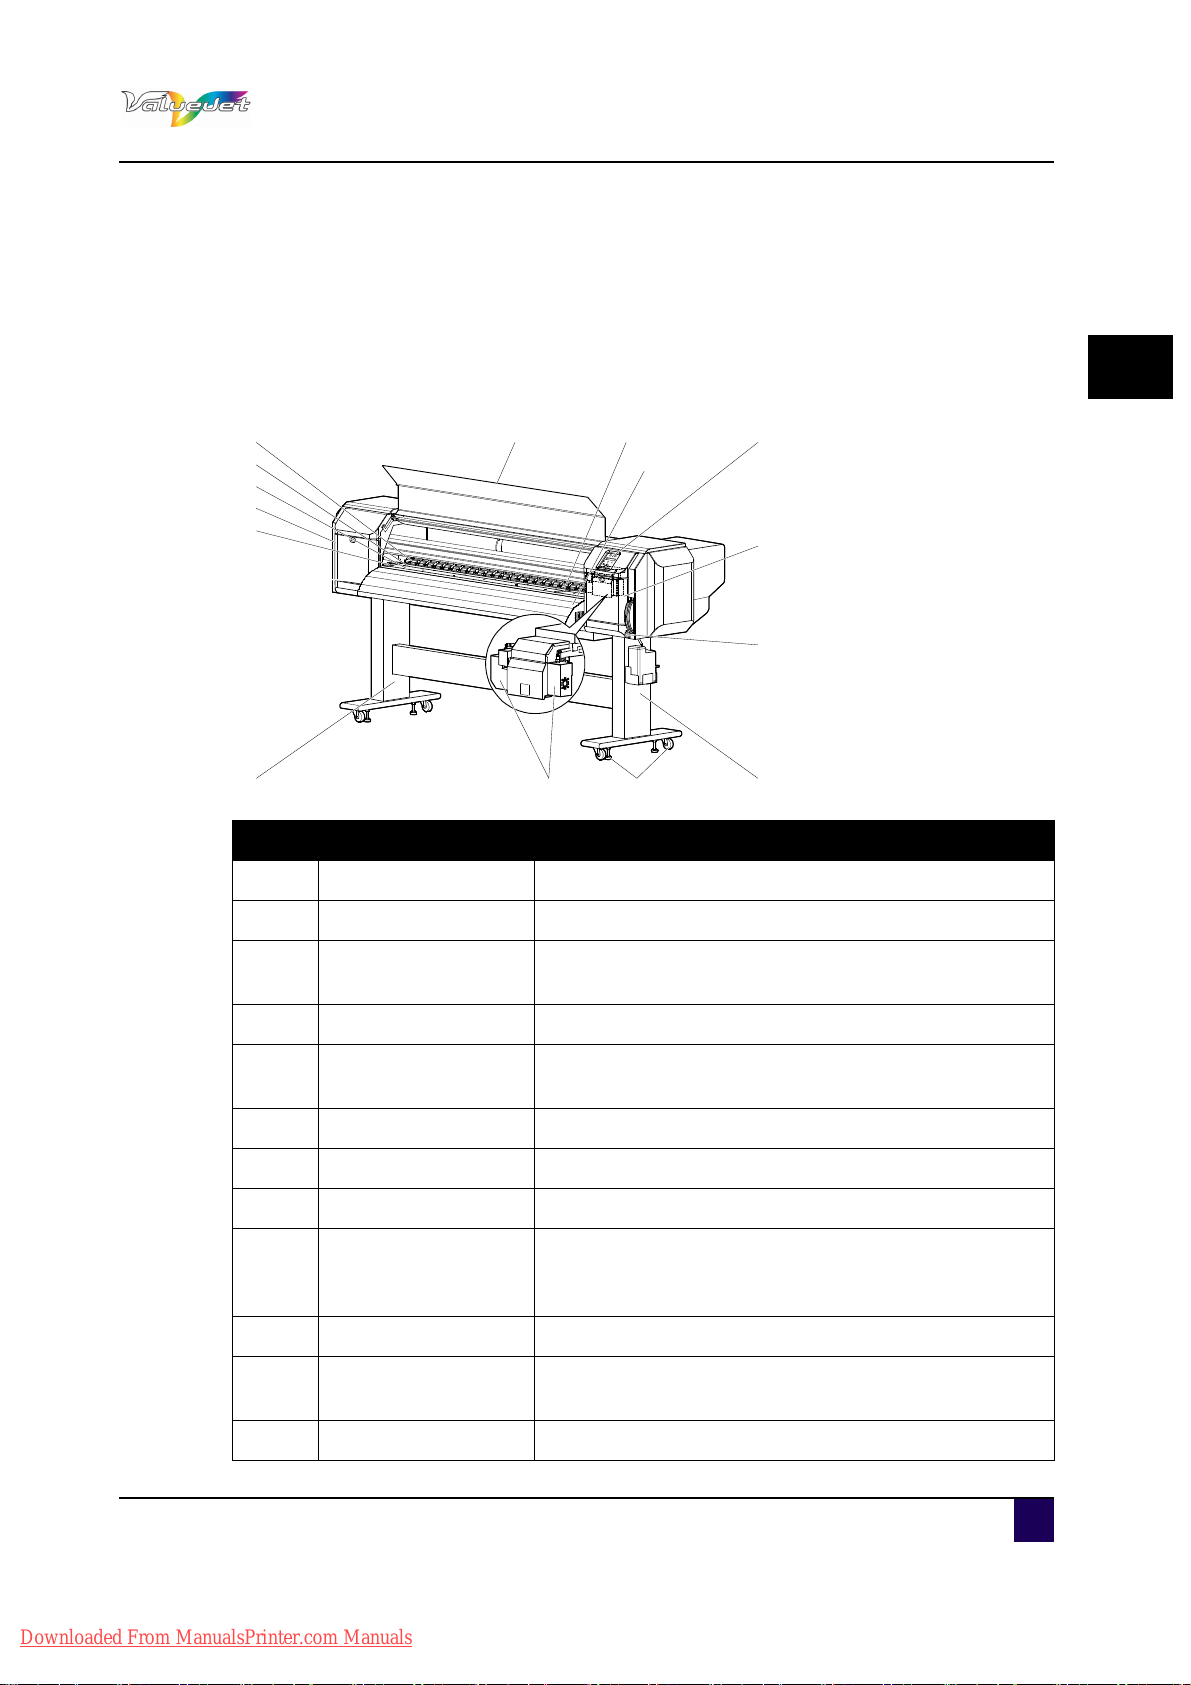
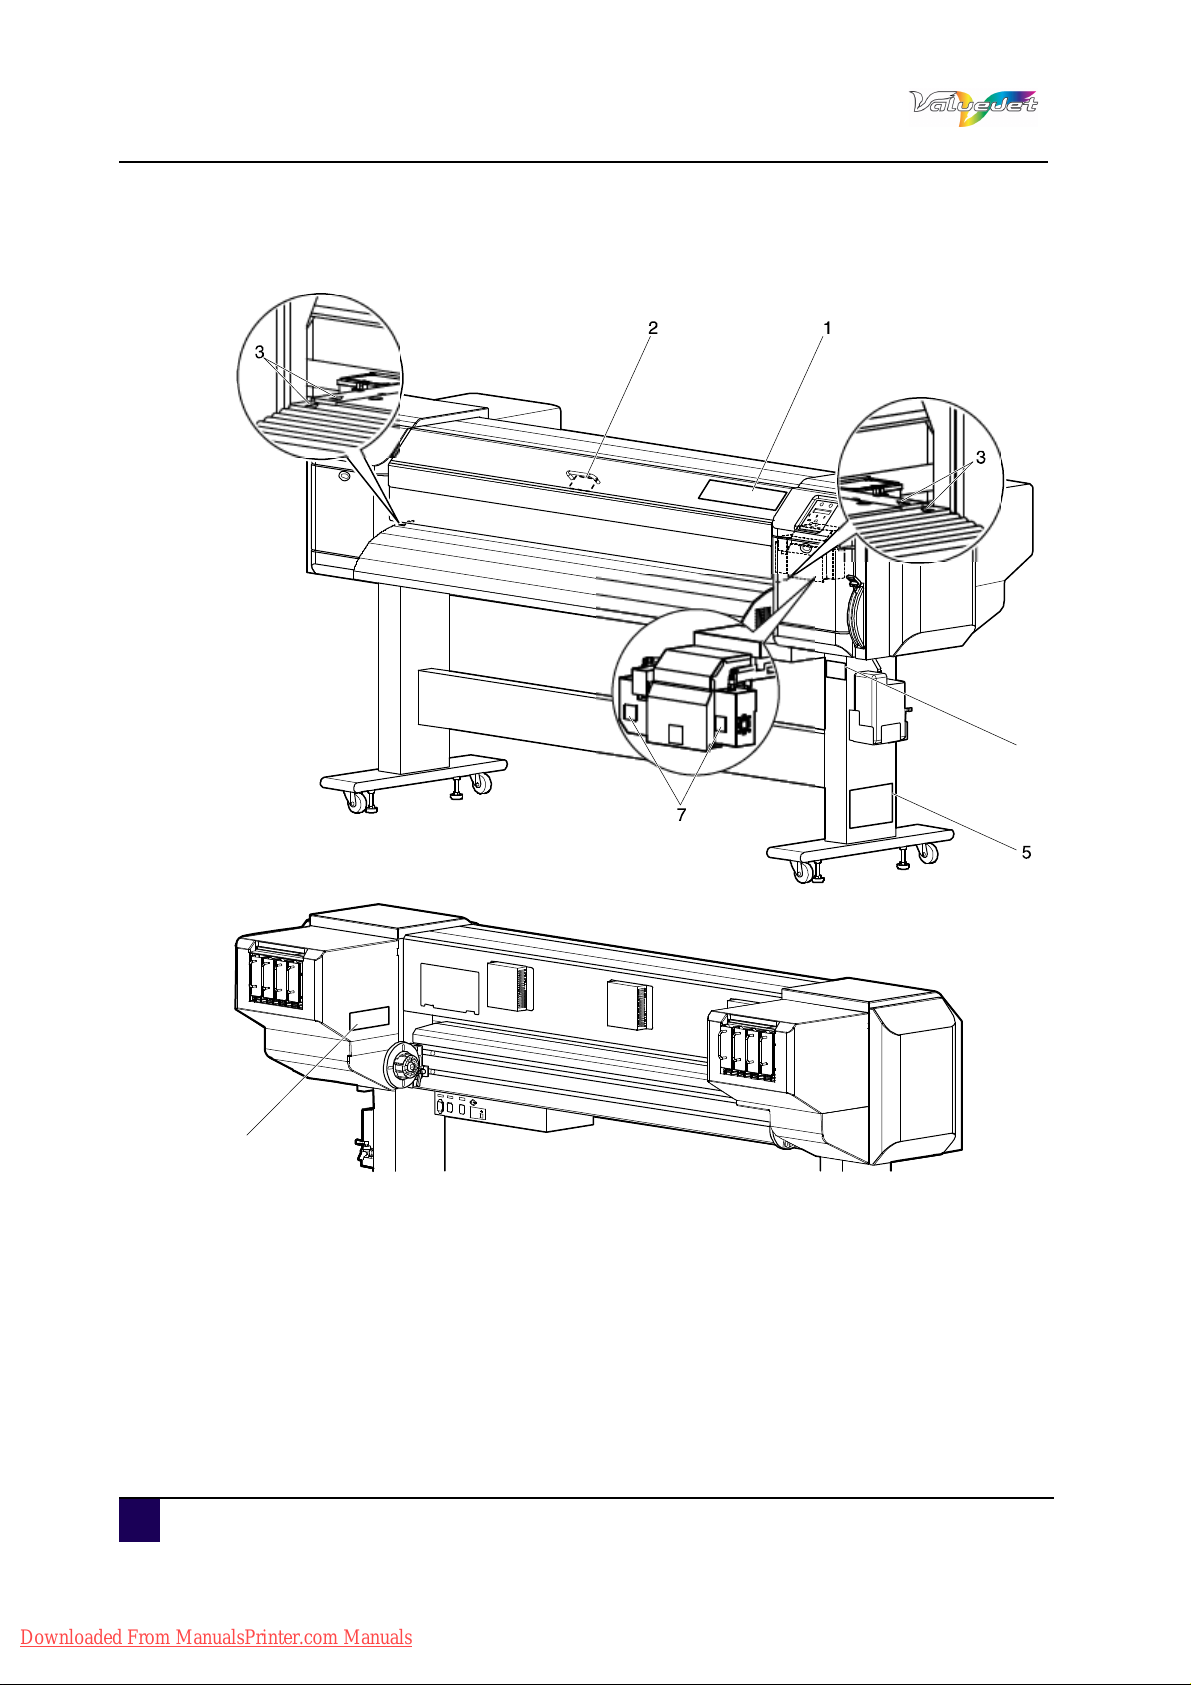
2.2 Names of parts and functions
11
1
10
2
113
9
4
7
8
12
4
9
6
5
This section explains the names and functions of each part.
User’s Guide ValueJet 1608 HS
Product overview
2.2.1 Front section
N° Description Function
1 Media loading lever Used to release or fix the media
2 Operation panel Various functions are performed via the panel.
2
3 Front cover
Used to prevent that a user comes in contact with the
driving mechanism.
4 Stand To install the printer on a level floor.
5 Media guide
Used to feed media smoothly through the printer. The
media guide incorporates the heaters to dry ink.
6 Platen The heater is installed inside of the front cover.
7 Pressure rollers Used to hold the media down while printing.
8 Media cut groove Use this groove to manually cut the media.
Only open and close when cleaning the cleaning wiper
9 Maintenance cover
unit or when cleaning around the print head.
In all other cases, leave this cover closed.
10 Adjuster Used to install the printer horizontally
11 Media retainers
12 Air heater Blows hot air to accelerate the drying of the ink.
AP-75810 - Revision 2.0 21
Attach media retainers to both sides of the media to
prevent warpage.
Downloaded From ManualsPrinter.com Manuals
User’s Guide ValueJet 1608 HS
5
4
1
10
8
9
6 7
1
3
2
43
Product overview
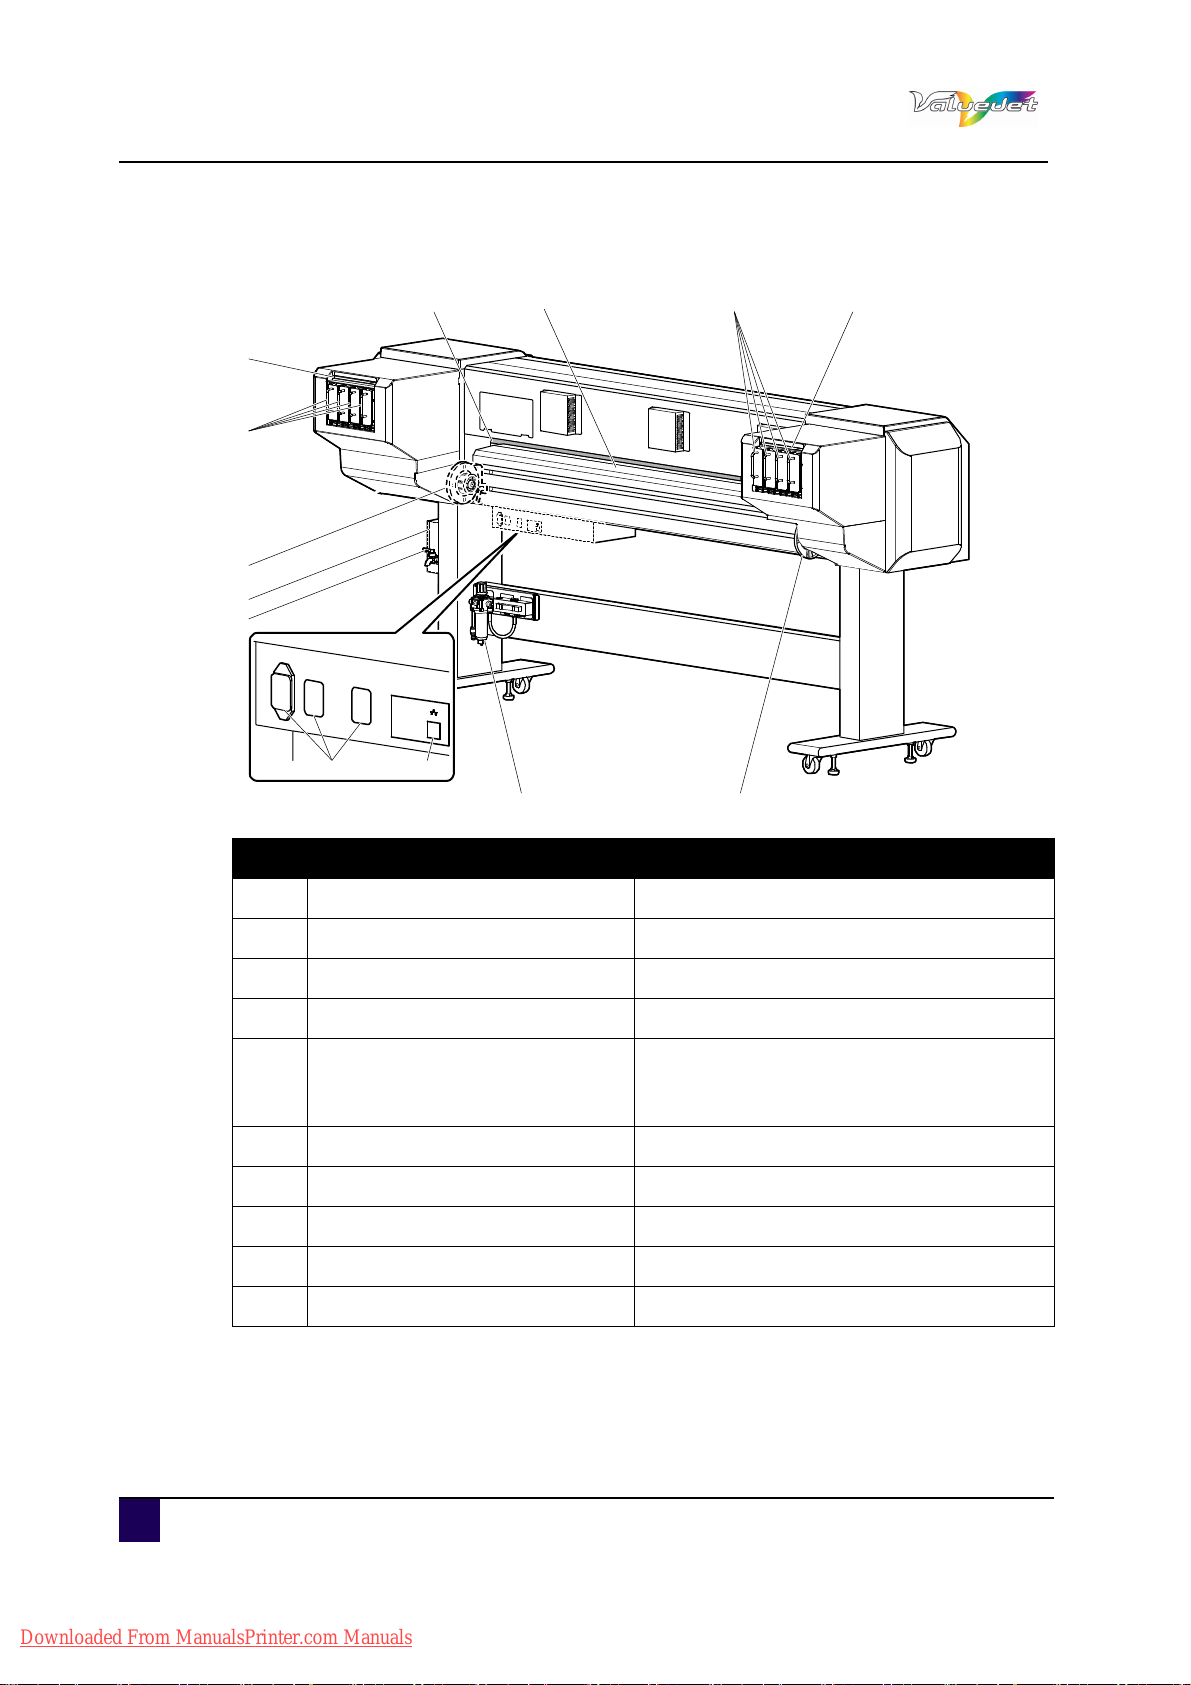
2.2.2 Rear section
N° Description Function
1 Roll media holders Used to load the roll media.
2 Media feed slot Used to feed media
3 Ink bag slot Slot that holds the ink bag
4 S/C card slot Slot that holds the S/C card
Used to feed the media smoothly through.
5 Media guide
The media guide incorporates the heater
system.
6 AC inlet Used to connect the power cables
7 Network interface connector Connects a network interface cable
8 Waste fluid tank To collect the discharged waste ink.
9 Waste fluid valve Open and close when discharging waste fluid.
10 Solenoid valve unit Controls the flow to the air heater.
22 AP-75810 - Revision 2.0
Downloaded From ManualsPrinter.com Manuals
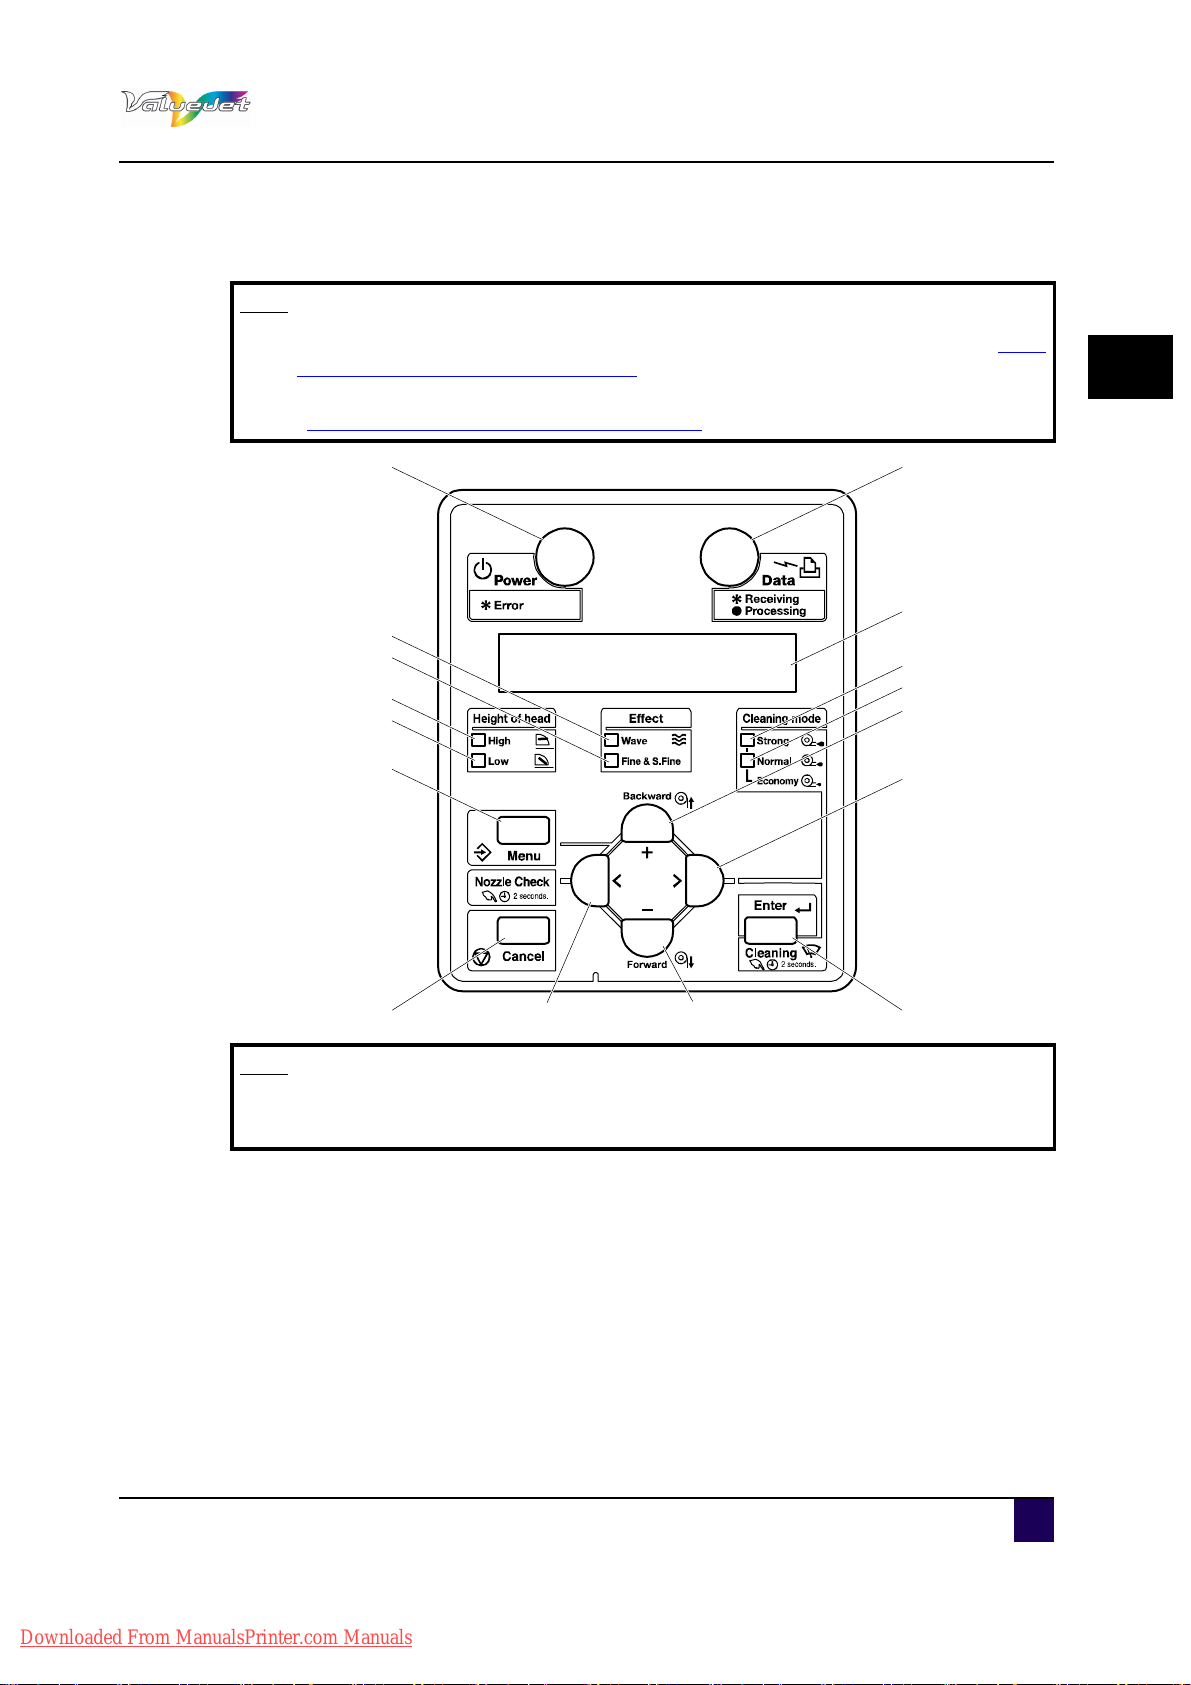
2.2.3 Operation panel
8, 9
3
15
17
16
6
5
11
12
1
13
14
10
27
4
Note
When performing menu settings from the operation panel, please refer to Menu
setup on the operation panel on page99.
When performing various operations in the operation panel, please refer to
“Operating from the operation panel on page93
User’s Guide ValueJet 1608 HS
Product overview
2
”.
Note
The operation keys are assigned with different functions and names depending
AP-75810 - Revision 2.0 23
Downloaded From ManualsPrinter.com Manuals
on the printer status (Normal or Setup menu display)
User’s Guide ValueJet 1608 HS
Product overview
Operation keys
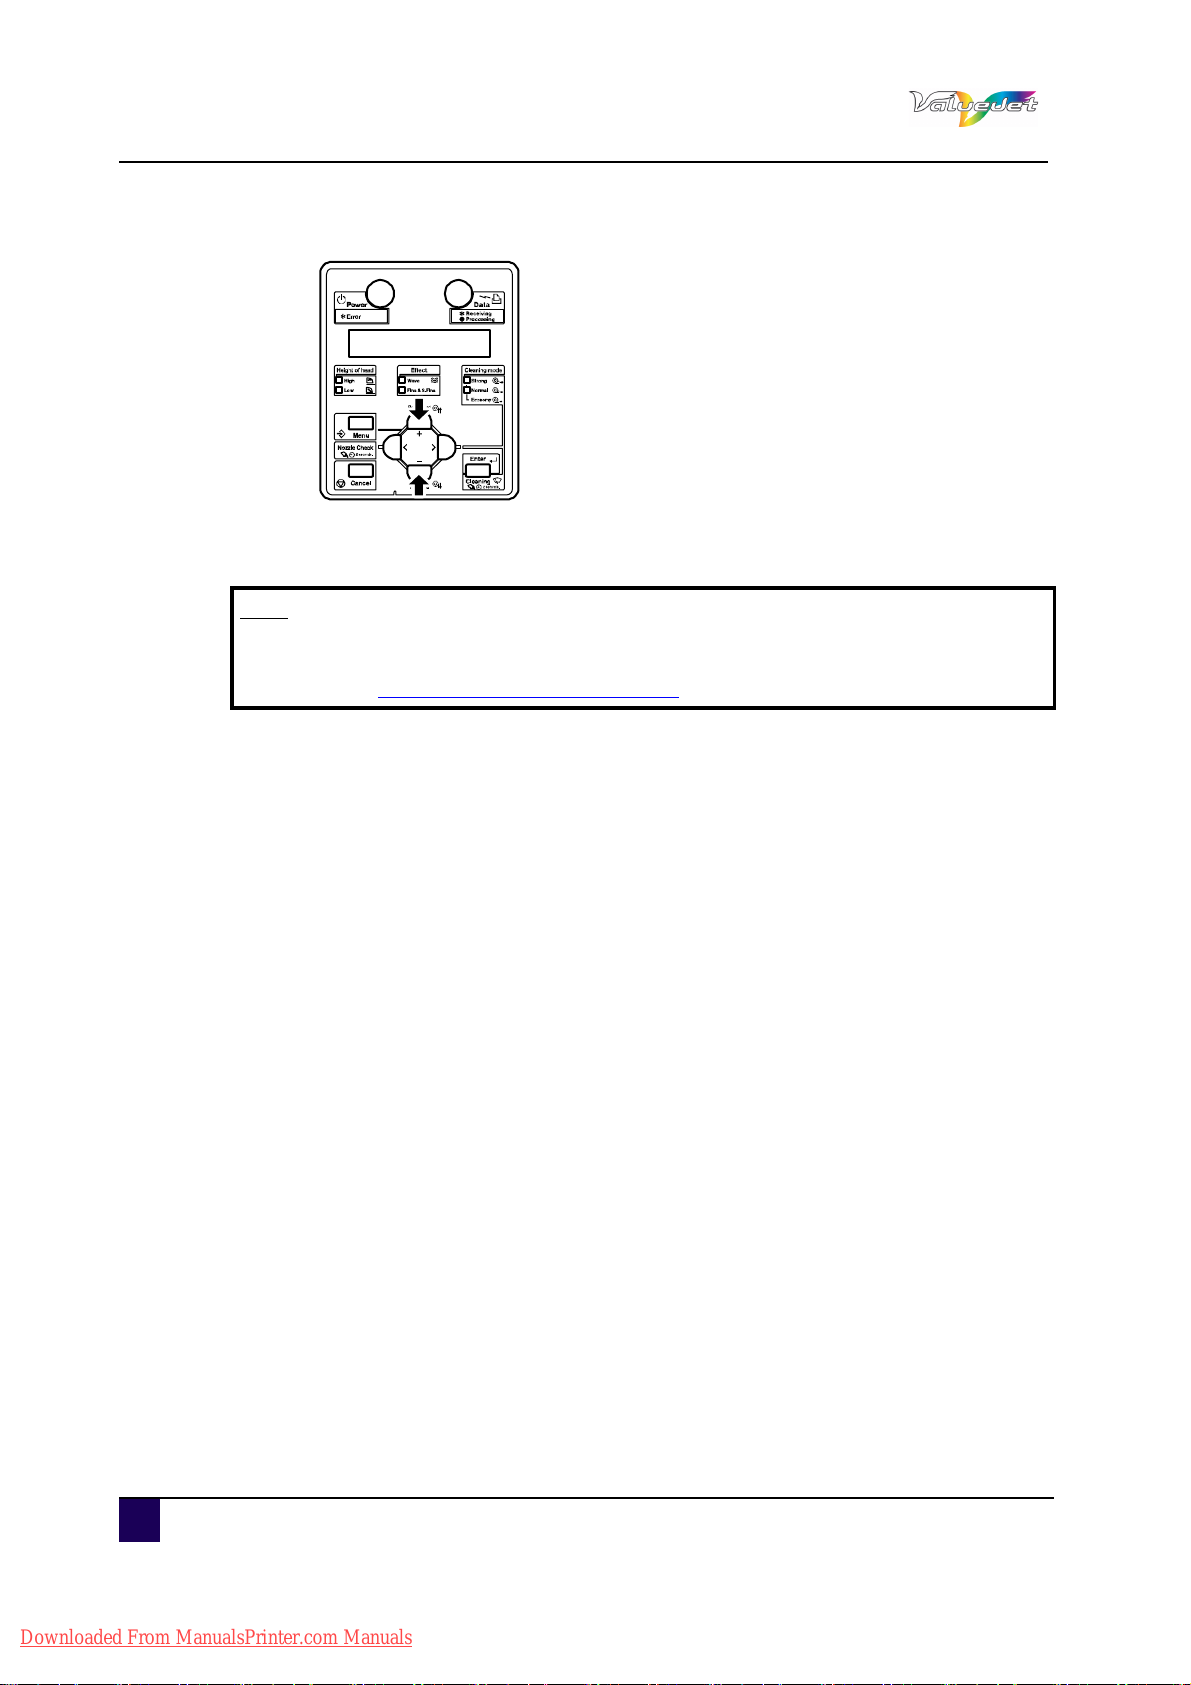
N° Key Normal Setup menu display
1 Menu Shifts to the Setup menu. Shifts from Setup menu display to Normal.
Enter
2
Cleaning
3 Cancel
< —
4
Nozzle Check
5 > Sets Cleaning Mode. Down the menu level in the directory tree.
Backward Media is fed backwards. —
6
+ —
Forward Media is fed forwards —
7
–
8 Power
Restarts printing during
printing.
Press and hold for two
seconds to clean the print
head.
When printing:
Terminates printing
and deletes one file of
the remaining data.
When receiving or
analysing:
Deletes data that are
already received and
analysed, and delete
the next data.
Press and hold two
seconds or more to
perform Nozzle Check
printing.
Pauses the print during
printing.
Powers the printer ON
and OFF.
Shifts to the selected menu
The setting is determined and saved.
—
Returns to the previous menu hierarchy.
Changes made in the setting are
discarded.
Shifts from Setup menu display to
Normal.
The following menu changes the set value.
Origin menu
—
Changes to the previous item in the
displayed menu.
The setting is changed to the forward
direction.
The numeric value is increased during
numerical input.
Changes to the previous item in the
menu.
The setting is changed to the reverse
direction.
The numeric value is decreased during
numerical input.
Switches the printer ON and OFF.
24 AP-75810 - Revision 2.0
Downloaded From ManualsPrinter.com Manuals
User’s Guide ValueJet 1608 HS
Display section
N° Name Colour Status Description
Lamp
ON
9 Power lamp Green
Lamp
blinks
Lamp
OFF
Lamp
ON
10 Data lamp Orange
Lamp
blinks
Lamp
OFF
Lamp
ON
11 High lamp Green
Lamp
OFF
Lamp
12 Low lamp Green
ON
Lamp
OFF
Lamp
13 Wave lamp Green
ON
Lamp
OFF
Lamp
ON
Fine &S.Fine
14
lamp
Green
Lamp
OFF
Lamp
15 Strong lamp Green
ON
Lamp
OFF
Lamp
16 Normal lamp Green
ON
Lamp
OFF
17 LCD display — — Displays the status of the printer.
Power ON.
An error has occurred.
The operation panel displays the error content.
Power OFF.
Analysing received data.
Under printing.
Receiving data.
Not receiving or analysing data.
The head height is set to High.
The head height is set to Low.
The head height is set to Low.
The head height is set to High.
The Effect menu is set to Wave or Fuzz.
The Effect menu is set to None.
The Effect menu is set to Fine or Super Fine.
The Effect menu is set to Wave or Fuzz.
When the Wave lamp is OFF, the Effect menu
is set to None.
Cleaning Mode is set to Strong.
When the Normal lamp is on, Cleaning Mode
is set to Economy.
Cleaning Mode is set to Normal.
Cleaning Mode is set to Normal.
When the Strong lamp is also on, Cleaning
Mode is set to Economy.
Cleaning Mode is set to Strong.
Product overview
2
AP-75810 - Revision 2.0 25
Downloaded From ManualsPrinter.com Manuals

User’s Guide ValueJet 1608 HS
Product overview
26 AP-75810 - Revision 2.0
Downloaded From ManualsPrinter.com Manuals

Chapter 3 Basics
Switching the power ON/OFF . . . . . . . . . . . . . . . . . . . . . . . . . . . . . . . . . . 29
Switching the power ON . . . . . . . . . . . . . . . . . . . . . . . . . . . . . . . . . . . . . . . . . 29
User’s Guide ValueJet 1608 HS
Basics
Switching the power OFF. . . . . . . . . . . . . . . . . . . . . . . . . . . . . . . . . . . . . . . . . 30
Loading media . . . . . . . . . . . . . . . . . . . . . . . . . . . . . . . . . . . . . . . . . . . . . . 32
loading rigid media. . . . . . . . . . . . . . . . . . . . . . . . . . . . . . . . . . . . . . . . . . . . . . 32
Loading roll media . . . . . . . . . . . . . . . . . . . . . . . . . . . . . . . . . . . . . . . . . . . . . . 37
Setting media type . . . . . . . . . . . . . . . . . . . . . . . . . . . . . . . . . . . . . . . . . . . . . . 40
Perfect media handling . . . . . . . . . . . . . . . . . . . . . . . . . . . . . . . . . . . . . . . 42
Unwinder / Winder 100 / T-winder 30 . . . . . . . . . . . . . . . . . . . . . . . . . . . . . . . 42
Rigid printing tables . . . . . . . . . . . . . . . . . . . . . . . . . . . . . . . . . . . . . . . . . . . . . 42
Media retainers . . . . . . . . . . . . . . . . . . . . . . . . . . . . . . . . . . . . . . . . . . . . . . . . 42
How to work with the media retainers. . . . . . . . . . . . . . . . . . . . . . . . . . . . 43
Head height adjustment . . . . . . . . . . . . . . . . . . . . . . . . . . . . . . . . . . . . . . . . . . 46
Adjusting the pressure on the media . . . . . . . . . . . . . . . . . . . . . . . . . . . . . . . . 48
Heater settings. . . . . . . . . . . . . . . . . . . . . . . . . . . . . . . . . . . . . . . . . . . . . . . . . 50
Pre-heater temperature setting. . . . . . . . . . . . . . . . . . . . . . . . . . . . . . . . . 51
Platen Heater temperature setting . . . . . . . . . . . . . . . . . . . . . . . . . . . . . . 53
Drier temperature setting . . . . . . . . . . . . . . . . . . . . . . . . . . . . . . . . . . . . . 55
3
Air Heater temperature setting . . . . . . . . . . . . . . . . . . . . . . . . . . . . . . . . . 57
Using the air heater . . . . . . . . . . . . . . . . . . . . . . . . . . . . . . . . . . . . . . . . . . 59
Filter connection. . . . . . . . . . . . . . . . . . . . . . . . . . . . . . . . . . . . . . . . . . . . . . . . 59
Setting the Air nozzle pressure . . . . . . . . . . . . . . . . . . . . . . . . . . . . . . . . . . . . 60
Adjusting the air pressure. . . . . . . . . . . . . . . . . . . . . . . . . . . . . . . . . . . . . 60
Replacing the ink bags . . . . . . . . . . . . . . . . . . . . . . . . . . . . . . . . . . . . . . . 61
Emptying the waste bottle . . . . . . . . . . . . . . . . . . . . . . . . . . . . . . . . . . . . . 66
Transfer and transportation . . . . . . . . . . . . . . . . . . . . . . . . . . . . . . . . . . . 67
Transferring the printer . . . . . . . . . . . . . . . . . . . . . . . . . . . . . . . . . . . . . . . . . . 67
AP-75810 - Revision 2.0 27
Downloaded From ManualsPrinter.com Manuals

User’s Guide ValueJet 1608 HS
Basics
Preparation before moving . . . . . . . . . . . . . . . . . . . . . . . . . . . . . . . . . . . . 67
Reinstalling . . . . . . . . . . . . . . . . . . . . . . . . . . . . . . . . . . . . . . . . . . . . . . . . 68
Transporting the printer . . . . . . . . . . . . . . . . . . . . . . . . . . . . . . . . . . . . . . . . . . 68
Longstore . . . . . . . . . . . . . . . . . . . . . . . . . . . . . . . . . . . . . . . . . . . . . . . . . . 69
Longstore procedure . . . . . . . . . . . . . . . . . . . . . . . . . . . . . . . . . . . . . . . . . . . . 69
28 AP-75810 - Revision 2.0
Downloaded From ManualsPrinter.com Manuals
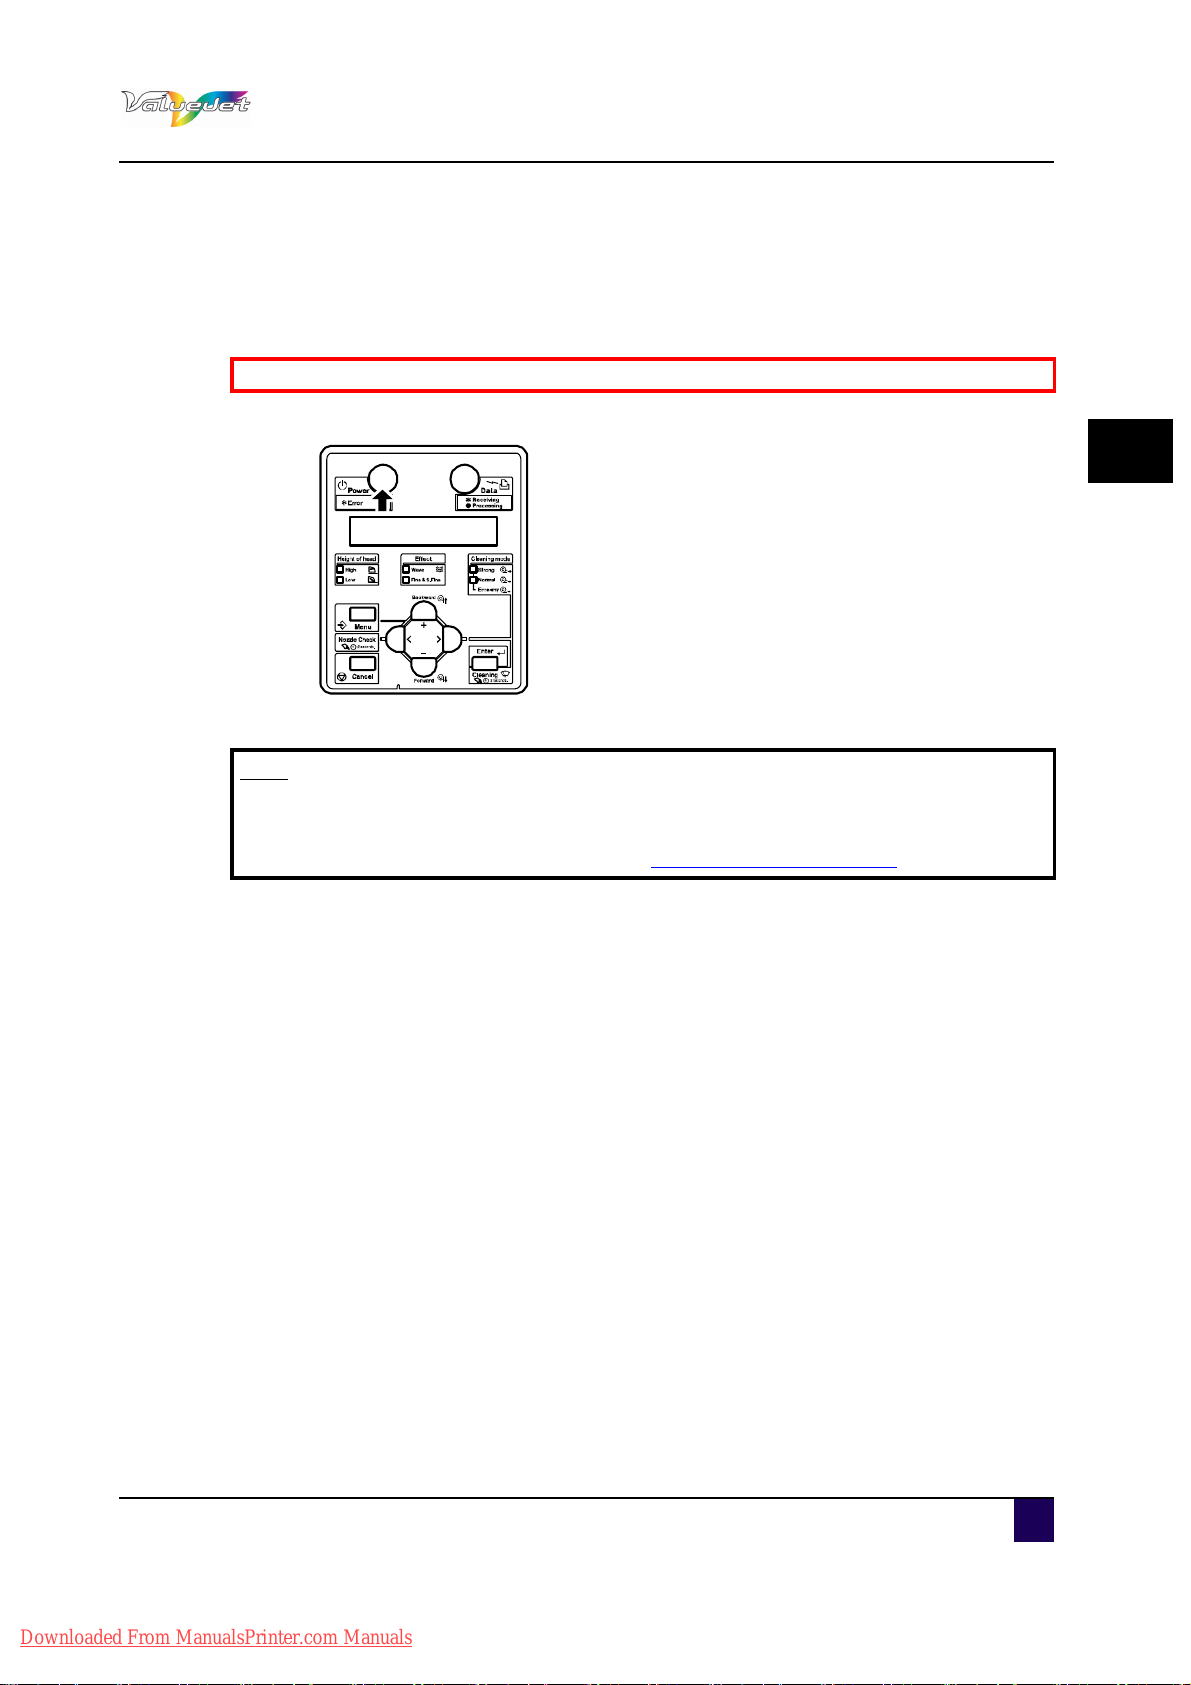
3.1 Switching the power ON/OFF
3.1.1 Switching the power ON
Be sure to read and understand the safety warnings before handling the printer.
Step 1: Press Power to switch ON the printer.
User’s Guide ValueJet 1608 HS
Basics
3
When the initial operation is complete, the printer enters Normal.
Note
If there is a problem during the initial operation, the operation panel displays a
message and the printer may stop operating.
In case the operation stops, refer to “Troubleshooting on page159
”
AP-75810 - Revision 2.0 29
Downloaded From ManualsPrinter.com Manuals
User’s Guide ValueJet 1608 HS
Basics
3.1.2 Switching the power OFF
Step 1: Verify that.
Printing or other operations are not in progress.
The operation panel display is Normal.
Step 2: Press Power to switch OFF the printer.
Note
If pressing the POWER, or the power indication light lights up green, the power
is ON.
Press the key once again to switch OFF the printer.
In case the head temperature is higher than 41°C, the Head cooling down
procedure starts automatically. This sequence continues until the head
temperature is back at 37°C.
The operation panel displays “CR Mainte.: Start”.
Step 3: Press ENTER.
Maintenance starts.
The print head moves to the left.
The cleaning wiper raises.
The operation panel displays “CR Maintenance: End”.
Step 4: Clean the cleaning wiper unit.
Refer to Cleaning the cleaning wiper unit and head cap unit on page144
30 AP-75810 - Revision 2.0
Downloaded From ManualsPrinter.com Manuals
User’s Guide ValueJet 1608 HS
1
Step 5: Clean around the print head.
Refer to Cleaning around the print head on page147
Note
If you wish to bypass the maintenance, press CANCEL. Be aware that proper
maintenance is necessary to obtain perfect printing quality.
Step 6: After cleaning is complete, press ENTER.
Basics
3
The cleaning wiper returns to its original position.
The print head returns to its original position.
The printer powers OFF.
Note
When powering OFF the printer, wait for 10 seconds or more before powering
ON again.
If you do not use the printer for a long period, raise the media loading lever.
1 = Lever
AP-75810 - Revision 2.0 31
Downloaded From ManualsPrinter.com Manuals

User’s Guide ValueJet 1608 HS
Basics
3.2 Loading media
3.2.1 loading rigid media
This section explains how to load rigid media.
Caution
When printing on resin board, aluminium sheets (including composite sheets),
steel sheets, glass or other rigids, do not place them directly on the rigid
printing table.
Doing so may cause erroneous printing.
The grid roller will become worn and media will not be fed correctly.
Note
The following media can be loaded on the rigid printing tables
Weight max 5 kg
Length max 1200 mm
Width 1600 mm
Thickness max 10 mm.
Note
We recommend working with the rigid printing tables when printing on rigid
materials.
Please refer to the Installation Guide of the rigid printing tables for more
information.
Note
Use mild detergent to wipe off dirt or dust before using thick media.
When printing on thick media, use both air and platen heater.
When printing using only one of the heaters, the heated surface of the thick
media expands, which warps the media, causing head friction.
The set temperatures for the air heater and platen heater vary depending on the
material and width of the thick media you are using.
Try printing on the thick media you are using once to set the temperature.
Refer to Heater settings on page50
After changing the media type, reset the media feed compensation.
32 AP-75810 - Revision 2.0
Downloaded From ManualsPrinter.com Manuals

User’s Guide ValueJet 1608 HS
1
Step 1: Power ON the printer.
Refer to Switching the power ON on page29
Caution
Do not operate the media loading lever during initial operation and printing.
The printhead may touch the pressure rollers and cause malfunction.
The operation panel displays “Media end”.
Step 2: Raise the media loading lever.
Basics
3
N° Description
1 Media loading lever
The operation panel displays “Lever Up”.
AP-75810 - Revision 2.0 33
Downloaded From ManualsPrinter.com Manuals

User’s Guide ValueJet 1608 HS
Dowel
1
2
1
2
1
2
Basics
Step 3: Open the front cover.
Step 4: Put the dowels in place.
Step 5: Load the media on the rear table making use of the media guidance system.
Step 6: Manually feed the media through.
Note
When loading rigid media, make sure that the outer pressure rollers are at least
34 AP-75810 - Revision 2.0
half covered.
If the outer pressure rollers are not half covered, reposition the dowels so that
the outer pressure rollers are fully covered.
Downloaded From ManualsPrinter.com Manuals

Step 7: Lever down.
1
N° Description
User’s Guide ValueJet 1608 HS
Basics
3
1 Media loading lever
Step 8: Remove the dowels.
Step 9: Close the front cover.
Step 10: The operation panel displays media type setup menu.
Step 11: Press + or - to select the type of media.
AP-75810 - Revision 2.0 35
Downloaded From ManualsPrinter.com Manuals

User’s Guide ValueJet 1608 HS
Basics
Step 12: Press ENTER.
The media type is set.
The operation panel displays “Head Height Initial”.
Head height initial operation starts.
The media's thickness is detected and the optimum distance of the printhead
from the platen is automatically adjusted. The operation panel displays
“Change:*.* =>”.
Note
Before starting the printing operation, make sure to remove the dowels. This to
ensure unstraight media follows the correct feeding path.
Step 13: To change the setting value for the head height, press + or - and change the setting.
36 AP-75810 - Revision 2.0
Downloaded From ManualsPrinter.com Manuals

3.2.2 Loading roll media
This section explains how to load roll media.
Note
The following media can be attached to the scroller supplied with this unit.
Outer diameter 150 mm or less
Tube diameter: 3 inch
Weight: maximum 30 kg
Length: maximum 50 m
Width maximum 1.625 mm
Thickness maximum 0.3 mm
Step 1: Loosen the fixing levers on the right and left side. Set the distance between the roll
media holders wider than the roll media width.
User’s Guide ValueJet 1608 HS
Basics
3
N° Description
1 Left roll media holder
2 Right roll media holder
3 Roll media
4 Fixing lever
AP-75810 - Revision 2.0 37
Downloaded From ManualsPrinter.com Manuals

User’s Guide ValueJet 1608 HS
1
1
2
1 2
Basics
Step 2: Fix the left roll media holder.
N° Description
1 Left roll media holder
2 Fixing lever
Step 3: Set the roll media to the left roll media holder.
N° Description
1 Left roll media holder
2 Roll media
38 AP-75810 - Revision 2.0
Downloaded From ManualsPrinter.com Manuals

User’s Guide ValueJet 1608 HS
1
3
2
2
3
31 2
1
3
4 4
Step 4: Set the roll media to the right roll media holder and fix the fixing lever.
N° Description
1 Right roll media holder
Basics
3
2 Roll media
3 Fixing lever
Step 5: Loosen both the right and left fixing levers of the media holders, move the roll media
to the centre and tighten the levers.
Note
Press the holders to the printer to fix the roll media holders.
N° Description
1 Left roll media holder
2 Right roll media holder
3 Roll media
4 Fixing lever
AP-75810 - Revision 2.0 39
Downloaded From ManualsPrinter.com Manuals

User’s Guide ValueJet 1608 HS
Basics
3.2.3 Setting media type
This section explains how to set the media type.
Note
After changing the media type, reset the media feed compensation.
Step 1: Power ON the printer.
Step 2: Load media.
Step 3: Press + or - to select the type of media.
Step 4: Press ENTER.
Note
If not touching any keys for 10 seconds, or pressing CANCEL when in the media
type setup menu, the printer starts media initial operation with the media type
displayed on the panel.
40 AP-75810 - Revision 2.0
Downloaded From ManualsPrinter.com Manuals

User’s Guide ValueJet 1608 HS
The media type is set.
The operation panel displays “Head Height Initial”.
Head-height initial operation starts.
The media's thickness is detected and the optimum distance (setting value of
the head height) of the print head from the platen is automatically adjusted.
The operation panel displays “Change: *.* mm –>”.
Caution
When setting the Media Initial menu to “Off “, “TopWidth”, or “Width”, the head
height initial operation will not be conducted.
When the operation panel displays “Warning! *.* mm ->”, check if the value
matches the thickness of the loaded media. If the value is wrong, enter the
correct setting value.
If a wrong value is set, the head and media can collide and may damage the
head.
Step 5: To change the value of the head height, press + or -.
Basics
3
Note
If the printing side of the rigid media is soft, the head height setting value
displayed and the actual thickness of the media may differ.
In this case, follow the steps below to input the correct value to align the head
height with the actual thickness of the media.
Remove the media from the printer.
Measure the media's thickness with a calliper.
Set the thick media again.
Input the difference of the setting value and the actual thickness as the
adjustment value.
Step 6: Press ENTER.
The operation panel displays “Media Initial”.
After media initial operation is complete, the operation panel displays “Ready to
Print” and the display shifts to Normal.
The procedure for setting media type is complete.
AP-75810 - Revision 2.0 41
Downloaded From ManualsPrinter.com Manuals

User’s Guide ValueJet 1608 HS
Basics
3.3 Perfect media handling
3.3.1 Unwinder / Winder 100 / T-winder 30
The Winder systems always provide an equal tension on the media when printing.
It is important that the Winder system is perfectly lined out to prevent cockling. To line out the
Winder system, please refer to the corresponding User’s Guide.
3.3.2 Rigid printing tables
When printing on Rigid materials, we recommend to install the rigid printing tables. These
tables will smoothly guide your media through the printer.
For more information, please refer to the installation guide of the rigid printing tables.
3.3.3 Media retainers
Some media tends to curl and cockle, which could lead to head crashes. Media retainers
keep the media edges pushed down.
Note
When using roll media, we recommend you to always use the media retainers.
Note
When using sheet media, media retainers are not necessary used. If used,
make sure the media is loaded straight. Otherwise, media can slant and the
media retainers could tear the media.
42 AP-75810 - Revision 2.0
Downloaded From ManualsPrinter.com Manuals
User’s Guide ValueJet 1608 HS
How to work with the media retainers
Step 1: Display the Side margin menu on the operation panel.
Step 2: Press Menu.
The operation panel displays “Menu 1: Setup>”.
Step 3: Press >.
Basics
3
The operation panel displays “Set1: MediaType” i
Step 4: Press the + or – to select “Set4: Side Margin”.
AP-75810 - Revision 2.0 43
Downloaded From ManualsPrinter.com Manuals
User’s Guide ValueJet 1608 HS
Basics
Step 5: Press Enter.
The operation panel displays “Side Margin: ** mm”.
Step 6: Set up the margins (side margins) to 10 mm while printing.
Step 7: Press + or – to select “Side Margin: 10 mm”.
Step 8: Press Enter.
After saving the setting, the operation panel displays “Set4: Side Margin”.
Step 9: Press Cancel several times.
The operation panel returns to Normal.
44 AP-75810 - Revision 2.0
Downloaded From ManualsPrinter.com Manuals

User’s Guide ValueJet 1608 HS
1
1
4
3
2
1
4
2
3
1
1
2
1
2
Step 10: Slide the media holder plates from both sides of the platen to set them.
Note
Do not use the media retainers when the media thickness is larger then 0.5mm.
Basics
3
Caution
If media is jammed when using media retainers, stop using the printer and do
not remove the jammed media by force. This could deform the media retainers.
Using the printer with deformed media retainers could damage the grid roller or
print head.
If the media retainers are deformed, contact your local Mutoh dealer.
Step 11: If the media retainers are not used, return them to their initial position.
AP-75810 - Revision 2.0 45
Downloaded From ManualsPrinter.com Manuals

User’s Guide ValueJet 1608 HS
Basics
3.3.4 Head height adjustment
Printing with high printing rate or using strongly-curved media can cause head crashes.
Adjusting the distance from the print head surface to the media (head height) allows you to
prevent head crashes.
Follow the procedure below to adjust the head height
Note
If raising the head height, high print quality is not guaranteed.
Step 1: Press Menu.
The operation panel displays “Menu 1: Setup>.
The operation panel shifts to the Setup menu display.
Step 2: Press the >.
The operation panel displays “Set1: MediaType”.
Step 3: Press Enter.
The operation panel displays “Media: Type 1".
46 AP-75810 - Revision 2.0
Downloaded From ManualsPrinter.com Manuals

Step 4: Press the + or – to select the media type to use.
Step 5: Press Enter.
The operation panel displays “**>1: Print Mode”.
Step 6: Press the + or - to change the setting value.
Note
User’s Guide ValueJet 1608 HS
Basics
3
The valid range is as follows:
Upper limit: 11.0 mm
Lower limit: 0.0 mm
Step 7: Press Enter.
The value set is saved.
The operation panel displays “**>9: Thickness Ajst.”.
Step 8: Press Cancel several times.
The operation panel returns to Normal.
Head height adjustment is complete.
AP-75810 - Revision 2.0 47
Downloaded From ManualsPrinter.com Manuals

User’s Guide ValueJet 1608 HS
2
1
3
Basics
3.3.5 Adjusting the pressure on the media
This section explains how to adjust the pressure on the media.
Step 1: Check that the media loading lever is raised.
Step 2: Measure the thickness of the media you are loading with callipers.
Step 3: Open the left maintenance cover.
Step 4: Turn the pressure adjustment handle and adjust it so that it comes to the level
measured in previous step.
N° Description
1 Pressure adjustment handle
2 White line
3 Media thickness gradation
48 AP-75810 - Revision 2.0
Downloaded From ManualsPrinter.com Manuals

Step 5: Close the maintenance cover.
1
User’s Guide ValueJet 1608 HS
Basics
3
N° Description
1 Maintenance cover
Note
Depending on the media type, even when measured media thickness is set,
feeding accuracy may not be stabilized. In such cases, turn the pressure
adjustment handle to shift the white line towards MAX. But make sure to avoid
that the pressure roller leave marks on the media.
AP-75810 - Revision 2.0 49
Downloaded From ManualsPrinter.com Manuals

User’s Guide ValueJet 1608 HS
Basics
3.3.6 Heater settings
The pre-heater, platen heater, drier, and air heater are built into this printer.
Pre-heater: Set up, to pre-heat the media before printing. For roll media, set the
temperature higher than that of the platen heater.
Platen heater: Warms up the media to increase adhesion property of ink and printing
quality.
Drier: Dries the ink after printing
Air-heater: Blows hot air on the media surface while printing on thick media to accelerate
drying of the ink.
Set appropriate heater temperatures depending on the media.
The following is a guide for temperature settings.
For marking films
Pre-heater: 45°C
Platen heater: 40°C
Drier: 50°C
Air-heater: 130°C
For 5 mm plastic cardboard
Pre-heater: Off
Platen heater: Off
Drier: Off
Air-heater: 160°C
Note
When printing on thick media, use both air heater and platen heater.
If printing using only one of the heaters, the heated surface of the thick media
expands, which warps the media, causing head friction.
50 AP-75810 - Revision 2.0
Downloaded From ManualsPrinter.com Manuals

Pre-heater temperature setting
Set the pre-heater temperature following the procedure below.
Step 1: Press Menu.
The operation panel displays “Menu 1: Setup>”.
Step 2: Press >.
User’s Guide ValueJet 1608 HS
Basics
3
The operation panel displays “Set1: MediaType”.
Step 3: Press Enter.
The operation panel displays “Media: Type 1".
Step 4: Press the + or – to select the media type for using.
AP-75810 - Revision 2.0 51
Downloaded From ManualsPrinter.com Manuals

User’s Guide ValueJet 1608 HS
Basics
Step 5: Press Enter.
The operation panel displays “**>1: Print Mode”.
Note
The selected media (Type 1 to 30) is displayed in “**”.
Refer to
Set 1: MediaType menu on page106
Step 6: Press + or – to select “**3: Pre-heater”.
Step 7: Press Enter.
The operation panel displays “Pre-heater: Off”.
Step 8: Press + or – to set the pre-heater temperature.
Step 9: Press Enter.
The temperature of pre-heater is set.
52 AP-75810 - Revision 2.0
Downloaded From ManualsPrinter.com Manuals

User’s Guide ValueJet 1608 HS
Platen Heater temperature setting
Follow the procedure below to set the platen heater temperature.
Step 1: Press Menu.
The operation panel displays “Menu 1: Setup>”.
Step 2: Press >.
Basics
3
The operation panel displays “Set1: MediaType”.
Step 3: Press Enter.
The operation panel displays “Media: Type 1".
AP-75810 - Revision 2.0 53
Downloaded From ManualsPrinter.com Manuals

User’s Guide ValueJet 1608 HS
Basics
Step 4: Press + or – to select the media type.
Step 5: Press Enter.
The operation panel displays “**>1: Print Mode”.
Note
The selected media (Type 1 to 30) is displayed in “**”.
Refer to
Set 1: MediaType menu on page106
Step 6: Press the + or – to select “**4: Platen heater”.
Step 7: Press Enter.
The operation panel displays “Platen heater: 42° C”.
Step 8: Press + or – to set the platen heater temperature.
Step 9: Press Enter.
The temperature of platen heater is set.
54 AP-75810 - Revision 2.0
Downloaded From ManualsPrinter.com Manuals

Drier temperature setting
Follow the procedure below to set the drier temperature.
Step 1: Press Menu.
The operation panel displays “Menu 1: Setup>”.
Step 2: Press >.
User’s Guide ValueJet 1608 HS
Basics
3
The operation panel displays “Set1: MediaType”.
Step 3: Press Enter.
The operation panel displays “Media: Type 1".
AP-75810 - Revision 2.0 55
Downloaded From ManualsPrinter.com Manuals

User’s Guide ValueJet 1608 HS
Basics
Step 4: Press + or – to select the media type for using.
Step 5: Press Enter.
The operation panel displays “**>1: Print Mode”.
Note
The selected media (Type 1 to 30) is displayed in “**”.
Refer to
Set 1: MediaType menu on page106
Step 6: Press + or – to select “**5: After heater”.
Step 7: Press Enter.
The operation panel displays “After heater: Off”.
Step 8: Press + or – to set the drier temperature.
Step 9: Press Enter.
The temperature of drier is set.
56 AP-75810 - Revision 2.0
Downloaded From ManualsPrinter.com Manuals

Air Heater temperature setting
Refer to Using the air heater on page59 for more information.
Follow the procedure below to set the air heater temperature.
Step 1: Press Menu
The operation panel displays “Menu 1: Setup>”.
Step 2: Press >.
User’s Guide ValueJet 1608 HS
Basics
3
The operation panel displays “Set1: MediaType”.
Step 3: Press Enter.
The operation panel displays “Media: Type 1".
AP-75810 - Revision 2.0 57
Downloaded From ManualsPrinter.com Manuals
User’s Guide ValueJet 1608 HS
Basics
Step 4: Press + or – to select the media type for using.
Step 5: Press Enter.
The operation panel displays “**>1: Print Mode”.
Note
The selected media (Type 1 to 30) is displayed in “**”.
Refer to
Set 1: MediaType menu on page106
Step 6: Press + or – to select “**7: Air heater”.
Step 7: Press Enter.
The operation panel displays “Air heater:190° C”.
Step 8: Press + or – to set the air heater temperature.
Step 9: Press Enter.
The temperature of air heater is set.
58 AP-75810 - Revision 2.0
Downloaded From ManualsPrinter.com Manuals

3.4 Using the air heater
This section explains how to use the air heater.
The air heater blows hot air on the media surface during printing, which dries ink faster.
Follow the procedure below to use the air heater.
Caution
User’s Guide ValueJet 1608 HS
Basics
The supplied air must comply to ISO 8573-1 1.1.2 - 1.6.2:2001.
If using air that does not satisfy the quality grade, it may not only cause
inappropriate printing results but may also cause parts deterioration/
damage, or a fire.
When following the example below, the above mentioned quality grade
will be guaranteed.
3.4.1 Filter connection
When following the example below, the above
Connection, joints and tubes are also required.
For details, contact the air compressor manufacturer or dealer.
Step 1: Make sure the printer is OFF.
Step 2: Power the air compressor ON.
Step 3: Power ON the printer.
Step 4: Set the temperature of air heater.
3
Refer to
When printing starts, the air heater automatically operates.
Caution
Do not touch the air heater before a cooling down period of 30 minutes.
It is hot and may cause a burn.
AP-75810 - Revision 2.0 59
Downloaded From ManualsPrinter.com Manuals
Air Heater temperature setting on page57

User’s Guide ValueJet 1608 HS
Air pressure valve knob
Basics
3.4.2 Setting the Air nozzle pressure
The heated air nozzle system must be calibrated to the proper pressure to ensure consistent
print quality. Please use the following guidelines to set up and operate your ValueJet 1608
HS.
Adjusting the air pressure
Note
For more information concerning the air quality, refer to Using the air heater on
page59.
The regulator valve on the back of the printer has a gauge that reads from 0 - 1 MPa. The
specifications for the air flow through the heated air nozzles is 0.06 - 0.2 MPa. The needle on
the gauge must be at or just below the first thick mark on the gauge.
Step 1: To adjust the pressure, pull straight up on the knob.
Turn counter clockwise to decrease the pressure.
Turn clockwise to increase the pressure.
Note
As a general rule, the air pressure must be set high enough to activate the flow
switch circuit, and yet allow the heat elements to fully come up to the set
temperature.
Note
If problems occur, refer to Air pressure related troubleshooting on page170
60 AP-75810 - Revision 2.0
Downloaded From ManualsPrinter.com Manuals

3.5 Replacing the ink bags
Important
In case of working with another type of Mutoh ink than described in this
manual, refer to the dedicated instruction sheet added to the ink kit.
Replacement time
Caution
Before using the ink and cleaning cassettes, be sure to read and understand
the msds-sheets which come together with the ink and cleaning cassettes.
When the operation panel displays “[*******] InkNearEnd”
There is a small amount of ink remaining in the ink bag.
The alarm buzzer sounds. To stop the buzzer, press Enter.
Replace with new ink bags and ink S/C cards.
User’s Guide ValueJet 1608 HS
Basics
3
When the operation panel displays “[*******] ink end”
There is no ink remaining in the ink bag.
Printing operation stops.
The alarm buzzer sounds. To stop the buzzer, press Enter.
Replace with new ink bags and ink S/C cards immediately.
Note
If displaying “Ink End”, printing operation is suspended even during printing.
If displaying “Ink End”, you cannot print until inserting the new ink bag.
If there is no ink bag for replacement at hand, leave the empty ink bag inserted
in the printer.
Leaving the printer with the ink bag removed may cause the print head to clog
Note
This printer is designed to use genuine ink bags.
If you use a non genuine ink bag,
Printing might become blurred, or the end of the ink in the bag might not be
correctly detected.
Any problems caused by using non genuine ink will not be covered by the
warranty. All repair expenses will be paid by the customer.
AP-75810 - Revision 2.0 61
Downloaded From ManualsPrinter.com Manuals

User’s Guide ValueJet 1608 HS
1
2
Basics
Replacing steps
Caution
When handling ink bags, make sure that ink does not get into your eyes or
stick to your skin.
If ink gets into your eyes or sticks to your skin, immediately wash it off with
water.
Failing to do so might cause irritation or light inflammation of eyes.
In case of any abnormality, consult a physician immediately.
Do not disassemble the ink bags.
If disassembled, there is a possibility that ink might come into contact with
eyes or skin.
Note
Do not shake the ink bags strongly. Doing so may cause ink leakage.
Do not disassemble the ink bags. A disassembled ink bags cannot be used.
When moving an ink bag from a cold place to warm place, keep the ink bag for
three hours or more in the new printing environment before printing.
Do not refill an ink bag with ink. It may result in abnormal printing.
Step 1:
Power ON the printer.
Note
Do not replace the ink bags when the printer is OFF.
The remaining ink may not be detected correctly, causing abnormal printing.
Step 2: Remove the ink S/C card
N° Description
1
S/C card
2 S/C card slot
62 AP-75810 - Revision 2.0
Downloaded From ManualsPrinter.com Manuals

Step 3: Pull out the ink bag you want to replace.
1
2
N° Description
Ink bag
1
2 Ink slot
User’s Guide ValueJet 1608 HS
Basics
3
Note
Used ink bags should be disposed of in compliance with local regulations.
Step 4: Take out the new ink S/C card and the ink bag from the plastic bag.
Note
Open the bag just before placing the ink bag in the bag slot. Leaving the ink
bag open for a long time may result in abnormal printing.
Use the ink bag within the expiration date. Using an ink with an expired shelf
life may affect print quality.
If not using the ink bags while installed in the printer, replace the ink three
months after installing it into the printer.
AP-75810 - Revision 2.0 63
Downloaded From ManualsPrinter.com Manuals

User’s Guide ValueJet 1608 HS
1 2
&
1
Basics
Step 5: Install the new ink S/C card and ink bag.
Insert the ink S/C card into the S/C card slot.
Ink S/C cards are specified depending on the colours of the ink bag. Match
the mark on each slot with the colour of the ink bag.
Insert the S/C card all the way to the end of the slot.
N° Description
1
S/C card
2 S/C card slot
Shake the new ink bag two or three times gently side ways and front to back.
then turn it over and shake again before inserting it into the ink bag slot.
64 AP-75810 - Revision 2.0
Downloaded From ManualsPrinter.com Manuals

User’s Guide ValueJet 1608 HS
1
2
Insert the new ink bag into the ink bag slot and push the slot all the way to the
end of the slot.
N° Description
1
Ink bag
2 Ink bag slot
Basics
3
Step 6: Confirm that the operation panel returns to Normal.
AP-75810 - Revision 2.0 65
Downloaded From ManualsPrinter.com Manuals

User’s Guide ValueJet 1608 HS
1
2
Basics
3.6 Emptying the waste bottle
The timing and method for the disposal of waste fluid are described below.
Disposal timing
Dispose the waste fluids in the following cases:
When the waste fluid tank is more than half full.
When the operation panel displays “Waste Ink Tank Full”.
Disposal method
Follow the procedure below to dispose of waste fluid.
Important
Waste fluid is considered industrial waste. Proper waste fluid disposal
according to industrial waste disposal laws and ordinances of your local
government is required.
Step 1: Prepare an empty container to contain the waste fluid.
Step 2: Lay a protective material on the floor under the waste fluid tank.
Step 3: Open the waste fluid valve, and transfer the waste fluid to the container.
Note
When pouring the waste fluid to the empty container, the waste fluid may
splash, therefore put the container close to the waste fluid valve.
N° Description
1
Waste fluid valve
2 Empty container
Step 4: After pouring the waste fluid into the empty container, close the waste fluid valve.
Step 5: Wipe the opening of the waste fluid valve with a cloth.
66 AP-75810 - Revision 2.0
Downloaded From ManualsPrinter.com Manuals

3.7 Transfer and transportation
11
1
3.7.1 Transferring the printer
Caution
User’s Guide ValueJet 1608 HS
Basics
Move the printer while maintaining a horizontal position.
Do not slant the printer, prop it against a wall or turn it upside down. There is a
possibility that the ink inside the printer may leak.
Preparation before moving
Step 1: Make sure the printer is OFF.
Step 2: When the air compressor is connected, remove the tube from the solenoid valve
unit.
Step 3: Dispose the waste fluid.
Step 4: Remove all cables such as power cables.
Step 5: Loosen the 4 adjusters of the stand.
3
N° Description
1
Adjusters
AP-75810 - Revision 2.0 67
Downloaded From ManualsPrinter.com Manuals

User’s Guide ValueJet 1608 HS
Basics
Step 6: Move the printer.
Note
The casters supplied with the dedicated stand are manufactured for little
movement in flat indoor areas, not for transporting equipment.
Reinstalling
After moving the printer, follow the procedure below to set it ready for use.
Step 1: Select a suitable place for installation.
Refer to the installation guide for more information.
Step 2:
Step 3: Attach all cables such as the power cables
Step 4: Perform a nozzle check and confirm that there is no clogging in the print head.
Move and install the printer to the location.
3.7.2 Transporting the printer
When transporting the printer, it is necessary to pack in the same condition as purchased
using protective and packing materials to protect the printer from vibrations and shocks.
Note
When transporting the printer, consult your local Mutoh Technician.
68 AP-75810 - Revision 2.0
Downloaded From ManualsPrinter.com Manuals

3.8 Longstore
Caution
In case of working with other inks than described in this manual, refer to the
instruction sheet enclosed with the ink to know if a longstore procedure is
necessary and how to perform the procedure correct.
User’s Guide ValueJet 1608 HS
Basics
When transporting your printer or leaving it unattended for five days or more, for example on
holidays, it is highly recommended to longstore your printer in order not to damage the print
head and / or the complete ink system. This means that the complete ink channel system will
be filled with cleaning liquid.
3.8.1 Longstore procedure
Be sure to perform the daily and weekly maintenance before starting the longstore procedure.
Action Panel message
Step 1:
Step 2: Press the menu key
Step 3: Press the > key
Step 4: Press the + or - key to select
Step 5: Press Enter
Step 6: Press Enter
Step 7: Open the ink slots and remove
Step 8: Insert the cleaning bags and
Step 9: Open the ink slots and remove
Step 10: Power off the printer
Power On the printer
“Set 19: Longstore”
the ink bags.
close the ink slots.
the cleaning bags.
3
“Menu 1: Setup>”
“Set 1: MediaType”
“Set 19: Longstore”
“Longstore : Start”
“Remove cartridges”
“During discharge”
“Insert cleaningcart.”
“Busy-washing”
“Remove cartridges”
“Busy-washing”
“[ALL]No Cartridge”
AP-75810 - Revision 2.0 69
Downloaded From ManualsPrinter.com Manuals

User’s Guide ValueJet 1608 HS
Basics
70 AP-75810 - Revision 2.0
Downloaded From ManualsPrinter.com Manuals

User’s Guide ValueJet 1608 HS
Preparations before printing
Chapter 4 Preparations
before printing
General info on usable media . . . . . . . . . . . . . . . . . . . . . . . . . . . . . . . . . . 72
Media compatibility . . . . . . . . . . . . . . . . . . . . . . . . . . . . . . . . . . . . . . . . . . . . . 72
Printing area. . . . . . . . . . . . . . . . . . . . . . . . . . . . . . . . . . . . . . . . . . . . . . . . . . . 73
For rigid media . . . . . . . . . . . . . . . . . . . . . . . . . . . . . . . . . . . . . . . . . . . . . 73
For roll media . . . . . . . . . . . . . . . . . . . . . . . . . . . . . . . . . . . . . . . . . . . . . . 73
Notes on handling media . . . . . . . . . . . . . . . . . . . . . . . . . . . . . . . . . . . . . . . . . 74
Notes on storing media . . . . . . . . . . . . . . . . . . . . . . . . . . . . . . . . . . . . . . . . . . 74
Test print . . . . . . . . . . . . . . . . . . . . . . . . . . . . . . . . . . . . . . . . . . . . . . . . . . . 75
Overview and functions of the test prints . . . . . . . . . . . . . . . . . . . . . . . . . . . . . 75
Performing a Test print . . . . . . . . . . . . . . . . . . . . . . . . . . . . . . . . . . . . . . . . . . 76
Nozzle Check. . . . . . . . . . . . . . . . . . . . . . . . . . . . . . . . . . . . . . . . . . . . . . . . . . 78
Mode Print . . . . . . . . . . . . . . . . . . . . . . . . . . . . . . . . . . . . . . . . . . . . . . . . . . . . 78
Setup print . . . . . . . . . . . . . . . . . . . . . . . . . . . . . . . . . . . . . . . . . . . . . . . . . . . . 79
Palette print . . . . . . . . . . . . . . . . . . . . . . . . . . . . . . . . . . . . . . . . . . . . . . . . . . . 80
Set the correct distance adjust (Step) . . . . . . . . . . . . . . . . . . . . . . . . . . . 81
Basics about the step. . . . . . . . . . . . . . . . . . . . . . . . . . . . . . . . . . . . . . . . . . . . 81
Media feed compensation value. . . . . . . . . . . . . . . . . . . . . . . . . . . . . . . . 81
4
Adjust print . . . . . . . . . . . . . . . . . . . . . . . . . . . . . . . . . . . . . . . . . . . . . . . . . 85
AP-75810 - Revision 2.0 71
Downloaded From ManualsPrinter.com Manuals

User’s Guide ValueJet 1608 HS
Preparations before printing
4.1 General info on usable media
4.1.1 Media compatibility
Be sure to read and understand the safety warnings before handling the printer.
The Mutoh ValueJet 1608 HS printer offers a wide media compatibility with both uncoated
and coated media.
The appropriate media needs to be selected in accordance with the application type. Mutoh
offers a selection of dedicated coated and uncoated media.
Next to this, a wide range of media from known media brands in the market has been tested
and found compatible with the ValueJet 1608 HS printer.
Note
For details on the recommended media, visit www.Mutoh.eu or contact your
local Mutoh dealer.
If printer failures or malfunctions occur by using non compatible media:
The printer will not be covered by the warranty and repair expenses will have to be
paid by the customer.
For details refer to the “Periodical maintenance on page135” and “Troubleshooting on
page159”.
If repair is necessary, contact your local Mutoh dealer.
Note
When using tested and compatible media, the print quality is set according to
each media type.
When printing on non compatible or non-tested media:
Refer to the media specifications of the media supplier for information on the media
type or appropriate settings for this printer.
72 AP-75810 - Revision 2.0
Downloaded From ManualsPrinter.com Manuals

4.1.2 Printing area
a
c
bd
Printable A rea
a=Max. 15mm
b=5mmto25mm
c=On is set for BtmInterlace=34.9mm
Of f i s setfor BtmInterlace=60.3mm
d=5mmto25mm
Media feeding direction
a
c
bd
a*
a=Max. 15mm
(a*= from the second pages onwards
in continuos printing=5mm)
b=5mm to 25mm
c=5mm
d=5mm to 25mm
Media feeding direction
for roll media
Printable Area
The printable area of the ValueJet 1608 HS is as follows:
For rigid media
User’s Guide ValueJet 1608 HS
Preparations before printing
4
For roll media
AP-75810 - Revision 2.0 73
Downloaded From ManualsPrinter.com Manuals

User’s Guide ValueJet 1608 HS
Preparations before printing
4.1.3 Notes on handling media
Note
Use compatible media under an appropriate environment.
The appropriate temperature and humidity ranges for printing are:
Temperature: 22°C to 30°C with a change rate of 2°C per hour
Humidity: 40% to 60% with a change rate of 5% per hour.
Do not use folded or torn media.
The size of media shall change according to temperature and humidity
variations in the print environment. Therefor, place the media minimum 30
minutes in the print environment before use, to let it acclimatize to the print
environment.
Printing on media without having it acclimatized to the printing environment
might cause media jams and bad print quality, caused by media expansion or
contraction.
Media has a printable side and a non-printable side. Printing on the non-print
side can cause blurs and blots.
Always handle media with dry and clean hands to avoid bad print quality.
When the printer will be unused for more than 24 hours, remove the media to
prevent media floating, media jams and degradation of the print quality.
Avoid using media in cold places and dry places.
Always store the media in its original packing material.
Do not throw away the individual box and bag. Use them to store media.
4.1.4 Notes on storing media
Note
Avoid storing media in rooms with high temperature and high humidity.
Avoid direct sunlight on stored media.
Always repack sheet media in its original packing and store it in a horizontal
position.
when removing unused roll media, wind it properly, wrap it in an individual bag
and store it in an individual box.
Keep the media dry.
74 AP-75810 - Revision 2.0
Downloaded From ManualsPrinter.com Manuals

4.2 Test print
4.2.1 Overview and functions of the test prints
Testplot Description
Nozzle Check To check the head nozzles
Used to confirm:
Print quality
Effect
Mode Print
Set list To check the current setup of the printer
All Setup List To make an overview of the complete setup list
Palette To compare outputs colours with printing colours
Pre Heater Temperature
Platen heater temperature
Drier temperature
Air heater temperature
Adjustment Value
User’s Guide ValueJet 1608 HS
Preparations before printing
4
AP-75810 - Revision 2.0 75
Downloaded From ManualsPrinter.com Manuals

User’s Guide ValueJet 1608 HS
Preparations before printing
4.2.2 Performing a Test print
Step 1: Verify that the printer is ON and that the media is more than an A3 size.
Step 2: Verify that the printer is in Normal mode.
Press menu.
The operation panel displays “Menu 1: Setup>”.
Press + or - to select “Menu 2: TestPrint”.
Press >.
The operation panel displays “Test1: NozzleCheck”.
76 AP-75810 - Revision 2.0
Downloaded From ManualsPrinter.com Manuals

User’s Guide ValueJet 1608 HS
Preparations before printing
Step 3: Press + or - to select a test print menu.
Nozzle Check
Mode print
Set List
All Setup List
Palette
Note
When setting “Banner 1” or “Banner 2” in the print mode menu, the test print
menu does not display “PalettePrint”.
Step 4: Press ENTER.
Start Test print for the selected item.
Step 5: Repeat the previous steps when performing test print for other items.
Step 6: Press Cancel to exit from the test print.
4
AP-75810 - Revision 2.0 77
Downloaded From ManualsPrinter.com Manuals

User’s Guide ValueJet 1608 HS
2009/01/ 01 0: 00 G2( 720x720N 8Pas s Bi ) - Wave1/Pre:30°C/Platen:30°C/After:30°C/Air:190°C/PF Adjust:0
Preparations before printing
4.2.3 Nozzle Check
Used to check whether there are any head clogging, missing nozzles or misfiring nozzles.
Note
If the nozzle check result indicates that the checked points are blurred or
missing, clean the head. Refer to
Perform the nozzle check once again after the head has been cleaned.
Note
For the printing procedure, refer to Test print on page75
Nozzle Check on page78 for more information.
4.2.4 Mode Print
Used to confirm the following printing conditions:
Print mode
Pre heater set temperature
Fixer (Platen) heater set temperature
Drier heater Set temperature
Air heater set temperature
Adjustment value
Note
For the printing procedure, refer to Test print on page75
78 AP-75810 - Revision 2.0
Downloaded From ManualsPrinter.com Manuals

4.2.5 Setup print
Setup List
<Information>
Ser i al No.
Model
Memor y Si ze
2:None[ ]
3:None[ ]
4:None[ ]
5:None[ ]
!Error!
0:None[ ]
1:None[ ]
Fi r mware M
Fi r mware C
= V 1. 00
= V 5. 04
<Menu Setup>
[Number] [ Sel ect ] Menu = Set up
[1][*]Medi aT ype = Ty pe 1
[ 1] Pri nt Mode = Graphics 2
[ 2] PF Length
[ 1] I ni t i al Adj . Pr i nt
[2] I ni t i al Adjus t = 250. 0/250mm
[ 3] Conf i rm Adj . Pri nt
[ 4] MicroAdj. Print
[ 5] Mi cr o Adj us t = 0pul se
[ 3] PreHeat er = Off
[ 4] Pl at enHeat er = Off
[ 5] Af t er Heat er = Off
[ 6] Sta ndby Heat = 60min
[ 7] Ai r Heat er = 19 0℃
[ 8] VacuumFan = High
[ 9] Thi ck Adj us t . = 0. 1mm
[ 2] [ *] Ef fec t = Fi ne&Wave2
[ 3] [ *] Spi tt i ng = Origin
[4][*]SideMar gi n = 5mm
[5][*]Medi a I ni t i al = Top&Width
[6][*]Medi aWi dth = 1000mm
[ 7] [ ] Tak e- up = Off
[8][]Feed
[9][*]Ori gin
[ 10] [* ] Pr event St ic k = On
[ 11] [* ] Pr eheat Heat er = 0s ec
Medi a = 0c nt
[12][*]Head Tr av el = Data
[13][*]Mul t i St r i ke = 1cnt
= F K6E000001
= VJ - 1608H
= 128MB
2009/ 01/ 01 0: 00
Cl eani ng mode: Nor mal
[Number ] [Sel ect] Menu = Set up
[14][*]StrikeWai t = 0. 0s ec
[15][*]Medi a Sl ant = Off
[16][*]AutoCleani ng Wai t i ngTime=Off
Pr i nti ngTi me=Off
Bef or e Pri nt = Off
[17][*]Ink Status K:100% k:100% C: 100% c: 100%
M:100% m: 100% Y: 100% y: 100%
[ 18] [* ] Rol l Ki nd = Off
[19][*]Longstore
[20][*]CR Mai ntenance
[21][*]Initialization
[22][*]Life Times Head : E★★★★★F
Pump : E★★★★★F
CR Mot or : E★★★★★F
PF Motor : E★★★★★F
[ 23] [ *] I P Addres s = 192. 168. 001. 253
[24][*]Subnet Mas k = 255. 255. 255. 000
[25][*]Gat eway = 192. 168. 001. 254
[26][*]BtmI nt er l ace = Off
[27][*]StartupClean. = Off
Sl ee pModeT i mer = 3h
<Media Type List>
Medi a Type
Pr i nt Mode
PF>I ni t i al Adj ust
PF>Mi cro ( 4pass)
Pf >Mi cro (6pass)
Pf >Mi cro (8pass)
PF>Mi cro ( 16pass )
Pr e Heate r
Pl at en Heater
Af t er Heater
Standby Heat
Ai r Heater
Vacuum Fan
Medi a Type
Pr i nt Mode
PF>I ni t i al Adj ust
PF>Mi cro ( 4pass)
Pf >Mi cro (6pass)
Pf >Mi cro (8pass)
PF>Mi cro ( 16pass )
Pr e Heate r
Pl at en Heater
Af t er Heater
Standby Heat
Ai r Heater
Vacuum Fan
Medi a Type
Pr i nt Mode
PF>I ni t i al Adj ust
PF>Mi cro ( 4pass)
Pf >Mi cro (6pass)
Pf >Mi cro (8pass)
PF>Mi cro ( 16pass )
Pr e Heate r
Pl at en Heater
Af t er Heater
Standby Heat
Ai r Heater
Vacuum Fan
Ty pe 1 Type 2 Type 3 Type 4 Type 5 Ty pe 6 T ype 7 Ty pe 8 T ype 9 Ty pe10
Gr a ph i cs 2 Gr a ph i cs 2 Gr a ph i cs 2 Gr a ph i cs 2 Gr a ph i cs 2 Gr a ph i cs 2 Gr a ph i cs 2 Gr a ph i cs 2 Graphics 2 Graphi cs 2
250. 0/ 250mm 250. 0/250mm 250. 0/ 250mm 250. 0/ 250mm 250. 0/ 250mm 250. 0/ 250mm 250. 0/250mm 250. 0/ 250mm 250. 0/ 250mm 250. 0/ 250mm
0pul se 0pul se 0puls e 0puls e 0puls e 0pul s e 0pul se 0pul s e 0pul se 0pul s e
0pul se 0pul se 0puls e 0puls e 0puls e 0pul s e 0pul se 0pul s e 0pul se 0pul s e
0pul se 0pul se 0puls e 0puls e 0puls e 0pul s e 0pul se 0pul s e 0pul se 0pul s e
0pul se 0 pul se 0pul s e 0pul se 0pul se 0pul se 0 pul se 0pul se 0pul se 0pul s e
30゜C 30゜C 30゜C 30゜C 30゜C 30゜C 30゜C 30゜C 30゜C 30゜C
30゜C 3 0゜C 30゜C 30゜C 30゜C 30゜C 30゜C 3 0゜C 30゜C 30゜C
30゜C 30゜C 30゜C 30゜C 30゜C 30゜C 30゜C 30゜C 30゜C 30゜C
60min 60min 60min 60min 60min 60min 60min 60min 60mi n 60min
190゜C 190゜C 190゜C 190゜C 1 90゜C 190゜C 190゜C 190゜C 190゜C 190゜C
High H
igh High High High High High High High High
Ty pe11 Ty pe12 Ty pe1 3 T ype 14 Type 15 Ty pe16 Ty pe17 Ty pe1 8 T ype 19 Type 20
Gr a ph i cs 2 Gr a ph i cs 2 Gr a ph i cs 2 Gr a ph i cs 2 Gr a ph i cs 2 Gr a ph i cs 2 Gr a ph i cs 2 Gr a ph i cs 2 Graphics 2 Graphi cs 2
250. 0/ 250mm 250. 0/250mm 250. 0/ 250mm 250. 0/ 250mm 250. 0/ 250mm 250. 0/ 250mm 250. 0/250mm 250. 0/ 250mm 250. 0/ 250mm 250. 0/ 250mm
0pul se 0pul se 0puls e 0puls e 0puls e 0pul s e 0pul se 0pul s e 0pul se 0pul s e
0pul se 0pul se 0puls e 0puls e 0puls e 0pul s e 0pul se 0pul s e 0pul se 0pul s e
0pul se 0pul se 0puls e 0puls e 0puls e 0pul s e 0pul se 0pul s e 0pul se 0pul s e
0pul se 0pul se 0puls e 0puls e 0puls e 0pul s e 0pul se 0pul s e 0pul se 0pul s e
30゜C 30゜C 30゜C 30゜C 30゜C 30゜C 30゜C 30゜C 30゜C 30゜C
30゜C 30゜C 30゜C 30゜C 30゜C 30゜C 30゜C 30゜C 30゜C 30゜C
30゜C 30゜C 30゜C 30゜C 30゜C 30゜C 30゜C 30゜C 30゜C 30゜C
60min 60min 60min 60min 60min 60min 60min 60min 60mi n 60min
190゜C 190゜C 190゜C 190゜C 1 90゜C 190゜C 190゜C 190゜C 190゜C 190゜C
High High High High High High High High High High
Ty pe21 Ty pe22 Ty pe2 3 T ype 24 Type 25 Ty pe26 Ty pe27 Ty pe2 8 T ype 29 Type 30
Gr a ph i cs 2 Gr a ph i cs 2 Gr a ph i cs 2 Gr a ph i cs 2 Gr a ph i cs 2 Gr a ph i cs 2 Gr a ph i cs 2 Gr a ph i cs 2 Graphics 2 Graphi cs 2
250. 0/ 250mm 250. 0/250mm 250. 0/ 250mm 250. 0/ 250mm 250. 0/ 250mm 250. 0/ 250mm 250. 0/250mm 250. 0/ 250mm 250. 0/ 250mm 250. 0/ 250mm
0pul s e 0pul s e 0pul s e 0pul se 0 pul s e 0pul s e 0pul se 0 pul s e 0pul se 0 pul s e
0pul s e 0pul s e 0pul s e 0pul se 0 pul s e 0pul s e 0pul se 0 pul s e 0pul se 0 pul s e
0pul s e 0pul s e 0pul s e 0pul se 0 pul s e 0pul s e 0pul se 0 pul s e 0pul se 0 pul s e
0pul s e 0pul s e 0pul s e 0pul se 0 pul s e 0pul s e 0pul se 0 pul s e 0pul se 0 pul s e
30゜C 30゜C 30゜C 30゜C 30゜C 30゜C 30゜C 30゜C 30゜C 30゜C
30゜C 30゜C 30゜C 30゜C 30゜C 30゜C 30゜C 30゜C 30゜C 30゜C
30゜C 30゜C 30゜C 30゜C 30゜C 30゜C 30゜C 30゜C 30゜C 30゜C
60min 60min 60min 60min 60min 60min 60min 60min 60mi n 60min
190゜C 190゜C 190゜C 190゜C 1 90゜C 190゜C 190゜C 190゜C 190゜C 190゜C
High High High High High High High High High High
Used to check the current setup of the printer.
Note
User media and print mode lists are only printed when selecting “ALLSetList”.
User’s Guide ValueJet 1608 HS
Preparations before printing
4
Downloaded From ManualsPrinter.com Manuals
AP-75810 - Revision 2.0 79

User’s Guide ValueJet 1608 HS
Preparations before printing
4.2.6 Palette print
Used to compare pen colours used on the computer to the printing colours.
Note
When setting “Banner 1” or “Banner2” in the Print Mode menu, the test print
menu does not display “PalettePrint”.
For the printing procedure, refer toTest print on page75.
80 AP-75810 - Revision 2.0
Downloaded From ManualsPrinter.com Manuals

4.3 Set the correct distance adjust (Step)
Obtaining constant print quality is not only determined by the working environment, the RIP,
the profiles, the inks or the media which is used. One of the key factors to obtain constant
output quality is the correct distance adjustment also called “Step”.
4.3.1 Basics about the step
Every image is printed in several print passes. After every pass, the media is fed a certain
distance. When the step is not set correctly, or you switched media, you need to re-adjust the
step. This to avoid the following phenomenon:
Printed swaths overlap
White lines between every swath.
In such cases, follow the procedure below and adjust the media feed compensation value.
Step 1: Adjust the pressure on the media.
User’s Guide ValueJet 1608 HS
Preparations before printing
4
Refer to Adjusting the pressure on the media on page48
Step 2: Adjust the media feed compensation value.
Refer to Media feed compensation value on page81
Media feed compensation value
Step 1: Press Menu.
The operation panel displays “Menu 1: Setup>”.
Step 2: Press >.
The operation panel displays “Set1: MediaType”.
Step 3: Press Enter.
The operation panel displays “Media: Type 1".
Step 4: Press the + or – to select the media type to use.
Step 5: Press Enter.
The operation panel displays “**>1: Print Mode”.
Step 6: Press the + or – to select “**2: PF Adjust”.
Step 7: Press >.
The operation panel displays “PF1: Initial Print”.
Proceed to Media feed compensation menu.
Step 8: Press Enter.
The operation panel displays “Feed Length: 250 mm”.
The feeding length for initial adjustment printing is normally set at 250 mm.
If you increase the feeding length, the accuracy of the Media feed compensation
improves.
To change the feeding length, press the + or – and change the value.
AP-75810 - Revision 2.0 81
Downloaded From ManualsPrinter.com Manuals
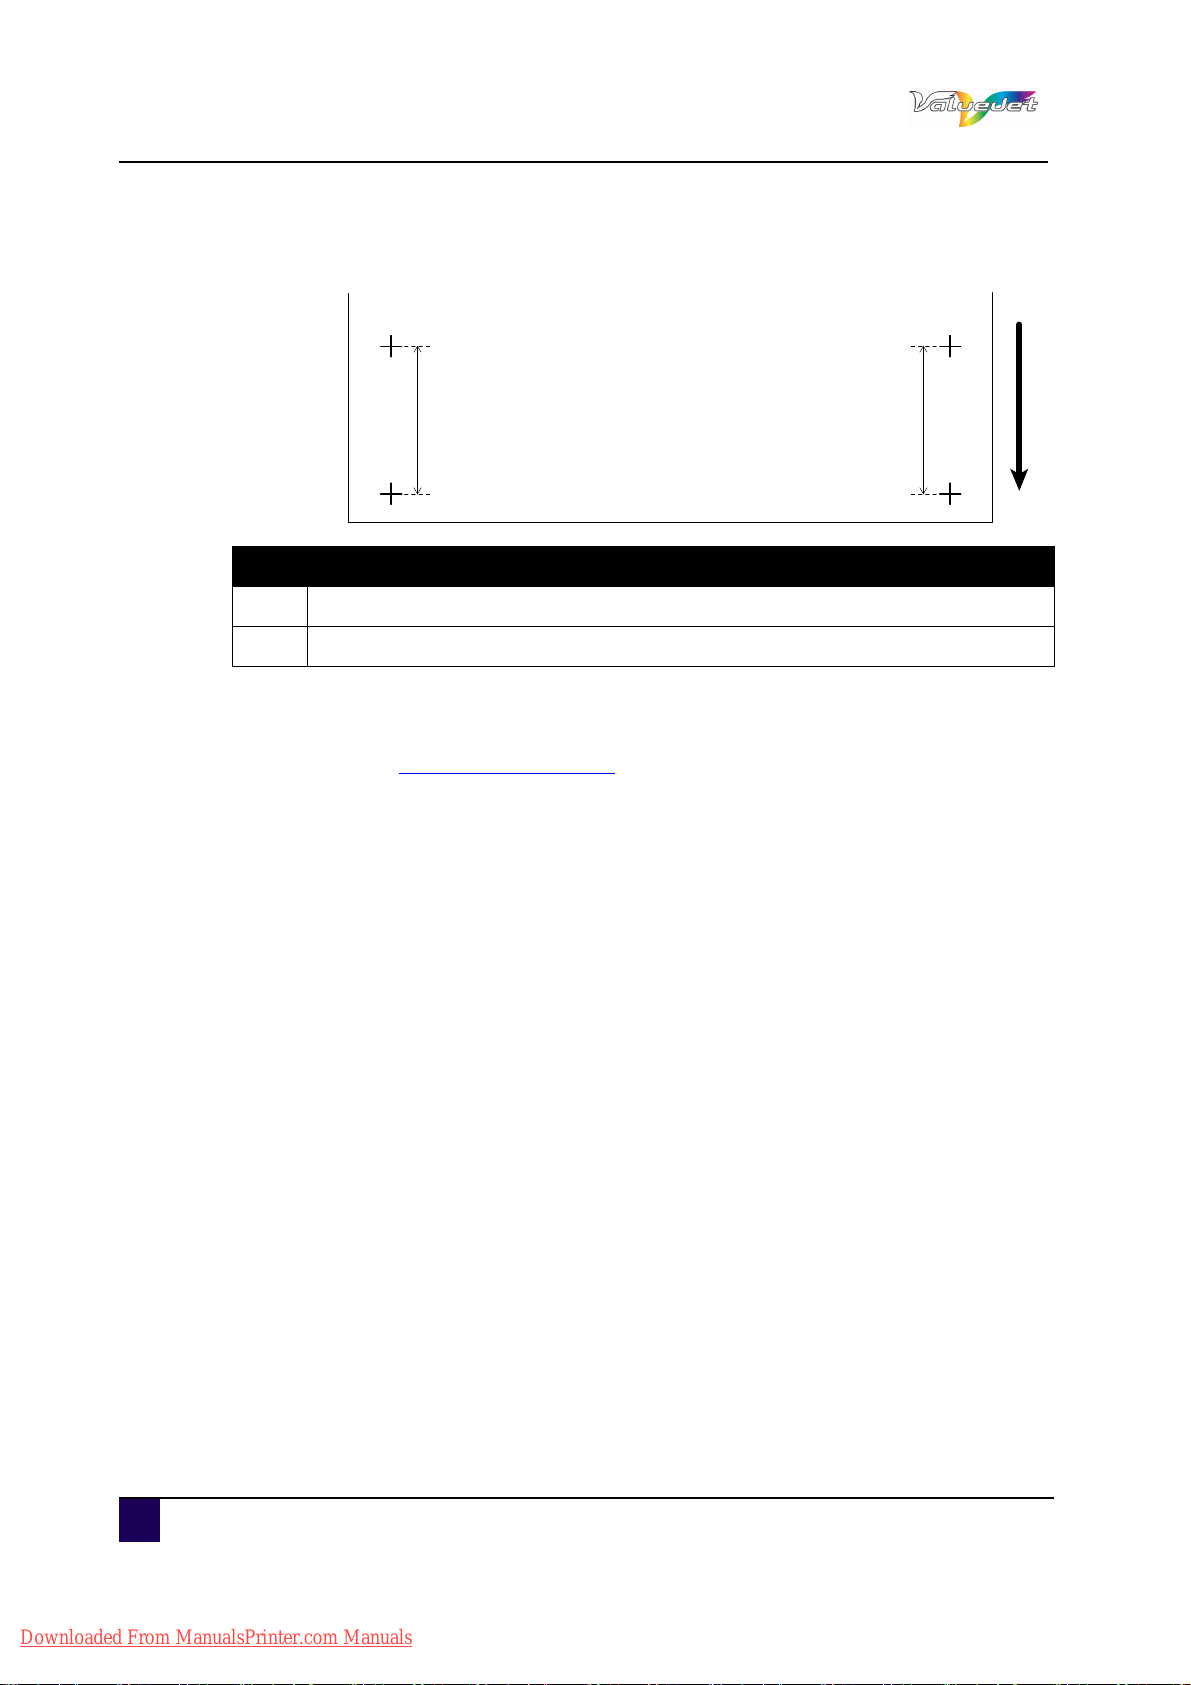
User’s Guide ValueJet 1608 HS
2
1
1
Preparations before printing
Step 9: Press Enter.
The printer prints the Initial adjustment pattern.
N° Description
1
Media length
2 Media feed direction
When the initial adjustment printing is complete, the printer enters Normal.
Step 10: After the initial adjustment printing, cut the media.
Refer to Cutting media on page95
Step 11: Measure the distance between the two pluses in the initial adjustment print using a
ruler.
Step 12: Press the + or – to select “PF2: Initial Change”.
Step 13: Press Enter.
The operation panel displays “Init.: 250.0/250 mm”.
Step 14: Press the + or – and enter the measured value in step 3.
Step 15: Press Enter.
The initial adjustment value is saved.
The operation panel displays “PF2: Initial Change”.
Step 16: Press the + or – to select “PF3: Confirm Print”.
Step 17: Press Enter.
The operation panel displays “Feed Length: 250 mm”.
The feeding length for confirmation adjustment printing is normally set at 250
mm.
If you increase the feeding length, the accuracy of the Media feed compensation
improves.
To change the feeding length, press + or – and change the value.
82 AP-75810 - Revision 2.0
Downloaded From ManualsPrinter.com Manuals

Step 18: Press Enter.
Start Confirmation adjustment printing.
User’s Guide ValueJet 1608 HS
Preparations before printing
N° Description
1
Feed length
2 Media feed direction
When the Confirm Print is complete, the printer enters Normal.
Step 19: After the confirmation adjustment printing, cut the media.
Refer to Cutting media on page95
Step 20: Measure the distance between the two pluses in the confirmation print using a ruler.
Then, confirm that the distance matches the feeding length when printing.
If the distance does not match the feeding length, perform previous steps again.
If the distance matches the feeding length, proceed to the next step.
Step 21: Display the Media feed compensation menu on the operation panel in the same way
as previous.
Step 22: Press the + or – to select “PF4:Micro Print”.
4
AP-75810 - Revision 2.0 83
Downloaded From ManualsPrinter.com Manuals

User’s Guide ValueJet 1608 HS
Current adjustment value
2
1
0
1
2
Preparations before printing
Step 23: Press Enter.
The operation panel displays “Printing”.
After completing the micro adjustment printing, the operation panel displays
“PF4:Micro Print”.
Refer to the illustrations below and check the printing result.
Step 24: Press + or – to select “PF5:Micro Change”.
Step 25: Press Enter.
The operation panel displays “Micro: 0pulse”.
Step 26: Press + or – and enter the micro adjustment value according to the printing result in
previous step.
Step 27: Press Enter.
The micro adjustment value is saved.
The operation panel displays “PF5:Micro Change”.
Step 28: Press Cancel several times.
The operation panel returns to Normal.
The adjustment of media feed compensation value is complete.
84 AP-75810 - Revision 2.0
Downloaded From ManualsPrinter.com Manuals
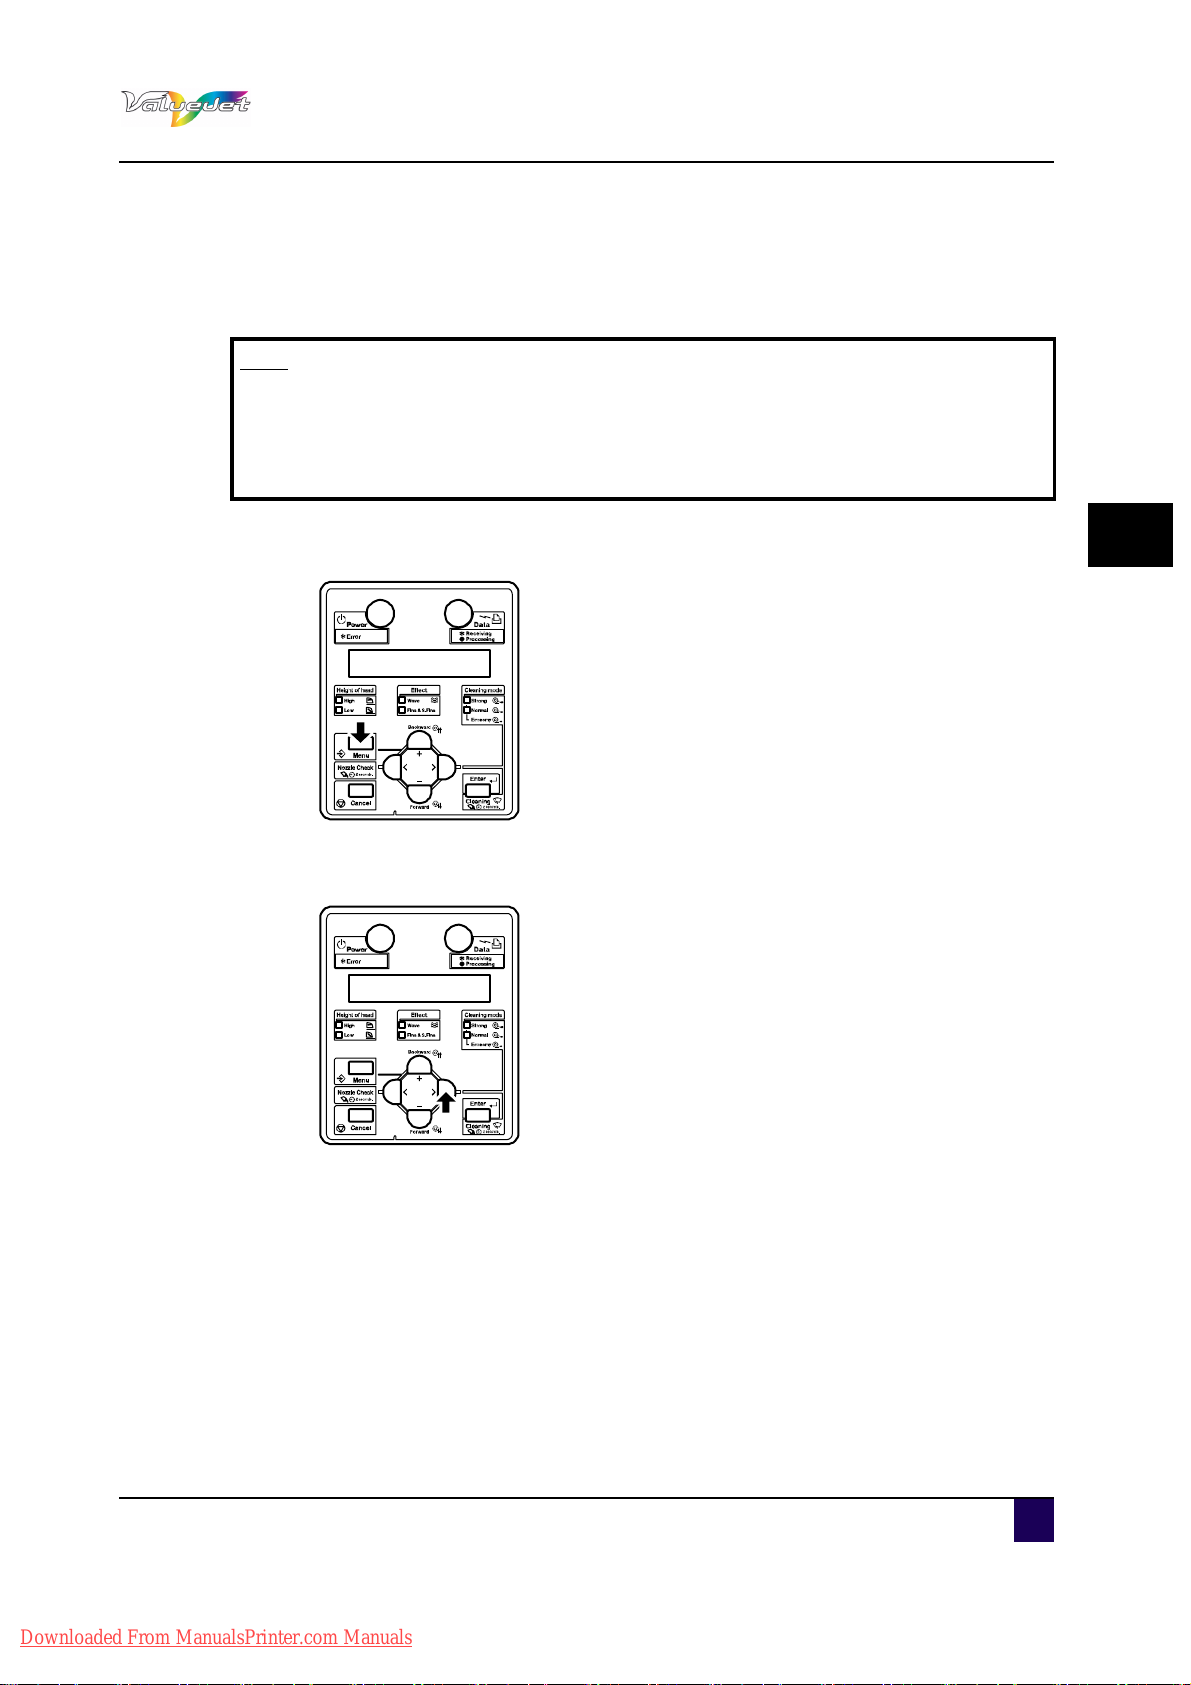
4.4 Adjust print
Used to align the print head.
Note
This printer has been adjusted for optimum print quality before shipment at the
Mutoh factory.
Align the print head when the print quality decreases after the installation
environment or the media has been changed.
User’s Guide ValueJet 1608 HS
Preparations before printing
Step 1: Switch On the printer and load the roll media.
Step 2: Press Menu.
The operation panel displays “Menu1:Setup>”.
Step 3: Press >.
4
The operation panel displays “Set1: MediaType”.
AP-75810 - Revision 2.0 85
Downloaded From ManualsPrinter.com Manuals

User’s Guide ValueJet 1608 HS
Preparations before printing
Step 4: Press Enter.
The operation panel displays “Media: Type 1".
Step 5: Press + or – to select the media type to use.
Step 6: Press Enter.
The operation panel displays “**>1: Print Mode”.
Step 7: Press Enter.
The operation panel displays “Mode: Graphics 2 – > “.
Step 8: Press + or – to select the printing mode to use.
Step 9: Press ENTER.
Step 10: Press Cancel several times.
Step 11: Press Menu.
The operation panel displays “Menu 1: Setup>”.
Step 12: Press + or – to select “Menu3: Adjust Print”.
Step 13: Press >.
The operation panel displays “Adj.1: Confirm”.
86 AP-75810 - Revision 2.0
Downloaded From ManualsPrinter.com Manuals

Step 14: Press Enter.
1A1B2A3A4A 2B3B4B
1A1B2A3A4A 2B3B4B
Q
1A1B2A3A4A 2B3B4B
1A1B2A
1A1B2A
1A1B2A3A4A 2B3B4B
1A1B2A3A4A 2B3B4B
Q
1A1B2A3A4A 2B3B4B
1A1B2A
1A1B2A
1235746
1235746
1235746
AlignmentBi-DQ
A confirmation pattern for quality adjustment is printed.
User’s Guide ValueJet 1608 HS
Preparations before printing
After the confirmation pattern is printed, the operation panel shifts to Normal.
Step 15: Confirm that the confirmation pattern printing result is as follows.
When the printing result is O:
You do not need to perform another alignment.
When the printing result is X:
Perform the alignment again.
Step 16: Register a set value for Bi-D quality (two-way printing/quality priority mode).
Display the Adjust Print menu on the operation panel in the same way as in step
5.
Step 17: Press + or – to select “Adj.5: Bi-D Quality”.
Step 18: Press Enter.
Start Bi-D Quality pattern printing.
Check three print samples that printed with Bi-D Quality pattern, and select the
number that is not out of alignment. “4” is selected in the next printing sample.
4
Step 19: Press + or – to enter the number if your selection.
AP-75810 - Revision 2.0 87
Downloaded From ManualsPrinter.com Manuals

User’s Guide ValueJet 1608 HS
Preparations before printing
Step 20: Press Enter.
The set value for Bi-D Quality is registered.
The operation panel returns to Normal.
Step 21: Register the setting for Bi-D Normal (two-way printing/normal mode) in the same
way as in step 8.
The procedure for Alignment is complete.
88 AP-75810 - Revision 2.0
Downloaded From ManualsPrinter.com Manuals

User’s Guide ValueJet 1608 HS
Chapter 5 Printer menu
How to work in the menu . . . . . . . . . . . . . . . . . . . . . . . . . . . . . . . . . . . . . . 91
Normal mode . . . . . . . . . . . . . . . . . . . . . . . . . . . . . . . . . . . . . . . . . . . . . . . . . . 91
Setup menu display . . . . . . . . . . . . . . . . . . . . . . . . . . . . . . . . . . . . . . . . . . . . . 91
Changing the printer status . . . . . . . . . . . . . . . . . . . . . . . . . . . . . . . . . . . . . . . 92
Changing from Normal mode to Menu mode. . . . . . . . . . . . . . . . . . . . . . 92
Changing from Menu mode to normal mode . . . . . . . . . . . . . . . . . . . . . . 92
Printer menu
Operating from the operation panel . . . . . . . . . . . . . . . . . . . . . . . . . . . . . 93
Feeding media . . . . . . . . . . . . . . . . . . . . . . . . . . . . . . . . . . . . . . . . . . . . . . . . . 93
Stop printing operation. . . . . . . . . . . . . . . . . . . . . . . . . . . . . . . . . . . . . . . . . . . 94
Cutting media. . . . . . . . . . . . . . . . . . . . . . . . . . . . . . . . . . . . . . . . . . . . . . . . . . 95
Changing and confirming settings while printing . . . . . . . . . . . . . . . . . . . . . . . 96
Procedure for changing and confirming settings while printing . . . . . . . . 96
Settings that can be changed or confirmed while printing . . . . . . . . . . . . 97
Pause printing . . . . . . . . . . . . . . . . . . . . . . . . . . . . . . . . . . . . . . . . . . . . . . . . . 98
Menu setup on the operation panel . . . . . . . . . . . . . . . . . . . . . . . . . . . . . 99
Panel setup menu overview. . . . . . . . . . . . . . . . . . . . . . . . . . . . . . . . . . . . . . . 99
Menu setup procedure . . . . . . . . . . . . . . . . . . . . . . . . . . . . . . . . . . . . . . . . . . . 99
Menu overview. . . . . . . . . . . . . . . . . . . . . . . . . . . . . . . . . . . . . . . . . . . . . . . . 101
Panel Setup Menu. . . . . . . . . . . . . . . . . . . . . . . . . . . . . . . . . . . . . . . . . . . 105
Menu 1: Setup . . . . . . . . . . . . . . . . . . . . . . . . . . . . . . . . . . . . . . . . . . . . . . . . 105
Set 1: MediaType menu . . . . . . . . . . . . . . . . . . . . . . . . . . . . . . . . . . . . . 106
Set 2: Effect menu . . . . . . . . . . . . . . . . . . . . . . . . . . . . . . . . . . . . . . . . . 115
5
Set 3: Spitting menu . . . . . . . . . . . . . . . . . . . . . . . . . . . . . . . . . . . . . . . . 117
Set 4: Side margin menu . . . . . . . . . . . . . . . . . . . . . . . . . . . . . . . . . . . . 117
Set 5: Media initial menu . . . . . . . . . . . . . . . . . . . . . . . . . . . . . . . . . . . . 118
Set 6: Media Width/MediaWidth check menu. . . . . . . . . . . . . . . . . . . . . 119
Set 7: Take-up menu . . . . . . . . . . . . . . . . . . . . . . . . . . . . . . . . . . . . . . . 120
Set 9: Origin menu . . . . . . . . . . . . . . . . . . . . . . . . . . . . . . . . . . . . . . . . . 121
Set 10: Prev. Stick menu . . . . . . . . . . . . . . . . . . . . . . . . . . . . . . . . . . . . 122
AP-75810 - Revision 2.0 89
Downloaded From ManualsPrinter.com Manuals

User’s Guide ValueJet 1608 HS
Printer menu
Set 11: Media heat menu . . . . . . . . . . . . . . . . . . . . . . . . . . . . . . . . . . . . 122
Set 12: Head travel menu. . . . . . . . . . . . . . . . . . . . . . . . . . . . . . . . . . . . 123
Set 13: Multistrike count menu . . . . . . . . . . . . . . . . . . . . . . . . . . . . . . . . 123
Set 14: Strike wait menu. . . . . . . . . . . . . . . . . . . . . . . . . . . . . . . . . . . . . 124
Set 15: Slant Check menu . . . . . . . . . . . . . . . . . . . . . . . . . . . . . . . . . . . 124
Set 16:Auto cleaning menu . . . . . . . . . . . . . . . . . . . . . . . . . . . . . . . . . . 124
Set 17: Ink status menu . . . . . . . . . . . . . . . . . . . . . . . . . . . . . . . . . . . . . 126
Set 18: Roll Length menu . . . . . . . . . . . . . . . . . . . . . . . . . . . . . . . . . . . . 126
Set 19: longstore menu . . . . . . . . . . . . . . . . . . . . . . . . . . . . . . . . . . . . . 127
Set 20: CR Maintenance menu . . . . . . . . . . . . . . . . . . . . . . . . . . . . . . . 127
Set 21: Initialization menu . . . . . . . . . . . . . . . . . . . . . . . . . . . . . . . . . . . 128
Set 22: Life times menu . . . . . . . . . . . . . . . . . . . . . . . . . . . . . . . . . . . . . 128
Set 23: IP address menu . . . . . . . . . . . . . . . . . . . . . . . . . . . . . . . . . . . . 129
Set 24: Subnet mask menu . . . . . . . . . . . . . . . . . . . . . . . . . . . . . . . . . . 129
Set 25: Gateway menu . . . . . . . . . . . . . . . . . . . . . . . . . . . . . . . . . . . . . . 130
Set 26: BtmInterlace menu . . . . . . . . . . . . . . . . . . . . . . . . . . . . . . . . . . . 130
Set 27: Startup clean menu . . . . . . . . . . . . . . . . . . . . . . . . . . . . . . . . . . 131
Menu 2 - 5 . . . . . . . . . . . . . . . . . . . . . . . . . . . . . . . . . . . . . . . . . . . . . . . . . . . 131
Menu 7: Version. . . . . . . . . . . . . . . . . . . . . . . . . . . . . . . . . . . . . . . . . . . . . . . 132
Menu 8: Sleep mode . . . . . . . . . . . . . . . . . . . . . . . . . . . . . . . . . . . . . . . . . . . 132
Timer setting menu. . . . . . . . . . . . . . . . . . . . . . . . . . . . . . . . . . . . . . . . . 133
Sleep Mode Start menu . . . . . . . . . . . . . . . . . . . . . . . . . . . . . . . . . . . . . 134
90 AP-75810 - Revision 2.0
Downloaded From ManualsPrinter.com Manuals

5.1 How to work in the menu
5.1.1 Normal mode
Be sure to read and understand the safety warnings before handling the printer.
Printing is possible when media is loaded. Various printing functions can be performed on the
operation panel.
5.1.2 Setup menu display
Various settings regarding printing can be made from the operation panel.
The various printing functions can be performed on the operation panel.
In this mode, various setup items (IP address, etc ...) can be set on the operation panel.
Note
User’s Guide ValueJet 1608 HS
Printer menu
5
Essential settings for normal printing can be modified on the printer driver, the
graphics application software or via the operation panel.
AP-75810 - Revision 2.0 91
Downloaded From ManualsPrinter.com Manuals

User’s Guide ValueJet 1608 HS
Normal
Setup Menu Display
[Menu] key
[Cancel] key
Leave the printer
as it is for 3 minutes
Printer menu
5.1.3 Changing the printer status
Changing from Normal mode to Menu mode.
Press Menu.
The operation panel displays “Menu 1: Setup>” and the display shifts to the Setup menu.
Changing from Menu mode to normal mode
When the printer is at the Setup menu display, perform on of the following operations to shift
to the Normal display.
Press Cancel.
In the setup menu, leave the keys untouched for 3 minutes.
Note
The printer will not return to the normal status, even when leaving the keys
untouched for 3 minutes when displaying the CR maintenance menu.
92 AP-75810 - Revision 2.0
Downloaded From ManualsPrinter.com Manuals

5.2 Operating from the operation panel
Be sure to read and understand the safety warnings before handling the printer.
5.2.1 Feeding media
You can feed roll media to any position you want. Follow the procedure below to feed media.
Step 1: Confirm that the operation panel is Normal.
Step 2: Check that the media loading lever is down.
Step 3: Press Forward or Backward.
User’s Guide ValueJet 1608 HS
Printer menu
5
Feeds the media forward or backward.
Step 4: Release the key after feeding media to the desired position.
AP-75810 - Revision 2.0 93
Downloaded From ManualsPrinter.com Manuals

User’s Guide ValueJet 1608 HS
Printer menu
5.2.2 Stop printing operation
If you want to stop printing for some reasons, operate as follows.
Step 1: Stop sending printing data from the computer to the printer.
Step 2: Press Cancel.
The printer operates as follows
Printer status Operation with CANCEL pressed
During printing Terminates printing and deletes the remaining data in the printer
Receiving/Converting Deletes the received/analysed data and the subsequent data.
Note
If saving a large amount of data on the printer, the operation panel may not
return to normal when pressing CANCEL once. In such cases, wait for a few
seconds and press CANCEL again.
94 AP-75810 - Revision 2.0
Downloaded From ManualsPrinter.com Manuals
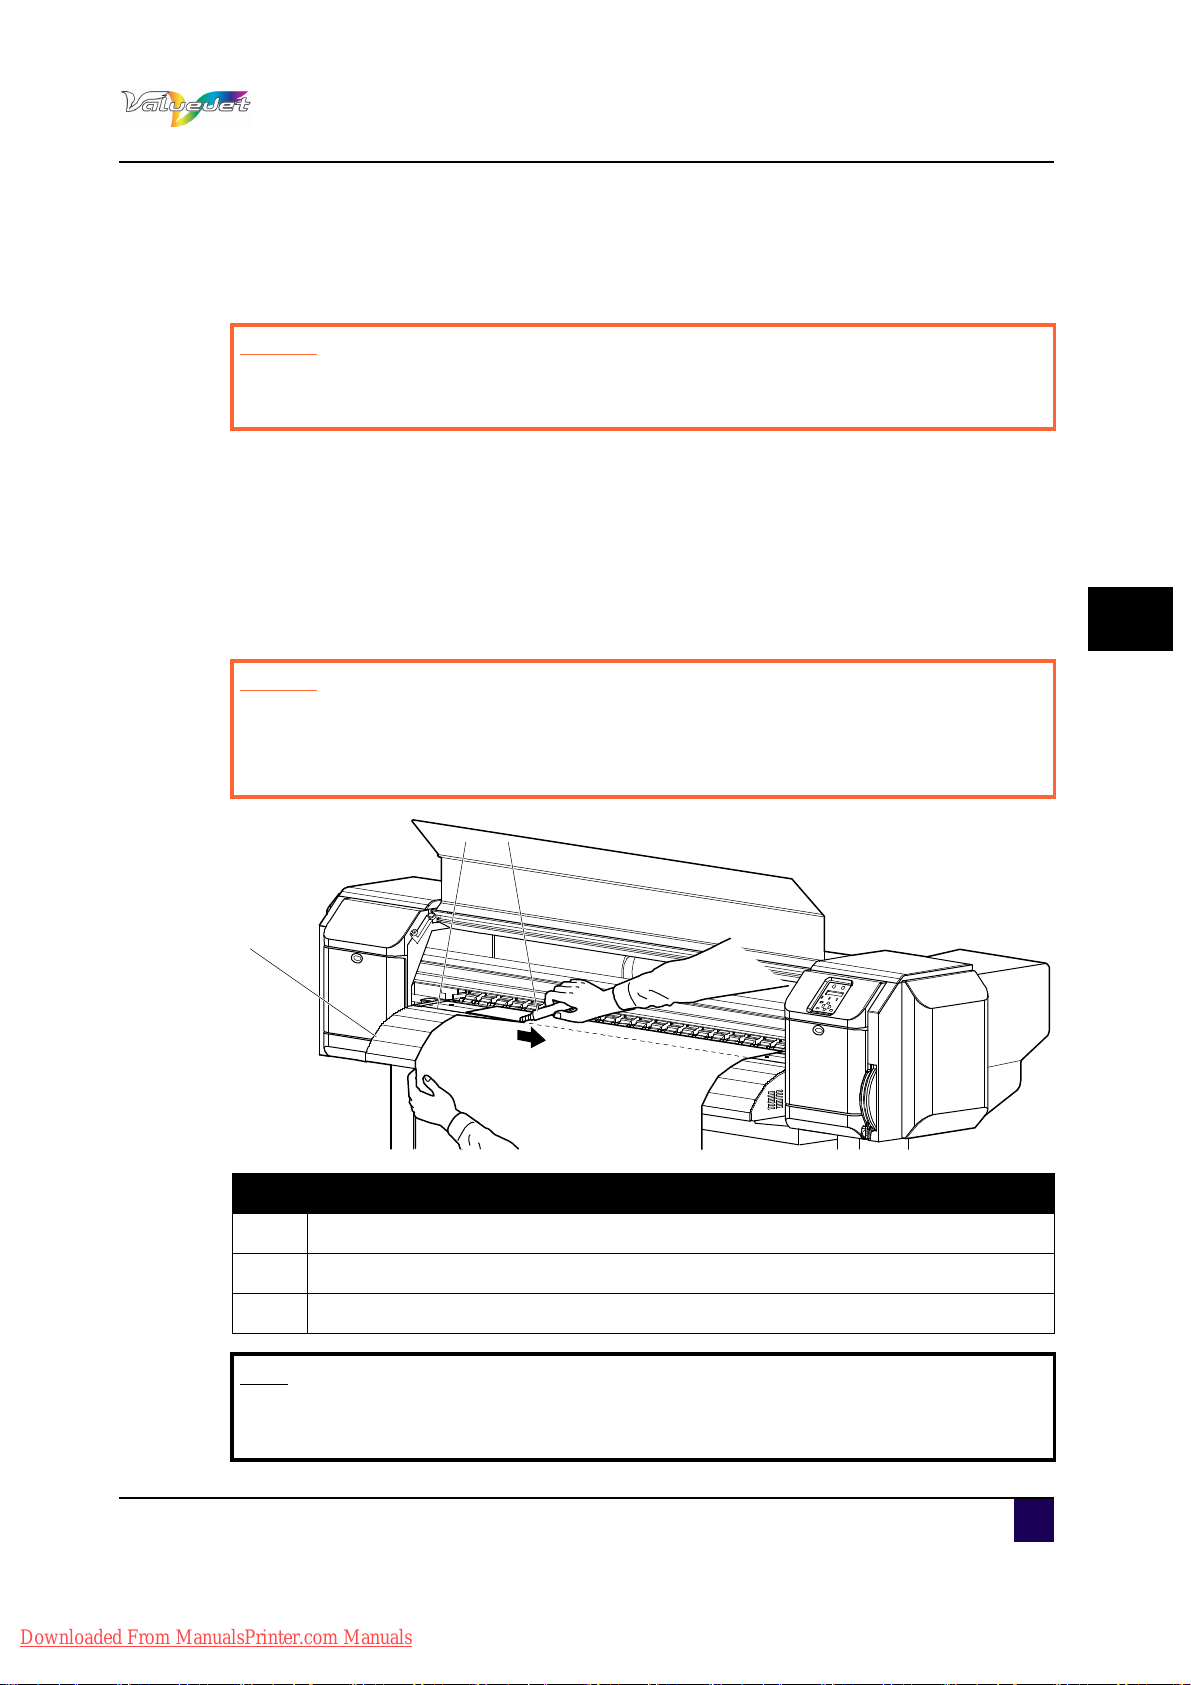
5.2.3 Cutting media
1
2
3
This sub section explains how to cut roll media.
Caution
When printing is finished, the media guide is at high temperature.
Wait until the media guide has cooled down sufficiently.
Follow the procedure below to cut roll media.
Step 1: Verify that the operation panel display is normal and there are no printing or other
operations in progress.
Step 2: Feed the roll media to the media cut position.
Step 3: Open front cover.
Step 4: Place a razor blade on the media cut groove on the media guide, and cut the roll
media.
User’s Guide ValueJet 1608 HS
Printer menu
5
Caution
Pay attention to the following points when you cut roll media.
When you hold media, do not place your finger on the media cut groove.
Move the razor blade along the media cut groove.
N° Description
1
Media guide
2 Media cut groove
3 Razor blade
Note
When loading the new roll media, cut the front edge of the media if it is not
straight.
AP-75810 - Revision 2.0 95
Downloaded From ManualsPrinter.com Manuals

User’s Guide ValueJet 1608 HS
Printer menu
5.2.4 Changing and confirming settings while printing
While the printer is operating, you can change or confirm settings for the Panel setup menu.
Procedure for changing and confirming settings while printing
Follow the procedure below to change or confirm settings for the Panel setup menu.
Step 1: Confirm that the printer is in one of the following conditions.
Receiving
Analysing
Printing
Warming up
Pre-heating
Step 2: Press Menu.
The operation panel displays “Menu 1: Print Start”.
Step 3: Press + or – to change or confirm settings
.
Note
Refer to Settings that can be changed or confirmed while printing on page97 for more
information on this topic.
96 AP-75810 - Revision 2.0
Downloaded From ManualsPrinter.com Manuals

User’s Guide ValueJet 1608 HS
Printer menu
Settings that can be changed or confirmed while printing
Note
The Print start menu is displayed only when the printer is warming up.
When you change a setting during operation, be sure to select “Backup” to
save the setting that you changed.
If the printer returns to Normal without “Backup” being selected, the changed
setting is not saved.
Setup item Setting Description
Enter: If the heater temperature does
Print Start —
Pre
Temperature
Pre Heater Off / 30 °C to 50 °C Change the Pre Heater temperature.
Platen Heater Off / 30 °C to 50 °C Change the Platen Heater temperature.
After Heater Off / 30 °C to 50 °C Change the Drier temperature.
Air heater Off / 130°C to 190°C Change the air heater
PF Adjust
Backup —
Platen
After Check the current Drier temperature.
–20 pulse to 0 to 20
pulse
—
not reach the set value during
warming-up, printing starts.
Check the current Pre Heater
temperature.
Check the current Platen Heater
temperature.
Change the feed adjustment value.
ENTER: Save the changed setting.
CANCEL: The printer returns to Normal.
5
AP-75810 - Revision 2.0 97
Downloaded From ManualsPrinter.com Manuals

User’s Guide ValueJet 1608 HS
Printer menu
5.2.5 Pause printing
It is possible to suspend the print during printing.
Follow the procedure below to pause or restart printing.
Note
Quality can not be guaranteed when pausing a print.
Step 1: Press -.
The printer pauses the current job.
The operation panel displays “PrintRestart ==> ENTER”.
Step 2: To restart printing, press ENTER.
98 AP-75810 - Revision 2.0
Downloaded From ManualsPrinter.com Manuals

5.3 Menu setup on the operation panel
5.3.1 Panel setup menu overview
This section explains the panel setup menu of the printer.
Setup item Description
Menu 1 : Setup Various settings of the printer are configured.
Menu 2 : Test print Performs nozzle check of the print head and setup list
Menu 3 : Adjust print Prints an adjust test pattern
Menu 4 : Cleaning Perform head cleaning
Menu 5 : Option Set up the contents of the setup menu
Menu 7 : Version Displays the version of the firmware
Menu 8 : Sleep mode Sleep mode settings are configured.
User’s Guide ValueJet 1608 HS
Printer menu
5
5.3.2 Menu setup procedure
Be sure to read and understand the safety warnings before handling the printer.
Follow the procedure below to configure each setup menu.
Step 1: Confirm that the operation panel is in Normal mode.
Step 2: Press Menu.
The operation panel displays “Menu 1: Setup>”.
Step 3: Press + or – to select a setup item and press Enter.
The settings will be confirmed.
When setup items have a submenu, the display shifts to the next menu.
Note
The operation panel displays “>” when a setup item has a submenu.
AP-75810 - Revision 2.0 99
Downloaded From ManualsPrinter.com Manuals

User’s Guide ValueJet 1608 HS
Printer menu
Step 4: The setting in the blinking part on the LCD monitor can be changed.
Press + or – to change the setting.
Step 5: To save the changed setting, press Enter.
The setting is saved and displays the next setup item.
Note
If you press Cancel, + or – without pressing Enter after changing a setting, the
change will not be saved.
Step 6: Press Cancel to exit from the setup.
The previous setup menu is displayed.
When displaying the main menu, the screen turns to Normal.
100 AP-75810 - Revision 2.0
Downloaded From ManualsPrinter.com Manuals
 Loading...