

Website:
http://www.mustek.com
Customer Service:
(General Info)
Email: cservices@mustek.com
Fax: (949) 788-3670
Technical Support:
Email: tsupport@mustek.com
Phone: (949) 788-3600
Address:
15271 Barranca Parkway
Irvine, CA 92618
• Installation CD
• Video Studio CD
• User Guide
• Getting Started
• Strap
• Camera Bag
• USB Cable
• AV Cable
• AA Alkaline Battery x 2
• Style Panel x 4
GETTING STARTED
We have included this convenient Getting Started
guide to help with basic operations. For more
details on the different functions and operations,
please refer to the User Guide.
Thank you for purchasing the Mustek Style DV3
Multi-Functional Digital Video Camera.
PACKAGE CONTENTS
HOW TO CONTACT US
82-134-00360
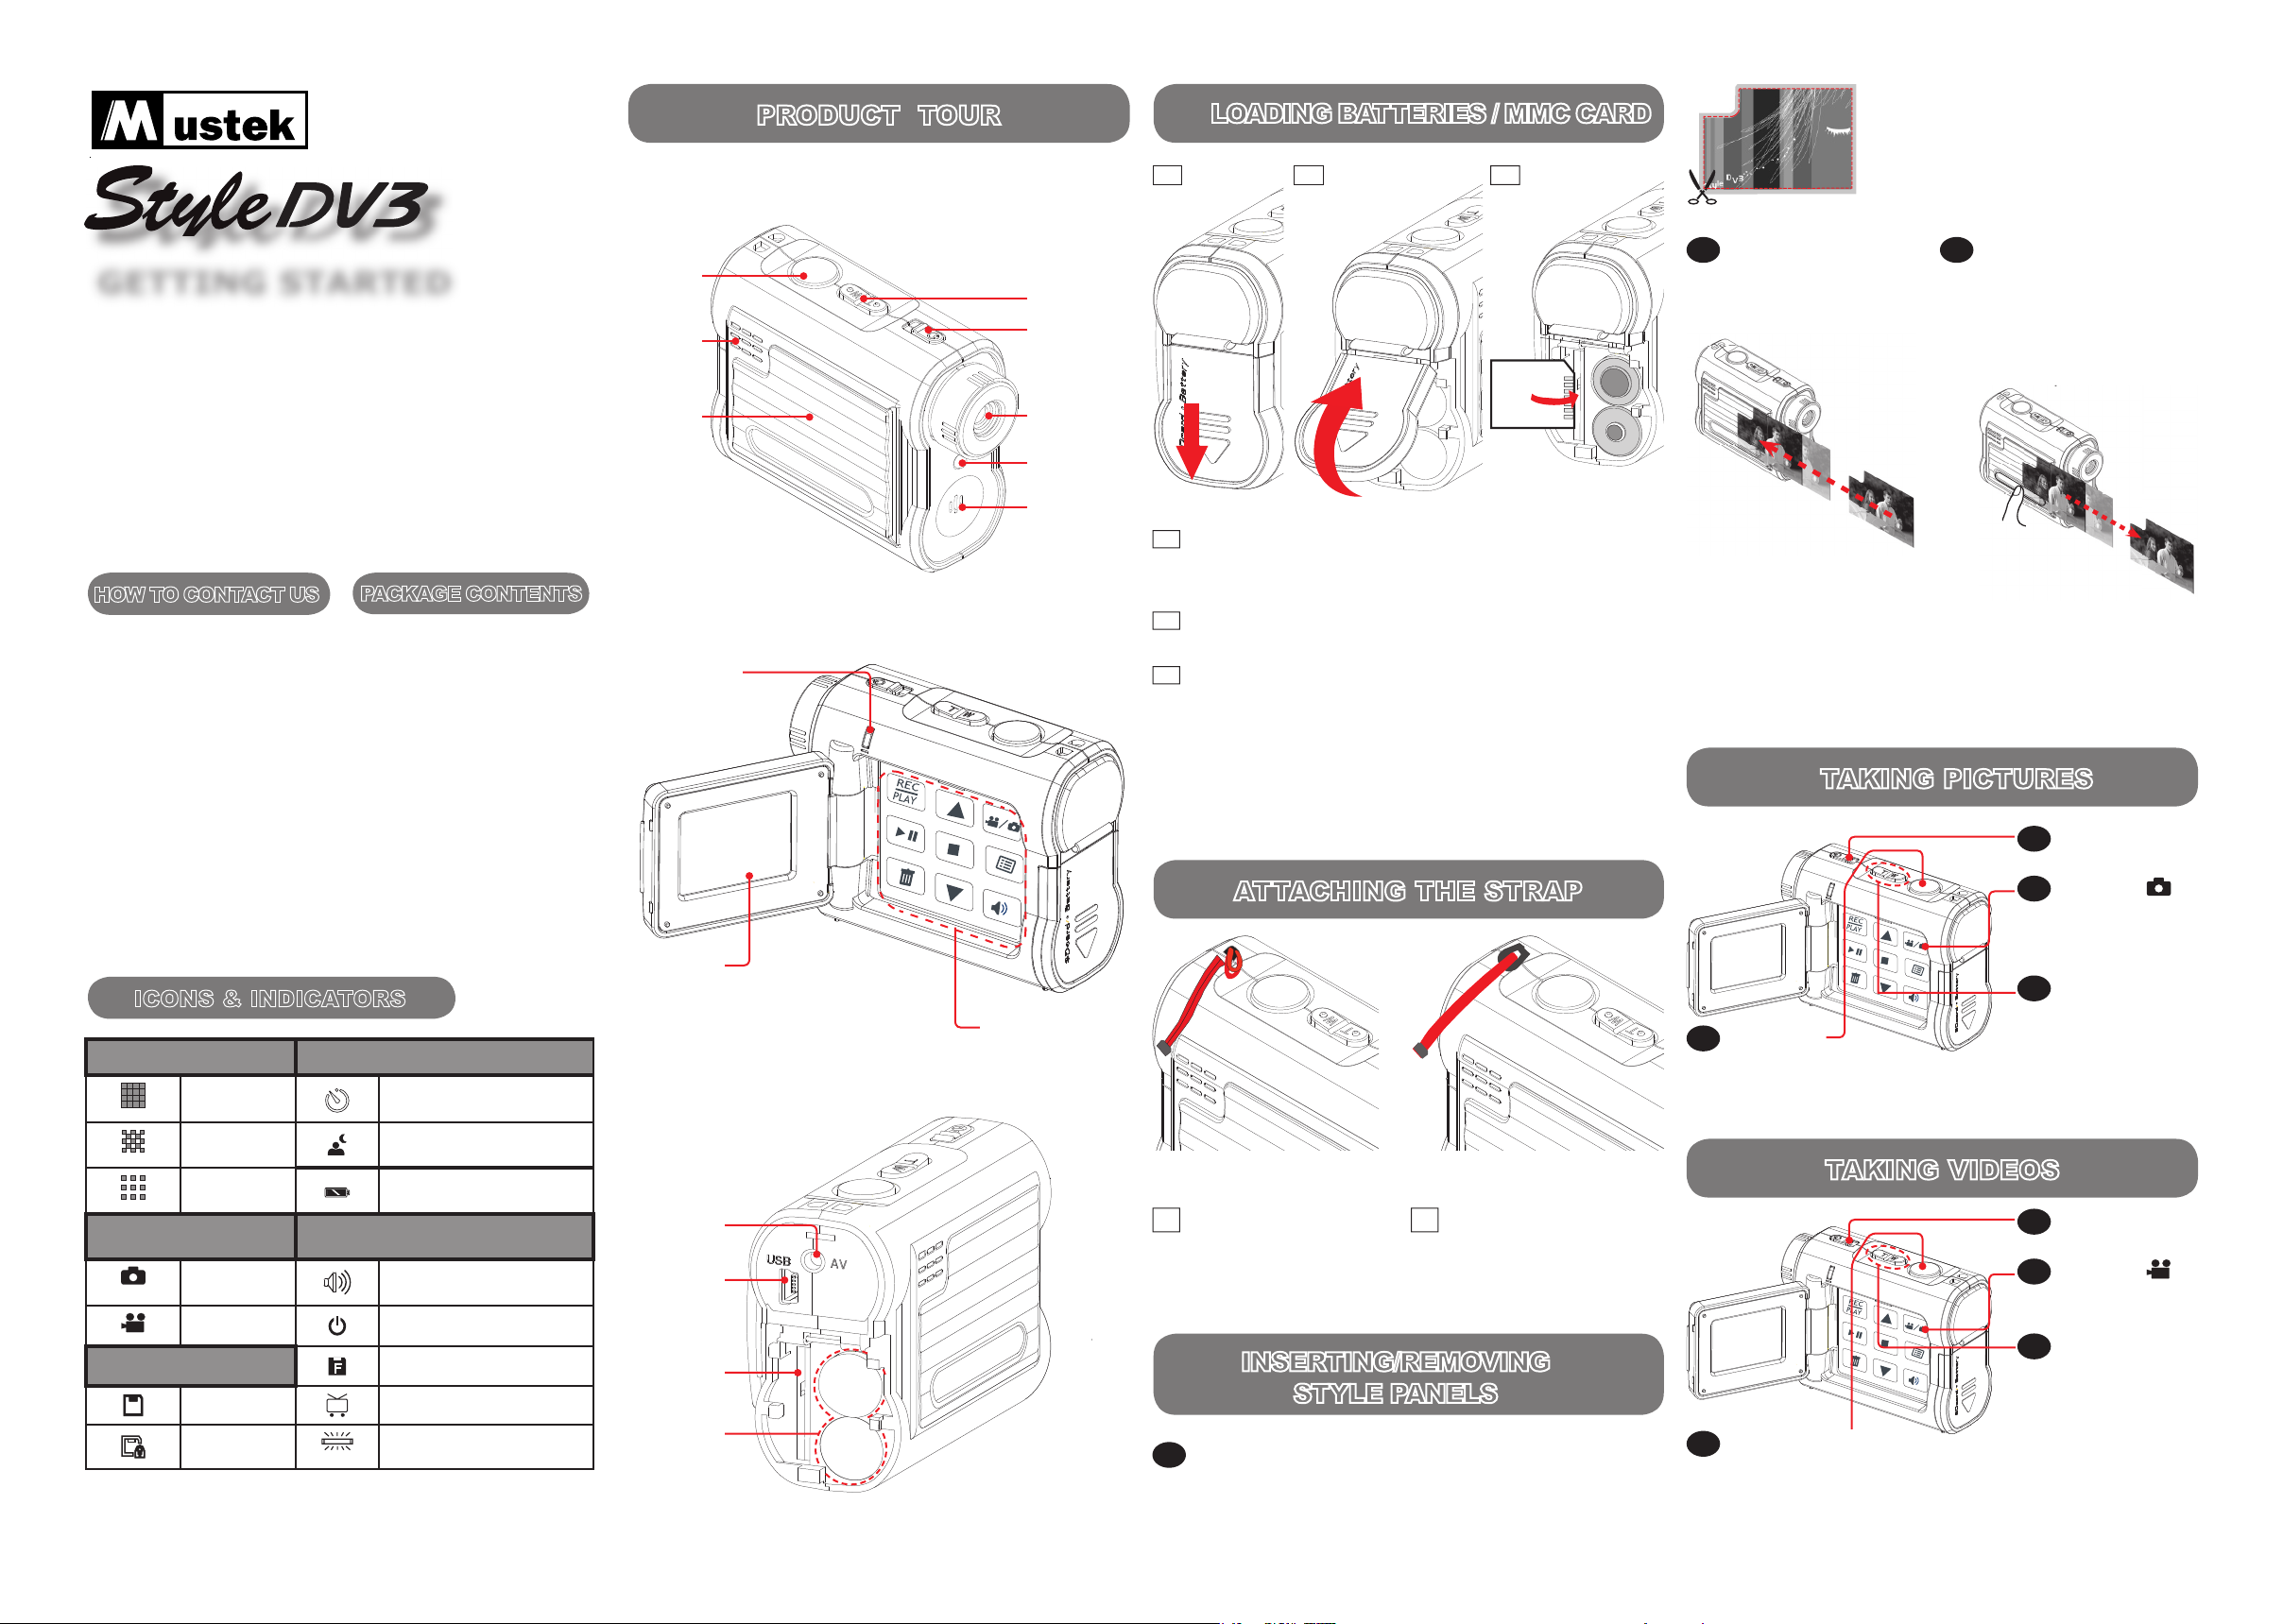
ICONS & INDICATORS
Resolution Other
Fine
Self-Timer
Normal
Nightshot
Low
Battery Status
Camera Mode System Setting
Camera System Sound
Video Auto Shutdown
Card Status
Format Card
With Card Video Output System
Card Lock Video Frequency
PRODUCT TOUR
1
Front View
Side View
S
E
T
Shutter/
Set button
Speaker
Style
Slot
Zoom
Power
Lens
Self-timer
LED
Microphone
S
E
T
Back View
2
ATTACHING THE STRAP
3
S
E
T
S
E
T
A
B
LOADING BATTERIES / MMC CARD
Insert the thin end
of the strap into the
strap holder
Pass the other end
of the strap through
the loop of thin cord
and pull tight
A B
S
E
T
C
A
Slide the Battery/SD/MMC cover in the direc-
tion of the arrow (down).
B
Lift the Battery/SD/MMC cover up.
C
Insert batteries into the battery slots.
Insert the MMC memory card into the SD/
MMC card slot.
Note: When the MMC memory card is correctly
inserted, a “click” sound will be heard.
1
Create a new Style Panel through Panel Magic and
carefully cut it out along the inner borders.
2
Slide the Style Panel
into the Style Slot.
3
To remove a Style
Panel, carefully slide it
towards the opening.
Grab the Style Panel
by the edge and pro-
ceed to pull it out.
ceed to pull it out.
Warning: Please DO NOT apply pressure to the panel
slot. Excessive pressure will cause the frame to break.
Caution: Frequent removal of the same Style Panel
may cause ink loss and distort the Style Panel image.
INSERTING/REMOVING
STYLE PANELS
4
4
TAKING PICTURES
5
1
Press Power.
2
Switch to
(Camera)
Mode.
3
Press T (zoom-
in) / W (zoomout) to frame
your subject.
S
E
T
4
TAKING VIDEOS
6
4
Press the
Shutter buton
to take a
picture.
1
Press Power.
2
Switch to
(Video) Mode.
3
Press T (zoom-
in) / W (zoomout) to frame
your subject.
S
E
T
4
Press the Shutter button
to start recording. Press the
Shtter button again to stop
recording.
Note: Be sure to cut along the
inner borders when cutting out
the Style Panel otherwise it will
not t into the Style Slot.
Status LED
(Power On/
USB)
LCD Screen
Control Panel
Video Out
USB Port
MMC/SD
Card Slot
Battery Slot
7
S
E
T
BEEPON
AUTOOFF
FORMAT
60Hz
S
E
T
U
S
B
S
E
T
PLAYING BACK
CONNECTING TO COMPUTER
8
10
CREATING STYLE PANELS
11
PRINTING OUT STYLE PANEL
1. Power on the camera.
2. Set the camera to (Camera) mode to
playback pictures or
(Video) mode to
playback videos.
3. Press to enter Playback mode.
4. Press / to review your pictures or
videos.
õ Press the W (zoom-out) button to switch to
thumbnail format.
To playback on a TV set
1. Power on the camera.
2. Press to bring up the OSD menu.
For PC
Driver Installation
1. Insert the installation CD into
your CD-ROM drive.
2. Follow the on-screen instructions
to complete the driver and
bundled software installation.
Getting Connected to a Computer
1. Connect one end of the USB
cable into the USB port of
your computer and the other
end into your camera.
2. Power on the camera.
For MAC
(Mac OS 9.x and 10.1 or above)
A Mass Storage drive will be detected when you
connect the camera to a MAC. You can easily
manipulate your les via the MAC user interface.
Launch the
1.
MAX Console
and select the im
age you wish to transform into a Style Panel.
2. Select “Creative Cropping” under the “Photo
Editing” tab.
3. Select the Style Panel icon ( ) under the
“Custom” tab.
Photo with dif
ferent scaling
ratios.
Select Style Panels or photos that you wish
1.
to print for your Style Slot and select
Magic”
Note1:
under the
“Sharing”
For best results, crop your photos through
tab.
“Creative Cropping” before attempting to print
them via “Panel Magic”. Otherwise, photos may
appear off-scale.
-
Note2:
For more Style Panel designs, please go
to the “Panel Template” folder under the program
installation path. You may print these template
photos for Style Panel without cropping.
2. Selected photos will appear as thumbnails in
the preview window. If the photo does not ll
the Style Panel, use the settings on the right
side to adjust its size.
“Panel
3. Select NTSC or PAL from the OSD menu.
NTSC for North America.
4. Connect the sigle-ended cable into the AV
connector on your camera and the yellow
connector into the VIDEO IN and the black
connector into the AUDIO IN on your
television set.
5. Turn on the TV.
6. Switch to the input source where your
camera is connected on your TV set. (eg.
Video 1, Video 2, etc.)
7. Set the camera to (Camera) mode to
playback pictures or
(Video) mode to
playback videos.
8. Press to enter Playback mode.
9. Press / to review your pictures or
videos.
9
STORING TO COMPUTER
When the camera is connected to a computer,
launch the MAX Console to transfer les from
your camera to your computer.
Note: Initial launch of
MAX Console
will bring you
to the Panel Templates folder. It will save your
location upon exit and go to the last opened folder
upon next launch.
Select the source from the left menu and Drag
and Drop les to your computer.
Note: The style panel icon ( ) appears on the
preview window.
4. Adjust the panel borders in order to select the
area you wish to print as a Style Panel.
Important: For best results, use proportional rescaling (
) to scale frame content.
5. Save the cropped picture as a new photo.
Note:
The Style Panel icon (
) under the “Cus
tom” tab can not be deleted.
6. You may also apply special effects to your im
ages by utilizing
as Photo Decoration
Photo Toy
. For more details on these features
MAX Console
Digital Effect
,
please refer to the built-in help
plugins such
Funny
and
.
Note: In order for the Style Panel to stay in the
Style Slot securely be sure to use photo paper with
at least 0.25mm of thickness for printing.
3. Press
-
The number of photos that t on a sheet of photo paper
will vary according to the paper orientation and size.
Paper size Orientation No. of photo per sheet
-
3 x 5 Portrait 2
3 x 5 Landscape 1
4 x 6 Portrait 3
4 x 6 Landscape 4
5 x 7 Portrait 3
5 x 7 Landscape 4
A4 Portrait 18
A4 Landscape 16
to set up your printer then press
to print the photos.
 Loading...