

Page 1

• Before attempting to connect, operate or adjust this product,
please save and read the User Manual completely.
• The style of the product shown in the User Manual may be
different from the actual unit due to various models.
ScanExpress S324
Standalone A4 Photo Scanner
User Manual
Page 2

2
Contents
Safety Information.........................................................3
Package Contents.........................................................4
Scanner Parts................................................................5
Preparation...................................................................6
- Connecting to Power.........................................................................6
- Inserting a SD/MMC Card.................................................................7
- Turning the Power on........................................................................7
Scan and Playback........................................................8
- Scanner Setting...............................................................................8
- Using the Photo Protective Sleeve....................................................9
- Scanning Images.............................................................................9
- Playing back and Scanned Images...............................................10
- Zoom.........................................................................................11
- Playback Setting.............................................................................12
Transferring the Scanned Images to PC....................13
- Disconnecting the Scanner from PC...............................................13
Cleaning and Calibrating the Scanner.......................14
Specifi cation...............................................................16
Helpful Hints............................................................16
Page 3

3
Safety Information
• Keep away from water or moisture and dusty areas.
• Never store in hot and very cold areas.
• Only use attachments/accessories specifi ed by the manufacturer.
• No objects fi lled with liquids, such as vases, shall be placed on apparatus.
• Avoid dust contamination when the scanner is not in use.
• When left unused for a long period of time, the unit should be disconnected
from the power supply.
• Avoid environments where the scanner would be exposed to direct sunlight (or
any other source of excessive heat) for long periods of time.
• Protect the scanner from potential liquid spills such as soda, coffee, tea, etc.
• Be carefully to keep it without dropping it or strong impact.
• Operate the scanner on a level, well-grounded work surface, free of
excessive vibration.
• Don’t open the scanner case alone without technical support because there
is danger of electrical shock.
• Position the equipment near a power outlet where it can be easily accessed
when plugged in.
Page 4
4
for purchasing this Standalone A4 Photo Scanner.
With this new standalone scan-and-view technology, there’s no longer
a need to install drivers and operate on a PC for scanning. You can
view the scanned images directly on the 2.4” display screen, and then
store the scanned images to a MMC or SD memory card. It makes your
scanning experience easier and more enjoyable. You can also transfer
the scanned images to your PC via mini USB port. Read the following
instructions for more details.
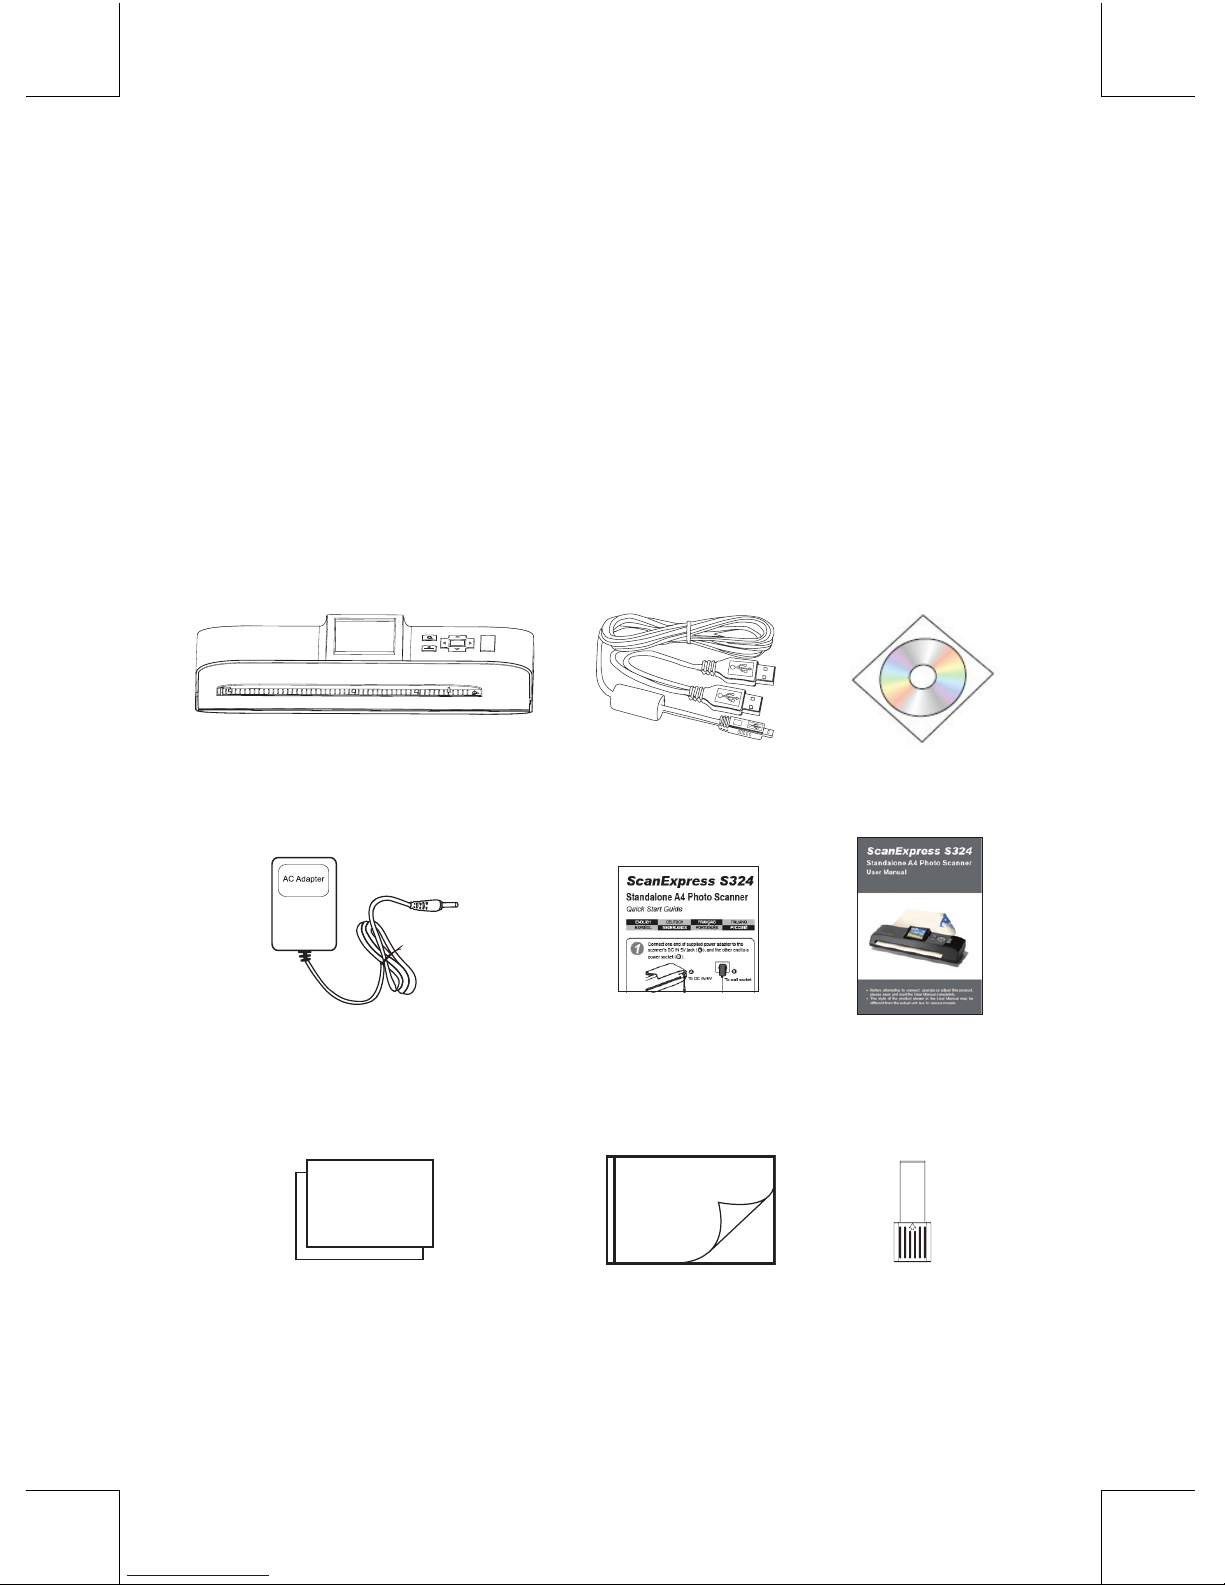
Power Adapter
B
User Manual
Package Contents
mini USB Cable
Calibration and
Cleaning Paper
Cleaning StickPhoto Protective
Sleeve
Thank you
Quick Guide
MENU
OK
SCAN
A8
A4
A6
Scanner Software CD
Page 5
5
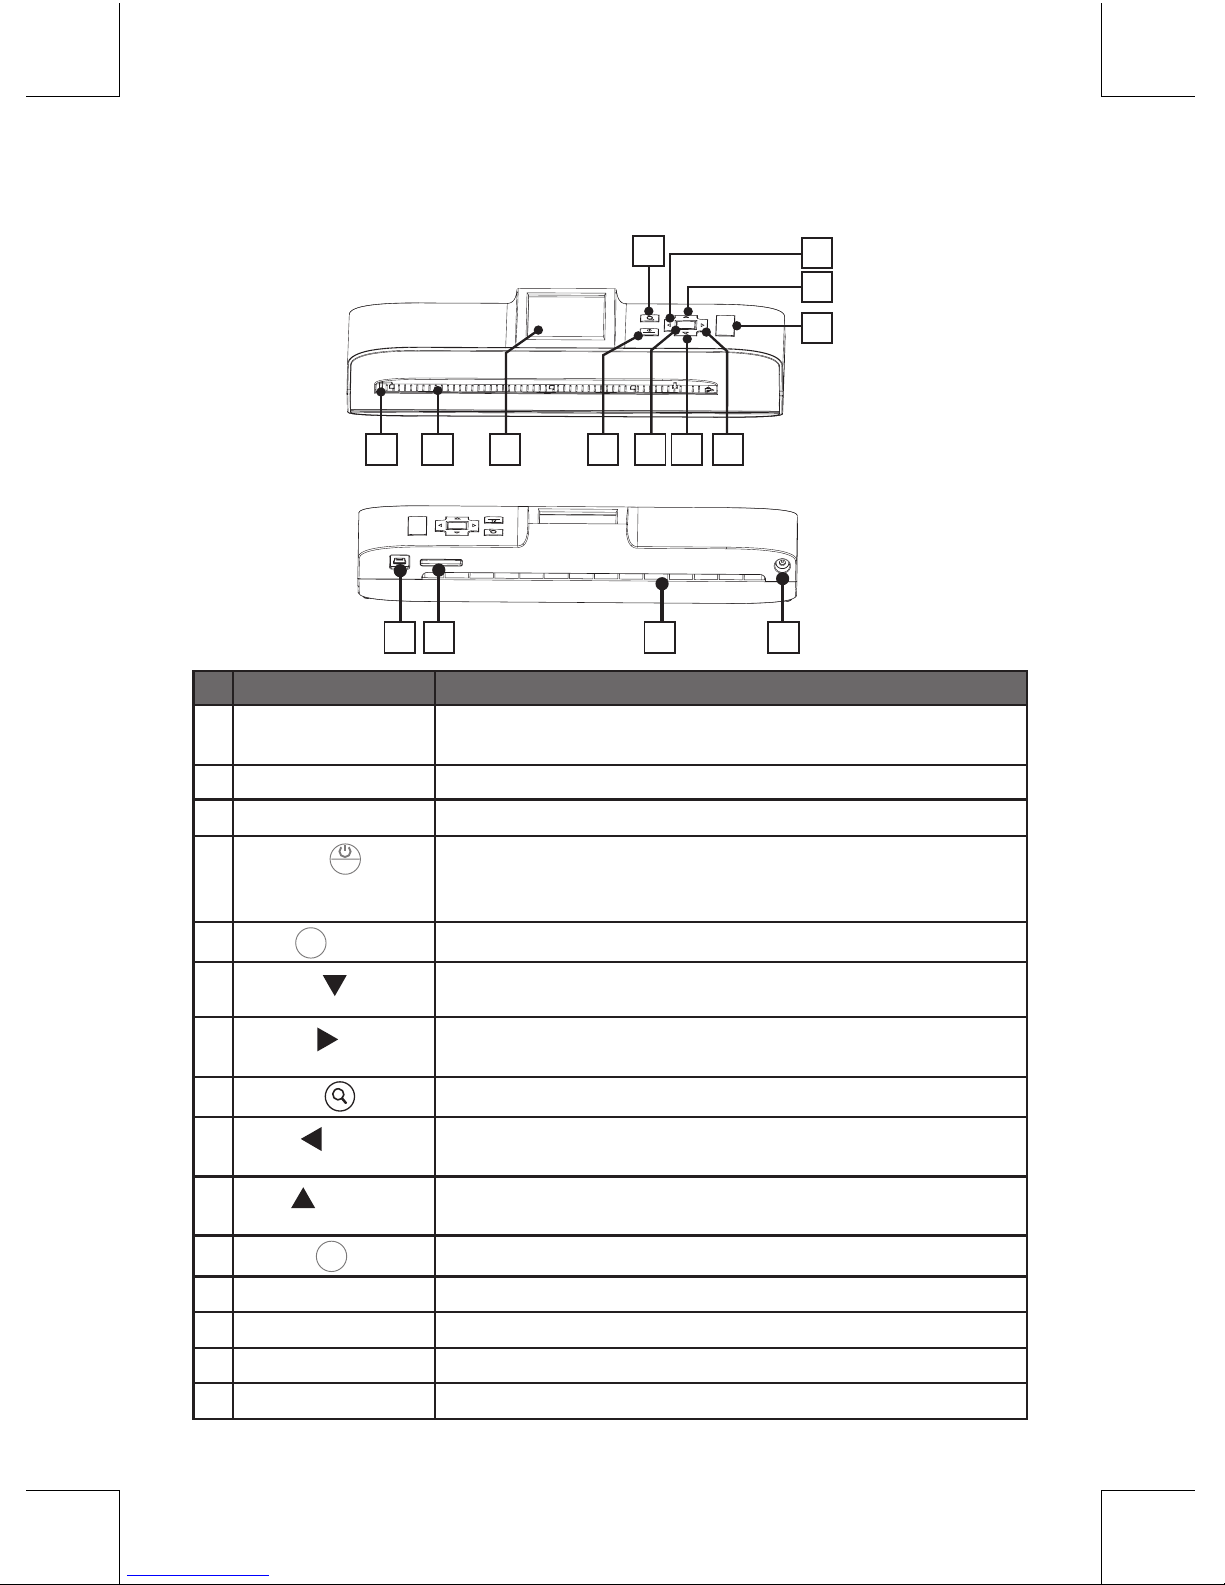
Scanner Parts
Top View
Rear View
Names
Descriptions
1 Paper guide • Adjustable paper guide makes easy for guiding
paper.
2 Feed slot
• Feeds the paper or photo for scanning.
3 2.4” LCD screen
• For viewing the scanned images.
4
Power (
MENU
) /
Menu
• Press to turn the power to on or off.
•
Press for 3~5 seconds to turn off the scanner.
• Press to display the setting menu.
5
OK (
OK
)
• Press to make or confi rm selections in the menus.
6
Down (
)
• Moves down in the menus.
• Moves down in the thumbnail mode.
7
Right ( )
• Moves right in the menus.
• Moves to the next scanned image.
8
Zoom (
)
• Zoom the scanned image.
9
Left (
)
• Moves left in the menus.
• Moves to the previous scanned image.
10
Up ( )
• Moves up in the menus.
• Moves up in the thumbnail mode.
11
Scan (
SCAN
)
• Press to enter the Scan mode.
12 Mini USB port
• Connects to PC for fi le transfer and power supply.
13 SD/MMC • Accommodates a SD/MMC card.
14 Paper exit slot • Outputs the paper after scanning.
15 DC-IN 5V jack
• Connects to the supplied AC power adapter.
1
5 7
6
4
2 3
8
9
10
11
MENU
OK
SCAN
A8
A4
A6
1312 14 15
MENU
OK
SCAN
Page 6

6
Preparation
2. Press Power (
MENU
) button to bring up the USB Mode menu.
USB Mode
Mass Storage
USB Power
3. Press UP
( )
/ DOWN
( )
button to select USB Power, then press
OK
(OK
)
button.
Connecting to Power
Using AC adapter
Connect one end to the scanner’s DC IN jack, and the other end to a
power socket.
Using mini USB cable
1. Connect the mini USB connector to the scanner, and the other 2
regular USB connectors to laptop or PC.
To DC IN 5V
To wall socket
mini USB cable
(supplied)
Laptop
Page 7

7
Inserting a SD/MMC Card
Insert your SD or MMC card into the card slot with the gold contacts
facing up.
Rear View
Turning the Power on
Press Power (
MENU
) button to turn on the scanner.
MENU
OK
SCAN
A8
A6
MENU
Page 8

8
Scan and Playback
Scanner Setting
1. Press MENU(
MENU
) button to enter the
scanner setting menu.
2. Press LEFT
( )
/ RIGHT
( )
button
to select Scan( ) or Setup( ) .
3. Press UP
( )
/ DOWN
( )
button to
select an option from the submenus.
Note: Press MENU(
MENU
) button
repeatedly to go to the upper level,
or exit the Scan menu.
Menus Sub-menus Descriptions
Scan( )
Color Mode(
)
Selects a scan mode:
Gray(
), Color( ).
Color Optimum( )
This function provides a color
optimization mechanism which
will achieve the best color match
possible based on the actual color
content of the image.
Note 1: Scanning will take longer
than normal with this
setting. Please be patient
and wait until the process
is fi nished.
Note 2: This setting is set to its
default of “OFF” after the
scanner is restarted.
Setup(
)
Language( )
English, German, French, Italian,
Spanish, Dutch, Portuguese, Polish.
Format(
) Deletes all the data stored in the
SD/MMC card.
Calibration(
)
Select “OK” to calibrate the scanner.
Note: Refer to page 14 for
detailed procedures.
Factory Default(
)
Restores the scanner settings to
the default settings.
Page 9

9
It is recommended to use the supplied photo protective sleeve for
photo scanning. Please place the photo inside the protective sleeve.
Make sure the sealed end goes fi rst into the feed slot for scanning.
Note: Do not place the photo into the protective sleeve if the photo you
wish to scan has been laminated.
Scanning Images
Note: “Please insert a SD/MMC card”. A reminder message will
appear if you did not insert a SD or MMC card to the scanner.
1. Insert the photo, or document facing DOWN into the feed slot, adjust
the paper guide against the edges of the photo if necessary.
Note: To avoid the paper jams, align the photo, or document against
the right side of the feed slot if it is smaller than A4 size.
Using the Photo Protective Sleeve
Photo facing down
Paper guide
Page 10

10
Note 3: When scanning images with a dark
background , the scanner may
not be able to detect the images,
or may crop the images in an
undesirable way.
Memory Full
3. The scanned image will appear on the screen of the scanner and will
be saved into the inserted memory card.
Note 2: When the memory card is full,
a “Memory Full” warning will
appear.
Note 1: By default the folder \DCIM\100NVtim will be created in the
inserted memory card. All scanned images will be saved in
the 100NVTIM folder. When the counter reaches 9999 it will
be automatically generated another new folder in a sequential
order.
Note: The scanner will enter the playback mode after scanned, or
press OK
(OK
)
button.
1. Press LEFT
( )
/ RIGHT
( )
button to browse forward or backward
through the scanned images at a full screen.
2. Press OK
(OK
)
button to enter the thumbnail mode from the browse
mode. All scanned images stored in the SD/MMC card will be
displayed in the thumbnail mode.
Playing back the Scanned Images
1/15
2. Press Scan(
SCAN
) button, the photo or document will be pulled
through and scanned.
Note: Do not press any button when the screen is still showing
“Scanning...” message. Wait until scanning is complete.
Page 11

11
3. Press LEFT
( )
/ RIGHT
( )
button repeatedly to move to the
previous or the next page.
4. Press UP
( )
/ DOWN
( )
/ LEFT
( )
/ RIGHT
( )
button to select
an image, and then press OK
(OK
)
button to view the image in full
screen.
1. Press ZOOM( ) button to zoom in an image. Each time of the
button is pressed, the image will be enlarged in the sequence of x2,
x3, x4, and x5.
2. Press UP
( )
/ DOWN
( )
/ LEFT
( )
/ RIGHT
( )
button to move
the pointer to view the zoom-in image at the pointed area.
Note: This function only works in the Zoom-in view.
2
+
Zoom
Page 12

12
Playback Setting
Menus Sub-menus Descriptions
Playback( )
Delete(
)
Delete the scanned image(s):
One(
), All( ).
Rotate(
)
Rotate the scanned image(s):
Normal( ), 90 degree( ),
180 degree( ), or 270 degree
( ).
Note: The orientation of the
scanned images remain
unchanged when
transferring images to PC,
although they have been
rotated with this setting.
Setup(
)
Language(
)
English, German, French, Italian,
Spanish, Dutch, Portuguese, Polish.
Format(
)
Deletes all the data stored in the
SD/MMC card.
Calibration( )
Select “OK” to calibrate the scanner.
Note: Refer to page 14 for detailed
procedures.
Factory Default
(
)
Restores the playback settings to
the default settings.
1. Press MENU(
MENU
) button to enter the
playback setting menu.
2. Press LEFT
( )
/ RIGHT
( )
button
to select Playback(
) or Setup
(
) .
3. Press UP
( )
/ DOWN
( )
button to
select an option from the submenus.
Note: Press MENU(
MENU
) button
repeatedly to go to the upper
level, or exit the Playback menu.
Delete
Rotate
Page 13

13
Transferring the Scanned
Images to PC
ATTENTION: To get proper connection with your PC and the unit,
please turn the power off before making the connection.
1. Connect the mini USB connector to the scanner, and the master
connector to PC.
3. P
ress UP
( )
/ DOWN
( )
button to select Mass Storage, then press
OK
(OK
)
button.
4. Once the connection is established, a “Removable Disk” window will
appear on the PC.
5. Enter the Removable Disk in the PC and use the drag and drop
method to copy fi les between the Scanner and the PC.
Note: The Removable Disk on the PC shows the fi les stored in the
SD/MMC card which is connected to the scanner.
Disconnecting the Scanner from PC
1. Double click the Safely Remove Hardware
icon on the task bar in Windows.
2. Select the USB Mass Storage Device, then
click OK to disconnect the scanner from the
PC.
Note: Remove the mini USB cable from the scanner when you have
fi nished fi le transfers.
2. Press Power(
MENU
) button to bring up the USB Mode menu.
Please insert a SD/MMC card!
USB Mode
USB Power
Mass Storage
Master connector
mini USB Cable
(supplied)
Page 14

14
• To get high image quality and good recognition results, please
perform step 1, 2, 3 in that order prior to use if necessary.
• Make sure the cleaning and calibration paper, and cleaning stick are
clean without any dust before use.
• Do not use any solvent to clean the sensor.
1. Put your thumbs in the feed slot and pull the feed slot cover upwards
to remove it from the scanner.
2. Insert the thin end of the cleaning stick into the slot of the scanner at
the rear side. Move the stick from one side to the other slightly a few
times, then remove it.
Step 2: Using the cleaning stick
Insert the supplied cleaning paper into the feed slot of the scanner,
then press SCAN
(
SCAN
)
button to rolled through and scanned.
Step 1: Using the cleaning paper
Note: Do not insert the cleaning stick into the feed slot at the front side
of the scanner as this may damage the internal component.
Front side
Cleaning paper
Cleaning and Calibrating the
Scanner
Rear side
Cleaning stick
MENU
OK
SCAN
A8
A4
A6
Page 15

15
Step 3: Using the calibration paper
1. Insert the calibration paper with the white side DOWN into the feed
slot.
2. Press MENU
(
MENU
)
button to bring up the System Menu.
4. Select OK
(OK
)
to begin the calibration process.
Note: The process will take few minutes to fi nish, and then shut down
automatically. Please turn the power back on again.
3. Align the feed slot cover. Assembly the edge’s two latching tabs with
the mounting holes on the scanner. Push the cover back in until it
clicks in place.
3. Press LEFT
( )
/ RIGHT
( )
button to select Setup( ) button
then press
UP
( )
/ DOWN
( )
button to select “Calibration”.
MENU
OK
SCAN
A8
A4
A6
Page 16

16
Specifi cation
Scan Sensor Linear Color CIS
Display 2.4” Color TFT LCD (480 x 234 pixels)
Scan Size
Minimum: 38.1mm x 50.8mm (1.5” x 2”)
Maximum: 216mm x 356mm (8.5” x 14”)
Scan Speed(A4 size) 10 sec at gray 300dpi
15 sec at color 300dpi
Supported OS for Mass
storage
Windows XP / Vista / 7
Mac OS X (10.4 / 10.5 / 10.6)
Memory Card Slot MMC / SD (SDHC) (Up to 32GB)
I/O DC-in (5V, 1A) / USB mini-B
USB port mass storage / power supply
File Format JPEG
OSD language English, German, French, Italian, Spanish,
Dutch, Portuguese, Polish.
Buttons Power/Menu, Scan, Zoom, OK, Up, Down,
Left, Right
Dimensions 300 x 86 x 56.2 mm (11.8” x 3.4” x 2.2”)
Weight 520g (1.1lbs)
• Check to make sure the mini USB cable is fi rmly plugged into the
scanner.
• Please clean and calibrate the scanner if the scan result is poor
quality.
• Make sure the paper/photo is gripped and slightly pulled into the
feed slot prior to scanning.
Helpful Hints
This symbol on the product or in the instructions means that your electrical
and electronic equipment should be disposed at the end of its life separately
from your household waste. There are separate collection systems for
recycling in the EU. For more information, please contact the local authority or
your retailer where you purchased the product.
82-329-00220
 Loading...