

Page 1

Page 2
600/l
200 CU Scanner
Installation Guide
Unpacking the Scanner
Unpack the package and inspect the items closely to make sure no item is
damaged.
The package should include:
n
The Scanner
n
600/1200
CU Scanner Installation Guide
n
Power Adapter
H
Installation CD
n
Scanning Utilities Manual (either included in the Installation CD or printed
separately)
Driver, Installation
NOTE:
Please complete the driver installation before installing the Scanner. Do
not connect the power adapter to the scanner at this stage.
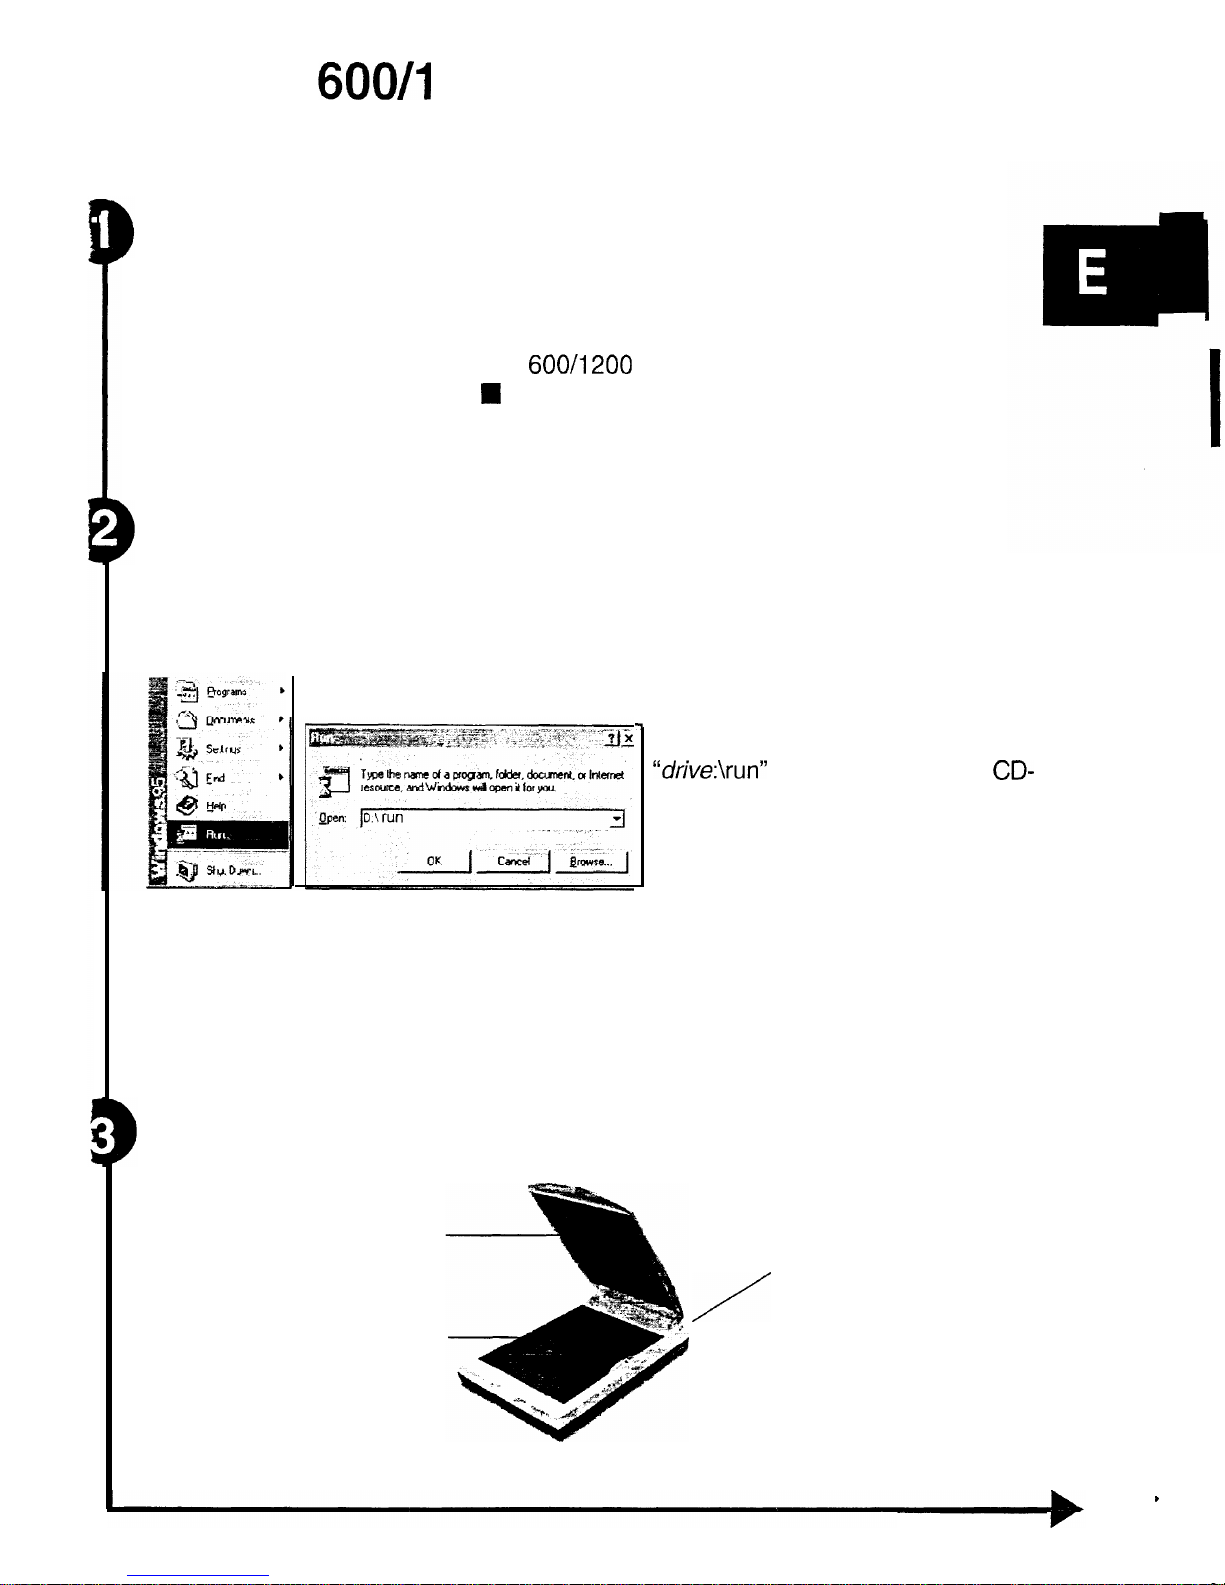
1.
Insert the Driver Installation CD into your disk drive.
2. Click on
“Start”
and select
“Run”.
4. Follow all on-screen instructions.
-I
3.
In the
“Run”
dialog box, type
“drive:\run”
where drive is your
CD-
ROM drive and click
“OK.”
NOTE:
When you are presented with the option of whether to restart Windows
after completing the driver installation please choose “Yes”.
The Scanner Parts
Document cover
Scan window glass
Back of the scanner
/
.
82-062-000 11
Page 3

ting the Scanner to the PC
Refer to the
follo,wing
illustration and steps to connect your scanner,
1.
With the power to your PC on, connect the scanner’s USB cable to the
USB port of your PC.
2. Connect the power adapter to the Scanner and plug it into an appropriate
power outlet.
Upon connecting the power adapter, the Windows operating system would
automatically detect your scanner and update your system configuration.
Scanner USB cable
bFor
Windows 95 OSR2 Users:
Upon installing the software driver and connecting the power adapter if the
Update Device Driver Wizard
dialog box appears, perform the following steps:
1. Click on the
“Next”
button.
2. On the next screen click on the
“Other Locations”
button and go
into the
“Win95” directory of your
installation CD.
3. Click on the “OK” button and on the
next screen Windows will confirm
that it has found the driver for your
scanner.
4. Follow all on-screen instructions to
complete driver installation.
,
Thus mrard
will comple?e
fhe
nrstzlialion
ot
bFor
Windows 98 Users:
Upon installing the software driver and connecting the power adapter if the
Add New Hardware Wizard
dialog box appears, perform the following
steps:
I.
Click on the
“Next”
button.
2. On the next screen select the
following option and go into the
Win98 directory of your
installation CD.
~ Gearc~~~~~~~bel~~~~~~~~~~,~~~.~~~~~~~
i(Recommended).
i -................................._...........
_ . . ..-..*.-...........” . . . . .
^.,.”
. . . . . . . . . . . .
“..”
. . . . . . . . . . . . .
..-
I.
___ei----
-__.--_--__- ---I - ---. .--.._ _ ---.__
_
__
< ;. ~.?
r ~--ii- ‘.
3a
Page 4

3. Click on the
“OK’”
button and on the
next
screen Windows
will
confirm
that
it has found the driver for your scanner.
4.
Click the
“Finish”
button to exit.
NOTE:
Since your scanner model is equipped with a Cover Sensor,
upon raising
the cover of your
scianner
you will be given a choice on whether to use the Scan
Dialog box (refer to the Scanning Utilities Manual) that came with your scanner or
use the Imaging program (refer to your Windows 98 reference guide) that is built
in to your Windows 98 operating system.
1
Using the Scanner
Ml
There are two separate methods to scan an image, the Scan Dialog box and the
TWAIN Dialog box. Refer to the Scanning Utilities Manual for a description of
these to facilitate your use of the scanner; or refer to the on-line manual and help
I
system any time when using the scanner software. This easy-to-use system
contains detailed information about the scanner topics and its functions.
ä
TO access the Scan Dialog box, you can do any of the following:
1.
The Cover Sensor:
Simply lift the cover and begin scanning. This scanner is
equipped with a Cover Sensor feature that automatically opens the Scan
Dialog box; or
2. The Direct Scan Icon:
Double-click the Direct Scan icon, located in
your Windows
taskbar;
or
Q
2
3. The Scan Dialog Box Item:
Click on
“Start”
on your Windows desktop and
locate the name of your scanner model under
“Programs”.
Then
double-
click the item
“Scan Dialog Box”.
.To
access the TWAIN Dialog box, you can do the following:
:f
1. Launch the TWAIN-compliant program (e.g. Photo Express).
2. Under the File menu open the Acquire command and choose
Scanner
OR Click the Scanner icon.
The Select Data Source dialog box appears.
3. Choose your scanner model from the list.
4. Click on the
“Acquire”
button.
f”;.&‘v&-m
j”;,= :’ ‘&f~ -1
The Select Data Source dialog box closes.
I
2
Acquire
lli
The TWAIN Dialog box appears.
ä
TO access the on-line manual:
1. Click on
“Start”
and select
“Programs”.
2. Click on your scanner model and select
“Scanner’s User‘s Guide”.
.
i
Page 5

-- -.__
e
0
’
1
Driver Installation
(iMac)
NOTE: Please complete the driver installation before installing the Scanner. Do
not connect the power adapter to the scanner at this stage.
I.
Insert the Driver Installation CD into your disk drive.
(T)
-,i&
fnslallcr
2. Wait for the Installer icon to appear on your
desktop.
3. Double-click
on
the
Installer
icon to open the
Installer
dialog box.
4. Double-click
own
the
Install
icon.
5. Continue to follow all on-screen instructions to complete the driver
installation.
.Connecting
the Scanner to the
iMac
Refer to the following steps to connect your scanner.
1. With the power to your
iMac
on, connect the scanner’s USB
cab!e
to the
USB port of your
iMac.
2. Connect the power adapter to the Scanner and plug it into an appropriate
power outlet.
Page 6

e
)
Specifications
Scanner Type
Scan Area
Scan Modes:
True Color (600 CU)
(1200
CU)
Gray Mode (600 CU)
(1200
CU)
Text/Line Art
Scan Method
Resolution Control:
Optical (600 CU)
(1200
CU)
Enhanced (600 CU)
(1200
CU)
Scanning Data Buffer
Power Consumption
Operating Temperature
Operating Humidity
Storage Temperature
Storage Humidity
Dimensions:
(600 CU)
(1200
CU)
Weight:
(600 CU)
(1200
CU)
Color Flatbed
2
1.6 cm x 29.7 cm (8.5” x I 1.7”‘)
30-bit (Internal), I
.074
billion colors
24-bit (External), 16.7 million colors
48-bit (software enhanced)
36-bit, 68.7 billion colors
48-bit
(software enhanced)
IO-bit (Internal), 1024 shades of
gray
&bit (External), 256 shades of
gray
12-bit, 4096 shades of gray
1 bit/pixel (2 levels)
Single Pass Scanning
300dpi (H) x 600dpi (V)
600dpi (H) x 1200dpi (V)
9600dpi x 9600dpi (software controlled)
19200dpi x 19200dpi (software controlled)
32KB
(maximum)
9.6 Watt (12V DC)
10°C - 40°C (50°F - 104°F)
35% - 80% RH, Non-Condensing
-10°C - 60°C (14°F - 140°F)
20% - 80% RH, Non-Condensing
414 x 269 x 52 mm
16.3 x 10.6 x 2.1 inches (L x W x H)
410 x 268 x 36 mm
16.1
x10.6x 1.4inches(LxWxH)
2.3 Kg (5.06 Lbs.)
1.9 Kg (4.20 Lbs.)
 Loading...