

Page 1
Page 2
.
P
B
l
P
1200 FS Scanner
Installation Guide
Unpacking the Scanner
Unpack the package and inspect the items closely to make sure no item is
damaged.
The package should include: Scanner Cable
The Scanner
1200 FS Scanner Installation Guide
Power Cord
PCI SCSI Interface Card
Installation CD
Scanning Utilities Manual (either included in the Installation CD or printed separately)
MPORTANT:
Please perform the following steps by first completing the software
driver installation, then shutting down your computer system, before connecting the
PCI SCSI Interface Card to the computer and the power cord to the scanner.
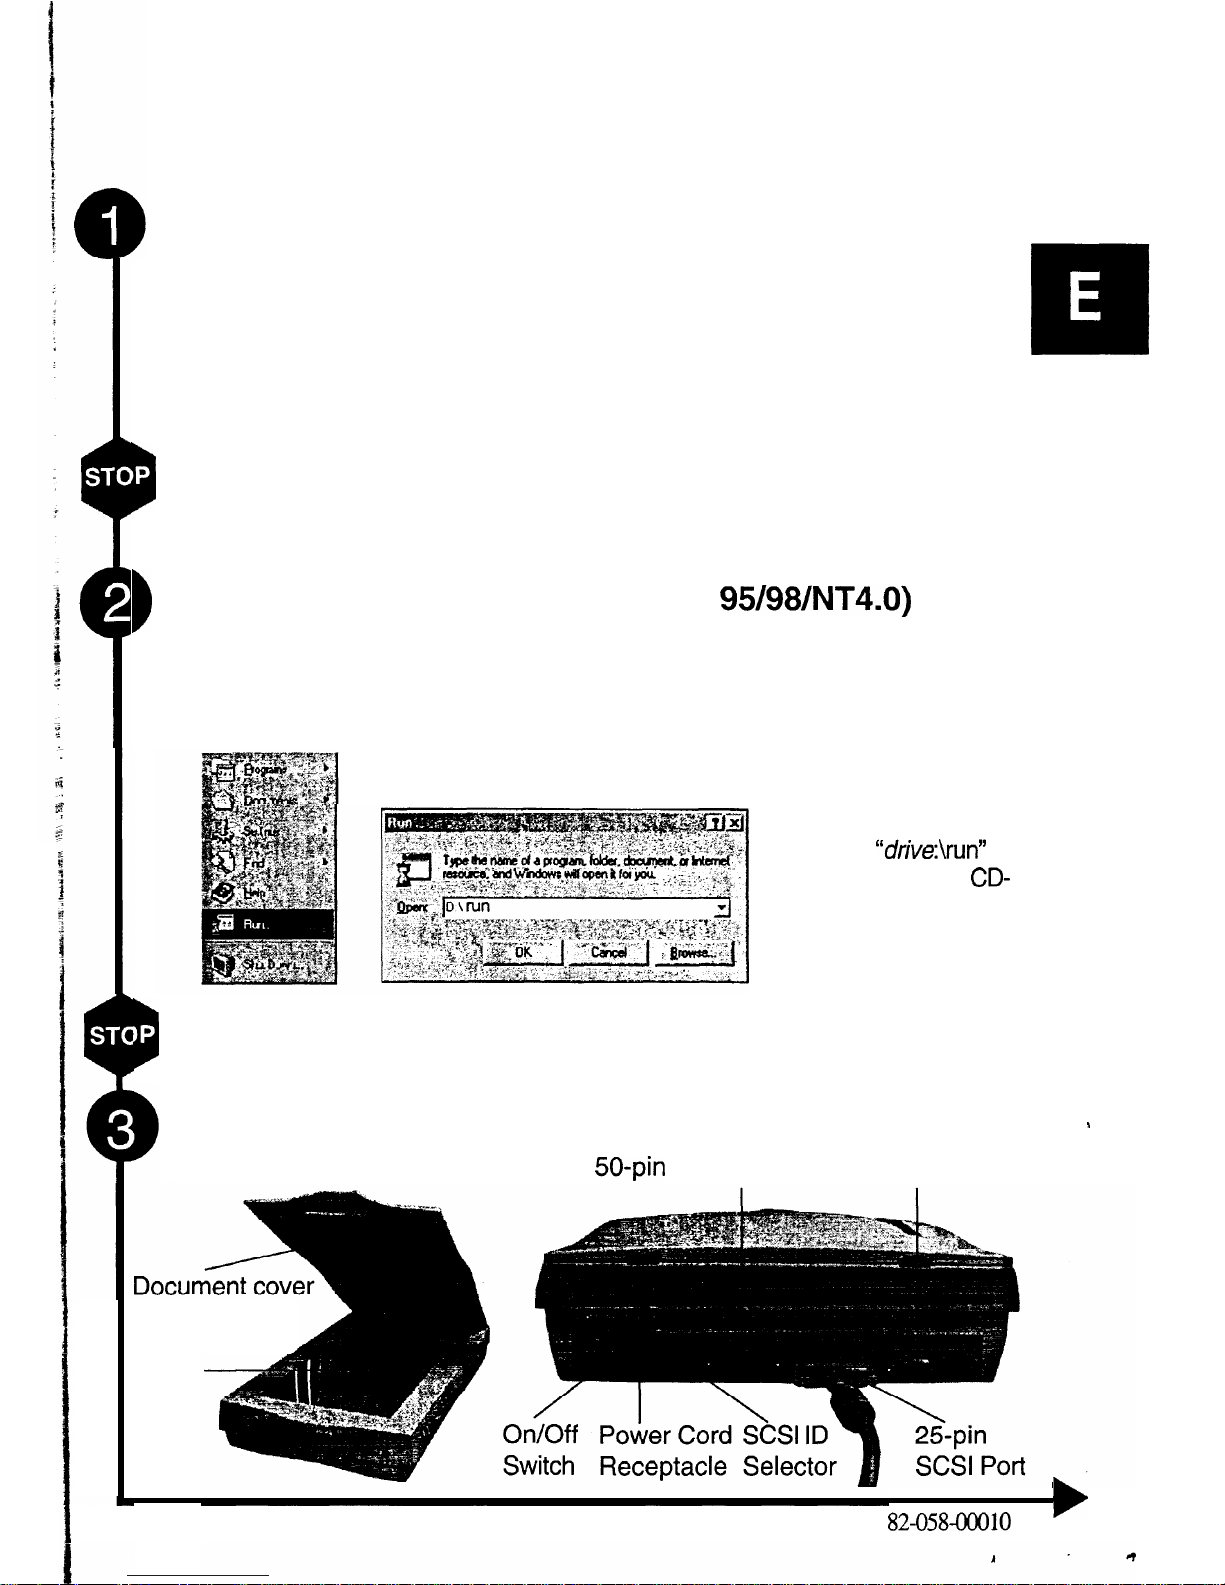
Driver installation (For Windows@
95/98/NT4.0)
1. Insert the Driver Installation CD into your disk drive.
2. Follow all on-screen instructions.
NOTE:
If, after inserting the Driver Installation CD into your disk drive, the Driver
Installation Welcome screen does not appear, do the following:
1. Click on
“Start”
and select
“Run”.
2.
In the
“Run”
dialog
box, type
“drive:\run”
where drive is your
CD-
ROM drive and click
“0 K.”
3. Follow all on-screen instructions.
IMPORTANT:
Please shutdown your computer system after completing the driver
installation and before connecting the scanner to the PC.
Connecting the Scanner to the PC
L
Front
Rear
50-pin SCSI Port 26-pin Optional Control Port
Scan window
A
glass
82-058-00010
Page 3

Refer to the following illustration and steps to connect your scanner.
1. Power off the computer and any connected devices (e.g., display monitor,
printer, modem, etc.).
2. Remove the computer housing.
3. Select an empty slot and remove its back plate.
4. Remove the PCI SCSI interface card
from the anti-static bag.
5. Insert the PCI SCSI interface card
firmly into the empty slot and
screw in the card’s metal plate.
NOTE:
Do not force the PCI SCSI
interface card into the slot at an
angle
as you may cause damage to your
computer.
6. Attach one end of the included
scanner cable to the
25pin
SCSI
port at the back of the scanner
and tighten the retaining screws.
7. Connect the other end of the
scanner cable to the PCI SCSI
interface card (SCSI port) that
you just installed at the back of
the computer and tighten the
screws.
IMPORTANT:
Before continuing,
move the scanner’s carriage lock
switch (located on the side near
the rear of the scanner) to the
Unlock
position. Failure to do so
may cause damage to your
\
Power Cord
Receptacle
scanner’s scanning mechanism.
8. Connect the power cord to the scanner and plug it into an appropriate
power outlet. Turn on the power on/off switch of the scanner.
IMPORTANT:
Before continuing, lift the cover and wait for the scanning lamp
to light and move part way down the Scanner Glass.
Upon turning on power to the scanner, the Windows operating system would
automatically detect your scanner and update your system configuration.
Page 4

Using the Scanner
There are two separate methods to scan an image, the Scan Dialog box and the
TWAIN Dialog box. Refer to the Scanning Utilities Manual for a description of
these to facilitate your use of the scanner; or refer to the on-line manual and
help system any time when using the scanner software. This
easy-to-use
system contains detailed information about the scanner topics and its functions.
b
To access the Scan Dialog box, you can do any of the following:
1.
The Cover Sensor:
Simply lift the cover and begin scanning. This
scanner is equipped with a Cover Sensor feature that automatically opens
the Scan Dialog box; or
2. The Direct Scan Icon:
Double-click the Direct Scan icon, located in
your Windows
taskbar;
or
Q
Z
3. The Scan Dialog Box Item:
Click on
‘Start”
on your Windows desktop
and locate the name of your scanner model under
“Programs”.
Then
double-click the item
“Scan Dialog Box”.
b
To access the TWAIN Dialog box, you can do the following:
1. Launch the TWAIN-compliant program (e.g. Photo Express).
2. Under the File menu open the
Acquire
command and choose
Scanner
OR Click the Scanner icon.
The Select Data Source dialog box appears.
3. Choose your scanner model from
the
list.
4. Click on the
“Acquire”
button.
The Select Data Source dialog box
closes.
The TWAIN Dialog box appears.
To access the on-line manual and help system:
1. Click on
“Start”
and select
“Programs”.
2. Click on your scanner model and select
“Scanner’s User‘s Guide”.
IMPORTANT:
Before scanning your image at a maximum of 48-bit high color
resolution, make sure that your system resources and the available memory
in your hard disk is enough otherwise, your system may crash.
D
Moving the Scanner
IMPORTANT:
Before continuing, move the scanner’s carriage lock switch
(located on the side near the rear of the scanner) to the
Lock
position. Failure
to do so may cause damage to your scanner’s scanning mechanism.
In case you need to ship the scanner for any reason, be sure to lock the
carriage. It is also safer if you pack the scanner in its original box and use the
original packing materials as they provide ample protection to the scanner.
Page 5

1
Specifications
Scanner Type
Interface
Scan Speed
Scan Area
Scan Modes:
True Color
Gray Mode
Text/Line Art
Scan Method
Resolution Control:
Optical
Enhanced
Scanning Data Buffer
Voltage Requirement
Power Consumption
Operating Temperature
Operating Humidity
Storage Temperature
Storage Humidity
Dimensions:
Weight:
Color Flatbed
SCSI
1
Sms/line
21.6 cm x 35.6 cm (8.5” x 14”)
36-bit (Internal), 68.7 billion colors
24-bit (External), 16.7 million colors
48-bit
maximum (software enhanced)
12-bit (Internal), 4096 shades of gray
&bit
(External), 256 shades of gray
1 bit/pixel (2 levels)
Single Pass Scanning
600dpi (H) x
12OOdpi
(V)
9600dpi x 9600dpi (software controlled)
2MB (maximum)
AC
85V -
260V
43 Watt
10°C - 40°C
(50°F - 104°F)
35% - 80% RH, Non-Condensing
-1OOC - 60°C
(14°F - 140°F)
20% - 80% RH, Non-Condensing
558x322~
116mm
22 x 12.7 x 4.5 inches (L x W x H)
5.2 Kg (11.4 Lbs.)
NOTE: Product specifications are subject to change without prior notice.
 Loading...