

Page 1
82-253-00080
1
2
3
4
5
ScanExpress S80 Name Card Scanner
1 2
C
B
A
43 5
1
2
3
5
4
3
1
2
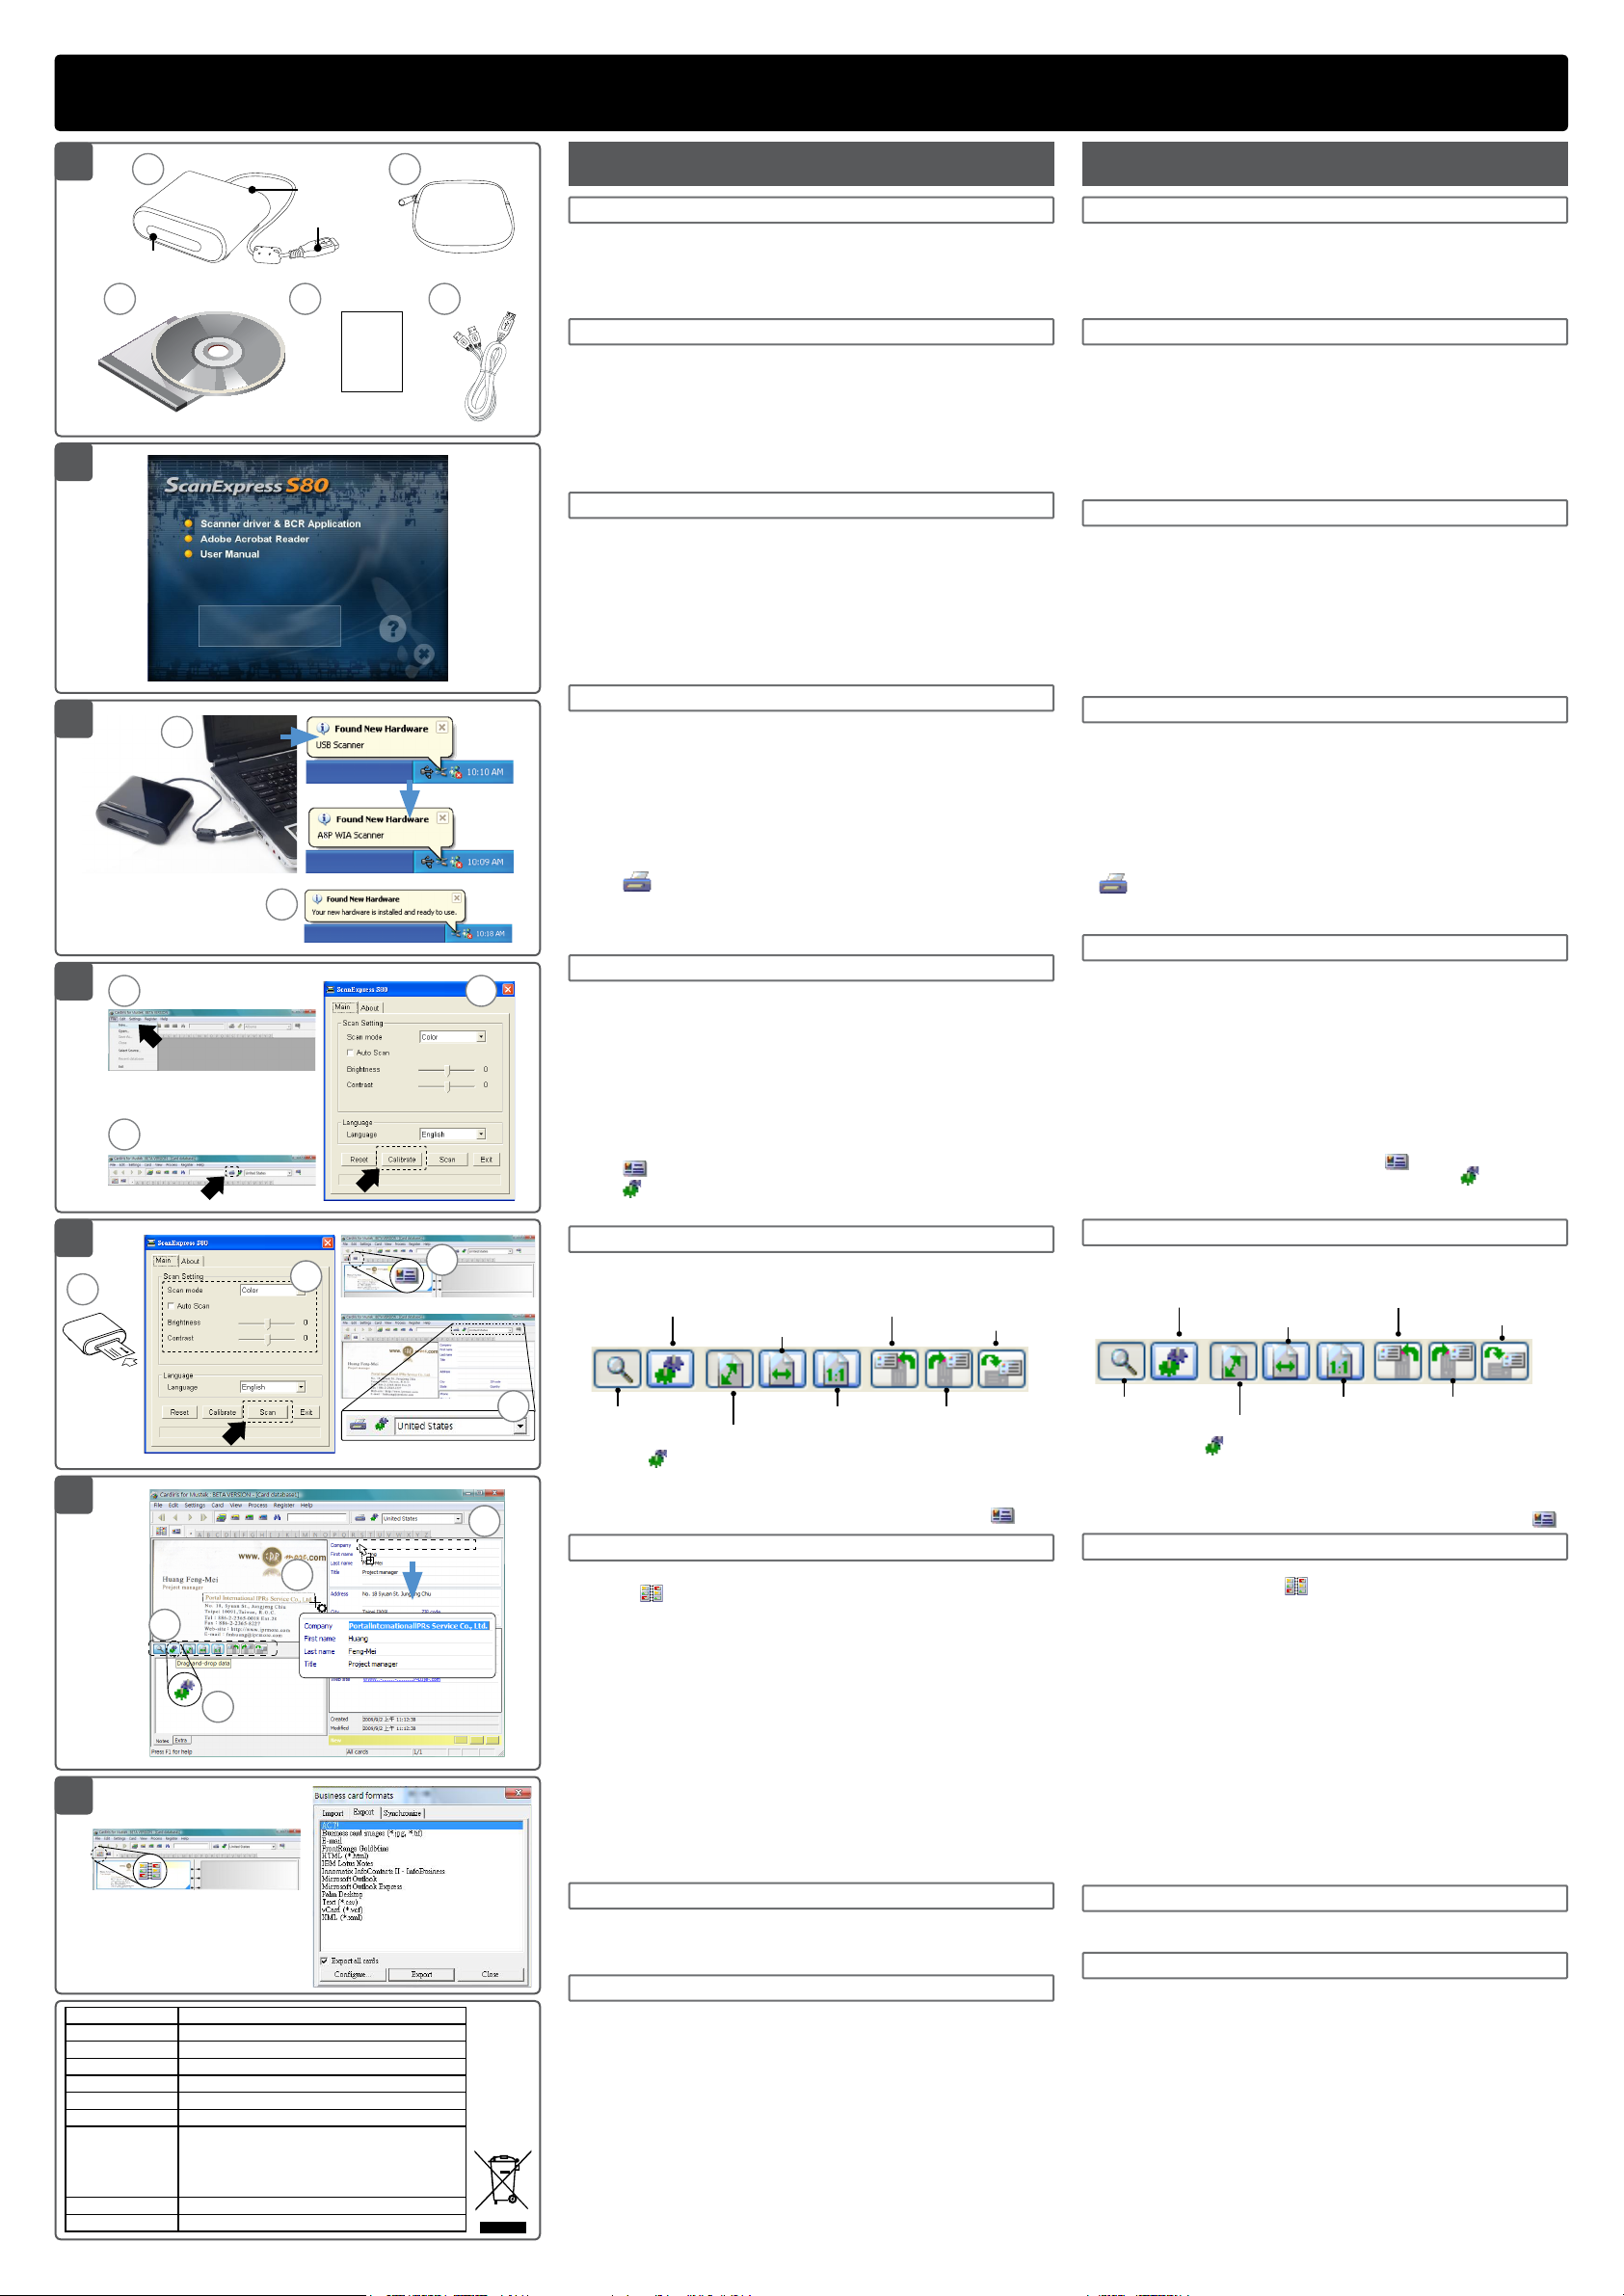
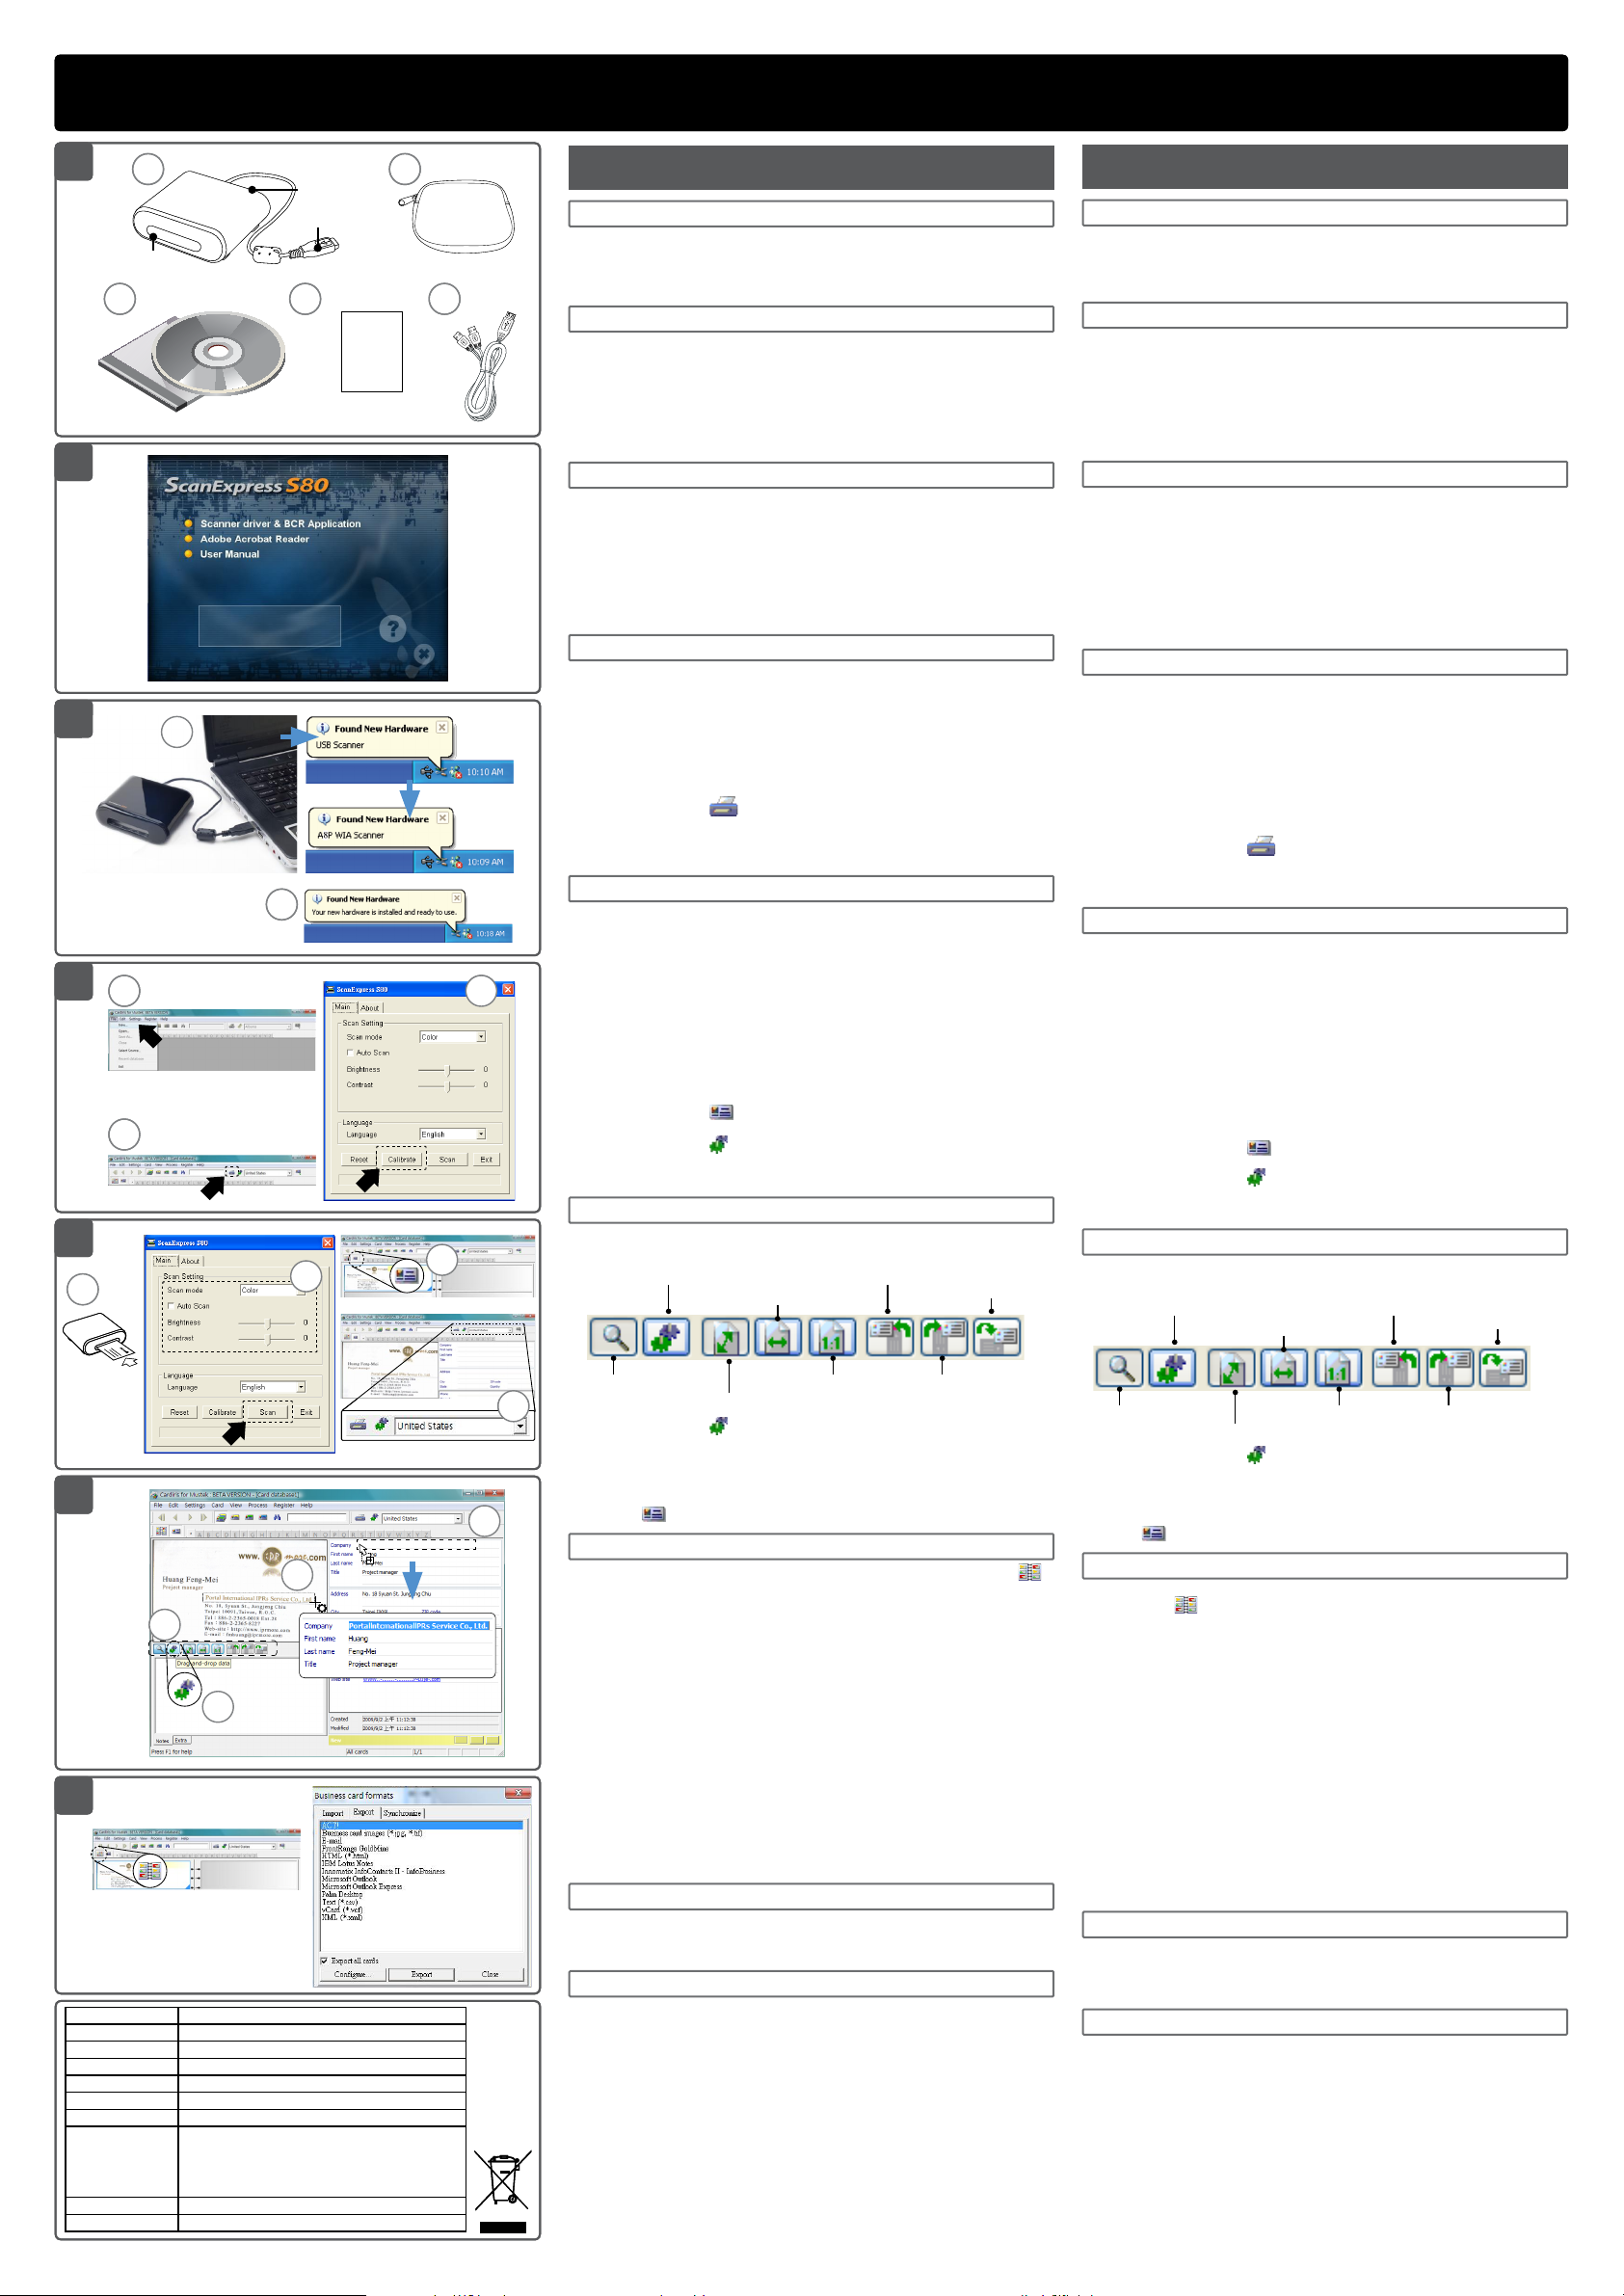
1. Package Contents
1. Name card scanner 2. Carry pouch
A: Paper Feed Slot 3. Installation CD
B: USB Type A plug 4. Calibration paper
C: Paper withdraw slot 5. USB extension cable
2. Installing Software
1. Insert the software Installation CD into your CD or DVD-ROM drive.
2. Click on Scanner driver & BCR Application, then follow the
on screen instructions to complete the scanner driver and BCR
(Cardiris) software installation.
ATTENTION: Please complete the software installation before
connecting the scanner. Don not connect the scanner to PC at this
stage.
3. Installing Hardware
1. With the PC being turned on, connect the scanner's USB plug to the
USB port of your PC.
Note: Two pop-ups will appear at the right side of task bar after the
computer detects the new hardware being inserted.
2. The Windows Hardware Manager will detect the hardware and start
to install it. Follow on screen instructions to complete installation.
The pop-up message will appear at the right side of task bar when
the hardware installation is complete.
4. Calibrate and clean the scanner
To get high image quality and good recognition results, you must
calibrate the scanner for use at the rst time prior to scanning. Please
repeat the calibrate and clean procedures from time to time.
1. Insert the attached calibration and clean paper facing up into the
feed slot of the scanner.
2. Click Start > All programs > I.R.I.S. Applications > Cardiris >
Cardiris.
3. Click File > New to create a new sheet.
4. Click (Scan Cards) button to bring up the Scan setting dialog
window.
5. Click the Calibrate button, then click OK to start the calibrating
procedure.
5. Business card scanning
1. Follow Steps 1-4 in the Calibrate and clean the scanner section to
bring up the scan dialog window.
Note: Insert the document facing up into the paper feed slot of the
scanner, making sure the document remains in position. Gently push
forward until the document is grasped by the feed slot.
2. Select the preferred Scan Mode, Auto Scan, and Brightness/
Contrast, then click the Scan to start the scan procedure.
Note: For more detailed settings above, please refer to Cardiris Help
located in Help > Help Topics.
3. Click (Card view) button on the upper toolbar.
4. Click (Recognize cards) button to start the character recognition.
Make sure the correct country is selected in the country select eld.
6. Editing
1. Select and click a function below to adjust the preview of the
scanned card.
Drag-and drop data Rotate left Turn
upside
English
Fit to width
1. Lieferumfang
1. Visitenkarten-Scanner 2. Tragetasche
A: Papiereinzugsschlitz 3. Installations-CD
B: USB-Stecker (Typ A) 4.
C: Papierausgabeschlitz 5. USB-Verlängerungskabel
2. Software installieren
1. Legen Sie die Installations-CD in Ihr CD- oder DVD-Laufwerk ein.
2.
Klicken Sie auf
& BCR-Anwendung); befolgen Sie anschließend zur Fertigstellung der
Installation des Scanner-Treibers und der BCR-Software (Cardiris) die
Anweisungen auf dem Bildschirm.
ACHTUNG: Bitte führen Sie vor dem Anschließen des Scanners die
Softwareinstallation durch. Schließen Sie den Scanner während dieses
Schrittes noch nicht am PC an.
3. Hardware installieren
1. Verbinden Sie den USB-Stecker des Scanners mit den USB-Anschluss eines eingeschalteten PCs.
Hinweis: Nachdem der Computer die neue Hardware erkannt hat,
erscheinen zwei Dialogfenster im rechten Bereich der Taskleiste.
2. Der Geräte-Manager von Windows erkennt die Hardware und
startet die Installation. Befolgen Sie zum Abschluss der Installation
die Anweisungen auf dem Bildschirm. Das Dialogfenster erscheint
im rechten Bereich der Taskleiste, sobald die Hardwareinstallation
abgeschlossen ist.
4. Den Scanner kalibrieren und reinigen
Damit Sie beim Einlesen eine gute Bildqualität und hohe Erkennbarkeit
erhalten, müssen Sie den Scanner vor dem ersten Einlesen kalibrieren.
Bitte wiederholen Sie Kalibrierung und Reinigung von Zeit zu Zeit.
1. Legen Sie das mitgelieferte Kalibrierungs- und Reinigungspapier
nach oben zeigend in den Einzugsschlitz des Scanners.
2. Klicken Sie auf Start > All programs (Alle Programme) (Alle Programme) > I.R.I.S.
Applications > Cardiris > Cardiris.
3. Klicken Sie zum erstellen einer neuen Seite auf Datei > Neu.
4. Klicken Sie zum Aufrufen des Scan-Einstellungsdialogfensters auf
5. Klicken Sie auf Calibrate (Kalibrieren)Kalibrieren) und anschließend zum Start
der Kalibrierung auf OK.
5. VisitenKarten scannen
1. Befolgen Sie zum Aufrufen des Scan-Dialogfensters die Schritte 1
bis 4 im Abschnitt Den Scanner kalibrieren und reinigen.
Hinweis: Führen Sie das Dokument langsam mit der Textseite nach
oben in den Papiereinzugsschlitz des Scanners ein; achten Sie darauf,
dass das Dokument in der richtigen Position bleibt. Drücken Sie es
sanft hinein, bis das Dokument vom Einzugsschlitz eingezogen wird.
2. Wählen Sie die gewünschten Optionen bei Scan-Modus, Automa-
tisches Einlesen und Helligkeit/Kontrast; klicken Sie dann zum
Start des Einlesens auf Scan.
Hinweis: Weitere Einzelheiten zu den Einstellungen weiter oben erhalten Sie in der Cardiris-Hilfe unter Hilfe > Hilfethemen.
3.
Klicken Sie in der oberen Werkzeugleiste auf (Anzeigemodus Karte).
4. Klicken Sie zum Start der Buchstabenerkennung auf (Karten
erkennen). Stellen Sie sicher, dass Sie im Land-Auswahlfeld das
korrekte Land ausgewählt haben.
6. Bearbeiten
1. Wählen Sie zur Anpassung der Vorschau der eingelesenen Karte
eine der nachstehenden Funktionen und klicken Sie diese an.
Daten ziehen und platzieren
Quick Start Guide
Deutsch
Kalibrierungs-/Reinigungspapier
Scanner driver & BCR Application (
(Karten scannen).
Nach Links rotieren
Ganzes Breite
Scanner-Treiber
Auf den Kopf stellen
6
3
1
2
7
Scanner Type Color CIS Sheet feed
Scan Area A8 size, 54mm (W)
Light Source LED
Interface USB 1.1
Scanning Mode Color mode, Gray Mode, Line Art
Power Consumption 0.7W (standby), 2.3W (during scan), fully USB powered
System Support Windows XP, Vista
System requirement • Pentium III 300 CPU or above
Dimension 108mm x 89mm x 32mm
Weight 153g
• 256MB RAM (512MB for Windows Vista / 7)
• 200MB available hard disk space Windows XP / Vista / 7
• CD-ROM Drive
• Available USB Port
4
4
Magnifying glass Actual size Rotate right
Fit the window
2. Click the (Drag-and-drop data) button.
3. Select the area you wish to edit or recognize again using a mouse.
4. Drag and drop the selected square to the target eld.
Note: Drag-and-drop operation works only in the Card view ( ).
7. Export and Synchronize
• To export and synchronize the data with other softwares, please
switch to (Album view).
1. Click File > Import, Export and Synchronize... > Synchronize tap.
2. Click Export tab.
3. Select a preference format you wish to export the scanned name
card, and then click Export. The supported formats include as follow:
*.jpg, *.tif, E-mail, FrontRange GoldMine, HTML(*.html), IBM Lotus
Notes, Innomatix InfoContacts II, Outlook, Outlook Express, Palm
Desktop, Text (*.csv), vCard(*.vcf) and XML(*xml).
4. Alternatively, repeat the steps above 1-2 to select Synchronize.
5. Select a preference software you wish to synchronize the scanned
name card, and then click Synchronize. The supported softwares
include as follow: ACT!, FrontRange GoldMine, IBM Lotus Notes,
Outlook, Outlook Express, Palm Desktop and Pocket PC.
For more BCR functions, please refer to Cardiris Help located in Help
> Help Topics.
8. Troubleshooting
• Check to make sure the USB cable is rmly plugged into the
computer.
• Please calibrate or clean the scanner if the scan result is poor quality.
9. Safety Information and Specication
• Keep away from water or moisture and dusty areas.
• Never store in hot and very cold areas.
• Only use attachments/accessories specied by the manufacturer.
• No objects lled with liquids, such as vases, shall be placed on apparatus.
• Avoid dust contamination when the scanner is not in use.
• When left unused for a long period of time, the unit should be disconnected from
the USB cable and PC.
• Avoid environments where the scanner would be exposed to direct sunlight (or
any other source of excessive heat) for long periods of time.
• Protect the scanner from potential liquid spills such as soda, coffee, tea, etc.
• Be carefully to keep it without dropping it or strong impact.
• Operate the scanner on a level, well-grounded work surface, free of excessive
vibration.
• Don’t open the scanner case alone without technical support because there is
danger of electrical shock.
Vegrößerungsglas
2. Klicken Sie auf (Daten ziehen und platzieren).
3. Wählen Sie mit der Maus einen Bereich, den Sie bearbeiten oder
erneut erkennen möchten.
4. Verschieben Sie das ausgewählte Rechteck durch Ziehen-undAblegen in das gewünschte Feld.
Hinweis: Ziehen-und-Ablegen funktioniert nur in der Anzeigemodus Karte ( ).
Ganzes Bild
7. Exportieren und synchronisieren
• Schalten Sie zum Exportieren und Synchronisieren der Daten mit
anderen Programmen in die (Anzeigemodus Album).
1. Klicken Sie auf Datei > Import, Export and Synchronize... (Im-Im-
portieren, Exportieren und Synchronisieren...) > Synchronize
(Synchronisieren)Synchronisieren).
2. Klicken Sie auf die Exportieren-Registerkarte.
3. Wählen Sie das gewünschte Format, in dem Sie die eingelesene
Visitenkarte exportieren möchten; klicken Sie dann auf Exportieren.
Zu den unterstützten Formaten zählen: *.jpg, *.tif, E-Mail, FrontRange GoldMine, HTML (*.html), IBM Lotus Notes, Innomatix InfoContacts II, Outlook, Outlook Express, Palm Desktop, Text (*.csv), vCard
(*.vcf) und XML (*xml).
4. Alternativ können Sie zur Auswahl von Synchronize (Synchronisie-Synchronisie-
ren) die oben genannten Schritte 1 bis 2 wiederholen.
5. Wählen Sie das gewünschte Programm, mit dem Sie die eingele-
sene Visitenkarte synchronisieren möchten; klicken Sie dann auf
Synchronize (Synchronisieren)Synchronisieren). Zu den unterstützten Programmen
zählen: ACT!, FrontRange GoldMine, IBM Lotus Notes, Outlook, Outlook Express, Palm Desktop und Pocket PC.
Weitere Informationen zu BCR-Funktionen nden Sie in der Cardiris-
Hilfe unter Hilfe > Hilfethemen.
8. Problemlösung
•
Stellen Sie sicher, dass das USB-Kabel richtig am Computer angeschlossen ist.
•
Bitte kalibrieren oder reinigen Sie den Scanner bei schlechter Scan-Qualität.
9. Sicherheitsinformationen und Spezikationen
• Halten Sie das Gerät von nassen, feuchten und staubigen Umgebungen fern.
• Lagern Sie das Produkt niemals an heißen oder sehr kalten Orten.
• Verwenden Sie nur die vom Hersteller angegebene Zubehörteile/Zusatzgeräte.
• Platzieren Sie keine mit Wasser gefüllten Behälter (z. B. Vasen) auf dem Gerät.
• Verhindern Sie Staubablagerungen, wenn der Scanner nicht genutzt wird.
• Wenn Sie das Gerät über einen längeren Zeitraum nicht verwenden, sollten Sie
das USB-Kabel vom Scanner sowie vom PC trennen.
• Meiden Sie Umgebungen, in denen der Scanner über einen längeren Zeitraum
dem direkten Sonnenlicht (oder einer anderen Hitzequelle) ausgesetzt ist.
• Achten Sie darauf, nicht versehentlich Flüssigkeiten (z. B. Limonade, Kaffee,
Tee, etc.) über den Scanner zu verschütten.
• Achten Sie darauf, den Scanner nicht fallen zu lassen und keinen Erschütterun-
gen auszusetzen.
• Betreiben Sie den Scanner auf einer ebenen, stabilen Arbeitsober äche, die
keinen starken Erschütterungen ausgesetzt ist.
• Öffnen Sie keinesfalls allein das Scanner-Gehäuse; aufgrund von Stromschlag-
gefahr sollten Sie dies ausschließlich mit Hilfe des technischen Kundendienstes
durchführen.
Reelle Größe
Nach rechts rotieren
Page 2

82-253-00080
1
2
3
4
5
ScanExpress S80 Name Card Scanner
1 2
C
B
A
43 5
1
2
53
4
3
1
2
1. Contenu de la boîte
1. Scanneur de cartes de visite 2. Housse de transport
A: Fente d'alimentation du papier 3. CD d'installation
B: Prise USB de type A 4. Page de calibrage
C: Fente de sortie du papier 5. Câble prolongateur USB
2. Installation du logiciel
1. Insérez le CD d'installation du logiciel dans votre lecteur CD ou
DVD-ROM.
2. Cliquez sur Scanner driver & BCR Application (Pilote du scan-Pilote du scan-
neur et application BCR), puis suivez les instructions à l'écran
pour terminer l'installation du pilote du scanneur et du logiciel BCR
(Cardiris).
ATTENTION : Veuillez terminer l'installation complète du logiciel avant
de brancher le scanneur. Ne reliez pas le scanneur au PC à ce niveau
de l'installation.
3. Installation du matériel
1. Lorsque le PC est mis en marche, connectez la prise USB du scan-
neur sur le port USB de votre PC.
Note :Une fois le nouveau matériel inséré et détecté, deux fenêtres
apparaissent à droite de la barre de tâches.
2. Le gestionnaire des périphériques Windows détecte le matériel et
lance son installation. Suivez les instructions à l'écran pour terminer
l'installation. Un message apparaît à droite de la barre de tâche une
fois l'installation du périphérique terminée.
4. Calibrer et nettoyer le scanneur
De façon à obtenir une bonne qualité d'image et un résultat de reconnaissance adéquat, il faut calibrer le scanneur avant sa première
utilisation. Veuillez réitérer les procédures de calibrage et de nettoyage
de temps à autre.
1. Insérez le papier de calibration et de nettoyage joint, face vers le
haut, dans la fente d'alimentation du scanneur.
2. Cliquez sur Start (Démarrer)Démarrer) > All programs (Tous les program-Tous les program-
mes) > I.R.I.S. Applications > Cardiris > Cardiris.
3. Cliquez sur Fichier > Nouvelle pour créer une nouvelle che.
4. Cliquez sur le bouton (Numériser des cartes) pour afcher la
fenêtre de dialogue de réglage de la numérisation.
5. Cliquez sur le bouton Calibrate (Calibrer)Calibrer) , puis cliquez sur OK pour
démarrer la procédure de calibrage.
5. Numérisation de cartes de visite
1. Suivez les étapes 1-4 dans la section Calibrer et nettoyer le scan-
neur pour afcher la fenêtre de dialogue de numérisation.
Note : Insérez le document face vers le haut dans la fente d'alimenta-
tion de papier du scanneur, en s'assurant que le document reste bien
en place. Poussez doucement vers l'avant jusqu'à ce que le document
soit pris dans la fente d'alimentation.
2. Choisissez le Mode de numérisation, le Scan auto, et la Lumino-
sité/le Contraste, puis cliquez sur Scan (Scanner)Scanner) pour démarrer la
procédure de numérisation.
Note : Pour des réglages plus détaillés ci-dessus, veuillez vous référer
à l'aide de Cardiris située dans Aide > Sujet de l'aide.
3.
Cliquez sur le bouton (Vue carte) sur la barre d'outils supérieure.
4. Cliquez sur le bouton (Reconnaître des cartes) pour démarrer
la reconnaissance de caractères. Assurez-vous d'avoir choisi le bon
pays dans le champs de choix du pays.
6. Édition
1. Choisissez et cliquez sur une fonction ci-dessous pour régler
l'aperçu de la carte numérisée.
Glisser-déposer des données Rotation gauche
Français
Pleine largeur
Tourner à l'envers
1. Комплект поставки
1. Сканер визитных карточек 2. Сумка для переноски
A: Приемная прорезь 3. Установочный компакт-диск
B: USB-разъем типа A 4. Лист для калибровки
C: Прорезь извлечения листа 5. Удлинительный кабель USB
2. Установка программного обеспечения
1. Вставьте установочный компакт-диск с ПО в привод компакт-
дисков или DVD.
2. Выберите Scanner driver & BCR Application, затем следуйте
указаниям на экране для выполнения установки драйвера сканера и программы распознавания визитных карточек (Cardiris).
ВНИМАНИЕ. До подключения сканера завершите установку программного обеспечения. На данном этапе не подключайте сканер к ПК.
3. Установка оборудования
1. При включенном ПК, подсоедините USB-разъем сканера к USBпорту ПК.
Примечание.После обнаружения компьютером подключения нового оборудования, в правой части панели задач отобразятся два
всплывающих окна.
2. Диспетчер оборудования Windows обнаружит новое оборудование и начнет его установку. Для выполнения установки следуйте
экранным инструкциям. После завершения установки в правой
части панели задач отобразится всплывающее сообщение.
4. Калибровка и очистка сканера
Чтобы получить изображение высокого качества при сканировании
и хороший результат при распознавании изображения, до сканирования при первом использовании следует выполнить калибровку
сканера. Время от времени повторяйте процедуры калибровки и
очистки сканера.
1. Вставьте прилагаемую бумагу для калибровки и очистки лицевой стороной вверх в приемную прорезь сканера.
2. Нажмите Start > All programs > I.R.I.S. Applications > Cardiris >
Cardiris.
3. Чтобы создать новый лист, выберите File > New.
4. Нажмите кнопку (Scan Cards), чтобы отобразить диалоговое окно настройки сканирования.
5. Нажмите кнопку Calibrate, затем нажмите кнопку OK, чтобы
запустить процедуру калибровки.
5. Сканирование визитных карточек
1. Выполните шаги 1-4 раздела Калибровка и очистка сканера,
чтобы отобразить диалоговое окно сканирования.
Примечание.Вставьте документ лицевой стороной вверх в приемную прорезь сканера, обеспечив правильное положение документа. Осторожно протолкните документ вперед до его захвата приемным устройством сканера.
2. Выберите желаемый Режим сканирования, установите при
необходимости флажок Автосканирование, отрегулируйте Яр-
кость и Контрастность, затем нажмите кнопку Scan для запуска процедуры сканирования.
Примечание. Дополнительные сведения о приведенных выше параметрах настройки см. в справке к программе Cardiris через меню
Справка > Разделы справки.
3. Нажмите кнопку (Card view) на верхней панели инструментов.
4. Нажмите кнопку (Recognize cards) для запуска распознавания символов. Убедитесь, что страна в поле выбора страны
указана правильно.
6. Правка
1. В этом окне найдите и выберите нужную функцию для настройки
предварительного просмотра сканированной карточки.
Перетаскивание данных Повернуть влево Перевернуть
Quick Start Guide
Русский
По ширине
через верх
6
3
1
2
7
Scanner Type Color CIS Sheet feed
Scan Area A8 size, 54mm (W)
Light Source LED
Interface USB 1.1
Scanning Mode Color mode, Gray Mode, Line Art
Power Consumption 0.7W (standby), 2.3W (during scan), fully USB powered
System Support Windows XP, Vista
System requirement • Pentium III 300 CPU or above
Dimension 108mm x 89mm x 32mm
Weight 153g
• 256MB RAM (512MB for Windows Vista / 7)
• 200MB available hard disk space Windows XP / Vista / 7
• CD-ROM Drive
• Available USB Port
Loupe Taille réelle Rotation droite
Pleine page
4
4
2. Cliquez sur le bouton (Glisser-déposer des données).
3. Choisissez la zone que vous voulez éditer et reconnaître à l'aide de
la souris.
4. Glissez et déposez le carré sélectionné dans le champ cible.
Note : Les opérations de glisser et déposer fonctionnement uniquement dans Vue carte ( ).
7. Exporter et synchroniser
• Pour exporter et synchroniser les données avec d'autres logiciels,
veuillez basculer vers (Vue album).
1.
Cliquez sur Fichier > Import, Export and Synchronize... (Importer,Importer,
Exporter et synchroniser...) > onglet Synchronize (Synchroniser)Synchroniser) .
2. Cliquez sur l'onglet Exporter.
3. Choisissez le format préféré vers lequel vous voulez exporter la
carte de visite, puis cliquez sur Exporter. Les formats pris en charge
incluent les suivants : *.jpg, *.tif, E-mail, FrontRange GoldMine,
HTML(*.html), IBM Lotus Notes, Innomatix InfoContacts II, Outlook, Outlook Express, Palm Desktop, Text (*.csv), vCard(*.vcf) et
XML(*xml).
4. Sinon, répétez les étapes 1-2 pour choisir Synchronize (Synchro-
niser).
5. Choisissez le logiciel préféré avec lequel vous voulez exporter la
carte de visite numérisée, puis cliquez sur Synchronize (Synchro-
niser). Les logiciels pris en charge incluent les suivants : ACT!,
FrontRange GoldMine, IBM Lotus Notes, Outlook, Outlook Express,
Palm Desktop et Pocket PC.
Pour plus de fonctions BCR, veuillez vous référer à l'aide de Cardiris
située dans Aide > Sujet de l'aide.
8. Guide de dépannage
• Assurez-vous que le câble USB est bien relié à l'ordinateur.
• Calibrez et nettoyez le scanneur si le résultat de la numérisation n'est
pas de bonne qualité.
9. Informations et notice relatives à la sécurité
• Gardez cet appareil à l’abri de l’eau, de l’humidité et de la poussière.
• Ne stockez jamais dans des zones très chaudes ou très froides.
• Utilisez seulement les pièces ou les accessoires recommandés par le fabricant.
• Ne placez aucun objet pouvant contenir du liquide, comme un vase, sur l’appareil.
• Évitez de l’exposer à la poussière lorsqu’il n’est pas utilisé.
• Débranchez le câble USB et déconnectez le PC relié à cet appareil si vous n’allez
pas l’utiliser pendant une longue période de temps.
• Évitez les environnements où le scanneur risque d’être exposé longtemps à la
lumière direct du soleil (ou à tout autre source de chaleur excessive).
• Protégez le scanneur de tout liquide qui risquerait de se renverser sur lui, comme
le soda, le café, le thé, etc.
• Faites attention à ne jamais provoquer de chute ni d’impact fort.
• Faites fonctionner le scanneur sur une surface de travail de niveau et stable, ne
présentant aucune vibration excessive.
• N’ouvrez jamais le boîtier du scanneur sans le support d’un technicien : risque d’
électrocution.
Лупа Фактический размер Повернуть вправо
По размеру окна
2. Нажмите кнопку (Drag-and-drop data).
3. Выберите область, которую требуется отредактировать или распознать еще раз, с помощью мыши.
4. Перетащите выбранный квадрат в нужное поле.
Примечание. Операции по перетаскиванию возможны только в
представлении Card view ( ( ).
7. Экспорт и синхронизация
• Для экспорта и синхронизации данных с другим ПО переключи-
тесь в представление (Album view).
1. Выберите File > Import, Export and Synchronize... >
Synchronize.
2. Выберите вкладку Export.
3. Выберите желаемый формат для экспорта сканированной визитной карточки, затем нажмите кнопку Export. Поддерживаются
следующие форматы: *.jpg, *.tif, E-mail, FrontRange GoldMine,
HTML, IBM Lotus Notes, Innomatix InfoContacts II, Outlook, Outlook
Express, Palm Desktop, Text (*.csv), vCard(*.vcf) и XML(*xml).
4. Либо повторите приведенные выше шаги 1-2, чтобы выбрать
Synchronize.
5. Выберите желаемой ПО, с которым требуется синхронизировать сканированную визитную карточку, затем нажмите кнопку
Synchronize. Поддерживается следующее ПО: ACT!, FrontRange
GoldMine, IBM Lotus Notes, Outlook, Outlook Express, Palm
Desktop и Pocket PC.
Дополнительные сведения о функциях распознавания визитных
карточек см. в справке к программе Cardiris через меню Справка >
Разделы справки.
8. Поиск и устранение неполадок
• Убедитесь в надежности подключения кабеля USB к компьютеру.
• Если качество сканирования неудовлетворительное, выполните
калибровку и очистку сканера.
9. Сведения о технике безопасности и технические характеристики
• Оберегайте от попадания воды, влаги и пыли.
• Не храните в условиях очень высокой и низкой температуры.
• Используйте только приспособления и принадлежности, указанные
производителем.
• Никакие предметы с жидкостями, например, вазы, не должны
устанавливаться на устройстве.
• Оберегайте от загрязнения пылью, когда сканер не используется.
• Если устройство не используется длительное время, от него следует
отключить кабель USB и компьютер.
• Избегайте попадания на сканер прямого солнечного света (или от других
источников излучения повышенного тепла) в течение длительного времени.
• Не допускайте попадания на сканер жидкостей, таких как газированная
вода, кофе, чай и т.п.
• Не допускайте падения сканера или сильных ударов.
• Располагайте сканер на ровной, устойчивой рабочей поверхности, без
излишний вибраций.
• Не открывайте корпус сканера без консультации технического специалиста,
так как существует опасность поражения электрическим током.
Page 3
82-253-00080
82-253-00080
ScanExpress S80 Name Card Scanner
ScanExpress S80 Name Card Scanner
Quick Start Guide
Quick Start Guide
1
1
2
2
3
3
4
4
5
5
1 2
1 2
C
C
B
B
A
A
43 5
43 5
1. Contenuto della confezione
1. Scanner biglietti da visita 2. Custodia
A: Fessura ingresso fogli 3. CD d'installazione
B: Connettore USB di tipo A 4. Foglio per la calibratura
C: Fessura uscita fogli 5. Prolunga USB
2. Installazione del software
1. Inserire il CD d'installazione del software nell'unità CD o DVD-
ROM.
2. Fare clic su Scanner driver & BCR Application (Driver scanner
e applicazione BCR) e poi seguire le istruzioni per completare l’
installazione del driver scanner e del software BCR (Cardiris).
ATTENZIONE: Completare l’installazione del software prima di collegare lo scanner. Non collegare lo scanner al PC a questo punto.
3. Installazione dell’hardware
1. Con il PC acceso, collegare il connettore USB dello scanner alla por-
ta USB del PC.
Nota:Dopo che il computer ha rilevato il nuovo hardware, sulla destra
della barra delle applicazioni appariranno due nestre.
2. La gestione hardware di Windows rileverà l’hardware e lo installerà.
Seguire le istruzioni su schermo per completare l'installazione. Dopo
che l’installazione dell’hardware è stata completata, sulla destra
della barra delle applicazioni apparirà un messaggio.
4. Calibratura e pulizia dello scanner
Per ottenere la migliore qualità d’immagine ed i migliori risultati di
riconoscimento, prima di eseguire le scansioni è necessario calibrare lo
scanner all’uso. Ripetere le procedure di calibratura di tanto in tanto.
1
1
1. Inserire il foglio speciale per la calibratura fornito in dotazione rivolto
verso l’alto nella fessura d’ingresso fogli dello scanner.
2. Fare clic su Start > All programs (Tutti i programmi)All programs (Tutti i programmi)Tutti i programmi) > I.R.I.S.I.R.I.S.
Applications (Applicazioni I.R.I.S.)Applicazioni I.R.I.S.) > Cardiris > Cardiris.
3. Fare clic su Archivio > Nuovo per creare un nuovo foglio.
4. Fare clic sul tasto (Scandire biglietti) per fare apparire la ne-
stra di dialogo Scan setting (Impostazione scansione).
5. Fare clic sul tasto Calibrate (Calibra) e poi su OK per avviare la
procedura di calibratura.
5. Scansione dei biglietti da visita
2
2
53
53
4
4
1. Seguire le istruzioni dei punti da 1 a 4 della sezione Calibratura
e pulizia dello scanner per fare apparire la nestra di dialogo di
Scansione.
Nota: Inserire lentamente il documento rivolto verso l’alto nella fessura
d’ingresso fogli, assicurandosi che il documento rimanga in posizione.
Spingere delicatamente nché il documento afferrato dalla fessura nché il documento afferrato dalla fessuranché il documento afferrato dalla fessura
d'ingresso.
2. Selezionare l’impostazione preferita per Modalità di scansione,
Scansione automatica e Luminosità / Contrasto e poi fare clic sul
tasto Scan (Scansione) per avviare la procedura di scansione.
Nota: Per altre istruzioni dettagliate fare riferimento alla Guida di Cardiris facendo clic su Guida > Argomenti della guida.
3. Fare clic sul tasto (Modo biglietto) nella barra degli strumenti
superiore.
4. Fare clic sul tasto (Riconoscere biglitti) per avviare il riconosci-
mento dei caratteri. Assicurarsi di avere selezionato il paese corretto
nel campo di selezione del paese.
6. Modica
1. Selezionare e fare clic su una delle seguenti funzioni per regolare l’
3
2
1
1
2
3
anteprima del biglietto digitalizzato.
Trascinare e rilasciare dati Rotazione a sinistra
Italiano
Adatta alla larghezza
Capovolgi
1. Contenido del paquete
1. Escáner de tarjetas de visita 2. Funda de transporte
A: Ranura de entrada del papel 3. CD de instalación
B: Conector USB de tipo A 4. Papel de calibración
C: Ranura de salida del papel 5.
2. Instalación del software
1. Inserte el CD de instalación del software en la unidad de CD o
DVD-ROM.
2. Haga clic en Scanner driver & BCR Application (Controlador del
escáner y aplicación BCR) y, a continuación, siga las instrucciones
que aparecerán en la pantalla para llevar a cabo la instalación del
controlador del escáner y el software BCR (Cardiris).
ATENCIÓN: Lleve a cabo la instalación del software antes de conectar
el escáner. No conecte el escáner a su PC ahora.
3. Instalación del hardware
1. Con el PC encendido, conecte el conector USB del escáner al
puerto USB de su PC.
Nota: Aparecerán dos mensajes emergentes en la parte derecha de
la barra de tareas cuando el equipo detecte la conexión del nuevo
hardware.
2. El Administrador de hardware de Windows detectará el hardware y
comenzará a instalarlo. Siga las instrucciones que aparecerán en
la pantalla para llevar a cabo la instalación. Aparecerá un mensaje
emergente en la parte derecha de la barra de tareas una vez que
haya nalizado la instalación del hardware.
4. Calibración y limpieza del escáner
Para conseguir una alta calidad de imagen y un buen resultado
de reconocimiento, deberá calibrar el uso del escáner en primer
lugar antes de comenzar a digitalizar. Repita los procedimientos de
calibración y limpieza con cierta frecuencia.
1. Inserte el papel de calibración y limpieza adjunto orientado hacia
arriba a través de la ranura de entrada del escáner.
2. Haga clic en Start (Inicio) > All programs (Todos los programas)
> I.R.I.S. Applications (Aplicaciones I.R.I.S.) > Cardiris >
Cardiris.
3. Haga clic en Archivo > Nuevo para crear una lámina nueva.
4. Haga clic en el botón (Escanear tarjetas) para abrir el cuadro
de diálogo de conguración de digitalización.
5. Haga clic en el botón Calibrate (Calibrar) y, a continuación, haga
clic en OK (Aceptar) para iniciar el procedimiento de calibración.
5. Digitalización de tarjetas de visita
1. Siga los Pasos 1 a 4 de la sección Calibrar y limpiar el escáner
para abrir el cuadro de diálogo de digitalización.
Nota: Inserte el documento orientado hacia arriba en la ranura de
entrada de papel del escáner. Asegúrese de que el documento
permanezca en la posición correcta. Presione suavemente
el documento hacia delante hasta que lo capture la ranura de entrada.
2. Congure según sus preferencias los parámetros Modo de
digitalización, Digitalización automática y Brillo / Contraste y, a
continuación, haga clic en el botón Scan (Digitalizar) para iniciar el
procedimiento de digitalización.
Nota: Si desea obtener más información acerca de los parámetros
anteriores, consulte la Ayuda de Cardiris a través del menú Ayuda >
Temas de ayuda.
3. Haga clic en el botón (Modo tarjeta) en la barra de
herramientas superior.
4. Haga clic en el botón (Reconocer tarjetas) para iniciar el
reconocimiento de caracteres. Asegúrese de haber seleccionado el
país correcto en el campo de selección de país.
6. Edición
1. Seleccione y haga clic en una de las siguientes funciones para
ajustar la vista previa de la tarjeta digitalizada.
Arrastrar y colocar datos Rotar a la izquierda
Español
Ajustar a lo ancho
Cable prolongador de tipo USB
Voltear
6
6
3
3
1
1
2
2
7
7
Scanner Type Color CIS Sheet feed
Scanner Type Color CIS Sheet feed
Scan Area A8 size, 54mm (W)
Scan Area A8 size, 54mm (W)
Light Source LED
Light Source LED
Interface USB 1.1
Interface USB 1.1
Scanning Mode Color mode, Gray Mode, Line Art
Scanning Mode Color mode, Gray Mode, Line Art
Power Consumption 0.7W (standby), 2.3W (during scan), fully USB powered
Power Consumption 0.7W (standby), 2.3W (during scan), fully USB powered
System Support Windows XP, Vista
System Support Windows XP, Vista
System requirement • Pentium III 300 CPU or above
System requirement • Pentium III 300 CPU or above
Dimension 108mm x 89mm x 32mm
Dimension 108mm x 89mm x 32mm
Weight 153g
Weight 153g
• 256MB RAM (512MB for Windows Vista / 7)
• 256MB RAM (512MB for Windows Vista / 7)
• 200MB available hard disk space Windows XP / Vista / 7
• 200MB available hard disk space Windows XP / Vista / 7
• CD-ROM Drive
• CD-ROM Drive
• Available USB Port
• Available USB Port
Lente d’ingrandimento
4
4
4
4
2. Fare clic sul tasto (Trascinare e rilasciare dati).
3. Usando il mouse, selezionare l’area che si vuole modicare o riconoscere di nuovo.
4. Trascinare la cornice selezionata nel campo di destinazione.
Nota: Le funzioni di trascinamento selezione funzionano solo su Modo
biglietto ( ).
7. Esporta e sincronizza
• Per esportare e sincronizzare i dati con altro software passare a
(Modo Album).
1. Fare clic su Archivio >Import, Export and Synchronize... (Impor-
ta, Esporta e Sincronizza...) > Synchronize (Sincronizza)Sincronizza).
2. Fare clic sulla scheda Esporta.
3. Selezionare il formato preferito col quale si vuole esportare il biglietto da visita e poi fare clic su Esporta. I formati supportati sono i seguenti: *.jpg, *.tif, E-mail, FrontRange GoldMine, HTML (*.html), IBM
Lotus Notes, Innomatix InfoContacts II, Outlook, Outlook Express,
Palm Desktop, Text (*.csv), vCard (*.vcf) e XML (*xml).
4. Alternativamente, ripetere le precedenti istruzioni dei punti 1 e 2 per
selezionare Synchronize (Sincronizza)Sincronizza).
5. Selezionare il formato preferito col quale si vuole sincronizzare il
biglietto da visita e poi fare clic su Synchronize (Sincronizza)Sincronizza). I
software supportati sono i seguenti: ACT!, FrontRange GoldMine,
IBM Lotus Notes, Outlook, Outlook Express, Palm Desktop e Pocket
PC.
Per altre funzioni BCR fare riferimento alla Guida di Cardiris facendo
clic su Guida > Argomenti della guida.
8. Risoluzione dei problemi
• Vericare che il cavo USB sia collegato in modo appropriato al com-
puter.
• Calibrare o pulire lo scanner se la qualità della scansione è mediocre.
9. Informazioni sulla sicurezza e speciche
• Tenere lontano dall acqua, dall umidità e da aree polverose.
• Non immagazzinare in aree molto calde o molto fredde.
• Usare solo cavi/accessori speci cati dal costruttore.
• Sull’apparato non devono essere collocati oggetti riempiti con liquidi, come vasi.
• Evitare che lo scanner si impolveri quando non è in uso.
• Quando non è usata per periodi prolungati, l’unità deve essere scollegata dal
cavo USB e dal PC.
• Evitare ambienti in cui lo scanner potrebbe essere esposto alla luce diretta del
sole (o altre sorgenti di calore) per periodi prolungati.
• Proteggere lo scanner da potenziali versamenti di liquidi come bibite, caffè, tè,
eccetera.
• Evitare le cadute ed i forti impatti.
• Usare lo scanner su una supercie piatta, stabile e libera da vibrazioni.
• Non aprire lo scanner senza assistenza tecnica perché c’è il pericolo di scariche
elettriche.
Dimensione reale Rotazione a destra
Adatta alla nestra
Lupa Tamaño real Rotar a la derecha
Ajustar a la ventana
2. Haga clic en el botón (Arrastrar y colocar datos).
3. Seleccione el área que desee editar o reconocer de nuevo usando
el ratón.
4. Arrastre y coloque el cuadro seleccionado en el campo de destino.
Nota: La operación "arrastrar y colocar" sólo funciona en la Modo
tarjeta ( ).
7. Exportar y sincronizar
• Si desea exportar y sincronizar los datos con otras aplicaciones,
cambie a la (Modo álbum).
1. Haga clic en Archivo > Import, Export and Synchronize...
(Importar, exportar y sincronizar...) > cha Synchronize
(Sincronizar).
2. Haga clic en la cha Exportar.
3. Seleccione el formato en el que desee exportar la tarjeta de visita
digitalizada y haga clic en Exportar. Los formatos compatibles son
los siguientes: *.jpg, *.tif, Correo electrónico, FrontRange GoldMine,
HTML(*.html), IBM Lotus Notes, Innomatix InfoContacts II, Outlook,
Outlook Express, Palm Desktop, Texto (*.csv), vCard(*.vcf) y XML(*.
xml).
4. Alternativamente, puede repetir los pasos 1 a 2 anteriores para
seleccionar Synchronize (Sincronizar).
5. Seleccione la aplicación con la que desee sincronizar la tarjeta de
visita digitalizada y haga clic en Synchronize (Sincronizar). Las
aplicaciones compatibles son las siguientes: ACT!, FrontRange
GoldMine, IBM Lotus Notes, Outlook, Outlook Express, Palm
Desktop y Pocket PC.
Si desea obtener más información acerca de las funciones BCR,
consulte la Ayuda de Cardiris a través del menú Ayuda > Temas de
ayuda.
8. Solucionar problemas
• Asegúrese de que el cable USB se encuentre rmemente conectado
al equipo.
• Calibre o limpie el escáner si el resultado de la digitalización es de
mala calidad.
9. Información de seguridad y especicaciones
• Mantenga la unidad alejada de áreas con agua, humedad o polvo.
• No almacene nunca la unidad en áreas con temperatura elevada o muy baja.
• Utilice únicamente los accesorios especi cados por el fabricante.
• No coloque recipientes que contengan líquido (como jarrones o oreros) en el
aparato.
• Proteja el escáner del polvo cuando no lo utilice.
• Si va a dejar de utilizar el escáner durante un prolongado período de tiempo,
desconéctelo del cable USB y de su PC.
• Evite entornos donde el escáner quede expuesto a la luz solar directa (o a
cualquier otra fuente de calor excesivo) durante prolongados períodos de
tiempo.
• Proteja el escáner para evitar que posibles líquidos se derramen en él, como
por ejemplo soda, café, té, etc.
• Tenga cuidado para que la unidad no se caiga ni sufra Fuertes impactos.
• Utilice el escáner en una super cie de trabajo nivelada, rme y sin vibraciones.
Page 4

82-253-00080
1
2
3
4
5
ScanExpress S80 Name Card Scanner
1 2
C
B
A
43 5
1
2
53
4
3
1
2
1. Inhoud van de verpakking
1. Visitekaartjesscanner 2. Draagtas
A: Papiertoevoersleuf 3. Installatie-cd
B: USB type A-stekker 4. Kalibratie-/reinigingsblad
C: papieruitvoersleuf 5. USB-verlengkabel
2. De software installeren
1. Plaats de installatie-cd met de software in uw cd- of dvd-romstation.
2. Klik op Scanner driver & BCR Application
(Scannerstuurprogramma & BCR-toepassing) en volg
daarna de instructies op het scherm om de installatie van het
scannerstuurprogramma en de BCR-software (Cardiris) te voltooien.
OPGELET: voltooi de software-installatie voordat u de scanner
aansluit. Sluit de scanner in deze fase niet aan op de pc.
3. De hardware installeren
1. Sluit de USB-stekker aan op de USB-poort van de pc terwijl de
computer is ingeschakeld.
Opmerking: Rechts van de taakbalk verschijnen twee pop-upvensters
nadat de computer heeft gedetecteerd dat er nieuwe hardware is
aangesloten.
2. Het Apparaatbeheer van Windows zal de hardware detecteren en
starten met de installatie. Volg de instructies op het scherm om de
installatie te voltooien. Wanneer de hardware-installatie is voltooid,
verschijnt het pop-upbericht rechts in de taakbalk.
4. De scanner kalibreren en reinigen
Om een hoge beeldkwaliteit en goede herkenningsresultaten te
verkrijgen, moet u de scanner kalibreren wanneer u deze de eerste
keer gebruikt voordat u start met het scannen. Herhaal af en toe de
procedures voor het kalibreren en schoonmaken.
1. Plaats het bijgeleverde kalibratie- en reinigingsblad met de voorkant
omhoog gericht in de invoersleuf van de scanner.
2. Klik op Start > All programs (Alle programma's) > I.R.I.S.
Applications (I.R.I.S.-toepassingen)> Cardiris > Cardiris.
3. Klik op Bestand > Nieuw om een nieuw vel te maken.
4. Klik op de knop (Kaarten scannen) om het dialoogvenster
Scaninstelling te openen.
5. Klik op de knop Calibrate (Kalibreren) en vervolgens op OK om de
kalibratieprocedure te starten.
5. Visitekaartjes scannen
1. Volg Stappen 1-4 in de sectie De scanner kalibreren en reinigen
om het scandialoogvenster te openen.
Opmerking: Plaats het document met de voorzijde omhoog gericht
in de papierinvoersleuf van de scanner en zorg dat het document op
zijn plaats blijft. Duw voorzichtig naar voor tot het document wordt
vastgenomen door de toevoersleuf.
2. Selecteer de voorkeursinstellingen voor de Scanmodus,
Automatisch scannen en Helderheid/Contrast, en klik vervolgens
op Scan om de scanprocedure te starten.
Opmerking: Meer gedetailleerde uitleg over de bovenstaande
instellingen vindt u in het Help-bestand van Cardiris onder Help >
Help-onderwerpen.
3. Klik op de knop (Kaart viewmodus) in de werkbalk bovenaan.
4. Klik op de knop (Kaart herkennen) om de tekenherkenning te
starten. Controleer of het juiste land is geselecteerd in het veld voor
de landselectie.
6. Bewerken
1. Selecteer en klik op een functie hieronder om het voorbeeld van de
gescande kaart aan te passen.
Drag-and-drop van data Links roteren 180 graden
roteren
Nederlands
Volle breedte
1. Conteúdo da embalagem
1. Scanner para cartões de visita 2. Bolsa de transporte
A:
Ranhura de alimentação de papel
B: Ficha USB tipo-A 4. Papel de calibragem
C: Ranhura de saída de papel 5. Cabo de extensão USB
2. Instalar o software
1. Insira o CD de instalação de software na sua unidade de CD ou
DVD-ROM.
2. Clique em Scanner driver & BCR Application e siga as instruções
no ecrã para concluir o processo de instalação do controlador do
scanner e do software BCR (Cardiris).
ATENÇÃO: Conclua a instalação do software antes de ligar o scanner. Não ligue o scanner ao PC nesta fase.
3. Instalar o hardware
1. Com o PC ligado, ligue a tomada USB do scanner à entrada USB do
seu PC.
Nota: Serão exibidas duas noticações no lado direito da barra de
tarefas quando o computador detectar o novo hardware inserido.
2. O Gestor de dispositivos do Windows irá detectar o hardware e
começará a instalá-lo. Siga as instruções no ecrã para concluir a
instalação. Será exibida uma mensagem no lado direito da barra de
tarefas quando a instalação do hardware estiver concluída.
4. Calibragem e limpeza do scanner
Para obter uma alta qualidade de imagem e um bom resultado de reconhecimento, deverá calibrar o scanner antes de efectuar a primeira
digitalização. Repita regularmente os procedimentos de calibragem e
limpeza.
1. Insira o papel de calibragem e limpeza fornecido virado para cima
na ranhura do scanner.
2. Clique em Start > All programs > I.R.I.S. Applications > Cardiris
> Cardiris.
3. Clique em File > New para criar uma nova folha.
4. Clique no botão (Scan Cards) para entrar na janela de conguração da digitalização.
5. Clique no botão Calibrate, e de seguida clique em OK para iniciar o
procedimento de calibragem.
5. Digitalização de cartões de visita
1. Sigas os passos 1 a 4 na secção Calibragem e limpeza do scanner para entrar na janela de digitalização.
Nota: Insira o documento virado para cima na ranhura de alimentação
de papel do scanner, mantendo o documento na posição correcta. Empurre o documento suavemente para a frente até que este seja puxado
pela ranhura de alimentação.
2. Seleccione as denições preferidas para Modo de digitalização,
Digitalização automática, e Brilho/Contraste, e de seguida clique
em Scan para iniciar o processo de digitalização.
Nota: Para mais detalhes sobre as denições acima, consulte o chei-
ro de ajuda da Cardiris localizado em Ajuda > Tópicos de ajuda.
3. Clique no botão (Card view) na barra de ferramentas superior.
4. Clique no botão (Recognize cards) para iniciar o reconhecimento de caracteres. Certique-se que está seleccionado o país correcto no campo de selecção do país.
6. Editar
1. Seleccione e clique numa das funções abaixo para ajustar a prévisualização do cartão digitalizado.
Arrastar e largar dados Rodar para a esquerda
Quick Start Guide
Português
3. CD de instalação
Ajustar à largura
Inverter
6
3
1
2
7
Scanner Type Color CIS Sheet feed
Scan Area A8 size, 54mm (W)
Light Source LED
Interface USB 1.1
Scanning Mode Color mode, Gray Mode, Line Art
Power Consumption 0.7W (standby), 2.3W (during scan), fully USB powered
System Support Windows XP, Vista
System requirement • Pentium III 300 CPU or above
Dimension 108mm x 89mm x 32mm
Weight 153g
• 256MB RAM (512MB for Windows Vista / 7)
• 200MB available hard disk space Windows XP / Vista / 7
• CD-ROM Drive
• Available USB Port
Lente de aumento Tamanho real Rodar para a direita
Ajustar à janela
Vergrootglas Ware grootte Rechts roteren
4
4
2. Klik op de knop (Drag-and-drop van data).
3. Selecteer het gebied dat u opnieuw wilt bewerken of herkennen met
een muis.
4. Sleep het geselecteerde vakje naar het doelveld.
Opmerking: Het slepen en neerzetten werkt alleen in de Kaart
viewmodus ( ).
7. Exporteren en synchroniseren
• Om de gegevens te exporteren en met andere software te
synchroniseren, moet u schakelen naar (Album viewmodus).
1. Klik op Bestand > Import, Export and Synchronize... (Importeren,
exporteren en synchroniseren...) > tabblad
(
Synchroniseren).
2. Klik op het tabblad Uitvoeren.
3. Selecteer een indeling van uw voorkeur waarin u het gescande
visitekaartje wilt exporteren en klik vervolgens op Uitvoeren.
De ondersteunde indelingen zijn de volgende: *.jpg, *.tif, E-mail,
FrontRange GoldMine, HTML(*.html), IBM Lotus Notes, Innomatix
InfoContacts II, Outlook, Outlook Express, Palm Desktop, Text
(*.csv), vCard(*.vcf) en XML(*xml).
4. U kunt ook de stappen 1-2 hierboven herhalen om
(
Synchroniseren) te selecteren.
5. Selecteer de software van uw voorkeur waarmee u het gescande
visitekaartje wilt synchroniseren en klik vervolgens op
Synchroniseren). De ondersteunde programma's zijn de volgende:
ACT!, FrontRange GoldMine, IBM Lotus Notes, Outlook, Outlook
Express, Palm Desktop en Pocket PC.
Meer informatie over de BCR-functies, vindt u in het Help-bestand van
Cardiris onder Help > Help-onderwerpen.
Volle bladzijde
Synchronize
Synchronize
Synchronize(
8. Probleemoplossing
• Controleer of de USB-kabel goed is aangesloten op de computer.
• Kalibreer of reinig de scanner als de scankwaliteit slecht is.
9. Veiligheidsinformatie en specicaties
• Houd het apparaat uit de buurt van water, vocht en stofrijke omgevingen.
• Bewaar het apparaat nooit in warme en zeer koude gebieden.
• Gebruik alleen hulpstukken/accessoires die worden aangegeven door de
fabrikant.
• Plaats geen objecten die met vloeistoffen zijn gevuld, zoals een vaas, op het
apparaat.
• Vermijd vervuiling door stof wanneer de scanner niet in gebruik is.
• Als u het apparaat gedurende lange tijd niet gebruikt, moet u het loskoppelen
van de USB-kabel en pc.
• Vermijd omgevingen waar de scanner gedurende langere tijd wordt blootgesteld
aan direct zonlicht (of elke andere bron van overmatige warmte).
• Bescherm de scanner tegen het morsen van bijv. water, kofe, thee, enz.
• Zorg dat u het apparaat niet laat vallen en vermijd krachtige impact.
• Gebruik de scanner op een effen, goed ondersteund werkoppervlak dat vrij is
van overmatige trilling.
• Open de scannerbehuizing nooit alleen, zonder technische ondersteuning,
omdat er een risico op elektrische schok bestaat.
2. Clique no botão (Drag-and-drop data).
3. Seleccione novamente a área que deseja editar ou reconhecer utilizando o rato.
4. Arraste e largue o quadrado seleccionado para o campo alvo.
Nota: A função Arrastar e largar apenas funciona na Card view ( ).
7. Exportar e sincronizar
• Para exportar e sincronizar os dados com outros softwares, mude
para a (Album view).
1. Clique em File > Import, Export and Synchronize... > e no separador
Synchronize
2. Clique no separador Export.
3. Seleccione o formato preferido para o qual deseja exportar o cartão
de visita digitalizado, e de seguida clique em Export. Os formatos
suportados incluem os seguintes: *.jpg, *.tif, E-mail, FrontRange
GoldMine, HTML(*.html), IBM Lotus Notes, Innomatix InfoContacts
II, Outlook, Outlook Express, Palm Desktop, Texto (*.csv), vCard(*.
vcf) e XML(*xml).
4.
Em alternativa, repita os passos 1 e 2 acima e seleccione
5. Seleccione o software preferido com o qual deseja sincronizar o cartão de visita digitalizado, e de seguida clique em
softwares suportados incluem os seguintes: ACT!, FrontRange GoldMine, IBM Lotus Notes, Outlook, Outlook Express, Palm Desktop e
Pocket PC.
Para mais detalhes sobre as funções BCR, consulte o cheiro de ajuda
da Cardiris localizado em Ajuda > Tópicos de ajuda.
.
Synchronize
Synchronize
. Os
8. Resolução de problemas
• Verique se o cabo USB se encontra correctamente ligado ao com-
putador.
• Efectue a calibragem ou limpeza do scanner se o resultado da digita-
lização for de baixa qualidade.
9. Informações de segurança e especicações
• Mantenha o dispositivo afastado de locais com água, humidade e pó.
• Nunca armazene em locais quentes ou muito frios.
• Utilize apenas dispositivos/acessórios especi cados pelo fabricante.
• Não deverão ser colocados objectos com líquidos, tais como jarras, em cima do
aparelho.
• Evite a acumulação de pó no scanner quando este não estiver a ser utilizado.
• Quando não utilizado durante um longo período de tempo, o dispositivo deve
ser desligado do cabo USB e do PC.
• Evite ambientes onde o scanner possa car exposto a luz solar directa (ou
qualquer outra fonte de calor excessivo) durante longos períodos.
• Proteja o scanner de potenciais derrames de líquidos, como refrigerantes, café,
chá, etc.
• Não deixe cair o dispositivo e não o sujeite impactos fortes.
• Utilize o scanner numa superfície nivelada bem estável, sem vibração
excessiva.
• Não desmonte o scanner sem a ajuda de um técnico quali cado, pois existe o
risco de choque eléctrico.
.
Page 5

82-253-00080
1
2
3
4
5
ScanExpress S80 Name Card Scanner
1 2
C
B
A
43 5
1
2
53
4
1. Zawartość opakowania
1. Skaner wizytówek 2. Futerał
A: Szczelina podawania papieru 3. Płyta instalacyjna CD
B: Wtyczka USB typu A 4. Papier do kalibracji
C: Szczelina wychodzenia papieru 5. Kabel przedłużający USB
2. Instalacja oprogramowania
1. Włóż do napędu CD lub DVD-ROM Płytę instalacyjną CD.
2. Kliknij przycisk Scanner driver & BCR Application, a następnie
wykonaj polecenia wyświetlane na ekranie, aby zakończyć instalację
sterownika skanera oraz programu BCR (Cardiris).
UWAGA: Przed podłączeniem skanera należy zakończyć instalację
oprogramowania. Na tym etapie nie należy jeszcze podłączać skanera
do komputera PC.
3. Instalacja sprzętu
1. Przy włączonym komputerze PC podłącz wtyczkę USB skanera do
gniazda USB w komputerze.
Uwaga:Po wykryciu przez komputer podłączonego nowego sprzętu z
prawej strony paska zadań pojawią się dwa pomocnicze elementy.
2. Menedżer urządzeń systemu Windows wykryje urządzenie i rozpo-
cznie jego instalację. Wykonaj instrukcje ekranowe w celu dokończenia instalacji. Po zakończeniu instalacji w prawej części paska zadań
wyświetlony zostanie komunikat.
4. Kalibracja i czyszczenie skanera
Aby uzyskać doskonałą jakość skanowanego obrazu i dobre rezultaty
jego rozpoznania, należy przed pierwszym użyciem skanera wykonać
jego kalibrację. Procedury kalibracji oraz czyszczenia należy okresowo
powtarzać.
1.
Włóż dołączony arkusz papieru do kalibracji i czyszczenia do szczeliny
podawania papieru w skanerze przednią stroną skierowaną ku górze.
2. Kliknij Start > All programs > I.R.I.S. Applications > Cardiris >
Cardiris.
3. Kliknij polecenie File > New, aby utworzyć nowy dokument.
4. Kliknij przycisk (Scan Cards) w celu wyświetlenia okna dialogo-
wego ustawień skanowania.
5. Kliknij przycisk Calibrate, a następnie przycisk OK, aby rozpocząć
procedurę kalibracji.
5. Skanownie wizytówek
1. Wykonaj kroki 1-4 opisane w rozdziale Kalibracja i czyszczenie
skanera, aby wyświetlone zostało okno dialogowe skanowania.
Uwaga: Włóż równo dokument do szczeliny podawania papieru stroną
przednią skierowaną ku górze. Delikatnie dociśnij go do przodu, aż
zostanie on uchwycony przez szczelinę podawania papieru.
2. Wybierz preferowane ustawienia dla Tryb skanowania, Autom.
skanowanie oraz Jasność / Kontrast, a następnie kliknij przycisk
Scan, aby rozpocząć procedurę skanowania.
Uwaga: W celu uzyskania szczegółówych informacji na temat usta-
wień opisanych powyżej, przejdź do pomocy programu Cardiris, która
dostępna jest w menu Pomoc > Tematy pomocy.
3. Kliknij przycisk (Card view), który umieszczony jest na górnym
pasku narzędzi.
4. Kliknij przycisk (Recognize cards), aby rozpocząć rozpoznawa-
nie znaków. Upewnij się, że w polu wyboru wybrany jest właściwy
kraj.
6. Edycja wizytówek
1. Wybierz i kliknij poniższe funkcje, aby dopasować podgląd skanowa-
nej wizytówki.
Przeciągnij i upuść dane Obróć w lewo Obróć do
Dopasuj do szerokości
3
1
2
Polski
góry nogami
1. Obsah krabice
1. Skener vizitek 2. Pouzdro na přenášení
A: Otvor pro vkládání papíru 3. Instalační CD
B: Konektor USB typ A 4. Kalibrační/čistý papír
C: Otvor pro vyjímání papíru 5. Prodlužovací kabel USB
2. Instalace softwaru
1. Vložte Instalační CDse softwarem do jednotky CD- nebo DVD-
ROM.
2. Klepněte na Scanner driver & BCR Application, poté podle pokynů
na obrazovce dokončete instalaci ovladače skeneru BCR (software
Cardiris).
UPOZORNĚNÍ: Před připojením skeneru dokončete instalaci softwaru.
Zatím nepřipojujte skener k počítači.
3. Instalace hardwaru
1. Zapněte počítač a připojte kabel USB od skeneru k portu USB počí-
tače.
Poznámka:Když počítač rozpozná nový připojený hardware, na pravé
straně hlavního panelu se zobrazí dvě místní okna.
2. Správce hardwaru Windows rozpozná hardware a zahájí jeho
instalaci. Dokončete instalaci podle zobrazených pokynů. Po dokončení instalace hardwaru se na pravé straně hlavního panelu zobrazí
místní okno se zprávou.
4. Kalibrace a čištění skeneru
Aby byla dosažena dobrá kvalita skenování obrázku a výsledky rozpoznávání, je před prvním skenováním nezbytné skener zkalibrovat.
Postup kalibrace a čištění pravidelně opakujte.
1. Vložte dodávaný čistý kalibrační papír lícem nahoru do otvoru pro
vkládání papíru na skeneru.
2. Klepněte na Start > All programs > I.R.I.S. Applications > Cardiris
> Cardiris.
3. Klepnutím na File > New vytvořte nový arch.
4. Klepnutím na (Scan Cards) vyvolejte okno Nastavení skenová-
ní.
5. Klepnutím na Calibrate a pak na OK spusťte kalibraci.
5. Skenování vizitek
1. Proveďte kroky 1-4 postupu Kalibrace a čištění skeneru a vyvolejte
okno skenování.
Poznámka: Vložte dokument lícem nahoru do otvoru pro vkládání
papíru na skeneru tak, aby zůstal ve správné poloze. Jemně zatlačte
dopředu, až bude dokument zachycen otvorem pro vkládání papíru.
2. Vyberte upřednostňovaná nastavení Režim skenování, Auto sken
a Jas/Kontrasta klepnutím na Scan spusťte skenování.
Poznámka: Podrobnější popis zmíněných nastavení je v nápovědě
Cardiris, kterou lze vyvolat volbou Nápověda > Témata nápovědy.
3. Klepněte na (Card view) na horním panelu nástrojů.
4. Klepnutím na (Recognize cards) spusťte rozpoznávání znaků.
Zkontrolujte, zda je v poli Země vybrána správná země.
6. Úpravy
1. Výběrem a klepnutím na jednu z následujících funkcí zobrazte náh-
led skenované vizitky.
Quick Start Guide
Čeština
Přetažení dat Otočení doleva Otočení
Přizpůsobení šířce
vzhůru nohama
6
3
1
2
7
Scanner Type Color CIS Sheet feed
Scan Area A8 size, 54mm (W)
Light Source LED
Interface USB 1.1
Scanning Mode Color mode, Gray Mode, Line Art
Power Consumption 0.7W (standby), 2.3W (during scan), fully USB powered
System Support Windows XP, Vista
System requirement • Pentium III 300 CPU or above
Dimension 108mm x 89mm x 32mm
Weight 153g
• 256MB RAM (512MB for Windows Vista / 7)
• 200MB available hard disk space Windows XP / Vista / 7
• CD-ROM Drive
• Available USB Port
Szkło powiększające
2. Kliknij przycisk (Drag-and-drop data).
3. Przy użyciu myszki zaznacz ponownie obszar do edycji lub rozpo-
4
znawania.
4. Przeciągnij i upuść wybrany kwadrat na docelowym polu.
Uwaga: Czynność przeciągania i upuszczania działa tylko w trybie
Card view ( ).
7. Wykonywanie eksportu i synchronizacji
4
• Aby wykonać eksport lub synchronizację danych przy użyciu innego
oprogramowania, włącz tryb (Album view).
1.
Kliknij zakładkę
Synchronize
2. Kliknij zakładkę Export.
3. Wybierz preferowany format, w jakim wizytówka ma być wyeksporto-
wana, a następnie kliknij przycisk Export. Obsługiwane są następujące formaty: *.jpg, *.tif, poczta elektroniczna, FrontRange GoldMine,
HTML(*.html), IBM Lotus Notes, Innomatix InfoContacts II, Outlook,
Outlook Express, Palm Desktop, Text (*.csv), vCard(*.vcf) oraz
XML(*xml).
4. Możesz także powtórzyć kroki 1-2 opisane powyżej, aby wybrać
polecenie Synchronize.
5. Wybierz preferowane oprogramowanie, z krórym skanowana
wizytówka ma być zsynchronizowana, a następnie kliknij przycisk
Synchronize. Obsługiwane są następujące programy: ACT!, Fron-
tRange GoldMine, IBM Lotus Notes, Outlook, Outlook Express, Palm
Desktop oraz Pocket PC.
W celu uzyskania szczegółowych informacji na temat funkcji BCR,
przejdź do pomocy programu Cardiris, która dostępna jest w menu
Pomoc > Tematy pomocy.
8. Rozwiązywanie problemów technicznych
• Sprawdź, czy kabel USB jest prawidłowo podłączony do komputera.
• Wykonaj kalibrację lub czyszczenie skanera, jeśli rezultaty skanowania są niezadawalające.
9. Informacje na temat bezpieczeństwa oraz parame-
try techniczne
• Należy izolować od wody i miejsc zapylonych.
•
Nigdy nie należy przechowywać w miejscach bardzo gorących I bardzo zimnych.
• Należy używać wyłącznie dodatków/akcesoriów określonych przez producenta.
• Nie należy ustawiać na urządzeniach obiektów napełnionych płynami, takich jak
wazony.
• Należy zapobiegać zabrudzeniu kurzem, gdy skaner nie jest używany.
• Przy dłuższym nieużywaniu, od urządzenia należy odłączyć kabel USB i kom-
puter PC.
• Należy unikać miejsc, gdzie skaner byłby narażony na długie oddziaływanie
bezpośredniego światła słonecznego (lub dowolnego innego źródła nadmiernego ciepła).
• Skaner należy chronić przed potencjalnym rozlaniem takich płynów jak soda,
kawa, herbata, itd.
• Należy uważać, aby go nie upuścić lub mocno uderzyć.
• Skaner można używać na równej, prawidłowo uziemionej powierzchni roboczej,
bez nadmiernych drgań.
• Nie należy otwierać skanera samemu, bez wsparcia technicznego, ponieważ
może to spowodować porażenie prądem elektrycznym.
Rzeczywisty rozmiar Obróć prawo
Dopasuj do okna
File > Import, Export and Synchronize... >
.
Lupa Skutečná velikost Otočit doprava
Přizpůsobení oknu
2. Klepněte na (Drag-and-drop data).
3. Vyberte myší oblast, kterou chcete upravit nebo znovu rozpoznat.
4. Přetáhněte rámeček na požadovanou oblast.
Poznámka: Přetažení funguje jen v Card view ( ).
7. Export a Synchronizace
• Pokud chcete exportovat a synchronizovat data s jiným softwarem,
přepněte na (Album view).
1. Klepněte na File > Import, Export and Synchronize... >
Synchronize .
2. Klepněte na kartu Export.
3. Vyberte formát, ve kterém chcete exportovat naskenovanou vizitku
a pak klepněte na Export. K podporovaným formátům patří: *.jpg,
*.tif, E-mail, FrontRange GoldMine, HTML(*.html), IBM Lotus Notes,
Innomatix InfoContacts II, Outlook, Outlook Express, Palm Desktop,
Text (*.csv), vCard(*.vcf) a XML(*xml).
4. Alternativně opakováním výše zmíněných bodů 1-2 vyberte
Synchronize.
5. Vyberte software, ve kterém chcete synchronizovat naskenovanou
vizitku, a pak klepněte na Synchronize. K podporovaným programům patří: ACT!, FrontRange GoldMine, IBM Lotus Notes, Outlook,
Outlook Express, Palm Desktop a Pocket PC.
Podrobnější popis funkcí BCR je v nápovědě Cardiris, kterou lze vyvolat volbou Nápověda > Témata nápovědy.
8. Odstraňování problémů
• Zkontrolujte, zda je kabel USB řádně připojen k počítači.
• Pokud jsou výsledky skenování špatné, zkalibrujte nebo vyčistěte
skener.
9. Bezpečnostní informace a specikace
• Chraňte před vodou, vlhkem a prachem.
• Neuchovávejte na místě s příliš vysokou nebo nízkou teplotou.
• Používejte pouze doplňky specikované výrobcem.
• Na zařízení neumísťujte žádné předměty naplněné vodou, například vázy.
• Zabraňte znečištění skeneru prachem, když není používán.
• Pokud nebudete zařízení delší dobu používat, odpojte jej od kabelu USB a od
počítače.
• Nepoužívejte skener na místech, na kterých by byl dlouhodobě vystaven přímému slunečnímu záření (nebo jinému zdroji nadměrného tepla).
• Chraňte skener před potřísněním tekutinami, jako například vodou, kávou,
čajem atd.
• Zabraňte pádu nebo nárazu.
• Skener používejte na rovném dobře uzemněném povrchu bez nadměrných otřesů.
• Neotevírejte plášť skeneru sami bez technické pomoci, protože hrozí nebezpečí
úrazu elektrickým proudem.
Page 6

82-253-00080
1
2
3
4
5
ScanExpress S80 Name Card Scanner
1 2
C
B
A
43 5
1
2
53
4
3
1
2
1. До комплекту входять
1. Сканер візитних карток 2. Сумка для перенесення
A: Отвір постачання паперу 3.
B:
Штепсельна виделка USB типу A
C: Отвір для виймання паперу 5. Кабель розширення USB
2. Інсталяція ПЗ
1. Вставте інсталяційний компакт-диск із ПЗ до оптичного
дисководу для компакт-дисків або DVD-ROM.
2. Клацніть по Scanner driver & BCR Application, а потім
виконуйте інструкції на екрані, щоб завершити інсталяцію ПЗ
драйвера сканера та сканера візитних карток (Cardiris).
УВАГА: Будь ласка, завершіть інсталяцію ПЗ перед підключенням
сканера. Не підключайте сканер до ПК на цьому етапі.
3. Інсталяція апаратних засобів
1. До порту USB увімкненого ПК підключіть штепсельну виделку
USB сканера.
Примітка: Два тимчасових вікна з'являться праворуч на панелі
задачі після того, як комп'ютер визначить нове вставлене апаратне
забезпечення.
2. Пристрій управління апаратним забезпеченням Windows
визначить апаратне забезпечення і почне його інсталяцію.
Виконуйте інструкції на екрані, щоб завершити інсталяцію.
Тимчасове повідомлення з'явиться праворуч на панелі задач,
коли інсталяцію апаратного забезпечення буде завршено.
4. Калібрування і чищення сканера
Щоб отримати високу якість зображення і хороші результати
розпізнавання, слід калібрувати сканер перед першим
скануванням. Будь ласка, час від часу повторюйте процедури
калібрування та чищення.
1. Вставте чистий калібрувальний папір з комплекту до отвору
постачання паперу сканера лицевим боком вгору.
2. Клацніть по Start > All programs > I.R.I.S. Applications > Cardiris
> Cardiris.
3. Клацніть по File > New, щоб створити новий аркуш.
4. Клацніть по кнопці Scan Cards (Scan Cards) , щоб викликати
діалогове вікно налаштування сканування.
5. Клацніть по кнопці Calibrate, а потім клацніть по OK, щоб почати
процедуру калібрування.
5. Сканування візитних карток
1. Виконуйте Кроки 1-4 у розділі Калібрування і чищення сканеру,
щоб викликати діалогове вікно сканування.
Примітка: Вставте документ лицьовою стороною до отвору
постачання паперу сканера і переконайтеся, що документ
лишається на місці. Злегка натисніть вперед, поки отвір постачання
паперу не захопить документ.
2. Виберіть бажані Режим сканування, Автоматичне сканування
і Яскравість/Контраст, потім клацніть по Scan, щоб почати
процедуру сканування.
Примітка: Детальніше про налаштування вище, будь ласка, див.
Допомога Cardiris, розташовані у Допомога > Теми допомоги.
3. Клацніть по кнопці (Card view) на верхній панелі.
4. Клацніть по кнопці (Recognize cards), щоб почати розпізнання
символів. Переконайтеся, що у полі країни вибрана потрібна
країна.
6. Редагування
1. Виберіть і клацніть по функції нижче, щоб відрегулювати
попередній перегляд сканованої картки.
Перетягти і лишити дані Обертати ліворуч Повернути
Українська
4. Калібрувальний папір
Вміститися у ширину
Інсталяційний компакт-диск
вгору
1. Conţinutul pachetului
1. Scaner de cărţi de vizită 2. Husă pentru transport
A: Slot de alimentare cu hârtie 3. CD de instalare
B: Fişă pentru USB de tip A 4. Hârtie pentru calibrare
C: Slot pentru extragerea hârtiei 5. Cablu de extensie pentru USB
2. Instalarea software
1. Introduceţi CD-ul de instalare pentru software în unitatea CD sau
DVD-ROM.
2. Faceţi clic pe Scanner driver & BCR Application, apoi urmaţi
instrucţiunile de pe ecran pentru a naliza instalarea driverului de
scaner şi a software-ului BCR (Cardiris).
ATENŢIE: Finalizaţi instalarea de software înainte de a conecta
scanerul. Nu conectaţi scanerul la PC în această etapă.
3. Instalarea hardware
1. Conectaţi şa USB a scanerului la portul USB al PC-ului dvs. atunci
când PC-ul este pornit.
Notă: Două mesaje pop-up vor apărea în partea dreaptă a barei de
activităţi după ce computerul detectează noua componentă hardware
introdusă.
2. Managerul Windows pentru hardware detectează componenta
hardware şi începe să o instaleze. Urmaţi instrucţiunile de pe ecran
pentru a naliza instalarea. Mesajul pop-up va apărea în partea
dreaptă a barei de activităţi la nalizarea instalării componentei
hardware.
4. Calibrarea şi curăţarea scanerului
Pentru a obţine o calitate bună a imaginii şi un rezultat bun la
recunoaştere, trebuie să calibraţi scanerul pentru utilizare înainte de a
scana pentru prima oară. Repetaţi procedurile de calibrare şi curăţare
din când în când.
1. Introduceţi hârtia de calibrare şi curăţare cu faţa în sus în slotul de
alimentare al scanerului.
2. Faceţi clic pe Start > All programs > I.R.I.S. Applications >
Cardiris > Cardiris.
3. Faceţi clic pe File > New pentru a crea o foaie nouă.
4. Faceţi clic pe butonul (Scan cards) pentru a deschide fereastra
de dialog Scan setting (Setare scanare).
5. Faceţi clic pe butonul Calibrate, apoi faceţi clic pe OK pentru a
începe procedura de calibrare.
5. Scanare cărţi de vizită
1. Urmaţi paşii 1-4 din secţiunea Calibrarea şi curăţarea scanerului
pentru a deschide fereastra de dialog pentru scanare.
Notă: Introduceţi documentul cu faţa în sus în slotul de alimentare cu
hârtie al scanerului, asigurându-vă că documentul rămâne în poziţie.
Împingeţi uşor în faţă, până când documentul este prins de către slotul
de alimentare.
2. Selectaţi opţiunile Mod scanare, Scanare automată şi
Luminozitate/Contrast preferate şi apoi faceţi clic pe Scan pentru a
începe procedura de scanare.
Notă: Pentru setări mai detaliate, vă rugăm să consultaţi secţiunea
Ajutor Cardiris amplasată în Ajutor > Subiecte de ajutor.
3. Faceţi clic pe butonul (Card view) din bara de instrumente de
sus.
4. Faceţi clic pe butonul (Recognize cards) pentru a începe
recunoaşterea caracterelor. Asiguraţi-vă că în câmpul pentru
selectarea ţării este selectată ţara corectă.
6. Editare
1. Selectaţi şi faceţi clic pe o funcţie de mai jos pentru a regla
examinarea cardului scanat.
Glisare şi xare date Rotire la stânga Rotaţie
Quick Start Guide
Română
Potrivire pe lăţime
răsturnată
6
3
1
2
7
Scanner Type Color CIS Sheet feed
Scan Area A8 size, 54mm (W)
Light Source LED
Interface USB 1.1
Scanning Mode Color mode, Gray Mode, Line Art
Power Consumption 0.7W (standby), 2.3W (during scan), fully USB powered
System Support Windows XP, Vista
System requirement • Pentium III 300 CPU or above
Dimension 108mm x 89mm x 32mm
Weight 153g
• 256MB RAM (512MB for Windows Vista / 7)
• 200MB available hard disk space Windows XP / Vista / 7
• CD-ROM Drive
• Available USB Port
Збільшувальне скло
4
2. Клацніть по кнопці (Drag-and-drop data).
3.
Вишею виберіть ділянку, яку бажаєте редагувати або розпізнати знову.
4. Перетягніть вибрану клітинку у цільове поле і лишіть її там.
Примітка: Операція "перетягти і лишити" працює лише у Card view
( ).
7. Експортувати і синхронізувати
4
• Щоб експортувати і синхронізувати дані з іншими ПЗ, будь ласка,
перемкніться до (Album view).
1. Клацніть по File > Import, Export and Synchronize... >
Synchronize.
2. Клацніть по панелі Export.
3.
Виберіть бажаний формат для експорту сканованої візитної
кратки і клацніть по
*.tif, електронне повідомлення, FrontRange GoldMine, HTML(*.
html), IBM Lotus Notes, Innomatix InfoContacts II, Outlook, Outlook
Express, Palm Desktop, Text (*.csv), vCard(*.vcf) та XML(*xml).
4. Також можна повторити вищевказані кроки 1-2, щоб вибрати
Synchronize.
5. Виберіть бажаний формат для синхронізації сканованої візитної
кратки і клацніть по Synchronize. Серед підтримуваного ПЗ:
ACT!, FrontRange GoldMine, IBM Lotus Notes, Outlook, Outlook
Express, Palm Desktop та Pocket PC.
Про більше функцій сканера візитних карток, будь ласка, див.
Допомога Cardiris, розташовані у Допомога > Теми допомоги.
8. Усунення несправностей
• Перевірте, чи кабель USB надійно увімкнений до комп'ютера.
• Будь ласка, калібруйте або очистіть сканер, якщо Ви отримали
погану якість сканування.
9. Заходи безпеки та технічні характеристики
• Тримайте подалі від води або вологи та запилених місць.
• Ніколи не зберігайте у гарячих та дуже холодних місцях.
• Використовуйте лише додатки/аксесуари, визначені виробником.
• На пристрій неможна ставити жодних наповнених водою предметів, таких
як вази.
• Уникайте забруднення пилом, коли сканер не використовується.
• Коли пристрій не використовується протягом тривалого часу, його слід
відключити від кабелю USB та ПК.
• Уникайте місць, в яких сканер може тривалий час потрапляти під пряме
сонячне світло (або знаходитися поруч із іншим джерелом надмірної спеки).
• Захищайте сканер від можливого пролиття рідин, таких як газовані напої,
кава, чай тощо.
• Не впускайте і не вдаряйте пристрій.
• Користуйтеся сканером на рівній стійкій поверхні, де нема надмірної
вібрації.
• Не відкривайте корпус сканера без кваліфікованої допомоги: існує
небезпека ураження електричним струмом.
Справжній розмір Обертати праворуч
Вмітитися у вікно
Export
. Серед підтримуваних форматів: *.jpg,
Lupă Dimensiune reală Rotire la dreapta
Potrivire în fereastră
2. Faceţi clic pe butonul (Drag-and-drop data).
3. Selectaţi zona pe care doriţi să o editaţi sau să o recunoaşteţi din
nou utilizând un mouse.
4. Glisaţi şi xaţi pătratul selectat în câmpul ţintă.
Notă: Procedura de glisare şi xare funcţionează numai în opţiunea
Card view ( ).
7. Export şi sincronizare
• Pentru a exporta şi sincroniza datele cu alte software-uri, vă rugăm să
comutaţi la (Album view).
1. Faceţi clic pe la File > Import, Export and Synchronize... >
Synchronize.
2. Faceţi clic pe la Export.
3. Selectaţi formatul preferat în care doriţi să exportaţi cartea de vizită
scanată şi apoi faceţi clic pe Export. Formatele acceptate includ
următoarele: *.jpg, *.tif, E-mail, FrontRange GoldMine, HTML(*.
html), IBM Lotus Notes, Innomatix InfoContacts II, Outlook, Outlook
Express, Palm Desktop, Text (*.csv), vCard(*.vcf) şi XML(*xml).
4. Alternativ, repetaţi paşii 1-2 de mai sus pentru a selecta
Synchronize.
5. Selectaţi software-ul preferat în care doriţi să sincronizaţi cartea
de vizită scanată şi apoi faceţi clic pe Synchronize. Software-urile
acceptate includ următoarele: ACT!, FrontRange GoldMine, IBM
Lotus Notes, Outlook, Outlook Express, Palm Desktop şi Pocket PC.
Pentru mai multe funcţii BCR, vă rugăm să consultaţi secţiunea Cardisis
Help (Ajutor Cardiris) amplasată în Ajutor > Subiecte de ajutor.
8. Depanare
•
Vericaţi cablul USB pentru a siguri că este conectat ferm la computer.
• Calibraţi sau curăţaţi scanerul dacă rezultatul scanării este de calitate
slabă.
9. Informaţii de siguranţă şi specicaţie
• Feriţi de apă sau umezeală şi de zonele cu praf.
• Nu depozitaţi niciodată în zone erbinţi sau foarte reci.
• Utilizaţi numai ataşări/accesorii speci cate de producător.
• Nu trebuie aşezat pe aparat niciun obiect umplut cu lichide, cum sunt vazele.
• Evitaţi contaminarea cu praf când scanerul nu este utilizat.
• Când este lăsată neutilizată pentru o perioadă lungă de timp, unitatea trebuie
deconectată de la cablul USB şi de la PC.
• Evitaţi mediile în care scanerul poate expus la lumină solară directă (sau orice
altă sursă de căldură în exces) pentru perioade îndelungate.
• Protejaţi scanerul de stropirea cu lichide, precum apă minerală, cafea, ceai etc.
• Aveţi grijă să nu îl scăpaţi sau să îl supuneţi unor impacturi puternice.
• Utilizaţi scanerul pe o suprafaţă de lucru plană, stabilă, fără vibraţii excesive.
• Nu deschideţi singuri carcasa scanerului fără a asistenţă tehnică, deoarece
există pericolul de electrocutare.
Page 7

82-253-00080
1
2
3
4
5
ScanExpress S80 Name Card Scanner
1 2
C
B
A
43 5
1. Sadržaj pakiranja
1. Skener za posjetnice 2. Torbica
A: Otvor za uvlačenje papira 3. Instalacijski CD
B: USB utikač tipa A 4. Papir za kalibraciju/čišćenje
C: Otvor za izvlačenje papira 5. USB produžni kabel
2. Instaliranje softvera
1. Umetnite CD za instalaciju softvera u CD ili DVD-ROM pogon.
2. Kliknite Scanner driver & BCR Application, a zatim slijedite upute
na zaslonu da biste instalirali upravljački program za skener i BCR
(Cardiris) softver.
POZOR:Prije priključivanja skenera instalirajte sav softver. Nemojte još
priključivati skener na računalo.
3. Postavljanje hardvera
1. Uključite računalo pa ukopčajte USB utikač skenera u USB
priključnicu računala.
Napomena:Kad računalo otkrije da je dodan novi hardver, na desnoj
strani trake zadataka pojavljuju se dva skočna prozora.
2. Program Windows Hardware Manager otkrit će hardver i pokrenuti
njegovu instalaciju. Slijedite upute na zaslonu za završetak
instalacije. Po završetku instalacije hardvera, na desnoj strani trake
zadataka pojavit će se skočna poruka.
4. Kalibriranje i čišćenje skenera
Za visoku kvalitetu slika i dobre rezultate prepoznavanja znakova, prije
prve uporabe trebate kalibrirati skener. Povremeno ponovite postupke
kalibracije i čišćenja.
1
2
53
4
1. Umetnite priloženi papir za kalibraciju i čišćenje licem prema gore u
otvor za uvlačenje papira na skeneru.
2. Kliknite Start > All programs > I.R.I.S. Applications > Cardiris >
Cardiris.
3. Kliknite File > New da biste stvorili novi list.
4. Kliknite gumb (Scan Cards) i otvorit će se dijaloški prozor s
postavkama skeniranja.
5. Kliknite gumb Calibrate, a zatim kliknite OK da biste pokrenuli
postupak kalibracije.
5. Skeniranje posjetnica
1. Slijedite upute od 1. do 4. koraka u odjeljku Kalibriranje i čišćenje
skenera za otvaranje dijaloškog prozora skeniranja.
Napomena:Umetnite dokument licem prema gore u otvor za uvlačenje
papira na skeneru, pazeći da se ne pomiče. Lagano gurnite papir
prema naprijed dok se ne zahvati u otvor za uvlačenje.
2. Odaberite željene postavke za Način skeniranja, Automatsko
skeniranje, Svjetlinu i Kontrast, a zatim kliknite Scan da biste
pokrenuli postupak skeniranja.
Napomena: Pojedinosti o gore navedenim postavkama potražite u
odjeljku "Pomoć za Cardiris" u izborniku Pomoć > Teme pomoći.
3. Kliknite gumb (Card view) na gornjoj alatnoj traci.
4. Kliknite gumb (Recognize cards) da biste pokrenuli postupak
prepoznavanja znakova. Provjerite je li u polju za odabir države
odabrana točna država.
6. Uređivanje
1. Odaberite i kliknite donju funkciju da biste prilagodili pregled
skenirane posjetnice.
Povuci i ispusti podatke Zakreni ulijevo
3
1
2
Hrvatski
Prilagodi širinu
Preokreni
1. Sadržaj paketa
1. Skener za poslovne kartice 2. Torba za nošenje
A: Prorez za ubacivanje papira 3. Instalacioni CD
B: USB priključak tipa A 4. Papir za kalibraciju/čišćenje
C: Prorez za izvlačenje papira 5. Ekspanzioni USB kabl
2. Instaliranje softvera
1. Ubacite instalacioni CD sa softverom u svoj CD ili DVD ROM drajv.
2. Kliknite na Scanner driver & BCR Application, a potom pratite
uputstva na ekranu da završite instaliranje drajvera za skener i BCR
(Cardiris) aplikacije.
PAŽNJA: Molimo vas, instalirajte softver pre nego što povežete skener.
Za sada, ne povezujte skener za PC.
3. Instaliranje hardvera
1. Kada je PC uključen, povežite USB priključak skenera za USB port
na svom PC-ju.
Pažnja: Dva skočna prozora će se pojaviti sa desne strane linije sa
zadacima nakon što kompjuter detektuje ubacivanje novog hardvera.
2. Windows hardver menadžer će detektovati hardver i počeće da ga
instalira. Pratite uputstva na ekranu da završite instaliranje. Ikačuća
poruka će se pojaviti da desne strane linije sa zadacima kada je
instliranje hardvera obavljeno.
4. Kalibrirajte i očistite skener
Kako biste dobili dobar kvalitet skenirane slike i dobre rezultate
prepoznavanja, morate da kalibrirate skener za korišćenje po prvi put,
pre skeniranja. Molimo ponovite proceduru kalibriranja i čišćenja sa
vremena na vreme.
1. Ubacite priloženi papir za kalibriranje i čišćenje okrenut naviše u
prorez za ubacivanje skenera.
2. Kliknite na Start > All programs > I.R.I.S. Applications > Cardiris
> Cardiris.
3. Kliknite na File > New da kreirate novi papir.
4. Kliknite na taster (Scan Cards) da prikažete prozor za dijaloški
okvir za podešavanje skeniranja.
5. Kliknite na taster Calibrate, a potom kliknite na OK da pokrenete
proceduru kalibriranja.
5. Skeniranje poslovnih kartica
1. Pratite korake 1-4 u odeljku kalibrirajte i očistite skener da
prikažete prozor za dijaloški okvir za skeniranje.
Pažnja: Polako ubacite dokument okrenut naviše u prorez za
ubacivanje papira na skeneru i proverite da dokument stoji kako je
postavljen. Pažljivo gurnite napred dok prorez za ubacivanje ne uhvati
dokument.
2. Odaberite preferirani režim za skeniranje, auto skeniranje i
osvetljenje/kontrast, a potom kliknite na Scan da pokrenete
proceduru skeniranja.
Pažnja: Za detaljnija podešavanja iznad, molimo pogledajte Cardiris
pomoć koju možete pronaći u pomoć > teme za pomoć.
3. Kliknite na taster (Card view) na gornjoj liniji sa alatkama.
4. Kliknite na taster (Recognize cards) da pokrenete prepoznavanje
karaktera. Proverite da je odabrana ispravna država u polju za
odabiranje države.
6. Uređivanje
1. Odaberite i kliknite na funkciju ispod da podesite pregled skenirane
kartice.
Quick Start Guide
Srpski
Povuci i pusti podatke Okreni levo Okreni
obrnuto
Uklopi širinu
6
3
1
2
7
Scanner Type Color CIS Sheet feed
Scan Area A8 size, 54mm (W)
Light Source LED
Interface USB 1.1
Scanning Mode Color mode, Gray Mode, Line Art
Power Consumption 0.7W (standby), 2.3W (during scan), fully USB powered
System Support Windows XP, Vista
System requirement • Pentium III 300 CPU or above
Dimension 108mm x 89mm x 32mm
Weight 153g
• 256MB RAM (512MB for Windows Vista / 7)
• 200MB available hard disk space Windows XP / Vista / 7
• CD-ROM Drive
• Available USB Port
Povećalo Stvarna veličina Zakreni udesno
Prilagodi prozor
2. Kliknite gumb (Drag-and-drop data).
4
3. Uz pomoć miša odaberite područje koje želite urediti ili ponovno
prepoznati.
4. Povucite i ispustite odabrani kvadrat u odredišno polje.
Napomena: Značajka povlačenja i ispuštanja aktivna je samo u načinu
Card view ( ).
7. Izvoz i sinkronizacija
4
• Da biste izvozili i sinkronizirali podatke s ostalim programima,
prebacite se u način (Album view).
1. Kliknite karticu File > Import, Export and Synchronize... >
Synchronize.
2. Kliknite karticu Export.
3. Odaberite format u kojem želite izvesti skeniranu posjetnicu, a zatim
kliknite Export. Podržani su sljedeći formati: *.jpg, *.tif, E-mail,
FrontRange GoldMine, HTML(*.html), IBM Lotus Notes, Innomatix
InfoContacts II, Outlook, Outlook Express, Palm Desktop, Text
(*.csv), vCard(*.vcf) i XML(*xml).
4. Također možete ponoviti 1. i 2. korak gore i odabrati Synchronize.
5. Odaberite program s kojim želite sinkronizirati skeniranu posjetnicu,
a zatim kliknite SSynchronize. Podržani su sljedeći programi: ACT!,
FrontRange GoldMine, IBM Lotus Notes, Outlook, Outlook Express,
Palm Desktop i Pocket PC.
Pojedinosti o BCR funkcijama potražite u odjeljku "Pomoć za Cardiris"
u izborniku Pomoć > Teme pomoći.
8. Otklanjanje poteškoća
• Provjerite je li USB kabel čvrsto priključen u računalo.
• Ako su rezultati skeniranja nezadovoljavajuće kvalitete, kalibrirajte i
očistite skener.
9. Informacije o sigurnosti i tehničke karakteristike
• Držati podalje od vode, vlage i prašnjavih područja.
• Ne čuvati na hladnom i vrlo toplom mjestu.
• Koristite samo dodatke / dodatnu opremu koju je preporučio proizvođač.
• Na uređaj ne postavljajte predmete napunjene tekućinama, kao što su vaze.
• Kad skener nije u uporabi pripazite da se na njemu ne nakuplja prašina.
• Ako skener ne namjeravate koristiti dulje vremensko razdoblje, iskopčajte ga s
USB kabela i računala.
• Ne izlažite skener izravnoj sunčevoj svjetlosti (ili izvorima prevelike topline)
tijekom dužih razdoblja.
• Spriječite dospijevanje tekućina, kao što su sokovi, kava, čaj, itd., na skener.
• Ne bacajte skener i ne izlažite ga snažnim udarcima.
• Skener smjestite na ravnu, čvrstu podlogu, bez prevelikih vibracija.
• Ne otvarajte sami kućište skenera jer to može uzrokovati strujni udar.
Lupa Realna veličina Okreni desno
Uklopi prozor
2. Kliknite na taster (Drag-and-drop data)
3. Odaberite područje koje želite da uredite ili da ponovo prepoznate
koristeći miša.
4. Povucite i pustite odabrani kvadratić u ciljno polje.
Pažnja: Povucite i pustite radove u operaciji, isključivo u Card view (
).
7. Eksportuj i sinhronizuj
• Da izvezete i sinhronizujete podatke sa drugim softverima, molimo
prebacite se na (Album view).
1. Kliknite na File > Import, Export and Synchronize... > tabela zatabela za
Synchronize.
2. Kliknite na tabelu za Export.
3. Odaberite preferirani format na koji želite da eksportujete skenirano
ime kartice, a potom kliknite na Export. Podržani formati uključuju:
*.jpg, *.tif, E-mail, FrontRange GoldMine, HTML(*.html), IBM Lotus
Notes, Innomatix InfoContacts II, Outlook, Outlook Express, Palm
Desktop, Text (*.csv), vCard(*.vcf) i XML(*xml).
4. Alternativno, ponovite korake iznad 1-2 da odaberete Synchronize.
5. Odaberite preferirani softver koji želite da sinhronizujete sa
skeniranim imenom kartice, a potom kliknite na Synchronize.
Podržani softveri uključuju: ACT!, FrontRange GoldMine, IBM Lotus
Notes, Outlook, Outlook Express, Palm Desktop i Pocket PC.
Za detaljnija BCR funkcija, molimo pogledajte Cardiris pomoć koju
možete pronaći u pomoć > teme za pomoć.
8. Rešavanje problema
• Proverite da biste bili sigurni da je USB kabl čvrsto priključen za
kompjuter i skener.
• Molimo kalibrirajte ili očistite skener ukoliko je rezultat skeniranja
lošeg kvaliteta.
9. Bezbednosne informacije i specikacije
• Držite dalje od vode ili vlage i prašnjavih područja.
• Nikada ne skladištite na izuzetno toplim ili izuzetno hladnim područjima.
• Koristite isključivo priključke/dodatke koje je odredio proizvođač.
• Objekti napunjeni tečnošču, poput vaza, ne smeju se stavljati na uređaj.
• Izbegavajte konaminiranje prašinom kada se skener ne koristi.
• Kada se uređaj ne koristi tokom dužeg vremenskog perioda, treba ga isključiti iz
USB kabla i PC-ja.
• Izbegavajte sredine gde bi skener bio direktno izložen suncu (ili bilo kom
drugom izvoru prekomerne toplote) tokom dužeg vremenskog perioda.
• Zaštitite skener od mogućih prosipanja tečnosti, poput sode, kafe, čaja itd.
• Budite pažljivi da ne ispustite uređaj ili da se uređaj ne udari.
• Skener treba da radi na ravnoj, stabilnoj površini, koja ne vibrira.
• Ne otvarajte kućište skenera sami, bez tehničke podrške jer postoji opasnost od
električnog šoka.
 Loading...