

Page 1

DIGITAL VIDEO CAMERA
中文
82-197-00021
multi-lang cover.indd 5/31/2005, 9:55 AM1
Page 2

This symbol on the product or in the instructions
should be disposed at the end of its life separately from
your household waste. There are separate collection
systems for recycling in the EU.
or your retailer where you purchased the product.
English.indd 2005/6/2, �� 01:561
Page 3

En 2
Table of Contents
Getting Started
Getting to know your Digital Video Camera..................................... 3
Understanding the Control Panel................................................. 5
Power...................................................................................6
Modes...................................................................................7
DV Mode
Taking Movies........................................................................10
Video Out............................................................................ 11
DSC Mode
Taking Pictures......................................................................12
DVR Mode
Recording Voice Messages........................................................ 14
MP3 Mode
Listening To MP3 Music............................................................ 16
PLAYBACK Mode
Basic Playback.......................................................................18
Advanced Playback................................................................. 20
Main Functions
Changing the Resolution Setting.................................................23
Using Self-timer (for DV and DSC modes).......................................24
Using Guide Line/The LCD Screen............................................... 25
Using Hold............................................................................ 26
Volume Adjustment.................................................................26
Advanced Functions
Attention Icon...................................................................... 27
Menu.................................................................................. 28
Page 4

En 3
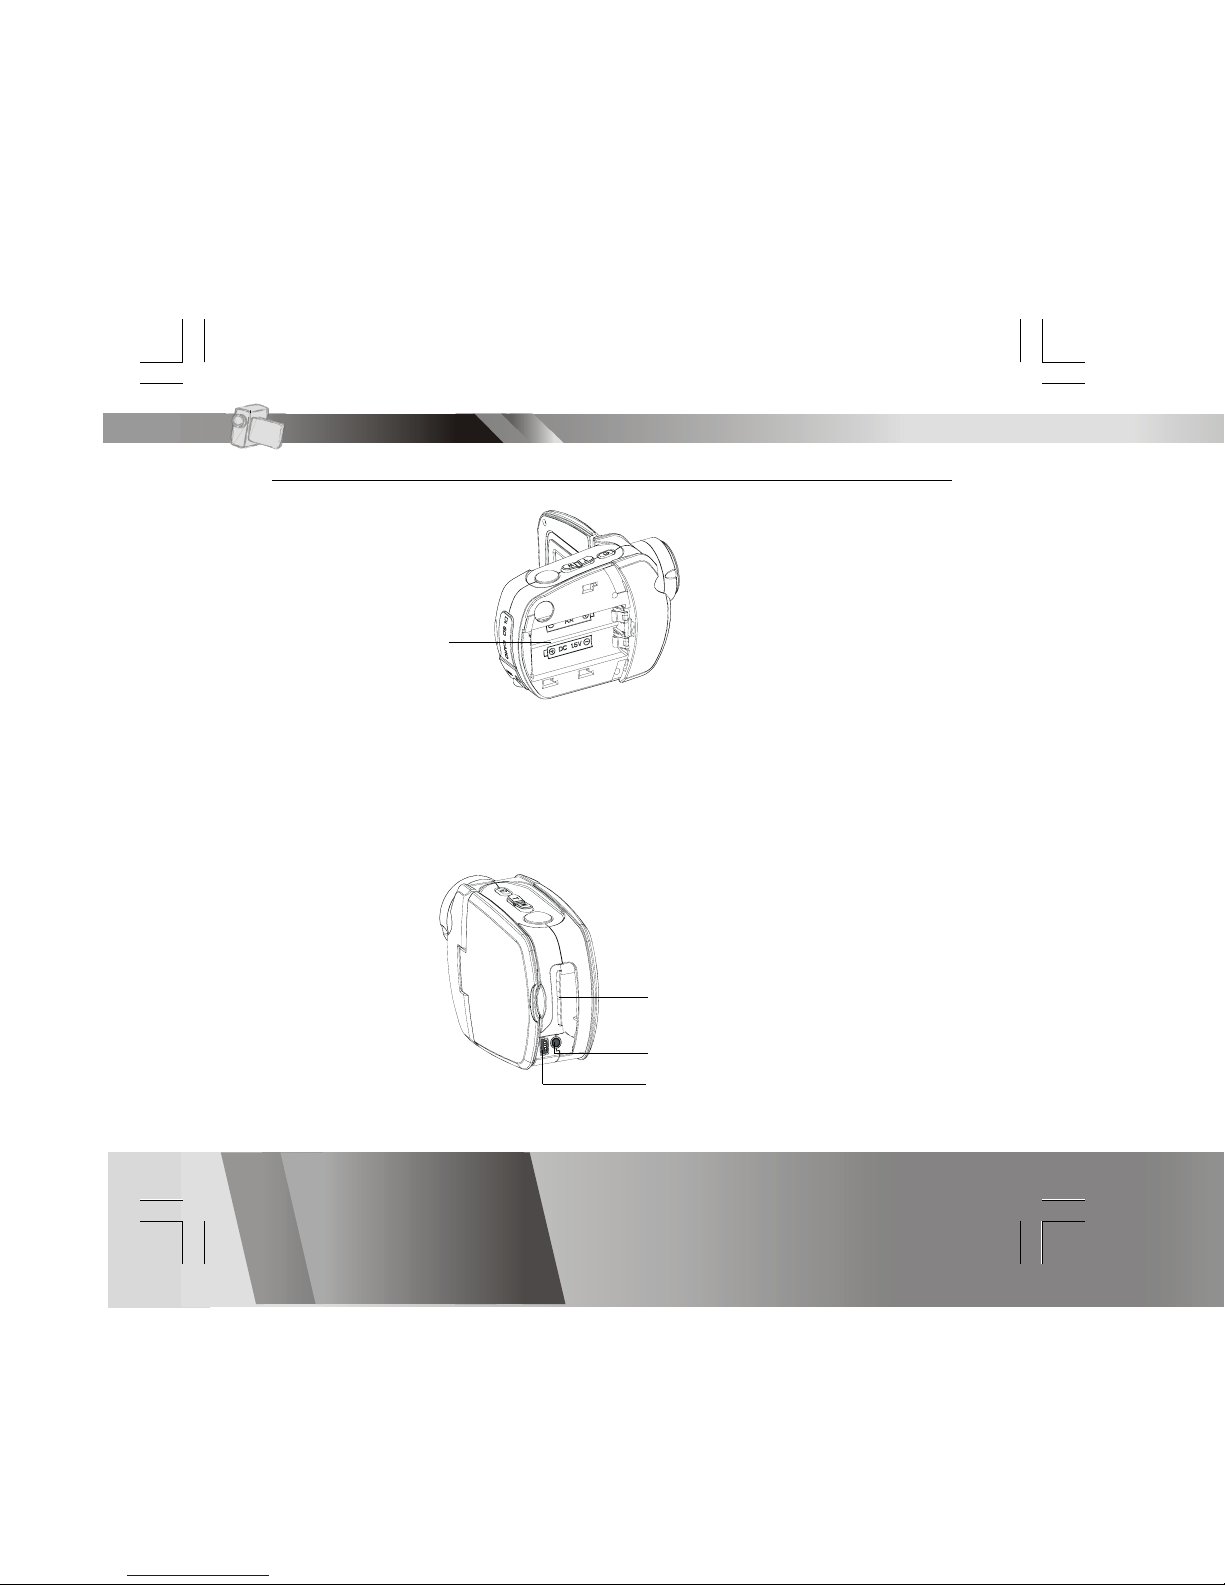
Front View
Back View
LCD Screen
Control Panel
Getting Started
MMC/SD card
cover
USB/Earphone
cover
Microphone
Flash (Optional)
Speaker
Power Button
Zoom Lever
Shutter button
Lens
Battery cover
Front LED
Focus Ring
Getting to know your Digital Video Camera
Page 5
En 4
Getting to know your Digital Video-continued
Side View
Getting Started
MMC/SD card slot
AV out/Earphone jack
USB port
Battery Slot
Back View
Page 6

En 5
Understanding the Control Panel
Display
Next/Up/Resolution
Play/Pause/
Enter
Record/
Playback
Mode Switch
Exit/
Stop
Menu DV/DSC/DVR/MP3 Mode Switch
Back/Down/Self-timer Volume/Hold(Press 2 Sec.)
Getting Started
Page 7
En 6
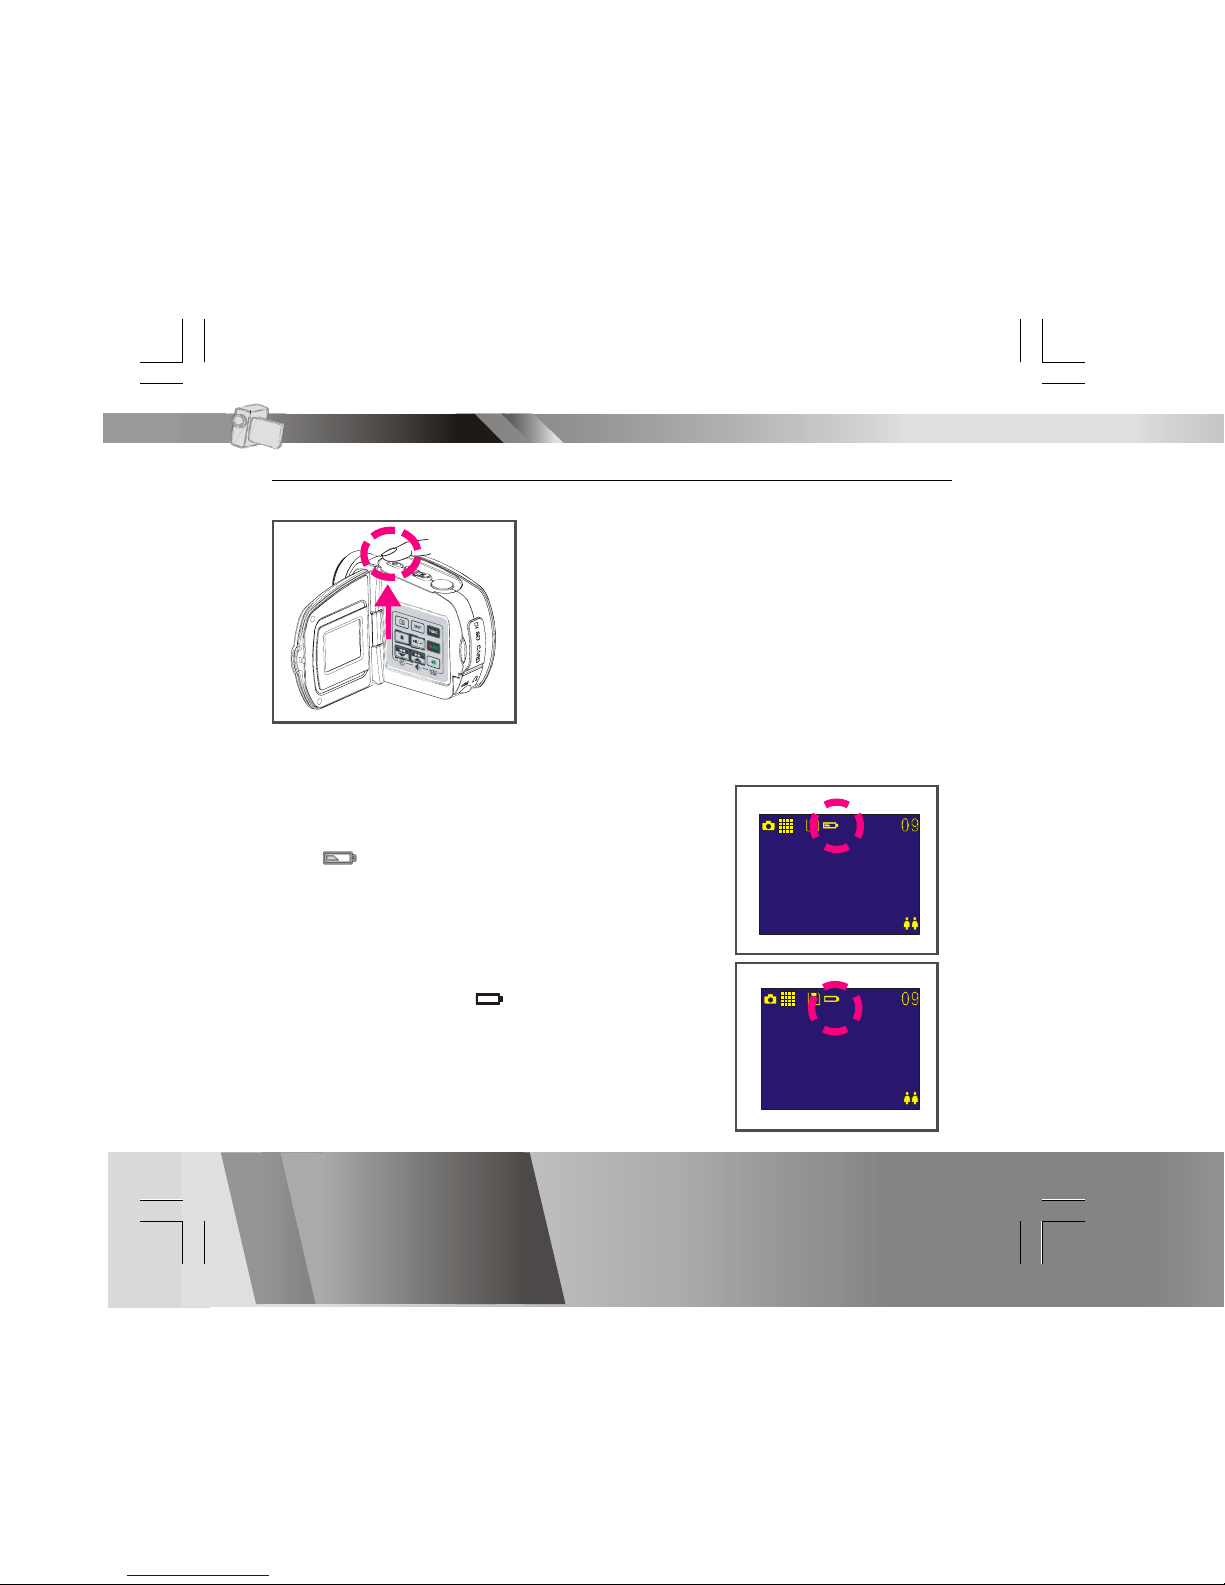
Power
Power On/Off
Press the power button to turn your digital
video camera on and off.
Power Low
When the battery is running low, a battery
icon ( ) will appear on the top of the LCD.
When the battery is about to run out, a
blinking battery icon ( ) will appear on the
top of the LCD. Your digital video camera will
shutdown automatically in a few seconds.
Getting Started
Page 8
En 7
Modes
Power On
DV Record Mode
DSC Record Mode
USB connected
Mass Storage Mode
DVR Record Mode
MP3 Mode
PLAYBACK Mode
Getting Started
Page 9

En 8
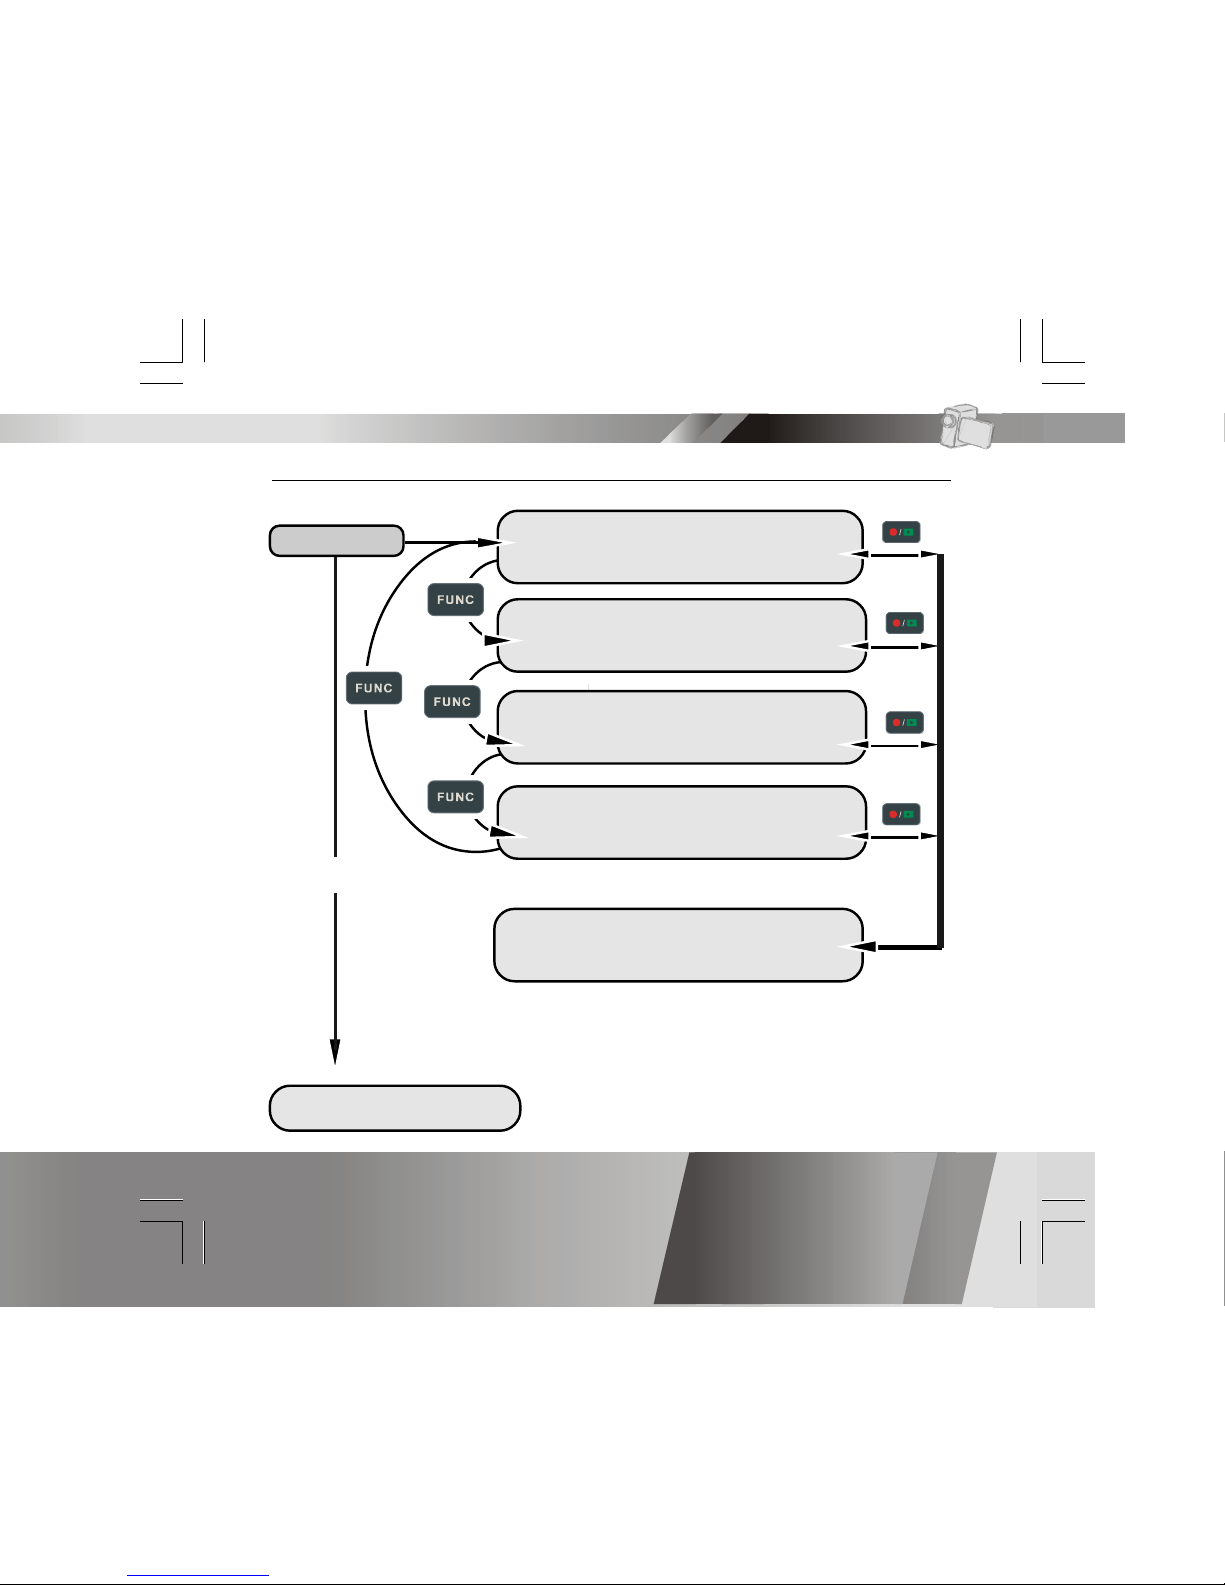
Modes-continued
DV Mode/DSC Mode/DVR Mode/MP3 Mode/PLAYBACK Mode
This unit provides 4 modes. These modes are:
1.DV Mode: take videos with sound
2.DSC Mode: take pictures
3.DVR Mode: record voice messages.
4.MP3 Mode: listen to MP3 music.
You can switch among these four modes by pressing . By
pressing
, you can switch to PLAYBACK mode to review your
videos, pictures and voice messages. DV Mode/DSC Mode/DVR
mode shares the same PLAYBACK mode. You can switch back to
the previous mode by pressing
again.
Getting Started
Page 10

En 9
Connecting to PC (Mass Storage Mode)
Using Console (Not applicable to MAC computers)
Connect your Digital Video to a computer with an USB cable.
Modes-continued
Getting Started
USB Cable
USB port
Mass Storage Mode
Connect your digital video camear to a computer. In Mass Storage Mode,
it acts exactly like a hard disk. You can now drag and drop your pictures,
movies, voice messages and MP3 files between the computer and your
digital video camera.
Note:
1.Please do not copy any files into the DCIM folder. This may make the unit
unstable or cause it to crash.
2.Remember to copy the MP3 files into the MP3 folder of your digital video
camera.
Page 11

En 10
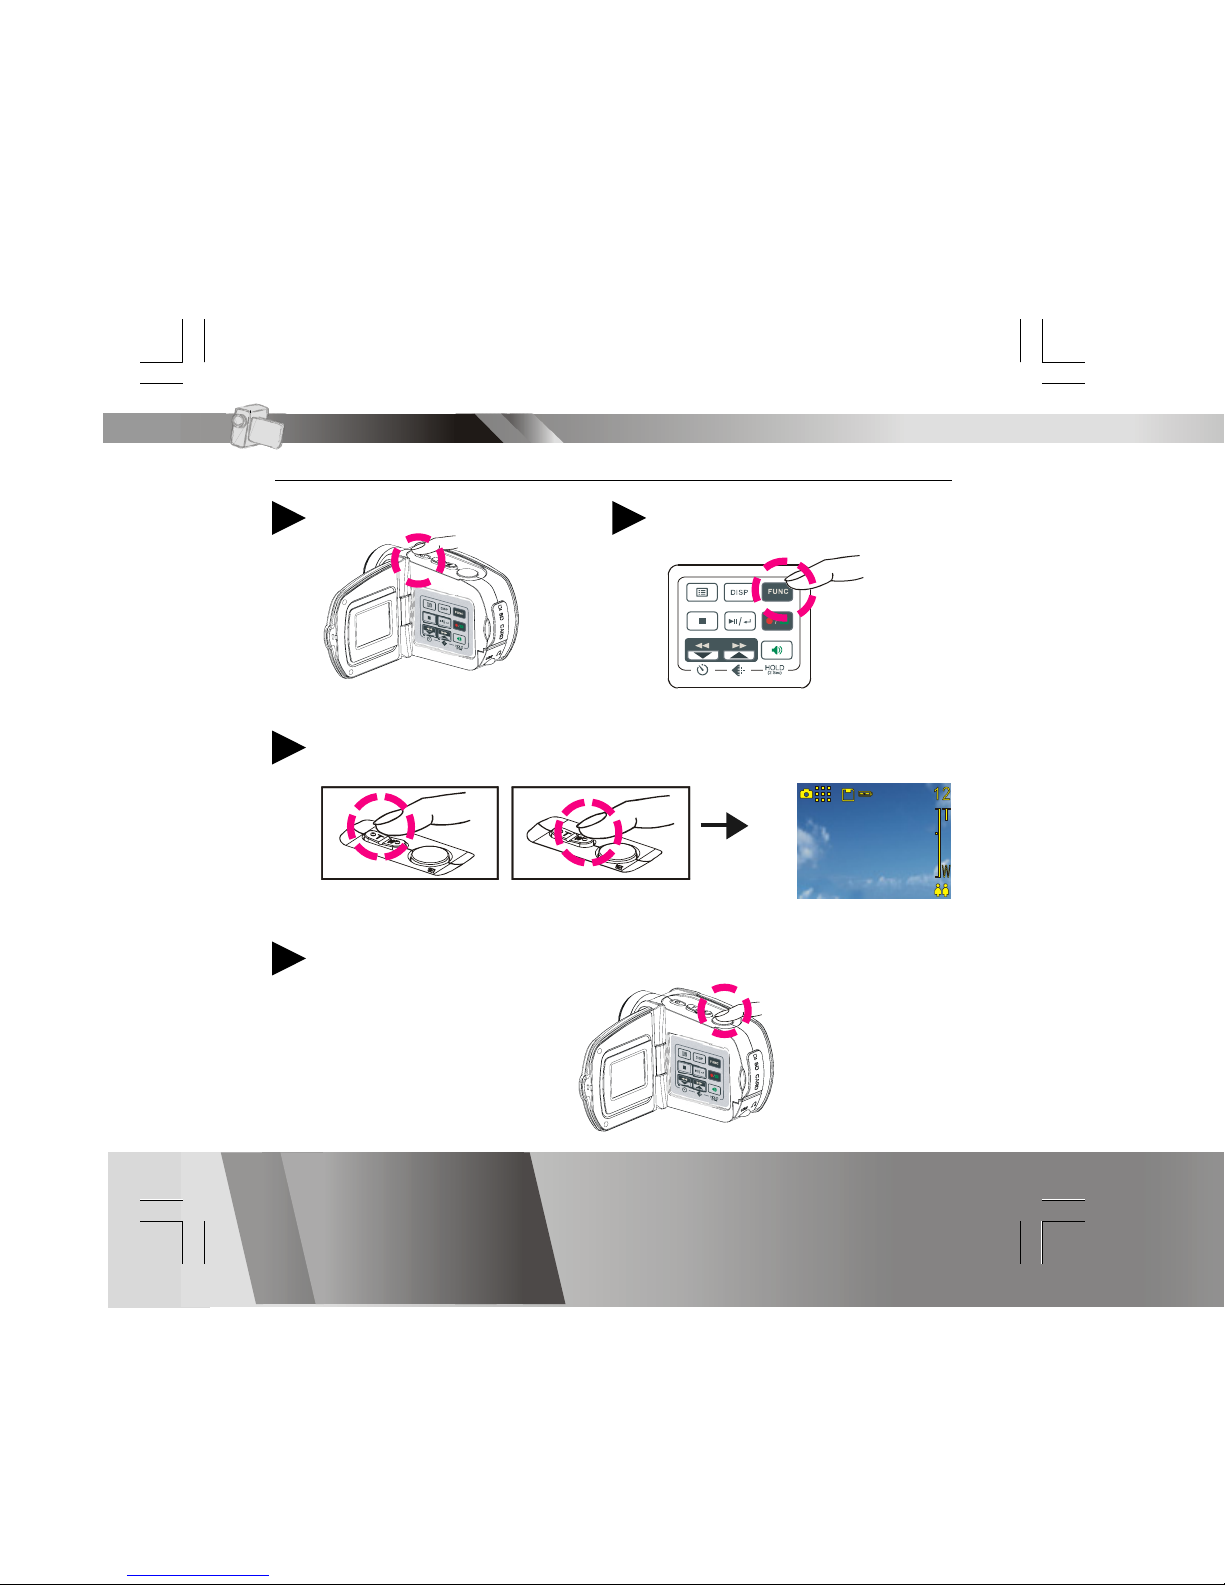
Taking Movies
Slide Zoom-in or Zoom-out to frame your video2
Press Shutter button to start recording
3
Press Shutter button again to stop
4
Zoom in or Zoom out
Switch to DV Mode
2
Press Power
1
DV Mode
Page 12
En 11
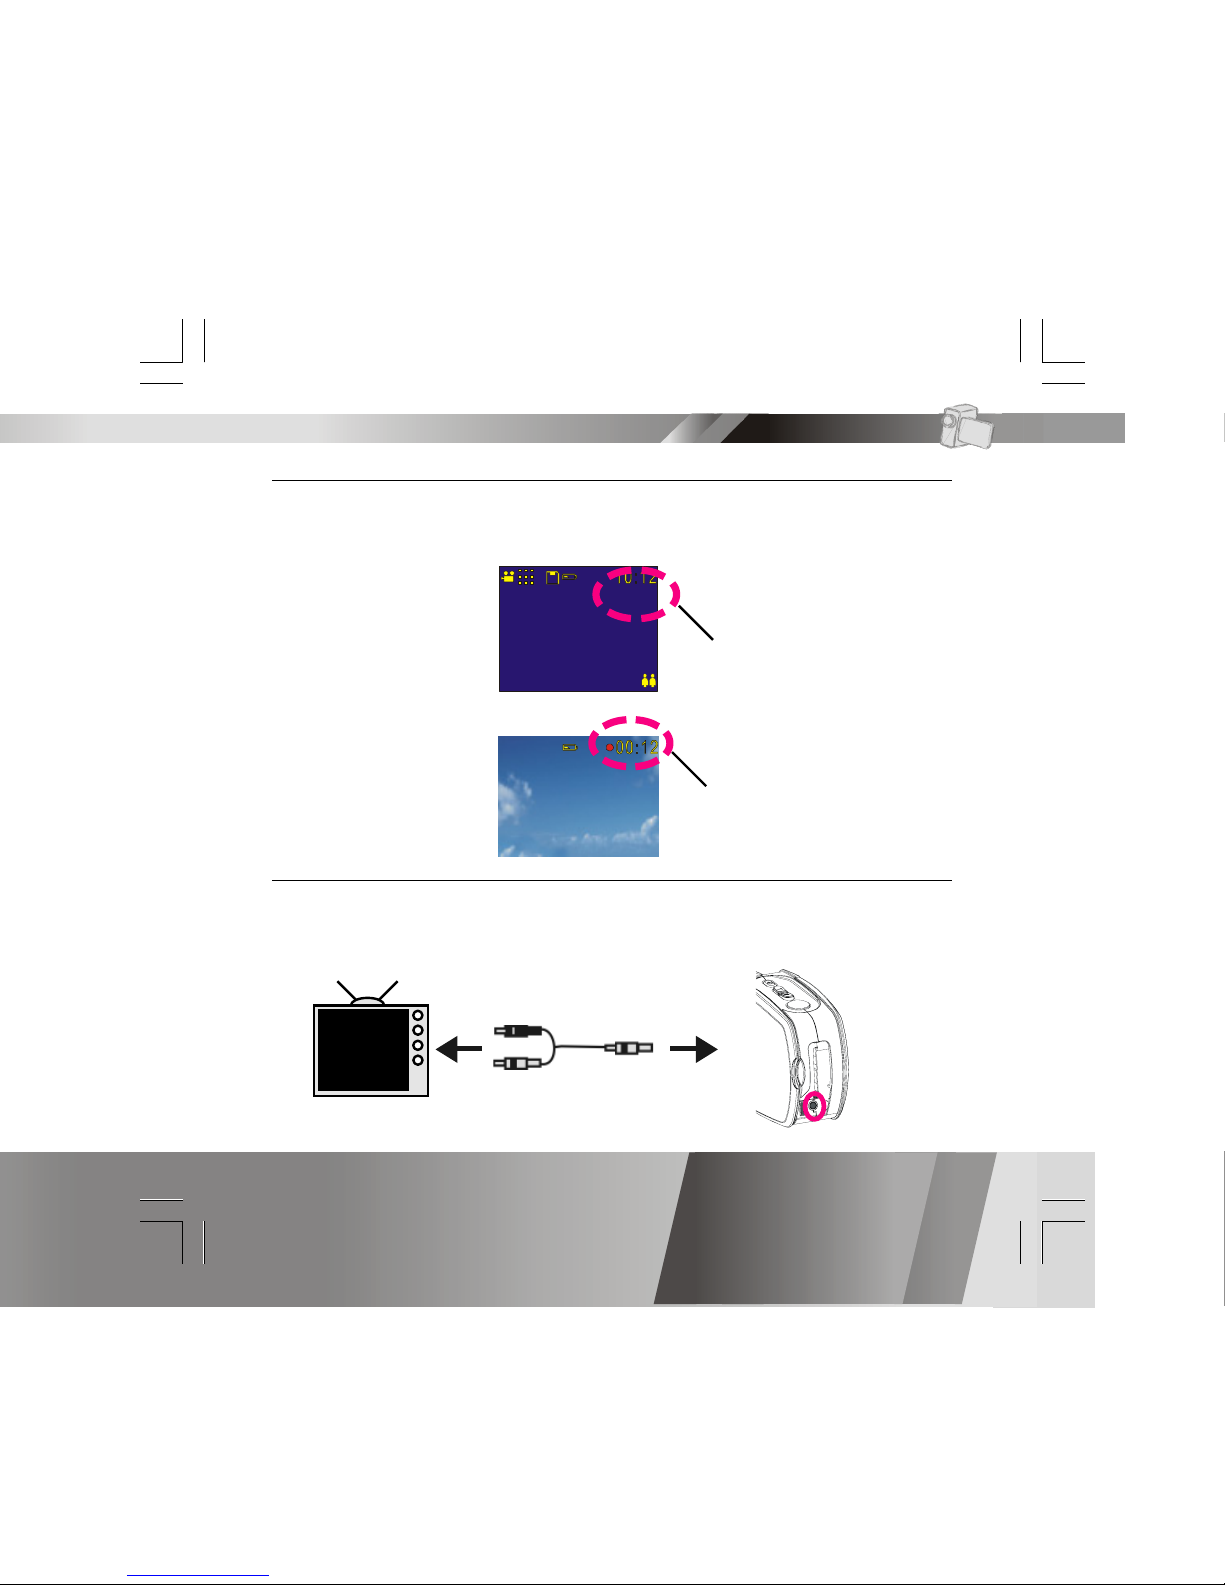
Video Out
This Digital Video can output analog video to a home TV set. To configure
the Digital Video, please refer to the NTSC/PAL section.
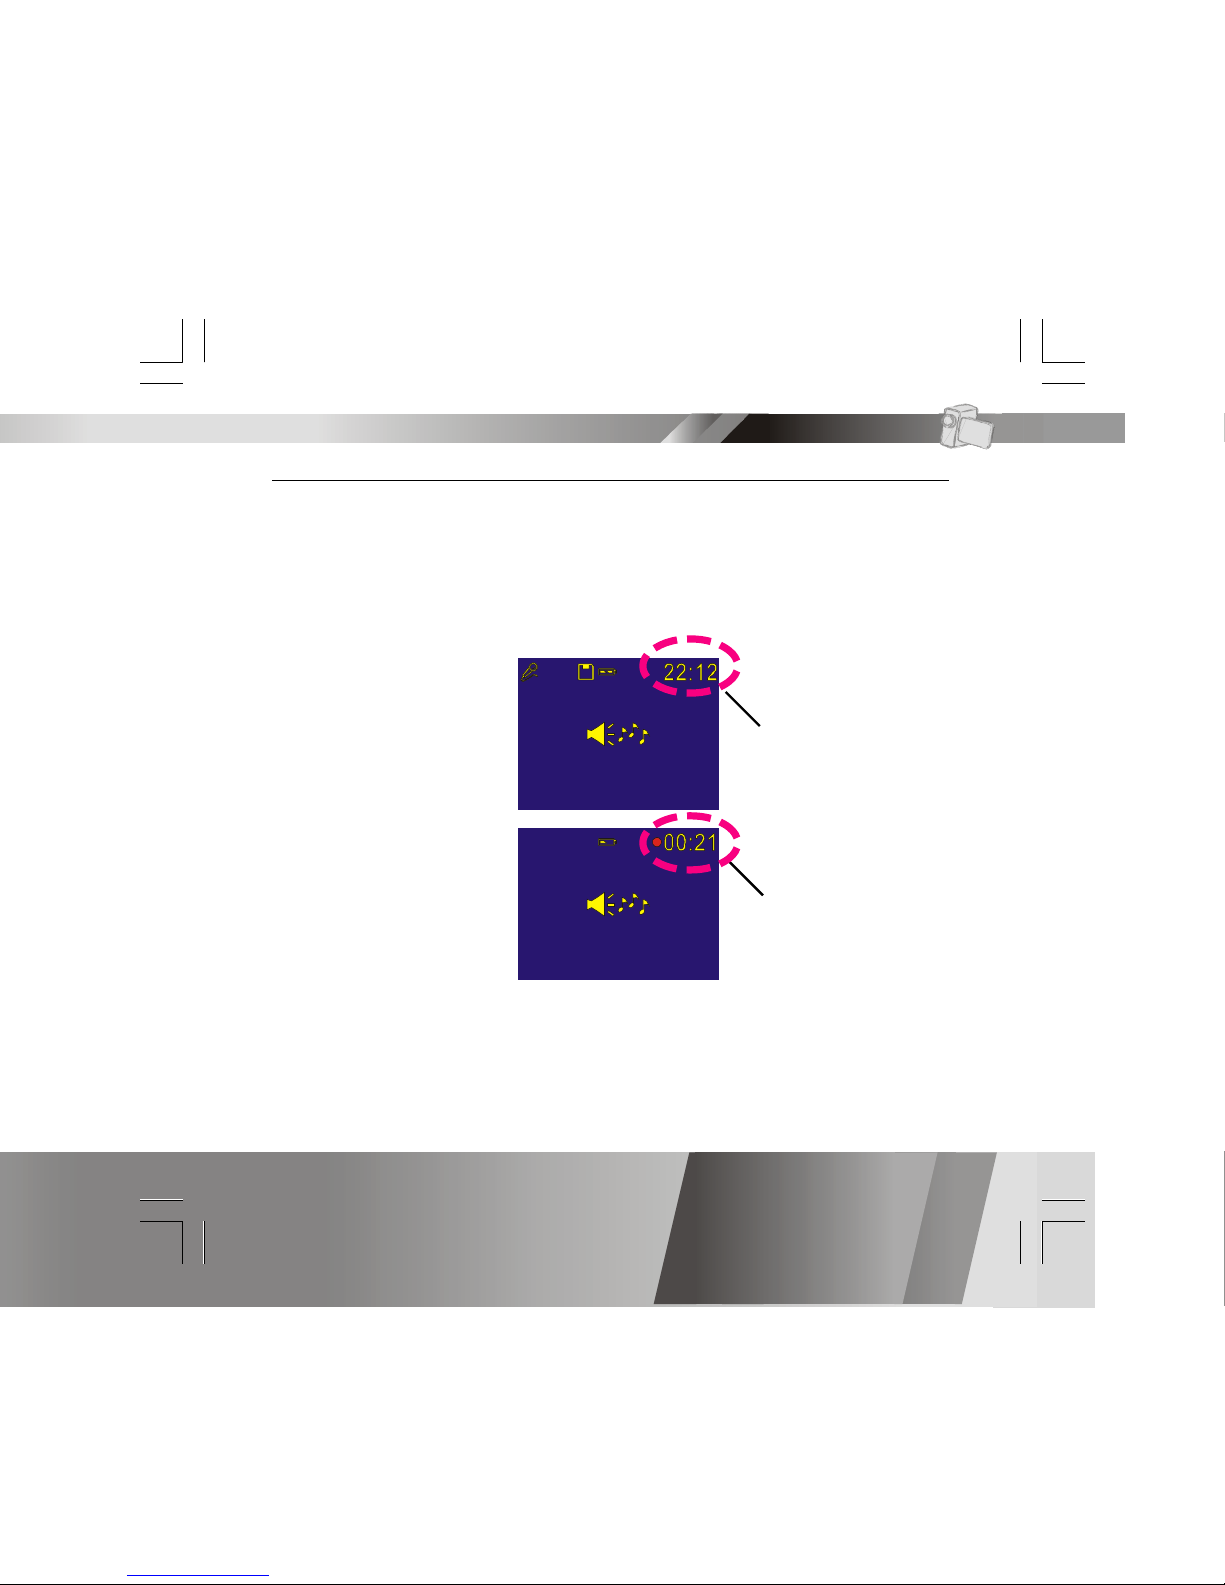
Taking Movies-continued
The recording timer
While you’re filming, the recording timer will be displayed on the LCD.
Before Recording
While Recording
Total estimative
recordable time
The recording time
DV Mode
Page 13
En 12
Taking Pictures
Press Zoom lever to adjust the magnification ratio.3
Press Shutter button to take a picture
4
Zoom in or Zoom out
DSC Mode
Press Power
1
Switch to DSC Mode
2
Page 14

En 13
Taking Pictures-continued
The Picture Counter
You can see the picture counter displayed on the upper-right corner of
your LCD. It will show the number of the total recordable files of this
Digital Video.
Macro/Portrait Mode
You may set your camera to (macro mode) for closeup focus or to
(portrait mode) for normal range focus. Turn the focus ring to switch
between modes.
DSC Mode
Total estimative
recordable files
Page 15

En 14
Recording Voice Messages
Press Power
1
Switch to DVR Mode
2
Press Shutter button again to stop4
Press Shutter button to start recording3
DVR Mode
Page 16
En 15
Recording Voice Messages-continued
The recording timer
While recording voice messages, the recording timer will display on the
upper-right corner of your LCD.
Before Recording
While Recording
Total estimative
recordable time
Total recording time
DVR Mode
Page 17
En 16
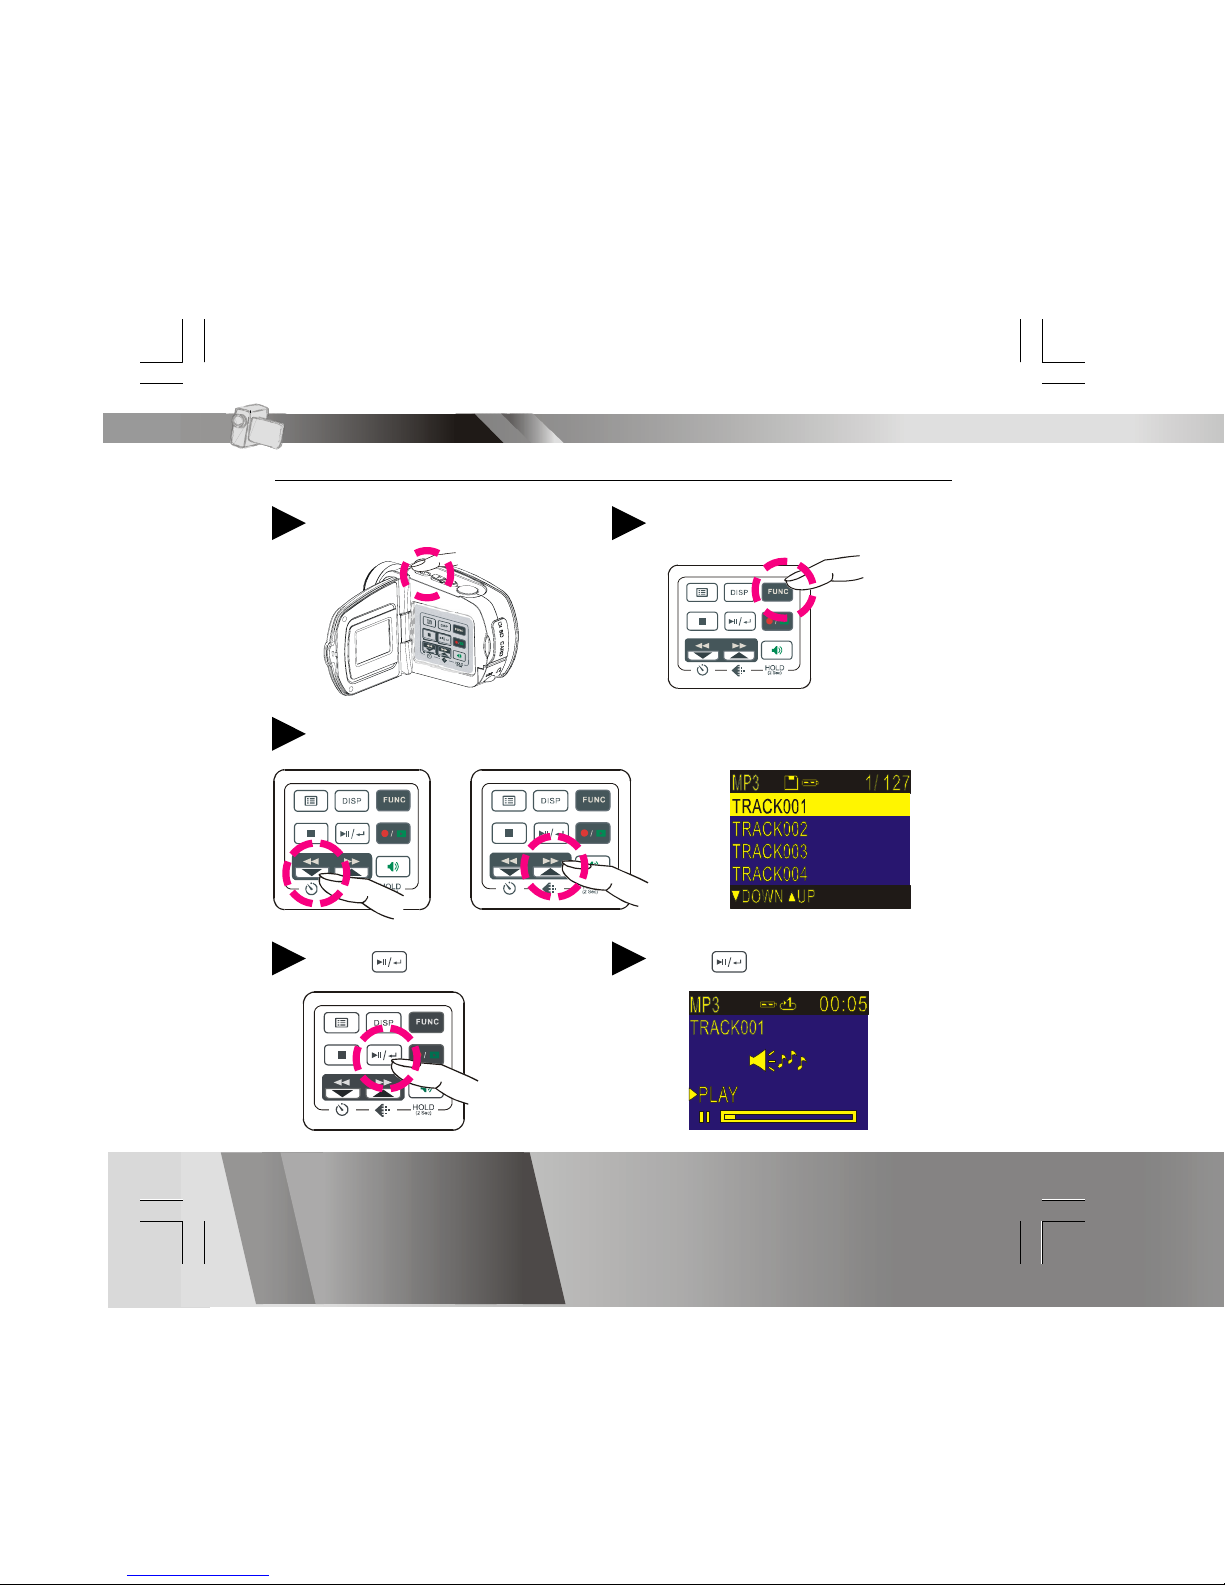
Press to pause5
MP3 Mode
Listening to MP3 Music
Press Power
1
Switch to MP3 Mode
2
Press to play MP3 music4
Press UP or DOWN to select a track3
Page 18
En 17
Listening to MP3 Music-continued
NOTE:
The title of the tracks will display ONLY in alphabetical letters. Title with
illegal characters will display in “TRACK001”, “TRACK002”, and
“TRACK003” and so on.
MP3 information
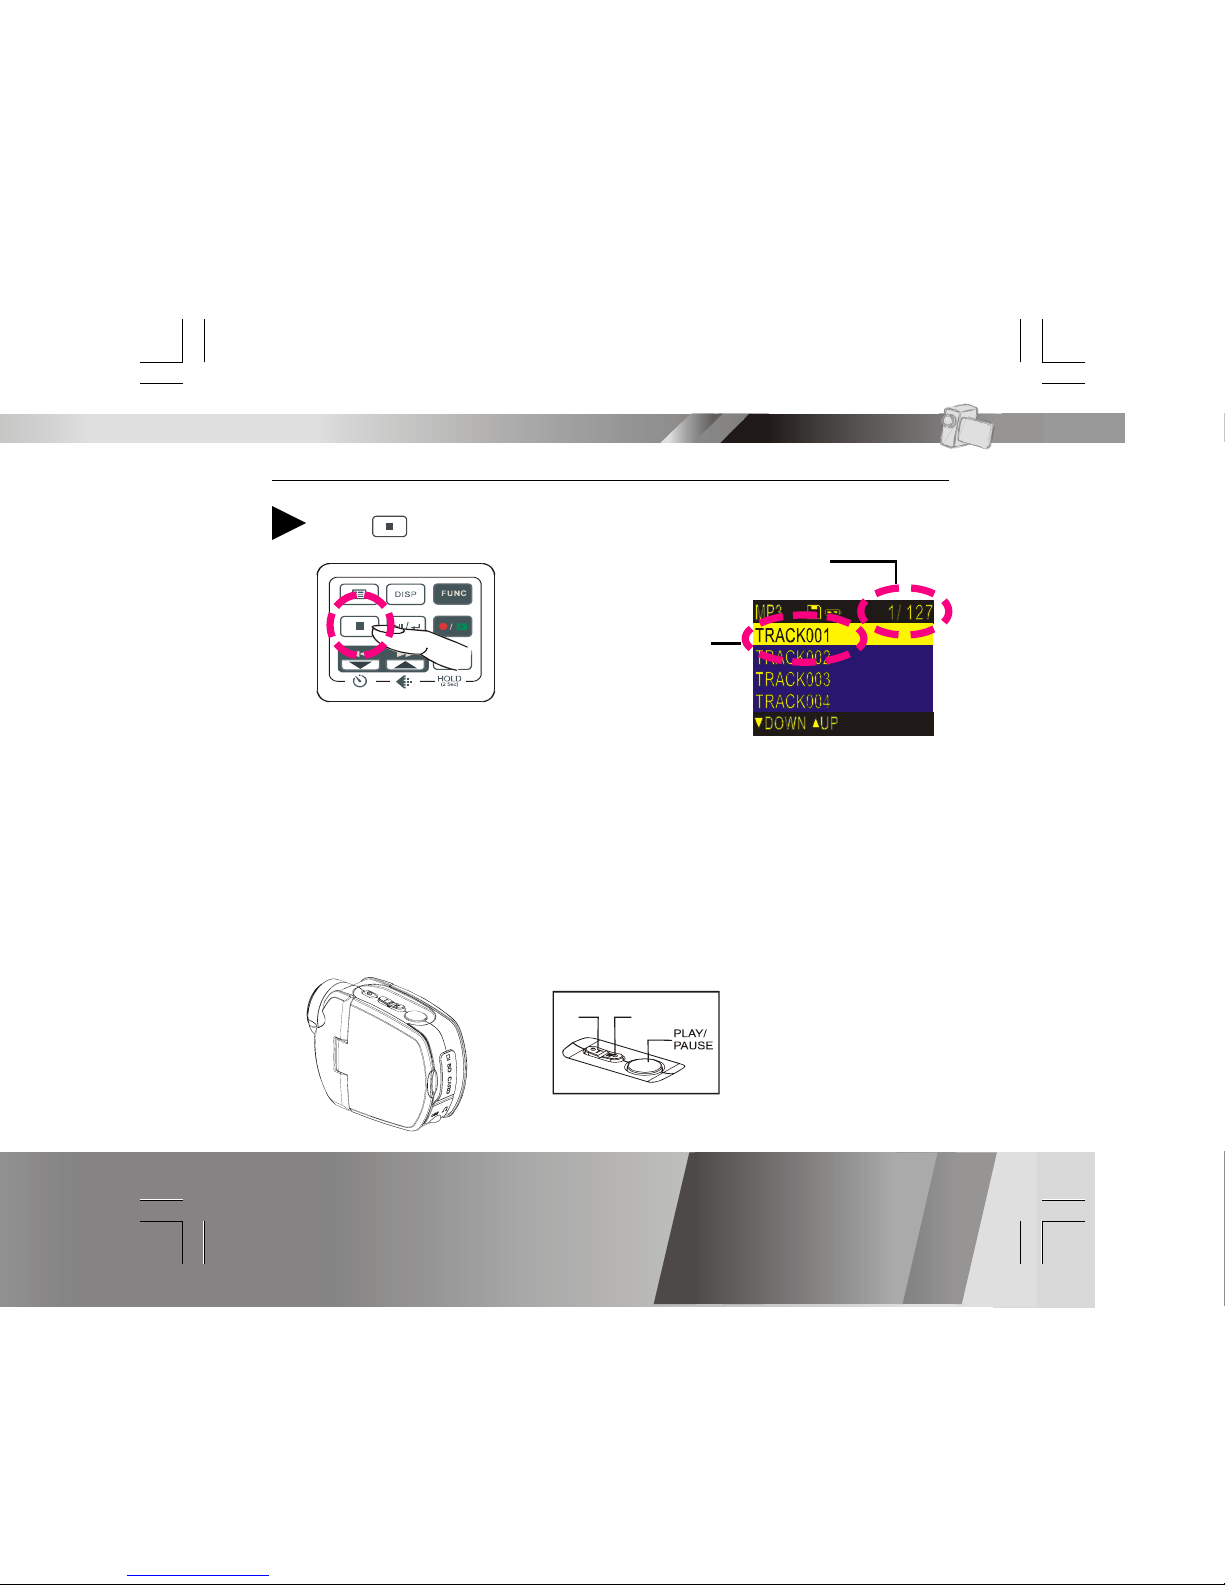
Press to stop6
MP3 Mode
Current track/
Total tracks
The title of the
selected track
UP DOWN
Playing MP3s with the displaying panel closed
You may close the displaying panel while playing MP3s and use the Zoom
lever to select sound and Shutter button to play or pause.
Page 19
En 18
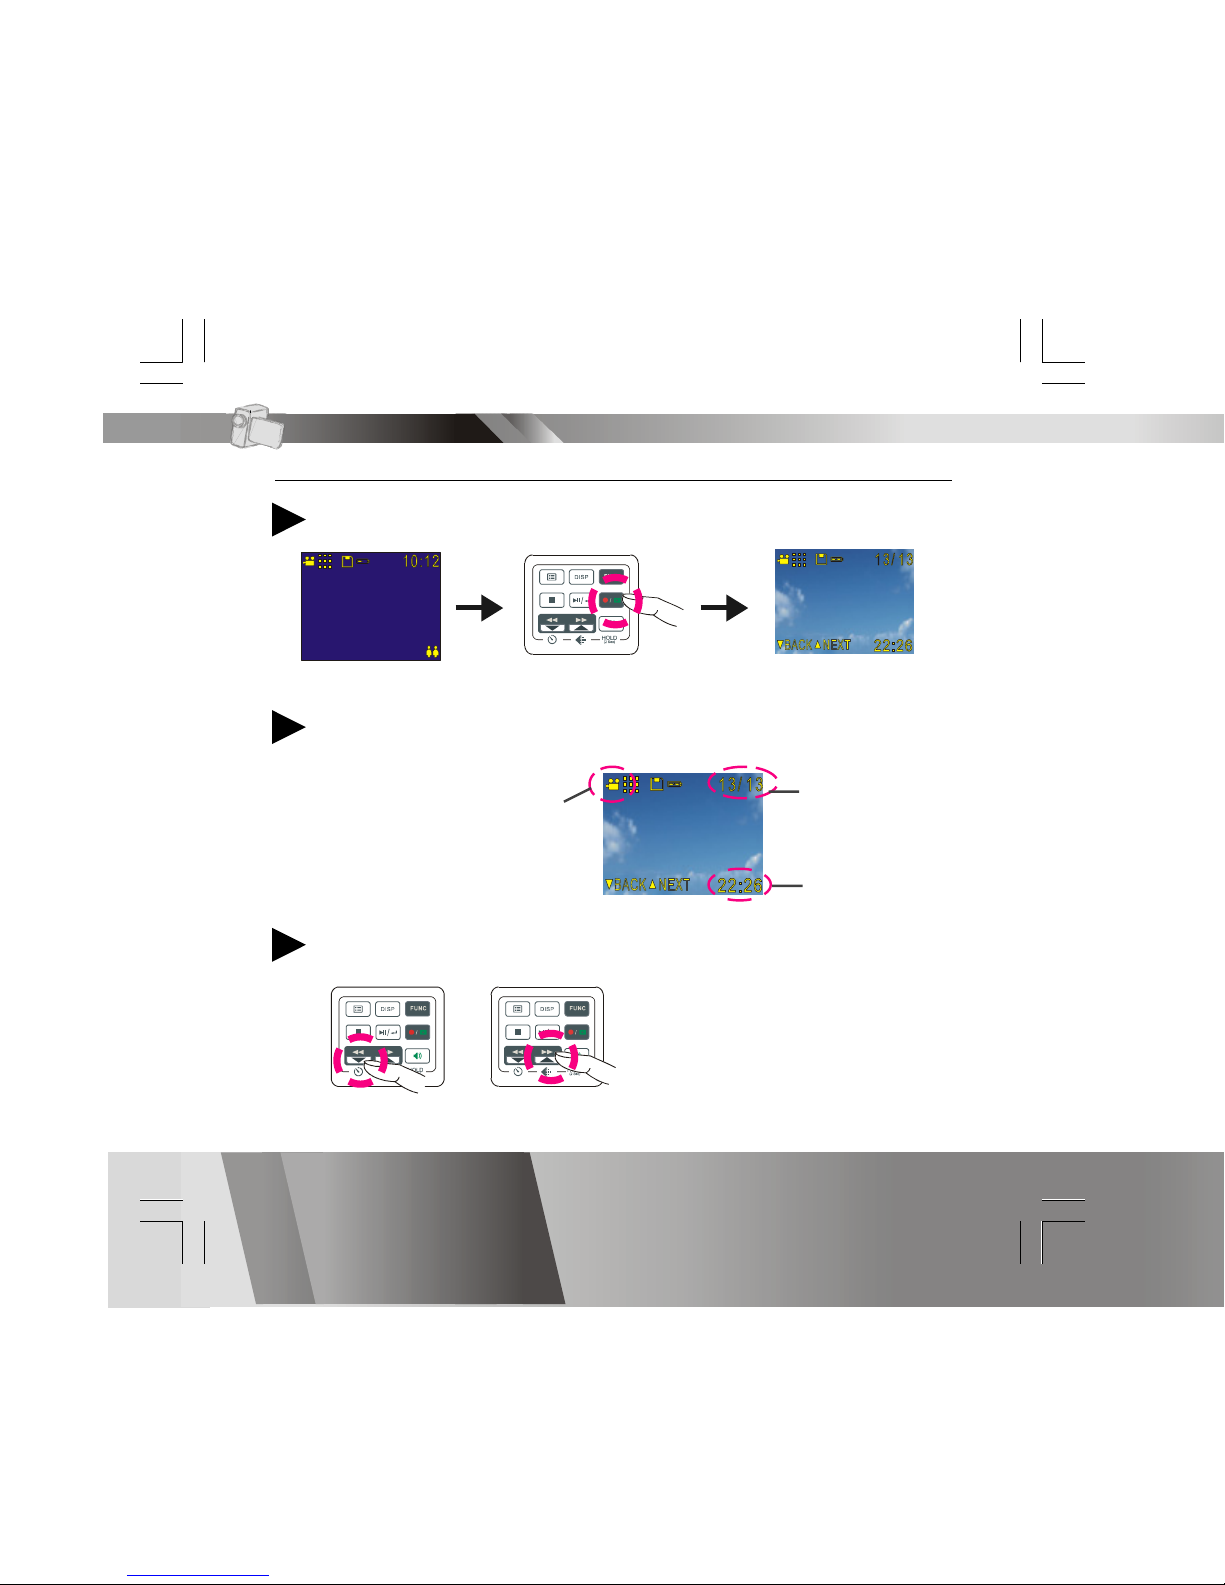
Basic Playback
Switch to PLAYBACK mode
1
The information of the selected file will display on the LCD.
2
Press BACK or NEXT to navigate
3
The Mode of the selected file
Current file
number/ The total
files number
The time of the
selected file
PLAYBACK Mode
Page 20
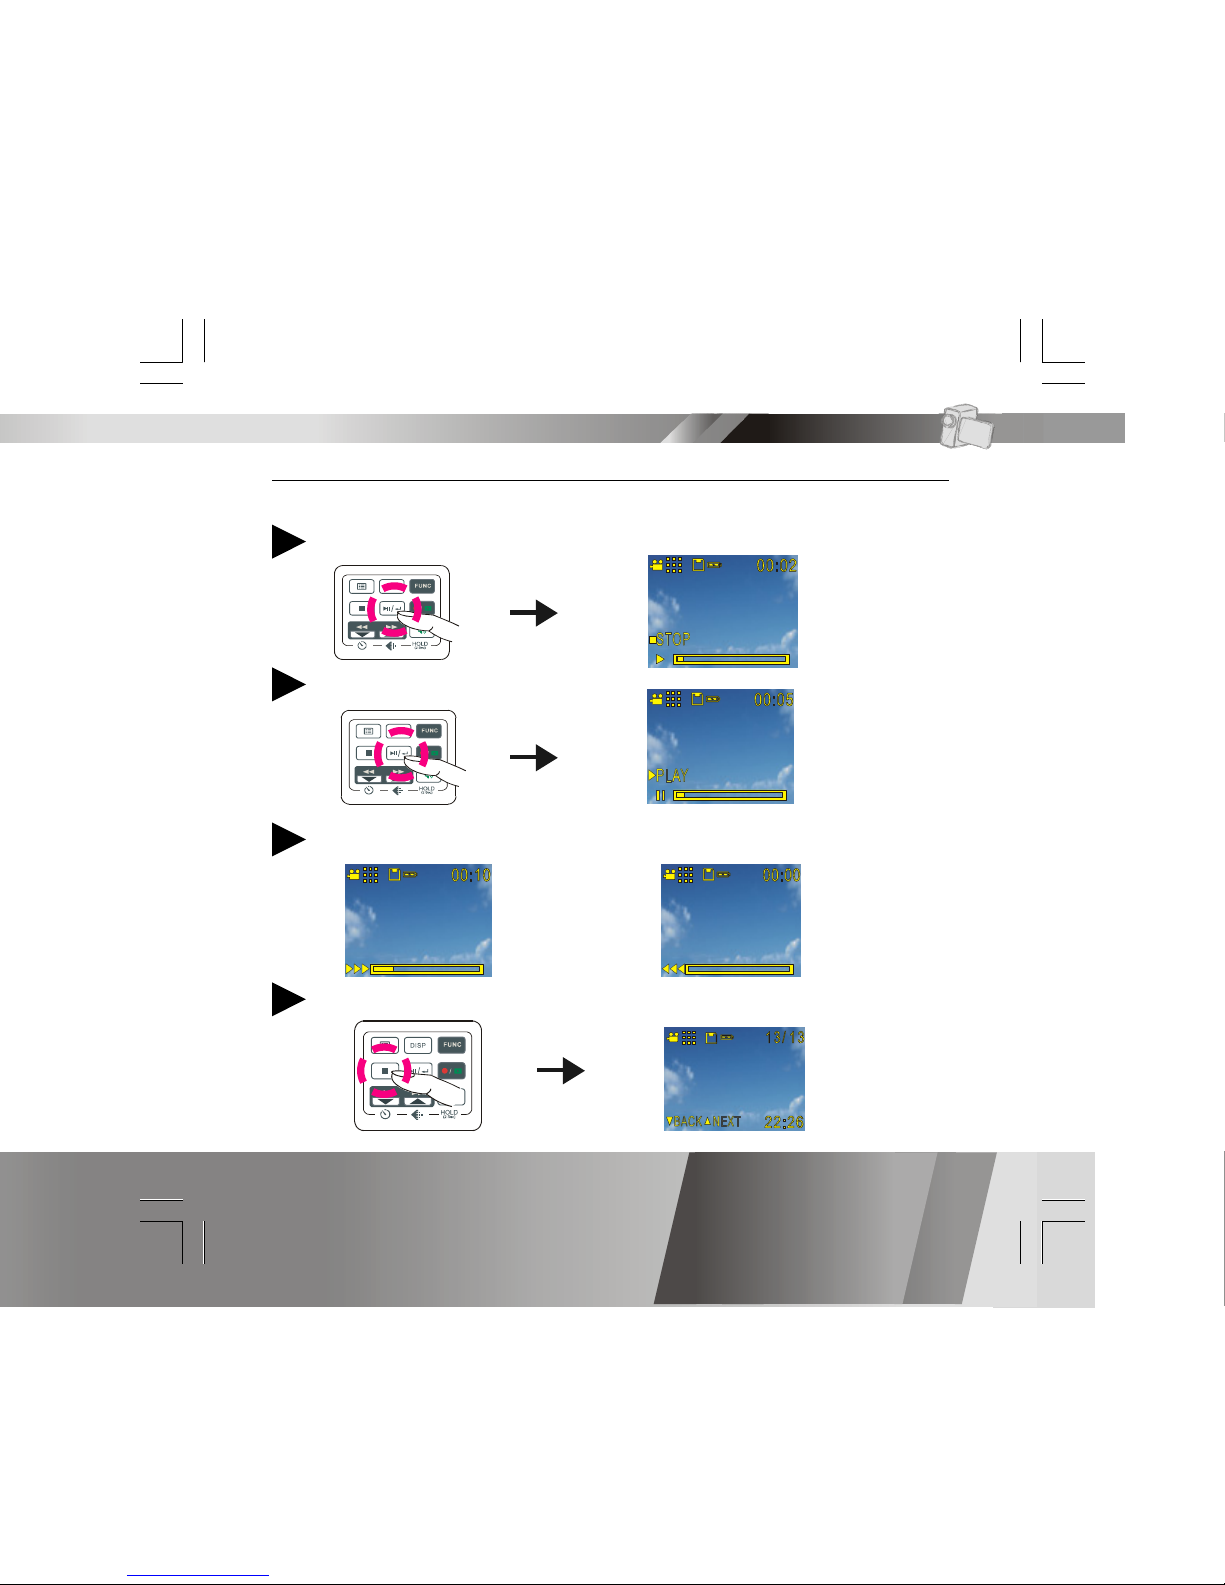
En 19
Press PLAY to start
4
Basic Playback-continued
Press PLAY again to pause
5
Press NEXT or BACK to fast-forward or fast-backward
6
Press STOP to stop
7
The following steps are only applicable to DV and DVR files.
PLAYBACK Mode
Page 21
En 20
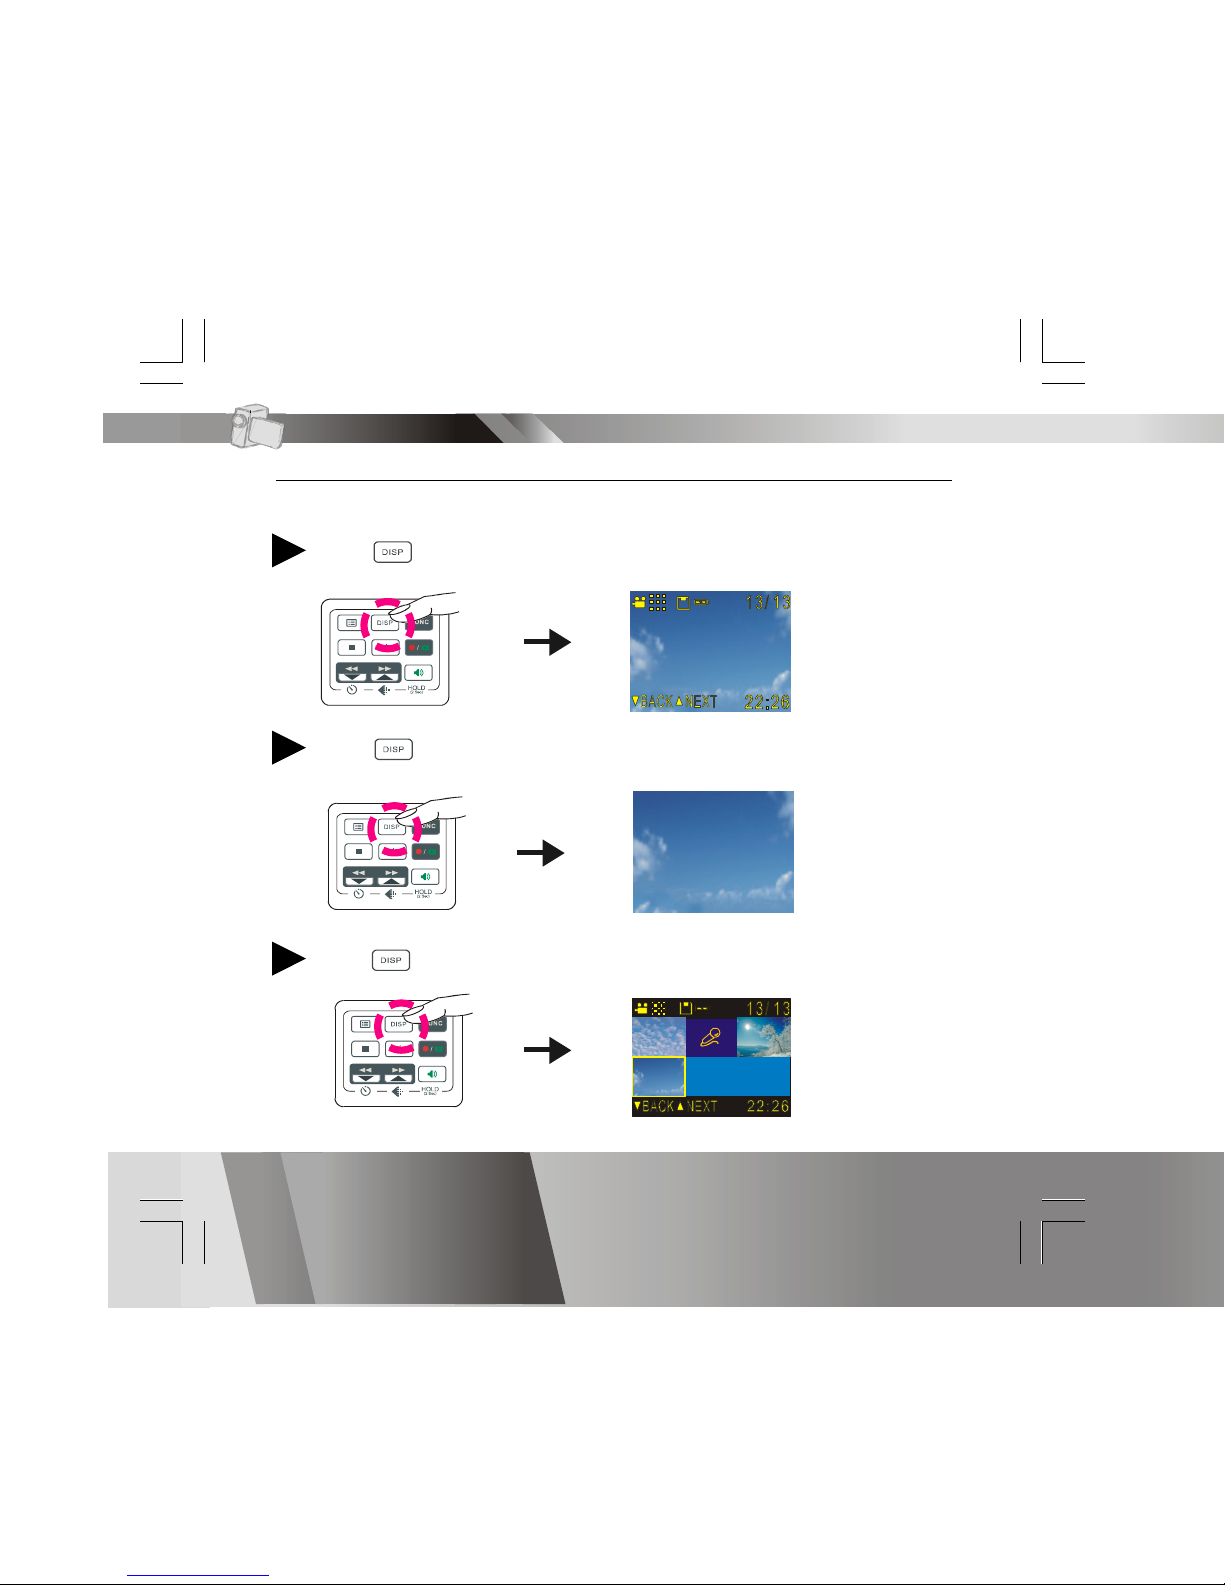
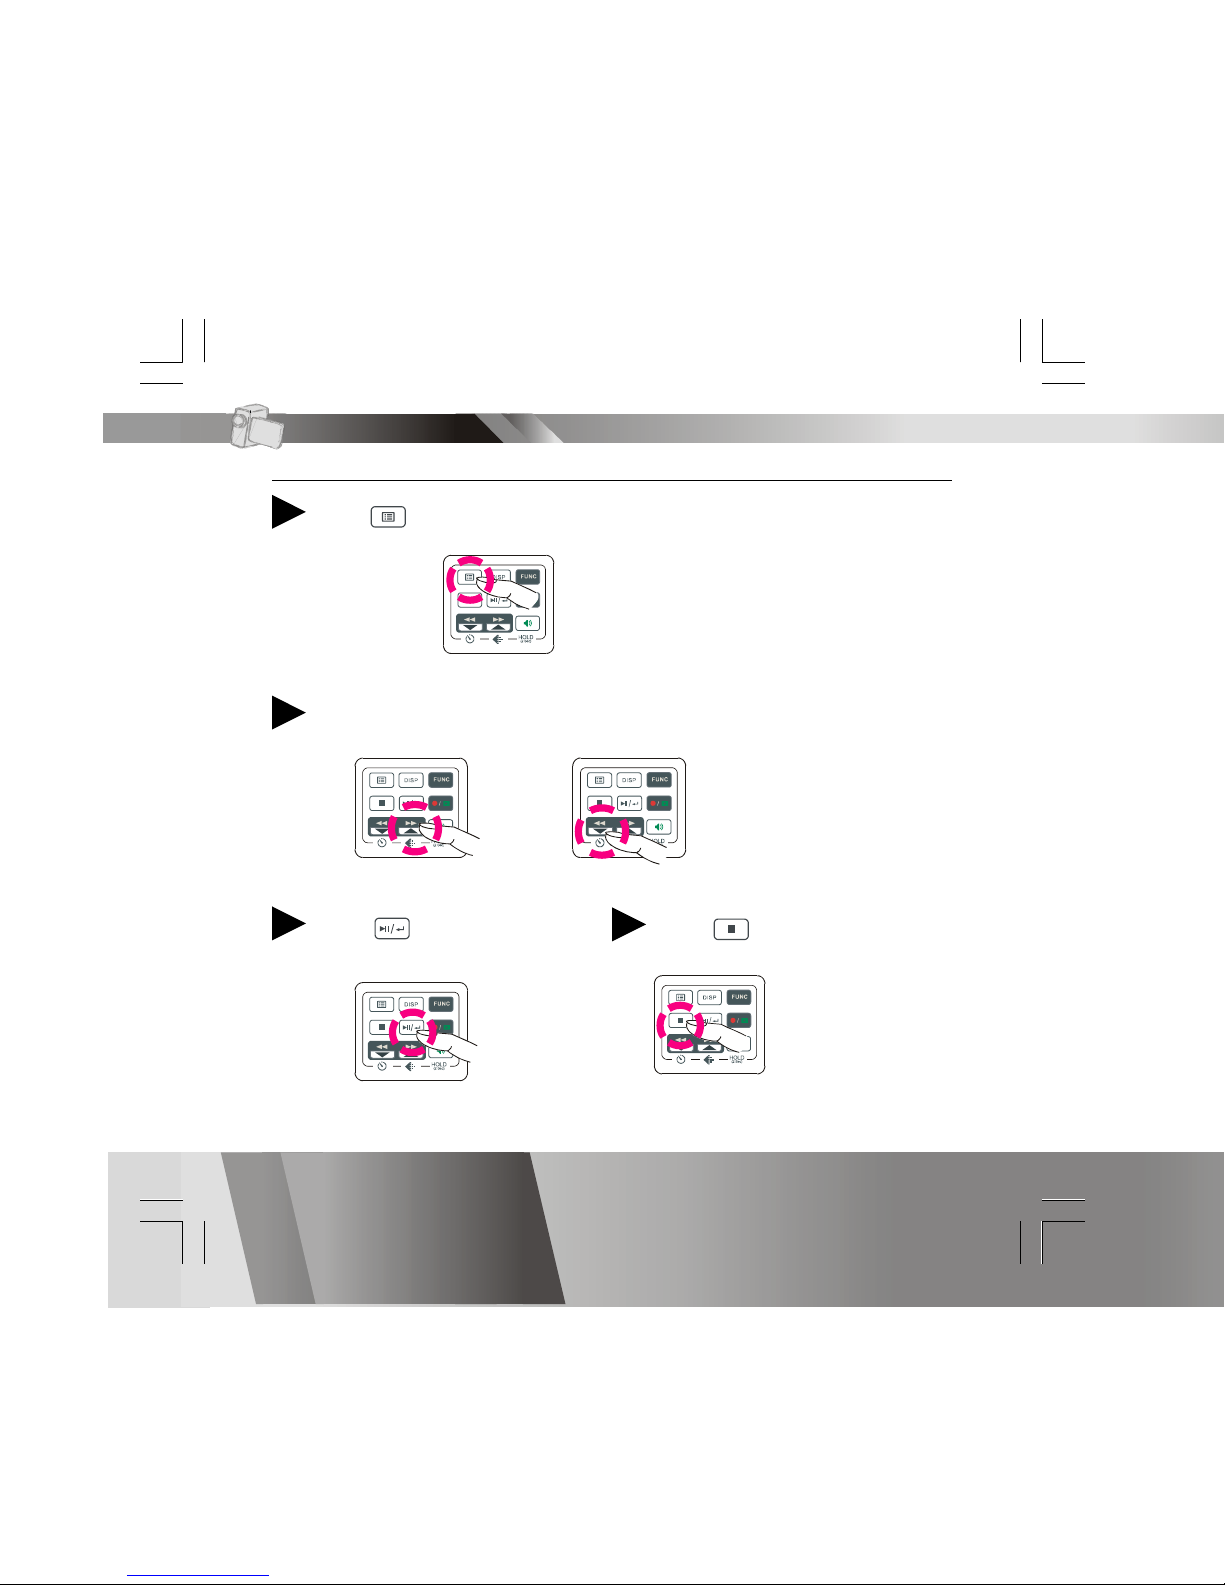
Advanced Playback
Preview in multiple/single view or hide the information
Press to preview in single view
1
Press again to hide the information
2
Press again to preview in multiple view
3
PLAYBACK Mode
Page 22
En 21
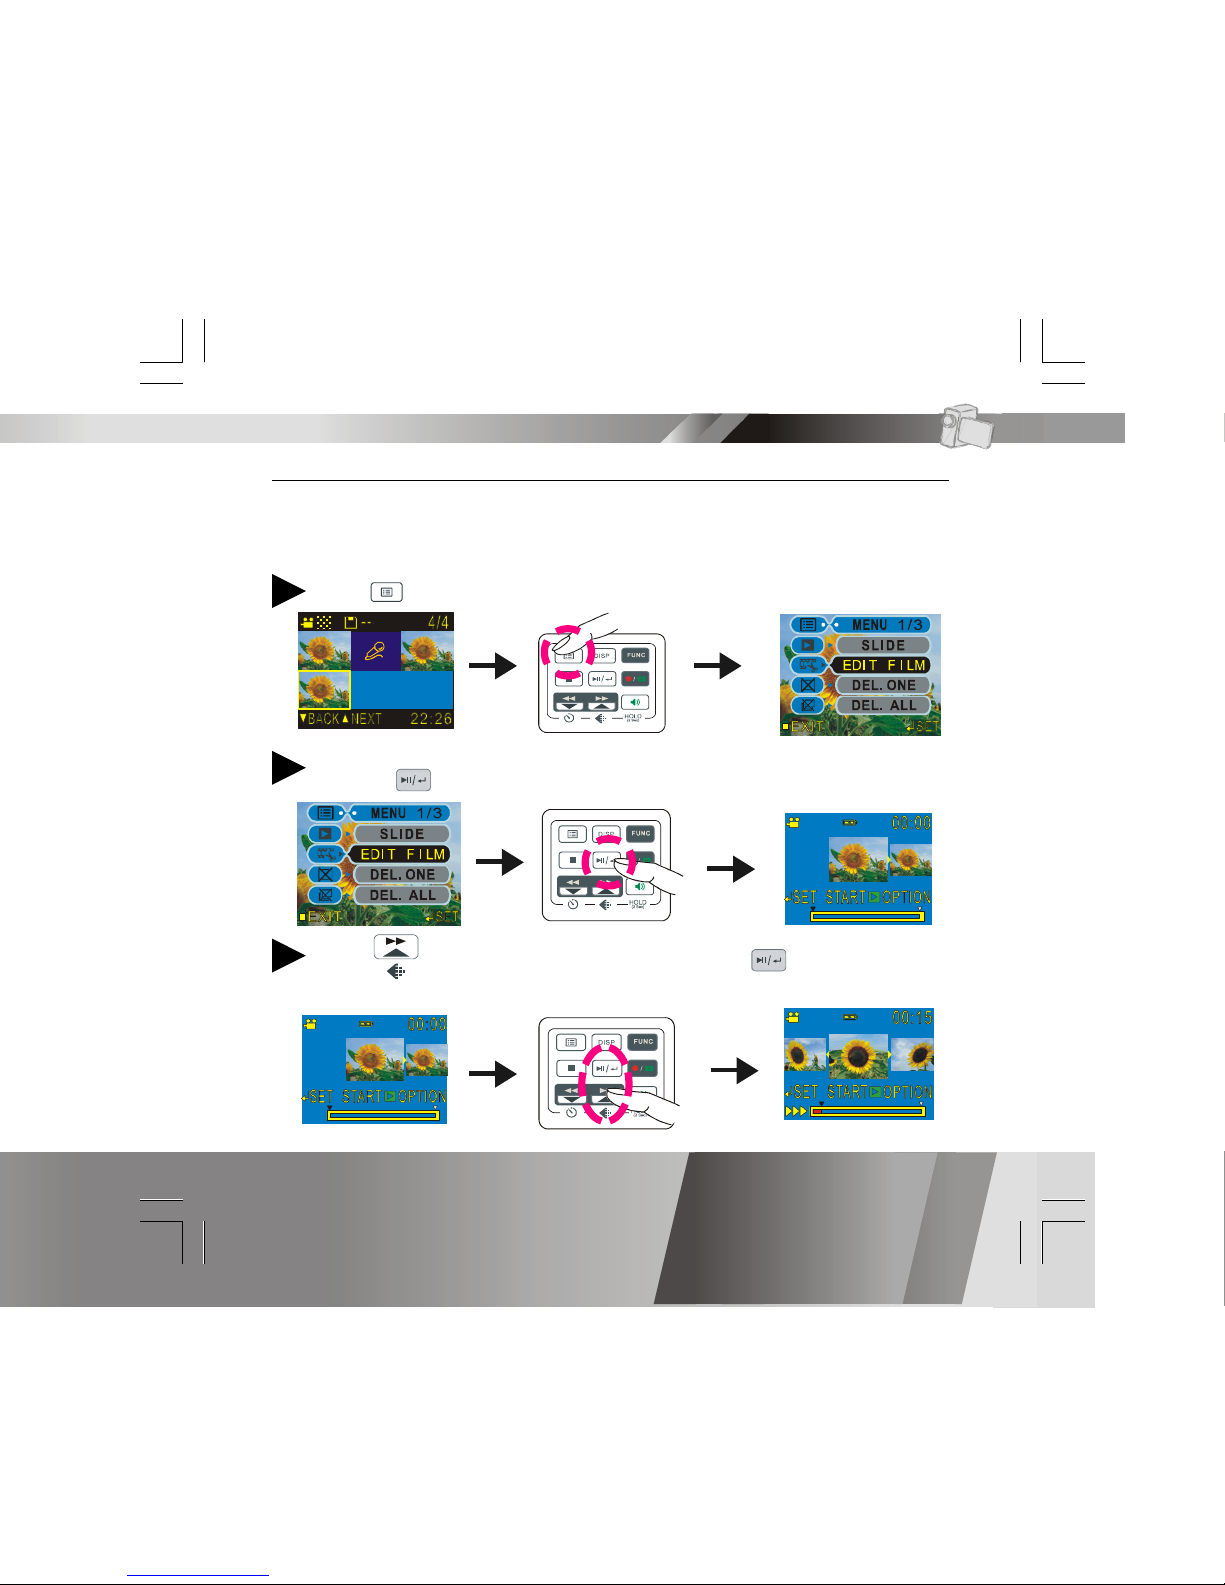
Advanced Playback-continued
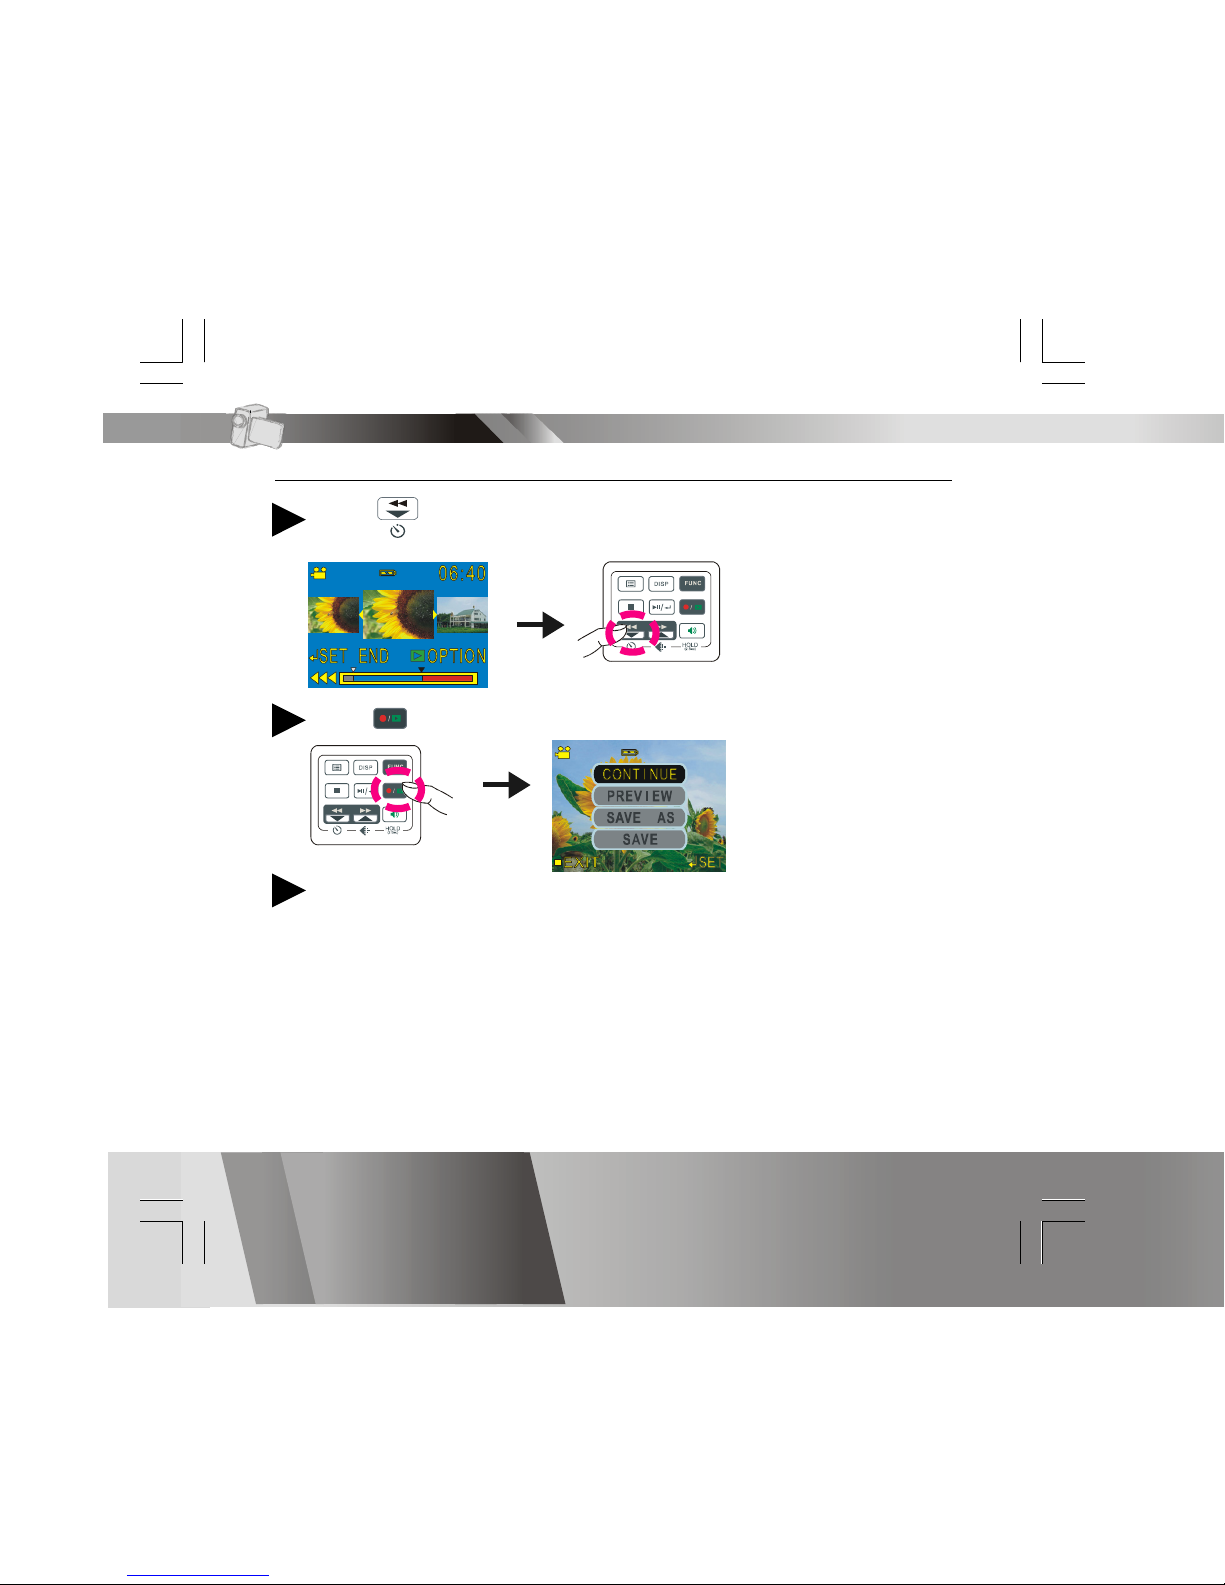
Edit the beginning and ending of a video clip (optional)
This function is only available on certain model
Press to bring up the menu1
Press to select “EDIT FILM”
2
Press to advance to a position and press to set it as the
starting point of the video clip.
3
PLAYBACK Mode
Page 23
En 22
Advanced Playback-continued
Press to reverse to an ending position for the video clip.
Select CONTINUE to return to editing screen, PREVIEW to play the
edited clip, SAVE AS to save the clip as a new file, or SAVE to save
and overwrite the original file.
6
4
Notes
1. You may encounter a “MEMORY FULL” message while saving over the
original file or as a new file to a storage media that is nearly full. If this
occurs, free up more memory on your storage media and try again.
2. Lengthy video clip editing may take a long time to process thus please
make sure to equip your DV with sufficiently charged batteries to
avoid battery depletion during editing process.
Press to enter the option menu
5
PLAYBACK Mode
Page 24
En 23
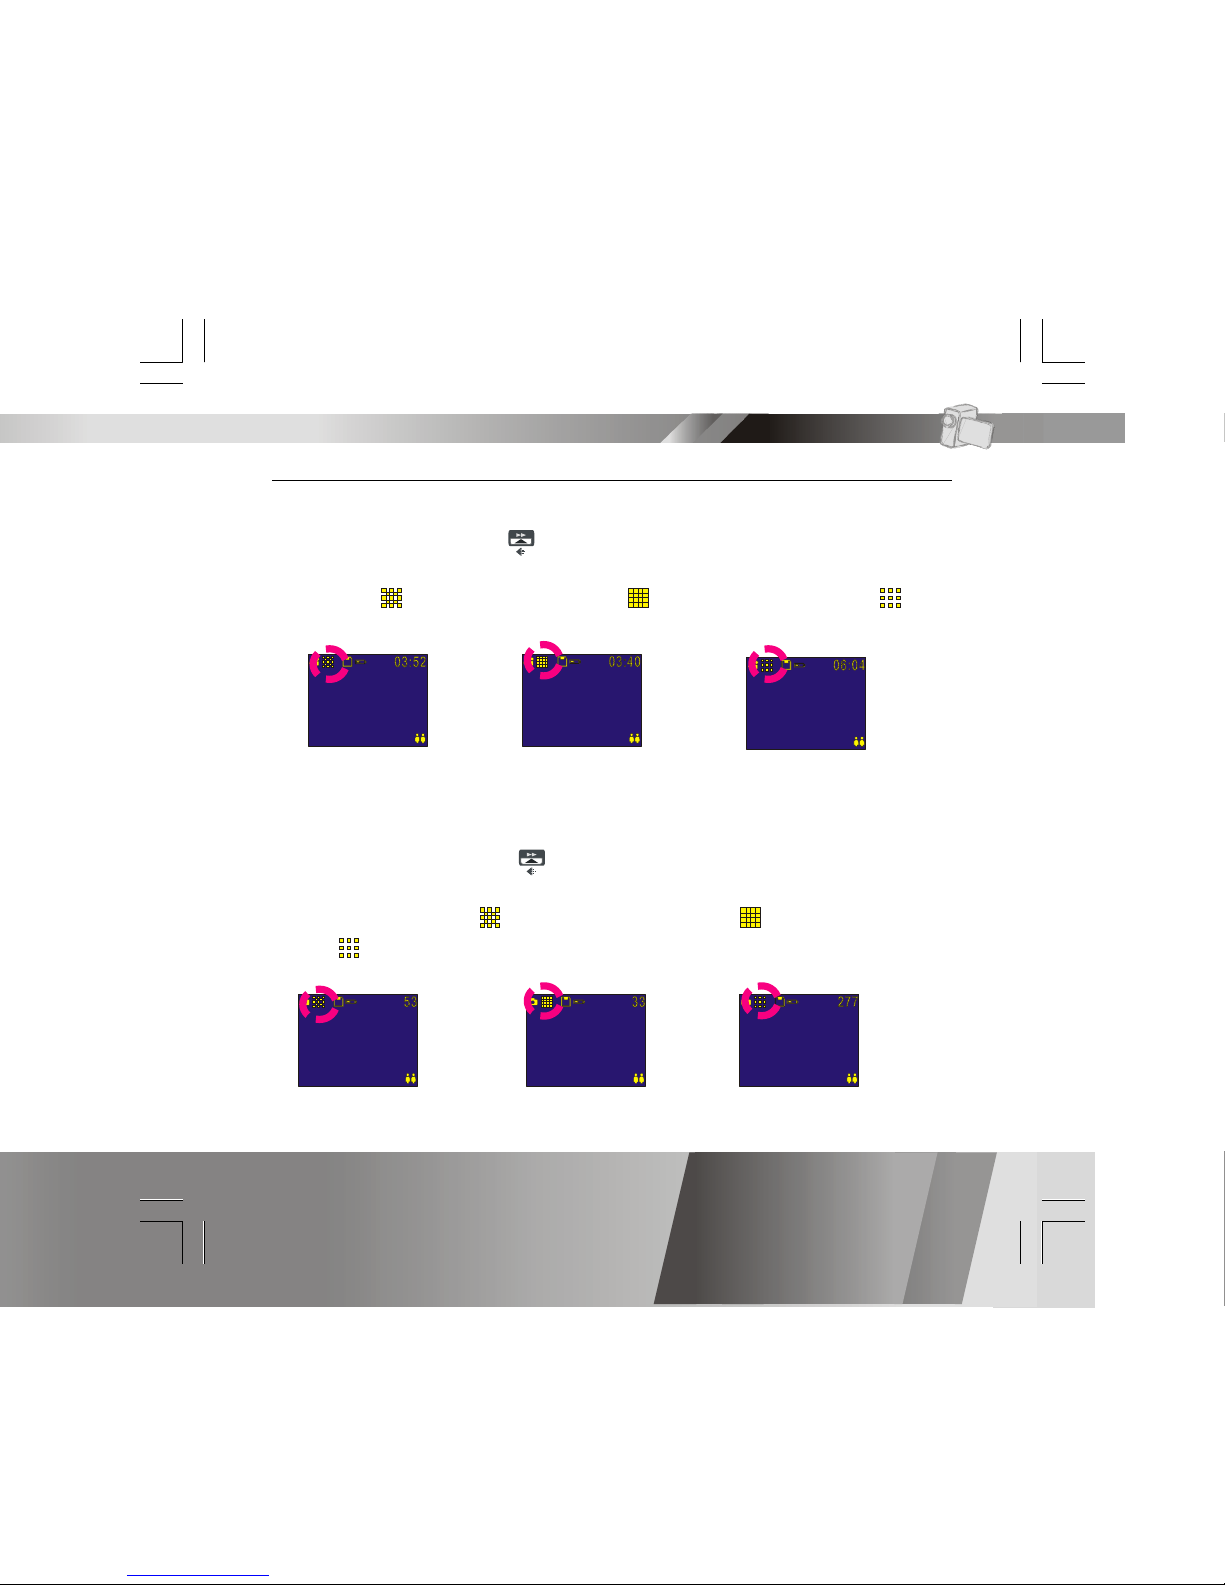
Changing the Resolution Setting
DV Record Mode
1. In DV Mode, press the button.
2. The LCD will display your current quality setting on the upper-left
corner. “ ” is normal resolution, “ ” is fine resolution and “ ” is
economic resolution.
DSC Record Mode
1. In DSC Mode, press the button.
2. The LCD will display your current picture’s resolution setting on the
upper-left corner. “ ” for normal resolution, “ ” for fine resolution
or “ ” for economic resolution.
Fine resolution
Fine resolution Economic resolution
Economic resolutionNormal resolution
Main Functions
Normal resolution
Page 25
En 24
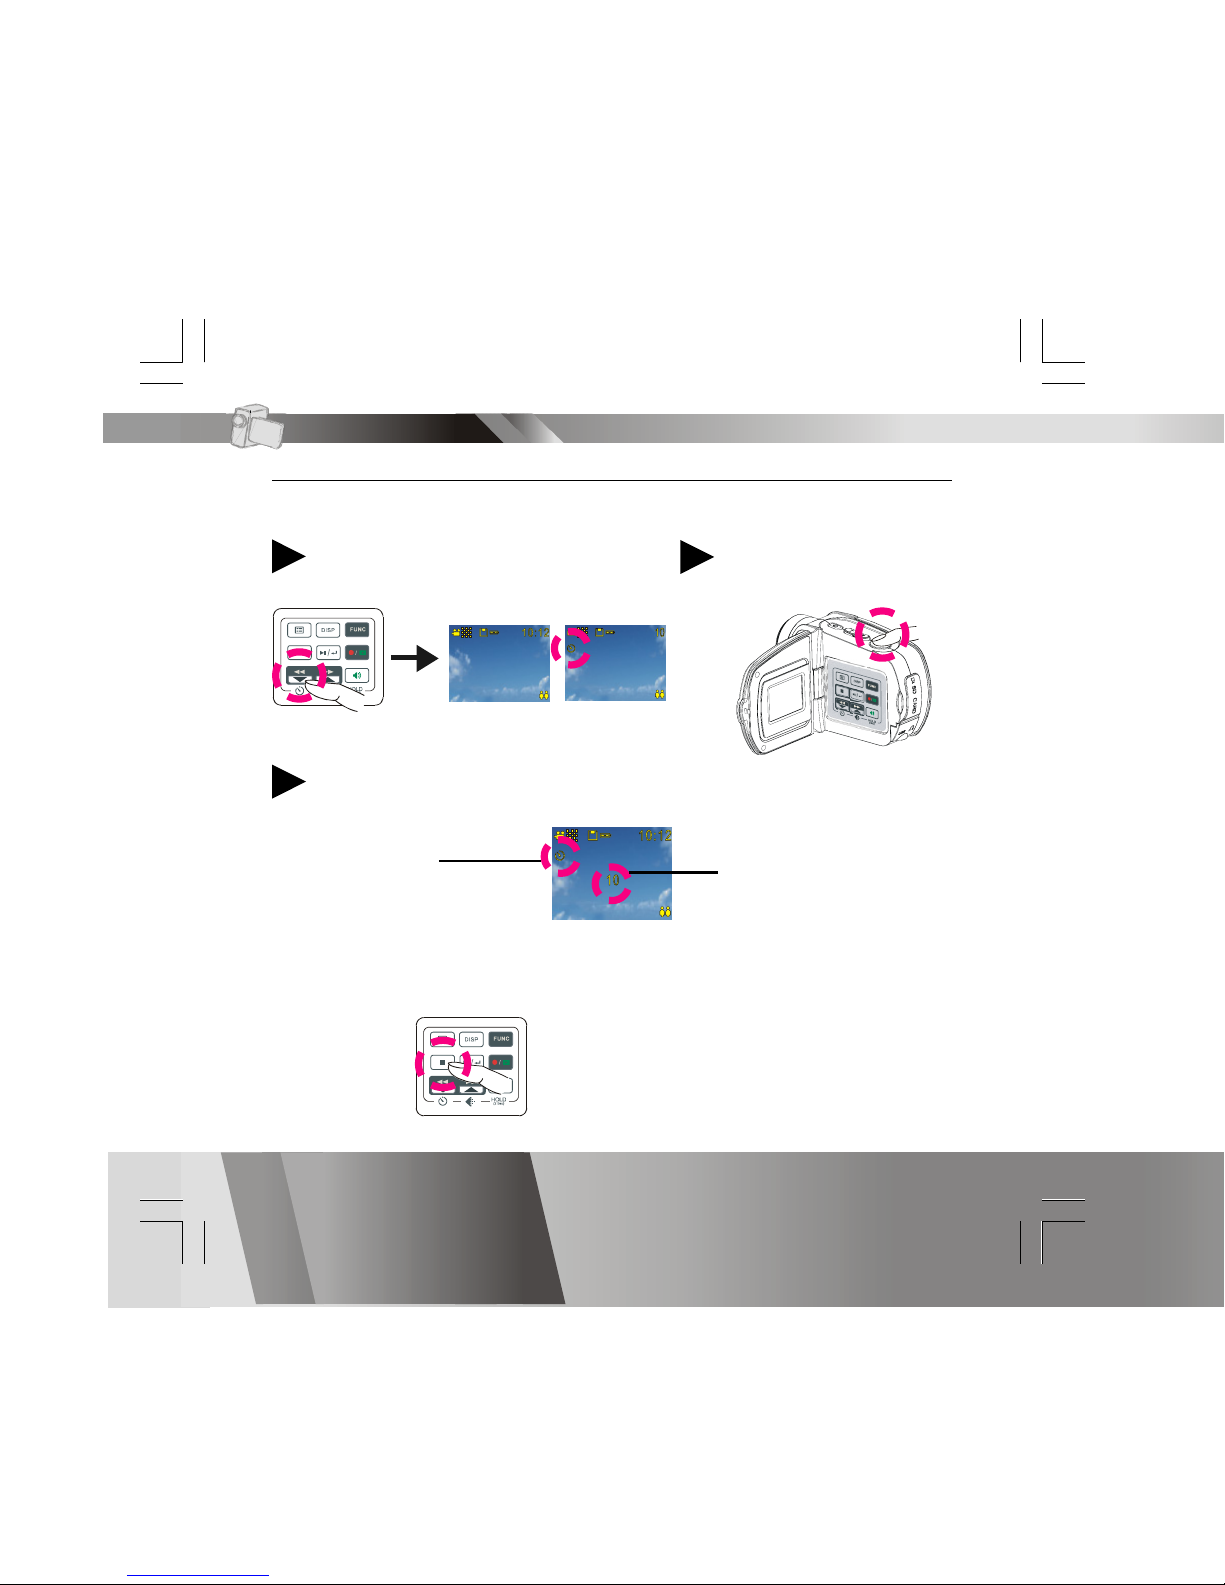
Using Self-timer (for DV and DSC modes)
This Digital Video has a built-in 10 second self-timer.
Press Timer
1
Press Shutter button to
start
2
The timer starts to count down from 10 seconds.
3
This icon will
blink during
count-down.
The count-down number
(Note: Press any button to cancel self-timer during the count-down.)
Main Functions
Page 26
En 25
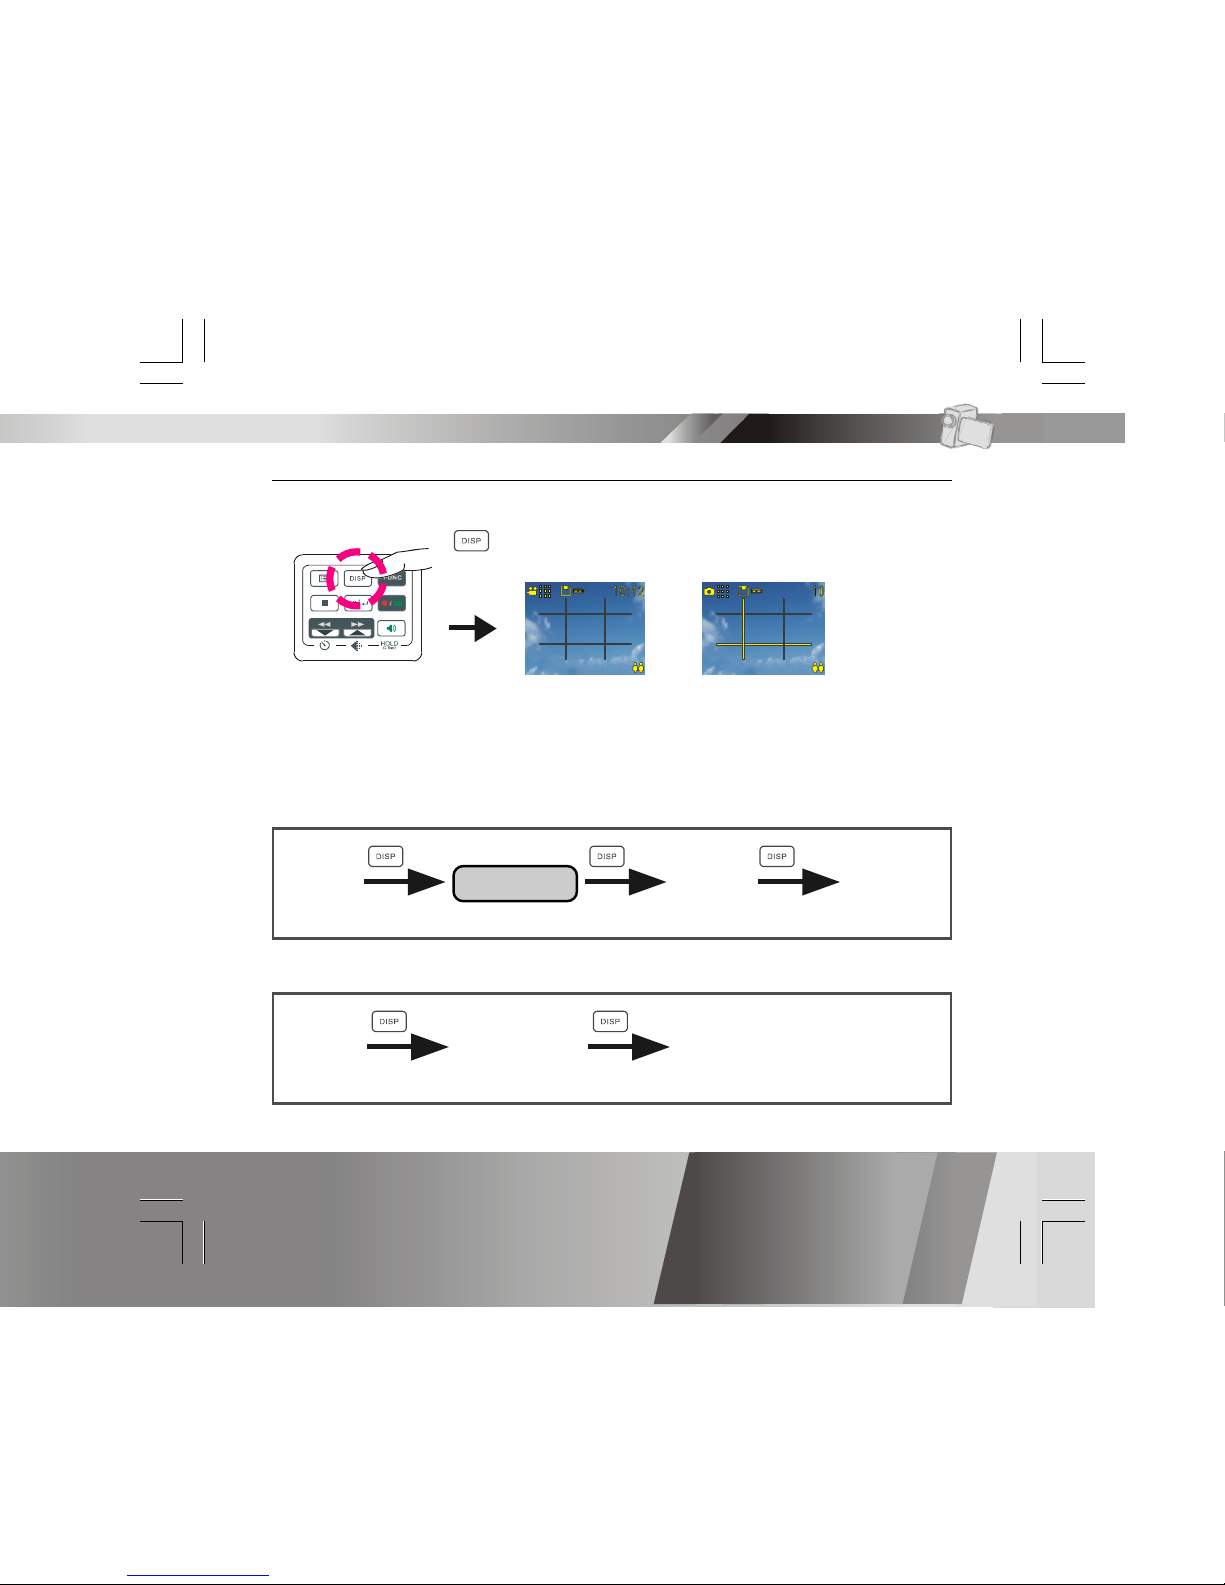
Using Guide Line/The LCD Screen
You can use guide line while recording videos or taking pictures. In
Record Mode, press
, the guide line will show on the LCD screen.
The LCD Screen
To save energy, Digital Video allows you to switch off the LCD screen.
For DV and DSC mode
For DVR and MP3 mode
Guide LineLCD On
LCD Off LCD On
LCD On
LCD Off LCD On
Main Functions
Page 27
En 26
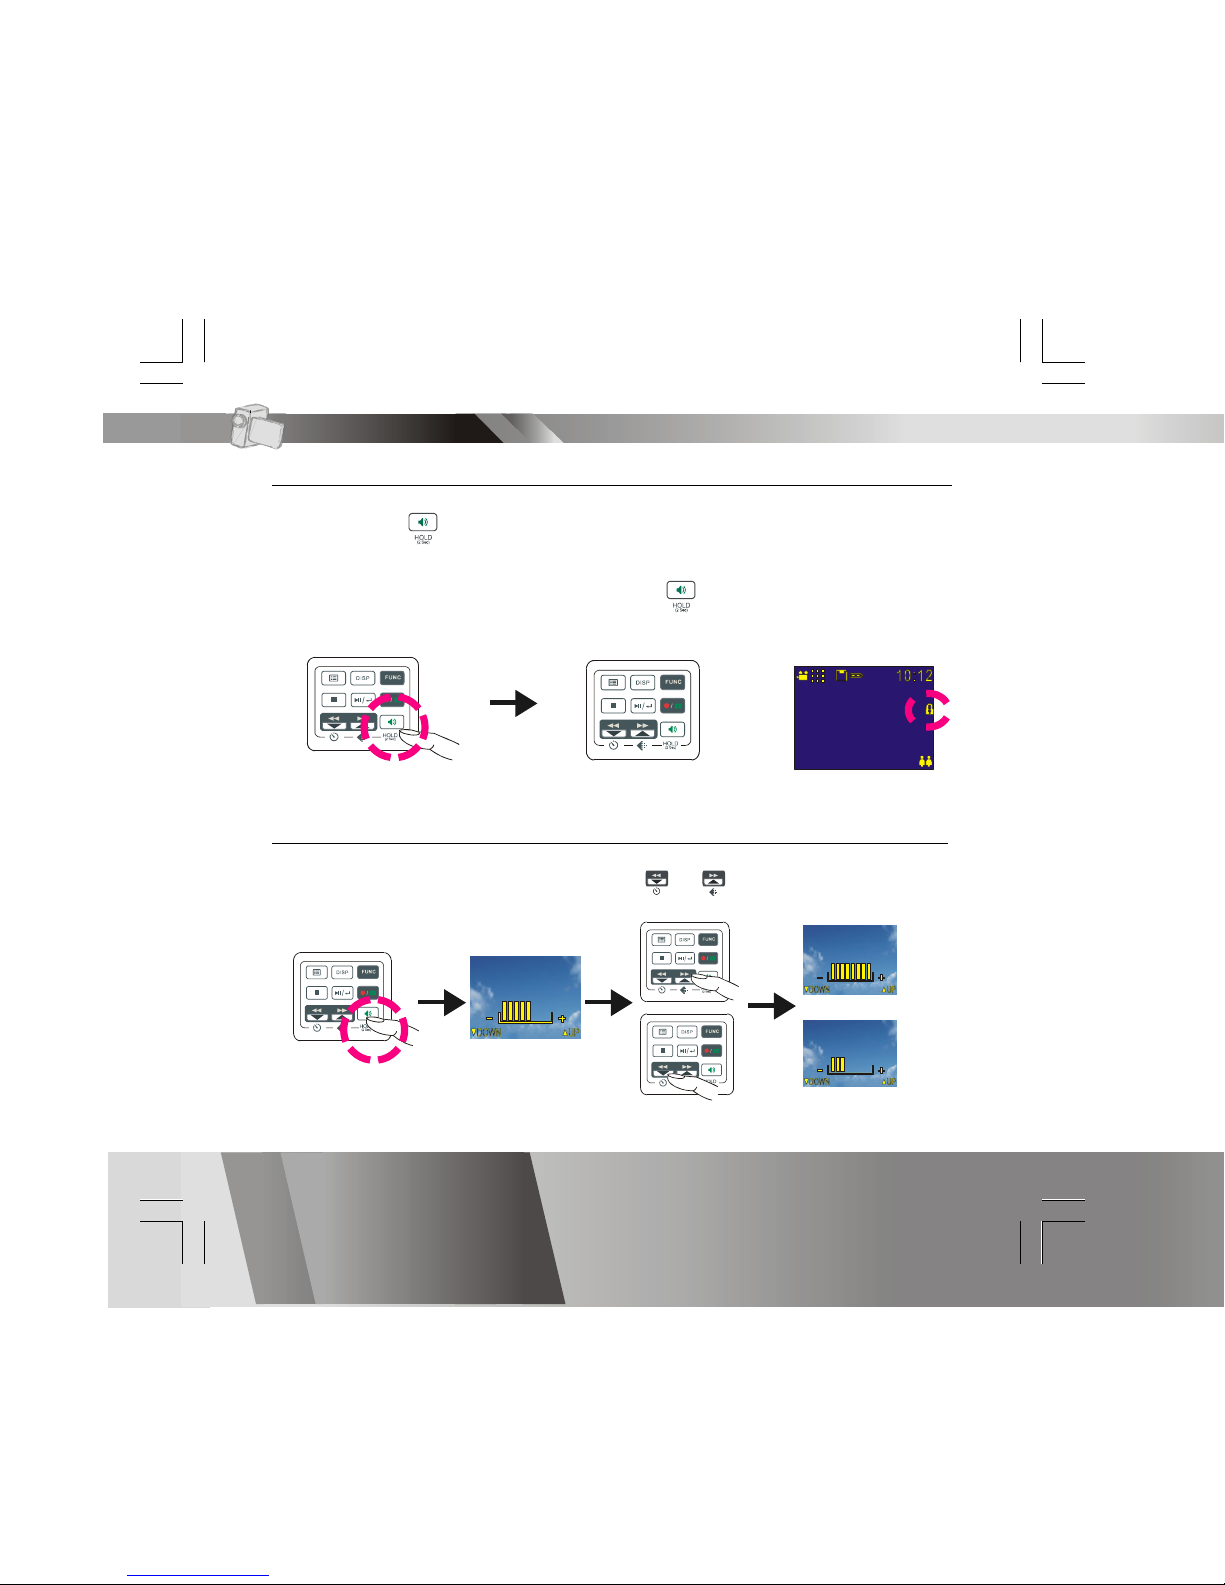
Using Hold
Press and hold for 2 seconds to lock all buttons on the control panel.
The buttons on the control panel will be locked while in HOLD function. To
release the HOLD function, press and hold for another 2 seconds.
Volume Adjustment
You can adjust playback volume by using or .
buttons locked
Main Functions
Page 28

En 27
Attention Icon
Memory Full
The Memory Full indicator lets you know to
switch memory cards or transfer all files to
your computer in order to continue taking
videos or pictures.
Card Lock
When you insert a SD memory card that is write
protected, you will see a card lock icon on the
upper-left side of the LCD.
Advanced Functions
Internal
Memory
Indicator
Memory
Card
Indicator
Page 29
En 28
Menu
Press
1
Press NEXT or BACK to select
2
Press to change
3
Press to exit
4
Advanced Functions
Page 30
En 29
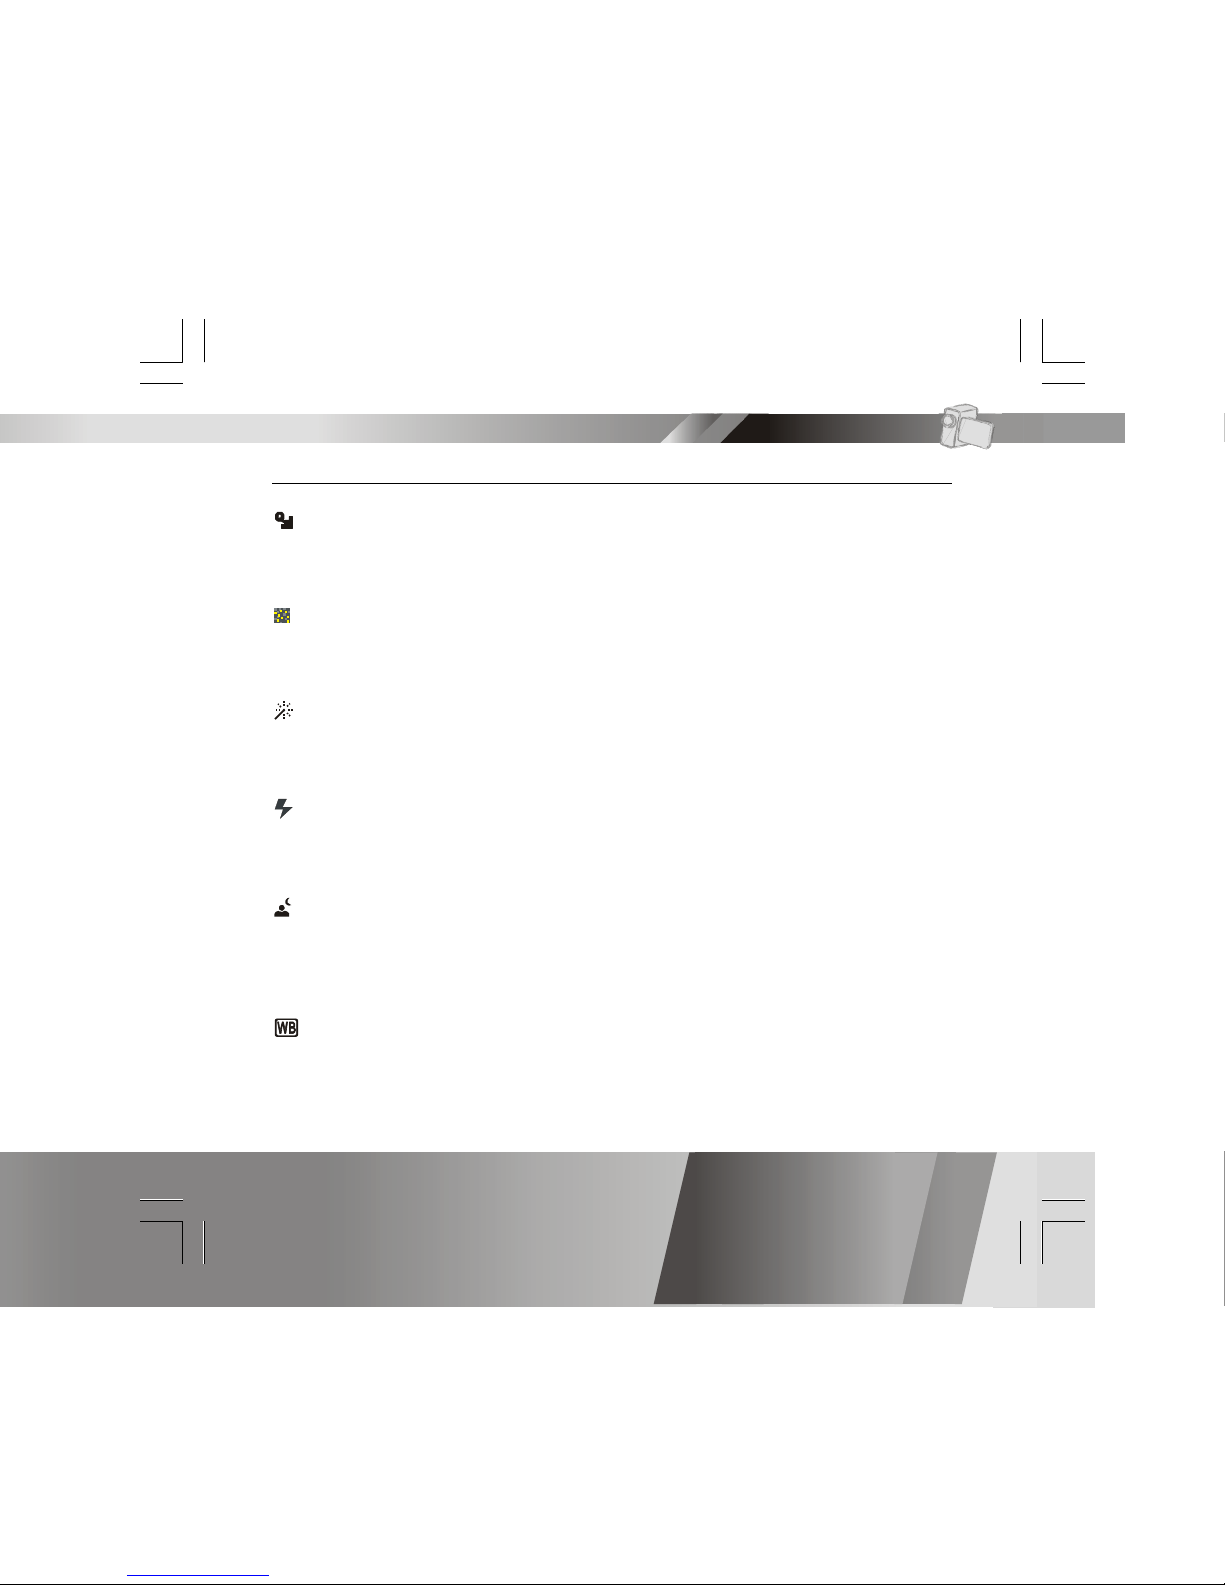
Menu-continued
Quality Settings (for DV mode)
There are two quality selections for your movies: Fine and Normal. Please
keep in mind that the higher the quality setting, the higher the file size.
Fader (for DV mode)
This function is only available on certain model
This function lets you apply a fade effect to your videos.
Digital Effects (for DV and DSC mode)
You can apply SEPIA, B&W, and a NEGATIVE effect to your videos and
pictures.
Flash (for DSC mode)
This function is only available on certain model
You can set your flash to OFF or AUTOMATIC.
Night Shot ON/OFF (for DV and DSC mode)
The Night Shot mode allows you to take videos and pictures in low lighting
conditions. When activated, an icon will appear on the lower-left corner
of the LCD.
White Balance Auto/Daylight/Cloudy/Fluorescent/Tungsten (for
DSC and DV mode)
White Balance settings allow your camera to adjust to the lighting
conditions in which you are taking videos or pictures. Select the option
that best suits your environment.
Advanced Functions
Page 31

En 30
Advanced Functions
Menu-continued
Quick Review ON/OFF (for DSC mode)
The Quick Review feature let’s you preview your video and picture files.
When this feature is activated, an icon will appear on the LCD.
Attach Voice ON/OFF (for DSC mode)
You can attach voice messages to your pictures. If you choose Attach
Voice ON, the icon will appear on the LCD screen.
Taking a picture with Attach Voice ON
After taking a picture with Attach Voice ON, “ATTACH VOICE!” will appear
on the center of the LCD screen. Press SHUTTER to start to record the
voice message. Press SHUTTER again to stop the recording. Press to
exit.
Information ON/OFF (for DV and DSC mode)
You can choose to show or hide extended information.
Attach Date ON/OFF (for DSC mode)
This feature will stamp pictures taken with the date and appear on the
lower-right corner of each image. Turning this feature OFF will not stamp
images.
Format your Memory Card
If you want to erase all movies, pictures, voice messages, MP3 and other
files, you can select FORMAT under the menu and press to wipe out
the current employed memory source ( memory card or internal
memory) completely. If you do not want to delete all files, press to
exit.
Page 32

En 31
Menu-continued
Date
Allows you to set the date.
Time
Allows you to set the time.
Beep On/OFF
If you choose Beep On, there will be a beep sound when you press the
buttons. If you choose Beep Off, there will be no sound.
Auto-Off ON/OFF
This feature is designed to conserve battery power by letting you set the
time increment in which you unit should power off. There are 3 options:
OFF, 2 minutes and 5 minutes. Please note that if you set the Auto-Off
feature for 2 or 5 minutes, the LCD will turn off after 1 minute. Press any
button to turn it back on.
NTSC/PAL
NTSC/PAL are two analog TV signal formats. You can toggle between NTSC
and PAL to match your equipment.
NTSC: North America and Japan
PAL: U.K. and Germany, France, Russia, certain European and African
countries
PA L SECAMNTSC
Advanced Functions
Page 33

En 32
Menu-continued
To exit, press STOP.
Slide Show
You can choose to playback your movies, pictures, voice messages or
MP3s in a Slide Show. The Slide Show playback time is 5 seconds for
pictures, 10 seconds for videos, voice messages and MP3.
Edit Film (for video clip)
This function is only available on certain model
This function enables you to extract a portion of a video clip and save it
as a new video.
Repeat OFF/ONE/ALL/RANDOM (for MP3 mode)
You can choose to playback your MP3s repeatedly. You can choose to
Repeat One, Repeat All or Play Random.
50Hz/60Hz
Match the frequency of the main power supply in your country. Please refer
to the following figures:
50 Hz : Europe, P.R.C.,Hong kong, Australia, New Zealand and South Africa.
60 Hz : America, Canada, Taiwan, Japan,and Korea.
Advanced Functions
Page 34

En 33
Menu-continued
Rotate ON/OFF (only for image files)
You can choose to rotate your pictures. Press to bring up the menu,
select ROTATE and then use to select rotation degree.
Del One/ Del ALL
You can choose to delete one file or all files. Select DEL. ONE from the
menu to delete a single file and then use to select a file. Otherwise,
select DEL. ALL from menu to delete all files. Press to confirm or
press to exit.
NoYes
Single repeat All repeat Random repeat
Advanced Functions
Page 35

DIGITALE VIDEOKAMERA
cover.indd 5/31/2005, 10:28 AM1
Page 36

gesammelt und entsorgt werden müssen. In der EU
stehen verschiedene Sammlungssysteme zur Rücknahme
örtlichen Behörden bzw. an Ihren Händler.
German.indd 2005/6/2, �� 02:041
Page 37

De 2
Erste Schritte
Kennenlernen lhrer digitalen Videokamera ............................. 3
Bedienfeld...................................................................... 5
Stromversorgung .............................................................. 6
Betriebsmodi................................................................... 7
Videomodus
Aufzeichnen von Videos ................................................... 10
Video-Ausgang ............................................................... 11
Fotomodus
Aufnehmen von Bildern .................................................... 12
Sprachaufnahmemodus
Aufzeichnen von Sprachmemos .......................................... 14
MP3-Modus
Wiedergabe von MP3-Musik ............................................... 16
Wiedergabe-Modus
Einfache Wiedergabe ...................................................... 18
Erweiterte Wiedergabe .................................................... 20
Hauptfunktionen
Ändern der Auflösungseinstellung....................................... 23
Verwendung des Selbstauslösers (für Video- und Fotomodus) .... 24
Verwendung des Hilfsrasters / Der LCD-Bildschirm .................. 25
Verwendung der Tastensperre ........................................... 26
Lautstärkeregelung......................................................... 26
Erweiterte Funktionen
Warnsymbole ................................................................. 27
Menü .......................................................................... 28
Inhaltsverzeichnis
Page 38

De 3
Vorderansicht
Rückansicht
LCD-Bildschirm
Bedienfeld
Erste Schritte
MMC-/SDKartenabdeckung
USB-/
Kopfhörerabdeckung
Blitz (optional)
Kennenlernen Ihrer digitalen Videokamera
Mikrofon
Lautsprecher
Ein-/Aus-Taste
Zoomtaste
Auslösertaste
Objektiv
Akkuabdeckung
Vordere LED
Fokusring
Page 39

De 4
Kennenlernen Ihrer digitalen Videokamera - Fortsetzung
Seitenansicht
Erste Schritte
MMC-/SD-Karteneinschub
AV-Ausgang / Kopfhörerbuchse
USB-Anschluss
Batteriefach
Rückansicht
Page 40

De 5
Bedienfeld
Anzeige
Modus-Wahlschalter
DV/DSC/DVR/MP3
ModusWahlschalter
Aufnahme/
Wiedergabe
Wiedergabe/
Pause/
Enter
Lautstärke/Tastensperre
(2 sek. drücken)
Nächstes/Auf/Auflösung
Voriges/Ab/Selbstauslöser
Beenden/
Stopp
Menü
Erste Schritte
Page 41

De 6
Stromversorgung
Ein- und Ausschalten
Drücken Sie die Ein-/Aus-Taste, um Ihre
digitale Videokamera ein- und
auszuschalten.
Geringer Niedrige Batterieladung
Wenn der die Batterien zu schwach werden
schwach wird, erscheint am oberen Rand des
LCD-Bildschirms ein Batteriesymbol ( ).
Kurz bevor der die Batterie gänzlich erschöpft
ist, wird am oberen Rand des LCD-Bildschirms
ein blinkendes Batteriesymbol ( ) angezeigt.
Das bedeutet, dass Ihre digitale Videokamera
sich in wenigen Sekunden automatisch
abschaltet.
Erste Schritte
Page 42

De 7
Betriebsmodi
Einschalten
Videomodus
Fotomodus
Sprachaufnahmemodus
MP3-Modus
USB-Verbindung
Wiedergabemodus
Speichermodus
Erste Schritte
Page 43

De 8
Betriebsmodi - Fortsetzung
DV-Modus/DSC-Modus/DVR-Modus/MP3-Modus/Wiedergabemodus
Digital Video bietet vier Haupt-Betriebsmodi und einen
Wiedergabemodus.
Die vier Haupt-Betriebsmodi sind: DV- (Digitalvideo), DSC- (Foto), DVR(Sprache) und MP3-Modus
1. DV-Modus: zur Aufnahme von Videos mit Ton
2. DSC-Modus: zur Fotoaufnahme
3. DVR-Modus: zur Aufzeichnung von Sprachnotizen
4. MP3-Modus: zur Wiedergabe von MP3-Musik
Mithilfe der Taste können Sie zwischen diesen vier Betriebsarten
umschalten. Mithilfe der Taste können Sie zum Wiedergabemodus
wechseln, um Videos, Fotos oder Sprachnotizen abzuspielen. Die
Betriebsmodi DV, DSC, DVR und MP3 verwenden denselben
Wiedergabemodus. Durch erneutes Drücken der Taste kehren Sie
zum vorigen Betriebsmodus zurück.
Erste Schritte
Page 44

De 9
Anschluss an einen PC (Massenspeichermodus)
Verwendung als Konsole (für MAC-Computer nicht verfügbar)
Schließen Sie Ihre digitale Videokamera mit einem USB-Kabel an einen
Computer an.
Betriebsmodi - Fortsetzung
Erste Schritte
USB-Kabel
USB-Anschluss
Massenspeichermodus
Schließen Sie Ihre digitale Videokamera an einen Computer an. Im
Massenspeichermodus gleichen Ihre Eigenschaften dabei exakt jenen
einer Festplatte. Sie können Bilder, Videos, Sprachmemos und MP3Dateien mittels Drag&Drop zwischen dem Computer und Ihrer digitalen
Videokamera verschieben.
Hinweis:
1. Bitte kopieren Sie keine Dateien in den Ordner "DCIM". Dies könnte zu
Instabilität oder einem Absturz des Geräts führen.
2. Denken Sie daran, MP3-Dateien stets in den MP3-Ordner Ihrer digitalen
Videokamera zu kopieren.
Page 45

De 10
Aufzeichnen von Videos
Verwenden Sie die Zoomtaste zum Vergrößern/Verkleinern Ihres
Videoaufnahmeobjekts
2
Vergrößern oder
Verkleinern
Videomodus
Wechseln Sie in den Videomodus2Drucken Sie die Ein-/Aus-Taste
1
Drücken Sie die Auslösertaste erneut,
um die Aufzeichnung zu beenden
4
Drücken Sie die Auslösertaste, um mit
der Aufzeichnung zu beginnen
3
Page 46

De 11
Video-Ausgang
Diese digitale Videokamera kann analoge Videosignale an ein herkömmliches
TV-Gerät ausgeben. Um die digitale Videokamera dafür zu konfigurieren,
lesen Sie bitte den Abschnitt NTSC/PAL.
Aufzeichnen von Videos - Fortsetzung
Die Aufnahmezeitanzeige
Während Sie filmen, wird die Aufnahmezeitanzeige auf dem LCD-Bildschirm
angezeigt.
Vor dem Aufzeichnen
Während der
Aufzeichnung
Geschätzte verfügbare
Gesamtaufnahmezeit
Die Aufnahmezeit
Videomodus
Page 47

De 12
Aufnehmen von Bildern
Verwenden Sie die Zoomtaste, um das Vergrößerungsverhältnis
anzupassen.
3
Drücken Sie die Auslösertaste, um ein Bild aufzunehmen.
4
Vergrößern oder
Verkleinern
Fotomodus
Drücken Sie die Ein-/Aus-Taste
1
Wechseln Sie in den Fotomodus
2
Page 48

De 13
Aufnehmen von Bildern - Fortsetzung
Die Bildzählung
In der rechten oberen Ecke des LCD-Bildschirms wird die anzahl der Bilder
angezeigt. Dieser gibt an, wie viele Dateien insgesamt auf der digitalen
Videokamera aufgenommen werden können.
Makro-/Portrait-Modus
Sie können Ihre Kamera auf (Makromodus) für Nahaufnahmen oder auf
(Portraitmodus) für Aufnahmen mit gewöhnlichem Fokus einstellen.
Drehen Sie den Fokusring, um zwischen den beiden Modi umzuschalten.
Fotomodus
Geschätzte maximale Anzahl
aufzeichenbarer Dateien
Page 49

De 14
Aufzeichnen von Sprachmemos
Sprachaufnahmemodus
Drücken Sie die Auslösertaste erneut, um die Aufzeichnung zu beenden4
Drücken Sie die Auslösertaste, um mit der Aufzeichnung zu beginnen3
Drücken Sie die Ein-/Aus-Taste
1
Wechseln Sie in den
Sprachaufnahmemodus
2
Page 50

De 15
Aufzeichnen von Sprachmemos- Fortsetzung
Anzeige der Aufnahmedauer
Während der Aufzeichnung von Sprachmemos wird in der rechten oberen
Ecke des LCD-Bildschirms die Aufnahmedauer angezeigt.
Vor dem Aufzeichnen
Während der
Aufzeichnung
Geschätzte verfügbare
Aufnahmedauer
Gesamtaufnahmedauer
Sprachaufnahmemodus
Page 51

De 16
Drücken Sie die Taste , um
die Wiedergabe anzuhalten
5
MP3-Modus
Wiedergabe von MP3-Musik
Drücken Sie die Ein-/Aus-
Taste
1
Wechseln Sie in den MP3-Modus
2
Drücken Sie die Taste , um
MP3-Musik wiederzugeben
4
Drücken Sie die Tasten AUFWÄRTS oder ABWÄRTS, um einen
Titel auszuwählen
3
Page 52

De 17
Wiedergabe von MP3-Musik - Fortsetzung
HINWEIS:
Titelnamen werden NUR mit Buchstaben angezeigt. Titelnamen mit
unzulässigen Zeichen werden als "TRACK001", "TRACK002", "TRACK003"
und so weiter angezeigt.
MP3-Informationen
Drücken Sie die Taste ,
um die Wiedergabe zu beenden
6
MP3-Modus
Wiedergabe von MP3-Dateien bei geschlossenem Bildschirm
Sie können den Bildschirm während der Wiedergabe von MP3-Dateien
zuklappen und die Zoomtaste zur Auswahl von Titeln sowie die
Auslösertaste zum Starten oder Anhalten der Wiedergabe verwenden.
Aktueller Titel /
Titel insgesamt
Der Name des
aktuellen Titels
UP DOWN
AUFWÄRTS
ABWÄRTS
WIEDERGABE/
PAUSE
Page 53

De 18
Einfache Wiedergabe
Wechseln Sie in den Wiedergabe-Modus
1
Die Informationen der ausgewählten Datei werden auf dem LCDBildschirm angezeigt.
2
Drücken Sie zum Navigieren die Tasten ZURÜCK oder VORWÄRTS
3
Der Modus der
ausgewählten Datei
Aktuelle
Dateinummer /
Anzahl Dateien
insgesamt
Die Dauer der
ausgewählten Datei
Wiedergabe-Modus
Page 54

De 19
Drücken Sie die Taste WIEDERGABE, um die Wiedergabe zu starten
4
Einfache Wiedergabe - Fortsetzung
Drücken Sie für schnellen Vorlauf oder schnellen Rücklauf die Tasten
VORWÄRTS oder ZURÜCK
6
Drücken Sie die Taste STOP, um die Wiedergabe zu beenden
7
Die folgenden Schritte gelten nur für Video- und Sprachdateien.
Wiedergabe-Modus
Drücken Sie die Taste WIEDERGABE erneut, um die Wiedergabe
anzuhalten
5
Page 55

De 20
Erweiterte Wiedergabe
Vorschau in Mehrfach- oder Einzelansicht bzw. Ausblenden der Informationen
Drücken Sie die Taste für die Vorschau in Einzelansicht
1
Drücken Sie die Taste erneut, um die angezeigten
Informationen auszublenden
2
Drücken Sie die Taste erneut für die Vorschau in
Mehrfachansicht
3
Wiedergabe-Modus
Page 56

De 21
Erweiterte Wiedergabe - Fortsetzung
Bearbeiten des Anfangs und Endes einer Videodatei (optional)
Diese Funktion steht nur bei bestimmten Modellen zur Verfügung
Drücken Sie die Taste , um das Menü aufzurufen1
Wiedergabe-Modus
Drücken Sie die Taste , um "EDIT FILM (FILM BEARBEITEN)" auszuwählen
2
Drücken Sie die Taste , um zu einer gewünschten Position vorzurücken und
drücken Sie die Taste , um diese als Startpunkt Ihres Videos zu bestätigen.
3
Page 57

De 22
Erweiterte Wiedergabe - Fortsetzung
Drücken Sie die Taste , um zu einer Endposition für Ihr Video zu
gelangen.
4
Hinweise
1. Es kann vorkommen, dass die Meldung "MEMORY FULL (SPEICHER VOLL)" angezeigt
wird, wenn Sie die ursprüngliche Datei oder eine neue Datei auf einem fast vollen
Speichermedium speichern. Falls diese Meldung angezeigt wird, geben Sie bitte
Speicherplatz auf Ihrem Speichermedium frei und versuchen Sie es erneut.
2. Die Verarbeitung von Änderungen an längeren Videodateien kann einige Zeit in
Anspruch nehmen, legen Sie daher bitte eine ausreichend geladene Batterie in
Ihre digitale Videokamera ein, um zu vermeiden, dass der die Batterie während
des Verarbeitungsvorgangs leer wird.
Drücken Sie die Taste , um das Optionsmenü aufzurufen.
5
Wiedergabe-Modus
Wählen Sie "CONTINUE (FORTSETZEN)", um zum Bearbeitungsbildschirm
zurückzukehren, "PREVIEW (VORSCHAU)", um die bearbeitete Datei
wiederzugeben, "SAVE AS (SPEICHERN UNTER)", um die Datei als eine
neue Datei zu speichern oder "SAVE (SPEICHERN)", um die Bearbeitung
in der ursprünglichen Datei zu speichern und diese zu überschreiben.
6
Page 58

De 23
Ändern der Auflösungseinstellung
Videoaufnahmemodus
1. Drücken Sie im Videoaufnahmemodus die Taste .
2. Auf dem LCD-Bildschirm wird in der linken oberen Ecke die aktuelle
Qualitätseinstellung angezeigt. “ ” steht für normale Auflösung,
“ ” für feine Auflösung und “ ” für speicherschonende Auflösung.
Fotoaufnahmemodus
1. Drücken Sie im Fotoaufnahmemodus die Taste .
2. Auf dem LCD-Bildschirm wird in der linken oberen Ecke die aktuelle
Fotoqualitätseinstellung angezeigt. “ ” steht für normale Auflösung,
“ ” für feine Auflösung und “ ” für speicherschonende Auflösung.
Feine Auflösung
Feine Auflösung Speicherschonende
Auflösung
Speicherschonende
Auflösung
Normale Auflösung
Hauptfunktionen
Normale Auflösung
Page 59

De 24
Verwendung des Selbstauslösers (für Video- und Fotomodus)
Diese digitale Videokamera verfügt über einen eingebauten Selbstauslöser
mit 10 Sekunden Intervall.
Drücken Sie die
Auslösertaste, den
Vorgang zu starten.
2
Dieses Symbol
blinkt während des
Herunterzählens
Die heruntergezählten
Sekunden
(Hinweis: Drücken Sie eine beliebige Taste, um den Selbstauslöser während
des Herunterzählens abzubrechen.)
Hauptfunktionen
Drücken Sie die Selbstauslösertaste
1
Die Zeit wird beginnend bei zehn Sekunden heruntergezählt.
3
Page 60

De 25
Verwendung des Hilfsrasters / Der LCD-Bildschirm
Sie können für die Aufnahme von Videos oder Fotos ein Hilfsraster
verwenden. Drücken Sie im Aufnahmemodus die Taste , um das
Hilfsraster auf dem LCD-Bildschirm anzuzeigen.
Der LCD-Bildschirm
Um Energie zu sparen, ermöglicht es Ihnen die digitale Videokamera, den
LCD-Bildschirm auszuschalten.
Für Video- und Fotomodus
Für Sprach- und MP3-Modus
HilfsrasterLCD ein
LCD aus LCD ein
LCD ein
LCD aus LCD ein
Hauptfunktionen
Page 61

De 26
Verwendung der Tastensperre
Halten Sie die Taste zwei Sekunden lang gedrückt, um alle Tasten des
Bedienfelds zu sperren. Solange die TASTENSPERRE aktiviert ist, bleiben
alle Tasten des Bedienfelds gesperrt. Um die TASTENSPERRE aufzuheben,
drücken Sie die Taste erneut zwei Sekunden lang.
Lautstärkeregelung
Sie können die Lautstärke mit Hilfe der Tasten und anpassen.
Tasten gesperrt
Hauptfunktionen
Page 62

De 27
Warnsymbole
Speicher voll
Die Meldung "Memory Full (Speicher voll)" weist
Sie darauf hin, dass Sie eine andere
Speicherkarte einlegen oder alle Dateien auf
einen Computer übertragen sollten, damit Sie
weiter Videos oder Fotos aufnehmen können.
Kartensperre
Wenn Sie eine schreibgeschützte SD-Karte
einlegen, wird links oben auf dem LCDBildschirm ein Kartensperrsymbol angezeigt.
Erweiterte Funktionen
Anzeige
des
internen
speicher
Speicherkartenanzeige
Page 63

De 28
Menü
Erweiterte Funktionen
Drücken Sie die Taste
1
Drücken Sie die Taste VORWÄRTS oder ZURÜCK, um
Menüpunkte auszuwählen.
2
Drücken Sie die Taste , um
Einstellungen zu ändern
3
Drücken Sie die Taste , um
das Menü zu– verlassen
4
Page 64

De 29
Menü - Fortsetzung
Quality Settings [Qualitätseinstellungen] (für Videomodus)
Für Ihre Filme stehen zwei Qualitätseinstellungen zur Auswahl: Fine (Fein)
und Normal. Bitte bedenken Sie, dass die Dateigröße mit der höheren
Qualitätseinstellung zunimmt.
Fader [Blendeffekt] (für Videomodus)
Diese Funktion steht nur bei bestimmten Modellen zur Verfügung
Mit Hilfe dieser Funktion können Sie in Ihre Videos einen Blendeffekt einbauen.
Digital Effects [Digitale Effekte] (für Video- und Fotomodus)
Sie können die Effekte "SEPIA", "B&W (S&W)" und "NEGATIVE (NEGATIV)" für
Ihre Videos und Fotos verwenden.
Flash [Blitz] (für Fotomodus)
Diese Funktion steht nur bei bestimmten Modellen zur Verfügung
Sie können den Blitz auf "OFF (AUS)" oder "AUTOMATIC (AUTOMATIK)" einstellen.
Night Shot ON/OFF [Nachtaufnahme EIN/AUS] (für Video- und Fotomodus)
Der Nachtaufnahmemodus ermöglicht es Ihnen, Videos und Fotos bei geringem
Licht aufzunehmen. Ist der Modus aktiviert, wird links unten auf dem LCDBildschirm ein entsprechendes Symbol angezeigt.
White Balance Auto/Daylight/Cloudy/Fluorescent/Tungsten
[Weißabgleich Auto/Tageslicht/Bewölkung/Neonlicht/Raumbeleuchtung]
(für Foto- und Videomodus)
Die Weißabgleichseinstellungen ermöglichen es Ihrer Kamera, sich an die
Lichtverhältnisse anzupassen, bei denen Sie Videos oder Fotos aufnehmen.
Wählen Sie die Option, die Ihrer Aufnahmeumgebung am besten entspricht.
Erweiterte Funktionen
Page 65

De 30
Erweiterte Funktionen
Menü - Fortsetzung
Quick Review ON/OFF [Schnellanzeige EIN/AUS] (für Fotomodus)
Die Schnellanzeigefunktion ermöglicht Ihnen eine rasche Vorschau auf
Ihre Video- und Bilddateien. Ist diese Funktion aktiviert, wird auf dem
LCD-Bildschirm ein entsprechendes Symbol angezeigt.
Attach Voice ON/OFF [Sprachmemo hinzufügen EIN/AUS] (für Fotomodus)
Sie können Ihre Fotos um Sprachmemos ergänzen. Wenn Sie die
Sprachmemofunktion aktivieren, wird dieses Symbol auf dem LCDBildschirm angezeigt.
Aufnehmen eines Fotos mit aktivierter Sprachmemofunktion
Nachdem Sie ein Foto mit aktivierter Sprachmemofunktion aufgenommen
haben, wird auf dem LCD-Bildschirm die Meldung "ATTACH VOICE!
(SPRACHMEMO ANFÜGEN!)" angezeigt. Drücken Sie die AUSLÖSERTASTE, um
mit der Aufzeichnung Ihres Sprachmemos zu beginnen. Drücken Sie die
AUSLÖSERTASTE erneut, um die Aufzeichnung zu beenden. Drücken Sie die
Taste , um das Menü zu verlassen.
Information ON/OFF [Informationen EIN/AUS] (für Video- und Fotomodus)
Sie können auswählen, ob Sie die erweiterten Informationen ein- oder
ausblenden möchten.
Attach Date ON/OFF [Datum hinzufügen EIN/AUS] (für Fotomodus)
Mit dieser Funktion werden Fotos rechts unten mit dem Aufnahmedatum
versehen. Wenn Sie die Funktion deaktivieren, werden Fotos nicht mit
dem Datum versehen.
Formatieren Ihrer Speicherkarte
Wenn Sie alle Videos, Fotos, Sprachmemos, MP3- und sonstigen Dateien
löschen möchten, können Sie aus dem Menü die Option "FORMAT
(FORMATIEREN) auswählen und die Taste drücken, um das aktuell
aktivierte Speichermedium ( Speicherkarte oder interner Speicher)
vollständig zu löschen. Falls Sie nicht alle Dateien löschen möchten,
drücken Sie die Taste , um den Vorgang abzubrechen.
Page 66

De 31
Menü - Fortsetzung
Date [Datum]
Ermöglicht Ihnen das Einstellen des Datums.
Time [Zeit]
Ermöglicht Ihnen das Einstellen der Uhrzeit.
Beep On/OFF [Tastentöne EIN/AUS]
Wenn Sie die Funktion aktivieren, ist beim Drücken der Tasten ein Ton zu hören.
Wenn Sie die Funktion deaktivieren, werden keine Tastentöne ausgegeben.
Auto-Off ON/OFF [Auto-Abschaltung EIN/AUS]
Diese Funktion ermöglicht es Ihnen, die Batterie zu schonen, indem Sie
Leerlaufintervalle einstellen, nach denen das Gerät sich automatisch
abschaltet. Es stehen drei Optionen zur Auswahl: OFF (AUS), 2 minutes (2
Minuten) und 5 minutes (5 Minuten). Bitte beachten Sie, dass der LCDBildschirm nach einer Minute Inaktivität ausgeschaltet wird, wenn Sie
automatische Abschaltfunktion auf 2 oder 5 Minuten einstellen. Drücken
Sie eine beliebige Taste, um den LCD-Bildschirm wieder einzuschalten.
NTSC/PAL
NTSC/PAL sind zwei analoge TV-Signalformate. Sie können Ihr Gerät
zwischen NTSC und PAL umschalten.
NTSC: Nordamerika und Japan
PAL: Großbritannien, Deutschland, Frankreich, Russland sowie bestimmte
europäische und afrikanische Länder
PA L SECAMNTSC
Erweiterte Funktionen
Page 67

De 32
Menü - Fortsetzung
Um die Diavorführung zu beenden,
drücken Sie die STOPPTASTE.
Slide Show [Diavorführung]
Sie können Ihre Videos, Fotos, Sprachmemos oder MP3-Dateien in Form
einer Diavorführung wiedergeben. Die Wiedergabezeit bei der
Diavorführung beträgt fünf Sekunden für Bilder bzw. 10 Sekunden für
Videos, Sprachmemos und MP3-Dateien.
Edit Film [Film bearbeiten] (für Videos)
Diese Funktion steht nur bei bestimmten Modellen zur Verfügung
Diese Funktion ermöglicht es Ihnen, einen Teil eines Videos zu
extrahieren und als neue Videodatei zu speichern.
Repeat OFF/ONE/ALL/RANDOM [Wiederholung AUS/EINZELN/ALLE/
ZUFALL] (für MP3-Modus)
Sie können für Ihre MP3-Dateien eine Wiedergabewiederholung
aktivieren. Dabei können Sie zwischen Wiederholung einzelner Dateien,
Wiederholung aller Dateien und Zufallswiedergabe auswählen.
50Hz/60Hz
Passen Sie die Frequenz an jene der Stromversorgung in Ihrem Land an.
Bitte beachten Sie hierzu die nachstehenden Angaben:
50 Hz : Europa, Volksrepublik China, Hongkong, Australien, Neuseeland und
Südafrika.
60 Hz : Amerika, Kanada, Taiwan, Japan und Korea.
Erweiterte Funktionen
Page 68

De 33
Menü - Fortsetzung
Rotate ON/OFF [Drehen EIN/AUS] (nur für Fotodateien)
Sie können Ihre Bilder drehen. Drücken Sie die Taste , um das Menü
aufzurufen, wählen Sie "ROTATE (DREHEN)" und verwenden Sie die Taste
, um den Drehwinkel auszuwählen.
Del One [Einzeln löschen]/ Del ALL [ALLES löschen]
Sie können einzelne Dateien oder alle Dateien löschen. Wählen Sie aus dem
Menü "DEL. ONE (EINZELN LÖSCHEN)", um eine einzelne Datei zu löschen
und verwenden Sie danach die Taste , um eine Datei auszuwählen.
Oder wählen Sie aus dem Menü "DEL. ALL (ALLES LÖSCHEN)", um alle
Dateien zu löschen. Drücken Sie die Taste , um das Löschen zu
bestätigen oder die Taste , um den Vorgang abzubrechen.
NeinJa
Single repeat
(Einzelwiederholung)
All repeat
(Alle wiederholen)
Random repeat
(Zufallswiederholung)
Erweiterte Funktionen
Page 69

CAMÉRA VIDÉO NUMÉRIQUE
cover.indd 5/31/2005, 10:46 AM1
Page 70

électronique, lorsqu’il ne fonctionne plus, doit être jeté
séparément de vos déchets ménagers.
ou le revendeur auprès duquel vous avez acheté le produit.
French.indd 2005/6/2, �� 04:511
Page 71

Fr 2
Prise en main
Apprendre à connaître votre caméra vidéo numérique ....................... 3
Utilisation du panneau de commande .............................................. 5
Alimentation ............................................................................. 6
Utilisation du panneau de commande .............................................. 7
Mode DV
Tourner des films ..................................................................... 10
Sortie vidéo ............................................................................ 11
Mode DSC
Prendre des images .................................................................. 12
Mode DVR
Enregistrer des messages vocaux ................................................ 14
Mode MP3
Ecouter de la musique MP3 ......................................................... 16
Mode LECTURE
Lecture de base ...................................................................... 18
Lecture avancée ..................................................................... 20
Fonctions principales
Modifier le réglage de résolution ................................................. 23
Utiliser le retardateur (Pour les modes DV et DSC) ........................... 24
Utiliser les règles / L'écran LCD .................................................. 25
Utiliser le verrouillage (Hold)....................................................... 26
Réglage du volume .................................................................... 26
Fonctions avancées
Icône Attention ....................................................................... 27
Menu..................................................................................... 28
Table des matières
Page 72

Fr 3
Vue en face avant
Vue arrière
Ecran LCD
Panneau de
commande
Prise en main
Couvercle carte
MMC/SD
Couvercle USB/
écouteur
Microphone
Flash (en option)
Haut-parleur
Bouton d'alimentation
Levier de zoom
Déclencheur
Objectif
Couvercle batterie
LED avant
Bague de mise au point
Apprendre à connaître votre caméra vidéo numérique
Page 73

Fr 4
Apprendre à connaître votre caméra vidéo numérique - suite
Vue de côté
Prise en main
Logement carte MMC/SD
Sortie AV / écouteurs
Port USB
Logement batterie
Vue arrière
Page 74

Fr 5
Utilisation du panneau de commande
Affichage
Sélection des modes
DV/DSC/DVR/MP3
Sélection
des modes
Enreg./
Lecture
Lecture/
Pause/
Entrée
Volume/Verrouillage
(appuyez pendant 2 sec.)
Suivant/Vers le haut/Résolution
Précédent/Vers le bas/
Retardateur
Quitter/
Arrêt
Menu
Prise en main
Page 75

Fr 6
Alimentation
Marche / Arrêt
Appuyez sur le bouton pour allumer ou
éteindre votre caméra vidéo numérique.
Alimentation faible
Lorsque la batterie devient faible, une icône
batterie ( ) apparaît en haut de l'écran
LCD.
Lorsque la batterie est presque déchargée,
une icône batterie clignotante ( ) apparaît
en haut de l'écran LCD. Votre caméra vidéo
numérique s'éteint automatiquement après
quelques secondes.
Prise en main
Page 76

Fr 7
Modes
Mise sous tension
Mode enregistrement DV
Mode enregistrement DSC
Mode enregistrement DVR
Connexion USB
Mode LECTURE
Mode Stockage
Mode MP3
Prise en main
Page 77

Fr 8
Modes - Suite
Mode DV / Mode DSC / Mode DVR / Mode MP3 / Mode LECTURE
Ce caméscope numérique offre 4 modes principaux et un mode de LECTURE.
Les 4 modes principaux sont : Mode DV, Mode DSC, Mode DVR et Mode
MP3.
1. Mode DV : Permet de filmer avec du son.
2. Mode DSC : Prend des photos.
3. Mode DVR : Enregistre des messages vocaux.
4. Mode MP3 : Permet d’écouter de la musique MP3.
Vous pouvez passer d’un mode à l’autre en appuyant sur . En
appuyant sur , vous pouvez passer en mode de LECTURE pour revoir
vos vidéos, réafficher vos photos ou réécouter vos messages vocaux. Les
3 premiers modes (Mode DV / Mode DSC / Mode DVR) partagent le même
mode de LECTURE. Pour revenir au mode précédent, appuyez à nouveau
sur .
Prise en main
Page 78

Fr 9
Branchement à un PC (Mode stockage de masse)
Utilisation de la console (Non applicable sur les ordinateurs MAC)
Branchez votre caméra vidéo numérique sur un ordinateur via le câble USB.
Modes-suite
Prise en main
Câble USB
Port USB
Mode stockage de masse
Branchez votre caméra vidéo numérique sur un ordinateur. En mode
stockage de masse, il se comporte exactement comme un disque dur.
Vous pouvez glisser et déposer vos images, vos films, vos messages
vocaux et fichiers MP3 entre l'ordinateur et la caméra vidéo numérique.
Remarque :
1.Veuillez ne pas copier de fichier dans le dossier DCIM. Ceci peut rendre
l'appareil instable ou le faire planter.
2.Souvenez-vous de copier vos fichiers MP3 dans le dossier MP3 de votre
caméra vidéo numérique.
Page 79

Fr 10
Tourner des films
Utilisez Zoom-in (zoomer) ou Zoom-out (dézoomer) pour cadrer
votre vidéo
2
Appuyez sur le déclencheur pour démarrer
l'enregistrement
3
Appuyez sur le déclencheur de nouveau pour arrêter
4
Zoomer ou dézoomer
Basculez en Mode DV
2
Appuyez sur Power (Alimentation)
1
Mode DV
Page 80

Fr 11
Sortie vidéo
La caméra vidéo numérique peut sortir de la vidéo analogique vers un
téléviseur. Pour configurer la caméra vidéo numérique, veuillez-vous
référer à la section NTSC/PAL.
Tourner des films-suite
Le minuteur d'enregistrement
Pendant que vous filmez, le minuteur d'enregistrement s'affiche sur le LCD.
Avant d'enregistrer
Pendant
l'enregistrement
Durée totale estimée
enregistrable
La durée
d'enregistrement
Mode DV
Page 81

Fr 12
Prendre des images
Appuyez sur le Levier de zoom pour régler le taux de grossissement.3
Appuyez sur le déclencheur pour prendre une image.
4
Zoomer ou dézoomer
Mode DSC
Appuyez sur Power
(Alimentation)
1
Basculez en Mode DSC
2
Page 82

Fr 13
Prendre des images-suite
Le compteur d'images
Vous pouvez voir le compteur d'images affiché dans le coin supérieur
droit de votre LCD. Il indique le nombre total de fichiers enregistrables
sur cette caméra vidéo numérique.
Mode Macro/Portrait
Vous pouvez régler votre appareil sur (mode macro) pour des prises de
vues en gros plan ou sur (mode portrait) pour la plage normale de mise
au point. Tournez la bague de mise au point pour basculer entre les modes.
Mode DSC
Total fichiers estimés
enregistrables
Page 83

Fr 14
Enregistrer des messages vocaux
Appuyez sur Power (Alimentation)1 Basculez en Mode DVR
2
Appuyez sur le déclencheur de nouveau pour arrêter4
Appuyez sur le déclencheur pour démarrer l'enregistrement3
Mode DVR
Page 84

Fr 15
Enregistrer des messages vocaux-suite
Le minuteur d'enregistrement
Pendant l'enregistrement de messages vocaux, le minuteur
d'enregistrement s'affiche dans le coin supérieur droit de votre LCD.
Avant d'enregistrer
Pendant
l'enregistrement
Durée totale estimée
enregistrable
Durée
d'enregistrement
totale
Mode DVR
Page 85

Fr 16
Appuyez sur pour mettre
en pause
5
Mode MP3
Ecouter de la musique MP3
Appuyez sur Power (Alimentation)
1
Basculez en Mode MP3
2
Appuyez sur pour lire la
musique MP3
4
Appuyez sur UP (haut) ou DOWN (bas) pour sélectionner un morceau3
Page 86

Fr 17
Ecouter de la musique MP3-suite
REMARQUE :
Le titre des morceaux ne s'affiche QUE par ordre alphabétique. Les titres
avec des caractères illégaux s'affichent sous la forme "TRACK001",
"TRACK002", and "TRACK003" et cetera.
Informations MP3
Appuyez sur pour arrêter6
Mode MP3
Morceau en cours /
Total morceaux
Le titre du
morceau choisi
UP DOWN
Lire des MP3 lorsque le panneau d'affichage est fermé
Vous pouvez fermer le panneau d'affichage pendant la lecture de MP3 et
utiliser le levier de zoom pour sélectionner le son, et le déclencheur pour
lire ou mettre en pause.
HAUT BAS
LECTURE/
PAUSE
Page 87

Fr 18
Lecture de base
Basculez en Mode LECTURE
1
Les informations sur le fichier sélectionné s'affichent sur le LCD.
2
Appuyez sur BACK (Précédent) ou NEXT (suivant) pour naviguer
3
Le mode du fichier choisi
Numéro du fichier
en cours /
Nombre total de
fichiers
La durée du
fichier choisi
Mode LECTURE
Page 88

Fr 19
Appuyez sur PLAY (Lecture) pour démarrer
4
Lecture de base-suite
Appuyez de nouveau sur PLAY (Lecture) pour mettre en pause
5
Appuyez sur BACK (Précédent) ou NEXT (suivant) pour
l'avance ou le retour rapide
6
Appuyez sur STOP (Arrêt) pour arrêter
7
Les étapes suivantes ne s'appliquent que pour les fichiers DV et DVR.
Mode LECTURE
Page 89

Fr 20
Lecture avancée
Prévisualisation en un/plusieurs vue(s) ou cacher les informations
Appuyez sur pour prévisualiser en une seule vue
1
Appuyez de nouveau sur pour cacher les informations
2
Appuyez de nouveau sur pour prévisualiser en plusieurs vues
3
Mode LECTURE
Page 90

Fr 21
Lecture avancée-suite
Editer le début et la fin d'une séquence vidéo (en option)
Cette fonction n'est disponible que sur certains modèles
Appuyez sur pour amener le menu1
Appuyez sur pour sélectionner "EDIT FILM" (EDITER LE FILM)
2
Appuyez sur pour avancer à une certaine position et appuyez
sur pour la choisir comme point de départ de la séquence
vidéo.
3
Mode LECTURE
Page 91

Fr 22
Lecture avancée-suite-suite
Appuyez sur pour inverser jusqu'à une position finale pour la
séquence vidéo.
Sélectionnez CONTINUE (CONTINUER) pour revenir à l'écran d'édition,
PREVIEW (PREVISUALISATION) pour lire la séquence éditée, SAVE AS
(ENREGISTRER SOUS) pour enregistrer la séquence sous un nouveau
fichier, ou SAVE (ENREGISTRER) pour enregistrer sur le fichier d'origine.
6
4
Remarques
1. Vous pouvez tomber sur le message "MEMORY FULL" (MEMOIRE PLEINE)
lors de l'enregistrement sur le fichier d'origine ou sous un nouveau fichier,
sur un support de stockage qui est presque plein. Le cas échéant, libérez
de la mémoire sur votre support de stockage et essayez de nouveau.
2. L'édition de séquences vidéo longues peut demander un temps de
traitement assez long, veuillez donc vous assurer que votre DV est
équipé de batteries suffisamment chargées pour éviter la panne de
batterie pendant le processus d'édition.
Appuyez sur pour entrer dans le menu d'options.
5
Mode LECTURE
Page 92

Fr 23
Modifier le réglage de résolution
Mode Enregistrement DV
1. En mode DV, appuyez sur le bouton .
2. Le LCD affiche le réglage de qualité en cours dans le coin supérieur
gauche. “ ” est la résolution normale, “ ” est la résolution fine et
“ ” est la résolution économique.
Mode Enregistrement DSC
1. En mode DSC, appuyez sur le bouton .
2. Le LCD affiche le réglage de résolution image en cours dans le coin
supérieur gauche. “ ” est la résolution normale, “ ” est la
résolution fine et “ ” est la résolution économique.
Résolution fine
Résolution fine Résolution économique
Résolution économiqueRésolution normale
Fonctions principales
Résolution normale
Page 93

Fr 24
Utiliser le retardateur (Pour les modes DV et DSC)
La caméra vidéo numérique intègre un retardateur de 10 secondes.
Appuyez sur Timer
(Retardateur)
1
Appuyez sur le
déclencheur pour
démarrer
2
Le retardateur commence le compte à rebours à partir de 10
secondes.
3
Cette icône clignote
pendant le compte à
rebours
Le numéro du compte
à rebours
(Remarque: Appuyez sur n'importe quel bouton pour annuler le
retardateur pendant le compte à rebours.)
Fonctions principales
Page 94

Fr 25
Utiliser les règles / L'écran LCD
Vous pouvez utiliser les règles pendant la prise de vue de vidéos ou
d'images. En mode Enregistrement, appuyez sur
, la règle apparaît
sur l'écran LCD.
L'écran LCD
Pour économiser l'énergie, la caméra vidéo numérique vous permet
d'éteindre l'écran LCD.
Pour les modes DV et DSC
Pour les modes DVR et MP3
RègleLCD Allumé
LCD Eteint LCD Allumé
LCD Allumé
LCD Eteint
LCD Allumé
Fonctions principales
Page 95

Fr 26
Utiliser le verrouillage (Hold)
Appuyez et maintenez enfoncé pendant 2 secondes pour verrouiller
tous les boutons du panneau de commande. Les boutons du panneau de
commande sont verrouillés en mode HOLD (VERROUILLAGE). Pour libérer la
fonction HOLD (VERROUILLAGE), appuyez et maintenez enfoncé
pendant 2 secondes supplémentaires.
Réglage du volume
Vous pouvez régler le volume de lecture à l'aide de ou .
boutons vérrouillés
Fonctions principales
Page 96

Fr 27
Icône Attention
Mémoire pleine
L'indicateur de mémoire pleine vous signale
quand changer de carte mémoire ou quand
transférer tous vos fichiers vers l'ordinateur
pour pouvoir continuer à prendre des vidéos ou
des images.
Verrouillage carte
Lorsque vous insérez une carte mémoire SD qui
est protégée en écriture, l'icône de verrouillage
carte s'affiche dans le coin supérieur gauche du
LCD.
Fonctions avancées
Indicateur
de mémoire
interne
Indicateur
de carte
mémoire
Page 97

Fr 28
Menu
Appuyez sur
1
Appuyez sur NEXT (Suivant) ou BACK (Précédent) pour
sélectionner
2
Appuyez sur pour modifier
3
Appuyez sur pour sortir
4
Fonctions avancées
Page 98

Fr 29
Menu-suite
Réglages qualité (pour le mode DV)
Il y a deux choix de qualité pour vos films : Fin et Normal. Veuillez garder
à l'esprit que plus la qualité est élevée, plus la taille du fichier est
importante.
Fondu (pour le mode DV)
Cette fonction n'est disponible que sur certains modèles
Cette fonction vous permet d'appliquer des effets de fondu sur vos
vidéos.
Effet numériques (Pour les modes DV et DSC)
Vous pouvez appliquer des effets SEPIA, N&B et Négatif à vos photos et
vidéos.
Flash (Pour le mode DSC)
Cette fonction n'est disponible que sur certains modèles
Vous pouvez régler votre flash sur OFF (éteint) ou sur AUTOMATIC
(Automatique).
Prise de vue nocturne MARCHE/ARRET (Pour les modes DV et DSC)
Le mode Night Shot (Prise de vue nocturne) vous permet de prendre des
vidéos et des images en faibles conditions de luminosité. Lorsque qu'il est
activé, une icône batterie apparaît en bas à gauche de l'écran LCD.
Balance des blancs Auto/ Ensoleillé/ Nuageux/ Néon/ Tungstène
(Pour les modes DSC et DV)
Le réglage de balance des blancs permet à votre appareil de s'ajuster aux
conditions de luminosité dans lesquels vous prenez des images ou des
vidéos. Sélectionnez l'option qui correspond le mieux à votre
environnement.
Fonctions avancées
Page 99

Fr 30
Fonctions avancées
Menu-suite
Revue rapide MARCHE/ARRET (pour le mode DSC)
La fonctionnalité de revue rapide vous permet de prévisualiser vos
fichiers vidéo et images. Lorsque qu'elle est activée, une icône batterie
apparaît sur l'écran LCD.
Attacher Voix MARCHE/ARRET (Pour le mode DSC)
Vous pouvez attachez des messages vocaux à vos images. Si vous
choisissez Attachez Voix MARCHE, une icône apparaît sur l'écran LCD.
Prendre une image avec Attacher Voix MARCHE
Après avoir pris une image avec Attacher Voix MARCHE, "ATTACH VOICE!"
(ATTACHER VOIX) apparaît au centre de l'écran LCD. Appuyez sur le
DECLENCHEUR pour démarrer l'enregistrement du message vocal. Appuyez
sur le DECLENCHEUR de nouveau pour arrêter l'enregistrement. Appuyez
sur pour sortir.
Informations MARCHE/ARRET (Pour les modes DV et DSC)
Vous pouvez choisir de montrer ou cacher les informations étendues.
Attacher Date MARCHE/ARRET (Pour le mode DSC)
Cette fonctionnalité estampille les images prises avec la date qui apparaît
dans le coin inférieur droit de chaque image. Eteindre cette
fonctionnalité n'estampille pas les images.
ormater votre carte mémoire
Si vous voulez effacer tous les fichiers films, images, messages vocaux,
MP3 et autres, vous pouvez sélectionner FORMAT (FORMATER) sous le
menu et appuyer sur pour supprimer le contenu mémoire
actuellement utilisé ( carte mémoire ou mémoire interne)
complètement. Si vous ne voulez pas supprimer tous les fichiers, appuyez
sur pour sortir.
Page 100

Fr 31
Menu-suite
Date
Vous permet de régler la date.
Heure
Vous permet de régler l'heure.
Bip Marche/Arrêt
Si vous choisissez Bip Marche, un bip retentit lorsque vous appuyez sur
les boutons. Si vous choisissez Bip Arrêt, aucun son ne retentit.
Arrêt auto MARCHE/ARRET
Cette fonctionnalité est faite pour préserver la puissance batterie en
vous permettant de régler l'incrément de temps au bout duquel l'appareil
doit s'éteindre. Il y a 3 options : ARRET, 2 minutes et 5 minutes. Veuillez
noter que si vous réglez la fonction Arrêt-auto sur 2 ou 5 minutes, l'écran
s'éteint au bout d'une minute. Appuyez sur n'importe quelle touche pour le
rallumer.
NTSC/PAL
NTSC/PAL sont deux formats de signaux TV analogiques. Vous pouvez
basculer entre NTSC et PAL pour vous adapter à votre équipement.
NTSC: Amérique du Nord et Japon
PAL: Royaume-Uni, Allemagne, France, Russie, certains pays européens et
africains
PA L SECAMNTSC
Fonctions avancées
 Loading...