

Page 1

Digital Video
User Guide
Page 2

En 2
Table of Contents
Getting Started
Getting to Know Your Digital Video............................................... 4
Using the Panel............................................................. .......... 6
Preparation........................................................................... 7
Power.................................................................................. 1 0
Modes..................................................................................11
DV Mode
Taking Movies........................................................................15
Video Out........................................................................... 16
DSC Mode
Taking Pictures......................................................................1 7
DVR Mode
Recording Voice Messages........................................................ 19
MP3 Mode
Listening To MP3 Music............................................................ 21
PLAYBACK Mode
Basic Playback.......................................................................23
Advance Playback...................................................................25
Page 3

En 3
Main Functions
Changing the Quality Setting.....................................................27
Using Macro Select Dial............................................................ 29
Using Self-timer......................................................................30
Using AE Lock........................................................................31
Using Guide Line/The LCD Display............................................... 32
Using Hold............................................................................ 33
Volume Adjust........................................................................33
Advanced Functions
Attention Icon...................................................................... 34
Menu.................................................................................. 3 5
Notice for video clip playback on PC............................................ 41
Page 4

En 4
Getting to Know Y our Digital Video
Front View
Back View
LCD Viewfinder Panel
Power Indicator/
Charge Indicator
Strap Mount
Lens
Microphone
Status LED Indicator
Speaker
Power Button
Zoom
AE-Lock
Shutter
Getting Started
Page 5
En 5
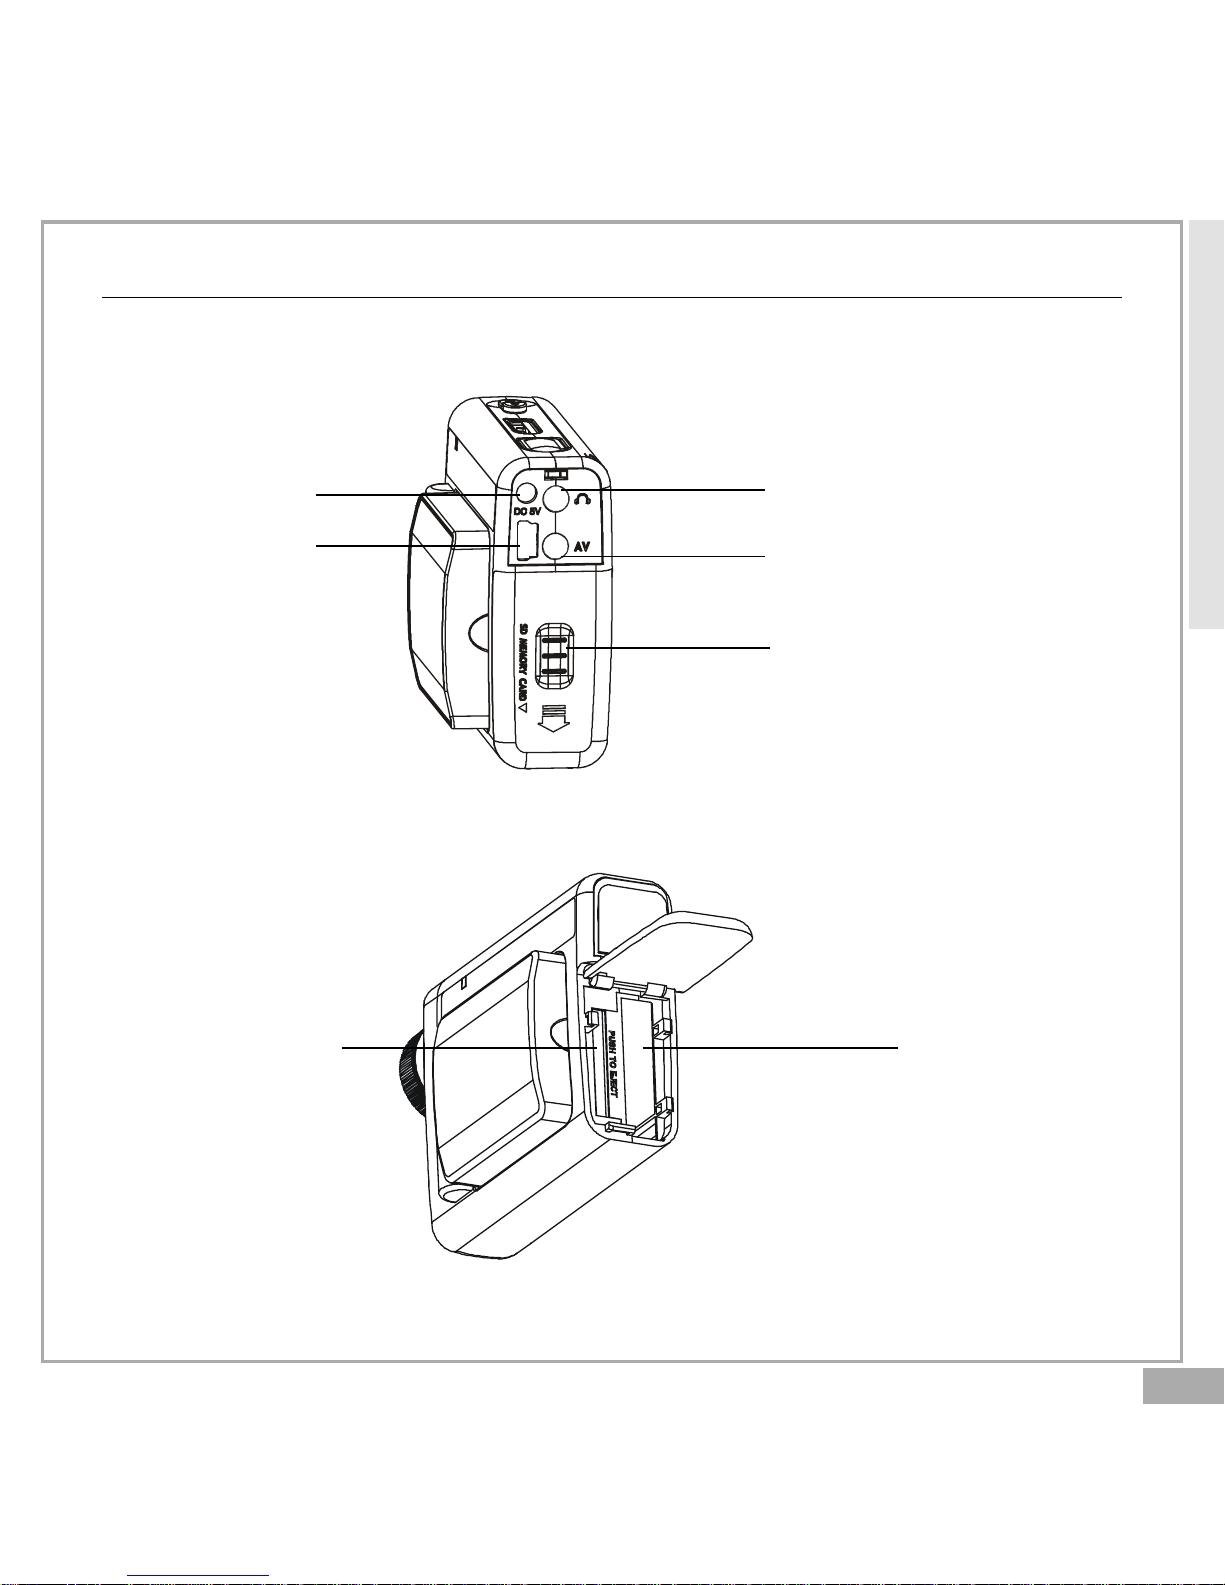
Getting to Know Your Digital Video-continued
Side View
DC IN jack
USB port
Earphone jack
AV out
Battery/SD/MMC Cover
Battery Slot
SD/MMC card Slot
Getting Started
Page 6

En 6
Using the Panel
Display
Next/Up/Resolution
Play/P ause/
Enter
R ecord/
Playback
Mode Switch
Exit/
Stop
Menu DV/DSC/DVR/MP3 Mode Switch
Back/Down/Self-timer V olume/Hold(P ress 2 Sec.)
Getting Started
Page 7
En 7
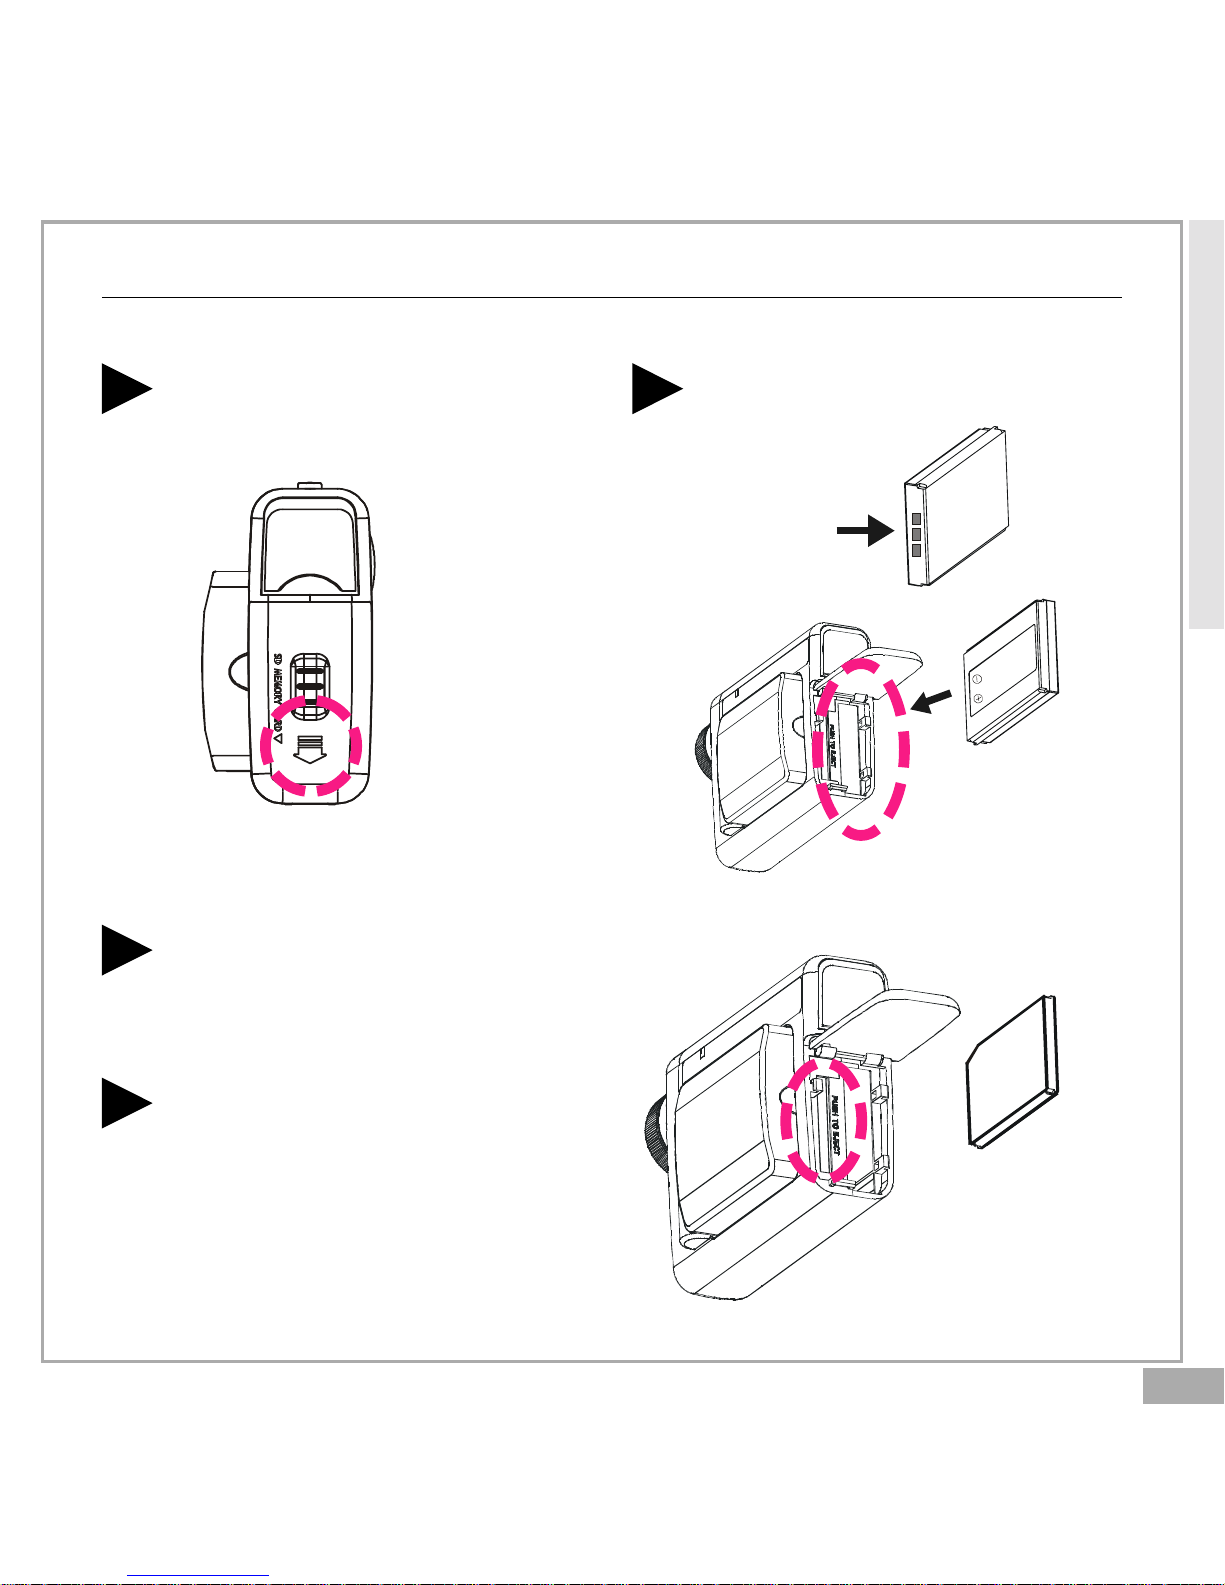
P reparation
Loading Battery
Slide door in the direction
of arrow.
1 Insert the battery as shown
below.
2
Inserting the SD/MMC Card
Repeat STEP 1. mentioned above.
1
Insert SD/MMC card as shown
right.
2
Getting Started
Page 8
En 8
Preparation-continued
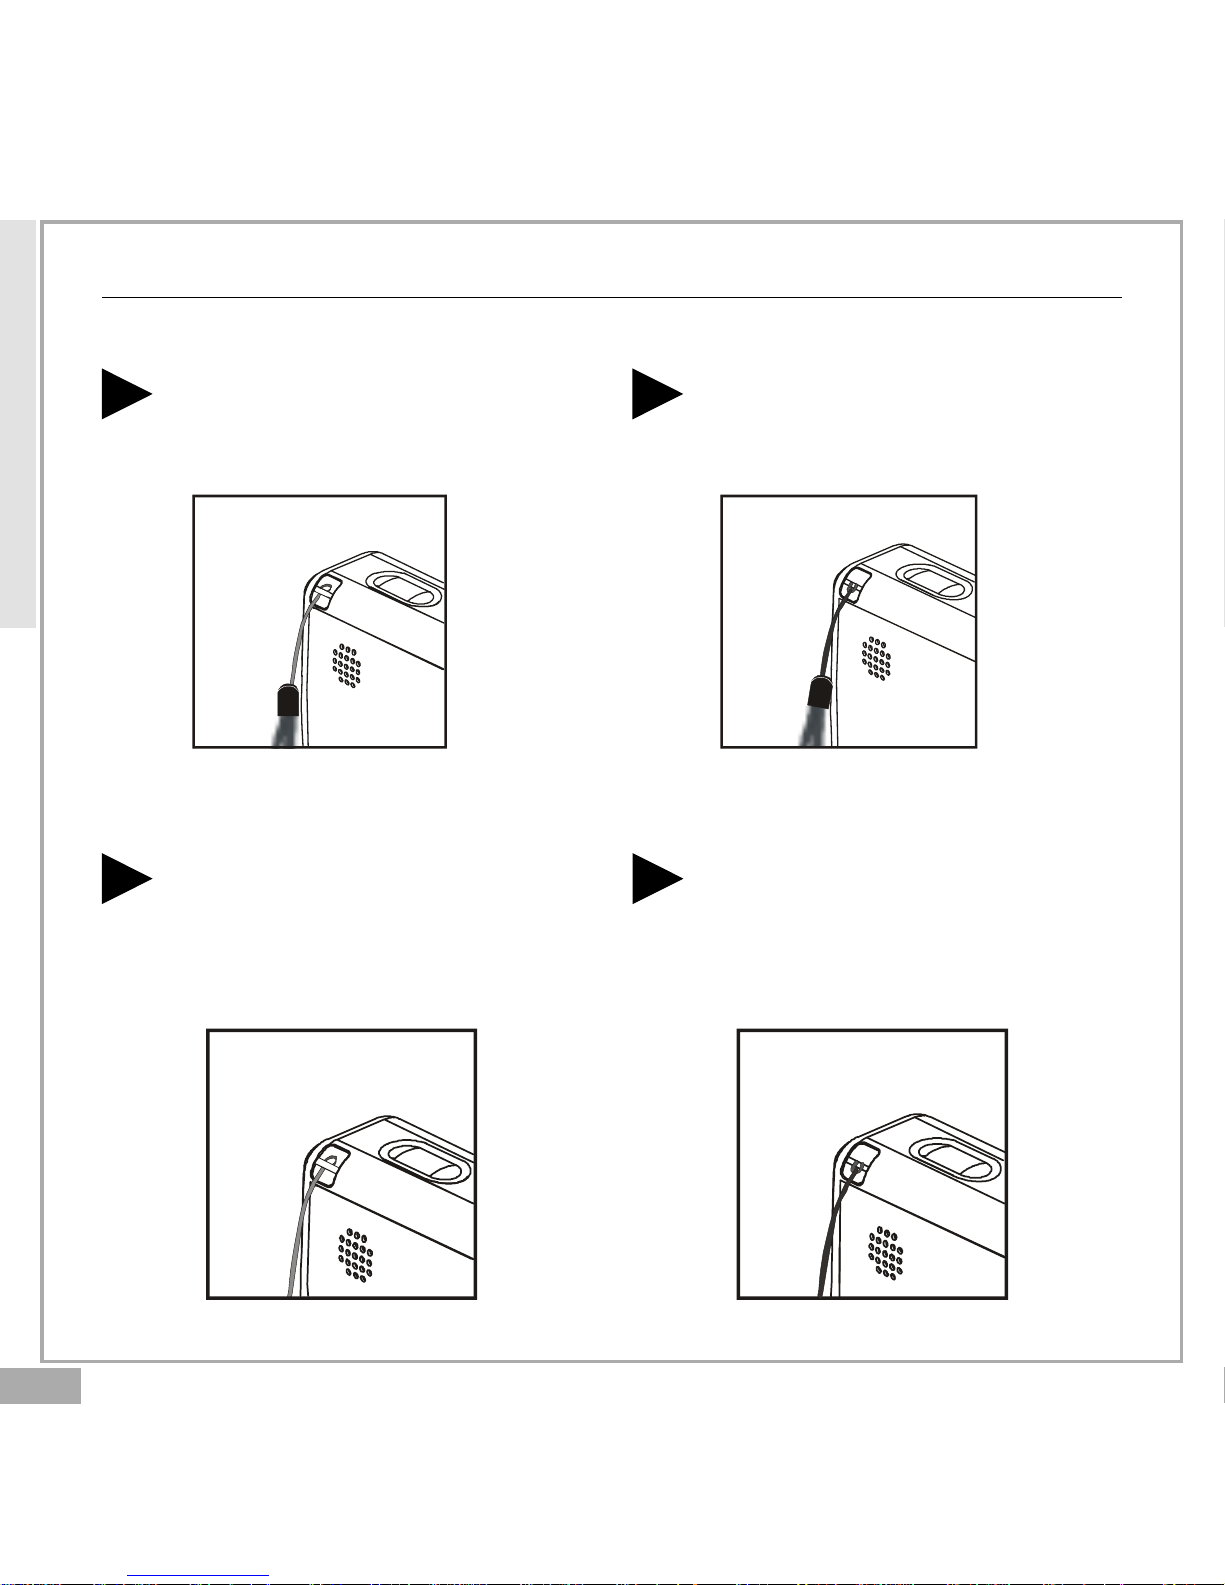
Attaching the Carry Strap
Press the other end of the
strap through the loop of thin
cord and pull tight.
2
Getting Started
Attaching the Strap connected to the lens cover
Insert the thin end of the
strap into the strap mount.
1
Insert the thin end of the
strap into the strap mount.
1 Press the other end of the
strap through the loop of thin
cord and pull tight.
2
Page 9
En 9
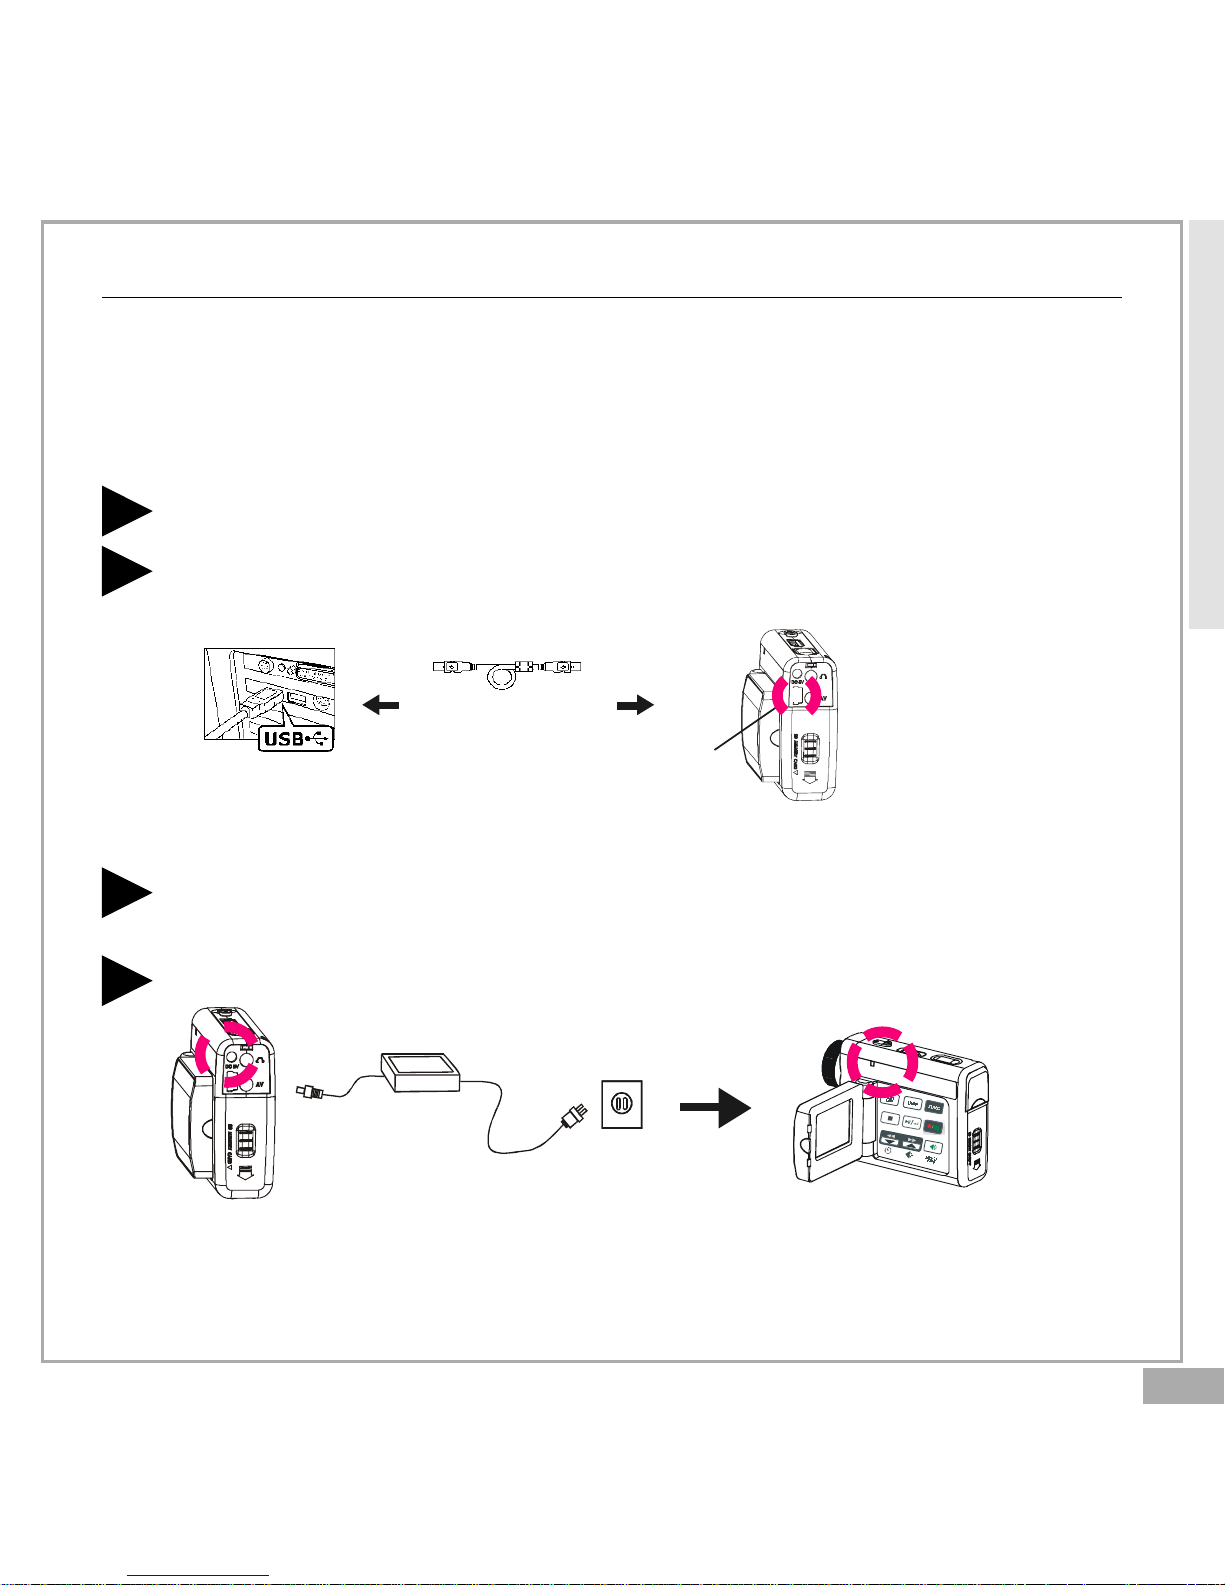
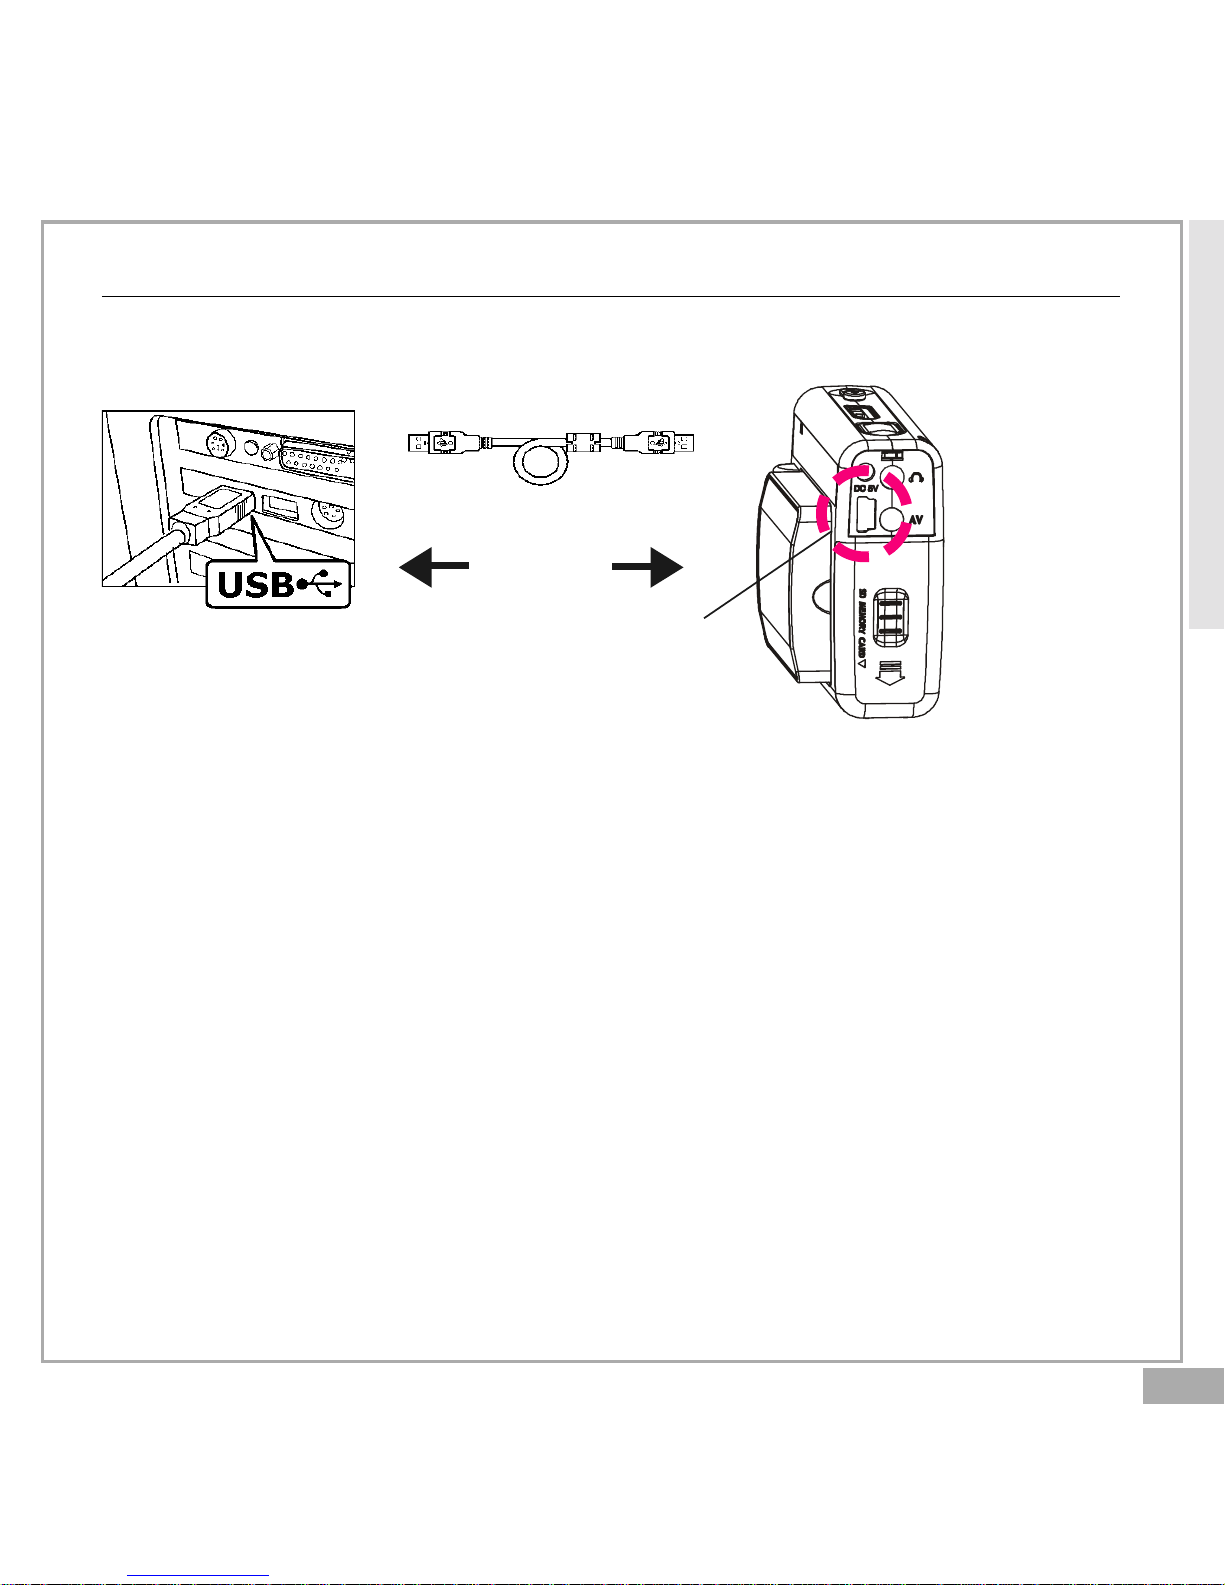
Charging this Digital Video
You have two ways to charge this Digital Video. One is to charge this
Digital Video by USB, the other is to charge it by AC adapter(optional).
Connect the AC adapter(5V, 500mA) to the DC IN jack and a house-
hold power outlet.
1
The Charge indicator will light in red and start charging.
2
Preparation-continued
To Charge this Digital Video by USB
Connect USB between this Digital Video and a computer.
1
The Charge indicator will light in red and start charging. If the
battery is fully charged, the charging indicator will be off.
2
To Charge this Digital Video by AC Adapter (optional).
USB Cable
USB port
Note: If you charge this Digital Video while turning POWER on, the
charge speed will slow down.
Getting Started
Page 10
En 10
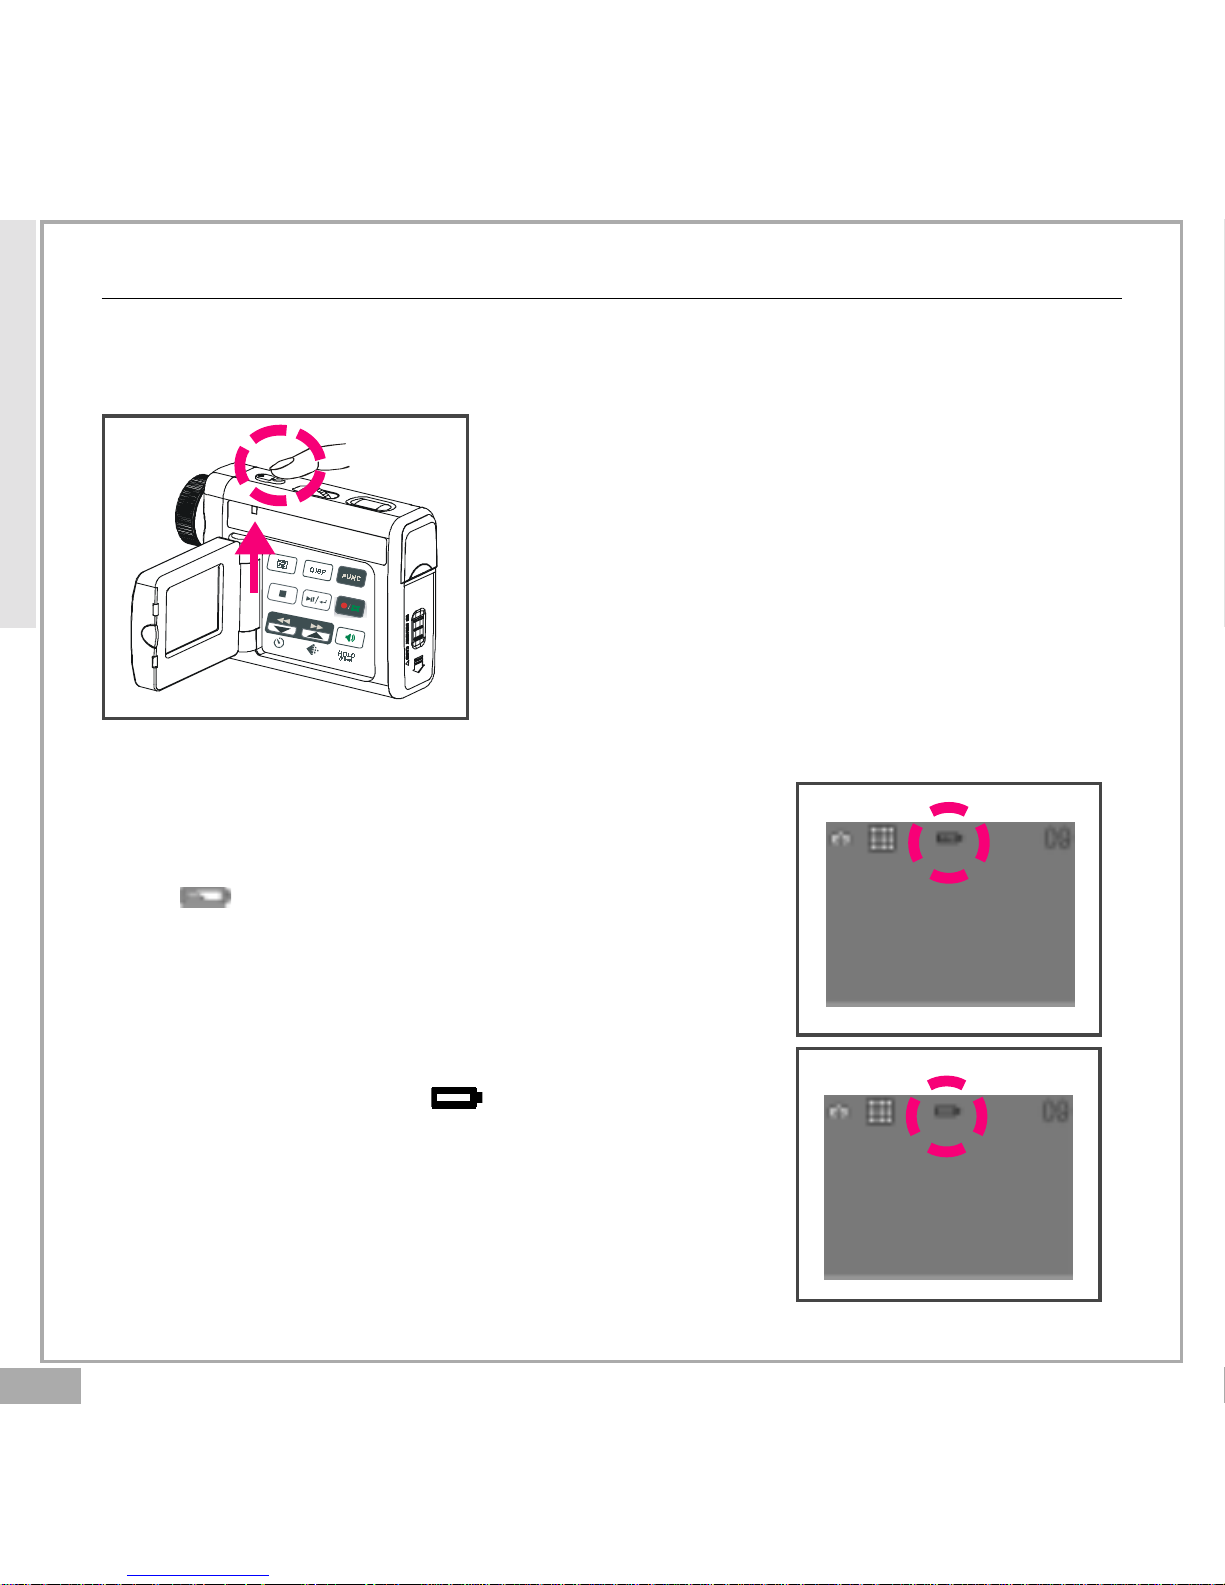
Getting Started
P ower
Power On/Off
Nudge the Power slider to activate your
Digital Video. When Power is on, the Power
indicator lights in green. Nudge it again to
turn this Digital Video off.
Power Low
If your battery is low, you will see a battery
icon ( )shown on the top center of the LCD.
If your battery is about to run out, you will see
a blinking battery icon ( ) shown on the top
center of the LCD. Your Digital Video will turn
off itself in several seconds.
Page 11
En 11
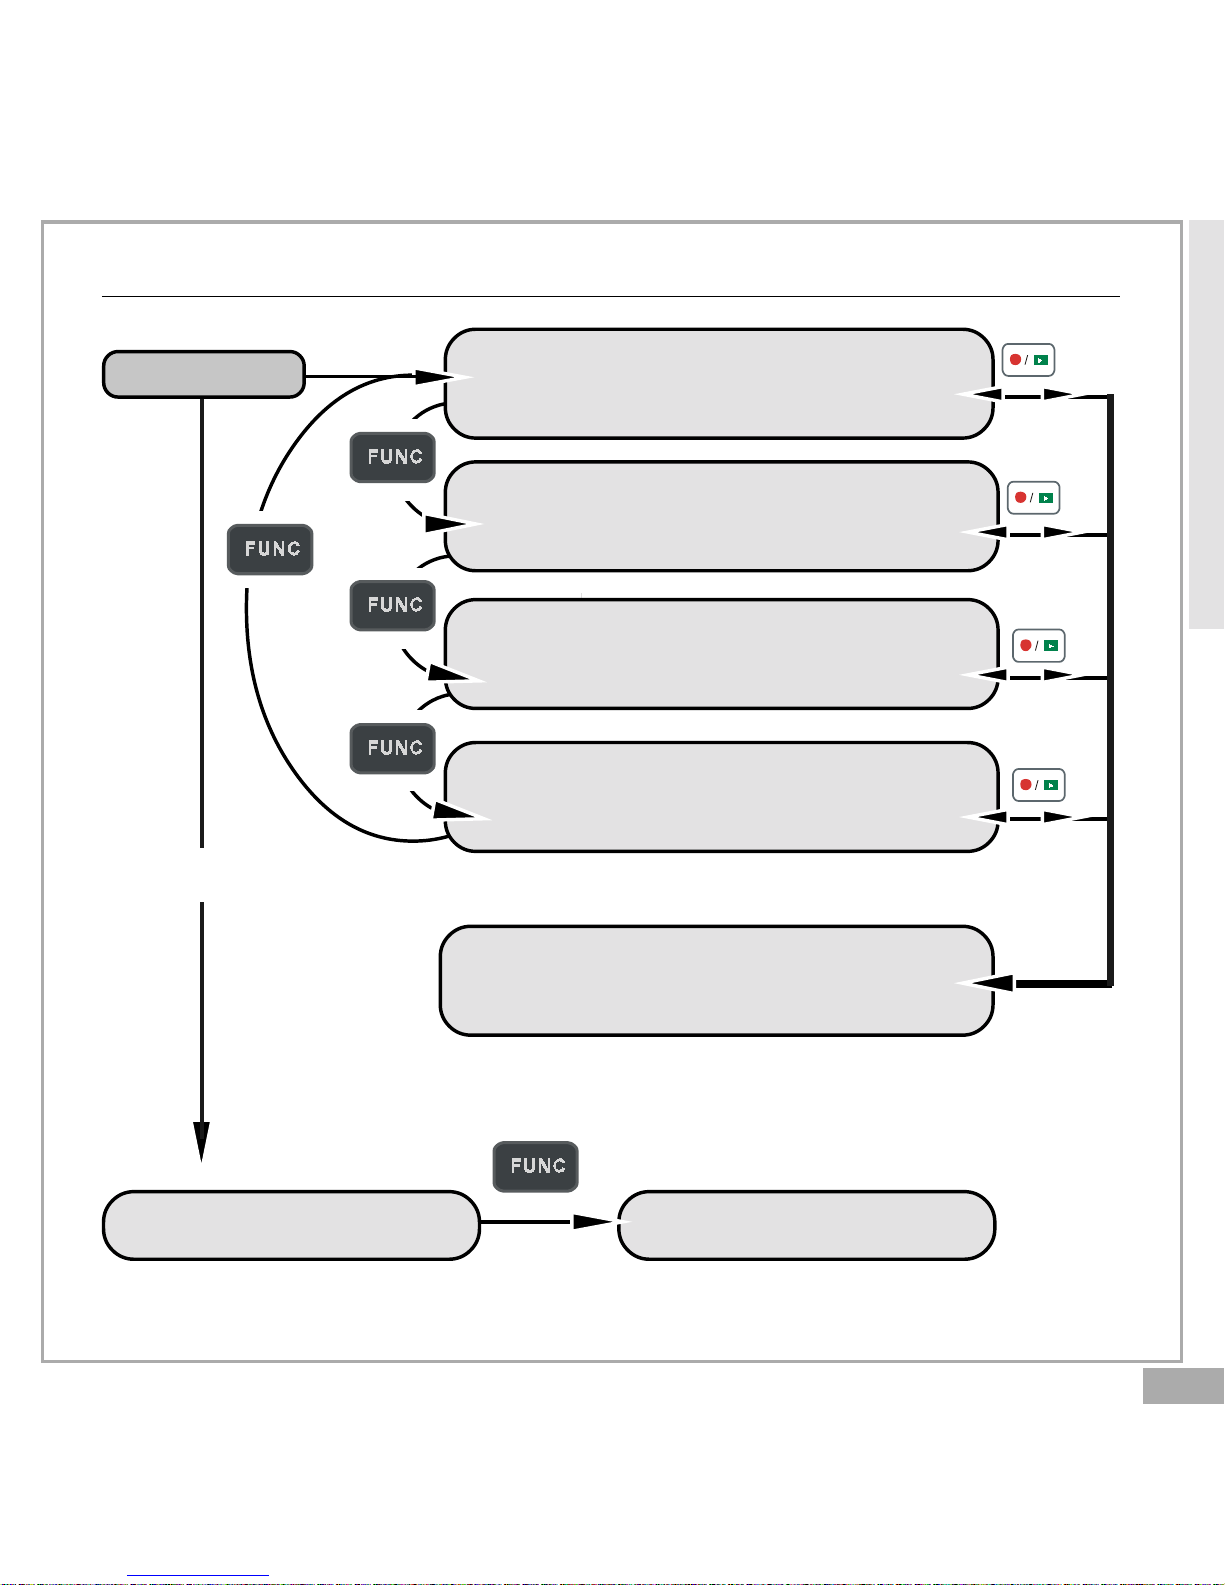
Modes
Power On
DV Record Mode
DSC Record Mode
USB connected
PC Camera Mode Mass Storage Mode
DVR Record Mode
MP3 Mode
PLAYBACK Mode
Getting Started
Page 12
En 12
Getting Started
Modes-continued
DV Mode/DSC Mode/DVR Mode/MP3 Mode/PLAYBACK Mode
There are four main modes and PLAYBACK mode in this Digital Video.
The four main modes are DV Mode, DSC Mode, DVR Mode and MP3 Mode.
1.DV Mode: take videos with sound
2.DSC Mode: take pictures
3.DVR Mode: record voice messages.
4.MP3 Mode: listen to MP3 music.
You can switch among these four modes by pressing . By pressing
, you can switch to PLAYBACK mode to review your videos, pictures
and voice messages. DV Mode/DSC Mode/DVR mode shares the same
PLAYBACK mode. You can switch back to the previous mode by pressing
again.
Page 13
En 13
Connected to PC(Mass Storage Mode/PC Camera Mode)
Using Console (Not Available for MAC)
By connecting your Digital Video to a computer, the Console opens.
Meanwhile your Digital Video switches to Mass Storage, too. You may
choose either to transfer the camera data through Console program or
through Mass Storage Mode.
Modes-continued
Getting Started
USB Cable
USB port
Page 14

En 14
Modes-continued
Mass Storage Mode
Connect your Digital Video to a computer, it will turn to Mass Storage
Mode. In Mass Storage Mode, your Digital Video acts exactly like a hard
disk. That means you can access it via the Windows user interface. You
can copy, move or delete files (pictures, movies, voice messages or MP3
music) exactly the way you manipulate files under Windows user interface.
Note:
1.Please do not copy any files into the DCIM folder of your Digital Video.
Otherwise it may cause Digital Video unstable or crash.
2.Remember to copy the MP3 files into the MP3 folder of your Digital Video.
PC Camera Mode
You can connect this Digital Video to a computer with its supplied USB
cable and use it as a PC camera.
After USB connecting, the screen will show as below.
By pressing , it will turn to PC Camera Mode. With a compatible
video capture program, you can capture movies.
Getting Started
Page 15

En 15
DV Mode
Taking Movies
Taking Your First Movie
Slide Zoom-in or Zoom-out to frame your picture2
Press Shutter to start recording
3
Press Shutter again to stop
4
Zoom in or Zoom out
Switch to DV Mode
2
P ress Power
1
(Note: You can still use ZOOM while recording.)
Page 16

En 16
Video Out
Video Out
This Digital Video can output analog video to a home TV set. To configure
the Digital Video, please refer to the section NTSC/PAL.
Taking Movies-continued
The recording timer
While you’re filming, the recording timer will be displayed on the LCD.
Before Recording
While Recording
Total estimative
recordable time
The recording time
DV Mode
Page 17

En 17
DSC Mode
Taking P ictures
Taking Your First Picture
Press Power
1
Switch to DSC Mode
2
Press Zoom-in or Zoom-out to frame your picture3
Press Shutter to take a picture4
Zoom in or Zoom out
Page 18

En 18
Taking Pictures-continued
The P icture Counter
You can see the picture counter displayed on the top right corner of
your LCD. First, it will show the number of the total recordable files of
this Digital Video. For example, it shows “20” on the top right corner of
your LCD; that is to say, there are “20” recordable files for you to take
pictures. If you have taken 1 picture, your LCD will display “19”.
Before Taking Pictures
After Taking Pictures
Total estimative
recordable files
The left estimative
recordable files
DSC Mode
Page 19

En 19
R ecording V oice Messages
R ecording Your Voice Messages
Press Power
1
Switch to DVR Mode
2
P ress Shutter again to stop4
Press Shutter to start recording3
DVR Mode
Page 20

En 20
Recording Voice Messages-continued
The recording timer
While you are recording voice messages, the recording timer will show on
the top right corner of your LCD.
Before Recording
After Recording
Total estimative
recordable time
Total recording time
DVR Mode
Page 21

En 21
Listening To MP3 Music
Listening To MP3 Music
Press Power
1
Switch to MP3 Mode
2
Press to play MP3 music4
Press BACK or NEXT to select one track3
MP3 Mode
Page 22

En 22
Listening To MP3 Music-continued
NOTE:
The title of the tracks will show ONLY in alphabet. If the title can’t show
in alphabet, it will show in “TRACK O1”, “TRACK 02”, and “TRACK 03” and
so on.
MP3 information
While you are listening to MP3 music, the MP3 information will show on
the LCD.
Press to pause5 Press to stop6
MP3 Mode
The track number/
The total tracks
The time of the
selected track
The title of the
selected track
Page 23

En 23
Basic Playback
Basic Playback
Switch to PLAYBACK mode
1
The information of the selected file will show on the LCD.
2
P ress NEXT or BACK to navigate
3
The Mode of the selected file
The selected file
number/ The total
files number
The time of the
selected file
PLAYBACK Mode
Page 24

En 24
PLAYBACK Mode
Press PLAY to start
4
Basic Playback-continued
P ress PLAY again to pause
5
Press NEXT or BACK to fast-forward or fast-backward
6
P ress STOP to stop
7
Blink
The following step only works in DV and DVR files.
Page 25

En 25
Advanced Playback
Preview in Multiple view/Single view or Hide the information
Press to preview in Single view
1
Press again to hide the information
2
Press again to preview in Multiple view
3
PLAYBACK Mode
Page 26

En 26
Advanced Playback-continued
Quick Search (Back/Next)
Press for a second to Quick Search backward
1
Press for a second to Quick Search forward
2
PLAYBACK Mode
Page 27

En 27
Changing the Quality Setting
DV Record Mode
You can change the movie’s quality setting whenever you want.
1. In DV Mode, press the button.
2. The LCD will display your current quality setting on the top left
corner. “ ” is fine quality, “ ” is normal quality and “ “ is economic quality.
DSC Record Mode
You can change the picture’s resolution setting whenever you want.
1. In DSC Mode, press the button.
2. The LCD will display your current picture’s resolution setting on the
top left corner. “ ” is fine resolution, “ ” is normal resolution or
“ ” is economic resolution.
Main Functuions
Normal quality
Fine resolution Normal resolution Economic
resolution
Economic quality
Fine quality
Page 28

En 28
Main Functuions
Changing the Quality Setting-continued
DVR Record Mode
You can change the quality setting of voice messages whenever you
want.
1. In DVR Mode, press the button.
2. The LCD will display your current quality setting on the top left
corner. “ ” for standard quality, “ ” for Long Time.
Standard quality Long Time
Page 29

En 29
Using Macro Select Dial (for DV and DSC mode)
Using Macro select dial
You can use the macro select dial (“ ” icon) when taking a movie or
picture from a near distance. (For details, refer to the Specification.)
Note: When taking a movie or picture from normal distance, set the dial
to the normal focus range (“ ” icon).
Main Functuions
Page 30

En 30
Main Functuions
Using Self-T imer (for DV and DSC mode)
This Digital Video has a built-in 10 second self-timer.
Press Timer
1
Press Shutter to start
2
The timer starts to count down from 10 seconds.
3
This icon will blink
during count-down.
The count-down
number from 10 to 1.
(Note: You could press any button to cancel self-timer during the countdown.)
Page 31

En 31
Using AE Lock
Using AE Lock (for DV and DSC mode)
You could use AE Lock (Automatic Exposure Lock) to lock the exposure
while taking a movie or picture.
This is effective when the contrast is too strong between the subject
and background or when a subject is backlit.
How to use AE Lock?
Focus on the subject on which you wish to lock the exposure setting,
then press AE LOCK button, and you can lock the exposure setting.
Press AE Lock
1
AE Lock on
2
Main Functuions
Press Shutter to take a picture or movie with the locked exposure.
3
Page 32

En 32
Using Guide Line/The LCD Display
Using Guide Line (for DV mode and DSC mode)
You can use guide line while taking movies or pictures. In Record Mode,
press the button, the guide line will show on the LCD screen.
The LCD Display
To save energy, Digital Video allows you to switch off the LCD panel.
For DV and DSC mode
For DVR and MP3 mode
Guide LineLCD On
LCD Off LCD On
LCD On
LCD Off LCD On
Main Functuions
Page 33

En 33
Using Hold
Using Hold (Press 2 Sec.)
By pressing for 2 seconds, the buttons on the panel will be locked. The
buttons on the panel will not function while in HOLD function. To cancel
the HOLD function, press for 2 seconds.
Main Functions
V olume Adjust (for Playback Mode and MP3 Mode)
You can adjust playback volume by using or .
buttons locked
Page 34

En 34
Attention Icon
Memory Full
If your Digital Video’s memory card is full, you
can not take any new movie, picture or voice
message. So when you press the Shutter to take
a movie, picture or voice message, the LCD will
display “MEMORY FULL” in the center.
No Card
If you don’t install a MMC card or SD card in this
Digital Video, the LCD will display “NO CARD” in
the center.
Card Lock
If you insert a SD memory card with the lock
feature on, you will see a card lock icon in the
left side of the LCD. (Only if you turn on the
security lock of a SD card, there will be a card
lock icon.)
Advanced Functions
Page 35

En 35
Menu
Advanced Functuions
Press
1
Press NEXT or BACK to select2
Press to change
3
Press to exit
4
Page 36

En 36
Menu-continued
Digital Effect (for DV and DSC mode)
This Digital Video offers four options to varify your movies and pictures.
The four options are OFF (no effect), SEPIA, B&W and MOSAIC.
Night Shot ON/OFF (for DV and DSC mode)
Night Shot is long time exposure to let you take a movie or picture at
night or in dim light. If you choose Night Shot ON, the icon will appear on
the right corner of the LCD screen.
Quick Review ON/OFF (for DSC mode)
You can have a quick review on your pictures. If you choose Quick
Review ON, the icon will appear on the LCD screen.
Attach Voice ON/OFF (for DSC mode)
You can attach voices on your pictures. If you choose Attach Voice ON,
the icon will appear on the LCD screen.
Taking a picture with Attach Voice ON
After taking a picture with Attach Voice ON, “ATTACH VOICE!” will appear
on the center of the LCD screen. Press SHUTTER to start to record the
voice message. Press SHUTTER again to stop the recording. Press to
exit.
Advanced Functuions
Page 37

En 37
Menu-continued
Information ON/OFF (for DV, DSC and DVR mode)
You can choose show the information or hide the information.
Attach Date/Time ON/OFF (for DSC mode)
If you choose Attach Date/Time ON, date and time will attach on the
picture that you recorded.
Date
You could set the correct date for your digital video.
Time
You could set the correct time for your digital video.
Beep On/OFF
If you choose Beep On, there will be beep sound when you press the
button. If you choose Beep Off, there will be soundless when you press
the button. (Note: When you connect this Digital Video to a PC by USB or
Power on, there will be one beep sound.)
Advanced Functuions
Page 38

En 38
Menu-continued
Auto-Off ON/OFF
Under Auto-Off, if you leave your Digital Video unused for certain times,
this Digital Video will be auto-off. There are three options: 1 minute, 2
minutes and 5 minutes. (Note: If you set Auto-off ON for 2 or 5 minutes;
LCD will be off first after 1 minute.)
NTSC/PAL
NTSC/PAL are two incompatiable analog TV signal formats. You can toggle
between NTSC and PAL to your TV set’s preference.
NTSC: North America and Japan
PAL: U.K. and Germany, France, Russia, certain European and African
countries
PAL SECAMNTSC
50Hz/60Hz
Match up with the frequency of the main power supply in your country.
Please refer to the following figures:
50 Hz : Europe, P.R.C.,Hong kong, Australia, New Zealand and South Africa.
60 Hz : America, Canada, Taiwan, Japan,and Korea.
Advanced Functuions
Page 39

En 39
Advanced Functions
Menu-continued
To exit, press STOP.
Slide Show
You can choose to playback your movies, pictures, voice messages or
MP3 in Slide Show. The Slide Show playback time is 5 seconds for each
movie, picture, voice message or MP3.
Repeat ON/OFF (only for MP3 files)
You can choose to playback your MP3 repeatedly. If you choose to Repeat
One, the selected track will playback repeatedly. If you choose to Repeat
All, the whole tracks will playback repeatedly.
Rotate ON/OFF (only for image files)
You can choose to rotate your pictures on your Digital Video. Pressing
or , you can rotate the picture every 90 degree in counter-clock
direction.
repeat one
repeat all
Page 40

En 40
Advanced Functuions
Menu-continued
Del One/ Del ALL
You can choose to delete one file or all files. Press to confirm.
Otherwise, press to exit.
Format your Memory Card
If you want to erase all movies, pictures, voice messages, MP3 and other
files, you can select FORMAT under the menu and press to wipe out
the memory completely. If you want to keep your memory contents, press
to exit.
NoYes
Yes
No
Page 41

En 41
Notice for video clip playback on PC
Our video clip adopts Microsoft latest video technology(Direct X
8.1). Therefore user(Windows 98, 2000) needs to install our
enclosed Direct X to playback the video clip files.
Note: Direct X is a program to upgrade Microsoft’s Media Player codec.
Advanced Functions
 Loading...