

Muse Research Receptor VIP Operating Manual
RECEPTOR VIP
Virtual Instrument and Eects Module
Operating
Manual V1.1
September 1, 2012
www.museresearch.com

RECEPTOR VIP™ Operating Manual
Introduction
First off, thank you for purchasing a RECEPTOR VIP. Your're now among the thousands of top
professional musicians who use RECEPTOR to run virtual instruments and effects live and in the
studio. We sincerely hope your RECEPTOR VIP becomes an invaluable tool in your music-making
ventures.
RECEPTOR VIP is a breakthrough hardware plug-in player that is incredibly powerful yet super
easy-to-use. Featuring a completely revolutionary user interface and superb performance even with
heavy loads, RECEPTOR VIP is certain to become your "go to" device for making music, whether
you play keyboards, sing, play guitar, or do all three at once!
RECEPTOR VIP runs a wide range of VST virtual instruments and effects "plug-ins". It comes with a
large number of instruments and effects built-in, ready to use, letting you start making music right
out of the box. Additionally, there are several software instruments and effects pre-installed and
available in demo mode, such as Native Instruments KOMPLETE 8. This lets you try out new and
exciting plugins before purchasing a license for them. And you can also install your own plugins
using an external computer and the large number of installers available on the www.plugorama.
com support website.
The software that comes free with your RECEPTOR VIP is pre-congured so that making music with
it could not be easier: simply plug it in, turn it on, and play. However, that’s just where the fun
begins. You can easily create your own custom sounds and effects with the powerful graphical user
interface that you can access by simply plugging in a mouse, monitor, and keyboard. RECEPTOR
VIP can run a large number of virtual instruments and effects simultaneously, making it arguably
the most versatile music instrument or effects processor you’ve ever owned.
RECEPTOR VIP has something for every musician. Here are some of the many ways you can use
yours:
As the ultimate sound module for use with any MIDI keyboard or controller.•
As a mind-blowing piano module for enhancing your digital piano's sound. •
As an amazing guitar effects processor for electric or acoustic guitars.•
As a vocal processor to give your voice fullness and clarity.•
As an astounding electric bass processor-like a DI box with processing!•
As an electronic drum module for providing punchy drum sounds live or in the studio. •
As a versatile effects processor for your recording studio or P.A. system.•
As an "all-in-one" device for processing both your voice and guitar at the same time. •
As a software-expandable device that will grow with you and your music. •
This manual will help you get your RECEPTOR VIP set up and working. We highly recommend that
you register your RECEPTOR VIP as soon as possible by visiting www.plugorama.com and taking
advantage of the online tutorial videos and wealth of information available there.
So... let’s jump in and start making music!
2
Getting Familiar: Unpacking and Setup
First, you are going to want to unpack your RECEPTOR VIP and remove all the packing material. In
your RECEPTOR VIP package, you'll nd the following:
1. Your RECEPTOR VIP (of course).
2. The power cable appropriate for your region.
3. A CD containing this manual and some other useful utility software.
4. An Ethernet cable for connecting your RECEPTOR VIP to your computer.
RECEPTOR VIP is really easy to set up and get working:
1. Remove all the packing material from your RECEPTOR VIP, and place it on a stable indoor surface
with adequate ventilation where it won’t get wet.
2. Plug the power cord into the back of the unit.
Note: RECEPTOR VIP's power supply is auto-ranging and can be used anywhere in the world. All
you need is the correct AC cable to connect to the power supply to your wall outlet.
3. Plug your MIDI keyboard into the back, or your microphone into the bottom front panel input, or
your guitar into the top front panel input
4. Power it up by pressing the power button on the top right hand corner of the front panel.
5. Press the PLAY button to select a sound or effect of interest to you.
6. Make some music!
Be sure to check out our Video Demos on our YouTube Channel:
http://www.youtube.com/receptorland
3
Getting Familiar with RECEPTOR VIP: Overview
To start, here are some general concepts about RECEPTOR VIP:
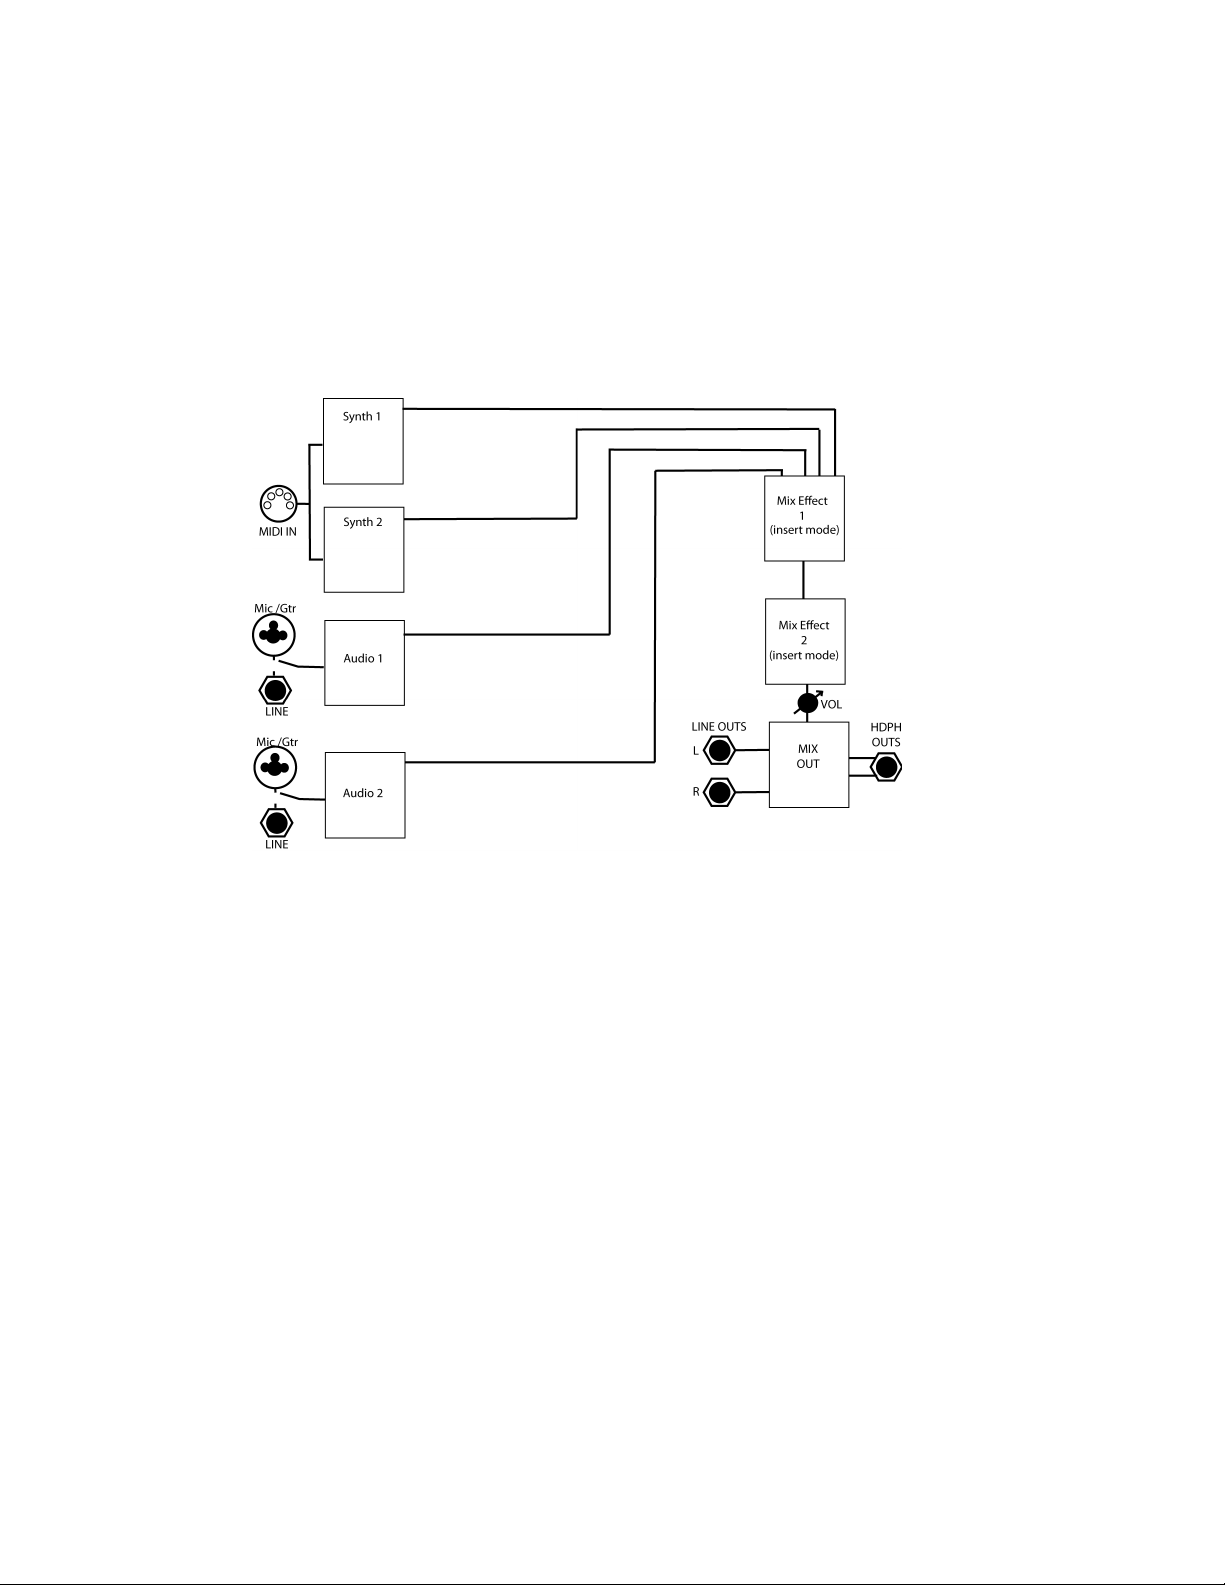
RECEPTOR VIP is a sixteen channel device. A channel can either be a "Synth" for creating sampled
or synthesized sounds in response to MIDI messages from your MIDI keyboard, or an "Effect"
channel, for processing audio from either stereo or mono analog input signals. Each Synth channel
can have a different virtual instrument program running to produce up to 16 entirely unique
sounds at once. Each Effect input channel can have a different virtual effect program running to
independently process the two incoming audio signal chains, letting you process audio in parallel for
incedibly dramatic results. . RECEPTOR VIP also has a mixer section that allows for two additional
effect programs to process any or all of the four input channels.
(up to 16)
RECEPTOR VIP is capable of doing more than one thing at a time, which makes it truly unique! For
example, you can play an acoustic piano sound using your MIDI keyboard, and simultaneously "mix
in" and process the sounds of your keyboard's internal sounds through the inputs on the back of
the unit, supplementing the sounds of your keyboard with the sounds of RECEPTOR VIP!
Or, if you are a singer, you can plug your microphone in to your RECEPTOR VIP and take advantage
of the vocal processing capabilities it offers. It also lets you play one of the RECEPTOR VIP synth
sounds using your MIDI keyboard while processing your vocals simultaneously.
If you are a guitarist, you can process your guitar using the supplied amp-modeling and effects
processor software. And since there is a second input channel available for guitar, you can have a
friend play their guitar at the same time, or you want to sing and play guitar, you can simply plug
in a microphone and process your vocals along with your guitar!
RECEPTOR VIP is an incredibly versatile device. With a little exploration on your part, your
RECEPTOR VIP will become an indispensible musical tool, whether you're jamming with some
friends, recording an album, or playing a sold-out festival in front of thousands of screaming fans!
So let's dive right in and explore the knobs, buttons, and jacks on your RECEPTOR VIP!
4
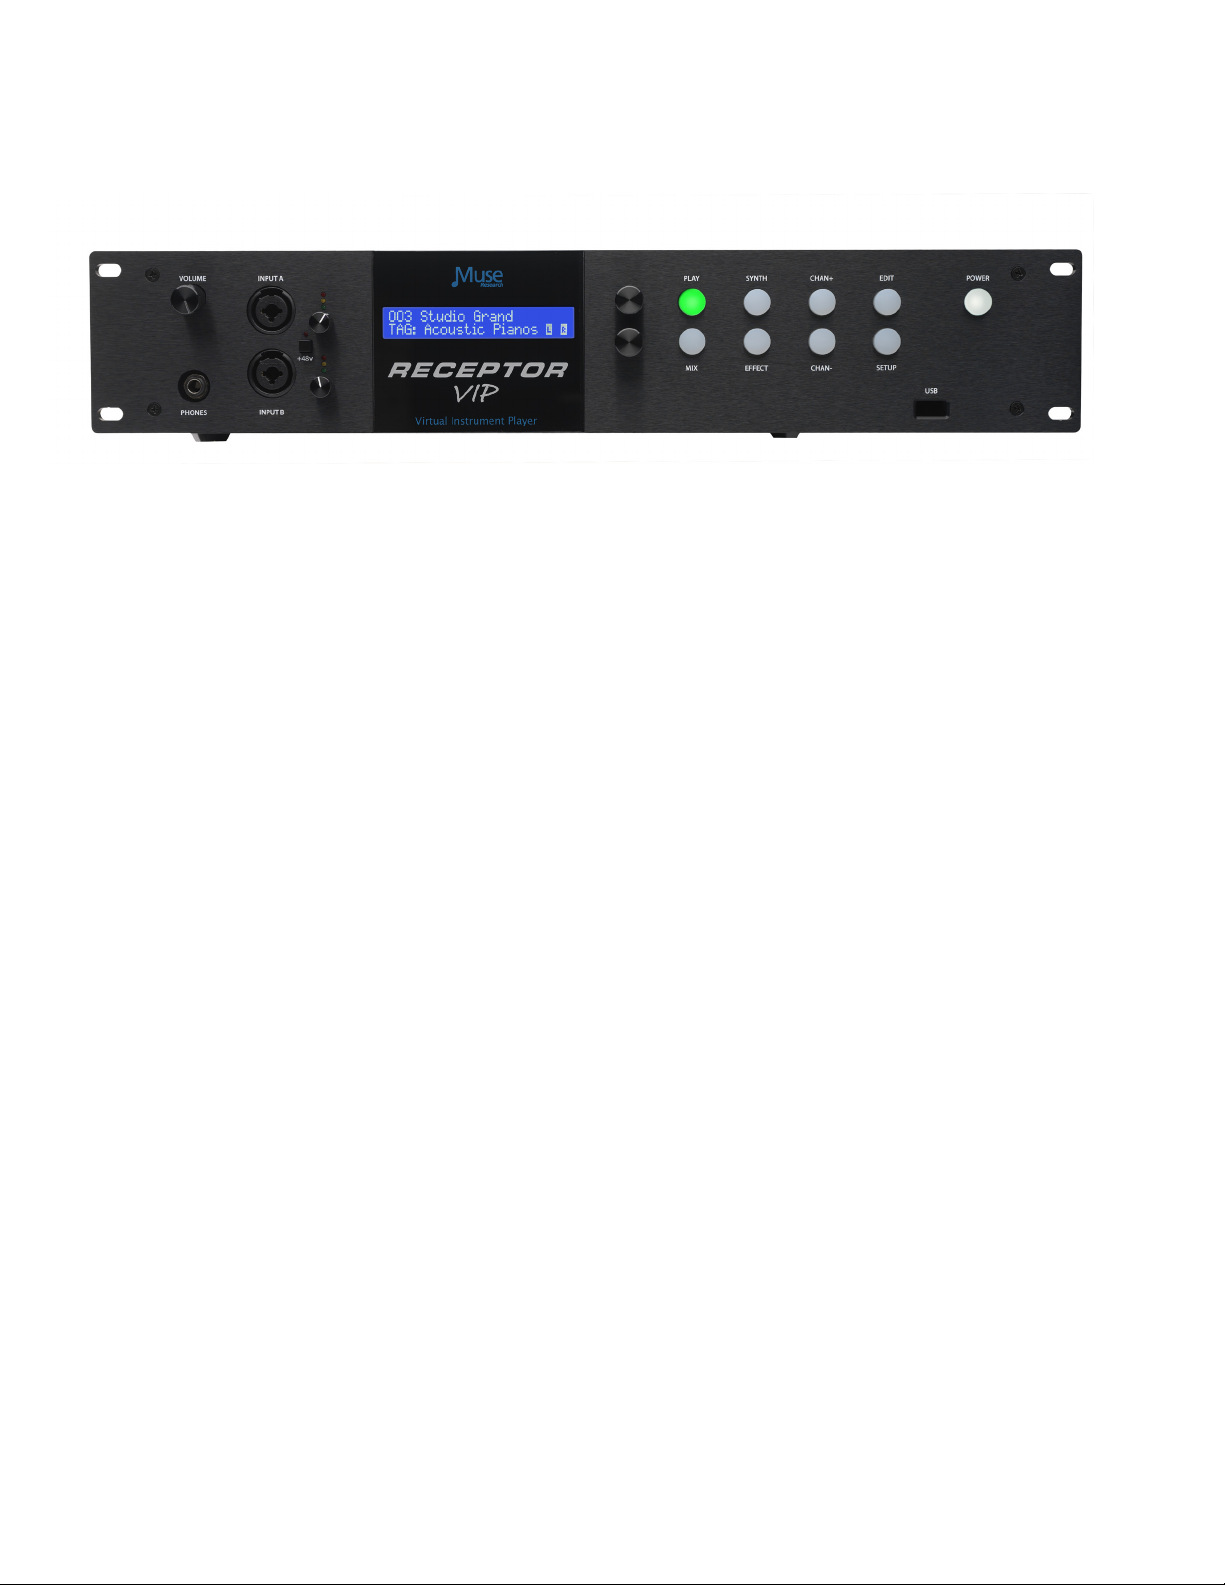
The Front Panel
The RECEPTOR VIP can be controlled using the buttons, control knobs, and 2-line LCD located on
the front panel. RECEPTOR VIP might have a couple of concepts that are new to you, so be sure to
read this section in its entirety so you can get the most out of your RECEPTOR VIP.
10
2
3
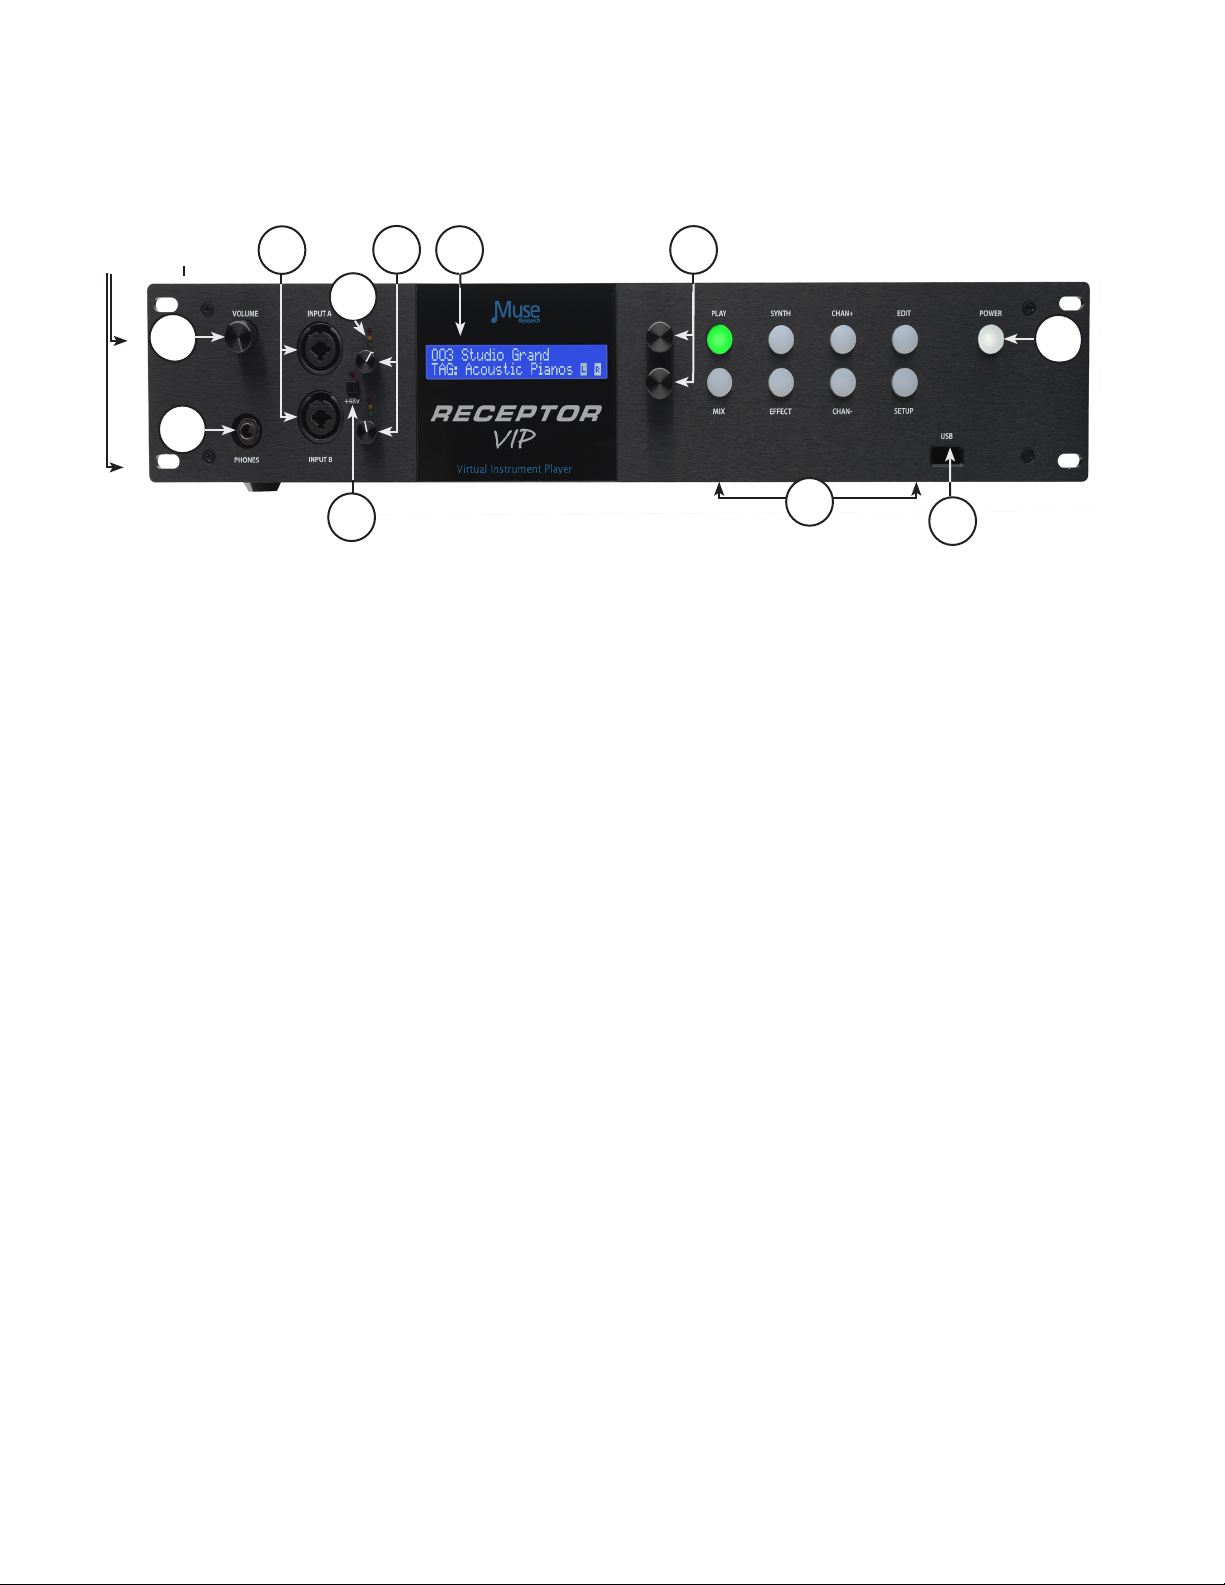
Front panel Controls and Functions
1. Power Button: Press once to turn on; press twice to shut it down completely. Since it can
take a minute or so for the RECEPTOR VIP to power up and initialize all your presets, instead of
powering it up and shutting it down each time you use it you have the option of "putting it to sleep"
when it is powered on by simply pressing the power button ONCE while the unit is powered up. This
"suspends" the current state of your RECEPTOR VIP, keeping your settings as they were but saving
power until you're ready to continue from where you left off. To "wake up" the RECEPTOR VIP,
simply press the power button again and in a few moments you'll be ready to continue on. Should
you ever want to reboot the unit, simply press the power button three times. Pressing and holding
the power button will force an instant power down, but you should not do this unless the unit is
completely unresponsive.
7
8
9
5
4
1
6
11
Note: Be sure to press the power button TWICE and wait until the unit turns off completely before
removing power from the RECEPTOR VIP. This ensures normal start up next time you apply power.
2. Master Volume Control: This control affects the output volume of the RECEPTOR VIP in
addition to controlling the volume heard in the headphones. When using it with an external P.A.
or powered speakers, we recommend that you set this control to its maximum, and then adjust
the gain on the amp or speakers to a comfortable listening or performance level. When using
headphones, use this control to ensure that you are listening at a comfortable and safe listening
volume. Note that this is the actual hardware output level of the unit and does not affect the
metering either on the front panel or on the graphical user interface.
Note: Listening to music at high volumes for extended periods of time can cause temporary or
permanent hearing loss. Always use common sense and take adequate precautions when listening
to loud sounds or instruments so as to protect your hearing!
3. Headphone Output: The 1/4" front panel headphone jack lets you listen to your RECEPTOR
VIP in private. You can also use it as an additional set of analog audio outputs by connecting an
appropriate stereo TRS jack to dual mono cable. The headphone outputs and main outputs have
identical audio signals and audio quality.
4. Control Encoders: These controls let you change the menu items that are on the LCD. The
top knob controls the menu items on the top line of the display, and the bottom knob controls the
menu items on the lower line of the display. Pushing on either of these knobs "selects" displayed
items in the LCD when a choice is presented on the LCD.
5

5. LCD: This blue LED backlit display shows the names of presets and TAGS, lists the parameters of
the sounds or effect so you can edit them, as well indicating MIDI activity (indicated by a note) and
audio output levels (L / R meters) in real-time.
6. Main Function Buttons: These eight buttons provide control the main functions of RECEPTOR
VIP and let you control and program the sounds or effects in the RECEPTOR VIP. The buttons are
described in detail in the next section.
7. Front Panel Input Gain Controls: This control sets the input gain of the front panel
microphone/instrument inputs, with the top one controlling input "A," and the bottom one
controlling input "B." These gain controls do not affect the line level inputs on the back; they only
control the front panel input gain settings.
Note: Before connecting either an instrument or microphone to the front panel inputs, turn the
GAIN control all the way counter-clockwise to its minimum setting to prevent overload or feedback
audio signals that could damage speakers.
8. Front Panel Input Led Level Indicators: These three LEDs show you the level of the inputs
(both front and rear). The green LED indicates signal presence (-40dB and above); the amber LED
shows levels above -7dB; and the red LED indicates the onset of clipping (-1dB). For best delity,
your input should trigger the green and yellow LEDs regularly and very rarely, if ever, trigger the
red LED. If the red LED stays lit on a regular basis, your input level is too high and you should turn
the gain control counter-clockwise until the red light is no longer lit.
9. Phantom Power Switch and Indicator LED: When this switch is depressed, the 48VDC
Phantom Power is applied to both Microphone jacks to power condenser-type microphones. When
the Phantom Power is active, the red LED above the switch will illuminate.
NOTE: You should reduce the output level of RECEPTOR VIP or reduce the input gain of any
ampliers attached to the RECEPTOR VIP outputs when turning on and off the phantom power, as it
can cause a slight audio pop or thump to occur in the audio outputs.
10. Front Panel Microphone/Guitar/Bass Inputs (A and B): These two high-grade
combination microphone/instrument input jacks feature a high impedance guitar preamp on the
1/4" jack section in the middle of the jack, and a balanced, low-impedance input (with optional
phantom power ... see #9) for dynamic or condenser microphones. The top input is Input A; the
bottom is input B.
11. Front panel USB port: This USB port intended for inserting an iLok™ USB dongle, which is
used by many software developers to license their software. It can also be used to connect a USB
MIDI keyboard, mouse, or keyboard. Note that this USB port may be disconnected in favor of
connecting an internal USB dongle port. This port is designed for installing an internal USB iLok
dongle, accessible from the bottom of the unit. Please see the Muse Research website for more
details.
6
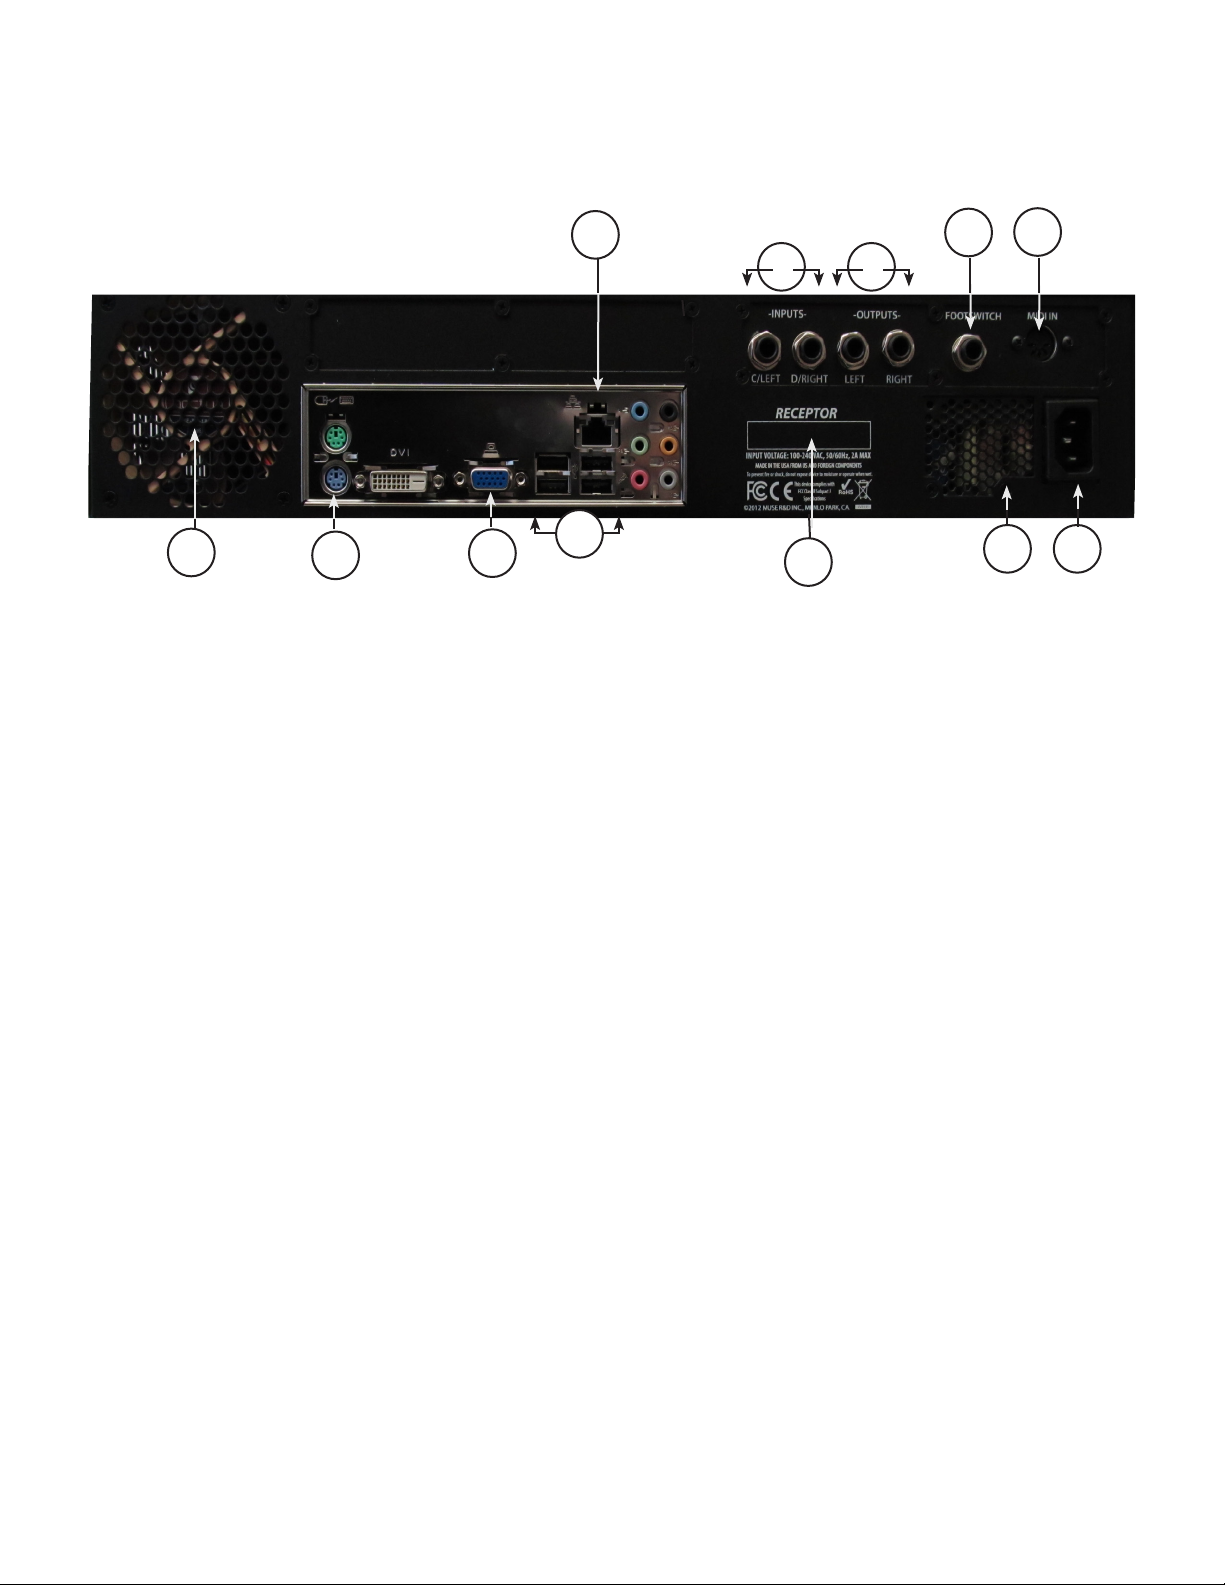
Getting Familiar: The Rear Panel
Connecting your RECEPTOR VIP to your mixer, your amplier, your computer, or to other music gear
is simple to do with the connectors on the back.
9
5 6
11
1. AC Power Input: This is where you connect RECEPTOR VIP to a AC mains supply. RECEPTOR
VIP has an auto-ranging, auto-power factor correction power supply that you can use anywhere in
the world, from 100 VAC to 240VAC, 50 / 60 Hz.
2. Power supply fan outlet: This is exhaust port for the power supply. Please keep it
unobstructed at all times so that the power supply remains at a safe operating temperature.
3. Footswitch Input: The footswitch input accepts either a single 1/4" tip-sleeve jack footswitch
(single action) or a double footswitch with a 1/4" tip/ring/sleeve connection. The footswitch input
can be used for incrementing (or decrementing using a second footswitch) through patches in the
unit, making it easy to change sounds or effects while performing. This is particuarly valuable to
guitarists who might not have any MIDI devices attached to their RECEPTOR VIP, or keyboardists
who do not have their hands free to select program changes from their keyboard while performing.
10
7
8
12
3
4
2
1
4. MIDI Input: This full-size 5-pin DIN connector is where you plug in your standard MIDI
keyboard for controlling the virtual instruments in your RECEPTOR VIP. If you want to connect more
than one keyboard to this input, you can rst connect to a MIDI merge box, and then connect to
this input.
5. Audio Line Inputs (C and D): This input accepts a balanced, 1/4" tip/ring/sleeve (TRS) linelevel device, such as the output of your keyboard or another sound module, a drum machine, an
MP3 player, or the effects sends of your mixer. The rear input on the left is Input C; the rear input
on the right is Input D; and if you want to use a stereo input, you would connect the left output of
your device to Input C and the right output of your device to input D. Once connected, your linelevel inputs can be processed using the audio effects slots or passively combined with the sounds
being generated by virtual instruments running in RECEPTOR VIP
Warning: Do not connect the output of an amplier or other "speaker-level signals" to the
RECEPTOR VIP line inputs or damage to your RECEPTOR VIP will result.
.
7
.

6. Audio Outputs: This is the Left (L) and Right (R) channel output of RECEPTOR VIP for
connection to your mixer, amplier, or powered speakers. The outputs accept 1/4" unbalanced
cables and should be connected to a high impedance input. You can adjust the output level using
the front panel volume control. The audio outputs will not drive speakers directly; you must
connect your RECEPTOR VIP to a mixer, keyboard amplier, or amplied speakers to hear sufcient
audio volume.
7. VGA Video Monitor Output: This is where you connect a VGA computer monitor to view the
software graphical user interface of RECEPTOR VIP, as well as to see the graphical user interface
of the virtual instruments and effects that are running inside RECEPTOR VIP. You do not need to
connect it to a computer to see the software running inside RECEPTOR VIP.
8. USB 2.0 Ports: Each port will accept a standard computer mouse, computer "ASCII" keyboards
for controlling the graphical user interface of RECEPTOR VIP, as well as device-compliant USB
MIDI keyboard inputs or software license dongles such as the Pace iLok. You can attach up to 4
devices at once to these ports. The USB ports do not support external USB drives, hubs, or network
adapters at this time.
Note: "Device Compliant USB MIDI devices" are required for use with RECEPTOR VIP. All compliant
USB MIDI devices are "plug and play" devices that do not require additional drivers or software to
work. If the device requires special software to be installed, the USB MIDI hardware may still work,
but it is not guaranteed to work with RECEPTOR VIP since those types of devices are not "device
compliant."
9. Gigabit Ethernet Port: This port is used to perform software updates or to connect to a
laptop or desktop computer with an Ethernet cable. By connecting to your computer, you can view
the graphical user interface ("GUI") of your RECEPTOR VIP without having to attach a computer
monitor to #7 above. However, you must rst install the RECEPTOR VIP Tools software onto your
computer (see the supplied CD-ROM). The Ethernet port and the RECEPTOR VIP Tools software
is compatible with Macs or PCs and can be used with a WiFi network. See the website for more
information about networking to your RECEPTOR VIP.
10. PS2 Ports: You can connect PS2 style keyboards or mice to these ports.
11. Cooling Fan Exhaust Port: This keeps RECEPTOR VIP running cool at all times. Please ensure
unrestricted airow around this exhaust port to ensure that your RECEPTOR VIP performs reliably
for many years to come.
12. Serial Number Field: This is the unique identity of your particular RECEPTOR VIP. You will
need the LAST 12 DIGITS of this numberin order to register your RECEPTOR VIP on the www.
plugorama.com website. You also need this serial number to get technical support should you ever
need to contact Muse Research.
8
Making Music: The PLAY mode and SoundFinder™ Feature
PLAY mode is the super simple default mode that happens when the RECEPTOR VIP powers up.
You can tell you are in PLAY mode because the PLAY button on the top left side of the button eld is
lit. PLAY mode is the easiest way to operate your RECEPTOR VIP.
FIRST... some denitions
SoundFinder is a feature in RECEPTOR VIP that lets you quickly and easily nd the right preset
for the instrument you have connected and/or the style of music you are making. SoundFinder
works whenever you are selecting presets either on a global (PLAY mode) basis, or when you are
selecting a sound or effect preset in a particular synth or effect channel. SoundFinder uses TAGS
and PRESETS to organize the sounds and effects in your RECEPTOR VIP.
TAGS are the "categories" in SoundFinder that allow you to organize your sounds and effects. For
example, you might have an "Acoustic Pianos" TAG, that contains all of your various acoustic pianos
for playing with your MIDI keyboard. You might have an "Guitar Clean" Tag, which contains your
various clean-sounding amp models for playing your electric guitar. And you might have a "Vocal
FX" Tag that contains the appropriate vocal effects when using a microphone.
TAGS are also user-denable, meaning you can create your own categories using the graphical user
interface. This lets you create Tags to organize sounds in your own categories, or dene a set list,
where each preset in that particular Tag has all the sounds you are using for a particular gigl
Note: TAGS are organized into two primary main groups: sounds for playing with a MIDI
keyboard, and effects for processing the incoming audio from one of the inputs. Sounds are
simply listed with the description of the TAG, and effects are preceeded by the letters FX. Within
the FX group you have different sub-categories depending on what you are processing, like electric
guitar, acoustic guitar, vocals, etc.
PRESETS are the unique sounds or effects that are in a particular Tag. Take for example the
"Acoustic Pianos" Tag, where you might have presets like "Concert Grand Piano", "Studio Grand",
"Rock Piano", "Jazz Piano", etc. These different pianos can be selected by turning the top knob, and
pressing the knob to load.
Note: The same preset may be associated with several different Tags. For example, the "Rock
Piano" preset might reside in the "Acoustic Pianos" Tag, as well as the "Jam Night" Tag you created.
Using SoundFinder in PLAY mode
SoundFinder preset selection works like this: Turn the BOTTOM knob to select a TAG (category)
you want to choose from, and then turn the TOP knob to select the sound or effect (preset) that
you want to perform with. Once you have selected the TAG and PRESET you are interested in,
simply press the bottom or top knob to load that particular sound or effect preset.
Note: A preset selected in PLAY mode affects all aspects of the RECEPTOR VIP. So when you
select a PLAY preset, not only does the virtual instrument or effect associated with the preset load,
but it also congures the MIDI ports, input selection, and mixer settings for the entire unit. When
you change to another preset, the entire RECEPTOR VIP setup will change with that preset; all
channels, all synths and effects, and all input assignment and mix settings.
9

What's great about PLAY mode is that it makes it really easy to utlilize all the functionality of your
RECEPTOR VIP without having to spend a bunch of time creating sounds. With SoundFinder in the PLAY
mode, even someone completely unfamiliar with music technolology can operate RECEPTOR VIP!
As you become more comfortable with your RECEPTOR VIP, you'll nd it valuable to know how the
different sounds and effects are organized so you can quickly nd the preset you are looking for. Let's
explain how sounds and effects are organized so you will better understand how RECEPTOR VIP works
You already know RECEPTOR VIP does two basic things: it generates sounds using a MIDI keyboard or
controller, or it processes sounds coming from an audio input of some sort. Because of this, there are
two main categories of TAGs: SOUNDS and EFFECTS.
The Tags for SOUNDS simply state the type of sounds to expect in that particular Tag. For example, the
"Acoustic Pianos" Tag has all the various acoustic piano sounds, the "Strings" Tag has all sampled string
instruments inside it.
Here are some example Tags for the synth and sampled sounds:
TAG Name TAG contains: Expected Input:
TAG: Acoustic Guitars Synth / Sampled Sounds MIDI keyboard, controller or interface
TAG: Acoustic Pianos Synth / Sampled Sounds MIDI keyboard, controller or interface
TAG: Brass Synth / Sampled Sounds MIDI keyboard, controller or interface
TAG: Electric Basses Synth / Sampled Sounds MIDI keyboard, controller or interface
TAG: Electric Guitars Synth / Sampled Sounds MIDI keyboard, controller or interface
TAG: Electric Pianos Synth / Sampled Sounds MIDI keyboard, controller or interface
- etcetera -
The Tags for EFFECTS all have the letters FX before the effect category. Therefore, to hear a preset with
FX in the TAG name, you have to have a source of audio connected to the appropriate audio input.
In the realm of FX presets, different presets are designed for different sources of audio. You wouldn't
normally want to sing through a distorted guitar amp model, nor would you want to play guitar through
a vocal harmonizer. For this reason, presets are designed specically for use with different pre-assigned
inputs However, there are also "generic" effect categories for specic types of effects that let you indulge
your more experimental side, or simply get you to a specic effect regardless of the input source quickly.
Here are some example Tags for effects organized by the expected input source:
TAG Name TAG contains: Expected Input:
TAG: FX Acous Guitar Effects for Acous Gtrs Input A on front panel
TAG: FX Elec Guitar Effects for Acous Gtrs Input A on front panel
TAG: FX Vocals Effects for Vocalists Input B on front panel
TAG: FX PA Effects Effects for use with Mixers Inputs C and D on rear panel
TAG: FX Kbd + Gtr Synths + effects at once MIDI and Input A
Here are some example Tags for effects organized by effect type:
TAG Name TAG contains: Expected Input:
TAG: FX Reverb Reverb effects only Any Audio Input (varies by preset)
TAG: FX Spectral Chorus, anger, etc. effects Any Audio Input (varies by preset)
TAG: FX Dynamics Compression, limiter, gates Any Audio Input (varies by preset)
Inside the effects-specic Tags you'll nd presets organized by input type, i.e. inside the TAG: FX Reverb,
you might have GTR Large Hall, VOC Large Hall, and AUX Large Hall, where the GTR preset processes a
guitar on Input A, the VOC preset processes a microphone on Input B, and an AUX preset processes line
level inputs from an external device (keyboard, mixer, etc.) on inputs C & D.
10

The Difference Types of Presets in your RECEPTOR VIP
It is important to realize that there are not only different types of Tags for different purposes, but there
are also different "levels" of presets in your RECEPTOR VIP.
The PLAY level has presets that control every aspect of your RECEPTOR VIP. These presets control the
entire nature of the RECEPTOR VIP. The PLAY presets can contain several different virtual instruments
and their MIDI settings, different audio effects and their input assignments, and mixer settings along with
the mixer effects, their presets, and their routing conguration. One preset changes all aspects of the
box in one go.
A PLAY preset can / will change any/all of the following:
The virtual instrument synths that are loaded.
The presets for each of these virtual instruments.
The MIDI settings for each and every synth, including MIDI chanel, note range, and velocity range
The MIDI controller assignments for every synth.
The Mixer send effect levels for each synth channel.
The audio input effects that are loaded.
The presets for each of the loaded effects.
The input assignments for those effects.
The relative gain levels for each channel.
The Pan settings for each channel.
The Main mixer channel master effects that are loaded
The presets for those main master effects.
The routing conguration of those main master effects
The main mixer level and panning.
So you can see from the list above that one preset in the PLAY mode controls a lot of things. This is very
handy when you want to explore the factory presets of your RECEPTOR VIP.
However, there are times when you might want to build a preset from scratch, sound by sound or effect
by effect. For this reason, there is a "lower level" of presets that you can access on a channel-by-channel
basis. So just as there are PLAY level TAGS and PRESETS, there are also TAGS and PRESETS on the
"synth channel" and "effect channel" level. This lets you open up a synth or effect channel, and then
either select a preset by choosing a Tag of interest and loading a preset in to that channel.
But wait... there's more. What if you don't want to go directly to a particular preset in a particular virtual
instrument or effect? Well, you can do that too by simply loading in a particular virtual instrument or
effect, and then selecting the BANK tab from the Tag / Preset listing for that particular virtual instrument
or effect.
Since many hardware devices have only one level of presets, this can be kind of confusing at rst, but
keep in mind there are presets at the highest level that control all aspects of your RECEPTOR VIP, as well
as presets associated with each particular virtual instrument or effect that is loaded on to your device,
and you'll quickly see how this allows you to completely exploit all the power that RECEPTOR VIP gives
you.
11
 Loading...