

Murray 612100x30NA, Turboshovel 1200 Owner's Manual
OWNER’S MANUAL
MANUEL DE L’UTILISATEUR
Model No.
612100x30NA
Modèle No.
612100x30NA
120 V.A.C. 6 AMP. 60 Hz.
Double Insulated
12” Clearing Width
ELECTRIC SNOW SHOVEL
PELLE À NEIGE ÉLECTRIQUE
120 V. CA 6 ampères 60 Hz
Double isolation
Largeur de déblayage 12 po
Caution: Read and Follow all Safety
Rules and Instructions Before
Operating This Equipment
Attention : Lire et suivre toutes les
instructions et consignes de sécurité
et avant d’utiliser cet appareil
F-041018C
LISTED
SNOW MOVER
894Y
File No E76832

2
F-041018C
TABLE OF CONTENTS
WARRANTY 2
SAFE OPERATING PRACTICES 3
ASSEMBLY 4
OPERATING INSTRUCTIONS 7
MAINTENANCE AND STORAGE 10
REPAIR PARTS 13
FRENCH MANUAL 17
ONE YEAR LIMITED WARRANTY
Murray, Inc. warrants to the original purchaser that this unit shall be free from defects in material and workmanship under
normal use and service for a period of One (1) Year from the date of purchase; however, this warranty does not cover engines,
accessories (such as electric starters) and Normal Wear Parts (except as noted below) as the companies that manufacture
these items furnish their own warranties and provide service through their authorized field service facilities. For additional
information, see the warranties covering these particular parts. If you are uncertain whether your unit contains or is equipped
with one or more of these parts, consult your dealer prior to purchase. Subject to the terms and conditions noted in this Limited
Warranty, we shall, at our option, repair or replace at no cost to the original purchaser any part covered by this Limited
Warranty during the applicable warranty period.
Normal Wear Parts are defined as drive belts, augers, shear pins, tires and headlights. These parts are warranted to be free
from defects in material and workmanship as delivered with the product. Any claim for repair or replacement of Normal Wear
Parts must be made within thirty (30) days of the date of purchase. No claims involving damage caused from material use,
abuse or misuse will be honored.
This Murray, Inc. One (1) Year Limited Warranty is your exclusive remedy; however, this warranty is void or does not apply to
any unit that has been tampered with, altered, misused, abused or used for rental or other commercial and/or professional
(non–homeowner) uses. Your warranty does not cover minor mechanical adjustments which are not due to any defect in
material or workmanship. For assistance in making such adjustments, consult your Instruction Book.
To make a claim under this Murray, Inc. One (1) Year Limited Warranty, return the unit (or if authorized in advance, the
defective part) along with your proof of purchase to an Authorized Service Center near you. To locate the nearest Authorized
Service Center, call the Central Parts Distributor for your area shown in the list provided with your unit or check the Yellow
Page listings in your local telephone directory. If you return the entire unit, we will repair the unit. If we authorize the return of
the defective part only, we will either replace or repair the part.This Murray, Inc. One (1) Year Limited Warranty gives you
specific legal rights, and you may also have other rights which vary from state to state.
This Limited Warranty is given in lieu
of all other expressed and implied warranties including the implied warranty of merchantability and warranty of
fitness for a particular purpose. If you need additional information on this written warranty or assistance in obtaining service,
write:
MURRAY CANADA, INC.
Factory Customer Service
1195 Coutneypark Drive East
Mississauga, Ont. L5T–1R1
1–800–661–6662
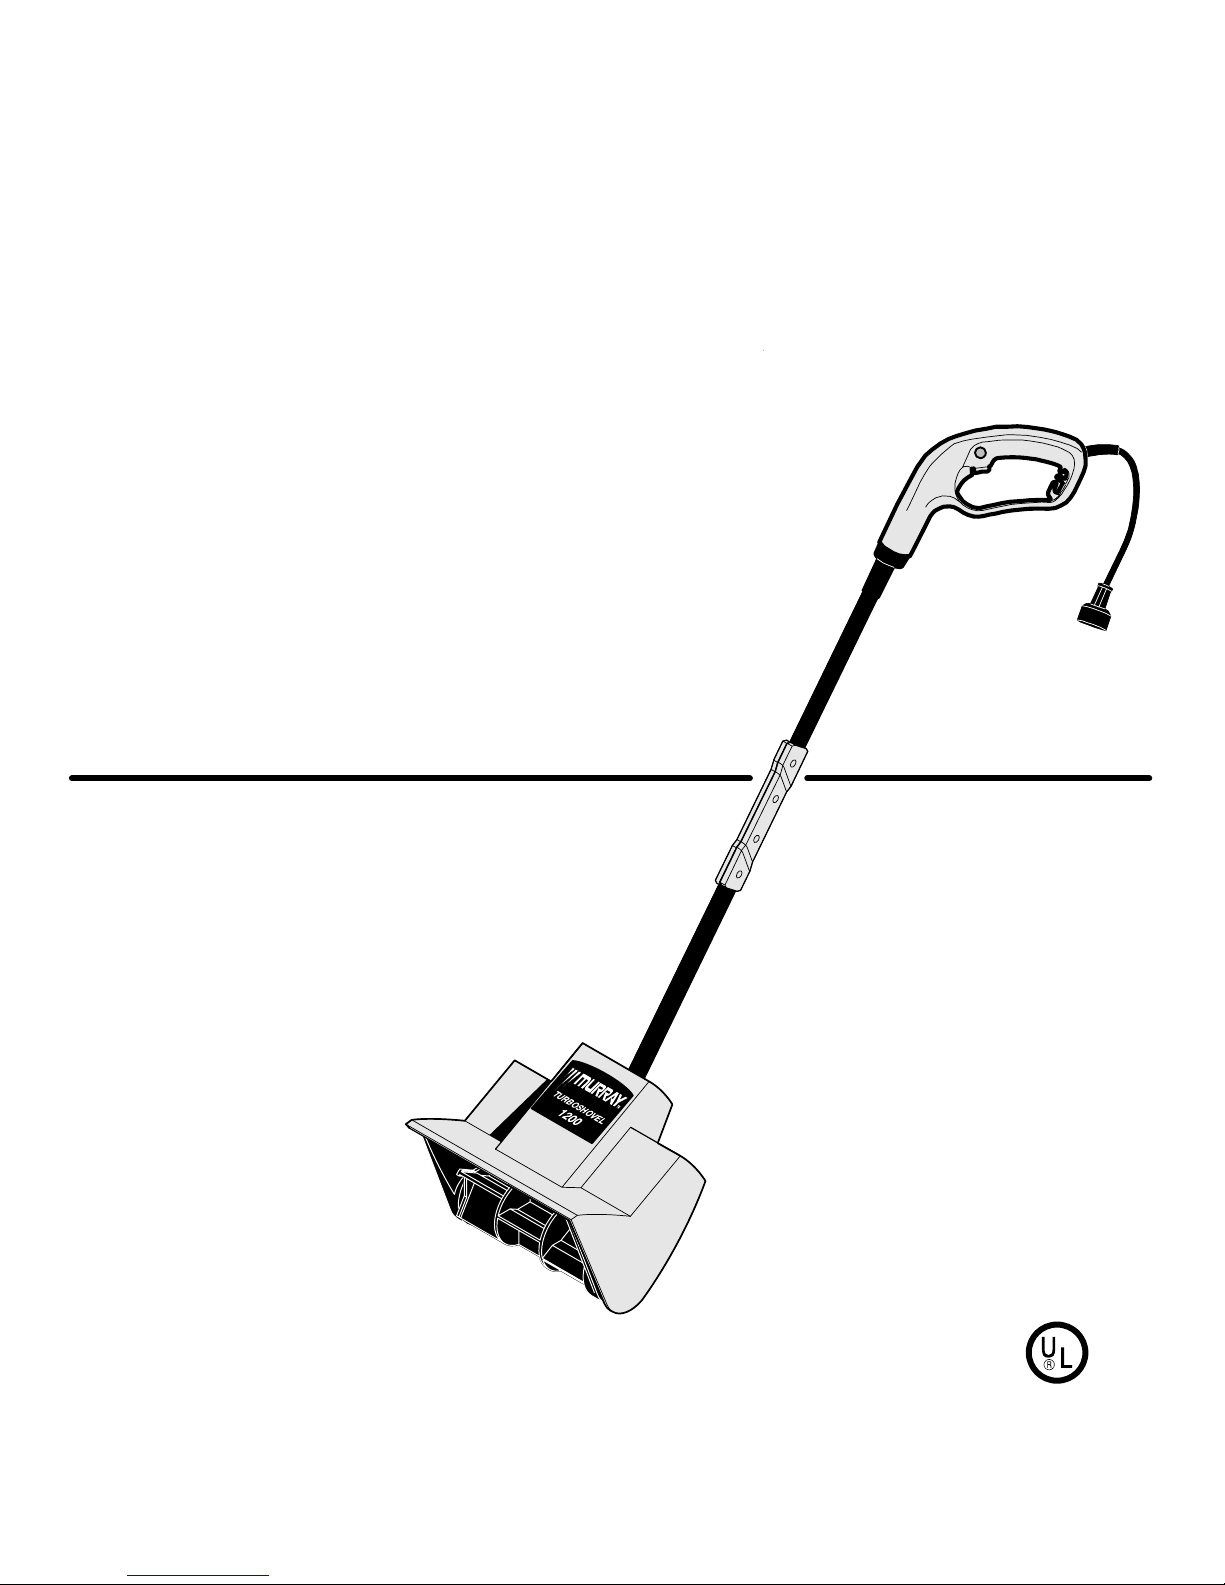
Thank you for purchasing this snow shovel. Care for your snow
shovel properly and it will provide you with satisfactory, labor–
saving performance.
This operator’s manual has been prepared to provide you with
the information necessary for safe operation and proper maintenance. To gain a complete understanding of the snow shovel,
read this manual thoroughly. Before operating familiarize yourself
with the location of controls, operating procedures, and general
maintenance instructions.
FOLLOW THE SAFE OPERATING INSTRUCTIONS to insure
proper snow shovel operating and to prevent possible injury to
yourself or others.
Thank you again for selecting this snow shovel as your labor–
saving tool for snow removal. If you have any questions about
your snow shovel or if you desire parts and service, contact your
authorized service dealer. He is prepared with service parts and
technical knowledge to care for your particular needs.
PRODUCT SPECIFICATIONS
RATING: 120 V.A.C. 6 AMPS, 60 HZ
CLEARING WIDTH: 12”
CLEARING HEIGHT: 7”
WARNING: The motor is equipped with a protector that
will disconnect power to the motor temporarily if the
snow thrower is overworked, and will automatically
reset as the motor cools. If the motor stops, release the control
bar, disconnect the extension cord and allow the motor to cool 5
minutes before continuing operation.

IMPORTANT
3
F-041018C
DO NOT OPERATE THIS EQUIPMENT BEFORE READING THIS MANUAL
Read entire owner’s manual before attempting to assemble
or operate this snow shovel.
Before Operation
Read and understand this manual. Become familiar with the
snow shovel and all its controls.
Exercise caution to avoid slipping or falling, especially when
operating in reverse.
Know how to stop quickly.
KEEP CHILDREN AWAY – Keep bystanders a safe distance
from work area.
Never allow children to operate the snow shovel. Never allow
adults to operate the equipment without proper instruction.
Remove mats, boards, sticks, wire or any foreign objects
which can be picked up and thrown by the snow shovel. Do
not use on gravel surface.
Do not wear lose clothing or jewelry. They could be caught in
moving parts.
Do not operate the equipment without wearing adequate
winter outer garments. Wear footwear which will improve your
footing on slippery surfaces.
Wear rubber boots that don’t leak when operating the snow
shovel.
WARNING: TO PREVENT ELECTRICAL SHOCK use only
with an extension cord suitable for outdoor use and in usable
condition. Extension cords are available at your local service
center.
Inspect the snow shovel. If any part is damaged, have it
inspected by your local Service dealer before operating.
Make sure impeller will spin freely before attaching to power
source.
If impeller will not rotate freely due to frozen ice, thaw unit
thoroughly before attempting to operate under power.
Use only with a receptacle that has been installed in
accordance with local inspection authorities and wired for
110/120V, 10/20 AMP outdoor service.
DO NOT USE OVERLOADED CIRCUIT.
Maintain snow shovel with care. Follow instructions contained
in this manual.
Never attempt to make adjustments while the motor is running
(except where specifically recommended by manufacturer).
To prevent disconnection of snow shovel from extension cord
during operation follow the instructions for securing the
extension cord contained in this manual.
Keep bystanders away from the area of operation.
Avoid accidental starting. Don’t carry plugged in snow shovel
with finger on switch. Be sure switch is off when plugging in.
If snow shovel is to be left unattended, remove key and
disconnect from power source.
If extension cord is damaged in any way while plugged in –
pull extension cord from wall receptacle. Replace damaged
cord immediately
WARNING: DON’T ABUSE CORD – never carry snow shovel
by cord or yank cord to disconnect from receptacle. Keep cord
from heat, oil and sharp edges.
Keep hands and feet away from moving parts. Keep clear of
discharge opening at all times.
Don’t force snow shovel. It will perform better and safer at the
rate for which it was designed.
Don’t overreach. Keep proper footing at all times.
If snow shovel strikes a foreign object:
a. Stop immediately
b. Disconnect from power source.
c. Inspect for damage.
d. Repair any damage before restarting.
Operate snow shovel only in adequate light – never in the
dark.
Never direct snow discharge chute toward glass enclosures,
automobiles, or bystanders. Keep children and pets away.
Never discharge snow onto public roads or near moving traffic.
Never attempt using the snow shovel on a roof.
Never operate the snow shovel near window wells, drop–offs,
etc.
Always be sure of your footing, and keep a firm hold on the
handle.
Walk, never run.
Disconnect power cord and remove key whenever you leave
the operating position, before cleaning, or maintaining snow
shovel.
Preparing for Storage
Remove residue ice or snow from impeller by briefly running
motor out of snow.
Disconnect from power source and remove key.
Store snow shovel indoors, in dry, locked place, out of reach of
children.
Observe Caution Decals Located On Motor
Housing.
The use of any other accessory or attachment might increase
the risk of injury to the user.
When servicing use only genuine factory replacement parts
and accessories.
For safe operation in snow use only CONTINUOUS power
cords without cuts or cracks in insulation and without taped
splices or mechanical plugs that could seep moisture.
This safety alert symbol identifies important safety messages on machines and in manuals. When you see it, be alert to the possibility of personal injuries or damage to unit. Follow all instructions in these safety messages.
ASSEMBLY
4
F-041018C
Your snow shovel was completely assembled at the factory,
except for the upper handle assembly.
Shipping Carton
Carefully remove complete unit from carton. Make sure parts bag
and all components have been removed before discarding
carton.
The shipping carton contains the following items:
Snow shovel housing, with lower handles attached.
Upper handle loosely attached to lower handle by the wire
harness.
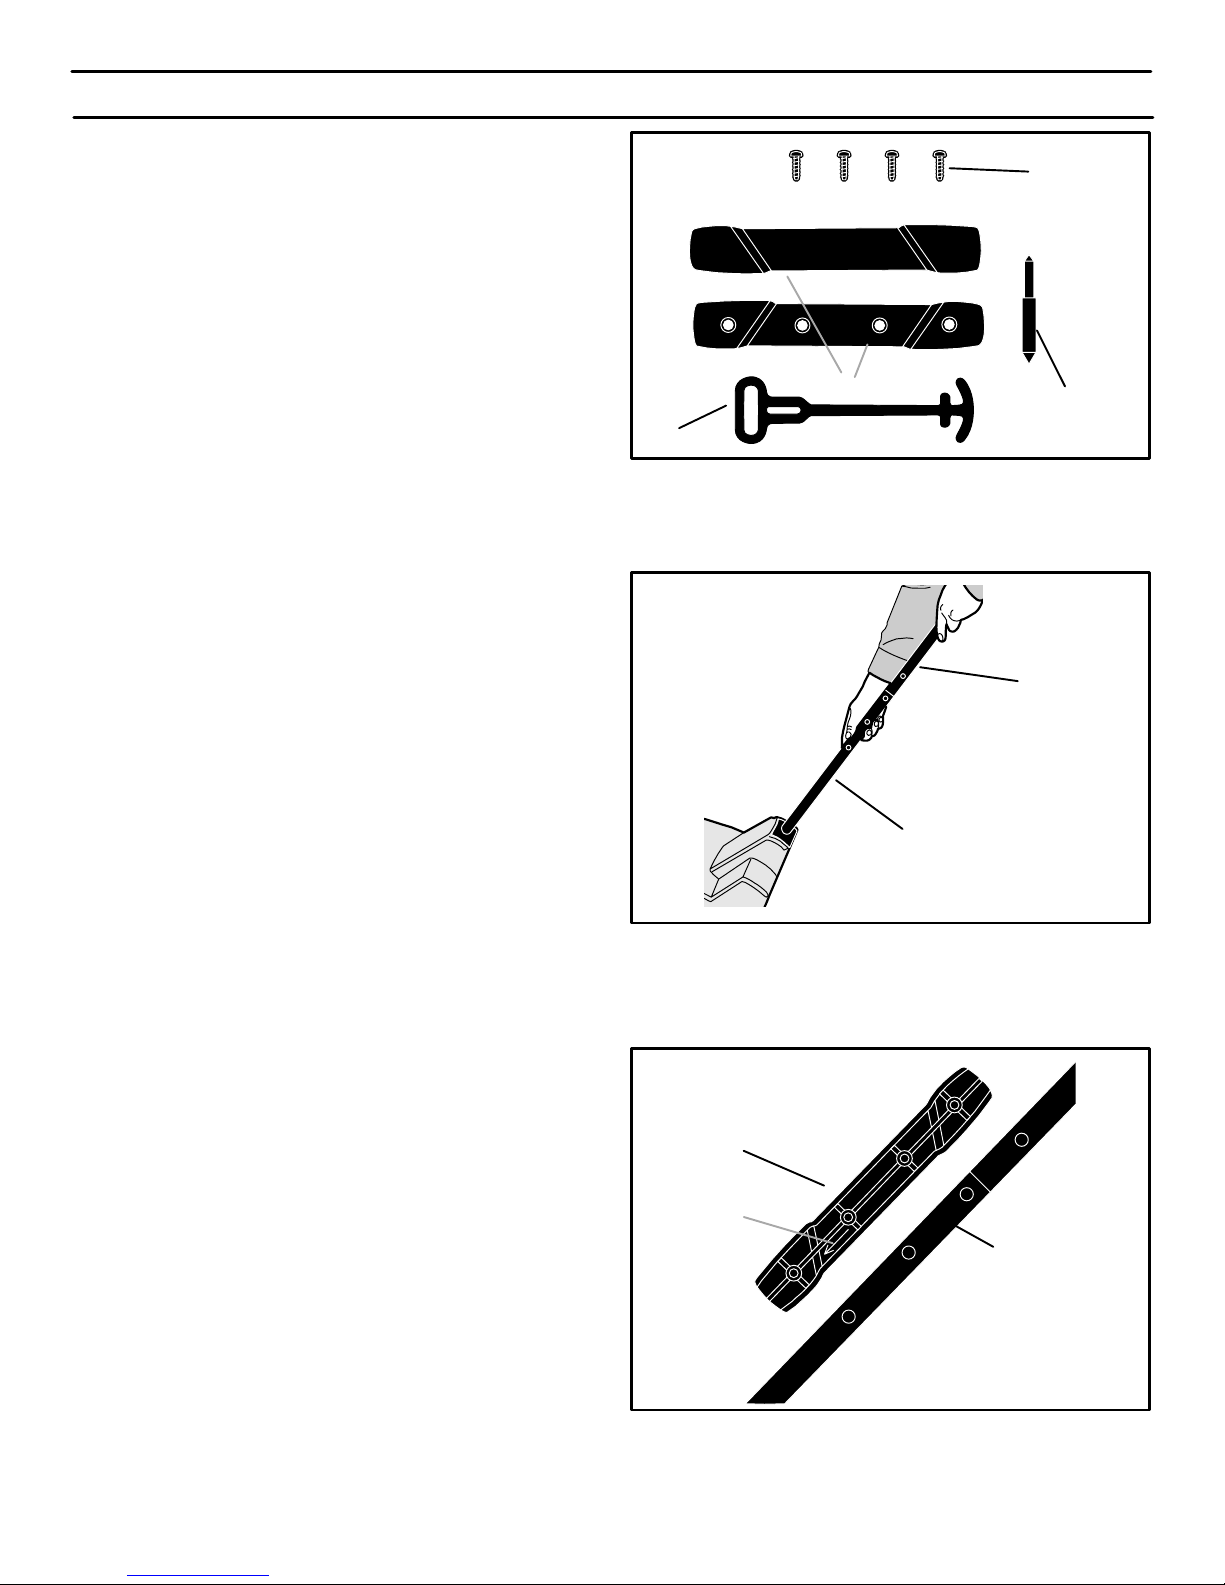
Plastic bag, containing the following parts (Figure 1):
Owner’s Manual
Plastic probe
Set center grip (left & right pieces)
Strain Relief
(4) #8 X 3/4 screws
Assembly
1. Remove and discard wire protector from lower handle tube.
Figure 2.
NOTE: Care should be given as not to damage wire harness
while assembling snow shovel.
2. Slide the upper handle assembly into the lower handle.
NOTE: You may find it difficult to slide the upper handle
assembly into the lower handle during initial assembly. This
is due to the close tolerance fit between the upper and lower
tubes, required to ensure a rigid assembly. If this problem
arises proceed as follows:
Place a small amount of grease or oil on the inside of lower
tubes. This will ensure a smooth and even fit when sliding
upper tubes into lower tubes.
Fold wire harness, and insert excess wire into lower right
handle tube. Put as much of the wire harness as possible into
lower tube.
While holding lower grip firmly, carefully slide the right and left
upper handle tubes into lower handle tubes until two holes are
aligned evenly on both sides. DO NOT DAMAGE WIRE
HARNESS. Figure 2.
Wipe off any excess grease or oil.
3. Position left center grip, point arrow (found inside of grip)
down, towards the shovel housing, onto handle so that the
tabs in the grip align with the holes on handle tubes. Figure 3.
Plastic Probe
Figure 1
Screws
Strain Relief
Center Grip
Figure 2
Lower Handle
Tube
Upper Handle
Tube
Figure 3
Handle Tube
Center Grip
* Arrow Down
4. Press left grip firmly against handle tubes, it will snap into
position. Figure 3.
ASSEMBLY
5
F-041018C
You may find it necessary to use the plastic probe furnished to
ensure power cord will not be pinched or damaged when
attaching the center grips.
5. Insert plastic probe into holes in handle. Maneuver probe to
ensure the wire harness will not be pinched when installing
center grips.
CAUTION: Do not pinch or damage wire harness while
installing center grip.
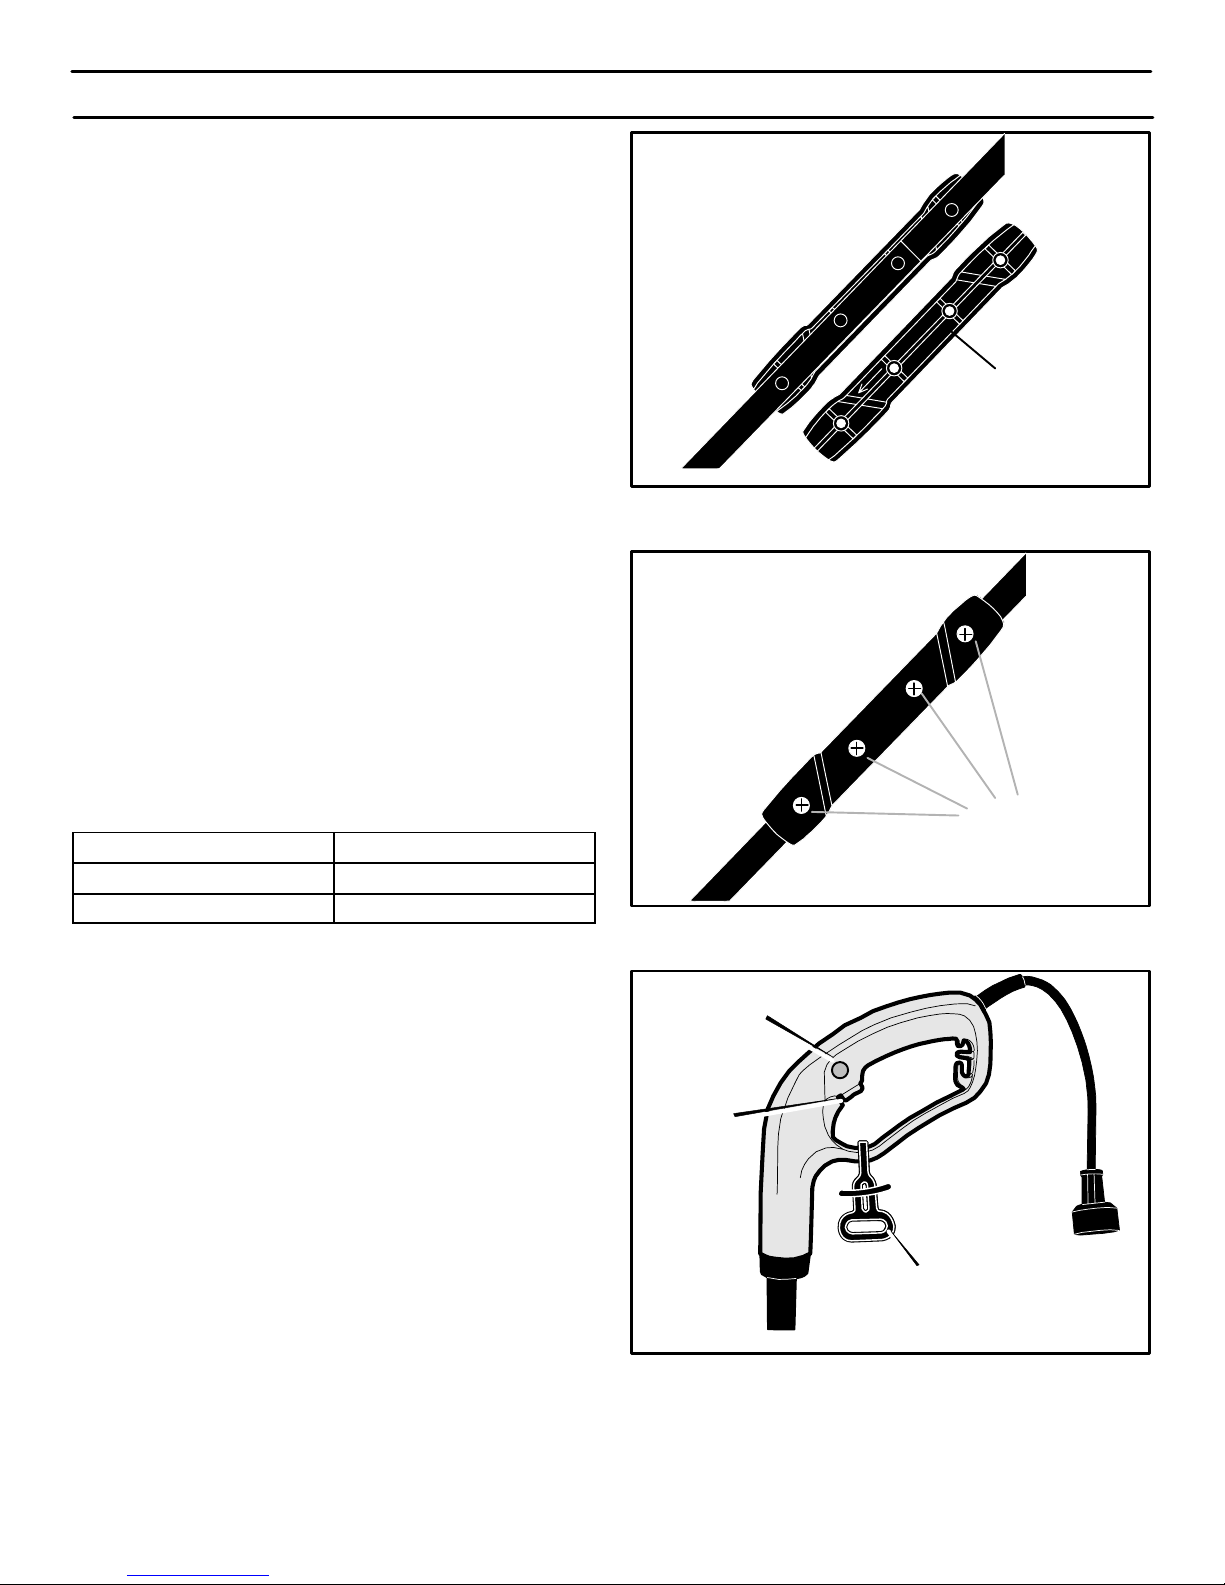
6. Place right center grip, point arrow (found inside of grip) down
towards the shovel housing, onto handle tube aligning holes.
Press firmly in place. Figure 4
7. Secure center grips to handle using four #8 X 3/4 poly screws
provided. Figure 5
NOTE: Thoroughly inspect the entire snow shovel for any
loose and/or damage parts prior to using this unit.
Securing the Extension Cord
Use only approved outdoor extension cords of adequate
gauge (16 gauge recommended) which accept the appliance’s
plug. Replace or repair damaged cord. Extension cords are
available at your dealer.
If extension cord is damaged in any manner while plugged in,
pull extension cord from wall receptacle.
The use of any extension cord will cause some loss of power.
To keep this to a minimum and to prevent overheating and
motor burn–out,, use the table below to determine the
minimum wire size (A.W.G.) extension cord.
Extension Cord Length
Wire Size A.W.G.
25–100 Feet 16
100–150 Feet 14
Do not exceed 150 feet in extension cord length. Attach strain
relief to trigger stock as follows:
Figure 4
Center Grip
Figure 5
Poly Screws
Figure 6
Trigger Lock
Looped Strain Relief
Trigger

ASSEMBLY
6
F-041018C
Attach strain relief to trigger stock as follows:
Loop strain relief around trigger stock. Figure 6
Fasten strain relief to trigger stock by inserting one tab
through the first slot (Figure 7A), pulling until both tabs are
through (Figure 7B).
Loop extension cord in strain relief through the second slot.
Figure 7C
Secure extension cord to strain relief by looping cord around
tabs as shown in Figure 7D.
This will prevent disconnection in case of accidental pull.
Handle
Strain
Relief
First Slot
Ta b
Tabs
Figure 7
Tabs
Extension
Cord
Second Slot
Strain
Relief
Extension
Cord
Strain
Relief
AB
CD
OPERATION
7
F-041018C
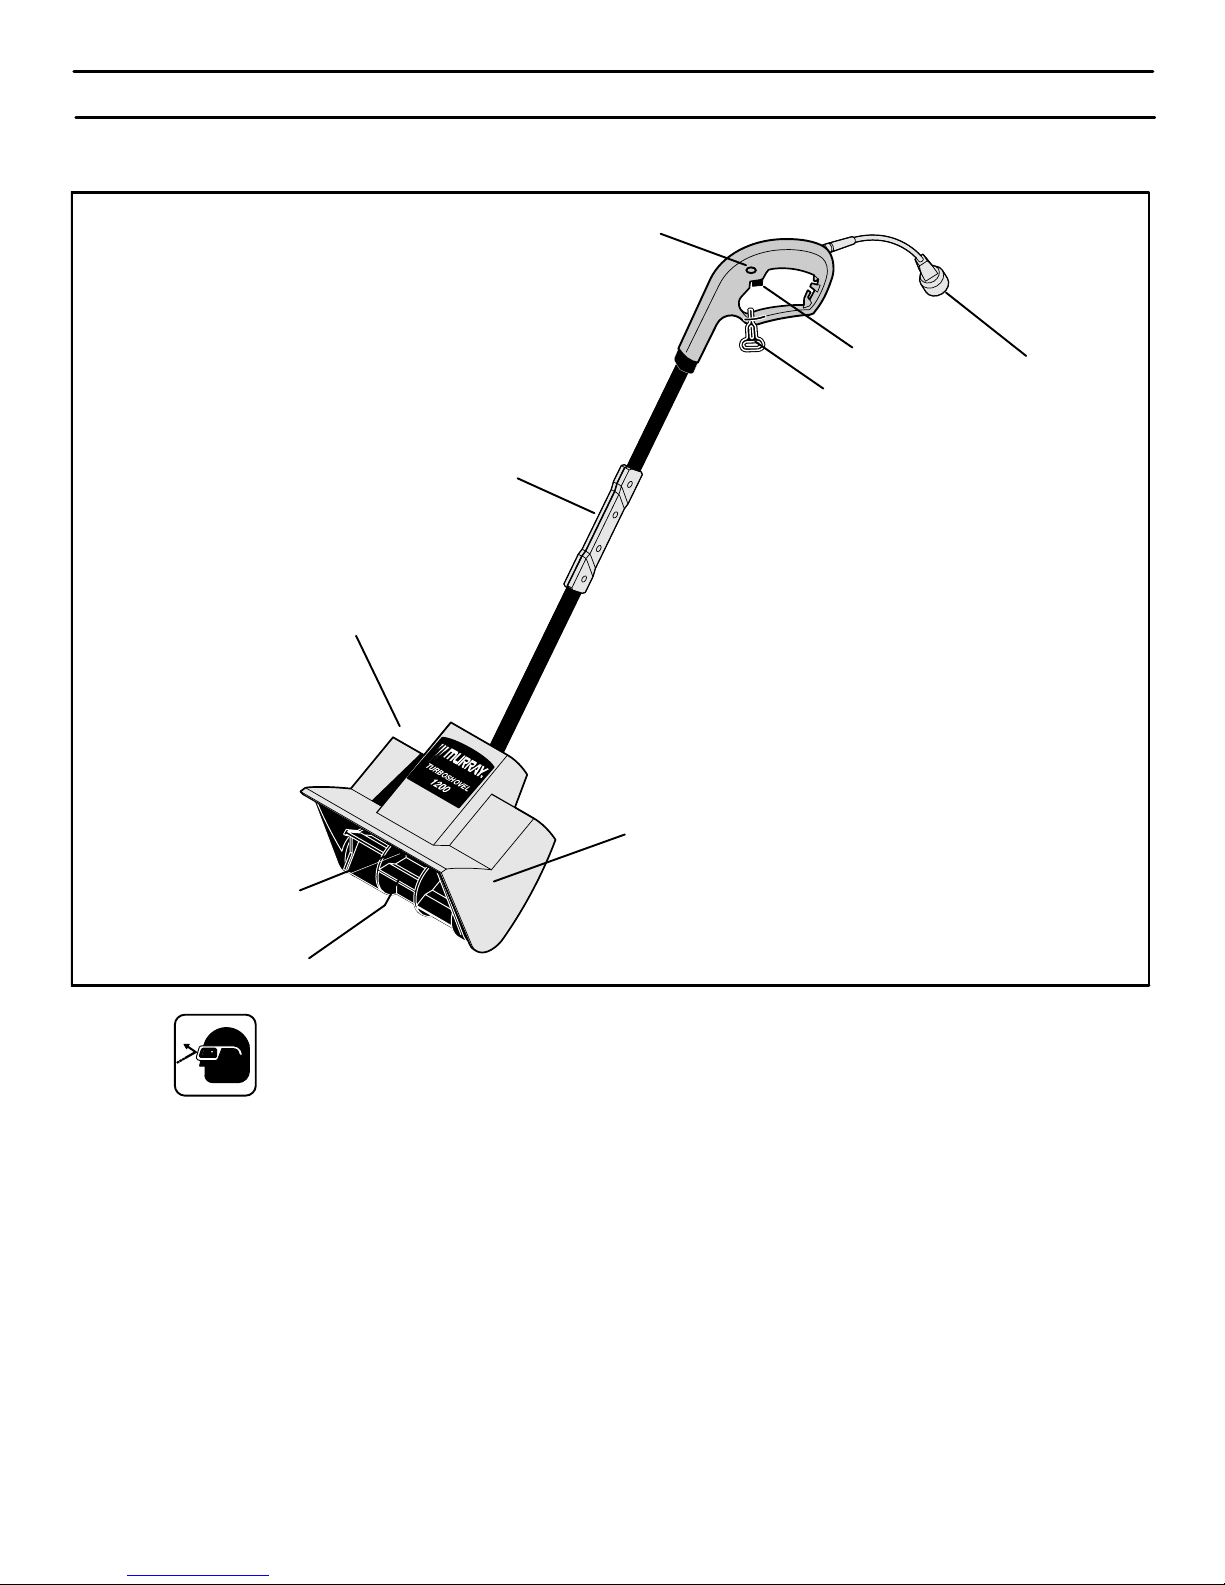
Know your snow shovel and its controls. Be sure you (or any other operator) have read and understood the Operation
Precautions listed on page 3 of this manual. This snow shovel conforms to applicable North American safety standards.
Figure 8
Power Cord
Connector
Strain Relief
Center Grip
Upper Housing
Lower Housing
Impeller
Scraper Blade
Trigger Lock
Trigger
The Operation of any snow shovel can result in foreign objects thrown into the eyes, which
can result in severe eye damage. Always wear safety glasses or eye shields before starting
your snow shovel and while operating. We recommend Wide Vision Safety Mask for over the
spectacles or standard safety glasses, available at your authorized service dealer.
SNOW SHOVEL OPERATING CONTROLS AND PARTS
TRIGGER LOCK – Push button in and hold. Then squeeze
Trigger Switch.
TRIGGER SWITCH – Squeeze trigger for operation, release
trigger to stop operation.
STRAIN RELIEF – To attach extension cord to the power cord
connector and releave stress on the connection. Also, to keep the
two cords from pulling apart.
IMPELLER – When operating shovel, impeller spins to discharge
snow. Replace damaged or worn impeller.
SCRAPER BLADES – Replace scraper blades when worn or
damaged.
OPERATION
8
F-041018C
HOW TO USE
Clearing Undrifted Snow
Keep area to be cleared free of foreign objects which may be
picked up and thrown by the snow shovel.
Tilt snow shovel forward until impeller contacts the ground.
Push snow shovel forward at a speed comfortable for the
operator.
Do not force the snow shovel, it will perform better at a slow
constant speed. The depth and consistency of the snow will
govern the speed of forward travel.
Direct snow discharge with the wind, whenever possible, at a
slight angle to the left or right as required. Figure 9.
CAUTION: Never direct snow discharge towards
bystanders, glass enclosures or automobiles.
Should you find it necessary to clear snow from over crushed
rock or gravel, push down on handle to raise impeller clear of
loose material that may be thrown.
NOTE: Do not operate snow shovel out of snow for extended
periods of time.
Figure 9
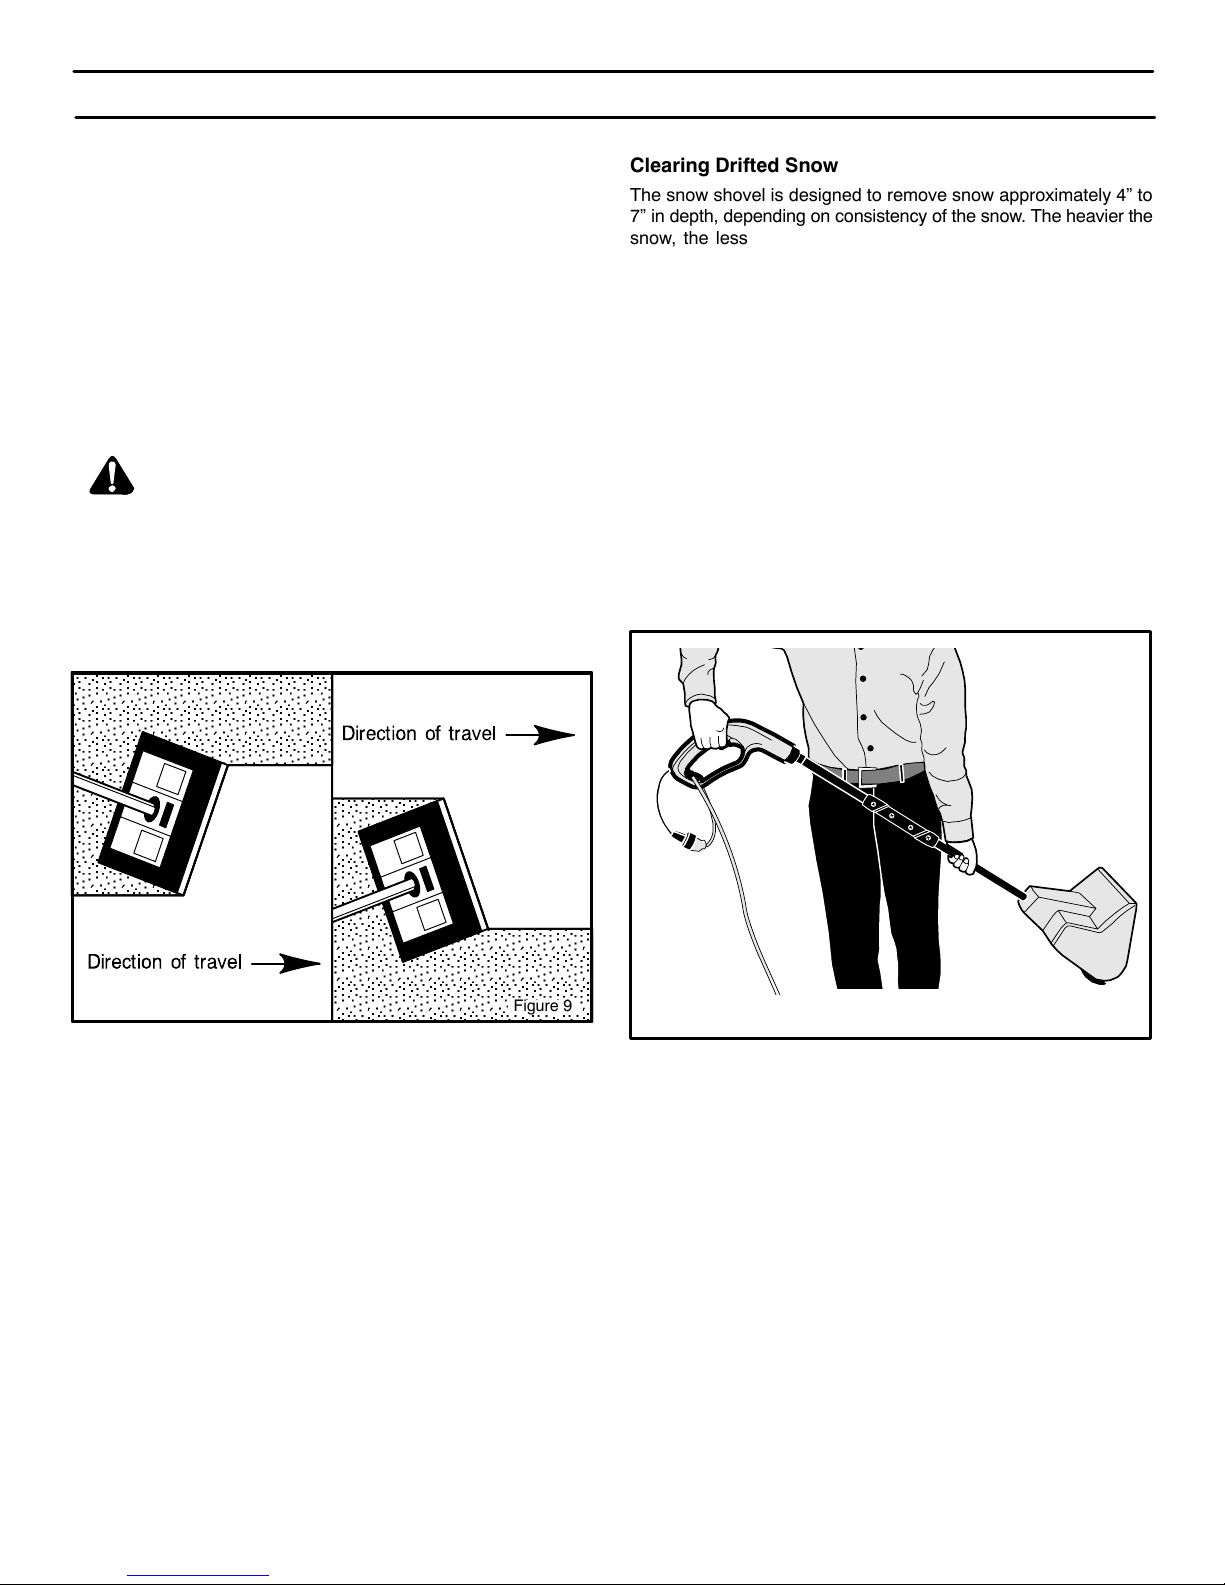
Clearing Drifted Snow
The snow shovel is designed to remove snow approximately 4” to
7” in depth, depending on consistency of the snow. The heavier the
snow, the less depth clearing capability. It may be necessary to
make two or three passes over the same area in order to clear it
acceptably.
With the unique dual position palm trigger switch, snowdrift topping
and clearing is fast and easy.
Grasp handle as shown, and begin to level snowdrift starting
at the top and clearing 4” to 7” depending on consistency of
the snow. Figure 10.
When clearing semi–frozen snow, make your shovel attack in
very short bites. Advance 1” or 2” and back up 12” or more to
enable motor to return to normal operating speed. Allowing
motor to return to normal operating speed enables motor fan
to dissipate excess heat.
IMPORTANT: Running shovel at a constant overload will result in
serious motor damage.
Figure 10
MAINTENANCE
9
F-041018C
CAUTION: To prevent the possibility of electrical
shock or accidental starting of the shovel while
performing maintenance, remove key from switch
and disconnect extension cord.
Lubrication
Your Snowthrower does NOT require any lubrication for the life of
the Snowthrower.
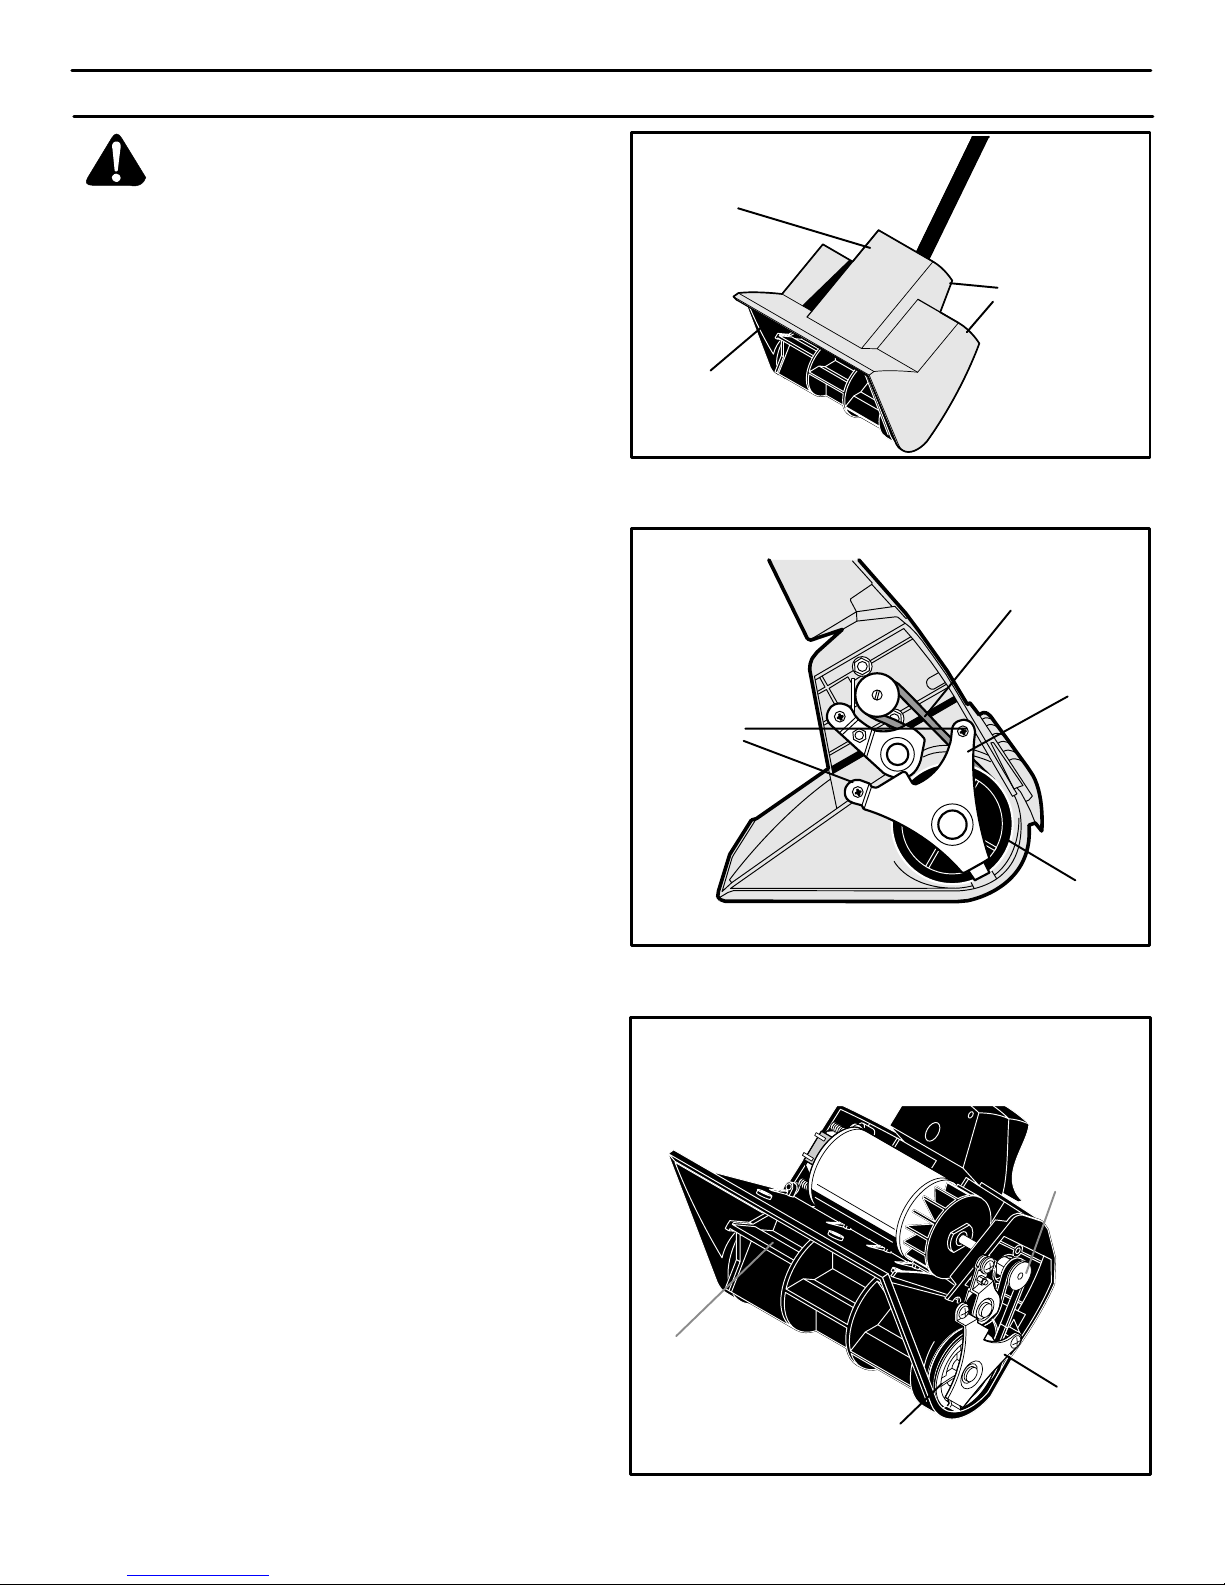
Drive Belt Replacement
Should the drive belt require replacement proceed as follows:
Remove the eleven (11) screws securing the upper housing to
the lower housing and remove upper housing. Figure 11.
You will find the driven pulley and belt on the left side of snow
shovel.
Remove two (2) screws and bracket securing the driven
pulley. Figure 12.
Remove complete driven pulley assembly with belt.
Install new belt around driven pulley and around drive pulley.
Figure 13.
Position belt on the inside of idler pulley as shown in
Figure 13.
Replace driven pulley assembly bracket and driven pulley at
the same time. Figure 13.
Secure bracket with two (2) screws. Figure 13.
Rotate impeller a few turns by hand to ensure proper
operation prior to starting the shovel.
CAUTION: Failure of impeller to spin freely may result in
serious motor damage. Ensure proper operation prior to
starting the snow shovel.
Re–attach upper housing to lower housing using the eleven
(11) screws. Fasten Securely.
Impeller Replacement
Should you find it necessary to replace a damaged or worn
impeller proceed as follows:
Remove the eleven (11) screws securing the upper housing to
the lower housing and remove upper housing. Figure 11.
Figure 11
Upper
Housing
Screws
Screws
Driven Pulley
Figure 12
Belt
Driven Pulley
Assembly Bracket
Screws
Figure 13
Impeller
Driven
Pulley
Drive
Pulley
Driven Pulley
Assembly Bracket
 Loading...