

Page 1
BRIGGS & STRATTON POWER PRODUCTS GROUP, LLC
JEFFERSON, WISCONSIN, U.S.A.
This pressure washer is rated in accordance to the Pressure
Washer Manufacturer’s Association (PWMA) standard PW101
(Testing and Rating Performance of Pressure Washers).
Manual No. 208882GS Revision A (01/14/2009)
Page 2

2 www.murray.com
Briggs & Stratton Power Products Group, LLC
900 North Parkway
Jefferson, WI 53549
Copyright © 2009 Briggs & Stratton Power Products Group,
LLC. All rights reserved. No part of this material may be
reproduced or transmitted in any form by any means without
the express written permission of Briggs & Stratton Power
Products Group, LLC.
Thank you for purchasing this quality-built Briggs & Stratton pressure washer. We are pleased that you’ve placed your
confidence in the Murray brand. When operated and maintained according to the instructions in this manual, your Briggs &
Stratton pressure washer will provide many years of dependable service.
This manual contains safety information to make you aware of the hazards and risks associated with pressure washers and
how to avoid them. Because Briggs & Stratton does not necessarily know all the applications this pressure washer could be
used for, it is important that you read and understand these instructions thoroughly before attempting to start or operate this
equipment. Save these instructions for future reference.
This pressure washer requires final assembly before use. Refer to the Assembly section of this manual for instructions on
final assembly procedures. Follow the instructions completely.
Where to Find Us
You never have to look far to find Briggs & Stratton support and service for your pressure washer. Consult your Yellow Pages.
There are over 30,000 Briggs & Stratton authorized service dealers worldwide who provide quality service. You can also
contact Briggs & Stratton Customer Service by phone at (800) 528-5087, or on the Internet at www.murray.com.
Pressure Washer
Model Number
Revision
Serial Number
Engine
Model Number
Type Number
Code Number
Date Purchased
MURRAY is a trademark of Briggs & Stratton Power Products Group, LLC.
Page 3

Table of Contents
Operator Safety . . . . . . . . . . . . . . . . . . . . . . . . . . . . . . . . . 4
Equipment Description. . . . . . . . . . . . . . . . . . . . . . . . . . . . . . . . . . . . . . . . . 4
Important Safety Information. . . . . . . . . . . . . . . . . . . . . . . . . . . . . . . . . . . . 4
Assembly . . . . . . . . . . . . . . . . . . . . . . . . . . . . . . . . . . . . . 7
Unpack Pressure Washer. . . . . . . . . . . . . . . . . . . . . . . . . . . . . . . . . . . . . . . 7
Attach Handle and Accessory Tray . . . . . . . . . . . . . . . . . . . . . . . . . . . . . . . 7
Add Engine Oil . . . . . . . . . . . . . . . . . . . . . . . . . . . . . . . . . . . . . . . . . . . . . . . 8
Add Fuel. . . . . . . . . . . . . . . . . . . . . . . . . . . . . . . . . . . . . . . . . . . . . . . . . . . . 8
Connect Hose and Water Supply to Pump. . . . . . . . . . . . . . . . . . . . . . . . . . 9
Features and Controls . . . . . . . . . . . . . . . . . . . . . . . . . . . . 10
Operation . . . . . . . . . . . . . . . . . . . . . . . . . . . . . . . . . . . . 11
Pressure Washer Location. . . . . . . . . . . . . . . . . . . . . . . . . . . . . . . . . . . . . 11
How to Start Your Pressure Washer . . . . . . . . . . . . . . . . . . . . . . . . . . . . . 11
How to Stop Your Pressure Washer . . . . . . . . . . . . . . . . . . . . . . . . . . . . . 13
How to Use Accessory Tray. . . . . . . . . . . . . . . . . . . . . . . . . . . . . . . . . . . . 13
How to Use Spray Tips . . . . . . . . . . . . . . . . . . . . . . . . . . . . . . . . . . . . . . . 13
Applying Detergent . . . . . . . . . . . . . . . . . . . . . . . . . . . . . . . . . . . . . . . . . . 14
Pressure Washer Rinsing . . . . . . . . . . . . . . . . . . . . . . . . . . . . . . . . . . . . . 14
Cleaning Detergent Siphoning Tube. . . . . . . . . . . . . . . . . . . . . . . . . . . . . . 14
Automatic Cool Down System (Thermal Relief). . . . . . . . . . . . . . . . . . . . . 14
Maintenance . . . . . . . . . . . . . . . . . . . . . . . . . . . . . . . . . . 15
Maintenance Schedule. . . . . . . . . . . . . . . . . . . . . . . . . . . . . . . . . . . . . . . . 15
Pressure Washer Maintenance . . . . . . . . . . . . . . . . . . . . . . . . . . . . . . . . . 15
Engine Maintenance. . . . . . . . . . . . . . . . . . . . . . . . . . . . . . . . . . . . . . . . . . 17
After Each Use . . . . . . . . . . . . . . . . . . . . . . . . . . . . . . . . . . . . . . . . . . . . . . 19
Winter Storage. . . . . . . . . . . . . . . . . . . . . . . . . . . . . . . . . . . . . . . . . . . . . . 20
Long Term Storage . . . . . . . . . . . . . . . . . . . . . . . . . . . . . . . . . . . . . . . . . . 20
Troubleshooting . . . . . . . . . . . . . . . . . . . . . . . . . . . . . . . . 21
Warranties. . . . . . . . . . . . . . . . . . . . . . . . . . . . . . . . . . . . 22
Emissions Control System Warranty . . . . . . . . . . . . . . . . . . . . . . . . . . . . . 22
Pressure Washer Owner Warranty. . . . . . . . . . . . . . . . . . . . . . . . . . . . . . . 24
Specifications . . . . . . . . . . . . . . . . . . . . . . . . . . . . . . . . . 26
Product Specifications. . . . . . . . . . . . . . . . . . . . . . . . . . . . . . . . . . . . . . . . 26
Common Service Parts . . . . . . . . . . . . . . . . . . . . . . . . . . . . . . . . . . . . . . . 26
3
Page 4
Operator Safety
Equipment Description
Read this manual carefully and become familiar
with your pressure washer. Know its applications,
its limitations, and any hazards involved.
This pressure washer operates at 2,000 PSI at a flow rate of
1.9 gallons per minute. This high quality residential system
features 8” wheels, axial cam pump with stainless steel
pistons, automatic cool down system, detergent siphoning
system, nozzle extension with quick connect and spray tip
holder, quick connect spray tips, heavy duty 25’ hose, and
more. See OUTDOORCLEANING.COM for more product
details.
Every effort has been made to ensure that information in this
manual is accurate and current. However, we reserve the
right to change, alter, or otherwise improve the product and
this document at any time without prior notice.
The Emission Control System for this pressure washer is
warranted for standards set by the Environmental Protection
Agency and the California Air Resources Board.
Important Safety Information
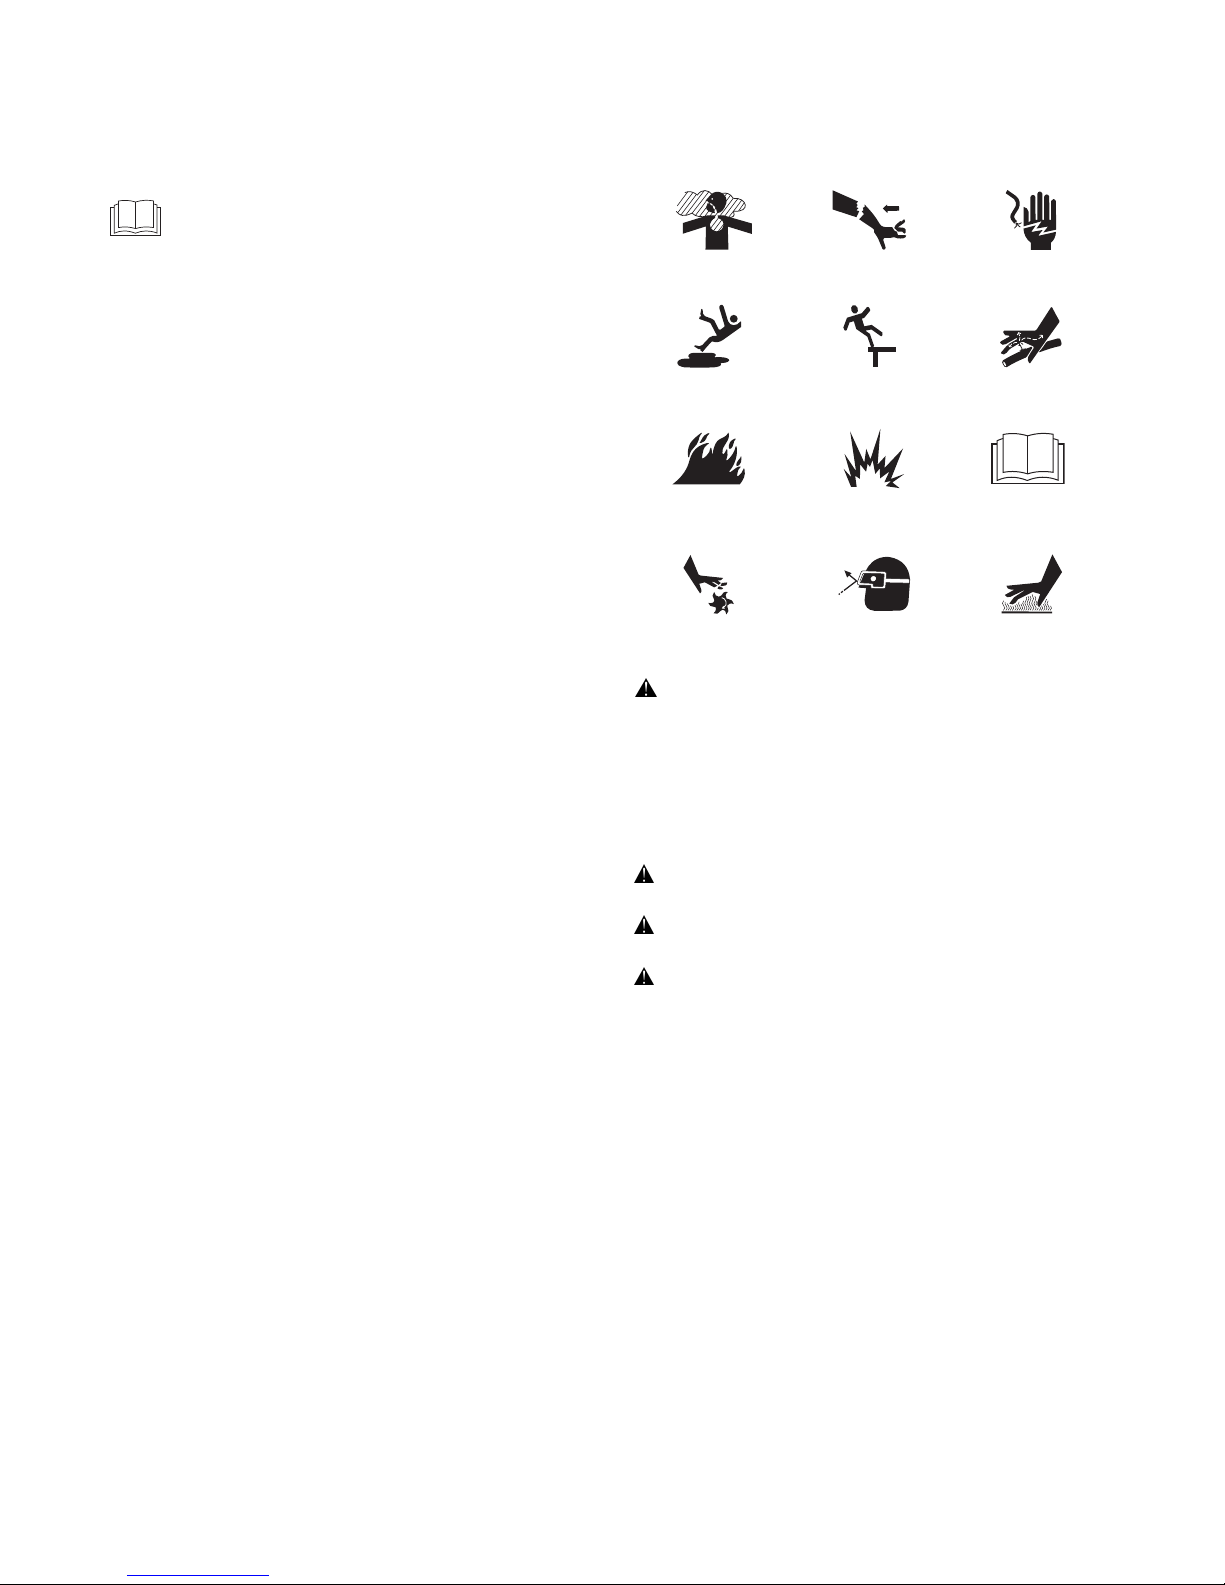
Safety Symbols and Meanings
The safety alert symbol indicates a potential personal
injury hazard. A signal word (DANGER, WARNING, or
CAUTION) is used with the alert symbol to designate a
degree or level of hazard seriousness. A safety symbol may
be used to represent the type of hazard. The signal word
NOTICE is used to address practices not related to personal
injury.
DANGER indicates a hazard which, if not avoided, will
result in death or serious injury.
WARNING indicates a hazard which, if not avoided,
could result in death or serious injury.
CAUTION indicates a hazard which, if not avoided, could
result in minor or moderate injury.
NOTICE address practices not related to personal injury.
4 www.murray.com
Fire
Explosion
Toxic Fumes
Hot Surface
Moving Parts
Electrical Shock
Slippery Surface
Fall
Kickback
Flying Objects
Fluid Injection
Operator’s Manual
Page 5
5
WARNING: The engine exhaust from this product
contains chemicals known to the State of California to
cause cancer, birth defects, or other reproductive harm.
WARNING: This product contains lead and lead
compounds, known to the State of California to cause
birth defects or other reproductive harm. Wash your
hands after handling this product.
WARNING: Fuel and its vapors are extremely
flammable and explosive.
Fire or explosion can cause severe burns
or death.
WHEN ADDING OR DRAINING FUEL
• Turn pressure washer OFF and let it cool at least 2 minutes
before removing fuel cap. Loosen cap slowly to relieve pressure
in tank.
• Fill or drain fuel tank outdoors.
• DO NOT overfill tank. Allow space for fuel expansion.
• If fuel spills, wait until it evaporates before starting engine.
• Keep fuel away from sparks, open flames, pilot lights, heat, and
other ignition sources.
• DO NOT light a cigarette or smoke.
WHEN STARTING EQUIPMENT
• Ensure spark plug, muffler, fuel cap, and air cleaner are in place.
• DO NOT crank engine with spark plug removed.
WHEN OPERATING EQUIPMENT
• DO NOT tip engine or equipment at angle which causes fuel to
spill.
• DO NOT spray flammable liquids.
WHEN TRANSPORTING OR REPAIRING EQUIPMENT
• Transport/repair with fuel tank EMPTY or with fuel shutoff valve
OFF.
• Disconnect spark plug wire.
WHEN STORING FUEL OR EQUIPMENT WITH FUEL IN TANK
• Store away from furnaces, stoves, water heaters, clothes
dryers, or other appliances that have pilot light or other ignition
source because they can ignite fuel vapors.
WARNING: Running engine gives off carbon
monoxide, an odorless, colorless, poison gas.
Breathing carbon monoxide can cause headache,
fatigue, dizziness, vomiting, confusion, seizures,
nausea, fainting or death.
Some chemicals or detergents may be harmful if inhaled
or ingested, causing severe nausea, fainting, or
poisoning.
• Operate pressure washer ONLY outdoors.
• Keep exhaust gas from entering a confined area through
windows, doors, ventilation intakes, or other openings.
• DO NOT start or run engine indoors or in an enclosed area,
even if windows and doors are open.
• Use a respirator or mask whenever there is a chance that
vapors may be inhaled.
• Read all instructions with mask so you are certain the mask will
provide the necessary protection against inhaling harmful
vapors.
WARNING: Risk of electrocution.
Contact with power source can cause electric
shock or burn.
• NEVER spray near power source.
WARNING: Use of pressure washer can create puddles
and slippery surfaces.
Kickback from spray gun can cause you
to fall.
• Operate pressure washer from a stable surface.
• The cleaning area should have adequate slopes and drainage to
reduce the possibility of a fall due to slippery surfaces.
• Be extremely careful if you must use the pressure washer from
a ladder, scaffolding, or any other similar location.
• Firmly grasp spray gun with both hands when using high
pressure spray to avoid injury when spray gun kicks back.
WARNING: Starter cord kickback (rapid retraction) can
result in bodily injury. Kickback will pull hand and
arm toward engine faster than you can let go.
Broken bones, fractures, bruises, or sprains
could result.
• NEVER pull starter cord without first relieving spray gun
pressure.
• When starting engine, pull cord slowly until resistance is felt
and then pull rapidly to avoid kickback.
• After each starting attempt, where engine fails to run, always
point spray gun in safe direction, press red button and squeeze
spray gun trigger to release high pressure.
• Firmly grasp spray gun with both hands when using high
pressure spray to avoid injury when spray gun kicks back.
WARNING: Contact with muffler area can result in
serious burns.
Exhaust heat/gases can ignite
combustibles, structures or damage
fuel tank causing a fire.
• DO NOT touch hot parts and AVOID hot exhaust gases.
• Allow equipment to cool before touching.
• Keep at least 5 feet (152 cm) of clearance on all sides of
pressure washer including overhead.
• It is a violation of California Public Resource Code, Section
4442, to use or operate the engine on any forest-covered,
brush-covered, or grass-covered land unless the exhaust
system is equipped with a spark arrester, as defined in Section
4442, maintained in effective working order. Other states or
federal jurisdictions may have similar laws.
Contact the original equipment manufacturer, retailer, or dealer
to obtain a spark arrester designed for the exhaust system
installed on this engine.
• Replacement parts must be the same and installed in the same
position as the original parts.
Page 6
NOTICE: High pressure spray may damage fragile items
including glass.
• DO NOT point spray gun at glass when using red (0°) spray tip.
• NEVER aim spray gun at plants.
NOTICE: Improper treatment of pressure washer can
damage it and shorten its life.
• If you have questions about intended use, ask dealer or contact
qualified service center.
• NEVER operate units with broken or missing parts, or without
protective housing or covers.
• DO NOT by-pass any safety device on this machine.
• DO NOT tamper with governed speed.
• DO NOT operate pressure washer above rated pressure.
• DO NOT modify pressure washer in any way.
• Before starting pressure washer in cold weather, check all parts of
the equipment to be sure ice has not formed there.
• NEVER move machine by pulling on hoses. Use handle provided
on unit.
• Check fuel system for leaks or signs of deterioration, such as
chafed or spongy hose, loose or missing clamps, or damaged
tank or cap. Correct all defects before operating pressure washer.
• This equipment is designed to be used with Briggs & Stratton
Power Products authorized parts ONLY. If equipment is used with
parts that DO NOT comply with minimum specifications, user
assumes all risks and liabilities.
6 www.murray.com
WARNING: The high pressure stream of water that this
equipment produces can cut through skin and
its underlying tissues, leading to serious injury
and possible amputation.
Spray gun traps high water pressure, even when engine is
stopped and water is disconnected, which can cause
injury.
• DO NOT allow CHILDREN to operate pressure washer.
• NEVER repair high pressure hose. Replace it.
• NEVER repair leaking connections with sealant of any kind.
Replace o-ring or seal.
• NEVER connect high pressure hose to nozzle extension.
• Keep high pressure hose connected to pump and spray gun
while system is pressurized.
• ALWAYS point spray gun in safe direction, press red button
and squeeze spray gun trigger to release high pressure, every
time you stop engine.
• NEVER aim spray gun at people, animals, or plants.
• DO NOT secure spray gun in open position.
• DO NOT leave spray gun unattended while machine is running.
• NEVER use a spray gun which does not have a trigger lock or
trigger guard in place and in working order.
• Always be certain spray gun, nozzles and accessories are
correctly attached.
WARNING: Unintentional sparking can result in fire or
electric shock.
WHEN ADJUSTING OR MAKING REPAIRS TO YOUR PRESSURE
WASHER
• Disconnect the spark plug wire from the spark plug and place
the wire where it cannot contact spark plug.
WHEN TESTING FOR ENGINE SPARK
• Use approved spark plug tester.
• DO NOT check for spark with spark plug removed.
WARNING: Starter and other rotating parts can
entangle hands, hair, clothing, or accessories.
• NEVER operate pressure washer without protective housing or
covers.
• DO NOT wear loose clothing, jewelry or anything that may be
caught in the starter or other rotating parts.
• Tie up long hair and remove jewelry.
WARNING: Risk of eye injury.
Spray can splash back or propel objects.
• Always wear indirect vented (chemical splash) safety goggles
marked to comply with ANSI Z87.1 when using or in vicinity of
this equipment.
• NEVER substitute safety glasses or dry-condition goggles for
indirect vented safety goggles.
Page 7
7
Assembly
Read entire operator’s manual before you attempt
to assemble or operate your new pressure washer.
Your pressure washer requires some assembly and is ready
for use after it has been properly serviced with the
recommended oil and fuel.
If you have any problems with the assembly of your pressure
washer, please call the pressure washer helpline at
(800) 528-5087. If calling for assistance, please have the
model, revision, and serial number from the identification
label available.
Unpack Pressure Washer
1. Remove the parts bag, accessories, and inserts
included with pressure washer.
2. Open carton completely by cutting each corner from
top to bottom.
3. Ensure you have all included items prior to assembly.
Items in the carton include:
• Main Unit
• Handle
• High Pressure Hose
• Spray Gun
• Nozzle Extension with Quick Connect and Spray Tip
Holder
• Oil Bottle
• Parts Bag (which includes the following):
• Operator’s Manual
• Owner’s Registration Card
• Bag containing 3 Multi–Colored Spray Tips
• Handle Fastening Hardware Kit (which includes):
• Carriage Bolts (2)
• Plastic Knobs (2)
• Tree Clips (2)
To prepare your pressure washer for operation, you will
need to perform these tasks:
1. Fill out and send in registration card.
2. Attach handle and accessory tray to main unit.
3. Add oil to engine crankcase.
4. Add fuel to fuel tank.
5. Connect high pressure hose to spray gun and pump.
6. Connect water supply to pump.
7. Attach nozzle extension to spray gun.
8. Select/attach quick connect spray tip to nozzle
extension.
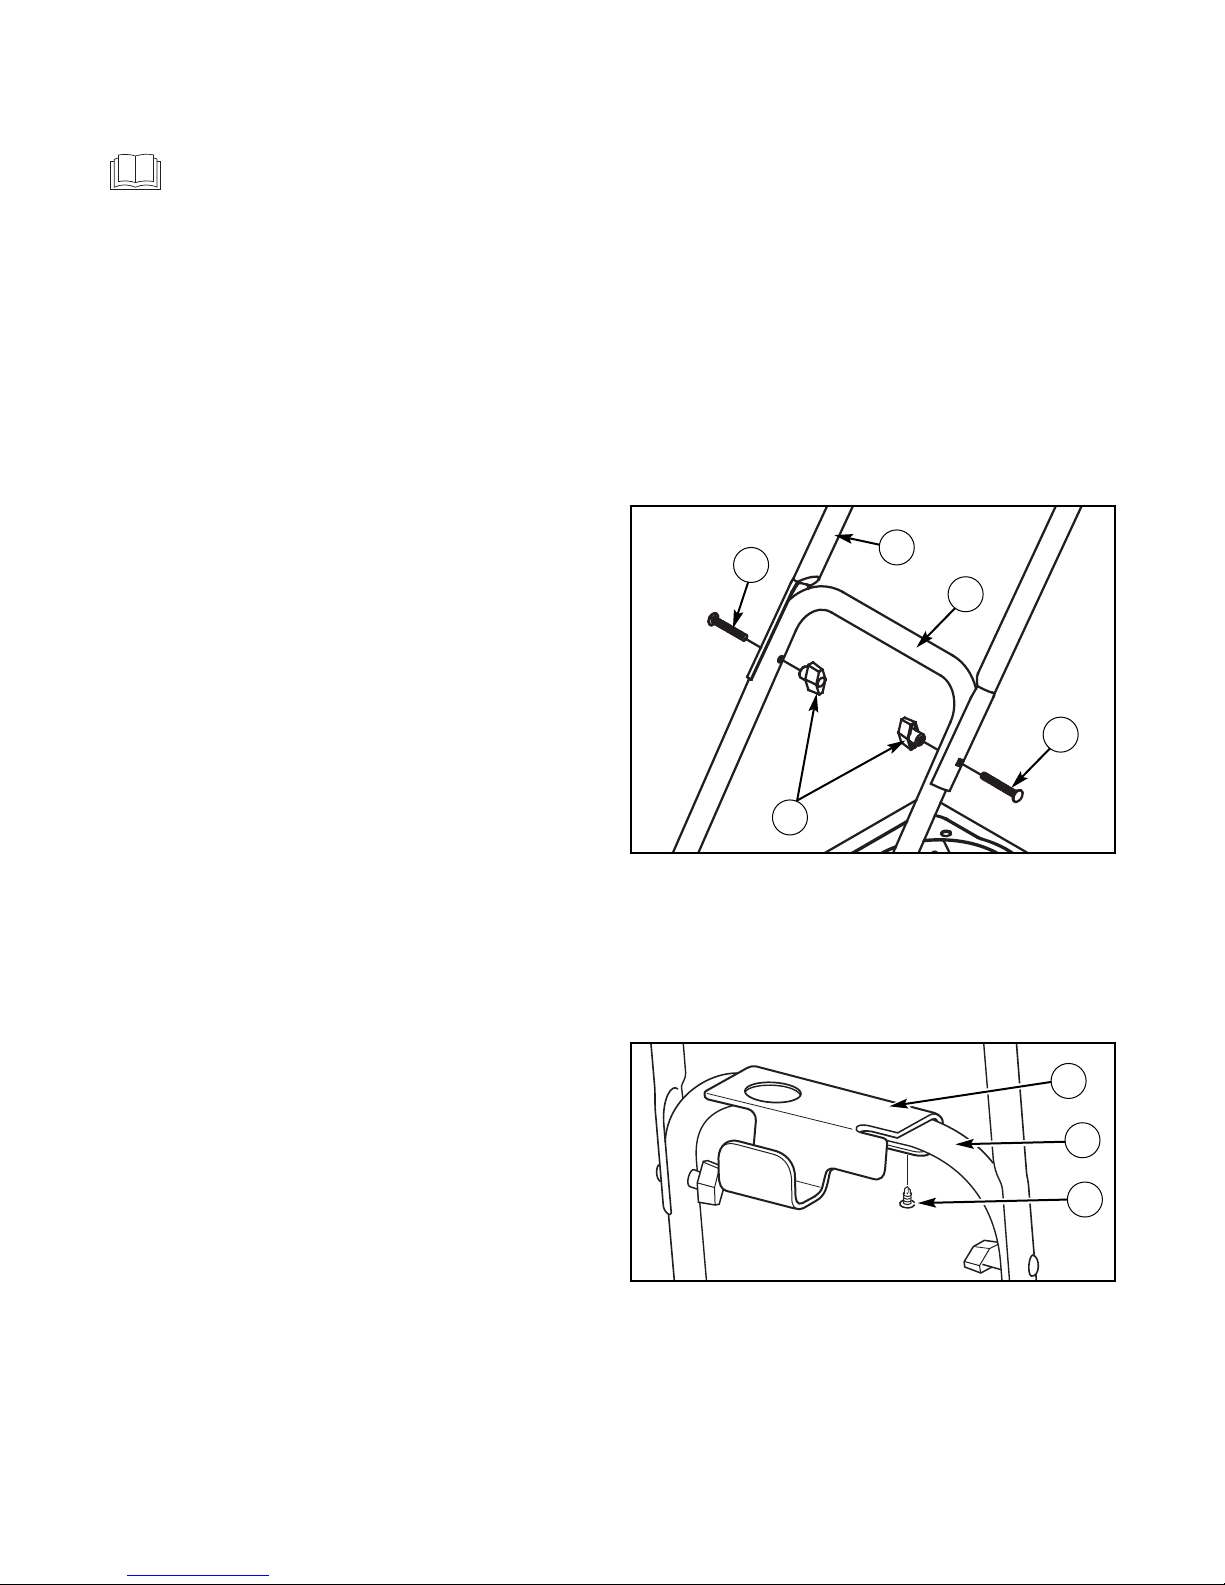
Attach Handle and Accessory Tray
1. Place handle (A) onto base (B). Make sure holes in
handle align with holes on base.
2. Insert carriage bolts (C) through holes from outside of
unit and attach a plastic knob (D) from inside of unit.
Tighten by hand.
3. Place accessory tray (E) over base (F) (viewing from
rear of unit). Make sure holes in accessory tray align
with holes on base. Push the tree clips (G) into the
holes until they sit flat against the accessory tray.
4. Insert supplied accessories in spaces provided in
accessory tray. See How to Use Accessory Tray.
D
A
B
C
C
G
F
E
Page 8
Add Engine Oil
1. Place pressure washer on a flat, level surface.
2. Clean area around oil fill and remove yellow oil fill
cap/dipstick.
3. Using oil funnel (optional), slowly pour contents of
provided oil bottle into oil fill opening.
NOTICE: Improper treatment of pressure washer can
damage it and shorten its life.
• DO NOT attempt to crank or start the engine before it has been
properly serviced with the recommended oil. This may result in an
engine failure.
4. Replace oil fill cap/dipstick and fully tighten.
Add Fuel
Fuel must meet these requirements:
• Clean, fresh, unleaded gasoline.
• A minimum of 87 octane/87 AKI (91 RON). High
altitude use, see High Altitude.
• Gasoline with up to 10% ethanol (gasohol) or up to
15% MTBE (methyl tertiary butyl ether) is acceptable.
NOTICE: Avoid pressure washer damage.
Failure to follow Operator’s Manual for fuel
recommendations voids warranty.
• DO NOT use unapproved gasoline such as E85.
• DO NOT mix oil in gasoline.
• DO NOT modify engine to run on alternate fuels.
To protect the fuel system from gum formation, mix in a fuel
stabilizer when adding fuel. See Storage. All fuel is not the
same. If you experience starting or performance problems
after using fuel, switch to a different fuel provider or change
brands. This engine is certified to operate on gasoline. The
emission control system for this engine is EM (Engine
Modifications).
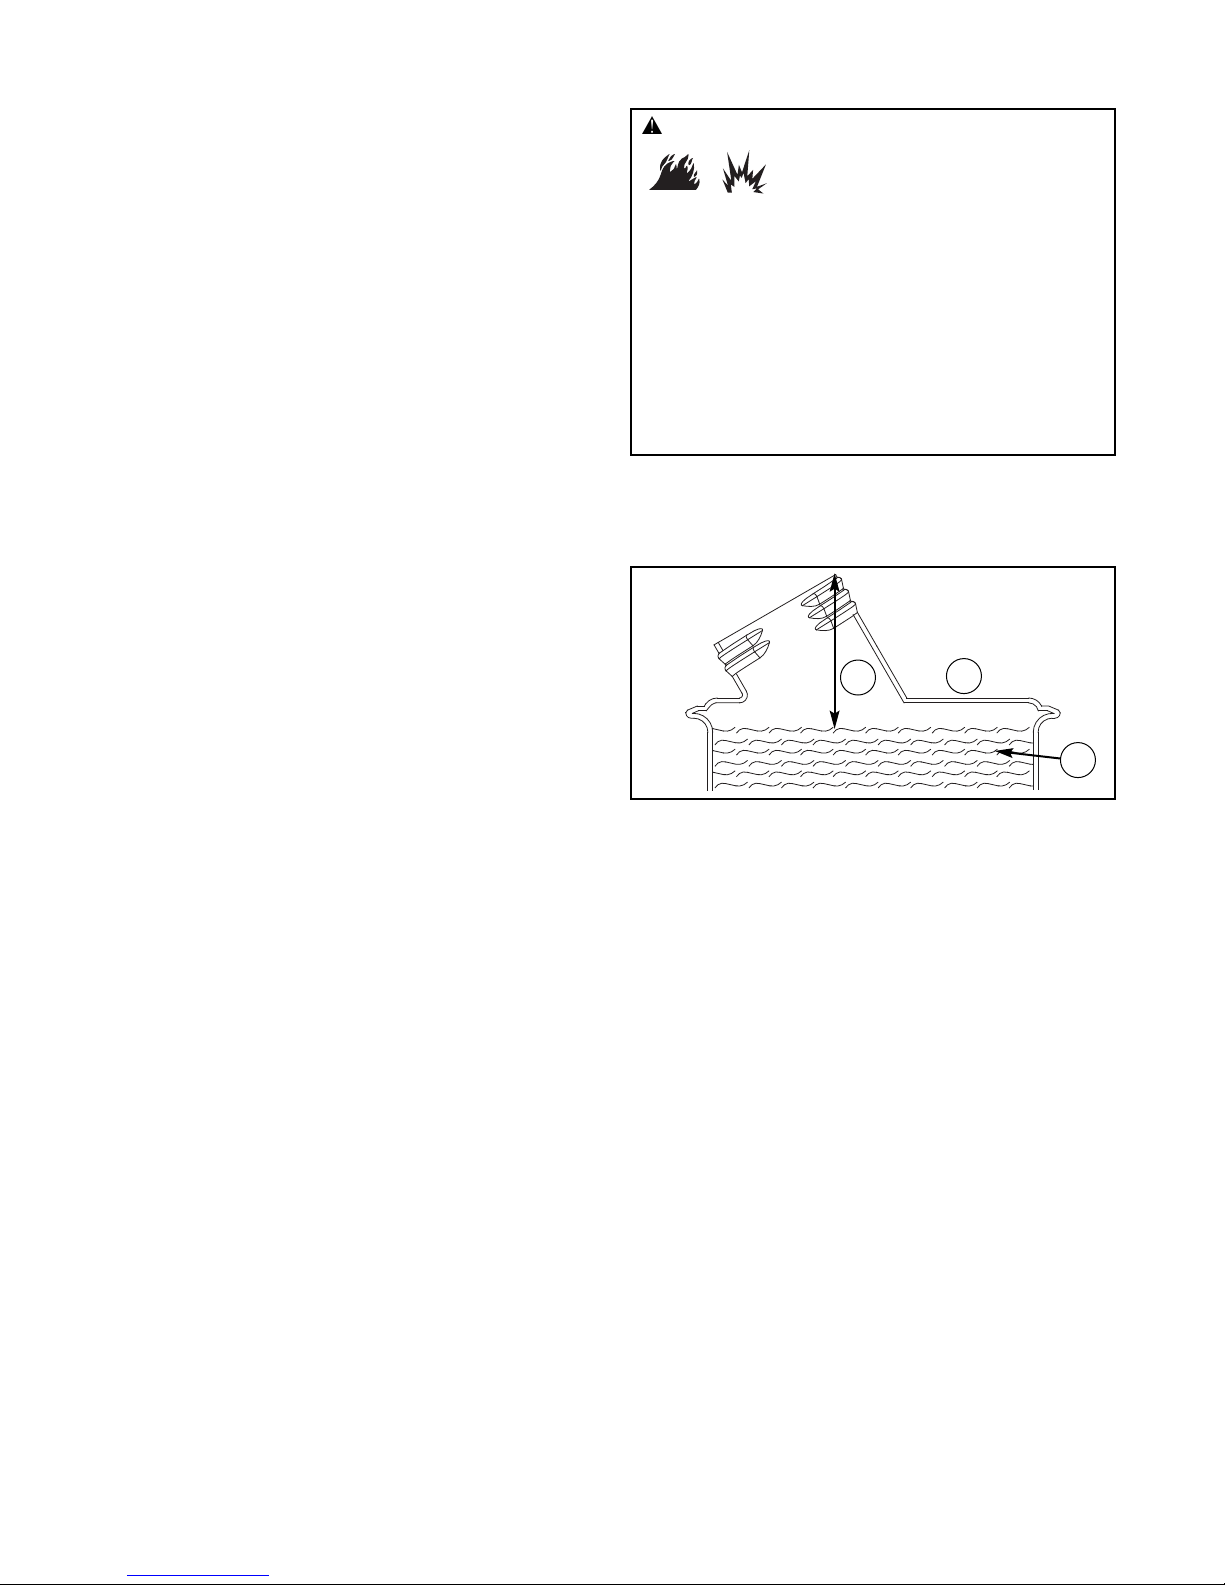
1. Clean area around fuel fill cap, remove cap.
2. Slowly add regular unleaded fuel (A) to fuel tank (B).
Becareful not to overfill. Allow about 1.5" (4 cm) (C) of
tank space for fuel expansion.
3. Install fuel cap and let any spilled fuel evaporate before
starting engine.
High Altitude
At altitudes over 5,000 feet (1524 meters), a minimum
85 octane / 85 AKI (89 RON) gasoline is acceptable. To
remain emissions compliant, high altitude adjustment is
required. Operation without this adjustment will cause
decreased performance, increased fuel consumption, and
increased emissions. See an Authorized Briggs & Stratton
dealer for high altitude adjustment information. Operation of
the engine at altitudes below 2,500 feet (762 meters) with
the high altitude kit is not recommended.
8 www.murray.com
C
B
A
WARNING: Fuel and its vapors are extremely
flammable and explosive.
Fire or explosion can cause severe burns
or death.
WHEN ADDING FUEL
• Turn pressure washer OFF and let it cool at least 2 minutes
before removing fuel cap. Loosen cap slowly to relieve pressure
in tank.
• Fill fuel tank outdoors.
• DO NOT overfill tank. Allow space for fuel expansion.
• If fuel spills, wait until it evaporates before starting engine.
• Keep fuel away from sparks, open flames, pilot lights, heat, and
other ignition sources.
• DO NOT light a cigarette or smoke.
Page 9
9
Connect Hose and Water Supply to Pump
NOTICE: DO NOT run the pump without the water supply
connected and turned on.
• Damage to equipment resulting from failure to follow this
instruction will void warranty.
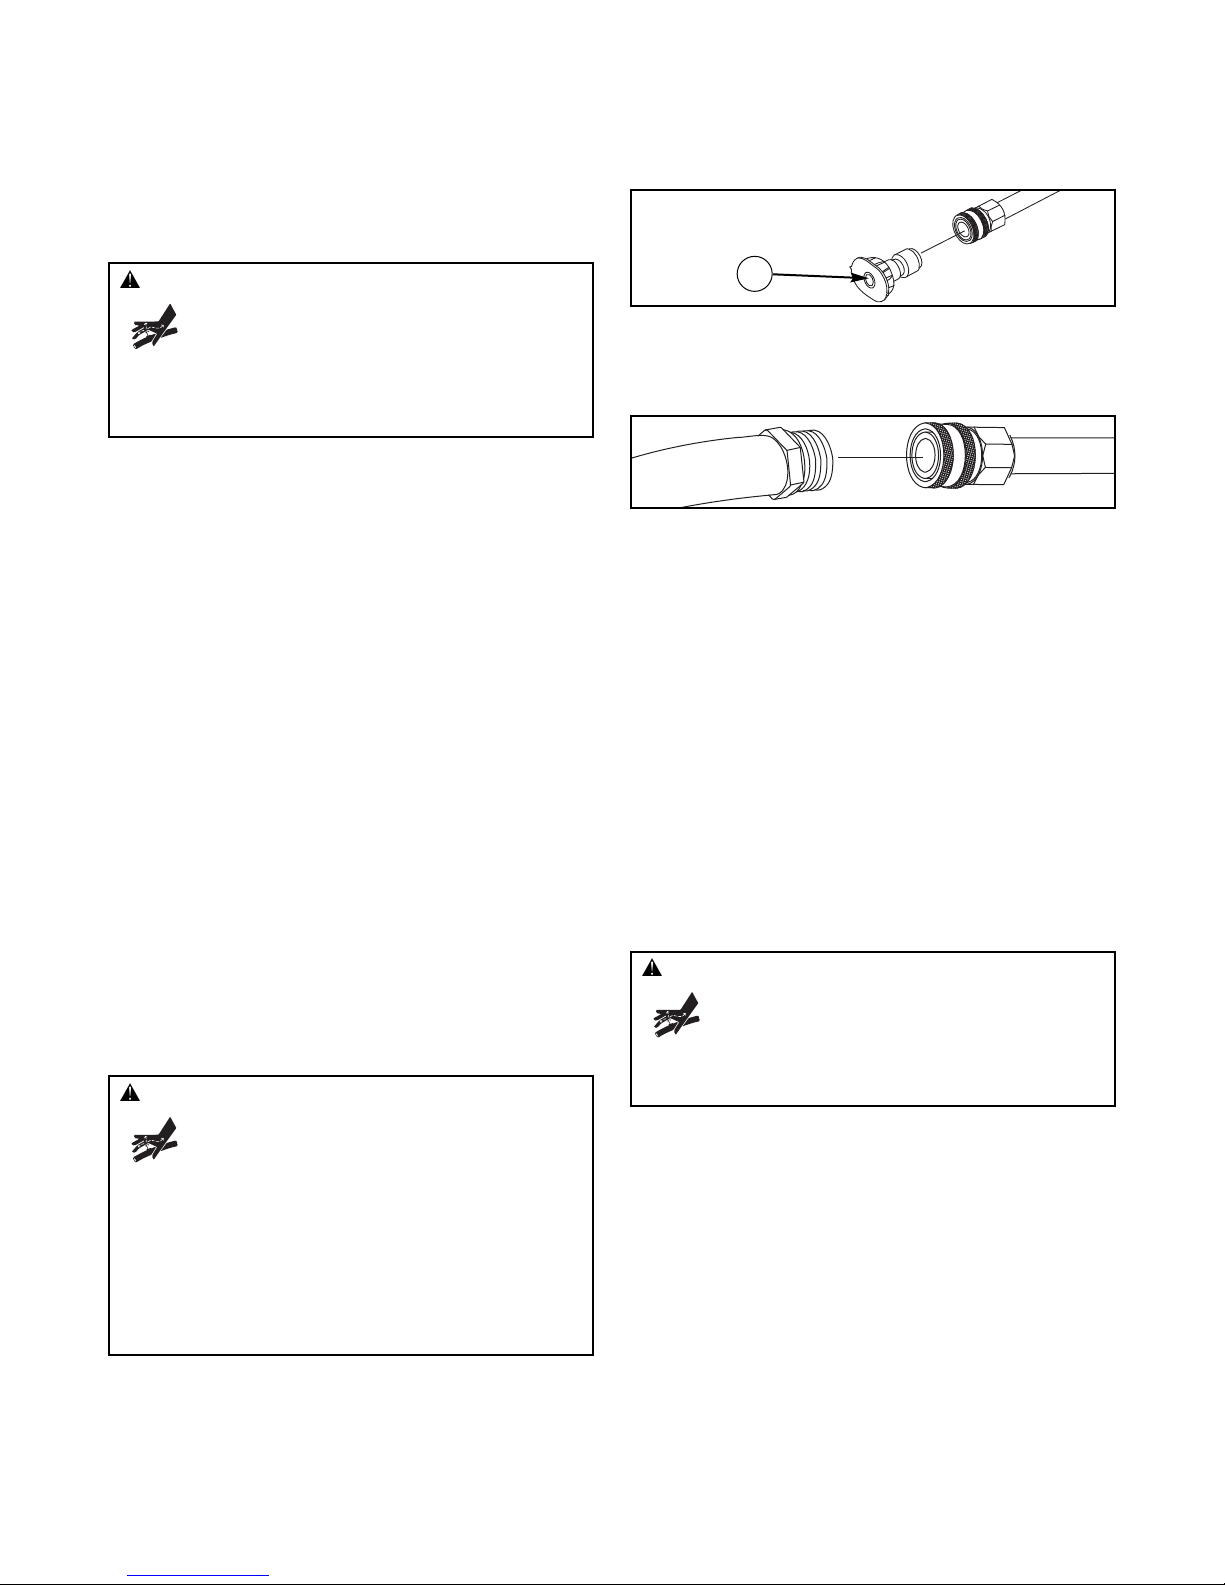
NOTE: Remove and discard the shipping caps from the
pump’s high pressure outlet and water inlet before attaching
hoses.
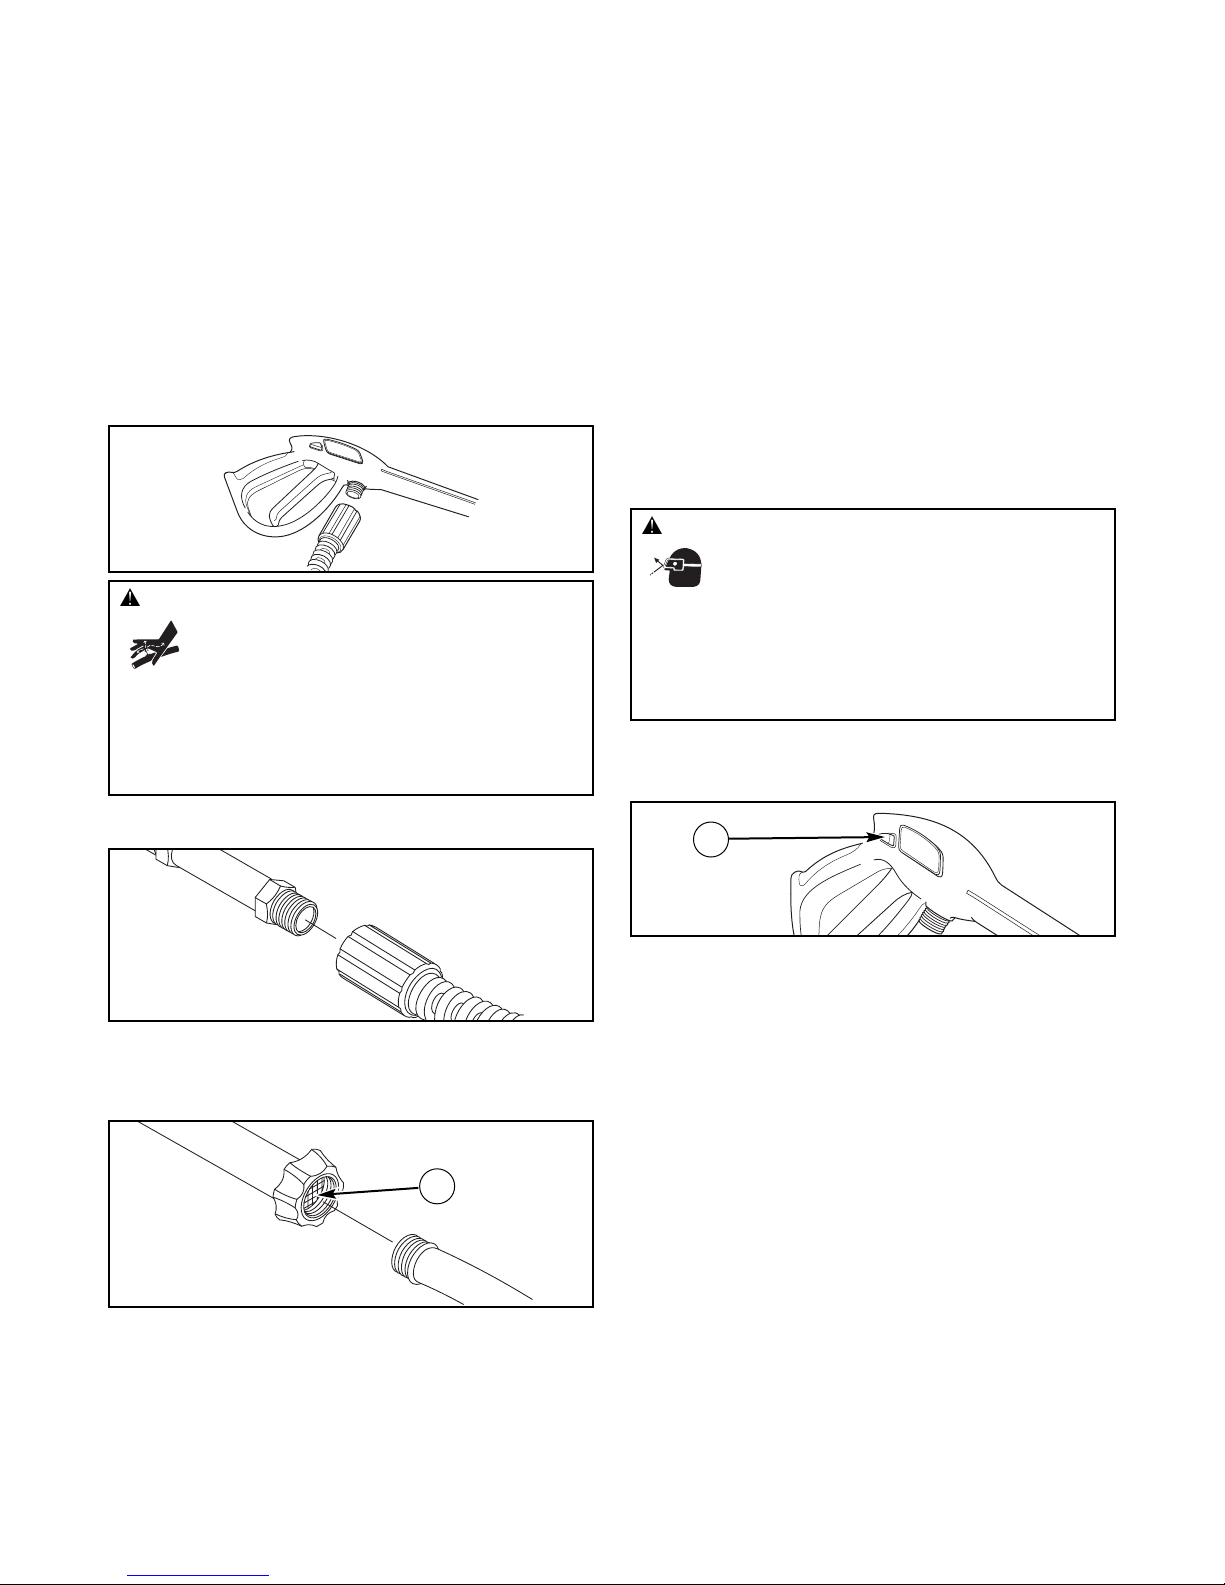
1. Uncoil high pressure hose and attach one end of hose
to base of spray gun. Tighten by hand.
2. Attach other end of high pressure hose to high
pressure outlet on pump. Tighten by hand.
3. Before connecting garden hose to water inlet, inspect
inlet screen (A). Clean screen if it contains debris or
have it replaced if damaged. DO NOT run pressure
washer if inlet screen is damaged.
4. Run water through your garden hose for 30 seconds to
clean out any debris.
IMPORTANT: DO NOT siphon standing water for the water
supply. Use ONLY cold water (less than 100°F).
NOTICE: Using a One Way Valve (vacuum breaker or check
valve) at pump inlet can cause pump or inlet connector
damage.
• There MUST be at least ten feet of unrestricted garden hose
between the pressure washer inlet and any device, such as a
vacuum breaker or check valve.
• Damage to equipment resulting from failure to follow this
instruction will void warranty.
5. Connect the garden hose (not to exceed 50 feet in
length) to the water inlet. Tighten by hand.
6. Turn ON the water, press red button (B) on the gun and
squeeze the trigger to purge the pump system of air and
impurities.
Checklist Before Starting Engine
Review the unit’s assembly to ensure you have performed all
of the following.
1. Be sure to read the Operator Safety section and How to
Use Your Pressure Washer in Operation section before
using pressure washer.
2. Make sure handle is in place and secure.
3. Check that oil has been added to proper level in the
engine crankcase.
4. Add proper fuel to fuel tank.
5. Check for properly tightened hose connections.
6. Check to make sure there are no kinks, cuts, or damage
to high pressure hose.
7. Provide a proper water supply at an adequate flow.
A
B
WARNING: The high pressure stream of water that this
equipment produces can cut through skin and
its underlying tissues, leading to serious injury
and possible amputation.
• NEVER connect high pressure hose to nozzle extension.
• Keep high pressure hose connected to pump and spray gun
while system is pressurized.
• Always be certain spray gun, nozzles and accessories are
correctly attached.
WARNING: Risk of eye injury.
Spray can splash back or propel objects.
• Always wear indirect vented (chemical splash) safety goggles
marked to comply with ANSI Z87.1 when using or in vicinity of
this equipment.
• NEVER substitute safety glasses or dry-condition goggles for
indirect vented safety goggles.
Page 10
10 www.murray.com
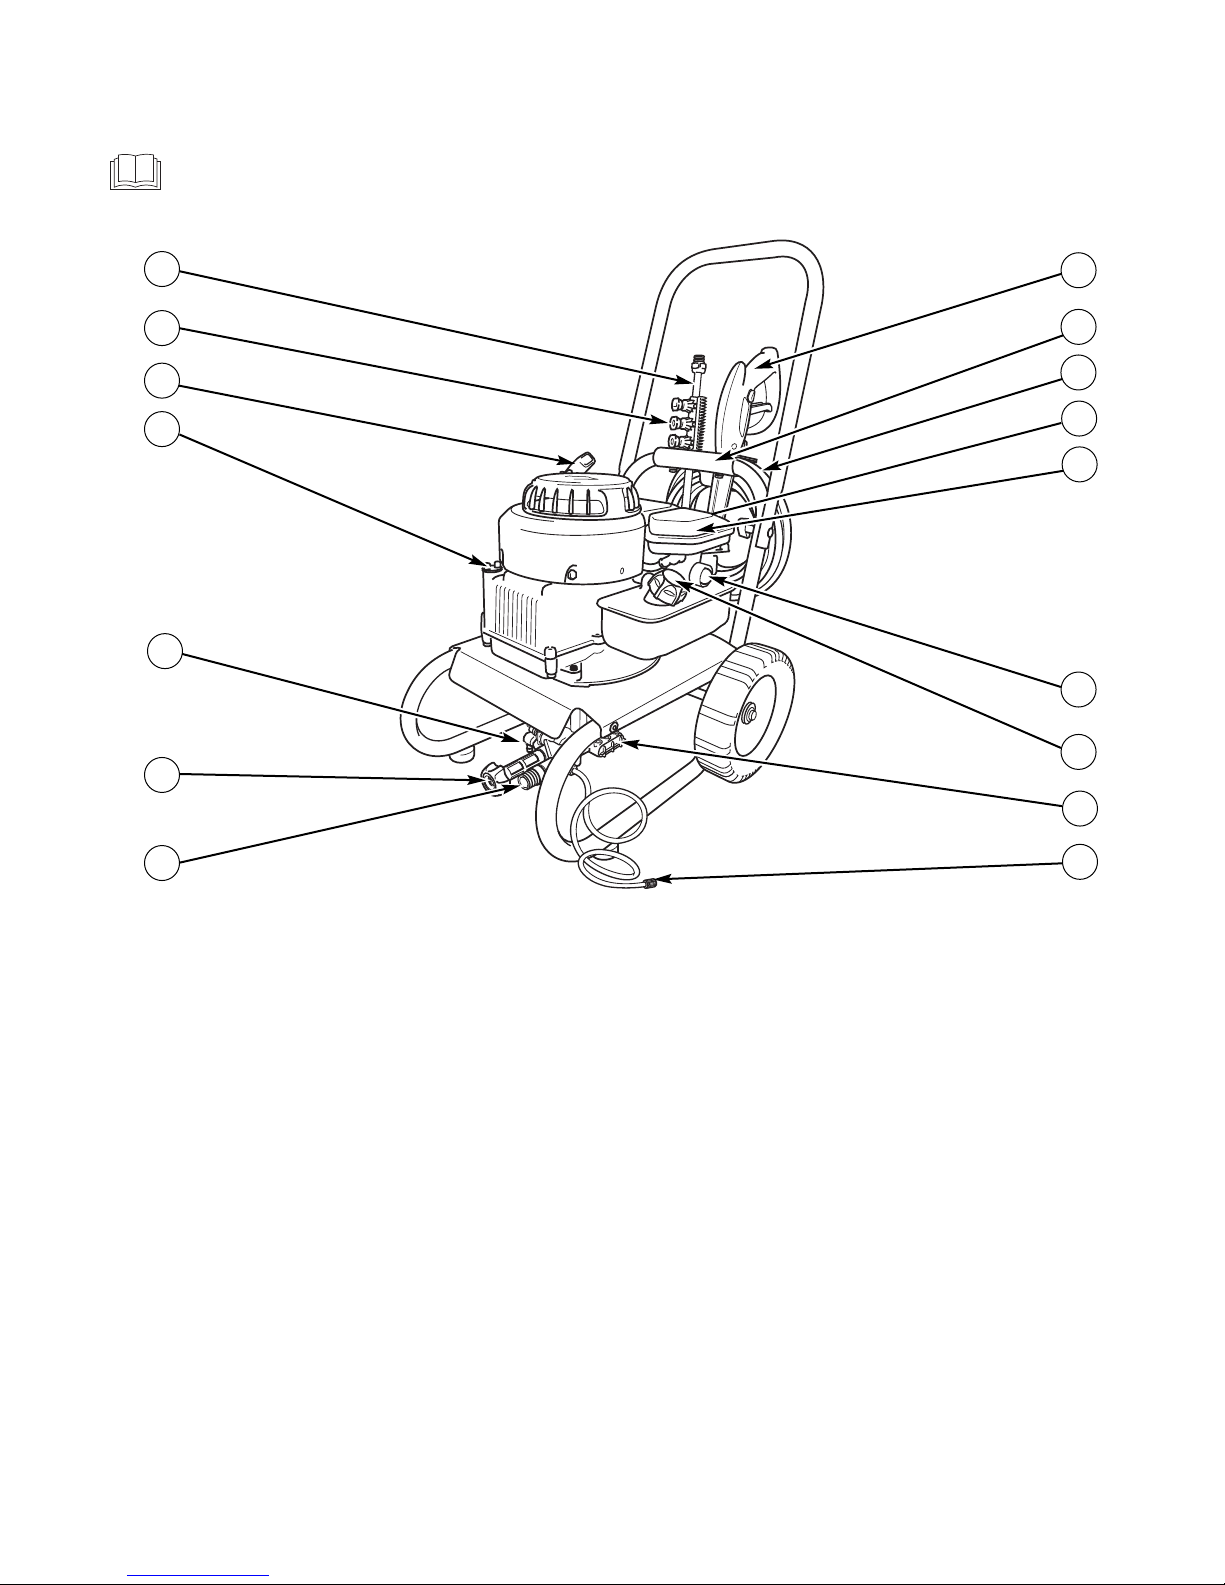
Features and Controls
Read this Operator’s Manual and safety rules before operating your pressure washer.
Compare the illustrations with your pressure washer, to familiarize yourself with the locations of various controls and
adjustments. Save this manual for future reference.
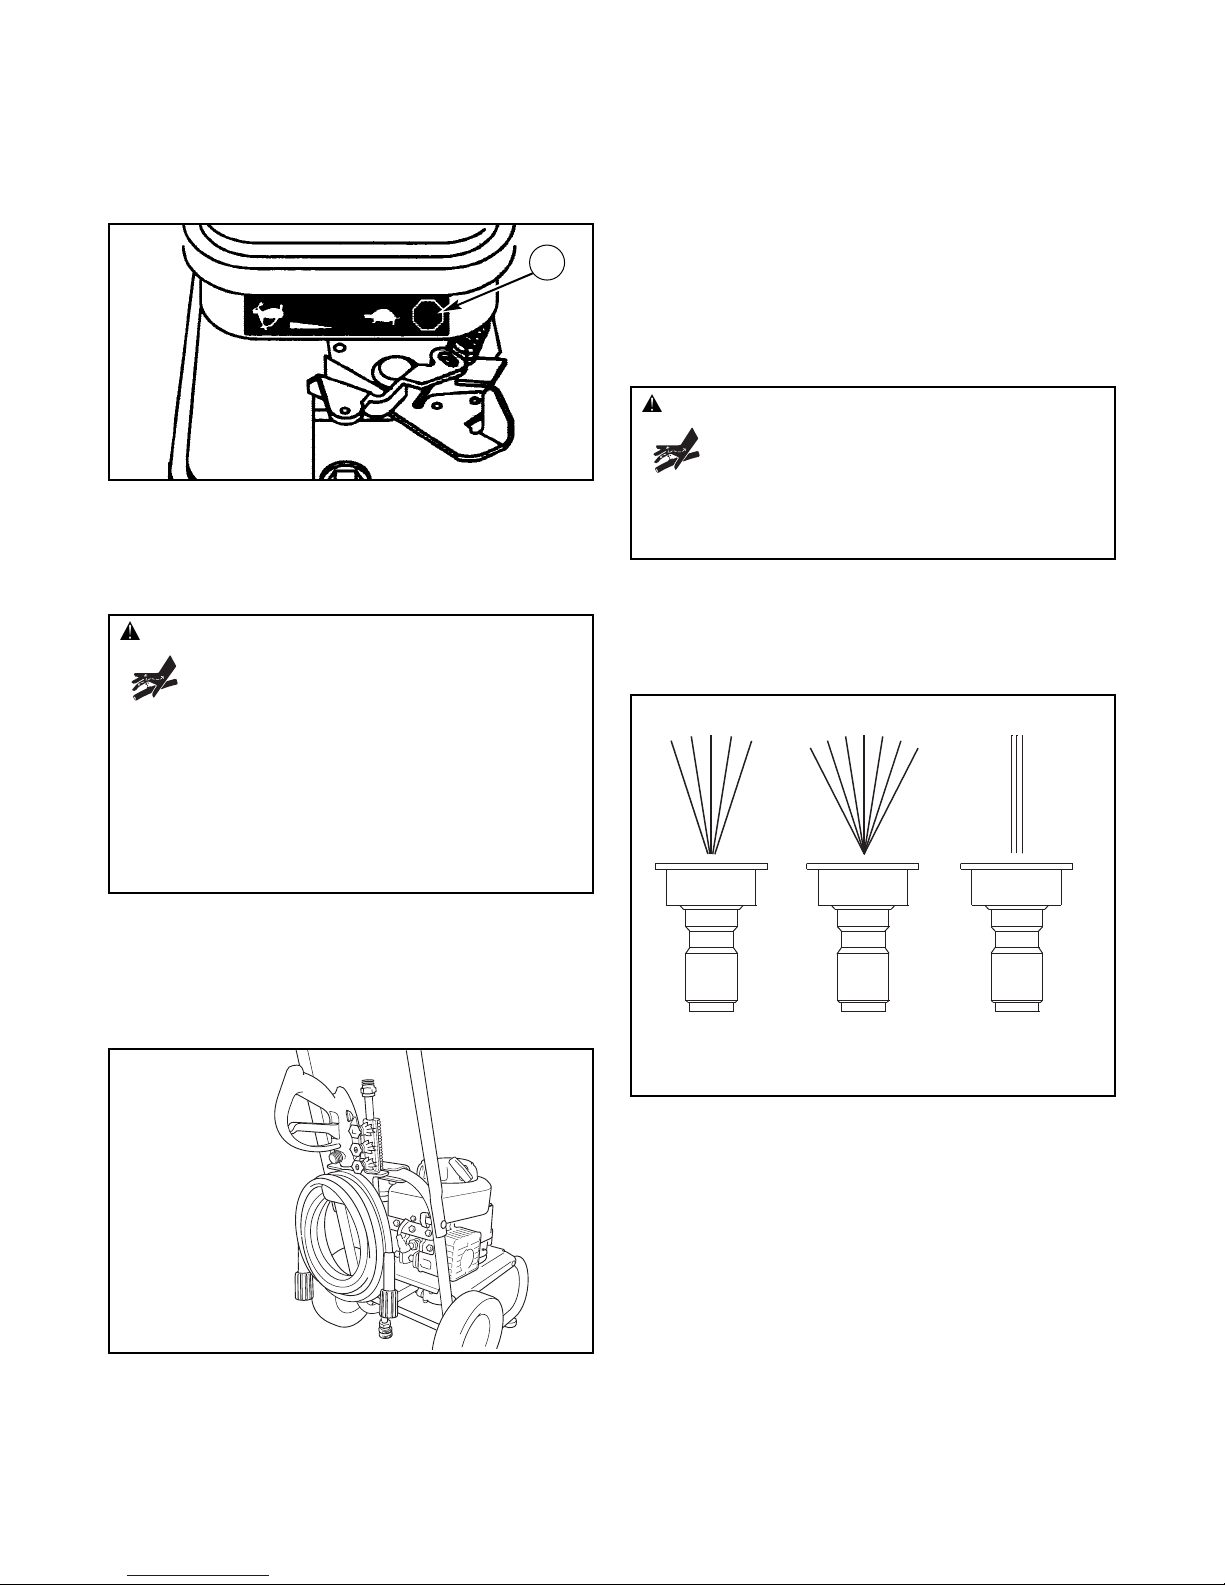
A - Nozzle Extension with Quick Connect — Allows you to
switch between three different spray tips.
B - Spray Tips — Detergent, 0°, and 25°: for various high
pressure cleaning applications.
C - Recoil Starter — Used for starting the engine manually.
D - Oil Fill/Dipstick — Check and add engine oil here.
E - Automatic Cool Down System — Cycles water through
pump when water reaches 125°-155°F. Warm water will
discharge from pump onto ground. This system prevents
internal pump damage.
F - Water Inlet — Connection for garden hose.
G - High Pressure Outlet — Connection for high pressure
hose.
H - Detergent Siphoning Tube/Filter — Use to siphon
pressure washer safe detergents into the low pressure
stream.
J - Pump — Develops high pressure.
K - Fuel Tank — Fill tank with regular unleaded fuel. Always
leave room for fuel expansion.
L - Primer Bulb — Prepares a cold engine for starting.
M - Air Filter — Protects engine by filtering dust and debris
out of intake air.
N - Throttle Lever — Sets engine in starting mode for recoil
starter and stops a running engine.
P - High Pressure Hose — Connect one end to water pump
and the other end to spray gun.
R - Accessory Tray — Provides convenient storage for
nozzle extension, spray gun and high pressure hose.
S - Spray Gun — Controls the application of water onto
cleaning surface with trigger device. Includes trigger
lock.
Items Not Shown:
Identification Label (near rear of base plate) — Provides
model and serial number of pressure washer. Please have
these readily available if calling for assistance.
Warning/Operating Instructions Tag — Identifies hazards
and proper procedure to start/stop pressure washer.
G
B
D
A
J
E
F
P
N
H
C
L
K
R
S
M
Page 11
11
Operation
If you have any problems operating your pressure washer,
please call the pressure washer helpline at (800) 528-5087.
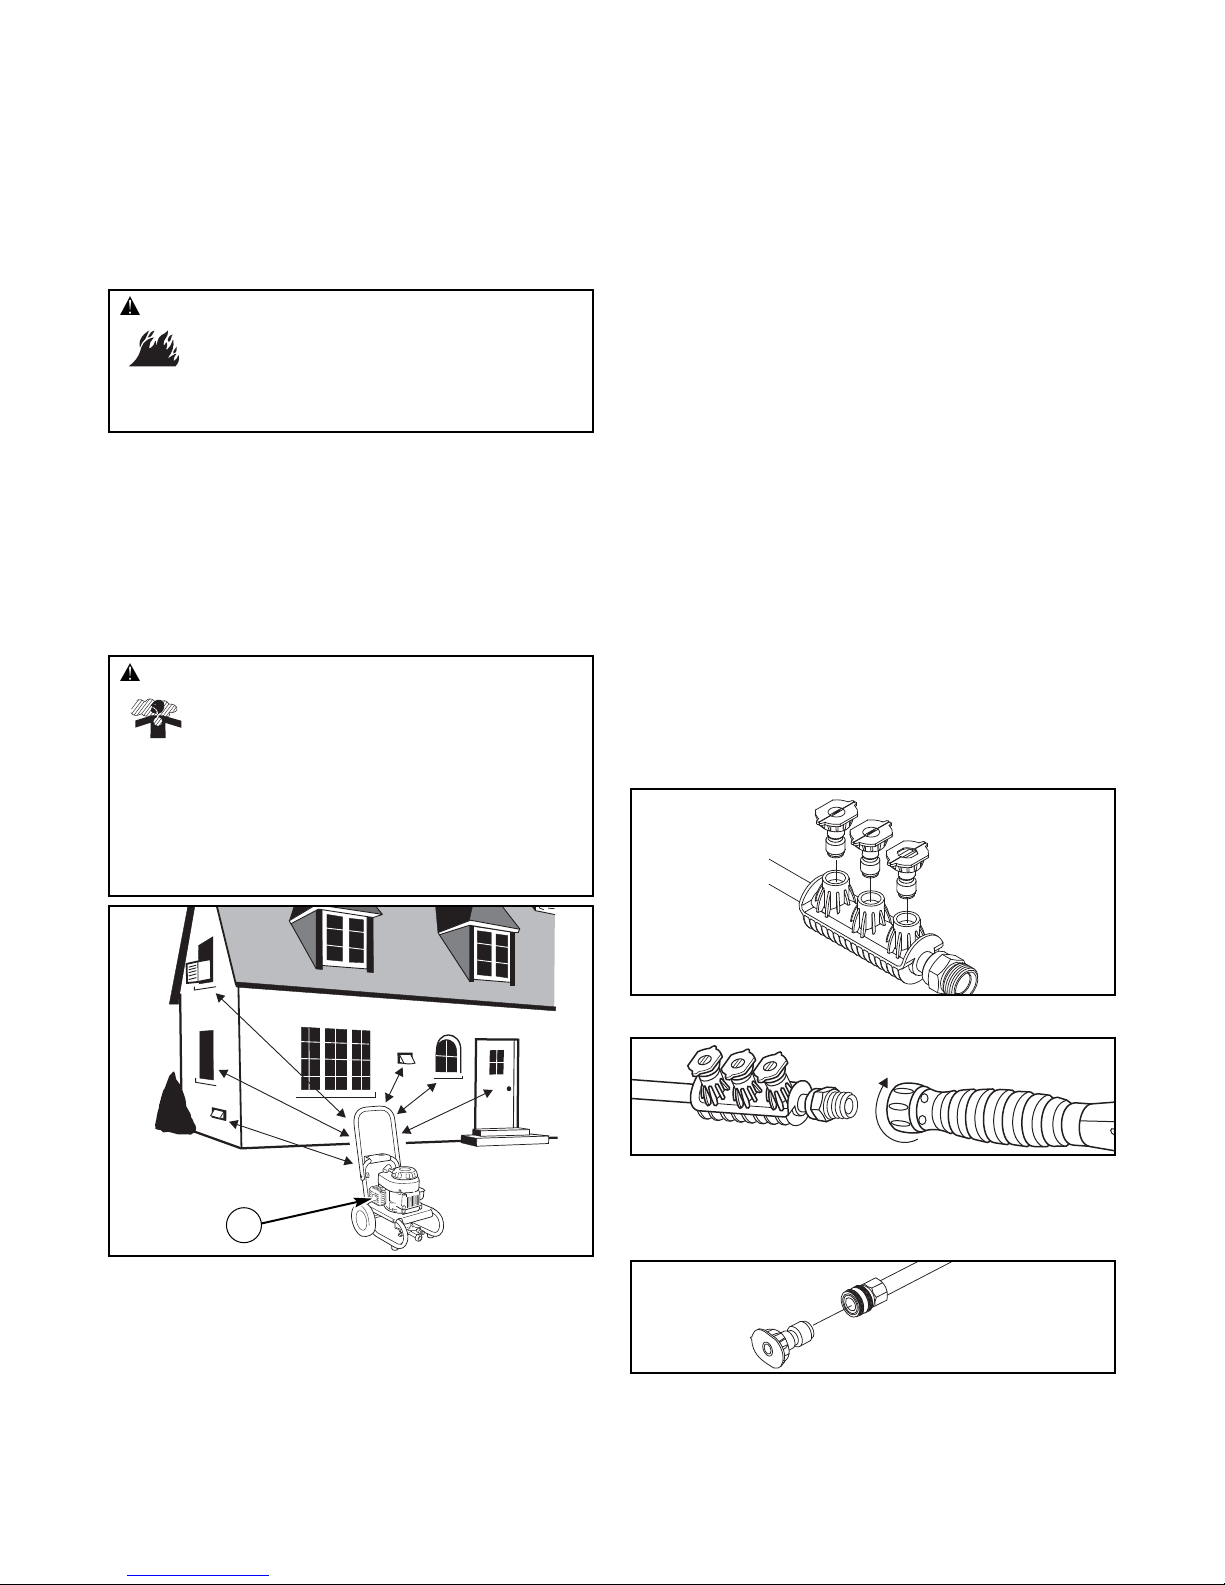
Pressure Washer Location
Clearances and Air Movement
Place pressure washer outdoors in an area that will not
accumulate deadly exhaust gas. DO NOT place pressure
washer where exhaust gas (A) could accumulate and enter
inside or be drawn into a potentially occupied building.
Ensure exhaust gas is kept away from any windows, doors,
ventilation intakes, or other openings that can allow exhaust
gas to collect in a confined area. Prevailing winds and air
currents should be taken into consideration when positioning
pressure washer.
How to Start Your Pressure Washer
To start your pressure washer for the first time, follow these
instructions step-by-step. This starting information also
applies if you have let the pressure washer sit idle for at least
a day.
1. Place pressure washer near an outside water source
capable of supplying water at a flow rate greater than
2.9 gallons per minute and no less than 20 PSI at
pressure washer end of garden hose. DO NOT siphon
supply water.
2. Check that high pressure hose is tightly connected to
spray gun and pump. See Assembly section.
3. Make sure unit is in a level position.
4. Connect garden hose to water inlet on pressure washer
pump.
NOTICE: DO NOT run the pump without the water supply
connected and turned on.
• Damage to equipment resulting from failure to follow this
instruction will void warranty.
5. Turn ON the water, press red button on the gun and
squeeze the trigger to purge the pump system of air and
impurities.
6. Place colored quick connect spray tips in slots on
holder that’s attached to nozzle extension.
7. Attach nozzle extension to spray gun. Tighten by hand.
8. Choose spray tip you want to use, pull back on collar of
nozzle extension, insert spray tip and release collar. Tug
on spray tip to make sure it is securely in place. See
How to Use Spray Tips.
A
WARNING: Running engine gives off carbon monoxide,
an odorless, colorless, poisonous gas.
Breathing carbon monoxide can cause headache,
fatigue, dizziness, vomiting, confusion, seizures,
nausea, fainting or death.
• Operate pressure washer ONLY outdoors.
• Keep exhaust gas from entering a confined area through
windows, doors, ventilation intakes, or other openings.
• DO NOT start or run engine indoors or in an enclosed area,
even if windows and doors are open.
WARNING: Exhaust heat/ gases can ignite
combustibles, structures or damage fuel tank
causing a fire.
• Keep at least 5 ft. (152 cm) clearance on all sides of pressure
washer including overhead.
Page 12

12 www.murray.com
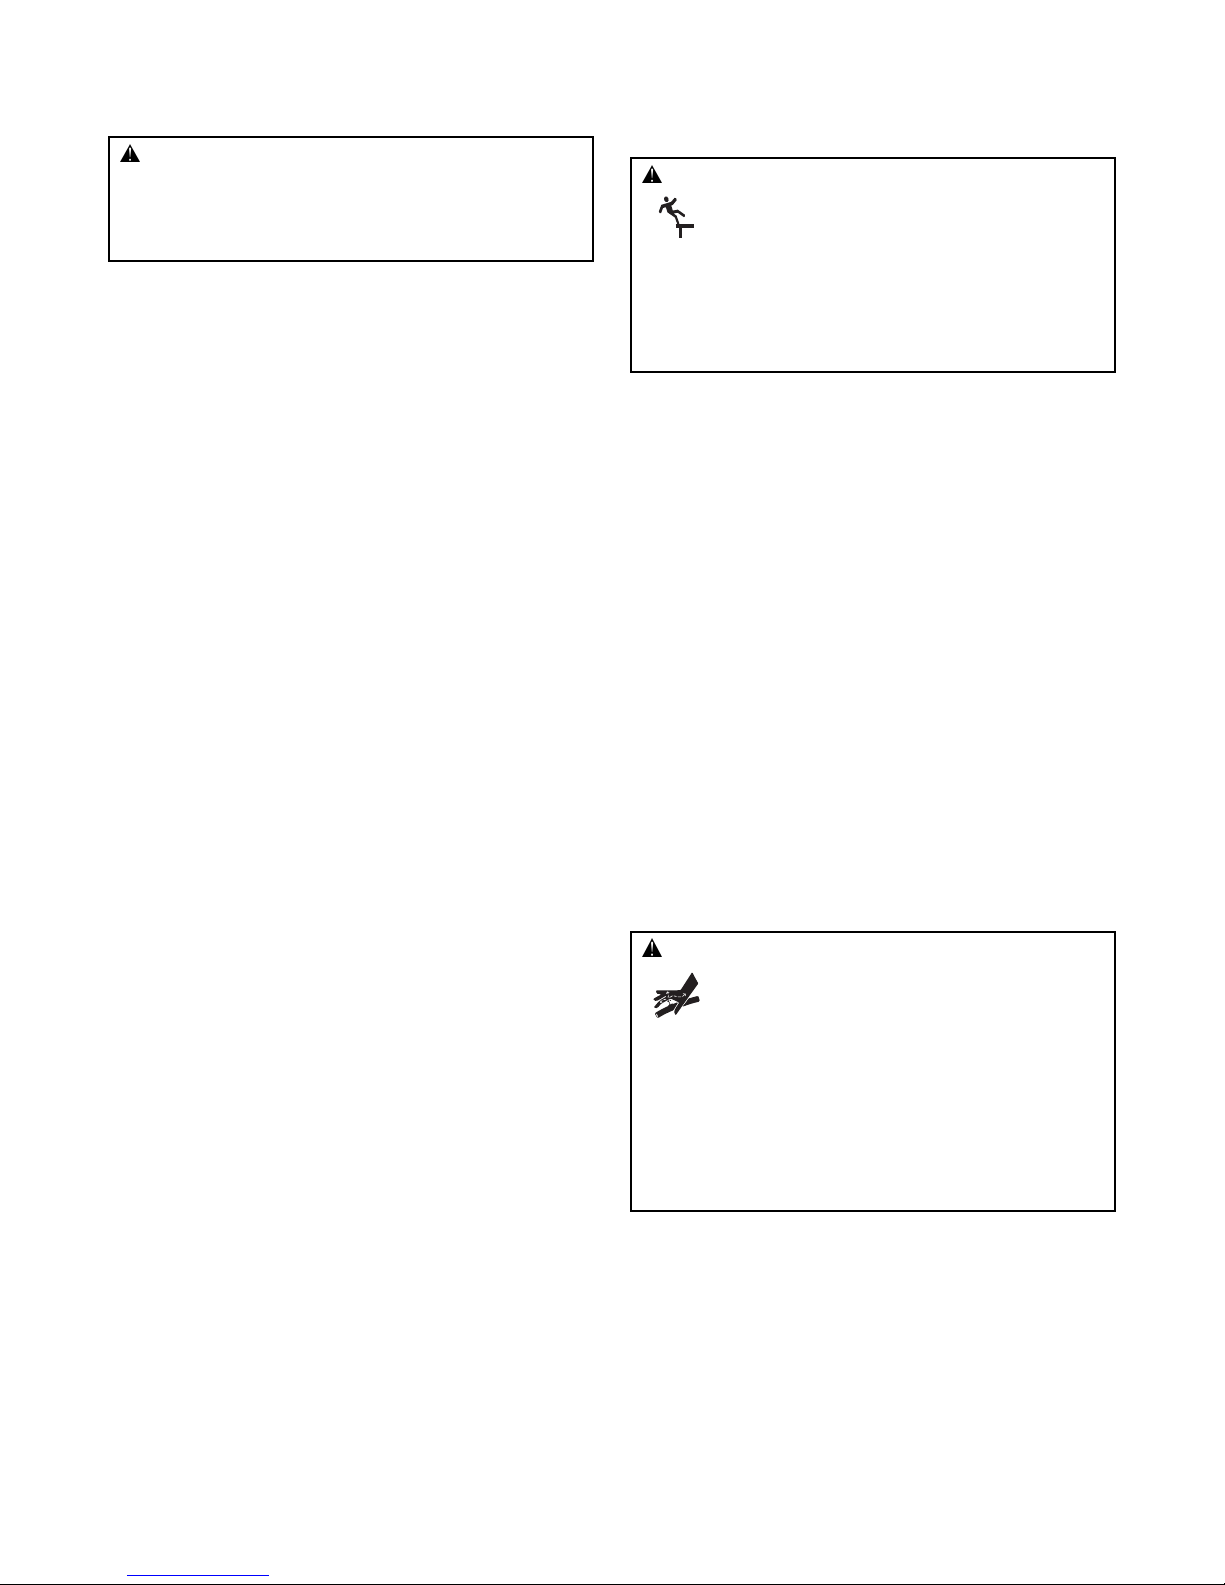
9. Move throttle lever to “Fast” position (A), shown as a
rabbit.
To start the engine for the very first time:
10A. Push primer bulb firmly 5 times, waiting 2 seconds
between each push.
To start engine thereafter:
10B. Press primer bulb firmly 3 times, waiting 2 seconds
between each push. For a warm engine, DO NOT press
primer bulb.
IMPORTANT: Before starting the pressure washer, be sure
you are wearing safety goggles as described below.
11. When starting engine, position yourself as
recommended below and grasp starter grip handle and
pull slowly until you feel some resistance. Then pull
rapidly to start engine.
12. Return starter grip handle slowly. DO NOT let rope
“snap back” against starter.
NOTE: Always keep the throttle lever in the “Fast” position
when operating the pressure washer.
A
WARNING: Risk of eye injury.
Spray can splash back or propel objects.
• Always wear indirect vented (chemical splash) safety goggles
marked to comply with ANSI Z87.1 when using or in vicinity of
this equipment.
• NEVER substitute safety glasses or dry-condition goggles for
indirect vented safety goggles.
WARNING: Starter cord kickback (rapid retraction) can
result in bodily injury. Kickback will pull hand and
arm toward engine faster than you can let go.
Broken bones, fractures, bruises, or sprains
could result.
• NEVER pull starter cord without first relieving spray gun
pressure.
• When starting engine, pull cord slowly until resistance is felt
and then pull rapidly to avoid kickback.
• After each starting attempt, where engine fails to run, always
point spray gun in safe direction, press red button and squeeze
spray gun trigger to release high pressure.
• Firmly grasp spray gun with both hands when using high
pressure spray to avoid injury when spray gun kicks back.
WARNING: Contact with muffler area can result in
serious burns.
Exhaust heat/gases can ignite
combustibles, structures or damage
fuel tank causing a fire.
• DO NOT touch hot parts and AVOID hot exhaust gases.
• Allow equipment to cool before touching.
• Keep at least 5 feet (152 cm) of clearance on all sides of
pressure washer including overhead.
• It is a violation of California Public Resource Code, Section
4442, to use or operate the engine on any forest-covered,
brush-covered, or grass-covered land unless the exhaust
system is equipped with a spark arrester, as defined in Section
4442, maintained in effective working order. Other states or
federal jurisdictions may have similar laws.
Contact the original equipment manufacturer, retailer, or dealer
to obtain a spark arrester designed for the exhaust system
installed on this engine.
• Replacement parts must be the same and installed in the same
position as the original parts.
WARNING: The high pressure stream of water that this
equipment produces can cut through skin and
its underlying tissues, leading to serious injury
and possible amputation.
Spray gun traps high water pressure, even when engine is
stopped and water is disconnected, which can cause
injury.
• DO NOT allow CHILDREN to operate pressure washer.
• Keep high pressure hose connected to pump and spray gun
while system is pressurized.
• NEVER aim spray gun at people, animals, or plants.
• DO NOT secure spray gun in open position.
• DO NOT leave spray gun unattended while machine is running.
• NEVER use a spray gun which does not have a trigger lock or
trigger guard in place and in working order.
• Always be certain spray gun, nozzles and accessories are
correctly attached.
Page 13
13
How to Stop Your Pressure Washer
1. Release spray gun trigger and let engine idle for two
minutes.
2. Move throttle to SLOW position, then STOP position (A).
3. ALWAYS point gun in a safe direction and press red
button and squeeze spray gun trigger to release
retained high water pressure.
IMPORTANT: Spray gun traps high water pressure, even
when engine is stopped and water is disconnected.
How to Use Accessory Tray
The unit is equipped with an accessory tray with places to store
your spray gun, nozzle extension and high pressure hose.
1. Place nozzle extension through hole on accessory tray,
as shown.
2. Place spray gun through hole on accessory tray on left
side of unit.
3. Hang high pressure hose on hook as shown.
How to Use Spray Tips
The quick–connect on the nozzle extension allows you to
switch between three different quick connect spray tips.
Spray tips can be changed while pressure washer is running
once spray gun trigger lock is engaged. The spray tips vary
the spray pattern as shown.
Follow these instructions to change spray tips:
1. Pull back collar on quick–connect and pull current
spray tip off. Store spray tips in holder provided on the
nozzle extension.
2. Select desired spray tip:
• For gentle rinse, select green 25° spray tip.
• To scour surface, select red 0° spray tip.
• To apply detergent, select black spray tip.
3. Pull back on collar, insert new spray tip and release
collar. Tug on spray tip to make sure it is securely in
place.
Usage Tips
• For most effective cleaning, keep spray tip from 8 to
24 inches away from cleaning surface.
• If you get spray tip too close, especially using a high
pressure spray tip, you may damage surface being
cleaned.
• DO NOT get closer than 6 inches when cleaning tires.
A
WARNING: The high pressure stream of water that this
equipment produces can cut through skin and
its underlying tissues, leading to serious injury
and possible amputation.
Spray gun traps high water pressure, even when engine is
stopped and water is disconnected, which can cause
injury.
• Keep high pressure hose connected to pump and spray gun
while system is pressurized.
• ALWAYS point spray gun in safe direction, press red button
and squeeze spray gun trigger to release high pressure, every
time you stop engine.
WARNING: The high pressure stream of water that this
equipment produces can cut through skin and
its underlying tissues, leading to serious injury
and possible amputation.
• NEVER exchange spray tips without the trigger lock being
engaged on the spray gun.
• DO NOT twist spray tips while spraying.
Black
Use to apply
detergent
25° Green 0° Red
Low Pressure
High Pressure
Page 14
14 www.murray.com
Applying Detergent
To apply detergent, follow these steps:
1. Review use of spray tips.
2. Prepare detergent solution as required by job.
3. Place small filter end of detergent siphoning tube into
detergent container.
NOTE: Make sure the filter is fully submerged in detergent
while applying detergent.
NOTICE: Contact with the hot muffler can damage detergent
siphoning tube.
• When inserting the siphon into a detergent solution bottle, route
the tube so as to keep it from inadvertently contacting the hot
muffler.
4. Make sure black spray tip is installed.
NOTE: Detergent cannot be applied with the high pressure
spray tips (Green or Red).
5. Make sure garden hose is connected to water inlet.
Check that high pressure hose is connected to spray
gun and pump. Turn on water.
NOTICE: You must attach all hoses before you start the
engine.
• Starting the engine without all the hoses connected and without
the water turned ON will damage the pump.
• Damage to equipment resulting from failure to follow this
instruction will void warranty.
6. Start engine following instructions How to Start Your
Pressure Washer.
7. Apply detergent to a dry surface, starting at lower
portion of area to be washed and work upward, using
long, even, overlapping strokes.
8. Allow detergent to "soak in" for 3-5 minutes before
washing and rinsing. Reapply as needed to prevent
surface from drying. DO NOT allow detergent to dry on
(prevents streaking).
IMPORTANT: You must flush the detergent siphoning
system after each use by placing the filter into a bucket of
clean water, then run the pressure washer in low pressure
for 1-2 minutes.
Pressure Washer Rinsing
For Rinsing:
1. Remove black spray tip from nozzle extension.
2. Select and install desired high pressure spray tip
following instructions How to Use Spray Tips.
3. Keep spray gun a safe distance from area you plan to
spray.
4. Apply a high pressure spray to a small area and then
check surface for damage. If no damage is found, you
can assume it is okay to continue rinsing.
5. Start at top of area to be rinsed, working down with same
overlapping strokes as you used for cleaning.
Cleaning Detergent Siphoning Tube
If you used the detergent siphoning tube, you must flush it
with clean water before stopping the engine.
1. Place detergent siphoning tube/filter in a bucket full of
clean water.
2. Remove high pressure spray tip from nozzle extension.
3. Select and install black detergent spray tip following
instructions How to Use Spray Tips.
4. Flush for 1-2 minutes.
5. Shut off engine following instructions How to Stop
Pressure Washer and turn off water supply.
6. ALWAYS point spray gun in a safe direction and
squeeze spray gun trigger to release retained high
water pressure.
IMPORTANT: Spray gun traps high water pressure, even
when engine is stopped and water is disconnected.
Automatic Cool Down System (Thermal Relief)
If you run the engine on your pressure washer for
3-5 minutes without pressing the trigger on the spray gun,
circulating water in the pump can reach temperatures above
125°F. The system engages to cool the pump by discharging
the warm water onto the ground.
CAUTION: Chemicals can cause bodily injury, and/or
property damage.
• NEVER use caustic liquid with pressure washer.
• Use ONLY pressure washer safe detergents/soaps. Follow all
manufacturers instructions.
WARNING: Kickback from spray gun can cause you to
fall.
• Operate pressure washer from a stable surface.
• Be extremely careful if you must use the pressure washer from
a ladder, scaffolding, or any other similar location.
• Firmly grasp spray gun with both hands when using high
pressure spray to avoid injury when spray gun kicks back.
WARNING: The high pressure stream of water that this
equipment produces can cut through skin and
its underlying tissues, leading to serious injury
and possible amputation.
Spray gun traps high water pressure, even when engine is
stopped and water is disconnected, which can cause
injury.
• Keep high pressure hose connected to pump and spray gun
while system is pressurized.
• ALWAYS point spray gun in safe direction, press red button
and squeeze spray gun trigger to release high pressure, every
time you stop engine.
Page 15
15
Maintenance
Maintenance Schedule
Follow the hourly or calendar intervals, whichever occurs
first. More frequent service is required when operating in
adverse conditions noted below.
1
Clean if clogged. Replace if perforated or torn.
2
Service more often under dirty or dusty conditions.
General Recommendations
Regular maintenance will improve the performance and
extend the life of the pressure washer. See any qualified
dealer for service.
The pressure washer’s warranty does not cover items that
have been subjected to operator abuse or negligence. To
receive full value from the warranty, the operator must
maintain the pressure washer as instructed in this manual,
including proper storage as detailed in Winter Storage and
Long Term Storage.
NOTE: Should you have questions about replacing
components on your pressure washer, please call
(800) 528-5087 for assistance.
Some adjustments will need to be made periodically to
properly maintain your pressure washer.
All service and adjustments should be made at least once
each season. Follow the requirements in the Maintenance
Schedule chart above.
NOTE: Once a year you should clean or replace the spark
plug, clean or replace the air filter, and check the spray gun
and nozzle extension assembly for wear. A new spark plug
and clean air filter assure proper fuel-air mixture and help
your engine run better and last longer.
Pump Oil
DO NOT attempt any oil maintenance on this pump. The
pump is pre-lubricated and sealed from the factory, requiring
no additional maintenance for the life of the pump.
Emissions Control
Maintenance, replacement, or repair of the emissions
control devices and systems may be performed by any
non-road engine repair establishment or individual.
However, to obtain ”no charge” emissions control service,
the work must be performed by a factory authorized dealer.
See the Emissions Warranty.
Before Each Use
1. Check engine oil level.
2. Clean debris.
3. Check water inlet screen for damage.
4. Check high pressure hose for leaks.
5. Check detergent siphoning tube and filter for damage.
6. Check spray gun and nozzle extension assembly for
leaks.
7. Rinse out garden hose to flush out debris.
Pressure Washer Maintenance
Clean Debris
Daily or before use, clean accumulated debris from cleaning
system. Keep linkage, spring and controls clean. Keep area
around and behind muffler free from any combustible debris.
Inspect cooling air slots and openings on the pressure
washer. These openings must be kept clean and
unobstructed.
Cleaning system parts should be kept clean to reduce the risk of
overheating and ignition of accumulated debris.
• Use a damp cloth to wipe exterior surfaces clean.
NOTICE: Improper treatment of pressure washer can
damage it and shorten its life.
• DO NOT insert any objects through cooling slots.
• Use a soft bristle brush to loosen caked on dirt, oil, etc.
• Use a vacuum cleaner to pick up loose dirt and debris.
Check and Clean Inlet Screen
Examine the screen on the pump’s water inlet. Clean it if the
screen is clogged or replace it if screen is damaged.
First 5 Hours
• Change engine oil
Every 8 Hours or Daily
• Check/clean water inlet screen
1
• Check high pressure hose
• Check detergent siphoning hose/filter
• Check spray gun and assembly for leaks
• Clean debris
• Check engine oil level
Every 25 Hours or Yearly
• Service engine air cleaner
2
Every 50 Hours or Yearly
• Change engine oil
2
• Inspect muffler and spark arrester
Every 100 Hours or Yearly
• Service spark plug
• Clean cooling system
2
Page 16
16 www.murray.com
Check High Pressure Hose
The high pressure hose can develop leaks from wear,
kinking, or abuse. Inspect the hose each time before using it.
Check for cuts, leaks, abrasions or bulging of cover, damage
or movement of couplings. If any of these conditions exist,
replace the hose immediately.
Check Detergent Siphoning Tube
Examine the filter on the detergent tube and clean if clogged.
The tube should fit tightly on the barbed fitting. Examine the
tube for leaks or tears. Replace the filter or tube if either is
damaged.
Check Spray Gun
Examine the hose connection to the spray gun and make
sure it is secure. Test the trigger by pressing the red button
and making sure the trigger “springs back” into place when
you release it. You should not be able to press the trigger
without pressing the red button. Replace spray gun
immediately if it fails any of these tests.
Nozzle Maintenance
A pulsing sensation felt while squeezing the spray gun
trigger may be caused by excessive pump pressure. The
principal cause of excessive pump pressure is a spray tip
clogged or restricted with foreign materials, such as dirt, etc.
To correct the problem, immediately clean the spray tip
following these instructions:
1. Shut off engine and turn off water supply.
2. ALWAYS point spray gun in a safe direction, press red
button and squeeze spray gun trigger to release
retained high water pressure.
3. Remove spray tip from end of nozzle extension.
4. Use a small paper clip to free any foreign material
clogging or restricting spray tip (A).
5. Remove nozzle extension from spray gun.
6. Using a garden hose, remove additional debris by back
flushing water through nozzle extension. Back flush
between 30 to 60 seconds.
7. Reinstall spray tip into nozzle extension.
8. Reconnect nozzle extension to spray gun.
9. Make sure garden hose is connected to water inlet.
Check that high pressure hose is connected to spray
gun and pump. Turn on water.
10. Start engine following instructions How to Start Your
Pressure Washer.
11. Test pressure washer by operating with each quick
connect spray tip.
O-Ring Maintenance
Purchase an O-Ring/Maintenance Kit, model 6048, by
contacting the nearest authorized service center. It is not
included with the pressure washer. This kit includes
replacement o-rings, rubber washer and water inlet filter.
Refer to the instruction sheet provided in the kit to service
your unit’s o-rings.
A
WARNING: The high pressure stream of water that this
equipment produces can cut through skin and
its underlying tissues, leading to serious injury
and possible amputation.
• NEVER repair high pressure hose. Replace it.
• Replacement hose rating MUST exceed maximum pressure
rating of unit.
WARNING: The high pressure stream of water that this
equipment produces can cut through skin and
its underlying tissues, leading to serious injury
and possible amputation.
Spray gun traps high water pressure, even when engine is
stopped and water is disconnected, which can cause
injury.
• Keep high pressure hose connected to pump and spray gun
while system is pressurized.
• ALWAYS point spray gun in safe direction, press red button
and squeeze spray gun trigger to release high pressure, every
time you stop engine.
WARNING: The high pressure stream of water that this
equipment produces can cut through skin and
its underlying tissues, leading to serious injury
and possible amputation.
• NEVER repair leaking connections with sealant of any kind.
Replace o-ring or seal.
Page 17

17
Engine Maintenance
Oil
Oil Recommendations
We recommend the use of Briggs & Stratton Warranty
Certified oils for best performance. Other high-quality
detergent oils are acceptable if classified for service SF, SG,
SH, SJ or higher. DO NOT use special additives.
Outdoor temperatures determine the proper oil viscosity for
the engine. Use the chart to select the best viscosity for the
outdoor temperature range expected.
* Below 40°F (4°C) the use of SAE 30 will result in hard starting.
** Above 80°F (27°C) the use of 10W30 may cause increased oil
consumption. Check oil level more frequently.
NOTE: Synthetic oil meeting ILSAC GF-2, API
certification mark and API service symbol with
“SJ/CF ENERGY CONSERVING” or higher, is an
acceptable oil at all temperatures. Use of synthetic
oil does not alter required oil change intervals.
Checking Oil Level
Oil level should be checked prior to each use or at least
every 8 hours of operation. Keep oil level maintained.
1. Make sure pressure washer is on a level surface.
2. Remove oil dipstick and wipe dipstick with clean cloth.
Replace and tighten dipstick. Remove and and check oil
level.
3. Verify oil is at “Full” mark (top hole) on dipstick.
Replace and tighten dipstick.
Adding Engine Oil
1. Make sure pressure washer is on a level surface.
2. Check oil level as described in Checking Oil Level.
3. If needed, slowly pour oil into oil fill opening to the
“Full” mark on dipstick. DO NOT overfill.
NOTICE: Overfilling with oil may cause the engine to not
start, or hard starting.
• DO NOT overfill.
• If over the FULL mark on dipstick, drain oil to reduce oil level to
FULL mark on dipstick.
4. Replace and tighten dipstick.
Changing Engine Oil
If you are using your pressure washer under extremely dirty
or dusty conditions, or in extremely hot weather, change the
oil more often.
KEEP OUT OF REACH OF CHILDREN. DON’T
POLLUTE. CONSERVE RESOURCES. RETURN
USED OIL TO COLLECTION CENTERS.
WARNING: Unintentional sparking can result in fire or
electric shock.
WHEN ADJUSTING OR MAKING REPAIRS TO YOUR PRESSURE
WASHER
• Disconnect the spark plug wire from the spark plug and place
the wire where it cannot contact spark plug.
WHEN TESTING FOR ENGINE SPARK
• Use approved spark plug tester.
• DO NOT check for spark with spark plug removed.
CAUTION: Avoid prolonged or repeated skin contact
with used motor oil.
• Used motor oil has been shown to cause skin cancer in certain
laboratory animals.
• Thoroughly wash exposed areas with soap and water.
Full
Add
Page 18

18 www.murray.com
Change oil while engine is still warm from running, as
follows:
1. Drain fuel tank by running pressure washer until fuel
tank is empty.
2. Disconnect spark plug wire and keep it away from
spark plug.
3. Clean area around oil fill, remove oil fill cap/dipstick.
Wipe dipstick clean.
4. Tip your pressure washer to drain oil from oil fill into a
suitable container making sure you tip your unit away
from spark plug. When crankcase is empty, return
pressure washer to upright position.
5. Slowly pour recommended oil (about 20 oz.) into oil fill
opening. Pause to permit oil to settle. Fill to “Full”
mark on dipstick.
6. Wipe dipstick clean each time oil level is checked. DO
NOT overfill.
7. Replace and tighten dipstick.
8. Wipe up any remaining oil.
9. Reconnect spark plug wire to spark plug.
Service Air Cleaner
Your engine will not run properly and may be damaged if
you run it with a dirty air cleaner. Service more often if
operating under dirty or dusty conditions.
To service the air cleaner, follow these steps:
1. Remove screw (A).
2. Carefully remove air cleaner assembly to prevent debris
from falling into carburetor.
3. Take air cleaner assembly apart and clean all parts.
Wash foam air cleaner (B) in liquid detergent and
water. Squeeze dry in a clean cloth.
4. SATURATE foam air cleaner in engine oil and squeeze
in a clean cloth to remove excess oil.
5. Reinstall clean or new foam air cleaner in base (C).
6. Install air cleaner securely on carburetor with screw.
Service Spark Plug
Changing the spark plug will help your engine to start easier
and run better.
1. Clean area around spark plug.
2. Remove and inspect spark plug.
3. Replace spark plug if electrodes are pitted, burned or
porcelain is cracked. Use the recommended
replacement plug. See Specifications.
4. Check electrode gap with wire feeler gauge and set
spark plug gap to 0.030 inch (0.76 mm) if necessary.
5. Install spark plug and tighten firmly.
Inspect Muffler and Spark Arrester
Inspect the muffler for cracks, corrosion, or other damage.
Remove the spark arrester, if equipped, and inspect for
damage or carbon blockage. If replacement parts are
required, make sure to use only original equipment
replacement parts.
A
B
C
WARNING: Contact with muffler area can result in
serious burns.
Exhaust heat/gases can ignite
combustibles, structures or damage
fuel tank causing a fire.
• DO NOT touch hot parts and AVOID hot exhaust gases.
• Allow equipment to cool before touching.
• Keep at least 5 feet (152 cm) of clearance on all sides of
pressure washer including overhead.
• It is a violation of California Public Resource Code, Section
4442, to use or operate the engine on any forest-covered,
brush-covered, or grass-covered land unless the exhaust
system is equipped with a spark arrester, as defined in Section
4442, maintained in effective working order. Other states or
federal jurisdictions may have similar laws.
Contact the original equipment manufacturer, retailer, or dealer
to obtain a spark arrester designed for the exhaust system
installed on this engine.
• Replacement parts must be the same and installed in the same
position as the original parts.
Page 19

19
Air Cooling System
Over time debris may accumulate in cylinder cooling fins and
cannot be observed without partial engine disassembly. For
this reason, we recommend you have a qualified service
dealer clean the cooling system per recommended intervals
(see Maintenance Schedule in beginning of Maintenance
section). Equally important is to keep top of engine free from
debris. See Clean Debris.
After Each Use
Water should not remain in the unit for long periods of time.
Sediments or minerals can deposit on pump parts and freeze
pump action. Follow these procedures after every use:
1. Shut off engine, turn off water supply, point gun in a
safe direction, press red button and squeeze trigger to
relieve trapped pressure, and let engine cool.
2. Disconnect hose from spray gun and high pressure
outlet on pump. Drain water from hose, gun, and nozzle
extension. Use a rag to wipe off the hose.
3. Place the spray gun, nozzle extension and nozzles in
the accessory tray. Hang high pressure hose on hook
attached to accessory tray.
4. Empty pump of all pumped liquids by pulling recoil
handle about six times. This should remove most liquid
in pump.
5. Store unit in a clean, dry area.
6. If storing for more than 30 days, see Long Term
Storage on next page.
Keep areas within heavy line clear of debris.
WARNING: The high pressure stream of water that this
equipment produces can cut through skin and
its underlying tissues, leading to serious injury
and possible amputation.
Spray gun traps high water pressure, even when engine is
stopped and water is disconnected, which can cause
injury.
• Keep high pressure hose connected to pump and spray gun
while system is pressurized.
• ALWAYS point spray gun in safe direction, press red button
and squeeze spray gun trigger to release high pressure, every
time you stop engine.
WARNING: Fuel and its vapors are extremely
flammable and explosive.
Fire or explosion can cause severe burns
or death.
WHEN STORING FUEL OR EQUIPMENT WITH FUEL IN TANK
• Store away from furnaces, stoves, water heaters, clothes
dryers, or other appliances that have pilot light or other
ignition source because they can ignite fuel vapors.
Page 20

20 www.murray.com
Winter Storage
NOTICE: You must protect your unit from freezing
temperatures.
• Failure to do so will permanently damage your pump and render
your unit inoperable.
• Freeze damage is not covered under warranty.
To protect the unit from freezing temperatures:
1. Follow steps 1-4 in the previous section After Each Use.
2. Use pump saver, Model 6039, to treat pump. This
minimizes freeze damage and lubricates pistons and
seals.
3. If pump saver is not available, connect a 3-foot section
of garden hose to water inlet adapter. Pour
RV-antifreeze (antifreeze without alcohol) into hose.
Pull recoil handle twice. Disconnect 3-foot hose.
4. Store unit in a clean, dry area.
Long Term Storage
If you do not plan to use the pressure washer for more than
30 days, you must prepare the engine and pump for long
term storage.
Protect Fuel System
Fuel Additive:
Fuel can become stale when stored over 30 days. Stale fuel
causes acid and gum deposits to form in the fuel system or
on essential carburetor parts. To keep fuel fresh, use Briggs
& Stratton FRESH START® fuel stabilizer, available as a
liquid additive or a drip concentrate cartridge.
There is no need to drain gasoline from the engine if a fuel
stabilizer is added according to instructions. Run the engine
for 2 minutes to circulate the stabilizer throughout the fuel
system. The engine and fuel can then be stored up to
24 months.
If gasoline in the engine has not been treated with a fuel
stabilizer, it must be drained into an approved container. Run
the engine until it stops from lack of fuel. The use of a fuel
stabilizer in the storage container is recommended to
maintain freshness.
Change Engine Oil
While engine is still warm, drain oil from crankcase. Refill
with recommended grade. See Changing Engine Oil in Engine
Maintenance.
Protecting the Pump
To protect the pump from damage caused by mineral
deposits or freezing, use PumpSaver, Model 6039, to treat
pump. This prevents freeze damage and lubricates pistons
and seals.
NOTE: PumpSaver is available as an optional accessory. It is
not included with the pressure washer. Contact the nearest
authorized service center to purchase PumpSaver.
NOTICE: You must protect your unit from freezing
temperatures.
• Failure to do so will permanently damage your pump and render
your unit inoperable.
• Freeze damage is not covered under warranty.
To use PumpSaver, make sure the pressure washer is turned
off and disconnected from supply water. Read and follow all
instructions and warnings given on the PumpSaver
container.
Other Storage Tips
1. DO NOT store fuel from one season to another unless it
has been treated as described in Protect Fuel System.
2. Replace fuel container if it starts to rust. Rust and/or
dirt in fuel can cause problems if it’s used with this
unit.
3. Cover unit with a suitable protective cover that does not
retain moisture.
4. Store unit in a clean and dry area.
WARNING: Storage covers can be flammable.
• DO NOT place a storage cover over a hot pressure washer.
• Let equipment cool for a sufficient time before placing the
cover on the equipment.
Page 21

21
Troubleshooting
Problem Cause Correction
Pump has following problems: failure
to produce pressure, erratic pressure,
chattering, loss of pressure, low water
volume.
1. Low pressure spray tip installed.
2. Water inlet is blocked.
3. Inadequate water supply.
4. Inlet hose is kinked or leaking.
5. Clogged inlet hose screen.
6. Water supply is over 100°F.
7. High pressure hose is blocked or
leaks.
8. Spray gun leaks.
9. Spray tip is obstructed.
10. Pump is faulty.
1. Replace with high pressure spray
tip.
2. Clear inlet.
3. Provide adequate water flow.
4. Straighten inlet hose, patch leak.
5. Check and clean inlet hose screen.
6. Provide cooler water supply.
7. Clear blocks in outlet hose.
8. Replace spray gun.
9. Clean spray tip.
10. Contact local service facility.
Detergent fails to mix with spray.
1. Detergent siphoning tube is not
submerged.
2. Detergent siphoning tube/filter is
clogged or cracked.
3. High pressure spray tip installed.
1. Insert detergent siphoning tube into
detergent.
2. Clean or replace filter/detergent
siphoning tube.
3. Replace with low pressure spray
tip.
Engine runs good at no-load but "bogs"
when load is added.
Engine speed is too slow. Move throttle control to FAST position. If
engine still "bogs down", contact local
service facility.
Engine will not start; or starts and runs
rough.
1. Low oil level.
2. Dirty air cleaner.
3. Out of fuel.
4. Stale fuel.
5. Spark plug wire not connected to
spark plug.
6. Bad spark plug.
7. Water in fuel.
8. Excessively rich fuel mixture.
1. Fill crankcase to proper level.
2. Clean or replace air cleaner.
3. Fill fuel tank.
4. Drain fuel tank; fill with fresh fuel.
5. Connect wire to spark plug.
6. Replace spark plug.
7. Drain fuel tank; fill with fresh fuel.
8. Contact local service facility.
Engine shuts down during operation.
Out of fuel. Fill fuel tank.
Engine lacks power. Dirty air filter. Replace air filter.
Page 22

22 www.murray.com
Warranties
California, U.S. EPA, and Briggs & Stratton
Corporation Emissions Control Warranty
Statement
Your Warranty Rights And Obligations
The California Air Resources Board, U.S. EPA, and Briggs &
Stratton (B&S) are pleased to explain the emissions control
system warranty on your Model Year 2008 and later
engine/equipment. In California, new small off-road engines
must be designed, built, and equipped to meet the State’s
stringent anti-smog standards. B&S must warrant the
emissions control system on your engine/equipment for the
periods of time listed below provided there has been no
abuse, neglect, or improper maintenance of your small offroad engine.
Your emissions control system may include parts such as
the carburetor or fuel injection system, fuel tank, ignition
system, and catalytic converter. Also included may be hoses,
belts, connectors, sensors, and other emissions-related
assemblies. Where a warrantable condition exists, B&S will
repair your engine/equipment at no cost to you including
diagnosis, parts, and labor.
Manufacturer’s Warranty Coverage:
Small off-road engines are warranted for two years. If any
emissions-related part on your engine/equipment is
defective, the part will be repaired or replaced by B&S.
Owner’s Warranty Responsibilities:
• As the small engine/equipment owner, you are
responsible for the performance of the required
maintenance listed in your owner’s manual. B&S
recommends that you retain all receipts covering
maintenance on your engine/equipment, but B&S
cannot deny warranty solely for the lack of receipts or
your failure to ensure the performance of all scheduled
maintenance.
• As the engine/equipment owner, you should however
be aware that B&S may deny you warranty coverage if
your engine/equipment or a part has failed due to
abuse, neglect, improper maintenance, or unapproved
modifications.
• You are responsible for presenting your
engine/equipment to a B&S distribution center,
servicing dealer, or other equivalent entity, as
applicable, as soon as a problem exists. The warranty
repairs should be completed in a reasonable amount of
time, not to exceed 30 days. If you have any questions
regarding your warranty rights and responsibilities, you
should contact B&S at (414) 259-5262.
Briggs & Stratton Emissions Control Warranty Provisions
The following are specific provisions relative to your
Emissions Control Warranty Coverage. It is in addition to the
B&S engine warranty for non-regulated engines found in the
Operator’s Manual.
1. Warranted Emissions Parts
Coverage under this warranty extends only to the parts
listed below (the emissions control systems parts) to
the extent these parts were present on the engine
purchased.
a. Fuel Metering System
• Cold start enrichment system (soft choke)
• Carburetor and internal parts
• Fuel pump
• Fuel line, fuel line fittings, clamps
• Fuel tank, cap and tether
• Carbon canister
b. Air Induction System
• Air cleaner
• Intake manifold
• Purge and vent line
c. Ignition System
• Spark plug(s)
• Magneto ignition system
d. Catalyst System
• Catalytic converter
• Exhaust manifold
• Air injection system or pulse valve
e. Miscellaneous Items Used in Above Systems
• Vacuum, temperature, position, time sensitive
valves and switches
• Connectors and assemblies
2. Length of Coverage
For a period of two years from date of original
purchase, B&S warrants to the original purchaser and
each subsequent purchaser that the engine is designed,
built, and equipped so as to conform with all applicable
regulations adopted by the Air Resources Board; that it
is free from defects in material and workmanship that
could cause the failure of a warranted part; and that it
is identical in all material respects to the engine
described in the manufacturer’s application for
certification. The warranty period begins on the date the
engine is originally purchased.
Page 23

23
The warranty on emissions-related parts is as follows:
• Any warranted part that is not scheduled for
replacement as required maintenance in the owner’s
manual supplied, is warranted for the warranty period
stated above. If any such part fails during the period of
warranty coverage, the part will be repaired or replaced
by B&S at no charge to the owner. Any such part
repaired or replaced under the warranty will be
warranted for the remaining warranty period.
• Any warranted part that is scheduled only for regular
inspection in the owner’s manual supplied, is warranted
for the warranty period stated above. Any such part
repaired or replaced under warranty will be warranted
for the remaining warranty period.
• Any warranted part that is scheduled for replacement as
required maintenance in the owner’s manual supplied, is
warranted for the period of time prior to the first
scheduled replacement point for that part. If the part fails
prior to the first scheduled replacement, the part will be
repaired or replaced by B&S at no charge to the owner.
Any such part repaired or replaced under warranty will
be warranted for the remainder of the period prior to the
first scheduled replacement point for the part.
• Add on or modified parts that are not exempted by the
Air Resources Board may not be used. The use of any
non exempted add on or modified parts by the owner
will be grounds for disallowing a warranty claim. The
manufacturer will not be liable to warrant failures of
warranted parts caused by the use of a non exempted
add on or modified part.
3. Consequential Coverage
Coverage shall extend to the failure of any engine
components caused by the failure of any warranted
emissions parts.
4. Claims and Coverage Exclusions
Warranty claims shall be filed according to the
provisions of the B&S engine warranty policy. Warranty
coverage does not apply to failures of emissions parts
that are not original equipment B&S parts or to parts
that fail due to abuse, neglect, or improper maintenance
as set forth in the B&S engine warranty policy. B&S is
not liable for warranty coverage of failures of emissions
parts caused by the use of add-on or modified parts.
Look For Relevant Emissions Durability Period and Air
Index Information On Your Engine Emissions Label
Engines that are certified to meet the California Air
Resources Board (CARB) Emissions Standard must display
information regarding the Emissions Durability Period and
the Air Index. Briggs & Stratton makes this information
available to the consumer on our emissions labels. The
engine emissions label will indicate certification information.
The Emissions Durability Period describes the number of
hours of actual running time for which the engine is certified
to be emissions compliant, assuming proper maintenance in
accordance with the Operating & Maintenance Instructions.
The following categories are used:
Moderate:
Engine is certified to be emissions compliant for 125 hours
of actual engine running time.
Intermediate:
Engine is certified to be emissions compliant for 250 hours
of actual engine running time.
Extended:
Engine is certified to be emissions compliant for 500 hours
of actual engine running time.
For example, a typical walk-behind lawn mower is used 20 to
25 hours per year. Therefore, the Emissions Durability
Period of an engine with an intermediate rating would
equate to 10 to 12 years. Briggs & Stratton engines are
certified to meet the United States Environmental Protection
Agency (USEPA) Phase 2 emissions standards. For Phase 2
certified engines, the Emissions Compliance Period referred
to on the Emissions Compliance label indicates the number
of operating hours for which the engine has been shown to
meet Federal emissions requirements.
For engines less than 225 cc displacement.
Category C = 125 hours
Category B = 250 hours
Category A = 500 hours
For engines of 225 cc or more displacement.
Category C = 250 hours
Category B = 500 hours
Category A = 1000 hours
Page 24

24 www.murray.com
BRIGGS & STRATTON POWER PRODUCTS GROUP, LLC PRESSURE WASHER OWNER WARRANTY POLICY
LIMITED WARRANTY
Briggs & Stratton Power Products Group, LLC will repair or replace, free of charge, any part(s) of the pressure washer that is defective in material or
workmanship or both. Transportation charges on product submitted for repair or replacement under this warranty must be borne by purchaser. This
warranty is effective for the time periods and subject to the conditions stated below. For warranty service, find the nearest Authorized Service Dealer in
our dealer locator map at BRIGGSandSTRATTON.COM.
THERE IS NO OTHER EXPRESS WARRANTY. IMPLIED WARRANTIES, INCLUDING THOSE OF MERCHANTABILITY AND FITNESS FOR A PARTICULAR
PURPOSE, ARE LIMITED TO ONE YEAR FROM PURCHASE, OR TO THE EXTENT PERMITTED BY LAW. ANY AND ALL IMPLIED WARRANTIES ARE
EXCLUDED. LIABILITY FOR INCIDENTAL OR CONSEQUENTIAL DAMAGES ARE EXCLUDED TO THE EXTENT EXCLUSION IS PERMITTED BY LAW. Some
states or countries do not allow limitations on how long an implied warranty lasts, and some states or countries do not allow the exclusion or limitation
of incidental or consequential damages, so the above limitation and exclusion may not apply to you. This warranty gives you specific legal rights and
you may also have other rights which vary from state to state or country to country.
1 year
90 days
Consumer Use
Commercial Use
The warranty period begins on the date of purchase by the first retail consumer or commercial end user, and continues for the period of time stated above.
“Consumer use" means personal residential household use by a retail consumer. “Commercial use" means all other uses, including use for commercial,
income producing or rental purposes. Once equipment has experienced commercial use, it shall thereafter be considered as commercial use for purposes of
this warranty.
NO WARRANTY REGISTRATION IS NECESSARY TO OBTAIN WARRANTY ON BRIGGS & STRATTON PRODUCTS. SAVE YOUR PROOF OF PURCHASE
RECEIPT. IF YOU DO NOT PROVIDE PROOF OF THE INITIAL PURCHASE DATE AT THE TIME WARRANTY SERVICE IS REQUESTED, THE MANUFACTURING
DATE OF THE PRODUCT WILL BE USED TO DETERMINE THE WARRANTY PERIOD.
ABOUT YOUR WARRANTY
We welcome warranty repair and apologize to you for being inconvenienced. Any Authorized Service Dealer may perform warranty repairs. Most warranty
repairs are handled routinely, but sometimes requests for warranty service may not be appropriate. For example, warranty service would not apply if
equipment damage occurred because of misuse, lack of routine maintenance, shipping, handling, warehousing or improper installation. Similarly, the
warranty is void if the manufacturing date or the serial number on the pressure washer or engine has been removed or the equipment has been altered or
modified. During the warranty period, the Authorized Service Dealer, at its option, will repair or replace any part that, upon examination, is found to be
defective under normal use and service. This warranty will not cover the following repairs and equipment:
• Normal Wear: Outdoor Power Equipment, like all mechanical devices, needs periodic parts and service to perform well. This warranty also does not
cover normal maintenance such as air filters, adjustments, fuel system cleaning and obstruction (due to chemical, lime, dirt, and so forth).
• Installation and Maintenance: This warranty does not apply to equipment or parts that have been subjected to improper or unauthorized installation or
alteration and modification, misuse, negligence, accident, overloading, overspeeding, improper maintenance, repair or storage so as, in our judgment,
to adversely affect its performance and reliability. This warranty also does not cover normal maintenance such as air filters, adjustments, fuel system
cleaning and obstruction (due to chemical, lime, dirt, and so forth).
• Other Exclusions: This warranty excludes wear items such as quick couplers, seals, o-rings, pumps that have been run without water supplied or
damage or malfunctions resulting from accidents, abuse, modifications, alterations, or improper servicing or freezing or chemical deterioration.
Accessory parts, such as guns, hoses, nozzle extensions (wands), and nozzles, are excluded from the product warranty. This warranty excludes used,
reconditioned, and demonstration equipment and failures due to acts of God and other force majeure events beyond the manufacturers control.
198187E, Rev. C, 12/31/2006
BRIGGS & STRATTON POWER PRODUCTS GROUP, LLC
JEFFERSON, WI, USA
Effective December 1, 2005 replaces all undated Warranties and all Warranties dated before December 1, 2005
WARRANTY PERIOD
Page 25

25
Reserved
Page 26

26 www.murray.com
Briggs & Stratton Power Products Group, LLC
900 N. Parkway
Jefferson, Wisconsin, 53549 U.S.A.
Pressure Washer
Power Ratings: The gross power rating for individual gas engine models is labeled in accordance with SAE (Society of
Automotive Engineers) code J1940 (Small Engine Power & Torque Rating Procedure), and rating performance has been
obtained and corrected in accordance with SAE J1995 (Revision 2002-05). Torque values are derived at 3060 RPM; horsepower
values are derived at 3600 RPM. Actual gross engine power will be lower and is affected by, among other things, ambient
operating conditions and engine-to-engine variability. Given both the wide array of products on which engines are placed and
the variety of environmental issues applicable to operating the equipment, the gas engine will not develop the rated gross power
when used in a given piece of power equipment (actual "on-site" or net power). This difference is due to a variety of factors
including, but not limited to, accessories (air cleaner, exhaust, charging, cooling, carburetor, fuel pump, etc.), application
limitations, ambient operating conditions (temperature, humidity, altitude), and engine-to-engine variability. Due to
manufacturing and capacity limitations, Briggs & Stratton may substitute an engine of higher rated power for this Series engine.
This pressure washer is rated in accordance to the Pressure Washer Manufacturer’s Association (PWMA) standard PW101
(Testing and Rating Performance of Pressure Washers).
Product Specifications
Outlet Pressure . . . . . . . . . . . . . . .2,000 PSI (137.9 BARS)
Flow Rate . . . . . . . . . . . . . . . . . . . .1.9 GPM (7.2 liters/min)
Water Supply Temperature . . . . . . . . . . .100ºF (38ºC) MAX
Displacement . . . . . . . . . . . . . . . . . . . .9.64 cu. in. (158 cc)
Spark Plug Gap . . . . . . . . . . . . . . . . . . .0.030 in. (0.76 mm)
Fuel Capacity . . . . . . . . . . . . . . . . . . . . . .1 Qt. (0.95 Liters)
Oil Capacity . . . . . . . . . . . . . . . . . . . .20 Ounces (0.6 Liters)
Common Service Parts
PumpSaver . . . . . . . . . . . . . . . . . . . . . . . . . . . . . . . . . .6039
O-Ring Maintenance Kit . . . . . . . . . . . . . . . . . . . . . . . .6048
Water Inlet Screen . . . . . . . . . . . . . . . . . . . . . . . . .B2384GS
Air Cleaner . . . . . . . . . . . . . . . . . . . . . . . . . .698369 o 5088
Resistor Spark Plug . . . . . . . . . . . . . . . . . . .802592 o 5095
Long Life Platinum Spark Plug . . . . . . . . . . . . . . . . . . .5062
Engine Oil Bottle . . . . . . . . . . . . . . . . . . . . . . . . . . . .100005
Fuel Stabilizer . . . . . . . . . . . . . . . . . . . . . . . . . . . . . . . .5041
Spark Arrester . . . . . . . . . . . . . . . . . . . . . . . . . . . . . .398067
(800) 528-5087
Page 27

BRIGGS & STRATTON POWER PRODUCTS GROUP, LLC
JEFFERSON, WISCONSIN, U.S.A.
Les caractéristiques nominales de ce nettoyeur à haute pression sont conformes
à la norme PW101 de la Pressure Washer Manufacturer’s Association (PWMA)
(Tests et performance nominale des nettoyeurs à haute pression).
Page 28

2 www.murray.com
Briggs & Stratton Power Products Group, LLC.
900 North Parkway
Jefferson, WI 53549
Copyright © 2009 Briggs & Stratton Power Products Group,
LLC. Tous droits réservés. Aucune partie de ce manuel ne peut
être reproduite ou transmise sous n’importe quelle forme et
par quelque moyen que ce soit sans l’autorisation expresse
écrite de Briggs & Stratton Power Products Group, LLC.
Merci d’avoir acheté cette nettoyeur à pression de qualité Briggs & Stratton. Nous sommes heureux que vous fassiez
confiance à la marque Murray. Si vous respectez les instructions d’utilisation et d’entretien de ce manuel, vous pourrez vous
fiez à votre nettoyeur à pression Briggs & Stratton durant de nombreuses années.
Ce manuel contient des renseignements sur la sécurité pour vous informer des dangers et des risques associés aux nettoyeur
à pressions et à la façon de les éviter. Comme Briggs & Stratton ne connaît pas nécessairement toutes les raisons pour
lesquelles cette nettoyeur à pression peut être utilisée, il est important de lire et de bien comprendre ces instructions avant de
tenter de démarrer ou d’utiliser cet équipement. Conservez ces instructions pour référence future.
Cette nettoyeur à pression exige un assemblage final avant utilisation. Consultez la section Assemblage de ce manuel pour
les directives sur les procédures d’assemblage finales. Suivez ces instructions à la lettre.
Où nous trouver
Vous n’aurez jamais à chercher bien loin pour trouver un centre de support et service Briggs & Stratton pour votre nettoyeur à
pression. Consultez les Pages Jaunes. Il y a plus de 30 000 distributeurs de service après-vente agréés Briggs & Stratton dans
le monde qui offrent un service de qualité. Vous pouvez aussi téléphoner au Service à la clientèle de Briggs & Stratton au
(800) 528-5087 ou communiquer avec eux par Internet à l’adresse www.murray.com.
Murray sont de marques de Briggs & Stratton Power Products.
Nettoyeur à pression
Numéro de modèle
Révision
Numéro de série
Moteur
Numéro de modèle
Numéro de type
Numéro de code
Date d’achat
Page 29

3
Table des matières
Sécurité de l’opérateur . . . . . . . . . . . . . . . . . . . . . . . . . . . . 4
Description de l équipement . . . . . . . . . . . . . . . . . . . . . . . . . . . . . . . . . . . . 4
Renseignements importants de sécurité . . . . . . . . . . . . . . . . . . . . . . . . . . . 4
Assemblage. . . . . . . . . . . . . . . . . . . . . . . . . . . . . . . . . . . . 7
Déballage du nettoyeur à pression. . . . . . . . . . . . . . . . . . . . . . . . . . . . . . . . 7
Fixez la poignée et le plateau pour accessoires . . . . . . . . . . . . . . . . . . . . . . 7
Ajoutez de l'huile à moteur . . . . . . . . . . . . . . . . . . . . . . . . . . . . . . . . . . . . . 8
Ajoutez de l'essence . . . . . . . . . . . . . . . . . . . . . . . . . . . . . . . . . . . . . . . . . . 8
Raccorder le tuyau et la source d'eau à la pompe. . . . . . . . . . . . . . . . . . . . 9
Fonctions et commandes . . . . . . . . . . . . . . . . . . . . . . . . . . 10
Opération . . . . . . . . . . . . . . . . . . . . . . . . . . . . . . . . . . . . 11
Emplacement de la nettoyeur à pression . . . . . . . . . . . . . . . . . . . . . . . . . . 11
Mettre votre nettoyeur à pression en marche . . . . . . . . . . . . . . . . . . . . . . 11
Comment arrêter votre nettoyeur à pression . . . . . . . . . . . . . . . . . . . . . . . 13
Comment utiliser le plateau pour accessoires . . . . . . . . . . . . . . . . . . . . . . 13
Comment utiliser les buses . . . . . . . . . . . . . . . . . . . . . . . . . . . . . . . . . . . . 13
Application de détergent . . . . . . . . . . . . . . . . . . . . . . . . . . . . . . . . . . . . . . 14
Rincer le nettoyeur à pression . . . . . . . . . . . . . . . . . . . . . . . . . . . . . . . . . . 15
Tube de siphonnement du détergent . . . . . . . . . . . . . . . . . . . . . . . . . . . . . 15
Système de refroidissement automatique (surpression thermique) . . . . . 15
Entretien . . . . . . . . . . . . . . . . . . . . . . . . . . . . . . . . . . . . . 16
Calendrier d’entretien. . . . . . . . . . . . . . . . . . . . . . . . . . . . . . . . . . . . . . . . . 16
Entretien du nettoyeur à pression . . . . . . . . . . . . . . . . . . . . . . . . . . . . . . . 16
Entretien du moteur . . . . . . . . . . . . . . . . . . . . . . . . . . . . . . . . . . . . . . . . . . 18
Après chaque utilisation. . . . . . . . . . . . . . . . . . . . . . . . . . . . . . . . . . . . . . . 20
Entreposage pour l'hiver . . . . . . . . . . . . . . . . . . . . . . . . . . . . . . . . . . . . . . 21
Entreposage à long terme . . . . . . . . . . . . . . . . . . . . . . . . . . . . . . . . . . . . . 21
Dépannage . . . . . . . . . . . . . . . . . . . . . . . . . . . . . . . . . . . 22
Garanties . . . . . . . . . . . . . . . . . . . . . . . . . . . . . . . . . . . . 23
Garantie du dispositif antipollution . . . . . . . . . . . . . . . . . . . . . . . . . . . . . . 23
Garantie du propriétaire d'une nettoyeur à pression . . . . . . . . . . . . . . . . . 25
Caractéristiques . . . . . . . . . . . . . . . . . . . . . . . . . . . . . . . . 26
Caractéristiques du produit . . . . . . . . . . . . . . . . . . . . . . . . . . . . . . . . . . . . 26
Pièces d’entretien courant . . . . . . . . . . . . . . . . . . . . . . . . . . . . . . . . . . . . . 26
Page 30

Sécurité de l’opérateur
Description de l équipement
Lisez avec soin ce manuel et familiarisez-vous
avec votre nettoyeur à pression. Connaissez ses
applications, ses limitations et les dangers qu'il
implique.
Ce nettoyeur à haute pression fonctionne à 2 000 lb/po2
(137.9 bars) et à un débit allant jusqu'à 7.2 litres
(1.9 gallons) par minute. Ce système résidentiel de haute
qualité est doté d’une pompe à came axiale avec pistons en
acier inoxydable, d’un système de refroidissement
automatique, d’un système de siphonnement du détergent,
d’une rallonge de buse avec raccord de connexion rapide, un
assortiment de buses avec raccord de connexion rapide et
un boyau de 7.6 m (25 pi) ultrarésistant et plus encore.
Tout a été mis en oeuvre pour que les informations
contenues dans ce manuel soient exactes et à jour.
Cependant, nous se réserve le droit de changer, d'altérer ou
d'améliorer le produit à n'importe quel moment sans avis
préalable.
Le Système de contrôle de l'émission du nettoyeur à
pression est garanti pour des normes établies par L'Agence
de protection de l'environnement et le California Air
Resources Board.
Renseignements importants de sécurité
Symboles de sécurité et leur signification
Le symbole d’alerte de sécurité indique un risque
potentiel de blessure personnelle. Un mot signal (DANGER,
ATTENTION ou AVERTISSEMENT) est utilisé avec un
symbole d'alerte pour vous indiquer le degré ou le niveau du
risque. Un symbole de sécurité peut être utilisé pour
représenter le type de risque. Le mot signal AVIS est utilisé
pour traiter les pratiques qui ne sont pas reliées aux
blessures personnelles.
Le mot signal DANGER indique un danger qui, s’il n’est
pas évité, causera la mort ou des blessures graves.
Le mot signal AVERTISSEMENT indique un risque qui,
s’il n’est pas évité, pourrait causer la mort ou des blessures
graves.
Le mot signal ATTENTION indique un risque qui, s’il n’est
pas évité, pourrait causer des blessures mineures ou
modérées.
Le mot AVIS est utilisé pour les pratiques qui ne sont pas
reliées aux blessures personnelles.
4 www.murray.com
Feu
Explosion
Emanations toxiques
Surface chaude
Parties en mouvement
Choc électrique
Surface glissante
Chute
Effet de recul
Objets volant
Injection fluide
Manuel d'utilisation
Page 31

5
AVERTISSEMENT:
Le nettoyeur à pression, lorsqu'il
fonctionne, produit du monoxyde de carbone, un
gaz toxique inodore et incolore.
L’inhalation du monoxyde de carbone peut causer
des maux de tête, de la fatigue, des étourdissements, le
vomissement, de la confusion, des crises épileptiques, des
nausées, l’évanouissement ou la mort.
Certains produits chimiques et détergents peuvent être
nocifs en cas d’ingestion ou d’inhalation et peuvent
provoquer des nausées, un évanouissement ou un
empoisonnement.
• Faites fonctionner le nettoyeur à pression SEULEMENT à
l'extérieur.
• Évitez que les gaz d'échappement entrent dans un espace
restreint, par une fenêtre, une porte, une prise d'aération ou
toute autre ouverture.
• NE démarrez, ni ne faites fonctionner un moteur à l'intérieur ou
dans un espace fermé, même si les fenêtres ou les portes sont
ouvertes.
• Utilisez un appareil respiratoire ou un masque lorsqu'il y a des
risques d'inhalation des vapeurs.
• Lisez toutes les instructions qui accompagnent le masque pour
être certain qu'il vous protègera de façon efficace contre
l'inhalation des vapeurs nocives.
AVERTISSEMENT: L’échappement du moteur de ce
produit contient des produits chimiques que l’État de
Californie considère comme causant le cancer, des
déformations à la naissance ou d’autres dangers
concernant la reproduction.
AVERTISSEMENT: Ce produit contient du plomb et des
composés de plomb, produits chimiques reconnus par
l’État de la Californie comme causant des malformations
congénitales ou d’autres problèmes de reproduction.
Nettoyez-vous les mains après la manipulation de ce
produit.
AVERTISSEMENT:
Risque d’électrocution.
Tout contact avec une source d’alimentation de
courant peut causer un choc électrique ou des
brûlures.
• NE pulvérisez JAMAIS près d’une source d’alimentation.
AVERTISSEMENT:
L'essence et ses vapeurs sont
extrêmement inflammables et
explosives.
Le feu ou l'explosion risque de
provoquer des blessures graves, pouvant être fatales.
LORS DE L'AJOUT OU DE LA VIDANGE DU CARBURANT
• Éteignez le nettoyeur à pression et laissez-le refroidir au moins
2 minutes avant de retirer le capuchon du réservoir de
carburant. Desserrez lentement le capuchon pour laisser la
pression s'échapper du réservoir.
• Remplissez ou vidangez le réservoir d'essence à l'extérieur.
• NE REMPLISSEZ PAS trop le réservoir. Laissez l'expansion de
l'essence.
• Si du carburant est renversé, attendez qu'il s'évapore avant de
démarrer le moteur.
• Éloignez l'essence des étincelles, des flammes, des veilleuses,
de la chaleur et de toute autre source d'inflammation.
• N'ALLUMEZ PAS de cigarette ou ne fumez pas à proximité de
l'appareil.
LORS DU DÉMARRAGE DE L'ÉQUIPEMENT
• Assurez-vous que la bougie d'allumage, le silencieux, le
bouchon à essence et le filtre à air sont en place.
• NE démarrez PAS le moteur lorsque la bougie d'allumage est
enlevée.
LORSQUE L'ÉQUIPEMENT FONCTIONNE
• NE penchez PAS le moteur ou l'équipement, vous risqueriez de
renverser de l'essence.
• NE vaporisez PAS de liquides inflammables.
LORSQUE VOUS TRANSPORTEZ OU RÉPAREZ L'ÉQUIPEMENT
• Le réservoir d'essence doit être VIDE ou le robinet d'arrêt de
carburant doit être à la position fermée (OFF) pendant le
transport ou la réparation.
• Débranchez le câble de bougie.
LORSQUE VOUS ENTREPOSEZ L'ESSENCE OU UN ÉQUIPEMENT
AVEC UN RÉSERVOIR À ESSENCE
• Entreposez-le loin des appareils de chauffage, des fours, des
chauffe-eau, des sécheuses ou de tout autre appareil
électroménager disposant d'une veilleuse ou de toute autre
source d'inflammation risquant d'enflammer les vapeurs
d'essence.
AVERTISSEMENT: Un effet de recul (rétroaction rapide)
de la corde du démarreur pourrait entraîner des
blessures corporelles. L’effet de recul tirera votre
main et votre bras vers le moteur plus rapidement
que vous ne pouvez relâcher la corde.
Vous risquez ainsi de subir des fractures, des
ecchymoses ou des entorses.
• NE tirez JAMAIS sur la corde du démarreur sans avoir d’abord
libéré la pression du pistolet de pulvérisation.
• Lors du démarrage du moteur, tirez lentement sur la corde
jusqu’à ce que vous sentiez une résistance et tirez alors
rapidement afin d’éviter un effet de recul.
• Après chaque tentative de démarrage, alors que le moteur n’a pas
démarré, dirigez toujours le pistolet à pulvérisation vers un
endroit sécuritaire et appuyez sur le bouton rouge et sur la
détente du pistolet de pulvérisation pour libérer la haute pression.
• Lorsque vous utilisez une vaporisation à haute pression,
saisissez fermement le pistolet de vaporisation avec les deux
mains afin d’éviter les risques de blessures entraînés par les
effets de recul.
AVERTISSEMENT
: Usage de pression peut créer
puddles et glissant.
Un effet de recul du pistolet de
pulvérisation pourrait entraîner une
chute.
• Utilisez le nettoyeur à pression à partir d’une surface stable.
• La surface à nettoyer doit être inclinée et équipée
d'écoulements afin de réduire la possibilité de chutes dues aux
surfaces glissantes.
• Soyez très vigilant si vous devez utiliser le nettoyeur à pression
lorsque vous êtes dans une échelle, un échafaudage ou autre
emplacement similaire.
• Lorsque vous utilisez une vaporisation à haute pression,
saisissez fermement le pistolet de vaporisation avec les deux
mains afin d’éviter les risques de blessures entraînés par les
effets de recul.
Page 32

AVIS
: Le jet à haute pression risque d'endommager les
articles fragiles comme le verre.
• NE PAS diriger le pistolet de pulvérisation vers les vitres lorsque
la buse rouge 0° est utilisée.
• N’visez JAMAIS des plantes avec le pistolet pulvérisateur.
AVIS
: Le traitement inadéquat du nettoyeur à pression peut
l'endommager et réduire sa durée de vie utile.
• Si vous avez des questions à propos de l'utilisation prévue de cet
appareil, consultez votre détaillant.
• N'utilisez JAMAIS un appareil ayant des pièces brisées ou
manquantes ou sans bâti ou couvercles protecteurs.
• NE neutralisez AUCUN dispositif de sécurité de cette machine.
• NE modifiez PAS la vitesse régulée du moteur.
• N’utilisez PAS le nettoyeur à pression à des valeurs excédant la
pression nominale.
• NE modifiez PAS le nettoyeur à pression.
• Par temps froid, avant de démarrer le nettoyeur à pression,
vérifiez-en tous les éléments pour vous assurer qu'aucune glace
ne s'y est formée.
• N'utilisez JAMAIS le tuyau à haute pression comme poignée pour
déplacer l'appareil. Utilisez toujours la poignée de l'appareil.
• Vérifiez la présence de fuites ou les signes de détérioration du
système de combustible, comme un tuyau usé ou spongieux, des
brides de serrage desserrées ou manquantes, ou un réservoir ou
un bouchon endommagé. Réparez toutes les défectuosités avant
d'utiliser le nettoyeur à pression.
• Cet appareil est conçu pour être utilisé uniquement avec des
pièces Briggs & Stratton approuvées. Si l'appareil est utilisé avec
des pièces qui NE sont PAS conformes aux caractéristiques
minimales, tous les risques et responsabilités incomberont à
l'utilisateur.
6 www.murray.com
AVERTISSEMENT
: Tout contact avec la zone du
silencieux peut causer des brûlures
graves.
La chaleur et les gaz d’échappement
peuvent enflammer des matériaux combustibles et les
structures ainsi que causer des dommages au réservoir
d’essence et entraîner un incendie.
• NE touchez PAS aux pièces chaudes et évitez le contact avec les
gaz d’échappement.
• Laissez l'équipement refroidir avant de le toucher.
• Laissez un dégagement d’au moins 1,5 m (5 pi) tout autour de
la nettoyeur à pression, y compris au-dessus.
• L’utilisation ou le fonctionnement d’un moteur sur un terrain
boisé, couvert de broussailles ou gazonné constitue une violation
dans l’État de la Californie, en vertu de la section 4442 du
California Public Resources Code, à moins qu’il ne soit doté d’un
pare-étincelles tel que défini dans la section 4442 et maintenu en
bon état de fonctionnement. Il se peut que d’autres États ou
d’autres compétences fédérales aient des lois semblables.
Communiquez avec le fabricant, le détaillant ou le concessionnaire
original de l’appareil afin d’obtenir un pare-étincelles conçu pour le
système d’échappement installé sur ce moteur.
• Les pièces de rechange doivent être identiques aux pièces
d’origine et être installées à la même position.
AVERTISSEMENT: Unintentional peut résulter dans feu
ou électrique.
LORSQUE VOUS RÉGLEZ OU RÉPAREZ VOTRE NETTOYEUR À
PRESSION
• Débranchez toujours le câble de bougie et placez-le de façon à
ce qu'il ne soit pas en contact avec la bougie.
LORS DE TESTS D'ALLUMAGE DU MOTEUR
• Utilisez un vérificateur de bougies d'allumage approuvé.
• NE vérifiez PAS l'allumage lorsque la bougie d'allumage est enlevée.
AVERTISSEMENT:
Risque de blessure aux yeux.
Le jet peut rejaillir sur vous ou propulser des
objets.
• Portez toujours des lunettes de sécurité à aération indirecte
(contre les produits chimiques) spécifiées conformes à ANSI
Z87.1 lorsque vous utilisez ou que vous vous trouvez à
proximité de cet appareil.
• N’utilisez JAMAIS de lunettes de sécurité ou de lunettes de
sécurité pour condition sèche au lieu de lunettes de sécurité à
aération indirecte.
AVERTISSEMENT:
Démarreur et autre tourneres peut
empêtrer mains, cheveux, vêtement, ou
accessoires.
• N'utilisez JAMAIS un appareil sans bâti ou couvercles
protecteurs.
• NE portez PAS de vêtements lâches, de bijoux ou tout ce qui
risquerait d'être pris dans le démarreur ou toute autre pièce
rotative.
• Embouteiller des cheveux longs et enlève la bijouterie.
AVERTISSEMENT:
Le jet d'eau sous pression produit
par cet équipement peut percer la peau et les tissus
sous-jacents, risquant de provoquer des blessures
graves pouvant mener à une amputation.
Le pistolet de pulvérisation retient une pression d’eau
élevée, même lorsque le moteur est éteint et que l’eau est
déconnectée, ce qui peut causer des blessures.
• N'autorisez JAMAIS des ENFANTS à se servir du nettoyeur à
pression.
• Ne réparez JAMAIS les tuyaux à haute pression. Remplacez.
• Ne réparez JAMAIS des raccords non étanches à l’aide de
scellant. Remplacez le joint torique ou le joint d’étanchéité.
• Ne connectez JAMAIS le boyau à haute pression à la rallonge
de buse.
• Gardez toujours le tuyau flexible à haute pression raccordé à la
pompe et au pistolet de pulvérisation lorsque le système est
sous pression.
• À chaque fois que vous arrêtez le moteur, dirigez TOUJOURS le
pistolet vers un endroit sécuritaire et appuyez sur le bouton
rouge et sur la détente du pistolet de pulvérisation pour libérer
la haute pression.
• N visez JAMAIS des personnes, des animaux ou des plantes
avec le pistolet pulvérisateur.
• NE verrouillez PAS le pistolet de pulvérisation dans la position
ouverte.
• NE laissez PAS le pistolet de pulvérisation sans surveillance
alors que l'appareil est en marche.
• N'utilisez JAMAIS un pistolet de pulvérisation qui n'est pas
muni d'un verrou d'arme ou d'un pontet installé et en ordre de
marche.
• Assurez-vous toujours que le pistolet de pulvérisation, les
buses et les accessoires sont bien fixés.
Page 33

7
Assemblage
Lisez le manuel de l’opérateur en entier avant de
tenter d’assembler ou d’utiliser votre nouveau
nettoyeur à haute pression.
Votre nettoyeur à pression doit être assemblée et vous
pourrez l’utiliser après l’avoir correctement remplie d’huile et
d’essence recommandées.
Si vous avez n'importe quels problèmes avec l'assemblée de
votre nettoyeur à pression, s'il vous plaît appeler le helpline
de nettoyeur à pression à (800) 528-5087. Si vous
téléphonez pour obtenir de l'aide, veuillez avoir disponibles
les renseignements du étiquettes d'identification: numéro de
modèle, de révision et de série. Consultez la section
Commandes et fonctions de la nettoyeur à pression pour
connaître l’emplacement de l’étiquettes d'identification.
Déballage du nettoyeur à pression
1. Enlevez tous les composants de la boîte d’expédition à
l’exception du nettoyeur à pression.
2. Ouvrez la boîte d’expédition en coupant tous les coins
du haut vers le bas.
3. Enlevez le nettoyeur à pression de la boîte d’expédition.
Les articles dans la boîte incluent:
• Appareil principal
• Poignée
• Tuyau à haute pression
• Pistolet pulvérisateur
• Rallonge de buse à raccord rapide
• Plateau pour accessoires en plastique
• Huile à moteur
• Sac de pièces (comprenant les pièces énumérées
ci-dessous):
• Manuel d'utilisation
• Carte d’enregistrement du propriétaire
• Sac de 3 buses multicolores
• Ensemble de quincaillerie d’assemblage de la
poignée/plateau pour accessoires (comprenant):
• Boulons de carrosserie, (2)
• Boutons en plastique, (2)
• Agrafes, (2)
Pour mettre le nettoyeur pression en état de fonctionnement,
les tâches suivantes doivent être effectuées:
1. Remplissez et envoyez la carte d’enregistrement.
2. Fixez la poignée et le plateau pour accessoires à l’unité
principale.
3. Ajoutez de l'huile au carter du moteur.
4. Ajoutez de l'essence dans le réservoir.
5. Branchez le tuyau à haute pression au pistolet
pulvérisateur et à la pompe.
6. Branchez la source d'alimentation d'eau à la pompe.
7. Connectez la rallonge de buse sur le pistolet de
pulvérisation.
8. Choisissez et installez une buse à raccord rapide sur la
rallonge de buse.
Fixez la poignée et le plateau pour accessoires
1. Placez la poignée (A) sur la base (B). Assurez-vous que
les trous de la poignée sont alignés avec ceux de la
base.
2. Insérez les boulons de carrosserie (C) dans les trous à
l’extérieur de l’unité, puis fixez un bouton en plastique
(D) à partir de l’intérieur de l’unité. Serrez à la main.
3. Placez le plateau pour accessoires (E) sur la base (F)
(en regardant à partir de l’arrière de l’unité). Assurezvous que les trous du plateau pour accessoires sont
alignés avec ceux de la base. Poussez les agrafes (G)
dans les trous jusqu’à ce qu’elles reposent sur le
plateau pour accessoires.
4. Insérez les accessoires fournis dans les espaces prévus
sur le plateau pour accessoires. Consultez la section
Comment utiliser le plateau pour accessoires.
D
A
B
C
C
G
F
E
Page 34

Ajoutez de l'huile à moteur
1. Placez le nettoyeur à pression sur une surface plane.
2. Nettoyez la surface autour de l’orifice de remplissage
d’huile et enlevez la jauge d’huile.
3. À l'aide d'un entonnoir pour huile (optionnel), versez
lentement le contenu complet de la bouteille d'huile
fournie dans l'orifice de remplissage.
AVIS
: Un traitement inapproprié du nettoyeur à pression
risque de l'endommager et de raccourcir sa durée
d'utilisation.
• NE tentez JAMAIS de démarrer le moteur sans d’abord vérifier s'il
a été entretenu de façon appropriée avec l’huile recommandée.
Cela risquerait d'entraîner un bris de moteur.
4. Replacez la jauge d’huile et serrez-la solidement.
Ajoutez de l'essence
L’essence satisfait les exigences suivantes:
• Essence sans plomb fraîche et propre.
• Un indice d’octane minimum de 87/87 AKI (91 IOR).
Utilisation à des altitudes élevées, consultez la section
Altitude élevée.
• Une essence avec jusqu’à 10 % d’éthanol (gazohol) ou
jusqu’à 15 % d’éther méthyltertiobutylique est acceptable.
AVIS
: Évitez d’endommager le nettoyeur à pression.
Le manquement à suivre les recommandations relatives à
l’huile du manuel d’utilisation annule la garantie.
• NE PAS utiliser d’essence non approuvée telle que E85.
• NE PAS mélanger l’huile avec l’essence.
• NE PAS modifier le moteur afin qu’il fonctionne avec d’autres
types d’essence.
Au moment d’ajouter de l’essence, la mélanger avec un
stabilisateur d’essence afin de protéger le circuit d’alimentation
contre la formation de dépôts de gomme. Voir Entreposage.
Les essences ne sont pas toutes pareilles. Si vous éprouvez
des problèmes de démarrage ou de performance après avoir
utilisé une essence, changez de fournisseur d’essence ou de
marque d’essence. Le fonctionnement du moteur avec de
l’essence est certifié. Ce dispositif antipollution pour ce moteur
est de type EM (Modifications de moteur).
1. Nettoyez la partie autour du bouchon du réservoir
d'essence, enlevez le bouchon.
2. Ajoutez lentement de l'essence "SANS PLOMB" (A) dans
le réservoir (B). Utilisez un entonnoir pour éviter d'en
renverser. Remplissez lentement le réservoir jusqu'à
environ 4 cm (1.5”) (C) po en dessus du col de
remplissage.
3. Installez le bouchon à essence et attend le carburant
renversé pour s'évaporer.
Altitude élevée
À des altitudes de plus de 5 000 pi (1 524 m), il convient
d’utiliser des essences présentant un indice d’octane minimal
de 85/85 AKI (89 IOR). Un réglage pour les altitudes élevées
est requis pour respecter les normes relatives aux émissions.
Une utilisation sans ce réglage entraîne une diminution de la
performance ainsi qu’une augmentation de la consommation
d’essence et des émissions. Consultez un détaillant autorisé
Briggs & Stratton pour des renseignements sur les réglages
pour les altitudes élevées. L’utilisation à des altitudes
inférieures à 762 mètres (2 500 pieds) avec la trousse pour
les altitudes élevées est déconseillée.
8 www.murray.com
C
B
A
AVERTISSEMENT:
L'essence et ses vapeurs sont
extrêmement inflammables et
explosives.
Le feu ou l'explosion risque de
provoquer des blessures graves, pouvant être fatales.
LORS DE L'AJOUT DU CARBURANT
• Éteignez le nettoyeur à pression et laissez-le refroidir au moins
2 minutes avant de retirer le capuchon du réservoir de
carburant. Desserrez lentement le capuchon pour laisser la
pression s'échapper du réservoir.
• Remplissez ou vidangez le réservoir d'essence à l'extérieur.
• NE remplissez PAS trop le réservoir. Laissez l'expansion de
l'essence.
• Attend le carburant renversé pour s'évaporer avant de démarrer
le moteur.
• Éloignez l'essence des étincelles, des flammes, des veilleuses,
de la chaleur et de toute autre source d'inflammation.
• N'ALLUMEZ PAS de cigarette ou ne fumez pas à proximité de
l'appareil.
Page 35

9
Raccorder le tuyau et la source d'eau à la pompe
AVIS: NE faites PAS marcher la pompe sans que le
nettoyeur à pression soit connecté à la source d'eau
ouverte.
• Vous devez suivre cet avertissement, au risque d'endommager la
pompe.
IMPORTANT: Enlevez et jetez les bouchons d'expédition de
la sortie haute pression de la pompe et de l'admission de
l'eau avant de brancher les boyaux.
1. Déroulez le tuyau à haute pression et fixez le à la base
du pistolet pulvérisateur. Serrez manuellement.
2. Fixez l'autre extrémité du tuyau à haute pression à la
prise haute pression sur la pompe. Serrez manuellement.
3. Avant de brancher votre tuyau d'arrosage à la prise
d'eau, inspectez la filtre intégré (A). Nettoyez la filtre
intégré si elle contient des débris, remplacez-la si elle
est endommagée. NE vous servez PAS du nettoyeur à
pression si la filtre intégré est endommagée.
4. Faites couler de l'eau dans le tuyau d'arrosage pendant
30 secondes pour nettoyer tous les débris. Fermez le
robinet d'eau.
IMPORTANT: NE siphonnez PAS de l'eau stagnante pour
vous en servir. Utilisez SEULEMENT de l'eau froide (à moins
de 100ºF (38°C)).
5. Connectez le tuyau d'arrosage (ne pas dépasser
50 pieds dans la longueur) à la prise d'eau. Serrez
manuellement.
AVIS
: L’utilisation d’un clapet de non-retour (reniflard ou
soupape de sûreté) à l’entrée de la pompe peut entraîner
l’endommagement de la pompe ou du connecteur d’entrée.
• Il doit y avoir une longueur d’au moins dix pieds (trois mètres) de
boyau d’arrosage libre entre l’entrée du nettoyeur à haute pression
et tout dispositif, tel que reniflard ou soupape de sûreté.
• Les dommages infligés au nettoyeur à pression par suite de ne
pas avoir respecté cette consigne, ne seront pas couverts par la
garantie.
6. Ouvrez l’eau, appuyez sur le bouton rouge (B) du
pistolet et sur la détente pour purger la pompe de l’air
et des impuretés qui s’y trouvent.
Liste de vérifications avant de démarrer le moteur
Examinez l'assemblage de l'appareil pour confirmer que vous
avez effectué tout ce qui suit:
1. Assurez-vous d'avoir lu les Règles de Sécurité et Comment
Utiliser Votre Nettoyeur à Pression avant de l'utiliser.
2. Assurez-vous que la poignée est en place et bien fixée.
3. Vérifiez qu'il y a de l'huile dans le carter, jusqu'au
niveau approprié.
4. Ajoutez de l'essence dans le réservoir.
5. Vérifiez que les connexions du tuyau sont correctement
serrées (haute pression et eau) et qu'il n'y ait pas de
coude, de coupures ou d'endroits abîmés.
6. Fournissez de l'eau à une cadence appropriée.
A
B
AVERTISSEMENT:
Le jet d'eau sous pression produit
par cet équipement peut percer la peau et les tissus
sous-jacents, risquant de provoquer des blessures
graves pouvant mener à une amputation.
• Ne connectez JAMAIS le boyau à haute pression à la rallonge
de buse.
• Gardez toujours le tuyau flexible à haute pression raccordé à la
pompe et au pistolet de pulvérisation lorsque le système est
sous pression.
• Assurez-vous toujours que le pistolet de pulvérisation, les
buses et les accessoires sont bien fixés.
AVERTISSEMENT:
Risque de blessure aux yeux.
Le jet peut rejaillir sur vous ou propulser des
objets.
• Portez toujours des lunettes de sécurité à aération indirecte
(contre les produits chimiques) spécifiées conformes à ANSI
Z87.1 lorsque vous utilisez ou que vous vous trouvez à
proximité de cet appareil.
• N’utilisez JAMAIS de lunettes de sécurité ou de lunettes de
sécurité pour condition sèche au lieu de lunettes de sécurité à
aération indirecte.
Page 36

A - Rallonge de buse à raccord rapide — Cette rallonge vous
permet de changer les buses (trois modèles différents).
B - Buses — Détergent, 0° et 25° : pour les différentes applications
de nettoyage à haute pression.
C - Démarreur à recul — Utilisé pour démarrer le moteur
manuellement.
D - Bouchon de remplissage/Jauge d’huile — Vérifiez le niveau
d’huile, remplir et videz l’huile à moteur ici.
E - Système de refroidissement automatique — Fait circuler l'eau
dans la pompe lorsqu'elle atteint 51° à 68°C (125° à 155°F).
L'eau chaude s'écoulera de la pompe sur le sol. Ce système
empêche la pompe interne de s'abîmer.
F - Prise d'eau — Branchement pour le tuyau d'arrosage.
G - Prise haute pression — Vous permet de brancher le tuyau à
haute pression.
H - Filtro y Tubo para Recolección de Detergente — Usado para
succionar detergente de la botella de químicos a la corriente de
agua de baja presión.
J - Pompe — Développe une pression élevée.
K - Réservoir d'essence — Remplissez le réservoir avec de
l'essence ordinaire sans plomb. Laissez toujours de la place
pour l'expansion de l'essence.
L - Pompe d'amorçage — Prépare un moteur froid pour le
démarrage.
M - Filtre à air — Filtre de type sec qui limite la quantité de
poussières et de saletés dans le moteur.
N - Manette de poussée — Cette manette place le moteur en mode
démarrage pour le lanceur et éteint le moteur en marche.
P - Tuyau à haute pression — Raccordez une extrémité à la pompe
à eau et l’autre au pistolet de pulvérisation.
R - Plateau pour accessoires — Fournit un espace de rangement
pratique pour les accessoires.
S - Pistolet de pulvérisation — Un dispositif de détente permet de
contrôler le jet d'eau sur la surface à nettoyer. Le pistolet est
muni d'un verrou de sécurité.
Articles non montrés:
Étiquettes d'identification (près de l’arrière de la plaque de fond)
— Indique le numéro de modèle et de série du nettoyeur à haute
pression. Veuillez avoir ces renseignements sous la main lors
d’appel de service.
Étiquette Avertissement/Directives d’utilisation — Identifie les
risques et la procédure appropriée pour le démarrage et l’arrêt du
nettoyeur à haute pression.
10 www.murray.com
Fonctions et commandes
Lisez ce manuel d'utilisation ainsi que les règles de sécurité avant de faire fonctionner votre nettoyeur à pression.
Comparez les illustrations avec votre nettoyeur à pression pour vous familiariser avec l'emplacement des différents
boutons et réglages. Conservez ce manuel pour référence ultérieure.
G
B
D
A
J
E
F
P
N
H
C
L
K
R
S
M
Page 37

11
Opération
Si vous éprouvez des problèmes lors de l’utilisation de votre
nettoyeur à haute pression, veuillez appeler la ligne d’aide du
nettoyeur à haute pression au (800) 528-5087.
Emplacement de la nettoyeur à pression
Dégagement de la nettoyeur à pression
Placez la nettoyeur à pression dans un endroit bien ventilé qui
permet l'élimination des gaz d'échappement mortels.
N'installez PAS la nettoyeur à pression dans un endroit où les
gaz d'échappement (A) pourraient s'accumuler et pénétrer ou
être aspirés dans un édifice qui pourrait être occupé. Assurezvous que les gaz d'échappement ne puissent entrer par une
fenêtre, une porte, une prise d'aération ou une autre
ouverture qui pourrait leur permettre de s'accumuler dans un
espace restreint. Tenez aussi compte des vents dominants et
des courants d'air au moment de choisir l'endroit où vous
installerez la nettoyeur à pression.
Mettre votre nettoyeur à pression en marche
Pour démarrer votre nettoyeur à haute pression la première
fois, suivez ces instructions pas à pas. Cette information qui
vous aide à mettre votre nettoyeur à haute pression en
marche s'applique également s'il est resté sans fonctionner
pendant au moins une journée.
1. Placer la rondelle de pression près d'un hors de la
source d'eau capable d'alimentation d'eau à un taux de
flux plus grand que 2.9 gallons (11.0 l) par la minute et
aucun moins que 20 PSI (1.38 BARS) à la fin de
nettoyeur à pression du tuyau de jardin.
2. Vérifiez que le tuyau à haute pression est bien serré sur
le pistolet pulvérisateur et sur la pompe. Consultez les
illustrations de la rubrique Assemblage.
3. Vérifiez que l'appareil est en position horizontale.
4. Branchez le tuyau d'arrosage à la source d'eau sur la
pompe du nettoyeur à pression.
AVIS: NE faites PAS marcher la pompe sans que le
nettoyeur à pression soit connecté à la source d'eau
ouverte.
• Vous devez suivre cet avertissement, au risque d'endommager la
pompe.
5. Ouvrez l’eau, appuyez sur le bouton rouge du pistolet et
sur la détente pour purger la pompe de l’air et des
impuretés qui s’y trouvent.
6. Placez les buses à raccord rapide à leur emplacement
approprié sur le support relié à la rallonge de buse.
7. Fixez la rallonge du gicleur au pistolet pulvérisateur.
Serrez manuellement.
8. Choisissez la buse que vous voulez utiliser, tirez la
bague de la rallonge de buse, insérez la buse, puis
relâchez la bague. Vérifiez si la buse est correctement
installée en tirant dessus. Consultez la section
Comment utiliser les buses.
A
AVERTISSEMENT:
Le nettoyeur à pression, lorsqu'il
fonctionne, produit du monoxyde de carbone, un
gaz toxique inodore et incolore.
L’inhalation du monoxyde de carbone peut causer
des maux de tête, de la fatigue, des étourdissements, le
vomissement, de la confusion, des crises épileptiques, des
nausées, l’évanouissement ou la mort.
• Faites fonctionner le nettoyeur à pression SEULEMENT à
l'extérieur.
• Évitez que les gaz d'échappement entrent dans un espace
restreint, par une fenêtre, une porte, une prise d'aération ou
toute autre ouverture.
• NE démarrez, ni ne faites fonctionner un moteur à l'intérieur ou
dans un espace fermé, même si les fenêtres ou les portes sont
ouvertes.
AVERTISSEMENT:
La chaleur et les gaz
d’échappement peuvent enflammer des
matériaux combustibles et les structures ainsi
que causer des dommages au réservoir
d’essence et entraîner un incendie.
• Laissez un dégagement d’au moins 1,5 m (5 pi) tout autour de
la nettoyeur à pression, y compris au-dessus.
Page 38

9. Placez la manette de poussée de puissance en position
"Rapide" (A), illustrée ici par un lapin.
Pour démarrer le moteur pour la première fois:
10A. Poussez la pompe d'amorçage fermement 5 fois, en
attendant 2 secondes entre chaque poussée.
Par la suite, pour démarrer le moteur:
10B. Actionnez la pompe d'amorçage fermement 3 fois, en
attendant 2 secondes entre chaque poussée. Si le moteur
est chaud, N'actionnez PAS la pompe d'amorçage.
IMPORTANT: Avant de démarrer le nettoyeur à haute
pression, assurez-vous de porter des lunettes de sécurité tel
que décrit ci-dessous.
11. Lors du démarrage du moteur, placez-vous tel que
recommandé, saisissez la poignée du démarreur et tirez
lentement jusqu'à ce que vous sentiez de la résistance.
Tirez alors rapidement pour démarrer le moteur.
12. Ramenez la poignée du démarreur lentement. NE
laissez PAS le cordon se frapper contre le démarreur.
REMARQUE: Toujours garder l'manette de poussée dans le
“Rapide” la position en opérant la nettoyeur à pression.
12 www.murray.com
A
AVERTISSEMENT:
Risque de blessure aux yeux.
Le jet peut rejaillir sur vous ou propulser des
objets.
• Portez toujours des lunettes de sécurité à aération indirecte
(contre les produits chimiques) spécifiées conformes à ANSI
Z87.1 lorsque vous utilisez ou que vous vous trouvez à
proximité de cet appareil.
• N’utilisez JAMAIS de lunettes de sécurité ou de lunettes de
sécurité pour condition sèche au lieu de lunettes de sécurité à
aération indirecte.
AVERTISSEMENT: Un effet de recul (rétroaction rapide)
de la corde du démarreur pourrait entraîner des
blessures corporelles. L’effet de recul tirera votre
main et votre bras vers le moteur plus rapidement
que vous ne pouvez relâcher la corde.
Vous risquez ainsi de subir des fractures, des
ecchymoses ou des entorses.
• NE tirez JAMAIS sur la corde du démarreur sans avoir d’abord
libéré la pression du pistolet de pulvérisation.
• Lors du démarrage du moteur, tirez lentement sur la corde
jusqu’à ce que vous sentiez une résistance et tirez alors
rapidement afin d’éviter un effet de recul.
• Après chaque tentative de démarrage, alors que le moteur n’a pas
démarré, dirigez toujours le pistolet à pulvérisation vers un
endroit sécuritaire et appuyez sur le bouton rouge et sur la
détente du pistolet de pulvérisation pour libérer la haute pression.
• Lorsque vous utilisez une vaporisation à haute pression,
saisissez fermement le pistolet de vaporisation avec les deux
mains afin d’éviter les risques de blessures entraînés par les
effets de recul.
AVERTISSEMENT:
Le jet d'eau sous pression produit
par cet équipement peut percer la peau et les tissus
sous-jacents, risquant de provoquer des blessures
graves pouvant mener à une amputation.
Le pistolet de pulvérisation retient une pression d’eau
élevée, même lorsque le moteur est éteint et que l’eau est
déconnectée, ce qui peut causer des blessures.
• N'autorisez JAMAIS des ENFANTS à se servir du nettoyeur à
pression.
• Gardez toujours le tuyau flexible à haute pression raccordé à la
pompe et au pistolet de pulvérisation lorsque le système est
sous pression.
• N visez JAMAIS des personnes, des animaux ou des plantes
avec le pistolet pulvérisateur.
• NE verrouillez PAS le pistolet de pulvérisation dans la position
ouverte.
• NE laissez PAS le pistolet de pulvérisation sans surveillance
alors que l'appareil est en marche.
• N'utilisez JAMAIS un pistolet de pulvérisation qui n'est pas muni
d'un verrou d'arme ou d'un pontet installé et en ordre de marche.
• Assurez-vous toujours que le pistolet de pulvérisation, les
buses et les accessoires sont bien fixés.
Page 39

13
Comment arrêter votre nettoyeur à pression
1. Relâchez la détente du pistolet de pulvérisation et laissez
le moteur tourner au ralenti durant deux minutes.
2. Placez le manette de poussée du moteur en position
“Slow” , puis à la position “Stop” (A).
3. Dirigez TOUJOURS le pistolet vers un endroit sécuritaire
et appuyez sur le bouton rouge et sur la détente du
pistolet de pulvérisation pour libérer la haute pression.
IMPORTANT: Le pistolet de pulvérisation retient une
pression d’eau élevée, même lorsque le moteur est éteint et
que l’eau est déconnectée.
Comment utiliser le plateau pour accessoires
L’unité est dotée d’un plateau pour accessoires servant à
ranger le pistolet de pulvérisation, la rallonge de buse et le
boyau à haute pression.
1. Insérez la rallonge de buse par le trou du plateau pour
accessoires, tel que montré.
2. Insérez le pistolet à pulvérisation par le trou du plateau
pour accessoires, du côté droit de l’unité, tel que montré.
3. Suspendez le tuyau à haute pression sur le crochet, tel
que montré.
Comment utiliser les buses
Le raccord rapide de la rallonge de buse vous permet de
changer les trois différentes buses. Les buses peuvent être
changées pendant que le nettoyeur à haute pression est en
marche, alors que le verrou de la détente du pistolet de
pulvérisation est engagé. Chacune des buses donne un jet
différent, tel qu’indiqué ci-dessus.
Pour changer les buses, veuillez suivre les directives
suivantes:
1. Tirez la bague du raccord rapide et retirez la buse qui
est déjà en place. Rangez les buses dans le support fixé
à la rallonge de buse.
A
Noir
Utilisez pour appliquer
du détergent
25° Vert Rouge 0°
Basse pression
Haute pression
AVERTISSEMENT
: Tout contact avec la zone du silencieux
peut causer des brûlures graves.
La chaleur et les gaz d’échappement
peuvent enflammer des matériaux
combustibles et les structures ainsi que causer des
dommages au réservoir d’essence et entraîner un incendie.
• NE touchez PAS aux pièces chaudes et évitez le contact avec les
gaz d’échappement.
• Laissez l'équipement refroidir avant de le toucher.
• Laissez un dégagement d’au moins 1,5 m (5 pi) tout autour de
la nettoyeur à pression, y compris au-dessus.
• L’utilisation ou le fonctionnement d’un moteur sur un terrain
boisé, couvert de broussailles ou gazonné constitue une violation
dans l’État de la Californie, en vertu de la section 4442 du
California Public Resources Code, à moins qu’il ne soit doté d’un
pare-étincelles tel que défini dans la section 4442 et maintenu en
bon état de fonctionnement. Il se peut que d’autres États ou
d’autres compétences fédérales aient des lois semblables.
Communiquez avec le fabricant, le détaillant ou le concessionnaire
original de l’appareil afin d’obtenir un pare-étincelles conçu pour le
système d’échappement installé sur ce moteur.
• Les pièces de rechange doivent être identiques aux pièces
d’origine et être installées à la même position.
AVERTISSEMENT:
Le jet d'eau sous pression produit
par cet équipement peut percer la peau et les tissus
sous-jacents, risquant de provoquer des blessures
graves pouvant mener à une amputation.
Le pistolet de pulvérisation retient une pression d’eau
élevée, même lorsque le moteur est éteint et que l’eau est
déconnectée, ce qui peut causer des blessures.
• Gardez toujours le tuyau flexible à haute pression raccordé à la
pompe et au pistolet de pulvérisation lorsque le système est
sous pression.
• À chaque fois que vous arrêtez le moteur, dirigez TOUJOURS le
pistolet vers un endroit sécuritaire et appuyez sur le bouton
rouge et sur la détente du pistolet de pulvérisation pour libérer
la haute pression.
Page 40

2. Choisissez la buse désirée:
• Pour un rinçage délicat, prenez la buse vert 25°.
• Pour récurer une surface, choisissez la buse rouge 0°.
• Pour appliquer un produit détergent, sélectionnez la
buse noire.
Conseils d'utilisation
• Tirez la bague, insérez la nouvelle buse, puis relâchez la
bague. Vérifiez si la buse est correctement installée en
tirant dessus.
• Pour obtenir un nettoyage optimal, gardez la buse à
une distance de 8 à 24 pouces de la surface à nettoyer.
Si la buse est trop près, vous risquez d'endommager la
surface à nettoyer.
• NE vous approchez PAS à moins de 6 pouces lors du
nettoyage de pneus.
Application de détergent
Pour appliquer des produits détergents, procédez comme
suit:
1. Révisez la partie sur l’utilisation de la buse.
2. Préparez une solution détergente comme requis par le
fabricant.
3. Placez la petite extrémité du filtre du tube siphon dans
le récipient de détergent.
REMARQUE: Assurez-vous que le filtre est entièrement
immergé dans le détergent lors de l’application du détergent.
AVIS: Tout contact avec le silencieux chaud peut
endommager le tube de siphonnement du détergent.
• Lorsque vous insérez le filtre dans une bouteille de solution de
détergent, placez le tube de manière à ce qu'il n'entre pas en
contact par mégarde avec le silencieux chaud.
4. Assurez-vous que la buse pour détergent est installée.
REMARQUE: Les buses à haute pression (vert et rouge) ne
peuvent pas être utilisées pour appliquer du détergent.
5. Assurez-vous que le boyau d’arrosage est connecté à
l’entrée d’eau. Vérifiez si le boyau à haute pression est
connecté au pistolet de pulvérisation et à la pompe.
Ouvrez l’alimentation d’eau.
AVIS: Vous devez attacher tous les tuyaux avant de
démarrer le moteur.
• Si vous démarrez le moteur sans que tous les tuyaux soient
branchés et sans que l'eau soit OUVERTE, vous allez abîmer la
pompe.
• Vous devez suivre cet avertissement, au risque d'endommager la
pompe.
6. Démarrez le moteur selon les directives Comment
démarrer votre nettoyeur à pression.
7. Appliquez le détergent sur une surface sèche, en
commençant par la partie inférieure de la surface à
nettoyer et travaillez vers le haut, avec de longs
mouvements réguliers et qui se chevauchent.
8. Laissez le détergent "tremper" pendant 3 à 5 minutes
avant de laver et de rincer. Appliquez à nouveau, si
besoin est, pour éviter que la surface ne sèche. NE
laissez PAS le détergent sécher (pour éviter les traces).
IMPORTANT: Vous devez rincer le système d'injection de
produits détergentes après chaque utilisation en plaçant le
filtre dans un seau rempli d'eau claire, puis faire fonctionner le
nettoyeur à pression à basse pression pendant 1 à 2 minutes.
14 www.murray.com
AVERTISSEMENT:
Le jet d'eau sous pression produit
par cet équipement peut percer la peau et les tissus
sous-jacents, risquant de provoquer des blessures
graves pouvant mener à une amputation.
• Ne changez JAMAIS les buses sans avoir d’abord enclenché le
verrou de la détente du pistolet de pulvérisation.
• NE tournez PAS les buses pendant la pulvérisation.
ATTENTION:
Les produits chimiques peuvent entraîner
des blessures corporelles ou des dommages matériels.
• Ne JAMAIS utiliser de liquide caustique avec le nettoyeur à
haute pression.
• Utilisez SEULEMENT des détergents/savons sans risque
d’endommagement pour le nettoyeur à pression.
Page 41

15
Rincer le nettoyeur à pression
Pour rincer:
1. Enlevez la buse noire de la rallonge de buse.
2. Sélectionnez la buse à haute pression désirée et
installez-la en suivant les directives décrites dans la
section Comment utiliser les buses.
3. NE placez PAS le pistolet pulvérisateur trop près de la
surface que vous désirez pulvériser.
4. Appliquez le jet à haute pression sur une petite surface,
puis vérifiez-la pour voir si elle n'est pas abîmée. Si elle
n'est pas abîmée, vous pouvez continuer.
5. Commencez en haut de l'endroit que vous devez rincer,
en descendant avec les mêmes mouvements qui se
chevauchent comme lorsque vous avez nettoyé.
Tube de siphonnement du détergent
Si vous utilisez le tube de siphonnement du détergent, vous
devez le rincer à l’eau propre avant d’arrêter le moteur.
1. Placez le siphon/filtre d’injection de produits chimiques
dans un seau rempli d’eau.
2. Retirez la buse à haute pression de la rallonge de buse.
3. Sélectionnez et installez la buse noire de détergeant
selon les directives décrites dans la section Comment
utiliser les buses.
4. Rincez durant 1 à 2 minutes.
5. Arrêtez le moteur selon les directives Comment arrêter
le nettoyeur à pression et fermez l’alimentation en eau.
6. Dirigez TOUJOURS le pistolet à pulvérisation vers un
endroit sécuritaire et appuyez sur le bouton rouge et
sur la détente du pistolet de pulvérisation pour libérer la
haute pression de l’eau.
IMPORTANT: Le pistolet de pulvérisation retient une
pression d’eau élevée, même lorsque le moteur est éteint et
que l’eau est déconnectée.
Système de refroidissement automatique
(surpression thermique)
Si vous faites tourner le moteur de votre pulvérisateur
pendant 3 à 5 minutes sans appuyer sur la gâchette du
pistolet pulvérisateur, l'eau qui circule dans la pompe peut
atteindre une température de 51° à 68°C (125° à 155°F).
Lorsque l'eau atteint cette température, le système de
refroidissement automatique se déclenche et refroidit la
pompe en vidant l'eau chaude sur le sol.
AVERTISSEMENT:
Un effet de recul du pistolet de
pulvérisation pourrait entraîner une chute.
• Utilisez le nettoyeur à pression à partir d’une surface stable.
• Soyez très vigilant si vous devez utiliser le nettoyeur à pression
lorsque vous êtes dans une échelle, un échafaudage ou autre
emplacement similaire.
• Lorsque vous utilisez une vaporisation à haute pression,
saisissez fermement le pistolet de vaporisation avec les deux
mains afin d’éviter les risques de blessures entraînés par les
effets de recul.
AVERTISSEMENT:
Le jet d'eau sous pression produit
par cet équipement peut percer la peau et les tissus
sous-jacents, risquant de provoquer des blessures
graves pouvant mener à une amputation.
Le pistolet de pulvérisation retient une pression d’eau
élevée, même lorsque le moteur est éteint et que l’eau est
déconnectée, ce qui peut causer des blessures.
• Gardez toujours le tuyau flexible à haute pression raccordé à la
pompe et au pistolet de pulvérisation lorsque le système est
sous pression.
• À chaque fois que vous arrêtez le moteur, dirigez TOUJOURS le
pistolet vers un endroit sécuritaire et appuyez sur le bouton
rouge et sur la détente du pistolet de pulvérisation pour libérer
la haute pression.
Page 42

16 www.murray.com
Entretien
Calendrier d’entretien
Respectez le calendrier d'entretien du nettoyeur selon le
nombre d'heures de fonctionnement ou le temps écoulé, le
premier des deux prévalant. Lorsque l'appareil est utilisé dans
les conditions adverses décrites ci-dessous, il faut en faire
l'entretien plus fréquemment.
1
Nettoyez l'appareil s'il est encrassé. Remplacez toute pièce perforée ou
endommagée.
2
Remplacez les pièces plus fréquemment si vous utilisez l'appareil dans un milieu
sale ou poussiéreux.
Recommandations générales
Un entretien régulier améliorera la performance et prolongera
la durée de vie de la nettoyeur à pression. Consultez un
détaillant autorisé pour l’entretien.
La garantie de la nettoyeur à pression ne couvre pas les
éléments soumis à l'abus ou à la négligence de l'opérateur.
Pour qu'elle soit entièrement valide, l'opérateur doit
entretenir la nettoyeur à pression conformément aux
instructions contenues dans ce manuel, incluant
l’entreposage approprié tel que décrit dans Entreposage pour
l’hiver et Entreposage à long terme.
REMARQUE: Si vous avez des questions sur le remplacement
des composants du nettoyeur à haute pression veuillez
composer le (800) 528-5087 pour obtenir de l’aide.
Certains ajustements devront être faits périodiquement pour
assurer un entretien adéquat de la nettoyeur à pression.
Il faut effectuer toutes les opérations d'entretien et les
réglages au moins une fois par saison. Suivez les
instructions du Calendrier d'entretien ci-dessus
REMARQUE: Une fois par année, vous devez nettoyer ou
remplacer la bougie d'allumage et remplacer le filtre à air.
Une nouvelle bougie d'allumage et un filtre à air propre
permettent d'assurer que le mélange essence-air est adéquat
en plus de contribuer au meilleur fonctionnement de votre
moteur et d'augmenter sa durée de vie.
Pompe à huile
NE tentez PAS d’effectuer d’entretien relatif à l’huile sur la
pompe. La pompe est pré-lubrifiée et scellée en usine, ne
nécessitant aucune lubrification supplémentaire au cours de
la durée de vie de la pompe.
Contrôle des émissions
L'entretien, le remplacement ou la réparation des
dispositifs et systèmes antipollution peuvent être effectués
par un établissement de réparation de moteurs hors route
ou par une personne qualifiée. Pour obtenir un entretien
« sans frais » du dispositif antipollution, le travail doit être
effectué par un détaillant autorisé par le fabricant. Voir la
Garantie du dispositif antipollution.
Avant chaque utilisation
1. Vérifiez le niveau d'huile du moteur.
2. Nettoyage des débris.
3. Vérifiez si la grille de la prise d'eau n'est pas abîmée.
4. Vérifiez si le tuyau à haute pression n'a pas de fuite.
5. Vérifiez si des dommages sont visibles sur le tube de
siphonnement du détergent.
6. Vérifiez si le pistolet pulvérisateur et de l'assemblage de
la rallonge réglable du gicleur n'ont pas de fuite.
7. Rincez le boyau d’arrosage pour déloger tous débris.
Entretien du nettoyeur à pression
Nettoyage des débris
Nettoyez les débris accumulés sur le nettoyeur à haute
pression tous les jours ou avant de l’utiliser. Gardez toujours
la tringlerie, le ressort et les commandes propres. Gardez la
zone autour et derrière le silencieux libre de débris
combustibles. Inspectez les fentes d’air de refroidissement et
les ouvertures sur le nettoyeur à haute pression. Ces
ouvertures doivent demeurer propres et non obstruées.
Les parties du nettoyeur à haute pression doivent être
gardées propres afin de réduire le risque de surchauffe et
d’inflammation des débris accumulés.
• Utilisez un linge humide pour nettoyer les surfaces
extérieures.
AVIS: Un traitement inapproprié du nettoyeur à pression
risque de l'endommager et de raccourcir sa durée
d'utilisation.
• N'INSÉREZ aucun objet dans les fentes de refroidissement.
• Utilisez une brosse à soies douces pour détacher les
accumulations de saletés, d’huile, etc.
• Utilisez un aspirateur pour ramasser les saletés et débris.
Cinq (5) premières heures
• Changer l’huile du moteur
Aux 8 heures ou Quotidien
• Vérifier/nettoyer la crépine d’eau d’arrivée
1
• Vérifier le tuyau à haute pression
• Vérification du tube de siphonnement du détergent
• Vérifier la présence de fuites dans le pistolet à
pulvérisation et l’assemblage
• Nettoyez les débris
• Vérifier le niveau d’huile du moteur
Aux 25 heures ou 1 fois l’an
• Faire l’entretien du filtre à air
2
Aux 50 heures ou 1 fois l’an
• Changer l’huile du moteur
2
• Inspectez le silencieux et l’écran pare-étincelles
Aux 100 heures ou 1 fois l’an
• Faire l’entretien de la bougie d’allumage
• Nettoyez le système de refroidissement
2
Page 43

17
Vérifiez et nettoyez la grille de la prise d'eau
Inspectez la grille de la prise d'eau. Nettoyez-la si elle est
bouchée ou remplacez-la si elle est endommagée.
Vérifiez le tuyau à haute pression
Le tuyau à haute pression peut avoir des fuites, s'il est usé,
tordu ou mal utilisé. Inspectez le tuyau avant chaque
utilisation. Vérifiez tous les tuyaux pour les coupures, les
fuites, l'abrasion ou le gonflement du couvercle, ou si
certains raccords sont abîmés ou mobiles. Si vous remarquez
quelque chose, remplacez immédiatement le tuyau.
Vérifiez le tube de siphonnement du détergent
Examinez le filtre du tube de siphonnement et nettoyez-le s’il
est encrassé. Le tube doit s’ajuster fermement au raccord à
barbelure. Examinez le tube pour déceler des fuites ou
craquelures. Remplacez le filtre ou le tube si l’un ou l’autre
est endommagé.
Vérifiez le pistolet et la rallonge de gicleur réglable
Examinez le branchement du boyau au pistolet à
pulvérisation et assurez-vous que le branchement est solide.
Faites l’essai de la détente en appuyant sur le bouton rouge
et en vous assurant que la détente revient à sa position
initiale lorsque vous la relâchez. Vous ne devriez pas être en
mesure d’actionner la détente sans avoir appuyé sur le
bouton rouge. Remplacez le pistolet à pulvérisation
immédiatement s’il échoue un de ces essais.
Entretien du buse
Si vous sentez un effet de pulsation en appuyant sur la détente
du pistolet de pulvérisation, c’est que la pression de la pompe
est peut-être trop élevée. Cela peut se produire si la buse est
obstruée, complètement ou en partie, par un corps étranger,
comme des saletés, etc. Pour remédier à ce problème,
nettoyez immédiatement la buse en suivant ces instructions:
1. Éteignez le moteur et fermez l’alimentation en eau.
2. Dirigez TOUJOURS le pistolet à pulvérisation vers un
endroit sécuritaire et appuyez sur le bouton rouge et
sur la détente du pistolet de pulvérisation pour libérer la
haute pression de l’eau.
3. Enlevez la buse de l’extrémité de la rallonge de buse.
4. Utilisez un trombone pour dégager tout élément
pouvant obstruer la buse (A).
5. Détachez la rallonge du pistolet pulvérisateur.
6. À l’aide d’un tuyau d’arrosage, enlevez les débris
supplémentaires en rinçant la rallonge de buse. Rincezla pendant 30 à 60 secondes.
7. Réinstallez la buse dans la rallonge de buse.
8. Rebranchez la rallonge de buse sur le pistolet de
pulvérisation.
9. Assurez-vous que le boyau d’arrosage est connecté à
l’entrée d’eau. Vérifiez si le boyau à haute pression est
connecté au pistolet de pulvérisation et à la pompe.
Ouvrez l’alimentation d’eau.
10. Démarrez le moteur selon les directives Comment
démarrer votre nettoyeur à pression.
11. Testez le nettoyeur à pression en l’utilisant avec chaque
buse à raccord rapide.
Entretien du joint torique
Achetez un ensemble Joint torique/Maintenance, modèle
6048, en contactant le centre de service autorisé situé le plus
près de chez vous. Ce nécessaire n'est pas inclus avec le
nettoyeur à haute pression. Le nécessaire comprend des
joints toriques de rechange, une rondelle de caoutchouc et
un filtre d'arrivée d'eau. Pour remplacer les joints toriques
de votre nettoyeur, consultez la feuille d'instructions fournie
avec le nécessaire.
A
AVERTISSEMENT:
Le jet d'eau sous pression produit
par cet équipement peut percer la peau et les tissus
sous-jacents, risquant de provoquer des blessures
graves pouvant mener à une amputation.
• NE réparez JAMAIS les tuyaux à haute pression. Remplacez.
• Le tuyau de remplacement DOIT résister à une pression
supérieure à la pression nominale du nettoyeur.
AVERTISSEMENT:
Le jet d'eau sous pression produit
par cet équipement peut percer la peau et les tissus
sous-jacents, risquant de provoquer des blessures
graves pouvant mener à une amputation.
Le pistolet de pulvérisation retient une pression d’eau
élevée, même lorsque le moteur est éteint et que l’eau est
déconnectée, ce qui peut causer des blessures.
• Gardez toujours le tuyau flexible à haute pression raccordé à la
pompe et au pistolet de pulvérisation lorsque le système est
sous pression.
• À chaque fois que vous arrêtez le moteur, dirigez TOUJOURS le
pistolet vers un endroit sécuritaire et appuyez sur le bouton
rouge et sur la détente du pistolet de pulvérisation pour libérer
la haute pression.
AVERTISSEMENT:
Le jet d'eau sous pression produit
par cet équipement peut percer la peau et les tissus
sous-jacents, risquant de provoquer des blessures
graves pouvant mener à une amputation.
• Ne réparez JAMAIS des raccords non étanches à l’aide de
scellant. Remplacez le joint torique ou le joint d’étanchéité.
Page 44

18 www.murray.com
Entretien du moteur
Huile
Recommandations relatives à l’huile
Nous recommandons l’utilisation des huiles certifiées par
garantie Briggs & Stratton pour obtenir une meilleure
performance. Les autres huiles détergentes de haute qualité
sont acceptables si elles ont les cotes pour service SF, SG,
SH, SJ ou plus. N’utilisez PAS d’additifs spéciaux.
Les températures extérieures déterminent la viscosité de
l’huile requise pour le moteur. Utilisez le tableau pour choisir
la meilleure viscosité pour la gamme de températures
extérieures attendues.
* Sous 40ºF (4ºC), l’utilisation d’une huile SAE 30 entraîne un
démarrage difficile.
** Au-dessus de 80ºF (27ºC), l’utilisation d’une huile 10W30 peut
entraîner une consommation d’huile plus élevée. Vérifiez
fréquemment le niveau d’huile.
REMARQUE : L’huile synthétique respectant la
marque d’homologation ILSAC GF-2, API et portant
le symbole d’entretien API (montré à la gauche) avec
la mention « SJ/CF (économie d’énergie) » ou plus,
est une huile acceptable pour toutes les
températures. L’utilisation d’huile synthétique ne
modifie pas les intervalles de changement d’huile.
Vérification du niveau d'huile
Il est nécessaire de vérifier le niveau d'huile avant chaque
utilisation ou après chaque période de 8 heures d'utilisation.
Gardez un niveau d'huile constant.
1. Assurez-vous que nettoyeur à pression se trouve sur
une surface de niveau.
2. Enlevez la jauge d’huile et nettoyez-la avec un linge.
Replacez-la et resserrez-la. Retirez la jauge et vérifiez le
niveau d’huile.
3. Vérifiez que l’huile est à la marque “Full” sur la jauge
de niveau d'huile. Replacez-la et resserrez-la.
Ajout d’huile
1. Assurez-vous que nettoyeur à pression se trouve sur
une surface de niveau.
2. Vérifiez le niveau d’huile de la manière décrite dans la
rubrique Vérification du niveau d’huile.
3. Au besoin, videz lentement l’huile dans l’orifice de
remplissage d’huile, jusqu’à marque “Full” sur la jauge
de niveau d'huile. NE remplissez PAS trop le carter
d'huile.
AVIS: Le moteur risque de ne pas démarrer ou de démarrer
difficilement lorsqu’il est trop rempli d’huile.
• NE remplissez PAS trop.
• Si le niveau d’huile dépasse la marque FULL de la jauge d’huile,
vidangez l’huile de sorte que le niveau soit égal à la marque FULL
de la jauge d’huile.
4. Replacez-la et resserrez-la.
Vidange de l'huile moteur
Si vous utilisez votre nettoyeur à pression dans un endroit
très sale ou poussiéreux ou par temps très chaud, changez
l'huile plus fréquemment.
GARDEZ HOS DE PORTÉE DES ENFANTS. NE
POLLUEZ PAS. CONSERVEZ LE SURPLUS.
RAPPORTEZ L'HUILE USAGÉE AUX CENTRES DE
RECYCLAGE.
AVERTISSEMENT: Unintentional peut résulter dans feu
ou électrique.
LORSQUE VOUS RÉGLEZ OU RÉPAREZ VOTRE NETTOYEUR À
PRESSION
• Débranchez toujours le câble de bougie et placez-le de façon à
ce qu'il ne soit pas en contact avec la bougie.
LORS DE TESTS D'ALLUMAGE DU MOTEUR
• Utilisez un vérificateur de bougies d'allumage approuvé.
• NE vérifiez PAS l'allumage lorsque la bougie d'allumage est enlevée.
ATTENTION: Évitez tout contact cutané prolongé ou
répété avec l'huile moteur usagée.
• Il a été démontré que l'huile moteur usagée risque de
provoquer un cancer de la peau chez certains animaux de
laboratoire.
• Rincez consciencieusement les zones exposées avec de l'eau et
du savon.
Full
Add
Page 45

19
Changez l'huile alors que le moteur est encore chaud, de
la façon suivante:
1. Videz le réservoir d'essence en faisant tourner le
nettoyeur à pression jusqu'à l'épuisement de l'essence.
2. Débranchez le fil de la bougie d'allumage et gardez-le
éloigné de la bougie d'allumage.
3. Nettoyez la surface autour de l'orifice de remplissage
d'huile, enlevez le bouchon de remplissage d'huile et la
jauge d'huile. Essuyez la jauge d'huile.
4. Inclinez votre nettoyeur à haute pression pour vidanger
l'huile par l'orifice de remplissage dans un contenant
adéquat en vous assurant d'incliner le nettoyeur du côté
opposé à la bougie d'allumage et au filtre à air. Une fois
le carter vidé de son huile, remettez le nettoyeur debout.
5. Videz lentement l’huile (environ 20 oz (0,6 l)) dans
l’orifice de remplissage d’huile, jusqu’à marque “Full”
sur la jauge de niveau d'huile.
6. Essuyez la jauge d'huile chaque fois que vous vérifiez le
niveau d'huile. NE remplissez PAS trop le carter d'huile.
7. Replacez-la et resserrez-la.
8. Essuyez toute huile restante.
9. Rebranchez le fil de la bougie d'allumage à la bougie
d'allumage.
Entretien du filtre à air
Votre moteur ne fonctionnera pas adéquatement et pourrait
s'endommager si vous le faites fonctionner avec un filtre à
air sale. Remplacez le filtre plus souvent si vous utilisez le
nettoyeur dans un endroit sale ou poussiéreux.
Pour faire l'entretien du filtre à air, procédez comme suit:
1. Enlevez la vis (A).
2. Enlevez l'ensemble filtre à air avec soin de manière à
éviter la chute de débris dans le carburateur.
3. Démontez l'ensemble filtre à air et nettoyez-en toutes
les pièces. Nettoyez le filtre à air (B) en mousse dans
un mélange de détergent liquide et d'eau. Séchez le
filtre en le comprimant dans un linge propre.
4. SATUREZ le filtre à air en mousse d'huile à moteur et
comprimez-le dans un linge propre pour enlever
l'excédent d'huile.
5. Replacez l’ensemble filtre à air avec le filtre en mousse
propre ou un filtre neuf dans la base (C).
6. Fixez solidement l'ensemble filtre à air sur le
carburateur avec la vis.
Entretien de la bougie d'allumage
Changez la bougie d'allumage le moteur démarrera plus
facilement et fonctionnera mieux.
1. Nettoyez la surface autour de la bougie d'allumage.
2. Enlevez la bougie d'allumage et examinez-la.
3. Si les électrodes sont usés ou si la porcelaine est
craquée ou écaillée. Utilisez la bougie de remplacement
recommandée. Consultez Spécifications.
4. Vérifiez l’écartement des électrodes à l’aide d’une jauge
d’épaisseur et ajustez l’écartement des électrode selon
les spécifications recommandées au besoin (voir
Spécifications).
5. Installez la bougie d'allumage et serrez-la solidement.
Inspectez le silencieux et l’écran pare-étincelles
Inspectez s’il y a fissures, corrosion ou outre dommage du
silencieux. Retirez l’écran pare-étincelles, si inclus, et
inspectez s’il y a dommage ou obstruction de calamine. S’il y
a besoin des pièces de rechange, assurez-vous d’installer
seulement pièces de rechange originelles pour l'équipement.
A
B
C
AVERTISSEMENT
: Tout contact avec la zone du
silencieux peut causer des brûlures
graves.
La chaleur et les gaz d’échappement
peuvent enflammer des matériaux combustibles et les
structures ainsi que causer des dommages au réservoir
d’essence et entraîner un incendie.
• NE touchez PAS aux pièces chaudes et évitez le contact avec les
gaz d’échappement.
• Laissez l'équipement refroidir avant de le toucher.
• Laissez un dégagement d’au moins 1,5 m (5 pi) tout autour de
la nettoyeur à pression, y compris au-dessus.
• L’utilisation ou le fonctionnement d’un moteur sur un terrain
boisé, couvert de broussailles ou gazonné constitue une violation
dans l’État de la Californie, en vertu de la section 4442 du
California Public Resources Code, à moins qu’il ne soit doté d’un
pare-étincelles tel que défini dans la section 4442 et maintenu en
bon état de fonctionnement. Il se peut que d’autres États ou
d’autres compétences fédérales aient des lois semblables.
Communiquez avec le fabricant, le détaillant ou le concessionnaire
original de l’appareil afin d’obtenir un pare-étincelles conçu pour le
système d’échappement installé sur ce moteur.
• Les pièces de rechange doivent être identiques aux pièces
d’origine et être installées à la même position.
Page 46

20 www.murray.com
Système de refroidissement à air
Avec le temps, les débris peuvent s’accumuler dans les
ailettes de refroidissement du cylindre et ne peuvent être
repérés que par un désassemblage partiel du moteur. Nous
vous recommandons donc de demander à un distributeur de
service qualifié de nettoyer le système de refroidissement aux
intervalles recommandés (consultez la section Calendrier
d'entretien figurant au début de la section Entretien). Il est
aussi important de garder la partie supérieure du moteur libre
de débris. Consultez Nettoyage des débris.
Après chaque utilisation
L'eau ne doit pas demeurer dans le nettoyeur durant une
longue période de temps. Des sédiments ou des minéraux
pourraient s'accumuler sur les pièces de la pompe et bloquer
son mouvement. Suivez la procédure suivante après chaque
utilisation:
1. Éteignez le moteur, fermez l’alimentation en eau, dirigez
pistolet vers un endroit sécuritaire et appuyez sur le
bouton rouge et sur la détente pour libérer la pression
et laisse refroidir le moteur.
2. Débranchez le tuyau du pistolet de pulvérisation et de la
sortie haute pression de la pompe. Vidangez l’eau du
tuyau, du pistolet et de la rallonge de buse. Utilisez un
chiffon pour essuyer le tuyau.
3. Placez le pistolet de pulvérisation, la rallonge de buse et
les buses dans le plateau pour accessoires. Suspendez
le tuyau à haute pression sur le crochet fixé à l’avant du
plateau pour accessoires.
4. Videz la pompe de tout liquide en tirant sur la poignée
du lanceur environ 6 fois. Cette opération devrait suffire
pour enlever presque tout le liquide dans la pompe.
5. Entreposez le nettoyeur dans un endroit propre et sec.
6. Si vous remisez le nettoyeur durant plus de 30 jours,
consultez la section Entreposage à long terme.
AVERTISSEMENT:
Le jet d'eau sous pression produit
par cet équipement peut percer la peau et les tissus
sous-jacents, risquant de provoquer des blessures
graves pouvant mener à une amputation.
Le pistolet de pulvérisation retient une pression d’eau
élevée, même lorsque le moteur est éteint et que l’eau est
déconnectée, ce qui peut causer des blessures.
• Gardez toujours le tuyau flexible à haute pression raccordé à la
pompe et au pistolet de pulvérisation lorsque le système est
sous pression.
• À chaque fois que vous arrêtez le moteur, dirigez TOUJOURS le
pistolet vers un endroit sécuritaire et appuyez sur le bouton
rouge et sur la détente du pistolet de pulvérisation pour libérer
la haute pression.
AVERTISSEMENT:
L'essence et ses vapeurs sont
extrêmement inflammables et
explosives.
Le feu ou l'explosion risque de
provoquer des blessures graves, pouvant être fatales.
LORSQUE VOUS ENTREPOSEZ L'ESSENCE OU UN ÉQUIPEMENT
AVEC UN RÉSERVOIR À ESSENCE
• Entreposez-le loin des appareils de chauffage, des fours, des
chauffe-eau, des sécheuses ou de tout autre appareil
électroménager disposant d'une veilleuse ou de toute autre
source d'inflammation risquant d'enflammer les vapeurs
d'essence.
Page 47

21
Entreposage pour l'hiver
AVIS: Vous devez protéger votre appareil contre le gel.
• Si vous ne le faites pas, vous pouvez causer des dommages
irréversibles à votre pompe qui la rendront inutilisable.
• Les dommages causés par le gel ne sont pas couverts par la
garantie.
Pour protéger l'appareil contre le gel:
1. Répéter des étapes 1-4 dans la section précédente
Après Chaque Utilisation.
2. Utilisez “Pump Saver”, Modèle 6039, pour traiter votre
pompe. Ce produit vous permet de réduire les
dommages causés par le gel et de lubrifier les pistons
et les joints.
3. Si “Pump saver” n’est pas disponible, raccordez une
section de tuyau d'arrosage de 1 m (3 pi) de long à un
raccord d'eau d'arrivée. Versez de l'antigel de véhicule
de plaisance (antigel sans alcool) dans le tuyau. Tirez
sur la poignée du lanceur deux fois. Débranchez le
tuyau de 1 m (3 pi).
4. Entreposez le nettoyeur dans un endroit propre et sec.
Entreposage à long terme
Si vous ne prévoyez pas utiliser le nettoyeur à pression
durant plus de 30 jours, vous devez préparer le moteur et la
pompe pour l’entreposage à long terme.
Protection du système d’alimentation
Additif de carburant :
Le carburant peut être éventé après un entreposage de plus
de 30 jours. Un carburant éventé cause la formation de
dépôts acides et de gomme dans le système d’alimentation
ou sur les pièces essentielles du carburateur. Pour garder
l’essence propre, utilisez le stabilisateur d’essence FRESH
START® de Briggs & Stratton, disponible sous forme
d’additif liquide ou cartouche de liquide concentré.
Il est inutile de vidanger le carburant du moteur si vous ajoutez
un stabilisateur d’essence conformément aux directives. Faites
tourner le moteur pendant 2 minutes pour faire circuler le
stabilisateur dans le système de carburant. Vous pouvez
ensuite entreposer le moteur et l’essence durant une période
maximale de 24 mois.
Si le carburant du moteur n’a pas été traité avec un
stabilisateur d’essence, vous devez le vidanger dans un
contenant approuvé. Faites tourner le moteur jusqu’à ce qu’il
s’arrête par manque d’essence. Il est recommandé d’utiliser
du stabilisateur d’essence dans le contenant d’entreposage
pour en conserver la fraîcheur.
Changement de l'huile
Alors que le moteur est encore chaud, vidangez l'huile du
carter. Remplissez le carter à nouveau avec de l'huile de la
qualité recommandée. Consultez la section Changement
d'huile.
Huilage de l'alésage du cylindre
• Enlevez la bougie d’allumage et versez environ 15 ml
(1/2 once) d’huile à moteur neuve dans le cylindre.
• Installez la bougie d'allumage et tirez lentement la
poignée du démarreur pour distribuer l’huile.
Protection de la pompe
Utilisez PumpSaver pour traiter la pompe contre les
dommages causés par de dépôts minéraux ou le gel. Vous
préviendrez ainsi les dommages causés par le gel et
lubrifierez les pistons et les joints.
REMARQUE: PumpSaver est un accessoire disponible en
option. Il n’est pas fourni avec le nettoyeur à pression.
Contactez le détaillant agréé de service après vente situé le
plus près de chez vous pour vous procurer PumpSaver.
AVIS: Vous devez protéger votre appareil contre le gel.
• Si vous ne le faites pas, vous pouvez causer des dommages
irréversibles à votre pompe qui la rendront inutilisable.
• Les dommages causés par le gel ne sont pas couverts par la
garantie.
Pour utiliser PumpSaver, assurez-vous que le nettoyeur à
haute pression est en position d’arrêt et débranché de
l’alimentation d’eau. Veuillez lire les directives et les
avertissements mentionnés sur le contenant de PumpSaver.
Autres directives
1. N’entreposez PAS d’essence d’une saison à l’autre à
moins qu’elle ne soit traitée tel que décrit dans
Protection du système d’alimentation.
2. Remplacez le contenant à essence s’il commence à
rouiller. Un carburant contaminé peut causer des
problèmes de moteur.
3. Couvrez l’appareil à l’aide d’une housse de protection
adéquate qui ne retient pas l’humidité.
4. Entreposez la nettoyeur à pression dans un endroit
propre et sec.
AVERTISSEMENT:
Les couvertures de rangement
peuvent être inflammables.
• NE placez JAMAIS une couverture de rangement sur un
nettoyeur à pression.
• Laissez l’appareil refroidir suffisamment avant de placer la
couverture de rangement dessus.
Page 48

22 www.murray.com
Dépannage
Problème Cause Correction
La pompe a les problèmes suivants: pas de
pression, pression irrégulière, pressure,
claquement, perte de pression, faible débit
d'eau.
1. Buse à basse pression installée.
2. Entrée d'eau bloquée.
3. Pas assez d'eau qui arrive.
4. Tuyau d'entrée tortillé ou avec fuites.
5. Filtre de tuyau bouché.
6. Eau à plus de 100ºF.
7. Tuyau de sortie bloqué ou avec fuites.
8. Le pistolet fuie.
9. La buse est bouchée.
10. La pompe est défectueuse.
1. Replacez la buse par la buse à haute
pression.
2. Dégager l'entrée d'eau.
3. Fournir un débit adéquat.
4. Redresser le tuyau, boucher la fuite.
5. Vérifier et nettoyer le filtre du tuyau
d'entrée.
6. Ayez une eau plus froide.
7. Débloquez le tuyau de sortie.
8. Remplacer le pistolet.
9. Déboucher la buse.
10. Contacter négociant de service autorisé.
Le détergent ne se mélange pas avec le jet.
1. Le tube n'est pas submergé.
2. Le filtre du tube est bouché.
3. Buse à haute pression installée.
1. Insérer le tube dans le détergent.
2. Nettoyer ou remplacer le tube et/ou le
filtre.
3. Remplacez la buse par la buse à basse
pression.
Le moteur tourne sans charge mais cale
quand une charge est ajoutée.
Vitesse trop lente du moteur. Mettre l'accélérateur sur FAST. Si le moteur
continue à caler contacter votre
concessionaire fabricant de moteur.
Le moteur ne démarre pas, ou il démarre et
a des ratés.
1. Filtre à air encrassé.
2. Panne d'essence.
3. Essence éventée.
4. Fil de bougie non branché à la bougie.
5. Bougie défectueuse.
6. Eau présente dans l'essence.
7. Mélange d'essence trop riche.
8. Perte de compression du moteur.
1. Nettoyez ou remplacez le filtre à air.
2. Faites le plein du réservoir.
3. Vidangez le réservoir; faites le plein avec
de l'essence nouvelle.
4. Branchez le fil à la bougie.
5. Remplacez la bougie.
6. Vidangez le réservoir; faites le plein avec
de l'essence nouvelle.
7. Contacter négociant de service autorisé.
8. Contacter négociant de service autorisé.
El motor se apaga durante la operación.
Sin gasolina. Llene el tanque de combustible.
Manque de puissance du moteur. Filtre à air encrassé. Remplacez le filtre à air.
Page 49

23
Garanties
Énoncé de garantie du dispositif antipollution
pour la Californie, l’U.S. EPA et Briggs &
Stratton Corporation
Vos droits et obligations relatifs à la garantie
Le California Air Resources Board, l’U.S. EPA et Briggs &
Stratton (B&S) sont heureux de vous expliquer la garantie
couvrant le dispositif antipollution de votre moteur ou de
votre équipement, de l’année 2008 ou plus récent. En
Californie, les nouveaux petits moteurs hors route doivent
être conçus, construits et équipés de façon à respecter les
normes anti-smog rigoureuses de l’état. B&S doit garantir le
dispositif antipollution de votre moteur ou de votre
équipement pour les périodes indiquées ci-dessous, à
condition qu’il n’y ait pas eu d’abus, de négligence, de
mauvais entretien sur le petit moteur hors route.
Votre dispositif antipollution peut comprendre des pièces
comme le carburateur ou le système d’injection de
combustible, le réservoir d’essence, le système d’allumage et
le convertisseur catalytique. Il peut aussi y avoir des tuyaux,
des courroies, des connecteurs, des capteurs et d’autres
dispositifs reliés aux émissions. Dans le cas d’un défaut
couvert par la garantie, B&S réparera votre moteur ou votre
équipement sans frais, et ce, incluant le diagnostic, les
pièces et la main-d’ouvre.
Couverture de garantie du fabricant :
Les petits moteurs hors route sont garantis pour une période
de deux ans. Si une pièce reliée au dispositif antipollution de
votre moteur ou de votre équipement est défectueuse, B&S
la réparera ou la remplacera.
Responsabilités du propriétaire relativement à la garantie :
• En tant que propriétaire du petit moteur ou de
l’équipement, vous êtes responsable de l’exécution de
l’entretien requis indiqué dans le manuel d’utilisation.
B&S recommande de conserver tous les reçus reliés à
l’entretien de votre moteur ou de votre équipement;
toutefois, B&S ne peut refuser d’honorer la garantie
uniquement parce que vous êtes dans l’impossibilité de
produire les reçus ou que vous n’avez pas effectué
toutes les étapes de l’entretien prévu.
• Néanmoins, vous devez savoir, en tant que propriétaire
du moteur ou de l’équipement, que B&S peut renier la
garantie si votre moteur ou votre équipement ou,
encore, une pièce font défaut en raison d’abus, de
négligence, d’entretien inadéquat ou de modifications
non approuvées.
• Dès qu’un problème survient, vous avez la
responsabilité de faire examiner votre moteur ou votre
équipement dans un centre de distribution B&S, un
centre de service ou une autre entité équivalente, selon
le cas. Les réparations couvertes par la garantie doivent
être effectuées dans un délai raisonnable, n’excédant
pas 30 jours. Si vous avez des questions au sujet de
vos droits et responsabilités reliés à la garantie, veuillez
communiquer avec B&S au (414) 259-5262.
Dispositions de la garantie contre les défauts du dispositif
antipollution de Briggs & Stratton
Les dispositions qui suivent sont spécifiques à la couverture
de garantie contre les défauts du dispositif antipollution. Elle
est un ajout à la garantie sur les moteurs de B&S pour les
moteurs non régulés, figurant dans le manuel d'utilisation.
1. Pièces garanties
La couverture de cette garantie n'englobe que les
pièces énumérées ci-dessous (pièces du dispositif
antipollution) dans la mesure où ces pièces étaient
présentes sur le moteur au moment de l'achat.
a. Système de contrôle d'alimentation en carburant
• Dispositif d'enrichissement pour démarrage à
froid (étrangleur à glissement)
• Carburateur et pièces internes
• Pompe à carburant
• Conduit d'essence, raccords de conduit
d'essence, brides de serrage
• Réservoir d'essence, bouchon et attache
• Absorbeur de vapeurs d’essence
b. Circuit d'entrée d'air
• Filtre à air
• Collecteur d'admission
• Ligne de purge et d’évacuation
c. Système d'allumage
• Bougie(s) d'allumage
• Système d'allumage à magnéto
d. Système de catalyseur
• Catalytic converter
• Collecteur d'échappement
• Système d'injection d'air ou soupape d'impulsion
e. Éléments divers utilisés dans les systèmes
précédemment mentionnés
• Soupapes et interrupteurs de dépression, de
température, de position, à délai critique
• Connecteurs et dispositifs
2. Durée de la couverture
Pour une période de deux ans à compter de la date d’achat
originale, B&S garantit à l’acheteur initial et à tous les
acheteurs subséquents que le moteur a été conçu,
construit et équipé de façon à respecter toutes les
normes en vigueur adoptées par l’Air Resources Board;
qu’il est libre de tout défaut de matériel et de maind’ouvre qui pourrait entraîner la défectuosité d’une
pièce garantie; et, qu’il est identique d’un point de vue
matériel au moteur décrit dans la demande
d’homologation du fabricant. La période de garantie
débute à la date d’achat du moteur par le premier
acheteur.
Page 50

La garantie des pièces reliées au dispositif antipollution est la
suivante :
• Toute pièce garantie dont le remplacement ne fait pas
partie de l’entretien requis dans le manuel d’utilisation
doit être garantie pour la période de garantie indiquée
ci-dessus. Si une telle pièce s’avère défectueuse au
cours de la période de la couverture de garantie, B&S
devra la réparer ou la remplacer sans frais pour le
propriétaire. Toute pièce réparée ou remplacée en vertu
de la garantie sera garantie pour la durée restante de la
période de garantie.
• Toute pièce garantie qui fait partie de l’entretien
uniquement pour une inspection régulière dans le
manuel d’utilisation est garantie pour la période de
garantie indiquée ci-dessus. Toute pièce réparée ou
remplacée en vertu de la garantie sera garantie pour la
durée restante de la période de garantie.
• Toute pièce garantie dont le remplacement fait partie de
l’entretien requis dans le manuel d’utilisation est
garantie pour la période de temps avant le premier
point de remplacement prévu pour cette pièce. Si une
telle pièce s’avère défectueuse avant son remplacement
prévu, B&S devra la réparer ou la remplacer sans frais
pour le propriétaire. Toute pièce réparée ou remplacée
en vertu de la garantie sera garantie pour la durée
restante de la période avant le premier point de
remplacement prévu pour la pièce.
• Les pièces ajoutées ou modifiées ne faisant pas partie
d’une exemption par l’Air Resources Board ne doivent
pas être utilisées. L’utilisation de pièces ajoutées ou
modifiées par le propriétaire qui ne font pas partie
d’une exemption pourrait entraîner le refus d’une
réclamation au titre de la garantie. Le fabricant n’a pas
la responsabilité de garantir les défectuosités des
pièces garanties causées par l’utilisation de pièces
ajoutées ou modifiées qui ne font pas partie d’une
exemption.
3. Couverture indirecte
La couverture englobe toute défectuosité de l’un des
composants du moteur causée à la suite d’une
défectuosité d’une des pièces reliées au dispositif
antipollution garanties.
4. Réclamations et exclusions de couverture
Les réclamations au titre de la garantie doivent être
présentées conformément aux dispositions de la
politique de garantie du moteur de B&S. La couverture
de garantie n’englobe pas les défectuosités des pièces
reliées au dispositif antipollution qui ne sont pas des
pièces originales de B&S ni les défectuosités de pièces
reliées à un abus, de la négligence ou un entretien
inapproprié tel que détaillé dans la politique de garantie
du moteur de B&S. B&S n’est pas responsable de
couvrir les défectuosités des pièces reliées au dispositif
antipollution causées par l’utilisation de pièces ajoutées
ou modifiées.
Recherchez la période de durabilité des émissions et
l’indice de pollution atmosphérique sur l’étiquette
d’émissions du moteur
Les renseignements concernant la période de durabilité des
émissions et l’indice de pollution atmosphérique doivent être
fournis avec les moteurs qui répondent aux normes relatives
aux émissions de la California Air Resources Board (CARB).
Briggs & Stratton doit fournir ces renseignements aux
consommateurs sur des étiquettes d’émissions. L’étiquette
des émissions du moteur fournit des renseignements sur la
certification.
La période de durabilité des émissions décrit le nombre
d’heures pendant lesquelles le moteur peut fonctionner en
respectant les normes relatives aux émissions, en supposant
que l’entretien est effectué conformément aux directives de
fonctionnement et d’entretien. Les catégories utilisées sont
les suivantes :
Modéré : Le moteur peut fonctionner pendant 125 heures
tout en respectant la norme relative aux émissions.
Intermédiaire : Le moteur peut fonctionner pendant 250
heures tout en respectant la norme relative aux émissions.
Prolongé : Le moteur peut fonctionner pendant 500 heures
tout en respectant la norme relative aux émissions.
Par exemple, l’utilisation d’une tondeuse poussée est
d’environ 20 à 25 heures par année. Par conséquent, la
période de durabilité des émissions d’un moteur de
catégorie intermédiaire équivaut à une période de 10 à 12
années.
Les moteurs Briggs & Stratton respectent les normes
relatives aux émissions de phase 2 de l’USEPA (United
States Environmental Protection Agency). Dans le cas des
moteurs homologués phase 2, la période de conformité des
émissions indiquée sur l’étiquette de conformité des
émissions indique le nombre d’heures de fonctionnement
pendant lesquelles le moteur a démontré qu’il respectait les
exigences fédérales en matière d’émissions.
Pour les moteurs de cylindrée inférieure à 225 cc:
Catégorie C = 125 heures
Catégorie B = 250 heures
Catégorie A = 500 heures.
Pour les moteurs de cylindrée égale ou supérieure à 225 cc:
Catégorie C = 250 heures
Catégorie B = 500 heures
Catégorie A = 1000 heures.
24 www.murray.com
Page 51

25
GARANTIE DU PROPRIÉTAIRE D'UNE NETTOYEUR À PRESSION DEBRIGGS & STRATTON POWER PRODUCTS GROUP, LLC
GARANTIE LIMITÉE
Briggs & Stratton Power Products Group, LLC réparera ou remplacera, sans frais, toutes pièces défectueuses de la nettoyeur à pression comportant un
vice de matériau ou un défaut de fabrication ou les deux. En vertu de la présente garantie, les frais de transport des produit soumises pour réparation ou
remplacement sont à la charge de l'acheteur. La présente garantie sera en vigueur durant les périodes stipulées ci-dessous et est assujettie aux
conditions stipulées ci-dessous. Pour obtenir des services en vertu de la garantie, veuillez consulter notre Outil de recherche d'un Service après-vente
agréé au http://www.BRIGGSandSTRATTON.COM afin de trouver un distributeur de service après-vente agréé dans votre région.
IL N'EXISTE AUCUNE AUTRE GARANTIE EXPRESSE. LES GARANTIES IMPLICITES, INCLUANT CELLES DE QUALITÉ MARCHANDE ET D'ADAPTATION À
UN USAGE PARTICULIER, SONT LIMITÉES À UNE PÉRIODE D'UN AN À PARTIR DE LA DATE D'ACHAT OU JUSQU'À LA LIMITE PERMISE PAR LA LOI,
TOUTE GARANTIE IMPLICITE EST EXCLUE. LA RESPONSABILITÉ POUR DOMMAGES ACCESSOIRES OU INDIRECTS EST EXCLUE DANS LA MESURE
OÙ UNE TELLE EXCLUSION EST PERMISE PAR LA LOI. Certains États/provinces ou pays n'autorisent aucune restriction sur la durée d'une garantie
implicite, et certains États/provinces ou pays n'autorisent pas l'exclusion ou la limitation des dommages consécutifs ou indirects. Par conséquent, les
restrictions et exclusions décrites ci-dessus pourraient ne pas s'appliquer dans votre cas. La présente garantie vous accorde certains droits légaux
spécifiques et vous pourriez également en avoir d'autres, qui peuvent varier d'un État ou d'une province à l'autre et d'un pays à l'autre.
1 an
90 jours
Usage par un consommateur
Usage à des fins commerciales
La période de garantie débute à la date d'achat par le premier acheteur au détail ou par le premier utilisateur commercial final, et se prolonge pour la durée
stipulée ci-dessus. " Usage par un consommateur " signifie utilisation domestique personnelle dans une résidence, par l'acheteur au détail. " Usage à des fins
commerciales " signifie toute autre utilisation, y compris à des fins commerciales, de génération de revenus ou de location. Aux fins de la présente garantie,
dès qu'un équipement a été utilisé commercialement une fois, il est par la suite considéré comme étant d'usage à des fins commerciales.
POUR EXERCER LA GARANTIE SUR TOUT PRODUIT FABRIQUÉ PAR BRIGGS & STRATTON, IL N'EST PAS NÉCESSAIRE DE L'ENREGISTRER. CONSERVEZ
LE REÇU COMME PREUVE D'ACHAT. SI, LORS D'UNE RÉCLAMATION DE GARANTIE, VOUS NE POUVEZ PROUVER LA DATE INITIALE DE L'ACHAT, NOUS
UTILISERONS LA DATE DE FABRICATION DU PRODUIT COMME DATE DE RÉFÉRENCE POUR DÉTERMINER LA PÉRIODE DE GARANTIE.
À PROPOS DE LA GARANTIE
Nous acceptons de faire effectuer les réparations couvertes par la garantie et tenons à nous excuser pour tout inconvénient subi. Tout agent d'un service
après-vente agréé peut exécuter les réparations couvertes par la garantie. La plupart des réparations couvertes par la garantie sont traitées automatiquement;
cependant, il arrive parfois que les demandes de service en vertu de la garantie soient non fondées. Par exemple, la garantie ne couvre pas les dommages
causés à l'équipement par une utilisation abusive, par un manque d'entretien périodique, durant l'expédition, la manutention ou l'entreposage, ou en raison
d'une installation inadéquate. De même, la garantie sera annulée si la date de fabrication ou le numéro de série apposé à la nettoyeur à pression ou au moteur
a été enlevé ou si l'équipement a été changé ou modifié. Durant la période de garantie, le distributeur de service après-vente agréé réparera ou remplacera, à
son gré, toute pièce qui, après examen, est trouvée défectueuse à la suite d'une utilisation et d'un entretien normaux. La présente garantie ne couvre pas les
réparations et les équipements suivants:
• Usure normale: Comme tout autre dispositif mécanique, les groupes électrogènes d'extérieur nécessitent l'entretien périodique de certaines pièces
pour fonctionner adéquatement. La présente garantie ne couvre pas les frais de réparation des pièces ou des équipements dont la durée de vie utile a
été dépassée à la suite d'une utilisation normale.
• Installation et entretien: La présente garantie ne couvre pas les équipements ou les pièces qui ont fait l'objet d'une installation ou de modifications et
de changements inadéquats ou non autorisés, d'une mauvaise utilisation, de négligence, d'un accident, d'une surcharge, d'emballement, d'entretien
inadéquat, de réparation ou d'entreposage qui, selon nous, auraient nui à la performance et à la fiabilité du produit. De plus, la garantie ne couvre pas
l'entretien normal tel que les filtres à air, le réglage, le nettoyage du circuit d'alimentation et son obstruction (causée par l'accumulation de produits
chimiques, de saletés, de calamine, de calcaire, et ainsi de suite).
• Exclusions supplémentaires: La présente garantie exclut les pièces qui s'usent tels que les raccords rapides, les joints d'étanchéité, les joints toriques,
les pompes ayant fonctionné sans alimentation en eau ou tout dommage ou tout mauvais fonctionnement résultant d'un accident, d'une utilisation
abusive, de modifications, de changements ou d'un entretien inadéquat du système, du gel ou d'une détérioration chimique. La garantie du produit ne
couvre pas les pièces accessoires telles que les pistolets, les boyaux, les (rallonge du gicleur) lances et les buses. Cette garantie exclut tout
équipement usé, remis à neuf ou de démonstration et toute défaillance due à une catastrophe naturelle ou à toute autre force majeure hors du contrôle
du fabricant. 198187F, Rev. C, 12/31/2006
BRIGGS & STRATTON POWER PRODUCTS GROUP, LLC
JEFFERSON, WI, USA
À partir du 1er décembre 2005, la présente garantie remplace toute garantie non datée et toute garantie dont la date est antérieure au 1er décembre 2005.
PÉRIODE DE GARANTIE
Page 52

26 www.murray.com
Briggs & Stratton Power Products Group, LLC
900 N. Parkway
Jefferson, Wisconsin, 53549 U.S.A.
Nettoyeur à pression
Puissance nominale: Les étiquettes de puissance nominale brute des modèles de moteur à essence sont conformes au code SAE (Society
of Automotive Engineers) J1940 (Small Engine Power & Torque Rating Procedure) et la performance nominale a été obtenue et corrigée
selon le code SAE J1995 (Révision 2002-05). La puissance brute réelle du moteur sera inférieure et influencée entre autres par les
conditions ambiantes de fonctionnement et la variabilité d’un moteur à l’autre. Étant donné la vaste gamme de produits sur lesquels les
moteurs sont installés, ainsi que la variété de problèmes environnementaux reliés au fonctionnement de l’équipement, le moteur à essence
ne développe pas la puissance nominale brute lorsqu’il est utilisé pour entraîner un appareil donné (puissance d’utilisation nette « sur le site
» ou réelle). La différence peut être liée à divers facteurs incluant, sans s’y limiter, aux accessoires (filtre à air, échappement, recharge,
refroidissement, carburateur, pompe à carburant, etc.), limites des applications, conditions ambiantes de fonctionnement (température,
humidité, altitude) et la variabilité d’un moteur à l’autre. En raison des limites de fabrication et de capacités, Briggs & Stratton peut remplacer
les moteurs de cette série par un moteur d’une plus grande puissance nominale.
Les caractéristiques nominales de ce nettoyeur à haute pression sont conformes à la norme PW101 de la Pressure Washer Manufacturer’s
Association (PWMA) (Tests et performance nominale des nettoyeurs à haute pression).
Caractéristiques du produit
Pression nominale . . . . . . . . . . . .137,9 BARS (2,000 PSI)
Débit d'écoulement . . . . . . . . . . . .7,2 litres/min (1,9 GPM)
Température de l'eau . . . . . . . . . . . . . . .38ºC (100ºF) MAX
Cylindrée . . . . . . . . . . . . . . . . . . . . . . .158 cc (9.64 cu. in.)
Écartement des électrodes . . . . . . . . .0,76 mm (0,030 in.)
Volume du réservoir . . . . . . . . . . . . . . .0,95 Litres (1,0 Qt.)
Capacité du carter d’huile . . . . . . . . .0,6 Litres (20 Onces)
Pièces d’entretien courant
PumpSaver . . . . . . . . . . . . . . . . . . . . . . . . . . . . . . . . .6039
Entretien du joint torique . . . . . . . . . . . . . . . . . . . . . . .6048
Crépine d’entrée d’eau . . . . . . . . . . . . . . . . . . . . .B2384GS
Filtre à air . . . . . . . . . . . . . . . . . . . . . . . . .698369 ou 5088
Bougie antiparasite . . . . . . . . . . . . . . . . . .802592 ou 5095
Bougie d’allumage de platine de longue durée . . . . . .5062
Bouteille d’huile à moteur . . . . . . . . . . . . . . . . . . . .100005
Stabilisateur d’essence . . . . . . . . . . . . . . . . . . . . . . . .5041
Pare-étincelles . . . . . . . . . . . . . . . . . . . . . . . . . . . . .398067
(800) 528-5087
 Loading...